
UserGuide
ThinkPad11eandThinkPadYoga11e

Note:Beforeusingthisinformationandtheproductitsupports,besuretoreadandunderstandthefollowing:
•Safety,Warranty,andSetupGuide
•RegulatoryNotice
•“Importantsafetyinformation”onpagevi
•AppendixE“Notices”onpage143
ThelatestSafety,Warranty,andSetupGuideandtheRegulatoryNoticeareavailableontheLenovoSupport
Websiteat:
http://www.lenovo.com/UserManuals
EighthEdition(January2016)
©CopyrightLenovo2014,2016.
LIMITEDANDRESTRICTEDRIGHTSNOTICE:IfdataorsoftwareisdeliveredpursuantaGeneralServicesAdministration
“GSA”contract,use,reproduction,ordisclosureissubjecttorestrictionssetforthinContractNo.GS-35F-05925.

Contents
Readthisfirst..............v
Importantsafetyinformation..........vi
Conditionsthatrequireimmediateaction..vii
Serviceandupgrades..........vii
Powercordsandpoweradapters.....viii
Extensioncordsandrelateddevices.....ix
Plugsandoutlets.............ix
Powersupplystatement..........ix
Externaldevices.............x
Generalbatterynotice...........x
Noticeforbuilt-inrechargeablebatteries....x
Lithiumcoin-cellbatterynotice.......xi
Heatandproductventilation........xi
Electricalcurrentsafetyinformation....xii
Liquidcrystaldisplay(LCD)notice.....xiii
Usingheadphonesorearphones......xiii
Additionalsafetyinformation.......xiii
Chapter1.Productoverview......1
Locatingcomputercontrols,connectors,and
indicators..................1
Frontview................1
Right-sideview..............3
Left-sideview..............5
Rearview................6
Statusindicators.............7
Locatingimportantproductinformation......8
Machinetypeandmodellabel........8
FCCIDandICCertificationnumber
information...............9
LabelsfortheWindowsoperatingsystems..10
Features.................11
Specifications...............12
Lenovoprograms.............13
AccessingLenovoprograms.......13
AnintroductiontoLenovoprograms....14
Chapter2.Usingyourcomputer...17
Registeringyourcomputer..........17
Frequentlyaskedquestions.........17
GettinghelpabouttheWindowsoperating
system..................19
Usingthemulti-touchscreen.........19
Specialkeys...............23
Usingthetouchpad............24
UsingtheThinkPadYoga11eindifferentmodes.25
Rotatingthecomputerdisplay.......25
Notebookmode............26
Standmode..............27
Tabletmode..............28
Tentmode..............29
Usingthetabletbuttons.........30
Powermanagement............31
Usingtheacpower...........31
Checkingthebatterystatus........31
Chargingthebattery..........32
Managingthebatterypower.......32
Power-savingmodes..........32
Maximizingthebatterylife........33
Connectingtothenetwork..........34
Ethernetconnections..........34
Wirelessconnections..........34
Usinganexternaldisplay..........36
Connectinganexternaldisplay......36
Choosingadisplaymode........36
Changingdisplaysettings........37
Usingaudiofeatures............37
Usingthecamera.............37
Usingaflashmediacard...........38
Installingaflashmediacard.......38
Removingaflashmediacard.......39
UsingtheThinkPadActivePen........39
Chapter3.Youandyourcomputer..43
Accessibilityandcomfort..........43
Ergonomicinformation..........43
Comfort...............44
Accessibilityinformation.........44
Travelingwithyourcomputer.........47
Traveltips...............47
Travelaccessories...........47
Chapter4.Security..........49
Attachingamechanicallock.........49
Usingpasswords..............49
Typingpasswords...........49
Power-onpassword...........49
Supervisorpassword..........50
Harddiskpasswords..........52
Harddisksecurity.............54
Noticeondeletingdatafromyourharddiskdrive
orsolid-statedrive.............54
Usingfirewalls...............55
Protectingdataagainstviruses........55
©CopyrightLenovo2014,2016
i

Chapter5.Advancedconfiguration..57
Installinganewoperatingsystem.......57
InstallingtheWindows7operatingsystem..57
InstallingtheWindows8.1orWindows10
operatingsystem............58
Installingdevicedrivers...........59
UsingtheThinkPadSetupprogram......59
Mainmenu..............60
Configmenu..............60
Date/Timemenu............64
Securitymenu.............64
Startupmenu.............68
Restartmenu.............70
UpdatingtheUEFIBIOS.........70
Usingsystemmanagement..........70
Settingmanagementfeatures.......71
Chapter6.Preventingproblems...73
Generaltipsforpreventingproblems......73
Makingsuredevicedriversareup-to-date....74
Takingcareofyourcomputer.........75
Cleaningthecoverofyourcomputer....76
Chapter7.Troubleshooting
problems...............79
Diagnosingproblems............79
Troubleshooting..............79
Computerstopsresponding.......79
Spillsonthekeyboard..........80
Errormessages............80
Beeperrors..............81
Memorymoduleproblems........82
Networkingproblems..........82
Keyboardproblems...........84
Problemswiththedisplayandmultimedia
devices................84
Batteryandpowerproblems.......90
Problemswithdrivesandotherstorage
devices................93
Asoftwareproblem...........94
AUSBproblem............94
Chapter8.Recoveryoverview....95
RecoveryinformationfortheWindows7operating
system..................95
Creatingandusingrecoverymedia.....95
Performingbackupandrecoveryoperations.96
UsingtheRescueandRecoveryworkspace.97
Creatingandusingarescuemedium....98
Reinstallingpreinstalledapplicationsand
devicedrivers.............99
Solvingrecoveryproblems........100
RecoveryinformationfortheWindows8.1
operatingsystem..............100
Refreshingyourcomputer........100
Resettingyourcomputertothefactorydefault
settings................100
Usingtheadvancedstartupoptions....101
RecoveringyouroperatingsystemifWindows
8.1failstostart.............101
Creatingandusingrecoverymedia.....101
RecoveryoverviewfortheWindows10operating
system..................102
Resettingyourcomputer.........103
Usingadvancedstartupoptions......103
RecoveringyouroperatingsystemifWindows
10failstostart.............103
CreatingandusingarecoveryUSBdrive..103
Chapter9.Replacingdevices....105
Staticelectricityprevention..........105
Disablingthebuilt-inbatteries.........105
Replacingthememorymodule........106
Replacingthecoin-cellbattery........108
Replacingtheharddiskdriveorsolid-state
drive...................111
Replacingthekeyboard...........115
Replacingtheuser-replaceablewireless-LAN
card...................120
Chapter10.Gettingsupport....125
BeforeyoucontactLenovo..........125
Gettinghelpandservice...........125
Usingdiagnosticprograms........126
LenovoSupportWebsite.........126
CallingLenovo.............126
FindingThinkPadoptions........127
Purchasingadditionalservices........127
AppendixA.Regulatory
information.............129
Wirelessrelatedinformation.........129
LocatingtheUltraConnectwireless
antennas...............130
Wireless-radiocomplianceinformation...130
Locatingwirelessregulatorynotices....131
Certificationrelatedinformation......131
Exportclassificationnotice..........131
Electronicemissionnotices..........131
FederalCommunicationsCommission
DeclarationofConformity........131
IndustryCanadaClassBemissioncompliance
statement...............132
EuropeanUnion-Compliancetothe
ElectromagneticCompatibilityDirective...132
iiUserGuide

GermanClassBcompliancestatement...132
KoreaClassBcompliancestatement....133
JapanVCCIClassBcompliancestatement..133
Japancompliancestatementforproducts
whichconnecttothepowermainswith
ratedcurrentlessthanorequalto20Aper
phase................133
Japannoticeforacpowercord......133
Lenovoproductserviceinformationfor
Taiwan................133
Eurasiancompliancemark..........134
Brazilaudionotice.............134
AppendixB.WEEEandrecycling
information.............135
ImportantWEEEinformation.........135
RecyclinginformationforChina........135
RecyclinginformationforJapan........135
RecyclinginformationforBrazil........136
BatteryrecyclinginformationforTaiwan.....137
BatteryrecyclinginformationfortheEuropean
Union..................137
BatteryrecyclinginformationfortheUnitedStates
andCanada................137
AppendixC.RestrictionofHazardous
SubstancesDirective(RoHS)....139
EuropeanUnionRoHS...........139
TurkishRoHS...............139
UkraineRoHS...............139
IndiaRoHS................139
ChinaRoHS................140
AppendixD.ENERGYSTARmodel
information.............141
AppendixE.Notices.........143
Trademarks................144
©CopyrightLenovo2014,2016
iii

ivUserGuide

Readthisfirst
Besuretofollowtheimportanttipsgivenheretogetthemostuseandenjoymentoutofyourcomputer.
Failuretodosomightleadtodiscomfortorinjury,orcauseyourcomputertofail.
Protectyourselffromtheheatthatyourcomputergenerates.
Whenyourcomputeristurnedonorthebatteryischarging,thebase,thepalm
rest,andsomeotherpartsmaybecomehot.Thetemperaturetheyreach
dependsontheamountofsystemactivityandthelevelofchargeinthebattery.
Extendedcontactwithyourbody,eventhroughclothing,couldcause
discomfortorevenaskinburn.
•Avoidkeepingyourhands,yourlap,oranyotherpartofyourbodyin
contactwithahotsectionofthecomputerforanyextendedtime.
•Periodicallytakehandsfromusingthekeyboardbyliftingyourhandsfrom
thepalmrest.
Protectyourselffromtheheatgeneratedbytheacpoweradapter.
Whentheacpoweradapterisconnectedtoanelectricaloutletandyour
computer,itgeneratesheat.
Extendedcontactwithyourbody,eventhroughclothing,maycauseaskin
burn.
•Donotplacetheacpoweradapterincontactwithanypartofyourbody
whileitisinuse.
•Neveruseittowarmyourbody.
Preventyourcomputerfromgettingwet.
Toavoidspillsandthedangerofelectricalshock,keepliquidsawayfromyour
computer.
Protectthecablesfrombeingdamaged.
Applyingstrongforcetocablesmaydamageorbreakthem.
Routecommunicationlines,orthecablesofanacpoweradapter,amouse,a
keyboard,aprinter,oranyotherelectronicdevice,sothattheycannotbewalked
on,trippedover,pinchedbyyourcomputerorotherobjects,orinanyway
subjectedtotreatmentthatcouldinterferewiththeoperationofyourcomputer.
©CopyrightLenovo2014,2016
v
Protectyourcomputeranddatawhenmovingit.
Beforemovingacomputerequippedwithaharddiskdriveorsolid-statedrive,
dooneofthefollowing:
•Turnitoff.
•Putitinsleepmode.
•Putitinhibernationmode.
Thiswillhelptopreventdamagetothecomputer,andpossiblelossofdata.
Handleyourcomputergently.
Donotdrop,bump,scratch,twist,hit,vibrate,push,orplaceheavyobjectson
yourcomputer,display,orexternaldevices.
Carryyourcomputercarefully.
•Useaqualitycarryingcasethatprovidesadequatecushioningandprotection.
•Donotpackyourcomputerinatightlypackedsuitcaseorbag.
•Beforeputtingyourcomputerinacarryingcase,makesurethatitisoff,insleep
mode,orinhibernationmode.Donotputacomputerinacarryingcasewhileit
isturnedon.
Importantsafetyinformation
Note:Readtheimportantsafetyinformationfirst.
Thisinformationcanhelpyousafelyuseyournotebookcomputer.Followandretainallinformationincluded
withyourcomputer.Theinformationinthisdocumentdoesnotalterthetermsofyourpurchaseagreement
ortheLenovo
®
LimitedWarranty.Formoreinformation,see“WarrantyInformation”intheSafety,Warranty,
andSetupGuidethatcomeswithyourcomputer.
Customersafetyisimportant.Ourproductsaredevelopedtobesafeandeffective.However,personal
computersareelectronicdevices.Powercords,poweradapters,andotherfeaturescancreatepotential
safetyrisksthatcanresultinphysicalinjuryorpropertydamage,especiallyifmisused.Toreducethese
risks,followtheinstructionsincludedwithyourproduct,observeallwarningsontheproductandinthe
operatinginstructions,andreviewtheinformationincludedinthisdocumentcarefully.Bycarefullyfollowing
theinformationcontainedinthisdocumentandprovidedwithyourproduct,youcanhelpprotectyourself
fromhazardsandcreateasafercomputerworkenvironment.
Note:Thisinformationincludesreferencestopoweradaptersandbatteries.Inadditiontonotebook
computers,someproducts(suchasspeakersandmonitors)shipwithexternalpoweradapters.Ifyouhave
suchaproduct,thisinformationappliestoyourproduct.Inaddition,computerproductscontainacoin-sized
internalbatterythatprovidespowertothesystemclockevenwhenthecomputerisunplugged,sothe
batterysafetyinformationappliestoallcomputerproducts.
viUserGuide

Conditionsthatrequireimmediateaction
Productscanbecomedamagedduetomisuseorneglect.Someproductdamageisseriousenough
thattheproductshouldnotbeusedagainuntilithasbeeninspectedand,ifnecessary,repairedby
anauthorizedservicer.
Aswithanyelectronicdevice,paycloseattentiontotheproductwhenitisturnedon.Onveryrare
occasions,youmightnoticeanodororseeapuffofsmokeorsparksventfromyourproduct.Oryou
mighthearsoundslikepopping,crackingorhissing.Theseconditionsmightmerelymeanthatan
internalelectroniccomponenthasfailedinasafeandcontrolledmanner.Or,theymightindicate
apotentialsafetyissue.However,donottakerisksorattempttodiagnosethesituationyourself.
ContacttheCustomerSupportCenterforfurtherguidance.ForalistofServiceandSupportphone
numbers,seethefollowingWebsite:
http://www.lenovo.com/support/phone
Frequentlyinspectyourcomputeranditscomponentsfordamageorwearorsignsofdanger.
Ifyouhaveanyquestionabouttheconditionofacomponent,donotusetheproduct.Contact
theCustomerSupportCenterortheproductmanufacturerforinstructionsonhowtoinspectthe
productandhaveitrepaired,ifnecessary.
Intheunlikelyeventthatyounoticeanyofthefollowingconditions,orifyouhaveanysafety
concernswithyourproduct,stopusingtheproductandunplugitfromthepowersourceand
telecommunicationlinesuntilyoucanspeaktotheCustomerSupportCenterforfurtherguidance.
•Powercords,plugs,poweradapters,extensioncords,surgeprotectors,orpowersuppliesthatare
cracked,broken,ordamaged.
•Signsofoverheating,smoke,sparks,orfire.
•Damagetoabattery(suchascracks,dents,orcreases),dischargefromabattery,orabuildupofforeign
substancesonthebattery.
•Acracking,hissingorpoppingsound,orstrongodorthatcomesfromtheproduct.
•Signsthatliquidhasbeenspilledoranobjecthasfallenontothecomputerproduct,thepowercordor
poweradapter.
•Thecomputerproduct,powercord,orpoweradapterhasbeenexposedtowater.
•Theproducthasbeendroppedordamagedinanyway.
•Theproductdoesnotoperatenormallywhenyoufollowtheoperatinginstructions.
Note:Ifyounoticetheseconditionswithaproduct(suchasanextensioncord)thatisnotmanufacturedfor
orbyLenovo,stopusingthatproductuntilyoucancontacttheproductmanufacturerforfurtherinstructions,
oruntilyougetasuitablereplacement.
Serviceandupgrades
DonotattempttoserviceaproductyourselfunlessinstructedtodosobytheCustomerSupportCenteror
yourdocumentation.OnlyuseaServiceProviderwhoisapprovedtorepairyourparticularproduct.
Note:Somecomputerpartscanbeupgradedorreplacedbythecustomer.Upgradestypicallyare
referredtoasoptions.ReplacementpartsapprovedforcustomerinstallationarereferredtoasCustomer
ReplaceableUnits,orCRUs.Lenovoprovidesdocumentationwithinstructionswhenitisappropriatefor
customerstoinstalloptionsorreplaceCRUs.Youmustcloselyfollowallinstructionswheninstallingor
replacingparts.Beforeyouremovethecoversfromaproductequippedwithapowercord,alwaysmake
surethatthepoweristurnedoffandthattheproductisunpluggedfromanypowersource.Ifyouhave
anyquestionsorconcerns,contacttheCustomerSupportCenter.
Althoughtherearenomovingpartsinyourcomputerafterthepowercordhasbeendisconnected,the
followingwarningsarerequiredforyoursafety.
©CopyrightLenovo2014,2016
vii

CAUTION:
Hazardousmovingparts.Keepfingersandotherbodypartsaway.
CAUTION:
Beforeyouopenthecomputercover,turnoffthecomputerandwaitthreetofiveminutestolet
thecomputercoolbeforeopeningthecover.
Powercordsandpoweradapters
DANGER
Useonlythepowercordsandpoweradapterssuppliedbytheproductmanufacturer.
Thepowercordsshallbesafetyapproved.ForGermany,itshallbeH05VV-F,3G,0.75mm
2
,or
better.Forothercountries,thesuitabletypesshallbeusedaccordingly.
Neverwrapapowercordaroundapoweradapterorotherobject.Doingsocanstressthecordin
waysthatcancausethecordtofray,crack,orcrimp.Thiscanpresentasafetyhazard.
Alwaysroutepowercordssothattheywillnotbewalkedon,trippedover,orpinchedbyobjects.
Protectpowercordsandpoweradaptersfromliquids.Forinstance,donotleaveyourpowercord
orpoweradapternearsinks,tubs,toilets,oronfloorsthatarecleanedwithliquidcleansers.
Liquidscancauseashortcircuit,particularlyifthepowercordorpoweradapterhasbeenstressed
bymisuse.Liquidsalsocancausegradualcorrosionofpowercordterminalsand/ortheconnector
terminalsonapoweradapter,whichcaneventuallyresultinoverheating.
Ensurethatallpowercordconnectorsaresecurelyandcompletelypluggedintoreceptacles.
Donotuseanypoweradapterthatshowscorrosionattheacinputpinsorshowssignsof
overheating(suchasdeformedplastic)attheacinputpinsoranywhereonthepoweradapter.
Donotuseanypowercordswheretheelectricalcontactsoneitherendshowsignsofcorrosionor
overheatingorwherethepowercordappearstohavebeendamagedinanyway.
Topreventpossibleoverheating,donotcoverthepoweradapterwithclothingorotherobjects
whenthepoweradapterispluggedintoanelectricaloutlet.
viiiUserGuide

Extensioncordsandrelateddevices
Ensurethatextensioncords,surgeprotectors,uninterruptiblepowersupplies,andpowerstripsthatyouuse
areratedtohandletheelectricalrequirementsoftheproduct.Neveroverloadthesedevices.Ifpowerstrips
areused,theloadshouldnotexceedthepowerstripinputrating.Consultanelectricianformoreinformation
ifyouhavequestionsaboutpowerloads,powerrequirements,andinputratings.
Plugsandoutlets
DANGER
Ifareceptacle(poweroutlet)thatyouintendtousewithyourcomputerequipmentappearstobe
damagedorcorroded,donotusetheoutletuntilitisreplacedbyaqualifiedelectrician.
Donotbendormodifytheplug.Iftheplugisdamaged,contactthemanufacturertoobtain
areplacement.
Donotshareanelectricaloutletwithotherhomeorcommercialappliancesthatdrawlargeamounts
ofelectricity;otherwise,unstablevoltagemightdamageyourcomputer,data,orattacheddevices.
Someproductsareequippedwithathree-prongedplug.Thisplugfitsonlyintoagrounded
electricaloutlet.Thisisasafetyfeature.Donotdefeatthissafetyfeaturebytryingtoinsertitinto
anon-groundedoutlet.Ifyoucannotinserttheplugintotheoutlet,contactanelectricianforan
approvedoutletadapterortoreplacetheoutletwithonethatenablesthissafetyfeature.Never
overloadanelectricaloutlet.Theoverallsystemloadshouldnotexceed80percentofthebranch
circuitrating.Consultanelectricianformoreinformationifyouhavequestionsaboutpowerloads
andbranchcircuitratings.
Besurethatthepoweroutletyouareusingisproperlywired,easilyaccessible,andlocatedclose
totheequipment.Donotfullyextendpowercordsinawaythatwillstressthecords.
Besurethatthepoweroutletprovidesthecorrectvoltageandcurrentfortheproductyouare
installing.
Carefullyconnectanddisconnecttheequipmentfromtheelectricaloutlet.
Powersupplystatement
DANGER
Neverremovethecoveronapowersupplyoranypartthathasthefollowinglabelattached.
Hazardousvoltage,current,andenergylevelsarepresentinsideanycomponentthathasthislabel
attached.Therearenoserviceablepartsinsidethesecomponents.Ifyoususpectaproblemwith
oneoftheseparts,contactaservicetechnician.
©CopyrightLenovo2014,2016
ix

Externaldevices
CAUTION:
DonotconnectordisconnectanyexternaldevicecablesotherthanUSBand1394cableswhilethe
computerpowerison;otherwise,youmightdamageyourcomputer.Toavoidpossibledamageto
attacheddevices,waitatleastfivesecondsafterthecomputerisshutdowntodisconnectexternal
devices.
Generalbatterynotice
DANGER
BatteriessuppliedbyLenovoforusewithyourproducthavebeentestedforcompatibilityand
shouldonlybereplacedwithapprovedparts.AbatteryotherthantheonespecifiedbyLenovo,ora
disassembledormodifiedbatteryisnotcoveredbythewarranty.
Batteryabuseormishandlingcancauseoverheat,liquidleakage,oranexplosion.Toavoidpossible
injury,dothefollowing:
•Donotopen,dissemble,orserviceanybattery.
•Donotcrushorpuncturethebattery.
•Donotshort-circuitthebattery,orexposeittowaterorotherliquids.
•Keepthebatteryawayfromchildren
•Keepthebatteryawayfromfire.
Stopusingthebatteryifitisdamaged,orifyounoticeanydischargeorthebuildupofforeign
materialsonthebatteryleads.
Storetherechargeablebatteriesorproductscontainingtherechargeablebatteriesatroom
temperature,chargedtoapproximately30to50%ofcapacity.Werecommendthatthebatteriesbe
chargedaboutonceperyeartopreventoverdischarge.
Donotputthebatteryintrashthatisdisposedofinlandfills.Whendisposingofthebattery,comply
withlocalordinancesorregulations.
Noticeforbuilt-inrechargeablebatteries
DANGER
Donotattempttoreplacethebuilt-inrechargeablebattery.Replacementofthebatterymustbe
donebyaLenovo-authorizedrepairfacilityortechnician.
Onlyrechargethebatterystrictlyaccordingtoinstructionsincludedintheproductdocumentation.
TheLenovo-authorizedrepairfacilitiesortechniciansrecycleLenovobatteriesaccordingtolocal
lawsandregulations.
xUserGuide

Lithiumcoin-cellbatterynotice
DANGER
Ifthecoin-cellbatteryisincorrectlyreplaced,thereisdangerofanexplosion.Thebatterycontains
asmallamountofharmfulsubstance.
Donotheattomorethan100°C(212°F).
ThefollowingstatementappliestousersinthestateofCalifornia,U.S.A.
CaliforniaPerchlorateInformation:
Productscontainingmanganesedioxidelithiumcoin-cellbatteriesmaycontainperchlorate.
PerchlorateMaterial-specialhandlingmayapply,See
www.dtsc.ca.gov/hazardouswaste/perchlorate
Heatandproductventilation
DANGER
Computers,acpoweradapters,andmanyaccessoriescangenerateheatwhenturnedonandwhen
batteriesarecharging.Notebookcomputerscangenerateasignificantamountofheatduetotheir
compactsize.Alwaysfollowthesebasicprecautions:
•Whenyourcomputeristurnedonorthebatteryischarging,thebase,thepalmrest,andsome
otherpartsmaybecomehot.Avoidkeepingyourhands,yourlap,oranyotherpartofyour
bodyincontactwithahotsectionofthecomputerforanyextendedlengthoftime.Whenyou
usethekeyboard,avoidkeepingyourpalmsonthepalmrestforaprolongedperiodoftime.
Yourcomputergeneratessomeheatduringnormaloperation.Theamountofheatdependson
theamountofsystemactivityandthebatterychargelevel.Extendedcontactwithyourbody,
eventhroughclothing,couldcausediscomfortorevenaskinburn.Periodicallytakebreaks
fromusingthekeyboardbyliftingyourhandsfromthepalmrest;andbecarefulnottouse
thekeyboardforanyextendedlengthoftime.
•Donotoperateyourcomputerorchargethebatterynearflammablematerialsorinexplosive
environments.
•Ventilationslots,fansand/orheatsinksareprovidedwiththeproductforsafety,comfort,and
reliableoperation.Thesefeaturesmightinadvertentlybecomeblockedbyplacingtheproducton
abed,sofa,carpet,orotherflexiblesurface.Neverblock,cover,ordisablethesefeatures.
•Whentheacpoweradapterisconnectedtoanelectricaloutletandyourcomputer,itgenerates
heat.Donotplacetheadapterincontactwithanypartofyourbodywhileusingit.Neverusethe
acpoweradaptertowarmyourbody.Extendedcontactwithyourbody,eventhroughclothing,
maycauseaskinburn.
Foryoursafety,alwaysfollowthesebasicprecautionswithyourcomputer:
•Keepthecoverclosedwheneverthecomputerispluggedin.
•Regularlyinspecttheoutsideofthecomputerfordustaccumulation.
•Removedustfromventsandanyperforationsinthebezel.Morefrequentcleaningsmightbe
requiredforcomputersindustyorhigh-trafficareas.
•Donotrestrictorblockanyventilationopenings.
©CopyrightLenovo2014,2016
xi

•Donotoperateyourcomputerinsidefurniture,asthismightincreasetheriskofoverheating.
•Airflowtemperaturesintothecomputershouldnotexceed35°C(95°F).
Electricalcurrentsafetyinformation
DANGER
Electriccurrentfrompower,telephone,andcommunicationcablesishazardous.
Toavoidashockhazard:
•Donotuseyourcomputerduringalightningstorm.
•Donotconnectordisconnectanycablesorperforminstallation,maintenance,orreconfiguration
ofthisproductduringanelectricalstorm.
•Connectallpowercordstoaproperlywiredandgroundedelectricaloutlet.
•Connecttoproperlywiredoutletsanyequipmentthatwillbeattachedtothisproduct.
•Wheneverpossible,useonehandonlytoconnectordisconnectsignalcables.
•Neverturnonanyequipmentwhenthereisevidenceoffire,water,orstructuraldamage.
•Disconnecttheattachedpowercordsandallthecablesbeforeyouopenthedevicecovers,
unlessinstructedotherwiseintheinstallationandconfigurationprocedures.
•Donotuseyourcomputeruntilallinternalpartsenclosuresarefastenedintoplace.Neveruse
thecomputerwheninternalpartsandcircuitsareexposed.
DANGER
Connectanddisconnectcablesasdescribedinthefollowingprocedureswheninstalling,moving,
oropeningcoversonthisproductorattacheddevices.
Toconnect:
1.TurneverythingOFF .
2.First,attachallcablestodevices.
3.Attachsignalcablestoconnectors.
4.Attachpowercordstooutlets.
5.TurndevicesON.
Todisconnect:
1.TurneverythingOFF .
2.First,removepowercordsfromoutlets.
3.Removesignalcablesfromconnectors.
4.Removeallcablesfromdevices.
Thepowercordmustbedisconnectedfromthewalloutletorreceptaclebeforeinstallingallother
electricalcablesconnectedtothecomputer.
Thepowercordmaybereconnectedtothewalloutletorreceptacleonlyafterallotherelectrical
cableshavebeenconnectedtothecomputer.
DANGER
Duringelectricalstorms,donotperformanyreplacementanddonotconnectthetelephonecable
toordisconnectitfromthetelephoneoutletonthewall.
xiiUserGuide

Liquidcrystaldisplay(LCD)notice
CAUTION:
Theliquidcrystaldisplay(LCD)ismadeofglass,androughhandlingordroppingthecomputercan
causetheLCDtobreak.IftheLCDbreaksandtheinternalfluidgetsintoyoureyesoronyour
hands,immediatelywashtheaffectedareaswithwaterforatleast15minutes;ifanysymptomsare
presentafterwashing,getmedicalcare.
Note:Forproductswithmercury-containingfluorescentlamps(forexample,non-LED),thefluorescentlamp
intheLiquidcrystaldisplay(LCD)containsmercury;disposeofaccordingtolocal,state,orfederallaws.
Usingheadphonesorearphones
CAUTION:
Excessivesoundpressurefromearphonesandheadphonescancausehearingloss.Adjustmentof
theequalizertomaximumincreasestheearphoneandheadphoneoutputvoltageandthesound
pressurelevel.Therefore,toprotectyourhearing,adjusttheequalizertoanappropriatelevel.
Excessiveuseofheadphonesorearphonesforalongperiodoftimeathighvolumecanbedangerousifthe
outputoftheheadphoneorearphoneconnectorsdonotcomplywithspecificationsofEN50332-2.The
headphoneoutputconnectorofyourcomputercomplieswithEN50332-2Subclause7.Thisspecification
limitsthecomputer’smaximumwidebandtrueRMSoutputvoltageto150mV.Tohelpprotectagainst
hearingloss,ensurethattheheadphonesorearphonesyouusealsocomplywithEN50332-2(Clause7
limits)forawidebandcharacteristicvoltageof75mV.UsingheadphonesthatdonotcomplywithEN
50332-2canbedangerousduetoexcessivesoundpressurelevels.
IfyourLenovocomputercamewithheadphonesorearphonesinthepackage,asaset,thecombinationof
theheadphonesorearphonesandthecomputeralreadycomplieswiththespecificationsofEN50332-1.
Ifdifferentheadphonesorearphonesareused,ensurethattheycomplywithEN50332-1(Clause6.5
LimitationValues).UsingheadphonesthatdonotcomplywithEN50332-1canbedangerousdueto
excessivesoundpressurelevels.
Additionalsafetyinformation
Plasticbagnotice
DANGER
Plasticbagscanbedangerous.Keepplasticbagsawayfrombabiesandchildrentoavoiddanger
ofsuffocation.
Glasspartsnotice
CAUTION:
Somepartsofyourproductmaybemadeofglass.Thisglasscouldbreakiftheproductisdropped
onahardsurfaceorreceivesasubstantialimpact.Ifglassbreaks,donottouchorattempttoremove
it.Stopusingyourproductuntiltheglassisreplacedbytrainedservicepersonnel.
©CopyrightLenovo2014,2016
xiii

xivUserGuide
Chapter1.Productoverview
Thischapterprovidesinformationaboutthelocationsofconnectors,locationsofimportantproductlabels,
computerfeatures,specifications,andpreinstalledprograms.
Thischaptercontainsthefollowingtopics:
•“Locatingcomputercontrols,connectors,andindicators”onpage1
•“Locatingimportantproductinformation”onpage8
•“Features”onpage11
•“Specifications”onpage12
•“Lenovoprograms”onpage13
Locatingcomputercontrols,connectors,andindicators
Thistopicintroducesthecomputerhardwarefeaturestogiveyouthebasicinformationthatyouneed
tostartusingthecomputer.
Frontview
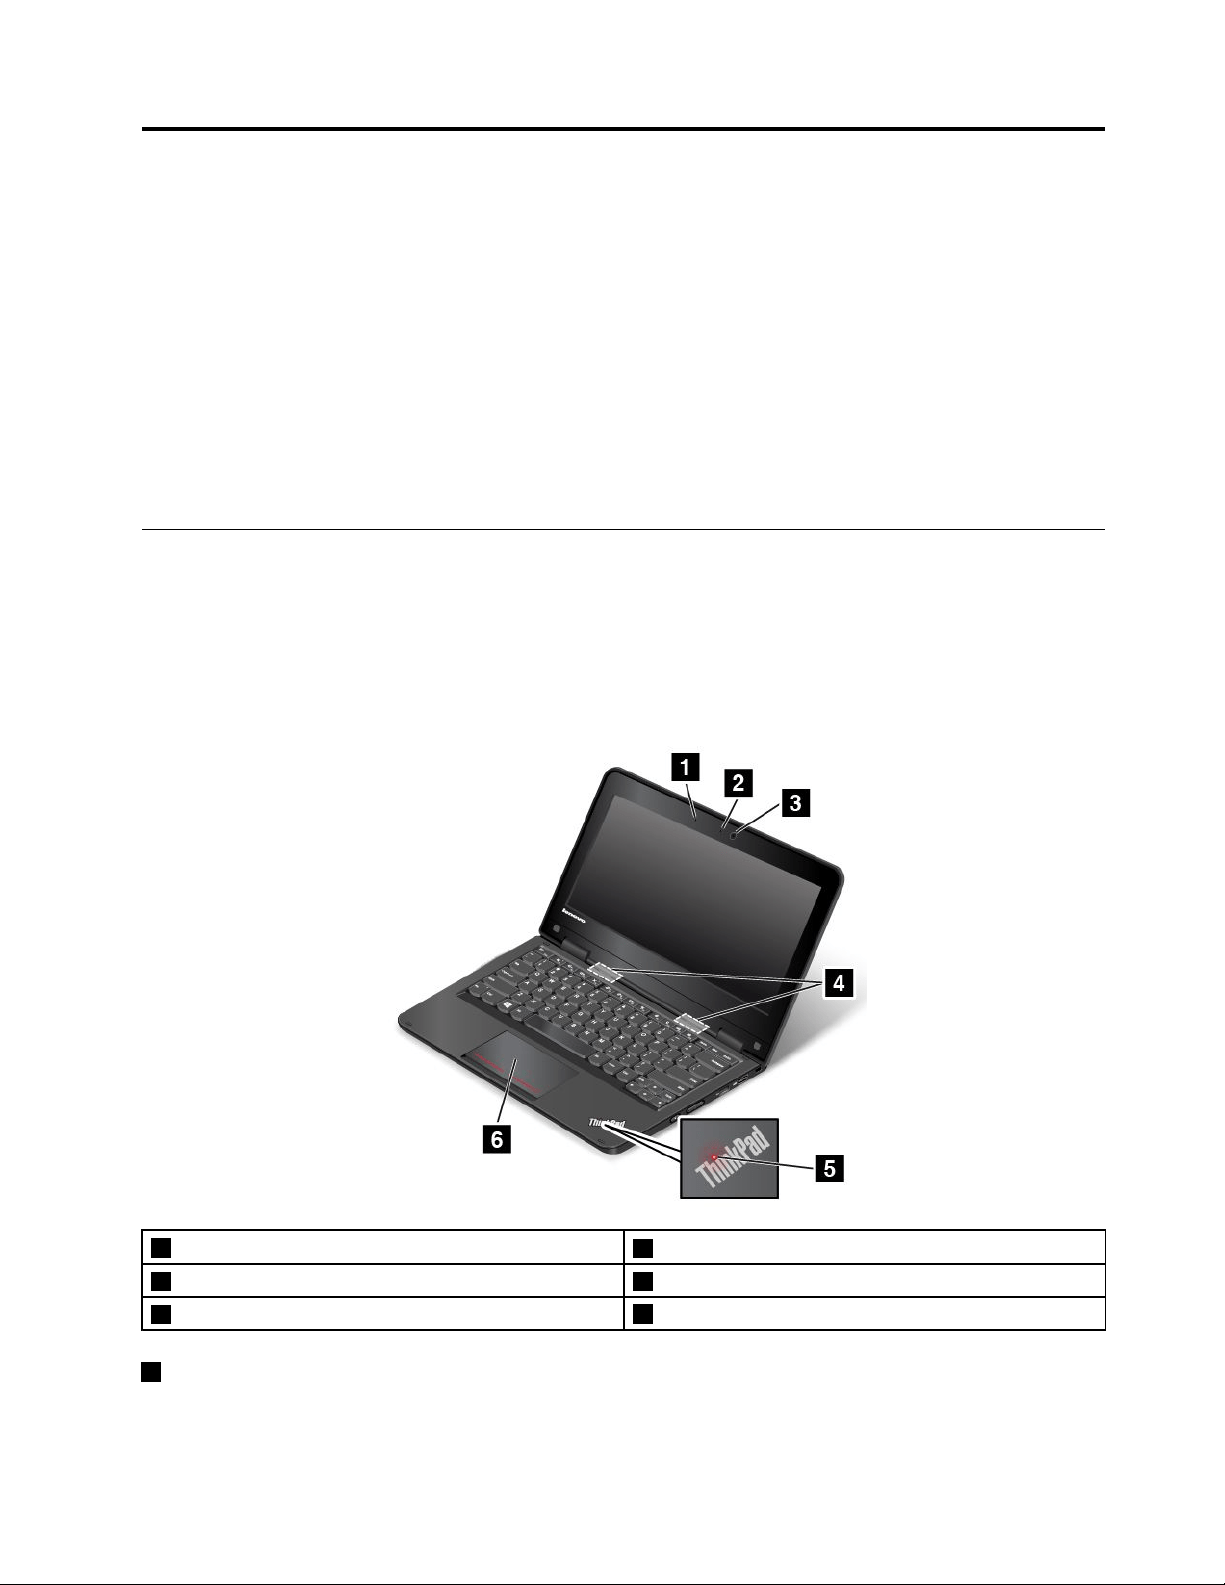
ThinkPad11efrontview
1Microphone
2Camera-in-useindicator
3Camera4Speakers
5System-statusindicator
6Touchpad
1Microphone
Themicrophonecapturessoundandvoicewhenusedwithaprogramcapableofhandlingaudio.
©CopyrightLenovo2014,2016
1
2Camera-in-useindicator
Whenthecameraisstarted,thecamera-in-useindicatorturnsoningreen.
3Camera
Usethecameratotakepicturesorholdavideoconference.Formoreinformation,see“Usingthecamera”
onpage37.
4Speakers
Yourcomputerisequippedwithapairofstereospeakers.
5System-statusindicator
TheilluminateddotintheThinkPad
®
logoonthepalmrestfunctionsasasystem-statusindicator.For
moreinformation,see“Statusindicators”onpage7.
6Touchpad
Yourcomputerisequippedwithatouchpadunderthebottomedgeofthekeyboard.Thetouchpad
enablesyoutomovethepointer,withouttheuseofaconventionalmouse.Formoreinformation,see“Using
thetouchpad”onpage24.
ThinkPadY oga
®
11efrontview
1Proximitysensor2Microphone
3Camera-in-useindicator4Camera
5Speakers6System-statusindicator
7Touchpad8Windowsbutton
9Multi-touchscreen
2UserGuide

1Proximitysensor
Theproximitysensorisdesignedtoworkwhenyourcomputerisintabletmode.Iftheproximitysensor
detectsyourhandsnearby,theActiveProtectionSystem
™
programwillbedisabledautomatically.Afteryour
handsleavethedetectingareaoftheproximitysensor,theActiveProtectionSystemwillbere-enabled.
2Microphone
Themicrophonecapturessoundandvoicewhenusedwithaprogramcapableofhandlingaudio.
3Camera-in-useindicator
Whenthecameraisstarted,thecamera-in-useindicatorturnsoningreen.
4Camera
Usethecameratotakepicturesorholdavideoconference.Formoreinformation,see“Usingthecamera”
onpage37.
5Speakers
Yourcomputerisequippedwithapairofstereospeakers.
6System-statusindicator
TheilluminateddotintheThinkPadlogoonthepalmrestfunctionsasasystem-statusindicator.For
moreinformation,see“Statusindicators”onpage7
.
7Touchpad
Yourcomputerisequippedwithatouchpadunderthebottomedgeofthekeyboard.Thetouchpad
enablesyoutomovethepointer,withouttheuseofaconventionalmouse.Formoreinformation,see“Using
thetouchpad”onpage24
.
8Windowsbutton
•ForWindows7andWindows10:PresstheWindowsbuttontoopentheStartmenu;orpressthe
Windowsbuttontowakeupthecomputerfromsleepmode.
•ForWindows8.1:PresstheWindowsbuttontoswitchbetweenthecurrentworkspaceandtheStart
screen;orpresstheWindowsbuttontowakeupthecomputerfromsleepmode.
9Multi-touchscreen
Yourcomputermightcomewithamulti-touchscreen.Formoreinformation,see“Usingthemulti-touch
screen”onpage19.
Right-sideview
Note:Yourcomputermightlookslightlydifferentfromthefollowingillustration.
Chapter1.Productoverview3
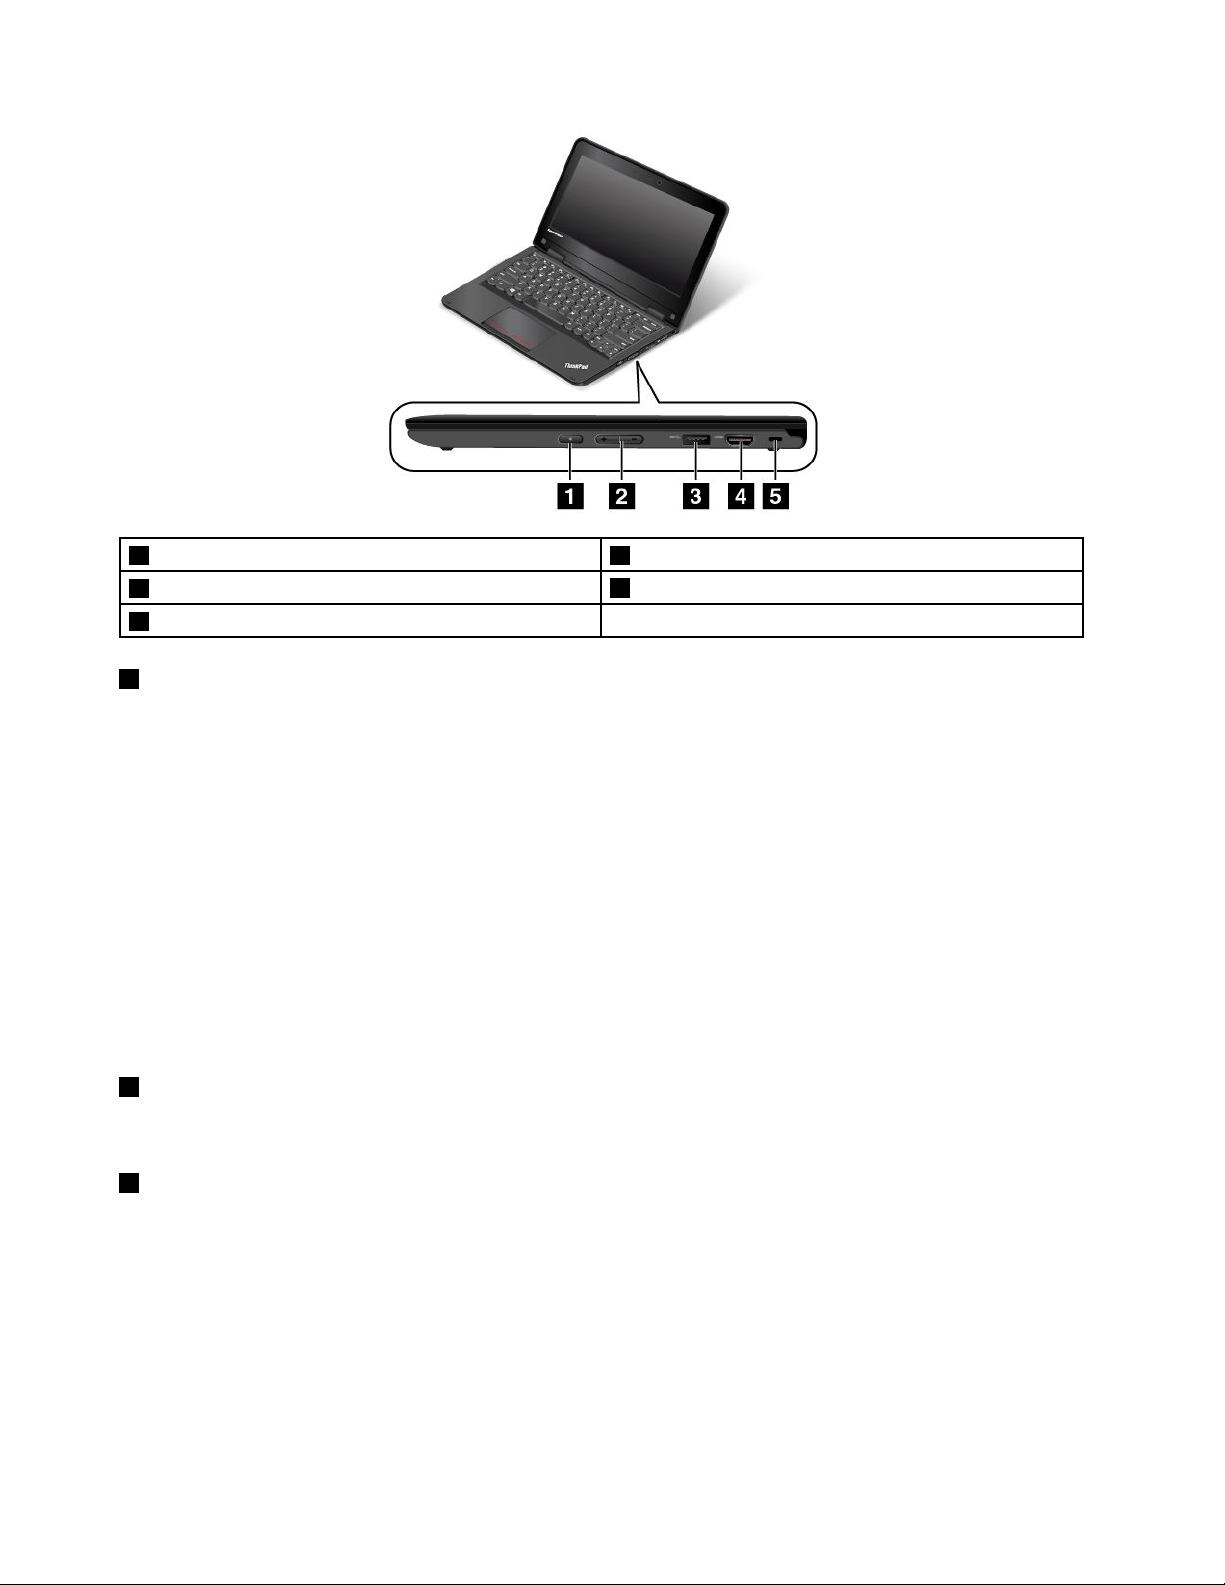
1Powerbutton2Volume-controlbuttons
3USB3.0connector
4HDMI™connector
5Security-lockslot
1Powerbutton
Pressthepowerbuttontoturnonthecomputerorputthecomputerintosleepmode.Forhowtoturnoffthe
computer,see“Frequentlyaskedquestions”onpage17.
Ifyourcomputeriscompletelyunresponsive,youcanturnoffthecomputerbypressingandholdingthe
powerbuttonforfourormoreseconds.Ifthecomputercannotbeturnedoff,see“Computerstops
responding”onpage79
formoreinformation.
Youalsocandefinewhatthepowerbuttondoes.Forexample,bypressingthepowerbutton,youcanturn
offthecomputerorputthecomputerintosleeporhibernationmode.Tochangewhatthepowerbutton
does,dothefollowing:
1.GotoControlPanel,thenchangetheviewofControlPanelfromCategorytoLargeiconsorSmallicons.
2.ClickPowerOptions➙Choosewhatthepowerbuttonsdo.
3.Followtheinstructionsonthescreen.
2Volume-controlbuttons
Usethevolume-controlbuttonstoadjustthevolume.
3USB3.0connector
TheUniversalSerialBus(USB)3.0connectorisusedforconnectingdevicescompatiblewithaUSB
interface,suchasaUSBprinteroradigitalcamera.
Attention:WhenyouconnectaUSBcabletothisconnector,ensurethattheUSBmarkisfacingupward.
Otherwisetheconnectormightgetdamaged.
4UserGuide
4HDMIconnector
YourcomputerhasaHigh-DefinitionMultimediaInterface(HDMI)connector.Thisconnectorcanconnecta
compatibledigitalaudiodeviceorvideomonitor,suchasahigh-definitiontelevision(HDTV).Youalsocan
connectyourcomputertoacompatiblevideographicsarray(VGA)videodevice,suchasaVGAmonitor,by
usinganHDMI-to-VGAmonitorcable.
5Security-lockslot
Toprotectyourcomputerfromtheft,youcanpurchaseasecuritycablelockthatfitsthesecurity-lock
slottolockthecomputertoastationaryobject.
Note:Youareresponsibleforevaluating,selecting,andimplementingthelockingdeviceandsecurity
feature.Lenovomakesnocomments,judgments,orwarrantiesaboutthefunction,quality,orperformance
ofthelockingdeviceandsecurityfeature.
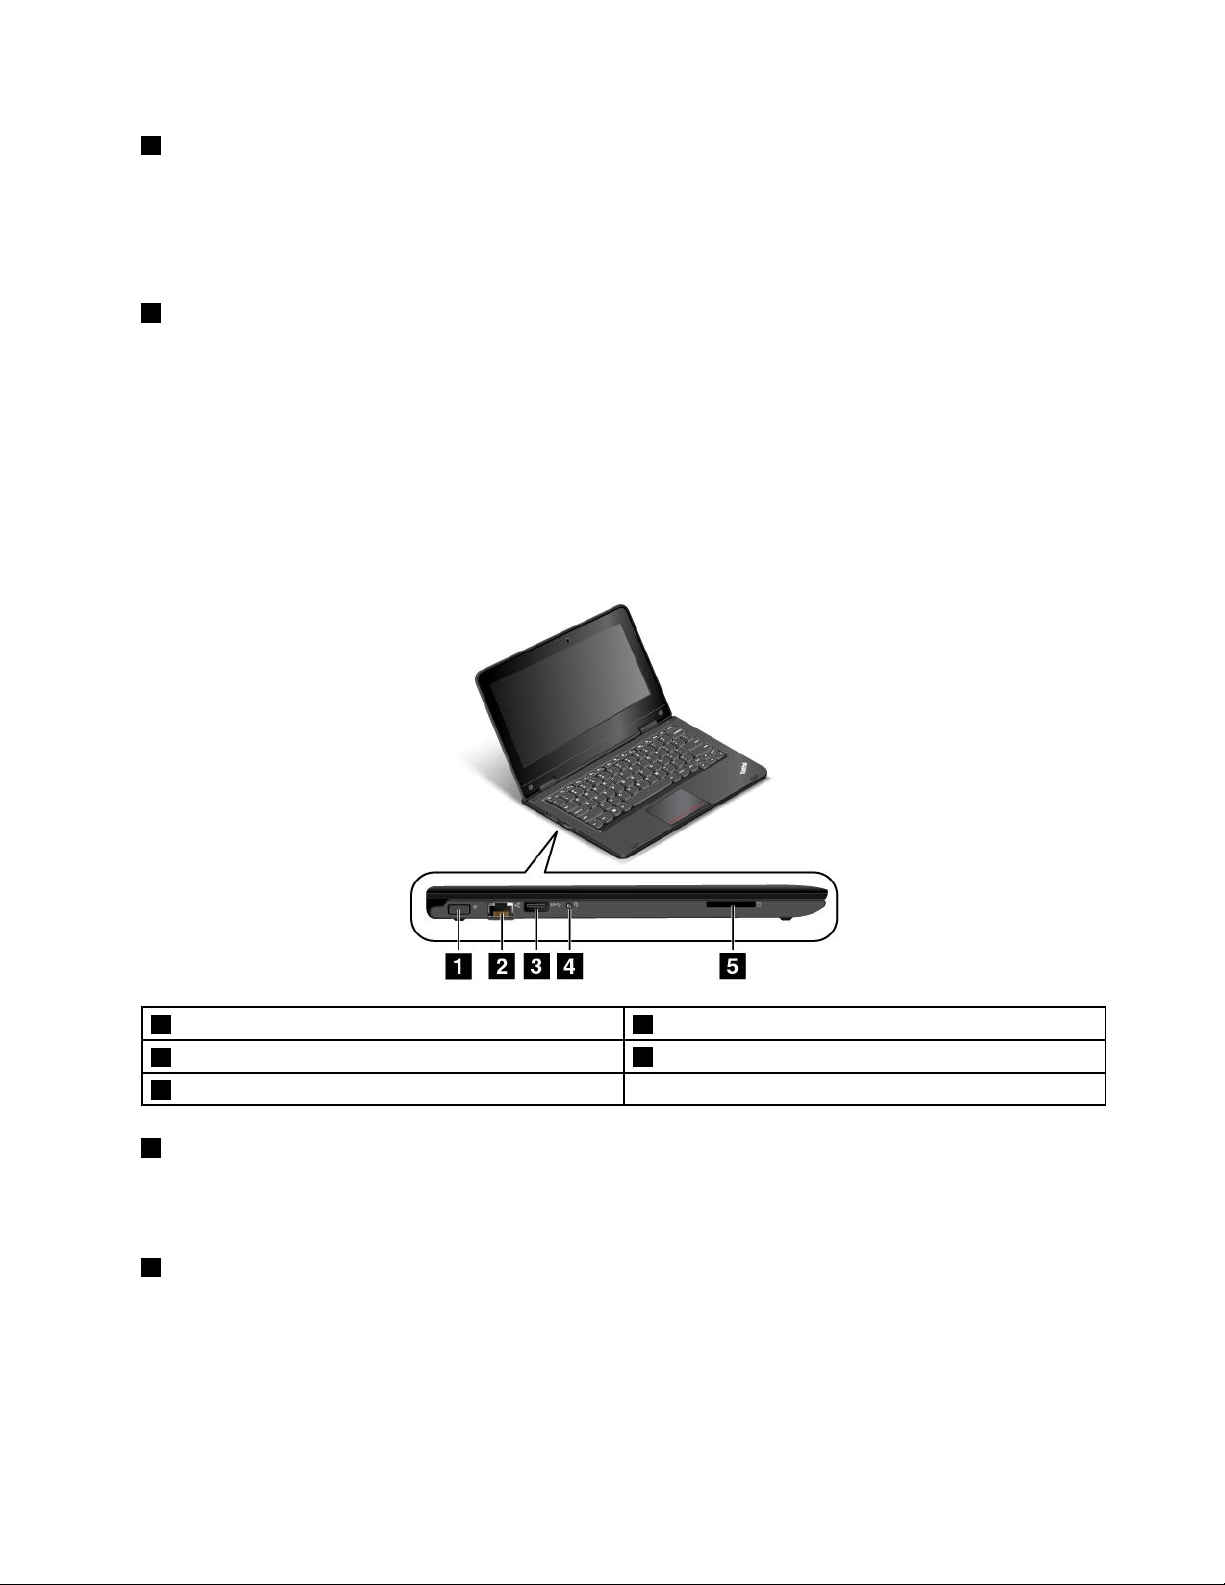
Left-sideview
Note:Yourcomputermightlookslightlydifferentfromthefollowingillustration.
1Powerconnector2Ethernetconnector
3AlwaysOnUSBconnector(USB2.0connector)
4Audioconnector
5Mediacardslot
1Powerconnector
Connecttheacpoweradaptertothepowerconnectortoprovideacpowertothecomputerandcharge
thebattery.
2Ethernetconnector
Connectthecomputertoalocalareanetwork(LAN)withtheEthernetconnector.
Chapter1.Productoverview5
DANGER
Toavoidtheriskofelectricalshock,donotconnectthetelephonecabletotheEthernetconnector.
YoucanonlyconnectanEthernetcabletothisconnector.
TheEthernetconnectorhastwoindicatorsthatshowthestatusofthenetworkconnection.Whenthe
greenindicatorison,thecomputerisconnectedtoaLAN.Whentheyellowindicatorblinks,dataisbeing
transmitted.
Note:Ifyouattachthecomputertoadockingstationorportreplicator,usetheEthernetconnectoronthe
dockingstationorportreplicatortoconnecttoaLAN,nottheoneonthecomputer.
3AlwaysOnUSBconnector(USB2.0connector)
Bydefault,theAlwaysOnUSBconnectorenablesyoutochargesomemobiledigitaldevicesand
smartphoneswhenyourcomputerisinthefollowingsituations:
•Thecomputerisonorinsleepmode.
•Thecomputerisinhibernationmodeoristurnedoff,butconnectedtoacpower.
Ifyouwanttochargethesedeviceswhenthecomputerisinhibernationmodeoristurnedoff,andthe
computerisnotconnectedtoacpower,dothefollowing:
•ForWindows
®
7:StartthePowerManagerprogram,clicktheGlobalPowerSettingstab,andthen
followtheinstructionsonthescreen.
•ForWindows8.1andWindows10:StarttheLenovoSettingsprogram,clickPOWER,andthenfollow
theinstructionsonthescreen.
Forinstructionsonhowtostarttheprograms,see“AccessingLenovoprograms”onpage13.
4Audioconnector
Connectheadphonesoraheadsetthathasa3.5-mm(0.14-inch),4-poleplugtotheaudioconnectorto
listentothesoundfromthecomputer.
Note:Ifyouareusingaheadsetwithafunctionswitch,theaudioconnectormightnotfullysupportthe
functionswitch.
5Mediacardslot
Yourcomputerhasamediacardslot.Insertyourflashmediacardintothisslottoreadthedataonthecard.
Formoreinformationaboutthesupportedcards,see“Usingaflashmediacard”onpage38.
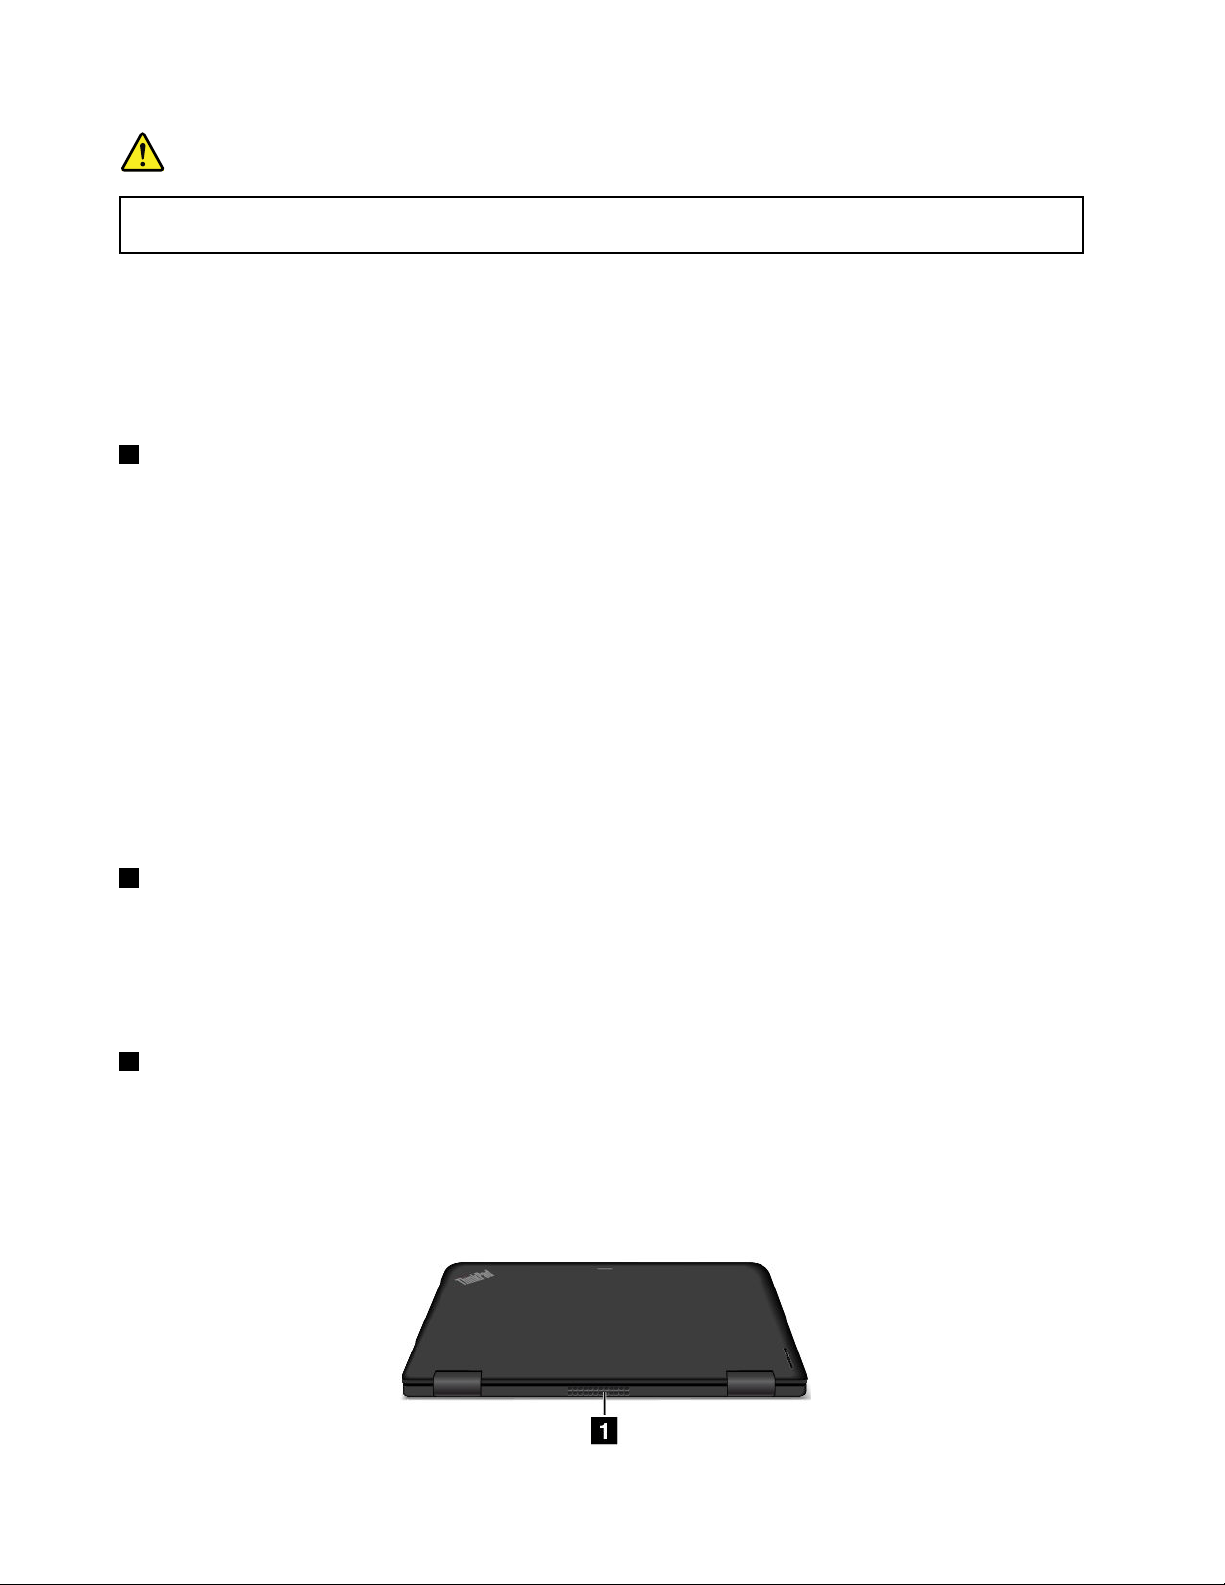
Rearview
Note:Yourcomputermightlookslightlydifferentfromthefollowingillustration.
6UserGuide
1Fanlouvers
Thefanlouversandinternalfanenableairtocirculateinthecomputer,whichinturnensurespropercooling,
especiallythecoolingofthemicroprocessor.
Notes:
•Toensureproperairflow,donotplaceanyobstaclesinfrontofthefanlouvers.
•Thefanlouversofyourcomputermightgettoohotwhenthecomputerisrunningheavytasks.Whenyou
areusingorcarryingthecomputer,takecaretoavoiddirectcontacttothefanlouvers.
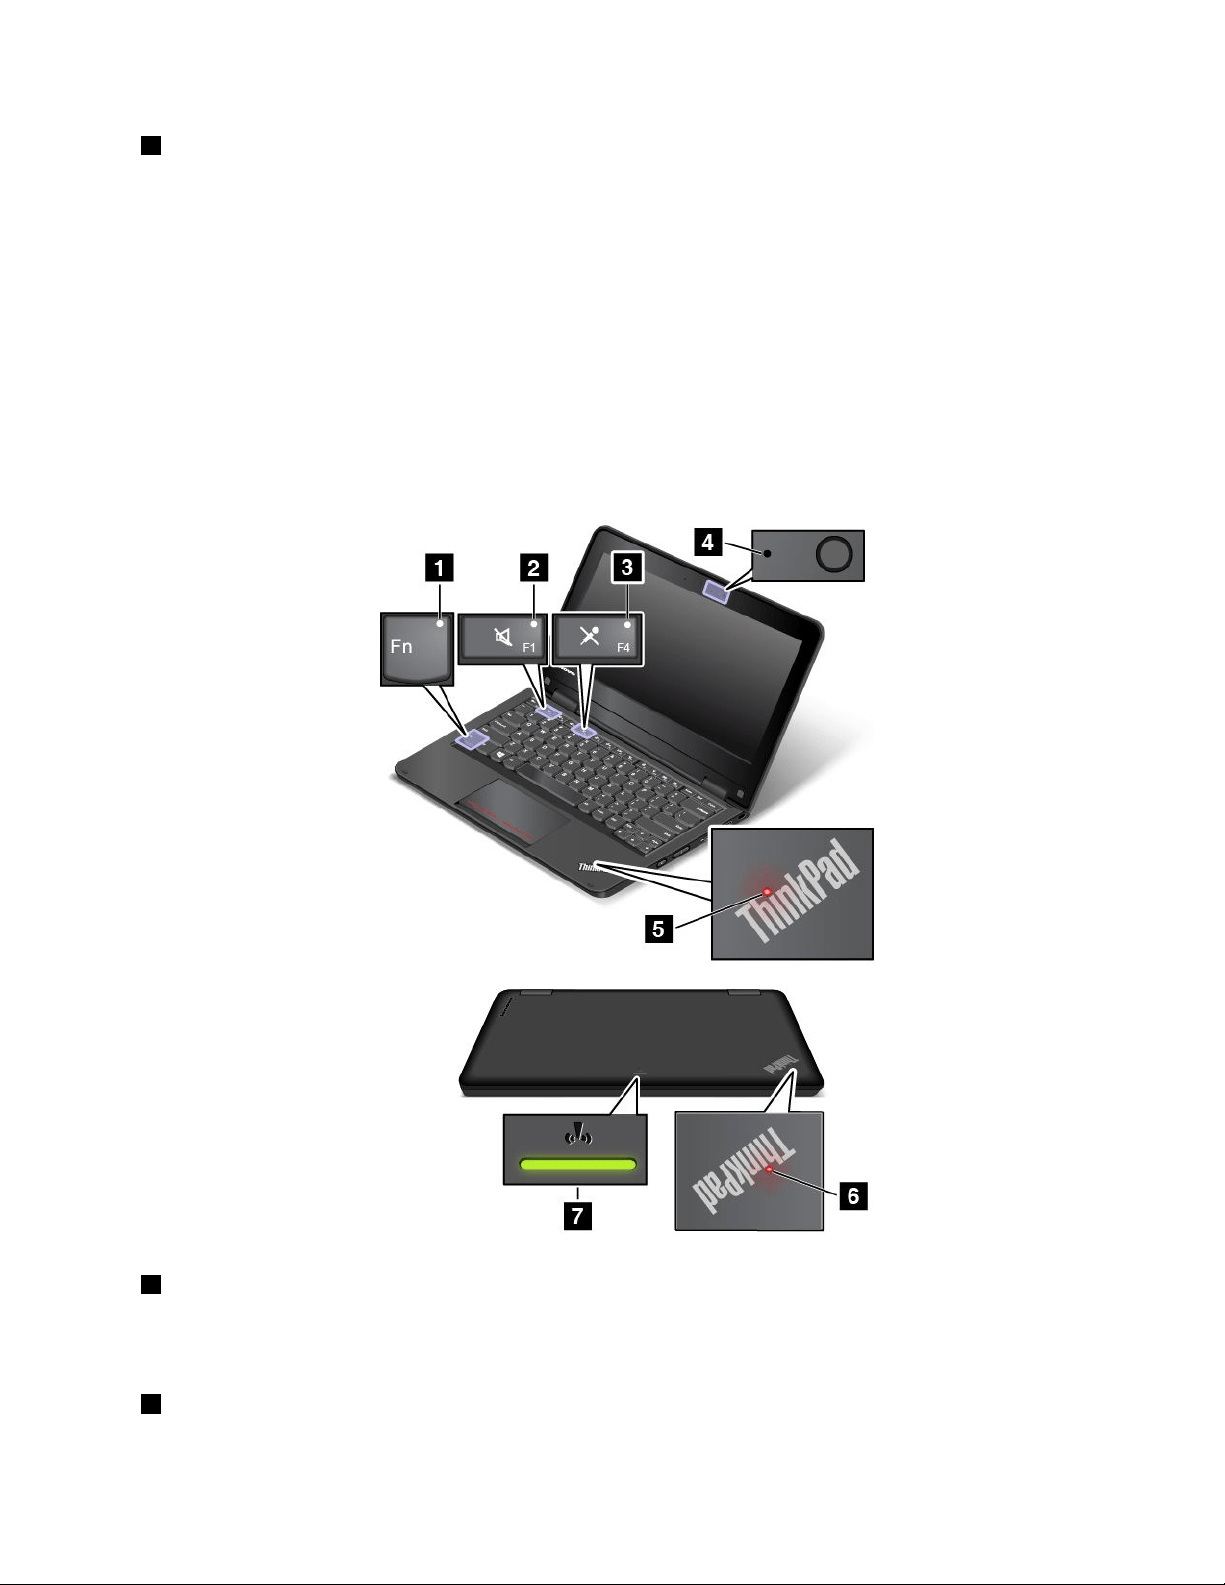
Statusindicators
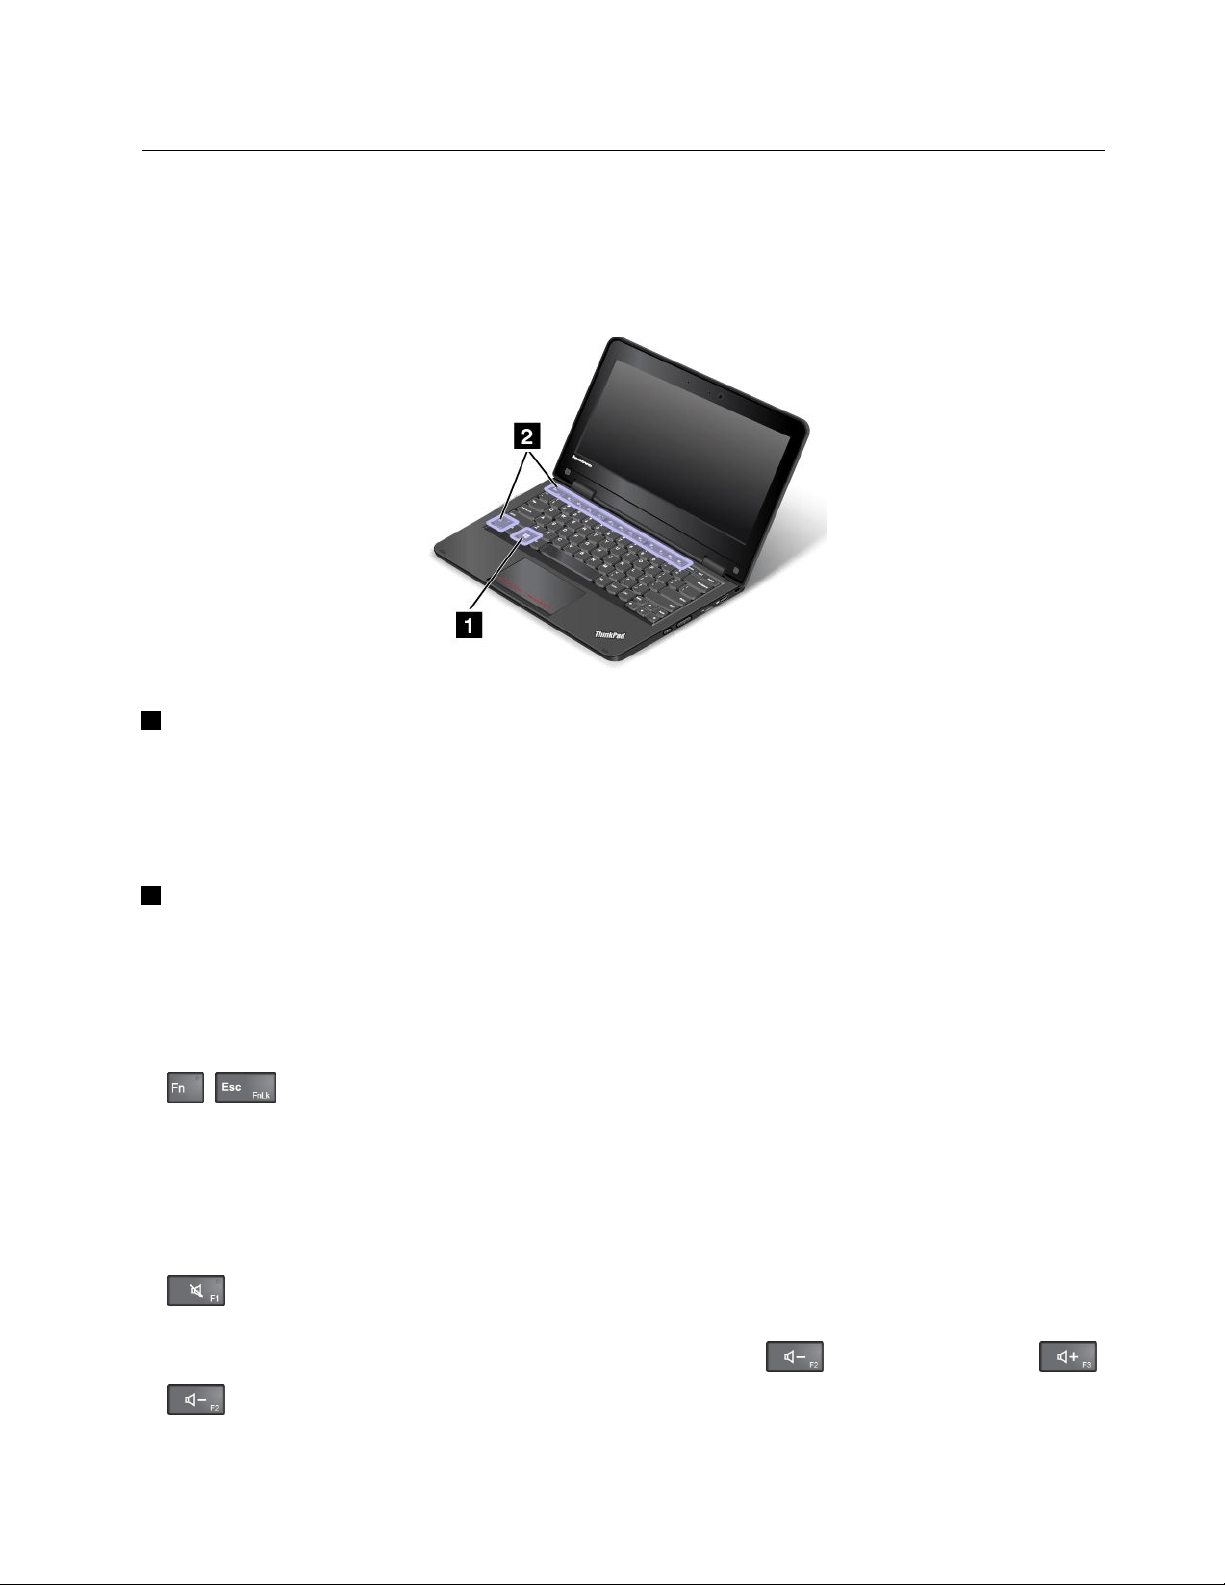
Thestatusindicatorsshowthecurrentstatusofyourcomputer.
Note:Yourcomputermightlookslightlydifferentfromthefollowingillustrations.
1FnLockindicator
TheFnLockindicatorshowsthestatusofFnLockfunction.Formoreinformation,see“Specialkeys”
onpage23.
2Speaker-muteindicator
Chapter1.Productoverview7

Whenthespeaker-muteindicatorison,thespeakersaremuted.
3Microphone-muteindicator
Whenthemicrophone-muteindicatorison,themicrophoneismuted.
4Camera-in-useindicator
Whenthecameraisstarted,thecamera-in-useindicatorturnsoningreen.
56System-statusindicators
TherearetwoThinkPadlogosonyourcomputer,oneonthepalmrestandtheotherontheouterlid.
TheilluminateddotineachThinkPadlogoworksasasystem-statusindicatorandhelpsyouidentifythe
statusofyourcomputer.
•Solidon:Thecomputerison(innormaluse).
•Blinksfast:Thecomputerisenteringhibernationmode.
•Blinksslowly:Thecomputerisinsleepmode.
•Blinksforthreetimes:Thecomputerisinitiallyconnectedtopower.
•Off:Thecomputerisofforinhibernationmode.
7Wireless-statusindicator
Thewireless-statusindicatorislocatedontheouterlidofthecomputerandithelpsyouidentifythewireless
statusofyourcomputer.
•Solidgreen:Thewirelessfeaturesofthecomputerareon.
•Off:Thewirelessfeaturesofthecomputerareoff.
Locatingimportantproductinformation
Thissectionprovidesinformationtohelpyoulocatethemachinetypeandmodellabel,FCCIDandIC
Certificationnumberlabel,andtheGenuineMicrosoft
®
label.
Machinetypeandmodellabel
Themachinetypeandmodellabelidentifiesyourcomputer.WhenyoucontactLenovoforhelp,themachine
typeandmodelinformationhelpssupporttechnicianstoidentifyyourcomputerandprovidefasterservice.
8UserGuide

Thefollowingillustrationshowsthelocationofthemachinetypeandmodelofyourcomputer.
Note:Yourcomputermightlookslightlydifferentfromthefollowingillustration.
FCCIDandICCertificationnumberinformation
TheFCCandICCertificationinformationisidentifiedbyalabellocatedonthecomputerasshowninthe
followingfigure.
Note:Yourcomputermightlookslightlydifferentfromthefollowingillustrations.
Thecontentofthislabeldiffersdependingonthewirelessmodulesthatcomewithyourcomputer:
•Forapreinstalledwirelessmodule,thislabelidentifiestheactualFCCIDandICcertificationnumberfor
thewirelessmoduleinstalledbyLenovo.
Note:Donotremoveorreplaceapreinstalledwirelessmodulebyyourself.Formodulereplacement,you
mustcontactLenovoservicefirst.Lenovoisnotresponsibleforanydamagecausedbyunauthorized
replacement.
•Forauser-replaceablewirelessmodule,thislabeldirectsyoutoconsultthisuserguidefortheactual
FCCIDandICcertificationnumber.
TheFCCIDandICCertificationnumberlabelfortheuser-replaceablewirelessmoduleisaffixedto
thewirelessmodule
1installedinyourcomputer.
Chapter1.Productoverview9

Note:Fortheuser-replaceablewirelessmodule,ensurethatyouuseonlyLenovo-authorizedwireless
modulesforthecomputer.Otherwise,anerrormessagewillbedisplayedandthecomputerwillbeep
whenyouturnonthecomputer.
LabelsfortheWindowsoperatingsystems
Windows7CertificateofAuthenticity:ComputermodelspreinstalledwiththeWindows7operating
systemhaveaCertificateofAuthenticitylabelaffixedtothecomputercoverorinsidethebattery
compartment.TheCertificateofAuthenticityisyourindicationthatthecomputerislicensedforaWindows7
productandispreinstalledwithaWindows7genuineversion.Insomecases,anearlierWindowsversion
mightbepreinstalledunderthetermsoftheWindows7Professionallicensedowngraderights.Printedon
theCertificateofAuthenticityistheWindows7versionforwhichthecomputerislicensedandtheProduct
ID.TheProductIDisimportantincaseyouneedtoreinstalltheWindows7operatingsystemfromasource
otherthanaLenovoproductrecoverydiscset.
Windows8.1andWindows10GenuineMicrosoftlabel:Dependingonyourgeographiclocation,
thedatewhenyourcomputerwasmanufactured,andtheversionofWindows8.1orWindows10
thatispreinstalled,yourcomputermighthaveaGenuineMicrosoftlabelaffixedtoitscover.See
http://www.microsoft.com/en-us/howtotell/Hardware.aspxforillustrationsofthevarioustypesofGenuine
Microsoftlabels.
•InthePeople’sRepublicofChina,theGenuineMicrosoftlabelisrequiredonallcomputermodels
preinstalledwithanyversionofWindows8.1orWindows10.
•Inothercountriesandregions,theGenuineMicrosoftlabelisrequiredonlyoncomputermodelslicensed
forWindows8.1ProorWindows10Pro.
TheabsenceofaGenuineMicrosoftlabeldoesnotindicatethatthepreinstalledWindowsversionisnot
genuine.FordetailsonhowtotellwhetheryourpreinstalledWindowsproductisgenuine,refertothe
informationprovidedbyMicrosoftathttp://www.microsoft.com/en-us/howtotell/default.aspx.
UnlikeWindows7products,therearenoexternal,visualindicatorsoftheProductIDorWindowsversionfor
whichthecomputerislicensed.Instead,theProductIDisrecordedinthecomputerfirmware.Whenevera
Windows8.1orWindows10productisinstalled,theinstallationprogramchecksthecomputerfirmwarefor
avalid,matchingProductIDtocompletetheactivation.
Insomecases,anearlierWindowsversionmightbepreinstalledunderthetermsoftheWindows8.1
ProorWindows10Prolicensedowngraderights.
10UserGuide

Features
Thistopicprovidesgeneralinformationaboutthecomputerfeaturesforvariousmodels.Dependingonyour
specificmodel,somefeaturesmightbeunavailable.
Microprocessor
Toviewthesystempropertiesofyourcomputer,dothefollowing:
•ForWindows7:OpentheStartmenu,right-clickComputer,andthenclickProperties.
•ForWindows8.1:Gotothedesktopscreen,andthenmovethepointertothetop-rightorbottom-right
cornerofthescreentodisplaythecharms.ThenclickSettings➙PCinfo.
•ForWindows10:doeitherofthefollowing:
–OpentheStartmenuandclickSettings.IfSettingsisnotdisplayed,clickAllappstodisplayall
programs.ThenclickSettings➙System➙About.
–Right-clicktheStartbutton.ThenselectSystem.
Memory
Youcomputermightbeshippedwithoneofthefollowingmemorymodules:
•Doubledatarate3lowvoltagesmalloutlinedualin-linememorymodule(DDR3LVSODIMM)
•Doubledatarate3lowvoltagesynchronousdynamicrandomaccessmemory(DDR3LVSDRAM)
Thememorycapacityvariesdependingonyourcomputermodel.Toviewthememoryinformationof
yourcomputer,dothefollowing:
•ForWindows7:OpentheStartmenu,right-clickComputer,andthenclickProperties.
•ForWindows8.1:Gotothedesktopscreen,andthenmovethepointertothetop-rightorbottom-right
cornerofthescreentodisplaythecharms.ThenclickSettings➙PCinfo.
•ForWindows10:doeitherofthefollowing:
–OpentheStartmenuandclickSettings.IfSettingsisnotdisplayed,clickAllappstodisplayall
programs.ThenclickSettings➙System➙About.
–Right-clicktheStartbutton.ThenselectSystem.
Storagedevice
•2.5-inchformfactor,7-mmheightharddiskdrive
•2.5-inchformfactor,7-mmheightsolid-statedrive
Display
•Size:11.6inches(294.64mm)
•Resolution:
–LCD:Upto1366x768
–Externalmonitor:Upto1920x1080(HDMI)
•Colordisplaywiththethin-filmtransistor(TFT)technology
•Brightnesscontrol
•Integratedcamera
Chapter1.Productoverview11

Powersource(acpoweradapter)
•Sine-waveinputat50–60Hz
•Inputratingoftheacpoweradapter:100–240Vac,50–60Hz
Keyboard
•6-rowkeyboard
•Functionkeys
•Touchpad
Interface
•Audioconnector
•HDMIconnector
•USB3.0connector
•AlwaysOnUSBconnector
•RJ45Ethernetconnector
•Media-cardslot
Wirelessfeatures
•Integratedwireless-LAN
•IntegratedBluetooth
FeaturesforThinkPadYoga11eonly:
•Accelerometer
•Digitalcompass
•Gyrometer
•Multi-touchscreen
•Proximitysensor
•Windowsbutton
Specifications
Thistopicliststhephysicalspecificationsforyourcomputer.
Dimensions
•Width:300mm(11.81inches)
•Depth:216mm(8.50inches)
•Height:
–ThinkPad11e:22.30mm(0.88inch)
–ThinkPadYoga11e:22.90mm(0.90inch)
Maxweight
•ThinkPad11e:1.52kg(3.35lb)
•ThinkPadYoga11e:1.59kg(3.50lb)
Environment
12UserGuide

•Maximumaltitudewithoutpressurization:3048m(10000ft)
•Temperature
–Ataltitudesupto2438m(8000ft)
–Operating:From5.0°C(41°F)to35.0°C(95°F)
–Storage:From5.0°C(41°F)to43.0°C(109°F)
–Ataltitudesabove2438m(8000ft)
–Maximumtemperaturewhenoperatingundertheunpressurizedcondition:31.3°C(88°F)
Note:Whenyouchargethebattery,thebatterytemperaturemustbeatleast10°C(50°F).
•Relativehumidity:
–Operating:From8%to80%
–Storage:From5%to95%
Heatoutput
•45W(154Btu/hr)maximum
Attention:
•Keepyourcomputerawayfromelectricalappliancessuchasanairconditioner,anelectricfan,a
microwaveoven,andaradio.Thestrongmagneticfieldsgeneratedbytheseappliancescandamagethe
motoranddataontheharddiskdrive.
•Donotplaceanybeveragesontopoforbesidethecomputerorotherattacheddevices.Ifliquidisspilled
onorinthecomputeroranattacheddevice,ashortcircuitorotherdamagemightoccur.
•Donoteatorsmokeoveryourkeyboard.Particlesthatfallintoyourkeyboardcancausedamage.
Lenovoprograms
YourcomputercomeswithLenovoprogramstohelpyouworkmoreeasilyandsecurely.Theavailable
programsmightvarydependingonthepreinstalledWindowsoperatingsystem.
TolearnmoreabouttheprogramsandothercomputingsolutionsofferedbyLenovo,goto
http://www.lenovo.com/support.
AccessingLenovoprograms
ToaccessLenovoprogramsonyourcomputer,dothefollowing:
•ForWindows7andWindows10:
1.ClicktheStartbuttontoopentheStartmenu.Locateaprogrambytheprogramname.
2.IftheprogramisnotdisplayedontheStartmenu,clickAllprogramsorAllappstodisplayall
programs.
3.Ifyoustilldonotfindtheprogramintheprogramlist,searchfortheprograminthesearchbox.
•ForWindows8.1:
1.PresstheWindowskeytoopentheStartscreen.Locateaprogrambytheprogramname.
2.IftheprogramisnotdisplayedontheStartscreen,clickthearrowicontoopentheAppsscreen.
3.IfyoustilldonotfindtheprogramontheAppsscreen,searchfortheprograminthesearchbox.
Chapter1.Productoverview13

SomeLenovoprogramsarereadytobeinstalled.Youcannotfindtheseprogramsthroughtheabove
methodsunlessyouhaveinstalledthemfirst.ToinstalltheseLenovoprograms,gotoLenovoPC
Experience➙LenovoToolsandfollowtheinstructionsonthescreen.
AnintroductiontoLenovoprograms
ThistopicprovidesabriefintroductiontoLenovoprograms.Dependingonyourcomputermodel,someof
theprogramsmightnotbeavailable.
AccessConnections™
(Windows7)
TheAccessConnectionsprogramisaconnectivityassistantprogramfor
creatingandmanaginglocationprofiles.Eachlocationprofilestoresallthe
networkandInternetconfigurationsettingsneededforconnectingtoanetwork
infrastructurefromaspecificlocationsuchasahomeoranoffice.
Byswitchingbetweenlocationprofilesasyoumoveyourcomputerfromplace
toplace,youcanquicklyandeasilyconnecttoanetworkwithnoneedto
manuallyreconfigureyoursettingsandrestartthecomputereachtime.
ActiveProtectionSystem™
(Windows7,Windows8.1,and
Windows10)
TheActiveProtectionSystemprogramprotectsyourinternalstoragedrive(such
asharddiskdrive)whentheshocksensorinsideyourcomputerdetectsa
conditionthatcoulddamagethedrive,suchassystemtilt,excessivevibration,
orshock.
Theinternalstoragedriveislessvulnerabletodamagewhenitisnotoperating.
Thisisbecausewhentheinternalstoragedriveisnotoperating,thesystem
stopsitfromspinning,andmightalsomovethereadandwriteheadsofthe
drivetoareasthatdonotcontaindata.
Assoonastheshocksensorsensesthattheenvironmentisstableagain
(minimalchangeinsystemtilt,vibration,orshock),itturnsontheinternal
storagedrive.
AutoScrollUtility
(Windows7,Windows8.1,and
Windows10)
Thisprogramenhancesyourexperiencewithwindowoperation.Thewindow
positionofaforegroundapplicationisautomaticallyadjusted.Thescrollbaron
auserinterfaceisalsoautomaticallyadjusted.
CommunicationsUtility
(Windows7)
TheCommunicationsUtilityprogramenablesyoutoconfiguresettingsforthe
integratedcameraandaudiodevices.
HotkeyFeaturesIntegration
(Windows7,Windows8.1,and
Windows10)
HotkeyFeaturesIntegrationisautilitypackagethatenablesyoutoselectand
installutilityprogramsspecificallyforthespecialkeysandbuttonsonyour
computer.Thespecialkeysandbuttonsaredesignedtomeetaccessibilityand
usabilityrequirements.Installingrelatedutilityprogramsenablesfullfunctionality
ofthespecialkeysandbuttons.
LenovoCompanion
(Windows8.1andWindows10)
Yoursystem’sbestfeaturesshouldbeeasytoaccessandunderstand.With
Companion,theyare.
UseCompaniontoregisteryourcomputer,accessyourusermanual,manage
systemhealthandupdate,checkthewarrantystatus,andseeaccessories
customizedforyourcomputer.Youalsocanreadhintsandtips,exploreLenovo
forums,andstayup-to-dateontechnologynewswitharticlesandblogsfrom
trustedsources.ThisappisfilledwithexclusiveLenovocontenttohelpyou
learnaboutyournewsystem.
LenovoPCExperience
(Windows7,Windows8.1,and
Windows10)
TheLenovoPCExperienceprogramhelpsyouworkmoreeasilyandsecurelyby
providingeasyaccesstovariousprograms,suchasActiveProtectionSystem
andLenovoSolutionCenter.
14UserGuide

LenovoSettings
(Windows8.1andWindows10)
TheLenovoSettingsprogramenablesyoutoenhanceyourcomputing
experiencebyturningyourcomputerintoaportablehotspot,configuring
cameraandaudiosettings,optimizingyourpowersettings,andcreatingand
managingmultiplenetworkprofiles.
LenovoSolutionCenter
(Windows7,Windows8.1,and
Windows10)
TheLenovoSolutionCenterprogramenablesyoutotroubleshootandresolve
computerproblems.Itcombinesdiagnostictests,systeminformationcollection,
securitystatus,andsupportinformation,alongwithhintsandtipsforoptimal
systemperformance.
MobileBroadbandConnect
(Windows7andWindows10)
TheMobileBroadbandConnectprogramenablesyoutoconnectthecomputer
tothemobilebroadbandnetworkthroughasupportedwireless-WANcard.
MessageCenterPlus
(Windows7)
TheMessageCenterPlusprogramautomaticallydisplaysmessagestoinform
youaboutimportantnoticesfromLenovo,suchasalertsonsystemupdates
andalertsonconditionsthatrequireyourattention.
PasswordManager
(Windows7andWindows8.1)
ThePasswordManagerprogramautomaticallycapturesandfillsin
authenticationinformationforWindowsprogramsandWebsites.
PowerManager
(Windows7)
ThePowerManagerprogramprovidesconvenient,flexible,andcompletepower
managementforthecomputer.Itenablesyoutoadjustyourcomputerpower
settingstoachievethebestbalancebetweenperformanceandpowersaving.
RecoveryMedia
(Windows7andWindows10)
TheRecoveryMediaprogramenablesyoutorestorethecontentsofthehard
diskdrivetothefactorydefaultsettings.
RescueandRecovery
®
(Windows7)
TheRescueandRecoveryprogramisaone-buttonrecoveryandrestore
solution.Itincludesasetofself-recoverytoolstohelpyoudiagnosecomputer
problems,gethelp,andrecoverfromsystemcrashes,evenifyoucannotstart
theWindowsoperatingsystem.
SystemUpdate
(Windows7andWindows8.1)
TheSystemUpdateprogramenablesyoutokeepthesoftwareonthecomputer
up-to-datebydownloadingandinstallingsoftwarepackages,includingdevice
drivers,UnifiedExtensibleFirmwareInterface(UEFI)basicinput/outputsystem
(BIOS)updates,andotherthird-partyprograms.
WRITEit
(Windows8.1andWindows10)
WRITEitgivesyouinstanthandwritinginputwhereveryouneedit.Youcanwrite
directlyinanyappandtextfield,edittextinreal-time,seeyourfullscreen,and
convertyourhandwritingintodigitaltext.
Chapter1.Productoverview15

16UserGuide

Chapter2.Usingyourcomputer
Thischapterprovidesinformationonusingsomeofthecomputercomponents.
Tocreateamorecomfortableconditionforyouruseofthecomputer,seeChapter3“Youandyour
computer”onpage43first.
Thischaptercontainsthefollowingtopics:
•“Registeringyourcomputer”onpage17
•“Frequentlyaskedquestions”onpage17
•“Specialkeys”onpage23
•“Usingthetouchpad”onpage24
•“UsingtheThinkPadYoga11eindifferentmodes”onpage25
•“Powermanagement”onpage31
•“Connectingtothenetwork”onpage34
•“Usinganexternaldisplay”onpage36
•“Usingaudiofeatures”onpage37
•“Usingthecamera”onpage37
•“Usingaflashmediacard”onpage38
•“UsingtheThinkPadActivePen”onpage39
Registeringyourcomputer
Whenyouregisteryourcomputer,informationisenteredintoadatabase,whichenablesLenovotocontact
youincaseofarecallorothersevereproblem.Inaddition,somelocationsofferextendedprivilegesand
servicestoregisteredusers.
WhenyouregisteryourcomputerwithLenovo,youalsowillreceivethefollowingbenefits:
•QuickerservicewhenyoucallLenovoforhelp
•Automaticnotificationoffreesoftwareandspecialpromotionaloffers
ToregisteryourcomputerwithLenovo,gotohttp://www.lenovo.com/register.Then,followtheinstructions
onthescreen.
Note:IfyouareusingtheWindows7operatingsystem,youalsocanregisteryourcomputerthroughthe
preinstalledLenovoProductRegistrationprogram.Theprogramlaunchesautomaticallyafteryouconnect
thecomputertotheInternetandyouhaveusedthecomputerforaperiodoftime.Then,followthe
instructionsonthescreentoregisteryourcomputer.
Frequentlyaskedquestions
ThistopicprovidesafewtipsthatwillhelpyouoptimizedtheuseofyourThinkPadnotebookcomputer.
Toensurethatyoureceivethebestperformancefromyourcomputer,gotothefollowingWebpage
tofindinformationsuchasaidsfortroubleshootingandanswerstofrequentlyaskedquestions:
http://www.lenovo.com/support/faq
©CopyrightLenovo2014,2016
17

CanIgetmyuserguideinanotherlanguage?
•Todownloadtheuserguideinanotherlanguage,goto:http://www.lenovo.com/support.Thenfollow
theinstructionsonthescreen.
Howtoturnoffmycomputer?
•ForWindows7:OpentheStartmenu,thenclickShutdown.
•ForWindows8.1:Dooneofthefollowing:
–GototheStartscreenbypressingtheWindowskey,clickthepowericoninthetop-rightcorner
ofthescreen,thenclickShutdown.
–Moveyourpointertothetop-rightorbottom-rightcornerofthescreentodisplaythecharms.Then
clickSettings➙Power➙Shutdown.
Note:YoualsocanopentheSettingscharmbypressingthesettingskey.
•ForWindows10:OpentheStartmenu,clickPower,andthenclickShutdown.
HowdoIaccessControlPanel?
•ForWindows7:OpentheStartmenu,thenclickControlPanel.
•ForWindows8.1:PresstheWindowskeytoopentheStartscreen,clickthearrowicontoopen
theAppsscreen,andthenclickControlPanel.
•ForWindows10:Right-clicktheStartbutton,thenclickControlPanel.
CanIchangetheWindows8.1startupbehaviortoopeneitherthedesktoportheStartscreen?
OntheWindows8.1operatingsystem,youcansetthecomputertoopeneitherthedesktoportheStart
screenbydefault.Tosetthedefaultstartupscreen,dothefollowing:
1.Onthedesktop,moveyourpointertothetaskbaratthebottomofthescreenandright-clickonthe
taskbar.
2.ClickProperties.TheTaskbarandNavigationpropertieswindowisdisplayed.
3.OntheNavigationtab,locatetheStartscreensection,andthendooneofthefollowing:
•Tosetthedesktopasyourdefaultstartupscreen,selectWhenIsigninorcloseallappsona
screen,gotothedesktopinsteadofStartsoacheckisvisible.
•TosettheStartscreenasyourdefaultstartupscreen,removethecheckfromtheWhenIsigninor
closeallappsonthescreen,gotodesktopinsteadofStartcheckbox.
4.ClickOKtosavethesetting.
HowdoIusebatterypowermoreeffectivelywhenIamonthego?
•Toconservepower,ortosuspendoperationwithoutexitingprogramsorsavingfiles,see“Power-saving
modes”onpage32
.
•Toachievethebestbalancebetweenperformanceandpowersaving,changepowerplansettings.
HowdoIsecurelydisposeofdatastoredonthestoragedevices?
•StudyChapter4“Security”onpage49
tofindouthowyoucanprotectyourcomputerfromtheftand
unauthorizeduse.
•UsethePasswordManagerprogramtoprotectthedatastoredonyourcomputer.Fordetails,seethe
helpinformationsystemoftheprogram.
18UserGuide

•Beforeyoudisposeofthedataontheharddiskdriveorsolid-statedrive,besuretoread“Noticeon
deletingdatafromyourharddiskdriveorsolid-statedrive”onpage54
.
HowdoIgivepresentationsorattachanexternalmonitor?
•Ensurethatyoufollowtheprocedurefor“Usinganexternaldisplay”onpage36.
•WiththeExtenddesktopfunction,youcandisplayoutputonboththecomputerdisplayandanexternal
monitor.
Ihavebeenusingyourcomputerforsometimealready,anditisgettingslower?
•Follow“Generaltipsforpreventingproblems”onpage73.
•Youcandiagnoseproblemsyourselfbyusingthepreinstalleddiagnosticsoftware.
•CheckforrecoverysolutionsinChapter8“Recoveryoverview”onpage95.
Printthefollowingsectionsandkeepthemwithyourcomputerincaseyouareunabletoaccessthisonline
userguidewhennecessary.
•“Installinganewoperatingsystem”onpage57
•“Computerstopsresponding”onpage79
•“Powerproblems”onpage91
GettinghelpabouttheWindowsoperatingsystem
TheWindowshelpinformationsystemprovidesyouwithdetailedinformationaboutusingtheWindows
operatingsystemtohelpyougetthemostofyourcomputer.ToaccesstheWindowshelpinformation
system,dooneofthefollowing:
•ForWindows7:OpentheStartmenu,andthenclickHelpandSupport.
•ForWindows8.1:Moveyourpointertothetop-rightorbottom-rightcornerofthescreentodisplay
thecharms.ThenclickSettings➙Help.Additionally,theWindows8.1operatingsystemprovidesa
Help+TipsapplicationthatyoucanopenfromtheStartscreenorAppsscreen.
•ForWindows10:OpentheStartmenu,andthenclickGetstarted.Additionally,youcanuseCortana
®
personalassistanttosearchforhelp,apps,files,settings,andsoon.
Usingthemulti-touchscreen
Thistopicprovidesinstructionsonhowtousethemulti-touchscreenthatisavailableonsomemodels.
Notes:
•Yourcomputerscreenmightlookdifferentfromthefollowingillustrations.
•Dependingontheappyouuse,somegesturesmightnotbeavailable.
Thefollowingtableintroducessomefrequentlyusedgestures.
Chapter2.Usingyourcomputer19

Touchgesture(touchmodels
only)
Description
Touch:Tap.
Mouseaction:Click.
Function:Openanapporperformanactiononanopenapp,suchasCopy,
Save,andDelete,dependingontheapp.
Touch:Tapandhold.
Mouseaction:Right-click.
Function:Openamenuwithmultipleoptions.
Touch:Slide.
Mouseaction:Scrollthemousewheel,movethescrollbar,orclickthescroll
arrow.
Function:Scrollthroughitems,suchaslists,pages,andphotos.
Touch:Draganitemtothedesiredlocation.
Mouseaction:Click,hold,anddraganitem.
Function:Moveanobject.
Touch:Movetwofingersclosertogether.
Mouseaction:PresstheCtrlkeywhilescrollingthemousewheelbackward.
Function:Zoomout.
Touch:Movetwofingersfartherapart.
Mouseaction:PresstheCtrlkeywhilescrollingthemousewheelforward.
Function:Zoomin.
Touch:Puttwoormorefingersonanitemandthenrotateyourfingersclockwise
orcounterclockwise.
Mouseaction:Iftheappsupportsrotation,clicktherotationicon.
Function:Rotateanitem.
20UserGuide
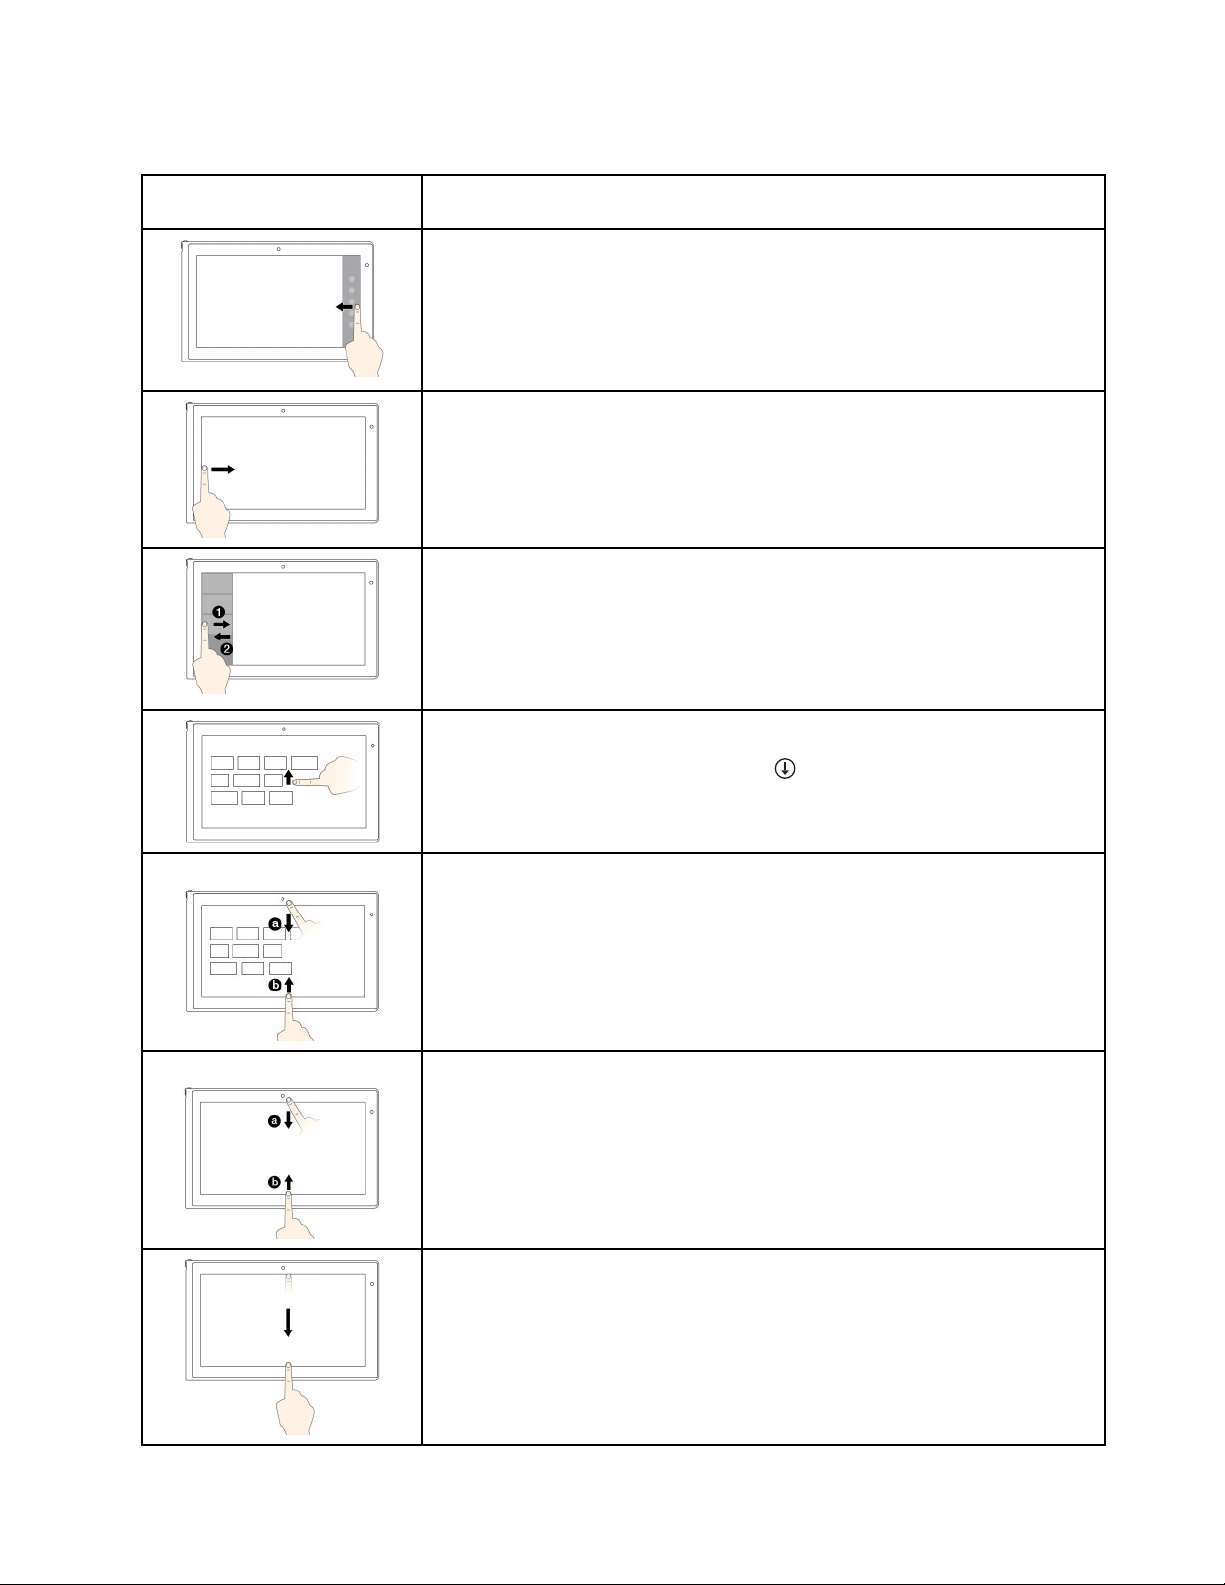
ThefollowingtableintroducestouchgesturesontheWindows8.1operatingsystem.
Touchgesture(touchmodels
only)
Description
Touch:Swipeinfromtherightedge.
Mouseaction:Movethepointertothebottom-rightortop-rightcornerofyour
screen.
Function:Displaythecharmsthatcontainsystemcommands,suchasStart,
Settings,Search,Share,andDevices.
Touch:Swipeinfromtheleftedge.
Mouseaction:Movethepointertothetop-leftcornerofyourscreen,andthen
click.Keepclickingtocyclethroughtheopenapps.
Function:Cyclethroughandswitchtoopenapps.
Touch:Swipeinandoutontheleftedge.
Mouseaction:Movethepointertothetop-leftcornerofthescreen,andthen
movethepointerdownwardalongtheleftedge.Tomakeaselection,clickthe
desiredapp.
Function:Viewtherecentlyusedappsorselectanactiveappfromthelist.
Touch:Swipeuptothetopedge.
Mouseaction:Clickthedownwardarrowlocatednearthebottom-leftcorner
oftheStartscreen.
Function:ViewallappsontheStartscreen.
Touch:SwipeinfromthetoporbottomedgeoftheStartscreen,tapCustomize,
andthentapthedesiredicon.
Mouseaction:Right-clickablankareaontheStartscreen,clickCustomize,
andthenclickthedesiredicon.
Function:CustomizetilesontheStartscreen,oruninstallanapp.
Touch:Swipeinfromthetoporbottomedgeofanopenapp.
Mouseaction:Right-clickanywhereonanopenapp.
Function:Viewtheappcommandsonanopenapp,suchasCopy,Save,and
Delete,dependingontheapp.
Touch:Swipeinfromthetopedgetothebottomonanopenapp.
Mouseaction:Fromthetopedgeofthescreen,click,hold,andmovethepointer
tothebottomofthescreen.Then,releasethebutton.
Function:Closethecurrentapp.
Chapter2.Usingyourcomputer21

ThefollowingtableintroducessometouchgesturesontheWindows10operatingsystem.
Touchgesture(touchmodels
only)
Description
Touch:Swipeinfromtherightedge.
Mouseaction:ClicktheactioncentericonintheWindowsnotificationarea.
Function:Opentheactioncentertoseeyournotificationsandquickactions.
Touch:Swipeinfromtheleftedge.
Mouseaction:Clickthetask-viewicononthetaskbar.
Function:Viewallyouropenwindowsintaskview.
Touch:Swipeinfromthebottomtotopforfull-screenedapp.
Mouseaction:MoveyourcursortotheWindowsnotificationareaatthebottom
ofthescreen.
Function:Viewthetaskbar.
Note:Thefullscreenfeatureisavailableonlyonsomeapps.Toopenanapp
infullscreen,click
onthetitlebar.
•Shortsnapforfull-screenedapporwhenyourcomputerisintabletmode
Touch:Swipedownwardsshortlyfromthetopedge.
Mouseaction:Moveyourcursortothetopedgeofthescreen.
Function:Showahiddentitlebar.
•Longswipewhenyourcomputerisintabletmode
Touch:Swipeinfromthetopedgetothebottomedge.
Mouseaction:Fromthetopedgeofthescreen,clickandhold,movethe
pointertothebottomofthescreen,andthenrelease.
Function:Closethecurrentapp.
Tipsonusingthemulti-touchscreen
•Themulti-touchscreenisaglasspanelcoveredwithaplasticfilm.Donotapplypressureorplaceany
metallicobjectonthescreen,whichmightdamagethetouchpanelorcauseittomalfunction.
•Donotusefingernails,glovedfingers,orinanimateobjectsforinputonthescreen.
•Regularlycalibratetheaccuracyofthefingerinputtoavoidadiscrepancy.
Tipsoncleaningthemulti-touchscreen
•Turnoffthecomputerbeforecleaningthemulti-touchscreen.
•Useadry,soft,andlint-freeclothorapieceofabsorbentcottontoremovefingerprintsordustfromthe
multi-touchscreen.Donotapplysolventstothecloth.
•Gentlywipethescreenusingatop-downmotion.Donotapplyanypressureonthescreen.
22UserGuide
Specialkeys
Yourcomputerkeyboardfeaturesseveralspecialkeystohelpyouworkmoreeasilyandeffectively.
Thefollowingillustrationshowsthelocationsofthespecialkeys.
Note:Yourcomputermightlookslightlydifferentfromthefollowingillustration.
1Windowskey
ForWindows7andWindows10:OpentheStartmenu.
ForWindows8.1:SwitchbetweenthecurrentworkspaceandtheStartscreen.
ForinformationaboutusingtheWindowskeywithotherkeys,refertothehelpinformationsystemofthe
Windowsoperatingsystem.
2Functionkeys
YoucanconfiguretheFnkeyandfunctionkeysintheKeyboardPropertieswindowbydoingthefollowing:
1.GotoControlPanel,thenchangetheviewofControlPanelfromCategorytoLargeiconsorSmallicons.
2.ClickKeyboard.IntheKeyboardPropertieswindow,clicktheFnandfunctionkeysorThinkPad
F1–F12keystab.
3.Selecttheoptionsofyourpreference.
•+EnablesordisablestheFnLockfunction.
WhentheFnLockfunctionisenabled:TheFnLockindicatorison.ToinputF1–F12,pressthefunction
keysdirectly.Toinitiatethespecialfunctionprintedasanicononeachkey,presstheFnkeyandthe
correspondingfunctionkey.
WhentheFnLockfunctionisdisabled:TheFnLockindicatorisoff.Toinitiatethespecialfunction
printedasanicononeachkey,pressthefunctionkeysdirectly.ToinputF1–F12,presstheFnkey
andthecorrespondingfunctionkey.
•Mutesorunmutesthespeakers.Whenthespeakersaremuted,theindicatorontheF1keyison.
Ifyoumutethesoundandturnoffyourcomputer,thesoundwillremainmutedwhenyouturnonyour
computeragain.Toturnonthesound,pressthevolume-downkeyandthevolume-upkey.
•Decreasesthespeakervolume.
Chapter2.Usingyourcomputer23

•Increasesthespeakervolume.
•Mutesorunmutesthemicrophones.Whenthemicrophonesaremuted,theindicatorison.
•Darkensthedisplay.
•Brightensthedisplay.
•Managesexternaldisplays.
•
Enablesordisablesthewirelessfeatures.
•
–Windows7:OpensControlPanel.
–Windows8.1:OpenstheSettingscharm.
–Windows10:OpenstheSettingswindow.
•
–Windows7:OpensWindowsSearch.
–Windows8.1:OpenstheSearchcharm.
–Windows10:OpenstheCortanasearchbox.
•
Viewsalltheprogramsthatyouhaveopened.
•
–Windows7:OpensComputer.
–Windows8.1andWindows10:Viewsalltheprograms.
•Fn+4:Putthecomputerintosleepmode.Toreturntonormaloperation,presstheFnkeyorpowerbutton.
•Fn+End:HasthesamefunctionastheInsertkeyonaconventionalkeyboard.
•Fn+B:HasthesamefunctionastheBreakkeyonaconventionalkeyboard.
•Fn+K:HasthesamefunctionastheScrLKkeyontheconventionalkeyboard.
•Fn+P:HasthesamefunctionasthePausekeyontheconventionalkeyboard.
•Fn+S:HasthesamefunctionastheSysRqkeyontheconventionalkeyboard.
Usingthetouchpad
Note:Yourcomputermightlookslightlydifferentfromthefollowingillustration.
Yourcomputerisequippedwithatouchpad
1underthebottomedgeofthekeyboard.Tomovethepointer
2onthescreen,slideyourfingertipoverthetouchpadinthedirectioninwhichyouwantthepointerto
move.Theleftandrightbottomofthetouchpadworkasclickbuttons.Thefunctionscorrespondtothose
oftheleftandrightmousebuttonsonaconventionalmouse.
24UserGuide
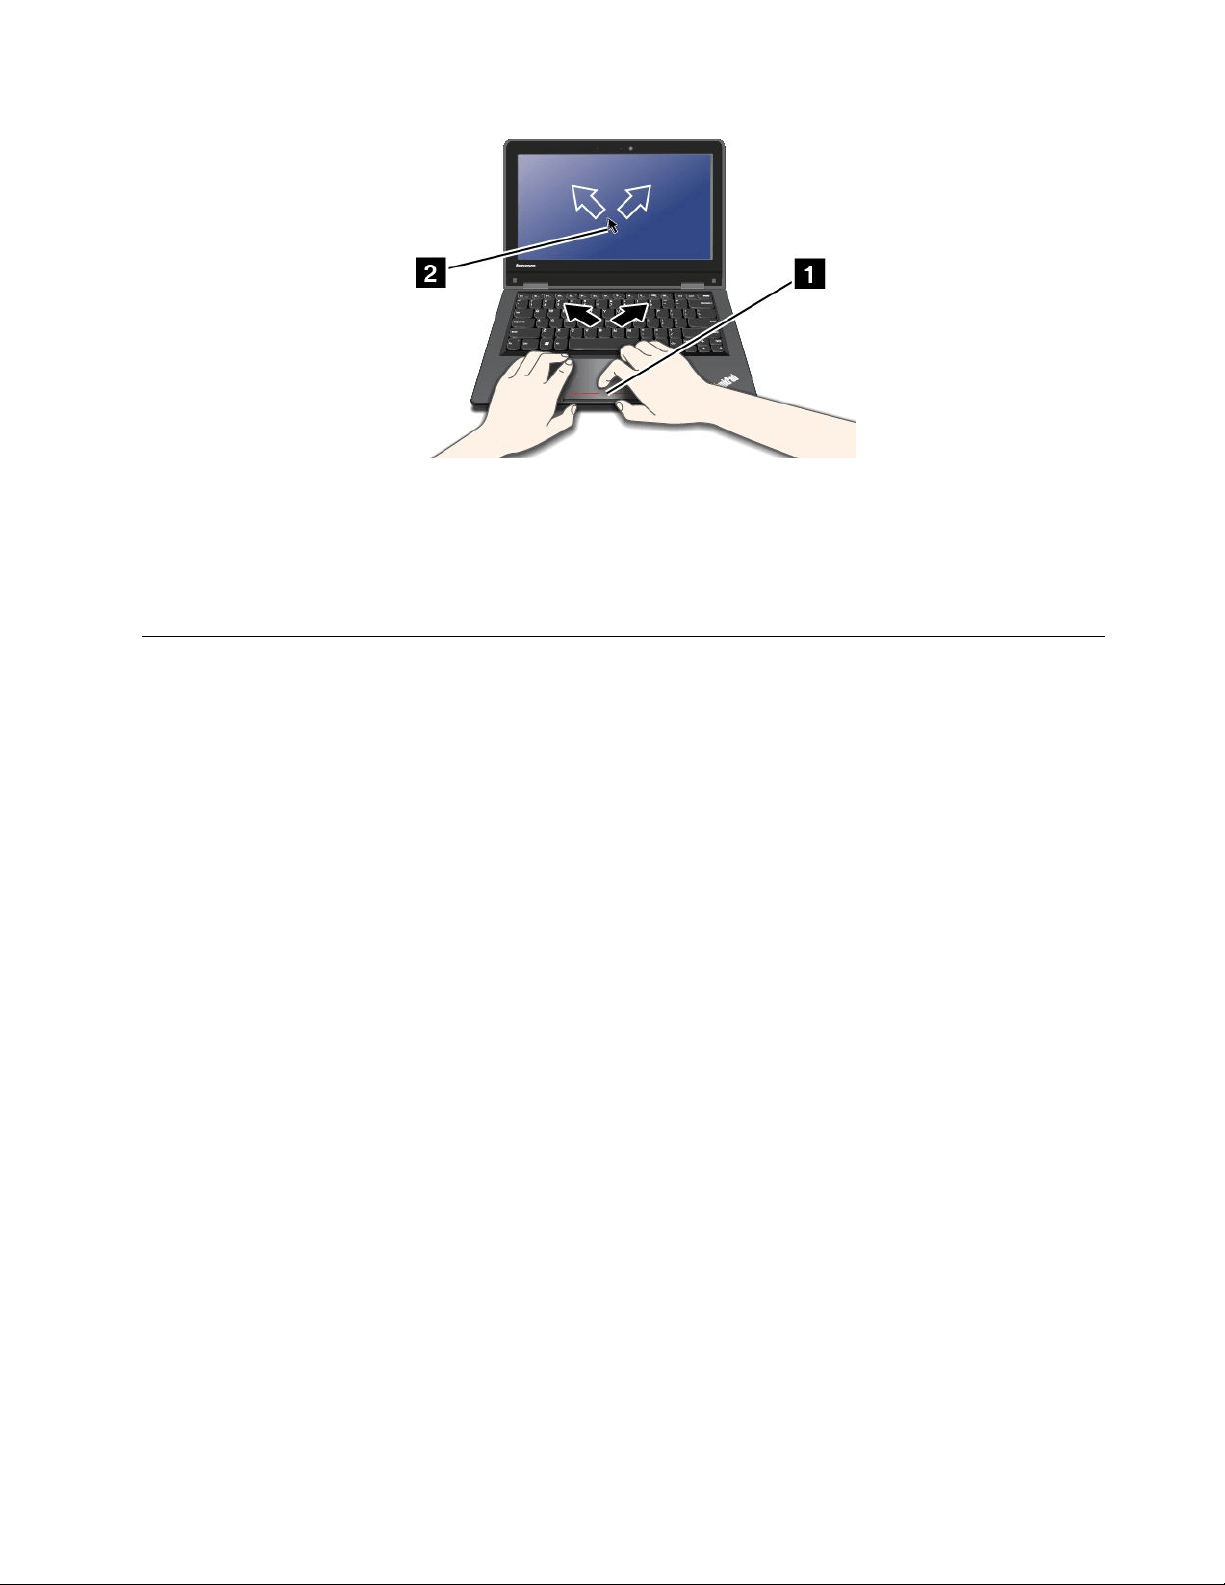
Customizingthetouchpad
Tocustomizethetouchpad,dothefollowing:
1.GotoControlPanelandclickHardwareandSound➙Mouse.
2.Followtheinstructionsonthescreen.
UsingtheThinkPadYoga11eindifferentmodes
TheThinkPadYoga11ecomputerfeaturesdifferentmodesandprovidessometabletfeaturestohelp
youworkmoreflexiblyandconveniently.
Thissectioncontainsthefollowingtopics:
•“Rotatingthecomputerdisplay”onpage25
•“Notebookmode”onpage26
•“Standmode”onpage27
•“Tabletmode”onpage28
•“Tentmode”onpage29
•“Usingthetabletbuttons”onpage30
•“Usingthemulti-touchscreen”onpage19
Rotatingthecomputerdisplay
YoucanopenthecomputerdisplayofyourThinkPadYoga11ecomputertoanyanglewithinarangeofupto
360degreesasshowninthefollowingillustration.
Note:Youcomputermightlookslightlydifferentfromthefollowingillustration.
Attention:Donotrotatethecomputerdisplaywithtoomuchforce,otherwisethecomputerdisplay
orhingesmightgetdamaged.Donotapplytoomuchforcetotheupper-rightorupper-leftcornerof
thecomputerdisplay.
Chapter2.Usingyourcomputer25
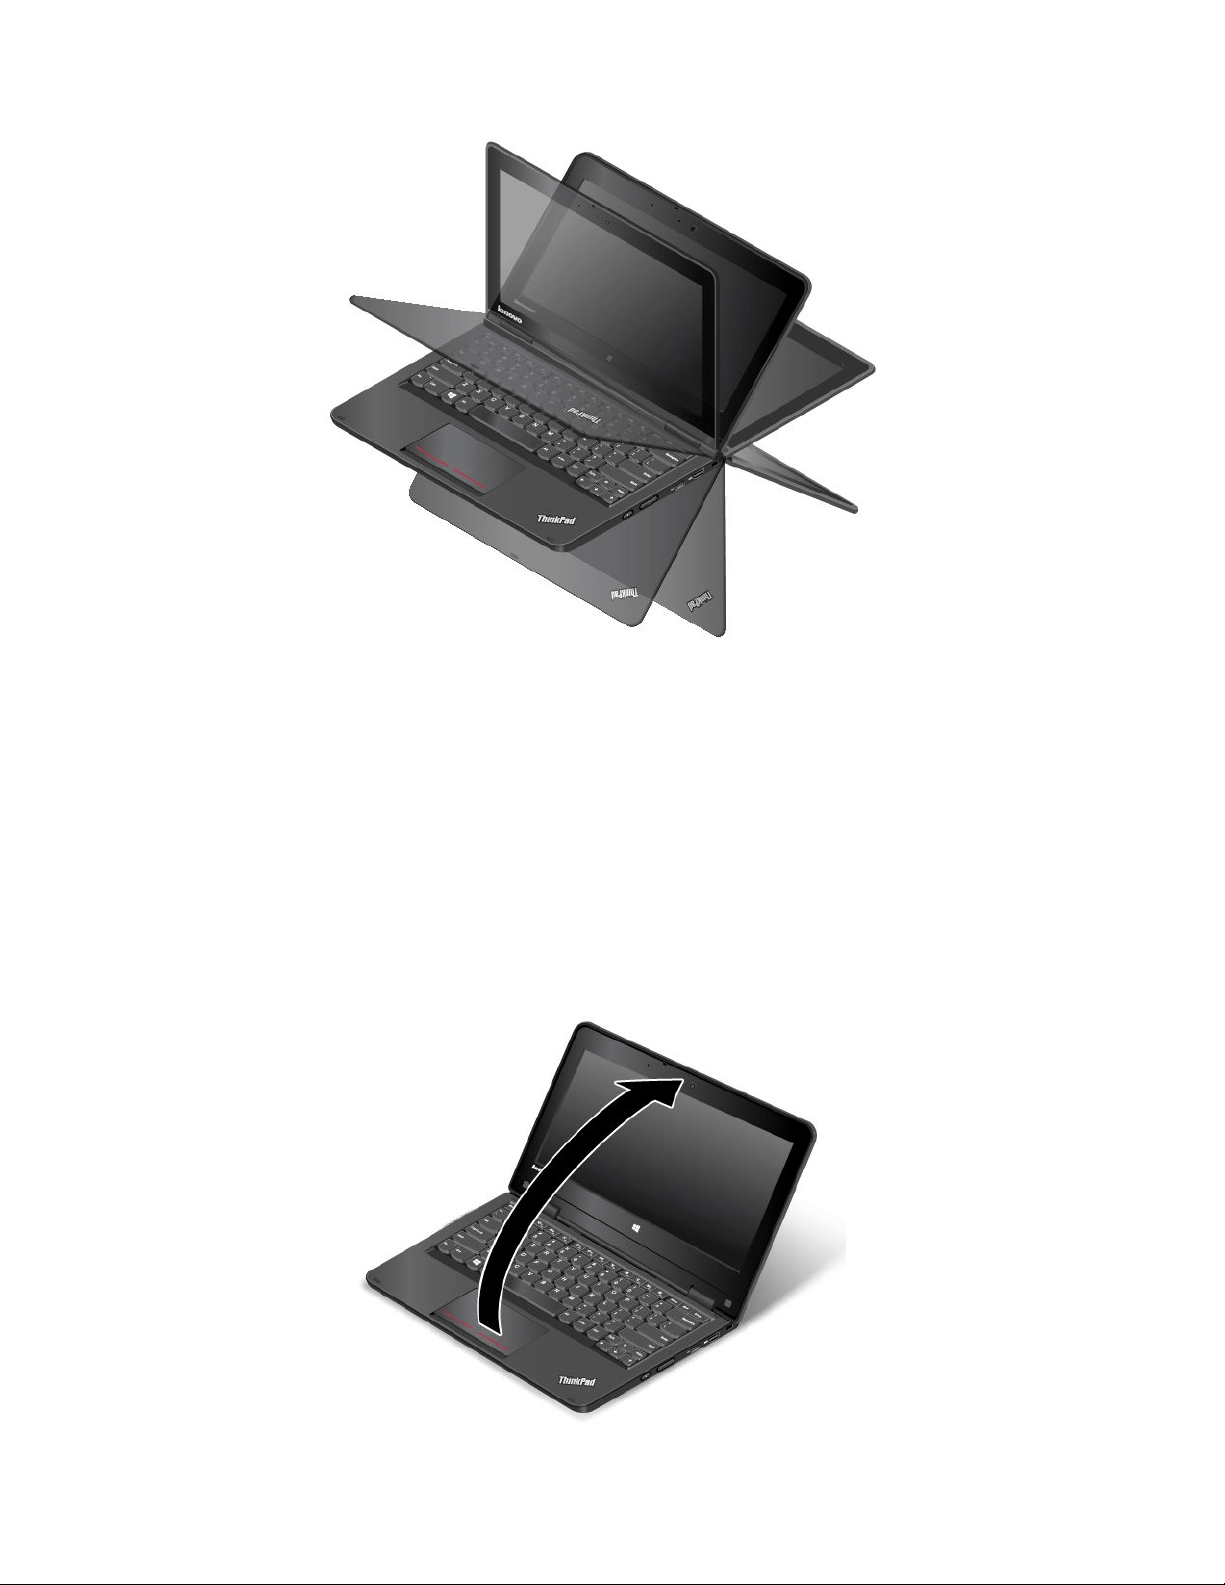
Notebookmode
YoucanusetheThinkPadYoga11ecomputerinnotebookmodeinscenariosthatrequireusingakeyboard
andamouse,suchaseditingdocumentsandwritinge-mails.
Attention:Donotrotatethecomputerdisplaywithtoomuchforce,otherwisethecomputerdisplay
orhingesmightgetdamaged.Donotapplytoomuchforcetotheupper-rightorupper-leftcornerof
thecomputerdisplay.
Openthecomputerdisplayslowlytoanyanglewithinarangeoflessthan190degreesasshowninthe
followingillustration.ThedegreesreferstotheangledegreesbetweentheLCDandthekeyboard.Your
computerisnowinnotebookmode.
Note:Youcomputermightlookslightlydifferentfromthefollowingillustration.
26UserGuide
Innotebookmode,thekeyboardandthetouchpadareenabled.Youalsocancontrolsomefunctionsof
yourcomputerthroughthetabletbuttonsandthemulti-touchscreen,withouttheuseofthekeyboard
andthetouchpad.Formoreinformation,referto“Usingthetabletbuttons”onpage30
and“Usingthe
multi-touchscreen”onpage19.
Standmode
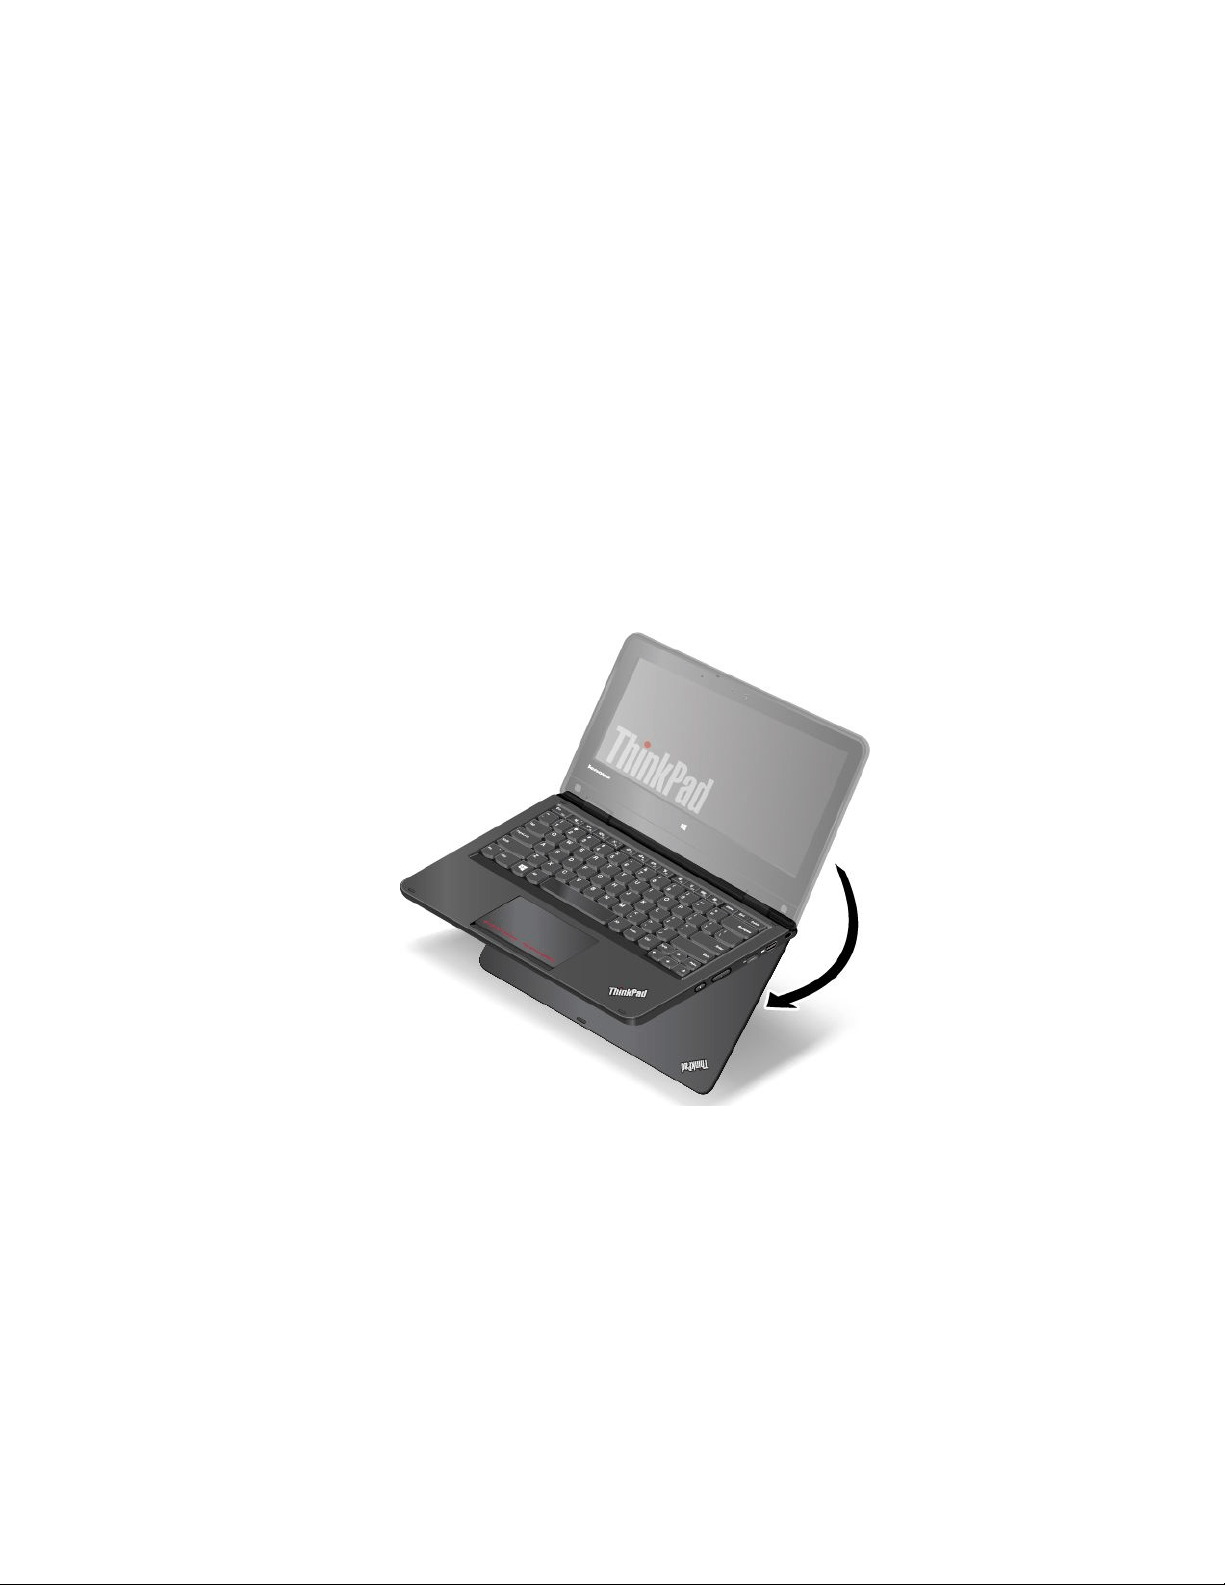
YoucanusetheThinkPadYoga11ecomputerinstandmodeinscenariosthatrequirelimitedinteractionwith
thescreen,suchasviewingphotosandplayingvideos.
Attention:Donotrotatethecomputerdisplaywithtoomuchforce,otherwisethecomputerdisplay
orhingesmightgetdamaged.Donotapplytoomuchforcetotheupper-rightorupper-leftcornerof
thecomputerdisplay.
Ifyourcomputerisinnotebookmode,dothefollowingtoturnthecomputerfromnotebookmodeinto
standmode:
1.Slowlyrotatethecomputerdisplayclockwisetoanyanglewithinarangeof190degreesto359degrees.
ThedegreesreferstotheangledegreesbetweentheLCDandthekeyboard.
Note:Youcomputermightlookslightlydifferentfromthefollowingillustrations.
Chapter2.Usingyourcomputer27

2.Positionyourcomputerasshown.Yourcomputerisnowinstandmode.
Instandmode,thekeyboardandthetouchpadareautomaticallydisabled.However,youcancontrol
somefunctionsofyourcomputerthroughthetabletbuttonsandthemulti-touchscreen,withouttheuse
ofthekeyboardandthetouchpad.Formoreinformation,referto“Usingthetabletbuttons”onpage30
and“Usingthemulti-touchscreen”onpage19.
Tabletmode
YoucanusetheThinkPadYoga11ecomputerintabletmodeinscenariosthatrequirefrequentinteraction
withthescreen,suchasbrowsingtheWebsite.
Attention:Donotrotatethecomputerdisplaywithtoomuchforce,otherwisethecomputerdisplay
orhingesmightgetdamaged.Donotapplytoomuchforcetotheupper-rightorupper-leftcornerof
thecomputerdisplay.
Ifyourcomputerisinstandmode,dothefollowingtoturnthecomputerfromstandmodeintotabletmode:
1.Positionyourcomputerasshownandslowlyrotatethecomputerdisplayclockwisetotheangleof360
degrees.ThedegreesreferstotheangledegreesbetweentheLCDandthekeyboard.
Note:Youcomputermightlookslightlydifferentfromthefollowingillustrations.
28UserGuide
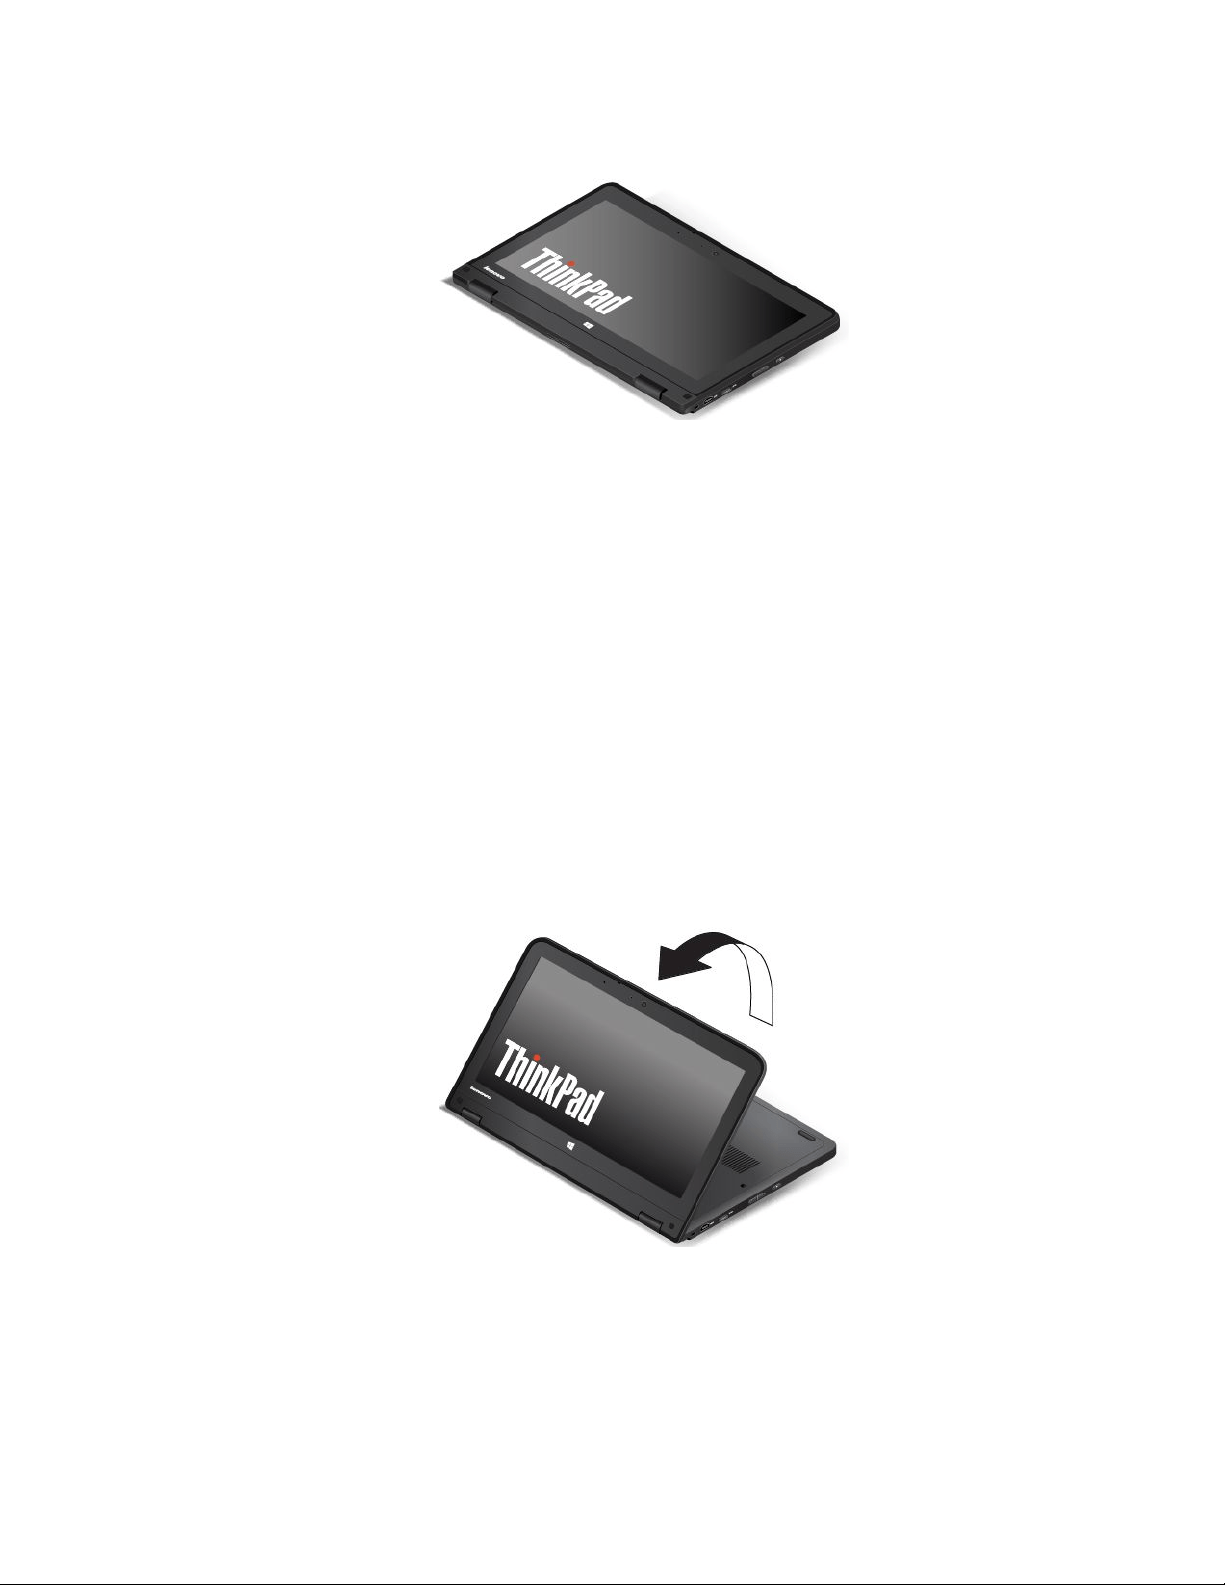
2.Positionyourcomputerasshown.Yourcomputerisnowintabletmode.
Intabletmode,thekeyboardandthetouchpadareautomaticallydisabled.However,youcancontrol
somefunctionsofyourcomputerthroughthetabletbuttonsandthemulti-touchscreen,withouttheuse
ofthekeyboardandthetouchpad.Formoreinformation,referto“Usingthetabletbuttons”onpage30
and“Usingthemulti-touchscreen”onpage19.
Tentmode
YoucanusetheThinkPadYoga11ecomputerintentmodeinscenariosthatrequirelimitedinteractionwith
thescreen,suchasviewingphotosandmakingapresentation.
Attention:Donotrotatethecomputerdisplaywithtoomuchforce,otherwisethecomputerdisplay
orhingesmightgetdamaged.Donotapplytoomuchforcetotheupper-rightorupper-leftcornerof
thecomputerdisplay.
Ifyourcomputerisintabletmode,dothefollowingtoturnthecomputerfromtabletmodeintotentmode:
1.Slowlyrotateyourcomputerdisplayanticlockwisetoanyanglewithinarangeof190degreesto359
degrees.ThedegreesreferstotheangledegreesbetweentheLCDandthekeyboard.
Note:Youcomputermightlookslightlydifferentfromthefollowingillustrations.
Chapter2.Usingyourcomputer29

2.Positionyourcomputerasshown.Yourcomputerisnowintentmode.
Intentmode,thekeyboardandthetouchpadareautomaticallydisabled.However,youcancontrolsome
functionsofyourcomputerthroughthetabletbuttonsandthemulti-touchscreen,withouttheuseofthe
keyboardandthetouchpad.Formoreinformation,referto“Usingthetabletbuttons”onpage30and
“Usingthemulti-touchscreen”onpage19
.
Usingthetabletbuttons
TheThinkPadYoga11ecomputerisequippedwithtabletbuttonsasshowninthefollowingillustration.You
cancontrolsomefunctionsofyourcomputerthroughthetabletbuttons,withouttheuseofthekeyboard.
Note:Youcomputermightlookslightlydifferentfromthefollowingillustration.
1Powerbutton:Pressthepowerbuttontoturnonthecomputer.
2Speakervolume-upbutton:Pressthespeakervolume-upbuttontoincreasethespeakervolume.
3Speakervolume-downbutton:Pressthespeakervolume-downbuttontodecreasethespeakervolume.
4Windowsbutton
30UserGuide

•ForWindows7andWindows10:PresstheWindowsbuttontoopentheStartmenu;orpressthe
Windowsbuttontowakeupthecomputerfromsleepmode.
•ForWindows8.1:PresstheWindowsbuttontoswitchbetweenthecurrentworkspaceandtheStart
screen;orpresstheWindowsbuttontowakeupthecomputerfromsleepmode.
Powermanagement
Thepowertorunyourcomputercomeseitherfromtheacpowerprovidedbytheacpoweradapterofyour
computer,orfromthelithium-ion(Li-ion)batteryprovidedwithyourcomputer.Whileyouuseacpower,the
batterychargesautomatically.
Whenyouuseyourcomputerawayfromelectricaloutlets,youdependonbatterypowertokeepyour
computerrunning.Differentcomputercomponentsconsumepoweratdifferentrates.Themoreyouusethe
power-intensivecomponents,thefasteryouconsumebatterypower.
Usingtheacpower
Thepowertorunyourcomputercancomeeitherfromthebatteryorfromacpower.Whileyouuseac
power,thebatterieschargeautomatically.
Yourcomputercomeswithanacpoweradapterandapowercord.
•acpoweradapter:Convertsacpowerfornotebookcomputeruse.
•Powercord:Connectstheacoutletandtheacpoweradapter.
Connectingtoacpower
Toconnectthecomputertoacpower,dothefollowing:
Attention:Usinganimproperpowercordmightcauseseveredamagetoyourcomputer.
Note:Ensurethatyouperformtheactionsintheorderinwhichtheyarelisted.
1.Connectthepowercordtotheacpoweradapter.
2.Connecttheacpoweradaptertothepowerconnectorofthecomputer.
3.Connectthepowercordintoanelectricaloutlet.
Tipsforusingtheacpoweradapter
•Whentheacpoweradapterisnotinuse,disconnectitfromtheelectricaloutlet.
•Donotbindthepowercordtightlyaroundtheacpoweradaptertransformerpackwhenitisconnectedto
thetransformer.
•Beforeyouchargethebatteries,makesurethattheirtemperatureisatleast10°C(50°F).
•Youcanchargethebatterieswhentheacpoweradapterisconnectedtothecomputer.Youneedto
chargethebatteriesinanyofthefollowingsituations:
–WhenthebatteryiconintheWindowsnotificationareashowsalowpercentageofbatterypower
remaining.
–Whenthebatterieshavenotbeenusedforalongtime
Checkingthebatterystatus
Moveyourpointertothebattery-statusiconintheWindowsnotificationareatocheckthebatterystatus.
Thebattery-statusicondisplaysthepercentageofbatterypowerremainingandhowlongyoucanuse
yourcomputerbeforeyoumustchargethebattery.
Chapter2.Usingyourcomputer31

Therateatwhichyouusebatterypowerdetermineshowlongyoucanusethebatteryofyourcomputer
betweencharges.Becauseeachcomputeruserhasdifferenthabitsandneeds,itisdifficulttopredicthow
longabatterychargewilllast.Therearetwomainfactors:
•Howmuchenergyisstoredinthebatterywhenyoubegintowork.
•Thewayyouuseyourcomputer.Forexample:
–Howoftenyouaccesstheharddiskdriveorsolid-statedrive.
–Howbrightyoumakethecomputerdisplay.
–Howoftenyouusethewirelessfeatures.
EnablingthebatteryalarmontheWindows7operatingsystem
FortheWindows7operatingsystem,youcanprogramyourcomputersothatwhenthebatterypowerfalls
belowacertainlevel,threeeventsoccur:analarmisinitiated,amessageisdisplayed,andtheLCDturnsoff.
Toenablethebatteryalarm,dothefollowing:
1.StartthePowerManagerprogramandthenclicktheGlobalPowerSettingstab.Forinstructionson
howtostartthePowerManagerprogram,see“AccessingLenovoprograms”onpage13
.
2.IntheAlarmsarea,setthepowerlevelpercentageandtheactionintheLowbatteryalarmsectionand
Criticallylowbatteryalarmsection.
Note:Ifyourcomputerenterssleeporhibernationmodewhenthebatterypowerislow,butthealarm
messagehasnotyetbeendisplayed,themessagewillbedisplayedwhenthecomputerresumes.Toreturn
tonormaloperation,whenthemessageisdisplayed,clickOK.
Chargingthebattery
Itisrecommendedthatyouchargethebatterywhenthebatterypowerremainingislow.Forexample:
•Whenyoufindthatthepercentageoftheremainingpowerislow.
•Whenthepoweralarmalertsyou.
Ifanacoutletisconvenient,connecttheacpoweradaptertothecomputerandtheacoutlet.Dependingon
thebatterysizeandthephysicalenvironment,thebatterywillbefullychargedinaboutthreetosixhours.
Thebattery-statusiconhelpsyouidentifythatthebatteryischarging,andthatthebatteryisfullycharged.
Note:Tomaximizethelifeofthebattery,thecomputerdoesnotstartrechargingthebatteryiftheremaining
powerisgreaterthan95%.
Managingthebatterypower
Toachievethebestbalancebetweenperformanceandpowersaving,adjustyourpowerplansettings
bydoingthefollowing:
1.GotoControlPanel,thenchangetheviewofControlPanelfromCategorytoLargeiconsorSmallicons.
2.ClickPowerOptions.
3.Followtheinstructionsonthescreen.
Power-savingmodes
Thereareseveralpower-savingmodesthatyoucanuseatanytimetoconservepower.Thissection
introduceseachmodeandgivestipsontheeffectiveuseofthebatterypower.
•Screen-blankmode(forWindows7only)
32UserGuide

Thecomputerdisplayrequiresconsiderablebatterypower.Toturnoffthepowertothedisplayandmake
thecomputerenterscreen-blankmode,right-clickthebatterygaugeiconintheWindowsnotification
areaandthenselectPoweroffdisplay.
•Sleepmode
Insleepmode,yourworkissavedtomemory,andthentheharddiskdriveorsolid-statedriveand
thecomputerdisplayareturnedoff.Whenyourcomputerresumestonormaloperation,yourworkis
restoredwithinseconds.
Toputyourcomputerintosleepmode,dothefollowing:
–ForWindows7:OpentheStartmenu,thenclickthearrownexttotheShutdownbutton.Click
Sleepfromthemenudisplayed.
–ForWindows8.1:GototheStartscreenbypressingtheWindowskey
,clickthepowericon
,thenclickSleep.
–ForWindows10:OpentheStartmenu,clickPower,andthenclickSleep.
•Hibernationmode
Byusingthismode,youcanturnoffyourcomputercompletelywithoutsavingfilesorexitingfromany
programsthatarerunning.Whenthecomputerentershibernationmode,allopenprograms,folders,and
filesaresavedtotheharddiskdriveorsolid-statedrive,andthenthecomputerturnsoff.
Toputthecomputerintohibernationmode,changeyourpowerplansettingsbydoingthefollowing:
–ForWindows7:OpentheStartmenu,thenclickthearrownexttotheShutdownbutton.Click
Hibernatefromthemenudisplayed.
–ForWindows8.1andWindows10:Definewhatthepowerbuttondoesfirst,thenpressthepower
buttontoputthecomputerintohibernationmode.
Ifyouputyourcomputerintohibernationmodewiththewake-upfunctiondisabled,thecomputerdoes
notconsumeanypower.Thewake-upfunctionisdisabledbydefault.Ifyouputyourcomputerinto
hibernationmodewiththewake-upfunctionenabled,thecomputerconsumesasmallamountofpower.
Toenablethewake-upfunction,dothefollowing:
1.GotoControlPanelandclickSystemandSecurity➙AdministrativeT ools.
2.Double-clickTaskScheduler.Ifyouarepromptedforanadministratorpasswordorconfirmation,
typethepasswordorprovideconfirmation.
3.Fromtheleftpane,selectthetaskfolderforwhichyouwanttoenablethewake-upfunction.The
scheduledtasksaredisplayed.
4.Clickascheduledtask,andthenclicktheConditionstab.
5.InthePowerarea,selectWakethecomputertorunthistask.
•Wirelessoff
Whenyouarenotusingthewirelessfeatures,suchasBluetoothorwireless-LAN,turnthemoff.This
helpsconservepower.Toturnoffthewirelessfeatures,pressthewireless-radioscontrolkey.
Maximizingthebatterylife
Tomaximizethelifeofthebattery,dothefollowing:
•Usethebatteryuntilthechargeiscompletelydepleted.
•Rechargethebatterycompletelybeforeusingit.Youcanseewhetherthebatteryisfullychargedfromthe
battery-statusiconintheWindowsnotificationarea.
•Takeconsiderationofusingpower-savingmodes,suchassleepmodeandhibernationmode.
Chapter2.Usingyourcomputer33

Connectingtothenetwork
YourcomputerhasoneormorenetworkcardsthatenableyoutoconnectyourcomputertotheInternet
andothernetworkconnections.
Ethernetconnections
Youcanconnecttoyourlocalnetworkorabroadbandconnectionbyusingthebuilt-inEthernetfeature
ofyourcomputer.
DANGER
YourcomputerhasanEthernetconnector.Toavoidtheriskofelectricalshock,donotconnect
thetelephonecabletotheEthernetconnector.
Wirelessconnections
Wirelessconnectionisthetransferofdatawithouttheuseofcablesbutbymeansofradiowavesonly.
Dependingonthewirelessdevicesinstalledonyourcomputer,youmightbeabletousethefollowing
wirelessnetworks:
•Wireless-LANconnection
•Bluetoothconnection
Usingthewireless-LANconnection
Awireless-LANcoversarelativelysmallgeographicarea,suchasanofficebuildingorahouse.Devices
basedonthe802.11standardscanconnecttothistypeofnetwork.
Yourcomputercomeswithabuilt-inwirelessnetworkcardandaconfigurationutilitytohelpyouestablish
wirelessconnectionsandmonitortheconnectionstatus.Thisenablesyoutostayconnectedtoyournetwork
whileyouareattheoffice,inameetingroom,orathome,withnoneedforawiredconnection.
Toestablishawireless-LANconnection,dothefollowing:
1.Clickthewireless-network-connection-statusiconintheWindowsnotificationarea.Alistofavailable
wirelessnetworksisdisplayed.
2.Double-clickanetworktoconnecttoit.Providerequiredinformationifneeded.
Thecomputerautomaticallyconnectstoanavailablewirelessnetworkwhenthelocationchanges.Open
NetworkandSharingCentertomanagemultiplenetworkprofiles.Formoreinformation,refertothe
Windowshelpinformationsystem.
Tipsforusingthewireless-LANfeature
Toachievethebestconnection,usethefollowingguidelines:
•Placeyourcomputersothatthereareasfewobstaclesaspossiblebetweenthewireless-LANaccess
pointandthecomputer.
•Openyourcomputerlidtoanangleofslightlymorethan90degrees.
•Ifyouusethewirelessfeature(the802.11standard)ofyourcomputersimultaneouslywithaBluetooth
option,thedatatransmissionspeedcanbedelayedandtheperformanceofthewirelessfeaturecanbe
degraded.
34UserGuide

Checkingthewireless-LANconnectionstatus
Youcancheckthewireless-LANconnectionstatusthroughthewireless-network-connection-statusiconin
theWindowsnotificationarea.Themorebarsencompassed,thebetterthesignalis.
FortheWindows7operatingsystem,youalsocanchecktheAccessConnectionsgauge,theAccess
Connectionsstatusicon,ortheAccessConnectionswireless-statusiconintheWindowsnotificationarea.
AccessConnectionsgauge:
•Powertothewirelessradioisoffornosignal.
•Powertothewirelessradioison.Thesignalstrengthofthewirelessconnectionispoor.To
improvesignalstrength,moveyourcomputerclosertothewirelessaccesspoint.
•Powertothewirelessradioison.Thesignalstrengthofthewirelessconnection
ismarginal.
•
Powertothewirelessradioison.Thesignalstrengthofthewirelessconnection
isexcellent.
AccessConnectionsstatusicon:
•
Nolocationprofileisactiveornoneexists.
•Currentlocationprofileisdisconnected.
•
Currentlocationprofileisconnected.
AccessConnectionswireless-statusicon:
•
Powertothewirelessradioisoff.
•
Powertothewirelessradioison.Noassociation.
•Powertothewirelessradioison.Nosignal.
•
Powertothewirelessradioison.Thesignalstrengthofthewirelessconnectionispoor.Toimprove
signalstrength,moveyourcomputerclosertothewirelessaccesspoint.
•
Powertothewirelessradioison.Thesignalstrengthofthewirelessconnectionismarginal.
•Powertothewirelessradioison.Thesignalstrengthofthewirelessconnectionisexcellent.
UsingtheBluetoothconnection
Bluetoothcanconnectdevicesashortdistancefromoneanother,andiscommonlyusedforconnecting
peripheraldevicestoacomputer,transferringdatabetweenhand-helddevicesandapersonalcomputer,or
remotelycontrollingandcommunicatingwithdevicessuchasmobilephones.
Dependingonthemodel,yourcomputermightsupporttheBluetoothfeature.Totransferdatathrough
theBluetoothfeature,dothefollowing:
1.EnsurethattheBluetoothfeatureisenabled.
•ForWindows7:Pressthewireless-radioscontrolkeyandturnontheBluetoothfeature.
•ForWindows8.1:
a.Moveyourpointertothetop-rightorbottom-rightcornerofthescreentodisplaythecharms.
b.ClickSettings➙ChangePCsettings➙PCanddevices➙Bluetooth.
c.TurnontheBluetoothfeature.
Chapter2.Usingyourcomputer35

•ForWindows10:Dooneofthefollowing:
–OpentheStartmenuandclickSettings.IfSettingsisnotdisplayed,clickAllappstodisplayall
programs.ThenclickSettings➙Devices➙Bluetooth.TurnontheBluetoothfeature.
–OpentheStartmenuandclickSettings.IfSettingsisnotdisplayed,clickAllappstodisplayall
programs.ThenclickSettings➙Network&Internet➙Airplanemode.TurnontheBluetooth
feature.
2.Right-clickthedatathatyouwanttosend.
3.SelectSendT o➙BluetoothDevices.
4.SelectaBluetoothdevice,andthenfollowtheinstructionsonthescreen.
Note:Ifyouusethewirelessfeature(the802.11standards)ofyourcomputersimultaneouslywitha
Bluetoothoption,thedatatransmissionspeedcanbedelayedandtheperformanceofthewirelessfeature
canbedegraded.
Formoreinformation,refertotheWindowshelpinformationsystemandtheBluetoothhelpinformation
system.
Usinganexternaldisplay
Youcanuseanexternaldisplaysuchasaprojectororamonitortogivepresentationsortoexpandyour
workspace.Thistopicintroduceshowtoconnectanexternaldisplay,choosedisplaymodes,andchange
displaysettings.
Formoreinformationabouttheexternaldisplay,refertothemanualsprovidedwithit.
Connectinganexternaldisplay
Youcanconnectanexternaldisplaytothecomputerbydoingthefollowing:
1.Connecttheexternaldisplaytoanappropriatevideoconnectoronyourcomputer,forexample,the
HDMIconnector.
2.Connecttheexternaldisplaytoanelectricaloutlet.
3.Turnontheexternaldisplay.
Choosingadisplaymode
Youcandisplayyourdesktopandappsonthecomputerdisplay,theexternaldisplay,orboth.Tochoose
howtodisplaythevideooutput,pressthedisplay-modeswitchingkeyandthenselectadisplay
modeyouprefer.
Therearefourdisplaymodes:
•Disconnect:Displaysthevideooutputonlyonyourcomputerscreen.
Note:Dependingonthesituation,youmightseeDisconnect,PCscreenonly,Computeronly,or
Disconnectprojector.
•Duplicate:Displaysthesamevideooutputonbothyourcomputerscreenandanexternaldisplay.
•Extend:Extendsthevideooutputfromyourcomputerdisplaytoanexternaldisplay.Youcandragand
moveitemsbetweenthetwodisplays.
•Projectoronly:Showsthevideooutputonlyonanexternaldisplay.
Note:Dependingonthesituation,youmightseeProjectoronlyorSecondscreenonly.
36UserGuide

Note:IfyoushowDOSorprogramsusingDirectDraworDirect3D
®
infull-screenmode,onlythemain
displayshowsthevideooutput.
Changingdisplaysettings
Youcanchangethesettingsforboththecomputerdisplayandtheexternaldisplay.Forexample,you
candefinewhichoneisthemaindisplayandwhichoneisthesecondarydisplay.Youalsocanchange
theresolutionandorientation.
Tochangedisplaysettings,dothefollowing:
1.Right-clickonthedesktopandselectScreenResolutionorDisplaysettings.
2.Selectthedisplaythatyouwanttoconfigure.
3.Changedisplaysettingsasyouwant.
Note:Ifyousetahigherresolutionforthecomputerdisplaythantheexternaldisplay,onlypartofthescreen
canbeshownontheexternaldisplay.
Usingaudiofeatures
Yourcomputerisequippedwiththefollowingitems:
•Microphone
•Speakers
•Audioconnector,3.5mm(0.14inch)indiameter
Yourcomputeralsohasanaudiochipthatenablesyoutoenjoyvariousmultimediaaudiofeatures:
•CompliantwithIntelHighDefinitionAudio
•Playbackofmusicalinstrumentdigitalinterface(MIDI)andmovingpictureexpertsgroupaudiolayer-3
(MP3)files
•Recordingandplaybackofpulse-codemodulation(PCM)andwaveformaudiofileformat(WAV)files
•Recordingfromvarioussoundsources,suchasaheadsetattached
Thefollowingtableshowswhichfunctionsoftheaudiodevicesattachedtotheconnectorsonyour
computeraresupported.
Table1.Audiofeaturelist
Connector
Headsetwitha3.5mm
(0.14-inch),4-poleplug
ConventionalheadphoneConventionalmicrophone
AudioconnectorHeadphoneand
microphonefunctions
supported
Headphonefunction
supported
Notsupported
Toconfigurethemicrophoneforoptimalsoundrecording,usetheDolbyAdvancedAudiov2program.To
starttheprogram,gotoControlPanelandclickHardwareandSound.ThenclicktheiconoftheDolby
AdvancedAudiov2program.
Usingthecamera
Yourcomputerhasanintegratedcamera.Youcanusethecameratopreviewyourvideoimageandtakea
snapshotofyourcurrentimage.
Chapter2.Usingyourcomputer37

Tostartthecamera,dothefollowing:
•ForWindows7:StarttheCommunicationsUtilityprogram.
•ForWindows8.1:ClickCamerafromtheStartscreen.
•ForWindows10:OpentheStartmenu,andclickCamerafromtheallappslist.
Whenthecameraisstarted,thecamera-in-useindicatorturnsoningreen.
Youalsocanusethecamerawithotherprogramsthatprovidefeaturessuchasphotographing,video
capturing,andvideoconferencing.Tousethecamerawithotherprograms,startoneoftheprograms
andstartthephotographing,videocapturing,orvideoconferencingfunction.Then,thecamerastarts
automaticallyandthecamera-in-useindicatorturnsoningreen.Formoreinformationaboutusingthe
camerawithaprogram,refertothehelpinformationsystemoftheprogram.
Configuringcamerasettings
Youcanconfigurethecamerasettingstomeetyourneeds,suchasadjustingthequalityofthevideooutput.
Toconfigurethecamerasettings,dothefollowing:
•ForWindows7:StarttheCommunicationsUtilityprogram.ClicktheManageSettingsbuttonand
configurethecamerasettingsasdesired.
•ForWindows8.1,dooneofthefollowing:
–Configurethecamerasettingsdirectlyfromtheprogramthatisusingthecamera.Fordetails,seethe
helpinformationsystemoftheprogram.
–ClickLenovoSettingsfromtheStartscreen.ThenclickCamera.Followtheinstructionsonthe
screentoconfigurethecamerasettingsasdesired.
•ForWindows10:Dooneofthefollowing:
–OpentheCameraapp,clickthesettingsiconintheupper-rightcorner.Followtheinstructionsonthe
screentoconfigurethecamerasettingsasdesired.
–ClickLenovoSettingsfromtheStartmenu.ThenclickCamera.Followtheinstructionsonthe
screentoconfigurethecamerasettingsasdesired.
Usingaflashmediacard
Yourcomputerhasamediacardreaderslot,anditsupportsthefollowingtypesofcards:
•MultiMediaCard(MMC)module
•SecureDigital(SD)card
•SecureDigitaleXtended-Capacity(SDXC)card
•SecureDigitalHigh-Capacity(SDHC)card
Note:YourcomputerdoesnotsupporttheCPRMfeaturefortheSDcard.
Attention:Whiletransferringdatatoorfromaflashmediacard,suchasanSDcard,donotputyour
computerintosleeporhibernationmodebeforethedatatransfercompletes;otherwise,yourdatacould
becomedamaged.
Installingaflashmediacard
Attention:Beforeyoustartinstallingacard,touchametaltableoragroundedmetalobject.Thisaction
reducesanystaticelectricityfromyourbody.Staticelectricitycoulddamagethecard.
Toinstallaflashmediacard,dothefollowing:
38UserGuide

1.Locatethemediacardslotonyourcomputer.See“Left-sideview”onpage5.
2.Ensurethatthemetalcontactsofthecardarefacingdownandpointingtowardthemediacardslot.
3.Pressthecardfirmlyintothemediacardslot.
Iftheplug-and-playfeatureisnotenabledfortheinstalledflashmediacard,dothefollowingtoenable
thefeature:
1.GotoControlPanel.
2.ClickHardwareandSound.
3.ClickDeviceManager.Ifyouarepromptedforanadministratorpasswordorconfirmation,typethe
passwordorprovideconfirmation.
4.FromtheActionmenu,selectAddlegacyhardware.TheAddHardwareWizardstarts.
5.Followtheinstructionsonthescreen.
Removingaflashmediacard
Attention:
•Beforeremovingacard,stopthecardfirst.Otherwise,dataonthecardmightgetdamagedorlost.
•Donotremoveacardwhilethecomputerisinsleepmodeorhibernationmode.Otherwise,thesystem
mightnotrespondwhenyoutrytoresumeoperation.
Toremoveaflashmediacard,dothefollowing:
1.ClickthetriangulariconintheWindowsnotificationareatoshowhiddenicons.Then,right-clickthe
SafelyRemoveHardwareandEjectMediaicon.
2.Selecttheitemyouwanttoremovetostopthecard.
3.Pressthecardtoejectitfromyourcomputer.
4.Removethecardandstoreitsafelyforfutureuse.
Note:IfyoudonotremovethecardfromyourcomputerafteryouejectthecardfromtheWindows
operatingsystem,thecardcannolongerbeaccessed.Toaccessthecard,youmustremoveitonce,
theninsertitagain.
UsingtheThinkPadActivePen
SomecomputermodelsareequippedwithaThinkPadActivePen.TheThinkPadActivePenenablesyouto
inputtextinanaturalmannerwhenyouaretakingnotes,annotatingPortableDocumentFormat(PDF)files,
ordrawinggraphicstogetherwithapplicationscapableofeditingandsketching.Whenyoudraworwrite
withtheThinkPadActivePen,keepthepenperpendiculartothedisplaytoachievethebestlinequality.
UsetheThinkPadActivePeninsteadofyourfingerinconditionssuchasthefollowing:
•Youneedpreciseanddetailedinput,suchasdrawingapictureorusingthehandwritingmode.
•Toomanyelementsarecrowdedonthescreen,forexample,whenyouareplayinggames.
•Youwanttokeepyourscreenfreefromsmudges.
•Youhavelongfingernailsanditisdifficultforyoutotype.
Chapter2.Usingyourcomputer39
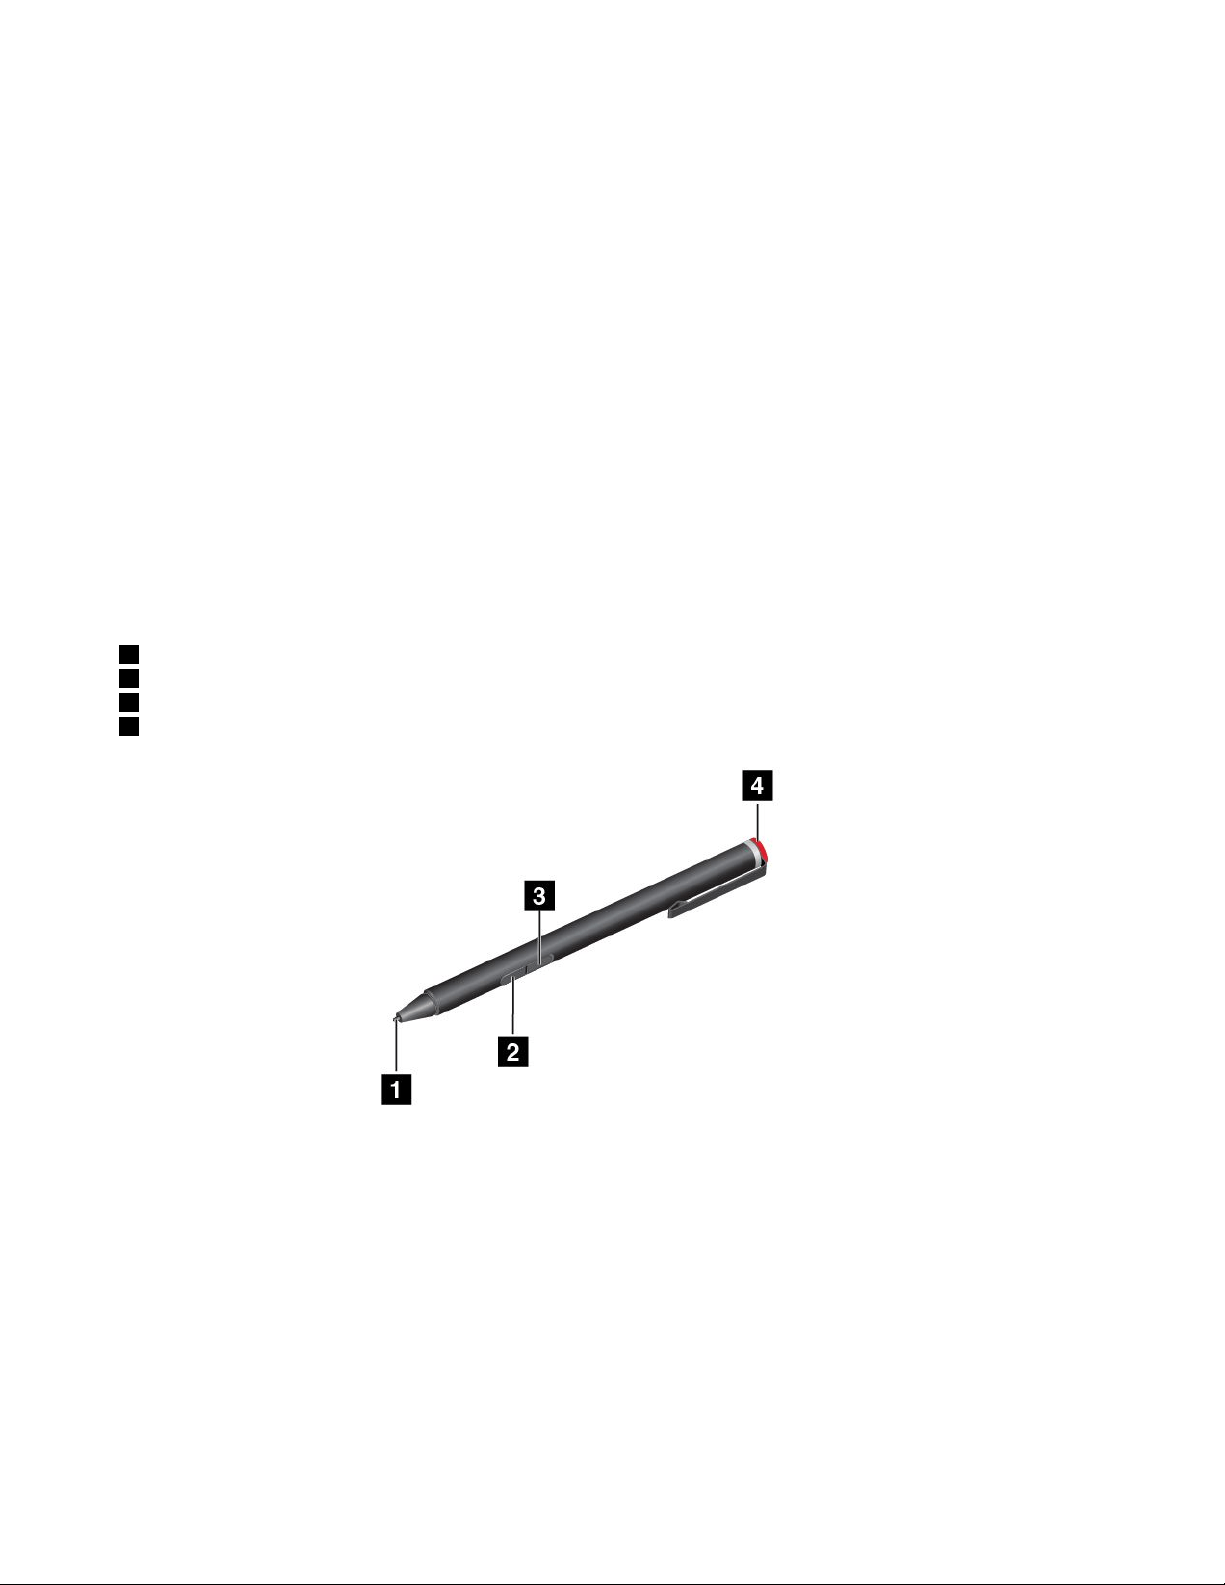
Notes:
•TheThinkPadActivePenisnotwaterproof.Takecarenottosoakitordipitinwater.
•IfyourcomputerdoesnotcomewithaThinkPadActivePen,yourcomputerdoesnotsupporttheuseof
apen.
•TopurchasetheThinkPadActivePen,gototheLenovoSupportWebsite:
http://www.lenovo.com/accessories
UsingtheThinkPadActivePen
TheThinkPadActivePenisbattery-poweredandusedwithoneAAAAalkalinebattery.
ToinstallabatteryintotheThinkPadActivePen,unscrewandremovetheendcapoftheThinkPadActive
Pen,insertthebatteryintothebatterycompartmentwiththenegativepolarityfacingoutward,andthen
tightentheendcapbackintoposition.
Note:Ensurethatyouinstallthebatteryincorrectorientationwiththenegativepolarityfacingoutward.
Whenthebatterypowerrunsout,theThinkPadActivePenstopsfunctioning.Inthiscase,replacethebattery.
ThefollowingillustrationshowstheThinkPadActivePen.
1Tip
2Eraserbutton
3Clickbutton
4Endcap
YoucanperformthefollowingoperationswiththeThinkPadActivePen:
•Toclickormakeaselection,tapthedisplayoncewiththepen.
•Todouble-click,taptwicewithoutpausing.
•Toright-click,tapthetiponthedisplayandholdthepenforonesecond,orpresstheclickbutton
andtapthetiponthedisplay.
•Toeraseink,pressandholdtheeraserbutton,tapthetiponthedisplay,anddragthepenacrossthe
inkyouwanttoerase.
TheThinkPadActivePenisdeliveredwithapenholder.TostoretheThinkPadActivePenonthecomputer,
dothefollowing:
1.InsertthepenholderconnectorintoanavailableUSBconnectoronthecomputer.
40UserGuide
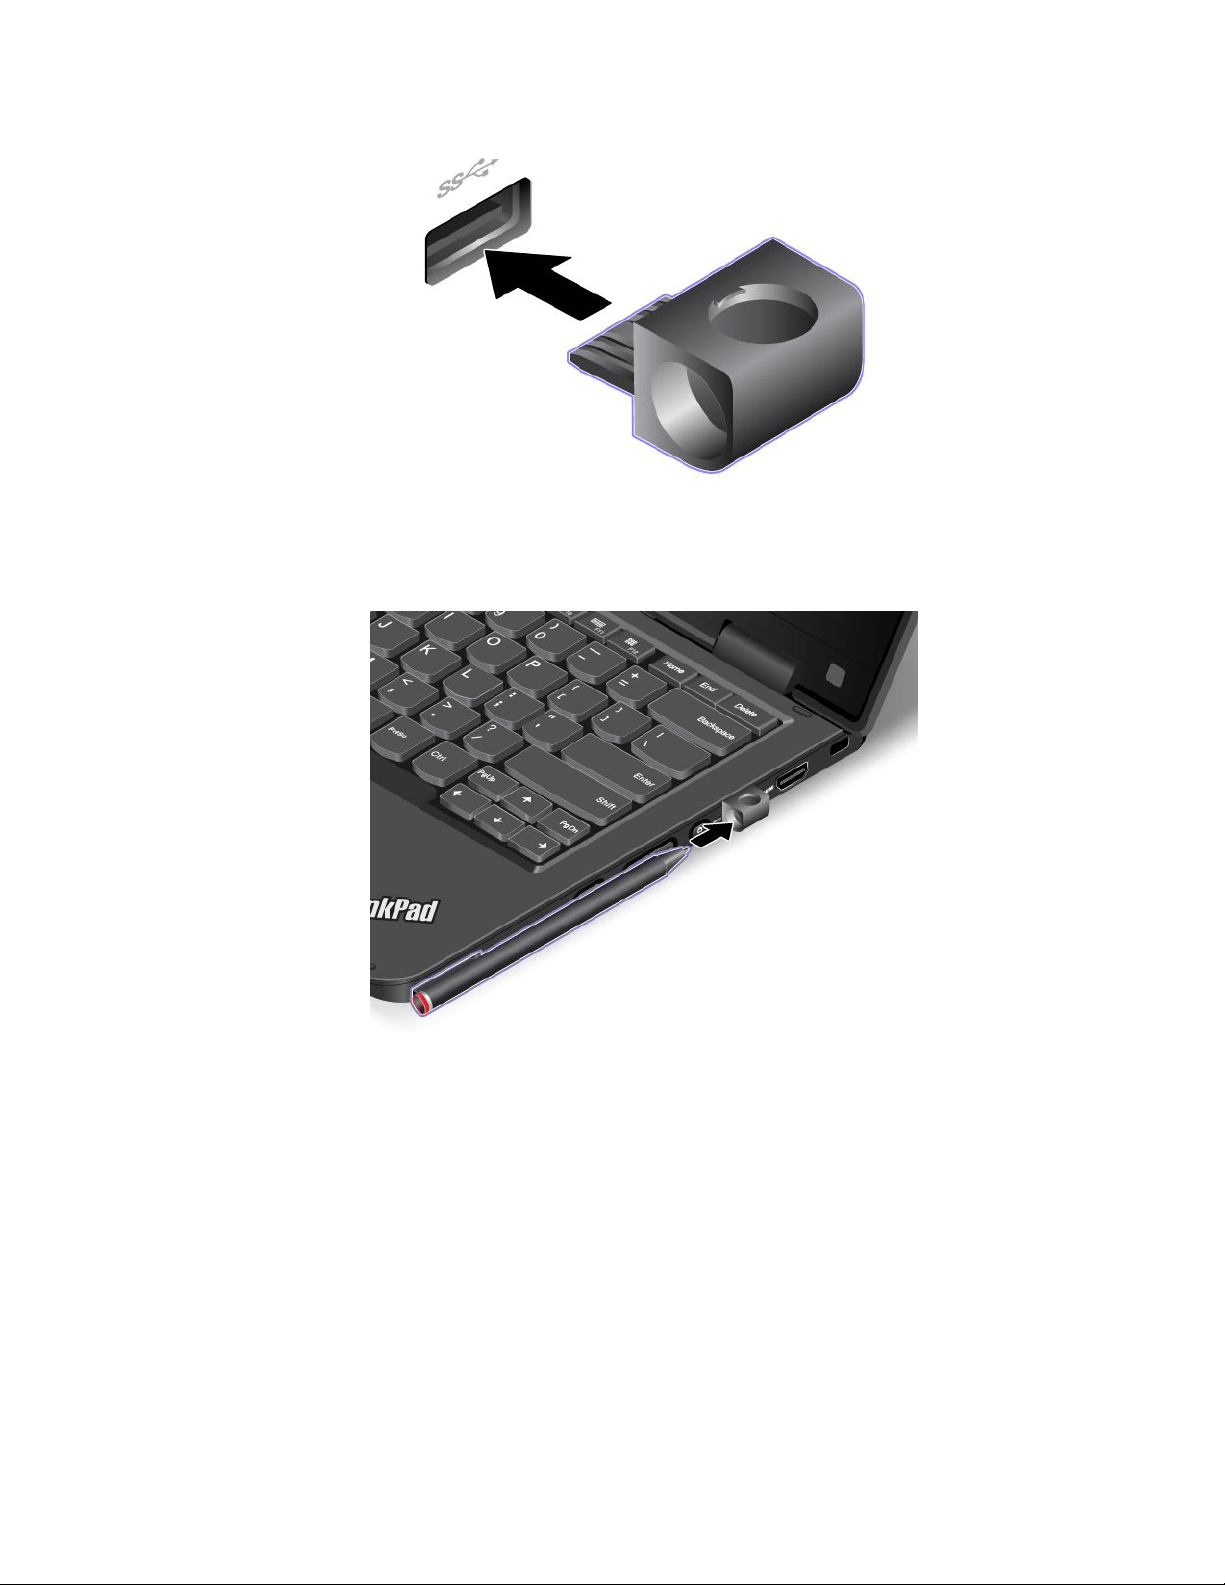
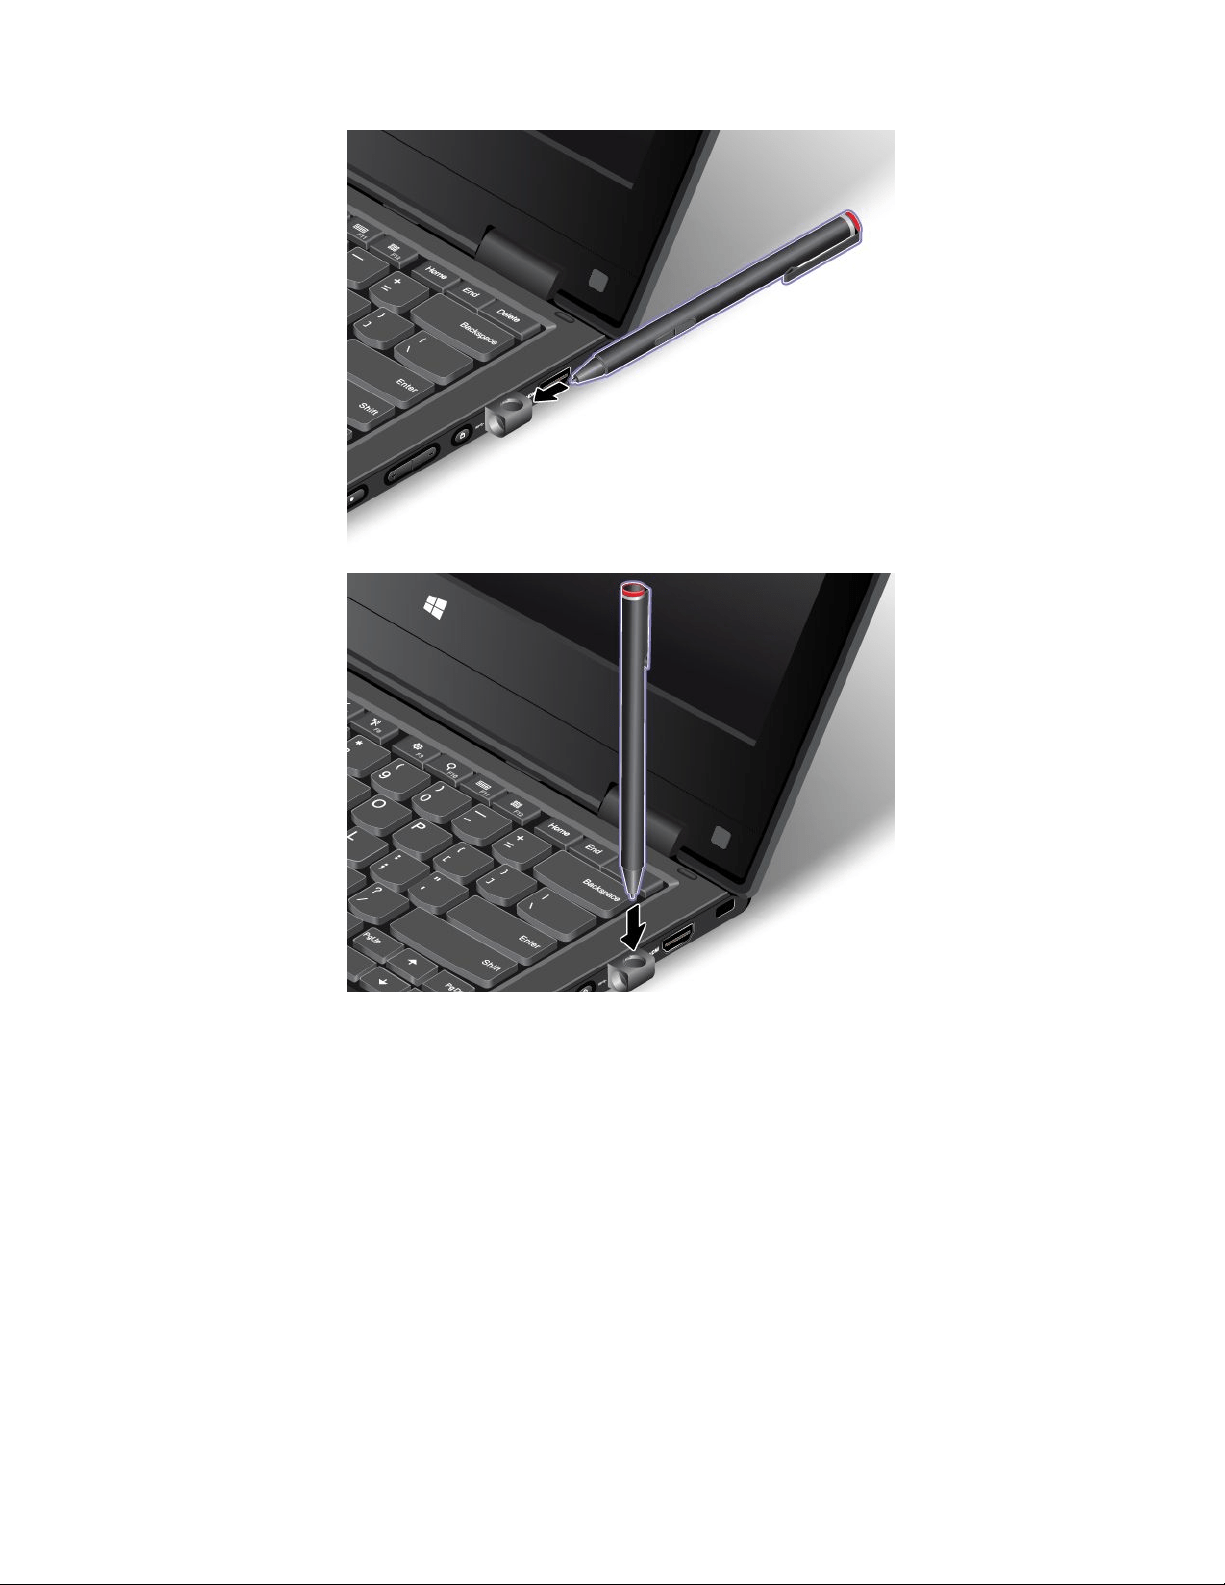
42UserGuide
Chapter3.Youandyourcomputer
Thischapterprovidesinformationaboutaccessibility,comfort,andtravelingwithyourcomputer.
Accessibilityandcomfort
Goodergonomicpracticeisimportanttogetthemostfromyourpersonalcomputerandtoavoiddiscomfort.
Arrangeyourworkplaceandtheequipmentyouusetosuityourindividualneedsandthekindofwork
thatyouperform.Inaddition,usehealthyworkhabitstomaximizeyourperformanceandcomfortwhile
usingyourcomputer.
Thefollowingtopicsprovideinformationaboutarrangingyourworkarea,settingupyourcomputer
equipment,andestablishinghealthyworkhabits.
Lenovoiscommittedtoprovidingthelatestinformationandtechnologytoourcustomerswithdisabilities.
Refertotheaccessibilityinformationthatoutlinesoureffortsinthisarea.See“Accessibilityinformation”
onpage44
.
Ergonomicinformation
Workinginthevirtualofficemightmeanadaptingtofrequentchangesinyourenvironment.Forexample,
adaptingtothesurroundinglightingsources,properseating,andtheplacementofyourcomputerhardware,
canhelpyouimproveyourperformanceandachievegreatercomfort.
Thefollowingexampleshowssomeoneinaconventionalsetting.Evenwhennotinsuchasetting,youcan
followmanyofthesetips.Developgoodhabits,andtheywillserveyouwell.
Generalposture:Makeminormodificationsinyourworkingposturetodetertheonsetofdiscomfort
causedbylongperiodsofworkinginthesameposition.Frequentshortbreaksfromyourworkalsohelp
topreventminordiscomfortassociatedwithyourworkingposture.
Display:Positionthedisplaytomaintainacomfortableviewingdistanceof510-760mm(20-30inches).
Avoidglareorreflectionsonthedisplayfromoverheadlightingoroutsidesourcesoflight.Keepthedisplay
screencleanandsetthebrightnesstolevelsthatenableyoutoseethescreenclearly.
Headposition:Keepyourheadandneckinacomfortableandneutral(vertical,orupright)position.
Chair:Useachairthatgivesyougoodbacksupportandseatheightadjustment.Usechairadjustmentsto
bestsuityourdesiredposture.
Armandhandposition:Keepyourforearms,wrists,andhandsinarelaxedandneutral(horizontal)position.
Typewithasofttouchwithoutpoundingthekeys.
©CopyrightLenovo2014,2016
43

Legposition:Keepyourthighsparalleltothefloorandyourfeetflatonthefloororonafootrest.
Whatifyouaretraveling?
Itmightnotbepossibletoobservethebestergonomicpracticeswhenyouareusingyourcomputer
whileonthemoveorinacasualsetting.Regardlessofthesetting,trytoobserveasmanyofthetipsas
possible.Sittingproperlyandusingadequatelighting,forexample,willhelpyoumaintaindesirablelevels
ofcomfortandperformance.
Questionsaboutvision?
ThevisualdisplayscreensofThinkPadnotebookcomputersaredesignedtomeetthehigheststandards
andtoprovideyouwithclear,crispimagesandlarge,brightdisplaysthatareeasytosee,yeteasyonthe
eyes.Ofcourse,anyconcentratedandsustainedvisualactivitycanbetiring.Ifyouhavequestionsoneye
fatigueorvisualdiscomfort,consultavision-carespecialistforadvice.
Comfort
Observethefollowingguidelinestoachievegreatercomfortandimproveperformance.
Activesittingandrestbreaks:Thelongeryousitandworkwithyourcomputer,themoreimportantitisto
observeyourworkingposture.Follow“Ergonomicinformation”onpage43andpractice“activesitting”to
avoiddiscomfortassociatedwithyourworkingpostures.Makingminorvoluntaryposturalchangesand
takingshortfrequentworkbreaksarethekeyingredientsforhealthycomputing.Yourcomputerislightand
mobile;youcaneasilyrepositionyourworkingsurfacetoaccommodatemanyposturemodifications.
Workareasetupoptions:Familiarizeyourselfwithallofyourofficefurnituresothatyouknowhowtoadjust
yourworksurface,seat,andotherworktoolstoaccommodateyourpreferencesforcomfort.Ifyourwork
areaisnotinanofficesetting,besuretotakespecialnoteofemployingactivesittingandtakingwork
breaks.ManyThinkPadproductsolutionsareavailabletohelpyoumodifyandexpandyourcomputerto
bestsuityourneeds.Youcanfindsomeoftheseoptionsathttp://www.lenovo.com/essentials.Exploreyour
optionsfordockingsolutionsandexternalproductsthatprovidetheadjustabilityandfeaturesthatyouwant.
Accessibilityinformation
Lenovoiscommittedtoprovidinguserswhohavehearing,vision,andmobilitylimitationswithgreater
accesstoinformationandtechnology.Thissectionprovidesinformationaboutthewaystohelpthese
usersgetthemostoutoftheircomputerexperience.Youalsocangetthemostup-to-dateaccessibility
informationfromthefollowingWebsite:
http://www.lenovo.com/accessibility
Keyboardshortcuts
Thefollowingtablecontainskeyboardshortcutsthatcanhelpmakeyourcomputereasiertouse.
Note:Dependingonyourkeyboard,someofthefollowingkeyboardshortcutsmightnotbeavailable.
KeyboardshortcutFunction
Windowslogokey+U
OpenEaseofAccessCenter
RightShiftforeightseconds
TurnonorturnoffFilterKeys
ShiftfivetimesTurnonorturnoffStickyKeys
NumLockforfivesecondsTurnonorturnoffToggleKeys
LeftAlt+LeftShift+NumLock
TurnonorturnoffMouseKeys
LeftAlt+LeftShift+PrtScn(orPrtSc)TurnonorturnoffHighContrast
44UserGuide

Formoreinformation,gotohttp://windows.microsoft.com/,andthentypeanyofthefollowingkeywords
forsearching:keyboardshortcuts,keycombinations,shortcutkeys.
EaseofAccessCenter
EaseofAccessCenterontheWindowsoperatingsystemenablesuserstoconfiguretheircomputersto
suittheirphysicalandcognitiveneeds.
TouseEaseofAccessCenter,dothefollowing:
1.GotoControlPanel,andensurethatyouviewControlPanelbyCategory.
2.ClickEaseofAccess➙EaseofAccessCenter.
3.Usethetoolsbyfollowingtheinstructionsonthescreen.
EaseofAccessCentermainlyincludesthefollowingtools:
•Magnifier
Magnifierisausefulutilitythatenlargestheentirescreenorpartofthescreensothatyoucansee
theitemsbetter.
•Narrator
Narratorisascreenreaderthatreadswhatisdisplayedonthescreenaloudanddescribeseventslike
errormessages.
•On-ScreenKeyboard
Ifyouprefertotypeorenterdataintoyourcomputerwithoutusingaphysicalkeyboard,youcanuse
On-ScreenKeyboard.On-ScreenKeyboarddisplaysavisualkeyboardwithallthestandardkeys.You
canselectkeysusingthemouseoranotherpointingdevice,oryoucantaptoselectthekeysifyour
computersupportsmulti-touchscreen.
•HighContrast
HighContrastisafeaturethatheightensthecolorcontrastofsometextandimagesonyourscreen.Asa
result,thoseitemsaremoredistinctandeasiertoidentify.
•Personalizedkeyboard
Adjustkeyboardsettingstomakeyourkeyboardeasiertouse.Forexample,youcanuseyourkeyboard
tocontrolthepointerandmakethekeyboardeasiertotypecertainkeycombinations.
•Personalizedmouse
Adjustmousesettingstomakeyourmouseeasiertouse.Forexample,youcanchangethepointer
appearanceandmakeyourmouseeasiertomanagewindows.
SpeechRecognition
SpeechRecognitionenablesyoutocontrolyourcomputerbyvoice.
Usingonlyyourvoice,youcanstartprograms,openmenus,clickobjectsonthescreen,dictatetextinto
documents,andwriteandsende-mails.Everythingyoudowiththekeyboardandmousecanbedonewith
onlyyourvoice.
TouseSpeechRecognition,dothefollowing:
1.GotoControlPanel,andensurethatyouviewControlPanelbyCategory.
2.ClickEaseofAccess➙SpeechRecognition.
3.Followtheinstructionsonthescreen.
Chapter3.Youandyourcomputer45

Screen-readertechnologies
Screen-readertechnologiesareprimarilyfocusedonsoftwareprograminterfaces,helpinformationsystems,
andvariousonlinedocuments.Foradditionalinformationaboutscreenreaders,seethefollowing:
•UsingPDFswithscreenreaders:
http://www.adobe.com/accessibility.html?promoid=DJGVE
•UsingtheJAWSscreenreader:
http://www.freedomscientific.com/jaws-hq.asp
•UsingtheNVDAscreenreader:
http://www.nvaccess.org/
Screenresolution
Youcanmakethetextandimagesonyourscreeneasiertoreadbyadjustingthescreenresolutionofyour
computer.
Toadjustthescreenresolution,dothefollowing:
•ForWindows7andWindows8.1:
1.Right-clickanemptyareaofthedesktopandselectScreenResolution.
2.Followtheinstructionsonthescreen.
•ForWindows10:
1.Right-clickanemptyareaofthedesktopandselectDisplaysettings➙Advanceddisplaysettings.
2.Followtheinstructionsonthescreen.
Note:Settingaresolutiontoolowmightpreventsomeitemsfromfittingonthescreen.
Customizableitemsize
Youcanmaketheitemsonyourscreeneasiertoreadbychangingtheitemsize.
•Tochangetheitemsizetemporarily,usetheMagnifiertoolinEaseofAccessCenter.
•Tochangetheitemsizepermanently,dothefollowing:
–Changethesizeofalltheitemsonyourscreen.
1.GotoControlPanel,andensurethatyouviewControlPanelbyCategory.
2.ClickAppearanceandPersonalization➙Display.
3.Changetheitemsizebyfollowingtheinstructionsonthescreen.
4.ClickApply.Thischangewilltakeeffectthenexttimeyoulogintotheoperatingsystem.
–ChangethesizeoftheitemsonaWebpage.
PressandholdCtrl,andthenpresstheplus-signkey(+)toenlargeortheminus-signkey(-)to
reducethetextsize.
–Changethesizeoftheitemsonthedesktoporawindow.
Note:Thisfunctionmightnotworkonsomewindows.
Ifyourmousehasawheel,pressandholdCtrl,andthenscrollthewheeltochangetheitemsize.
Industry-standardconnectors
Yourcomputerprovidesindustry-standardconnectorsthatenableyoutoconnectassistivedevices.
Formoreinformationaboutthelocationandfunctionoftheconnectors,see“Locatingcomputercontrols,
connectors,andindicators”onpage1
.
46UserGuide

Documentationinaccessibleformats
Lenovoprovideselectronicdocumentationinaccessibleformats,suchasproperlytaggedPDFfilesor
HyperTextMarkupLanguage(HTML)files.Lenovoelectronicdocumentationisdevelopedtoensure
thatvisuallyimpaireduserscanreadthedocumentationthroughascreenreader.Eachimageinthe
documentationalsoincludesadequatealternativetextsothatvisuallyimpaireduserscanunderstandthe
imagewhentheyuseascreenreader.
Travelingwithyourcomputer
Thistopicprovidesinformationtohelpyouworkwithyourcomputerwhenyouaretraveling.
Traveltips
Usethefollowingtraveltipstotravelmoreconfidentlyandefficientlywithyourcomputer.
•Althoughitissafetoallowyourcomputertogothroughthex-raymachinesatairportsecuritystations,it
isimportanttokeepyoureyesonthecomputeratalltimestopreventtheft.
•Considerbringinganelectricaladapterforuseinanairplaneorautomobile.
•Ifyoucarryanacpoweradapter,detachtheaccordfromittoavoiddamagingthecord.
Traveltipsonairplanes
Ifyoucarryyourcomputerintoanairplane,takenoteofthefollowingtips:
•Ifyouintendtouseyourcomputerorwirelessservices(suchasInternetandBluetooth),checkwiththe
airlineforrestrictionsandavailabilityofservicesbeforeboardingtheairplane.Iftherearerestrictions
ontheuseofcomputerswithwirelessfeaturesontheairplane,youmustabidebythoserestrictions.If
necessary,enabletheAirplanemodebeforeboarding.IntheAirplanemode,allwirelessfeaturesare
disabled.ToenabletheAirplanemode,dothefollowing:
–ForWindows8.1:Swipeinfromtherightedgeofthescreentodisplaythecharms,tapSettings➙
ChangePCsettings➙Network,andthenslidethecontrolforAirplanemodetotheright.
–ForWindows10:OpentheStartmenuandclickSettings.IfSettingsisnotdisplayed,clickAllapps
todisplayallprograms.ThenclickSettings➙Network&Internet➙Airplanemode.Slidethe
controlforAirplanemodetoenableit.
•Becarefulabouttheseatinfrontofyouonairplanes.Angleyourcomputerdisplaysothatitdoesnotget
caughtwhenthepersoninfrontofyouleansback.
•Whentakingoff,remembertoturnoffyourcomputerorputitintohibernationmode.
Travelaccessories
Thefollowingisachecklistofitemstoconsiderpackingwhenyouaregoingtotravel:
•ThinkPadacpoweradapter
•Externalmouse,ifyouareaccustomedtousingone
•Ethernetcable
•Externalstoragedevice
•HDMIcable
•HDMI-to-VGAmonitorcable
•Aqualitycarryingcasethatprovidesadequatecushionandprotection
Ifyouaretravelingtoanothercountry,youmightwanttoconsideranacpoweradapterforthecountryto
whichyouaretraveling.
Chapter3.Youandyourcomputer47


Chapter4.Security
Thischapterprovidesinformationabouthowtoprotectyourcomputerfromtheftandunauthorizeduse.
•“Attachingamechanicallock”onpage49
•“Usingpasswords”onpage49
•“Harddisksecurity”onpage54
•“Noticeondeletingdatafromyourharddiskdriveorsolid-statedrive”onpage54
•“Usingfirewalls”onpage55
•“Protectingdataagainstviruses”onpage55
Attachingamechanicallock
Youcanattachamechanicallocktoyourcomputertohelppreventitfrombeingremovedwithoutyour
permission.
Attachamechanicallocktothesecurity-lockslotofthecomputer;thensecurethechainonthelocktoa
stationaryobject.Refertotheinstructionsshippedwiththemechanicallock.
Note:Youareresponsibleforevaluating,selecting,andimplementingthelockingdevicesandsecurity
features.Lenovomakesnocomments,judgments,orwarrantiesaboutthefunction,quality,orperformance
oflockingdevicesandsecurityfeatures.
Usingpasswords
Youcanhelppreventyourcomputerfromunauthorizedusebyusingpasswords.Onceyousetapassword,
apromptisdisplayedonthescreeneachtimeyouturnonthecomputer.Enteryourpasswordattheprompt.
Youcannotusethecomputerunlessyouenterthevalidpassword.
Ifyouhavesetapower-onpassword,asupervisorpassword,oraharddiskpassword,itunlocks
automaticallywhenthecomputerresumesfromsleepmode.
Note:IfaWindowspasswordhasbeenset,youwillbepromptedtoenterit.
Typingpasswords
Whenthisiconisdisplayed,typeapower-onpasswordorasupervisorpassword.
Whenthisiconisdisplayed,typeauserharddiskpassword.Ifyouwanttotypeamasterharddisk
password,PressF1.Whentheiconchangesto,typethemasterharddiskpassword.
Note:Toreturntotheicon,pressF1again.
Power-onpassword
Youcansetapower-onpasswordtohelpprotectyourcomputeragainstunauthorizedaccess.
©CopyrightLenovo2014,2016
49

Ifyousetapower-onpassword,thepasswordpromptisdisplayedonthescreenwheneveryouturnonthe
computer.Youmustenterthecorrectpasswordtostartusingthecomputer.
Setting,changing,orremovingapower-onpassword
Beforeyoustart,printtheseinstructions.
Toset,change,orremoveapower-onpassword,dothefollowing:
1.Turnoffyourcomputer.Waitforaboutfiveseconds,andthenturnonthecomputeragain.
2.Whenthelogoscreenisdisplayed,pressF1tostarttheThinkPadSetupprogram.
3.SelectSecurity➙Password➙Power-onPasswordbyusingthearrowkeys.
4.Dependingonyourneed,dooneofthefollowing:
•Tosetapassword,dothefollowing:
a.IntheEnterNewPasswordfield,typeadesiredpasswordandpressEnter.
b.IntheConfirmNewPasswordfield,retypethepasswordandpressEnter.
•Tochangeapassword,dothefollowing:
a.IntheEnterCurrentPasswordfield,typethecurrentpower-onpasswordandpressEnter.
b.IntheEnterNewPasswordfield,typethenewpower-onpasswordandpressEnter;thenretype
thepasswordintheConfirmNewPasswordfieldandPressEnter.
•Toremoveapassword,dothefollowing:
a.IntheEnterCurrentPasswordfield,typethecurrentpower-onpasswordandpressEnter.
b.LeavetheEnterNewPasswordandConfirmNewPasswordfieldsblank.PressEntertwice.
5.ASetupNoticewindowisdisplayed.PressEntertocontinue.
6.PressF10.ASetupConfirmationwindowisdisplayed.SelectYestosavetheconfigurationchanges
andexit.
Note:Youmightwanttorecordyourpasswordandstoreitinasafeplace.Otherwise,ifyouforgetthe
password,youhavetotakeyourcomputertoaLenovoreselleroramarketingrepresentativetohave
thepasswordcanceled.
Supervisorpassword
ThesupervisorpasswordprotectsthesysteminformationstoredintheThinkPadSetupprogram.Ifyouhave
setasupervisorpassword,noonecanchangetheconfigurationofthecomputerwithoutthepassword.It
providesthefollowingsecurityfeatures:
•Ifonlyasupervisorpasswordisset,apasswordpromptisdisplayedwhenyoutrytostarttheThinkPad
Setupprogram.UnauthorizeduserscannotaccesstheThinkPadSetupprogramwithoutthepassword.
•Thesystemadministratorcanusethesupervisorpasswordtoaccessacomputereveniftheuserofthat
computerhassetapower-onpassword.Thesupervisorpasswordoverridesthepower-onpassword.
•Ifbothasupervisorpasswordandapower-onpasswordareset,youcandothefollowingonlyifyou
havethesupervisorpassword:
–Changingordeletingthepower-onpassword
–Changingordeletingthesupervisorpassword
–Changingdateandtime
–Changingthesettingforthesecuritychip
–Specifyingtheminimumlengthforpower-onpasswordandharddiskpassword
50UserGuide

–Enablingordisablingthefollowingfeatures:
–BootDeviceListF12Option
–BootOrderLock
–FlashBIOSUpdatingbyEnd-Users
–Internalnetworkdevice
–Internalwirelessdevice
–InternalBluetoothdevice
–InternalNetworkOptionROM
–LockUEFIBIOSSettings
–Passwordatunattendedboot
–Securitymode
–WakeonLAN
Notes:
•ThesystemadministratorcansetthesamesupervisorpasswordonmanyThinkPadnotebookcomputers
tomakeadministrationeasier.
•WhenLockUEFIBIOSSettingsoptionisenabled,allBIOSsettingscannotbechanged.Tochange
thesettings,asupervisorpasswordisrequired.
Setting,changing,orremovingasupervisorpassword
Beforeyoustart,printtheseinstructions.
Onlyasystemadministratorcanset,change,orremoveasupervisorpassword.Toset,change,orremovea
supervisorpassword,dothefollowing:
1.Turnoffyourcomputer.Waitforaboutfiveseconds,andthenturnonthecomputeragain.
2.Whenthelogoscreenisdisplayed,pressF1tostarttheThinkPadSetupprogram.
3.SelectSecurity➙Password➙SupervisorPasswordbyusingthearrowkeys.
4.Dependingonyourneeds,dooneofthefollowing:
•Tosetapassword,dothefollowing:
a.IntheEnterNewPasswordfield,typeadesiredpasswordandpressEnter.
b.IntheConfirmNewPasswordfield,retypethepasswordandpressEnter.
•Tochangeapassword,dothefollowing:
a.IntheEnterCurrentPasswordfield,typethecurrentsupervisorpasswordandpressEnter.
b.IntheEnterNewPasswordfield,typethenewsupervisorpasswordandpressEnter;thenretype
thepasswordintheConfirmNewPasswordfieldandpressEnter.
•Toremoveapassword,dothefollowing:
a.IntheEnterCurrentPasswordfield,typethecurrentsupervisorpasswordandpressEnter.
b.LeavetheEnterNewPasswordandConfirmNewPasswordfieldsblank.PressEntertwice.
5.ASetupNoticewindowisdisplayed.PressEntertocontinue.
6.PressF10.ASetupConfirmationwindowisdisplayed.SelectYestosavetheconfigurationchanges
andexit.
Note:Youmightwanttorecordyourpasswordandstoreitinasafeplace.Thenexttimeyoustartthe
ThinkPadSetupprogram,youwillbepromptedtotypeyoursupervisorpasswordtoproceed.Ifyouforget
Chapter4.Security51

yoursupervisorpassword,Lenovocannotresetyourpassword.YoumusttakeyourcomputertoaLenovo
reselleroraLenovomarketingrepresentativetohavethesystemboardreplaced.Proofofpurchaseis
required,andafeewillbechargedforpartsandservice.
Harddiskpasswords
Thefollowingtwotypesofharddiskpasswordscanhelpprotecttheinformationstoredontheharddisk
driveorsolid-statedrive:
•Userharddiskpassword
Ifauserharddiskpasswordhasbeenset,butnomasterharddiskpasswordhasbeen,theuser
mustentertheuserharddiskpasswordtoaccessfilesandapplicationsontheharddiskdriveorthe
solid-statedrive.
•Masterharddiskpassword
Themasterharddiskpasswordalsorequiresauserharddiskpassword.Themasterharddiskpassword
isusuallysetandusedbyasystemadministrator.Itenablestheadministratortoaccessanyharddisk
driveorsolid-statedriveinasystemlikeamasterkey.Theadministratorsetsthemasterpassword;then
assignsauserpasswordforeachcomputerinthenetwork.Theusercanthenchangetheuserpassword
asdesired,buttheadministratorstillcangetaccessbyusingthemasterpassword.
Whenamasterharddiskpasswordisset,onlytheadministratorcanremovetheuserharddiskpassword.
Notes:TheeDrivestoragedrivesorTrustedComputingGroup(TCG)Opal-compliantstoragedrivesprovide
self-encryptioncapabilitiestosecureyourdata.
•IfaTCGOpal-compliantstoragedriveandaTCGOpalmanagementsoftwareprogramareinstalled,and
theTCGOpalmanagementsoftwareprogramisactivated,theharddiskpasswordisnotavailable.
•IfaneDrivestoragedriveisinstalledinyourcomputer,andyourcomputerispreinstalledwiththe
Windows8.1operatingsystem,theharddiskpasswordisnotavailable.
Settingaharddiskpassword
Beforeyoustart,printtheseinstructions.
Tosetaharddiskpassword,dothefollowing:
1.Turnoffyourcomputer.Waitforaboutfiveseconds,andthenturnonthecomputeragain.
2.Whenthelogoscreenisdisplayed,pressF1tostarttheThinkPadSetupprogram.
3.SelectSecurity➙Password➙Harddisk1Passwordbyusingthearrowkeys.
4.Apasswordwindowisdisplayed.YouarepromptedtoselectUserorUser+Master.SelectUserif
youwanttosetonlyoneharddiskpassword.SelectUser+Masterifyouwanttosetauserharddisk
passwordandamasterharddiskpassword,forexampleifyouareanadministratororasupervisor.
•IfyouselectUser,dothefollowing:
a.Whenawindowfortypingthenewpasswordopens,typeyournewpasswordintheEnterNew
PasswordfieldandpressEnter.
b.IntheConfirmNewPasswordfield,retypethepasswordyoujustenteredandpressEnter.
•IfyouselectUser+Master,dothefollowing:
a.First,setauserharddiskpassword.Whenamessagewindowpromptsyoutosettheuserhard
diskpassword,pressEntertocontinue.TypeyournewuserharddiskpasswordintheEnter
NewPasswordfieldandpressEnter.RetypethepasswordintheConfirmNewPassword
fieldandpressEnter.
b.Then,setamasterharddiskpassword.Whenamessagewindowpromptsyoutosetthemaster
harddiskpassword.PressEntertocontinue.Typeyournewmasterharddiskpasswordinthe
52UserGuide

EnterNewPasswordfieldandpressEnter.RetypethepasswordintheConfirmNewPassword
fieldandpressEnter.
5.ASetupNoticewindowisdisplayed.PressEntertocontinue.
6.PressF10.ASetupConfirmationwindowisdisplayed.SelectYestosavetheconfigurationchanges
andexit.
Thenexttimeyouturnonyourcomputer,typetheuserormasterharddiskpasswordtostartyourcomputer
andaccesstheoperatingsystem.
Changingorremovingaharddiskpassword
Tochangeorremovetheharddiskpassword,dothefollowing:
•IfyouareinUser+Masterharddiskmode,youcanselecteitherUserHDPorMasterHDPtochange
thepassword,dependingonyourneeds.
–IfyouselectUserHDPmode,followthefollowingstepstochangetheuserharddiskpassword:
1.TypethecurrentuserharddiskpasswordintheEnterCurrentPasswordfieldandpressEnter.
2.TypethenewpasswordintheEnterNewPasswordfieldandpressEnter;thenretypethe
passwordintheConfirmNewPasswordfieldandpressEnter.
3.ASetupNoticewindowisdisplayed.PressEnteragaintocontinue.Theuserharddiskpassword
ischanged.
Note:TheharddiskpasswordcannotberemovedinUserHDPmode.
–IfyouselectMasterHDPmode,followthefollowingstepstochangethemasterharddiskpassword:
1.TypethecurrentmasterharddiskpasswordintheEnterCurrentPasswordfieldandpressEnter.
2.TypethenewmasterharddiskpasswordintheEnterNewPasswordfieldandpressEnter;then
retypethenewpasswordyoujustenteredintheConfirmNewPasswordfieldandpressEnter.
3.ASetupNoticewindowisdisplayed.PressEntertocontinue.Themasterharddiskpasswordis
changed.
Note:IfyouleavetheEnterNewPasswordandConfirmNewPasswordfieldsblankandpressEnter
twice,boththeuserandmasterharddiskpasswordsareremoved.
•IfyouareinUserharddiskmode,followthefollowingstepstochangetheuserharddiskpassword:
1.Followsteps1through6in“Settingaharddiskpassword”onpage52,typingyourpasswordto
starttheThinkPadSetupprogram.
2.TypethecurrentuserharddiskpasswordintheEnterCurrentPasswordfieldandpressEnter.
3.TypethenewpasswordintheEnterNewPasswordfieldandpressEnter;thenretypethenew
passwordintheConfirmNewPasswordfieldandpressEnter.
4.ASetupNoticewindowisdisplayed.PressEnteragaintocontinue.Theuserharddiskpasswordis
changed.
Note:IfyouleavetheEnterNewPasswordandConfirmNewPasswordfieldsblankandpressEnter
twice,theuserharddiskpasswordisremoved.
Tipsforusingtheharddiskpasswords
•YoucansettheminimumlengthofaharddiskpasswordthroughtheSecuritymenu.
•Ifyousetaharddiskpasswordofoversevencharacters,theharddiskdriveorsolid-statedrivecanbe
usedonlywithacomputerthatcanrecognizeaharddiskpasswordofoversevencharacters.Ifyouthen
installtheharddiskdriveorsolid-statedriveinacomputerthatcannotrecognizeaharddiskpassword
thatcontainsmorethansevencharacters,youcannotaccessthedrive.
Chapter4.Security53

•Recordyourpasswordandstoreitinasafeplace.Ifyouforgettheuserharddiskpassword,orboth
userandmasterharddiskpasswords,Lenovocannotresetyourpasswordsorrecoverdatafromthe
harddiskdriveorsolid-statedrive.YoumusttakeyourcomputertoaLenovoreselleroramarketing
representativetohavetheharddiskdriveorsolid-statedrivereplaced.Proofofpurchaseisrequired,
andafeewillbechargedforpartsandservice.
Harddisksecurity
Toprotectpasswordsfromunauthorizedsecurityattacks,refertothefollowingtipstomaximizesecurity:
•Setapower-onpasswordaswellasaharddiskpasswordforyourinternalharddiskdriveorsolid-state
drive.Refertotheproceduresin“Power-onpassword”onpage49
and“Harddiskpasswords”onpage
52.Forsecurity,alongerpasswordisrecommended.
•IfaDiskEncryptionstoragedriveisinstalledinyourcomputer,besuretoprotectthecontentsofyour
computermemoryfromunauthorizedaccessbyuseofdriveencryptionsoftware,suchasMicrosoft
WindowsBitLocker
®
DriveEncryption.Referto“UsingWindowsBitLockerDriveEncryption”onpage54
.
•Beforeyoudisposeof,sell,orhandoveryourcomputer,besuretodeletedatastoredonit.Formore
information,referto“Noticeondeletingdatafromyourharddiskdriveorsolid-statedrive”onpage54.
Note:Theharddiskdriveorsolid-statedrivebuiltintoyourcomputercanbeprotectedbyUEFIBIOS.
UsingWindowsBitLockerDriveEncryption
Tohelpprotectyourcomputeragainstunauthorizedaccess,usethedriveencryptionsoftware,suchas
WindowsBitLockerDriveEncryption.
WindowsBitLockerDriveEncryptionisanintegralsecurityfeatureofsomeeditionsoftheWindows
operatingsystem.Itcanhelpyouprotecttheoperatingsystemanddatastoredonyourcomputer,even
ifyourcomputerislostorstolen.BitLockerworksbyencryptingalluserandsystemfiles,includingthe
swapandhibernationfiles.
BitLockerprovidesenhancedprotectionforyourdataandtoensureearlybootcomponentintegrity.
TochecktheBitLockerstatus,gotoControlPanel,andclickSystemandSecurity➙BitLockerDrive
Encryption.
FormoreinformationaboutWindowsBitLockerDriveEncryption,seethehelpinformationsystemofthe
Windowsoperatingsystem,orsearchfor“MicrosoftWindowsBitLockerDriveEncryptionStep-by-Step
Guide”ontheMicrosoftWebsite.
DiskEncryptionharddiskdriveandEncryptionsolid-statedrive
SomemodelscontaintheDiskEncryptionharddiskdriveorEncryptionsolid-statedrive.Thisfeaturehelps
toprotectyourcomputeragainstsecurityattacksonmedia,NANDflashordevicecontrollersbyuseof
ahardwareencryptionchip.Fortheefficientuseoftheencryptionfeature,besuretosetaharddisk
passwordfortheinternalstoragedevice.
Noticeondeletingdatafromyourharddiskdriveorsolid-statedrive
Someofthedatastoredontheharddiskdriveorsolid-statedrivemightbesensitive.Handingyour
computerovertosomeoneelsewithoutdeletingtheloadedsoftware,suchasoperatingsystemsand
applicationsoftware,mightevenviolatelicenseagreements.Besuretodeletedatastoredontheharddisk
driveorsolid-statedrivebeforeyoudisposeof,sell,orhandoveryourcomputer.
Youcanusethefollowingmethodstodeletedatafromtheharddiskdriveorsolid-statedrive:
54UserGuide

•MovethedatatotheRecycleBin,andthenemptytheRecycleBin.
•Deletethedata.
•Formatyourharddiskdriveorsolid-statedrive,usingthesoftwareforinitializingit.
•UsetherecoveryprogramprovidedbyLenovotobringtheharddiskdriveorsolid-statedrivebackto
thefactorydefaultsettings.
Theseoperations,however,onlychangethefilelocationofthedata;theydonotdeletethedataitself.In
otherwords,thedataretrievalprocessingisdisabledunderanoperatingsystemsuchasWindows.The
dataisstillthere,eventhoughitseemstobelost.Thus,itissometimespossibletoreadthedatabyuseof
specialsoftwarefordatarecovery.Thereisariskthatpeopleofbadfaithmightreadandmisusethecritical
dataonharddiskdrivesorsolid-statedrivesforunexpectedpurposes.
Topreventleakageofdata,itisimportantthatyoudeleteallthedatafromtheharddiskdriveorsolid-state
drivewhenyoudisposeof,sell,orhandoveryourcomputer.Youcandestroythedataphysicallyby
smashingtheharddiskdrivewithahammer,ormagneticallybymeansofstrongmagneticpower,thus
makingthedataunreadable.Butitisrecommendedthatyouusethesoftware(payware)orservice(pay
service)developedforthatpurpose.Theprocessmighttakeseveralhours.
Fordisposingofdataonthesolid-statedrive,LenovoprovidestheDriveEraseUtilityforResettingthe
CryptographicKeyandErasingtheSolidStateDrivetool.Fordisposingofdataontheharddiskdrive,
LenovoprovidestheSecureDataDisposal™tool.
IfaDiskEncryptionharddiskdriveoranEncryptionsolid-statedriveissupportedandinstalledinyour
computer,youcanlogicallydisposeofallthedataonthedriveinashorttimebyerasingthecryptographic
key.Thedataencryptedwiththeoldkeyisnotphysicallyerasedbutremainsonthedrive;however,itcannot
bedecryptedwithouttheoldkey.ThisfeatureisalsoavailablewiththeDriveEraseUtilityforResetting
theCryptographicKeyandErasingtheSolidStateDrivetool.Gotohttp://www.lenovo.com/supportto
downloadthesetools.
Usingfirewalls
Ifyoursystemispreinstalledwithafirewallprogram,itprotectsagainstcomputerInternetsecuritythreats,
unauthorizedaccesses,intrusions,andInternetattacks.Italsoprotectsyourprivacy.
Formoreinformationabouthowtousethefirewallprogram,refertothehelpinformationsystemthat
comeswiththeprogram.
Protectingdataagainstviruses
Yourcomputerispreinstalledwithanantivirusprogramsoyoucandetectandeliminateviruses.The
antivirusprogramisdesignedtohelpyoudetectandeliminateviruses.
Lenovoprovidesafullversionofantivirussoftwareonyourcomputerwithafree30-daysubscription.After
30days,youmustrenewthelicensetocontinuereceivingtheantivirussoftwareupdates.
Formoreinformationabouthowtouseyourantivirussoftware,refertothehelpinformationsystemof
yourantivirussoftware.
Chapter4.Security55

56UserGuide

Chapter5.Advancedconfiguration
Thischapterprovidesthefollowinginformationtohelpyouconfigurethecomputer:
•“Installinganewoperatingsystem”onpage57
•“Installingdevicedrivers”onpage59
•“UsingtheThinkPadSetupprogram”onpage59
•“Usingsystemmanagement”onpage70
Installinganewoperatingsystem
Insomesituations,youmightneedtoinstallanewoperatingsystem.Thistopicprovidesinstructionson
howtoinstallanewoperatingsystem.
InstallingtheWindows7operatingsystem
Beforeyoustart,printtheseinstructions.
Attention:Theprocessofinstallinganewoperatingsystemdeletesallthedataonyourharddiskdriveor
solid-statedrive,includingthedatathatwerestoredinahiddenfolder.
ToinstalltheWindows7operatingsystem,dothefollowing:
1.CopyallthesubdirectoriesandfilesintheC:\SWTOOLSdirectorytoaremovablestoragedevice.
•ThesupplementfilesfortheWindows7operatingsystemareintheC:\SWTOOLS\OSFIXESdirectory.
•ThedevicedriversareintheC:\SWTOOLS\DRIVERSdirectory.
•ThepreinstalledprogramsareintheC:\SWTOOLS\APPSdirectory.
2.StarttheThinkPadSetupprogram.See“UsingtheThinkPadSetupprogram”onpage59.
3.SelectStartup➙UEFI/LegacyBoot.Thendooneofthefollowing:
•ToinstalltheWindows7(32-bit)operatingsystem,selectLegacyOnlyorBoth.
•ToinstalltheWindows7(64-bit)operatingsysteminLegacymode,selectLegacyOnly.
•ToinstalltheWindows7(64-bit)operatingsysteminUEFImode,selectUEFIOnly.
4.PresstheF10keytoexittheThinkPadSetupprogram.
5.InserttheWindows7operatingsysteminstallationDVDintotheexternalopticaldrive,andrestartthe
computer.
6.RestoretheC:\SWTOOLSdirectorythatyoubackedupbeforeinstallingtheWindows7operatingsystem.
7.Installthedevicedrivers.See“Installingdevicedrivers”onpage59.
8.InstalltheWindows7fixmodules.YoucanfindtheWindows7fixmodulesintheC:\SWTOOLS\OSFIXES\
directory.Formoreinformation,gototheMicrosoftKnowledgeBasehomepageat:
http://support.microsoft.com/
9.Installtheregistrypatches,forexampletheEnablingWakeonLANfromStandbyforENERGYSTAR
patch.Todownloadandinstalltheregistrypatches,gototheLenovoSupportWebsiteat:
http://www.lenovo.com/support
Note:Afterinstallingtheoperatingsystem,donotchangetheinitialUEFI/LegacyBootsettinginthe
ThinkPadSetupprogram.Otherwisetheoperatingsystemwillnotstartcorrectly.
©CopyrightLenovo2014,2016
57

WhenyouinstalltheWindows7operatingsystem,youmightneedoneofthefollowingcountryorregion
codes:
CountryorregionCodeCountryorregionCode
ChinaSC
DenmarkDK
FinlandFIFranceFR
GermanyGR
ItalyIT
JapanJPNetherlandsNL
Norway
NOSpainSP
SwedenSV
TaiwanandHongKong
TC
UnitedStatesUS
InstallingtheWindows8.1orWindows10operatingsystem
Beforeyoustart,printtheseinstructions.
Attention:
•Theprocessofinstallinganewoperatingsystemdeletesallthedataonyourinternalstoragedrive,
includingthedatathatwerestoredinahiddenfolder.
•IfyourcomputerisequippedwithbothaharddiskdriveandanM.2solid-statedrive,donotusethe
M.2solid-statedriveasabootabledevice.TheM.2solid-statedriveisusedfor“cache”functionandto
supporttheIntelRapidStartTechnology.
ToinstalltheWindows8.1orWindows10operatingsystem,dothefollowing:
1.StarttheThinkPadSetupprogram.See“UsingtheThinkPadSetupprogram”onpage59.
2.SelectStartup➙BoottodisplaytheBootPriorityOrdersubmenu.
3.Selectthedrivethatcontainstheoperatingsysteminstallationprogram,forexampleUSBHDD.
4.PresstheF10keytoexittheThinkPadSetupprogram.
5.Connectthedrivethatcontainstheoperatingsysteminstallationprogramtothecomputer,andrestart
thecomputer.
6.Installthedevicedriversandnecessaryprograms.See“Installingdevicedrivers”onpage59.
7.Afterinstallingthedevicedrivers,applyWindowsUpdatetogetthelatestmodules,forexamplethe
securitypatches.
8.Dependingonyourpreference,installLenovoprograms.ForinformationaboutLenovoprograms,
see“Lenovoprograms”onpage13.
Note:Afterinstallingtheoperatingsystem,donotchangetheinitialUEFI/LegacyBootsettinginthe
ThinkPadSetupprogram.Otherwise,theoperatingsystemwillnotstartcorrectly.
WhenyouinstalltheWindows8.1orWindows10operatingsystem,youmightneedoneofthefollowing
countryorregioncodes:
CountryorregionCodeCountryorregionCode
ChinaSC
NetherlandsNL
DenmarkDKNorway
NO
FinlandFI
SpainSP
FranceFR
SwedenSV
58UserGuide

GermanyGR
TaiwanandHongKong
TC
ItalyIT
UnitedStatesUS
JapanJP
Installingdevicedrivers
Devicedriveristheprogramthatoperatesaparticularhardwaredeviceofthecomputer.Ifadevicedoes
notperformwelloryouinstallanewdevice,youneedtoupdateorinstallthecorrespondingdevicedriver.
Forexample,ifyouusetheWindows7operatingsystem,tousetheUSB3.0connector,youneedto
downloadandinstalltheUSB3.0driver.
Todownloadthelatestdevicedrivers,dothefollowing:
1.Gotohttp://www.lenovo.com/ThinkPadDrivers.
2.Selectyourproductnametoviewallthedevicedriversforyourcomputer.
3.Selectthedevicedriversyouthatyouneed,andfollowtheinstructionsonthescreen.
Attention:DonotdownloadthedevicedriversfromtheWindowsUpdateWeb.Alwaysdownloadthedevice
driverfrom:
http://www.lenovo.com/ThinkPadDrivers
IfyouusetheWindows7operatingsystem,youalsocanfindthedevicedriversintheC:\SWTOOLS\DRIVERS
directoryonyourharddiskdriveorsolid-statedrive.Formoreinformation,see“Reinstallingpreinstalled
applicationsanddevicedrivers”onpage99
.
UsingtheThinkPadSetupprogram
TheThinkPadSetupprogramenablesyoutoselectvarioussetupconfigurationsforyourcomputerthrough
configuringtheBIOS.
ToconfiguretheBIOSofyourcomputer,dothefollowing:
1.Turnonthecomputer.Whenthelogoscreenisdisplayed,pressF1.TheThinkPadSetupprogramstarts.
Note:Ifyouarerequiredtoenterthesupervisorpassword,enterthecorrectpassword.Youalsocan
pressEntertoskipthepasswordpromptandstarttheThinkPadSetupprogram.Ifyoudonotenterthe
password,youcannotchangetheconfigurationsthatareprotectedbythesupervisorpassword.For
moreinformation,referto“Usingpasswords”onpage49.
2.Usethearrowkeystoselectatab;orusethearrowkeystolocateanitemandpressEntertoselectit.
Thenasubmenuisdisplayed.
Note:Somemenuitemsaredisplayedonlyifthecomputersupportsthecorrespondingfeatures.
3.Setthevalueofanitembydoingoneofthefollowing:
•PresstheF6keytochangetoahighervalue.
•PresstheF5keytochangetoalowervalue.
Note:Defaultvaluesareinboldface.
4.Tochangeotherconfigurations,presstheEsckeytoexitthesubmenuandreturntotheparentmenu.
5.Whenyoucompletetheconfiguration,presstheF10keytosaveandexit.Youalsocanselectthe
RestarttabintheThinkPadSetupmenu,andrestartyourcomputerwithoneoftheprovidedoptions.
Note:YoucanpressF9torestoretothedefaultsettings.
Chapter5.Advancedconfiguration59

Mainmenu
WhenyouentertheThinkPadSetupprogram,youlfirstseetheMainmenuasfollows:
Note:Themenuitemsdisplayedonyourcomputermightbeslightlydifferentfromthefollowinglist.
•UEFIBIOSVersion
•UEFIBIOSDate
•EmbeddedControllerVersion
•TXEFirmwareVersion
•MachineTypeModel
•System-unitserialnumber
•Systemboardserialnumber
•AssetTag
•CPUType
•CPUSpeed
•Installedmemory
•UUID
•MACaddress(InternalLAN)
•PreinstalledOSlicense
•UEFISecureBoot
Configmenu
Tochangetheconfigurationofyourcomputer,selecttheConfigtabfromtheThinkPadSetupmenu.
ThefollowingtableliststheConfigmenuitems.Defaultvaluesareinboldface.Themenuitemsmight
changewithoutnotice.Dependingonthemodel,thedefaultvaluemightvary.
Note:Themenuitemsdisplayedonyourcomputermightbeslightlydifferentfromthefollowingtable.
Attention:Thedefaultconfigurationsarealreadyoptimizedforyou.Improperchangeoftheconfigurations
mightcauseunexpectedresults.
Table2.Configmenuitems
Menuitem
Submenuitem
Value
Comments
WakeOnLAN
•Disabled
•ACOnly
•ACandBattery
Enablethecomputerto
poweronwhentheEthernet
controllerreceivesamagic
packet(aspecialnetwork
message).
IfyouselectACOnly,Wake
onLANisenabledonly
whentheacpoweradapter
isattached.
IfyouselectACand
Battery,WakeonLANis
enabledwithanypower
sources.
Notes:
Network
60UserGuide

Table2.Configmenuitems(continued)
Menuitem
Submenuitem
Value
Comments
•Themagicpackettype
WakeonLANrequiresac
power.
•TheWakeonLAN
functiondoesnot
workwhenaharddisk
passwordisset.
EthernetLANOptionROM
(forLegacyOnlyboot
modeorBothwithLegacy
first)
•Disabled
•Enabled
LoadtheEthernetLAN
OptionROMtoenable
startupfromanintegrated
networkdevice.
UEFIIPv4NetworkStack
(forUEFIOnlybootmode
orBothwithUEFIfirst)
•Disabled
•Enabled
EnableordisableInternet
ProtocolVersion4(IPv4)
networkstackfortheUEFI
environment.
UEFIIPv6NetworkStack
(forUEFIOnlybootmode
orBothwithUEFIfirst)
•Disabled
•Enabled
EnableordisableInternet
ProtocolVersion6(IPv6)
networkstackfortheUEFI
environment.
UEFIPXEBootPriority
(forBothwithUEFIfirst
bootmode,andIPv6
andIPv4stacksareboth
enabled.)
•IPv6First
•IPv4First
Selectnetworkstack
priorityforUEFIpreboot
executeenvironment(PXE)
boot.
USBUEFIBIOSSupport
•Disabled
•Enabled
Enablesordisablesboot
supportforUSBstorage
devices.
AlwaysOnUSB
•Disabled
•Enabled
IfyouselectEnabled,the
externalUSBdevicescan
bechargedthroughthe
AlwaysOnUSBconnector
evenwhenthecomputeris
inlow-powermode(sleep,
hibernate,orpower-off).
-ChargeinBattery
Operation
•Disabled
•Enabled
IfyouselectEnabled,the
externalUSBdevicescan
bechargedthroughUSB
connectorsevenwhen
systemishibernateor
power-offandinbattery
operation.
USB
USB3.0Mode
•Disabled
•Enabled
SettheUSB3.0controller
modefortheconnectors
sharedbetweenUSB2.0
andUSB3.0controllers.
IfyouselectEnabled,it
enablesUSB3.0mode
andallowsUSB3.0tobe
supportedintheoperating
system.
Chapter5.Advancedconfiguration61

Table2.Configmenuitems(continued)
Menuitem
Submenuitem
Value
Comments
IfyouselectDisabled,it
disablesandhidestheUSB
3.0controller,andtheUSB
3.0connectorwillworkasa
USB2.0connector.
FnandCtrlKeyswap
•Disabled
•Enabled
EnableexchangesofFn
andCtrlkeyactionatthe
bottom-leftofthekeyboard.
Disabled:FnkeyandCtrl
keybehaviorisasprinted
onthekeyboard.
Enabled:Fnkeyworksas
Ctrlkey.Ctrlkeyworksas
Fnkey.
F1–F12asprimaryfunction
•Disabled
•Enabled
EnabletheF1-F12function
orthespecialfunction
printedasanicononeach
keyastheprimaryfunction.
Enabled:Executesthe
F1-F12function.
Disabled:Executesthe
specialfunction.
Totemporarilyswitchthe
abovetwooptions,press
Fn+EsctoenableFnLock.
TheFnLockindicatorison
whenFnLockisenabled.
Keyboard/Mouse
FnStickykey
•Disabled
•Enabled
Whentheoptionisenabled,
youcanpresstheFnkey
tokeepitinapressed
condition;thenpressthe
desiredfunctionkey.The
actionisequivalentto
pressingtherequiredkey
simultaneouslywiththeFn
key.Whenyoupressthe
Fnkeytwice,thestateis
lockeduntilyoupressthe
Fnkeyagain.
62UserGuide

Table2.Configmenuitems(continued)
Menuitem
Submenuitem
Value
Comments
BootDisplayDevice
•ThinkPadLCD
•HDMI
Selectthedisplaydevice
thatistobeactivatedat
boottime.Thisselection
iseffectiveforboottime,
passwordprompt,and
ThinkPadSetup.
HDMIistheHDMI
connectoronyour
computer.
Display
BootTimeExtension•Disabled
•1second
•2seconds
•3seconds
•5seconds
•10seconds
Thisoptiondefinesthetime
toextendthebootprocess.
Someexternalmonitors
needafewsecondstobe
readysothatthecomputer
cannotdetectthemat
boot.Trythisoptiontogive
enoughwakeuptimeto
thesemonitors.
IntelSpeedStep
®
technology
(IntelSpeedStepmounted
modelsonly)
•Disabled
•Enabled
ModeforAC
•MaximumPerformance
•BatteryOptimized
ModeforBattery
•MaximumPerformance
•BatteryOptimized
SelectthemodeofIntel
SpeedSteptechnologyat
runtime.
MaximumPerformance:
Alwayshighestspeed
BatteryOptimized:Always
lowestspeed
Disabled:Noruntime
support,lowestspeed
CPUPowerManagement
•Disabled
•Enabled
Enableordisablethe
power-savingfeaturethat
stopsthemicroprocessor
clockautomaticallywhen
therearenocomputer
activities.Normally,itisnot
necessarytochangethe
setting.
Power
DisableBuilt-inBattery•Yes
•No
Temporarilydisablebattery
forservicingthecomputer.
Afterselectingthisitem,
thecomputerwillbe
automaticallypoweredoff.
Thecomputeristhenready
tobeserviced.
Note:Thebatterywillbe
automaticallyre-enabled
whentheacpoweradapter
isreconnectedtothe
computer.
Chapter5.Advancedconfiguration63

Table2.Configmenuitems(continued)
Menuitem
Submenuitem
Value
Comments
PasswordBeep•Disabled
•Enabled
Enablethisoptiontohave
abeepsoundwhenthe
computeriswaitingfor
apower-on,harddisk,
orsupervisorpassword.
Differentbeepswillsound
whentheenteredpassword
matchesordoesnotmatch
theconfiguredpassword.
BeepandAlarm
KeyboardBeep•Disabled
•Enabled
Enablesordisablesthe
keyboardbeepwhen
unmanageablekey
combinationsarepressed.
Date/Timemenu
Tochangethedateortimeofyourcomputer,selecttheDate/TimetabfromtheThinkPadSetupmenu.
Thendothefollowing:
1.UsethearrowkeystoselectSystemDateorSystemTime.
2.Typeadateortime.
Securitymenu
Tochangethesecuritysettingsofyourcomputer,selecttheSecuritytabfromtheThinkPadSetupmenu.
ThefollowingtableliststheSecuritymenuitems.Defaultvaluesareinboldface.Themenuitemsmight
changewithoutnotice.Dependingonthemodel,thedefaultvaluemightvary.
Note:Themenuitemsdisplayedonyourcomputermightbeslightlydifferentfromthefollowingtable.
Attention:Thedefaultconfigurationsarealreadyoptimizedforyou.Improperchangeoftheconfigurations
mightcauseunexpectedresults.
Table3.Securitymenuitems
Menuitem
Submenuitem
Value
Comments
SupervisorPassword
•Disabled
•Enabled
Referto“Supervisor
password”onpage50
.
LockUEFIBIOSSettings
•Disabled
•Enabled
Enableordisablethe
functionthatprotects
itemsintheThinkPad
Setupprogramfrom
beingchangedbyauser
whodoesnothavethe
supervisorpassword.
Bydefault,thisissetto
Disabled.Ifyousetthe
supervisorpasswordand
enablethisfunction,no
onebutyoucanchange
itemsintheThinkPadSetup
program.
Password
64UserGuide

Table3.Securitymenuitems(continued)
Menuitem
Submenuitem
Value
Comments
Passwordatunattended
boot
•Disabled
•Enabled
Ifyouselectandenable
Passwordatunattended
boot,apasswordprompt
isdisplayedwhenthe
computeristurnedon,
fromeitherapower-off
stateorhibernationstate,
byanunattendedevent
suchasaWakeonLAN
attempt.Ifyouselect
Disabled,nopassword
promptisdisplayed;the
computergoesaheadand
loadstheoperatingsystem.
Topreventunauthorized
access,settheuser
authenticationonthe
operatingsystem.
Passwordatrestart•Disabled
•Enabled
Ifyouselectandenable
Passwordatrestart,
apasswordpromptis
displayedwhenyourestart
thecomputer.Ifyouselect
Disabled,nopassword
promptisdisplayed;the
computergoesaheadand
loadstheoperatingsystem.
Topreventunauthorized
access,settheuser
authenticationonthe
operatingsystem.
SetMinimumLength
•Disabled
•xcharacters
(4≤x≤12)
Specifyaminimumlength
forthepower-onpassword
andharddiskpassword.
Ifyousetthesupervisor
passwordandspecify
aminimumlengthfor
passwords,noonebutyou
canchangethelength.
Power-OnPassword
•Disabled
•Enabled
Referto“Power-on
password”onpage49.
HardDisk1Password•Disabled
•Enabled
Referto“Harddisk
passwords”onpage
52
.
Chapter5.Advancedconfiguration65

Table3.Securitymenuitems(continued)
Menuitem
Submenuitem
Value
Comments
FlashBIOSUpdatingby
End-Users
•Disabled
•Enabled
IfyouselectEnabled,
alluserscanupdatethe
UEFIBIOS.Ifyouselect
Disabled,onlytheperson
whoknowsthesupervisor
passwordcanupdatethe
UEFIBIOS.
UEFIBIOSUpdateOption
SecureRollBackPrevention
•Disabled
•Enabled
IfyouselectDisabled,
youcanflashtoanearlier
versionoftheUEFIBIOS.
IfyouselectEnabled,you
cannotflashtoanearlier
versionoftheUEFIBIOS.
Note:Thisitemissetas
Disabledbydefaultwhen
theOSOptimizedDefaults
ontheRestartmenuisset
asDisabled.Thisitemis
setasEnabledbydefault
whentheOSOptimized
DefaultsissetasEnabled.
MemoryProtectionExecutionPrevention•Disabled
•Enabled
Somecomputerviruses
andwormscausememory
bufferstooverflow.By
selectingEnabled,you
canprotectyourcomputer
againstattacksbysuch
virusesandworms.Ifafter
choosingEnabledyoufind
thataprogramdoesnotrun
correctly,selectDisabled
andresetthesetting.
IntelVirtualization
Technology
or
AMD(TM)Virtualization
Technology
•Disabled
•Enabled
IfyouselectEnabled,a
VirtualMachineMonitor
(VMM)canutilizethe
additionalhardware
capabilitiesprovidedby
Intel/AMDVirtualization
Technology.
Virtualization
IntelVT-dFeature(available
forIntelmicroprocessor
only)
•Disabled
•Enabled
IntelVT-dstandsforIntel
VirtualizationTechnology
forDirectedI/O.When
enabled,aVMMcanutilize
theplatforminfrastructure
forI/Ovirtualization.
66UserGuide

Table3.Securitymenuitems(continued)
Menuitem
Submenuitem
Value
Comments
EthernetLAN•Disabled
•Enabled
IfyouselectEnabled,
youcanuseEthernetLAN
devices.
WirelessLAN•Disabled
•Enabled
IfyouselectEnabled,
youcanusewirelessLAN
devices.
Bluetooth•Disabled
•Enabled
IfyouselectEnabled,you
canuseBluetoothdevices.
USBPort
•Disabled
•Enabled
IfyouselectEnabled,you
canuseUSBconnectors.
MemoryCardSlot
•Disabled
•Enabled
IfyouselectEnabled,you
canusethememorycard
slot.
IntegratedCamera
•Disabled
•Enabled
IfyouselectEnabled,you
canusetheintegrated
camera.
I/OPortAccess
Microphone•Disabled
•Enabled
IfyouselectEnabled,you
canusethemicrophones
(internal,external,or
line-in).
Anti-Theft
Computrace
•Enabled
•Disabled
•PermanentlyDisabled
Enablesordisablesthe
UEFIBIOSinterfaceto
activatethecomputrace
module.Computraceisan
optionalmonitoringservice
fromAbsoluteSoftware.
Note:Ifyousetthe
computracemodule
activationtoPermanently
Disabled,youwillbe
unabletoenablethis
settingagain.
SecureBoot
•Disabled
•Enabled
EnableordisabletheUEFI
SecureBootfeature.
SelectEnabletoprevent
unauthorizedoperating
systemsfromrunningat
boottime.SelectDisabled
toallowanyoperating
systemstorunatboottime.
IfyouenabletheSecure
Boot,thefollowingitem
settingsontheStartup
menualsowillchange
automatically:
1.TheUEFI/Legacy
Bootsettingwill
changetoUEFIOnly.
SecureBoot
Chapter5.Advancedconfiguration67

Table3.Securitymenuitems(continued)
Menuitem
Submenuitem
Value
Comments
2.TheCSMSupport
settingwillchangeto
No.
Note:Thisitemissetas
Disabledbydefaultwhen
theOSOptimizedDefaults
ontheRestartmenuisset
asDisabled.Thisitemis
setasEnabledbydefault
whentheOSOptimized
DefaultsissetasEnabled.
PlatformMode
•UserMode
•SetupMode
Specifythesystem
operatingmode.
SecureBootMode•StandardMode
•CustomMode
SpecifytheSecureBoot
mode.
ResettoSetupMode
Thisoptionisusedtoclear
thecurrentplatformkey
andputthecomputerinto
SetupMode.Youcan
installyourownplatform
keyandcustomizethe
SecureBootsignature
databasesinSetupMode.
SecureBootmodewillbe
settoCustomMode.
RestoreFactoryKeysThisoptionisusedto
restoreallkeysand
certificatesinSecure
Bootdatabasestofactory
defaultsettings.Any
customizedSecureBoot
settingswillbeerased,
andthedefaultplatform
keywillbere-established
alongwiththeoriginal
signaturedatabases
includingcertificatefor
Windows8.1.
Startupmenu
Tochangethestartupsettingsofyourcomputer,selecttheStartuptabfromtheThinkPadSetupmenu.
Attention:
•Afteryouchangethestartupsequence,ensurethatyouselectacorrectdeviceduringacopy,asave,ora
formatoperation.Otherwiseyourdatamightbeerasedoroverwritten.
•IfyouareusingtheBitLockerdriveencryption,youshouldnotchangethestartupsequence.BitLocker
driveencryptionlocksthecomputerfromstartingoncedetectsthechangeofstartupsequence.
Tochangethestartupsequencetemporarilysothatthecomputerstartsfromadesireddrive,dothefollowing:
68UserGuide

1.Turnoffthecomputer.
2.Turnonthecomputer.Whenthelogoscreenisdisplayed,presstheF12key.
3.Selectthedeviceyouwantthecomputertostartfrom.
Note:TheBootmenuwillbedisplayedifthecomputercannotstartfromanydevicesortheoperating
systemcannotbefound.
ThefollowingtableliststheStartupmenuitems.Defaultvaluesareinboldface.Themenuitemsmight
changewithoutnotice.Dependingonthemodel,thedefaultvaluemightvary.
Note:Themenuitemsdisplayedonyourcomputermightbeslightlydifferentfromthefollowingtable.
Table4.Startupmenuitems
MenuitemValue
Comments
Boot
•USBCD
•USBFDD
•ATAHDD0
•USBHDD
•PCILAN-xxxxxxxxxx
•PCILAN
Selectthebootdevicewhenyou
pressthepowerbuttontoturnonthe
computer.
NetworkBoot
•USBCD
•USBFDD
•ATAHDD0
•USBHDD
•PCILAN
Selectthebootdevicewhenthe
computerwakesfromLAN.If
PCILANisenabled,anetwork
administratorcanturnonallofthe
computersinaLANremotelybyuse
ofnetworkmanagementsoftware.
UEFI/LegacyBoot
•Both
–UEFI/LegacyBootPriority
–UEFIFirst
–LegacyFirst
•UEFIOnly
•LegacyOnly
CSMSupport(forUEFIOnly)
•Yes
•No
Selectsystembootcapability.
•Both:Selectpriorityofboot
optionsbetweenUEFIandLegacy.
•UEFIOnly:Thesystemwillstart
fromtheUEFI-enabledoperating
system.
•LegacyOnly:Thesystemwillstart
fromanyoperatingsystemother
thantheUEFI-enabledone.
Note:IfyouselectUEFIOnly,the
computercannotstartfromthe
bootabledevicesthatdonothavethe
UEFIenabledoperatingsystem.
CompatibilitySupportModule(CSM)
isrequiredforstartingthelegacy
operatingsystem.IfyouselectUEFI
Only,CSMSupportisselectable.
ForBothorLegacyOnlymode,CSM
Supportisnotselectable.
Chapter5.Advancedconfiguration69

Table4.Startupmenuitems(continued)
MenuitemValue
Comments
BootMode
•Quick
•Diagnostics
ScreenduringthePOST:
•Quick:TheThinkPadlogoscreen
isdisplayed.
•Diagnostics:Textmessagesare
displayed.
Note:Youalsocanenterthe
DiagnosticmodebypressingEsc
duringthePOST.
OptionKeyDisplay
•Disabled
•Enabled
IfyouselectDisabled,themessage
“Tointerruptnormalstartup,press
Enter.”willnotbedisplayedduring
thePOST.
BootDeviceListF12Option
•Disabled
•Enabled
IfyouselectEnabled,theF12key
isrecognizedandtheBootMenu
windowisdisplayed.
BootOrderLock
•Disabled
•Enabled
IfyouselectEnabled,theboot
priorityorderislockedforyourfuture
use.
Restartmenu
ToexittheThinkPadSetupprogramandrestartthecomputer,selectRestartfromtheThinkPadSetupmenu.
Thefollowingsubmenuitemsaredisplayed:
•ExitSavingChanges:Savethechangesandrestartthecomputer.
•ExitDiscardingChanges:Discardthechangesandrestartthecomputer.
•LoadSetupDefaults:Restoretothefactorydefaultsettings.
Note:EnableOSOptimizedDefaultstomeettheWindows8orWindows10certificationrequirements.
Whenyouchangethissetting,someothersettingsarechangedautomatically,suchasCSMSupport,
UEFI/LegacyBoot,SecureBoot,andSecureRollBackPrevention.
•DiscardChanges:Discardthechanges.
•SaveChanges:Savethechanges.
UpdatingtheUEFIBIOS
TheUEFIBIOSisthefirstprogramthatthecomputerrunswhenthecomputeristurnedon.TheUEFIBIOS
initializesthehardwarecomponents,andloadstheoperatingsystemandotherprograms.
YoucanupdatetheUEFIBIOSbystartingyourcomputerfromaflashupdateopticaldiscoraflashupdate
programrunningintheWindowsenvironment.Whenyouinstallanewprogram,adevicedriver,orhardware,
youmightbeinformedtoupdatetheUEFIBIOS.
ForinstructionsonhowtoupdatetheUEFIBIOS,goto:
http://www.lenovo.com/ThinkPadDrivers
Usingsystemmanagement
Thistopicisprimarilyintendedforthenetworkadministrators.
70UserGuide

Yourcomputerisdesignedformanageability,sothatyoucanredirectmoreresourcestobettermeet
yourbusinessobjectives.
Thismanageabilityenablesyoutoremotelyoperateclientcomputersinthesamewayasyouoperate
yourowncomputer,suchasturningonaclientcomputer,formattingharddiskdriveorsolid-statedrive,
andinstallingaprogram.
Oncethecomputerisconfiguredandoperational,youcanmanageitbyusingthesoftwareandthe
manageabilityfeaturesthatarealreadyintegratedintotheclientcomputerandthenetwork.
DesktopManagementInterface
TheUEFIBIOSofyourcomputersupportsaninterfacecalledSystemManagementBIOS(SMBIOS)
ReferenceSpecification.SMBIOSprovidesinformationaboutthehardwarecomponentsofyourcomputer.
ItistheresponsibilityoftheUEFIBIOStoprovideinformationaboutitselfandthedevicesonthesystem
board.ThisspecificationdocumentsthestandardsforgettingaccesstothisBIOSinformation.
PrebooteXecutionEnvironment
ThePrebooteXecutionEnvironment(PXE)technologymakesthecomputermoremanageablebyenabling
thecomputertostartfromaserver.YourcomputersupportsthepersonalcomputerfunctionsthatPXE
requires.Forexample,withtheappropriateLANcard,yourcomputercanbestartedfromthePXEserver.
Note:TheRemoteInitialProgramLoad(RIPLorRPL)functioncannotbeusedwithyourcomputer.
WakeonLAN
ThenetworkadministratorcanturnonacomputerfromamanagementconsolebyusingtheWakeon
LANfeature.
WhentheWakeonLANfeatureisenabled,manyoperations,suchasdatatransfer,softwareupdates,and
FlashupdatesoftheUEFIBIOS,canbedoneremotelywithoutremoteattendance.Theupdatingprocess
canperformafternormalworkinghoursandonweekends,sothattheusersarenotinterruptedduringwork,
andtheLANtrafficiskepttoaminimum.Itsavestimeandincreasesproductivity.
Note:IfthecomputeristurnedonthroughWakeonLAN,thecomputerstartsfollowtheNetworkBoot
sequence.
AssetIDEEPROM
TheAssetIDEEPROMcontainsinformationaboutthecomputerconfigurationandtheserialnumbersof
thekeycomponents.Italsoincludesanumberofblankfieldswhereyoucanrecordinformationabout
theendusersinyournetwork.
Settingmanagementfeatures
Toenableanetworkadministratortoremotelycontrolyourcomputer,setthefollowingsystem-management
featuresintheThinkPadSetupprogram:
•WakeonLAN
•NetworkBootsequence
•Flashupdate
Note:Ifasupervisorpasswordhasbeenset,youwillberequiredtoenterthesupervisorpasswordwhen
youstarttheThinkPadSetupprogram.
Chapter5.Advancedconfiguration71

EnablingordisablingtheWakeonLANfeature
WhentheWakeonLANfeatureisenabledandthecomputerisconnectedtoaLAN,thenetworkadministrator
canstartthecomputerremotelyfromamanagementconsole,usingaremotenetwork-managementprogram.
ToenableordisabletheWakeonLANfeature,dothefollowing:
1.StarttheThinkPadSetupprogram.See“UsingtheThinkPadSetupprogram”onpage59.
2.SelectConfig➙Network.TheNetworksubmenuisdisplayed.
3.SelectacorrespondingoptionfortheWakeonLANfeature.
4.PresstheF10keytosaveandexit.
DefiningaNetworkBootsequence
WhenthecomputerwakesonLAN,thecomputerbootsfromthedeviceasspecifiedontheNetworkBoot
menu,andthenfollowthebootorderlistontheBootmenu.
TodefineaNetworkBootsequence,dothefollowing:
1.StarttheThinkPadSetupprogram.See“UsingtheThinkPadSetupprogram”onpage59.
2.SelectStartup➙NetworkBoot.Thebootdevicelistisdisplayed.
3.Selectabootdevicetomakeitasthetopbootpriority.
4.PresstheF10keytosaveandexit.
Note:YoucanpresstheF9keytorestoretothefactorydefaultsettings.
Checkingtherequirementsforflashupdates
Anetworkadministratorcanupdatetheprogramsonyourcomputerfromamanagementconsole,ifthe
followingrequirementsaremet:
•ThecomputermustbestartedoverLAN.
•ThecomputermustbeengagedinthePXE.
•Anetwork-managementprogrammustbeinstalledonthecomputerofthenetworkadministrator.
72UserGuide

Chapter6.Preventingproblems
AnimportantpartofowningaThinkPadnotebookcomputerismaintenance.Withpropercare,you
canavoidcommonproblems.Thischapterprovidesinformationthatcanhelpyoukeepyourcomputer
runningsmoothly.
•“Generaltipsforpreventingproblems”onpage73
•“Makingsuredevicedriversareup-to-date”onpage74
•“Takingcareofyourcomputer”onpage75
Generaltipsforpreventingproblems
Thistopicprovidesthefollowingtipstohelpyoupreventcomputingproblems:
•Checkthecapacityofyourharddiskdriveorsolid-statedrivefromtimetotime.Iftheharddiskdriveor
solid-statedrivegetstoofull,theWindowsoperatingsystemwillslowdownandmightproduceerrors.
Tochecktheharddiskdriveorsolid-statedrivecapacity,dothefollowing:
–Windows7:ClickStart➙Computer.
–Windows8.1:OpentheFileExplorerandclickComputer.
–Windows10:OpentheFileExplorerandclickThisPC.
•Emptyyourrecyclebinonaregularbasis.
•Usediskdefragmenttoolregularlyonyourharddiskdriveorsolid-statedrivetoimprovedataseek
andreadtimes.
•Tofreeupdiskspace,uninstallunusedapplicationprograms.
Note:Youalsomightwanttolookforprogramduplicationoroverlappingversions.
•CleanoutyourInbox,Sent,andTrashfoldersfromyoure-mailclientprogram.
•Backupyourdataatleastonceaweek.Ifcriticaldataispresent,itisagoodideatoperformadaily
backupoperation.Lenovohasmanybackupoptionsavailableforyourcomputer.Rewritableoptical
drivesareavailableformostmachinesandareeasilyinstalled.
•Schedulesystemrestoreoperationstotakeasystemsnapshotperiodically.Formoreinformationabout
systemrestore,seeChapter8“Recoveryoverview”onpage95.
•UpdatedevicedriversandtheUEFIBIOSwhenneeded.
•Profileyourmachineathttp://www.lenovo.com/supporttokeepuptodatewithcurrentdriversand
revisions.
•Keepuptodatefordevicedriversonothernon-Lenovohardware.Youmightwanttoreadthedevice
driverinformationreleasenotespriortoupdatingforcompatibilityorknownissues.
•Keepalogbook.Entriesmightincludemajorhardwareorsoftwarechanges,driverupdates,minorissues
youhaveexperienced,andhowyouresolvedtheminorissues.
•Ifyoueverneedtorunarecoveryonyourcomputertoreturnthepreinstalledcontentsontothemachine,
thefollowingtipsmighthelpalongtheway:
–Removeallexternaldevicessuchastheprinter,keyboard,andsoon.
–Makesurethatyourbatteryischargedandyourcomputerhastheacpowerconnected.
–AccessThinkPadSetupandloadthedefaultsettings.
–Restartthecomputerandstarttherecoveryoperation.
©CopyrightLenovo2014,2016
73

–Ifyourcomputerusesdiscsastherecoverymedia,donotremovethediscfromthedriveuntil
promptedtodoso.
•Forsuspectedharddiskdriveorsolid-statedriveissues,referto“Diagnosingproblems”onpage79and
runadiagnostictestforthedrivebeforeyoucalltheCustomerSupportCenter.Ifyourcomputerdoesnot
startup,downloadthefilestocreateabootableself-testmediumfromhttp://www.lenovo.com/hddtest.
Runthetestandrecordanymessagesorerrorcodes.Ifthetestreturnsanyfailingerrorcodesor
messages,calltheCustomerSupportCenterwiththecodesormessagesandthecomputerinfrontof
you.Atechnicianwillassistyoufurther.
•Ifrequired,youcanfindthecontactinformationabouttheCustomerSupportCenterforyourcountry
orregionathttp://www.lenovo.com/support/phone.WhencallingtheCustomerSupportCenter,make
surethatyouhaveyourmachinemodeltype,serialnumber,andthecomputerinfrontofyou.Also,ifthe
computerisproducingerrorcodes,itishelpfultohavetheerrorscreenonorthemessageswrittendown.
Makingsuredevicedriversareup-to-date
Devicedriversareprogramsthatcontaininstructionsfortheoperatingsystemabouthowtooperateor
“drive”acertainpieceofhardware.Eachhardwarecomponentonyourcomputerhasitsownspecificdriver.
Ifyouaddanewcomponent,theoperatingsystemneedstobeinstructedonhowtooperatethatpiece
ofhardware.Afteryouinstallthedriver,theoperatingsystemcanrecognizethehardwarecomponent
andunderstandhowtouseit.
Note:Becausedriversareprograms,likeanyotherfileonyourcomputer,theyaresusceptibletocorruption
andmightnotperformcorrectlyifcorruptionoccurs.
Itisnotalwaysnecessarytodownloadthelatestdrivers.However,youshoulddownloadthelatestdriverfor
acomponentifyounoticepoorperformancefromthatcomponentorifyouaddanewcomponent.This
mighteliminatethedriverasthepotentialcauseoftheproblem.
GettingthelatestdriversfromtheWebsite
YoucandownloadandinstallupdateddevicedriversfromtheLenovoWebsitebydoingthefollowing:
1.Gotohttp://www.lenovo.com/ThinkPadDrivers.
2.Selecttheentryforyourcomputerandthenfollowtheinstructionsonthescreentodownloadand
installnecessarysoftware.
GettingthelatestdriversusingSystemUpdate
TheSystemUpdateprogramhelpsyoukeepthesoftwareonyourcomputerup-to-date.Updatepackages
arestoredonLenovoserversandcanbedownloadedfromtheLenovoSupportWebsite.Updatepackages
cancontainapplications,devicedrivers,UEFIBIOSflashes,orsoftwareupdates.WhentheSystemUpdate
programconnectstotheLenovoSupportWebsite,theSystemUpdateprogramautomaticallyrecognizes
themachinetypeandmodelofyourcomputer,theinstalledoperatingsystem,andthelanguageofthe
operatingsystemtodeterminewhatupdatesareavailableforyourcomputer.TheSystemUpdateprogram
thendisplaysalistofupdatepackagesandcategorizeseachupdateascritical,recommended,oroptionalto
helpyouunderstandtheimportance.Youhavecompletecontrolofwhichupdatestodownloadandinstall.
Afteryouselecttheupdatepackagesyouwant,theSystemUpdateprogramautomaticallydownloadsand
installstheupdateswithoutanyfurtherinterventionfromyou.
TheSystemUpdateprogramispreinstalledonyourcomputerandisreadytorun.Theonlyprerequisiteis
anactiveInternetconnection.Youcanstarttheprogrammanually,oryoucanusetheschedulefeature
toenabletheprogramtosearchforupdatesautomaticallyatspecifiedintervals.Youalsocanpredefine
scheduledupdatestosearchbyseverity(criticalupdates,criticalandrecommendedupdates,orallupdates)
sothelistyouchoosefromcontainsonlythoseupdatetypesthatareofinteresttoyou.
FormoreinformationabouthowtouseSystemUpdate,refertothehelpinformationsystemoftheprogram.
74UserGuide

Takingcareofyourcomputer
Althoughyourcomputerisdesignedtofunctionreliablyinnormalworkenvironments,youneedtouse
commonsenseinhandlingit.Byfollowingtheimportanttipsinthistopic,youwillgetthemostuseand
enjoymentoutofyourcomputer.
Becarefulaboutwhereandhowyouwork
•Storepackingmaterialssafelyoutofthereachofchildrentopreventtheriskofsuffocationfromplastic
bags.
•Keepyourcomputerawayfrommagnets,activatedcellularphones,electricalappliances,orspeakers
(morethan13cmor5inches).
•Avoidsubjectingyourcomputertoextremetemperatures(below5°C/41°Forabove35°C/95°F).
•Someappliances,suchascertainportabledesktopfansorairpurifiers,canproducenegativeions.Ifa
computerisclosetosuchanappliance,andisexposedforanextendedtimetoaircontainingnegative
ions,itmightbecomeelectrostaticallycharged.Suchachargemightbedischargedthroughyourhands
whenyoutouchthekeyboardorotherpartsofthecomputer,orthroughconnectorsonI/Odevices
connectedtothecomputer.Eventhoughthiskindofelectrostaticdischarge(ESD)istheoppositeofa
dischargefromyourbodyorclothingtothecomputer,itposesthesameriskofacomputermalfunction.
Yourcomputerisdesignedandmanufacturedtominimizeanyeffectsofelectrostaticcharge.Anelectrostatic
chargeaboveacertainlimit,however,canincreasetheriskofESD.Therefore,whenusingthecomputer
closetoanappliancethatcanproducenegativeions,givespecialattentiontothefollowing:
•Avoiddirectlyexposingyourcomputertotheairfromanappliancethatcanproducenegativeions.
•Keepyourcomputerandperipheralsasfaraspossiblefromsuchanappliance.
•Whereverpossible,groundyourcomputertofacilitatesafeelectrostaticdischarge.
Note:Notallsuchappliancescauseasignificantelectrostaticcharge.
Begentlewithyourcomputer
•Avoidplacinganyobjects(includingpaper)betweenthedisplayandthekeyboardorthepalmrest.
•Donotturnyourcomputeroverwhiletheacpoweradapterisconnected.Thiscouldbreaktheadapter
plug.
Carryyourcomputerproperly
•Beforemovingyourcomputer,besuretoremoveanymedia,turnoffattacheddevices,anddisconnect
cordsandcables.
•Whenpickingupyouropencomputer,holditbythebottom.Donotpickuporholdyourcomputerby
thedisplay.
Handlestoragemediaanddrivesproperly
•Wheninstallingtheharddiskdriveorsolid-statedrive,followtheinstructionsshippedwithyourhardware,
andapplypressureonlywhereneededonthedevice.
•Turnoffyourcomputerifyouarereplacingtheharddiskdriveorthesolid-statedrive.
•Afteryoureplacetheharddiskdriveorsolid-statedrive,reattachthecoverofthedriveslot.
•Storeyourexternalandremovableharddiskdriveoropticaldrivesintheappropriatecontainersor
packagingwhentheyarenotbeingused.
•Beforeyouinstallanyofthefollowingdevices,touchametaltableoragroundedmetalobject.Thisaction
reducesanystaticelectricityfromyourbody.Thestaticelectricitycoulddamagethedevice.
Chapter6.Preventingproblems75

–Memorymodule
–Memorycard,suchasanSDcard,SDHCcard,SDXCcard,andaMultiMediaCard
Note:Notalllisteddevicesareincludedinyourcomputer.
•Whiletransferringdatatoorfromaflashmediacard,suchasanSDcard,donotputyourcomputer
intosleeporhibernationmodebeforethedatatransferiscomplete.Todosomightcausedamageto
yourdata.
Takecarewhensettingpasswords
•Rememberyourpasswords.Ifyouforgetasupervisororharddiskpassword,Lenovowillnotresetit,and
youmighthavetoreplaceyoursystemboard,orharddiskdrive,orsolid-statedrive.
Registeryourcomputer
•RegisteryourThinkPadcomputerwithLenovoathttp://www.lenovo.com/register.Formoreinformation,
see“Registeringyourcomputer”onpage17
.
Besurenottomodifyyourcomputer
•OnlyanauthorizedThinkPadrepairtechnicianshoulddisassembleandrepairyourcomputer.
Cleaningthecoverofyourcomputer
Occasionallycleanyourcomputerbydoingthefollowing:
1.Prepareamixtureofagentlekitchen-usedetergent.Thedetergentmustnotcontainabrasivepowderor
strongchemicalssuchasacidoralkaline.Usefivepartswatertoonepartdetergent.
2.Absorbthediluteddetergentintoasponge.
3.Squeezeexcessliquidfromthesponge.
4.Wipethecoverwiththesponge,usingacircularmotionandtakingcarenottoletanyexcessliquiddrip.
5.Wipethesurfacetoremovethedetergent.
6.Rinsethespongewithcleanrunningwater.
7.Wipethecoverwiththecleansponge.
8.Wipethesurfaceagainwithadry,soft,lint-freecloth.
9.Waitforthesurfacetodrycompletelyandremoveanyfibersfromthecloth.
Cleaningyourcomputerkeyboard
Tocleanthecomputerkeyboard,dothefollowing:
1.Applysomeisopropylrubbingalcoholtoasoft,dust-freecloth.
Note:Avoidsprayingcleanerdirectlyontothekeyboard.
2.Wipeeachkeytopsurfacewiththecloth.Wipethekeysonebyone;ifyouwipeseveralkeysatatime,
theclothmighthookontoanadjacentkeyandpossiblydamageit.Makesurethatnoliquiddripsonto
orbetweenthekeys.
3.Allowtodry.
4.Toremoveanycrumbsordustfrombeneaththekeys,youcanuseacamerablowerwithabrush
orcoolairfromahairdryer.
Cleaningyourcomputerdisplay
Tocleanthecomputerdisplay,dothefollowing:
76UserGuide

1.Gentlywipethedisplaywithadry,soft,lint-freecloth.Ifyouseeascratchlikemarkonyourdisplay,it
mightbeastaintransferredfromthekeyboardwhenthecoverwaspressedfromtheoutside.
2.Wipeordustthestaingentlywithasoft,drycloth.
3.Ifthestainremains,moistenasoft,lint-freeclothwithwaterora50-50mixtureofisopropylalcoholand
waterthatdoesnotcontainimpurities.
Note:Avoidsprayingcleanerdirectlyontothekeyboard.
4.Wringoutasmuchoftheliquidasyoucan.
5.Wipethedisplayagain;donotletanyliquiddripintothecomputer.
6.Besuretodrythedisplaybeforeclosingit.
Chapter6.Preventingproblems77

78UserGuide

Chapter7.Troubleshootingproblems
Thischapterprovidesinformationonwhattodoifyouexperienceaproblemwithyourcomputer.
Thischaptercontainsthefollowingtopics:
•“Diagnosingproblems”onpage79
•“Troubleshooting”onpage79
Diagnosingproblems
Ifyouexperienceproblemswithyourcomputer,usetheLenovoSolutionCenterprogramasastarting
pointforsolvingthem.
TheLenovoSolutionCenterprogramenablesyoutotroubleshootandresolvecomputerproblems.It
combinesdiagnostictests,systeminformationcollection,securitystatus,andsupportinformation,along
withhintsandtipsforoptimalsystemperformance.
Notes:
•TheLenovoSolutionCenterprogramalsoisavailablefordownloadedat:
http://www.lenovo.com/diags
•IfyouareusingotherWindowsoperatingsystem,youcanfindthelatestinformationaboutdiagnosticsfor
yourcomputerat:
http://www.lenovo.com/diagnose
Whenyouaresettingupyourcomputer,theLenovoSolutionCenterprogrampromptsyoutocreaterecovery
media.Youcanusetherecoverymediatorestoretheharddiskdriveorsolid-statedrivetothefactory
defaultstate.Formoreinformation,see“Creatingandusingrecoverymedia”onpage95
.
ToruntheLenovoSolutionCenterprogram,see“Lenovoprograms”onpage13
.
Foradditionalinformation,refertotheLenovoSolutionCenterhelpsystem.
Note:IfyouareunabletoisolateandrepairtheproblemyourselfafterrunningtheLenovoSolutionCenter
program,saveandprintthelogfilescreatedbytheprogram.Youwillneedthelogfileswhenyouspeaktoa
Lenovotechnicalsupportrepresentative.
Troubleshooting
Ifyourcomputerhasanerror,ittypicallydisplaysamessageoranerrorcode,ormakesabeepwhen
youturniton.Whenyouexperienceaproblem,refertothecorrespondingsectionsinthistopictotryto
solvetheproblembyyourself.
Computerstopsresponding
Printtheseinstructionsnowandkeepitwithyourcomputerforreferencelater.
Ifyourcomputeriscompletelyunresponsive(youcannotusethetouchpadorthekeyboard),dothefollowing:
1.Pressandholdthepowerbuttonuntilthecomputerturnsoff.Afterthecomputeristurnedoff,restart
thecomputerbypressingthepowerbutton.Ifthecomputerdoesnotturnon,continuewithstep2.
©CopyrightLenovo2014,2016
79

2.Whilethecomputerisoff,removetheacpoweradapterfromthecomputer.Holddownthepower
buttonfor10seconds.Connecttheacpoweradapter.Ifthecomputerdoesnotturnbackon,continue
withstep3.
3.Whilethecomputerisoff,removetheacpoweradapterfromthecomputer.Removeallexternaldevices
thatareattachedtoyourcomputer(keyboard,mouse,printer,scanner,andsoon).Repeatstep2.
Ifstep2isunsuccessful,continuewithstep4.
Note:Thefollowingstepsinvolveremovingstaticsensitivecomponentsfromyourcomputer.Make
surethatyouareproperlygroundedandremoveallsourcesofpowerattachedtothecomputer.If
youareuncomfortableorunsureaboutremovingcomponents,pleasecalltheCustomerSupport
Centerforassistance.
4.Whilethecomputerisoff,removeallsourcesofpowerandexternalhardware.Removeanynon-original
memorymoduleaddedtoyourcomputer.Afterremovingtheextramemorymodule,repeatstep2.Ifthe
computerstilldoesnotturnon,consulttheusermanualforothercustomer-replaceablecomponents
thatareattachedtoyourcomputer.
Ifthecomputerstilldoesnotstartup,calltheCustomerSupportCenterandaCustomerSupportSpecialist
willassistyou.
Spillsonthekeyboard
Withamobilecomputer,thereareincreasedchancesofspillingliquidsonthekeyboard.Becausemost
liquidsconductelectricity,liquidspilledonthekeyboardcouldcreatenumerousshortcircuits,potentially
causingirreparabledamagetoyourcomputer.
Ifyouspillsomethingonyourcomputer:
Attention:Ensurethatnoliquidcreatesashortcircuitbetweenyouandtheacpoweradapter(ifinuse).
Althoughyoumightlosesomedataorworkbyturningoffthecomputerimmediately,leavingthecomputer
onmightmakeyourcomputerunusable.
1.Carefullydisconnecttheacpoweradapterimmediately.
2.Turnoffthecomputerimmediately.Themorequicklyyoustopthecurrentfrompassingthroughthe
computer,themorelikelyyouwillreducedamagefromshortcircuits.
3.Waituntilyouarecertainthatalltheliquidisdrybeforeturningonyourcomputer.
Errormessages
•Message:0177:BadSVPdata,stopPOSTtask.
Solution:ChecksumofthesupervisorpasswordintheEEPROMisnotcorrect.Thesystemboard
shouldbereplaced.Havethecomputerserviced.
•Message:0183:BadCRCofSecuritySettingsinEFIVariable.EnterThinkPadSetup.
Solution:ChecksumoftheSecuritysettingsintheEFIVariableisnotcorrect.EnterThinkPadSetup
tocheckthesecuritysettings,PressF10andthenpressEntertorestartthesystem.Ifyoustillhavea
problem,havethecomputerserviced.
•Message:0187:EAIAdataaccesserror
Solution:TheaccesstoEEPROMisfailed.Havethecomputerserviced.
•Message:0188:InvalidRFIDSerializationInformationArea
Solution:TheEEPROMchecksumisnotcorrect(block#0and1).Thesystemboardshouldbereplaced,
andtheboxserialnumberneedstobereinstalled.Havethecomputerserviced.
80UserGuide

•Message:0189:InvalidRFIDconfigurationinformationarea
Solution:TheEEPROMchecksumisnotcorrect(block#4and5).Thesystemboardshouldbereplaced,
andtheUUIDneedstobereinstalled.Havethecomputerserviced.
•Message:0190:Criticallow-batteryerror
Solution:Thecomputerturnsoffbecausethebatteryislow.Connecttheacpoweradaptertothe
computerandchargethebattery.
•Message:0191:SystemSecurity-Invalidremotechangerequested
Solution:Thesystemconfigurationchangehasfailed.Confirmtheoperationandtryagain.Toclearthe
error,enterThinkPadSetup.
•Message:0199:SystemSecurity-Securitypasswordretrycountexceeded.
Solution:Thismessageisdisplayedifyouenterawrongsupervisorpasswordmorethanthreetimes.
Confirmthesupervisorpasswordandtryagain.Tocleartheerror,enterThinkPadSetup.
•Message:1802:Unauthorizednetworkcardispluggedin-Poweroffandremovethenetworkcard.
Solution:Thewirelessnetworkcardisnotsupportedonthiscomputer.Removeit.
•Message:0270:RealTimeClockError.
Solution:SystemRealTimeClockisnotfunctional.Havethecomputerserviced.
•Message:0271:CheckDateandTimesettings.
Solution:Neitherthedatenorthetimeissetinthecomputer.Setthedateandtime,usingThinkPad
Setup.
•Message:2100:DetectionerroronHDD0(MainHDD)
Solution:Theharddiskdriveorsolid-statedriveisnotworking.Havetheharddiskdriveorsolid-state
driveserviced.
•Message:2110:ReaderroronHDD0(MainHDD)
Solution:Theharddiskdriveorsolid-statedriveisnotworking.Havetheharddiskdriveorsolid-state
driveserviced.
•Message:2200:MachineTypeandSerialNumberareinvalid.
Solution:MachineTypeandSerialNumberareinvalid.Havethecomputerserviced.
•Message:2201:MachineUUIDisinvalid.
Solution:MachineUUIDisinvalid.Havethecomputerserviced.
•Message:Fanerror
Solution:Coolingfanhasfailed.Shutdownthecomputerimmediatelyandhavethecomputerserviced.
•Message:Thermalsensingerror
Solution:Thethermalsensorhasaproblem.Shutdownthecomputerimmediatelyandhavethe
computerserviced.
Beeperrors
Thefollowingtabledescribesthecommonbeeperrorsandcorrespondingsolutions.
Chapter7.Troubleshootingproblems81

Table5.Beeperrors
Beeps
Solution
Oneshortbeep,pause,threeshortbeeps,pause,three
moreshortbeeps,pause,andoneshortbeep(1-3-3-1
beeps)
Memoryproblem.Shutdownthecomputerimmediately
andhavethecomputerserviced.
Fourcyclesoffourshortbeeps
TCG
*
-compliantfunctionality-relatedproblem(might
betheBIOScodevalidationfailure).Shutdownthe
computerimmediatelyandhavethecomputerserviced.
*
TCGistheabbreviationforTrustedComputingGroup.
Fiveshortbeeps,pause,fivemoreshortbeeps,and
pause
TCG-compliantfunctionality-relatedproblem(mightbe
theTPMinitializationfailure).Continuewiththeboot
processandcalltheLenovoservicecenterfortechnical
support.
Memorymoduleproblems
Printtheseinstructionsnowandkeepitwithyourcomputerforreferencelater.
Ifyourmemorymoduleisnotoperatingproperly,checkthefollowingitems:
1.Ifyourcomputercomeswithamemorymodulethatisseatedinthememoryslot,verifytheinstallation.
Formoreinformation,see“Replacingthememorymodule”onpage106
.
2.Checkforerrormessagesduringstartup.
Followtheappropriatecorrectiveactionsforpower-onself-test(POST)errormessages.
3.VerifythatthelatestUEFIBIOSforyourmodelhasbeeninstalled.
4.Verifythepropermemoryconfigurationandcompatibilityincludingthemaximummemorysizeandthe
memoryspeed.
5.Rundiagnosticprograms.See“Diagnosingproblems”onpage79.
Networkingproblems
Thefollowingarethemostcommonnetworkingproblems.
Ethernetproblems
•Problem:Thecomputercannotconnecttothenetwork.
Solution:Ensurethat:
–Thecableisinstalledcorrectly.
ThenetworkcablemustbesecurelyconnectedbothtotheEthernetconnectorofyourcomputerand
totheRJ45connectorofthehub.Themaximumallowabledistancefromthecomputertohubis
100meters.Ifthecableisconnectedandthedistanceiswithinacceptablelimitsbuttheproblem
persists,tryadifferentcable.
–Youareusingthecorrectdevicedriver.Toinstallthecorrectdriver,dothefollowing:
1.GotoControlPanelandclickHardwareandSound➙DeviceManager.Ifyouarepromptedfor
anadministratorpasswordorconfirmation,typethepasswordorprovideconfirmation.
2.Iftheexclamationmark!isdisplayednexttotheadapternameunderNetworkadapters,you
mightnotbeusingthecorrectdriverorthedrivermighthavebeendisabled.Toupdatethedriver,
right-clickthehighlightedadapter.
3.ClickUpdateDriverSoftware,andthenfollowtheinstructionsonthescreen.
–Theswitchportandtheadapterhavethesameduplexsetting.
82UserGuide

Ifyouconfiguredtheadapterforfullduplex,makesurethattheswitchportalsoisconfiguredforfull
duplex.Settingwrongduplexmodecandegradeperformance,causedataloss,orresultinlost
connections.
–Youhaveinstalledallnetworkingsoftwarethatisnecessaryforyournetworkenvironment.
CheckwithyourLANadministratorforthenecessarynetworkingsoftware.
•Problem:Theadapterstopsworkingfornoapparentreason.
Solution:Thenetworkdriverfilesmightbecorruptormissing.Updatethedriverbyreferringtothe
previoussolutionfortheproceduretomakesurethatthecorrectdevicedriverisinstalled.
•Problem:MycomputerisaGigabitEthernetmodelandIuseaspeedof1000Mbps,buttheconnection
failsorerrorsoccur.
Solution:
–UseCategory5wiringandmakesurethatthenetworkcableissecurelyconnected.
–Connecttoa1000BASE-Thub/switch(not1000BASE-X).
•Problem:TheWakeonLANfeatureisnotworking.
Solution:EnsurethatWakeonLANisenabledinThinkPadSetup.Ifitis,checkwithyourLAN
administratorforthenecessarysettings.
•Problem:MycomputerisaGigabitEthernetmodel,butthecomputercannotconnecttothenetworkat
1000Mbps.Instead,itconnectsat100Mbps.
Solution:
–Tryanothercable.
–Makesurethatthelinkpartnerissettoauto-negotiate.
–Makesurethattheswitchis802.3ab-compliant(gigabitovercopper).
Awireless-LANproblem
Problem:Icannotconnecttothenetworkusingthebuilt-inwirelessnetworkcard.
Solution:Makesurethat:
•TheAirplanemodeisoff.
•Yourwireless-LANdriveristhelatestversion.
•Yourcomputeriswithinrangeofawirelessaccesspoint.
•Thewirelessradioisenabled.
Note:IfyouareusingtheWindows7operatingsystem,clickShowhiddeniconsonthetaskbar.The
AccessConnectionsiconisdisplayed.Formoreinformationabouttheicon,refertotheAccessConnections
helpinformationsystem.
FortheWindows7operatingsystem,checktheNetworkName(SSID)andyourencryptioninformation.Use
theAccessConnectionsprogramtoverifythiscase-sensitiveinformation.
Bluetoothproblems
Note:CheckyourconnectionanytimeandmakesurethatnootherBluetooth-enableddeviceissearchingfor
thedevicetowhichyouwanttoconnect.SimultaneoussearchingisnotallowedintheBluetoothconnection.
•Problem:SounddoesnotcomefromtheBluetoothheadset/headphonebutcomesfromthelocal
speakereventhoughtheBluetoothheadset/headphoneisconnectedusingaHeadsetprofileorAVprofile.
Chapter7.Troubleshootingproblems83

Solution:Dothefollowing:
1.Exittheprogramthatusesthesounddevice(forexample,WindowsMedia
®
Player).
2.GotoControlPanelandclickHardwareandSound➙Sound➙Playback.
3.IfyouareusingaHeadsetprofile,selectBluetoothHands-freeAudioandclicktheSetDefault
button.IfyouareusinganAVprofile,selectStereoAudioandclicktheSetDefaultbutton.
4.ClickOKtoclosetheSoundwindow.
•Problem:PIMitemssentfromtheWindows7operatingsystemscannotbereceivedcorrectlyintothe
addressbookofanyotherBluetooth-enableddevice.
Solution:TheWindows7operatingsystemsendsPIMitemsinXMLformat,butmostBluetooth-enabled
deviceshandlePIMitemsinvCardformat.IfanotherBluetooth-enableddevicecanreceiveafilethrough
Bluetooth,aPIMitemsentfromtheWindows7mightbesavedasafilewiththeextension.contact.
Keyboardproblems
•Problem:Allorsomekeysonthekeyboarddonotwork.
Solution:Ifanexternalnumerickeypadisconnected:
1.Turnoffthecomputer.
2.Removetheexternalnumerickeypad.
3.Turnonthecomputerandtryusingthekeyboardagain.
Ifthekeyboardproblemisresolved,carefullyreconnecttheexternalnumerickeypad.Makesurethatyou
haveseatedtheconnectorscorrectly.
Iftheproblempersists,makesurethatthecorrectdevicedriverisinstalledbydoingthefollowing:
1.GotoControlPanel.ChangetheviewofControlPanelfromCategorytoLargeiconsorSmallicons.
2.ClickKeyboard.
3.SelecttheHardwaretab.IntheDevicePropertiespane,makesurethatyouseethismessage:
DeviceStatus:Thisdeviceisworkingproperly.
Ifkeysonthekeyboardstilldonotwork,havethecomputerserviced.
•Problem:Allorsomekeysontheexternalnumerickeypaddonotwork.
Solution:Makesurethattheexternalnumerickeypadiscorrectlyconnectedtothecomputer.
Problemswiththedisplayandmultimediadevices
Thistopicincludesthemostcommonproblemswithdisplaysandmultimediadevices,includingthe
computerdisplay,theexternalmonitor,andtheaudiodevices.
Computerscreenproblems
•Problem:MyscreenkeepsblankingwhenIdonotwantitto.
Solution:
–IfyourcomputerispreinstalledwiththeWindows7operatingsystem,youcandisableanysystem
timers,suchastheLCDturn-offtimerortheblanktimerbydoingthefollowing:
1.StartPowerManager.
2.ClickthePowerplantab,andthenselectMaximumPerformancefromthepredefinedpower
plans.
–IfyourcomputerispreinstalledwiththeWindows8.1orWindows10operatingsystem,dothefollowing:
1.GotoControlPanel,andensurethatyouviewControlPanelbyCategory.
84UserGuide

2.ClickHardwareandSound➙PowerOptions➙Highperformance.
3.Showtheadditionalplans,thenchooseHighperformance.
•Problem:Thescreenisblank.
Solution:Dothefollowing:
–Pressthedisplay-modeswitchingkeytobringuptheimage.
–Ifyourcomputerisinsleepmode,pressFntoresumefromthesleepmode.
–Iftheproblempersists,followthesolutionforthefollowingproblem.
•Problem:WhenIturnonthecomputer,nothingisdisplayedonthescreenandthecomputerdoesnot
beepwhilestartingup.
Note:Ifyouarenotsurewhetheryouheardanybeeps,turnoffthecomputerbypressingandholdingthe
powerbuttonforfoursecondsormore.Thenturnonthecomputerandlistenagain.
Solution:Ensurethat:
–Theacpoweradapterisconnectedtothecomputerandthepowercordisconnectedtoaworking
electricaloutlet.
–Thecomputeristurnedon.(Pressthepowerbuttonagainforconfirmation.)
–Thebrightnesslevelofthescreenisappropriatelyset.
Ifapower-onpasswordisset,pressanykeytodisplaythepromptforthepower-onpasswordand
thentypethecorrectpasswordandpressEnter.
Iftheseitemsarecorrectlyset,andthescreenremainsblank,havethecomputerserviced.
•Problem:WhenIturnonthecomputer,onlyawhitepointerisdisplayedonablankscreen.
Solution:Ifyouhavemodifiedapartitiononyourharddiskdriveorsolid-statedrivebyusingpartition
software,informationaboutthatpartition,orthemasterbootrecordmighthavebeendestroyed.
Dothefollowingtotrytosolvetheproblem:
1.Turnoffthecomputer,andthenturnitonagain.
2.Ifyoustillseeonlythepointeronthescreen,dothefollowing:
–Ifyouhaveusedthepartitionsoftware,examinethepartitionontheharddiskdriveorsolid-state
drivebyusingthesoftware,andrecoverthepartitionifrequired.
–Usetherecoverysolutionstorestorethesystemtothefactorydefaultstate.
Iftheproblempersists,havethecomputerserviced.
•Problem:Thescreenisunreadableordistorted.
Solution:Makesurethat:
–Thedisplaydevicedriverisinstalledcorrectly.
–Thescreenresolutionandcolorqualityarecorrectlyset.
–Themonitortypeiscorrect.
Tocheckthesesettings,dothefollowing:
1.Right-clickonthedesktopanddothefollowing:
–ForWindows7andWindows8.1:ClickScreenresolution.
–ForWindows10:ClickDisplaysettings.Showthedisplayedwindowinfullscreen.Thenclick
Advanceddisplaysettings.
Chapter7.Troubleshootingproblems85

Note:Ifyourcomputercannotdetecttheexternalmonitor,clicktheDetectbutton.
2.SelecttheexternalmonitorandsetResolution.
3.Dothefollowing:
–ForWindows7andWindows8.1:ClickAdvancedsettings.
–ForWindows10:ClickDisplayadapterproperties.
4.ClicktheMonitortab.Checkthemonitorinformationtomakesurethatthemonitortypeiscorrect.If
itis,clickOKtoclosethewindow;otherwiseproceedwiththefollowingsteps.
5.Ifmorethantwomonitortypesaredisplayed,selectGenericPnPMonitororGenericNon-PnP
Monitor.
6.ClickProperties.Ifyouarepromptedforanadministratorpasswordorconfirmation,typethe
passwordorprovideconfirmation.
7.ClicktheDrivertab.
8.ClickUpdateDriver.
9.ClickBrowsemycomputerfordriversoftware,andthenclickLetmepickfromalistofdevice
driversonmycomputer.
10.CleartheShowcompatiblehardwarecheckbox.
11.Selectthecorrectmanufacturerandmodelfortheexternalmonitor.Ifyoucannotfindyourmonitor
onthelist,stoptheinstallationofthisdriverandusethedrivershippedwithyourmonitor.
12.Afterupdatingthedriver,clickClose.
•Problem:Incorrectcharactersaredisplayedonthescreen.
Solution:Ensurethatyouinstalltheoperatingsystemorprogramcorrectly.Iftheyareinstalledand
configuredcorrectly,havethecomputerserviced.
•Problem:Thescreenstaysonevenafteryouturnoffyourcomputer.
Solution:Pressandholdthepowerbuttonforfoursecondsormoretoturnoffyourcomputer;then
turnitonagain.
•Problem:Missing,discolored,orbrightdotsappearonthescreeneverytimeyouturnonyourcomputer.
Solution:ThisisanintrinsiccharacteristicoftheTFTtechnology.Yourcomputerdisplaycontainsmultiple
TFTs.Asmallnumberofmissing,discolored,orbrightdotsonthescreenmightexistallthetime.
•Problem:Myscreengoesblankwhilethecomputerison.
Solution:Yourscreensaverorpowermanagementmighthavebeenenabled.Doeitherofthefollowing:
–Touchthetouchpadorpressakeytoexitthescreensaver.
–Pressthepowerbuttontoresumethecomputerfromsleeporhibernation.
Externalmonitorproblems
•Problem:Theexternalmonitorisblank.
Solution:Tobringuptheimage,pressthedisplay-modeswitchingkeyandselectthedesired
monitor.Iftheproblempersists,dothefollowing:
1.Connecttheexternalmonitortoanothercomputertomakesurethatitworks.
2.Reconnecttheexternalmonitortoyourcomputer.
3.Refertothemanualshippedwiththeexternalmonitortochecktheresolutionsandrefreshratesthat
aresupported.
86UserGuide

–Iftheexternalmonitorsupportsthesameresolutionasthecomputerdisplayorahigherresolution,
viewoutputontheexternalmonitororonboththeexternalmonitorandthecomputerdisplay.
–Iftheexternalmonitorsupportsalowerresolutionthanthecomputerdisplay,viewoutputonthe
externalmonitoronly.(Ifyouviewoutputonboththecomputerdisplayandtheexternalmonitor,
theexternalmonitorscreenwillbeblankordistorted.)
•Problem:Youcannotsetahigherresolutionthanthepresentoneonyourexternalmonitor.
Solution:Ensurethatthemonitorinformationiscorrect.Dothefollowing:
1.Right-clickonthedesktopanddothefollowing:
–ForWindows7andWindows8.1:ClickScreenresolution.
–ForWindows10:ClickDisplaysettings.Showthedisplayedwindowinfullscreen.Thenclick
Advanceddisplaysettings.
Note:Ifyourcomputercannotdetecttheexternalmonitor,clicktheDetectbutton.
2.Clicktheiconforthedesiredmonitor(theMonitor-2iconisfortheexternalmonitor).
3.Dothefollowing:
–ForWindows7andWindows8.1:ClickAdvancedsettings.
–ForWindows10:ClickDisplayadapterproperties.
4.ClicktheAdaptertab.Makesurethatthecorrectdevicedrivernameisshownintheadapter
informationwindow.
Note:Thedevicedrivernamedependsonthevideochipthathasbeeninstalledonyourcomputer.
5.ClickOK.
Iftheinformationisincorrect,reinstallthedevicedriver.
–Checkthemonitortypeand,ifnecessary,updatethedriverbydoingthefollowing:
1.Connecttheexternalmonitortothemonitorconnector,andthenconnectthemonitortoan
electricaloutlet.
2.Turnontheexternalmonitorandthecomputer.
3.Right-clickonthedesktopanddothefollowing:
–ForWindows7andWindows8.1:ClickScreenresolution.
–ForWindows10:ClickDisplaysettings.Showthedisplayedwindowinfullscreen.Then
clickAdvanceddisplaysettings.
Note:Ifyourcomputercannotdetecttheexternalmonitor,clicktheDetectbutton.
4.Clicktheiconforthedesiredmonitor(theMonitor-2iconisfortheexternalmonitor).
5.Dothefollowing:
–ForWindows7andWindows8.1:ClickAdvancedsettings.
–ForWindows10:ClickDisplayadapterproperties.
6.ClicktheMonitortab.Checkthemonitorinformationwindowtomakesurethatthemonitortype
iscorrect.Ifitis,clickOKtoclosethewindow;otherwisedothefollowing.
7.Ifmorethanonemonitortypeisdisplayed,selectGenericPnPMonitororGenericNon-PnP
Monitor.
8.ClickProperties.Ifyouarepromptedforanadministratorpasswordorconfirmation,typethe
passwordorprovideconfirmation.
9.ClicktheDrivertab.
Chapter7.Troubleshootingproblems87

10.ClickUpdateDriver.
11.ClickBrowsemycomputerfordriversoftware,andthenclickLetmepickfromalistof
devicedriversonmycomputer.
12.CleartheShowcompatiblehardwarecheckbox.
13.Selectyourmonitormanufacturerandmodel.
14.Afterupdatingthedriver,clickClose.
15.SetResolution.
Note:Tochangethecolorsettings,selecttheMonitortab,thensetColors.
16.ClickOK.
•Problem:Thescreenisunreadableordistorted.
Solution:Makesurethat:
–Themonitorinformationiscorrectandtheappropriatemonitortypeisselected.Refertothesolutionto
thepreviousproblem.
–Makesurethatanappropriaterefreshrateisselectedbydoingthefollowing:
1.Connecttheexternalmonitortothemonitorconnector,andthenconnectthemonitortoan
electricaloutlet.
2.Turnontheexternalmonitorandthecomputer.
3.Right-clickonthedesktopanddothefollowing:
–ForWindows7andWindows8.1:ClickScreenresolution.
–ForWindows10:ClickDisplaysettings.Showthedisplayedwindowinfullscreen.Then
clickAdvanceddisplaysettings.
Note:Ifyourcomputercannotdetecttheexternalmonitor,clicktheDetectbutton.
4.Clicktheiconforthedesiredmonitor(theMonitor-2iconisfortheexternalmonitor).
5.Dothefollowing:
–ForWindows7andWindows8.1:ClickAdvancedsettings.
–ForWindows10:ClickDisplayadapterproperties.
6.ClicktheMonitortab.
7.Selectthecorrectscreenrefreshrate.
•Problem:Wrongcharactersaredisplayedonthescreen.
Solution:Ensurethatyoufollowthecorrectprocedurewheninstallingtheoperatingsystemorprogram.
Ifyoudid,havetheexternalmonitorserviced.
•Problem:TheExtenddesktopfunctiondoesnotwork.
Solution:EnabletheExtenddesktopfunctionbydoingthefollowing:
1.Connecttheexternalmonitortothemonitorconnector,andthenconnectthemonitortoanelectrical
outlet.
2.Turnontheexternalmonitorandthecomputer.
3.Right-clickonthedesktopanddothefollowing:
–ForWindows7andWindows8.1:ClickScreenresolution.
–ForWindows10:ClickDisplaysettings.Showthedisplayedwindowinfullscreen.Thenclick
Advanceddisplaysettings.
88UserGuide

Note:Ifyourcomputercannotdetecttheexternalmonitor,clicktheDetectbutton.
4.ClicktheMonitor-2icon.
5.SelectExtendthesedisplaysformultipledisplays.
6.ClicktheMonitor-1icon(fortheprimarydisplay,thecomputerdisplay).
7.Settheresolutionfortheprimarydisplay.
8.ClicktheMonitor-2icon(fortheexternalmonitor).
9.Setthescreenresolutionforthesecondarydisplay.
10.Settherelativepositionofeachmonitorbydraggingitsicon.Youcansetthemonitorsinanyrelative
position,buttheiconsmusttoucheachother.
11.ClickOKtoapplythechanges.
•Problem:IfyouusetheExtenddesktopfunction,youcannotsetahigherresolutionorhigherrefresh
rateonthesecondarydisplay.
Solution:Changetheresolutionandthecolordepthtolowersettingsfortheprimarydisplay.Referto
thesolutiontothepreviousproblem.
•Problem:Displayswitchingdoesnotwork.
Solution:IfyouusetheExtenddesktopfunction,disableit,andchangethedisplayoutputlocation.If
aDVDmovieoravideoclipisplaying,stoptheplayback,closetheprogram,andthenchangethe
displayoutputlocation.
•Problem:Thescreenpositionontheexternalmonitorisincorrectwhenthatmonitorissetforahigh
resolution.
Solution:Sometimes,whenyouuseahighresolutionsuchas1600x1200,theimageisshiftedtoleftor
rightonthescreen.Tocorrectthis,firstmakesurethatyourexternalmonitorsupportsthedisplaymode
(theresolutionandtherefreshrate)thatyouhaveset.Ifitdoesnot,setadisplaymodethatthemonitor
supports.Ifitdoessupportthedisplaymodeyouhaveset,gotothesetupmenuforthemonitoritself
andadjustthesettingsthere.Usuallytheexternalmonitorhasbuttonsforaccesstothesetupmenu.For
details,seethedocumentationthatcomeswiththemonitor.
Audioproblems
•Problem:WaveorMIDIsounddoesnotplaycorrectly.
Solution:Makesurethatthebuilt-inaudiodeviceisconfiguredcorrectly.
1.GotoControlPanelandclickHardwareandSound.
2.ClickDeviceManager.Ifyouarepromptedforanadministratorpasswordorconfirmation,typethe
passwordorprovideconfirmation.
3.Double-clickSound,videoandgamecontrollers.MakesurethattheDolbyAdvancedAudio
v2driverisenabledandconfiguredcorrectly.
•Problem:Recordingsmadeusingthemicrophoneinputarenotloudenough.
Solution:MakesurethattheMicrophoneBoostfunctionisturnedonandsetbydoingthefollowing:
1.GotoControlPanelandclickHardwareandSound➙Sound.
2.ClicktheRecordingtabintheSoundwindow.
3.SelectMicrophone,andclickthePropertiesbutton.
4.ClicktheLevelstab,andmovetheMicrophoneBoostsliderupwards.
5.ClickOK.
Chapter7.Troubleshootingproblems89

Note:Fordetailsaboutcontrollingvolume,refertoyourWindowsonlinehelp.
•Problem:Avolumeorbalanceslidercannotbemoved.
Solution:Theslidermightbegrayedout.Thismeansthatitspositionisfixedbythehardwareand
cannotbechanged.
•Problem:Thevolumeslidersdonotstayinplacewhensomeaudioprogramsareused.
Solution:Itisnormalforthesliderstochangepositionwhencertainsoundprogramsareused.The
programsareawareofthesettingsintheVolumeMixerwindowandareallowedtochangethesettings
themselves.AnexampleistheWindowsMediaPlayer.Usuallytheapplicationhasslidersavailableto
controlthesoundfromwithintheprogram.
•Problem:Thebalanceslidercannotcompletelymuteonechannel.
Solution:Thecontrolisdesignedtocompensateforminordifferencesinbalanceanddoesnot
completelymuteeitherchannel.
•Problem:ThereisnovolumecontrolforMIDIsoundintheVolumeMixerwindow.
Solution:Usethehardwarevolumecontrol.Thisisbecausethebuilt-insynthesizersoftwaredoes
notsupportthecontrol.
•Problem:ThesoundcannotbeturnedoffevenifyousettheMastervolumecontrolatminimum.
Solution:YoustillcanhearsomesoundeventhoughyouhavesettheMastervolumecontrolatminimum.
Toturnoffthesoundcompletely,gototheMastervolumecontrolandselectMutespeakers.
•Problem:Whenyouconnectaheadphonetoyourcomputerwhileplayingsound,aspeakerdoesnot
producesound.
Solution:Oncetheheadphoneisattached,thestreamingisautomaticallyredirectedtoit.Ifyouwant
tolistentosoundfromthespeakersagain,besuretosetthosespeakersasthedefaultdevice.The
procedureisasfollows:
1.GotoControlPanel.ChangetheviewofControlPanelfromCategorytoLargeiconsorSmallicons.
2.ClickSmartAudio.TheSmartAudiowindowopens.
3.Lookattheplaybackdevices.Ifyouhaveattachedaheadphone,theheadphonewillbeautomatically
setasthedefaultdevice,andtheiconforthatheadphonewillbechecked.
4.Tosetadifferentdeviceasthedefault,double-clicktheiconforthosespeakers.Thaticonwill
nowhaveacheckmark.
5.PlayanysoundbyuseofamusicprogramsuchasWindowsMediaPlayer.Makesurethatsound
comesfromthespeakers.
Fordetails,refertothehelpinformationsystemforSmartAudio.
Batteryandpowerproblems
Thistopiccontainsinstructionsontroubleshootingbatteryandpowerproblems.
Batteryproblems
•Problem:Thebuilt-inbatterycannotbefullychargedinthestandardchargetimewhenthecomputeris
poweredoff.
Solution:Thebatterymightbeover-discharged.Dothefollowing:
1.Turnoffthecomputer.
2.Connecttheacpoweradaptertothecomputerandletitcharge.
90UserGuide

Ifthebuilt-inbatterycannotbefullychargedin24hours,haveyourcomputerserviced.
•Problem:Yourcomputershutsdownbeforethebattery-statusindicatorshowsempty,oryourcomputer
operatesafterthebattery-statusindicatorshowsempty.
Solution:Dischargeandrechargethebuilt-inbattery.
•Problem:Theoperatingtimeforafullychargedbuilt-inbatteryisshort.
Solution:Dischargeandrechargethebuilt-inbattery.Ifyourbatteryoperatingtimeisstillshort,have
yourcomputerserviced.
•Problem:Thecomputerdoesnotoperatewithafullychargedbuilt-inbattery.
Solution:Thesurgeprotectorinthebuilt-inbatterymightbeactive.Turnoffthecomputerforoneminute
toresettheprotector;thenturnonthecomputeragain.
•Problem:Thebuilt-inbatterycannotbecharged.
Youcannotchargethebatterywhenitistoohot.Turnoffthecomputerandallowittocooltoroom
temperature.Afterthecomputercools,rechargethebattery.Ifthebatterystillcannotbecharged,
haveyourcomputerserviced.
Powerproblems
Printtheseinstructionsnowandkeepitwithyourcomputerforreferencelater.
Ifyourcomputerisgettingnopoweratall,checkthefollowingitems:
1.Checkallpowerconnections.Removeanypowerstripsandsurgeprotectorstoconnecttheacpower
adapterdirectlytotheacpoweroutlet.
2.Inspecttheacpoweradapter.Checkforanyphysicaldamage,andmakesurethatthepowercableis
firmlyattachedtotheadapterbrickandthecomputer.
3.Verifytheacpowersourceisworkingbyattachinganotherdevicetotheoutlet.
4.Removealldevicesandthentestforsystempowerwithminimaldevicesattached.
Ifyourcomputerdoesnotrunonbatterypower,checkthefollowingitems:
1.Ifthebatteryrunsoutofpower,attachacpoweradaptertorechargethebattery.
2.Ifthebatteryischargedbutthecomputerdoesnotrun,callLenovoCustomerServiceCentertohave
yourcomputerserviced.
Anacpoweradapterproblem
Problem:Theacpoweradapterisconnectedtothecomputerandtheworkingelectricaloutlet,butthe
poweradapter(powerplug)iconisnotdisplayedintheWindowsnotificationarea.
Solution:Dothefollowing:
1.Makesurethattheconnectionoftheacpoweradapteriscorrect.Forinstructionsonconnectingtheac
poweradapter,seeSafety,Warranty,andSetupGuidethatcomeswithyourcomputer.
2.Iftheconnectionoftheacpoweradapteriscorrect,turnoffthecomputer,thendisconnecttheac
poweradapter.
3.Reconnecttheacpoweradapter,thenturnonthecomputer.
4.IfthepoweradaptericonstillisnotdisplayedintheWindowsnotificationarea,havetheacpower
adapterandyourcomputerserviced.
Note:IfyouareusingtheWindows7operatingsystem,todisplaythepoweradapter(powerplug)icon,click
ShowhiddeniconsintheWindowsnotificationarea.
Chapter7.Troubleshootingproblems91

Apowerbuttonproblem
Problem:Thesystemdoesnotrespond,andyoucannotturnoffthecomputer.
Solution:Turnoffthecomputerbypressingandholdingthepowerbuttonforfoursecondsormore.Ifthe
systemisstillnotreset,removetheacpoweradapter.
Bootproblems
Printtheseinstructionsnowandkeepthemwithyourcomputerforreferencelater.
Ifyoureceiveanerrormessagebeforetheoperatingsystemloads,followtheappropriatecorrectiveactions
forPOSTerrormessages.
Ifyoureceiveanerrormessagewhiletheoperatingsystemisloadingthedesktopconfigurationafterthe
POSTiscompleted,checkthefollowingitems:
1.GototheLenovoSupportWebsiteathttp://www.lenovo.com/supportandsearchfortheerrormessage.
2.GototheMicrosoftKnowledgeBasehomepageathttp://support.microsoft.com/andsearchforthe
errormessage.
Sleepandhibernationproblems
•Problem:Thecomputerenterssleepmodeunexpectedly.
Solution:Ifthemicroprocessoroverheats,thecomputerautomaticallyenterssleepmodetoallowthe
computertocoolandtoprotectthemicroprocessorandotherinternalcomponents.Checkthesettings
forsleepmode.
•Problem:ThecomputerenterssleepmodeimmediatelyafterthePOST.
Solution:Makesurethat:
–Thebatteryischarged.
–Theoperatingtemperatureiswithintheacceptablerange.Referto“Specifications”onpage12.
Ifthebatteryischargedandthetemperatureiswithinrange,havethecomputerserviced.
•Problem:Acriticallow-batteryerroroccurs,andthecomputerimmediatelyturnsoff.
Solution:Thebatterypowerisgettinglow.Connecttheacpoweradaptertothecomputerandtoan
electricaloutlet.
•Problem:ThecomputerdisplayremainsblankafteryoupressFntoreturnfromsleepmode.
Solution:Checkwhetheranexternalmonitorwasdisconnectedorturnedoffwhilethecomputerwas
insleepmode.Ifyoudisconnectedorturnedofftheexternalmonitor,connectitorturnitonbefore
resumingthecomputerfromthesleepmode.Whenresumingthecomputerfromthesleepmode
withoutattachingtheexternalmonitororturningiton,andthecomputerdisplayremainsblank,press
F7tobringupthecomputerdisplay.
Notes:
–IfyouareusingF7toapplyapresentationscheme,youwillneedtopressF7atleastthreetimesin
threesecondstobringupthecomputerdisplay.
–IfyourcomputerisaWindows7model,itdoesnotsupportthepresentationscheme.
•Problem:Thecomputerdoesnotreturnfromsleepmode,andthecomputerdoesnotwork.
Solution:Ifthecomputerdoesnotreturnfromsleepmode,itmighthaveenteredsleeporhibernation
modeautomaticallybecausethebatteryisdepleted.Checkthesystem-statusindicator(illuminated
ThinkPadlogo).
92UserGuide

–Ifthesystem-statusindicator(illuminatedThinkPadlogo)blinksslowly,yourcomputerisinsleepmode.
Connecttheacpoweradaptertothecomputer;thenpressFn.
–Ifthesystem-statusindicator(illuminatedThinkPadlogo)isoff,yourcomputerisinpower-offstateor
inhibernationmode.Connecttheacpoweradaptertothecomputer;thenpressthepowerbutton
toresumeoperation.
Ifthesystemstilldoesnotreturnfromsleepmode,yoursystemmightstoprespondingandyoumightnot
beabletoturnoffthecomputer.Inthiscase,youneedtoresetthecomputer.Ifyouhavenotsaved
yourdata,itmightbelost.Toresetthecomputer,pressandholdthepowerbuttonforfoursecondsor
more.Ifthesystemisstillnotreset,removetheacpoweradapter.
•Problem:Yourcomputerdoesnotentersleeporhibernationmode.
Solution:Checkwhetheranyoptionhasbeenselectedtodisableyourcomputerfromenteringsleep
orhibernationmode.
Ifyourcomputertriestoentersleepmodebuttherequestisrejected,thedeviceattachedtotheUSB
connectormighthavebeendisabled.Ifthisoccurs,doahot-unplug-and-plugoperationfortheUSB
device.
•Problem:Thebatterydischargesslightlywhilethecomputerisinhibernationmode.
Solution:Ifthewake-upfunctionisenabled,thecomputerconsumesasmallamountofpower.Thisis
notadefect.Fordetails,referto“Power-savingmodes”onpage32
.
Problemswithdrivesandotherstoragedevices
Thissectionincludesharddiskdriveproblemsandasolid-statedriveproblem.
Harddiskdriveproblems
•Problem:Theharddiskdrivemakesarattlingnoiseintermittently.
Solution:Therattlingnoisemightbeheard:
–Whentheharddiskdrivebeginsorfinishesgettingaccesstodata.
–Whenyoucarrytheharddiskdrive.
–Whenyoucarryyourcomputer.
Thisisanormalcharacteristicofaharddiskdriveandisnotadefect.
•Problem:Theharddiskdrivedoesnotwork.
Solution:OntheStartupmenuofThinkPadSetup,makesurethattheharddiskdriveisontheBoot
priorityorderlist.IfitisontheExcludedfrombootorderlist,itisdisabled.Selecttheentryforitonthe
listandpresstheShift+1key.ThismovestheentrytotheBootpriorityorderlist.
•Problem:Aftersettingaharddiskpasswordontheharddiskdriveofthecomputer,youmovedthedrive
toanothercomputer.Nowyoucannotunlocktheharddiskpassword.
Solution:Yourcomputersupportsanenhancedpasswordalgorithm.Computersolderthanyoursmight
notsupportsuchasecurityfunction.
Asolid-statedriveproblem
Problem:WhenyoucompressfilesorfoldersbyuseofthedatacompressionfunctioninWindows,and
thendecompressthem,theprocessofwritingtoorreadingfromthefilesorfoldersisslow.
Solution:ApplythediskdefragmentationtoolinWindowsforfasteraccesstothedata.
Chapter7.Troubleshootingproblems93

Asoftwareproblem
Problem:Anapplicationdoesnotruncorrectly.
Solution:Ensurethattheproblemisnotbeingcausedbytheapplication.
Checkthatyourcomputerhastheminimumrequiredmemorytoruntheapplication.Refertothemanuals
suppliedwiththeapplication.
Checkthefollowing:
•Theapplicationisdesignedtooperatewithyouroperatingsystem.
•Otherapplicationsruncorrectlyonyourcomputer.
•Thenecessarydevicedriversareinstalled.
•Theapplicationworkswhenitisrunonsomeothercomputer.
Ifanerrormessageisdisplayedwhileyouareusingtheapplication,refertothemanualssuppliedwiththe
application.
Iftheapplicationstilldoesnotruncorrectly,contactyourplaceofpurchaseoraservicerepresentative
forhelp.
AUSBproblem
Problem:AdeviceconnectedtotheUSBconnectordoesnotwork.
Solution:OpentheDeviceManagerwindow.MakesurethattheUSBdevicesetupiscorrect,andthatthe
assignmentofcomputerresourceandtheinstallationofthedevicedriverarecorrect.ToopentheDevice
Managerwindow,gotoControlPanelandclickHardwareandSound➙DeviceManager.Ifyouare
promptedforanadministratorpasswordorconfirmation,typethepasswordorprovideconfirmation.
Referto“Diagnosingproblems”onpage79andrunadiagnostictestoftheUSBconnector.
94UserGuide

Chapter8.Recoveryoverview
ThischapterprovidesinformationabouttherecoverysolutionsprovidedbyLenovo.
•“RecoveryinformationfortheWindows7operatingsystem”onpage95
•“RecoveryinformationfortheWindows8.1operatingsystem”onpage100
•“RecoveryoverviewfortheWindows10operatingsystem”onpage102
RecoveryinformationfortheWindows7operatingsystem
ThissectionprovidesinformationabouttherecoverysolutionsprovidedbyLenovoontheWindows7
operatingsystem.
Notes:
•Thereareavarietyofmethodstochoosefromwhenconsideringhowtorecoverintheeventofasoftware-
orhardware-relatedproblem.Somemethodsvarydependingonthetypeofyouroperatingsystem.
•Theproductontherecoverymediamightbeusedonlyforthefollowingpurposes:
–Restoretheproductpreinstalledonyourcomputer
–Reinstalltheproduct
–ModifytheproductusingtheAdditionalFiles
Topreventpotentialperformancerisksorunexpectedbehaviorthatmightbecausedbythenewharddisk
drivetechnology,itisrecommendedthatyouuseoneofthefollowingsoftwareprogramsforbackup:
•RescueandRecoveryversion4.3orlater
•AcronisTrueImage2010orlater
•ParagonBackup&Recovery10Suiteorlater,ParagonBackup&Recovery10Homeorlater
Creatingandusingrecoverymedia
Youcanuserecoverymediatorestoretheharddiskdriveorsolid-statedrivetothefactorydefaultsettings.
Recoverymediaareusefulifyoutransferthecomputertoanotherarea,sellthecomputer,recyclethe
computer,orputthecomputerinanoperationalstateafterallothermethodsofrecoveryhavefailed.Asa
precautionarymeasure,itisimportanttocreaterecoverymediaasearlyaspossible.
Note:Therecoveryoperationsyoucanperformusingrecoverymediavarydependingontheoperating
systemfromwhichtherecoverymediawerecreated.Therecoverymediamightcontainabootmedium
andadatamedium.YourMicrosoftWindowslicensepermitsyoutocreateonlyonedatamedium,soitis
importantthatyoustoretherecoverymediainasafeplaceafteryouhavemadethem.
Creatingrecoverymedia
Thissectionprovidesinstructionsonhowtocreaterecoverymedia.
Note:YoucancreaterecoverymediausingdiscsorexternalUSBstoragedevices.
Tocreaterecoverymedia,clickStart➙AllPrograms➙LenovoPCExperience➙LenovoTools➙
FactoryRecoveryDisks.Then,followtheinstructionsonthescreen.
©CopyrightLenovo2014,2016
95

Usingrecoverymedia
Youcanuserecoverymediatorestorethecomputertothefactorydefaultsettingsonly.Youcanuse
recoverymediatoputthecomputerinanoperationalstateafterallothermethodsofrecoveryhavefailed.
Attention:Whenyouuserecoverymediatorestorethecomputertothefactorydefaultsettings,allthefiles
currentlyontheharddiskdriveorsolid-statedrivewillbedeletedandreplacedbythefactorydefaultsettings.
Touserecoverymedia,dothefollowing:
1.Dependingonthetypeofyourrecoverymedia,connectthebootmedium(memorykeyorotherUSB
storagedevice)tothecomputer,orinsertthebootdiscintoanexternalopticaldrive.
2.RepeatedlypressandreleasetheF12keywhenturningonthecomputer.WhentheBootMenuwindow
opens,releasetheF12key.
3.SelectthedesiredstartupdeviceandpressEnter.Therestoreprocessbegins.
4.Followtheinstructionsonthescreentocompletetheoperation.
Notes:
1.Afterrestoringyourcomputertothefactorydefaultsettings,youmighthavetoreinstalldevicedrivers
forsomedevices.See“Reinstallingpreinstalledapplicationsanddevicedrivers”onpage99.
2.SomecomputerscomewithMicrosoftOfficeorMicrosoftWorkspreinstalled.Ifyouneedtorecover
orreinstallyourMicrosoftOfficeorMicrosoftWorksapplications,youmustusetheMicrosoftOffice
CDorMicrosoftWorksCD.ThesediscsareprovidedonlywithcomputerspreinstalledwithMicrosoft
OfficeorMicrosoftWorks.
Performingbackupandrecoveryoperations
TheRescueandRecoveryprogramenablesyoutobackupallyourharddiskdriveorsolid-statedrive
contentsincludingtheoperatingsystem,datafiles,softwareprograms,andpersonalsettings.Youcan
designatewheretheRescueandRecoveryprogramstoresthebackup:
•Inaprotectedareaofyourharddiskdriveorsolid-statedrive
•OnanattachedexternalUSBharddiskdrive
•Onanetworkdrive
•Onrecordablediscs(arecordableopticaldriveisrequiredforthisoption)
Afteryouhavebackedupthecontentsontheharddiskdriveorsolid-statedrive,youcanrestorethe
completecontentsoftheharddiskdriveorsolid-statedrive,restoreonlytheselectedfiles,orrestoreonly
theWindowsoperatingsystemandapplications.
Performingabackupoperation
ThissectionprovidesinstructionsonhowtoperformabackupoperationusingtheRescueandRecovery
program.
1.FromtheWindowsdesktop,clickStart➙AllPrograms➙LenovoPCExperience➙LenovoTools➙
EnhancedBackupandRestore.TheRescueandRecoveryprogramopens.
2.IntheRescueandRecoverymainwindow,clicktheLaunchadvancedRescueandRecoveryarrow.
3.ClickBackupyourharddriveandselectbackupoperationoptions.Then,followtheinstructionson
thescreentocompletethebackupoperation.
Performingarecoveryoperation
ThissectionprovidesinstructionsonhowtoperformarecoveryoperationusingtheRescueandRecovery
program.
96UserGuide

1.FromtheWindowsdesktop,clickStart➙AllPrograms➙LenovoPCExperience➙LenovoTools➙
EnhancedBackupandRestore.TheRescueandRecoveryprogramopens.
2.IntheRescueandRecoveryprogrammainwindow,clicktheLaunchadvancedRescueandRecovery
arrow.
3.ClicktheRestoreyoursystemfromabackupicon.
4.Followtheinstructionsonthescreentocompletetherecoveryoperation.
FormoreinformationaboutperformingarecoveryoperationfromtheRescueandRecoveryworkspace,see
“UsingtheRescueandRecoveryworkspace”onpage97.
UsingtheRescueandRecoveryworkspace
TheRescueandRecoveryworkspaceresidesinaprotected,hiddenareaofyourharddiskdriveor
solid-statedrivethatoperatesindependentlyfromtheWindowsoperatingsystem.Thisenablesyouto
performrecoveryoperationsevenifyoucannotstarttheWindowsoperatingsystem.Youcanperformthe
followingrecoveryoperationsfromtheRescueandRecoveryworkspace:
•Rescuefilesfromyourharddiskdriveorsolid-statedrive,orfromabackup
TheRescueandRecoveryworkspaceenablesyoutolocatefilesonyourharddiskdriveorsolid-state
driveandtransferthemtoanetworkdriveorotherrecordablemedia,suchasaUSBdeviceoradisc.
Thissolutionisavailableevenifyoudidnotbackupyourfilesorifchangesweremadetothefilessince
yourlastbackupoperation.YoualsocanrescueindividualfilesfromaRescueandRecoverybackup
locatedonyourlocalharddiskdriveorsolid-statedrive,aUSBdevice,oranetworkdrive.
•Restoreyourharddiskdriveorsolid-statedrivefromaRescueandRecoverybackup
Ifyouhavebackedupyourharddiskdriveorsolid-statedriveusingtheRescueandRecoveryprogram,
youcanrestoretheharddiskdriveorsolid-statedrivefromaRescueandRecoverybackup,evenif
youcannotstarttheWindowsoperatingsystem.
•Restoreyourharddiskdriveorsolid-statedrivetothefactorydefaultsettings
TheRescueandRecoveryworkspaceenablesyoutorestorethecompletecontentsofyourharddisk
driveorsolid-statedrivetothefactorydefaultsettings.Ifyouhavemultiplepartitionsonyourharddisk
driveorsolid-statedrive,youhavetheoptiontorestorethefactorydefaultsettingstotheC:partitionand
leavetheotherpartitionsintact.BecausetheRescueandRecoveryworkspaceoperatesindependently
fromtheWindowsoperatingsystem,youcanrestorethefactorydefaultsettingsevenifyoucannot
starttheWindowsoperatingsystem.
Attention:Ifyourestoretheharddiskdriveorsolid-statedrivefromaRescueandRecoverybackupor
restoretheharddiskdriveorsolid-statedrivetothefactorydefaultsettings,allfilesontheprimaryhard
diskdriveorsolid-statedrivepartition(usuallydriveC:)willbedeletedintherecoveryprocess.Ifpossible,
makecopiesofimportantfiles.IfyouareunabletostarttheWindowsoperatingsystem,youcanusethe
rescuefilesfeatureoftheRescueandRecoveryworkspacetocopyfilesfromyourharddiskdriveor
solid-statedrivetoothermedia.
TostarttheRescueandRecoveryworkspace,dothefollowing:
1.Turnoffyourcomputer.
2.RepeatedlypressandreleasetheF11keywhenturningonthecomputer.Whenyouhearbeepsor
seealogoscreen,releasetheF11key.
3.IfyouhavesetaRescueandRecoverypassword,typeyourpasswordwhenprompted.TheRescue
andRecoveryworkspaceopensafterashortdelay.
Note:IftheRescueandRecoveryworkspacefailstoopen,see“Solvingrecoveryproblems”on
page100
.
4.Dooneofthefollowing:
Chapter8.Recoveryoverview97

•Torescuefilesfromyourharddiskdriveorsolid-statedrive,orfromabackup,clickRescuefilesand
followtheinstructionsonthescreen.
•Torestoreyourharddiskdriveorsolid-statedrivefromaRescueandRecoverybackuportorestore
yourharddiskdriveorsolid-statedrivetothefactorydefaultsettings,clickRestoreyoursystem
andfollowtheinstructionsonthescreen.
FormoreinformationaboutthefeaturesoftheRescueandRecoveryworkspace,clickHelp.
Notes:
1.Afterrestoringyourharddiskdriveorsolid-statedrivetothefactorydefaultsettings,youmighthave
toreinstalldevicedriversforsomedevices.See“Reinstallingpreinstalledapplicationsanddevice
drivers”onpage99.
2.SomecomputerscomewithMicrosoftOfficeorMicrosoftWorkspreinstalled.Ifyouneedtorecover
orreinstallyourMicrosoftOfficeorMicrosoftWorksapplications,youmustusetheMicrosoftOffice
CDorMicrosoftWorksCD.ThesediscsareprovidedonlywithcomputerspreinstalledwithMicrosoft
OfficeorMicrosoftWorks.
Creatingandusingarescuemedium
Witharescuemedium,suchasadiscoraUSBharddiskdrive,youcanrecoverthecomputerfromfailures
thatpreventyoufromgainingaccesstotheRescueandRecoveryworkspaceonyourharddiskdriveor
solid-statedrive.
Notes:
1.Therecoveryoperationsyoucanperformusingarescuemediumvarydependingontheoperating
system.
2.Therescuedisccanbestartedinalltypesofexternalopticaldrives.
Creatingarescuemedium
Tocreatearescuemedium,dothefollowing:
1.FromtheWindowsdesktop,clickStart➙AllPrograms➙LenovoPCExperience➙LenovoTools➙
EnhancedBackupandRestore.TheRescueandRecoveryprogramopens.
2.IntheRescueandRecoverymainwindow,clicktheLaunchadvancedRescueandRecoveryarrow.
3.ClicktheCreateRescueMediaicon.TheCreateRescueandRecoveryMediawindowopens.
4.IntheRescueMediaarea,selectthetypeoftherescuemediumyouwanttocreate.Youcancreatea
rescuemediumusingadiscoraUSBharddiskdrive.
5.ClickOKandfollowtheinstructionsonthescreentocreatearescuemedium.
Usingarescuemedium
Thissectionprovidesinstructionsonhowtousetherescuemediumyouhavecreated.
•Ifyouhavecreatedarescuemediumusingadisc,usethefollowinginstructionstousetherescuemedium:
1.Turnoffyourcomputer.
2.RepeatedlypressandreleasetheF12keywhenturningonthecomputer.WhentheBootMenu
windowopens,releasetheF12key.
3.IntheBootMenuwindow,selectthedesiredopticaldriveasthefirstbootdevice.Then,insertthe
rescuediscintotheexternalopticaldriveandpressEnter.Therescuemediumstarts.
•IfyouhavecreatedarescuemediumusingaUSBharddiskdrive,usethefollowinginstructionsto
usetherescuemedium:
1.AttachtheUSBharddiskdrivetooneoftheUSBconnectorsonyourcomputer.
98UserGuide

2.RepeatedlypressandreleasetheF12keywhenturningonthecomputer.WhentheBootMenu
windowopens,releasetheF12key.
3.IntheBootMenuwindow,selecttheUSBharddiskdriveasthefirstbootdeviceandpressEnter.
Therescuemediumstarts.
Whentherescuemediumstarts,theRescueandRecoveryworkspaceopens.Thehelpinformationfor
eachfeatureisavailablefromtheRescueandRecoveryworkspace.Followtheinstructionstocomplete
therecoveryprocess.
Reinstallingpreinstalledapplicationsanddevicedrivers
Yourcomputerhasprovisionsthatenableyoutoreinstalldesiredfactory-installedapplicationsanddevice
drivers.
Reinstallingpreinstalledprograms
Toreinstallselectedapplications,dothefollowing:
1.Turnonyourcomputer.
2.GototheC:\SWTOOLSdirectory.
3.OpentheAPPSfolder.Thefoldercontainsseveralsubfoldersnamedforthevariouspreinstalled
applications.
4.Openthesubfolderfortheapplicationyouwanttoreinstall.
5.Double-clickSetup,andthenfollowtheon-screenstepstoreinstalltheapplication.
Reinstallingpreinstalleddevicedrivers
Attention:Whenyoureinstalldevicedrivers,youarechangingthecurrentconfigurationofyourcomputer.
Reinstalldevicedriversonlywhenitisnecessarytocorrectaproblemwithyourcomputer.
Toreinstalladevicedriverforafactory-installeddevice,dothefollowing:
1.Turnonyourcomputer.
2.GototheC:\SWTOOLSdirectory.
3.OpentheDRIVERSfolder.Thefoldercontainsseveralsubfoldersnamedforthevariousdevices
installedinyourcomputer(forexample,AUDIOandVIDEO).
4.Openthesubfolderforthedevice.
5.Reinstallthedevicedriverbyoneofthefollowingmethods:
•Inthesubfolderforthedevice,lookforatextfile(afilewiththeextension.txt).Thetextfilecontains
informationonhowtoreinstallthatdevicedriver.
•Ifthesubfolderforthedevicecontainsafileofsetupinformation(afilewiththeextension.inf),you
canusetheAddNewHardwareprogram(intheWindowsControlPanel)toreinstallthedevicedriver.
Notalldevicedriverscanbereinstalledbyuseofthisprogram.IntheAddNewHardwareprogram,
whenpromptedforthedevicedriveryouwanttoinstall,clickHaveDiskandBrowse.Thenselect
thedevicedriverfilefromthedevicesubfolder.
•Inthesubfolderforthedevice,lookfortheexecutablefile(afilewiththeextension.exe).Double-click
thefile,andfollowtheinstructionsonthescreen.
Attention:Ifyouneedupdateddevicedriversforyourcomputer,donotdownloadthemfromtheWindows
UpdateWebsite.ObtainthemfromLenovo.Formoreinformation,see“Makingsuredevicedriversare
up-to-date”onpage74.
Chapter8.Recoveryoverview99

Solvingrecoveryproblems
IfyouareunabletoaccesstheRescueandRecoveryworkspaceortheWindowsenvironment,doone
ofthefollowing:
•UsearescuemediumtostarttheRescueandRecoveryworkspace.See“Creatingandusingarescue
medium”onpage98
.
•Userecoverymediaifallothermethodsofrecoveryhavefailedandyouneedtorestoretheharddiskdrive
orsolid-statedrivetothefactorydefaultsettings.See“Creatingandusingrecoverymedia”onpage95.
Note:IfyouareunabletoaccesstheRescueandRecoveryworkspaceortheWindowsenvironmentfrom
arescuemediumorrecoverymedia,youmightnothavetherescuedevice(aninternalharddiskdriveor
solid-statedrive,adisc,aUSBharddiskdrive,orotherexternaldevices)setasthefirstbootdeviceinthe
startupdevicesequence.Youmustfirstmakesurethatyourrescuedeviceissetasthefirstbootdevicein
thestartupdevicesequenceintheThinkPadSetupprogram.Fordetailedinformationonhowtotemporarily
orpermanentlychangethestartupdevicesequence,see“Startupmenu”onpage68
.
Itisimportanttocreatearescuemediumandasetofrecoverymediaasearlyaspossibleandstorethem
inasafeplaceforfutureuse.
RecoveryinformationfortheWindows8.1operatingsystem
ThissectionprovidesinformationabouttherecoverysolutionsfortheWindows8.1operatingsystem.
AWindowsrecoveryimageispreinstalledintherecoverypartitiononyourcomputer.TheWindowsrecovery
imageenablesyoutorefreshyourcomputer,orresetyourcomputertothefactorydefaultsettings.
YoucancreaterecoverymediaasbackupsorreplacementfortheWindowsrecoveryimage.Withthe
recoverymedia,youcantroubleshootandfixtheproblemsonyourcomputerevenifyoucannotstartthe
Windows8.1operatingsystem.Itisrecommendedthatyoucreaterecoverymediaasearlyaspossible.For
moreinformation,see“Creatingandusingrecoverymedia”onpage101
.
Refreshingyourcomputer
Ifyourcomputerdoesnotperformwellandtheproblemmightbecausedbyarecentlyinstalledprogram,
youcanrefreshyourcomputerwithoutlosingyourpersonalfilesorchangingyoursettings.
Attention:Ifyourefreshyourcomputer,theprogramsthatcamewithyourcomputerandtheprogramsthat
youinstalledfromWindowsStorewillbereinstalled,butallotherprogramswillberemoved.
Torefreshyourcomputer,dothefollowing:
1.Moveyourpointertothetop-rightorbottom-rightcornerofthescreentodisplaythecharms.Click
Settings➙ChangePCsettings➙Updateandrecovery➙Recovery.
2.IntheRefreshyourPCwithoutaffectingyourfilessection,clickGetstarted.
3.Followtheinstructionsonthescreentorefreshyourcomputer.
Resettingyourcomputertothefactorydefaultsettings
Ifyouwanttorecycleyourcomputerorjuststartover,youcanresetyourcomputertothefactorydefault
settings.Resettingthecomputerwillreinstalltheoperatingsystem,reinstallalltheprogramsthatcamewith
yourcomputer,andresetallthesettingstothefactorydefaultsettings.
Attention:Ifyouresetthecomputertothefactorydefaultsettings,allyourpersonalfilesandsettingswillbe
deleted.Toavoiddataloss,makeabackupcopyofallthedatathatyouwanttokeep.
Toresetyourcomputertothefactorydefaultsettings,dothefollowing:
100UserGuide

1.Moveyourpointertothetop-rightorbottom-rightcornerofthescreentodisplaythecharms.Click
Settings➙ChangePCsettings➙Updateandrecovery➙Recovery.
2.IntheRemoveeverythingandreinstallWindowssection,clickGetstarted.ThenclickNextto
confirmtheoperation.
3.Dependingonyourneeds,dooneofthefollowing:
•Toperformaquickformat,clickJustremovemyfilestostarttheprocess.Theprocesswilltake
severalminutes.
•Toperformacompleteformat,clickFullycleanthedrivetostarttheprocess.Theprocesswill
takeseveralhours.
4.Followtheinstructionsonthescreentoresetyourcomputertothefactorydefaultsettings.
Usingtheadvancedstartupoptions
Withtheadvancedstartupoptions,youcanchangethefirmwaresettingsofthecomputer,changethe
startupsettingsoftheWindowsoperatingsystem,startthecomputerfromanexternaldevice,orrestorethe
Windowsoperatingsystemfromasystemimage.
Tousetheadvancedstartupoptions,dothefollowing:
1.Moveyourpointertothetop-rightorbottom-rightcornerofthescreentodisplaythecharms.Click
Settings➙ChangePCsettings➙Updateandrecovery➙Recovery.
2.IntheAdvancedstartupsection,clickRestartnow➙Troubleshoot➙Advancedoptions.
3.Selectadesiredstartupoption,thenfollowtheinstructionsonthescreen.
RecoveringyouroperatingsystemifWindows8.1failstostart
TheWindowsrecoveryenvironmentonyourcomputeriscapableofoperatingindependentlyfromthe
Windows8.1operatingsystem.Thisenablesyoutorecoverorrepairtheoperatingsystemevenifthe
Windows8.1operatingsystemfailstostart.
Aftertwoconsecutivefailedbootattempts,theWindowsrecoveryenvironmentstartsautomatically.Then
youcanchooserepairandrecoveryoptionsbyfollowingtheinstructionsonthescreen.
Note:Ensurethatyourcomputerisconnectedtoacpowerduringtherecoveryprocess.
Creatingandusingrecoverymedia
YoucancreaterecoverymediaasbackupsfortheWindowsrecoveryenvironmentandtheWindows
recoveryimage.Ifyoucannotstartthecomputer,youcanuserecoverymediatotroubleshootandfixthe
problemsonyourcomputer.
Itisrecommendedthatyoucreaterecoverymediaasearlyaspossible.Onceyoucreaterecoverymedia,
keeptheminasafeplaceanddonotusethemtostoreotherdata.
Creatingrecoverymedia
Tocreaterecoverymedia,youneedaUSBdrivewithatleast8GBofstorage.TherequiredUSBcapacity
dependsonthesizeoftherecoveryimage.
Attention:CreatingrecoverymediawilldeleteanythingstoredontheUSBdrive.Toavoiddataloss,makea
backupcopyofallthedatathatyouwanttokeep.
Tocreaterecoverymedia,dothefollowing:
Note:Ensurethatyourcomputerisconnectedtoacpower.
Chapter8.Recoveryoverview101

1.Moveyourpointertothetop-rightorbottom-rightcornerofthescreentodisplaythecharms,and
clickSearch.
2.TyperecoveryintheSearchfieldandclicktheSearchbutton.ThenclickCreatearecoverydrive.
3.ClickYesintheUserAccountControlwindowtoallowtheRecoveryMediaCreatorprogramtostart.
4.SelecttheCopytherecoverypartitionfromthePCtotherecoverydrive.option.ThenclickNext.
Important:IfyoucleartheCopytherecoverypartitionfromthePCtotherecoverydrive.option,
youwillcreaterecoverymediawithouttherecoverypartitioncontent.Youstillcanstartthecomputer
fromtherecoverymedia,butyoumightbeunabletorecoveryourcomputeriftherecoverypartitionon
yourcomputerisdamaged.
5.ConnectaproperUSBdrivethenclickNext.
6.ClickCreateintheRecoveryDrivewindow.Thecreationoftherecoverymediastarts.
7.Whenthecreationoftherecoverymediafinishes,dooneofthefollowing:
•Tokeeptherecoverypartitiononyourcomputer,clickFinish.
•Todeletetherecoverypartitiononyourcomputer,clickDeletetherecoverypartition.
Attention:Ifyoudeletetherecoverypartitiononyourcomputer,dokeeptherecoverymediaina
safeplace.TheWindowsrecoveryimagewillnotbestoredinyourcomputeranymore,andyouwill
needtherecoverymediatorefreshorresetyourcomputer.
8.RemovetheUSBdrive.Therecoverymediaarecreatedsuccessfully.
Usingrecoverymedia
Ifyoucannotstartyourcomputer,orifyoucannotstarttheWindowsrecoveryimageonyourcomputer,use
recoverymediatorecoveryourcomputer.
Touserecoverymedia,dothefollowing:
Note:Ensurethatyourcomputerisconnectedtoacpower.
1.Turnonorrestartthecomputer.BeforetheWindowsoperatingsystemstarts,repeatedlypresstheF12
key.TheBootMenuwindowopens.
2.Selecttherecoverydriveasthebootdevice.
3.Selectapreferredlanguageandthenselectapreferredkeyboardlayout.
4.ClickTroubleshoottodisplaytheoptionalrecoverysolutions.
5.Selectacorrespondingrecoverysolutionaccordingtoyoursituation.Forexample,selectResetyour
PCifyouwanttoresetyourcomputertothefactorydefaultsettings.
FormoreinformationabouttherecoverysolutionsprovidedbytheWindows8.1operatingsystem,goto:
http://go.microsoft.com/fwlink/?LinkID=263800
RecoveryoverviewfortheWindows10operatingsystem
TheWindowsrecoveryprogramsenableyoutoresetyourcomputeroruseadvancedstartupoptions.
ItisrecommendedthatyoucreatearecoveryUSBdriveasearlyaspossible.StoretherecoveryUSBdrive
asabackuporreplacementfortheWindowsrecoveryprograms.
Formoreinformation,see“CreatingandusingarecoveryUSBdrive”onpage103.
102UserGuide

Resettingyourcomputer
Ifyourcomputerdoesnotperformwell,youmightconsiderresettingyourcomputer.Intheresettingprocess,
youcanchoosetokeepyourfilesorremovethem,andthenreinstalltheWindowsoperatingsystem.
Toresetyourcomputer,dothefollowing:
Note:Thegraphicaluserinterface(GUI)itemsoftheoperatingsystemmightchangewithoutnotice.
1.OpentheStartmenuandthenclickSettings.IfSettingsisnotdisplayed,clickAllappstodisplayall
programs,andthenclickSettings➙Update&security➙Recovery.
2.IntheResetthisPCsection,clickGetstarted.
3.Followtheinstructionsonthescreentoresetyourcomputer.
Usingadvancedstartupoptions
Withadvancedstartupoptions,youcanchangethefirmwaresettingsofthecomputer,changethestartup
settingsoftheWindowsoperatingsystem,startthecomputerfromanexternaldevice,orrestorethe
Windowsoperatingsystemfromasystemimage.
Touseadvancedstartupoptions,dothefollowing:
Note:TheGUIitemsoftheoperatingsystemmightchangewithoutnotice.
1.OpentheStartmenuandthenclickSettings.IfSettingsisnotdisplayed,clickAllappstodisplayall
programs,andthenclickSettings➙Update&security➙Recovery.
2.IntheAdvancedstartupsection,clickRestartnow➙Troubleshoot➙Advancedoptions.
3.Selectadesiredstartupoption,thenfollowtheinstructionsonthescreen.
RecoveringyouroperatingsystemifWindows10failstostart
TheWindowsrecoveryenvironmentonyourcomputeriscapableofoperatingindependentlyfromthe
Windows10operatingsystem.Thisenablesyoutorecoverorrepairtheoperatingsystemevenifthe
Windows10operatingsystemfailstostart.
Aftertwoconsecutivefailedbootattempts,theWindowsrecoveryenvironmentstartsautomatically.Then
youcanchooserepairandrecoveryoptionsbyfollowingtheinstructionsonthescreen.
Note:Ensurethatyourcomputerisconnectedtoacpowerduringtherecoveryprocess.
CreatingandusingarecoveryUSBdrive
YoucancreatearecoveryUSBdriveasabackupfortheWindowsrecoveryprograms.Withtherecovery
USBdrive,youcantroubleshootandfixtheproblemsevenifthepreinstalledWindowsrecoveryprograms
aredamaged.
CreatingarecoveryUSBdrive
TheUSBdrivethatyouusetocreatetherecoveryUSBdrivemustbeatleast16GBofstorage.Theactual
USBcapacitythatisrequireddependsonthesizeoftherecoveryimage.
Attention:ThecreationprocessdeletesanythingstoredontheUSBdrive.Toavoiddataloss,makea
backupcopyofallthedatathatyouwanttokeep.
TocreatearecoveryUSBdrive,dothefollowing:
Note:Ensurethatyourcomputerisconnectedtoacpowerduringthefollowingprocess.
Chapter8.Recoveryoverview103

1.ConnectaproperUSBdrive(atleast16GBofstorage).
2.Typerecoveryinthesearchboxonthetaskbar.ThenclickCreatearecoverydrive.
3.ClickYesintheUserAccountControlwindowtoallowtheRecoveryMediaCreatorprogramtostart.
4.IntheRecoveryDrivewindow,followtheon-screeninstructionstocreatearecoveryUSBdrive.
UsingtherecoveryUSBdrive
Ifyoucannotstartyourcomputer,refertothecorrespondinginformationinthetopic“Troubleshooting”on
page79totrytosolvetheproblembyyourself.Ifyoustillcannotstartyourcomputer,usetherecovery
USBdrivetorecoveryourcomputer.
TousearecoveryUSBdrive,dothefollowing:
Note:Ensurethatyourcomputerisconnectedtoacpower.
1.ConnecttherecoveryUSBdrivetothecomputer.
2.Turnonorrestartthecomputer.BeforetheWindowsoperatingsystemstarts,repeatedlypresstheF12
key.TheBootMenuwindowopens.
3.SelecttherecoveryUSBdriveasthebootdevice.
4.Selectapreferredkeyboardlayout.
5.ClickTroubleshoottodisplaytheoptionalrecoverysolutions.
6.Selectacorrespondingrecoverysolutionaccordingtoyoursituation.Thenfollowtheinstructionson
thescreentocompletetheprocess.
104UserGuide

Chapter9.Replacingdevices
Thischaptercontainsthefollowingitems:
•“Staticelectricityprevention”onpage105
•“Disablingthebuilt-inbatteries”onpage105
•“Replacingthememorymodule”onpage106
•“Replacingthecoin-cellbattery”onpage108
•“Replacingtheuser-replaceablewireless-LANcard”onpage120
•“Replacingtheharddiskdriveorsolid-statedrive”onpage111
•“Replacingthekeyboard”onpage115
Staticelectricityprevention
Staticelectricity,althoughharmlesstoyou,canseriouslydamagecomputercomponentsandoptions.
Improperhandlingofstatic-sensitivepartscancausedamagetothepart.Whenyouunpackanoptionor
aCRU,donotopenthestatic-protectivepackagecontainingthepartuntiltheinstructionsdirectyou
toinstallit.
WhenyouhandleoptionsorCRUs,orperformanyworkinsidethecomputer,takethefollowingprecautions
toavoidstatic-electricitydamage:
•Limityourmovement.Movementcancausestaticelectricitytobuilduparoundyou.
•Alwayshandlecomponentscarefully.Handleadapters,memorymodules,andothercircuitboardsbythe
edges.Nevertouchexposedcircuitry.
•Preventothersfromtouchingcomponents.
•Whenyouinstallastatic-sensitiveoptionorCRU,touchthestatic-protectivepackagecontainingthe
parttoametalexpansion-slotcoverorotherunpaintedmetalsurfaceonthecomputerforatleasttwo
seconds.Thisreducesstaticelectricityfromthepackageandyourbody.
•Whenpossible,removethestatic-sensitivepartfromthestatic-protectivepackagingandinstallthepart
withoutsettingitdown.Whenthisisnotpossible,placethestatic-protectivepackagingonasmooth,
levelsurfaceandplacethepartonit.
•Donotplacethepartonthecomputercoverorothermetalsurface.
Disablingthebuilt-inbatteries
BeforereplacinganyFRU,ensurethatyouhavedisabledthebuilt-inbattery.
ForWindows10,disableFastStartupbeforedisablingthebuilt-inbattery.
TodisableFastStartupforWindows10,dothefollowing:
1.Fromthedesktop,typePowerinthesearchboxonthetaskbar,andselectPowerOptions.
2.ClickChangewhatthepowerbuttonsdoontheleftpane.
3.ClickChangesettingsthatarecurrentlyunavailableatthetop.
4.IfpromptedbyUserAccountControl(UAC),clickYes.
5.CleartheTurnonfaststartupcheckbox,andthenclickSavechanges.
Todisablethebuilt-inbattery,dothefollowing:
©CopyrightLenovo2014,2016
105
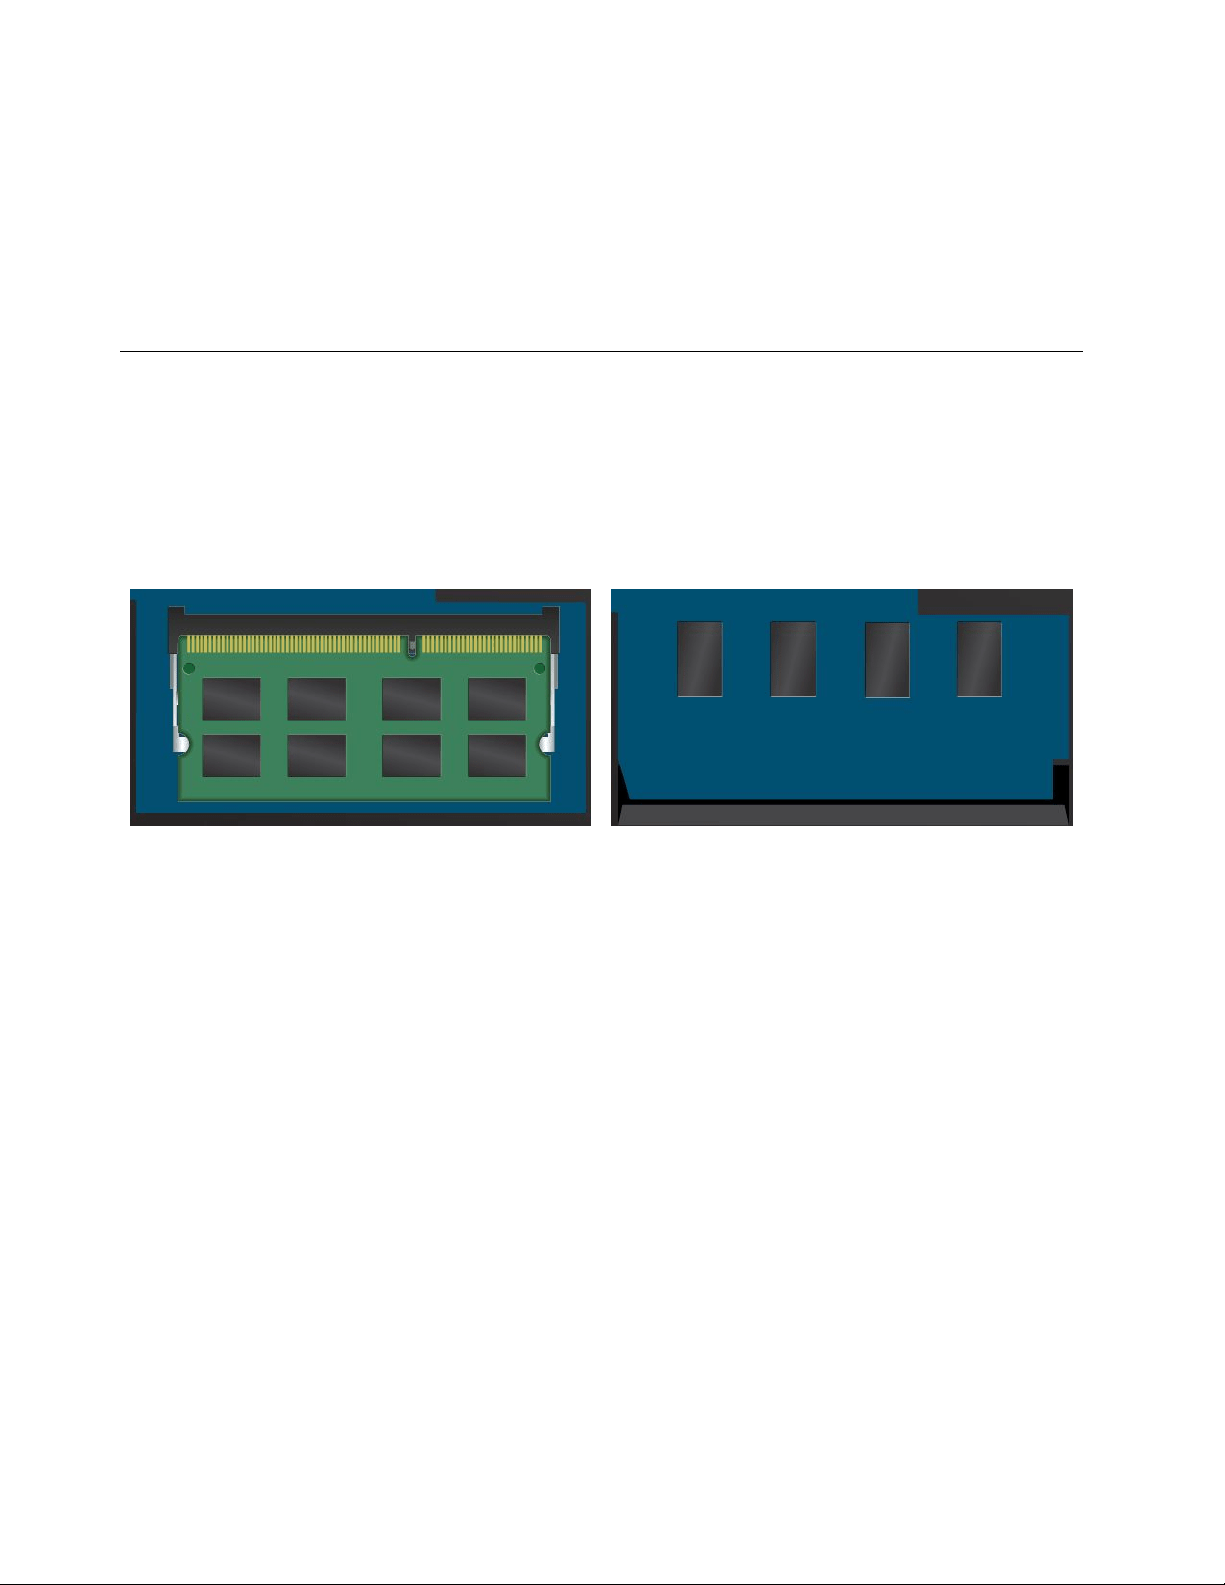
1.Turnoffyourcomputeranddisconnecttheacpoweradapterandallcablesfromthecomputer.
2.Turnonyourcomputer.Whenthelogoscreenisdisplayed,immediatelypressF1toenterThinkPad
Setup.
3.SelectConfig➙Power.ThePowersubmenuisdisplayed.
4.SelectDisablebuilt-inbatteryandpressEnter.
5.SelectYesintheSetupConfirmationwindow.Thebuilt-inbatteryisdisabledandthecomputerturnsoff
automatically.Waitthreetofiveminutestoletthecomputercool.
Replacingthememorymodule
Beforeyoustart,printtheseinstructions.Readtheimportantsafetyinformationfirst.
Thistopiconlyappliestothememorymodulethatisseatedinthememoryslot.Thememorymoduleofyour
computermightbeseatedinthememoryslot(figure1)orsolderedonthesystemboard(figure2).Ifthe
memorymoduleissolderedonthesystemboard,itcannotbereplaced.
Figure1.Memorymoduleseatedinthememoryslot
(replaceable)
Figure2.Memorymodulesolderedonthesystemboard
(non-replaceable)
Increasingmemorycapacityisaneffectivewaytomakeprogramsrunfaster.Theoperatingspeedofthe
memorymodulehasdependencyonthesystemconfiguration.Insomeconditions,thememorymodulein
yourcomputermightnotbeabletooperateatthemaximumspeed.
Toreplacethememorymodule,readthefollowingprerequisitesandthentheinstructions.
Attention:Beforeyoustartinstallingamemorymodule,touchametaltableoragroundedmetalobject.This
actionreducesanystaticelectricityfromyourbody.Thestaticelectricitycoulddamagethememorymodule.
Toreplaceamemorymodule,dothefollowing:
Note:Yourcomputermightlookslightlydifferentfromthefollowingillustrations.
1.Turnoffthecomputer;thendisconnecttheacpoweradapterandallcablesfromthecomputer.Wait
threetofiveminutestoletthecomputercool.
2.Closethecomputerdisplay,andturnitover.
106UserGuide
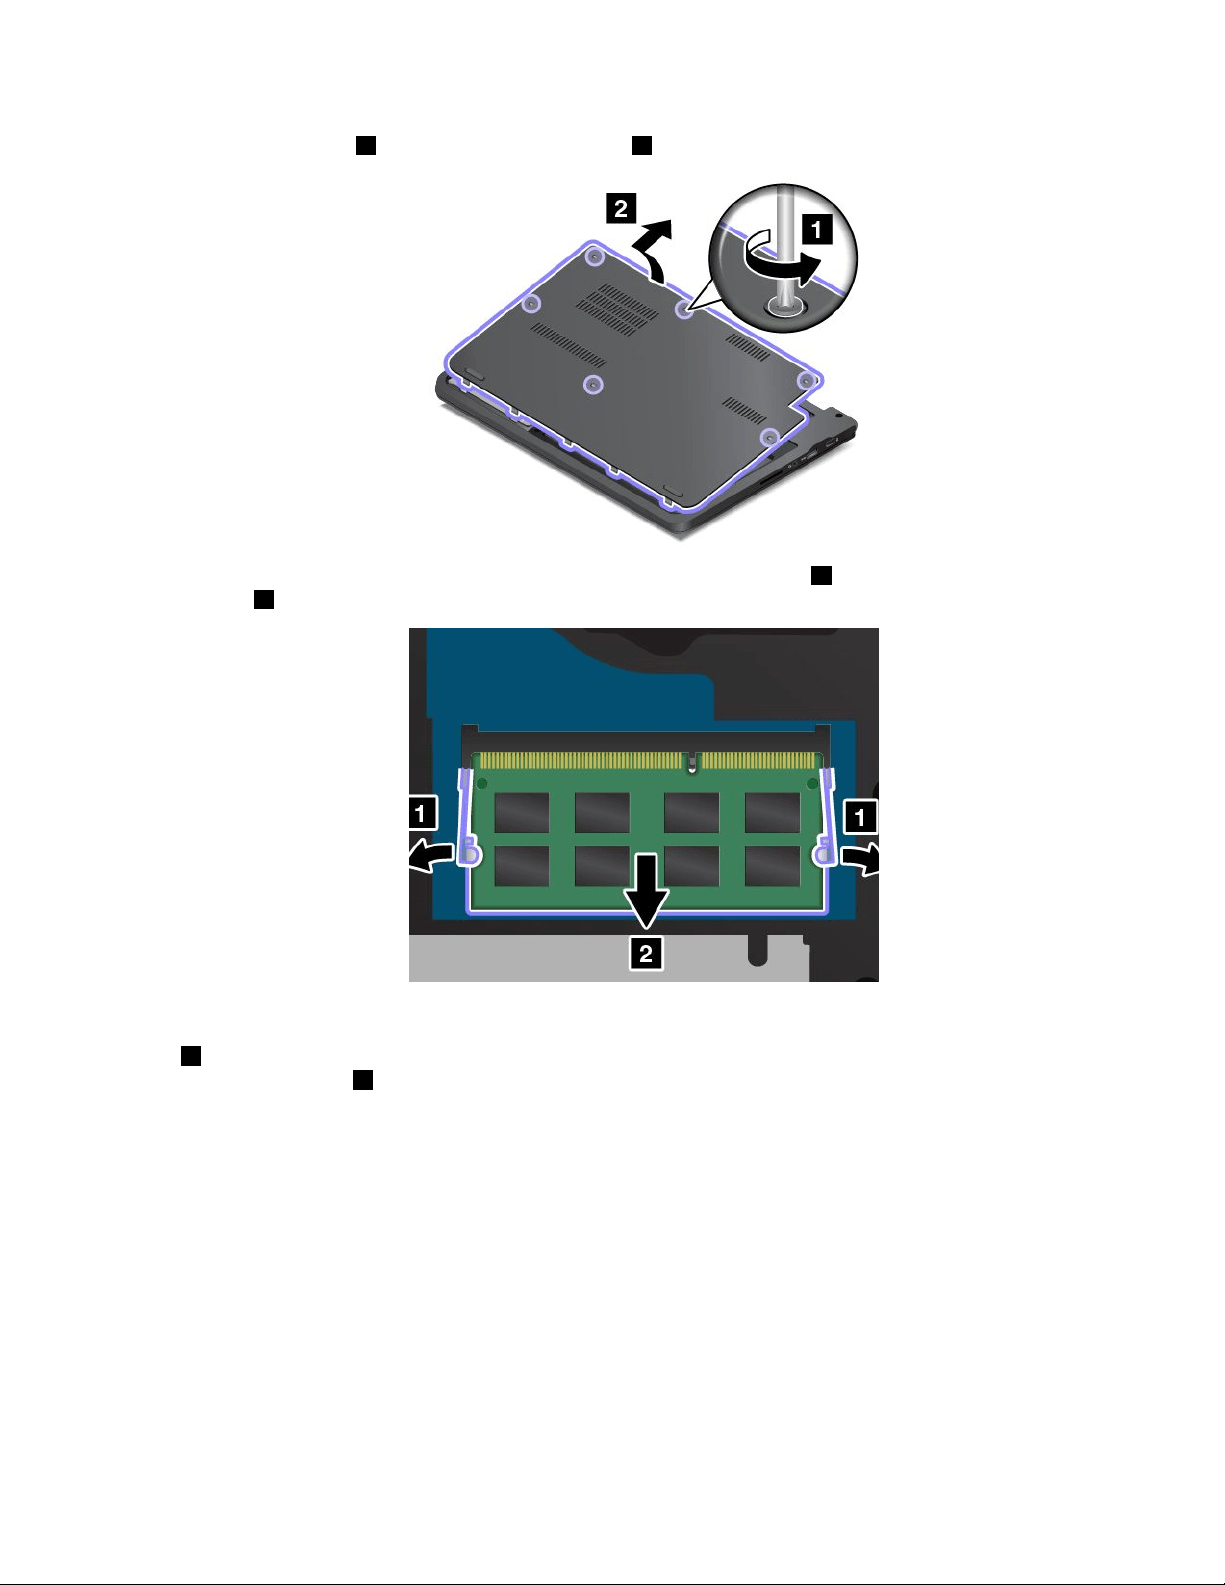
3.Loosenthescrews1,andthenremovethecover2.
4.Pressoutonthelatchesonbothedgesofthesocketatthesametime1,andthenremovethememory
module
2tomakeroomforthenewone.
5.Findthenotchonthecontactedgesideofthememorymoduleyouareinstalling.Withthenotched
endofthememorymoduletowardthecontactedgesideofthesocket,insertthememorymodule
1intothesocketatanangleofabout20degrees;thenpivotthememorymoduledownwarduntil
itsnapsintoplace
2.
Attention:Toavoiddamagingthememorymodule,donottouchitscontactedge.
Chapter9.Replacingdevices107

6.Installthecover1andpivotitdownwards2.Thentightenthescrews3.
7.Turnthecomputeroveragain.Connecttheacpoweradapterandallcables.
Replacingthecoin-cellbattery
Beforeyoustart,printtheseinstructions.Readtheimportantsafetyinformationfirst.
108UserGuide
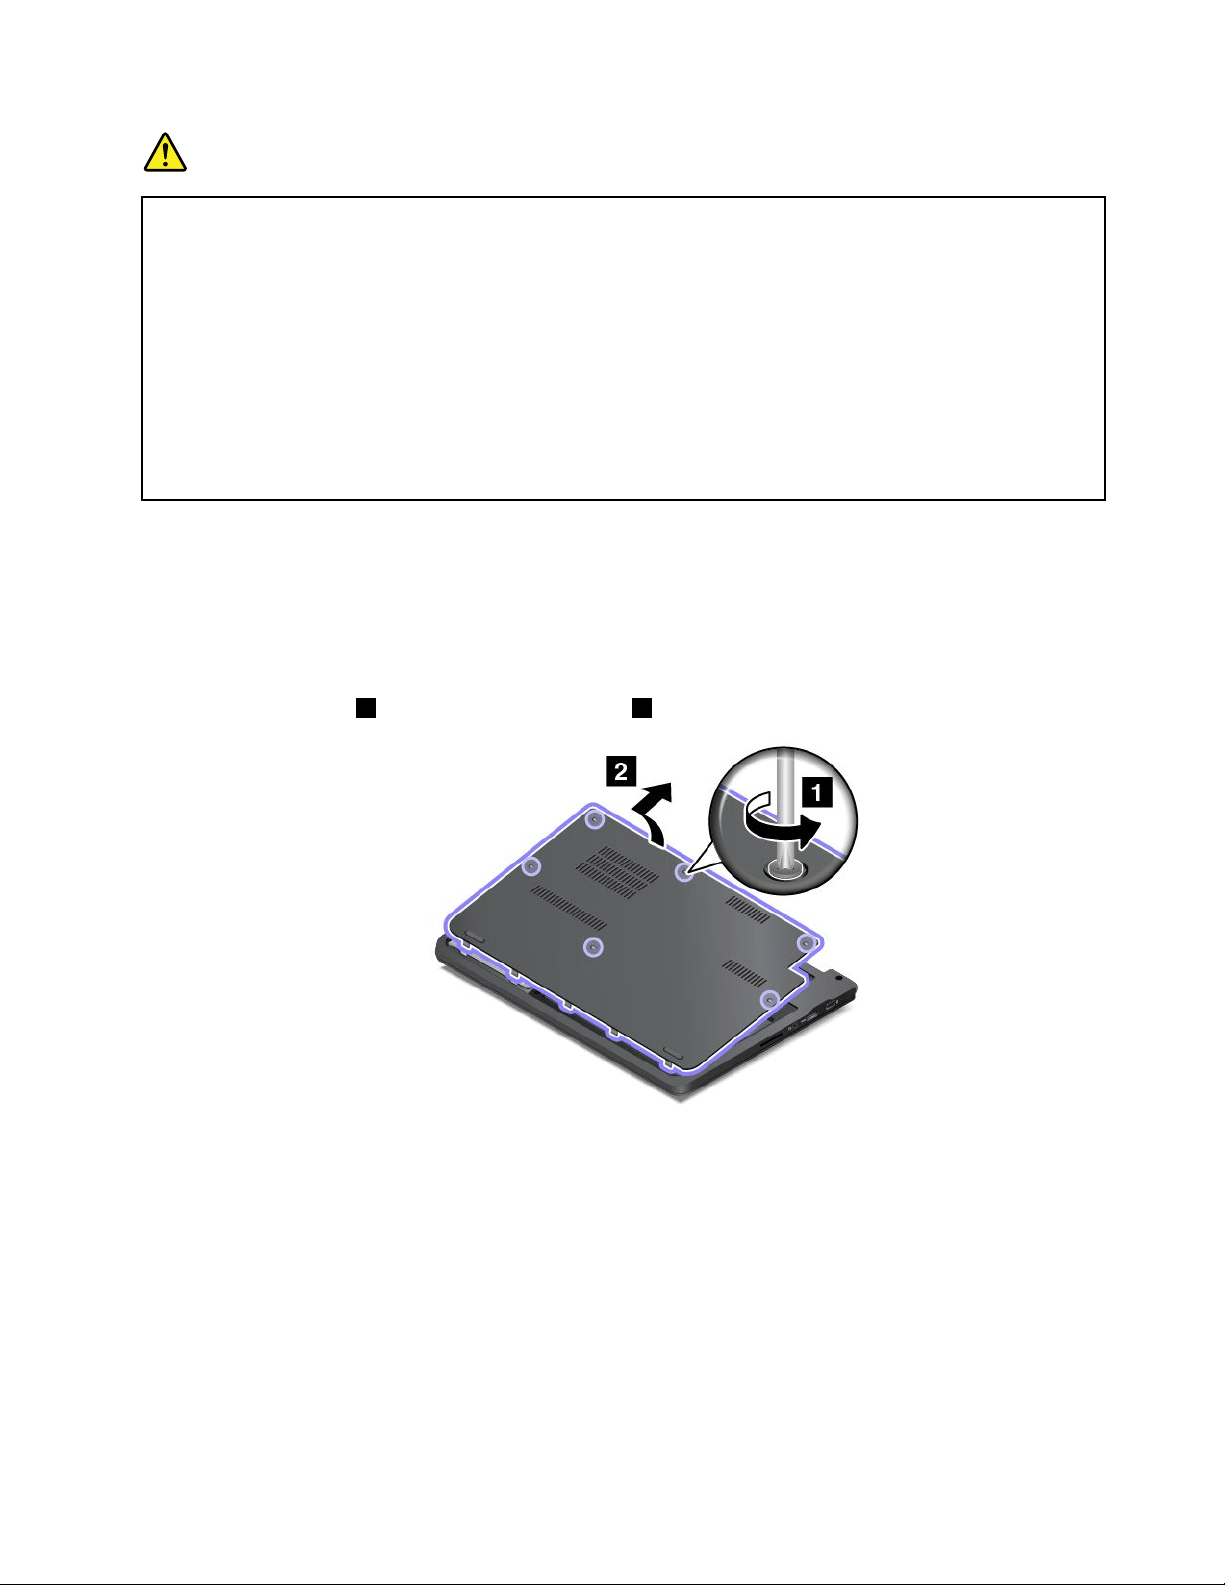
DANGER
Ifthecoin-cellbatteryisincorrectlyreplaced,thereisdangerofanexplosion.Thecoin-cellbattery
containsasmallamountofharmfulsubstances.Toavoidpossibleinjury:
•ReplaceonlywithabatteryofthetyperecommendedbyLenovo.
•Keepthebatterypackawayfromfire.
•Donotexposeittoexcessiveheat.
•Donotexposeittowaterorrain.
•Donotshort-circuitit.
•Donotdrop,crush,puncture,orsubjecttostrongforces.Batteryabuseormishandlingcan
causethebatterytooverheat,whichcancausegassesorflameto“vent”fromthebattery
packorcoincell.
Toremovethecoin-cellbattery,dothefollowing:
Note:Yourcomputermightlookslightlydifferentfromthefollowingillustrations.
1.Turnoffthecomputer;thendisconnecttheacpoweradapterandallcablesfromthecomputer.Wait
threetofiveminutestoletthecomputercool.
2.Closethecomputerdisplay,andturnthecomputerover.
3.Loosenthescrews1,andthenremovethecover2.
Chapter9.Replacingdevices109

4.Detachtheconnector1.Thenremovethecoin-cellbattery2.
Toinstallthebackupbattery,dothefollowing:
1.Installthecoin-cellbattery1.Thenattachtheconnector2.
2.Installthecover1andpivotitdownwards2.Thentightenthescrews3.
3.Turnthecomputeroveragain.Connecttheacpoweradapterandallcables.
110UserGuide
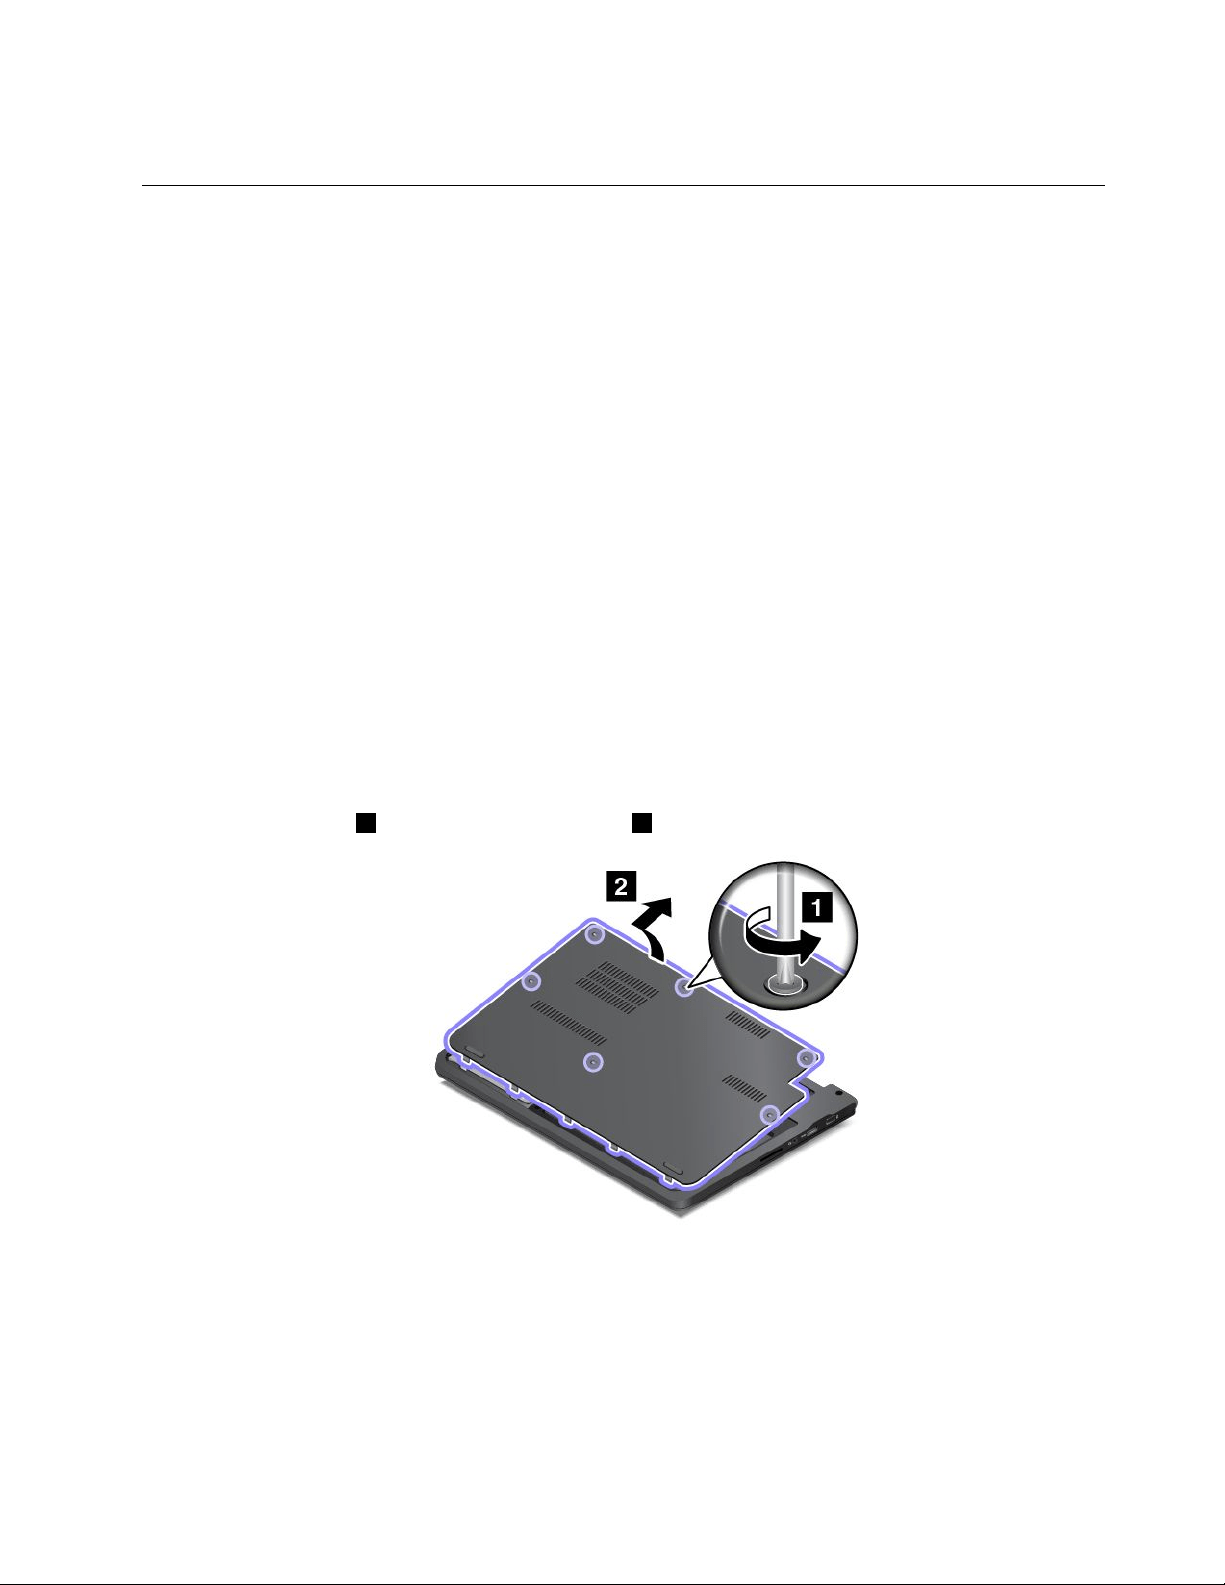
4.Afteryouinstallthecoin-cellbattery,resetthesystemdateandtimeintheThinkPadSetupprogram.
Replacingtheharddiskdriveorsolid-statedrive
Beforeyoustart,printtheseinstructions.Readtheimportantsafetyinformationfirst.
Attention:Theharddiskdriveorsolid-statedriveisverysensitive.Incorrecthandlingcancausedamage
andpermanentlossofdata.Observethefollowingguidelines:
•Replacetheharddiskdriveorsolid-statedriveonlyifyouupgradeitorhaveitrepaired.Theconnectors
andslotoftheharddiskdriveorsolid-statedrivearenotdesignedforfrequentchanges,ordrive
swapping.
•Donotdropthedriveorsubjectittophysicalshocks.Putthedriveonamaterial,suchassoftcloth,that
absorbsanyphysicalshocks.
•Donotapplypressuretothecoverofthedrive.
•Donottouchtheconnector.
•Beforeremovingtheharddiskdriveorsolid-statedrive,makeabackupcopyofalltheinformation
onit,andthenturnthecomputeroff.
•Neverremovethedrivewhilethecomputerisoperating,insleepmode,orinhibernationmode.
Toreplacetheharddiskdriveorsolid-statedrive,dothefollowing:
Note:Yourcomputermightlookslightlydifferentfromthefollowingillustrations.
1.Turnoffthecomputer;thendisconnecttheacpoweradapterandallcablesfromthecomputer.Wait
threetofiveminutestoletthecomputercool.
2.Closethecomputerdisplay,andturnitover.
3.Loosenthescrews1,andthenremovethecover2.
Chapter9.Replacingdevices111

4.Removethescrewthatsecurestheharddiskdriveorsolid-statedrive.
5.Taketheblacktabandlifttheharddiskdriveorsolid-statedrive.
6.Gentlytaketheharddiskdriveorsolid-statedriveoutofthedrivebaytorevealthedrivecable.Then
disconnectthecablefromtheharddiskdriveorsolid-statedrive.
7.Detachthebracketfromtheharddiskdriveorsolid-statedrive.
112UserGuide
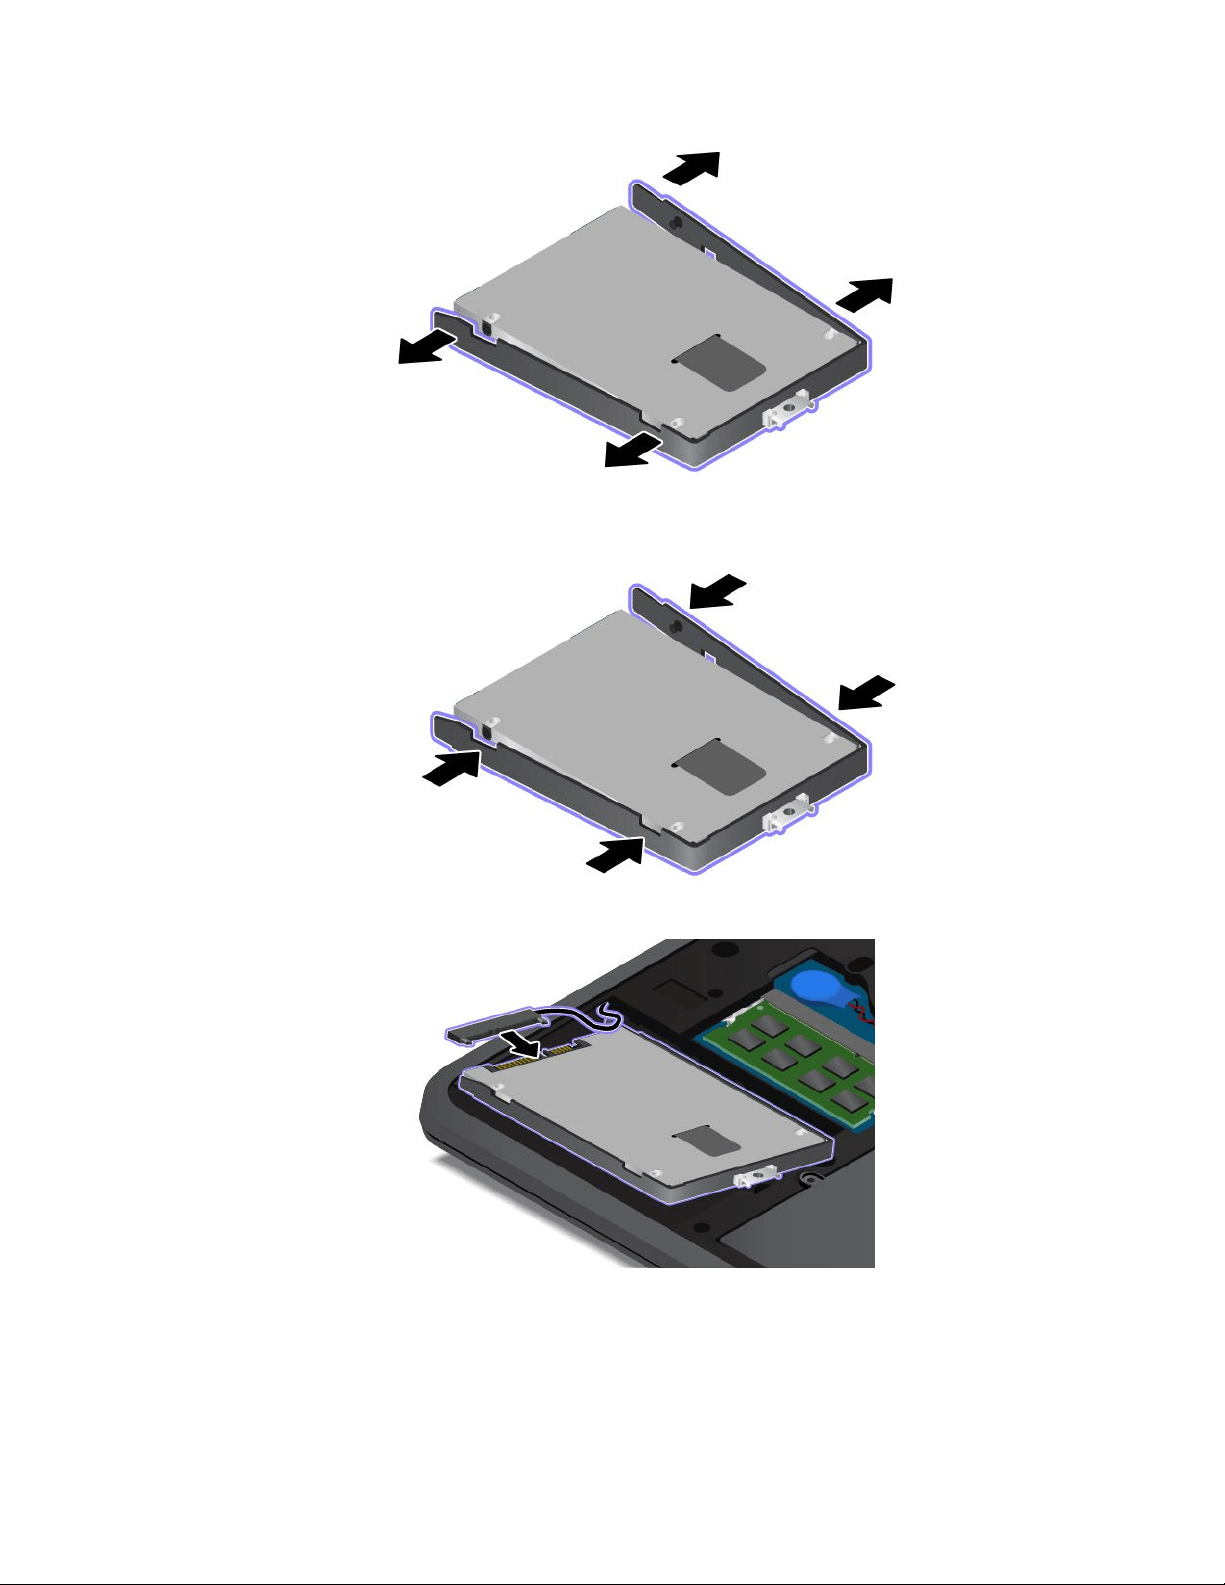

10.Placethenewharddiskdriveorsolid-statedriveintotheharddiskdriveorsolid-statedrivebay.
11.Reinstallthescrewtosecuretheharddiskdriveorsolid-statedrive.
12.Installthecover1andpivotitdownwards2.Thentightenthescrews3.
13.Turnthecomputeroveragain.Connecttheacpoweradapterandallcables.
114UserGuide

Replacingthekeyboard
Beforeyoustart,printtheseinstructions.Readtheimportantsafetyinformationfirst.
DANGER
Electriccurrentfrompower,telephone,andcommunicationcablesishazardous.Toavoidshock
hazard,disconnectthecablesbeforeopeningthecoverofthisslot.
Removingthekeyboard
Toremovethekeyboard,dothefollowing:
Note:Yourcomputermightlookslightlydifferentfromthefollowingillustrations.
1.Turnoffthecomputer;thendisconnecttheacpoweradapterandallcablesfromthecomputer.Wait
threetofiveminutestoletthecomputercool.
2.Closethecomputerdisplay,andturnitover.
3.Loosenthescrews1,andthenremovethecover2.
Chapter9.Replacingdevices115
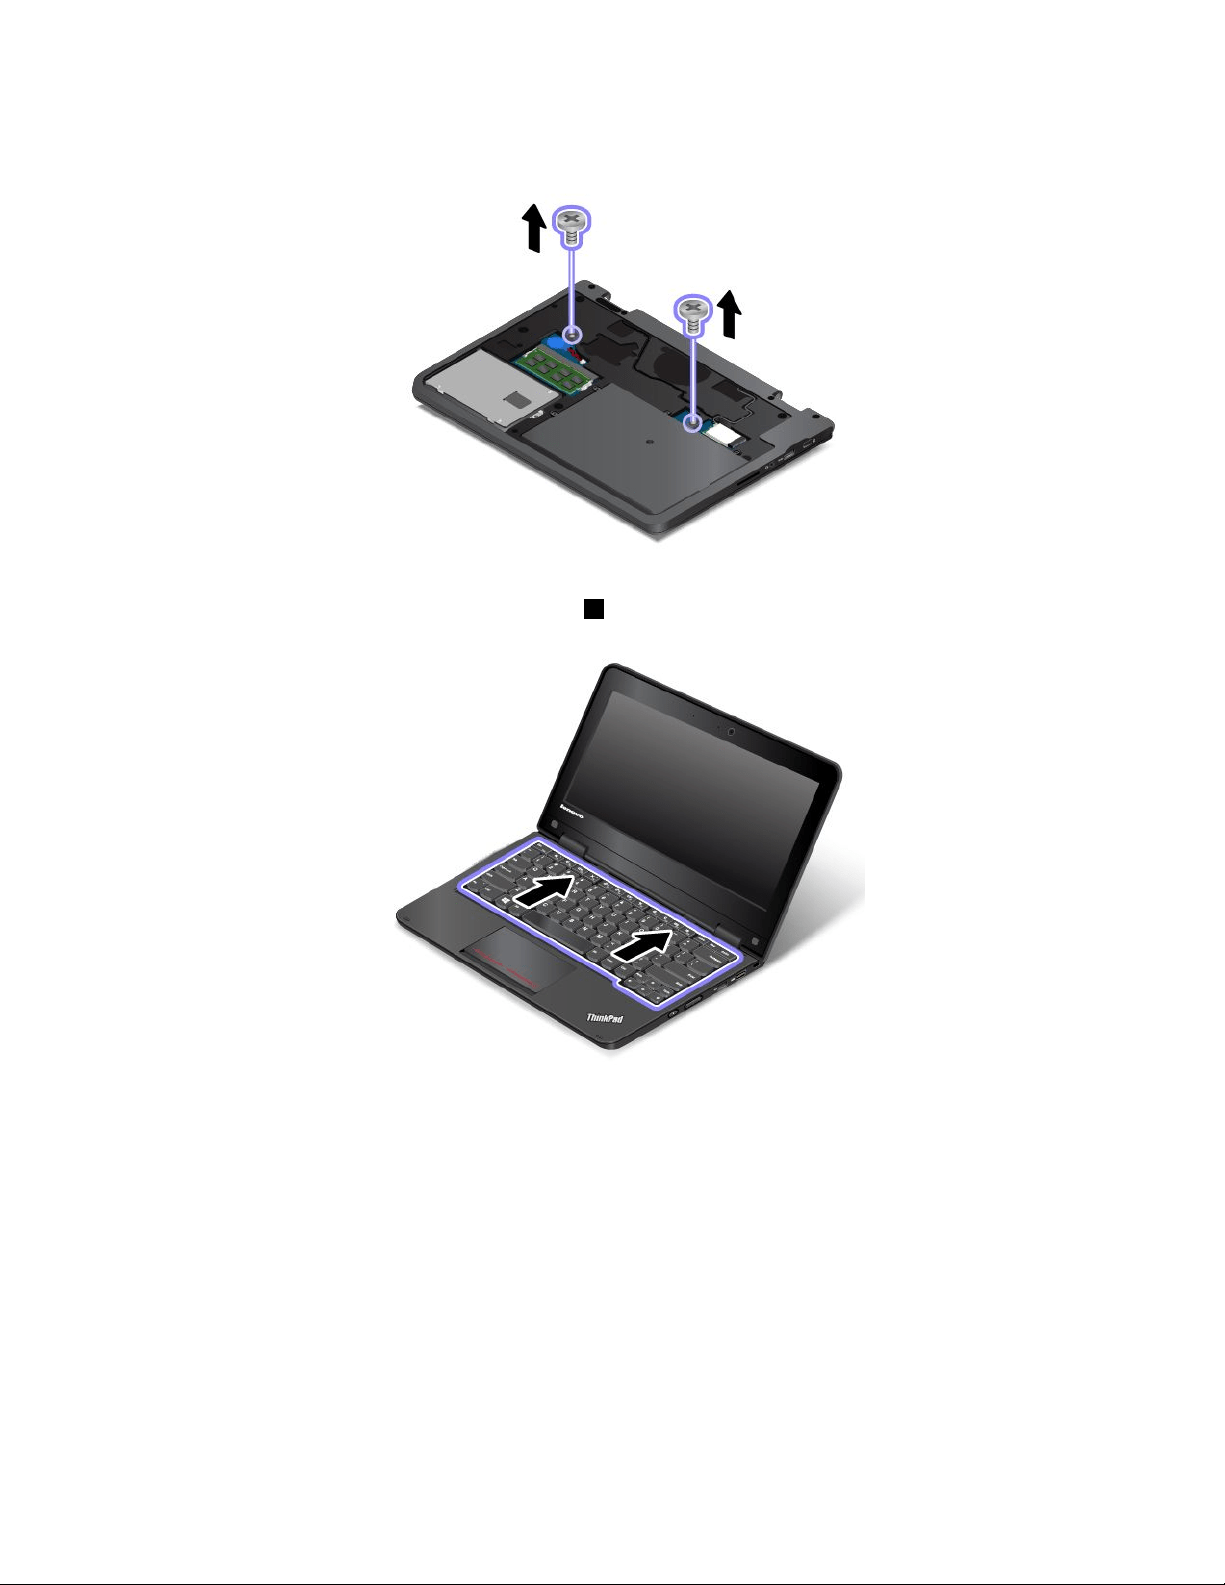
4.Removethescrewsthatsecurethekeyboard.
5.Turnthecomputeroverandopenthedisplay.
6.Pushhardinthedirectionshownbythearrows1tounlatchthefrontsideofthekeyboard.
116UserGuide
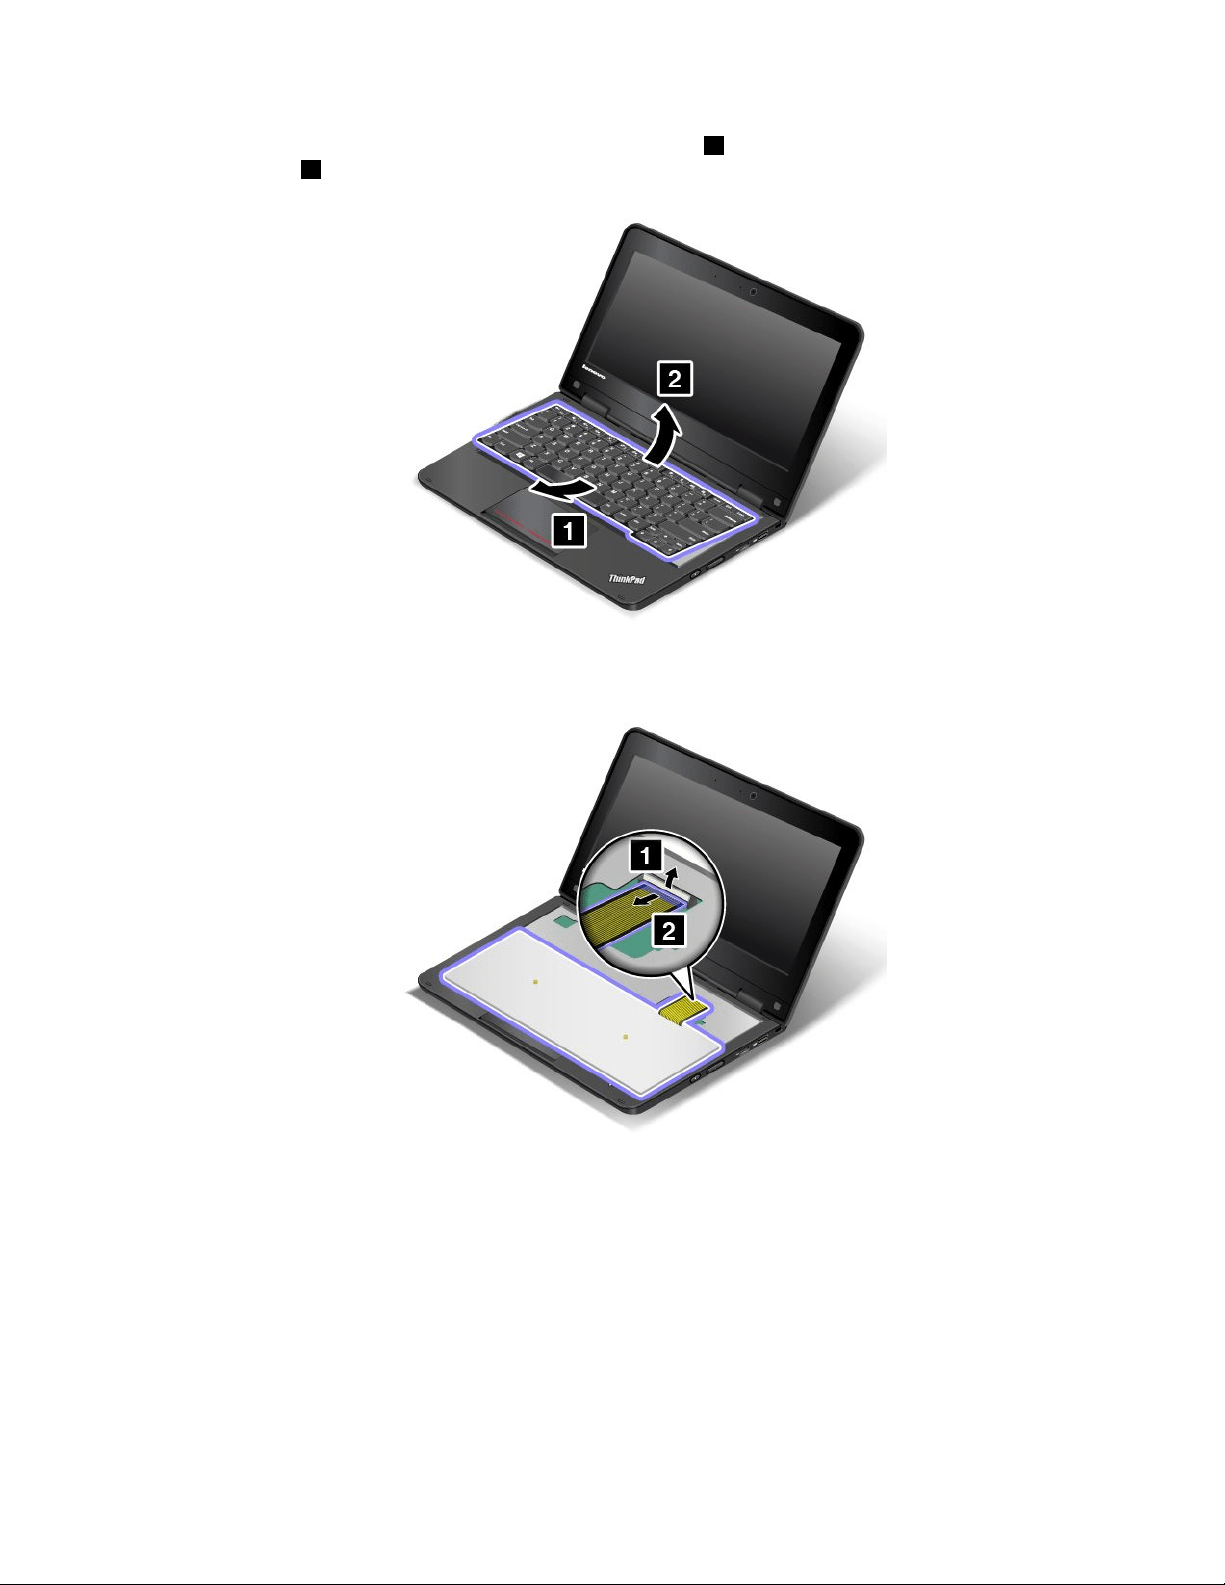
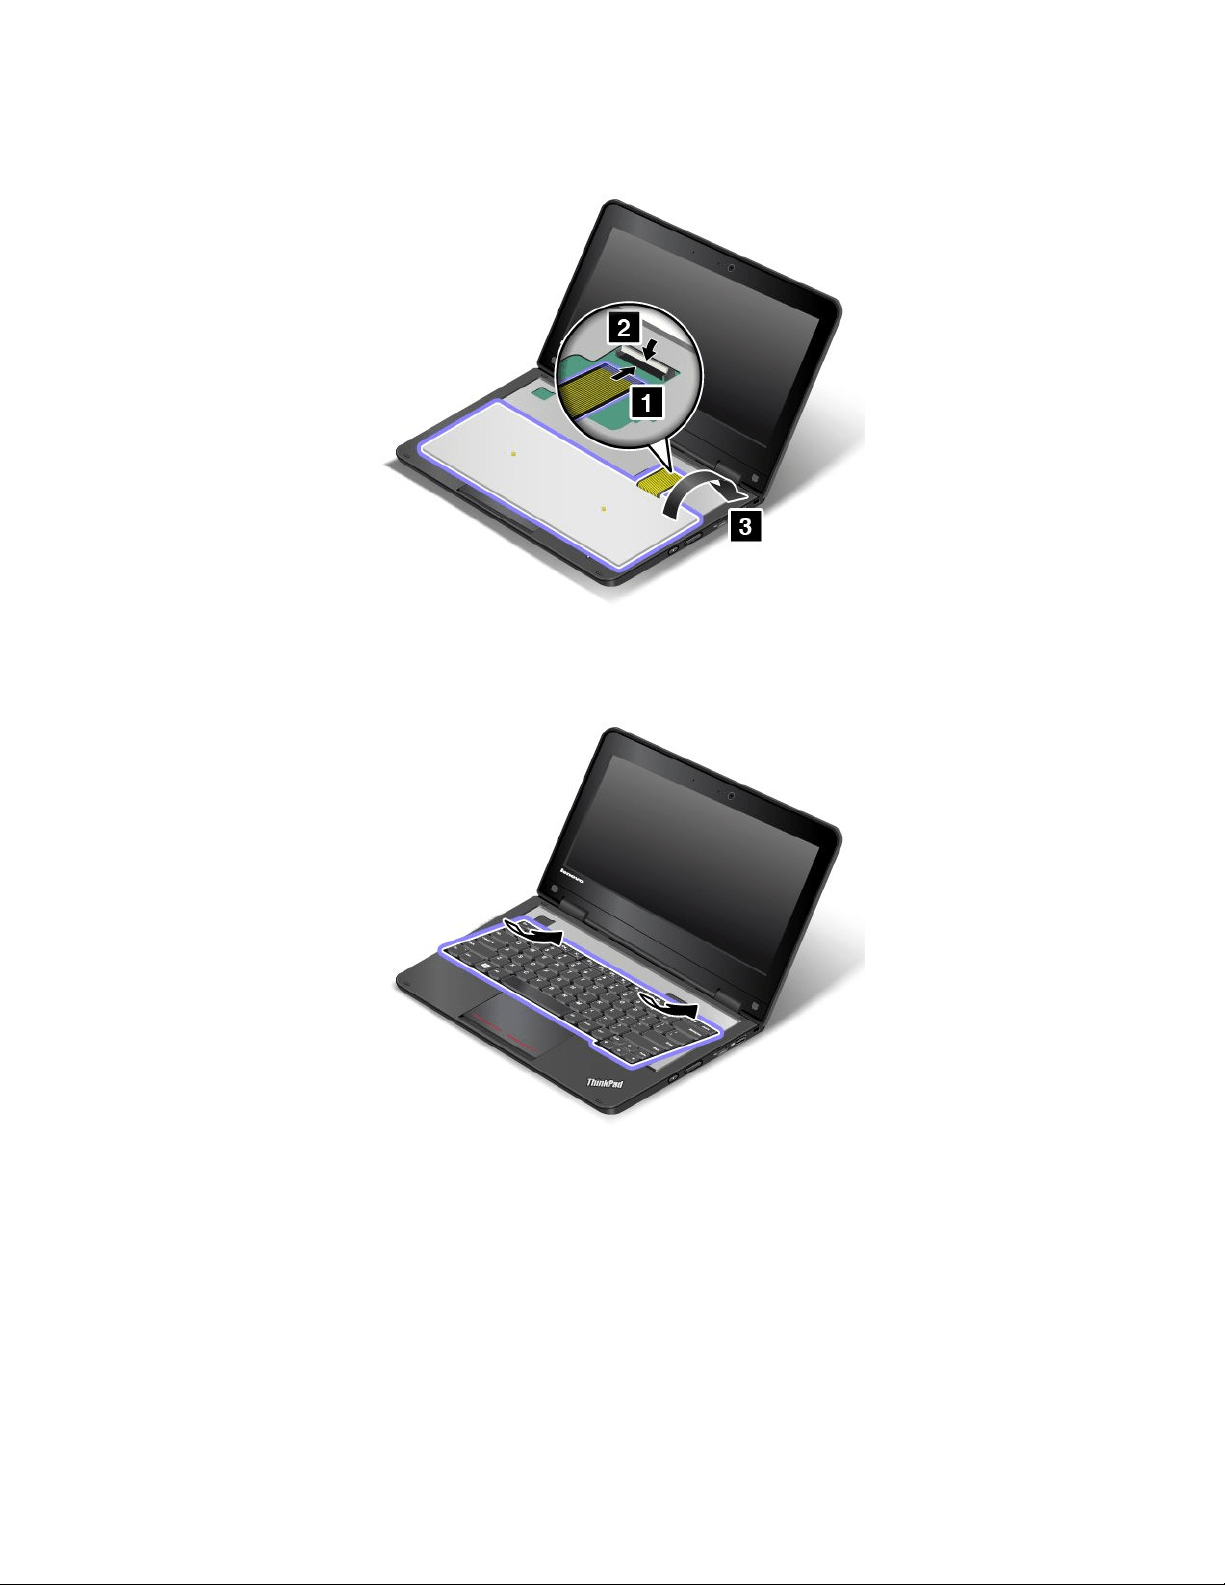
1.Attachthecable,andthenturnoverthekeyboard.
2.Insertthekeyboardintothekeyboardbezelasshown.Ensurethatthefrontedgeofthekeyboardis
undertheframeofthekeyboardbezel.
118UserGuide

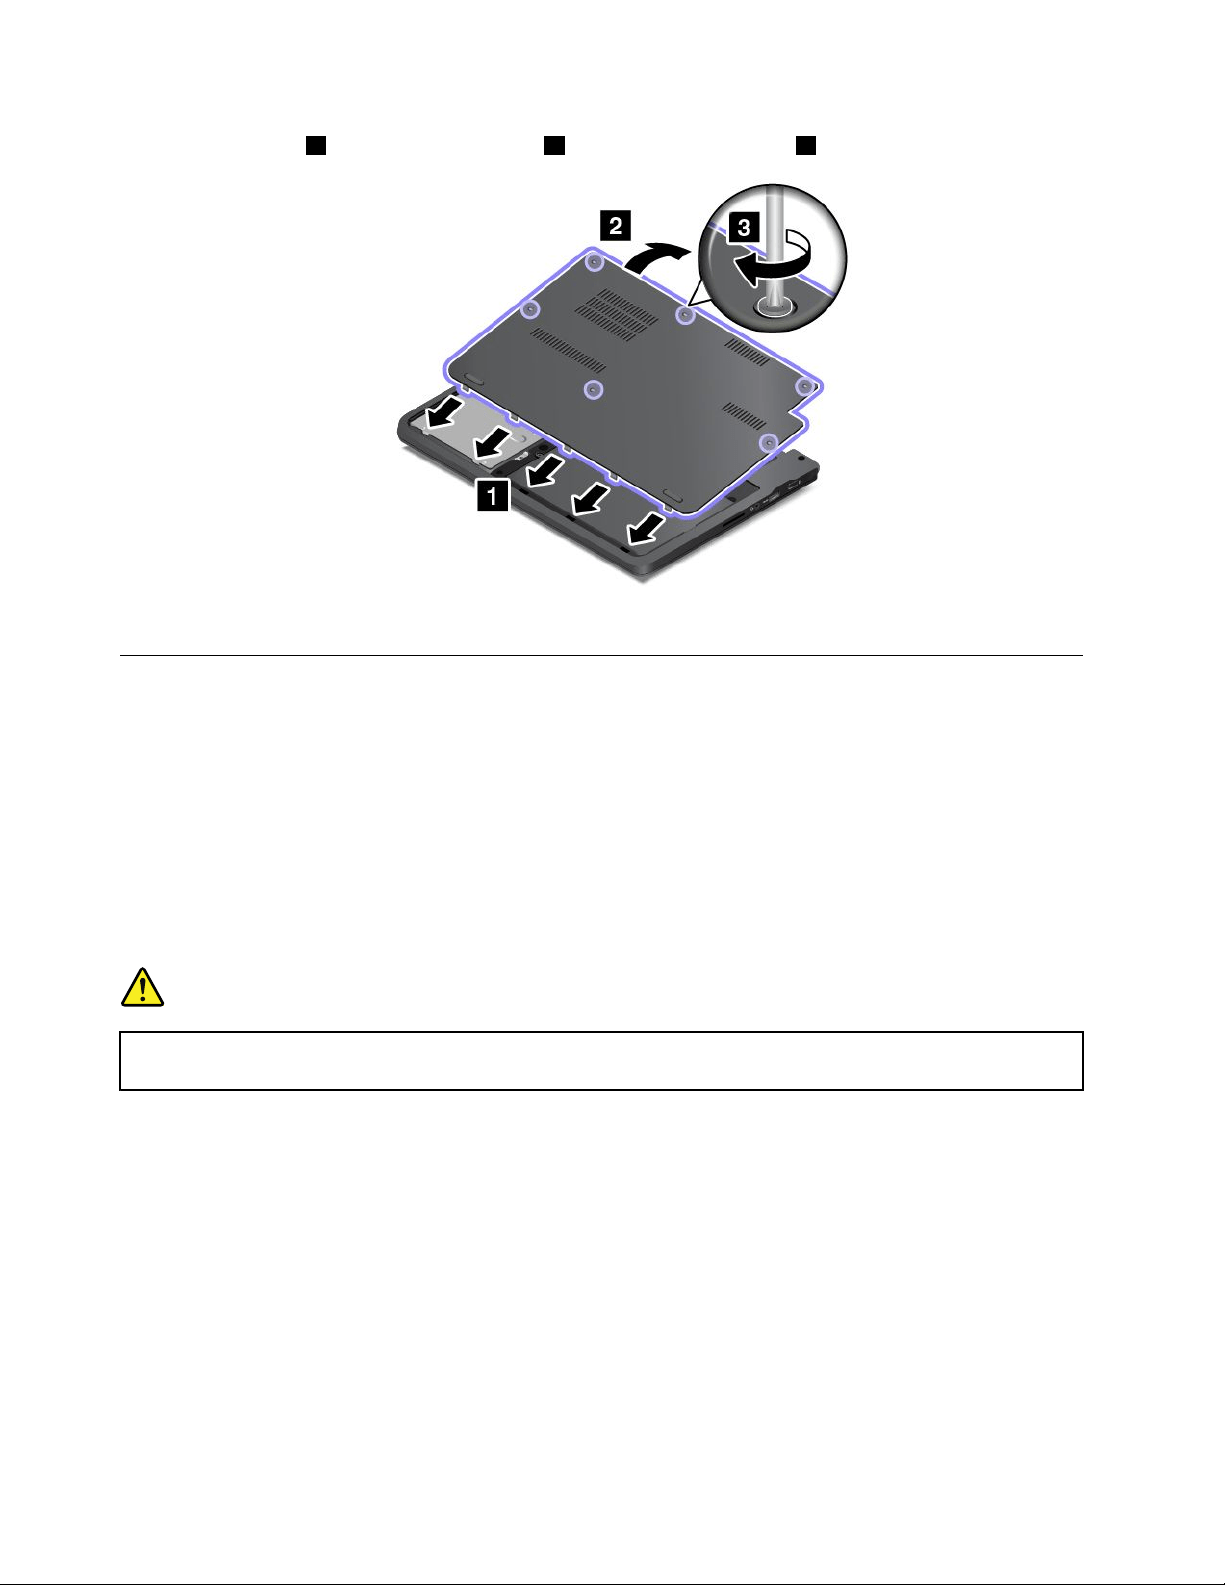
5.Installthecover1andpivotitdownwards2.Thentightenthescrews3.
6.Turnthecomputeroveragain.Connecttheacpoweradapterandallcables.
Replacingtheuser-replaceablewireless-LANcard
Beforeyoustart,printtheseinstructions.Readtheimportantsafetyinformationfirst.
Thistopiconlyappliestotheuser-replaceablewireless-LANcard.Donotreplacethepreinstalled
wireless-LANcardbyyourself.
Todistinguishauser-replaceablewireless-LANcardfromapreinstalledwireless-LANcard,see“FCCIDand
ICCertificationnumberinformation”onpage9.
Ifthepreinstalledwireless-LANcardneedsreplacement,contactLenovo.Forinformationaboutcontacting
Lenovo,seeChapter10“Gettingsupport”onpage125.
DANGER
Electriccurrentfrompower,telephone,andcommunicationcablesishazardous.Toavoidshock
hazard,disconnectthecablesbeforeopeningthecoverofthisslot.
Attention:Beforeyoustartinstallingauser-replaceablewireless-LANcard,touchametaltableora
groundedmetalobject.Thisactionreducesanystaticelectricityfromyourbody.Thestaticelectricity
coulddamagethecard.
Toreplacetheuser-replaceablewireless-LANcard,dothefollowing:
Note:Yourcomputermightlookslightlydifferentfromthefollowingillustrations.
1.Turnoffthecomputer;thendisconnecttheacpoweradapterandallcablesfromthecomputer.Wait
threetofiveminutestoletthecomputercool.
2.Closethecomputerdisplay,andturnthecomputerover.
120UserGuide
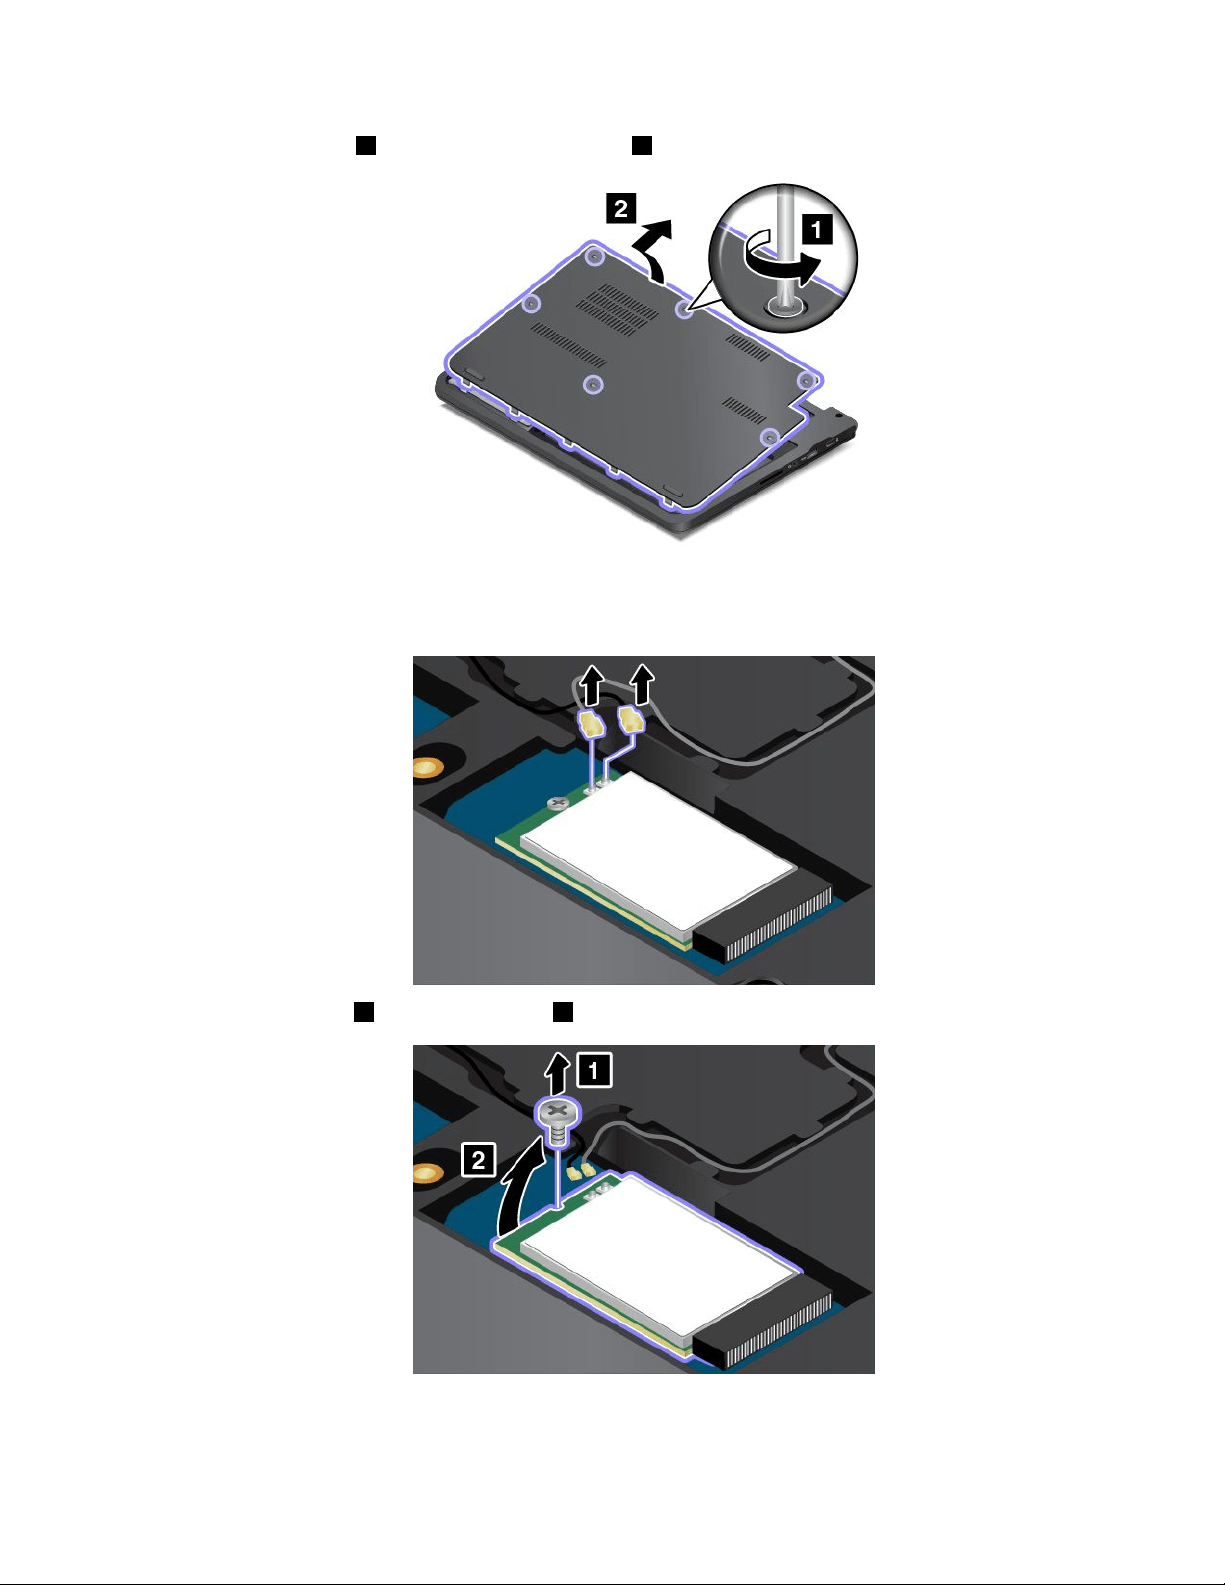
3.Loosenthescrews1,andthenremovethecover2.
4.Ifatoolforremovingconnectorsisincludedinthepackagewiththenewcard,useittodisconnectthe
cablesfromthecard.Ifnosuchtoolisincluded,disconnectthecablesbypickinguptheconnectors
withyourfingersandgentlyunpluggingthem.
5.Removethescrew1.Thecardpopsup2.
6.Removethecard.
Chapter9.Replacingdevices121
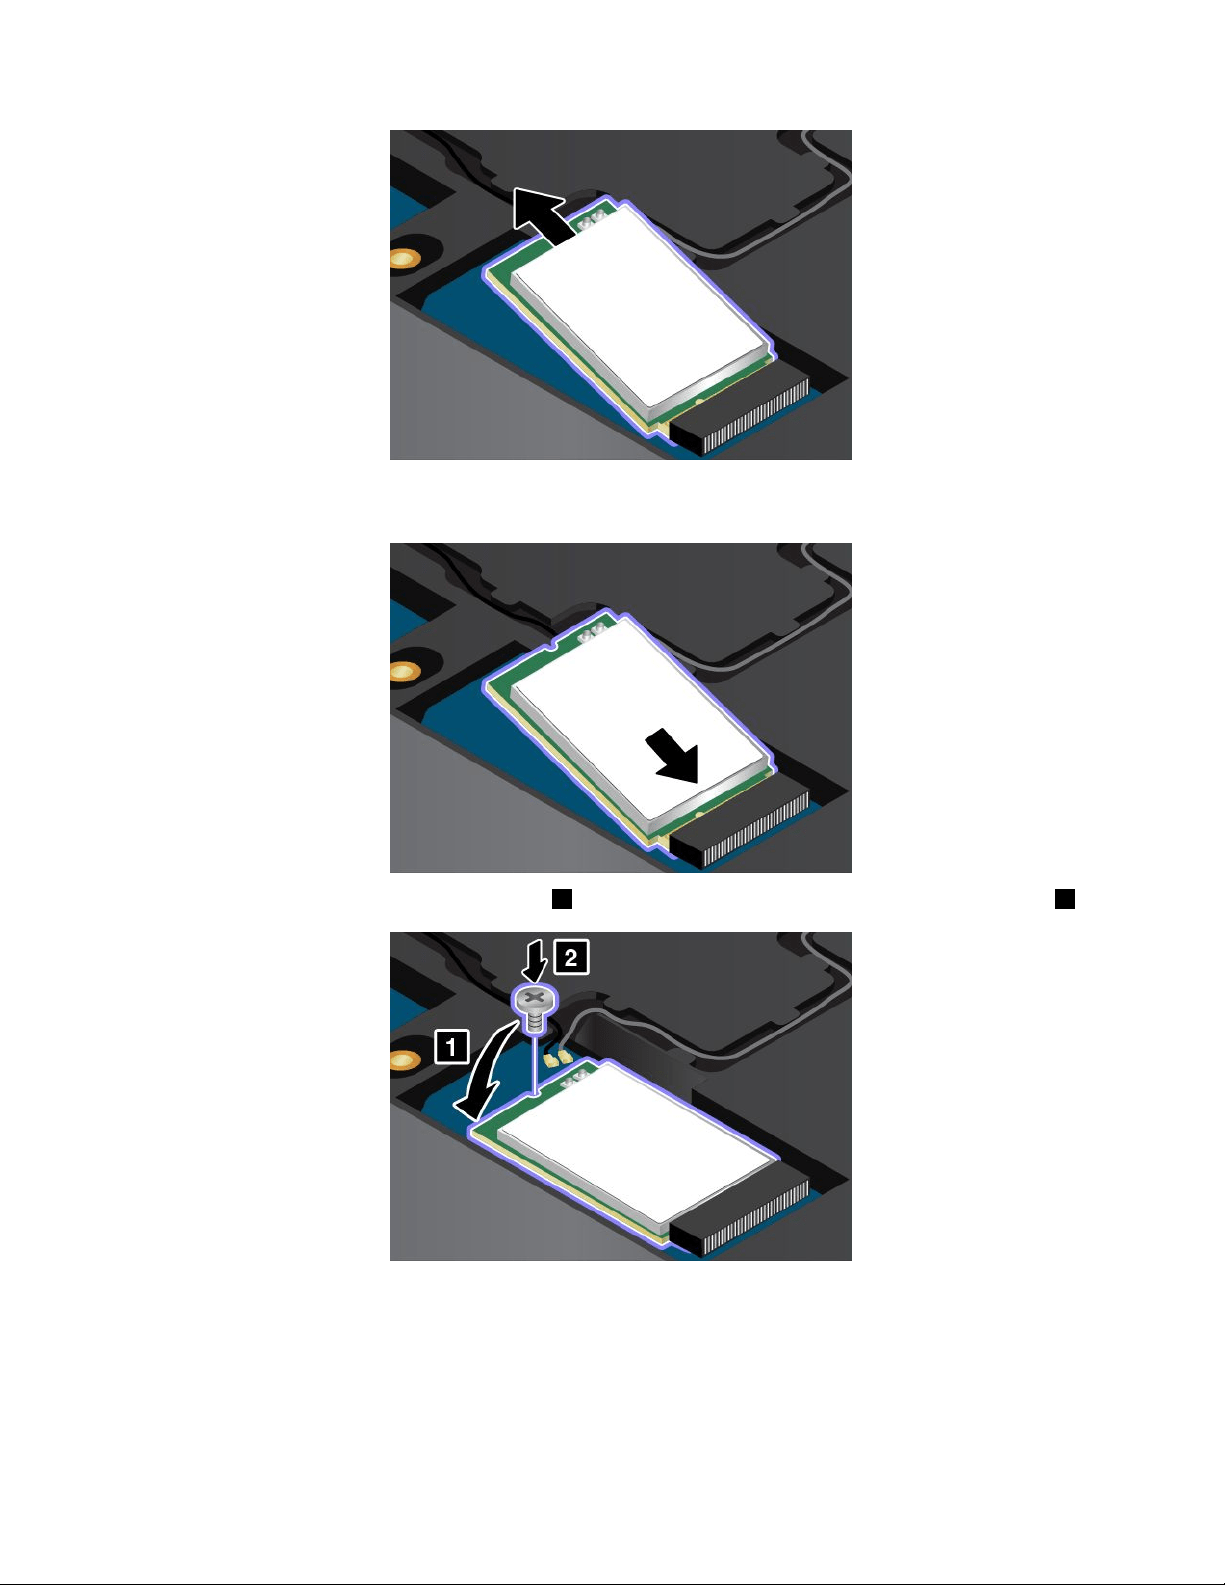
7.Alignthenotchededgeofthenewwireless-LANcardwiththekeyintheslot.Thencarefullyinsertthe
cardintotheslotatanangleofabout20degrees.
8.Pivotthenewwireless-LANcarddownward1,andtheninstallthescrewtosecurethecardinplace2.
122UserGuide
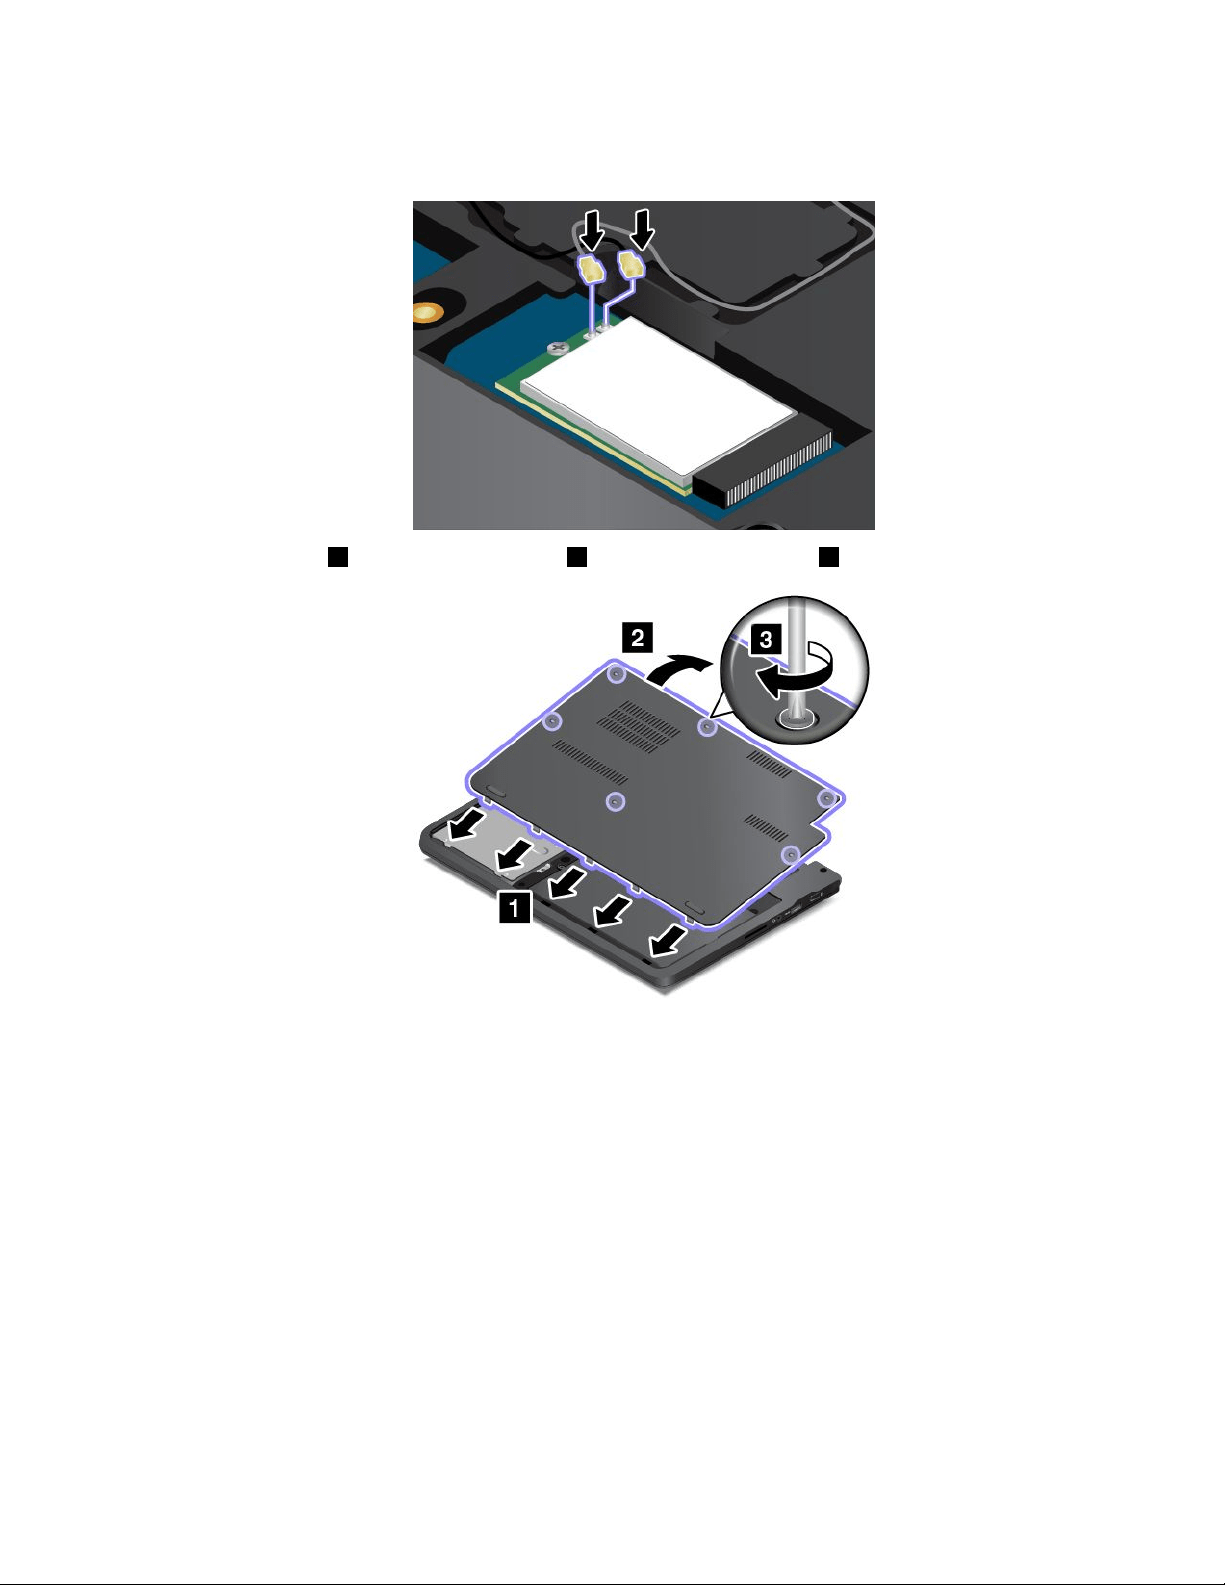
9.Connecttheantennacablestothenewcard.Besuretoattachthegraycabletotheconnectormarked
“MAIN”onthecard,andattachtheblackcabletotheconnectormarked“AUX”.
10.Installthecover1andpivotitdownwards2.Thentightenthescrews3.
11.Turnthecomputeroveragain.Connecttheacpoweradapterandallcables.
Chapter9.Replacingdevices123

124UserGuide

Chapter10.Gettingsupport
ThischapterprovidesinformationaboutgettinghelpandsupportfromLenovo.
•“BeforeyoucontactLenovo”onpage125
•“Gettinghelpandservice”onpage125
•“Purchasingadditionalservices”onpage127
BeforeyoucontactLenovo
Often,youcansolveyourcomputerproblemsbyreferringtotheinformationintheexplanationsoferror
codes,runningdiagnosticprograms,orbyconsultingtheLenovoWebsite.
Registeringyourcomputer
RegisteryourcomputerwithLenovoathttp://www.lenovo.com/register.Formoreinformation,see
“Registeringyourcomputer”onpage17.
Downloadingsystemupdates
Downloadingupdatedsoftwaremightresolveproblemsyouexperiencewithyourcomputer.
Todownloadupdatedsoftware,gotothefollowingWebsiteandfollowtheinstructionsonthescreen:
http://www.lenovo.com/support
Recordinginformation
BeforeyoutalktoaLenovorepresentative,recordthefollowingimportantinformationaboutyourcomputer.
Recordingproblemsymptomsanddetails
Collecttheanswerstothequestionsbelowbeforeyoucallforhelp.Then,youwillbeabletogethelp
asquicklyaspossible.
•Whatistheproblem?Isitcontinuousorintermittent?
•Isthereanerrormessage?Whatistheerrorcode,ifany?
•Whatoperatingsystemareyouusing?Whichversion?
•Whichsoftwareprogramswererunningatthetimeoftheproblem?
•Cantheproblembereproduced?Ifso,how?
Recordingsysteminformation
Theserialnumberlabelisonthebottomofyourcomputer.Recordthemachinetypeandtheserialnumber.
•WhatisthenameofyourLenovoproduct?
•Whatisthemachinetype?
•Whatistheserialnumber?
Gettinghelpandservice
Ifyouneedhelp,service,technicalassistance,orjustwantmoreinformationaboutLenovoproducts,you
willfindawidevarietyofsourcesavailablefromLenovotoassistyou.Thissectioncontainsinformation
©CopyrightLenovo2014,2016
125

aboutwheretogoforadditionalinformationaboutLenovoandourproducts,whattodoifyouexperiencea
problemwithyourcomputer,andwhomtocallforserviceshoulditbenecessary.
Informationaboutyourcomputerandpreinstalledsoftware,ifany,isavailableinthedocumentationthat
comeswithyourcomputer.Thatdocumentationincludesprintedbooks,onlinebooks,readmefiles,and
helpfiles.Inaddition,informationaboutLenovoproductsisavailableontheWorldWideWeb.
MicrosoftServicePacksarethelatestsoftwaresourceforWindowsproductupdates.Theyareavailable
throughWebdownload(connectionchargesmightapply)orthroughdisc.Formorespecificinformationand
links,gotohttp://www.microsoft.com.Lenovoofferstechnicalassistancewithinstallationof,orquestions
relatedto,ServicePacksforyourLenovo-preloadedMicrosoftWindowsproduct.Forinformation,contact
theCustomerSupportCenter.
Usingdiagnosticprograms
Manycomputerproblemscanbesolvedwithoutoutsideassistance.Ifyouexperienceaproblemwithyour
computer,thefirstplacetostartisthetroubleshootinginformationofyourcomputerdocumentation.Ifyou
suspectasoftwareproblem,seethedocumentation,includingreadmefilesandhelpinformationsystems,
thatcomeswiththeoperatingsystemorprogram.
ThinkPadnotebookcomputerscomewithasetofdiagnosticprogramsthatyoucanusetohelpyouidentify
hardwareproblems.See“Diagnosingproblems”onpage79
forinstructionsonusingthediagnostic
programs.
Thetroubleshootinginformationorthediagnosticprogramsmighttellyouthatyouneedadditionalor
updateddevicedriversorothersoftware.Youcangetthelatesttechnicalinformationanddownloaddevice
driversandupdatesfromtheLenovoWebsiteathttp://www.lenovo.com/support.
LenovoSupportWebsite
TechnicalsupportinformationisavailableontheLenovoSupportWebsiteat:
http://www.lenovo.com/support
ThisWebsiteisupdatedwiththelatestsupportinformationsuchasthefollowing:
•Driversandsoftware
•Diagnosticsolutions
•Productandservicewarranty
•Productandpartsdetails
•Userguidesandmanuals
•Knowledgebaseandfrequentlyaskedquestions
CallingLenovo
Ifyouhavetriedtocorrecttheproblemyourselfandstillneedhelp,duringthewarrantyperiod,youcan
gethelpandinformationbytelephonethroughtheCustomerSupportCenter.Thefollowingservicesare
availableduringthewarrantyperiod:
•Problemdetermination-Trainedpersonnelareavailabletoassistyouwithdeterminingifyouhavea
hardwareproblemanddecidingwhatactionisnecessarytofixtheproblem.
•Lenovohardwarerepair-IftheproblemisdeterminedtobecausedbyLenovohardwareunderwarranty,
trainedservicepersonnelareavailabletoprovidetheapplicablelevelofservice.
126UserGuide

•Engineeringchangemanagement-Occasionally,theremightbechangesthatarerequiredafteraproduct
hasbeensold.Lenovooryourreseller,ifauthorizedbyLenovo,willmakeselectedEngineeringChanges
(ECs)thatapplytoyourhardwareavailable.
Thefollowingitemsarenotcovered:
•ReplacementoruseofpartsnotmanufacturedfororbyLenovoornon-warrantedparts
Note:Allwarrantedpartscontaina7-characteridentificationintheformatFRUXXXXXXX.
•Identificationofsoftwareproblemsources
•ConfigurationofUEFIBIOSaspartofaninstallationorupgrade
•Changes,modifications,orupgradestodevicedrivers
•Installationandmaintenanceofnetworkoperatingsystems(NOS)
•Installationandmaintenanceofprograms
ForthetermsandconditionsoftheLenovoLimitedWarrantythatappliestoyourLenovohardwareproduct,
see“Warrantyinformation”intheSafety,Warranty,andSetupGuidethatcomeswithyourcomputer.
Ifpossible,benearyourcomputerwhenyoumakeyourcallincasethetechnicalassistancerepresentative
needstohelpyouresolveacomputerproblem.Ensurethatyouhavedownloadedthemostcurrentdrivers
andsystemupdates,rundiagnostics,andrecordedinformationbeforeyoucall.Whencallingfortechnical
assistance,havethefollowinginformationavailable:
•Machinetypeandmodel
•Serialnumbersofyourcomputer,monitor,andothercomponents,oryourproofofpurchase
•Descriptionoftheproblem
•Exactwordingofanyerrormessages
•Hardwareandsoftwareconfigurationinformationforyoursystem
Telephonenumbers
ForalistoftheLenovoSupportphonenumbersforyourcountryorregion,goto
http://www.lenovo.com/support/phoneorrefertotheSafety,Warranty,andSetupGuidethatcomeswith
yourcomputer.
Note:Phonenumbersaresubjecttochangewithoutnotice.Thelatestphonenumbersareavailableat
http://www.lenovo.com/support/phone.Ifthenumberforyourcountryorregionisnotprovided,contact
yourLenovoresellerorLenovomarketingrepresentative.
FindingThinkPadoptions
Ifyouwanttoexpandthecapabilitiesofyourcomputer,Lenovohasanumberofhardwareaccessories
andupgradestomeetyourneeds.Optionsincludememorymodules,storagedevices,networkcards,port
replicatorsordockingstations,batteries,poweradapters,printers,scanners,keyboards,mice,andmore.
YoucanshopatLenovo24hoursaday,7daysaweekdirectlyovertheWorldWideWeb.Allyouneedisan
Internetconnectionandacreditcard.
ToshopatLenovo,goto:
http://www.lenovo.com/essentials
Purchasingadditionalservices
Duringandafterthewarrantyperiod,youcanpurchaseadditionalservices,suchassupportforLenovo
andnon-Lenovohardware,operatingsystems,andapplicationprograms;networksetupandconfiguration
Chapter10.Gettingsupport127


AppendixA.Regulatoryinformation
Wirelessrelatedinformation
Wirelessinteroperability
Thewireless-LANPCIExpressMiniCardisdesignedtobeinteroperablewithanywireless-LANproducts
thatarebasedonDSSS,CCK,and/orOFDMradiotechnology,andarecompliantto:
•The802.11b/gStandard,802.11a/b/g,802.11n,or802.11aconwireless-LANs,asdefinedandapproved
bytheInstituteofElectricalandElectronicsEngineers.
•TheWiFicertificationasdefinedbytheWi-FiAlliance.
Note:DependingontheBluetoothcardandtheoperatingsystemyouuse,someprofilesmightnot
beavailable.
ABluetoothdeviceisdesignedtobeinteroperablewithanyBluetoothproductsthatarecompliantto
BluetoothSpecification4.0asdefinedbytheBluetoothSIG.Thefollowingprofilesaresupportedby
Bluetoothdevices:
•AudioGateway
•AV
•BasicImage
•Dial-upNetworking
•FileTransfer
•GenericAccess
•ServiceDiscovery
•SerialPort
•LANAccessusingPPP
•PersonalAreaNetwork
•GenericObjectExchange
•GenericObjectPush
•Synchronization
•Headset
•Printer
•HumanInterfaceDevices(Keyboard/Mouse)
•Handsfree
•PBAP(fortheWindows7operatingsystemonly)
•VDP-SyncProfile(fortheWindows7operatingsystemonly)
Usageenvironmentandyourhealth
Thiscomputercontainsintegratedwirelesscardsthatoperatewithintheguidelinesidentifiedbyradio
frequency(RF)safetystandardsandrecommendations;therefore,Lenovobelievesthisproductissafefor
usebyconsumers.Thesestandardsandrecommendationsreflecttheconsensusoftheworldwidescientific
©CopyrightLenovo2014,2016
129

community,andresultfromdeliberationsofpanelsandcommitteesofscientists,whocontinuallyreviewand
interprettheextensiveresearchliterature.
Insomesituationsorenvironments,theuseofwirelessdevicesmightberestrictedbytheproprietorofa
buildingorresponsiblerepresentativesofanorganization.Forexample,thesesituationsandareasmight
includethefollowing:
•Onboardofairplanes,inhospitalsornearpetrolstations,blastingareas(withelectro-explosivedevices),
medicalimplantsorbody-wornelectronicmedicaldevices,suchaspacemakers.
•Inanyotherenvironmentwheretheriskofinterferencetootherdevicesorservicesisperceivedor
identifiedasharmful.
Ifyouareuncertainofthepolicythatappliestotheuseofwirelessdevicesinaspecificarea(suchasan
airportorhospital),youareencouragedtoaskforauthorizationtouseawirelessdevicepriortoturning
onthecomputer.
LocatingtheUltraConnectwirelessantennas
ThinkPadnotebookcomputersfeatureanUltraConnect™wirelessantennasystembuiltintothedisplayfor
optimalreception,whichenablesyoutoestablishwirelesscommunicationswhereveryouare.
Note:Yourcomputermightlookslightlydifferentfromthefollowingillustration.
1Wireless-LANantenna(main)
2Wireless-LANantenna(auxiliary)
Wireless-radiocomplianceinformation
Computermodelsequippedwithwirelesscommunicationscomplywiththeradiofrequencyandsafety
standardsofanycountryorregioninwhichithasbeenapprovedforwirelessuse.
Brazilwireless-radiocomplianceinformation
Esteequipamentooperaemcarátersecundário,istoé,nãotemdireitoaproteçãocontrainterferência
prejudicial,mesmodeestaçõesdomesmotipo,enãopodecausarinterferênciaasistemasoperandoem
caráterprimário.
130UserGuide

Thisequipmentisasecondarytypedevice,thatis,itisnotprotectedagainstharmfulinterference,even
iftheinterferenceiscausedbyadeviceofthesametype,anditalsocannotcauseanyinterferenceto
primarytypedevices.
Mexicowireless-radiocomplianceinformation
Advertencia:EnMexicolaoperacióndeesteequipoestásujetaalassiguientesdoscondiciones:(1)es
posiblequeesteequipoodispositivonocauseinterferenciaperjudicialy(2)esteequipoodispositivodebe
aceptarcualquierinterferencia,incluyendolaquepuedacausarsuoperaciónnodeseada.
Locatingwirelessregulatorynotices
Formoreinformationaboutthewirelessregulatorynotices,refertotheRegulatoryNoticeshippedwithyour
computer.
IfyourcomputerisshippedwithouttheRegulatoryNotice,youcanfinditontheWebsiteat:
http://www.lenovo.com/UserManuals
Certificationrelatedinformation
Thefollowingtablecontainsinformationoftheproductname,complianceID,andmachinetypes.
Productname
ComplianceID
Machinetypes
TP00066A20D9and20DA
ThinkPad11eandThinkPadYoga11e
TP00066B20E5,20E6,20E7,20E8,20ED,and
20EE
Exportclassificationnotice
ThisproductissubjecttotheUnitedStatesExportAdministrationRegulations(EAR)andhasanExport
ClassificationControlNumber(ECCN)of5A992.c.Itcanbere-exportedexcepttoanyoftheembargoed
countriesintheEARE1countrylist.
Electronicemissionnotices
ThefollowinginformationreferstotheThinkPad11eandThinkPadYoga11ecomputers,machinetypes
20D9,20DA,20E5,20E6,20E7,20E8,20ED,and20EE.
FederalCommunicationsCommissionDeclarationofConformity
ThisequipmenthasbeentestedandfoundtocomplywiththelimitsforaClassBdigitaldevice,pursuant
toPart15oftheFCCRules.Theselimitsaredesignedtoprovidereasonableprotectionagainstharmful
interferenceinaresidentialinstallation.Thisequipmentgenerates,uses,andcanradiateradiofrequency
energyand,ifnotinstalledandusedinaccordancewiththeinstructions,maycauseharmfulinterference
toradiocommunications.However,thereisnoguaranteethatinterferencewillnotoccurinaparticular
installation.Ifthisequipmentdoescauseharmfulinterferencetoradioortelevisionreception,whichcanbe
determinedbyturningtheequipmentoffandon,theuserisencouragedtotrytocorrecttheinterferenceby
oneormoreofthefollowingmeasures:
•Reorientorrelocatethereceivingantenna.
•Increasetheseparationbetweentheequipmentandreceiver.
•Connecttheequipmentintoanoutletonacircuitdifferentfromthattowhichthereceiverisconnected.
•Consultanauthorizeddealerorservicerepresentativeforhelp.
AppendixA.Regulatoryinformation131

Lenovoisnotresponsibleforanyradioortelevisioninterferencecausedbyusingotherthanspecifiedor
recommendedcablesandconnectorsorbyunauthorizedchangesormodificationstothisequipment.
Unauthorizedchangesormodificationscouldvoidtheuser'sauthoritytooperatetheequipment.
ThisdevicecomplieswithPart15oftheFCCRules.Operationissubjecttothefollowingtwoconditions:(1)
thisdevicemaynotcauseharmfulinterference,and(2)thisdevicemustacceptanyinterferencereceived,
includinginterferencethatmaycauseundesiredoperation.
ResponsibleParty:
Lenovo(UnitedStates)Incorporated
1009ThinkPlace-BuildingOne
Morrisville,NC27560
PhoneNumber:919-294-5900
IndustryCanadaClassBemissioncompliancestatement
CANICES-3(B)/NMB-3(B)
EuropeanUnion-CompliancetotheElectromagneticCompatibility
Directive
ThisproductisinconformitywiththeprotectionrequirementsofEUCouncilDirective2004/108/EConthe
approximationofthelawsoftheMemberStatesrelatingtoelectromagneticcompatibility.Lenovocannot
acceptresponsibilityforanyfailuretosatisfytheprotectionrequirementsresultingfromanon-recommended
modificationoftheproduct,includingtheinstallationofoptioncardsfromothermanufacturers.
ThisproducthasbeentestedandfoundtocomplywiththelimitsforClassBInformationTechnology
EquipmentaccordingtoEuropeanStandardEN55022.ThelimitsforClassBequipmentwerederived
fortypicalresidentialenvironmentstoprovidereasonableprotectionagainstinterferencewithlicensed
communicationdevices.
EUcontact:Lenovo,Einsteinova21,85101Bratislava,Slovakia
GermanClassBcompliancestatement
DeutschsprachigerEUHinweis:
HinweisfürGerätederKlasseBEU-RichtliniezurElektromagnetischenVerträglichkeit
DiesesProduktentsprichtdenSchutzanforderungenderEU-Richtlinie2004/108/EG(früher89/336/EWG)zur
AngleichungderRechtsvorschriftenüberdieelektromagnetischeVerträglichkeitindenEU-Mitgliedsstaaten
undhältdieGrenzwertederEN55022KlasseBein.
Umdiesessicherzustellen,sinddieGerätewieindenHandbüchernbeschriebenzuinstallierenundzu
betreiben.DesWeiterendürfenauchnurvonderLenovoempfohleneKabelangeschlossenwerden.
LenovoübernimmtkeineVerantwortungfürdieEinhaltungderSchutzanforderungen,wenndasProdukt
ohneZustimmungderLenovoverändertbzw.wennErweiterungskomponentenvonFremdherstellernohne
EmpfehlungderLenovogesteckt/eingebautwerden.
132UserGuide

Deutschland:
EinhaltungdesGesetzesüberdieelektromagnetischeVerträglichkeitvonBetriebsmitteln
DiesesProduktentsprichtdem„GesetzüberdieelektromagnetischeVerträglichkeitvonBetriebsmitteln“
EMVG(früher„GesetzüberdieelektromagnetischeVerträglichkeitvonGeräten“).DiesistdieUmsetzungder
EU-Richtlinie2004/108/EG(früher89/336/EWG)inderBundesrepublikDeutschland.
ZulassungsbescheinigunglautdemDeutschenGesetzüberdieelektromagnetischeVerträglichkeit
vonBetriebsmitteln,EMVGvom20.Juli2007(früherGesetzüberdieelektromagnetische
VerträglichkeitvonGeräten),bzw.derEMVEGRichtlinie2004/108/EC(früher89/336/EWG),für
GerätederKlasseB.
DiesesGerätistberechtigt,inÜbereinstimmungmitdemDeutschenEMVGdasEG-Konformitätszeichen
-CE-zuführen.VerantwortlichfürdieKonformitätserklärungnachParagraf5desEMVGistdieLenovo
(Deutschland)GmbH,Gropiusplatz10,D-70563Stuttgart.
InformationeninHinsichtEMVGParagraf4Abs.(1)4:
DasGeräterfülltdieSchutzanforderungennachEN55024undEN55022KlasseB.
KoreaClassBcompliancestatement
JapanVCCIClassBcompliancestatement
Japancompliancestatementforproductswhichconnecttothepower
mainswithratedcurrentlessthanorequalto20Aperphase
Japannoticeforacpowercord
Theacpowercordshippedwithyourproductcanbeusedonlyforthisspecificproduct.Donotusetheac
powercordforotherdevices.
LenovoproductserviceinformationforTaiwan
AppendixA.Regulatoryinformation133

Eurasiancompliancemark
Модели,относящиесякнастоящейсерии(семейству)продуктовивпервыевыпущенныевобращение
до14февраля2013года,сертифицированыпотребованиямСистемысертификацииГОСТРи/или
потребованиямединойсистемысертификацииТаможенногоСоюза,действовавшимвмомент
сертификации,имаркируютсязнакомсоответствияГОСТР .
Модели,относящиесякнастоящейсерии(семейству)продуктовивпервыевыпущенныевобращение
после14февраля2013года,сертифицированывединойсистемесертификацииТаможенногоСоюза
насоответствиетребованиямприменимыхТехническихРегламентовимаркируютсязнакомEAC.
Brazilaudionotice
Ouvirsonscommaisde85decibéisporlongosperíodospodeprovocardanosaosistemaauditivo.
134UserGuide
AppendixB.WEEEandrecyclinginformation
Lenovoencouragesownersofinformationtechnology(IT)equipmenttoresponsiblyrecycletheirequipment
whenitisnolongerneeded.Lenovooffersavarietyofprogramsandservicestoassistequipmentownersin
recyclingtheirITproducts.ForinformationonrecyclingLenovoproducts,goto:
http://www.lenovo.com/recycling
ImportantWEEEinformation
TheWEEEmarkingonLenovoproductsappliestocountrieswithWEEEande-wasteregulations(for
example,theEuropeanWEEEDirective,IndiaE-WasteManagement&HandlingRules,2011).Appliancesare
labeledinaccordancewithlocalregulationsconcerningwasteelectricalandelectronicequipment(WEEE).
Theseregulationsdeterminetheframeworkforthereturnandrecyclingofusedappliancesasapplicable
withineachgeography.Thislabelisappliedtovariousproductstoindicatethattheproductisnottobe
thrownaway,butratherputintheestablishedcollectionsystemsforreclaimingtheseendoflifeproducts.
Usersofelectricalandelectronicequipment(EEE)withtheWEEEmarkingmustnotdisposeofendoflife
EEEasunsortedmunicipalwaste,butusethecollectionframeworkavailabletothemforthereturn,recycle,
andrecoveryofWEEEandtominimizeanypotentialeffectsofEEEontheenvironmentandhumanhealth
duetothepresenceofhazardoussubstances.ForadditionalWEEEinformationgoto:
http://www.lenovo.com/recycling
RecyclinginformationforChina
http://support.lenovo.com.cn/activity/551.htm
RecyclinginformationforJapan
CollectingandrecyclingadisusedLenovocomputerormonitor
IfyouareacompanyemployeeandneedtodisposeofaLenovocomputerormonitorthatistheproperty
ofthecompany,youmustdosoinaccordancewiththeLawforPromotionofEffectiveUtilizationof
Resources.Computersandmonitorsarecategorizedasindustrialwasteandshouldbeproperlydisposed
ofbyanindustrialwastedisposalcontractorcertifiedbyalocalgovernment.InaccordancewiththeLaw
forPromotionofEffectiveUtilizationofResources,LenovoJapanprovides,throughitsPCCollectingand
©CopyrightLenovo2014,2016
135

RecyclingServices,forthecollecting,reuse,andrecyclingofdisusedcomputersandmonitors.Fordetails,
visittheLenovoWebsiteathttp://www.lenovo.com/recycling/japan.
PursuanttotheLawforPromotionofEffectiveUtilizationofResources,thecollectingandrecyclingof
home-usedcomputersandmonitorsbythemanufacturerwasbegunonOctober1,2003.Thisservice
isprovidedfreeofchargeforhome-usedcomputerssoldafterOctober1,2003.Fordetails,goto
http://www.lenovo.com/recycling/japan.
DisposingofLenovocomputercomponents
SomeLenovocomputerproductssoldinJapanmayhavecomponentsthatcontainheavymetalsorother
environmentalsensitivesubstances.Toproperlydisposeofdisusedcomponents,suchasaprintedcircuit
boardordrive,usethemethodsdescribedaboveforcollectingandrecyclingadisusedcomputerormonitor.
DisposingofdisusedlithiumbatteriesfromLenovocomputers
Abutton-shapedlithiumbatteryisinstalledinsideyourLenovocomputertoprovidepowertothecomputer
clockwhilethecomputerisoffordisconnectedfromthemainpowersource.Ifyouneedtoreplaceitwitha
newone,contactyourplaceofpurchaseorcontactLenovoforservice.Ifyouneedtodisposeofadisused
lithiumbattery,insulateitwithvinyltape,contactyourplaceofpurchaseoranindustrial-waste-disposal
operator,andfollowtheirinstructions.
Disposalofalithiumbatterymustcomplywithlocalordinancesandregulations.
DisposingofadisusedbatterypackfromLenovonotebookcomputers
YourLenovonotebookcomputerhasalithiumionbatterypackoranickelmetalhydridebatterypack.Ifyou
areacompanyemployeewhousesaLenovonotebookcomputerandneedtodisposeofabatterypack,
contacttheproperpersoninLenovosales,service,ormarketing,andfollowthatperson'sinstructions.You
alsocanrefertotheinstructionsathttp://www.lenovo.com/jp/ja/environment/recycle/battery/.
IfyouuseaLenovonotebookcomputerathomeandneedtodisposeofabatterypack,you
mustcomplywithlocalordinancesandregulations.Youalsocanrefertotheinstructionsat
http://www.lenovo.com/jp/ja/environment/recycle/battery/.
RecyclinginformationforBrazil
DeclaraçõesdeReciclagemnoBrasil
DescartedeumProdutoLenovoForadeUso
Equipamentoselétricoseeletrônicosnãodevemserdescartadosemlixocomum,masenviadosàpontosde
coleta,autorizadospelofabricantedoprodutoparaquesejamencaminhadoseprocessadosporempresas
especializadasnomanuseioderesíduosindustriais,devidamentecertificadaspelosorgãosambientais,de
acordocomalegislaçãolocal.
ALenovopossuiumcanalespecíficoparaauxiliá-lonodescartedessesprodutos.Casovocêpossua
umprodutoLenovoemsituaçãodedescarte,ligueparaonossoSACouencaminheume-mailpara:
[email protected],informandoomodelo,númerodesérieecidade,afimdeenviarmosasinstruções
paraocorretodescartedoseuprodutoLenovo.
136UserGuide
BatteryrecyclinginformationforTaiwan
BatteryrecyclinginformationfortheEuropeanUnion
Notice:ThismarkappliesonlytocountrieswithintheEuropeanUnion(EU).
BatteriesorpackagingforbatteriesarelabeledinaccordancewithEuropeanDirective2006/66/EC
concerningbatteriesandaccumulatorsandwastebatteriesandaccumulators.TheDirectivedeterminesthe
frameworkforthereturnandrecyclingofusedbatteriesandaccumulatorsasapplicablethroughoutthe
EuropeanUnion.Thislabelisappliedtovariousbatteriestoindicatethatthebatteryisnottobethrown
away,butratherreclaimeduponendoflifeperthisDirective.
InaccordancewiththeEuropeanDirective2006/66/EC,batteriesandaccumulatorsarelabeledtoindicate
thattheyaretobecollectedseparatelyandrecycledatendoflife.Thelabelonthebatterymayalso
includeachemicalsymbolforthemetalconcernedinthebattery(Pbforlead,Hgformercury,andCdfor
cadmium).Usersofbatteriesandaccumulatorsmustnotdisposeofbatteriesandaccumulatorsasunsorted
municipalwaste,butusethecollectionframeworkavailabletocustomersforthereturn,recycling,and
treatmentofbatteriesandaccumulators.Customerparticipationisimportanttominimizeanypotential
effectsofbatteriesandaccumulatorsontheenvironmentandhumanhealthduetothepotentialpresenceof
hazardoussubstances.Forpropercollectionandtreatment,goto:
http://www.lenovo.com/lenovo/environment
BatteryrecyclinginformationfortheUnitedStatesandCanada
AppendixB.WEEEandrecyclinginformation137

138UserGuide
AppendixC.RestrictionofHazardousSubstancesDirective
(RoHS)
EuropeanUnionRoHS
ThisLenovoproduct,withincludedparts(cables,cords,andsoon)meetstherequirementsofDirective
2011/65/EUontherestrictionoftheuseofcertainhazardoussubstancesinelectricalandelectronic
equipment(“RoHSrecast”or“RoHS2”).
FormoreinformationaboutLenovoworldwidecomplianceonRoHS,goto:
http://www.lenovo.com/social_responsibility/us/en/RoHS_Communication.pdf
TurkishRoHS
TheLenovoproductmeetstherequirementsoftheRepublicofTurkeyDirectiveontheRestrictionoftheUse
ofCertainHazardousSubstancesinWasteElectricalandElectronicEquipment(WEEE).
UkraineRoHS
IndiaRoHS
RoHScompliantasperE-Waste(Management&Handling)Rules,2011.
©CopyrightLenovo2014,2016
139

ChinaRoHS
140UserGuide

AppendixD.ENERGYSTARmodelinformation
ENERGYSTAR
®
isajointprogramoftheU.S.EnvironmentalProtectionAgencyandtheU.S.Department
ofEnergyaimedatsavingmoneyandprotectingtheenvironmentthroughenergyefficientproductsand
practices.
LenovoisproudtoofferourcustomersproductswiththeENERGYSTARqualifieddesignation.Youmight
findanENERGYSTARmarkaffixedonthecomputerordisplayedonthepowersettingsinterface.Lenovo
computersofthefollowingmachinetypes,ifcarryanENERGYSTARmark,havebeendesignedandtested
toconformtotheENERGYSTARprogramrequirementsforcomputers.
20D9,20DA,20E5,20E6,20E7,20E8,20ED,and20EE
ByusingENERGYSTARqualifiedproductsandtakingadvantageofthepower-managementfeatures
ofyourcomputer,youcanhelpreducetheconsumptionofelectricity.Reducedelectricalconsumption
cancontributetopotentialfinancialsavings,acleanerenvironment,andthereductionofgreenhousegas
emissions.
FormoreinformationaboutENERGYSTAR,goto:
http://www.energystar.gov
Lenovoencouragesyoutomakeefficientuseofenergyanintegralpartofyourday-to-dayoperations.To
helpinthisendeavor,Lenovohaspresetthefollowingpower-managementfeaturestotakeeffectwhenyour
computerhasbeeninactiveforaspecifiedlengthoftime:
Powerplan:Default
•Turnoffthedisplay:After10minutes
•Putthecomputerintosleep:After20minutes
Toawakenyourcomputerfromsleepmode,presstheFnkeyonyourkeyboard.Formoreinformationabout
thesesettings,seetheWindowsHelpandSupportinformationonyourcomputer.
TheWakeonLANfunctionisenabledwhenyourLenovocomputerisshippedfromthefactory,andthe
settingremainsvalidevenwhenthecomputerisinsleepmode.IfyoudonotneedtohaveWakeonLAN
enabledwhilethecomputerisinsleepmode,youcanreducethepowerconsumptionandprolongthetime
insleepmode,bydisablingthesettingofWakeonLANforsleepmode.
TodisablethesettingofWakeonLANforsleepmode,dothefollowing:
1.GotoControlPanel.
2.ClickHardwareandSound➙DeviceManager.
3.IntheDeviceManagerwindow,expandNetworkadapters.
4.Right-clickyournetworkadapterdevice,andclickProperties.
©CopyrightLenovo2014,2016
141

5.ClickthePowerManagementtab.
6.CleartheAllowthisdevicetowakethecomputercheckbox.
7.ClickOK.
142UserGuide

AppendixE.Notices
Lenovomaynotoffertheproducts,services,orfeaturesdiscussedinthisdocumentinallcountries.Consult
yourlocalLenovorepresentativeforinformationontheproductsandservicescurrentlyavailableinyour
area.AnyreferencetoaLenovoproduct,program,orserviceisnotintendedtostateorimplythatonlythat
Lenovoproduct,program,orservicemaybeused.Anyfunctionallyequivalentproduct,program,orservice
thatdoesnotinfringeanyLenovointellectualpropertyrightmaybeusedinstead.However,itistheuser's
responsibilitytoevaluateandverifytheoperationofanyotherproduct,program,orservice.
Lenovomayhavepatentsorpendingpatentapplicationscoveringsubjectmatterdescribedinthis
document.Thefurnishingofthisdocumentdoesnotgiveyouanylicensetothesepatents.Youcansend
licenseinquiries,inwriting,to:
Lenovo(UnitedStates),Inc.
1009ThinkPlace-BuildingOne
Morrisville,NC27560
U.S.A.
Attention:LenovoDirectorofLicensing
LENOVOPROVIDESTHISPUBLICATION“ASIS”WITHOUTWARRANTYOFANYKIND,EITHEREXPRESS
ORIMPLIED,INCLUDING,BUTNOTLIMITEDTO,THEIMPLIEDWARRANTIESOFNON-INFRINGEMENT,
MERCHANTABILITYORFITNESSFORAPARTICULARPURPOSE.Somejurisdictionsdonotallow
disclaimerofexpressorimpliedwarrantiesincertaintransactions,therefore,thisstatementmaynotapply
toyou.
Thisinformationcouldincludetechnicalinaccuraciesortypographicalerrors.Changesareperiodically
madetotheinformationherein;thesechangeswillbeincorporatedinneweditionsofthepublication.
Lenovomaymakeimprovementsand/orchangesintheproduct(s)and/ortheprogram(s)describedinthis
publicationatanytimewithoutnotice.
Theproductsdescribedinthisdocumentarenotintendedforuseinimplantationorotherlifesupport
applicationswheremalfunctionmayresultininjuryordeathtopersons.Theinformationcontainedinthis
documentdoesnotaffectorchangeLenovoproductspecificationsorwarranties.Nothinginthisdocument
shalloperateasanexpressorimpliedlicenseorindemnityundertheintellectualpropertyrightsofLenovo
orthirdparties.Allinformationcontainedinthisdocumentwasobtainedinspecificenvironmentsandis
presentedasanillustration.Theresultobtainedinotheroperatingenvironmentsmayvary.
Lenovomayuseordistributeanyoftheinformationyousupplyinanywayitbelievesappropriatewithout
incurringanyobligationtoyou.
Anyreferencesinthispublicationtonon-LenovoWebsitesareprovidedforconvenienceonlyanddonotin
anymannerserveasanendorsementofthoseWebsites.ThematerialsatthoseWebsitesarenotpartof
thematerialsforthisLenovoproduct,anduseofthoseWebsitesisatyourownrisk.
Anyperformancedatacontainedhereinwasdeterminedinacontrolledenvironment.Therefore,theresult
obtainedinotheroperatingenvironmentsmayvarysignificantly.Somemeasurementsmayhavebeen
madeondevelopment-levelsystemsandthereisnoguaranteethatthesemeasurementswillbethesame
ongenerallyavailablesystems.Furthermore,somemeasurementsmayhavebeenestimatedthrough
extrapolation.Actualresultsmayvary.Usersofthisdocumentshouldverifytheapplicabledatafortheir
specificenvironment.
©CopyrightLenovo2014,2016
143

Trademarks
ThefollowingtermsaretrademarksofLenovointheUnitedStates,othercountries,orboth:
AccessConnections
ActiveProtectionSystem
Lenovo
RescueandRecovery
SecureDataDisposal
ThinkPad
UltraConnect
Yoga
AMDVirtualizationisatrademarkofAdvancedMicroDevices,Inc.
BitLocker,Microsoft,Cortana,Windows,andWindowsMediaaretrademarksoftheMicrosoftgroupof
companies.
IntelandIntelSpeedSteparetrademarksorregisteredtrademarksofIntelCorporationoritssubsidiariesin
theUnitedStatesandothercountries.
ThetermsHDMIandHDMIHigh-DefinitionMultimediaInterfacearetrademarksorregisteredtrademarksof
HDMILicensingLLCintheUnitedStatesandothercountries.
Othercompany,product,andservicenamesmaybetrademarksorservicemarksofothers.
144UserGuide