
ThinkPad USB-C Dock User Guide

http://www.lenovo.com/safety
Note: Before using this information and the product it supports, ensure that you read and understand the
warranty information in the documentation that comes with the product.
Second Edition (March 2019)
© Copyright Lenovo 2016, 2019.
LIMITED AND RESTRICTED RIGHTS NOTICE: If data or software is delivered pursuant to a General Services
Administration “GSA” contract, use, reproduction, or disclosure is subject to restrictions set forth in Contract No. GS-
35F-05925.

Contents
Chapter 1. About the dock . . . . . . . 1
Product description . . . . . . . . . . . . . . 1
Main features. . . . . . . . . . . . . . . . . 1
Maximum resolutions and refresh rates . . . . . . 1
Component overview . . . . . . . . . . . . . 2
Statement on USB transfer rate . . . . . . . . 4
System requirements . . . . . . . . . . . . . 4
Chapter 2. Setting up the dock . . . . . 5
Installing the device driver on Windows operating
systems . . . . . . . . . . . . . . . . . . . 5
Connecting the dock to your computer. . . . . . . 5
Uninstalling the device driver from Windows
operating systems . . . . . . . . . . . . . . . 6
Chapter 3. Using the dock. . . . . . . . 7
Using the headset and microphone combo
connector . . . . . . . . . . . . . . . . . . 7
Using the Ethernet connector . . . . . . . . . . 7
Using the USB connectors . . . . . . . . . . . 8
Using the DP and VGA connectors . . . . . . . . 8
Chapter 4. Working with the dock . . . 9
Understanding the video output modes . . . . . . 9
Extend mode . . . . . . . . . . . . . . . 9
Mirror mode . . . . . . . . . . . . . . 10
Single-display mode . . . . . . . . . . . 10
Configuring the dock . . . . . . . . . . . . . 11
Manually enabling the headset and
microphone combo connector . . . . . . . 11
Rotating the external monitor display. . . . . 11
Setting the color quality of the external
monitor . . . . . . . . . . . . . . . . 12
Setting the resolution of the external
monitor . . . . . . . . . . . . . . . . 12
Chapter 5. Troubleshooting . . . . . . 15
Appendix A. Accessibility
information . . . . . . . . . . . . . . . 17
Appendix B. Trademarks . . . . . . . 19
© Copyright Lenovo 2016, 2019 i

ii ThinkPad USB-C Dock User Guide

Chapter 1. About the dock
This chapter contains product information about the ThinkPad
®
USB-C Dock (hereafter called dock).
Product description
The dock is a portable expansion module that enables you to easily connect your computer to the Ethernet
and multiple devices, such as a headset, a monitor, and Universal Serial Bus (USB) devices.
You can set up your work area by connecting your computer to the dock with a USB-C cable, connecting
multiple devices to the dock, and configuring the dock on your computer. Then, you are ready to use the
multiple devices each time you connect your computer to the dock. The dock can also supply power to your
computer when it is connected to the computer.
Your option package includes the following:
• ThinkPad USB-C Dock
• Power adapter
• Power cord
• USB-C cable
• Warranty poster
Contact your place of purchase if any item is missing or damaged. Be sure to retain your proof of purchase
and packing material. They might be required to receive warranty service.
Main features
The dock provides the following main features:
• USB connectors: three USB 3.0 connectors, two USB 2.0 connectors, and one USB-C connector
• Network connection: Gigabit Ethernet speed
• Supported external monitors: DisplayPort
®
(DP) monitor and video graphics array (VGA) monitor
• Supported functions:
– ThinkVantage
®
Access Connections
TM
(Windows
®
7 only)
– Preboot eXecution Environment (PXE) (supported on some Lenovo
®
computers)
– Media Access Control (MAC) address Pass Through
– Wake on LAN
For more information about the supported functions, see “Using the Ethernet connector” on page 7.
Maximum resolutions and refresh rates
To achieve better display experience, it is recommended that you connect one or two external monitors to
the dock at a time.
• DP output only: 3840 x 2160 pixels (30 Hz)
• VGA output only: 1920 x 1200 pixels (60 Hz)
• DP and VGA simultaneous output: 1920 x 1080 pixels (60 Hz)
© Copyright Lenovo 2016, 2019 1
• DP and DP simultaneous output: 1920 x 1080 pixels (60 Hz)
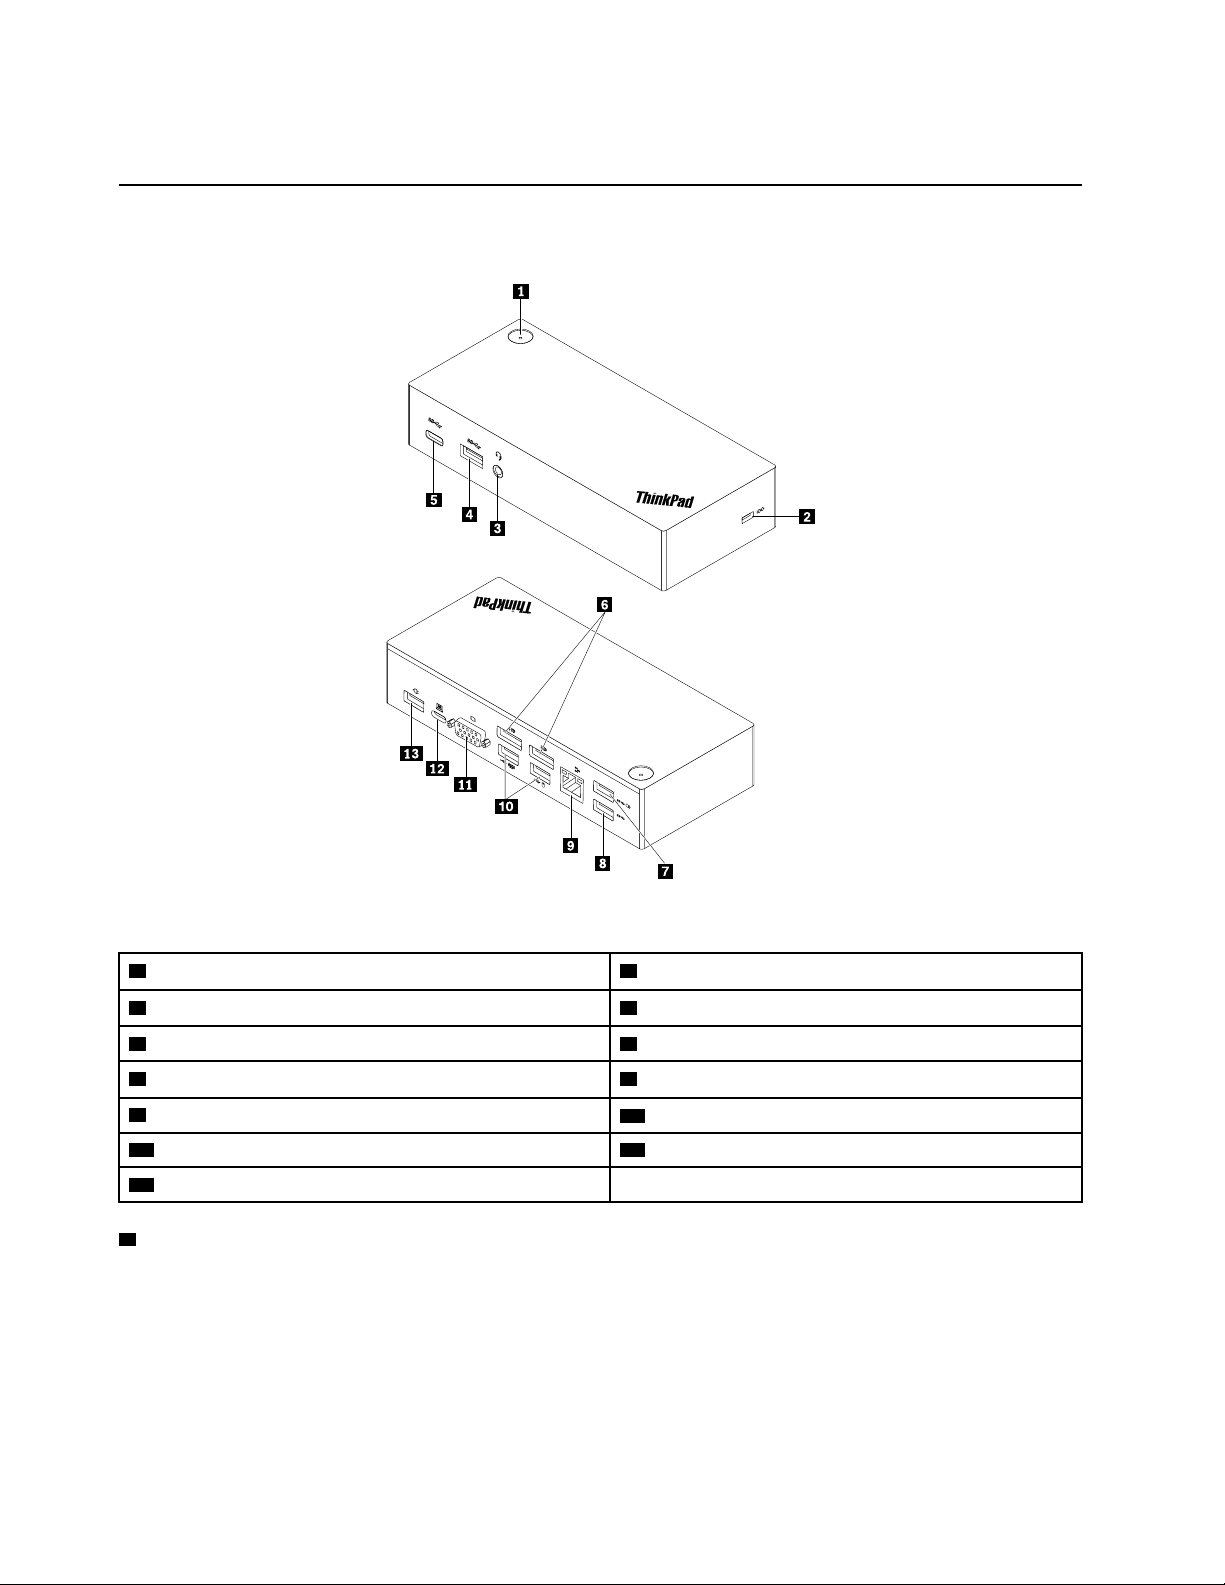
Component overview
The following illustration helps you locate and identify the connectors and controls on your dock.
Figure 1. Component overview
1 Power button with indicator
2 Security-lock slot
3 Headset and microphone combo connector
4 USB 3.0 connector
5 USB-C connector
6 DP connectors
7 Always On USB 3.0 connector 8 USB 3.0 connector
9 Ethernet connector
10 USB 2.0 connectors
11 VGA connector 12 USB-C connector
13 Power connector
1 Power button with indicator
• Power button
– When the dock is disconnected from the computer, press the power button to turn off the dock.
– When the dock is connected to the computer, the power button on the dock has the same functions as
the power button of the computer. You can use the power button on the dock to turn on, turn off, sleep,
hibernate, or wake up the computer after you define what power button does on your computer. To
change what the power button does, do the following:
2
ThinkPad USB-C Dock User Guide

1. Got to Control Panel and then change the view of the Control Panel from Category to Large icons
or Small icons.
2. Click Power Options ➙ Choose what the power buttons do.
3. Follow the instructions on the screen.
• Power button indicator
The indicator shows the dock status and computer status:
– Off: The dock is off, or the computer is off or in hibernation mode.
– White: The computer is on.
– White and blinking slowly: The computer is in sleep mode.
– Amber: The dock is on and ready to connect to the computer.
2 Security-lock slot
To protect your dock from theft, lock your dock to a desk, table, or other fixtures through a security cable
lock that fits this security-lock slot.
Note: You are responsible for evaluating, selecting, and implementing the locking device and security
feature. Lenovo makes no comments, judgments, or warranties about the function, quality, or performance
of the locking device and security feature.
3 Headset and microphone combo connector
Connect headphones or a headset with a 3.5-mm (0.14-inch), 4-pole plug.
4 8 USB 3.0 connector
Connect USB-compatible devices, such as a USB storage device, or a USB printer. For optimal data
transfer, connect a USB 3.0 device to a USB 3.0 connector instead of a USB 2.0 connector.
5 USB-C connector
Connect USB-C compatible devices for data transfer only, such as a USB-C storage device.
6 DP connector
Connect a high-performance monitor, a direct-drive monitor, or other devices that use a DP connector.
7 Always On USB 3.0 connector
Charge devices even when your computer is turned off, in sleep mode, or in hibernation mode; or when the
dock is disconnected from your computer.
9 Ethernet connector
Connect the dock to an Ethernet LAN with an Ethernet cable.
10 USB 2.0 connectors
Connect USB 2.0 devices, such as a USB keyboard, a USB mouse, a USB storage device, or a USB printer.
Notes:
• It is recommended that you connect a USB keyboard and a USB mouse to the USB 2.0 connectors.
Chapter 1. About the dock 3

• If you are using a USB 3.0 device, it is recommended that you connect it to a USB 3.0 connector for faster
USB transmission speed.
11 VGA connector
Connect a VGA-compatible video device, such as a VGA monitor.
12 USB-C connector
Connect the dock to your computer by a USB-C cable.
13 Power connector
Connect the dock to the power adapter.
Statement on USB transfer rate
Depending on many factors such as the processing capability of the host and peripheral devices, file
attributes, and other factors related to system configuration and operating environments, the actual transfer
rate using the various USB connectors on this device will vary and will be slower than the data rate listed
below for each corresponding device.
USB device Data rate (Gbit/s)
3.1 Gen 1 (3.0)
5
System requirements
Before using the dock, ensure that your computer has one of the following Microsoft
®
operating systems
installed:
• Windows 7
• Windows 10
4
ThinkPad USB-C Dock User Guide
Chapter 2. Setting up the dock
This section provides information about how to connect the dock to your computer, and how to install and
uninstall the device driver.
Installing the device driver on Windows operating systems
The Lenovo computer with USB-C connectors has the dock device driver preinstalled. In this situation, the
dock is ready for use after you connect it to an ac power source and your computer. For the detailed
computer model information, go to
http://www.lenovo.com/support/docks and click ThinkPad USB-C Dock.
The latest device driver for the dock also is available for downloading from the Lenovo Web site. Go to
http://
www.lenovo.com/support/docks
, click ThinkPad USB-C Dock, and download the driver installation file. Then
follow the instructions on the screen to install the device driver.
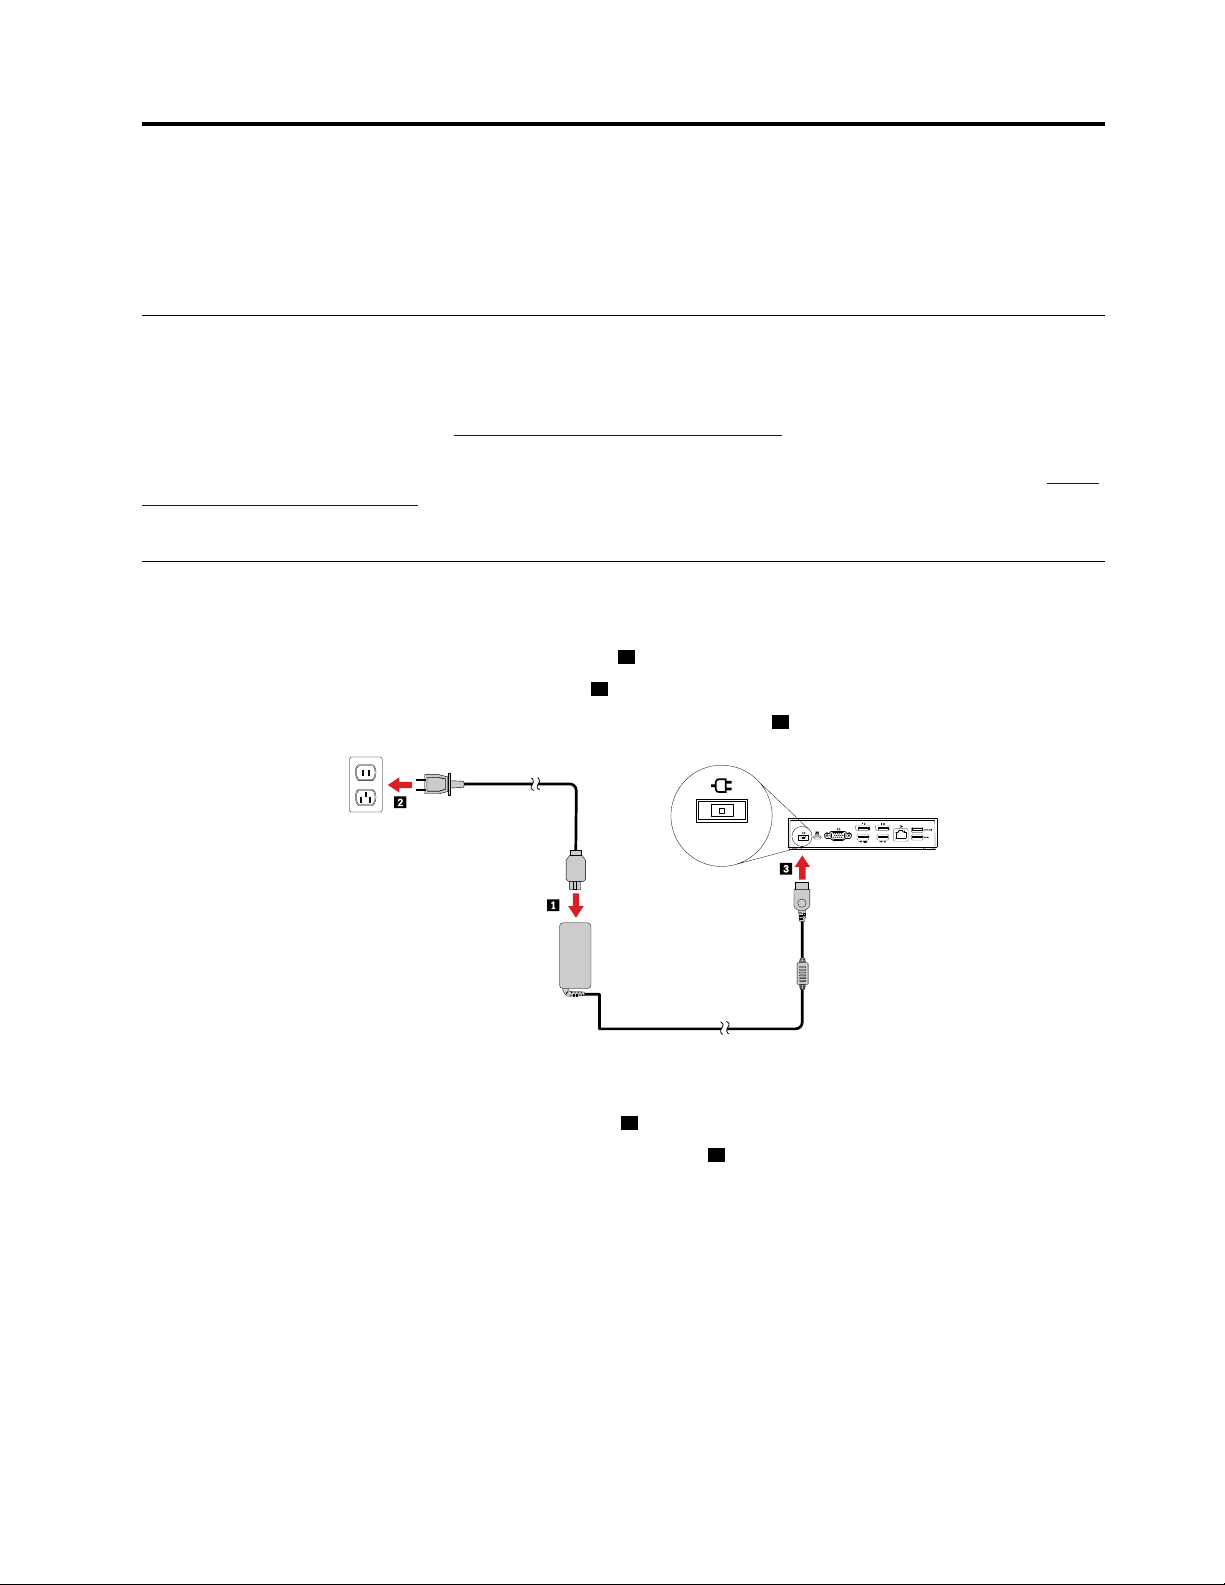
Connecting the dock to your computer
To connect the dock to your computer, do the following:
1. Connect the ac power adapter to the power cord
1 .
2. Connect the power cord to an electrical outlet
2 .
3. Connect the ac power adapter to the power connector of the dock
3 .
Figure 2. Connecting the dock to the power supply
4. Connect one end of the USB-C cable to the dock 1 .
5. Connect the other end of the USB-C cable to the computer
2 .
© Copyright Lenovo 2016, 2019 5
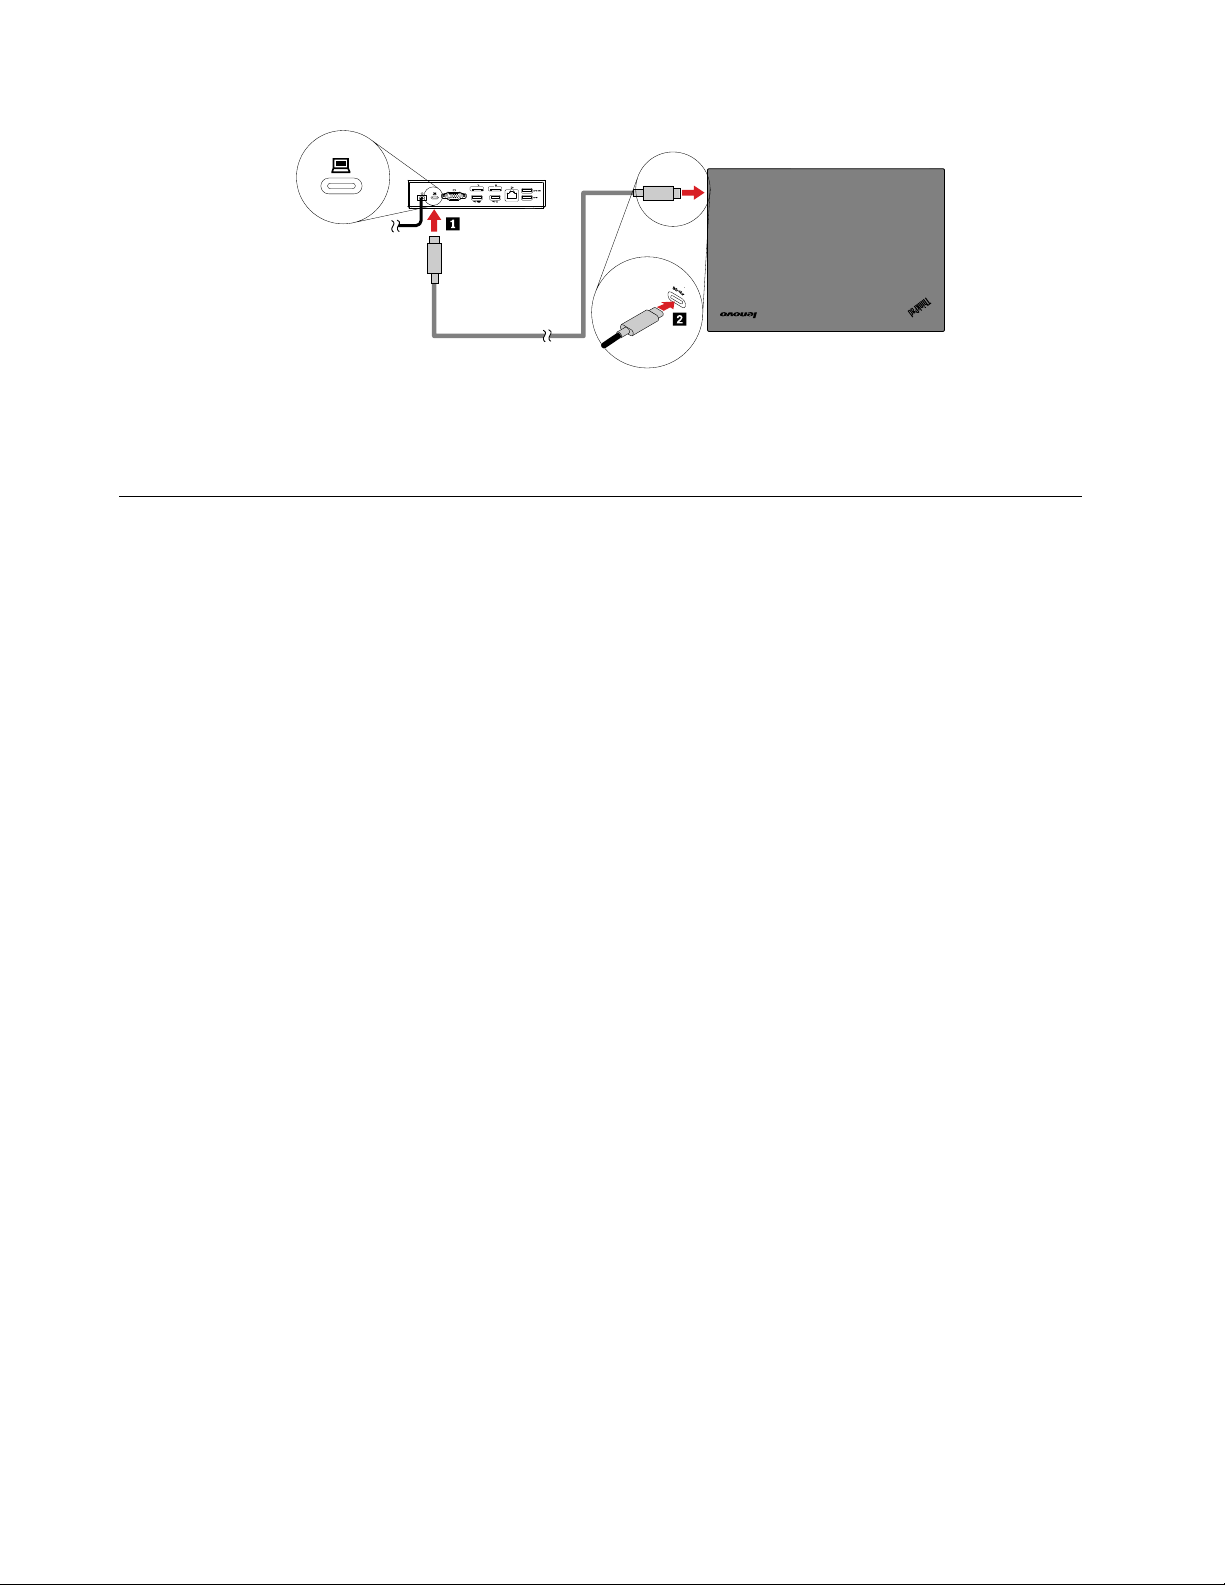
Figure 3. Connecting the dock to the computer
Note: The dock supplies power to the computer when it is connected to the computer.
Uninstalling the device driver from Windows operating systems
To uninstall the device driver, do the following:
For the Windows 7 operating system:
1. Exit all applications that use the dock.
2. Click Start ➙ Control Panel. Then change the view of Control Panel to Category.
3. Click Uninstall a program ➙ ThinkPad USB-C Dock USB Audio, and then right-click to select
Uninstall.
4. Follow the instructions on the screen to uninstall the device driver.
5. If necessary, restart your computer.
For the Windows 10 operating system:
1. From the desktop, move the pointer to the bottom-left corner of the screen, and then search Control
Panel in the search box.
2. Click Control Panel, and then change the view of Control Panel to Category.
3. Click Uninstall a program ➙ ThinkPad USB-C Dock USB Audio, and then right-click to select
Uninstall.
4. Follow the instructions on the screen to uninstall the device driver.
6
ThinkPad USB-C Dock User Guide

Chapter 3. Using the dock
This section provides instructions on how to use the connectors on the dock:
• “Using the headset and microphone combo connector” on page 7
• “Using the Ethernet connector” on page 7
• “Using the USB connectors” on page 8
• “Using the DP and VGA connectors” on page 8
The dock expands the connection capability of your computer. You can connect devices to the appropriate
connectors on the dock after your computer is turned on. Normally it takes several seconds for the computer
to recognize new devices.
The dock simplifies the connection between your computer and multiple devices. For example, you can
connect the USB devices and external monitors to the dock rather than the computer. When you want to
take your computer away, you can disconnect the computer from the dock rather than remove the USB
devices and external monitors. When you come back, simply connect your computer to the dock to resume
all previous connections and start working at once.
Using the headset and microphone combo connector
The headset and microphone combo connector on the dock is a 3.5-mm (0.14-inch) microphone combined
stereo line-out connector. It works for the standard 3.5-mm (0.14-inch) headset, microphone, or speaker.
Note: The headset and microphone combo connector on the dock are automatically enabled after you have
successfully connected the dock to your computer and installed the device driver. However, if you cannot
hear anything from the headset connected to the dock, you can manually enable the headset and
microphone combo connector on the dock. See “Manually enabling the headset and microphone combo
connector” on page 11 for more information.
Using the Ethernet connector
To use the Ethernet connector on the dock, connect the dock to a standard 10 Mbps, 100 Mbps, or 1000
Mbps network.
The Ethernet connection on the dock supports the following functions:
• ThinkVantage Access Connections (Windows 7 only)
Access Connections is a connectivity assistant program for creating and managing location profiles. Each
location profile stores all the network and Internet configuration settings needed for connecting to a
network infrastructure from a specific location such as a home or an office. By switching between location
profiles as you move your computer from place to place, you can quickly and easily connect to a network
with no need to manually reconfigure your settings and restart the computer each time.
• Preboot eXecution Environment (supported on some Lenovo computers)
The PXE technology makes the computer more manageable by enabling the computer to start from a
server. For the PXE supported computer list, go to
www.lenovo.com/accessoriesguide.
• MAC address Pass Through
Your dock MAC address is the same as that of your computer, after enabling the MAC address Pass
Through function.
• Wake on LAN
© Copyright Lenovo 2016, 2019 7

The network administrator can turn on a computer from a management console by using the Wake on
LAN function. When the Wake on LAN function is enabled, many operations, such as data transfer,
software updates, and flash updates of the UEFI BIOS, can be done remotely without remote attendance.
The updating process can perform after normal working hours and on weekends, so that the users are not
interrupted during work, and the LAN traffic is kept to a minimum. It saves time and increases productivity.
Note: You can enable the PXE function, the MAC address Pass Through function, and the Wake on LAN
function through configuring the BIOS on your computer. For more information about configuring the BIOS,
refer to the user guide that comes with your computer.
There are two indicators on the top of the Ethernet connector.
Indicator activity Working status
The right indicator stays on in green. The dock connects to the Ethernet successfully.
The left indicator keeps flashing in amber. The dock is transferring data.
Using the USB connectors
Connect USB-compatible devices, such as a USB storage device or a USB printer to the USB connectors.
Notes:
• It is recommended that you connect a USB keyboard and a USB mouse to the USB 2.0 connectors.
• If you are using a USB 3.0 device, it is recommended that you connect it to a USB 3.0 connector for faster
USB transmission speed.
• The dock provides two types of USB-C connectors:
–
: Connect your computer to this USB-C connector on the dock.
–
: Connect a USB-C compatible device to this USB-C connector on the dock for data transfer only,
such as a USB-C storage device.
Using the Always On USB 3.0 connector
By default, the Always On USB 3.0 connector (
) enables you to charge some mobile digital devices
and smartphones when the dock is connected to the power supply.
The Always on USB 3.0 connector can supply power up to 2.4 A during the charging process. When you
press the power button to turn off the dock, the dock stops power supply.
Using the DP and VGA connectors
To use the DP connector, connect an external DP monitor to the dock using a DP cable. To use the VGA
connector, connect an external VGA monitor to the dock using a VGA cable.
Note: For better performance, occasionally adjust the external monitor to realign its settings with the video
output of the dock. For more information about the adjustment procedure, refer to the documentation that
comes with your external monitor.
8
ThinkPad USB-C Dock User Guide

Chapter 4. Working with the dock
This section provides information about the video output modes of the dock and instructions on how to
configure the dock to your needs.
Understanding the video output modes
The dock works in the following three video output modes:
• “Extend mode” on page 9
• “Mirror mode” on page 10
• “Single-display mode” on page 10
By default, the dock works in the extend mode. The first time you connect the dock to your computer, the
resolution of your computer and the connected monitor is changed to the default. You can configure your
resolution to your needs.
Extend mode
When the dock is in the extend mode, it splits your display across two monitors. Your computer monitor
becomes the primary display and the external monitor becomes the secondary display. By default, the
external monitor display is on the right side of the computer monitor display.
In extend mode, you can drag and drop windows from one display to the other. You also can increase your
productivity by doing the following:
• Reading e-mails on one display and opening the attachments on the other
• Expanding a spreadsheet across two displays
• Increasing your work area by putting all the palette and toolbars on the other display when you are doing
graphics editing
• Keeping the desktop on one display and watching videos on the other
To enter the extend mode, do the following:
For the Windows 7 operating system:
1. Click Start ➙ Control Panel.
2. Depending on your Control Panel mode, do one of the following:
• Click Display ➙ Change display settings.
• Click Appearance and Personalization ➙ Display ➙ Change display settings.
3. In the Multiple displays drop-down list box, select Extend these displays.
4. Follow the instructions on the screen to complete the setting.
For the Windows 10 operating system:
1. From the desktop, move the pointer to the bottom-left corner of the screen, and then search Control
Panel in the search box.
2. Depending on your Control Panel mode, do one of the following:
• Click Display ➙ Change display settings.
• Click Appearance and Personalization ➙ Display ➙ Change display settings.
© Copyright Lenovo 2016, 2019 9

3. In the Multiple displays drop-down list box, select Extend these displays.
4. Follow the instructions on the screen to complete the setting.
Mirror mode
When the dock is in the mirror mode, it clones your computer screen to the external monitor. The dock
automatically selects the settings (screen resolution, color quality, and refresh rate) for the external monitor,
which achieves optimal resolution based on your computer.
To enter the mirror mode, do the following:
For the Windows 7 operating system:
1. Click Start ➙ Control Panel.
2. Depending on your Control Panel mode, do one of the following:
• Click Display ➙ Change display settings.
• Click Appearance and Personalization ➙ Display ➙ Change display settings.
3. In the Multiple displays drop-down list box, select Duplicate these displays.
4. Follow the instructions on the screen to complete the setting.
For the Windows 10 operating system:
1. From the desktop, move the pointer to the bottom-left corner of the screen, and then search Control
Panel in the search box.
2. Depending on your Control Panel mode, do one of the following:
• Click Display ➙ Change display settings.
• Click Appearance and Personalization ➙ Display ➙ Change display settings.
3. In the Multiple displays drop-down list box, select Duplicate these displays.
4. Follow the instructions on the screen to complete the setting.
Single-display mode
When the dock is in the single-display mode, you can show your desktop on only one screen.
To enter the single-display mode, do the following:
For the Windows 7 operating system:
1. Click Start ➙ Control Panel.
2. Depending on your Control Panel mode, do one of the following:
• Click Display ➙ Change display settings.
• Click Appearance and Personalization ➙ Display ➙ Change display settings.
3. In the Multiple displays drop-down list box, select Show desktop only on 1 or Show desktop only on
2.
4. Follow the instructions on the screen to complete the setting.
For the Windows 10 operating system:
1. From the desktop, move the pointer to the bottom-left corner of the screen, and then search Control
Panel in the search box.
2. Depending on your Control Panel mode, do one of the following:
10
ThinkPad USB-C Dock User Guide

• Click Display ➙ Change display settings.
• Click Appearance and Personalization ➙ Display ➙ Change display settings.
3. In the Multiple displays drop-down list box, select Show desktop only on 1 or Show desktop only on
2.
4. Follow the instructions on the screen to complete the setting.
Note: If you select Show desktop only on 1, your computer display will be on and the external monitor will
turn off. However, the other functions such as audio, Ethernet, and USB connection can still work though the
external monitor is off. If you select Show desktop only on 2, the external monitor will be on and your
computer display will turn off.
Configuring the dock
You can configure the display settings of the dock to your needs:
• “Manually enabling the headset and microphone combo connector” on page 11
• “Rotating the external monitor display” on page 11
• “Setting the color quality of the external monitor” on page 12
• “Setting the resolution of the external monitor” on page 12
Note: The settings you have configured for the dock will be retained each time when you connect the
computer to the dock.
Manually enabling the headset and microphone combo connector
To manually enable the headset and microphone combo connector on the dock, do the following:
1. Right-click the speaker icon in the Windows notification area. A pop-up menu opens.
2. Click Playback devices to select a USB audio line-out device, and then click the Recording tab to
select a USB audio line-in device.
3. Click OK.
Note: To apply the new settings, restart the applications that are using the audio devices.
Rotating the external monitor display
The dock enables you to rotate only your external monitor display as you want.
To rotate the external monitor display, do the following:
For the Windows 7 operating system:
1. Click Start ➙ Control Panel.
2. Depending on your Control Panel mode, do one of the following:
• Click Display ➙ Change display settings.
• Click Appearance and Personalization ➙ Display ➙ Change display settings.
3. In the Orientation drop-down list box, select one of the following options:
• Landscape: The external monitor display remains the same as your computer monitor display.
• Portrait: The external monitor display rotates 90 degrees to the left.
• Landscape (flipped): The external monitor display becomes upside-down.
• Portrait (flipped): The external monitor display rotates 90 degrees to the right.
Chapter 4. Working with the dock 11

4. Follow the instructions on the screen to complete the setting.
For the Windows 10 operating system:
1. From the desktop, move the pointer to the bottom-left corner of the screen, and then search Control
Panel in the search box.
2. Depending on your Control Panel mode, do one of the following:
• Click Display ➙ Change display settings.
• Click Appearance and Personalization ➙ Display ➙ Change display settings.
3. In the Orientation drop-down list box, select one of the following options:
• Landscape: The external monitor display remains the same as your computer monitor display.
• Portrait: The external monitor display rotates 90 degrees to the left.
• Landscape (flipped): The external monitor display becomes upside-down.
• Portrait (flipped): The external monitor display rotates 90 degrees to the right.
4. Follow the instructions on the screen to complete the setting.
Note: For a normal display, you can continually click Portrait or Portrait (flipped) until the display becomes
upside-down.
Setting the color quality of the external monitor
The color quality setting of the external monitor is supported only on the Windows 7 operating system.
To set the color quality of the external monitor, do the following:
1. Click Start ➙ Control Panel.
2. Depending on your Control Panel mode, do one of the following:
• Click Display ➙ Change display settings.
• Click Appearance and Personalization ➙ Display ➙ Change display settings.
3. Click Advanced settings, and then click the Monitor tab.
4. Select High Color (16 bit) or True Color (32 bit) from the Colors drop-down list box.
Note: The default and recommended setting is True Color (32 bit).
5. Click OK to save the setting.
Setting the resolution of the external monitor
To set the resolution of the external monitor, do the following:
For the Windows 7 operating system:
1. Click Start ➙ Control Panel.
2. Depending on your Control Panel mode, do one of the following:
• Click Display ➙ Change display settings.
• Click Appearance and Personalization ➙ Display ➙ Change display settings.
3. In the Resolution drop-down list box, move the slider up to increase or down to decrease the resolution
of the external monitor.
4. Follow the instructions on the screen to complete the setting.
12
ThinkPad USB-C Dock User Guide

For the Windows 10 operating system:
1. From the desktop, move the pointer to the bottom-left corner of the screen, and then search Control
Panel in the search box.
2. Depending on your Control Panel mode, do one of the following:
• Click Display ➙ Change display settings.
• Click Appearance and Personalization ➙ Display ➙ Change display settings ➙ Advanced
display settings.
3. In the Resolution drop-down list box, move the slider up to increase or down to decrease the resolution
of the external monitor.
4. Follow the instructions on the screen to complete the setting.
Chapter 4. Working with the dock 13

14 ThinkPad USB-C Dock User Guide

Chapter 5. Troubleshooting
This chapter provides some troubleshooting hints and tips to assist you if you experience any problems with
the dock. Check the following items first to try to solve the problem.
General
1. The dock does not work after connected to a computer with the provided USB-C cable.
• Ensure that the dock is correctly connected to the power adapter. The dock always needs external
power adapter for operation, because it does not get power supply from the USB connector attached
to your computer.
• Ensure that the device driver of the dock is installed; if not, install the device driver and restart the
computer.
2. The 2.4 GHz wireless keyboard or 2.4 GHz wireless mouse function is interrupted. The mouse
pointer lags or it cannot move. Some characters are lost when you input by the keyboard.
It is recommended that you connect your 2.4 GHz device receiver to the front USB 3.0 connector on the
dock and avoid connecting another USB 3.0 device next to the connector with the receiver attached.
3. The charging speed becomes slow, after I connect my device (such as a mobile phone) to the
dock for charging.
Ensure that you connect your mobile phone to the Always On USB 3.0 connector. Disconnect the dock
from the computer, the charging speed might become faster.
4. The mobile phones or other USB devices cannot be charged when connected to the Always On
USB 3.0 connector.
It is recommended that you can disconnect the dock from the computer, and then you can charge the
mobile phones or other USB devices.
5. The mouse and keyboard cannot wake up my computer when connected to the Always On USB
3.0 connector.
Ensure that you connect your keyboard and mouse to other USB connectors on the dock instead of the
Always On USB 3.0 connector.
6. The computer is not charged after connected to the dock.
Ensure that you use the power adapter that shipped with the dock.
Video output
1. The external monitor display is blank.
• Ensure that the computer connected to the dock is running correctly and is not in standby or
hibernation mode. When the computer is in standby or hibernation mode, the external monitor display
is always blank.
• Ensure that the device driver is installed following the installation instructions.
• Ensure that the following connections are correct:
– The connection between the USB-C cable and your computer
– The connection between the USB-C cable and the dock
– The connection among the power adapter, the dock, and the electrical outlet
– The connection between your video cable to the dock and the external monitor.
If the problem persists, disconnect all connections of the dock, and uninstall the dock device driver.
Then, reinstall the device driver and the dock.
© Copyright Lenovo 2016, 2019 15

2. I cannot play back videos on the external monitor but can play them back on the computer
monitor.
Some computers do not support the Certified Output Protection Protocol (COPP), and you will not be
able to play back the protected videos on the external monitor connected to the dock.
To play back videos on the external monitor, you can connect the external monitor to the VGA or DP
connector on your computer, and extend the display to the external monitor. For more information about
configuring the display settings, see Chapter 4 “Working with the dock” on page 9.
3. The images on the external monitor flutter.
Check the display resolution setting of the computer and ensure that the resolution is supported by the
dock.
4. The images on the external monitor are not in correct colors.
Check the color quality of the external monitor and adjust the color to the correct color. See “Setting the
color quality of the external monitor” on page 12.
5. The computer can play back Web flashes. However, when I drag the window to the external
monitor and maximize the playback window, the playback stops.
To solve the problem, update your Adobe Flash Player to the latest version.
6. The external monitor display is blank, or the images on the external monitor flutter.
Connect one or two external monitors at a time. It is not recommended that you connect three external
monitors.
Audio
I cannot hear anything through my computer speakers or I cannot use the audio connectors on the
computer.
By default, ThinkPad and other Lenovo computers use the headset and microphone combo connector on
the dock and disable built-in audio connectors when the dock is connected.
To enable the built-in audio connectors on your computer, do the following:
1. Right-click the Volume icon in the Windows notification area.
2. Select Sounds, and the Sound window is displayed.
3. Click the Playback tab to select a built-in audio device, and then click the Recording tab to select
another built-in audio device.
See “Manually enabling the headset and microphone combo connector” on page 11 for more information.
Notes:
• To apply the new settings, restart the applications that are using the audio devices.
• The settings you have adjusted will be saved until you change the settings next time.
16
ThinkPad USB-C Dock User Guide

Appendix A. Accessibility information
Documentation in accessible formats
Lenovo provides electronic documentation in accessible formats, such as properly tagged PDF files or
HyperText Markup Language (HTML) files. Lenovo electronic documentation is developed to ensure that
visually impaired users can read the documentation through a screen reader. Each image in the
documentation also includes adequate alternative text to explain the image so that visually impaired users
can understand the image when they use a screen reader.
To open and view PDF files, your computer must have the Adobe Reader program installed. The Adobe
Reader program also is available for download at:
http://www.adobe.com
© Copyright Lenovo 2016, 2019 17

18 ThinkPad USB-C Dock User Guide

Appendix B. Trademarks
ACCESS CONNECTIONS, LENOVO, LENOVO logo, THINKPAD, THINKPAD logo, and THINKVANTAGE are
trademarks of Lenovo.
Microsoft and Windows are trademarks of the Microsoft group of companies.
DisplayPort is a trademark of the Video Electronics Standards Association.
All other trademarks are the property of their respective owners. © 2019 Lenovo.
© Copyright Lenovo 2016, 2019 19

20 ThinkPad USB-C Dock User Guide


Part Number: SP40L36280
Printed in China
(1P) P/N: SP40L36280
*1PSP40L36280*