

Model: Y0LSX46B000
SAVE THIS MANUAL FOR REFERENCE
You will need this manual for safety
instructions, operating procedures, and Warranty.
The original sales receipt is required for warranty service.
Our Customer Service staff is ready to provide assistance.
In the case of a damaged or missing part, most replacement parts ship directly from
Merotec USA in Atlanta or from one of our service partners in the US.
For immediate help with assembly, or for additional product information, email support@
MerotecUSA.com or call 866-902-9690 M-F 8:30am – 5:00pm ET. More information can be
found on www.YardForceUSA.com.
18" Cordless Chain saw
OPERATOR’S MANUAL

120v
LITHIUM-ION
TM
2
6
6
6
6
9
11
12
13
16
18
19
TABLE OF CONTENTS
Description of product parts..................................................................................................................
Technical specication...........................................................................................................................
Intended use............................................................................................................................................
General safety warnings.........................................................................................................................
Product safety warnings.........................................................................................................................
Symbols...................................................................................................................................................
Installation...............................................................................................................................................
Operation.................................................................................................................................................
Maintenance and storage.......................................................................................................................
Troubleshooting......................................................................................................................................
Warranty.....................................................................................................................................
WARNING
1. To reduce the risk of electric shock- Do not expose to water.
2. Do not use in rain. Store indoors only. Replace damaged battery pack immediately.
3. Disconnect battery pack before cleaning or servicing. Use proper eye protection. Keep
away from rotating line.
4. Do not operate without guard in place.
5. Use only SUMEC 120V Li-ion battery Y0L120BAT2.5 and SUMEC battery charger
Y0L120CGR.
120v
LITHIUM-ION
TM
3
Fig.1
Fig.2
1
2
3
4
5
6
7
8
9
10
A
B
C
D
E
F
G
120v
LITHIUM-ION
TM
4
Fig.3
Fig.5
Fig.7
Fig.9
Fig.4
Fig.6
Fig.8
Fig.10
120v
LITHIUM-ION
TM
5
Fig.11
Fig.13
Fig.12
120v
LITHIUM-ION
TM
120v
LITHIUM-ION
TM
120v
LITHIUM-ION
TM
120v
LITHIUM-ION
TM
120v
LITHIUM-ION
TM
120v
LITHIUM-ION
TM
k
caP y
r
etta
B
V
0
2
1
F
31
1
.xaM
5.2TA
B
0
2
1F
Y
:
l
ed
o
M
kcaP yr
e
ttaB V021
l
a
i
r
t
s
ud
nI htr
oN
w
a
s
e
n
n
e
K
5563 .cnI cet
o
reM
yl
n
o
s
r
o
o
d
n
i
erots
dna e
s
U
GN
I
NR
AW
.y
til
ic
af g
n
irutcaf
u
nam CEMUS a ta an
i
h
C
ni
e
d
a
M
hA 5.2
:
yti
c
ap
aC
y
r
e
t
taB
.C.
D
V
021 :e
g
atloV
287
1
33
E
ECN
AIL
PPA
GNI
NE
D
R
A
G
.RG
C02
1FY
re
g
r
ahc
V
0
2
1
CE
M
U
S
r
of
y
l
n
o
e
s
U
4
4
103A
G
,
w
a
s
e
n
ne
K
,
y
a
w
k
r
aP
Fig.14
Fig.15
120v
LITHIUM-ION
TM
6
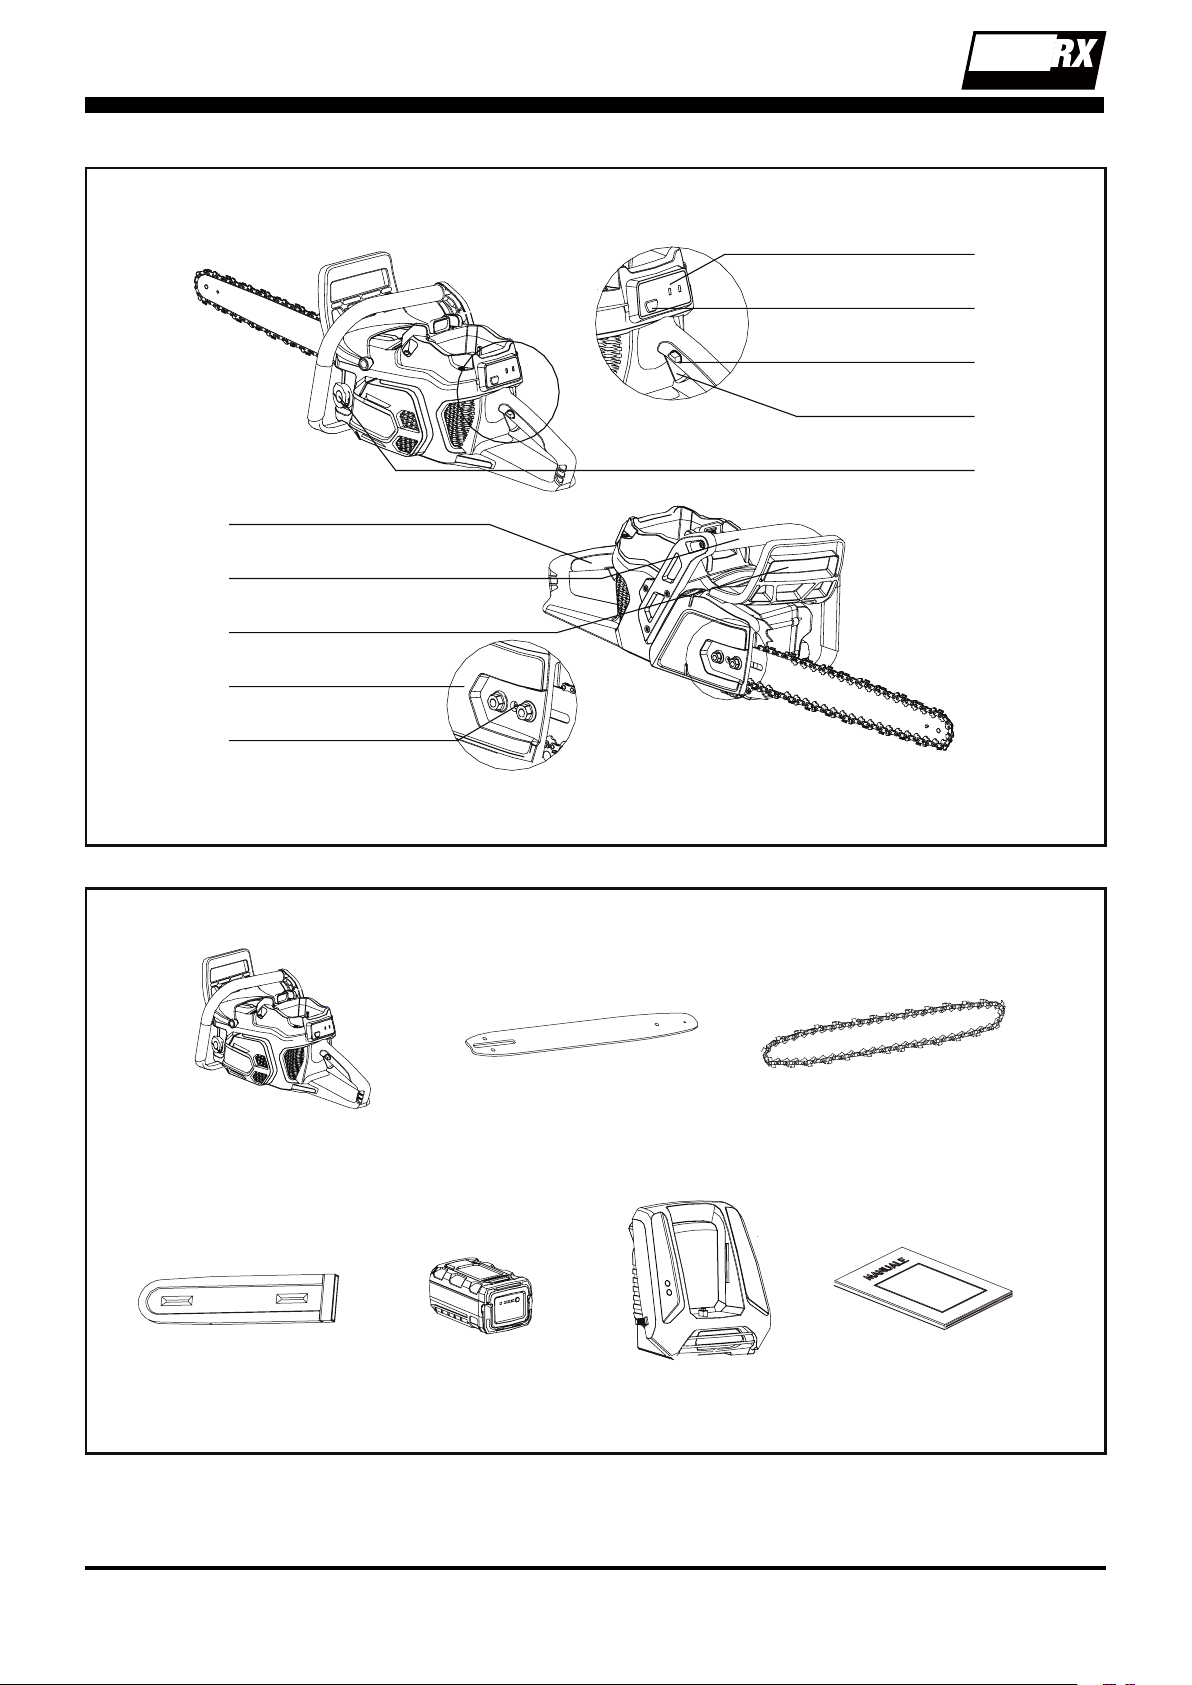
Description of product parts
Parts description (See Fig. 1)
1. Main handle
2. Auxiliary handle
3. Chain brake actuating lever
4. Clutch chain bar cover
5. Chain tensioner adjuster screw
6. Chain oil cap
7. Switch trigger
8. Safety lock o button
9. Power ON/OFF button
10. Panel
Parts included (See Fig. 2)
a. Chain saw(without bar and chain ) x 1
b. Chain bar x 1
c. Chain x 1
d. Protect sleeve x 1
e. Battery pack x 1
f. Charger x 1
g. Manual x 1
Carefully remove the machine and parts from its
packaging. Identify all the parts packaged in the
carton against the parts list.
Please contact our customer service center
(
Monday - Friday 8:30AM - 5:00PM ET)
at
(866)
902-9690
if anything is missing.
WARNING:
If any parts are damaged
or missing, do not operate this tool until
these parts have been replaced. Failure
to heed this warning could result in
serious personal injury.
NOTE:
Always recycle the packaging in
accordance with local recycling guidelines.
Technical Specications
Model # Y0LSX46B000
Voltage/Capacity 120 V DC, 2.5 Ah Li-ion
No-load chain speed 42.65 ft/s (13 m/s)
Bar Length 18"
Chain Pitch 3/8”
Type of chain blade 91P062X
Type of chain bar 180SDEA041
Oil tank capacity 5.63 oz.
Charger Input: 100~120 V, 50/60 Hz,
Output: 120 V DC, 4 A
Charging Time 40 minutes
Weight 11.46 lbs
Battery Pack Type Y0L120BAT2.5, 2.5 Ah
Adapter Type Y0L120CGR
Intended use
This Chain saw has been designed for cutting
branches, trees or logs.
The machine is to be used only for its prescribed
purpose, the cutting of wood. Any other use
is deemed to be a case of misuse. The user/
operator and not the manufacturers will be liable
for any damage or injuries of any kind caused as
a result of this.
The product is to be used outdoors
This product is not to be used by children or
by any persons not wearing the correct safety
protective equipment and clothing
General safety warnings
WARNING
Read all safety warnings
and all instructions. Failure to follow the
warnings and instructions may result in
electric shock, re and/or serious injury.
Save all warnings and instructions for future
reference
The term “power tool” in the warnings refers
to your mains-operated (corded) power tool or
battery-operated (cordless) power tool.
Work area safety
1.
Keep work area clean and well lit.
Cluttered
or dark areas invite accidents.
2.
Do not operate power tools in explosive
atmospheres, such as in the presence of
ammable liquids, gases or dust.
Power
tools create sparks which may ignite the dust
or fumes.
3.
Keep children and bystanders away while
operating a power tool.
Distractions can
cause you to lose control.

120v
LITHIUM-ION
TM
7
Electrical safety
1.
Power tool plugs must match the outlet.
Never modify the plug in any way. Do
not use any adapter plugs with earthed
(grounded) power tools.
Unmodied plugs
and matching outlets will reduce risk of
electric shock.
2.
Avoid body contact with earthed or
grounded surfaces, such as pipes,
radiators, ranges and refrigerators.
There
is an increased risk of electric shock if your
body is earthed or grounded.
3.
Do not expose power tools to rain or wet
conditions.
Water entering a power tool will
increase the risk of electric shock.
4.
Do not abuse the cord. Never use the
cord for carrying, pulling or unplugging
the power tool. Keep cord away from
heat, oil, sharp edges or moving parts
.
Damaged or entangled cords increase the
risk of electric shock.
5.
When operating a power tool outdoors,
use an extension cord suitable for
outdoor use.
Use of a cord suitable for
outdoor use reduces the risk of electric
shock.
6.
If operating a power tools in a damp
location is unavoidable, use a residual
current device (RCD) protected supply.
Use of an RCD reduces the risk of electric
shock.
Personal safety
1.
Stay alert, watch what you are doing and
use common sense when operating a
power tool. Do not use a power tool while
you are tired or under the inuence of
drugs, alcohol or medication.
A moment of
inattention while operating power tools may
result in serious personal injury.
2.
Use personal protective equipment.
Always wear eye protection.
Protective
equipment such as dust mask, non-skid
safety shoes, hard hat, or hearing protection
used for appropriate conditions will reduce
personal injuries.
3.
Prevent unintentional starting. Ensure
the switch is in the o-position before
connecting to power source and/or
battery pack, picking up or carrying the
tool.
Carrying power tools with your nger
on the switch or energizing power tools that
have the switch on invites accidents.
4.
Remove any adjusting key or wrench
before turning the power tool on.
A
wrench or a key left attached to a rotating
part of the power tool may result in personal
injury.
5.
Do not overreach. Keep proper footing
and balance at all times.
This enables
better control of the power tool in unexpected
situations.
6.
Dress properly. Do not wear loose
clothing or jewellery. Keep your hair,
clothing and gloves away from moving
parts.
Loose clothes, jewellery or long hair
can be caught in moving parts.
7.
If devices are provided for the connection
of dust extraction and collection facilities,
ensure these are connected and properly
used.
Use of dust collection can reduce
dust-related hazards.
Power tool use and care
1.
Do not force the power tool. Use the
correct power tool for your application.
The correct power tool will do the job
better and safer at the rate for which it was
designed.
2.
Do not use the power tool if the switch
does not turn it on and o.
Any power tool
that cannot be controlled with the switch is
dangerous and must be repaired.
3.
Disconnect the plug from the power
source and/or the battery pack from
the power tool before making any
adjustments, changing accessories,
or storing power tools.
Such preventive
safety measures reduce the risk of starting
the power tool accidentally.
4.
Store idle power tools out of the reach
of children and do not allow persons
unfamiliar with the power tool or these
instructions to operate the power tool.
Power tools are dangerous in the hands of
untrained users.
5.
Maintain power tools. Check for
misalignment or binding of moving
parts, breakage of parts and any other
condition that may aect the power tool’s
operation. If damaged, have the power
tool repaired before use.
Many accidents
are caused by poorly maintained power
tools.

120v
LITHIUM-ION
TM
8
6.
Keep cutting tools sharp and clean.
Properly maintained cutting tools with sharp
cutting edges are less likely to bind and are
easier to control.
7.
Use the power tool, accessories and
tool bits etc. in accordance with these
instructions, taking into account the
working conditions and the work to
be performed.
Use of the power tool for
operations dierent from those intended
could result in a hazardous situation.
Charger
1. R
echarge only with the charger specied
by the manufacturer.
Do not use the
original charger on other li-ion batteries or on
any other type of battery as this can increase
the risk of re or explosion.
2.
Check the battery charger, cable and plug
before each use.
Do not use the battery
charger if damaged.
Do not open the
battery charger yourself;
charger must be
repaired by qualied personnel using original
spare parts.
3. The charger is designed to use a standard
household 100-120 V~, 50/60 Hz power
source, ensure that the plug matches the
outlet.
4.
Never modify the plug in any way; this
will reduce the risk of electric shock.
5.
Do not abuse the cord of charger.
Never use the cord for carrying, pulling or
unplugging the charger. Keep cord away
from heat, oil, sharp edges or moving parts.
Damaged or entangled cords increase the
risk of electric shock.
6.
Make sure the charger cord is situated so
that it will not be stepped on,
tripped over
or get damaged.
7.
Keep the battery charger clean.
Contamination can increase the risk of
electric shock.
8.
Protect the battery charger from rain and
moisture.
If water accesses the battery
charger there is an increased risk of electric
shock.
9.
Battery will heat up whilst charging.
To
reduce the risk of re, do not operate battery
charger on ammable surfaces such as
paper or textiles.
10.
The temperature range over which the
battery pack can be charged is typically
between 41° F to 113° F.
Attempts to
charge out with the prescribed temperature
range may automatically be blocked by
the protection circuitry of the battery pack.
Longest life and best performance can be
obtained if the battery pack is charged at
room temperature.
11.
Disconnect charger from the power
supply when not in use.
This will reduce
the risk of electric shock or damage to the
charger.
Battery pack
1.
Fully charge battery pack before rst use.
2. Recharge battery pack immediately when
the power output starts to slow.
DO NOT
CONTINUE TO USEPRODUCT WHEN
BATTERY LEVEL IS LOW.
3.
To prevent serious damage to the battery,
charge in temperatures above 41° F
or below 113° F.
Longest life and best
performance can be achieved when battery
is charged at room temperature.
4
If the battery temperature is above113° F
it must be allowed to cool before putting
it into the charging station.
5. To reduce the risk of explosion, ensure
the battery pack is not left in the sun for
extended periods of time and that it is kept
away from re.
6.
Do not c
arry individual battery packs in your
pockets or bag as they could short-circuit
against other metal items.
7. Should a li-ion battery catch re, ensure to
use the correct re extinguisher to combat
the re.
DO NOTTHROW WATER ON A
BURNING LI-ION BATTERY.
8. If the battery pack becomes too hot during
charging, disconnect and switch o
immediately. Contact the service centre
directly.
9.
Do not attempt to open the battery
yourself.
10.
When battery pack is not in use keep it
away from other metal objects
such as
paperclips, coins, keys, nails, screws or
other small metal objects that can make a
connection from one terminal to another.
Maintenance and storage
1.
Keep all nuts, bolts and screws tight to
be sure the product is in a safe working

120v
LITHIUM-ION
TM
9
condition.
2. Always allow the product to cool down before
storing.
3. When servicing the chain be aware that even
though he power source is switched o, the
chain can still move.
4. Replace worn or damaged parts for safety.
Use only genuine replacement parts and
accessories.
5.
DO NOT attempt to open the charger
and battery pack.
There are no customer
serviceable parts inside. Return to any
authorized service center.
6. Store the appliance with battery pack fully
charged at room temperature (around 68° F).
7.
Every deep discharge cycle decreases
the capacity of battery pack.
To prolong
battery life, it is recommended that you
charge the battery every six months within
extended periods of time when the product
is not in use.
Servicing
1. Have your tool repaired by an authorized
service agent. This tool is manufactured
in accordance with the relevant safety
regulations. To avoid danger, equipment
must only be repaired by qualied
technicians.
2. Only use identical replacement and
accessories made for this machine by the
manufacturer. Failure to do so can result in
personal injury.
Product safety warnings
1.
Keep all parts of the body away from
the saw chain when the chain saw is
operating. Before you start the chain
saw, make sure the saw chain is not
contacting anything.
A moment of
inattention while operating chain saws may
cause entanglement of your clothing or body
with the saw chain.
2.
Always hold the chain saw with your
right hand on the rear handle and your
left hand on the front handle.
Holding the
chain saw with a reversed hand conguration
increases the risk of personal injury and
should never be done.
3.
Hold the power tool by insulated gripping
surfaces only, because the saw chain
may contact hidden wiring.
Saw chains
contacting a "live" wire may make exposed
metal parts of the power tool "live" and could
give the operator an electric shock.
4.
Wear safety glasses and hearing
protection. Further protective equipment
for head, hands, legs and feet is
recommended.
Adequate protective clothing
will reduce personal injury by ying debris or
accidental contact with the saw chain.
5.
Do not operate a chain saw in the tree.
Operation of a chain saw while up in a tree
may result in personal injury.
6.
Always keep proper footing and operate
the chain saw only when standing on
xed, secure and level surface.
Slippery
or unstable surfaces such as ladders may
cause a loss of balance or control of the
chain saw.
7.
When cutting a limb that is under tension
be alert for spring back.
When the tension
in the wood bers is released the spring
loaded limb may strike the operator and/or
throw the chain saw out of control.
8.
Use extreme caution when cutting brush
and saplings.
The slender material may
catch the saw chain and be whipped toward
you or pull you o balance.
9.
Carry the chain saw by the front handle
with the chain saw switched o and away
from your body. When on transporting
or storing the chain saw always ts
the guide bar cover.
Proper handling of
the chain saw will reduce the likelihood of
accidental contact with the moving saw
chain.
10.
Follow instructions for lubricating, chain
tensioning and changing accessories.
Improperly tensioned or lubricated chain
may either break or increase the chance for
kickback.
11.
Keep handles dry, clean, and free from
oil and grease.
Greasy, oily handles are
slippery causing loss of control.
12.
Cut wood only. Do not use chain saw for
purposes not intended. For example: do
not use chain saw for cutting plastic,
masonry or non-wood building materials.
Use of the chain saw for operations dierent

120v
LITHIUM-ION
TM
10
than intended could result in a hazardous
situation.
13.
Causes and operator prevention of
kickback:
Kickback may occur when the nose or tip of
the guide bar touches an object, or when the
wood closes in and pinches the saw chain in
the cut.
Tip contact in some cases may cause a
sudden reverse reaction, kicking the guide
bar up and back towards the operator.
Pinching the saw chain along the top of the
guide bar may push the guide bar rapidly back
towards the operator.
Either of these reactions may cause you to
lose control of the saw which could result
in serious personal injury. Do not rely
exclusively upon the safety devices built into
your saw.
As a chain saw user, you should take several
steps to keep your cutting jobs free from
accident or injury.
Kickback is the result of tool misuse and/or
incorrect operating procedures or conditions
and can be avoided by taking proper
precautions as given below:
-
Maintain a rm grip, with thumbs and
ngers encircling the chain saw handles,
with both hands on the saw and position
your body and arm to allow you to
resist kickback forces.
Kickback forces
can be controlled by the operator, if proper
precautions are taken. Do not let go of the
chain saw.
-
Do not overreach and do not cut above
shoulder height.
This helps prevent
unintended tip contact and enables better
control of the chain saw in unexpected
situations.
-
Only use replacement bars and chains
specied by the manufacturer.
Incorrect
replacement bars and chains may cause
chain breakage and/or kickback.
-
Follow the manufacturer’s sharpening
and maintenance instructions for the saw
chain.
Decreasing the depth gauge height
can lead to increased kickback.
14. Cut the wood in right direction.
15.
Before use the chain saw, be sure to
check the chain and bar in tension.
Don’t
use the chain saw if the chain and bar are
loose. Also conrm with that no abnormality
exists by actual test running.
16. Do not operate in rain.
17.
Switch o and remove the battery pack
when not in use, and before performing
maintenance or adjustments.
18. Pull out the battery pack before you change
or adjust the bar and chain Use only suitable
bar Oregon/180SDEA041 and chain Oregon
/91P062X.
19.
Never leave the machine unattended in
rooms with children.
20.
Keep the machine out of children’s reach.
21. The rst-time user should, as a minimum
practice, cutting logs on a saw-horse or
cradle.
120v
LITHIUM-ION
TM
11
Symbols
Safety symbols
The purpose of safety symbols is to attract your
attention to any possible dangers. The safety
symbols and their explanations deserve your
careful attention and full understanding. The
symbol warnings do not, by themselves, eliminate
any danger. The instructions and warnings
they give are no substitute for proper accident
prevention measures.
WARNING:
Be sure to read and
understand all safety instructions
within this operator’s manual,
including all safety alert symbols such
as
“DANGER,” “WARNING,”
and
“CAUTION”
before using this tool.
Failure to follow all instructions listed
below may result in electric shock, re
and/or serious personal injury.
SAFETY ALERT SYMBOLS:
Indicate
DANGER, WARNING,
or
CAUTION.
May be used in conjunction with other
symbols or pictographs.
Symbol meanings
This page depicts and describes safety symbols
that may appear on this product. Read, fully
understand and follow all instructions on the
machine before attempting to assemble and
operate.
This symbol, before a safety comment,
indicates a precaution, a warning or
a danger. Ignoring this warning can
lead to an accident for yourself or
for others. To limit the risk of injury,
re, or electrocution always apply the
recommendations indicated.
To reduce the risk of injury, user must
read and understand operator’s manual
before using this product.
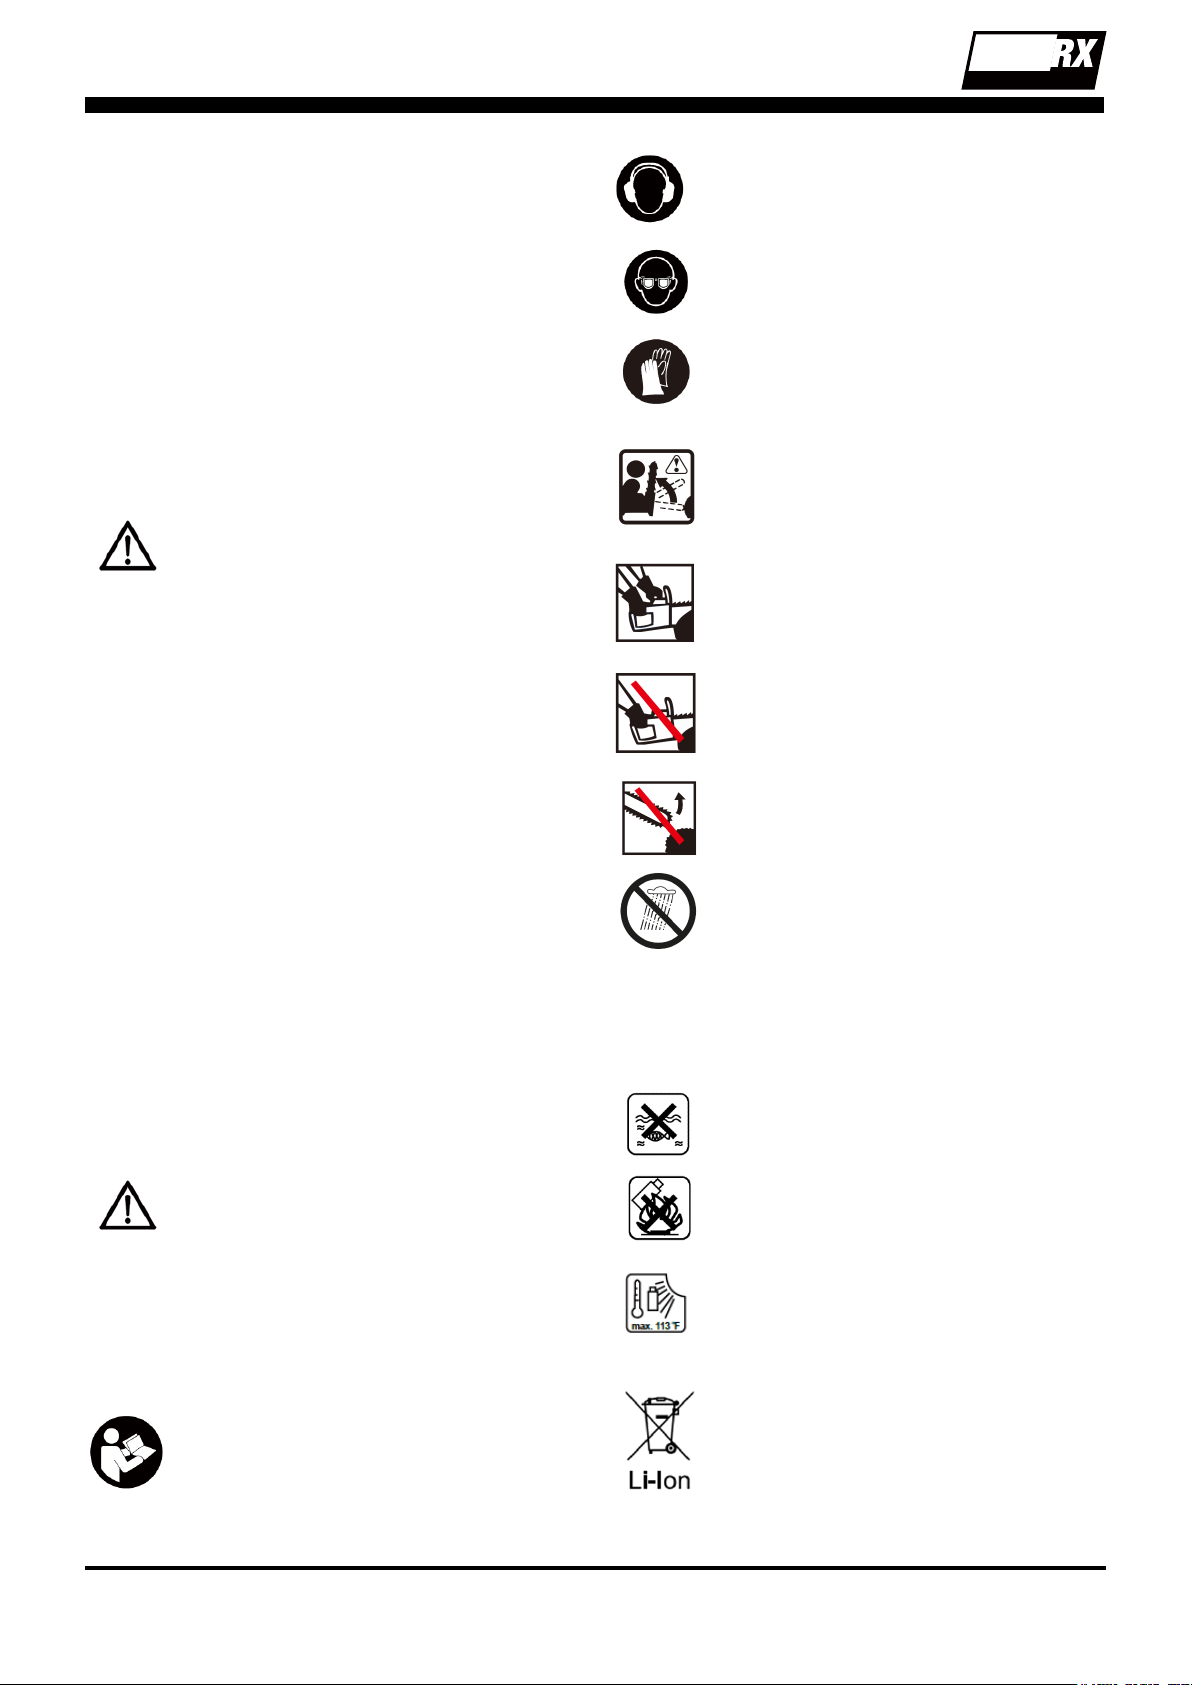
Wear ear hearing protection when
operating this product.
Wear eye protection
Wear heavy-duty protective gloves when
handling the chain saw.
Tip contact can cause the guide bar to
move suddenly upward and backward,
which can cause serious injury.
Hold and operate the saw properly with
both hands.
Do not operate the saw using only one
hand.
Contact of the guide bar tip with any
object should be avoided.
Do not expose to rain
Warning symbols on the battery pack
Do not throw into water
Do not throw on re.
Do not subject the battery to strong
sunlight over long periods of time. Do not
leave on a heater (max.113˚F).
Batteries contain Li-ion. Do not dispose
of waste batteries in domestic waste.
Contact local authority to nd out how to
dispose of batteries appropriately.
120v
LITHIUM-ION
TM
12
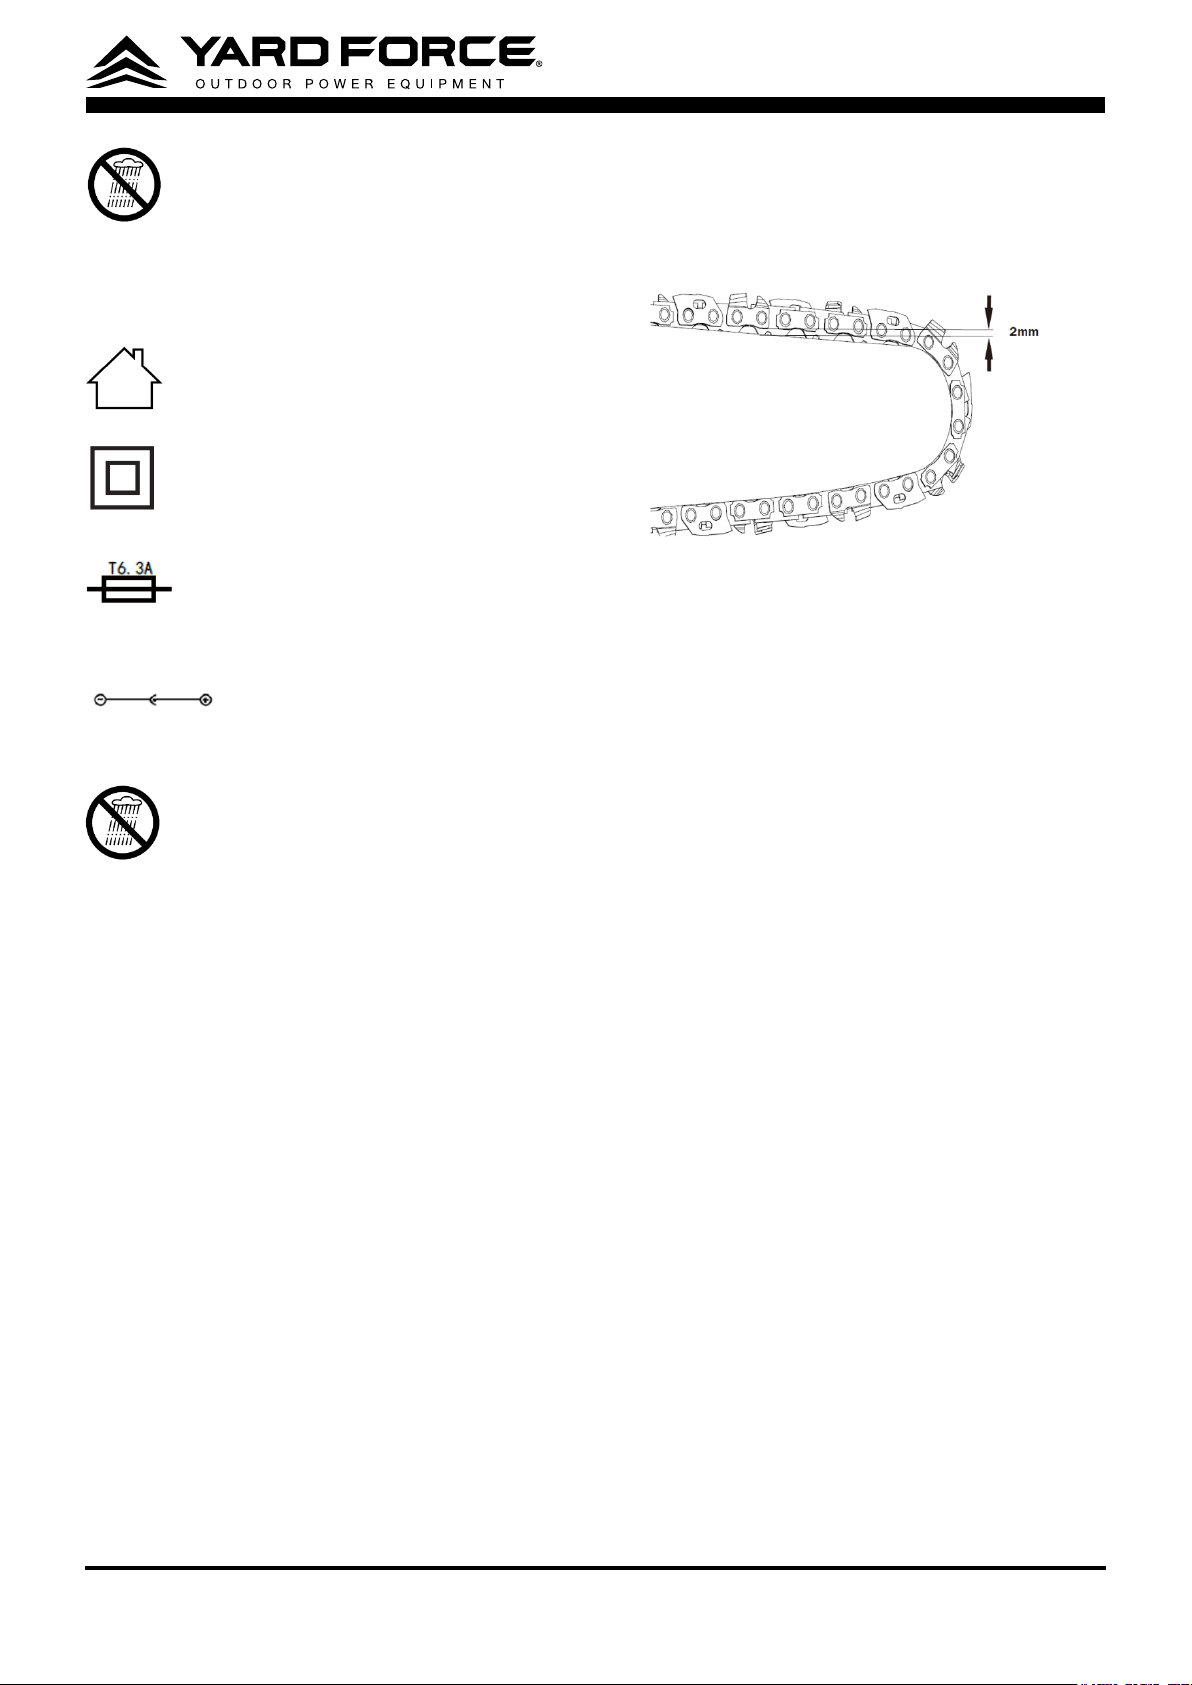
Do not expose and operate the tool in
rain.
Warning symbols on the charger
The charger is for indoor use only.
Double insulation
Protective 6.3A limited
Pole orientation.
Do not expose and operate the tool in
rain.
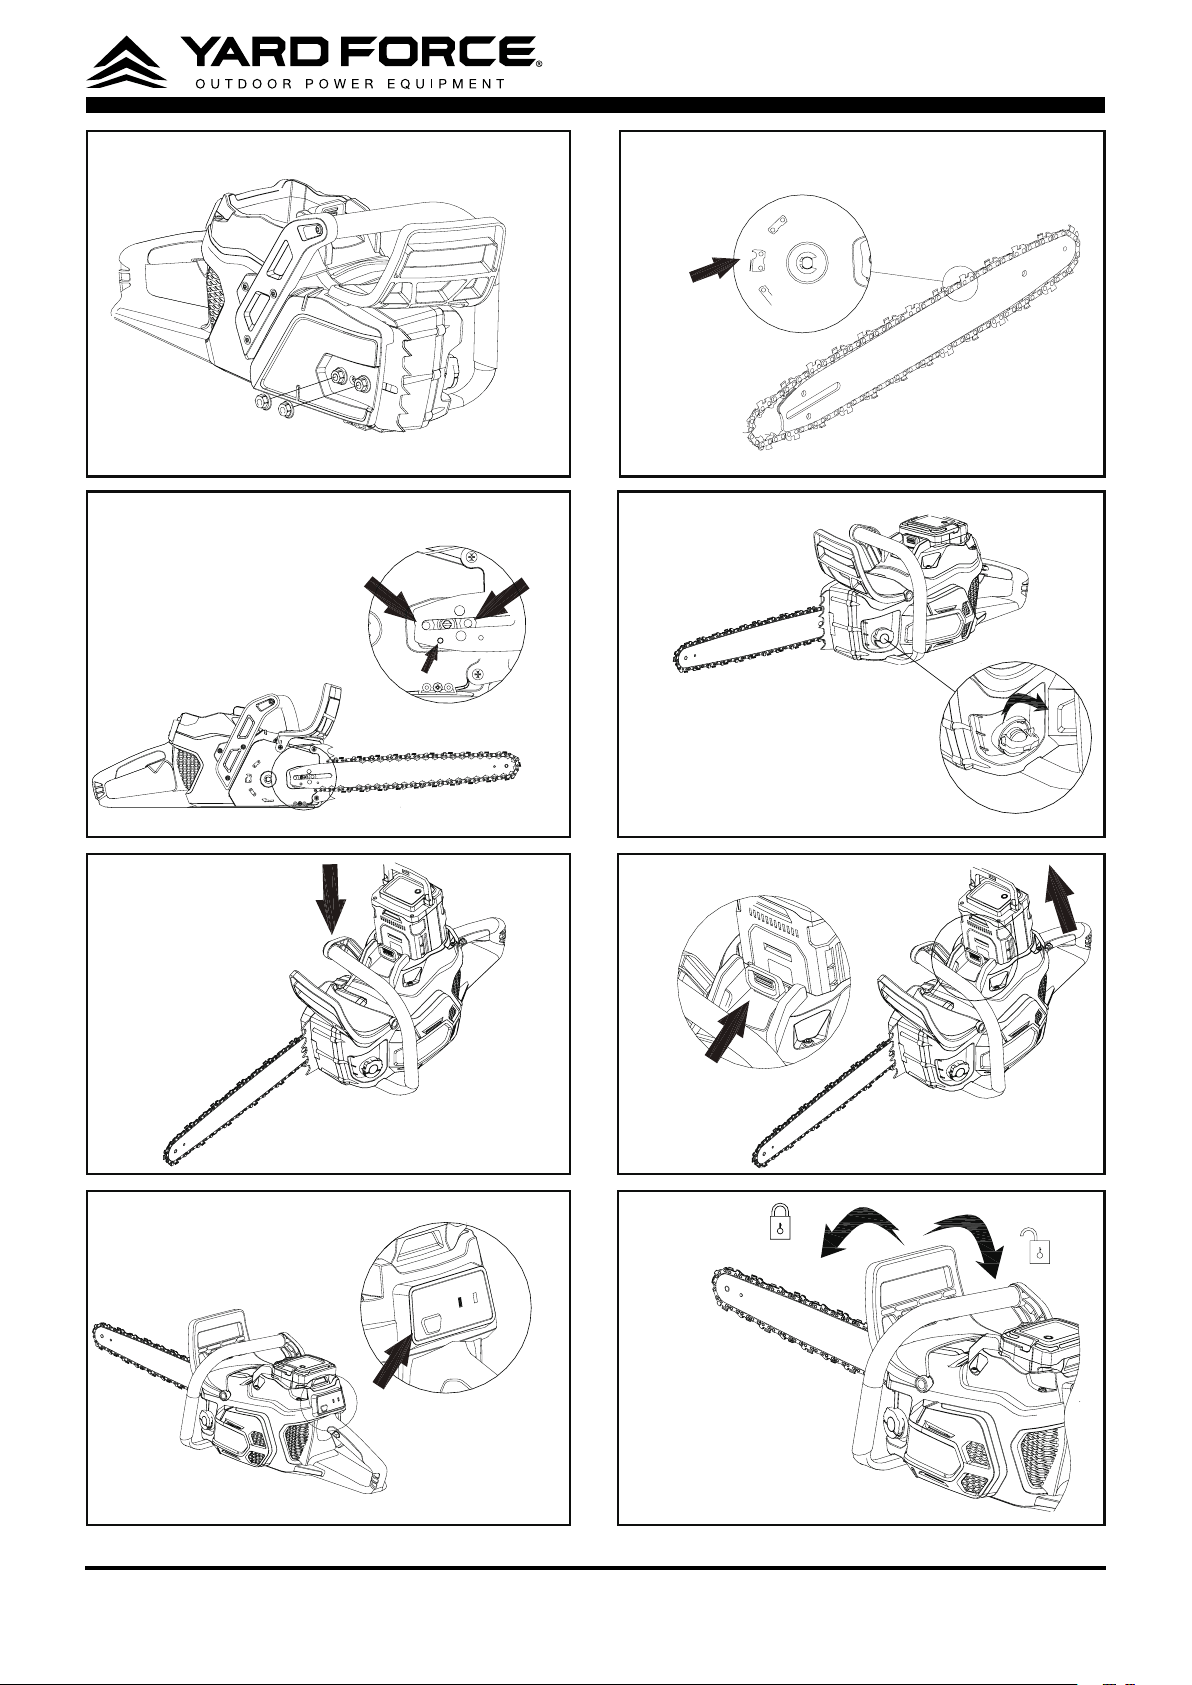
Installation
Install the chain Bar and chain
1. Uninstall the two nuts on the Chain bar cover
and disassembly the clutch cover. (See Fig. 3)
2. The saw chain should face in the direction
of chain rotation. If backwards, turn the loop
over.
3. Place the chain drive links into the bar groove.
4. Position the chain so there is a loop at the
back of the bar. (See Fig. 4)
Hold the chain in position on the bar and then
place the loop around the sprocket and make
sure it is correctly mounted. Make sure the bar
hole ts well with bolt for saw chain tension. (See
Fig. 5)
5. Install the Chain bar cover. With the two cover
nuts and then adjust the chain tension as
detailed below.
Adjust the chain’s tension
Use a at screwdriver to adjust the tension
of chain, clockwise direction to tighten, and
anticlockwise direction to release.
0.079“
CAUTION!
Always ensure the battery pack has
been removed before any adjustments are made.
When the saw chain can be raised by around
2mm In the middle of the cutter bar. You know
that the chain tension is ideal.
CAUTION:
Proper saw chain tension is extremely
important. If saw chain is too tight, the guide bar
and saw chain will be quickly damaged. If the saw
chain is too loose, it may get out of the guide bar
groove and cause an injury.
NOTE:
All the chain links must lie properly in the
guide groove of the saw rail.
NOTE:
During cutting. The chain gets heat and
its length changes. It is important therefore to
check the chain tension at least every 10 minutes
and to adjust it again as required.
NOTE:
A new chain will stretch so adjust the
tension after a few cuts. Watch saw chain tension
carefully for the rst half hour of cutting. Once
chain tension has been completed - retighten
the chain bar cover nut and make sure they are
secure.

120v
LITHIUM-ION
TM
13
Operation
Charging the battery pack
NOTE:
- The battery pack is supplied partially charged.
To ensure the best performance, charge the
battery completely before rst use.
- Make sure the main voltage is the same as
rating label which is located on the charger.
- Remove the battery pack from the charger
after it has been fully charged.
1. Connect the charger to a power supply. The
red LED light on the charger will be on.
2. To insert the battery pack into the charger, align
the grooves on the battery pack with the raised
ribs in the opening of the charger. Then press
the battery pack downward with a moderate
force. (There is a carrying handle at the top of
the battery pack. Lift the handle up for easy-
transporting.)
3. Once the battery pack is correctly located in
the charger, the green LED light of the charger
will ash continuously during normal charging,
while the red LED light is still on.
4. When charging is complete, both green and
red LED light of the charger will be on.
5. If you encounter one of following kind of
situations, the red LED light of charger will
ash.
- Wrong communication. It refers to poor
connection between charger and battery pack.
- Fault with battery pack. It need be repaired by
the customer service center.
Power indicator
This Li-Ion battery pack is equipped with a power
indicator which is used to show the battery pack’s
remaining charge. Press the power indicator
button to check battery charge as below. The
LEDs will stay lit for approximately 4 seconds.
Meaning of power indicator
1. When you push the power indicator button,
the green LED lights will show the power
remaining.
2. When the battery pack over discharges or
remains very low power, the red LED light will
ash.
3. When the battery pack temperature is
exceeded, the red LED light will ash. Cool it
down for 10~20 minutes.
4. When there is fault with the battery pack, the
red LED light will ash.
5. Once the battery pack is correctly located in
the charger, the 4 green LED lights of the
battery pack will ash LED lights to indicate the
charging process. At the same time the green
LED light of the charger will ash continuously
during normal charging, while the red LED light
is still on.
Low capacity warning
Unlike other battery pack types, lithium-ion
battery packs deliver fade-free power for their
entire run time. The tool will not experience a
slow, gradual loss of power as you work. If the
red LED on the battery pack begins to ash, the
battery pack’s charge is below 1% capacity and
should be recharged.
To obtain the best life from the battery
1. Never allow the battery to completely
discharge before recharging. The battery pack
should be placed on the charger whenever
the battery pack is noticeably running down or
the tool no longer performs a task it previously
performed.
2. Avoid conducting short charges. Make sure
that the battery is fully charged each time
by allowing the charger to complete its full
charging cycle.
3. Avoid allowing lose items like screws or nails
etc. to be stored with battery packs as these
or similar items can short battery packs and
cause a re or explosion
4. Always unplug the charger when not in use
and store in a dry and secure place.
5. Avoid charging or storing your battery in
temperatures below 41˚F and above 113˚F.
6. After use, allow the battery to pack to cool
down for approximately 30 minutes before
attempting to recharge.
Filling the chain oil tank
1. Open the chain oil tank cap. (See Fig. 6)
2. Fill ONLY with Chain OIL - 406 Lubricating Oil
3. Reinstall oil tank cap. Tighten rmly.
4. Wipe o excess oil.
NOTE:
It is normal for oil to seep when saw is not
in use. Empty oil tank after each use in case of
seepage.

120v
LITHIUM-ION
TM
14
To insert the battery pack
1. Align the groove on the battery pack with the
corresponding ribs in the receptacle of the
device. (See Fig. 7)
2. Depress the battery pack with moderate force
until it is locked in place. Make sure that the
battery handle is folded down. (See Fig. 7)
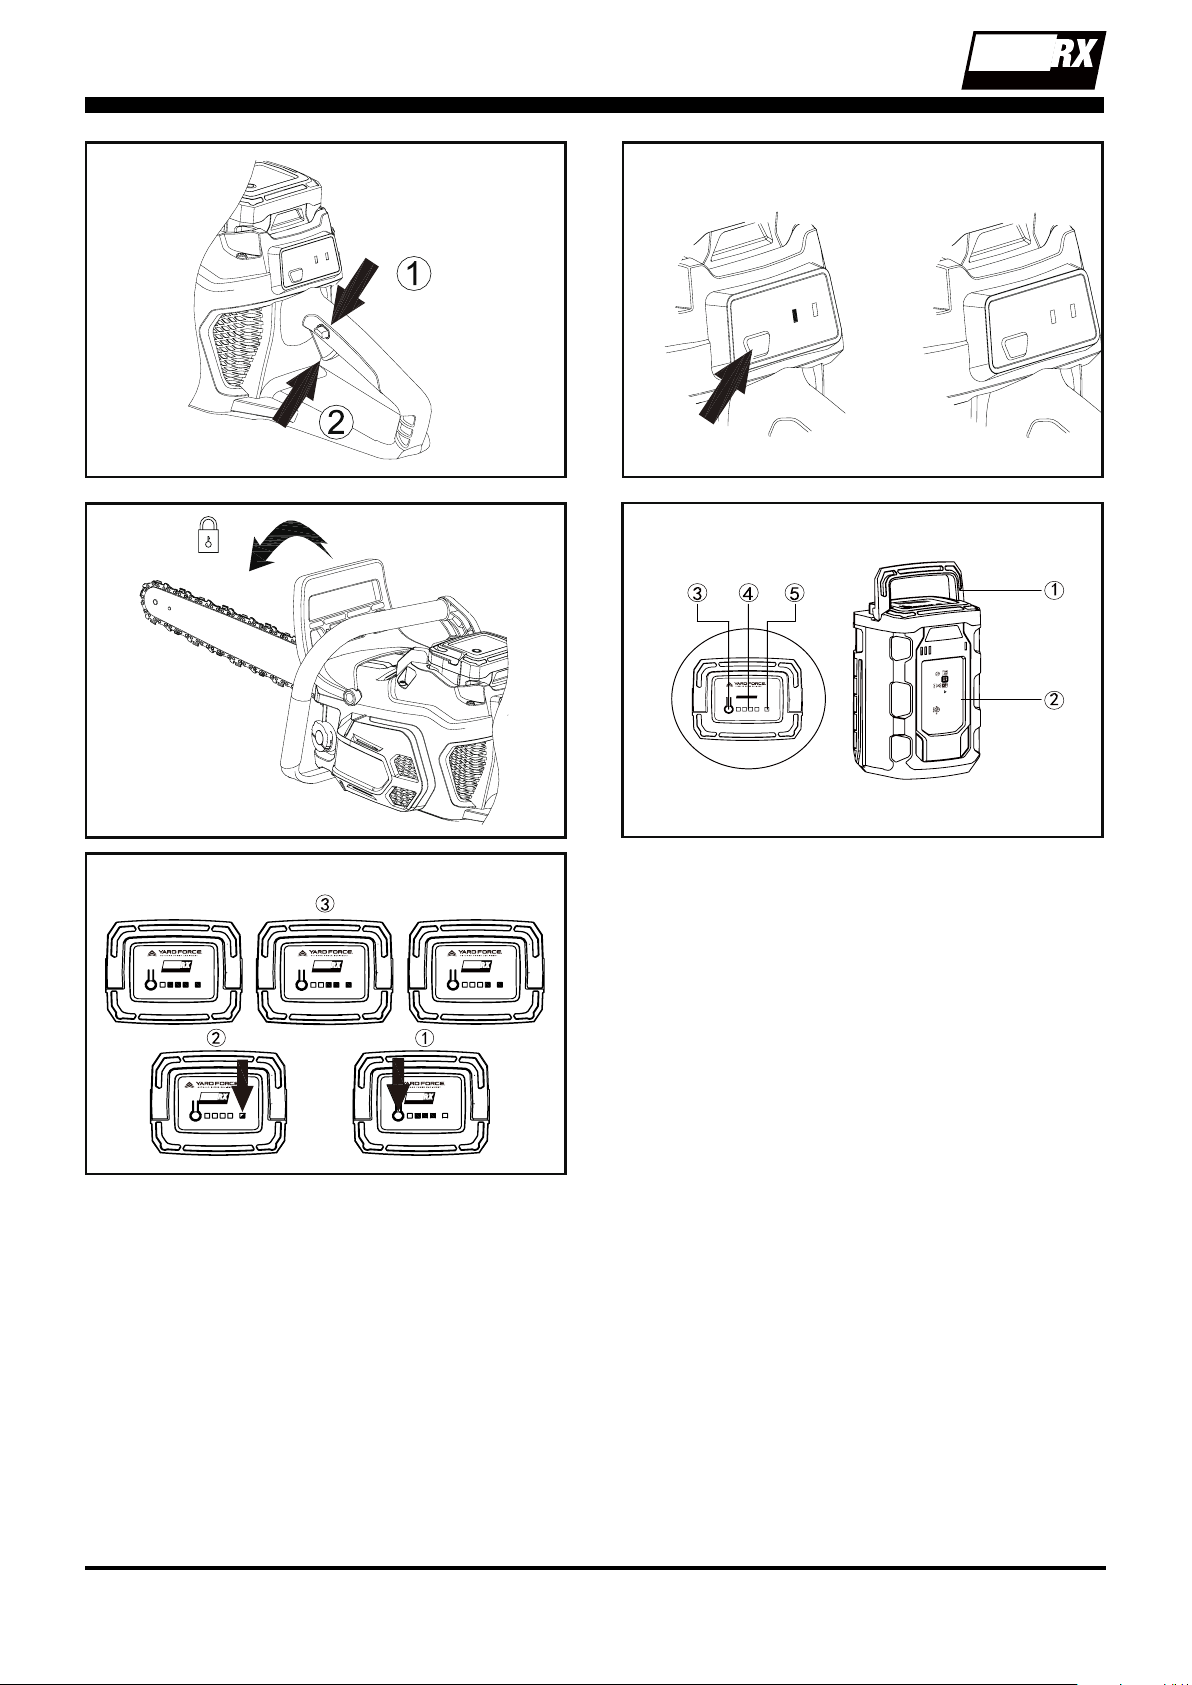
Battery Pack Y0L120BAT2.5 (See Fig. 14)
1. Lift handle
2. Main housing
3. Indicator button
4. Green LED lamps
5. Red LED lamp
Battery Pack Operation (See Fig. 15)
1. When you push the power indicator button, the
green LED lights will show the power remaining.
(See Fig. 15
①
)
2. When the battery pack over discharges or
remains very low power, the red LED light will
ash. (See Fig. 15
②
)
3. When the battery pack temperature is exceeded,
the red LED light will ash. Cool it down for
10~20 minutes. (See Fig. 15
②
)
4. When there is fault with the battery pack, the red
LED light will ash. (See Fig. 15
②
)
5. Once the battery pack is correctly located in the
charger, the 4 green LED lights of the battery
pack will ash LED lights to indicate the charging
process. At the same time the green LED light of
the charger will ash continuously during normal
charging, while the red LED light is still on. (See
Fig. 15
③
)
To remove the battery pack from the tool
1. Press the battery pack release button, the
battery pack will spring out automatically. (See
Fig. 8)
2. Lift up the carrying handle and remove the
battery pack. (See Fig. 8)
Switch ON the chain saw
1. Depress the power button and hold down for
2 seconds- The green LED light will be ON.
This means the tool is power on normally. (See
Fig. 9)
2. Make sure the Chain Brake lever is in the
OFF position – (pulled backwards towards the
rear). (See Fig. 10)
3. Grip the main handle with your right hand and
auxiliary handle with left hand.
4. Press the safety lock o button with your
thumb and then grip the switch trigger. (See
Fig. 11)
Switch OFF the chain saw
Depress the power button and hold down for 2
seconds- All LED lights will be OFF. (See Fig. 12)
Make sure the Chain Brake lever is in the ON
position. (See Fig. 13)
Caution:
Always switch o the chain saw when work break
or long time storage, ensure the Chain break
lever is in the ON (lock) position.
Before use
1. Check that the chain brake works correctly
and is not damaged.
Check the operation of the chain brake prior to
each use.
Engage the chain brake by rotating your
left hand around the front handle and then
allowing your hand to push forward the chain
brake lever guard while the chain is rotating
at normal speed. Make sure you have both
hands on the chainsaw at all times. The chain
should stop immediately.
Reset the Chain brake lever by pulling the
brake lever back toward the handle.
2. Check that the rear right hand guard is not
damaged.
3. Check that the lock-o button and on/o trigger
switch works correctly and is not damaged.
4. Check that all handles are free from oil.
5. Check that all parts of the chain saw are
tightened correctly and that they are not
damaged or missing.
6. Check the chain tension.
Correct posture
1. Never work on unstable surfaces!
2. Never work while standing on a ladder!
3. Do not lean too far forward or too far back!
4. Use the product only under favorable weather
and site conditions!
5. Stand with both legs securely on the ground.
Watch out for obstacles in the work area.
120v
LITHIUM-ION
TM
15
General using method
1.Use the chain saw only with secure footing.
2.Always hold the chain saw rmly with both
hands. Front grip with the left hand and
rear grip with the right hand. Fully grip both
handles at all times during operation. Never
operate chain saw using only one hand. Hold
the chain saw at the right-hand side of your
body.
3. Switch on the saw and always allow the chain
blade to reach full speed before it makes
contact with the wood.
The proper techniques for basic felling,
limbing, and cross-cutting
Felling a tree
When bucking and felling operations are being
performed by two or more persons at the same
time, the felling operations should be separated
from the bucking operation by a distance of at
least twice the height of the tree being felled.
Trees should not be felled in a manner that
would endanger any person, strike any utility line
or cause any property damage. If the tree does
make contact with any utility line, the company
should be notied immediately.
The chain saw operator should keep on the uphill
side of the terrain as the tree is likely to roll or
slide downhill after it is felled.
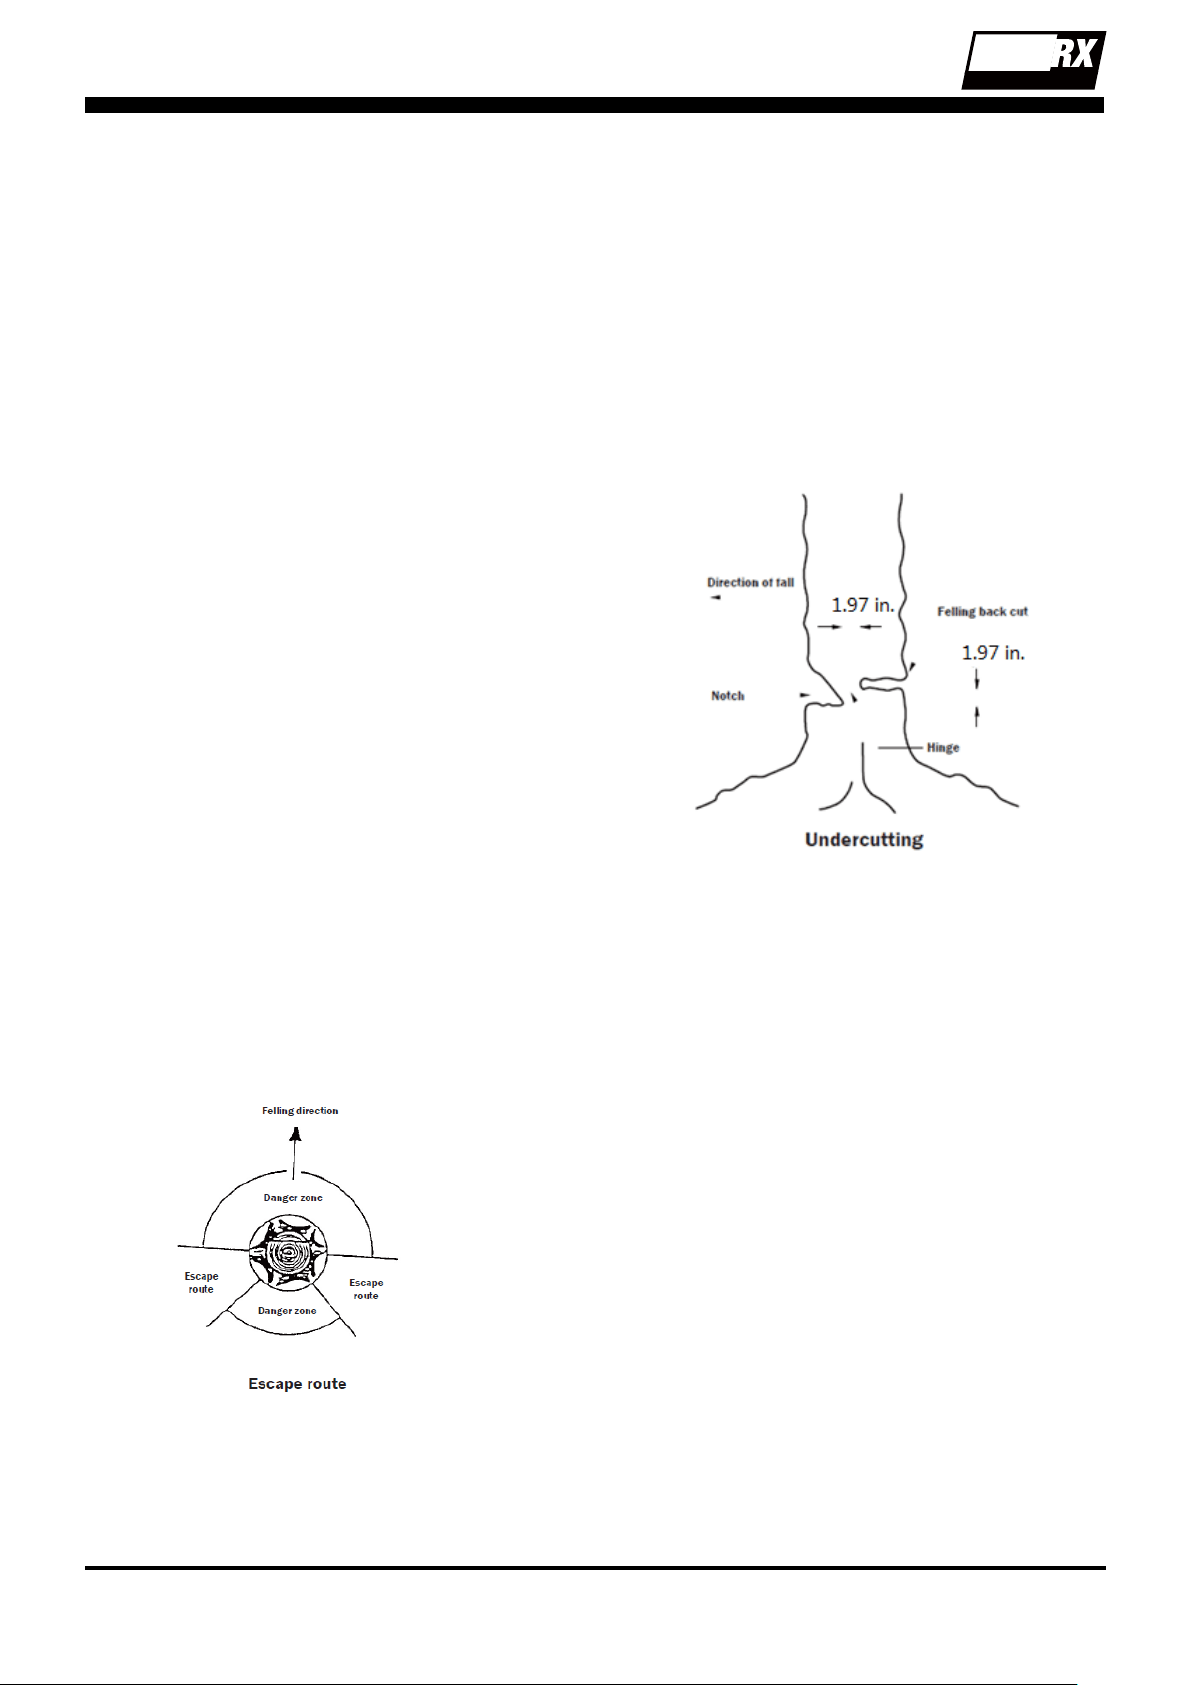
An escape path should be planned and cleared
as necessary before cuts are started.
The escape path should extend back and
diagonally to the rear of the expected line of fall .
Before felling is started, consider the natural lean
of the tree, the location of larger branches and
the wind direction to judge which way the tree
will fall. Remove dirt, stones, loose bark, nails,
staples and wire from the tree.
Notching undercut
Make the notch 1/3 the diameter of the tree,
perpendicular to the direction of falls.
Make the lower horizontal notching cut rst. This
will help to avoid pinching either the saw chain
or the guide bar when the second notch is being
made.
Felling back cut
Make the felling back cut at least 1.97 in. higher
than the horizontal notching cut.
Keep the felling back cut parallel to the horizontal
notching cut. Make the felling back cut so enough
wood is left to act as a hinge. The hinge wood
keeps the tree from twisting and falling in the
wrong direction. Do not cut through the hinge. As
the felling gets close to the hinge, the tree should
begin to fall. If there is any chance that the tree
may not fall in desired direction or it may rock
back and bind the saw chain, stop cutting before
the felling back cut is complete and use wedges
of wood, plastic or aluminum to open the cut and
drop the tree along the desired line of fall. When
the tree begins to fall remove the chain saw from
the cut, stop the motor, put the chain saw down,
then use the retreat path planned. Be alert for
overhead limbs falling and watch your footing.
Limbing a tree
Limbing is removing the branches from a fallen
tree. When limbing leave larger lower limbs to
support the log o the ground. Remove the small
limbs in one cut.
Branches under tension should be cut from the
bottom up to avoid binding the chain saw.
120v
LITHIUM-ION
TM
16
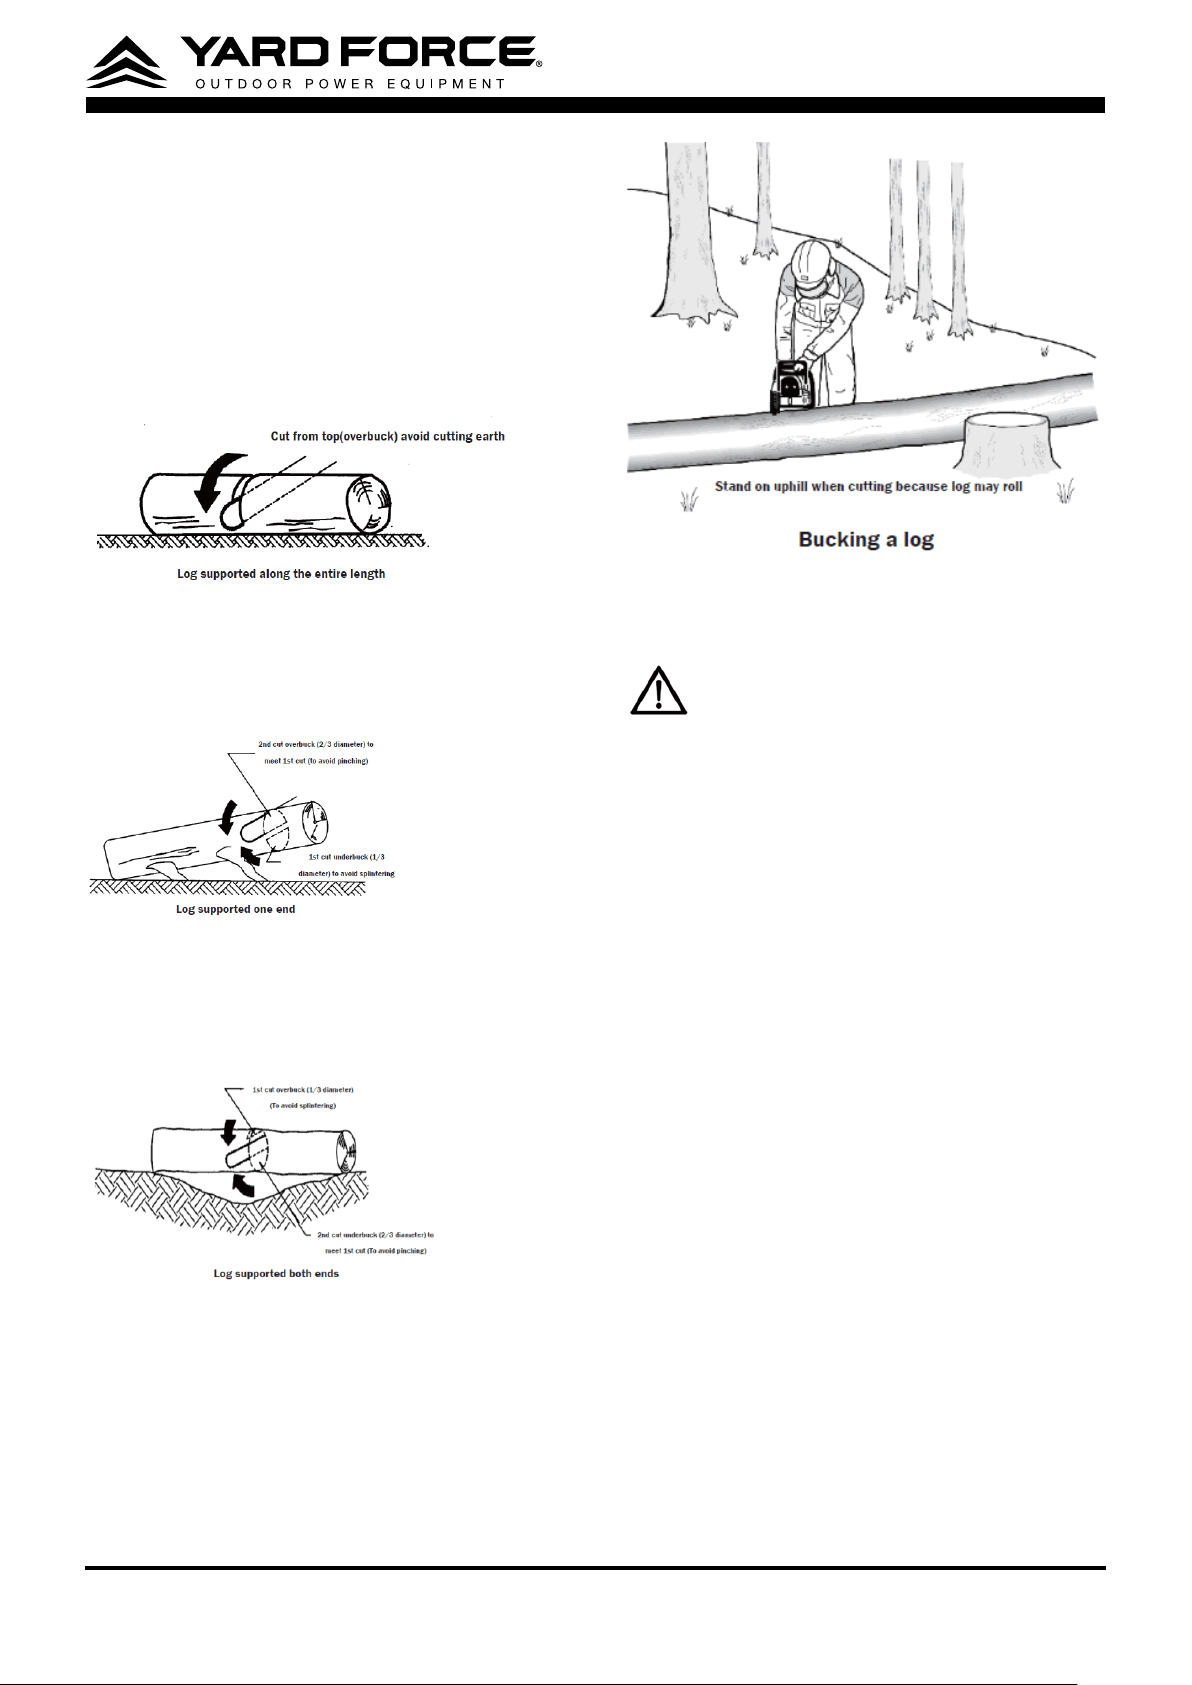
Bucking a log
Bucking is cutting a log into lengths. It is
important to make sure your footing is rm and
your weight is evenly distributed on both feet.
When possible, the log should be raised and
supported by the use of limbs, logs or chocks.
Follow the simple directions for easy cutting.
When the log is supported along its entire length
It is cut from the top (over buck).
When the log is supported on one end, cut 1/3
the diameter from the underside (under buck).
Then make the nished cut by over bucking to
meet the rst cut.
When the log is supported on both ends, cut
1/3 the diameter from the top (over buck). Then
make the nished cut by under bucking the lower
2/3 to meet the rst cut.
When bucking on a slope always stand on the
uphill side of the log,
When “cutting through”, to maintain complete
control release the cutting pressure near the end
of the cut without relaxing your grip on the chain
saw handles. Don’t let the chain contact the
ground.
After completing the cut, wait for the saw chain
to stop before you move the chain saw. Always
stop the motor before moving from tree to tree.
Maintenance and storage
WARNING!
Before performing any
repair work, always remove the battery
pack and wait until the cutting blade has
come to a standstill!
1. Do not spray the unit with water. Ingress of
water may destroy the battery pack and the
electric motor.
2. Clean the unit with a cloth, hand brush, etc.
3. Keep all nuts, bolts and screws tight to be sure
the equipment is in safe working condition;
4. Replace worn or damaged parts for safety.
Battery Maintenance:
Use the following procedures to enable optimum
usage of the battery:
1. Protect the battery against moisture and
water.
2. Store the battery only within a temperature
range from32° F to 113° F.As an example,
do not leave the battery in a vehicle or in the
trimmer in direct sunlight.
3. Clean the ventilation slots of the battery
occasionally with a soft, clean and dry brush.
A considerably shortened operating time after
charging is an indication that the battery is
exhausted and must be replaced.
4. If you do not use the product for a long time,
please charge and discharge the battery pack
once every 6 months.

120v
LITHIUM-ION
TM
17
Cutting System Maintenance:
1. Check that the lubrication system is adequate.
2. Turn the bar over every day.
3. Check the bar wear.
4. Ensure that the oil ow hole is unobstructed.
5. Check the chain tension, sharpen the blades
and check their conditions eventually removing
irregularities.
6. Check the guide bar sprocket conditions.
7. Ensure that the oil reservoir is clean.
Storage:
Clean the exterior of the machine thoroughly
using a soft brush and cloth. Do not use water,
solvents or polishes.
Store the machine in a dry place. Do not place
other objects on top of the machine.
Transport
Use the original packaging to ship whenever
possible.

120v
LITHIUM-ION
TM
18
Troubleshooting
WARNING !
Before performing any repair work, always ensure that the battery pack/safety key has been
removed and wait until the tool has stopped completely.
WARNING !
Always wear heavy duty gloves when adjusting or cleaning.
Fault/malfunction Cause Remedy
Chainsaw does not power ON
and start
Battery discharged? Recharge the battery.
battery pack is not located correctly Re-Install the battery pack once again
Device defective? Contact service partner.
Poor cutting performance Chain blade is blunt Replace or re-sharpen chain blades
Chain blade is lack of lubricant Check the lubricant system to ensure lubrication
is working
Chain tension is incorrect Re-adjust chain tension as detailed in the
instructions
Chain is not in the bar groove Re-install the saw chain as detailed in the
instructions
Insucient chain lubrication. Oil tank empty Rell with specied Chain oil.
Is the oil guide groove of the saw rail
clogged up?
Clean oil guide groove and clean any debris
Bar and chain smoking when
cutting
Check chain tension for over tightening Re-adjust chain tension as detailed in the
instructions
Chain oil tank empty Re-ll the Chain oil tank
Debris in guide bar Clear debris from the bar groove
Working LED
indicator(Green)
Status Instruction
OFF Power OFF Switch OFF
ON Power ON, Switch Trigger OFF Standby model
ashing 1 time in cycle Power ON, Switch Trigger ON Hardware overheat, release the switch trigger and cool
down for a while
ashing 2 times in cycle Power ON, Switch Trigger ON software protection, restart the machine and try again
ashing 3 times in cycle Power ON, Switch Trigger ON Hall sensor faulty
,
restart the machine and try again
ashing 4 times in cycle Power ON, Switch Trigger ON motor stalling protection, release the switch trigger and
then try again
ashing 5 times in cycle Power ON, Switch Trigger ON motor overheat protection, power OFF the machine,
cooling down, then restart the machine
ashing 6 times in cycle Power ON, Switch Trigger ON Control board overheat protection, power OFF the
machine, cooling down, then restart the machine
ashing 7 times in cycle Power ON, Switch Trigger ON Battery pack overheat protection, power OFF the
machine, cooling down, then restart the machine
ashing 8 times in cycle Power ON, Switch Trigger ON low voltage protection
,
charge the battery pack or replace
a battery
ashing 9 times in cycle Power ON, Switch Trigger ON Internal communications problem
,
replace a battery pack
and then try again
ashing 10 times in cycle Power ON, Switch Trigger ON Chain brake actuating lever is in lock position, pull the
lever to unlock position

120v
LITHIUM-ION
TM
19
WARRANTY
Product Warranty
Please keep your original purchase receipt in a safe place as proof of purchase. Warranty coverage for
this product must be veried by the original purchase receipt. The warranty period begins on the day
that the product was purchased from an authorized retailer of Yard Force products. Warranty coverage
only applies to the original purchaser and is not transferable. Warranty coverage is only provided on
products purchased and used in the USA and Puerto Rico from authorized Yard Force retailers. Products
purchased or used outside of the USA and Puerto Rico are not covered by this warranty.
(1) Five-Year Warranty on Model: Y0LSX46B000 chain saw tool only and Three-Year Warranty on
120vRX Battery Pack and Charger
The Yard Force Outdoor Power Equipment has a 5-Year Limited Warranty and 120vRX Battery Pack
and Adapter has a 3-Year Limited Warranty from the date of purchase against manufacturer defects
for residential use only. Commercial use voids the warranty. This warranty does not cover accidental
damage, unreasonable use, normal wear and tear, neglect or non-compliance with the Operating, Safety
and Maintenance Instructions. All service, outside of normal maintenance as described in this manual,
must be done by an authorized service technician. Any unauthorized service or changes to the original
conguration of this product will void the warranty. All parts and accessories used on and with this
product must be manufactured and/or authorized by Merotec Inc.
(2) Ninety-Day Warranty – Accessories
The accessories included with the Y0LSX46B000 are warranted against manufacturer defects for
residential use only for a period of 90 days from date of purchase.
Warranty does not cover loss of use or other consequential damages arising from any of the above, nor
does it cover repairs made or attempted by unauthorized persons.
This warranty is void if the product is used for commercial, rental or industrial purposes.
Certain parts, attachments and accessories are subject to normal wear and tear and are excluded from
the warranty.
Service and Warranty Claims Process
Contact the Yard Force Support Center toll-free at
(866) 902-9690 Monday-Friday between 8:30 AM
and 5:00 PM Eastern Time
for service and warranty support.
Yard Force Service Support agents can help you troubleshoot problems over the phone to get you back
up and running as quickly as possible. In the situation where service or warranty inspection is needed,
please follow these steps:
1. Call Yard Force at
(866) 902-9690 Monday-Friday between 8:30 AM and 5:00 PM Eastern Time
.
2. Send in proof-of-purchase and serial number (if applicable) to conrm warranty Coverage as directed
by Yard Force.
3. If service or a warranty evaluation is requested, Yard Force will provide an RGA number that should be
used in all communications with Yard Force and is required to be indicated on the product itself and on
the outside of the box.
4. All shipments to Yard Force must have an RGA number. Any shipment received that does not have an
RGA number clearly marked on the outside of the box will be refused.
5. All shipments must be sent pre-paid, Yard Force does not pay for any shipping costs for service or
warranty evaluation. Yard Force is not responsible for any packages that are lost by carrier. We recom-
mend that shipments are made by a carrier that provides tracking and delivery conrmation.
For more information or to ask questions, please call toll-free
(866) 902-9690 Monday-Friday between
8:30 AM and 5:00 PM Eastern Time
.
SAVE THESE INSTRUCTIONS
120v
LITHIUM-ION
TM
20
Need Help?
Please do not return the product to the place of purchase yet.
We’re here to help and take care of all your needs.
Contact our Customer Care Center in
Atlanta, GA for help with:
Product assembly or use
Missing or damaged parts
Troubleshooting
You can also visit our website to download
owner's manuals and get additional product information.
Visit www.YardForceUSA.com, or call our
toll free hotline: 1-866-902-9690 M-F 8:30am – 5:00pm ET
1-866-902-9690 [email protected]
Merotec Inc.
3655 Kennesaw North Industrial Parkway, Kennesaw, GA 30144
© Copyright 2020 Merotec Inc.
Made in China at a SUMEC manufacturing facility.
MADE IN CHINA