NOTE: Some fine grounds may flow through the filter and appear as sediment in the carafe.
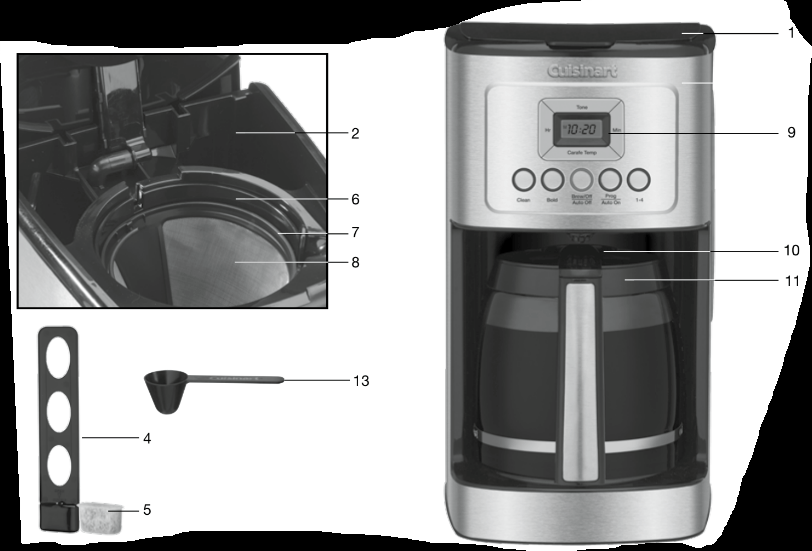
9. Control Panel
See detailed illustration, page 6.
10. Brew PauseTM
Stops flow of coffee from basket when carafe is removed (20 seconds max) from the heater plate, so a cup can be poured mid-brew.
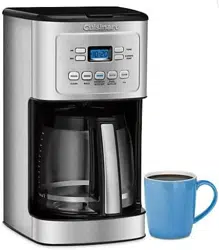
11. Cup Glass Carafe
The easy-pour carafe has an ergonomic han- dle and brewed coffee markings for 4 to 14 cups.
12. 60-Second Reset (not shown)
One-minute protection in case a breaker trips, the unit is unplugged, or the power fails. It holds all programmed information, including time of day, Auto On time and Auto Off time.
13. Measuring Scoop
14. BPA Free (not shown)
All parts that come in contact with coffee or liquids are BPA free.
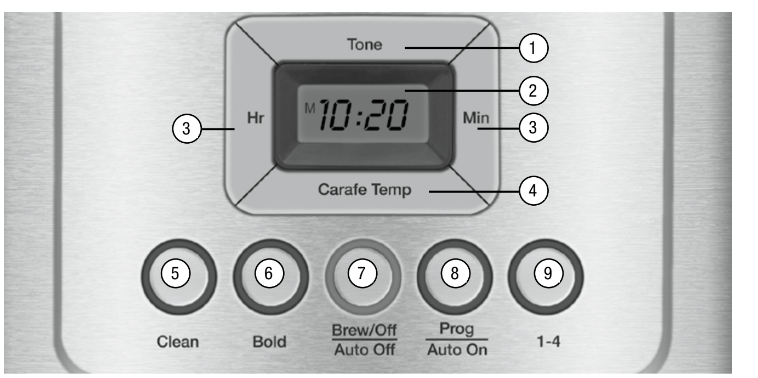
GETTING TO KNOW YOUR CONTROL PANEL
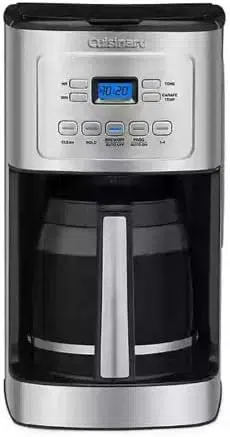
1. Ready Tone Button Lets you turn an audible “Brew Cycle Finished” alert on or off. 2. Blue Backlit Display Displays time of day, Auto On and Auto Off times. A. Low, Medium and High (L,M,H) warming plate indicators. B. Ready Tone off icon appears when Ready Tone is off. 3. Hour and Minute Buttons Use to set hours and minutes for time of day, Auto On and Auto Off times. 4. Carafe Temperature Button Adjusts warming plate temperature to Low, Medium or High to keep freshly brewed coffee at the temperature you prefer. 5. Clean Button Red indicator appears when it is time to decalcify your coffeemaker. 6. Bold Flavor Strength Button Lets you choose bold or regular coffee flavor; blue indicator appears when bold is selected. 7. Brew/Off & Auto Off Button Turns coffeemaker on and off. Use the Auto Off feature to program the time you want the coffeemaker to shut off – from 0 to 4 hours after brew cycle is finished. 8. Prog/Auto On Button Lets you program coffeemaker to automatically begin brewing up to 24 hours in advance. 9. 1–4 Cup Button Adjusts brew process to maximize coffee flavor when brewing fewer than 5 cups. Blue indicator appears when function is selected.
PROGRAMMING YOURCOFFEEMAKER
SETTING THE CLOCK
When the coffeemaker is plugged in, 12:00 will flash in the display for 10 seconds, indicating the unit is in Clock Set mode. If 12:00 stops flashing, simply press and hold Hour or Minute button to return to flashing Clock Set mode.
Setting Hours and Minutes
Press either button to select the desired time. Hold buttons down to scroll through the digits quickly, or press and release to advance one digit at a time. Be sure the PM indicator is on if setting a PM time.
SETTING THE AUTO ON TIME
1. Press and hold the Prog/Auto On button for 2 seconds.
The digital display will flash the default (12:00) or previously selected time.
Follow directions under SETTING THE CLOCK (above) to program your start- brew time. Five seconds after finishing, the unit will automatically exit Auto On Setup mode and the indicator light will illuminate, letting you know Auto On is activated.
NOTE: To exit Auto On Setup mode, you can also just press Auto On button again.
2. To activate Auto On using previously selected time:
Press the Prog/Auto On button. Previously set time will appear and indicator will light up. Display will return to clock setting.
3. To deactivate Auto On:
Press illuminated Auto On button; light will go off, indicating mode is turned off.
SETTING THE AUTO OFF TIME
1. Press and hold the Auto Off button for 2 seconds.
The digital display will flash the programmed Auto Off default (2:00) or previously selected time. Follow directions under SETTING THE CLOCK to program coffeemaker to shut off from 0 to 4 hours after brew cycle is finished.
2. To exit/confirm Auto Off time setting:
Do not touch any buttons. Auto Off Setup mode will be exited automatically after 5 seconds.
TURNING OFF READY TONE
Your coffeemaker features a Ready Tone that beeps 5 times when coffee is finished brewing. To turn this alert off, press Tone button; an icon will appear in display to indicate tone is off. To turn tone back on, press Tone button again; icon will disappear.
MAKING COFFEE
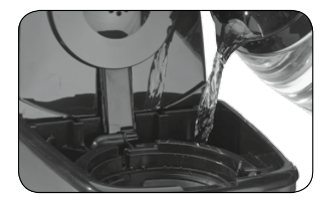
1. Fill the water reservoir Lift the coffeemaker lid to open. Pour the desired amount of water into the water reservoir using the water level indicator located at the side of the coffeemaker.
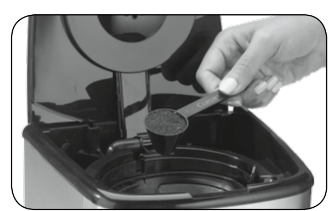
2. Add the ground coffee Insert a #4 paper filter OR the gold-tone filter. Be sure that the paper filter is completely open and fully inserted in the basket. It may help to fold and flatten the seams of a paper filter beforehand. Add 1 level scoop of ground coffee per cup. Adjust the amount according to taste.
NOTE: The maximum capacity for ground coffee is 15 tablespoons for this coffeemaker. Exceeding this amount may cause overflow if the coffee is too finely ground. 3. Position carafe and plug in unit Place carafe on heating plate and be sure coffeemaker lid is closed. Plug coffeemaker into an electrical outlet. 4. Set preferences a. Press the 1–4 cup button if you are brewing fewer than 5 cups. The indicator light will illuminate. b. Press the Bold button to select stronger coffee flavor, if desired. The button’s indicator light will illuminate. Press again to turn off light and brew at regular strength. c. Choose Low (L), Medium (M) or High (H) carafe temperature by pressing Carafe Temp button. Selection will appear in display. 5. Start Brewing Press the Brew/Off button to begin brewing. 6. After brewing When the brewing cycle has been completed, five beeps will sound. Coffee will continue to stream from the filter for several seconds.
Note: Reservoir cover may be hot during and directly after brewing. Wait at least 10 minutes before opening.
CLEANING AND MAINTENANCE
Always turn coffeemaker off and remove the plug from the electrical outlet before cleaning.
Lift up the reservoir cover. Remove and discard the filter and ground coffee.
Remove the filter basket, coffee reservoir and drip tray. These can be washed in warm, soapy water and rinsed thoroughly, or cleaned in the upper rack of the dishwasher. Dry all parts after use.
Do not put any water in the unit once the filter basket and coffee reservoir have been removed. Wipe the area under the reservoir with a damp cloth.
Neither the reservoir lid nor the reservoir should be put into the dishwasher. Clean them with a damp, soapy, non-abrasive cloth and rinse thoroughly. Do not dry the inside of the water reservoir with a cloth, as lint may remain.
Do not use any scouring agents or harsh cleansers on any part of the coffeemaker.
Never immerse base unit in water or other liquids. To clean base, simply wipe with a clean, damp cloth and dry before storing. Fingerprints and other blemishes on the housing can be washed off with soap and water or a nonabrasive cleaning solution. Do not dry the inside of the water reservoir with a cloth, as lint may remain.
Maintenance: Any other servicing should be performed by an authorized service representative.
Decalcification
Decalcification refers to the removal of cal- cium deposits that form over time on the metal parts of your coffeemaker. The mineral content of the tap water in your area and the frequency of use affects the rate of the calcium buildup, which can affect the func- tioning of your coffeemaker and the flavor of your coffee.
For best performance from your PerfecTemp® coffeemaker, we recommend cleaning it whenever the CLEAN LED indicator lights up.
NOTE: Before decalcifying your coffeemaker, remember to remove the charcoal water filter from the water filter holder located in the water reservoir.
To clean:
Fill the water reservoir to capacity with a mixture of 1 white vinegar and 2 water.
Press and hold the CLEAN button. When the CLEAN LED indicator flashes, the coffeemaker is in Clean mode. Release the button.
When the cycle is completed, 5 beeps will sound and the coffeemaker will shut off.
If the CLEAN indicator illuminates once more, repeat the cleaning procedure with a fresh solution of vinegar and water.
When the CLEAN indicator remains off, run one cycle with a full reservoir of fresh, cold water to rinse the unit.
Return the charcoal water filter to the holder inside the water reservoir and your coffeemaker is ready to brew!
WARRANTY
LIMITED THREE-YEAR WARRANTY
This warranty is available to consumers only. You are a consumer if you own a Cuisinart® Coffee On Demand™ Coffeemaker that was purchased at retail for personal, family or household use. Except as otherwise required under applicable law, this warranty is not available to retailers or other commercial purchasers or owners.
We warrant that your Cuisinart® Coffee On Demand™ Coffeemaker will be free of defects in materials and workmanship under normal home use for 3 years from the date of original purchase.
We recommend that you visit our website, cuisinart.com for a fast, efficient way to complete your product registration. However, product registration does not eliminate the need for the consumer to maintain the original proof of purchase in order to obtain the warranty benefits. In the event that you do not have proof of purchase date, the purchase date for purposes of this warranty will be the date of manufacture.
If your Cuisinart® Coffee On Demand™ Coffeemaker should prove to be defective within the warranty period, we will repair it, or if we think necessary, replace it. To obtain warranty Service Representatives, or send the defective product to Customer
Service at Cuisinart, 7475 North Glen Harbor Blvd., Glendale, AZ 85307.
To facilitate the speed and accuracy of your return, please enclose $10.00 for shipping and handling of the product.
Please pay by check or money order (California residents need only supply proof of purchase and should call 1-800-726-0190 for shipping instructions).
NOTE: For added protection and secure handling of any Cuisinart product that is being returned, we recommend you use a traceable, insured delivery service. Cuisinart cannot be held responsible for in-transit damage or for packages that are not delivered to us. Lost and/or damaged products are not covered under warranty. Please be sure to include your return address, daytime phone number, description of the product defect, product model number (located on bottom of product), original date of purchase, and any other information pertinent to the product’s return.
CALIFORNIA RESIDENTS ONLY:
California law provides that for In-Warranty Service, California residents have the option of returning a nonconforming product (A) to the store where it was purchased or (B) to another retail store that sells Cuisinart products of the same type.
The retail store shall then, at its discretion, either repair the product, refer the consumer to an independent repair facility, replace the product, or refund the purchase price less the amount directly attributable to the consumer’s prior usage of the product. If the above two options do not result in the appropriate relief to the consumer, the consumer may then take the product to an independent repair facility if service or repair can be economically accomplished. Cuisinart and not the consumer will be responsible for the reasonable cost of such service, repair, replacement, or refund for nonconforming products under warranty.
California residents may also, according to their preference, return nonconforming products directly to Cuisinart for repair, or if necessary, replacement, by calling our Consumer Service Center toll-free at 1-800-726-0190.
Cuisinart will be responsible for the cost of the repair, replacement, and shipping and handling for such products under warranty.
BEFORE RETURNING YOUR CUISINART PRODUCT
If you are experiencing problems with your Cuisinart product, we suggest that you call our Consumer Service Center at 1-800-726-0190 before returning the product to be serviced.
If servicing is needed, a representative can confirm whether the product is under warranty and direct you to the nearest service location.
Your Cuisinart® Coffee On Demand™ Coffeemaker has been manufactured to the strictest specifications and has been designed for use only in 120 volt outlets and only with authorized accessories and replacement parts. This warranty expressly excludes any defects or damages caused by attempted use of this unit with a converter, as well as use with accessories, replacement parts or repair service other than those authorized by Cuisinart. This warranty does not cover any damage caused by accident, misuse, shipment or other than ordinary household use. This warranty excludes all incidental or consequential damages. Some states do not allow the exclusion or limitation of these damages, so these exclusions may not apply to you. You may also have other rights, which vary from state to state.
Important: If the nonconforming product is to be serviced by someone other than Cuisinart’s Authorized Service Center, please remind the servicer to call our Consumer Service Center at 1-800-726-0190 to ensure that the problem is properly diagnosed, the product is serviced with the correct parts, and the product is still under warranty.