HR 2825/26

2
English Page 4
• Keep page 3 open when reading
these operating instructions.
Français Page 6
• Pour le mode d'emploi: dépliez les page 3.
Deutsch Seite 8
• Schlagen Sie beim Lesen der Gebrauchs-
anweisung Seite 3 auf.
Nederlands Pagina 11
• Sla bij het lezen van de gebruiksaanwijzing
pagina 3 op.
Italiano Pagina 14
• Prima di usare l'apparecchio, aprite le pagina 3
e leggete attentamente le istruzioni per l'uso.
Español Página 17
• Desplegar las página 3 al leer las instrucciones
de manejo.
Português Página 20
• Durante a leitura do modo de emprêgo,
desdobre e verifique as pág. 3.
Ελληνικά Σελίδα 23
• Ανοίξτε την σελίδα 3 για τις οδηγίες
χρήσεως.
3
1
A
C
D
E
G
B
5
0
0
4
5
0
4
0
0
3
5
0
3
0
0
2
5
0
2
0
0
1
5
0
5
0
F
1
0
0
H
I
4
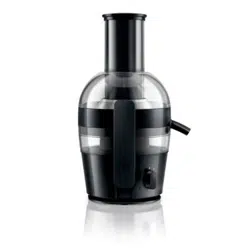
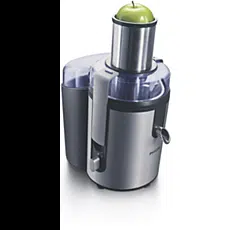
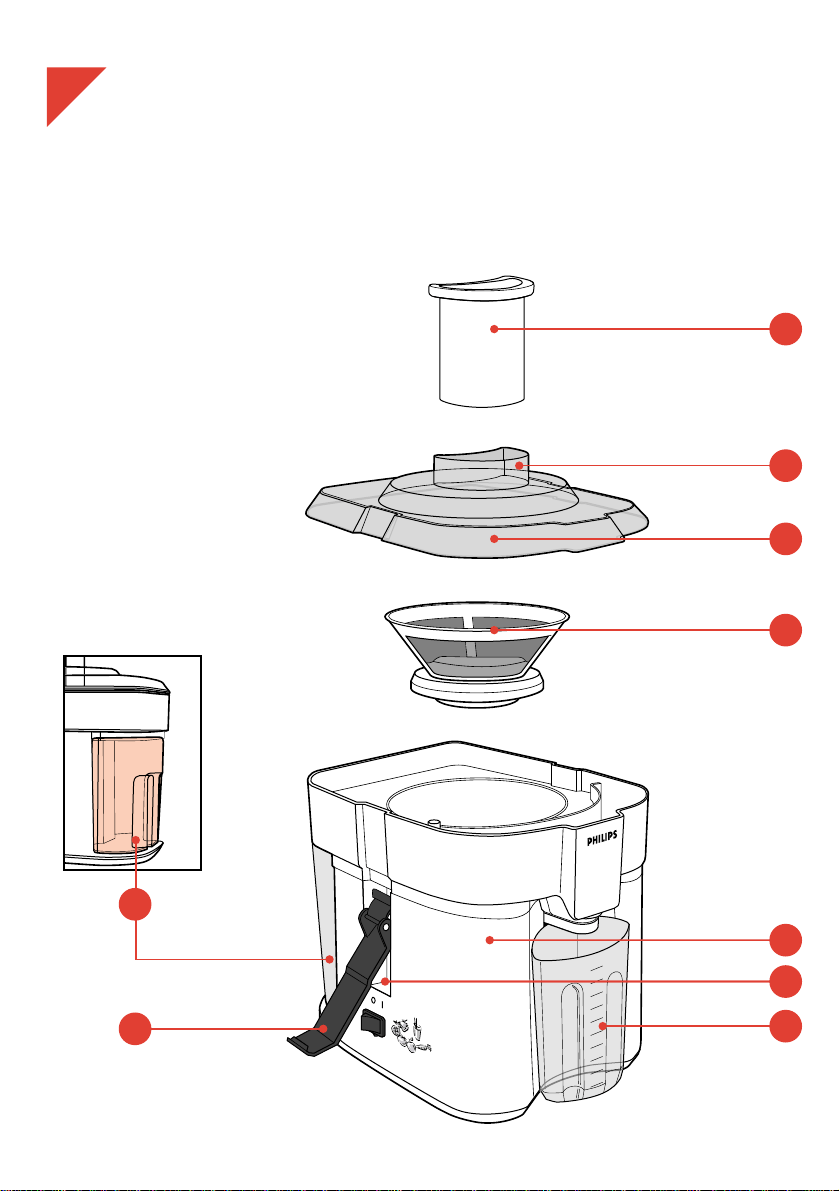
General description (fig. 1)
A Pusher
B Feeding tube
C Lid
D Sieve
E Pulp container
F Base unit
G Lid latches
H On/off switch
I Juice cup (type HR 2826 only)
English
Important
• Read the instructions in conjunction
with the illustrations before using the
appliance.
• Avoid damage. Before connecting please
check if the voltage indicated on the
appliance corresponds to the mains
voltage in your home (110 - 127 V;
220 - 240 V).
• If the mains cord of this appliance is
damaged, it must only be replaced by
Philips or their service representative, as
special tools and/or parts are required.
• Keep the appliance away from children.
• Do not leave the appliance switched on
unattended.
• Never use any accessories or parts from
other manufacturers or which have not
specifically been advised by Philips.
Your guarantee is void if such
accessories or parts have been used.
• Never put your fingers or cutlery into the
feeding tube. Only the provided pusher
is suited for this purpose.
• Let the sieve come to a complete stop
before releasing the latches and opening
the lid.
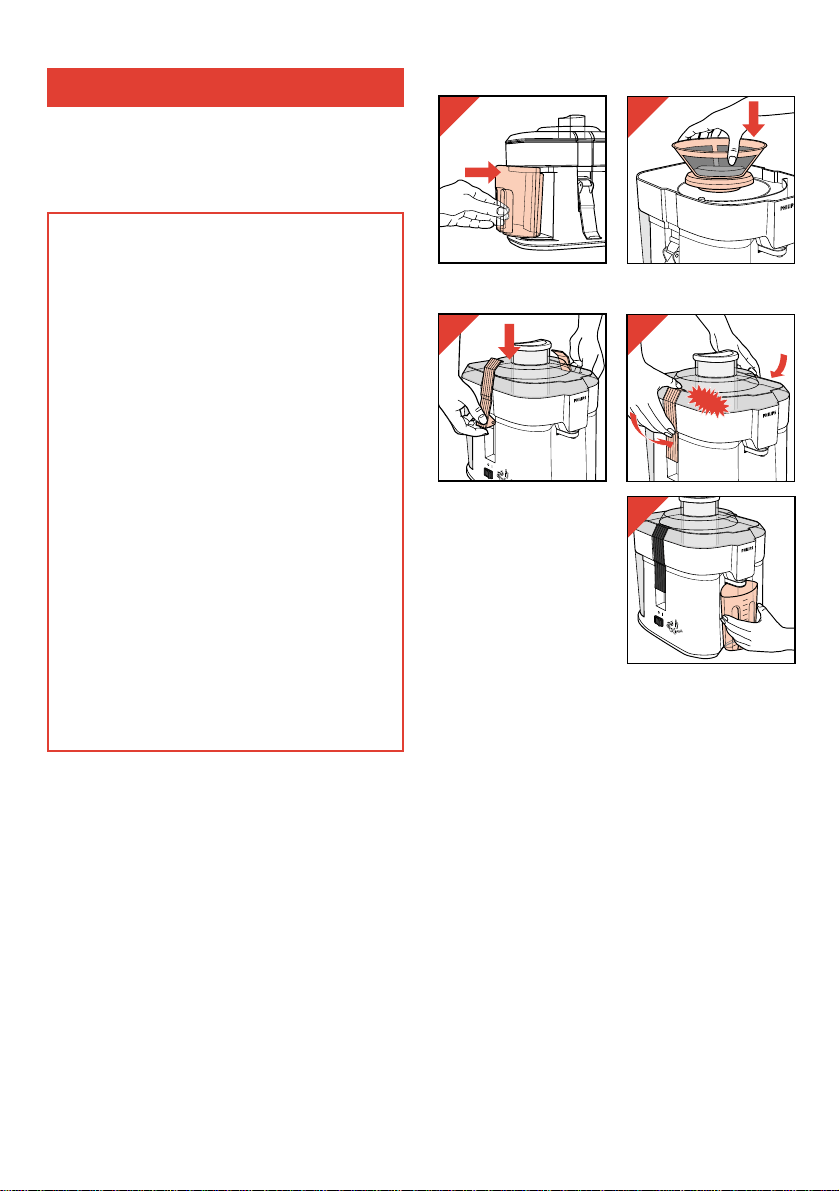
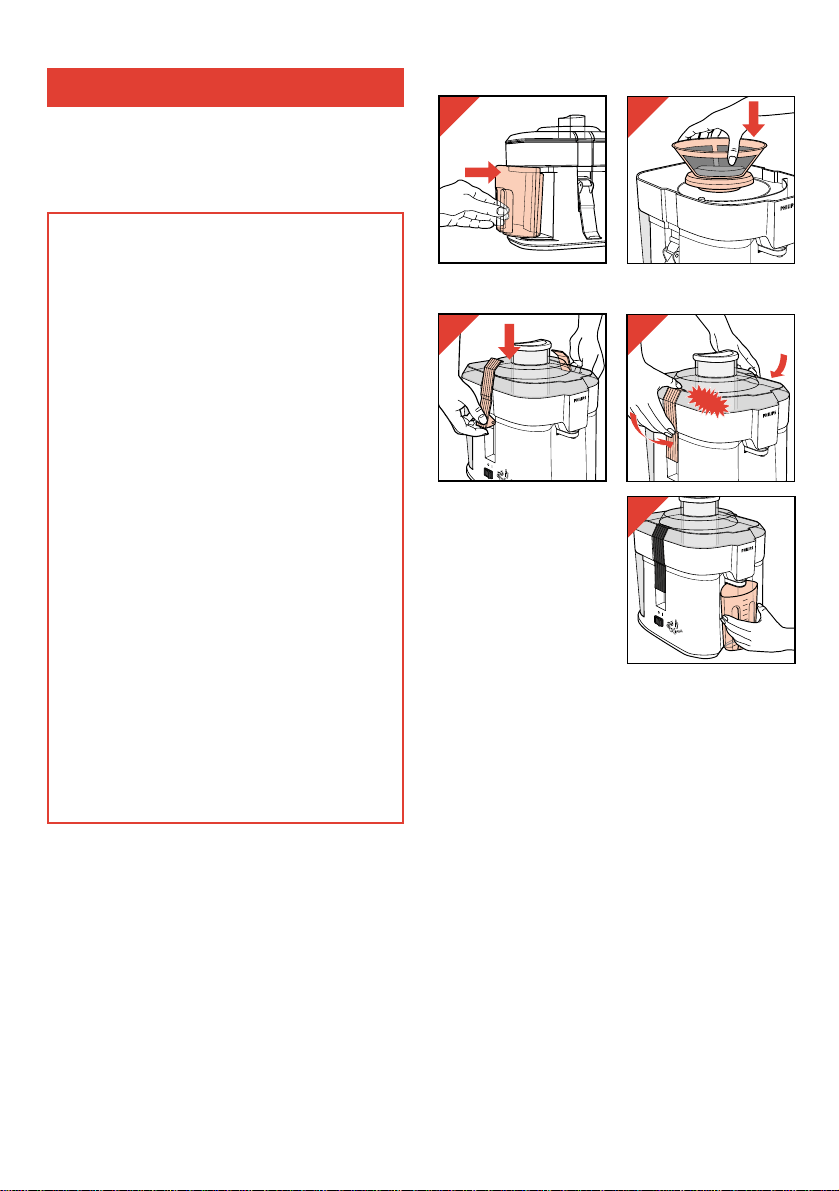
Assembling
- Position the pulp container (fig. 2).
- Position the sieve (fig. 3).
- Place the lid so that it
fits on all sides (fig. 4a).
Lock the lid with the
latches (“Click!”)
(fig. 4b). Check if the lid
is positioned correctly.
- Position your juice jar
or cup (fig. 5).
- Insert the mains plug
into the wall socket.
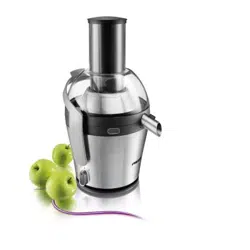
Ingredients
• Always use fresh fruits and vegetables,
because they produce more juice.
• Especially advisable are pineapple, beetroot,
apple, cucumber, carrot, spinach, melon,
tomato, orange and grape.
• Starchy fruits, such as banana, paw-paw,
avocado, fig and mango fruit should not be
processed in this juice extractor.
For these types of fruit use a food processor or
a (bar) blender.
• It is not necessary to remove thin skins and
peels. Only thick ones of e.g. orange,
pineapple, apple, uncooked beetroot must be
removed.
• Leaves and stems of e.g. lettuce can also be
processed in the juice extractor.
• If you wish to make juice from oranges, lemons,
mandarin or grape fruit, it is necessary to
unpeel and remove the white fibres as
otherwise the juice will acquire a bitter taste.
• Apple juice may quickly turn brown. A few drops
of lemon juice will slow down this process.
With this juice extractor you can make 100% pure
fruit juice and vegetable juice.
The appliance is simple to use and very easy to
clean.
2
3
CLICK
4b
500
450
400
350
300
250
200
150
50
5
4a
5
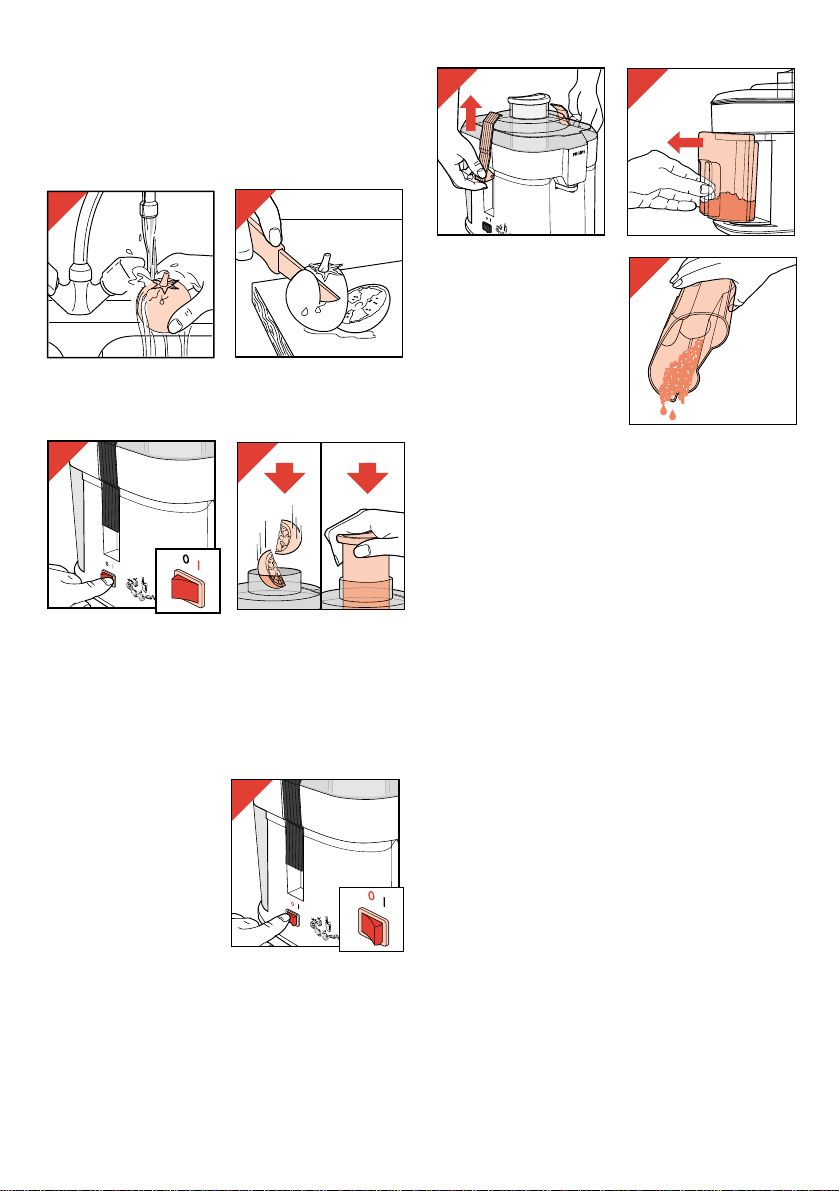
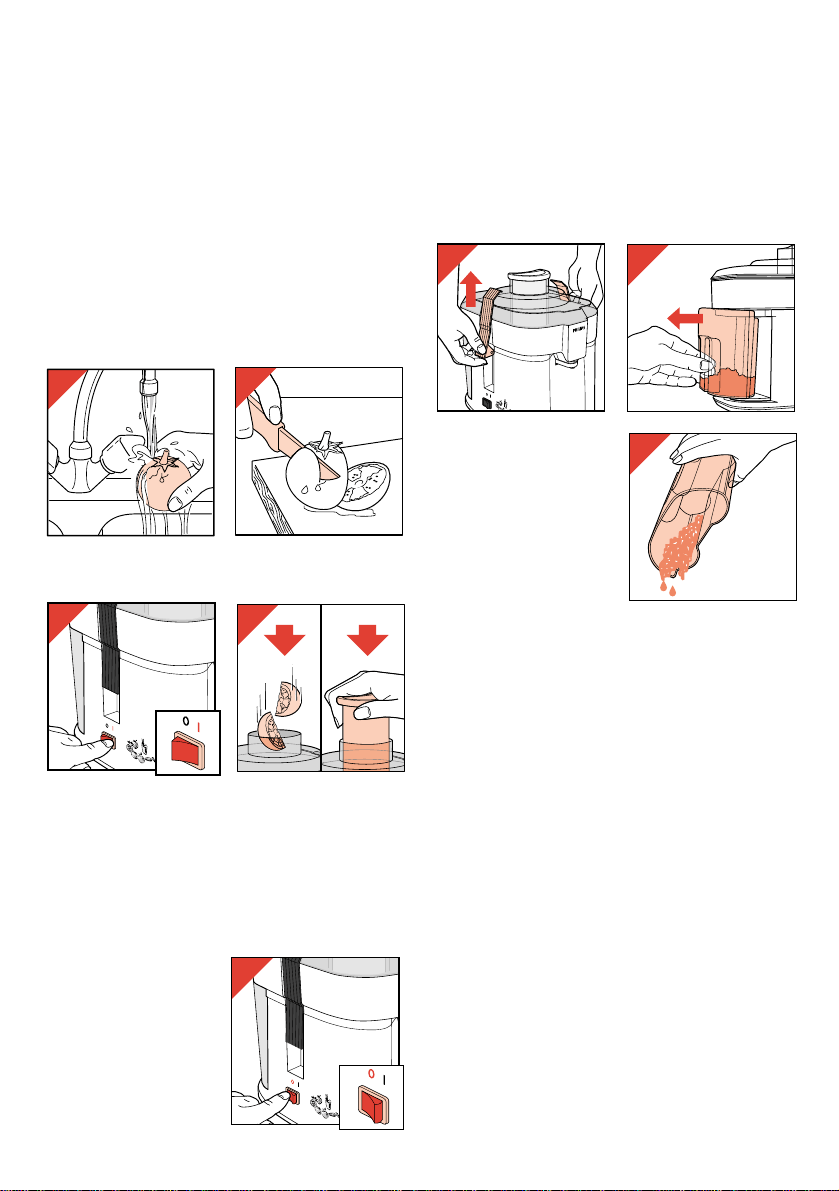
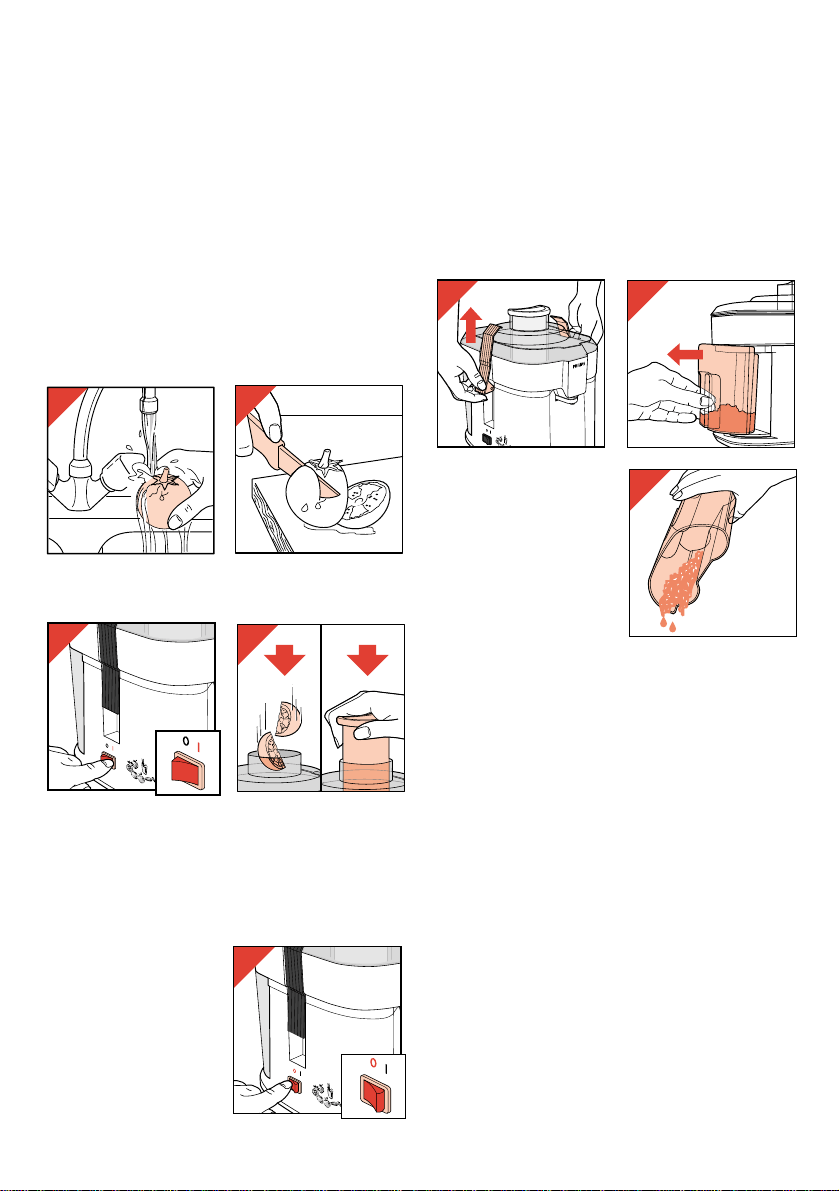
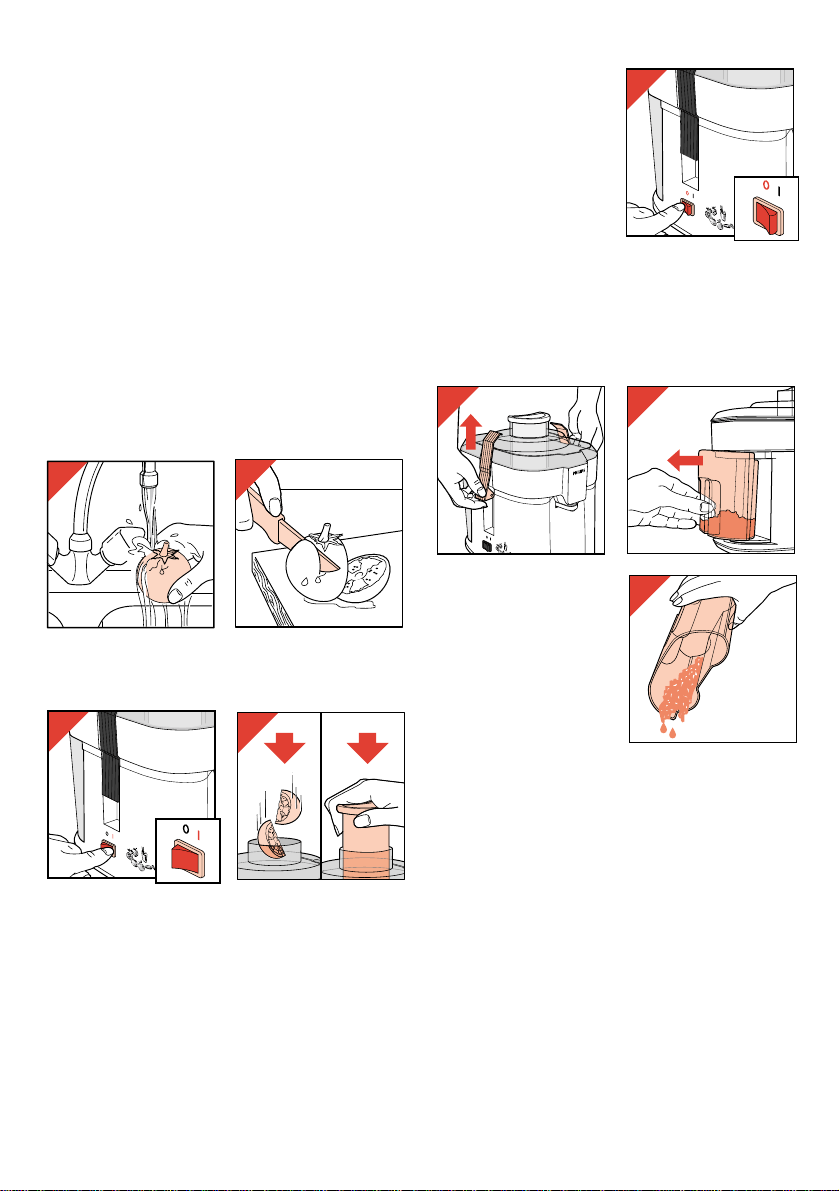
How to use
- Check if the lid is correctly placed.
• For your safety: the appliance can only
operate when the lid has been correctly
mounted on to the base unit.
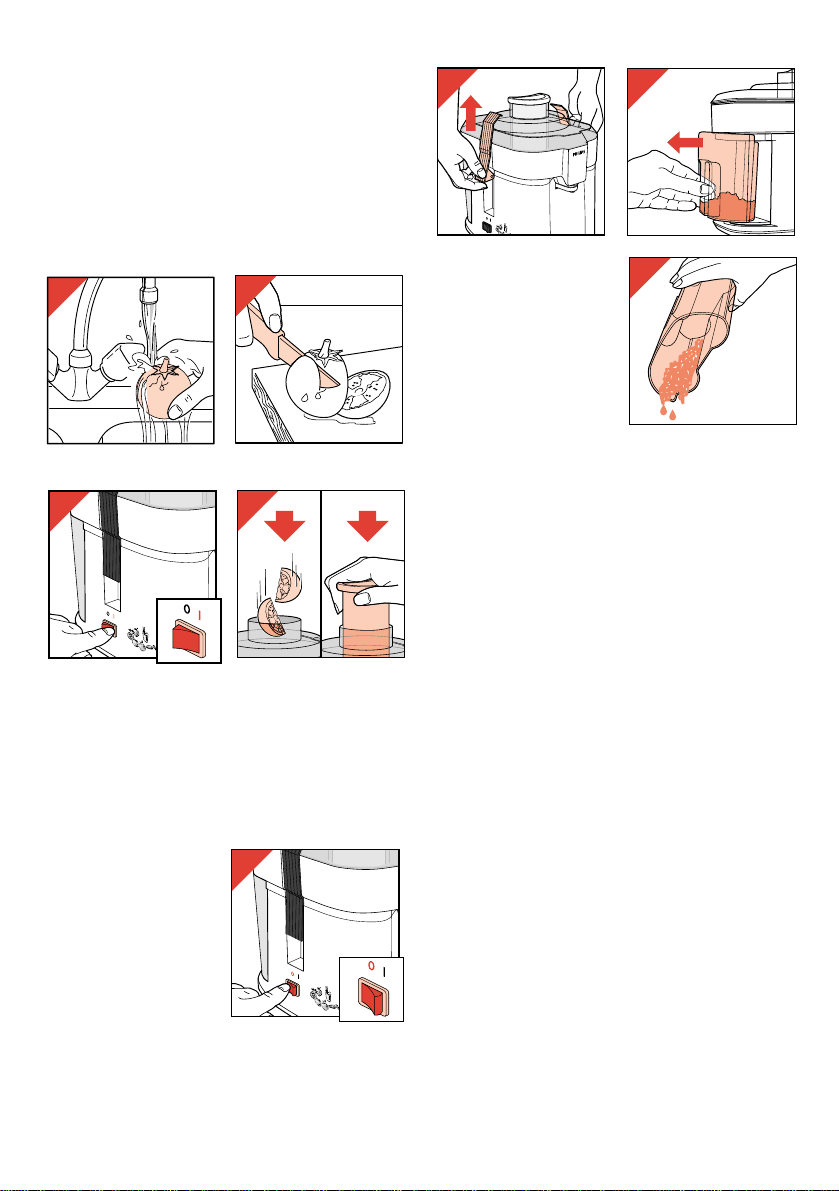
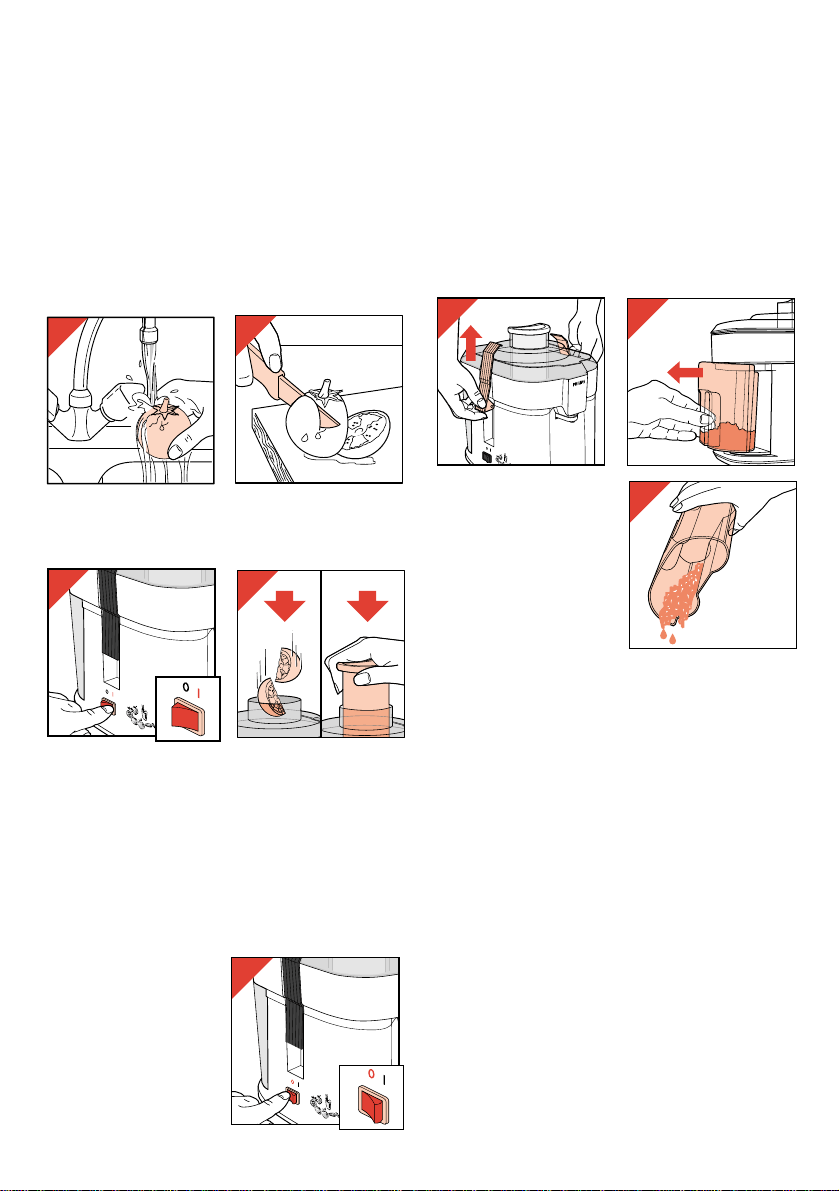
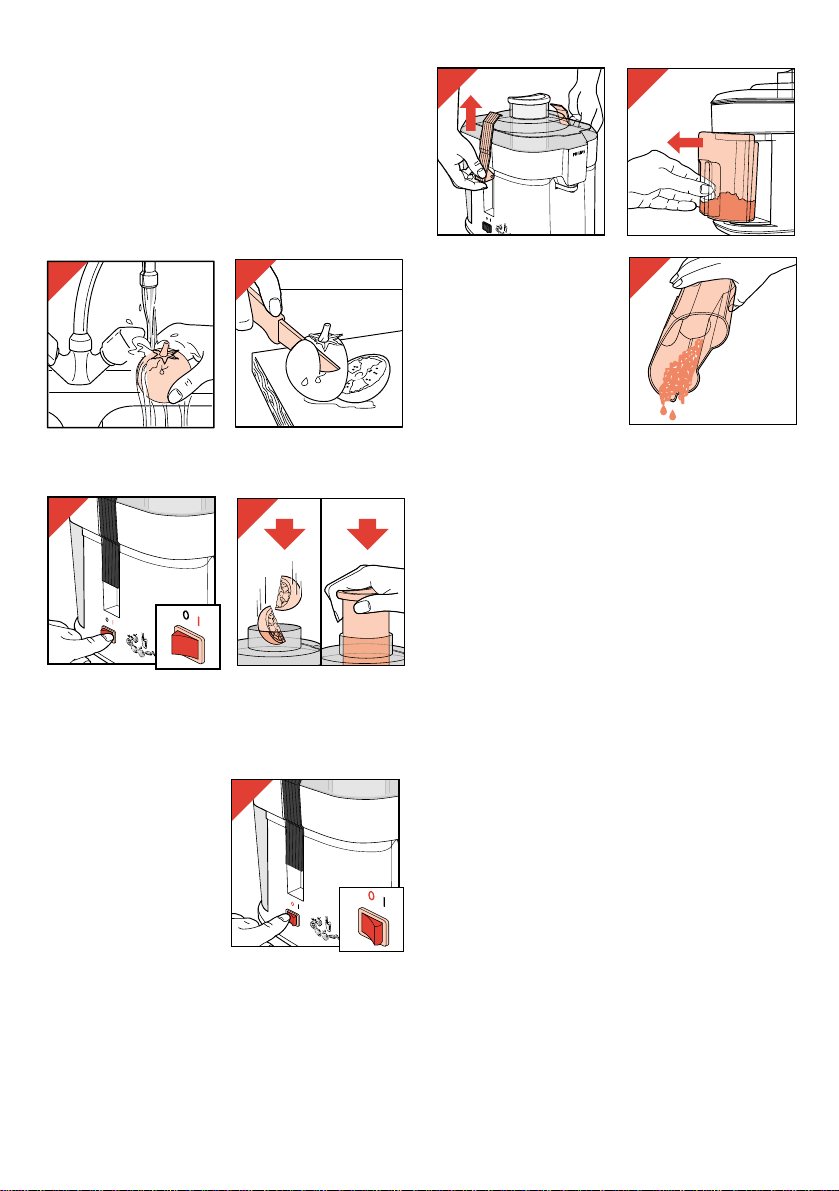
- Wash the fruits and/or vegetable(s) (fig. 6) and
cut them in pieces (fig. 7) to fit into the feeding
tube.
- Switch the appliance on by pressing the on/off
switch (fig. 8).
- Put the pieces into the feeding tube and press
them gently downwards with the pusher (fig. 9).
• Do not press down with force. This would
give worse results and could even block the
rotating sieve.
• Never put any objects or your fingers in the
feeding tube.
- After the juice has
stopped flowing:
switch the appliance
off (fig. 10) and wait
for the sieve to come
to a complete
standstill before
removing the juice jug
or cup.
- Preferably, drink the juice immediately after it
has been extracted.
Exposure to the open air for any length of time
will result in the juice losing its nutritional value
and its taste.
However, if you wish to keep the juice, put it
into the refrigerator in a well-closed container
for a maximum of 24 hours.
- When the pulp
container is full:
switch off (fig. 10) and
wait for the sieve to
come to a complete
standstill,
release the two latches
to disassemble the lid
(fig. 11),
remove the pulp
container (fig. 12),
empty the pulp container (fig. 13).
Reassemble the juice extractor and continue
the process.
Culinary hints
• With tomato juice you can prepare a delicious
Bloody Mary.
• Pulp of e.g. carrots, beetroots, cabbage,
spinach can be used as a basis for soup,
sauce, jam, ice-cream and dessert.
Cook the pulp with some spices. Liquidize the
cooked pulp using a food processor or a (bar)
blender.
Use tomato pulp to make a tomato paste.
• Try these combinations of juices: apple with
carrot, orange with grape, pineapple with
grapefruit, beetroot with carrot, carrot with
melon, apple with orange.
Cleaning
• Switch off and remove the mains plug from the
wall socket before cleaning.
• Disassemble the appliance for washing-up as
indicated in figs. 11-13.
• The base unit may be wiped with a damp cloth,
some detergent may be required.
• Do not use scourers, scouring pads, abrasives,
steel wool, acetone, alcohol etc.
• Wash the parts which have been in contact with
food in warm soapy water immediately after
use.
• Do not clean parts in a dishwasher.
• Use a soft brush for cleaning the sieve.
6
7
8
9
10
11
12
13

6
Description générale (fig. 1)
A Poussoir
B Cheminée
C Couvercle
D Tamis
E Réservoir à pulpe
F Bloc moteur
G Bouton de verrouillage
H Interrupteur marche/arrêt
I Récipient à jus (uniquement type HR 2826 )
Français
Important
• Lisez les instructions en regardant les
illustrations avant d'utiliser l'appareil.
• Avant de brancher l'appareil, vérifiez si
la tension indiquée sur celui-ci
correspond bien à celle de votre
logement ( 110-127 v ; 220 - 240 v ).
• Si le cordon secteur de votre appareil est
endommagé, il doit impérativement être
remplacé par un réparateur indépendant
agréé Philips car des équipements et
des composants spécifiques sont
exigés.
• Tenez l'appareil hors de portée des
enfants.
• Ne quittez pas l'appareil lorsqu'il est en
marche.
• N'utilisez jamais d'accessoires ou
d'éléments en provenance d'autres
fabricants ou qui n'ont pas été
spécifiquement conseillés par Philips,
car votre garantie deviendrait caduque.
• N'introduisez jamais vos doigts ou un
couteau dans la cheminée. Utilisez
uniquement le poussoir fourni à cet
effet.
• Attendez toujours l'arrêt complet du
tamis avant d'appuyer sur le bouton
d'ouverture du couvercle.
Assemblage
- Positionnez le réservoir à pulpe (fig. 2).
- Positionnez le tamis (fig. 3).
- Mettez en place le
couvercle (fig. 4a) ;
poussez les 2 crochets
vers le bas pour
verrouiller ("clic")
(fig. 4b).
- Mettez en place le
récipient à jus ou un
verre (fig. 5).
- Vérifiez que le bouton
marche/arrêt est bien
sur la position "Arrêt".
- Branchez l'appareil.
Ingrédients
• Utilisez toujours des fruits et légumes frais qui
donneront plus de jus.
• Nous vous conseillons particulièrement :
ananas, betteraves, pommes, concombres,
carottes, épinards, melons, tomates, oranges
et raisins.
• Vous ne pouvez pas utiliser : bananes,
papayes, avocats, figues et mangues, qui
nécessitent un robot ou un mixer.
• Il n'est pas nécessaire de retirer les peaux et
pelures, sauf sur les oranges, ananas,
pommes, betteraves crues.
• Les feuilles et tiges de laitue par exemple
peuvent être mis dans la centrifugeuse.
• Si vous désirez préparer des jus d'orange,
citron, mandarine ou pamplemousse, il est
nécessaire de les peler et de retirer les peaux
blanches, qui pourraient donner un goût amer
au jus.
Cette centrifugeuse vous permet de réaliser des
jus de fruits et légumes 100 % naturels.
L'appareil est simple à utiliser et très facile à
nettoyer.
2
3
CLICK
4b
500
450
400
350
300
250
200
150
50
5
4a
7
• Le jus de pomme brunit rapidement. Afin de
l'éviter, ajoutez quelques gouttes de jus de
citron.
Utilisation
- Vérifiez si le couvercle est correctement placé.
• Pour votre sécurité : l'appareil ne peut être
mis en marche que si le couvercle est
monté correctement sur le bloc moteur.
- Lavez les fruits et/ou les légumes (fig. 6) et
coupez-les en morceaux (fig. 7)
- Mettez en marche l'appareil en appuyant sur
l'interrupteur (H) (fig. 8).
- Ensuite seulement introduisez les morceaux
dans la cheminée et appuyez légèrement à
l'aide du poussoir (fig. 9).
• N'appuyez pas trop fort sur le poussoir,
afin d'obtenir de meilleurs résultats et de ne
pas bloquer éventuellement le tamis.
• Ne mettez jamais d'objets ni vos doigts dans
la cheminée.
- Quand le jus ne
coule plus :
arrêtez l'appareil (fig.
10), et attendez que la
pulpe ait fini de
s'écouler avant de
retirer le récipient à
jus ou le verre.
- Buvez le jus
immédiatement, car il
perd sa valeur nutritionnelle et son goût si vous
le laissez à l'air libre quelque temps.
Néanmoins, vous pourrez conserver le jus 24
heures maximum dans un récipient bien fermé
au réfrigérateur.
- Quand le réservoir à
pulpe est plein :
arrêtez l'appareil (fig.
10), attendez que la
pulpe ait fini de
s'écouler,
liberez les crochets de
verrouillage pour retirer
le couvercle (fig. 11),
retirez le réservoir à
pulpe ou le verre (fig. 12),
videz-le (fig. 13)
Assemblez l'appareil de nouveau.
Conseils de préparation
• Vous pouvez préparer un délicieux "Bloody
Mary" avec du jus de tomates.
• La pulpe de carottes, betteraves, choux,
épinards, peut être utilisée comme base pour
les soupes, sauces, confitures, glaces et
desserts.
Faites cuire la pulpe avec quelques épices.
Utilisez un robot ou un mixer pour la rendre
liquide.
Utilisez de la pulpe de tomates pour faire une
pâte à la tomate.
• Essayez ces combinaisons de fruits : pomme
et carotte, ananas et raisin, ananas et
pamplemousse, betterave et carotte, carotte
et melon, pomme et orange.
Nettoyage
• Arrêtez l'appareil et débranchez-le.
• Désassemblez l'appareil comme indiqué
(fig. 11 à 13).
• Vous pouvez nettoyer le bloc moteur avec un
chiffon humide, et éventuellement un peu de
détergent.
• N'utilisez jamais de produits abrasifs, éponges
métalliques, d'acétone, alcool, etc.
• Nettoyez immédiatement après utilisation les
éléments qui ont été en contact avec des
aliments.
• Aucun élément ne peut être mis au lave-
vaisselle.
• Nettoyez le tamis à l'aide d'une brosse
souple.
6
7
8
9
10
11
12
13

8
Allgemeine Beschreibung (Abb. 1, Seite 3)
A Stopfer
B Einfüllöffnung
C Deckel
D Raspelsieb
E Tresterbehälter
F Grundgerät
G Deckelverriegelungen
H Ein-/Ausschalter
I Saftkanne (Nur Type HR 2826)
Deutsch
Wichtig
• Lesen Sie die Gebrauchsanweisung
sorgfältig durch, und sehen Sie sich
dabei die Abbildungen an, bevor Sie das
Gerät zum ersten Mal benutzen.
• Prüfen Sie, bevor Sie das Gerät in Betrieb
nehmen, ob die Spannungsangabe auf
dem Typenschild mit der örtlichen
Netzspannung (110-127 V; 220-240 V)
übereinstimmt.
• Wenn das Netzkabel defekt oder
beschädigt ist, muß es von einer durch
Philips autorisierten Werkstatt ersetzt
werden, da für die Reparatur Spezial-
Werkzeug und/oder spezielle Teile
benötigt werden.
• Halten Sie Kinder von dem Gerät fern.
• Lassen Sie das eingeschaltete Gerät
nicht unbeaufsichtigt.
• Verwenden Sie keine Zusatzteile oder -
geräte, die nicht von Philips
ausdrücklich empfohlen werden.
Anderenfalls erlischt die Garantie.
• Stecken Sie niemals Ihre Finger oder
Besteckteile in die Einfüllöffnung.
Verwenden Sie stets nur den
mitgelieferten Stopfer.
• Lassen Sie das Raspelsieb zum völligen
Stillstand kommen, bevor Sie den Deckel
entriegeln und öffnen.
Zusammensetzen des Entsafters
- Setzen Sie den Tresterbehälter ein (Abb. 2).
- Setzen Sie das Raspelsieb ein (Abb. 3).
- Setzen Sie den Deckel
auf das Gerät
(Abb. 4a). Befestigen
Sie den Deckel mit
dem Schnappveschluß
("Klick") (Abb. 4b).
Prüfen Sie, ob der
Deckel richtig sitzt und
fest geschlossen ist.
- Stellen Sie die
Saftkanne oder einen
anderen passenden Behälter unter den Auslauf
(Abb. 5).
- Stecken Sie den Stecker in die Steckdose.
Die Zutaten
• Verwenden Sie nur frisches Obst bzw. frisches
Gemüse. Sie erhalten dann mehr Saft.
• Besonders zu empfehlen sind Ananas, Äpfel,
Melonen, Orangen und Grapefruit bzw. Möhren,
rote Rüben, Tomaten, Gurken und Spinat.
• Stärkehaltige Früchte, z.B. Bananen, Papaya,
Avocado, Mango und Feigen, sollten mit
diesem Gerät nicht entsaftet werden.
Verwenden Sie für solche Früchte eine
Küchenmaschine oder einen Stabmixer.
• Sie brauchen nur Früchte mit dicken oder
harten Schalen zu schälen, wie Ananas, Äpfel,
Orangen, Grapefruit und rohe rote Rüben.
• Blätter und Strünke (z.B. vom Kopfsalat)
können in diesem Gerät mitverarbeitet werden.
• Wenn Sie Saft aus Zitrusfrüchten herstellen
wollen, müssen Sie den weißen Anteil der
Mit diesem Entsafter können Sie 100 % reinen
Frucht- oder Gemüsesaft zubereiten.
Das Gerät ist einfach zu bedienen und zu
reinigen.
2
3
CLICK
4b
500
450
400
350
300
250
200
150
50
5
4a
9
Schalen gründlich entfernen, weil sie sonst
einen bitteren Beigeschmack verursachen.
• Apfelsaft wird schnell braun. Geben Sie ein
paar Tropfen Zitronensaft hinzu, um diesen
Vorgang zu verzögern.
Der Gebrauch des Entsafters
- Prüfen Sie, ob der Deckel korrekt aufgesetzt ist.
• Das Gerät kann zu Ihrer Sicherheit nur dann
richtig arbeiten, wenn der Deckel korrekt auf
dem Grundgerät sitzt.
- Waschen Sie Obst und Gemüse (Abb. 6), und
schneiden Sie es in Stücke, die in die
Einfüllöffnung passen (Abb. 7).
- Schalten Sie das Gerät am Ein-/Ausschalter ein
(Abb. 8).
- Geben Sie die Stücke in die Einfüllöffnung, und
drücken Sie sie langsam mit dem Stopfer nach
(Abb. 9).
• Drücken Sie niemals stark nach. Das führt zu
einem schlechten Ergebnis und kann das
Raspelsieb blockieren.
• Stecken Sie niemals Ihre Finger oder
irgendwelche Gegenstände in die Einfüllöffnung.
- Wenn kein Saft mehr
herausfließt, so ...
schalten Sie das Gerät
aus (Abb. 10), warten,
bis das Raspelsieb
zum völligen Stillstand
gekommen ist, und
nehmen das Gefäß
mit dem Saft aus dem
Gerät.
- Trinken Sie den Saft möglichst sofort. Wenn er
längere Zeit der Luft ausgesetzt ist, verliert er an
Geschmack und an Nährwert.
Wenn Sie den Saft jedoch aufbewahren wollen,
so gießen Sie ihn in ein fest verschließbares
Gefäß. So können Sie ihn bis zu 24 Stunden im
Kühlschrank aufbewahren.
- Wenn Sie noch einen im Gerät verbliebenen
Rest auffangen wollen, so stellen Sie die
Saftkanne in das Gerät zurück und schalten das
Gerät nochmals ein.
- Ist der Tresterbehälter voll, so ...
schalten Sie das Gerät
aus (Abb. 10), und
warten Sie, bis das
Raspelsieb stillsteht,
lösen Sie die beiden
Deckelverriegelungen
(Abb. 11), nehmen Sie
den Deckel ab, nehmen
Sie den Tresterbehälter
heraus (Abb. 12), und
leeren den Tresterbehälter (Abb. 13). Setzen
Sie danach das Gerät wieder zusammen. Sie
können dann weiterarbeiten.
Hinweise zu den Zutaten
• Mit dem Saft der Tomaten können Sie köstliche
Bloody Mary zubereiten.
• Das Fruchtfleisch von Möhren, roten Rüben,
Kohl und Spinat kann als Basis für Suppen und
Saucen dienen.
Pürieren Sie das gekochte Fruchtfleisch in einer
Küchenmaschine oder mit einem Stabmixer.
Mit dem Fruchtfleisch von Tomaten können Sie
Tomatenmark herstellen.
• Probieren Sie folgende Kombinationen: Apfel-
mit Möhrensaft, Orangen- mit Grapefruitsaft,
Ananas- mit Grapefruitsaft, Möhren- mit
Melonensaft, Orangen- mit Apfelsaft, rote
Rüben mit Möhren.
6
7
8
9
10
11
12
13

10
Reinigung
• Schalten Sie vor jeder Reinigung das Gerät
aus, und ziehen Sie den Netzstecker.
• Nehmen Sie das Gerät zum Abwaschen
auseinander, wie in den Abb. 11 bis 13 gezeigt.
• Sie können das Grundgerät mit einem feuchten
Tuch abwischen, auf das Sie bei Bedarf etwas
Spülmittel aufgetragen haben.
• Verwenden Sie keine scheuernden oder
ätzenden Substanzen und keine Lösungsmittel
wie Alkohol und Azeton.
• Waschen Sie alle Teile, die mit Nahrungsmitteln
in Berührung gekommen sind, nach Gebrauch
mit warmem Wasser ab, dem Sie etwas
Spülmittel zugesetzt haben.
• Spülen Sie keine Teile dieses Geräts im
Geschirrspüler.
• Reinigen Sie das Raspelsieb mit einer weichen
Bürste.

11
Algemene beschrijving (fig. 1, bladzij 3)
A Aandrukhulpje
B Vulbuis
C Deksel
D Zeef
E Opvangbak voor pulp
F Motorgedeelte
G Dekselklemmen
H Aan/uit schakelaar
I Sapbeker (alleen bij type HR 2826)
Nederlands
Belangrijk
• Bekijk de tekeningen en lees de
gebruiksaanwijzing voordat u het
apparaat in gebruik neemt.
• Voorkom schade. Controleer, voordat u
de stekker in het stopcontact steekt, of
het op het apparaat aangegeven voltage
overeenkomt met de netspanning in uw
huis (110 - 127 V; 220 - 240 V).
• Indien het snoer van dit apparaat is
beschadigd, dient het uitsluitend te
worden vervangen door een door
Philips daartoe aangewezen reparateur,
omdat voor de reparatie speciale
gereedschappen en/of onderdelen
vereist zijn.
• Houd het apparaat uit de buurt van
kinderen.
• Laat het apparaat niet zonder toezicht
werken.
• Gebruik nooit accessoires of onderdelen
van andere fabrikanten of die niet
uitdrukkelijk door Philips worden
aanbevolen. Uw garantie vervalt indien
zulke accessoires of onderdelen zijn
gebruikt.
• Steek nooit uw vingers of bijvoorbeeld
vorken, messen, lepels, e.d. in de
vulbuis. Alleen het meegeleverde
aandrukhulpje is hiervoor geschikt.
• Laat de zeef geheel tot stilstand komen
voordat u de dekselklemmen losmaakt
en het deksel opent.
In elkaar zetten
- Zet de opvangbak voor pulp op zijn plaats (fig. 2).
- Zet de zeef op zijn plaats (fig. 3).
- Zet het deksel zo op
zijn plaats dat het aan
alle zijden past (fig. 4a).
Bevestig het deksel
met de klemmen
(“Klik”) (fig. 4b).
Controleer of het
deksel goed op zijn
plaats zit.
- Zet uw sapkan of -beker
op zijn plaats (fig. 5).
- Steek de stekker in het stopcontact.
Ingrediënten
• Gebruik altijd verse vruchten en groenten: deze
geven meer sap.
• Vooral aan te bevelen zijn: ananas, rode biet,
appel, komkommer, wortel (peen), spinazie,
meloen, tomaat, sinaasappel en druif.
• Vruchten die zetmeel bevatten, zoals banaan,
papaja, avocado, vijg en mango zijn niet
geschikt voor de sapcentrifuge.
Gebruik voor deze soorten fruit een
foodprocessor, mengbeker of staafmixer.
• Het is niet nodig dunne schilletjes en vliezen te
verwijderen. Alleen dikke schillen, van bijv.
sinaasappel, ananas, appel, ongekookte rode
biet, moeten worden verwijderd.
• Bladeren en bladstelen van bijv. sla kunnen ook
in de sapcentrifuge worden verwerkt.
• Als u sap van sinaasappel, citroen, mandarijn of
grapefruit wenst, schil de vruchten dan eerst en
verwijder de witte binnenschil: deze geeft een
bittere nasmaak.
Met deze sapcentrifuge kunt u 100% zuivere
vruchtesappen en groentesappen bereiden.
Het apparaat is gemakkelijk te gebruiken en heel
eenvoudig schoon te maken.
2
3
CLICK
4b
500
450
400
350
300
250
200
150
50
5
4a
12
• Appelsap kan snel bruin worden. Een paar
druppels citroensap kan dit proces vertragen.
Gebruik
- Controleer of het deksel goed is geplaatst.
• Voor uw veiligheid: het apparaat kan alleen
werken indien het deksel goed op het
motorgedeelte is bevestigd.
- Was de vruchten en/of groente(n) (fig. 6) en
snijd ze in stukjes (fig. 7) die in de vulbuis
passen.
- Schakel het apparaat in door op de aan/uit
schakelaar te drukken (fig. 8).
- Doe de stukjes in de vulbuis en druk ze
zachtjes omlaag met het aandrukhulpje (fig. 9).
• Niet met kracht omlaag drukken. Dit zou tot
minder goede
resultaten leiden en
kan zelfs de
ronddraaiende zeef tot
stilstand brengen.
• Steek nooit
voorwerpen of uw
vingers in de vulbuis.
- Als er geen sap meer
uit het apparaat
stroomt:
schakel het apparaat uit (fig. 10), wacht tot de
zeef geheel tot stilstand is gekomen en
verwijder de sapkan of -beker.
- Drink het sap meteen na het centrifugeren. Als
het enige tijd aan de lucht wordt blootgesteld,
verliest het sap zijn voedingswaarde en smaak.
Als u het sap echter wilt bewaren, doe het dan
in een goed afgesloten
kan of pot en zet deze
voor max. 24 uur in de
koelkast.
- Indien u het laatste sap
nog in de sapkan wilt
opvangen, kunt u de
kan in het apparaat
terugzetten en het
apparaat inschakelen.
- Wanneer de opvangbak voor pulp vol is:
schakel het apparaat uit (fig. 10), en wacht tot
de zeef geheel tot stilstand is gekomen,
maak de dekselklemmen los om het deksel te
verwijderen (fig. 11),
verwijder de opvangbak voor pulp (fig. 12),
maak de opvangbak leeg (fig. 13).
Zet de sapcentrifuge weer in elkaar en ga
verder met het centrifugeren.
Culinaire tips
• Met tomatensap kunt u een heerlijke Bloody
Mary maken.
• Pulp van bijv. wortelen, rode bieten, kool of
spinazie kan worden gebruikt als basis voor
soep, saus, jam, dessert, ijs, enz.
Kook de pulp met wat kruiden. Pureer de
gekookte pulp met behulp van een
foodprocessor, mengbeker of staafmixer.
Gebruik de pulp van tomaat om tomatenpasta
te maken.
• Probeer eens deze combinaties van sappen uit:
appel met wortel, sinaasappel met druif, ananas
met grapefruit, rode biet met wortel, wortel met
meloen, appel met sinaasappel.
6
7
8
9
10
11
12
13

13
Schoonmaken
• Schakel het apparaat uit en haal de stekker uit
het stopcontact voordat u het apparaat gaat
schoonmaken.
• Haal het apparaat voor het afwassen uit elkaar
zoals aangegeven in fig. 11 -13.
• U kunt het motorgedeelte schoonmaken met
een vochtige doek, desgewenst met wat
vloeibaar schoonmaakmiddel.
• Gebruik geen krassende of schurende schoon-
maakmiddelen, pannesponsen, schuurdoekjes
of -sponsen, staalwol, aceton, alcohol e.d.
• Maak de delen die met het voedsel in aanraking
zijn gekomen meteen na gebruik schoon in
warm sop en spoel ze af met heet water.
• Doe geen onderdelen in de afwasmachine.
• Gebruik een zachte borstel om de zeef schoon
te maken.
14
Descrizione generale (fig. 1, pag. 3)
A Pestello
B Apertura inserimento cibo
C Coperchio
D Setaccio
E Contenitore polpa
F Base motore
G Sgancio coperchio
H Interruttore ON/OFF (acceso/spento)
I Caraffa succo (solo modello HR 2826)
Italiano
IMPORTANTE
• Leggere attentamente le istruzioni e
osservare le illustrazioni prima di usare
l'apparecchio.
• Per evitare eventuali danni, controllate
che la tensione indicata sull'apparecchio
corrisponda a quella della rete locale
(110-127 V o 220-240 V).
• Se il cavo di alimentazione di questo
apparecchio si dovesse rovinare,
occorrerà farlo sostituire da un Centro
Assistenza autorizzato Philips perchè
occorrono speciali attrezzature e/o
ricambi.
• Tenete l'apparecchio fuori dalla portata
dei bambini.
• Non lasciate mai l'apparecchio acceso
nel caso doveste allontanarvi anche solo
per un attimo.
• Non usate mai accessori o parti che non
siano originali Philips o comunque non
specificamente autorizzati dalla Philips.
In questo caso, infatti, la garanzia non
sarebbe valida.
• Non mettete mai le dita o altri oggetti
nell'apertura per l'inserimento di frutta o
verdura. A tale scopo, utilizzate
l'apposito pestello.
• Aspettate che il setaccio sia
completamente fermo prima di
sganciare e aprire il coperchio.
Come montare l'apparecchio
- Posizionate il contenitore della polpa (fig. 2)
- Inserite il setaccio (fig. 3).
- Mettete il coperchio e
bloccatelo premendo
verso il basso (fig. 4a)
fino a quando sentirete
un "Click!" (fig. 4b).
Controllate che il
coperchio sia
posizionato in modo
corretto.
- Posizionate la caraffa
del succo (fig. 5).
- Inserite la spina nella presa di alimentazione.
Ingredienti
• Usate sempre frutta e verdura fresca per
ottenere una maggiore quantità di succo.
• Vi consigliamo soprattutto: ananas,
barbabietole, mele, cetrioli, carote, spinaci,
meloni, pomodori, arance e uva.
• I frutti ricchi di amido come le banane, gli
avocado, i manghi e i fichi non sono adatti per
l'uso con la centrifuga.
• Per questi tipi di frutta vi consigliamo di
utilizzare un robot da cucina o un frullatore a
immersione.
• Non è necessario sbucciare la frutta o la
verdura, tranne nel caso di bucce molto dure
o spesse, come quelle delle arance,
dell'ananas, delle mele e delle barbabietole
crude.
• Con la centrifuga è possibile utilizzare anche
le foglie della verdura (ad es. quelle di
lattuga).
Con questa centrifuga è possibile estrarre
purissimo succo di frutta e di verdura.
L'apparecchio è facile da usare e veloce da pulire.
2
3
CLICK
4b
500
450
400
350
300
250
200
150
50
5
4a
15
• Se volete estrarre il succo da arance, limoni,
mandarini o uva, vi consigliamo di sbucciare
la frutta e togliere la pellicina bianca affinché il
succo non assuma un sapore amarognolo.
• Il succo di mela diventa scuro molto
rapidamente. Basterà aggiungere qualche
goccia di limone per ritardare il fenomeno.
Come usare l'apparecchio
- Controllate che il coperchio sia stato
posizionato in modo corretto.
• Per una maggior sicurezza, l'apparecchio
funziona soltanto con il coperchio posizionato
in modo corretto sulla base del motore.
- Lavate la frutta e/o la verdura (fig. 6) e tagliatela
a pezzi (fig. 7) in modo che possano passare
facilmente attraverso l'apposita apertura.
- Accendete l'apparecchio premendo l'interruttore
ON/OFF (fig. 8).
- Inserite i pezzi nell'apposita apertura e premete
delicatamente verso il basso con il pestello
(fig. 9).
• Non premete con forza! I risultati non
cambierebbero e rischiereste addirittura di
danneggiare il setaccio rotante.
• Non inserite le dita e
nessun tipo di
oggetto nell'apertura
della centrifuga.
- Non appena il succo
cessa di scorrere:
spegnete
l'apparecchio (fig. 10)
e aspettate che il
setaccio sia completamente fermo prima di
togliere la caraffa.
- Se possibile, bevete immediatamente il succo
in quando l'esposizione all'aria riduce il valore
nutritivo e rende meno intenso il gusto. Nel
caso tuttavia decideste di conservare il succo
estratto, mettetelo in frigorifero, in un
contenitore ben chiuso, per un massimo di
24 ore.
- Quando il contenitore
della polpa è pieno:
spegnete l'apparecchio
(fig. 10) e aspettate che
il setaccio sia
completamente fermo,
sbloccate i ganci per
togliere il coperchio
(fig. 11), togliete il
contenitore della polpa
(fig. 12) e svuotatelo (fig. 13).
Rimettete a posto l'apparecchio e continuate a
centrifugare.
Consigli culinari
• Con il succo di pomodoro potrete preparare
un delizioso Bloody Mary.
• La polpa di carote, barbabietole, cavolo e
spinaci può essere utilizzata come base per
zuppe, salse, marmellate, gelati e dessert.
Fate cuocere la polpa insaporendola con
alcune spezie. Riducetela poi in purea più o
meno liquida utilizzando un frullatore a
immersione o un robot da cucina.
Usate la polpa di pomodoro per preparare la
pasta.
• Assaggiate le seguenti combinazioni di
succhi: mela e carota, ananas e uva, ananas
e pompelmo, barbabietola e carota, carota e
melone, mela e arancia.
6
7
8
9
10
11
12
13

16
Pulizia
• Togliete la spina dalla presa di corrente prima
di procedere alle operazioni di pulizia.
• Smontate l'apparecchio come indicato nelle
figure 11-13.
• La base motore può essere pulita con uno
straccio umido ed eventualmente un po' di
detersivo.
• Non usate sostanze abrasive, paglietta,
acetone, alcool ecc.
• Lavate le parti che sono venute a contatto con
il cibo in acqua tiepida saponata subito dopo
l'uso.
• Non lavate le parti in lavastoviglie.
• Usate una spazzolina morbida per pulire il
setaccio.

17
Descripción general (fig. 1)
A Empujador
B Tubo de llenado
C Tapa
D Tamiz
E Depósito de la pulpa
F Unidad básica
G Bridas para fijar la tapa
H Interruptor Paro / Marcha
I Jarra para el zumo (Solo en el tipo HR 2826)
Español
Importante
• Antes de usar el aparato, lean las
instrucciones junto con las
ilustraciones.
• Eviten los deterioros. Antes de
enchufarlo, comprueben si el voltaje
indicado en el aparato se corresponde
con el de su hogar (110 - 127 V ; 220 -
240 V).
• Si el cable de red de este aparato es
dañado, solo puede ser reemplazado por
la Organización Philips o por un taller de
servicio autorizado por ella, ya que se
requieren herramientas y/o piezas
especiales.
• Mantengan el aparato fuera del alcance
de los niños.
• No dejen el aparato en marcha y sin
vigilancia.
• No usen nunca ningún accesorio o
piezas de otros fabricantes o que no
hayan sido específicamente aconsejadas
por Philips.
Su garantía quedará anulada si se han
usado tales accesorios o piezas.
• No pongan nunca sus dedos o
cuchillería dentro del tubo de llenado.
Para ello, solo es adecuado el
empujador que se suministra.
• Esperen a que el tamiz se pare
completamente antes de aflojar las
bridas y abrir la tapa.
Montaje
- Coloquen el depósito de la pulpa (fig. 2).
- Coloquen el tamiz (fig. 3).
- Coloquen la tapa de
modo que quede
totalmente ajustada
(fig. 4a).
Fijen la tapa mediante
las bridas ("Click")
(fig. 4b). Comprueben
si la tapa está
correctamente
posicionada.
- Coloquen su jarra o la
copa para el zumo
(fig. 5).
- Enchufen el aparato a la red.
Ingredientes
• Usen siempre frutas y vegetales frescos, ya
que ellos producen más zumo.
• Especialmente aconsejables son : Piña,
remolacha, manzana, pepino, zanahoria,
espinacas, melón, tomate, naranja y uva.
• Las frutas que tienen fécula, como plátano,
papaya, aguacate, higo y mango no deberán
ser procesados en esta Licuadora.
Para ese tipo de frutas usen un procesador de
alimentos o una batidora (de varilla).
• No es necesario quitar las pieles y cortezas
finas. Solo deben quitarse las gruesas de, por
ejemplo, naranja, piña, manzana, remolacha
cruda, etc.
• Las hojas y tallos de, por ejemplo, lechuga
también pueden procesarse en la Licuadora.
Con esta Licuadora pueden hacer un zumo de
frutas y de vegetales 100 % puro.
El aparato tiene un uso simple y es muy fácil de
limpiar.
2
3
CLICK
4b
500
450
400
350
300
250
200
150
50
5
4a
18
• Si desean hacer zumo de naranja, limón,
mandarina o toronja, es necesario mondarlas
y quitar las fibras blancas ya que, de otro
modo, el zumo adquirirá un sabor amargo.
• El zumo de manzana puede volverse marrón
con rapidez. Unas pocas gotas de zumo de
limón retardarán este proceso.
Cómo usar la Licuadora
- Comprueben que la tapa esté correctamente
colocada.
• Para su seguridad : El aparato solo puede
funcionar cuando la tapa ha sido
correctamente montada sobre la unidad
básica.
- Laven las frutas y / o vegetales (fig. 6) y
córtenlos a trozos (fig. 7) para ponerlos en el
tubo de llenado.
- Presionando el interruptor Paro / Marcha
(fig. 8), pongan en marcha el aparato.
- Pongan los trozos en el tubo de llenado y, con
el empujador, presiónenlos suavemente
hacia abajo (fig. 9).
• No presionen con fuerza. Ello daría peores
resultados e, incluso, podría bloquear el tamiz
rotativo.
• No pongan nunca ni
sus dedos ni ningún
objeto dentro del
tubo de llenado.
- Una vez que el zumo
haya cesado de fluir :
Paren la Licuadora
(fig. 10).
Esperen a que el tamiz esté completamente
parado antes de sacar la jarra o la copa para
el zumo.
- Preferiblemente, beban el zumo
inmediatamente después de ser extraído.
La exposición al aire libre durante algún
período de tiempo dará como resultado una
pérdida de su valor nutricional y de su sabor.
Sin embargo, si desean guardar el zumo,
pónganlo en el frigorífico en un frasco bien
cerrado y durante un máximo de 24 horas.
- Cuando el depósito de
la pulpa esté lleno :
Paren la Licuadora
(fig. 10) y esperen a
que el tamiz esté
completamente
parado,
Aflojen las dos bridas
para desmontar la
tapa (fig. 11),
Saquen el depósito de la pulpa (fig. 12),
Vacíen el depósito de la pulpa (fig. 13).
Vuelvan a montar la Licuadora y sigan el
proceso.
Sugerencias culinarias
• Con el zumo de tomate pueden preparar un
delicioso "Bloody Mary".
• La pulpa de, por ejemplo, zanahorias,
remolachas, coles, espinacas, puede usarse
como base para sopas, salsas, mermeladas,
helados y postres.
Cuezan la pulpa con algunas especies.
Hagan líquida la pulpa cocida, usando un
procesador de alimentos o una batidora ( de
varilla ).
Usen la pulpa de tomate para hacer pasta de
tomate.
• Prueben estas combinaciones : Manzana con
zanahoria, piña con uva, piña con toronja,
remolacha con zanahoria, zanahoria con
melón, manzana con naranja.
6
7
8
9
10
11
12
13

19
Limpieza
• Antes de limpiarla, paren la Licuadora y
desenchúfenla de la red.
• Para lavarlo, desmonten el aparato tal como
se indica en las figs. 11 - 13.
• La unidad básica puede ser limpiada frotando
con un paño húmedo y un poco de
detergente, si es necesario.
• No usen desengrasadores, almohadillas
fregadoras, abrasivos, lana de acero,
acetona, alcohol, etc.
• Las piezas que hayan estado en contacto con
alimentos, lávenlas con agua jabonosa
caliente inmediatamente después del uso.
• No limpien las piezas en un lavavajillas.
• Para limpiar el tamiz, usen un cepillo suave.

20
Descrição geral (fig. 1)
A Pressor
B Tubo dos alimentos
C Tampa
D Crivo
E Reservatório da polpa
F Corpo da máquina
G Molas para soltar a tampa
H Comutador "on/off"
I Jarro (apenas no mod. HR 2826)
Português
Importante
• Leia cuidadosamente as instruções e
observe as ilustrações antes de utilizar o
aparelho pela primeira vez.
• Evite estragos. Antes de ligar o
aparelho, certifique-se que a voltagem
nele indicada corresponde à voltagem
da sua casa (110-127 V; 220-240 V).
• Se o cabo eléctrico deste aparelho
estiver danificado, apenas deverá ser
substituído pela Philips ou pelos seus
serviços de assistência, uma vez que
serão necessárias ferramentas especiais
e/ou peças.
• Mantenha o aparelho fora do alcance
das crianças.
• Não deixe o aparelho ligado ou a
trabalhar sozinho.
• Nunca utilize acessórios ou peças
doutros fabricantes ou que não tenham
sido recomendados expressamente pela
Philips. A sua garantia cessará se
aplicar acessórios ou peças doutras
origens.
• Nunca ponha a mão ou qualquer objecto
dentro do tubo dos alimentos. Só deverá
ser utilizado o pressor indicado para o
efeito.
• Deixe o crivo parar por completo antes
de soltar as molas e de abrir a tampa.
Montagem
- Coloque o reservatório da polpa (fig. 2)
- Coloque o crivo (fig. 3)
- Coloque a tampa e
encaixe-a bem de
todos os lados (fig. 4a).
Feche a tampa com as
molas ("Clique!")
(fig. 4b). Verifique se a
tampa está bem
colocada.
- Coloque o jarro ou o
copo (fig. 5)
- Introduza a ficha na
tomada de parede.
Ingredientes
• Utilize sempre fruta e legumes frescos porque
produzem mais sumo.
• Recomenda-se sobretudo: ananás, beterraba,
maçã, pepino, cenoura, espinafres, melão,
tomate, laranja e uvas.
• Frutos com amido, como a banana, a papaia, o
abacate, a manga, o figo, não deverão ser
processados nesta máquina.
Para esse tipo de frutos utilize um robot de
cozinha ou uma liquidificadora.
• Não se torna necessário retirar a pele ou a
casca fina. Só no caso de uma casca mais
grossa, como a laranja, o ananás, a maçã, a
beterraba crua se deverá tirar primeiro a pele.
• As folhas e as sementes, por exemplo da
alface, também podem ser tratadas nesta
centrifugadora.
Com esta centrifugadora poderá fazer sumos de
fruta ou de vegetais 100% puros.
O aparelho é simples de utilizar e limpa-se com
muita facilidade.
2
3
CLICK
4b
500
450
400
350
300
250
200
150
50
5
4a

21
• Se pretender fazer sumo de laranja, limão,
mandarim ou uva, deverá primeiro tirar-lhes a
pele e as fibras brancas. Caso contrário, o
sumo ficará com um gosto amargo.
• O sumo de maçã escurece muito rapidamente.
Se lhe deitar algumas gotas de sumo de limão
aguentar-se-á mais tempo.
Como utilizar
- Certifique-se que a tampa está correctamente
colocada.
• Para sua própria segurança: o aparelho só
poderá funcionar se a tampa estiver
devidamente colocada sobre o corpo da
máquina.
- Lave as frutas e/ou o(s) legume(s) (fig. 6) e
corte-os em pedaços (fig. 7) por forma a
caberem no tubo dos alimentos.
- Ligue a máquina, carregando no botão "on/off"
(fig. 8).
- Coloque os pedaços no tubo de alimentação e
empurre-os cuidadosamente para baixo com o
auxílio do pressor (fig. 9).
• Não faça força a empurrar os alimentos. Os
resultados poderão não ser os melhores e o
crivo poderá ficar
bloqueado.
• Nunca ponha
qualquer objecto ou
os dedos dentro do
tubo dos alimentos.
- Quando o sumo parar
de sair:
desligue a máquina
(fig. 10) e espere que
o crivo se imobilize por completo antes de
retirar o jarro ou o copo.
- Beba o sumo imediatamente após ter sido feito,
porque se ficar exposto ao ar durante algum
tempo perderá o seu valor nutritivo e o sabor
natural.
Contudo, se quiser conservar o sumo, poderá
colocá-lo no frigorífico num recipiente bem
fechado, por um período máximo de 24 horas.
- Quando o reservatório
da polpa estiver cheio:
desligue a máquina
(fig. 10) e espere até o
crivo se imobilizar por
completo,
solte as duas molas
para soltar a tampa
(fig. 11),
retire o depósito da
polpa (fig. 12),
esvazie o depósito (fig. 13).
Volte a colocar tudo na máquina e continue o
trabalho.
Sugestões culinárias
• Com sumo de tomate poderá preparar um
delicioso "Bloody Mary".
• A polpa de, por exemplo, cenouras, beterrabas,
couves, espinafres, poderá ser aproveitada
como base para sopas, molhos, compotas,
gelados e sobremesas.
Cozinhe a polpa com alguns condimentos.
Liquefaça a polpa cozida com um robot de
cozinha ou um liquidificador.
Utilize polpa de tomate para fazer pasta de
tomate.
• Experimente as seguintes combinações: maçã
com cenoura, laranja com uvas, ananás com
toranja, beterraba com cenoura, cenoura com
melão, maçã com laranja.
6
7
8
9
10
11
12
13

22
Limpeza
• Antes de limpar, desligue a máquina e retire a
ficha da tomada de corrente.
• Desmonte o aparelho para a lavagem conforme
indicado nas figs. 11-13.
• O corpo da máquina pode ser limpo com um
pano húmido e, se necessário, com um pouco
de detergente.
• Não utilize desengordurantes, esfregões,
abrasivos, palha de aço, acetona, álcool, etc.
• Lave as peças que estiveram em contacto com
os alimentos numa sabonária de água quente,
imediatamente após a utilização.
• Não lave nada na máquina da loiça.
• Sirva-se duma escova macia para limpar o
crivo.

23
Tεχνική περιγραφή (εικ. 1)
A Eξάρτηµα ώθησης
B Σωλήνας τροφοδοσίας
C Kαπάκι
D K"φτης
E ∆οχείο συγκέντρωσης πολτού
F Kύρια µονάδα
G Aσφάλειες για το καπάκι
H ∆ιακ"πτης λειτουργίας
I ∆οχείο χυµού (για τον τύπο HR 2826)
Ελληνικά
Σηµαντικ"
• ∆ιαβάστε τις οδηγίες σε συνδυασµ" µε
τις εικ"νες πριν την χρησιµοποιήσετε.
• Προσέχετε µην την καταστρέψετε. Πριν
την συνδέσετε στην τάση ελέγξτε αν η
τάση που αναφέρεται στην ταµπέλα
επάνω στη συσκευή είναι ίδια µε την
τάση της περιοχής σας (220-240V).
• Άν το καλώδιο τάσεως της συσκευής
αυτής υποστεί βλάβη, πρέρει να
αποκατασταθεί αποκλειστικά απ"
εξουσιοδοτηµένο επισκευαστή της
Philips, δι"τι για την επισκευή
απαιτούνται ειδικά εργαλεία και
εξαρτήµατα.
• Kρατήστε τα παιδιά µακρυά απ" τη
συσκευή.
• Mην αφήνετε τη συσκευή να λειτουργεί
χωρίς παρακολούθηση.
• Mη χρησιµοποιείτε αξεσουάρ ή µέρη της
συσκευής απ" άλλους κατασκευαστές ή
απ" κατασκευαστές που δεν έχουν
εξουσιοδ"τηση απ" τη Φίλιπς. Θα
ακυρωθεί η εγγύησή σας αν
χρησιµοποιήσετε αυτ" το εξάρτηµα.
• Mην βάζετε τα δάκτυλά σας ή
µαχαιροπήρουνα µέσα στο σωλήνα
τροφοδοσίας. M"νο το παρεχ"µενο
εξάρτηµα ώθησης θα πρέπει να
χρησιµοποιείτε.
• Aφήστε τον κ"φτη να σταµατήσει
εντελώς πριν ελευθερώσετε τις
ασφάλειες και ανοίξετε το καπάκι.
Συναρµολ"γησης
- Tοποθετήστε το δοχείο πολτού (εικ. 2)
- Tοποθετήστε τον κ%φτη (εικ. 3)
- Tοποθετήστε το
καπάκι, έτσι ώστε να
εφαρµ%ζει απ’ %λες
τις πλευρές (εικ. 4a).
Kλειδώστε το καπάκι
µε τις ασφάλειες
(κλικ) (εικ. 4b).
Eλέγξτε τη σωστή
τοποθέτηση στο
καπάκι
- Tοποθετήστε το
δοχείο χυµού ή µία κούπα (εικ. 5)
- Bάλτε το φις στην πρίζα
Yλικά
• Πάντα να χρησιµοποείτε φρέσκα φρούτα
και λαχανικά γιατί παράγουν περισσ%τερο
χυµ%.
• Iδιαίτερα σας συνιστούµε ανανά, παντζάρια,
µήλο, αγγούρι, καρ%τα, σπανάκι, πεπ%νι,
ντοµάτες, πορτοκάλια και γκρέιπ.
• Tα αµυλώδη φρούτα %πως µπανάνα,
παπάγια, αβοκάντο, σύκα και µάγκο δεν
πρέπει να χρησιµοποιούνται σ’ αυτ%ν τον
αποχυµωτή.
• Γι’ αυτ% το είδος των φρούτων
χρησιµοποιήστε µία κουζινοµηχανή ή ένα
µπλέντερ.
• ∆εν χρειάζεται να βγάζετε τις λεπτές
φλούδες και τα σπ%ρια. M%νο οι λεπτές
φλούδες απ% τα π.χ. πορτοκάλια, ανανάδες,
µήλα, άβραστα παντζάρια πρέπει να
βγαίνουν.
Mε τον αποχυµωτή σας µπορείτε να έχετε
100% γνήσιο φρουτοχυµ και χυµ απ
λαχανικά.
H συσκευή είναι ευκολχρηστη κι απλή.
2
3
CLICK
4b
500
450
400
350
300
250
200
150
50
5
4a
24
• Tο µαρούλι µπορεί να αποχυµωθεί µε τη
συσκευή αυτή.
• Aν θελήσετε να βγάλετε το χυµ% απ%
πορτοκάλια, λεµ%νια, µανιτάρια ή γκρέιπς
είναι αναγκαίο να τα ξεφλουδίσετε και να
αποµακρύνετε την άσπρη ψίχα (ίνες)
διαφορετικά ο χυµ%ς θα έχει µία πικρή
γεύση.
• O χυµ%ς του µήλου πέρνει καφετί χρώµα
γρήγορα. Λίγες σταγ%νες λεµονιού θα
επιβραδύνουν τη διαδικασία αυτή.
Πώς θα τον χρησιµοποιήσετε
- Eλέγχτε αν το καπάκι έχει τοποθετηθεί
σωστά.
• Για την ασφάλεια σας: H συσκευή µπορεί να
λειτουργήσει µ"νο αν το καπάκι έχει
τοποθετηθεί σωστά πάνω στη βάση της
συσκευής.
- Πλύνετε τα φρούτα και/ή τα λαχανικά
(εικ. 6) και κ%φτε τα σε κοµµάτια (εικ. 7) για
να χωράνε στο σωλήνα τροφοδοσίας.
- Θέστε σε λειτουργία τη συσκευή µε τον
διακ%πτη (H) (εικ. 8).
- Tοποθετήστε τα κοµµάτια µέσα στο σωλήνα
και πιέστε τα απαλά προς τα κάτω µε το
εξάρτηµα πίεσης (εικ. 9).
• Mην τα πιέζετε µε δύναµη. Aυτ" θα δώσει
χειρ"τερα αποτελέσµατα και µπορεί να
εµποδίσει την κίνηση του τρίφτη.
• Mη βάζετε αντικείµενα ή τα δάκτυλά σας
µέσα στον σωλήνα που µπαίνουν υλικά.
- Dταν ο αποχυµωτής σταµατήσει να βγάζει
χυµ%:
Σβύστε τη συσκευή
(εικ. 10) και
περιµένετε να
σταµατήσει ο
τρίφτης εντελω΄ς
πριν πάρετε το
δοχείο χυµών ή την
κούπα.
- Προτιµάτε να πίνετε
το χυµ% αµέσως
µετά το στύψιµο. H έκθεση του χυµού στον
αέρα για αρκετ% διάστηµα έχει σαν
αποτέλεσµα να χάσει ο χυµ%ς την θρεπτική
του αξία και την γεύση του.
- Aν %µως θέλετε να διατηρήσετε τον χυµ%
βάλτε τον στο ψυγείο σ’ ένα πολύ καλά
κλειστ% δοχείο το πολύ µέχρι 24 ώρες.
- Dταν γεµίσει το
δοχείο του πολτού:
Σβύστε τη συσκευή
(εικ. 10) και
περιµένετε να
σταµατήσει ο στίφτης
εντελώς,
ελευθερώστε τις δύο
ασφάλειες για να
βγάλετε το καπάκι
(εικ. 11), πάρτε το
δοχείο πολτού (εικ. 12), αδειάστε το δοχείο
(εικ. 13).
- Eπανασυναρµολογήστε τον αποχυµωτή και
συνεχίστε το στίψιµο.
Συµβουλές µαγειρικής
• Mε τον χυµ% της ντοµάτας µπορείτε να
ετοιµάσετε εύγεστο Mπλάντυ Mαίρη.
• O πολτ%ς π.χ. του καρ%του, του παντζαριού,
του λάχανου, απ% το σπανάκι µπορεί να
χρησιµοποιηθεί σα βάση για σούπες,
σάλτες, µαρµελάδες, παγωτ% και επιδ%ρπια.
Mαγειρέψτε τον πολτ% µε καρυκεύµενα.
Λιώστε τον µαγειρεµένο πολτ% µε µπλέντερ
ή κουζινοµηχανή. Xρησιµοποιήστε τον
πολτ% ντοµάτας για να κάνετε πελτέ.
6
7
8
9
10
11
12
13

25
• Kάνετε τους παρακάτω συνδιασµούς µε
τους χυµούς: µήλα µε καρ%το, πορτοκάλι µε
γκρέιπ, ανανάς µε γκρέιπ, παντζάρια µε
καρ%τα, καρ%τα µε πεπ%νι, µήλο µε
πορτοκάλι.
Kαθαρισµ"ς
• Σβύστε τη συσκευή και βγάλτε την πρίζα
απ% τον τοίχο πριν καθαρίσετε τη συσκευή.
• Aποσυναρµολογήστε τη συσκευή για να την
πλύνετε %πως δείχνουν οι εικ%νες 11-13.
• H βάση της συσκευής µπορεί να καθαριστεί
µε ένα υγρ% ύφασµα ίσως χρειαστεί ελαφρ%
απορρυπαντικ%.
• Mη χρησιµοποιείτε ξίστρες, αποξεστικά,
σύρµα κουζίνας, ασετ%ν, οιν%πνευµα κ.λπ.
• Πλύντε τα µέρη που έρχονται σε επαφή µε
την τροφή µε ζεστή σαπουνάδα αµέσως
µετά τη χρήση.
• Mη βάζετε τα εξαρτήµατα του αποχυµωτή
σε πλυντήριο πιάτων.
• Xρησιµοποιείστε την µαλακή βούρτσα για
να καθαρίστε τον τρίφτη.

4222 000 89684
u