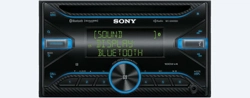
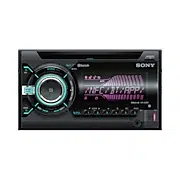
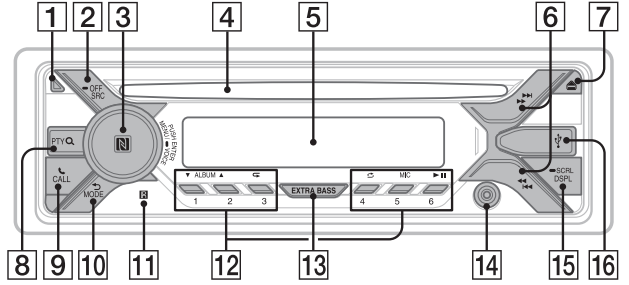
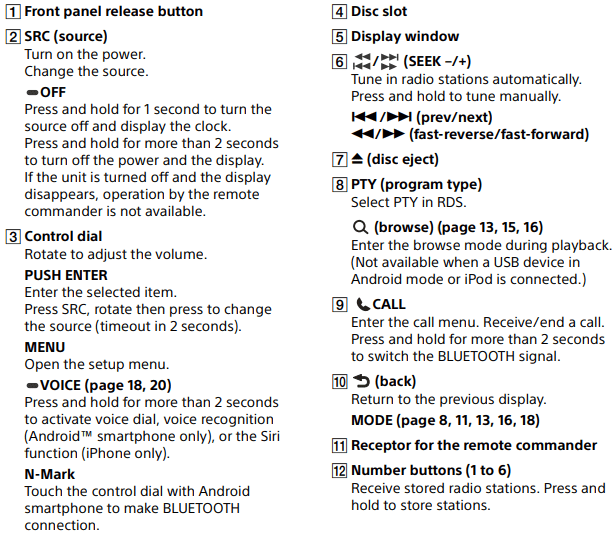
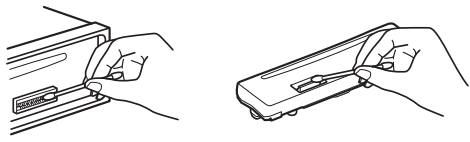
You can detach the front panel of this unit to prevent theft.
1 Press and hold OFF until the unit turns off, press the front panel release button , then pull the panel towards you to remove.
Caution alarm
If you turn the ignition switch to the OFF position without detaching the front panel, the caution alarm will sound for a few seconds. The alarm will only sound if the built-in amplifier is used.
Serial numbers
Make sure the serial numbers on the bottom of the unit and the back of the front panel are matched correctly. Otherwise you cannot make BLUETOOTH pairing, connection and disconnection by NFC.
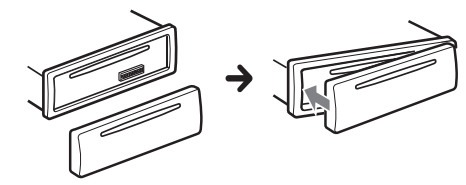
Attaching the front panel
Resetting the Unit
Before operating the unit for the first time, or after replacing the car battery or changing connections, you must reset the unit.
1 Press DSPL and (back)/MODE for more than 2 seconds.
Note Resetting the unit will erase the clock setting and some stored contents.
Setting the Clock
1 Press MENU, rotate the control dial to select [GENERAL], then press it.
2 Rotate the control dial to select [SET CLOCK-ADJ], then press it. The hour indication flashes.
3 Rotate the control dial to set the hour and minute. To move the digital indication, press (SEEK –/+).
4 After setting the minute, press MENU. The setup is complete and the clock starts.
Preparing a BLUETOOTH Device
You can enjoy music, or perform handsfree calling depending on the BLUETOOTH compatible device such as a smartphone, cellular phone and audio device (hereafter “BLUETOOTH device” if not otherwise specified). For details on connecting, refer to the operating instructions supplied with the device.
Before connecting the device, turn down the volume of this unit; otherwise, loud sound may result.
Connecting with a Smartphone by One touch (NFC)
By touching the control dial on the unit with an NFC* compatible smartphone, the unit is paired and connected with the smartphone automatically.
* NFC (Near Field Communication) is a technology enabling short-range wireless communication between various devices, such as mobile phones and IC tags. Thanks to the NFC function, data communication can be achieved easily just by touching the relevant symbol or designated location on NFC compatible devices.
For a smartphone with Android OS 4.0 or lower installed, downloading the app “NFC Easy Connect” available at Google Play™ is required. The app may not be downloadable in some countries/regions.
1 Activate the NFC function on the smartphone.
For details, refer to the operating instructions supplied with the smartphone.
2 Touch the N-Mark part of the unit with the N-Mark part of the smartphone.
Make sure that lights up on the display of the unit.
To disconnect by One touch
Touch the N-Mark part of the unit with the N-Mark part of the smartphone again.
Notes
• When making the connection, handle the smartphone carefully to prevent scratches.
• One touch connection is not possible when the unit is already connected to two NFC compatible devices. In this case, disconnect either device, and make connection with the smartphone again.
Pairing and connecting with a BLUETOOTH device
When connecting a BLUETOOTH device for the first time, mutual registration (called “pairing”) is required. Pairing enables this unit and other devices to recognize each other. This unit can connect two BLUETOOTH devices (two cellular phones, or a cellular phone and an audio device).
1 Place the BLUETOOTH device within 1 m (3 ft) of this unit.
2 Press MENU, rotate the control dial to select [BLUETOOTH], then press it.
3 Rotate the control dial to select [SET PAIRING], then press it.
4 Rotate the control dial to select [SET DEVICE 1]* or [SET DEVICE 2]*, then press it.
flashes while the unit is in pairing standby mode.
* [SET DEVICE 1] or [SET DEVICE 2] will be changed to the paired device name after pairing is complete.
5 Perform pairing on the BLUETOOTH device so it detects this unit.
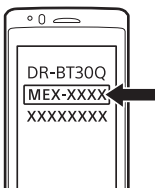
6 Select [MEX-XXXX] (your model name) shown in the display of the BLUETOOTH device. If your model name does not appear, repeat from step 2.
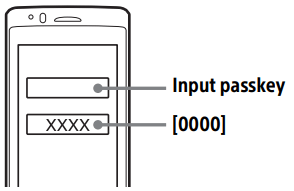
7 If passkey* input is required on the BLUETOOTH device, input [0000].
* Passkey may be called “Passcode,” “PIN code,” “PIN number” or “Password,” etc., depending on the device.
When pairing is made, stays lit.
8 Select this unit on the BLUETOOTH device to establish the BLUETOOTH connection.
or lights up when the connection is made.
Note While connecting to a BLUETOOTH device, this unit cannot be detected from another device. To enable detection, enter the pairing mode and search for this unit from another device.
To start playback
For details, see “Playing a BLUETOOTH Device” (page 14).
To disconnect the paired device
Perform steps 2 to 4 to disconnect after this unit and the BLUETOOTH device are paired.
Connecting with a paired BLUETOOTH device
To use a paired device, connection with this unit is required. Some paired devices will connect automatically.
1 Press MENU, rotate the control dial to select [BLUETOOTH], then press it.
2 Rotate the control dial to select [SET BT SIGNL], then press it. Make sure that lights up.
3 Activate the BLUETOOTH function on the BLUETOOTH device.
4 Operate the BLUETOOTH device to connect to this unit.
or lights up.
Icons in the display:
Lights up when handsfree calling is available by enabling the HFP (Handsfree Profile).
Lights up when the audio device is playable by enabling the A2DP (Advanced Audio Distribution Profile).
To connect the last-connected devicefrom this unit
Activate the BLUETOOTH function on the BLUETOOTH device.
To connect with the audio device, press SRC to select [BT AUDIO] and press (play/ pause).
To connect with the cellular phone, press CALL.
Note
While streaming BLUETOOTH audio, you cannot connect from this unit to the cellular phone.
Connect from the cellular phone to this unit instead.
Tip With BLUETOOTH signal on: when the ignition is turned to on, this unit reconnects automatically to the last-connected cellular phone.
To install the microphone
For details, see “Installing the microphone” (page 40).
Connecting with an iPhone/iPod (BLUETOOTH Auto Pairing)
When an iPhone/iPod with iOS5 or later installed is connected to the USB port, the unit is paired and connected with the iPhone/iPod automatically.
To enable BLUETOOTH Auto Pairing, make sure [SET AUTOPAIR] in [BLUETOOTH] is set to [ON] (page 24).
1 Activate the BLUETOOTH function on the iPhone/iPod.
2 Connect an iPhone/iPod to the USB port.
Make sure that lights up on the display of the unit.
Notes
• BLUETOOTH Auto Pairing is not possible if the unit is already connected to two BLUETOOTH devices. In this case, disconnect either device, then connect the iPhone/iPod again.
• If BLUETOOTH Auto Pairing is not established, see “Preparing a BLUETOOTH Device” (page 8).
Connecting a USB Device
1 Turn down the volume on the unit.
2 Connect the USB device to the unit. To connect an iPod/iPhone, use the USB connection cable for iPod (not supplied).
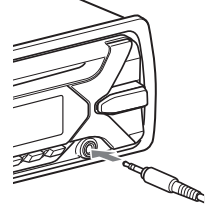
Connecting Other Portable Audio Device
1 Turn off the portable audio device.
2 Turn down the volume on the unit.
3 Connect the portable audio device to the AUX input jack (stereo mini jack) on the unit with a connecting cord (not supplied)*.
* Be sure to use a straight type plug.
4 Press SRC to select [AUX].
To match the volume level of the connected device to other sources
Start playback of the portable audio device at a moderate volume, and set your usual listening volume on the unit.
Press MENU, then select [SOUND] → [SET AUX VOL] (page 23).
Listening to the Radio
Listening to the Radio
To listen to the radio, press SRC to select [TUNER].
Storing automatically (BTM)
1 Press MODE to change the band (FM1, FM2, FM3, AM1 or AM2).
2 Press MENU, rotate the control dial to select [GENERAL], then press it.
3 Rotate the control dial to select [SET BTM], then press it.
The unit stores stations in order of frequency on the number buttons.
Tuning
1 Press MODE to change the band (FM1, FM2, FM3, AM1 or AM2).
2 Perform tuning.
To tune manually
Press and hold (SEEK –/+) to locate the approximate frequency, then press (SEEK –/+) repeatedly to finely adjust to the desired frequency
To tune automatically
Press (SEEK –/+). Scanning stops when the unit receives a station.
Storing manually
1 While receiving the station that you want to store, press and hold a number button (1 to 6) until [MEM] appears.
Receiving the stored stations
1 Select the band, then press a number button (1 to 6).
Playback
Playing a Disc
1 Insert the disc (label side up).
Playback starts automatically.
Playing a USB Device
In these Operating Instructions, “iPod” is used as a general reference for the iPod functions on an iPod and iPhone, unless otherwise specified by the text or illustrations.
For details on the compatibility of your iPod, see “About iPod” (page 26) or visit the support site on the back cover.
AOA (Android Open Accessory) 2.0, MSC (Mass Storage Class) and MTP (Media Transfer Protocol) type USB devices* compliant with the USB standard can be used. Depending on the USB device, the Android mode or MSC/MTP mode can be selected on the unit.
Some digital media players or Android smartphones may require setting to MTP mode.
* e.g., a USB flash drive, digital media player, Android smartphone
Notes
• For details on the compatibility of your USB device, visit the support site on the back cover.
• Smartphones with Android OS 4.1 or higher installed support Android Open Accessory 2.0 (AOA 2.0). However, some smartphones may not fully support AOA 2.0 even if Android OS 4.1 or higher is installed.
For details on the compatibility of your Android smartphone, visit the support site on the back cover.
• Playback of the following files is not supported. MP3/WMA/FLAC:
– copyright-protected files
– DRM (Digital Rights Management) files
– Multi-channel audio files MP3/WMA:
– lossless compression files
Before making a connection, select the USB mode (Android mode or MSC/MTP mode) depending on the USB device (page 22).
1 Connect a USB device to the USB port (page 11).
Playback starts.
If a device is already connected, to start playback, press SRC to select [USB] ([IPD] appears in the display when the iPod is recognized).
2 Adjust the volume on this unit.
To stop playback
Press and hold OFF for 1 second.
To remove the device
Stop playback, then remove the device.
Caution for iPhone
When you connect an iPhone via USB, phone call volume is controlled by the iPhone, not the unit. Do not inadvertently increase the volume on the unit during a call, as a sudden loud sound may result when the call ends.
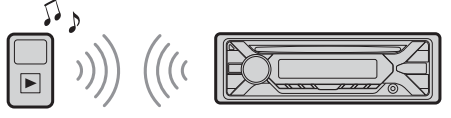
Playing a BLUETOOTH Device
You can play contents on a connected device that supports BLUETOOTH A2DP (Advanced Audio Distribution Profile).
1 Make BLUETOOTH connection with the audio device (page 8).
To select the audio device, press MENU, then select [BLUETOOTH] → [SET AUDIODEV] (page 24).
2 Press SRC to select [BT AUDIO].
3 Operate the audio device to start playback.
4 Adjust the volume on this unit.
Notes
• Depending on the audio device, information such as title, track number/time and playback status may not be displayed on this unit.
• Even if the source is changed on this unit, playback of the audio device does not stop.
• [BT AUDIO] does not appear in the display while running the “SongPal” application via the BLUETOOTH function.
To match the volume level of the BLUETOOTH device to other sources
Start playback of the BLUETOOTH audio device at a moderate volume, and set your usual listening volume on the unit. Press MENU, then select [SOUND] → [SET BTA VOL] (page 23).
Listening to Pandora®
Pandora® is available to stream music through your iPhone and Android smartphone. You can control Pandora® on a BLUETOOTH connected iPhone/Android smartphone from this unit.
Setting up Pandora®
1 Check the compatibility of your mobile device by visiting the support site on the back cover.
2 Download the latest version of the Pandora® application from your smartphone’s app store.
Streaming Pandora®
1 Make BLUETOOTH connection with the audio device (page 8).
To select the audio device, press MENU, then select [BLUETOOTH] → [SET AUDIODEV] (page 24).
2 Press SRC to select [PANDORA].
3 Launch Pandora® application on your mobile device.
4 Press (play/pause) to start playback.
If the device number appears
Make sure that the same numbers are displayed (e.g., 123456) in this unit and the mobile device, then press ENTER on this unit and select [Yes] on the mobile device.
“Thumbs Up” or “Thumbs Down” feedback allows you to personalize stations.
1 During playback, press (Thumbs Up) or (Thumbs Down).
Using the station list
The station list allows you to easily select a desired station.
1 During playback, press (browse).
2 Press (SEEK +) to select the sorting order [BY DATE] or [A TO Z].
3 Rotate the control dial to select the desired station, then press it. Playback starts.
Bookmarking
The track currently being played can be bookmarked and stored in your Pandora® account.
1 During playback, press MODE.
Settings
Canceling the DEMO Mode
You can cancel the demonstration display which appears when the source is off and the clock is displayed.
1 Press MENU, rotate the control dial to select [GENERAL], then press it.
2 Rotate the control dial to select [SET DEMO], then press it.
3 Rotate the control dial to select [SET DEMO-OFF], then press it. The setting is complete.
4 Press (back) twice. The display returns to normal reception/ play mode.
Basic Setting Operation
You can set items in the following setup categories:
General setup (GENERAL), Sound setup (SOUND), Display setup (DISPLAY), BLUETOOTH setup (BLUETOOTH), SongPal setup (SONGPAL)
1 Press MENU.
2 Rotate the control dial to select the setup category, then press it. The items that can be set differ depending on the source and settings.
3 Rotate the control dial to select the options, then press it.
To return to the previous display
Press (back).
Maintenance
Replacing the lithium battery (CR2025) of the remote commander
When the battery becomes weak, the range of the remote commander becomes shorter.
CAUTION Danger of explosion if battery is incorrectly replaced. Replace only with the same or equivalent type.
Note on the lithium battery
Keep the lithium battery out of the reach of children. Should the battery be swallowed, immediately consult a doctor.
Cleaning the connectors
The unit may not function properly if the connectors between the unit and the front panel are not clean. In order to prevent this, detach the front panel (page 8) and clean the connectors with a cotton swab. Do not apply too much force. Otherwise, the connectors may be damaged.
Notes
• For safety, turn off the ignition before cleaning the connectors, and remove the key from the ignition switch.
• Never touch the connectors directly with your fingers or with any metal device.
Troubleshooting
The following checklist will help you remedy problems you may encounter with your unit. Before going through the checklist below, check the connection and operating procedures.
For details on using the fuse and removing the unit from the dashboard, see “Connection/Installation” (page 37).
If the problem is not solved, visit the support site on the back cover.
General
No power is being supplied to the unit.
If the unit is turned off and the display disappears, the unit cannot be operated with the remote commander.
Turn on the unit.
No sound or the sound is very low.
The position of the fader control [FADER] is not set for a 2-speaker system.
The volume of the unit and/or connected device is very low.
Increase the volume of the unit and connected device.
No beep sound.
An optional power amplifier is connected and you are not using the built-in amplifier.
The contents of the memory have been erased.
The power supply lead or battery has been disconnected or not connected properly.
Stored stations and correct time are erased.
The fuse has blown.
Makes a noise when the position of the ignition is switched.
The leads are not matched correctly with the car’s accessory power connector.
During playback or reception, the demonstration mode starts.
If no operation is performed for 5 minutes with [DEMO-ON] set, the demonstration mode starts.
Set [DEMO-OFF] (page 22).
The display disappears from/does not appear in the display window.
The dimmer is set to [DIM-ON] (page 24).
The display disappears if you press and hold OFF.
Press OFF on the unit until the display appears.
The connectors are dirty (page 27).
The display/illumination flashes.
The power supply is not sufficient.
Check that the car battery supplies enough power to the unit. (The power requirement is 12 V DC.)
The operation buttons do not function. The disc will not eject.
Press DSPL and (back)/MODE for more than 2 seconds to reset the unit.
The contents stored in memory are erased.
For your safety, do not reset the unit while you are driving.
Radio reception
Stations cannot be received. The sound is hampered by noises.
The connection is not correct.
If your car has built-in radio antenna (aerial) in the rear/side glass, connect an REM OUT lead (blue/white striped) or accessory power supply lead (red) to the power supply lead of a car’s antenna (aerial) booster.
Check the connection of the car antenna (aerial).
If the auto antenna (aerial) will not extend, check the connection of the power antenna (aerial) control lead.
Preset tuning is not possible.
The broadcast signal is too weak.
RDS
PTY displays [- - - - - - - -].
The current station is not an RDS station.
RDS data has not been received.
The station does not specify the program type.
CD playback
The disc does not play.
Defective or dirty disc.
The CD-R/CD-RW is not for audio use (page 26).
MP3/WMA files cannot be played.
The disc is incompatible with the MP3/ WMA format and version. For details on playable discs and formats, visit the support site on the back cover.
MP3/WMA files take longer to play than others.
The following discs take a longer time to start playback.
A disc recorded with a complicated tree structure.
A disc recorded in Multi Session.
A disc to which data can be added.
The sound skips.
Defective or dirty disc.
USB device playback
You cannot play items via a USB hub.
This unit cannot recognize USB devices via a USB hub.
A USB device takes longer to play.
The USB device contains files with a complicated tree structure.
The sound is intermittent.
The sound may be intermittent at a highbit-rate.
DRM (Digital Rights Management) files may not be playable in some cases.
The audio file cannot be played.
USB devices formatted with file systems other than FAT16 or FAT32 are unsupported.*
* This unit supports FAT16 and FAT32, but some USB device may not support all of these FAT. For details, refer to the operating instruction of each USB device or contact the manufacturer.
Operations for skipping an album, skipping items (Jump mode), and searching a track by name (QuickBrowZer) cannot be performed.
These operations cannot be performed when a USB device in Android mode or iPod is connected.
Set [USB MODE] to [MSC/MTP] (page 22).
Remove the iPod.
The USB mode of the device is not set to the appropriate mode.
Make sure that the USB mode of the device is set to MSC/MTP mode.
The sound cannot be output during playback in Android mode.
While the unit is in Android mode, the sound outputs only from the Android smartphone.
Check the status of the audio playback application on the Android smartphone.
Playback may not perform properly depending on the Android smartphone.
NFC function
One touch connection (NFC) is not possible.
If the smartphone does not respond to the touching.
Check that the NFC function of the smartphone is turned on.
Move the N-Mark part of the smartphone closer to the N-Mark part on this unit.
If the smartphone is in a case, remove it.
NFC receiving sensitivity depends on the device.
If One touch connection with the smartphone fails several times, make BLUETOOTH connection manually.
BLUETOOTH function
The connecting device cannot detect this unit.
Before the pairing is made, set this unit to pairing standby mode.
While connected to two BLUETOOTH devices, this unit cannot be detected from another device.
Disconnect either connection and search for this unit from another device.
When the device pairing is made, set the BLUETOOTH signal output to on (page 10).
Connection is not possible.
The connection is controlled from one side (this unit or BLUETOOTH device), but not both.
Connect to this unit from a BLUETOOTH device or vice versa.
The name of the detected device does not appear.
Depending on the status of the other device, it may not be possible to obtain the name.
No ringtone.
Adjust the volume by rotating the control dial while receiving a call.
Depending on the connecting device, the ringtone may not be sent properly.
Set [RINGTONE] to [1] (page 24).
The front speakers are not connected to the unit.
Connect the front speakers to the unit. The ringtone is output only from the front speakers.
The talker’s voice cannot be heard.
The front speakers are not connected to the unit.
Connect the front speakers to the unit. The talker’s voice is output only from the front speakers.
A call partner says that the volume is too low or high.
Adjust the volume accordingly using Mic gain adjustment (page 18).
Echo or noise occurs in phone call conversations.
Lower the volume.
Set EC/NC Mode to [EC/NC-1] or [EC/NC-2] (page 18).
If the ambient noise other than the phone call sound is loud, try reducing this noise. E.g.: If a window is open and road noise, etc., is loud, shut the window. If an air conditioner is loud, lower the air conditioner.
The phone is not connected.
When BLUETOOTH audio is played, the phone is not connected even if you press CALL.
Connect from the phone.
The phone sound quality is poor.
Phone sound quality depends on reception conditions of cellular phone.
Move your car to a place where you can enhance the cellular phone’s signal if the reception is poor.
The volume of the connected audio device is low (high).
Volume level will differ depending on the audio device.
Adjust the volume of the connected audio device or this unit (page 23).
The sound skips during playback of a BLUETOOTH audio device.
Reduce the distance between the unit and the BLUETOOTH audio device.
If the BLUETOOTH audio device is stored in a case which interrupts the signal, remove the audio device from the case during use.
Several BLUETOOTH devices or other devices which emit radio waves are in use nearby.
Turn off the other devices.
Increase the distance from the other devices.
The playback sound stops momentarily when the connection between this unit and the cellular phone is being made. This is not a malfunction.
The connected BLUETOOTH audio device cannot be controlled.
Check that the connected BLUETOOTH audio device supports AVRCP.
Some functions do not work.
Check if the connecting device supports the functions in question.
A call is answered unintentionally.
The connecting phone is set to answer a call automatically
Pairing failed due to a timeout.
Depending on the connecting device, the time limit for pairing may be short.
Try completing the pairing within the time.
BLUETOOTH function cannot operate.
Turn off the unit by pressing OFF for more than 2 seconds, then turn the unit on again.
No sound is output from the car speakers during handsfree call.
If the sound is output from the cellular phone, set the cellular phone to output the sound from the car speakers.
Siri Eyes Free is not activated.
Perform the handsfree registration for an iPhone that supports Siri Eyes Free.
Set the Siri function on the iPhone to on.
Cancel the BLUETOOTH connection with the iPhone and the unit, and reconnect.
SongPal operation
Application name is mismatched with the actual application in “SongPal”.
Launch the application again from the "SongPal” application.
While running the “SongPal” application via BLUETOOTH, the display automatically switches to [BT AUDIO].
The “SongPal” application or BLUETOOTH function has failed.
Run the application again.
The “SongPal” application is automatically disconnected when the display switches to [IPD].
The “SongPal” application on iPhone/iPod does not support iPod playback.
Change the source of the unit to other than [IPD], then establish the “SongPal” connection (page 19).
Pandora® operation
Pandora® connection is not possible.
Shut down the Pandora® application on the mobile device, and then launch it again.
Messages
The following messages may appear or flash during operation.
CD ERROR: The disc cannot be played. The disc will be ejected automatically.
Clean or insert the disc correctly, or make sure the disc is not blank or defective.
CD NO MUSIC: There is no playable file. The disc will be ejected automatically.
Insert a disc containing playable files page 27).
CD PUSH EJT: The disc could not be ejected properly.
Press : (eject).
HUB NO SUPRT: USB hubs are not supported.
INVALID
The selected operation could be invalid.
[USB MODE] cannot be changed during iPod playback.
IPD STOP: iPod playback has finished.
Operate your iPod/iPhone to start playback.
NOT SUPPORT - ANDROID MODE
A USB device not supporting AOA (Android Open Accessory) 2.0 is connected to the unit while [USB MODE] is set to [ANDROID].
Set [USB MODE] to [MSC/MTP] (page 22).
OVERLOAD: The USB device is overloaded.
Disconnect the USB device, then press SRC to select another source.
The USB device has a fault, or an unsupported device is connected.
READ: Now reading information.
Wait until reading is complete and playback starts automatically. This may take some time depending on the file organization.
USB ERROR: The USB device cannot be played.
Connect the USB device again.
USB NO DEV: A USB device is not connected or recognized.
Make sure the USB device or USB cable is securely connected.
USB NO MUSIC: There is no playable file.
Connect a USB device containing playable files (page 28).
USB NO SUPRT: The USB device is not supported.
For details on the compatibility of your USB device, visit the support site on the back cover.
The beginning or the end of the disc has been reached.
(underscore): The character cannot be displayed.
For BLUETOOTH function:
BTA NO DEV: The BLUETOOTH device is not connected or recognized.
Make sure the BLUETOOTH device is securely connected, or the BLUETOOTH connection is established with the BLUETOOTH device.
ERROR: The selected operation could not be performed.
Wait for a while, then try again.
UNKNOWN: A name or phone number cannot be displayed.
WITHHELD: The phone number is hidden by the caller.
For SongPal operation:
APP --------: A connection with the application is not established.
Make the “SongPal” connection again page 19).
APP DISCNCT: The application is disconnected.
Make the “SongPal” connection (page 19).
APP DISPLAY: A screen setting display of the application is open.
Exit the screen setting display of the application to enable button operation.
APP LIST: The contents list of the CD/USB/ iPod is open.
Exit the list of the application to enable button operation.
APP MENU: A setting display of the application is open.
Exit the setting display of the application to enable button operation.
APP NO DEV: The device with the application installed is not connected or recognized.
Make the BLUETOOTH connection and establish the “SongPal” connection again (page 19).
APP SOUND: A sound setting display of the application is open.
Exit the sound setting display of the application to enable button operation.
OPEN APP: The “SongPal” application is not running.
Launch the application.
For Pandora® operation:
BOOKMARK - ERROR: Bookmarking failed.
Wait for a while, then try again.
CANNOT SKIP: Skipping tracks is not allowed.
Wait until the commercial ends, next track begins, or select another station on the list. Pandora® limits the number of skips allowed on their service.
LICENSING - RESTRICTIONS: Pandora® is not available outside your country.
MAINTENANCE - PLEASE - TRY AGAIN - LATER: The Pandora® server is under maintenance.
Wait for a while, then try again.
NO NETWORK: The network connection is unstable or lost.
Make the network connection again on the device, or wait until the network connection is established.
NO STATION - PLEASE - CREATE - STATION - IN - PANDORA APP: No stations on your account.
Create the station on the mobile device.
NOT ALLOWED: The selected operation is not allowed.
“Thumbs” feedback is not allowed.
Wait until the commercial ends.
Some functions, such as Shared Station, do not permit feedback. Wait until the next track begins, or select another station on the list.
Bookmark is not allowed.
Wait until the commercial ends.
Select another track or station, then try it again.
PAN ERROR: The selected operation could not be performed.
Wait for a while, then try again.
PAN OPEN APP - PRESS PAUSE: Pandora® is not running.
Launch the Pandora® application on the mobile device, then press (play/ pause).
PLEASE LOGIN - PANDORA APP: You are not logged into your Pandora® account.
Disconnect the device, log into your Pandora® account, then connect the device again.
RATING ERROR: “Thumbs” feedback failed.
Wait for a while, then try again.
UPDATE - PANDORA APP: An old version of Pandora® is connected.
Update the Pandora® application to the latest version.
For SiriusXM operation (MEXN5200BT only):
CH LOCKED
The channel that you have requested is locked by the radio parental control feature.
See “To set a parental control” (page 13) for more information on the parental control feature and how to access locked channels.
CH UNAVAIL
The channel that you have requested is not a valid SiriusXM channel or the channel that you were listening to is no longer available.
You may also see this message briefly when first connecting a new SiriusXM Connect Vehicle Tuner.
CHAN UNSUB
The channel that you have requested is not included in your SiriusXM subscription package or the channel that you were listening to is no longer included in your SiriusXM subscription package.
If you have questions about your subscription package or would like to subscribe to this channel, please contact SiriusXM.
CHK ANT
The radio has detected a fault with the SiriusXM antenna.
The antenna cable may be either disconnected or damaged.
Verify that the antenna cable is connected to the SiriusXM Connect Vehicle Tuner.
Inspect the antenna cable for damage and kinks.
CHECK TUNER
The radio is having difficulty communicating with the SiriusXM Connect Vehicle Tuner.
The tuner may be disconnected or damaged.
Verify that the SiriusXM Connect Vehicle Tuner cable is securely connected to the radio.
NO SIGNAL
SiriusXM Connect Vehicle Tuner is having difficulty receiving the SiriusXM satellite signal.
Verify that your vehicle is outdoors with a clear view of the sky.
Verify that the SiriusXM magnetic mount antenna is mounted on a metal surface on the outside of the vehicle.
Move the SiriusXM antenna away from any obstructions.
Inspect the antenna cable for damage and kinks.
Consult the SiriusXM Connect Vehicle Tuner installation manual for more information on antenna installation.
SUBSCRIPTION UPDATED - PRESS ENT TO CONTINUE
The radio has detected a change in your SiriusXM subscription status.
Press ENTER to clear the message. If you have questions about your subscription, please contact SiriusXM.
For steering wheel remote control operation:
ERROR: An error occurred during the function registration.
Register again from the function where the error occurred (page 22).
TIMEOUT: The function registration failed due to a timeout.
Try completing the registration while [REGISTER] is blinking (about 6 seconds) (page 22).
If these solutions do not help improve the situation, consult your nearest Sony dealer. If you take the unit to be repaired because of CD playback trouble, bring the disc that was used at the time the problem began.
 until the unit turns off, press the front panel release button
  , then pull the panel towards you to remove.
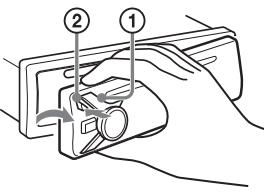
 (back)/MODE for more than 2 seconds.
 (SEEK –/+).
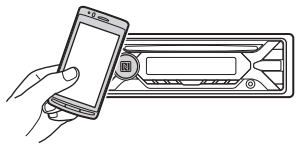
 lights up on the display of the unit.
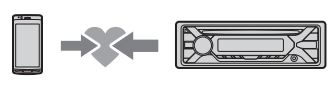
 or
or  lights up when the connection is made.
 (play/ pause).
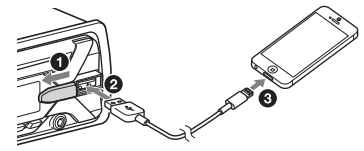
 lights up on the display of the unit.
 (SEEK –/+) to locate the approximate frequency, then press
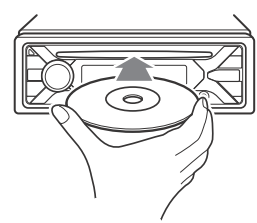
 (play/pause) to start playback.
 (Thumbs Up) or
  (Thumbs Down).
 (SEEK +) to select the sorting order [BY DATE] or [A TO Z].
 (back) twice. The display returns to normal reception/ play mode.
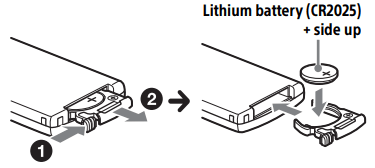
 (back)/MODE for more than 2 seconds to reset the unit.
 : (eject).
 The beginning or the end of the disc has been reached.
 (underscore): The character cannot be displayed.
 (play/ pause).