
2
ENG
ENGLISH
TABLE OF CONTENTS
CONTENTS
3 LICENSES
4 ASSEMBLING AND
PREPARING
4 Unpacking
5 OptionalAccessories
6 Partsandbuttons
7 ConnectingtheSpeakers
7 PortraitLayout
8 Installingonawall
9 REMOTE CONTROL
11 USING THE MONITOR SET
11 ConnectingtoaPC
11 - Usingtheinputlist
12 - RGBconnection
12 - HDM/DVIconnection
13 - HDMIconnection
14 CUSTOMIZING SETTINGS
14 Accessingmainmenus
15 - PICTUREsettings
20 - AUDIOsettings
21 - TIMEsettings
22 - OPTIONsettings
24 - TILEsettings
26 ENTERTAINMENT
26 Usingintegratedmediafeatures
26 - ConnectingUSBstoragedevices
27 - Browsingfiles
29 - ViewingPhotos
30 - ListeningtoMusic
31 - ViewingMovies
34 - DivXregistrationcode
34 - DeactivatingtheDivXfeature
35 MAKING CONNECTIONS
36 ConnectingtoaHDreceiver,DVD,Cam-
corder,Camera,GamingDeviceorVCR
player
36 - HDMIconnection
36 - HDMI/DVIconnection
37 - Componentconnection
37 - AV(CVBS)connection
38 ConnectingtotheLAN
38 - LANconnection
39 DaisyChainMonitors
39 - RGBMode
39 - AV(CVBS)Mode
40 TROUBLESHOOTING
43 SPECIFICATIONS
47 IR CODES
48 CONTROLLING THE MULTIPLE
PRODUCT
48 Connectingthecable
48 RS-232CConfigurations
48 CommunicationParameter
49 Commandreferencelist
51 Transmission/Receivingprotocol

ENGLISH
3
LICENSES
LICENSES
Supportedlicensesmaydifferbymodel.Formoreinformationofthelicenses,visitwww.lg.com.
HDMI,theHDMIlogoandHigh-DefinitionMultimediaInterfacearetrademarks
orregisteredtrademarksofHDMILicensingLLC.
ABOUTDIVXVIDEO:DivX®isadigitalvideoformatcreatedbyDivX,LLC,a
subsidiaryofRoviCorporation.ThisisanofficialDivXCertified®devicethat
playsDivXvideo.Visitdivx.comformoreinformationandsoftwaretoolsto
convertyourfilesintoDivXvideos.
ABOUTDIVXVIDEO-ON-DEMAND:ThisDivXCertified®devicemustbe
registeredinordertoplaypurchasedDivXVideo-on-Demand(VOD)movies.
Toobtainyourregistrationcode,locatetheDivXVODsectioninyourdevice
setupmenu.Gotovod.divx.comformoreinformationonhowtocomplete
yourregistration.
DivXCertified®toplayDivX®video,includingpremiumcontent.
DivX®,DivXCertified®andassociatedlogosaretrademarksofRovi
Corporationoritssubsidiariesandareusedunderlicense.
CoveredbyoneormoreofthefollowingU.S.patents:7,295,673;7,460,668;
7,515,710;7,519,274
ManufacturedunderlicensefromDolbyLaboratories.“Dolby“andthe
double-DsymbolaretrademarksofDolbyLaboratories.
4
ENG
ENGLISH
ASSEMBLING AND PREPARING
ASSEMBLING AND PREPARING
Unpacking
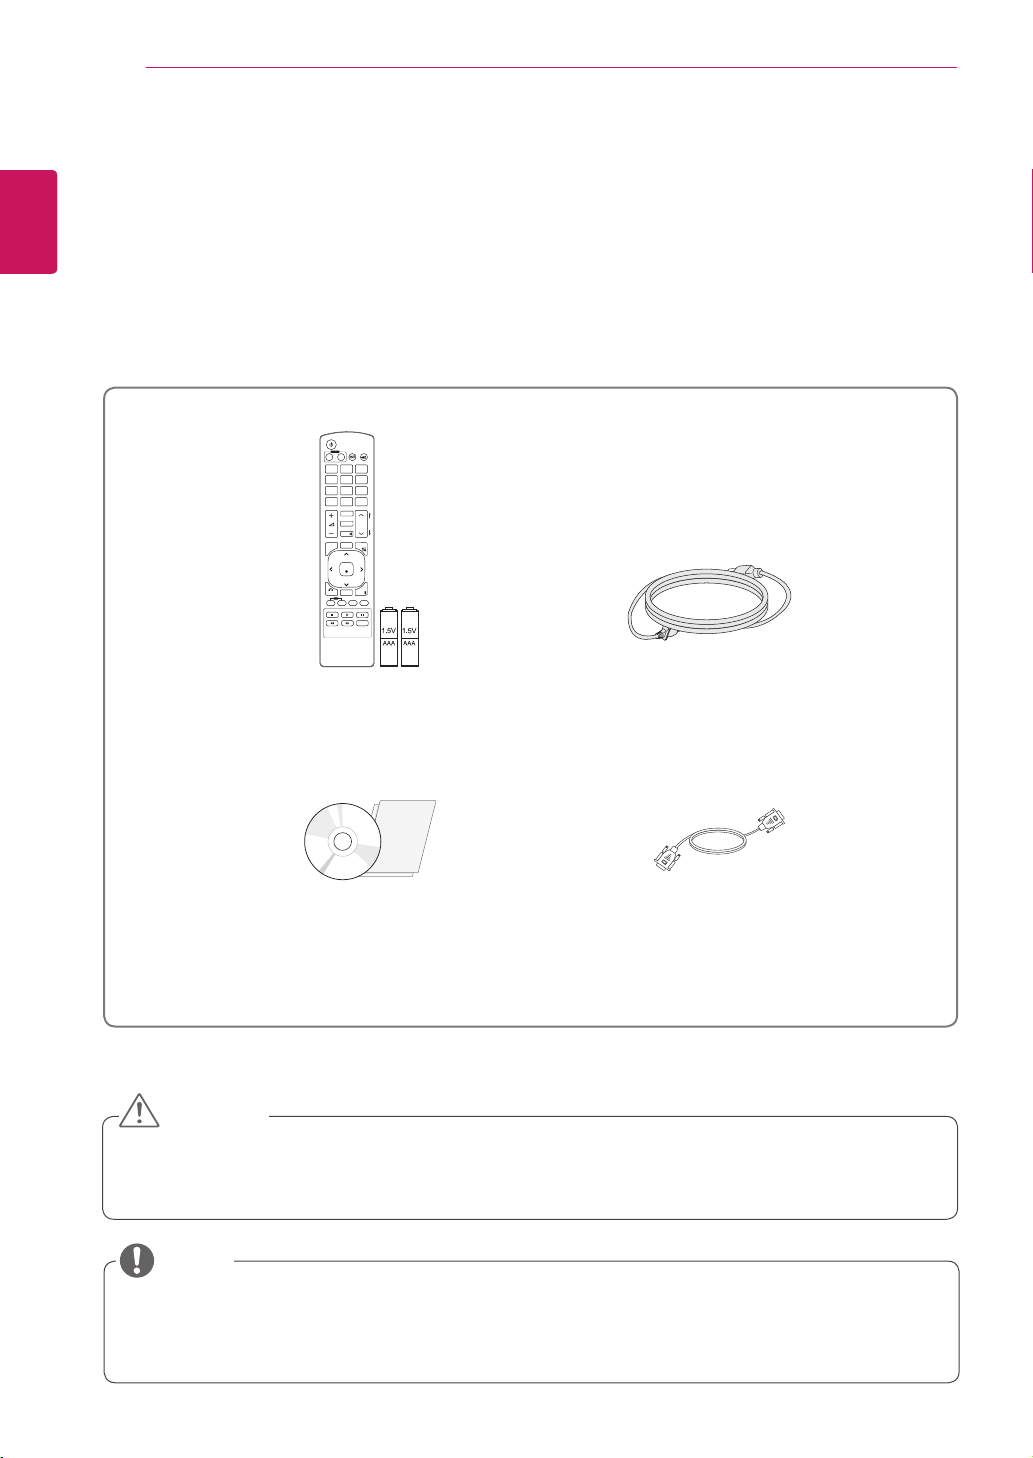
Checkyourproductboxforthefollowingitems.Ifthereareanymissingaccessories,contactthelocal
dealerwhereyoupurchasedyourproduct.Theillustrationsinthismanualmaydifferfromtheactualproduct
andaccessories.
Donotuseanypirateditemstoensurethesafetyandproductlifespan.
Anydamagesorinjuriesbyusingpirateditemsarenotcoveredbythewarranty.
Theaccessoriessuppliedwithyourproductmayvarydependingonthemodel.
Productspecificationsorcontentsinthismanualmaybechangedwithoutpriornoticeduetoupgrade
ofproductfunctions.
Remote control and Batteries
Power Cord
CD (Owner's Manual)/ Card
D-Sub Signal Cable
CAUTION
NOTE
P
A
G
E
INPUT
ENERGY
SAVING
MARK
ARC
ON
OFF
. , !
ABC
DEF
GHI
JKL
MNO
PQRS
TUV
1/a/A
- * #
WXYZ
CLEAR
MONITOR
PSM
AUTO
MUTE
BRIGHT
NESS
MENU
POWER
OK
S.MENU
ID
BACK
TILE
ON
OFF
EXIT
5
ENG
ENGLISH
ASSEMBLING AND PREPARING
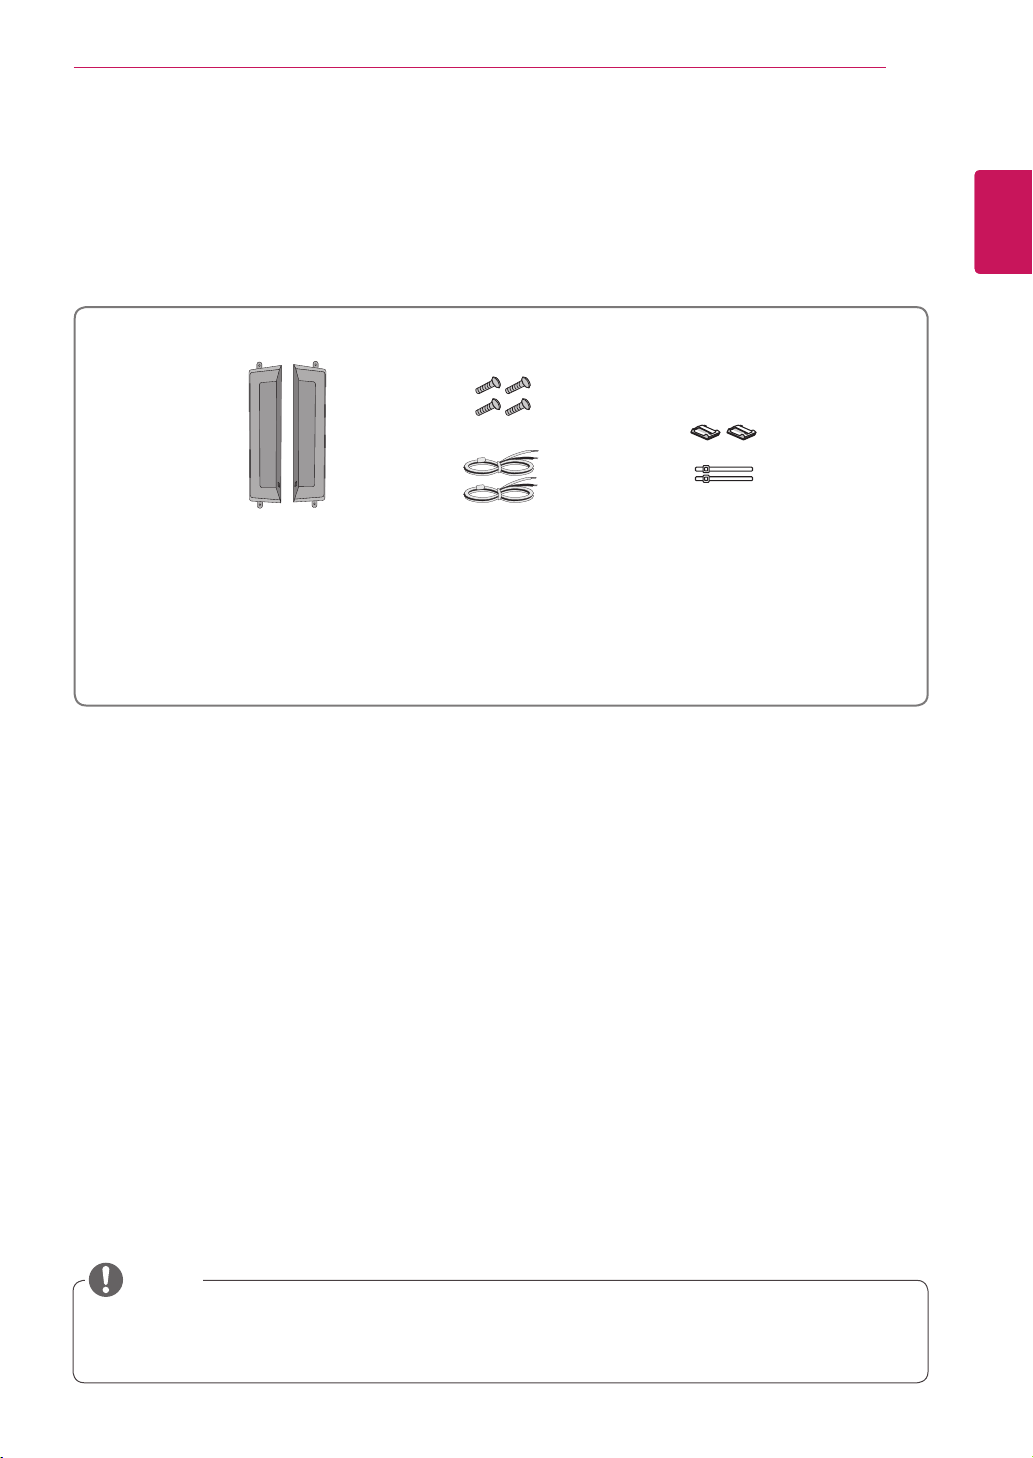
Optional Accessories
Withoutpriornotice,optionalaccessoriesaresubjecttochangetoimprovetheperformanceoftheproduct,
andnewaccessoriesmaybeadded.Theillustrationsinthismanualmaydifferfromtheactualproductand
accessories.
Cableholder/Cabletiemaynotbeavailableinsomeareasorforsomemodels.
Optionalaccessoriesarenotincludedforallmodels.
NOTE
Speaker kit
Cable holder/
Cable Tie
Screws/ Cable
Speaker
6
ENG
ENGLISH
ASSEMBLING AND PREPARING
YoucansetthePowerindicatortoonoroffbyselectingOPTIONinthemainmenu.
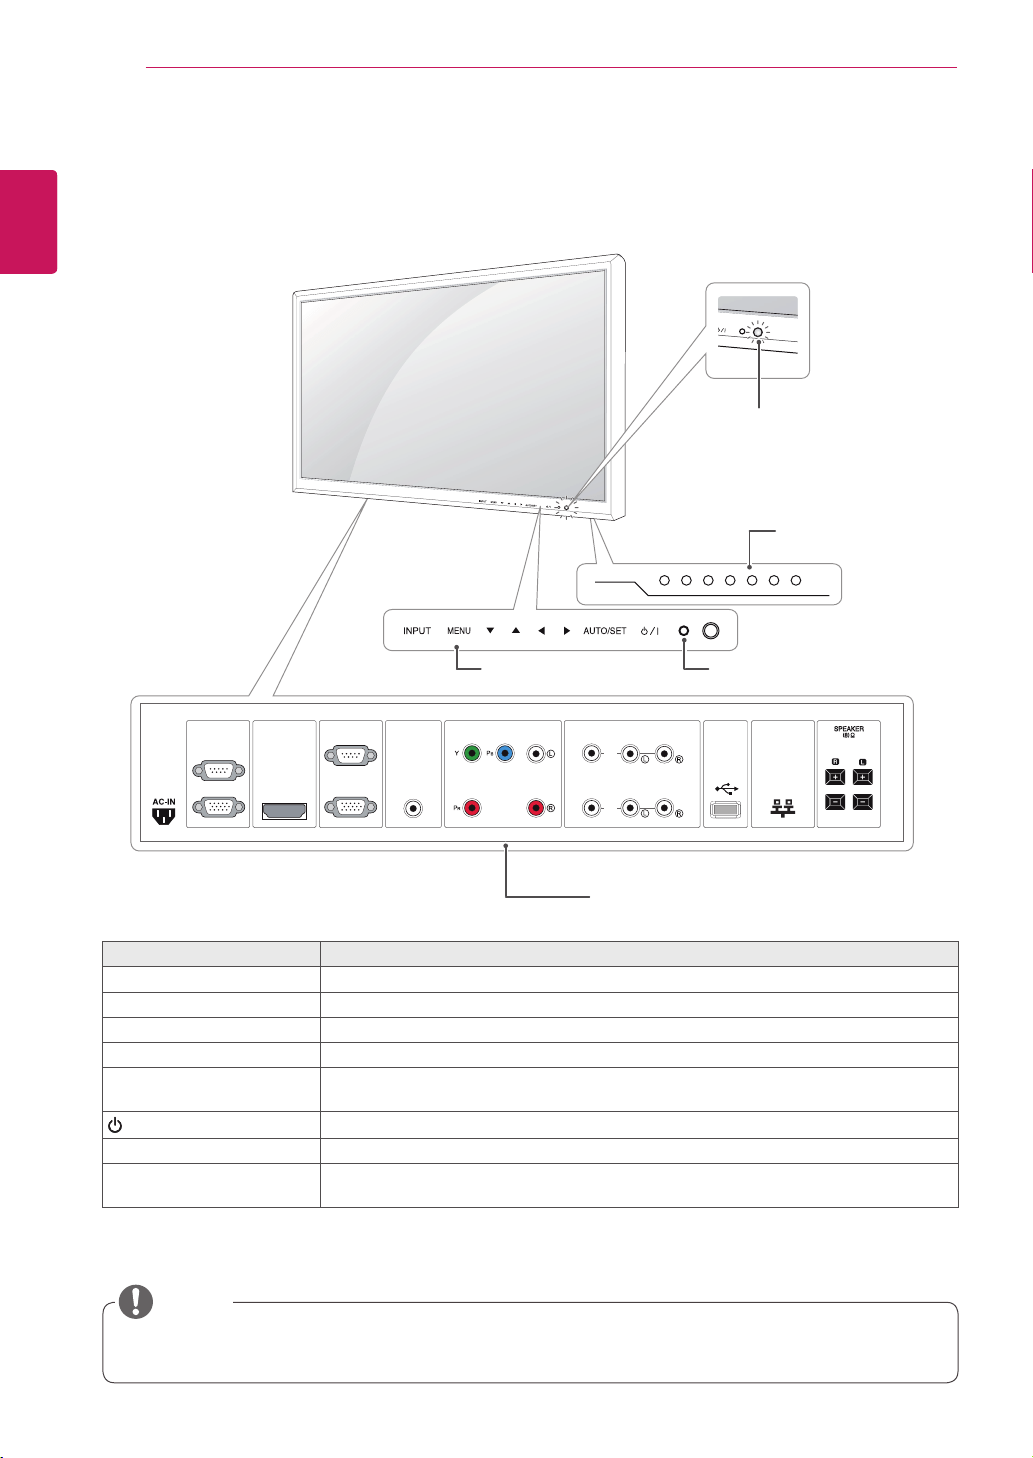
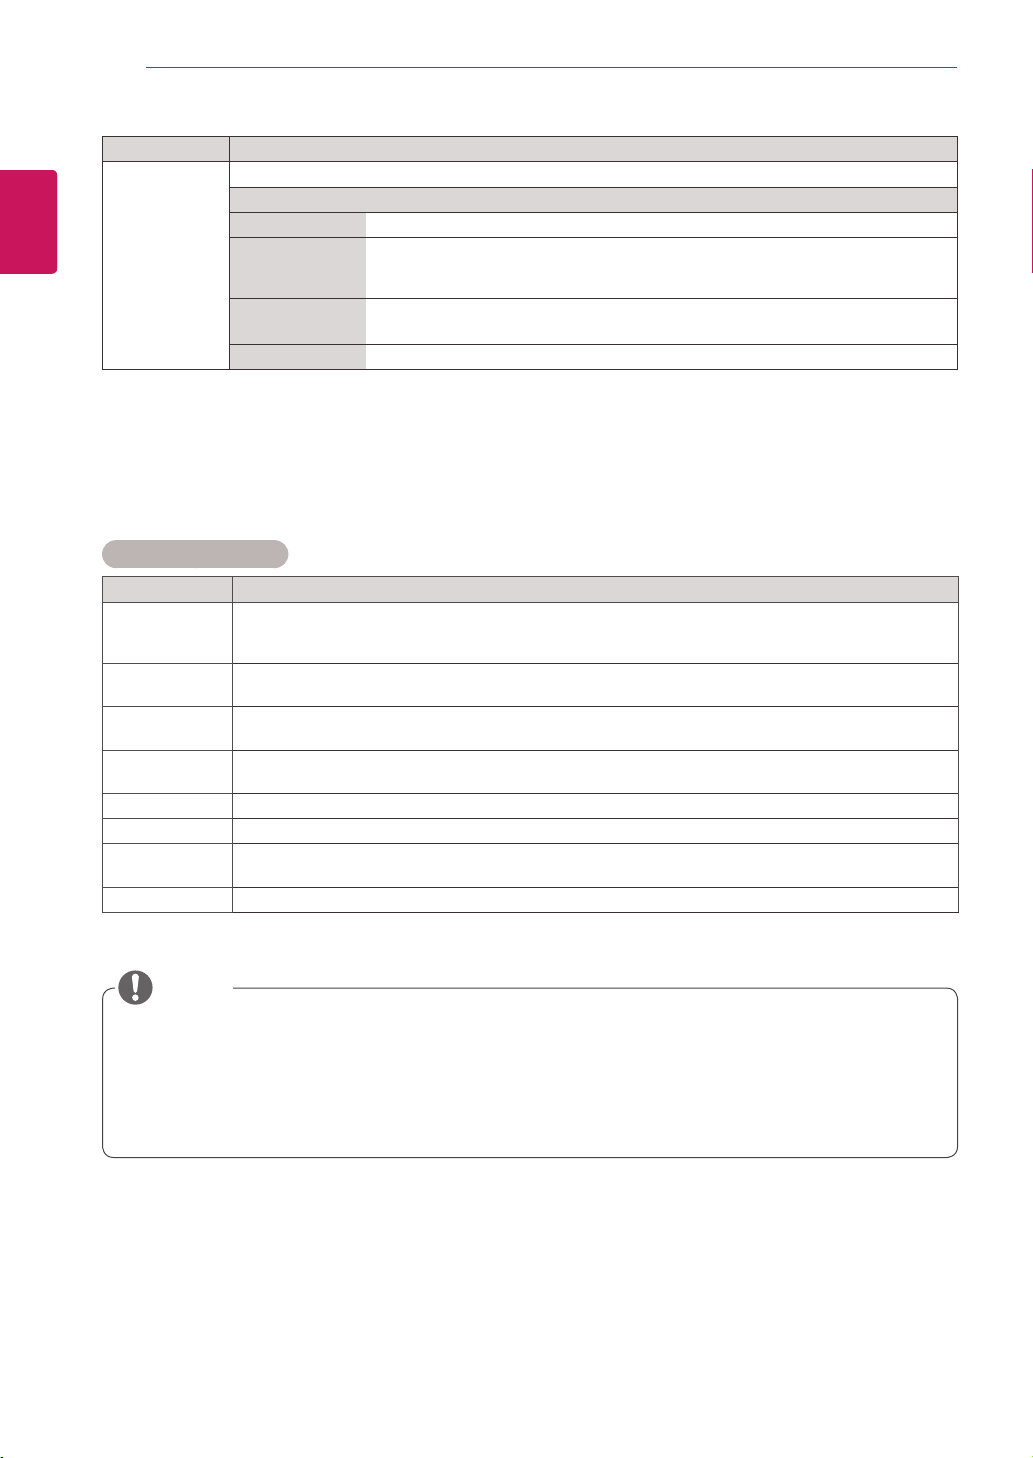
Parts and buttons
Screen Marks Description
INPUT Changestheinputsource.
MENU Accessesthemainmenus,orsavesyourinputandexitsthemenus.
▼▲ Adjusttheupanddown.
◄► Adjuststhevolumelevel.
AUTO/SET AutosetupwhenusingRGBinput.ItisalsotheSetorenterbuttontomakechangesin
theon-screenmenus.
/I
Turnsthepoweronoroff.
IRReceiver Thisiswheretheunitreceivessignalsfromtheremotecontrol.
PowerIndicator ThisIndicatorlightsupgreenwhenthedisplayoperatesnormally(onmode).Ifthe
displayisinsleep(EnergySaving)mode,thisindicatorcolorchangestoamber.
NOTE
RS-232C
(CONTROL)
IN
OUT
HDMI / DVI RGB IN
RGB OUT
AUDIO
(RGB/DVI)
LAN
COMPONENT IN
VIDEO AUDIO
AV IN / OUT
VIDEO
IN
OUT
AUDIO
USB
Connection panel ( See p.36 to p.38 )
Screen Buttons
Screen Marks IR Receiver
Power Indicator
LightingOn:Turnedon
LightingOff:Turnedoff
7
ENG
ENGLISH
ASSEMBLING AND PREPARING
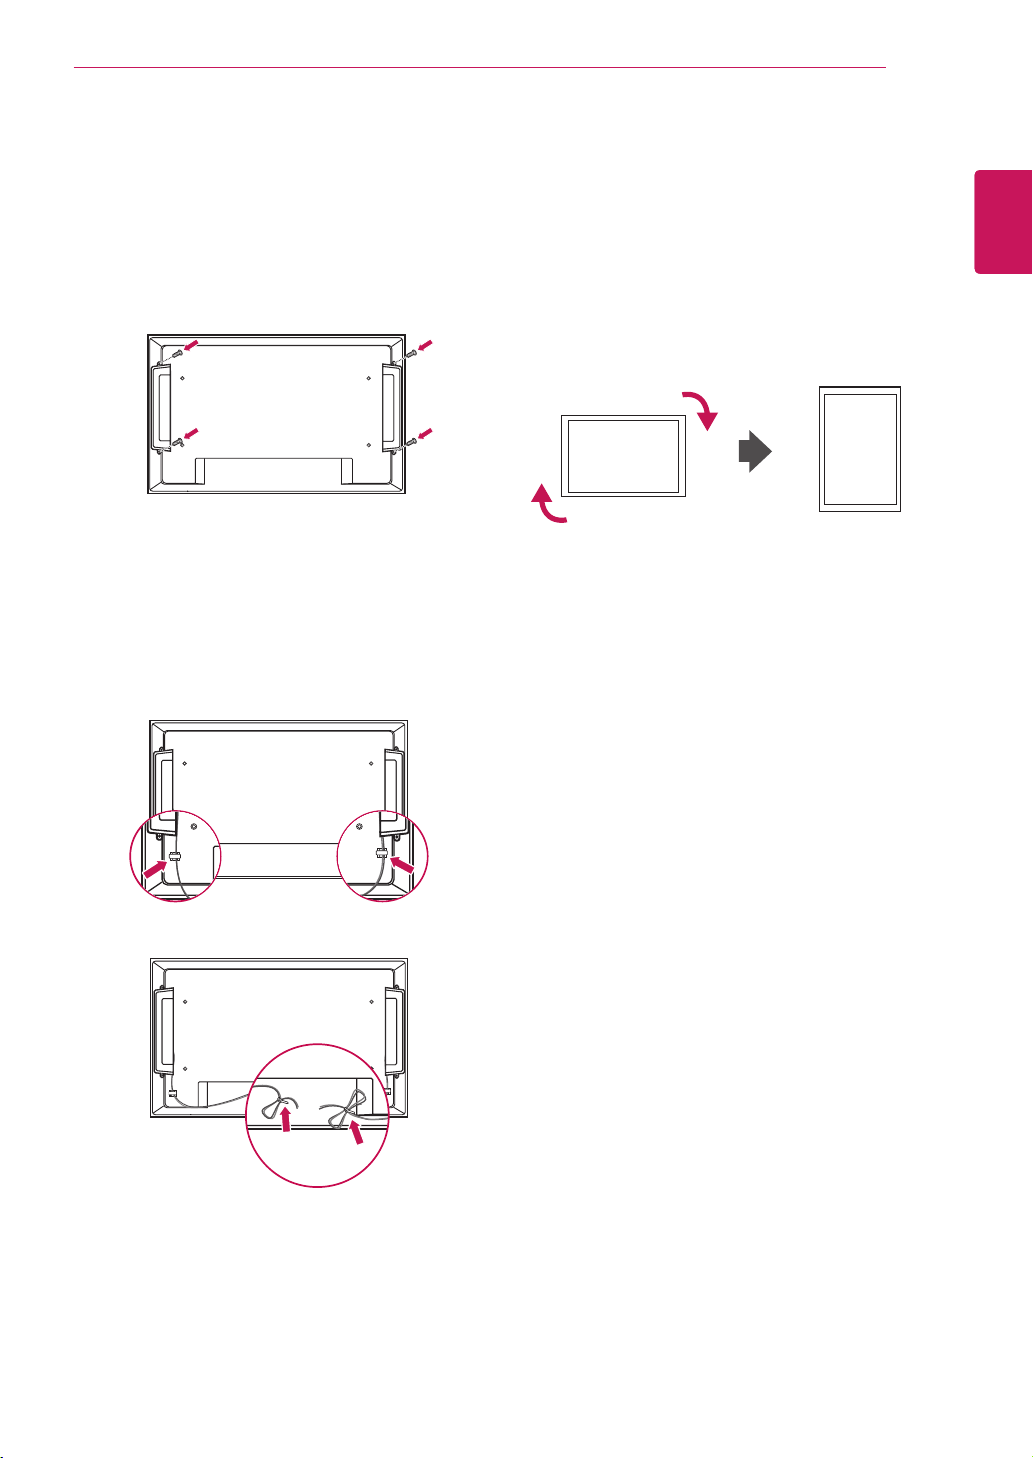
Connecting the Speakers
-Onlyonsomemodels.
1
Mountthespeakerbyusingascrewasshown
inthefollowing.Thenconnectthespeaker
cable.
2
Afterinstallingyourspeakers,useholdersand
cabletiestoorganizethespeakercables.
Portrait Layout
-Onlyonsomemodels.
WheninstallinginaPortraitLayout,rotatethe
monitorclockwise90degrees(whenfacingthe
screen).
8
ENG
ENGLISH
ASSEMBLING AND PREPARING
Disconnectthepowercordfirst,andthen
moveorinstalltheMonitorset.Otherwise
electricshockmayoccur.
IfyouinstalltheMonitorsetonaceilingor
slantedwall,itmayfallandresultinsevere
injury.UseanauthorizedLGwallmount
andcontactthelocaldealerorqualified
personnel.
Donotovertightenthescrewsasthismay
causedamagetotheMonitorsetandvoid
yourwarranty.
Usethescrewsandwallmountsthat
meettheVESAstandard.Anydamages
orinjuriesbymisuseorusinganimproper
accessoryarenotcoveredbythewarranty.
Thewallmountkitincludesaninstallation
manualandnecessaryparts.
Thewallmountbracketisoptional.Youcan
obtainadditionalaccessoriesfromyourlocal
dealer.
Thelengthofscrewsmaydifferdepending
onthewallmount.Besuretousetheproper
length.
Formoreinformation,refertothe
instructionssuppliedwiththewallmount.
CAUTION
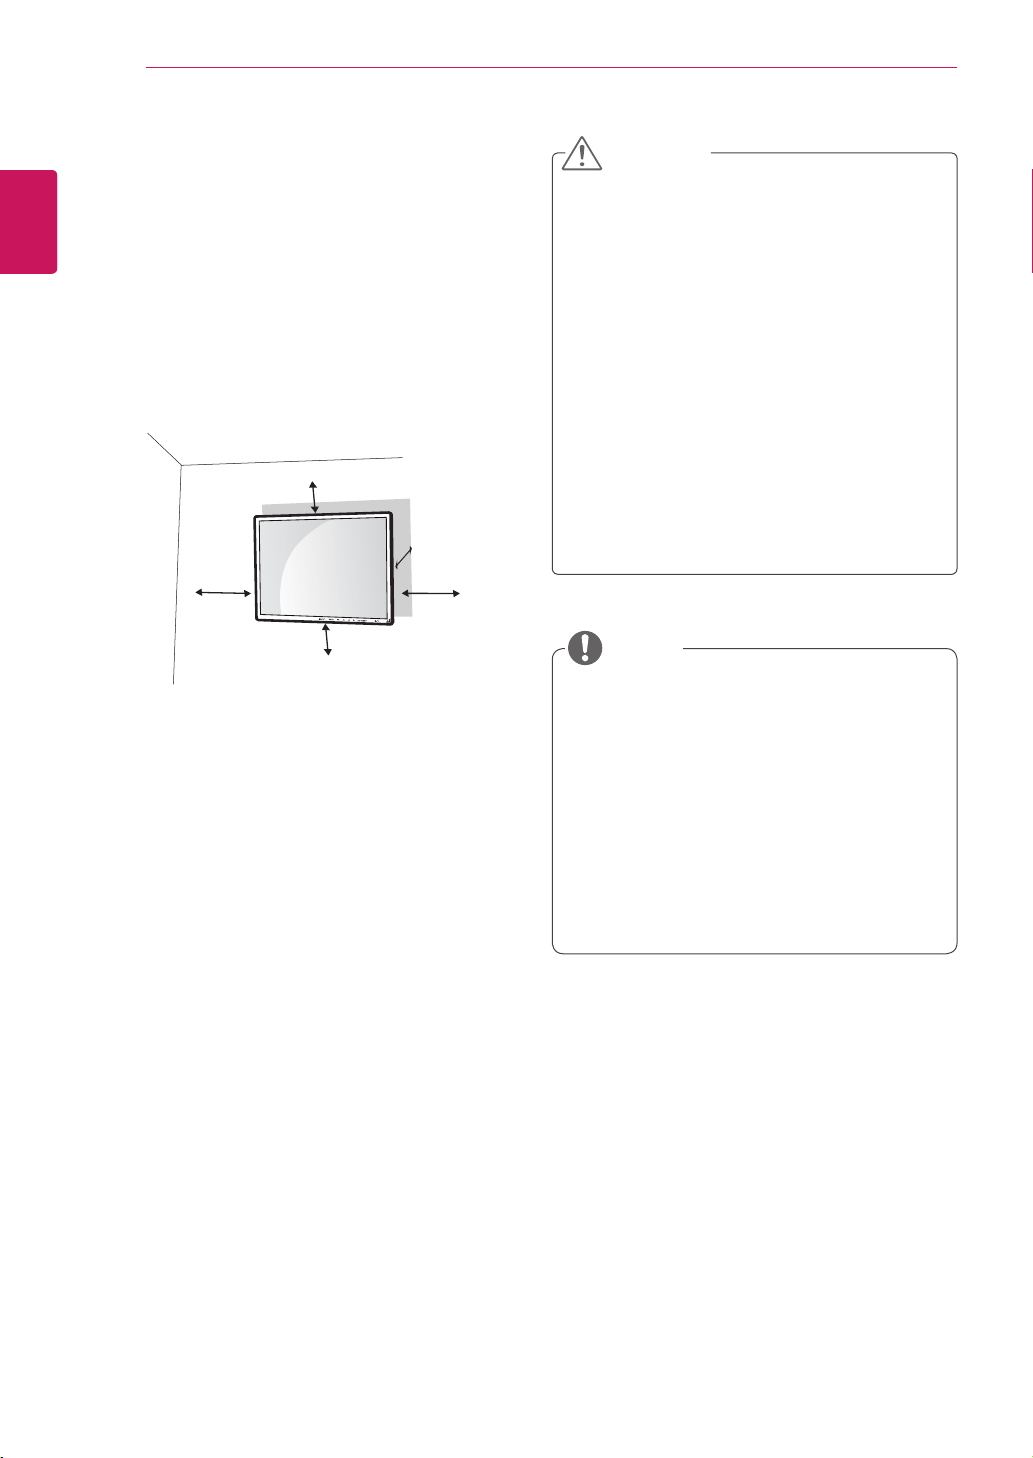
Installing on a wall
Installthemonitoratleast10cmawayfromthe
wallandleaveabout10cmofspaceateachside
ofthemonitortoensuresufficientventilation.De-
tailedinstallationinstructionscanbeobtainedfrom
yourlocalretailstore.Pleaserefertothemanual
toinstallandsetupatiltingwallmountingbracket.
10cm
10cm
10cm
10cm
10cm
NOTE
Ifyouintendtomountthemonitortoawall,attach
Wallmountinginterface(optionalparts)totheback
oftheset.
Whenyouinstallthemonitorusingthewall
mountinginterface(optionalparts),attachit
carefullysoitwillnotdrop.
1
Please,Usethescrewandwallmountinterface
inaccordancewithVESAStandards.
2
Ifyouusescrewlongerthanstandard,the
monitormightbedamagedinternally.
3
Ifyouuseimproperscrew,theproductmight
bedamagedanddropfrommountedposition.
Inthiscase,LGElectronicsisnotresponsible
forit.
4
VESAcompatible.
5
PleaseuseVESAstandardasbelow.
785mm(31inch)orgreater
*Fasteningscrew:Diameter6.0mmxPitch1.0
mmxLength10mm
(32inchisDiameter4.0mmxPitch0.7mmx
Length10mm)
9
ENG
ENGLISH
REMOTE CONTROL
REMOTE CONTROL
P
A
G
E
INPUT
ENERGY
SAVING
MARK
ARC
ON
OFF
. , !
ABC
DEF
GHI
JKL
MNO
PQRS
TUV
1/a/A
- * #
WXYZ
CLEAR
OK
S.MENU
MONITOR
PSM
AUTO
MUTE
BRIGHT
NESS
MENU
ID
BACK
TILE
ON
OFF
EXIT
POWER
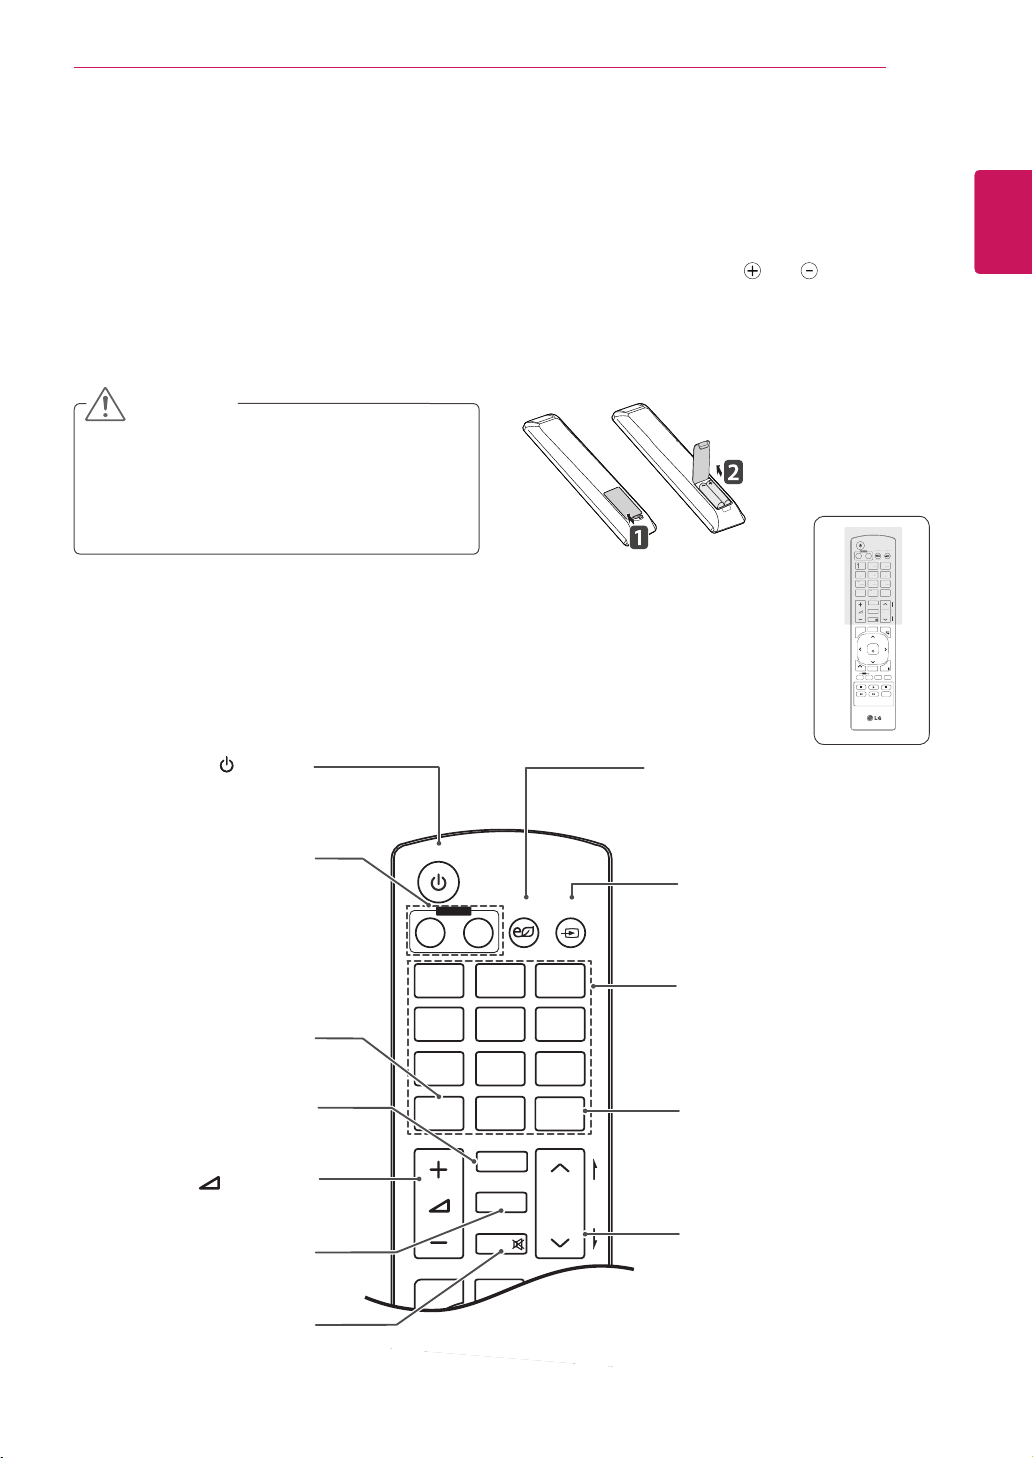
(POWER)
TurnstheMonitorsetonoroff.
MONITOR ON / OFF
Turnoffthemonitorandthen
turnitbackon.
1/a/A Button
Thisbuttonselectionisnot
applicable.
ENERGY SAVING
Adjuststhebrightnessof
thescreentoreduceenergy
consumption.
INPUT
Selectstheinputmode.
Number and Alphabet buttons
Entersnumbers.
Thealphabetselectionisnot
applicable.
CLEAR
Thisbuttonselectionisnot
applicable.
PSM
SelectsthePictureStatus
Mode.
MUTE
Mutesallsounds.
ARC
SelectstheAspectRatio
Mode.
P
A
G
E
INPUT
ENERGY
SAVING
MARK
ARC
ON
OFF
. , !
ABC
DEF
GHI
JKL
MNO
PQRS
TUV
1/a/A
- * #
WXYZ
CLEAR
OK
S.MENU
MONITOR
PSM
AUTO
MUTE
BRIGHT
NESS
MENU
ID
BACK
TILE
ON
OFF
EXIT
POWER
(VOLUME)
Adjuststhevolumelevel.
BRIGHTNESS Key
Adjustthebrightnessby
pressingtheUpandDown
buttonsontheremotecontrol.
InUSBmode,theOSDmenu
hasthePagefunctionto
movetothenextfilelist.
P
A
G
E
INPUT
ENERGY
SAVING
MARK
ARC
ON
OFF
1
. , !
2
ABC
3
DEF
4
GHI
5
JKL
6
MNO
7
PQRS
8
TUV
9
1/a/A
0
- * #
WXYZ
CLEAR
OK
S.MENU
MONITOR
PSM
AUTO
MUTE
BRIGHT
NESS
MENU
ID
BACK
TILE
ON
OFF
EXIT
POWER
P
A
G
E
I
NP
U
T
ENER
GY
S
AVIN
G
MARK
ARC
1
.
,
!
2
AB
C
3
D
E
F
4
G
HI
5
J
K
L
6
M
N
O
7
PQ
R
S
7
7
8
T
UV
9
1/a/A
0
- * #
WXY
Z
C
LEAR
O
N
O
F
F
MONITOR
MONITOR
PS
M
MU
T
E
BRI
G
H
T
NESS
PO
WE
R
Thedescriptionsinthismanualarebasedonthebuttonsoftheremotecontrol.Pleasereadthismanual
carefullyandusetheMonitorsetcorrectly.
Toreplacebatteries,openthebatterycover,replacebatteries(1.5VAAA)matching and endstothe
labelinsidethecompartment,andclosethebatterycover.
Toremovethebatteries,performtheinstallationactionsinreverse.
CAUTION
Donotmixoldandnewbatteries,asthis
maydamagetheremotecontrol.
Makesuretopointtheremotecontroltothe
remotecontrolsensorontheMonitorset.
10
ENG
ENGLISH
USING THE MONITOR SET
P
A
G
E
INPUT
ENERGY
SAVING
MARK
ARC
ON
OFF
. , !
ABC
DEF
GHI
JKL
MNO
PQRS
TUV
1/a/A
- * #
WXYZ
CLEAR
OK
S.MENU
MONITOR
PSM
AUTO
MUTE
BRIGHT
NESS
MENU
ID
BACK
TILE
ON
OFF
EXIT
POWER
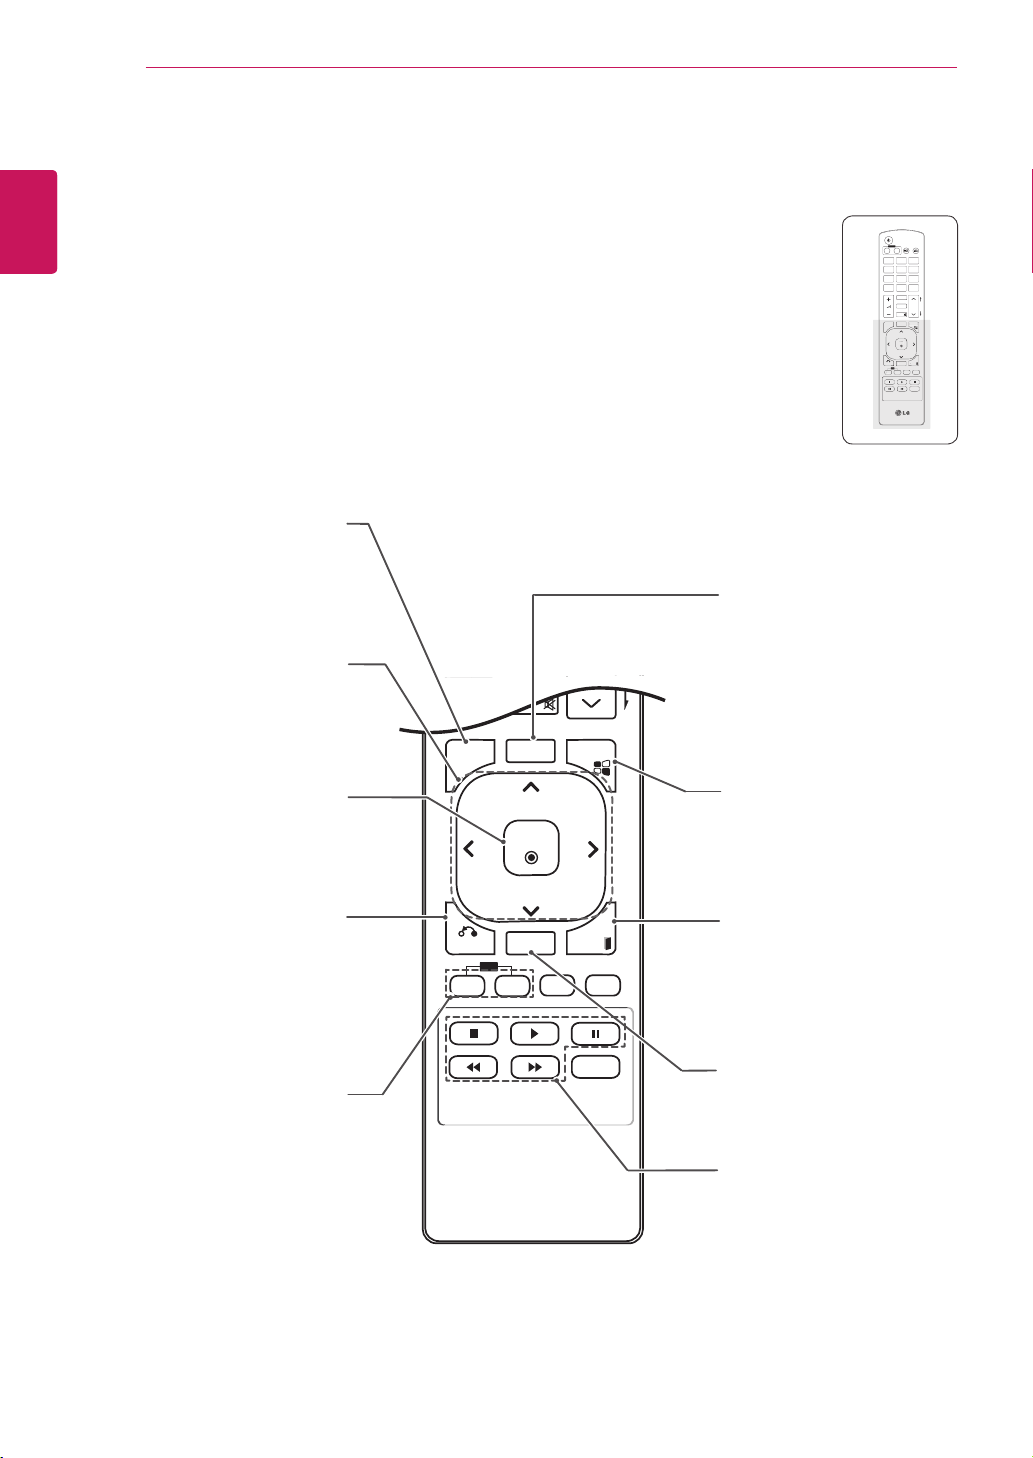
S.MENU
(SuperSignMenuKey)
Thisbuttonselectionisnot
applicable.
EXIT
Clearsallon-screendisplays
andreturnstoMonitorset
viewingfromanymenu.
TILE
SelectstheTILEMode.
MENU (Seep.14)
Accessesthemainmenus
orsavesyourinputandexit
menus.
Navigation buttons
Scrollsthroughmenusor
options.
OK
Selectsmenusoroptionsand
confirmsyourinput.
BACK
Allowstheusertomoveback
onestep.
USB Menu control buttons
Controlsmediaplayback.
ID ON/OFF
WhenthenumberofinputID
isequaltothenumberofID
Mode,youcancontrolthe
monitorwhichyouwantinthe
multidisplaycondition.
AUTO
Automaticallyadjustspicture
positionandminimizesimage
instability.(RGBinputonly)
P
A
G
E
INPUT
ENERGY
SAVING
MARK
ARC
ON
OFF
1
. , !
2
ABC
3
DEF
4
GHI
5
JKL
6
MNO
7
PQRS
8
TUV
9
1/a/A
0
- * #
WXYZ
CLEAR
OK
S.MENU
MONITOR
PSM
AUTO
MUTE
BRIGHT
NESS
MENU
ID
BACK
TILE
ON
OFF
EXIT
POWER
OK
S
.MEN
U
A
U
T
O
MEN
U
ID
BA
C
K
TIL
E
ON
O
F
F
EXI
T
11
ENG
ENGLISH
USING THE MONITOR SET
USING THE MONITOR SET
Connecting to a PC
YourMonitorsetsupportsthePlug&Play*feature.
*Plug&Play:ThefunctionwhenaPCrecognizes
aconnecteddevicethatusersconnecttoaPC
andturnon,withoutdeviceconfigurationoruser
intervention.
ItisrecommendedtousetheMonitorset
withanHDMIconnectionforthebestimage
quality.
IfyouturntheMonitorsetonwhencold,the
screenmayflicker.Thisisnormal.
Somered,green,orbluespotsmayappear
onthescreen.Thisisnormal.
NOTE
Connectthesignal
inputcableandtighten
itbyturningthescrews
clockwise.
Donotpressthescreenwithyourfingerfor
alongtimeasthismayresultintemporary
distortiononthescreen.
Avoiddisplayingafixedimageonthe
screenforalongperiodoftimetoprevent
imageburn.Useascreensaverifpossible.
CAUTION
Using the input list
Selecting an input source
1
PressINPUTtoaccesstheinputsourcelist.
-Theconnecteddevicedisplaysoneachinput
source.
2
PresstheNavigationbuttonstoscrolltooneof
theinputsourcesandpressOK.
Input source Description
AV(CVBS) AVCRorotherexternaldevices
Component Olderdevicesthatdonothave
HDMI.
RGB Computerinput.
HDMI/DVI Preferredconnectiontype.
Supportshighresolutioninputs.
12
ENG
ENGLISH
USING THE MONITOR SET
HDMI/DVI
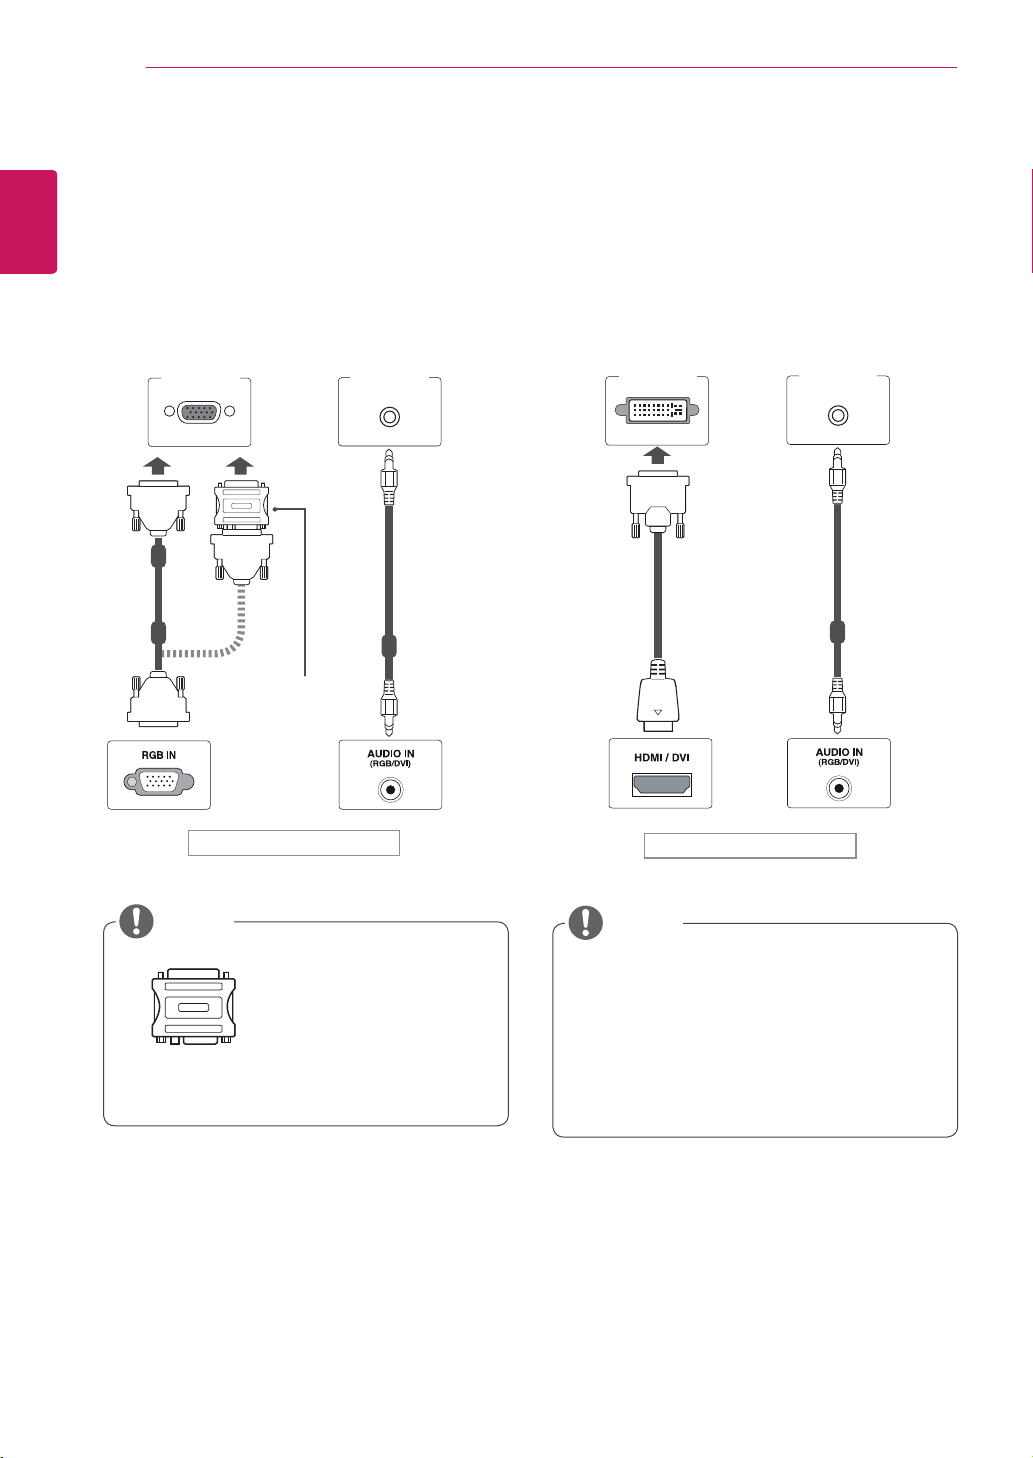
RGB connection
TransmitstheanalogvideosignalfromyourPCto
theMonitorset.ConnectthePCandtheMonitor
setwiththeD-sub15pincableasshownthe
followingillustrations.
SelectRGBinputsource.
Applecomputersmay
requireanadapter
toconnecttothis
monitor.Callorvisit
theirwebsiteformore
information.
MacintoshAdapter
(notincluded)
NOTE
Backoftheproduct.
(notincluded)
HDMI/DVI
PC/MAC
PC
WhenusingcomputerinputwithHDMI,you
mustsetthelabelofthatHDMIinputtoPC.
Useashieldedsignalinterfacecable,such
asD-sub15pinsignalcableandDVIto
HDMIcable,withaferritecoretomaintain
standardcompliancefortheproduct.
NOTE
HDM/DVI connection
TransmitsthedigitalvideosignalfromyourPCto
theMonitorset.ConnectthePCandtheMonitor
setwiththeHDMI/DVIcableasshownthe
followingillustrations.
SelectHDMI/DVIinputsource.
Backoftheproduct.
(notincluded)
PC PC
13
ENG
ENGLISH
USING THE MONITOR SET
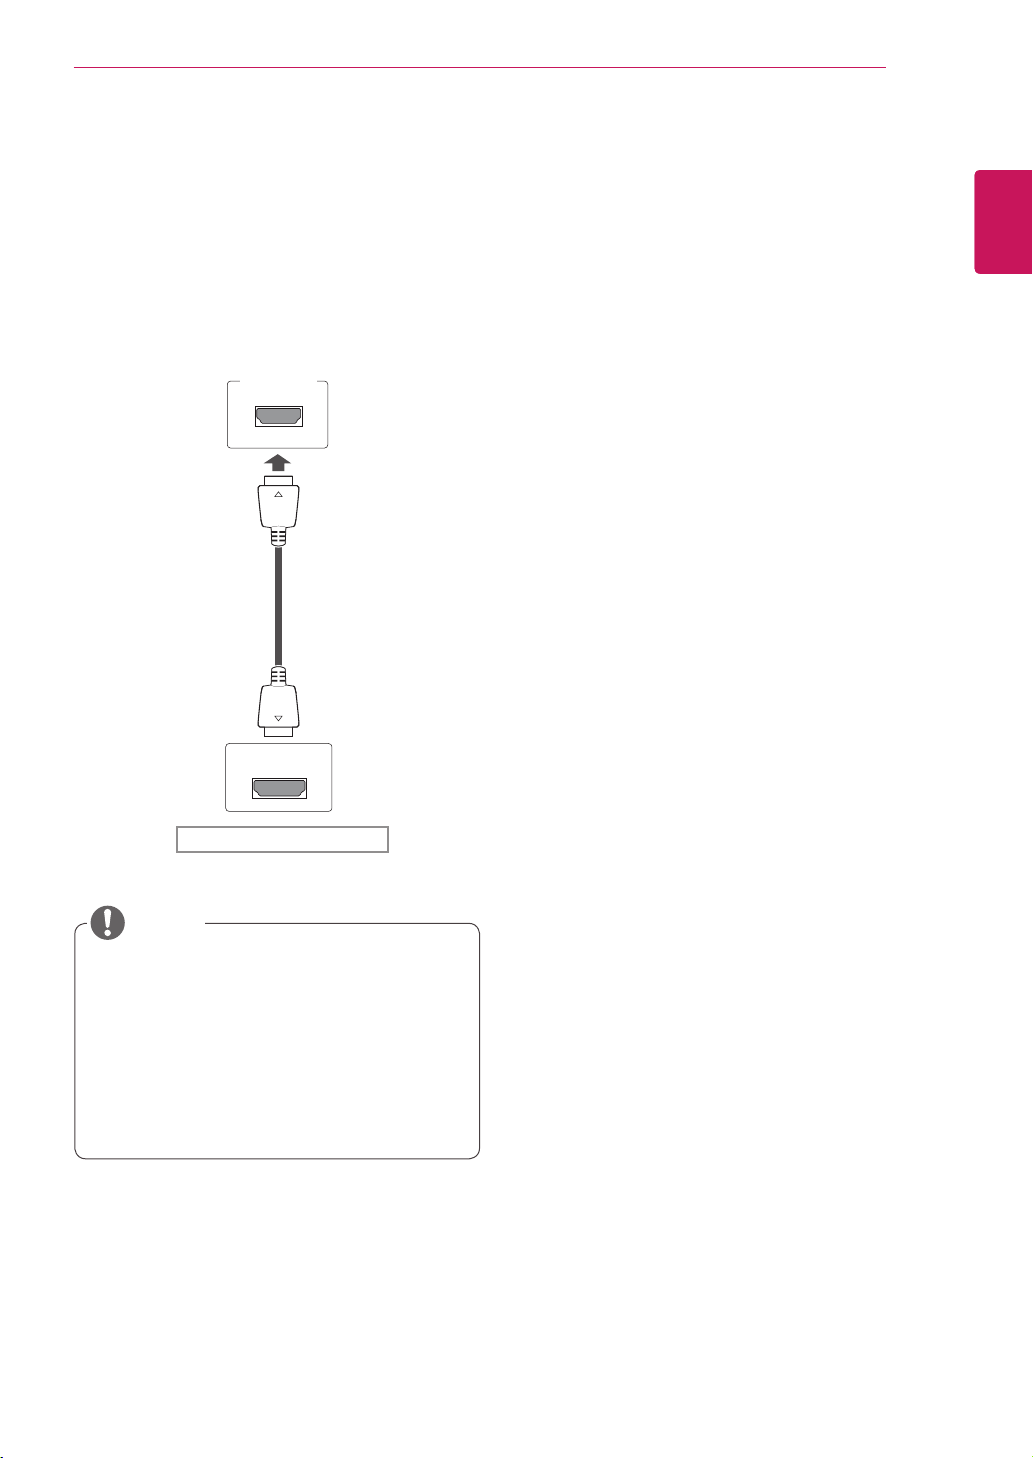
HDMI connection
Transmitsthedigitalvideoandaudiosignalsfrom
yourPCtotheMonitorset.ConnectthePCand
theMonitorsetwiththeHDMIcableasshownin
thefollowingillustrations.
SelectHDMI/DVIinputsource.
Backoftheproduct.
UseaHighSpeedHDMI™Cable.
PleasecheckthePCenvironmentifyou
cannothearthesoundinHDMImode.Some
PCsrequireyoutomanuallychangethe
defaultaudiooutputtoHDMI.
IfyouwanttouseHDMI-PCmode,youmust
settheinputlabeltoPCmode.
NOTE
HDMI/DVI
PC
(notincluded)
14
ENG
ENGLISH
CUSTOMIZING SETTINGS
CUSTOMIZING SETTINGS
Accessing main menus
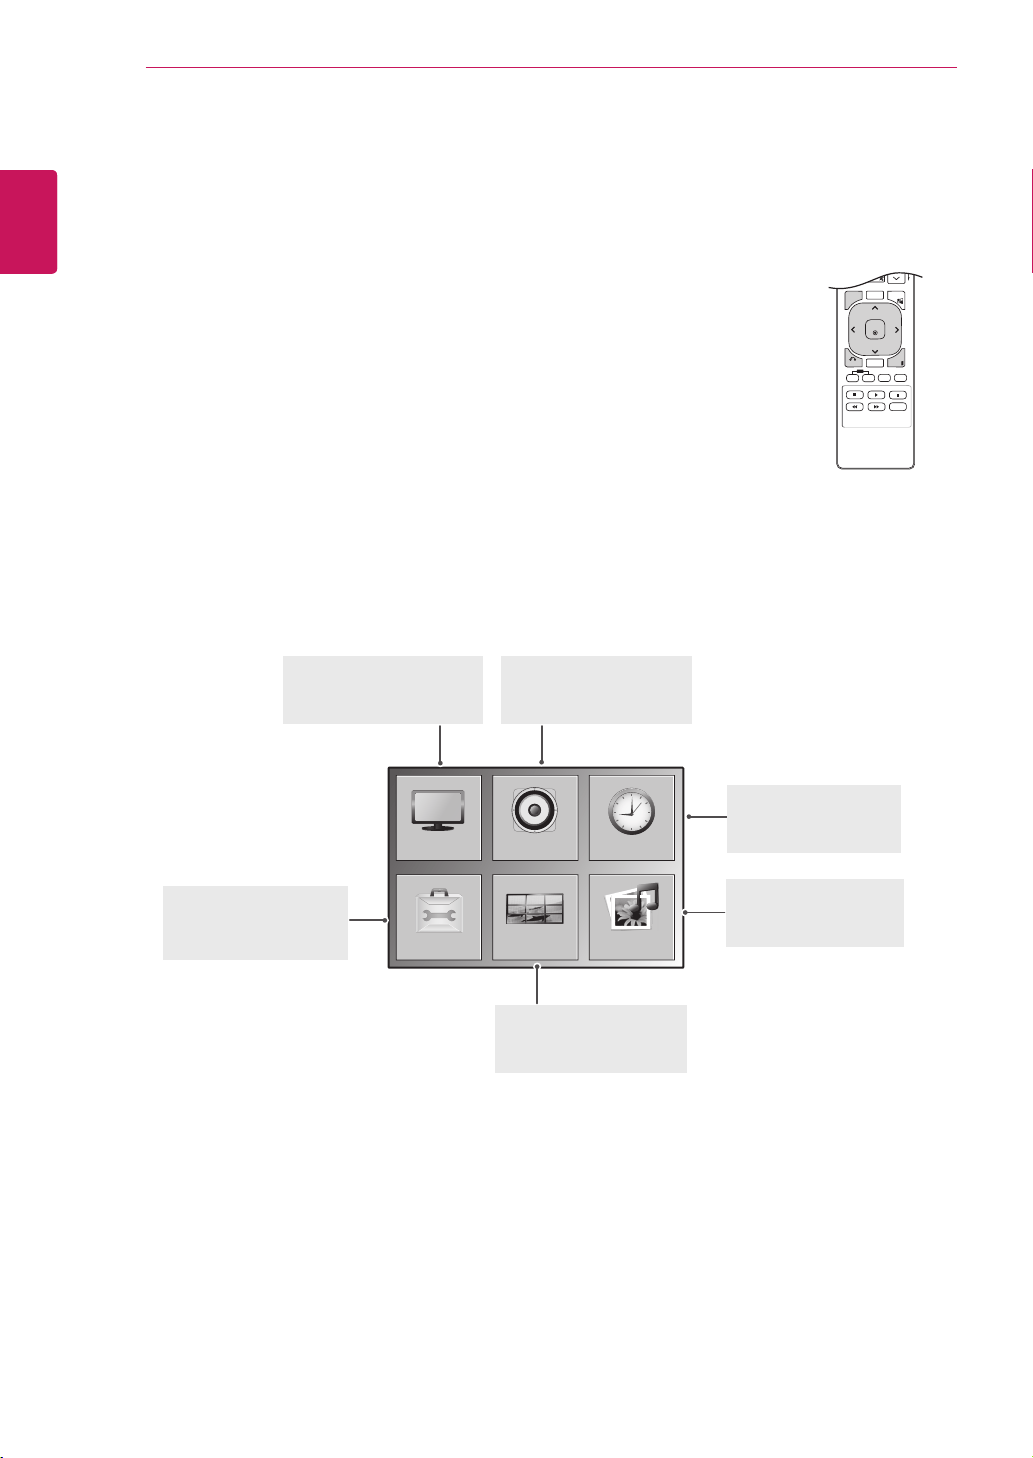
1
PressMENUtoaccessthemainmenus.
2
PresstheNavigationbuttonstoscrolltooneofthefollowingmenusand
pressOK.
3
PresstheNavigationbuttonstoscrolltothesettingoroptionyouwant
andpressOK.
4
Whenyouarefinished,pressEXIT.
Whenyoureturntothepreviousmenu,pressBACK.
P
A
G
E
MARK
ARC
OK
S.MENU
PSM
AUTO
MUTE
BRIGHT
NESS
MENU
ID
BACK
TILE
ON
OFF
EXIT
OPTION
PICTURE
TILE
AUDIO TIME
USB
AUDIO(Seep.20)
Adjuststhesoundquality,
effect,orvolumelevel.
PICTURE (Seep.15)
Adjuststheimagesize,
quality,oreffect.
TIME(Seep.21)
Setsthetime,date,or
Timerfeature.
USB(Seep.26)
Usingintegratedmedia
features.
TILE(Seep.24)
Adjuststhetileoptions.
OPTION (Seep.22)
Customizesthegeneral
settings.

15
ENG
ENGLISH
CUSTOMIZING SETTINGS
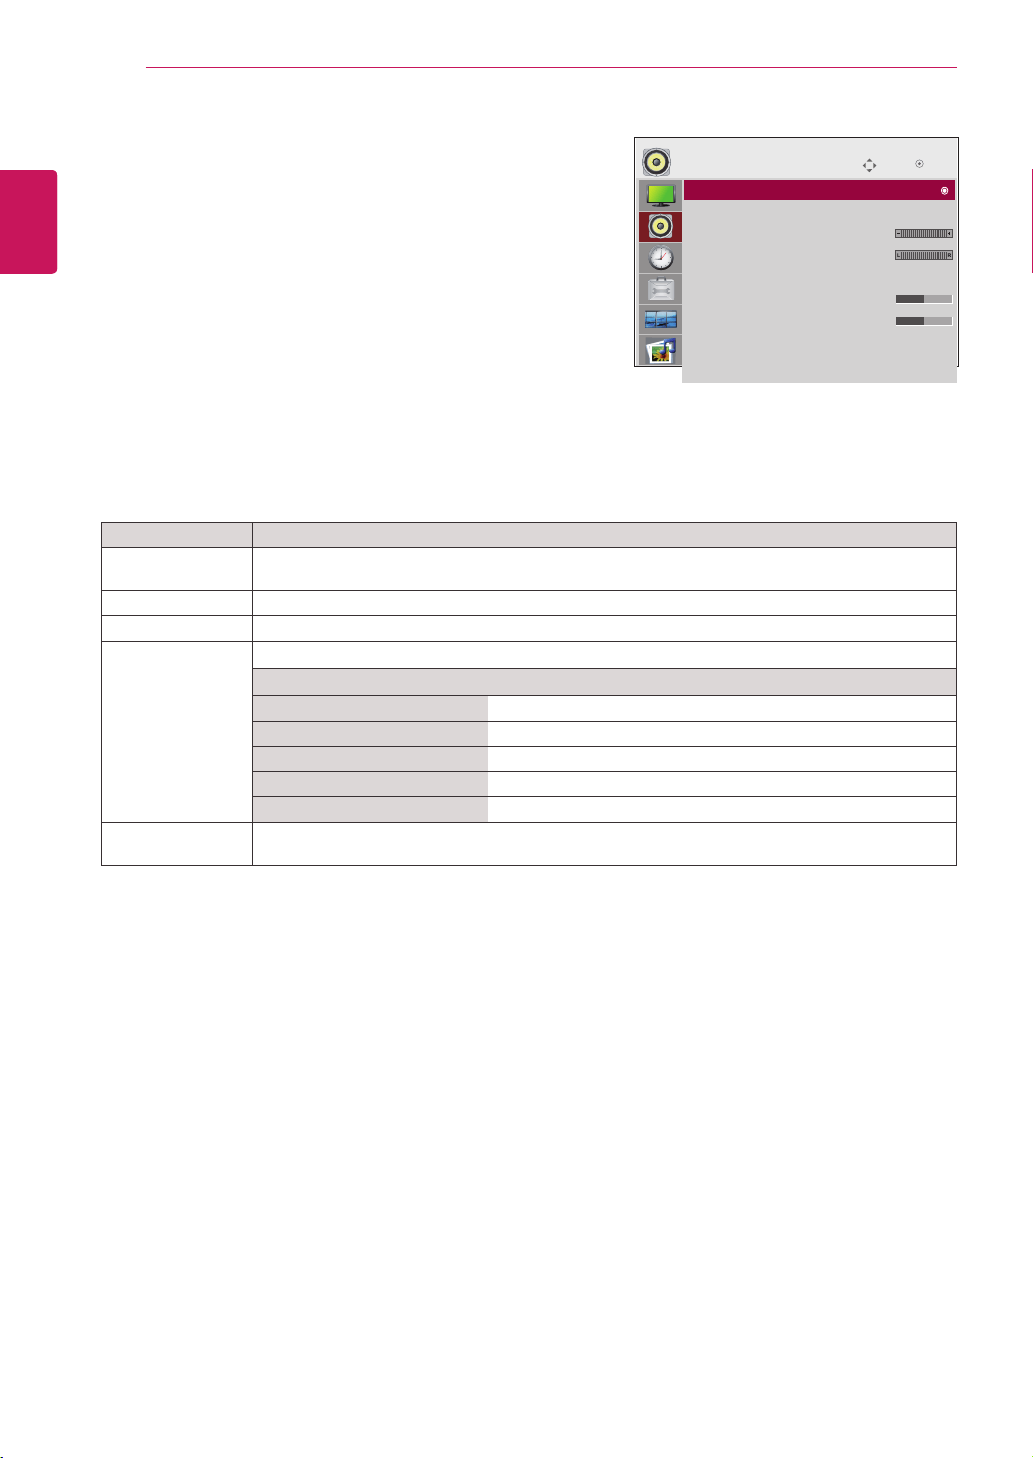
PICTURE settings
1
PressMENUtoaccessthemainmenus.
2
PresstheNavigationbuttonstoscrolltoPICTUREand
pressOK.
3
PresstheNavigationbuttonstoscrolltothesettingor
optionyouwantandpressOK.
-Toreturntothepreviouslevel,pressBACK.
4
Whenyouarefinished,pressEXIT.
Whenyoureturntothepreviousmenu,press
BACK.
Theavailablepicturesettingsaredescribedinthefollowing:
Setting Description
Aspect Ratio Changestheimagesizetoviewimagesatitsoptimalsize(Seep.18top.19).
Energy Saving Setstoautomaticallyadjustthescreenbrightnesscorrespondingtothesurroundings.
Level
Off 100%light
Level 1 80%light
Level 2 60%light
Level 3 40%light
Ifthe'Picture Mode'issetto'Cinema',the'Energy saving'modeisdisabled.
Picture Mode SelectsoneofthepresetimageorcustomizesoptionsineachmodeforthebestMonitorsetscreen
performance.Youarealsoabletocustomizeadvancedoptionsofeachmode.
TheavailablepresetpicturemodesvarydependingontheMonitorset.
Mode
Vivid Adjuststhevideoimagefortheretailenvironmentbyenhancingthecontrast,
brightness,Color,andsharpness.
Standard Adjuststheimageforthenormalenvironment.
Cinema Optimizesthevideoimageforacinematiclooktoenjoymoviesasifyouareina
movietheater.
Sport Optimizesthevideoimageforhighanddynamicactionsbyemphasizingprimary
Colorssuchaswhite,grass,orskyblue.
Game OptimizesthevideoimageforafastgamingscreensuchasPCsorgames.
Expert1/2 Adjuststhedetailedvideoimagesettingsforvideoexpertsaswellasgeneral
viewers.RefertotheBasicimageoptions.(Seep.16).
Move
OK
PICTURE
Aspect Ratio : 16:9
Energy Saving : Off
Picture Mode : Standard
• Backlight 70
• Contrast 90
• Brightness 50
• Sharpness 70
• Color 60
• Tint 0
• Advanced Control
• Picture Reset
Screen
NOTE
Aspect Ratio : 16:9
16
ENG
ENGLISH
CUSTOMIZING SETTINGS
NOTE
Basic image options
Setting Description
Backlight AdjuststhebrightnessofthescreenbycontrollingtheLCDbacklight.Ifyoudecreasethebrightness
level,thescreenbecomesdarkerandthepowerconsumptionwillbereducedwithoutanyvideo
signalloss.
Contrast Increasesordecreasesthegradientofthevideosignal.YoumayuseContrastwhenthebrightpart
ofthepictureissaturated.
Brightness Adjuststhebaselevelofthesignalinthepicture.YoumayuseBrightnesswhenthedarkpartofthe
pictureissaturated.
Sharpness Adjuststhelevelofcrispnessintheedgesbetweenthelightanddarkareasofthepicture.Thelower
thelevel,thesoftertheimage.
Color Adjustsintensityofallcolors.
Tint Adjuststhebalancebetweenredandgreenlevels.
Advanced
Control
Customizestheadvancedoptions.RefertotheAdvancedimageoptions.(Seep.17).
Picture Reset Restorestheoptionstothedefaultsetting.
Ifthe'Picture Mode'settinginthePicturemenuissettoVivid, Standard, Cinema, SportorGame
thesubsequentmenuswillbeautomaticallyset.
YoucannotadjustcolorandtintintheRGB-PC/HDMI-PCmode.
WhentheExpert1,2isselected,youcanselectBacklight, Contrast, Brightness, H Sharpness, V
Sharpness, ColororTint.
Setting Description
SCREEN
(InRGB
ModeOnly)
CustomizesthePCdisplayoptionsinRGBmode.
Option
Resolution Selectsaproperresolution.See“CustomizingPCdisplayoptions”.
Auto Config. Setstoadjustthescreenposition,clock,andphaseautomatically.
Thedisplayedimagemaybeunstableforafewsecondswhiletheconfigurationis
inprogress.
Position/Size/
Phase
Adjuststheoptionswhenthepictureisnotclear,especiallywhencharactersare
shaky,aftertheautoconfiguration.
Reset Restorestheoptionstothedefaultsetting.

17
ENG
ENGLISH
CUSTOMIZING SETTINGS
Setting Description
Colour
Temperature
SettowarmtoenhancehotterColorssuchasred,orsettocooltomakepicturebluish.
Option
Cool Setsthescreencolortoabluishtone.
Medium Setsthescreentothestandardcolor.
Warm Setsthescreencolortoareddishtone.
Dynamic
Contrast
Adjuststhecontrasttokeepitatthebestlevelaccordingtothebrightnessofthescreen.The
pictureisimprovedbymakingbrightpartsbrighteranddarkpartsdarker.(Thisfunctioncanbeused
onlyunderAV(CVBS)andComponent.)
Dynamic Color AdjustsscreenColorssothattheylooklivelier,richerandclearer.Thisfeatureenhances
hue,saturationandluminancesothatred,blue,greenandwhitelookmorevivid.(Thisfunctioncan
beusedonlyunderAV(CVBS)andComponent.)
Noise
Reduction
Reducesscreennoisewithoutcompromisingvideoquality.(Thisfunctioncanbeusedonlyunder
AV(CVBS)andComponent.)
Gamma Setyourowngammavalue.Onthemonitor,highgammavaluesdisplaywhitishimagesandlow
gammavaluesdisplayhighcontrastimages.
Black Level »Low:Thepictureofthescreengetsdarker.
»High:Thepictureofthescreengetsbrighter.
Setblacklevelofthescreentoproperlevel.
(Functionworksinthefollowingmode-AV(CVBS),Component,HDMI-DTV)
Film Mode Youcanwatchacinema-likevideobyeliminatingjuddereffect.
Usethisfunctionwhenyouwatchmovies.
White Balance ThisisthefunctiontoadjusttheoverallColoroftheimagetothefeelingyouwant.
(Functionworksinthefollowingmode-Expert1,Expert2Picturemode)
Color
Management
System
Asthetoolusedbytheexpertstomakeadjustmentsbyusingthetestpatterns,thisdoesnot
affectotherColorsbutcanbeusedtoselectivelyadjustthe6Colorareas(Red/Green/Blue/
Cyan/Magenta/Yellow).Colordifferencemaynotbedistinctiveevenwhenyoumakethe
adjustmentsforthegeneralvideo.
AdjustsRed/Green/Blue/Yellow/Cyan/Magenta.
»Red/Green/Blue/Yellow/Cyan/MagentaColor:Theadjustmentrangeis-30to+30.
»Red/Green/Blue/Yellow/Cyan/MagentaTint:Theadjustmentrangeis-30to+30.
(Functionworksinthefollowingmode-Expert1,Expert2Picturemode)
Advanced image options
18
ENG
ENGLISH
CUSTOMIZING SETTINGS
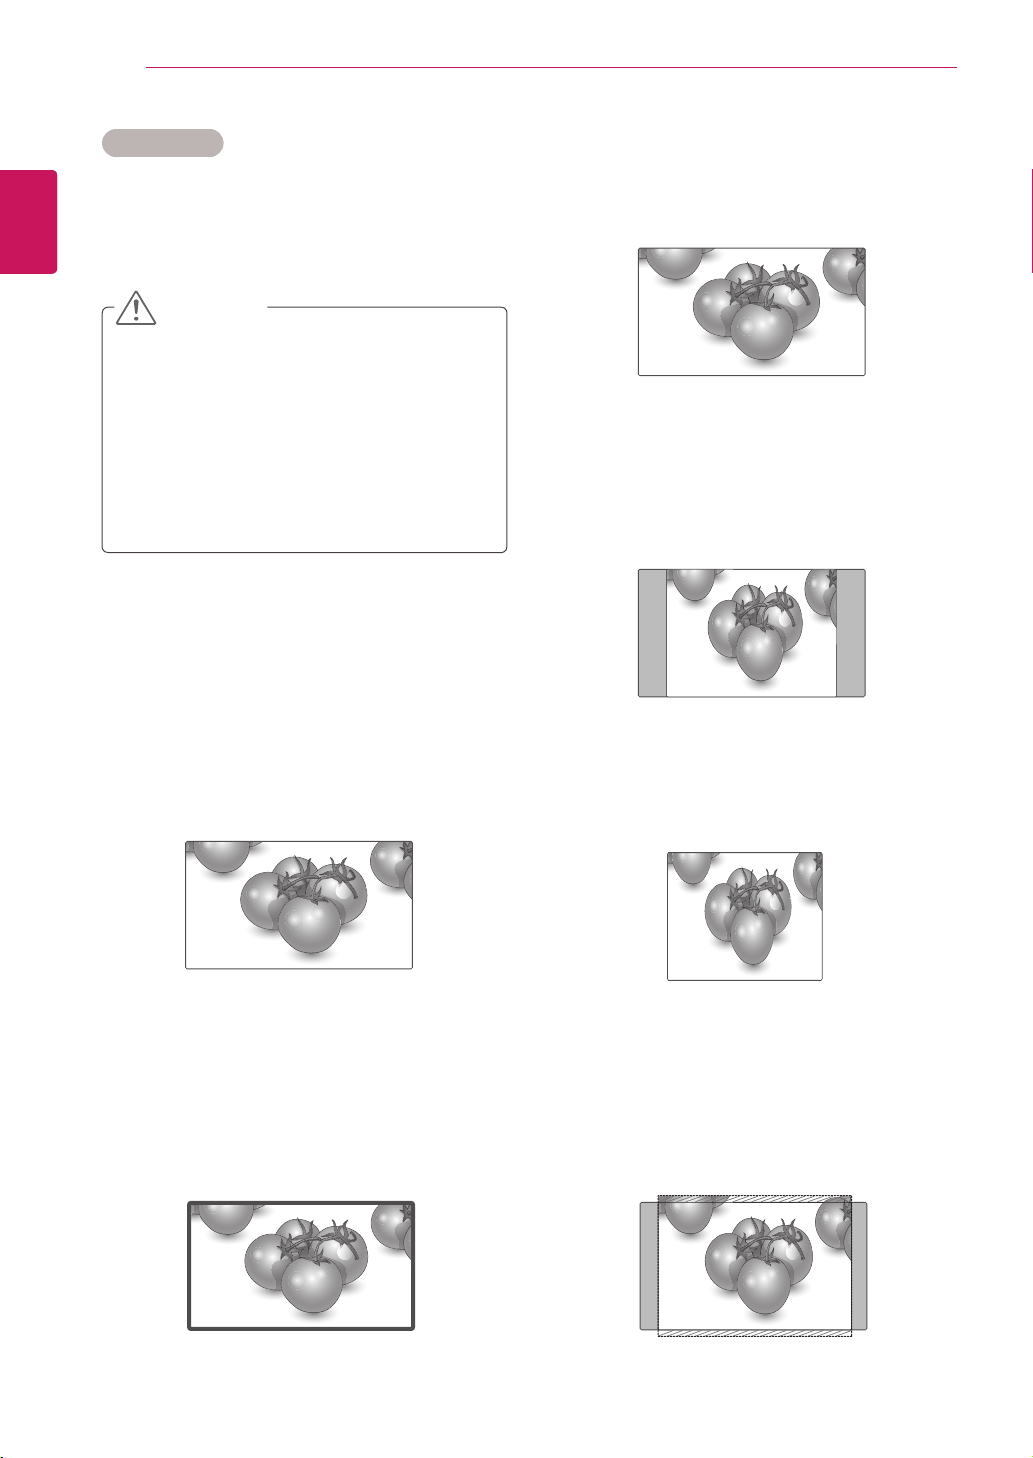
-Original:Theaspectratioisnotadjustedfrom
theoriginal.Itissetbytheprogrambeing
watched.
-4:3 :Thefollowingselectionwillallowyouto
viewapicturewithanoriginal4:3aspectratio,
graybarswillappearonboththeleftandrightof
thescreen.
-1:1 :Theaspectratioisnotadjustedfromthe
original.(OnlyHDMI/DVIPC,RGBPC)
-14:9 :Youcanviewapictureformatof14:9ora
generalMonitorsetprograminthe14:9mode.The
14:9screenisviewedinthesamewayasin4:3,
butismagnifiedtotheleftandright.
Aspect Ratio
Resizetheimagetoviewtheimageatitsoptimal
sizebypressingARC button.
Ifafixedimagedisplaysonthescreenfora
longperiodoftime,itwillbeimprintedand
becomeapermanentdisfigurementonthe
screen.Thisis“imageburn”or“burn-in”and
notcoveredbythewarranty.
Iftheaspectratioissetto4:3foralong
periodoftime,imageburnmayoccuron
theletterboxedareaofthescreen.
-16:9 :Thefollowingselectionwillallowyou
toadjustthepicturehorizontally,inlinear
proportion,tofilltheentirescreen(usefulfor
viewing4:3formattedDVDs).
-Just Scan :FollowingSelectionwillleadtoyou
viewthepictureofbestqualitywithoutlossof
originalpictureinhighresolutionimage.Note:If
thereisnoiseinoriginalPicture,Youcanseethe
noiseattheedge.
CAUTION
Just Scan
Original
19
ENG
ENGLISH
CUSTOMIZING SETTINGS
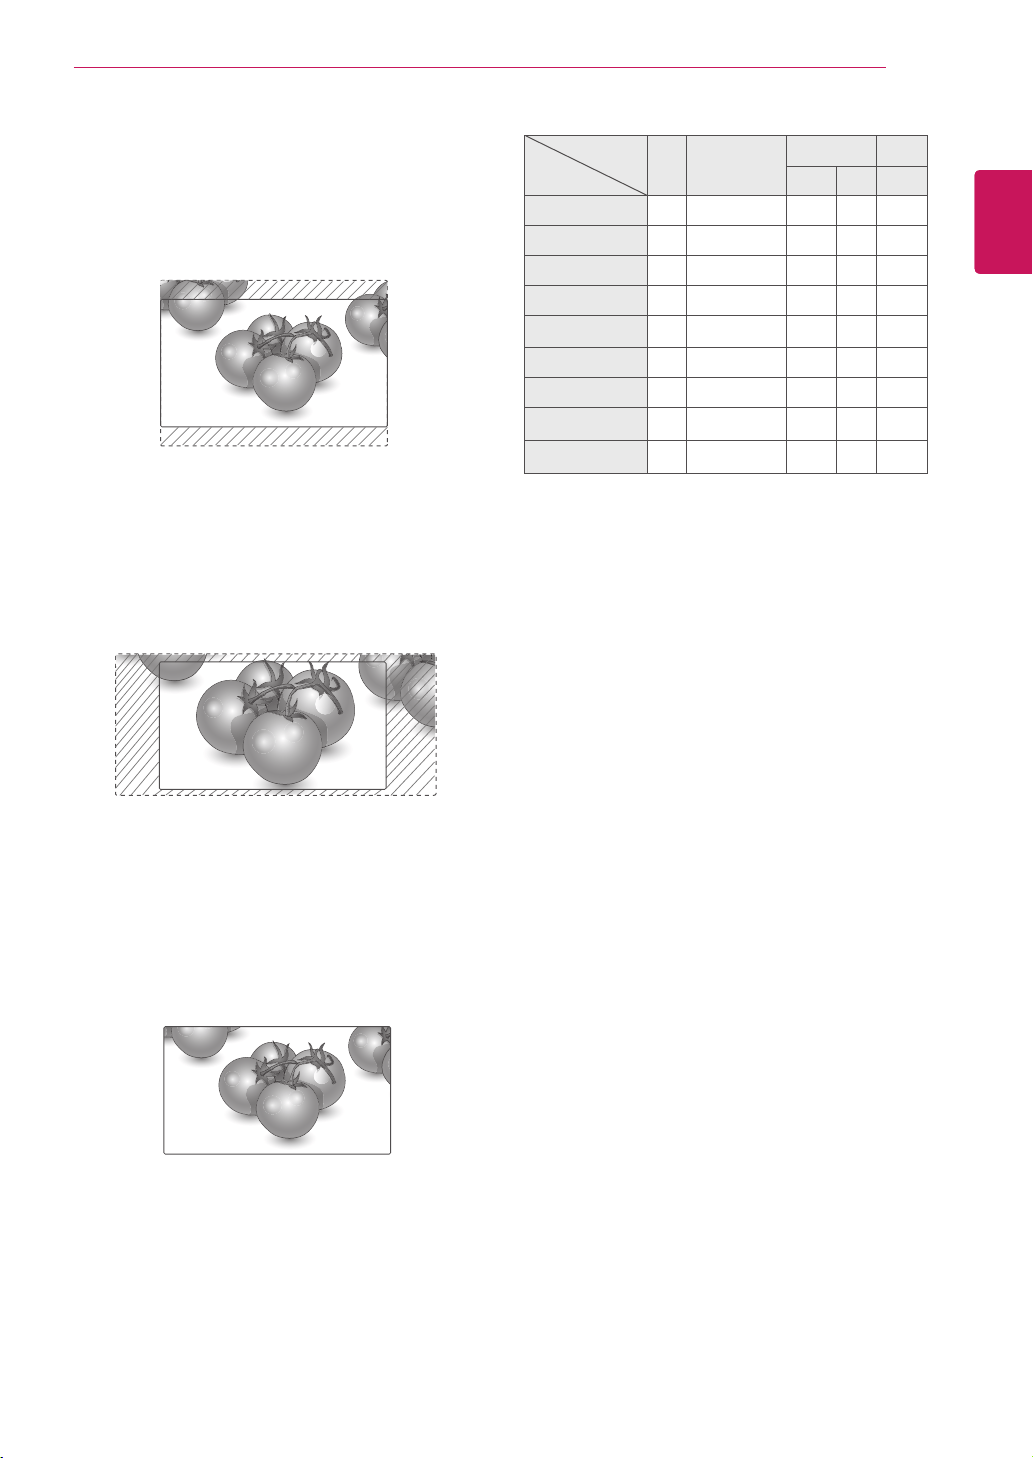
-Zoom :Thefollowingselectionwillallowyou
toviewthepicturewithoutanyalteration,while
fillingtheentirescreen.However,thetopand
bottomofthepicturewillbecropped.
-Cinema Zoom 1 :ChooseCinemaZoom
whenyouwanttoenlargethepictureincorrect
proportion.Note:Whenenlargingorreducing
thepicture,theimagemaybecomedistorted.
-Full Wide :WhenMonitorsetreceivesthewide
screensignal,itwillleadyoutoadjustthepicture
horizontallyorvertically,inalinearproportion,to
filltheentirescreenfully.
Full Wide
MODE
ARC
AV Component HDMI/DVI RGB
DTV PC PC
16:9 o o o o o
Just Scan x o o x x
Original o x x x x
4:3 o o o o o
1:1 x x x o o
14:9 o o o x x
Zoom o o o x x
Cinema Zoom 1 o o o x x
Full Wide o x x x x
20
ENG
ENGLISH
CUSTOMIZING SETTINGS
AUDIO settings
1
PressMENUtoaccessthemainmenus.
2
PresstheNavigationbuttonstoscrolltoAUDIOandpress
OK.
3
PresstheNavigationbuttonstoscrolltothesettingor
optionyouwantandpressOK.
-Toreturntothepreviouslevel,pressBACK.
4
Whenyouarefinished,pressEXIT.
Whenyoureturntothepreviousmenu,pressBACK.
Theavailableaudiooptionsaredescribedinthefollowing:
Setting Description
Auto Volume Toadjustunevensoundvolumesacrossallchannelsorsignalsautomaticallytothemost
appropriatelevel.Tousethisfeature,selectOn.
Clear Voice ll Bydifferentiatingthehumansoundrangefromothers,ithelpsuserslistentohumanvoicesbetter.
Balance Adjustsbalancebetweentheleftandrightspeakersaccordingtoyourroomenvironment.
Sound Mode Selectsoneofthepresetsoundmodesorcustomizeeachoptionineachmode.
Mode
Standard Selectwhenyouwantstandard-qualitysound.
Music Selectwhenyoulistentomusic.
Cinema Selectwhenyouwatchmovies.
Sport Selectwhenyouwatchsportsevents.
Game Selectwhenyouwatchgameevents.
Speaker ON:Enablessoundtothemonitorspeaker.(*Themonitorspeakerissoldseparately.)
OFF:Disablessoundtothemonitorspeaker.Usethisoptionwhenusinganexternalsounddevice.
Move
AUDIO
Auto Volume : Off
Clear Voice II : Off
• Level 3
Balance 0
Sound Mode : Standard
• Treble 50
• Bass 50
• Reset
Speaker : On
OK
Auto Volume : Off

21
ENG
ENGLISH
CUSTOMIZING SETTINGS
TIME settings
1
PressMENUtoaccessthemainmenus.
2
PresstheNavigationbuttonstoscrolltoTIMEandpress
OK.
3
PresstheNavigationbuttonstoscrolltothesettingoroption
youwantandpressOK.
-Toreturntothepreviouslevel,pressBACK.
4
Whenyouarefinished,pressEXIT.
Whenyoureturntothepreviousmenu,pressBACK.
Theavailabletimesettingsaredescribedinthefollowing:
Setting Description
Clock Setsthetimefeature.
On/Off Time SetsthetimetoturnonorofftheMonitorset.
Sleep Timer SetsthelengthoftimeuntiltheMonitorsettoturnsoff.WhenyouturntheMonitorsetoffand
turnitonagain,theSleepTimerwillbesettooff.
Auto off IfAutooffisactiveandthereisnoinputsignal,thesetswitchestooffmodeautomaticallyafter
15minutes.
Power on delay Whenconnectingmultiplemonitorsandturningthepoweron,themonitorsareturnedon
individuallytopreventoverload.
Automatic Standby Ifyoudonotusethemonitorformorethan4hours,itwillbeinstandbymodeautomatically.
Move
TIME
OK
Clock
Off Time : Off
On Time : Off
Sleep Timer : Off
Auto Off : On
Power On Delay : Off
Automatic Standby : On(4hours)
Clock : −− : −− −−−−
NOTE
Oncetheonorofftimeisset,thesefunctionsoperatedailyatthepresettime.
Thescheduledpower-offfunctionworksproperlyonlywhenthedevicetimeissetcorrectly.
Whenthescheduledpower-onandpower-offtimesarethesame,thepower-offtimehaspriorityoverthe
power-ontimeifthesetisturnedon,andviceversaifthesetisturnedoff.
The'Automatic Standby'functionmaynotbeavailabledependingonthecountry.
22
ENG
ENGLISH
CUSTOMIZING SETTINGS
Setting Description
Language Tochoosethelanguageinwhichthecontrolnamesaredisplayed.
Input Label Selectsalabelforaninputsourcetoidentifyadeviceconnectedtoeachinputsource.
IfyouwanttouseHDMI-PCmode,youmustsettheinputlabeltoPCmode.
Key Lock UsethebuttonstoselectOnorOff.Themonitorcanbesetupsothatitcanonlybeusedwiththe
remotecontrol.Thisfeaturecanpreventunauthorizedviewing.
InordertolocktheOSDscreenadjustment,settheKeyLocktabtothe'On'position.
Inordertounlockit,dothefollowing:
PushtheMENUbuttonontheremotecontrolandsetKeyLocktothe'Off'position.
Set ID YoucanassignauniqueSetIDNO(nameassignment)toeachproductwhenseveralproducts
areconnectedfordisplay.Specifythenumber(1to99)usingthebuttonandexit.Usethe
assignedSetIDtoindividuallycontroleachproductusingtheProductControlProgram.
*IfSetIDissettoOff,youcannotcontrolRS-232Cfunctions.
TouseRS-232C,SetIDmustbesettoavalueotherthanOff.
ISM Method AfrozenorstillpicturefromaPC/Videogamedisplayedonthescreenforprolongedperiods
couldresultinaghostimageremainingevenwhenyouchangetheimage.Avoidallowingafixed
imagetoremainonthescreenforalongperiodoftime.
Setting
Normal Leaveonnormalifyoudon'tforeseeimageburninbeingaproblem.
Orbiter Mayhelppreventghostimages.However,itisbestnottoallowanyfixed
imagetoremainonthescreen.Toavoidapermanentimageonthescreen,
thescreenwillmoveevery2minutes.
Inversion Thisfunctioninvertsthepanelcolorofthescreen.Thepanelcoloris
automaticallyinvertedevery30minutes.
White wash Whitewashfillsthescreenwithsolidwhite.Thishelpsremovespermanent
imagesburnedintothescreen.Apermanentimagemaybeimpossibletoclear
entirelywithwhitewash.
DPM Select AusercanchoosetoturnthepowersavingmodeOn/Off.
Power Indicator UsethisfunctiontosetthepowerindicatoronthefrontsideoftheproducttoOnorOff.
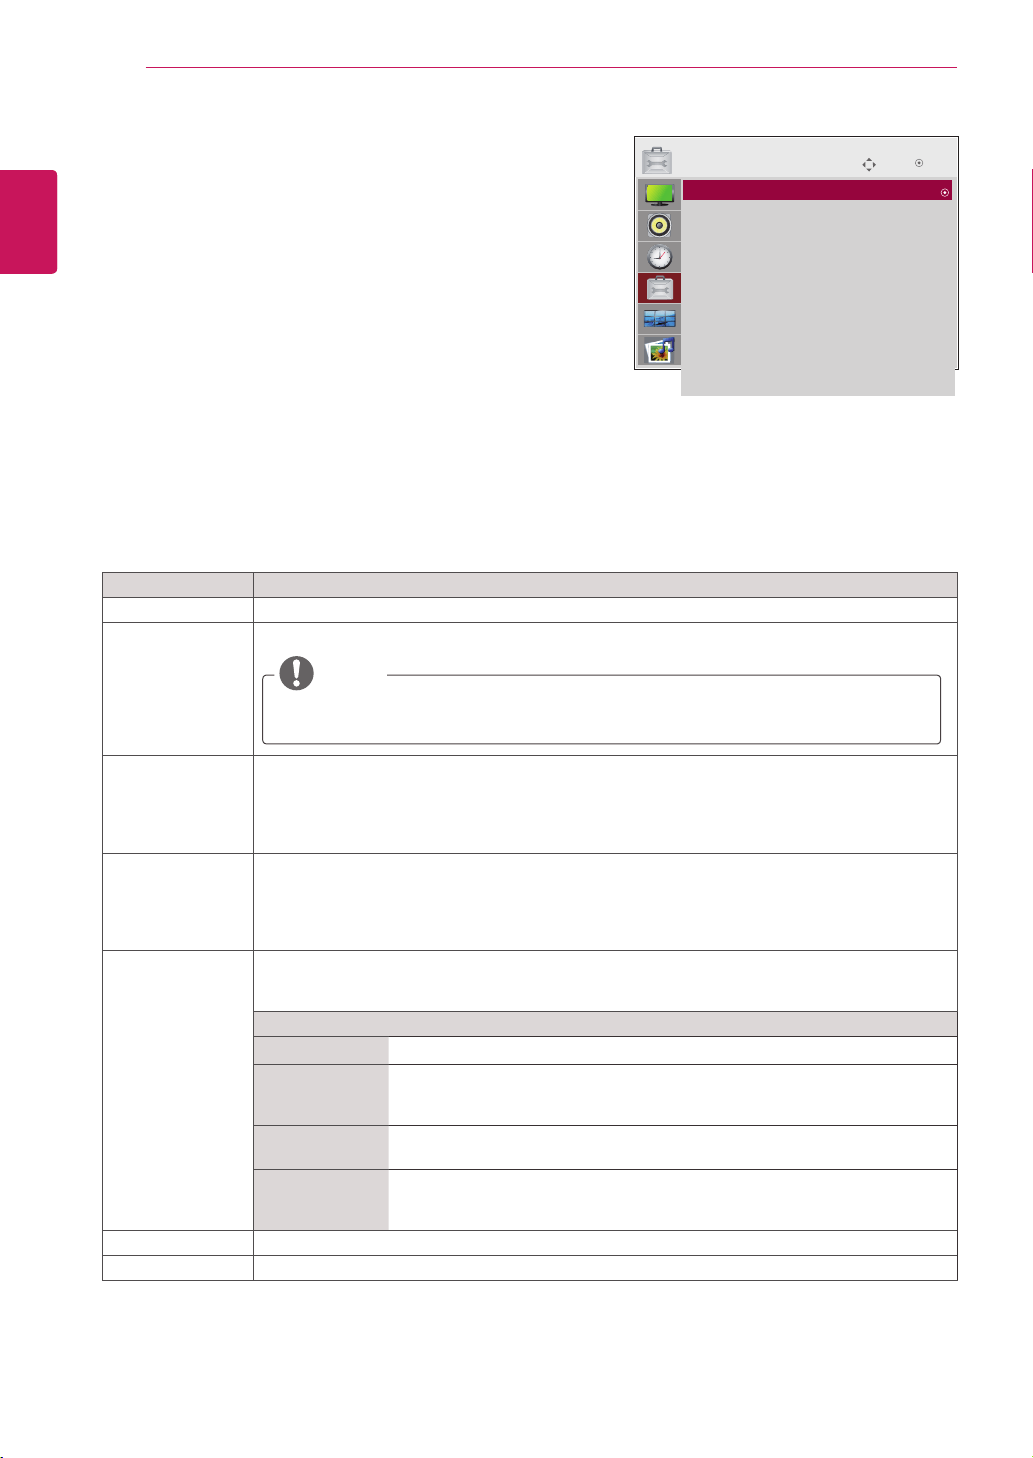
OPTION settings
1
PressMENUtoaccessthemainmenus.
2
PresstheNavigationbuttonstoscrolltoOPTIONandpress
OK.
3
PresstheNavigationbuttonstoscrolltothesettingoroption
youwantandpressOK.
-Toreturntothepreviouslevel,pressBACK.
4
Whenyouarefinished,pressEXIT.
Whenyoureturntothepreviousmenu,pressBACK.
Theavailableoptionsettingsaredescribedinthefollowing:
Move
OPTION
OK
Language : English
Input Label
Key Lock : Off
Set ID : Off
ISM Method : Normal
DPM Select : On
Power Indicator : ON
Interface Select : RS232C
Network Setup
Information
Factory Reset
Language : English
NOTE

23
ENG
ENGLISH
CUSTOMIZING SETTINGS
Setting Description
Interface Select Setsupnetworkconnections.
Option
RS-232C EnablescommunicationviaSerial.
Network LAN-EnablescommunicationviaEthernet.
Network Setup Option
DHCP AllocatesandsetsupIPautomatically.
Manual SetsupIPaddress,Gateway,SubnetMask,PrimaryDNSandSecondary
DNS.
ThesetupprocessiscompletewhenyouselectExecute,and"IPSetup
Completed"isdisplayedatthebottomofthescreen.While"WaitforIPSetup"
isdisplayed,youcannotusethelocalkeysandremotecontrol."WaitforIP
Setup"isdisplayedforupto40seconds.
*IfNetworkselectissettoRS232C.DHCPandManualaredisabled.
Information YoucanfindinformationsaboutSerialNo,F/Wversion,IPAddressandMACAddress.
Factory Reset Selectthisoptiontoreturntothedefaultfactorysettings.
24
ENG
ENGLISH
CUSTOMIZING SETTINGS
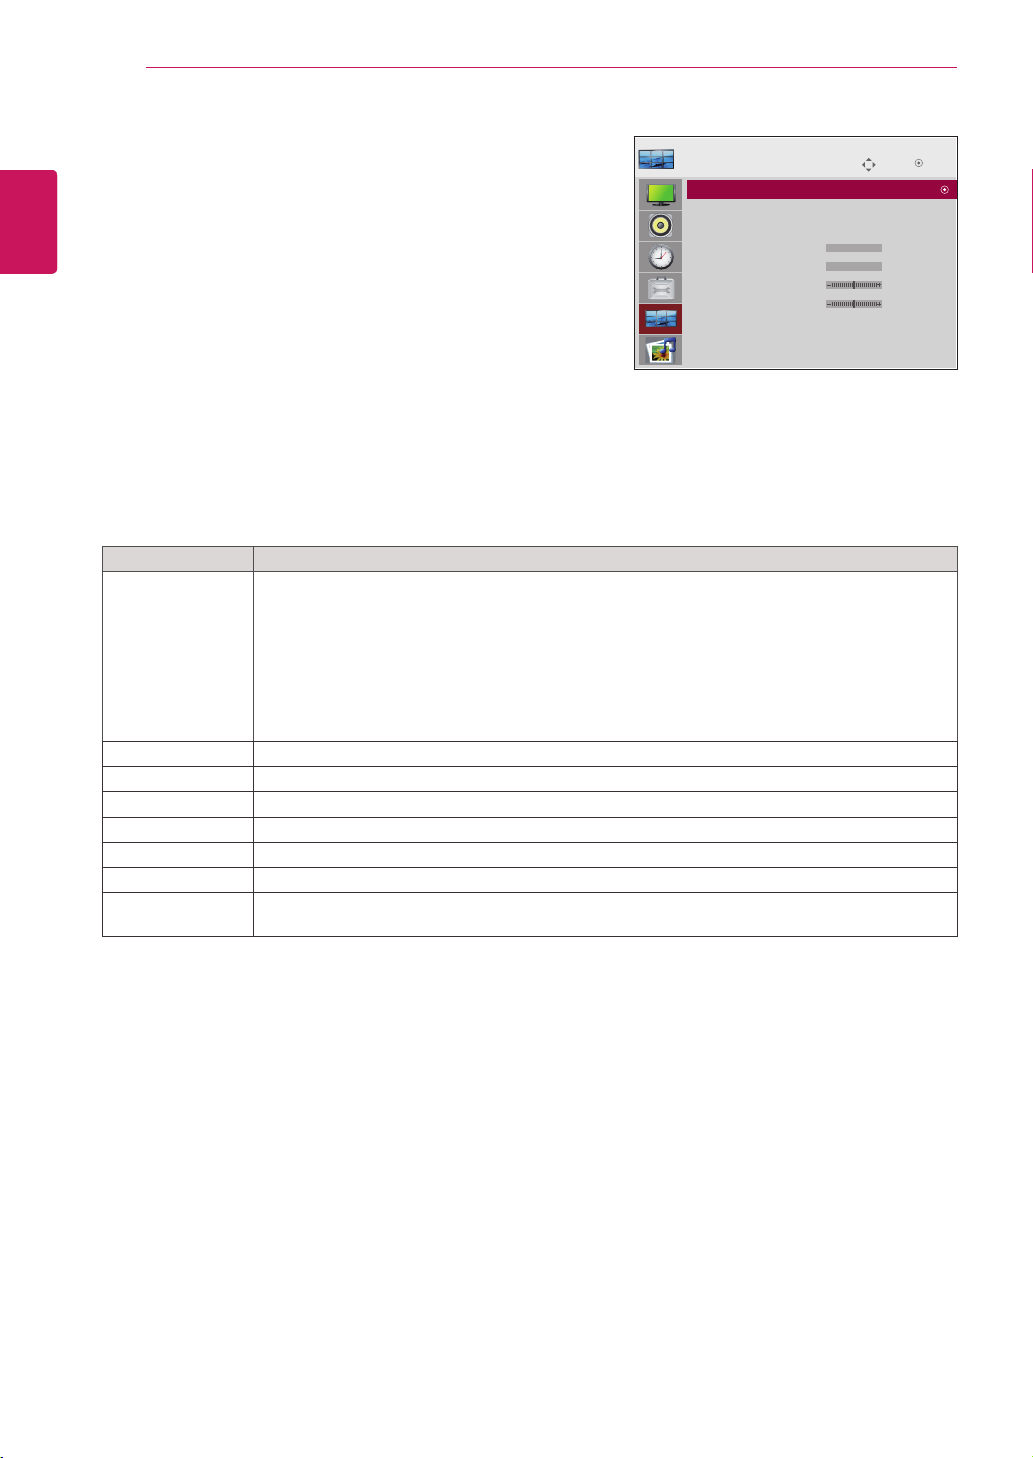
TILE settings
1
PressMENUtoaccessthemainmenus.
2
PresstheNavigationbuttonstoscrolltoTILEandpress
OK.
3
PresstheNavigationbuttonstoscrolltothesettingor
optionyouwantandpressOK.
-Toreturntothepreviouslevel,pressBACK.
4
Whenyouarefinished,pressEXIT.
Whenyoureturntothepreviousmenu,pressBACK.
Theavailablelocksettingsaredescribedinthefollowing:
Move
TILE
OK
Tile Mode : Off
Tile ID : 0
Natural Mode : Off
H Size : 0
V Size : 0
H Position : 0
V Position : 0
Reset
Tile Mode : 2x2
Setting Description
Tile Mode Tousethisfunction
-Mustbedisplayedwithvariousotherproducts.
-MustbeinafunctionthatcanbeconnectedtoRGBCablebydistributorandRS-232C.
TilemodeandchooseTilealignmentandsettheIDofthecurrentproducttosetlocation.
*OnlyafterpressingtheSETbuttontheadjustmentsmadetothesettingswillbesaved.
-Tilemode:columnxrow(c=1,2,3,4,5r=1,2,3,4,5)
-5x5available.
-ConfigurationofanintegrationscreenisalsoavailableaswellasconfigurationofOnebyone
Display.
Tile ID SelectthelocationoftheTilebysettinganID.
Natural Theimageisomittedbythedistancebetweenthescreenstobenaturallyshown.
H-Size Adjustthehorizontalsizeofthescreentakingintoaccountthesizeofthebezel.
V-Size Adjusttheverticalsizeofthescreentakingintoaccountthesizeofthebezel.
H-Position Movingthescreenpositionhorizontally.
V-Position Movingthescreenpositionvertically.
Reset FunctiontoinitializeandreleaseTile.
AllTilesettingarereleasedwhenselectingTilerecallandthescreenreturnstoFullscreen.
25
ENG
ENGLISH
CUSTOMIZING SETTINGS
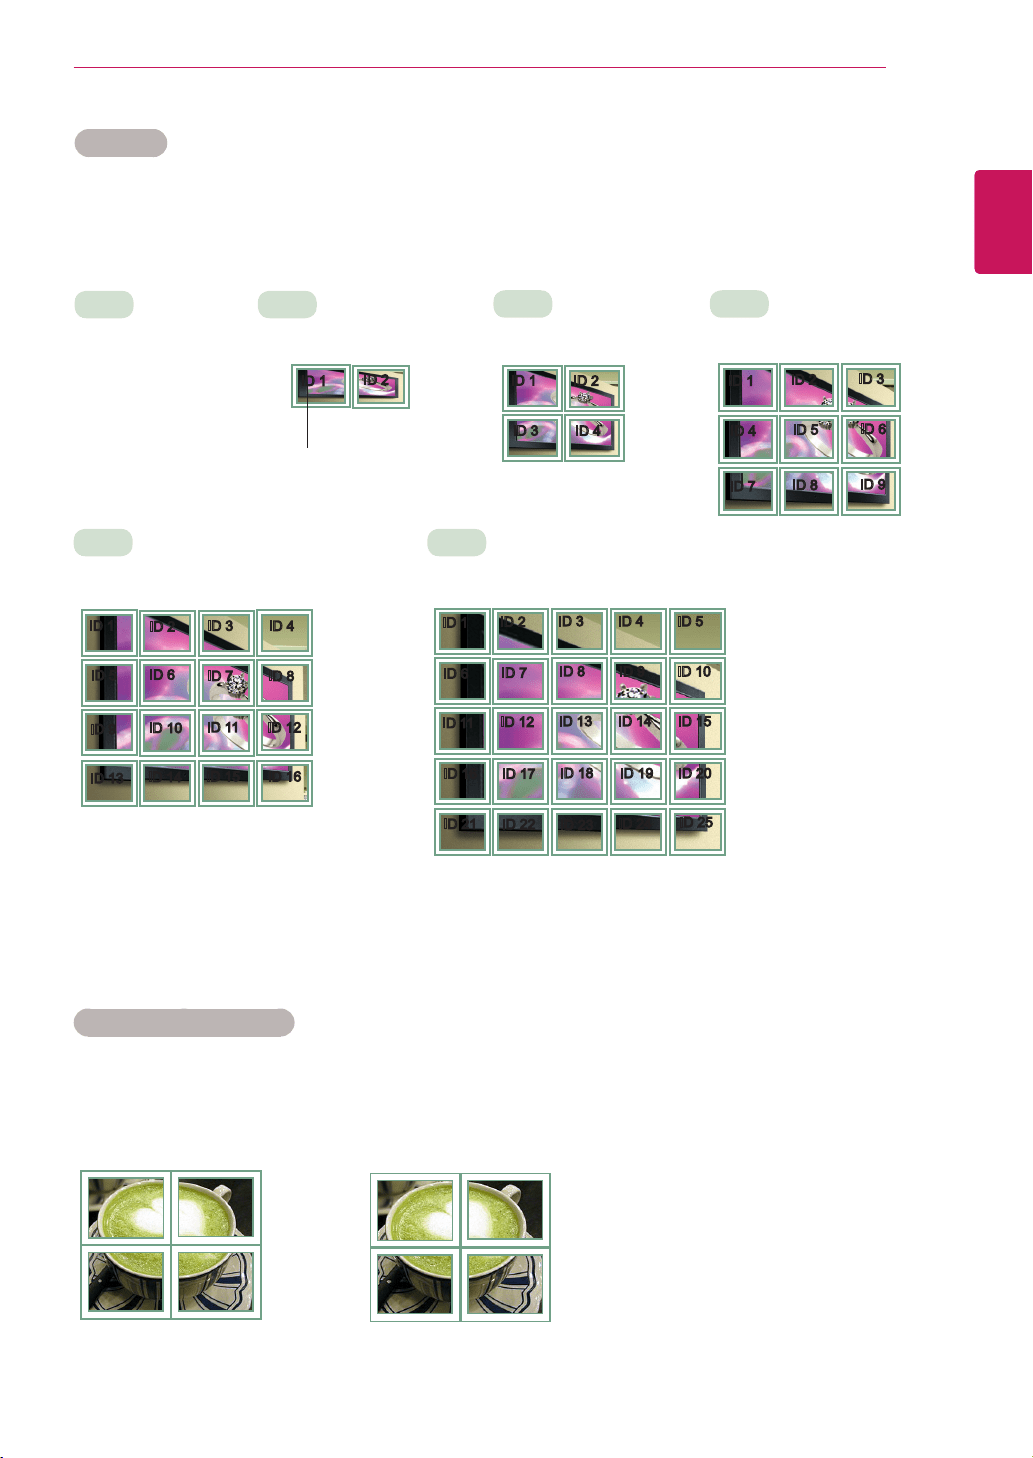
Tile Mode
Thismonitorcanbetiledwithadditionalmonitorstocreatealargetileddisplay.
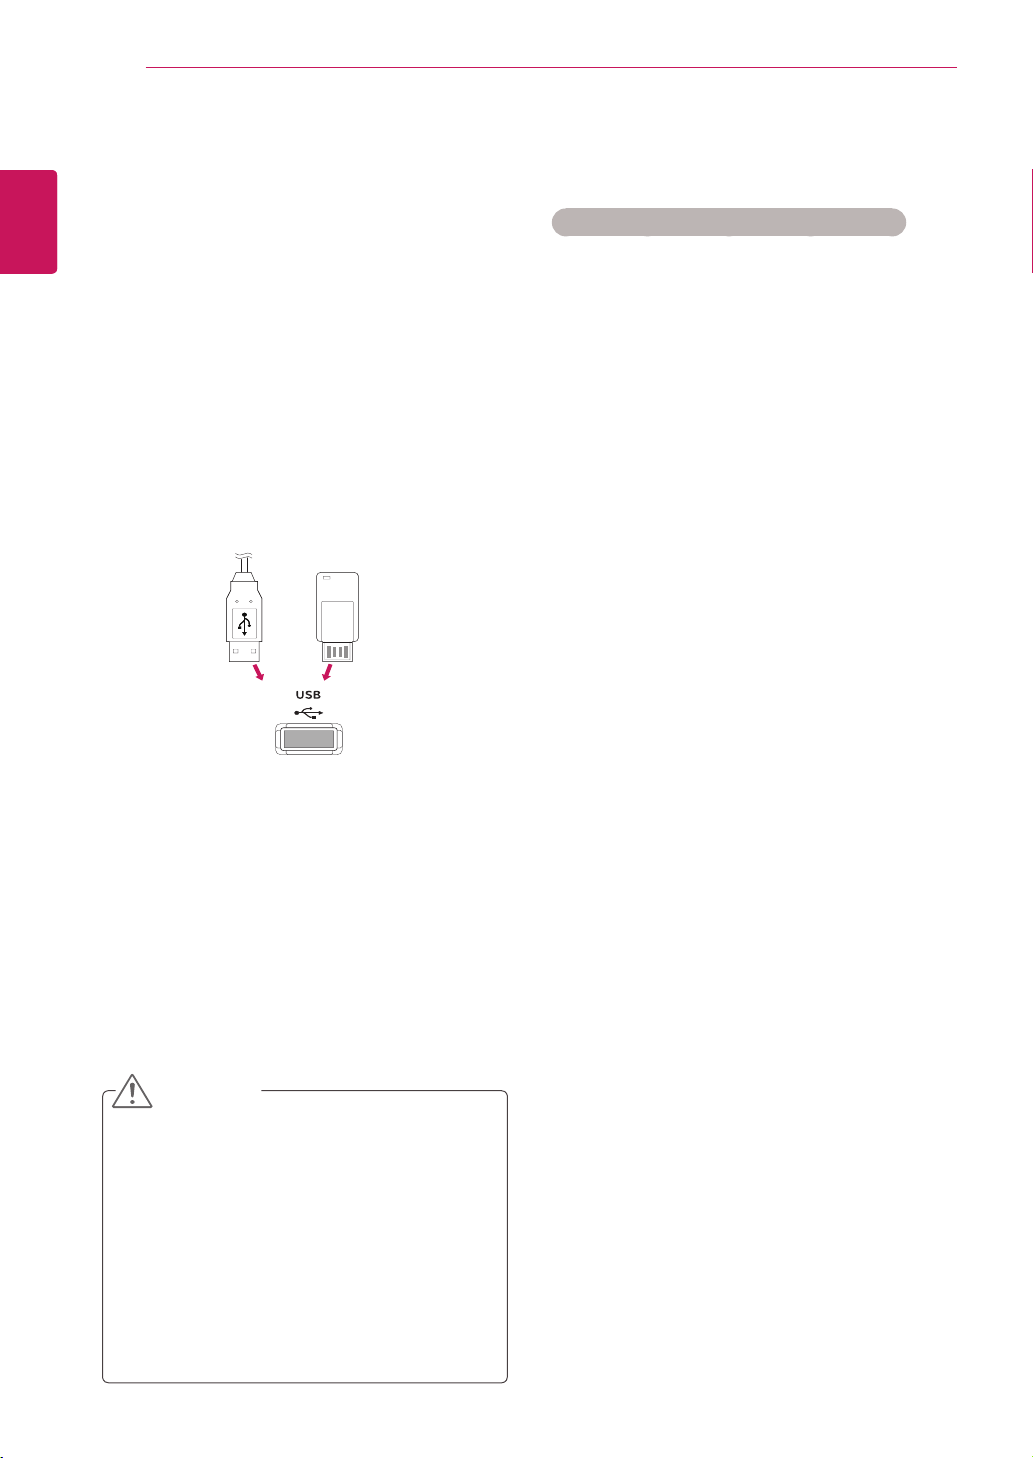
Tile Mode - Natural mode
Whenactive,thepartoftheimagethatwouldnormallybedisplayedinthegapbetweenthemonitorsis
omitted.
ID1
ID2
ID3
ID4
ID1
ID2
ID4
ID5
ID3
ID6
ID7
ID8
ID9
•3X3:
Whenusing9monitors
ID1
ID2
ID5
ID6
ID3
ID7
ID9
ID10
ID11
ID4
ID8
ID12
ID13
ID14
ID15
ID16
ID1
ID2
ID6
ID7
ID3
ID8
ID11
ID12
ID13
ID4 ID5
ID9 ID10
ID14 ID15
ID16
ID21
ID17
ID22
ID18
ID23
ID19
ID24
ID20
ID25
•Off:
WhentheTileMode
optionisdisabled
•2X1:
Whenusing2monitors
•2X2:
Whenusing4monitors
•5X5:
Whenusing25monitors
•4X4:
Whenusing16monitors
ID1
ID2
TileID
Before After
26
ENG
ENGLISH
ENTERTAINMENT
ENTERTAINMENT
Using integrated media
features
Connecting USB storage devices
ConnectUSBstoragedevicessuchasaUSB
flashmemory,externalharddrive,orMP3player
totheMonitorsetandusemultimediafeatures
(“Browsing files”Seep.27).
ConnectaUSBflashmemoryorUSBmemory
cardreadertotheMonitorsetasshownonthe
followingillustration.TheUSBscreenappears.
TodisconnectaUSBstoragedevice,
makesuretoendtheconnectionproperlyto
preventdamagestotheMonitorsetorfiles.
DonotturntheMonitorsetofforremovea
USBstoragedevicewhiletheUSBstorage
deviceisconnectedtotheMonitorset,as
thiscouldresultinlossoffilesordamageto
theUSBstoragedevice.
BackupyourfilessavedonaUSBstorage
devicefrequently,asyoumayloseor
damagethefilesandthismaybenot
coveredbythewarranty.
CAUTION
Precautions when using the USB device
OnlyaUSBstoragedeviceisrecognizable.
IftheUSBstoragedeviceisconnected
throughaUSBhub,thedeviceisnot
recognizable.
AUSBstoragedeviceusinganautomatic
recognitionprogrammaynotberecognized.
AUSBstoragedevicewhichusesitsown
drivermaynotberecognized.
TherecognitionspeedofaUSBstorage
devicemaydependoneachdevice.
PleasedonotturnofftheSetorunplug
theUSBdevicewhentheconnectedUSB
storagedeviceisworking.Whensuchdevice
issuddenlyseparatedorunplugged,the
storedfilesortheUSBstoragedevicemay
bedamaged.
PleasedonotconnecttheUSBstorage
devicewhichwasartificiallymaneuveredon
thePC.Thedevicemaycausetheproductto
malfunctionorfailtobeplayed.Neverforget
touseonlyaUSBstoragedevicewhichhas
normalmusicfilesorimagefiles.
PleaseuseonlyaUSBstoragedevicewhich
wasformattedasaFAT16,FAT32,NTFSfile
systemprovidedwiththeWindowsoperating
system.Incaseofastoragedevice
formattedasadifferentutilityprogramwhich
isnotsupportedbyWindows,itmaynotbe
recognized.DatainaUSBstoragedevice
cannotbedeletedintheNTFSfilesystem.
PleaseconnectpowertoaUSBstorage
devicewhichrequiresanexternalpower
supply.Ifnot,thedevicemaynotbe
recognized.
PleaseconnectaUSBstoragedevicewith
cableisofferedbyUSBmaker.Ifconnected
withcableisnotofferedbyUSBmakeroran
excessivelylongcable,thedevicemaynot
berecognized.
SomeUSBstoragedevicesmaynotbe
supportedoroperatedsmoothly.
Maximumof999filesandfolderscanbe
recognized.
DatainaUSBstoragedevicecannotbe
aligned.Upto128Englishcharacterscanbe
or
27
ENG
ENGLISH
ENTERTAINMENT
recognizedasafilename.
Pleasebackuptheimportantfilebecausea
dataofUSBdevicemaybedamaged.Data
managementisconsumer'sresponsibility
andinconsequencethemanufacturesdoes
notcovertheproductbearingdatadamage.
IftheUSBisconnectedinStandbyMode,
specificharddiskwillautomaticallybeloaded
whentheSetisturnedon.
Therecommendedcapacityis1TBorless
foraUSBexternalharddiskand32GBor
lessforUSBmemory.
Anydevicewithmorethantherecommended
capacitymaynotworkproperly.
IfaUSBexternalharddiskwitha“Power
Saving”functiondoesnotwork,turnthe
harddiskoffandonagaintomakeitwork
properly.
Namesandsubtitlesofsomelanguagefiles
maynotdisplayproperly.(Korean,Chinese,
Japanese)
WhenusingKoreanorChinesesubtitles
orfilenames,itisrecommendedtosetthe
languagetothecorrespondingone.
AccessthePhoto,MusicorMovielistsand
browsefiles.
1
ConnectaUSBstoragedevice.
2
PressMENUtoaccessthemainmenus.
3
PresstheNavigationbuttonstoscrolltoUSB
andpressOK.
4
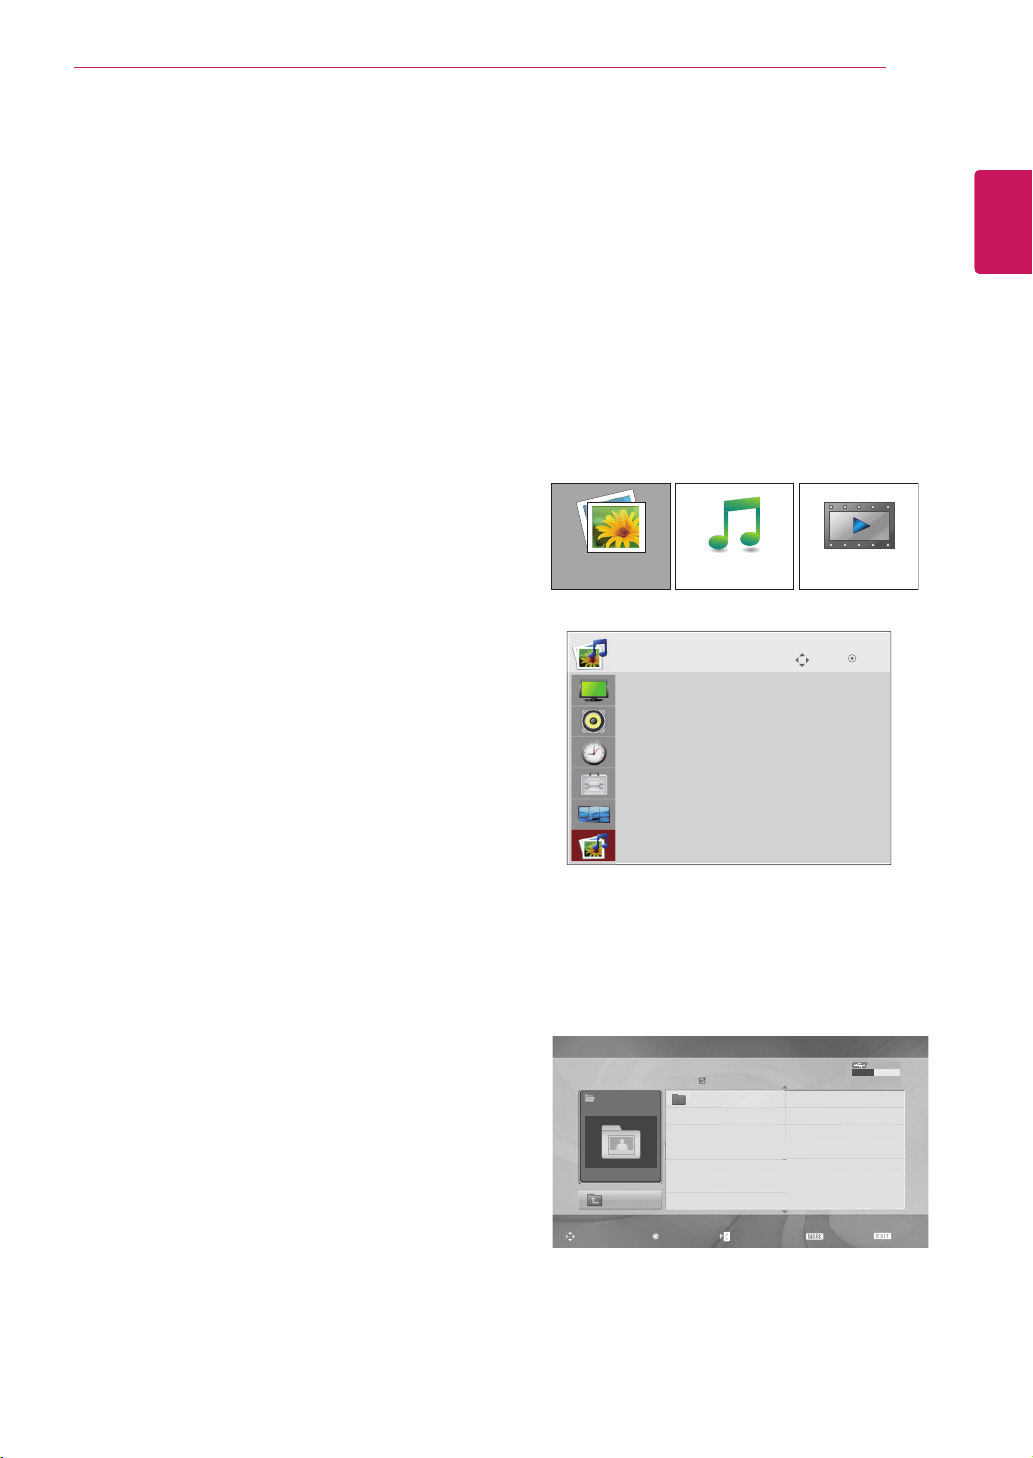
PresstheNavigationbuttonstoscrollto
PHOTO LIST,MUSIC LISTorMOVIE LIST
andpressOK.
5
SelectDrive1toaccesstheconnectedUSB
storagedevice
PHOTO LIST MOVIE LISTMUSIC LIST
Photo List
USB
Up Folder
Drive 1
Drive 1
Page 1/1 No Marked
Navigation
Option
Page Change
Mark
Exit
0 folder(s), 0 file(s)
USB Device
Free Space 150 MB
Move
USB
OK
Photo List
Music List
Movie List
DivX Reg.Code
Deactivation
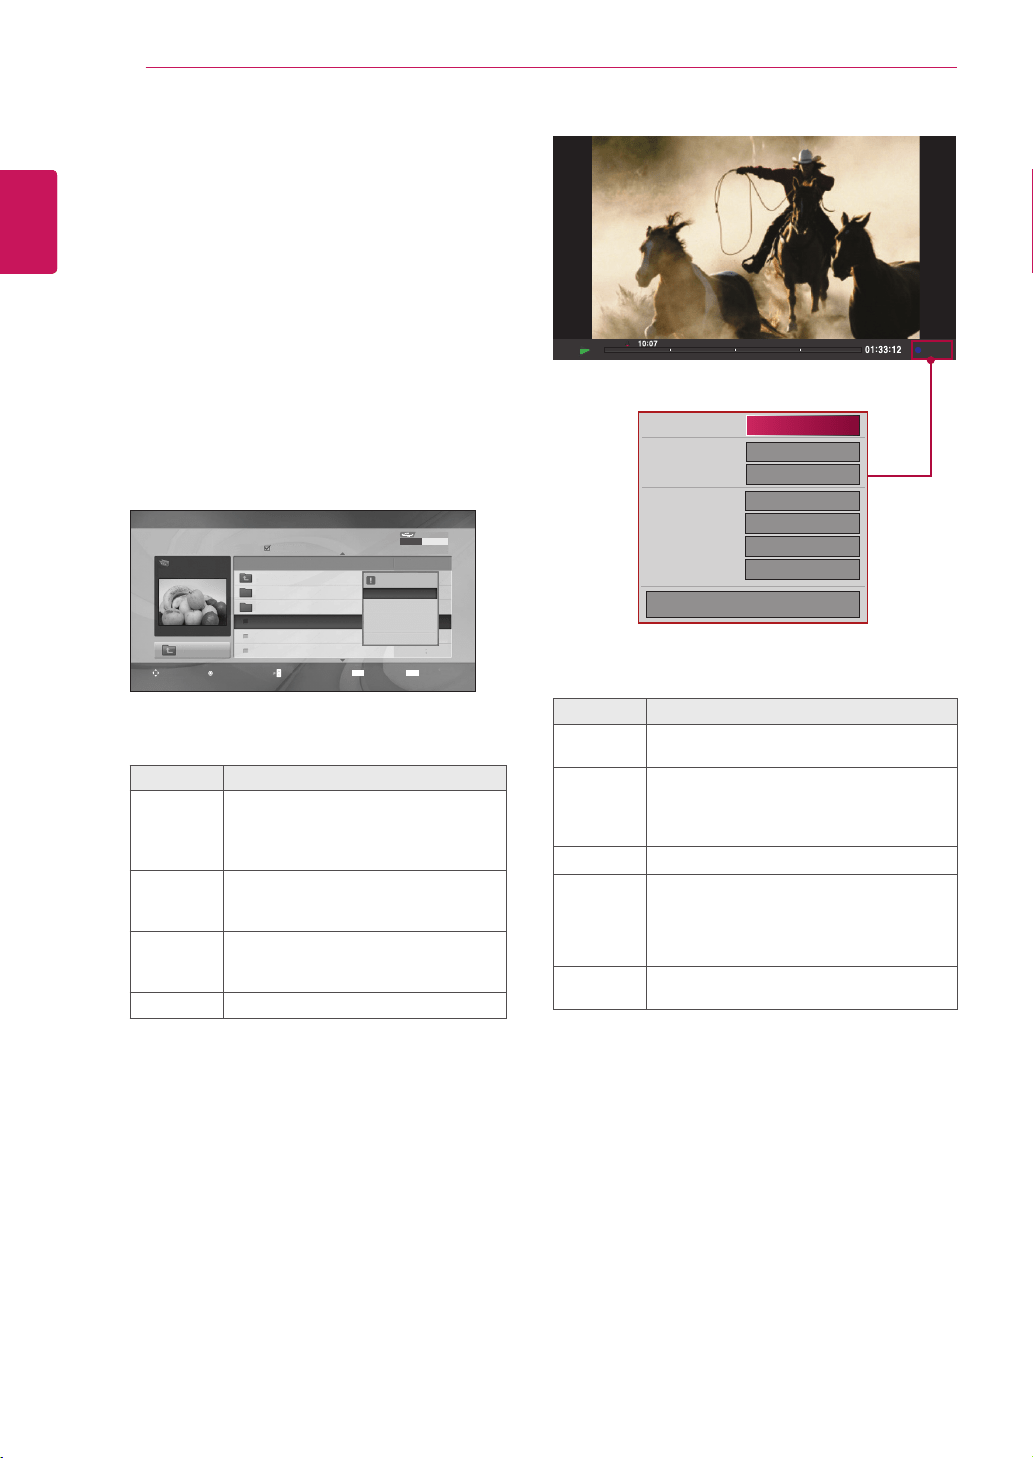
Browsing files
28
ENG
ENGLISH
ENTERTAINMENT
6
Selectafolderyouwant.
-Toreturntothepreviouslevel,select
Up Folder.
Photo List
USB
Up Folder
Drive 1
HR101
HR103
HR105
HR102
HR104
Page 1/1 No Marked
Navigation
Option
Page Change
Mark
Exit
0 folder(s), 0 file(s)
USB Device
Free Space 150 MB
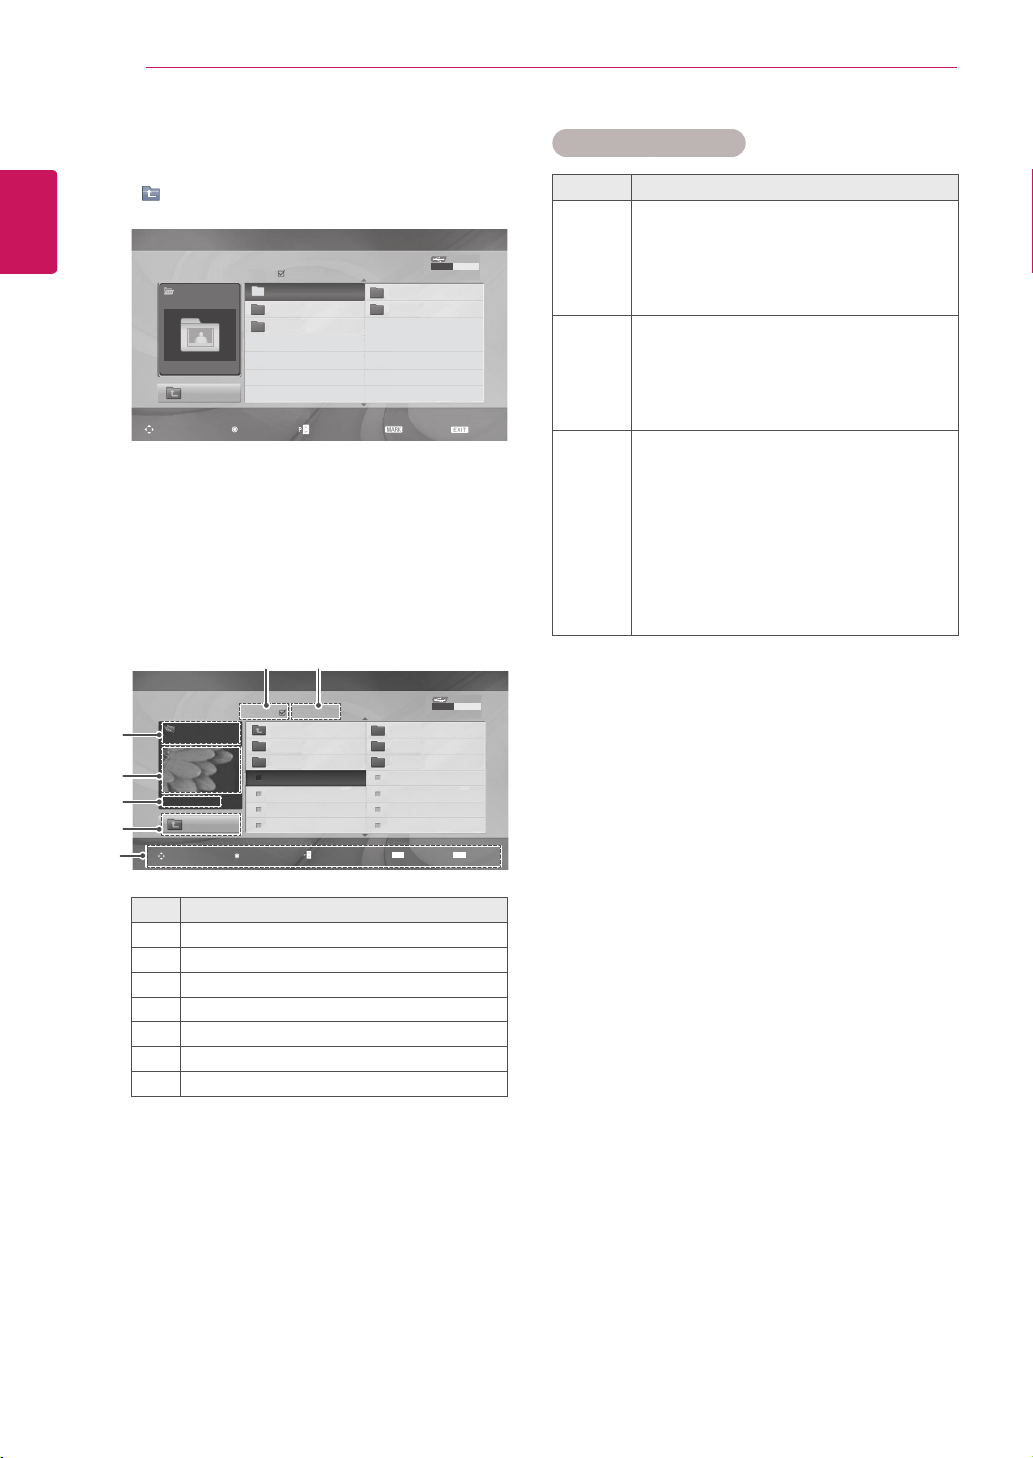
7
PresstheNavigationbuttonstobrowsefiles.
Thehighlightedfilewilldisplayinthepreview
window.
No. Description
1
Currentpagenumber/totalnumberofpages
2
Thenumberofselectedfiles
3
FileandFoldername
4
Previewwindow
5
Filesize,information.
6
Returntothepreviouslevel
7
Availablebuttonsontheremotecontrol
Supported file format
Type Supported file format
Photo
JPG
Availablesize
Baseline:64pixel(W)x64pixel(H)-
15360pixel(W)x8640pixel(H)
Progressive:64pixel(W)x64pixel(H)-
1024pixel(W)x768pixel(H)
Music
MP3
Bitraterange32Kbpsto320Kbps
Samplingrate(SamplingFrequency)
MPEG1layer3:32kHz,44.1kHz,
48kHz
* Acopy-protectedfilewillnotplay.
Video
MPEG1,MPEG2,MPEG4(Doesn't
supportMicrosoftMPEG4-V2,V3),
DivX3.xx,DivX4.xx,DivX5.xx,DivX
VOD(DRM),XviD,DivX6.xx(Playback)
Audioformat:Mpeg,Mp3,PCM
Samplingfrequency:within32kto48khz
Bitrateofaudioformat:within32kto
320kbps
Supportedsubtitleformat:*.smi,*.srt,
*.sub(MicroDVD,SubViewer2.0),*.ass,
*.ssa,*.txt(DVDSubtitleSystem)
Drive 1
Up Folder
JMJ001
Up Folder
Navigation
Option
Page Change
Mark
Exit
1366x768, 125KB
HR101 02/21/2010
HR102 02/21/2010
JHR001 02/21/2010
JHR002 02/21/2010
JHR003 02/21/2010
JHR004 02/21/2010
HR103 02/21/2010
HR104 02/21/2010
HR105 02/21/2010
JHR005 02/21/2010
JHR006 02/21/2010
JHR007 02/21/2010
JHR008 02/21/2010
USB Device
Free Space 150 MB
MARK
EXIT
Photo List
Page 2/3 No Marked
3
4
5
6
7
1 2
29
ENG
ENGLISH
ENTERTAINMENT
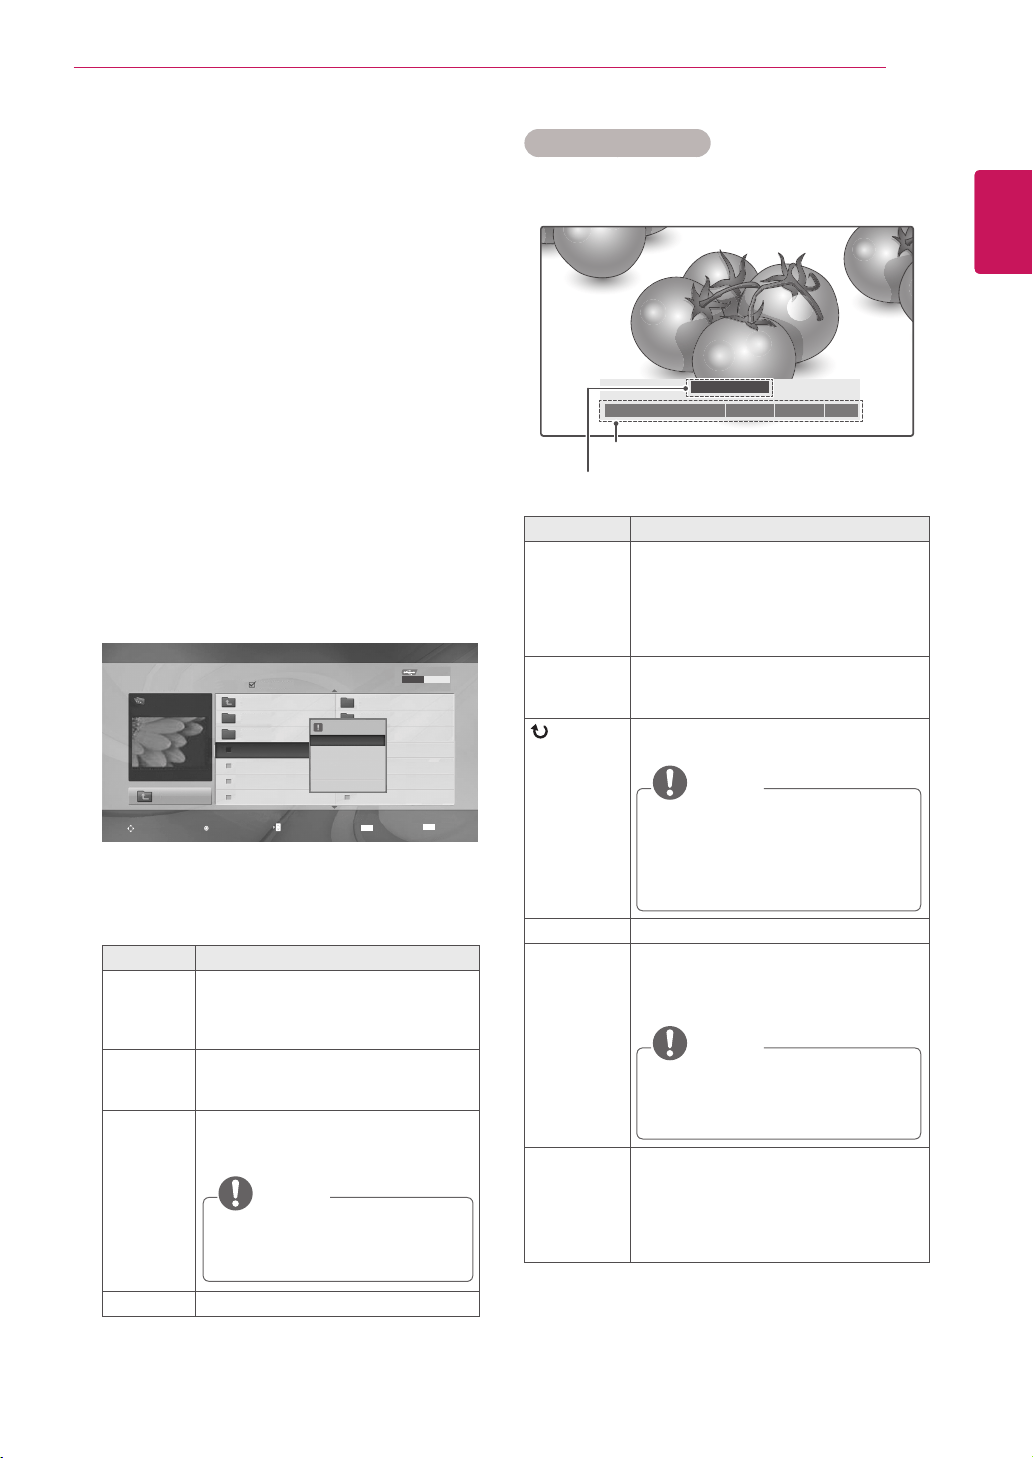
Using photo options
Usethefollowingoptionswhileviewingphotos.
Number of selected photos
Options
Option Description
Slideshow Startsorstopsaslideshowwithselected
photos.
Iftherearenoselectedphotos,all
photossavedinthecurrentfolder
displayduringaslideshow.
Tosetaslideshowspeed,selectOption.
BGM Turnsthebackgroundmusiconoroff.
Tosetthebackgroundmusicfolder,
selectOption.
(Rotate)
Rotatesphotosclockwise(90°,180°,
270°,360°).
NOTE
Thesupportedphotosizeislimited.
Youcannotrotateaphotoifthe
resolutionoftherotatedwidthis
largerthanthesupportedresolution
size.
Delete Deletesaphoto.
Option
Slide Speed:Selectsaslideshow
speed(Fast, Medium, Slow).
Music Album:Selectsamusicfolder
forthebackgroundmusic.
NOTE
Youcannotchangethemusicfolder
whilethebackgroundmusicis
playing.
Hide Hidestheoptionwindow.
Todisplaytheoptions,pressOK.
IfyoupresstheARCkeyontheremote
controlafterhidingthemenu,youcan
togglebetweennormalandfullscreen
mode.
◄ 1/17 ►
Slideshow ◘ BGM ◘ Delete Option Hide
꘤
Viewing Photos
ViewimagefilessavedinaUSBstoragedevice.
Thedisplaysonthescreenmaydifferfromthe
model.
1
PresstheNavigationbuttonstoscrolltoUSB
andpressOK.
2
PresstheNavigationbuttonstoscrolltoPhoto
ListandpressOK.
3
PresstheNavigationbuttonstoselectDrive1
toaccesstheconnectedUSBstoragedevice.
4
PresstheNavigationbuttonstoscrolltoa
folderyouwantandpressOK.
5
PresstheNavigationbuttonstoscrolltoafile
youwantandpressOK.
Apop-upwindowwillappears.
6
Viewphotosbyusingthefollowingmenus.
Menu Description
View Displaystheselectedphotoinafull-
screenview.
Drive:Viewsphotossavedina
USBstoragedrive.
Mark All
or Unmark
All
Selectsallfilesorclearsallofyour
selections
Delete DeletesafilesavedinaUSBstorage
device.
NOTE
Youcannotdeletethefilessaved
inasharedfolderofaPC.
Close Closesthepop-upmenu.
Drive 1
Up Folder
JHR001
Up Folder
Navigation
Option
Page Change
Mark
Exit
1366x768, 125KB
HR101 02/21/2010
HR102 02/21/2010
JHR001 02/21/2010
JHR002 02/21/2010
JHR003 02/21/2010
JHR004 02/21/2010
HR103 02/21/2010
HR104 02/21/2010
HR105 02/21/2010
JHR005 02/21/2010
JHR006 02/21/2010
JHR007 02/21/2010
JHR008 02/21/2010
USB Device
Free Space 150 MB
MARK
EXIT
Photo List
Page 2/3 No Marked
1366x768, 125KB
View
Mark All
Delete
Close
30
ENG
ENGLISH
ENTERTAINMENT
Listening to Music
1
PresstheNavigationbuttonstoscrolltoUSB
andpressOK.
2
PresstheNavigationbuttonstoscrolltoMusic
ListandpressOK.
3
SelectDrive1toaccesstheconnectedUSB
storagedevice.
4
PresstheNavigationbuttonstoscrolltoa
folderyouwantandpressOK.
5
PresstheNavigationbuttonstoscrolltoafile
youwantandpressOK.
Apop-upwindowwillappears.
6
Playmusicbyusingthefollowingmenus.
Menu Description
Play, Stop
Play, or
Play
Marked
Playsmusic,stopsplayback,orplays
theselectedmusicfile.Ifyouplay
musicwithoutselectingmusicfiles,all
ofthemusicfilessavedinthecurrent
folderwillplay.
The iconwillappearinfrontofthe
durationonthecurrentlyplayingfile.
Drive:Listentomusicfilessavedin
aUSBstoragedrive.
Play with
Photo
Displaysphotosduringplayback.
Mark All
or Unmark
All
Selectsallfilesorclearsallofyour
selections
Delete DeletesafilesavedinaUSBstorage
device.
Close Closesthepop-upmenu.
Music List
Page 2/3
Music
S003
00:00/01:34
Up Folder
Title Duration
Up Folder
S001
S002
S003
S004
S005
Up Folder
03:33
04:45
01:30
02:37
01:58
No Marked
4395KB 1Kbps
Play
Play with Photo
Mark All
Delete
Close
USB Device
Free Space 150 MB
Option
Mark
Navigation
Page Change
Exit
MARK
EXIT
Music
S003
0:27 / 3:67
Adamagedorcorruptedfilewillnotplayand
thedurationofthefiledisplayas00:00.
Acopy-protectedfilewillnotplay.
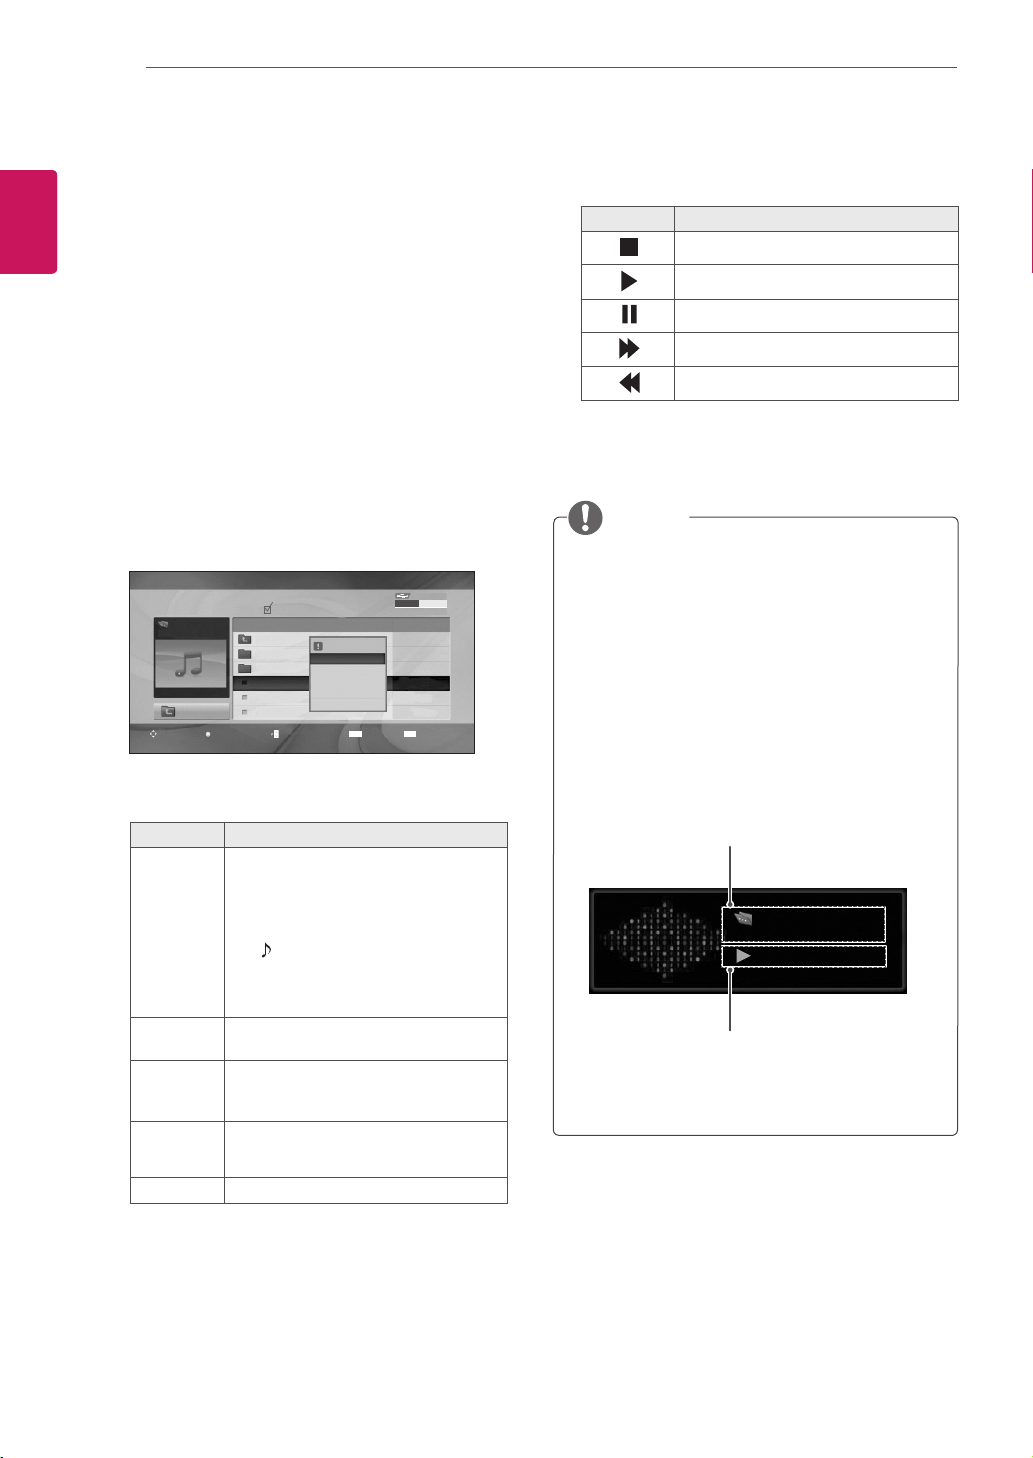
IftheMonitorsetisnotinuseforsometime
duringplayback,theinformationboxasa
screensaverwillappeartopreventimage
burn.
ToreturntotheMusiclistscreen,pressOK,
■(stop)orBACK.
NOTE
7
Controlplaybackbyusingthefollowing
buttons.
Button Description
Stopsplayback
Playsamusicfile
Pausesorresumesplayback
Skipstothenextfile
Skipstothepreviousfile
Time elapsed /Duration
Folder name/file name

31
ENG
ENGLISH
ENTERTAINMENT
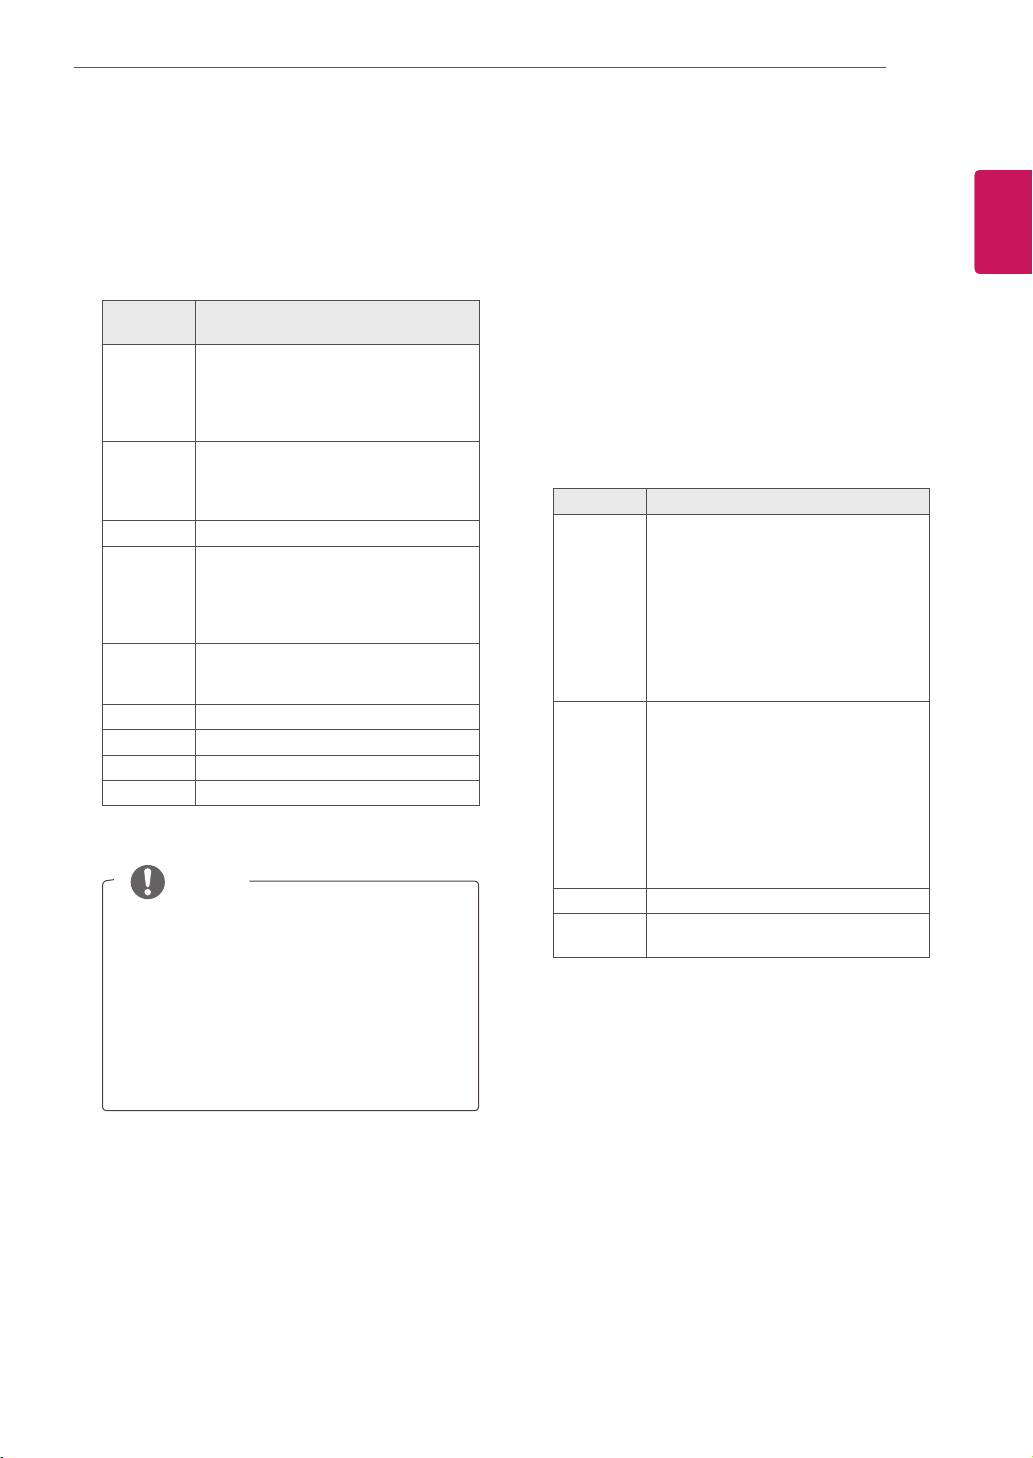
Viewing Movies
PlayvideofilesontheMonitorset.YourMonitor
setdisplaysallofthevideofilessavedinaUSB
storagedevice.
Movie(*.dat/*.mpg/*.mpeg/*.vob/*.m4v/
*.avi/*.divx)supportingfile.
Videoformat:MPEG1,MPEG2,
MPEG4(Doesn’tsupportMicrosoftMPEG
4-V2,V3),DivX3.xx,DivX4.xx,DivX5.xx,
DivXVOD(DRM),XviD,DivX6.xx(Playback)
Audioformat:Mpeg,Mp3,PCM
Bitrate:within32kbpsto320kbps(MP3)
Subtitleformat:*.smi/*.srt/*.sub(Micro
DVD,SubViewer2.0)/*.ass/*.ssa/*.txt(DVD
SubtitleSystem).
Someuser-createdsubtitlesmaynotwork
properly.
Somespecialcharactersarenotsupportedin
subtitles.
HTMLtagsarenotsupportedinsubtitles.
Subtitlesinlanguagesotherthanthe
supportedlanguagesarenotavailable.
Timeinformationinanexternalsubtitlefile
shouldbearrangedinascendingordertobe
played.
Thescreenmaysuffertemporaryinterruptions
(imagestoppage,fasterplayback,etc.)when
theaudiolanguageischanged.
Adamagedmoviefilemaynotbeplayed
correctly,orsomeplayerfunctionsmaynotbe
usable.
Moviefilesproducedwithsomeencodersmay
notbeplayedcorrectly.
Ifthevideoandaudiostructureofrecorded
fileisnotinterleaved,eithervideooraudiois
outputted.
HDvideoswithamaximumof1920x1080
@25/30Por1280x720@50/60Pare
supported,dependingontheframe.
Videoswithresolutionshigherthan1920x
1080@25/30Por1280x720@50/60Pmay
notworkproperlydependingontheframe.
Moviefilesotherthanthespecifiedtypesand
formatsmaynotworkproperly.
Max bit rate of playable movie file is 20
Mbps.
Wedonotguaranteesmoothplaybackof
profilesencodedlevel4.1orhigherinH.264/
AVC.
DTSAudiocodecisnotsupported.
Amoviefilemorethan30GBinfilesizeisnot
supportedforplayback.
ADivXmoviefileanditssubtitlefilemustbe
locatedinthesamefolder.
Avideofilenameanditssubtitlefilename
mustbeidenticalforittobedisplayed.
PlayingavideoviaaUSBconnectionthat
doesn’tsupporthighspeedmaynotwork
properly.
FilesencodedwithGMC(GlobalMotion
Compensation)maynotbeplayed.
WhenyouarewatchingthemoviebyMovie
Listfunction,youcanadjustanimageby
Energy Savingkeyontheremotecontrol.
Usersetupforeachimagemodedoesnot
operate.
Video Decoder
mpg, mpeg, vob, dat:MPEG1,MPEG2
avi, divx, m4v:MPEG4SP,MPEG4ASP,
DivX3.xx,DviX4.xx,DviX5.xx,DviX6.xx
(Playback),XviD
Audio Codec
mpg, mpeg, vob, dat, avi, divx, m4v:AC3,
MPEG,MP3,PCM
Max Resolution
720 x 576 @ 25p
720 x 480 @ 30p
32
ENG
ENGLISH
ENTERTAINMENT
1
PresstheNavigationbuttonstoscrolltoUSB
andpressOK.
2
PresstheNavigationbuttonstoscrolltoMovie
ListandpressOK.
3
SelectDrive1toaccesstheconnectedUSB
storagedevice.
4
PresstheNavigationbuttonstoscrolltoa
folderyouwantandpressOK.
5
PresstheNavigationbuttonstoscrolltoafile
youwantandpressOK.
Apop-upwindowwillappears.
6
Playvideobyusingthefollowingmenus.
Menu Description
Play or
Play
Marked
Playsamovieorplaystheselected
movie.
Drive:ViewsvideossavedinaUSB
storagedrive.
Mark All
or Unmark
All
Selectsallfilesorclearsallofyour
selections.
Delete or
Delete
marked
DeletesafileformattedontheFAT32
filesystemandsavedinaUSB
storagedevice.
Close Closesthepop-upmenu.
Option
1/6
1/6
Off
+0.5
Latin 1
15
◀FullScreen▶
PictureSize
SubtitleLanguage
AudioLanguage
SubtitleFile
●Language
●Sync
●Position
OK
WhenyouselecttheSet Video Play.
Menu Description
Picture
Size
Selectsyourdesiredpictureformatduring
movieplay
Subtitle
Language
or Audio
Language
ChangestheLanguageGroupofthe
subtitle/audioduringmovieplay.
Language SelectsyourdesiredLanguage.
Sync Adjuststhetimesynchronisationofthe
subtitlefrom-10secsto+10secsby
stepsof0.5secsduring
movieplay.
Position Changesthepositionofthesubtitleeither
upordownduringmovieplay.
Page 2/3
Movie
M002
640x480, 720KB
Up Folder
Title Duration
Up Folder
Favorite Music
M001
M002
M001
M001
01:34:15
01:35:30
01:30:20
No Marked
1366x768, 125KB
Play
Mark All
Delete
Close
Movie List
USB Device
Free Space 150 MB
Option
Mark
Navigation
Page Change
Exit
MARK
EXIT
33
ENG
ENGLISH
ENTERTAINMENT
OnlythefilessavedinASCIICODEis
supportedfortheexternalsubtitlesofthe
movie.
Only500alphabetsand500numbersare
supportedforeachlineofthesubtitle.
Only10,000ofsyncblockscanbe
supportedwithinthesubtitlefile.
NOTE
WhenyouselecttheSet Video.
1
PresstheNavigationbutton tomake
appropriateadjustments.Seep.9
WhenyouselecttheSet Audio,
1
PresstheNavigationbutton toshowthe
Sound Mode, Auto Volume, Clear Voice II,
Balance.
2
PresstheNavigationbutton tomake
appropriateadjustments.
Usingtheremotecontrol.
Button Description
ꕚ ꕙ
Whenplaying,
repeatedly,presstheREW(
ꔊꔊ
)button
tospeedup
ꔊꔊ
(x2)
ꔊꔊꔊ
(x4)
ꔊꔊꔊꔊ
(x8)
ꔊꔊꔊꔊꔊ
(x16)
ꔊꔊꔊꔊꔊꔊ
(x32).
repeatedly,presstheFF(
ꔋꔋ
)button
tospeedup
ꔋꔋ
(x2)
ꔋꔋꔋ
(x4)
ꔋꔋꔋꔋ
(x8)
ꔋꔋꔋꔋꔋ
(x16)
ꔋꔋꔋꔋꔋꔋ
(x32).
Pressingthesebuttonsrepeatedly
increasesthefastforward/reverse
speed.
Pause(
ꕘ
) Duringplayback,pressthePause(
ꕘ
)
button.
Stillscreenisdisplayed.
Ifnobuttonsarepressedonthe
remotecontrolfor10minutesafter
pausing,theMonitorsetreturnsto
theplaybackstate.
PressthePause(
ꕘ
)buttonand
thenusetheFF(
ꔋꔋ
)buttonforslow
motion.
■ Duringplayback,stopsthescreen.
Play
(ꕖ)
PressthePlay
(ꕖ)
buttontoreturnto
normalplayback.
1
PresstheNavigationbutton toshowthe
Picture Size, Audio LanguageorSubtitle
Language.
2
PresstheNavigationbutton tomake
appropriateadjustments.
Subtitle
Language
Support Language
Latin1 Albanian,Breton,Catalan,Danish,
Dutch,English,Faeroese,Finnish,
French,Gaelic,German,Icelandic,
Irish,Italian,Norwegian,Portuguese,
SpanishandSwedish
Latin2 Albanian,Croatian,Czech,Dutch,
English,German,Hungarian,Irish,
Polish,Romanian,Slovak,Slovene
andSorbian
Latin4 Estonian,Latvian,Lithuanian
Latin5 Albanian,Danish,Dutch,English,
Finnish,French,Gaelic,German,
Italian,Kurdish(Latin),Norwegian,
Portuguese,Spanish,Swedishand
Turkish
Cyrillic Bulgarian,Belorussian,English,
Macedonian,Moldavian,Russian,
SerbianandUkrainian
Greek Greek
Hebrew Hebrew
Chinese Chinese
Korean Korean
34
ENG
ENGLISH
ENTERTAINMENT
DivX registration code
CheckandregistertheDivXregistrationcodeof
yourMonitorsetsothatyoucanrentorpurchase
thelatestmoviesat
www.divx.com/vod
.Toplaya
rentedorpurchasedDivXfile,thefile’sregistration
codeshouldbesamewithyourMonitorset’sDivX
registrationcode.
1
PressMENUtoaccesstheUSBmenus.
2
PresstheNavigationbuttontoscrolltoDivX
Reg. CodeandpressOK.
3
ViewtheregistrationcodeofyourMonitorset.
Whileyouarecheckingtheregistrationcode,
somebuttonsmaynotwork.
IfyouusetheDivXregistrationcodeof
anotherdevice,youcannotplaytherented
orpurchasedDivXfile.Makesuretouse
theDivXregistrationcodeassignedtoyour
Monitorset.
Thevideooraudiofilesthatarenot
convertedbythestandardDivXcodecmay
becorruptedornotbeplayed.
TheDivXVODcodeallowsyoutoactivate
upto6devicesunderoneaccount.
NOTE
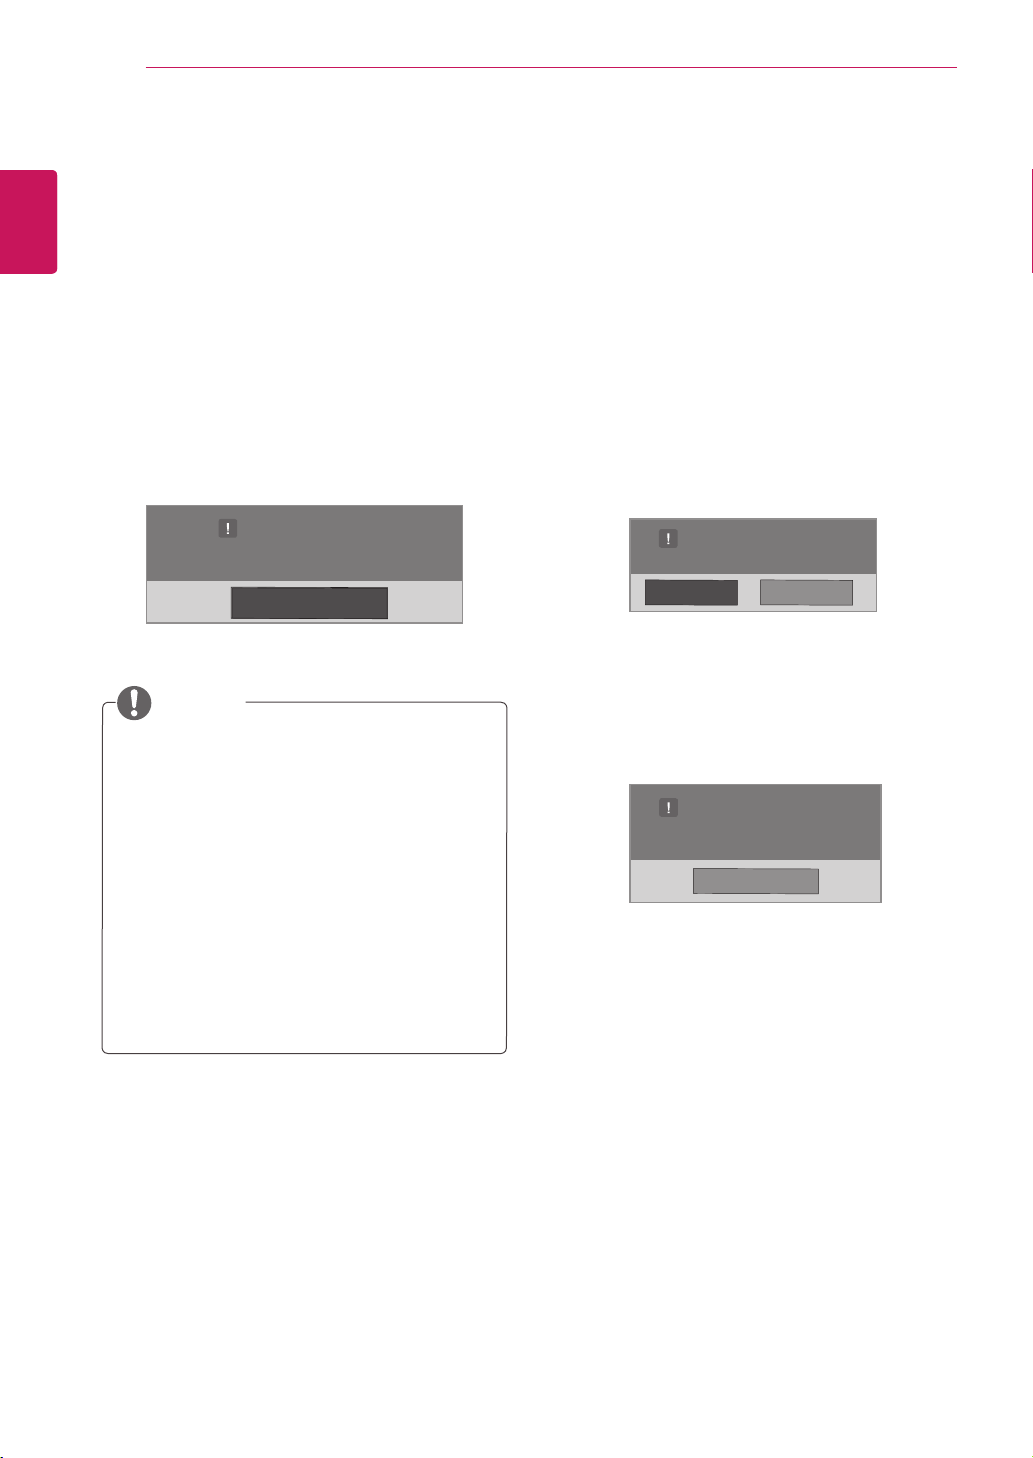
Deactivating the DivX feature
Deactivateallofthedevicesthroughtheweb
serverandblockdevicesfromactivating.
Deletetheexistingauthenticationinformationto
receiveanewDivXuserauthenticationforthe
Monitorset.Oncethisfunctionisexecuted,aDivX
userauthenticationisrequiredagaintoseeDivX
DRMfiles.
1
PressMENUtoaccesstheUSBmenus.
2
PresstheNavigationbuttontoscrollto
DeactivationandpressOK.
3
SelectYestoconfirm.
4
SelectClose.
5
Whenyouarefinished,pressEXIT.
Whenyoureturntothepreviousmenu,press
BACK.
DivX(R) Video On Demand
Do you want to deactivate your device?
Yes No
DivX(R) Video On Demand
This device is deactivated.
Your deactivation code is: xxxxxxxx
To learn more visit www.divx.com/vod.
Close
DivX(R) Video On Demand
Your registration Code is: xxxxxxxxxx
To learn more visit www.divx.com/vod.
Close
Close
35
ENG
ENGLISH
MAKING CONNECTIONS
HDMI - See p.36
DVI - See p.36
AV(CVBS) - See p.37
Component - See p.37
HDMI - See p.13
DVI - See p.12
RGB - See p.12
LAN - See p.38
HDMI - See p.36
DVI - See p.36
AV(CVBS) - See p.37
Component - See p.37
HDMI - See p.36
DVI - See p.36
AV(CVBS) - See p.37
Component - See p.37
AV(CVBS)
- See p.37
Component
- See p.37
HDMI - See p.36
AV(CVBS)
- See p.37
Component
- See p.37
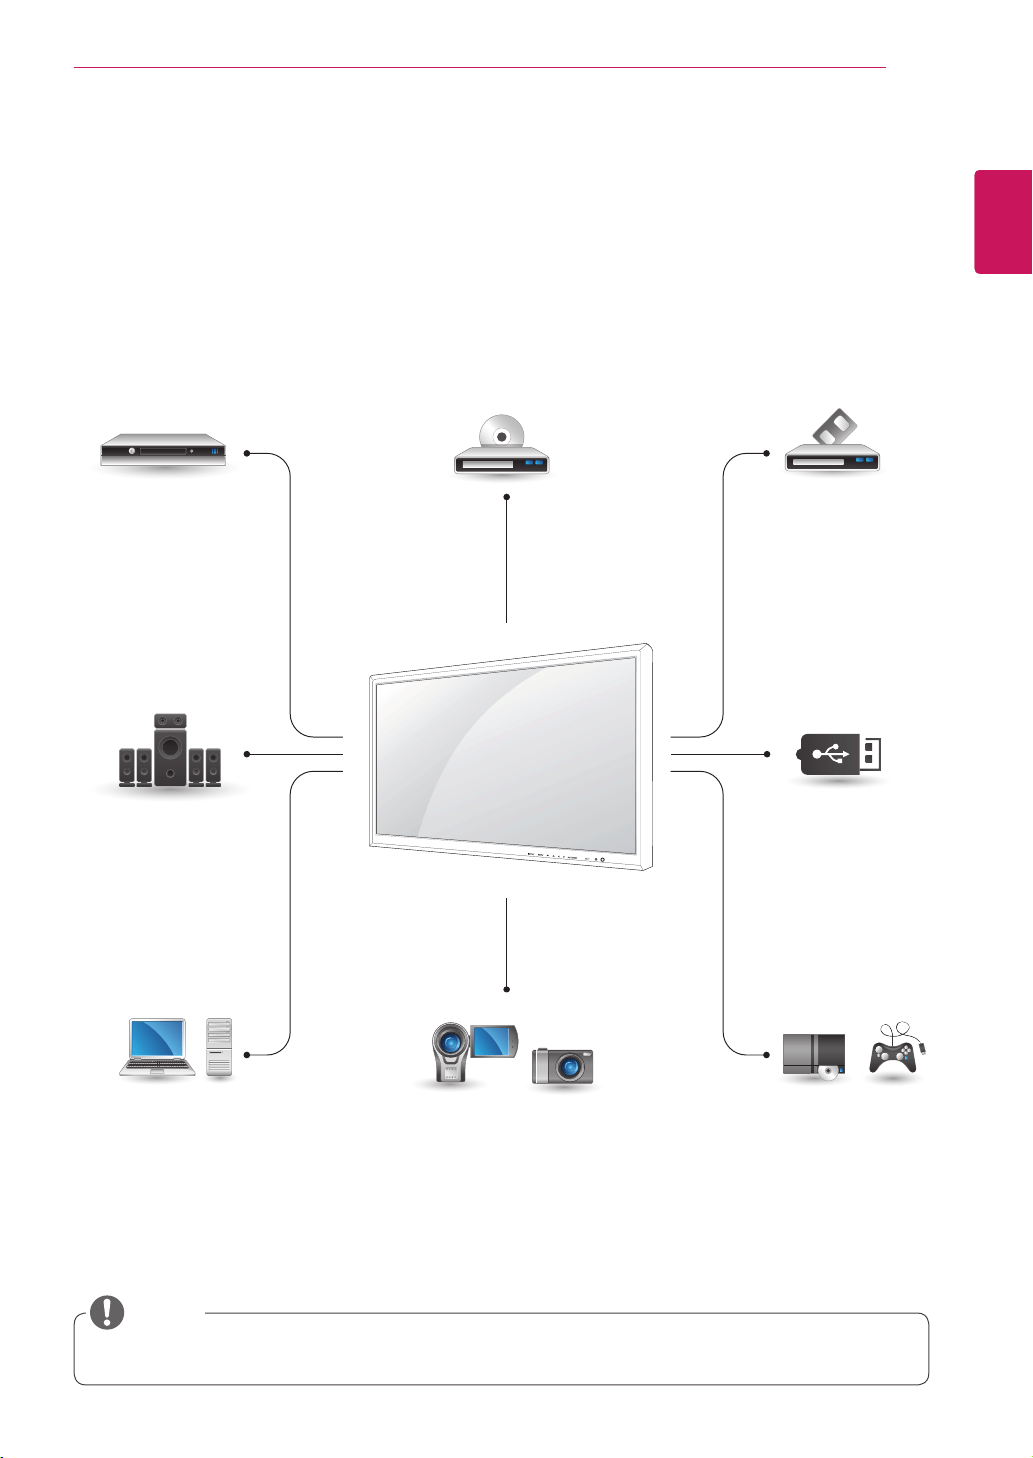
MAKING CONNECTIONS
ConnectvariousexternaldevicestotheportsontheMonitorset’sbackpanel.
1
FindanexternaldeviceyouwanttoconnecttoyourMonitorsetshownonthefollowingillustration.
2
Checktheconnectiontypeoftheexternaldevice.
3
Gototheappropriateillustrationandchecktheconnectiondetails.
IfyouconnectagamingdevicetotheMonitorset,usethecablesuppliedwiththegamingdevice.
NOTE
HD Receiver DVD VCR
USB
PC
Camcorder/Camera
Gaming device
Speaker
Memory storage
– See p.26

36
ENG
ENGLISH
MAKING CONNECTIONS
RGB IN
RGB OUT
RGB IN
RGB OUT
RGB IN
RGB OUT
RGB IN
RGB OUT
Connecting to a HD receiver,
DVD, Camcorder, Camera,
Gaming Device or VCR player
ConnectaHDreceiver,DVD,orVCRplayertothe
Monitorsetandselectanappropriateinputmode.
HDMI connection
Transmitsthedigitalvideoandaudiosignalsfrom
anexternaldevicetotheMonitorset.Connectthe
externaldeviceandtheMonitorsetwiththeHDMI
cableasshownonthefollowingillustration.
HDMI/DVI connection
Transmitsthedigitalvideosignalfromanexternal
devicetotheMonitorset.Connecttheexternal
deviceandtheMonitorsetwiththeHDMI/DVI
cableasshowninthefollowingillustration.To
transmitanaudiosignal,connectanoptionalaudio
cable.
UseaHighSpeedHDMI™Cable.
HighSpeedHDMI™Cablesaretestedto
carryanHDsignalupto1080pandhigher.
RCA-PC
AudioCable
(notincluded)
HDMI-DVI
SignalCable
(notincluded)
HDMISignalCable
(notincluded)
NOTE
37
ENG
ENGLISH
MAKING CONNECTIONS
AV IN / OUT
VIDEO
IN
OUT
AUDIO
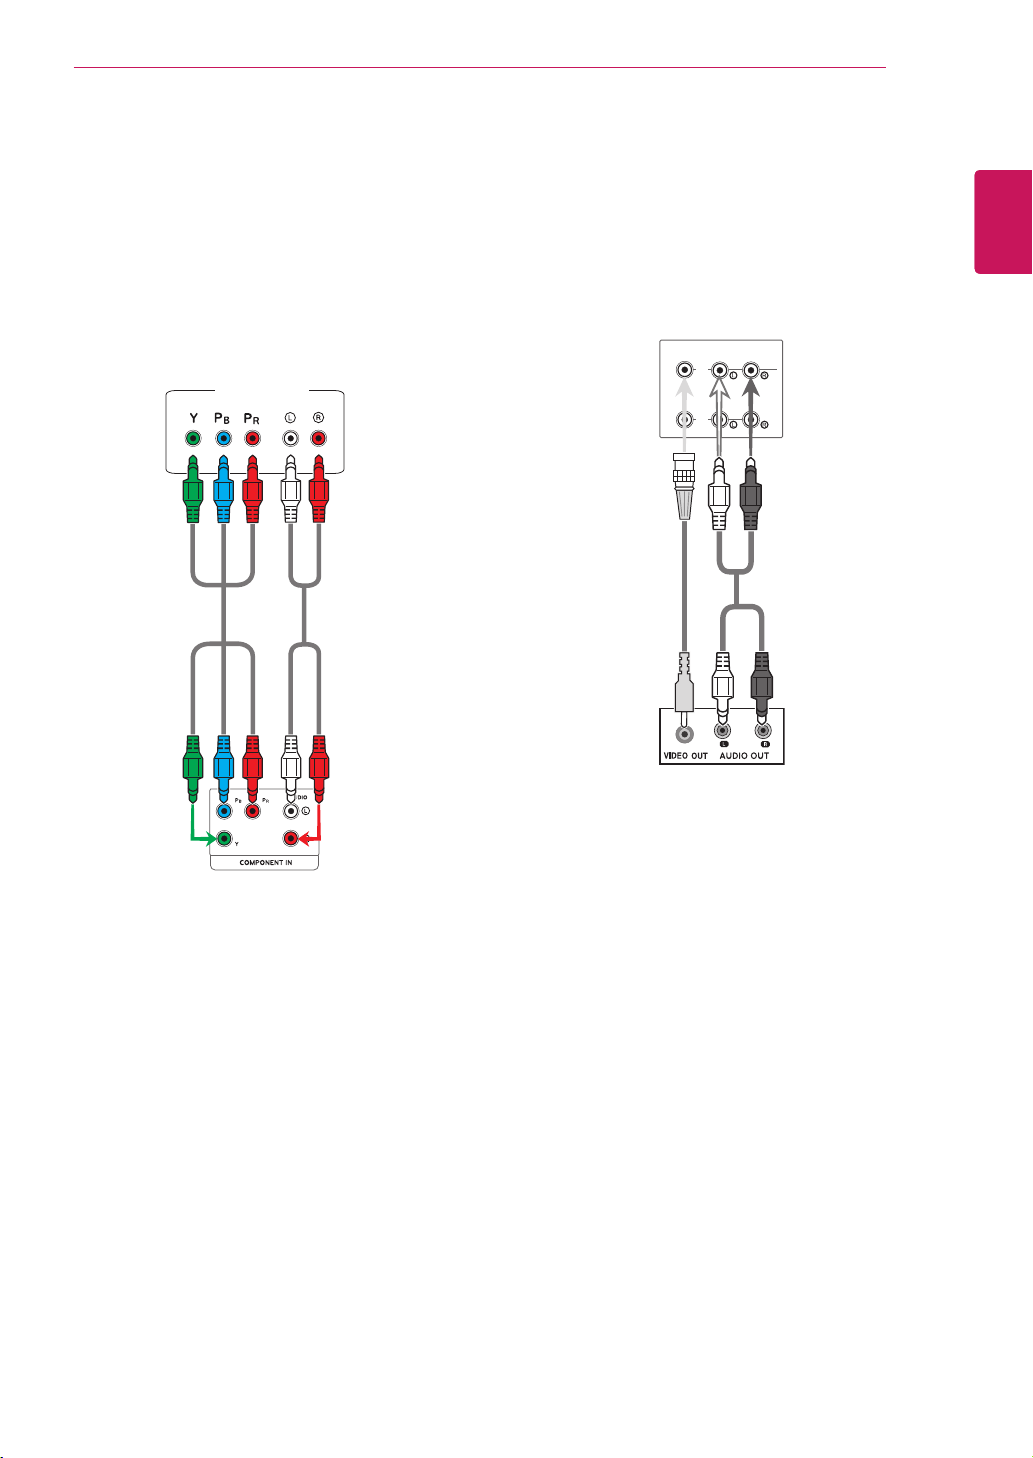
AV(CVBS) connection
Transmitstheanalogvideoandaudiosignalsfrom
anexternaldevicetotheMonitorset.Connectthe
externaldeviceandtheMonitorsetwiththeBNC
cableasshownonthefollowingillustration.
BNCCable
(notincluded)
RCA-PC
AudioCable
(notincluded)
Component connection
Transmitstheanalogvideoandaudiosignalsfrom
anexternaldevicetotheMonitorset.Connect
theexternaldeviceandtheMonitorsetwiththe
componentcableasshownonthefollowing
illustration.Todisplayimagesbyusingprogressive
scan,makesuretousethecomponentcable.
HDMI/DVI IN
HDMI/DVI IN
AUDIO
(RGB/DVI)
PC
38
ENG
ENGLISH
MAKING CONNECTIONS
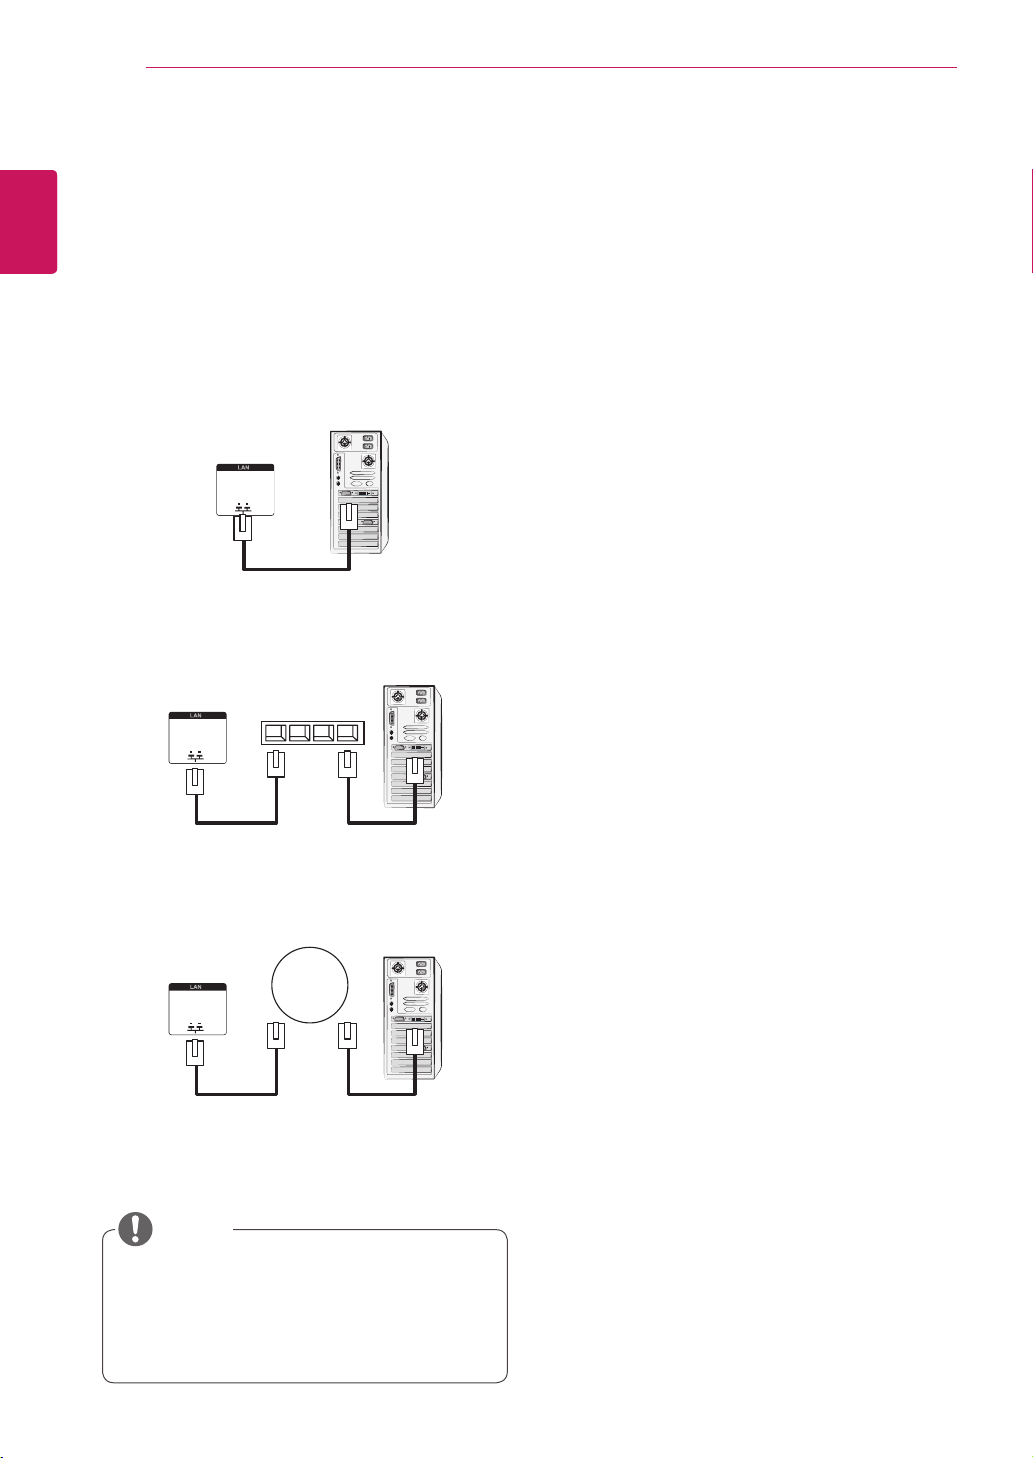
Connecting to the LAN
UsingLANestablishescommunication
betweenyourPCandthemonitorand
enablestousetheOSDmenusonthePCas
wellasonthemonitor.
LAN connection
ConnecttheLANcableandinstalltheeZ-Net
ManagerprogramontheCD-ROM.
Formoreinformationabouttheprogram,please
refertoeZ-NetGuideintheenclosedCD-ROM.
A
ConnectPCtoMonitordirectly.
B
Usingarouter(Switch)
PC
MonitorSet
MonitorSet
MonitorSet
Network
LAN
Network
PC
LAN
Network
PC
LAN
Switch
C
UsingtheInternet.
NOTE
39
ENG
ENGLISH
MAKING CONNECTIONS
AV IN / OUT
VIDEO
IN
OUT
AUDIO
AV IN / OUT
VIDEO
IN
OUT
AUDIO
AV IN / OUT
VIDEO
IN
OUT
AUDIO
AV IN / OUT
VIDEO
IN
OUT
AUDIO
AV IN / OUT
VIDEO
IN
OUT
AUDIO
AV IN / OUT
VIDEO
IN
OUT
AUDIO
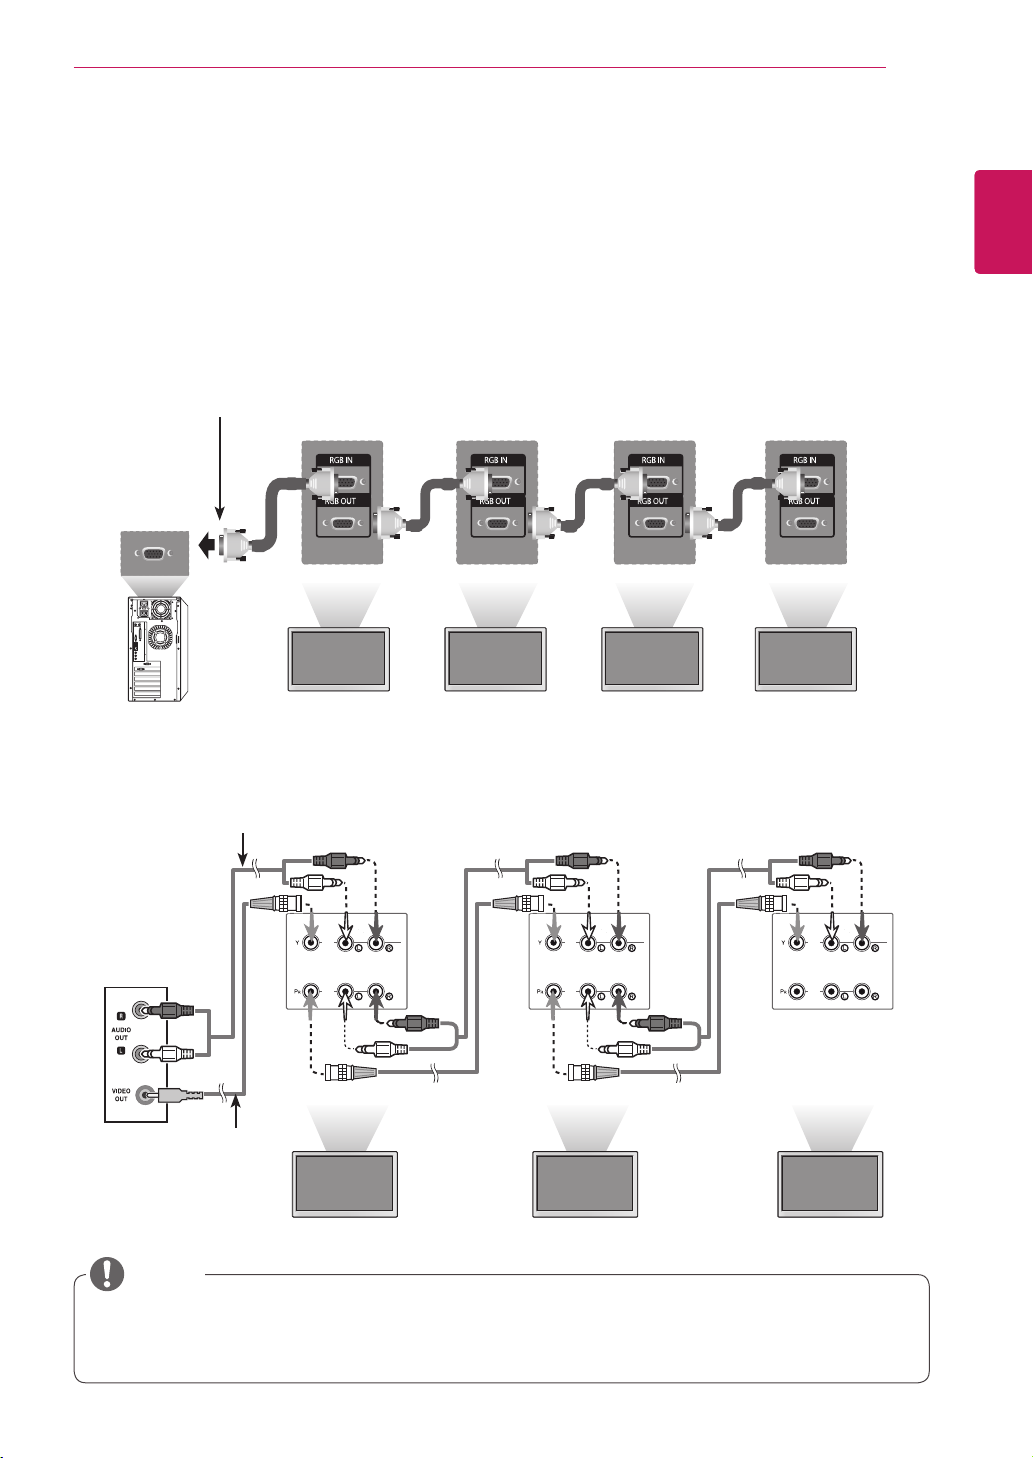
Daisy Chain Monitors
UsethisfunctiontosharetheRGBvideosignalwithothermonitorswithouthavingtouseaseparatesignal
splitterbox.
•TousedifferentproductsconnectedtoeachotherConnectoneendofthesignalinputcable(15-pin
D-SubSignalCable)totheRGBOUTconnectorofproduct1andconnecttheotherendtotheRGBIN
connectorofotherproducts
AV(CVBS) Mode
RGB Mode
15-pinD-SubSignalCable
(Max3m)
AudioCable
(Notincluded)
Product1
Product1
Product2
Product2
Product3
Product3
Product4
BNCCable
(Notincluded)
Whenmulti-connectingin/outcascadeformat,nolosscablesarerecommended.
Werecommendthatyoushouldusecabledistributor.
NOTE

40
ENG
ENGLISH
TROUBLESHOOTING
TROUBLESHOOTING
No image is displayed
Problem Resolution
Istheproductpowercord
connected?
Seeifthepowercordisproperlyconnectedtotheoutlet.
Isthepowerindicatorlighton?
Seeifthepowerswitchisturnedon.
Mayneedservice.
Powerison,powerindicator
isbluebutthescreenappears
extremelydark.
Adjustbrightnessandcontrastagain.
Backlightmayneedrepair.
Thepowerindicatoramber?
Iftheproductisinpowersavingmode,movethemouseorpressany
key.
Turnbothdevicesoffandthenbackon.
Doesthe'Outofrange'
messageappear?
ThesignalfromthePC(videocard)isoutoftheverticalorhorizontal
frequencyrangeoftheproduct.Adjustthefrequencyrangeby
referringtotheSpecificationsinthismanual.
*Maximumresolution
RGB:1920x1080@60Hz
HDMI/DVI:1920x1080@60Hz
Doesthe'Checksignalcable'
messageappear?
ThesignalcablebetweenPCandproductisnotconnected.Check
thesignalcable.
Pressthe'INPUT'menuintheremoteControltochecktheinput
signal.
'Unknown Product' message appears when the product is connected.
Problem Resolution
Didyouinstallthedriver?
Installtheproductdriver,whichisprovidedwiththeproduct,or
downloaditfromthewebsite.(http://www.lg.com)
Seeiftheplug&playfunctionissupportedbyreferringtothevideo
cardusermanual.

41
ENG
ENGLISH
TROUBLESHOOTING
'Key Lock On' message appears.
Problem Resolution
The'KeyLockOn'message
appearswhenpressingthe
Menubutton.
TheLockfunctionpreventstheOSDsettingsfrombeingchanged
inadvertently.Toreleasethelock,gotoMenuandOptionanddisable
theKeyLockoption.
The screen image looks abnormal.
Problem Resolution
Isthescreenpositionwrong?
D-Subanalogsignal-Pressthe"AUTO"buttonintheremotecontrol
toautomaticallyselecttheoptimalscreenstatusthatfitsintothe
currentmode.Ifadjustmentisnotsatisfactory,usethePositionOSD
menu.
Seeifthevideocardresolutionandfrequencyaresupportedbythe
product.Ifthefrequencyisoutofrange,settotherecommended
resolutionintheControlPanel"Display"Settingmenu.
Dothinlinesappearonthe
backgroundscreen?
D-Subanalogsignal-Pressthe"AUTO"buttonintheremotecontrol
toautomaticallyselectanoptimalscreenstatusthatfitsintothe
currentmode.Ifadjustmentisnotsatisfactory,usetheClockOSD
menu.
Horizontalnoiseappearsorthe
characterslookblurred.
D-Subanalogsignal-Pressthe"AUTO"buttonintheremotecontrol
toautomaticallyselectanoptimalscreenstatusthatfitsintothe
currentmode.Ifadjustmentisnotsatisfactory,usethePhaseOSD
menu.
Thescreenisdisplayed
abnormally.
Theproperinputsignalisnotconnectedtothesignalport.Connect
thesignalcablethatmatcheswiththesourceinputsignal.
After-image appears on the product.
Problem Resolution
After-imageappearswhenthe
productisturnedoff.
Ifyouuseafixedimageforalongtime,thepixelsmaybedamaged
quickly.Usethescreen-saverfunction.

42
ENG
ENGLISH
TROUBLESHOOTING
Screen color is abnormal.
Problem Resolution
Screenhaspoorcolorresolution
(16colors).
Setthenumberofcolorstomorethan24bits(truecolor)Select
ControlPanel-Display-Settings-ColorTablemenuinWindows.
Screencolorisunstableor
mono-colored.
Checktheconnectionstatusofthesignalcable.Or,re-insertthePC
videocard.
Doblackspotsappearonthe
screen?
Severalpixels(red,green,whiteorblackcolor)mayappearonthe
screen,whichcanbeattributabletotheuniquecharacteristicsofthe
LCDpanel.ItisnotamalfunctionoftheLCD.
The operation does not work normally.
Problem Resolution
Thepowersuddenlyturnedoff.
Isthesleeptimerset?
Checkthepowercontrolsettings.Powerinterrupted.
"CAUTION!FANSTOP!"
Ifthepoweristurnedoffafterthismessageappears,itmeansthat
thefanisoutoforder.Inthiscase,contactyourlocalservicecenter.
The audio function does not work.
Problem Resolution
Nosound?
Seeiftheaudiocableisconnectedproperly.
Adjustthevolume.
Seeifthesoundissetproperly.
Soundistoodull.
AdjusttheClearVoicell,TrebleandBassappropriately.
Soundistoolow.
Adjustthevolume.

43
ENG
ENGLISH
SPECIFICATIONS
SPECIFICATIONS
LCDPanel ScreenType 1638.3mmWide(64.5inch)TFT(ThinFilmTransistor)
LCD(LiquidCrystalDisplay)Panel.
Visiblediagonalsize:1638.3mm
PixelPitch 0.744mm(H)x0.744mm(V)
VideoSignal Max.Resolution RGB:1920X1080@60Hz
HDMI/DVI:1920X1080@60Hz
-ItmaynotbesupporteddependingontheOSorvideocardtype.
RecommendedResolution RGB:1920X1080@60Hz
HDMI/DVI:1920X1080@60Hz
-ItmaynotbesupporteddependingontheOSorvideocardtype.
HorizontalFrequency
RGB:30kHzto83kHz
HDMI/DVI:30kHzto83kHz
VerticalFrequency RGB:56Hzto75Hz
HDMI/DVI:56Hzto60Hz
SynchronizationType SeparateSync,CompositeSync,Digital
InputConnector 15-pinD-Subtype,HDMI(digital),CompositeVideo,
RS-232C,LAN,USB
Power RatedVoltage AC100-240V~50/60Hz4.6A
PowerConsumption OnMode:480WTyp.
SleepMode:≤1W(RGB)/1W(HDMI/DVI)
OffMode:≤0.5W
Environmental
conditions
OperatingTemperature
OperatingHumidity
0°Cto40°C
10%to80%
StorageTemperature
StorageHumidity
-20°Cto60°C
5%to95%
Productspecificationsshownabovemaybechangedwithoutpriornoticeduetoupgradeofproduct
functions.
SPECIFICATIONS
44
ENG
ENGLISH
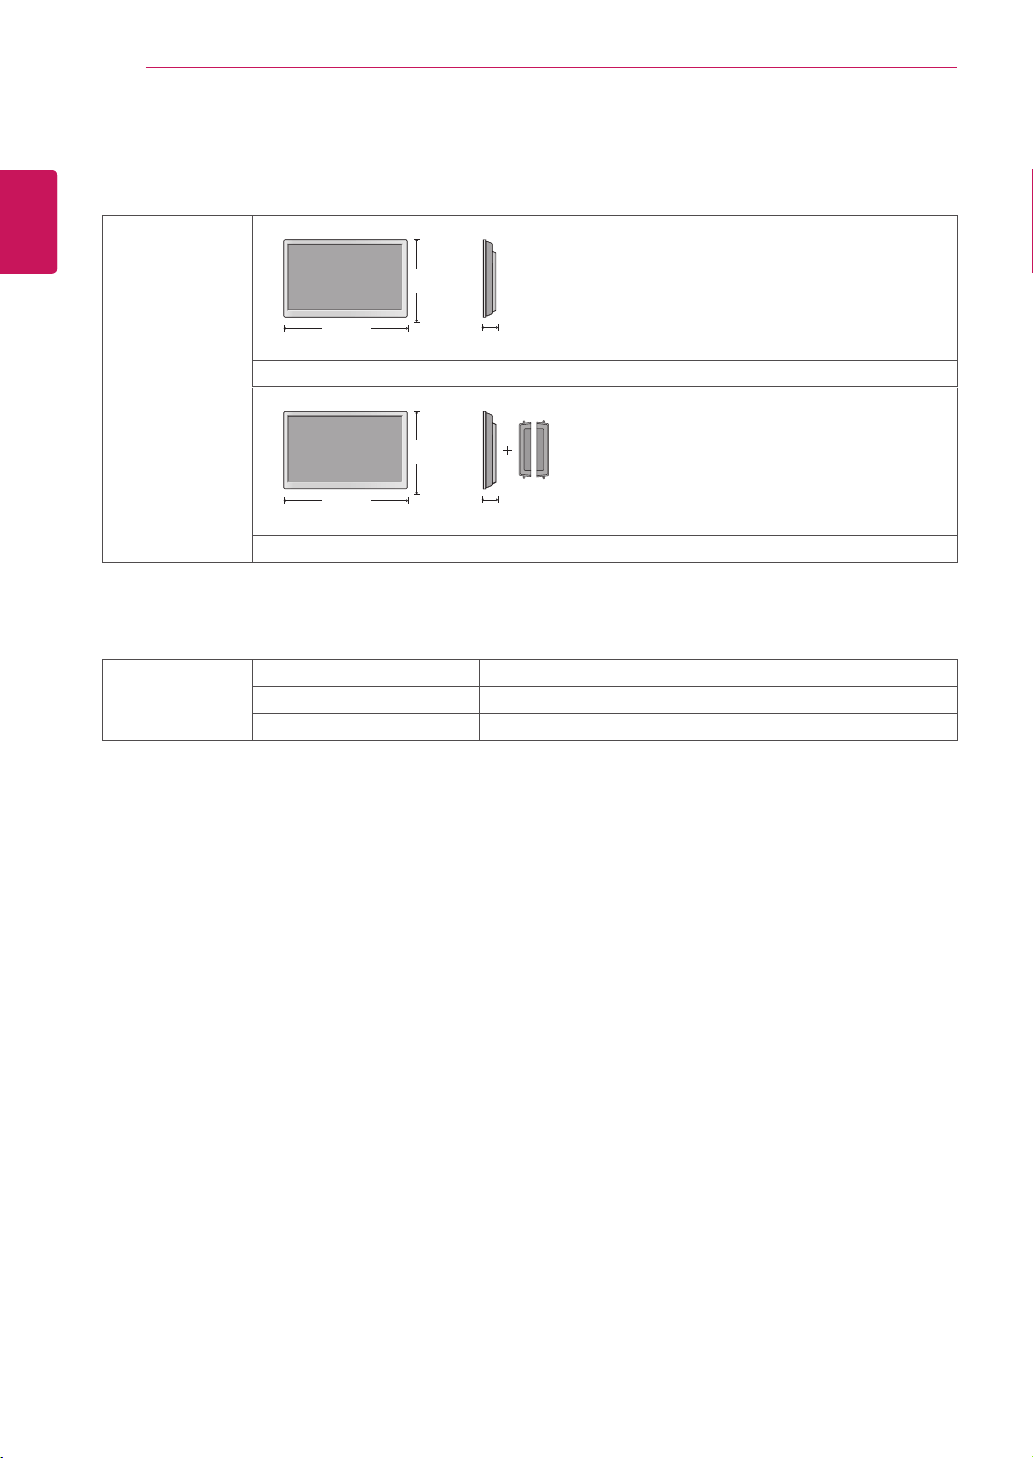
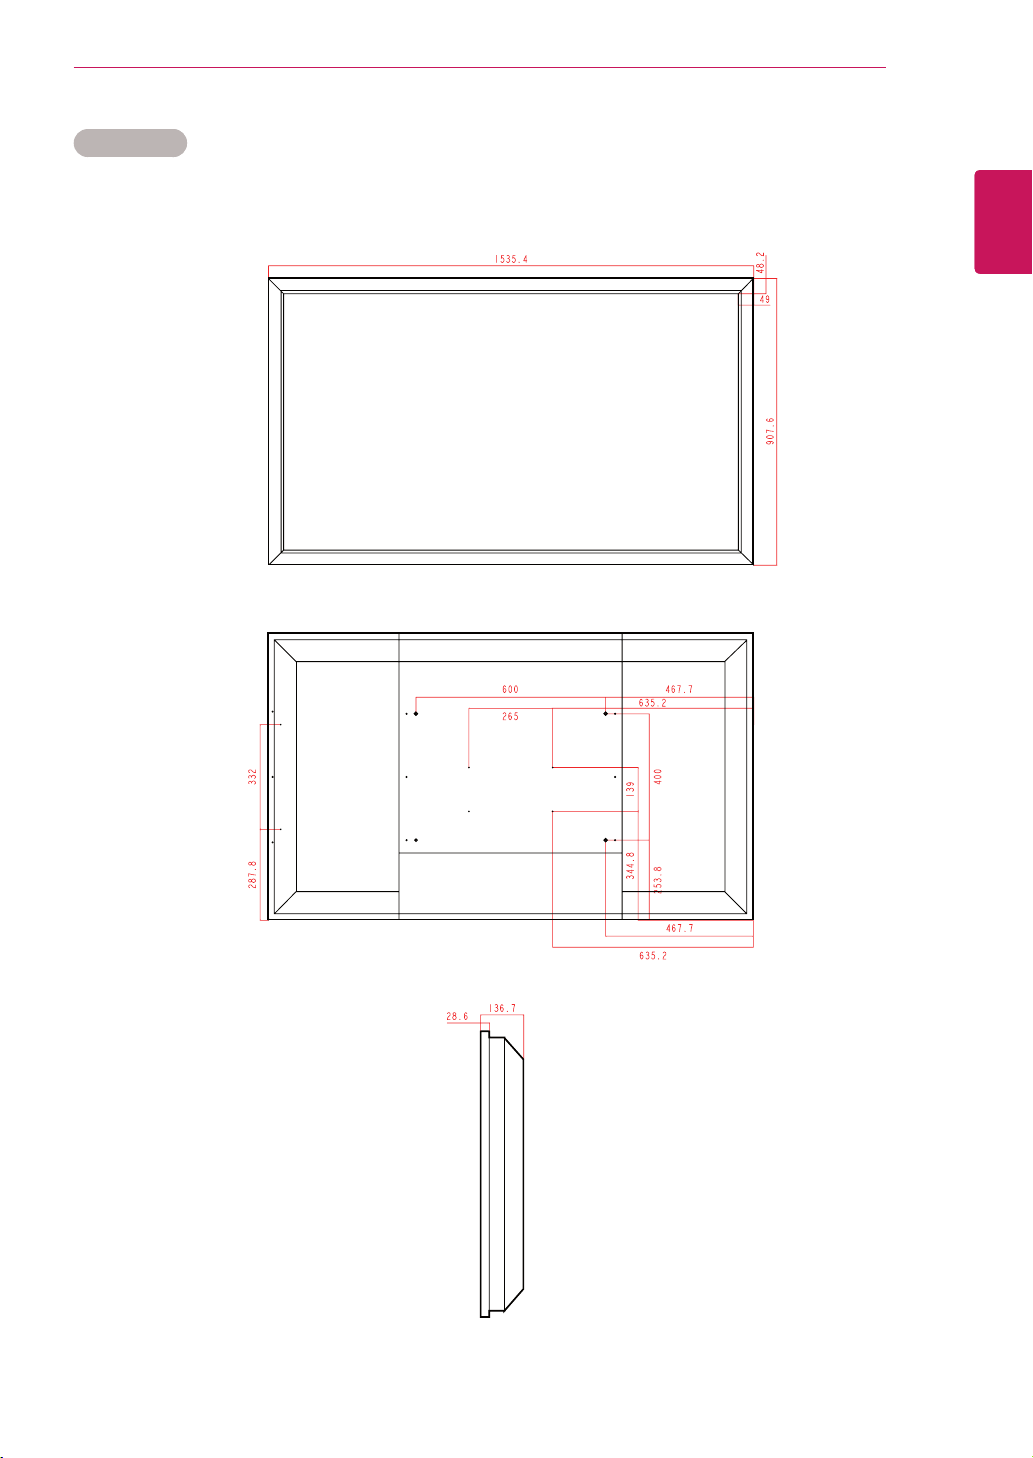
Dimensions
(WidthxHeightx
Depth)/Weight
1535.4mmx136.7mmx907.6mm/51.1kg
1535.4mmx136.7mmx907.6mm/51.85kg
* Applicable only for models that support the speakers
Audio RMSAudioOutput 10W+10W(R+L)
InputSensitivity 0.7Vrms
SpeakerImpedance 8Ω
Productspecificationsshownabovemaybechangedwithoutpriornoticeduetoupgradeofproduct
functions.
H
W
D
H
W
D
SPECIFICATIONS
46
ENG
ENGLISH
RGB (PC) supported mode
Resolution
Horizontal
Frequency(kHz)
Vertical
Frequency(Hz)
640x350
31.469 70.8
720x400
31.468 70.8
640x480
31.469 59.94
640x480
37.5 75
800x600
37.879 60.317
800x600
46.875 75
832x624
49.725 74.55
1024x768
48.363 60
1024x768
60.123 75.029
1280x720
44.772 59.855
1280x768
47.7 60
1360x768
47.72 59.799
1366x768
47.7 60
1280x1024
63.981 60.02
1280x1024
79.98 75.02
1680x1050
65.290 59.954
1920x1080
67.5 60
HDMI/DVI(PC) supported mode
Resolution
Horizontal
Frequency(kHz)
Vertical
Frequency(Hz)
640x480
31.469 59.94
800x600
37.879 60.317
1024x768
48.363 60
1280x720
44.772 59.855
1360x768
47.72 59.799
1366x768
47.7 60
1280x1024
63.981 60.02
1680x1050
65.290 59.954
1920x1080
67.5 60
DTV/PCselectiononRGBandHDMI/DVI
inputsisavailableforPCresolutions:640
x480/60Hz,1280x720/60Hz,1920x
1080/60HzandDTVresolutions:480p,
720p,1080p.
DTV Mode
Resolution Component
HDMI/DVI
(DTV)
480i o x
576i o x
480p o o
576p o o
720p o o
1080i o o
1080p o o
Power Indicator
Mode Product
OnMode Green
SleepMode Amber
OffMode -
NOTE
Verticalfrequency:Toenabletheuserto
watchtheproductdisplay,screenimage
shouldbechangedtensoftimesevery
secondlikeafluorescentlamp.Thevertical
frequencyorrefreshrateisthetimesof
imagedisplaypersecond.TheunitisHz.
Horizontalfrequency:Thehorizontalinterval
isthetimetodisplayonehorizontalline.
When1isdividedbythehorizontalinterval,
thenumberofhorizontallinesdisplayed
everysecondcanbetabulatedasthe
horizontalfrequency.TheunitiskHz.
NOTE
47
ENG
ENGLISH
IR CODES
IR CODES
Thisfeatureisnotavailableforallmodels.
Code (Hexa) Function Note
95 EnergySaving(
ꕊ
) R/CBUTTON
08
(POWER)
R/CBUTTON(POWERON/OFF)
0B INPUT R/CBUTTON
C4 MonitorOn R/CBUTTON(DiscreteIRCode)
C5 MonitorOff R/CBUTTON(DiscreteIRCode)
79 ARC(MARK) R/CBUTTON(DiscreteIRCode)
43 MENU R/CBUTTON
40 Up(
ꕌ
) R/CBUTTON
41 Down(
ꕍ
) R/CBUTTON
07 Left(<) R/CBUTTON
06 Right(>) R/CBUTTON
44 OK(
ꔉ
) R/CBUTTON
28 BACK(
ꕉ
) R/CBUTTON
5B EXIT R/CBUTTON
4D PSM R/CBUTTON
02
(+)
R/CBUTTON
03
(-)
R/CBUTTON
09 MUTE R/CBUTTON
E0 Brightness
ꕌ
(PageUP) R/CBUTTON
E1 Brightness
ꕍ
(PageDown) R/CBUTTON
10to19 NumberKey0to9 R/CBUTTON
72 RedKey R/CBUTTON
71 GreenKey R/CBUTTON
63 YellowKey R/CBUTTON
61 BlueKey R/CBUTTON
7B TILE R/CBUTTON
5A AV(CVBS) DiscreteIRCode(InputAVSelection)
BF Component DiscreteIRCode(InputComponentSelection)
D5 RGBPC DiscreteIRCode(InputRGBPCSelection)
C6 HDMI/DVI DiscreteIRCode(InputHDMI/DVISelection)
76 ARC(4:3) DiscreteIRCode(Only4:3mode)
77 ARC(16:9) DiscreteIRCode(Only16:9mode)
AF ARC(ZOOM) DiscreteIRCode
(OnlyZoom,CinenaZoom1mode)
99 AutoConfig. R/CBUTTON(DiscreteIRCode)
B1
ꕗ
R/CBUTTON
B0
ꕖ
R/CBUTTON
BA
ꕘ
R/CBUTTON
8F
ꕚ
R/CBUTTON
8E
ꕙ
R/CBUTTON
48
ENG
ENGLISH
CONTROLLING THE MULTIPLE PRODUCT
CONTROLLING THE MULTIPLE PRODUCT
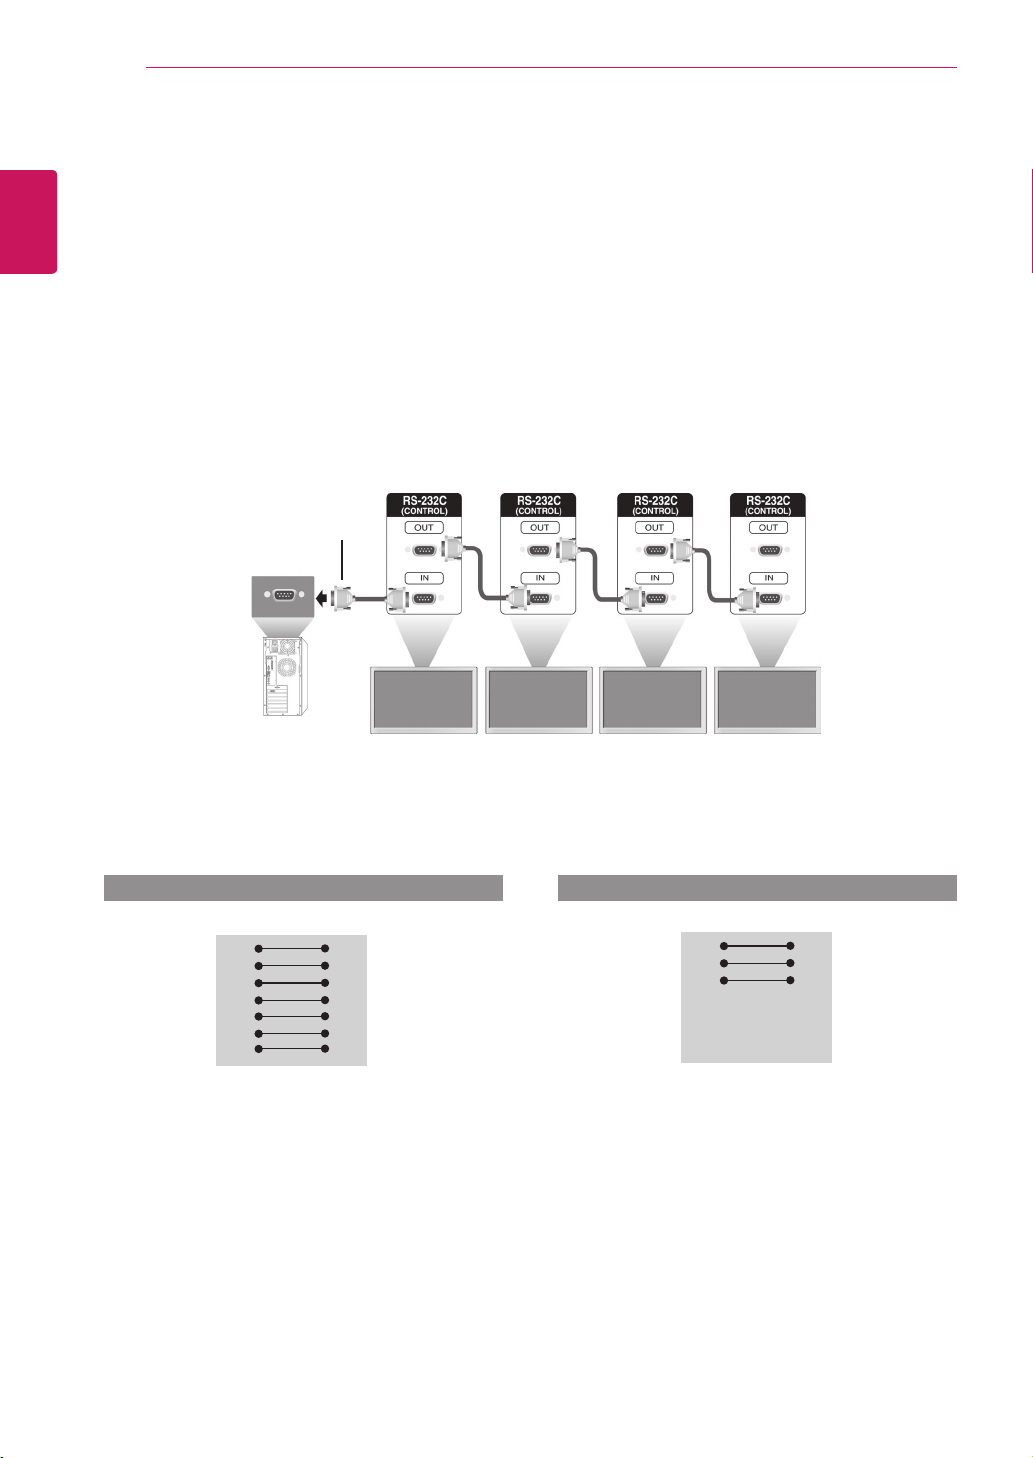
UsethismethodtoconnectseveralproductstoasinglePC.Youcancontrolseveralproductsata
timebyconnectingthemtoasinglePC.
IntheOptionmenu,SetIDmustbebetween1and99withoutbeingduplicated.
Connecting the cable
ConnecttheRS-232Ccableasshowninthepicture.
TheRS-232CprotocolisusedforcommunicationbetweenthePCandproduct.Youcanturnthe
producton/off,selectaninputsourceoradjusttheOSDmenufromyourPC.
Communication Parameter
MonitorSet1 MonitorSet2 MonitorSet3 MonitorSet4
PC
RS-232CCable
(notincluded)
RS-232C Configurations
RXD
TXD
GND
DTR
DSR
RTS
CTS
RXD
TXD
GND
DTR
DSR
RTS
CTS
TXD
RXD
GND
DSR
DTR
CTS
RTS
TXD
RXD
GND
DSR
DTR
CTS
RTS
PC Set PC Set
2
3
5
4
6
7
8
3
2
5
6
4
8
7
D-Sub 9 D-Sub 9
(Female) (Female)
D-Sub 9 D-Sub 9
(Female) (Female)
2
3
5
4
6
7
8
3
2
5
6
4
7
8
BaudRate:9600buadRate(UART)
DataLength:8bit
ParityBit:None
StopBit:1bit
FlowControl:None
CommunicationCode:ASCIIcode
Useacrossed(reverse)cable
7-WireConfigurations(StandardRS-232Ccable)
3-WireConfigurations(NotStandard)

49
ENG
ENGLISH
CONTROLLING THE MULTIPLE PRODUCT
Command reference list
COMMAND DATA
1 2 1 2 3
01.Power k a 00Hto01H
02.AspectRatio k c 01Hto1FH
03.ScreenMute k d 00Hto01H
04.VolumeMute k e 00Hto01H
05.VolumeControl k f 00Hto64H
06.Contrast k g 00Hto64H
07.Brightness k h 00Hto64H
08.Color k i 00Hto64H
09.Tint k j 00Hto64H
10.Sharpness k k 00Hto64H
11.OSDSelect k l 00Hto01H
12.RemoteLock/keyLock k m 00Hto01H
13.Balance k t 00Hto64H
14.ColorTemperature k u 00Hto02H
15.Abnomalstate k z FFH
16.ISMmode j p 01Hto08H
17.Autoconfiguration j u 01H
18.Key m c KeyCode
19.TileMode d d 00Hto55H
20.TileHPosition d e 00Hto14H
21.TileVPosition d f 00Hto14H
22.TileHSize d g 00Hto64H
23.TileVSize d h 00Hto64H
24.TileIDSet d i 00Hto19H
25.NaturalMode(InTilemode) d j 00Hto01H
26.Picturemode(PSM) d x 00Hto06H
27.Soundmode d y 00Hto05H
28.FanFaultcheck d w FFH
29.Elapsedtimereturn d l FFH
30.Temperaturevalue d n FFH
31.Lampfaultcheck d p FFH
32.AutoVolume d u 00Hto01H
33.Speaker d v 00Hto01H
34.Time f a 00Hto06H 00Hto17H 00Hto3BH
35.OnTimer(On/OffTimer)Time f d F1HtoF4H
E0HtoE4H
01Hto80H
00Hto17H 00Hto3BH
36.OffTimer(On/OffTimer)Time f e F1HtoF4H
E0HtoE4H
01Hto80H
00Hto17H 00Hto3BH
37.Schedulinginputselect f u F1HtoF4H 02Hto09H
38.SleepTime f f 00Hto08H

50
ENG
ENGLISH
CONTROLLING THE MULTIPLE PRODUCT
COMMAND DATA
1 2 1 2 3
39.AutoSleep f g 00Hto01H
40.PowerOnDelay f h 00Hto64H
41.Language f i 00Hto09H
42.DPMSelect f j 00Hto01H
43.Reset f k 00Hto02H
44.PowerSaving f l 00Hto03H
45.PowerIndicator f o 00Hto01H
46.Serialno. f y FFH
47.S/WVersion f z FFH
48.InputSelect x b 20HtoA0H
Note:DuringUSBoperationssuchasDvixorEMF,allcommandsexceptPower(ka)andKey(mc)are
notexecutedandtreatedasNG.

51
ENG
ENGLISH
CONTROLLING THE MULTIPLE PRODUCT
Transmission
[Command1][Command2][][SetID][][Data][Cr]
*[Command1]:Firstcommand.(k,j,m,d,f,x)
*[Command2]:Secondcommand.(atou)
*[SetID]:SetuptheSetIDnumberofproduct.
range:01Hto63H.bysetting'0',servercancontrolallproducts.
*Incaseofoperatingwithmorethan2setsusingsetIDas'0'atthesametime,itshouldnotbecheckedtheack
message.Becauseallsetswillsendtheackmessage,soit'simpossiblethecheckthewholeackmessages.
*[DATA]:Totransmitcommanddata.
Transmit'FF'datatoreadstatusofcommand.
*[Cr]:CarriageReturn(ASCIIcode'0x0D')
*[]:ASCIIcodeSpace(0x20)
OK Acknowledgement
[Command2][][SetID][][OK][Data][x]
*TheProducttransmitsACK(acknowledgement)basedonthisformatwhenreceivingnormaldata.Atthistime,
ifthedataisdatareadmode,itindicatespresentstatusdata.Ifthedataisdatawritemode,itreturnsthedataof
thePCcomputer.
Error Acknowledgement
[Command2][][SetID][][NG][Data][x]
*Ifthereiserror,itreturnsNG
Transmission / Receiving protocol

52
ENG
ENGLISH
CONTROLLING THE MULTIPLE PRODUCT
03. Screen Mute (Command: k d)
Toselectscreenmuteon/off.
Transmission
[k][d][][SetID][][Data][Cr]
Data00:Screenmuteoff(Pictureon)
01:Screenmuteon(Pictureoff)
Acknowledgement
[d][][SetID][][OK][Data][x]
04. Volume Mute (Command: k e)
TocontrolOn/OffoftheVolumeMute.
Transmission
[k][e][][SetID][][Data][Cr]
Data00:VolumeMuteOn(VolumeOff)
01:VolumeMuteOff(VolumeOn)
Acknowledgement
[e][][SetID][][OK][Data][x]
Data00:VolumeMuteOn(VolumeOff)
01:VolumeMuteOff(VolumeOn)
01. Power (Command: k a)
TocontrolPowerOn/Offoftheset.
Transmission
[k][a][][SetID][][Data][Cr]
Data00:PowerOff Data01:PowerOn
Acknowledgement
[a][][SetID][][OK][Data][x]
ToshowthestatusofPowerOn/Off.
Transmission
[k][a][][SetID][][FF][Cr]
Acknowledgement
[a][][SetID][][OK][Data][x]
Data00:PowerOff Data01:PowerOn
02. Aspect Ratio (Command: k c)
Toadjustthescreenformat.
YoucanalsoadjustthescreenformatusingtheARC
(AspectRatioControl)buttononremotecontrolorin
theScreenmenu.
Transmission
[k][c][][SetID][][Data][Cr]
Data01:NormalScreen(4:3)
02:WideScran(16:9)
04:Zoom(AV(CVBS),Component,HDMI-DTV)
06:Original(AV(CVBS))
07:14:9(AV(CVBS),Component,HDMI-DTV)
09:JustScan(HDDTV)
*WhentheRGB,HDMI-PCmode(1:1)
10to1F:CinemaZoom1to16
(AV(CVBS),Component,HDMI-DTV)
B:FullWide(AV(CVBS))
Acknowledgement
[c][][SetID][][OK][Data][x]

53
ENG
ENGLISH
CONTROLLING THE MULTIPLE PRODUCT
05. Volume Control (Command: k f)
ToadjustVolume.
Transmission
[k][f][][SetID][][Data][Cr]
DataMin:00HtoMax:64H
(Hexadecimalcode)
Acknowledgement
[f][][SetID][][OK][Data][x]
DataMin:00HtoMax:64H
*Realdatamapping
0:STEP0
:
A:STEP10
:
F:STEP15
10:STEP16
:
64:STEP100
06. Contrast (Command: k g)
Toadjustscreencontrast.
YoucanalsoadjustthecontrastinthePicturemenu.
Transmission
[k][g][][SetID][][Data][Cr]
DataMin:00HtoMax:64H
Acknowledgement
[g][][SetID][][OK][Data][x]
DataMin:00HtoMax:64H
*Referto'Realdatamapping’.Seep.53
07. Brightness (Command: k h)
Toadjustscreenbrightness.
YoucanalsoadjustthebrightnessinthePicture
menu.
Transmission
[k][h][][SetID][][Data][Cr]
DataMin:00HtoMax:64H
(Hexadecimalcode)
*Referto'Realdatamapping’.Seep.53
Acknowledgement
[h][][SetID][][OK][Data][x]
*Referto'Realdatamapping’.Seep.53
08. Color (Command: k i) (Video Timing only)
Toadjustthescreencolor.
YoucanalsoadjustthecolorinthePicturemenu.
Transmission
[k][i][][SetID][][Data][Cr]
DataMin:00HtoMax:64H
(Hexadecimalcode)
*Referto'Realdatamapping’.Seep.53
Acknowledgement
[i][][SetID][][OK][Data][x]
DataMin:00HtoMax:64H
09. Tint (Command: k j)
Toadjustthescreentint.
YoucanalsoadjustthetintinthePicturemenu.
Transmission
[k][j][][SetID][][Data][Cr]
DataMin:00HtoMax:64H
(Hexadecimalcode)
00H:StepR50
64H:StepG50
Acknowledgement
[j][][SetID][][OK][Data][x]
DataMin:00HtoMax:64H
*TintRealdatamapping
0:Step0toRed
:
64:Step100toGreen
10. Sharpness (Command: k k) (Video input only)
ToadjustthescreenSharpness.
YoucanalsoadjustthesharpnessinthePicture
menu.
Transmission
[k][k][][SetID][][Data][Cr]
DataMin:00HtoMax:64H
(Hexadecimalcode)
*Referto'Realdatamapping’.Seep.53
Acknowledgement
[k][][SetID][][OK][Data][x]
DataMin:00HtoMax:64H

54
ENG
ENGLISH
CONTROLLING THE MULTIPLE PRODUCT
11. OSD Select (Command: k l)
TocontrolOSDon/offtotheset.
Transmission
[k][l][][SetID][][Data][Cr]
Data00:OSDOff Data01:OSDOn
Acknowledgement
[l][][SetID][][OK][Data][x]
Data00:OSDOff Data01:OSDOn
12. Remote Lock /Key Lock (Command: k m)
TocontrolRemoteLockon/offtotheset.
Thisfunction,whencontrollingRS-232C,locksthe
remotecontrolandthelocalkeys.
Transmission
[k][m][][SetID][][Data][Cr]
Data00:Off Data01:On
Acknowledgement
[m][][SetID][][OK][Data][x]
Data00:Off Data01:On
13. Balance (Command: k t)
Toadjustthesoundbalance.
Transmission
[k][t][][SetID][][Data][Cr]
DataMin:00HtoMax:64H
(Hexadecimalcode)
00H:StepL50
64H:StepR50
Acknowledgement
[t][][SetID][][OK][Data][x]
DataMin:00HtoMax:64H
(Hexadecimalcode)
00H:Step0toL50
64H:Step100toR50
*Balance:L50toR50
14. Color Temperature (Command: k u)
Toadjustthescreencolortemperature.
Transmission
[k][u][][SetID][][Data][Cr]
Data00:Medium
01:Cool
02:Warm
Acknowledgement
[u][][SetID][][OK][Data][x]
Data00:Medium
01:Cool
02:Warm
15. Abnormal state (Command: k z)
UsedtoReadthepoweroffstatuswhenStand-by
mode.
Transmission
[k][z][][SetID][][Data][Cr]
DataFF:Read
Acknowledgement
[z][][SetID][][OK][Data][x]
Data00:Normal(Poweronandsignalexist)
01:Nosignal(Poweron)
02:Turnthemonitoroffbyremotecontrol
03:Turnthemonitoroffbysleeptimefunction
04:TurnthemonitoroffbyRS-232Cfunction
08:Turnthemonitoroffbyofftimefunction
09:Turnthemonitoroffbyautoofffunction
16. ISM mode (Command: j p)
Usedtoselecttheafterimagepreventingfunction.
Transmission
[j][p][][SetID][][Data][Cr]
Data01:Inversion
02:Orbiter
04:WhiteWash
08:Normal
Acknowledgement
[p][][SetID][][OK][Data][x]

55
ENG
ENGLISH
CONTROLLING THE MULTIPLE PRODUCT
20. Tile H Position (Command: d e)
TosettheHorizontalposition.
Transmission
[d][e][][SetID][][Data][Cr]
DataMin:00HtoMax:14H
00H:Step-10(Left)
14H:Step10(Right)
Acknowledgement
[e][][SetID][][OK/NG][Data][x]
21. Tile V Position (Command: d f)
TosettheVerticalposition.
Transmission
[d][f][][SetID][][Data][Cr]
DataMin:00HtoMax:14H
00H:Step-10(Down)
14H:Step10(Up)
Acknowledgement
[f][][SetID][][OK/NG][Data][x]
22. Tile H Size (Command: d g)
TosettheHorizontalsize.
Transmission
[d][g][][SetID][][Data][x]
DataMin:00HtoMax:64H
*Referto'Realdatamapping’.Seep.53
Acknowledgement
[g][][SetID][][OK/NG][Data][x]
17. Auto Configure (Command: j u)
Toadjustpicturepositionandminimizeimage
shaking.
Automatically.NB:OnlyappliestoRGB(PC)mode.
Transmission
[j][u][][SetID][][Data][Cr]
Data01:Toset
Acknowledgement
[u][][SetID][][OK][Data][x]
18. Key (Command: m c)
TosendIRremotekeycode.
Transmission
[m][c][][SetID][][Data][Cr]
DataKeycode:Referto‘IRCODES’.Seep.47
Acknowledgement
[c][][SetID][][OK][Data][x]
19. Tile Mode (Command: d d)
ChangeaTileMode.
Transmission
[d][d][][SetID][][Data][Cr]
Data Description
00or11 Tilemodeisoff.
12 1x2mode(columnxrow)
13 1x3mode
14 1x4mode
...
...
55 1x2mode
*Thedatacannotbesetto0XorX0except00.
Acknowledgement
[d][][SetID][][OK/NG][Data][x]

56
ENG
ENGLISH
CONTROLLING THE MULTIPLE PRODUCT
23. Tile V Size (Command: d h)
TosettheVerticalsize.
Transmission
[d][h][][SetID][][Data][x]
DataMin:00HtoMax:64H
*Referto'Realdatamapping’.Seep.53
Acknowledgement
[h][][SetID][][OK/NG][Data][x]
24. Tile ID Set (Command: d i)
ToassigntheTileIDforTilingfunction.
Transmission
[d][i][][SetID][][Data][x]
DataMin:00HtoMax:19H
(Hexadecimalcode)
Acknowledgement
[i][][SetID][][OK/NG][Data][x]
25. Natural Mode (Command: d j)
ToassigntheTileNaturalmodeforTilingfunction.
Transmission
[d][j][][SetID][][Data][x]
Data00:NaturalOff
01:NaturalOn
ff:ReadStatus
Acknowledgement
[j][][SetID][][OK/NG][Data][x]
26. Picture Mode (Command: d x)
Toadjustthepicturemode.
Transmission
[d][x][][SetID][][Data][x]
DataStructure
Data(Hex) Mode
00 Vivid
01 Standard
02 Cinema
03 Sport
04 Game
05 Export1
06 Export2
Acknowledgement
[x][][SetID][][OK/NG][Data][x]
27. Sound Mode (Command: d y)
ToadjusttheSoundmode.
Transmission
[d][y][][SetID][][Data][x]
DataStructure
Data(Hex) Mode
01 Standard
02 Music
03 Cinema
04 Sport
05 Game
Acknowledgement
[y][][SetID][][OK/NG][Data][x]
28. Fan Fault check (Command: d w)
TochecktheFanfaultoftheSet.
Transmission
[d][w][][SetID][][Data][x]
*ThedataisalwaysFF(inHex).
Dataff:ReadStatus
Acknowledgement
[w][][SetID][][OK/NG][Data][x]
*DataisthestatusvalueoftheFanfault.
Data00:Fanfault
01:FanOk
02:N/A(NotAvaliable)

57
ENG
ENGLISH
CONTROLLING THE MULTIPLE PRODUCT
29. Elapsed time return (Command: d l)
Toreadtheelapsedtime.
Transmission
[d][l][][SetID][][Data][x]
*ThedataisalwaysFF(inHex).
Acknowledgement
[l][][SetID][][OK/NG][Data][x]
*ThedataisalwaysFF(inHex).
(Hexadecimalcode)
30. Temperature value (Command: d n)
Toreadtheinsidetemperaturevalue.
Transmission
[d][n][][SetID][][Data][x]
*ThedataisalwaysFF(inHex).
Acknowledgement
[n][][SetID][][OK/NG][Data][x]
*Thedatais1bytelonginHexadecimal.
31. Lamp fault Check (Command: d p)
Tochecklampfault.
Transmission
[d][p][][SetID][][Data][x]
*ThedataisalwaysFF(inHex).
Acknowledgement
[p][][SetID][][OK/NG][Data][x]
*Thedatais1bytelonginHexadecimal.
Data00:LampFault
01:LampOk
02:N/A(DPM/PowerOff)
32. Auto volume (Command: d u)
Automaticallyadjustthevolumelevel.
Transmission
[d][u][][SetID][][Data][x]
Data00:Off Data01:On
Acknowledgement
[u][][SetID][][OK/NG][Data][x]
33. Speaker (Command: d v)
Turnthespeakeronoroff.
Transmission
[d][v][][SetID][][Data][x]
Data00:Off Data01:On
Acknowledgement
[v][][SetID][][OK/NG][Data][x
34. Time (Command: f a)
Setthecurrenttime.
Transmission
[f][a][][SetID][][Data1][][Data2][][Data3][Cr]
[Data1]
00:Monday
01:Tuesday
02:Wednesday
03:Thursday
04:Friday
05:Saturday
06:Sunday
[Data2]
0Hto17H(Hours)
[Data3]
00Hto3BH(Minutes)
Acknowledgement
[a][][SetID][][OK/NG][Data1][Data2][Data3][x]
*Whenreadingdata,FFHisinputtedfor[Data1],
[Data2]and[Data3].Inothercases,allaretreatedas
NG.

58
ENG
ENGLISH
CONTROLLING THE MULTIPLE PRODUCT
35. On Timer (On/Off Timer) Time (Command: f d)
SetOnTimer.
Transmission
[f][d][][SetID][][Data1][][Data2][][Data3][Cr]
[Data1]
1.f1htof4h(readoneindex)
f1:read1stindexofOnTimeList
f2:read2ndindexofOnTimeList
f3:read3rdindexofOnTimeList
f4:read4thindexofOnTimeList
2.e1h~e4h(deleteoneindex),e0h(deleteallindexes)
e0:deleteallindexesofOnTimeList
e1:delete1stindexofOnTimeList
e2:delete2ndindexofOnTimeList
e3:delete3rdindexofOnTimeList
e4:delete4thindexofOnTimeList
3.01hto80h(write)(DayofWeek)
bit0(01h):Monday
bit1(02h):Tuesday
bit2(04h):Wednesday
bit3(08h):Thursday
bit4(10h):Friday
bit5(20h):Saturday
bit6(40h):Sunday
bit7(80h):Everyday
(1fh):MondaytoFriday
(3fh):MondaytoSaturday
(60h):SaturdaytoSunday
[Data2]
00hto17h(Hours)
[Data3]
00hto3bh(Minutes)
*Whenyouread/deletethecurrentontimelist,allof
[Data2][Data3]arehavetobeFFH.
(ex1:fd01f1ffff-whenyouread1stindexofOn
TimeList
ex2:fd01e1ffff-whenyoudelete1stindexofOn
TimeList
ex3:fd013f0203-whenyouwriteoneOnTime
Data,"MondaytoSaturday,02:03"
Acknowledgement
[d][][SetID][][OK][Data1][Data2][Data3][x]
36. Off Timer (On/Off Timer) Time (Command: f e)
SetOffTimer.
Transmission
[f][e][][SetID][][Data1][][Data2][][Data3][Cr]
[Data1]
1.f1htof4h(readoneindex)
f1:read1stindexofOffTimeList,
f2:read2ndindexofOffTimeList
f3:read3rdindexofOffTimeList
f4:read4thindexofOffTimeList
2.e1htoe4h(deleteoneindex),e0h(deleteall
indexes)
e0:deleteallindexesofOffTimeList
e1:delete1stindexofOffTimeList
e2:delete2ndindexofOffTimeList
e3:delete3rdindexofOffTimeList
e4:delete4thindexofOffTimeList
3.01hto80h(write)(DayofWeek)
bit0(01h):Monday
bit1(02h):Tuesday
bit2(04h):Wednesday
bit3(08h):Thursday
bit4(10h):Friday
bit5(20h):Saturday
bit6(40h):Sunday
bit7(80h):Everyday
(1fh):MondaytoFriday
(3fh):MondaytoSaturday
(60h):SaturdaytoSunday
[Data2]
00hto17h(Hours)
[Data3]
00hto3bh(Minutes)
*Whenyouread/deletethecurrentontimelist,allof
[Data2][Data3]arehavetobeFFH.
(ex1:fd01f1ffff-whenyouread1stindexofOff
TimeList
ex2:fd01e1ffff-whenyoudelete1stindexofOff
TimeList
ex3:fd013f0203-whenyouwriteoneOffTime
Data,"MondaytoSaturday,02:03")
Acknowledgement
[e][][SetID][][OK][Data1][Data2][Data3][x]

59
ENG
ENGLISH
CONTROLLING THE MULTIPLE PRODUCT
37. Scheduling Input select (Command: f u) (Main
Picture Input)
ToselectinputsourceforSetdependingonday.
Transmission
[f][u][][SetID][][Data1][][Data2][Cr]
[Data1]
1.f1htof4h(write/readoneindex)
f1:read1stindexofSchedulingInput
f2:read2ndindexofSchedulingInput
f3:read3rdindexofSchedulingInput
f4:read4thindexofSchedulingInput
[Data2]
Input
Data(Hex) Input
02 AV(CVBS)
04 Component
07 RGB-PC
08 HDMI/DVI-HD-DVD
09 HDMI/DVI-PC
*Whenyouread/deletethecurrentSchedulingInput,
[Data2]needstobeFFH.
(ex1:fu01f1ff-whenyouread1stindexof
SchedulingInput.
ex2:fu01f302-whenyouwriteoneScheduling
InputDatainto3rdindex,"AV(CVBS)")
Acknowledgement
[u][][SetID][][OK][Data1][Data2][x]
38. Sleep Time (Command: f f)
SetSleepTime.
Transmission
[f][f][][SetID][][Data][Cr]
Data00:Off
01:10
02:20
03:30
04:60
05:90
06:120
07:180
08:240
Acknowledgement
[f][][SetID][][OK/NG][Data][x]
39. Auto Sleep (Command: f g)
SetAutoSleep.
Transmission
[f][g][][SetID][][Data][Cr]
Data00:Off
01:On
Acknowledgement
[g][][SetID][][OK/NG][Data][x]
40. Power On Delay (Command: f h)
Setthescheduledelaywhenthepoweristurnedon
(Unit:second).
Transmission
[f][h][][SetID][][Data][Cr]
Data:00Hto64H(Datavalue)
*Referto'Realdatamapping’.Seep.53
Acknowledgement
[h][][SetID][][OK/NG][Data][x]

60
ENG
ENGLISH
CONTROLLING THE MULTIPLE PRODUCT
41. Language (Command: f i)
SettheOSDlanguage.
Transmission
[f][i][][SetID][][Data][Cr]
Data00:English
01:French
02:German
03:Spanish
04:Italian
05:Portuguese
06:Chinese
07:Japanese
08:Korean
09:Russian
Acknowledgement
[i][][SetID][][OK/NG][Data][x]
42. DPM Select (Command: f j)
SettheDPM(DisplayPowerManagement)function.
Transmission
[f][j][][SetID][][Data][Cr]
Data00:Off
01:On
Acknowledgement
[j][][SetID][][OK/NG][Data][x]
43. Reset (Command: f k)
SettheDPM(DisplayPowerManagement)function.
Transmission
[f][k][][SetID][][Data][Cr]
Data00:PictureReset
01:ScreenReset
02:FactoryReset
Acknowledgement
[k][][SetID][][OK/NG][Data][x]
44. Power saving (Command: f l)
TosetthePowersavingmode.
Transmission
[f][l][][SetID][][Data][Cr]
Data00:Off
01:staticlevel1
02:staticlevel2
03:staticlevel3
Acknowledgement
[l][][SetID][][OK/NG][Data][x]
45. Power Indicator (Command: f o)
TosettheLEDforPowerIndicator
Transmission
[f][o][][SetID][][Data][Cr]
Data00:Off
01:On
Acknowledgement
[o][][SetID][][OK/NG][Data][x]
46. Serial no.Check (Command: f y)
ChecktheSerialno.
Transmission
[f][y][][SetID][][Data][Cr]
DataFF(toreadtheserialnumbers)
Acknowledgement
[y][][SetID][][OK/NG][Data1]to[Data13][x]
*ThedataformatisASCIICode.

61
ENG
ENGLISH
CONTROLLING THE MULTIPLE PRODUCT
47. S/W Version (Command: f z)
Checkthesoftwareversion.
Transmission
[f][z][][SetID][][Data][Cr]
DataFFH:Read
Acknowledgement
[z][][SetID][][OK/NG][Data][x]
48. Input Select (Command: x b)
ToselectinputsourcefortheSet.
Transmission
[x][b][][SetID][][Data][Cr]
Data20H:AV(CVBS)
40H:Component
60H:RGB(PC)
90H:HDMI/DVI(DTV)
A0H:HDMI/DVI(PC)
Acknowledgement
[b][][SetID][][OK/NG][Data][x]
Data20H:AV(CVBS)
40H:Component
60H:RGB(PC)
90H:HDMI/DVI(DTV)
A0H:HDMI/DVI(PC)

Make sure to read the Safety Precautions
before using the product.
Keep the Owner's Manual(CD) in an accessible
place for future reference.
The model and serial number of the SET is
located on the back and one side of the SET.
Record it below should you ever need service.
MODEL
SERIAL
TemporarynoiseisnormalwhenpoweringONor
OFFthisdevice.