LC-55LE643U LC-65LE643U
TM
ENGLISHESPAÑOL
LIQUID CRYSTAL TELEVISION
TELEVISOR CON PANTALLA DE
CRISTAL LÍQUIDO
TÉLÉVISEUR À CRISTAUX LIQ-
UIDES
OPERATION MANUAL
MANUAL DE OPERACIÓN
Mode d’emploi
IMPORTANT : Please read this operation manual before
starting operating the equipment.
IIMPORTANTE : Lea este manual de operación antes de
comenzar a operar el equipo.
IMPORTANT :
Veuillez lire le présent manuel d’utilisation
avant de commencer à utiliser l’appareil.
FRANÇAIS
1
IMPORTANT INFORMATION
INFORMATION:
This equipment has been tested and found to comply with the limits for a Class B digital device,
pursuant to Part 15 of the FCC Rules. These limits are designed to provide reasonable protection
against harmful interference in a residential installation. This equipment generates, uses and can
radiate radio frequency energy and, if not installed and used in accordance with the instructions, may
cause harmful interference to radio communications. However, there is no guarantee that interference
will not occur in a particular installation. If this equipment does cause harmful interference to radio
or television reception, which can be determined by turning the equipment off and on, the user is
encouraged to try to correct the interference by one or more of the following measures:
—
Reorient or relocate the receiving antenna.
—
Increase the separation between the equipment and receiver.
—
Connect the equipment into an outlet on a circuit different from that to which the receiver is connected.
—
Consult the dealer or an experienced radio/TV technician for help.
FCC Compliance Statement
This device complies with part 15 of the FCC Rules. Operation is subject to the following two conditions:
(1) This device may not cause harmful interference, and (2) this device must accept any interference
received, including interference that may cause undesired operation.
Wireless Radio
For product available in the USA/Canada market, only channel 1–11 can be operated. Selection of
other channels is not possible. This device is going to be operated in 5.15–5.25GHz frequency range,
it is restricted in indoor environment only.
Important: Any changes or modications not expressly approved by the party responsible for
compliance could void the user’s authority to operate the equipment.
FCC Radiation Exposure Statement: This equipment complies with FCC radiation exposure limits set
forth for an uncontrolled environment. This equipment should be installed and operated with minimum
distance 20cm between the radiator & your body.
Industry Canada Statement
This Class B digital apparatus complies with CAN ICES-003(B)/NMB-3(B)
Wireless Radio
For product available in the USA/Canada market, only channel 1–11 can be operated. Selection of
other channels is not possible.
The device could automatically discontinue transmission in case of absence of information to transmit,
or operational failure.
Note that this is not intended to prohibit transmission of control or signaling information or the use of
repetitive codes where required by the technology.
Important: Any changes or modications not expressly approved by the party responsible for
compliance could void the user’s authority to operate the equipment.
IC Radiation Exposure Statement: This device complies with IC RSS-210 rules; Operation is subject
to the following two conditions:
(1) This device may not cause harmful interference, and (2) this device must accept interference
recieved, including interference that may cause undesired operation.
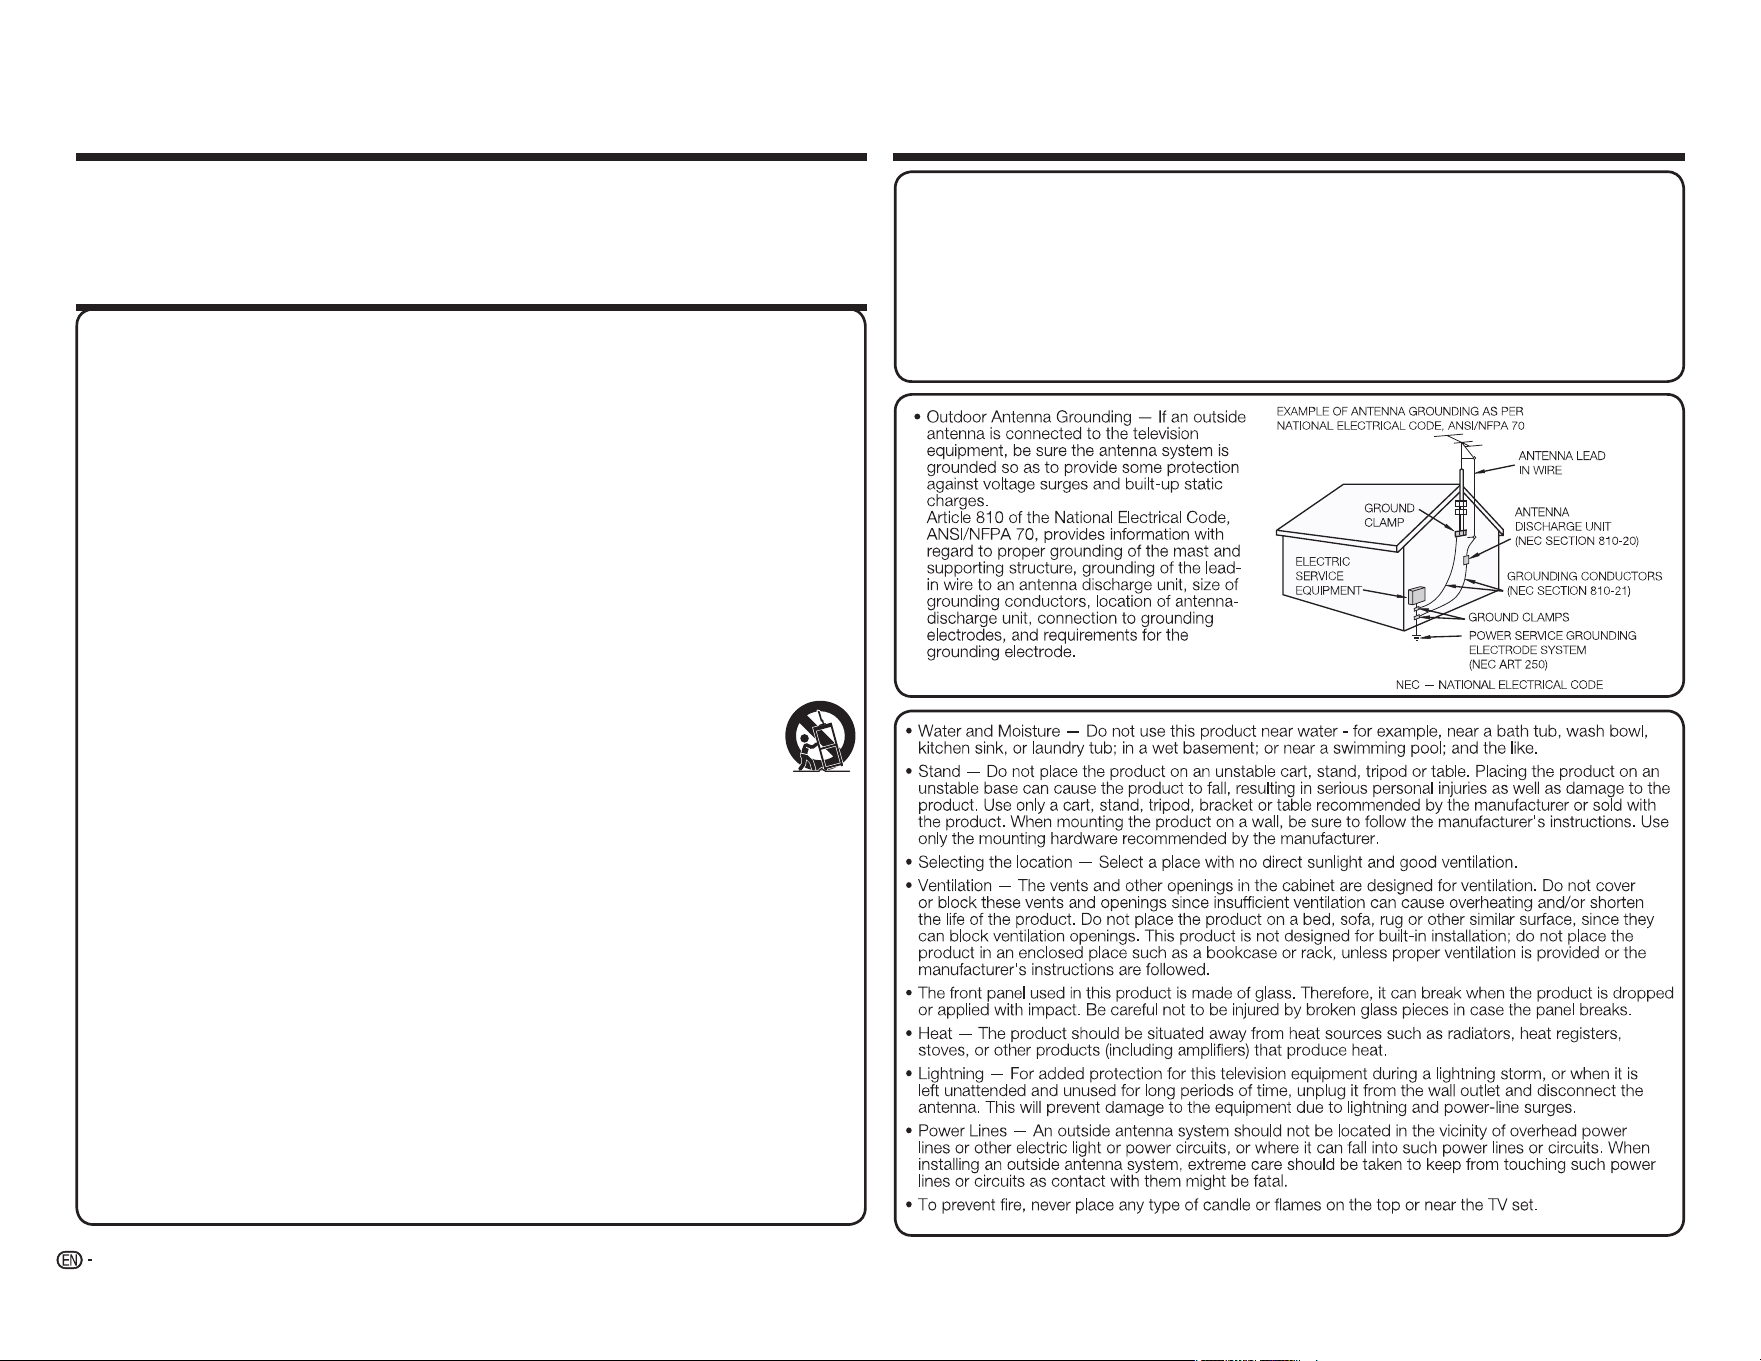
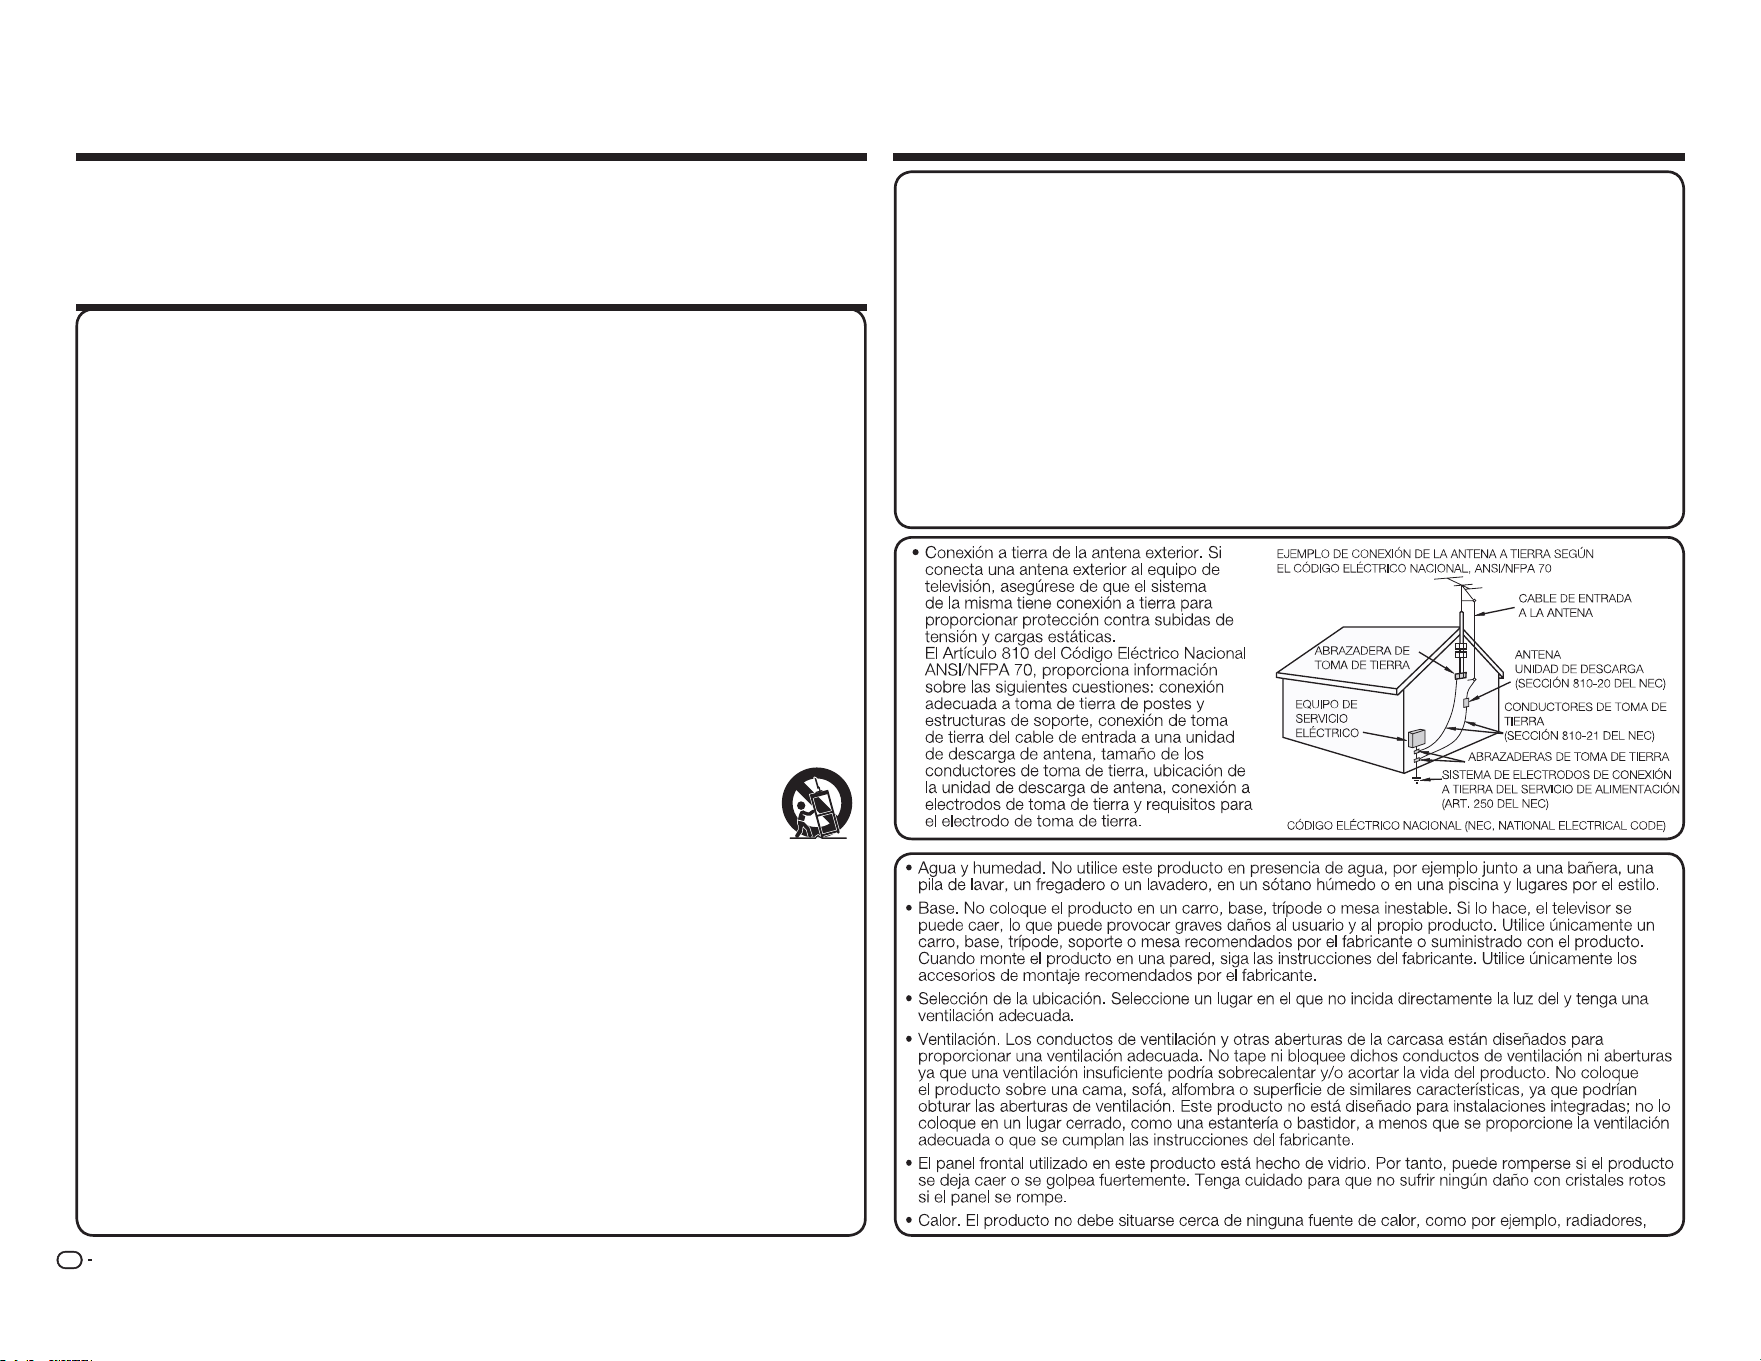
"Note to CATV system installer: This reminder is provided to call the CATV system installer's attention
to Article 820 of the National Electrical Code that provides guidelines for proper grounding and, in
particular, species that the cable ground shall be connected to the grounding system of the building,
as close to the point of cable entry as practical."
This product qualies for ENERGY STAR when "Home Mode" is selected for "Easy Setup".
Setting "Easy Setup" to "Home Mode" allows the TV to achieve an energy-saving status for household
use.
IMPORTANT:
To aid reporting in case of loss or theft, please record the
TV's model and serial numbers in the space provided.
The numbers are located at the rear and left side of the TV.
WARNING: TO REDUCE THE RISK OF FIRE OR ELECTRIC SHOCK, DO NOT EXPOSE THIS
PRODUCT TO RAIN OR MOISTURE.
CAUTION: TO REDUCE THE RISK OF ELECTRIC SHOCK,
DO NOT REMOVE COVER (OR BACK).
NO USER-SERVICEABLE PARTS INSIDE.
REFER SERVICING TO QUALIFIED SERVICE
PERSONNEL.
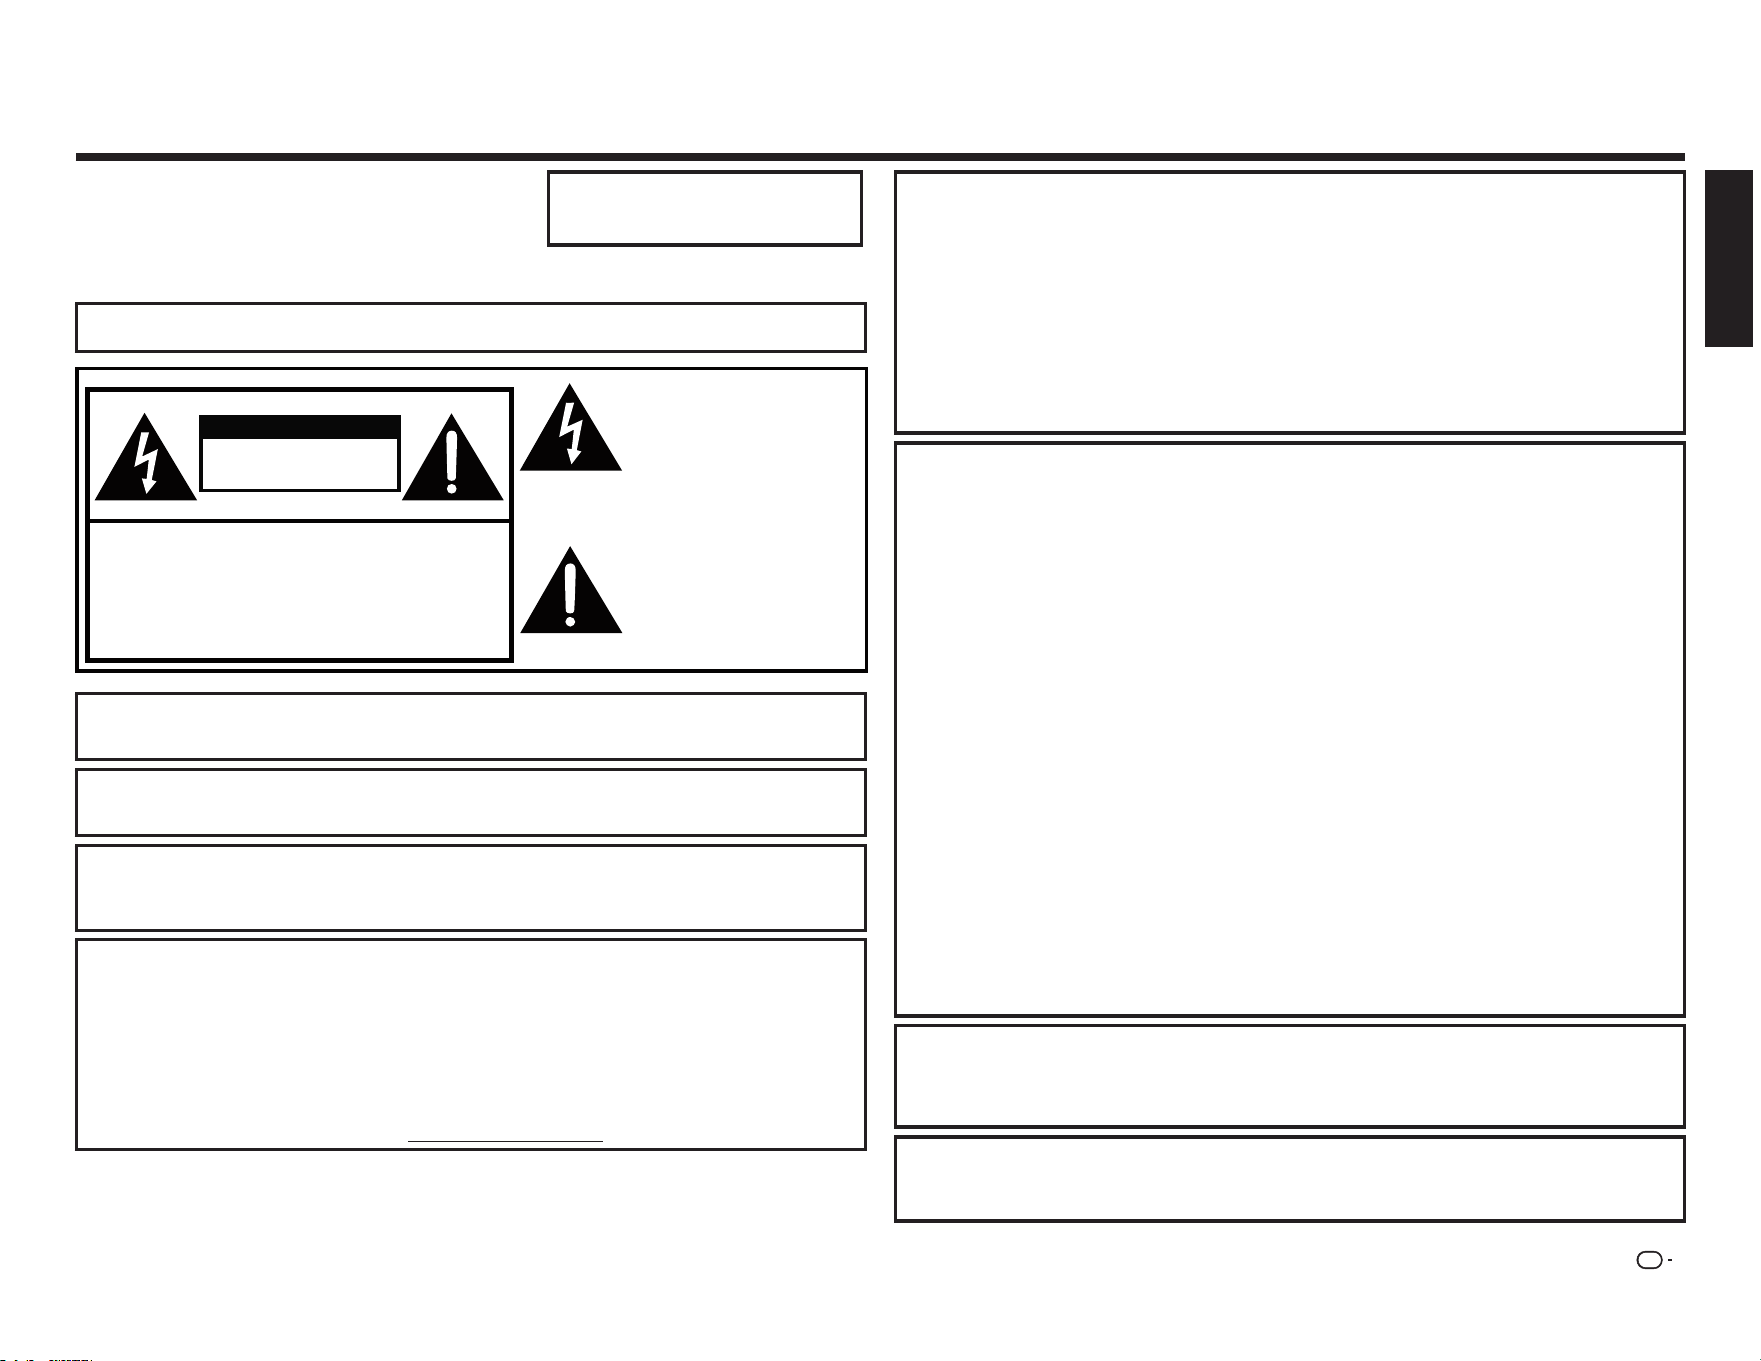
The lightning ash with arrow-
head symbol, within an equilateral
triangle, is intended to alert
the user to the presence of
uninsulated "dangerous voltage"
within the product's enclosure that
may be of sufcient magnitude to
constitute a risk of electric shock
to persons.
The exclamation point within a
triangle is intended to alert the
user to the presence of important
operating and maintenance
(servicing) instructions in the
literature accompanying the
product.
RISK OF ELECTRIC SHOCK
DO NOT OPEN
CAUTION
Model No. :
Series No.
:
CAUTION: TO PREVENT ELECTRIC SHOCK, MATCH WIDE BLADE OF PLUG TO WIDE SLOT, FULLY
INSERT.
WARNING: FCC Regulations state that any unauthorized changes or modications to this equipment
not expressly approved by the manufacturer could void the user's authority to operate this
equipment.
CAUTION: This product satises FCC regulations when shielded cables and connectors are used
to connect the unit to other equipment. To prevent electromagnetic interference with
electric appliances such as radios and televisions, use shielded cables and connectors for
connections.
DECLARATION OF CONFORMITY:
SHARP LIQUID CRYSTAL TELEVISION, MODEL LC-55LE643U / LC-65LE643U
This device complies with Part 15 of the FCC Rules. Operation is subject to the following two
conditions:
(1) This device may not cause harmful interference, and (2) this device must accept any interference
received, including interference that may cause undesired operation.
RESPONSIBLE PARTY:
SHARP ELECTRONICS CORPORATION
Sharp Plaza, Mahwah, New Jersey 07495-1163
TEL: 1-800-BE-SHARP
For Business Customers: URL http://www.sharpusa.com
ENGLISH
2
Thank you for your purchase of the Sharp Liquid Crystal Television. To ensure safety and many
years of trouble-free operation of your product, please read the Important Safety Instructions
carefully before using this product.
IMPORTANT SAFETY INSTRUCTIONS
DEAR SHARP CUSTOMER IMPORTANT SAFETY INSTRUCTIONS
Electricity is used to perform many useful functions, but it can also cause personal injuries and
property damage if improperly handled. This product has been engineered and manufactured with
the highest priority on safety. However, improper use can result in electric shock and/or re. In order
to prevent potential danger, please observe the following instructions when installing, operating
and cleaning the product. To ensure your safety and prolong the service life of your Liquid Crystal
Television, please read the following precautions carefully before using the product.
1) Read these instructions.
2) Keep these instructions.
3) Heed all warnings.
4) Follow all instructions.
5) Do not use this apparatus near water.
6) Clean only with dry cloth.
7) Do not block any ventilation openings. Install in accordance with the manufacturer's instructions.
8) Do not install near any heat sources such as radiators, heat registers, stoves, or other apparatus
(including ampliers) that produce heat.
9)
Do not defeat the safety purpose of the polarized or grounding-type plug. A polarized plug has two
blades with one wider than the other. A grounding type plug has two blades and a third grounding
prong. The wide blade or the third prong are provided for your safety. If the provided plug does not t
into your outlet, consult an electrician for replacement of the obsolete outlet.
10) Protect the power cord from being walked on or pinched particularly at plugs, convenience
receptacles, and the point where they exit from the apparatus.
11) Only use attachments/accessories specied by the manufacturer.
12) Use only with the cart, stand, tripod, bracket, or table specied by the manufacturer,
or sold with the apparatus. When a cart is used, use caution when moving the cart/
apparatus combination to avoid injury from tip-over.
13) Unplug this apparatus during lightning storms or when unused for long periods of
time.
14) Refer all servicing to qualied service personnel. Servicing is required when the apparatus has
been damaged in any way, such as power-supply cord or plug is damaged, liquid has been
spilled or objects have fallen into the apparatus, the apparatus has been exposed to rain or
moisture, does not operate normally, or has been dropped.
Additional Safety Information
15)
Power Sources—This product should be operated only from the type of power source indicated
on the marking label. If you are not sure of the type of power supply to your home, consult your
product dealer or local power company. For products intended to operate from battery power, or
other sources, refer to the operating instructions.
16) Overloading—Do not overload wall outlets, extension cords, or integral convenience receptacles
as this can result in a risk of re or electric shock.
17) Object and Liquid Entry—Never push objects of any kind into this product through openings as
they may touch dangerous voltage points or short-out parts that could result in a re or electric
shock. Never spill liquid of any kind on the product.
18) Damage Requiring Service—Unplug this product from the wall outlet and refer servicing to
qualied service personnel under the following conditions:
a) When the AC cord or plug is damaged,
b) If liquid has been spilled, or objects have fallen into the product,
c) If the product has been exposed to rain or water,
d)
If the product does not operate normally by following the operating instructions.
Adjust only those controls that are covered by the operating instructions as an improper
adjustment of other controls may result in damage and will often require extensive work by a qualied
technician to restore the product to its normal operation,
e) If the product has been dropped or damaged in any way, and
f ) When the product exhibits a distinct change in performance - this indicates a need for
service.
19) Replacement Parts—When replacement parts are required, be sure the service technician has
used replacement parts specied by the manufacturer or have the same characteristics as the
original part. Unauthorized substitutions may result in re, electric shock, or other hazards.
20) Safety Check—Upon completion of any service or repairs to this product, ask the service
technician to perform safety checks to determine that the product is in proper operating
condition.
21) Wall or ceiling mounting—When mounting the product on a wall or ceiling, be sure to install the
product according to the method recommended by the manufacturer.
3
IMPORTANT SAFETY INSTRUCTIONS
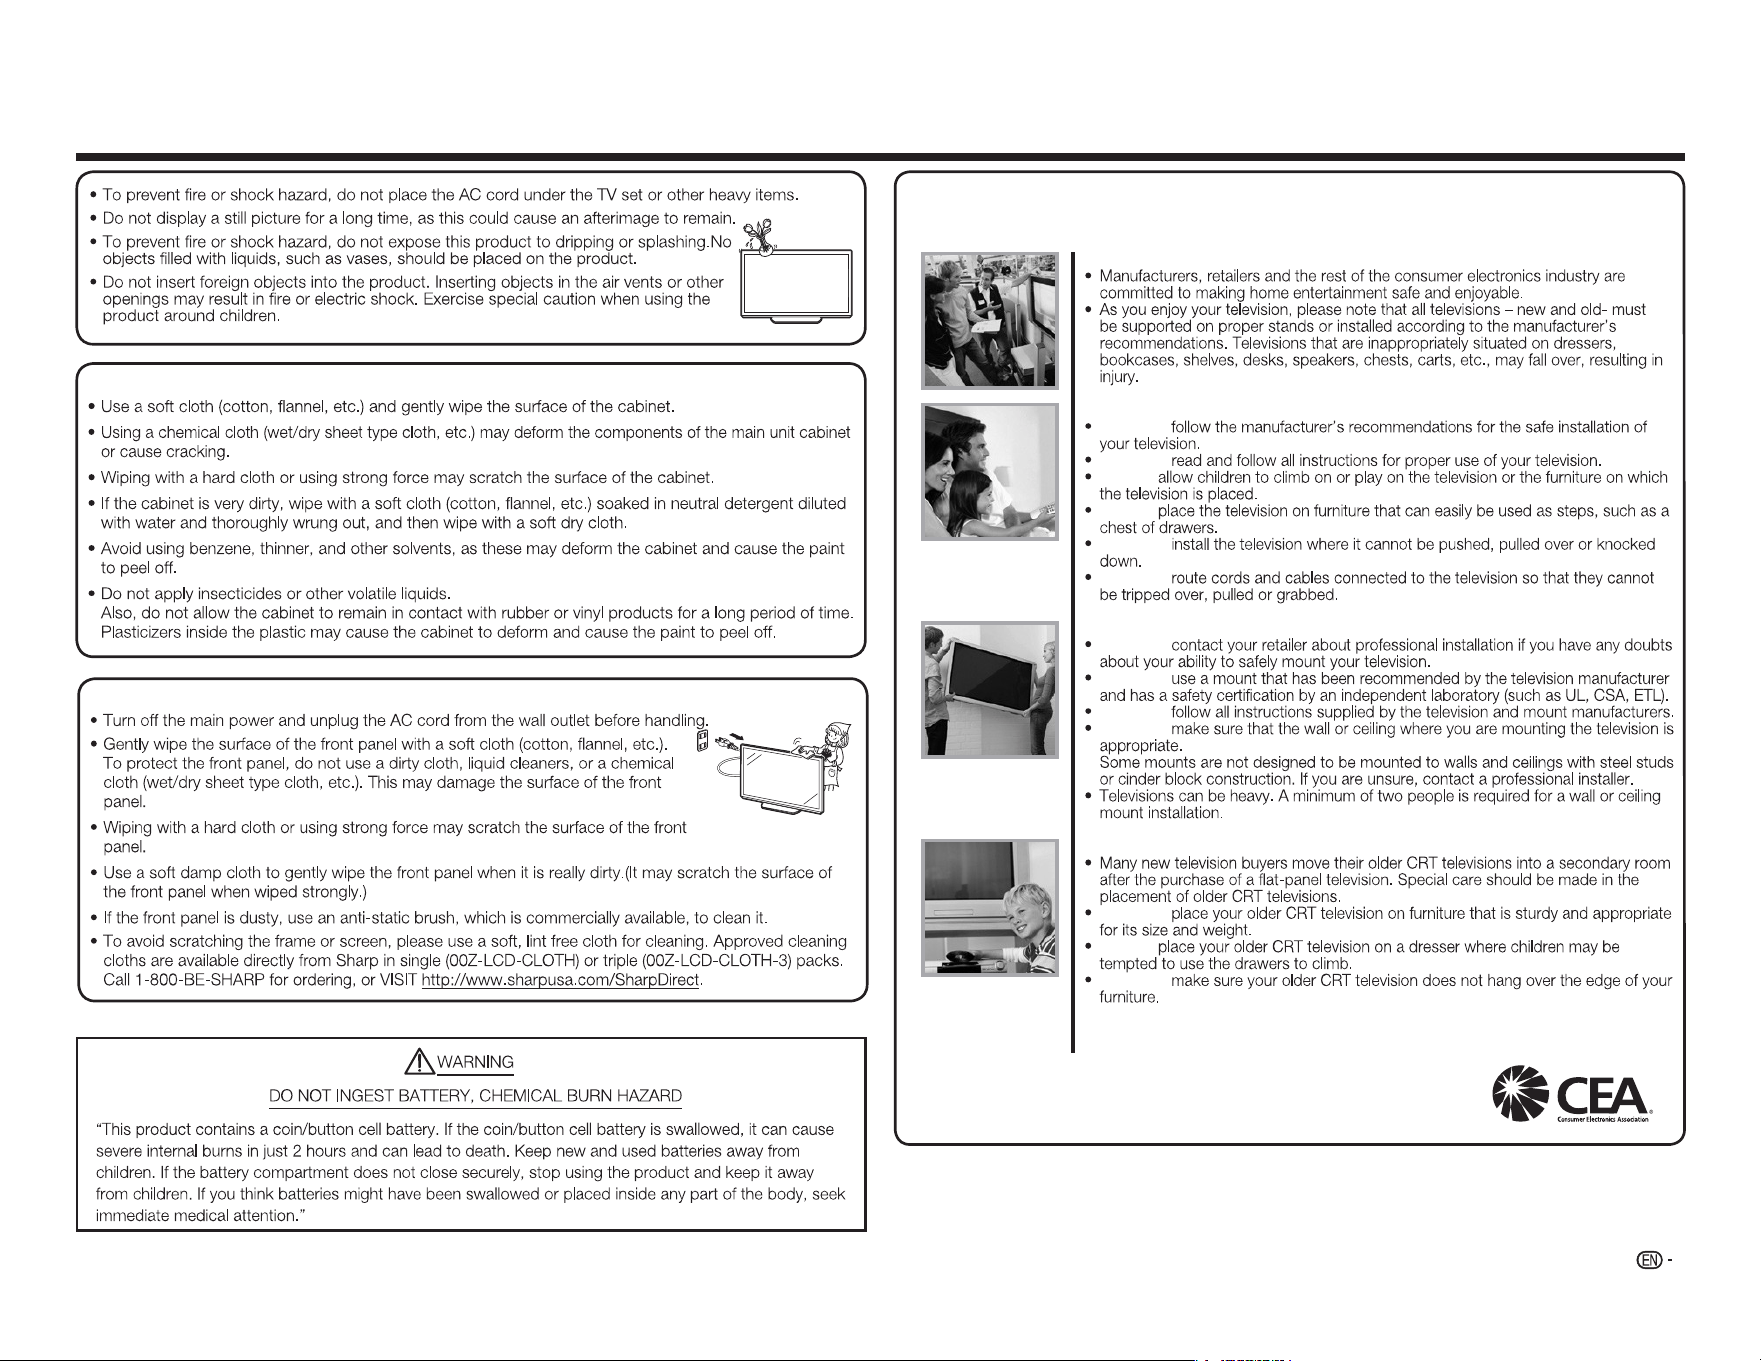
Caring for the cabinet
Caring for the front panel
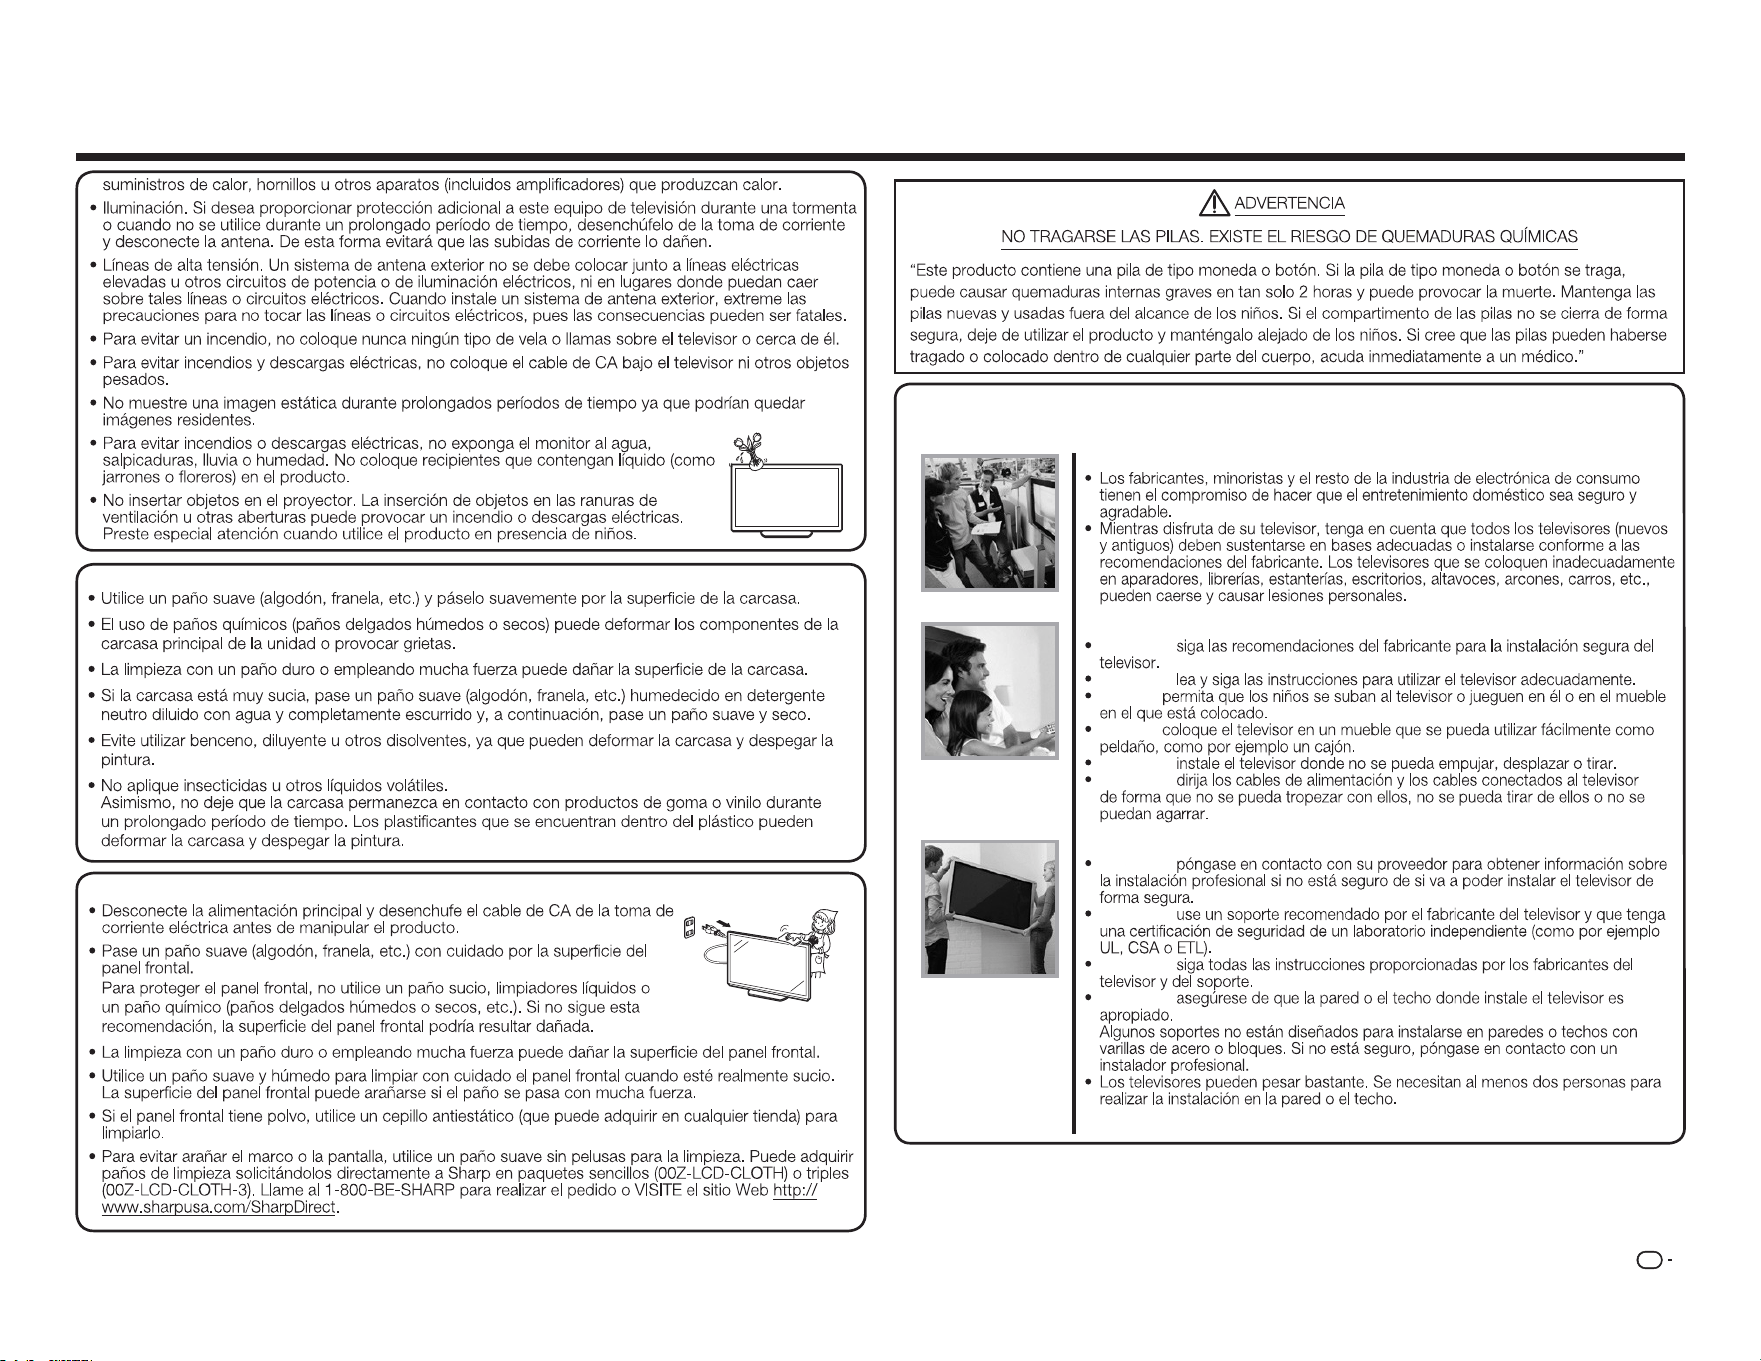
CHILD SAFETY:
PROPER TELEVISION PLACEMENT MATTERS
THE CONSUMER ELECTRONICS INDUSTRY CARES
TUNE IN TO SAFETY
ALWAYS
ALWAYS
NEVER
NEVER
ALWAYS
ALWAYS
WALL OR CEILING MOUNT YOUR TELEVISION
ALWAYS
ALWAYS
ALWAYS
ALWAYS
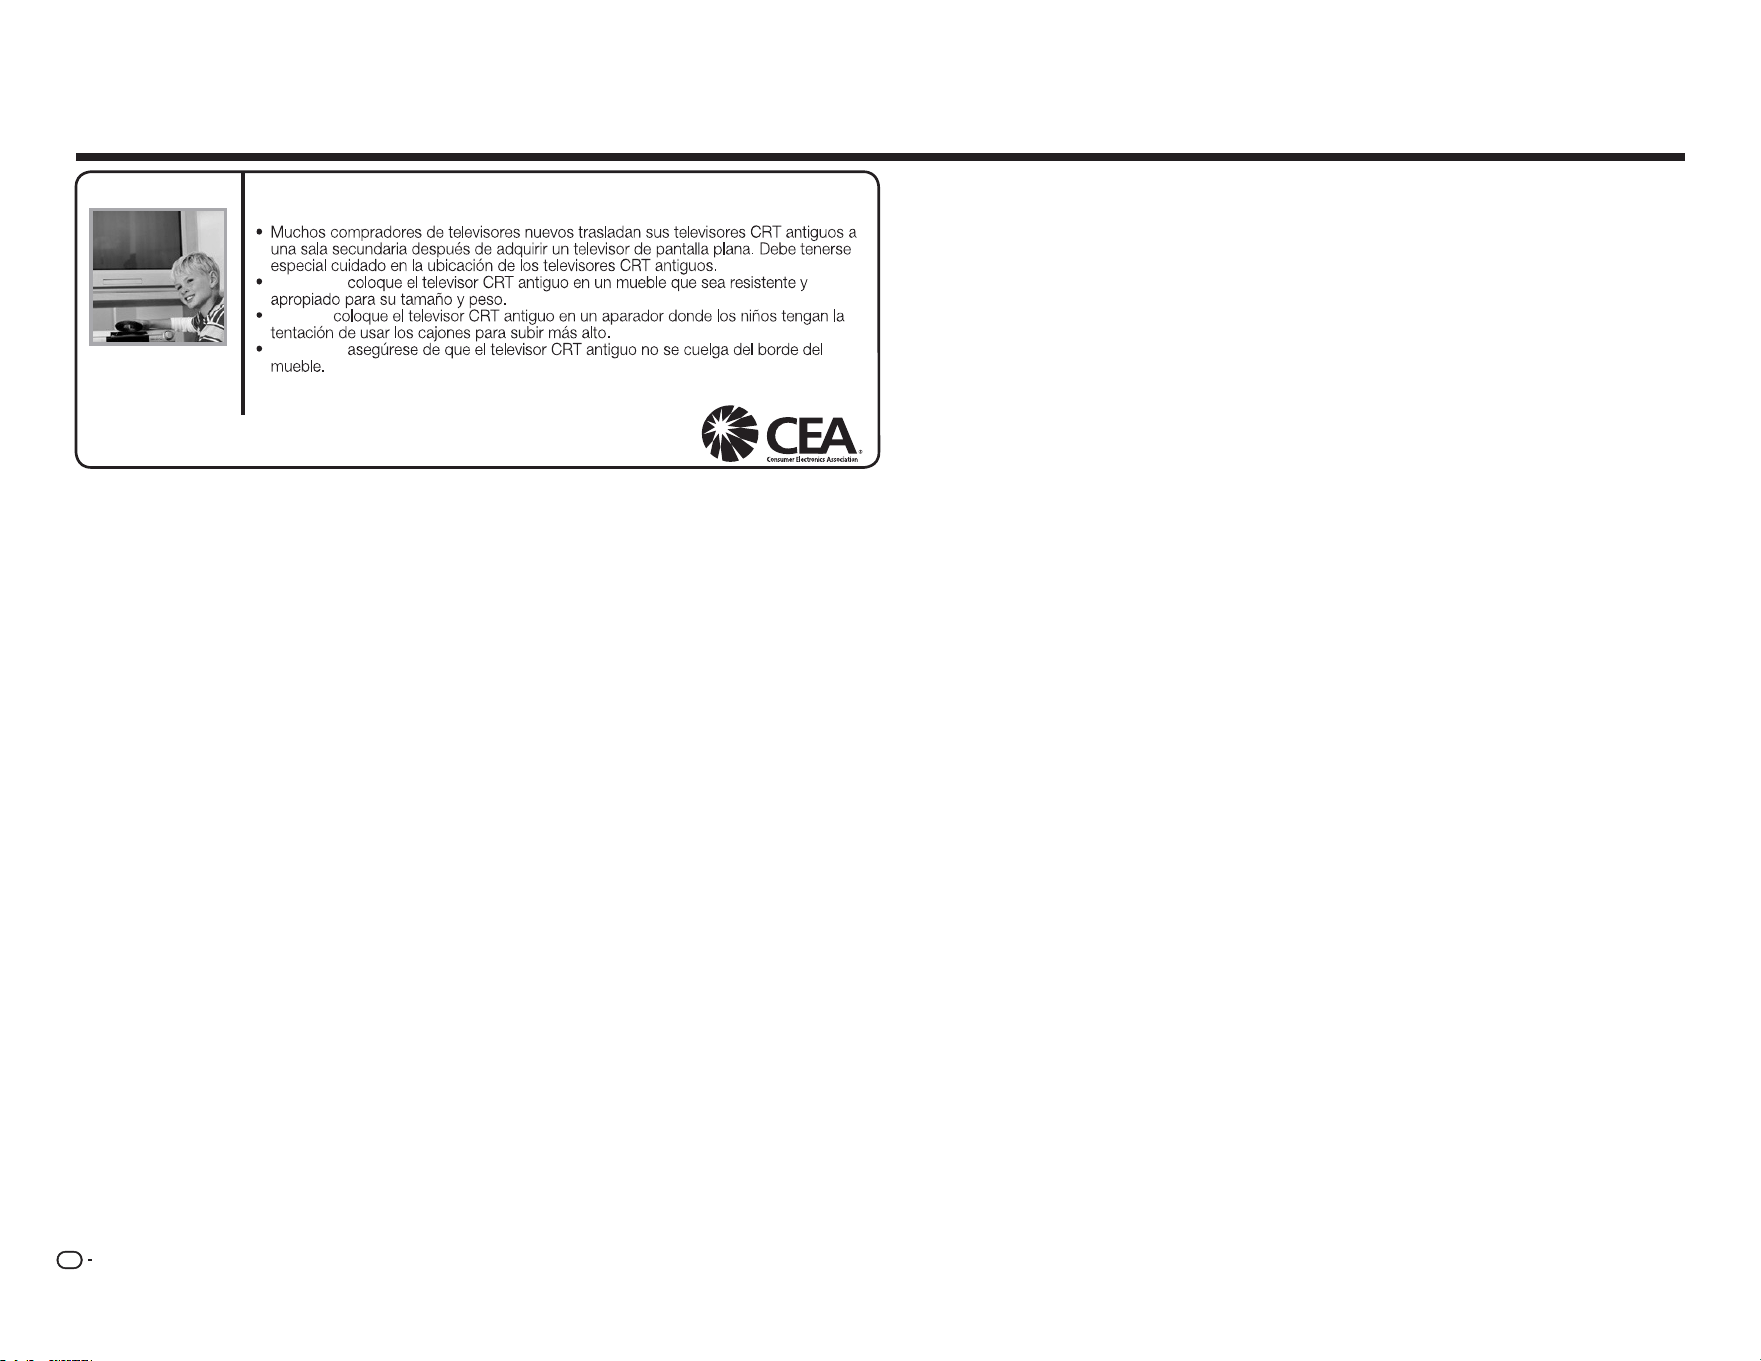
MOVING AN OLDER TELEVISION TO A NEW PLACE IN YOUR HOME
ALWAYS
NEVER
ALWAYS
CE.org/safety
4
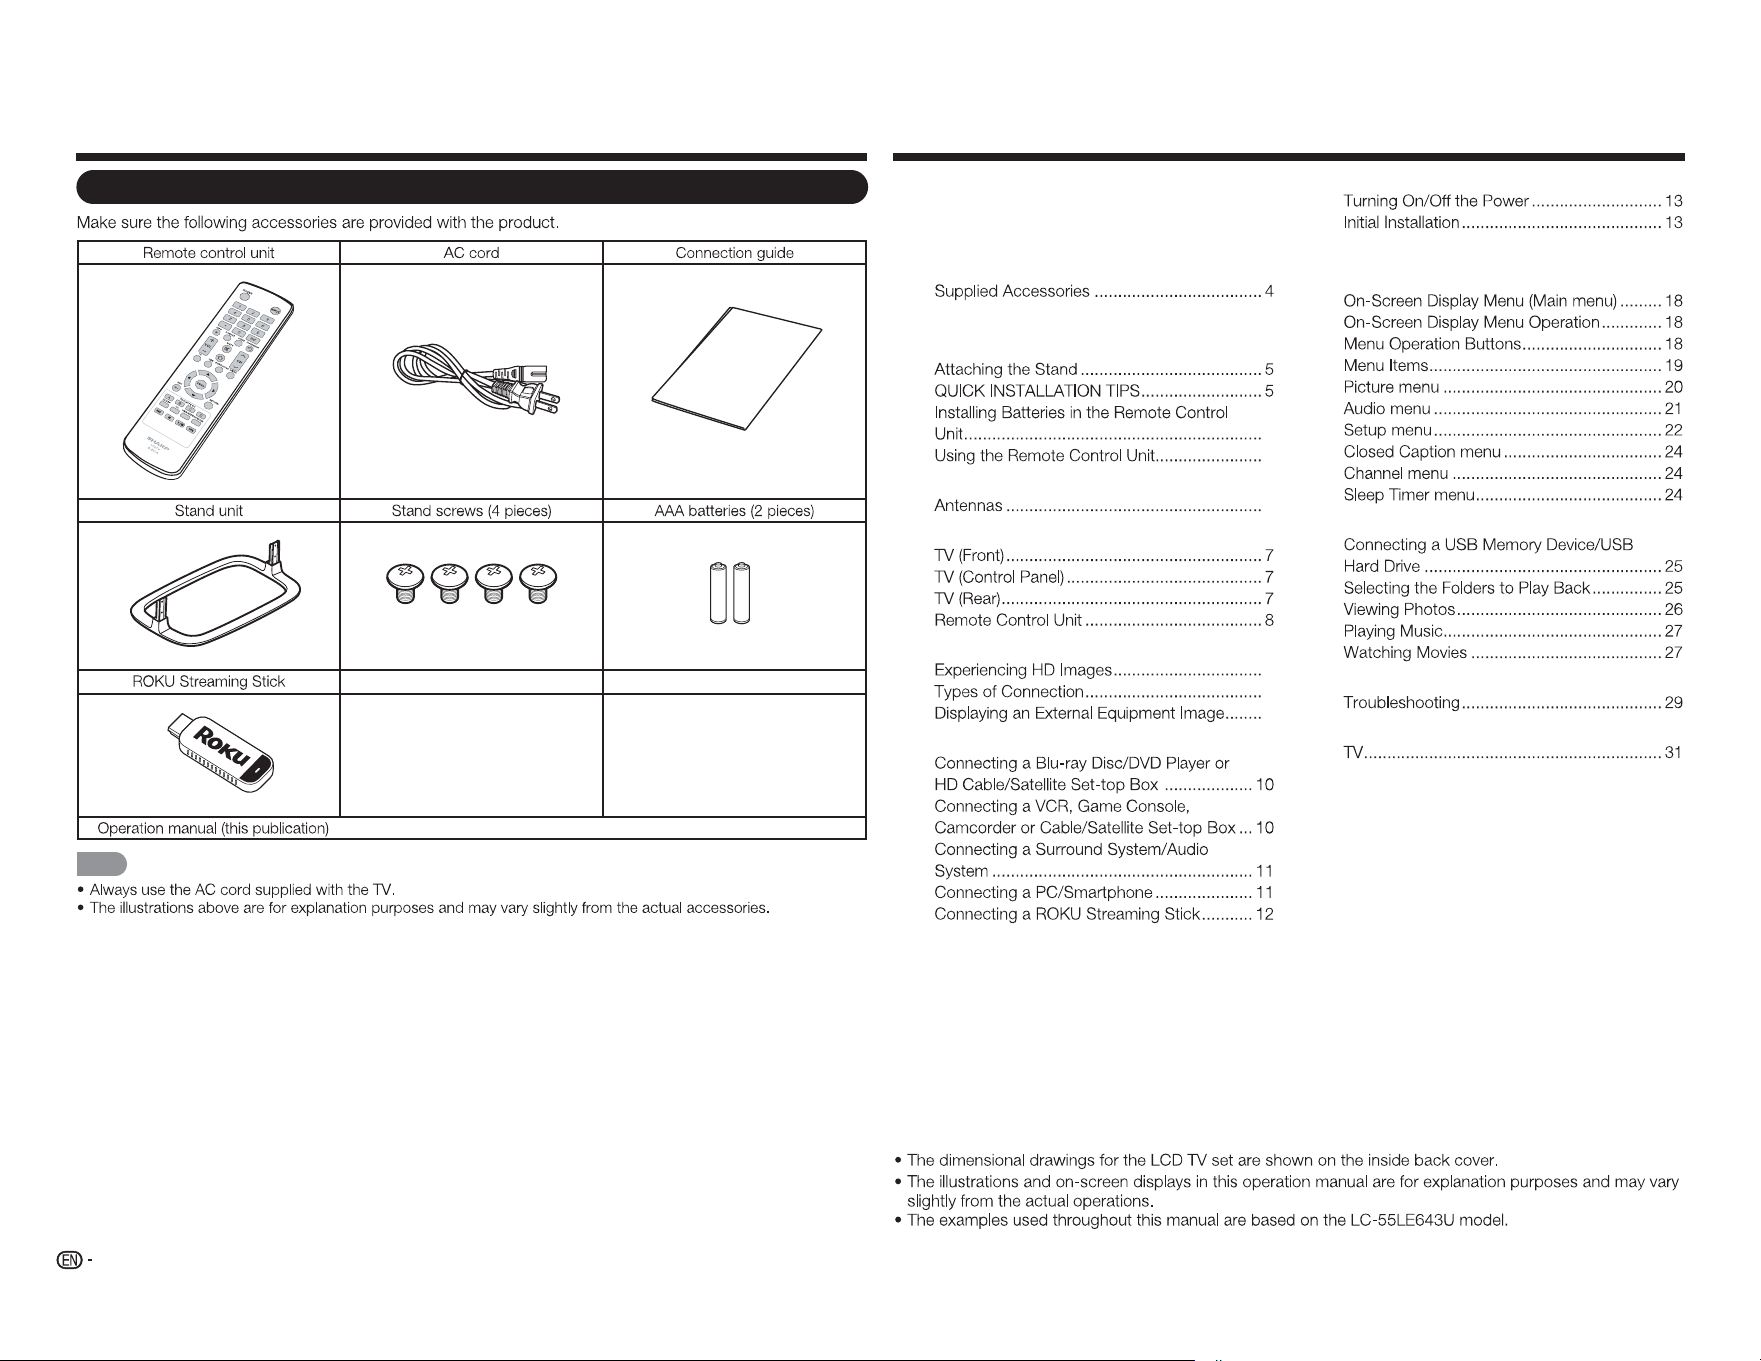
Accessories Contents
Supplied Accessories
■
NOTE
C
o
n
ne
c
t
i
o
n
G
ui
d
e
IMPORTANT INFORMATION .............................. 1
DEAR SHARP CUSTOMER ................................. 2
IMPORTANT SAFETY INSTRUCTIONS .............. 3
Accessories.......................................................... 4
Contents ............................................................... 4
QUICK REFERENCE ............................................ 5
6
6
Preparation .......................................................... 6
6
Part Names .......................................................... 7
Introduction to Connections .............................. 9
9
9
9
Connecting to External Equipment .................. 10
Watching TV .......................................................13
Direct Button Operation ....................................15
On-Screen Display Menu ..................................18
Enjoying Photo/Music/Movie Playback ...........25
Appendix ............................................................ 28
Specifications .................................................... 31
Trademarks ........................................................ 33
Calling for Service .............................................33
LIMITED WARRANTY ........................................33
Dimensional Drawings

5
QUICK REFERENCE
Attaching the Stand
CAUTION
Be sure to follow the instructions. Incorrect installation of the stand may result in the TV falling over.
1
2
3
4
CAUTION
Do not push too hard or put excessive pressure to the stand neck to avoid damage to the TV.
Do not remove the stand from the TV unless using an optional wall mount bracket to mount it.
After attaching the stand to the TV, do not hold the stand when you put up, set up, move or lay down the
TV.
NOTE
QUICK INSTALLATION TIPS
1
2
AC IN
NOTE
TO PREVENT RISK OF ELECTRIC SHOCK, DO NOT TOUCH UN-INSULATED PARTS OF ANY CABLES
WITH THE AC CORD CONNECTED.
3
POWER
4
NOTE
POWER
6
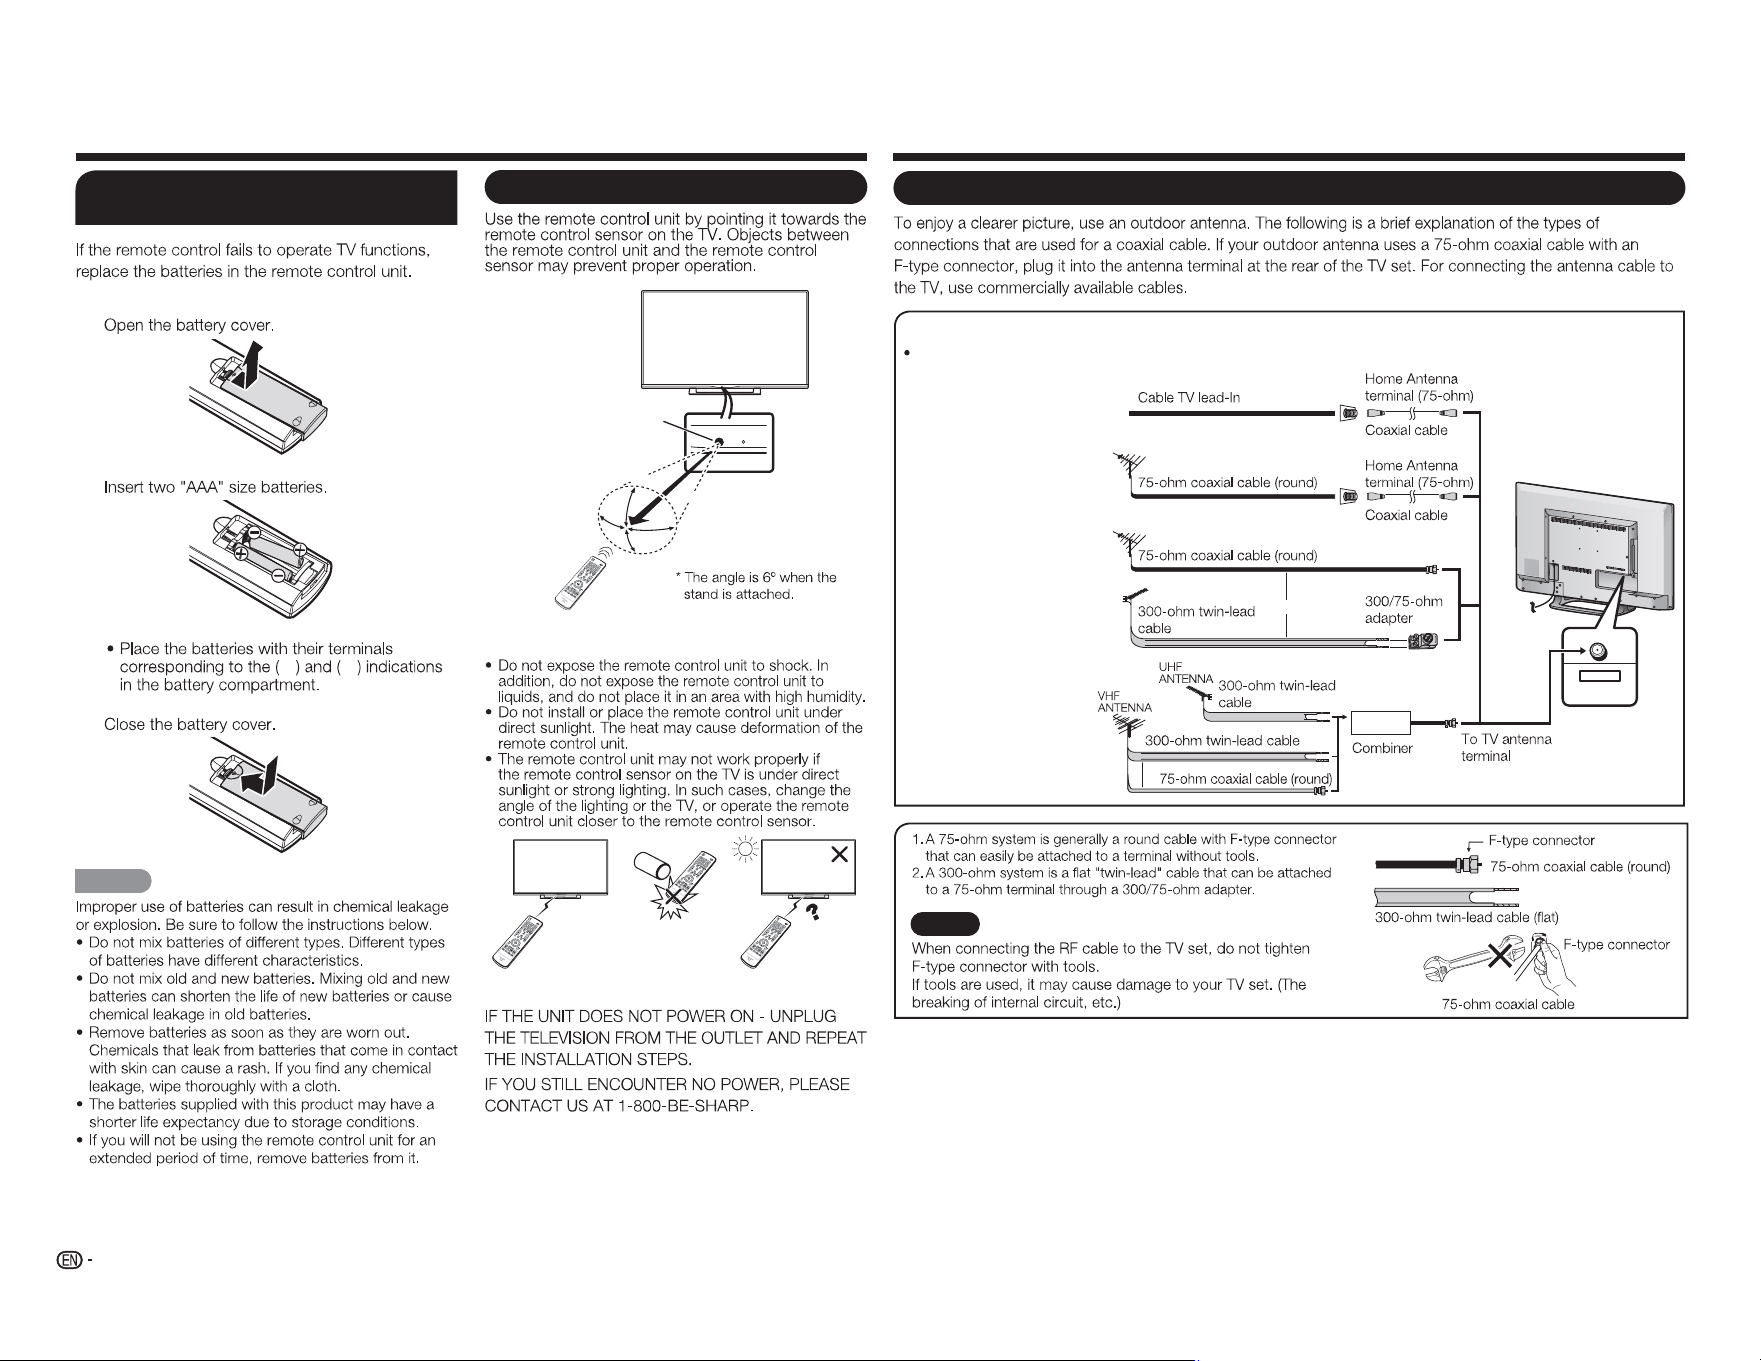
Antennas
CABLE / ANTENNA
DTV / TV
IN OUT
Connecting Antenna Cable
Connect the antenna cable to the TV using one of the methods in the illustration as shown (
1
,
2
,
3
or
4
).
1
Cable without a
CATV converter
3
Combination VHF/
UHF antenna
4
Separate VHF/UHF
antenna
2
VHF/UHF antenna
or
or
NOTICE
F-type connector should be finger-tightened only.
Preparation
Using the Remote Control Unit
30°
30°
30°
*
30°
17´ (5 m)
Remote control sensor
■ Cautions regarding the remote control unit
IMPORTANT:
QUICK REFERENCE
Installing Batteries in the Remote
Control Unit
1
2
e f
3
CAUTION

7
Part Names
TV (Front)
TV (Control Panel)
TV (Rear)
1
ARC
2 Y/V Pb/Cb CABLE / ANTENNAPr/Cr
COMPONENT / VIDEO DTV / TV
AUDIO
L R
L R OPTICAL MHL
(DC 5V, 900mA)
USB
AUDIO OUT
AC IN
NOTE
POWER
button
MENU
button
INPUT
button
Channel
buttons
(
CH
r
/
s
)
Volume
buttons
(
VOL
k
/
l
)
USB terminal
AC IN jack
HDMI 3 terminal
MHL: Mobile High-Denition Link
HDMI 1/2 terminal
ARC: Audio Return Channel
COMPONENT/VIDEO IN terminal
DIGITAL AUDIO OUT terminal
CABLE/ANTENNA IN
(DC 5V, 500mA)
ANALOG AUDIO OUT terminal
8
Part Names
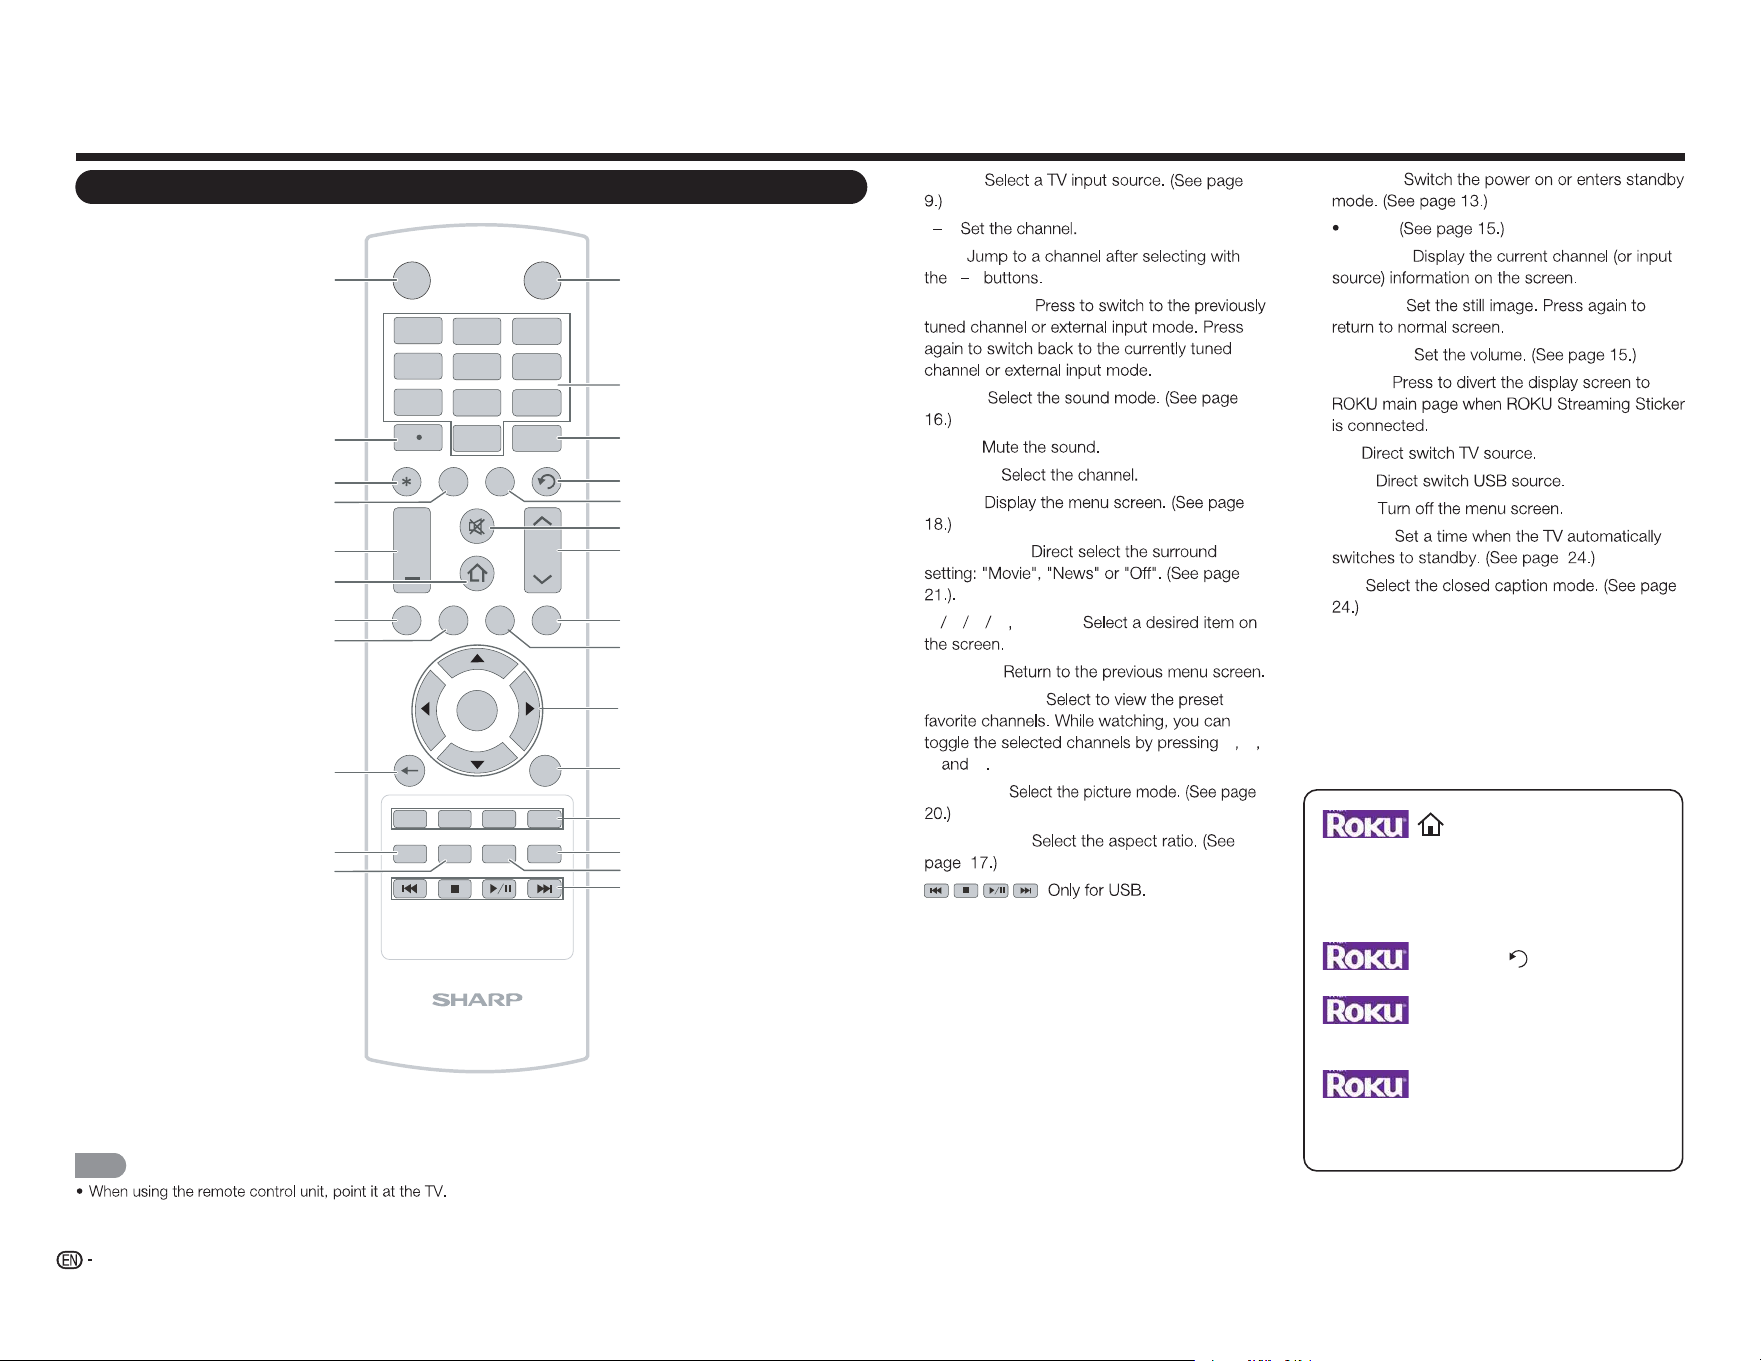
Remote Control Unit
INPUT
3
4
5 6
7
8 9
0
ENT
1
2
INFO FREEZ E
FLASHBACK
MUTE
TV US B MENUS U RROUN D
FAV O RITE CH
SLEE P CC VIEWMODEAV MODE
AUDIO
VOL CH
+
RETURNEXIT
LCDTV
GJ221-R
A B C D
ENTER
POWER
1
2
3
4
5
6
7
8
9
10
11
12
13
14
15
16
17
18
19
20
21
22
23
24
25
26
1 INPUT:
2 0 9:
3 ENT:
0 9
4 FLASHBACK:
5 AUDIO:
6 MUTE:
7 CH
r
/
s
:
8 MENU:
9 SURROUND:
10
a b c d
ENTER:
11 RETURN:
12 FAVORITE CH:
A B
C D
13
AV MODE:
14 VIEW MODE:
15 :
16 POWER:
17 (DOT):
18 DISPLAY:
19 FREEZE:
20 VOL
k
/
l
:
21 HOME:
22 TV:
23 USB:
24 EXIT:
25 SLEEP:
26 CC:
NOTE
Press to return to ROKU home screen.
MUTE
Press to disable or enable sound.
Flashback
Press to change to the previously viewed channel
ENTER
Press to confirm the selection.
INFO*
Press to obtain more information or access special
option on ROKU.
9
Introduction to Connections
Experiencing HD Images
NOTE
Types of Connection
For connecting the TV to external equipment, use commercially available cables.
■ Connecting to video equipment or PC
Pages
10, 11
Terminal
on the TV
Cable
Terminal on external
equipment
Image
Quality
AV cable
Component video cable
Audio cable
HDMI-certified cable
RCA audio to Ø 3.5 mm stereo minijack cable
DVI-HDMI conversion cable
HD
Quality
Standard
Quality
AUDIO
DVI OUT
1 2
Y/V Pb/Cb Pr/Cr
COMPONENT / VIDEO
AUDIO
L R
Y/V
Pb
/C
b
P
r
/C
r
COMPONENT / VIDEO
AUDIO
L R
Y
/V
Pb
/C
b
P
r
/C
r
COMPONENT / VIDEO
AUDIO
L R
MHL
1 2
MHL
Page 10
Page 10
Pages
10, 11
■ Connecting to audio equipment
Cable
Terminal on external
equipment
Optical fiber cable
Audio cable
Terminal on the TV
DIGITAL AUDIO INPUT
OPTICAL
ANALOG AUDIO IN
L
R
OPTICAL
AUDIO OUT
L R
O
PTICA
L
AUDIO OUT
Page 11
Page 11
1
INPUT
2
a b
INPUT INPUT
Input
TV
AV IN
Component
HDMI-1
HDMI-2
HDMI-3(Side)
Example
Displaying an External Equipment Image
INPUT
10
Connecting to External Equipment
INPUT
For connecting the TV to external equipment, use commercially available cables.
CAUTION
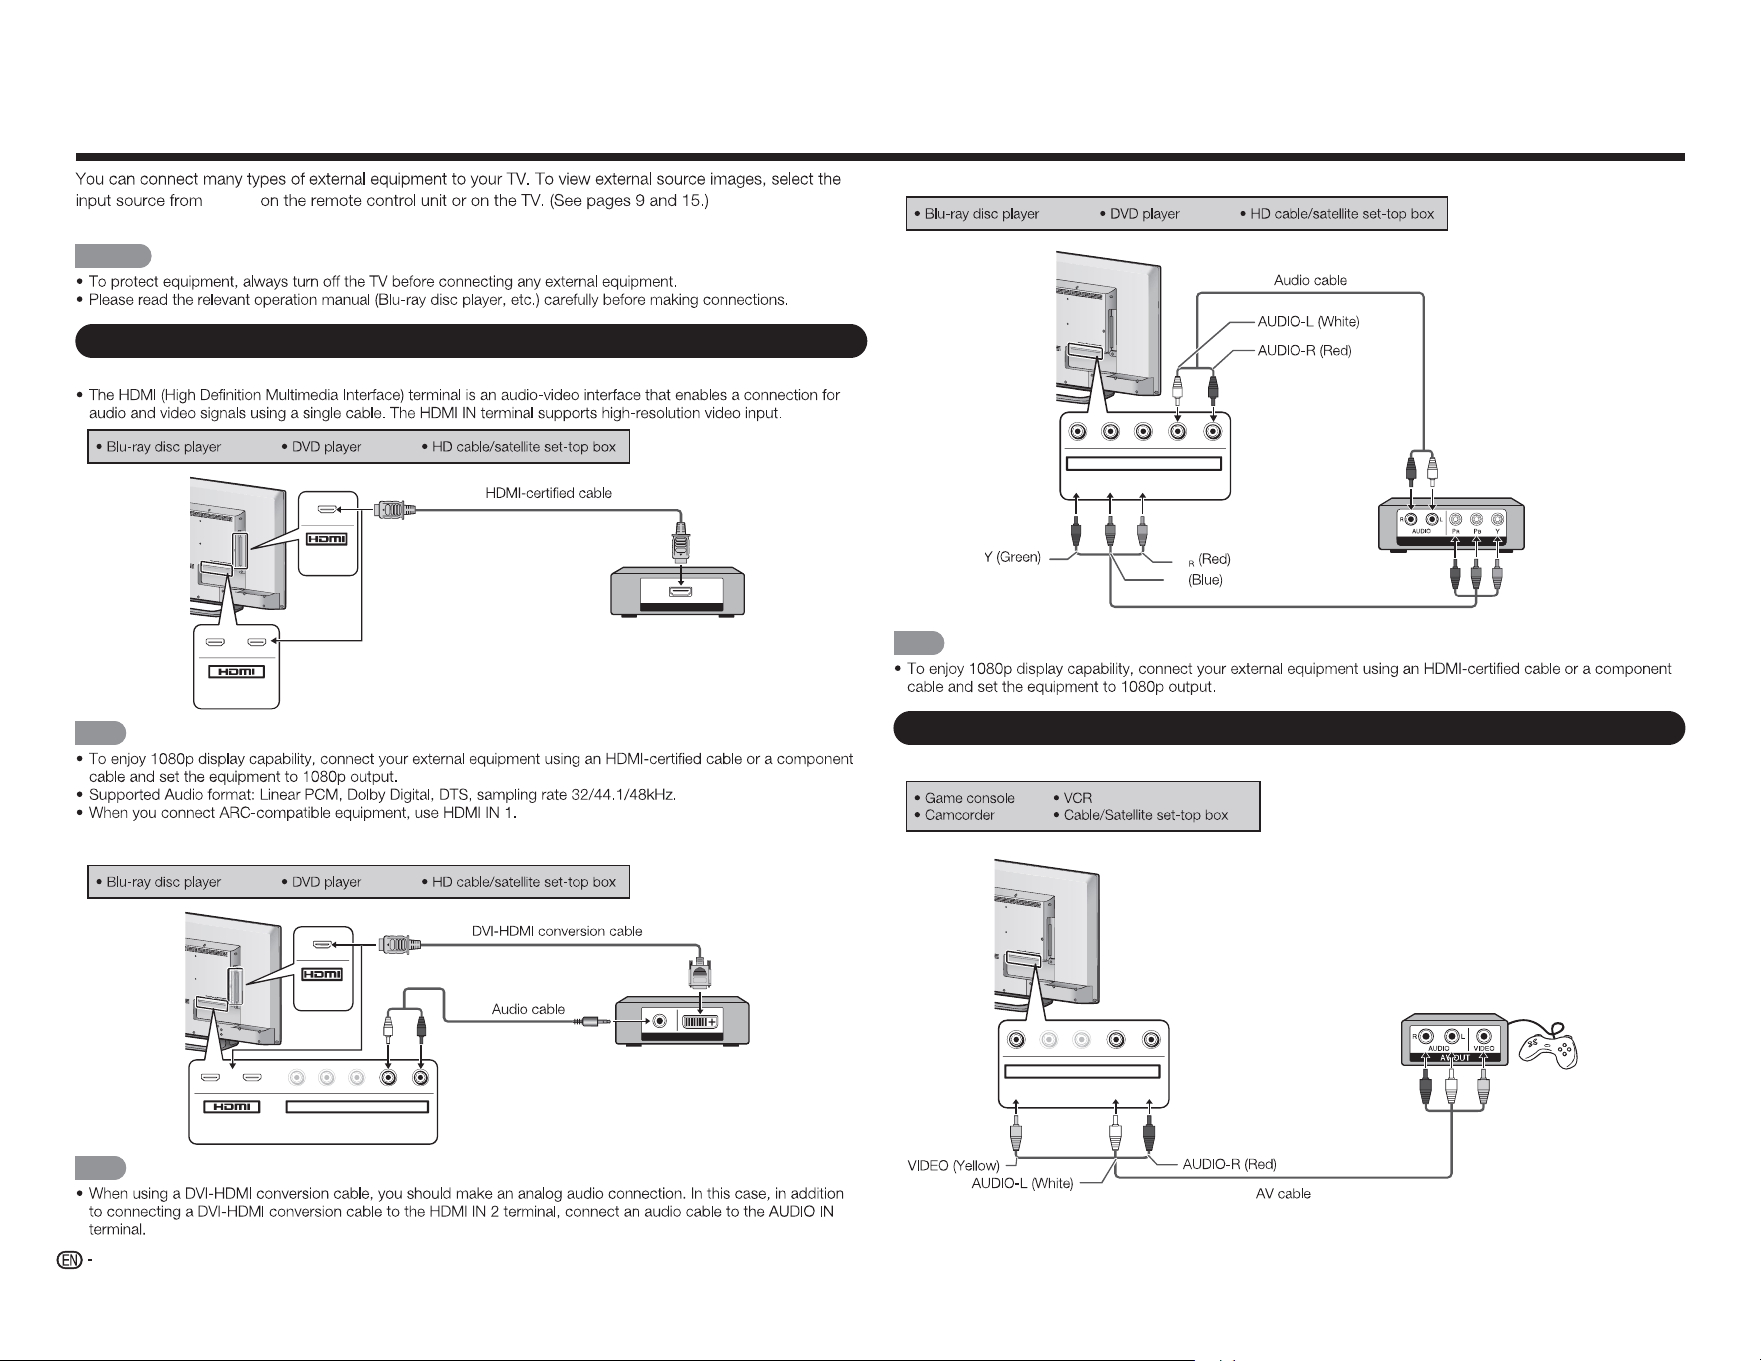
Connecting a Blu-ray Disc/DVD Player or HD Cable/Satellite Set-top Box
■ When using an HDMI cable (HDMI IN 1, 2, or 3):
HDMI OUT
MHL
(DC 5V, 900mA)
1
ARC
2
NOTE
■ When using a DVI-HDMI conversion cable (HDMI IN 1, 2, or 3):
AUDIO OUT
DVI OUT
MHL
(DC 5V, 900mA)
1
ARC
2
Y/V
Pb/Cb
C
Pr/Cr
COMPONENT / VIDEO
AUDIO
L R
NOTE
■ When using a Component cable (COMPONENT IN):
COMPONENT OUT
Y/V Pb/Cb Pr/Cr
COMPONENT / VIDEO
AUDIO
L R
NOTE
Connecting a VCR, Game Console, Camcorder or Cable/Satellite Set-top Box
■ When using a Composite cable (COMPONENT/VIDEO):
Y/V
Pb/Cb
Pr/Cr
COMPONENT / VIDEO
AUDIO
L R
P
B
P
11
Connecting to External Equipment
Connecting a Surround System/Audio System
■ When connecting an AV amplifier for a surround system
DIGITAL AUDIO INPUT
OPTICAL
HDMI INHDMI OUT
HDMI OUT
L
R
OPTICAL MHL
(DC 5V, 900mA)
AUDIO OUT
1
ARC
2
NOTE
■ When connecting an audio amplifier
DIGITAL AUDIO INPUT
OP TICAL
L
R
OPTICAL
AUDIO OUT
ANALOG AUDIO IN
L R
OPTICA
L
AUDIO OUT
Connecting a PC/Smartphone
■ When using an HDMI cable (HDMI IN 1, 2, or 3):
MHL
(DC 5V, 900mA)
1
ARC
2
HDMI OUT
NOTE
■ When using a DVI-HDMI conversion cable (HDMI IN 1, 2, or 3):
DVI OUT
AUDIO
MHL
(DC 5V, 900mA)
1
ARC
2
Y/V
Pb/Cb
C
Pr/C
r
COMPONENT / VIDEO
AUDIO
L R
NOTE
■ When using a MHL cable (HDMI IN 3):
MHL
NOTE
HD Cable/Satellite set-top box
Smartphone
12
Connecting to External Equipment
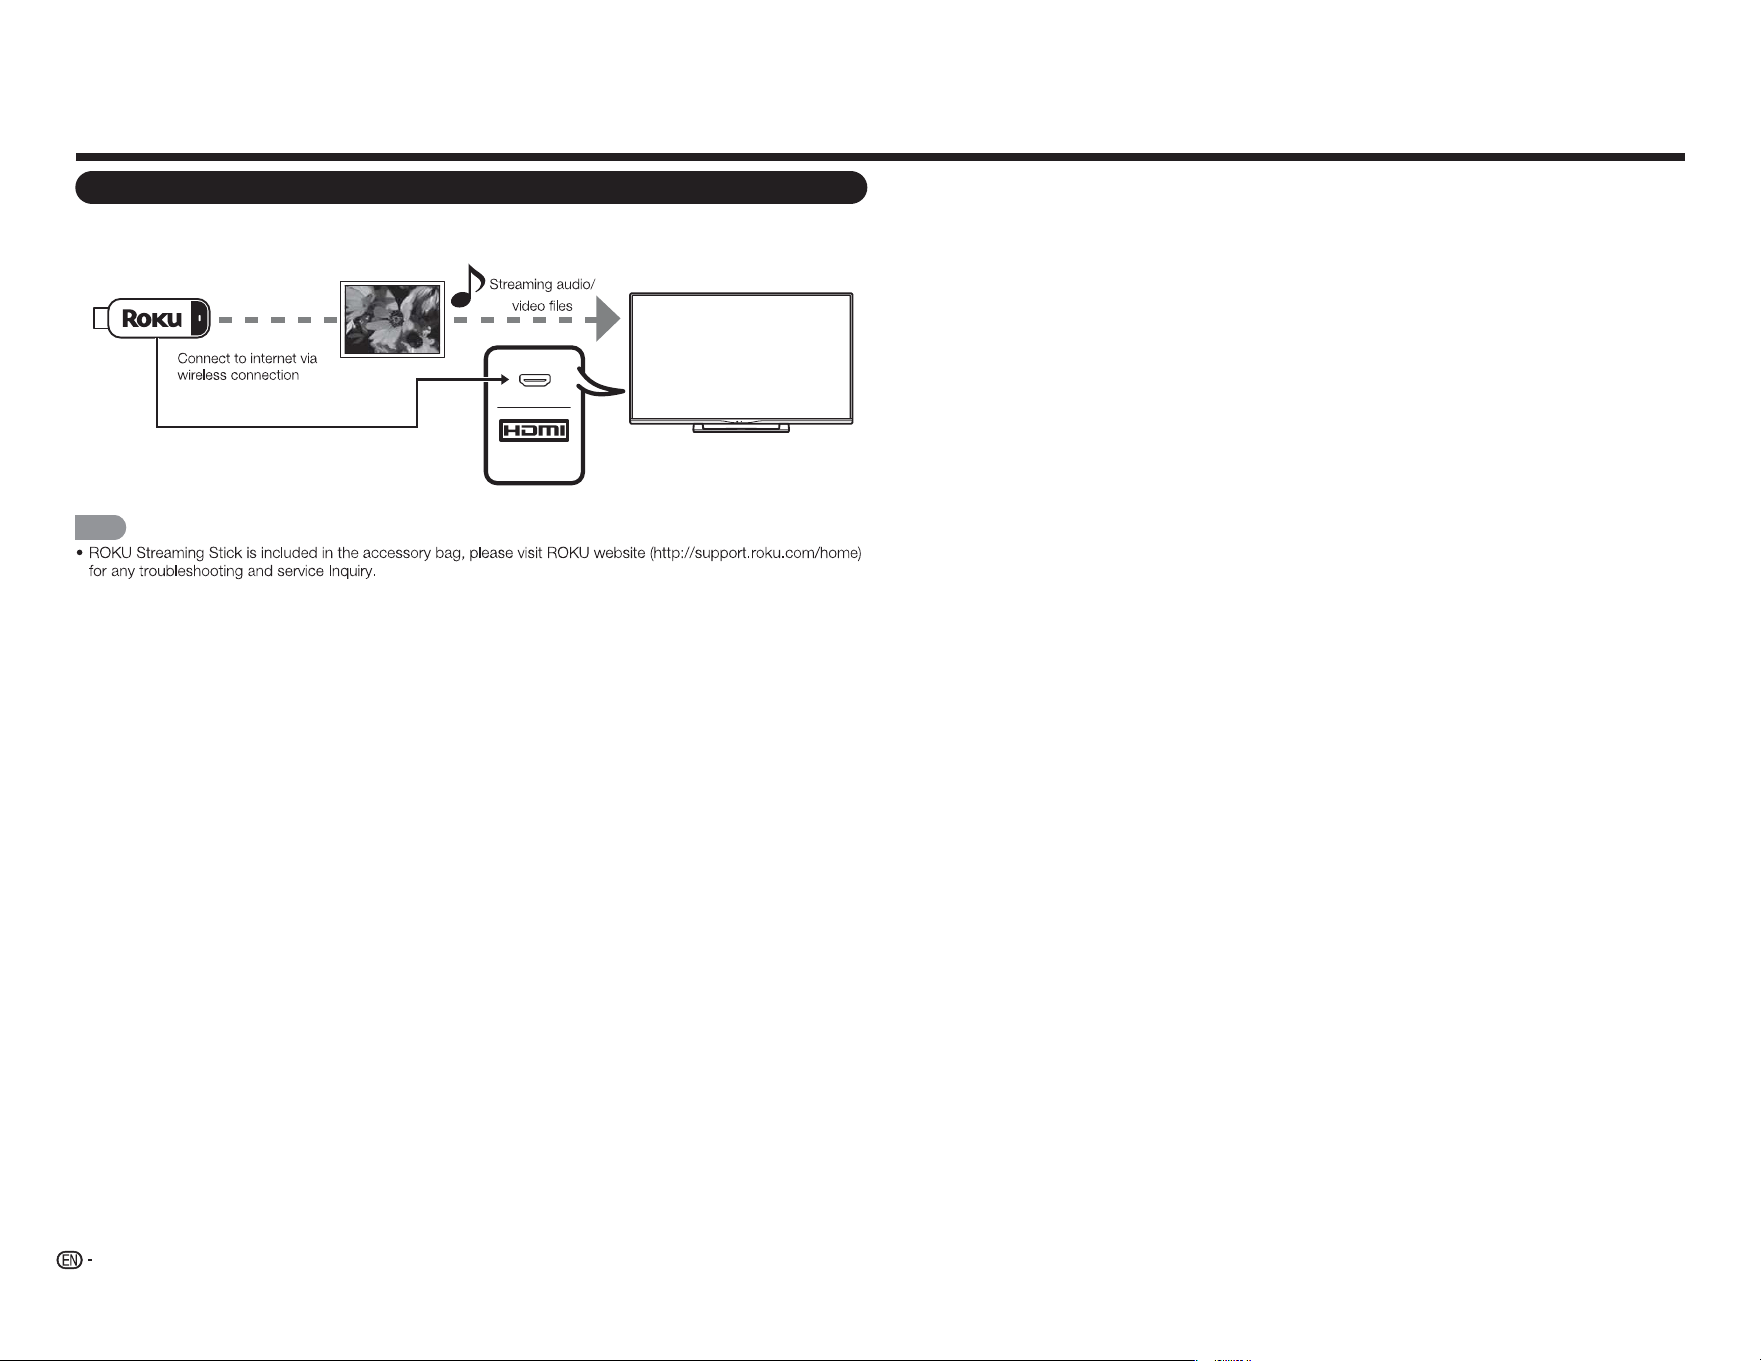
Connecting a ROKU Streaming Stick
■ Connect ROKU via MHL
MHL
NOTE
ROKU
Streaming Stick
13
Watching TV
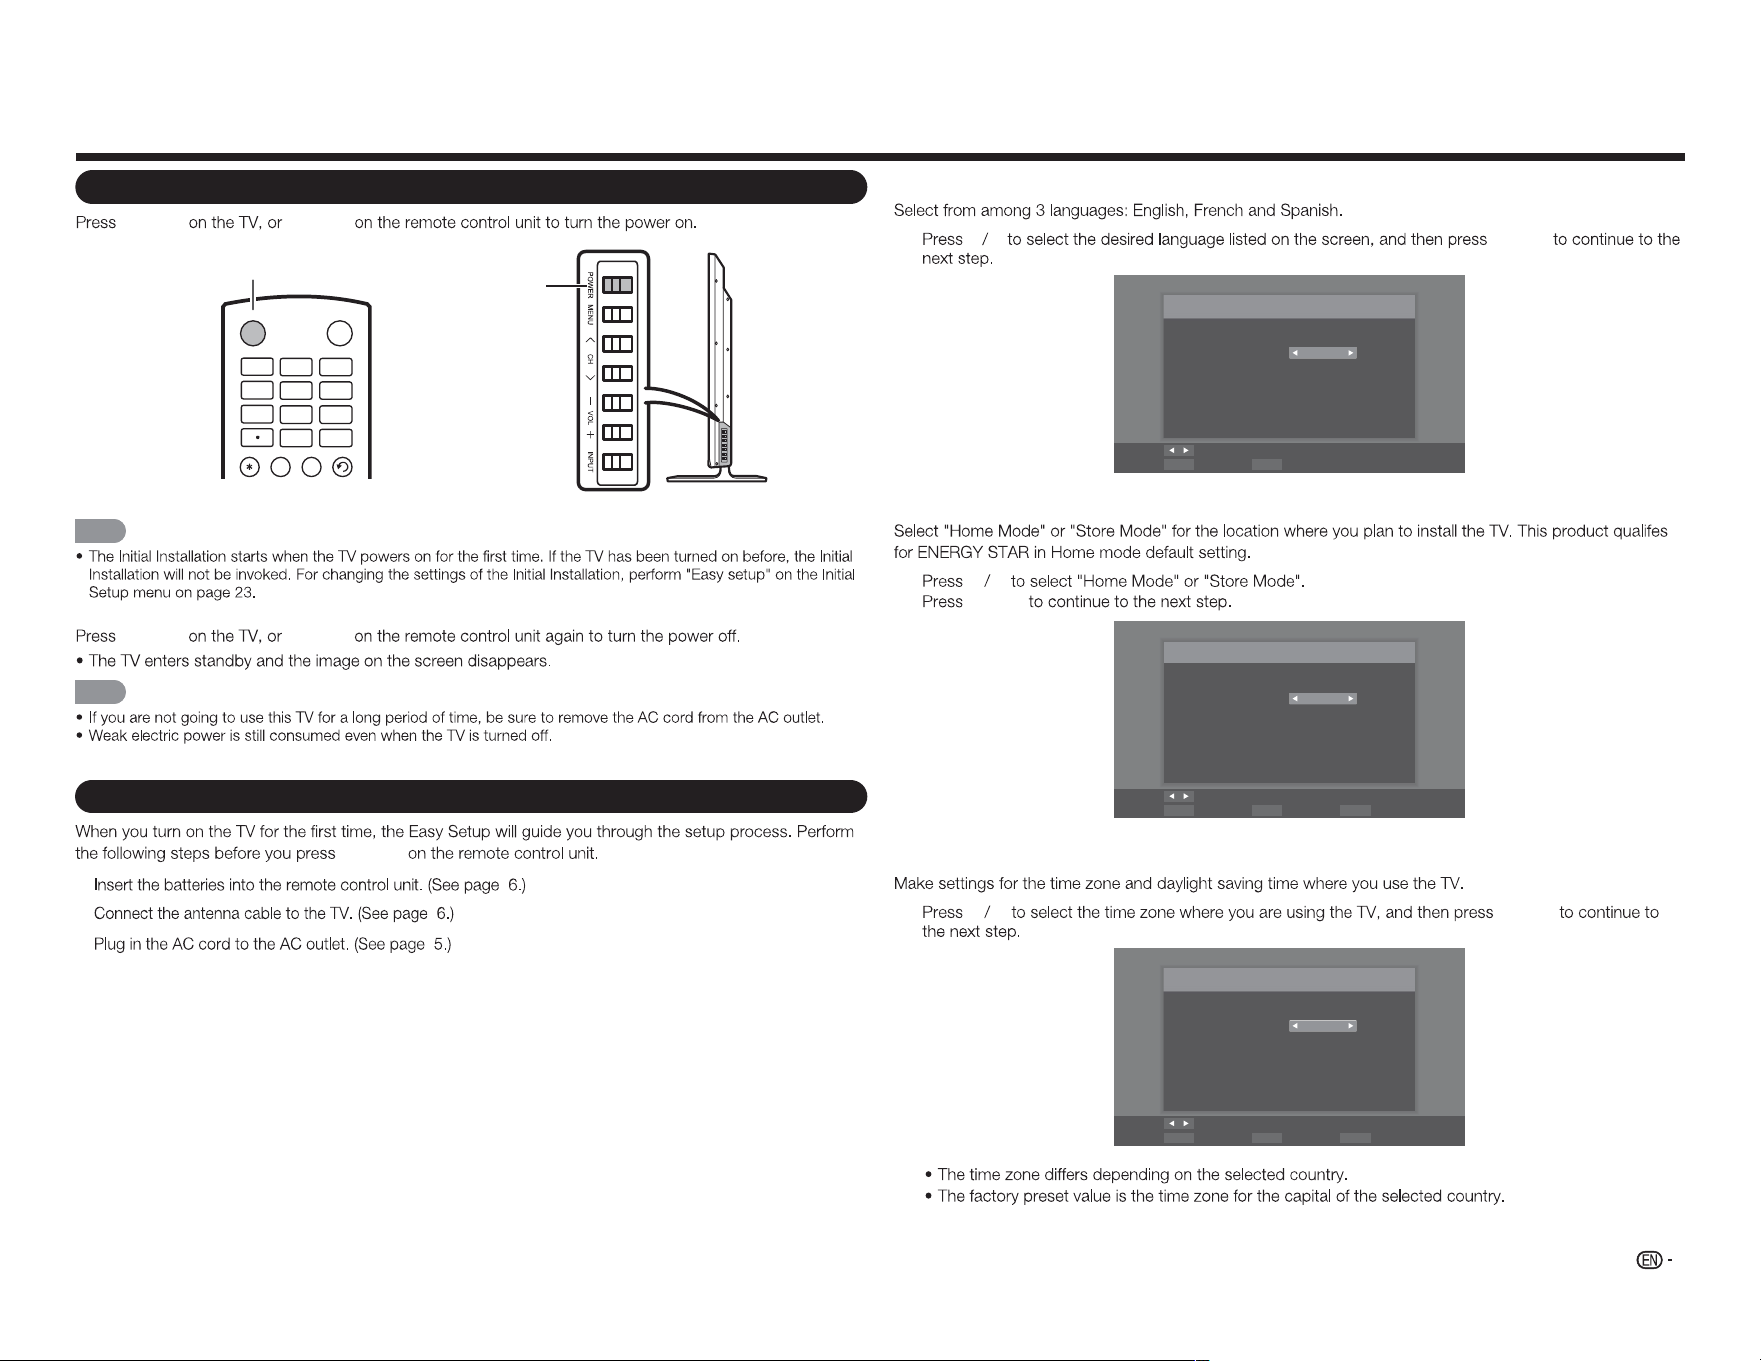
Turning On/Off the Power
POWER POWER
Language Setting
1
t u
ENTER
Menu Language
Language selection
Language: English
Change
SelectENTER ExitEXIT
TV Location Setting
2
c d
ENTER
TV Mode
Mode selection
Mode: Home Mode
Change
SelectENTER Previous StepRETURN ExitEXIT
Time Zone and Daylight Saving Time Settings
3
c d
ENTER
Time Zone
Set your time zone
Time Zone: Alaska
Change
SelectENTER Previous StepRETURN ExitEXIT
POWER button
POWER
button
INPUT
3
4
5 6
7
8 9
0
ENT
1
2
INFO F R EE Z E
FLASHBACKAUDIO
POWER
NOTE
POWER POWER
NOTE
Initial Installation
POWER
1.
2.
3.

14
Watching TV
4
c d
ENTER
Daylight Saving
Daylight Saving selection
Daylight Saving: On
Change
SelectENTER Previous StepRETURN ExitEXIT
Antenna Setting
5
c d
ENTER
Auto Scan
Select the Signal Type of your TV input and start auto scan.
Signal Type: Cable
Start Scan
Move Change
SelectENTER Previous StepRETURN ExitEXIT
Channel Scanning
6
p q
ENTER
ENTER
Auto Scan
Select the Signal Type of your TV input and start auto scan.
Signal Type: Cable
Start Scan
Move
SelectENTER Previous StepRETURN ExitEXIT
ENTER
Scanning
Channel scan in process, if you want to stop scanning, please
press “Stop Scan”.
Scan Status:
Analog Channel : 89
Digital Channel : 0
70%
Stop Scan
SelectENTER
Completed
7
ENTER
Scan Finish
Channel scan completed.
Analog Channel : 100
Digital Channel : 0
OK
SelectENTER Previous StepRETURN ExitEXIT
8
ENTER
Finish
Initial Setup has finished, please press “OK” to exit Easy Setup.
OK
SelectENTER Previous StepRETURN ExitEXIT
NOTE
15
Changing Channels
Method 1
CH
r
/
s
Method 2
0 9
Examples:
To select a 1 or 2-digit channel number
(e. g., Channel 5):
5 ENTER
To select a 3-digit channel number
(e. g., Channel 115):
1 1 5 ENTER
To select a 4-digit channel number
(e. g., Channel 22.1):
2 2 (DOT) 1
ENTER
NOTE
0
0 9
0 9
Changing Volume
VOL
k
/
l
VOL
k
VOL
l
HOME
HOME
INPUT
3
4
5 6
7
8 9
0
ENT
1
2
INFO FRE E ZE
FLASHBACK
MUTE
TV US B MENUSURROU N D
FAVORITE CH
S L EEP CC VIEW MODE AV MODE
AUDIO
VOL CH
+
RETURNEXIT
LCDTV
GJ221-R
A B C D
ENTER
POWER
INPUT
INPUT
1
INPUT
2
p q
INPUT
INPUT
p q
ENTER
NOTE
MUTE
MUTE
NOTE
VOL
k
/
l
MUTE
SLEEP
SLEEP
SLEEP
SLEEP
NOTE
SLEEP
Direct Button Operation
FLASHBACK
FLASHBACK
FLASHBACK
NOTE
FLASHBACK
SURROUND
SURROUND
FREEZE
FREEZE
FREEZE
AV MODE
AV MODE
Standard (Energy Star):
Movie:
Game:
DYNAMIC:
Sport:
User:
AV MODE
16
AUDIO
AUDIO
You can enjoy Hi-Fi stereo sound or SAP
broadcasts where available.
Stereo broadcasts:
SAP broadcasts:
If stereo sound is difficult to hear.
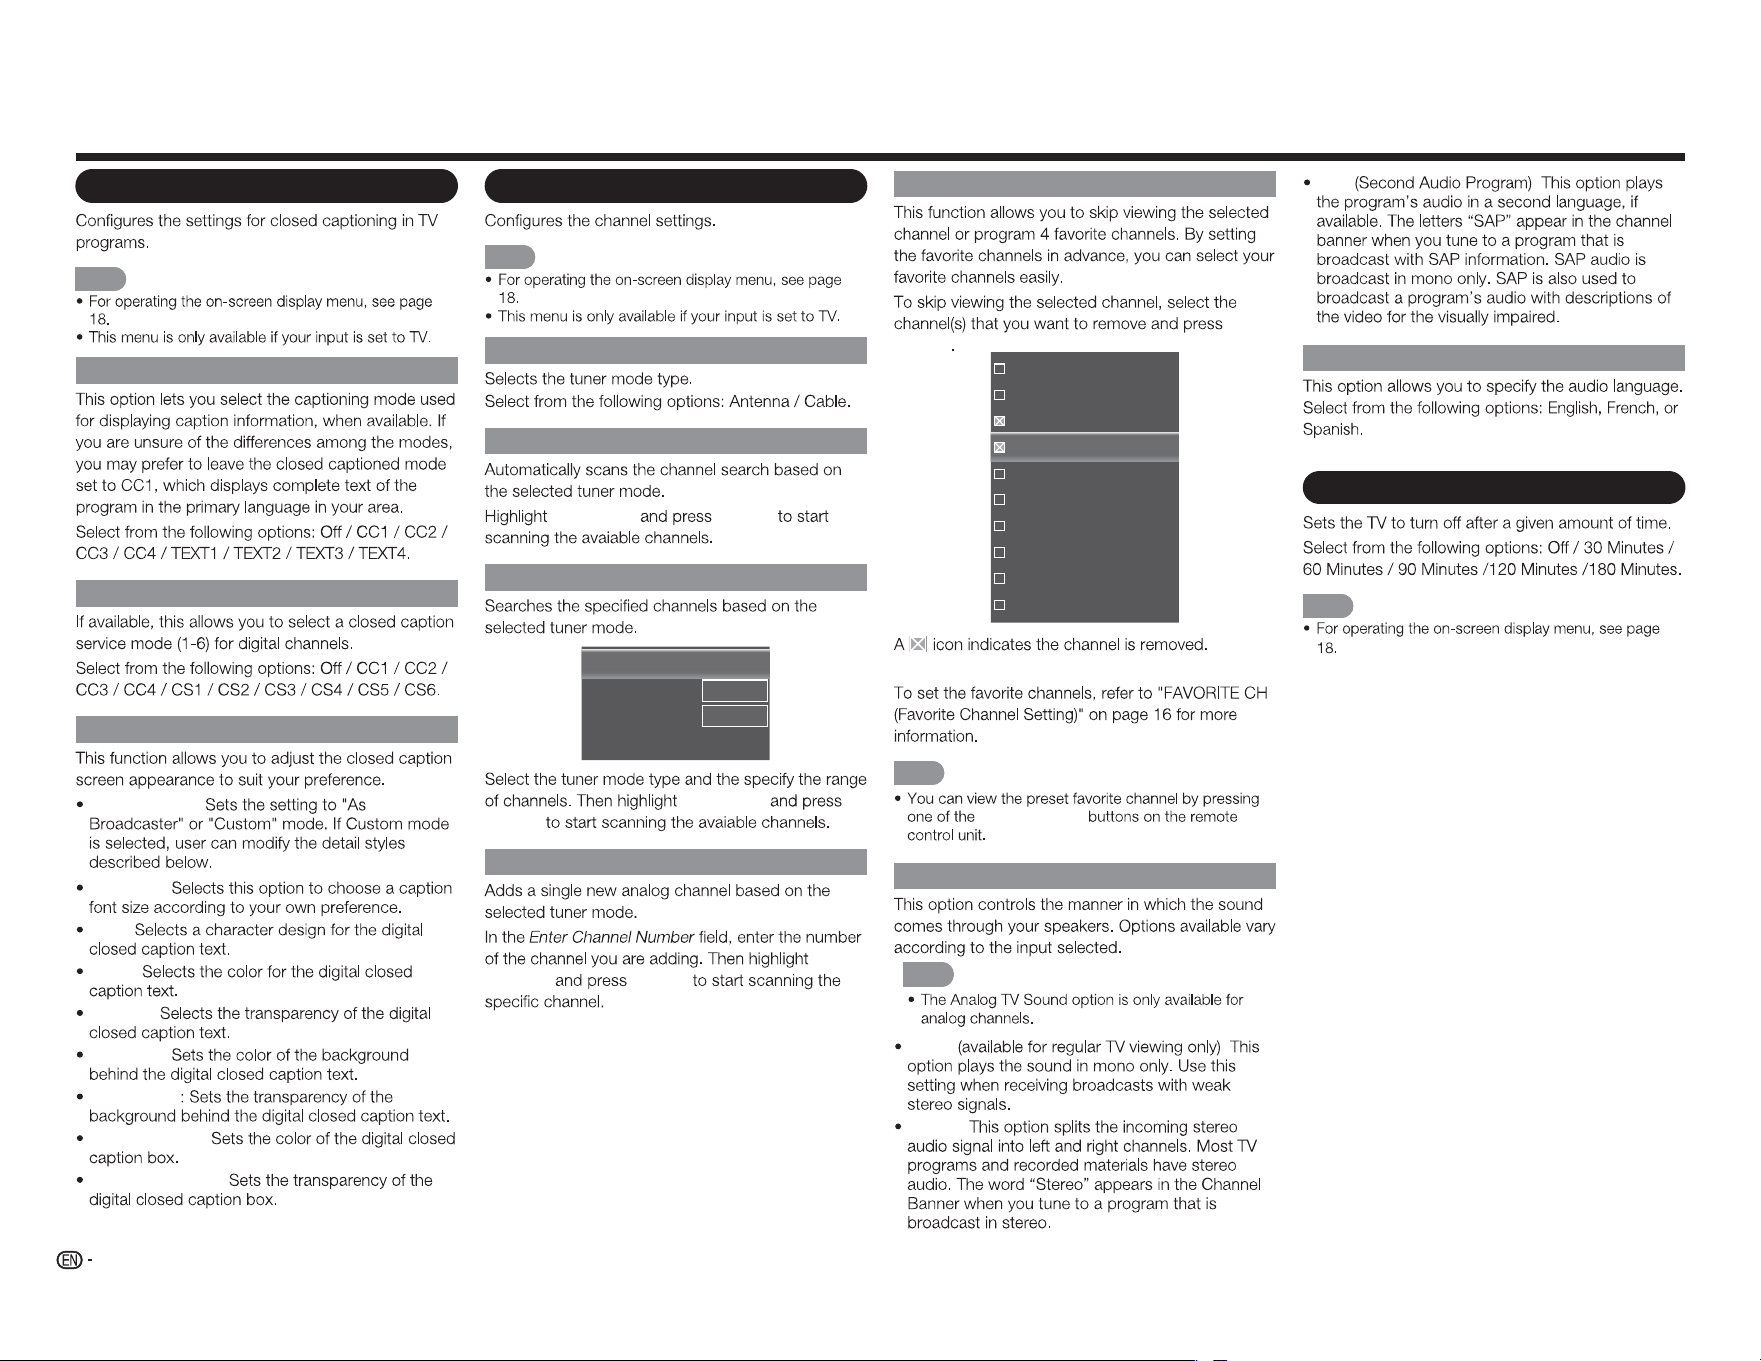
FAVORITE CH (Favorite Channel Setting)
To register your favorite channel
1
MENU
2
c d
Channel
3
p q
Skip/Favorite
Channel
u
ENTER
4
p q
FAVORITE CH A B C D
16
19
21
24
25
26
27
28
29
30
5
MENU
To watch your favorite channel
FAVORITE CH A B C
D
Closed Captions and Digital Closed
Captions
1
CC
2
CC
Direct Button Operation
Example:
CC
NOTE
17
VIEW MODE
1
VIEW MODE
2
VIEW MODE
p q
3
ENTER
NOTE
■ For 4:3 programs
Normal Wide Zoom Panoramic
■ For 16:9 programs
Normal
Wide Zoom Stretch
NOTE
Direct Button Operation
18
On-Screen Display Menu
Menu Operation Buttons
Using the remote control
On-Screen Display Menu Operation
Audio Setup Channel
Closed
Caption
View
Mode
Sleep
Timer
Surround
Auto Volume Control
Bass
Treble
Balance
Lip Sync
TV Speakers
Audio Only
Digital Audio Out
Analog Audio Out
Equalizer Settings
Reset Audio Mode
Off
Movie
News
[Movie]
[On]
0
0
0
0
[On]
[PCM]
[Fixed]
Example
1
MENU
2
c d
3
p q u
ENTER
a
/
b
4
p q
c d
ENTER
5
MENU
NOTE
On-Screen Display Menu (Main menu)
Input Picture Audio Setup
Closed
Caption
View
Mode
TV
AV IN
Component
HDMI-1
HDMI-2
HDMI-3(Side)
■ About Menu Items
NOTE
Main Menu
Submenu/Menu options
MENU:
a
/
b
/
c
/
d
:
ENTER:
RETURN:
TV US B MENUSU RR OU ND
FAV ORI TE CH
RETURNEXIT
A B
C D
ENTER
Using the control panel of the TV
MENU: MENU
INPUT: ENTER
CH
r
/
s
:
a b
VOL
k
/
l
:
c d
19
Picture menu
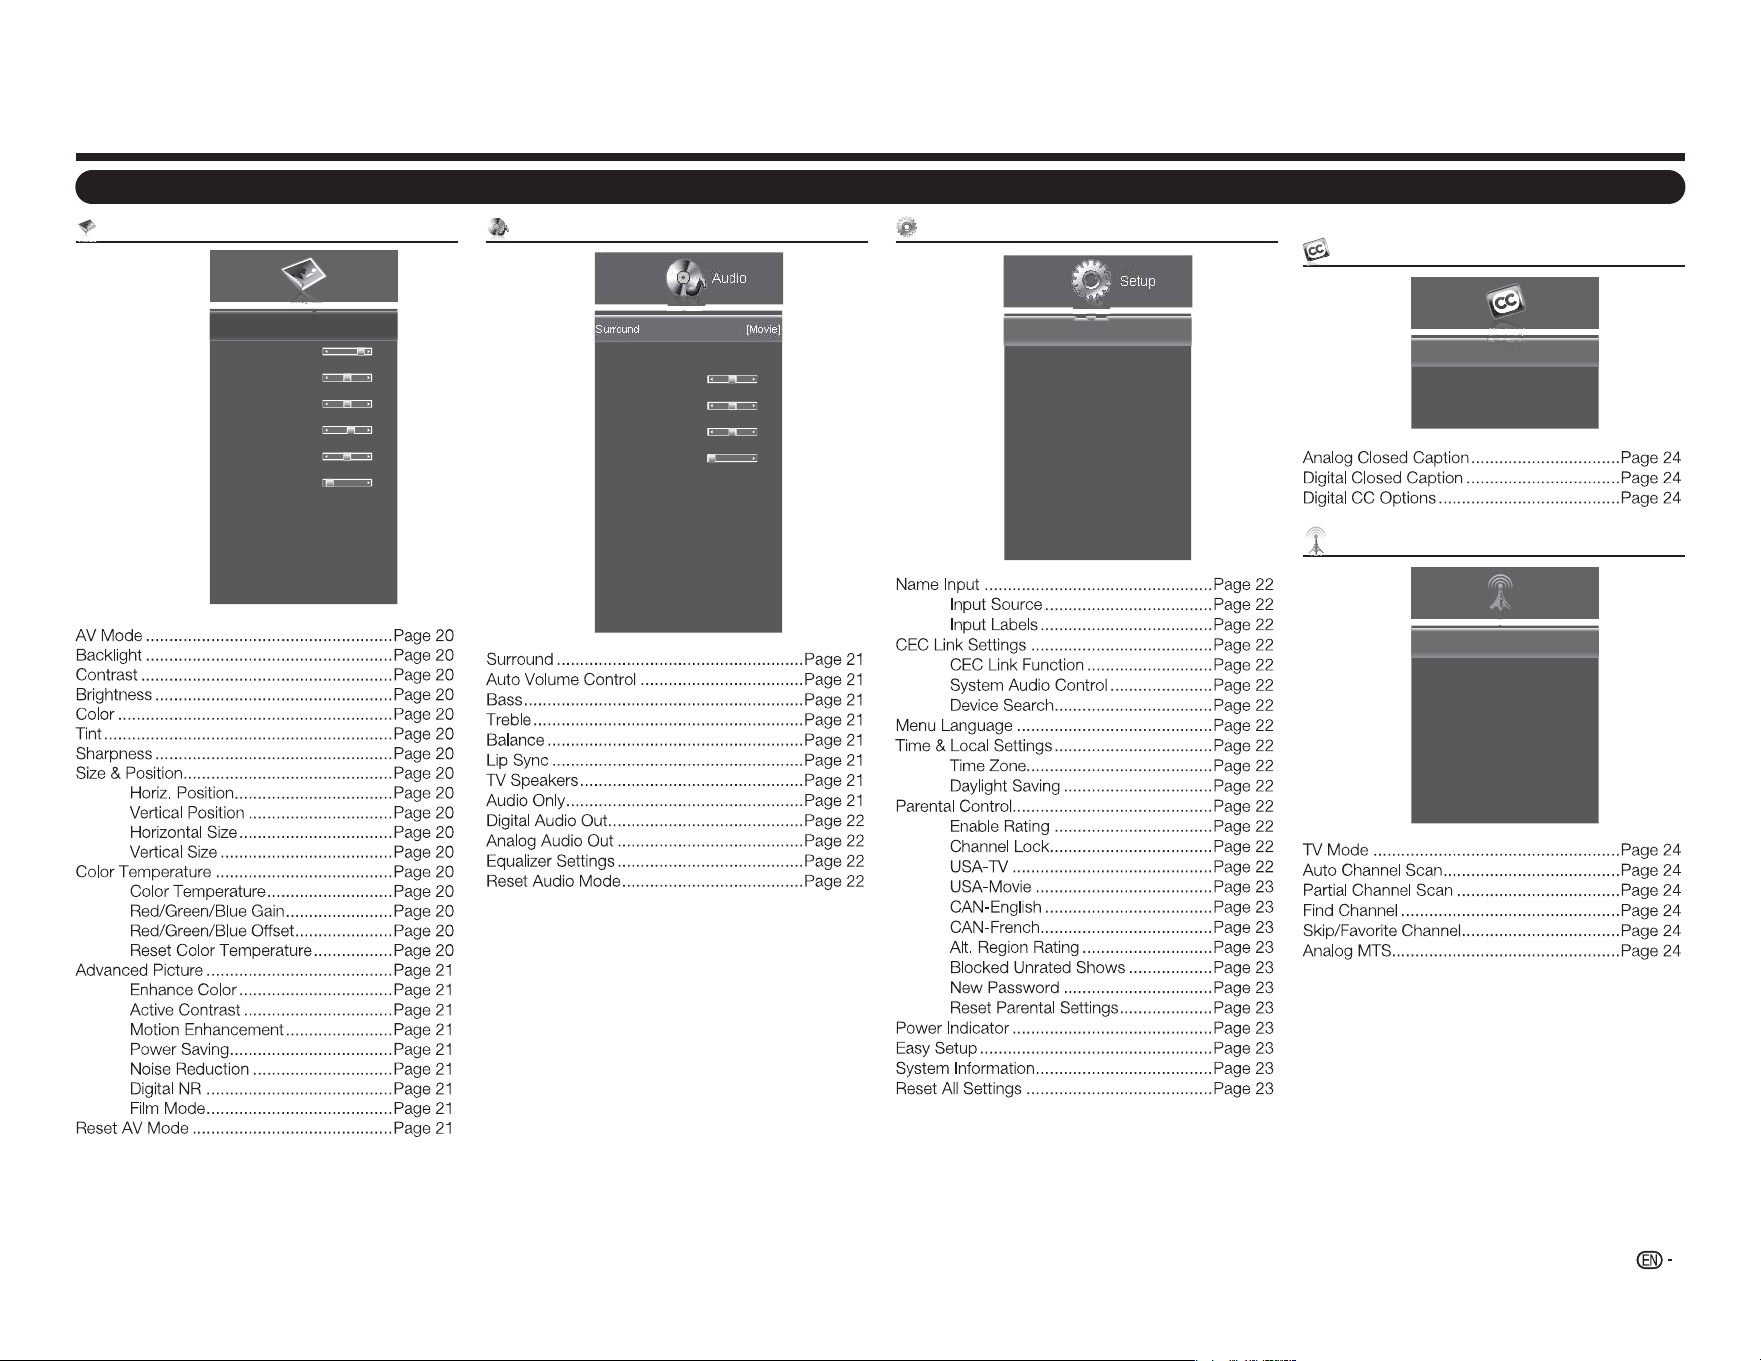
Picture
AV Mode
Backlight
Contrast
Brightness
Color
Tint
Sharpness
Size & Position
Color Temperature
Advanced Picture
Reset AV Mode
[Standard (Energy Star)]
80
52
50
60
0
2
Example
Menu Items
Audio menu
Audio
Surround
Auto Volume Control
Bass
Treble
Balance
Lip Sync
TV Speakers
Audio Only
Digital Audio Out
Analog Audio Out
Equalizer Settings
Reset Audio Mode
[Movie]
[On]
0
0
0
0
[On]
[PCM]
[Fixed]
Example
Setup menu
Setup
Name Input
CEC Link Settings
Menu Language
Time & Local Settings
Parental Control
Power Indicator
Easy Setup
System Information
Reset All Settings
[English]
[On]
Example
On-Screen Display Menu
Closed Caption menu (TV input signal only)
Closed
Caption
Analog Closed Caption
Digital Closed Caption
Digital CC Options
[Off]
[Off]
Example
Channel menu (TV input signal only)
TV Mode
Auto Channel Scan
Partial Channel Scan
Find Channel
Skip/ Favorite Channel
Analog MTS
Digital MTS
[Cable]
[Mono]
Channel
Example

20
Brightness
c d
Color
c d
Tint
c
d
Sharpness
c d
Size & Position
Horiz. Position
Vertical Position
Horizontal Size
Vertical Size
31
16
0
0
Horiz. Position:
Vertical Position:
Horizontal Size:
Vertical Size:
Picture menu
NOTE
AV Mode (Changing Pic.Quality)
Standard (Energy Star):
Movie:
Game:
DYNAMIC:
Sport:
User:
NOTE
AV MODE
Backlight
c d
Contrast
c d
Color Temperature
Color Temperature
Red Gain
Green Gain
Blue Gain
Red Offset
Green Offset
Blue Offset
Reset Color Temperature
[Cool]
128
128
128
128
128
128
Color Temperature
Custom:
Cool:
Normal:
Warm:
Red/Green/Blue Gain
Red/Green/Blue Offset
Reset Color Temperature
Input menu
Input
TV
AV IN
Component
HDMI-1
HDMI-2
HDMI-3(Side)
Example
View Mode menu
Normal
Wide
Zoom
Panoramic
View
Mode
Example
Sleep Timer menu
Off
30 Minutes
60 Minutes
90 Minutes
120 Minutes
180 Minutes
Sleep
Timer
OffSleep Timer
Example
On-Screen Display Menu
21
On-Screen Display Menu
Advanced Picture Settings
Enhance Color
Active Contrast
Motion Enhancement
Power Saving
Noise Reduction
Digital NR
Film Mode
[Normal]
[Medium]
[Medium]
[On]
[Low]
[Low]
[Auto]
Echance Color
Off:
Normal/Rich:
Active Contrast
Off:
High/Middle/Low:
Motion Enhancement
Off:
High/Medium/Low:
Power Saving
Off:
On:
Noise Reduction
Off:
High/Middle/Low:
Digital NR
Off:
High/Middle/Low:
Film Mode
Auto:
Off:
Reset AV Mode
Picture
Audio menu
NOTE
Surround
Off:
Movie:
News:
NOTE
Auto Volume Control
Off:
On:
Bass
c d
NOTE
Treble
c d
NOTE
Balance
c
d
Lip Sync
c
/
d
TV Speakers
Off:
On:
NOTE
Audio Only
The TV has entered Audio Only Mode.
The Backlight will turn off soon. Press
any key to wake up again.
22
Digital Audio Out
Dolby Digital:
PCM:
Analog Audio Out
Fixed
Variable
Equalizer Settings
c
/
d
a
/
b
MENU
NOTE
Reset Audio Mode
Audio
Setup menu
NOTE
Name Input
Input Source
Input Labels
[TV]
[TV]
TV
Input Source
Input Labels
Input Labels
ENTER
OK
ENTER
CEC Link Settings
CEC Link Function
System Audio Control
Device Search
[Enable]
[Off]
CEC Link
Function Enable
System Audio Control
On
Device Search
Menu Language
Time & Local Settings
Time Zone
Daylight Saving
[Alaska]
[On]
Time Zone:
Daylight Saving: Daylight Saving
On
Parental Control
NOTE
Please enter password.
****
OK Cancel
OK
ENTER
Enable Rating
Channel Lock
USA-TV
USA-Movie
CAN-English
CAN-French
Alt. Region Rating
Block Unrated Shows
New Password
Reset Parental Settings
[Off]
[Off]
NOTE
Enable Rating
Program Rating On
Channel Lock
16
19
21
24
25
26
27
28
29
30
USA-TV
TV-Y
TV-Y7
TV-G
TV-PG
TV-14
TV-MA
ALL FV D L S V
TV ratings level TV ratings content
On-Screen Display Menu
23
On-Screen Display Menu
USA-Movie
G
PG
PG-13
R
NC-17
X
G:
PG:
PG-13:
R:
NC-17:
X:
CAN-English
C
C8+
G
PG
14+
18+
C:
C8+:
G:
PG:
14+:
18+:
CAN-French
G
8ans+
13ans+
16ans+
18ans+
G:
8ans+:
13ans+:
16ans+:
18ans+:
Alt. Region Rating
Blocked Unrated Shows
On
New Password
New Password
Re-Enter Password
Reset Parental Settings
Parental Control
Power Indicator
Off:
On:
Easy Setup
NOTE
System Information
Reset All Settings
NOTE
24
Closed Caption menu
NOTE
Analog Closed Caption
Digital Closed Caption
Digital CC Options
Caption Style:
Text Size:
Font:
Color:
Opacity:
BG Color:
BG Opacity
Window Color:
Window Opacity:
Channel menu
NOTE
TV Mode
Auto Channel Scan
Start Scan
ENTER
Partial Channel Scan
Scan Mode
From Channel
To Channel
Start Scan
[Analog/Digital]
1
135
Start Scan
ENTER
Find Channel
Add
Channel
ENTER
Skip/Favorite Channel
ENTER
16
19
21
24
25
26
27
28
29
30
NOTE
FAVORITE CH
Analog MTS
NOTE
Mono :
Stereo:
SAP :
Digital MTS
Sleep Timer menu
NOTE
On-Screen Display Menu
25
Enjoying Photo/Music/Movie Playback
NOTE
Connecting a USB Memory Device/USB Hard Drive
MHL
(DC 5V, 900mA)
USB
USB Device Compatibility
Container Extensions A/V CODEC/Profile
USB media detected. Enter multimedia menu?
Yes No
Yes
ENTER
1
USB ENTER
USB:
2
a b
ENTER
PHOTO
MUSIC
MOVIE
3
a
/
b
/
c
/
d
ENTER
Selecting the Folders to Play Back
(DC 5V, 500mA)
26
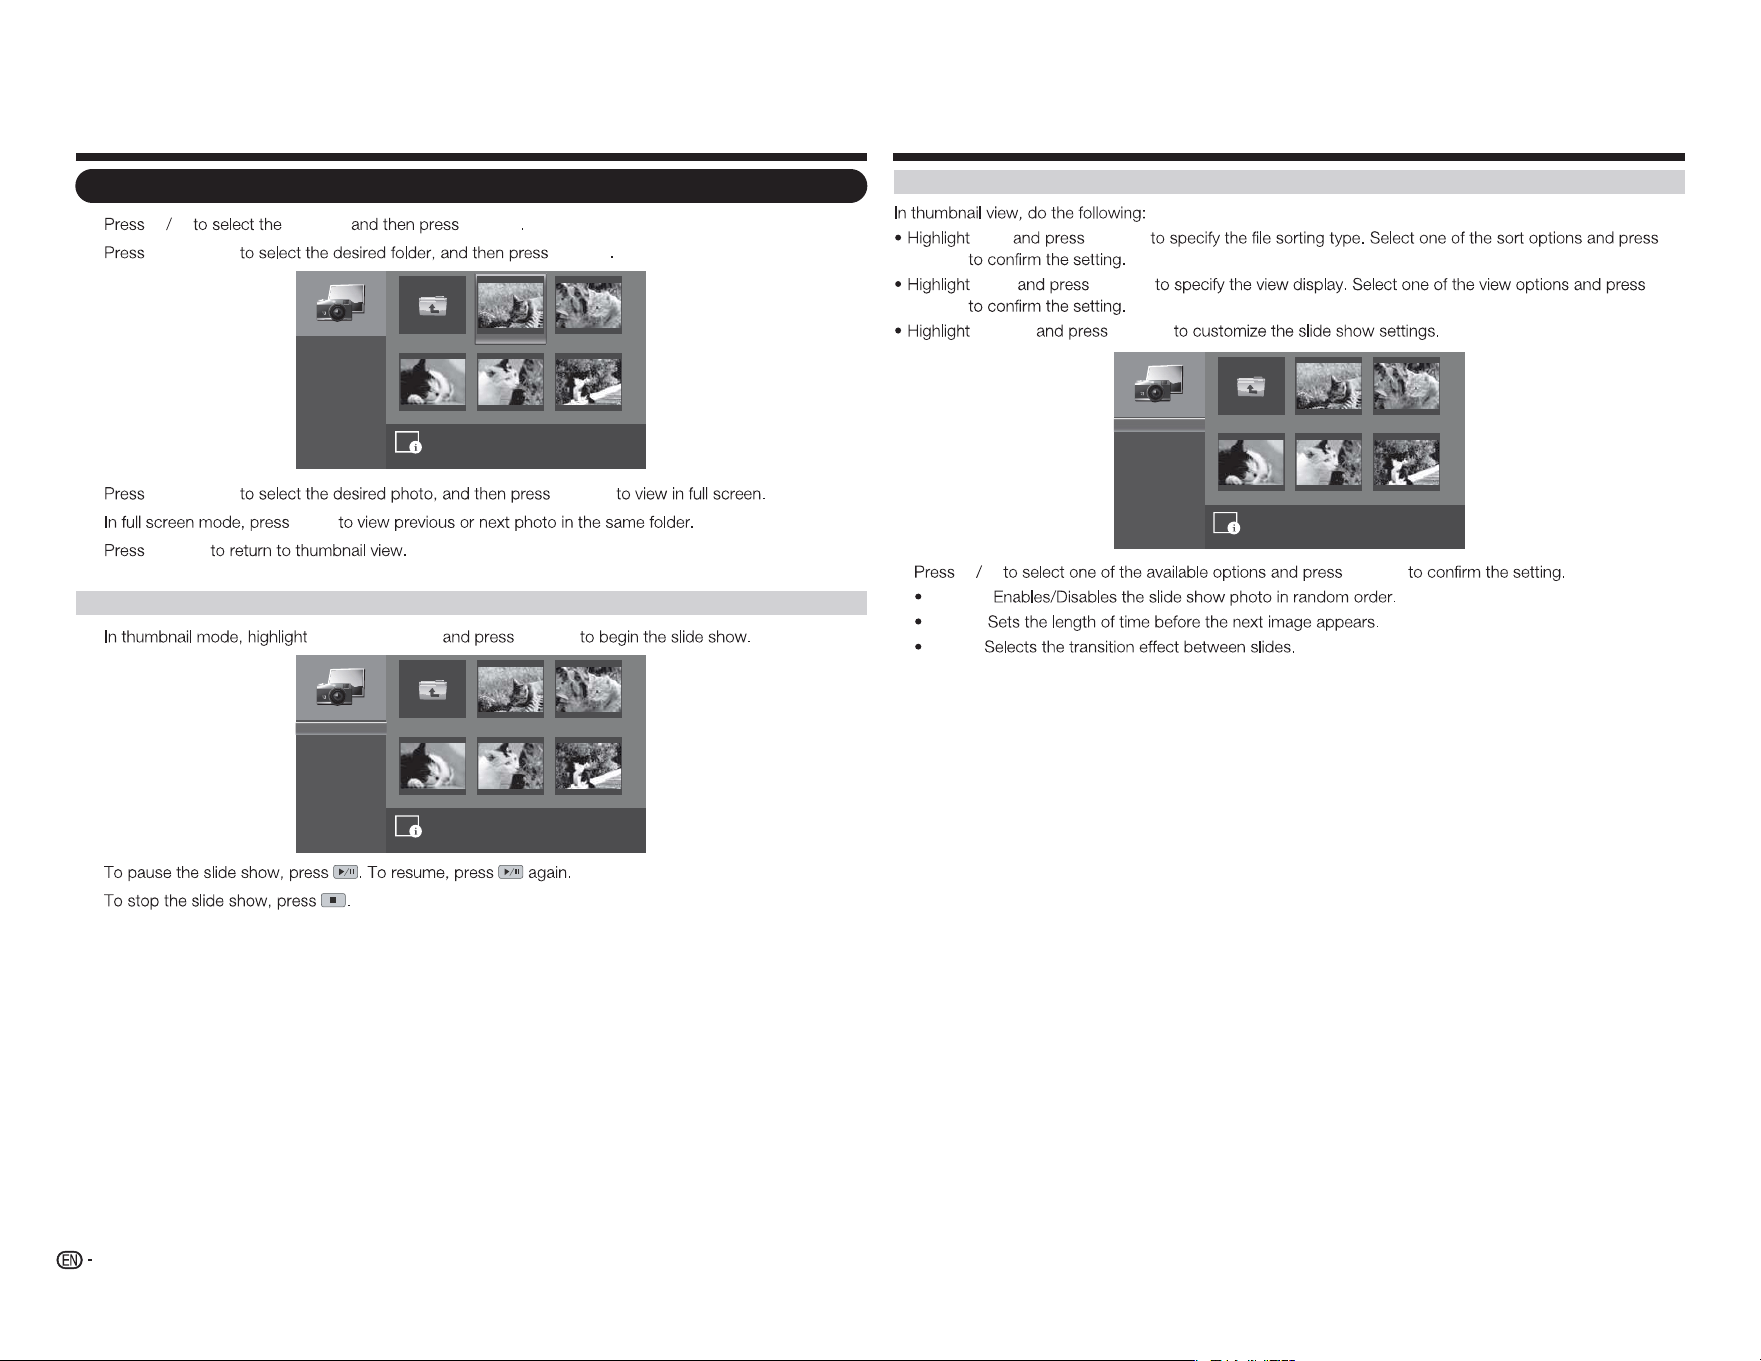
Viewing Photos
1
a b
PHOTO
ENTER
2
a
/
b
/
c
/
d
ENTER
image001.jpg image002.jpg
image004.jpgimage003.jpg image005.jpg
Up Folder
Start Slideshow
Sort:
View:
Setting
\photo\
File Name:image001.jpg
Resolution: 725x510 File Size: 965 KBytes
1
/
3
Name A-Z
Folders
3
a
/
b
/
c
/
d
ENTER
4
c
/
d
5
ENTER
Viewing Photos in a Slide Show
1
Start Slideshow
ENTER
image001.jpg image002.jpg
image004.jpgimage003.jpg image005.jpg
Up Folder
Start Slideshow
Sort:
View:
Setting
\photo\
1
/
3
Name A-Z
Folders
2
3
Enjoying Photo/Music/Movie Playback
Customizing Photo Settings
Sort
ENTER
ENTER
View
ENTER
ENTER
Setting
ENTER
image001.jpg image002.jpg
image004.jpgimage003.jpg image005.jpg
Up Folder
Shuffle:
Speed:
Effect:
\photo\
1
/
3
Shuffle On
5 seconds
Random
a b
ENTER
Shuffle:
Speed:
Effect:
27
Enjoying Photo/Music/Movie Playback
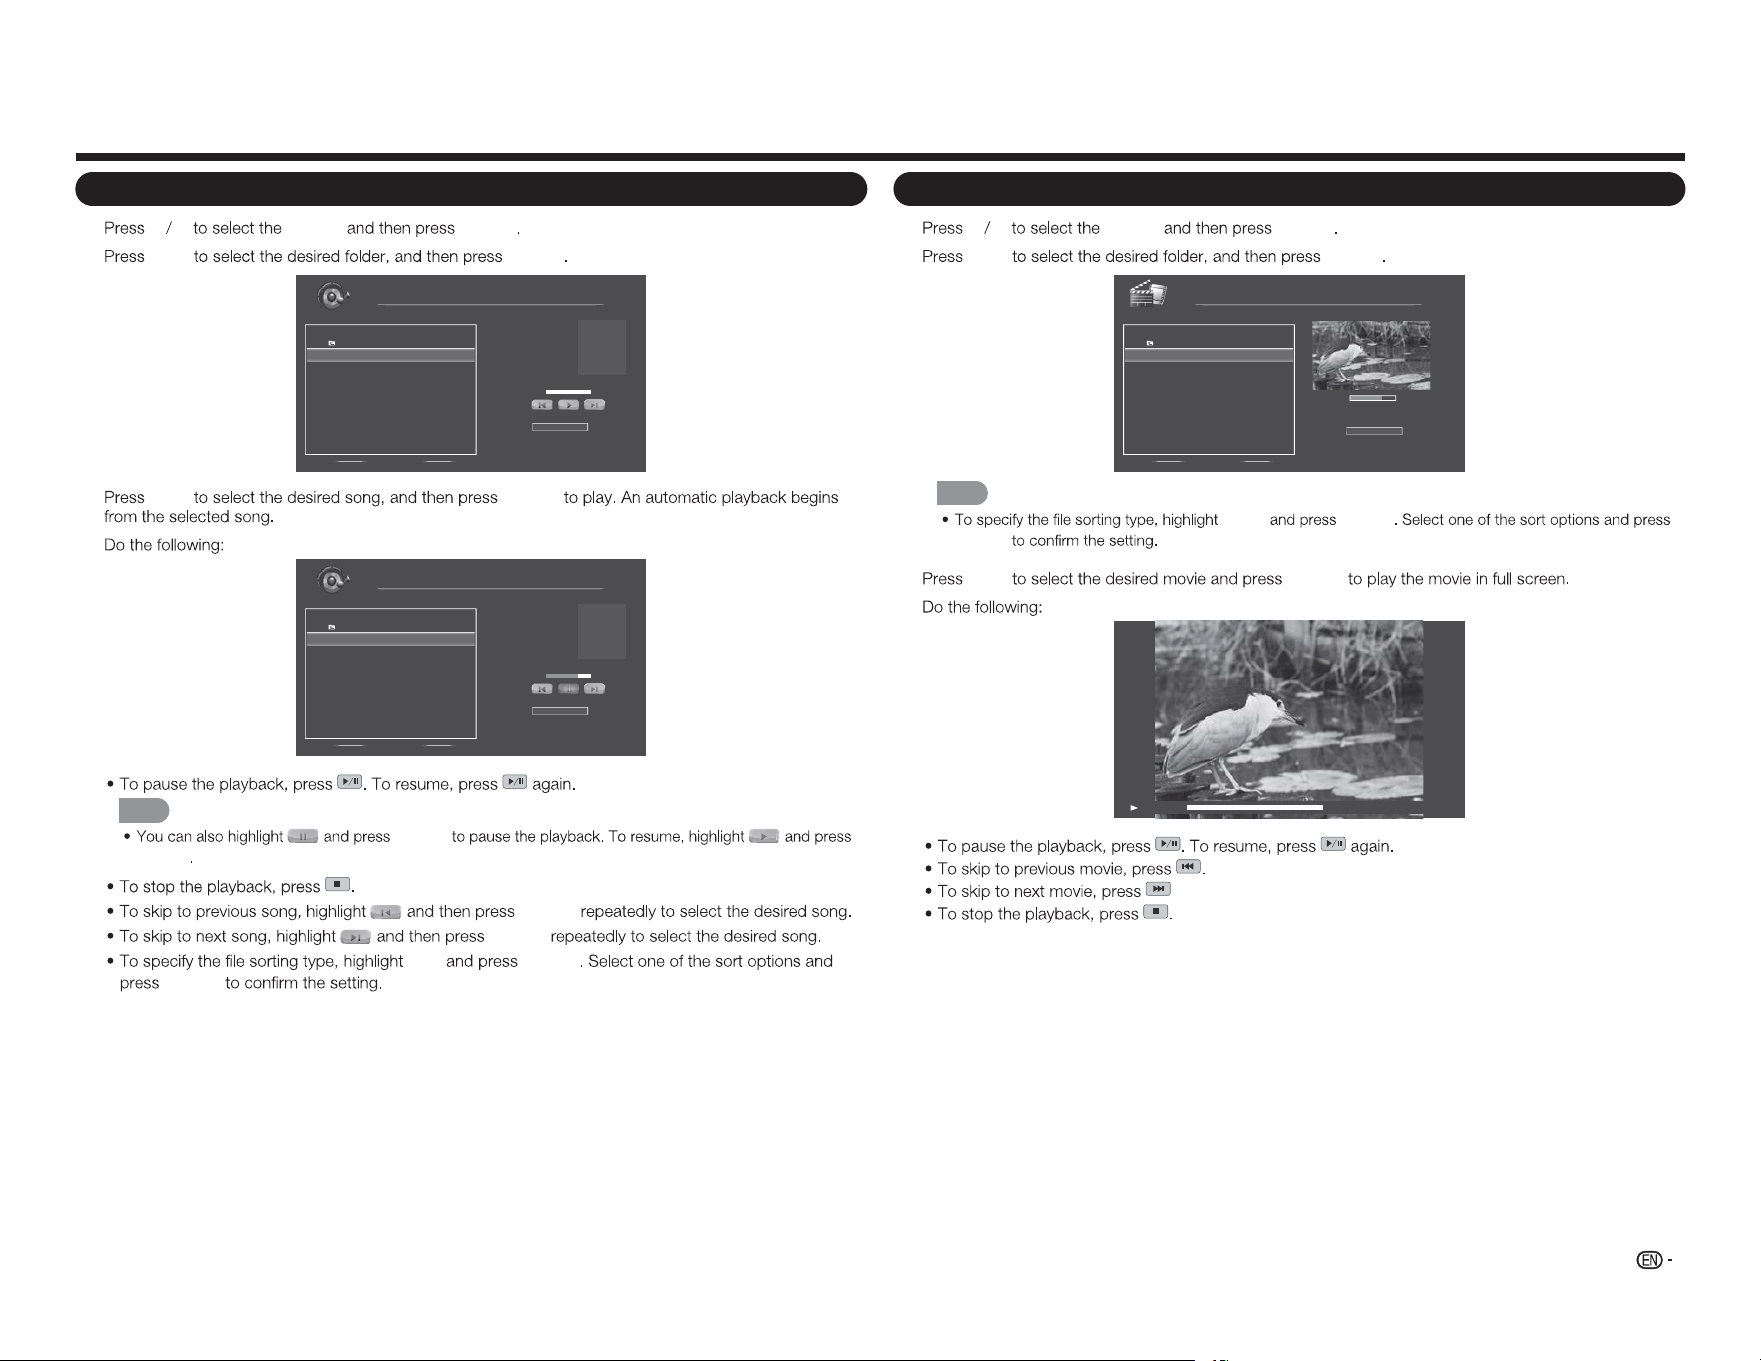
Playing Music
1
a b
MUSIC
ENTER
2
a
/
b
ENTER
File Name:
Artist:
Album:
MUSIC
\music
1 / 1
# Track Duration
1. Up Folder
2. song0 01.mp3 00:03:15
3. song0 02.mp3 00:03:12
4. song0 03.mp3 00:03:10
Sort:
Name A- Z
00:00:00 00:00:00
3
a
/
b
ENTER
4
File Name:
Artist:
Album:
song001.mp3
Unknow
Unknow
MUSIC
\music
1 / 1
# Track Duration
1. Up Folder
2. song0 01.mp3 00:03:15
3. song0 02.mp3 00:03:12
4. song0 03.mp3 00:03:10
Sort:
Name A- Z
00:02:07 00:03:15
NOTE
ENTER
ENTER
ENTER
ENTER
Sort
ENTER
ENTER
Watching Movies
1
a b
MOVIE
ENTER
2
a
/
b
ENTER
00:06:07
Sort:
00:08:07
MOVIE
\movie
1 / 1
# File Duration
1. Up Folder
2. movie001.avi 00 :08:15
3. movie002.avi - -:- -:- -
4. movie003.avi - -:- -:- -
Name A- Z
NOTE
SORT ENTER
ENTER
3
a
/
b
ENTER
4
00:06:07 00:08:15
.

28
Wall Mount Kit Specifications
1 2 Y/V Pb/Cb
AC IN
CABLE / ANTENNAPr/Cr
COMPONENT / VIDEO
L R OPTICAL MH L USB
AUDIO OUT
DTV / TV
AUDIO
L R
A
b1
B
b3
c1
b2
a2
a1
Model
v
v
DEPTH OF
MOUNTING HOLES
SCREW
WALL MOUNT
UNIT
MOUNTING
HOLES
CABINET
Model
NOTE
Appendix
29
Troubleshooting
The TV displays “No Signal.”
INPUT
There is no power.
POWER
INPUT
There is no sound.
VOL
k
MUTE
On
The colors on the TV don’t look right.
Appendix
The image quality is not good.
The picture is distorted.
The display image does not cover the entire screen.
VIEW MODE
The TV has pixels (dots) that are always dark or always lit.
I see “noise” or static on the screen.
When I change input source, the volume changes.
VOL
k
/
l
When I change input source, the display image changes size.
30
Cautions regarding use in high and low temperature environments
IF YOU HAVE FURTHER INQUIRIES, PLEASE CONTACT OUR CUSTOMER SERVICE FOR
ASSISTANCE.
Appendix
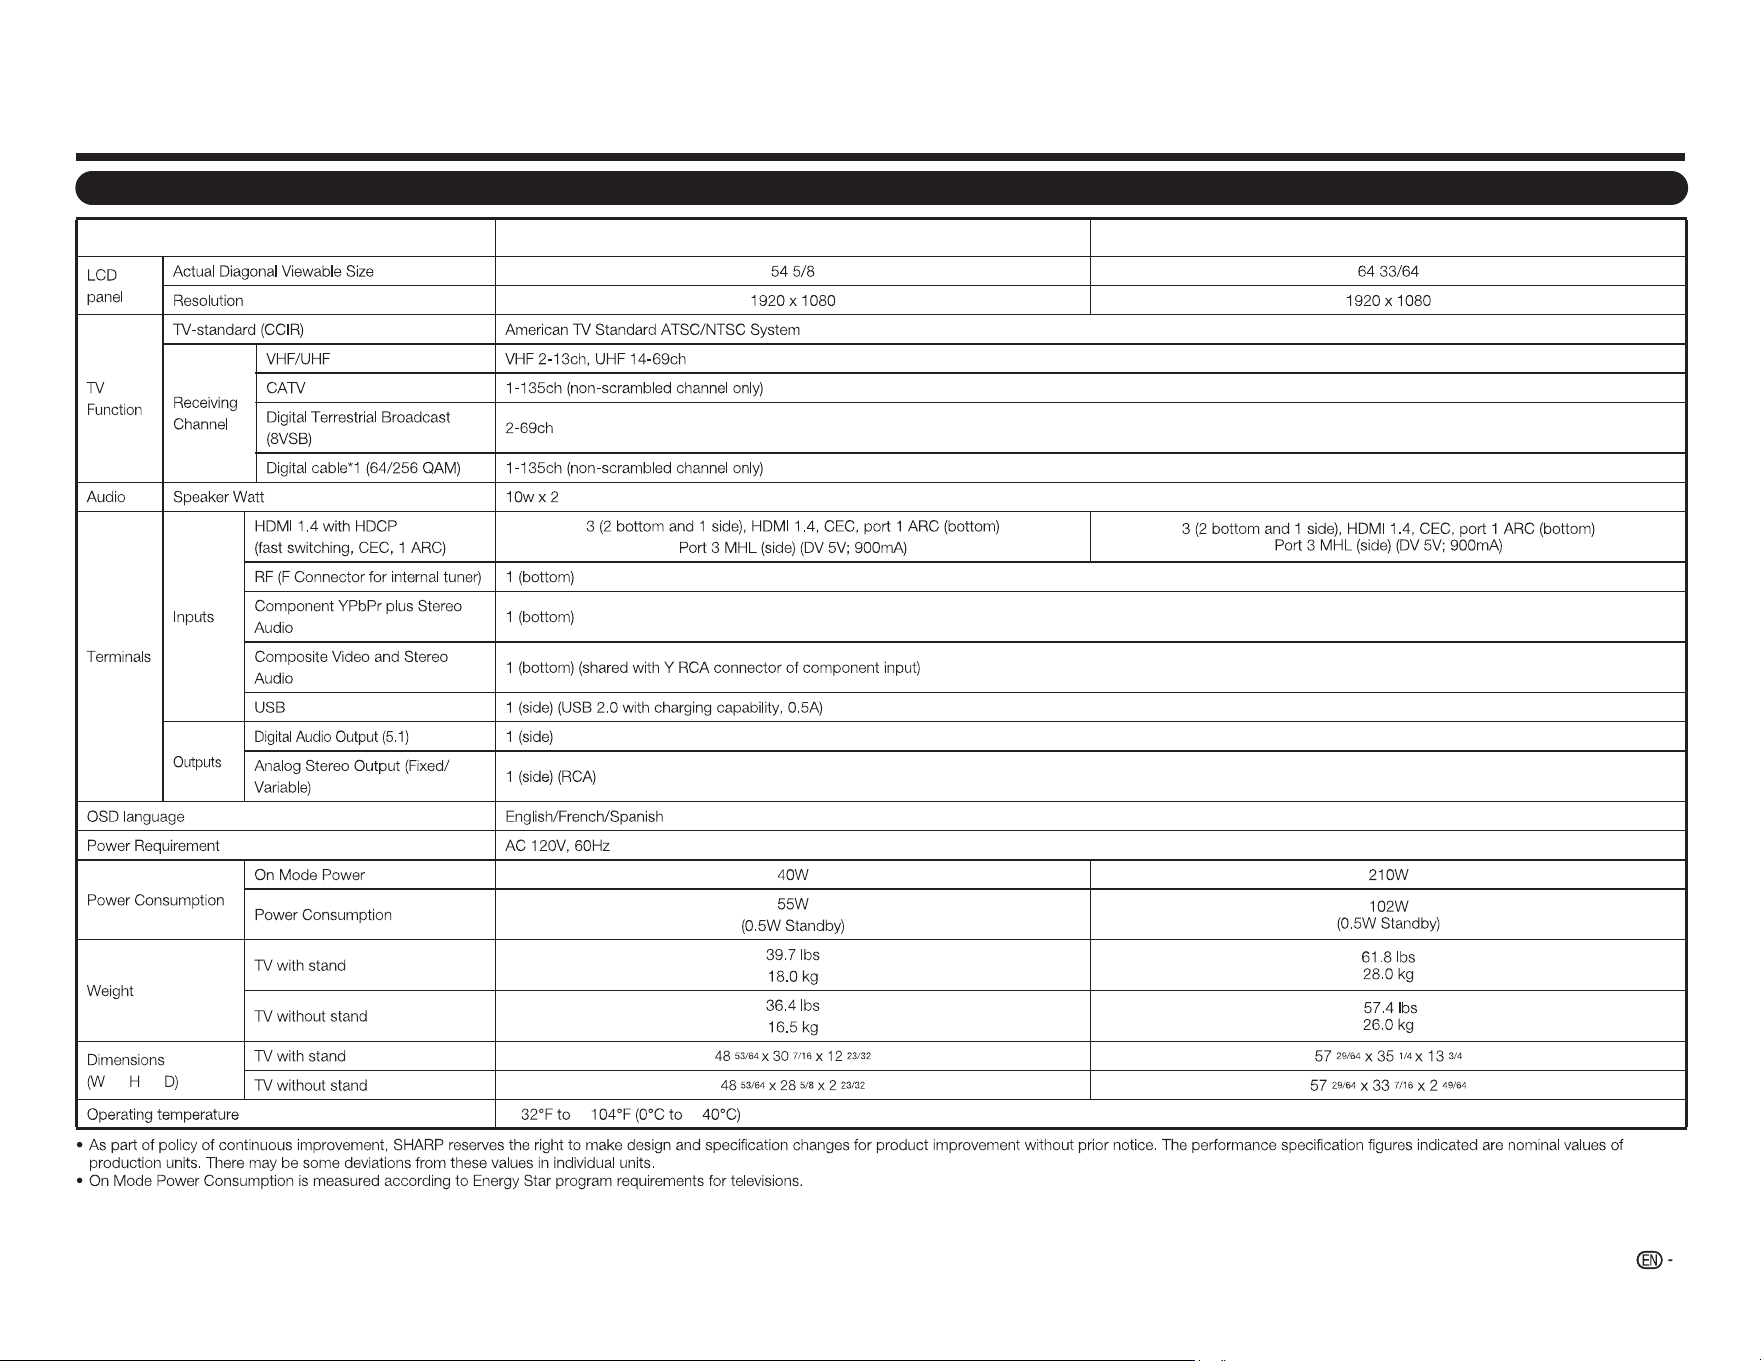
TV
Item
Model: LC-55LE643U
Model: LC-65LE643U
g g
e e e
31
Specifications
32
1 2 Y/V Pb/Cb
AC IN
CABLE / ANTENNAPr/Cr
COMPONENT / VIDEO
L R OPTICAL MHL USB
AUDIO OUT
DTV / TV
AUDIO
L R
15
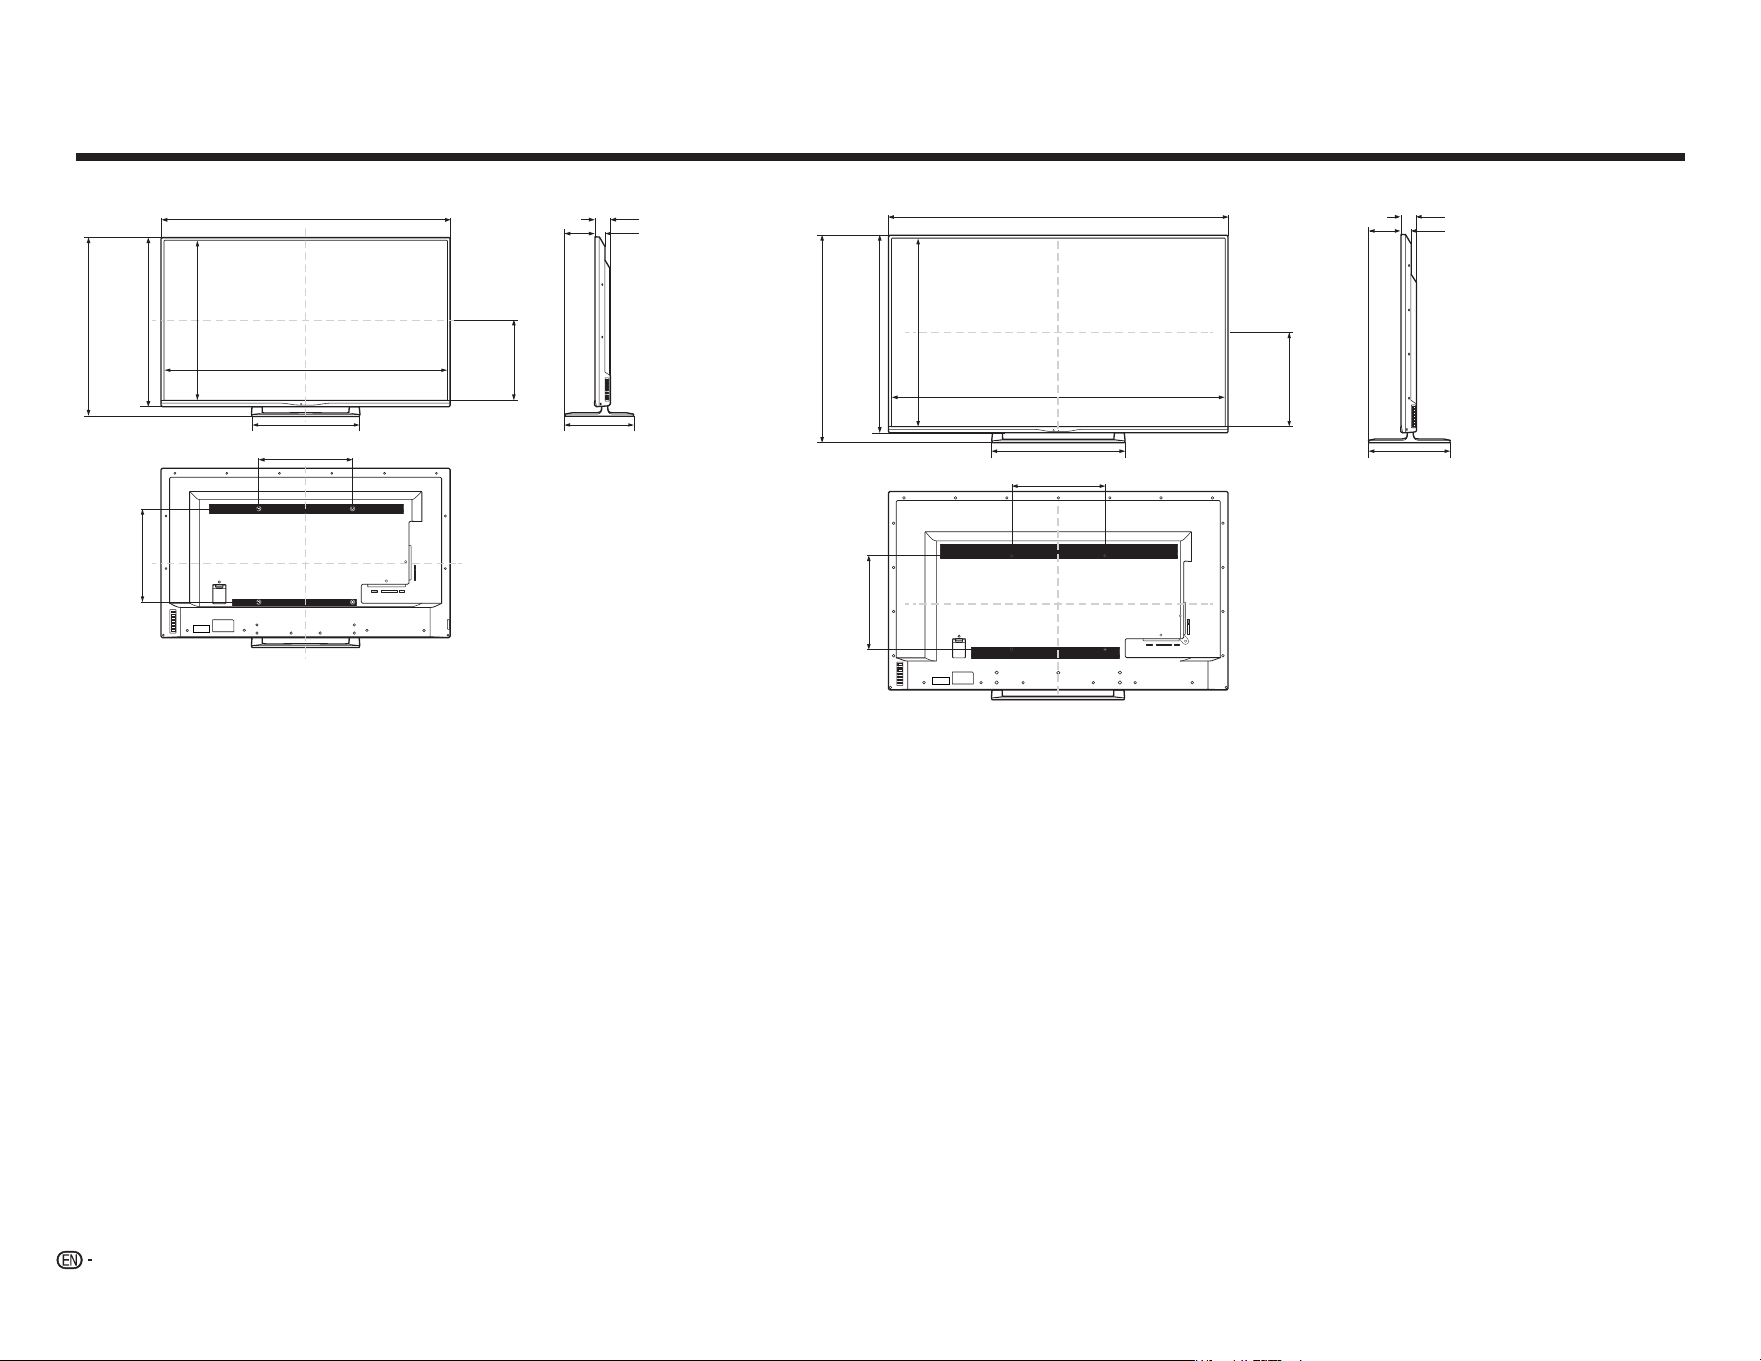
3/4
(400)
57
29/64
(1459)
56
3/8
(1432)
*1
2
49/64
(70)
1
47/64
(44)
*2
15
3/4
(400)
13
3/4
(349)
5
23/64
(136)
33
7/16
(846)
31
47/64
(806)
*1
22
9/16
(573)
35
1/4
(895)
15
55/64
(403)
1 2 Y/V Pb/Cb
AC IN
CABLE / ANTENNAPr/Cr
COMPONENT / VIDEO
L R OPTICAL MHL USB
AUDIO OUT
DTV / TV
AUDIO
L R
15
3/4
(400)
48
53/64
(1240)
47
23/32
(1212)
*1
2
23/32
(69)
1
47/64
(44)
*2
15
3/4
(400)
12
23/32
(323)
28
5/8
(727)
30
7/16
(773)
13
7/16
(342)
26
57/64
(683)
*1
18
15/64
(463)
5
3/64
(128)
LC-65LE643U
Dimensional Drawings
LC-55LE643U
Unit: inch (mm)
Unidad: pulgada (mm)
Unité : pouces (mm)
*1 Thinnest part/Parte más delgada/Partie la plus mince
*2 Including projecting parts/Incluidas las partes que sobresalen/Parties saillantes incluses
33
Products that have earned the ENERGY STAR
®
are designed to protect the environment through superior
energy efciency.
Manufactured under license from Dolby Laboratories. Dolby and the double-D symbol are trademarks of
Dolby Laboratories.
The terms HDMI and HDMI High-Denition Multimedia Interface, and the HDMI Logo are trademarks or
registered trademarks of HDMI Licensing LLC in the United States and other countries.
MHL, the MHL Logo, and Mobile High-Denition Link are trademarks or registered trademarks of MHL LLC
in the United States and other countries.
MHL
TM
Trademarks Calling for Service
ENERGY STAR
®
User Information
●FormoreinformationontheENERGYSTARprogram,youcanrefertoenergystar.gov.
●LeavingtheENERGYSTARhomemodeorenablingoptionalfeatureswillcauseanincrease
powerconsumed.
●ThisproductqualifiesforENERGYSTARwhen"Home"isselectedfor"EasySetup".
Setting"EasySetup"to"Home"allowstheTVtoachieveanenergy-savingstatusforhouseholduse.
ProductsthathaveearnedtheENERGYSTAR
®
aredesignedtoprotectthe
environmentthroughsuperiorenergyefficiency.
LIMITED WARRANTY
CONSUMER LIMITED WARRANTY
SHARP ELECTRONICS CORPORATION warrants to the first consumer purchaser that this Sharp brand Liquid Crystal
Display product (the “Product”), when shipped in its original container, will be free from defective workmanship and
materials, and agrees that it will, at its option, either repair the defect or replace the defective Product or part thereof with a
new or remanufactured equivalent at no charge to the purchaser for parts or labor for the period(s) set forth below.
This warranty does not apply to any appearance items of the Product or if the serial number or model number affixed to the
Product has been removed, defaced, changed, altered or tampered with. This warranty does not cover installation or signal
reception problems. This limited warranty will not apply if the Product has been or is being used in a commercial setting or
application; this warranty is meant solely for the non-commercial, household use of the Product by consumers in their home or
residence. If you intend to or already use this Product for commercial purposes or in a commercial setting, there are warranties
available to cover your use of this Product, the terms of which may vary. Please contact
1-888-GO-SHARP
for further
information.
In order to enforce your rights under this limited warranty, you should follow the steps set forth below. You must be able to
provide proof of purchase to the servicer, which proof must include the date of purchase.
To the extent permitted by applicable state law, the warranties set forth are in lieu of, and exclusive of, all other warranties,
express or implied. Specifically ALL OTHER WARRANTIES OTHER THAN THOSE SET FORTH ABOVE ARE EXCLUDED,
ALL EXPRESS AND IMPLIED WARRANTIES INCLUDING THE WARRANTIES OF MERCHANTABILITY, FITNESS FOR
USE, AND FITNESS FOR A PARTICULAR PURPOSE ARE SPECIFICALLY EXCLUDED. IF, UNDER APPLICABLE STATE
LAW, IMPLIED WARRANTIES MAY NOT VALIDLY BE DISCLAIMED OR EXCLUDED, THE DURATION OF SUCH IMPLIED
WARRANTIES IS LIMITED TO THE PERIOD(S) FROM THE DATE OF PURCHASE SET FORTH BELOW. THIS WARRANTY
GIVES YOU SPECIFIC LEGAL RIGHTS. YOU MAY ALSO HAVE OTHER RIGHTS WHICH VARY FROM STATE TO STATE.
The warranties given herein shall be the sole and exclusive warranties granted by Sharp and shall be the sole and exclusive remedy
available to the purchaser and only for the time periods set forth herein. No other representations or promises made by anyone are
permitted. Correction of defects, in the manner and for the period of time described herein, shall constitute complete fulfillment of all
liabilities and responsibilities of Sharp to the purchaser with respect to the Product, and shall constitute full satisfaction of all claims,
whether based on contract, negligence, strict liability or otherwise. Sharp does not warrant nor shall Sharp be liable, or in any way
responsible, for Products which have been subject to abuse (including, but not limited to, improper voltage), accident, misuse,
negligence, lack of reasonable care, alteration, modification, tampering, misuse, improper operation or maintenance or any damages
or defects in the Product which were caused by repairs or attempted repairs performed by anyone other than a Sharp authorized
servicer. Nor shall Sharp be liable or in any way responsible for any incidental or consequential economic or property damage. Some
states do not allow limits on warranties or on remedies for breach in certain transactions; in such states, the limits herein may not
apply.
THIS LIMITED WARRANTY IS VALID ONLY IN THE FIFTY (50) UNITED STATES, THE DISTRICT OF COLUMBIA AND
PUERTO RICO.
Model Specic Section
Your Product Model Number &
Description:
LC-55LE643U / LC-65LE643U
LCD Color Television
(Be sure to have this information available when you need service for your Product.)
Warranty Period for this Product:
One (1) year parts and labor from the date of purchase.
Additional Exclusions from
Warranty Coverage (if any):
I
n order for the Product to be serviced, the Product must be readily available to
the servicer, free and clear of any complex or non-standard installation, mounting
or other encumbrance which would unreasonably interfere with servicing the
Product. The Servicer will remount the Product after service, provided that such
remounting is not into a complex or non-standard installation. Any additional labor
and materials required to remove and/or reinstall a Product above and beyond
the foregoing are not covered by this warranty, may result in additional ch
arges
and are the responsibility of the consumer.
Image Retention resulting from a fixed image being displayed for long periods of time
is not covered by this Limited Warranty (see Operation Manual on how to prevent this).
Where to Obtain Service:
From a Sharp Authorized Servicer located in the United States. To find the
location of the nearest Sharp Authorized Servicer, please call Sharp toll free at
1-800-BE-SHARP.
What to do to Obtain Service:
Contact your Sharp Authorized Servicer to obtain in home service for this
product. The Servicer will come to your location and if necessary remove the unit
for repair at the Servicer’s facility and return the set to you once completed. Be
sure to have Proof of Purchase available.
TO OBTAIN PRODUCT INFORMATION OR PURCHASE ACCESSORIES AND EXTENDED WARRANTIES, CALL
1-800-BE-SHARP
OR VISIT www.sharpusa.com

34

Hi!
Let’s get started.
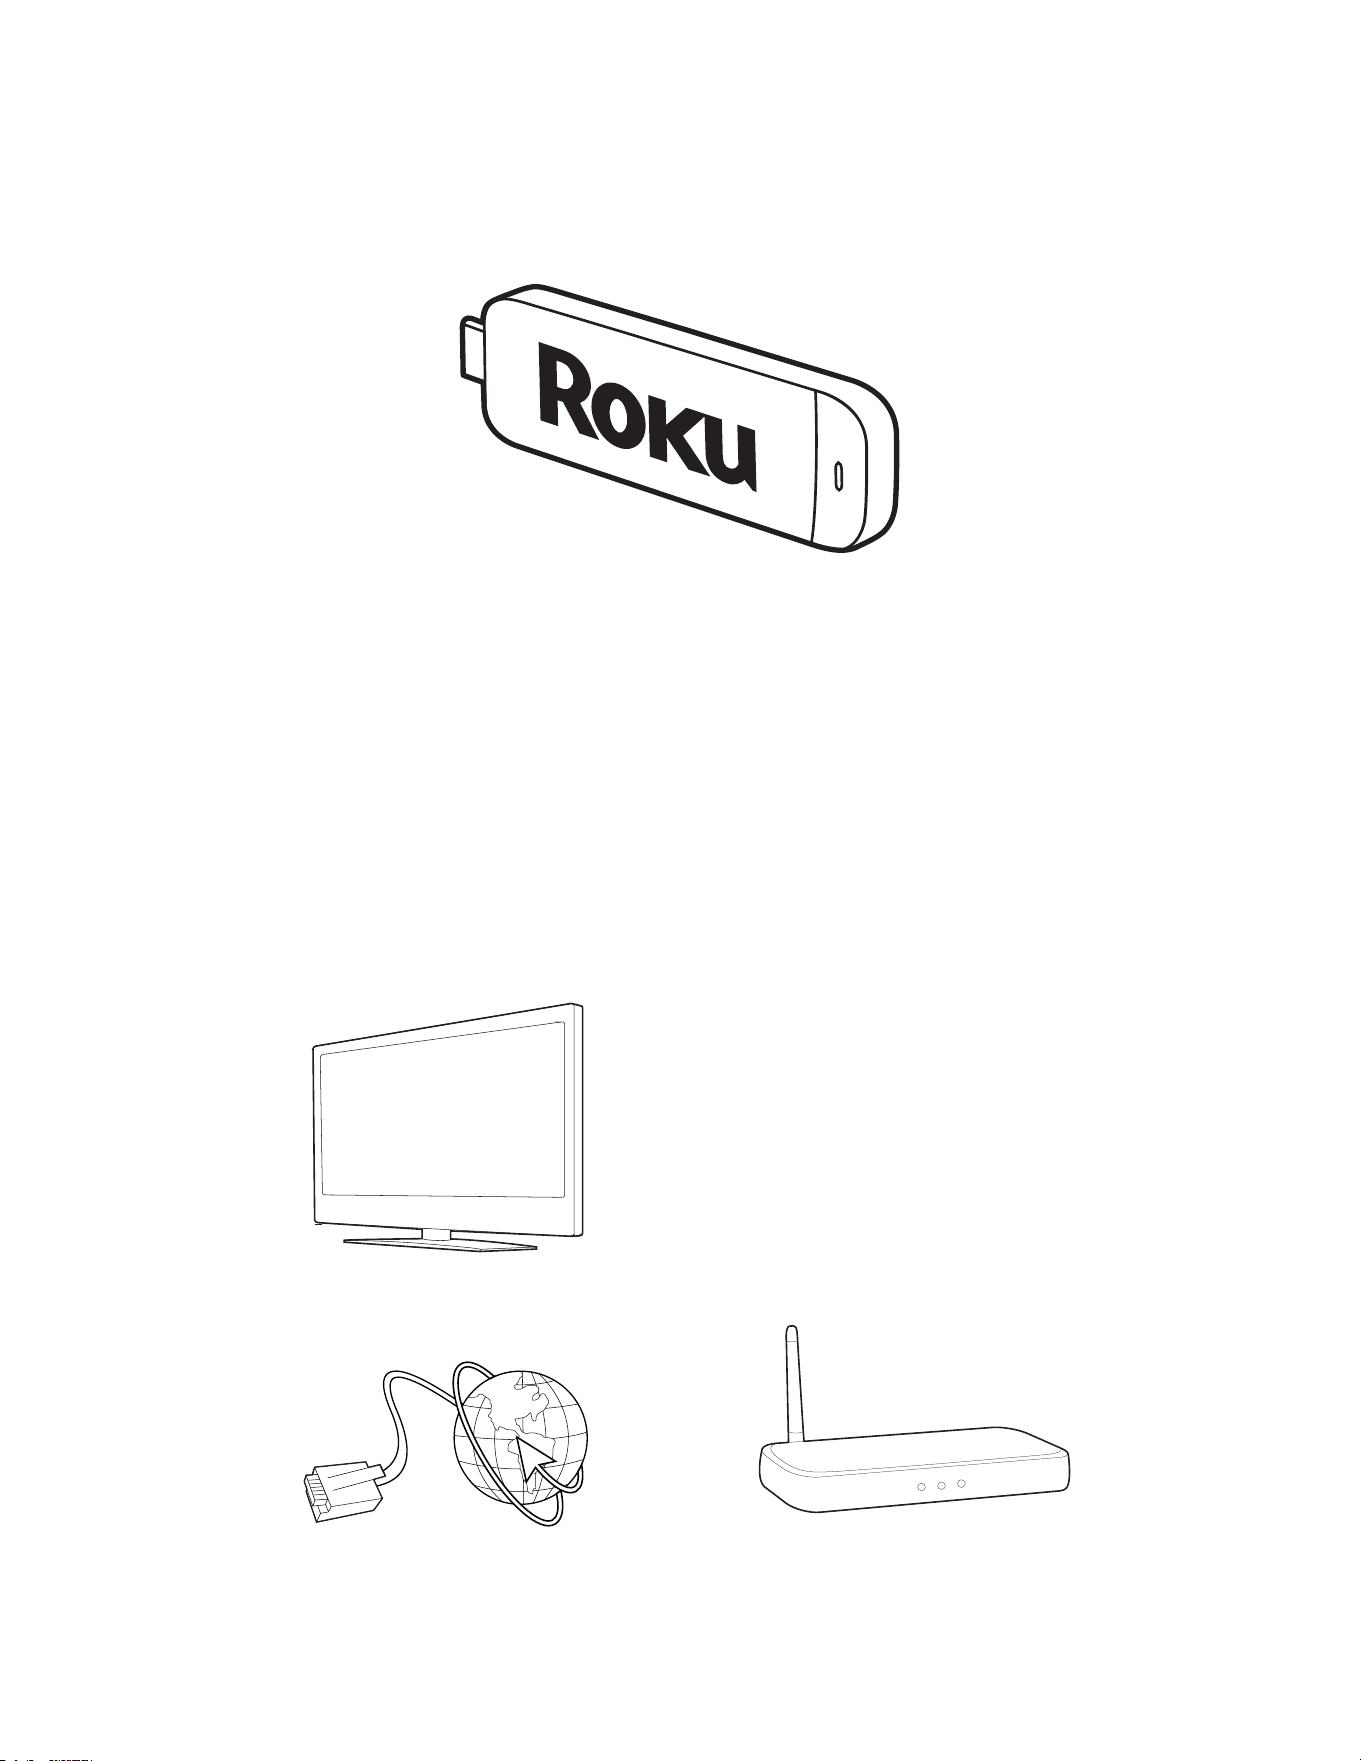
What’s in the box
Roku Streaming Stick
TM
High speed
Internet
What you need
Roku Ready
TM
TV
(or other device)
Wireless Router
Know your
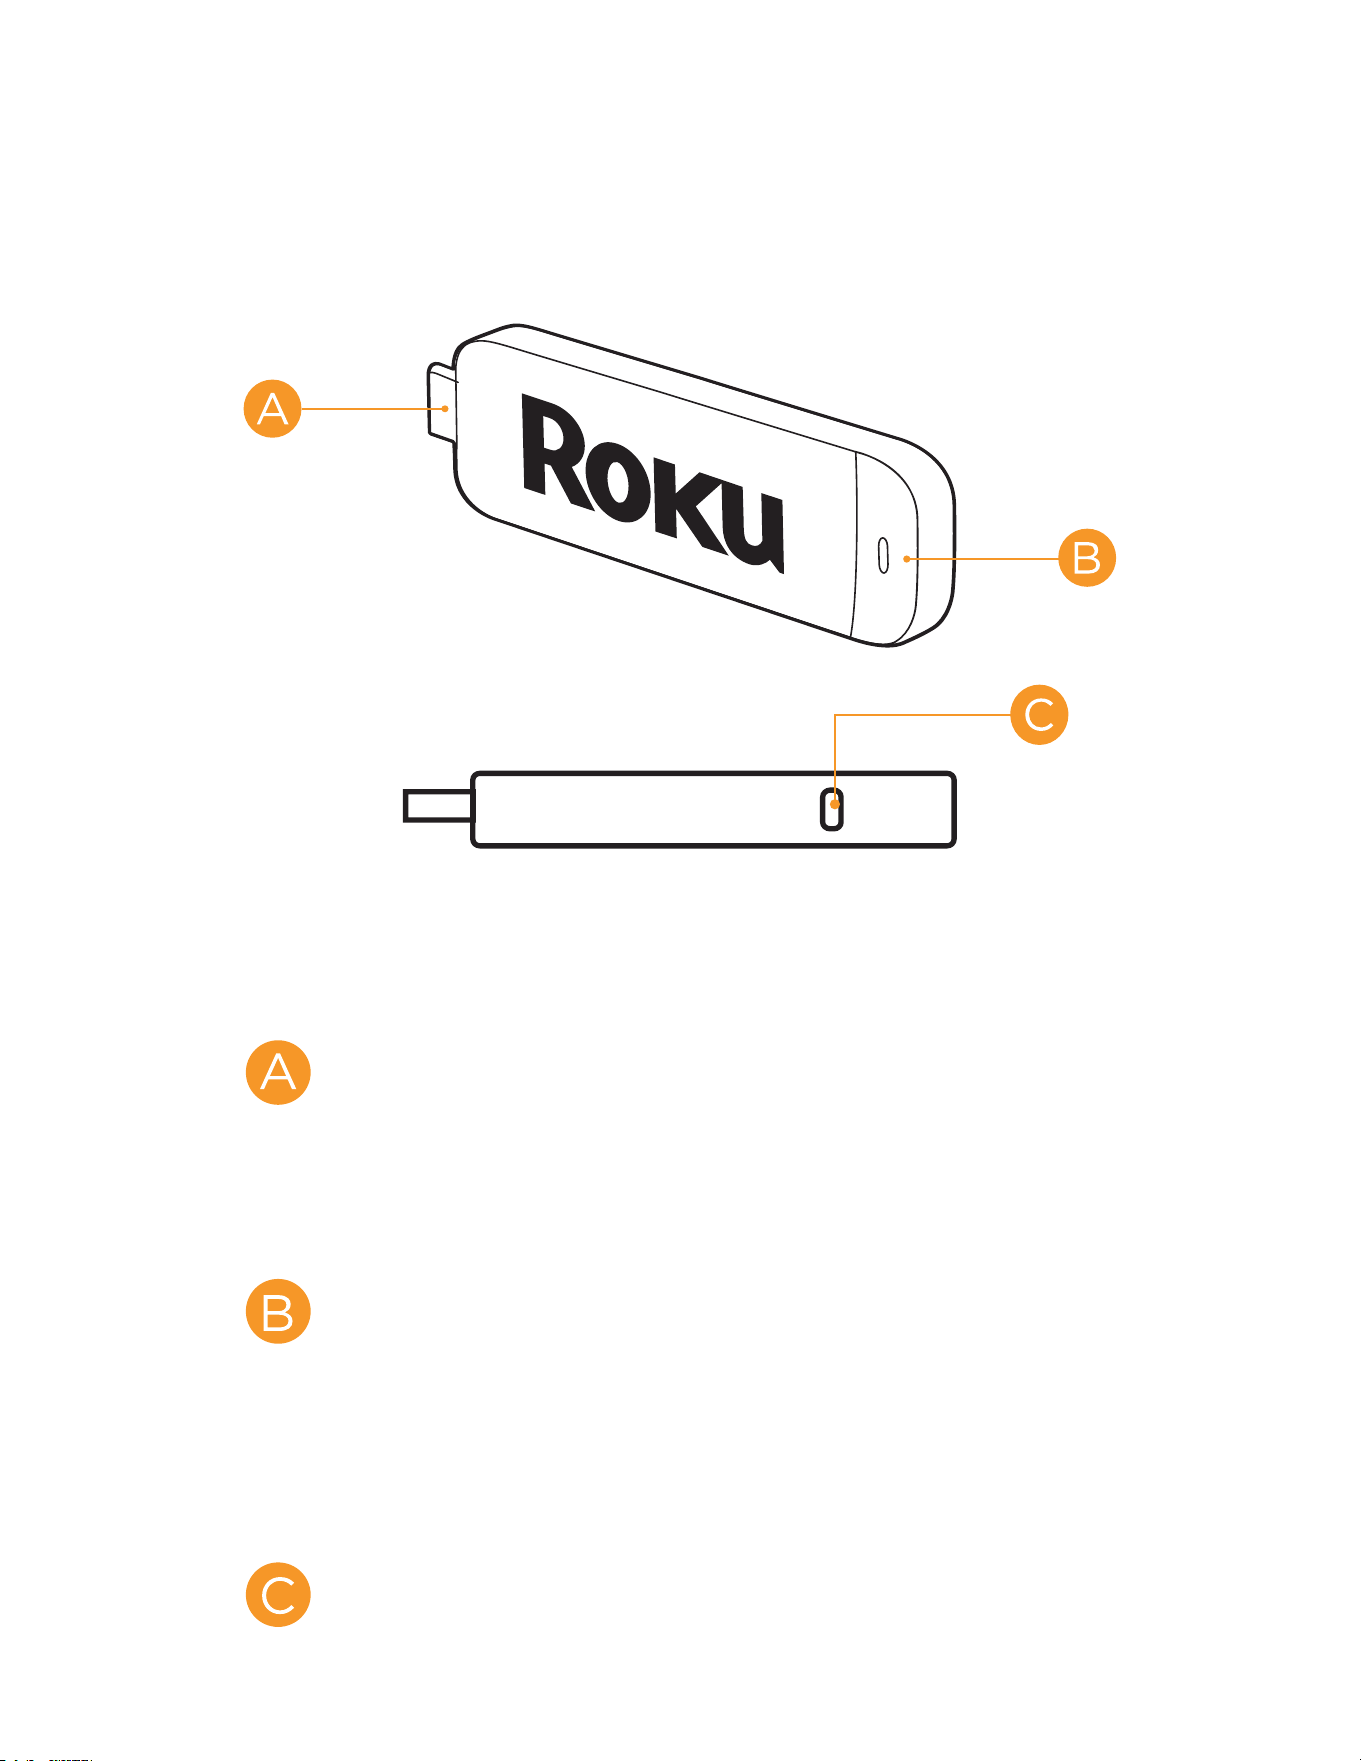
Streaming Stick
[MHL CONNECTOR] Plugs into the
MHL port on the back of your TV.
[STATUS LIGHT] Signifies it is on
when lit, or activity when flashing.
[RESET BUTTON] Used to reset
your Streaming Stick (you probably
won’t ever have to use this).
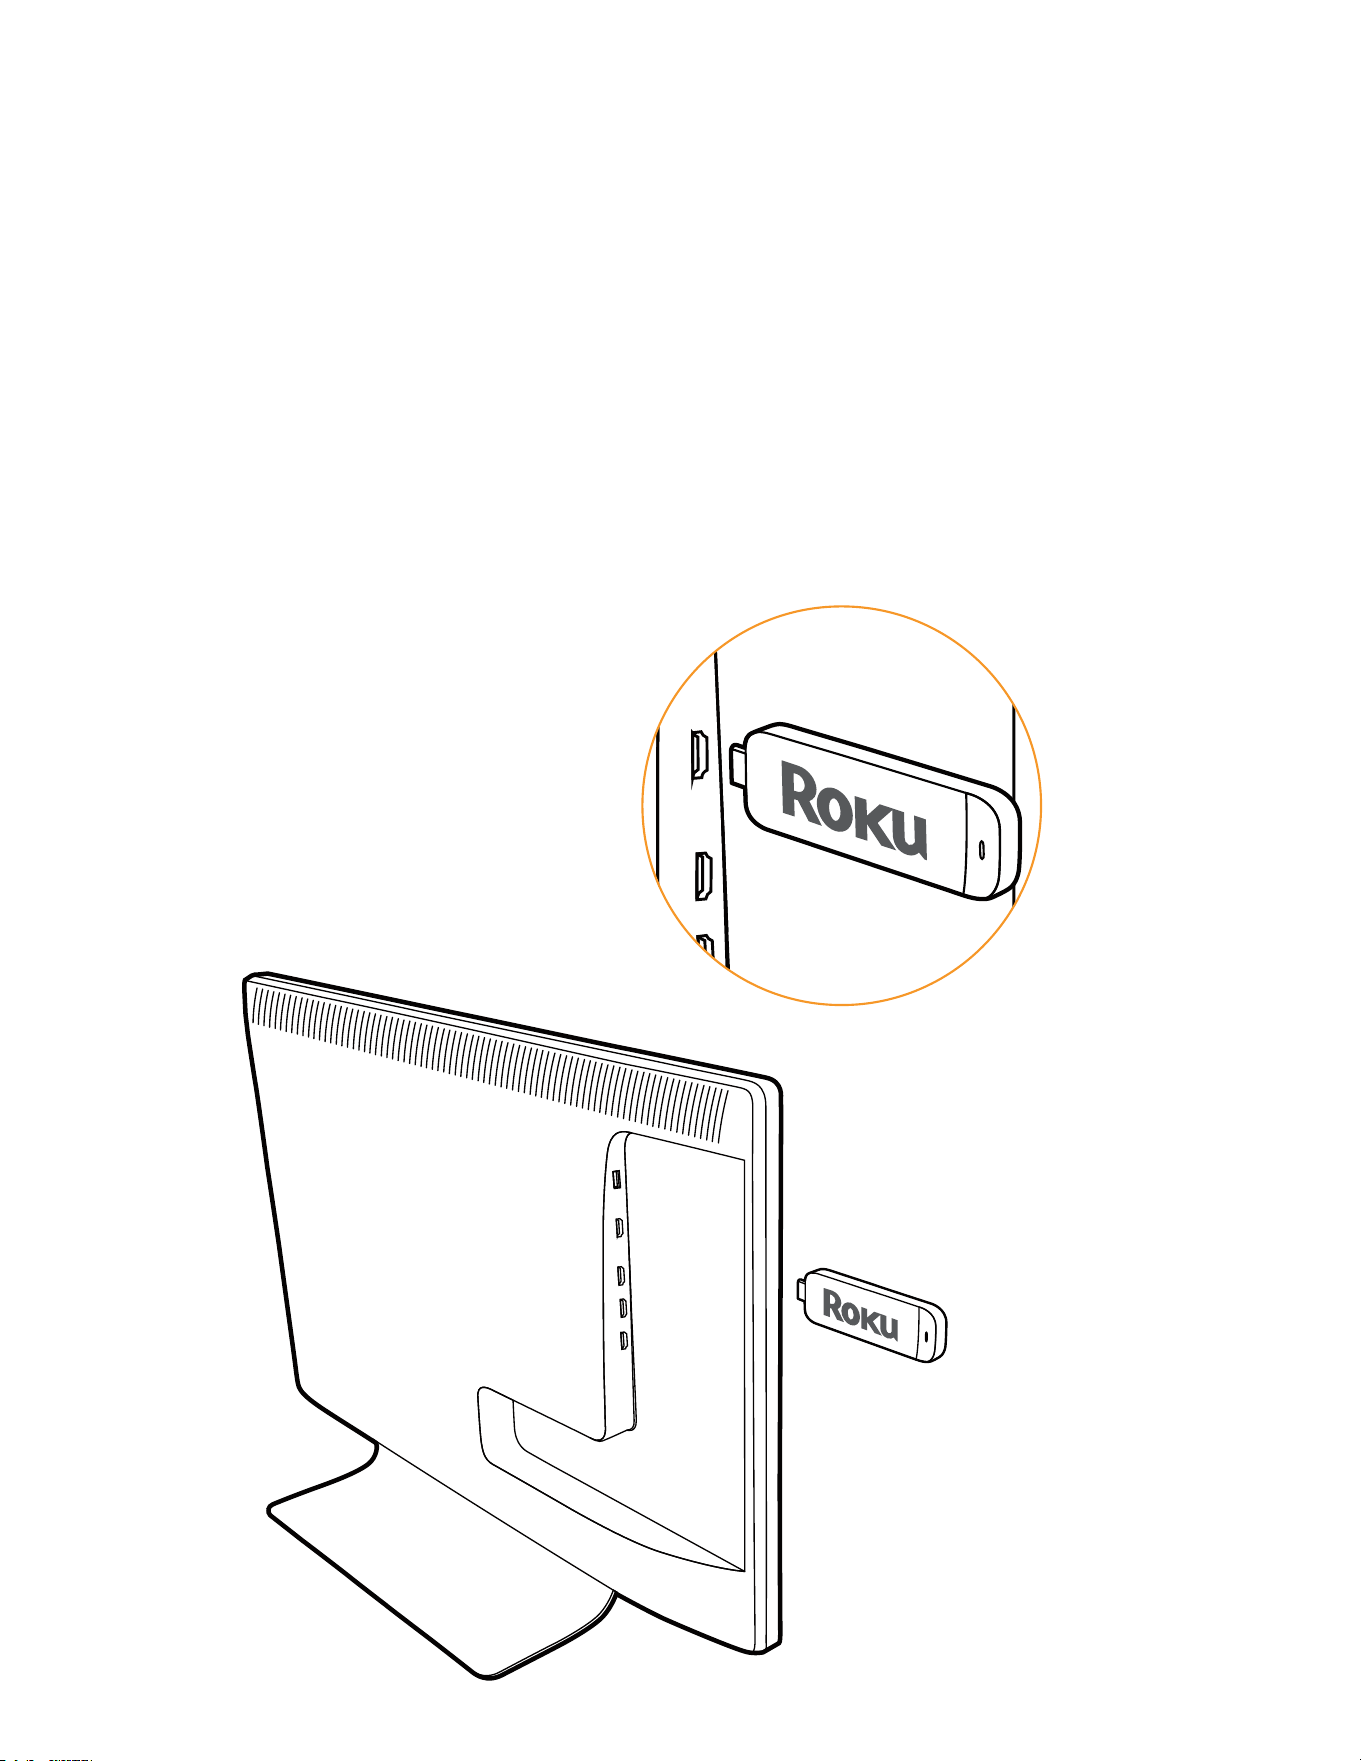
What to do
Plug it in
Plug your Roku Streaming Stick
into the MHL port of your TV or
other Roku Ready device. Simple
as that!
HDMI/MHL

Connect to network
Now you can grab your remote
and jump right into guided
setup. Have your network name
and password ready and do the
following:
Select your network from the
list of available networks.
Enter your network password,
if you use one. Remember,
network passwords are case
sensitive.

Complete guided setup
It’s the final stretch and hooray—it’s
a breeze! Continue following the
on-screen instructions and you’ll:
Get the latest software.
Link the Roku Streaming Stick
to your Roku account on your
computer.
What to do
(cont.)

Your Roku account:
During setup, you’ll be
prompted to create
your Roku account
online at roku.com/link. Your Roku
Streaming Stick will generate
a unique code that links your
player to your new account. Roku
accounts are free and secure. And
while a valid credit card number is
required to create your account,
rest assured you will only be
charged if you authorize purchases
of apps and games from the Roku
Channel Store.

Having trouble completing setup?
Don’t worry: it’s usually an easy fix.
If you cannot see a picture on
your TV:
Make sure your TV is turned
on. (This tip could save you
some embarrassment.)
Make sure the video input
on your TV or home theater
receiver is set to match the
output (usually HDMI or MHL)
used with the Roku Streaming
Stick. Most TVs have an Input
button on the remote control
to change video inputs.
Troubleshooting

If you cannot connect to your
wireless home network during
guided setup:
If you are not getting 3 or
more signal-strength bars
above your wireless network,
adjust the location of your
Roku Streaming Stick and/
or wireless router. Make sure
there are no obstructions, like
cement walls, between your
Roku Streaming Stick and your
wireless router.
Make sure you select the
correct wireless router name
on the “Wireless” screen.

Troubleshooting
(cont.)
Make sure you enter the
correct password, if your
network is security-enabled
(password is case sensitive).
If you have turned o
SSID broadcasting on your
wireless router, you can add
your network by selecting
“My network is not shown”
from the “Wireless” screen.
If you cannot hear sound:
Make sure the connectors on
the cables between your TV
and home theater receiver
are pushed in all the way.

Make sure the volume on your
TV or home theater receiver is
turned up and isn’t on mute.
Make sure the input on your
TV or home theater receiver
matches the output (HDMI
or MHL) used with your Roku
Streaming Stick.

2009-2012 by Roku, Inc. All rights reserved. Roku, Roku
Streaming Stick, and the Roku logo are trademarks or
registered trademarks of Roku, Inc. Other brand and product
names are trademarks or registered trademarks of their
respective owners.
Need more help?
roku.com/support
Get the most out of your Roku
Streaming Stick.
Check out our FAQs, instructional
videos and user forums.
4100000040-01
ES
1
INFORMACIÓN IMPORTANTE
INFORMACIÓN:
Este equipo ha sido probado, hallándose que satisface los límites de un dispositivo digital de Clase
B de acuerdo con los requisitos denidos en la Sección 15 de la normativa FCC. Estos límites se
establecieron con el n de proporcionar una protección razonable contra interferencias perjudiciales
en una instalación residencial. Este equipo genera, utiliza y puede irradiar energía de radiofrecuencia
y, si no se instala y utiliza de acuerdo a las instrucciones, puede causar interferencias perjudiciales a
las comunicaciones de radio. Sin embargo, no se puede garantizar que la interferencia no ocurrirá en
una instalación en particular. En el caso de que el equipo causara interferencias perjudiciales para la
recepción de radio o TV, lo que puede determinarse encendiendo y apagando el equipo, se sugiere
que el usuario lleve a cabo una o varias de las siguientes medidas para corregir dichas interferencias:
—
Reorientar o reubicar la antena receptora.
—
Aumentar la separación entre el equipo y el receptor.
—
Conectar el equipo a una toma de corriente de un circuito diferente al que está conectado el receptor.
—
Consultar al proveedor o a un técnico especialista en radio/televisión.
Declaración de cumplimiento de las normas FCC
Este dispositivo cumple con la Parte 15 de las Reglas de la FCC. Su funcionamiento está sujeto a dos
condiciones:
(1) Este dispositivo no debe causar interferencias perjudiciales y (2) este dispositivo debe aceptar
cualquier interferencia recibida, incluidas aquellas que provoquen un funcionamiento no deseado.
Radio inalámbrica
En el caso de un producto disponible en el mercado de EE.UU. y Canadá, solo se pueden utilizar los
canales del 1 al 11. No es posible seleccionar otros canales. Si este dispositivo se va a utilizar en la
banda de frecuencia de 5,15 ~ 5,25 GHz, su uso se debe restringir a interiores únicamente.
Importante: Los cambios o modicaciones no aprobados expresamente por la parte responsable del
cumplimiento anularán la autorización del usuario para trabajar con el equipo.
Declaración FCC sobre la exposición a la radicación: Este equipo cumple los límites FCC de
exposición a la radicación jados para un entorno no controlado. Este equipo debe ser instalado y
operado a una distancia mínima de 20cm entre el dispositivo radiador y su cuerpo.
Declaración de Industry Canada
Este aparato digital de Clase B cumple el estándar CAN ICES-003(B)/NMB-3(B)
Radio inalámbrica
En el caso de un producto disponible en el mercado de EE.UU. y Canadá, solo se pueden utilizar los
canales del 1 al 11. No es posible seleccionar otros canales.
El dispositivo podría suspender la trasmisión automáticamente en el caso de que no haya información
para transmitir o se produzca un error de funcionamiento.
Tenga en cuenta que no está diseñado para prohibir la transmisión de información de control o
señalización o el uso de códigos repetitivos donde la tecnología lo requiera.
Importante: Los cambios o modicaciones no aprobados expresamente por la parte responsable del
cumplimiento anularán la autorización del usuario para trabajar con el equipo.
Declaración de exposición a la radiación IC: Este dispositivo cumple las reglas IC RSS-210 y su uso
está sujeto a las dos condiciones siguientes:
(1) Este dispositivo no debe causar interferencias perjudiciales y (2) este dispositivo debe aceptar las
interferencias recibidas, incluidas aquellas que provoquen un funcionamiento no deseado.
"Nota para el instalador del sistema CATV: este recordatorio pretende llamar la atención del instalador
del sistema CATV en relación al Artículo 820 del Código Eléctrico Nacional (NEC) en el que se
proporcionan instrucciones para realizar una conexión a tierra adecuada y, en particular, especica
que el cable de tierra se debe conectar al sistema de tierra del edicio tan cerca del punto de entrada
del cable como sea posible."
Este producto utiliza el programa ENERGY STAR cuando se selecciona "Modo Casa" para "Asistente
de instalación".
Al establecer "Asistente de instalación" en "Modo Casa", el televisor logrará un estado de ahorro de
energía para uso doméstico.
IMPORTANTE:
Para facilitar el procedimiento de información en caso de
pérdida o robo, anote el modelo y los números de serie del
televisor en el espacio proporcionado.
Los números se encuentran en la parte posterior e izquierda
del televisor.
ADVERTENCIA: PARA REDUCIR EL RIESGO DE INCENDIO O DESCARGAS ELÉCTRICAS, NO
EXPONGA ESTE PRODUCTO A LA LLUVIA NI A LA HUMEDAD.
PRECAUCIÓN: PARA REDUCIR EL RIESGO DE DESCARGAS ELÉCTRICAS,
NO RETIRE LA CARCASA (O LA PARTE POSTERIOR).
EN EL INTERIOR NO HAY NINGUNA PIEZA QUE NECESITE
MANTENIMIENTO POR PARTE DEL USUARIO.
PÓNGASE EN CONTACTO CON PERSONAL DE SERVICIO CUALIFICADO
CUANDO TENGA PROBLEMAS CON EL EQUIPO.
El símbolo de rayo dentro de
un triángulo equilátero pretende
alertar al usuario de la existencia
de "voltaje peligroso" no aislado
en el interior del producto
cuya magnitud puede ser lo
sucientemente grande como para
constituir un riesgo de descarga
eléctrica para las personas.
El símbolo de exclamación dentro
de un triángulo pretende alertar
al usuario de la existencia de
importantes instrucciones de
funcionamiento y mantenimiento
(servicio técnico) en la
documentación que acompaña al
producto.
RIESGO DE DESCARGA
ELÉCTRICA
NO ABRIR
PRECAUCIÓN
Nº de modelo:
Nº de serie
:
PRECAUCIÓN: PARA EVITAR DESCARGAS ELÉCTRICAS, HAGA COINCIDIR LA CLAVIJA
ANCHA DEL ENCHUFE CON LA RANURA ANCHA, E INSÉRTELA EN ESTA
COMPLETAMENTE.
ADVERTENCIA: Las normas FCC establecen que cualquier cambio o modicación no autorizados en
este equipo no aprobado expresamente por el fabricante podría anular la autorización
del usuario para utilizarlo.
PRECAUCIÓN: Este producto cumple las normas FCC cuando se utilizan conectores y cables
apantallados para conectar la unidad a otro equipo. Para evitar interferencias
electromagnéticas con aparatos eléctricos, como radios y televisores, utilice
conectores y cables apantallados para las conexiones.
DECLARACIÓN DE CONFORMIDAD:
TELEVISOR DE CRISTAL LÍQUIDO SHARP, MODELO LC-55LE643U / LC-65LE643U
Este dispositivo cumple la Parte 15 de las Reglas de la FCC. Su funcionamiento está sujeto a dos
condiciones:
(1) Este dispositivo no debe causar interferencias perjudiciales y (2) este dispositivo debe aceptar
cualquier interferencia recibida, incluidas aquellas que provoquen un funcionamiento no deseado.
PARTE RESPONSABLE:
SHARP ELECTRONICS CORPORATION
Sharp Plaza, Mahwah, New Jersey 07495-1163
TELÉFONO: 1-800-BE-SHARP
Para clientes profesionales: Dirección URL: http://www.sharpusa.com
ESPAÑOL
ES
2
Gracias por adquirir el televisor de cristal líquido Sharp. Para garantizar la seguridad del producto
y que este funcione sin problemas durante muchos años, lea atentamente estas instrucciones de
seguridad importantes antes de utilizarlo.
INSTRUCCIONES DE SEGURIDAD IMPORTANTES
ESTIMADO CLIENTE DE SHARP
INSTRUCCIONES DE SEGURIDAD IMPORTANTES
Muchas de las funciones útiles funcionan gracias a la electricidad pero esta también puede causar
daños al producto y al usuario si se manipula de forma inadecuada. Este producto se ha diseñado y
fabricado teniendo en cuenta la seguridad como prioridad máxima. No obstante, el uso inapropiado
puede provocar descargas eléctricas o un incendio. Para evitar daños potenciales, tenga en cuenta
las siguientes instrucciones cuando instale, utilice y limpie el producto. Para garantizar la seguridad
y prolongar la vida del Televisor de cristal líquido, lea atentamente las siguientes precauciones antes
de utilizarlo.
1) Lea estas instrucciones.
2) Guarde estas instrucciones.
3) Preste atención a todas las advertencias.
4) Siga todas las instrucciones.
5) No utilice este aparato cerca del agua.
6) Limpie el producto solamente con un paño seco.
7) No bloquee las aberturas de ventilación. Realice la instalación siguiendo las instrucciones del
fabricante.
8) No coloque el aparato cerca de fuentes de calor, como por ejemplo radiadores, hornillos u otros
aparatos (incluidos amplicadores) que produzcan calor.
9) No desarme el dispositivo de seguridad del enchufe polarizado o con conexión a tierra. Un
enchufe polarizado tiene dos clavijas, una más ancha que la otra. Un enchufe con toma de tierra
tiene dos clavijas y una tercera clavija de toma de tierra. La clavija ancha del enchufe polarizado
y la clavija de conexión a tierra del enchufe polarizado son dispositivos de seguridad. Si el
enchufe suministrado con el aparato no encaja en la toma de corriente donde desea conectarlo,
diríjase a un electricista para sustituir sus tomas de corriente obsoletas.
10) Proteja el cable de corriente para que no se pise ni se pellizque, especialmente en los enchufes,
las tomas de corriente y el punto donde salen del aparato.
11) Utilice únicamente los accesorios especicados por el fabricante.
12) Utilice el aparato sólo con un carro, base, trípode, soporte o mesa especicado por
el fabricante o vendido conjuntamente con dicho aparato. Si utiliza un carro, preste
atención cuando lo desplace para evitar daños por caída.
13) Desconecte este aparato durante las tormentas eléctricas o cuando no se utilice
durante un prolongado período de tiempo.
14) Pida todo tipo de servicio a personal de servicio calicado. El aparato deberá ser reparado
siempre que sufra cualquier tipo de daño, por ejemplo si el cable o la clavija de alimentación
están en mal estado, si se derrama líquido sobre el mismo, en caso de caída de objetos sobre el
aparato, en caso de exposición a la lluvia o la humedad, en caso de funcionamiento incorrecto o
en caso de caída del aparato.
Información de seguridad adicional
15) Fuentes de alimentación. Solo se debe aplicar al producto el tipo de alimentación indicado en el
etiquetado. Si no está seguro del tipo de alimentación de su domicilio, póngase en contacto con
su distribuidor o con la compañía eléctrica local. Para productos diseñados para que funcionen
con batería u otras fuentes de alimentación, consulte las instrucciones de funcionamiento.
16) Sobrecarga. No sobrecargue las tomas de corriente ni los alargadores ya que se puede provocar
un incendio o descargas eléctricas.
17) Inserción de objetos y líquidos. Nunca coloque objetos de ningún tipo en este producto de
forma que obturen sus aberturas, ya que pueden entrar en contacto con componentes de alto
voltaje o cortocircuitar éstos, lo que podría dar lugar a un incendio o descargas eléctricas.
Nunca derrame líquidos de ningún tipo sobre el producto.
18) Daños que requieren servicio técnico. Desenchufe el producto de la toma de corriente y remita
todas las reparaciones al personal de servicio técnico cualicado cuando se den las siguientes
condiciones:
a) El enchufe o el cable de CA está dañado,
b) Se ha derramado líquido o han caído objetos sobre el producto,
c) El producto se ha expuesto a la lluvia o al agua,
d) El producto no funciona con normalidad y, sin embargo, se han seguido las instrucciones
de funcionamiento,
Ajuste sólo los controles descritos en las instrucciones de funcionamiento; el ajuste inadecuado
de otros controles puede provocar daños y obligar al personal técnico cualicado a realizar un
trabajo exhaustivo para que el producto vuelva a funcionar con normalidad,
e) El producto se ha dejado caer o ha sufrido daños de alguna manera, y
f) El producto muestra un cambio claro de rendimiento, lo que indica la necesidad de tareas
de mantenimiento.
19) Reemplazar piezas. Cuando sea necesario reemplazar piezas, asegúrese de que el técnico
ha empleado piezas de repuesto especicadas por el fabricante o que tienen las mismas
características que las originales. Las sustituciones no autorizadas pueden provocar un
incendio, descargas eléctricas o constituir otros riesgos.
20) Comprobación de seguridad. Después de realizar cualquier tarea de mantenimiento o
reparación de este producto, pida al técnico que realice comprobaciones de seguridad para
determinar si el producto funciona perfectamente.
21) Montaje en la pared o el techo. Cuando monte el producto en la pared o el techo, asegúrese de
instalarlo siguiendo el método recomendado por el fabricante.
ES
3
INSTRUCCIONES DE SEGURIDAD IMPORTANTES
Mantenimiento de la carcasa
Mantenimiento del panel frontal
SEGURIDAD PARA LOS NIÑOS
CUESTIONES RELACIONADAS CON LA UBICACIÓN APROPIADA DEL TELEVISOR
LOS CUIDADOS DE LA INDUSTRIA DE ELECTRÓNICA DE CONSUMO
EN BUSCA DE LA SEGURIDAD
SIEMPRE
SIEMPRE
NUNCA
NUNCA
SIEMPRE
SIEMPRE
INSTALACIÓN DEL TELEVISOR EN LA PARED O EL TECHO
SIEMPRE
SIEMPRE
SIEMPRE
SIEMPRE
ES
4
TRASLADAR UN TELEVISOR ANTIGUO A UNA NUEVA UBICACIÓN DE SU
HOGAR
SIEMPRE
NUNCA
SIEMPRE
CE.org/safety
ES
5
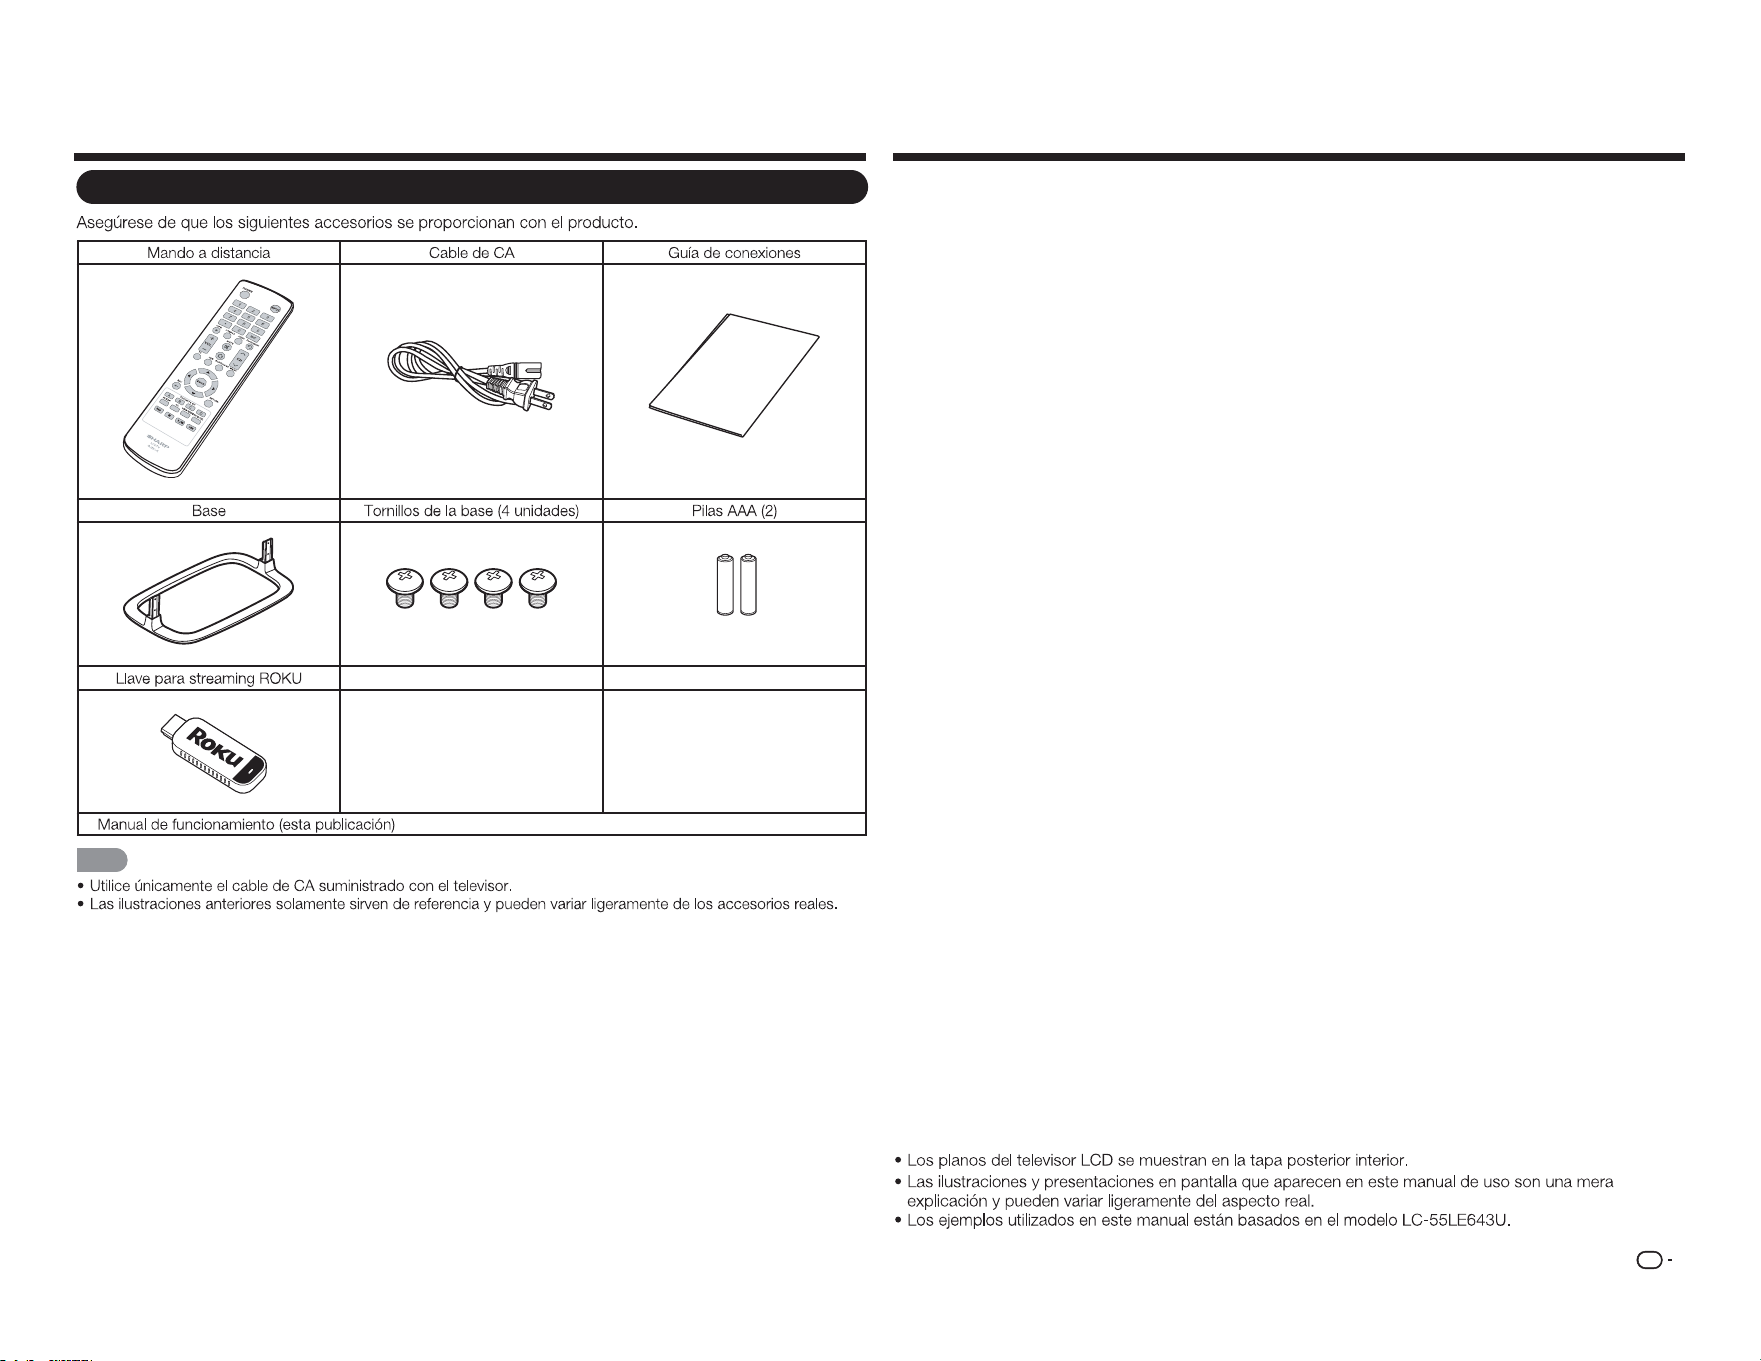
Accesorios Contenido
Accesorios suministrados
C
on
ne
c
t
io
n
G
u
id
e
■
NOTA
INFORMACIÓN IMPORTANTE ........................... 1
ESTIMADO CLIENTE DE SHARP ........................ 2
INSTRUCCIONES DE SEGURIDAD
IMPORTANTES ................................................. 2
Accesorios ........................................................... 5
Accesorios suministrados .............................. 5
Contenido ............................................................. 5
REFERENCIA RÁPIDA ......................................... 6
Acoplar la base .............................................. 6
SUGERENCIA PARA UNA
INSTALACIÓN RÁPIDA ..................................6
Usar el mando a distancia .............................. 7
Antenas .........................................................7
Instalar las pilas en el mando a distancia ........ 7
Preparación .......................................................... 7
Nombre de los componentes ............................. 8
Televisor (parte frontal) ................................... 8
Televisor (panel de control) ............................ 8
Televisor (parte posterior) ...............................8
Mando a distancia .........................................9
Introducción a las conexiones ......................... 10
Disfrutar de imágenes en alta
definición (HD) ............................................. 10
Tipos de conexión ....................................... 10
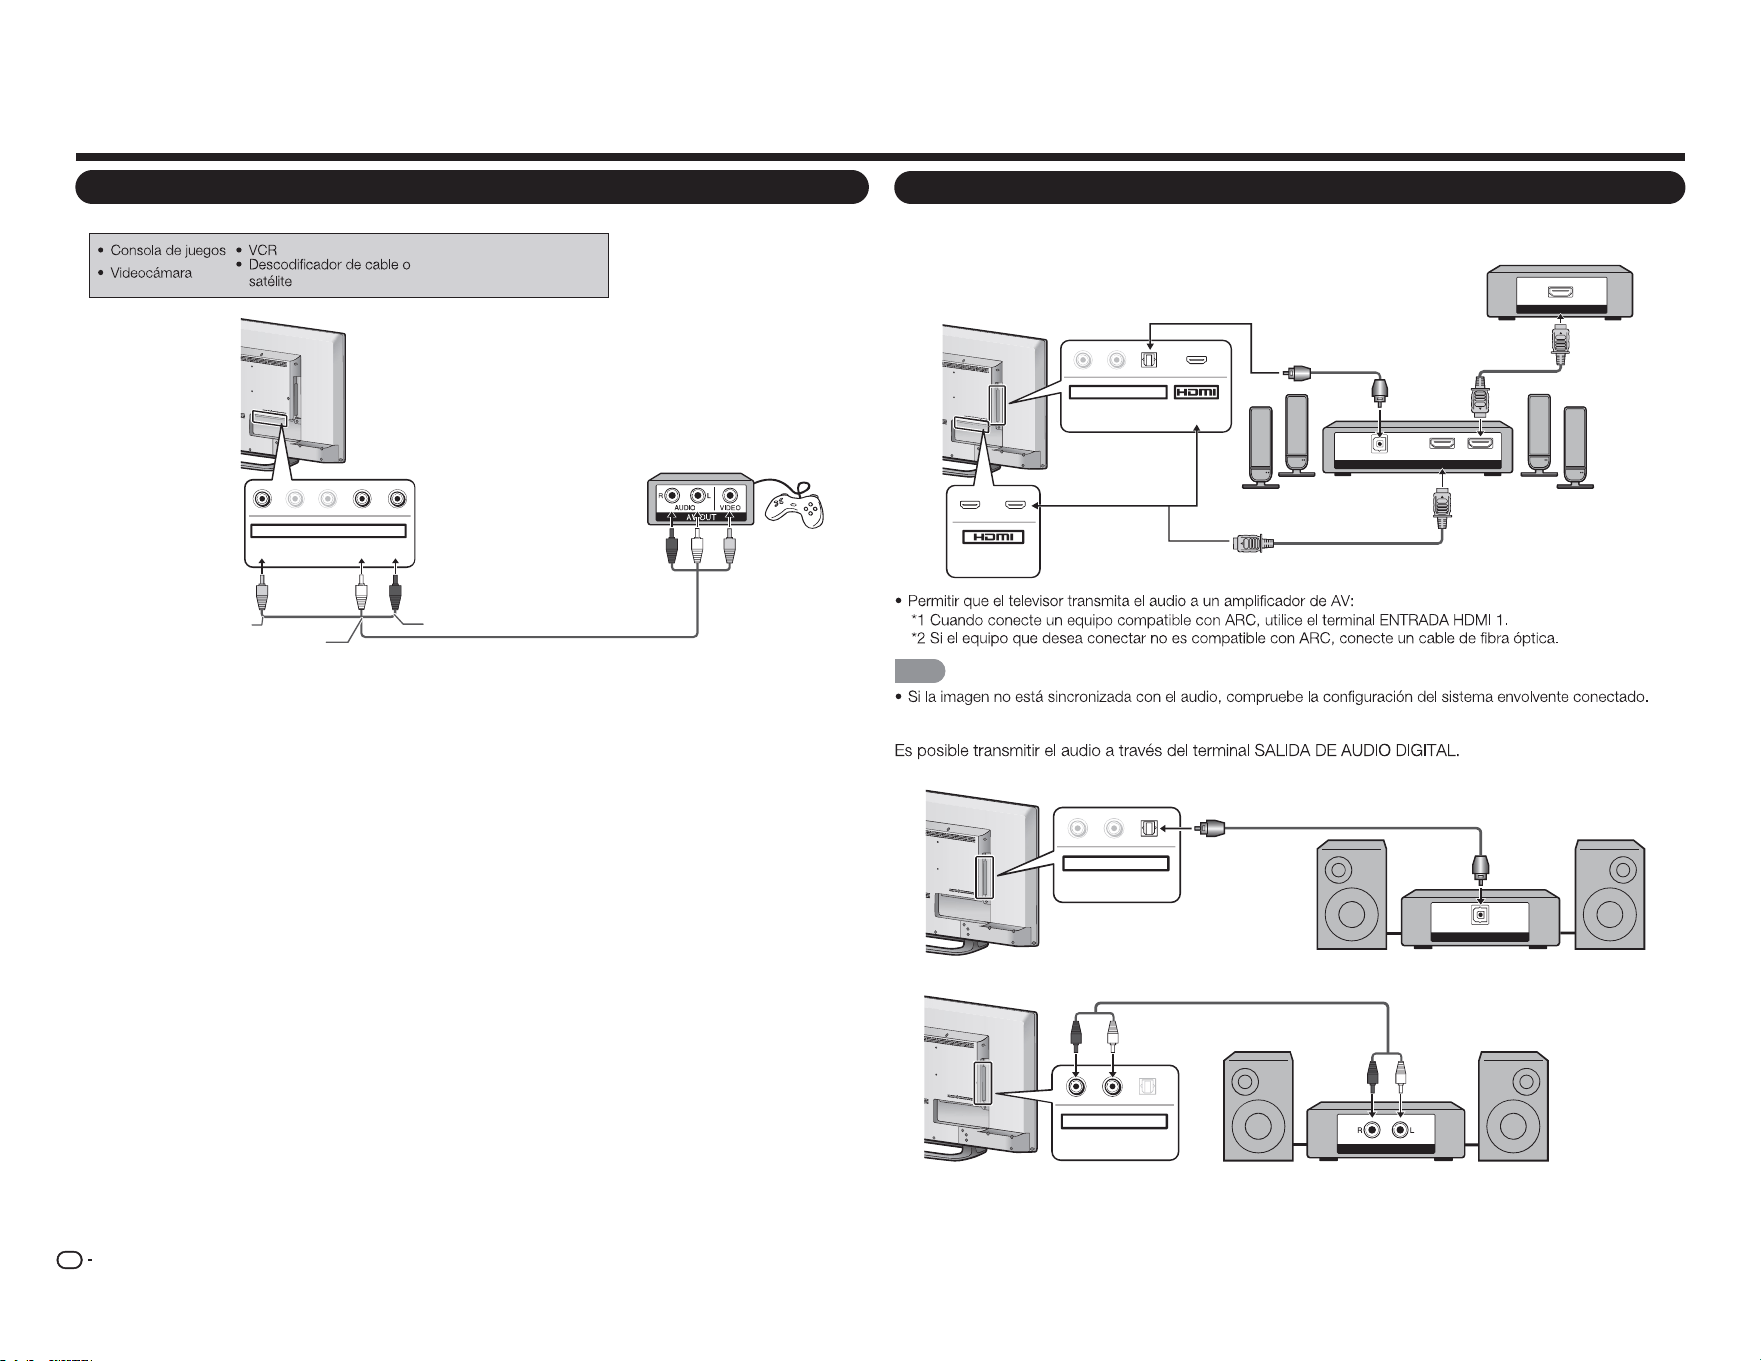
Mostrar una imagen de un equipo externo ...10
Conectar un equipo externo ............................. 11
Conectar un reproductor de discos
Blu-ray o DVD o un descodificador de ........ 11
Conectar un sistema envolvente o
de audio ...................................................... 11
Conectar una unidad VCR, una
consola de juegos, una
videocámara o un .................................... 12
Conectar un PC o teléfono inteligente ..........13
Conectar una llave para streaming ROKU .... 13
Ver la televisión..................................................14
Encender y apagar la alimentación ............... 14
Instalación inicial .......................................... 14
Funcionamiento de los botones directos ........16
Elementos del menú en pantalla ...................... 19
Menú en pantalla (menú principal) ................ 19
Funcionamiento de los menús en pantalla ....19
Botones de funcionamiento de menú ...........20
Elementos de menú ..................................... 21
Menú Imagen ...............................................22
Menú Audio ................................................. 23
Menú Configuración ..................................... 24
Menú Subtítulos ........................................... 26
Menú Canal ................................................. 26
Menú Temporizador de apagado .................26
Disfrutar de la reproducción de
fotografías, música y películas......................27
Conectar un dispositivo de memoria
USB o una unidad de disco duro USB .........27
Seleccionar las carpetas para reproducir ..... 27
Ver fotografías ............................................. 28
Reproducir música ....................................... 29
Ver películas ................................................ 29
Apéndice ............................................................ 30
Solución de problemas ................................ 31
Especificaciones ...............................................33
TV ................................................................ 33
Marcas comerciales .......................................... 34
Llamar al servicio técnico .................................34
GARANTÍA LIMITADA ........................................ 34
Planos
ES
6
REFERENCIA RÁPIDA
Acoplar la base
PRECAUCIÓN
Asegúrese de seguir las instrucciones que se indican a continuación: La instalación incorrecta de la
base puede provocar la caída del televisor.
1
2
3
4
PRECAUCIÓN
Para no dañar el televisor, no empuje con demasiada fuerza ni ejerza mucha presión en el cuello de la
base.
No quite la base del televisor a menos que utilice un soporte para instalación en pared opcional para
montarlo.
Después de acoplar la base al televisor, no la sujete cuando levante, coloque, traslade o tumbe el
televisor.
NOTA
SUGERENCIA PARA UNA INSTALACIÓN RÁPIDA
1
2
AC IN
NOTA
PARA EVITAR RIESGOS DE DESCARGAS ELÉCTRICAS, NO TOQUE LAS PARTES NO AISLADAS DE
NINGÚN CABLE CUANDO EL CABLE DE CA ESTÉ CONECTADO.
3
ALIMENTACIÓN
ALIMENTACIÓN
4.
N
OTA
ES
7
Antenas
CABLE / ANTENNA
DTV / TV
IN OUT
Conectar un cable de antena
Conecte el cable de antena al televisor mediante uno de los métodos de la ilustración mostrada (
1
,
2
,
3
o
4
).
1
Cable sin
convertidor CATV
3
Antena combinada
de VHF/UHF
4
Antena de VHF/UHF
independiente
2
Antena de VHF/
UHF
AVISO
El conector tipo F solamente se debe ajustar con
los dedos.
Preparación
Usar el mando a distancia
30°
30°
30°
*
30°
17´ (5 m)
Remote control sensor
■ Precauciones relacionadas con el mando a
distancia
IMPORTANTE:
REFERENCIA RÁPIDA
S
1
7
2
e f
3
PRECAUCIÓN
Instalar las pilas en el mando a
distancia

ES
8
Nombre de los componentes
Televisor (parte frontal)
Televisor (panel de control)
Televisor (parte posterior)
1
ARC
2 Y/V Pb/Cb CABLE / ANTENNAPr/Cr
COMPONENT / VIDEO DTV / TV
AUDIO
L R
L R OPTICAL MHL
(DC 5V, 900mA)
USB
AUDIO OUT
AC IN
NOTA
Botón
ALIMENTACIÓN
Botón
MENÚ
Botón
ENTRADA
Botones de
canal
(
CANAL
r
/
s
)
Botones de
volumen
(
VOL
k
/
l
)
Terminal USB
Conector
ENTRADA DE CA
Terminal HDMI 3
MHL: Mobile High-Denition Link,
es decir, Enlace de alta denición
móvil
Terminal HDMI 1/2
ARC: Audio Return
Channel, es decir, Canal de
retorno de audio
Terminal ENTRADA DE COMPONENTES/VÍDEO
Terminal SALIDA DE AUDIO
DIGITAL
ENTRADA DE CABLE Y ANTENA
(5 VCC, 500 mA)
Terminal SALIDA DE AUDIO
ANALÓGICA

ES
9
Nombre de los componentes
Mando a distancia
INPUT
3
4
5 6
7
8 9
0
ENT
1
2
INFO FREEZ E
FLASHBACK
MUTE
TV US B MENUS U RROUN D
FAV O RITE CH
SLEE P CC VIEWMODEAV MODE
AUDIO
VOL CH
+
RETURNEXIT
LCDTV
GJ221-R
A B C D
ENTER
POWER
1
2
3
4
5
6
7
8
9
10
11
12
13
14
15
16
17
18
19
20
21
22
23
24
25
26
1
ENTRADA:
0–9:
ENT:
ANTERIOR:
AUDIO:
6 SILENCIO:
7 CANAL
r
/
s
:
8
MENÚ:
9
ENVOLVENTE:
10
a b c d
ENTRAR:
11 VOLVER:
12 CANAL FAVORITO:
A B C
D
13
MODO AV:
14 MODO DE VISUALIZACIÓN:
15 :
16 ALIMENTACIÓN:
18 INFORMACIÓN:
19 CONGELAR:
20 VOL
k
/
l
:
21 INICIO:
22 TV:
23 USB:
24 SALIR:
25 APAGADO AUTOMÁTICO:
26 SUBTÍTULOS:
NOTA
ES
10
Introducción a las conexiones
Disfrutar de imágenes en alta definición (HD)
NOTA
Para obtener información acerca de la actualización a programas HD, pregunte a su proveedor de servicio de cable
o satélite.
Tipos de conexión
Para conectar el televisor a un equipo externo, utilice cables que puede adquirir en cualquier
tienda especializada.
■ Conectar un equipo de vídeo o PC
Páginas
11, 13
Câble
Câble AV
Câble component vidéo
Câble audio
Câble certié HDMI
Câble RCA audio vers minijack stéréo de Ø 3,5 mm
Câble de conversion DVI-HDMI
Qualité
d'image
Borne sur le
téléviseur
Qualité
HD
Qualité
standard
Borne sur l'équipement
externe
AUDIO
Sortie DVI OUT
1 2
Y/V Pb/Cb Pr/Cr
COMPONENT / VIDÉO
AUDIO
G D
Y/V
Pb
/C
b
P
r
/C
r
COMPONENT / VIDÉO
AUDIO
G D
Y
/
V
Pb
/C
b
P
r
/C
r
COMPONENT / VIDÉO
AUDIO
G D
MHL
1 2 MHL
Página
11
Página
11
Páginas
11, 13
Câble
Câble à bre optique
Câble audio
Borne sur le téléviseur
Borne sur
l'équipement externe
ENTRÉE AUDIO NUMÉRIQUE
OPTIQUE
ENTRÉE AUDIO ANALOGIQUE
G
D
OPTIQUE
Sortie AUDIO OUT
G D
O
PTI
Q
U
E
Sortie AUDIO OUT
Página 12
Página 12
Mostrar una imagen de un equipo externo
ENTRADA
1
ENTRADA
2
a b
ENTRADA
ENTRADA
■ Conectar un equipo de audio

ES
11
Conectar un equipo externo
ENTRADA
Para conectar el televisor a un equipo externo, utilice cables que puede adquirir en cualquier tienda
especializada.
PRECAUCIÓN
Conectar un reproductor de discos Blu-ray o DVD o un descodificador de
■ Cuando utilice un cable HDMI (ENTRADA HDMI 1, 2 o 3):
Cable con la certificación HDMI
HDMI OUT
MHL
(DC 5V, 900mA)
1
ARC
2
NOTA
■ Cuando utilice un cable de conversión DVI-HDMI (ENTRADA HDMI 1, 2 o 3):
Cable de conversión DVI-HDMI
Cable de audio
AUDIO OUT
DVI OUT
MHL
(DC 5V, 900mA)
1
ARC
2
Y/V
Pb/Cb
C
Pr/Cr
COMPONENT / VIDEO
AUDIO
L R
NOTA
■ Cuando utilice un cable de componentes (ENTRADA DE COMPONENTES):
Cable de audio
AUDIO-L (White)
AUDIO-R (Red)
Y (Green)
P
B
(azul)
Y(Verde)
COMPONENT OUT
Y/V Pb/Cb Pr/Cr
COMPONENT / VIDEO
AUDIO
L R
NOTA
Pr(Rojo)
ES
12
Conectar un equipo externo
Conectar un sistema envolvente o de audio
■ Cuando conecte un amplificador de AV para un sistema envolvente
DIGITAL AUDIO INPUT
OPTICAL
HDMI INHDMI OUT
HDMI OUT
L
R
OPTICAL MHL
(DC 5V, 900mA)
AUDIO OUT
1
ARC
2
NOTA
■ Cuando conecte un amplificador de audio
DIGITAL AUDIO INPUT
OP TICAL
L
R
OPTICAL
AUDIO OUT
ANALOG AUDIO IN
L R
OPTICA
L
AUDIO OUT
Cable con la certificación HDMI *1
Descodificador de satélite o cable HD
Cable de fibra óptica *2
Cable de fibra óptica
Cable de audio
Conectar una unidad VCR, una consola de juegos, una videocámara o un
■ Cuando utilice un cable compuesto (COMPONENTES/VÍDEO):
Y/V
Pb/Cb
Pr/Cr
COMPONENT / VIDEO
AUDIO
L R
Cable de AV
AUDIO-L (White)
AUDIO-R (Red)
VIDEO (Yellow)
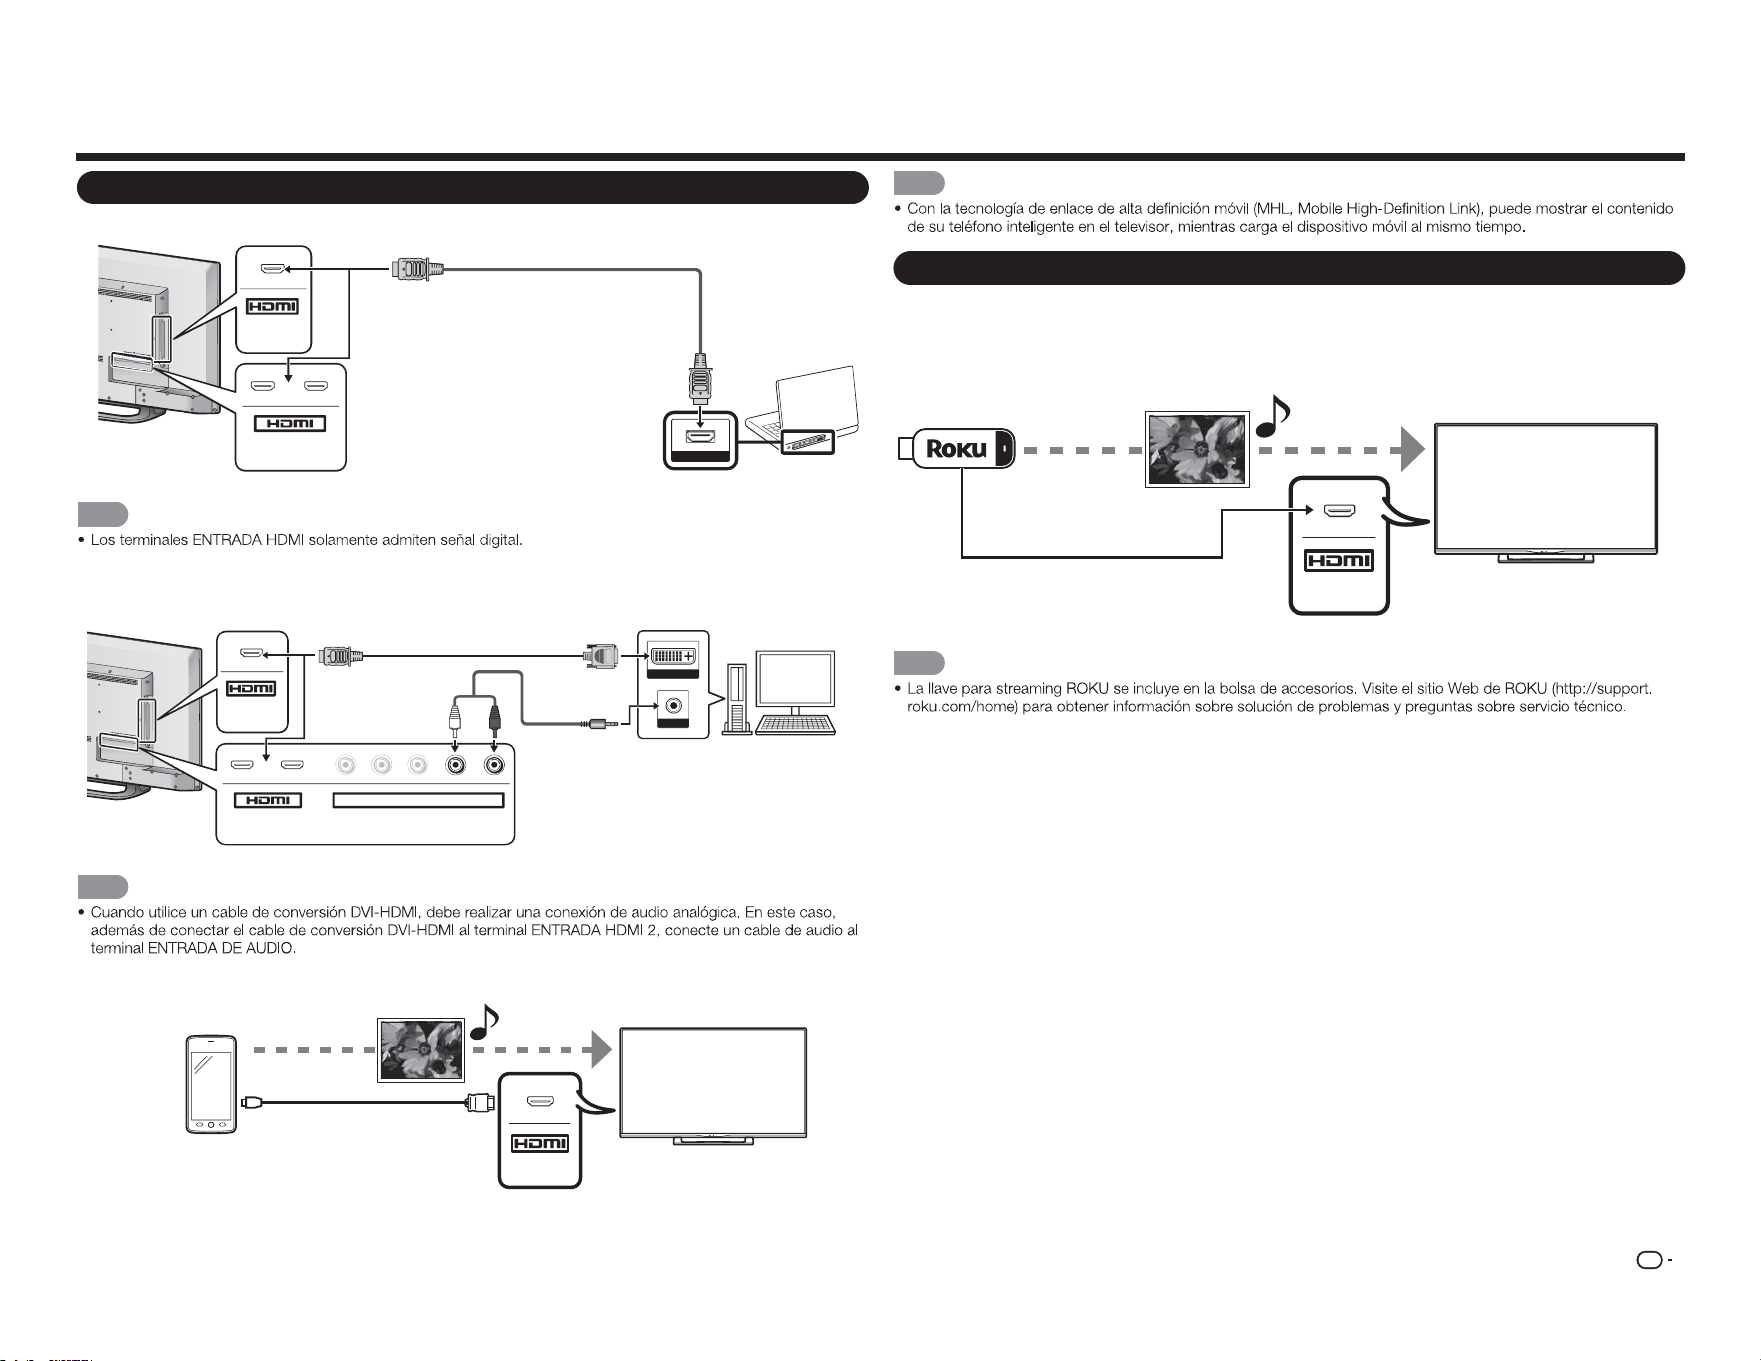
ES
13
Conectar un PC o teléfono inteligente
■ Cuando utilice un cable HDMI (ENTRADA HDMI 1, 2 o 3):
Cable con la certificación HDMI
MHL
(DC 5V, 900mA)
1
ARC
2
HDMI OUT
NOTA
■ Cuando utilice un cable de conversión DVI-HDMI (ENTRADA HDMI 1, 2 o 3):
Cable de conversión DVI-HDMI
Cable de audio
DVI OUT
AUDIO
MHL
(DC 5V, 900mA)
1
ARC
2
Y/V
Pb/Cb
C
Pr/C
r
COMPONENT / VIDEO
AUDIO
L R
NOTA
■ Cuando utilice un cable MHL (ENTRADA HDMI 3):
Cable MHL
Teléfono
inteligente
Archivos
multimedia
MHL
Conectar un equipo externo
NOTA
Conectar una llave para streaming ROKU
■ Conectar ROKU a través de MHL
Llave para
streaming ROKU
Streaming de
archivos de audio y
vídeo
Conectarse a Internet a
través de una conexión
inalámbrica
MHL
NOTA

ES
14
Ver la televisión
Encender y apagar la alimentación
ALIMENTACIÓN ALIMENTACIÓN
Botón ALIMENTACIÓN
Botón
ALIMENTACIÓN
INPUT
3
4
5 6
7
8 9
0
ENT
1
2
INF O FR EE Z E
FLASHBACKAUDIO
POWER
NOTA
ALIMENTACIÓN
NOTA
Instalación inicial
ALIMENTACIÓN
1.
2.
3.
Configuración de idioma
Los
1 Pr
ENTRAR
Idioma del menú
Selección del idioma
Idioma: Español
Cambiar
ENTER SalirEXITSeleccione
Configuración de la ubicación del televisor
2
c d
ENTRAR
Modo TV
Modo de selección
Modo: Modo Casa
Cambiar
ENTER RETURN EXITSeleccione Paso anterior Salir
Configuración de la zona horaria y el horario de verano
3
c d
ENTRAR
Zona horaria
Configure la zona horaria
Zona horaria: Alaska
Cambiar
ENTER RETURN EXITSeleccione Paso anterior Salir
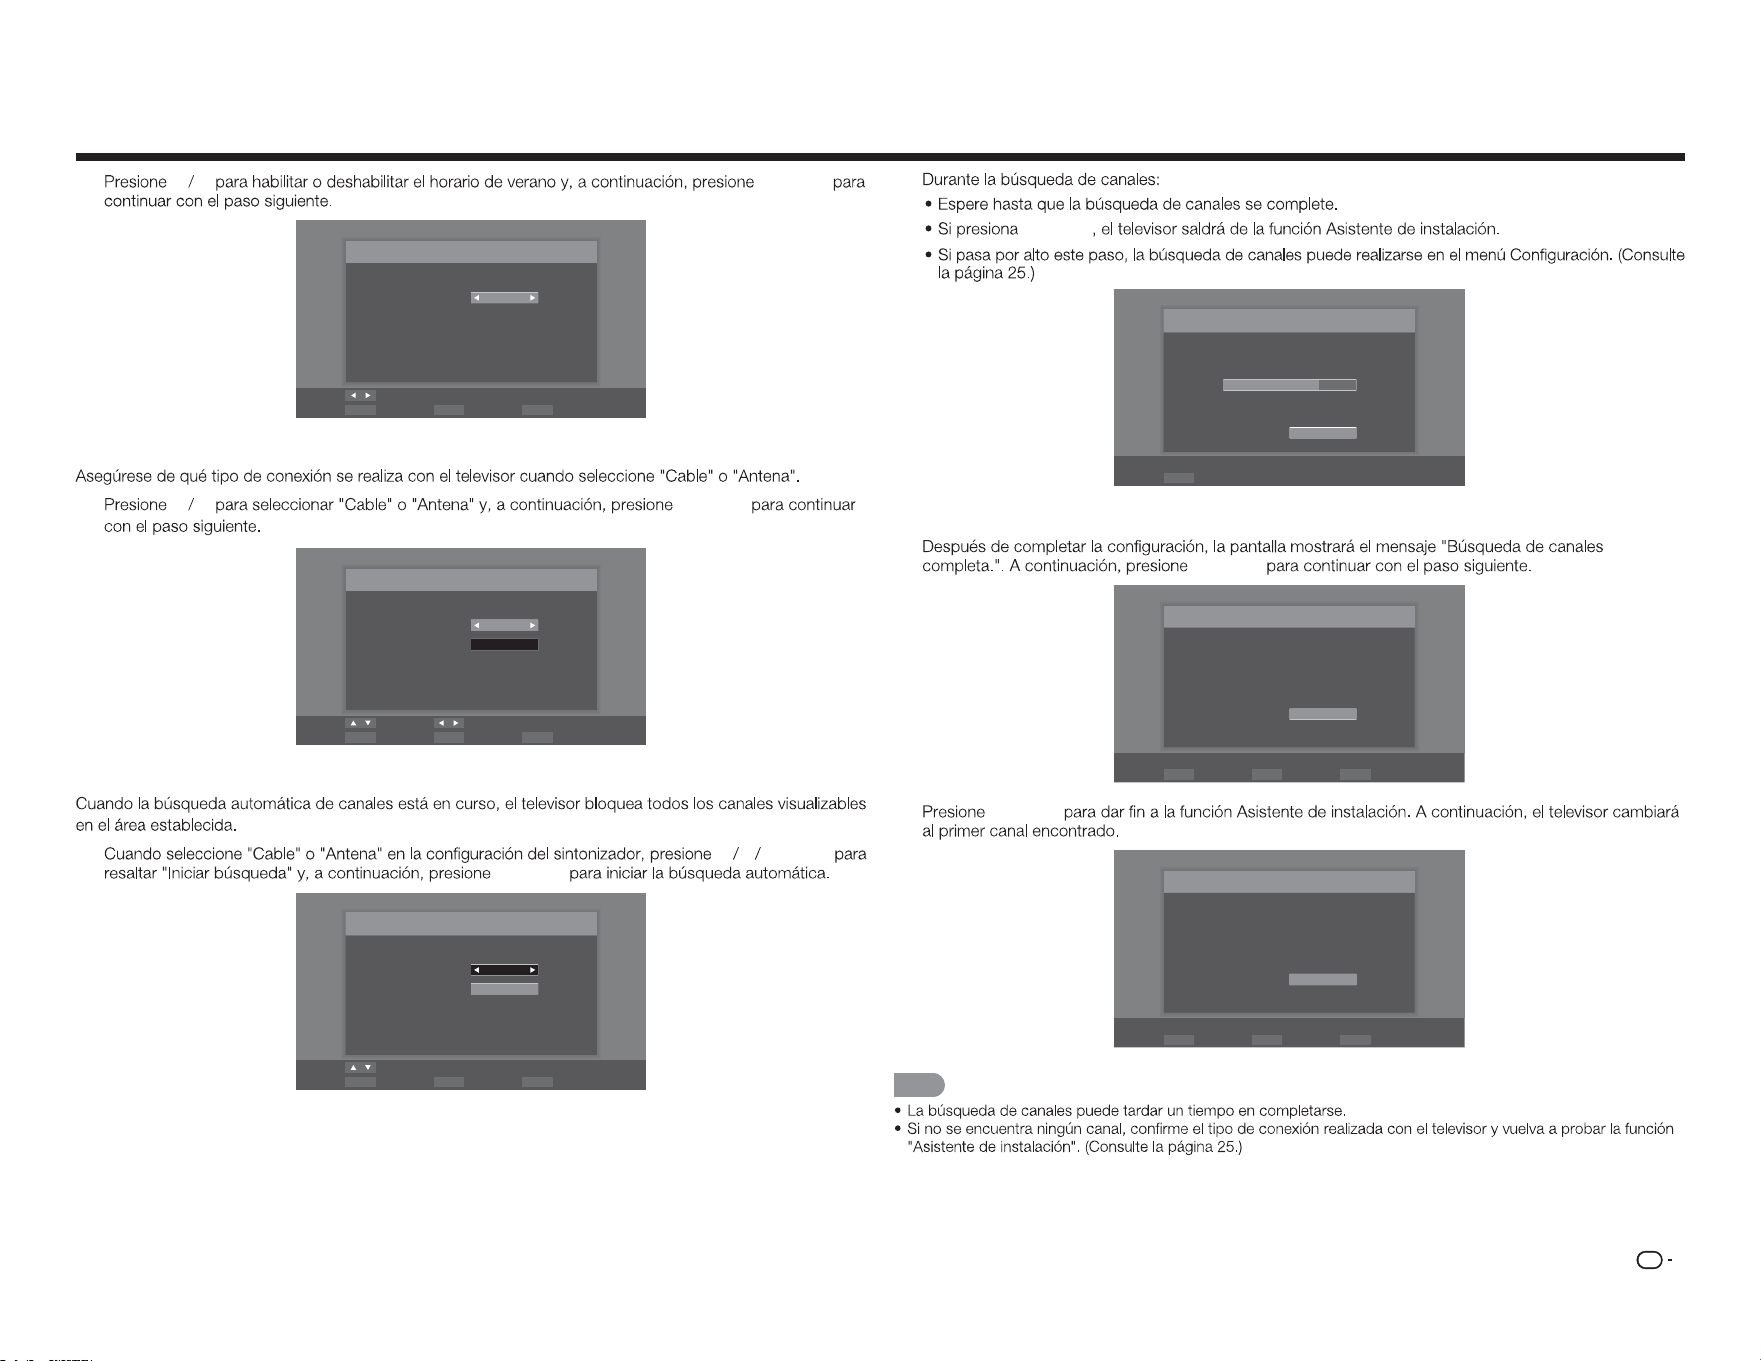
ES
15
Ver la televisión
4
c d
ENTRAR
Horario de verano
Selección de Horario de Verano
Horario de verano: Activado
Cambiar
ENTER RETURN EXITSeleccione Paso anterior Salir
Configuración de la antena
5
c d
ENTRAR
Búsqueda automática
Seleccione el tipo de señal de entrada de su televisor e inicie la búsqueda
Tipo de señal: Cable
Iniciar búsqueda
Mover Cambiar
ENTER RETURN EXITSeleccione Paso anterior Salir
Búsqueda de canales
6
p q
ENTRAR
ENTRAR
Cable
Iniciar búsqueda
Mover
ENTER RETURN EXITSeleccione Paso anterior Salir
Búsqueda automática
Seleccione el tipo de señal de entrada de su televisor e inicie la búsqueda
Tipo de señal:
ENTRAR
Búsqueda
Búsqueda de canales en el proceso, si desea detener la
búsqueda, por favor, pulse "Detener búsqueda".
Scan Status:
Analógico : 89
Digital : 0
70%
Detener búsqueda
ENTER Seleccione
Completada
7
ENTRAR
Búsqueda finalizada
Búsqueda de canales completa.
Analógico : 100
Digital : 0
OK
ENTER RETURN EXITSeleccione Paso anterior Salir
8
ENTRAR
Finalizar
La configuración inicial ha terminado, por favor, pulse el botón
"Aceptar" para salir del Asistente de Instalación.
OK
SeleccioneENTER Paso anteriorRETURN SalirEXIT
NOTA
ES
16
Cambiar de canal
Método 1
CANAL
r
/
s
Método 2
0 9
Ejemplos:
Para seleccionar un número de canal de 1 o 2
dígitos
(por ejemplo el canal 5):
5 ENTRAR
Para seleccionar un número de canal de 3
dígitos
(por ejemplo el canal 115):
1 1 5 ENTRAR
Para seleccionar un número de canal de 4
dígitos
(por ejemplo el canal 22,1):
2 2 (PUNTO) 1
ENTRAR
NOTA
0
0 9
0 9
Cambiar el volumen
VOL
k
/
l
VOL
k
VOL
l
INICIO
INICIO
INPUT
3
4
5 6
7
8 9
0
ENT
1
2
INFO FRE E ZE
FLASHBACK
MUTE
TV US B MENUSURROU N D
FAVORITE CH
S L EEP CC VIEW MODE AV MODE
AUDIO
VOL CH
+
RETURNEXIT
LCDTV
GJ221-R
A B C D
ENTER
POWER
ENTRADA
ENTRADA
1
ENTRADA
2
p q
ENTRADA
ENTRADA
p q
ENTRAR
NOTA
SILENCIO
SILENCIO
NOTA
VOL
k
/
l
SILENCIO
APAGADO AUTOMÁTICO
APAGADO AUTOMÁTICO
APAGADO
AUTOMÁTICO
APAGADO
AUTOMÁTICO
Funcionamiento de los botones directos
NOTA
APAGADO
AUTOMÁTICO
ANTERIOR
ANTERIOR
ANTERIOR
NOTA
El botón
ANTERIOR
ENVOLVENTE
ENVOLVENTE
CONGELAR
CONGELAR
CONGELAR
MODO AV
MODO AV
Estándar (Energy Star):
Película:
Juego:
DINÁMICO:
ES
17
Deporte:
Usuario:
MODO AV
AUDIO
AUDIO
Puede disfrutar de sonido estéreo Hi-Fi PFU de
difusiones SAP donde estén disponibles.
Transmisiones estéreo:
Transmisiones SAP:
Si el sonido estéreo es difícil de escuchar.
CANAL FAVORITO (configuración de
Para registrar su canal favorito
1
MENÚ
2
c d
Canal
3
p q
Saltar/
Canales Favoritos
u
ENTRAR
4
p q
CANAL
FAVORITO A B C D
16
19
21
24
25
26
27
28
29
30
5
MENÚ
Para ver su canal favorito
CANAL FAVORITO A
B C D
Subtítulos ocultos y subtítulos ocultos
digitales
1
Subtítulos
2
Subtítulos
Funcionamiento de los botones directos
Ejemplo:
Subtítulos
NOTA

ES
18
MODO DE VISUALIZACIÓN
1
MODO DE VISUALIZACIÓN
2
MODO DE VISUALIZACIÓN
p q
3
ENTRAR
NOTA
■ Para programas 4:3
Normal Alargamiento Zoom Panorámico
■ Para programas 16:9
Normal
Alargamiento Zoom Estirar
NOTA
Funcionamiento de los botones directos
ES
19
Elementos del menú en pantalla
Funcionamiento de los menús en pantalla
Audio
Configura
ción
CanalSubtítulos
Modo de
visualización
Temporizador de
Apagado
Rodear
Ctrl. Volúmen Auto.
Graves
Agudos
Balance
Sinc. de Audio
Altavoces TV
Sólo audio
Salida audio digital
Salida audio analóg
Parámetros del ecualizador
Restablecer modo de audio
Apagado
Película
Noticias
[Película]
[Activado]
0
0
0
0
[Activado]
[PCM]
[Fijo]
Ejemplo
1
MENÚ
2
c d
3
p q u
ENTRAR
a
/
b
4
p q
c d
ENTRAR
5
MENÚ
NOTA
Menú en pantalla (menú principal)
Entrada Imagen Audio
Configura
ción
Subtítulos
Modo de
visualización
TV
ENTRADA AV
Componentes
HDMI-1
HDMI-2
HDMI-3(Lateral)
Menú principal
Opciones de submenú y menú
■ Acerca de los elementos de menú
NOTA
ES
20
Botones de funcionamiento de menú
Usar el mando a distancia
TV USB MEN USURR OU N D
FAV O RI TE CH
RETURNEXIT
A B
C D
ENTER
MENÚ:
a
/
b
/
c
/
d
:
ENTRAR:
VOLVER:
Utilizar el panel de control del televisor
MENÚ: MENÚ
ENTRADA: ENTRAR
CANAL
r
/
s
:
a b
VOL
k
/
l
:
c d
Menú en pantalla
ES
21
Menú Imagen
Imagen
Modo AV
Luz de fondo
Contraste
Brillo
Color
Tono
Nitidez
Tamaño y posición
Temp. del color
Imagen avanzada
Reiniciar modo AV
[Estándar(Energy Star)]
80
52
50
60
0
2
Ejemplo
Elementos de menú
Menú Audio
Audio
Rodear
Control Automático de Volúmen
Graves
Agudos
Balance
Sinc. de Audio
Altavoces TV
Sólo audio
Salida audio digital
Salida audio analóg
Parámetros del ecualizador
Restablecer modo de audio
[Película]
[Activado]
0
0
0
0
[Activado]
[PCM]
[Fijo]
Ejemplo
Menú Configuración
Configura
ción
Nombre de la Entrada
Ajustes Link CEC
Idioma del menú
Ajustes locales y hora
Control Parental
Indicador de alimentación
Asistente de Instalación
Información del sistema
Restaurar todos los ajustes
[Español]
[Activado]
Ejemplo
Menú en pantalla
Menú Subtítulos (solo señal de entrada de
TV)
Subtítulos
Subtítulo analógico
Subtítulo digital
Estilo SD
[Apagado]
[Apagado]
Ejemplo
Menú Canal (solo señal de entrada de TV)
Modo TV
Búsqueda automática de canales
Búsqueda parcial de canales
Añadir canal analógico
Saltar/ Canales Favoritos
MTS analógico
MTS digital
[Cable]
[Mono]
Canal
Ejemplo

ES
22
Brillo
c d
Color
c d
Tono
c
d
Nitidez
c d
Tamaño y posición
Posición horiz.
Posición vertical
Tamaño horiz.
Tamaño vertical
31
16
0
0
Posición horiz.:
Posición vertical:
Tamaño horiz.:
Tamaño vertical:
Menú Imagen
NOTA
Modo AV (cambiar la calidad de la i
imagen)
Estándar (Energy Star):
Película:
Juego:
DINÁMICO:
Deporte:
Usuario:
NOTA
MODO AV
Luz de fondo
c
d
Contraste
c d
Temp. del color
Temp. del color
Ganancia de rojo
Ganancia verde
Ganancia de azul
Saturación de rojo
Saturación de verde
Saturación de azul
Restablecer temperatura de color
[Frio]
128
128
128
128
128
128
Temp. del color
Personalizar:
Frío:
Normal:
Cálido:
Ganancia de rojo, verde o azul
Saturación de rojo, verde o azul
Restablecer temperatura de color
Menú Entrada
Entrada
TV
ENTRADA AV
Componentes
HDMI-1
HDMI-2
HDMI-3(Lateral)
Ejemplo
Menú Modo de visualización
Normal
Alargamiento
Zoom
Panorámico
Modo de
visualización
Ejemplo
Menú Temporizador de apagado
Apagado
30 Minutos
60 Minutos
90 Minutos
120 Minutos
180 Minutos
Temporizador de
Apagado
ApagadoTemporizador de Apagado
Ejemplo
Menú en pantalla
ES
23
Menú en pantalla
Configuración avanzada de imagen
Realzar color
Contraste activo
mejora del movimiento
ahorro de energía
Reducción de ruido
NR Digital
Modo de película
[Normal]
[Medio]
[Medio]
[Activado]
[Bajo]
[Bajo]
[Auto]
Realzar color
Apagado:
Normal/Enriquecido:
Contraste activo
Apagado:
Alto/Medio/Bajo:
Mejora del movimiento
Apagado:
Alto/Medio/Bajo:
Ahorro de energía
Apagado:
Activado:
Reducción de ruido
Apagado:
Alto/Medio/Bajo:
NR digital
Apagado:
Alto/Medio/Bajo:
Modo de película
Automático:
Apagado:
Reiniciar modo AV
Imagen
Menú Audio
NOTA
Rodear
Apagado:
Película:
Noticias:
NOTA
Control automático de volumen
Apagado:
Activado:
Graves
c d
NOTA
Agudos
c d
NOTA
Balance
c d
Sinc. de audio
c
/
d
Altavoces TV
Apagado:
Activado:
NOTA
Sólo audio
La televisión ha entrado en modo de
sólo audio. La Iluminación se apagará
pronto. Pulse cualquier tecla para
despertar de nuevo.
ES
24
Salida audio digital
Dolby Digital:
PCM:
Salida audio analóg
Fijo
Variable
Parámetros del ecualizador
c
/
d
a
/
b
MENÚ
NOTA
Restablecer modo de audio
Audio
Menú Configuración
NOTA
Nombre de la entrada
Fuente de entrada
Etiqueta de Entrada
[TV]
[TV]
TV
Fuente de entrada
Etiqueta de entrada
Etiqueta
de entrada
ENTRAR
OK
ENTRAR
Ajustes Link CEC
Función Enlace CEC
Control de Sistema de Audiol
Búsqueda de Dispositivos
[Activar]
[Apagado]
Función
Enlace CEC
Activar
Control de sistema de audio
Activado
Búsqueda de dispositivos
Idioma del menú
Ajustes locales y hora
Zona horaria
Horario de verano
[Alaska]
[Activado]
Zona horaria:
Horario de verano:
Horario de verano Activado
Control parental
NOTA
Introduzca la contraseña
****
OK Cancelar
OK
ENTRAR
Activar clasif.
Bloqueo de canales
EE.UU. - TV
EE.UU. - Película
CAN - Inglés
CAN - Francés
Valoración región alternativa
Bloquear no clasif.
Nueva Contraseña
Restablecer conf. Parental
[Apagado]
[Apagado]
NOTA
Activar clasif.
Clasificación de
programa Activado
Bloqueo de canales
16
19
21
24
25
26
27
28
29
30
EE.UU. - TV
TV-Y
TV-Y7
TV-G
TV-PG
TV-14
TV-MA
ALL FV D L S V
Menú en pantalla
ES
25
Menú en pantalla
Nivel de clasificación
de TV
Contenido de
clasificación de TV
EE.UU. - Película
G
PG
PG-13
R
NC-17
X
G:
PG:
PG-13:
R:
NC-17:
X:
CAN - Inglés
C
C8+
G
PG
14+
18+
C:
C8+:
G:
PG:
14+:
18+:
CAN - Francés
G
8ans+
13ans+
16ans+
18ans+
G:
8ans+:
13ans+:
16ans+:
18ans+:
Valoración región alternativa
Bloquear no clasif.
Activado
Nueva contraseña
Nueva Contraseña
Volver a introducir contraseña
Restablecer conf. parental
Control parental
Indicador de alimentación
Apagado:
Activado:
Asistente de instalación
NOTA
Información del sistema
Restaurar todos los ajustes
NOTA
ES
26
Menú Subtítulos
NOTA
19
Este menú solamente está disponible si la entrada se
establece en TV.
Subtítulo analógico
Subtítulo digital
Estilo SD
Estilo subtítulos:
Tamaño del texto:
Caracteres:
Color:
Opacidad:
Color BG:
Opacidad BG
Color de ventana:
Opacidad de ventana:
Menú Canal
NOTA
19
Este menú solamente está disponible si la entrada se
establece en TV.
Modo TV
Búsqueda automática de canales
Iniciar búsqueda
ENTRAR
Búsqueda parcial de canales
Modo Buscar
Del canal
Al canal
Iniciar búsqueda
[Analógico/Digital]
1
135
Iniciar
búsqueda
ENTRAR
Añadir canal analógico
Añadir canal
ENTRAR
Saltar/Canales Favoritos
ENTRAR
16
19
21
24
25
26
27
28
29
30
NOTA
CANAL FAVORITO
MTS analógico
NOTA
Mono
:
Estéreo:
Menú en pantalla
SAP
:
MTS digital
Menú Temporizador de apagado
NOTA

ES
27
Disfrutar de la reproducción de fotografías, música y películas
NOTA
Conectar un dispositivo de memoria USB o una unidad de disco duro USB
MHL
(DC 5V, 900mA)
USB
Compatibilidad con dispositivos USB
Contenedor Extensiones A/V CÓDEC/Perfil
USB de medios detectada. ¿Entrar al menú multimedia?
Sí No
Sí
ENTRAR
1
USB ENTRAR
USB:
2
a b
ENTRAR
Foto
Música
Película
3
a
/
b
/
c
/
d
ENTRAR
Seleccionar las carpetas para reproducir
(5 VCC, 500 mA)
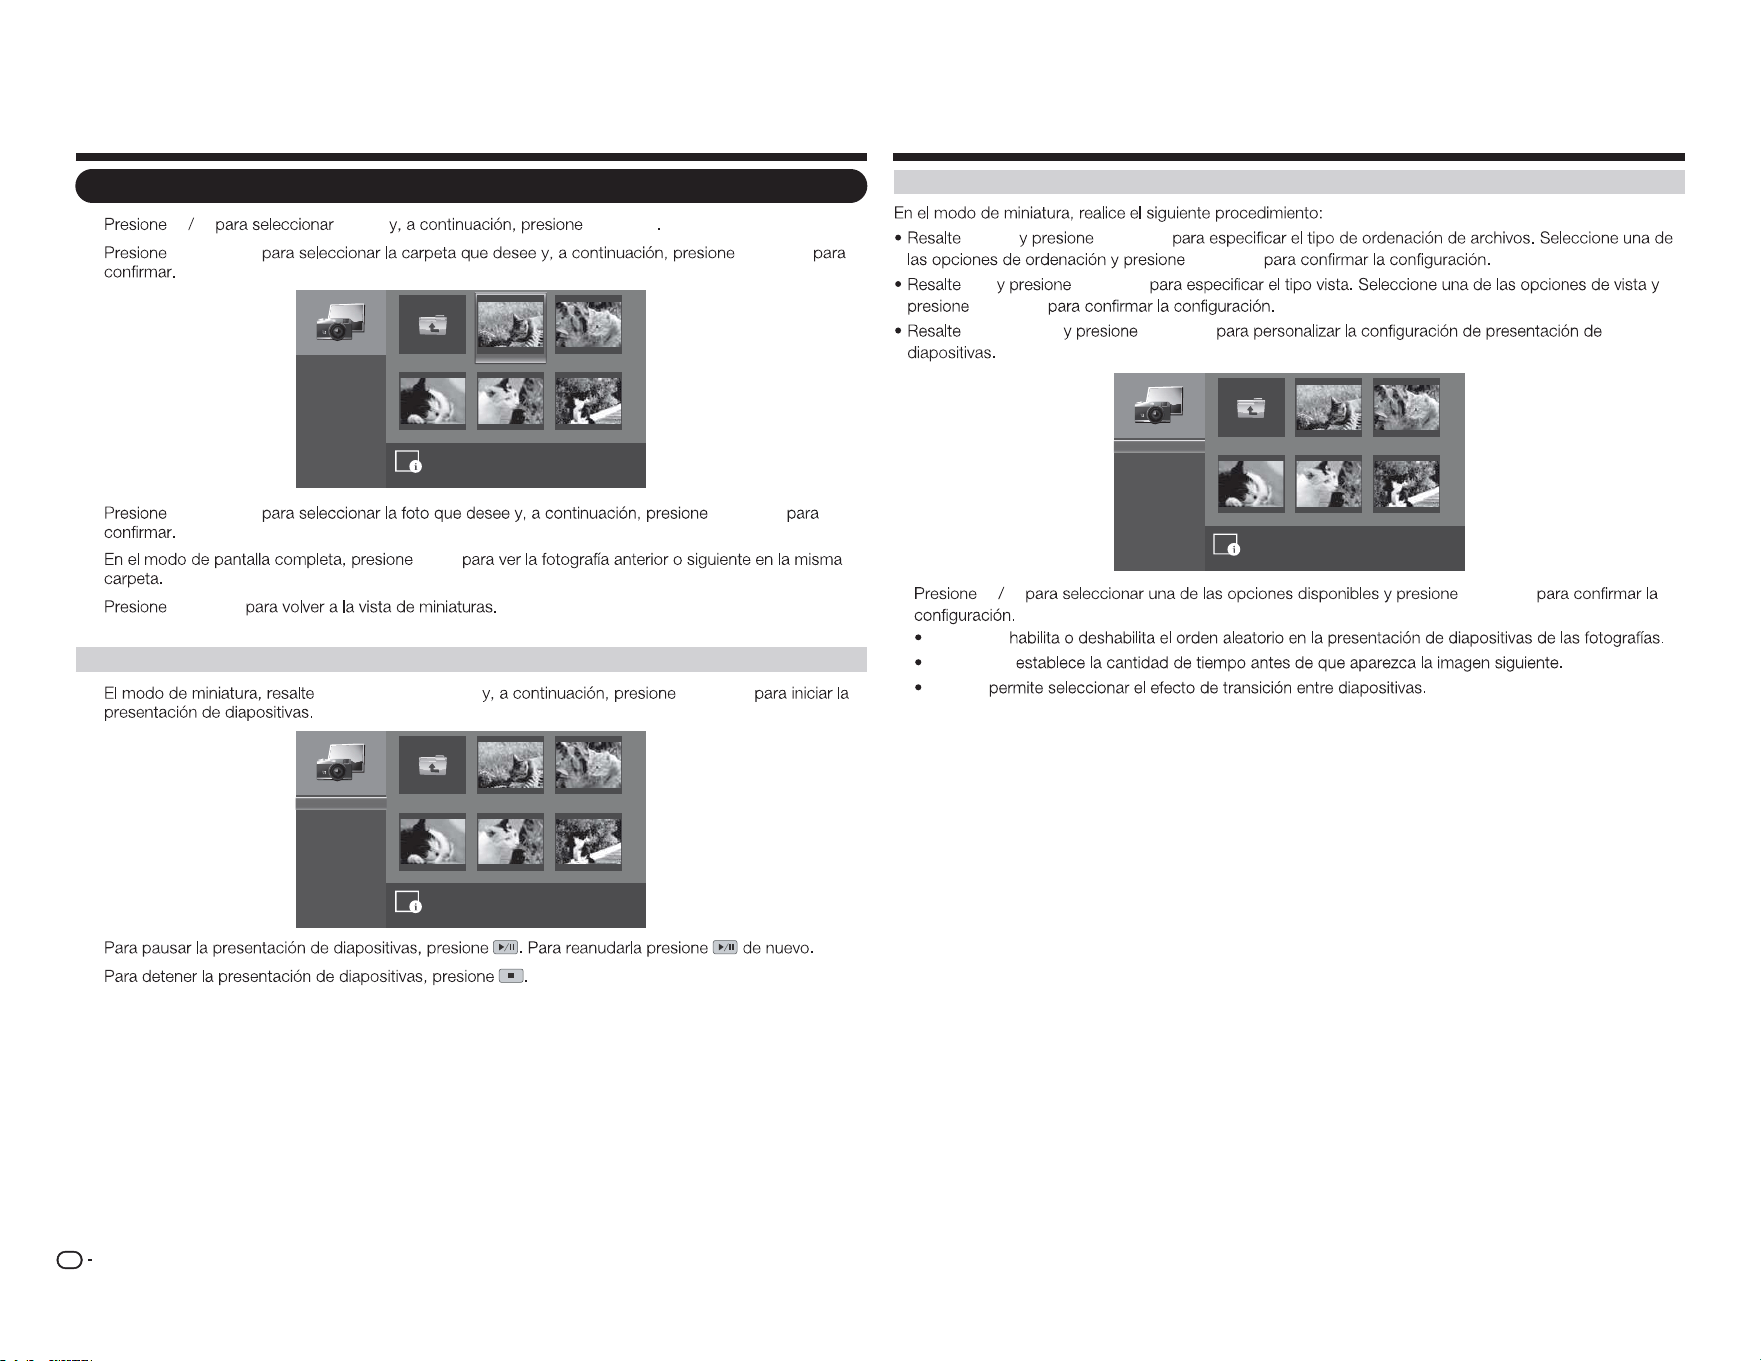
ES
28
Ver fotografías
1
a b
FOTO
ENTRAR
2
a
/
b
/
c
/
d
ENTRAR
image001.jpg image002.jpg
image004.jpgimage003.jpg image005.jpg
Folder siguiente
Iniciar presentación
Orden:
Ver:
Parámetros
\foto\
Nomb. archivo:image001.jpg
Resolución: 725x510 Tamaño de arc.: 965 KBytes
1
/
3
Nombre A-Z
Archivos
3
a
/
b
/
c
/
d
ENTRAR
4
c
/
d
5
ENTRAR
Ver fotografías en una presentación de diapositivas
1
Iniciar presentación
ENTRAR
image001.jpg image002.jpg
image004.jpgimage003.jpg image005.jpg
Folder siguiente
\foto\
1
/
3
Iniciar presentación
Orden:
Ver:
Parámetros
Nombre A-Z
Archivos
2
3
Disfrutar de la reproducción de fotografías, música y películas
Personalizar la configuración de fotografías
Orden
ENTRAR
ENTRAR
Ver
ENTRAR
ENTRAR
Parámetros
ENTRAR
image001.jpg image002.jpg
image004.jpgimage003.jpg image005.jpg
Folder siguiente
Aleatorio:
Velocidad:
Efecto:
\foto\
1
/
3
Aleatorio activado
5 segundos
Al azar
a b
ENTRAR
Aleatorio:
Velocidad:
Efecto:
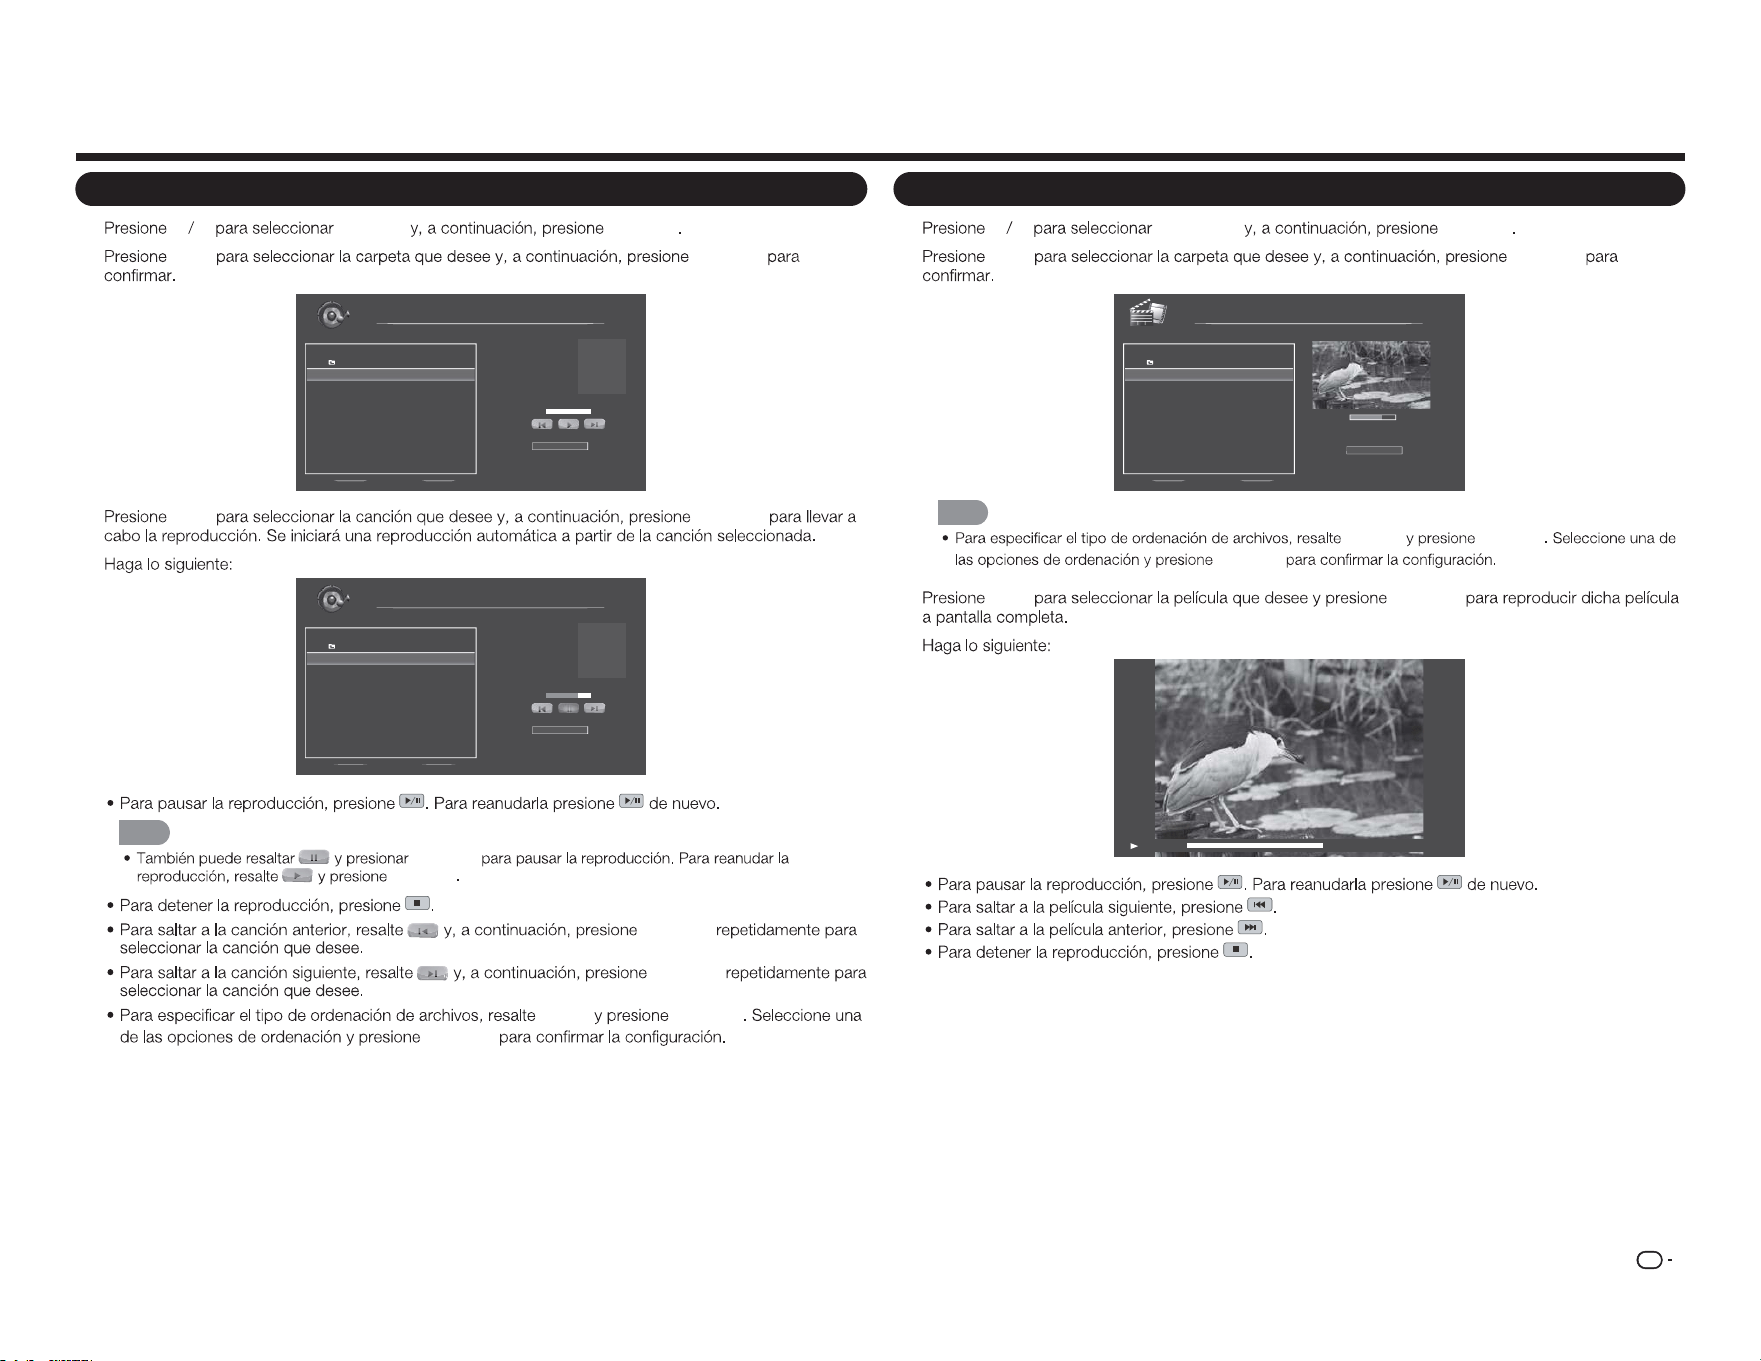
ES
29
Disfrutar de la reproducción de fotografías, música y películas
Reproducir música
1
a b
MÚSICA
ENTRAR
2
a
/
b
ENTRAR
Nomb. archivo:
Artista:
Álbum:
Música
\música
1 / 1
# Pista Duración
1. Folder siguiente
2. song0 01.mp3 00:03:15
3. song0 02.mp3 00:03:12
4. song0 03.mp3 00:03:10
Orden:
Nombr e A-Z
00:00:00 00:00:00
3
a
/
b
ENTRAR
4
song001.mp3
Unknow
Unknow
1 / 1
Orden:
Nombr e A-Z
00:02:07 00:03:15
Nomb. archivo:
Artista:
Álbum:
Música
\música
# Pista Duración
1. Folder siguiente
2. song0 01.mp3 00:03:15
3. song0 02.mp3 00:03:12
4. song0 03.mp3 00:03:10
NOTA
ENTRAR
ENTRAR
ENTRAR
ENTRAR
Orden
ENTRAR
ENTRAR
Ver películas
1
a b
PELÍCULA
ENTRAR
2
a
/
b
ENTRAR
00:06:07
Orden:
00:08:07
Película
\película
1 / 1
# Archivo Duración
1. Folder siguiente
2. movie001.avi 00 :08:15
3. movie002.avi - -:- -:- -
4. movie003.avi - -:- -:- -
Nombr e A-Z
NOTA
ORDEN ENTRAR
ENTRAR
3
a
/
b
ENTRAR
4
00:06:07 00:08:15
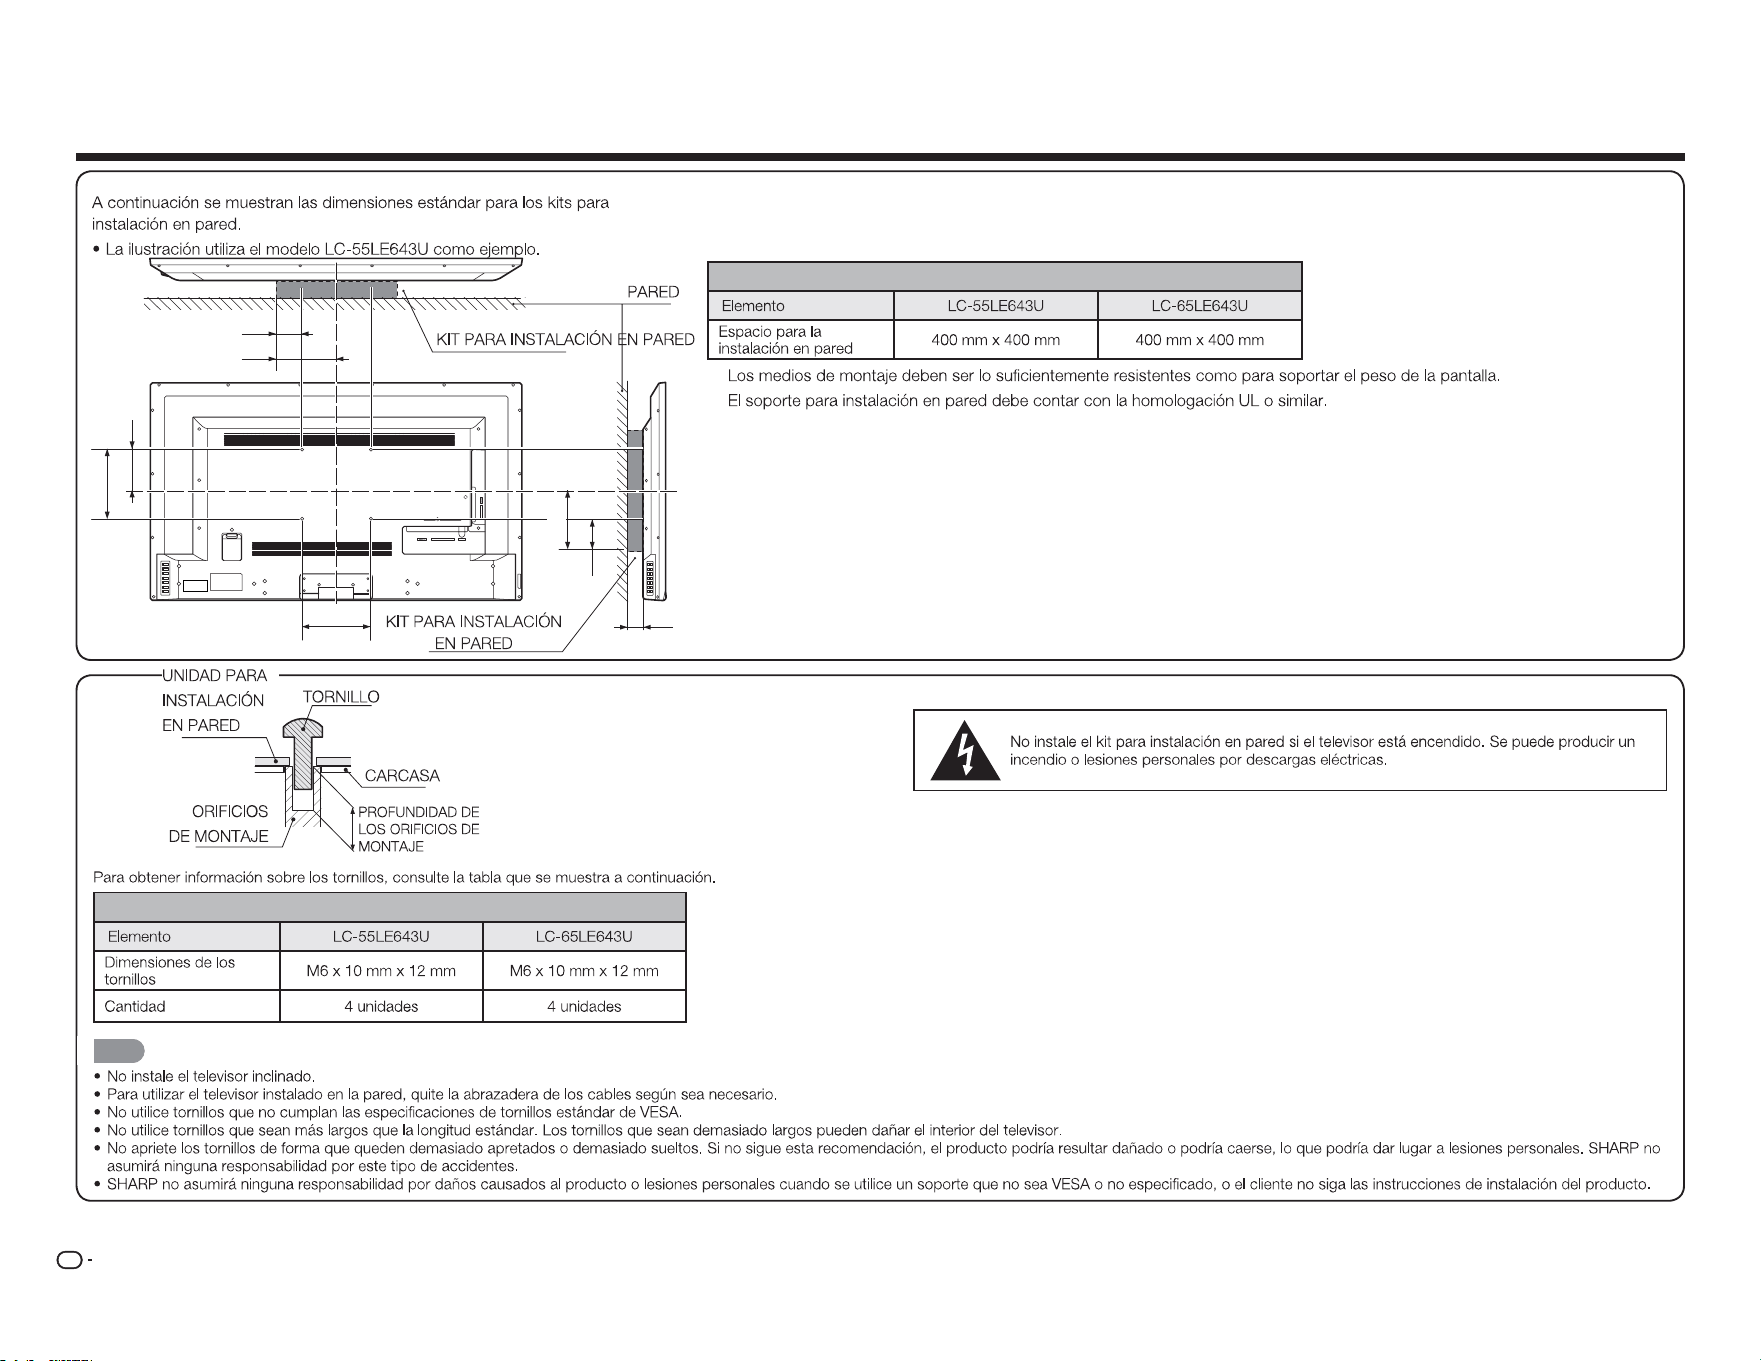
ES
30
Especificaciones del kit para instalación en pared
Modelo
DEPTH OF
MOUNTING HOLES
SCREW
WALL MOUNT
UNIT
MOUNTING
HOLES
CABINET
Modelo
NOTA
Apéndice
1 2 Y/V Pb/Cb
AC IN
CABLE / ANTENNAPr/Cr
COMPONENT / VIDEO
L R OPTICAL MH L USB
AUDIO OUT
DTV / TV
AUDIO
L R
A
b1
B
b3
c1
b2
a2
a1
ES
31
Solución de problemas
El televisor muestra el mensaje “No hay señal.”.
ENTRADA
No hay alimentación.
ALIMENTACIÓN
ENTRADA
No hay sonido.
VOL
k
SILENCIO
Los colores del televisor no se muestran correctamente.
Apéndice
La calidad de la imagen no es buena.
La imagen está distorsionada.
La imagen de visualización no ocupa toda la pantalla.
MODO DE VISUALIZACIÓN
El televisor tiene píxeles (puntos) que siempre permanecen oscuros o iluminados.
Veo “ruido” o electricidad estática en la pantalla.
Cuando cambio la fuente de entrada, el volumen también cambia.
VOL
k
/
l
Cuando cambio la fuente de entrada, el tamaño de la imagen de visualización también
cambia.

ES
32
Precauciones relacionadas con el uso en entornos con altas y bajas temperaturas
SI TIENE MÁS PREGUNTAS, PÓNGASE EN CONTACTO CON NUESTRO SERVICIO DE
ATENCIÓN AL CLIENTE PARA OBTENER AYUDA.
Apéndice
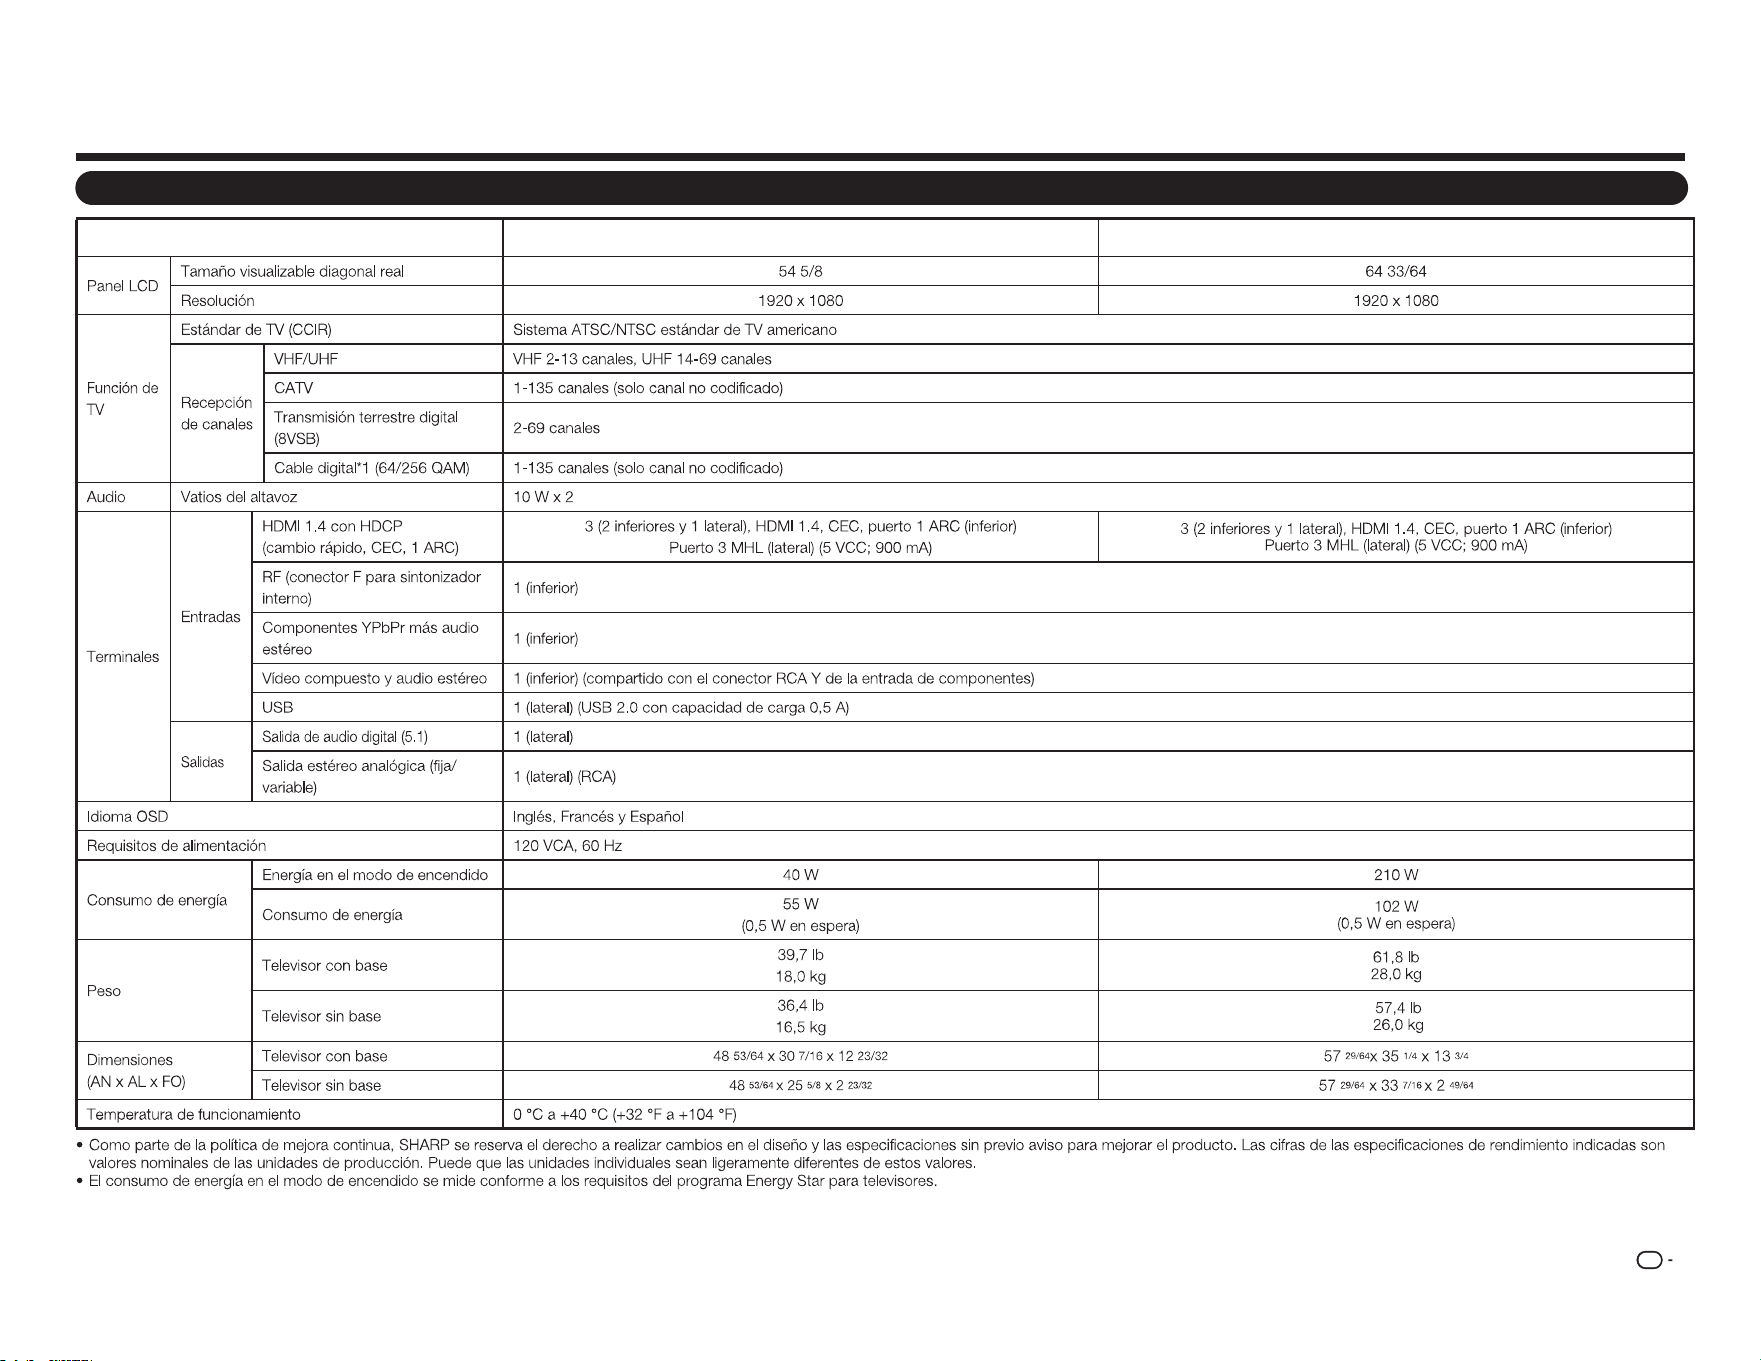
TV
Elemento
Modelo: LC-55LE643U
Modelo: LC-65LE643U
ES
33
Especificaciones
ES
34
Los productos que han obtenido la homologación ENERGY STAR
®
están diseñados para proteger el medio
ambiente a través de una eciencia energética superior.
Fabricado con licencia de Dolby Laboratories. Dolby y el símbolo de la doble D son marcas comerciales de
Dolby Laboratories.
Los términos HDMI, HDMI High-Denition Multimedia Interface y el logotipo de HDMI son marcas comerciales
o marcas registradas de HDMI Licensing, LLC en Estados Unidos y otros países.
MHL, el logotipo de MHL y Mobile High-Denition Link son marcas comerciales o marcas registradas de
MHL LLC en Estados Unidos y otros países.
MHL
TM
Marcas comerciales
Información para el usuario sobre ENERGY STAR®
●ParaobtenermásinformaciónacercadelprogramaENERGYSTAR,puedeconsultarelsitioWeb
energystar.gov.
●SidejaelmododomésticoENERGYSTARohabilitafuncionesopcionales,elconsumodeenergía
aumentará.
●EsteproductoutilizaelprogramaENERGYSTARcuandoseselecciona"Casa"para"Fácil
configuración".Alestablecer"Fácilconfiguración"en"Cas a",eltelevisorlograráunestadode
ahorrodeenergíaparausodoméstico.
LosproductosquehanobtenidolahomologaciónENERGYSTAR®están
diseñadosparaprotegerelmedioambienteatravésdeunaeficiencia
energéticasuperior.
Llamar al servicio técnico
FR
1
INFORMATIONS IMPORTANTES
INFORMATION :
Cet é quipement a é té testé et dé claré conforme aux limites pour appareils numé riques de classe B,
selon la section 15 des rè glements de la FCC. Ces limites sont conçues pour fournir une protection
raisonnable contre les interfé rences nuisibles dans une installation ré sidentielle. Cet é quipement
produit, utilise et peut é mettre de l'é nergie radio é lectrique et, s'il n'est pas installé et utilisé
conformé ment aux instructions, peut causer des interfé rences nuisibles aux communications radio.
Cependant, il n'existe aucune garantie que des interfé rences ne se produiront pas dans une installation
particuliè re. Si cet é quipement provoque des interfé rences nuisibles à la ré ception radio ou té lé vision,
ce qui peut ê tre dé terminé en mettant l'é quipement hors tension puis sous tension, l'utilisateur est
encouragé à essayer de corriger les interfé rences par une ou plusieurs des mesures suivantes :
—
Ré orienter ou dé placer l'antenne de ré ception.
—
Augmenter la distance entre l'é quipement et le ré cepteur.
—
Connecter l'é quipement à une prise d'un circuit é lectrique diffé rent de celui sur lequel le ré cepteur est
branché .
—
Consulter le revendeur ou un technicien radio / TV expé rimenté pour obtenir de l'aide.
Déclaration de conformité FCC
Cet appareil est conforme à la partie 15 de la ré glementation FCC. Son fonctionnement est soumis aux
deux conditions suivantes :
(1) Cet appareil ne doit pas causer d'interfé rences nuisibles, et (2) cet appareil doit accepter toute
interfé rence reçue, y compris les interfé rences qui peuvent provoquer un fonctionnement indé sirable.
Radio sans l
Pour les produits disponibles sur le marché amé ricain / canadien, seul les canaux 1-11 peuvent ê tre
exploité s. Le choix d'autres canaux n'est pas possible. Cet appareil va ê tre exploité dans la gamme de
fré quences 5,15-5,25GHz, il est limité à un environnement inté rieur uniquement.
Important :
Tout changement ou modification non expressé ment approuvé par la partie responsable
de la conformité peut annuler l'autorité de l'utilisateur à utiliser l'é quipement.
Déclaration d'exposition aux rayonnements de la FCC :
Cet é quipement est conforme aux
limites d'exposition aux rayonnements de la FCC dé finies pour un environnement non contrô lé . Cet
é quipement doit ê tre installé et utilisé à une distance minimum de 20cm entre l'é lé ment é metteur et
votre corps.
Déclaration d' Industrie Canada
Cet appareil numé rique de classe B est conforme à la norme CAN ICES-003(B)/NMB-3(B)
Radio sans l
Pour les produits disponibles sur le marché amé ricain / canadien, seul les canaux 1-11 peuvent ê tre
exploité s. Le choix d'autres canaux n'est pas possible.
L'appareil peut interrompre automatiquement la transmission en cas d'absence d'informations à
transmettre, ou de dé faillance opé rationnelle.
A noter que ceci n'est pas destiné à interdire la transmission de commandes ou d'informations de
signalisation ou de l'utilisation de codes ré pé titifs lorsque ceci est requis par la technologie.
Important :
Tout changement ou modification non expressé ment approuvé par la partie responsable
de la conformité peut annuler l'autorité de l'utilisateur à utiliser l'é quipement.
Déclaration d'exposition aux rayonnements IC :
Cet appareil est conforme à la ré glementation IC
RSS-210, le fonctionnement est soumis aux deux conditions suivantes :
(1) Cet appareil ne doit pas causer d'interfé rences nuisibles, et (2) cet appareil doit accepter les
interfé rences reçues, y compris les interfé rences qui peuvent provoquer un fonctionnement indé sirable.
"Note à l'installateur du systè me de câ blodistribution : Ce rappel est destiné à attirer l'attention de
l'installateur du systè me de câ blodistribution sur l'article 820 du Code national de l'é lectricité qui
fournit des consignes pour un raccordement correct à la terre et, en particulier, spé cifie que la terre du
câ ble doit ê tre relié e au systè me de mise à la terre du bâ timent, aussi prè s du point d'entré e du câ ble
que possible."
Ce produit ré pond aux critè res ENERGY STAR quand "Accueil Mode" est sé lectionné dans "Easy
Setup".
Le fait de ré gler "Easy Setup" sur "Accueil Mode" permet au té lé viseur d'atteindre un é tat d'é conomie
d'é nergie pour un usage domestique.
IMPORTANT :
Pour aider à rapporter les cas de perte ou de vol, veuillez
enregistrer les numé ros de modè le et de sé rie du té lé viseur
dans l'espace pré vu.
Les numé ros sont situé s sur le cô té arriè re gauche du
té lé viseur.
ATTENTION : POUR RÉ DUIRE LE RISQUE DE CHOC É LECTRIQUE, NE
PAS RETIRER LE CAPOT (NI LE DOS).
AUCUNE PIÈ CE RÉ PARABLE PAR L'UTILISATEUR À L'INTÉ RIEUR.
CONFIER TOUTE RÉ PARATION À UN PERSONNEL QUALIFIÉ .
L'é clair avec le symbole de tê te
flé ché e, dans un triangle é quilaté ral,
est destiné à alerter l'utilisateur
de la pré sence d'une "tension
dangereuse" non isolé e dans
l'enceinte de l'appareil, qui peut
ê tre d'une amplitude suffisante
pour constituer un risque de choc
é lectrique pour les personnes.
Le point d'exclamation dans
un triangle est destiné à avertir
l'utilisateur de la pré sence
d'instructions importantes
relatives au fonctionnement et à
l'entretien (la ré paration) dans la
documentation accompagnant le
produit.
RISQUE DE CHOC
É LECTRIQUE
NE PAS OUVRIR
ATTENTION
No. modèle :
N° série
:
ATTENTION :
POUR É VITER TOUTE É LECTROCUTION, INSÉ REZ LA FICHE DE TERRE DANS SA
PRISE, INSÉ RER COMPLÈ TEMENT.
AVERTISSEMENT :
Le rè glement FCC pré cise que toute modification non autorisé e de cet é quipement
non expressé ment approuvé e par le fabricant peut annuler le droit de l'utilisateur
à utiliser cet é quipement.
ATTENTION :
Ce produit satisfait la ré glementation de la FCC lorsque des câ bles et des connecteurs
blindé s sont utilisé s pour connecter l'appareil à un autre é quipement. Pour é viter les
interfé rences é lectromagné tiques avec des appareils é lectriques tels que les ré cepteurs
de radio et de té lé vision, utilisez des câ bles et des connecteurs blindé s pour les
branchements.
DÉCLARATION DE CONFORMITÉ :
TÉ LÉ VISEUR À CRISTAUX LIQUIDES SHARP, MODÈ LE LC-55LE643U / LC-65LE643U
Cet appareil est conforme à la partie 15 de la ré glementation FCC. Son fonctionnement est soumis aux
deux conditions suivantes :
(1) Cet appareil ne doit pas causer d'interfé rences nuisibles, et (2) cet appareil doit accepter toute
interfé rence reçue, y compris les interfé rences qui peuvent provoquer un fonctionnement indé sirable.
PARTIE RESPONSABLE :
SHARP ELECTRONICS CORPORATION
Sharp Plaza, Mahwah, New Jersey 07495-1163
TÉ L : 1-800-BE-SHARP
Pour les clients professionnels : URL http://www.sharpusa.com
FRANÇAIS

FR
2
Merci pour votre achat du téléviseur à cristaux liquides Sharp. Pour assurer la sécurité et de
nombreuses années de fonctionnement sans problème de votre produit, veuillez lire attentivement
les consignes de sécurité importantes avant d'utiliser ce produit.
CONSIGNES IMPORTANTES DE SÉCURITÉ
CHER CLIENT SHARP CONSIGNES IMPORTANTES DE SÉCURITÉ
L'é lectricité est utilisé e pour ré aliser de nombreuses fonctions utiles, mais elle peut aussi causer des
blessures et des dommages maté riels en cas de mauvaise manipulation. Ce produit a é té conçu et
fabriqué avec la sé curité comme plus priorité la plus é levé e. Cependant, une utilisation incorrecte
peut provoquer un choc é lectrique et / ou un incendie. Pour é viter tout danger potentiel, veuillez
respecter les consignes suivantes lors de l'installation, de l'utilisation et du nettoyage du produit.
Pour assurer votre sé curité et prolonger la duré e de vie de votre té lé viseur à cristaux liquides,
veuillez lire attentivement les pré cautions suivantes avant d'utiliser le produit.
Lisez ces instructions.
Conservez ces instructions.
Respectez tous les avertissements.
Suivez toutes les instructions.
Ne pas utiliser l'appareil à proximité d'eau.
Nettoyer avec un chiffon sec.
Ne pas bloquer les ouvertures de ventilation. Installer conformé ment aux instructions du fabricant.
Ne pas installer prè s de sources de chaleur telles que des radiateurs, convecteurs, poê les ou
autres appareils (incluant les amplificateurs) qui produisent de la chaleur.
Ne pas contourner le dispositif de sé curité de la fiche polarisé e ou de la fiche avec mise à la
terre. Une fiche polarisé e possè de deux lames dont une plus large que l'autre. Une fiche de terre
comporte deux lames et une troisiè me broche de mise à la terre. La lame large ou la troisiè me
broche sont là pour votre sé curité . Si la fiche fournie ne rentre pas dans votre prise, consulter un
é lectricien pour faire remplacer la prise obsolè te.
Proté ger le cordon d'alimentation pour qu'il ne soit ni pié tiné ni pincé , en particulier au niveau
des fiches, des prises de courant et du point de sortie de l'appareil.
N'utiliser que des fixations / accessoires spé cifié s par le fabricant.
N'utiliser qu'avec le chariot, socle, tré pied, support ou table spé cifié par le fabricant, ou
vendu avec l'appareil. Lorsque vous utilisez un chariot, soyez prudent lorsque vous
dé placez l'ensemble chariot / appareil pour é viter des blessures lié es au renversement.
Dé brancher cet appareil pendant les orages ou lorsqu'il n'est pas utilisé pendant de
longues pé riodes de temps.
Confier toute ré paration à un personnel qualifié . Une ré paration est né cessaire lorsque l'appareil
a é té endommagé de quelque façon que ce soit, par exemple si le cordon d'alimentation ou la
fiche est endommagé , si du liquide a é té renversé ou si des objets sont tombé s dans l'appareil,
si l'appareil a é té exposé à la pluie ou à l'humidité , s'il ne fonctionne pas normalement, ou s'il est
tombé .
Informations supplémentaires de sécurité
Sources d'alimentation - Ce produit ne doit ê tre utilisé qu'avec le type de source d'alimentation
indiqué sur l'é tiquette. Si vous n'ê tes pas certain du type de source d'alimentation de votre
domicile, consultez votre revendeur ou la compagnie d'é lectricité locale. Pour les produits
destiné s à fonctionner sur batterie ou sur d'autres sources, reportez-vous aux instructions
d'utilisation.
Surcharge - Ne pas surcharger les prises secteur, les rallonges ni les multiprises car cela peut
entraîner un risque d'incendie ou de choc é lectrique.
Ingestion d'objets ou de liquides - Ne jamais enfoncer d'objets d'aucune sorte dans ce produit à
travers les ouvertures car ils pourraient toucher des points de tension dangereuse ou provoquer
des courts-circuits qui pourraient entraîner un incendie ou un choc é lectrique. Ne jamais
renverser de liquide d'aucune sorte sur le produit.
Dommages né cessitant une ré paration - Dé brancher ce produit de la prise secteur et confier la
ré paration à du personnel qualifié dans les situations suivantes :
Lorsque le cordon d'alimentation ou la fiche est endommagé ,
Si du liquide a é té renversé ou si des objets sont tombé s dans l'appareil,
Si le produit a é té exposé à la pluie ou à l'eau,
Si le produit ne fonctionne pas normalement en suivant les instructions de fonctionnement.
Ré gler seulement les contrô les qui sont couverts par les instructions de fonctionnement car un
mauvais ré glage des autres commandes peut entraîner des dommages et né cessite souvent
l'intervention d'un technicien qualifié pour remettre l'appareil en é tat de fonctionnement normal,
Si le produit est tombé ou est endommagé de quelque façon, et
Lorsque le produit pré sente une alté ration visible de ses performances - ce qui indique un
besoin de ré paration.
Piè ces de rechange - Lorsque des piè ces de rechange sont né cessaires, s'assurer que le
technicien a utilisé des piè ces de rechange spé cifié es par le fabricant ou ayant les mê mes
caracté ristiques que les piè ces d'origine. Les substitutions non autorisé es peuvent provoquer
un incendie, de choc é lectrique ou d'autres dangers.
Contrô le de sé curité - À la fin de tout entretien ou ré paration de cet appareil, demander au
technicien d'effectuer des vé rifications de sé curité pour s'assurer que le produit est en bon é tat
de fonctionnement.
Montage au mur ou au plafond - Pour monter l'appareil au mur ou au plafond, veillez à installer
le produit selon la mé thode recommandé e par le fabricant.
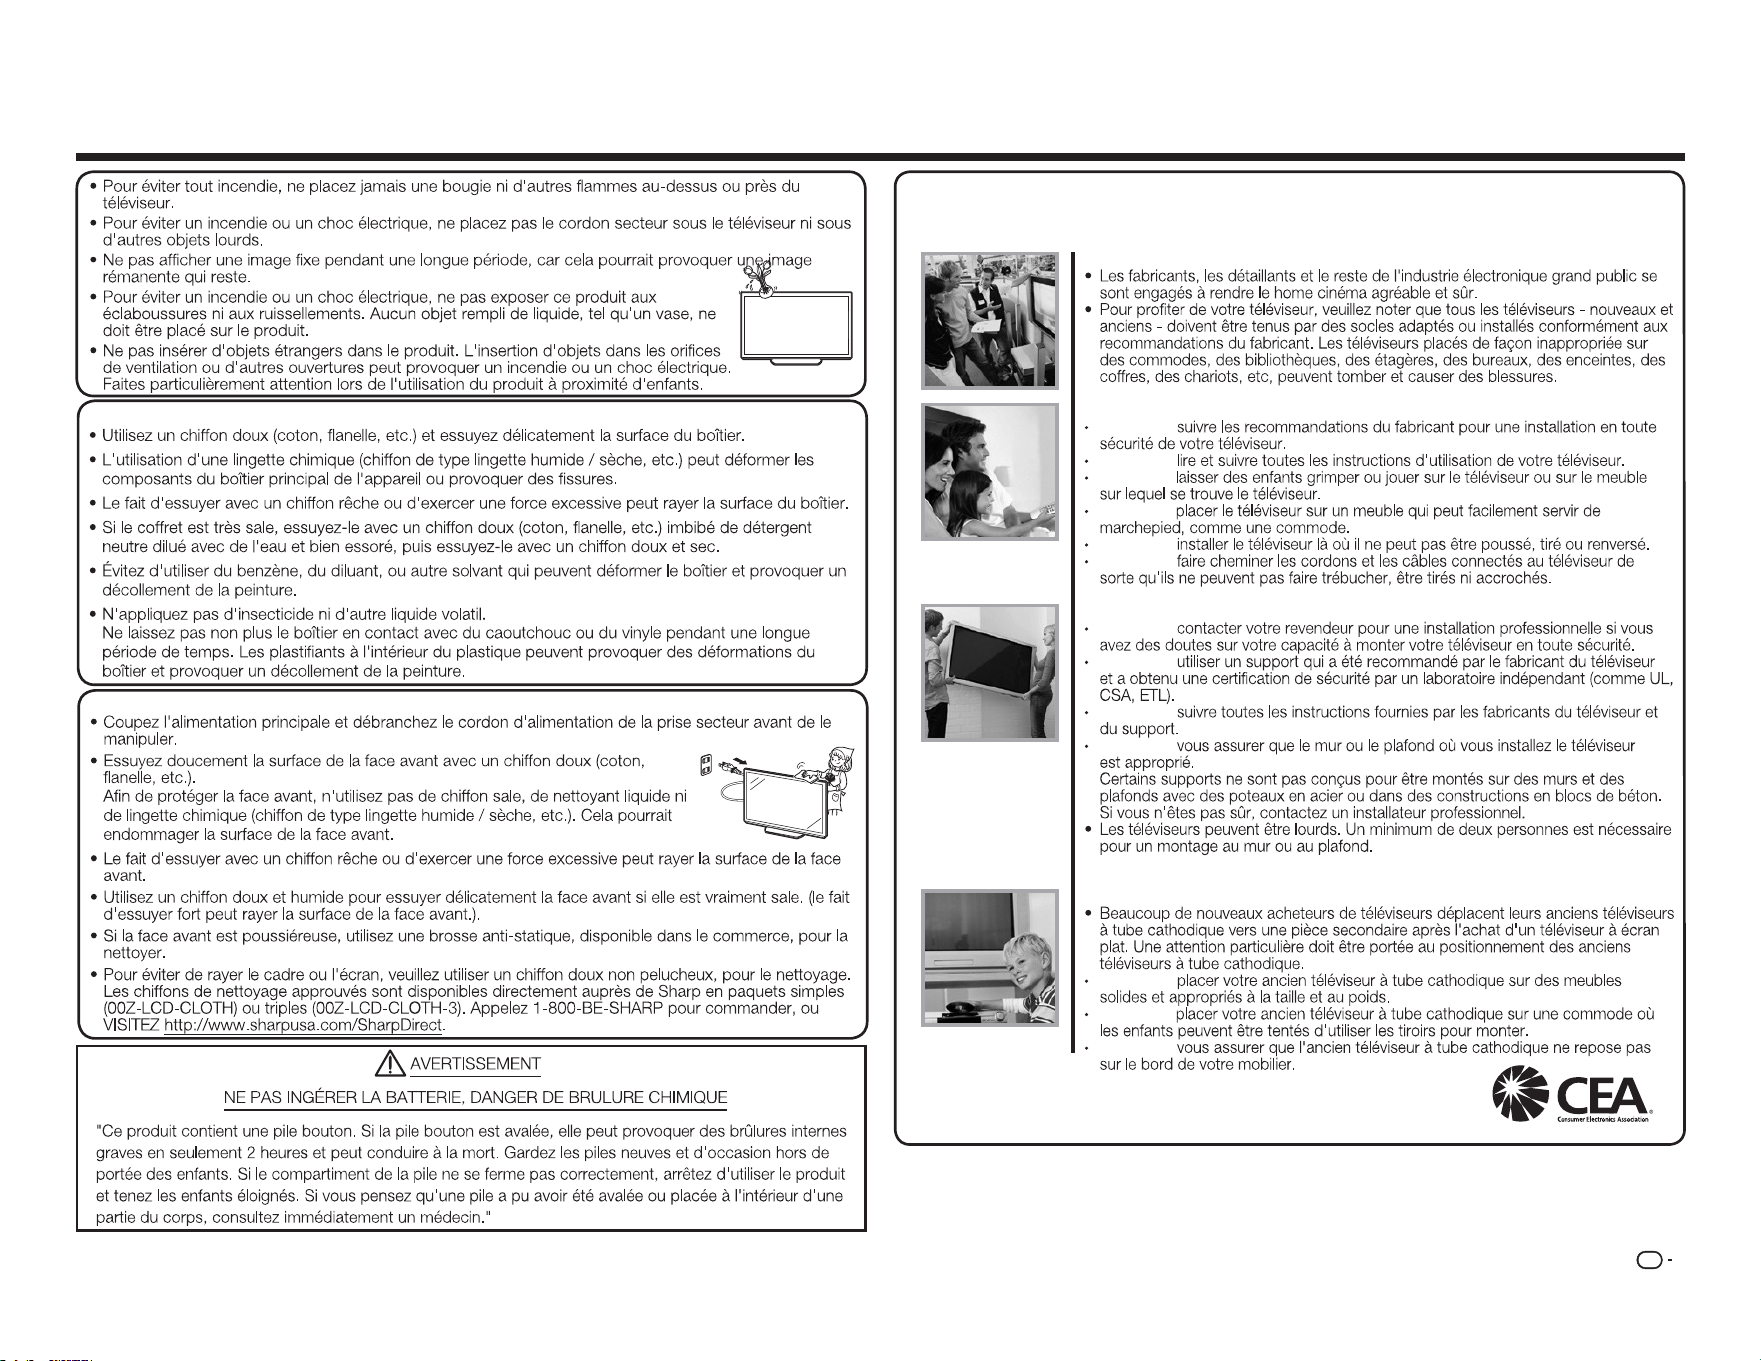
FR
3
CONSIGNES IMPORTANTES DE SÉCURITÉ
Entretien du boîtier
Entretien de la face avant
SÉCURITÉ DES ENFANTS :
QUESTIONS LIÉES AU BON POSITIONNEMENT DU TÉLÉVISEUR
L'INDUSTRIE DE L 'ELECTRONIQUE S'EN SOUCIE
LA VOIE DE LA SÉCURITÉ
TOUJOURS
TOUJOURS
NE JAMAIS
NE JAMAIS
TOUJOURS
TOUJOURS
MONTAGE AU MUR OU AU PLAFOND DE VOTRE TÉLÉVISEUR
TOUJOURS
TOUJOURS
TOUJOURS
TOUJOURS
DÉPLACER UN ANCIEN TÉLÉVISEUR VERS UN NOUVEL EMPLACEMENT
DANS VOTRE MAISON
TOUJOURS
NE JAMAIS
TOUJOURS
CE.org/safety

FR
4
Accessoires Table des matières
INFORMATIONS IMPORTANTES .......................1
CHER CLIENT SHARP ......................................... 2
CONSIGNES IMPORTANTES
DE SÉCURITÉ ................................................... 3
Accessoires.......................................................... 4
Accessoires fournis ........................................ 4
Table des matières .............................................. 4
RÉFÉRENCE RAPIDE .......................................... 5
Fixer le socle ..................................................5
CONSEILS D'INSTALLATION RAPIDE ........... 5
Installer les piles dans la télécommande .........6
Préparation .......................................................... 6
Utiliser la télécommande ................................ 6
Antennes ....................................................... 6
Nomenclature ...................................................... 7
Téléviseur (avant) ...........................................7
Téléviseur (Panneau de commande)............... 7
Téléviseur (arrière) .......................................... 7
Télécommande ..............................................8
Présentation des branchements ........................ 9
Profigter d'images en HD ............................... 9
Types de branchements ................................ 9
Afficher une image d'un équipement
externe .......................................................... 9
Connexion à des équipements externes ......... 10
Raccordement d'un lecteur de disques
Blu-ray / DVD ou d'un décodeur HD
câble / satellite ............................................ 10
Raccordement d'un magnétoscope,
d'une console de jeu, d'un caméscope
ou d'un décodeur HD câble / satellite ..........11
Raccordement d'un système
Surround / d'un système audio .................... 11
Raccordement d'un PC / Smartphone ......... 12
Connexion d'un ROKU Streaming Sticker ....12
Regarder la télévision ....................................... 13
Mise sous / hors tension ..............................13
Installation initiale .........................................13
Fonctionnement direct du bouton ...................15
Menu d'affichage à l'écran ...............................18
Menu d'affichage à l'écran (menu
principal) ...................................................... 18
Utilisation du menu d'affichage à l'écran ......18
Boutons d'utilisation du menu ......................19
Éléments du menu ....................................... 19
Menu Image ................................................. 20
Menu Audio ................................................. 22
Menu Configuration ..................................... 22
Menu Sous-titres ......................................... 24
Menu Channel ............................................. 24
Menu Minuteur de veille ............................... 25
Profiter des photos / de la musique /
des films ..........................................................26
Raccordement d'un périphérique
mémoire USB / d'un disque dur USB ..........26
Sélection des dossiers pour la lecture ..........26
Voir des photos ...........................................27
Lecture de musique ..................................... 28
Regarder des films ....................................... 28
Annexe ................................................................ 29
Dépannage .................................................. 30
Spécifications .................................................... 32
Téléviseur .................................................... 32
Marques commerciales .................................... 33
GARANTIE LIMITÉE ........................................... 33
Réclamer une réparation .................................. 33
Plans cotés
Accessoires fournis
C
on
ne
c
t
io
n
G
u
id
e
REMARQUE
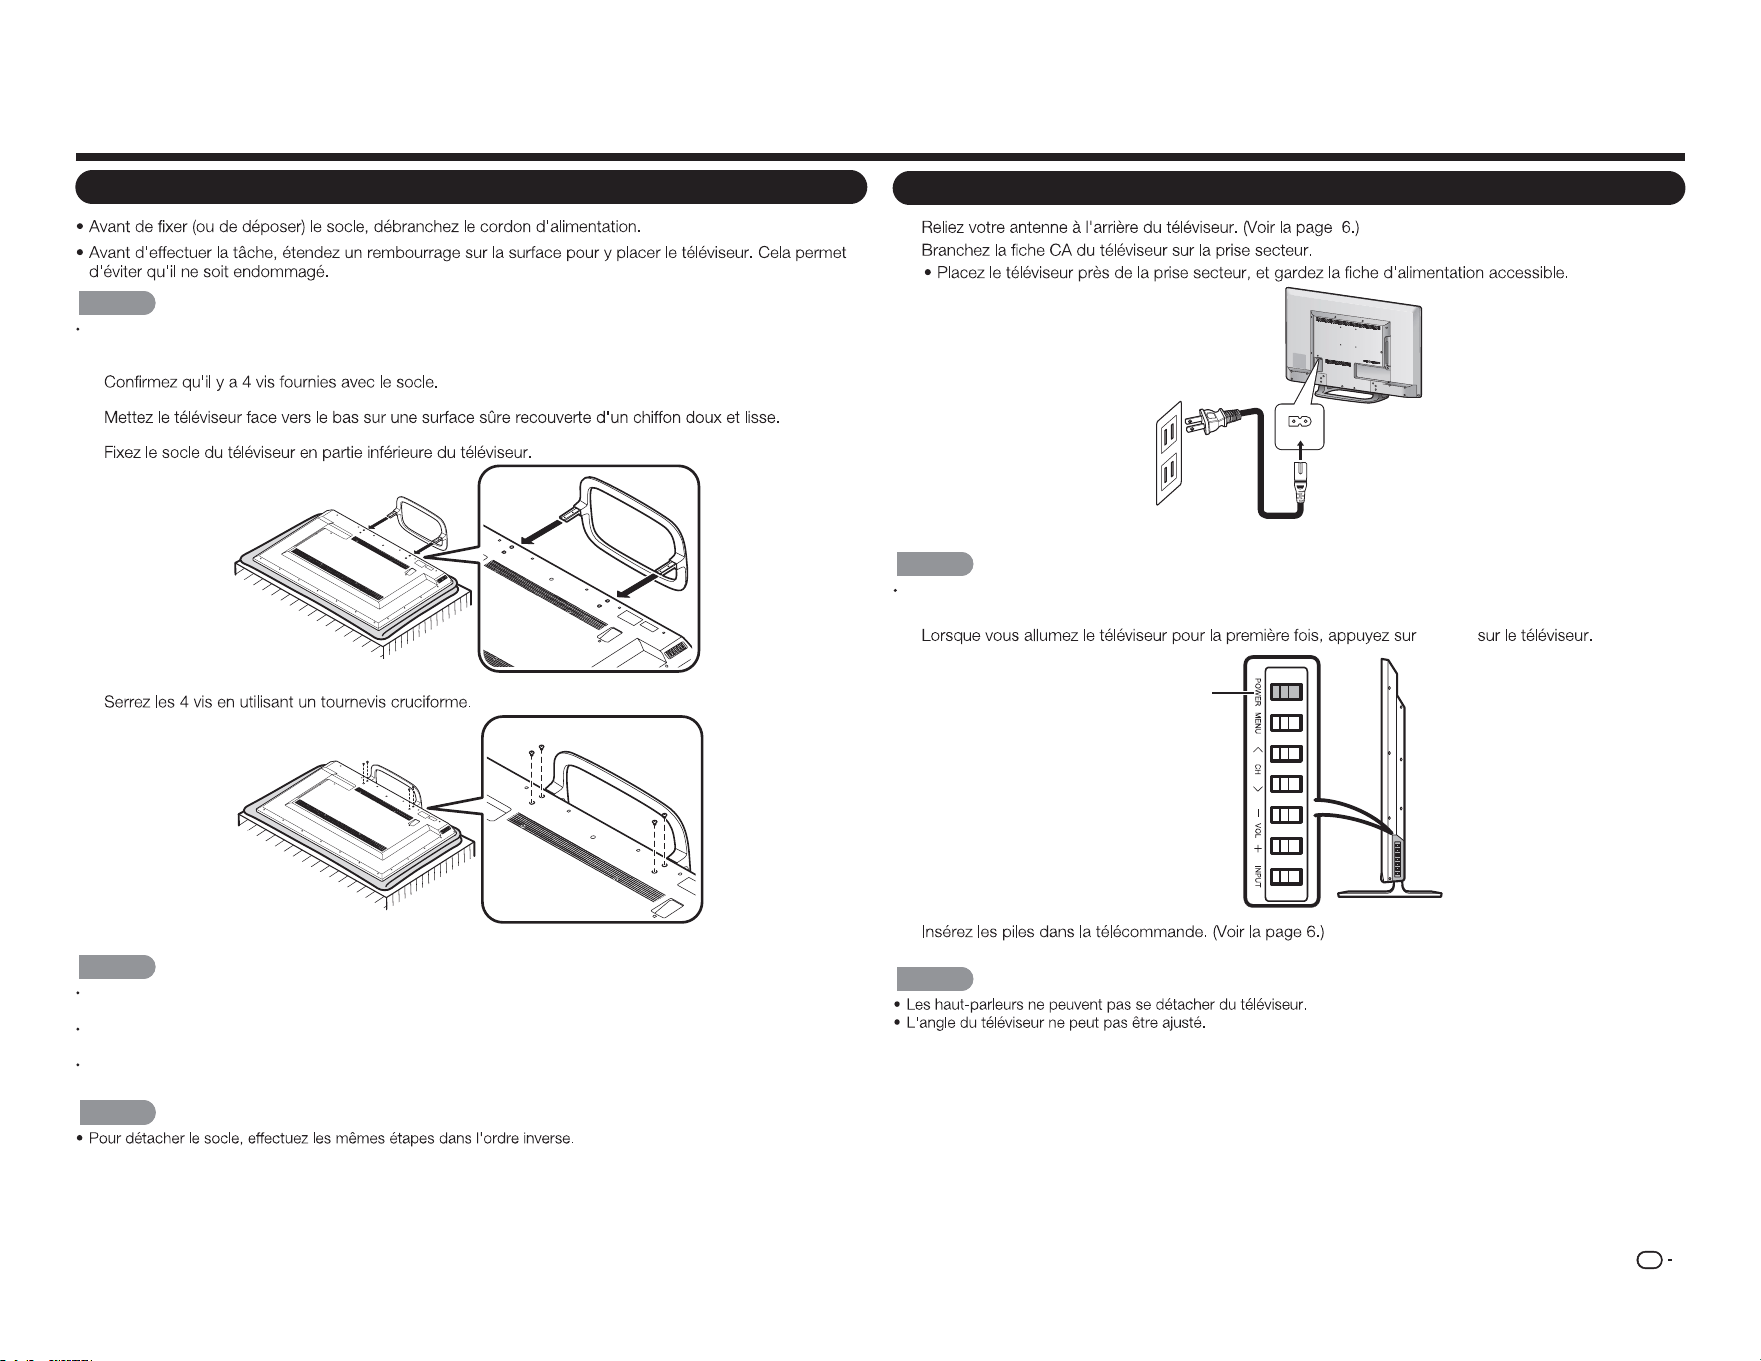
FR
5
RÉFÉRENCE RAPIDE
Fixer le socle
ATTENTION
Assurez-vous de suivre les instructions. Un montage incorrect du socle peut entraîner la chute du
téléviseur.
1
2
3
4
ATTENTION
Ne poussez pas trop fort et n'exercez pas une pression excessive sur le col du socle an d'éviter des
dommages au téléviseur.
Ne pas retirer le pied du téléviseur à moins d'utiliser un support de montage mural en option pour le
monter.
Après avoir xé le socle au téléviseur, ne tenez pas le socle lorsque vous mettez en place, installez,
déplacez ou xez le téléviseur.
REMARQUE
CONSEILS D'INSTALLATION RAPIDE
1
2
AC IN
REMARQUE
POUR ÉVITER TOUT RISQUE DE CHOC ÉLECTRIQUE, NE TOUCHEZ PAS LES PIÈCES NON-ISOLÉES
DES CÂBLES QUAND LE CORDON D'ALIMENTATION EST CONNECTÉ.
3
POWER
POWER
4
REMARQUE
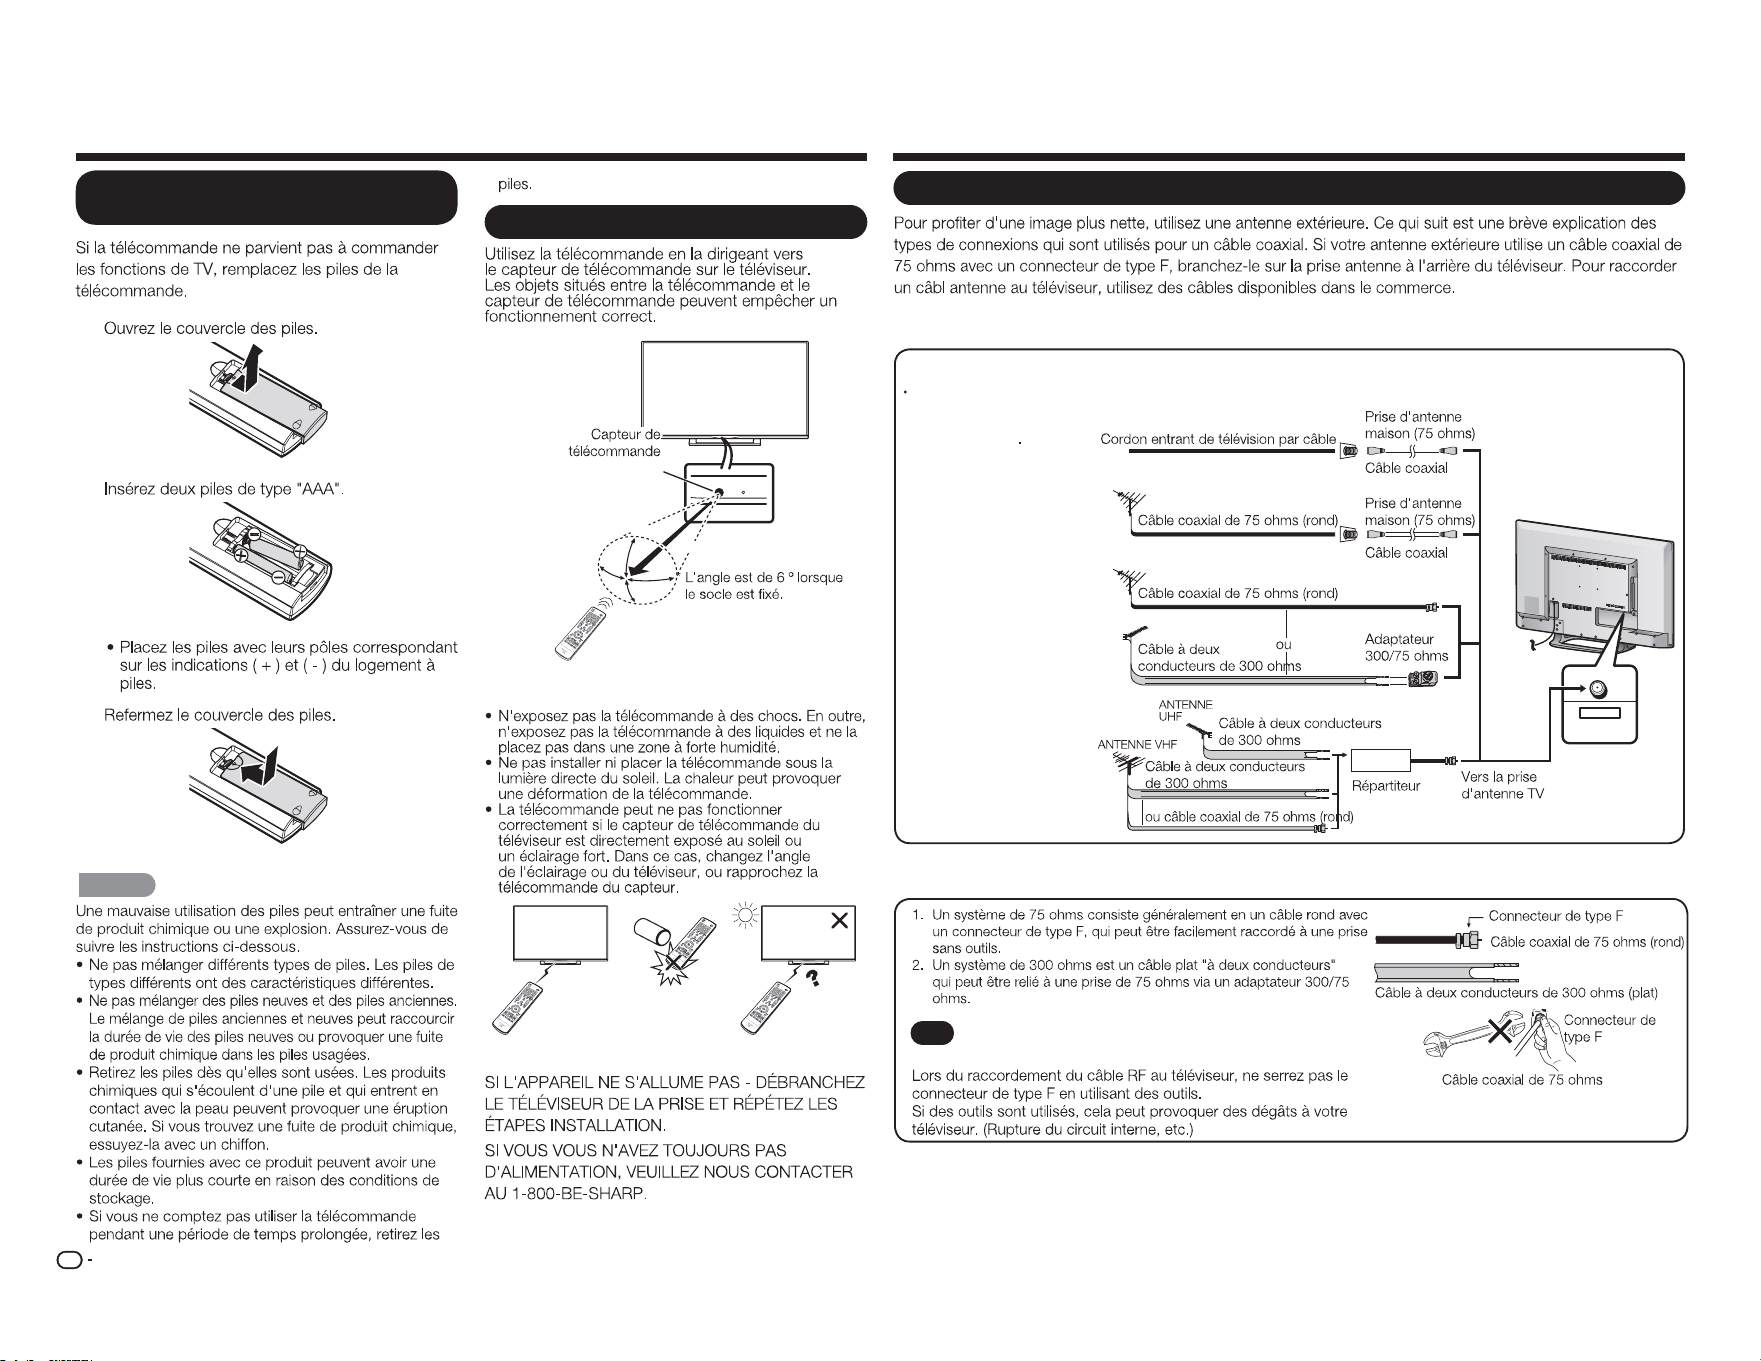
FR
6
Antennes
CABLE / ANTENNA
DTV / TV
IN OUT
Connecter le câble d'antenne
Branchez le câble d'antenne sur le téléviseur en utilisant l'une des méthodes de l'illustration indiquée(
1
,
2
,
3
ou
4
).
1
Câble sans
convertisseur CATV
3
Antenne combinée
VHF / UHF
4
Antenne séparée
VHF / UHF
2
Antenne VHF /
UHF
AVIS
Un connecteur de type F doit être serré manuellement
uniquement.
Préparation
Utiliser la télécommande
30°
30°
30°
*
30°
17´ (5 m)
Remote control sensor
■
Précautions concernant la télécommande
IMPORTANT :
RÉFÉRENCE RAPIDE
1
2
3
ATTENTION
Installer les piles dans la
télécommande
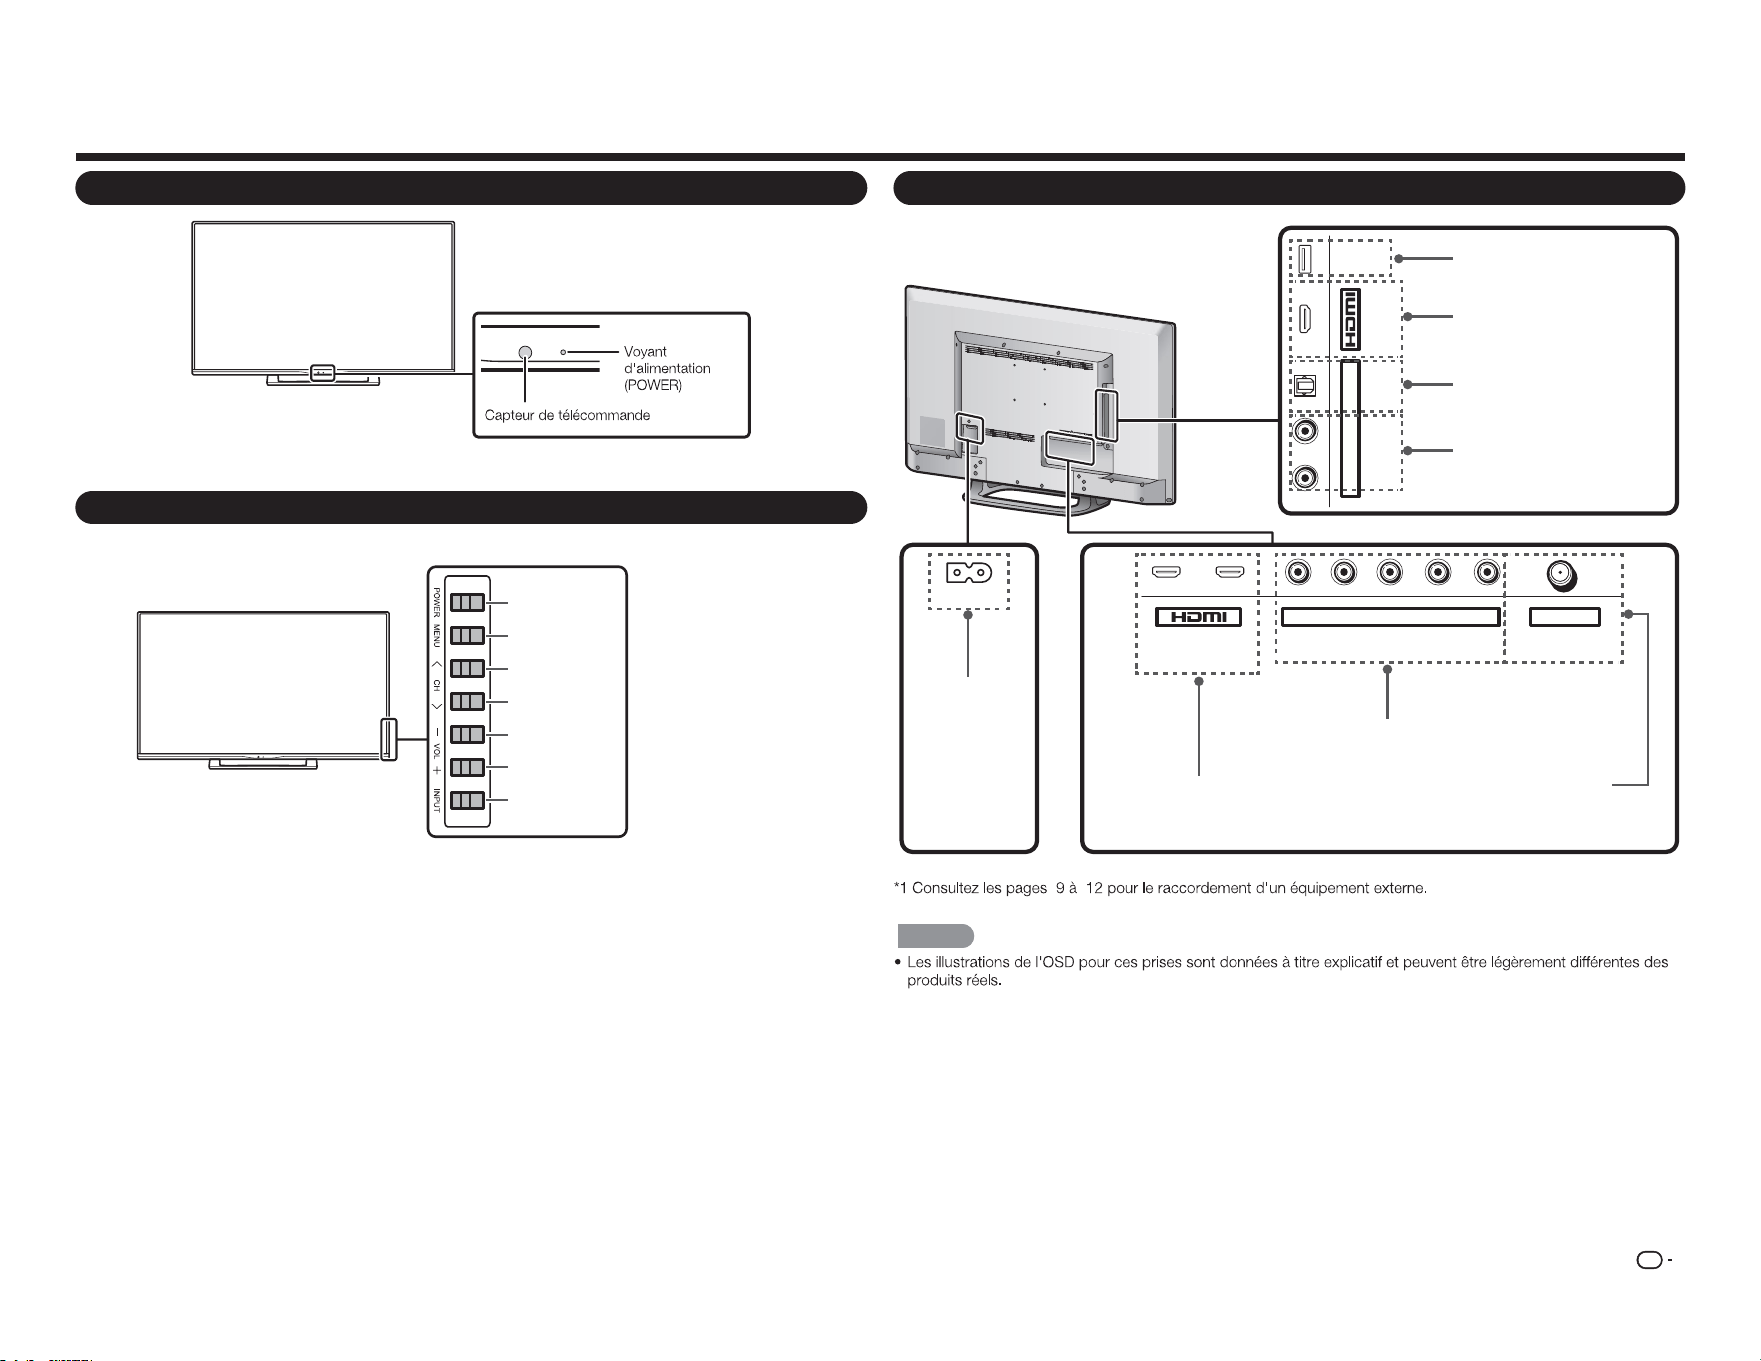
FR
7
Nomenclature
Téléviseur (avant)
Téléviseur (Panneau de commande)
Téléviseur (arrière)
1
ARC
2 Y/V Pb/Cb CABLE / ANTENNAPr/Cr
COMPONENT / VIDEO DTV / TV
AUDIO
L R
L R OPTICAL MHL
(DC 5V, 900mA)
USB
AUDIO OUT
AC IN
REMARQUE
Bouton
POWER
Bouton
MENU
Bouron
INPUT
(ENTRÉE)
boutons de
chaînes
(
CH
r
/
s
)
Boutons de
volume
(
VOL
k
/
l
)
Prise
USB
fiche
CA IN
Prise
HDMI 3
MHL : Mobile High-Definition Link
Prise
HDMI 1/2
ARC : Audio Return Channel
(Canal de retour audio)
Prise
COMPONENT / VIDEO IN
Prise
SORTIE SON NUM
CABLE / ANTENNE IN
(CC 5V, 500mA)
Prise
SORTIE SON ANAL.

FR
8
Nomenclature
Télécommande
INPUT
3
4
5 6
7
8 9
0
ENT
1
2
INFO FREEZ E
FLASHBACK
MUTE
TV US B MENUS U RROUN D
FAV O RITE CH
SLEE P CC VIEWMODEAV MODE
AUDIO
VOL CH
+
RETURNEXIT
LCDTV
GJ221-R
A B C D
ENTER
POWER
1
2
3
4
5
6
7
8
9
10
11
12
13
14
15
16
17
18
19
20
21
22
23
24
25
26
1 ENTRÉE :
2 0
–
9 :
3 ENT :
0
–
9
4 FLASHBACK :
5 AUDIO :
6 MUTE :
7 CH
r
/
s
:
8 MENU :
9 SURROUND :
10
a b c d
ENTER :
11 RETURN :
12 CH FAVORITES :
A B C
D
13 MODE AV :
14 MODE D'AFFICHAGE :
15 :
16 POWER :
17•(POINT):
18 DISPLAY (AFFICHAGE) :
19 FREEZE (GELER) :
20 VOL
k
/
l
:
21 HOME :
22 TV :
23 USB :
24 EXIT :
25 SLEEP :
26 CC :
REMARQUE
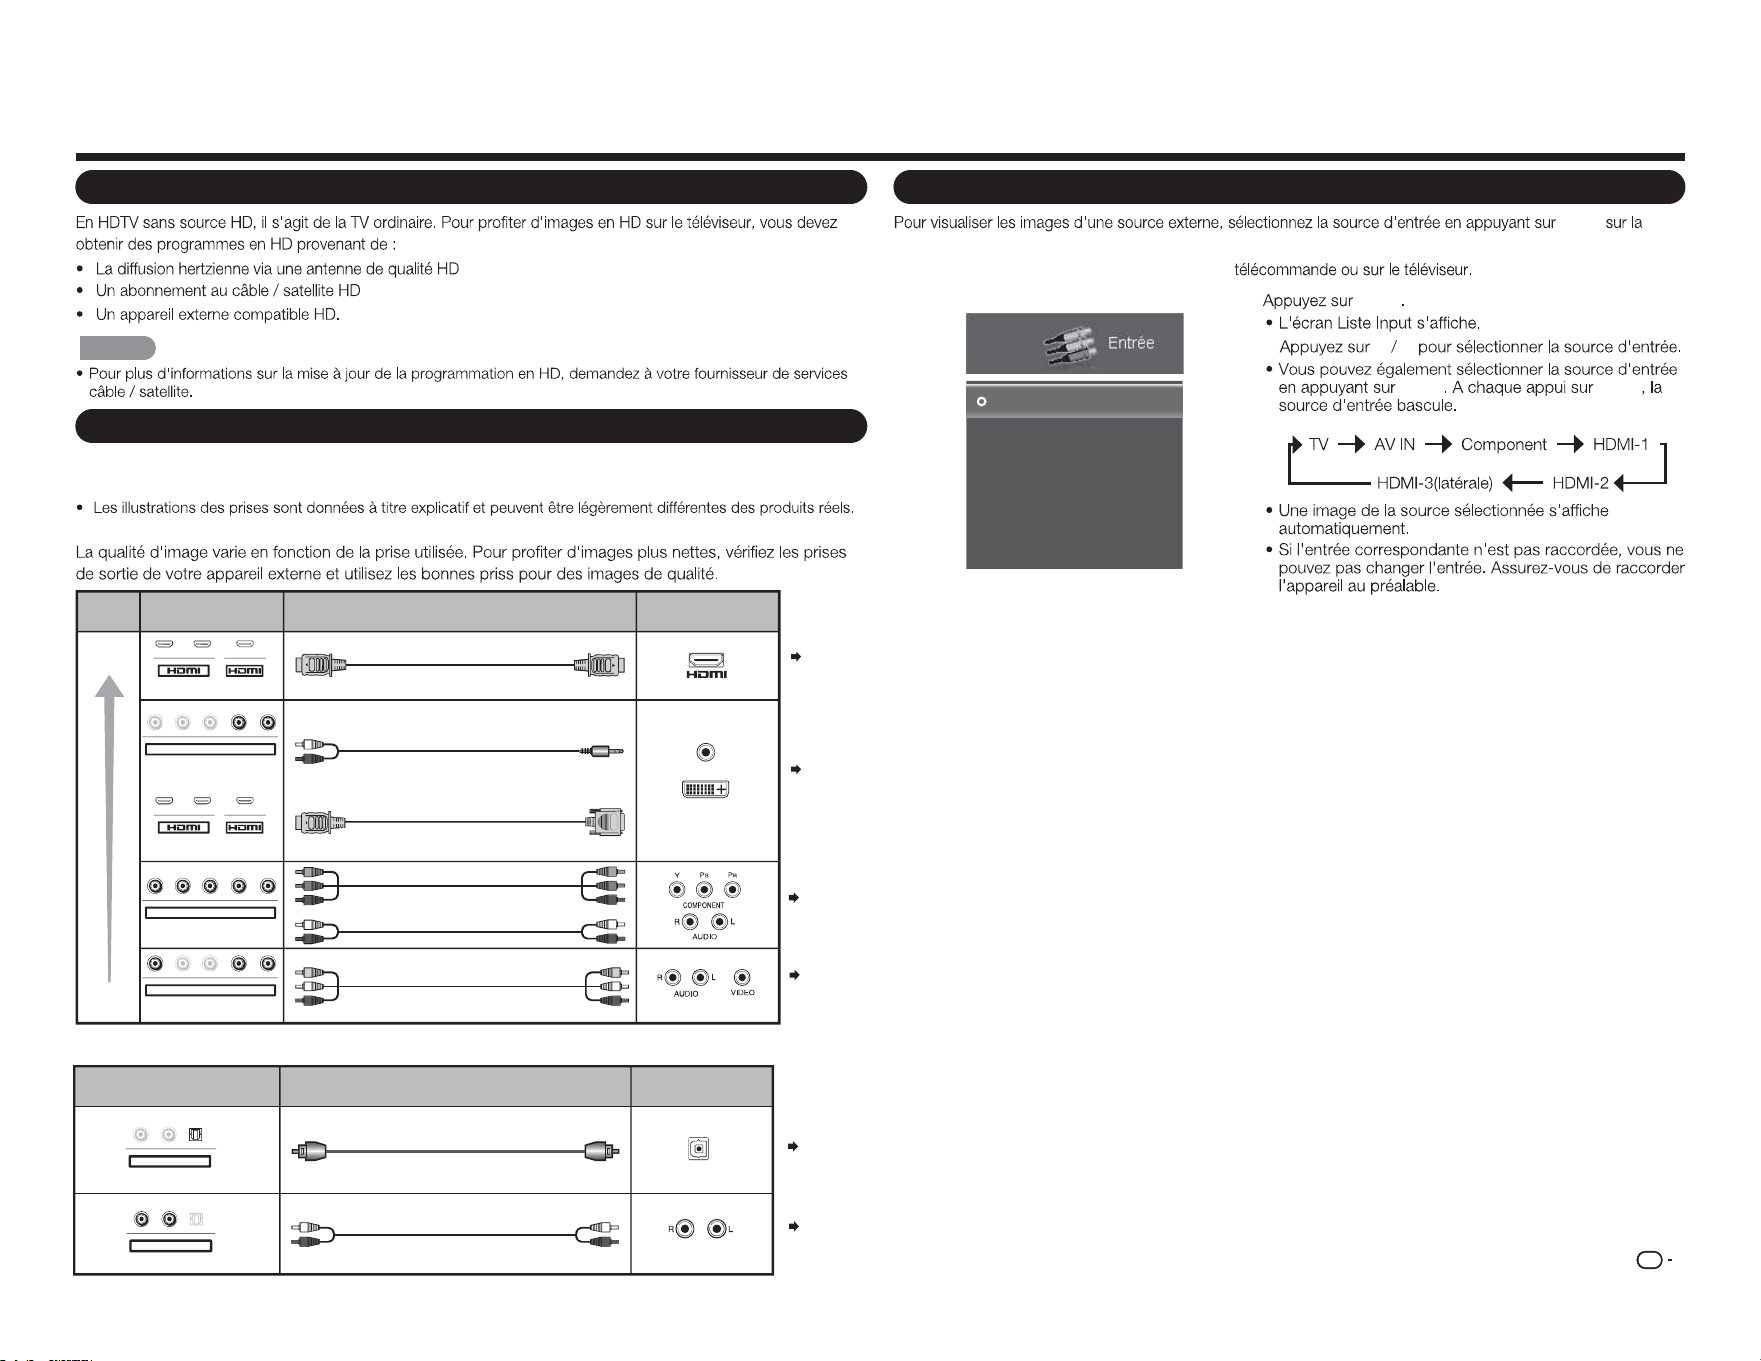
FR
9
Présentation des branchements
Progter d'images en HD
REMARQUE
Types de branchements
Pour raccorder le téléviseur à un équipement externe, utilisez des câbles disponibles dans le
commerce.
■ Raccordement à un équipement vidéo ou à un PC
Pages
10, 12
Câble
Câble AV
Câble component vidéo
Câble audio
Câble certié HDMI
Câble RCA audio vers minijack stéréo de Ø 3,5 mm
Câble de conversion DVI-HDMI
Qualité
d'image
Borne sur le
téléviseur
Qualité
HD
Qualité
standard
Borne sur l'équipement
externe
AUDIO
Sortie DVI OUT
1 2
Y/V Pb/Cb Pr/Cr
COMPONENT / VIDÉO
AUDIO
G D
Y/V
Pb
/C
b
P
r
/C
r
COMPONENT / VIDÉO
AUDIO
G D
Y
/
V
Pb
/C
b
P
r
/C
r
COMPONENT / VIDÉO
AUDIO
G D
MHL
1 2 MHL
Page 10
Page 10
Pages
10, 12
■ Connexion à un équipement audio
Câble
Câble à bre optique
Câble audio
Borne sur le téléviseur
Borne sur
l'équipement externe
ENTRÉE AUDIO NUMÉRIQUE
OPTIQUE
ENTRÉE AUDIO ANALOGIQUE
G
D
OPTIQUE
Sortie AUDIO OUT
G D OPTI
Q
U
E
Sortie AUDIO OUT
Page 11
Page 11
1
INPUT
2
a b
INPUT INPUT
Entrée
TV
AV IN
Component
HDMI-1
HDMI-2
HDMI-3(Side)
Exemple
Acher une image d'un équipement externe
INPUT
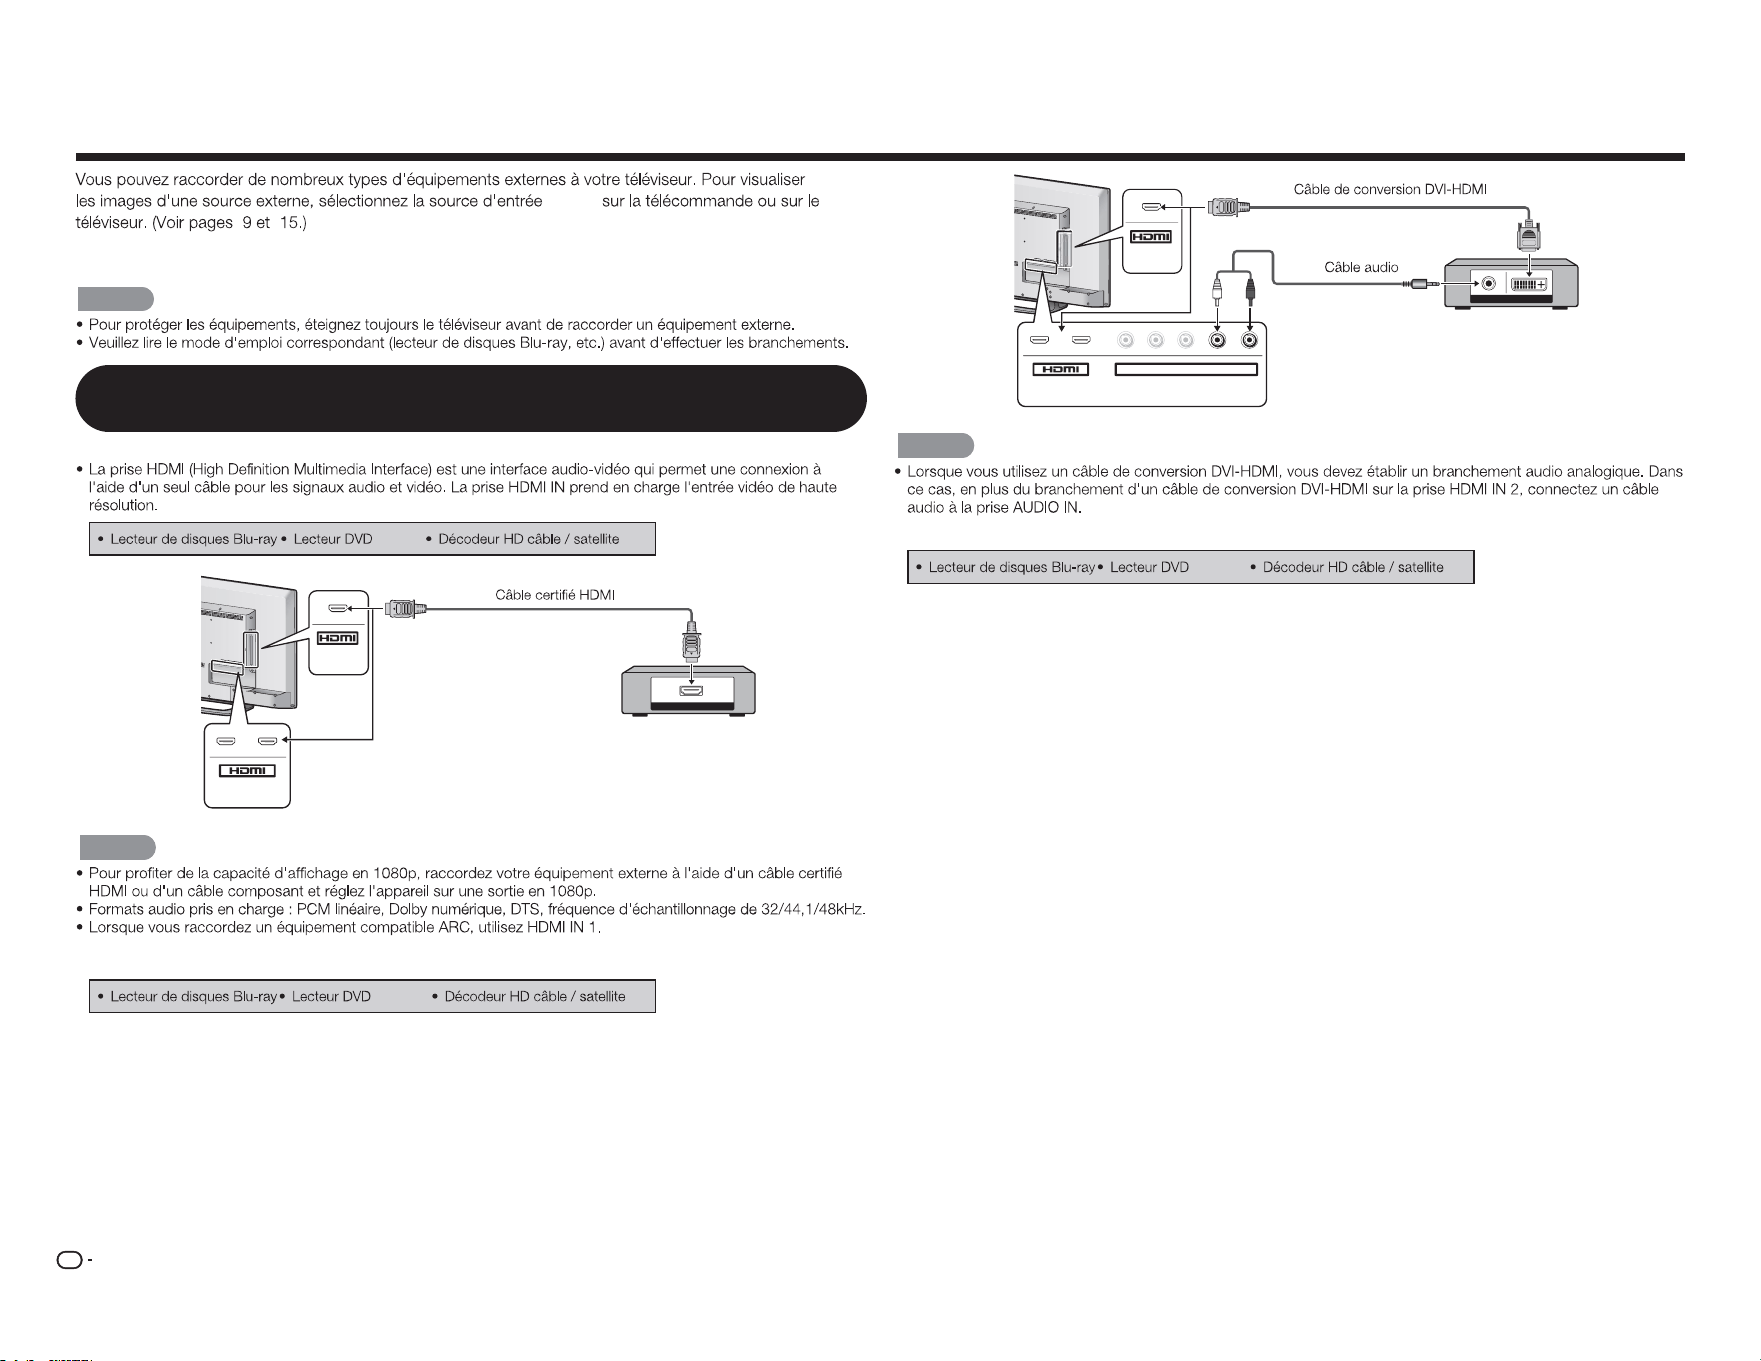
FR
10
Connexion à des équipements externes
INPUT
Pour raccorder le téléviseur à un équipement externe, utilisez des câbles disponibles dans le
commerce.
ATTENTION
Raccordement d'un lecteur de disques Blu-ray / DVD ou d'un décodeur
HD câble / satellite
■
En cas d'utilisation d'un câble HDMI (HDMI IN 1, 2, ou 3) :
HDMI OUT
MHL
(DC 5V, 900mA)
1
ARC
2
REMARQUE
■ En cas d'utilisation d'un câble de conversion DVI-HDMI (HDMI IN 1, 2, ou 3) :
AUDIO OUT
DVI OUT
MHL
(DC 5V, 900mA)
1
ARC
2
Y/V
Pb/Cb
C
Pr/Cr
COMPONENT / VIDEO
AUDIO
L R
REMARQUE
■
En cas d'utilisation d'un câble composant (COMPONENT IN) :
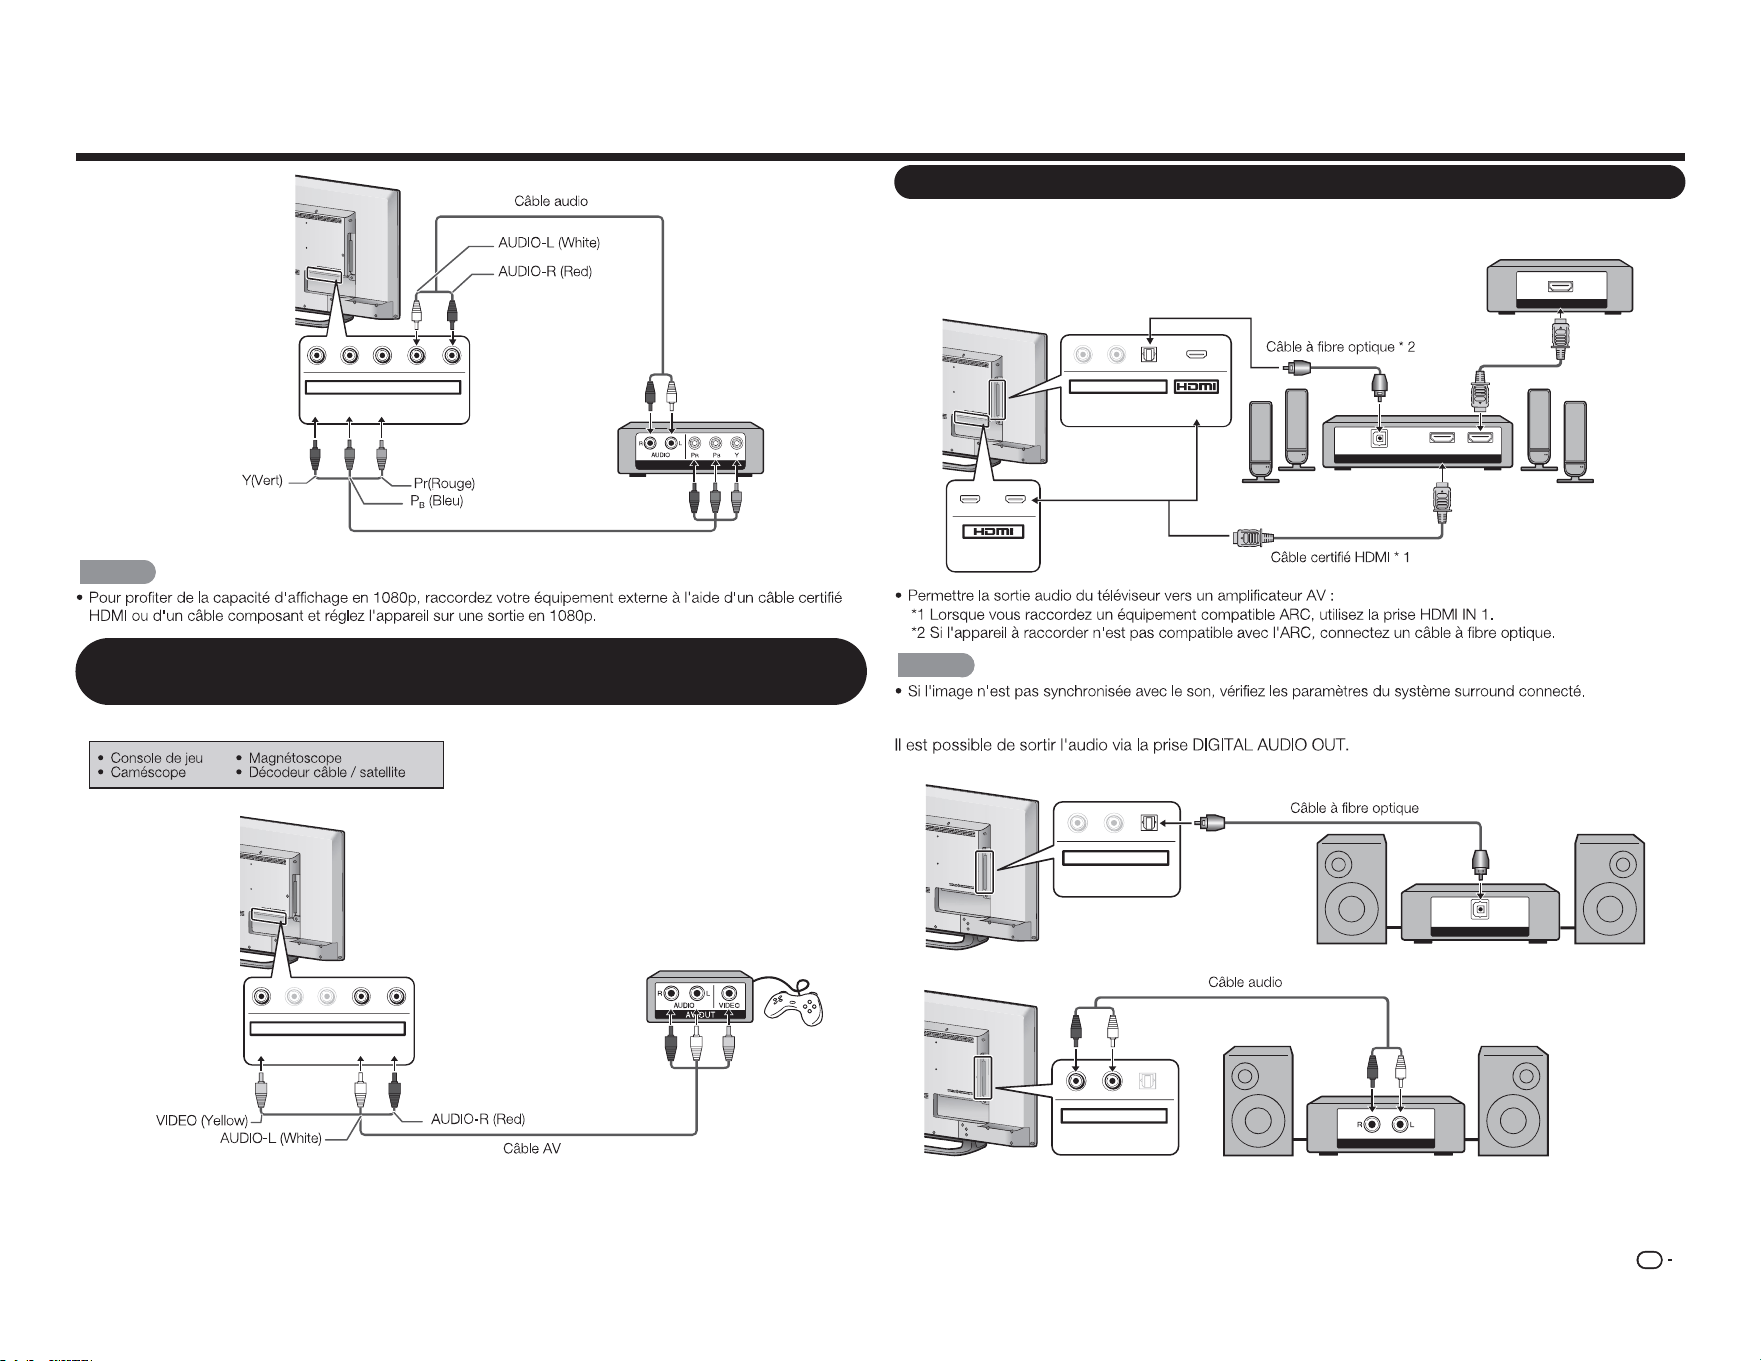
FR
11
COMPONENT OUT
Y/V Pb/Cb Pr/Cr
COMPONENT / VIDEO
AUDIO
L R
REMARQUE
Raccordement d'un magnétoscope, d'une console de jeu, d'un caméscope
ou d'un décodeur HD câble / satellite
■ En cas d'utilisation d'un câble composite (COMPONENT/VIDEO) :
Y/V
Pb/Cb
Pr/Cr
COMPONENT / VIDEO
AUDIO
L R
Raccordement d'un système Surround / d'un système audio
■
En cas de branchement d'un amplicateur AV pour un système surround
DIGITAL AUDIO INPUT
OPTICAL
HDMI INHDMI OUT
HDMI OUT
L
R
OPTICAL MHL
(DC 5V, 900mA)
AUDIO OUT
1
ARC
2
REMARQUE
■
Lors de la connexion à un amplicateur audio
DIGITAL AUDIO INPUT
OP TICAL
L
R
OPTICAL
AUDIO OUT
ANALOG AUDIO IN
L R
OPTICA
L
AUDIO OUT
Décodeur HD câble / satellite

FR
12
Connexion à des équipements externes
Raccordement d'un PC / Smartphone
■
En cas d'utilisation d'un câble HDMI (HDMI IN 1, 2, ou 3) :
MHL
(DC 5V, 900mA)
1
ARC
2
HDMI OUT
REMARQUE
■ En cas d'utilisation d'un câble de conversion DVI-HDMI (HDMI IN 1, 2, ou 3) :
DVI OUT
AUDIO
MHL
(DC 5V, 900mA)
1
ARC
2
Y/V
Pb/Cb
C
Pr/C
r
COMPONENT / VIDEO
AUDIO
L R
REMARQUE
■
En cas d'utilisation d'un câble MHL (HDMI IN 3) :
Smartphone
MHL
REMARQUE
Connexion d'un ROKU Streaming Sticker
■
Connectez le ROKU via MHL
ROKU Streaming
Sticker
MHL
REMARQUE
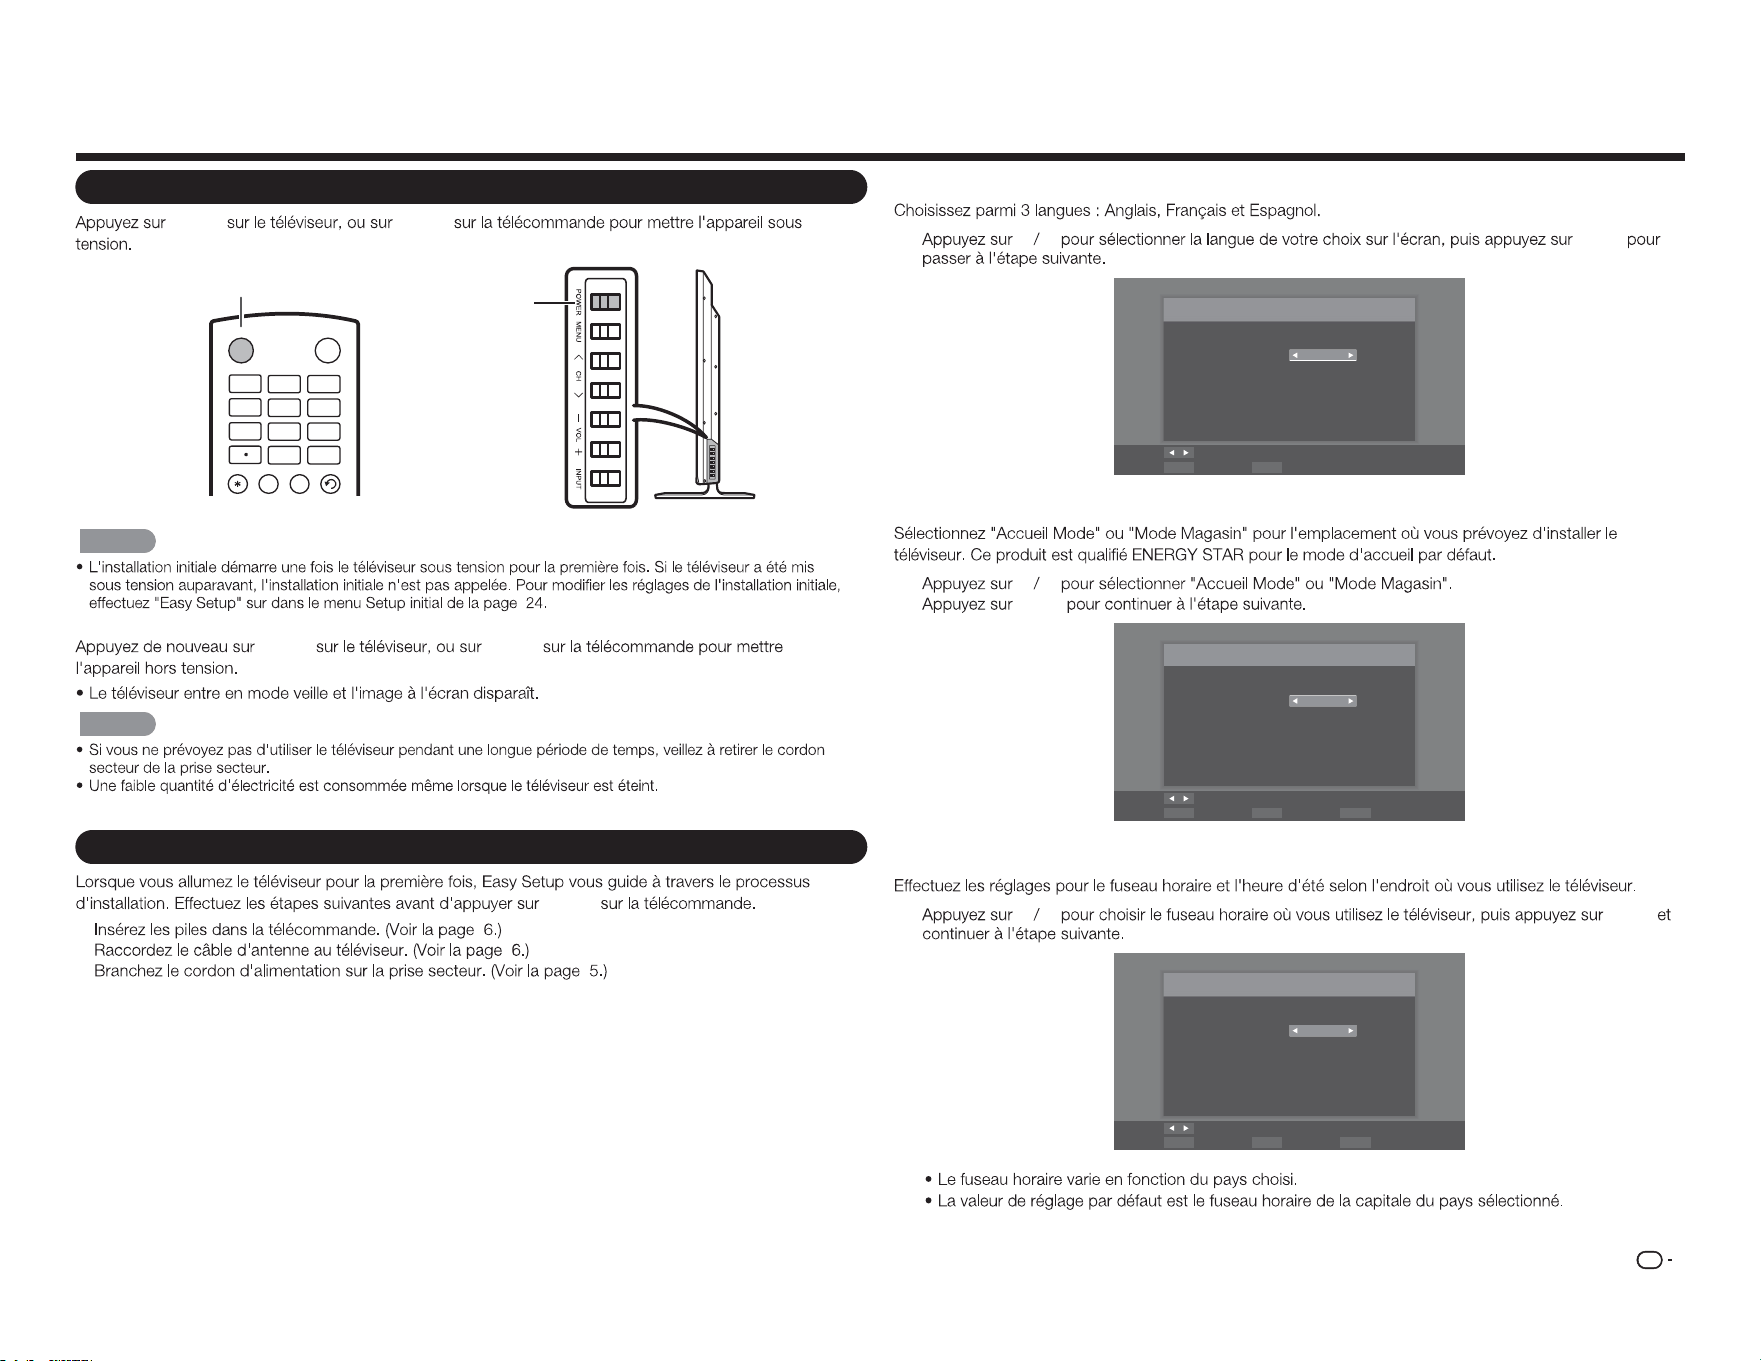
FR
13
Regarder la télévision
Mise sous / hors tension
POWER POWER
Bouton
POWER
Bouton
POWER
INPUT
3
4
5 6
7
8 9
0
ENT
1
2
INF O FR EE Z E
FLASHBACKAUDIO
POWER
REMARQUE
POWER POWER
REMARQUE
Installation initiale
POWER
1.
2.
3.
Réglage de la langue
1
c d
ENTER
Langue des menus
Choix de la langue
Langue: Français
Changement
SélectionnezENTER ExitEXIT
Réglage de l'emplacement du téléviseur
2
c d
ENTER
Mode TV
Mode selection
Mode: Accueil Mode
Changement
SélectionnezENTER Étape précédenteRETURN ExitEXIT
Réglage du fuseau horaire et de l'heure d'été
3
c d
ENTER
Fuseau Horaire
Sélectionner votre fuseau horaire
Fuseau hora.: Alaska
Changement
SélectionnezENTER Étape précédenteRETURN ExitEXIT
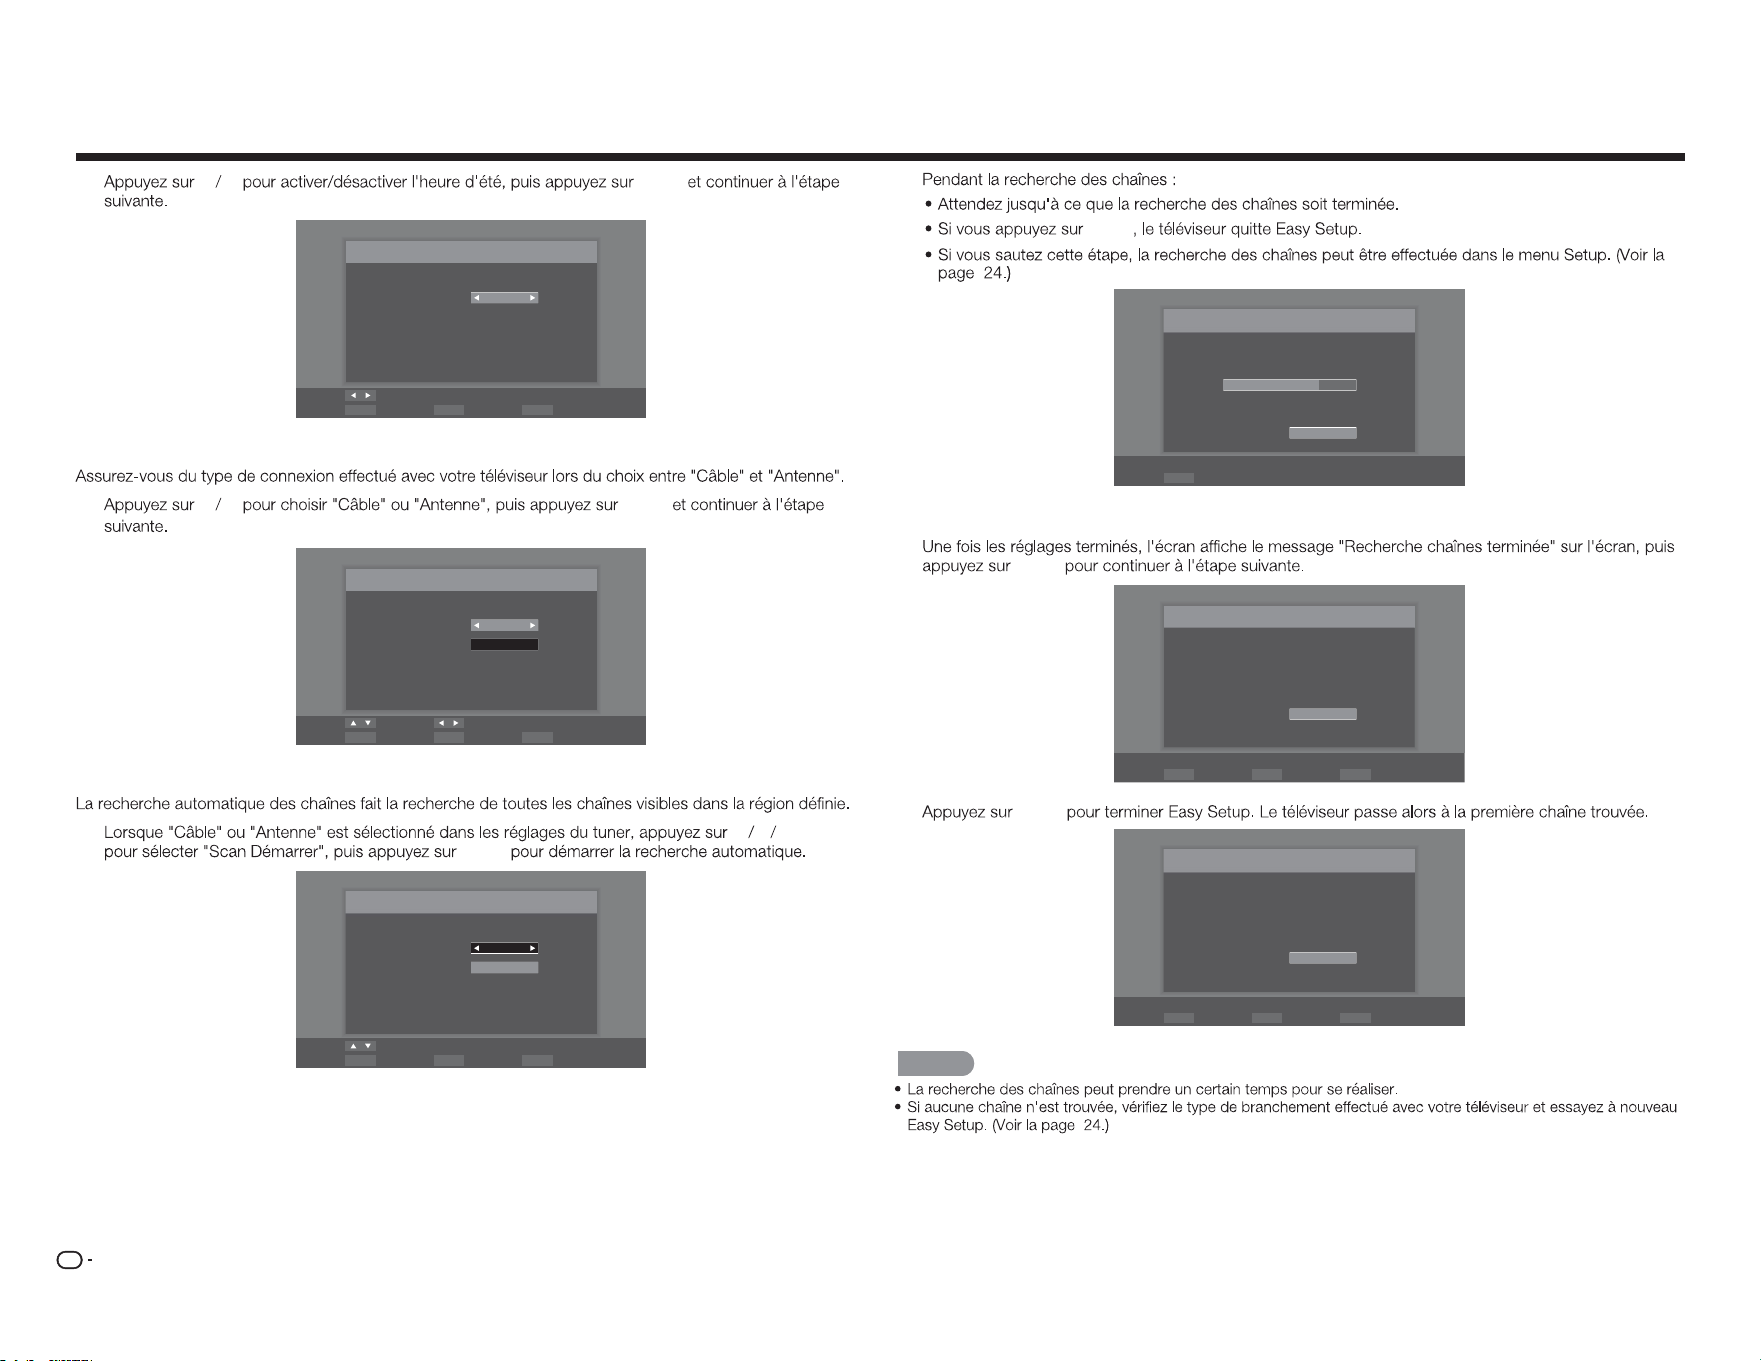
FR
14
Regarder la télévision
4
c d
ENTER
Heure d'été
Daylight Saving sélection.
Heure d'été: Activé
Changement
SélectionnezENTER Étape précédenteRETURN ExitEXIT
Réglages de l'antenne
5
c d
ENTER
Automatique analyse
Sélectionnez le type de signal saisie de votre Télévision et de
démarrage automatique
Type de signal: Câble
Scan Démarrer
Déplacez Changement
SélectionnezENTER Étape précédenteRETURN ExitEXIT
Analyse des chaînes
6
p q
ENTER
ENTER
Câble
Scan Démarrer
Déplacez
SélectionnezENTER Étape précédenteRETURN ExitEXIT
Automatique analyse
Sélectionnez le type de signal saisie de votre Télévision et de
démarrage automatique
Type de signal:
ENTER
Analyse
Balayage des canaux dans le processus, si vous voulez arrêter
le balayage, s'il vous plaît appuyez sur "Arrêter l'analyse".
Statut numérisation:
Analogique : 89
Numérique : 0
70%
Arrêter l'analyse
SélectionnezENTER
Terminé
7
ENTER
Scan Terminer
Channel Scan terminé.
Analogique : 100
Numérique : 0
OK
SélectionnezENTER Étape précédenteRETURN ExitEXIT
8
ENTER
Terminer
Setup initiale a fini, s'il vous plaît appuyez sur "OK" pour quitter
l'Assistant Installation.
OK
SélectionnezENTER Étape précédenteRETURN ExitEXIT
REMARQUE
FR
15
Changement de chaîne
Méthode 1
CH
r
/
s
Méthode 2
0
-
9
Exemples :
Pour choisir un numéro de chaîne à 1 ou 2
chires
(ex: Chaîne 5) :
5 ENTER
Pour choisir un numéro de chaîne à 3 chires
(ex: Chaîne 115) :
1 1 5 ENTER
Pour choisir un numéro de chaîne à 4 chires
(ex: Chaîne 22,1) :
2 2 (POINT)
1 ENTER
REMARQUE
0
0
-
9
0
-
9
Modication du volume
VOL
k
/
l
VOL
k
VOL
l
ACCUEIL
ACCUEIL
INPUT
3
4
5 6
7
8 9
0
ENT
1
2
INFO FRE E ZE
FLASHBACK
MUTE
TV US B MENUSURROU N D
FAVORITE CH
S L EEP CC VIEW MODE AV MODE
AUDIO
VOL CH
+
RETURNEXIT
LCDTV
GJ221-R
A B C D
ENTER
POWER
INPUT (Entrée)
INPUT
1
INPUT
2
p q
INPUT
ENTER
p q
ENTER
REMARQUE
MUTE
MUTE
REMARQUE
VOL
k
/
l
MUTE
SLEEP (Veille)
SLEEP
SLEEP
SLEEP
REMARQUE
SLEEP
Fonctionnement direct du bouton
FLASHBACK (Retour)
FLASHBACK
FLASHBACK
REMARQUE
FLASHBACK
SURROUND
SURROUND
FREEZE (Geler)
FREEZE
FREEZE
MODE AV
MODE AV
Standard (Energy Star) :
Film :
Jeu :
DYNAMIQUE:
Sport :
Utilisateur :
MODE AV
FR
16
AUDIO
AUDIO
Vous pouvez proter d'un son Hi-Fi stéréo ou
des émissions SAP disponibles.
Émissions stéréo :
Émissions SAP :
Si le son stéréo est dicile à entendre.
CH FAVORITES (Réglage des chaînes
favorites)
Pour enregistrer votre chaîne favorite
1
MENU
2
c d
Channel
3
p q Passer/
canaux favoris u
ENTER
4
p q
CH FAVORITES
A B C D
16
19
21
24
25
26
27
28
29
30
5
MENU
Pour regarder votre chaîne favorite
CH FAVORITES A B
C D
Les sous-titres et le sous-titrage
numérique
1
CC
2
CC
Fonctionnement direct du bouton
Exemple :
CC
REMARQUE
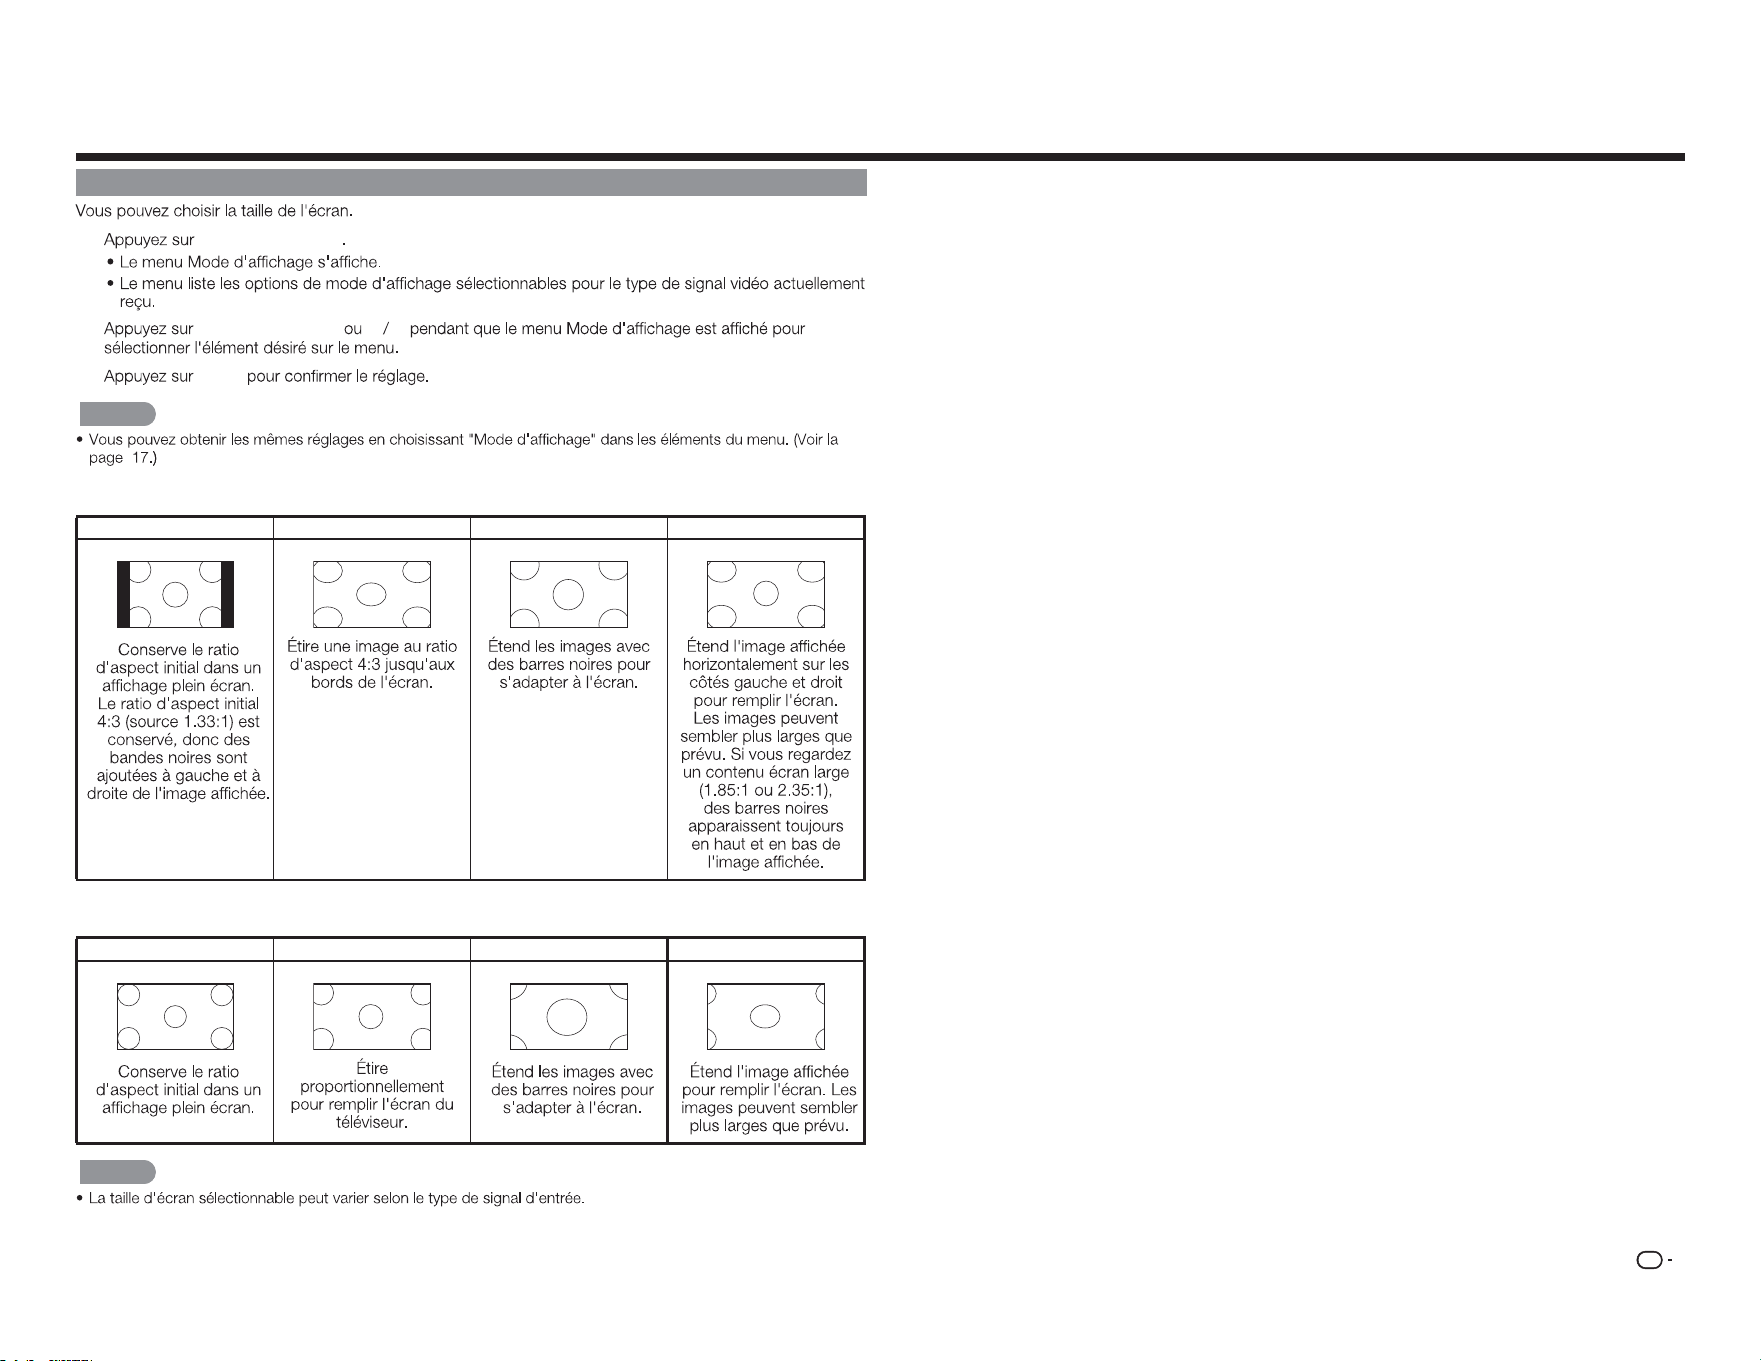
FR
17
MODE D'AFFICHAGE
1
MODE D'AFFICHAGE
2
MODE D'AFFICHAGE
p q
3
ENTER
REMARQUE
■
Pour les programmes en 4:3
Normal Large Zoom Panoramique
■ Pour les programmes en 16:9
Normal
Large Zoom Étirement
REMARQUE
Fonctionnement direct du bouton
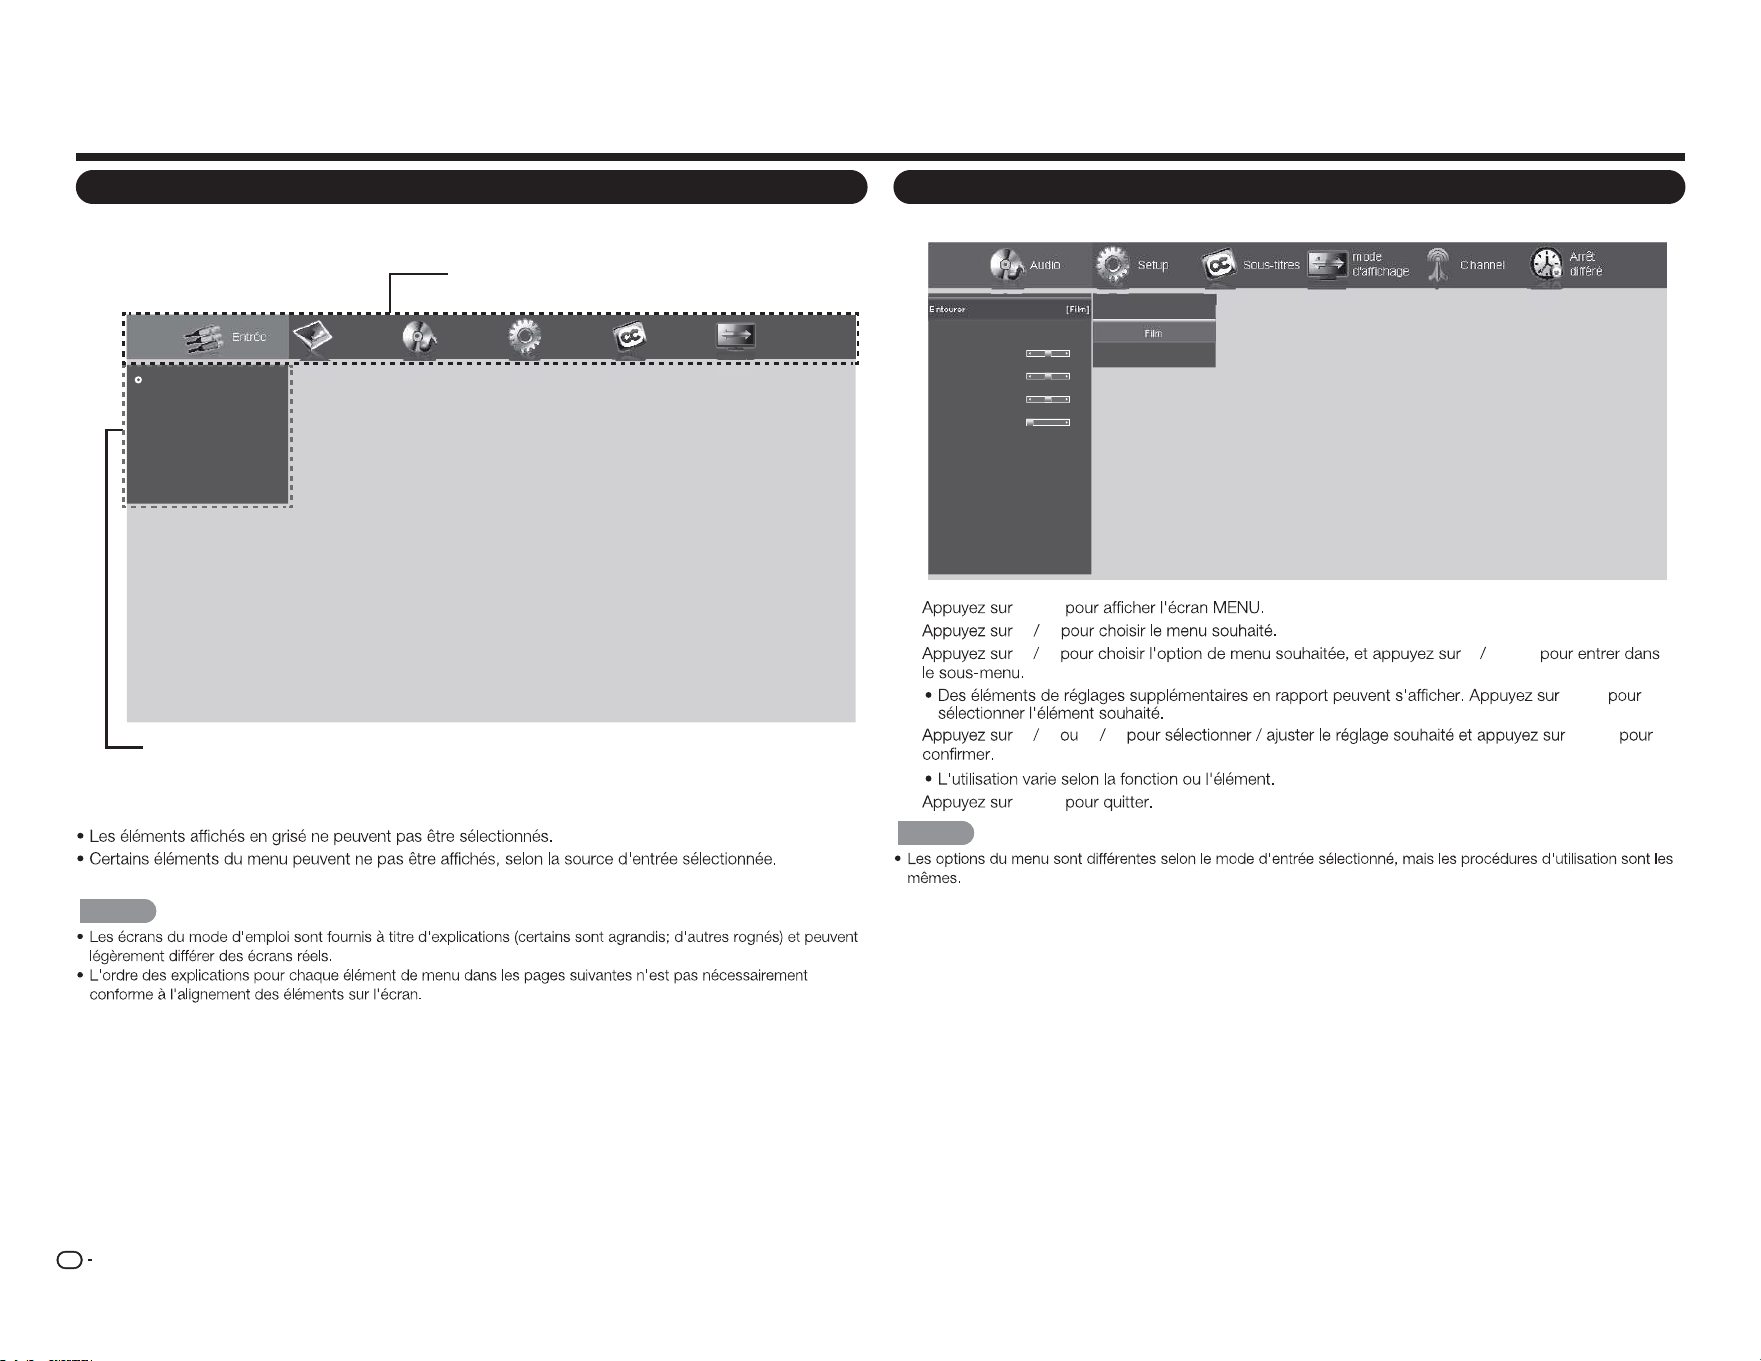
FR
18
Menu d'achage à l'écran
Utilisation du menu d'achage à l'écran
Audio Setup ChannelSous-titres
mode
d'affichage
Arrêt
différé
Entourer
Auto Volume Control
Basses
Aigus
Balance
Synch image/son
HP téléviseur
Audio seulement
Sortie son num
Sortie son anal.
Réglages de l'égaliseur
Réinitialisation du mode audio
Off
Film
Nouvelles
[Film]
[Activé]
0
0
0
0
[Activé]
[PCM]
[Fixe]
Exemple
1
MENU
2
c d
3
p q u
ENTER
a
/
b
4
p q
c d
ENTER
5
MENU
REMARQUE
Menu d'achage à l'écran (menu principal)
Entrée Image Audio Setup Sous-titres
mode
d'affichage
TV
AV IN
Component
HDMI-1
HDMI-2
HDMI-3(Side)
Menu principal
Options du Sous-menu / Menu
■ Éléments du menu À propos
REMARQUE
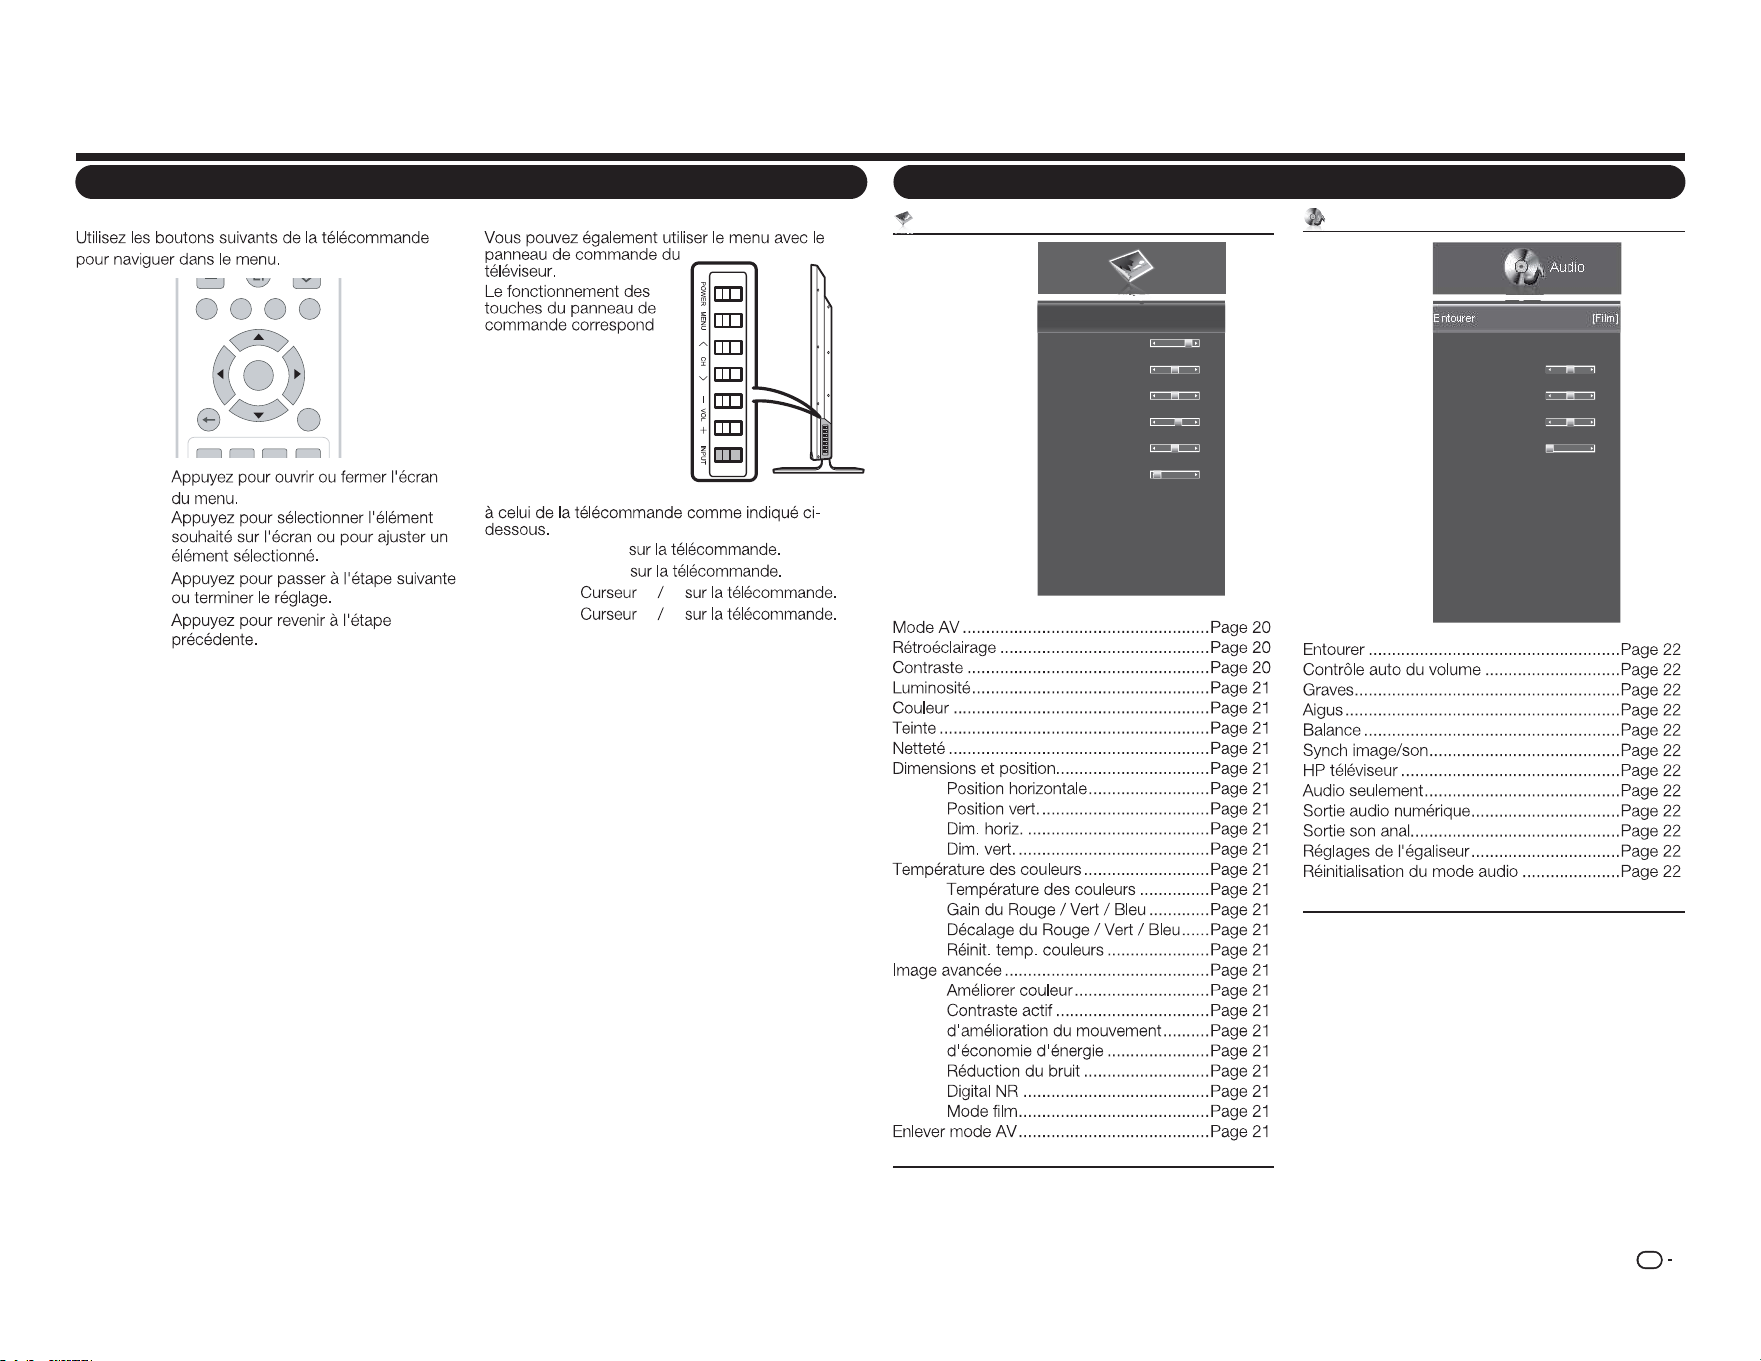
FR
19
Boutons d'utilisation du menu
Utiliser la télécommande
MENU:
a
/
b
/
c
/
d
:
ENTER :
RETURN :
TV US B MENUS URR O U ND
FAV ORITE CH
RETURNEXIT
A B
C D
ENTER
Utiliser le panneau de commande du téléviseur
MENU : MENU
ENTRÉE : ENTER
CH
r
/
s
:
a b
VOL
k
/
l
:
c d
Éléments du menu
Menu Image
Image
Mode AV
Rétroéclairage
Contraste
Luminosité
Couleur
Teinte
Netteté
Dimensions et position
Temp. couleurs
Image avancée
Enlever mode AV
[Standard (Energy Star)]
80
52
50
60
0
2
Exemple
Menu Audio
Audio
Entourer
Auto Volume Control
Basses
Aigus
Balance
Synch image/son
HP téléviseur
Audio seulement
Sortie son num
Sortie son anal.
Réglages de l'égaliseur
Réinitialisation du mode audio
[Film]
[Activé]
0
0
0
0
[Activé]
[PCM]
[Fixe]
Exemple
Menu d'achage à l'écran
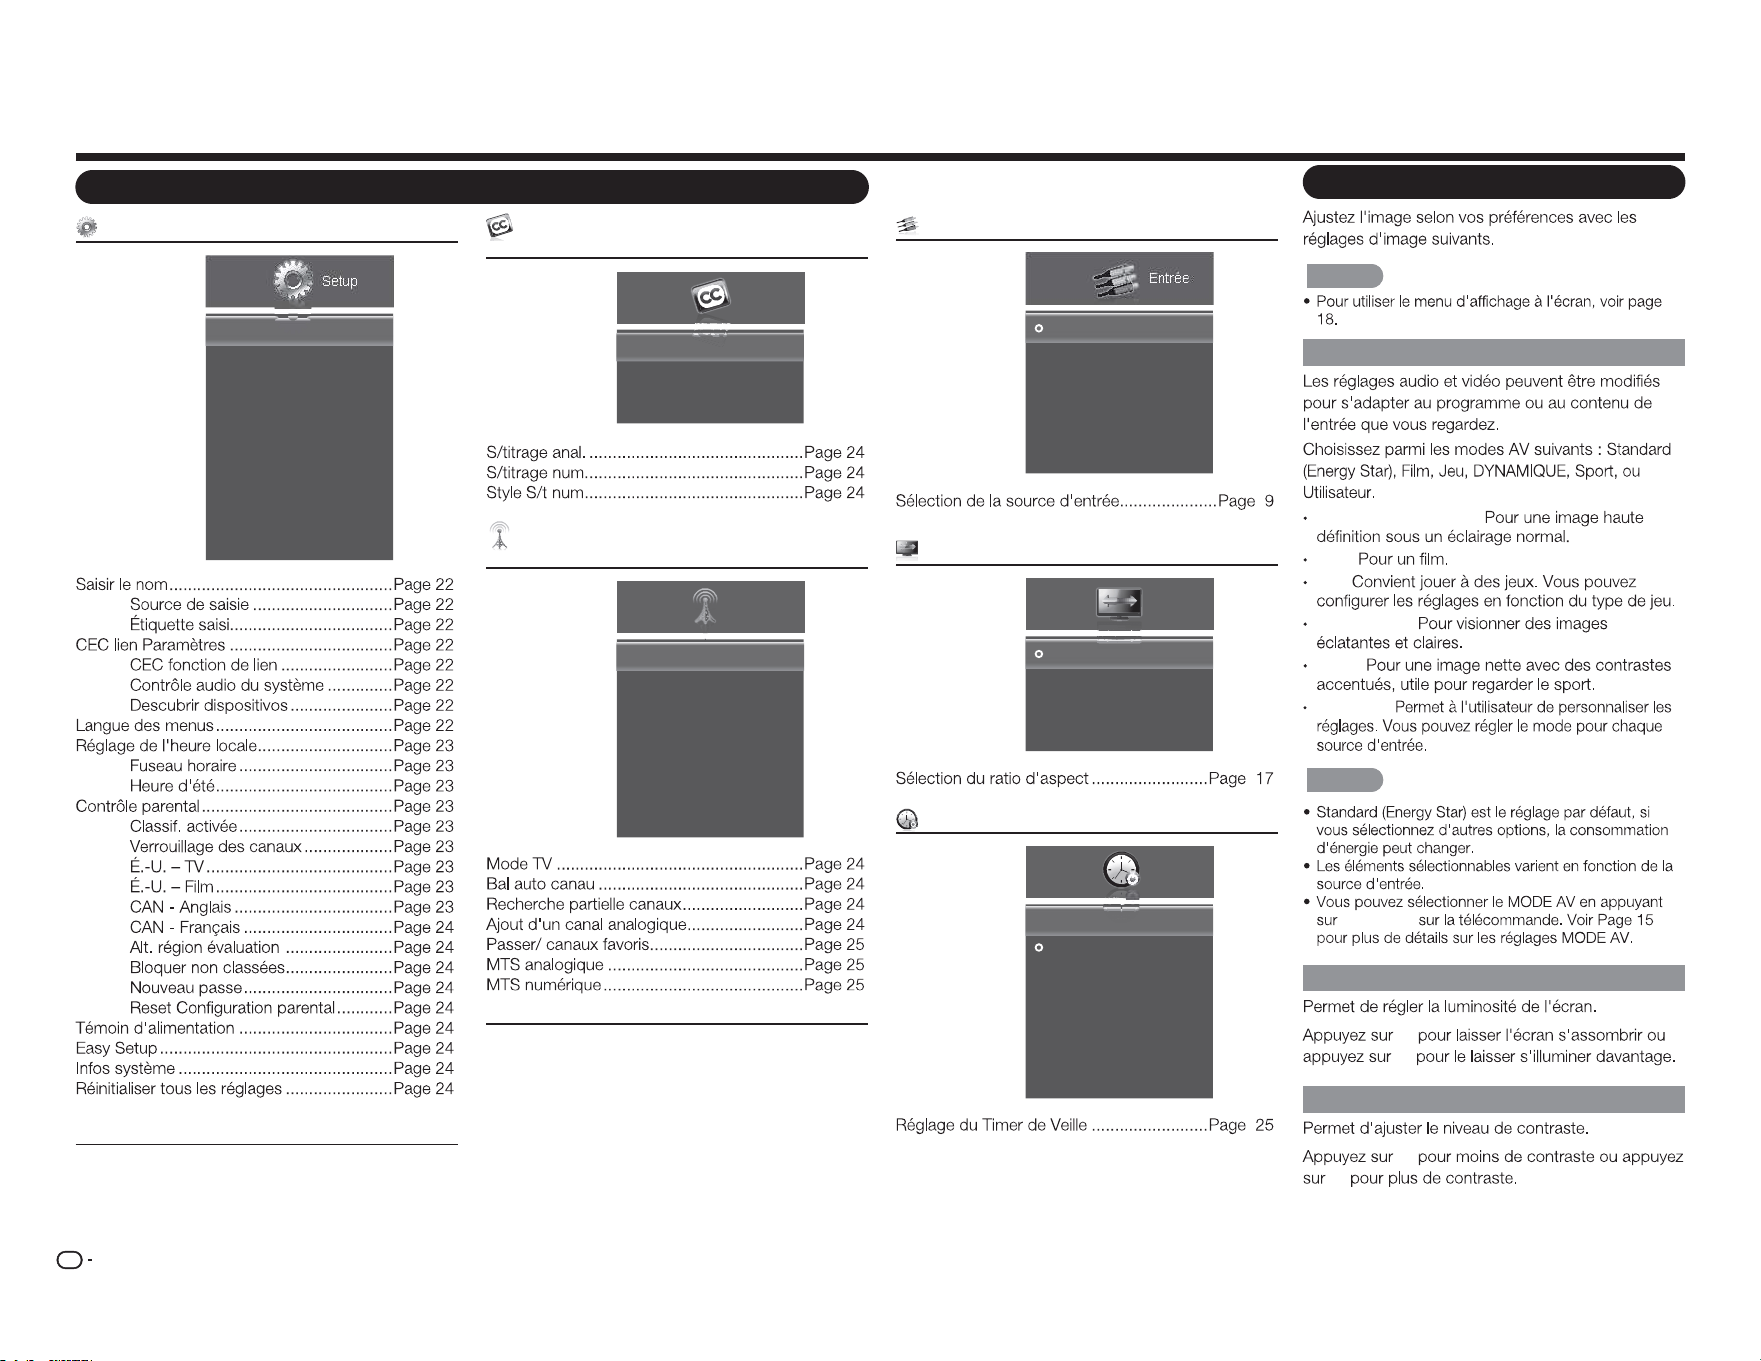
FR
20
Menu Conguration
Setup
Saisir le nom
CEC lien Paramètres
Langue des menus
Réglage de l'heure locale
Contrôle parental
Témoin d'alimentation
Easy Setup
Infos système
Réinitialiser tous les réglages
[Français]
[Activé]
Exemple
Éléments du menu
Menu Sous-titres (signal d'entrée du
téléviseur uniquement)
Sous-titres
S/titrage anal.
S/titrage num.
Style S/t num
[Arrêt]
[Arrêt]
Exemple
Menu Channel (signal d'entrée du téléviseur
uniquement)
Mode TV
Bal auto canau
Recherche partielle canaux
Ajout d'un canal analogique
Passer/ canaux favoris
MTS analogique
MTS numérique
[Câble]
[Mono]
Channel
Exemple
Menu Entrée
Entrée
TV
AV IN
Component
HDMI-1
HDMI-2
HDMI-3(Side)
Exemple
Menu Mode d'achage
Normal
Large
Zoom
Panorama
mode
d'affichage
Exemple
Menu Minuteur de veille
Arrêt
30 Minutos
60 Minutos
90 Minutos
120 Minutos
180 Minutos
Arrêt
différé
ArrêtArrêt différé
Exemple
Menu d'achage à l'écran
Menu Image
REMARQUE
Mode AV (Modier la qualité d'image)
Standard (Energy Star) :
Film :
Jeu :
DYNAMIQUE:
Sport :
Utilisateur :
REMARQUE
MODE AV
Rétroéclairage
c
d
Contraste
c
d
FR
21
Réglages d'image avancée
améliorer Couleur
Contraste actif
d'amélioration du mouvement
d'économie d'énergie
Réduction du bruit
Digital NR
Mode film
[Normal]
[Moyen]
[Moyen]
[Activé]
[Bas]
[Bas]
[Automatique]
Améliorer couleur
• Arrêt :
• Normal / Riche :
Contraste actif
• Arrêt :
• Élevé / Moyen / Bas :
d'amélioration du mouvement
• Arrêt :
• Élevé / Moyen / Bas :
d'économie d'énergie
• Arrêt :
• Activé :
Température des couleurs
Temp. couleurs
Gain du rouge
Gain du vert
Gain du bleu
Décal rouge
Décal vert
Décal bleu
Réinit. temp. couleurs
[Froid]
128
128
128
128
128
128
Température des couleurs
• Personnalisé :
• Froid :
• Normal :
• Chaud :
Gain du Rouge / Vert / Bleu
Décalage du Rouge / Vert / Bleu
Réinit. temp. couleurs
Réduction du bruit
• Arrêt :
• Élevé / Moyen / Bas :
Digital NR
• Arrêt :
• Élevé / Moyen / Bas :
Mode lm
• Auto :
• Arrêt :
Enlever mode AV
Image
Menu d'achage à l'écran
Luminosité
c
d
Couleur
c
d
Teinte
c
d
Netteté
c
d
Dimensions et position
Position horiz.
Position vert.
Dim. horiz.
Dim. vert.
31
16
0
0
• Position horiz. :
• Position vert. :
• Dim. horiz. :
• Dim. vert. :
FR
22
Menu d'achage à l'écran
Menu Audio
REMARQUE
Entourer
Arrêt :
Film :
Nouvelles :
REMARQUE
Contrôle auto du volume
Arrêt :
• Activé :
Graves
c
d
REMARQUE
Aigus
c
d
REMARQUE
Balance
c
d
Synch image/son
c
/
d
HP téléviseur
• Arrêt :
• Activé :
REMARQUE
Audio seulement
La Télévision a conclu Mode Audio
seulement. Le de rétroéclairage s'éteint
bientôt. Appuyez sur n'importe quelle
touche pour réveiller de nouveau.
Sortie audio numérique
• Dolby numérique :
• PCM :
Sortie son anal.
• Fixe
• Variable
Réglages de l'égaliseur
c
/
d
a
/
b
MENU
REMARQUE
Réinitialisation du mode audio
Audio
Menu Conguration
REMARQUE
Saisir le nom
Source de saisie
Étiquette saisi
[TV]
[TV]
TV
Source entrée
Labels d'entrée
Labels d'entrée
ENTER
OK
ENTER
CEC lien Paramètres
CEC fonction de lien
System Audio Control
Descubrir dispositivos
[Activation]
[Arrêt]
CEC
fonction de lien Activation
System Audio Control
Marche
Recherche d'appareils
Langue des menus
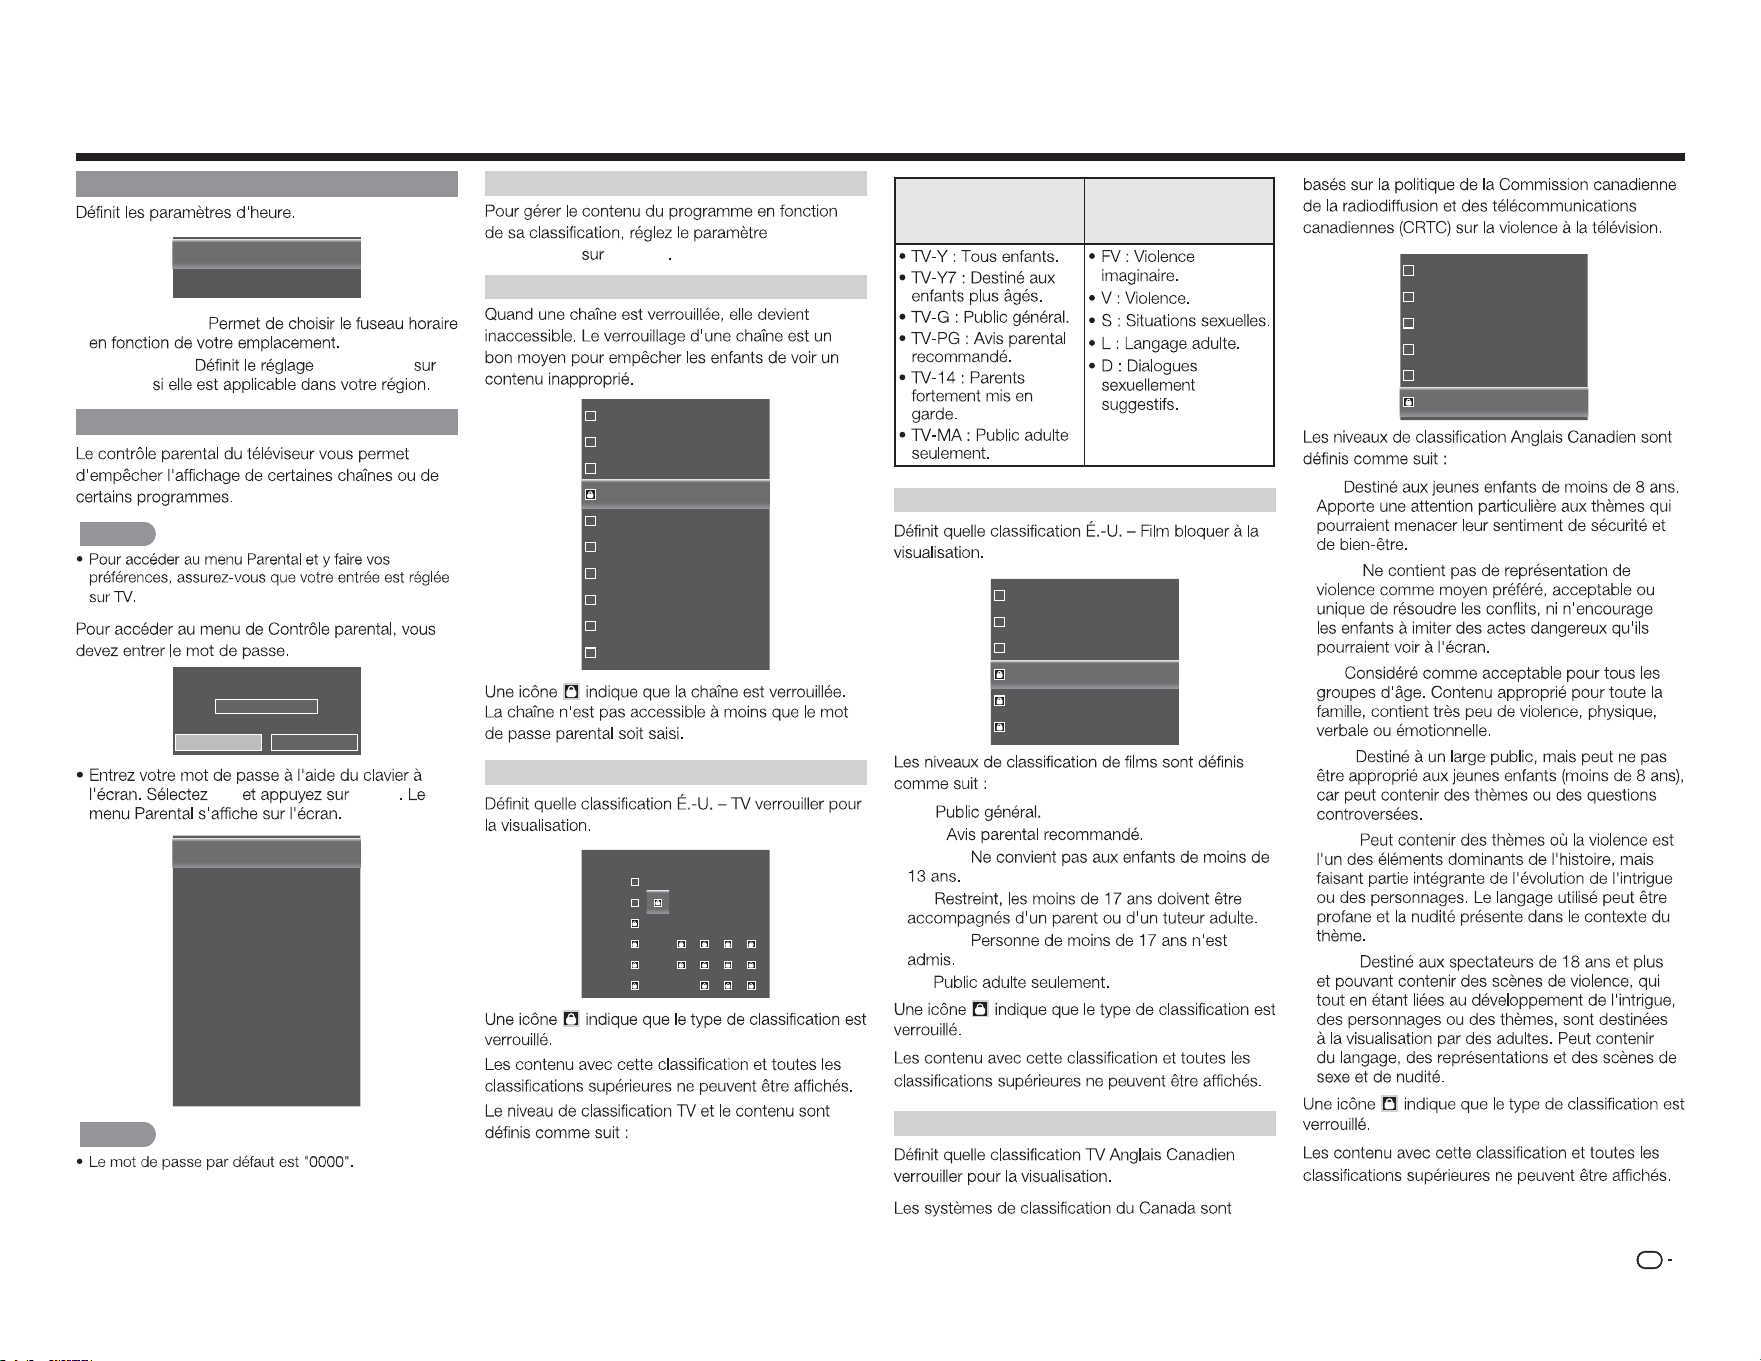
FR
23
Réglage de l'heure locale
Fuseau horaire
Heure d'été
[Alaska]
[Activé]
• Fuseau hora. :
• Heure d'été : Heure d'été
Marche
Contrôle parental
REMARQUE
Entrez le mot de passe
****
OK Cancel
OK
ENTER
Classif. activée
Verrouillage des canaux
É.-U. – TV
É.-U. – Film
CAN - Anglais
CAN - Français
Autre région de classification pour
Bloquer non classées
Nouveau passe
Reset Configuration parental
[Arrêt]
[Arrêt]
REMARQUE
Classif. activée
Classif.
programme Marche
Verrouillage des canaux
16
19
21
24
25
26
27
28
29
30
É.-U. – TV
TV-Y
TV-Y7
TV-G
TV-PG
TV-14
TV-MA
ALL FV D L S V
Niveaux de
classicationdela
télévision
Contenus de
classicationdela
télévision
É.-U. – Film
G
PG
PG-13
R
NC-17
X
• G :
• PG :
• PG-13 :
• R :
• NC-17 :
• X :
CAN - Anglais
C
C8+
G
PG
14+
18+
• C :
• C8+ :
• G :
• PG :
• 14+ :
• 18+ :
Menu d'achage à l'écran

FR
24
Menu d'achage à l'écran
CAN - Français
G
8ans+
13ans+
16ans+
18ans+
• G :
• 8ans+ :
• 13ans+ :
• 16ans+ :
• 18ans+ :
Bloquer non classées
Marche
Nouveau passe
Nouveau passe
Ré-Entrée passe
Reset Conguration parental
Contrôle parental
Témoin d'alimentation
• Arrêt :
• Activé :
Easy Setup
REMARQUE
Infos système
Réinitialiser tous les réglages
REMARQUE
Menu Sous-titres
REMARQUE
S/titrage anal.
S/titrage num.
Style S/t num
• Style s/titres :
• Taille caract. :
• Caractères :
• Couleur :
• Opacité :
• Couleur A-P :
• Opacité BG
• Couleur fenêtre :
• Opacit fenêtre :
Menu Channel
REMARQUE
18
Mode TV
Bal auto canau
Scan Démarrer
ENTER
Recherche partielle canaux
Balay.
Depuis le canal
Vers le canal
Scan Démarrer
[Analogique/Numérique]
1
135
Scan Démarrer
ENTER
Ajout d'un canal analogique
Ajoutez un
canal
ENTER
FR
25
Passer/ canaux favoris
ENTER
16
19
21
24
25
26
27
28
29
30
REMARQUE
CH FAVORITES
MTS analogique
REMARQUE
• Mono
:
• Stéréo :
• SAP
:
MTS numérique
Menu Minuteur de veille
REMARQUE
Menu d'achage à l'écran
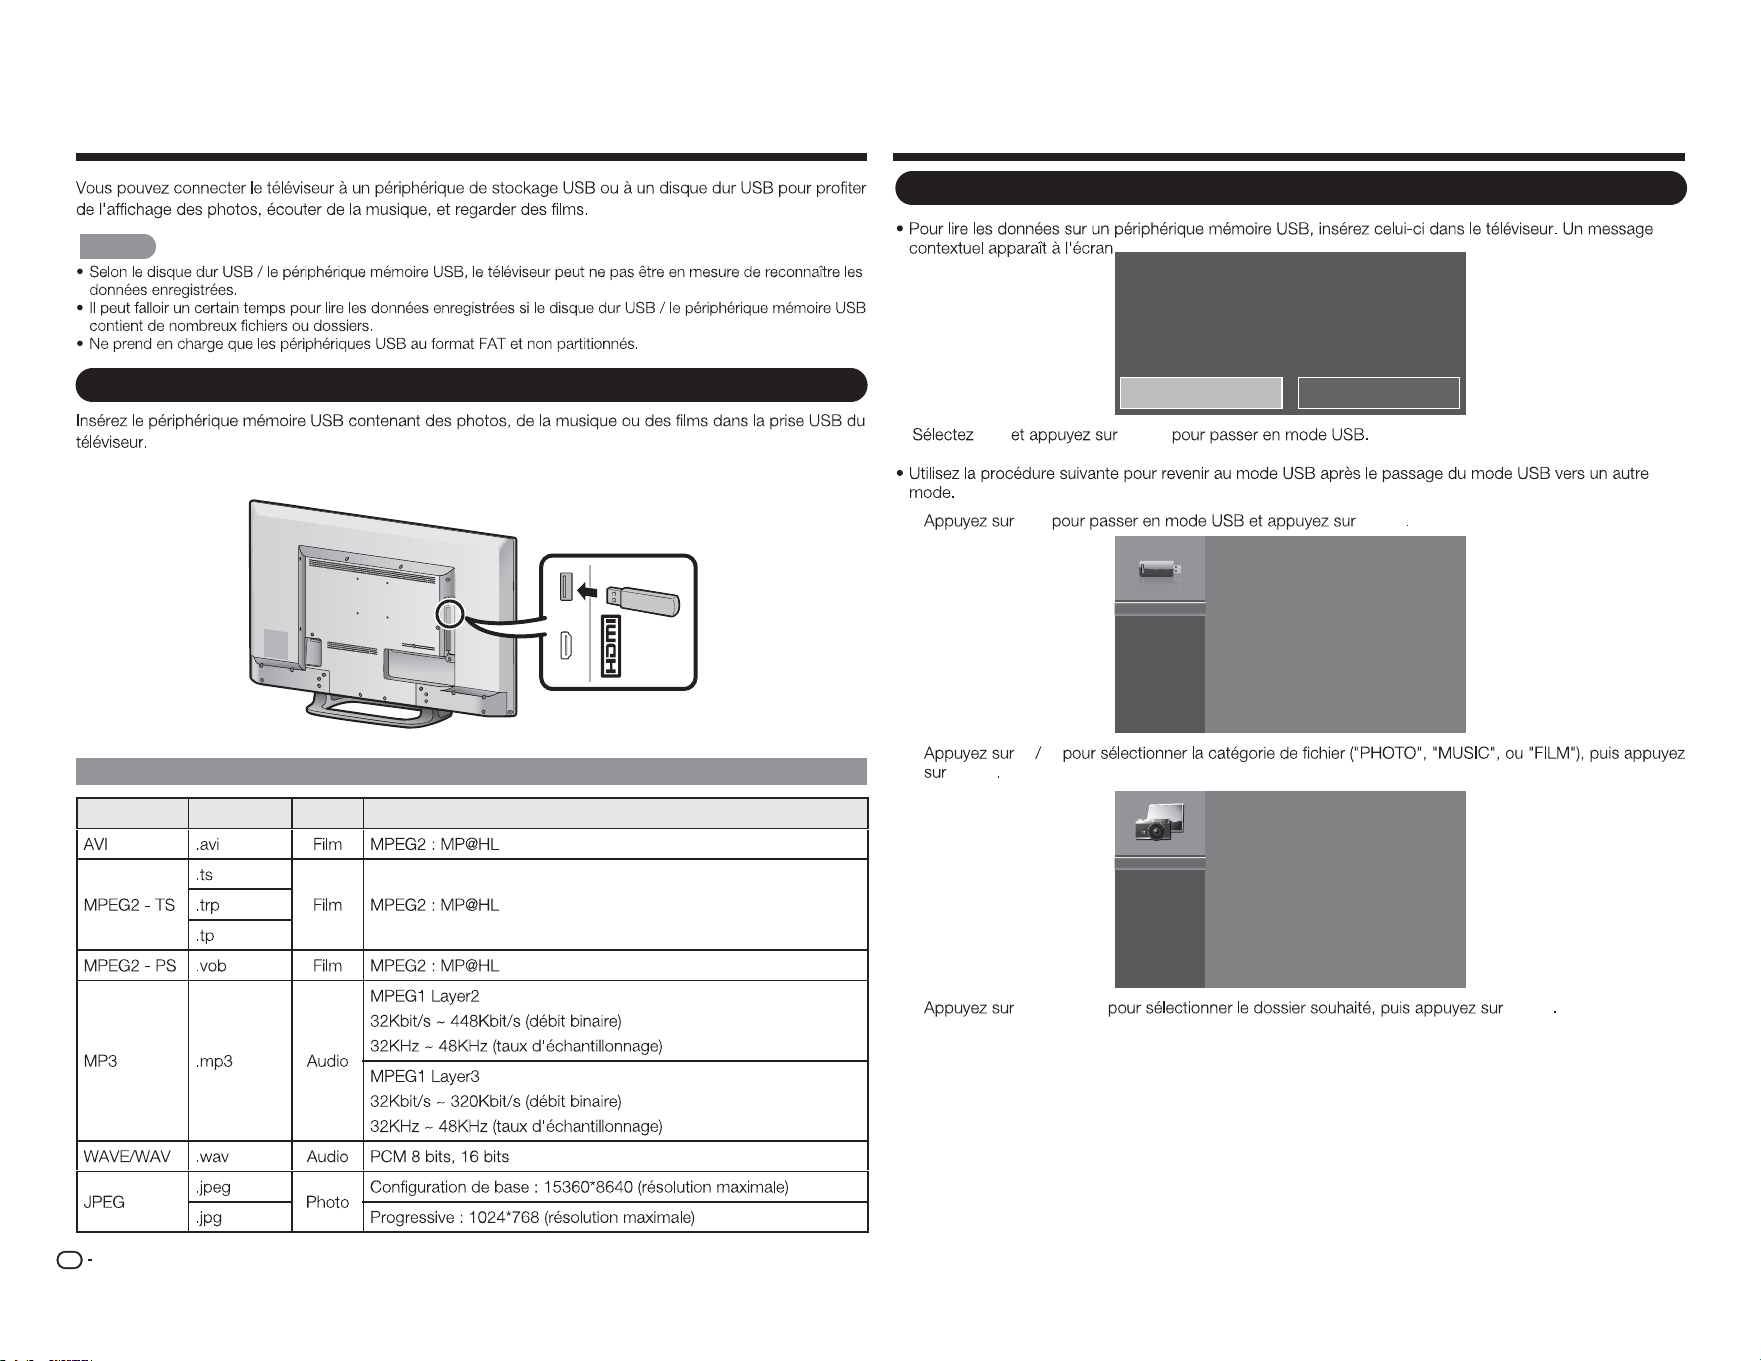
FR
26
Proter des photos / de la musique / des lms
REMARQUE
Raccordement d'un périphérique mémoire USB / d'un disque dur USB
MHL
(DC 5V, 900mA)
USB
Compatibilité des périphériques USB
Contenant Extensions A/V CODEC/Prol
Support USB détecté. Entrez dans le menu multimédia?
Oui Non
Oui
ENTER
1
USB ENTER
USB:
2
a b
ENTER
Photo
Musique
Film
3
a
/
b
/
c
/
d
ENTER
Sélection des dossiers pour la lecture
(CC 5V, 500mA)
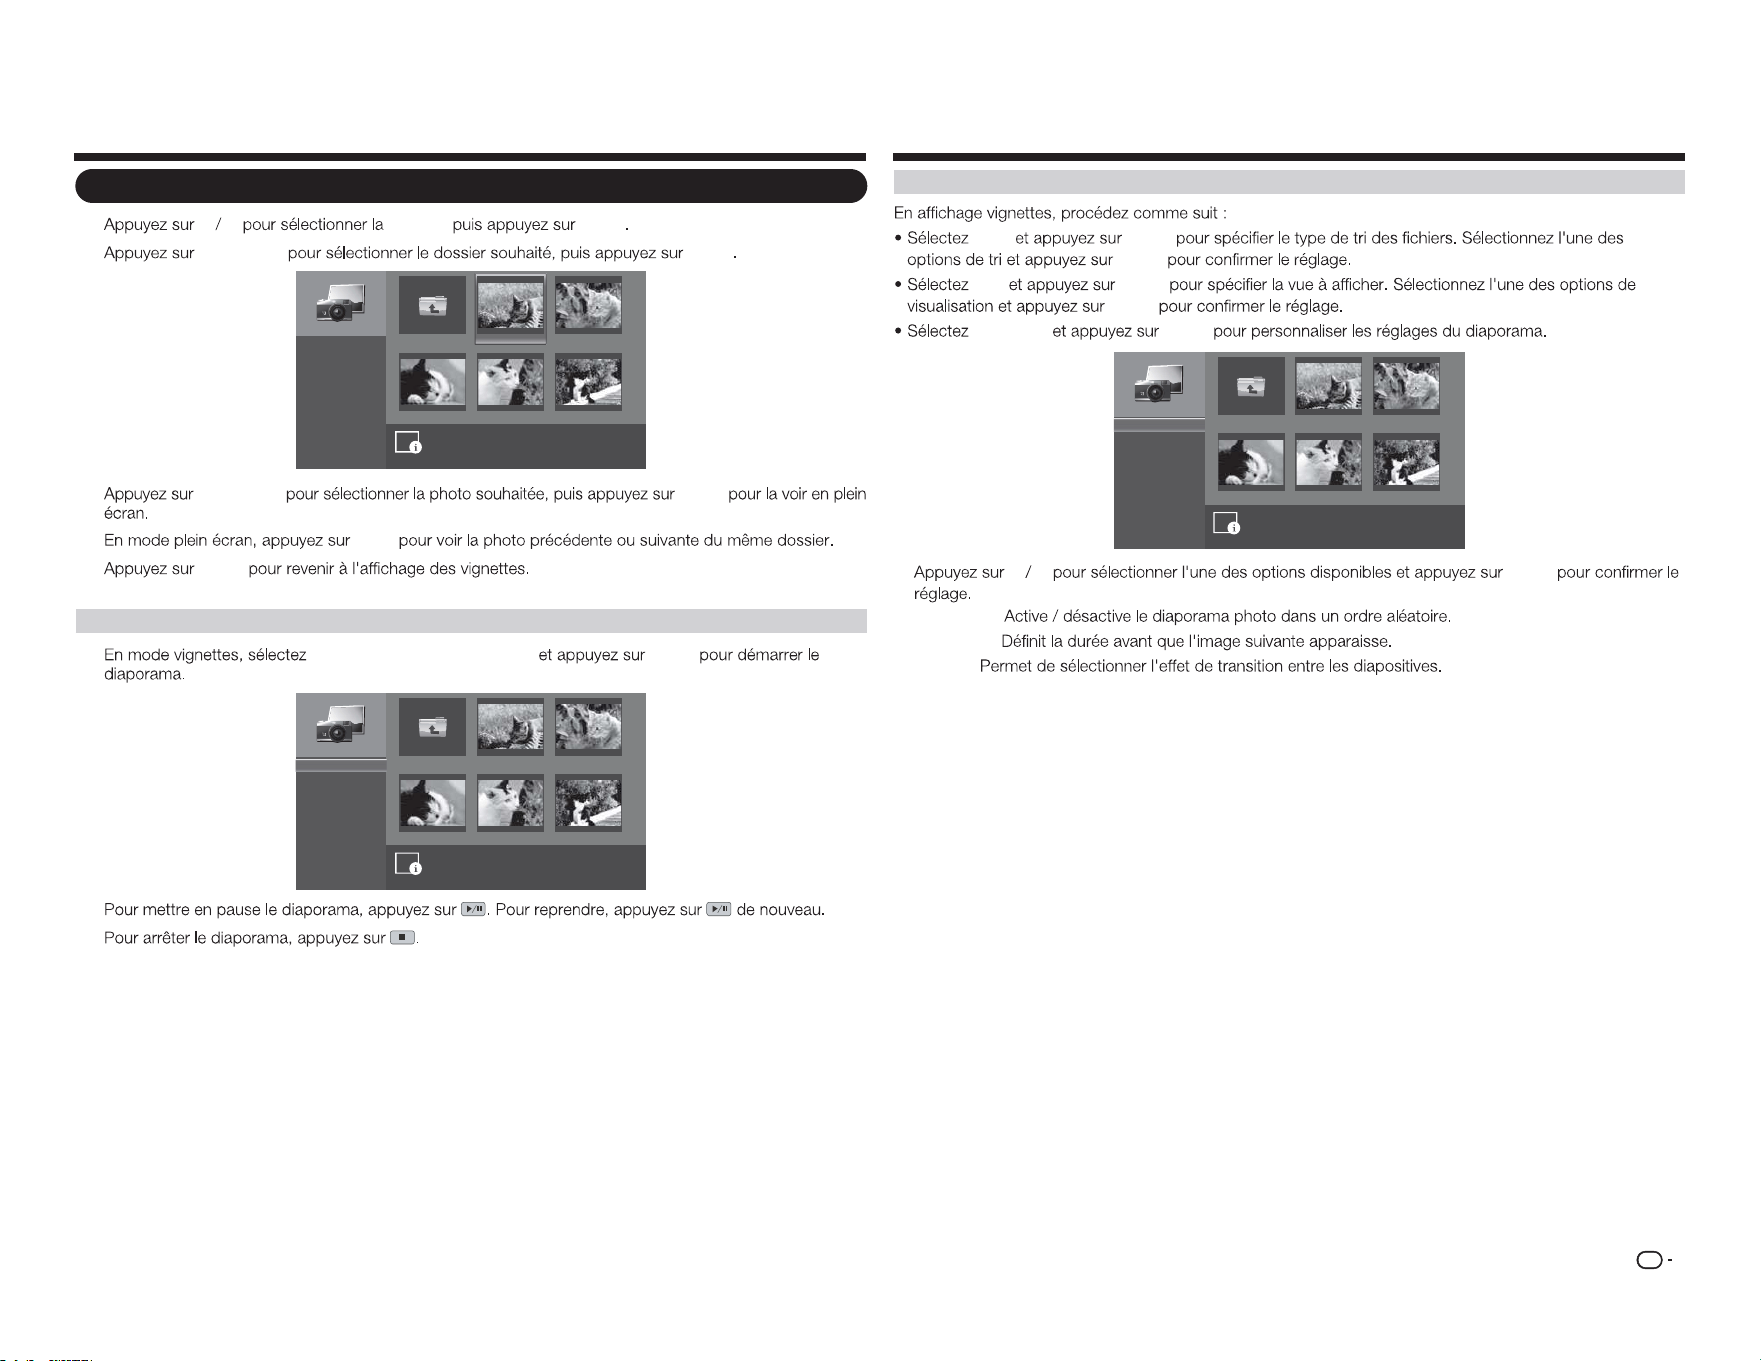
FR
27
Voir des photos
1
a b
PHOTO
ENTER
2
a
/
b
/
c
/
d
ENTER
image001.jpg image002.jpg
image004.jpgimage003.jpg image005.jpg
Up Folder
Commencez la présentation
Trier:
Vue:
Réglages
\photo\
Nom de fichier:image001.jpg
Résolution:: 725x510 Taille de fichier: 965 KBytes
1
/
3
Nom A-Z
Dossiers
3
a
/
b
/
c
/
d
ENTER
4
c
/
d
5
ENTER
Voir des photos en diaporama
1
Commencez la présentation
ENTER
image001.jpg image002.jpg
image004.jpgimage003.jpg image005.jpg
Up Folder
\photo\
1
/
3
Commencez la présentation
Trier:
Vue:
Réglages
Nom A-Z
Dossiers
2
3
Proter des photos / de la musique / des lms
Personnalisation des réglages photo
Trier
ENTER
ENTER
Vue
ENTER
ENTER
Réglages
ENTER
image001.jpg image002.jpg
image004.jpgimage003.jpg image005.jpg
Up Folder
Battage:
Vitesse:
Effet:
\photo\
1
/
3
Battage ON
5 secondes
aléatoire
a b
ENTER
• Battage :
• Vitesse :
• Effet :
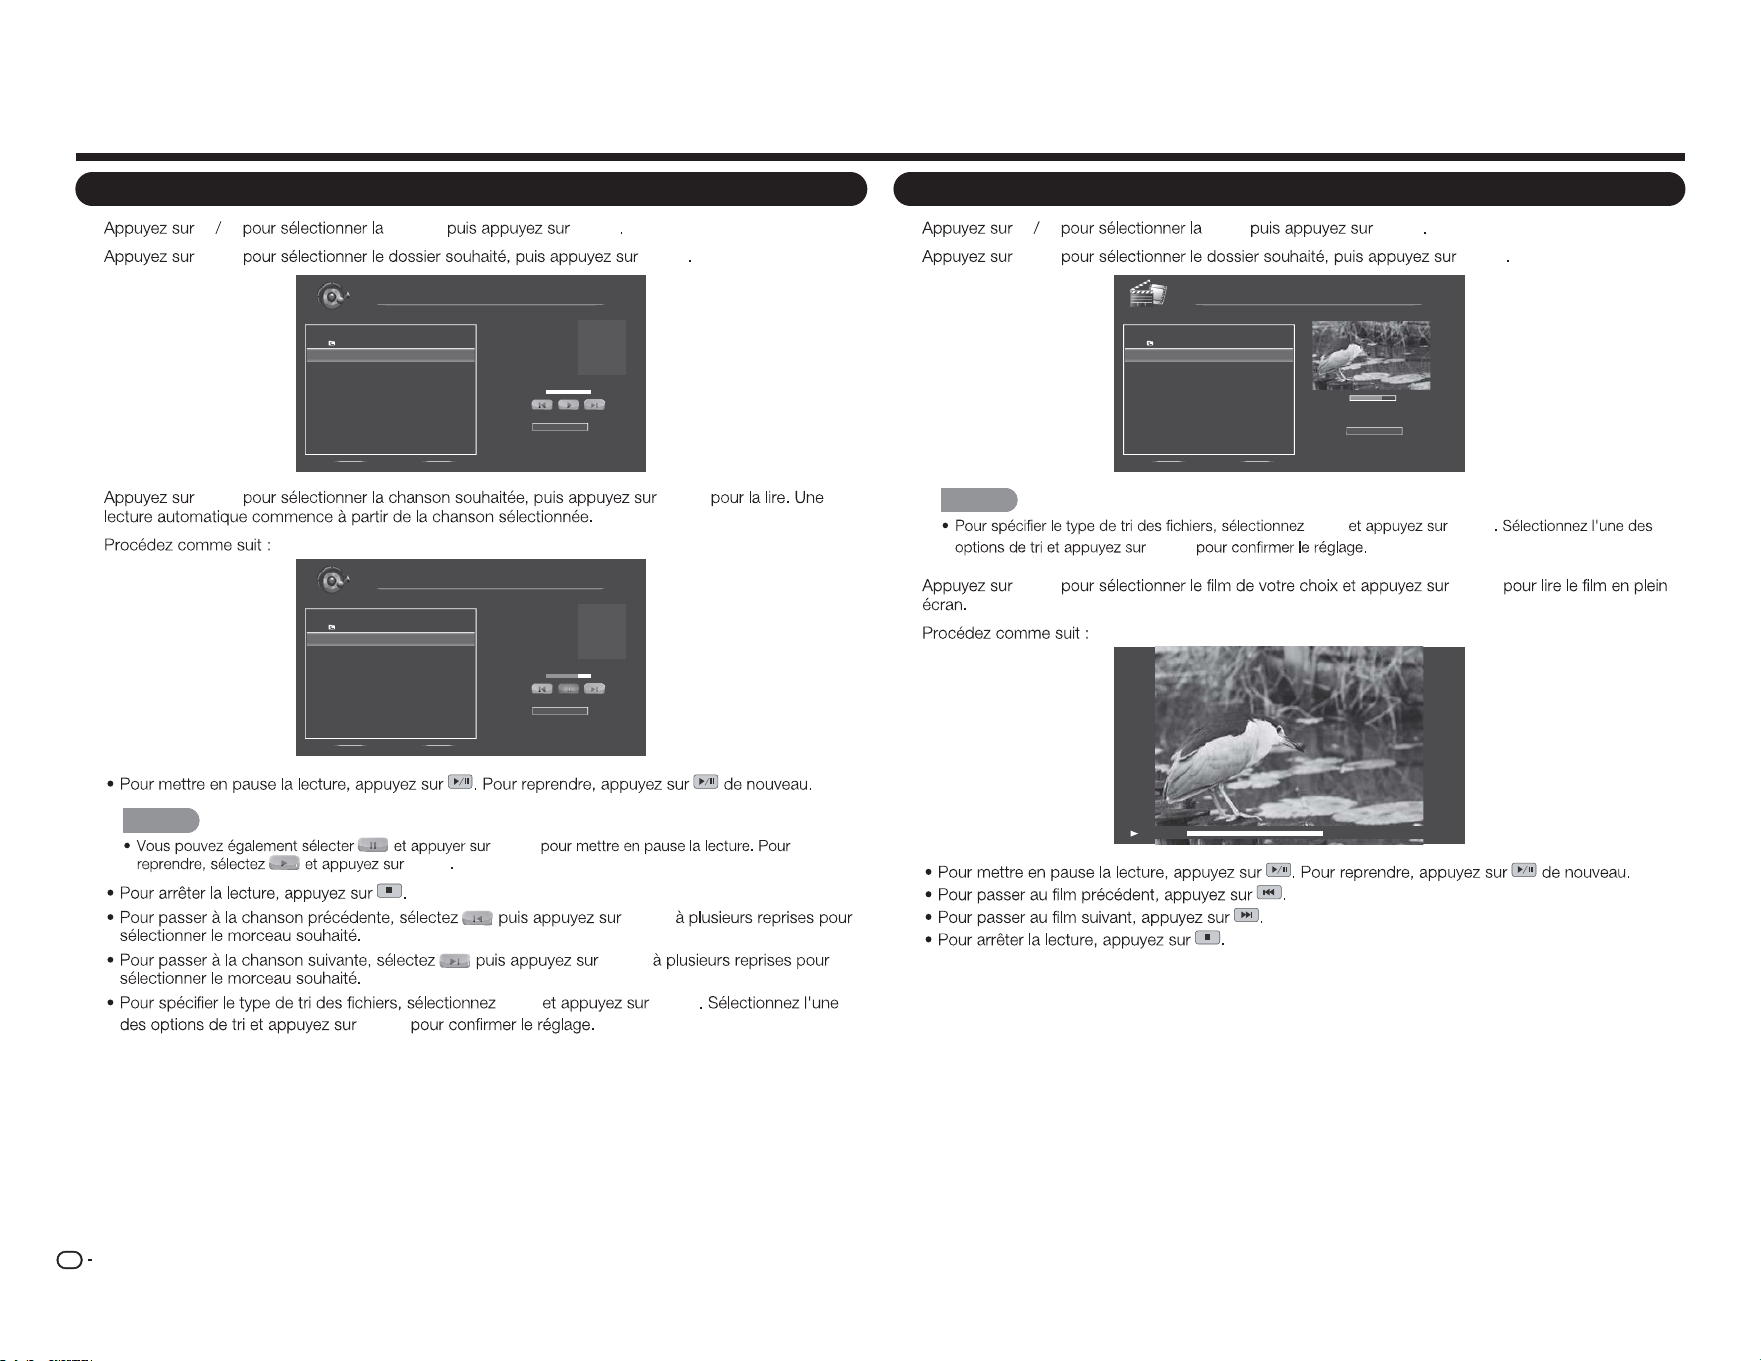
FR
28
Proter des photos / de la musique / des lms
Lecture de musique
1
a b
MUSIC
ENTER
2
a
/
b
ENTER
Nom de fichier:
Artiste:
Album:
Musique
\musique
1 / 1
# voie Durée
1. Up Folder
2. song0 01.mp3 00:03:15
3. song0 02.mp3 00:03:12
4. song0 03.mp3 00:03:10
Trier:
Nom A-Z
00:00:00 00:00:00
3
a
/
b
ENTER
4
song001.mp3
Unknow
Unknow
1 / 1
Sort:
Nom A-Z
00:02:07 00:03:15
Nom de fichier:
Artiste:
Album:
Musique
\musique
# voie Durée
1. Up Folder
2. song0 01.mp3 00:03:15
3. song0 02.mp3 00:03:12
4. song0 03.mp3 00:03:10
REMARQUE
ENTER
ENTER
ENTER
ENTER
Trier
ENTER
ENTER
Regarder des lms
1
a b
FILM
ENTER
2
a
/
b
ENTER
00:06:07
Trier:
00:08:07
Film
\film
1 / 1
# Fichier Durée
1. Up Folder
2. movie001.avi 00 :08:15
3. movie002.avi - -:- -:- -
4. movie003.avi - -:- -:- -
Nom A-Z
REMARQUE
TRIER ENTER
ENTER
3
a
/
b
ENTER
4
00:06:07 00:08:15
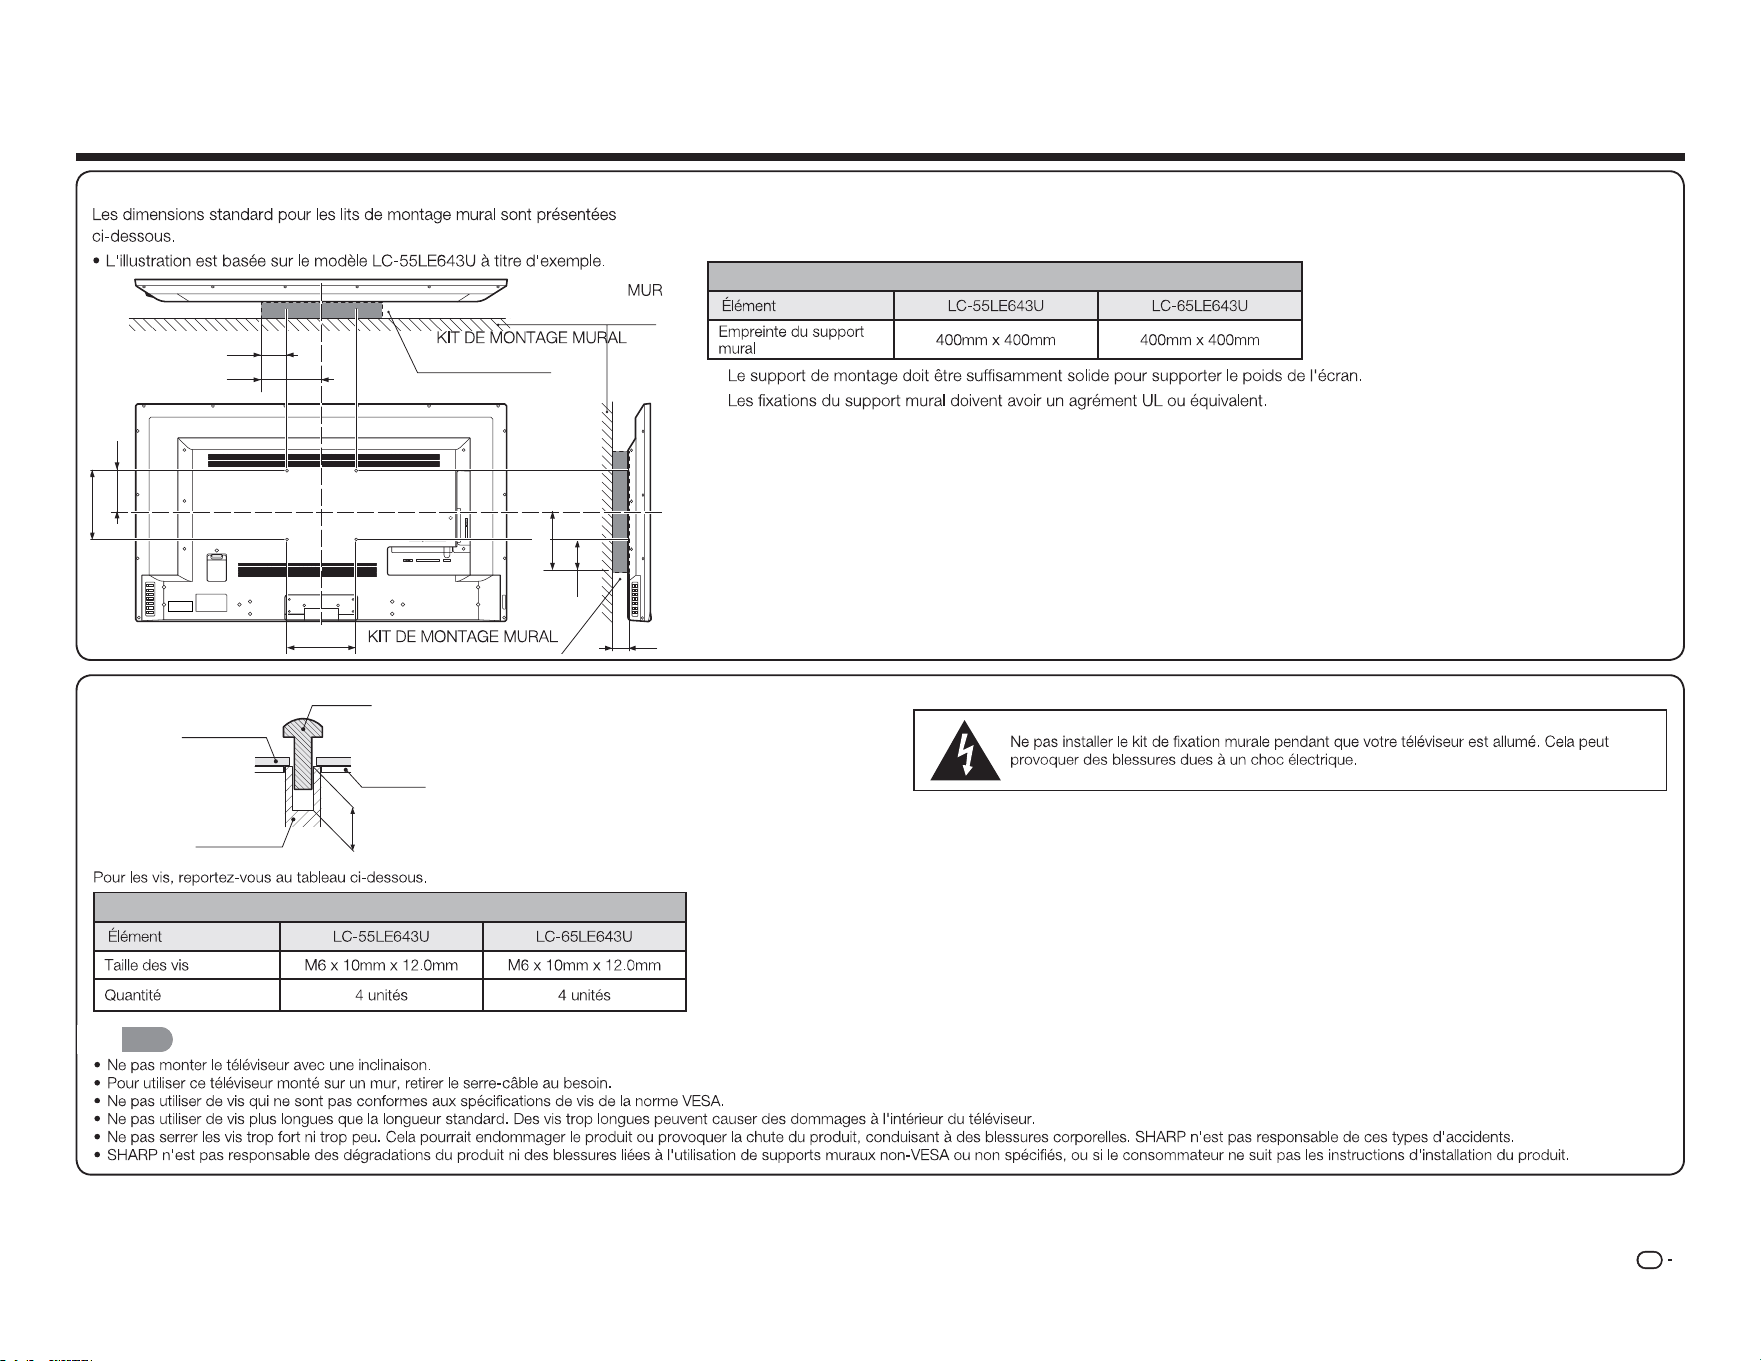
FR
29
Caractéristiques du kit de montage mural
Modèle
DEPTH OF
MOUNTING HOLES
SCREW
WALL MOUNT
UNIT
MOUNTING
HOLES
CABINET
Modèle
REMARQUE
Annexe
1 2 Y/V Pb/ Cb
AC IN
CABLE / ANTENNAPr/Cr
COMPONENT / VIDEO
L R OPTICAL MHL USB
AUDIO OUT
DTV / TV
AUDIO
L R
A
b1
B
b3
c1
b2
a2
a1
FR
30
Dépannage
Le téléviseur ache "Pas de signal."
ENTRÉE
Il n'y a pas d'alimentation.
POWER
ENTRÉE
Il n'y a pas de son.
VOL
k
MUTE
Les couleurs du téléviseur ne semblent pas correctes.
Annexe
La qualité d'image n'est pas bonne.
L'image est déformée.
L'image achée ne couvre pas la totalité de l'écran.
MODE
D'AFFICHAGE
Le téléviseur comporte des pixels (des points) qui sont toujours sombres ou toujours
allumés.
Je vois du "bruit" ou du statique sur l'écran.
Quand je change de source d'entrée, le volume change.
VOL
k
/
l
Quand je change de source d'entrée, l'image achée change de taille.
FR
31
Précautions concernant l'utilisation dans des environnements de haute et basse température
SI VOUS AVEZ D'AUTRES QUESTIONS, VEUILLEZ CONTACTER NOTRE SERVICE D'AIDE À LA
CLIENTÈLE .
Annexe
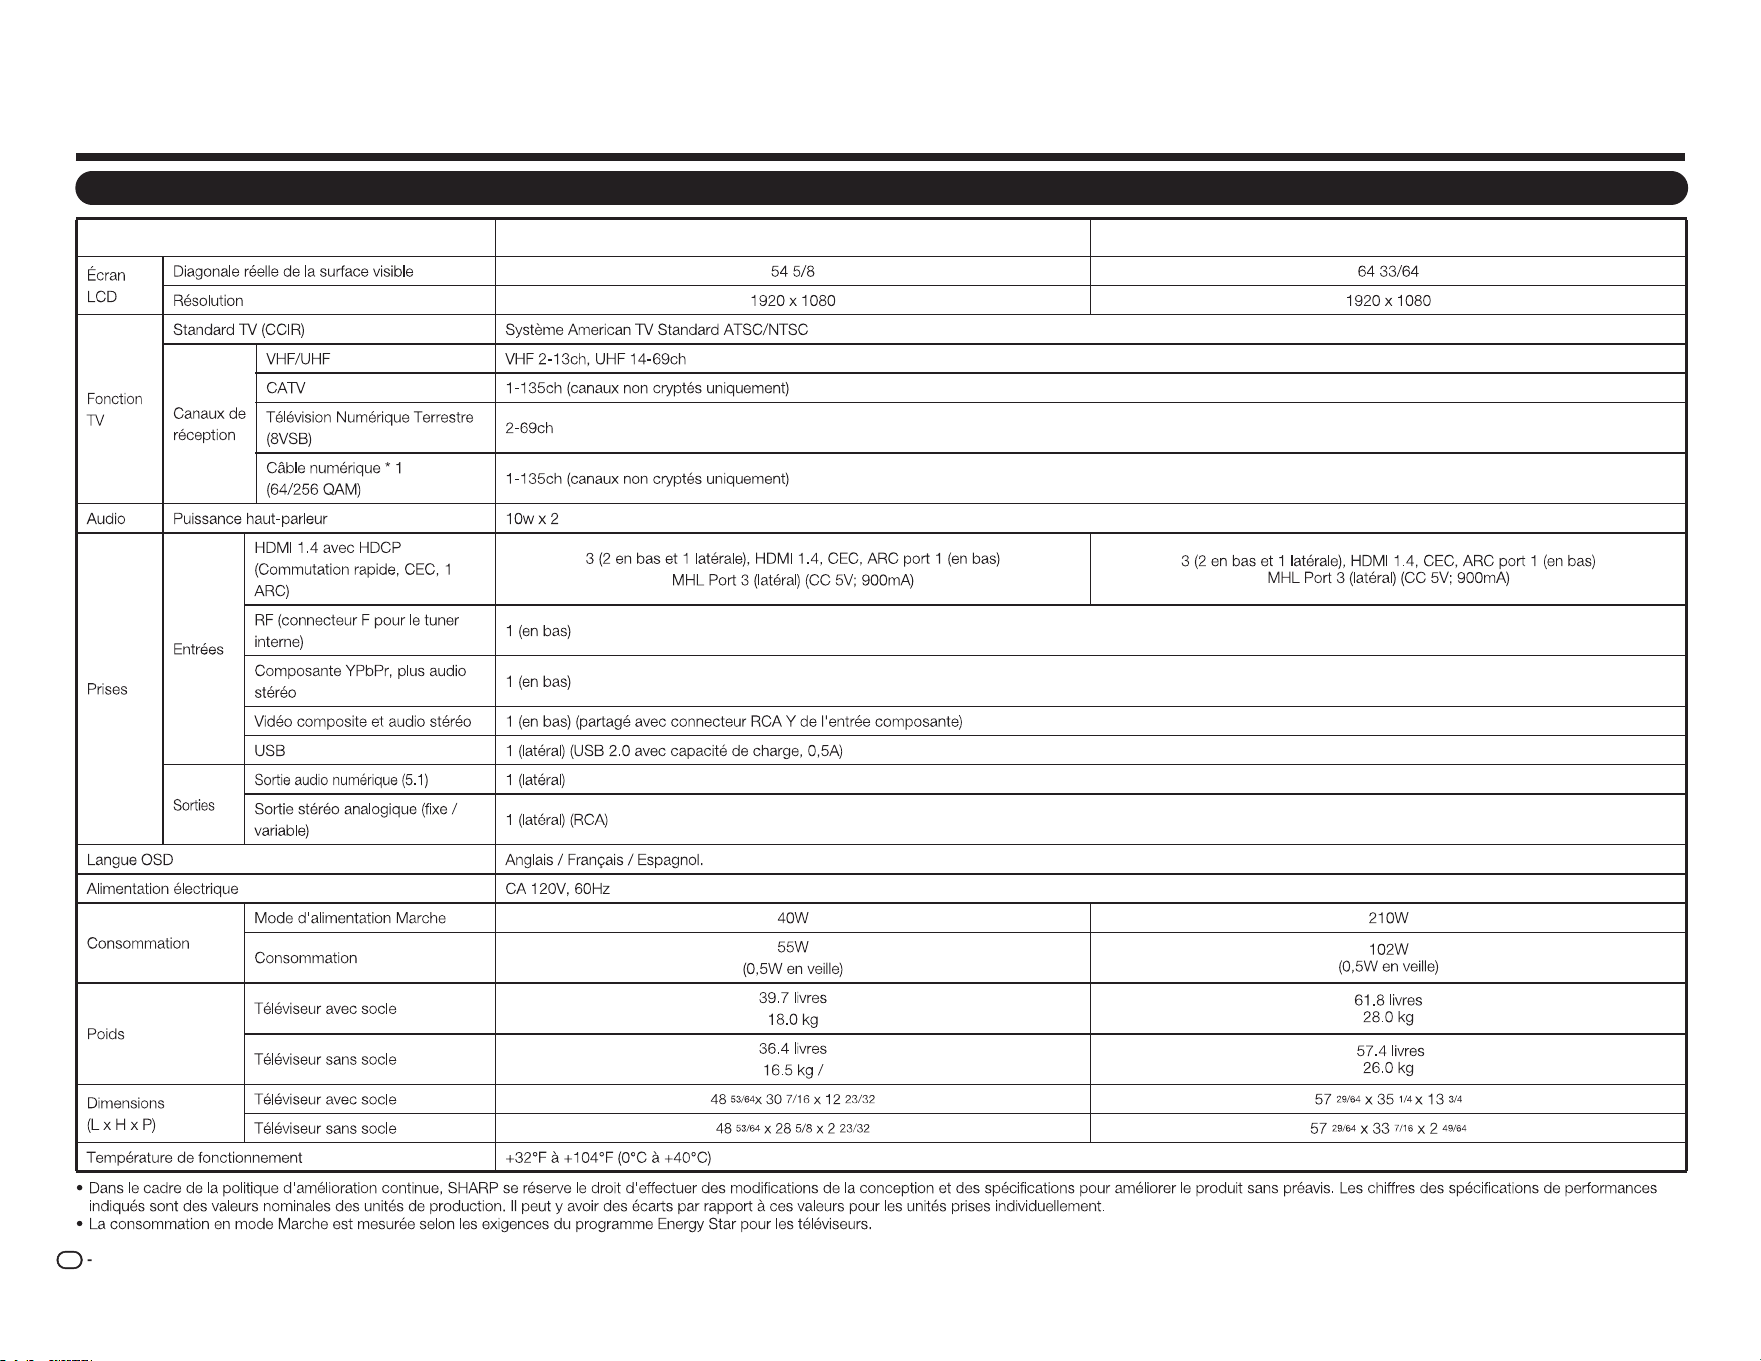
Téléviseur
Élément
Nom modèle : LC-55LE643U
Nom modèle : LC-65LE643U
FR
32
Spécications
FR
33
Les produits qui ont reçu le label ENERGY STAR
®
sont conçus pour proté ger l'environnement grâ ce à un
rendement é nergé tique supé rieur.
Fabriqué sous licence de Dolby Laboratories. Dolby et le symbole double-D sont des marques dé posé es
de Dolby Laboratories.
Les termes HDMI et HDMI High-Definition Multimedia Interface, ainsi que le logo HDMI sont des marques
commerciales ou des marques dé posé es de HDMI Licensing LLC aux É tats-Unis et d'autres pays.
MHL, le logo MHL et Mobile High-Definition Link sont des marques ou des marques dé posé es de MHL LLC
aux É tats-Unis et d'autres pays.
MHL
TM
Marques commerciales
Informations utilisateur de ENERGY STAR®
●Pourplusd'informationssurleprogrammeENERGYSTAR,vouspouvezvousréférerà
energystar.gov.
●LeavingtheENERGYSTARhomemodeorenablingoptionalfeatureswillcauseanincrease
powerconsumed.
●ThisproductqualifiesforENERGYSTARwhen"Home"isselectedfor"TVLocation".
Setting"TVLocation"to"Home"allowstheTVtoachieveanenergy-savingstatusforhouseholduse.
ProductsthathaveearnedtheENERGYSTAR
®
aredesignedtoprotectthe
environmentthroughsuperiorenergyefficiency.
Réclamer une réparation

FR
34

SHARP ELECTRONICS CORPORATION
Sharp Plaza, Mahwah, New Jersey 07495-1163
SHARP CORPORATION
OPERATION MANUAL MANUAL DE OPERACIÓN MODE D’EMPLOI