You can lock the keys except (power) on the unit to prevent them from being operated by mistake
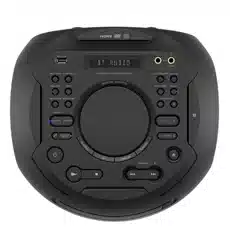
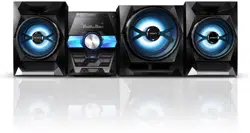
Unit (Top)
* The button has a tactile dot. Use the tactile dot as a reference when operating the system.
1.
(power) Turns on the system, or sets it to standby mode.
(stop)
- Stops playback. When pressed twice, resume playback can be canceled.
- Stops transfer during music transfer.
- Stops the built-in sound demonstration.
(play)
Starts playback.
Hold down for more than 2 seconds, the built-in sound demonstration will be played back. To stop the demonstration, press .
PARTY LIGHT
LIGHT MODE
2.
BLUETOOTH
Selects BLUETOOTH function.
BLUETOOTH indicator
PAIRING
Hold down to activate BLUETOOTH pairing during BLUETOOTH function.
REC TO USB
Transfers music to the USB device connected to the (USB) port.
MEGA BASS
MEGA BASS indicator
Lights up when MEGA BASS sound effect is selected.
(USB) (REC/PLAY) port
Use to connect a USB device. This port can be used for both playback and music transfer.
3.
FUNCTION
Selects a function.
FLANGER
ISOLATOR
4.
VOLUME/DJ CONTROL knob
Adjusts the volume.*
Adjusts the FLANGER and ISOLATOR effect or outputs the SAMPLER sound effect continuously
* You cannot use this knob to adjust the volume when DJ Effect is selected.
5.
(N-Mark)
6.
GUITAR
GUITAR indicator
Lights up when guitar mode is turned on.
DJ OFF
SAMPLER
7.
MIC1 jack
Use to connect the microphone.
MIC2/GUITAR jack
Use to connect the microphone or guitar.
8. Display
9.
VOCAL FADER
MIC ECHO
MIC/GUITAR LEVEL knob
10.
+/– (select folder)
Selects a folder on a data disc or a USB device.
S1, S2, S3, S4
(open/close)
Opens or closes the disc tray.
(go backward/go forward)
TUNING+/–
11.
ENTER
Enters the settings.
12.
FOOTBALL
FIESTA
SOUND FIELD
13. PARTY CHAIN
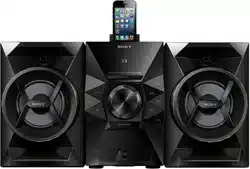
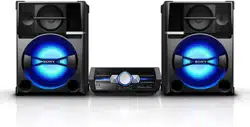
Unit (Front)
14. Remote control sensor
15. Disc tray
16. Front panel lighting If the front panel lighting is glaring, do not look directly at it.
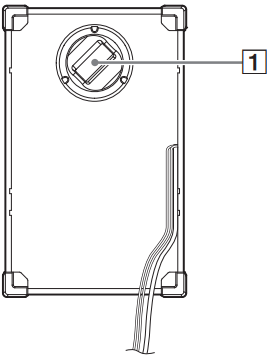
Speaker (Rear)
Example:
Party Light Do not look directly at the light emitting part when the Party Light is turned on.
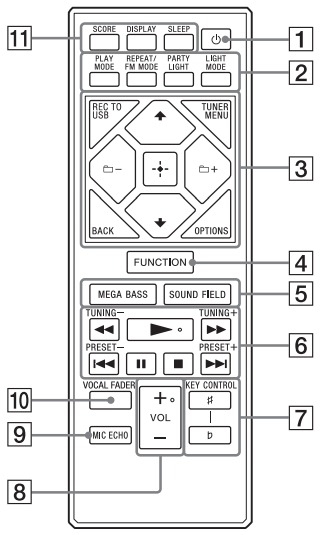
Remote control
1.
(power)
Turns on the system, or sets it to standby mode.
2.
PLAY MODE
REPEAT/FM MODE
PARTY LIGHT
LIGHT MODE
3.
REC TO USB
Transfers music to the USB device connected to the (USB) port.
TUNER MENU
BACK
Returns to the previous display.
OPTIONS
Enters or exits options menu.
Selects the menu items.
+/– (select folder)
Selects a folder on a data disc or a USB device.
(enter)
Enters or confirms the settings.
4.
FUNCTION
Selects a function.
5.
MEGA BASS
SOUND FIELD
6.
(fast reverse/fast forward)
TUNING+/–
(play)*
Starts playback.
(go backward/go forward)
PRESET+/–
(pause)
Pauses playback. To resume playback, press .
(stop)
- Stops playback. When pressed twice, resume playback can be canceled.
- Stops transfer during music transfer.
- Stops the built-in sound demonstration.
7. KEY CONTROL
8.
VOL (volume) +/–*
Adjusts the volume.
9. MIC ECHO
10. VOCAL FADER
11.
SCORE
DISPLAY
Changes the information on the display.
SLEEP
* The VOL + and buttons have a tactile dot. Use the tactile dot as a reference when operating the system.
Getting Started
Hooking up the system securely
Unit (Rear)
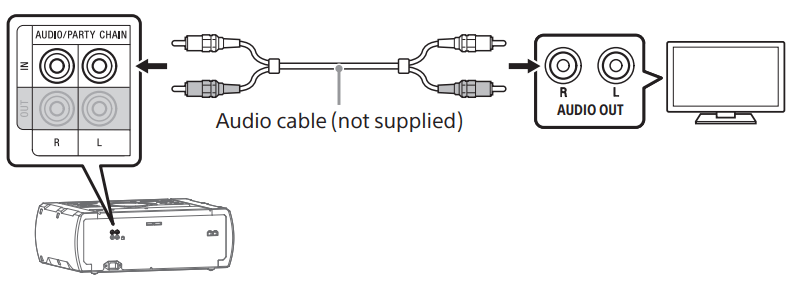
Audio input and output jacks
Use an audio cable (not supplied) to make either connection as follows:
AUDIO/PARTY CHAIN IN L/R jacks
- Connect to the audio output jacks of a TV or an audio/video equipment. The sound is output through this system.
- Connect to another audio system to enjoy the Party Chain function.
AUDIO/PARTY CHAIN OUT L/R jacks
- Connect to the audio input jacks of an optional equipment.
- Connect to another audio system to enjoy the Party Chain function
FM ANTENNA terminal
Find a location and an orientation that provide good reception when you set up the antennas.
Keep the antenna away from the speaker cables, the AC power cord (mains lead) and the USB cable to avoid picking up noise.
Speakers
PARTY LIGHT L/R terminals
Connect the Party Light connector of the speaker to this terminal. The lighting on the speakers will react according to the music source. You can select the Party Light and Speaker Light according to your preference
SPEAKERS L/R terminals
Connect the speaker connector of the speaker to this terminal.
Note:
Be sure to use only the supplied speakers.
When connecting speaker cables, insert the connector straight into the terminals.
AC power cord (mains lead)
Connect the AC power cord (mains lead) (supplied) to the unit, then plug it into a wall outlet.
A small space is left between the plug and the unit even when the AC power cord (mains lead) is inserted firmly. The cord is supposed be connected this way. This is not a malfunction.
When the AC power cord (mains lead) is connected, the demonstration starts automatically. If you press (power) to turn on the system, the demonstration ends.
Deactivating the demonstration
To deactivate the demonstration while the system is turned off, press DISPLAY repeatedly to select the no display mode.
Inserting batteries
Insert the two supplied R03 (size AAA) batteries, matching the polarities shown below.
Note
Do not mix an old battery with a new one or mix different types of batteries.
If you do not use the remote control for a long period of time, remove the batteries to avoid damage from battery leakage and corrosion.
To operate the system using the remote control
Point the remote control at the unit’s remote control sensor.
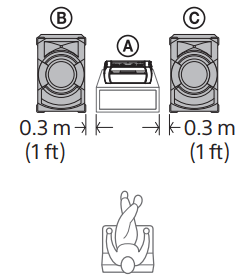
Positioning the speakers
To obtain optimum performance from the system, we recommend you to place the speakers as shown below.
A Unit
B Left speaker (L)
C Right speaker (R)
Note
Check the speaker type by referring to the speaker label (“L” or “R”) on the rear panel of the speaker.
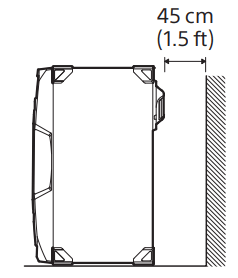
To obtain optimum Party Light effects, we recommend you to place the speakers from the wall as shown below.
Listening to TV sound via the system
Before connecting cables, be sure to disconnect the AC power cord (mains lead).
To listen to TV sound, press FUNCTION repeatedly to select “AUDIO IN”.
Hint
You can also enjoy the sound of external equipment (DVD players, etc.) via the system by connecting to the AUDIO/PARTY CHAIN IN jacks. For details, refer to the operating instructions of your equipment.
If the audio output level from the system is low when connecting the external equipment, try adjusting the audio output settings on the connected equipment. It may improve the audio output level. For details, refer to the operating instructions of your equipment.
Changing the display mode
Press DISPLAY repeatedly while the system is turned off.
Each time you press the button, the display mode changes as follows.
Demonstration
The messages about the main features of this system scrolls across the display and the illumination turns on. To turn off the illumination, press PARTY LIGHT.
No display (Power Saving Mode)
The display is turned off to conserve power.
Disc/USB Playback
Basic playback
1. Press FUNCTION repeatedly to select “CD” or “USB”.
2. Prepare the playback source.
For CD function:
Press on the unit to open the disc tray and load a disc with the label facing up.
When you play back an 8 cm disc such as a CD single, place it on the inner circle of the tray.
Press on the unit again to close the disc tray.
Do not forcibly push the disc tray to close it as this may cause a malfunction.
For USB function:
Connect a USB device to the (USB) port.
Note: You can use a USB adaptor (not supplied) to connect the USB device to the unit if the USB device cannot be plugged into the (USB) port.
3. Press to start playback.
Other operations
To
Do this
Stop playback
Press .
Pause playback
Press .
Resume playback or return to normal playback
Press .
Cancel the resume point
Press twice.
Select a track or file
Press or during playback. (Operation might be prohibited by disc or USB device.)
Locate a point quickly in fast forward or fast reverse (Lock Search)
Press or during playback.
Using play mode
Playing in sequential order (Normal Play)
When playback is stopped, press PLAY MODE repeatedly.
The following indicator lights up on the display.
(None): plays the disc or USB device.
“FLDR”*: plays all playable files in the specified folder on the disc or USB device.
* Cannot be selected for AUDIO CD.
Playing in random order (Shuffle Play)
When playback is stopped, press PLAY MODE repeatedly. The following indicators light up on the display.
“SHUF”: shuffles all playable files on the disc or USB device.
“FLDR SHUF”*: shuffles all playable files in the specified folder on the disc or USB device.
* Cannot be selected for AUDIO CD.
Note:
Shuffle Play is canceled when you:
- open the disc tray.
- perform Synchronized Transfer.
Shuffle Play may be canceled when you select a folder or a track to play back.
Playing repeatedly (Repeat Play)
Press REPEAT repeatedly.
The following indicators light up on the display.
“ ”: repeats all tracks or audio files on a folder/disc/USB device.
“ ”: repeats a track or audio file.
Note: Repeat Play is canceled when you:
- open the disc tray.
- perform Synchronized Transfer.
Viewing information on the display
Press DISPLAY repeatedly when the system is turned on.
You can view the information as follows:
- playing time/remaining time of track, file, disc
- file name, folder name
- title, artist name, and album name
Note:
The disc name or track name may not be displayed depending on the characters.
Playing time of audio files may not be displayed correctly.
The elapsed playing time for an audio file encoded using a VBR (variable bit rate) is not displayed correctly.
USB Transfer
Transferring music
You can transfer music from a disc (AUDIO CD or MP3 disc only) to a USB device connected to the (USB) port.
The audio format of files transferred by this system is MP3.
Note:
Do not remove the USB device during transfer or erase operations. Doing so may corrupt the data on the USB device or damage the USB device itself.
MP3 files are transferred with the same bit rate as the original files.
When transferring from AUDIO CD, you may select the bit rate before transferring.
USB transfer and erase operations are prohibited when the disc tray is opened.
Note on copyright-protected content The transferred music is limited to private use only. Use of the music beyond this limit requires permission of the copyright holders.
To select the bit rate
You can select a higher bit rate to transfer music with better quality.
1. Press OPTIONS.
2. Press repeatedly to select “BIT RATE”, then press .
3. Press repeatedly to select the bit rate you want, then press .
“128 KBPS”: encoded MP3 files have smaller file size and lower audio quality.
“256 KBPS”: encoded MP3 files have bigger file size but higher audio quality.
To exit the options menu, press OPTIONS.
Transferring music from a disc
You can transfer music to a USB device connected to (USB) port as follows:
Synchronized Transfer: Transfer all tracks or MP3 files from a disc to USB.
REC1 Transfer: Transfer a single track or MP3 file during playback.
Use the buttons on the unit to perform this operation.
1. Connect a transferable USB device to the (USB) port.
Note: You can use a USB adaptor (not supplied) to connect the USB device to the unit if the USB device cannot be plugged into the (USB) port.
2. Press FUNCTION repeatedly to select “CD” then load a disc.
3. Prepare the sound source.
Synchronized Transfer:
If the system starts playback automatically, press twice to stop the playback fully.
When playback is stopped, press PLAY MODE on the remote control repeatedly to select the play mode you want.
Note: If you start transferring in Shuffle Play or Repeat Play, the selected play mode changes to Normal Play automatically.
REC1 Transfer:
Select the track or MP3 file you want to transfer, then start playback.
4. Press REC TO USB.
“PUSH ENTER” appears on the display.
5. Press ENTER.
The transfer starts, then “DO NOT REMOVE” appears on the display. Do not remove the USB device until the transfer is complete.
When the transfer is complete, the system performs as follows:
Synchronized Transfer:
The disc stops automatically.
REC1 Transfer:
The disc continues to play the next track or file.
To stop transfer
Press .
Notes on transfer
While transferring, no sound is output.
CD-TEXT information is not transferred to the created MP3 files.
The transfer stops automatically if:
- the USB device runs out of space during transfer.
- the number of audio files or folders on the USB device reaches the limit that the system can recognize.
If a folder or file that you are trying to transfer already exists on the USB device with the same name, a sequential number is added after the name without overwriting the original folder or file.
You cannot perform the following operations during transfer:
- Eject the disc.
- Select another track or file.
- Pause playback or find a point in the track or file.
- Change the function.
When transferring music to a WALKMAN® using “Media Manager for WALKMAN”, be sure to transfer in MP3 format.
When connecting a WALKMAN® to the system, be sure to connect after the display “Creating Library” or “Creating Database” on the WALKMAN® has disappeared.
Folder and file generation rules
Maximum number of MP3 files that can be generated
298 folders
650 files in a folder
650 files in REC1-CD or REC1-MP3 folder.
These numbers may vary depending on the file or folder configuration.
When transferring to a USB device, a “MUSIC” folder is created directly below “ROOT”. Folders and files are generated within this “MUSIC” folder according to the transfer method and source as follows:
Synchronized Transfer
When transferring CD-DA tracks from an AUDIO CD
Folder name: “CDDA0001”*
File name: “TRACK001”*
When transferring MP3 files from a disc
Folder name: Same as the source
File name: Same as the source
REC1 Transfer
When transferring a CD-DA track from an AUDIO CD
Folder name: “REC1-CD”
File name: “TRACK001”*
When transferring an MP3 file from a disc
Folder name: “REC1-MP3”
File name: Same as the source
* Folder and file numbers are assigned serially thereafter.
Erasing audio files or folders on the USB device
1. Press FUNCTION repeatedly to select “USB”.
2. When playback is stopped, press OPTIONS.
3. Press repeatedly to select “ERASE”, then press .
4. Press repeatedly to select a folder, then press .
5. Press repeatedly to select an audio file you want to erase, then press .
If you want to erase all the audio files in the folder, select “ALL TRACKS”.
“FLDR ERASE” or “TRK ERASE” and “PUSH ENTER” appear on the display.
To cancel erase operations, press
6 Press .
“COMPLETE” appears on the display.
To exit the options menu, press OPTIONS.
Note:
You can erase the supported audio file, MP4 format file, and 3GP format file only.
You cannot erase audio files or folders when Shuffle Play has been selected. Set the play mode to Normal Play before erasing.
Erase operation is prohibited when the disc tray is opened.
Tuner
Listening to the radio
1. Press FUNCTION repeatedly to select “TUNER FM”.
2. Tune to a station.
For automatic scanning:
Hold down TUNING+/– until the frequency begins to change on the display.
Scanning stops automatically when a station is tuned in. “STEREO” (for FM stereo programs only) lights up on the display.
If scanning does not stop, press to stop scanning. Then, perform manual tuning (below).
For manual tuning:
Press TUNING+/– repeatedly to tune to the station you want.
Hint: To reduce static noise on a weak FM stereo station, press FM MODE repeatedly until “MONO” lights up on the display. You will lose the stereo effect, but reception will improve.
Presetting radio stations
You can store up to 20 FM stations as your favorite stations.
1. Tune to the station you want.
2. Press TUNER MENU.
3. Press repeatedly to select the preset number you want, then press .
“COMPLETE” appears on the display and the station is stored.
If another station is already assigned to the selected preset number, that station is replaced by the new one.
To listen to the preset station
Press PRESET+/– repeatedly to select the preset number you want.
BLUETOOTH
About the BLUETOOTH wireless technology
BLUETOOTH wireless technology is a short-range wireless technology that enables wireless data communication between digital devices.
Supported BLUETOOTH version, profiles and codecs
Compatible BLUETOOTH devices
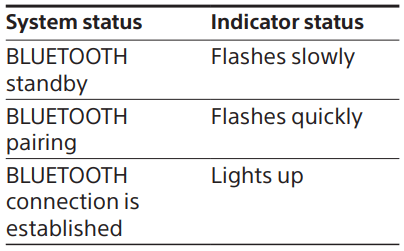
About the BLUETOOTH indicator
The BLUETOOTH indicator on the unit lights up or flashes in blue to show the BLUETOOTH status.
Pairing this system with a BLUETOOTH device
Pairing is an operation where BLUETOOTH devices register with each other beforehand. Once a pairing operation is performed, it does not need to be performed again.
If your device is an NFC-compatible smartphone, the manual pairing procedure is not necessary.
1. Place the BLUETOOTH device within 1 meter (3.3 feet) from the unit.
2. Press BLUETOOTH on the unit to select the BLUETOOTH function. “BLUETOOTH” appears on the display.
Hint:
When there is no pairing information on the system (for example, when you use the BLUETOOTH function for the first time after purchase), “PAIRING” flashes on the display and the system enters the pairing mode. Proceed to step 4.
If the system is connected to a BLUETOOTH device, press BLUETOOTH on the unit to disconnect the BLUETOOTH device.
3. Hold down PAIRING on the unit for 2 seconds or more.
“PAIRING” flashes on the display
4. Perform the pairing procedure on the BLUETOOTH device.
5. Select the system’s name (for example, “SHAKE-X30”) on the display of the BLUETOOTH device.
Perform this step within 5 minutes, otherwise pairing will be canceled. In this case, repeat from step 3. Note If passkey is required on the BLUETOOTH device, enter “0000”. “Passkey” may be called “Passcode”, “PIN code”, “PIN number”, or “Password”.
6. Establish connection with the BLUETOOTH device.
When pairing is completed and the BLUETOOTH connection is established, BLUETOOTH device name appears on the display.
Depending on the BLUETOOTH device, connection may start automatically after pairing is completed.
You can check the BLUETOOTH device address by pressing DISPLAY repeatedly.
Note:
You can pair up to 9 BLUETOOTH devices. If the 10th BLUETOOTH device is paired, the oldest paired device will be deleted.
If you want to pair with another BLUETOOTH device, repeat steps 1 to 6.
To cancel the pairing operation
Hold down PAIRING on the unit for 2 seconds or more until “BLUETOOTH” appears on the display.
To erase pairing information
Use the buttons on the unit to perform this operation.
1. Press BLUETOOTH to select BLUETOOTH function.
“BLUETOOTH” appears on the display.
If the system is connected to a BLUETOOTH device, the BLUETOOTH device name appears on the display. Press BLUETOOTH to disconnect the BLUETOOTH device.
2. Hold down ENTER and LIGHT MODE for about 3 seconds.
“BT HISTORY CLEAR” appears on the display and all the pairing information is erased.
Listening to music on a BLUETOOTH device
You can operate a BLUETOOTH device by connecting the system and the BLUETOOTH device using AVRCP.
Check the following before playing music:
- The BLUETOOTH function of the BLUETOOTH device is turned on.
- Pairing has been completed
Once the system and the BLUETOOTH device are connected, you can control playback by pressing , , , and .
1. Press BLUETOOTH on the unit to select the BLUETOOTH function. “BLUETOOTH” appears on the display.
2. Establish connection with the BLUETOOTH device.
Press BLUETOOTH on the unit to connect to the last connected BLUETOOTH device.
Perform the BLUETOOTH connection from the BLUETOOTH device if the device is not connected.
Once the connection is established, the BLUETOOTH device name appears on the display.
3. Press to start playback. Depending on the BLUETOOTH device,
- you may need to press twice.
- you may need to start playing an audio source on the BLUETOOTH device.
4. Adjust the volume.
Adjust the volume of the BLUETOOTH device first. If the volume level is still too low, adjust the volume level on the system.
Note:
When the system is not connected to any BLUETOOTH device, the system will connect to the last connected BLUETOOTH device automatically when you press BLUETOOTH or on the unit.
If you try to connect another BLUETOOTH device to the system, the current connected BLUETOOTH device will be disconnected.
To terminate the BLUETOOTH connection
Press BLUETOOTH on the unit. “BLUETOOTH” appears on the display.
Depending on the BLUETOOTH device, the BLUETOOTH connection may be terminated automatically when you stop playback.
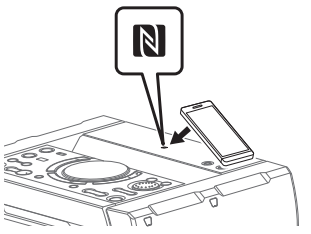
One Touch BLUETOOTH Connection by NFC
NFC (Near Field Communication) is a technology enabling shortrange wireless communication between various devices, such as smartphones and IC tags.
When you touch the system with an NFC-compatible smartphone, the system automatically:
- turns on in the BLUETOOTH function.
- completes the pairing and BLUETOOTH connection.
Compatible smartphones: Smartphones with a built-in NFC function (OS: Android 2.3.3 or later, excluding Android 3.x)
Note:
The system can only recognizes and connects to one NFC-compatible smartphone at a time. If you try to connect another NFC-compatible smartphone to the system, the currently connected NFC-compatible smartphone will be disconnected.
Depending on your NFC-compatible smartphone, you may need to perform the following steps on your NFCcompatible smartphone in advance.
- Turn on the NFC function. For details, refer to the operating instructions of the NFC-compatible smartphone.
- If your NFC-compatible smartphone has an OS version that is older than Android 4.1.x, download and start the “NFC Easy Connect” application. “NFC Easy Connect” is a free application for Android smartphones that can be obtained from Google Play. (The application may not be available in some countries/regions.)
1 Touch the smartphone to the N-Mark on the unit until the smartphone vibrates.
Complete the connection by following the instructions displayed on the smartphone.
When the BLUETOOTH connection is established, the BLUETOOTH device name appears on the display. 2. Start playback of an audio source on the smartphone.
Hint:
If pairing and the BLUETOOTH connection fail, do the following.
- Remove the case from the smartphone if using a commercially available smartphone case.
- Touch the smartphone to the N-Mark on the unit again.
- Relaunch the “NFC Easy Connect” application.
To terminate the BLUETOOTH connection
Touch the smartphone to the N-Mark on the unit again.
Setting the BLUETOOTH audio codecs
audio codecs You can enable AAC, LDAC or SBC codec reception from BLUETOOTH device. AAC/LDAC can be selected only when the BLUETOOTH device supports AAC/LDAC.
1. Press OPTIONS.
2. Press repeatedly to select “BT CODEC”, then press .
3. Press repeatedly to select the setting, then press .
“AUTO”: Enable reception in AAC or LDAC codec format.
“SBC”: Receive in SBC codec format.
To exit the options menu, press OPTIONS.
Note:
You can enjoy high quality sound if AAC or LDAC is selected. If you cannot listen to AAC or LDAC sound from your device or the sound is interrupted, select “SBC”.
If you change this setting while the system is connected to a BLUETOOTH device, the BLUETOOTH device will be disconnected. To connect to the BLUETOOTH device, perform the BLUETOOTH connection again.
Hint:
LDAC is an audio coding technology developed by Sony that enables the transmission of High-Resolution (Hi-Res) Audio content, even over a BLUETOOTH connection. Unlike other BLUETOOTH compatible coding technologies such as SBC, it operates without any down-conversion of the Hi-Res Audio content*, and allows approximately three times more data** than those other technologies to be transmitted over a BLUETOOTH wireless network with unprecedented sound quality, by means of efficient coding and optimized packetization.
* Excluding DSD format contents.
** In comparison with SBC (Subband Coding) when the bitrate of 990 kbps (96/48 kHz) or 909 kbps (88.2/44.1 kHz) is selected.
Setting the BLUETOOTH standby mode
The BLUETOOTH standby mode enables the system to turn on automatically when you establish a BLUETOOTH connection from a BLUETOOTH device.
1. Press OPTIONS.
2. Press repeatedly to select “BT STBY”, then press .
3. Press repeatedly to select the setting, then press .
“ON”: The system turns on automatically even when the system is in standby mode.
“OFF”: Turns off this function. To exit the options menu, press OPTIONS.
Turning on or off the BLUETOOTH signal
You can connect to the system from a paired BLUETOOTH device in all functions when the system’s BLUETOOTH signal is set to on. The BLUETOOTH signal is turned on by default.
Hold down ENTER and on the unit for about 3 seconds.
“BT ON” or “BT OFF” appears on the display.
Note:
You cannot perform the following operations when BLUETOOTH signal is set to off:
- Pair and/or connect with BLUETOOTH device
- Erase the pairing information
- Use “SongPal”
- Change the BLUETOOTH audio codecs
If you touch the N-Mark on the unit with an NFC-compatible smartphone or set the BLUETOOTH standby mode to on, the BLUETOOTH signal will be set to on automatically
Controlling the system using a smartphone or tablet (SongPal)
“SongPal” is a dedicated app for operating “SongPal”-compatible audio devices manufactured by Sony using a smartphone or tablet. Search for “SongPal” on Google Play™ or App Store and download it using your smartphone or tablet. “SongPal” allows you to:
- change the function of the system, control the playback of the disc/ USB device and tune to an FM station.
- browse the music content of disc/ USB device.
- view the information of disc/USB such as playing time and title.
- adjust the volume and change sound setting.
1. Search for “SongPal” or scan the two-dimensional code below.
2. Download “SongPal” app on your device.
3. Connect the system and device by BLUETOOTH connection.
4. Launch “SongPal” and follow the on-screen instructions.
Note:
We recommend you to use the latest “SongPal” version.
If the “SongPal” application does not work properly, press BLUETOOTH on the unit to terminate the BLUETOOTH connection, then perform the BLUETOOTH connection again so that the BLUETOOTH connection functions normally.
Available operations via “SongPal” may differ depending on the audio devices.
For more details on “SongPal”, refer to the following URL. http://info.songpal.sony.net/help/
Specifications and display design of “SongPal” are subject to change without notice.
Getting frenzied parties with the “Fiestable” app
You can control the party features of Sony’s Home Audio System with intuitive and fancy user interface with the “Fiestable” app. “Fiestable” allows you to control features such as DJ Effect, illumination and Karaoke.
Even if “Fiestable” is installed, the “Fiestable” icon is not displayed on the smartphone or tablet home screen. It is embedded in the “SongPal” app as a plug-in.
1. Search and download “SongPal” app on your device
2. Search and download “Fiestable” app from Google Play or App Store using your device.
3 Connect the system and device by BLUETOOTH connection
4. Launch “SongPal” and touch the “Fiestable” icon at the top left corner.
Troubleshooting
Should you encounter a problem with your system, find your problem in the troubleshooting checklist below and take the corrective action.
If the problem persists, consult your nearest Sony dealer. Note that if the service personnel changes some parts during repair, these parts may be retained.
If “PROTECT XX” (X is a number) appears on the display
Immediately unplug the AC power cord (mains lead), and check the following items.
Are you using only the supplied speakers?
Is anything blocking the ventilation holes of the unit?
After you have checked and found no problems, reconnect the AC power cord (mains lead), and turn on the system. If the issue persists, contact your nearest Sony dealer.
General
The power does not turn on.
Check that the AC power cord (mains lead) is connected securely.
The system has entered standby mode.
This is not a malfunction. The system enters standby mode automatically in about 15 minutes when there is no operation or audio signal output
There is no sound.
Adjust the volume.
Check the speaker connections
Check the connection of the optional equipment, if any
Turn on the connected equipment.
Unplug the AC power cord (mains lead), then plug in the AC power cord (mains lead) again and turn on the system.
There is no microphone sound.
Adjust the microphone volume level.
Make sure the microphone is connected to the MIC1 or MIC2/ GUITAR jack on the unit correctly.
Make sure the microphone is turned on.
There is severe hum or noise.
Move the system away from sources of noise.
Connect the system to a different wall outlet.
Install a noise filter (not supplied) to the AC power cord (mains lead).
Turn off surrounding electrical equipment.
The noise generated by the cooling fans of the system may be heard when the system is turned on. This is not a malfunction.
Move the unit away from the neon signs or fluorescent light.
The remote control does not function.
Remove the obstacles between the remote control and the unit.
Move the remote control closer to the unit.
Point the remote control at the unit’s sensor
Replace the batteries (R03/size AAA).
Move the unit away from the fluorescent light.
There is acoustic feedback.
Reduce the volume.
Move the microphone and guitar away from the system or change the direction of the microphone.
“PLEASE CONNECT ALL SPK” appears.
Check that all speakers are connected.
“CHILD LOCK” appears when you press any button on the unit.
Set the Child Lock function to off
A clicking sound is heard when turning the power on.
This is the operating sound and it occurs when the power is turned on or off, for example. This is not a malfunction.
Speakers
Sound comes from only one channel or the left and right volume is unbalanced.
Place the speakers as symmetrically as possible.
Check that the speakers are connected securely and correctly.
The source being played back is monaural.
There is no sound from a specific speaker.
Check that the speaker is connected securely and correctly
Disc player
The disc tray does not open and “LOCKED” appears on the display.
Consult your nearest Sony dealer or local authorized Sony service facility.
The disc tray does not close.
Load the disc correctly.
The disc does not eject.
You cannot eject the disc during Synchronized Transfer or REC1 Transfer. Press to cancel the transfer, then press on the unit to eject the disc.
Consult your nearest Sony dealer.
Playback does not start.
Wipe the disc clean
Reload the disc.
Load the disc that this system can play back
Remove the disc and wipe away the moisture on the disc, then leave the system turned on for a few hours until the moisture evaporates.
The sound skips.
Wipe the disc clean
Reload the disc.
Move the unit to a place with no vibration.
Move the speakers away from the unit. When you listen to a track with bass sounds at high volume, the speaker vibration may cause the sound to skip.
Playback does not start from the first track.
Set the play mode to Normal Play
Resume Play has been selected. Press twice. Then, press to start playback.
The MP3 disc cannot be played back.
The data is not stored in the supported format.
The folder name, track name, file name and ID3 tag characters do not appear properly.
The ID3 tag is not Version 1 (1.0/1.1) or Version 2 (2.2/2.3).
The character codes that can be displayed by this system are as follows:
- Upper cases (A to Z)
- Numbers (0 to 9)
- Symbols (< > * +, [ ] \ _) Other characters appear as “_”.
The sound loses stereo effect when you play back an AUDIO CD or audio file.
Turn off the Vocal Fader
Make sure the system is connected properly.
Check the speaker connections
USB device
Transferring results in an error.
You are using an unsupported USB device. Check the information on the website about compatible USB devices
The USB device is not formatted correctly. Refer to the operating instructions of the USB device on how to format.
Turn off the system and remove the USB device. If the USB device has a power switch, turn the USB device off and on again after removing it from the system. Then, perform the transfer again.
If the transfer and erase operations are repeated multiple times, the file structure within the USB device becomes fragmented. Refer to the operating instructions of the USB device on how to deal with this problem.
The USB device was disconnected or the power was turned off during transfer. Delete the partially-transferred file, and perform the transfer again. If this does not fix the problem, the USB device may be broken. Refer to the operating instructions of the USB device on how to deal with this problem.
Audio files or folders on the USB device cannot be erased.
Check if the USB device is writeprotected.
The USB device was disconnected or the power was turned off during the erase operation. Delete the partially-erased file. If this does not fix the problem, the USB device may be broken. Refer to the operating instructions of the USB device on how to deal with this problem.
There is no sound.
The USB device is not connected correctly. Turn off the system and reconnect the USB device, then turn on the system and check if “USB” appears on the display.
There is noise, skipping, or distorted sound.
You are using an unsupported USB device. Check the information on the website about compatible USB devices
Turn off the system and reconnect the USB device, then turn on the system.
The music data itself contains noise, or the sound is distorted. Noise may have entered during the transfer process. Delete the file, and try transfer again.
The bit rate used in encoding an audio file was low. Send an audio file with higher bit rate to the USB device.
“READING” is displayed for an extended time, or it takes a long time before playback starts.
The reading process can take a long time in the following cases.
- There are many folders or files on the USB device
- The file structure is extremely complex.
- The memory capacity is excessive.
- The internal memory is fragmented.
“NO FILE” appears on the display.
The system has entered the software update mode, and all buttons (except ) are deactivated. Press on the unit to cancel the software update.
“OVER CURRENT” appears on the display.
A problem has been detected with the level of electrical current from the (USB) port. Turn off the system and remove the USB device from the port. Make sure there is no problem with the USB device. If this display pattern persists, contact your nearest Sony dealer.
Erroneous display.
The data stored in the USB device may have been corrupted, perform the transfer again.
The character codes that can be displayed by this system are as follows:
- Upper cases (A to Z)
- Numbers (0 to 9)
- Symbols (< > * +, [ ] \ _) Other characters appear as “_”.
The USB device is not recognized.
Turn off the system and reconnect the USB device, then turn on the system.
Check the information on the website about compatible USB devices
The USB device is not working properly. Refer to the operating instructions of the USB device on how to deal with this problem.
Playback does not start.
Turn off the system and reconnect the USB device, then turn on the system.
Check the information on the website about compatible USB devices
Playback does not start from the first file.
Set the play mode to Normal Play
Files cannot be played back.
USB devices formatted with file systems other than FAT16 or FAT32 are unsupported.*
If you use a partitioned USB device, only files on the first partition can be played back.
* This system supports FAT16 and FAT32, but some USB devices may not support all of these FAT. For details, refer to the operating instructions of each USB device or contact the manufacturer.
Tuner*
There is severe hum or noise, or stations cannot be received.
Connect the antenna properly.
Change antenna location and its orientation to obtain good reception.
Turn off nearby electrical equipment.
* Radio may not be received depending on the radio wave conditions or the housing environment in your area.
BLUETOOTH device
Pairing cannot be performed.
Move the BLUETOOTH device closer to the system.
Pairing may not be possible if other BLUETOOTH devices are present around the system. In this case, turn off the other BLUETOOTH devices.
Make sure to enter the correct passkey when selecting the system’s name (this system) on the BLUETOOTH device.
The BLUETOOTH device cannot detect the system, or “BT OFF” appears on the display.
Set the BLUETOOTH signal to “BT ON”
Connection is not possible.
The BLUETOOTH device you attempted to connect does not support the A2DP profile, and cannot be connected with the system.
Enable the BLUETOOTH function of the BLUETOOTH device.
Establish a connection from the BLUETOOTH device.
The pairing registration information has been erased. Perform the pairing operation again.
Erase the pairing registration information of the BLUETOOTH device and perform the pairing operation again
The sound skips or fluctuates, or the connection is lost.
The system and the BLUETOOTH device are too far apart.
If there are obstacles between the system and your BLUETOOTH device, remove or avoid the obstacles.
If there is equipment that generates electromagnetic radiation, such as a wireless LAN, other BLUETOOTH device, or a microwave oven nearby, move them away.
The sound of your BLUETOOTH device cannot be heard on this system.
Increase the volume on your BLUETOOTH device first, then adjust the volume using VOL +/–.
There is severe hum, noise, or distorted sound.
If there are obstacles between the system and your BLUETOOTH device, remove or avoid the obstacles.
If there is equipment that generates electromagnetic radiation, such as a wireless LAN, other
BLUETOOTH device, or a microwave oven nearby, move them away.
Turn down the volume of the connected BLUETOOTH device
Party Chain
Party Chain function cannot be activated.
Check the connections
Make sure the audio cables are connected correctly.
“PARTY CHAIN” is flashing on the display.
You cannot select AUDIO IN function if you make connection during Party Chain function. Select other function
Press PARTY CHAIN on the unit.
Restart the system.
Party Chain function does not work properly.
Turn off the system. Then, turn it back on again to activate the Party Chain function.
Resetting the system
If the system still does not operate properly, reset the system to factory default settings. Use the buttons on the unit to perform this operation.
1. Unplug the AC power cord (mains lead), then plug it back in.
2. Press to turn on the system.
3. Hold down DJ OFF and for about 3 seconds.
“RESET” appears on the display. After the reset completes, the system automatically reboots. Press to turn on the system.
All user-configured settings, such as preset radio stations are reset to factory default setting.
Messages
One of the following messages may appear or flash on the display during operation.
CANNOT PLAY
A disc that cannot be played back was inserted.
DATA ERROR
The file is created in unsupported format.
The file extensions does not match the file format.
DEVICE ERROR
The USB device could not be recognized or an unknown device is connected.
DEVICE FULL
The memory of the USB device is full.
ERASE ERROR
Erase of audio files or folders on the USB device failed.
FATAL ERROR
The USB device was removed during transfer or erase operation, and may have been damaged.
FOLDER FULL
You cannot transfer onto the USB device because the number of folders has reached its maximum.
GUEST
The system has become a Party Guest as the Party Chain function has been activated by a Party Host.
HOST
The system activated the Party Chain function and has become a Party Host.
NO DEVICE
No USB device is connected or unsupported device is connected.
NO DISC
There is no disc in the unit.
NO MUSIC
No supported audio files exist in the playback source.
NOT IN USE
You tried to perform a specific operation under conditions where that operation is prohibited.
NOT SUPPORTED
An unsupported USB device is connected, or the USB device is connected through a USB hub.
OVER CURRENT
An over current from the (USB) port was detected.
PROTECTED
The USB device is write-protected.
PUSH STOP
You tried to perform an operation that can be performed only when the playback is stopped.
READING
The system is reading information of the disc or USB device. Some operations are not available.
REC ERROR
The transfer did not start, stopped partway, or otherwise could not be performed.
TRACK FULL
You cannot transfer onto the USB device because the number of files has reached its maximum.
 (power) on the unit to prevent them from being operated by mistake
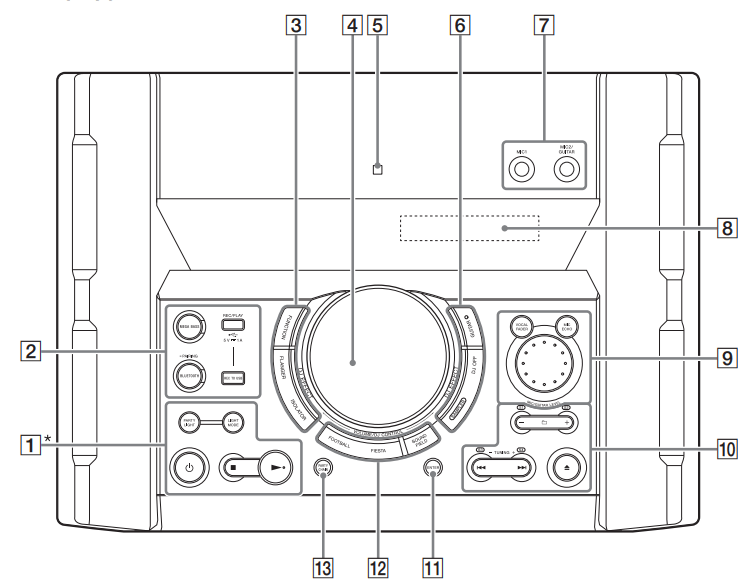
 button has a tactile dot. Use the tactile dot as a reference when operating the system.
 (stop)
  (play)
  PAIRING
  (USB) port.
  (N-Mark)
  +/– (select folder)
  (open/close)
  (go backward/go forward)
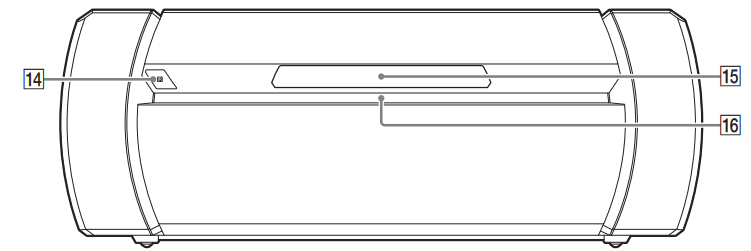
 (power)
  (USB) port.
 Selects the menu items.
  +/– (select folder)
  (enter)
  (fast reverse/fast forward)
  (play)*
  (go backward/go forward)
 (pause)
  .
.  (stop)

 Audio input and output jacks
  FM ANTENNA terminal
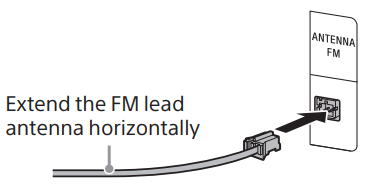
 Speakers
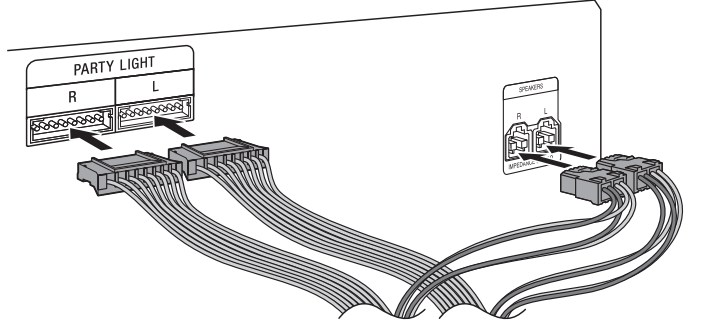
 AC power cord (mains lead)
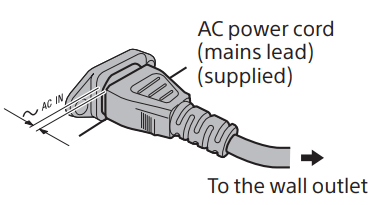
 (power) to turn on the system, the demonstration ends.
 on the unit to open the disc tray and load a disc with the label facing up.
 (USB) port.
  to start playback.
 .
. .
. twice.
 or
or  during playback. (Operation might be prohibited by disc or USB device.)
 or
or  ”: repeats all tracks or audio files on a folder/disc/USB device.
  ”: repeats a track or audio file.
  (USB) port.
  repeatedly to select “BIT RATE”, then press
  .
.  twice to stop the playback fully.
  repeatedly to select “ERASE”, then press
  .
. 
 PAIRING on the unit for 2 seconds or more until “BLUETOOTH” appears on the display.
 ,
,  ,
,  ,
,  and
and  .
. 
 repeatedly to select “BT CODEC”, then press
  .
.  repeatedly to select the setting, then press
  Controlling the system using a smartphone or tablet (SongPal)
 Getting frenzied parties with the “Fiestable” app
 to cancel the transfer, then press
  on the unit to eject the disc.
  to start playback.
  ) are deactivated. Press
  during Party Chain function. Select other function
 to turn on the system.
 for about 3 seconds.