Throughout this manual, features and appearance may vary from your model.
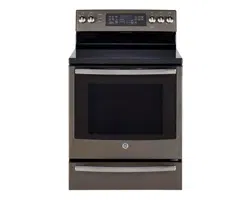
How to Set
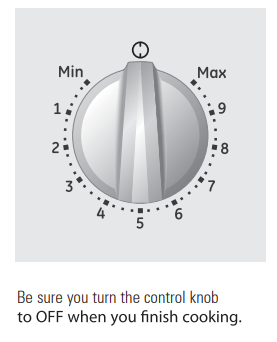
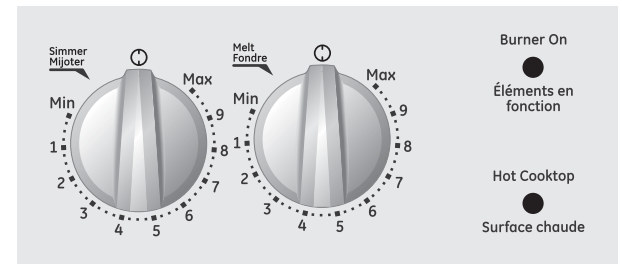
Push the knob in and turn in either direction to the setting you want.
At both OFF and Max the control clicks into position. You may hear slight clicking sounds during cooking, indicating the control is keeping the power level you set.
Indicator Lights (on radiant glass models only)
A Hot indicator light will glow when any radiant element is turned on, and will remain on until the surface is cool enough to touch.
A Burner On indicator light will glow when any surface unit is on.
NOTE: The Hot indicator light may glow between the surface control settings of Min and OFF, but there is no power to the surface units.
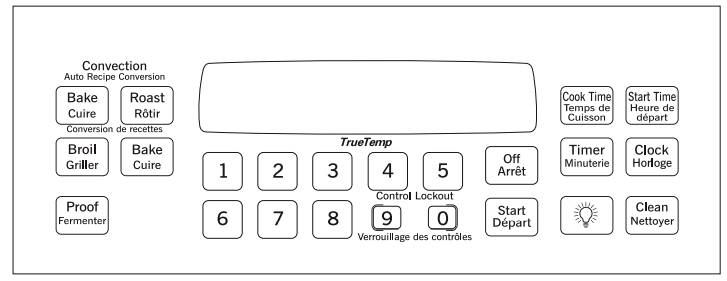
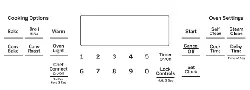
Using the oven controls
Features and appearance may vary.
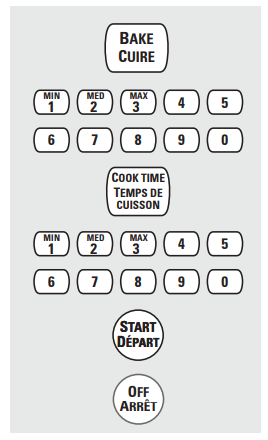
Control graphics for general artworks.
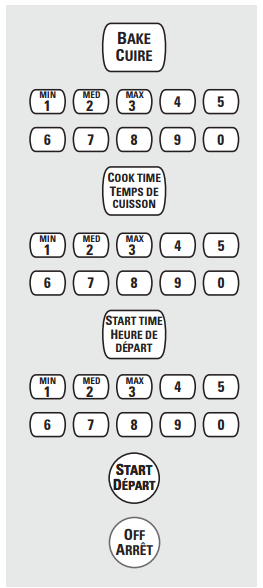
Control graphics for JCB560, JCB840 and JCB870 Models.
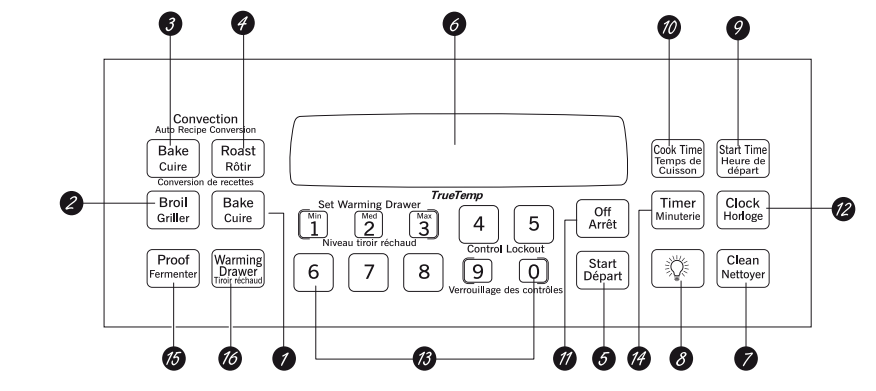
Oven Control, Clock and Timer Features and Settings
BAKE Pad Touch to select the bake function.
BROIL Pad Touch to select the broil function.
CONVECTION BAKE Pad Touch to select baking with the convection function.
CONVECTION ROAST Pad Touch to select roasting with the convection function.
START Pad Must be touched to start any cooking or cleaning function.
Display Shows the time of day, oven temperature, whether the oven is in the bake, broil or self-cleaning mode and the times set for the timer or automatic oven operations.
CLEAN Pad Touch to select self-cleaning function. See the Using the self-cleaning oven section.
LIGHT Pad Touch to turn the oven light on or off.
START TIME Pad Use along with COOK TIME or CLEAN pads to set the oven to start and stop automatically at a time you set.
COOK TIME Pad Touch and then touch the number pads to set the amount of time you want your food to cook. The oven will shut off when the cooking time has run out.
OFF Pad Touch to cancel ALL oven operations except the clock and timer.
CLOCK Pad Touch before setting the clock.
Number Pads Use to set any function requiring numbers such as the time of day on the clock, the timer, the oven temperature, the internal food temperature, the start time and length of operation for timed baking and self-cleaning.
TIMER Pad Touch to select the timer feature.
PROOF Pad Touch to select a warm environment useful for rising yeast-leavened products.
WARMING DRAWER ON/OFF Pad Touch to select the warming drawer function.
Temperature Conversions
Using the oven.
How to Set the Oven for Baking or Roasting
Touch the BAKE pad.
Touch the number pads to set the desired temperature.
Touch the START pad.
Check food for doneness at minimum time on recipe. Cook longerif necessary.
Touch theOFF pad when cooking is complete.
Preheating and Pan Placement
Preheat the oven if the recipe calls for it. Preheating is necesary for good results when baking cakes, cookies, pastry and breads.
To preheat, set the oven at the correct temperature. The control will beep when the oven is preheated an the display will show your set temperature.
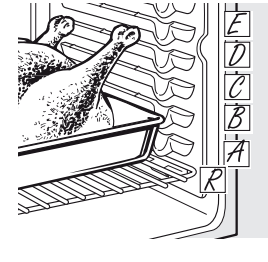
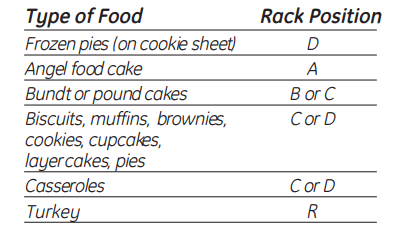
Baking results will be better if baking pans are centered in the oven as much as possible. If baking with more than one pan, place the pans so each has at least 2.5 cm to 3.8 cm (1" to 11/2") of air space around it.
If baking four cake layers at the same time, place two layers on rack B and two layers on rack D. Stagger pans on the rack so one is not directly above the other.
Using the timed baking and roasting features.
NOTE: Foods that spoil easily-such as milk, eggs, fish, stuffings, poultry and pork-should not be allowed to sit for more than 1 hour before or after cooking. Room temperature promotes the growth of harmful bacteria. Be sure that the oven light is off because heat from the bulb will speed harmful bacteria growth.
How to Set an Immediate Start and Automatic Stop
Touch the BAKE pad.
Touch the number pads to set the desired oven temperature.
Touch the COOK TIME pad.
Touch the number pads to set the desired length of cooking time. The minimum cooking time you can set is 1 minute. The oven temperature that you set and the cooking time that you entered will be in the display.
Touch the START pad.
Touch the OFF pad to clear the display if necessary. Remove the food from the oven. Remember, even though the oven turns off automatically, food left in the oven will continue cooking after the oven turns off
How to Set a Delayed Start and Automatic Stop
Touch the BAKE pad.
Touch the number pads to set the desired oven temperature.
Touch the COOK TIME pad.
Touch the number pads to set the desired length of cooking time. The minimum cooking time you can set is 1 minute. The oven temperature that you set and the cooking time that you entered will be in the display
Touch the START TIME pad.
Touch the number pads to set the time of day you want the oven to turn on and startcooking.
Touch the START pad.
Touch the OFF pad to clear the display if necessary. Remove the food from the oven. Remember, even though the oven turns off automatically, food left in the oven will continue cooking after the oven turns off
Care and cleaning
Care and cleaning of the range.
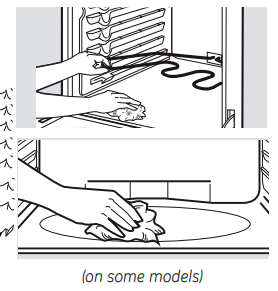
Oven Heating Elements
Do not clean the bake element or the broil element. Any soil will burn off when the elements are heated.
To clean the oven floor, gently lift the bake element Clean with warm soapy water
On some models, the bake element is not exposed and is under the oven floor. If spillover residue or ash accumulate on the oven floor, wipe up before self-cleaning.
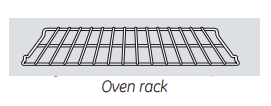
Oven Racks
All oven racks may be cleaned by hand with an abrasive cleaner or steel wool After cleaning, rinse the racks with clean water and dry with a clean cloth. Gray porcelain-coated oven racks may remain in the oven during the self-cleaning cycle without being damaged The shiny, silver colored oven racks may remain in the oven during the self-cleaning cycle, but they will lose their luster and become hard to slide.
It will be necessary to grease all oven rack side edges with a light coating of vegetable oil after cleaning them by hand or in the oven. This will help maintain the ease o sliding the racks in and out of the oven.
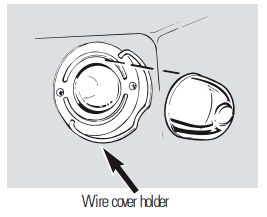
Oven Light Replacement (on somemodels)
To remove the cover:
Hold a hand under the cover so it doesn’t fall when released. With fingers of the same hand, firmly push back the wire cover holder. Lift off the cover.
Replace bulb with a 40-watt household appliance bulb.
To replace the cover:
Place it into groove of the light receptacle. Pull wire forward to the center of the cover until it snaps into place.
Connect electrical power to the range.
Storage Drawer Removal (on somemodels)
To remove the storage drawer:
Pull the drawer out all the way.
Tilt up the front and remove it.
To replace the storage drawer:
Insert glides at the back of the drawer beyond the stop on range glides.
Lift the drawer if necessary to insert easily.
Let the front of the drawer down; then push in to close.
Porcelain Enamel Cooktop (on radiant models)
The porcelain enamel finish is sturdy but breakable if misused. This finish is acid-resistant. However, any acidic foods spilled (such as fruit juices, tomato or vinegar) should not be permitted to remain on the finish.
If acids spill on the cooktop while it is hot, use a dry paper towel or cloth to wipe it up right away. When the surface has cooled, wash with soap and water. Rinse well.
For other spills such as fat spatterings, wash with soap and water or cleansing powders after the surface has cooled. Rinse well. Polish with a dry cloth.
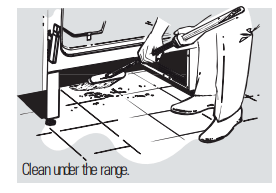
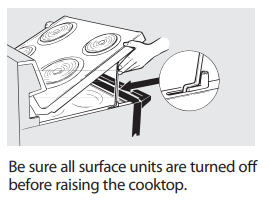
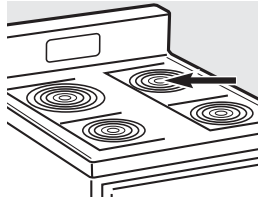
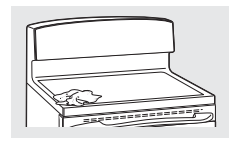
Lift-Up Cooktop (on coil models)
Some models have a cooktop that can be lifted up for easier cleaning. The entire cooktop may be lifted up and supported in the up position.
The surface units do not need to be removed; however, you may remove one to make raising the cooktop easier. There are two side supports that lock into position when the cooktop is lifted up.
After cleaning under the cooktop with hot, mild soapy water and a clean cloth, lower the cooktop. Be careful not to pinch your fingers.
To lower the cooktop, push the rods back and gently lower the cooktop until it rests in place.
NOTE: Do not lift the cooktop on radiant top models. Lifting the cooktop can lead to damage and improper operation of the range.
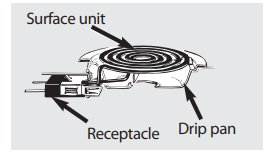
Surface Units (on coil models)
Be sure all the controls are turned to OFF and the surface units are cool before attempting to remove them.
To clean the surface units, turn the control to the highest setting for a minute. The coils will burn off any soil.
To remove a surface unit:
To remove the drip pans for cleaning, the surface units must be removed first.
Lift the surface unit about 1 inch above the drip pan and pull it out.
Do not lift the surface unit more than 1". If you do, it may not lie flat on the drip pan when you plug it back in.
Repeated lifting of the surface unit more than 1 inch above the drip pan can permanently damage the receptacle.
To replace a surface unit:
Replace the drip pan into the recess in the cooktop. Make sure the opening in the pan lines up with the receptacle.
Insert the terminals of the surface unit through the opening in the drip pan and into the receptacle.
Guide the surface unit into place so it rests evenly.
Drip Pans (on coil models)
Remove the surface units. Then lift out the drip pans.
Place them in a covered container. Add 1/4 cup ammonia and let soak several hours or overnight. Wash, rinse well and dry.
The drip pans may also be cleaned in the dishwasher.
Clean the area under the drip pans often. Built-up soil, especially grease, may catch fire.
Do not cover the drip pans with foil. Using foil so close to the receptacle could cause shock, fire or damage to the range.
NOTE: Do not clean the drip pans in a self-cleaning oven.
Oven Vent (on coil models)
On glass cooktop models, the oven is vented through an opening at the rear of the cooktop.
On coil cooktop models, the oven is vented through an opening under the right rear surface unit.
Never cover the opening with aluminum foil or any other material.
Painted Surfaces (on some models)
Painted surfaces include the sides of the range and the sides of the door trim.
To clean the painted surfaces, use a hot, damp cloth with a mild detergent suitable for these surfaces. Use a clean, hot, damp cloth to remove soap. Dry with a dry, clean cloth.
Do not use steel-wood pads, commercial oven cleaners, cleaning powders or other abrasive cleaners. They will damage the surface.
Stainless Steel Surfaces (on some models)
Do not use a steel wool pad; it will scratch the surface.
To clean the stainless steel surface, use warm sudsy water or a stainless steel cleaner or polish. Always wipe the surface in the direction of the grain. Follow the cleaner instructions for cleaning the stainless steel surface.
To inquire about purchasing stainless steel appliance cleaner or polish, or to find the location of a dealer or MC Commercial Parts Store nearest you, please call our toll-free number
Glass Window (on some models)
To clean the outside glass finish, use a glass cleaner. Rinse and polish with a dry cloth.
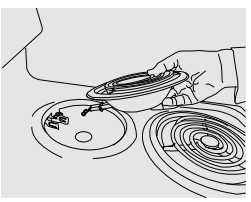
BOWL AND COIL ASSEMBLY (on coil models)
In order to do a right assembly of the bowl and the coil into the cook top you need to insert both components together as shown in the picture.
Avoid inserting components sparely, this will cause wrong assembly issues.
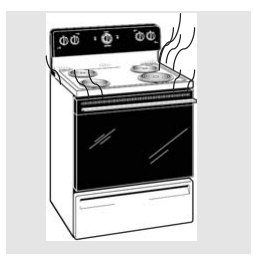
Attention (on coil models)
When using the oven is normal to have an increase of temperature on the cooktop surface, based on the fact that the release of heat from the oven is placed on the back right burner/coil of the range.
Cleaning the glass cooktop
Normal Daily Use Cleaning
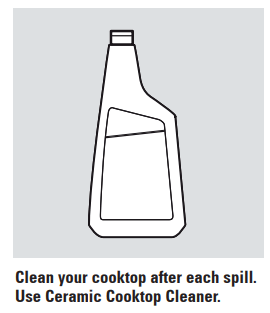
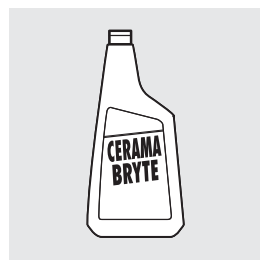
ONLY use Ceramic Cooktop Cleaner on the glass cooktop. Other types of cleaners may not be as effective.
To maintain and protect the surface of your glass cooktop, follow these steps:
Before using the cooktop for the first time, clean it with Ceramic Cooktop Cleaner. This helps protect the top and makes cleanup easier.
Daily use of Ceramic Cooktop Cleaner will help keep the cooktop looking new
Shake the cleaning cream well. Apply a few drops of Ceramic Cooktop Cleaner directly to the cooktop.
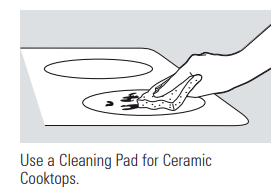
Use a paper towel for Ceramic Cooktops to clean the entire cooktop surface.
Use a dry cloth or paper towel to remove all cleaning residue. No need to rinse.
Burned-On Residue
Allow the cooktop to cool.
Spread a few drops of Ceramic Cooktop Cleaner on the entire burned residue area.
Using the included Cleaning Pad for Ceramic Cooktops, rub the residue area, applying pressure as needed.
If any residue remains, repeat the steps listed above as needed.
For additional protection, after all residue has been removed, polish the entire surface with Ceramic Cooktop Cleaner and a paper towel.
Heavy, Burned-On Residue
The Ceramic Cooktop Scraper and all recommended supplies are available through our dealers or through a MC Commercial Parts Store.
NOTE: Do not use a dull or nicked blade.
Allow the cooktop to cool.
Use a single-edge razor blade scraper at approximately a 45° angle against the glass surface and scrape the soil. It will be necessary to apply pressure to the razor scraper in order to remove the residue.
After scraping with the razor scraper, spread a few drops of Ceramic Cooktop Cleaner on the entire burned residue area. Use the Cleaning Pad to remove any remaining residue.
For additional protection, after all residue has been removed, polish the entire surface with Ceramic Cooktop Cleaner and a paper towel.
Metal Marks and Scratches
Be careful not to slide pots and pans across your cooktop. It will leave metal markings on the cooktop surface. These marks are removable using the Ceramic Cooktop Cleaner with the Cleaning Pad for Ceramic Cooktops.
If pots with a thin overlay of aluminum or copper are allowed to boil dry, the overlay may leave black discoloration on the cooktop. This should be removed immediately before heating again or the discoloration may be permanent.
Cooktop Seal
To clean the cooktop seal around the edges of the glass, lay a wet cloth on it for a few minutes, then wipe clean with nonabrasive cleaners.
Glass surface—potential for permanent damage.
Damage from Sugary Spills and Melted Plastic
1. Turn off all surface units. Remove hot pans.
2. Wearing an oven mitt:
a. Use a single-edge razor blade scraper to move the spill to a cool area on the cooktop.
b. Remove the spill with paper towels.
3. Any remaining spillover should be left until the surface of the cooktop has cooled.
4. Don’t use the surface units again until all of the residue has been completely removed.
NOTE: If pitting or indentation in the glass surface has already occurred, the cooktop glass will have to be replaced. In this case, service will be necessary.
To Order Parts
To order CERAMA BRYTE® Ceramic Cooktop Cleaner and the cooktop scraper, please call our toll-free number:
Surface units will not maintain a rolling boil or cooking is not fast enough
Improper cookware being used.
• Use pans which are flat and match the diameter of the surface unit selected.
Surface units do not work properly
A fuse in your home may be blown or the circuit breaker tripped.
• Replace the fuse or reset the circuit breaker.
Cooktop controls improperly set.
• Check to see the correct control is set for the surface unit you are using.
Scratches (may appear as cracks) on cooktop glass surface
Incorrect cleaning methods being used.
• Scratches are not removable. Tiny scratches will become less visible in time as a result of cleaning.
Cookware with rough bottoms being used or coarse particles (salt or sand) were between the cookware and the surface of the cooktop.
• To avoid scratches, use the recommended cleaning procedures. Make sure bottoms of cookware are clean before use, and use cookware with smooth bottoms.
Cookware has been slid across the cooktop surface.
Areas of discoloration on the cooktop
Food spillovers not cleaned before next use.
• See the Cleaning the glass cooktop section.
Hot surface on a model with a light-colored glass cooktop.
• This is normal. The surface may appear discolored when it is hot. This is temporary and will disappear as the glass cools.
Plastic melted to the surface
Hot cooktop came into contact with plastic placed on the hot cooktop.
• See the Glass surface—potential for permanent damage section in the Cleaning the glass cooktop section.
Pitting (or indentation) of the cooktop
Hot sugar mixture spilled on the cooktop.
• Call a qualified technician for replacement.
Frequent cycling off and on of surface units
Improper cookware being used.
• Use only flat cookware to minimize cycling.
Surface indicator lights turn on, but surface units do not work
The self-clean cycle has been set.
During a self-clean cycle,the surface units will not work Press the OFF pad to stop the self-clean cycle or wait until the self-clean cycle is finished to set and use the surface units See the About the radiant surface units section.
Surface unit stops glowing when turned to a lower setting
This is normal. The unit is still on and hot.
Coil Cooktops
Surface units not functioning properly
The surface units are not plugged in solidly.
• With the controls off, check to make sure the surface unit is plugged completely into the receptacle.
The surface unit controls improperly set.
• Check to see the correct control is set for the surface unit you are using.
The drip pans are not set securely in the cooktop.
• With the controls off, check to make sure the drip pan is in the recess in the cooktop and that the opening in the pan lines up with the receptacle.
Oven–All Models
Oven light does not work
Light bulb is loose or defective.
• Tighten or replace the bulb.
Switch operating light is broken.
• Call for service.
Oven will not work
Plug on range is not completely inserted in the electrical outlet.
• Make sure electrical plug is plugged into a live, properly grounded outlet.
A fuse in your home may be blown or the circuit breaker tripped.
• Replace fuse or reset circuit breaker.
Oven controls improperly set.
• See the Using the oven section.
On self-cleaning models, door left in the locked position.
• If necessary, allow the oven to cool; then unlock the door.
Food does not bake or roast properly
Oven controls improperly set.
• See the Using the oven section.
Rack position is incorrect or the rack is not level.
• See the Using the oven section.
Incorrect cookware or cookware of improper size being used.
• See the Using the oven section.
Oven thermostat needs adjustment.
• See the Adjust the oven thermostat—Easy to do yourself! section.
No power supply from convenience outlet on top of backguard (on some models)
Small appliance plug is not completely inserted in the convenience outlet.
• Make sure the small appliance plug is properly inserted.
The backguard is too hot and the convenience outlet breaker has tripped.
• Allow the range to cool; then reset the circuit breaker by pressing the switch located near the convenience outlet.
Food does not broil properly
Improper rack position being used.
• See the Broiling guide.
Food being cooked in a hot pan.
• Use the broiling pan and grid that came with your range. Make sure it is cool.
Aluminum foil used on the broiling pan and grid has not been fitted properly and slit as recommended.
• See the Using the ovensection.
In some areas the power (voltage) may be low.
• Preheat the broil element for 10 minutes.
• Broil for the longest period of time recommended in the Broiling guide.
Control signals after entering cooking time or delay start
You forgot to enter a bake temperature or cleaning time.
• Press the BAKE pad and desired temperature or the CLEAN pad and desired clean time.
Display flashes "bAd" then "linE" with a loud tone
The installed connection from the house to the unit is miswired.
• Contact installer or electrician to correct miswire.
Surface units do not work
There has been a main power supply surge and/or a power interruption and surge
• On the Control Panel, activate the Self Clean mode (press the SELF CLEAN button)
• Wait for 30 seconds and then press the OFF button.
• The cooktop should now be ready to operate
The words "CLOSE DOOR" flashes or scrolls in the display
This is a normal condition.
The "CLOSE DOOR" is a reminder message to keep the oven door closed during broil mode
• This is normal. Keep oven door closed during broil mode
Oven temperature too hot or too cold
Oven thermostat needs adjustment.
• See the Adjust the oven thermostat—Easy to do yourself! section.
Clock and timer do not work
Plug on range is not completely inserted in the electrical outlet.
• Make sure electrical plug is plugged into a live, properly grounded outlet.
A fuse in your home may be blown or the circuit breaker tripped.
• Replace fuse or reset circuit breaker
Oven controls improperly set.
• See the Using the clock, timer and convenience outlet section.
Display goes blank
A fuse in your home may be blown or the circuit breaker tripped.
• Replace the fuse or reset the circuit breaker.
The clock is turned off from showing in the display.
• See the Using the clock, timer and convenience outlet section
Oven door is crooked
The door is out of position.
• Because the oven door is removable, it sometimes gets out of position during installation. To straighten the door, push down on the high corner
Oven makes clicking noise
This is the sound of the heating element turning off and on during cooking functions.
• This is normal.
“F―and a number or letter” flash in the display
You have a function error code.
• Press the OFF pad. Put the oven back into operation
If the function code repeats:
• Disconnect all power to the range for at least 30 seconds and then reconnect power. If the function error code repeats, call for service.
• On self-cleaning models, if a function error code appears during the self-cleaning cycle, check the oven door latch. The latch may have been moved, if only slightly, from the locked position. Make sure the latch is moved to the right as far as it will go. Press the OFF pad. Allow the oven to cool for one hour. Put the oven back into operation.
Power outage clock flashes
Power outage or surge.
• Some models will automatically resume their setting once the power is restored. On models with a clock, you must reset the clock. If the oven was in use, you must reset it by pressing the OFF pad, setting the clock and resetting any cooking function.
Display flashes
Power failure.
• Reset the clock.
Unable to get the display to show “SF”
Oven control pads were not pressed properly
• The BAKE and BROIL pads must be pressed at the same time and held for 3 seconds.
"Burning" or "oily"
This is normal in a new oven
• To speed the process, set a self-clean cycle for a
odor emitting from the oven vent
and will disappear in time.
minimum of 3 hours. See the Using the self-cleaning oven section.
Strong odor
An odor from the insulation around the inside of the oven is normal for the first few times the oven is used.
• This is temporary.
Self-Cleaning Models
Oven will not self-clean
The oven temperature is too high to set a self-clean operation.
• Allow the range to cool to room temperature and reset the controls.
Oven controls improperly set.
• See the Using the self-cleaning oven section.
Oven door is not in the locked position.
• Make sure you move the door latch handle all the way to the right.
Oven starts a self-clean cycle when you wanted to bake, roast or broil
Oven door locked during cooking.
• Turn the Oven Temperature knob to OFF. Allow the oven to cool. Never force the door latch handle.
"Crackling" or "popping" sound
This is the sound of the metal heating and cooling during both the cooking and cleaning functions.
• This is normal.
Excessive smoking during a clean cycle
Excessive soil.
• Press the OFF pad. Open the windows to rid the room of smoke. Wait until the light on the CLEAN pad goes off. Wipe up the excess soil and reset the clean cycle.
Oven door will not unlock
Oven too hot.
• Allow the oven to cool below locking temperature.
Oven not clean after a clean cycle
Oven controls not properly set.
• See Using the self-cleaning oven section.
Oven was heavily soiled.
• Clean up heavy spillovers before starting the clean cycle. Heavily soiled ovens may need to self-clean again or for a longer period of time.