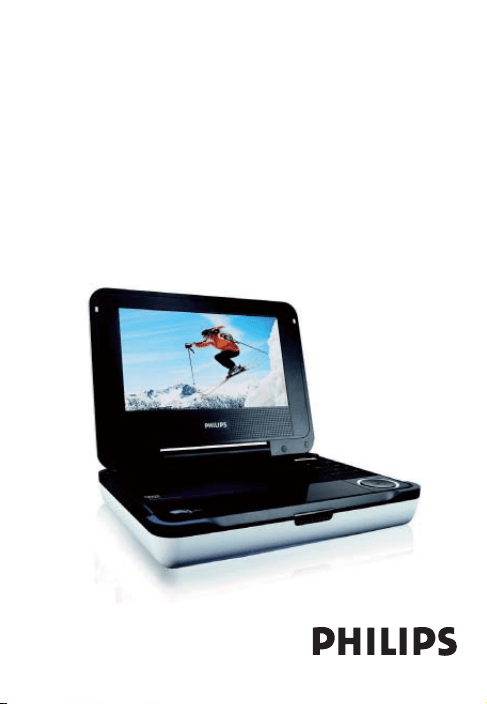
Portable DVD Player
Register your product and get support at
Registre su producto y obtenga asistencia en
Cadastre seu produto e obtenha suporte em
www.philips.com/welcome
User Manual
Manual de usuario
Manual do usuário
PET718
7
3
5
2
1
4
6
8
! @ # %$
9
0
AV OUT/DVD
1
2
2
6
7
8
9
!
^
$
#
3
@
%
0
7
5
1
4

Mexico
Es necesario que lea cuidadosamente su instructivo de manejo.
Modelo: PET718/55
Descripción: Adaptador ca/cc
Alimentación: 100–240V~ 50–60 Hz 9,0Vcc 2,0A
Descripción: Reproductor de DVD portátil
Alimentación: 9,0Vcc 2,0A
Consumo: 18 W
Importador: Philips Mexicana, S.A. de C.V.
Domicilio: Av. La palma No. 6
Col. San Fernando la Herradura, Huixquilucan
Localidad y Telefono: Edo. de M
é
xico C.P. 52784
Tel. 52 69 90 00
Exportador: Philips Electronics Hong Kong Ltd.
País de Origen: China
Nº de Serie: ________________________________
LEA CUIDADOSAMENTE ESTE INSTRUCTIVO
ANTES DE USAR SU APARATO.

AVISO IMPORTANTE
Philips Mexicana, S.A. de C.V. no se hace responsable por daños o desperfectos
causados por:
– Maltrato, descuido o mal uso, presencia de insectos o roedores (cucarachas,
ratones etc.).
– Cuando el aparato no haya sido operarado de acuerdo con el
instructivo del uso, fuera de los valores nominales y tolerancias de las ten-
siones (voltaje), frecuencia (ciclaje) de alimentación
eléctrica y las características que deben reunir las instalaciones auxiliares.
– Por fenómenos naturales tales como: temblores, inundaciones, incendios,
descargas eléctricas, rayos etc. o delitos causados por terceros (choques
asaltos, riñas, etc.).

English
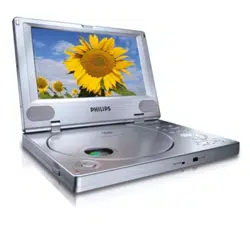
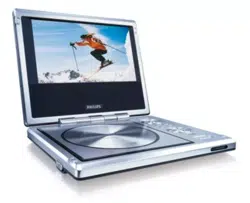
FUNCTIONAL OVERVIEW
Congratulations on your purchase and welcome to Philips! To fully
benefit from the support that Philips offers, register your product at
www.philips.com/welcome.
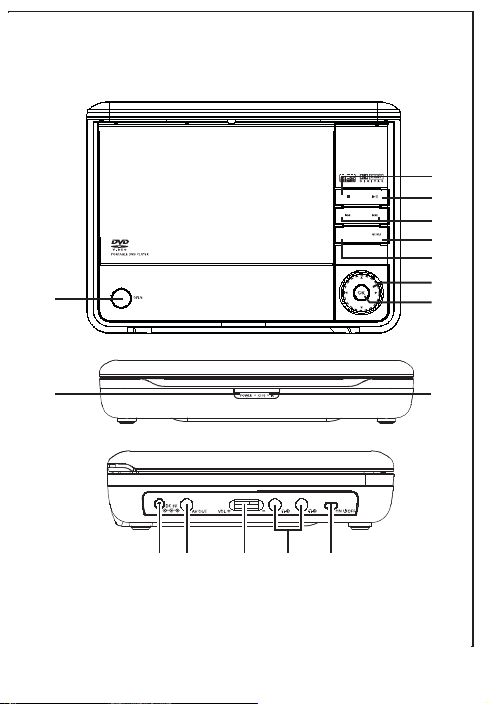
Main unit controls ( see figure 1)
1 OPEN .....................Open the disc door to insert or remove disc.
2 OK ..........................Confirm a selection.
3 3, 4, 1, 2 ...........Navigate in a menu.
...........(1 / 2) search backward/forward in a disc at different
speeds.
4 AV OUT/DVD.........Switch between DVD and AV OUT modes.
5 MENU.....................Enter or exit the disc contents menu.
6 J( / § ..................Skip to the previous/next chapter, track or title.
7 2
;
.........................Start or interrupt playback.
8 9 .............................Stop playback or erase a program.
9 IR.............................Remote sensor.
0 POWER and CHG..Power and charge indicator.
Left of player ( see figure 1)
! ....................Power supply socket.
@ AV OUT... ...............Audio/Video output jack.
# ...................Volume control.
$ ...............Headphone jacks.
% ON/OFF...................Switch the power on/off.

FUNCTIONAL OVERVIEW
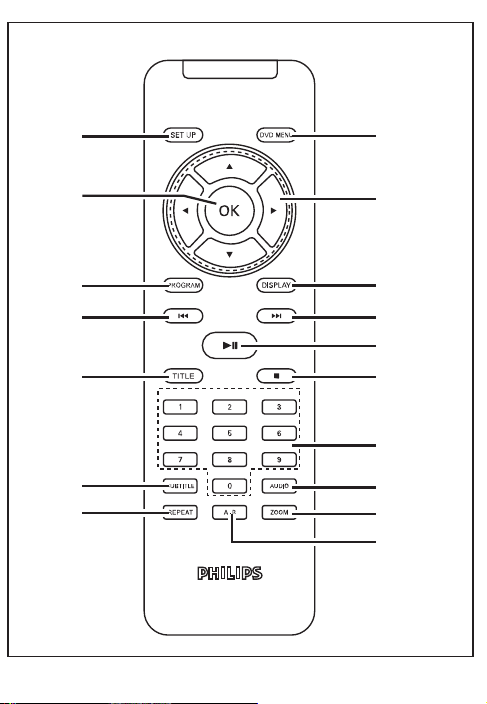
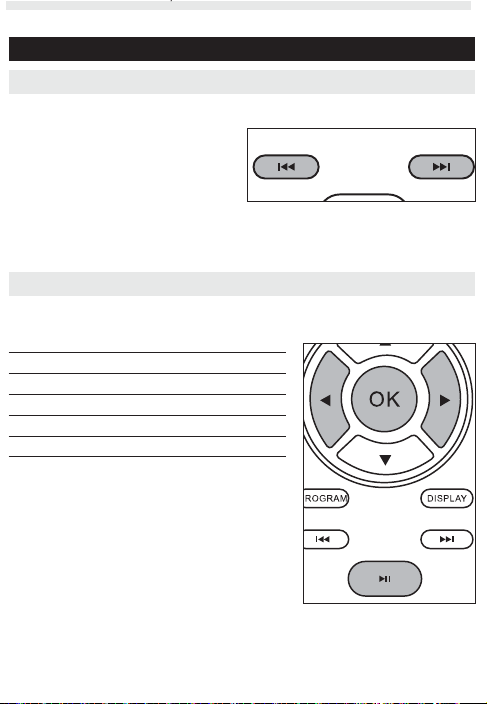
Remote controls ( see figure 2)
1 SETUP .............................Enter or exit the system menu.
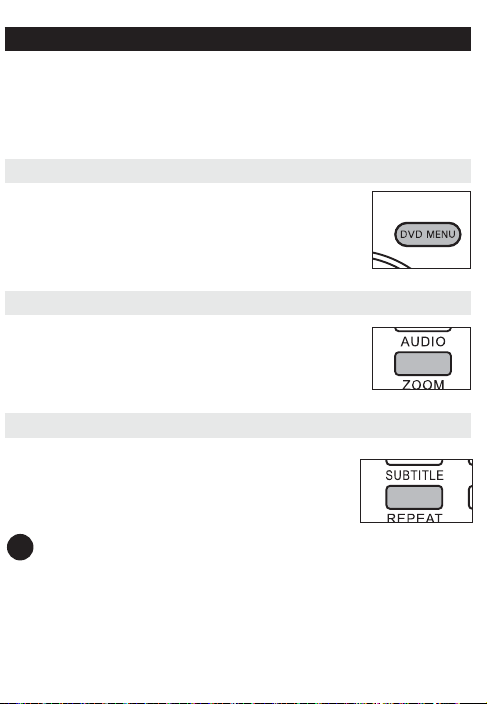
2 DVD MENU.....................Enter or exit the disc contents menu.
3 3, 4, 1, 2 .....................Navigate in a menu.
.....................(1 / 2) search backward/forward in a disc at
different speeds.
4 OK ....................................Confirm a selection.
5 PROGRAM ......................Enter the program menu.
6 DISPLAY..........................Display information on TFT during playback.
7 PREV/NEXT J( / § ......Skip to the previous/next chapter, track or title.
8 PLAY/PAUSE 2
;
............Start or interrupt playback.
9 STOP 9............................Stop playback or erase a program.
0 TITLE................................Display the disc title
! Numeric Keypad (0-9) ..Input numbers.
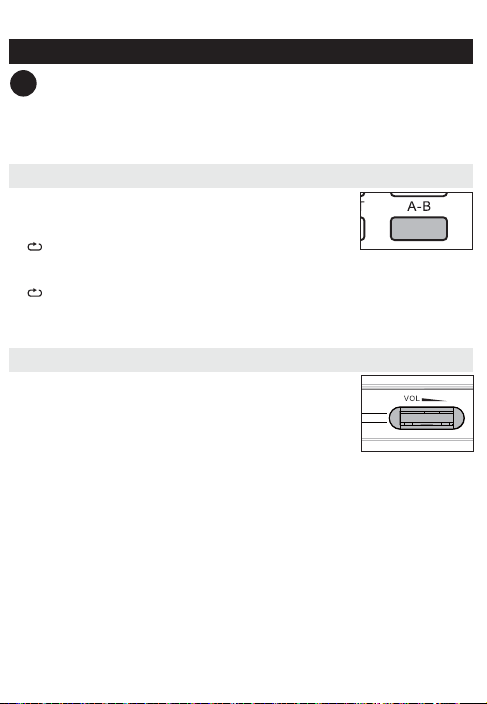
@ REPEAT ...........................Repeat a chapter/track/title.
# A-B...................................Repeat playback of a specific section on a disc.
$ ZOOM ..............................Enlarge or reduce a picture or active image on the TFT.
% SUBTITLE........................Select a subtitle language.
^ AUDIO .............................Select an audio language when playing a DVD disc
or select an audio mode (Stereo, Mono-Left or
Mono-Right) when playing a VCD/CD disc.
CAUTION
Use of controls or adjustments or performance of procedures other than
herein may result in hazardous radiation exposure or other unsafe operation.

INTRODUCTION
Your portable DVD player
Your portable DVD player plays digital video discs conforming to the universal
DVD Video standard. With it, you will be able to enjoy full-length movies with
true cinema picture quality, and stereo or multichannel sound (depending on the
disc and on your playback set-up).
The unique features of DVD-Video, such as selection of soundtrack and subtitle
languages, and of different camera angles (again depending on the disc), are all
included.
What’s more, parental lock lets you decide which discs your children will be able
to see. You will find your player remarkably easy to use with the On-Screen
Display and player display in combination with the remote control.
Unpacking
• Portable DVD player • Remote Control
• Car adaptor (12V) • Audio / Video cable
• User Manual • Warranty
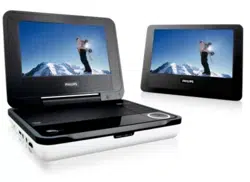
• Quick Start Guide • PAC132 second LCD screen
• AC power adaptor, DSA-20R-12F (DVE)
Placement
• Place the player on a firm, flat surface.
• Keep away from domestic heating equipment and direct sunlight.
• If the player cannot read CDs/DVDs correctly, try using a commonly
available cleaning CD/DVD to clean the lens before taking the player to be
repaired. Other cleaning methods may destroy the lens.
• Always keep the disc door closed to avoid dust on the lens.
• The lens may cloud over when the player is suddenly moved from cold to warm
surroundings. It is then not possible to play a CD/DVD. Leave the player in a warm
environment until the moisture evaporates.

INTRODUCTION
About Built-in Rechargeable Battery
Precautions related to battery recharge
1 Once the battery is fully discharged, immediately recharge it (regardless of
whether you plan to use the battery or not) in order to maximize the battery
life. When the power is low, the battery icon will be shown on the upper-left
corner of the TFT for warning.
2 To charge the battery, please directly connect this DVD player to AC mains
and the charge indicator will turn on.
Using and maintaining your rechargeable batteries
1 Please make sure you always use only the AC adapter included with the
player to recharge your batteries.
2 Recharge efficiency will degrade when the environmental temperature drops
below 50
o
F (10
o
C) or exceed 95
o
F (35
o
C).
3 The lasting time of the fully charged battery when a headphone is connected
to the DVD player is approximately 2 hours.
Playable disc formats
In addition to DVD-Video disc, you will also be able to play all Video CDs and
audio CDs (including CDR, CDRW,DVD
±R and DVD±RW).
DVD-Video
Depending on the material on the disc (a movie, video clips, a
drama series, etc.) these discs may have one or more Titles,
and each Title may have one or more Chapters. To make access
easy and convenient, your player lets you move between Titles, and also
between Chapters.
CD with JPEG files
You can also view JPEG still photos on this player.

INTRODUCTION
Video CD
Depending on the material on the disc (a movie, video clips, a
drama series, etc.) these discs may have one or more Tracks, and
tracks may have one or more indexes, as indicated on the disc
case.To make access easy and convenient, your player lets you
move between tracks and between indexes.
Audio CD / MP3 CD
Audio CDs / MP3-CD contain music tracks only. You can play
them in the conventional way through a stereo system using the
keys on the remote control and/or main unit, or via the TV using
the On Screen Display (OSD).

GENERAL INFORMATION
Power Sources
This unit operates on a supplied AC adapter, car adapter, or the built-in Ni-MH
battery.
• Make sure that the input voltage of the AC adaptor is in line with the local volt-
age. Otherwise, the AC adaptor and unit may be damaged.
• Do not touch the AC adaptor with wet hands to prevent electric shock.
• When connecting with car power (cigarette lighter) adaptor, be sure the
input voltage of the adaptor is identical with car voltage.
• Unplug the AC adaptor from the outlet when the unit is not used for long peri-
ods of time.
• Hold the plug to disconnect the AC adaptor. Do not pull the power cord.
Safety and maintenance
• Do not disassemble the unit for laser rays are dangerous to eyes.
Any service should be done by qualified service personnel.
• Unplug the AC adaptor to cut the power if liquid or objects get inside the unit.
• Take care not to drop the unit or subject it to strong shocks, which may
cause malfunction.
• Important (for models with by-packed headphones): Philips guarantees compli-
ance with the maximum sound power of its audio players as
determined by relevant regulatory bodies only with the original model of provid-
ed headphones. In case this one needs replacement, we recommend that you
contact your retailer to order a model identical to that of the original provided
by Philips.
• Traffic safety: do not use while driving or cycling as you may cause an accident
• Do not expose to excessive heat caused by heating equipment or
direct sunlight.
• This product is not waterproof: do not allow your player to be submersed
in water. Water entering the player may cause major damage.
• Do not use any cleaning agents containing alcohol, ammonia, benzene,
or abrasives as these may harm the player.
• The apparatus shall not be exposed to dripping or splashing. Do not place any
sources of danger on the apparatus (e.g. liquid filled objects,lighted candles)
• Do not touch the lens!
• Excessive sound pressure from earphones and headphones can cause hearing loss.
• Battery shall not be exposed to excessive heat such as sunshine, fire or the like.
Note: When the player is in use for a long period of time, the surface will be
heated. This is normal.

GENERAL INFORMATION
Hearing Safety
Listen at a moderate volume:
• Using headphones at a high volume can impair your hearing. This
product can produce sounds in decibel ranges that may cause hearing
loss for a normal person, even for exposure less than a minute. The
higher decibel ranges are offered for those that may have already experienced
some hearing loss.
• Sound can be deceiving. Over time your hearing "comfort level" adapts to high-
er volumes of sound. So after prolonged listening, what sounds "normal" can
actually be loud and harmful to your hearing. To guard against this, set your
volume to a safe level before your hearing adapts and leave it there.
To establish a safe volume level:
• Set your volume control at a low setting.
• Slowly increase the sound until you can hear it comfortably and clearly, with-
out distortion.
Listen for reasonable periods of time:
• Prolonged exposure to sound, even at normally "safe" levels, can also cause
hearing loss.
• Be sure to use your equipment reasonably and take appropriate breaks.
Be sure to observe the following guidelines when using your head-
phones:
• Listen at reasonable volumes for reasonable periods of time.
• Be careful not to adjust the volume as your hearing adapts.
• Do not turn up the volume so high that you can't hear what's around you.
• You should use caution or temporarily discontinue use in potentially hazardous
situations.
• Do not use headphones while operating a motorized vehicle, cycling, skate-
boarding, etc.; it may create a traffic hazard and is illegal in many areas.

GENERAL INFORMATION
Handling discs
• Do not attach paper or tape to the disc.
• Keep the disc away from direct sunlight or heat
sources.
• Store the disc in a disc case after playback.
• To clean, wipe the disc outwards from the center
with a soft, lint-free clean cloth.
On handling the LCD screen
The LCD is manufactured using high precision technology. You may, however, see
tiny black points and/or bright points(red,blue,green) that continuously appear on
the LCD. This is a normal result of the manufacturing process and does not indi-
cate a malfunction.
Environmental information
We have reduced the packaging to its minimum and made it easy to separate into
mono materials: cardboard, PS, PE and PET.
Your set consists of material which can be recycled if disassembled by a special-
ized company. Please observe the local regulations to dispose of packaging,
exhausted batteries and old equipment.
Copyright information
All other brand and product names are trademarks of their respective companies
or organizations.
Unauthorized duplication of any recordings downloaded from the internet or made
from CDs / VCDs / DVDs is a violation of copyright laws and international
treaties.
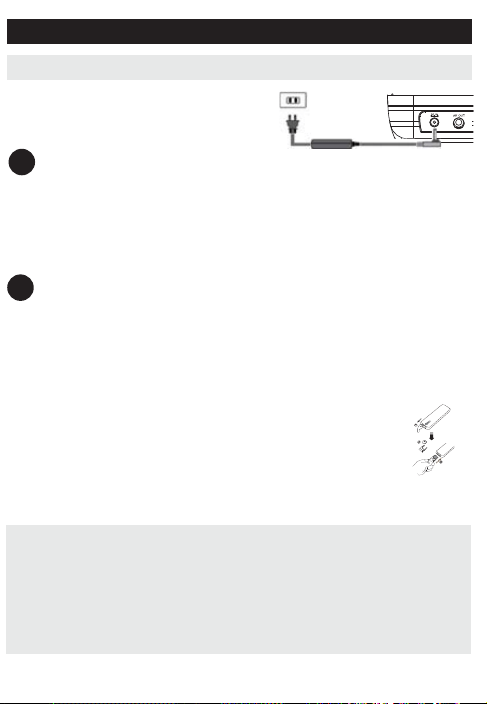
PREPARATIONS
Power supply
Using the AC / DC adaptor
Connect the supplied adapter to the set
and the main power supply (as shown).
TIP
To avoid damage to the player, switch off before plugging or unplugging the
AC adaptor.
Using the car adapter
Connect the supplied car adapter to the set and the
car cigarette lighter outlet.
TIP
• To avoid damage to the player, switch off before plugging or unplugging
the car adaptor.
• When connecting with car power (cigarette lighter) adaptor, be sure the
input voltage of the adaptor is identical with car voltage.
• Make sure the temperature is below 35
o
C when the DVD player is con-
nected to DC 16.0V in a car.
Powering your remote control
1 Open the battery compartment. Remove the protective
plastic tab (first time users only).
2 Insert 1 x lithium 3V battery, type CR2025, then close
the compartment.
✔
✔
CAUTION
- Batteries contain chemical substances, so they should be disposed of
properly.
- Danger of explosion if battery is incorrectly replaced. Replace only with
the same or equivalent type.
- Incorrect use of batteries can cause electrolyte leakage
and will corrode the compartment or cause the batteries to burst.
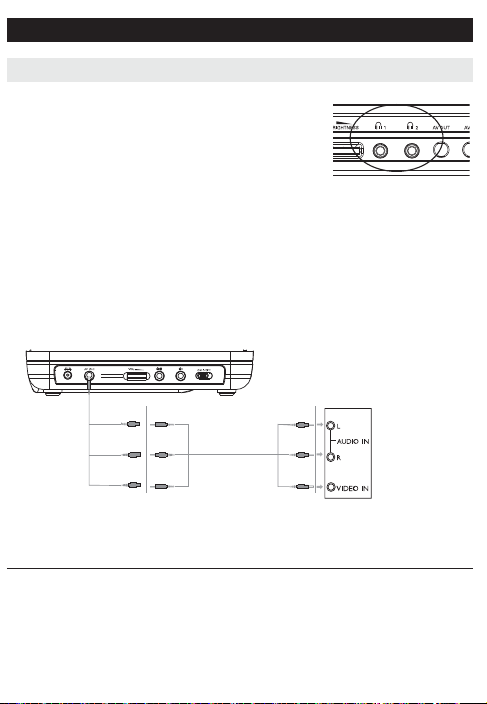
PREPARATIONS
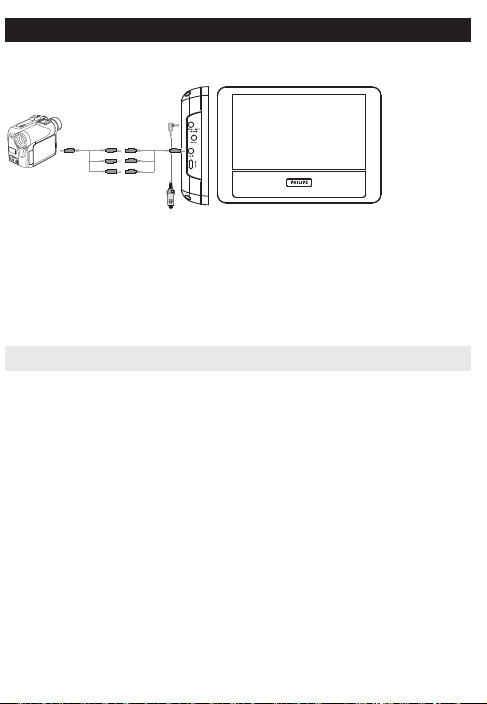
Connections
Connecting headphones
Connect the headphones into the n1 or the n2
jack of your set.
Connecting additional equipment
• Turn off your set before connecting to any additional equipment.
• You can connect the player to a TV or an amplifier to enjoy DVDs or karaoke.
AV OUT
Connect the desired device to this terminal directly.
Connection Video Audio (Left) Audio
(right)
Color Yellow White Red
TV
White
Red
Yellow
Not supplied

GENERAL EXPLANATION
About this manual
This manual gives the basic instructions for operating this DVD player.
Some DVD discs however are produced in a way that requires specific oper-
ation or allows only limited operation during playback. In these cases the
player may not respond to all operating commands. When this occurs,
please refer to the instructions in the disc inlay. When a “ ” appears on
the screen, the operation is not permitted by the player or the disc.
Remote control operation
• Unless otherwise stated, all operations can be carried out with the
remote control. Always point the remote control directly at the player,
making sure there are no obstructions in the path of the infrared beam.
• When there are corresponding keys on the main unit, they can also be used.
Menu navigation
• Your player has an intuitive menu navigation system to guide you through
various settings and operations.
• Use the function keys to activate / disable relevant operations.
• Use 3, 4, 1, 2 to browse through menus.
• Press OK key to confirm your selection.

BASIC FUNCTIONS
Switching on for OSD language setup
English is the default language of your player’s on screen display. You may choose
to use Spanish, Portuguese or English for your player’s on screen display.
Region OSD Language Options
Latin America Spanish, Portuguese, English
1 Slide the POWER switch to ON to switch on the
player.
2 Press SETUP for the setup menu.
3 Select General Setup Page and press OK.
4 Scroll and select OSD Language and press 2 to
select from OSD language options.
5 Select your preferred language and press OK.
Loading discs and switching on
1
Press OPEN to open the disc door.
2 Insert your chosen disc, label side up (also when a double sided
DVD disc is inserted). Make sure it is sitting properly in the correct recess.
3 Gently push to close the door.
4 Slide the POWER switch to ON to switch on the player.
TIP
A normal mechanical noise is heard during playback.
✔

BASIC FUNCTIONS
Playing a DVD disc
After switching on, inserting the disc and closing the door, playback starts auto-
matically. The screen shows the type of disc loaded. The disc may invite you to
select an item from a menu. Use the 3, 4, 1, 2 keys to highlight your
selection,and press OK.
Note: Since it is usual for DVD movies to be released at different times in differ-
ent regions of the world, all players have region codes and discs can have an
optional region code. If you load a disc of a different region code to your player,
you will see the region code notice on the screen. The disc will not play, and
should be unloaded.
Playing an audio or video CD disc
• After switching on, inserting the disc and closing the door, playback starts auto-
matically. The screen shows the type of disc loaded as well as information
about the disc’s contents.
• While playing VCD with MTV/Karaoke, press number keys(0-9) to select the
track and press 2
;
or OK to play the track.

BASIC FUNCTIONS
Playing an MP3 CD
The following playback features are available for MP3 CDs.
Please refer to the corresponding sections for more information.
Volume control, skipping tracks, searching, repeat, shuffle, etc.
Use the 3, 4 keys to highlight your selected music folder.
Press OK to play.
Playing a JPEG discs
Use the 3, 4, 1, 2 keys to highlight your selected picture folder.
Press OK. The player will then automatically enter the slide show mode.
During playback, you can:
• Use the 1, 2 to rotate the picture.
• Use the 3 to flip up/down.
• Use the 4 to flip left/right.
• Press DVD MENU to go back to folder screen.
• Press 9 to go to group preview.
• Use the 3, 4, 1, 2 to highlight the preview picture and access the
on-screen functions.
• Press ZOOM repeatedly to display the picture with different scales.
• Use the 3, 4, 1, 2 to view the zoomed picture (for picture zoomed in only).
Note: Unless stated otherwise, all operations described are based on remote con-
trol operation.
p
GENERAL FEATURESS
Moving to another title / track / chapter
When a disc has more than one title
or track, you can move to another
title/track/chapter as follows:
• Press § briefly during play to
select the next title/ track / chap-
ter.
• Press J( briefly during play to step
back to the previous title/track/chapter.
• To go directly to any title, track or chapter, enter the corresponding number
using the numerical keys (0-9).
Search
During playback, press 2 repeatedly for the following forward search options:
Press 1 repeatedly for the following backward search options:
12
2 X backwards 2 X forward
4 X backwards 4 X forward
8 X backwards 8 X forward
16 X backwards 16 X forward
32 X backwards 32 X forward
normal speed normal speed
Press OK or 2
;
to resume normal playback.
GENERAL FEATURES
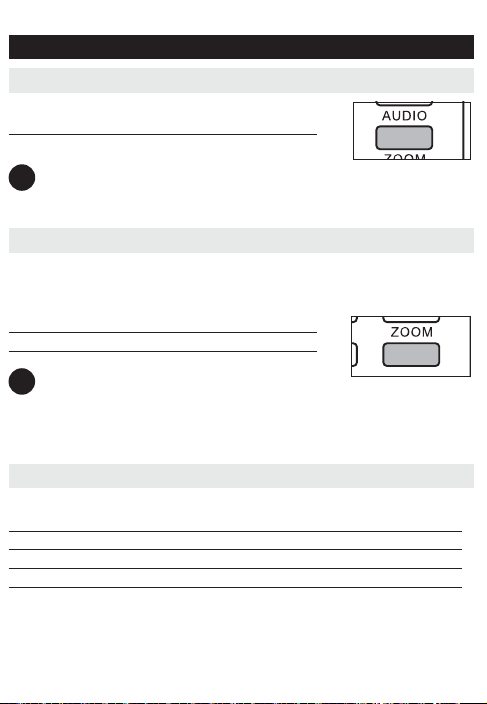
Changing the audio output (for VCD/CD)
Press AUDIO repeatedly for the following audio options.
x 1 Mono left x 2 Mono right
x 3 Stereo
TIP
This key is used to select audio languages during DVD playback.
ZOOM
The Zoom function allows you to enlarge the video image and to pan
through the enlarged image. Press ZOOM repeatedly to select the following
zooming options.
Zoom x 1 2X Zoom x 2 3X
Zoom x 3 4X Zoom x 4 normal
TIP
During JPEG operation, the sequence is 100%, 125%, 150%, 200%, 50%,
75% and normal.
REPEAT
Press REPEAT repeatedly for the following repeat options:
DVD actions MP3 actions CD actions JPEG actions
x 1 repeats chapter repeats one repeats track repeats one
x 2 repeats title repeats folder repeats all repeats all
x 3 repeats all cancels repeat cancels repeat cancels repeat
x 4 cancels repeat
✔
✔
GENERAL FEATURES
TIP
The repeat function is also available for JPEG etc. The actions may vary for
different media being played.
Repeat A - B
To repeat or loop a sequence in a title:
• Press A
- B at your chosen starting point;
A appears on the screen.
• Press A
- B again at your chosen end point;
AB appears on the display, and the repeat sequence begins.
• To exit the sequence, press A
- B.
Volume Control
• Use the rotary switch on the left side of the unit to
increase or decrease playback volume.
✔

GENERAL FEATURES
DISPLAY
Press DISPLAY on the remote repeatedly for the following display options:
DVD CD/VCD
x 1 Title elapsed Single elapsed
x 2 Title remained Single remained
x 3 Chapter elapsed Total elapsed
x 4 Chapter remained Total remained
X5 Display off Display off
TIP
During JPEG operation, pressing this button enables you to select 17
slideshow modes.
PROGRAM
1 During playback, press PROGRAM on the remote to enter a program menu.
2 Use the numerical keys 0-9 to directly input the tracks or chapters (single
track number with digit "0" in front, for example "05").
3 Move the cursor by pressing 1 2 to select START and then press OK to
start program playback.
✔
SPECIAL DVD FEATURES
Checking the contents of DVD-Video discs: DVD MENU.
For titles and chapters, selection menus may be included on the disc.
The DVD’s menu feature allows you to make selections from these menus. Press
the appropriate numerical key; or use the 3, 4, 1, 2 keys to highlight your selec-
tion, and press OK.
Disc menu
Press DVD MENU. The menu may list, for example, camera
angles, spoken language and subtitle options, and chapters for
the title.
Changing the language
Press AUDIO. If the current disc has different language options,
this now appears on the screen.
Press AUDIO repeatedly until you have reached
your desired language option.
Subtitle
Press SUBTITLE. If the current disc has different subtitles
options, this now appears on the screen.
Press SUBTITLE repeatedly until you have reached
your desired subtitles option.
TIP
The above two features depend on whether your disc contains any language
or subtitle options.
✔

SPECIAL DVD FEATURES
Playing a title
1 Press DVD MENU to enter the disc title
menu.
2 Use 1 2 3 4 or numeric keys (0-9) to
select a play option.
3 Press OK to confirm.

SETUP OPERATIONS
To maximize your playback experience, use SETUP to fine tune your settings.
Use the 3,4,1, 2 keys to highlight your selection, and press OK.
1 Press SETUP. A list of features is shown.
2 Use the 3 4 keys to highlight your selection.
When the cursor highlights these settings, press OK to:
General Setup Page select display and other options
Video Setup Page select video options
Password Setup Page select password options
Preference Page select playback preferences
3 Press 1 to abort current settings or go back to previous menu level.
4 Press SETUP to exit.
General Setup Page
When the cursor highlights these settings, press OK to:
Angle Mark select angle mark display options
OSD Language select onscreen display language
Screen Saver select screen saver options
Last Memory select last playback memory options
Press 1 to abort current settings or go back to previous menu level.
Note: Before using the 3,4 keys to select your desired angle mark, ensure the
disc has been recorded with angle mark and you have enabled the angle mark
option in the system menu.

SETUP OPERATIONS
Video Setup Page
When the cursor highlights these settings, press OK to:
Brightness select brightness level
Contrast select contrast level
Press 1 to abort current settings or go back to previous menu level
Password Setup Page
When the cursor highlights these settings, press OK to:
Password change existing password (3308 by default)
Press 1 to abort current settings or go back to previous menu level
Note: Parental options are only selectable when password mode is deactivated.
Preference Page
When the cursor highlights these settings, press OK to:
Audio select audio language options
Subtitle select subtitle language options
Disc Menu select disc menu language options
Parental select parental options
Default restore factory settings
Press 1 to abort current settings or go back to previous menu level.
3
5
1
2
4
7
6
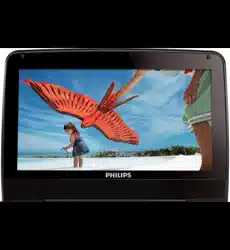
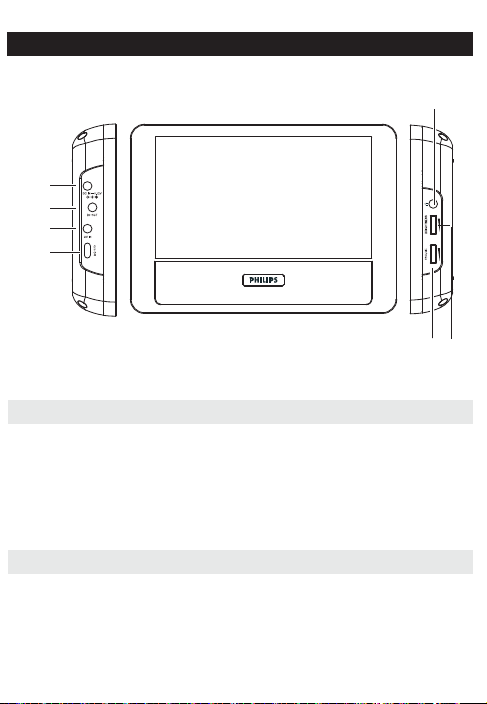
PAC132 SECONDARY LCD SCREEN
Left side of the player
1 DC IN ....................DC power input jack
2 DC OUT .................DC power output jack
3 AV IN .....................Audio/Video input
4 ON/OFF...................Switch the player on / off
Right side of the player
5 Headphone jack
6 Brightness ...........Finetune the TFT screen brightness
7 VOLUME ..............Volume control

PAC132 SECONDARY LCD SCREEN
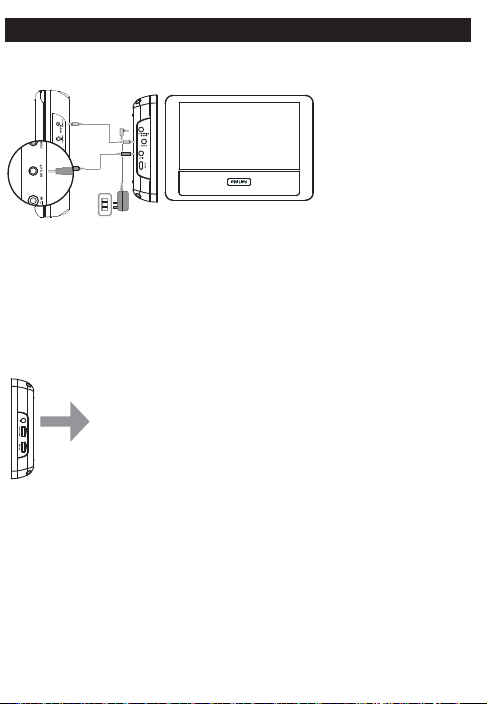
Connection
Make sure that the primary DVD player, secondary LCD screen and any other elec-
trical equipment are switched off before connection.
Use in a car
1 Mount the devices to the headrest with the mounting kits.
2 Connect the power plug of the car adaptor to PAC132.
3 Connect the power source to the primary DVD player using the power cord.
4 Connect the audio/visual cable to the devices.
Primary DVD player PAC132
3
4
2
PAC132 SECONDARY LCD SCREEN
Use at home
1 Connect the AC/DC power adaptor to PAC132.
2 Connect the power source to the primary DVD player using the power cord.
3 Connect the audio/visual cable to the devices.
Connect to headphone
Connect the headphones to the right side of the player for private listening.
p
Primary DVD player PAC132
2
3
1
PAC132 SECONDARY LCD SCREEN
Connect to camcorder
You can connect the player to your camcorder to view video on a bigger screen.
1 Connect PAC132 to the power source.
2 Connect the camcorder to PAC132 using the audio/video cable
You can adjust the volume and the brightness of the display screen during video
playback.
Enjoyment
Power on
1 Power on the connected device, such as the primary DVD player, camcorder
etc.
2 Power on PAC132
3 PAC132 will automatically playback the video content
4 Power off all the devices after viewing
Volume control
Adjust the volume control on the right side of the player.
Screen brightness
Use the rotary switch on the right side of the unit to finetune the TFT screen
brightness.
1
2

PAC132 SECONDARY LCD SCREEN
Technical data
TFT screen size 7 inches
Weight 0.37 kg / 0.81 lb
Power supply DC 9-12V, 2A
Power Consumption ) 20W
Operating temperature range 0 - 50°C (32 - 122°F)
Video system NTSC / PAL / AUTO

TROUBLESHOOTING
If it appears that the DVD-Video player is faulty, first consult this checklist.
It may be that something has been overlooked.
WARNING
Under no circumstances should you try to repair the set yourself as this
will invalidate the guarantee.
If a fault occurs, first check the points listed, before taking the set for
repair. If you are unable to solve a problem by following these hints, con-
sult your dealer or service centre.
Symptom Remedy
No power – Check if both plugs of the mains cord are
properly connected.
– Check if there is power at the AC outlet by
plugging in another appliance.
– Check if the built-in battery is drained.
– Check if car adaptor is connected appropriately.
Distorted picture – Check the disc for fingerprints and clean with
a soft cloth, wiping from centre to edge.
– Sometimes a small amount of picture distor-
tion may appear. This is not a malfunction.
Completely distorted – The PAL/NTSC setting may be in the wrong
picture / no colour in status. Match your TV’s setting with the
the TV screen player’s setting.
No sound – Check audio connections. If using a HiFi
amplifier, try another sound source.
Disc can’t be played – Ensure the disc label is upwards.
– Clean the disc.
– Check if the disc is defective by trying anoth-
er disc.

TROUBLESHOOTING
Symptom Remedy
The player does not – Aim the remote control directly at the
respond to the remote sensor on the front of the player. Avoid all
control obstacles that may interfere with the signal
path. Inspect or replace the batteries.
Distorted or B/W – Use only discs formatted according to the
picture with DVD TV-set used (PAL/NTSC).
Player does not respond – Operations are not permitted by the disc.
to all operating commands – Refer to the instructions in the disc inlay.
during playback
Player feels warm – When the player is in use for a long
period of time, the surface will be heated.
This is normal.
Display goes dimmer when – The unit is saving power to ensure longer
AC is unplugged playtime with battery. It is normal.
Adjust the brightness using the rotary bright-
ness control.
No sound (PAC132) – Make sure that the LCD screen is switched on
and is in the correct video mode.
– Make sure that your system connection is
properly connected.
– Make sure the video source is correct.
No video (PAC132) – Make sure all the connected devices are
switched on.
– Make sure that the system is properly con-
nected.
– Make sure that video playback has already
started on the primary device, such as DVD
player, camcorder.
– Make sure that the video out function on the
primary device has been activated.

TECHNICAL DATA
Dimensions 203 x 40.4 x 149 mm
Weight 0.71 kg
Power supply DC 9V 2.0A
Power Consumption 18W
Operating temperature range 0 - 45°C
Laser wavelength 650nm
Video system PAL/NTSC
Frequency response 20Hz ~ 20KHz ± 1dB
Signal/noise ratio * 80dB
Audio distortion + noise ) -80(1KHz)
Channel separation * 80dB
Dynamic range * 80dB
Output
Audio out (analog audio) Output level: 2V ± 10%
Load impedance: 10K1
Video out Output level: 1Vp - p ± 20%
Load impedance: 751
PHILIPS reserves the right to make design and specification
changes for product improvement without prior notice.
Modifications not authorized by the manufacturer may void users
authority to operate this device.
All rights reserved.
NOTES

L
ISTA DE
S
ERVIÇO
A
UTORIZADO - BRASIL
ACR E
BARRA S FRANCISCO 27-37562245 BELO HORIZONTE 31-32257262 PORTO TROMBETAS 93-3549160
CRUZEIRO DO SUL 68-33224432 CASTELO 28-35420482 BELO HORIZONTE 31-32254066 SANTAREM 93-3523532
RIO BRANCO 68-32217642 COLATINA 27-37222288 BELO HORIZONTE 31-34420944
RIO BRANCO 68-32249116 GUARAPARI 27-33614355 BELO HORIZONTE 31-34181919
PARAÍBA
LINHARES 27-33710148 BELO HORIZONTE 31-32957700 CAMPINA GRANDE 83-3212128
ALAGO AS
S GABRIEL DA PALHA 27-37271153 BELO HORIZONTE 31-34491000 ESPERANCA 83-3612273
ARAPIRACA 82-5222367 SAO MATEUS 27-37633806 BELO HORIZONTE 31-21027373 GUARABIRA 83-2711159
MACEIO 82-32417237 VILA VELHA 27-32891233 BETIM 31-35322088 JOAO PESSOA 83-3246968
PALMEIRA DOS INDIOS 82-4213452 VITORIA 27-32233899 BOM DESPACHO 37-35212906 JOAO PESSOA 83-3244604
UNIAO DOS PALMARES 82-32811305 BOM DESPACHO 37-35222511 JOAO PESSOA 83-3221046
GOÍAS
CARANGOLA 32-37412017 NOVA FLORESTA 83-3741014
AM AP Á
ANAPOLIS 62-3243562 CASSIA 35-35412293 SAPE 83-2832479
MACAPA 96-2175934 CACU 64-6561811 CONGONHAS 31-37311638 SOLANEA 83-3631241
SANTANA 96-2811080 CALDAS NOVAS 64-4532878 CONS LAFAIETE 31-37637784
CATALAO 64-4412786 CONTAGEM 31-33912994
PARANÁ
AM AZ ON AS
FORMOSA 61-6318166 CONTAGEM 31-33953461 AMPERE 46-5471605
MANAUS 92-36333035 GOIANIA 62-32919095 CORONEL FABRICIANO 31-38411804 ANTONINA 41-3432178
MANAUS 92-36633366 GOIANIA 62-32292908 CURVELO 38-37213009 APUCARANA 43-3422530
MANAUS 92-32324252 GOIATUBA 94-34952272 DIVINOPOLIS 37-32212353 ARAPONGAS 43-2753723
INHUMAS 62-5111840 FORMIGA 37-33214177 ASSIS CHATEAUBRIAND 44-5285181
BAHIA
IPAMERI 62-4511184 FRUTAL 34-34235279 BANDEIRANTES 43-5421711
ALAGOINHAS 75-4211128 ITAPURANGA 62-3551484 GOV. VALADARES 33-32716650 CAMPO MOURAO 44-3523897
BARREIRAS 77-36117592 ITUMBIARA 64-34310837 GUAXUPE 35-35513891 CASCAVEL 45-3225400
BOM JESUS DA LAPA 77-4814335 JUSSARA 62-3731806 GUAXUPE 35-35514124 CIANORTE 44-6292842
BRUMADO 77-4412381 LUZIANIA 61-6228519 IPATINGA 31-38222332 CURITIBA 41-3333476
CAETITE 77-34541183 MINEIROS 64-6618259 ITABIRA 31-38316218 CURITIBA 41-3264879
CAMACARI 71-36218288 PIRES DO RIO 64-4611133 ITAJUBA 35-36211315 CURITIBA 41-3253439
CICERO DANTAS 75-32782767 RIALMA 62-3971320 ITAPECERICA 37-33411326 FOZ DO IGUACU 45-3523302
CRUZ DAS ALMAS 75-6212839 RIO VERDE 64-36210173 ITAPECERICA 37-33411326 FOZ DO IGUACU 45-3523411
ESPLANADA 75-4271454 TRINDADE 62-5051505 ITAUNA 37-32412468 FRANCISCO BELTRAO 46-3523323
EUNAPOLIS 73-2815181 URUACU 62-3571285 ITUIUTABA 34-32682131 GUARAPUAVA 42-3623532
FEIRA DE SANTANA 75-32232882 JOAO MONLEVADE 31-38512909 IBAITI 43-5461162
FEIRA DE SANTANA 75-2213427
MARANHÃ O
JOAO MONLEVADE 31-38521112 IBIPORA 43-2581863
GANDU 73-32541664 ACAILANDIA 99-35381889 JOAO PINHEIRO 38-35611327 IRATI 42-3422133
ILHEUS 73-2315995 BACABAL 99-36212794 JUIZ DE FORA 32-30842584 LAPA 41-3622241
IRECE 74-36410202 BALSAS 99-5410113 JUIZ DE FORA 32-32151514 LOANDA 44-4252053
ITABERABA 75-32512358 CAROLINA 98-7311335 LAGOA DA PRATA 37-32613493 LONDRINA 43-3324100
ITABUNA 73-36137777 CAXIAS 99-35212377 LAVRAS 35-38219188 MANDAGUARI 44-2331335
ITAPETINGA 77-2613003 CHAPADINHA 98-4711364 MANHUACU 33-33314735 MARINGA 44-3226462
JACOBINA 74-36211323 CODO 99-36611277 MONTE CARMELO 34-38422082 MEDIANEIRA 45-3264258
JEQUIE 73-35254141 CODO 99-36612942 MONTE SANTO DE MINAS 35-35911888 PALMEIRA 42-2523006
JUAZEIRO 74-36116456 COELHO NETO 98-34731351 MONTES CLAROS 38-32218925 PARANAGUA 41-3422580
JUAZEIRO 74-36111002 IMPERATRIZ 99-35244969 MURIAE 32-37224334 PATO BRANCO 46-3224278
LAURO DE FREITAS 71-3784021 PEDREIRAS 99-36423142 MUZAMBINHO 35-5712419 PONTA GROSSA 42-3222659
MURITIBA 75-4241908 PRESIDENTE DUTRA 99-36631815 NANUQUE 33-36212165 RIO NEGRO 47-3645025
PAULO AFONSO 75-32811349 SANTA INES 98-36537553 NOVA LIMA 31-35412026 ROLANDIA 43-2561947
POCOES 77-4311890 SAO JOSE DE RIBAMAR 98-2241581 OLIVEIRA 37-33314444 S J DOS PINHAIS 41-3282252
RIBEIRA DO POMBAL 75-2761853 SAO LUIS 98-32323236 PARA DE MINAS 37-32316369 S MIGUEL DO IGUACU 45-5651429
SALVADOR 71-32473659 SAO LUIS 98-32315276 PARA DE MINAS 37-32321975 SANTA FE 44-2471147
SALVADOR 71-2675000 PARACATU 38-36711250 SAO JORGE D' OESTE 46-5341305
SALVADOR 71-32072070
M ATO GROSSO
PASSOS 35-35214342 STO ANTONIO PLATINA 43-3534180
SALVADOR 71-33356233 ALTA FLORESTA 66-35212460 PATOS DE MINAS 34-38222588 TELEMACO BORBA 42-3272604
SANTO AMARO 75-32413171 ALTO ARAGUAIA 66-4811726 PATROCINIO 34-38311531 TOLEDO 45-3252247
SENHOR DO BONFIM 74-5413143 BARRA DO GARGAS 66-4011394 PITANGUI 37-32716232 UMUARAMA 44-3623123
SERRINHA 75-32611794 CUIABA 65-36230421 PIUMHI 37-33714632
STO ANTONIO JESUS 75-36314470 LUCAS DO RIO VERDE 65-5491333 POCOS DE CALDAS 35-37121866
PERNAM BUCO
TEIXEIRA DE FREITAS 73-30111600 PONTES E LACERDA 65-2662326 POCOS DE CALDAS 35-37224448 BELO JARDIM 81-3726191
VALENCA 75-6413710 PRIMAVERA DO LESTE 66-4981682 PONTE NOVA 31-38172486 CABO STO AGOSTINHO 81-3521182
VITORIA DA CONQUISTA 77-34241183 RONDONOPOLIS 66-4233888 POUSO ALEGRE 35-34212120 CAMARAGIBE 81-3458124
SINOP 66-5314592 S SEBASTIAO PARAISO 35-35313094 CARUARU 81-3722023
CEARÁ
TANGARA DA SERRA 65-3261431 S SEBASTIAO PARAISO 35-35312054 FLORESTA 81-8771274
BREJO SANTO 88-5310133 VARZEA GRANDE 65-6826502 SANTOS DUMONT 32-32516369 GARANHUNS 87-3761109
CRATEUS 88-6910019 SAO JOAO DEL REI 32-33718306 GARANHUNS 87-3761008
CRATO 88-5212501
M ATO GROSSO DO SUL
STO ANTONIO MONTE 37-32811258 PAULISTA 81-3433114
FORTALEZA 85-32875506 AMAMBAI 67-4811543 TEOFILO OTONI 33-35225831 RECIFE 81-3231339
FORTALEZA 85-40088555 CAMPO GRANDE 67-33242804 TIMOTEO 31-38482728 RECIFE 81-2126211
IBIAPINA 88-36531223 CAMPO GRANDE 67-3831540 UBA 32-35323626 RECIFE 81-3465604
IGUATU 88-35810512 CAMPO GRANDE 67-3213898 UBERABA 34-33332520 RECIFE 81-3462909
ITAPIPOCA 88-6312030 DOURADOS 67-4217117 UBERLANDIA 34-32123636 SALGUEIRO 87-3871630
JUAZEIRO DO NORTE 88-35112667 IVINHEMA 67-4421244 UBERLANDIA 34-32360764 SERRA TALHADA 87-3831140
LIMOEIRO DO NORTE 88-4231938 NAVIRAI 67-4612486 VARGINHA 35-32227889
OROS 88-5841271 NOVA ANDRADINA 67-4413851 VARZEA DA PALMA 38-37311548
PIAUÍ
SOBRAL 88-36110605 PONTA PORA 67-4314313 VAZANTE 34-38131420 CAMPO MAIOR 86-3252137
TIANGUA 88-36713336 RIO BRILHANTE 67-4527950 VICOSA 31-38918000 FLORIANO 89-5221154
UBAJARA 88-6341233 TRES LAGOAS 67-5212007 OEIRAS 89-4621066
PARÁ
PARNAIBA 86-3222877
DISTRITO FEDERAL MINAS GERAIS
ABAETETUBA 91-37512272 PICOS 89-4221444
BRASILIA 61-32269898 ALFENAS 35-32927104 BELEM 91-32690400 PICOS 89-3415513
BRASILIA 61-33016666 ALMENARA 33-7211234 BELEM 91-32421090 TERESINA 86-3221353
GAMA 61-5564840 ANDRADAS 35-37312970 CAPANEMA 91-34621100 TERESINA 86-3223082
ARAXA 34-36611132 CASTANHAL 91-37215052 TERESINA 86-3221461
ESPÍRITO SANTO
ARAXA 34-36691869 ITAITUBA 93-5181545
ALEGRE 28-35526349 ARCOS 37-33513455 MARABA 94-3211891
RIO DE JANEIRO
ARACRUZ 27-32561251 BAMBUI 37-34311473 OBIDOS 93-5472116 B JESUS ITABAPOANA 22-3831221
BAIXO GUANDU 27-37321142 BARBACENA 32-33310283 PARAGOMINAS 91-30110778 BELFORD ROXO 21-2761606

Meet Philips at the Internet
http://www.philips.com
Printed in China WK812
CLASS 1
LASER PRODUCT
PET718