Loading ...
Loading ...
Loading ...
STAY ALERT - Watch what you are doing. Use
common sense. Do not operate the tiller/cultivator
when you are tired or under the influence of drugs
or medication.
WARNING: Do not operate the tiller/cultivator near
underground electrical cables, telephone lines,
pipes or hoses.
If the tiller/cultivator strikes a foreign body, turn it off
immediately, wait for the tines to stop and check for
damage. If necessary, repair before restarting.
If the tiller/cultivator starts to vibrate abnormally,
turn it off immediately and check for the cause.
Vibration is generally a warning of trouble.
DANGER: RISK OF CUT - Wear gloves and use
caution when cleaning or performing maintenance
on the tiller/cultivator.
Always turn off the tiller/cultivator, disconnect from
the power supply and wait until the tines come to a
complete stop before carrying out any maintenance
or repairs.
CAUTION: Tines do not stop immediately after the
tiller/cultivator is turned off.
CAUTION: Risk of injury. Do not put hands, feet or
any body part or clothing near the rotating tines.
WARNING: California Proposition 65:
This product contains chemicals known to the State
of California to cause cancer, birth defects or other
reproductive harm.
WARNING: Some dust and debris created by the
use of this tool could contain chemicals known to
the State of California to cause cancer and birth
defects or other reproductive harm.
Some examples of these chemicals are:
- chemicals in fertilizers
- compounds in insecticides, herbicides, and
pesticides
- arsenic and chromium from chemically treated
lumber
Your risk from exposure to these chemicals varies,
depending on how often you do this type of work.
To reduce your exposure, work in a well-ventilated
area and with approved safety equipment such as
dust masks that are specially designed to filter out
microscopic particles.
GROUND FAULT CIRCUIT INTERRUPTER (GFCI)
protection should be provided on the circuit or outlet
to be used for the tiller/cultivator. Receptacles are
available having built-in GFCI protection and may
be used.
DISCONNECT UNIT from the power supply when
not in use or when servicing or cleaning. Do not
leave unattended.
DON’T ABUSE CORD - Never carry this product
by the cord or yank the cord to disconnect from the
receptacle. Keep cord from heat, oil, and sharp
edges.
USE RIGHT APPLIANCE - Do not use this product
for any job except that for which it is intended.
DON’T OVERREACH - Guide the tiller/cultivator at a
walking pace only. Keep proper footing and balance
at all times.
LIGHTING - Only operate your tiller/cultivator in
daylight or good artificial light.
STORE IDLE UNIT INDOORS-When not in use, the
tiller/cultivator should be stored indoors in a dry area
out of children’s reach.
MAINTAIN UNIT WITH CARE-Keep clean for best
performance and to reduce the risk of injury. Inspect
extension cord periodically and replace if damaged.
Keep handles dry, clean and free from oil.
POLARIZED PLUGS-To reduce the risk of electric
shock, this product has a polarized plug. Polarized
connections will fit together only one way. Make
sure that the receptacle end of the extension cord
has large and small blade slot widths. If the plug
does not fit fully into the extension cord, reverse the
plug. If it still does not fit, obtain a suitable extension
cord. If the extension cord does not fit fully into the
outlet, contact a qualified electrician to install the
proper outlet. Do not change the plug on the tool or
the extension cord in any way.
Do not operate the tiller/cultivator on a slope that is
too steep for safe operation. When on slopes, slow
down and make sure you have good footing.
Before starting the tiller/cultivator make sure the
times are not touching any object and are free to
move.
Grip the guide bar firmly with both hands. Never
operate the tiller/cultivator with one hand.
CAUTION: The tiller/cultivator may bounce upward
and/or jump forward if the tines strike extremely
hard packed soil, frozen ground, or buried obstacles
such as large stones, roots or stumps.
GENERAL SAFETY
5
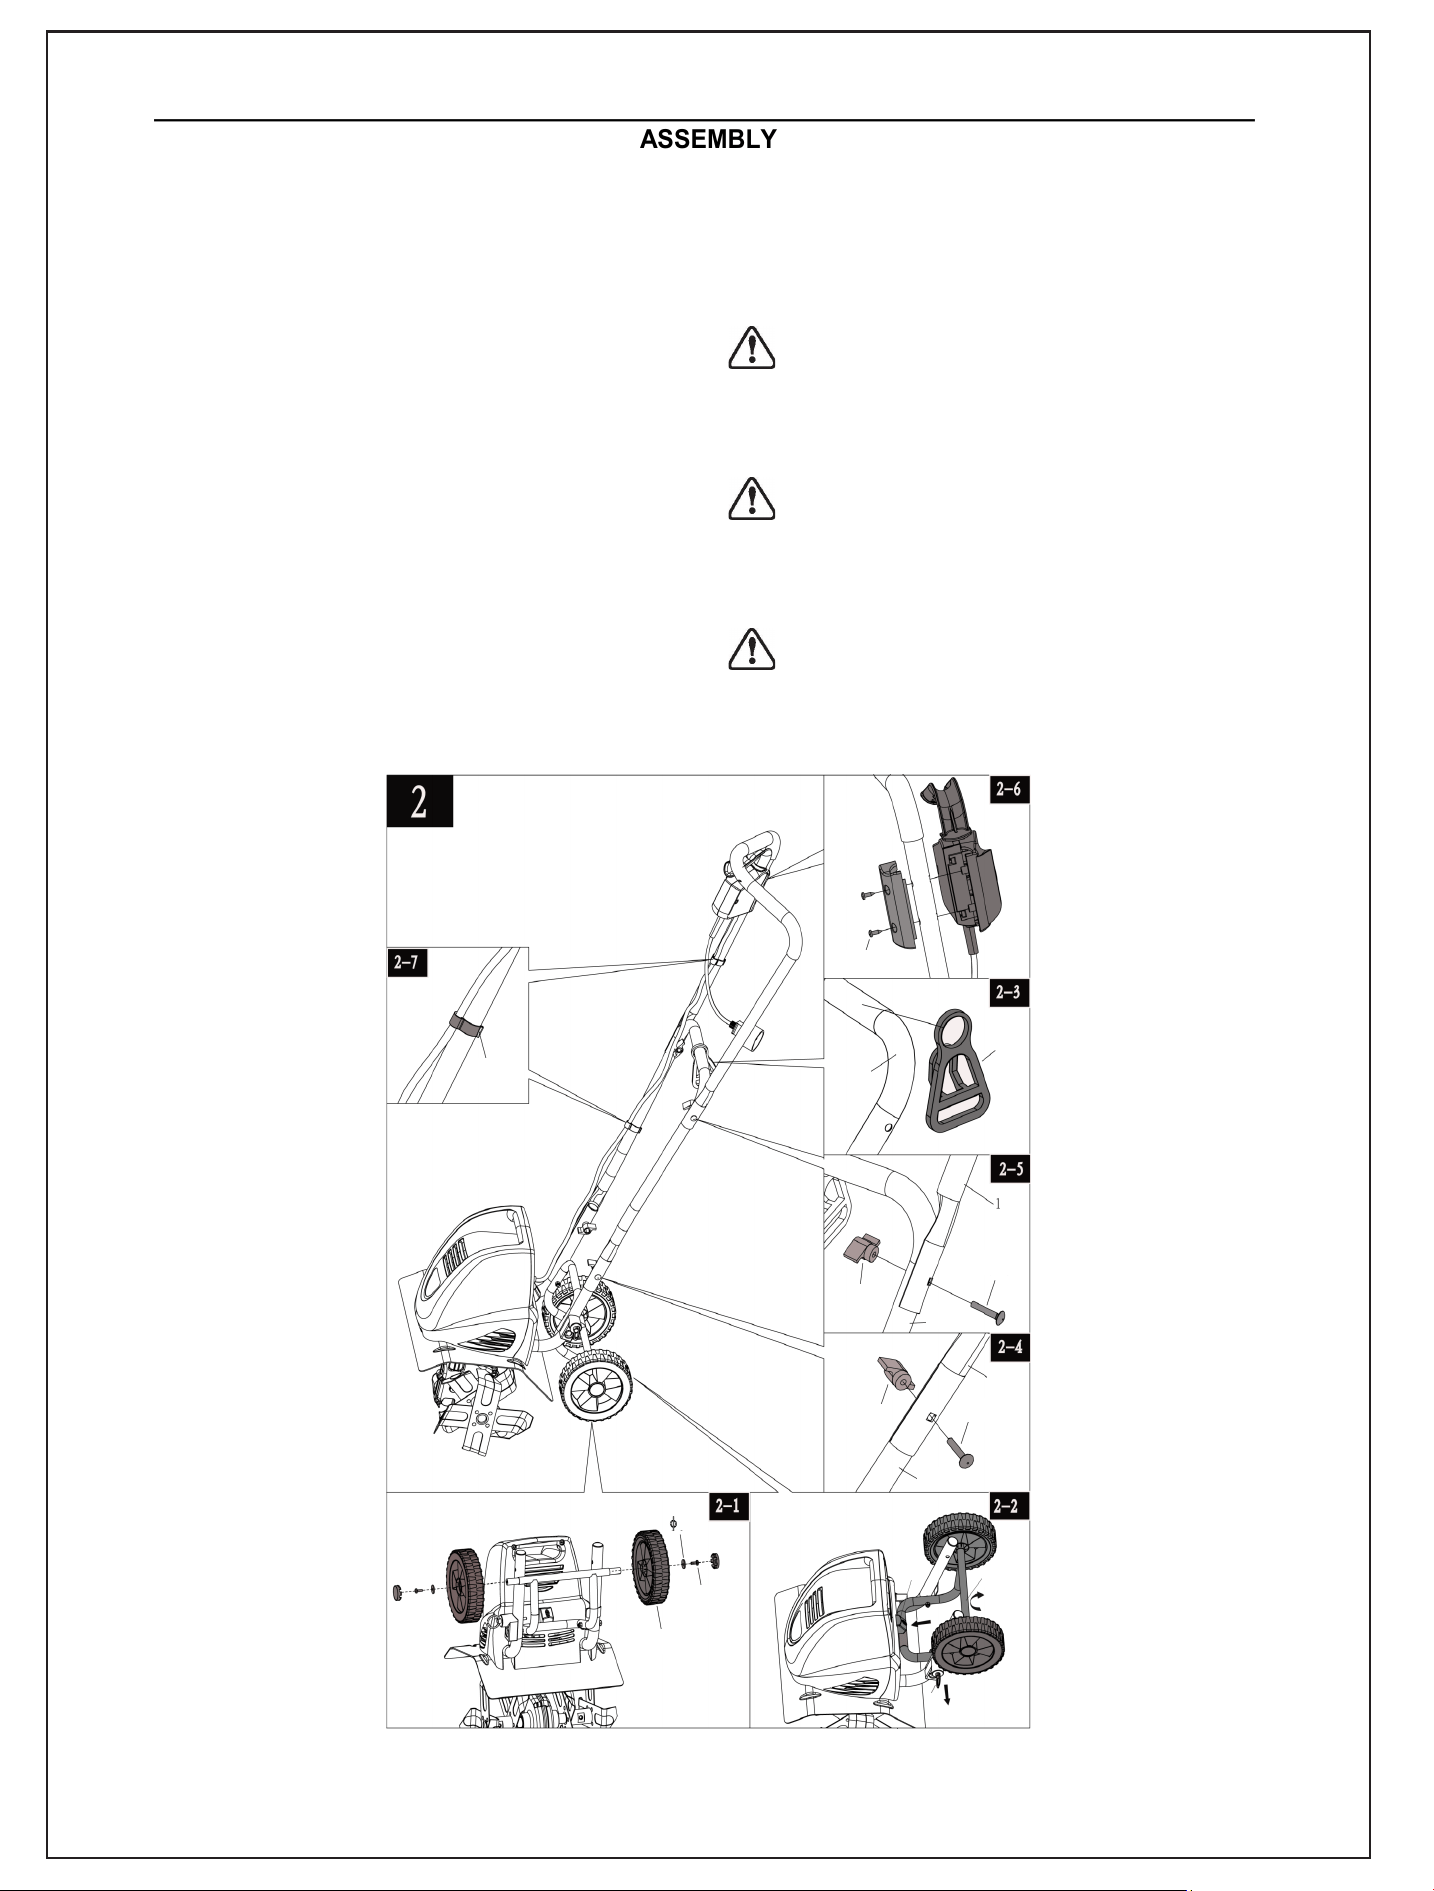
7. Install the switch and power cable assembly onto the
upper handle section using the two supplied bolts
(ST3.9 x 19). (Fig. 2-6)
8. Use the two supplied cable clips (3) to secure the
cord. (Fig. 2-7)
WARNING: If any parts are damaged or missing do
not operate this product until the parts are replaced.
Failure to heed this warning could result in serious
personal injury. Call our customer service help line at 1
-800-313-5111 for assistance
WARNING: Do not attempt to modify this product or
create accessories not recommended for use with
this product. Any such alteration or modification is misuse
and could result in a hazardous condition leading to
possible serious personal injury.
WARNING: Do not connect to power supply until
assembly is complete. Failure to comply could
result in accidental starting and possible serious
personal injury.
ASSEMBLY
6
This product must be assembled correctly before use.
1. Remove the screws (M5 X 12) and washers from
wheel frame. Insert the wheels on the axle of wheel
frame, then attach washers and screws (M5 X 12)
to secure. (Fig. 2-1)
2. Press the wheel covers into the wheel and cover the
ends of the axles. You may use a hammer to seat
them securely into the wheels. (Fig. 2-1)
3. To lower wheel frame, push the lock button on back
of motor housing to release the frame (Step A). Low-
er the wheel frame (Step B) and pull out the lock pin
on lower handle section (Step C). Align lock pin to
the hole in wheel frame then release it to lock the
wheel frame in position. (Fig. 2-2)
4. Slide the cord retainer (5) onto the center handle
section (4). (Fig. 2-3)
5. Attach the center handle section (4) to the lower
handle sections (9) using the two supplied M6 X 45
bolts (6) and wing nuts (7). (Fig. 2-4)
6. Fasten the upper handle section (1) to the center
handle section (4) using the two supplied M6 X 45
bolts (6) and wing nuts (7) (Fig. 2-5).
ST3.9 X 19
M5 X 12
M6 X 45
3
4
5
4
M6 X 45
4
7
7
9
10
5
B
A
C
7
OPERATING
STARTING:
Make sure the wheel frame is raised before you
start the tiller. To raise the frame, pull out the lock
pin (Step A); rotate the wheel frame upward, beyond
the lock button on the back of the motor housing
(Step B); release the lock pin. The wheel frame will
be locked in place by the lock button. (See Fig. 3)
Secure the extension cord into the cord retainer (5).
The loop of the extension cord must be long enough
for the cord retainer to freely slide from one side to
the other. Plug the extension cord into the power
cord plug on the tiller.
Use the tiller/cultivator for breaking sod, preparing
seed beds, and for cultivating gardens and flower
beds. The tiller/cultivator can also dig small holes for
planting saplings or potted plants.
Move the tiller/cultivator to the work area prior to
starting the motor.
To lower wheel frame, push the lock button on back
of motor housing to release the frame. Lower the
wheel frame and pull out the lock pin on lower
handle section. Align lock pin to the hole in wheel
frame then release it to lock the wheel frame in
position. (See Fig. 2-2)
Hold the tiller/cultivator firmly while starting. The
tines will pull the tiller/cultivator forward during
operation. Lower the tines slowly with the guide bar.
To start the tiller/cultivator press and hold the safety
lock button (A) on the safety switch while pulling the
trigger lever (B) up and against the handle bar. The
motor will start and the tines will begin to rotate. To
stop the tiller/cultivator simply release the lever.
For breaking sod or deep tilling, allow the tines to
pull the tiller/cultivator forward to the end of your
arm’s reach, then firmly pull it back toward yourself.
You will achieve the best results by repeatedly
allowing it to move forward and pulling it back.
By pulling the tiller/cultivator back towards yourself,
the tines will dig deeper and more aggressively.
To prevent tripping, take extra precautions when
moving backwards and when pulling the tiller/
cultivator back toward yourself.
If the tiller/cultivator digs deep enough to stay in one
spot, gently rock it side to side until it starts moving
forward again.
Never pass the tiller/cultivator over the extension
cord. Make sure the cord is always in a safe position
behind you.
When working on inclines always stand diagonally
to the incline to retain a firm, safe footing. Do not
work on extremely steep slopes.
OPERATING
For preparing seed beds, we recommend using one
of these tilling patterns:
Tilling Pattern A– Make two passes over area to be
tilled, the second at a right angle to the first.
Before use, remove any visible stones or other
foreign bodies from the area.
CAUTION: Before moving the tiller/cultivator from
one area to another switch off the motor and wait for
the tines to come to a complete stop. Be careful not
to let the tines touch the ground while moving the
tiller/cultivator. The tines as well as the unit itself
may be damaged even if the motor is switched off.
Tilling Pattern B– Make two passes over area to be
tilled, the second overlapping the first.
Clearing foreign objects:
During operation a stone or root could become
lodged in the tines, or tall grass or weeds may
become wrapped around the tine shaft. To clear
the tines or tine shaft release the trigger lever,
wait for the tines to come to a complete stop and
unplug the tiller/cultivator. Dislodge or remove
the foreign matter from the tines or tine shaft.
To simplify removal of tall grass or weeds from
the tine shaft, remove one or more of the tines.
See Tine Removal and Installation.
8
Loading ...
Loading ...
Loading ...