
Loading ...
Loading ...
Loading ...
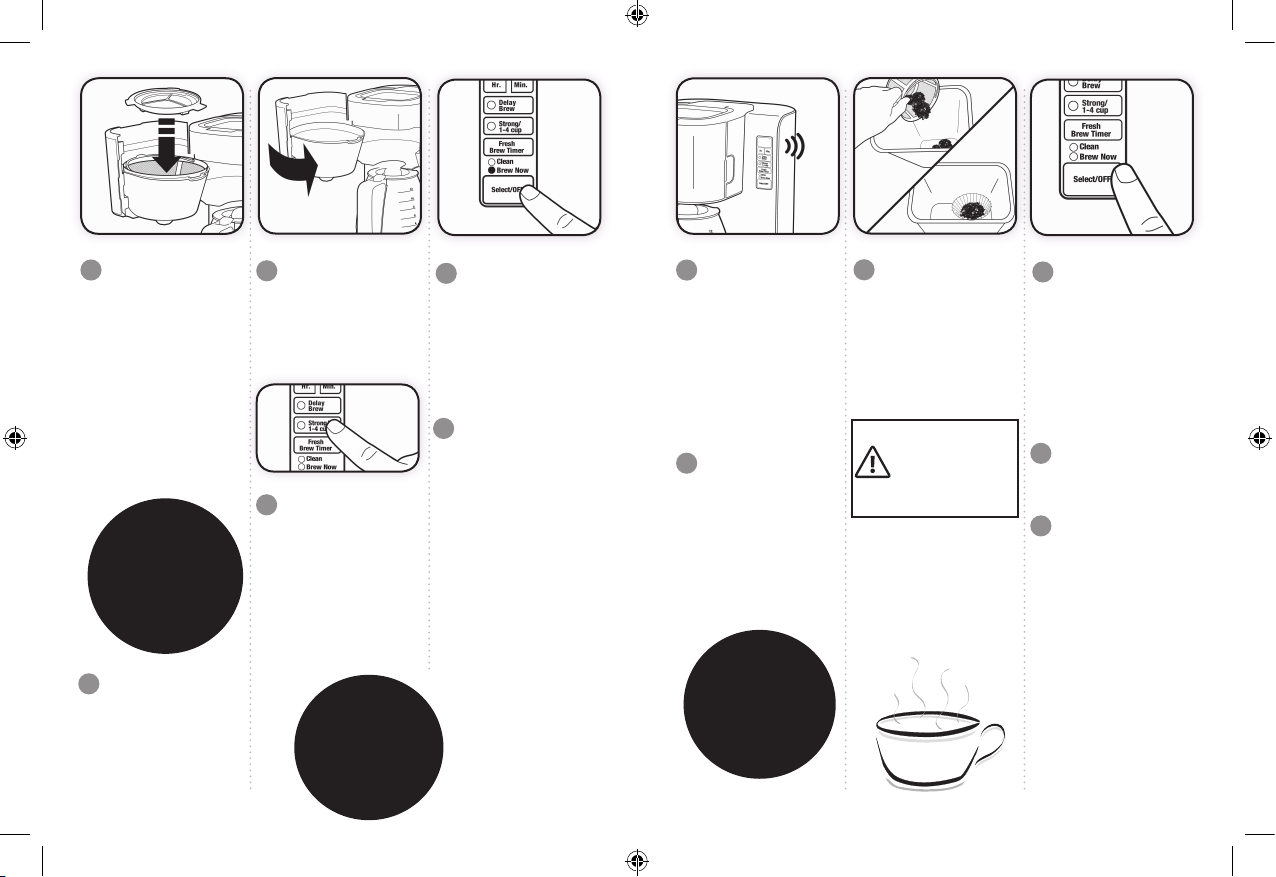
Figure 16
7
Make sure the glass
carafe and the filter
basket are securely
in place.
Figure 17
9
To enjoy a bolder cup
of coffee or if brewing 4
cups or less, press the
Strong/1-4 Cup Button
now. (Figure 17) (Refer
to the STRONG/1-4
CUP BUTTON section)
Note: You cannot turn
off the Strong/1-4 cup
mode once brewing
has started.
Figure 15
6
If included, place the
Water Filtraton Disk
with Frame on top
of the Removable
Filter Basket. (Refer
to the USING THE
WATER FILTRATION
SYSTEM section).
(Figure 15) Note:
Water Filtration
Frame must sit flat
on the top of the
Removable Filter
Basket.
TIP:
For optimum results,
use the water filtration
system with a reusable
filter (not included with
all models).
8
Close the Front
Loading Brew Basket
door. (Figure 16)
CAUTION: Do not
open until brewing
cycle is complete and
coffeemaker is cooled.
Figure 18
10
Turn the coffeemaker
on by pressing the
Select/Off button
once. (Figure 18) The
Brew Now indicator
light will turn on and
pulse to signal that
the coffeemaker is on
and brewing coffee.
11
Once the brew cycle
begins, the presoak
process will begin
by presoaking the
coffee grounds. The
coffeemaker will
pause for 30 seconds
before the full
brew cycle begins.
As the brew cycle
continues, the water
control system will
evenly distribute
water over the coffee
grounds for full flavor
extraction. (Refer
to the PRESOAK
FEATURE section)
Note: To deactivate
this feature, press
and hold the Select/
Off button for 5
seconds.
TIP: During the presoak
process there may be up to
2 cups of brewed coffee in
the carafe
Figure 19
12
After brewing is
complete, an audible
ready signal will
sound to let you
know your coffee is
ready. (Figure 19)
Note: To deactivate
the audible signal,
press and hold the
Delay Brew button
for 5 seconds.
Figure 21
16
Make sure the carafe
is empty before
starting to brew
coffee.
13
The coffeemaker
warming plate will
keep your coffee
hot for 2 hours and
then automatically
turn off. To track the
freshness of your
coffee, (Refer to the
FRESH BREW™
TIMER section).
Figure 20
14
After the used coffee
grounds have cooled,
carefully open the
Front Loading Brew
Basket door and
remove the paper or
resuable filter and
discard the grounds.
(Figure 20)
15
Prior to making a
second pot of coffee,
turn the coffeemaker
off. This will reset
the Fresh Brew™
Timer. To turn the
coffeemaker off,
press the Select/Off
button once and all
lights will turn off.
(Figure 21)
17
Be sure to turn
your coffeemaker
off when no longer
using it.
TIP:
This coffeemaker has a low
wattage heater in the warming
plate to keep your coffee
hot after brewing without
burning it.
CAUTION:The brew
basket door is hot
after brewing. Always
allow the coffeemaker
to cool down before
cleaning.
14 15
Loading ...
Loading ...
Loading ...