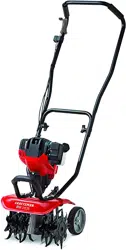
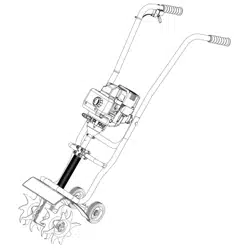
User manual 4-CYCLE GAS CULTIVATOR
ASSEMBLY
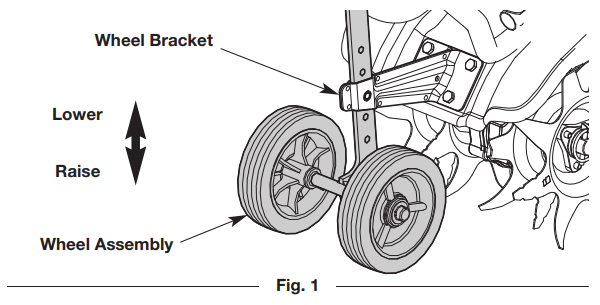
INSTALLING AND ADJUSTING THE WHEEL ASSEMBLY
WARNING: To avoid serious personal injury, the wheel assembly must be installed before operating the unit.
WARNING: To avoid injury from the tines, wear heavy gloves and a long sleeve shirt when installing or adjusting the wheel assembly.
Installing the Wheel Assembly
- Insert the wheel assembly into the wheel bracket. The *J" shape of the wheel assembly should point away from the unit (Fig. 1).
- Align the hole in the wheel bracket with the desired hole in the wheel assembly (Fig. 1).
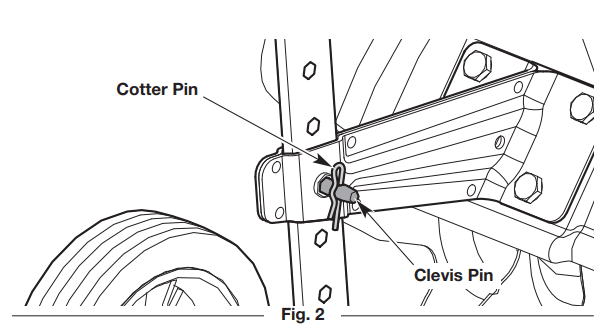
- Insert the clevis pin through the aligned holes (Fig. 2).
- Insert the cotter pin into the clevis pin (Fig. 2).
NOTE: It may be necessary to adjust the position of the wheel assembly before using the unit.
Adjusting the Wheel Assembly
- Remove the cotter pin from the clevis pin (Fig. 2).
- Remove the clevis pin from the wheel bracket and wheel assembly (Fig. 2).
- Align the hole in the wheel bracket with the desired hole in the wheel assembly (Fig. 1).
- NOTE: Moving the wheel assembly down will raise the wheel height. Moving the wheel assembly up will lower the wheel height.
- Insert the clevis pin through the aligned holes (Fig. 2).
- Insert the cotter pin into the clevis pin (Fig. 2).
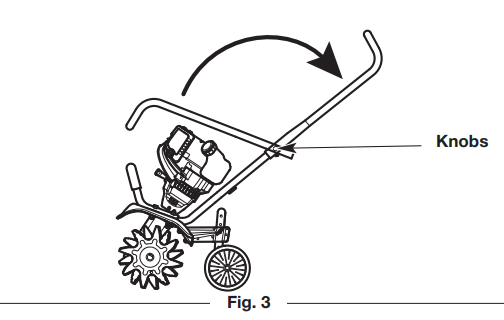
POSITIONING THE HANDLEBAR
- Set the unit upright.
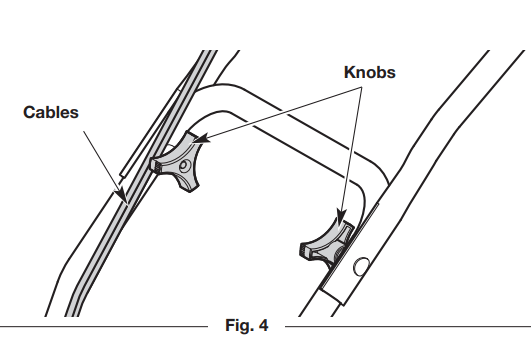
- Loosen the knobs (Fig. 4).
- Swing the handlebar up into the operating position (Fig. 3). NOTE: Take care not to pinch the cables when positioning the handlebar (Fig. 4).
- Tighten the knobs securely.
- NOTE: Do not over tighten the knobs.
- Readjust the cables so they are smooth and tight against the handlebar.
OIL AND FUEL
USING THE RIGHT OIL
Use a high-quality SAE 30 weight oil. DO NOT use dirty oil. Failure to use clean oil of the correct type can cause premature engine wear and failure.
ADDING OIL: INITIAL USE
WARNING: OVERFILLING THE CRANKCASE MAY CAUSE SERIOUS PERSONAL INJURY.
NOTE: This unit was shipped without oil in the crankcase. Oil must be added before starting the unit.
NOTE: Never add oil to the fuel tank. This unit has a four-cycle engine. DO NOT mix oil with gasoline.
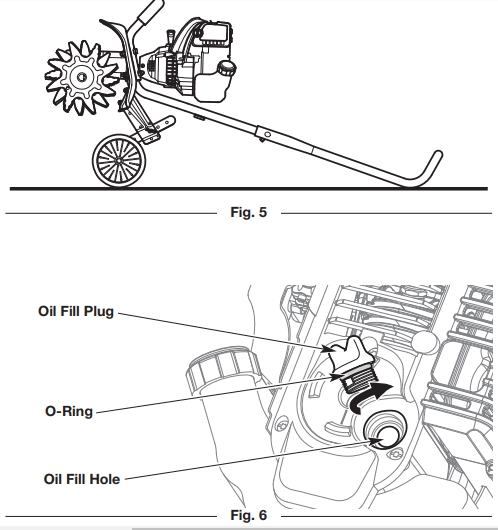
- Set the unit on a flat, level surface. Tip the unit back so that the handlebar touches the ground and the engine is in a horizontal position (Fig. 5).
- Unscrew the oil fill plug (Fig. 6).
- Pour 3.04 fluid oz. (90 ml) of oil into the oil fill hole (Fig. 6).
- NOTE: This unit comes with a 3.04 fluid oz. (90 ml) container of oil. NOTE: DO NOT overfill. Refer to Checking the Oil Level.
- Wipe up any oil that may have spilled.
- Make sure the O-ring is in place on the oil fill plug (Fig. 6).
- Reinstall the oil fill plug.
USING THE RIGHT FUEL
The use of old fuel is the most common cause of performance problems. Use only fresh, clean unleaded gasoline.
NOTE: This unit has a four-cycle engine. DO NOT mix oil with gasoline.
Definition of Blended Fuels
Today's fuels are often a blend of gasoline and oxygenates such as ethanol, methanol or MTBE (ether). Alcohol-blended fuel absorbs water. As little as 1% water in the fuel can make fuel and oil separate, forming acids when stored. ALWAYS use fresh fuel (less than 30 days old).
NOTE: Dispose of old fuel according to federal, state and local regulations.
Using Blended Fuels
If using a blended fuel:
- Always use fresh unleaded gasoline
- Use the fuel additive STA-BIL® or an equivalent
CAUTION: DO NOT USE E85 FUEL IN THIS UNIT.
It has been proven that fuel containing greater than 10% ethanol will likely damage this engine and void the warranty.
Using Fuel Additives
Use a fuel additive, such as STA-BIL Fuel Stabilizer or an equivalent, to inhibit corrosion and minimize gum deposits. Add 0.8 oz. (23 ml) of fuel additive per gallon of fuel, according to the instructions on the container. NEVER add fuel additives directly to the unit's fuel tank.
FUELING THE UNIT
WARNING: Gasoline is extremely flammable. Ignited vapors may explode. Always stop the engine and allow it to cool before filling the fuel tank. Do not smoke while filling the tank. Keep sparks and open flames at a distance from the area.
WARNING: Remove the fuel cap slowly to avoid injury from fuel spray. Never operate the unit without the fuel cap securely in place.
WARNING: Add fuel in a clean, well-ventilated outdoor area. Wipe up any spilled fuel immediately. Avoid creating a source of ignition for spilled fuel. Do not start the engine until fuel vapors dissipate.
- Position the unit with the fuel cap facing up.
- Slowly remove the fuel cap.
- Place the fuel container spout into the fuel tank fill hole and fill the tank.
- NOTE: Do not overfill the tank.
- Wipe up any fuel that may have spilled.
- Reinstall the fuel cap.
- Move the unit at least 30 ft. (9.1 m) from the fuel container and the fueling site before starting the engine.
STARTING AND STOPPING
STARTING INSTRUCTIONS
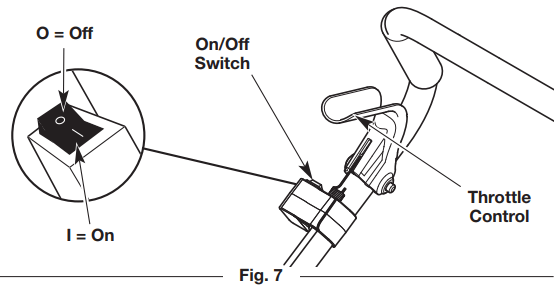
NOTE: There is no need to turn the unit on. The On/Off switch is in the On (1) position at all times (Fig. 7).
Before Starting the Unit
- Check the oil level. Refer to Checking the Oil Level.
- Fill the fuel tank. Refer to Fueling the Unit.
Starting the Unit
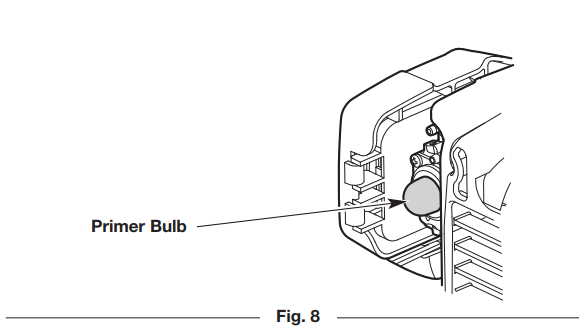
- Slowly press and release the primer bulb 10 times (Fig. 8).
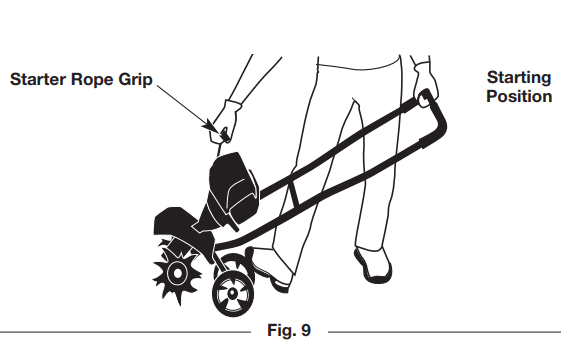
- Stand in the starting position (Fig. 9). Hold the handlebar firmly with one hand. Hold the starter rope with the other hand. Use one foot to hold the wheels in place.
- Tilt the unit back slightly to bring the tines off the ground (Fig. 9).
- Squeeze and hold the throttle control (Fig. 7).
- Continue to hold the throttle control. Pull the starter rope with a controlled and steady motion until the unit starts (Fig. 9).
IF... the engine does not start after pulling the starter rope 10 times, repeat the starting procedure.
IF... the engine fails to start after 3 attempts, begin the starting procedure with step 2.
IF... the engine stops while the throttle control is squeezed, repeat the starting procedure.
IF THE ENGINE IS HOT... repeat the starting procedure.
STOPPING INSTRUCTIONS
- Release the throttle control and allow the engine to idle.
- Press and hold the On/Off switch in the Off (O) position until the engine comes to a complete stop (Fig. 7).
OPERATING
OPERATING TIPS
- Move the cultivator to the work area prior to starting the engine. Refer to Moving the Unit.
- WARNING: To prevent serious personal injury, never pick up or carry the unit while the engine is running.
- Start the unit as described in the Starting Instructions.
- Tilt the unit back until the tines clear the ground.
- With the tines off the ground, squeeze the throttle control to increase the engine speed.
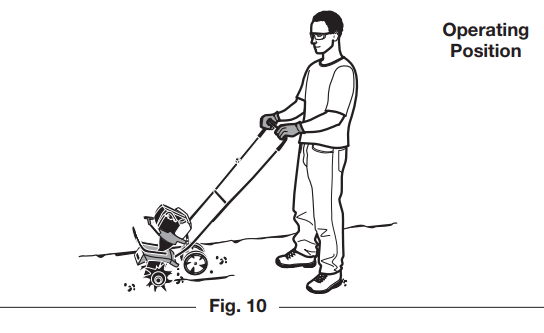
- Hold the handlebar firmly with both hands and slowly lower the unit until the tines make contact with the ground (Fig. 10).
- As cultivating action begins, pull back on the cultivator so that the tines can penetrate the ground.
- WARNING: To prevent serious personal injury, use extreme caution when reversing or pulling the unit towards you.
- Once the ground has been broken, continue at a moderate pace until you are familiar with the controls and the handling of the cultivator.
- Pull the cultivator backwards to improve the depth of cultivation and reduce your effort.
- If the tines are digging too deep or not deep enough, adjust them according to Adjusting the Tine Depth.
ADJUSTING THE TINE DEPTH
The tines should penetrate most garden soils approximately 4 to 5 inches. If necessary, adjust the tines as follows:
- Stop the engine and allow it to cool. Grasp the spark plug wire firmly and pull the cap from the spark plug.
- Raise the wheel height for shallower tine penetration or lower the wheel height for deeper tine penetration. Refer to Adjusting the Wheel Assembly in the Assembly Instructions section.
- Reconnect the spark plug wire and continue use.
MOVING THE UNIT
WARNING: To prevent serious personal injury, always stop the engine when operation is delayed or when moving the unit from one location to another.
- Stop the engine.
- Tilt the unit back until the tines clear the ground.
- Push or pull the unit to the next location.
MAINTENANCE
WARNING: To avoid serious personal injury, always stop the engine and allow it to cool before cleaning or maintaining the unit. Never perform cleaning or maintenance while the unil is running. Disconnect the spark plug wire to prevent the unit from starting accidentally.
WARNING: Wear protective clothing and observe all safety instructions to prevent serious personal injury.
MAINTENANCE SCHEDULE
Perform these required maintenance procedures at the frequency stated in the table. These procedures should also be a part of any seasonal tune-up.
NOTE: Some maintenance procedures may require special tools or skills. If you are unsure about these procedures, take the unit to an authorized service dealer. Call 1-888-331-4569 for more information.
NOTE: Maintenance, replacement, or repair of the emission control devices and system may be performed by an authorized service dealer. Call 1-888-331-4569 for more information.
NOTE: Please read the California/EPA statement that came with the unit for a complete listing of terms and coverage for the emissions control devices, such as the spark arrestor, muffler, carburetor, etc.
FREQUENCY – MAINTENANCE REQUIRED
Every 10 hours
- Clean and re-oil the air filter. Refer to Maintaining the Air Filter.
After the first 10 hours and at 38 hours
- Change the oil. Refer to Changing the Oil.
- Have the rocker arm clearance checked by an authorized service dealer.
- Check the spark plug condition and gap. Refer to Maintaining the Spark Plug.
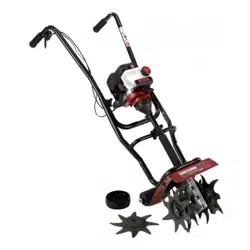
REPLACING THE TINES
WARNING: To prevent serious personal injury, always wear heavy gloves when handling the tines.
All tines should be replaced at the same time because they will wear evenly through normal use. Work on one side at a time.
Preparing the Unit for Tine Removal
- Stop the engine and allow it to cool. Grasp the spark plug wire firmly and pull the cap from the spark plug.
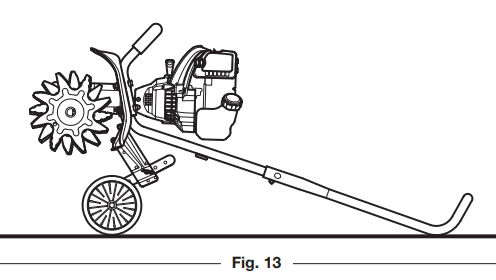
- Set the unit on a flat, level surface. Tip the unit back so that the handlebar touches the ground and the engine is in a horizontal position (Fig. 13).
NOTE: It may be necessary to wash dirt off the tines and tine shafts before removing the tines.
Removing the Old Tines
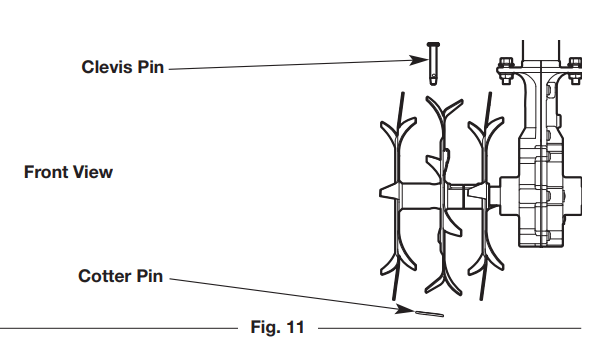
- Remove the cotter pin from the clevis pin (Fig. 11). Remove the clevis pin from the double tine and tine shaft.
- Slide the tines off of the tine shaft.
- Repeat this process for the other side.
Installing the New Tines
- Clean and oil the tine shaft.
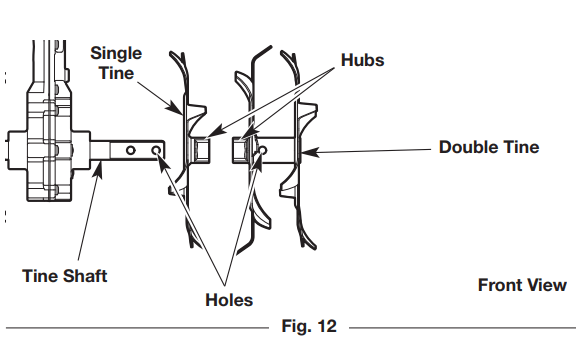
- Slide the new tines onto the tine shaft. The hubs must face toward each other (Fig. 12). Install the single tine first. Then install the double tine. Align the hole on the double tine with the hole on the tine shaft (Fig. 12).
- Insert a clevis pin through the aligned holes (Fig. 11). Insert a cotter pin into the clevis pin.
- Repeat this process for the other side.
- Reconnect the spark plug wire.
CHECKING THE OIL LEVEL
WARNING: Check the oil level before each use. The importance of maintaining the proper oil level cannot be overemphasized.
- Stop the engine and allow it to cool.
- Set the unit on a flat, level surface. Tip the unit back so that the handlebar touches the ground and the engine is in a horizontal position (Fig. 13).
- NOTE: Failure to keep the engine level may result in oil overfill.
- Clean the area around the oil fill plug (Fig. 14) to prevent debris from entering the oil fill hole (Fig. 14).
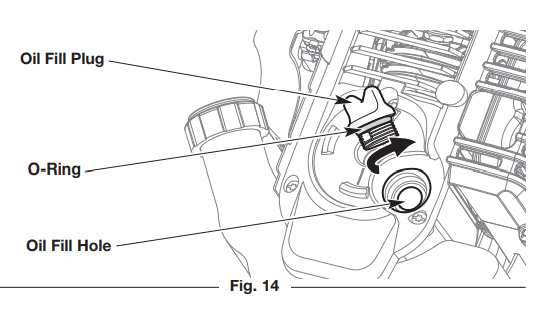
- Unscrew the oil fill plug.
- Look into the oil fill hole; use a flashlight if necessary. The oil level should just touch the bottom thread of the oil fill hole (Fig. 15).
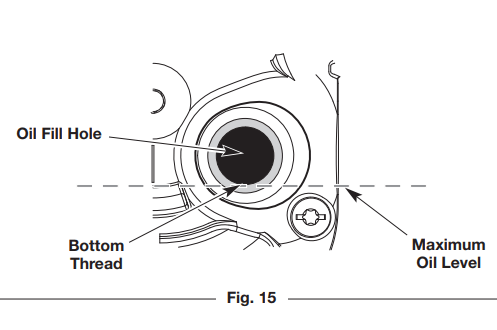
- If the oil level is too low, add a small amount of oil to the oil fill hole until the oil is at the correct level.
- WARNING: DO NOT overfill the crankcase. OVERFILLING THE CRANKCASE MAY CAUSE SERIOUS PERSONAL INJURY.
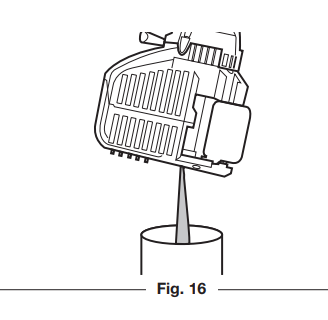
- If the oil level is too high, tip the unit and drain the excess oil into an appropriate container (Fig. 16).
- Wipe up any oil that may have spilled.
- Make sure the O-ring is in place on the oil fill plug (Fig. 14).
- Reinstall the oil fill plug.
CHANGING THE OIL
Change the oil while the engine is still warm. The oil will flow freely and carry away more impurities.
- Clean the area around the oil fill plug (Fig. 14) to prevent debris from entering the oil fill hole.
- Unscrew the oil fill plug.
- Tip the unit vertically to pour the oil out of the oil fill hole and into a container (Fig. 16). Allow ample time for complete drainage.
- NOTE: Dispose of the old oil according to federal, state and local regulations.
- Wipe up any oil that may have spilled.
- Pour 3.04 fl.oz. (90 ml) of SAE 30 oil into the oil fill hole.
- NOTE: DO NOT overfill. Refer to Checking the Oil Level.
- Wipe up any oil that may have spilled.
- Make sure the O-ring is in place on the oil fill plug (Fig. 14).
- Reinstall the oil fill plug.
MAINTAINING THE AIR FILTER
Failure to maintain the air filter can result in poor performance or can cause permanent damage to the engine. Engine failure due to improper air filter maintenance is not covered by the product warranty.
Cleaning the Air Filter
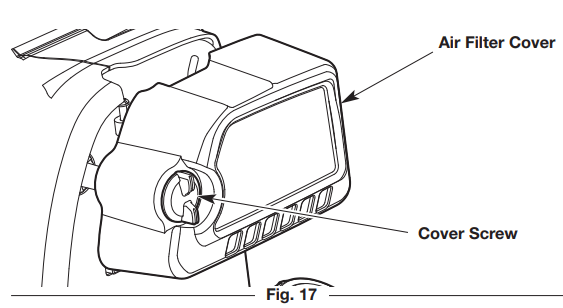
- Open the air filter cover: unscrew the cover screw and swing the air filter cover to the right (Fig. 17).
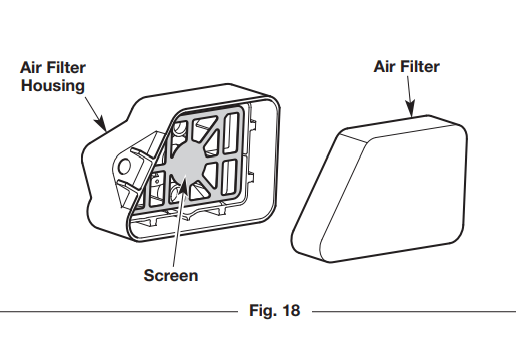
- Remove the air filter (Fig. 18).
- Wash the air filter in detergent and water. Rinse the air filter thoroughly and allow it to dry.
- Lightly coat the air filter with clean SAE 30 oil.
- Squeeze the air filter to spread and remove excess oil.
- Reinstall the air filter (Fig. 18).
- NOTE: Make sure the metal screen is seated in the air filter housing before reinstalling the air filter (Fig. 18).
- NOTE: Operating the unit without the air filter and air filter cover will VOID the warranty.
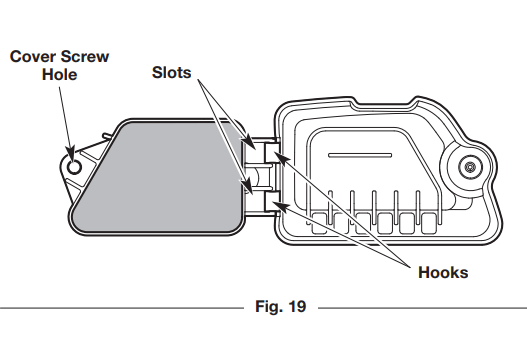
- Close the air filter cover: insert the hooks on the air filter cover into the slots on the air filter housing. Swing the air filter cover to the left and align the cover screw with the cover screw hole (Fig. 19). Tighten the cover screw to secure the air filter cover.
- NOTE: Do not over tighten as this may strip the screw.
ADJUSTING THE IDLE SPEED
WARNING: The tines may rotate during idle speed adjustments. Wear protective clothing and observe all safety instructions to prevent serious personal injury.
If the engine will not idle properly:
- Start the engine. Refer to Starting and Stopping.
- Release the throttle control and let the engine idle.
NOTE: Make sure the tines are not in contact with the ground when adjusting the idle speed.
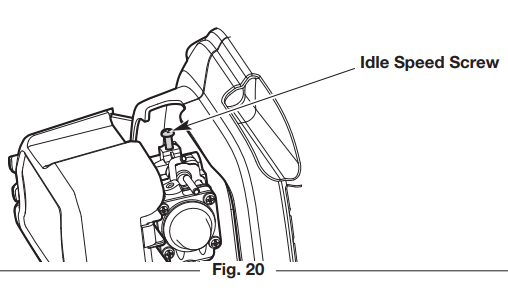
- If the engine stops, increase the idle speed. Use a small Phillips screwdriver to turn the idle speed screw clockwise, 1/8 of a turn at a time, until the engine idles smoothly (Fig. 20).
- If the tines rotate when the engine idles, reduce the idle speed. Turn the idle speed screw counterclockwise, 1/8 of a turn at a time, until the tines stop moving (Fig. 20).
MAINTAINING THE SPARK PLUG
- Stop the engine and allow it to cool. Grasp the spark plug boot firmly and pull it from the spark plug.
- Clean around the spark plug. Remove the spark plug from the cylinder head with a 5/8-inch socket, turning counterclockwise.
- WARNING: Do not sand blast, scrape or clean spark plug electrodes. Grit in the engine could damage the cylinder.
- Inspect the spark plug. If the spark plug is cracked, fouled or dirty, replace it with replacement part #794-00082, a Champion RDZ4H or an equivalent spark plug.
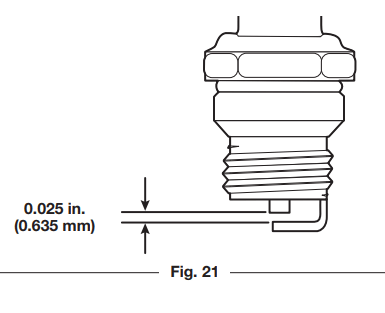
- Use a feeler gauge to set the air gap at 0.025 in. (0.635 mm) (Fig. 21).
- Install the spark plug in the cylinder head. Tighten the spark plug with a 5/8-inch socket, turning it clockwise until snug.
- NOTE: If using a torque wrench, torque to: 110-120 in.⚫lb. (12.3-13.5 N⚫m). Do not over tighten.
- Reattach the spark plug boot.
CLEANING AND STORAGE
CLEANING
WARNING: To avoid serious personal injury, always stop the engine and allow it to cool before cleaning or maintaining the unit.
Use a small brush to clean the outside of the unit. Do not use strong detergents. Household cleaners that contain aromatic oils such as pine and lemon, and solvents such as kerosene, can damage plastic. Wipe off any moisture with a soft cloth.
Clean the tines with a household cleaner to remove gum buildup. Wipe the tines with a light machine oil to prevent rust.
STORAGE
- Never store a fueled unit where fumes may reach an open flame or spark.
- Allow the engine to cool before storing.
- Lock up the unit to prevent unauthorized use or damage.
- Store the unit in a dry, well-ventilated area.
- Store the unit out of the reach of children.
Long-term Storage
- Remove the fuel cap, tip the unit and drain the fuel into an approved container. Reinstall the fuel cap.
- Start the engine and allow it to run until it stalls. This ensures that all fuel has been drained from the carburetor.
- Allow the engine to cool. Remove the spark plug and put 5 drops of any high-quality motor oil into the cylinder. Pull the starter rope slowly to distribute the oil. Reinstall the spark plug.
- Thoroughly clean the unit and inspect it for any loose or damaged parts. Repair or replace damaged parts and tighten loose screws, nuts or bolts.
Preparing the Unit for Use after Long-term Storage
- Remove the spark plug. Tip the unit and drain all of the oil from the cylinder into an approved container. Reinstall the spark plug.
- Change the oil. Refer to Changing the Oil.
- NOTE: Do not use fuel that has been stored for more than 30 days. Dispose of old fuel and oil according to federal, state and local regulations.
TROUBLESHOOTING
|
PROBLEM
|
SOLUTION
|
| THE ENGINE WILL NOT START |
- The fuel tank is empty
- The primer bulb was not pressed enough
- The fuel is old (over 30 days)
- The spark plug is fouled
- The engine is hot
|
- Fill the fuel tank with fresh fuel
- Press the primer bulb 10 times
- Drain the fuel tank and add fresh fuel
- Replace the spark plug
- Refer to the IF... THE ENGINE IS HOT instructions in the Starting and Stopping section
|
| THE ENGINE WILL NOT IDLE |
- The air filter is dirty
- The fuel is old (over 30 days)
- The idle speed is incorrect
|
- Clean or replace the air filter
- Drain the fuel tank and add fresh fuel
- Adjust the idle speed
|
| THE ENGINE WILL NOT ACCELERATE |
- The fuel is old (over 30 days)
- The tines are bound with dirt or grass
- The air filter is dirty
|
- Drain the fuel tank and add fresh fuel
- Stop the engine, remove the spark plug, and clean the tines Clean or replace the air filter
- Drain the fuel tank and add fresh fuel
|
| THE ENGINE LACKS POWER OR STALLS |
- The fuel is old (over 30 days)
- The air filter is dirty
- The spark plug is fouled
|
- Clean or replace the air filter
- Replace the spark plug
- If further assistance is required, contact an authorized service center.
|