Owner 's Manual for Dishwasher
USING THE DISHWASHER
Getting started
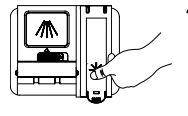
CONTROL PANEL - Model GBT412/632 Series
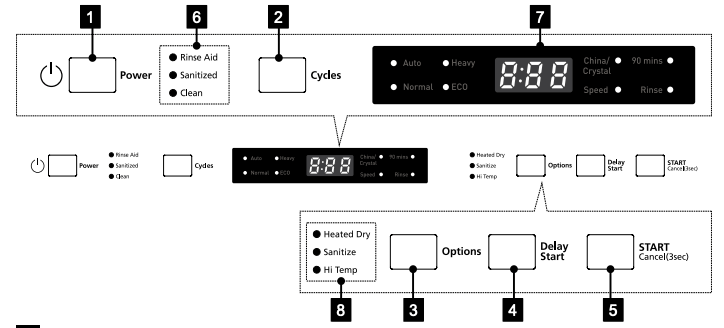
 Power Button
Switch on / off the power by pushing.
 Cycles Button
To select the program by pushing.
 Options Button
To select a function after setting a program.
 Delay Start Button
To set the delay start time, showing in the display window as H01- H24.
 Start/Cancel Button
Select or pause the washing program when the machine is working.
 Wash Cycle selections
Rinse Aid. When the indication light is on, add rinse agent such as Finish® Jet-Dry® Rinse Aid to the rinse agent dispenser. See Dispensers section.
NOTE: The use of rinse aid can further enhance the dishwasher’s drying performance.
Sanitized. Displayed at end of the cycle when the Sanitize option has been selected and dishwasher has met requirements for sanitization.
Clean. Displayed when a wash cycle is complete. The light stays ON as a reminder that the dishes are clean.
 Display - Wash Cycle selections
Auto. Auto sensing wash, lightly, or heavily soiled crockery, with or with out dried-on food
Heavy. This cycle is for hard-to-clean, heavily soiled dishes, pots, pans, and dishes.
Normal. For regularly soiled dinner dishes or silverware.
ECO. This is a standard program, suitable to clean normally soiled tableware and is the most efficient program in terms of combined energy and water consumption for that type of tableware.
China/Crystal. For lightly soiled loads, such as glasses, crystal and fine china. mins. Lightly soiled plates and pans that need a quick wash.
Speed. Shorter wash for lightly soiled loads that do not need drying.
Rinse. Use for rinsing dishes glasses and silverware that will not be wash right away.
 Options
Heated Dry. When the Heated Dry function is selected, the heater will work during the drying process.
Sanitize. When the”Sanitize”function is selected, the temperature of water will be maintained at 69°C (156.2°F) max. The max. temperature may not be reached if the incoming water temperature is not correct. Certified residential dishwashers are not intended for licensed food establishments.
WARNING: The sanitize option is available with Nomal, Heavy and Energy cycles.
Hi Temp. When the Hi Temp function is selected, the temperature of the water will be maintained at 60°C F) max.
Filter System
Your dishwasher has a multiple Filter System. In the System there are three mesh filters. It can separate soiled water and clean water in different chambers.
The multiple filter system helps your dishwasher to get better performance with less water and less energy.
Smart Wash System
Your dishwasher has a Smart Wash System.
When a partial load of lightly soiled dishes is placed in the unit, a wash cycle similar to a short wash will automatically be performed.
When a full load of heavily soiled dishes is placed in the unit, a heavy wash cycle will automatically be performed. It can determine the type of cycle required to clean the dishes and will clean more efficiently every time.
How your dishwasher cleans
Your dishwasher cleans by spraying a mixture of hot water and detergent through the spray arms against soiled surfaces. The dishwasher fills with water covering the filter area. Water is then pumped through the multiple filter and spray arms. Separated soil particles go down the drain as the water is pumped out and replaced with clean water. The number of water fills will vary with the cycle being used.
Getting Started
1. Load the dishwasher (See Dish Preparation and Loading sections).
2. Add detergent (See Filling the detergent dispenser).
3. Add rinse aid (See Filling the rinse aid dispenser).
4. Close door.
5. Press the Power button,and then select desired Cycle (See Cycle Chart).
6. Select desired Options (See Control Panel). The indicator light above the pad will glow when selected.
7. Run the hot water faucet nearest the dishwasher until the water is hot, then turn it off.
8. To start, press Start/Cancel (See Control Panel).
Note: Your dishwasher has the controls mounted in the front of the door. The door should be closed first if you want to operate the machine.
Wash Cycle Selections
Cycle times are approximate and will vary with the options selected. Hot water is necessary to activate the detergent and melt fatty food soils. An automatic sensor will check the incoming water temperature. If it is not at the appropriate temperature the timer will delay the cycle to allow automatic water heating during the main wash. When the Hi-Temp wash is selected an even higher temperature will be assured to handle heavier soil loads.
Loading
Dish Preparation
Scrape away large pieces of food, bones, pits, toothpicks, etc.
The continuously filtered wash system will remove the remaining food particles. Burned-onfoods should be loosened before loading. Empty liquids from glasses and cups.
Foods such as mustard, mayonnaise, vinegar, lemon juice and tomato based products may cause discoloration of stainless steel and plastics if allowed to sit for a long period of time.
Unless the dishwasher is to be operated at once it is best to rinse off these food soils.
If the dishwasher drains into a food disposer, be sure disposer is completely empty before starting the dishwasher.
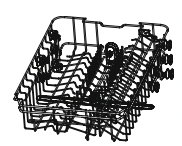
Loading the Upper Basket
The upper basket is designed for cups, glasses, small plates, bowls and plastic items marked dishwasher safe, etc. For best results, place the bowls, cups, glasses, sauce pans with soiled surface facing down or toward the center. Tilt slightly for better drainage.
Loading the Bottom Basket
The bottom basket is designed to load plates, soup bowls, plates, saucers and cookware. The adjustable basket space will allow you to load items with a maximum height of 11 inches (27.9 cm). The fold-down tins in the bottom basket make it easy to load those extra large and hard-to-fit items. The tins may be left up for normal use or folded down for more flexible loading. Fold down for more space to load large pots or pans.
 Make sure the loaded dishes do not interfere with the rotation of the middle spray arm, which is located at the bottom of the upper basket. (Check this by rotating the middle spray arm by hand.)
Large items should be placed along the edge so they do not interfere with the middle spray arm rotation, and make sure they not prevent the detergent dispenser from opening. Large items should be turned so that the inside faces downward, and make sure these items do not interfere with the lower spray arm rotation.
Loading the Lower Basket
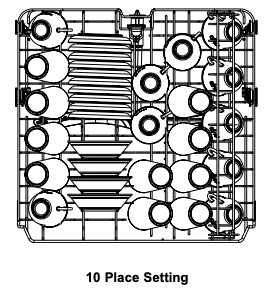
The lower basket has been especially designed for dinner dishes, soup bowls, plates, pots, lids, casserole dishes, and plates.
Load large items such as pans and pots into the dishwasher so their open sides face downwards. We recommend loading cups, stemware, and small plates into the upper basket. See the recommended loading patterns below.
Loading the Upper Basket
The upper basket has been designed for small plates, mugs, glasses, and plastic items marked “dishwasher safe”. Load your plates into the dishwasher in two half rows, so that the front of each plate faces the back of the plate in front of it, and the open sides of the plates at the center of the dishwasher face each other.
See the illustrations below.

Make sure the loaded dishes do not interfere with the rotation of the nozzle which is located at the bottom of the upper basket. (Check this by rotating the nozzle by hand.) When loading dishes, pull the upper basket out sufficiently so you can load it without striking the counter.
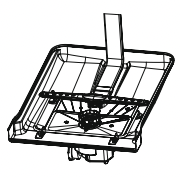
Loading the Silverware Basket
The silverware basket can be divided into three separate modules that can be used in both upper and lower racks.
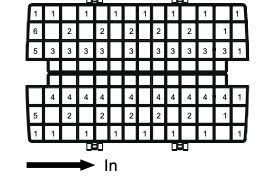
Modules for 10 place setting models
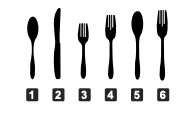
1. Spoons
2. Knives
3. Salad forks
4. Forks
5. Large spoons
6. Large forks
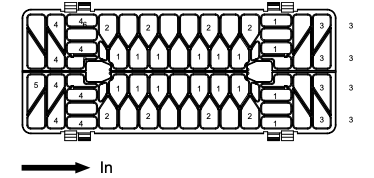
Modules for 8 place setting models
WARNING
- 1. Do not let items extend though bottom.
- 2. Be sure nothing protrudes though bottom of the basket or rack to block the lower spray arm.
Adding a Dish
To add or remove items after a washing cycle starts:
- 1. Open door slightly and wait a few seconds until wash action stops before completely opening.
- 2. Add the item.
- 3. Close the door firmly to latch within 4 secs, then the cycle will resume automatically
CAUTION TO AVOID BURN INJURY: Slightly open door and wait until spray arms and wash action stop. Hot water may splash out of dishwasher. Failure to do so may result in injury.
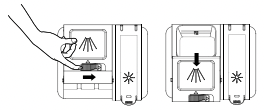
Filling the Rinse Aid dispenser
Rinse aid greatly improves drying and reduces water spots and filming. Without rinse aid your dishes and dishwasher interior will have excessive moisture.
The Heated Dry option will not perform as well without rinse aid. The rinse aid dispenser, located next to the Detergent cup, automatically releases a measured amount of rinse aid during the last rinse.
If the rinse aid is low, the Rinse Aid light is illuminated at the beginning and end of the cycle indicating that it is time to refill.
Your dishwasher is designed to use a liquid rinse aid.
The use of rinse greatly improves drying performance after the final rinse. Do not use a solid or bar-type rinse aid. Under normal conditions, the rinse aid will last approximately one month. It is best to keep it full, but do not over fill.
Dispensers
1. Open the detergent dispenser cap by pushing the detergent dispenser release catch.
NOTE: The flap is always open at the end of a dishwashing cycle.
2. Add the recommended amount of detergent to the main wash detergent compartment.
3. Close the flap and then press it down.
Filling the Rinse Aid dispenser
Your dishwasher has been designed to use liquid rinse aid only. Using a powdered rinse aid will clog the reservoir opening and cause the dishwasher to malfunction. Rinse aid improves the drying performance of the dishwasher.
Do not add regular detergent to the rinse aid reservoir.
1. Remove the rinse aid reservoir cap by rotating it counterclockwise.
2. Fill the rinse aid reservoir with rinse aid.
NOTE: Use the viewing port when filling the rinse aid reservoir.
Do not fill the reservoir above the full level indicator. Excess rinse aid can over flow during the wash cycle.

3. Add the rinse aid if the LED screen shows LSb.
4. Close the rinse aid reservoir cap by rotating it clockwise
Care and Cleaning
Keeping your dishwasher clean improves its performance, reduces unnecessary repairs, and lengthens its life.
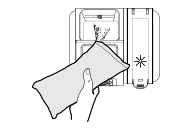
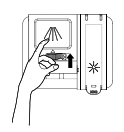
Cleaning the Exterior
It’s best to clean spills on the outside of your dishwasher as they occur. Use a soft, damp cloth on the control panel to gently wipe away spills and dust. Do not use benzene, wax, thinner, chlorine bleach, or alcohol. These materials may discolor the inner walls and cause stains. Do not clean the dishwasher by sprinkling water over it and avoid letting water come into contact with any of the electrical parts.
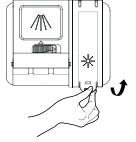
NOTE: If your dishwasher has a stainless steel door panel, you can clean it with a stainless steel cleaner for Home Appliances or a similar product using a clean, soft cloth.
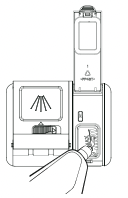
Cleaning the Interior
Clean the interior of your dishwasher periodically to remove any dirt or food particles. Wipe the inside of the dishwasher and the inner part of the door with a wet dishcloth. We recommend filling the detergent dispenser with dish detergent, and then running the dishwasher empty periodically using either the Normal or Express 60 cycle with the Sanitize option. This will keep your dishwasher clean.
If white spots and odor are still present in your dishwasher, run the Normal cycle with the dishwasher empty and without detergent until it fl ushes. Then, interrupt the cycle and put an 8 ounce cup of white vinegar into the lower basket. Close the dishwasher and let the cycle finish.
Do not remove the tub front seal (the long rubber seal enclosing the opening of the dishwasher).
 Do not touch the HEATING ELEMENT during or immediately after use.
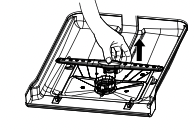
1. Turn off the dishwasher.
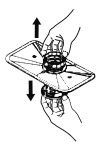
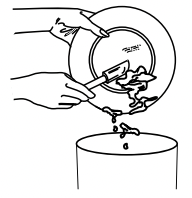
2. Rotate the filter, insert counterclockwise to unfasten and then detach the filter insert.
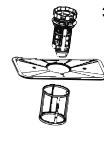
3. Remove the fine filter (flat, rectangular).
4. Remove any dirt or other remains from the filters, and then rinse them under running water.
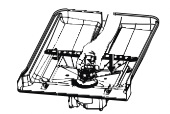
5. Reassemble the filters in the reverse order of dissasembly, replace the filter insert, and rotate clockwise to the close arrow.
CAUTION: If the filter insert is not closed properly, its performance will be decreased.
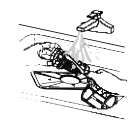
Cleaning the Nozzles
If your dishwasher does not seem to be cleaning adequately or the nozzles seem clogged, you can clean each of the nozzles. When removing the nozzles, take care as they may break.
Lower nozzle
- Check whether the nozzle holes are clogged by food particles.
- If cleaning is needed, remove the nozzle by pulling it upwards.
- Clean the nozzle, and then push it back into place.
- Check whether the nozzle is engaged correctly by rotating it by hand.
Troubleshooting tips ... Before you call for service
| Problem |
Possible Cause |
What To Do |
| Start status indicator light flashing (on some models) |
The door was opened or the cycle was interrupted. |
Press the Start pad once and close the door within 4 seconds to start the dishwasher. |
| Dishwasher BEEPS once every minute (on some models) |
This is a reminder that your dishwasher door has been left open during operation. It will continue beeping until you press Start and close the door |
Press Start and close the doo |
| Beeping at the end of the cycle (on some models) |
This is normal. Dishwasher will beep twice at the end of the cycle. |
To turn off the double beep indicator (or re-activate it if it was previously turned off), press the Heated Dry pad 5 times within 3 seconds. A triple beep will sound to indicate the end-of-cycle beep option has been turned on or off. |
| Dishes and flatware not clean |
Ultra-Fine Filter or Fine Filter is clogged. |
See the Care and Cleaning section. |
| Low inlet water temperature. |
Make sure inlet water temperature is correct (see the USING THE DISHWASHER section). Turn on the hot water faucet nearest the dishwasher, let run until the water temperature stops rising. Then start the dishwasher and turn off the faucet. This ensures the entering water is hot. Select Wash Temp Boost if available. |
| Water pressure is temporarily low. |
Turn on a faucet. Is water coming out more slowly than usual? If so, wait until pressure is normal before using your dishwasher. Normal water pressure to the dishwasher should be 20-120 psi. |
| Air gap or disposer clogged. |
Clean the air gap or flush the disposer. |
| High drain loop or air gap not installed. |
Refer to the Installation Instructions for proper drain line installation. |
| Improper rack loading. |
Make sure large dishware does not block the detergent dispenser or the wash arms. See the Loading section. When large utensils are placed in the silverware basket, do not mount the basket on the door (on some models). Instead, mount basket on the lower rack. |
| Poor performing detergent. |
Use a highly rated detergent such as Finish® Quantum® Automatic Dishwashing Detergent. |
Spots and filming on glasses and flatware
|
Extremely hard water. |
Use rinse agents such as Finish® Jet-Dry® Rinse Aid to prevent spots and prevent new film build-up. If water is extremely hard, a softener may be required. |
| Low inlet water temperature |
Make sure water temperature is at least 120°F (49°C). |
| Overloading or improper loading of the dishwasher |
Load dishwasher as shown in the Loading section. |
| Old or damp powder detergent. |
Make sure detergent is fresh. Use a highly rated detergent such as Finish® Quantum® Automatic Dishwashing Detergent. |
| Rinse agent dispenser empty. |
Refill with rinse agent such as Finish® Jet-Dry® Rinse Aid. |
| Too little or low performing detergent. |
Make sure you use the proper amount of highly rated detergent. |
| Cloudiness on glassware |
Combination of soft water and too much detergent. |
This is called etching and is permanent. To prevent this from happening, use less detergent if you have soft water. Wash glassware in the shortest cycle that will get it clean. |
| Low performing phosphate-free detergent. |
See A white film on glassware, dishware and the interior in this TROUBLESHOOTING TIPS section. |
| Water temperature entering the dishwasher exceeds 150°F (66°C) |
This could be etching. Lower the water heater temperature. |
Suds in the tub
|
Wrong detergent. |
Use only automatic dishwasher detergents to avoid sudsing. Finish® Quantum® Automatic Dishwashing Detergent has been approved for use in all GE Appliances dishwashers. To remove suds from the tub, open the dishwasher and let suds dissipate. Pump out water by pressing Start and close the door. Wait 30 seconds. Open the door, press and hold Start for 3 seconds, and close the door. Repeat if necessary. |
| Rinse agent was spilled. |
Always wipe up rinse agent spills immediately |
| Detergent left in dispenser cups |
Dishes or utensils are blocking the detergent cup. |
Reposition the dishes, so the water from the lower spray arm can flush the detergent cup. See the Loading section. Reposition the tall utensils or heavy silverware that may be keeping the dispenser cup door from opening. See the Loading section. |
| Black or gray marks on dishes |
Aluminum utensils have rubbed against dishes. |
Remove marks with a mild, abrasive cleaner. |
| Dishes don’t dry |
Low inlet water temperature. |
Make sure inlet water temperature is at least 120°F (49°C). Select Heated Dry or Dry Boost. Use Wash Temp Boost. |
| Rinse agent dispenser is empty |
Check the rinse agent dispenser and fill as required. |
| Additional drying time is needed. |
Leave door closed after the Clean light appears to allow the fan to run an additional 90 minutes (on some models).
Note: If you open the door, this fan extension will be cancelled.
|
| Cycle selection |
If using Light cycle which uses lower water temperature and thus limited dry performance, switch to a different cycle. |
| Cycle completion. |
Allow cycles to fully complete. See Long cycle times in this TROUBLESHOOTING TIPS section. |
| Long cycle times |
Dishwasher washes by alternating mid and lower spray arms |
Longer cycles are normal. For best wash and dry performance, let cycle complete. |
| |
Soil level. |
The turbidity sensor senses how much soil is on the dishes. Heavy soiled dish loads will add more time to the cycle. This is normal function. For best wash and dry performance, allow cycle to complete. |
| Control panel responded to inputs but dishwasher never filled with water |
Door may not be completely closed. |
Make sure the door is firmly closed. |
| Water valve may be turned off. |
Make sure water valve (usually located under the sink) is turned on. |
| Flood float may be stuck. |
Remove Ultra-Fine filter and lightly tap the piece under the ultra fine filter that looks like a salt shaker. Replace the filter |
| Stained tub interior |
Some tomato-based foods can cause reddish stains. |
Use of the Steam Sani cycle (on some models) after adding the dish to the load can decrease the level of staining. |
| Tea or coffee stains. |
Remove the stain by hand, using a solution of 1/2 cup (120 ml) ( bleach and 3 cups warm water. NOTE: Do not use bleach on stainless steel inner door.
CAUTION Before cleaning interior, wait at least 20 minutes after a cycle for the heating elements to cool down. Failure to do so can result in burns.
|
| |
| An overall yellow or brown film can be caused by iron deposits in water. |
A special filter in the water supply line is the only way to correct this problem. Contact a water softener company. |
| White film on inside surface— hard water minerals |
GE Appliances recommends Finish® Jet-Dry® Rinse Aid to help prevent hard water mineral deposits from forming. Run dishwasher with citric acid to remove mineral deposits. Citric acid (Part number: WD35X151) can be ordered through GE Appliances Parts. See back cover for ordering information. Alternatively, purchase Finish® Dishwasher Cleaner and follow the directions on the label. |
| Dishwasher won’t run |
Fuse is blown or circuit breaker is tripped. |
Replace fuse or reset circuit breaker. Remove any other appliances from the circuit. |
| |
Power is turned off. |
In some installations, the power to the dishwasher is provided through a wall switch, often located next to the disposer switch. Make sure it is on. |
| |
Control panel is locked. |
Unlock control panel. See the Getting started section. |
| Control panel lights go off when you’re setting controls |
Time too long between touching of selected buttons. |
Each pad must be touched within 30 seconds of the others. To relight, touch any pad again or open the door and unlock (top control). |
Water standing in the bottom of the tub
|
Air gap is clogged. |
Clean the air gap. See the Care and Cleaning section. |
| High drain loop or air gap not installed. |
Refer to the Installation Instructions for proper drain line installation. |
| Water won’t pump out of the tub |
Drain is clogged. |
If you have an air gap, clean it. See the Care and Cleaning section. If the dishwasher drains into a disposer, run disposer clear. Check to see if your kitchen sink is draining well. If not, you may need a plumber. |
| Steam |
This is normal. |
Warm, moist air comes through the vent during drying and when water is being pumped out. This is necessary for drying. |
| Sanitized light does not illuminate at the end of the cycle |
The door was opened and the cycle was interrupted during final rinse. |
Do not interrupt the cycle by opening the door during the wash cycle. |
| |
The incoming water temperature was too low. |
Raise the water heater temperature to between 120°F (49°C) and 150°F (66°C). |
| Noise |
Normal operating sounds:
Beeping at the end of the cycle( on some models).
Detergent cup opening.
Water entering dishwasher.
Motor stops and starts at various times during cycle.
Spray arms start and stop at various times.
Drain pump sounds during pump out.
Drain pump starts and stops several times during each drain.
|
These are all normal. No action is required. |
| Rattling dishes when the spray arm rotates. |
Make sure dishes are properly loaded. See the Loading section. |
| Rattling silverware against door during wash. |
Tall utensils may be placed in the upper rack to avoid bumping against inner door during wash cycle. |
| A white film on glassware, dishware and the interior |
This problem is likely caused by a low quality phosphate-free dishwasher detergent. |
To remove the white film, run your dishes through a dishwasher cycle with citric acid. Use Finish® Dishwasher Cleaner found at your local grocery store. Pour the citric acid in the detergent cup and close the cover. Place the filmed but otherwise clean glassware and dishware in the dishwasher. Leave silverware and other metal items out of the dishwasher. Turn the dishwasher on and let it run through a complete cycle without detergent. The glassware, dishware, and dishwasher should come out film free. Alternatively, a vinegar rinse may be used. Pour 1 cup (240 ml) of vinegar into dishwasher just after the detergent cup opens and let the dishwasher complete its cycle. This may be repeated several times a year as needed. The use of a rinse agent such as Finish® Jet-Dry® Rinse Aid may help minimize a repeat build up of film. Also, the use of a highly rated detergent such as Finish® Quantum® Automatic Dishwashing Detergent will help prevent film build-up |