Forew ord
This supplement contains explanations and instructions for correctly
operating the following systems.
• Navigation System
• Audio and Visual System
• Handsfree System
If your vehicle contains one of the systems above, be sure to check the
contents of this supplement carefully.
If you transfer the ownership of the vehicle to another person, make
sure that this supplement is provided with the Owner's Manual inside
the vehicle.
The information, specifications and illustrations in this supplement are
valid at the time of publication. Fuji Heavy Industries reserves the right
to change the specifications and design without prior notice, with no
obligation to perform the same or equivalent changes to vehicles sold
in the past.
This Owner's Manual supplement applies to all models, and describes
all devices, including manufacturer-installed options. This means that
information may be included about devices that are not installed in
your vehicle.
FUJI HEAVY INDUSTRIES LTD., TOKYO, JAPAN
is a registered trademark of Fuji Heavy Industries Ltd.
©Copyright 2011, Fuji Heavy Industries Ltd.
1
Read First
The symbols described below are found in this instruction manual as
well as on the unit itself to insure its proper and safe usage and to
prevent injury or damage to property. Make sure you understand the
meaning of these symbols before reading the rest of this manual.
Precautions for Use
We recommend that you wait until the positioning stabilizes
before starting to drive.
• If you start to drive while the positioning is not complete, the
indicated position may differ from the actual vehicle position. We
recommend waiting until the GPS indicator displays before
starting to drive.
Information in this manual that must be observed for the unit, and information
that is useful to know is indicated as follows.
NOTE
Useful Information
• Be sure to read all materials such as manuals and warranties that
come with the product. Fuji Heavy Industries is not responsible for
problems that arise due to failure to follow these instructions.
• Changes to product specifications may result in differences between
the content of the manual and the features of the unit.
* The screens shown in this manual may differ from the actual screens
depending on the data type or when the map data was created.
WARNING
This sign indicates a situation in which incorrect handling
through disregard of written information might result in death
or serious personal injury.
CAUTION
This sign indicates a situation in which incorrect handling
through disregard of written information might result in
personal injury or damage to property.
CAUTION
The touch buttons on the display screen may not operate
properly if condensation forms inside them. If this happens, do
not attempt to operate the touch buttons until the
condensation has disappeared.
Take good care of this manual.
If you forcibly spread this manual, or remove pages, you may cause damage
to the spine of the book.
Handle the manual gently.

2
Table of Contents
Introduction
Before Use .......................................................................................8
Safety Precautions .......................................................................................... 8
Viewing This Document .............................................................................11
About This Unit ..............................................................................................12
■ Part Names and Operations .......................................................................................................... 12
■ Turning the Power On or Off ........................................................................................................ 14
■ Loading and Unloading a Disc .................................................................................................... 15
■ Loading and Unloading an SD Memory Card .................................................................... 16
■ Connecting (or Disconnecting) the USB Memory .......................................................... 19
■ About the Unit Modes ...................................................................................................................... 20
■ Selecting a Mode ................................................................................................................................. 21
■ Operation Conditions for the Unit ............................................................................................ 23
Unit Settings ...................................................................................................24
■ Various Unit Settings .......................................................................................................................... 24
Screen Adjustment and Setting ..............................................................38
■ Displaying the picture quality adjustment screen .......................................................... 38
Precautions for Using Bluetooth Devices ............................................40
Bluetooth Handsfree Operation ..............................................................42
■ Using Bluetooth Handsfree ........................................................................................................... 42
■ Setting and Editing Bluetooth Handsfree ............................................................................ 56
■ Using the messaging function .................................................................................................... 69
Navigation
Before Using the Navigation System ..........................................80
Information on Warnings and Safety .........................................82
Read First ......................................................................................83
Navigation Menu .......................................................................................... 85
On-screen Buttons and Other buttons ................................................. 86
■ Using the Keyboard ............................................................................................................................88
■ Screen Operations Other than Single Touch ......................................................................89
Map Screen ..................................................................................................... 90
■ Navigating on the Map .....................................................................................................................90
■ Position Marker ......................................................................................................................................92
■ Map Objects .............................................................................................................................................93
■ Quick Menu ...........................................................................................................................................101
■ Check Current Position (Where Am I?) .................................................................................103
Navigation ..................................................................................105
Select route destination ...........................................................................105
■ Enter all or part of the address ..................................................................................................105
■ Selecting the destination from your favorite spots
(POI: Point Of Interest) ....................................................................................................................120
■ Selecting a Map Position as the Destination ....................................................................134
■ Selecting the Destination from the Destination List ...................................................135
■ Selecting a Frequently Used Destination (Smart History) ........................................137
■ Selecting a Recent Destination from History ...................................................................138
■ Creating a Route from the Destination List (Route Creator) ...................................140
Displaying the Entire Route on the Map ............................................141
Confirming Route Settings and Calling Route Related
Functions .......................................................................................................142
■ Setting the avoidance route .......................................................................................................143

3
Changing the Route .................................................................................. 144
■ Selecting a new destination after the route has been set:
new route, waypoint, and final destination ......................................................................144
■ Setting a New Starting Point for the Route .......................................................................145
■ Editing the Destination List (Route Editing) ......................................................................147
■ Pausing Route Navigation ............................................................................................................148
■ Canceling Route Navigation .......................................................................................................148
■ Changing the Method for Searching for a Route (Other Routes, etc.) .............149
■ Changing the Road Categories used for the Route Search .....................................150
Saving a Position to the Destination List .......................................... 152
Displaying a Simulation of the Route ................................................. 153
Voice Control Navigation ........................................................................ 155
Reference Data .......................................................................... 157
Feature ........................................................................................................... 157
■ Smart Zoom ..........................................................................................................................................157
■ Switching between Day and Night Screens .....................................................................157
■ Route Search/Search Again .........................................................................................................158
■ GPS Positioning Quality Indicator ............................................................................................159
■ Online Road Information Saved in Route Search ...........................................................159
“More” Menu .............................................................................................. 162
Settings Menu ............................................................................................. 163
■ Sound and Warnings .......................................................................................................................164
■ Customize Quick Menu ..................................................................................................................166
■ Traffic .........................................................................................................................................................168
■ Route Settings ......................................................................................................................................169
■ Map Settings .........................................................................................................................................170
■ Visual Guidance ...................................................................................................................................172
■ Units and Formats .............................................................................................................................173
■ Trip Monitor ...........................................................................................................................................173
Glossary .......................................................................................174
End-user License Agreement ....................................................176
Further Information ...................................................................181
Display Connection Status Information .............................................181
■ Display Connection Status Information ..............................................................................181
Accuracy & error calculation ..................................................................182
■ Regarding Precision Accuracy ...................................................................................................182
■ Regarding the Properties of the GPS Electro-Magnetic Waves and
Signal Reception ................................................................................................................................182
■ Regarding Errors in Current Position Display ...................................................................183
■ Regarding Vehicle Position Detection Correction Using Map Matching .......184
■ Regarding the Accuracy of the Current Position and Route Navigation ........184
■ Regarding Roads and Place Name Data .............................................................................186
■ Regarding Route Navigation ......................................................................................................186

4
Audio and Visual
Before Using the Audio and Visual System ............................. 190
Precautions When Using the System ................................................. 190
Precautions for Use ................................................................................... 193
■ About Discs ............................................................................................................................................194
Basic Operation ......................................................................... 198
Switching the Audio Source .................................................................. 198
■ Switching the Audio Source .......................................................................................................198
■ Displaying the Audio Operations Screen ............................................................................199
■ Stopping the Audio Mode ...........................................................................................................199
Source Operations Screen ...................................................................... 200
Volume Control .......................................................................................... 202
■ Main Volume Control ......................................................................................................................202
■ Displaying the Sound Settings Screen .................................................................................203
■ Adjusting the Sound Quality ......................................................................................................204
■ Adjusting the Audio Balance ......................................................................................................205
■ Setting the Source Volume Control .......................................................................................207
■ Setting the Automatic Sound Levelizer ...............................................................................208
Audio Operations ...................................................................... 209
Using the Radio .......................................................................................... 209
■ Using the Radio ...................................................................................................................................209
Using the SAT Radio ................................................................................. 216
■ Using the SAT Radio .........................................................................................................................216
Using the CD Player .................................................................................. 226
■ Using the CD Player ..........................................................................................................................226
Using the MP3/WMA Player ................................................................... 230
■ Using the MP3/WMA Player ........................................................................................................230
■ About MP3/WMA ...............................................................................................................................235
■ Creating and Playing MP3/WMA Files ..................................................................................238
Using the USB Music File Player ............................................................240
■ Using the USB Music File Player ...............................................................................................240
■ About USB Devices ...........................................................................................................................244
Visual Operations .......................................................................247
Using the USB Video File Player ............................................................247
■ Before Using the USB Video File Player ................................................................................247
■ Using the USB Video File Player ................................................................................................248
■ Displaying DivX VOD code ..........................................................................................................255
■ About USB Devices ...........................................................................................................................258
How to Operate Portable Audio Devices ..................................260
Using the iPod® Player ............................................................................260
■ Using the iPod Player ......................................................................................................................260
■ About the Supported iPods ........................................................................................................266
Using Bluetooth Audio .............................................................................267
■ Before Using Bluetooth Audio ..................................................................................................267
■ Using a Portable Device ................................................................................................................274
■ About the Compatible Bluetooth-Supporting Devices ............................................279
Using AUX .....................................................................................................280
■ Using AUX ..............................................................................................................................................280

5
Others
Other Operations ....................................................................... 282
Picture Function Operations ................................................................. 282
■ Using the Picture Function ..........................................................................................................282
■ About the Supported Image Data ..........................................................................................285
About Steering Wheel Switches ........................................................... 287
■ Compatibility with Steering Wheel Buttons .....................................................................287
Voice Control System Operations ........................................................ 291
■ About the Voice Control System ..............................................................................................291
■ Using the Voice Control System ...............................................................................................292
■ Displaying the Command List ...................................................................................................293
■ Examples of Using the Voice Control System ..................................................................294
■ Voice Command Lists ......................................................................................................................298
Reference ................................................................................... 324
Useful Information .................................................................................... 324
■ If the Following Messages Appear ..........................................................................................324
■ When You Think There Is a Malfunction ..............................................................................332
■ Glossary ....................................................................................................................................................334
■ About Trademarks .............................................................................................................................335

6

8Introduction
Before Use
Safety Precautions
WARNING
• The main unit requires a 12 V DC power supply. The main
unit should not be installed in any vehicle which does not
have a 12 V power system with a ground-connected
negative side. An installation other than the one intended
may cause severe damage to the main unit, and electric
shock or serious injury to the users.
• Even when using the route guidance of the navigation
system, be sure to drive by following the actual traffic
regulations. If you drive by following only the route
guidance of the navigation system, you may violate the
actual traffic regulations and cause a traffic accident.
• To ensure safety, the driver should not operate the
navigation system while driving. Operating the navigation
system while driving may result in an accidental steering
wheel operation or otherwise cause an accident. Stop the
vehicle before operating the navigation system. Also, do not
watch the screen while driving. Because doing so is
dangerous and may be unlawful. Inattention to road
conditions ahead may result in an accident.
• The driver should not perform operations such as volume
adjustment while driving. Inattention to road conditions
ahead may result in an accident, so be sure to stop the
vehicle in a safe place before performing the operation.
• The driver should not change discs while driving.
Inattention to road conditions ahead may result in an
accident, so be sure to stop the vehicle in a safe place before
performing the operation.
• The driver should not perform operations such as adding a
location or setting the memory while driving. Inattention to
road conditions ahead may result in an accident, so be sure
to stop the vehicle in a safe place before performing the
operation.
• Before viewing a video, be sure to stop the vehicle in a safe
place and apply the parking brake. To ensure safety, videos
are not displayed during driving.
• To ensure safety, never operate a cell phone while driving.
• Do not let foreign objects enter the disc slot or SD memory
card slot. Doing so may result in a fire or electric shock.
• Do not disassemble or modify the unit. Doing so may result
in an accident, fire or electric shock.
• Do not let water or foreign objects enter the internal parts of
the unit. Doing so may result in smoke, fire or an electric
shock.
• Do not use the unit when it is malfunctioning, such as when
the screen is not lit or no sound comes out. Doing so may
result in an accident, fire or electric shock.
Introduction 9
Before Use
• Always replace fuses with fuses of the same specified
capacity (amperage). Using a fuse with a higher capacity
than the specification may result in a fire.
• If a foreign object or water enters the unit, smoke or a
strange odor may be emitted. If such an abnormality occurs,
stop using the unit immediately and contact your SUBARU
dealer. An accident, fire or electric shock may result if you
continue to use the unit under these conditions.
• In a thunderstorm, do not touch the antenna line or the unit.
Lightning may cause an electric shock.
• Do not park or stop in prohibited areas to use the unit.
• If direct sunlight shines into the vehicle, light may reflect off
the product. Be very careful while driving.
• Never use headphones or earphones while driving. Driving
while not being able to hear sounds from outside the vehicle
may result in a traffic accident.
CAUTION
• Although the unit can be used when the ignition switch is
set to either ON or ACC, to protect the battery, start the
engine before using the unit.
• Do not use the unit anywhere other than in a vehicle. Doing
so may result in an electric shock or other injury.
• While driving, keep the volume low enough for you to hear
outside sounds. Driving while not being able to hear sounds
from outside the vehicle may result in an accident.
• Be careful of the volume when turning on the power. If a
loud noise is emitted suddenly when you turn on the power,
it may damage your hearing.
• Do not apply a strong force to the display. Doing so may
result in a malfunction.
• Do not put your fingers or hands into the disc slot or SD
memory card slot. Doing so may result in an injury.
• Do not touch the hot parts of the unit. The hot parts may
burn you.
• Do not use while there is an abnormality such as sound
breakup or distortion. Doing so may result in a fire.
• Using the unit during extremely high or low temperature
may result in mistaken operation or a malfunction. In
particular, the temperature inside the vehicle can often rise
to a high level during the summer. Cool the vehicle, for
example by opening a window, before using the unit.
• Be careful if metal or water enters the unit, or the unit is
exposed to a strong impact, because it may result in a
malfunction.
• The touch buttons on the display screen may not operate
correctly if condensation forms inside them. If this happens,
do not attempt to operate the switches until the
condensation has disappeared.

10 Introduction
Before Use
NOTE
• Fuji Heavy Industries is not responsible for any damages to the purchaser or
third parties that occur from using the map data.
• We do not provide any replacements or refunds for any mistakes there may be
in the map data displays or contents, such as misspelling, omissions or
misaligned positions.
• Fuji Heavy Industries makes no guarantee that the functions included in the
map data will be appropriate for the specific objectives of the purchaser.
• Functions that cannot be operated while driving have their colors toned
down when the vehicle is being driven, and their operation is disabled.
Touching a disabled switch may result in the display of an operation
prohibited message on the screen.
• During strong vibrations, such as when driving on a poor road surface, the
unit may no longer be able to read the data from the disc or “SD memory
card”, and it will not operate correctly. When the vibration lessens, normal
operation will return after a short time.
• Immediately after turning on the heater when the temperature is low, dew
(water drops) may adhere to the lens of the CD reader (condensation). If this
happens, leaving the unit for about an hour should remove the condensation
and return the unit to normal operation. If the unit does not return to normal
operation even after several hours, contact your SUBARU dealer.
• When using the unit for the first time after purchase, or after the battery was
removed for a long time, the current position may not be displayed correctly.
Wait a short time until the GPS positioning corrects the displayed position.
• This device is precision-engineered equipment and the recorded data can be
lost as a result of static electricity, electrical noise, vibration, or other
influences. To protect the device against data loss, we recommend keeping a
separate record of the data that you record after purchase.
• Note that the following events are not covered by the warranty.
1. Corruption or loss of the data recorded on the “SD memory card” by the
purchaser resulting from failure, incorrect operation or malfunction of the
unit, or any problems associated with it, or due to the effects of electrical
noise or other influences.
2. Corruption or loss of the map data or basic program stored in the “SD
memory card” resulting from the incorrect use of the unit by the
purchaser or a third party.
3. Corruption or loss of data recorded on the “SD memory card” by the
purchaser resulting from the malfunction or repair of the unit.
* Note that by installing or using the unit, you are regarded as having
consented to the points above.
• The unit has been designed to withstand electrical noise from other
electronic devices. However, if an electronic device that emits strong noise is
used next to the unit, the unit may show malfunctions such as screen
interference or noise. If this happens, stop using the electronic device that
you think is causing the problem.
• The liquid-crystal display may be difficult to read when wearing polarized
glasses.
Introduction 11
Before Use
Viewing This Document
NOTE
In this document, the unit is generally described using the screens which appear when the optional devices are connected. Navigation is mostly described using the
Heading - upwards 1 screen.
About button display
When a panel button should be pressed, button names are shown as ( , , etc.).
When a touch button on the screen should be touched, button names are shown as or [ccc].
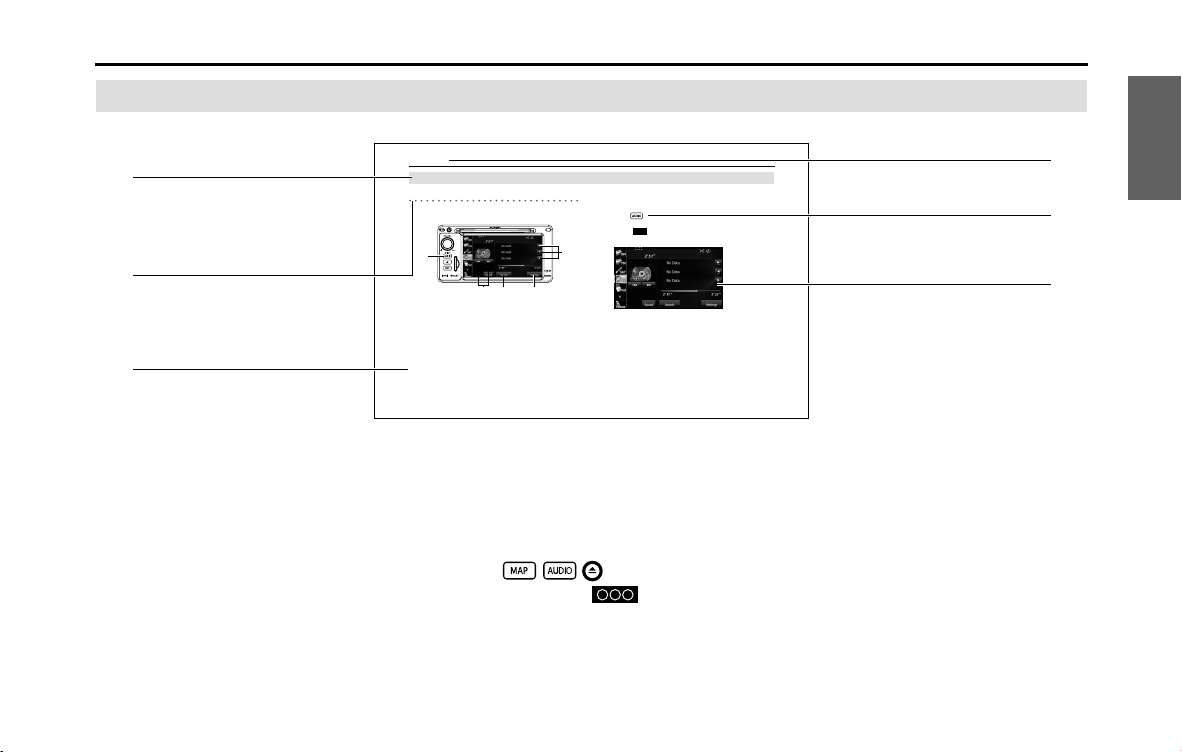
226 Audio and Visual
Audio Operations
Using the CD Player
Using the CD Player
(1) Title information scroll buttons
*
(2) Settings button
(3) Search button
(4) Track up/down and fast forward (fast reverse) buttons
(5) AUDIO button
* It will be displayed if the length of the information is too long and it
cannot be displayed.
NOTE
Some of the functions may not be available when vehicle is in motion.
■ Listening to a CD
Insert a CD into the disc slot, and it will start playing.
1
Press .
2
Tou c h (C D).
• The playback starts.
NOTE
• Playback may be intermittent when there is a scratch on the CD or when the
recorded side is dirty.
• If track titles and other data are recorded in the CD-Text format, they can be
displayed.
• It may not be possible to display the CD-Text of CD-R/RW discs.
• If no CD-Text data exist in the disc, “No Data” appears in the section where the
track titles and other data are displayed.
(2)(3)(4)
(5)
(1)
CD
Section title
The section title is displayed here.
Item title
A title is assigned for each item.
Operation title
A title is assigned for each operation
objective.
Operation procedure
Describes the operation.
Follow the numerical order.
NOTE
Describes information related to the
operation.
Operation screen
The screen to be operated is displayed.

12 Introduction
Before Use
About This Unit
Part Names and Operations
You can operate the unit by pressing the buttons on the panel (panel
buttons) or by directly touching the buttons displayed on the screen
(touch buttons).
■ Panel buttons
Press a panel button to operate it.
(5)
(4)
(1)
(2)
(3)
(1) MAP button Press to display the navigation screen.
(2) Voice recognition
button
Press to use voice recognition control.
(3) AUDIO button Press to use the audio or hands free function.
Press for 1 second or more to adjust the
picture quality or screen brightness.
(4) POWER/VOL button Pressing: Audio Power ON or OFF.
Rotating: Adjust the volume.
(5) EJECT button Press to eject the DISC.
Introduction 13
Before Use
■ Touch Screen Button
Touch a button on the screen to operate it.
About touch button operations
• Keep touching the touch button until a “beep” is emitted in
response. (When the guide tone is set to ON.)
• To protect the screen, touch the touch button lightly with your
finger.
• When there is no response from a button, remove your finger from
the screen and touch it again.
• Touch buttons that cannot be operated have their colors toned
down.
• When the button function is enabled, the touch button returns to a
brighter color.
CAUTION
Touch the touch buttons with your finger. Operating touch
buttons with the point of hard objects such as ballpoint pens
or mechanical pencils may damage the screen.
Touch Screen Buttons
14 Introduction
Before Use
Turning the Power On or Off
This unit switches on automatically at ignition, and when started for the
first time, it displays the Navigation setting screen
*
. When the engine is
switched off, the unit also switches off.
* The second and subsequent times that the unit is started, the mode
screen that was last in use is displayed. If the last mode in use was the
Navigation screen, then your current position will be displayed. If it was
the Audio operation screen, then the audio selection that was last playing
will be displayed.
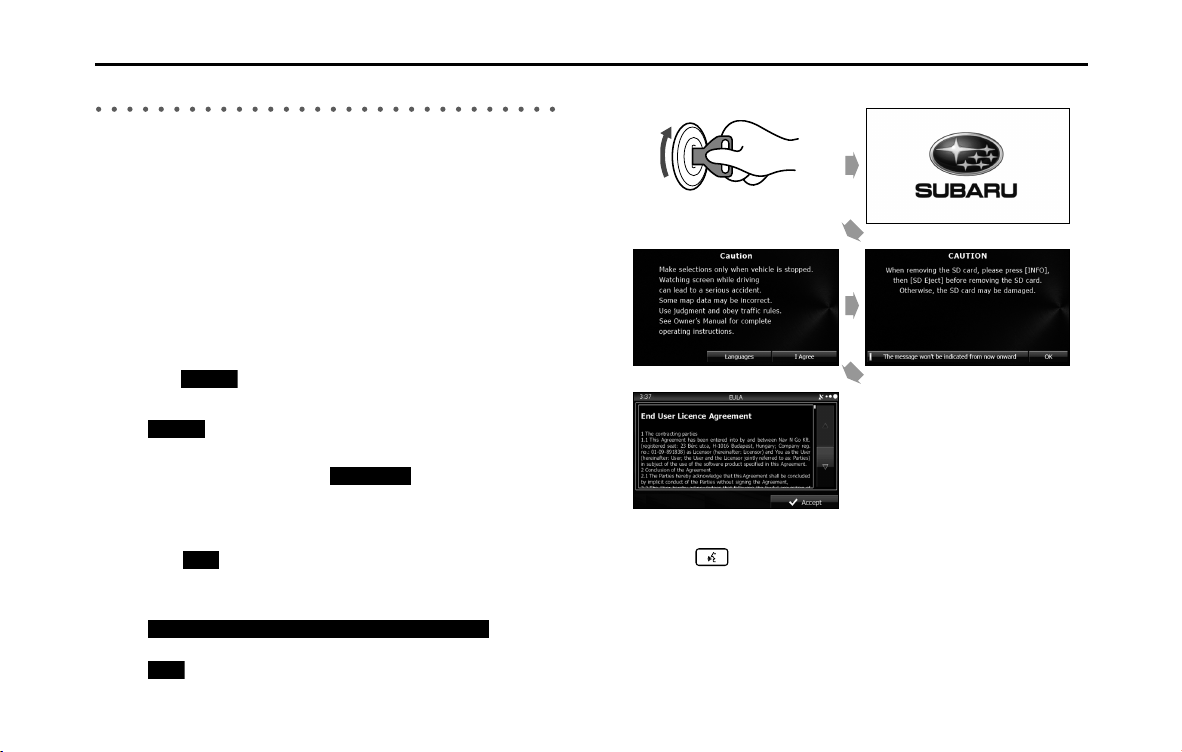
■ Turning on the power
1 The Caution screen is displayed automatically. When you
touch (I Agree), the “SD Eject” Caution screen
appears.
• (I Agree) turns down the tone during system startup.
Touch to increase the tone after system startup.
• To select a language, touch (Languages) to display
the Languages screen. Touch the language that you want to
use from the list. For details, see “Language setting” on Page 36.
2 Touch (OK) to display the Navigation setting screen.
• To stop the “SD Eject” Caution screen from being displayed
again, touch
(The
message won't be indicated from now onward) and then touch
(OK).
NOTE
Do not press (Main Unit/Steering Wheel Switch) without pressing the
“I Agree” button on the Caution screen. Otherwise, Navigation commands
cannot be used.
I Agree
I Agree
Languages
OK
The message won't be indicated from now onward
OK
<Opening screen>
<“SD Eject” Caution screen>
<Caution screen>
<Navigation setting screen>
Introduction 15
Before Use
■ Turning off the audio
• Press (POWER/VOL).
NOTE
• When the audio power is turned off, on the Source screen, touch the source
to which you want to change. For details, see “Switching the Audio Source” on
Page 198.
• You cannot turn off the navigation power.
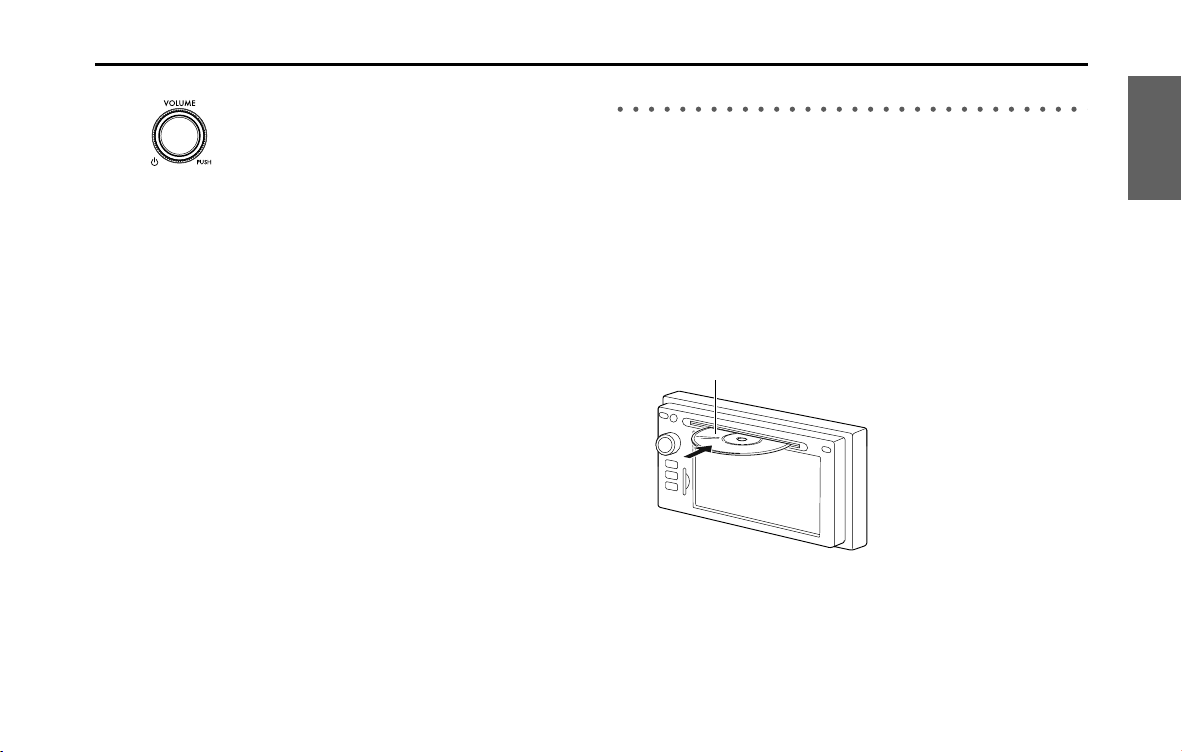
Loading and Unloading a Disc
To listen to music, insert a music CD into the slot.
■ Loading a disc
1 Insert a disc into the slot.
• Hold the disc by the center hole and the edges, and insert it
with the label facing upward.
• When the disc is inserted, playback of the music CD or MP3/
WMA starts.
• For disc details, see “About Discs” on Page 194.
Disc
16 Introduction
Before Use
■ Unloading a disc
1 Press .
• The disc is ejected automatically.
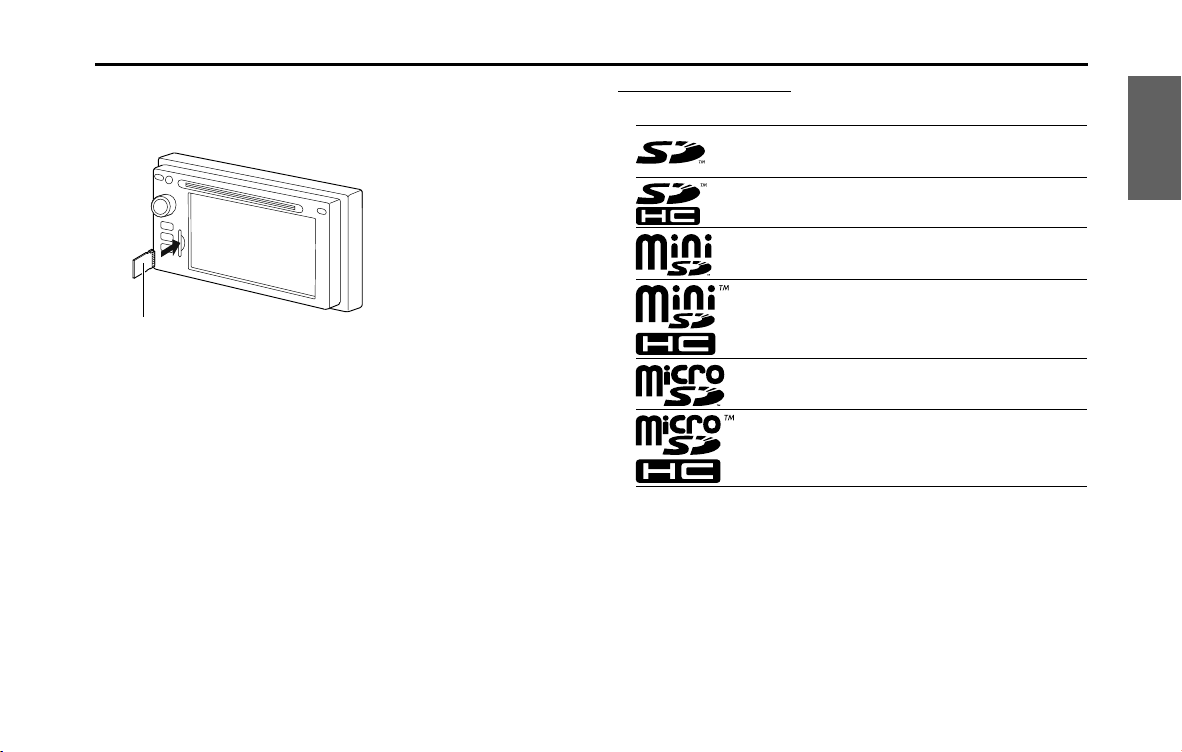
Loading and Unloading an SD Memory Card
Insert an SD memory card into the slot.
■ Loading an SD memory card
CAUTION
When removing a disc from the unit, pull it out horizontally. Do
not strongly pull up the disc. Also, do not strongly push down
the disc while removing it. Doing so may damage the disc or
cause the playback to jump.
CAUTION
• Position the SD memory card with the mark at the far
end and insert it until it makes a “click” sound. When it
makes contact with the stopper inside, the card cannot be
inserted any further. Do not try to forcibly push the card.
• Before inserting a miniSD card, microSD card, miniSDHC
card or microSDHC card, be sure to attach the card to the
special adapter. (If you insert only the miniSD card, microSD
card, miniSDHC card or microSDHC card, you may not be
able to remove it.)
Introduction 17
Before Use
1 Insert the SD memory card.
• Insert the SD memory card with the label on the left side.
• Make sure that the SD memory card is fully inserted.
NOTE
• Insert the map SD card without locking it.
• If you insert an SD memory card that contains image data, you can preview
the images, play a slideshow, or set an image as the Opening screen. (See
Page 282.)
About SD memory cards
• SD memory cards that are marked as follows can be used.
• Multi Media Cards (MMC) cannot be used.
• Supported capacities: 512 MB to 8 GB
• Supported speed class: Class 2 to Class 10
SD memory card
SD Logo is a trademark of SD-3C, LLC.
SDHC Logo is a trademark of SD-3C, LLC.
miniSD Logo is a trademark of SD-3C, LLC.
miniSDHC Logo is a trademark of SD-3C, LLC.
microSD Logo is a trademark of SD-3C, LLC.
microSDHC Logo is a trademark of SD-3C, LLC.
18 Introduction
Before Use
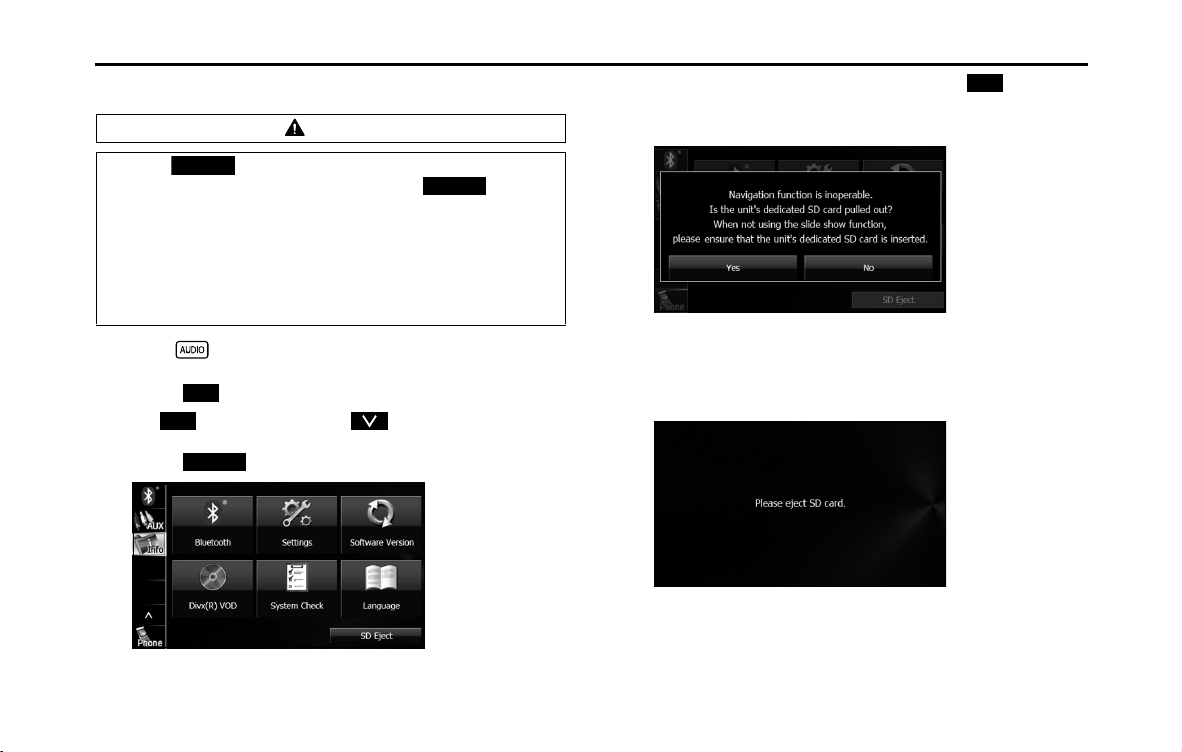
■ Unloading an SD memory card
1 Press .
2 Touch .
• If is not displayed, touch .
3 Touch (SD Eject).
4 After checking the caution screen, touch (Yes).
• This screen does not appear if the card is not the specified SD
memory card.
5 When “Please eject SD card.” appears, remove the SD
memory card.
• Press in the SD memory card until you hear it “click”, let go of
the card, and then pull it straight out.
CAUTION
• Touch (SD Eject) before removing the map SD card.
Removing the card without first touching (SD
Eject) may damage the data. No compensation will be given
for any damaged data.
• When removing a disc or SD memory card from the unit, pull
it out horizontally. Do not strongly pull to the right side.
Also, do not strongly push to the left side while removing it.
Doing so may damage the SD memory card.
SD Eject
SD Eject
Info
Info
SD Eject
Yes
Introduction 19
Before Use
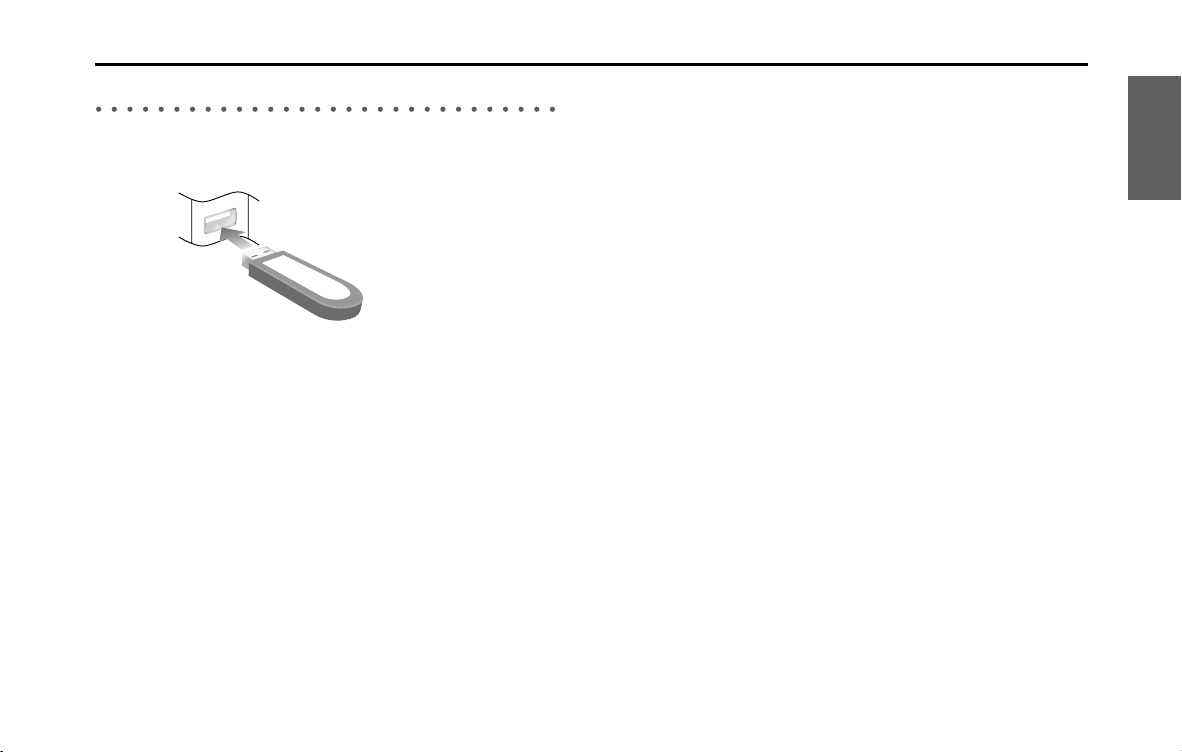
Connecting (or Disconnecting) the USB Memory
1 Connect (or disconnect) the USB memory.
NOTE
• This unit supports USB memory in the following formats.
- Supported class: Mass storage class
- Supported USB Ver.: USB1.0/1.1/2.0 (maximum transfer speed is same as USB
2.0)
- Maximum consumption current: Less than 1.0 A
- Supported capacities: 16 MB to 8 GB
• Do not connect USB memory devices other than those conforming to the
specifications above. There is a possibility that some USB memory devices
that do conform to specifications will not function correctly, due to many
variables. We suggest testing your USB device prior to departing to your
destination.
• This unit does not support commercially available USB hubs, multi card
readers, external hard discs or portable audio players with USB connectors.
• If the USB memory connection cord of this unit is connected to a USB device
via an extension cord, it may not function correctly.
• If you lose the data in the USB memory while using it with this unit, no
compensation will be given for the lost data. It is always a good practice to
back up data, and only access a copy for in-vehicle use.
• Leaving the USB memory for a long time in a place exposed to direct sunlight
may result in deformation or discoloration due to the high temperature, or
cause a malfunction. In such cases, Fuji Heavy Industries will not give any
compensation. When you are not using the USB memory, keep it in a place
away from direct sunlight. Further, when leaving the vehicle, do not keep the
USB memory inside.
• When the audio source is USB, do not disconnect the USB memory. Doing so
may damage the data in the USB memory. Before disconnecting the USB
memory, turn the ignition switch to the Off position or switch the audio
source to a source other than USB, and then disconnect it.
20 Introduction
Before Use
About the Unit Modes
The modes of this unit can be broadly divided into 3 categories:
Navigation, Audio and Multi.
Mode Main functions
(1) Navigation • Navigation screen display and operations
(current position display, destination setting,
destination guidance, destination registration,
etc.)
• Navigation menu display
(1)
(3) (2)
(2) Audio • Receiving AM/FM/SAT radio
• CD, MP3/WMA player operations
• USB music/video file player operations
•AUX display
•iPod operations
• Bluetooth audio operations
• Audio menu display
• Audio source selection
• Handsfree operation screen display
• Info menu display
(3) Multi • Navigation screen and Audio operations screen
selection
• Audio source selection
• Audio source operations
• Navigation screen display and operations
(current position display, destination setting,
destination guidance, destination registration,
etc.)
• Navigation menu display
* Some functions cannot be operated while driving.
Mode Main functions

Introduction 21
Before Use
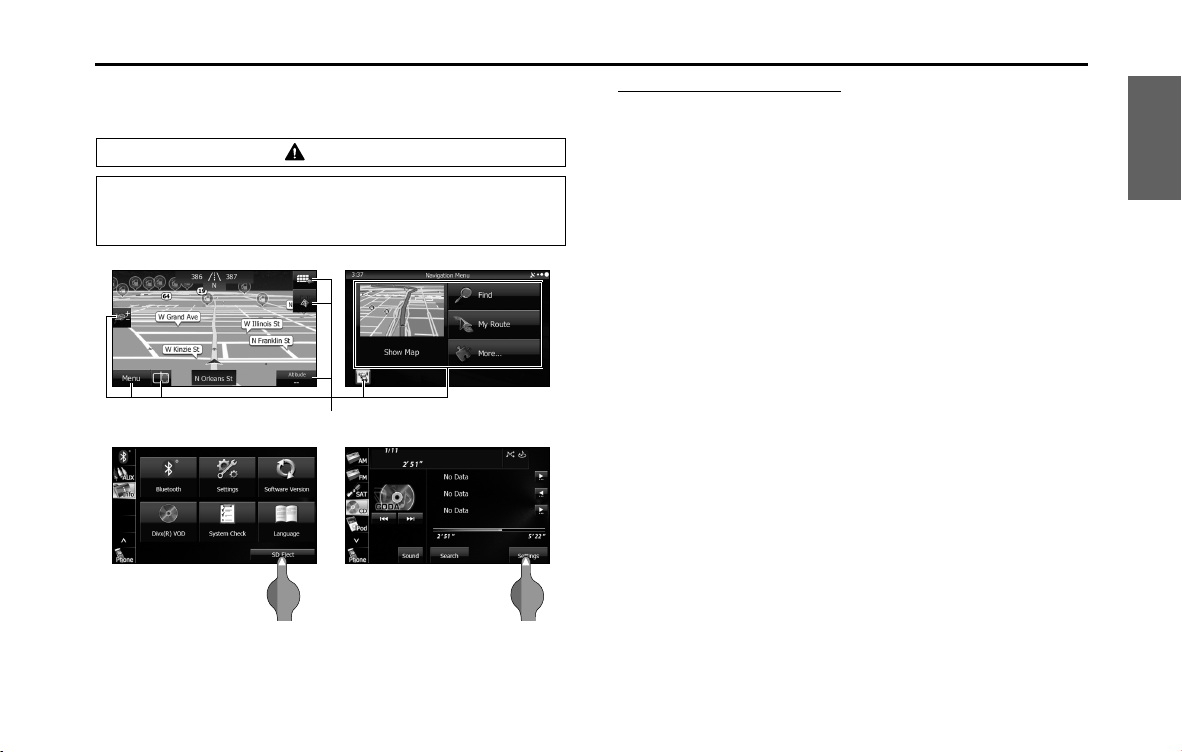
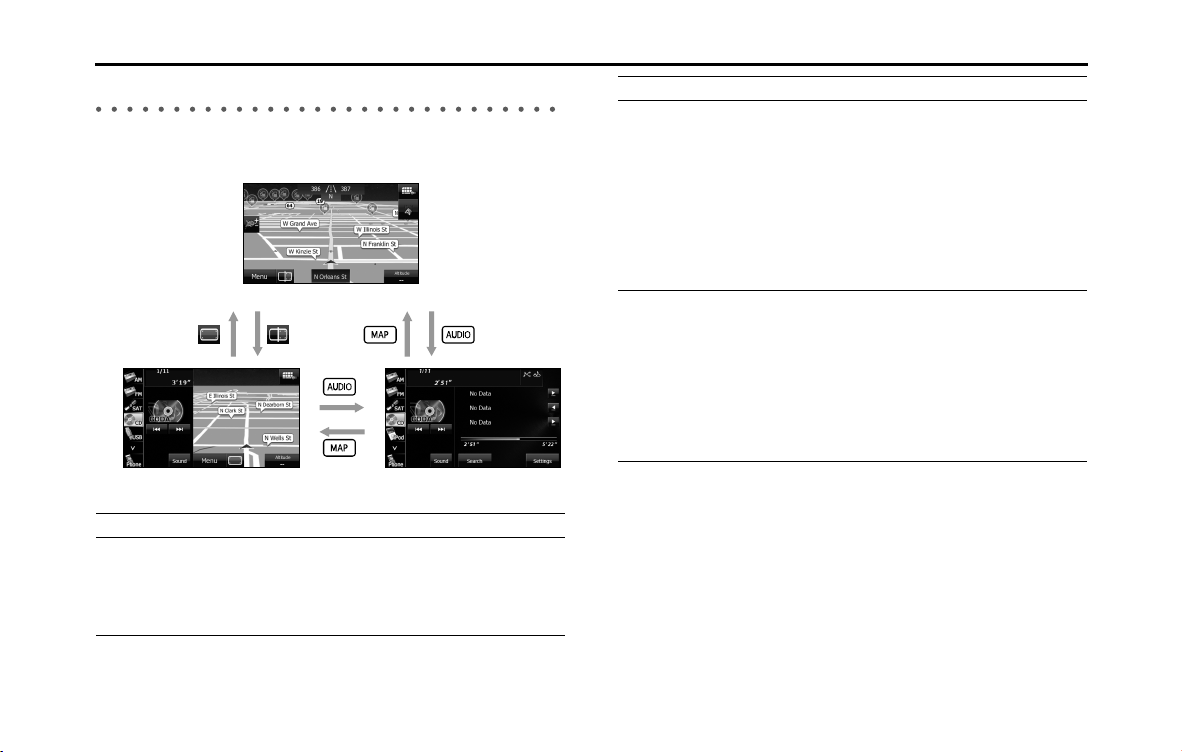
Selecting a Mode
Press the following buttons to select the screens.
■ Navigation screen
1 Press .
■ Audio operations screen
1 Press .
<When the CD player is operating>
• Displayed while the audio function is operating. For the audio
operations, see “Switching the Audio Source” on Page 198.
<OFF screen>
• Displayed when the audio function is off.
22 Introduction
Before Use
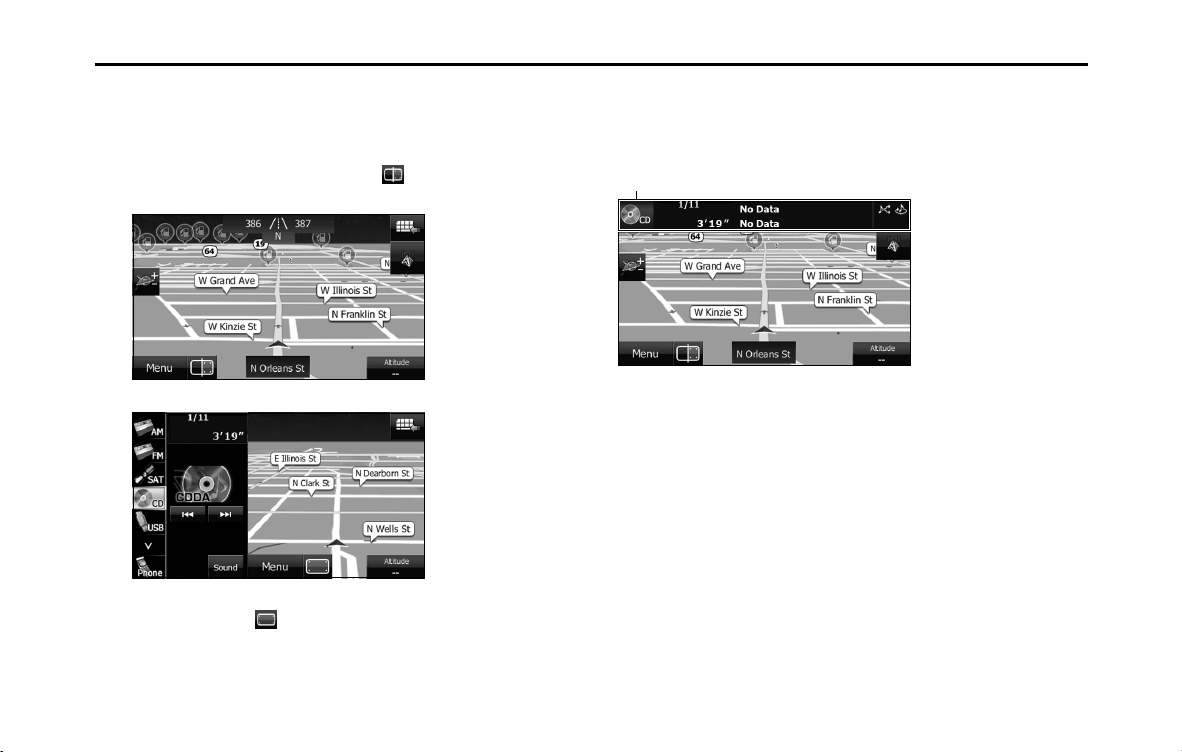
■ Multi screen
You can position the Navigation screen and Audio operations screen on
the left and right to display them at the same time.
1 On the Navigation screen, touch .
• The Multi screen appears.
<Multi screen>
NOTE
On the Multi screen, touch to return to the Navigation screen.
■ About the on-screen display
If a disc is loaded while the Navigation screen is displayed, an on-screen
display appears.
After a short time, the on-screen display disappears automatically.
On-screen display
Introduction 23
Before Use
Operation Conditions for the Unit
The operability of the unit's functions varies according to the following
conditions (the ignition switch position).
NOTE
Buttons that cannot be operated have their colors toned down. Operating a
button that is disabled while driving may result in the display of an operation
prohibited message on the screen.
c: Operable ×: Inoperable
Function Ignition switch
OFF ACC ON, vehicle
stopped
*1
ON, vehicle in motion
Navigation/
settings and
information
× cc When the vehicle is in
motion, some functions
become inoperable for
safety reasons
*2
Audio function × cc When the vehicle is in
motion, some functions
become inoperable for
safety reasons
Video function × cc When the vehicle is in
motion, some functions
become inoperable for
safety reasons
*3
Handsfree × cc When the vehicle is in
motion, some functions
become inoperable for
safety reasons
*1 When the parking brake is applied.
*2 When the navigation safety function is on.
*3 Video is not displayed.
24 Introduction
Before Use
Unit Settings
In addition to settings for navigation and audio operations,
the following settings can be performed for the unit.
• Bluetooth setting (See Page 25.)
• Interface Customization (See Page 26.)
• Opening screen setting (See Page 27.)
• Clock setting (See Page 28.)
• Time display setting (See Page 28.)
• Time zone setting (See Page 29.)
• Link to Day/Night View setting (See Page 30.)
• Voice recognition setting (See Page 32.)
• Guide tone setting (See Page 33.)
• Deleting Personal Data (See Page 34.)
• Initializing Settings menu (See Page 35.)
• Language setting (See Page 36.)
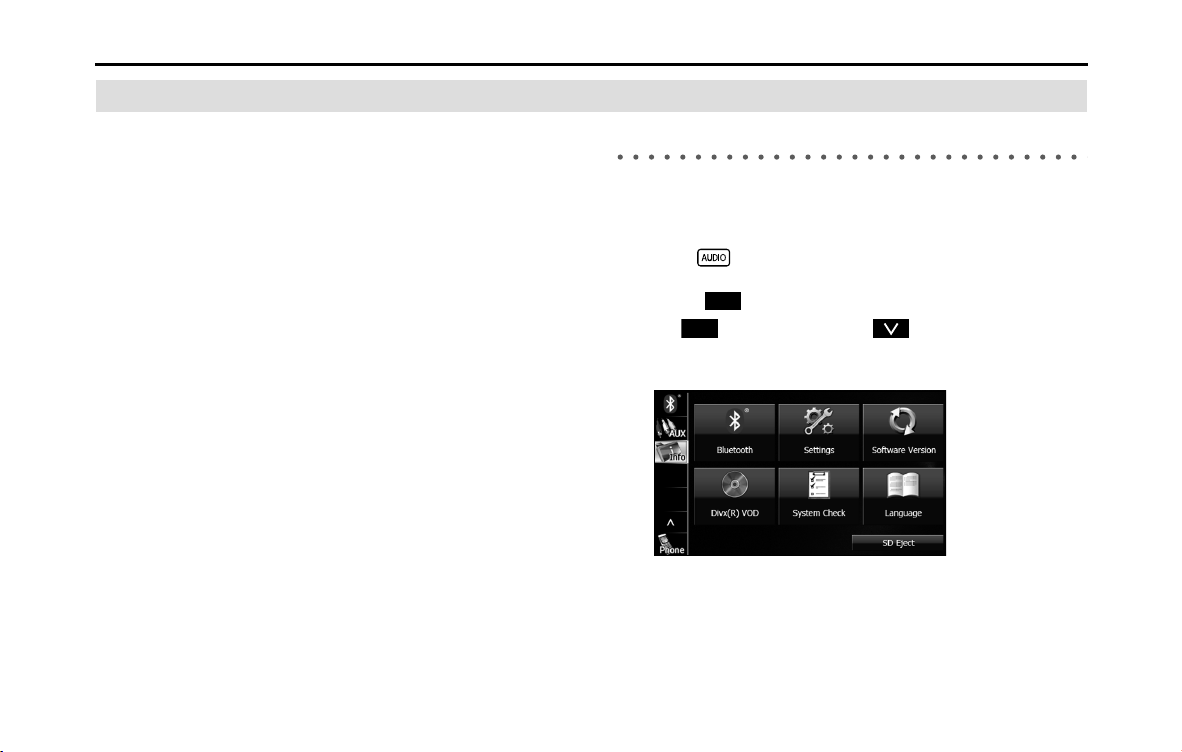
Various Unit Settings
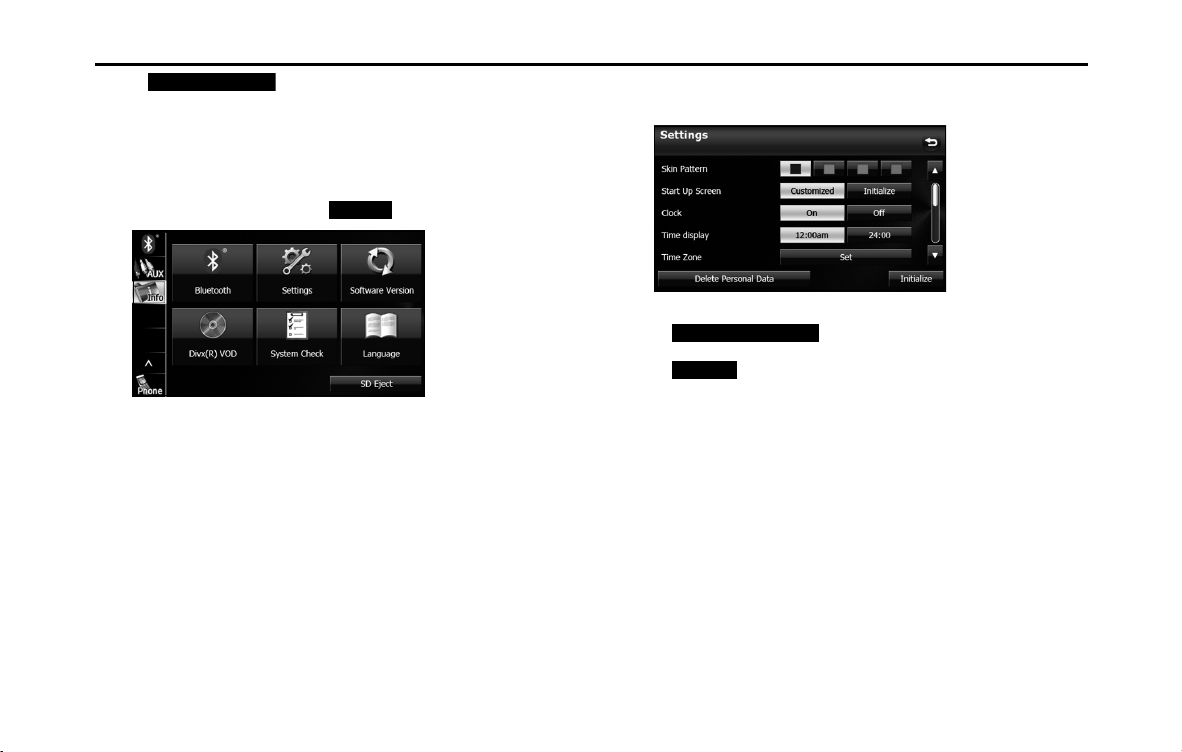
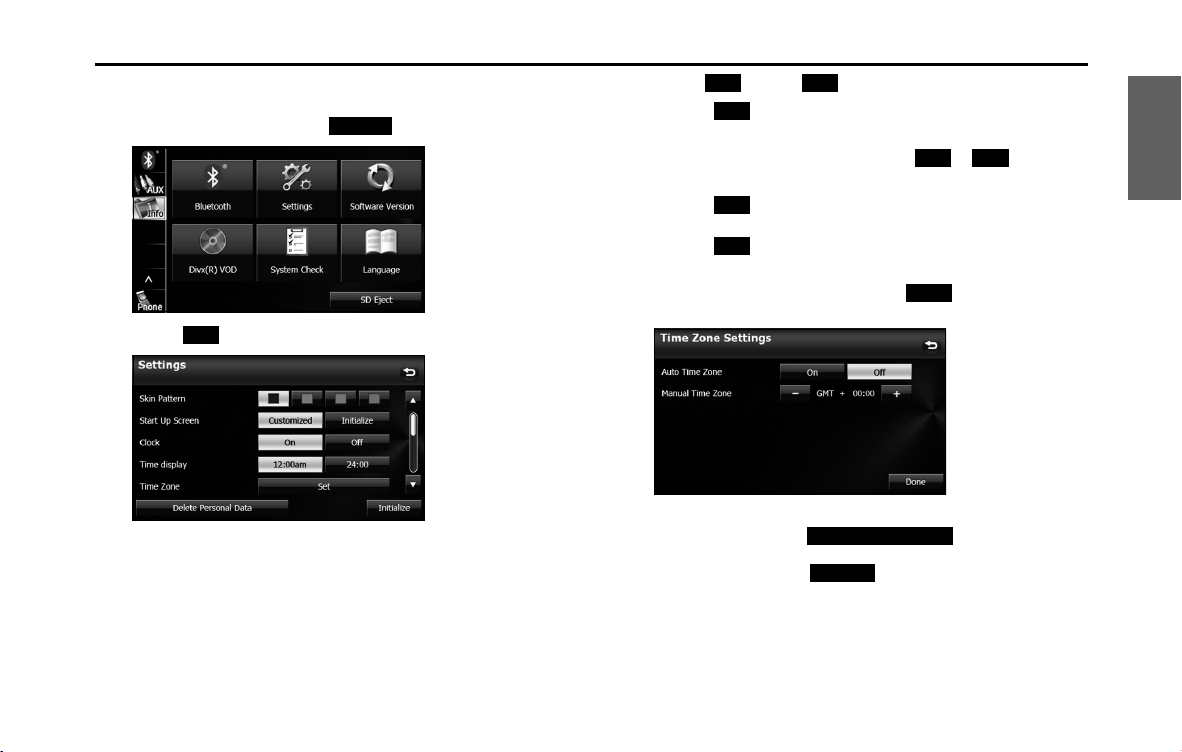
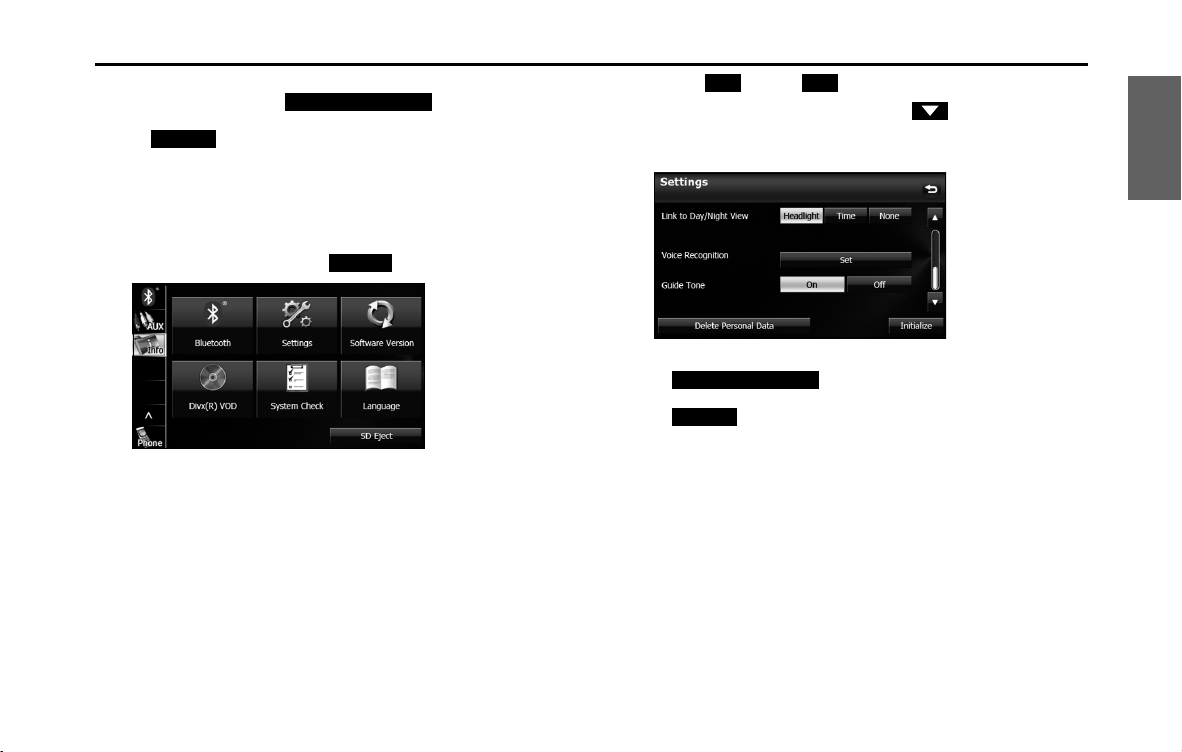
■ Displaying the Info screen
Display the Info screen to perform various settings.
1 Press .
2 Touch .
• If is not displayed, touch .
3 Touch the button that you want to set.
Info
Info
Introduction 25
Before Use
NOTE
:
Perform the Bluetooth settings. (See Page 25.)
(Settings):
Perform the unit settings. (See Page 26 - 35.)
(Software Version):
View information such as the map data that is stored on the unit or version
information for the audio application. (See Page 37.)
(DivX(R) VOD):
Display DivX VOD code. (See Page 255.)
(System Check):
Check the sensitivity of the GPS signal reception, or the connection of the
parking and reverse signals. (See Page 181.)
(Language):
Perform the language setting (See Page 36.)
(SD Eject):
Touch to remove the map SD card or the SD memory card that contains the
picture data. (See Page 16.)
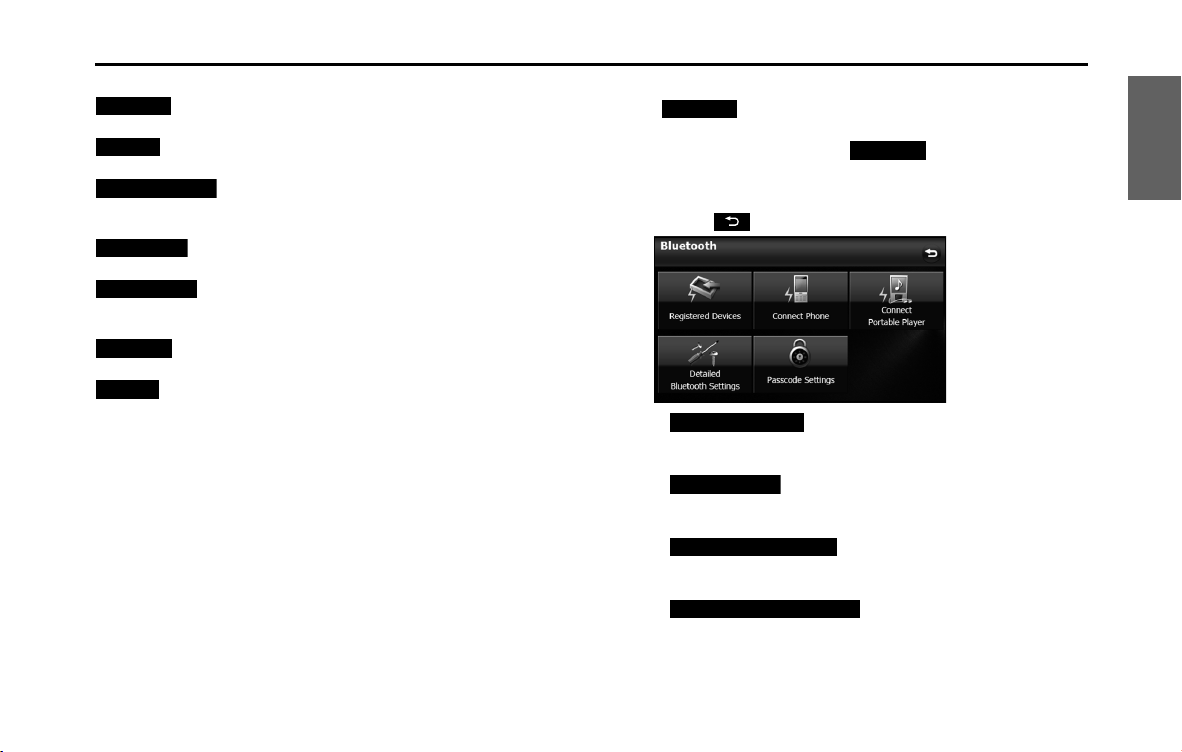
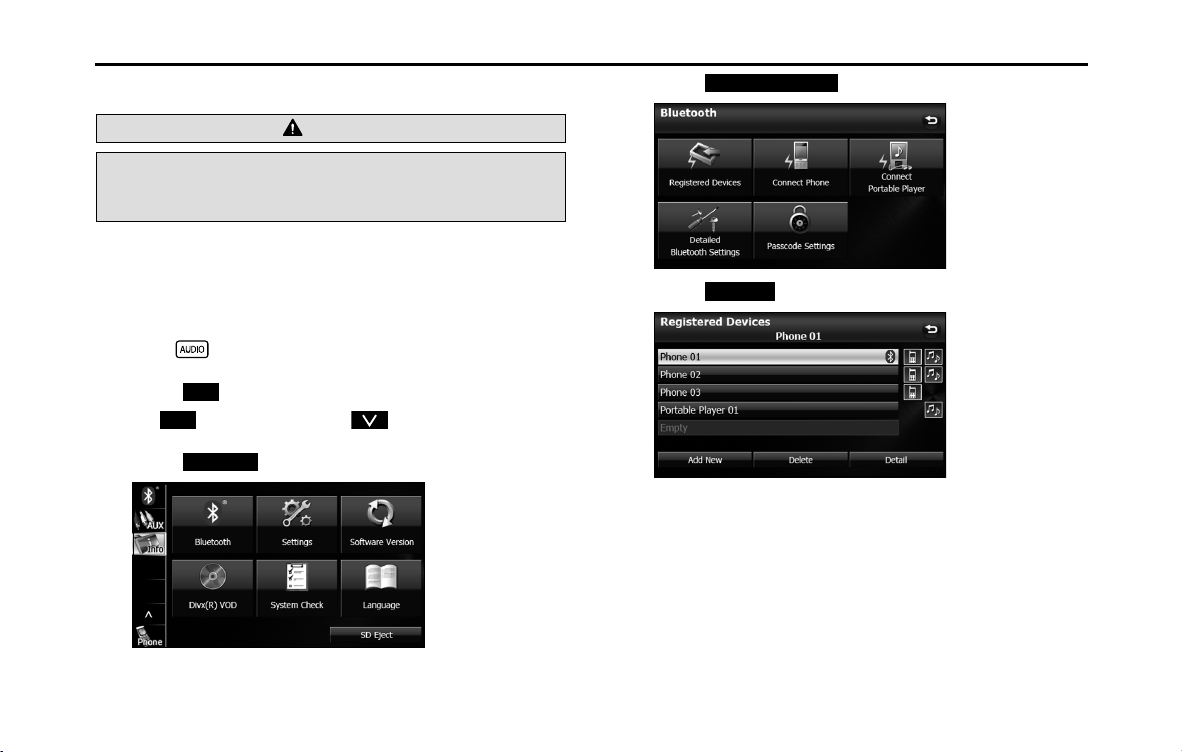
■ Bluetooth setting
Touch to perform the various Bluetooth settings.
1 On the Info screen, touch .
2 Touch the button that you want to set.
• Touch to return to the previous screen.
• (Registered Devices):
Register or delete a Bluetooth device, or display information for
connected devices. (See pages 44, 269.)
(Connect Phone):
Register a cell phone or perform the connection settings. (See
Page 46.)
(Connect Portable Player):
Register a Bluetooth audio device or perform the connection
settings. (See Page 271.)
(Detailed Bluetooth Settings):
Display or set the detailed Bluetooth information for this unit.
(See Page 67.)
Bluetooth
Settings
Software Version
DivX(R) VOD
System Check
Language
SD Eject
Bluetooth
Bluetooth
Registered Devices
Connect Phone
Connect Portable Player
Detailed Bluetooth Settings
26 Introduction
Before Use
(Passcode Settings):
Set the passcode (passkey). (See Page 68.)
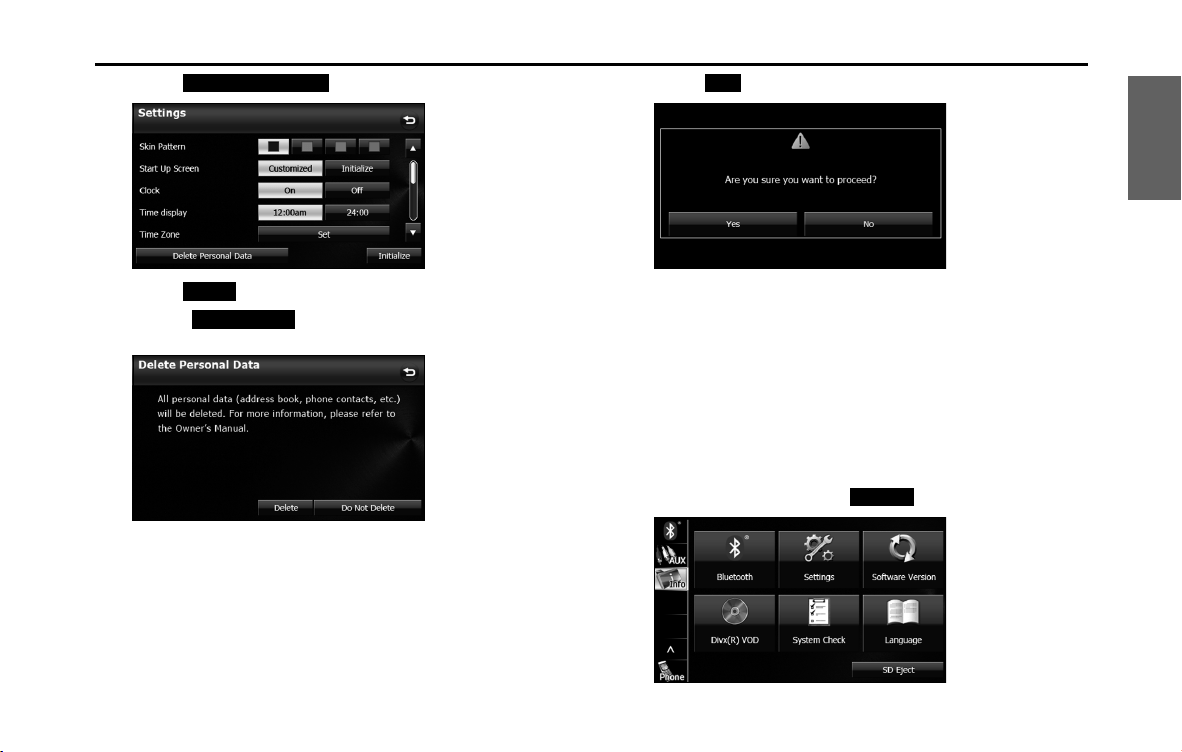
■ Interface Customization
You can set the color pattern (Black/Green/Amber/Blue) for the screen.
1 On the Info screen, touch (Settings).
2 Touch the color that you want to use as the skin pattern.
• The setting changes to the color pattern that you touched.
NOTE
• Touch (Delete Personal Data) to initialize your
personal data and all settings. (See Page 34.)
• Touch (Initialize) to return the settings in the Settings screen to
their initial values.
Passcode Settings
Settings
Delete Personal Data
Initialize
Introduction 27
Before Use
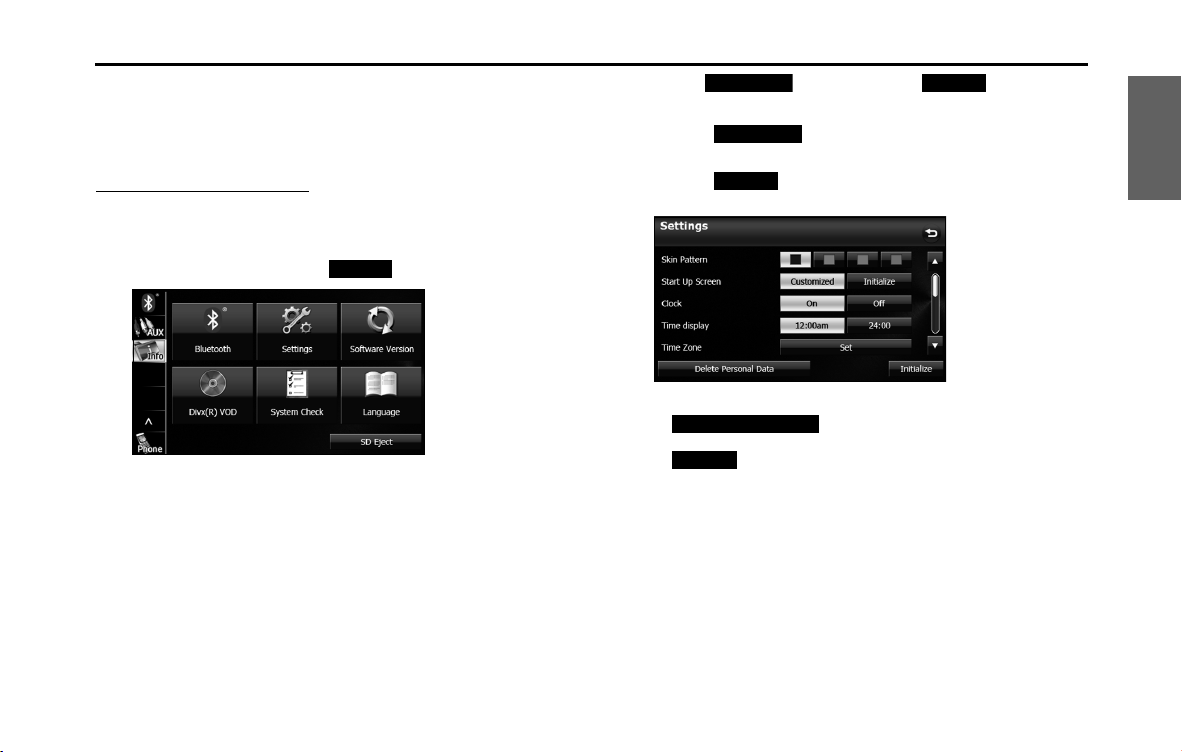
■ Opening screen setting
You can change the Opening screen to display the image of your
choice. You can also display image data imported from an SD memory
card as the Opening screen.
Changing the Opening screen
You can change the Opening screen of the unit (the screen that is
displayed when the power is turned on).
1 On the Info screen, touch (Settings).
2 Touch (Customized) or (Initialize) in
Start Up Screen.
• Touch (Customized) to change to the Opening
screen that was set with the picture function. (See Page 282.)
• Touch (Initialize) to return Start Up Screen to its initial
value.
NOTE
• Touch (Delete Personal Data) to Initialize your
personal data and all settings. (See Page 34.)
• Touch (Initialize) to return the settings in the Settings screen to
their initial values.
Settings
Customized Initialize
Customized
Initialize
Delete Personal Data
Initialize
28 Introduction
Before Use
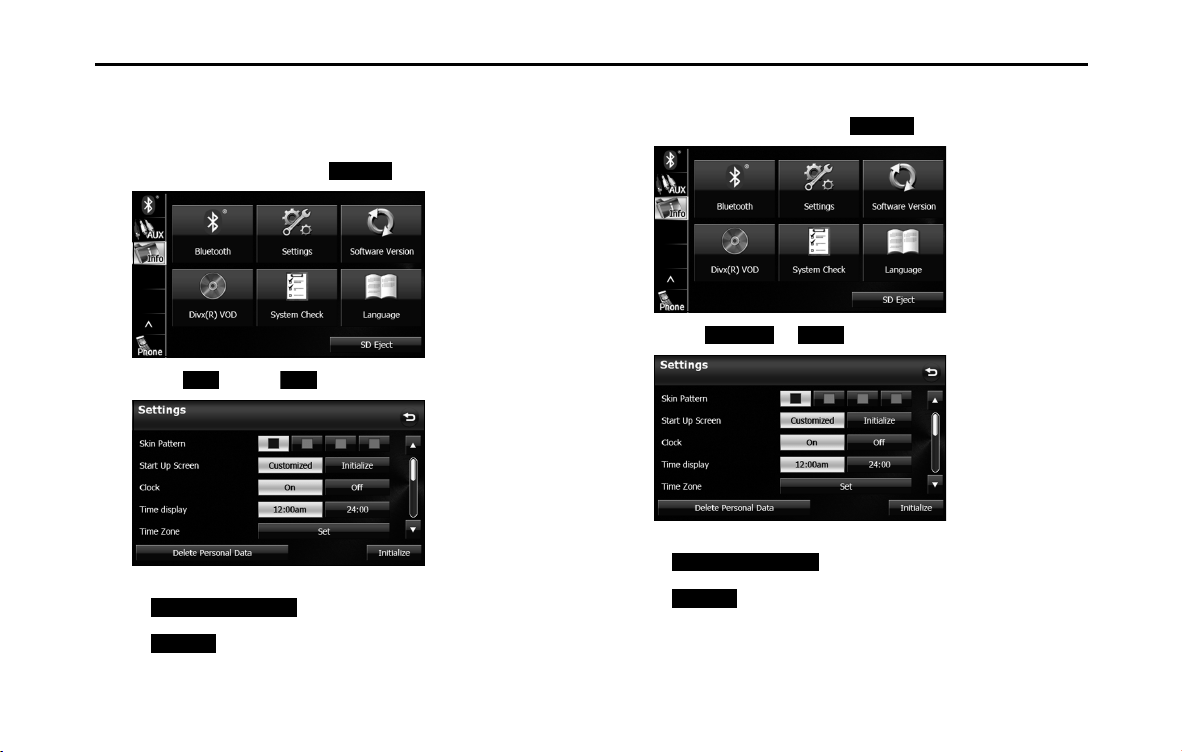
■ Clock setting
You can turn the clock display on or off, change the time display, and
set the time zone. (Only applies to navigation mode)
1 On the Info screen, touch (Settings).
2
Touch (On) or (Off ) in Clock.
NOTE
• Touch (Delete Personal Data) to Initialize your
personal data and all settings. (See Page 34.)
• Touch (Initialize) to return the settings in the Settings screen to
their initial values.
■ Time display setting
1 On the Info screen, touch (Settings).
2 Touch or in Time Display.
NOTE
• Touch (Delete Personal Data) to Initialize your
personal data and all settings. (See Page 34.)
• Touch (Initialize) to return the settings in the Settings screen to
their initial values.
Settings
On O
Delete Personal Data
Initialize
Settings
12:00 am 24:00
Delete Personal Data
Initialize
Introduction 29
Before Use
■ Time zone setting
1 On the Info screen, touch (Settings).
2 Touch (Set) in Time Zone.
3 Touch (On) or (Off ) in Auto Time Zone.
• Touch (On) in Auto Time Zone to set the time zone
automatically.
• When Auto Time Zone is “Off”, touch or in Manual
Time Zone to adjust the time zone manually.
• Touch for 1 second or more to raise the time
continuously.
Touch for 1 second or more to lower the time
continuously.
• After configuring the setting, touch (Done) to save the
setting and return to the previous screen.
NOTE
• On the Settings screen, touch (Delete Personal Data)
to initialize your personal data and all settings. (See Page 34.)
• On the Settings screen, touch (Initialize) to return the settings in
the Settings screen to their initial values.
Settings
Set
On O
On
- +
+
-
Done
Delete Personal Data
Initialize
30 Introduction
Before Use
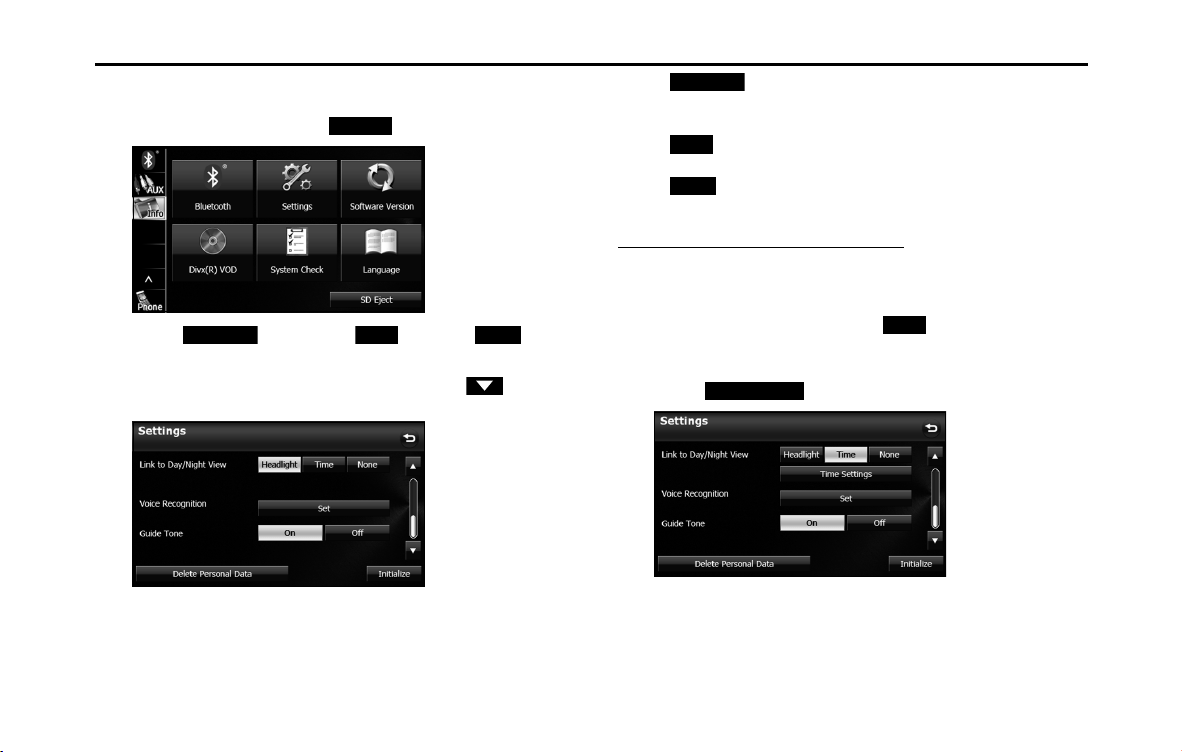
■ Link to Day/Night View setting
1 On the Info screen, touch (Settings).
2 Touch (Headlight), (Time) or
(None) in Link to Day/Night View.
• If Link to Day/Night View is not displayed, touch to
change the page.
• (Headlight):
Change to night view when the lights (sidelights, tail lights,
license plate lights) are turned on.
(Time):
Change to night view or day view at the set times.
(None):
Change to night view or day view manually.
Day/night view changeover time setting
When Link to Day/Night View is set to “Time”, you can set the time at
which to change to the day view.
1 On the Settings screen, touch (Time) in Link to
Day/Night View.
2 Touch (Time Settings).
Settings
Headlight Time None
Headlight
Time
None
Time
Time Settings
Introduction 31
Before Use
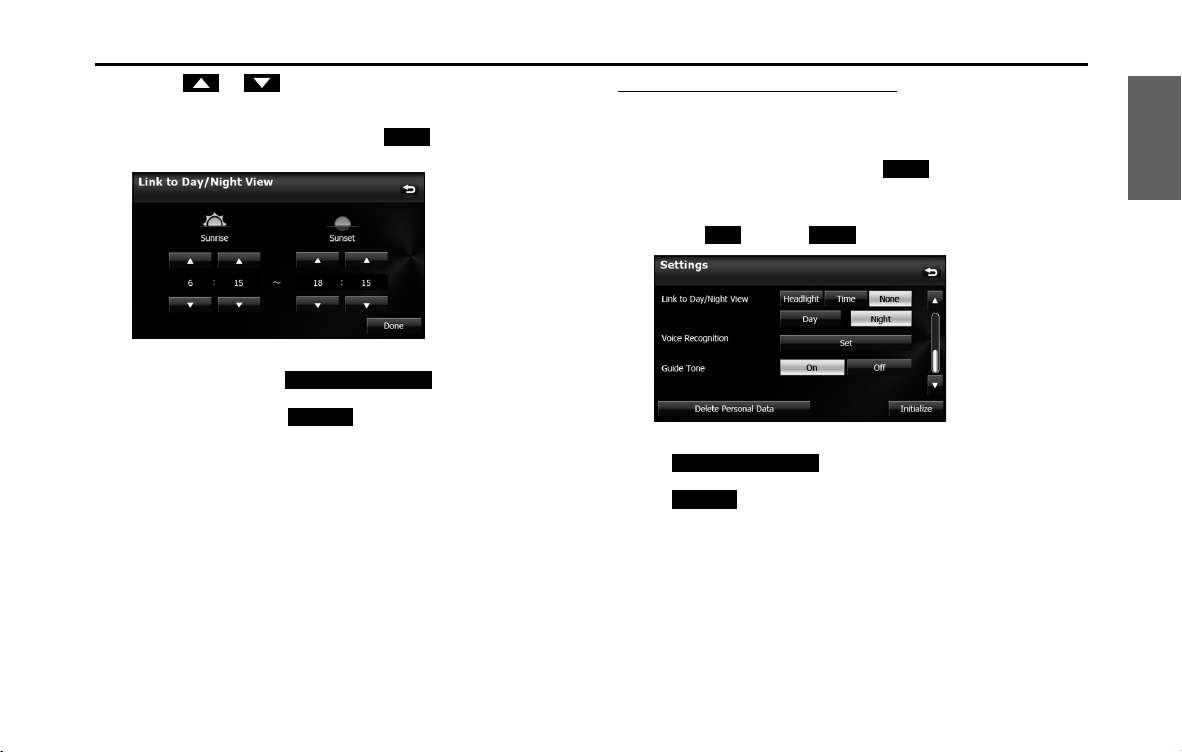
3 Touch or .
• You can set the “Sunrise” and “Sunset” time for the day view.
• After configuring the setting, touch (Done) to save the
setting and return to the previous screen.
NOTE
• On the Settings screen, touch (Delete Personal Data)
to initialize your personal data and all settings. (See Page 34.)
• On the Settings screen, touch (Initialize) to return the settings in
the Settings screen to their initial values.
Changing to the night view or day view
When Link to Day/Night View is set to “None”, you can change to the
night view or day view manually.
1 On the Settings screen, touch (None) in Link to
Day/Night View.
2 Touch (Day) or (Night).
NOTE
• Touch (Delete Personal Data) to Initialize your
personal data and all settings. (See Page 34.)
• Touch (Initialize) to return the settings in the Settings screen to
their initial values.
Done
Delete Personal Data
Initialize
None
Day Night
Delete Personal Data
Initialize
32 Introduction
Before Use
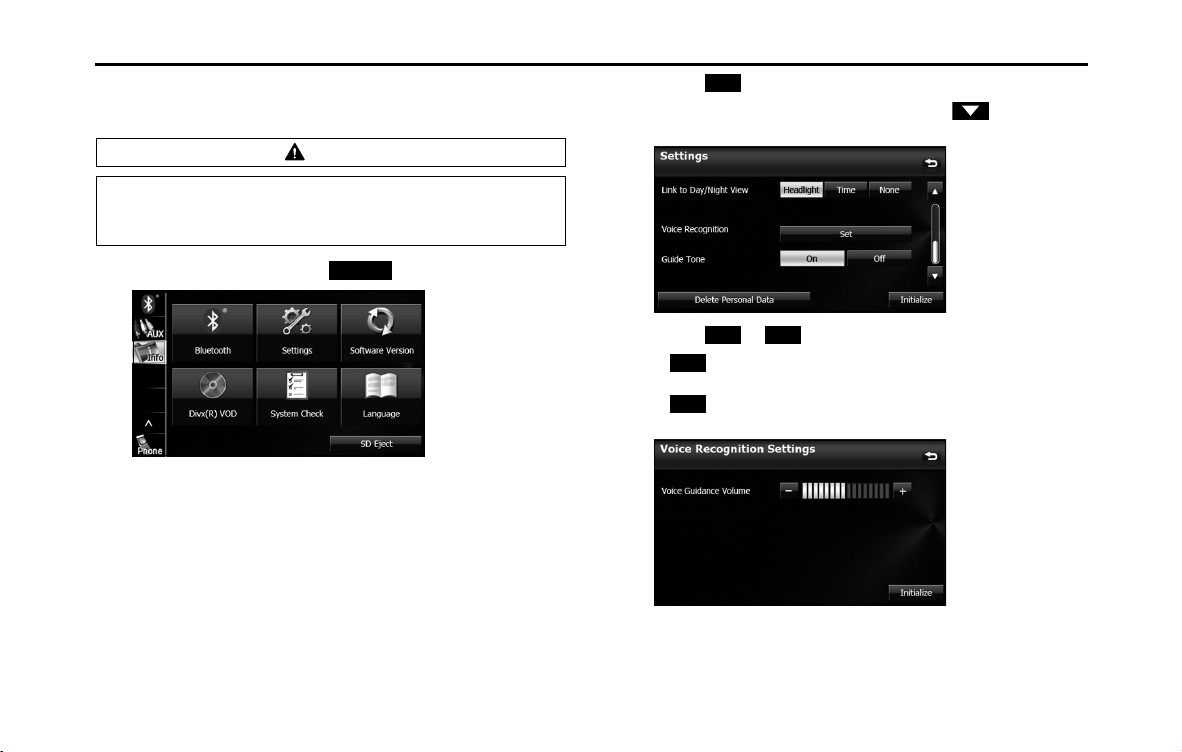
■ Voice recognition setting
You can set the volume of the voice recognition.
1 On the Info screen, touch (Settings).
2 Touch (Set) in Voice Recognition.
• If Voice Recognition is not displayed, touch to change the
page.
3 Touch or .
• (right side):
Volume up
(left side):
Volume down
CAUTION
Be sure to set the volume of the audio at an appropriate level.
Improper volume setting may result in hearing damage or a
traffic accident.
Settings
Set
- +
+
-
Introduction 33
Before Use
NOTE
• On the Settings screen, touch (Delete Personal Data)
to Initialize your personal data and all settings. (See Page 34.)
• Touch (Initialize) to return the settings in the different screens to
their initial values.
■ Guide tone setting
You can set the sound for button operations to on or off.
1 On the Info screen, touch (Settings).
2 Touch (On) or (Off ) in Guide Tone.
• If Guide Tone is not displayed, touch to change the page.
• When Guide Tone is set to “Off”, button operations do not emit
a sound.
NOTE
• Touch (Delete Personal Data) to Initialize your
personal data and all settings. (See Page 34.)
• Touch (Initialize) to return the settings in the Settings screen to
their initial values.
Delete Personal Data
Initialize
Settings
On O
Delete Personal Data
Initialize

34 Introduction
Before Use
■ Deleting Personal Data
You can delete the data items that you registered and return them to
their factory default values.
Deleted personal data items
Deleting personal data
1 Touch .
• If the Navigation screen is displayed, change to the Multi screen
or Audio operations screen before performing this operation.
• If is not displayed, touch .
2 Touch (Settings).
Item Deleted data
Navigation • Navigation settings
•Map display setting
• Route learning function
• Indication setting of facilities
•Current position
Settings • Clock setting
•Language Setting
•Guide tone setting
• Skin pattern setting, Opening screen setting
(including data registered in “Customized”)
• Screen settings
• Day/night view changeover setting
• Voice recognition setting (including song data
and phone book data)
• Display settings for the "SD Eject" caution screen
General audio • Volume setting
• Sound quality setting
• Screen setting
Radio • AM/FM/SAT preset channels
• Parental Lock setting
Bluetooth audio • Bluetooth audio registered data
• Settings and edited items related to Bluetooth
audio
Handsfree • Phone book data
• Outgoing call history and incoming call history
• Speed Dial data
• Bluetooth phone registered data
• Unread messages and read messages
• Reply Messages list
• Settings and edited items related to handsfree
messages
Item Deleted data
Info
Info
Settings
Introduction 35
Before Use
3 Touch (Delete Personal Data).
4 Touch (Delete).
• Touch (Do Not Delete) to cancel the Delete
Personal Data.
5 Touch ( Yes).
NOTE
Once the information (data) is initialized (deleted), it cannot be restored. Be very
careful when performing initialization.
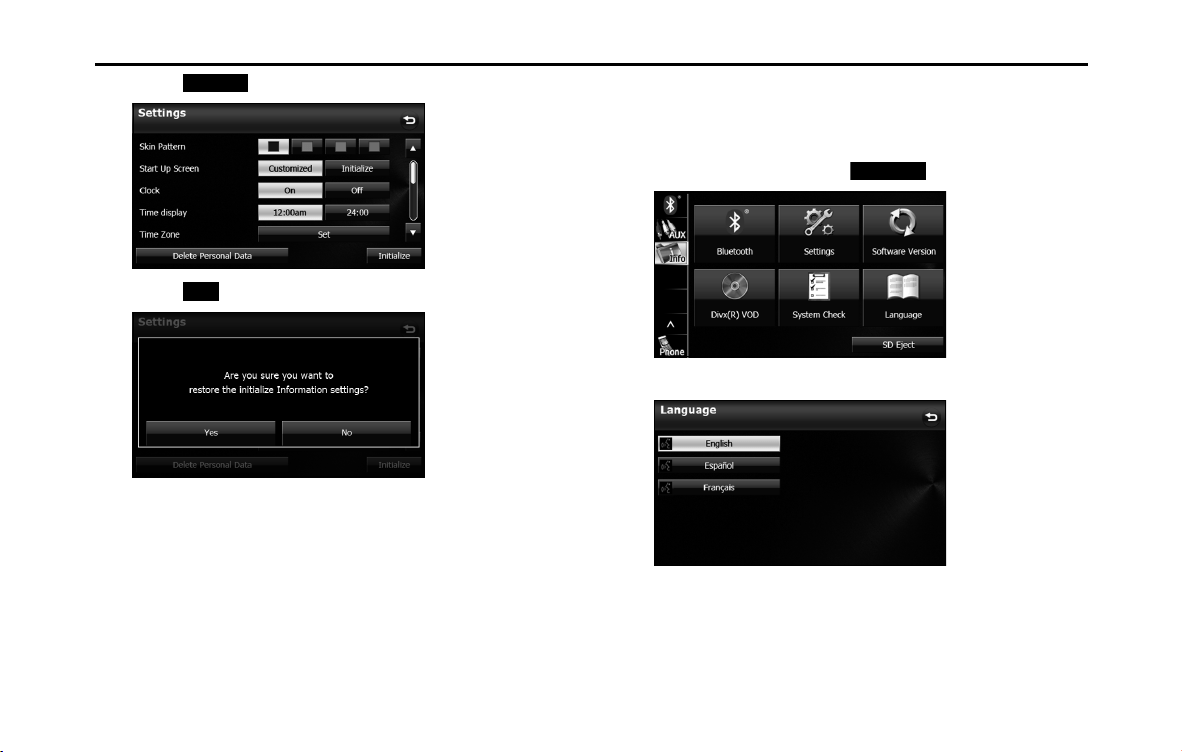
■ Initializing Settings menu
You can delete the contents (Skin Pattern, Start Up Screen, Clock, Time
Display, Time Zone, Link to Day/Night View, Voice Recognition, Guide
Tone) set in the Settings screen and return them to this Unit's initial
settings.
1 On the Info screen, touch (Settings).
Delete Personal Data
Delete
Do Not Delete
Yes
Settings
36 Introduction
Before Use
2 Touch (Initialize).
3 Touch ( Yes).
■ Language setting
You can change the navigation and audio display language, and the
voice recognition language.
1 On the Info screen, touch (Language).
2
Touch the language that you want to use.
Initialize
Yes
Language
Introduction 37
Before Use
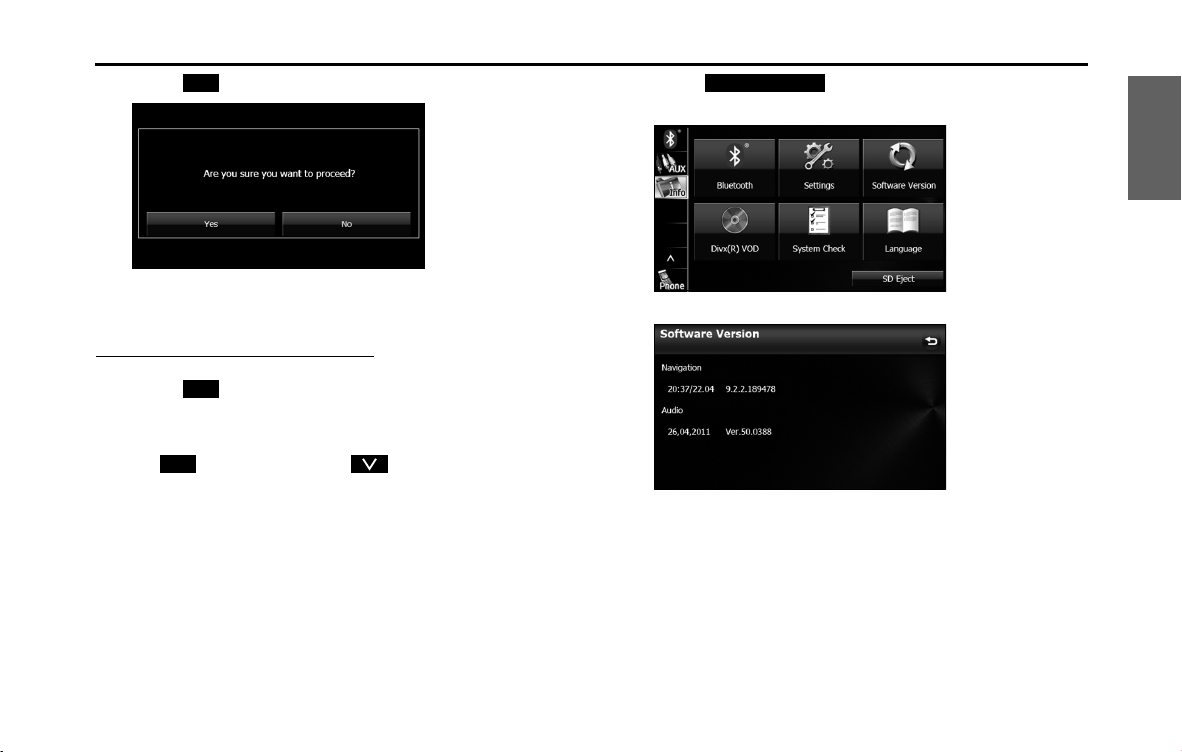
3 Touch ( Yes).
■ Checking the Software Version
You can check the version of the navigation and audio software.
Displaying the Software Version screen
1 Touch .
• If the Navigation screen is displayed, change to the Multi screen
or Audio operations screen before performing this operation.
• If is not displayed, touch .
2 Touch (Software Version).
• The Software Version screen appears.
<Software Version screen>
Yes
Info
Info
Software Version
38 Introduction
Before Use
Screen Adjustment and Setting
When Link to Day/Night View on the Settings screen is set to
“Headlight” (See Page 30.), day view or night view is selected based on
whether the lights (sidelights, tail lights, license plate light) are on or off,
to make it easier to view the screen. When “Time” is set (See Page 30.),
the view changes at the set time.
Also, when set to “None” (See Page 31.), you can manually switch to a
day view or a night view screen at any time.
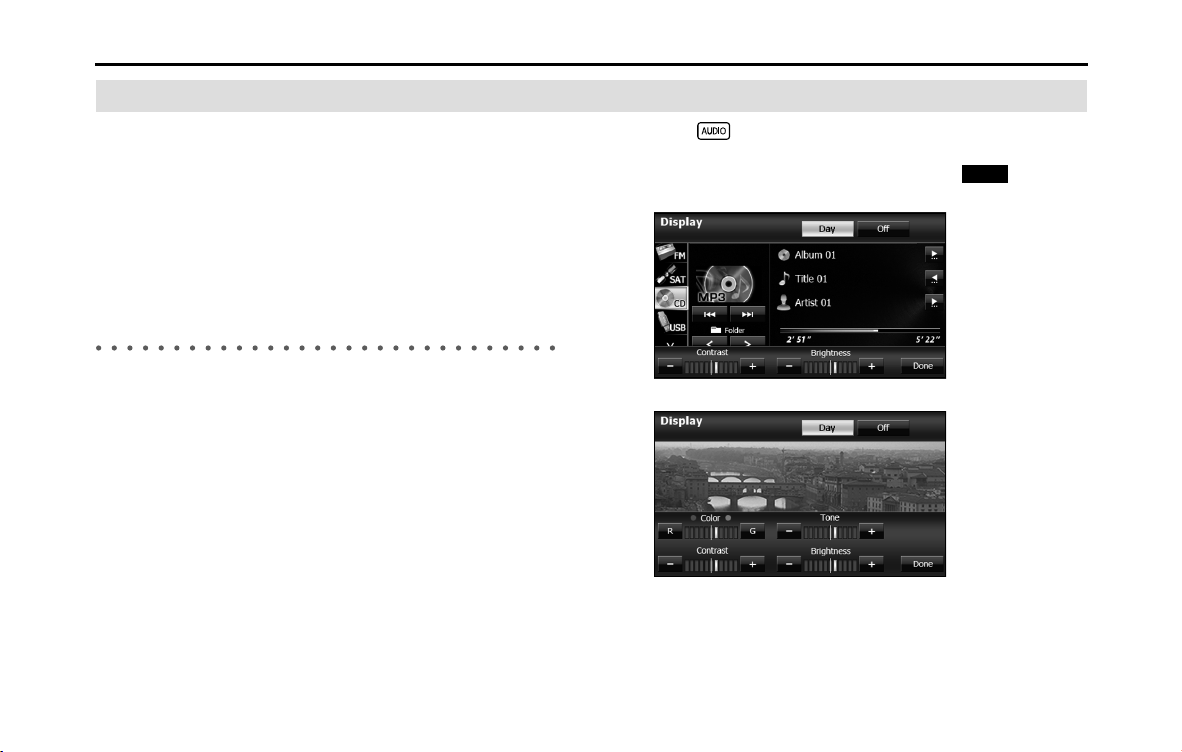
Displaying the picture quality adjustment
screen
The picture quality adjustment screen has different adjustment items
depending on whether it is the operations screen or video screen of the
navigation or audio.
1 Press for 1 second or more.
2 After completing the adjustment, touch (Done).
<For the operations screen>
<For the video screen>
Done
Introduction 39
Before Use
■ Changing to the night view or day view
1 Touch (Night) ( (Day)) if the day (night) view is
displayed on the image quality adjustment screen.
• The view changes between night view and day view each time
you touch the screen.
NOTE
When Link to Day/Night View is set to "None" on the Settings screen,
(Day) or (Night) are not displayed.
■ Closing the screen
1 On the picture quality adjustment screen, touch
(Off).
• To display the screen again, press or .
■ Adjusting the picture quality
You can independently adjust the day view and night view.
1 Display the day view or night view.
• For details on changing the view, see “Changing to the night
view or day view” on Page 39.
2 Adjust to the desired picture quality.
•Contrast:
Touch to increase contrast and touch to decrease
contrast.
• Brightness:
Touch to increase brightness and touch to
decrease brightness.
• Color (only applies to video screens):
Touch (G) to strengthen green colors and touch (R)
to strengthen red colors.
• Tone (only applies to video screens):
Touch to darken colors and touch to lighten colors.
Night Day
Day
Night
O
+ -
+ -
G R
+ -
40 Introduction
Before Use
Precautions for Using Bluetooth Devices
Be careful of the following when using Bluetooth devices.
WARNING
• To ensure safety, the driver should not operate Bluetooth-
connected phones while driving.
• Do not make calls on a cell phone while driving. If you
receive a call on your phone, calmly stop the vehicle in a safe
place and then answer the call. If you must answer the call,
use the handsfree function to inform the caller that you will
call back later. Then, stop the vehicle in a safe place and call
back.
• Buttons on the touch screen that cannot be used have their
colors toned down.
Operating the navigation system while driving could cause
your attention to be distracted from the current traffic
conditions. This could result in a severe or fatal accident.
Follow the descriptions of all operations and the instructions
for safety given in this manual without fail.
• When using a cell phone in a vehicle, be sure to observe the
local laws and regulations.
CAUTION
• Do not leave a Bluetooth-connected phone inside the
vehicle.
(Direct sunlight may cause the vehicle interior to rise to a very
high temperature.)
• When using a Bluetooth-connected phone, keep away from
devices inside the vehicle. If you get too close to a device
inside the vehicle, the sound or connection quality may
drop.

Introduction 41
Before Use
• The frequency band used by these devices is the same band
that is used by microwave ovens, wireless devices used in
factory production lines for identifying moving objects
(license required), special low output wireless devices
(license not required), amateur radios (license required), and
other industrial, scientific and medical devices. (The 3 types
of wireless devices above are hereafter called “other wireless
devices”.) When using a Bluetooth-connected phone, check
whether “other wireless devices” are used nearby. If the
Bluetooth-connected phone causes harmful radio wave
interference in “other wireless devices”, immediately move
the phone to a different location to stop the wireless
interference. The frequency band used by Bluetooth-
connected phones is the 2.4 GHz band. T
he FH-SS
modulation scheme is used. The estimated distance in which
interference may occur is less than 10 m. The band used by
Bluetooth-connected phones is the full band, which helps
avoid interference with the band used by devices that identify
moving objects.
42 Introduction
Before Use
Bluetooth Handsfree Operation
Using Bluetooth Handsfree
Bluetooth-supporting cell phones that utilize Bluetooth wireless
communication technology can be used with this unit. Connecting to
this unit allows you to make calls without touching your cell phone. To
use a Bluetooth-supporting cell phone with this unit, it is necessary to
perform Bluetooth registration and connection settings.
The cell phone connected to this unit must support the following
specifications. Be aware that the available functions may vary
depending on the type of cell phone.
• Supported Bluetooth Specifications
- Bluetooth Specification Ver. 1.1 or higher (Ver. 2.0 + EDR or higher is
recommended)
• Supported Profiles
- HFP (Hands Free Profile) Ver. 1.0
- OPP (Object Push Profile) Ver. 1.1
- DUN (Dial-up Networking Profile) Ver. 1.1
- SYNC (Synchronization Profile)
- PBAP (Phone Book Access Profile)
- MAP (Message Access Profile)
• Bluetooth is a short-range wireless technology for connecting cell
phones, computers and other such devices.
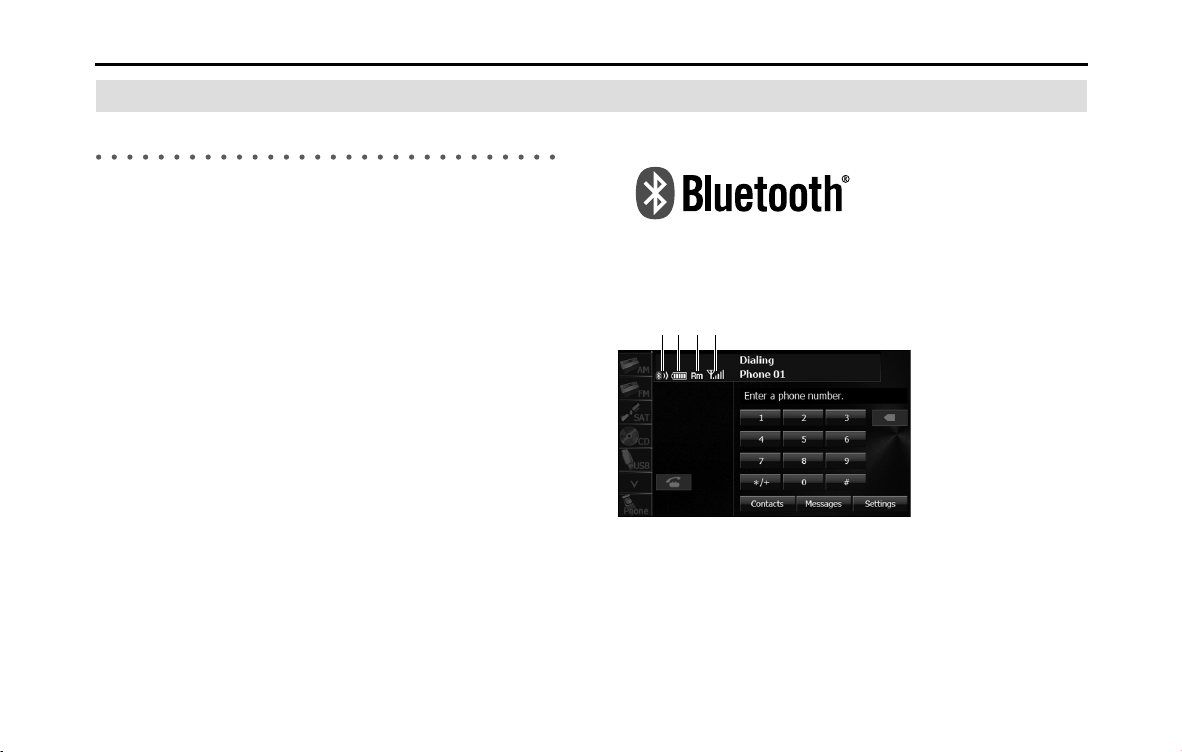
The Bluetooth
®
word mark and logos are registered trademarks
owned by Bluetooth SIG, Inc. and any of such marks by FUJITSU TEN
LIMITED is under license. Other trademarks and trade names are
those of their respective owners.
(1) Bluetooth signal icon
(2) Battery level indicator
(3) Roaming area icon
(4) Reception indicator
(1) (2) (3) (4)
Introduction 43
Before Use
■ Bluetooth signal quality icon
Displays the Bluetooth connection status of a cell phone.
• When a Bluetooth connection is established, “ ” and reception level
are displayed.
NOTE
• A Bluetooth communication antenna is embedded in the car display.
If a Bluetooth-enabled cell phone is used in the following locations or
conditions, the Bluetooth connection status display may turn gray or
Bluetooth connection may not be possible.
- When the cell phone is hidden from the display (when the cell phone is
behind or under a seat or in the glove box or console box).
- When the cell phone is touching or covered by a metal object.
To use a Bluetooth-enabled cell phone, move the phone to a location where
the blue display appears.
• When setting the cell phone to power saving mode, the Bluetooth
connection may be automatically disconnected. If this happens, switch off the
power saving mode of the cell phone.
■ Battery indicator
Displays the battery power remaining for the cell phone.
• The battery indicator may not match the battery indicator of the cell
phone. Depending on the model, it may not be possible to display
the battery power remaining.
■ Roaming area icon
Displayed when connected in the roaming area.
■ Reception indicator
Displays the reception level.
• When "No Service" is displayed, the location is either outside the
service area or cannot be reached by the signal. In such situations,
the cell phone itself cannot be used. Move to a location where the
"No Service" display is no longer shown.
• Observe the following point when using hands-free operation with a
cell phone.
- The reception level may not match the display of the cell phone. Depending
on the model, it may not be possible to display the reception level.
■ Displaying the handsfree screen
1 Press .
2 Touch (Phone).
• The handsfree screen appears.
<Handsfree screen>
Phone
44 Introduction
Before Use
■ Registering a cell phone
You can register cell phones on this unit. Up to 5 cell phones can be
registered on the unit. The order of connection precedence is always 1
to 5. When a cell phone is added or deleted, the order of connection
precedence is updated.
1 Press .
2 Touch .
• If is not displayed, touch .
3 Touch .
4 Touch (Registered Devices).
5 Touch (Add New).
6 Operate the cell phone to enter the passcode (passkey)
of the unit.
• The name of the unit is CAR MULTIMEDIA.
• The initial setting for the passcode (passkey) is 0000.
• Operate the cell phone while the Registered Devices screen is
displayed.
WARNING
Do not register a cell phone while driving. Be sure to park the
vehicle in a safe location and apply the parking brake before
registering a cell phone.
Info
Info
Bluetooth
Registered Devices
Add New

Introduction 45
Before Use
<Registered Devices screen>
7 When the registration is complete, “Connection
Completed” appears.
• The cell phone registration is complete.
• After the registration completed message is displayed, “Do you
want to transfer the phonebook from your mobile?” appears.
Touch (Yes) or (No). For the procedure when you
press (Yes), see step 4 in “Transferring the phone book
data from a cell phone” on Page 59.
NOTE
• If the registration fails, “Connection failed” appears on the screen. If this
happens, perform the registration operation again.
• For details of operations on the cell phone, see the cell phone's instruction
manual.
• When processing a Bluetooth connection, the Bluetooth Audio may skip.
■ Deleting a cell phone registration
You can delete cell phones that are registered on the unit.
1 Press .
2 Touch .
• If is not displayed, touch .
3
Touch .
4 Touch (Registered Devices).
Yes No
Yes
Info
Info
Bluetooth
Registered Devices

46 Introduction
Before Use
5 Select the cell phone that you want to delete.
6 Touch (Delete).
• “Are you sure you want to delete this device?” appears on the
screen. Touch (Yes) or (No).
• After touching “Yes”, when the deletion is complete,
“Completed” appears.
• The cell phone deletion is complete.
NOTE
When a cell phone registration is deleted, the outgoing call history, incoming
call history and phone book data that are saved in the unit are also deleted.
■ Connecting a cell phone
You can connect a cell phone that is registered on the unit.
• Make the preparations necessary for connecting to the unit, for
example by setting the cell phone's Bluetooth standby to “On”.
• For details of operations on the cell phone, see the cell phone's
instruction manual.
1 On the handsfree screen, touch (Settings).
2 Touch (Connection).
Delete
Yes No
Settings
Connection
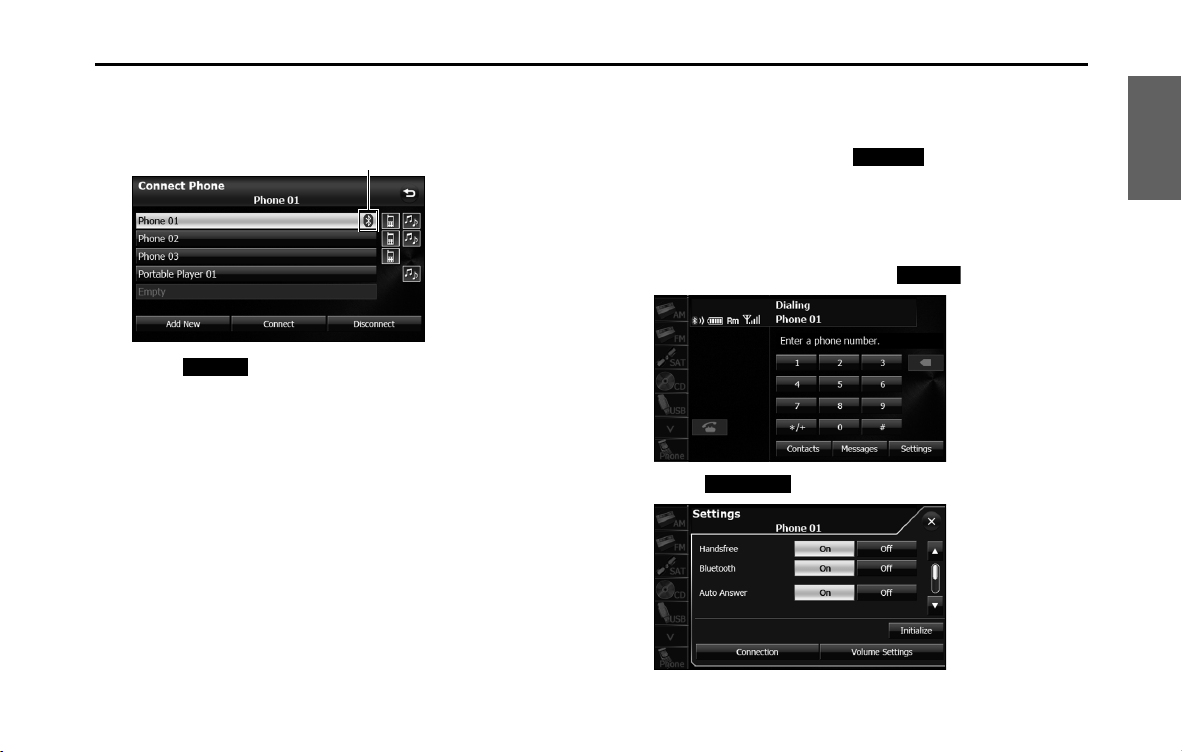
Introduction 47
Before Use
3 Select the cell phone that you want to connect.
• The Bluetooth mark is displayed for cell phones with an active
Bluetooth connection.
4 Touch (Connect).
5 When the connection is complete, “Connection
Completed” appears.
• The connection between the cell phone and the unit is
complete. The Bluetooth signal icon, battery level indicator,
roaming area icon (only when in a roaming area) and reception
indicator appear on the screen.
NOTE
• If the connection fails, “Connection failed” appears on the screen. If this
happens, perform the connection operation again.
• Connection is not possible if no cell phones are registered.
• On the Connect Phone screen, touch (Add New) to register a cell
phone.
• When processing a Bluetooth connection, the Bluetooth Audio may skip.
■ Canceling a cell phone connection
1 On the handsfree screen, touch (Settings).
2 Touch (Connection).
Bluetooth mark
Connect
Add New
Settings
Connection
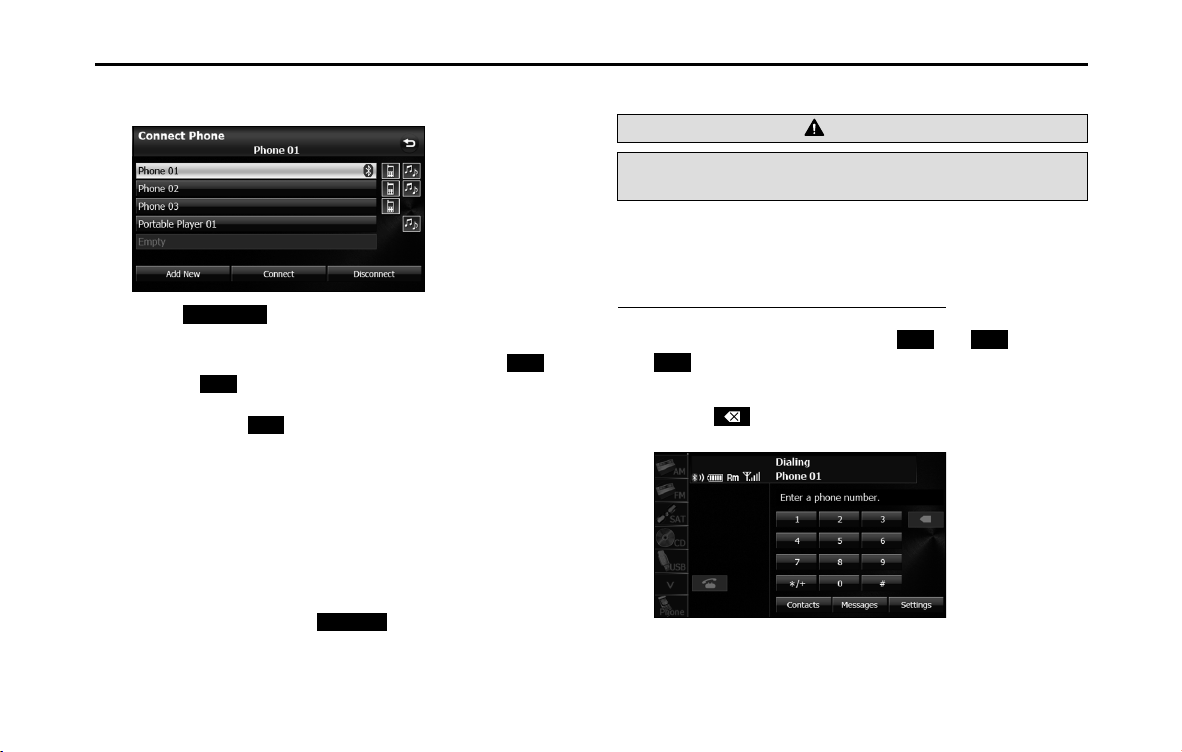
48 Introduction
Before Use
3 Select the cell phone with the connection that you want
to cancel.
4 Touch (Disconnect).
• “Another device is already connected. Do you want to
disconnect this device?” appears on the screen. Touch
(Yes) or (No).
5
After touching (Yes), when the cancelation is
complete, “Connection with the mobile telephone was
disconnect.” appears.
• The cancelation of the cell phone connection is complete. The
Bluetooth signal icon, battery level indicator, roaming area icon
(only when in a roaming area) and reception indicator
disappear from the screen.
NOTE
On the Connect Phone screen, touch (Add New) to register a cell
phone.
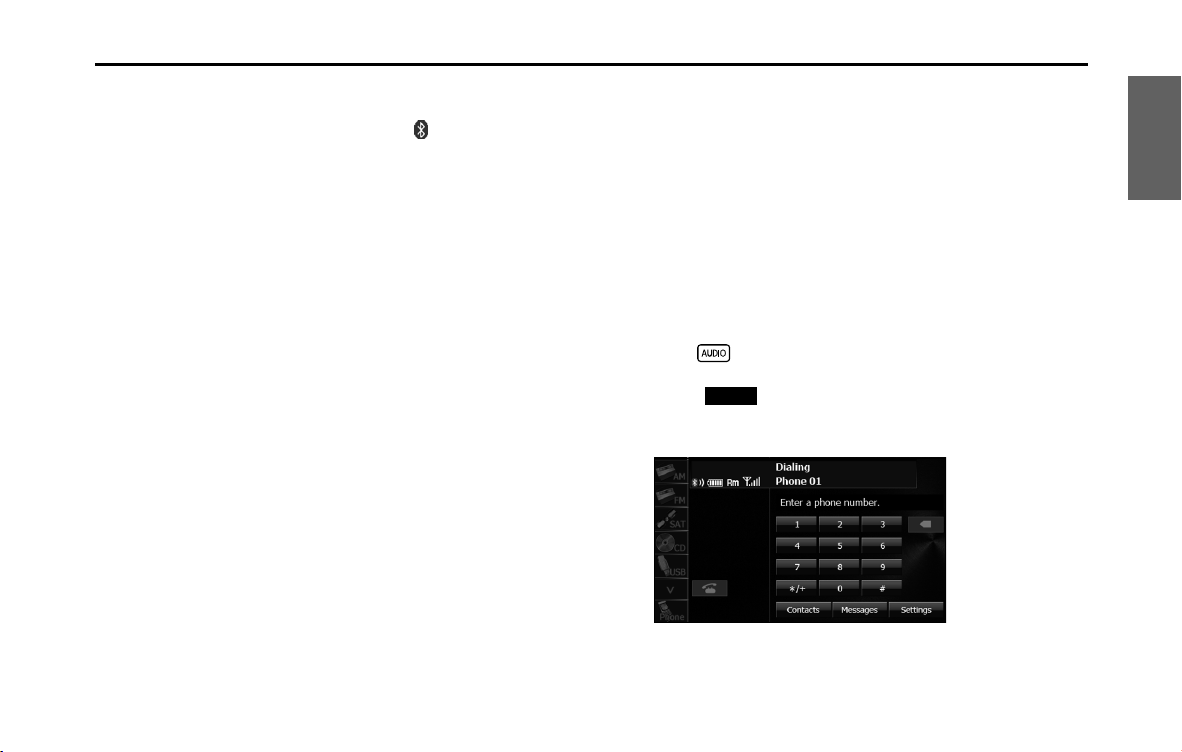
■ Making a call
You can make calls from the unit by entering a telephone number,
using a stored number (phone book or Speed Dial), or calling from the
incoming (missed call) or outgoing call history.
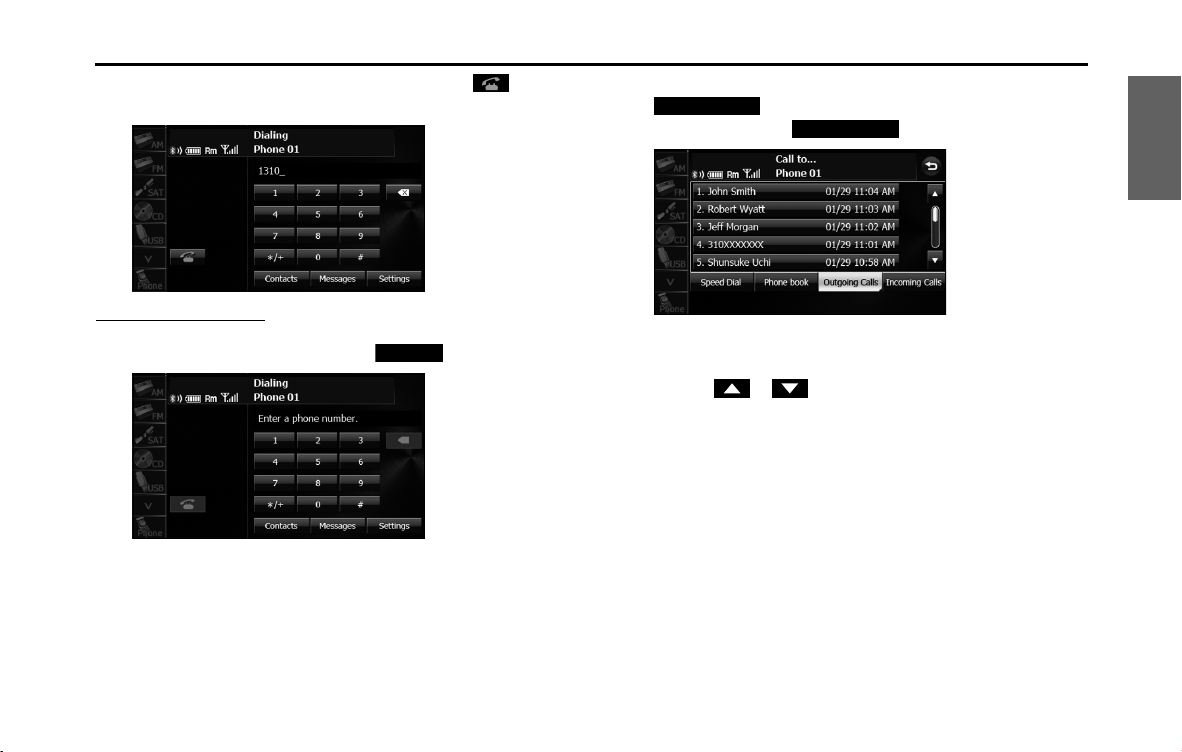
Making a call by entering a telephone number
1 On the handsfree screen, touch and through
to enter the telephone number.
• You can enter telephone numbers of up to 24 digits.
• Touch to delete 1 digit from the entered number. Touch
for 1 second or more to delete the digits continuously.
Disconnect
Yes
No
Yes
Add New
WARNING
Do not make a call while driving. Be sure to park the vehicle in a
safe location and apply the parking brake before making a call.
0 1
9
Introduction 49
Before Use
2 After entering the telephone number, touch .
• A call is made to the entered telephone number.
Calling from call history
1 On the handsfree screen, touch (Contacts).
2 To call from the incoming call history, touch
(Incoming Calls). To call from the outgoing
call history, touch (Outgoing Calls).
3 Select the name or telephone number to call from the
history.
• Touch or to scroll the history list.
Contacts
Incoming Calls
Outgoing Calls
50 Introduction
Before Use
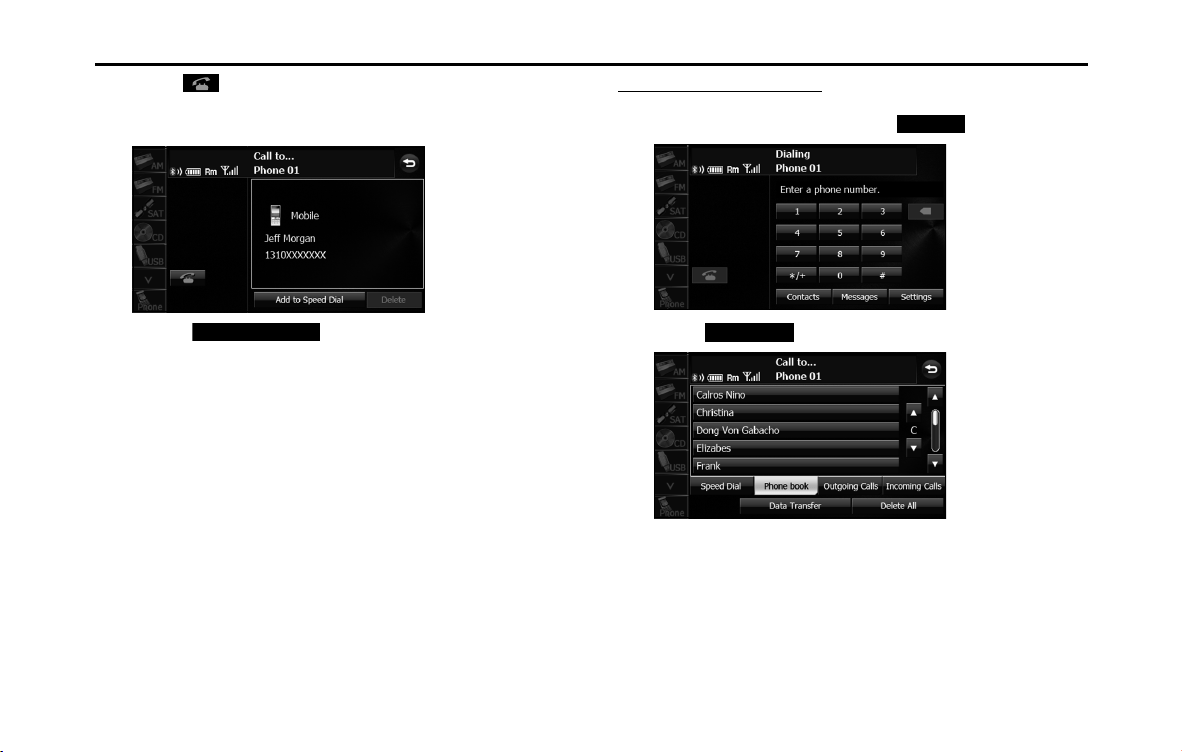
4 Touch .
• A call is made to the telephone number that you selected from
the history.
• Touch (Add to Speed Dial) to register the
displayed history item in “Speed Dial”. (See Page 62.)
NOTE
The incoming and outgoing call histories can each store 10 calls for each
registered cell phone. In the incoming call history, 5 missed calls and 5 other calls
can be stored. When 10 calls are stored (5 missed incoming calls and 5 other
calls), the oldest call is deleted from the history at the next call.
Calling from the phone book
1 On the handsfree screen, touch (Contacts).
2 Touch (Phone book).
Add to Speed Dial
Contacts
Phone book

Introduction 51
Before Use
3 Select a person (name or telephone number) to call.
• Touch or on the scroll function to scroll the List
Page of names or telephone numbers.
• Touch or on the index function to display in the list
the names or telephone numbers that start with the selected
letter or number.
• Touch (Data Transfer) to transfer the cell phone's
phone book to the unit. (See Page 59.)
• Touch (Delete All) to delete all the list data in the
phone book.
• If 2 or more telephone numbers are registered for the selected
person (name or telephone number), the telephone number
selection screen appears. Touch the telephone number that
you want to call.
<Telephone number selection screen>
4 Touch .
• A call is made to the selected person's telephone number.
• Touch (Add to Speed Dial) to register the
displayed item in “Speed Dial”. (See Page 62.)
• Touch (Delete) to delete the displayed item from each
phone book.
Data Transfer
Delete All
Add to Speed Dial
Delete

52 Introduction
Before Use
Calling from Speed Dial
1 On the handsfree screen, touch (Contacts).
2 Touch (Speed Dial).
3 Select a person (name or telephone number) to call.
• Touch or to scroll the List Page of names or
telephone numbers.
• Touch (Delete All) to delete all the list data in the
Speed Dial.
4 Touch .
• A call is made to the selected person's telephone number.
• Touch (Delete) to delete the displayed “Speed Dial”
item.
Contacts
Speed Dial
Delete All
Delete

Introduction 53
Before Use
NOTE
For details on “Speed Dial” registration, see “Registering a Speed Dial number” on
Page 62.
■ Receiving a call
You can receive incoming calls when any source mode is selected.
When a call arrives, the Incoming call screen appears automatically.
1
When you hear the ringtone, touch .
• You are connected and able to talk.
• Touch to hang up and refuse the incoming call.
<Incoming call screen>
NOTE
You can also receiving calls automatically. See “Auto Answer setting” on Page 57.
■ Operations during a call
During a call, the outgoing call or incoming call Talking screen is
displayed, and you can perform the following operations.
• Adjust the volume for phone calls
• End the call
• Enter numeric keys
• Perform call waiting
<Talking screen for outgoing calls>
<Talking screen for incoming calls>

54 Introduction
Before Use
Adjust the volume for phone calls
1 On the Talking screen, touch (Mic Level).
2 Adjust by touching or .
•:
Call volume up
:
Call volume down
• Touch for 1 second or more to raise the volume
continuously.
Touch for 1 second or more to lower the volume
continuously.
Transferring a call (private mode handsfree mode)
When using a Bluetooth cell phone, you can transfer calls between the
unit and the cell phone.
The call is switched from a handsfree call to a cell phone call, or from a
cell phone call to a handsfree call.
Operating with the screen
1
Touch (Transfer).
• Touch (Transfer) again to switch to a handsfree call.
Operating with the cell phone
You can transfer calls while making a call, while talking, while receiving
a call, and while a call is on hold.
• Switch from a cell phone call to a handsfree call to enable touch
button operations.
• The transfer method and operations vary depending on the type of
cell phone. For details of operations on the cell phone, see the
instruction manual that is supplied with the cell phone.
Mic Level
+ -
+
-
+
-
Transfer
Transfer

Introduction 55
Before Use
NOTE
• Calls cannot be transferred while driving.
• If a call is transferred on the screen, the transfer may fail and cut off the sound
of the call.
Ending a call
On the Talking screen, touch to end the call. You can also end the
call by hanging up the cell phone .When a call ends, the handsfree
screen disappears.
Entering numeric keys
On the Talking screen for outgoing calls, touch (Dial Tone) to
display the Dial Tone screen and enable numeric key input.
• (Send):
Send a dial tone that has already been registered in the phone book.
(Exit):
Skip the tones.
Call waiting
If a call arrives from another phone while you are already talking, you
can put the current call on temporary hold by using the Talking screen
and receive the new incoming call.
1 When you hear the ringtone, touch on the Talking
screen.
• You can put the current call on hold and connect to the new
call.
• To end call waiting, touch . When call waiting ends, the
phone connects to the call that was put on hold and you can
continue the previous call.
• During call waiting, touch again to switch between the
callers.
NOTE
If a call waiting contract has not been setup for the cell phone itself, you cannot
use the call waiting function.
Dial Tone
Send
Exit
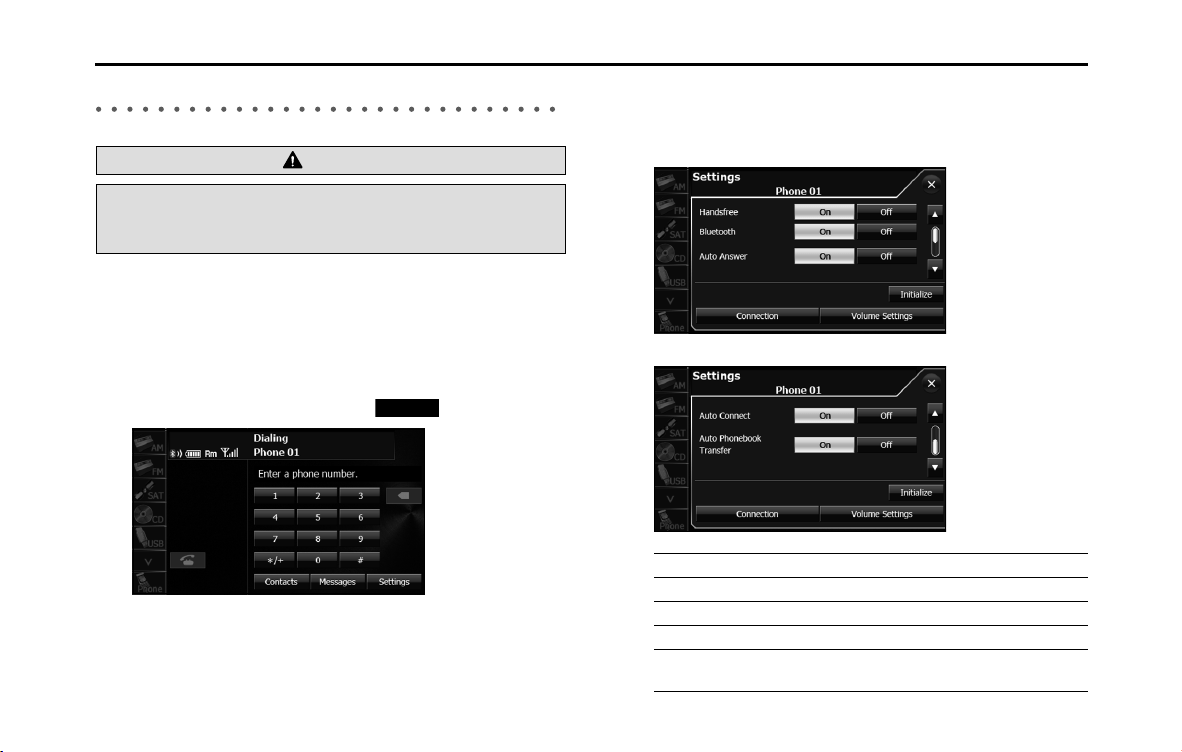
56 Introduction
Before Use
Setting and Editing Bluetooth Handsfree
■ Handsfree settings
You can perform settings for handsfree operation on the phone
Settings screen. You can perform settings individually for each
registered cell phone. For details on switching the cell phone, see
“Connecting a cell phone” on Page 46.
1 On the handsfree screen, touch (Settings).
2 On the phone Settings screen, you can perform the
following settings by touching the setting buttons for
each item.
<Phone Settings screen (page 1)>
<Phone Settings screen (page 2)>
WARNING
Do not set or edit cell phones while driving. Be sure to park the
vehicle in a safe location before performing setting or editing
operations.
Settings
Item Function
Handsfree Set the handsfree function to on or off.
Bluetooth Set the Bluetooth function to on or off.
Auto Answer Set automatic call acceptance.
Auto Connect Set automatic connection between a registered
cell phone and the unit.
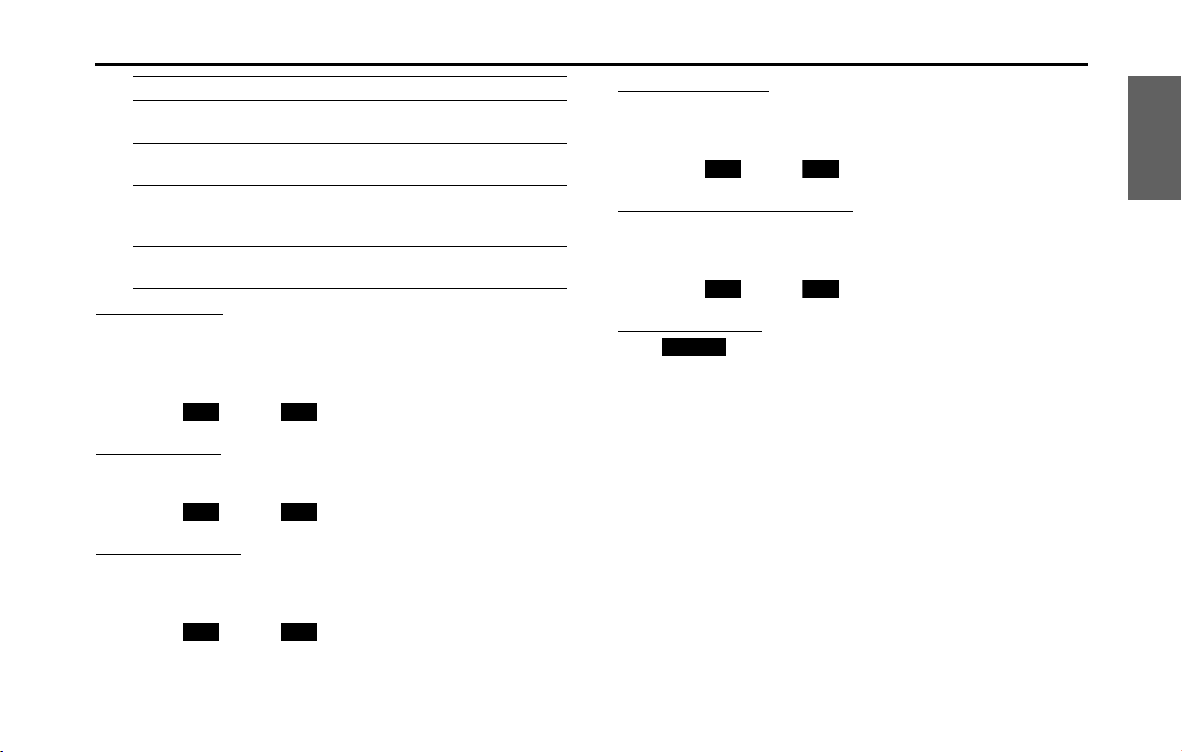
Introduction 57
Before Use
Handsfree setting
Set the handsfree function to on or off.
• When handsfree is set to “Off”, you cannot be sent a telephone
number from a this unit.
1 Touch (On) or (Off).
Bluetooth setting
Set the Bluetooth function to on or off.
1 Touch (On) or (Off).
Auto Answer setting
Start the call automatically 5 seconds after the arrival of an incoming
call.
1 Touch (On) or (Off).
Auto Connect setting
Set automatic connection between a registered cell phone and the
unit.
1 Touch (On) or (Off ).
Auto Phonebook Transfer setting
Automatically transfer the phone book to the unit when a cell phone is
registered.
1 Touch (On) or (Off ).
Setting initialization
Touch (Initialize) to return the “Handsfree”, “Bluetooth”, “Auto
Answer”, “Auto Connect” and “Auto Phonebook Transfer” settings to
their initial values.
Auto Phonebook
Transfer
Automatically transfer the phone book to the unit
when a cell phone is registered.
Initialize Return the settings displayed on the phone
Settings screen to their initial values.
Connection Display the Connect Phone screen to register a
cell phone or perform connection settings. (See
Page 46.)
Volume Settings Display the Volume Settings screen to perform
settings for the ringtone or call volume.
Item Function
On O
On O
On O
On O
On O
Initialize
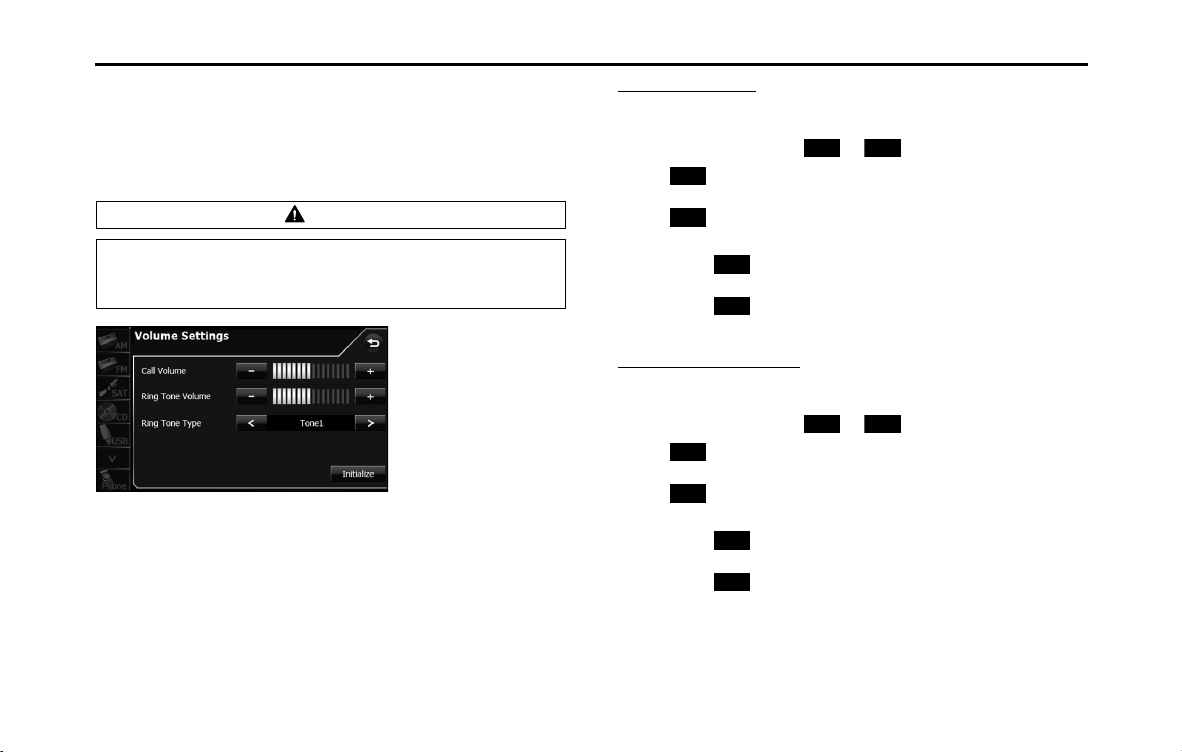
58 Introduction
Before Use
■ Volume setting (handsfree)
You can set the handsfree volume on the Volume Settings screen. You
can perform settings individually for each registered cell phone. For
details on switching the cell phone, see “Connecting a cell phone” on
Page 46.
Call Volume setting
You can adjust the call volume.
1 Adjust by touching or .
•:
Call volume up
:
Call volume down
• Touch for 1 second or more to raise the volume
continuously.
Touch for 1 second or more to lower the volume
continuously.
Ring Tone Volume setting
You can adjust the volume of the ringtone.
1 Adjust by touching or .
•:
Ringtone volume up
:
Ringtone volume down
• Touch for 1 second or more to raise the volume
continuously.
Touch for 1 second or more to lower the volume
continuously.
CAUTION
Be sure to set the volume of the audio at an appropriate level.
Improper volume setting may result in hearing damage or a
traffic accident.
+ -
+
-
+
-
+ -
+
-
+
-
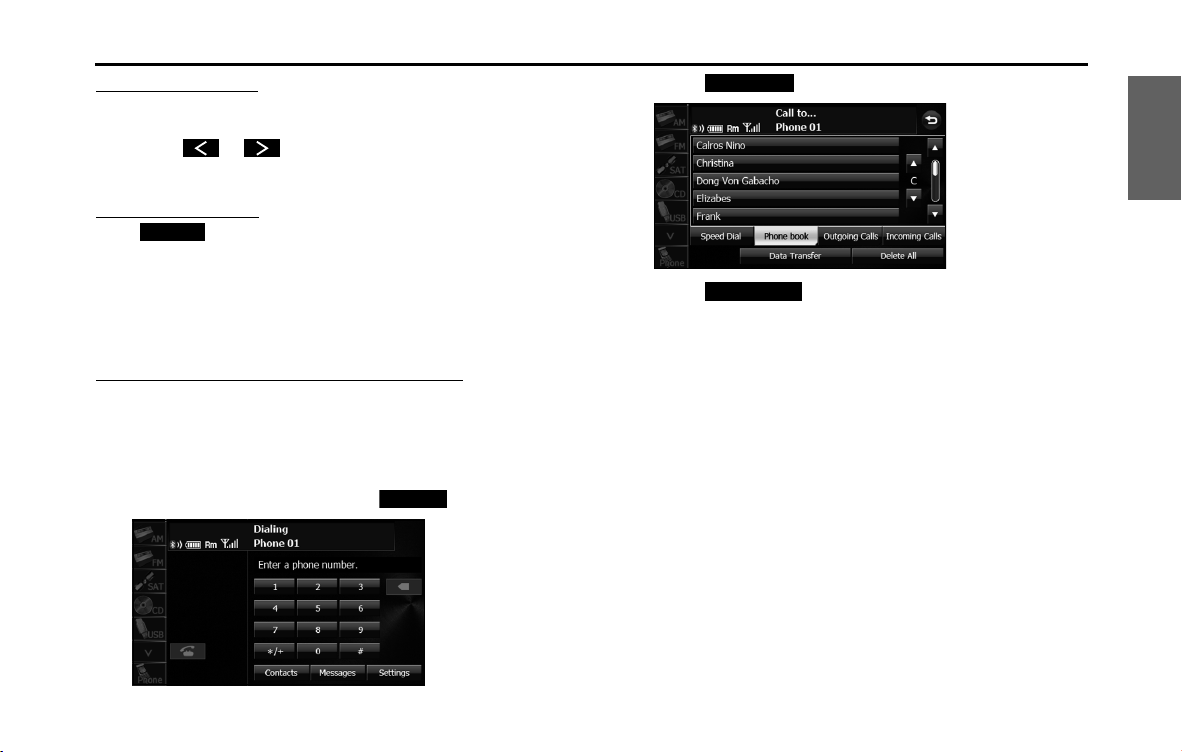
Introduction 59
Before Use
Ring Tone Type setting
You can set the ringtone.
1 Touch or .
•Tone 1 Q Tone 2 Q Tone 3 Q Tone 1 Q ...
Initializing the settings
Touch (Initialize) to return the sound settings (handsfree) to
their initial values.
■ Editing the phone book
You can register telephone numbers in the phone book of the unit by
transferring the phone book that is registered in the cell phone.
Transferring the phone book data from a cell phone
You can transfer the telephone numbers (phone book data) that are
registered in the cell phone to the unit. In the phone book of this unit,
you can register up to 4 telephone numbers for each person in each
registered cell phone, and you can register data for up to 1000 persons.
1 On the handsfree screen, touch (Contacts).
2 Touch (Phone book).
3 Touch (Data Transfer).
4 When the phone book transfer screen appears, operate
the cell phone to transfer the phone book data.
• Perform the transfer operation on the cell phone while the
phone book transfer screen is displayed.
• When the transfer is in progress, wait until the transfer
completed message appears.
• When the transfer is complete, the transfer completed message
appears.
Initialize
Contacts
Phone book
Data Transfer

60 Introduction
Before Use
<Phone book transfer screen>
NOTE
• Start the engine to prevent the battery from running out during transfer.
• This function cannot be used with cell phones that do not support PBAP
(Phone Book Access Profile) or OPP (Object Push Profile).
• Some cell phones are not able to transfer the phone book data.
• The method of transferring the phone book data from the cell phone varies
depending on the cell phone. For details, see the cell phone's instruction
manual.
• When transferring the phone book data, the following restrictions apply to
the data items.
- If 5 or more telephone numbers are registered for 1 person in the phone
book of the cell phone, the top 4 telephone numbers are registered in the
order "Mobile", "Home", "Work", and "Other". If the 4 entries have not been
filled, the number is registered in the highest available slot.
- Names are also transferred at the same time as the telephone numbers, but
symbols may not be transferred by some models, and sometimes not all the
characters may be transferred. Also, even if the data is transferred, it may not
be displayed correctly.
- Normally, a secret memory cannot be read. (Although it may be possible
depending on the specifications of the cell phone.)
- Group names that are registered in the cell phone are not transferred.
• In models where batch transfer is possible, the following applies when
transferring the phone book data.
- The time taken for the transfer depends on the number of telephone
numbers and the size of the phone book data that are transferred.
Depending on the data, it may take 30 minutes or longer.
- You can change to another screen even when the phone book data transfer
screen is displayed. If you do this, the transfer of the phone book data
continues.
• Operations when phone book data transfer is in progress are dealt with as
follows.
- If there is an incoming call during phone book data transfer, one of the
operations is prioritized depending on the circumstances. When the
incoming call is prioritized, the incoming call is taken on the cell phone. In
this case, perform the transfer operation again after completing the call.
- If the ignition switch is turned to OFF (LOCK) during the phone book data
transfer, the transfer is canceled. If this happens, start the engine and
perform the transfer operation again.
• In the following cases, the phone book data that has already been transferred
is saved in the phone book of the unit.
- When the transfer ends partway because the memory capacity of the unit is
reached
- When the transfer is canceled due to some reason
• The phone book of the unit cannot be transferred to a cell phone.
• During phone book data transfer, the Bluetooth Audio may skip.

Introduction 61
Before Use
Deleting the phone book data
You can delete the phone book data by selecting 1 number from a
phone book, or by deleting all the phone book data.
1 On the phone book screen, touch the data item that you
want to delete.
• Touch (Delete All) to delete all the phone book data.
• If 2 or more telephone numbers are registered for the selected
person (name or telephone number), the telephone number
selection screen appears. Touch the telephone number.
<Telephone number selection screen>
2 Touch (Delete).
3 Touch ( Yes).
NOTE
• When transferring the ownership of your vehicle, initialize your personal data.
(See Page 34.)
• When “Auto Phonebook Transfer” setting is “On”, the phone book data will be
automatically transferred if your cell phone is reconnected even after deleting
the phone book data.
Delete All
Delete
Yes

62 Introduction
Before Use
■ Registering a Speed Dial number
You can register telephone numbers from the phone book or call
histories as Speed Dial numbers. You can register up to 5 telephone
numbers for each cell phone that is registered on the unit.
Registering a Speed Dial number from the phone book
1 On the phone book screen, touch the data item that you
want to register.
• If 2 or more telephone numbers are registered for the selected
person (name or telephone number), the telephone number
selection screen appears. Touch the telephone number that
you want to register.
<Telephone number selection screen>
2 Touch (Add to Speed Dial).
Add to Speed Dial
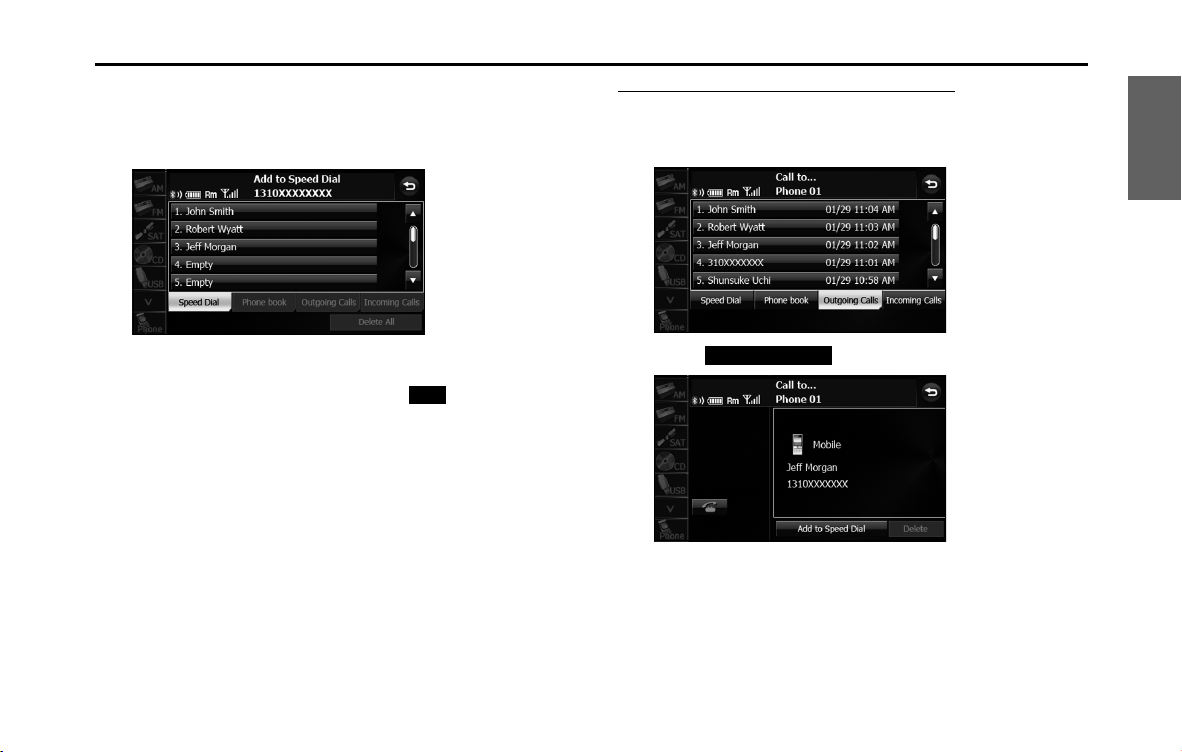
Introduction 63
Before Use
3 Touch the number in the Speed Dial list where you want
to register the telephone number.
• “Speed Dial Saved.” appears and the Speed Dial registration is
complete.
NOTE
If Speed Dial data already exists for the number, “Are you sure to overwirte the
entry?” appears. To overwrite the existing data, touch (Yes).
Registering a Speed Dial number from a history
1 On the history screen, touch the data item that you want
to register.
2 Touch (Add to Speed Dial).
Yes
Add to Speed Dial
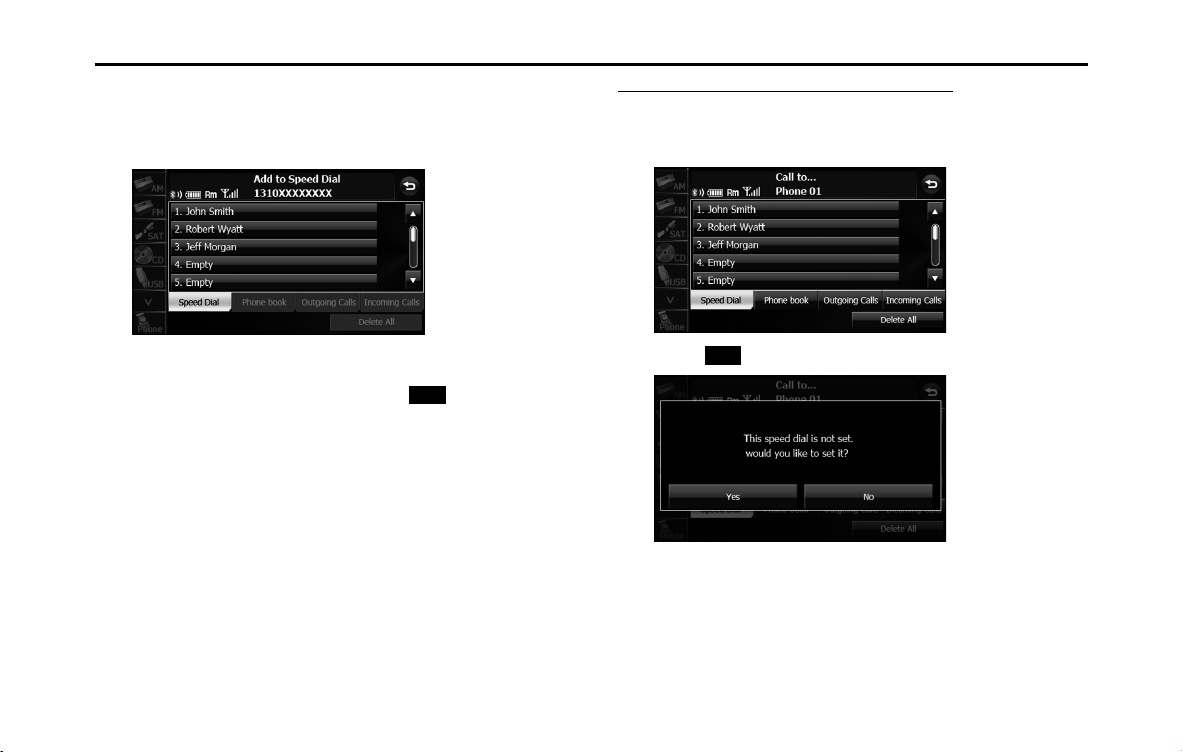
64 Introduction
Before Use
3 Touch the number in the Speed Dial list where you want
to register the telephone number.
• “Speed Dial Saved.” appears and the Speed Dial registration is
complete.
NOTE
If Speed Dial data already exists for the number, “Are you sure to overwirte the
entry?” appears. To overwrite the existing data, touch (Yes).
Registering from “Empty” in the Speed Dial list
1 On the Speed Dial screen, touch the “Empty” item where
you want to register the telephone number.
2 Touch ( Yes).
Yes
Yes
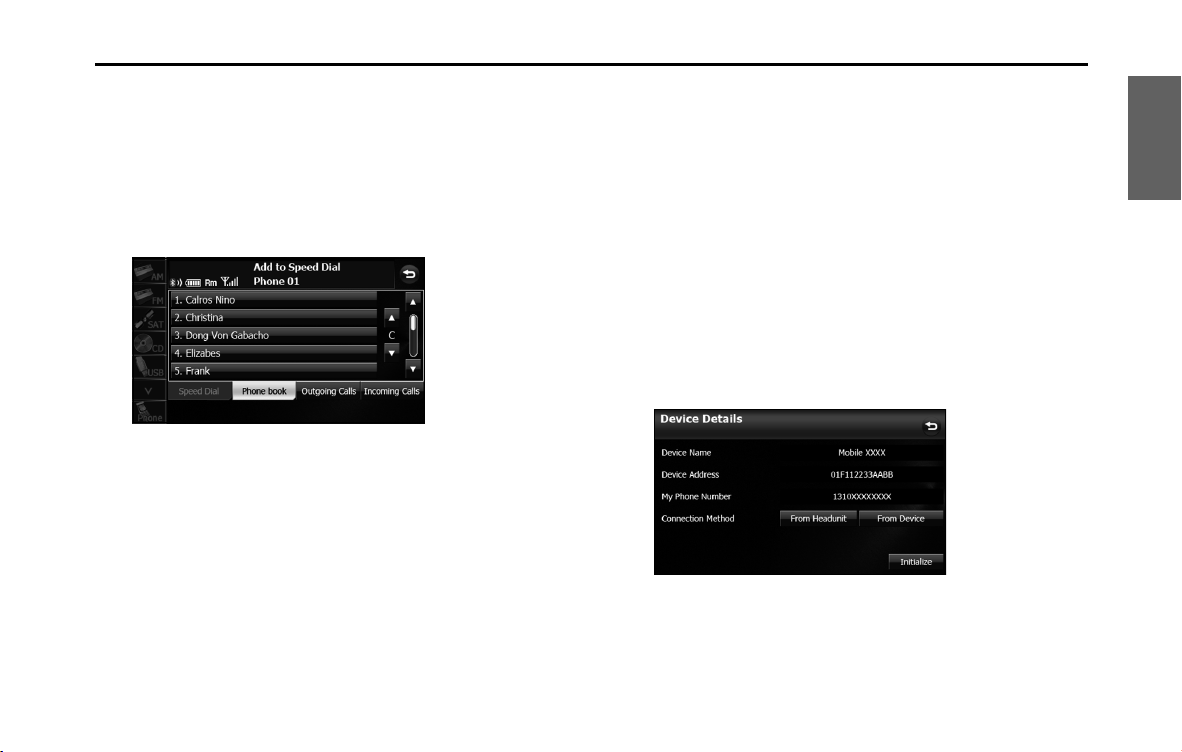
Introduction 65
Before Use
3 In the phone book or a call history, touch the data item
that you want to register.
• If you touch a data item in the phone book that has 2 or more
registered telephone numbers, the telephone number
selection screen appears. Touch the telephone number that
you want to register.
• “Speed Dial Saved.” appears and the Speed Dial registration is
complete.
■ Displaying Device Details
In the Device Details screen, you can display and set information related
to the cell phones that are registered in the unit.
The following information items are displayed.
• Device Name
This is the name of the cell phone that is displayed on the unit and
cannot be changed.
• Device Address
This is the unique address of the device and cannot be changed.
• My Phone Number
The telephone number of the cell phone.
• Connection Method
You can select “From Headunit” or “From Device” as the connection
method.
<Device Details screen>

66 Introduction
Before Use
1 Press .
2 Touch .
• If is not displayed, touch .
3
Touch .
4 Touch (Registered Devices).
5 Touch the cell phone for which to display the detailed
information.
6 Touch (Detail).
• The Device Details screen appears.
Info
Info
Bluetooth
Registered Devices
Detail
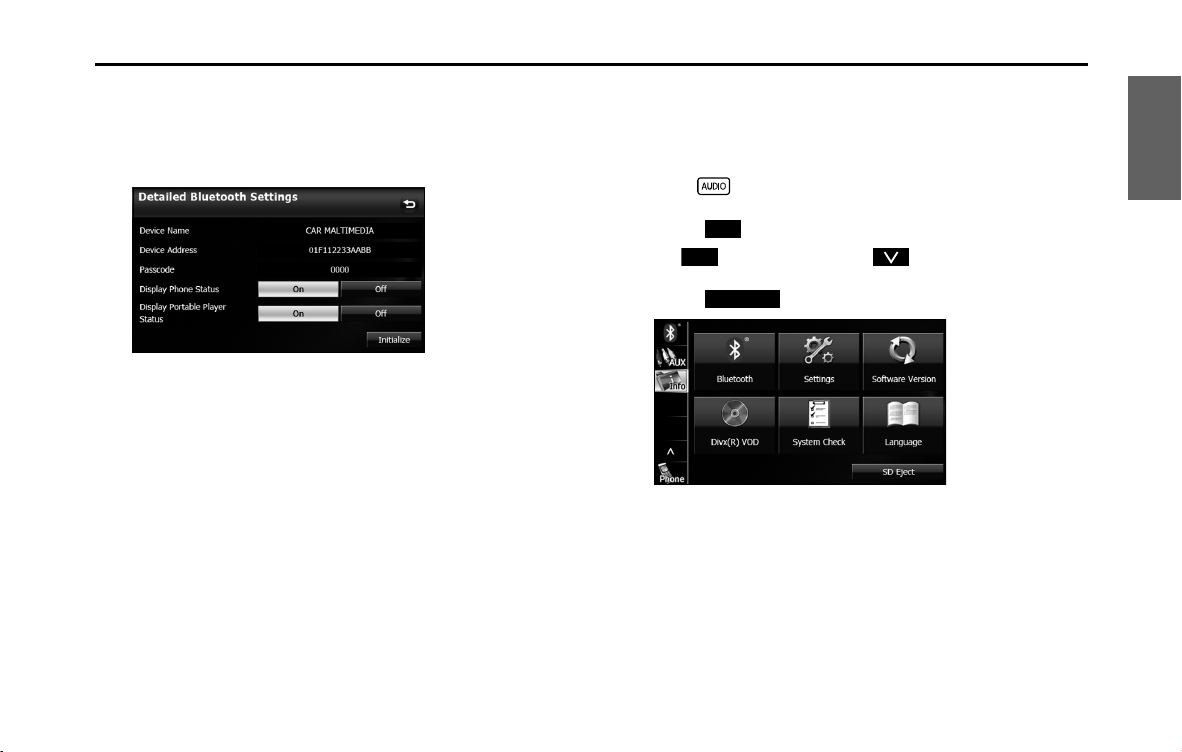
Introduction 67
Before Use
■ Displaying Detailed Bluetooth Settings for the unit
In the Detailed Bluetooth Settings screen, you can display and set
information related to Bluetooth devices that are registered on the unit.
The following information items are displayed.
<Detailed Bluetooth Settings screen>
• Device Name
The name of the unit within the Bluetooth network.
• Device Address
The unique address of the device that is registered on the unit.
• Passcode (passkey)
A number for registering the cell phone. You can change this to any
number with 4 to 8 digits. (See Page 68.)
• Display Phone Status
You can set whether or not to display the result of connecting via
Bluetooth to a cell phone when turning the ignition switch from OFF
(LOCK) to ACC or ON.
• Display Portable Player Status
You can set whether or not to display the result of connecting via
Bluetooth to a portable player when turning the ignition switch from
OFF (LOCK) to ACC or ON.
1
Press .
2 Touch .
• If is not displayed, touch .
3 Touch .
Info
Info
Bluetooth

68 Introduction
Before Use
4 Touch (Detailed Bluetooth
Settings).
• The Detailed Bluetooth Settings screen appears.
■ Changing the passcode (passkey)
You can change the passcode (passkey) for cell phone registration to
any number with 4 to 8 digits.
1 Press .
2 Touch .
• If is not displayed, touch .
3 Touch .
4 Touch (Passcode Settings).
Detailed Bluetooth Settings
Info
Info
Bluetooth
Passcode Settings
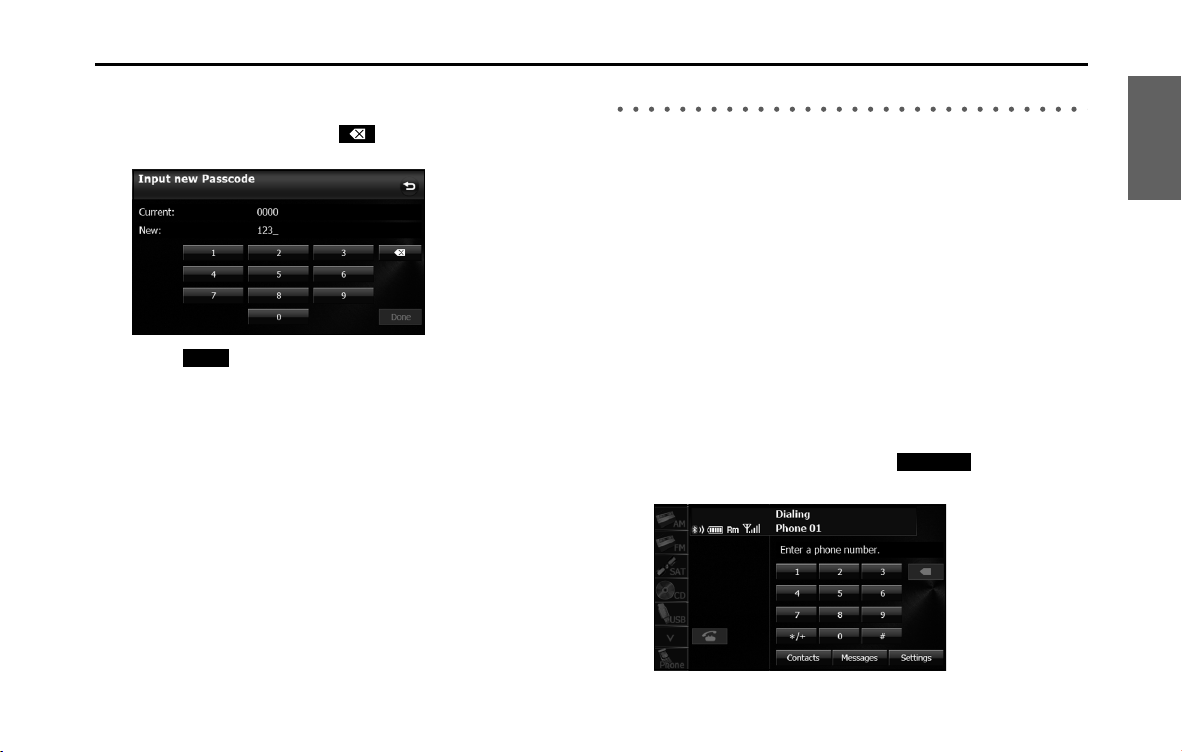
Introduction 69
Before Use
5 Enter a number by touching 1 digit at a time, and enter a
number with 4 to 8 digits.
• If you make a mistake, touch to delete 1 digit at a time.
Touch for 1 second or more to delete the digits continuously.
6
Touch (Done).
Using the messaging function
You can read messages that are received on the cell phone or send
messages that are created on the unit.
3 message types can be used on this unit: SMS (Short Message Service),
MMS (Multimedia Messaging Service) and e-mail.
You can also check received messages through audio playback.
NOTE
• Compatible Profiles:
- HFP (Hands Free Profile) Ver.1.0 or later (Conformed Ver.1.5)
- MAP (Message Access Profile)
• This function cannot be used with cell phones that do not support HFP
(Hands Free Profile) and MAP (Message Access Profile). For details, see the cell
phone's instruction manual.
■ Displaying the Messages screen
1 On the handsfree screen, touch (Messages).
• The Messages screen appears.
Done
Messages
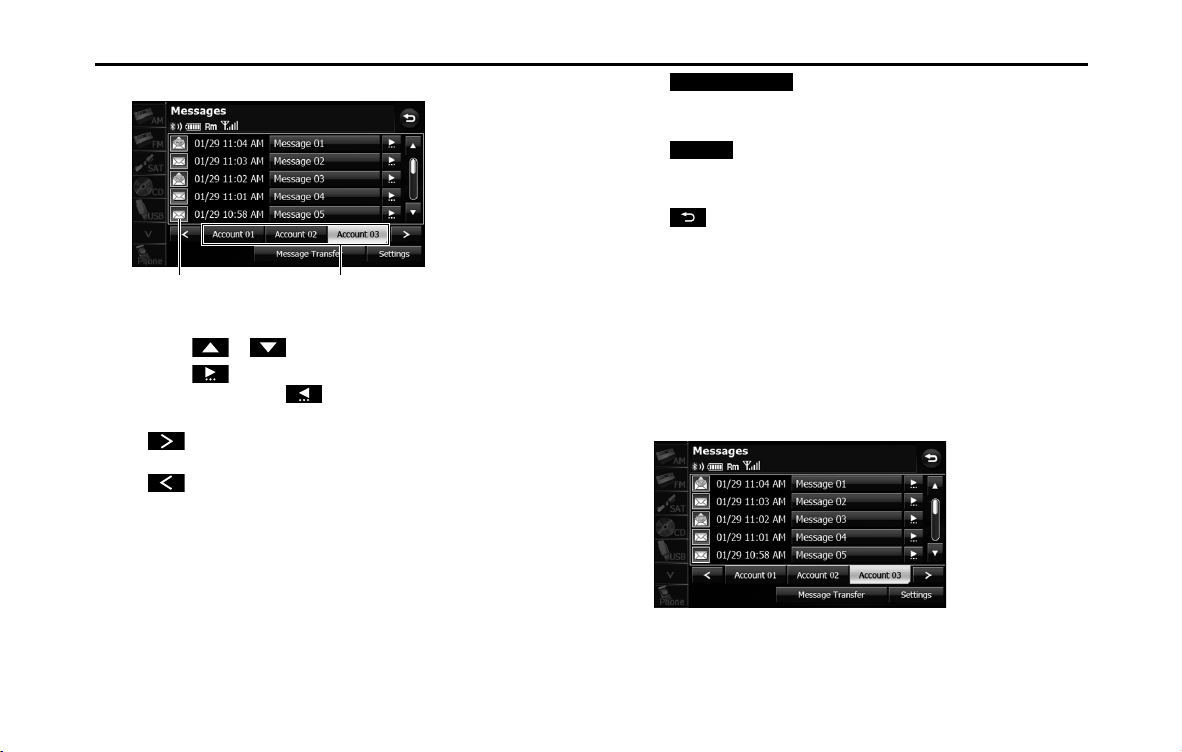
70 Introduction
Before Use
<Messages screen>
• Touch an account list to display the corresponding message list.
• Touch or to scroll the pages in the message list.
• Touch to scroll the addresses and title data. During or
after scrolling, touch to return to the beginning of the
data.
•:
Advance to the message list of the next account.
:
Return to the message list of the previous account.
• (Message Transfer):
Start the transfer of messages from the cell phone to update
the message list.
• (Settings):
Use to perform various settings for the messaging function.
(See Page 75.)
•:
Return to the handsfree screen.
NOTE
You cannot delete the messages that are received. When 50 messages are
stored, the oldest messages is deleted from the account list.
■ Checking received messages
1 On the Messages screen, touch the message that you
want to check.
Icon for unread data
Account list
Message Transfer
Settings
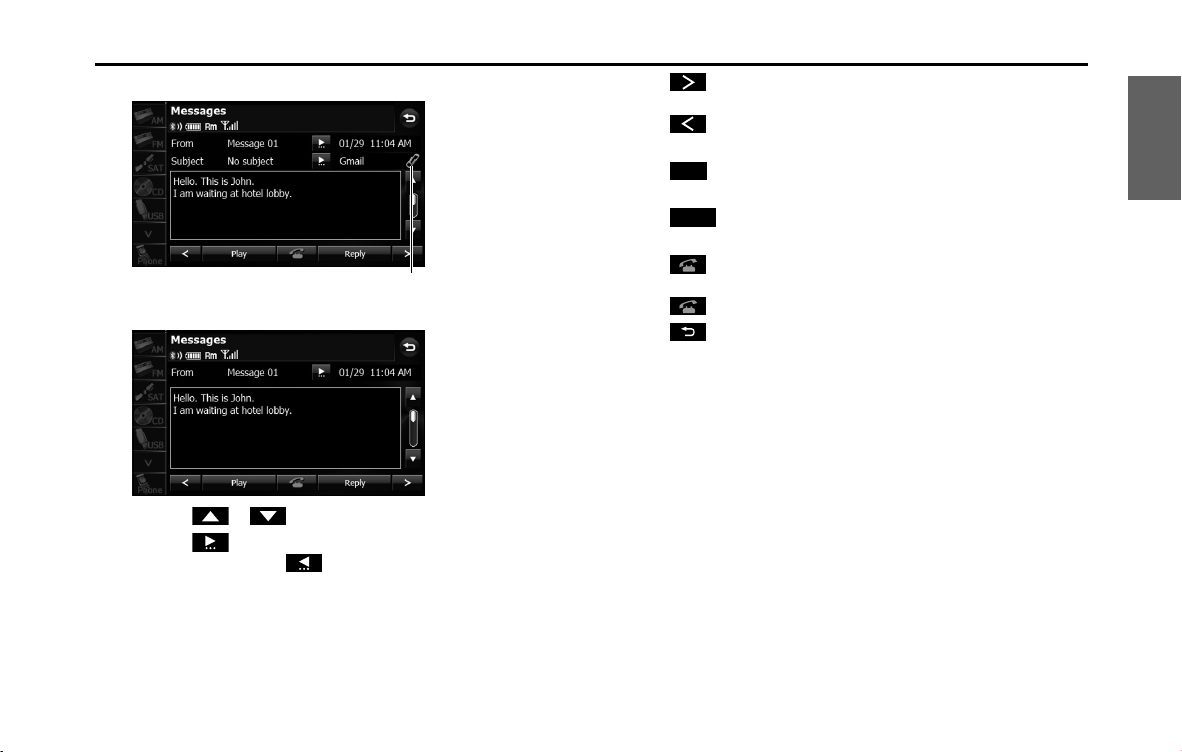
Introduction 71
Before Use
<MMS and e-mail details screen>
<SMS details screen>
• Touch or to scroll the pages in the message list.
• Touch to scroll the addresses and title data. During or
after scrolling, touch to return to the beginning of the
data.
•:
Advance to the next message.
:
Return to the previous message.
• (Play):
Perform audio playback of the message.
• (Reply):
Display the message reply screen.
•:
If there is telephone number data in the address, you can touch
to call the number.
•:
Return to the Messages screen.
NOTE
When a file is attached, an icon is displayed in the message details screen. The
contents of the attached file are not displayed. Check them with the cell phone.
Attached file icon
Play
Reply
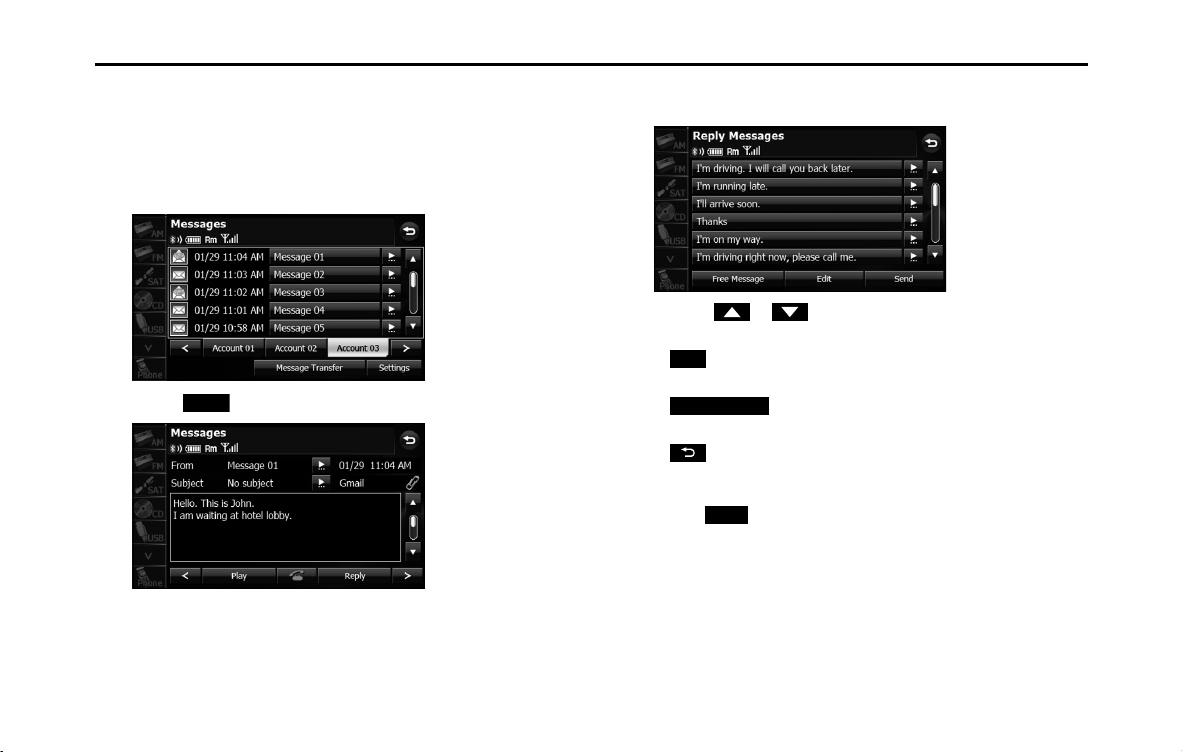
72 Introduction
Before Use
■ Replying to a message
You can select a reply destination from the Messages list and send a
message that you created on the unit.
1 On the Messages screen, touch the message to which
you want to reply.
2 Touch (Reply).
3 Touch the message that you want to use from the Reply
Messages list.
• Touch or to scroll the pages of the Reply Messages
list.
• (Edit):
Edit a registered reply message. (See Page 73.)
• (Free Message):
Create any message and use it as the reply. (See Page 73.)
•:
Return to the message details screen.
4 Touch (Send).
• The message is sent.
NOTE
18 messages are registered in Reply Messages in the initial setting.
Reply
Edit
Free Message
Send
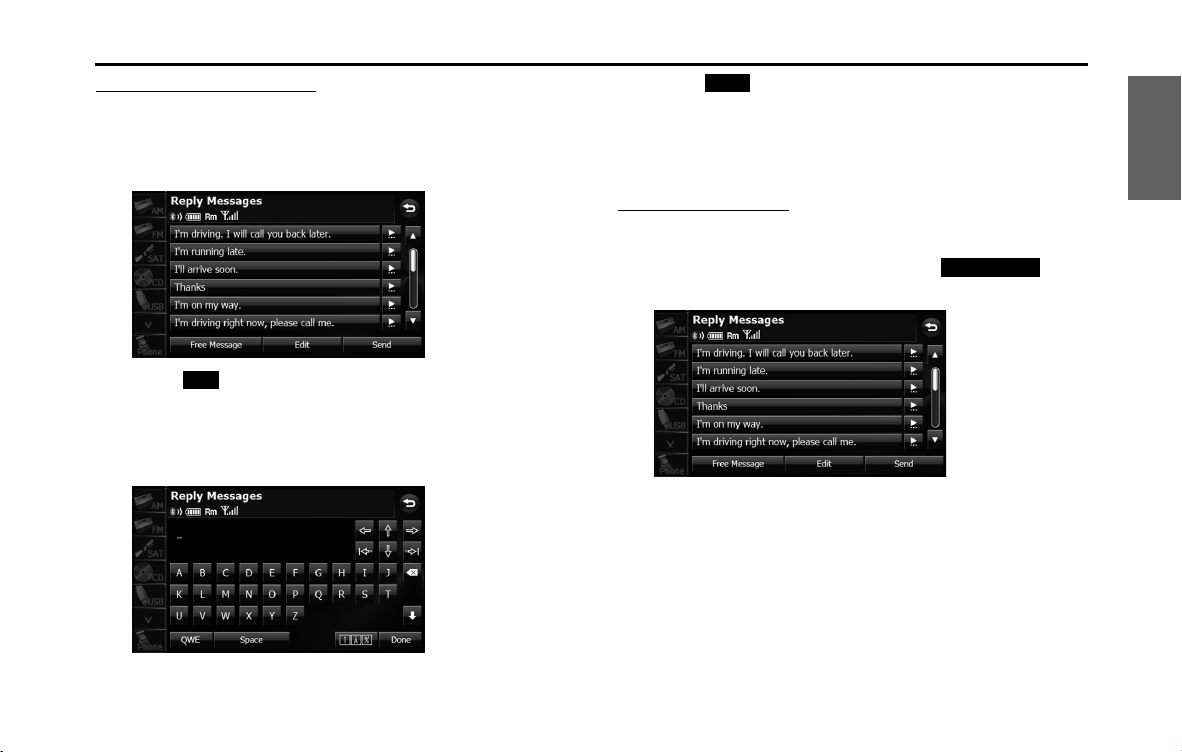
Introduction 73
Before Use
Editing the Reply Messages list
You can edit the messages that are registered in the list.
1 On the Reply Messages screen, touch the message that
you want to change.
2
Touch (Edit).
3 Touch the keyboard and enter any message.
• For details on entering the characters, see “Entering characters”
on Page 74.
4 Touch (Done).
• The message is registered.
NOTE
You can enter up to 160 single-byte characters in a reply message.
Sending a Free Message
You can create any message and use it as the reply.
1 On the Reply Messages screen, touch (Free
Message).
Edit
Done
Free Message
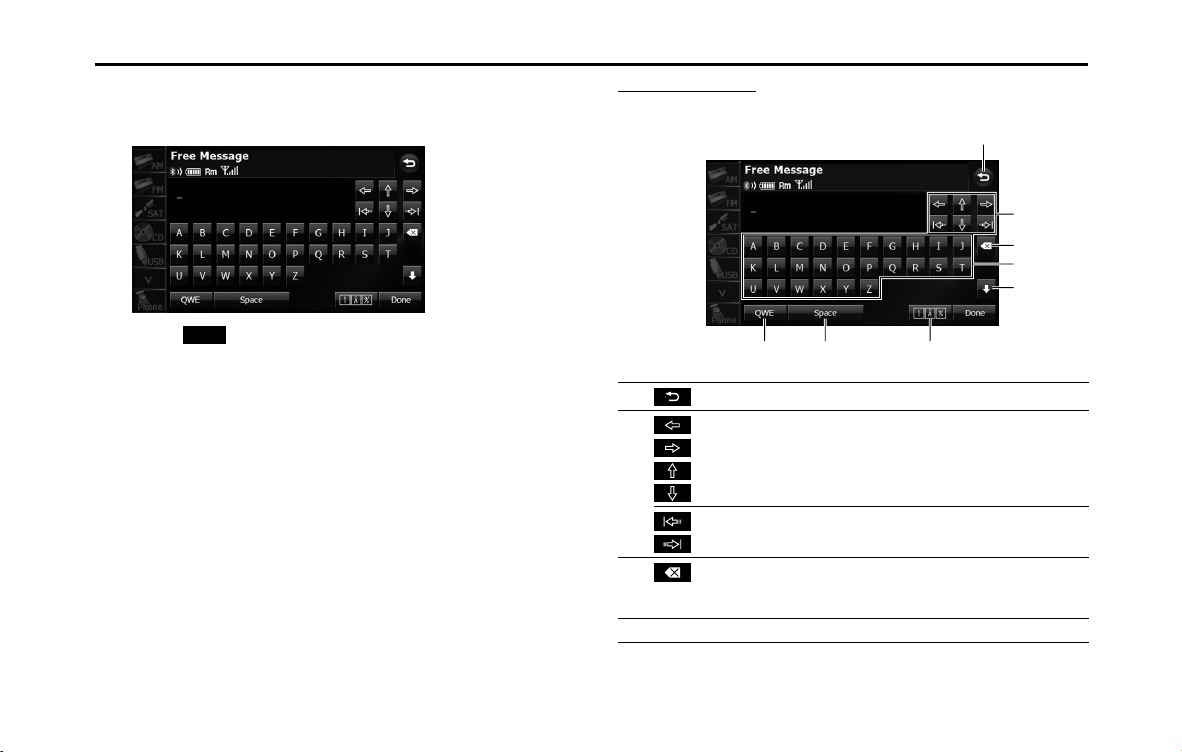
74 Introduction
Before Use
2 Enter a message.
• For details on entering the characters, see “Entering characters”
on Page 74.
3 Touch (Send).
• The message is sent.
NOTE
You can enter up to 160 single-byte characters in a free message.
Entering characters
Touch the following buttons to enter characters.
Send
(1) Return to the previous screen.
(2) Move the cursor. (Previous, next, up, down)
Move the cursor. (Top, end)
(3) Delete 1 character.
• Touch for 1 second or more to delete the characters
continuously.
(4) Input buttons Touch a button to enter the corresponding character.
(1)
(8) (7) (6)
(4)
(5)
(3)
(2)

Introduction 75
Before Use
■ Various message settings
You can perform message settings on the Message Settings screen. You
can perform message settings individually for each registered cell
phone. For details on switching the cell phone, see “Connecting a cell
phone” on Page 46.
1 On the Messages screen, touch (Settings).
2 On the message Settings screen, you can perform the
following settings by touching the setting buttons for
each item.
<Message Settings screen>
• Touch (Initialize) to return the settings in the
message Settings screen to their initial values.
Auto Message Transfer setting
On the handsfree screen, touch (Messages) to transfer
messages from the cell phone automatically.
1 Touch (On) or (Off ).
(5)
/
Switch between upper case and lower case characters.
/
Scroll the pages.
(Only in the 0-9-% character display)
(6) Touch to change the characters in the following order:
Latin characters, Umlaut, 0-9-%.
Latin characters J Umlaut J 0-9-% J Latin characters
J ...
(7)
(Space)
Enter a blank space.
(8) Switch between keyboard layouts.
Alphabet layout J QWERTY layout J Alphabet layout
J ...
Space
QWE
Settings
Item Function
Auto Message Transfer Set messages to be transferred automatically.
New Message Pop-up Set a new message pop-up to be displayed.
Auto Readout Message Set messages to be read out automatically.
Volume Settings Display the message volume setting screen
to set the various volumes.
Initialize
Messages
On O
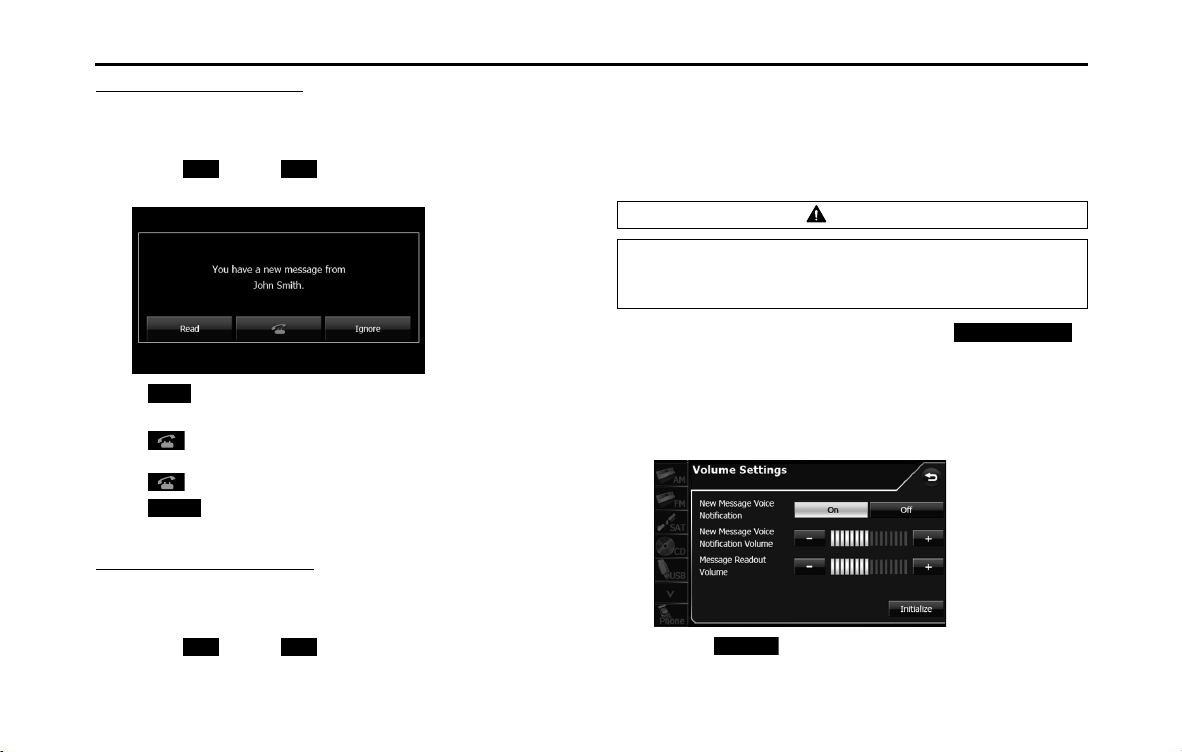
76 Introduction
Before Use
New Message Pop-up setting
You can set a new message pop-up to be displayed on the screen
when a message is received.
1 Touch (On) or (Off).
<New Message Pop-up>
• (Read):
Display the Messages screen.
•:
If there is telephone number data in the address, you can touch
to call the number.
• (Ignore):
Return to the previous screen.
Auto Readout Message setting
You can set messages to be played with audio playback when they are
received.
1 Touch (On) or (Off).
■ Setting the message volumes
You can set the various message volumes on the Volume Settings
screen. You can perform message settings individually for each
registered cell phone. For details on switching the cell phone, see
“Connecting a cell phone” on Page 46.
1 On the message Settings screen, touch
(Volume Settings).
2 You can perform the following settings by touching the
setting buttons for each item.
<Volume Settings screen>
• Touch (Initialize) to return the settings in the Volume
Settings screen to their initial values.
On O
Read
Ignore
On O
CAUTION
Be sure to set the volume of the audio at an appropriate level.
Improper volume setting may result in hearing damage or a
traffic accident.
Volume Settings
Initialize
Introduction 77
Before Use
NOTE
MMS messaging function can not display the picture on the audio screen, only
message characters.
New Message Voice Notification setting
You can set a voice notification for when a new message is received.
1
Touch (On) or (Off).
New Message Voice Notification Volume setting
You can adjust the volume of the new message voice notification.
1 Touch or .
• (right side):
Volume up
(left side):
Volume down
• Touch for 1 second or more to raise the volume
continuously.
Touch for 1 second or more to lower the volume
continuously.
Message Readout Volume setting
You can adjust the volume of the message readout.
1 Touch or .
• (right side):
Volume up
(left side):
Volume down
• Touch for 1 second or more to raise the volume
continuously.
Touch for 1 second or more to lower the volume
continuously.
■ About the messaging function
• Supported message standards:
SMS (Short Message Service)
MMS (Multimedia Messaging Service)
E-mail
• Maximum number of address characters:
256 single-byte characters
• Maximum number of subject characters:
256 single-byte characters
• Maximum number of message characters:
160 single-byte characters
• Maximum receivable message size:
50 KB or less
On O
- +
+
-
+
-
- +
+
-
+
-

78 Introduction
Before Use


80 Navigation
Before Using the Navigation System
WARNING
Read this manual first
Read this manual carefully before using the navigation
system. We are not liable for accidents or other problems
resulting from failure to follow the instructions in this
manual.
Follow all road signs and traffic rules
When driving using guidance from the navigation system,
be sure to follow the actual road signs and traffic
regulations. If road signs and traffic regulations are
changed, the data on the SD card may be out of date. Also,
the data on the map SD card does not take into account
factors such as weather, time zones, and occurrences such as
differences in congestion situations and temporary road
closures due to construction work. Always give precedence
to road signs and traffic rules over instructions from the
navigation system.
Not following the road signs and traffic rules could lead to
injury or traffic violations.
Drive safely
• Before following instructions from the navigation system
(changing lanes and so on), check that you can carry out the
maneuver safely given the current traffic conditions. Always
put safety first before following any instructions.
• Do not watch the navigation screen while driving.
Ignoring surrounding traffic could lead to an accident. If you
need to look at the screen while driving, make sure you only
glance at the screen.
• You should stop the vehicle in a safe place before operating
the navigation system. For safety's sake, some of the
navigation system's buttons and functions cannot be used
unless the vehicle is stationary.
• When you need to look at the navigation screen, do so for
the shortest time possible. Looking away from the road for
too long could lead to an accident.
• Make sure this system is installed in a position legally
allowed in the country where you intend to use it. Some
countries and regions do not allow video screens to be
installed within the driver's line of sight.
Navigation 81
Before Using the Navigation System
NOTE
In the interest of safety, the use of some functions may be unavailable while
driving. Buttons on the touch screen that cannot be used have their colors toned
down.
• If you stare at the display too much or operate the buttons of
the system while driving, the navigation system could
distract your attention from the current traffic conditions. Be
sure to enter as much information as possible into the
system before departing. Also, be sure to stop your vehicle
in a safe place if you need to enter information.
• Buttons on the touch screen that cannot be used have their
colors toned down.
Operating the navigation system while driving could cause
your attention to be distracted from the current traffic
conditions. This could result in a severe or fatal accident. Be
sure to follow all the operation descriptions and safety
instructions given in this manual.
Volume
• Keep the system's volume level low enough for you to be
able to hear outside sounds while driving. Otherwise, you
may not be able to react appropriately to traffic conditions,
resulting in an accident.
CAUTION
Foreign objects
Do not place foreign objects, such as fingers, into the disc
insertion slot.
If foreign objects enter the system's main unit, it could lead
to electric shock or fire. If the system emits smoke or an
unusual smell, stop using it immediately and contact the
nearest SUBARU dealer.
Never disassemble or modify the system
Never disassemble or modify any parts of the system. Doing
so may lead to a fire, an electric shock, or some other type of
accident.
Do not continue using the navigation system if it malfunctions
If the system shows any sign of malfunctioning (for example,
the monitor displays no picture), stop using it immediately
and contact the nearest SUBARU dealer.
Continuing to use the system could lead to a fire, an electric
shock, or some other type of accident.
If the navigation system gets contaminated, or emits smoke or
an odd smell, stop using it
If a foreign object gets inside the system, liquid is spilled
onto the system, or the system emits smoke or an unusual
smell, stop using it immediately and contact the nearest
SUBARU dealer. Continuing to use the system could lead to a
fire, an electric shock, or some other type of accident.

82 Navigation
Information on Warnings and Safety
The navigation system uses a built-in GPS receiver to guide
you to your destination. This software does not transmit the
GPS position of your vehicle, and cannot be used to track the
vehicle.
Do not look at the navigation screen if it is not safe to do so. If
the driver is operating the navigation system, we strongly
recommend operating the software before you start driving.
Program the route before leaving, and stop your vehicle in a
safe place if you need to change the route.
Follow all road signs and road conditions. If you deviate from
the recommended route while driving, the software updates
the route according to your current position.
For details, see “End-user License Agreement” on Page 176.
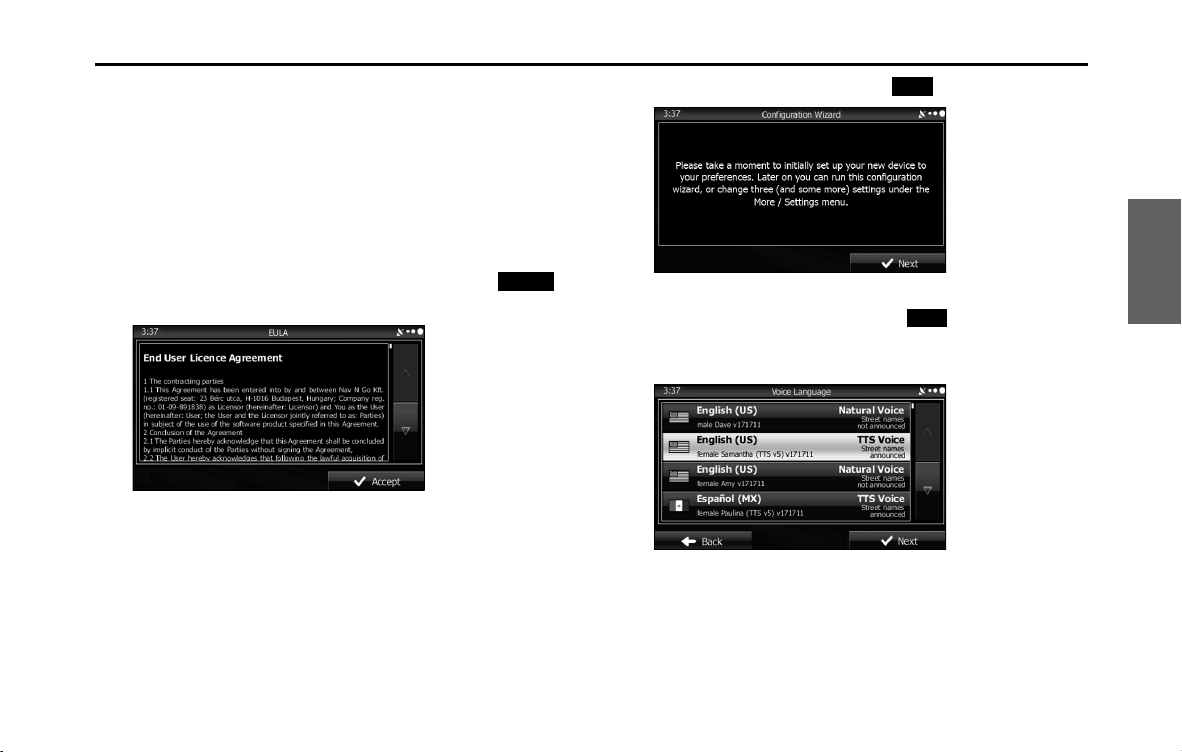
Navigation 83
Read First
This software is designed for optimum performance when
used for car navigation. It does not need a stylus for
operation. You can easily use buttons and maps on the screen
by touching them with the tip of your finger.
When you start the navigation software for the first time, the
initial settings screen is automatically displayed. Follow the
steps below to use the initial settings screen.
1 Confirm the end-user license agreement. Touch
(Accept) to continue.
2 The Setup Wizard starts. Touch (Next) to continue.
3 Select the language and narrator you want to use for
voice guidance messages. Touch (Next) to
continue. You can change this at any time from Sound
and Warnings settings. (See Page 164.)
• When the TTS Voice mode is selected, the voice control
navigation and street guidance can be used. These functions
cannot be used when the Natural Voice mode is selected.
Accept
Next
Next
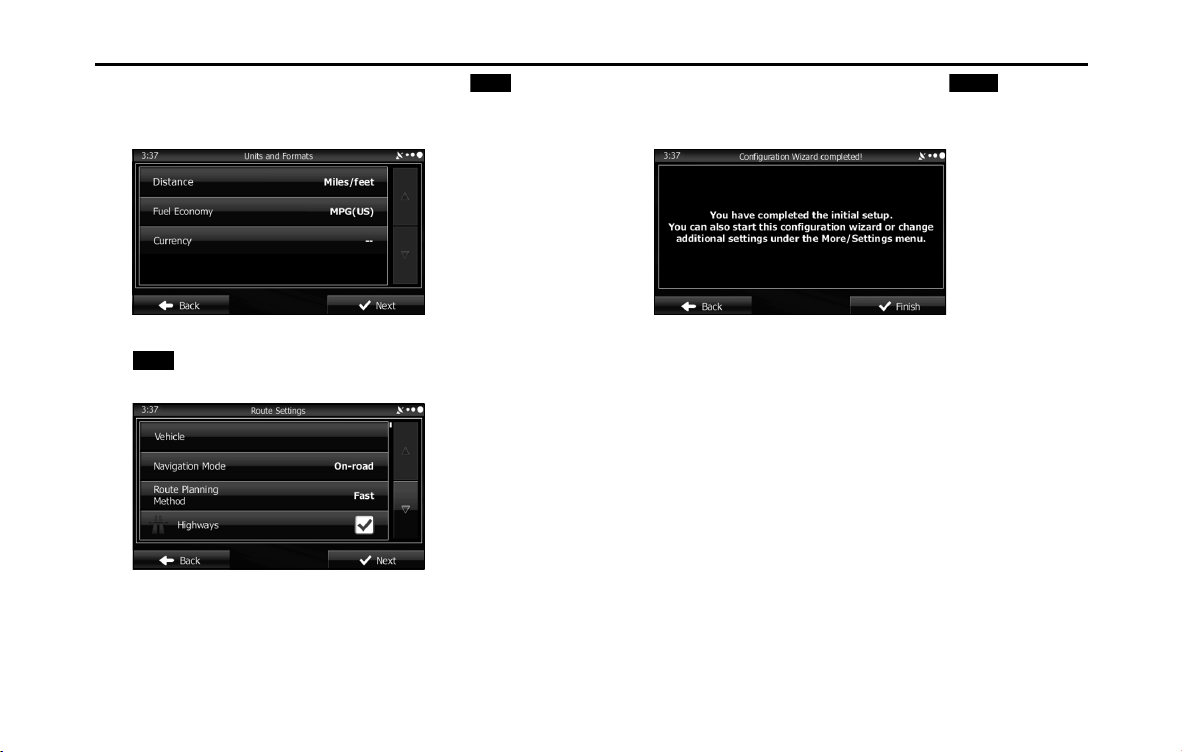
84 Navigation
Read First
4 Change the unit settings if necessary. Touch (Next)
to continue. You can change this at any time from Units
and Formats. (See Page 173.)
5 Change the initial route plan settings if necessary. Touch
(Next) to continue. You can change this at any time
from Route Settings. (See Page 169.)
6 This completes the initial setup. Touch (Finish) to
continue. After setting up, you can run the Setup Wizard
at any time from the Settings menu. (See Page 163.)
After the initial setup, the navigation menu is displayed and you can
start using the software.
Next
Next
Finish
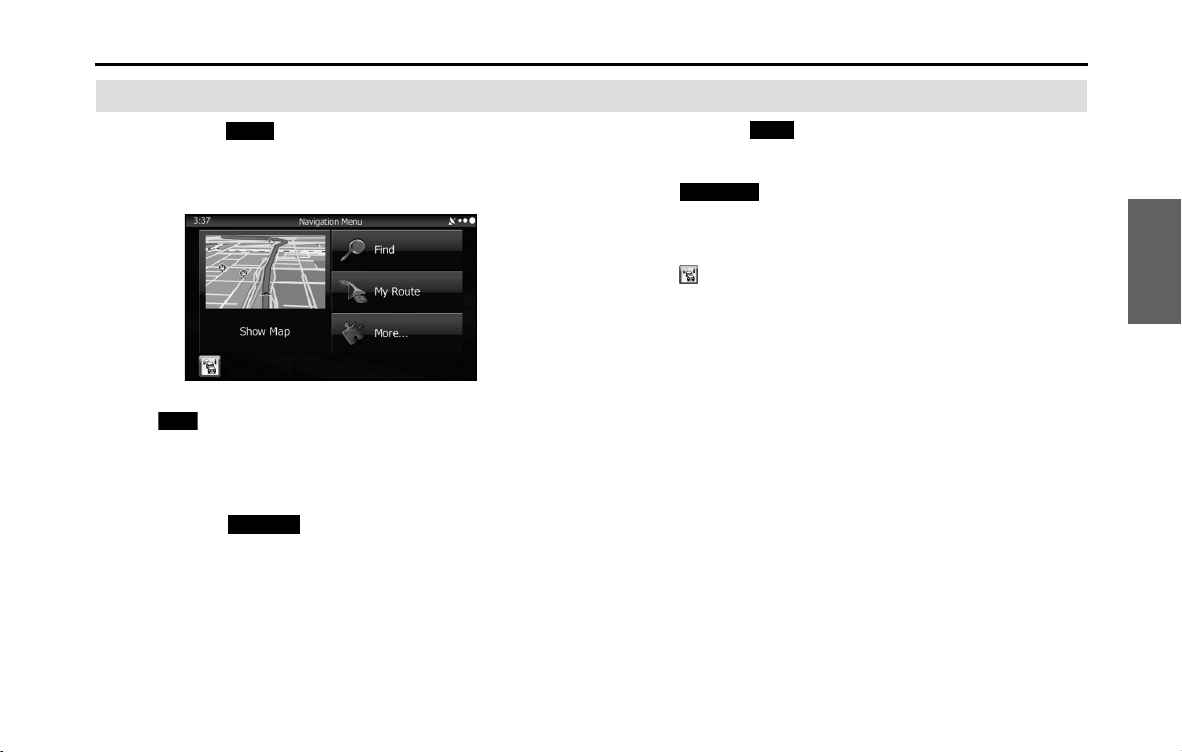
Navigation 85
Read First
Navigation Menu
When you touch (Menu) on the navigation screen or
the multi screen, the navigation menu (main menu) appears.
You can access all of the software's functions from this menu.
The following options are available.
• Touch (Find), and then select which method to use to reach
your destination by entering the address, selecting a favorite spot,
selecting a position on the map, or selecting from the destination
list. You can also select recent destinations from Smart History, or
enter coordinates into the system.
• When you touch (My Route), each point on the route, or
a path log on the map is displayed for the entire journey. You can
also perform various route related functions such as editing or
Canceling the route, setting the route departure point, selecting a
different route, avoiding a part of the route, performing a navigation
simulation, or adding an entry to the destination list.
• When you touch (More), you can set the navigation software
operating method, start the tutorial, show a demo route simulation,
or start various other auxiliary applications.
• Touch (Show Map) to start navigation on the map. The
button itself shows the current position, recommended route, and
reduces the surrounding area to display on the map being used.
Press the button to enlarge the map to full-screen size.
• Touch to open the Traffic Summary screen.
Menu
Find
My Route
More
Show Map
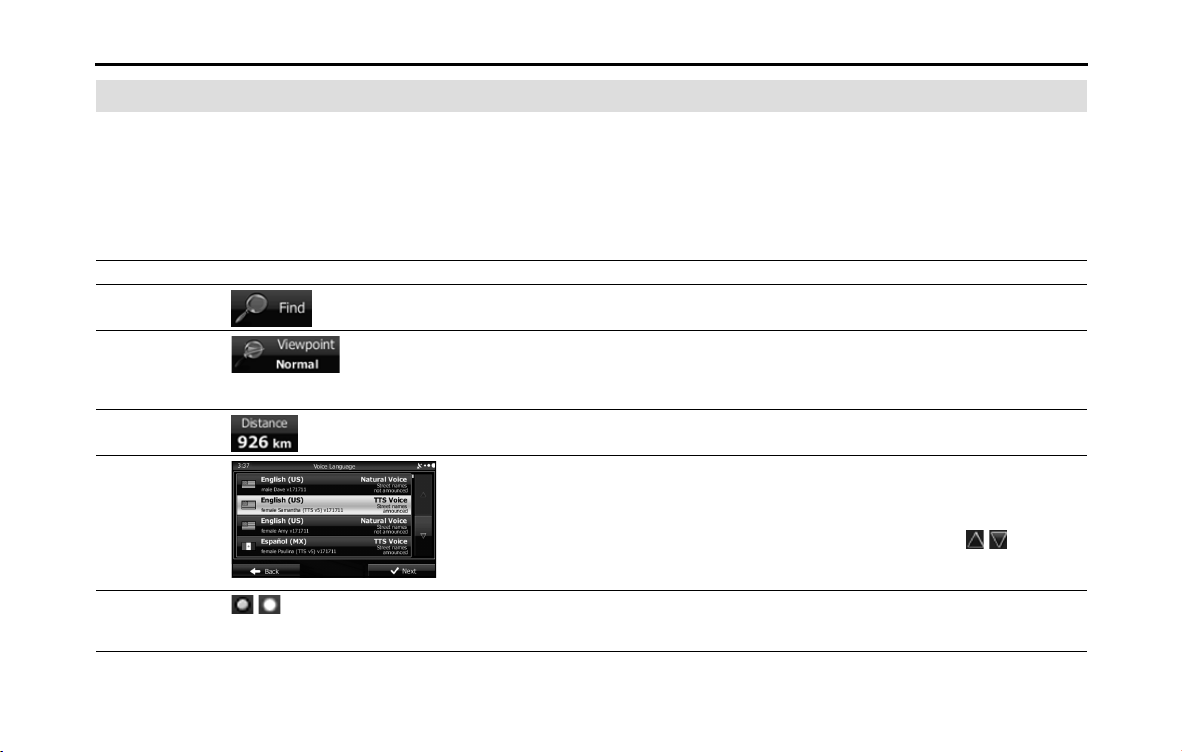
86 Navigation
Read First
On-screen Buttons and Other buttons
To use this software, you normally have to touch the buttons on the touch screen.
You only need to confirm selections and changes when the application needs to be restarted, when an important setting is
changed, or when a section of the user's data/settings may be lost. Other than that, when using the button selected content is
saved immediately without requiring confirmation, and the new setting is applied.
Type Example Explanation Use
Button Touch to start a function, open a new screen, and
save settings.
Touch once.
Button with
numbers displayed
Current fields or settings are displayed on the
button. Touch this button to change the value. After
changing, the value you enter is displayed on the
button.
Touch once.
Icon Displays status information. Some icons can also be used as buttons. Touch
once.
List If there are multiple options available, the selection
items are displayed as a list.
To view the list, touch and slide your finger up and
down. Because the scrolling speed changes
depending on the speed of the slide, you can reach
the end of the list, with just a small, quick flick of
your finger. Also, when using the
/ buttons,
touch the number you want to move through the
pages.
Radio button
/
When there are only a few selection items, you can
use the radio buttons instead of a list. Where only
one value can be selected.
Touch this button to select the new value.

Navigation 87
Read First
Check Box
/
If there are only two choices available, you can
enable or disable the function by entering a check
mark.
Touch to turn the switch On or Off.
Virtual keyboard Keyboard for entering text and numbers. Each key represents a button on the touch screen.
Type Example Explanation Use
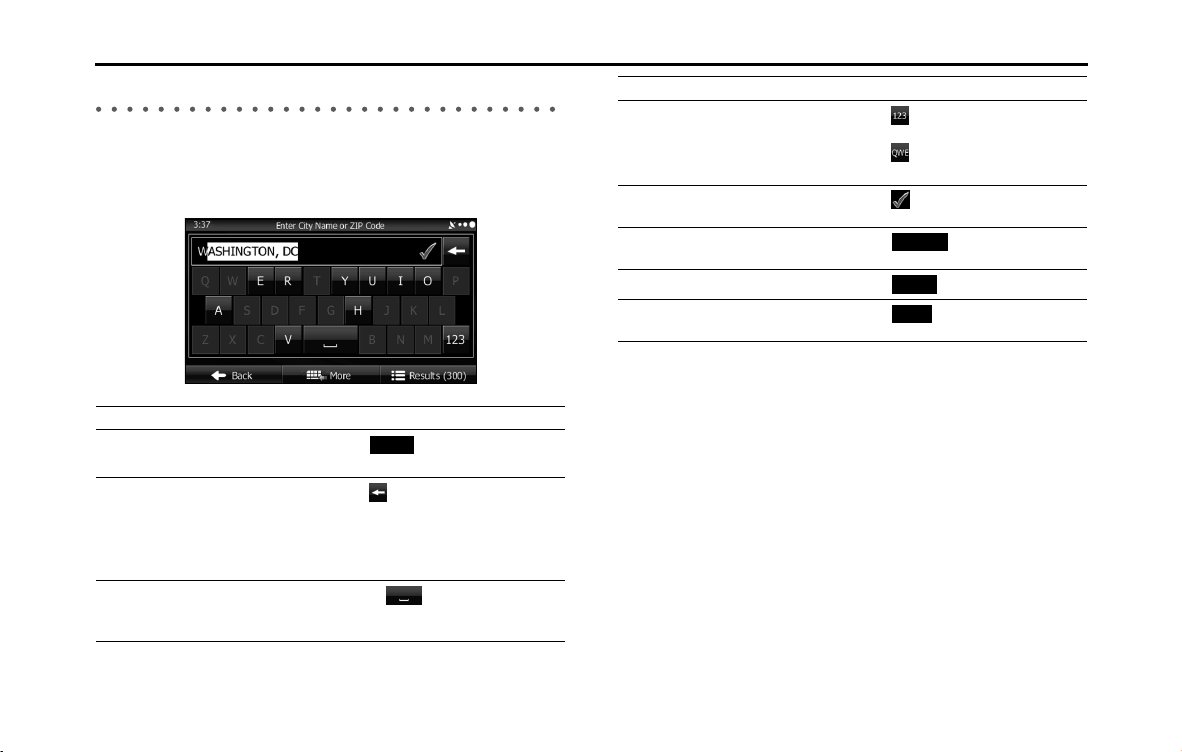
88 Navigation
Read First
Using the Keyboard
This navigation system has been designed to keep the entry of text and
numbers to a minimum. However, you can enter text and numbers
when necessary by using the full-screen keyboard. You can select the
keyboard layout from English, Greek characters, numbers, and so on.
NOTE
Even if a candidate term is displayed when the keyboard screen appears, you can
touch the keyboard and input a new term directly.
Operation Explanation
Button keyboard layouts, for example
from English to Greek
Touch (More) and select
another keyboard layout from the list.
Correcting entered values using the
keyboard
Touch to delete characters entered
by mistake.
Touch & hold (touch the screen and
do not remove your finger) to delete a
part or all of the entered text.
Enter a space between first names
and family names, or between
address display names
Press the button at the bottom
center of the screen.
More
Entering numbers and symbols
Touch to switch to the numbers
keyboard.
Touch to switch to the symbols
keyboard.
Confirm keyboard input (confirm the
displayed search results)
Touch .
Set keyboard input (confirm search
results list)
Touch (Results).
Set keyboard input (save entry)
Touch (Done).
Cancel keyboard input (return to main
screen)
Touch (Back).
Operation Explanation
Results
Done
Back
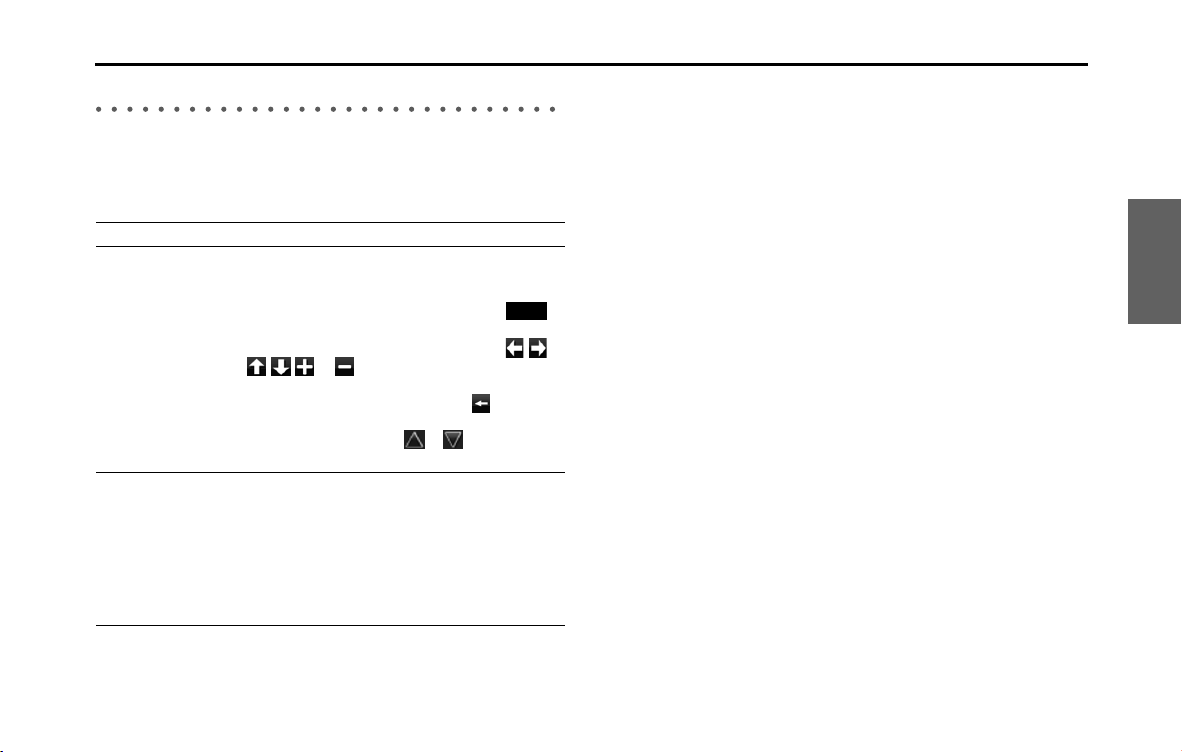
Navigation 89
Read First
Screen Operations Other than Single Touch
Normally, you only need to touch the screen once (single touch) to
perform an operation. However, you can make use of convenient
functions by combining different touch operations on the touch
screen. The following touch combinations are available.
Operation How to
Screen Touch & Hold You can call additional functions by performing touch
& hold (touch the screen and do not remove your
finger) with the next button.
• On the List and Menu screens, touch & hold
(Back) to display the Map screen.
• On the Map screen, touch & hold any of the , ,
, , , or buttons to rotate, tilt, enlarge, or
reduce the map.
• On the keyboard screen, touch & hold
to quickly
delete multiple characters.
• On long lists, touch & hold
or to scroll
through the page.
Gesturing (drag &
drop)
You may need to drag & drop in the following cases.
• Scrolling a list: To view the list, touch and slide your
finger up and down. Because the scrolling speed
changes depending on the speed of the slide, you
can reach the end of the list, with just a small, quick
flick of your finger.
• Moving the map in map display mode: Touch the
map and move it in the direction you want.
Back
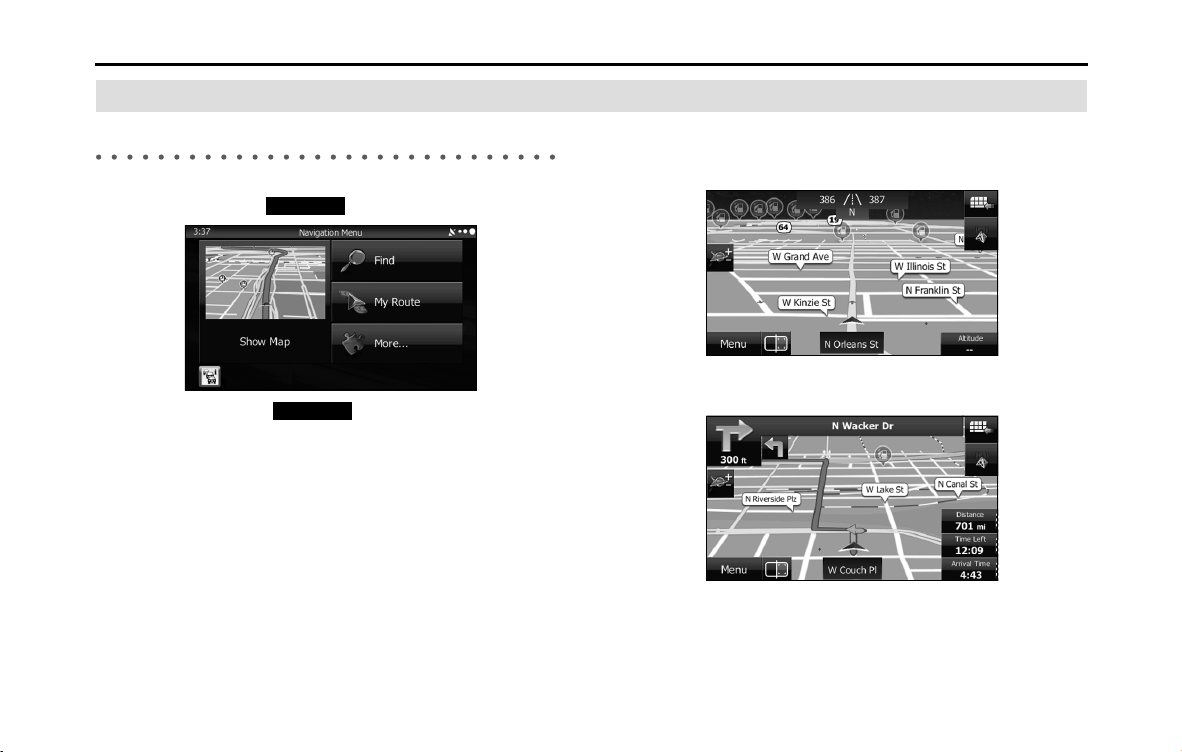
90 Navigation
Read First
Map Screen
Navigating on the Map
In the navigation menu startup screen, the currently active map is
reduced and displayed in (Show Map).
To enlarge the map, touch (Show Map) to open the Map
screen.
This map shows the current position (shown as the vehicle marked as a
blue arrow), recommended routes (orange lines), and the immediate
surrounding area.
When GPS positioning is not active, the vehicle marker is clear. The
latest confirmed position is displayed.
Colored spots are displayed on the circle around the satellite icon in the
top left corner. The more spots there are on the circle, the higher the
accuracy of the GPS positioning.
When GPS positioning is active, the vehicle marker is displayed in full-
color, and the current position is shown.
Show Map
Show Map

Navigation 91
Read First
Buttons and data fields are displayed on the screen, and you can
perform navigation. During navigation, route information is displayed
on the screen.
The data fields display differs when no destination is set during
navigation (no orange line is displayed). When performing navigation,
the number of the data fields displayed on the screen is three. Up to
two data fields can be displayed when no destination is set (no orange
line is displayed).
Default data fields when no destination is set while driving
Default data fields when performing navigation (you can change the
values in fields by using touch & hold):
Field Explanation
(Altitude)
Shows the altitude of the road currently being
driven and measured by the GPS receiver.
(There may be a maximum ±50 m of differences
depending on the reception status of GPS
satellites.)
(Time)
Displays the current time corrected using the
time zone offset. Accurate time is acquired from
the GPS satellite, while time zone information is
acquired form the map. You can also make
manual settings in Units and Formats.
(Only for the Menu screen, the current time is
shown in the bottom left corner of the screen.)
Field Explanation
(Distance)*
Displays the distance on the route to the final
destination.
(Time Left)
Displays the time left until arrival at the final
destination based on the information available
for the remainder of the journey. This is
calculated according to prior traffic data or
traffic patterns when ever available.
If a TMC receiver is connected to the main unit
and is receiving data, any traffic jams along the
route are also factored into calculations.
However, the accuracy of these calculations
varies greatly.
Altitude
Time
Distance
Time Left

92 Navigation
Read First
* Time and distance to the destination cannot be displayed when your vehicle is
located in the place other than roads and Highways. After the vehicle returns
to a road or Highway, time and distance are displayed.
Position Marker
■ Vehicle Marker and Lock-on-Road
If GPS positioning is available, the current position is shown using the
vehicle marker.
• When any vehicle is selected, the vehicle marker may not display an
accurate GPS position and direction of travel. If there is a road nearby,
the GPS positioning error is corrected based on the shortest distance
to the road to, and the direction of the icon is adjusted to match the
direction of the road.
■ Selected map location (cursor)
Use one of the following methods to mark a map location.
• Touch the map during navigation.
• Touch the map when the destination you want is displayed in the
search results.
• Touch the map in “Map Search”. (See Page 134.)
After selecting a map location, a cursor is displayed at the point
selected on the map. The cursor is displayed as a red point ( ) and can
be checked at all zoom levels.
You can use the cursor's position as the route's destination, search for
locations around the cursor, and save the position in the destination list.
(Arrival
Time)*
Displays the estimated arrival time at the final
destination based on the information available
for the remainder of the journey. This is
calculated according to prior traffic data or
traffic patterns when ever available.
If a TMC receiver is connected to the main unit
and is receiving data, any traffic jams along the
route are also factored into calculations.
However, the accuracy of these calculations
varies greatly.
(Time)
Displays the current time corrected using the
time zone offset. Accurate time is acquired from
the GPS satellite, while time zone information is
acquired form the map. You can also make
manual settings in Units and Formats.
(Only for the Menu screen, the current time is
shown in the bottom left corner of the screen.)
(Altitude)
Shows the altitude of the road currently being
driven and measured by the GPS receiver.
(There may be a maximum ±50 m of differences
depending on the reception status of GPS
satellites.)
Field Explanation
Arrival Time
Time
Altitude
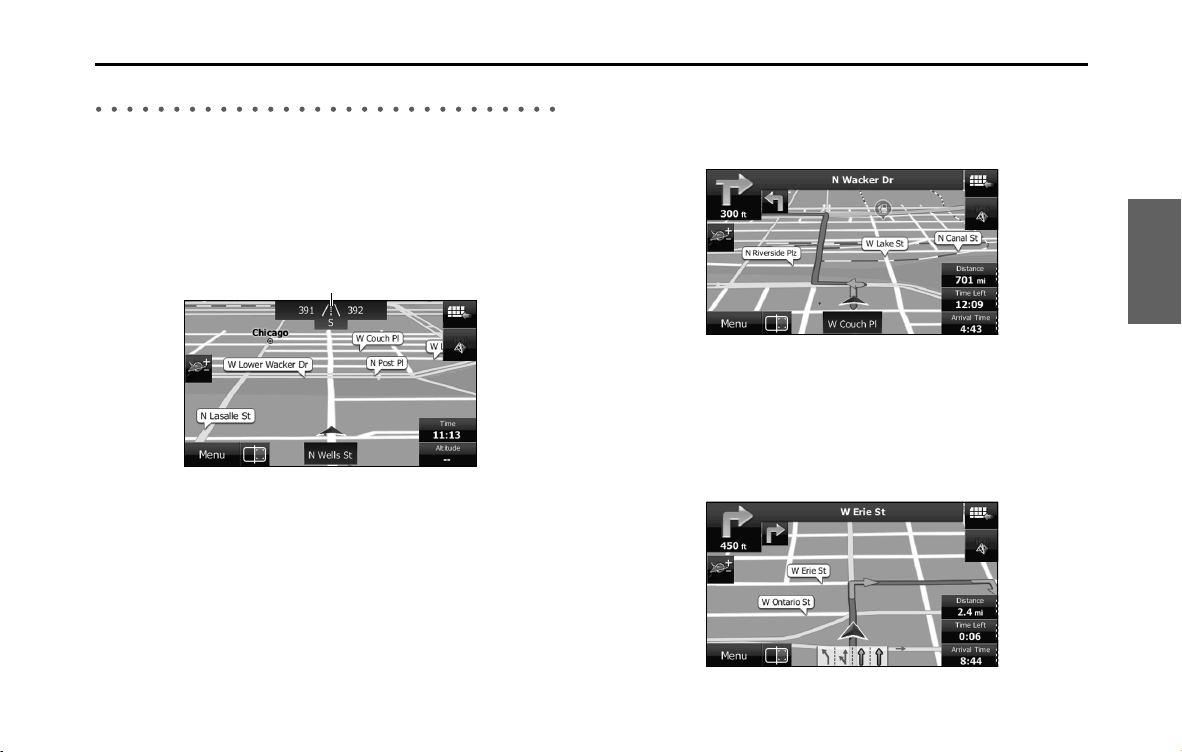
Navigation 93
Read First
Map Objects
■ Direction display
If no destination is set while driving, the direction is shown on the
screen in heads-up display.
Each letter indicates a direction: N (North), NE (North East), E (East), SE
(South East), S (South), SW (South West), W (West), and NW (North
West). However, this is not displayed while driving on an expressway.
■ Advanced confirmation of route changes and next road
During navigation, information on the next route event (the next
change in the route), as well as the next city or town, is displayed at the
top of the Map screen.
The next change in the route is displayed in the field at the top left
corner of the screen. Displays the type of route event (right or left turn,
roundabout, expressway interchange, and so on) and the distance from
the current position.
When the next route change approaches, the type of route change is
displayed as a small icon next to the main icon. Only the next route
change is displayed.
Direction display
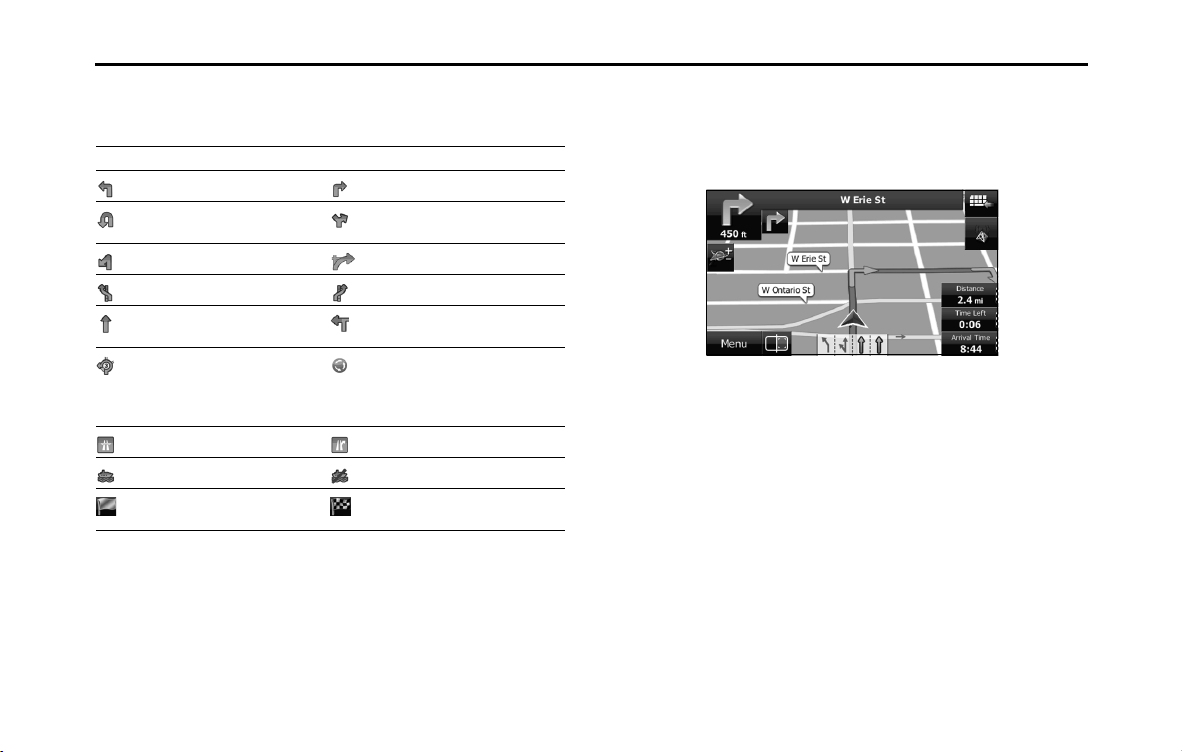
94 Navigation
Read First
Most of these icons can be understood intuitively. The following table
shows the most frequently displayed route events. The symbol design is
the same in each field.
■ Lane information & signs
When using route guidance on roads with two or more lanes, it is
important that you drive in the correct lane. When lane information is
available on the Map, the lane and direction are indicated below the
map with small arrows. The lane that you should drive in is highlighted.
When detailed information is available, the arrows are removed and
signs are displayed. Signs are displayed at the top of the map. The color
and design of the signs is the same as signs actually found at the side of
the road or overhead signs. These signs show the district and the route
number for the lane direction.
Icon Explanation Icon Explanation
Turn left Turn right
U-turn Keep right at the fork in
the road.
Turn left & sharp curve. Turn right & sharp curve.
Stay in the left lane. Stay in the right lane.
Go straight ahead at the
intersection.
Turn left at the T junction.
Go left at the
roundabout. Third exit
(next change in
direction).
Join the roundabout (the
route change after the
next change).
Join the expressway. Leave the expressway.
Board the ferry. Disembark from the ferry.
You are half way to your
destination.
You have arrived at your
destination.

Navigation 95
Read First
All signs are displayed in the same manner even when driving without
using the navigation system. During navigation, only the sign that
shows the lane in which you should drive is highlighted, the other signs
are toned down.
■ Junction display
When approaching an expressway exit or a complicated intersection,
the map switches to a 3D display if the necessary information can be
displayed. An arrow indicates the lane in which you should drive. Signs
are also displayed if the information is available.
■ Types of 3D Objects
The following 3D object types are supported.
Type Explanation
3D Topography On a 2D map, the changes in topography or
undulations in the ground are displayed; and
when using 3D this data is used to create a
route map image during navigation. On a 3D
map, hills and mountains are displayed in the
background, whilst on a 2D map they are
expressed using changes in color and shading.
Elevated Roads Complicated intersections and three
dimensional road objects (such as overpasses or
overhead bridges) are displayed in 3D.
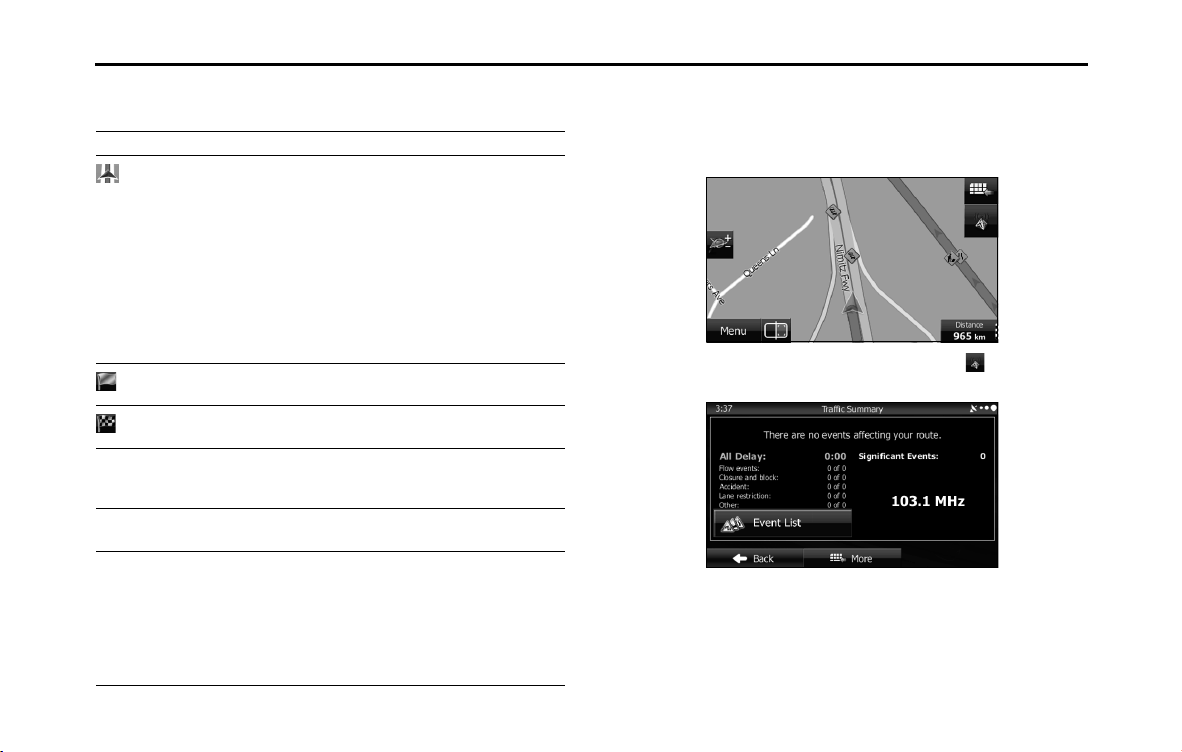
96 Navigation
Read First
■ Items displayed during route navigation
The route is displayed using the following methods.
■ Traffic condition
Road sections affected by traffic conditions are displayed in a different color on
the map, and a small icon representing the type of traffic condition is displayed
above the road. You can change the items displayed by setting the Traffic. (See
Page 168.)
To check traffic conditions outside the display, touch . The Traffic
Summary screen is displayed.
Symbol Name Explanation
Current GPS
position and
departure point
Current location of the user displayed on
the map
• When you select a vehicle in route
search, and if there is a road nearby, the
position of the icon is corrected based
on the nearest road.
When the GPS position is available, the
route usually starts from the current
position. If there is no GPS position
available, the last confirmed available GPS
position is used as the departure point.
Waypoint (midway
point)
The midway point target point before
arrival at the target destination.
Destination (final
point)
The final destination on the route.
Route color Displays using colors that are easy to
understand and that stand out in daytime
or night time color mode.
Roads excluded
from navigation
Select whether or not to exclude a road
from navigation. (See Page 169.)
Roads affected by
traffic conditions
Any section of the road may be affected
depending on the received traffic
conditions. Roads affected by traffic
conditions are displayed in a different color,
and a small icon representing the type of
traffic condition is displayed at the side of
the route.
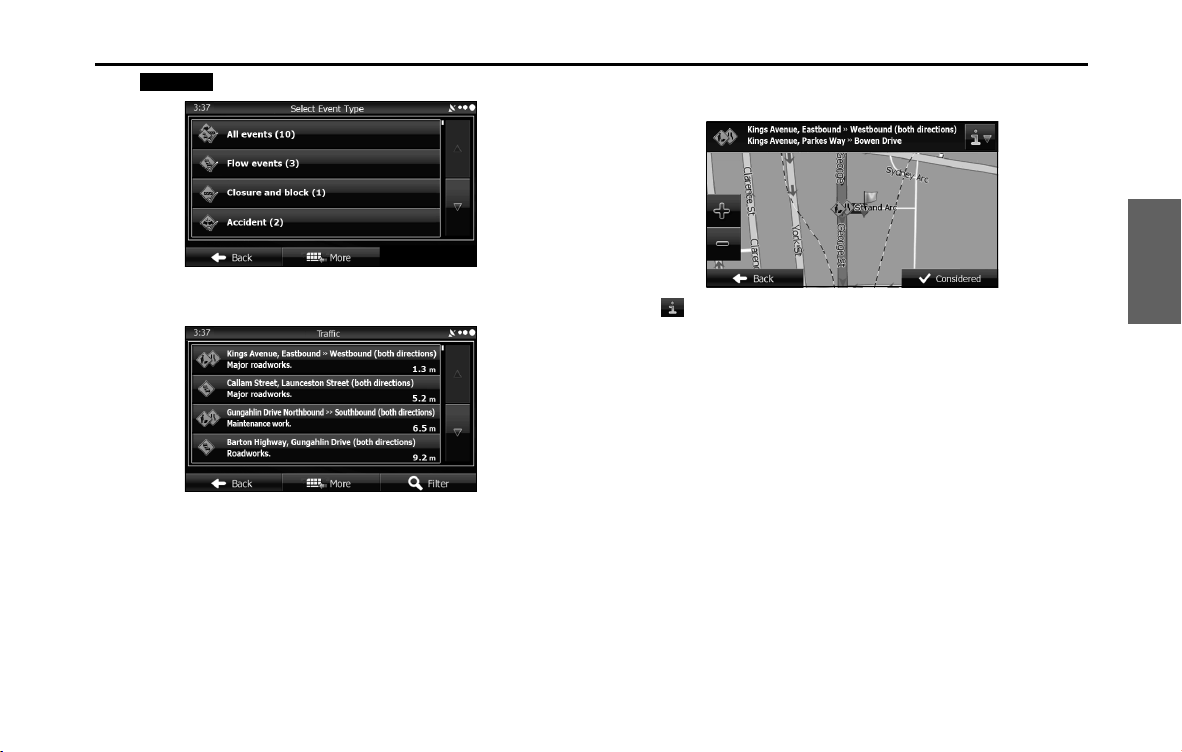
Navigation 97
Read First
Touch (Event List) to open the following Event List screen.
On this screen, you can select one entry from the list to view list of the
traffic conditions for that section of the road.
On this screen, you can select one entry from the list to view full details
of the traffic conditions for that section of the road.
Touch to open another screen displaying information on the
selected map position.
Event List

98 Navigation
Read First
■ Highway Services
When driving on the expressway, this displays information on the next
three highway service areas. By default, gas stations, restaurants, rest
rooms, and mechanics are displayed. You can change the items
displayed by setting the Visual Guidance. (See Page 172.)
When information is available for the highway service area, is
displayed.
Touch to display the highway service area information (distance,
time needed, and services provided).
When you touch highway service information, a list is displayed.
Select one from the list to display more details. You can check it on the
map and set it as a waypoint or as a destination.
Highway service area information

Navigation 99
Read First
■ Smart zoom display
When the navigation screen is set to auto zoom, this function is turned
on.
Touch to display the control button.
Touch to enlarge the display, and touch to reduce the display.
When expanding or reducing, the smart zoom function is switched off,
and is displayed. Touch to turn on the smart zoom function.
If no operations are made for about six seconds, the previous screen is
displayed.
<Smart Zoom On>
<Smart Zoom Off>
■ Map operations
You can touch a position on the map, and then check that position
during navigation. The map's current position tracking function stops
(the car marker (a blue arrow by default) is not fixed in position on the
screen), and the control buttons are displayed allowing you to change
the map display.
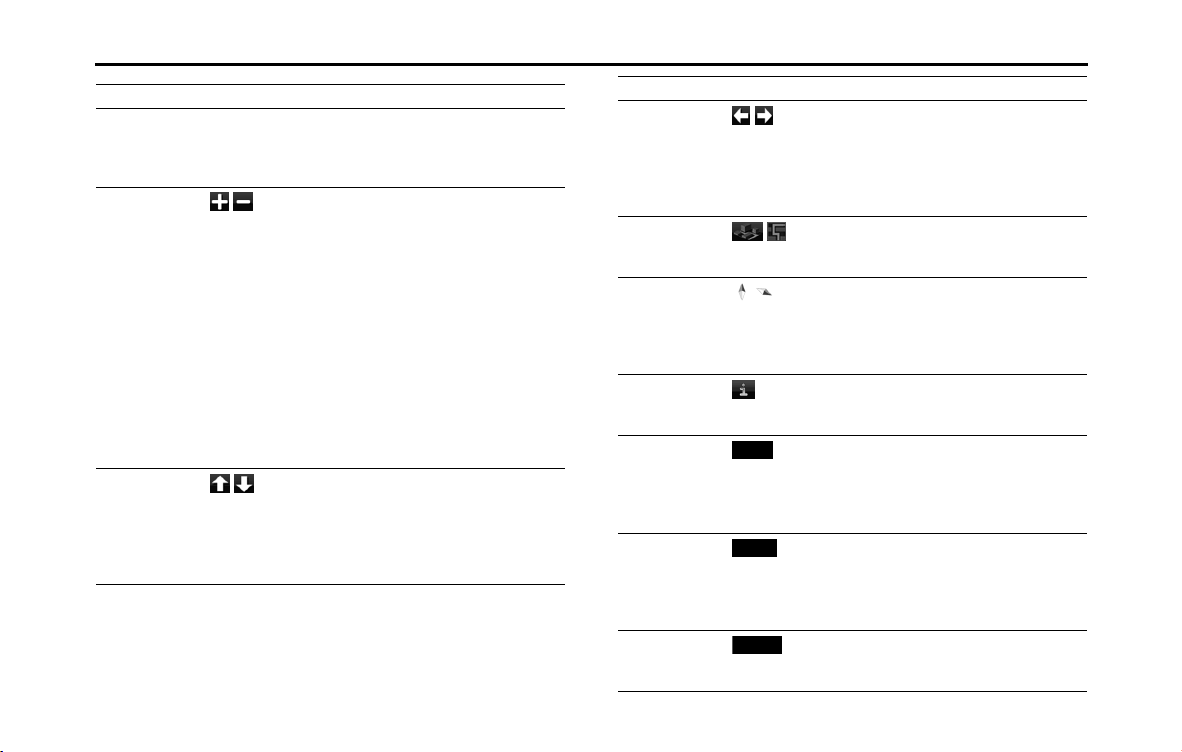
100 Navigation
Read First
Operation Button Explanation
Using drag &
drop to move the
map
No buttons You can move the map in any direction
you want by touching and holding the
map, and moving your finger in the
direction you want to move the map.
Zoom in/Zoom
out
/
Change the area of the map displayed
on the screen.
Road names and other characters are
always displayed in the correct
direction and at the same font size, and
you only need to check necessary
roads and icons.
In 3D mode, the map cannot be
reduced endlessly. The map changes
to 2D mode if you zoom out beyond
the defined amount.
The display changes slowly if you tap
the button, or changes in a smooth,
continuous motion if you touch & hold
the button.
Tilt up/Tilt down
/
In 3D mode, you can change the
vertical display angle of the map.
The display changes slowly if you tap
the button, or changes in a smooth,
continuous motion if you touch & hold
the button.
Rotate left/Rotate
right
/
Changes the horizontal display angle
of the map.
The display changes slowly if you tap
the button, or changes in a smooth,
continuous motion if you touch & hold
the button.
2D or 3D display
/
Touch this button to switch the map
display mode between a 3D bird's-eye
view and a flat 2D view.
Compass in 2D or
3D map display
mode
/
The compass direction indicates North.
Touch this button to change to a North
Up display, and then touch it again to
return to the direction previously
displayed.
Point information Touch this button to open another
screen displaying information on the
selected map position (cursor).
Return to normal
navigation
(Back)
Touch this button to return the map to
the current GPS position. Auto map
rotation is also enabled.
The map operation buttons are
hidden, and navigation restarts.
Additional
functions
(More)
Touch this button to display the
additional functions list. For example,
saving the cursor to the destination list,
and searching the area around the
cursor.
Selecting a
destination
(Select)
Touch this button to select the cursor
as a new destination. The route is
researched automatically.
Operation Button Explanation
Back
More
Select
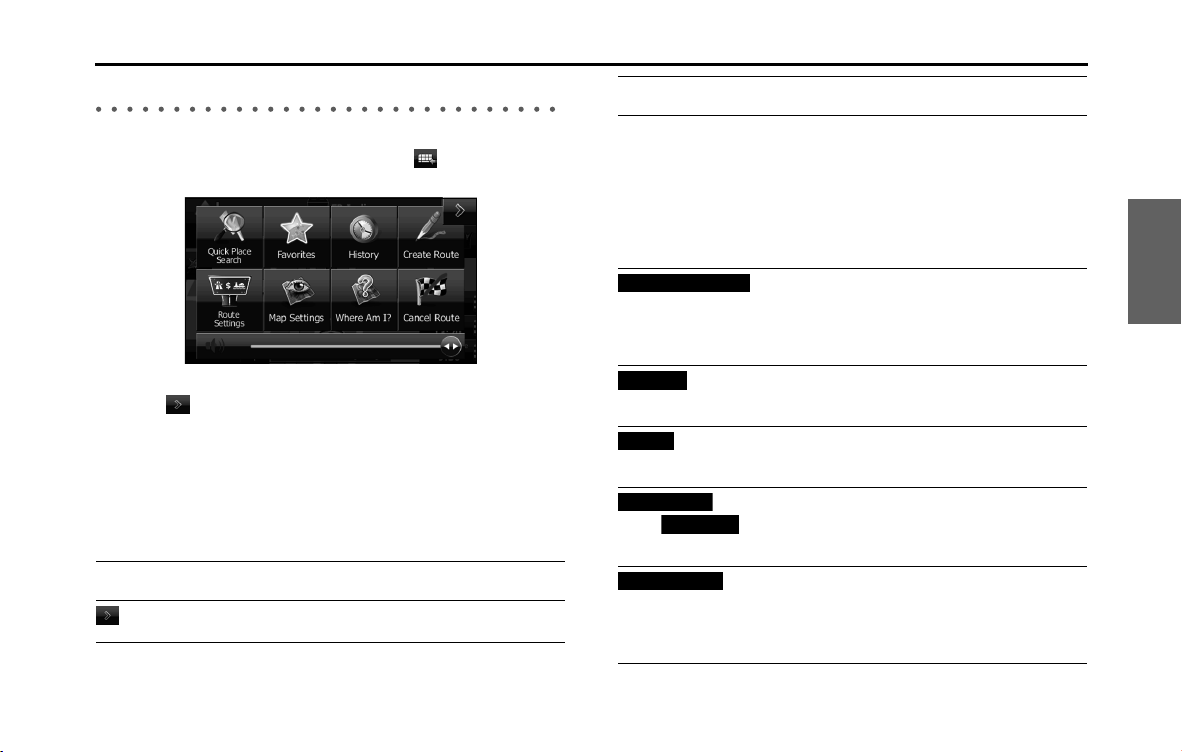
Navigation 101
Read First
Quick Menu
Frequently used buttons and functions used during navigation
are all displayed on the Quick menu.
Touch to open directly
from the Map screen.
The menu closes if no operations are performed for a few seconds, or if
you touch .
Touch another button to open a new screen displaying the option you
selected.
You can assign functions to shortcuts from the Menu screen. See the
following items for more details.
The following explains the buttons and functions displayed on this
screen.
Button Explanation Primary
Location
Touch this button to return to
the Map screen.
N/A
Guidance volume slider Adjusts the guidance volume.
This adjusts all volumes in the
guidance volume adjustment
application.
More /
Settings /
Sound and
Warnings /
Volume /
Master slider
(See Page
164.)
(Quick Place Search)
Touch this button to search
around a point on the route, or
your current position (when a
route search has not been
performed).
Find / Find
Places / Quick
Search (See
Page 120.)
(Favorites)
Touch this button to select an
item from the destination list.
Find / Favorite
(See Page
135.)
(History)
Touch this button to select
previously set destinations
from the history list.
Find / History
(See Page
137.)
(Create
Route)/ (Edit
Route)
Touch this button to change
the route.
My Route /
Create (Edit)
Route (See
Page 140.)
(Route
Settings)
Touch this button to change
route related settings.
More /
Settings /
Route
Settings (See
Page 169.)
Button Explanation Primary
Location
Quick Place Search
Favorites
History
Create Route
Edit Route
Route Settings
102 Navigation
Read First
In Settings, you can change the Quick menu buttons to use other
functions. (See Page 166.) The following functions are available.
(Map
Settings)
Touch this button to change
map related settings.
More /
Settings /
Map Settings
(See Page
170.)
(Where Am
I?)
Touch this button to display a
special screen with a button
that searches for information
on your current position and
determines the nearest
emergency assistance or road-
side assistance. See the
following section for more
details.
N/A
(Cancel
Route)
Touch this button to clear the
route and cancel navigation.
This button is available when
only one destination is set.
My Route /
Cancel Route
(See Page
148.)
(Remove Next Waypoint)
Touch this button to remove
the next waypoint from the
route. When multiple
destinations are set, the
previous waypoint is displayed.
This button is available when
only two or more destinations
are set.
N/A
Button Explanation Primary
Location
Map Settings
Where Am I?
Cancel Route
Remove Next Waypoint
Button Explanation Primary
Location
(Overview)
Reduces the scale of the 2D map
to display the entire route.
My Route /
Overview
(See Page
141.)
(Visual
Guidance)
Opens the Visual Guidance
settings screen.
More /
Settings /
Visual
Guidance
(See Page
172.)
(Traffic)
Opens the Traffic Summary
screen.
Touch the
navigation
menu or the
Map screen's
road icons.
(Avoid)
Avoids part of the
recommended route.
My Route /
Avoidances
(Trip
Monitor)
Opens the trip monitor screen
from which you can manage
your saved trip logs and path
logs.
More / Trip
Monitor (See
Page 162.)
(Itinerary)
Opens a list of changes in the
route (distances).
Touch the top
of the Map
screen during
navigation.
(Save Route)
The route being navigated is
saved to be used later.
My Route /
More / Save
Route
Overview
Visual Guidance
Trac
Avoid
Trip Monitor
Itinerary
Save Route

Navigation 103
Read First
Check Current Position (Where Am I?)
You can open this function from the Quick menu. The button on this
screen searches for information on the current position (if there is no
GPS reception it uses the last confirmed position) and recommended
spots in the area, and displays them on the screen.
This screen provides the following information.
• , :
Latitude/Longitude (Current positional coordinates use the WGS84
land survey system)
• :
Altitude (Advanced information acquired by the GPS receiver - may
not be accurate)
• :
Address of current position on left
• :
Address of current position on right
• The latest location information is displayed in the center of the
screen, or the time after the latest information was acquired is
displayed.
(Load
Route)
Changes to a saved, previously
navigated route.
My Route /
More / Load
Route
(Find Places)
Searches for your favorite spots
using a variety of methods.
Find / Find
Places (See
Page 120.)
(Simulate Navigation)
The Map screen opens and a
simulation of the route being
navigated starts.
My Route /
More /
Simulate
Navigation
(See Page
153.)
(GPS Info)
Opens the GPS information
screen showing satellite
positions and signal strength.
Touch the top
of the Map
screen if there
is no GPS
reception.
Button Explanation Primary
Location
Load Route
Find Places
Simulate Navigation
GPS Info
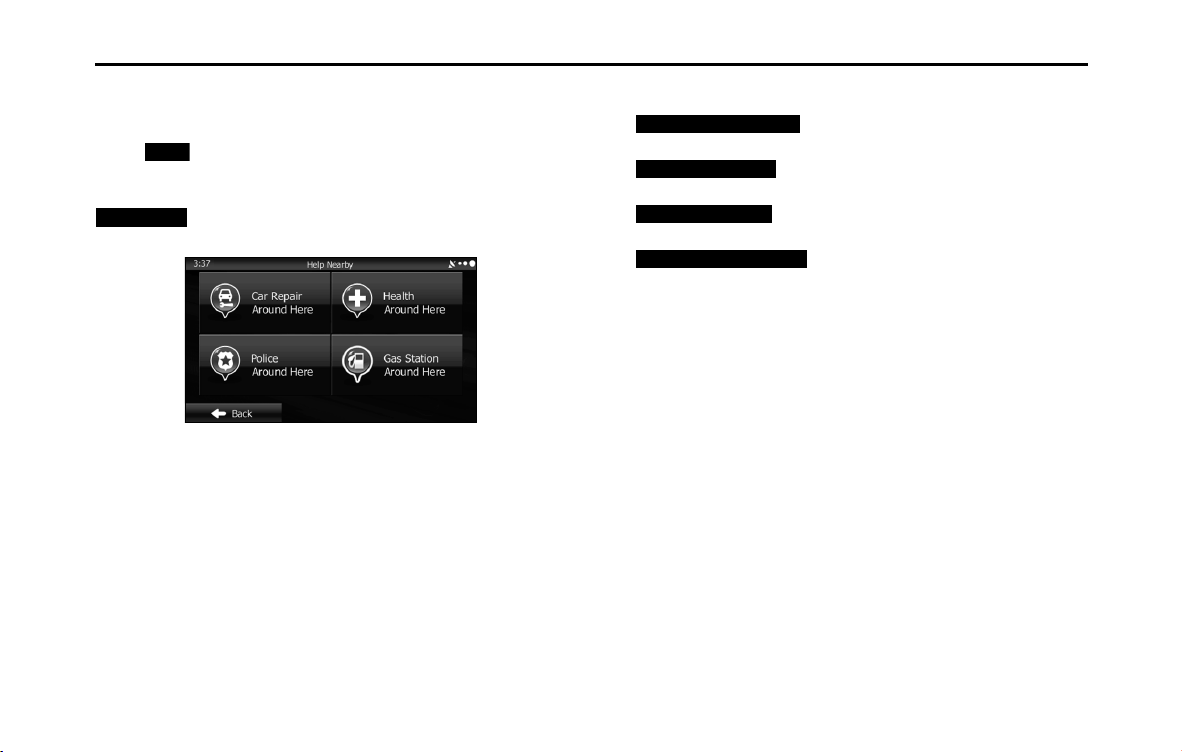
104 Navigation
Read First
• A detailed address (when available) for the current position is
displayed at the bottom of the screen.
The following functions are also available on this screen.
Touch (More) to save the current position in the destination
list.
You can also search for nearby help around the current position. Touch
(Help Nearby) to open a new screen and perform a quick
search.
You can search for the following services around your current position
or the latest confirmed position.
• (Car Repair Around Here):
Vehicle repairs / Road-side assistance services
• (Health Around Here):
Hospitals / Emergency services
• (Police Around Here):
Police stations
• (Gas Station Around Here):
Gas stations
Touch a button and then select an item from the list to display the route
navigation to the location.
More
Help Nearby
Car Repair Around Here
Health Around Here
Police Around Here
Gas Station Around Here
Navigation 105
Navigation
You can select one of the following methods to perform navigation.
• To start navigation right away, select a destination and set the route for standard navigation.
• You can search for a route regardless of the current GPS position (or if there is no GPS reception). To do this, turn off the GPS receiver, touch the flag
icon for the current position, and set a new departure point using My Route / Edit Route.
You can create a route plan even if you have multiple destinations. Select the destination. When selecting the next destination, if it is added to the route
currently being created, a multiple destination route is created. There is no limit on the number of destinations you can set.
Select route destination
You can use any of the following methods to select the destination.
• Enter all or part of the address. For example: Instead of entering the
address, you can just enter the name of the street or intersection.
• Enter the address by using the ZIP Code. (See Page 117.) This allows
you to search for the street name quickly, even if you have not
selected a district name.
• Use one of your pre-entered favorite spots as the destination. (See
Page 120.)
• Use the Find on Map function to select a destination. (See Page 134.)
• Use the list of previously saved destinations. (See Page 135.)
• You can select a destination from the history of previous
destinations. (See pages 137, 138.)
Enter all or part of the address
Entering part of the address is the quickest way to select the
destination for your route.
You can specify the address by entering the following items on the
same screen.
• An accurate address, such as the house number
• City/town center
• Intersection
• Street name
• Enter any of the items above, and then search using the ZIP Code
(See Page 117.)
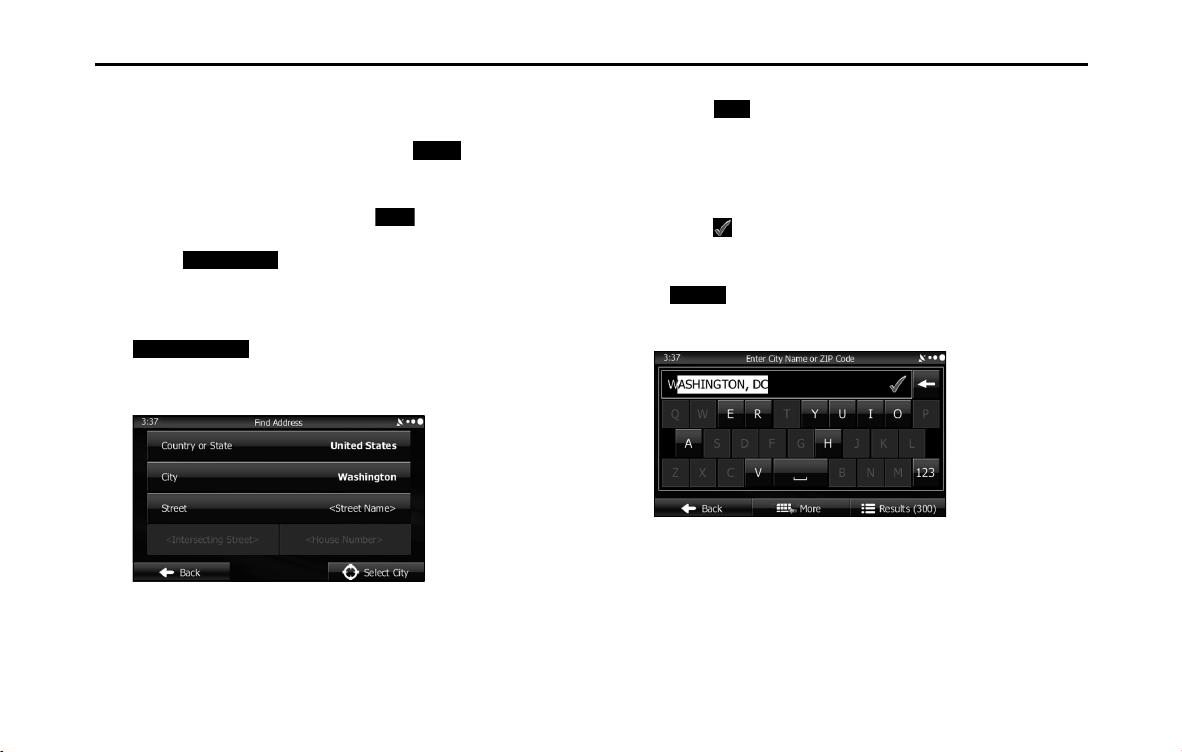
106 Navigation
Navigation
■ Entering an address
Follow the steps below to enter an address as the destination.
1 If the Map screen is displayed, touch (Menu) to
return to the navigation menu.
2 On the navigation menu, touch (Find).
3 Touch (Find Address).
4 By default, the country and district for your current
position are displayed. If necessary, touch
(Country or State) and then enter the first
few letters of the country name. You can then select the
country from the list displayed.
5 If necessary, select the city/town again.
(1) Touch (City).
(2) Use the keyboard to enter the start of the city/town.
• For the keyboard, see “Using the Keyboard” on Page 88.
(3) Follow the steps below to find the city/town you entered.
• The most likely city/town names are displayed in the entry field.
Touch to use the name displayed.
• If the name you want is not automatically entered, enter a few
more letters from the name until it is displayed in the list (touch
(Results) to open the results list before the search
results are automatically displayed). Select the city/town from
the list.
Menu
Find
Find Address
Country or State
City
Results

Navigation 107
Navigation
6 Enter the street name as follows.
(1) Touch (Street).
(2) Use the keyboard to enter the start of the street name.
• For the keyboard, see “Using the Keyboard” on Page 88.
(3) Find the street name to enter as follows.
• The most likely street name is displayed in the entry field.
Touch to use the name displayed.
• If the name you want is not automatically entered, enter a few
more letters from the name until it is displayed in the list (touch
(Results) to open the results list before the search
results are automatically displayed). Select the street from the
list.
Street
Results
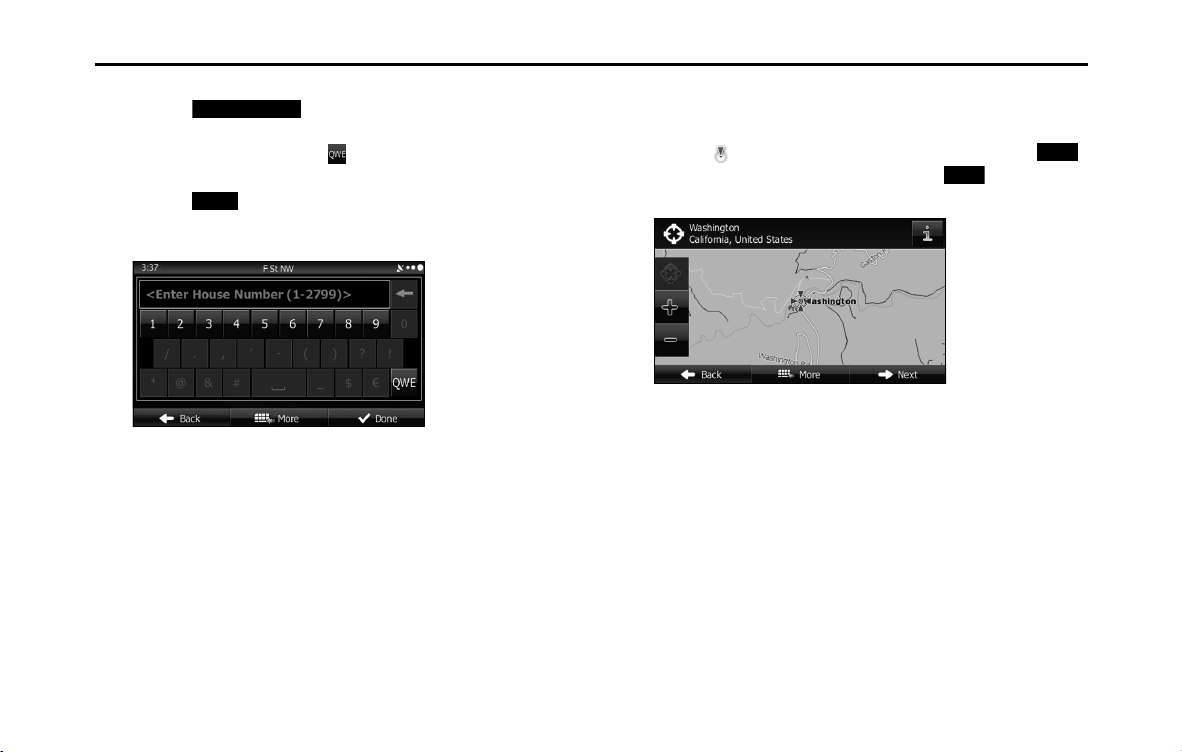
108 Navigation
Navigation
7 Enter the house number as follows.
(1) Touch (House Number).
(2) Enter the house number with the keyboard. (Enter the
number(s), and then touch .)
• For the keyboard, see “Using the Keyboard” on Page 88.
(3) Touch (Done) to finish entering the address. (If the
house number is not found, the center of the street is selected
as the destination.)
8 The map is displayed in full-screen mode with the
selected point at the center. If necessary, you can touch
another point on the map to change the destination. The
cursor ( ) is displayed at the new position. Touch
(Next) to set the destination, or touch (Back) to
select another destination.
House Number
Done
Next
Back
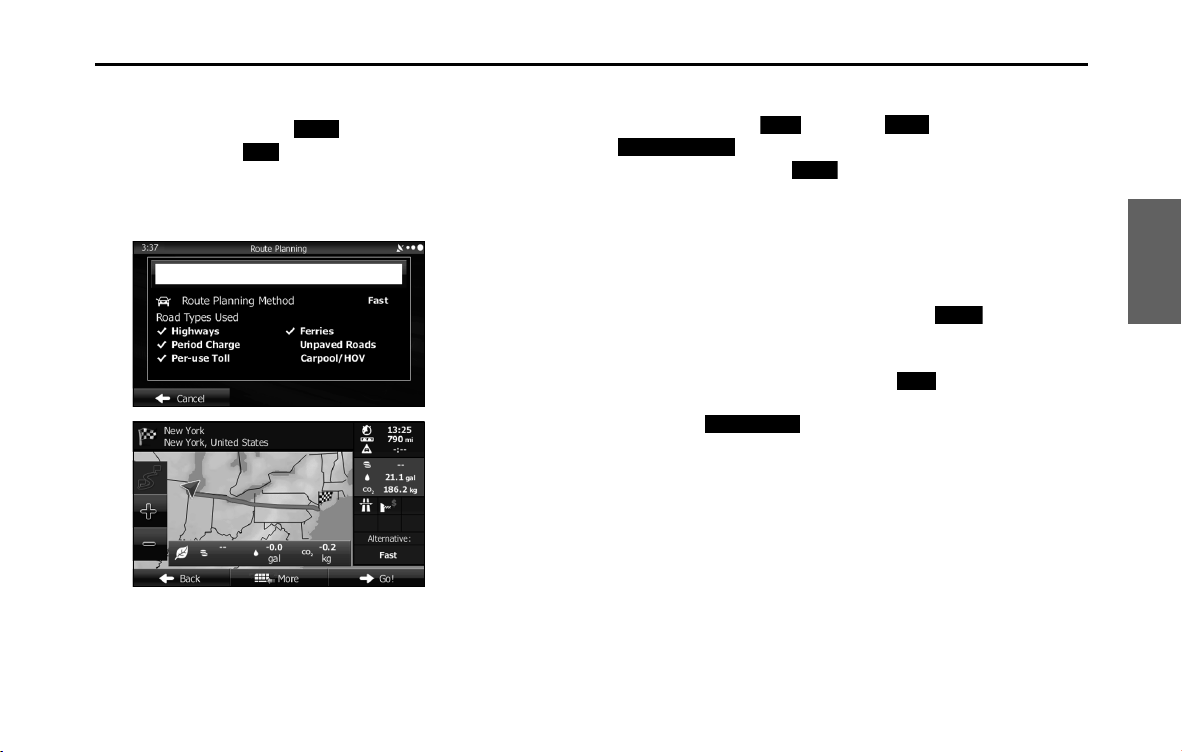
Navigation 109
Navigation
9 After a summary of the route plan is displayed, the entire
route is displayed on the map. The route is researched
automatically. Touch (More) to change the route
plan, or touch (Go!) to start navigation. (When the
countdown is displayed in the “Go!” button, guidance
begins automatically after 10 seconds even if you do not
touch the button.)
NOTE
If the destination will be used frequently, you can save it to the destination list as
follows before touching (Next). Touch (More), and then touch
(Add to Favorites). Enter a name for the destination you
want to save, and then touch (Done). You are automatically returned to
the map with the destination set. Start driving following the navigation.
■ Entering the center of the street as the destination
If you do not know the house number, you can navigate by setting the
center of the street as the destination.
1 If the Map screen is displayed, touch (Menu) to
return to the navigation menu.
2 On the navigation menu, touch (Find).
3 Touch (Find Address).
4 If necessary, change the country and district as
mentioned above. (See Page 106.)
More
Go!
Next More
Add to Favorites
Done
Menu
Find
Find Address
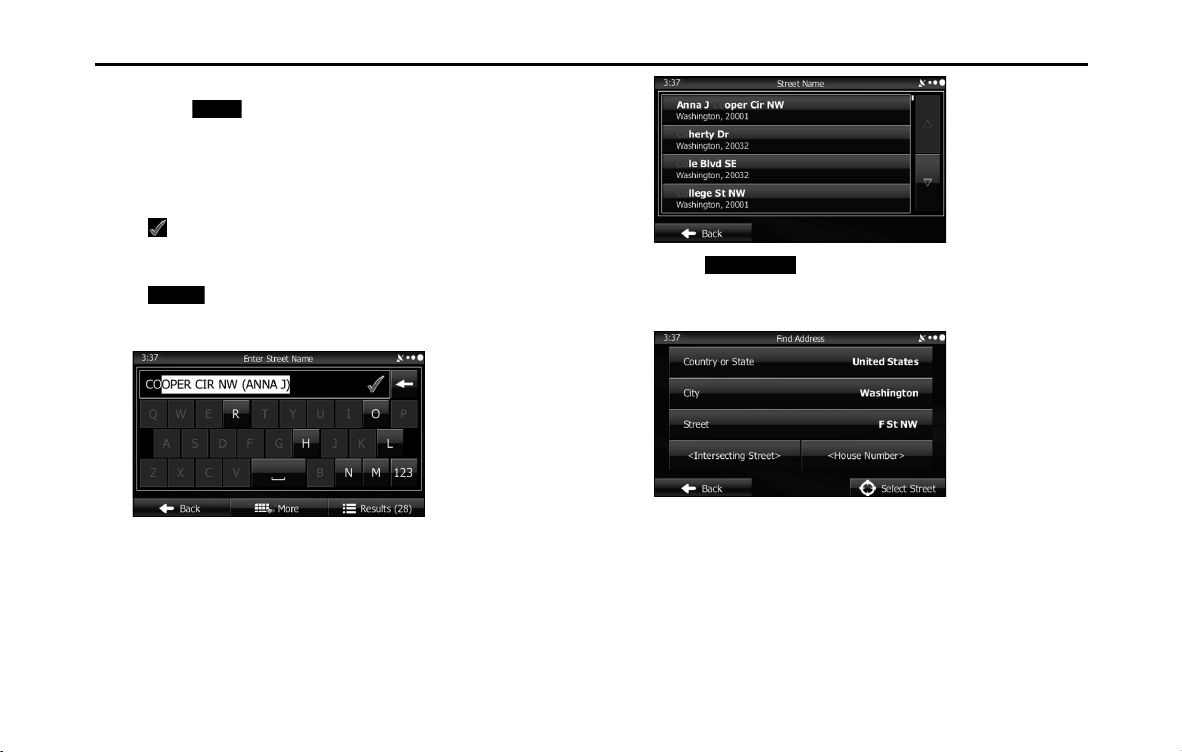
110 Navigation
Navigation
5 Enter the street name as follows.
(1) Touch (Street).
(2) Use the keyboard to enter the start of the street name.
• For the keyboard, see “Using the Keyboard” on Page 88.
(3) Find the street name to enter as follows.
• The most likely street name is displayed in the entry field. Touch
to use the name displayed.
• If the name you want is not automatically entered, enter a few
more letters from the name until it is displayed in the list (touch
(Results) to open the results list before the search
results are automatically displayed). Select the street from the
list.
6 Touch (Select Street) without entering an
address. The center of the street is selected as the
destination.
Street
Results
Select Street
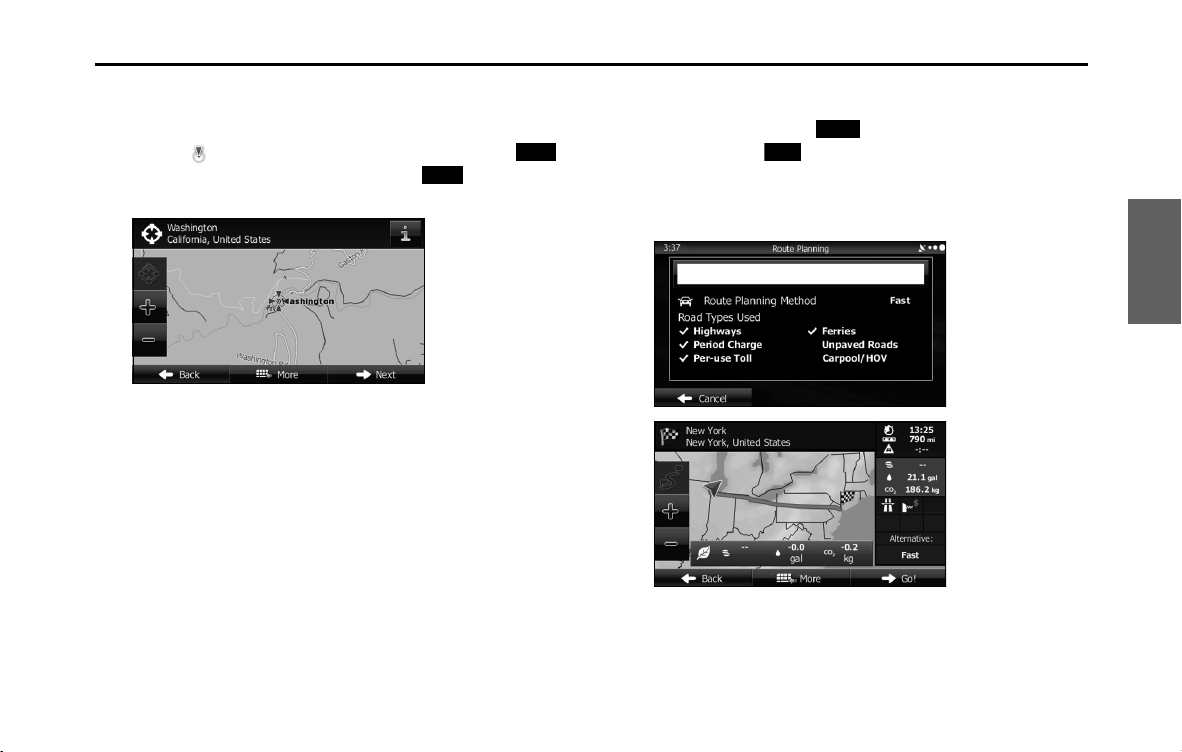
Navigation 111
Navigation
7 The map is displayed in full-screen mode with the
selected point at the center. If necessary, you can touch
another point on the map to change the destination. The
cursor ( ) is displayed at the new position. Touch
(Next) to set the destination, or touch (Back) to
select another destination.
8 After a summary of the route plan is displayed, the entire
route is displayed on the map. The route is researched
automatically. Touch (More) to change the route
plan, or touch (Go!) to start navigation. (When the
countdown is displayed in the “Go!” button, guidance
begins automatically after 10 seconds even if you do not
touch the button.)
Next
Back
More
Go!
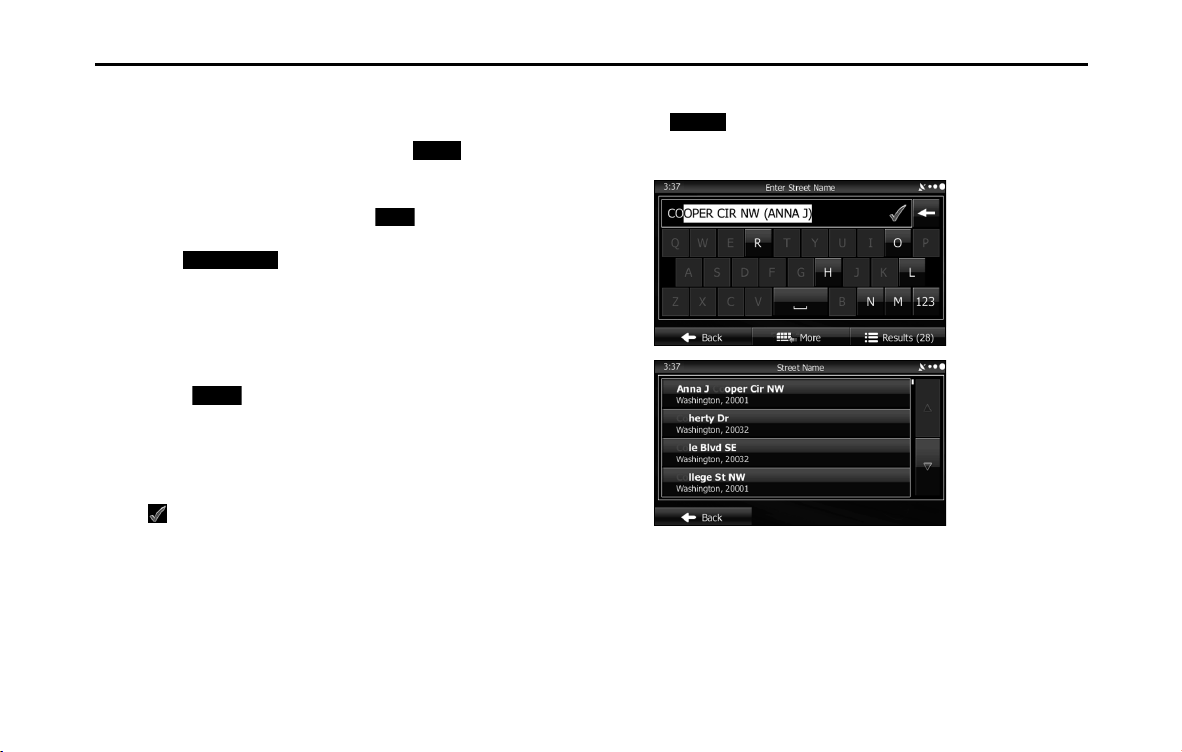
112 Navigation
Navigation
■ Selecting an intersection as the destination
Follow the steps below to enter an intersection as the destination.
1 If the Map screen is displayed, touch (Menu) to
return to the navigation menu.
2 On the navigation menu, touch (Find).
3 Touch (Find Address).
4 If necessary, change the country and district as
mentioned above. (See Page 106.)
5 Enter the street name as follows.
(1) Touch (Street).
(2) Use the keyboard to enter the start of the street name.
• For the keyboard, see “Using the Keyboard” on Page 88.
(3) Find the street name to enter as follows.
• The most likely street name is displayed in the entry field. Touch
to use the name displayed.
• If the name you want is not automatically entered, enter a few
more letters from the name until it is displayed in the list (touch
(Results) to open the results list before the search
results are automatically displayed). Select the street from the
list.
Menu
Find
Find Address
Street
Results
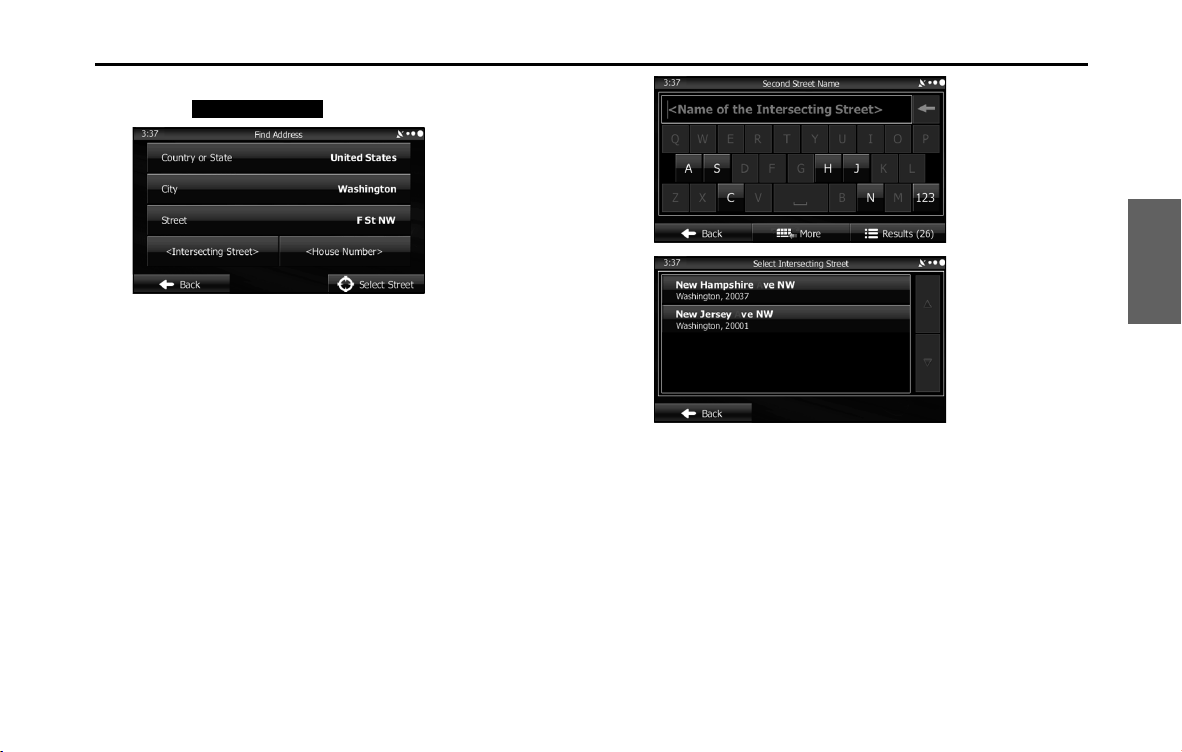
Navigation 113
Navigation
6 Enter the intersection name as follows.
(1) Touch (Intersecting Street).
• If there are only a few roads at the intersection, the list is
displayed immediately.
• If the road is a long way off, the keyboard screen is displayed.
Use the keyboard to enter the start of the intersection name.
(For the keyboard, see “Using the Keyboard” on Page 88.) A list is
automatically displayed when the entered road name matches
and can be displayed on one screen. Select from the list.
Intersecting Street
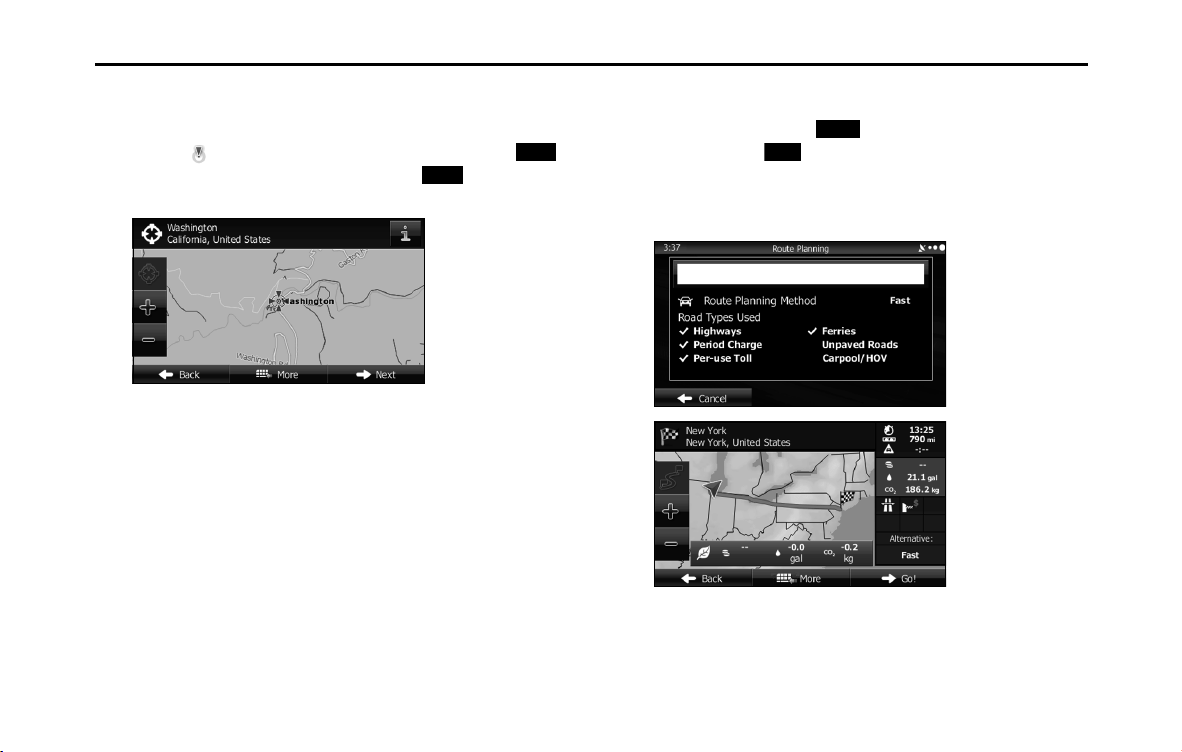
114 Navigation
Navigation
7 The map is displayed in full-screen mode with the
selected point at the center. If necessary, you can touch
another point on the map to change the destination. The
cursor ( ) is displayed at the new position. Touch
(Next) to set the destination, or touch (Back) to
select another destination.
8 After a summary of the route plan is displayed, the entire
route is displayed on the map. The route is researched
automatically. Touch (More) to change the route
plan, or touch (Go!) to start navigation. (When the
countdown is displayed in the “Go!” button, guidance
begins automatically after 10 seconds even if you do not
touch the button.)
Next
Back
More
Go!
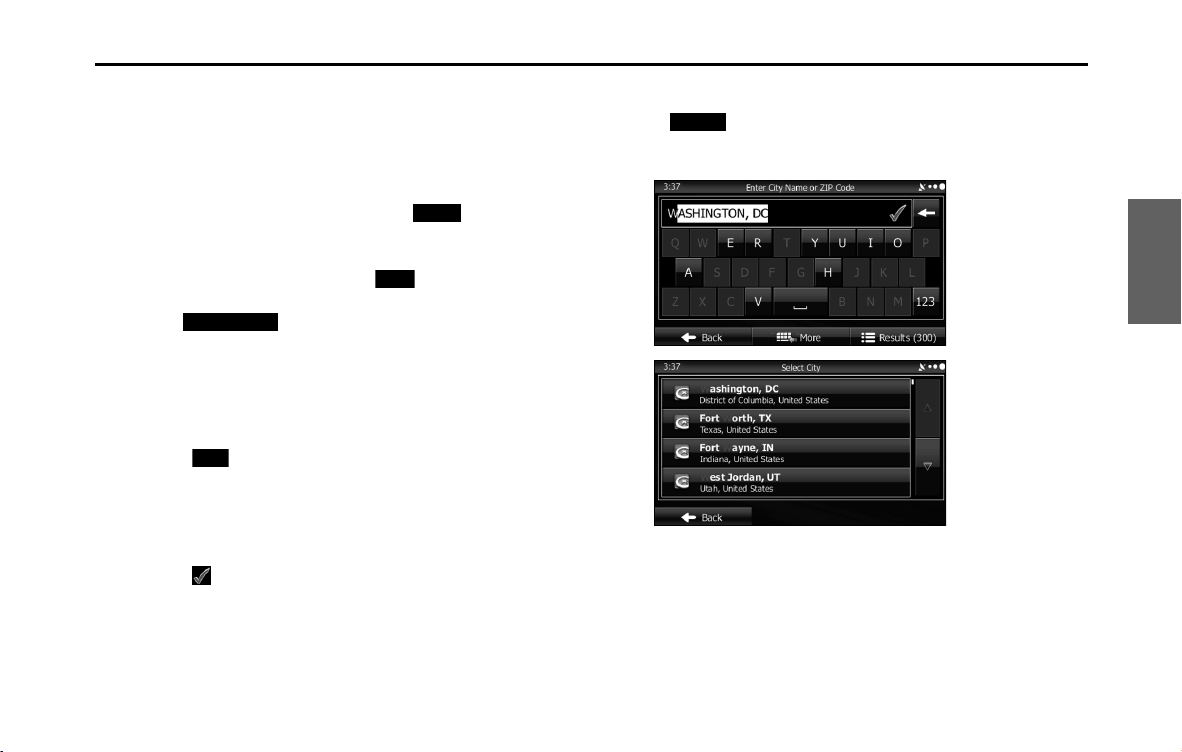
Navigation 115
Navigation
■ Selecting a city/town center as the destination
The center of the city/town is not the geographical center of the city/
town, but a location set by the cartographer. In towns and villages, this
is usually the most important intersection, while in larger cities it is
selected from multiple important intersections.
1 If the Map screen is displayed, touch (Menu) to
return to the navigation menu.
2 On the navigation menu, touch (Find).
3 Touch (Find Address).
4 If necessary, change the country as mentioned above.
(See Page 106.)
5 Select the city/town as follows.
(1) Touch (City).
(2) Use the keyboard to enter the start of the city/town.
• For the keyboard, see “Using the Keyboard” on Page 88.
(3) Follow the steps below to find the city/town you entered.
• The most likely city/town names are displayed in the entry field.
Touch to use the name displayed.
• If the name you want is not automatically entered, enter a few
more letters from the name until it is displayed in the list (touch
(Results) to open the results list before the search
results are automatically displayed). Select the city/town from
the list.
Menu
Find
Find Address
City
Results
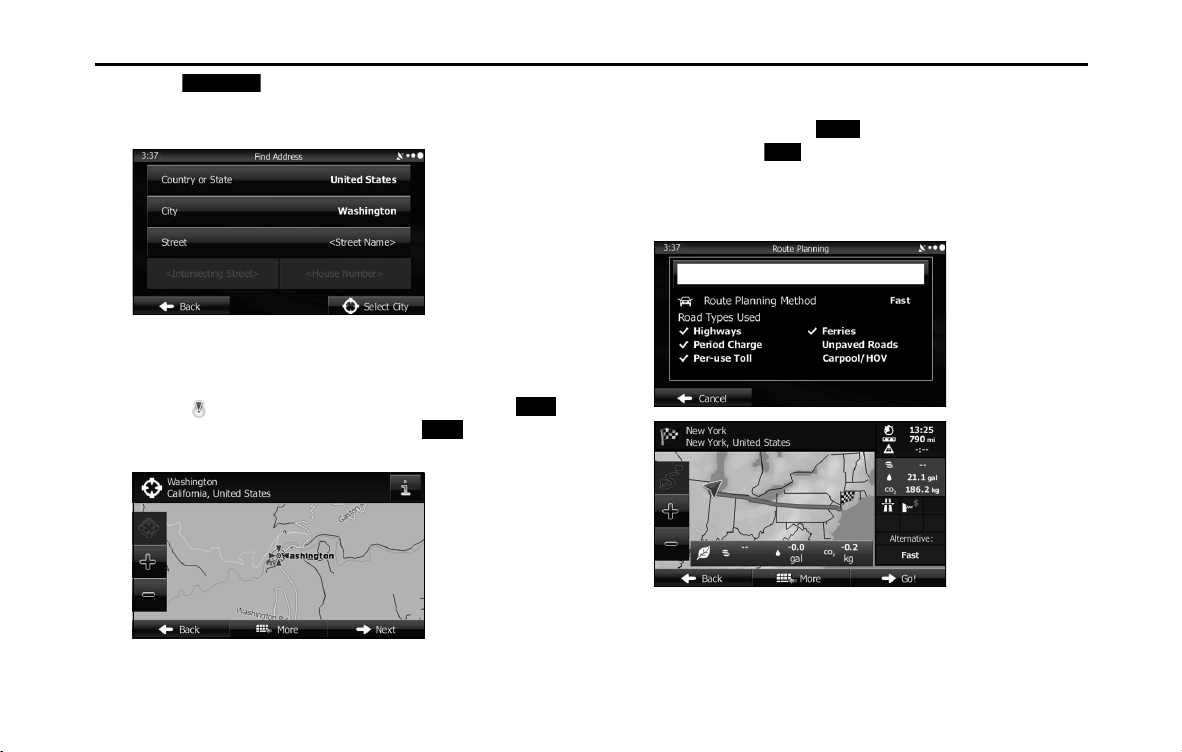
116 Navigation
Navigation
6 Touch (Select City) without entering the street
name. Set the city/town center displayed as the route's
destination.
7 The map is displayed in full-screen mode with the
selected point at the center. If necessary, you can touch
another point on the map to change the destination. The
cursor ( ) is displayed at the new position. Touch
(Next) to set the destination, or touch (Back) to
select another destination.
8 After a summary of the route plan is displayed, the entire
route is displayed on the map. The route is researched
automatically. Touch (More) to change the route
plan, or touch (Go!) to start navigation. (When the
countdown is displayed in the “Go!” button, guidance
begins automatically after 10 seconds even if you do not
touch the button.)
Select City
Next
Back
More
Go!
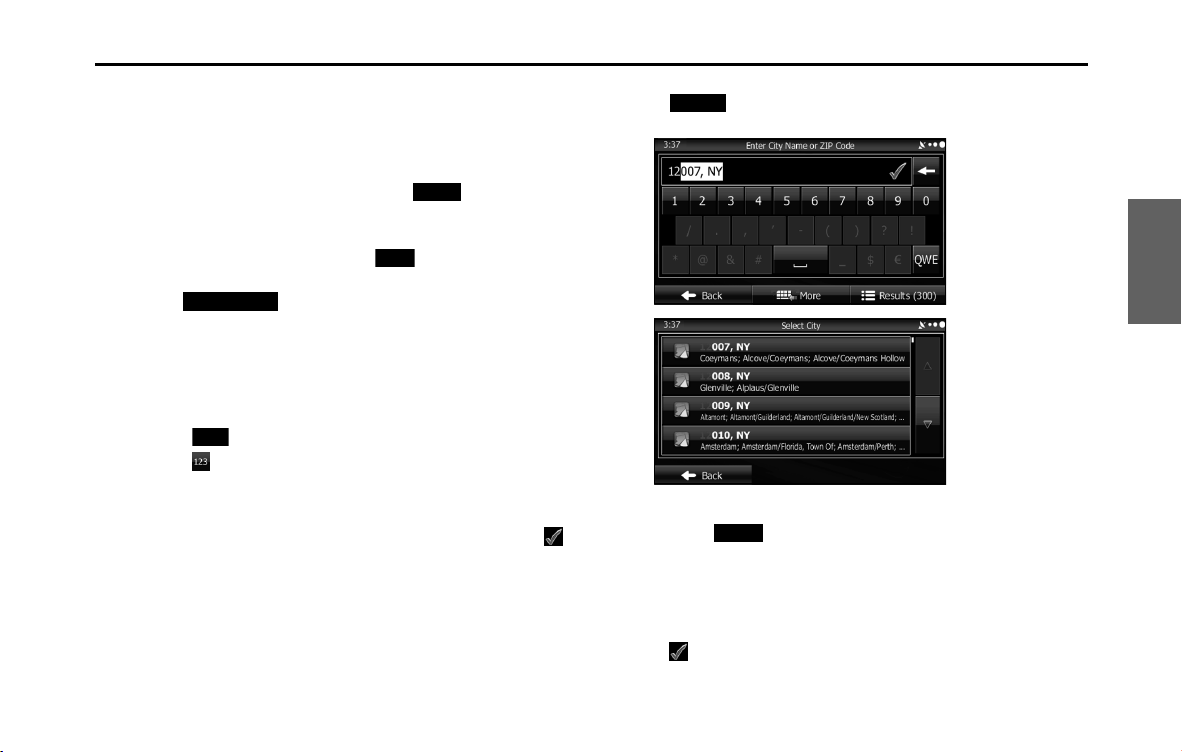
Navigation 117
Navigation
■ Using a ZIP Code
By entering the ZIP Code, you can perform the address search
mentioned above, even if you do not know the district name. The
following is an example of entering an accurate address.
1 If the Map screen is displayed, touch (Menu) to
return to the navigation menu.
2 On the navigation menu, touch (Find).
3 Touch (Find Address).
4 If necessary, change the country as mentioned above.
(See Page 106.)
5 Enter the city/town by using the ZIP Code.
(1) Touch (City).
(2) Touch to open the number pad.
(3) Start entering the ZIP Code.
(4) Follow the steps below to find the city/town you entered.
• The most likely ZIP Code is displayed in the entry field. Touch
to use the name displayed.
• If the ZIP Code you want to enter is not displayed, touch
(Results) to open the search results list. Select the ZIP
Code from the list.
6 Enter the street name as follows.
(1) Touch (Street).
(2) Use the keyboard to enter the start of the street name.
• For the keyboard, see “Using the Keyboard” on Page 88.
(3) Find the street name to enter as follows.
• The most likely street name is displayed in the entry field. Touch
to use the name displayed.
Menu
Find
Find Address
City
Results
Street

118 Navigation
Navigation
• If the name you want is not automatically entered, enter a few
more letters from the name until it is displayed in the list (touch
(Results) to open the results list before the search
results are automatically displayed). Select the street from the
list.
7 Enter the house number as follows.
(1) Touch (House Number).
(2) Enter the house number with the keyboard. (Enter the
number(s), and then touch .)
• For the keyboard, see “Using the Keyboard” on Page 88.
(3) Touch (Done) to finish entering the address. (If the
house number is not found, the center of the street is selected
as the destination.)
Results
House Number
Done

Navigation 119
Navigation
8 The map is displayed in full-screen mode with the
selected point at the center. If necessary, you can touch
another point on the map to change the destination. The
cursor ( ) is displayed at the new position. Touch
(Next) to set the destination, or touch (Back) to
select another destination.
9 After a summary of the route plan is displayed, the entire
route is displayed on the map. The route is researched
automatically. Touch (More) to change the route
plan, or touch (Go!) to start navigation. (When the
countdown is displayed in the “Go!” button, guidance
begins automatically after 10 seconds even if you do not
touch the button.)
Next
Back
More
Go!

120 Navigation
Navigation
■ Hints for quick address entry
• When entering a city/town name or a street name:
- Only characters that can be displayed in the search results are shown on the
keyboard. Other characters are grayed out.
- While entering text, the most likely search result is always displayed in the
text entry field. If the search result is correct, touch to select it.
- If you touch (Results) after entering two characters, items that
contain those two characters are displayed in the list.
• You can find intersections easily by using the following method.
- First, when searching for an uncommon road name, you only need to enter
the first few letters to acquire the name.
- When one street name is shorter than the other, the shorter one is searched
for first. This shortens the search time for the road with the longer name.
• You can search by road category as well as road name. When the
same word is included in names such as the street, road, and main
street, by entering the first character for the type of road, you can
quickly bring up the search results. For example, if you are searching
for “Pine Avenue” and you enter “Pi A”, roads such as “Pine Street” or
“Pickwick Road” are not displayed.
• You can also search by using the ZIP Code. If the ZIP Code only
contains a few characters, you can search more quickly than when
entering the city/town name.
Selecting the destination from your favorite
spots (POI: Point Of Interest)
You can select your destination from the favorite spots that have
already been saved in the software.
You can use the same screen to find a spot using the following various
methods.
• Using the quick search function, you can quickly search for spots
around the name.
• Using the preset search function, you can search for the most
popular spots with a few quick touches.
• Search using spot categories.
• Search using spot names.
You can also search for special services from the “Where Am I?” screen.
Results
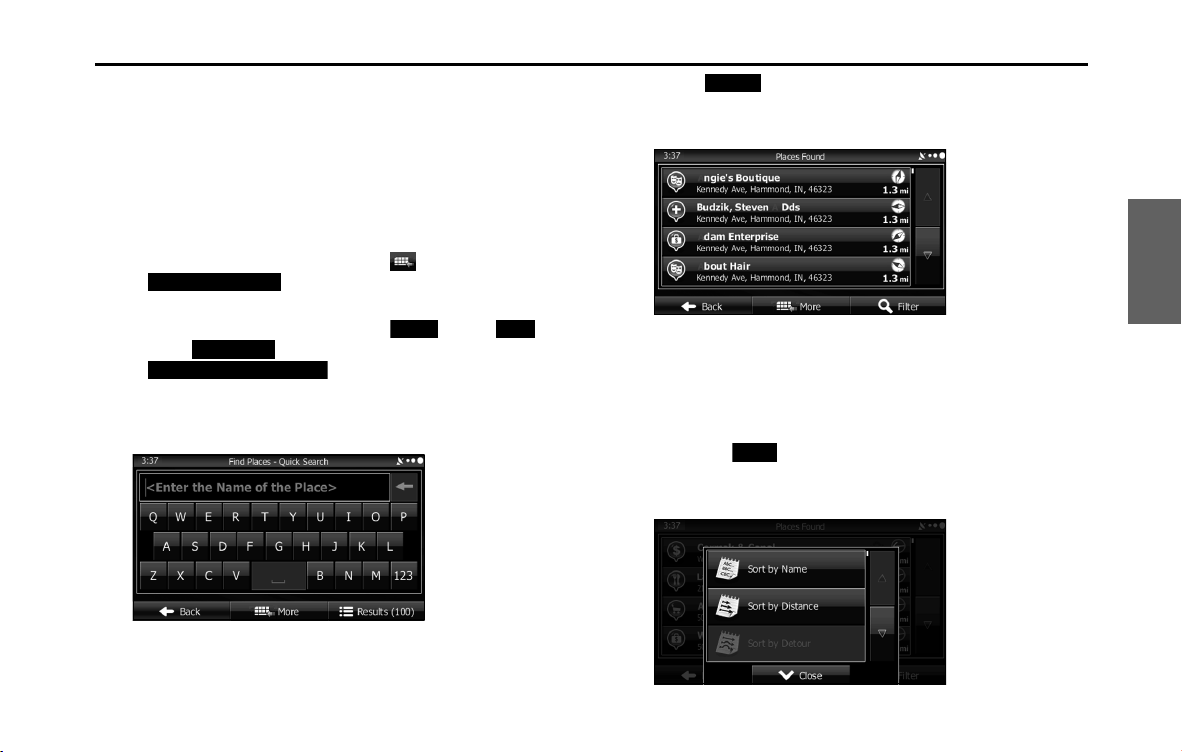
Navigation 121
Navigation
■ Performing a quick search for favorite spots
Using the quick search function, you can quickly search for spots by
name. You can use the following search items.
• Around the recommended route (when a recommended route is
available)
• Around the current location (when no destination is set)
1 Follow the steps below to start a quick search.
• If the Map screen is displayed, touch and then touch
(Quick Place Search). (Only when
registered to the Quick Menu.)
• If the Map screen is displayed, touch (Menu),
(Find), (Find Places), and then touch
(Quick Search Along Route).
2 Use the keyboard to enter the start of the spot name.
• For the keyboard, see “Using the Keyboard” on Page 88.
3 Touch (Results) after entering the first few
characters to open a list of spot names that include the
characters you entered.
4 (Optional) You can display spots on the list in name
order, in order of the distance from the current position
or previously confirmed position, or in order of necessary
detour distance (during navigation). If you want to
change the order in which entries are presented in the
list, touch (More) and select the style that you
want. Also, you can display all of the spots on the list on
the map.
Quick Place Search
Menu
Find
Find Places
Quick Search Along Route
Results
More
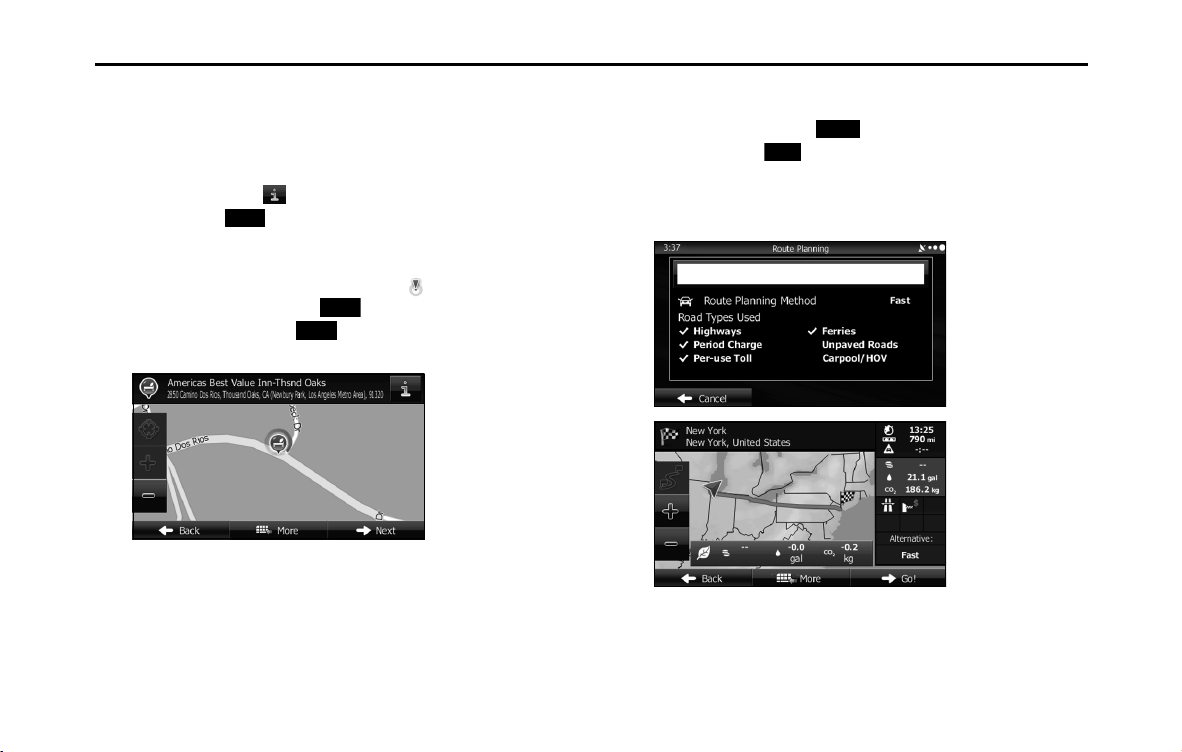
122 Navigation
Navigation
5 Find the item you want on the list, and then touch that
item. The map is displayed in full-screen mode with the
selected point at the center. The name and address of
the spot are displayed at the top of the screen.
6 (Optional) Touch to display details about the selected
spot. Touch (Back) to return to the map.
7 If necessary, you can touch another point on the map to
change the destination. The cursor ( ) is displayed at
the new position. Touch (Next) to set the
destination, or touch (Back) to select another
destination.
8 After a summary of the route plan is displayed, the entire
route is displayed on the map. The route is researched
automatically. Touch (More) to change the route
plan, or touch (Go!) to start navigation. (When the
countdown is displayed in the “Go!” button, guidance
begins automatically after 10 seconds even if you do not
touch the button.)
Back
Next
Back
More
Go!
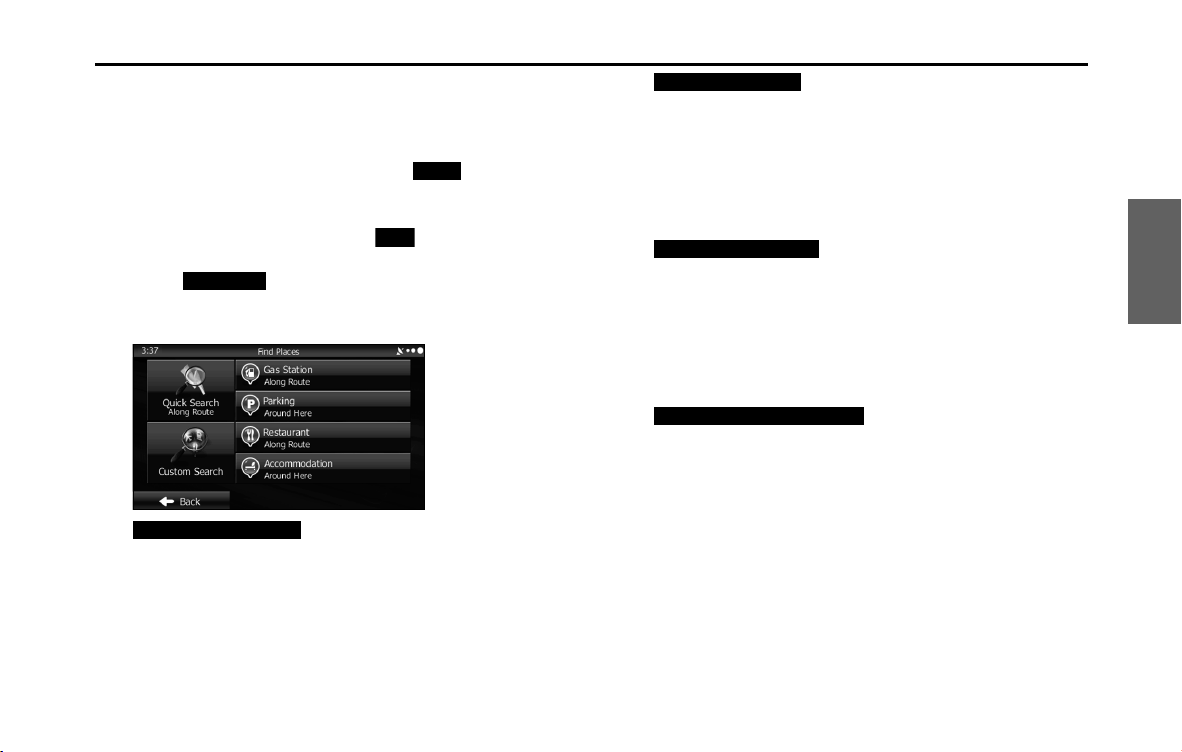
Navigation 123
Navigation
■ Searching for favorite spots using a preset category
By using the preset search function, you can quickly selected popular
spots.
1 If the Map screen is displayed, touch (Menu) to
return to the navigation menu.
2 On the navigation menu, touch (Find).
3 Touch (Find Places).
4 Display preset search categories as follows.
(Gas Station Around Route):
• Searches for gas stations along the route during route
navigation.
• Searches around the current position if navigation is not being
performed (if no destination is set).
• Searches the area around the last confirmed position if the
current position is unavailable (no GPS signal).
(Parking Around Here):
• Searches for parking lots at the destination during route
navigation.
• Searches around the current position if navigation is not being
performed (if no destination is set).
• Searches the area around the last confirmed position if the
current position is unavailable (no GPS signal).
(Restaurant Along Route):
• Searches for restaurants along the route during route
navigation.
• Searches around the current position if navigation is not being
performed (if no destination is set).
• Searches the area around the last confirmed position if the
current position is unavailable (no GPS signal).
(Accommodation Around Here ):
• Searches for accommodation at the destination during route
navigation.
• Searches around the current position if navigation is not being
performed (if no destination is set).
• Searches the area around the last confirmed position if the
current position is unavailable (no GPS signal).
Menu
Find
Find Places
Gas Station Along Route
Parking Around Here
Restaurant Along Route
Accommodation Around Here

124 Navigation
Navigation
5 Press the Favorites Quick Search button to display a basic
list of spots.
6 (Optional) You can display spots on the list in name
order, in order of the distance from the current position
or previously confirmed position, or in order of necessary
detour distance (during navigation). If you want to
change the order in which entries are presented in the
list, touch (More) and select the style that you
want. Also, you can display all of the spots on the list on
the map.
7 Find the item you want on the list, and then touch that
item. The map is displayed in full-screen mode with the
selected point at the center. The name and address of
the spot are displayed at the top of the screen.
8 (Optional) Touch to display details about the selected
spot. Touch (Back) to return to the map.
9 If necessary, you can touch another point on the map to
change the destination. The cursor ( ) is displayed at
the new position. Touch (Next) to set the
destination, or touch (Back) to select another
destination.
More
Back
Next
Back
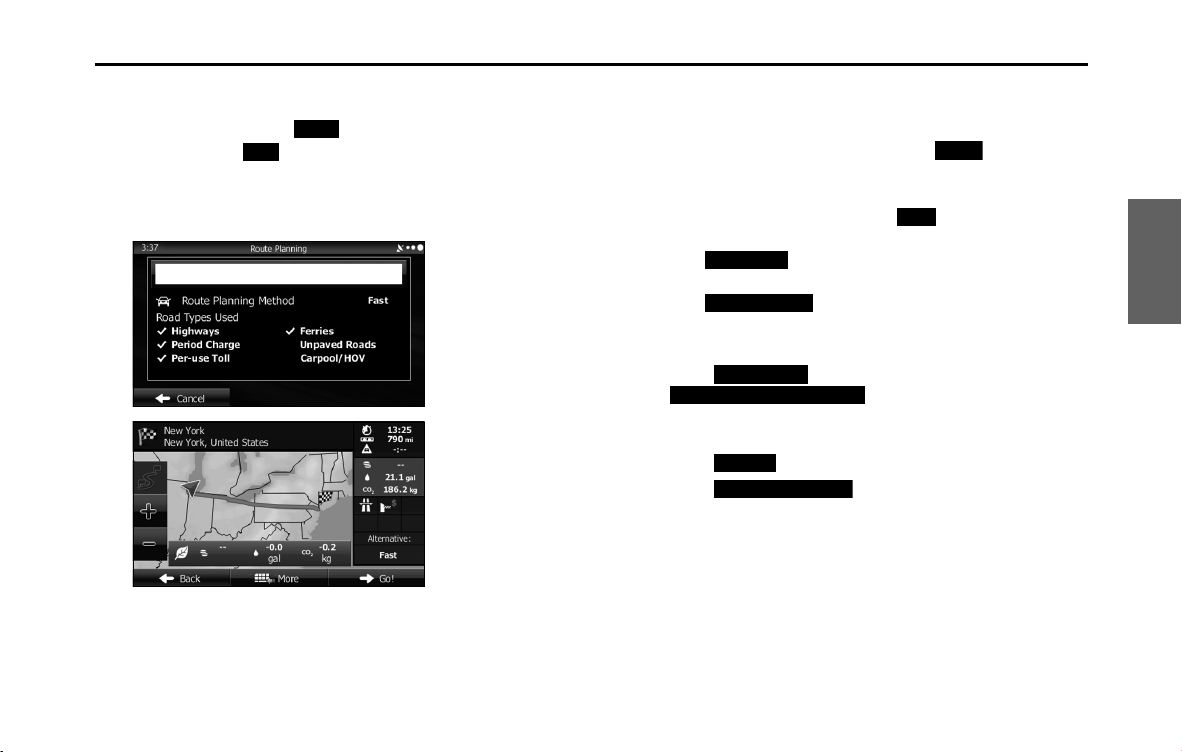
Navigation 125
Navigation
10 After a summary of the route plan is displayed, the entire
route is displayed on the map. The route is researched
automatically. Touch (More) to change the route
plan, or touch (Go!) to start navigation. (When the
countdown is displayed in the “Go!” button, guidance
begins automatically after 10 seconds even if you do not
touch the button.)
■ Searching for a favorite spot by category
You can search for favorite spots by category or sub-category.
1 If the Map screen is displayed, touch (Menu) to
return to the navigation menu.
2 On the navigation menu, touch (Find).
3 Touch (Find Places).
4 Touch (Custom Search).
5 Select the spot area you want to search for as follows.
• Touch (Around Here) or
(Around Last Known Position) to
search around your current position, or the latest confirmed
position.
• Touch (In a City) to search for city/town spots.
• Touch (Around Destination) to search for
spots at the destination during route navigation.
More
Go!
Menu
Find
Find Places
Custom Search
Around Here
Around Last Known Position
In a City
Around Destination

126 Navigation
Navigation
• Touch (Along Route) to search along the route
being navigated, rather than around an optional point. This is
useful when you want to search for a gas station or restaurant
and so on along the route taking the smallest detour to get
there.
• (Optional) If you select (In a City), you can select a
city/town displayed by the search.
•See “Entering an address” on Page 106 for information about
how to select a "Country or State" or "City".
6 By selecting a main category (such as accommodations),
or by touching (List All Places), the entire
list of spots around the position you selected or along
the route is displayed.
7
By selecting a sub-category (such as hotels or motels)
from the main category, or by touching (List
All Places), the entire list of spots around the position
you selected or along the route is displayed.
Along Route
In a City
List All Places
List All Places
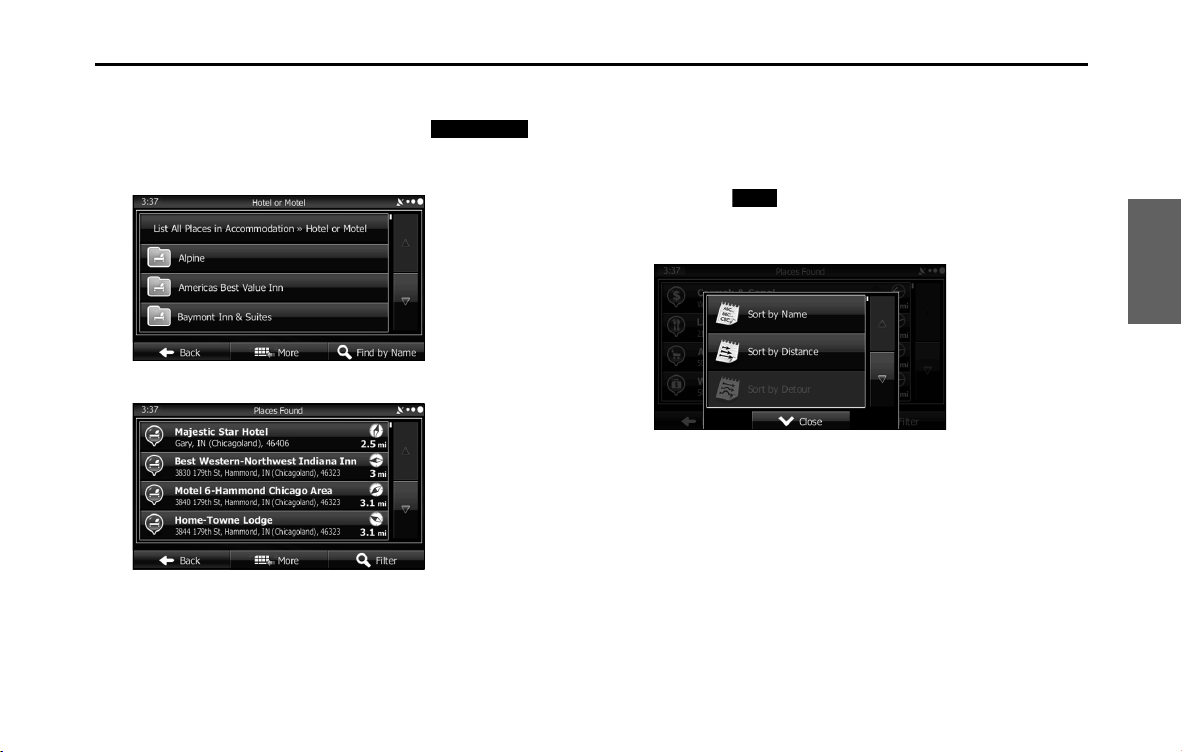
Navigation 127
Navigation
8 Brand names of services may also be displayed
depending on the sub-category of the selected spot. By
selecting a brand name, or by touching (List
All Places), the entire list of spots around the position
you selected or along the route is displayed.
9 The final search results are displayed as a list.
10 (Optional) You can display spots on the list in name
order, in order of the distance from the current position
or previously confirmed position, or in order of necessary
detour distance (during navigation). If you want to
change the order in which entries are presented in the
list, touch (More) and select the style that you
want. Also, you can display all of the spots on the list on
the map.
11 Find the item you want on the list, and then touch that
item. The map is displayed in full-screen mode with the
selected point at the center. The name and address of
the spot are displayed at the top of the screen.
List All Places
More
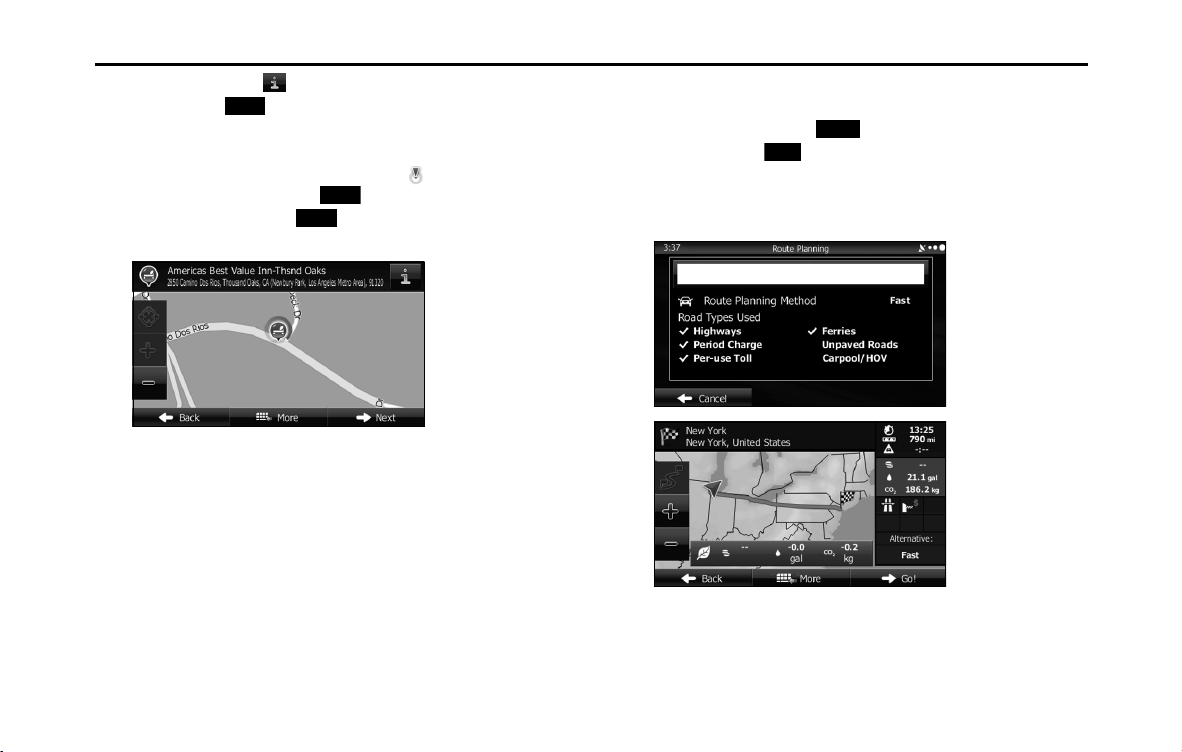
128 Navigation
Navigation
12 (Optional) Touch to display details about the selected
spot. Touch (Back) to return to the map.
13 If necessary, you can touch another point on the map to
change the destination. The cursor ( ) is displayed at
the new position. Touch (Next) to set the
destination, or touch (Back) to select another
destination.
14 After a summary of the route plan is displayed, the entire
route is displayed on the map. The route is researched
automatically. Touch (More) to change the route
plan, or touch (Go!) to start navigation. (When the
countdown is displayed in the “Go!” button, guidance
begins automatically after 10 seconds even if you do not
touch the button.)
Back
Next
Back
More
Go!
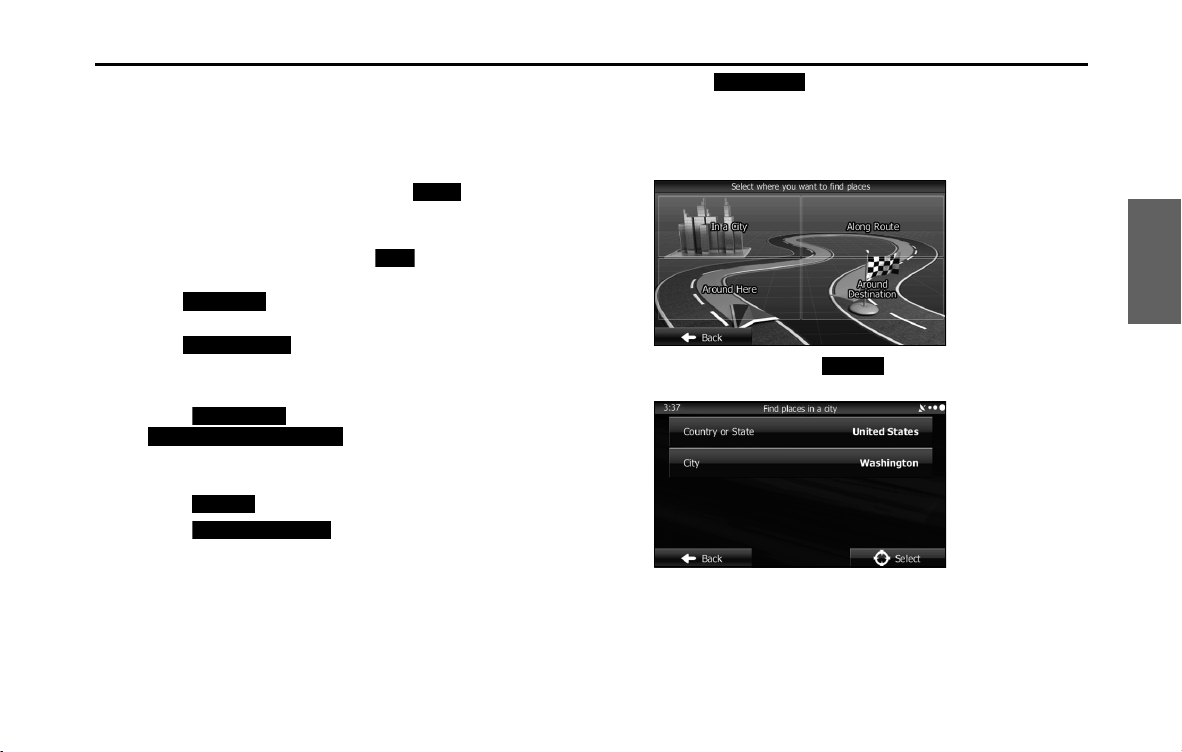
Navigation 129
Navigation
■ Searching for a favorite spot by name
You can search for a favorite spot by name. You can search the entire
spot database or select a category/sub-category for another location or
for the route being navigated.
1 If the Map screen is displayed, touch (Menu) to
return to the navigation menu.
2 On the navigation menu, touch (Find).
3 Touch (Find Places).
4 Touch (Custom Search).
5 Select the spot area you want to search for as follows.
• Touch (Around Here) or
(Around Last Known Position) to
search around your current position, or the latest confirmed
position.
• Touch (In a City) to search for city/town spots.
• Touch (Around Destination) to search for
spots at the destination during route navigation.
• Touch (Along Route) to search along the route
being navigated, rather than around an optional point. This is
useful when you want to search for a gas station or restaurant
and so on along the route taking the smallest detour to get
there.
• (Optional) If you select (In a City), you can select a
city/town displayed by the search.
•See “Entering an address” on Page 106 for information about
how to select a "Country or State" or "City".
Menu
Find
Find Places
Custom Search
Around Here
Around Last Known Position
In a City
Around Destination
Along Route
In a City

130 Navigation
Navigation
6 By selecting a main category (such as accommodations),
or by touching (Find by Name), you can
search all spots.
7 By selecting a sub-category (such as hotels or motels)
from the main category, or by touching
(Find by Name), you can search in the main category you
selected.
8 Touch (Find by Name) to search a sub-
category of the selected spot.
9 Use the keyboard to enter the start of the spot name.
• For the keyboard, see “Using the Keyboard” on Page 88.
Find by Name
Find by Name
Find by Name

Navigation 131
Navigation
10 Touch (Results) after entering the first few
characters to open a list of spot names that include the
characters you entered.
11 Find the item you want on the list, and then touch that
item. The map is displayed in full-screen mode with the
selected point at the center. The name and address of
the spot are displayed at the top of the screen.
12 (Optional) Touch to display details about the selected
spot. Touch (Back) to return to the map.
13 If necessary, you can touch another point on the map to
change the destination. The cursor ( ) is displayed at
the new position. Touch (Next) to set the
destination, or touch (Back) to select another
destination.
Results
Back
Next
Back

132 Navigation
Navigation
14 After a summary of the route plan is displayed, the entire
route is displayed on the map. The route is researched
automatically. Touch (More) to change the route
plan, or touch (Go!) to start navigation. (When the
countdown is displayed in the “Go!” button, guidance
begins automatically after 10 seconds even if you do not
touch the button.)
■ Using “Where Am I?” to select the closest assistance
service
You can search for the closest assistance service by using the “Where
Am I?” screen.
1
Touch on the Map screen to open the Quick menu.
2 Touch (Where Am I?), and then touch
(Help Nearby).
More
Go!
Where Am I?
Help Nearby

Navigation 133
Navigation
3 The preset search categories are displayed. This button
searches for everything around your current position (or
the latest confirmed position if it is unavailable).
• (Car Repair Around Here)
Vehicle repairs / Road-side assistance services
• (Health Around Here):
Hospitals / Emergency services
• (Police Around Here):
Police stations
• (Gas Station Around Here):
Gas stations
4 Press any of the quick search buttons to display a basic
list for the service you selected.
5 Find the item you want on the list, and then touch that
item. The map is displayed in full-screen mode with the
selected point at the center. The name and address of
the spot are displayed at the top of the screen.
6 (Optional) Touch to display details about the selected
spot. Touch (Back) to return to the map.
7 If necessary, you can touch another point on the map to
change the destination. The cursor ( ) is displayed at
the new position. Touch (Next) to set the
destination, or touch (Back) to select another
destination.
Car Repair Around Here
Health Around Here
Police Around Here
Gas Station Around Here
Back
Next
Back
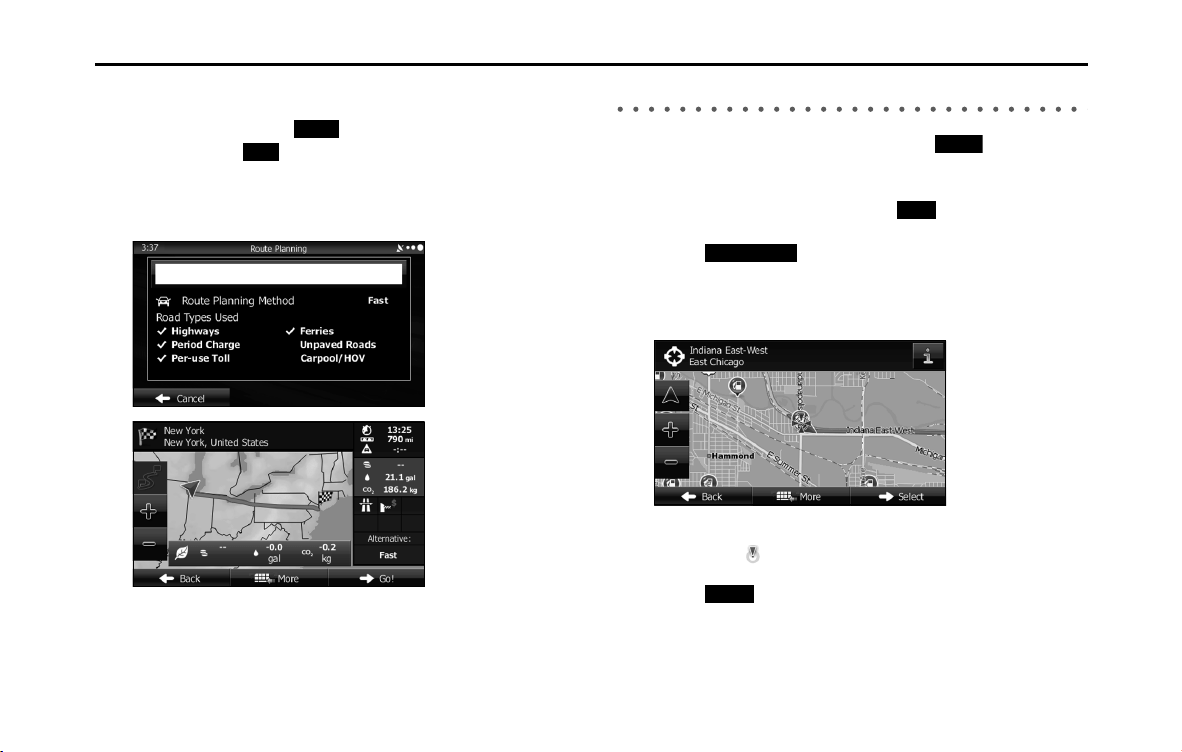
134 Navigation
Navigation
8 After a summary of the route plan is displayed, the entire
route is displayed on the map. The route is researched
automatically. Touch (More) to change the route
plan, or touch (Go!) to start navigation. (When the
countdown is displayed in the “Go!” button, guidance
begins automatically after 10 seconds even if you do not
touch the button.)
Selecting a Map Position as the Destination
1 If the Map screen is displayed, touch (Menu) to
return to the navigation menu.
2 On the navigation menu, touch (Find).
3
Touch (Find on Map).
4 Search for the destination on the map as follows. Move
or enlarge/reduce the map as necessary.
5 Touch the position you want to select as the destination.
The cursor ( ) is displayed.
6 Touch (Select) to select the cursor as the
destination.
More
Go!
Menu
Find
Find on Map
Select
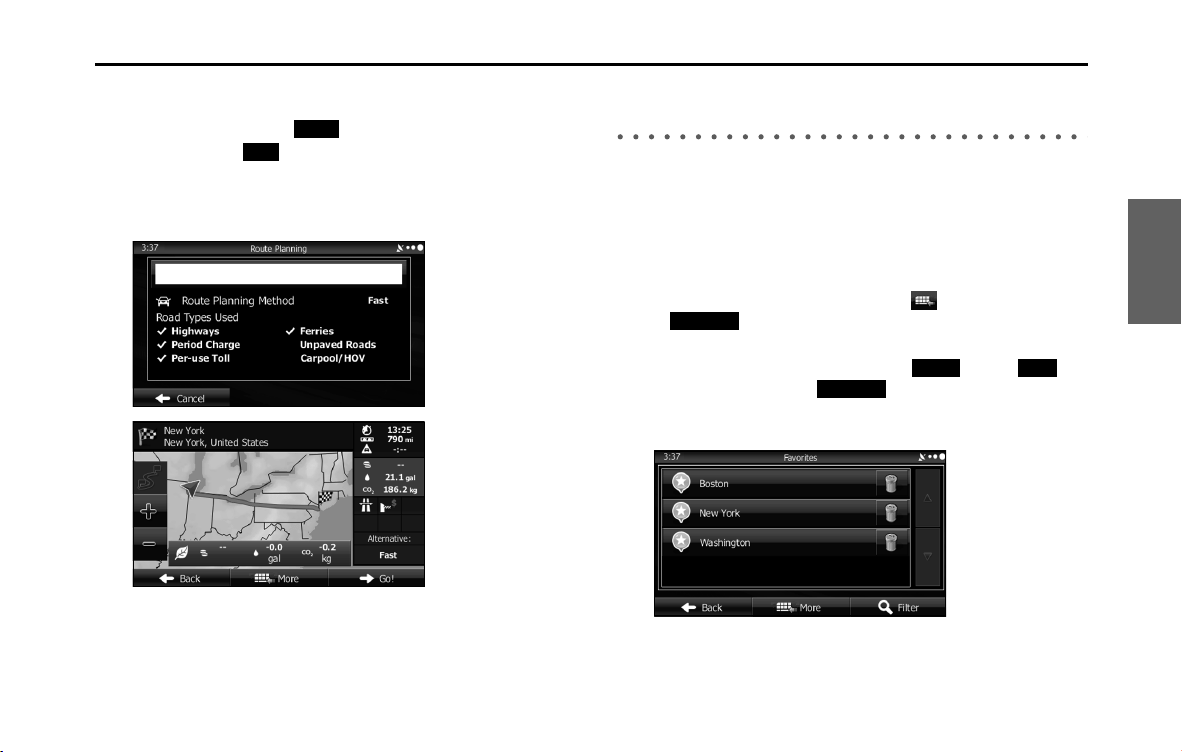
Navigation 135
Navigation
7 After a summary of the route plan is displayed, the entire
route is displayed on the map. The route is researched
automatically. Touch (More) to change the route
plan, or touch (Go!) to start navigation. (When the
countdown is displayed in the “Go!” button, guidance
begins automatically after 10 seconds even if you do not
touch the button.)
Selecting the Destination from the Destination
List
You can set a position that has been saved in the destination list as the
destination.
See “Editing the Destination List (Route Editing)” on Page 147 for more
details on registering a position to the destination list.
1
Display the destination list as follows.
• If the Map screen is displayed, touch and then touch
(Favorites). (Only when registered to the Quick
Menu.)
• If the Map screen is displayed, touch (Menu),
(Find) and then touch (Favorites).
2 The destination list is displayed.
More
Go!
Favorites
Menu Find
Favorites
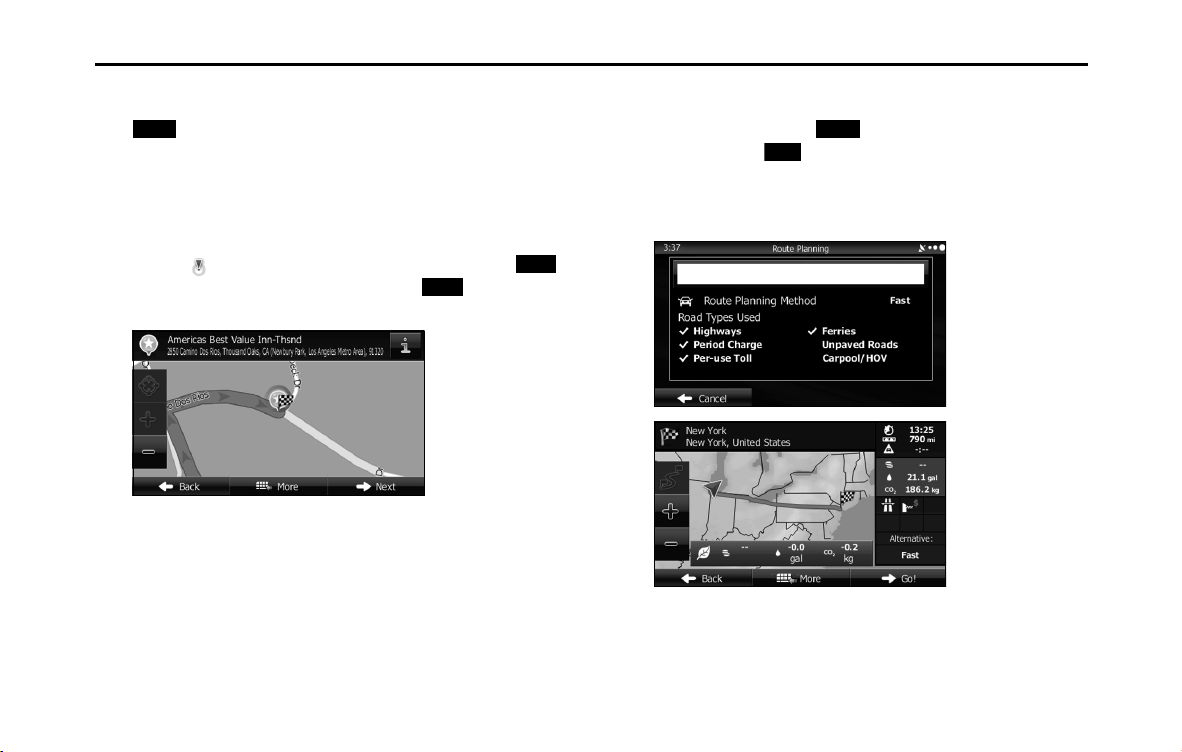
136 Navigation
Navigation
3 Touch the position you want to select as the destination.
If necessary, you can scroll through the list, or touch
(Filter) and enter a few letters form the item name
to search the list.
4 The map is displayed in full-screen mode with the
selected point at the center. If necessary, you can touch
another point on the map to change the destination. The
cursor ( ) is displayed at the new position. Touch
(Next) to set the destination, or touch (Back) to
select another destination.
5 After a summary of the route plan is displayed, the entire
route is displayed on the map. The route is researched
automatically. Touch (More) to change the route
plan, or touch (Go!) to start navigation. (When the
countdown is displayed in the “Go!” button, guidance
begins automatically after 10 seconds even if you do not
touch the button.)
Filter
Next
Back
More
Go!
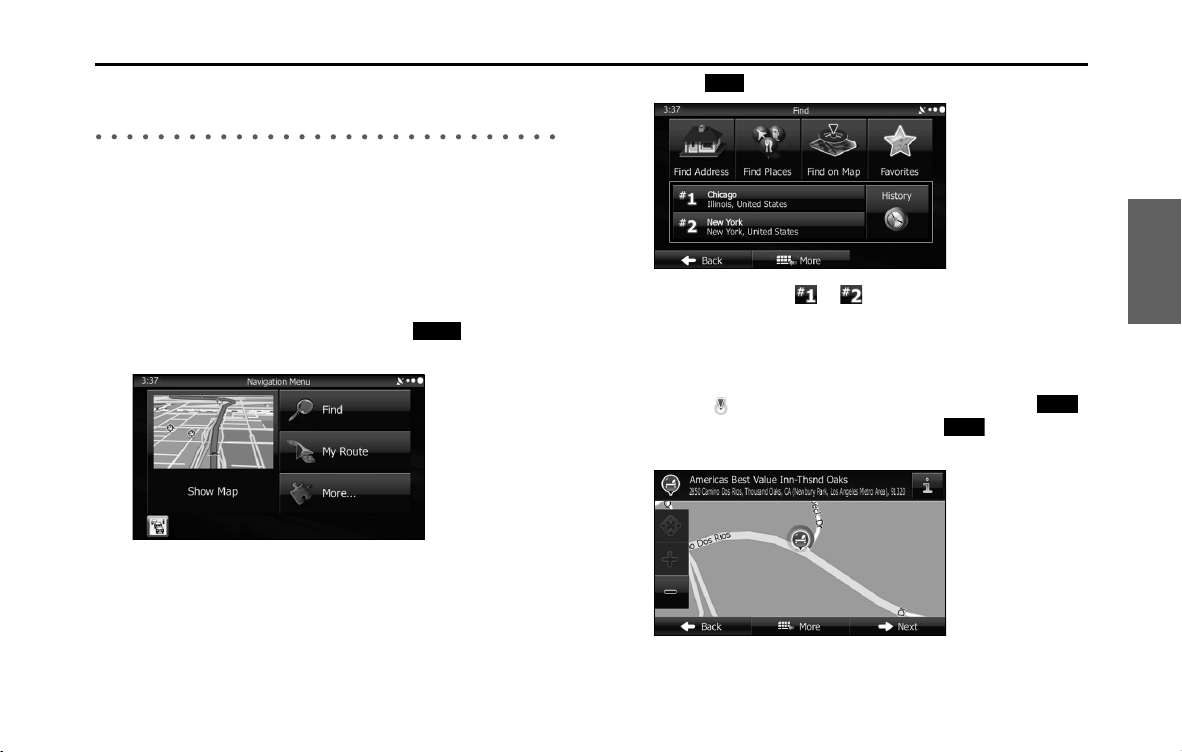
Navigation 137
Navigation
Selecting a Frequently Used Destination (Smart
History)
Destinations that have been set previously are displayed in the History
list. The two most recent destinations are displayed on the destination
menu allowing you to select them easily. Smart History uses conditions
such as the current time, date, and position, and displays a position in
response to the user's navigation habits. The more you use the
navigation system, the more accurate the anticipated destination
becomes.
1 If the Map screen is displayed, touch (Menu) to
return to the navigation menu.
2 Touch (Find) on the navigation menu.
3 Touch destination or in the History field.
4 The map is displayed in full-screen mode with the
selected point at the center. If necessary, you can touch
another point on the map to change the destination. The
cursor ( ) is displayed at the new position. Touch
(Next) to set the destination, or touch (Back) to
select another destination.
Menu
Find
Next
Back
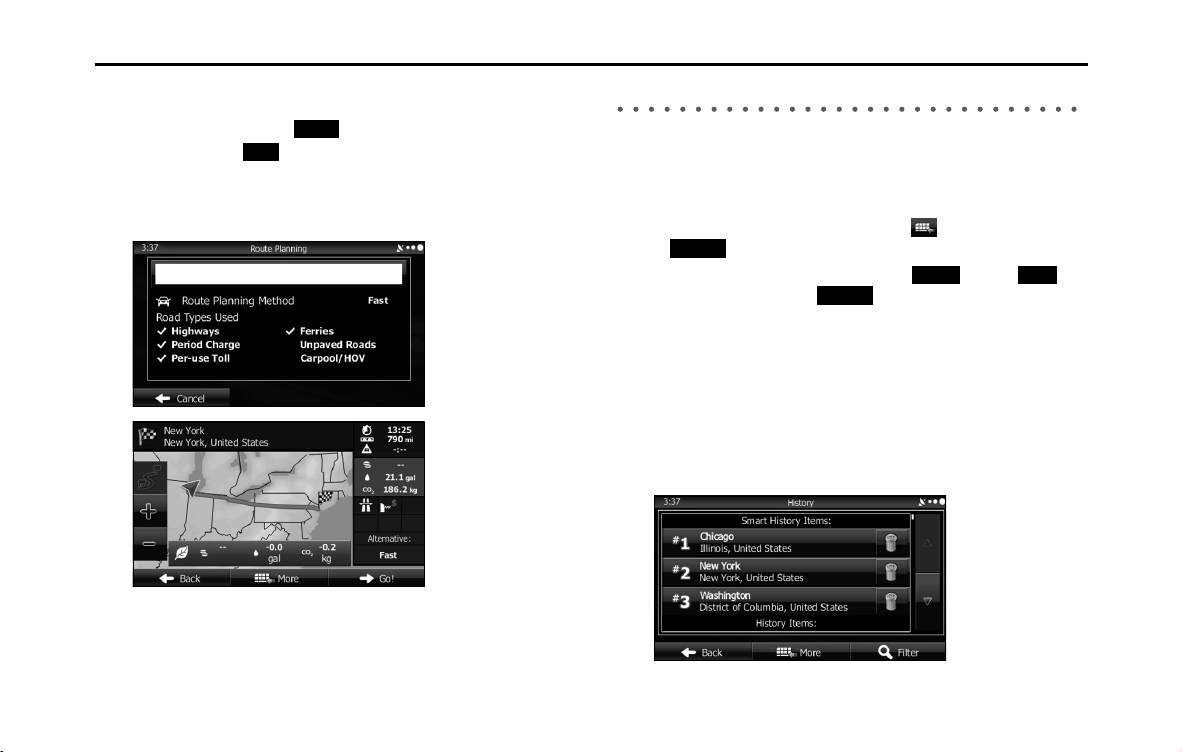
138 Navigation
Navigation
5 After a summary of the route plan is displayed, the entire
route is displayed on the map. The route is researched
automatically. Touch (More) to change the route
plan, or touch (Go!) to start navigation. (When the
countdown is displayed in the “Go!” button, guidance
begins automatically after 10 seconds even if you do not
touch the button.)
Selecting a Recent Destination from History
Destinations that have been set previously are displayed in the History
list.
1 Use the History function as follows.
• If the Map screen is displayed, touch and then touch
(History). (Only when registered to the Quick Menu.)
• If the Map screen is displayed, touch (Menu),
(Find) and then touch (History).
2 A list of recently entered destinations is displayed. A
History search displays three destination on the top page
based on previously entered routes (destinations with
the highest likelihood of use). Other destinations are
displayed based on the time they were entered in the
past. If necessary, scroll through the list to display older
entries and select the destination.
More
Go!
History
Menu
Find
History
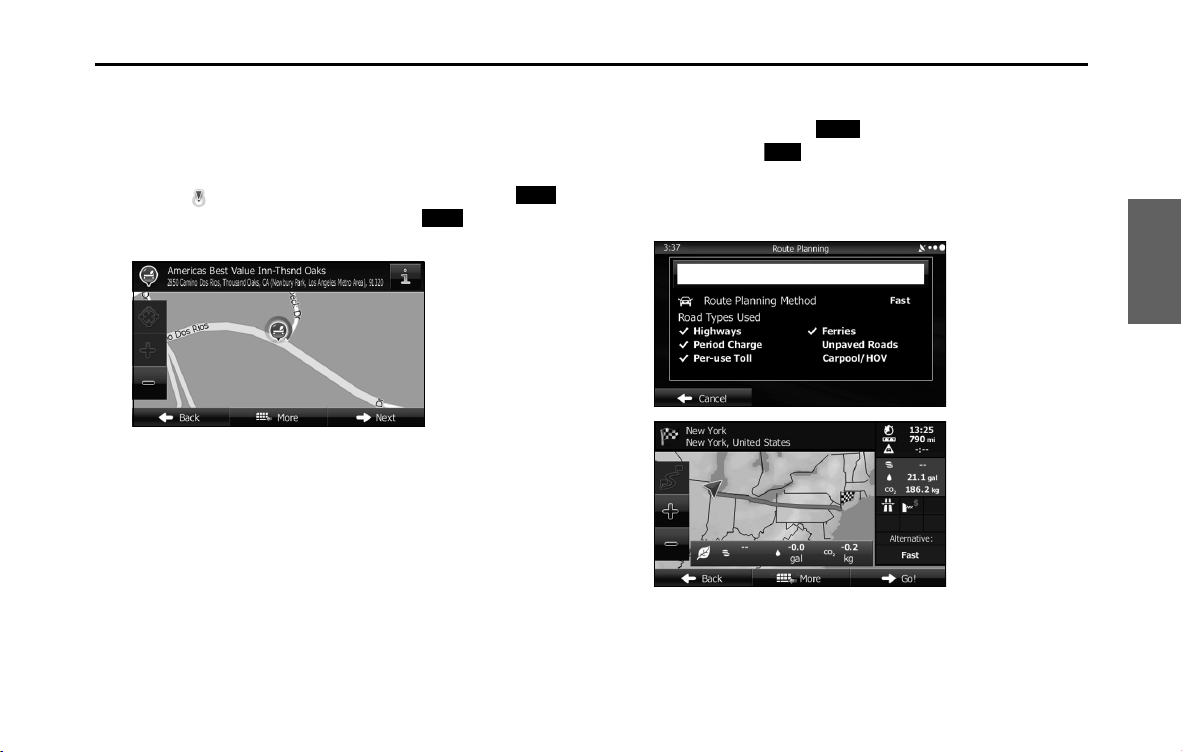
Navigation 139
Navigation
3 Select a destination from the list.
4 The map is displayed in full-screen mode with the
selected point at the center. If necessary, you can touch
another point on the map to change the destination. The
cursor ( ) is displayed at the new position. Touch
(Next) to set the destination, or touch (Back) to
select another destination.
5 After a summary of the route plan is displayed, the entire
route is displayed on the map. The route is researched
automatically. Touch (More) to change the route
plan, or touch (Go!) to start navigation. (When the
countdown is displayed in the “Go!” button, guidance
begins automatically after 10 seconds even if you do not
touch the button.)
Next
Back
More
Go!
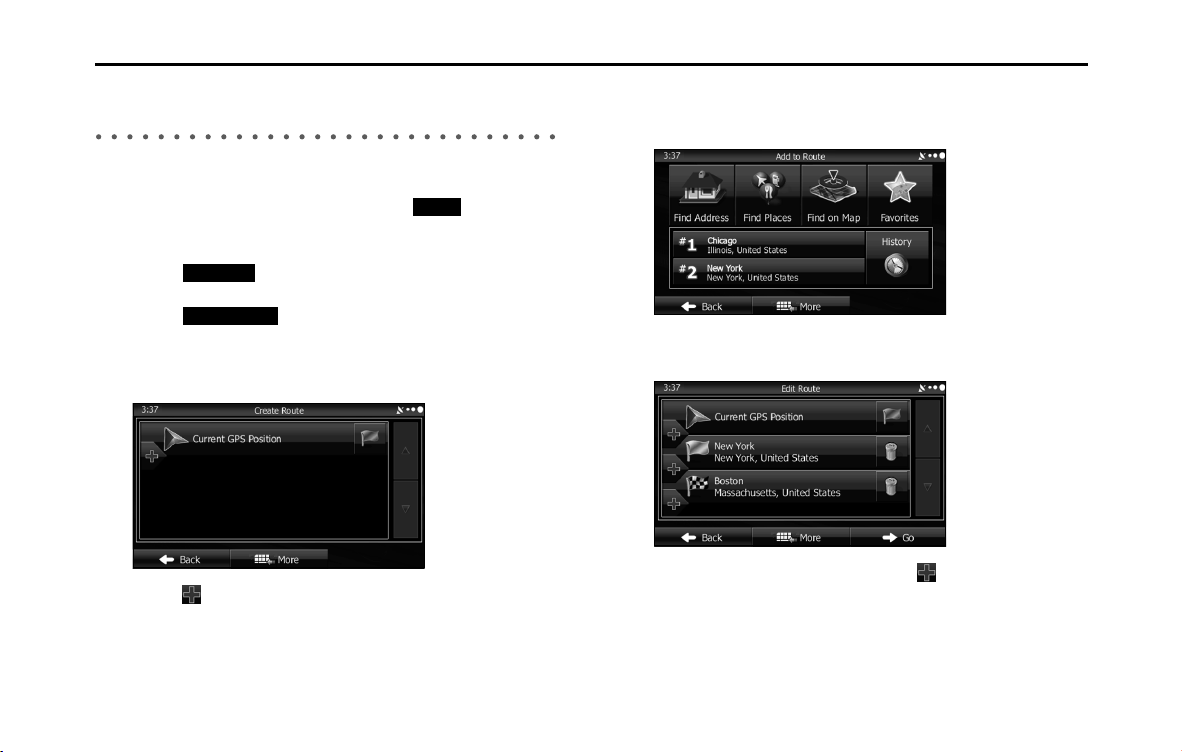
140 Navigation
Navigation
Creating a Route from the Destination List
(Route Creator)
You can create a route for each destination in the saved routes menu.
1 If the Map screen is displayed, touch (Menu) to
return to the navigation menu.
2 Touch (My Route) on the navigation menu.
3 Touch (Create Route).
4 Only one row showing the route's start point (current
position displayed) is displayed in the route point list.
5 Touch to select a destination.
6 When the destination menu is displayed, select the
route's destination using the same method as described
previously.
7 After selecting a new destination, you are returned to the
list.
8 To add another destination, touch at the point where
you want to add a new route point to the list, and repeat
the steps above.
Menu
My Route
Create Route
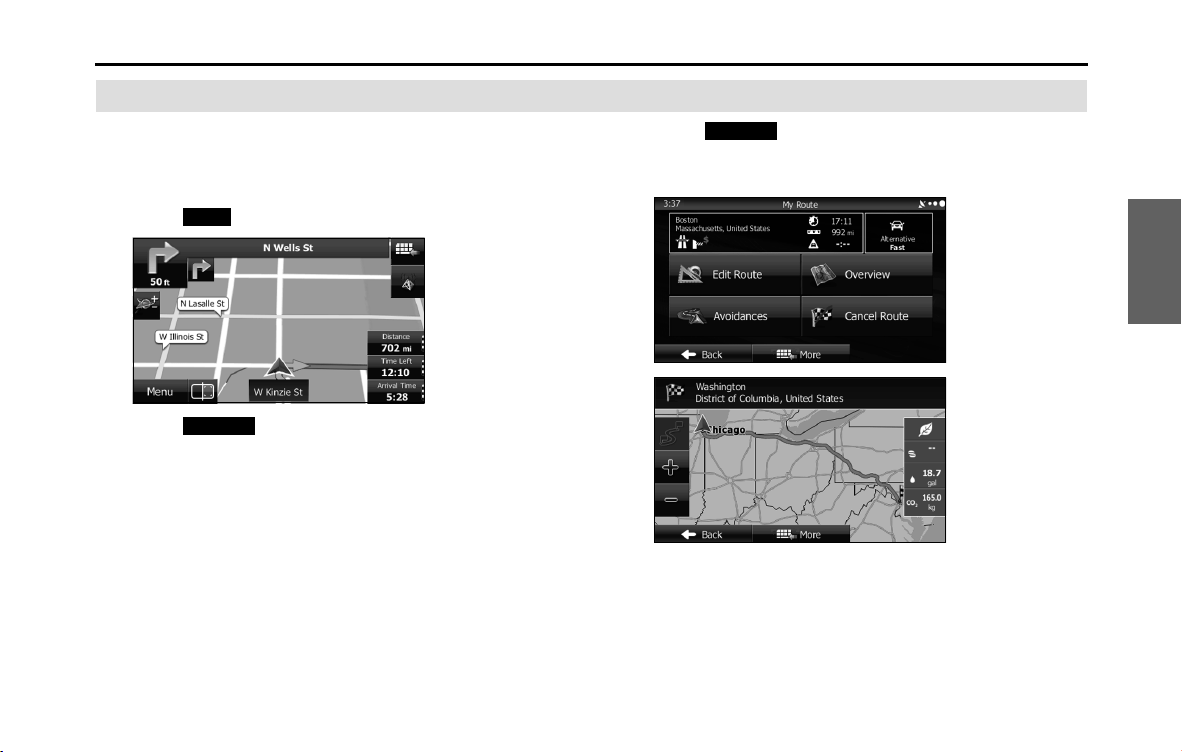
Navigation 141
Navigation
Displaying the Entire Route on the Map
You can easily display an overview of the entire route
currently being navigated. Follow the steps below to use the
initial settings screen.
1 Touch (Menu) on the Map screen.
2 Touch (My Route) on the navigation menu.
3 Touch (Overview). The entire route currently
being navigated is displayed on the map along with
detailed information and buttons.
Menu
My Route
Overview

142 Navigation
Navigation
Confirming Route Settings and Calling Route Related Functions
You can check a variety of route settings recommended by
the software.
1 If the Map screen is displayed, touch (Menu) to
return to the navigation menu.
2 Touch (My Route) on the navigation menu.
3 The following information items are displayed.
• Destination Name/Address
• Displays detailed information (unpaved roads, toll roads, and so
on) on the warning icons (depending on conditions) for the
current route.
•Total time for route
• Total distance for route
• Estimated delay times calculated from traffic conditions on the
route
• Route planning method (“Priority to time” and so on)
4 The following options are displayed on the screen (see
the next section for more detailed information).
• Touch (Edit Route) to add or delete a destination, or
change the order for the destinations. You can set the route
departure point, excluding the current position. This is useful
for creating a route in advance and saving it for later use.
• Touch (Overview) to display the entire route on the
map. (See Page 141.)
• Touch (Avoidances) to avoid a section of the
route. (See Page 143.)
• Touch (Cancel Route) to delete the route
currently being navigated. (See Page 148.)
• Touch (More) to display a list of various options such as
selecting another route, changing the route settings, running a
simulation of the route, saving the route being navigated, and
reading a previously saved route.
• Touch (Back) to return to the navigation menu.
Menu
My Route
Edit Route
Overview
Avoidances
Cancel Route
More
Back

Navigation 143
Navigation
Setting the avoidance route
The Avoidances feature allows you to remove any of the roads or
special sections on the planned route.
• (Avoid Special Sections):
Avoid Special Sections allows you to remove any special road types
(e.g. motorways or ferries) from your route. This feature is only
available if there are special sections along the planned route.
• (Avoid Route Ahead):
The Avoid Route Ahead option skips a predefined length of the
planned route (500m, 1000m, etc.) right ahead of the current
position.
• (Avoid Specific Road):
Avoid Specific Road allows you to skip a specific road from your
calculated route.
• (Restore Original Route):
Touch "Restore Original Route" to delete the avoid route being
navigated.
In each case, the result of the selected avoidance is shown on the map
with an indication of additional or saved time and distance. The user
can review and confirm the avoidance on this screen.
Note that avoidances are not permanent: they are only applied for the
active route.
Avoid Special Sections
Avoid Route Ahead
Avoid Specic Road
Restore Original Route
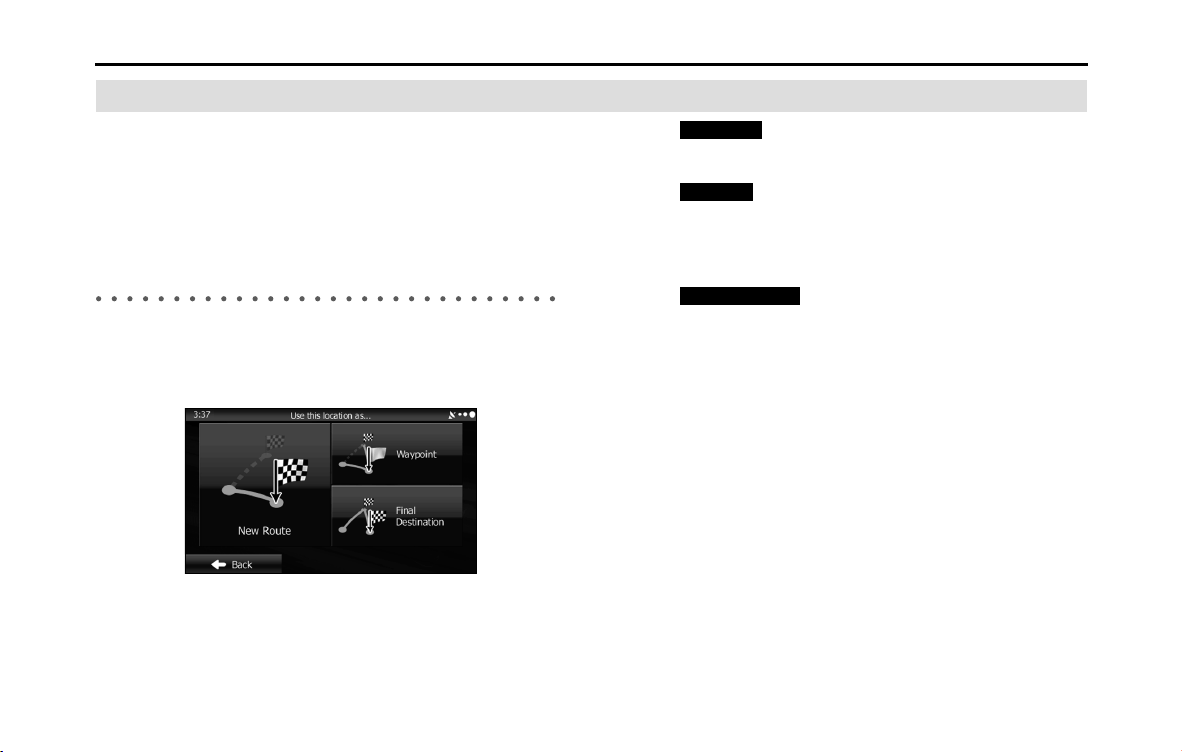
144 Navigation
Navigation
Changing the Route
When navigation has already begun, you can change the
route being navigated by using one of the following
methods. The methods are explained in the following section.
Selecting a new destination after the route has
been set: new route, waypoint, and final
destination
If a recommended route is already available, and a new destination has
been selected using the method described in the previous section, the
start new route, add a new waypoint (midway point), and add the
destination you selected as the final destination buttons are displayed.
• Touch (New Route) to create a new route at the
position you selected. Previous destinations and waypoints are
deleted.
• Touch (Waypoint) to add the position you selected as a
new waypoint for the current route. Other destinations for the route
are already enabled. Note: Waypoints are set so that the optimum
route is maintained between destinations. You can use the route
editing function to set the position for waypoints on the route.
• Touch (Final Destination) to add the destination
you selected as the final destination for the current route. Other
destinations for the route are already enabled. Up to now, the
position marked as the final destination becomes the final waypoint.
New Route
Waypoint
Final Destination
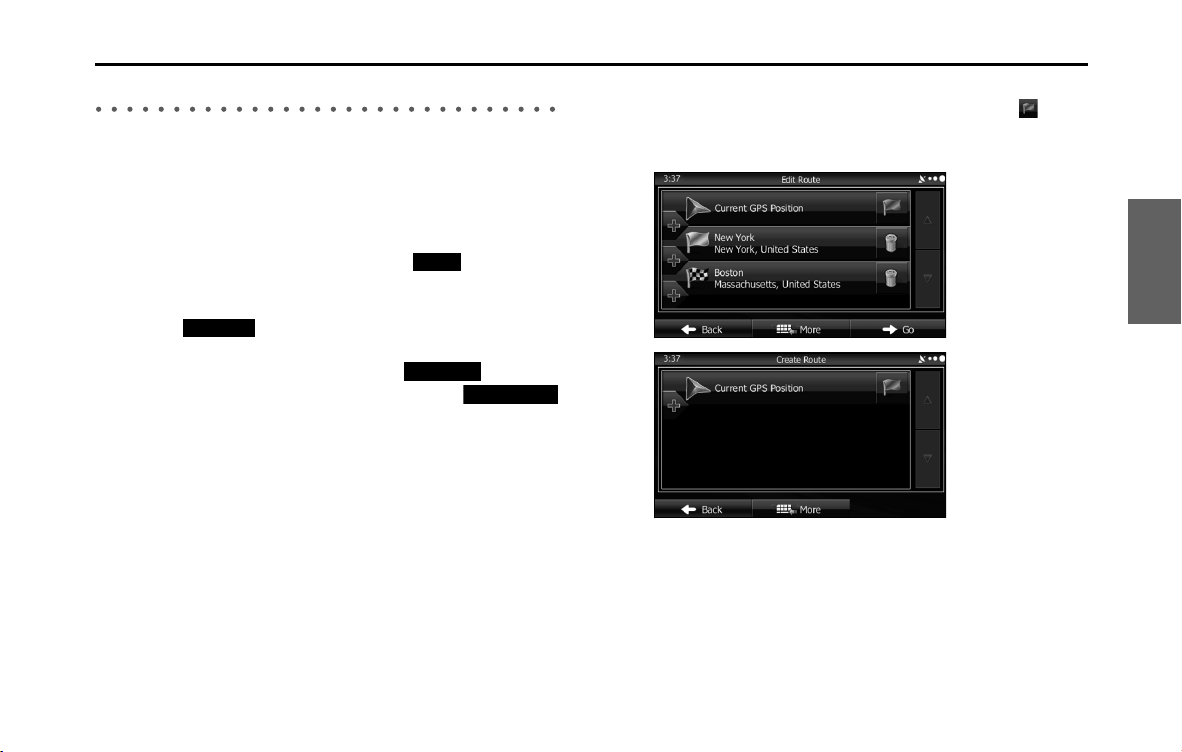
Navigation 145
Navigation
Setting a New Starting Point for the Route
In standard navigation, all routes are created from the current position.
You can turn off the GPS so that you can study a route that is not
currently being driven, run a simulation, and check the time or distance
for the route. This way, you can set a start point for the route without
using the current GPS position.
1 If the Map screen is displayed, touch (Menu) to
return to the navigation menu.
2 Touch (My Route) on the navigation menu.
3 If a route is already available, touch (Edit
Route). If a route has already started, touch
(Create Route).
4 The first row shows the start position (displays the
current position) for the route. When you touch , if a
warning message is displayed, select which operation to
perform.
Menu
My Route
Edit Route
Create Route

146 Navigation
Navigation
5 When the destination menu is displayed, select the
route's start point by using the same method as
selecting the destination.
6 Set the new start point, and then touch (Go!).
7 The vehicle marker goes clear on the map, indicating
that there is no GPS reception. If a route is already being
navigated, it is recalculated using the position selected
at that time.
8
To return to standard navigation, touch
(Turn on GPS), and if a warning message is displayed,
select which operation to perform.
Go!
Turn on GPS

Navigation 147
Navigation
Editing the Destination List (Route Editing)
You can change the destination list and edit the route. You can add or
delete destinations, change the start point, or change the order of the
list.
1 Use the Route Editing function as follows.
• If the Map screen is displayed, touch and then touch
(Edit Route) to start operation from Step 3. (Only
when registered to the Quick Menu.)
• If the Map screen is displayed, touch (Menu) and then
touch (My Route).
2 Touch (Edit Route).
3 The following options are available.
• Touch to add a new destination.
• Touch to delete a destination.
• Touch to change the start point of the route.
• Touch (More) to change the display order of the list. You
can also manually select the optimum route in the application.
Edit Route
Menu
My Route
Edit Route
More
148 Navigation
Navigation
Pausing Route Navigation
You do not need to pause a route currently being navigated. When you
start driving again, the software automatically restarts audio navigation
from the current position.
Canceling Route Navigation
Perform one of the following procedures to cancel a route that is
currently being navigated.
• If the Map screen is displayed, touch and then touch
(Cancel Route). (If waypoints are set on the route, you
need to touch (Remove Next Waypoint)
until all waypoints have been deleted.)
• On the Map screen is displayed, touch (Menu),
(My Route), and then touch (Cancel Route). The route
being navigated is deleted, including all waypoints.
Cancel Route
Remove Next Waypoint
Menu
My Route
Cancel Route
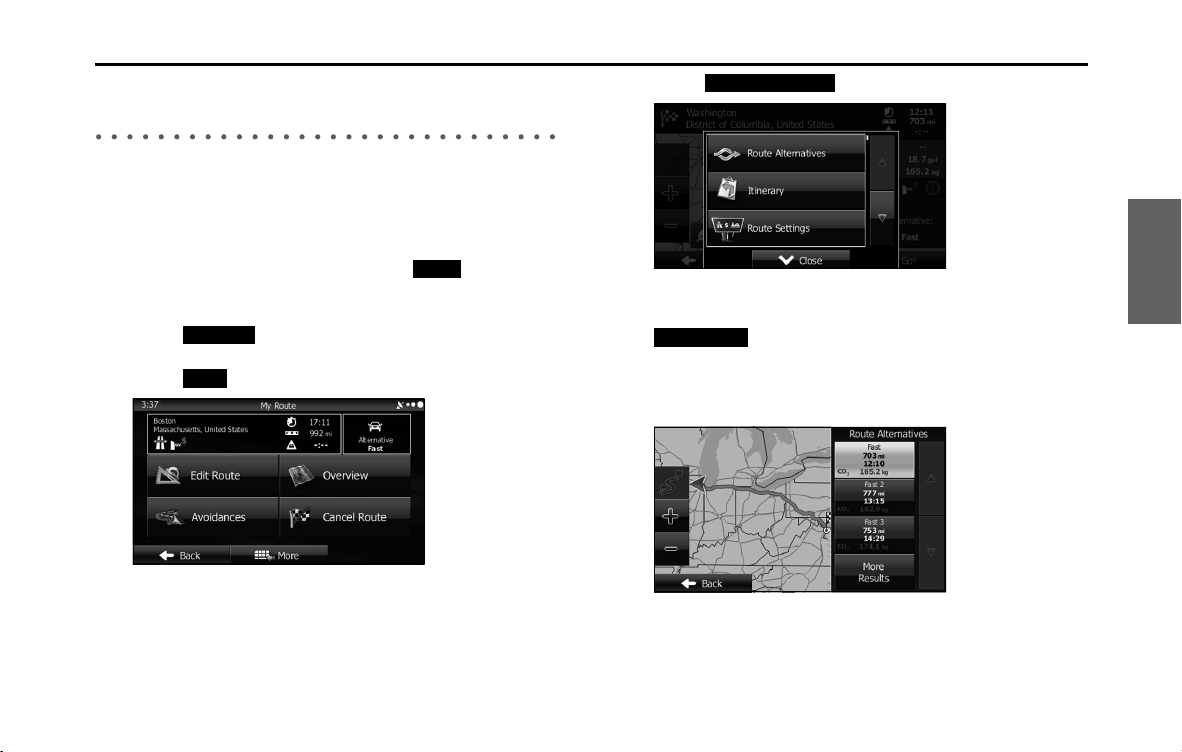
Navigation 149
Navigation
Changing the Method for Searching for a Route
(Other Routes, etc.)
Change the Route settings to perform a new search for the route being
navigated using a different method. (See Page 169.) You can even
search again by comparing different routes. Follow the steps below to
use the initial settings screen.
1 If the Map screen is displayed, touch (Menu) to
return to the navigation menu.
2 Touch (My Route) on the navigation menu.
3 Touch (More).
4 Touch (Route Alternatives).
5 Using the current search method, three routes are
displayed in order of recommendation. Touch
(More Results) to search using a different
method. Also, if only a short distance is being navigated
or only a few search candidates are found, each search
method displays only one route.
Menu
My Route
More
Route Alternatives
More Results

150 Navigation
Navigation
• (Fast):
Searches all roads for the quickest route following the speed
limits of the roads.
• (Short):
Searches for the shortest distance in all possible routes.
• (Green):
Searches for the route that conserves the most energy, taking
into account the merits of “Fast” and “Short”.
• (Easy):
Searches for a route that is easiest to drive, with few right and
left turns. Using this option, the program allows you to avoid
combinations of smaller roads and to take the expressway.
6 Touch (Back) to return to the previous screen. The
route is searched again using the selected method. The
new recommended route is indicated by an orange line.
Changing the Road Categories used for the
Route Search
You can use the following method to search the current route again
using different road categories. This can also be changed in Settings.
(See Page 169.)
1 Use the “Route Settings” function as follows.
• If the Map screen is displayed, touch and then touch
(Route Settings). (Only when registered to the
Quick Menu.)
• If the Map screen is displayed, touch (Menu),
(More), (Settings) and then touch
(Route Settings).
2 Touch one of the road categories displayed in the list to
change the route. If necessary, scroll the list to view all
road categories. The following items are available (the
order differs depending on the type of vehicle selected).
Fast
Short
Green
Easy
Back
Route Settings
Menu More
Settings Route Settings
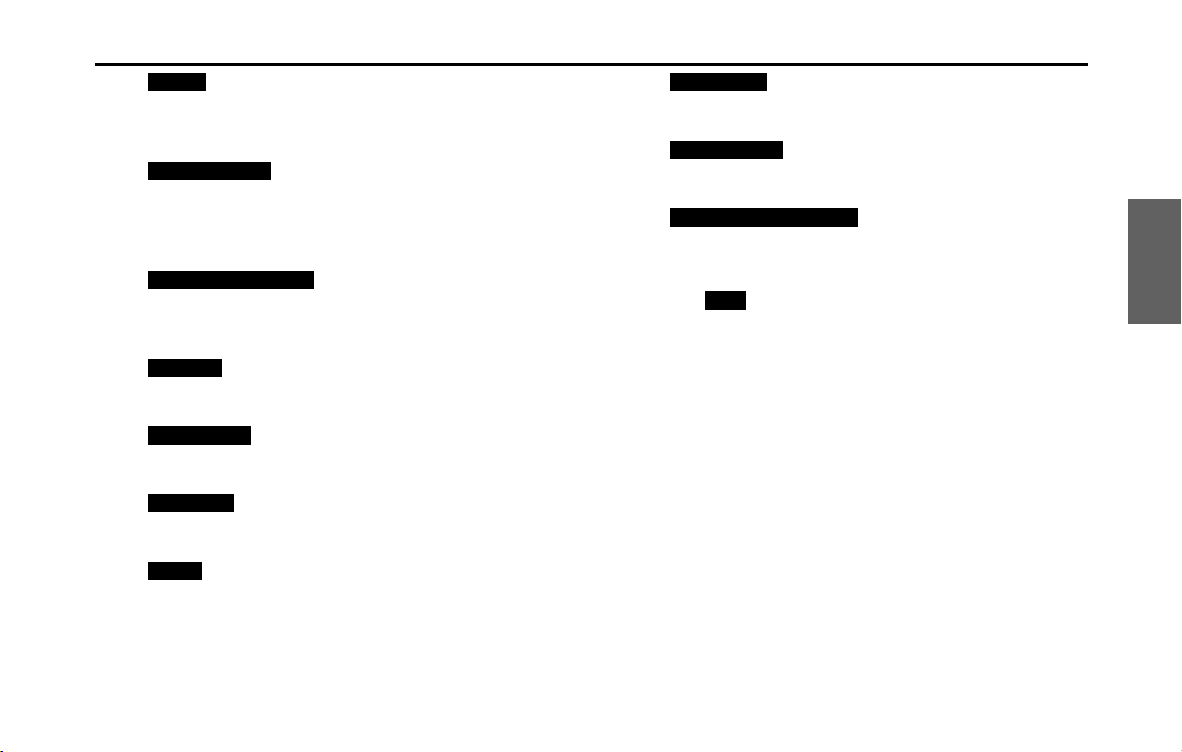
Navigation 151
Navigation
• (Vehicle):
Sets various factors to take into account when performing a
search, such as fuel consumption, vehicle model, fuel costs, and
maximum speeds on normal roads and expressways.
• (Navigation Mode):
You can change between On-road and Off-road.
Set to On-road to perform normal navigation, or set to Off-road
to navigate using the straightest possible route to the
destination.
• (Route Planning Method):
By changing the route search method, you can search for the
optimum route for a variety of situations and types of vehicle.
See the following items for more details.
• (Highways):
Select whether or not to use the expressway when creating the
route.
• (Period Charge):
Select whether or not to use toll roads (Period Charge) when
creating the route.
• (Per-use Toll):
Select whether or not to use toll roads (Per-use Toll) when
creating the route.
• (Ferries):
Select whether or not to use ferries when creating the
route.(However, ferries might not always be selected for the
route.)However, information on temporary service ferries may
not be displayed on the map. There may be a fee for using the
ferry.
• (Carpool/HOV):
Select whether or not to use Carpool/HOV lanes when creating
the route.
• (Unpaved Roads):
Select whether or not to use unpaved roads when creating the
route.
• (Calculate Green Alternative):
Select whether or not to consider energy efficiency when
creating the route.
3 Touch (Back) to set the changes. The route is
searched again, and the new recommended route is
indicated by an orange line.
Vehicle
Navigation Mode
Route Planning Method
Highways
Period Charge
Per-use Toll
Ferries
Carpool/HOV
Unpaved Roads
Calculate Green Alternative
Back
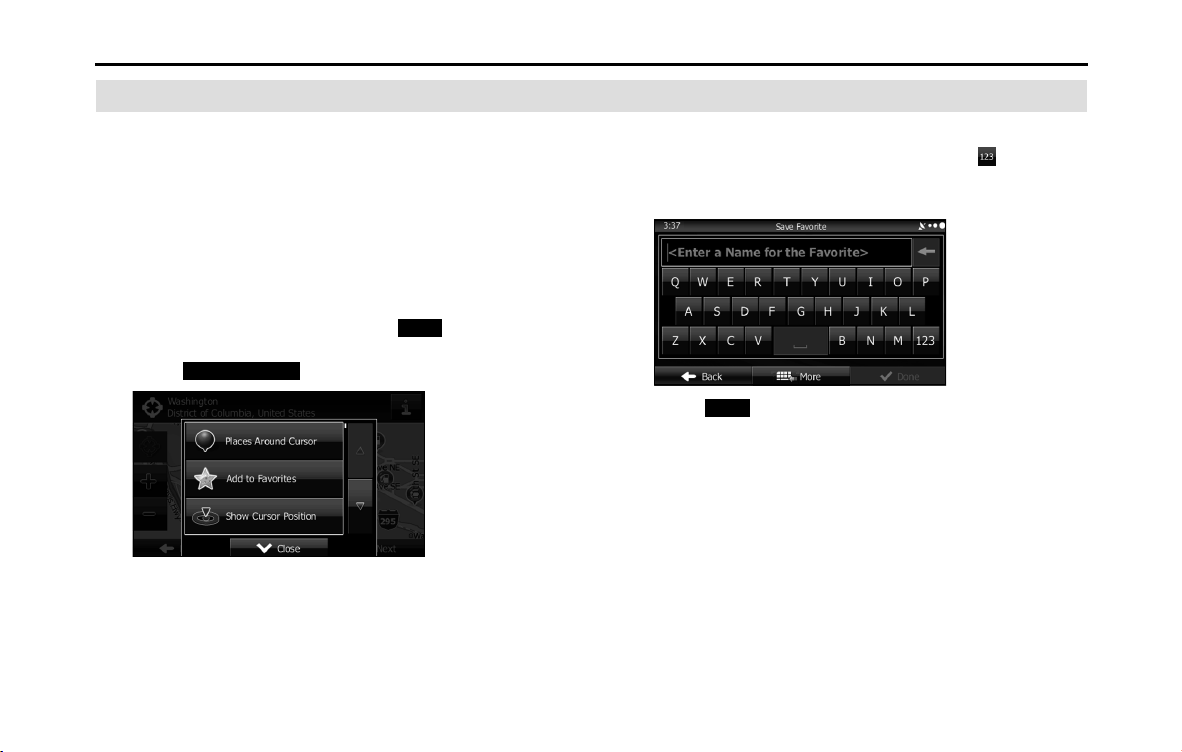
152 Navigation
Navigation
Saving a Position to the Destination List
The destination list is a list of frequently used destinations.
You can add any destination to this list. See “Selecting the
Destination from the Destination List” on Page 135 for more
details on searching for a route using a destination from the
destination list.
1 Select a destination.
2 When the map is displayed in full-screen mode with the
selected point at the center, touch (More).
3 Touch (Add to Favorites).
4 (Optional) You can use the keyboard to change the initial
display name in the destination list. Touch to enter
numbers or symbols.
• For the keyboard, see “Using the Keyboard” on Page 88.
5 Touch (Done) to save the position as a new entry
on the destination list.
More
Add to Favorites
Done
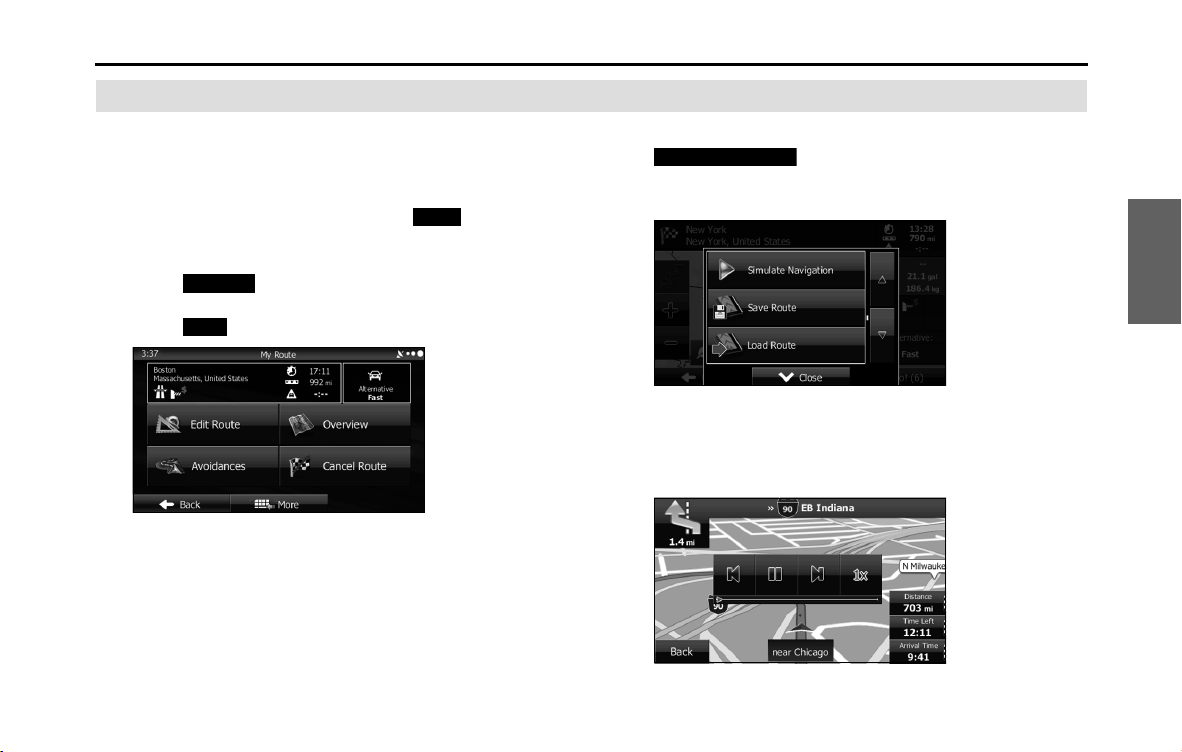
Navigation 153
Navigation
Displaying a Simulation of the Route
You can run a simulation of the route currently being
navigated. Follow the steps below to use the initial settings
screen.
1 If the Map screen is displayed, touch (Menu) to
return to the navigation menu.
2 Touch (My Route) on the navigation menu.
3 Touch (More).
4 Scroll down through the list, and then touch
(Simulate Navigation). The simulation
begins from the start point and works through the entire
route at the recommended speed.
5 (Optional) You can use the following buttons during the
simulation (although the control buttons disappear after
a few seconds, you can touch the map to show them
again).
Menu
My Route
More
Simulate Navigation

154 Navigation
Navigation
• : Returns to the previous route event (the previous change in
the route)
• : Pauses the simulation.
• : Goes to the next route event (the next change in the route)
• : Changes the speed of the simulation. You can select from
speeds of x4, x8, or x16. Touch again to return to normal speed.
6
Touch (Back) to stop the simulation.
Back
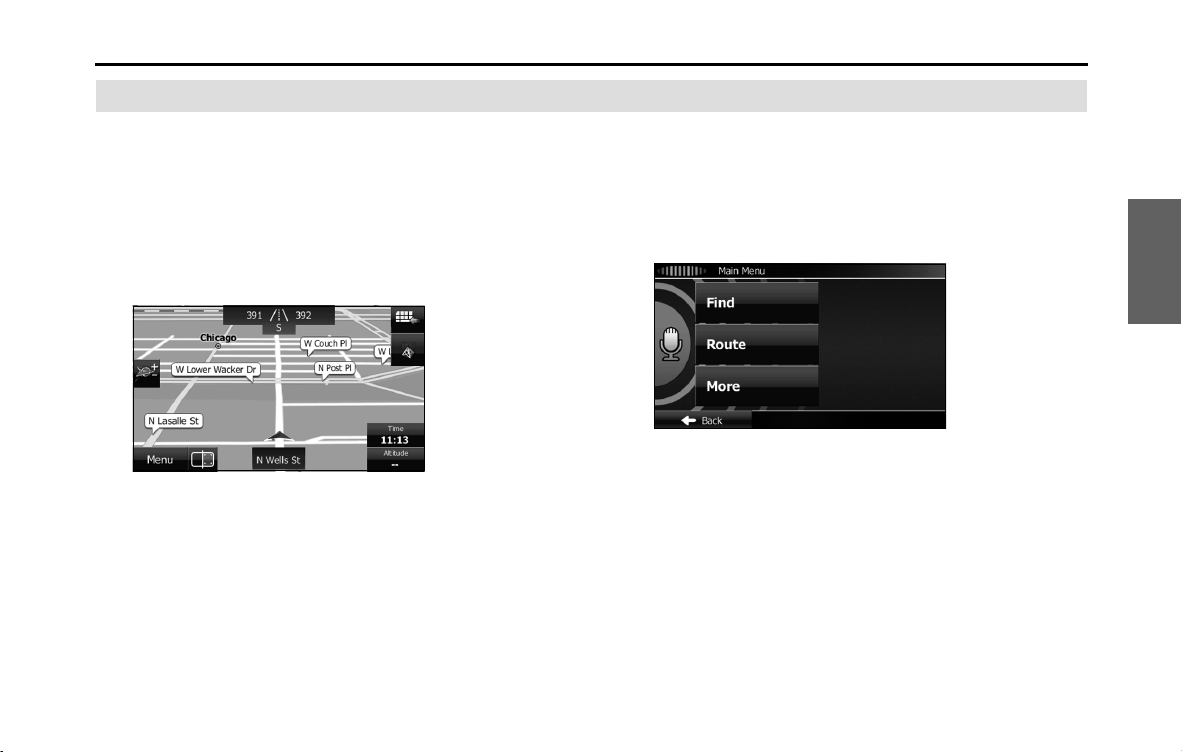
Navigation 155
Navigation
Voice Control Navigation
By using the voice control system (voice input microphone
and button), you can set the destination by giving voice
commands. This enables you to use functions that are usually
inoperable while driving.
1 By using the voice recognition trigger or voice
recognition button you can use voice commands to
operate the navigation. (See Page 292.)
2 When using voice commands to operate the navigation,
a command list is displayed. 155
3 Voice a command after the “beep”. From then on, you
can give voice commands that are displayed on the
command list to set the destination in the same manner.
• Voice control navigation can be interrupted by touching the
microphone icon on the screen. When the icon is touched, the
screen background color changes (green Q blue). To resume
navigation voice control, touch the microphone icon again.
The differences in background colors are explained below.
- Command standby screen (green):
This is the voice control command standby screen. When this
screen is displayed, you can speak a command to perform
navigation control. You can also perform control by directly
touching the commands that are displayed on the screen.

156 Navigation
Navigation
- Manual mode screen (blue):
This screen appears when voice control is interrupted. You can
perform control by directly touching the commands that are
displayed on the screen.
- Talkback screen (yellow):
This screen appears while the talkback voice is being played
when a command is recognized.
- Command recognition failed screen (red):
This screen appears when command recognition failed.
NOTE
“Address” searching using voice commands is only available when the device is
used within the USA and its language setting is set to English.

Navigation 157
Reference Data
The following pages explain the software's various features and menu screens.
Feature
Smart Zoom
Smart zoom offers a large improvement over standard zoom functions.
• While driving the route: When approaching an intersection, the
screen is enlarged and the viewpoint raised so that you can easily
see which way to drive at the next intersection. After navigating the
intersection, the screen is reduced and the angle lowered to check
the road in front.
• When driving without route navigation: The screen is enlarged as
you slow down and reduced as you speed up.
Switching between Day and Night Screens
For the Map screen and menu screen, the colors differ between day and
night.
• During daytime, the screen's colors are the same as those of a
printed map, and the menu is brighter.
• At night, the screen uses dark colors for large objects and reduces
the overall brightness of the screen.
The screen's color scheme differs between day and night. Using the
current time and GPS position, you can also switch automatically
between day and night screen settings just before sunrise (at dawn)
and just after sunset (at dusk).
158 Navigation
Reference Data
Route Search/Search Again
You can search for routes to suit your preferences.
Route search methods:
• (Fast):
Searches all roads for the quickest route following the speed limits of
the roads.
• (Green):
Searches for the route that conserves the most energy, taking into
account the merits of “Fast” and “Short”.
• (Short):
Searches for the shortest distance in all possible routes.
• (Easy):
Searches for a route that is easiest to drive, with few right and left
turns. Using this option, the program allows you to avoid
combinations of smaller roads and to take the expressway.
Search for a route by using or avoiding certain road categories:
• (Highways)
• (Period Charge)
• (Per-use Toll)
• (Ferries)
• (Carpool/HOV)
• (Unpaved Roads)
• (Calculate Green Alternative)
The route may change drastically when real time traffic conditions are
factored in. (See Page 159.)
If you leave the route that was searched for based on your current
position, and new information is received regarding traffic conditions
for the recommended route, the software automatically searches for
another route.
See “Route Settings” on Page 169 for detailed information on Route
settings.
Fast
Green
Short
Easy
Highways
Period Charge
Per-use Toll
Ferries
Carpool/HOV
Unpaved Roads
Calculate Green Alternative

Navigation 159
Reference Data
GPS Positioning Quality Indicator
The GPS reception quality icon at the top right of the menu screen
indicates the current accuracy of positional information.
Online Road Information Saved in Route Search
This unit can provide you with even better routes, if real-time traffic
information (TMC: Traffic Message Channel) is available.
If public traffic data is broadcast at your location, this unit automatically
takes into account the traffic data received. You do not need to set
anything in the program. The decoded information will immediately be
used in route planning. The moment unit receives traffic information
that may affect your route, the program recalculates the route, and this
unit will continue with a new route that is optimal based on the most
up-to-date traffic conditions.
Icon Explanation
The software is not connected to the GPS receiver. Cannot
perform GPS navigation.
Products with a built-in GPS receiver are always connected. This
icon is not normally displayed for those products.
Although the software is connected to the GPS receiver, the signal
is too weak to measure the GPS.
Cannot perform GPS navigation.
Only a few satellites are transmitting. Positional information is
available, but altitude (elevation above sea level) cannot be
calculated.
GPS navigation is possible, but large positional errors may occur.
Elevation above sea level is available, and measurements can be
performed in 3D.
GPS navigation is available.
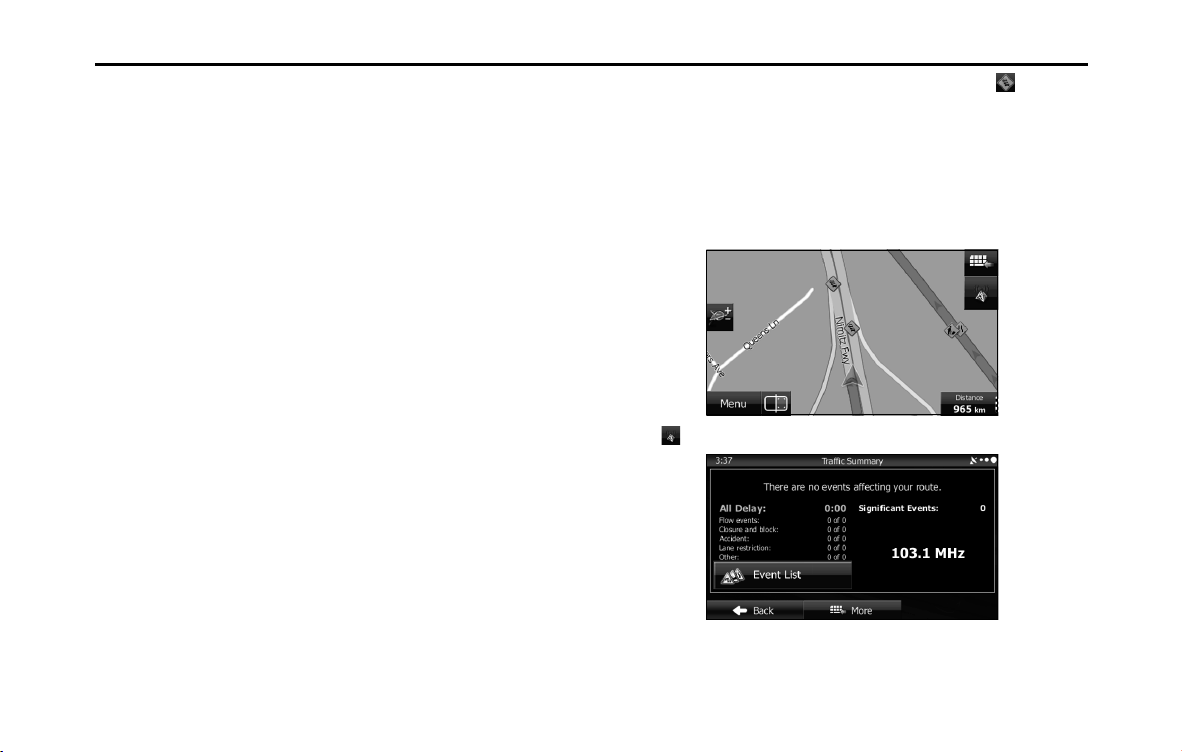
160 Navigation
Reference Data
Real-time traffic information (TMC)
TMC (Traffic Message Channel) offers real-time traffic conditions. This
can help you to avoid traffic jams that could not be anticipated due to
road closures or accidents.
TMC uses a dedicated FM Radio Data System (RDS) to broadcast real-
time traffic and weather reports.
The default settings use traffic information when searching for a route.
The TMC receiver necessary to receive traffic condition reports is built-in
to some products, but not for others. Contact your nearest SUBARU
dealer.
If traffic data normally broadcast in your region can be accessed, this
received information is automatically taken into account. This does not
need to be manually set. FM radio stations broadcasting TMC data are
searched for automatically, and decoded information is immediately
used to search for routes. If traffic information that might affect the
current route is received, a warning is displayed indicating that the
route will be searched for again, and navigation continues using a new,
optimal route taking into account the latest traffic conditions.
By delaying the timing before applying a route that has been searched
again, the user can check the route and fine-tune the details creating
the optimal search results. You can set this from Traffic settings. (See
Page 168.)
When traffic information is being received, a special icon ( ) is
displayed on the map. When there is no traffic information available for
the route, this icon indicates the status of the traffic information
receiver, and when information is received, the type of upcoming traffic
information is displayed.
Road sections affected by traffic conditions are displayed in a different
color on the map, and a small icon representing the type of traffic
condition is displayed above the road.
Touch to display the Traffic Summary screen.

Navigation 161
Reference Data
Touch (Event List) to check the traffic information that has
been received.
On this screen, you can select one entry from the list to view list of the
traffic conditions for that section of the road.
On this screen, you can select one entry from the list to view full details
of the traffic conditions for that section of the road.
Touch to open another screen displaying information on the
selected map position.
NOTE
• This function is only available when TMC is installed in the product being
used.
• The TMC service is not available for all regions. There are also times when it
may not be available in your country or district. For more information on
availability, contact your nearest SUBARU dealer.
Event List
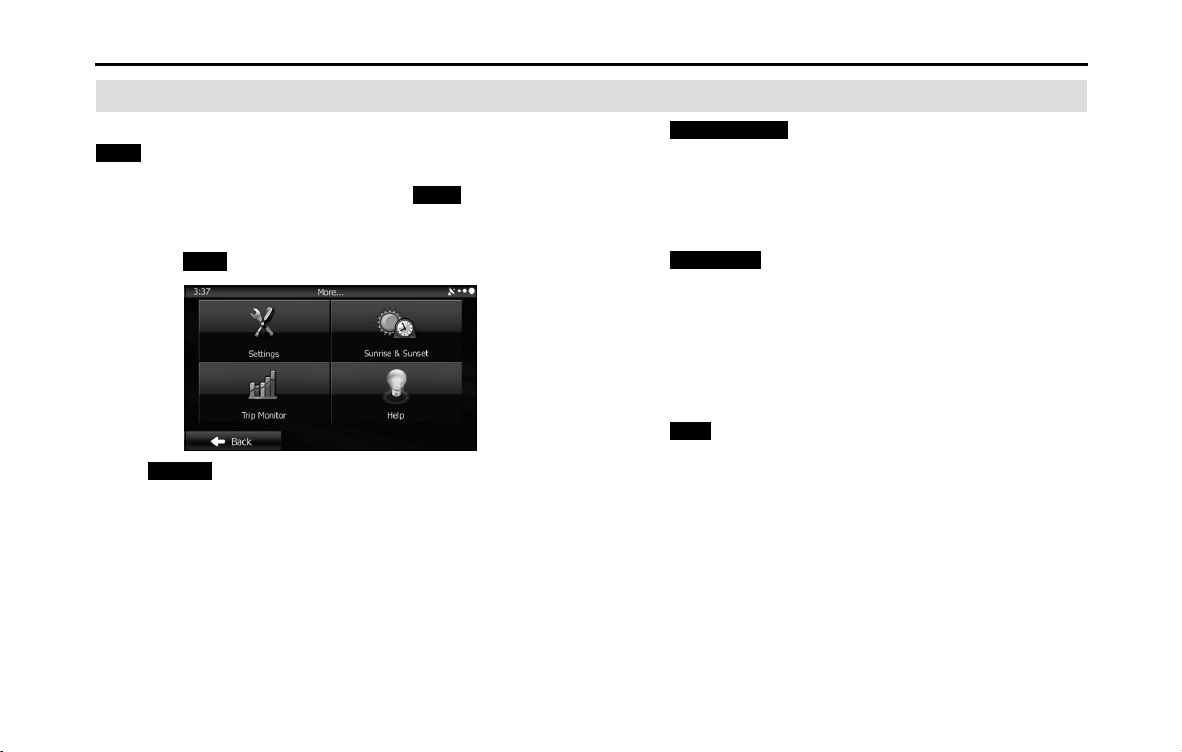
162 Navigation
Reference Data
“More” Menu
Various options are available from the “Others” menu. Touch
(More) on the navigation menu.
1 If the Map screen is displayed, touch (Menu) to
return to the navigation menu.
2 Touch (More) on the navigation menu.
• (Settings):
Configures programs and changes operational patterns for the
software. Performs functions such as fine tuning route search
options, changing the Map screen design, turning warnings on
or off, and launching the Setup Wizard.
• (Sunrise & Sunset):
You can check global sunrise and sunset times. Places a mark
on the map to show the user's current position and route
points. Touch the Details button to check accurate sunrise and
sunset times for all points along the route (current position, all
waypoints, final destination).
• (Trip Monitor):
Displays a list of all trip logs, whether they are saved by the user
upon reaching the destination or whether they are saved
automatically. By touching an item from the trip that is
displayed, you can check trip data, speeds, and more detailed
contents. When a path log has been saved, you can display it on
the map in the color selected. You can use the path log for
other purposes by exporting it as a GPX file.
• (Help):
Displays a tutorial allowing for a quick grasp of the software's
functions, and starts a demonstration showing a sample route
simulation to check the navigation functions. The About
section displays product information. Here you can view the
software and database user license agreements, search for the
contents license, and check the software ID. You can check
statistical data for program use.
More
Menu
More
Settings
Sunrise & Sunset
Trip Monitor
Help
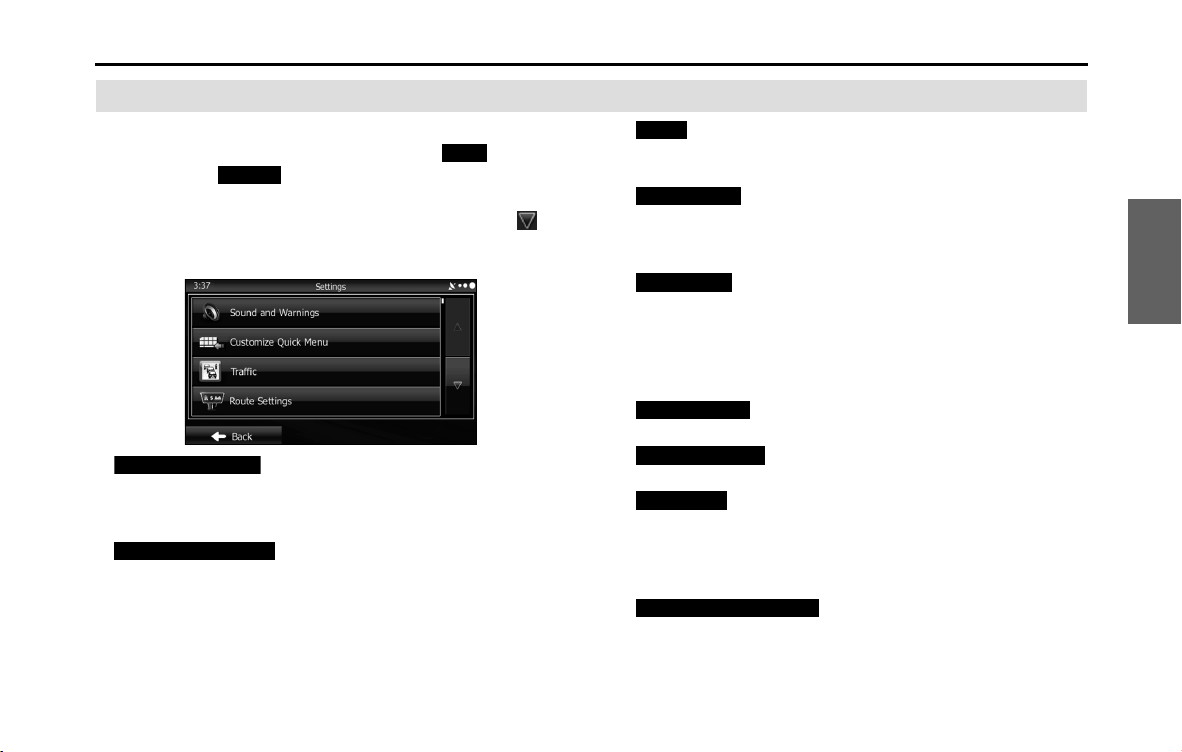
Navigation 163
Reference Data
Settings Menu
Configures programs and changes operational patterns for
the software. On the navigation menu, touch (More),
and then touch (Settings).
The Settings menu contains a variety of options. Touch or
scroll the list with your finger to view the entire list.
• (Sound and Warnings):
Performs volume adjustment or changes the voice guidance
language. Also enables various warnings and warning settings. (See
Page 164.)
• (Customize Quick Menu):
Allows you to set Quick menu items to suit your needs. Touch the
button you want to change, and then select another function from
the list. (See Page 166.)
• (Traffic):
Sets On/Off of traffic information display and the method to use the
received real-time traffic information on route search. (See Page 168.)
• (Route Settings):
Sets the route search method. Select the type of vehicle you are
using, the road category to use for the route search, and the route
search method. (See Page 169.)
• (Map Settings):
Fine tunes the Map screen appearance. Performs adjustments for
your selected map display, selects from a list of color designs used for
daytime and nighttime, turns the path log on or off, and manages
the spot display categories (allows you to select the type of spot
displayed on the map). (See Page 170.)
• (Visual Guidance):
Changes settings related to Map screen guidance. (See Page 172.)
• (Units and Formats):
Sets display units and the date display. (See Page 173.)
• (Trip Monitor):
Contains useful information on the user's distance moved in the trip
logs and path logs. You can save trip logs automatically by turning
this setting on, or save them manually when arriving at a destination.
(See Page 173.)
• (Start Configuration Wizard):
Changes basic software configurations set during the initial setup
process. See step 3 in “Read First” on Page 83.
More
Settings
Sound and Warnings
Customize Quick Menu
Trac
Route Settings
Map Settings
Visual Guidance
Units and Formats
Trip Monitor
Start Conguration Wizard

164 Navigation
Reference Data
Sound and Warnings
Performs volume adjustment or changes the voice guidance language.
Also enables various warnings and warning settings.
• (Volume):
Touch this button to adjust various volumes in the application. The
type and buttons for various different volumes is displayed on a new
screen. See the following items for more details.
• (Voice Language):
This button displays the current language for voice guidance. Touch
this button to select a new language/narrator from the available
languages and list of narrators. When you touch an item from the list,
a sample of the audio is played back. Touch (Back) after
selecting a new voice language.
• (TTS Pro):
Touch this button to select the frequency of voice information, as
well as turning on or off various voice information such as
information on traffic conditions.
• (Verbosity Level):
You can select the Verbosity Level from “Minimal”, “Compact”, or
“Verbose”.
• (Voice Recognition):
Touch this button to turn on or off talk back voice recognition results,
or change the voice recognition method.
• (Alert Point Settings):
Displays driver warning information on the map. Touch this button
to turn these warnings on or off, and set how far from the danger the
warning should be generated. You can make individual settings for
each type of warning.
• (Warning Sign Alerts):
Displays driver warning information on the map. Touch this button
to turn these warnings on or off, and set how far from the danger the
warning should be generated. You can make individual settings for
each type of warning.
CAUTION
Be sure to set the volume of the audio at an appropriate level.
Improper volume setting may result in hearing damage or a
traffic accident.
Volume
Voice Language
Back
TTS Pro
Verbosity Level
Voice Recognition
Alert Point Settings
Warning Sign Alerts

Navigation 165
Reference Data
You can adjust the volume for the following voice categories.
• Guidance:
Changes the volume for the guidance voice (when guiding using a
narrator).
• Alert Beeps:
Changes the volume for audio warnings (the beep).
Adjustment buttons for each audio classification:
• Volume slider:
Adjusts the volume of the associated audio.

166 Navigation
Reference Data
Customize Quick Menu
Allows you to set Quick menu items to suit your needs. (See Page 101.) Touch the button you want to change, and then select another function from
the list.
Button Explanation Primary Location
(Quick
Place Search)
Touch this button to search around a point on the route, or your current position
(when a route search has not been performed).
Find / Find Places / Quick Search (See Page 120.)
(Favorites)
Touch this button to select an item from the destination list. Find / Favorite (See Page 135.)
(History)
Touch this button to select previously set destinations from the history list. Find / History (See Page 137.)
(Create
Route)/ (Edit
Route)
Touch this button to change the route. My Route / Create (Edit) Route (See Page 140.)
(Route
Settings)
Touch this button to change route related settings. More / Settings / Route Settings (See Page 169.)
(Map
Settings)
Touch this button to change map related settings. More / Settings / Map Settings (See Page 170.)
(Where Am I?)
Touch this button to display a special screen with a button that searches for
information on your current position and determines the nearest emergency
assistance or road-side assistance. See the following section for more details.
N/A
(Cancel
Route)
Touch this button to clear the route and cancel navigation. This button is
available when only one destination is set.
My Route / Cancel Route (See Page 148.)
(Remove Next Waypoint)
Touch this button to remove the next waypoint from the route. When multiple
destinations are set, the previous waypoint is displayed. This button is available
when only two or more destinations are set.
N/A
(Overview)
Reduces the scale of the 2D map to display the entire route. My Route / Overview (See Page 141.)
Quick Place Search
Favorites
History
Create Route
Edit Route
Route Settings
Map Settings
Where Am I?
Cancel Route
Remove Next Waypoint
Overview

Navigation 167
Reference Data
(Visual
Guidance)
Opens the Visual Guidance settings screen. More / Settings / Visual Guidance (See Page 172.)
(Traffic)
Opens the overall traffic conditions screen. Touch the navigation menu or the Map screen's
road icons.
(Avoid)
Avoids part of the recommended route. My Route / Avoidances
(Trip Monitor)
Opens the trip monitor screen from which you can manage your saved trip logs
and path logs.
More / Trip Monitor (See Page 162.)
(Itinerary)
Opens a list of changes in the route (distances). Touch the top of the Map screen during navigation.
(Save Route)
The route being navigated is saved to be used later. My Route / More / Save Route
(Load Route)
Changes to a saved, previously navigated route. My Route / More / Load Route
(Find Places)
Searches for your favorite spots using a variety of methods. Find / Find Places (See Page 120.)
(Simulate Navigation)
The Map screen opens and a simulation of the route being navigated starts. My Route / More / Simulate Navigation (See Page
153.)
(GPS Info)
Opens the GPS information screen showing satellite positions and signal
strength.
Touch the top of the Map screen if there is no GPS
reception.
Button Explanation Primary Location
Visual Guidance
Trac
Avoid
Trip Monitor
Itinerary
Save Route
Load Route
Find Places
Simulate Navigation
GPS Info
168 Navigation
Reference Data
Traffic
Sets On/Off of traffic information display and the method to use the
received real-time traffic information on route search.
• (Traffic Receiver):
Turns on or off the traffic information display.
• (Detour):
Set to use real-time traffic information when searching for a route.
When searching for a new route, or when it is necessary to search
again based on the traffic information received, it searches for merits
to avoiding the current traffic conditions.
Set so that confirmation is needed every time you perform another
search by delaying the timing when the search is remade.
- (Never offer detour):
When this button is touched, routes that do not satisfy traffic conditions are
not searched.
- (Offer detour if
the calculated route saves more than:):
When this button is touched, routes that satisfy traffic conditions are
searched.
Time slider:
Adjust the timing before starting another route search. (You can set 0 to 60
every 5 minutes)
- (Do you want to confirm
the offered route?):
You can turn the route confirmation display on or off for each new search.
• (Event Types):
Touch this button to open a list of types of traffic conditions, and
select the events to take into consideration when searching for a
route.
Settings button for each type of traffic condition
- (All events in this category will be:):
You can select "Considered" or "Ignored" when searching for a route.
- (Visible on map):
You can turn the icon display on the map on or off.
Trac Receiver
Detour
Never oer detour
Oer detour if the calculated route saves more than:
Do you want to conrm the oered route?
Event Types
All events in this category will be:
Visible on map
Navigation 169
Reference Data
Route Settings
Sets the route search method.
• (Vehicle):
Sets various factors to take into account when performing a search,
such as fuel consumption, vehicle model, fuel costs, and maximum
speeds on normal roads and expressways.
• (Navigation Mode):
You can change between On-road and Off-road.
Set to On-road to perform normal navigation, or set to Off-road to
navigate using the straightest possible route to the destination.
• (Route Planning Method):
By changing the route search method, you can search for the
optimum route for a variety of situations and types of vehicle. See
the following items for more details.
You can set which road categories to include or to avoid in the route to
match the user's preferences.
Avoiding a road category is simply a matter of changing the priority
level. This does not mean that the selected road category will never be
used. If the navigation cannot reach the destination without using a
road category that should be avoided, the road category will be used,
but only as little as possible. If this does happen, a warning icon is
displayed on the My Route screen.
In the road category list you can check the number of sections used for
each road category on the current route and the overall distance.
• (Highways):
Select whether or not to use the expressway when creating the
route.
• (Period Charge):
Select whether or not to use toll roads (Period Charge) when
creating the route.
• (Per-use Toll):
Select whether or not to use toll roads (Per-use Toll) when creating
the route.
• (Ferries):
Select whether or not to use ferries when creating the
route.(However, ferries might not always be selected for the
route.)However, information on temporary service ferries may not be
displayed on the map. There may be a fee for using the ferry.
• (Carpool/HOV):
Select whether or not to use Carpool/HOV lanes when creating the
route.
• (Unpaved Roads):
Select whether or not to use unpaved roads when creating the
route.
Vehicle
Navigation Mode
Route Planning Method
Highways
Period Charge
Per-use Toll
Ferries
Carpool/HOV
Unpaved Roads
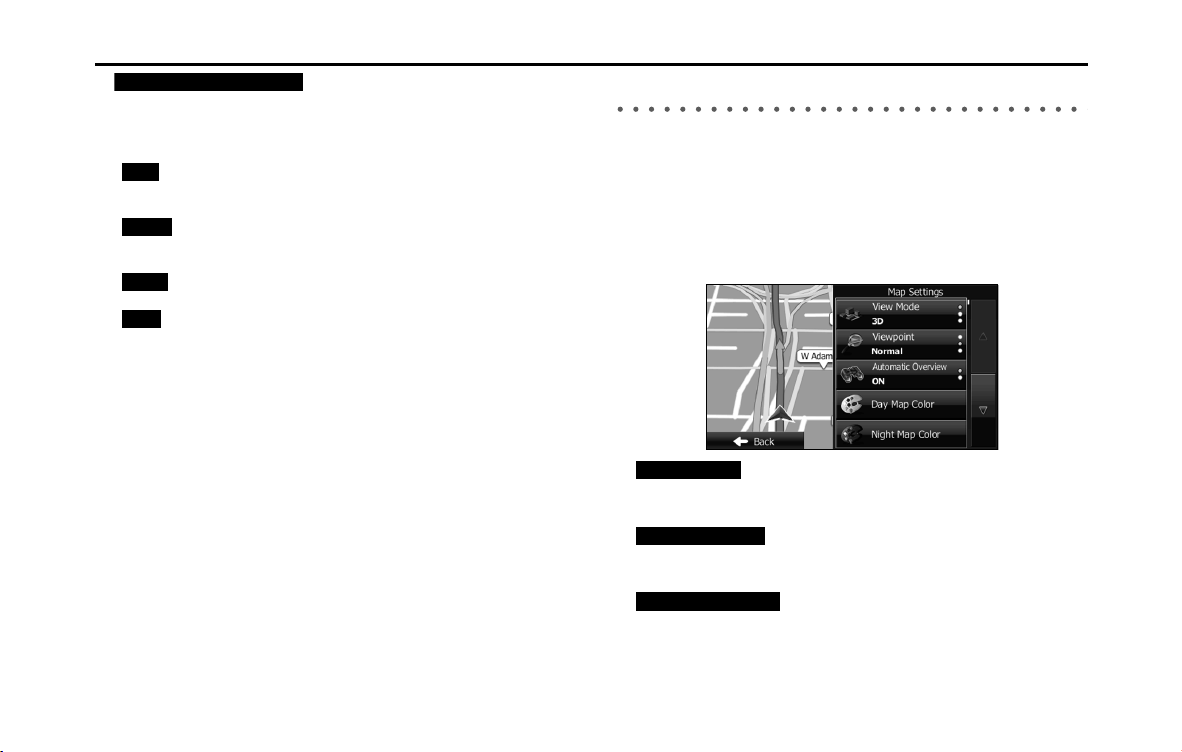
170 Navigation
Reference Data
• (Calculate Green Alternative):
Select whether or not to consider energy efficiency when creating
the route.
Type of route search method:
- (Fast):
Searches all roads for the quickest route following the speed limits of the
roads.
- (Green):
Searches for the route that conserves the most energy, taking into account
the merits of “Fast” and “Short”.
- (Short):
Searches for the shortest distance in all possible routes.
- (Easy):
Searches for a route that is easiest to drive, with few right and left turns.
Using this option, the program allows you to avoid combinations of smaller
roads and to take the expressway.
Map Settings
Fine tunes the Map screen appearance. Performs adjustments for your
selected map display, selects from a list of color designs used for
daytime and nighttime, turns the path log on or off, and manages the
spot display categories (allows you to select the type of spot displayed
on the map).
Because the map is displayed on the screen, you can check the results
as you change settings.
• (View Mode 3D):
Select the display mode from a 3D bird's-eye view, a 2D heads-up flat
view, or a 2D North Up flat view.
• (Viewpoint Normal):
You can adjust the standard zoom and the angle of tilt to suit your
needs. You can set the level in three stages.
• (Automatic Overview):
Automatically reduces the scale of the 2D map to display the entire
route. You can turn this function on and off.
Calculate Green Alternative
Fast
Green
Short
Easy
View Mode 3D
Viewpoint Normal
Automatic Overview
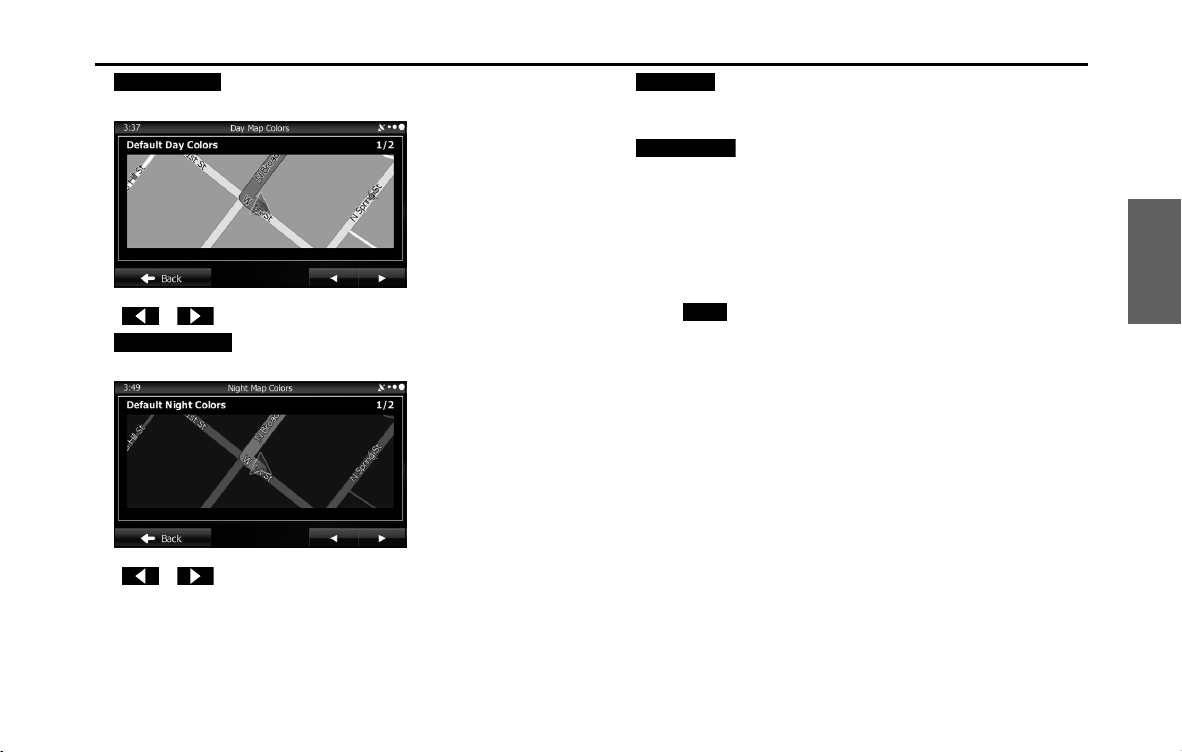
Navigation 171
Reference Data
• (Day Map Color):
Select the screen color used in daytime mode.
- The view changes between night view and day view each time you touch
or .
• (Night Map Color):
Select the screen color used in nighttime mode.
- The view changes between night view and day view each time you touch
or .
• (Track Logs):
Turns the path log save function on or off (saves in positional order
for each trip).
• (Place Markers):
Select a spot displayed on the map during navigation. We
recommend reducing the number of spots displayed as much as
possible as the map is difficult to see if there are too many spots.
Because of this, the software is designed to allow multiple spot
displays. Follow the steps below.
- Touch the check box to show or hide the spot category.
- Touch the spot category name to open a sub-category.
- Touch (More) to save the currently displayed spot position, or read
spot displays saved previously. You can also restore the default display
settings.
Day Map Color
Night Map Color
Track Logs
Place Markers
More

172 Navigation
Reference Data
Visual Guidance
Changes settings related to Map screen guidance.
• (Data Fields):
You can set the data fields displayed at the corner of the Map screen
to match your needs. Touch this button and select the guidance you
want to display. Values may differ when driving without having set a
destination in route navigation. You can select current speed or
altitude and so on for a standard trip data, or select route data related
to the final destination or the next waypoint on the route.
• (Highway Services):
Displays service area information while driving on the expressway.
You can turn this function on and off.
• (Facility Types):
Touch this button and select the service area information display
items you want to display.
• (Signposts):
When information is available, lane information similar to overhead
road traffic signs is displayed at the top of the map. You can turn this
function on and off.
• (Junction View):
When approaching an expressway exit or a complicated intersection,
the map switches to a 3D display if the necessary information can be
displayed.
• (Route Progress Bar):
Turns on the route progress bar which is displayed as a straight line
to the left of the map. This shows the progress made on the current
route. When a blue arrow is used to indicate position, the arrow
continues to rise as you drive towards your destination. Waypoints
and traffic conditions are displayed on the line.
Data Fields
Highway Services
Facility Types
Signposts
Junction View
Route Progress Bar
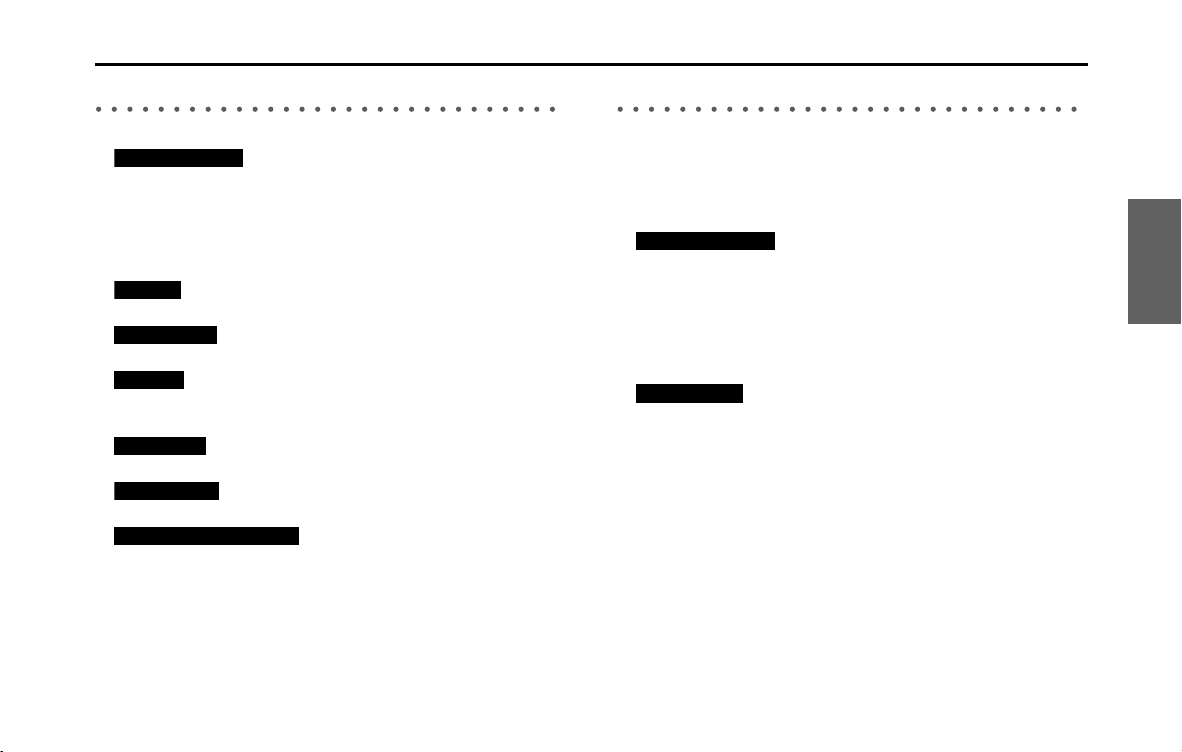
Navigation 173
Reference Data
Units and Formats
Sets display units and the date display.
• (Units and Formats):
Sets the units used by the program to measure distance. Voice
guidance languages do not support all units displayed in the list.
You can select to display the time in various international date
formats.
Types of display units and date display settings:
• (Distance):
Buttons the units used to display distance.
• (Fuel Economy):
Buttons the units used to display fuel consumption.
• (Currency):
Displays the keyboard screen allowing you to enter the currency
name. (For the keyboard, see “Using the Keyboard” on Page 88.)
• (Date Format):
Buttons the units used to display the date.
• (Date Delimiter):
Buttons the date delimiter.
• (Coordinate Display Format):
Buttons the coordinate display format.
Trip Monitor
Contains useful information on the user's distance moved in the trip
logs and path logs. You can save trip logs automatically by turning this
setting on, or save them manually when arriving at a destination. You
can view all logs on the trip monitor. Launch the trip monitor from the
“Others” menu.
• (Enable Auto-Saving):
The trip monitor saves statistical data for the distance traveled. You
can set it so that the route is saved automatically if you need a log
after driving.
• Trip Database Size:
This is not a button. This line indicates the current size of the trip
database. This shows the total for all saved trip logs and path logs.
• (Save Track Log):
You can save path logs (positional order acquired from GPS receiver)
in the trip log.
Units and Formats
Distance
Fuel Economy
Currency
Date Format
Date Delimiter
Coordinate Display Format
Enable Auto-Saving
Save Track Log

174 Navigation
Glossary
2D/3D GPS reception
The GPS receiver uses signals from satellites to calculate its current
position (the user's position), but to acquire a 3D position at least four
signals are necessary, including altitude. The GPS device may not be
able to acquire signals from four satellites as they are constantly moving
and obstacles may block satellite signals. Although the accuracy
decreases when only three signals can be acquired, and altitude data
cannot be sent, the receiver can calculate a latitude and longitude GPS
position. Only 2D reception is possible.
Route being navigated
The route currently being navigated. When a destination is set, the
route will be continuously navigated until the destination is deleted,
you arrive at the destination, or the software is closed. Also see “Route”.
City center
The center of the city/town is not the geographical center of the city/
town, but a location set by the cartographer. In towns and villages, this
is usually the most important intersection, while in larger cities it is
selected from multiple important intersections.
Color design
The color design used for the map and menu screens differs for daytime
and nighttime. Each design has a different graphic setting, with 2D and
3D each having colors for roads, blocks, seas, and lakes, whilst shadow
changes and shadows are displayed differently in 3D mode.
Daytime screen and nighttime screen designs for the map and menu
are selected one at a time. The design changes automatically when day
becomes night and night becomes day.
GPS accuracy
Various factors can contribute to a margin of error between the user's
actual position and the position acquired from the GPS device. For
example, signal delays in the ionosphere or reflections from objects
around the GPS equipment, can influence the accuracy with which the
GPS device can calculate the user's position.

Navigation 175
Glossary
Maps
Although this software uses digital maps, these are not simply digital
conversions from printed maps. The 2D mode digital map represents
roads in the same way as a traditional printed map, using color
classifications to show streets, roads, and changes in altitude.
In 3D mode, you can confirm differences in altitude for mountains,
valleys, highland roads and so on, and display areas of cities using 3D
landmarks and 3D images of buildings.
The digital map can be used interactively. You can zoom in and out
(enlarge/reduce), tilt up and down, and rotate left and right. By using
navigation that supports GPS, you can easily plan your route with the
digital maps.
North Up Map Direction
North Up mode rotates the map so that North is always at the top of
the map. You can use this direction with Find On Map and so on. Also
see “Heads-up Map Direction”.
Route
The route is an ordered arrangement of the route events (the next
change in the route - right or left turns, roundabouts, and so on),
presenting them as they occur until you reach your destination. If there
is one starting point, there must be at least one destination. On startup,
the start point is the current position (or the last confirmed position). If
you need to check a route that is not currently being driven, you can
move the start point to wherever you want.
Heads-up Map Direction
Heads-up mode rotates the map so that the direction you are currently
traveling is always at the top of the map. This is the default direction in
3D map display mode. Also see “North Up Map Direction”.

176 Navigation
End-user License Agreement
1 The contracting parties
1.1 This Agreement has been entered into by and between Nav N Go Kft.
(registered seat: 23 Bérc utca, H-1016 Budapest, Hungary; Company
reg.no.: 01-09-891838) as Licensor (hereinafter: Licensor) and You as
the User (hereinafter: User; the User and the Licensor jointly referred
to as: Parties) in subject of the use of the software product specified in
this Agreement.
2 Conclusion of the Agreement
2.1 The Parties hereby acknowledge that this Agreement shall be
concluded by implicit conduct of the Parties without signing the
Agreement.
2.2 The User hereby acknowledges that following the lawful acquisition
of the software product constituting the object of this Agreement
(Section 4), any degree of use, installation into a computer or other
hardware, installation of such hardware into a vehicle, pressing of the
“Accept” button displayed by the software during installation or use
(hereinafter referred to as Use) shall mean that the User has accepted
the terms and conditions of this Agreement as legally binding.
2.3 This Agreement shall by no means authorize use of the software
product by those persons having unlawfully acquired the software
product or having unlawfully installed it on a computer or in a vehicle.
3 Relevant laws and regulations
3.1 Any action related to this Agreement will be governed by the laws of
the Republic of Hungary, with specific reference to Act IV of 1959 on
the Civil Code and to Act LXXVI of 1999 on Copyrights shall apply.
3.2 The original language version of this Agreement is the Hungarian
version. This Agreement has versions in other languages as well. In
case of dispute the Hungarian version shall prevail.
4 Object of the Agreement and Termination
4.1 The object of this Agreement shall be the navigation guidance
software product of Licensor (hereinafter referred to as the Software
Product).
4.2 The Software Product shall include the operating computer program,
its complete documentation, the map database pertaining thereto
and any third-party content and services accessible through the
Software Product (hereinafter: Database).
4.3 Any form of display, storage, coding, including printed, electronic or
graphic display, storage, source or object code, or any other as yet
undefined form of display, storage, or coding, or any medium thereof
shall be deemed parts of the Software Product.
4.4 Error corrections, additions, updates used by the User following the
conclusion of this Agreement shall also be deemed parts of the
Software Product.
4.5 Your rights under this Agreement will terminate immediately without
notice from Licensor if you materially breach it or take any action in
derogation of Licensor's and/or its Licensor's rights to the Software
Product. Licensor may terminate this Agreement should any Software
Product become, or Licensor's reasonable opinion likely to become,
the subject of a claim of intellectual property infringement or trade
secret misappropriation. Upon termination, you will cease use of, and
destroy Software Product and confirm compliance in writing to
Licensor

Navigation 177
End-user License Agreement
5 Rights under copyright
5.1 Unless otherwise provided by law or contractual provisions, the
Licensor is the sole and exclusive owner of all material copyrights
vested in the Software Product.
5.2 Copyrights extend to the whole Software Product and to its parts
separately as well.
5.3 The owner(s) of the copyrights of the Database forming part of the
Software Product is (are) the natural person(s) or corporate entity(ies)
listed in the Appendix to this Agreement or in the “About” menu item
of the operating computer program (hereinafter referred to as
Database Owner). The user's manual of the Software Product includes
the name of the menu option where all the owners of the Database
items are listed. The Licensor hereby states that it has obtained
sufficient usage and representation rights from the Database owners
in order to utilise the Database, to offer it for utilisation and to transfer
it for utilisation as set forth in this Agreement.
5.4 Pursuant to this Agreement, all rights vested in the Software Product
shall remain in the ownership of the Licensor, except for those to
which the User is entitled under law or by virtue of this Agreement.
6 Rights of the User
6.1 The User is entitled to install the Software Product into one hardware
device (desktop, handheld, portable computer, navigation device),
and to run and use one copy of the Software Product or a preinstalled
copy of the Software Product thereon.
6.2 The User is entitled to make one backup copy of the Software
Product. However, if the Software Product operates after installation
without the use of the original media copy, then the original media
copy shall be deemed to be a backup copy. In all other cases, the User
is only entitled to use the backup copy if the original media copy of
the Software Product has been ascertainably and unequivocally
rendered unsuitable for its lawful and intended use.

178 Navigation
End-user License Agreement
7 Limitations of use
7.1 The User is not entitled
7.1.1 to duplicate the Software Product (to make a copy thereof );
7.1.2 to lease, rent or lend it or to transfer it to a third person for any reason;
7.1.3 to translate the Software Product (including translation (compilation)
to other programing languages);
7.1.4 to decompile the Software Product;
7.1.5 to evade the protection of the Software Product or to modify,
circumvent or obviate such protection through technological or by
any other means;
7.1.6 to modify, extend, transform the Software Product (in whole or in
part), to separate it into parts, combine it with other products, install it
in other products, utilise it in other products, not even for the purpose
of achieving interoperability with other devices;
7.1.7 apart from using the computer program, to obtain information from
the Database as a part of the Software Product, to decompile the
Database, to use, copy, modify, extend, transform the Database in
whole or in part or the group of data stored therein, or to install it in
other products or otherwise, utilise it in other products or to transfer
it, not even with the aim of achieving interoperability with other
products.
7.2 The User may only use the contents available through the Software
Product and provided by third parties and the data received through
the services provided by third parties (including but not limited to the
traffic data received from the RDS TMC traffic information service) for
his/her own personal benefit and at his/her own risk. It is strictly
prohibited to store, to transfer or to distribute these data or contents
or to disclose them in full or in part to the public in any format or to
download them from the product.
8 No warranty, limitation of responsibility
8.1 The Licensor hereby informs the User that although the greatest care
was taken in producing the Software Product, given the nature of the
Software Product and its technical limitations, the Licensor does not
provide a warranty for the Software Product being completely error-
free, and the Licensor is not bound by any contractual obligation
whereby the Software Product obtained by the User should be
completely error-free.
8.2 The Licensor does not warrant that the Software Product is suitable
for any purpose defined either by the Licensor or the User, and does
not warrant that the Software Product is capable of interoperating
with any other system, device or product (e.g. software or hardware).
8.3 The Licensor does not assume any responsibility for damages
incurred due to an error in the Software Product (including errors of
the computer program, the documentation and the Database).
8.4 The Licensor does not assume any responsibility for damages
incurred due to the Software Product not being applicable for any
defined purpose, or due to the error or incompatibility of the
Software Product with any other system, device or product (e.g.
software or hardware).
8.5 The Licensor also draws the attention of the User to the fact that,
when using the Software Product in any form of vehicle, observing
the traffic regulations and rules (e.g. use of obligatory and/or
reasonable and suitable security measures, proper and generally
expected care and attention in the given situation, and special care
and attention required due to the use of the Software Product) is the
exclusive responsibility of the User. The Licensor shall not assume any
responsibility for any damages occurred in relation to use of the
Software Product in a motor vehicle.
8.6 By concluding the Agreement, the User shall, in particular,
acknowledge the information stated in Section 8 above.

Navigation 179
End-user License Agreement
9Sanctions
9.1 The Licensor hereby informs the User that, if the Licensor finds its
rights under the Copyright Act to be breached, the Licensor may
9.1.1 seek judicial recognition of this breach;
9.1.2 demand that the breach cease and order the person in breach to
refrain from continuing such actions;
9.1.3 demand that the person under breach give proper compensation
(even by way of publicity at the expense of the person in breach);
9.1.4 claim the return of the increase of assets due to the breach;
9.1.5 demand the cease of the wrongful action and, demand restitution to
its state before the breach was committed at the expense of the
person in breach, and may demand the destruction of instruments
and materials used to commit the breach as well as of the products
created by the breach;
9.1.6 claim for damages.
9.2 The Licensor hereby also informs the User that the breach of
copyrights and related rights is a crime under Act IV of 1978 on the
Hungarian Criminal Code, which may be sentenced of two years in
prison in basic cases and up to eight years in prison in aggravated
cases.
9.3 Contents and services provided by third parties
The Licensor hereby excludes any liability of its own for the Database
in the Software Product and for any content or service provided by a
third party by using the Database. The Licensor does not warrant the
quality, suitability, accuracy, fitness for a specific purpose or territorial
coverage of the product or service or the availability of the service,
and it specifically excludes any liability for the suspension of the
service, and any damage arising in relation to the service or for
complete cancelation of the service.
The User hereby acknowledges that the contents and services
provided by third parties may only be used at the risk of the User and
for the personal benefit of the User.
9.4 The parties hereby agree that the courts of the Republic of Hungary will
have exclusive jurisdiction to rule on any disputes arising in connection
with this Agreement.

180 Navigation
End-user License Agreement
10 Anonymous date collection
10.1 The User hereby acknowledges that the Software Product may collect
and store data connected to the usage of the Software Product by
the User (e.g. movement/route date, user interaction data). Such data
collection functions may be disabled or enabled by User any time
from within the corresponding menu. The collected data is
connected to the device type identifier of the device running the
Software Product and not associated in any way with any personal
information of the User itself.
10.2 The collected data may be uploaded to licensor's database and used
exclusively of the purpose of enhancing and improving the features
and services of the Software Product and the Databases. Uploading is
executed through Licensor's special software or by the User
navigation device, and the upload may be enabled or disabled by
User. After successful data upload, the collected data is deleted from
the Software Product storage media.
10.3 Collected data is transmitted, stored and handled anonymously and
no connection of the data with the User shall be established by
Licensor or any third party.
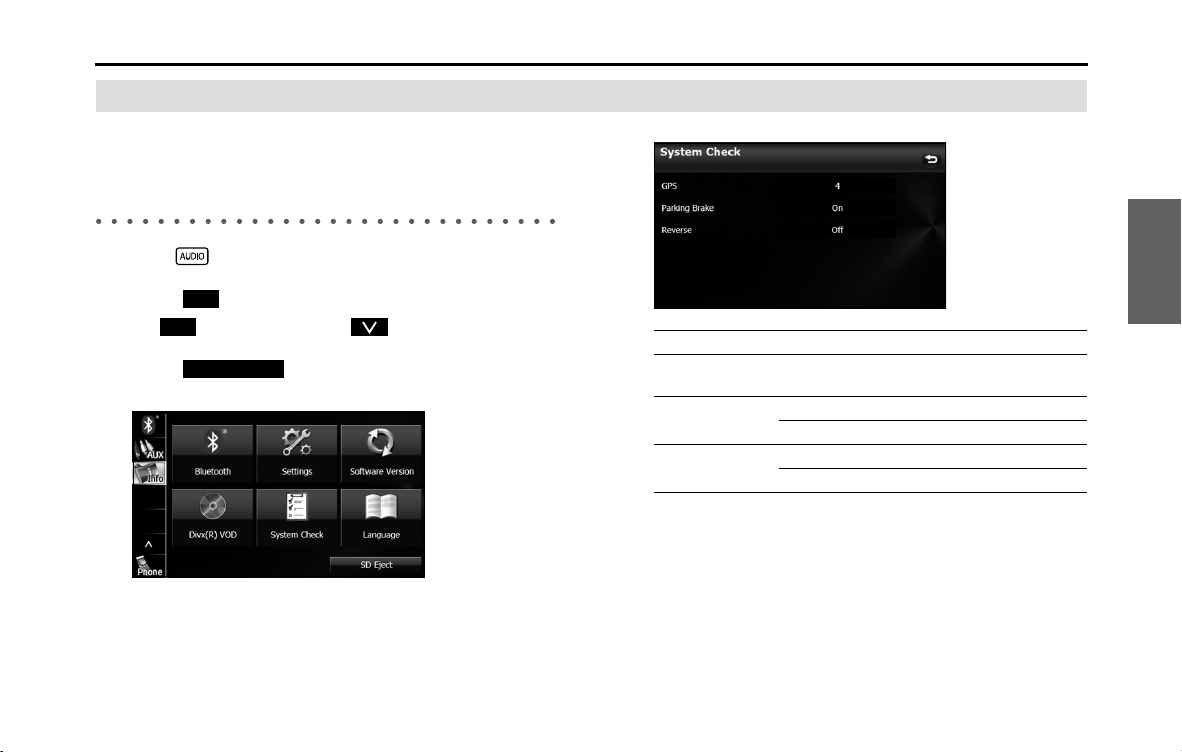
Navigation 181
Further Information
Display Connection Status Information
You can check the connection between the unit and the
vehicle, such as GPS information, parking signals and so on.
Display Connection Status Information
1 Press .
2 Touch .
• If is not displayed, touch .
3 Touch (System Check).
• Displays the connection status information screen.
<Connection status information screen>
Info
Info
System Check
Information Content
GPS information Displays the number of GPS satellites currently
sending information.
Parking signal On When the parking brake is applied.
Off When the parking brake is not applied.
Reverse signal On When shifting into reverse.
Off When shifting into another gear.
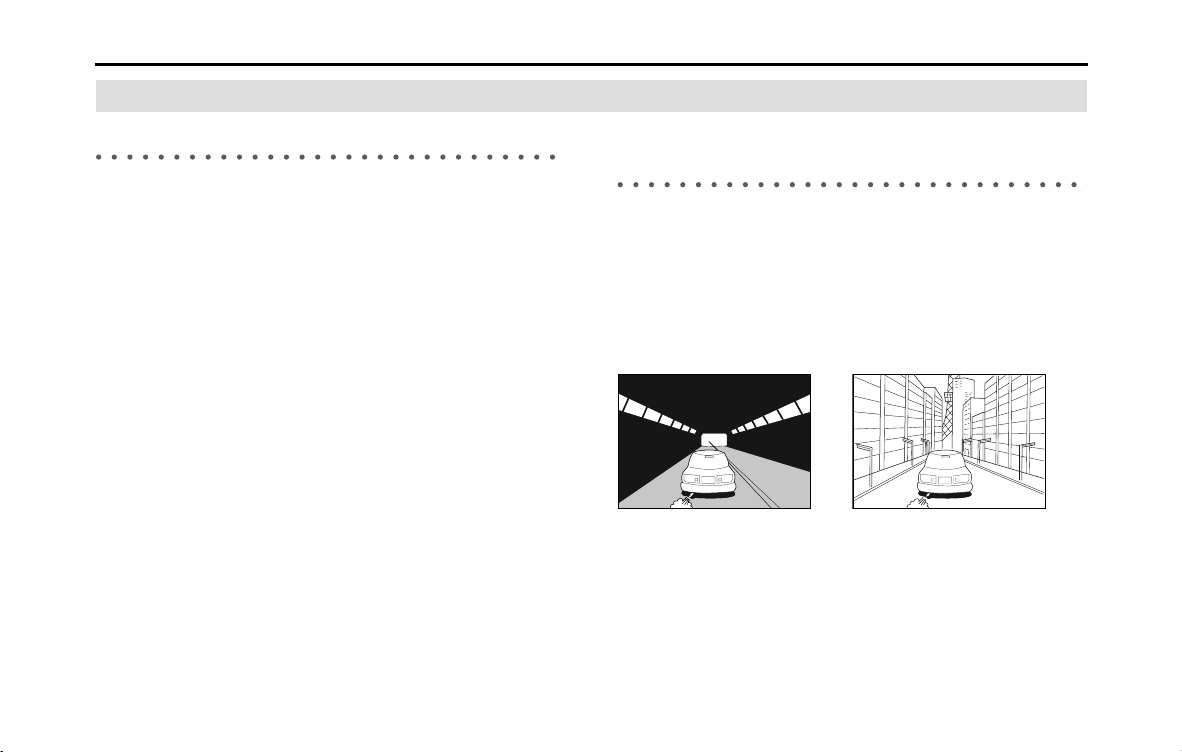
182 Navigation
Further Information
Accuracy & error calculation
Regarding Precision Accuracy
Since the GPS satellites are controlled by the US Department of Defense
they do have a very high level of accuracy, however a multipath due to
reflections from buildings and so on could cause errors to occur.
Regarding the Properties of the GPS Electro-
Magnetic Waves and Signal Reception
If there are any obstacles between the GPS antenna and the GPS
satellite, electromagnetic-waves cannot be received from the satellite.
It is also impossible to use GPS positioning in the following locations as
at least three simultaneous electromagnetic-waves are necessary to
take measurements.
Also, if there are any obstacles around the GPS antenna,
electromagnetic-waves cannot be received from the satellite.
• In tunnels • If the immediate area is enclosed by
large objects such as skyscrapers
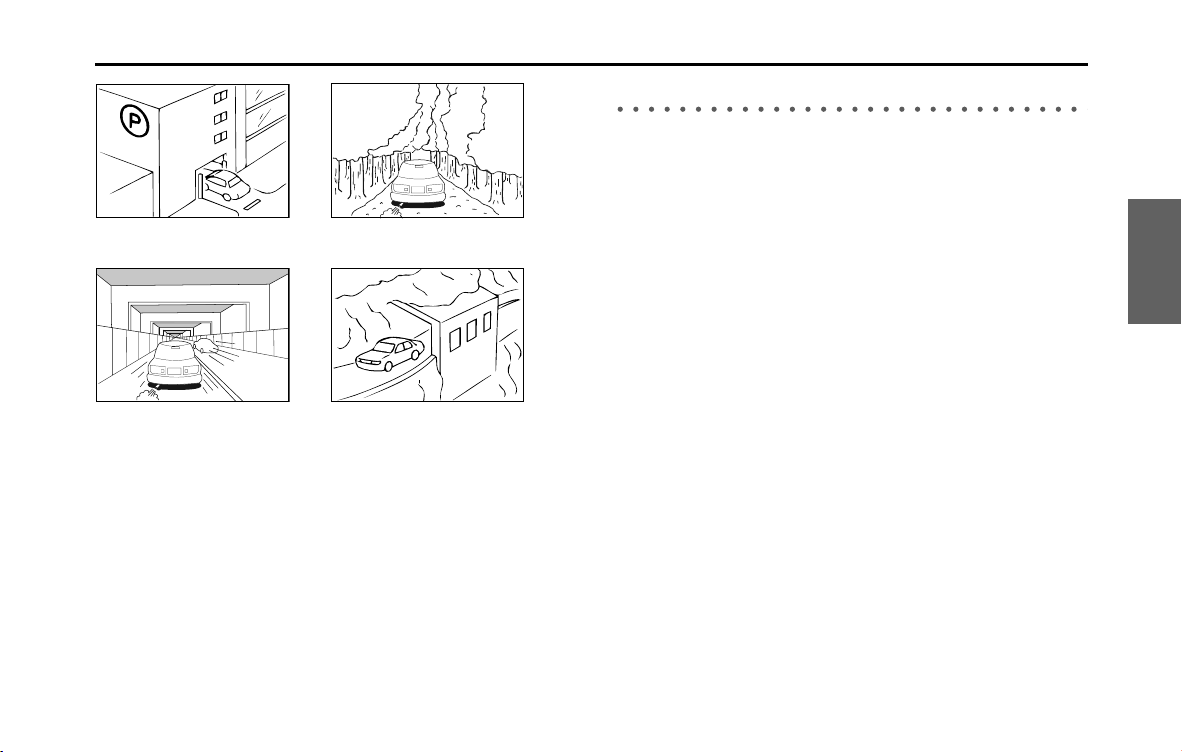
Navigation 183
Further Information
NOTE
• Because the GPS satellite is in orbit around the earth, the reception status for
the electromagnetic waves changes depending on their position at that point
in time, even if your vehicle is in the same place. Also, electromagnetic-waves
from satellites near the horizon can be easily influenced by surrounding
obstacles.
• At times, satellites under the control of the US Department of Defence will
intentionally drop positioning accuracy.
Regarding Errors in Current Position Display
To pinpoint the current position, the unit uses information from GPS
satellite electromagnetic waves. If any of these contain errors, the
current position may not match the actual position.
• In underground buildings and indoor
parking lots
• In places with a lot of overgrown
trees and so on
• Under elevated roads • Roads at the base of cliffs and caves
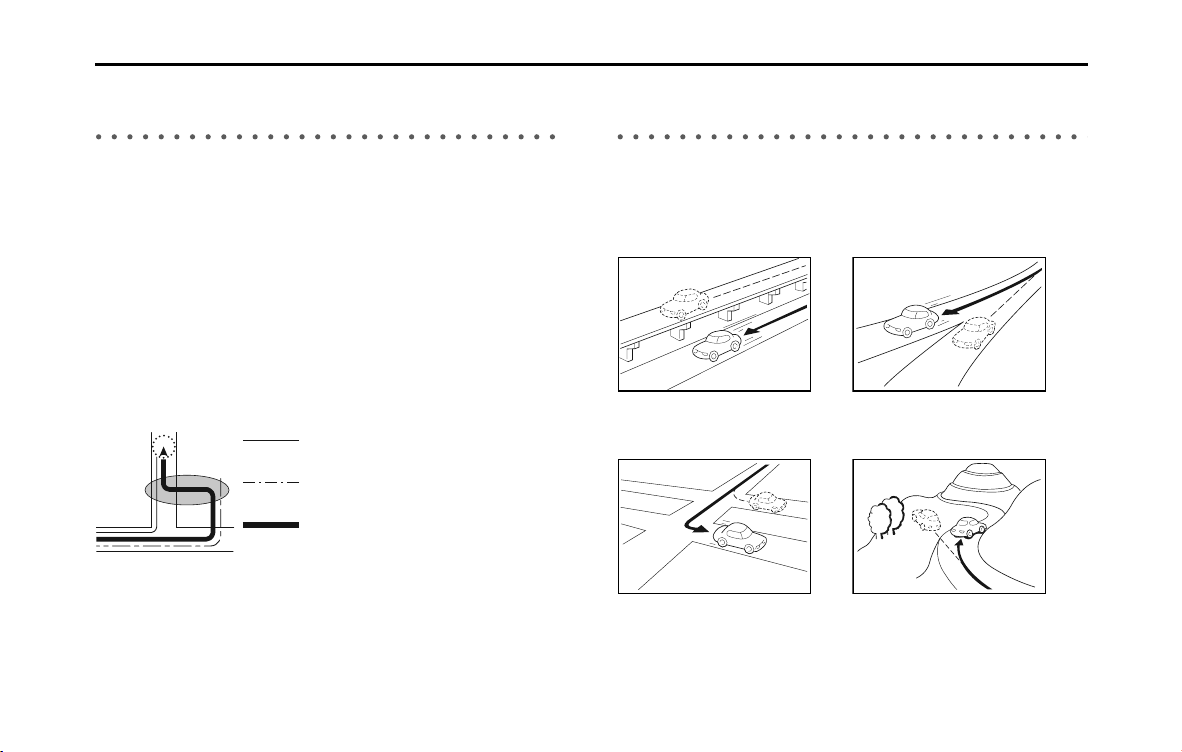
184 Navigation
Further Information
Regarding Vehicle Position Detection
Correction Using Map Matching
Map matching is a method of comparing information on the current
position acquired by GPS and so on, with the road driven up to that
point, and correcting the current position based on the most likely
road.
This unit uses information on the current position combined with
independent navigation and satellite navigation and matches it to the
shape of the road to create the correction.
However, as it cannot avoid the error margins at the current position,
the current position may shift away from the actual position even when
correcting using map matching.
Also, the vehicle marker may shift if the map data and the shape of the
road being driven on differ.
NOTE
Because it takes a short time for operations to stabilize just after turning on the
unit, the vehicle mark may not immediately match the vehicle as it moves. After
driving for a while, operations stabilize, and the marker should match the actual
driving position.
Regarding the Accuracy of the Current Position
and Route Navigation
As in the following images, an accurate display of the current position
or route navigation may not be provided, however this is not an
indication of a malfunction in the unit, but is due to road conditions or
driving conditions.
Actual Vehicle Swept Path
Vehicle swept path acquired from each sensor
Corrected using map matching on the screen
• Shows the current position on roads
running in parallel.
• Shows the current position on the
other road when there is a narrow
fork in the road.
• Shows the current position on the
road ahead or behind when turning
right or left.
• Shows the current position when
traveling up a steep hill.
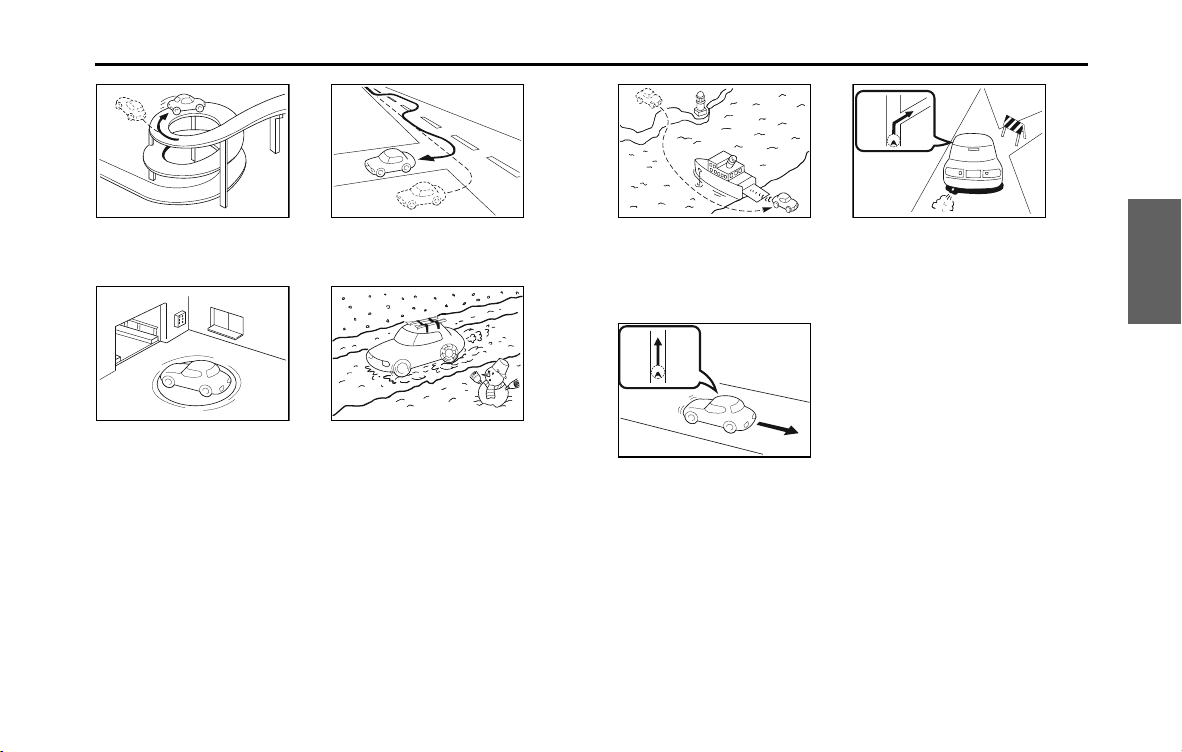
Navigation 185
Further Information
• Shows the current position if the
road continues to curve around on
itself in the same direction.
• Shows the current position after a
sudden change in lanes.
• Shows the current position when the
vehicle is on a parking garage
turntable and the ACC is off.
• Shows the current position when
driving on snowy roads where the
vehicle may slip easily, or when
driving with snow chains.
• Shows the current position in the last
confirmed position before moving
when using another means of
transport, such as a ferry, until the
GPS can determine the new position.
• It actually navigates through roads
that cannot be driven (no entry and
so on).
• Shows the current position when
reversing.
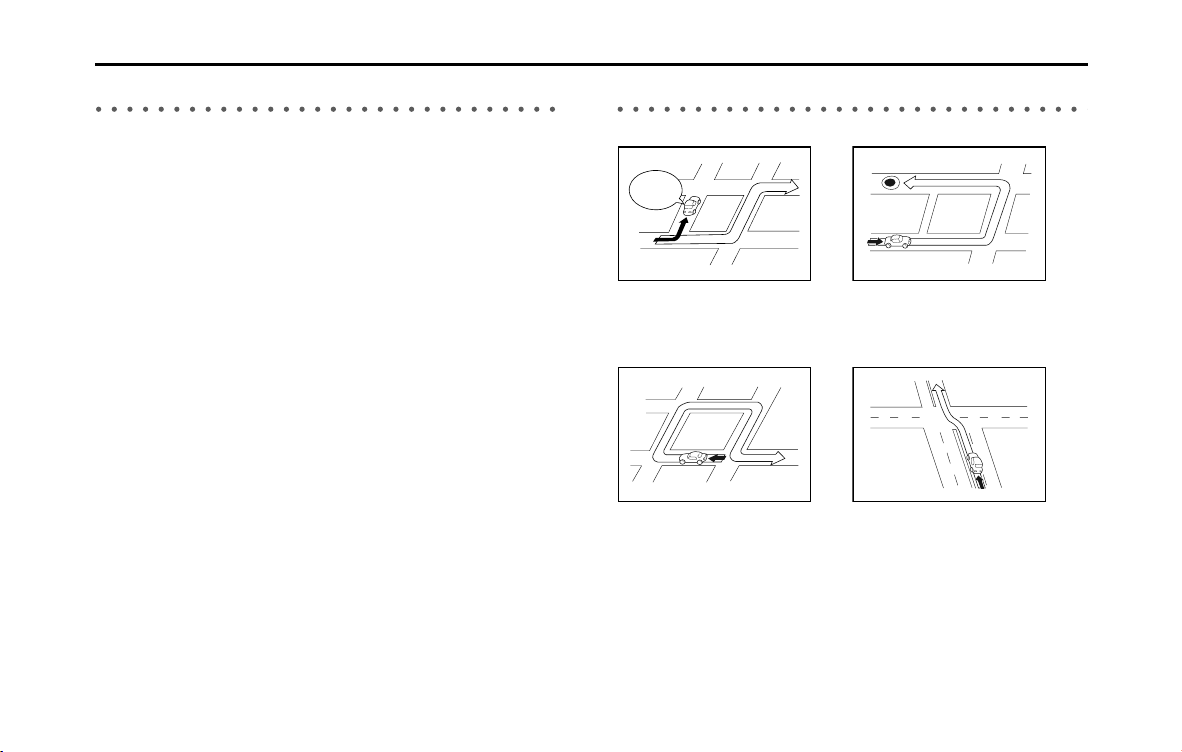
186 Navigation
Further Information
Regarding Roads and Place Name Data
Because road and place names may change after the map data has
been created, there may be times when road and place names do not
match.
When no information is available in the map data, function such as
display of road names, searching for facilities, and route guidance
cannot be used.
Regarding Route Navigation
• It may deviate from the route
navigation when there is a turn at an
intersection etc., and a mistake in the
voice navigation.
• When searching for the route, it may
take the long way around.
• The route may need you to make a U-
turn during navigation.
• When driving on a straight road,
information may be displayed
indicating that you should go
straight ahead.(When the
intersection shape is not clear and so
on.)
In six tenths
of a mile,
right turm.

Navigation 187
Further Information
• Performing a new search while traveling at high speeds may take
some time.
• The route may not change even after performing another search.
• When isolated locations or roads with no surrounding available
information are set as the current position/destination, you may not
be able to search for a route.
• A route may not be displayed when the current position is close to
the destination.
• Even if you select toll roads as a priority, the route may not guide you
through a toll road.
In a similar way, toll roads may be displayed even if you prioritize
other roads over toll roads.
(When it is possible to select a toll road or a normal road to create
the route, priority is given to the user's toll road preference - use toll
roads, or avoid toll roads.)
• The navigation may not indicate that
the road curves at an intersection.
• The navigation may guide you back
to a waypoint if you search for the
route again after passing the
waypoint and are heading to your
destination.
• Many place names may be displayed
when navigating a district.
• Always drive by following the actual
traffic regulations.
• When searching for a route, it may not be displayed quick enough for the next
left or right turn.
Transit point
Search
reinitiated
Route
search
complete

188 Navigation
Further Information

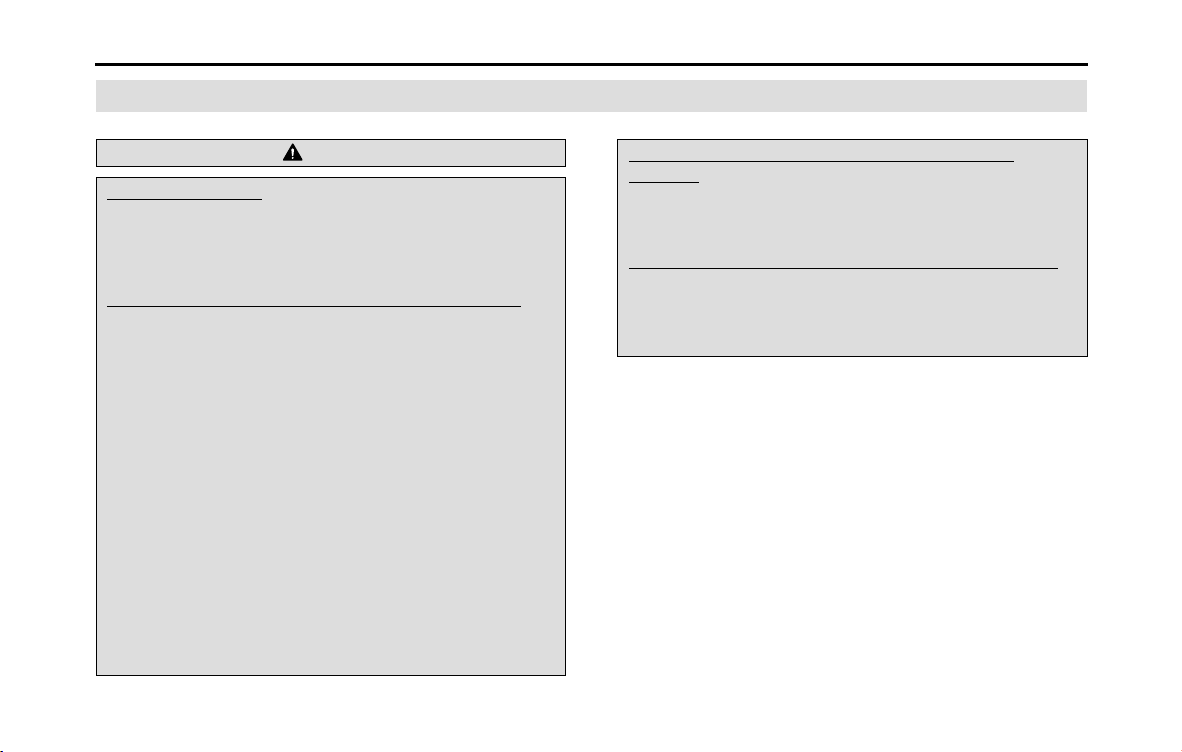
190 Audio and Visual
Before Using the Audio and Visual System
Precautions When Using the System
WARNING
Read this manual first
Read this supplement carefully before using the audio and
visual system. We are not liable for accidents or other
problems resulting from failure to follow the instructions in
this supplement.
Avoid operating the audio and visual system while driving
You should stop the vehicle in a safe place before operating
the audio and visual system. For safety, some of the audio
and visual system's functions cannot be used unless the
vehicle is stopped.
If you stare at the display too much or operate the buttons of
the system while driving, the navigation system could
distract your attention from the current traffic conditions. Be
sure to enter as much information as possible into the
system before departing. Also, be sure to stop your vehicle
in a safe place if you need to enter information.
The touch button on the display screen that cannot be used
have their colors toned down.
Operating the navigation system while driving could cause
your attention to be distracted from the current traffic
conditions. This could result in a severe or fatal accident.
Follow the descriptions of all operations and the instructions
for safety given in this manual without fail.
Look at the audio and visual system screen only when
necessary
When you need to look at the audio and visual system
screen, do so for the shortest time possible. Looking away
from the road for too long could lead to an accident.
Keep the volume low enough for you to hear outside sounds
Keep the system's volume level low enough for you to be
able to hear outside sounds while driving. Otherwise, you
may not be able to react appropriately to traffic conditions,
resulting in an accident.
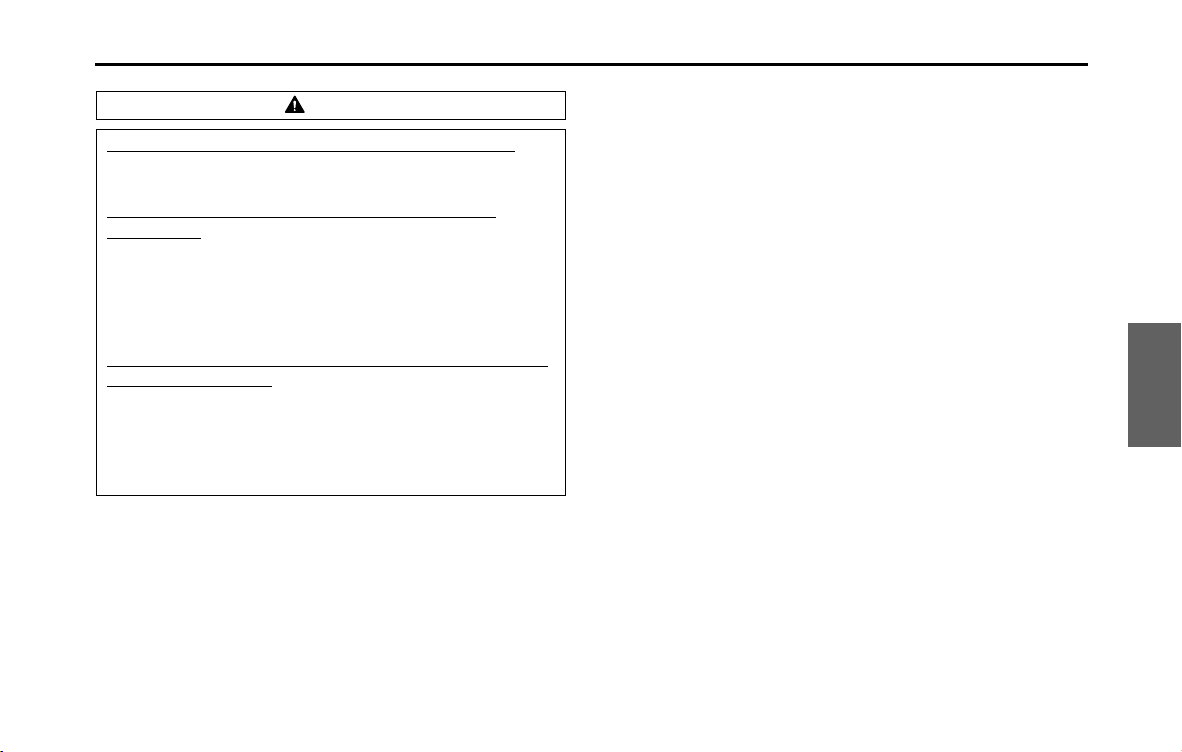
Audio and Visual 191
Before Using the Audio and Visual System
■ About the audio and visual system
• Subjecting the control buttons or liquid crystal display to excessive
shock could result in audio and visual screen deformation or other
damage.
• Keep any heat source (including lighted cigarettes) away from the
audio and visual system. If a heat source is brought into contact with
the audio and visual system cabinet or panel, they could be
deformed or otherwise degraded.
• In extreme cold, the audio and visual screen may operate sluggishly
and the display may dim. Such conditions do not indicate a problem.
They will disappear when the temperature inside the vehicle rises to
a normal temperature.
• Tiny black and white dots may occasionally appear on the liquid
crystal display. These dots are a normal characteristic of the display.
They do not indicate a problem.
• When the audio and visual screen requires cleaning, gently wipe it
with a silicone cloth or other soft cloth. If necessary, spray the cloth
with neutral cleaning fluid. Be sure to wipe away any cleaning fluid
left on the audio and visual screen. Do not spray the cleaning fluid
directly onto the audio and visual screen. Spraying cleaning fluid
directly onto the audio and visual screen could cause an adverse
effect on internal components. It is also not recommended to wipe
the audio and visual screen with a stiff cloth or attempt to clean it
using thinners, alcohol, or any other volatile solvent. Doing so could
leave scratches or erase the control button labels.
CAUTION
Never disassemble or modify the audio and visual system
Never disassemble or modify the system. Doing so may lead
to a fire, an electric shock, or some other type of accident.
Do not continue using the audio and visual system if it
malfunctions
If the system shows any sign of malfunctioning (for example,
the monitor displays no picture), stop using it immediately
and contact the nearest SUBARU dealer. Continuing to use
the system could lead to a fire, an electric shock, or some
other type of accident.
If the audio and visual system gets dirty, or emits smoke or an
odd smell, stop using it
If a foreign object gets inside the system, liquid is spilled
onto the system, or the system emits smoke or an unusual
smell, stop using it immediately and contact the nearest
SUBARU dealer. Continuing to use the system could lead to a
fire, an electric shock, or some other type of accident.

192 Audio and Visual
Before Using the Audio and Visual System
• Do not allow the audio and visual screen to get wet. If the screen
gets wet (for example, from a spilled drink or wet umbrella), its
internal electronic circuitry may malfunction.
• In hot weather, cool the passenger compartment before using the
audio and visual system. The liquid crystal display operates correctly at
temperatures between 0°C and 60°C (32°F and 140°F). When the
temperature exceeds 60°C (140°F), the audio and visual system circuit
protection function is activated, causing the display to dim.
NOTE
• For safety, the use of some functions are unavailable while driving. Buttons on
the touch screen that cannot be used have their colors toned down.
• The liquid-crystal display may be difficult to read when wearing polarized
glasses.
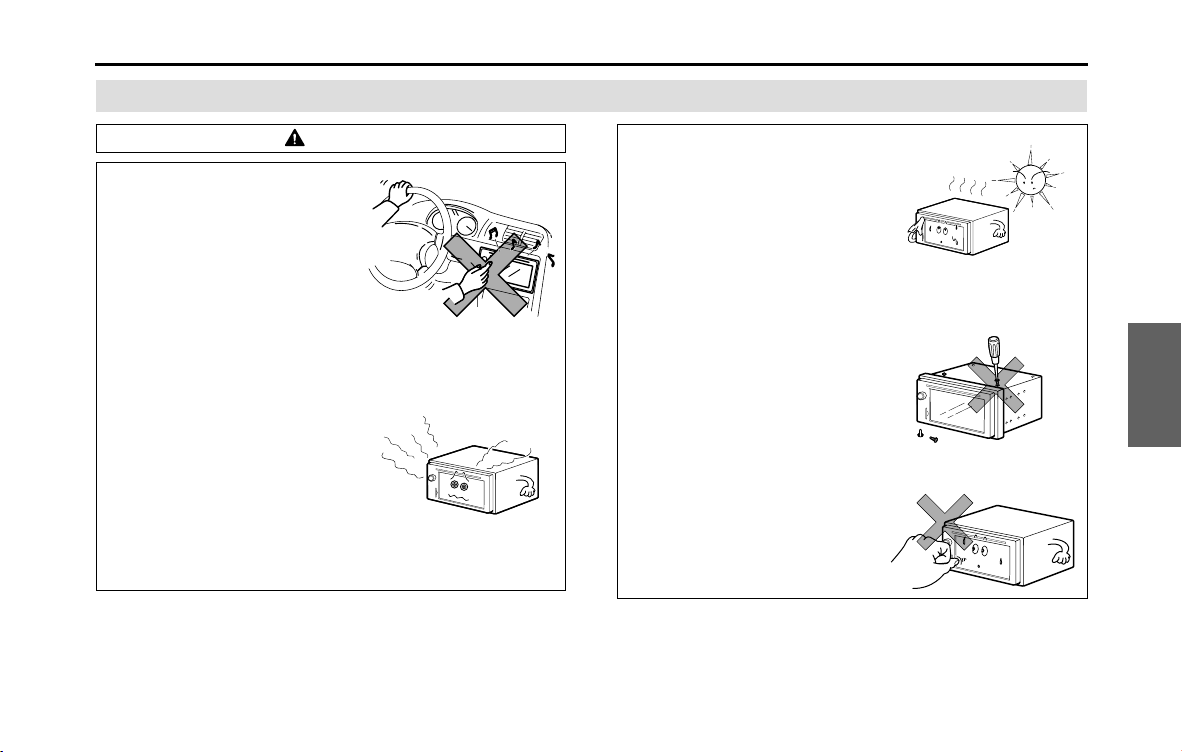
Audio and Visual 193
Before Using the Audio and Visual System
Precautions for Use
CAUTION
• Be very careful and pay full
attention to safety when
operating the audio controls
while driving. Otherwise, an
accident may occur. Also, be
sure to set the volume low
enough for you to still
adequately hear sounds
outside the vehicle.
Improper use may result in a
traffic accident.
• Never continue to use the
system if it is malfunctioning in
any way. If smoke, abnormal
noises or abnormal odors are
noticed, turn off the power
immediately.
In such situations, turn off the
power of the audio and visual
system immediately.
• Exercise caution regarding the
temperature inside the vehicle.
The temperature inside the
vehicle can increase during hot
weather. Wait for the
temperature inside the vehicle
to decrease before using this
unit.
Otherwise, damage may result.
• Do not disassemble or modify
this unit.
The unit has a precisely
designed structure, so consult
your SUBARU dealer in the
event any unsatisfactory
performance is observed.
• Do not apply excessive force to
the monitor.
Damage could result.
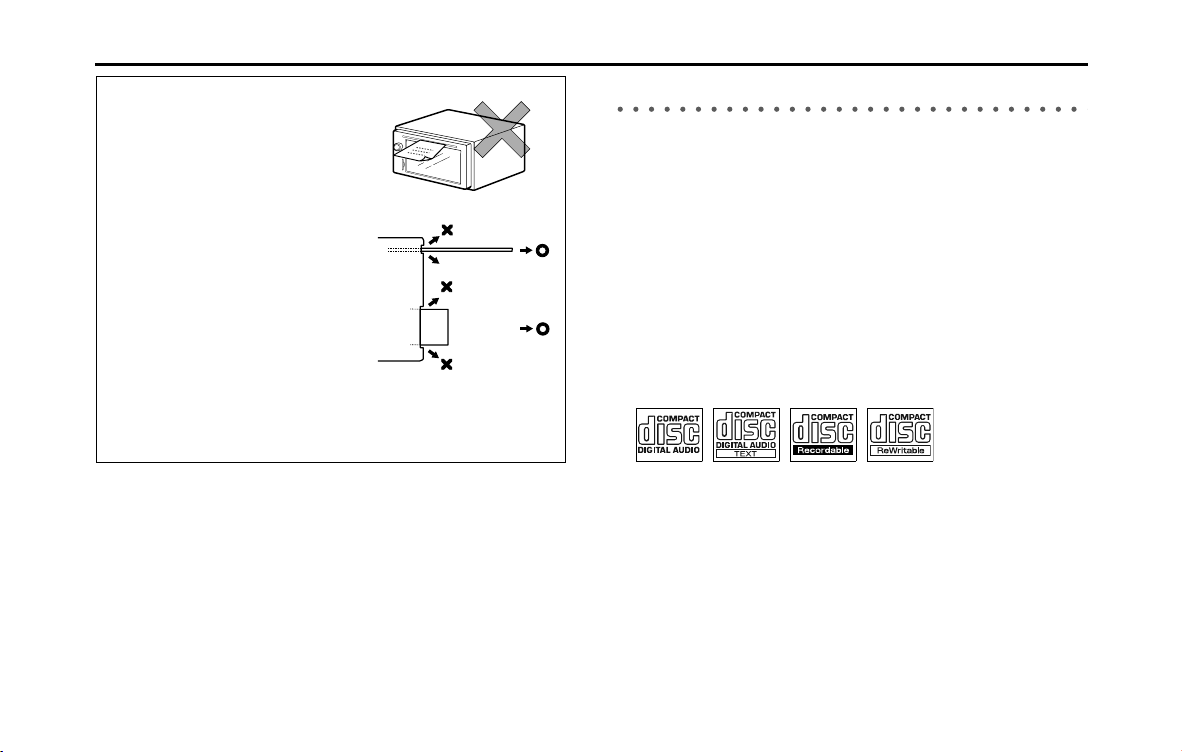
194 Audio and Visual
Before Using the Audio and Visual System
About Discs
NOTE
• In cold or rainy weather, just as the interior glass surface becomes fogged,
dew (water condensation) may also form on the unit. When this occurs, disc
playback may jump or stop. Ventilate or dehumidify the air in the vehicle for a
while before resuming playback.
• If a problem occurs, the player function stops automatically to protect its
internal parts. If the player does not operate even when you follow the on-
screen messages, the player may have failed. Consult your SUBARU dealer.
• Playback may jump when the player is subjected to severe vibrations while
traveling over a rough surface.
• Do not use a commercially available lens cleaner because it may damage the
pickup of the player.
■ About the supported discs
• An audio disc bearing one of the marks below can be played.
• It is possible that a CD-R (CD-Recordable) or CD-RW (CD-ReWritable) disc will
not play on the unit due to the recording condition, disc characteristics,
scratches, dirt, or deterioration caused by long-term storage in the vehicle.
Also, a CD-R or CD-RW disc that has not been finalized and a CD-R or CD-RW
disc recorded in UDF format cannot be played.
• The CD-TEXT function can be used only for commercially available CDs that
support CD-text. Characters written on CD-R and CD-RW discs may not be
displayed correctly.
• Do not use a CD or See Through disc that has a transparent or semi-
transparent recording area as they may fail to load or unload or play their
contents.
• Never insert any objects other
than discs into the disc slot.
Damage could result.
• When removing a disc or “SD
memory card” from the unit,
remove it horizontally.
Do not apply excessive force
vertically or sideways while
removing it.
Improper removal may result
in the disc becoming
scratched, causing the unit to
output unusual noises.
Improper removal of the “SD
memory card” may damage it.

Audio and Visual 195
Before Using the Audio and Visual System
• A Copy Control CD (CCCD) may not be played as it does not meet the official
CD Standard.
■ Handling discs
• Do not place a disc in direct sunlight. Store each disc in its protective case.
Otherwise, discs may warp and fail to play.
• Do not attach paper-based tape to either the recording side or label side of a
disc. Damage could result.
• Do not use cracked or badly warped discs.
Damage could result.
• Do not touch the recording area (the rainbow colored) side of a disc.
Otherwise, the disc may become dirty and playback may jump.
• If you play a dirty disc, the disc surface may be scratched and the playback
may jump.
Use a commercially available compact disc cleaner to clean the CD, wiping
gently from the center to the edge.
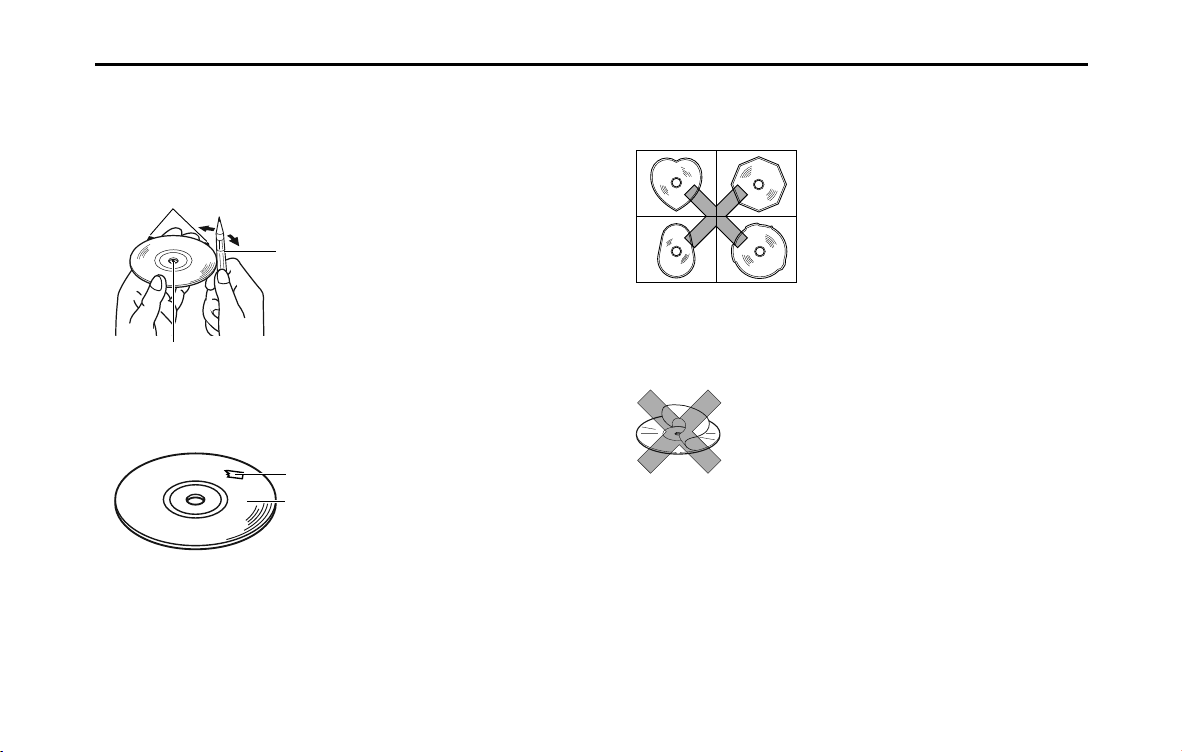
196 Audio and Visual
Before Using the Audio and Visual System
■ Brand new CDs
• You may notice that some brand new discs have “rough edges” around the
center hole or outside. In such cases, remove the “rough edges” or flakes
around the edge using the side of a ballpoint pen before using the new disc.
Not doing so may result in the “rough edges” or flakes attaching to the
recording side, preventing playback.
■ Rental discs
• Do not use a rental disc with glue or remnants of adhesive tape or labels
attached to the disc.
They may cause the disc to get stuck inside or damage the unit.
■ Irregularly-shaped CDs
• Irregularly-shaped discs, such as octagonal CDs or heart-shaped CDs, cannot
be played. Do not play this type of disc, even with an adapter.
Damage to the player could result.
■ Disc accessories
• Do not use accessories (such as stabilizers, protective seals, laser lens cleaners)
sold for improving sound performance or protecting CDs.
The changes in CD thickness or outside dimensions made by these
accessories may cause problems in the player.
Rough edges
Rough edges
Ballpoint pen
Recording side
Adhesive tape

Audio and Visual 197
Before Using the Audio and Visual System
• Do not attach any ring-shape protector (or other accessory) to the disc.
Although these protectors are commercially available and said to protect
discs and improve sound quality (and anti-vibration effect), in normal use they
can do more harm than good. The most common problems are disc insertion
and ejection problems and abnormal playback problems due to the protector
ring coming off in the disc mechanism.
CD ring
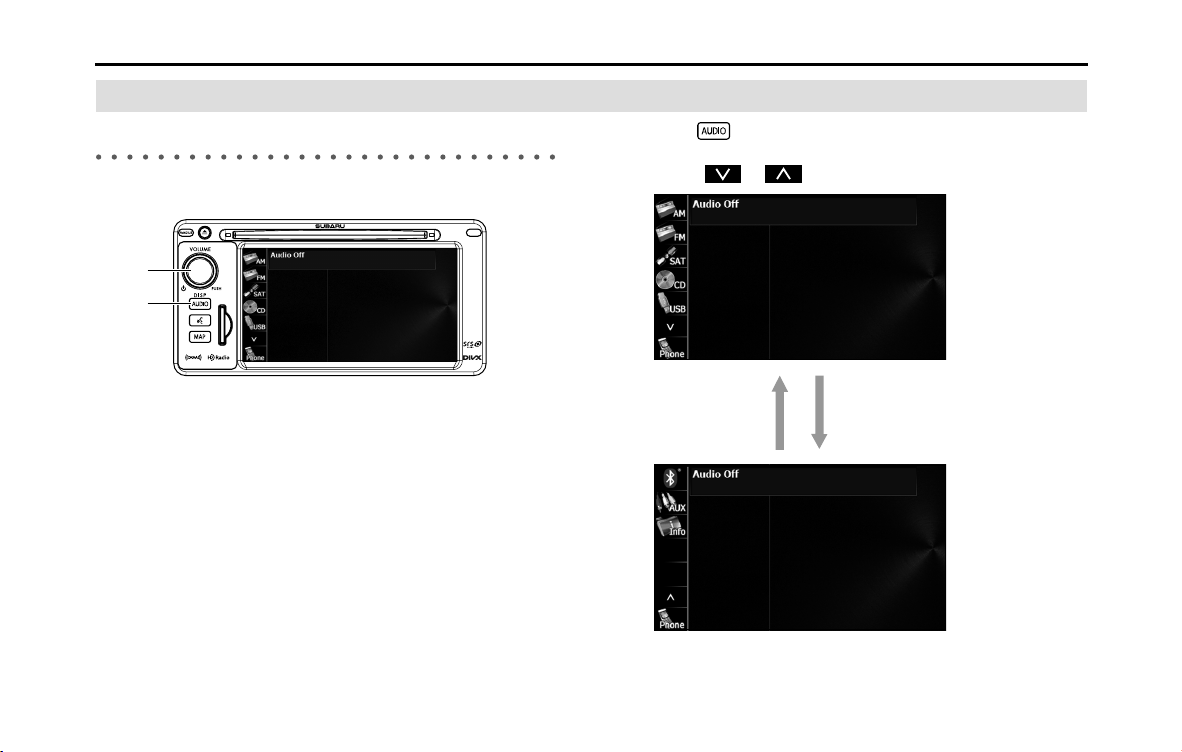
198 Audio and Visual
Basic Operation
Switching the Audio Source
Switching the Audio Source
(1) AUDIO button
(2) POWER/VOL button
1 Press .
2 Touch or to scroll the screens.
3 Select the audio mode that you want to use.
(2)
(1)
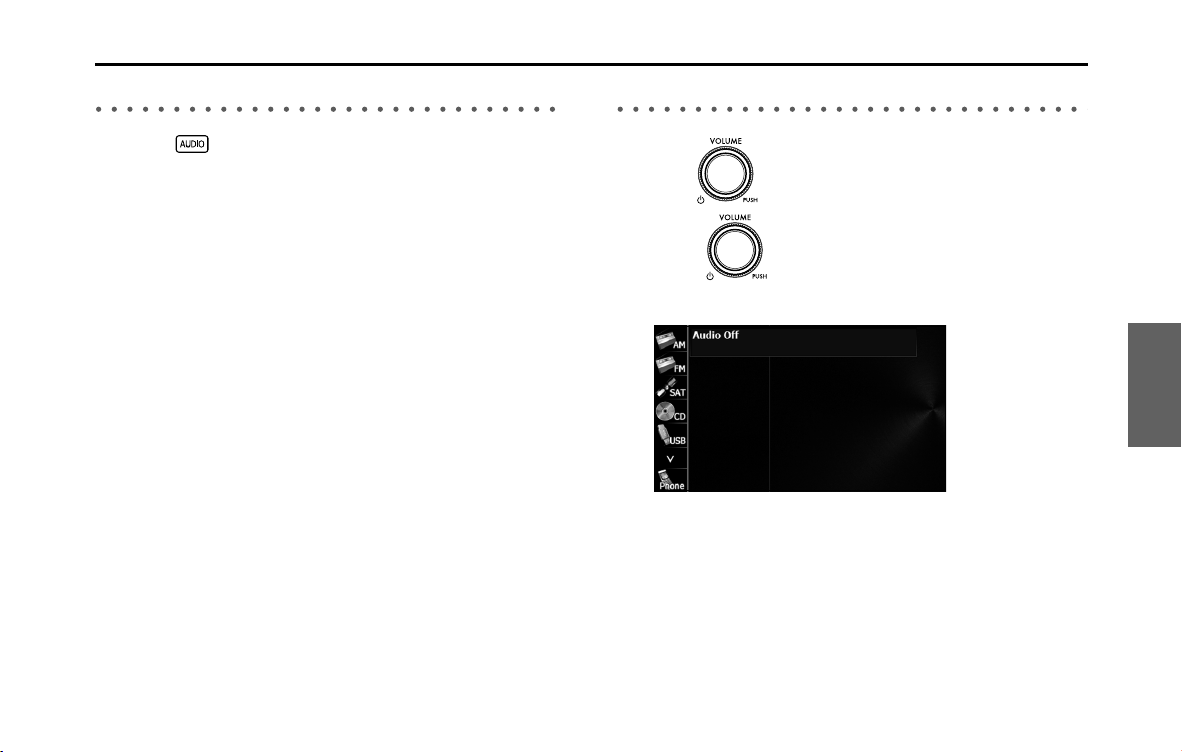
Audio and Visual 199
Basic Operation
Displaying the Audio Operations Screen
1 Press .
Stopping the Audio Mode
1 Press (POWER/VOL).
• Press (POWER/VOL) again to receive the station you
were receiving, the music you were playing or the video you
were playing before you stopped the audio mode.

200 Audio and Visual
Basic Operation
Source Operations Screen
The operations screen for the audio sources are as follows.
<Radio (AM) operations screen>
<Radio (FM) operations screen>
<Radio (SAT) operations screen>
<CD player operations screen>
<MP3/WMA operations screen>
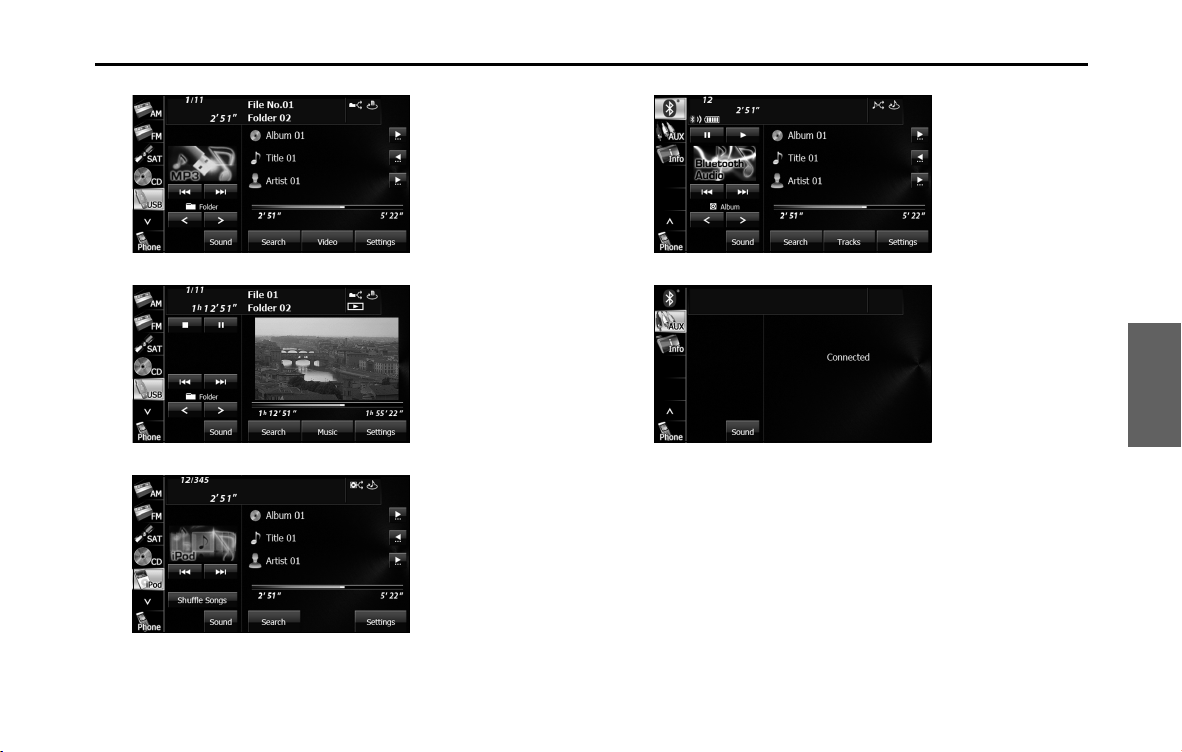
Audio and Visual 201
Basic Operation
<USB music file player operations screen>
<USB video file player operations screen>
<iPod operations screen>
<Bluetooth audio operations screen>
<AUX operations screen>
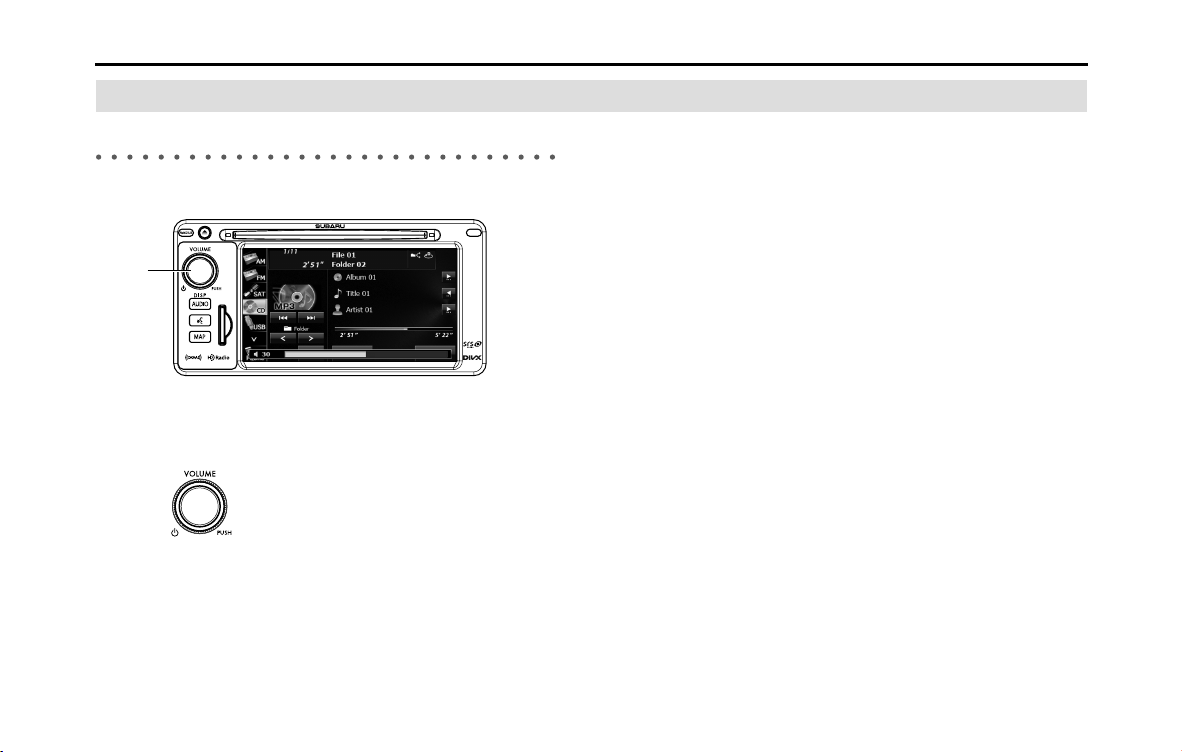
202 Audio and Visual
Basic Operation
Volume Control
Main Volume Control
(1) POWER/VOL button
1 Turn (POWER/VOL).
•Turn to right:
Volume up
Turn to left:
Volume down
NOTE
• Adjust to a volume level that will not prevent safe driving.
• You can adjust the level from 0 to 63. Max is displayed when the volume is 63.
• The volume may change when you switch the audio source. Adjust the
volume to a level appropriate for the audio source you select.
(1)
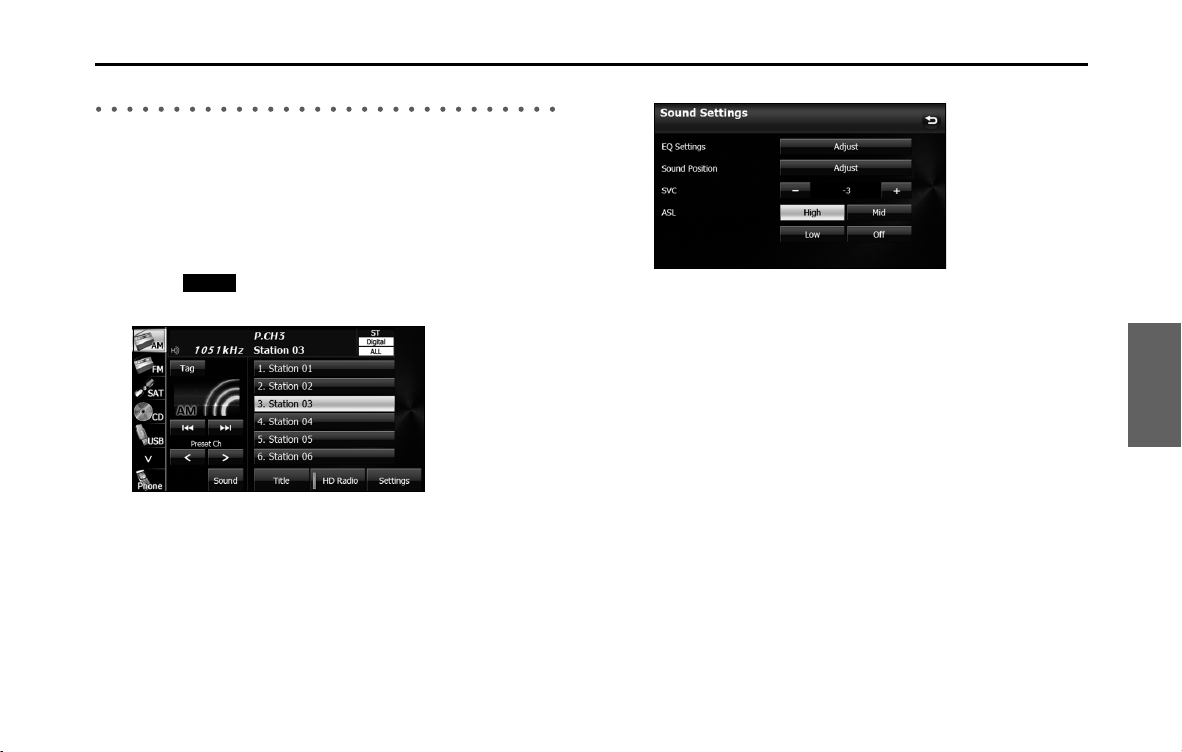
Audio and Visual 203
Basic Operation
Displaying the Sound Settings Screen
When you switch to the Sound Settings screen from any of the Audio
operations screens, the following operations are available.
• Adjusting the sound quality
• Adjusting the audio balance
• Setting the source volume control
• Adjusting the automatic sound levelizer
1 Touch (Sound) on any of the audio operations
screens.
2 Touch the button that you want to set.
Sound
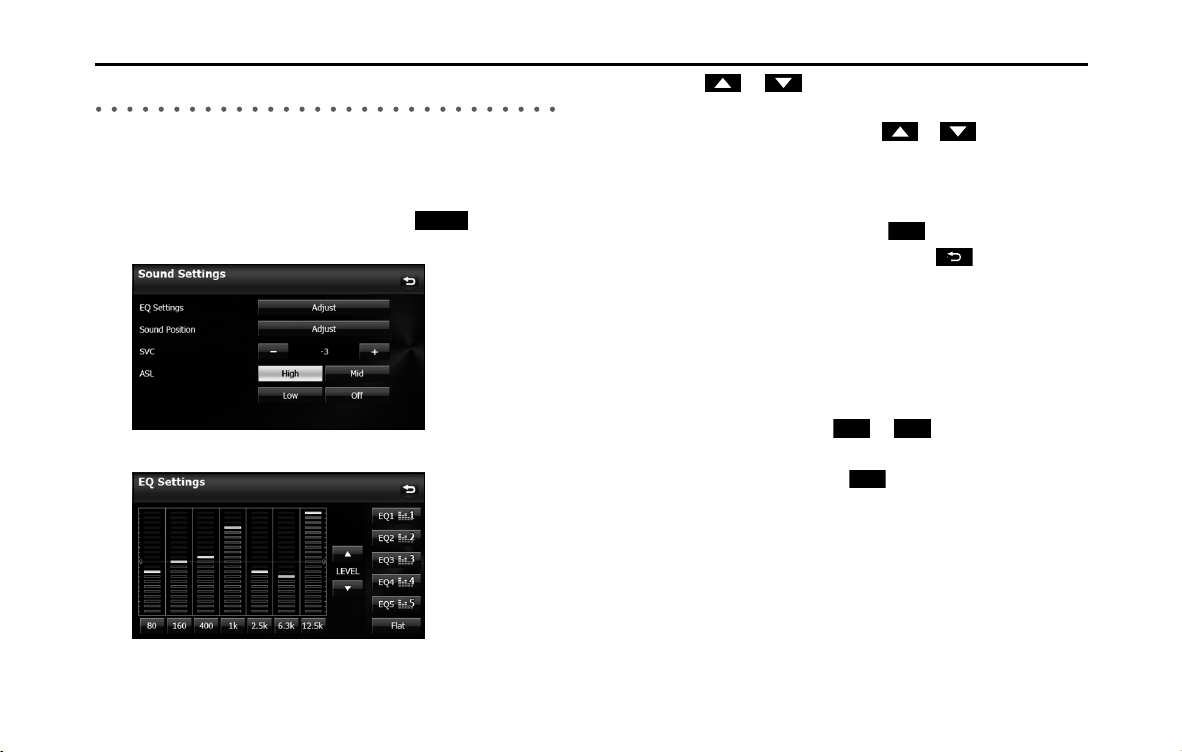
204 Audio and Visual
Basic Operation
Adjusting the Sound Quality
You can adjust the sound quality from the low band to the high band.
■ Adjusting the sound quality
1 On the Sound Settings screen, touch (Adjust) in
EQ Settings.
2 Touch the sound band that you want to adjust.
3 Touch or .
• When you touch and hold, the value changes continuously but
stops at the center value. Touch or again to restart.
• You can also adjust to the desired level by touching the screen.
• The maximum adjustment is +10 and the minimum
adjustment is -10.
• To reset the sound quality, touch (Flat).
• After completing the adjustment, touch to save the
adjusted settings and return to the previous screen.
■ Saving the sound quality
You can save the adjusted sound quality settings.
1 Adjust the sound quality.
2 Touch any button from to for 2 seconds or
more.
• Values cannot be saved for (Flat).
Adjust
Flat
EQ1 EQ5
Flat
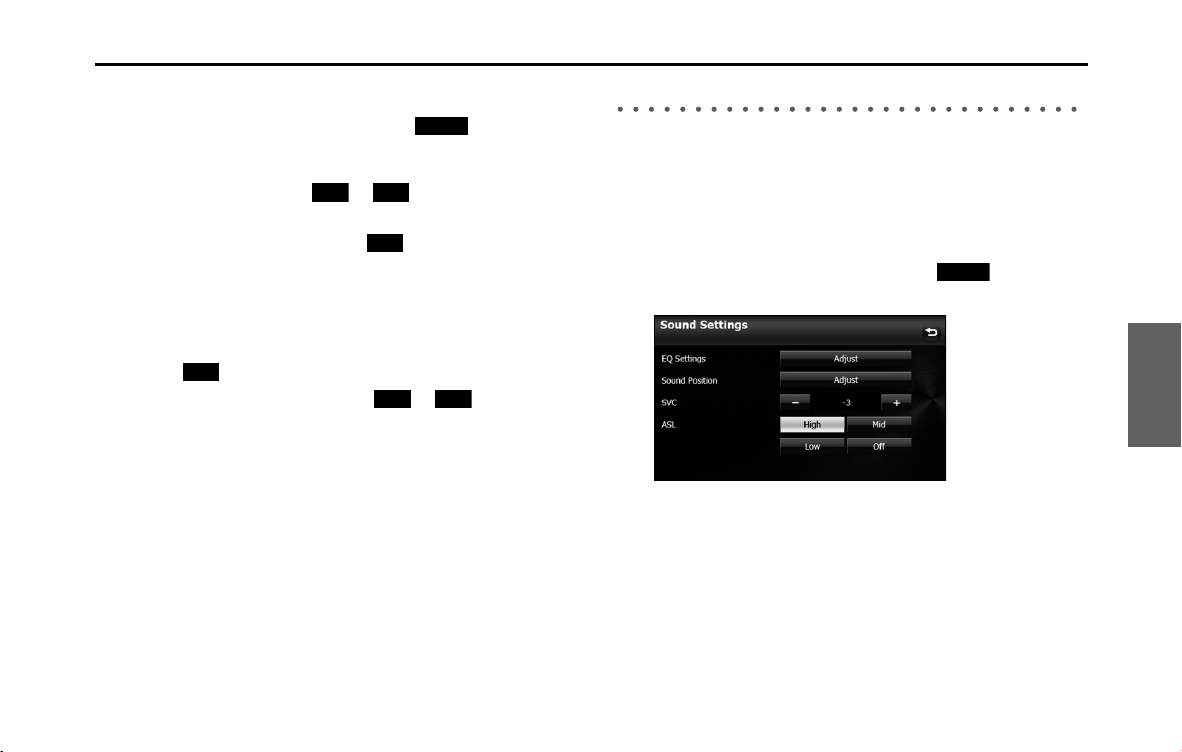
Audio and Visual 205
Basic Operation
■ Using a preset sound quality
1 On the Sound Settings screen, touch (Adjust) in
EQ Settings.
2 Touch any button from to to activate the
corresponding preset sound quality.
• To reset the sound quality, touch (Flat).
■ Resetting the EQ curve
You can return the adjusted value for the currently stored equalizer to
its initial value.
1 Touch (Flat) for 2 seconds or more.
• The adjusted values for the stored to are returned
to their initial values.
Adjusting the Audio Balance
■ Adjusting the positioning selector
You can change the sound localization according to the number and
position of passengers. Also, you can adjust the sound balance from
front to rear and left to right to optimize the sound from speakers from
which sound has difficulty traveling.
1 On the Sound Settings screen, touch (Adjust) in
Sound Position.
Adjust
EQ1 EQ5
Flat
Flat
EQ1 EQ5
Adjust
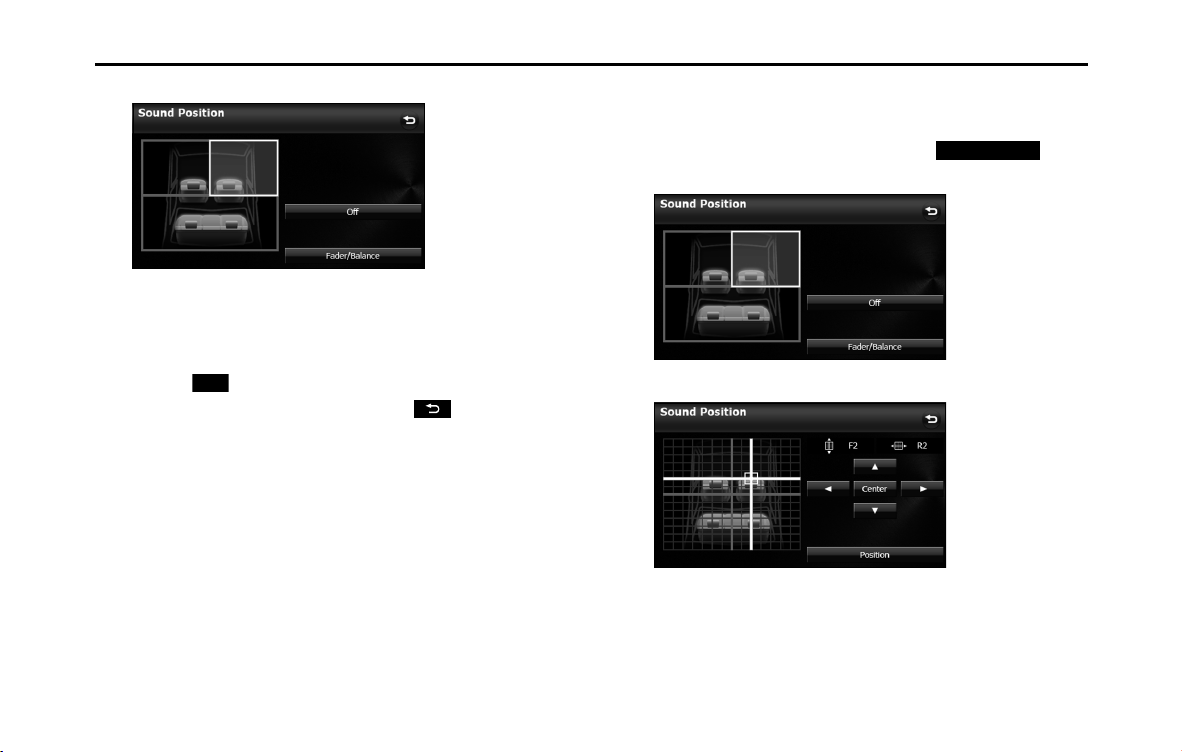
206 Audio and Visual
Basic Operation
2 Touch the seat that you want to set.
• A frame appears around the set position. Touch again to cancel
the setting.
• 4 positions are available for setting: the front right seat, the front
left seat, both front seats, or the rear seats.
• Touch (Off ) to cancel all the settings.
• After completing the adjustment, touch to save the
adjusted settings and return to the previous screen.
NOTE
You cannot set positioning selector adjustments at the same time as the volume
balance.
■ Adjusting the audio balance
You can adjust the sound balance from front to rear and left to right.
1 On the Sound Position screen, touch
(Fader/Balance).
2 Touch the balance point that you want to use.
O
Fader/Balance
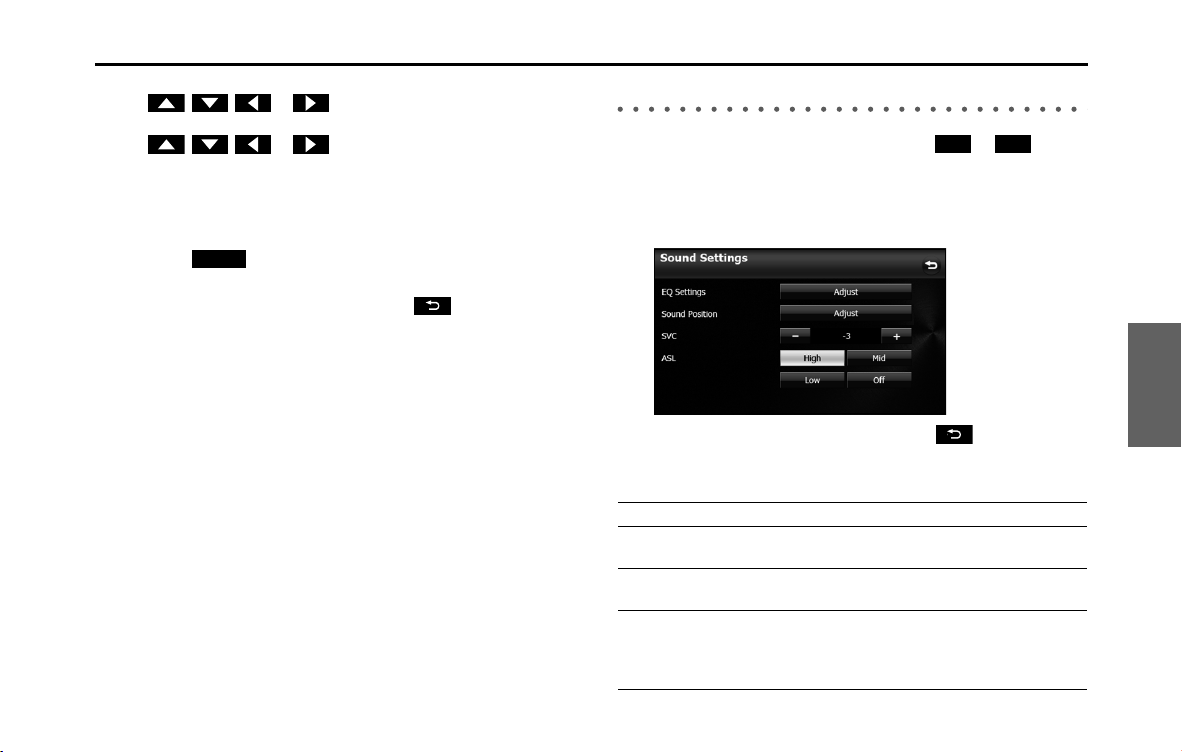
Audio and Visual 207
Basic Operation
• To fine adjust, touch any of the balance adjusting buttons
, , or to change the value by 1 step.
When you touch and hold one of the balance adjusting buttons
, , or , the value changes continuously
but stops at the center value. To continue to change the
balance, touch one of the balance adjusting buttons again.
• You can also adjust to the desired balance by touching the
screen.
• Touch (Center) to cancel the Fader/Balance setting and
return to the center value.
• After completing the adjustment, touch to save the
adjusted settings and return to the Sound Settings screen.
NOTE
You cannot set the volume balance at the same time as positioning selector
adjustments.
Setting the Source Volume Control
1 On the Sound Settings screen, touch or in SVC.
• You can set a volume difference for each audio mode. The
differences between the volume of the FM mode in the initial
setting (initial value: 19), which is used as reference, and the
volume levels set for each audio mode are saved.
• After completing the adjustment, touch to save the
adjusted settings and return to the previous screen.
Setting example:
Center
Audio mode FM AM CD USB BT-Audio
Initial value
(Volume level)
Reference
(19)
0
(19)
0
(19)
0
(19)
0
(19)
SVC setting
(Volume level)
Reference
(19)
+15
(34)
-10
(9)
+5
(24)
-5
(14)
When volume
level is adjusted
from 19J35 in
FM mode
35 34J50 9J25 24J40 14J30
-
+
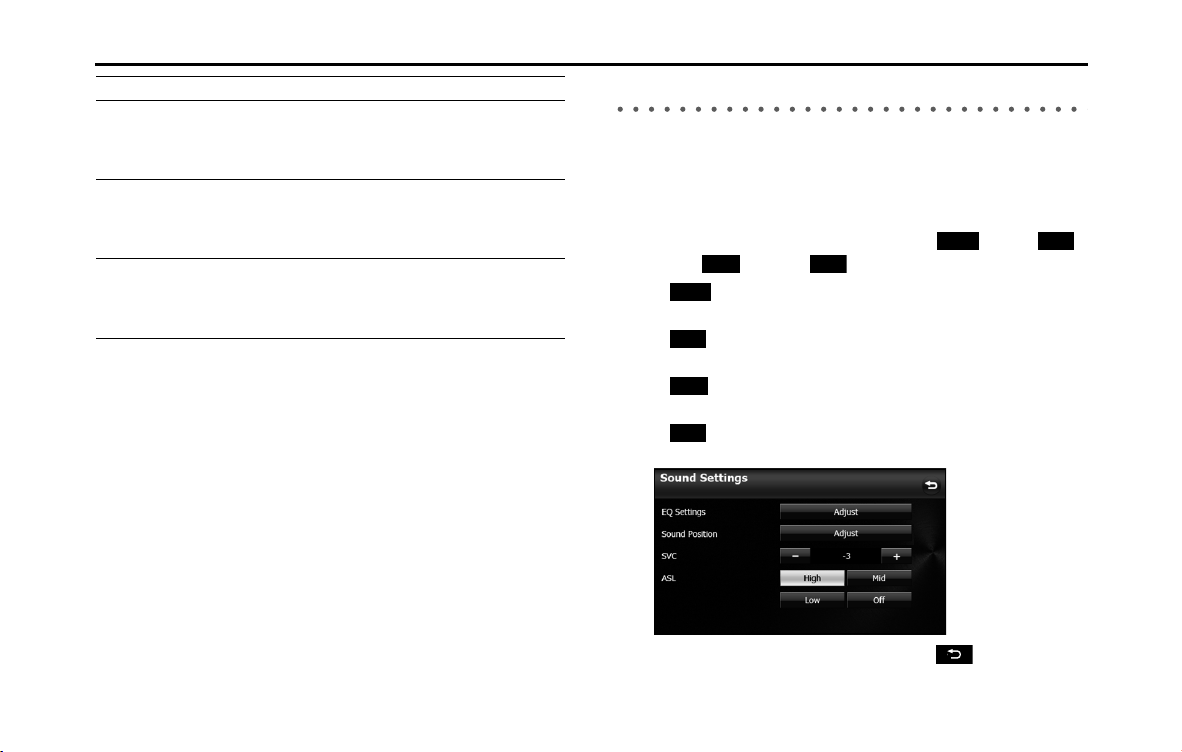
208 Audio and Visual
Basic Operation
* You can set the volume level in a range of 0 to 63 (Max). Set the volume level
differences in a range of -10 to +20.
Setting the Automatic Sound Levelizer
The Automatic Sound Levelizer (ASL) function detects the noise level
inside the vehicle as it changes according to the driving speed and road
conditions, and automatically increases the audio volume when the
noise increases.
1 On the Sound Settings screen, touch (High),
(Mid), (Low) or (Off) in ASL.
• (High):
Set the sensitivity for detecting noise inside the vehicle to High.
• (Mid):
Set the sensitivity for detecting noise inside the vehicle to Mid.
• (Low):
Set the sensitivity for detecting noise inside the vehicle to Low.
• (Off):
Cancel the ASL setting.
• After completing the adjustment, touch to save the
adjusted settings and return to the previous screen.
When volume
level is adjusted
from 25J45 in
CD mode
35J55
50
J
Max (70)
*
45 40J60 30J50
When volume
level is adjusted
from MaxJ20
in AM mode
55J52045J
0(-5)
*
60J10 50J0
When volume
level is adjusted
from 10J30 in
USB mode
5J25 20J40 0J15 30 0J20
Audio mode FM AM CD USB BT-Audio
High Mid
Low O
High
Mid
Low
O
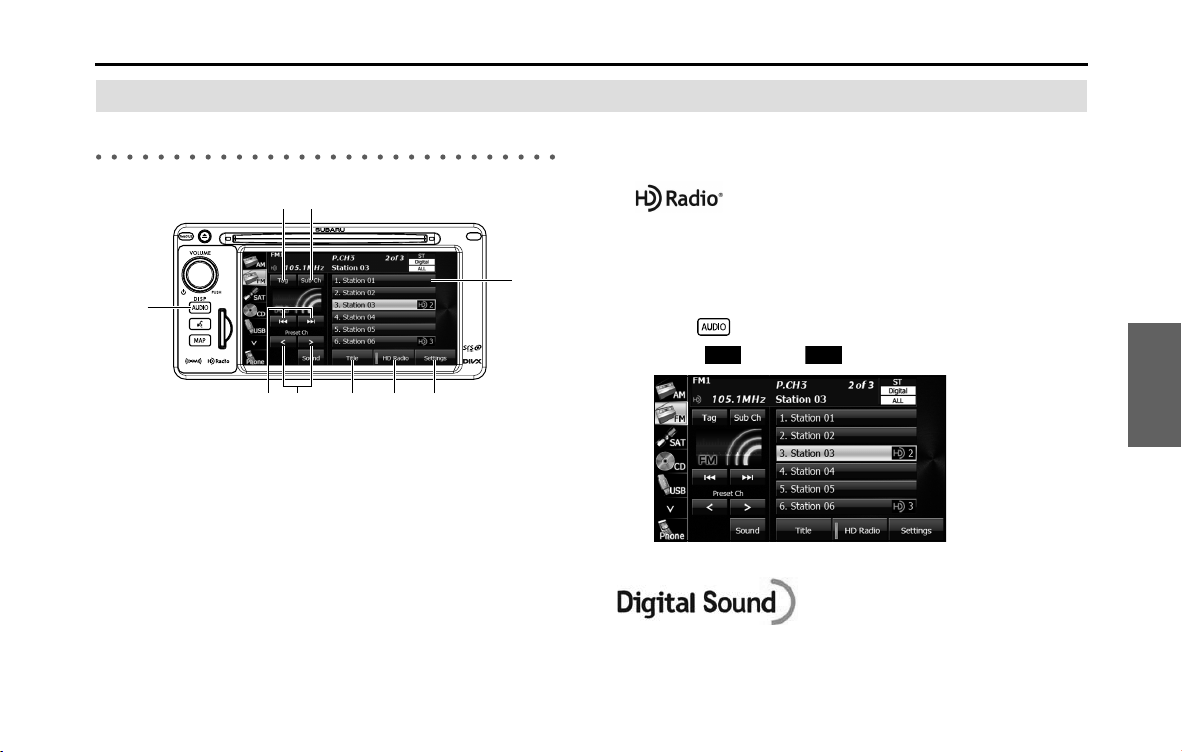
Audio and Visual 209
Audio Operations
Using the Radio
Using the Radio
(1) Preset button
(2) Settings button
(3) HD Radio button
(4) Title button
(5) Preset CH up/down buttons
(6) Tune up/down buttons
(7) AUDIO button
(8) Tag button
(9) Sub Ch button
*
* Displayed only in FM radio mode.
NOTE
• When a digital HD Radio™ broadcast is received, “Digital” is displayed.
• About HD Radio™ Technology
HD Radio Technology manufactured under license from iBiquity Digital
Corporation. U.S. and Foreign Patents. HD Radio™ and the HD, HD Radio, and
“Arc” logos are proprietary trademarks of iBiquity Digital Corp.
■ Listening to the radio
1 Press .
2 Touch (AM) or (FM).
NOTE
Digital, CD-quality sound. HD Radio Technology enables local radio stations to
broadcast a clean digital signal. AM sounds like today’s FM and FM sounds like a
CD.
(1)
(2)(4) (3)(6) (5)
(7)
(9)(8)
AM FM
210 Audio and Visual
Audio Operations
■ Tuning a station
Manual selection
1 Touch or .
•:
Move up 1 step.
:
Move down 1 step.
Auto tuning
1 Touch or for 1 second or more.
• The tuner moves automatically to the station closest to the
frequency currently displayed on the screen and stops. To
cancel auto tuning while it is operating, touch the button again.
NOTE
• In some cases, it is difficult to maintain the optimum reception because the
position of the antenna on the vehicle is always changing (relative to the
station antenna), and so the strength of the received wireless signal changes
continuously. Also, obstructions such as the natural topography or the pillars
of signboards may affect the reception.
• Auto tuning may not be possible in areas where the received signal is weak.
Selecting from a preset button
1 Touch a preset button saved in the memory.
• The saved preset channel is selected and the corresponding
station is received.
■ Selecting a radio band
In FM radio mode only, you can select the reception band.
1 Press .
2 Touch (FM).
• Touch (FM) to change the reception band in the
following order.
• The band currently being received is displayed at the top left of
the screen.
FM
FM
FM1
FM2
FM3
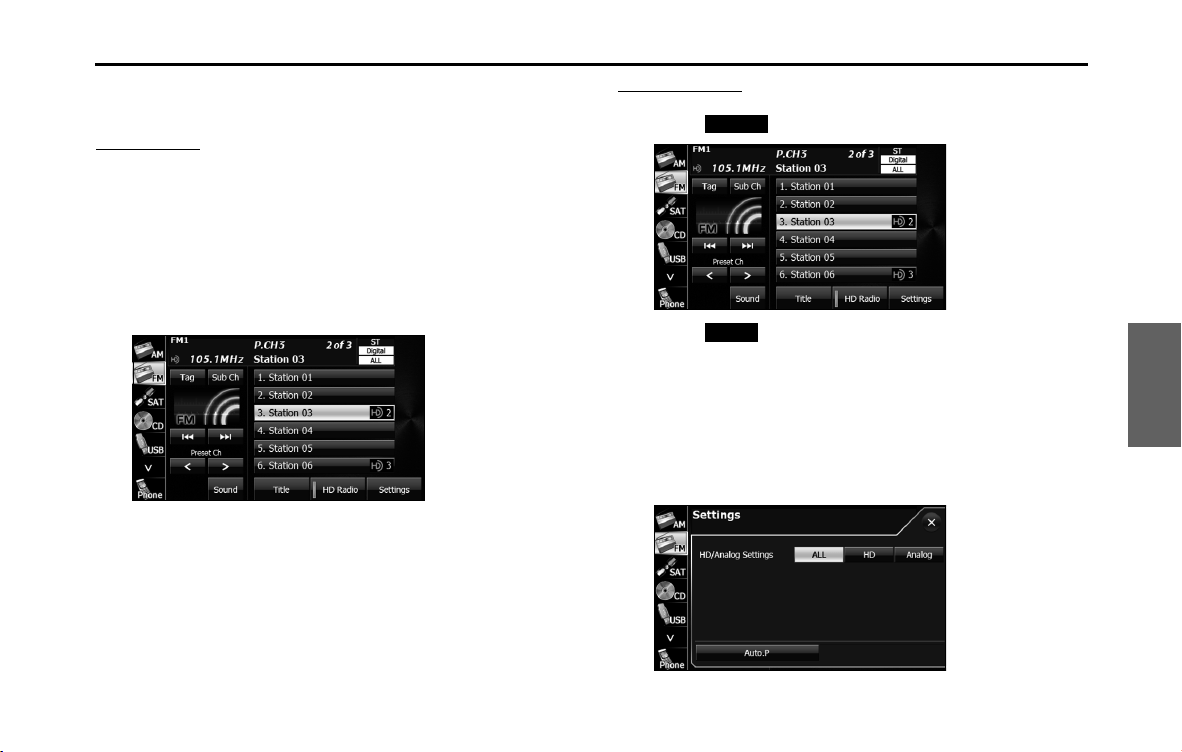
Audio and Visual 211
Audio Operations
■ Saving a station
You can save radio stations manually or automatically.
Manual saving
1 Select the station that you want to save using manual
tuning or auto tuning.
2 Touch the preset button that you want to use for 2
seconds or more.
• The selected station is saved and displayed on the preset
button.
• To manually set additional stations for the remaining preset
channels, repeat this procedure for each channel.
• You can set 6 stations each for FM 1, 2 and 3, and 6 stations for
AM, making a total of 24 stations.
Automatic saving
1 Touch (Settings).
2 Touch (Auto.P) for 2 seconds or more.
• To cancel “Auto.P” while it is operating, touch the switch again.
• The tuner searches for stations starting from the lowest
frequency and progressing toward higher frequencies. Once
stations with sufficiently strong reception are found, the
stations will be stored under FM3 preset buttons [1] to [6].
When this process is complete, a beep sound is heard, and the
reception of the station that was stored last continues.
Settings
Auto.P
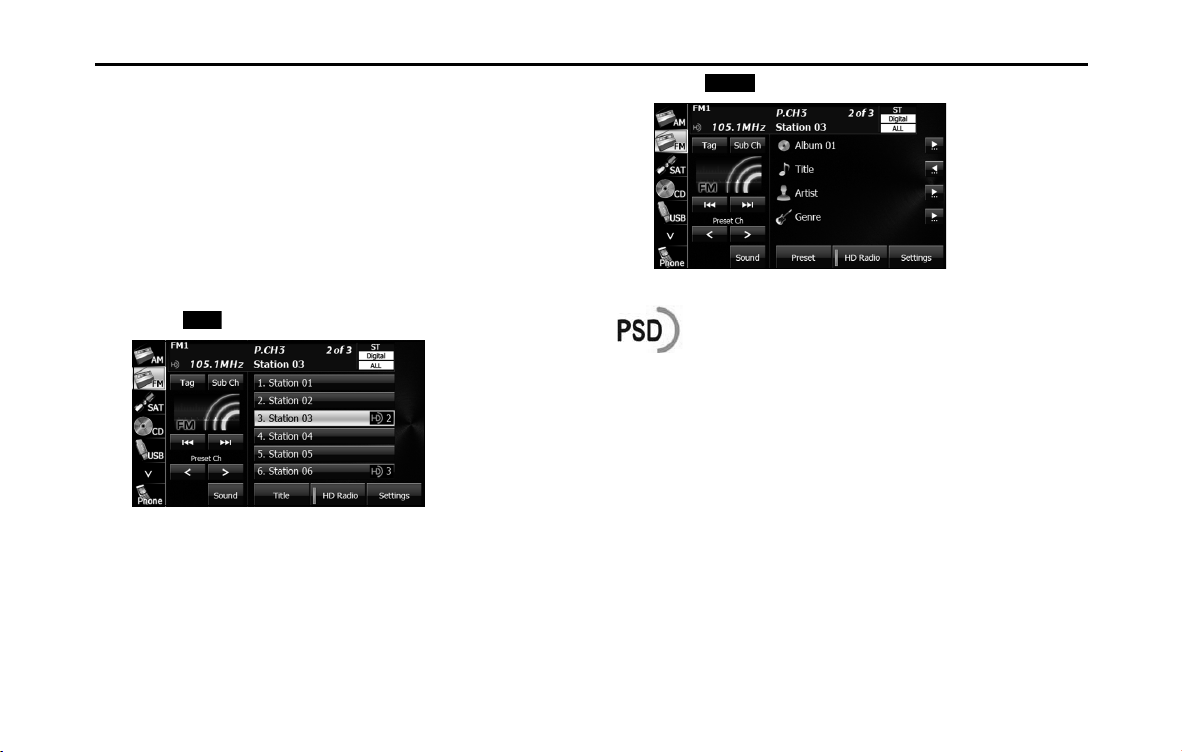
212 Audio and Visual
Audio Operations
NOTE
• You can select a station in a one-touch operation simply by touching a preset
button ([1] to [6]). The frequency of the selected station is displayed.
• When the new stations are set in the memory, the stations that were
previously set are deleted.
• If the number of receivable stations is less then six, the remaining buttons are
become blank.
■ Displaying title information
In FM radio mode only, you can display a song's album name, track
name, artist name and genre name during a broadcast.
1 Touch ( Title).
2 Touch (Preset) to return to the previous screen.
NOTE
Program Service Data: Presents song name, artist, station IDs, and other relevant
data streams.
Title
Preset
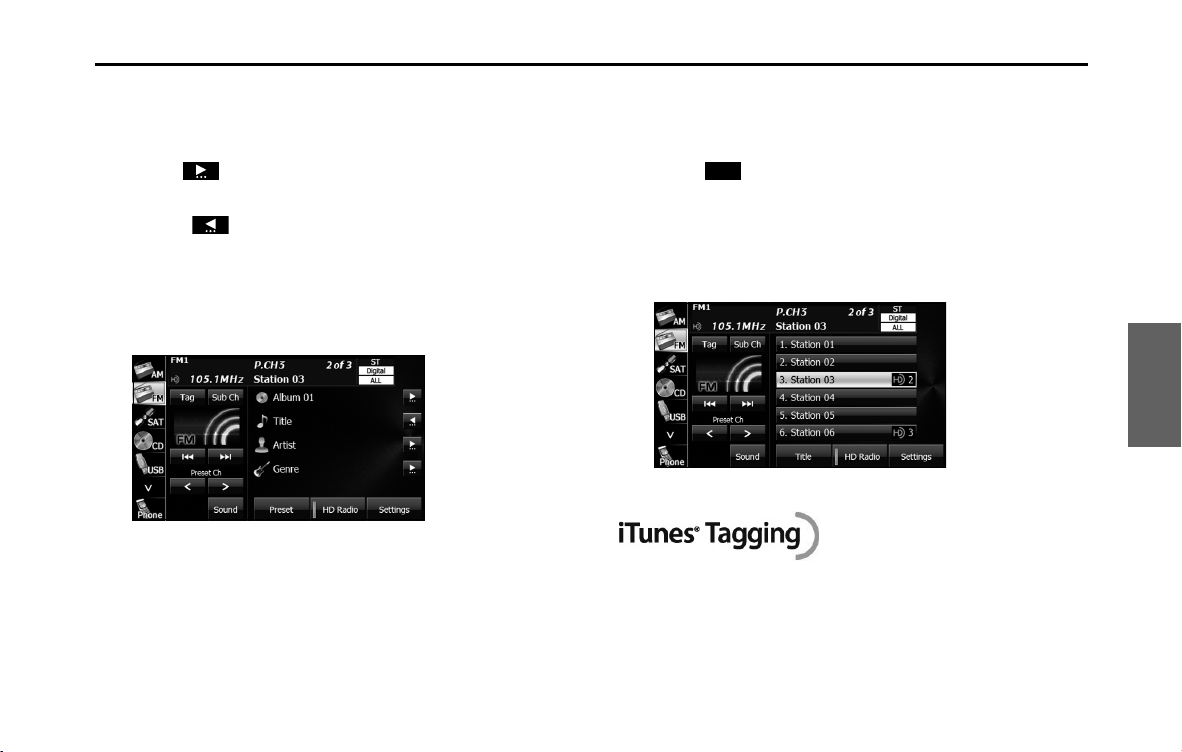
Audio and Visual 213
Audio Operations
■ Scrolling title information
If the Album, Title, Artist or Genre information cannot be fully displayed
because it is too long, you can scroll the display.
1 Touch on the item that you want to scroll.
• The selected title information scrolls to the left.
• Touch to stop the scrolling and return to the start of the
title.
• If driving is detected while the display is being scrolled, the
scrolling stops and returns to the start of the title.
• When the end of the title information is displayed, the scrolling
stops.
■ Acquiring tag information
If tag information exists for the track being broadcast, you can acquire
the track's tag information.
1 Touch (Tag).
• If an iPod is connected, the tag information is transferred to the
iPod.
• If an iPod is not connected, maximum 50 Tags will be stored in
the HD Radio tuner. It is transferred to iPod at the time of iPod
connection on the next time and is deleted from Tuner.
NOTE
iTunes
®
Tagging provides you the opportunity to discover a wide range of
content and the means to “tag” that content for later review and purchase from
the iTunesR Store. Also refer to the Apple Automotive specifications for
implementing iTunes
®
Tagging.
Tag
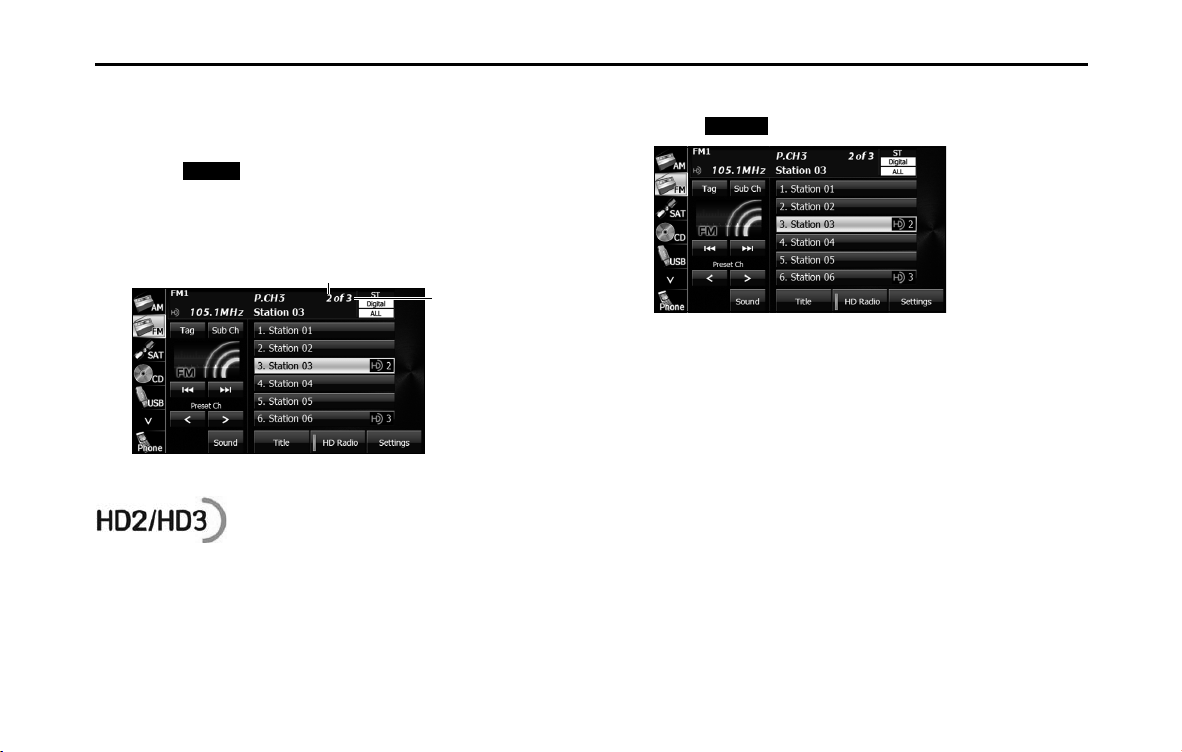
214 Audio and Visual
Audio Operations
■ Receiving sub channel broadcasts
In FM radio mode only, you can receive a sub channel broadcast if one
exists for the currently broadcasting station.
1 Touch (Sub Ch).
• The sub channel changes each time you touch the screen.
• The current channel and the number of sub-channel reception
is displayed at the upper right of the screen.
NOTE
FM stations can provide additional digital-only audio programing on HD2/HD3
Channels.
■ Changing the reception mode
1 Touch (Settings).
Sub Ch
The current channel
The number of sub-
channel reception
Settings
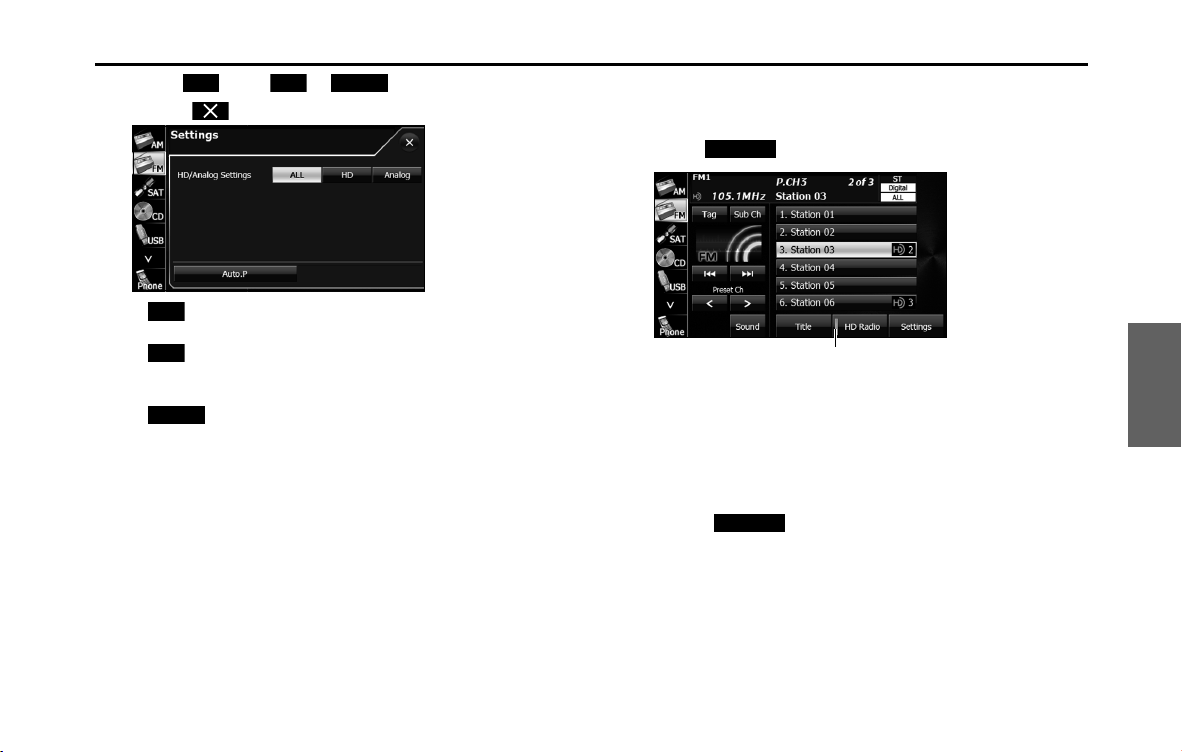
Audio and Visual 215
Audio Operations
2 Touch (ALL), or (Analog).
• Touch to return to the previous screen.
(ALL):
Receive by giving precedence to digital broadcasts.
:
Receive by giving precedence to digital broadcasts and setting
the seek operation to digital broadcasts only.
(Analog):
Receive analog broadcasts.
■ Changing the audio synchronization function of the
HD Radio receiver
1 Touch (HD Radio).
•ON (indicator lit):
Audio is output according to the HD Radio setting and
reception quality.
OFF (indicator off):
Audio is output in analog regardless of the HD Radio setting or
reception quality.
• Touch (HD Radio) to switch between ON and OFF.
NOTE
When the reception mode is analog, the setting is OFF.
ALL HD Analog
ALL
HD
Analog
HD Radio
Indicator
HD Radio
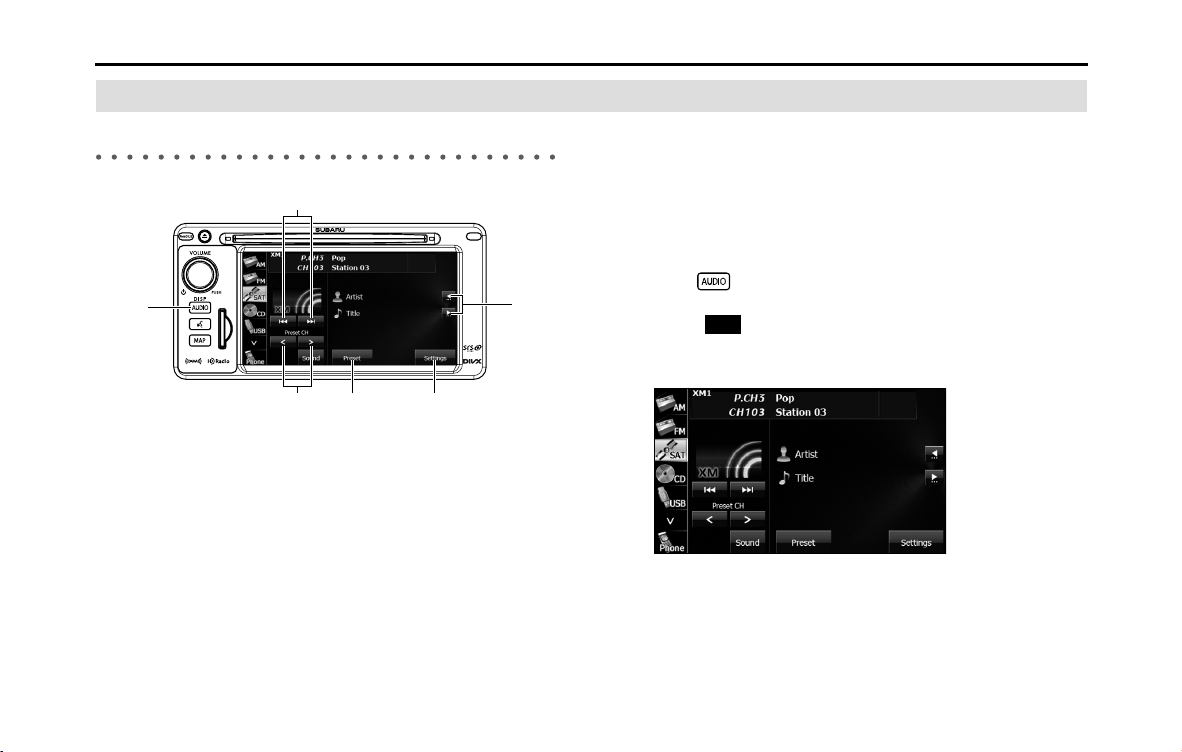
216 Audio and Visual
Audio Operations
Using the SAT Radio
Using the SAT Radio
(1) Title information scroll buttons
*
(2) Settings button
(3) Preset button
(4) Preset CH up/down buttons
(5) AUDIO button
(6) Channel up/down buttons
* It will be displayed if the length of the information is too long and it
cannot be displayed.
■ Listening to the SAT radio
The SAT radio (XM satellite radio) has more than 100 channels, including
music, news and leisure programs. You can select the channel that you
want from different categories such as dance or rock, or you can select
a channel by directly entering its number. The SAT radio can be
received by using a paid-for subscription service.
1 Press .
2
Touch (SAT).
• In SAT radio mode, the title and artists information for the
currently playing track is displayed.
(1)
(2)(3)(4)
(5)
(6)
SAT
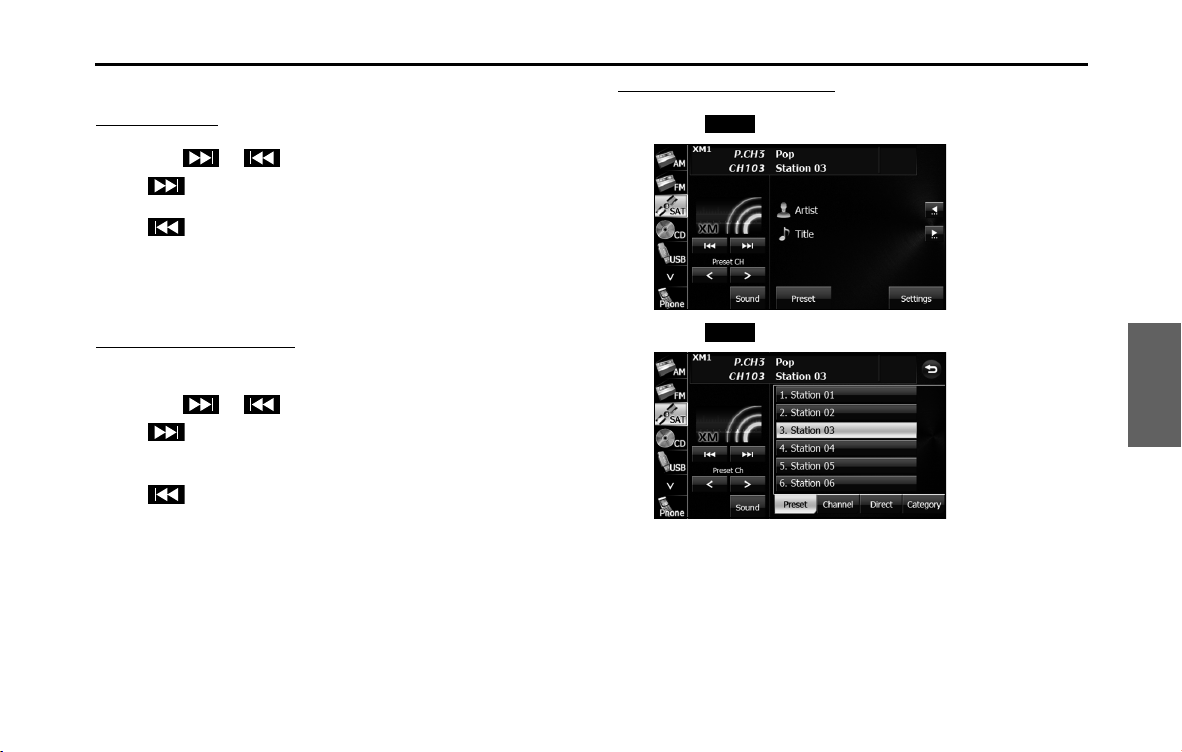
Audio and Visual 217
Audio Operations
■ Selecting a channel
Manual selection
1 Touch or .
•:
Select 1 channel higher.
:
Select 1 channel lower.
NOTE
Invalid channels and non-subscribed channels are skipped.
Manual tuning (continuous)
1 Touch or for 1 second or more.
•:
Moves up the channels continuously until you release your
finger from the button.
:
Moves down the channels continuously until you release your
finger from the button.
NOTE
Invalid channels, non-subscribed channels and channels set with the parental
lock are skipped.
Selecting from a preset button
1 Touch (Preset).
2 Touch (Preset).
3 Touch one of the preset buttons on the display from [1]
to [6].
• When selecting an item being Parental Locked in the list, the
screen for code input is displayed.
Preset
Preset
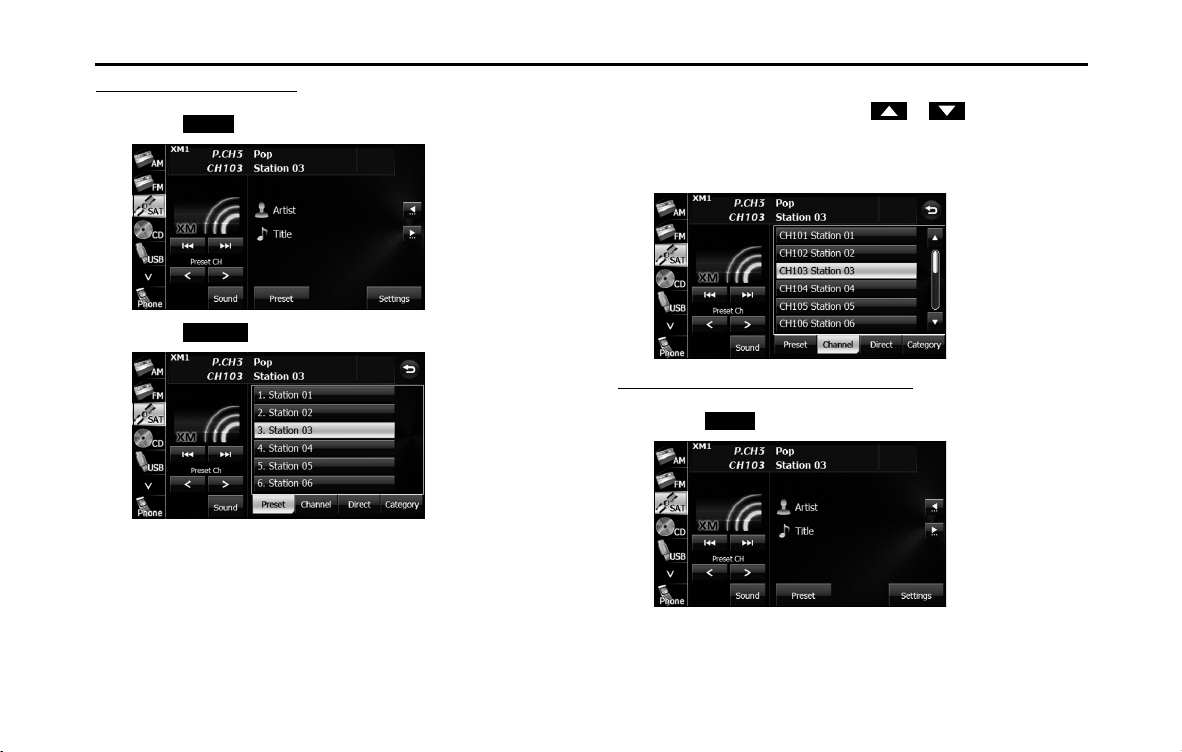
218 Audio and Visual
Audio Operations
Selecting from a channel list
1 Touch (Preset).
2 Touch (Channel).
3 Touch the channel to which you want to listen.
• If there are more pages, touch or to scroll the
pages.
• When selecting an item being Parental Locked in the channel,
the screen for code input is displayed.
Selecting a channel by entering it directly
1 Touch (Preset).
Preset
Channel
Preset
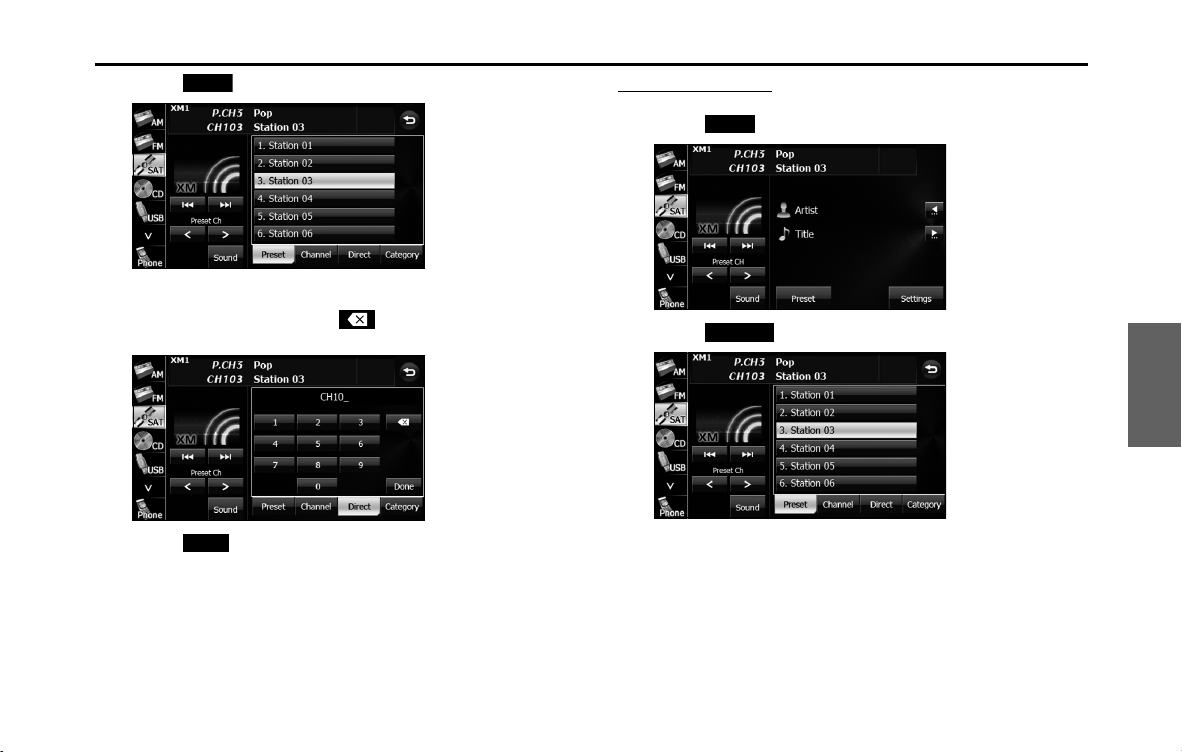
Audio and Visual 219
Audio Operations
2 Touch (Direct).
3 Enter a channel number by touching 1 digit at a time.
• If you make a mistake, touch to delete 1 digit at a time.
Touch for 1 second or more to delete the digits continuously.
4
Touch (Done).
• When selecting an item being Parental Locked in the channel,
the screen for code input is displayed.
NOTE
A reception possible broadcasting station is received.
Selecting by category
1 Touch (Preset).
2 Touch (Category).
Direct
Done
Preset
Category
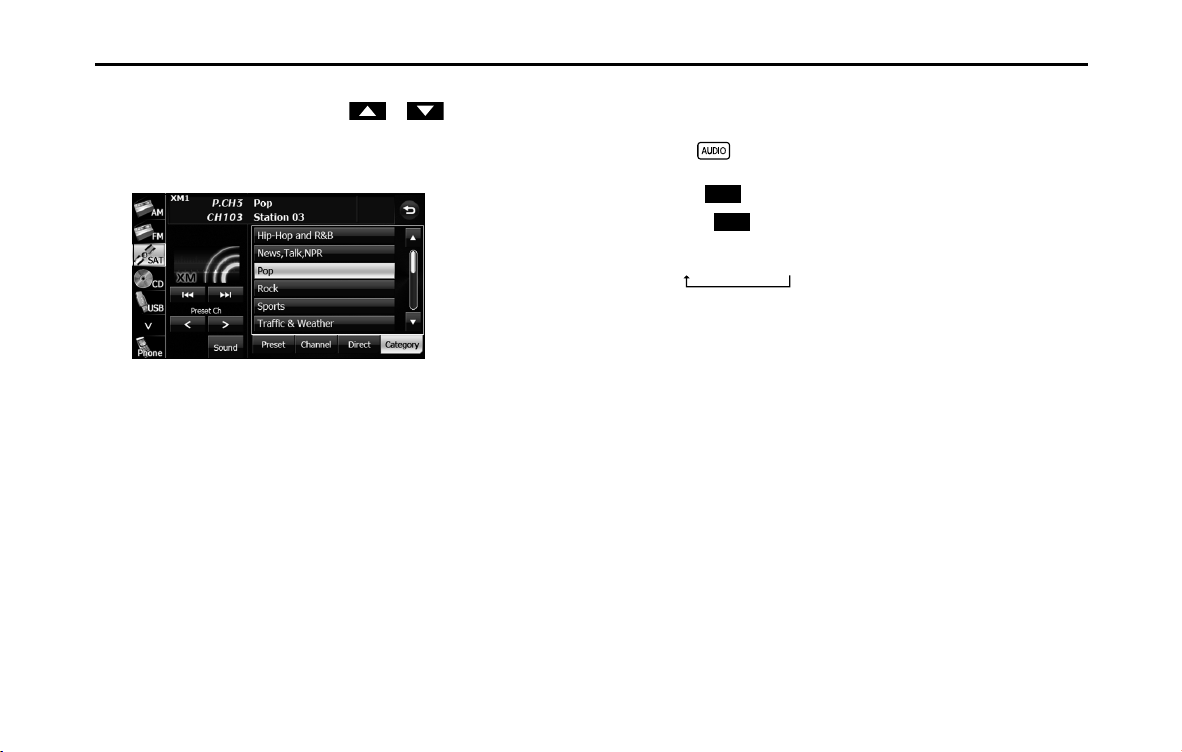
220 Audio and Visual
Audio Operations
3 Touch the category to which you want to listen.
• If there are more pages, touch or to scroll the
pages.
• When selecting an item being Parental Locked in the category,
the screen for code input is displayed.
NOTE
A reception possible broadcasting station is received.
■ Changing the SAT band
You can change the reception band of the SAT radio.
1 Press .
2 Touch (SAT).
• Touch (SAT) to change the reception band in the
following order.
• The band currently being received is displayed at the top left of
the screen.
SAT
SAT
XM1
XM2
XM3
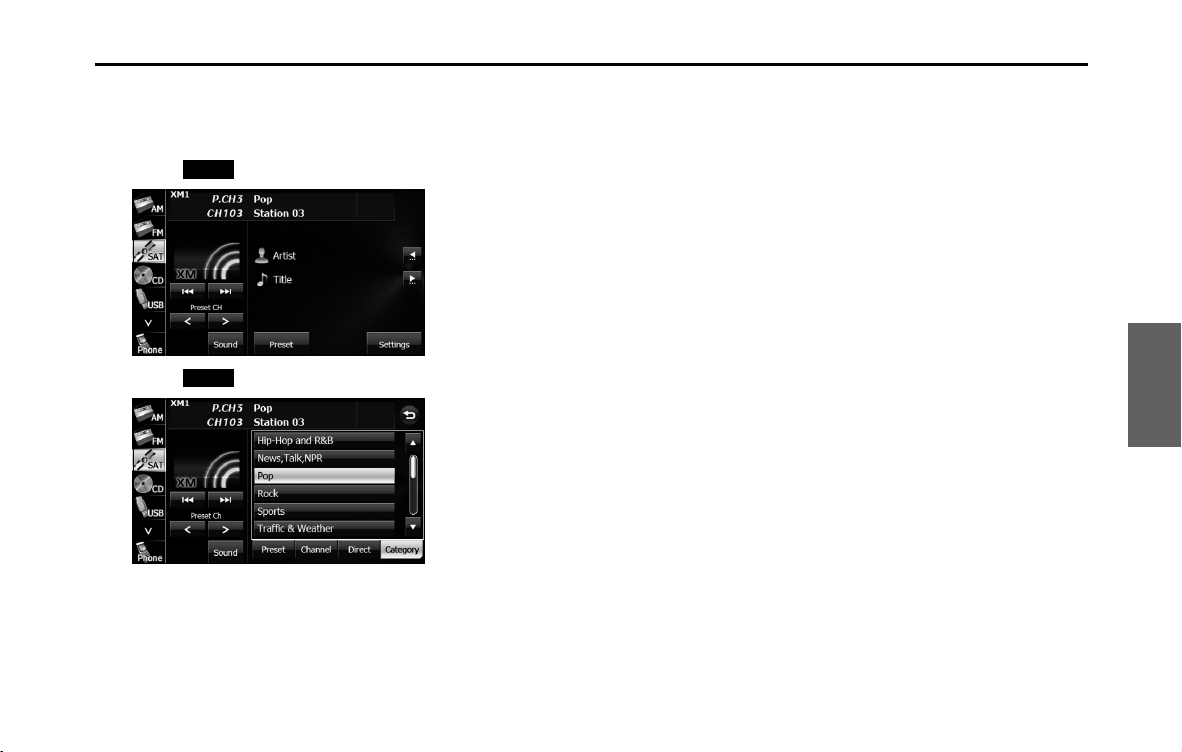
Audio and Visual 221
Audio Operations
■ Saving a channel
1 Select the channel that you want to save.
2 Touch (Preset).
3 Touch (Preset).
4 Touch the preset button that you want to use for 2
seconds or more.
• The selected channel is saved and displayed on the preset
button.
• To manually set additional channels for the remaining preset
channels, repeat this procedure for each channel.
• You can set 6 stations each for XM 1, 2 and 3, making a total of
18 stations.
NOTE
• You can select a channel in a one-touch operation simply by touching a
preset button ([1] to [6]). The channel number of the selected channel is
displayed.
• When the new channels are set in the memory, the channels that were
previously set are deleted.
Preset
Preset
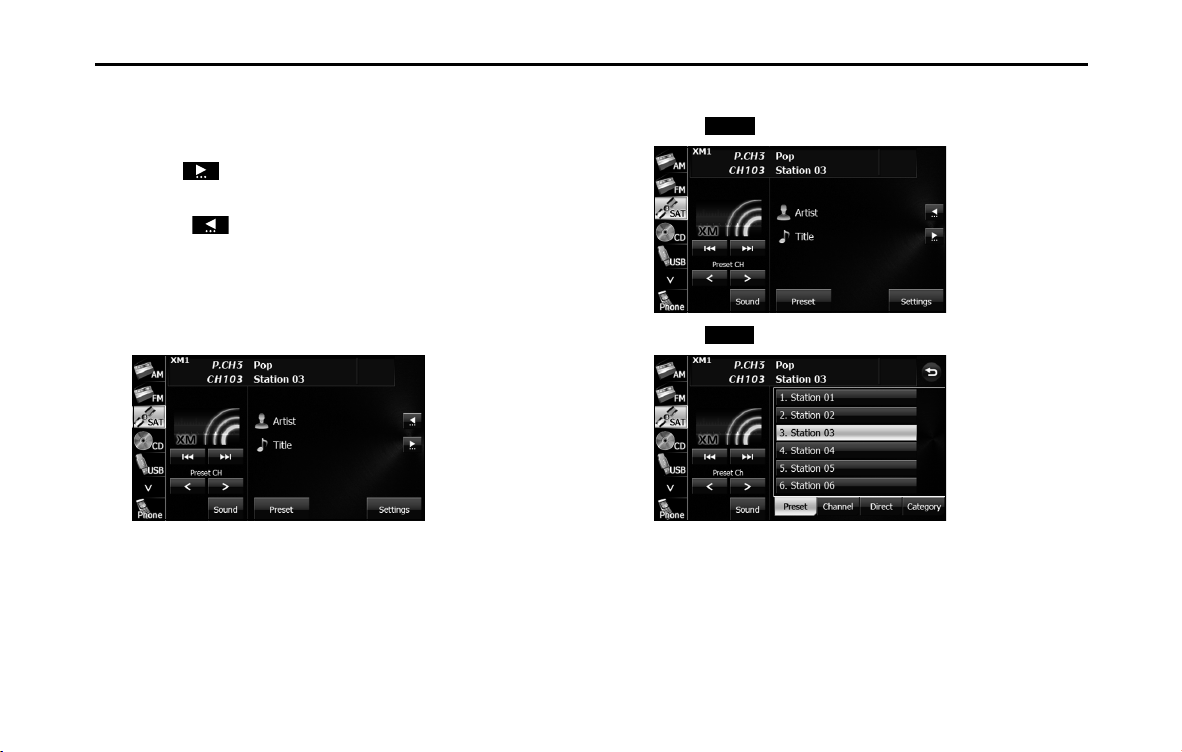
222 Audio and Visual
Audio Operations
■ Scrolling title information
If the title or artist information cannot be fully displayed because it is
too long, you can scroll the display.
1 Touch on the item that you want to scroll.
• The selected title information scrolls to the left.
• Touch to stop the scrolling and return to the start of the
title.
• If driving is detected while the display is being scrolled, the
scrolling stops and returns to the start of the title.
• When the end of the title information is displayed, the scrolling
stops.
■ Checking the radio ID
1 Touch (Preset).
2 Touch (Direct).
Preset
Direct
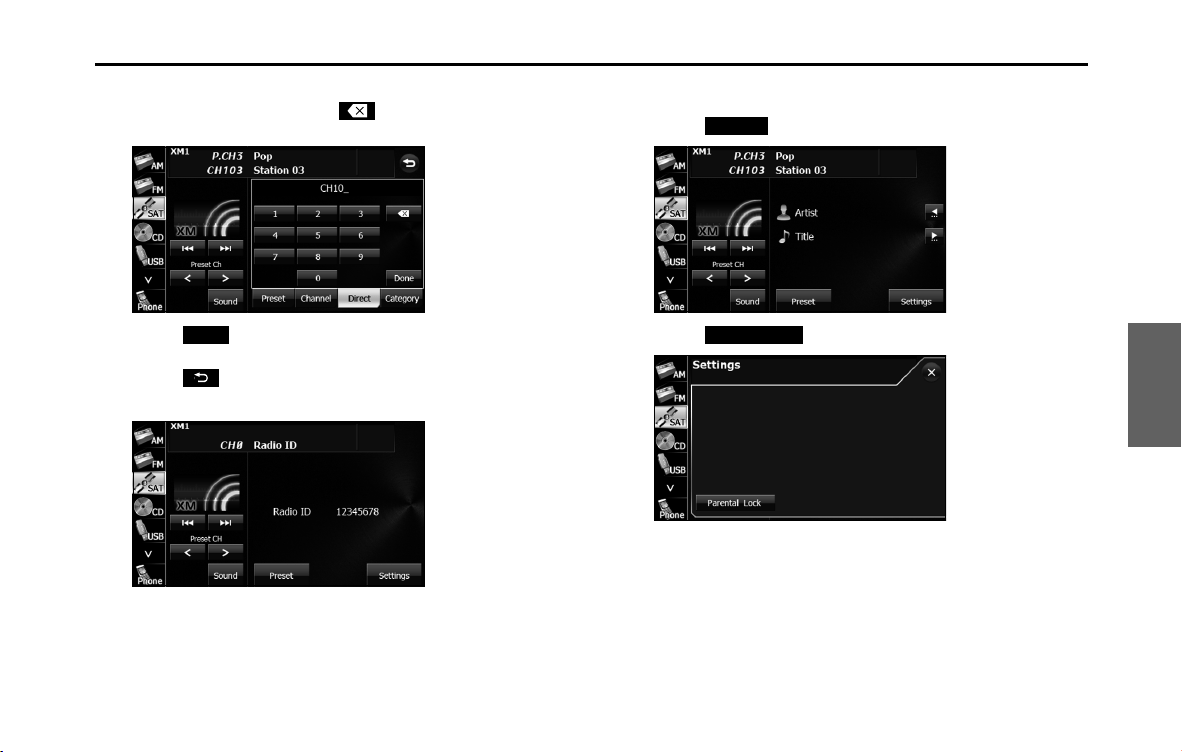
Audio and Visual 223
Audio Operations
3 Touch “0”.
• If you make a mistake, touch to delete 1 digit at a time.
Touch for 1 second or more to delete the digits continuously.
4 Touch (Done).
5 Touch .
• An 8-digit numerical code appears.
■ Restricting operation
1 Touch (Settings).
2 Touch (Parental Lock).
Done
Settings
Parental Lock
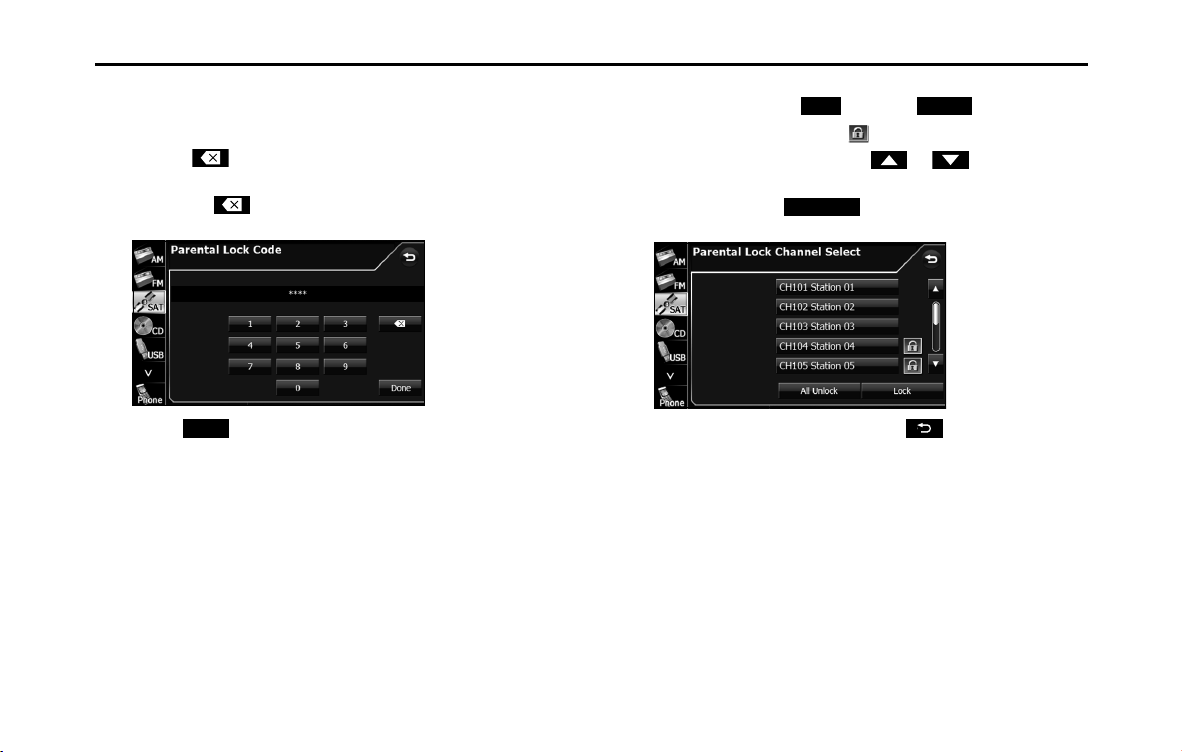
224 Audio and Visual
Audio Operations
3 Enter the 4-digit parental lock code.
• When setting for the first time, enter any code that you want to
use.
• Touch to delete 1 digit from the entered number. Touch
for 1 second or more to delete the digits continuously.
• Touching 10 times continuously clears the parental lock
code.
4 Touch (Done).
• If the code is correct, the setting screen appears.
• If an incorrect code is entered, “Incorrect code. Please try again.”
appears and the number is cleared.
5 Select the channel with the settings that you want to
change, and touch (Lock) or (Unlock).
• If the channel is restricted, appears.
• If there are more pages, touch or to scroll the
pages.
• When you touch (All Unlock), the all restricted
channels are canceled.
• After configuring the setting, touch to save the setting
and return to the initial screen.
• If you have locked the currently listening channel, the channel
buttons to the next receivable (unlocked) channel.
Done
Lock Unlock
All Unlock
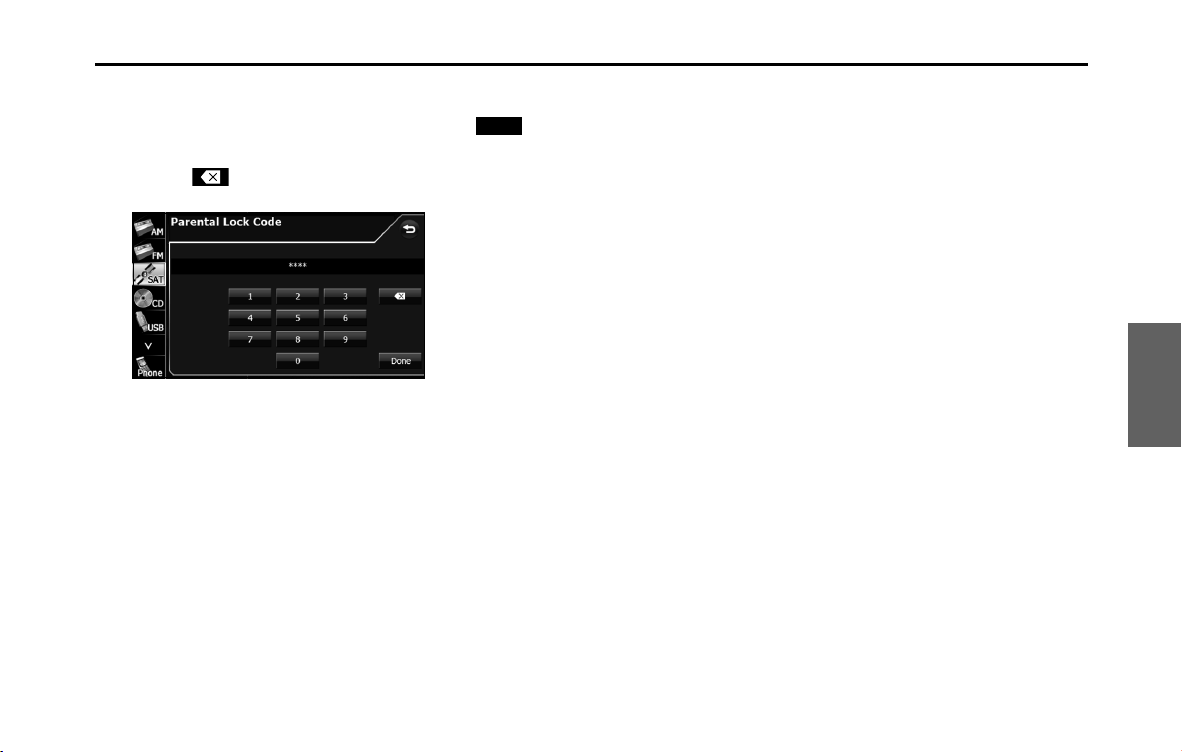
Audio and Visual 225
Audio Operations
■ Clearing the parental lock
1 Enter the parental lock code, and then touch
(Done).
• Touch to delete 1 digit from the entered number. Touch
for 1 second or more to delete the digits continuously.
Done
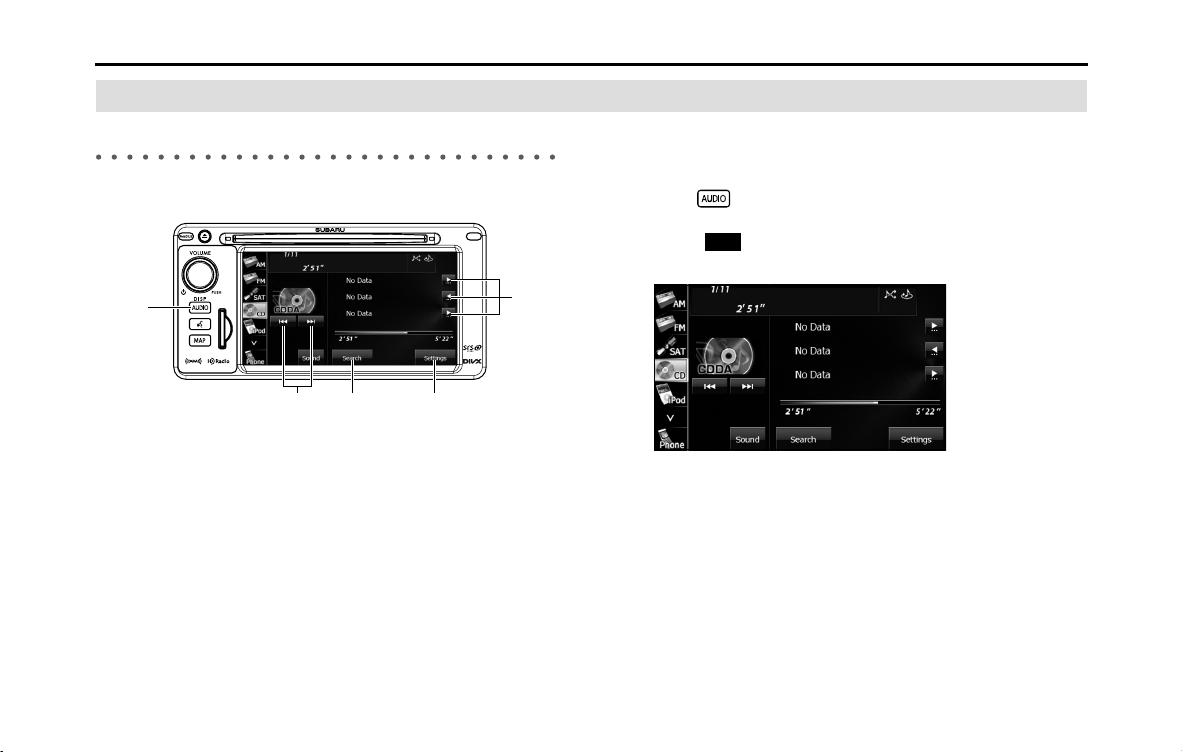
226 Audio and Visual
Audio Operations
Using the CD Player
Using the CD Player
(1) Title information scroll buttons
*
(2) Settings button
(3) Search button
(4) Track up/down and fast forward (fast reverse) buttons
(5) AUDIO button
* It will be displayed if the length of the information is too long and it
cannot be displayed.
NOTE
Some of the functions may not be available when vehicle is in motion.
■ Listening to a CD
Insert a CD into the disc slot, and it will start playing.
1 Press .
2 Touch (CD).
• The playback starts.
NOTE
• Playback may be intermittent when there is a scratch on the CD or when the
recorded side is dirty.
• If track titles and other data are recorded in the CD-Text format, they can be
displayed.
• It may not be possible to display the CD-Text of CD-R/RW discs.
• If no CD-Text data exist in the disc, “No Data” appears in the section where the
track titles and other data are displayed.
(2)(3)(4)
(5)
(1)
CD
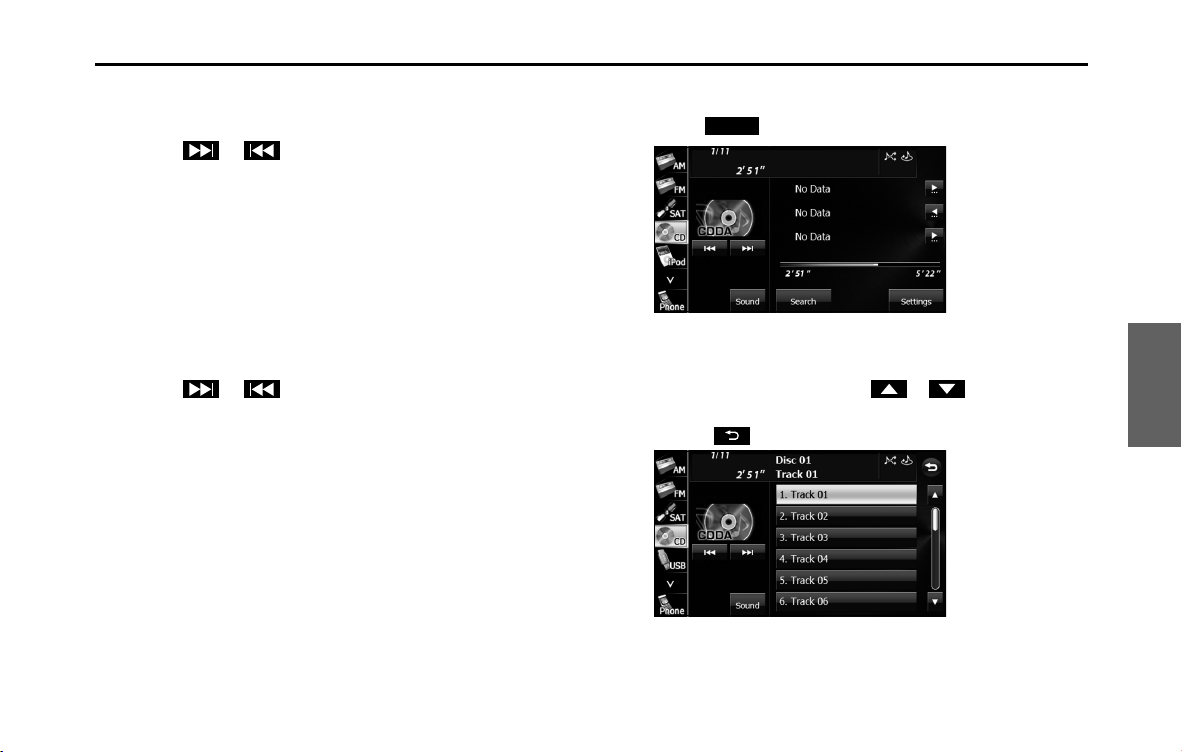
Audio and Visual 227
Audio Operations
■ Selecting a track
You can cue the track to which you want to listen.
1 Touch or .
•Right:
Advance to the next track.
Left (touch once):
Return to the start of the currently playing track.
Left (touch twice or more):
Return to a previous track.
■ Fast forwarding and fast reversing
You can fast forward or fast reverse the currently playing track.
1 Touch or for 1 second or more.
•Right:
Fast forward the track.
Left:
Fast reverse the track.
Fast forward (or fast reverse) operates until you release your
finger from the button.
■ Finding a track
1 Touch (Search).
2 Touch the track to which you want to listen.
• The selected track starts to play.
• If there are more pages, touch or to scroll the
pages.
• Touch to return to the previous screen.
Search
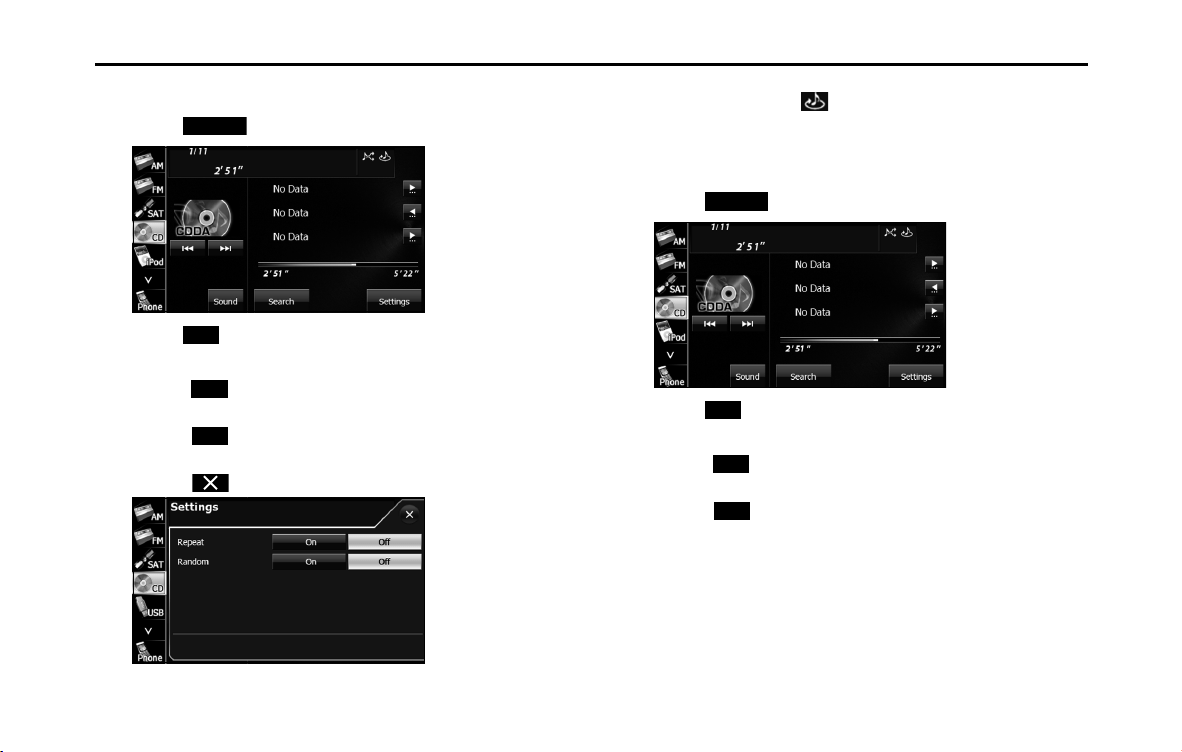
228 Audio and Visual
Audio Operations
■ Repeating the same track
1 Touch (Settings).
2 Touch (On) in Repeat.
• Repeat playback is set for the currently playing track.
• When (On) in Repeat is touched, the repeat playback of
the track continues until the function is canceled.
• Touch (Off ) in Repeat to cancel the repeat playback of the
track.
• Touch to return to the previous screen.
NOTE
When On is selected in Repeat, is displayed in the top right of the screen as
confirmation that the function is on.
■ Playing tracks randomly
1 Touch (Settings).
2
Touch (On) in Random.
• All tracks from the currently playing CD are played randomly.
• When (On) in Random is touched, the random playback
of the tracks continues until the function is canceled.
• Touch (Off ) in Random to cancel the random playback of
the tracks.
Settings
On
On
O
Settings
On
On
O
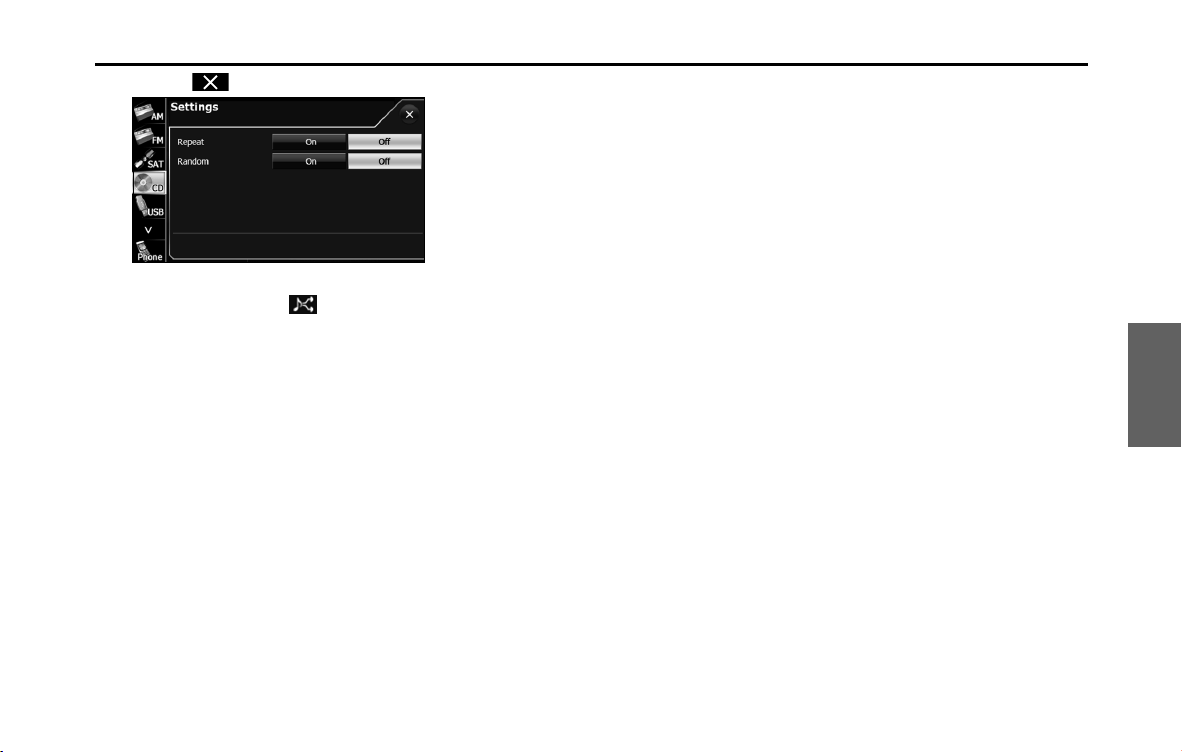
Audio and Visual 229
Audio Operations
• Touch to return to the previous screen.
NOTE
When On is selected in Random, is displayed in the top right of the screen
as confirmation that the function is on.

230 Audio and Visual
Audio Operations
Using the MP3/WMA Player
Using the MP3/WMA Player
(1) Title information scroll buttons
*
(2) Settings button
(3) Search button
(4) Folder selection buttons
(5) AUDIO button
(6) File up/down and fast forward (fast reverse) buttons
* It will be displayed if the length of the information is too long and it
cannot be displayed.
NOTE
Some of the functions may not be available when vehicle is in motion.
■ Listening to an MP3/WMA file
Insert a CD-R/RW that contains an MP3/WMA file into the disc slot, and
it will start playing.
1 Press .
2 Touch (CD).
• The playback starts.
• The usual playing order is J J J J J . (See
Page 237.)
• If multiple MP3/WMA files and folders are located in the same
hierarchy, they are played in the ascending order of folder name
and file name.
• If you try to play a non-MP3/WMA format file, “No Support” is
displayed.
(1)
(2)(3)(4)
(5)
(6)
CD
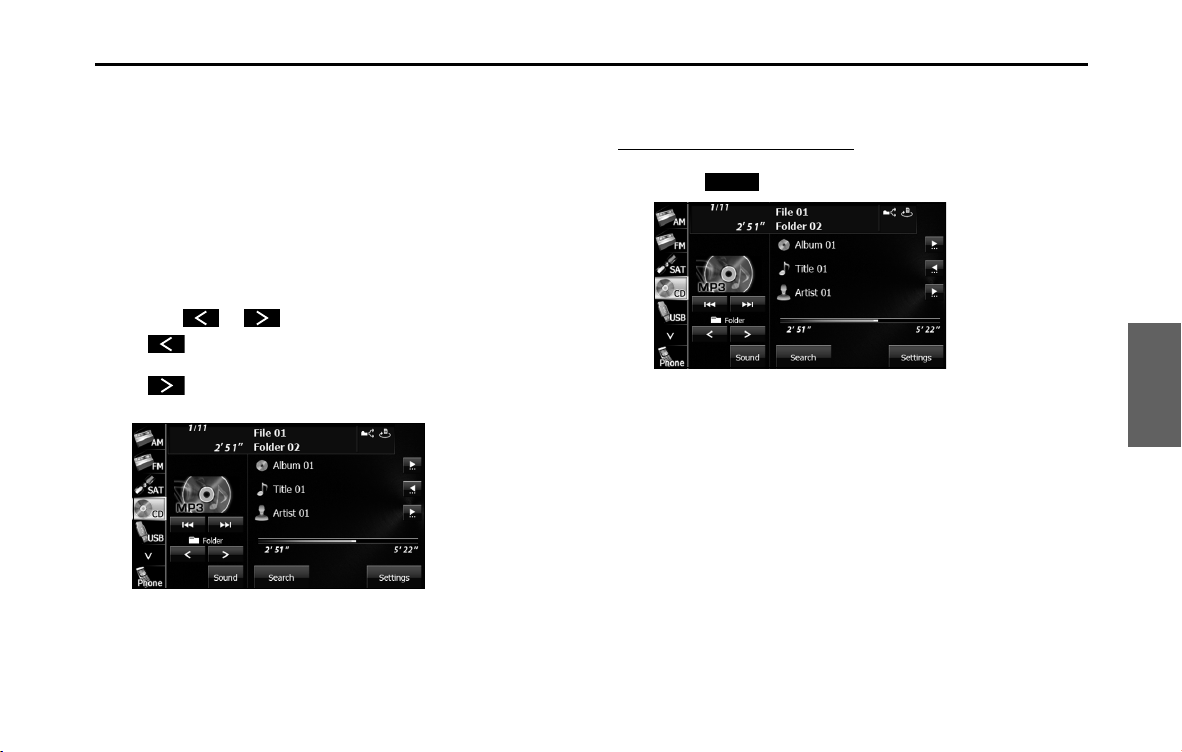
Audio and Visual 231
Audio Operations
NOTE
• Playback may be intermittent when there is a scratch on the CD or when the
recorded side is dirty.
• For CD-ROMs, a function is available for selecting the folder and file.
• If a non-MP3/WMA file has the “.mp3” or “.wma” file extension, it may be
recognized erroneously as an MP3 or WMA file. When such a file is played, a
loud noise may be output and damage the speakers. Take care not to assign
the “.mp3” or “.wma” extension to non- MP3/WMA files.
■ Selecting a folder
You can select the folder that you want to use from the disc.
1 Touch or .
•:
Return to the previous folder and play the first file in the folder.
:
Advance to the next folder and play the first file in the folder.
■ Selecting a music file
You can select the file that you want to play from a folder.
Selecting with a file name button
1 Touch (Search).
Search
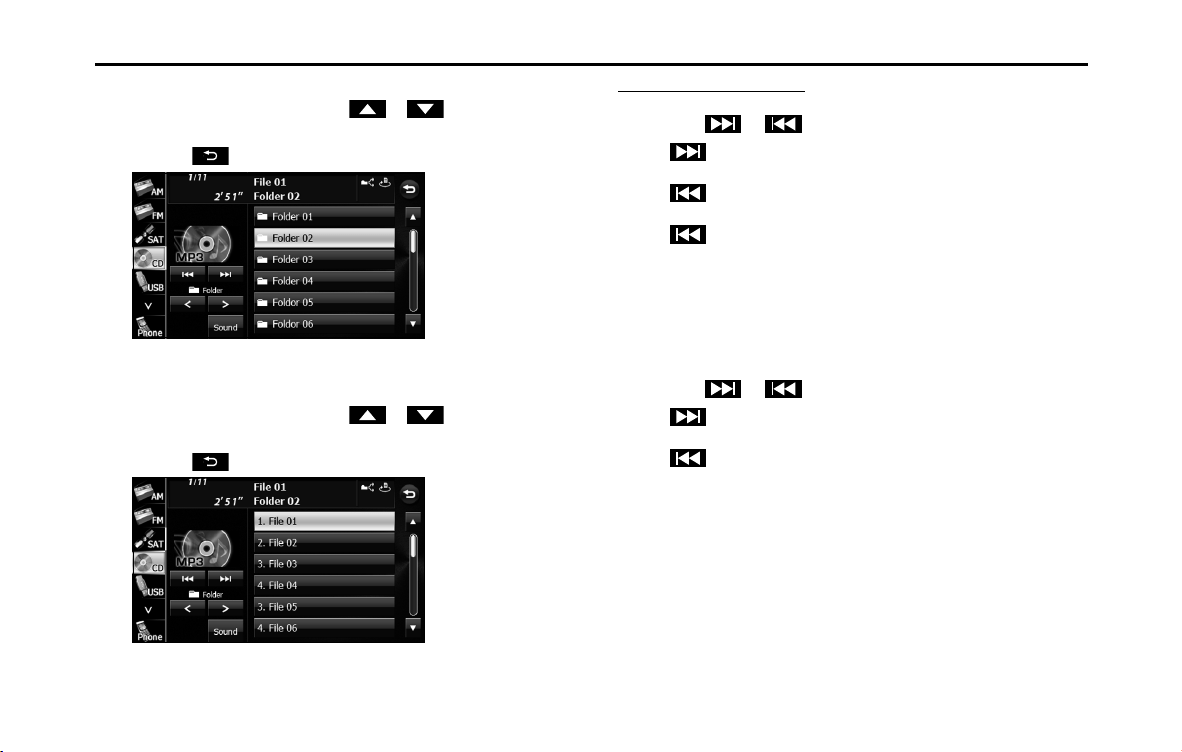
232 Audio and Visual
Audio Operations
2 Touch the folder that you want to use.
• If there are more pages, touch or to scroll the
pages.
• Touch to return to the previous screen.
3 Touch the file that you want to play.
• The selected file starts to play.
• If there are more pages, touch or to scroll the
pages.
• Touch to return to the previous screen.
Selecting consecutive files
1 Touch or .
•:
Advance to the next file.
(Press once):
Return to the start of the currently playing file.
(Press twice or more):
Return to the previous file.
• The selected file starts to play.
■ Fast forwarding and fast reversing
You can fast forward or fast reverse the currently playing file.
1 Touch or for 1 second or more.
•:
Fast forward the file.
:
Fast reverse the file.
Fast forward (or fast reverse) operates until you release your
finger from the button.
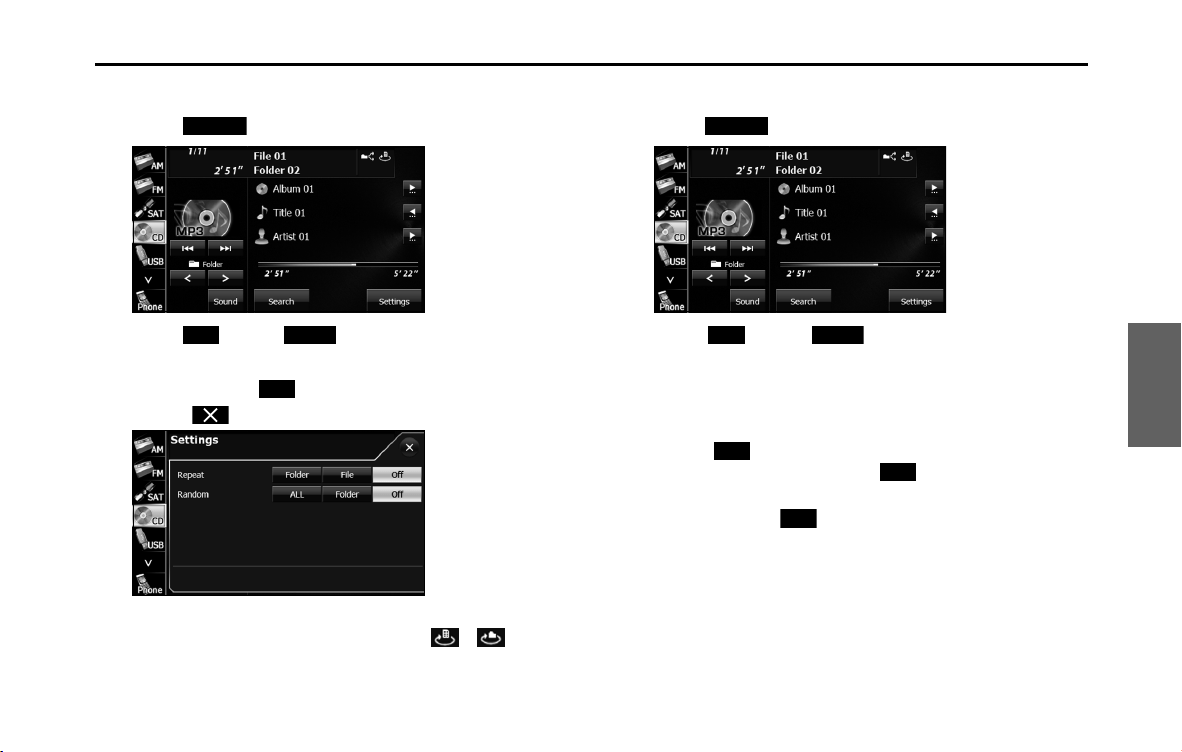
Audio and Visual 233
Audio Operations
■ Repeating the music file
1 Touch (Settings).
2 Touch (File) or (Folder) in Repeat.
• Repeat playback is set for the currently playing file or folder.
• To cancel, touch (Off ) in Repeat.
• Touch to return to the previous screen.
NOTE
When the file repeat or folder repeat function is selected, or is
displayed in the top right of the screen as confirmation that the function is on.
■ Playing randomly
1 Touch (Settings).
2 Touch (ALL) or (Folder) in Random.
• Folder random playback:
The files in the currently playing folder are played randomly.
All random playback:
The files in all folders are played randomly.
• Touch (File) in Repeat during random playback to repeat
the currently playing file. Touch (Off ) in Repeat to return
to random playback.
• To cancel, touch (Off ) in Random.
Settings
File Folder
O
Settings
ALL Folder
File
O
O
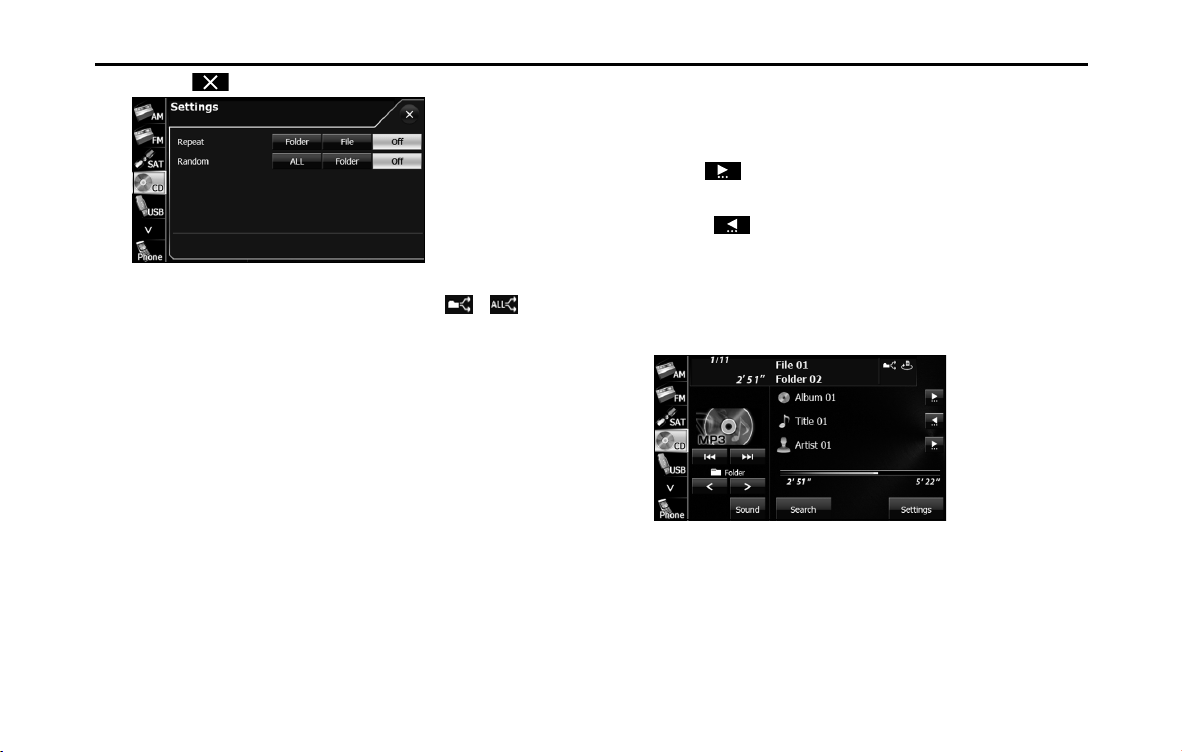
234 Audio and Visual
Audio Operations
• Touch to return to the previous screen.
NOTE
When the folder random or all random function is selected, or is
displayed in the top right of the screen as confirmation that the function is on.
■ Scrolling title information
If the Album, Title or Artist information cannot be fully displayed
because it is too long, you can scroll the display.
1 Touch on the item that you want to scroll.
• The selected title information scrolls to the left.
• Touch to stop the scrolling and return to the start of the
title.
• If driving is detected while the display is being scrolled, the
scrolling stops and returns to the start of the title.
• When the end of the title information is displayed, the scrolling
stops.

Audio and Visual 235
Audio Operations
About MP3/WMA
MP3 (MPEG Audio Layer 3) is a standard format for audio compression.
By using MP3, a file can be compressed to about 1/10 of the original
size.
WMA (Windows Media Audio) is Microsoft's audio compression
technology. WMA files can be compressed to a size even smaller than
MP3 files.
This unit only supports certain MP3/WMA file standards, recorded
media and formats. Take note of the following when writing MP3/WMA
files onto a disc.
■ About the supported MP3 file standards
• Supported standards:
MPEG1/2/2.5 Audio Layer 3
• Supported sampling frequencies (kHz):
- MP3 (MPEG1 Audio Layer 3): 32, 44.1, 48
- MP3 (MPEG2 Audio Layer 3): 16, 22.05, 24
- MP3 (MPEG2.5 Audio Layer 3): 8, 11.025, 12
• Supported bit rates (kbps):
- MP3 (MPEG1 Audio Layer 3): 32, 40, 48, 56, 64, 80, 96, 112, 128, 160, 192, 224,
256, 320
- MP3 (MPEG2/2.5 Audio Layer 3): 8, 16, 24, 32, 40, 48, 56, 64, 80, 96, 112, 128,
144, 160
* Supports VBR (Variable Bit Rate).
* Does not support Audio Layer 1/2.
* Emphasis supports only 50/15ms.
* Does not support free format.
* Does not support DRM (Digital Rights Management).
• Supported channel modes:
Stereo, Joint Stereo, Dual channels, Monaural
■ About the supported WMA file standards
• Supported standards:
WMA Ver. 7 to 9
• Supported sampling frequencies (kHz):
22.05, 24, 32, 44.1, 48
• Supported bit rates (kbps):
- WMA Ver. 7, 8: 48, 64, 80, 96, 128, 160, 192
- WMA Ver. 9: 48, 63, 64, 80, 95, 96, 127, 128, 160, 191, 192, 256, 320
* Supports 2-channel play only.
* Supports VBR (Variable Bit Rate).
* Does not support WMA9 Professional/Lossless/Voice.
* Does not support DRM (Digital Rights Management).
• Supported channel modes:
Stereo, Monaural

236 Audio and Visual
Audio Operations
■ About ID3/WMA tags
In MP3/WMA files, you can enter textual attribute information known as
ID3 tags/WMA tags to save information such as track titles and artist
names.
This unit supports ID3v.1.0, 1.1, 2.2, 2.3 and 2.4 tags. This unit supports
the ISO 8859-1, 2, 5 and 7 codes only. Use only the ISO 8859-1, 2, 5 or 7
codes to record tags. If characters not included in ISO8859-1, 2, 5 or 7
codes are recorded, they may not be readably displayed.
This unit supports the WMA tag ASF revision (v1.20.02). WMA tags using
only Unicode are supported. Always use Unicode characters to enter
the information.
* When Ver. 1.x and Ver. 2.x of the ID3 tags both exist, precedence is given to
Ver. 2.x.
■ About the supported media types
You can play MP3/WMA files recorded on a CD-ROM, CD-R or CD-RW
disc. Compared to the CD-ROM media commonly used for music discs,
CD-R and CD-RW discs are fragile in high temperature and high
humidity environments. It may not be possible to play some CD-R/CD-
RW discs. Fingerprints or scratches on a disc may prevent playback or
cause skipping during playback.
Some CD-R/CD-RW discs may deteriorate if left inside a vehicle for a
long time.
We recommend that you store UV-sensitive CD-R and CD-RW discs in
shield cases.
■ About the supported disc formats
You can use media in the following formats.
• CD-ROM formats:
CD-ROM MODE 1, CD-ROM XA MODE 2 Form 1
• File formats:
ISO9660 Level 1 or Level 2
ROMEO system, JOLIET system
MP3/WMA files recorded in a format other than those described
above may result in files that cannot be played normally or file
names and folder names that do not display properly.
In addition to these standards, the following limitations apply.
• Maximum number of directory layers:
8 layers
• Supported characters for folder and file names:
A to Z, 0 to 9, and underscore (_)
• Number of files that can be stored on a single disc:
999
• Number of folders that can be stored on a single disc:
255
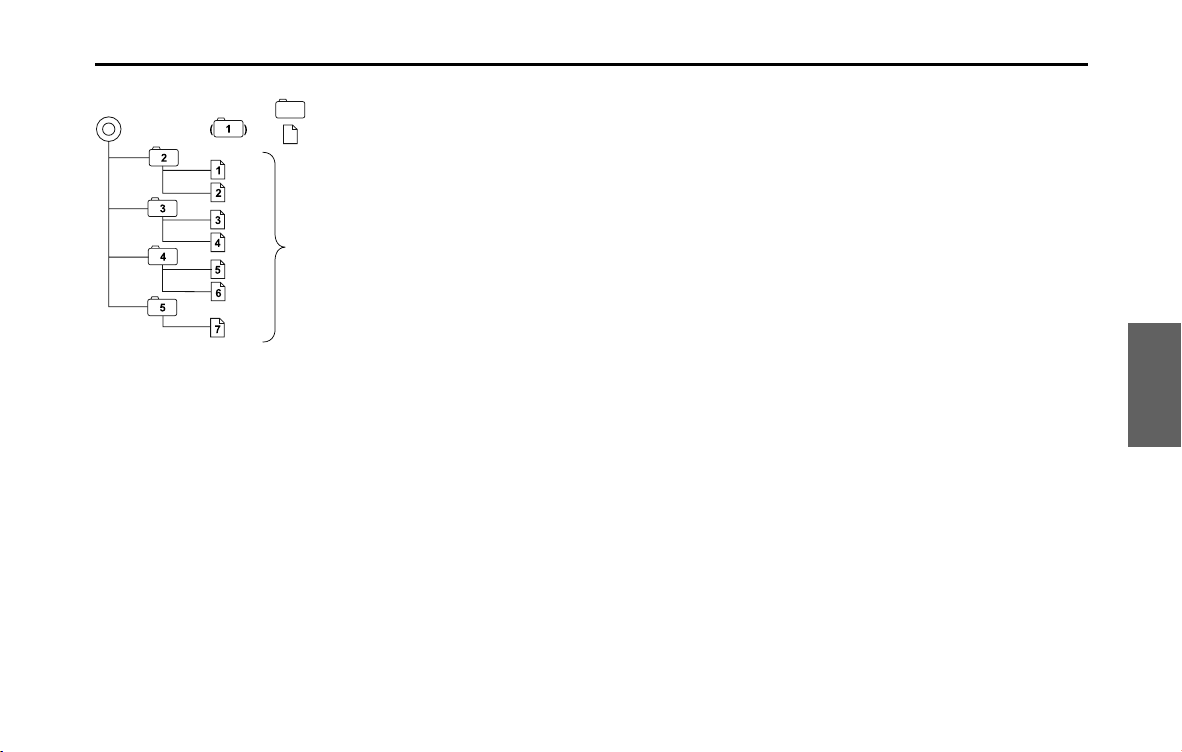
Audio and Visual 237
Audio Operations
<A configuration example of an MP3/WMA-supporting CD>
■ About the file names
Only a file with the “.mp3” or “.wma” extension is recognized as an MP3
or WMA file. Always save an MP3/WMA file with the “.mp3” or “.wma”
extension.
The “.mp3” or “.wma” file extension must be single-byte lower case
letters.
NOTE
If a non-MP3/WMA file has the “.mp3” or “.wma” file extension, it may be
recognized erroneously as an MP3 or WMA file. When such a file is played, a loud
noise may be output and damage the speakers. Do not save a non-MP3/WMA
file with the “.mp3” or “.wma” extension.
■ Multi-sessions
Multi-sessions are supported and CD-R/RW with recorded MP3/WMA
files can be played.
However, when writing with Track-At-Once, be sure to finalize the disc
with session close or write protect.
■ About MP3/WMA playback
When you load a disc containing MP3/WMA files, the system first
checks all files recorded on the disc. If the disc has many files and
folders, the system may take a while to check them.
While the system is checking the disc, the music that was playing
continues to play.
To allow quick checking of files, we recommend that you do not save
non-MP3/WMA files or create unnecessary folders on the disc.
Also, we recommend that you write the all data in a single session
because the system takes longer to read the CD control information of
a multi-session disc.
■ About the MP3/WMA playing time display
It is possible that the playing time will not be correct, depending on the
writing condition of the MP3/WMA file.
* It is possible that the playing time will not be correct when VBR (Variable
Bit Rate) Fast Up/Down is operated.
Folder
MP3/WMA audio le or text le
1
st
level 2
nd
level
Root directory
A total of 999 files can be created within a single disc
.
Files aside from MP3/WMA files (Example: 004.txt)
also count as single files.
238 Audio and Visual
Audio Operations
Creating and Playing MP3/WMA Files
Creating MP3/WMA files by recording them from sources such as
broadcasts, records, recordings, videos and live performances without
permission from the copyright holder for uses other than personal
enjoyment is prohibited.
■ Downloading from MP3/WMA music sites on the
Internet
You can find various types of MP3/WMA music distribution sites on the
Internet, including online shopping, trial listening, and free download
sites. You can download music files from these sites by following their
payment and other downloading rules.
■ Converting a music CD into MP3/WMA files
Prepare a computer and a commercially available MP3/WMA encoder
(conversion) software (some can be found for free on the Internet).
Load a music CD into the computer's CD-ROM drive and compress the
music CD by following the procedure of the MP3/WMA encoder
software. MP3/WMA-format music data files are created. A 12 cm music
CD (with a maximum of 74 minutes of recording/650 MB of data) can
be compressed to 65 MB (about 1/10 of the original size).
■ Writing MP3/WMA files on a CD-R/RW disc
MP3/WMA files can be recorded on a CD-R/RW disc by using a CD-R/
RW drive connected to a computer. Record by setting the recording
format of the recording software to ISO9660 level 1 or level 2 (not
including the extension format).
Select CD-ROM (mode 1) or CD-ROM XA (mode 2) as the disc format.
CAUTION
• To ensure stable sound quality during playback, we
recommend fixing the bit rate to 128 kbps and the sampling
frequency to 44.1 kHz.
• Note that it may not be possible to read some CD-R or CD-
RW discs, depending on their characteristics.
• There are many types of MP3/WMA encoding software
available, including commercial and freeware programs.
Depending on the encoder and the file format, the audio
quality may deteriorate, noise may be generated when
playing starts, or some recordings may not play.
• When files other than MP3/WMA files are recorded on a disc,
the system may take some time to recognize the disc and it
may not play.

Audio and Visual 239
Audio Operations
■ Playing a CD-R/RW disc
Insert a CD-R/RW disc on which MP3/WMA files are recorded. When
you load a disc, the system automatically determines whether it is a
music CD or a CD-R/RW disc that contains MP3/WMA files, and plays it
correctly. However, note that depending on the type of disc being used,
the disc may not play.
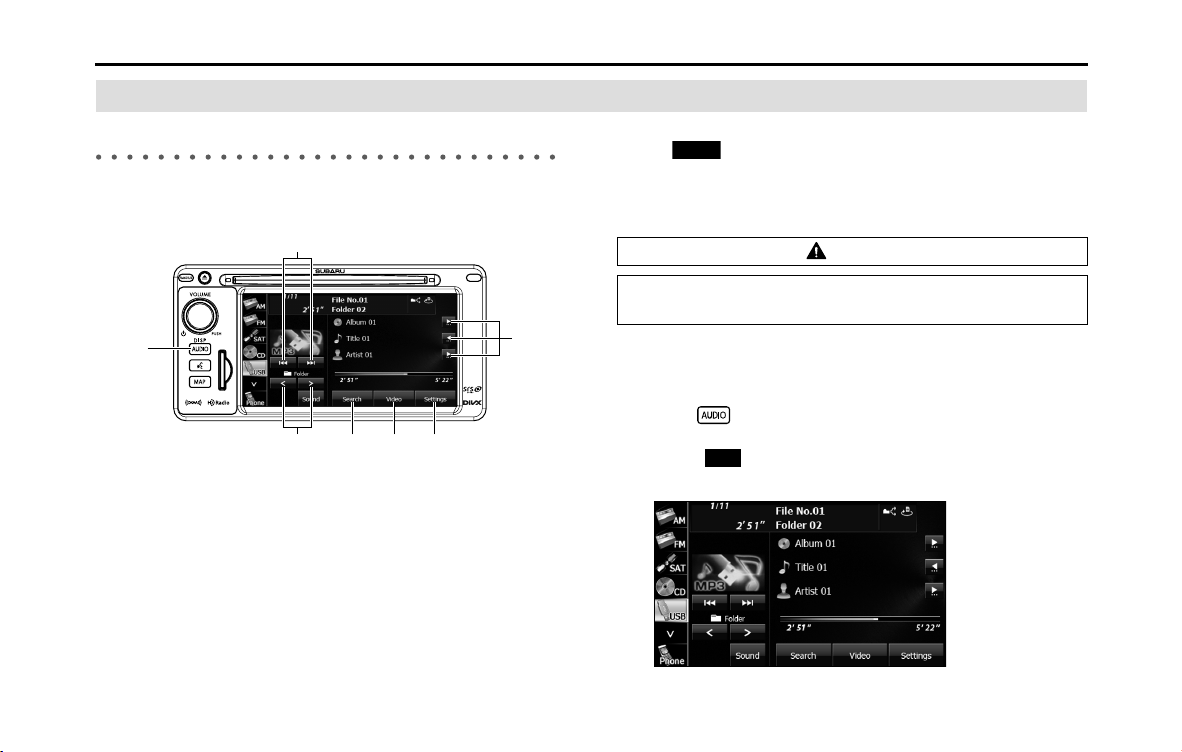
240 Audio and Visual
Audio Operations
Using the USB Music File Player
Using the USB Music File Player
This unit can play music files stored in a USB memory. Only MP3/WMA
playback is supported.
(1) Title information scroll buttons
*
(2) Settings button
(3) Video button
(4) Search button
(5) Folder selection buttons
(6) AUDIO button
(7) File up/down and fast forward (fast reverse) buttons
* It will be displayed if the length of the information is too long and it
cannot be displayed.
NOTE
• Touch (Video) to operate the USB video file player. (See Page 247.)
• Some of the functions may not be available when vehicle is in motion.
■ Listening to a USB music file
1 Connect a USB memory that contains music files to the
USB connector.
2 Press .
3 Touch (USB).
• The playback starts.
(1)
(3) (2)(4)(5)
(6)
(7)
CAUTION
Connect the USB cable correctly so that it does not interfere
with safe operation of the vehicle.
Video
USB
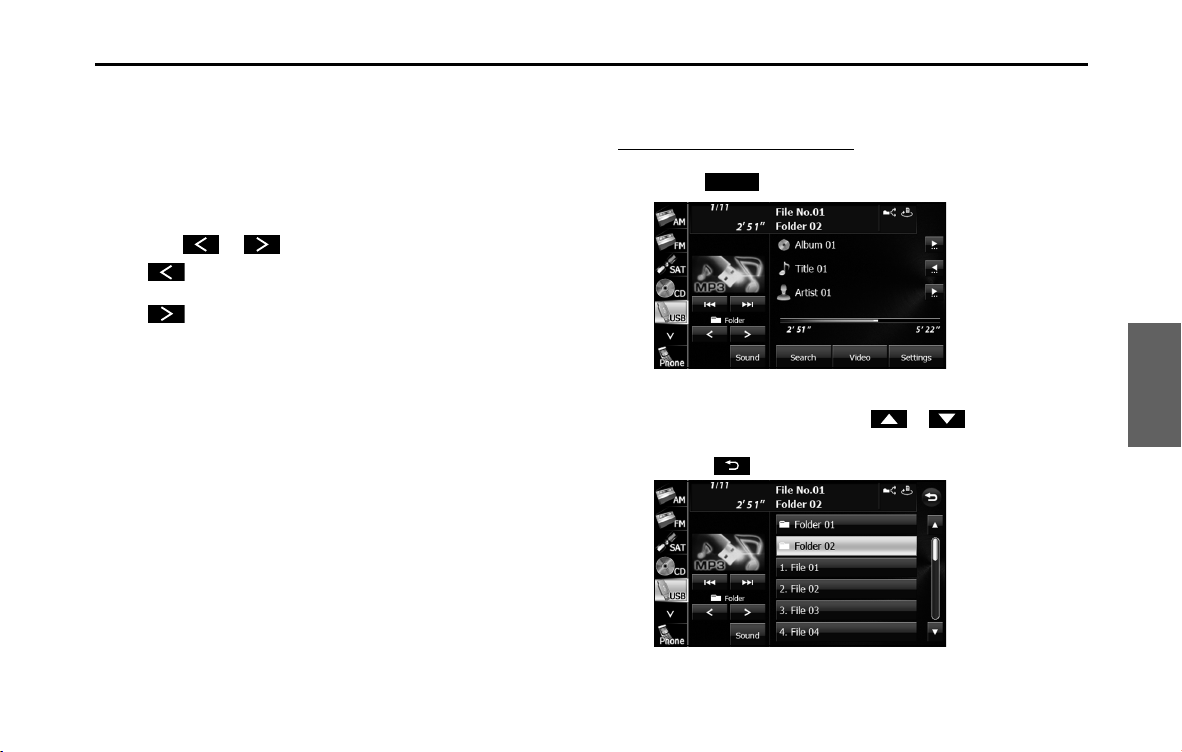
Audio and Visual 241
Audio Operations
NOTE
When a USB memory device is connected, the unit may take some time to scan
and read the file tag information. To shorten this scan time, try to store only MP3/
WMA files in the USB memory and minimize the number of folders.
■ Selecting a folder
You can select the folder that you want to use from the USB memory.
1 Touch or .
•:
Return to the previous folder and play the first file in the folder.
:
Advance to the next folder and play the first file in the folder.
NOTE
If no MP3/WMA files exist in the folder, “No Data” appears in the section where
the file name and folder name are displayed.
■ Selecting a music file
You can select the file that you want to play from a folder.
Selecting with a file name button
1 Touch (Search).
2
Touch the folder that you want to use.
• If there are more pages, touch or to scroll the
pages.
• Touch to return to the previous screen.
Search
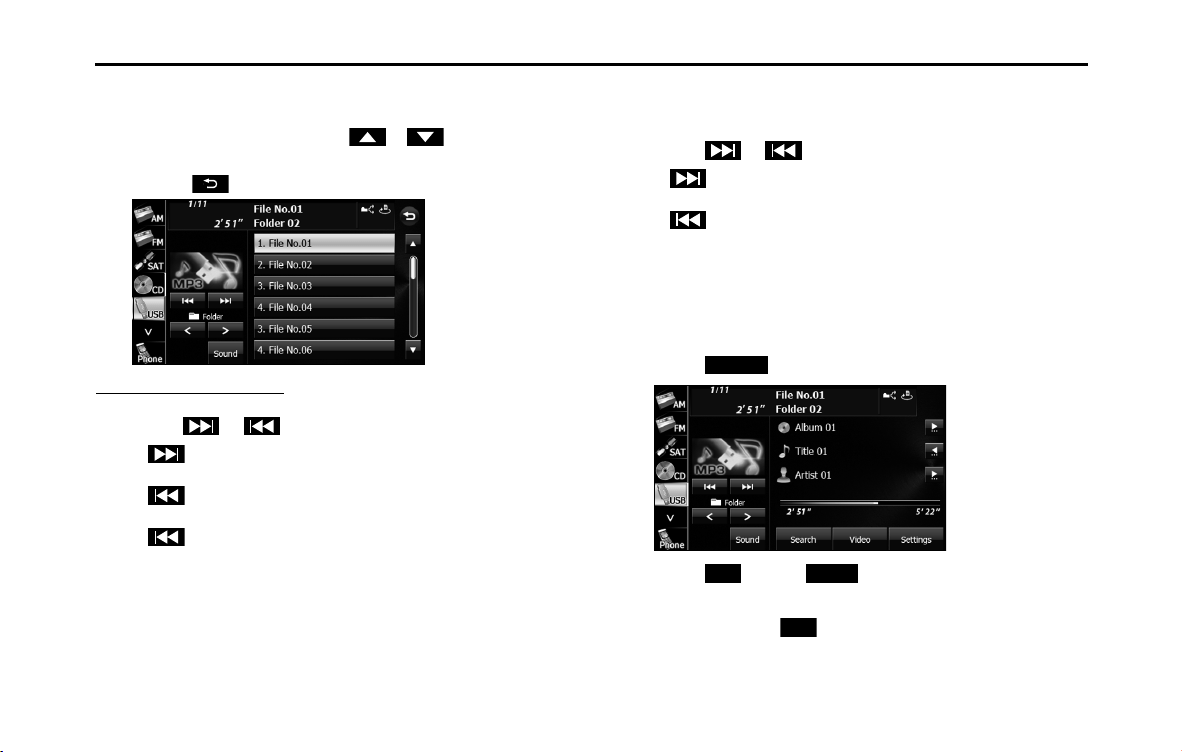
242 Audio and Visual
Audio Operations
3 Touch the file that you want to play.
• The selected file starts to play.
• If there are more pages, touch or to scroll the
pages.
• Touch to return to the previous screen.
Selecting consecutive files
1 Touch or .
•:
Advance to the next file.
(Press once):
Return to the start of the currently playing file.
(Press twice or more):
Return to the previous file.
• The selected file starts to play.
■ Fast forwarding and fast reversing
You can fast forward or fast reverse the currently playing file.
1 Touch or for 1 second or more.
•:
Fast forward the file.
:
Fast reverse the file.
Fast forward (or fast reverse) operates until you release your
finger from the button.
■ Repeating the music file
1 Touch (Settings).
2 Touch (File) or (Folder) in Repeat.
• Repeat playback is set for the currently playing file or folder.
• To cancel, touch (Off ) in Repeat.
Settings
File
Folder
O
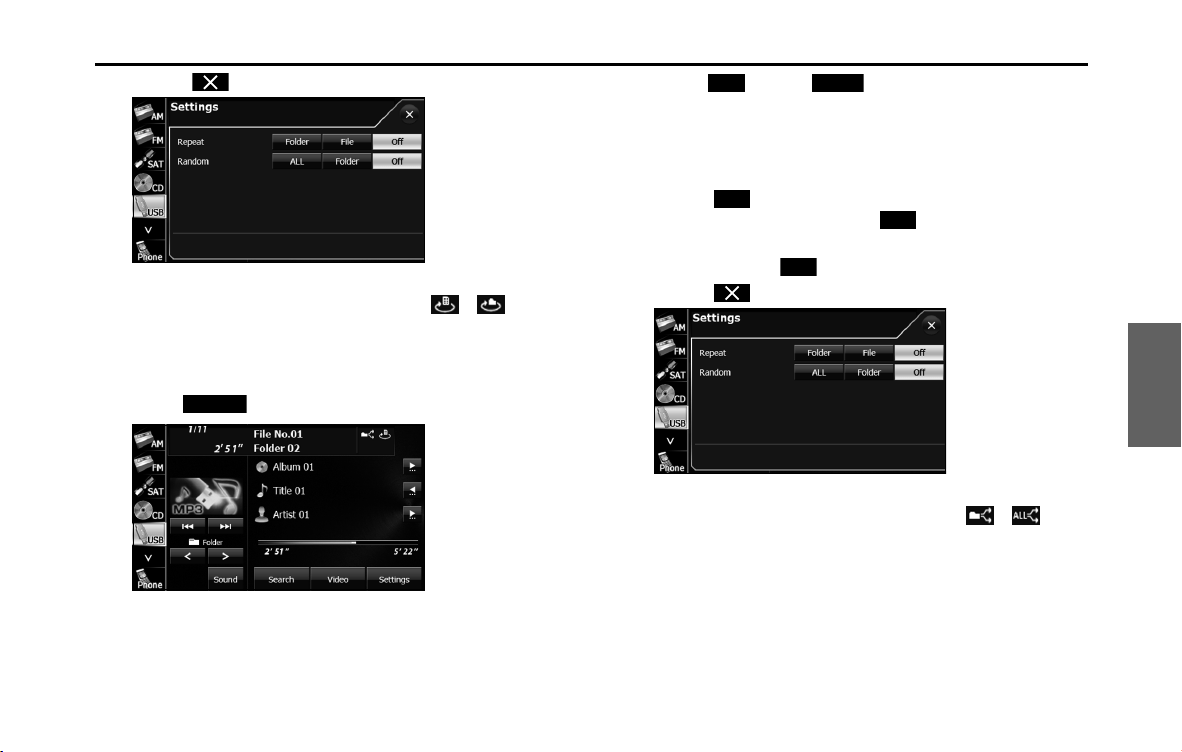
Audio and Visual 243
Audio Operations
• Touch to return to the previous screen.
NOTE
When the file repeat or folder repeat function is selected, or is
displayed in the top right of the screen as confirmation that the function is on.
■ Playing randomly
1 Touch (Settings).
2 Touch (ALL) or (Folder) in Random.
• Folder random playback:
The files in the currently playing folder are played randomly.
All random playback:
The files in all folders are played randomly.
• Touch (File) in Repeat during random playback to repeat
the currently playing file. Touch (Off ) in Repeat to return
to random playback.
• To cancel, touch (Off ) in Random.
• Touch to return to the previous screen.
NOTE
When the folder random or all random function is selected, or is
displayed in the top right of the screen as confirmation that the function is on.
Settings
ALL Folder
File
O
O

244 Audio and Visual
Audio Operations
■ Scrolling title information
If the Album, Title or Artist information cannot be fully displayed
because it is too long, you can scroll the display.
1 Touch on the item that you want to scroll.
• The selected title information scrolls to the left.
• Touch to stop the scrolling and return to the start of the
title.
• If driving is detected while the display is being scrolled, the
scrolling stops and returns to the start of the title.
• When the end of the title information is displayed, the scrolling
stops.
About USB Devices
■ About the supported USB memory standards
• Supported file formats:
FAT 32
• Supported audio formats:
MP3/WMA
• Maximum current:
1.0 A
• Supported capacities:
16 MB to 8 GB
• Compatibility:
USB1.0/1.1/2.0 (maximum transfer speed is same as USB 2.0)
• Mass memory support:
Supports USB mass storage class.
• Does not support USB hubs or multi card readers.

Audio and Visual 245
Audio Operations
■ Supported MP3 file standards
• Supported standards:
MPEG1/2/2.5 Audio Layer 3
• Supported sampling frequencies (kHz):
- MP3 (MPEG1 Audio Layer 3): 32, 44.1, 48
- MP3 (MPEG2 Audio Layer 3): 16, 22.05, 24
- MP3 (MPEG2.5 Audio Layer 3): 8, 11.025, 12
• Supported bit rates (kbps):
- MPEG1 Audio Layer : 32, 40, 48, 56, 64, 80, 96, 112, 128, 160, 192, 224, 256,
320
- MPEG2, 2.5 Audio Layer : 8, 16, 24, 32, 40, 48, 56, 64, 80, 96, 112, 128, 144, 160
* Supports VBR (Variable Bit Rate).
* Emphasis supports only 50/15ms.
* Does not support free format.
* Does not support DRM (Digital Rights Management).
• Supported channel modes:
Stereo, Joint Stereo, Dual channels, Monaural
■ Supported WMA file standards
• Supported standards:
WMA Ver. 7 to 9
• Supported sampling frequencies (kHz):
22.05, 24, 32, 44.1, 48
• Supported bit rates (kbps):
- WMA Ver. 7, 8: 48, 64, 80, 96, 128, 160, 192
- WMA Ver. 9: 48, 63, 64, 80, 95, 96, 127, 128, 160, 191, 192, 256, 320
* Supports 2-channel play only.
* Supports VBR (Variable Bit Rate).
* Does not support WMA9 Professional/Lossless/Voice.
* Does not support DRM (Digital Rights Management).
• Supported channel modes:
Stereo, Monaural
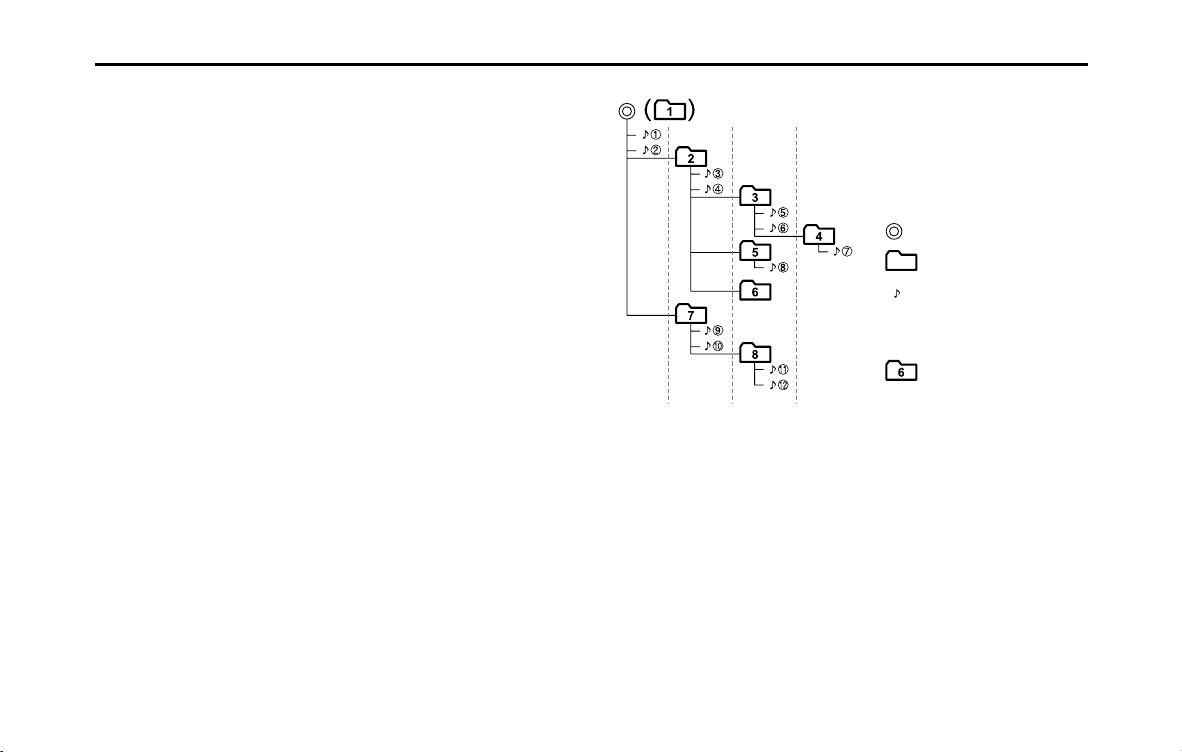
246 Audio and Visual
Audio Operations
■ About ID3/WMA tags
In MP3/WMA files, you can enter textual attribute information known as
ID3 tags/WMA tags to save information such as track titles and artist
names.
This unit supports ID3v.1.0, 1.1, 2.2, 2.3 and 2.4 tags.
This unit supports the ISO 8859-1, 2, 5 and 7 codes only. Use only the
ISO 8859-1, 2, 5 or 7 codes to record tags. If characters not included in
ISO8859-1, 2, 5 or 7 codes are recorded, they may not be readably
displayed.
This unit supports the WMA tag ASF revision (v1.20.02). WMA tags using
only Unicode are supported. Always use Unicode characters to enter
the information.
* When Ver. 1.x and Ver. 2.x of the ID3 tags both exist, precedence is given to Ver.
2.x.
■ USB memory format
The control items in this standard are described below.
• Maximum number of directory layers:
8 layers
• Maximum number of characters for file names:
128 byte
• Supported characters for file names:
A to Z, 0 to 9, and underscore (_)
(Range of alpha-numeric ISO-8859-1)
• Number of files that can be stored in a single memory device:
9999
<A configuration example of an MP3/WMA-supporting USB memory>
1st layer 2nd layer 3rd layer 4th layer
ROOT
Folder
MP3/WMA file
Supplement
Since there is no tune contained in
the folder 6, the folder in not
displayed. However, it is assigned with
a folder number.
Audio and Visual 247
Visual Operations
Using the USB Video File Player
Before Using the USB Video File Player
■ About DivX
DivX is a highly evaluated media technology developed by DivX, Inc.
DivX media files enable you to compress with a high compression ratio
while maintaining high image quality. Menus, subtitles, and sub audio
tracks can be included in the file compressed by DivX. DivX.com has a
variety of DivX media files. It is possible to create original content by
downloading these media and using the DivX dedicated tools.
■ About DivX Certified
• DivX Certified products have been tested by the DivX creators, and
have been officially tested and certified that they can be played on
DivX ver. 4, 5 and 6 (the DivX ver. 3 are not supported). A DivX
Certified logo on a product shows that it is a portable video or HD
video that complies with the DivX Profiles Standard.
• DivX, DivX Certified and associated logos are trademarks of DivX, Inc.
These trademarks are used with the permission of DivX, Inc.
• Covered by one or more of the following U.S. patents:
7,295,673; 7,460,668; 7,515,710; 7,519,274
• ABOUT DivX VIDEO:
DivX
®
is a digital video format created by DivX, Inc. This is an official
DivX Certified
®
device that plays DivX video. Visit divx.com for more
information and software tools to convert your files into DivX video.
WARNING
To ensure safety, you cannot watch a video while driving.

248 Audio and Visual
Visual Operations
• ABOUT DivX VIDEO-ON-DEMAND:
This DivX Certified
®
device must be registered in order to play
purchased DivX Video-on-Demand (VOD) movies. To obtain your
registration code, locate the DivX VOD section in your device setup
menu. Go to vod.divx.com for more information on how to complete
your registration.
DivX Certified
®
to play DivX
®
video, including premium content.
• This unit supports playback of DivX files recorded in USB memory. It
does not support the playback of DivX files recorded on discs.
• To ensure safety, only DivX music can be played while the vehicle is
in motion.
• Manufactured under license from Dolby Laboratories.
NOTE
• You can watch a USB video file only when you have stopped your vehicle and
applied the parking brake to ensure safety, and turned the ignition switch to
ON or ACC ON. (If the source is switched to USB while the vehicle is in motion,
only the audio function operates.)
• This unit supports playback of video files recorded in USB memory. It does not
support the playback of video files recorded on discs.
Using the USB Video File Player
(1) Settings button
(2) Music button
(3) Search button
(4) Folder selection buttons
(5) File up/down and fast forward (fast reverse) buttons
(6) AUDIO button
(7) Stop button
(8) Play/Pause button
NOTE
• Touch (Music) to operate the USB music file player. (See Page 240.)
• Some of the functions may not be available when vehicle is in motion.
(2) (1)(3)(4)
(5)
(6)
(8)(7)
Music
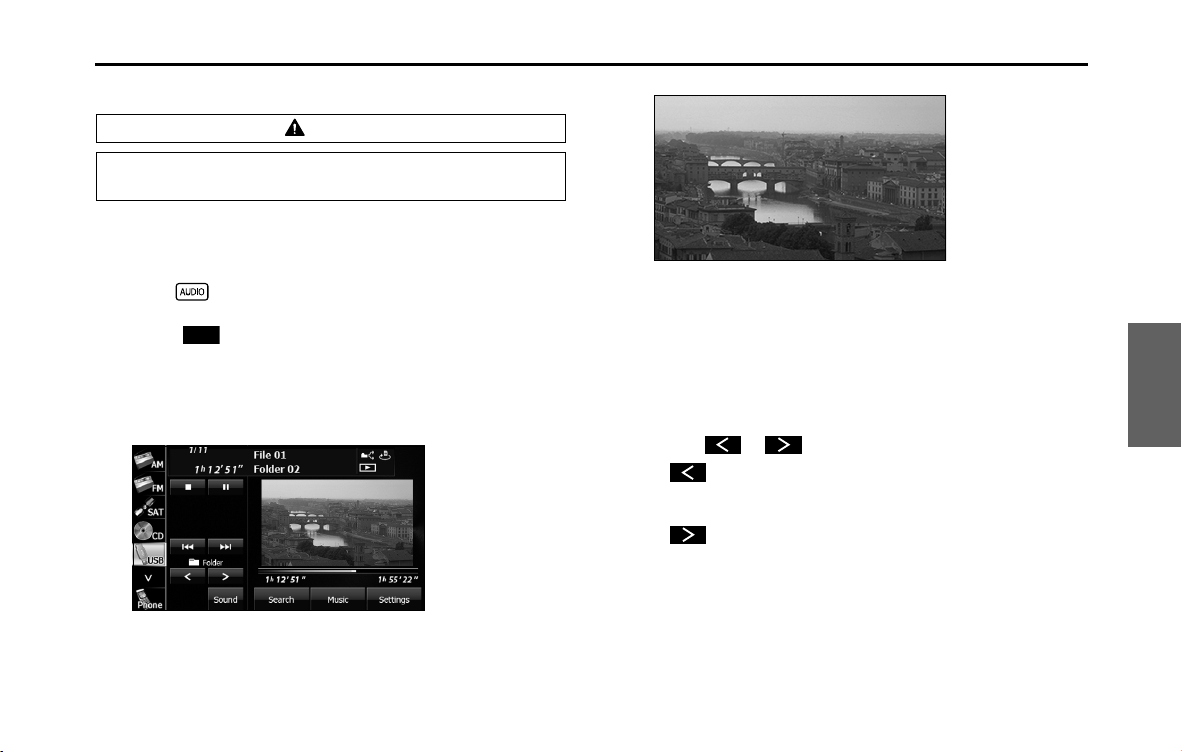
Audio and Visual 249
Visual Operations
■ Viewing a USB video file
1 Connect a USB memory that contains video files to the
USB connector.
2 Press .
3 Touch (USB).
• The playback starts.
• Touch the video to show it in a full-screen display. To display the
operation buttons (touch buttons) again, touch the full-screen
display.
<Full-screen display>
NOTE
When a USB memory device is connected, the unit may take some time to scan
and read the file tag information. To shorten this scan time, try to store only
video files in the USB memory and minimize the number of folders.
■ Selecting a folder
You can select the folder that you want to use from the USB memory.
1 Touch or .
•:
Return to the previous folder and play the first video in the
folder.
:
Advance to the next folder and play the first video in the folder.
NOTE
If no video files exist in the folder, “No Data” appears in the section where the file
name and folder name are displayed.
CAUTION
Connect the USB cable correctly so that it does not interfere
with the safe operation of the vehicle.
USB
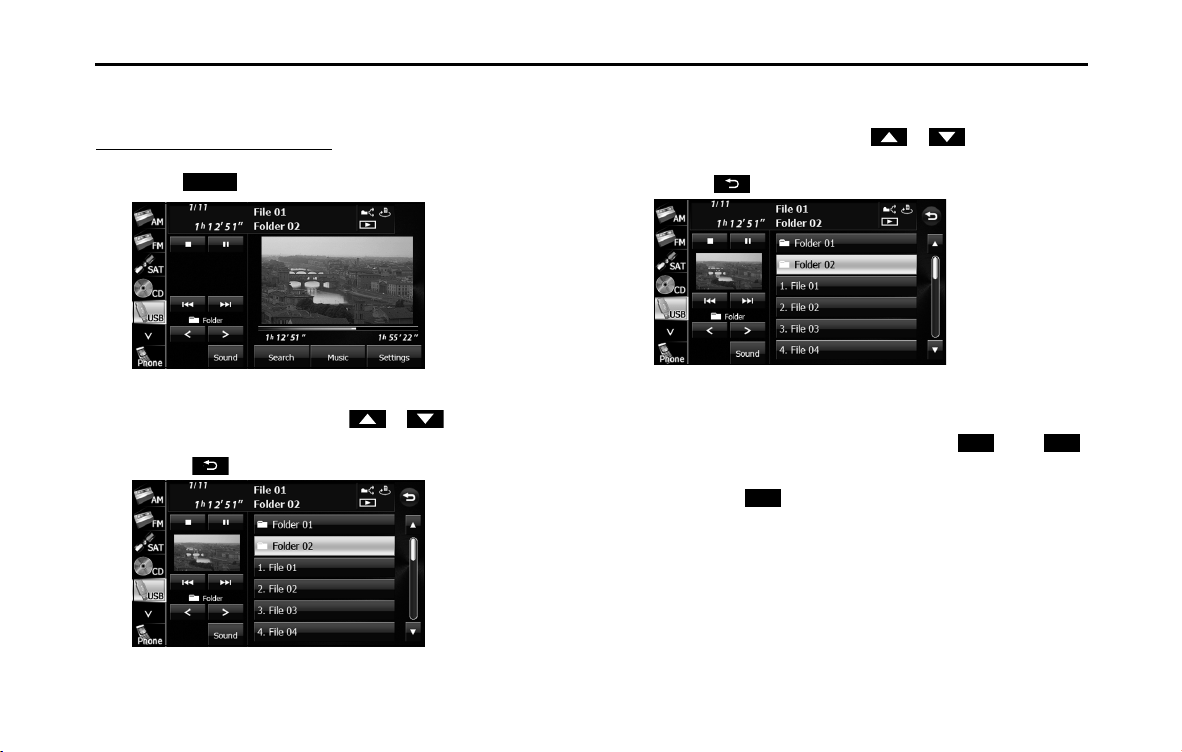
250 Audio and Visual
Visual Operations
■ Selecting a file
You can select the file that you want to play from a folder.
Selecting with a file name button
1 Touch (Search).
2
Touch the folder that you want to use.
• If there are more pages, touch or to scroll the
pages.
• Touch to return to the previous screen.
3 Touch the file that you want to play.
• The selected file starts to play.
• If there are more pages, touch or to scroll the
pages.
• Touch to return to the previous screen.
NOTE
• When the list is displayed, touch the video to show it in a full-screen display.
• A message is displayed on the screen when DivX VOD Rental files are played.
Read the displayed contents carefully, and touch either (Yes) or
(No).
- This message is only displayed if there are rental frequency limitations.
- When you touch (Yes), the rental frequency decreases and the
selected image is played back.
Search
Yes No
Yes
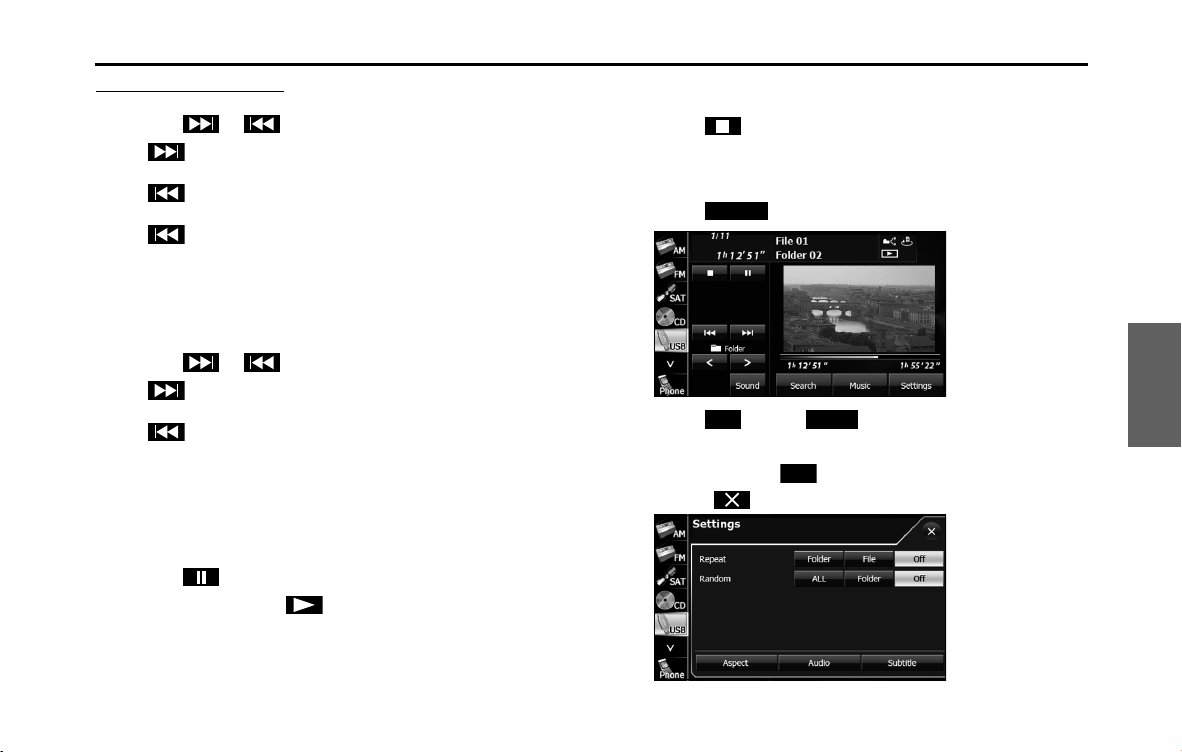
Audio and Visual 251
Visual Operations
Selecting consecutive files
1 Touch or .
•:
Advance to the next file.
(Press once):
Return to the start of the currently playing file.
(Press twice or more):
Return to the previous file.
■ Fast forwarding and fast reversing
You can fast forward or fast reverse the currently playing video.
1 Touch or for 1 second or more.
•:
Fast forward the video.
:
Fast reverse the video.
Fast forward (or fast reverse) operates until you release your
finger from the button.
■ Pausing a video
1 Touch .
• During pause, touch to restart playback.
■ Stopping a video
1 Touch .
■ Repeating the video file
1
Touch (Settings).
2 Touch (File) or (Folder) in Repeat.
• Repeat playback is set for the currently playing file or folder.
• To cancel, touch (Off ) in Repeat.
• Touch to return to the previous screen.
Settings
File Folder
O
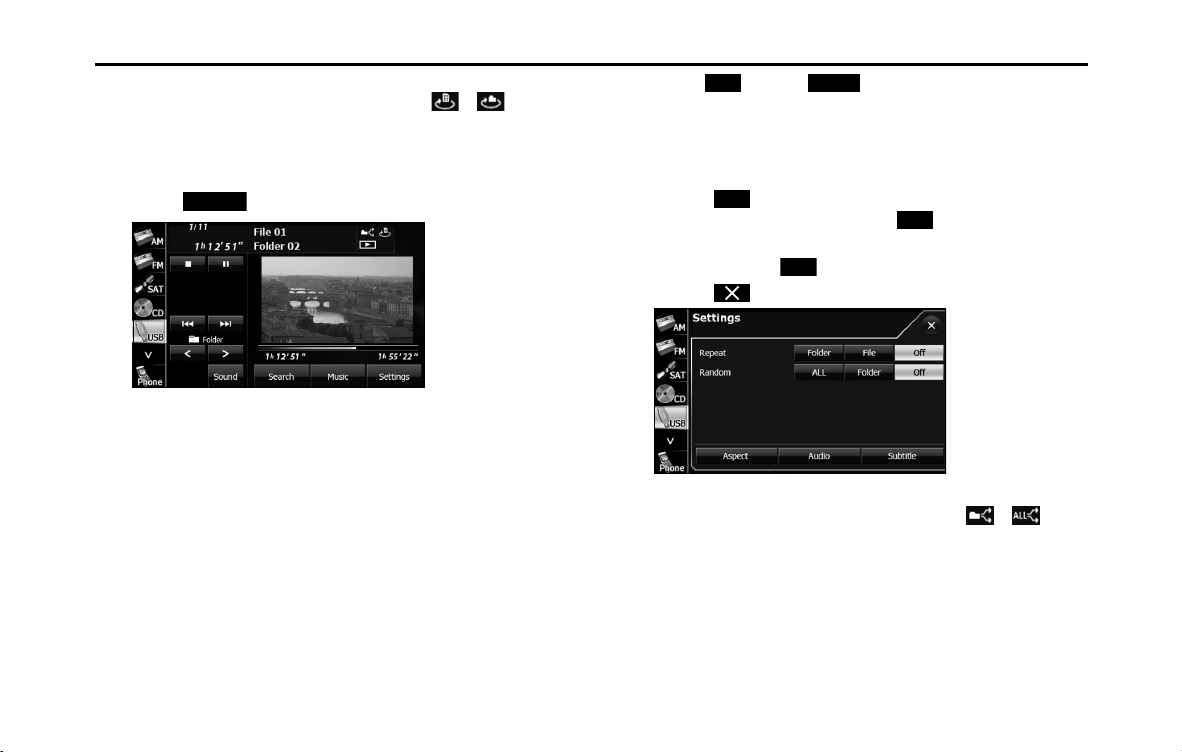
252 Audio and Visual
Visual Operations
NOTE
When the file repeat or folder repeat function is selected, or is
displayed in the top right of the screen as confirmation that the function is on.
■ Playing randomly
1 Touch (Settings).
2 Touch (ALL) or (Folder) in Random.
• Folder random playback:
The files in the currently playing folder are played randomly.
All random playback:
The files in all folders are played randomly.
• Touch (File) in Repeat during random playback to repeat
the currently playing video. Touch (Off ) in Repeat to
return to random playback.
• To cancel, touch (Off ) in Random.
• Touch to return to the previous screen.
NOTE
When the folder random or all random function is selected, or is
displayed in the top right of the screen as confirmation that the function is on.
Settings
ALL Folder
File
O
O
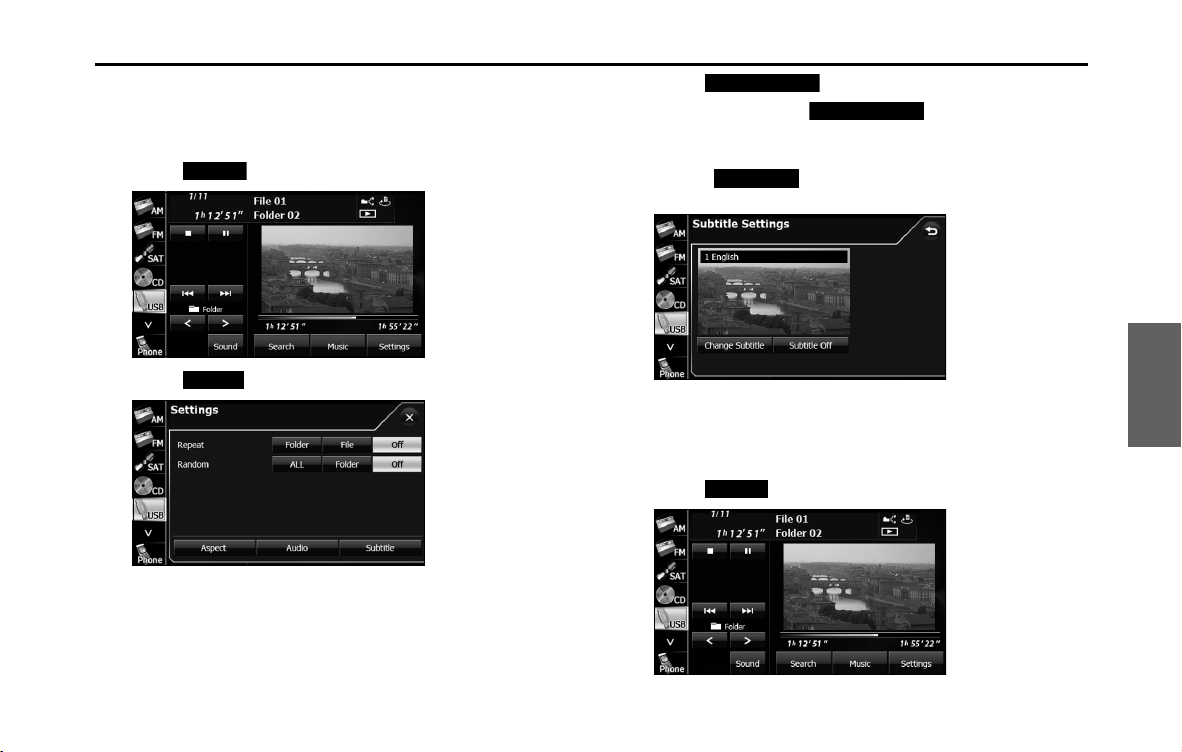
Audio and Visual 253
Visual Operations
■ Changing the subtitle language
If the video file stores multiple subtitle languages, you can change the
subtitle language that is used.
1 Touch (Settings).
2
Touch (Subtitle).
3 Touch (Change Subtitle).
• Each time you touch (Change Subtitle), the
subtitle number changes, and the subtitle languages recorded
on the video file change in sequence.
• Touch (Subtitle Off ) to play without displaying
subtitles on the screen.
■ Changing the audio language
If the video file stores multiple audio languages, you can change the
audio language that is used.
1 Touch (Settings).
Settings
Subtitle
Change Subtitle
Change Subtitle
Subtitle O
Settings
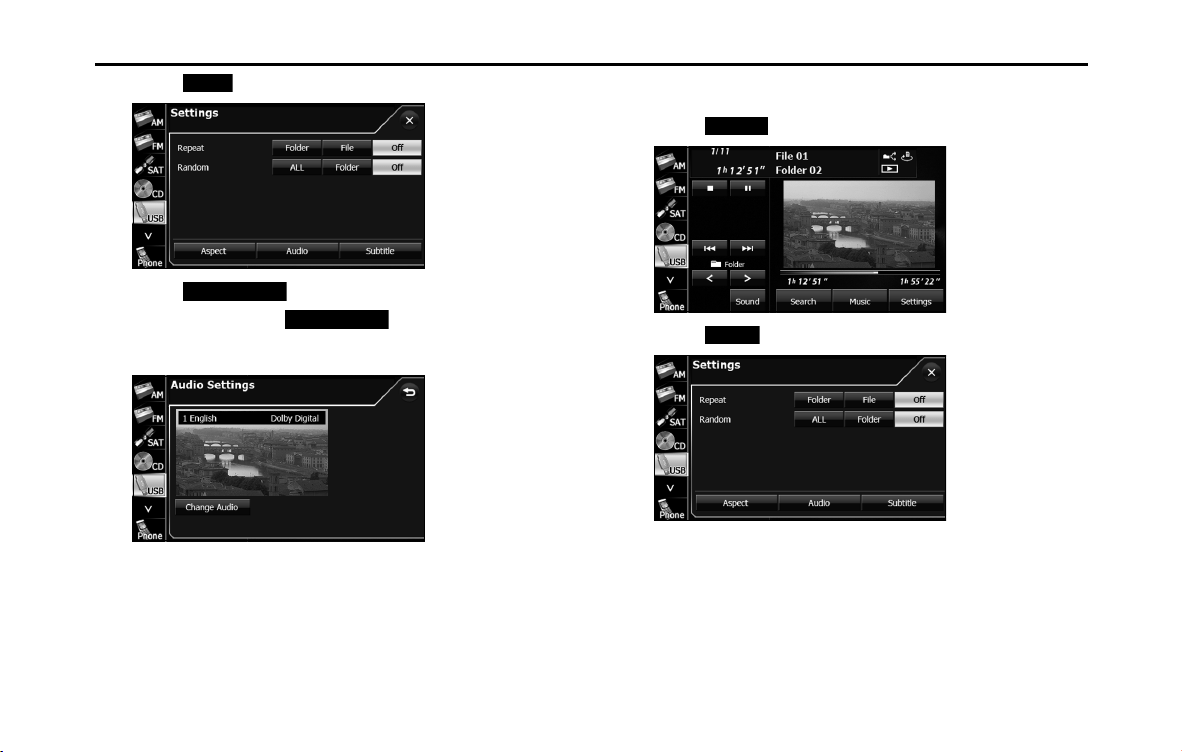
254 Audio and Visual
Visual Operations
2 Touch .
3 Touch (Change Audio).
• Each time you touch (Change Audio), the audio
number changes, and the audio languages recorded on the
video file change in sequence.
■ Changing the video output
1 Touch (Settings).
2 Touch (Aspect).
Audio
Change Audio
Change Audio
Settings
Aspect

Audio and Visual 255
Visual Operations
3 Touch (Original) or (Zoom).
• (Original):
Display the video in its original size.
• (Zoom):
Expand the video until its vertical or horizontal dimension
reaches the maximum size. (For DivX image files, the image is
enlarged to 4.5 times its original size.)
NOTE
You are allowed to watch a video on the zoom screen for personal enjoyment.
However, if you compress or enlarge the screen for commercial purposes or to
display to the public, it may infringe copyright that is protected by copyright
laws.
Displaying DivX VOD code
■ Displaying the DivX VOD registration code
To play DivX VOD (Video On Demand) content, first register this unit
with the content provider. To register, the DivX VOD registration code is
required.
You can display the DivX
®
Video On Demand registration code.
1
Touch .
• If is not displayed, touch .
Original Zoom
Original
Zoom
Info
Info
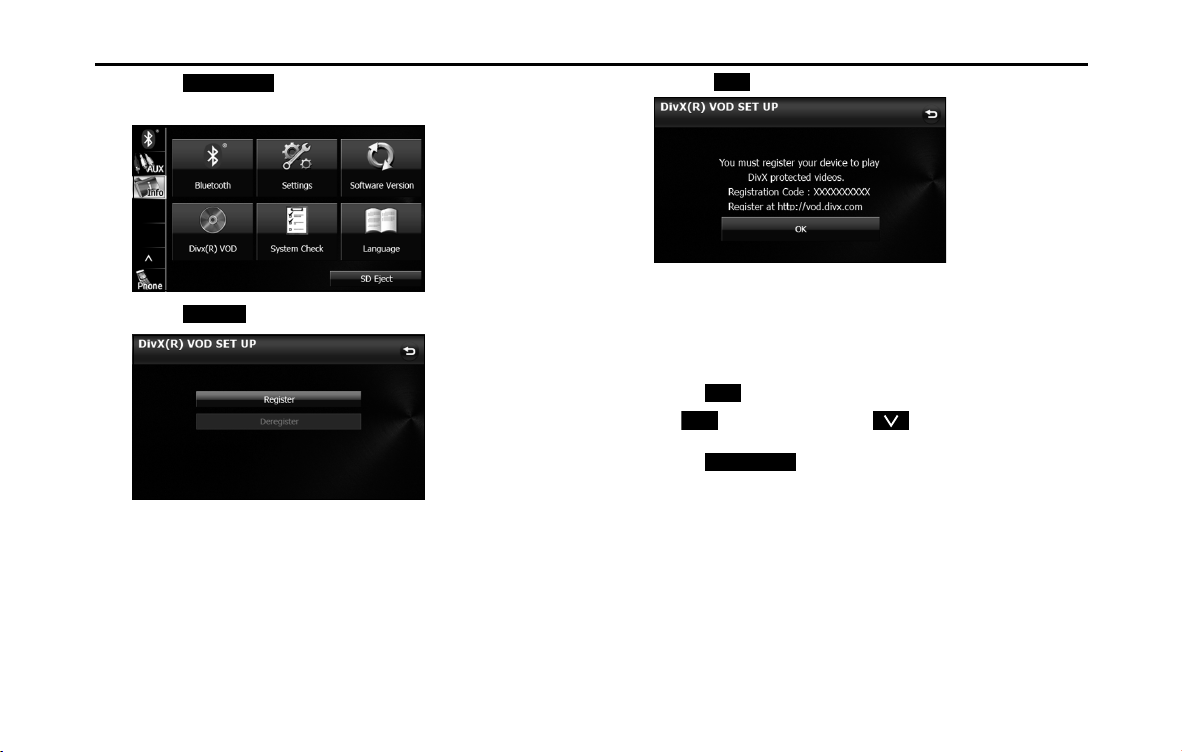
256 Audio and Visual
Visual Operations
2 Touch (DivX(R) VOD).
• The DivX(R) VOD Set Up screen appears.
3 Touch (Register).
• Touch (OK) to return to the Info screen.
■ Displaying the DivX VOD deregistration code
To cancel the unit's registration with the content provider, the DivX
VOD deregistration code is required. You can display the DivX
®
Video
On Demand deregistration code.
1 Touch .
• If is not displayed, touch .
2 Touch (DivX(R) VOD).
• The DivX(R) VOD Set Up screen appears.
DivX(R) VOD
Register
OK
Info
Info
DivX(R) VOD
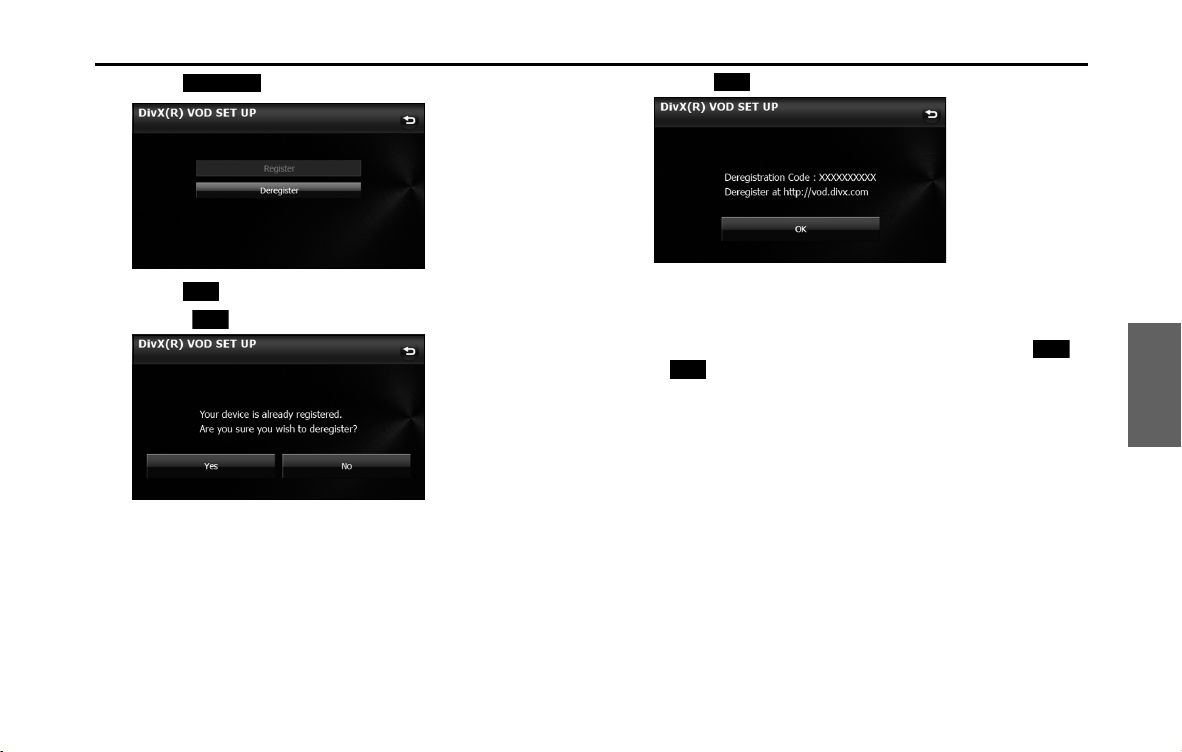
Audio and Visual 257
Visual Operations
3 Touch (Deregister).
4 Touch ( Yes).
• Touch (No) to return to the previous screen.
• Touch (OK) to return to the Info screen.
■ Caution display while playing VOD rental files
A message is displayed on the screen when DivX VOD rental files are
played. Read the displayed contents carefully, and touch either
(Yes) or (No).
Deregister
Yes
No
OK
Yes
No

258 Audio and Visual
Visual Operations
About USB Devices
■ Supported DivX standards
• Supported extensions:
DivX, Div, AVI (single-byte characters only, not case-sensitive)
• Maximum number of directory layers:
8 layers (including the root folder)
• Number of folders that can be stored in the USB memory:
3000 (including the root folder)
• Number of files that can be stored in the USB memory:
9999
• Standard level:
DivX Certified
* Only title 1 can be played in the DivX media format. The menu is not
displayed.
• Codec support:
DivX Ver. 4.x, 5.x, 6.x (supports NTSC/PAL)
• Profile:
DivX Home Theater 3.0
• Maximum resolution:
720×480 (30 fps), 720×576 (25 fps)
• Supported audio codec:
MP1, MP2, MP3, AC3
- Supported sampling frequencies (kHz):
AC3: 32 - 320
* For the other audio codec, see “About USB Devices” on Page 244.
- Supported channel modes:
Stereo, Monaural
■ Supported WMV standards
• Supported extensions:
WMV (single-byte characters only, not case-sensitive)
• Maximum number of directory layers:
8 layers (including the root folder)
• Number of folders that can be stored in the USB memory:
3000 (including the root folder)
• Number of files that can be stored in the USB memory:
9999
• Codec support:
WMV Windows Media Video 9 (VC-1)
* Does not support WMA9 Professional/lossless/Voice
• Maximum resolution:
720×480 (30 fps), 720×576 (25 fps)
• Supported audio codec:
MP3, WMA
* For the other audio codec, see “About USB Devices” on Page 244.
- Supported channel modes:
Stereo, Monaural

Audio and Visual 259
Visual Operations
■ Supported MP4 standards
• Supported extensions:
MP4, M4V (single-byte characters only, not case-sensitive)
• Maximum number of directory layers:
8 layers (including the root folder)
• Number of folders that can be stored in the USB memory:
255 (including the root folder)
• Number of files that can be stored in the USB memory:
9999
• Codec support:
Complies with MPEG1 Windows Media standards
MPEG4 MPEG-4 Simple Profile
• Maximum resolution:
720×480 (30 fps), 720×576 (25 fps)
• Supported audio codec:
MP3, AC3
- Supported sampling frequencies (kHz):
AC3: 32 - 320
* For the other audio codec, see “About USB Devices” on Page 244.
- Supported channel modes:
Stereo, Monaural
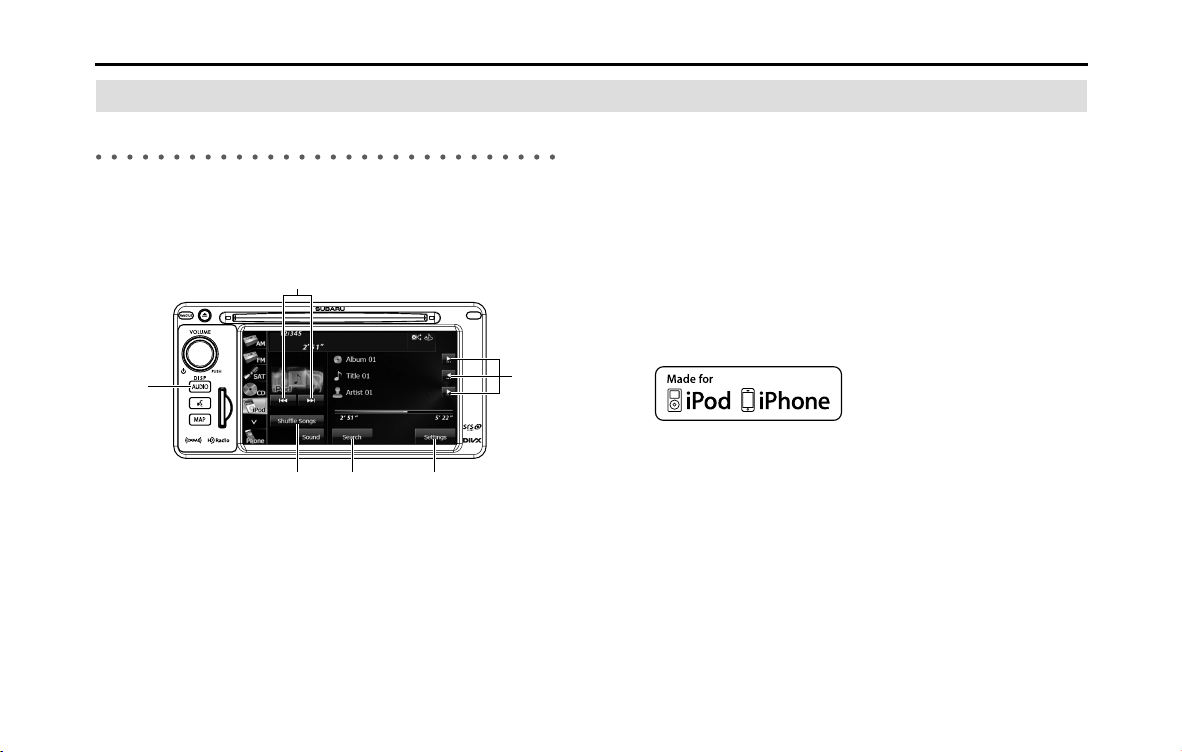
260 Audio and Visual
How to Operate Portable Audio Devices
Using the iPod
®
Player
Using the iPod Player
When an iPod is connected, you can play iPod music files. On this unit,
you can perform operations such as selecting a file from a list or
changing to the random playback mode. Note that you cannot connect
an iPod cable and USB at the same time.
(1) Title information scroll buttons
*
(2) Settings button
(3) Search button
(4) Shuffle Songs button
(5) AUDIO button
(6) File up/down and fast forward (fast reverse) buttons
* It will be displayed if the length of the information is too long and it
cannot be displayed.
NOTE
• iPod and iTunes may be used with materials without copyright, or materials
for which copying or playback are legally allowed for the purposes of private
copying or playback. The infringement of copyright is prohibited by law.
• The picture display and audiobook functions of iPod are not supported.
• The podcast function is supported, but it may operate differently to that on
iPod or iPhone.
• “Made for iPod” and “Made for iPhone” mean that an electronic accessory has
been designed to connect specifically to iPod or iPhone, respectively, and has
been certified by the developer to meet Apple performance standards. Apple
is not responsible for the operation of this device or its compliance with safety
and regulatory standards.
• iPhone, iPod, iPod classic, iPod nano, and iPod touch are trademarks of Apple
Inc., registered in the U.S. and other countries.
• To connect an iPod, first purchase a connection cord.
• For details on the iPod functions, see the iPod's instruction manual.
• For the iPod types (generations) supported by this unit, see “About the
Supported iPods” on Page 266.
• Some of the functions may not be available when vehicle is in motion.
(1)
(2)(3)(4)
(5)
(6)
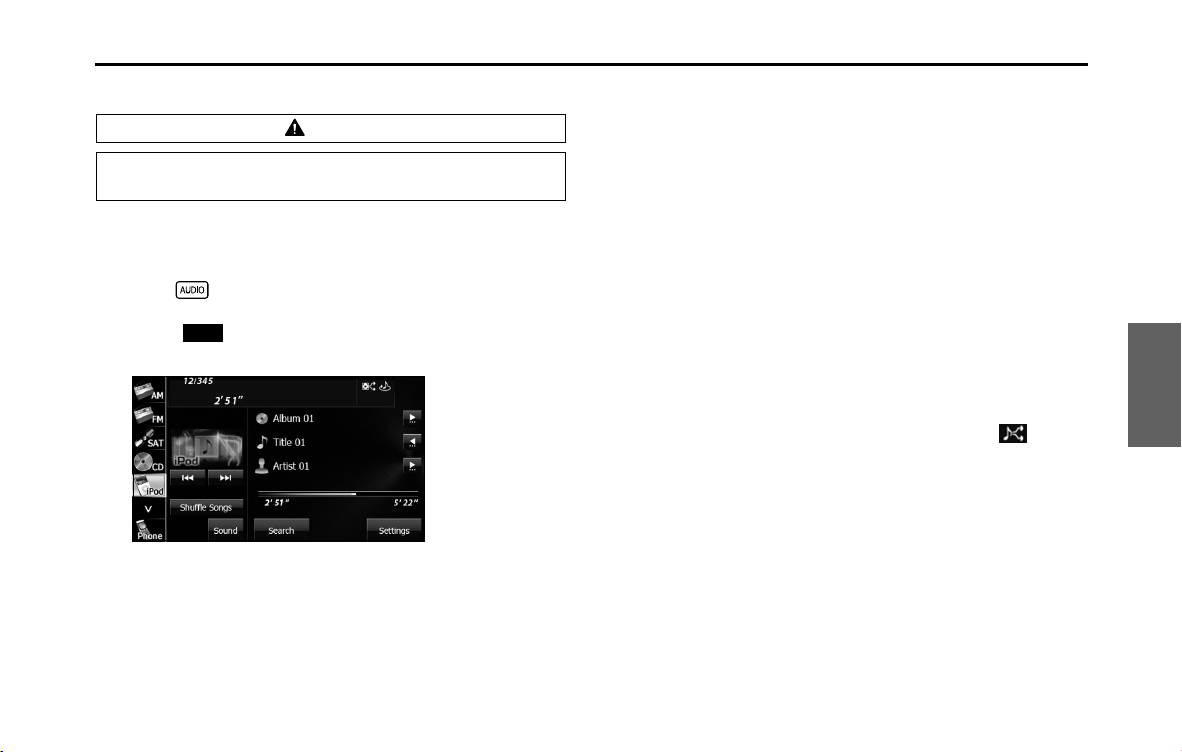
Audio and Visual 261
How to Operate Portable Audio Devices
■ Playing an iPod
1 Connect an iPod that contains music files to the iPod
connector.
2 Press .
3 Touch .
• The playback starts.
NOTE
• When the ignition switch is in the “ACC” or “ON” position, the battery of the
connected iPod is charged. However, it may take some time until the iPod is
turned on, depending on the remaining power in the battery.
• Disconnect headphones and other accessories from the iPod before
connecting it to this unit. Failure to do so may make it impossible to operate
the iPod from this unit.
• If the iPod's equalizer has been customized, the sound output may be
distorted when it is connected to the optional dedicated connection cable.
• If this unit does not support the language used in the iPod, album names,
titles, and artist names are displayed as blank.
• iPod may not be recognized in ACC OFF/ON. In this case, remove the iPod and
reconnect it.
• When you connect your iPod, the music file starts playing from the previous
position. Also, if you switch the power of the iPod off and on, the music file
starts playing from the previous position. But if the unit cannot detect the file
that was playing previously, it will start playing from the first file.
• If there are multiple music files stored on your iPod or iPhone, it may take
some time until the playback starts.
• If the iPod is set to Shuffle Songs and is connected to this unit, is not
shown on the display.
CAUTION
Connect the connection cord correctly so that it does not
interfere with the safe operation of the vehicle.
iPod
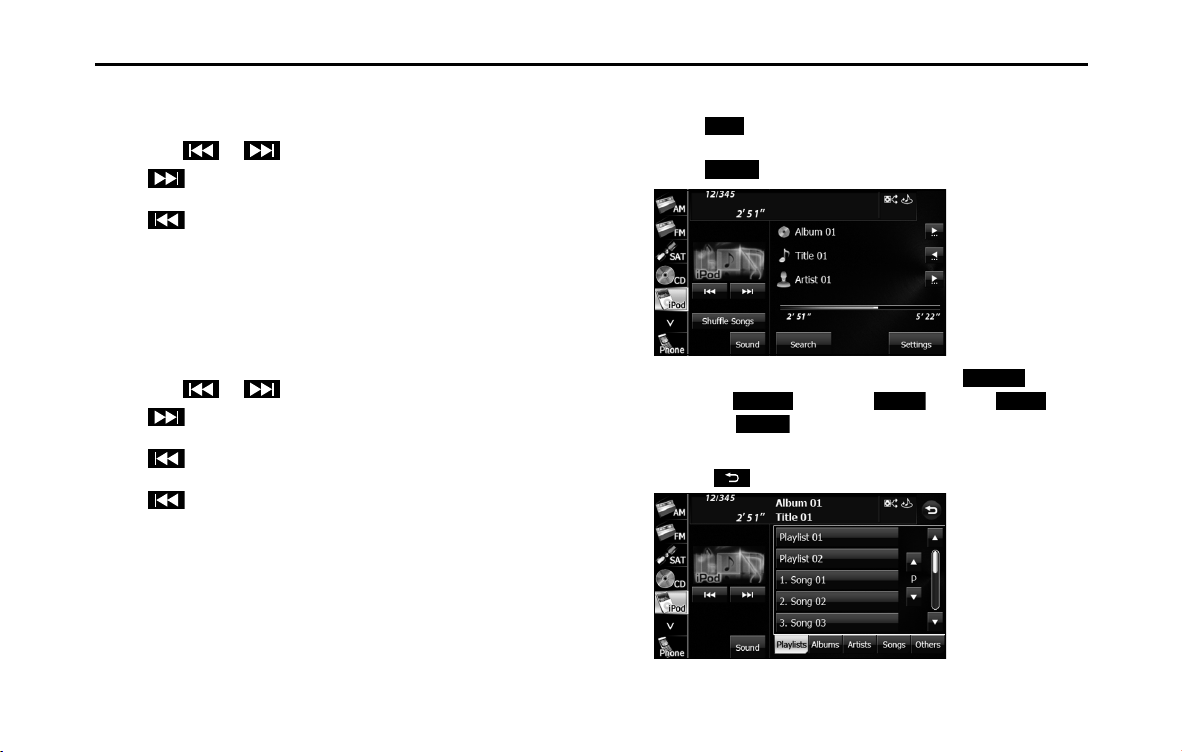
262 Audio and Visual
How to Operate Portable Audio Devices
■ Fast forwarding and fast reversing
You can fast forward or fast reverse the currently playing file.
1 Touch or for 1 second or more.
•:
Fast forward the file.
:
Fast reverse the file.
Fast forward (or fast reverse) operates until you release your
finger from the button.
■ Selecting a music file
You can select the music file that you want to play.
1 Touch or .
•:
Advance to the next file.
:
Return to the start of the currently playing file.
(Press twice or more):
Return to the previous file.
The selected music file starts to play.
■ Finding a music file
1 Touch .
2 Touch (Search).
3 To select a file or program to play, touch
(Playlists), (Albums), (Artists),
(Songs) or (Others).
• The list screen for the selected mode appears.
• Touch to return to the previous screen.
iPod
Search
Playlists
Albums Artists Songs
Others
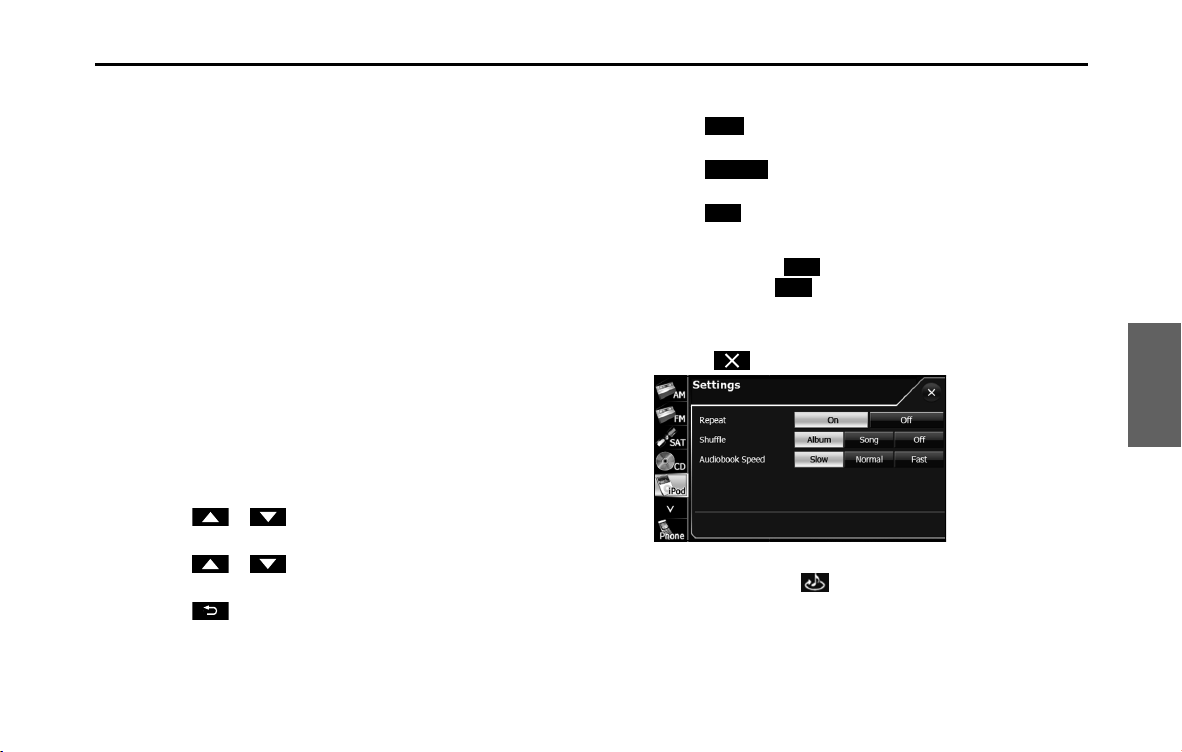
Audio and Visual 263
How to Operate Portable Audio Devices
4 Touch the list that you want to use.
• The list order depends on the selection mode, as shown below.
Playlists:
Playlist screen J Music file screen
Albums:
Album screen J Music file screen
Artists:
Artist screen J Album screen J Music file screen
Songs:
Music file screen
Others:
Others screen J Genre screen J Artist screen J Album screen
J Music file screen
Others screen J Program screen J Episode screen
Others screen J Book screen
Others screen J Composer screen J Album screen J Music
file screen
5 Touch the music file that you want to play.
• The selected music file starts to play.
• Touch or on the scroll function to scroll the display
pages of the music file list.
• Touch or on the index function to display in the list
the names that start with the selected letter or number.
• Touch to return to the previous screen.
■ Repeating the same music file
1 Touch .
2 Touch (Settings).
3 Touch (On) in Repeat.
• Repeat playback is set for the currently playing music file.
• When you touch (On), repeat is continued until you
cancel it. Touch (Off ) to cancel the repeat playback.
• When Repeat is canceled, repeat playback is performed for the
list that is playing back.
• Touch to return to the previous screen.
NOTE
When On is selected in Repeat, is displayed in the top right of the screen as
confirmation that the function is on.
iPod
Settings
On
On
O
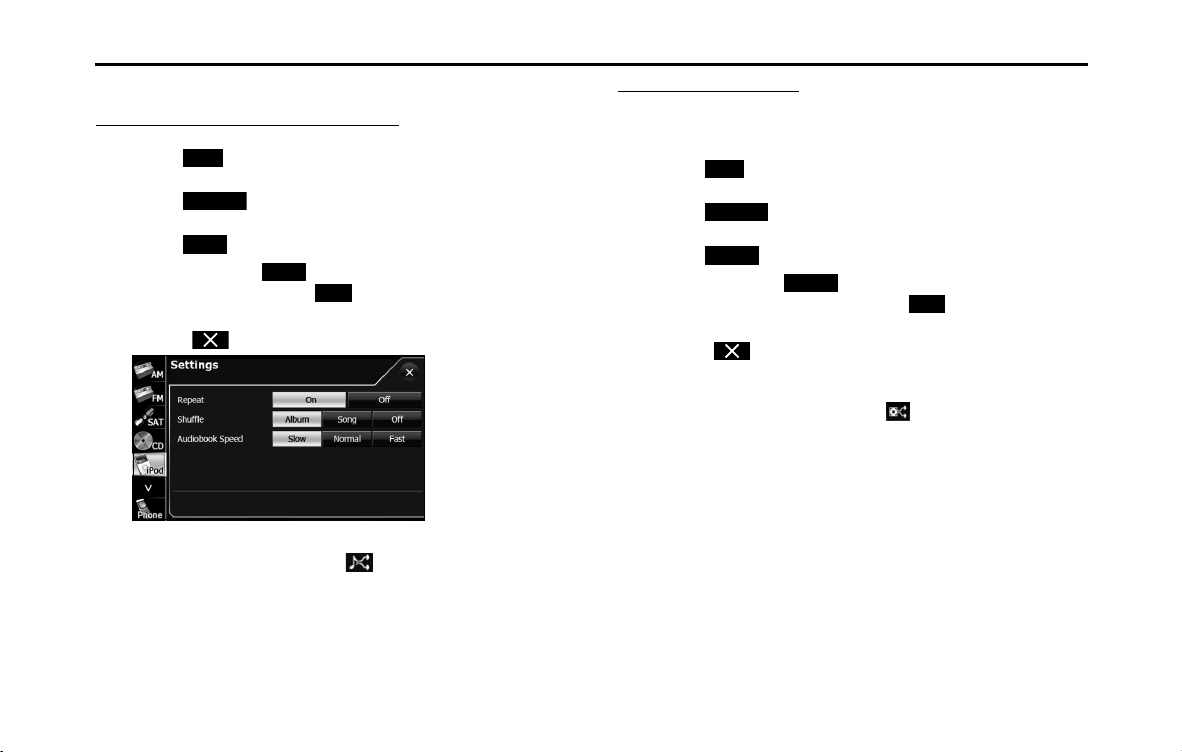
264 Audio and Visual
How to Operate Portable Audio Devices
■ Playing music files randomly
Playing files from the current list randomly
1 Touch .
2
Touch (Settings).
3 Touch (Song) in Shuffle.
• When you touch (Song), random playback is continued
until you cancel it. Touch (Off ) to cancel random
playback.
• Touch to return to the previous screen.
NOTE
When the list random function is selected, is displayed in the top right of
the screen as confirmation that the function is on.
Playing albums randomly
You can play albums randomly. Note that the music files within the
albums are played in order from the first.
1 Touch .
2
Touch (Settings).
3 Touch (Album) in Shuffle.
• When you touch (Album), random playback is
continued until you cancel it. Touch (Off ) to cancel
random playback.
• Touch to return to the previous screen.
NOTE
When the album random function is selected, is displayed in the top right of
the screen as confirmation that the function is on.
iPod
Settings
Song
Song
O
iPod
Settings
Album
Album
O
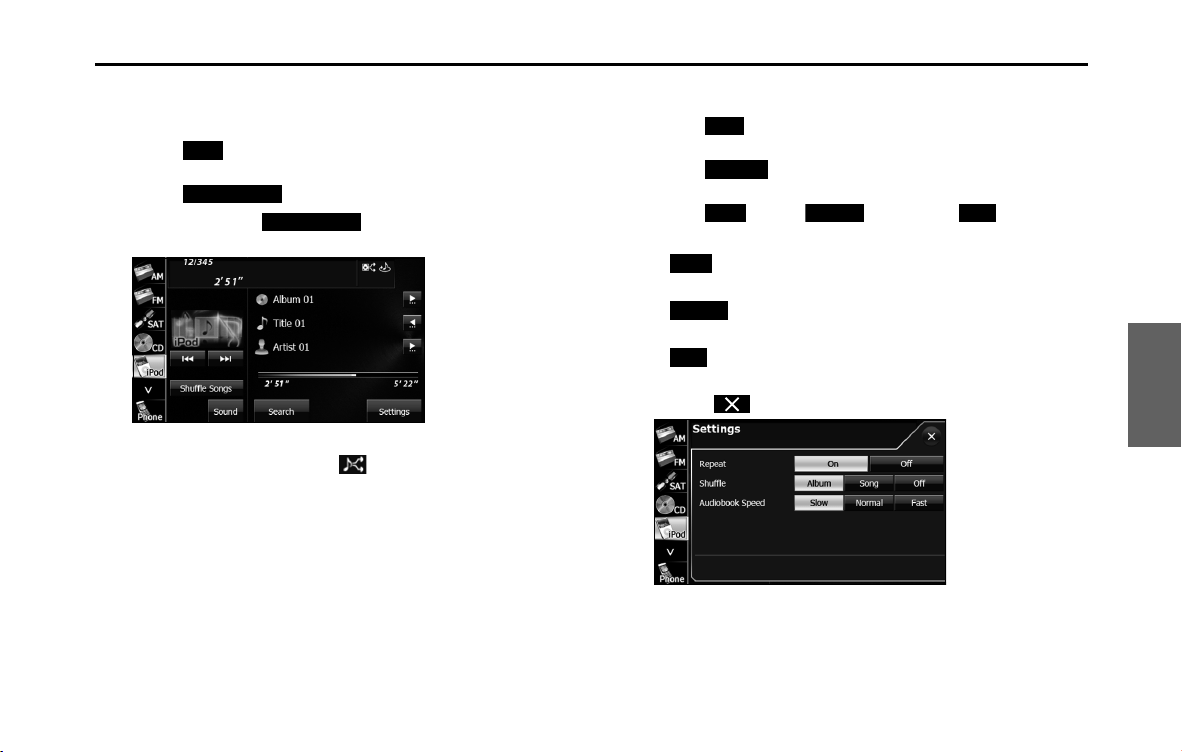
Audio and Visual 265
How to Operate Portable Audio Devices
■ Playing the Shuffle Songs
You can play all the music files randomly.
1 Touch .
2 Touch (Shuffle Songs).
• When you touch (Shuffle Songs), random
playback is continued until you cancel it.
NOTE
When the all random function is selected, is displayed in the top right of the
screen as confirmation that the function is on.
■ Changing the audiobook playback speed
1 Touch .
2 Touch (Settings).
3 Touch (Slow), (Normal) or (Fast) in
Audiobook Speed.
• (Slow):
Slow down the reading speed of the audiobook.
• (Normal):
Set the reading speed of the audiobook to normal.
• (Fast):
Speed up the reading speed of the audiobook.
• Touch to return to the previous screen.
iPod
Shue Songs
Shue Songs
iPod
Settings
Slow Normal Fast
Slow
Normal
Fast
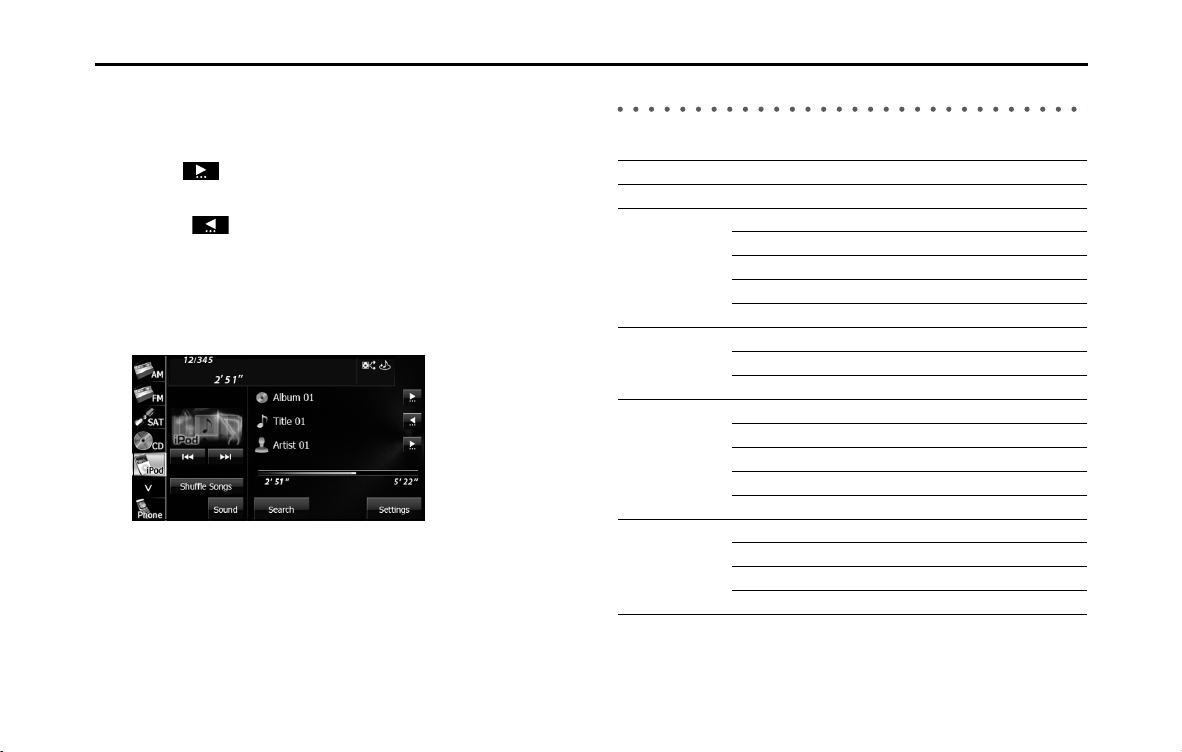
266 Audio and Visual
How to Operate Portable Audio Devices
■ Scrolling title information
If the Album, Title or Artist information cannot be fully displayed
because it is too long, you can scroll the display.
1 Touch on the item that you want to scroll.
• The selected title information scrolls to the left.
• Touch to stop the scrolling and return to the start of the
title.
• If driving is detected while the display is being scrolled, the
scrolling stops and returns to the start of the title.
• When the end of the title information is displayed, the scrolling
stops.
About the Supported iPods
This unit can be used with the following iPods.
NOTE
• Note that the warranty does not apply if an unsupported iPod is connected.
• The video playback function is not supported.
Type Generation Firmware version or OS
iPod 5G 1.3
iPod nano 1G 1.3.1
2G 1.1.3
3G 1.1.3
4G 1.0.4
5G 1.0.2
iPod classic 1G 1.1.2
2G (120 GB) 2.0.1
2009 (160 GB) 2.0.4
iPod touch 1G iOS 3.1.3
2G iOS 4
Late 2009 (8 GB/16 GB) iOS 4
Late 2009 (32 GB/64 GB) iOS 4
3G iOS 3.1.3
iPhone 1G (iPhone) iOS 4
2G (iPhone 3G) iOS 4
3G (iPhone 3GS) iOS 4
iPhone 4 iOS 4
Audio and Visual 267
How to Operate Portable Audio Devices
Using Bluetooth Audio
Before Using Bluetooth Audio
A Bluetooth-supporting portable audio player (“portable device”
hereafter) can be used as a source for this unit by utilizing the Bluetooth
wireless communication technology. To use a Bluetooth-supporting
portable device with this unit, it is necessary to perform Bluetooth
registration and connection settings.
• The Bluetooth-supporting portable device connected to the unit
must be a portable device which supports the relevant Bluetooth
specifications. For the Bluetooth specifications supported by this
unit, see “About the Compatible Bluetooth-Supporting Devices” on
Page 279.
• Bluetooth is a short-range wireless technology for connecting cell
phones, computers and other such devices.
The Bluetooth
®
word mark and logos are registered trademarks
owned by Bluetooth SIG, Inc. and any of such marks by FUJITSU TEN
LIMITED is under license. Other trademarks and trade names are
those of their respective owners.
• For vehicles sold in the U.S.A.
FCC ID: BABFT0021A
- This device complies with part 15 of the FCC Rules. Operation is subject to
the following two conditions: (1) This device may not cause harmful
interference, and (2) this device must accept any interference received,
including interference that may cause undesired operation.
FCC WARNING
Changes or modifications not expressly approved by the party
responsible for compliance could void the user's authority to operate
the equipment.
CAUTION: Radio Frequency Radiation Exposure
This equipment complies with FCC radiation exposure limits set forth
for uncontrolled equipment and meets the FCC radio frequency (RF)
Exposure Guidelines in Supplement C to OET65. This equipment has
very low levels of RF energy that it deemed to comply without
maximum permissive exposure evaluation (MPE). But it is desirable
that it should be installed and operated with at least 20cm and more
between the radiator and person's body (excluding extremities:
hands, wrists, feet and ankles).
Co-location: This transmitter must not be co-located or operated in
conjunction with any other antenna or transmitter.
268 Audio and Visual
How to Operate Portable Audio Devices
• For vehicles sold in Canada
IC: 2024B-FT0021A
-
English
:
Operation is subject to the following two conditions: (1) this device may not
cause interference, and (2) this device must accept any interference,
including interference that may cause undesired operation of the device.
- Français:
L'utilisation de ce dispositif est autorisée seulement aux deux conditions
suivantes : (1) il ne doit pas produire de brouillage, et (2) l'utilisateur du
dispositif doit être prêt à accepter tout brouillage radioélectrique reçu,
même si ce brouillage est susceptible de compromettre le fonctionnement
du dispositif.
CAUTION: Radio Frequency Radiation Exposure
This equipment complies with IC radiation exposure limits set forth
for uncontrolled equipment and meets the RSS-102 of the IC radio
frequency (RF) Exposure rules. This equipment has very low levels of
RF energy that it deemed to comply without maximum permissive
exposure evaluation (MPE). But it is desirable that it should be
installed and operated with at least 20cm and more between the
radiator and person's body (excluding extremities: hands, writsts, feet
and ankles).
- This Category II radiocommunication device complies with Industry Canada
Standard RSS-310.
Ce dispositif de radiocommunication de catégorie II respecte la norme CNR-
310 d'Industrie Canada.
CAUTION
• The frequency band used by this unit is the same band that
is used by industrial, scientific and medical devices such as
microwave ovens, facility wireless stations used for
identifying moving objects in factory production lines and
other locations (wireless station that requires a license),
special low output wireless stations (wireless station that
does not require a license), and amateur radios (wireless
station that requires a license). (The 3 types of wireless
stations above are hereafter called “other wireless
stations”.) Before operating this unit, make sure that no
“other wireless stations” are operating nearby. If the unit
causes harmful radio wave interference in “other wireless
stations”, immediately change the location to stop the radio
wave interference.
• The frequency band used by this unit is the 2.4 GHz band.
• The FH-SS modulation scheme is used.
• The estimated distance in which interference may occur is
less than 10 m.
• This unit uses the full band, making it possible to avoid the
band of devices that identify moving objects.
• This unit complies with the standards specified by the Radio
Act and Telecommunications Business Act in Japan. The
stickers attached to the product certify this. Do not remove
the stickers.
• Disassembling or modifying this unit is punishable by law.
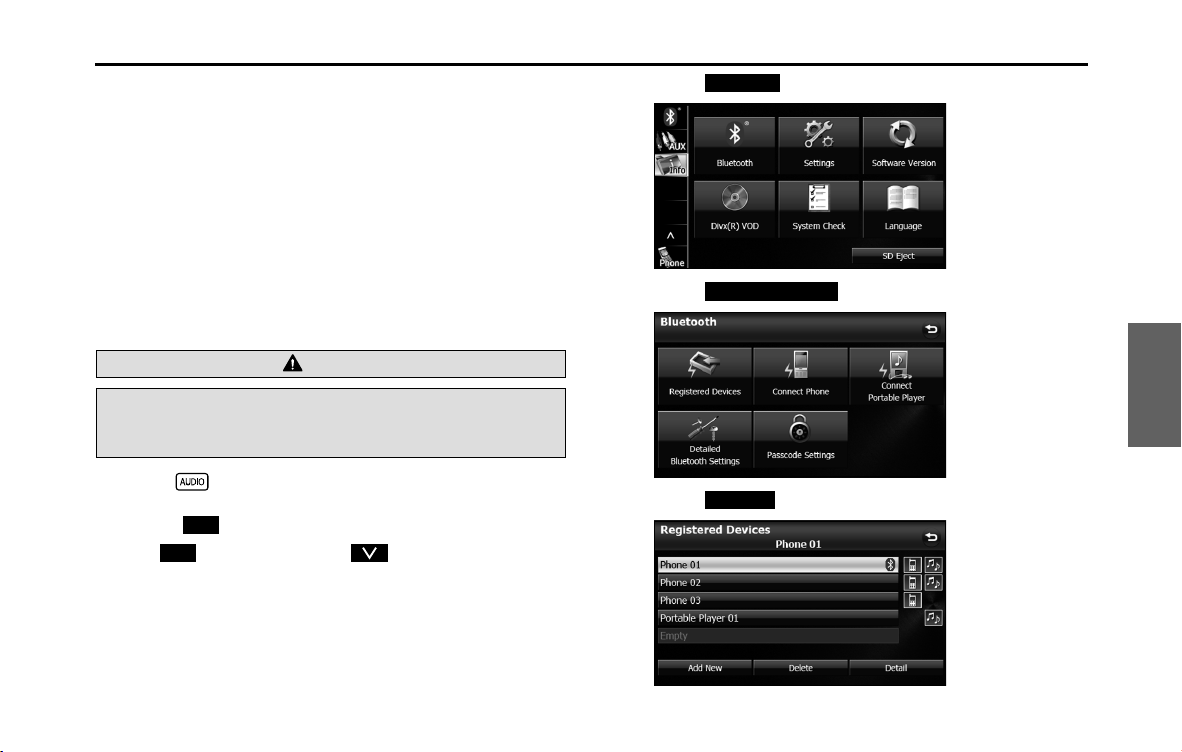
Audio and Visual 269
How to Operate Portable Audio Devices
NOTE
• This unit can be used with Bluetooth-supporting portable devices.
• For details of Bluetooth operations, see the portable device or cell phone
instruction manual.
• Factors in the surrounding environment may negatively affect the connection
status and prevent Bluetooth audio operations on the unit.
• BTA feature is subject to portable devices or cell phone compatibility.
■ Registering a portable device
You can register portable devices on this unit. Up to 5 portable devices
can be registered on the unit. The order of registration precedence is
always 1 to 5. When a portable device is added or deleted, the order of
precedence is updated.
1 Press .
2 Touch .
• If is not displayed, touch .
3 Touch .
4 Touch (Registreted Devices).
5 Touch (Add New).
WARNING
Do not register a portable device while driving. Be sure to park
the vehicle in a safe location and apply the parking brake
before registering a device.
Info
Info
Bluetooth
Registered Devices
Add New
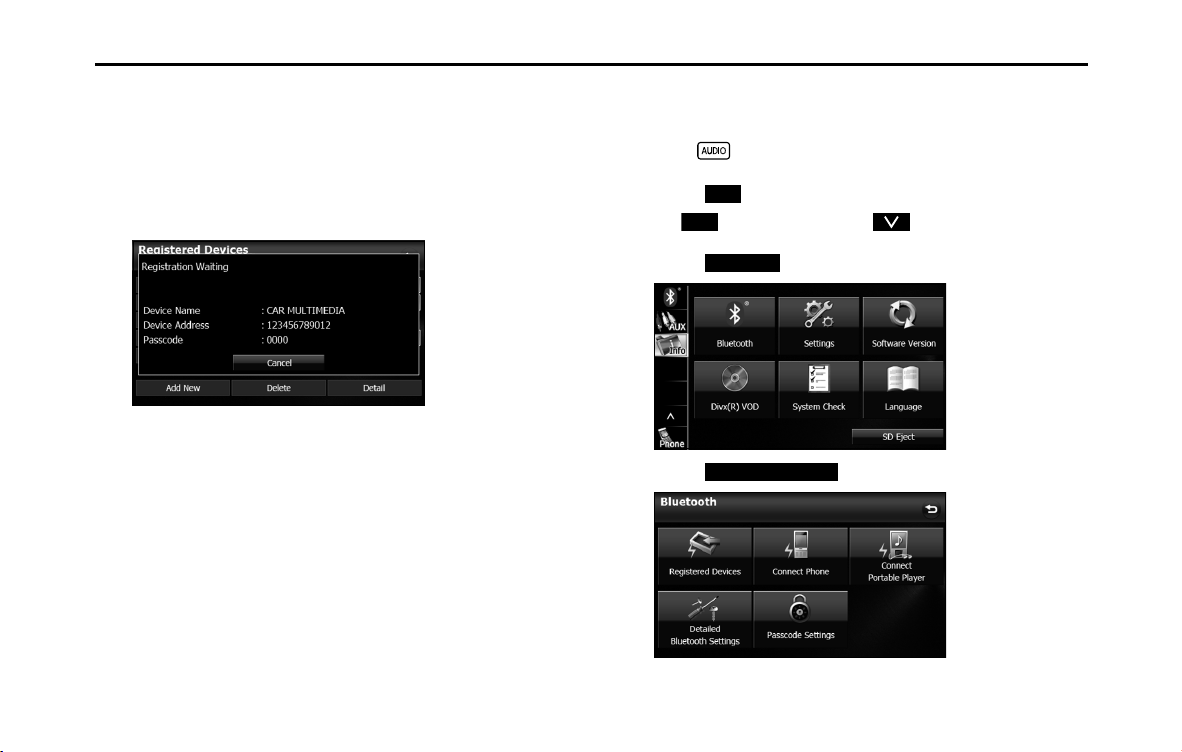
270 Audio and Visual
How to Operate Portable Audio Devices
6 Operate the portable device to enter the passcode
(passkey) of the unit.
• The name of the unit is CAR MULTIMEDIA.
• The initial setting for the passcode (passkey) is 0000.
• Operate the portable device while the Registered Devices
screen is displayed.
<Registered Devices screen>
7 When the registration is complete, “Connection
Completed” appears.
• The portable device registration is complete.
• After the registration completed message is displayed,
“Connection established successfully!” appears.
NOTE
• If the registration fails, “Connection failed.” appears on the screen. If this
happens, perform the registration operation again.
• For details of operations on the portable device, see the portable device's
instruction manual.
■ Deleting a portable device registration
You can delete portable devices that are registered on the unit.
1 Press .
2 Touch .
• If is not displayed, touch .
3
Touch .
4 Touch (Registreted Devices).
Info
Info
Bluetooth
Registered Devices
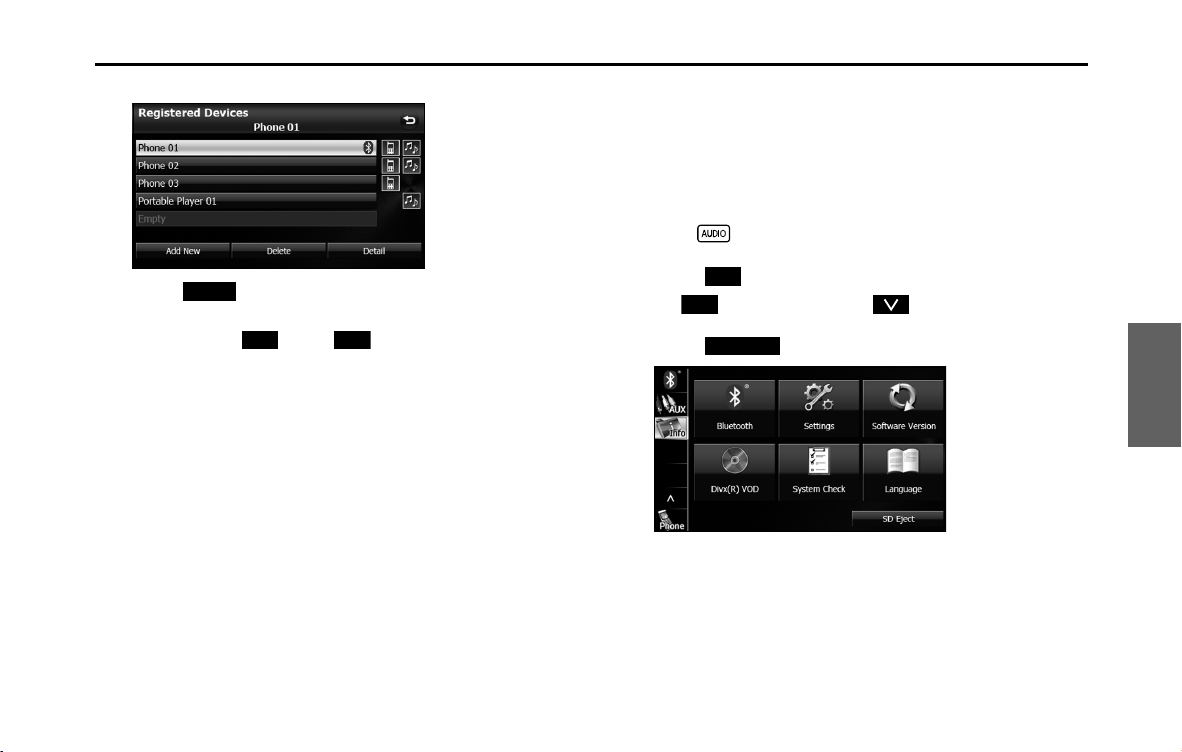
Audio and Visual 271
How to Operate Portable Audio Devices
5 Select the portable device that you want to delete.
6 Touch (Delete).
• “Are you sure you want to delete this device?” appears on the
screen. Touch (Yes) or (No).
7 After touching “Yes”, when the deletion is complete,
“Completed” appears.
• The portable device deletion is complete.
■ Connecting a portable device
You can connect portable devices that are registered on the unit.
• Make the preparations necessary for connecting to the unit, for
example by setting the portable device's Bluetooth standby to On.
For details of operations on the portable device, see the portable
device's instruction manual.
1 Press .
2 Touch .
• If is not displayed, touch .
3 Touch .
Delete
Yes No
Info
Info
Bluetooth
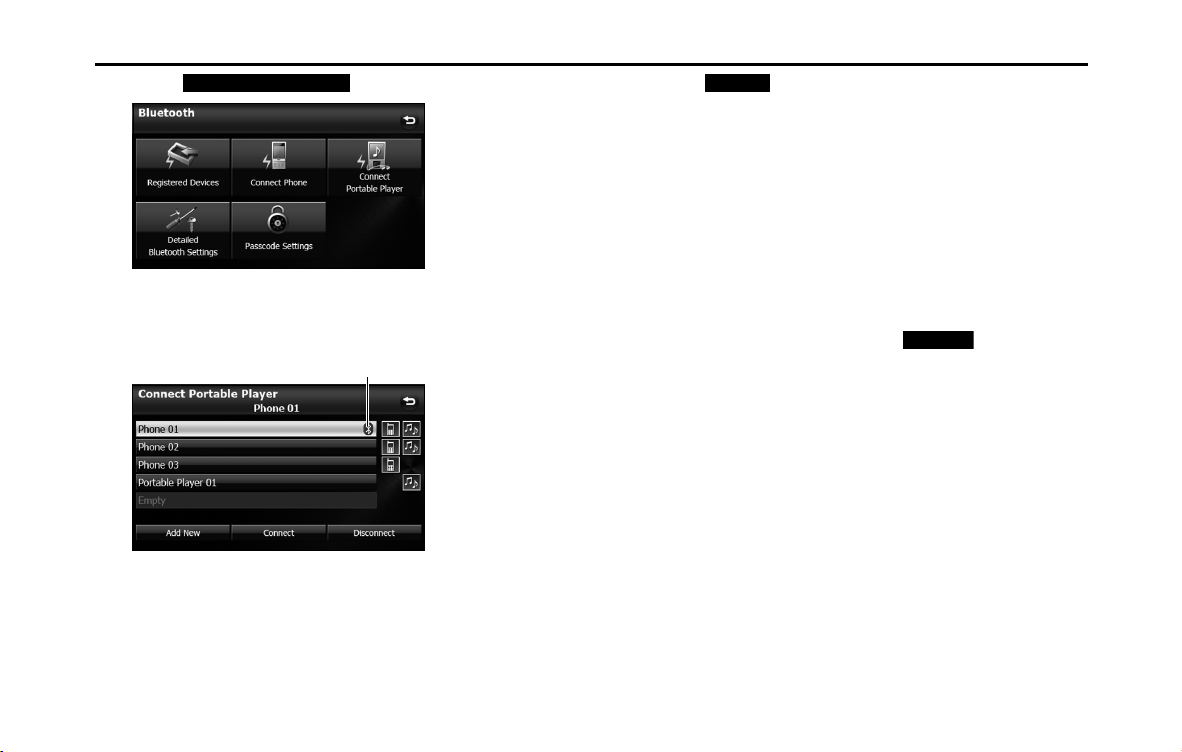
272 Audio and Visual
How to Operate Portable Audio Devices
4 Touch (Connect Portable Player).
5 Select the portable device that you want to connect.
• The Bluetooth mark is displayed for portable devices with an
active Bluetooth connection.
6 Touch (Connect).
• The connection screen appears.
7 When the connection is complete, “Connection
Completed” appears.
• The connection between the portable device and the unit is
complete.
NOTE
• If the connection fails, “Connection failed.” appears on the screen. If this
happens, perform the connection operation again.
• Connection is not possible if no portable devices are registered.
• On the Connect Portable Player screen, touch (Add New) to
register a portable device.
Connect Portable Player
Bluetooth mark
Connect
Add New
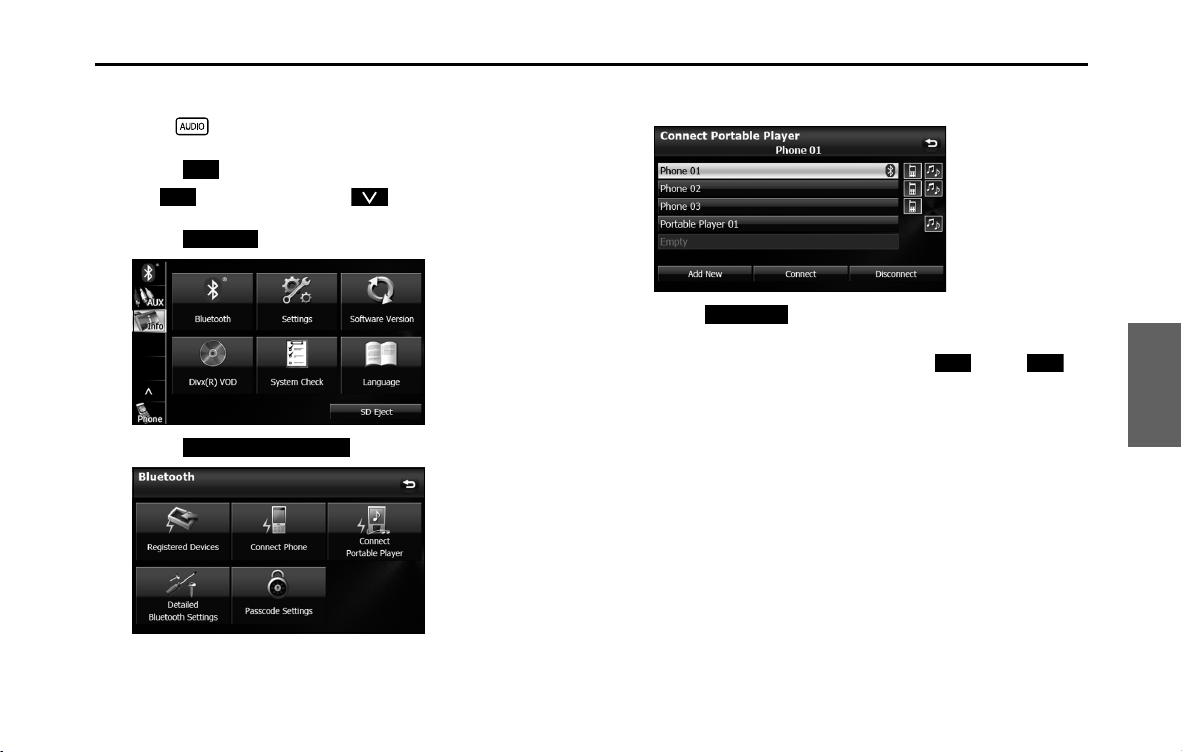
Audio and Visual 273
How to Operate Portable Audio Devices
■ Canceling a portable device connection
1 Press .
2 Touch .
• If is not displayed, touch .
3 Touch .
4 Touch (Connect Portable Player).
5 Select the portable device with the connection that you
want to cancel.
6 Touch (Disconnect).
• “Another device is already connected. Do you want to
disconnect this device?” appears. Touch (Yes) or
(No).
7
After touching “Yes”, when the cancelation is complete,
“Connection with the mobile telephone was
disconnected.” appears.
• The cancelation of the portable device connection is complete.
Info
Info
Bluetooth
Connect Portable Player
Disconnect
Yes No
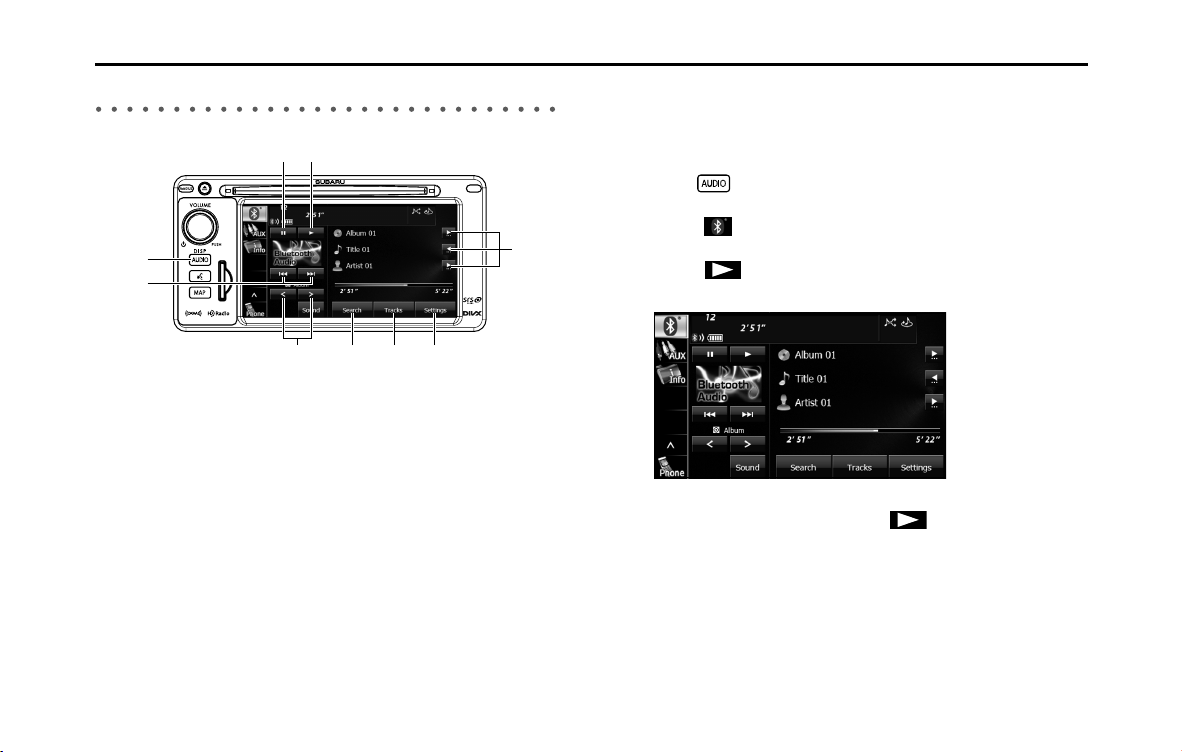
274 Audio and Visual
How to Operate Portable Audio Devices
Using a Portable Device
(1) Title information scroll buttons
*1 *2
(2) Settings button
(3) Tracks button
*1
(4) Search button
*1
(5) Album selection buttons
*1
(6) Track up/down and fast forward (fast reverse) buttons
*1
(7) AUDIO button
(8) Pause button
(9) Play button
*1 May not be displayed, and operations may not function depending on the
portable device type.
*2 It will be displayed if the length of the information is too long and it
cannot be displayed.
NOTE
Some of the functions may not be available when vehicle is in motion.
■ Listening to a portable device
1
Press .
2 Touch .
3 Touch .
• The playback starts on the connected portable device.
NOTE
If the playback does not start when you touch on the unit, press the play
button on the portable device.
(3) (2)(4)(5)
(6)
(7)
(9)(8)
(1)

Audio and Visual 275
How to Operate Portable Audio Devices
■ Pausing the playback
1 Touch .
• To start the playback again, touch .
■ Selecting a track
1 Touch or .
•:
Advance to the next track.
(Once):
Return to the start of the currently playing track.
(Twice or more):
Return to the previous track.
■ Selecting a music album
1 Touch or .
•:
Advance to the next music album.
:
Return to the previous music album.
■ Fast forwarding and fast reversing
1 Touch or for 1 second or more.
•:
Fast forward the track.
:
Fast reverse the track.
Fast forward (or fast reverse) operates until you release your
finger from the button.
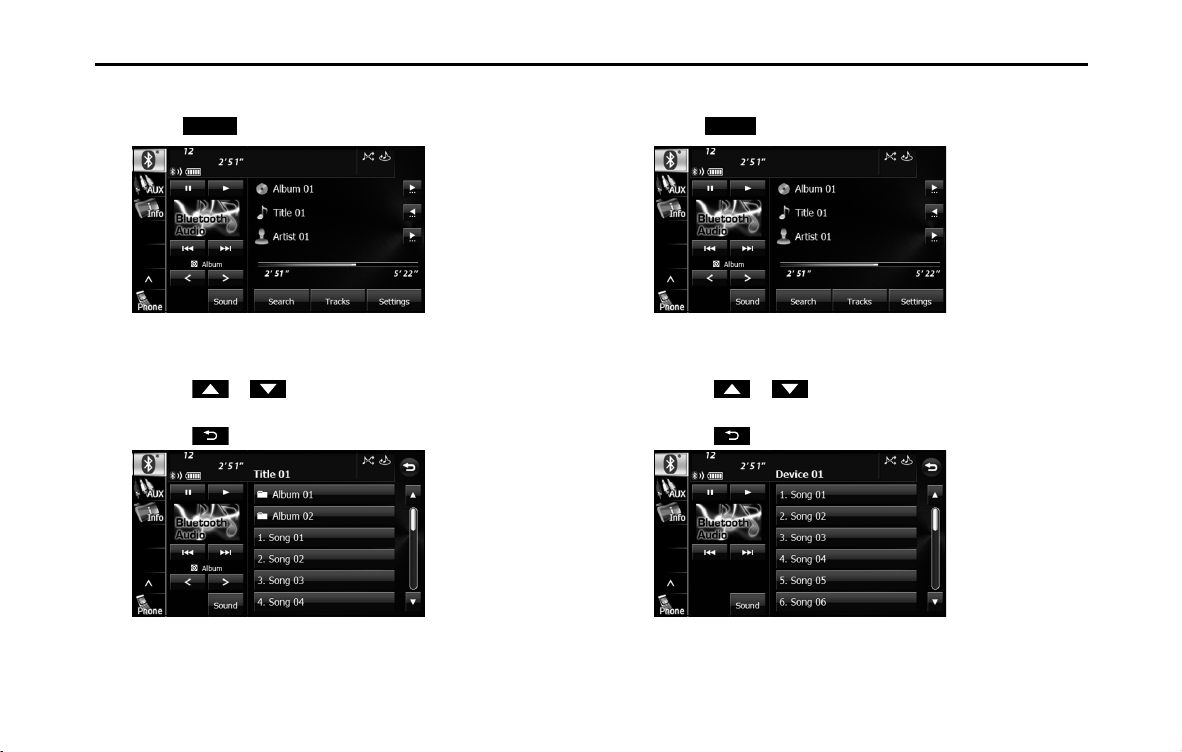
276 Audio and Visual
How to Operate Portable Audio Devices
■ Finding a music album
1 Touch (Search).
2 Touch the music album that you want to play.
• The selected music album starts to play.
• Touch or on the scroll function to scroll the display
pages of the music track screen.
• Touch to return to the previous screen.
■ Finding a music track
1 Touch (Tracks).
2 Touch the music track that you want to play.
• The selected music track starts to play.
• Touch or on the scroll function to scroll the display
pages of the music album screen.
• Touch to return to the previous screen.
Search Tracks

Audio and Visual 277
How to Operate Portable Audio Devices
■ Scrolling title information
If the Album, Title or Artist information cannot be fully displayed
because it is too long, you can scroll the display.
1 Touch on the item that you want to scroll.
• The selected title information scrolls to the left.
• Touch to stop the scrolling and return to the start of the
title.
• If driving is detected while the display is being scrolled, the
scrolling stops and returns to the start of the title.
• When the end of the title information is displayed, the scrolling
stops.
■ Various portable device settings
1 Touch (Settings).
WARNING
Do not set a portable device while driving. Be sure to park the
vehicle in a safe location and apply the parking brake before
performing the settings.
Settings
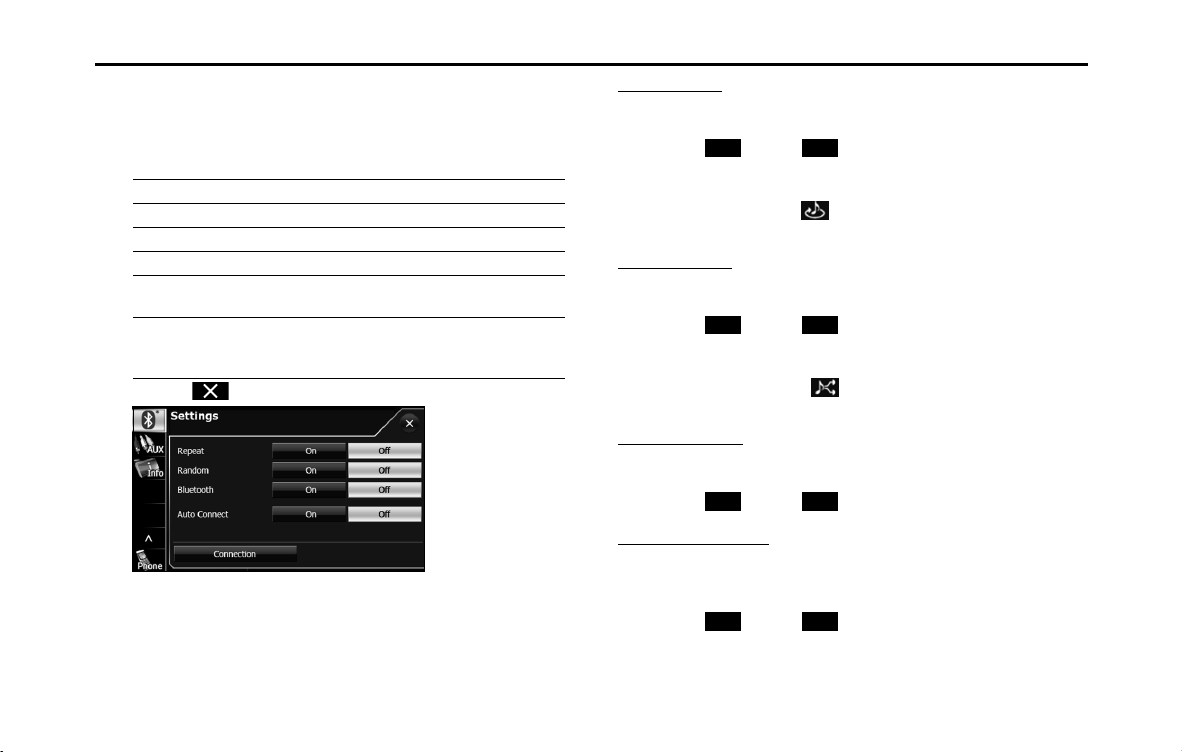
278 Audio and Visual
How to Operate Portable Audio Devices
2 On the portable device Settings screen, you can perform
the following settings by touching the setting buttons
for each item.
• Portable device settings screen
• Touch to return to the previous screen.
Repeat setting
Set the repeat function to on or off.
1 Touch (On) or (Off).
NOTE
When On is selected in Repeat, is displayed in the top right of the screen as
confirmation that the function is on.
Random setting
Set the random function to on or off.
1 Touch (On) or (Off).
NOTE
When On is selected in Random, is displayed in the top right of the screen
as confirmation that the function is on.
Bluetooth setting
Set the Bluetooth function to on or off.
1 Touch (On) or (Off).
Auto Connect setting
Set automatic connection between a registered portable device and
the unit.
1 Touch (On) or (Off).
Item Function
Repeat Set repeat playback to on or off.
Random Set random playback to on or off.
Bluetooth Set the Bluetooth function to on or off.
Auto Connect Set automatic connection between a portable
device and the unit to on or off.
Connection Display the Connect Portable Player screen to
register a portable device or perform the
connection settings. (See Page 271.)
On O
On O
On O
On O
Audio and Visual 279
How to Operate Portable Audio Devices
About the Compatible Bluetooth-Supporting
Devices
The following Bluetooth-supporting portable audio devices can be
used.
NOTE
The available functions may vary depending on the type of Bluetooth audio
device.
Specification • Bluetooth Specification Ver. 1.1 or higher (Ver. 2.0 + EDR
or higher is recommended)
Profile • A2DP (Advanced Audio Distribution Profile) Ver. 1.0 or
higher
• AVRCP (Audio/Video Remote Control Profile) Ver. 1.0 or
higher (Ver. 1.4 or higher is recommended)
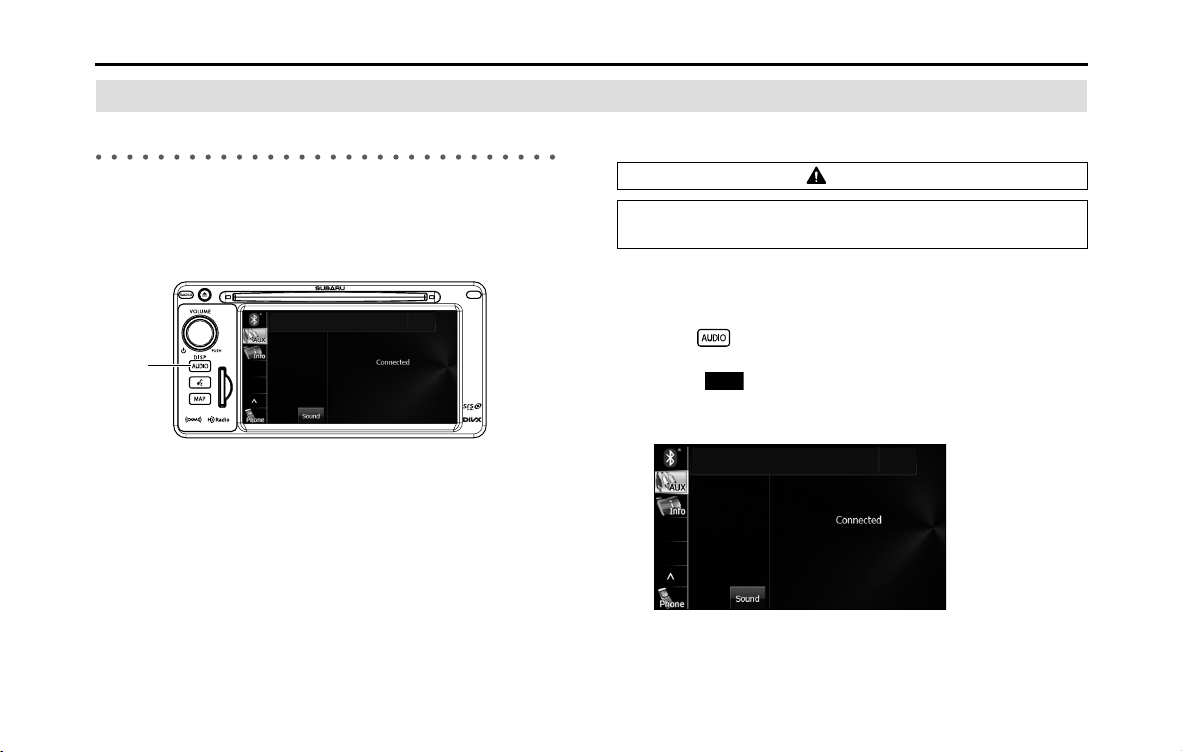
280 Audio and Visual
How to Operate Portable Audio Devices
Using AUX
Using AUX
When you connect a device such as a commercially available portable
audio device to the AUX (RCA) connector, you can use this unit to play
music recorded on the portable audio device.
(1) AUDIO button
NOTE
• To connect a portable audio device, first purchase a connection cord.
• Before using a portable audio device with this unit, be sure to read the
instruction manual of the portable audio device carefully to make sure that
there will be no problems when using it with the unit.
■ Using AUX to listen to music
1 Connect a commercially available portable audio device
and start playback.
2 Press .
3 Touch .
• The AUX screen appears, and the sound of the portable audio
device playback is output from the speakers.
NOTE
For details of operations on the portable audio device, see the portable audio
device's instruction manual.
(1)
CAUTION
Connect the connection cord correctly so that it does not
interfere with the safe operation of the vehicle.
AUX


282 Other
Other Operations
Picture Function Operations
Using the Picture Function
If you insert an SD memory card that contains image data, you can play
a slide show of the images, or set an image as the Opening screen.
NOTE
Some of the functions may not be available when vehicle is in motion.
■ Displaying the picture operations screen
1 Insert a different SD memory card that contains image
data. (See Page 16.)
2 Display the picture operations screen.
• (Menu):
You can display a picture list or set a slide show.
•:
Display the previous image.
:
Display the next image.
• (or ):
The slide show starts. Touch to stop the slide show.
• (Start-up Screen):
Register the displayed image data as the “Customized” opening
screen setting.
CAUTION
Before inserting an SD memory card that contains image data,
touch (SD Eject) and remove the map SD card.
Removing the card without first touching (SD Eject)
may damage the data. No compensation will be given for any
damaged data. (See Page 18.)
SD Eject
SD Eject
Menu
Start-up Screen
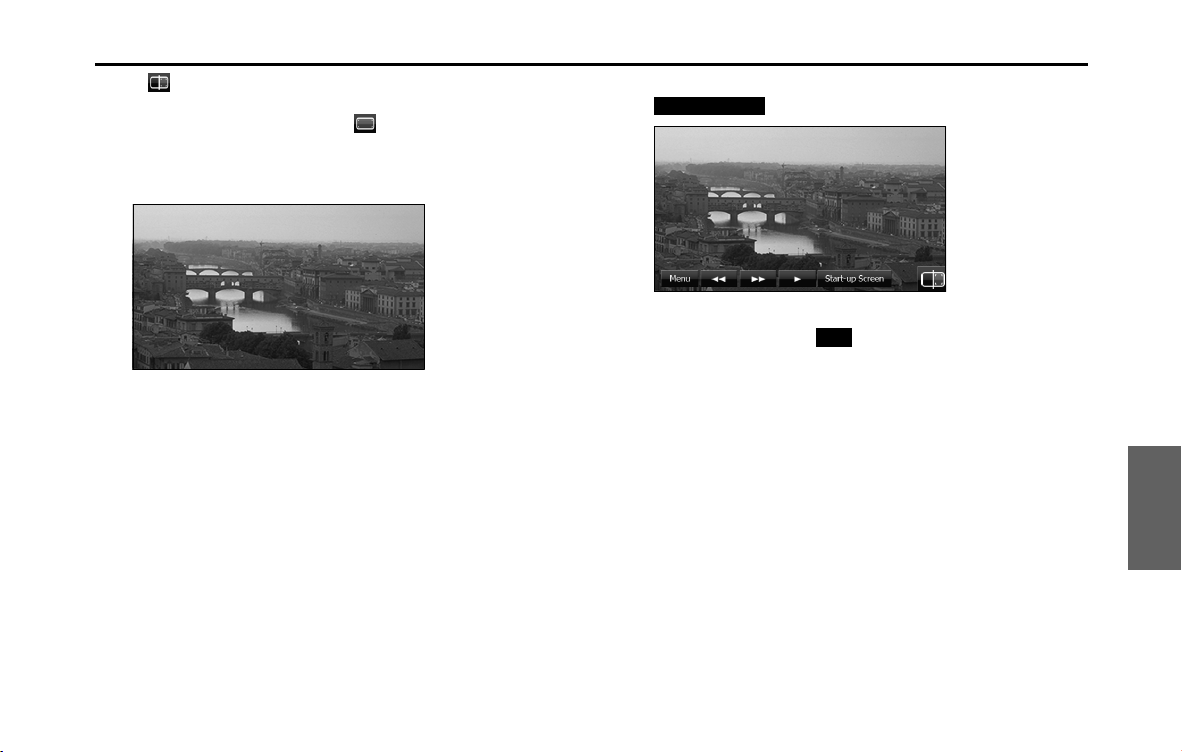
Other 283
Other Operations
•:
Display the Audio/Multi screen. To display the picture
operations screen again, touch .
• Touch the screen to show only the image on the display. To
display the picture operations screen again, touch the screen.
<Picture screen display>
■ Replacing the Opening screen with your own image
data
You can register image data (1 picture only) imported from an SD
memory card as the “Customized” opening screen setting.
1 Insert an SD memory card that contains the image data.
(See Page 16.)
2 Display the image that you want to set and touch
(Start-up Screen).
3 “Are you sure to overwrite the start-up screen?” appears
on the screen. Touch (Yes).
• The picture is registered as the “Customized” opening screen
setting.
Start-up Screen
Yes

284 Other
Other Operations
■ Selecting an image file from the picture list
You can select the image file that you want to view from a folder.
1 On the picture operations screen, touch (Menu).
2 Touch (Search) in Picture.
3 Touch the folder that you want to use.
• If there are more pages, touch or to scroll the
pages.
• Touch to return to the previous screen.
4 Touch the file that you want to view.
• The selected file is displayed. Touch the displayed image to
show it in a Picture screen display.
• If there are more pages, touch or to scroll the
pages.
• Touch to return to the previous screen.
■ Slide show setting
On the Slide Show Configuration screen, you can set a slide show.
1 On the picture operations screen, touch (Menu).
2 Touch (Configuration) in Slide Show.
Menu
Search
Menu
Conguration

Other 285
Other Operations
3 You can perform the following settings by touching the
setting buttons for each item.
Interval setting
You can change the display interval of the slide show.
1 Touch or .
•5 sec Q 10 sec Q 15 sec
Pattern setting
You can change the pattern of the slide show.
1 Touch or .
•Standard Q Effect 1 Q Effect 2 Q Effect 3 Q Effect 4 Q Random
Q Standard Q ...
About the Supported Image Data
About the supported image file standards
• Supported standards:
jpg (does not support jpg2000)
• Supported file names:
Supports single-byte characters (alphanumerics, symbols, kana) and
double-byte characters (alphanumerics, symbols, Chinese
characters, kana)
• Supported character code:
UNICODE
• Number of characters that can be displayed:
30 single-byte characters, 15 double-byte characters (+.jpg)
* Only single-byte numbers, single-byte letters (upper case), “_”
(underscore), symbols, Chinese characters (not all Chinese characters can
be displayed)
* Although more than 30 single-byte characters can be read, only 30
characters are displayed.
* The .jpg extension is not displayed.
• Image data size:
10 MB or less (per file)
• Number of images that can be imported from an SD memory card:
500
+ -
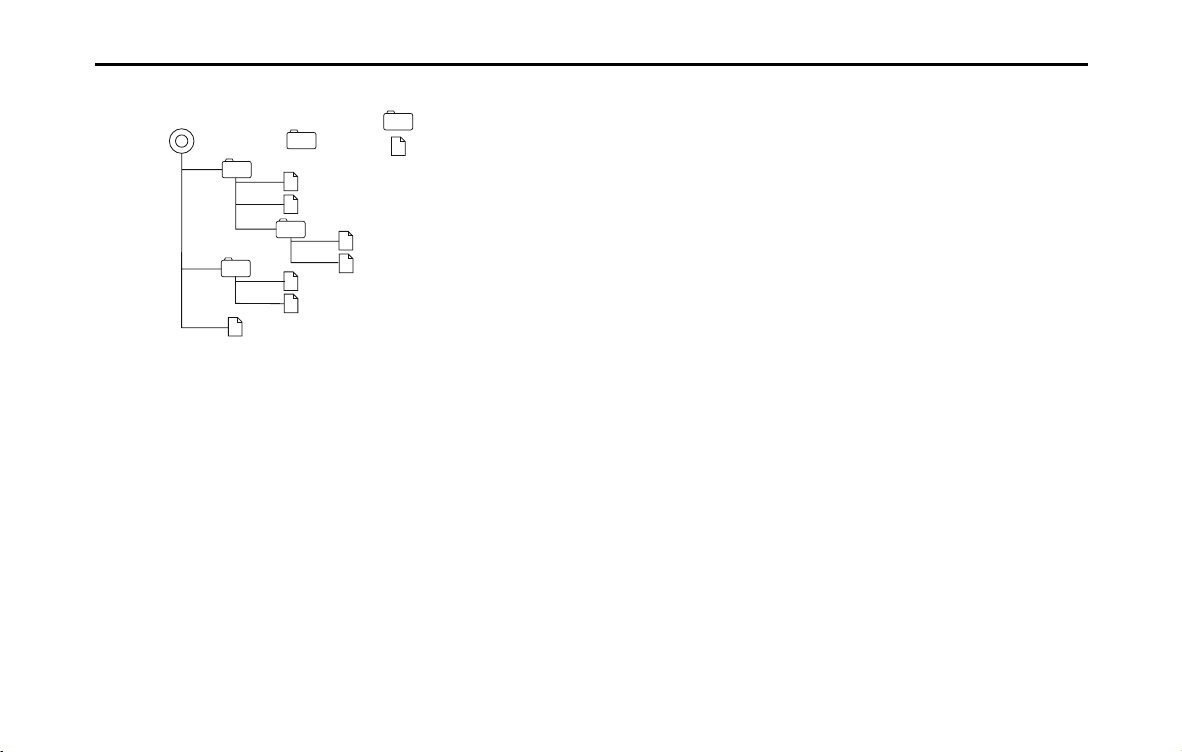
286 Other
Other Operations
<A configuration example of an jpg-supporting SD memory card>
NOTE
• When the image size is larger than horizontal 400 × vertical 234 dots, the
original image is compressed to the standard size before display. The areas
without an image are displayed as black bars.
• When the image size is smaller than horizontal 400 × vertical 234 dots, the
image is displayed at the center of the display without changing the image
size.
Folder
Image (.jpg) l
e
1
st
level 2
nd
level
Root directory ( )
2
3
2
3
4
5
4
6
7
1
1
3
nd
level
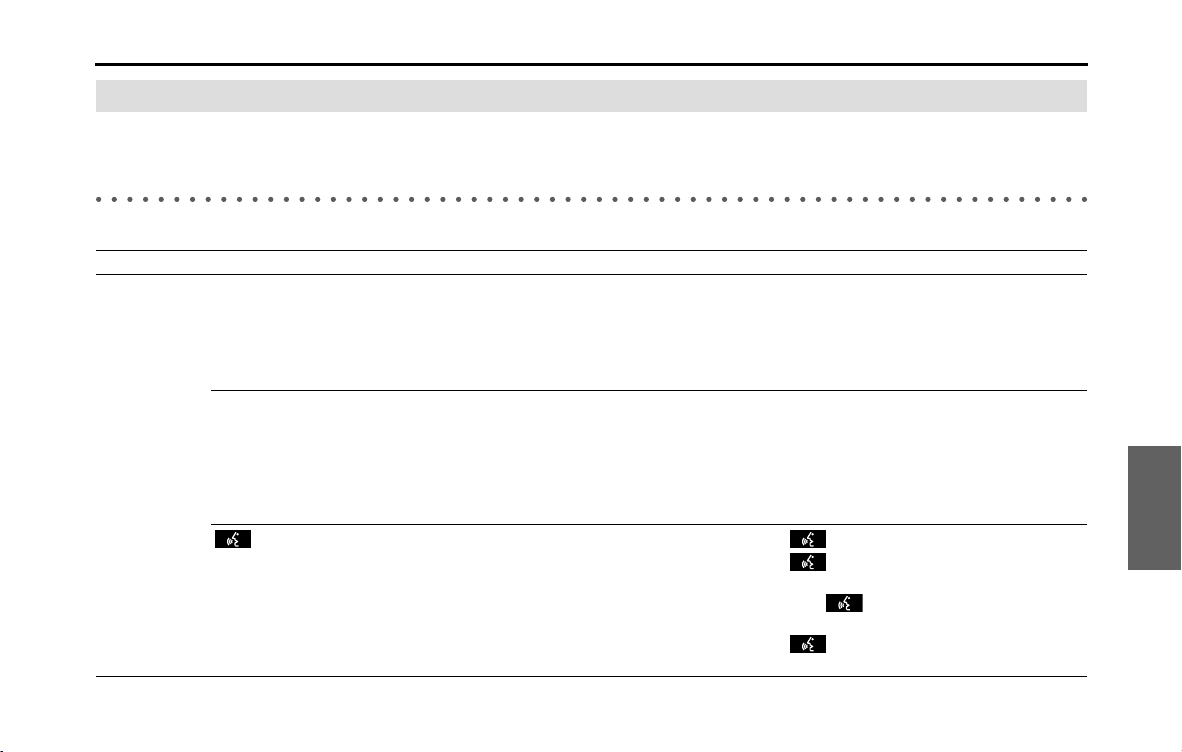
Other 287
Other Operations
About Steering Wheel Switches
You can use these buttons to perform the main audio controls and other operations.
Compatibility with Steering Wheel Buttons
The table below shows the compatibility between the steering wheel buttons and this unit.
Operation Button Name Function Explanation of operation
Common
operations
(+)
(-)
Volume button When these buttons are pressed briefly, the volume
changes by 1 step.
When these buttons are pressed and held, the volume
changes continuously.
(+): Increases the volume (in BT-TEL mode, the ringtone
volume, call volume and readout volume or in voice
recognition mode, the guidance volume).
(-): Decreases the volume (in BT-TEL mode, the ringtone
volume, call volume and readout volume or in voice
recognition mode, the guidance volume).
(MODE) Mode selection
button
• When this switch is pressed while the power is off,
the power turns on.
• The mode changes in the following order.
FM J SAT J DISC
*
(CD, MP3/WMA)
J USB/iPod
*
J BT-Audio
*
J AUX
*
J AM
J returns to FM.
• Ends voice recognition.
When the power is on, the mode changes each time
(MODE) is pressed.
Cannot be operated while making a calling, receiving a
call, or talking in BT-TEL mode.
On the voice recognition mode, press and hold (MODE)
to end voice recognition.
()
Voice
recognition
trigger
• Starts voice recognition.
• Skips guidance voice, talkback voice, or help voice.
• Ends voice recognition.
Press ( ) briefly to start voice recognition.
Press ( ) during guidance voice, talkback voice, or
help voice to skip the audio.
Hold down ( ) during voice recognition to close
the voice recognition screen.
Press ( ) during voice recognition to close the
voice recognition screen.
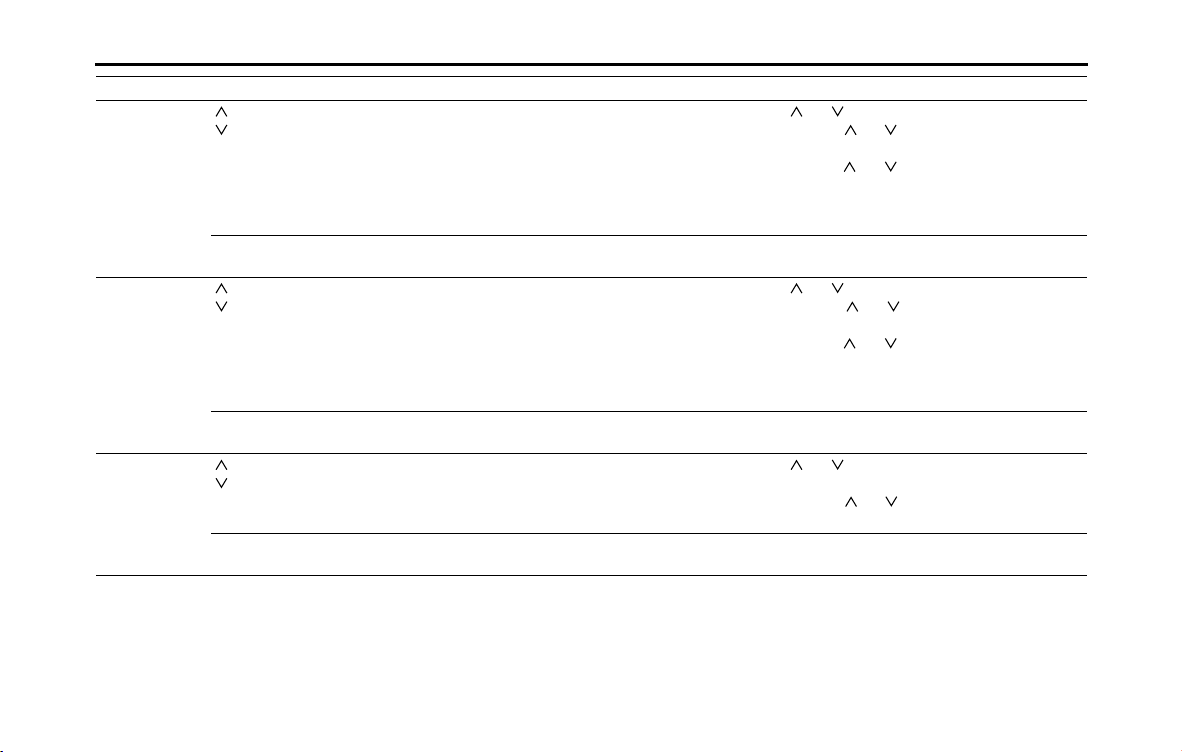
288 Other
Other Operations
AM / FM (HD
included) radio
operations
()
()
Channel
selection
buttons
• Selects in order the stations saved in the memory.
• Selects automatically the channel closest to the
currently received frequency.
• Selects in order the stations in the station list.
Press ( ) or ( ) briefly to select the stations in order.
Press and hold () or () to start the automatic station
selection operation.
Keep pressing ( ) or ( ) to start SEEK to search a
frequency quickly. The nearest broadcasting station
from the frequency where the button was released can
be received.
(MODE) Mode selection
button
Mutes or cancels the mute. Press and hold to mute or cancel the mute.
SAT radio
operations
()
()
Channel
selection
buttons
• Selects in order the channels saved in the memory.
• Selects automatically the channel closest to the
currently received frequency.
• Selects in order the channels in the station list.
Press ( ) or ( ) briefly to select the channels in order.
Press and hold () or () to start the automatic
channel selection operation.
Keep pressing ( ) or ( ) to start SEEK to search a
frequency quickly. The nearest broadcasting channel
from the frequency where the button was released can
be received.
(MODE) Mode selection
button
Mutes or cancels the mute. Press and hold to mute or cancel the mute.
CD player
operations
*1
()
()
Track selection
buttons
• Selects the next track, previous track, or start of the
current track.
•Fast forwarding or fast reversing
Press ( ) or ( ) briefly to select the next or previous
track.
Press and hold ( ) or ( ) to fast forward or fast reverse
the track.
(MODE) Mode selection
button
Pauses or plays. Press and hold to pause or play.
Operation Button Name Function Explanation of operation

Other 289
Other Operations
MP3/WMA player
operations
*1
()
()
File selection
buttons
• Selects the next file, previous file, or start of the
current file.
• Selects the next or previous folder.
Press ( ) or ( ) briefly to select the next or previous
file.
Press and hold ( ) or ( ) to select the next or previous
folder.
(MODE) Mode selection
button
Pauses or plays. Press and hold to pause or play.
USB operations
*1
()
()
File selection
buttons
• Selects the next file, previous file, or start of the
current file.
• Selects the next or previous folder.
Press ( ) or ( ) briefly to select the next or previous
file.
Press and hold ( ) or ( ) to select the next or previous
folder.
(MODE) Mode selection
button
Pauses or plays. Press and hold to pause or play.
iPod and BT-
Audio
operations
*1
()
()
Track selection
buttons
• Selects the next track, previous track, or start of the
current track.
•Fast forwarding or fast reversing
Press ( ) or ( ) briefly to select the next or previous
track.
Press and hold ( ) or ( ) to fast forward or fast reverse
the track.
(MODE) Mode selection
button
Pauses or plays. Press and hold to pause or play.
AUX operations
*1
(MODE) Mode selection
button
Mutes or cancels the mute. Press and hold to mute or cancel the mute.
Operation Button Name Function Explanation of operation
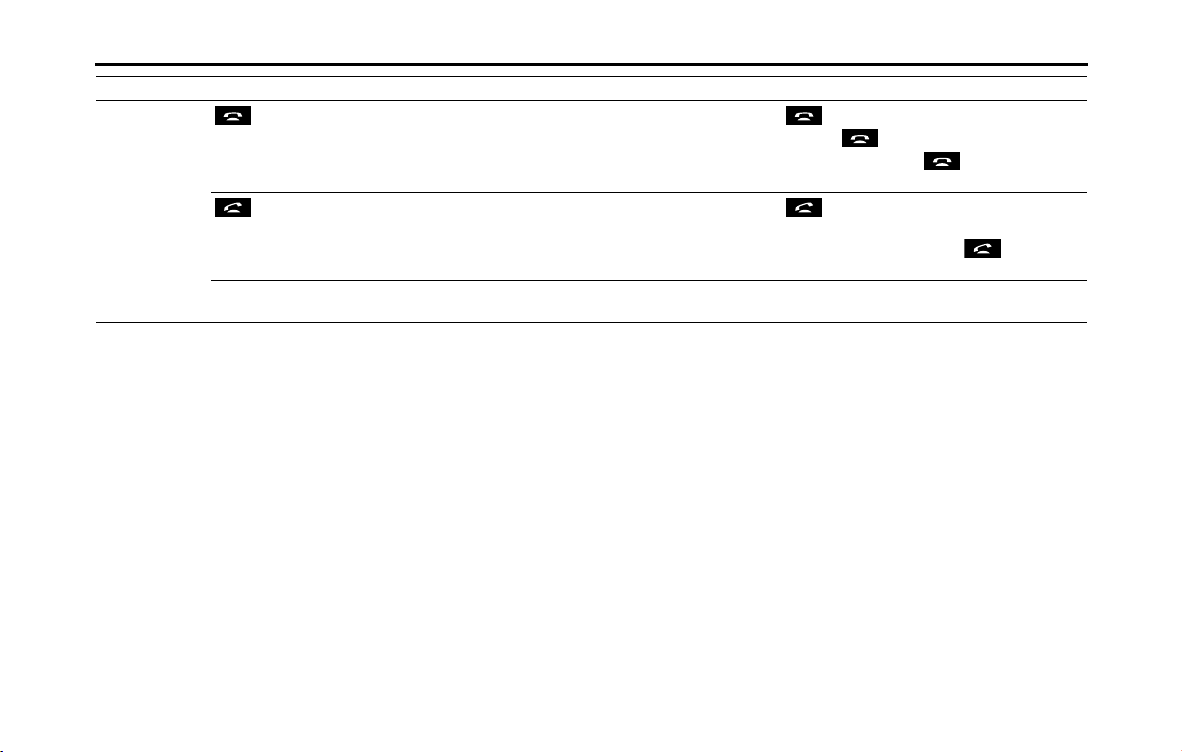
290 Other
Other Operations
BT-TEL
operations
*1
()
On Hook • Ending a call.
• Canceling a call.
• Refuse the incoming call.
• Holding the incoming call.
*2
Press briefly to end a call or cancel a call.
Press and hold to end the all call.
When in incoming call, press briefly to hold the
incoming call.
()
Off Hook • Selects the telephone mode.
• Making a call.
• Receiving the incoming call.
• Connecting the call on hold.
Press briefly to make or receive a call. When in a
different mode, changes to the telephone mode.
On the incoming call on hold, press briefly to
receive a call.
(MODE) Mode selection
button
Mutes or cancels the mute. Press and hold to mute or cancel the mute.
*1 Enabled only when operation is possible
*2 The Holding function is only available on the operation on the cell phone side.
Operation Button Name Function Explanation of operation

Other 291
Other Operations
Voice Control System Operations
About the Voice Control System
By using the voice control system (voice input microphone and
button), you can perform navigation and audio operation by saying
voice commands. This enables you to use functions that are usually
inoperable while driving.
The voice control system may not recognize the voice command if you
do not say it correctly.
Be aware of the following points that will assist correct recognition.
• Speak after you hear the “beep”. If you speak before or at the same
time as the “beep”, your command will not be recognized.
• Speak in a loud and clear voice.
• Some voices may be difficult to recognize.
• Keep the windows closed as much as possible while speaking. Noise
such as wind or other external sounds may prevent correct
recognition. Also, if the air conditioner fan is too loud, it may prevent
correct recognition.
• The system does not support regional variations or alternative
phrases. Be sure to say the specified phrases.
Under the following conditions, the voice recognition mode will be
turned off:
• Within 8 seconds after guidance, talkback or help voice finishes
playing, no voice is recognized.
(When the screen is operated, counting of 8 seconds starts again
after the screen is touched.)
• The button is pressed and held.
• The Steering button or Hard button (excluding the Voice
Recognition button) is pressed.
• A call is received.
NOTE
When voice recognition is started, the current audio output is muted or paused.
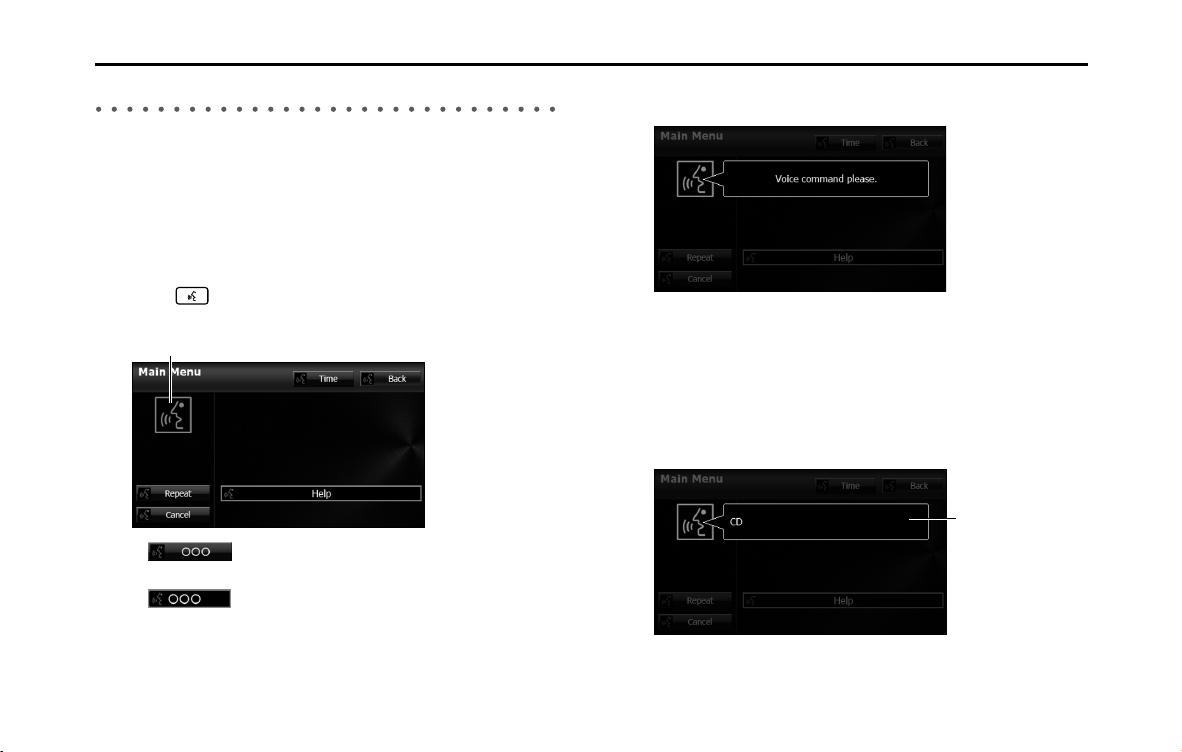
292 Other
Other Operations
Using the Voice Control System
When the voice control system is activated, you may speak the controls
displayed on the screen, or you may touch the corresponding button.
NOTE
For the following instructions found in this manual, we will use “000” as a
placeholder for the command text available on your actual system. “000” is only
for demonstration purposes.
1 Press .
• The screen changes to the Main Menu.
•:
“ccc” or touch the button.
•:
Operate by saying “ccc”.
2 After the “Voice command please.” voice guidance, a
“beep” sounds.
3 Say the operation command.
• After you hear the “beep”, speak or operate the screen while a
“recognition mark (green-faced icon)” is displayed (within
approx. 8 seconds).
• If you said the wrong command or the recognition result is
incorrect, cancel the operation by saying “Cancel” after the
talkback voice finishes playing.
“Voice recognition on” mark
Recognition result
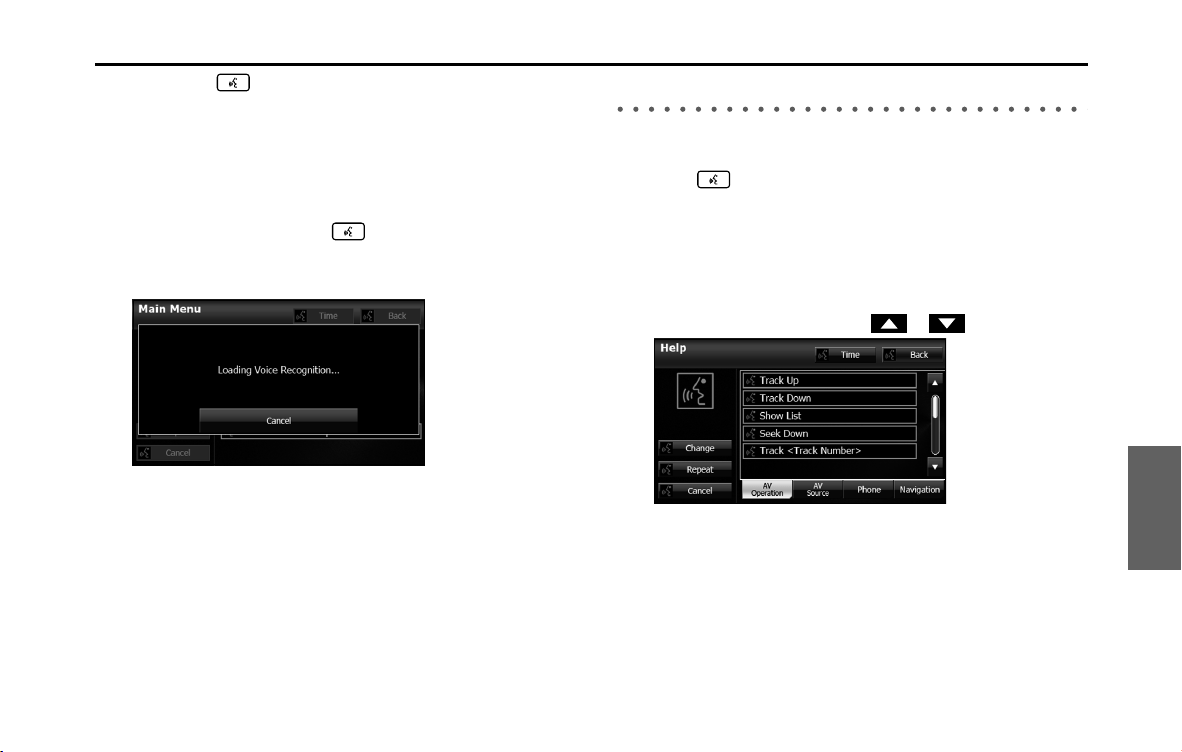
Other 293
Other Operations
• When the button is pressed while guidance voice,
talkback voice or help voice is being played, you can skip the
voice guidance.
• When you say “Help” while the Main Menu is displayed, a list of
the currently usable commands appears on the screen.
NOTE
A caution display appears after pressing (Main Unit/Steering Wheel
Switch) while a Bluetooth device, USB device or iPod is connected, and the
stored data is being read. Be sure to start the operation after the caution display
disappears.
Displaying the Command List
You can display a list of the usable commands on the screen.
1 Press .
• The screen changes to the Main Menu, and after the “Voice
command please.” voice guidance, a “beep” sounds.
2 Say “Help”.
• The command list appears.
• If there are more pages, touch or to scroll the list.

294 Other
Other Operations
• (Change):
Display the next page of the command list.
(AV Operation):
Display the command list for the current audio operation. (Only
when an audio source is being used.)
(AV Source):
Display the audio source command list.
(Phone):
Display the handsfree operation command list. (Only during
handsfree connection.)
(Navigation):
Display the navigation operation command list.
3 Check the command that you want to use in the
command list.
• You can perform the operation by saying the displayed
command.
Examples of Using the Voice Control System
This section describes examples of operating the voice control system.
For the voice commands, see “Voice Command Lists” on Page 298.
The notations used in the commands are as follows.
• <ccc>: Commands to be spoken
• J ccc: Names to be spoken
■ Changing the audio mode
1 Perform a voice input for the audio mode to which you
want to change. (USB in this example.)
•Say “USB”.
• The mode changes to USB.
■ Changing the radio frequency
1 Say “Seek up“.
• The current frequency switches to the next receivable
frequency.
• Saying “Seek down“ switches the current frequency to the
previous receivable frequency.
Change
AV Operation
AV Source
Phone
Navigation

Other 295
Other Operations
■ Changing the preset channel
1 Say “Preset 1”.
• The current frequency switches to the frequency registered in
the preset channel 1.
• Up to 6 preset channels can be changed.
■ Changing the frequency
(AM radio frequency is used as an example of changing frequencies.)
1 Say “Frequency 522”.
• The current frequency switches to 522 kHz.
• For the rules of frequencies, see “Radio Frequency Lists” on Page
316.
■ Changing the channel
1 Say “Channel 100”.
• The current channel switches to 100 ch.
• For the rules of channels, see “XM Channel Lists” on Page 320.
■ Changing the currently playing track
1 Say “Track up”.
• The playback changes to the next track.
• Say “Track down” to change the playback to the previous track
or start of the track.
■ Changing the currently playing track number
1 Say “Track 1”.
• The currently playing track number switches to track 1 .
■ Calling the list screen
1
Say “Show list”.
• The screen changes to the list screen.
■ Changing the currently playing folder
1 Say “Folder up”.
• The playback changes to the start of the next folder.
• Say “Folder down” to change the playback to the start of the
previous folder.

296 Other
Other Operations
■ Specifying a folder
(Switching USB folders)
1 Say “Folder”.
• After you hear “Folder” spoken back to you, the current mode
changes to the folder specification mode.
(The screen also changes.)
2 After the voice guidance, say the name of the folder that
you want to play.
• Starting from the first track of the specified folder, all tracks in
the folder will be switched from one to the next after your voice
command.
* iPod mode allows you to specify the desired music track from
artist, genre or playlist.
* A maximum of 1000 music tracks can be specified (when
specifying from genre or playlist, a maximum of 100).
■ Making a call with the phone book
1 Say “Phone”.
• After you hear “Hands-Free” spoken back to you, the current
mode changes to the hands-free menu mode.
(The screen also changes.)
2 After the voice guidance, say “Call <Name>”.
• If there are multiple candidates, follow the voice guidance and
say a list number.
• If there are multiple telephone numbers, follow the voice
guidance and say a location.
• Under the following conditions, some of registered names and
telephone numbers will be deleted from the multiple
candidates.
- When multiple registered names of completely identical
characters are found, the first name to be found will be the
candidate.
- When there are multiple identical locations registered in one
phone book, the first location to be found will be the candidate.
3 After notifying the name of the person you want to call
by the voice guidance, if you hear the name of the right
person spoken back to you, say “Yes”.
• A call is made to the selected person's telephone number.
• If the name of the selected person is wrong, say “No”.

Other 297
Other Operations
■ Using the speed dial to make a call
1 Say “Hands-Free”.
• After you hear “Hands-Free” spoken back to you, the current
mode changes to the hands-free menu mode.
(The screen also changes.)
2
Say “Speed Dial 1”.
• The candidate registered in the Speed Dial 1 will be selected.
3 After notifying the number of the Speed Dial by the
voice guidance, if you hear the name of the right person
spoken back to you, say “Yes”.
• A call is made to the selected Speed Dial number.
• If the number of the selected Speed Dial is wrong, say “No”.
■ Using the Dial to make a call
1 Say “Hands-Free”.
• After you hear “Hands-Free” spoken back to you, the current
mode changes to the hands-free menu mode.
(The screen also changes.)
2
Say “Dial”.
• After you hear “Dial” spoken back to you, the current mode
changes to the dial calling mode.
3 Say “123” (dial number).
• The dial calling mode allows you to say the desired dial number
with any number of digit at a time.
4 Notify “123” by voice command.
• When adding a dial number, speak the number you want to
add as in step 3.
(Notify the added dial number by voice command.)
• When you dial the wrong number, speak “Delete” to delete the
digits of the number that you spoke last.
(After the delete, notify all of the remaining dial number.)
5 Say “Call”.
• A call is made to the selected dial number.
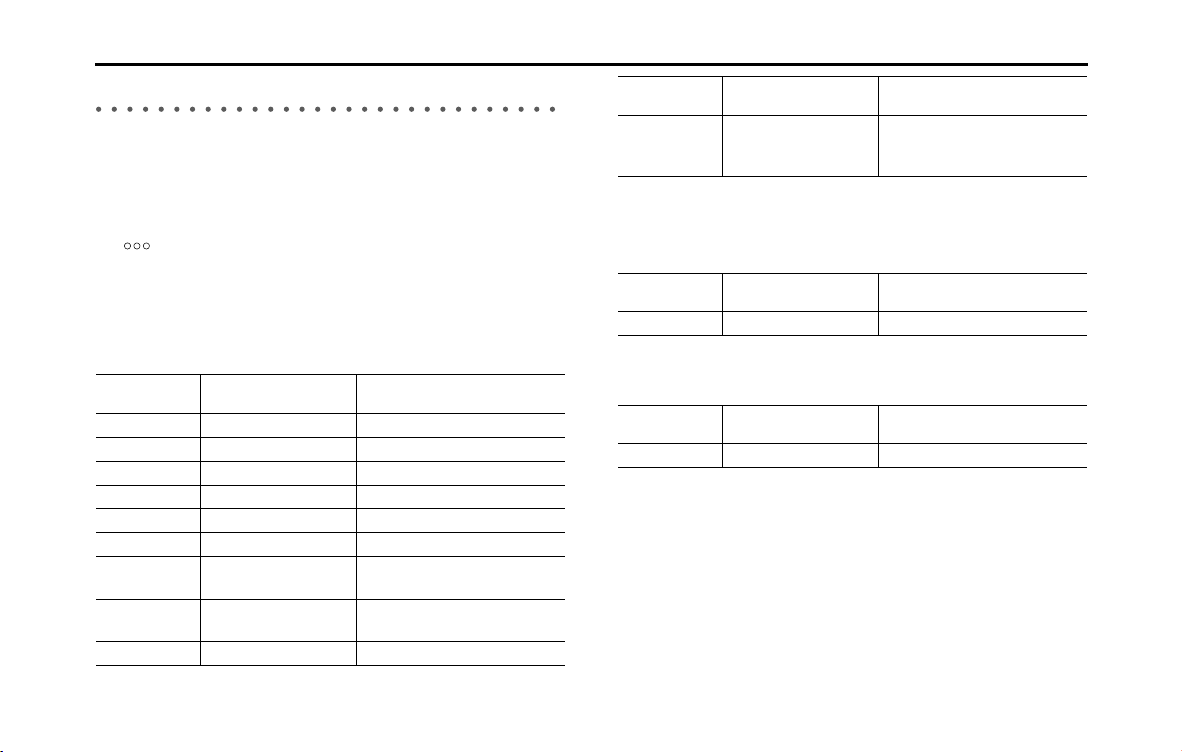
298 Other
Other Operations
Voice Command Lists
The navigation or audio control function enables you to operate the
navigation or audio system by voice, using the voice input microphone
and button. This section shows the voice command lists for voice
control operations.
The notations used in the commands are as follows.
• [ ]: Commands that need not to be spoken
• <ccc>: Numbers or names to be spoken
• Jccc: Commands to be spoken after the voice guidance
■ Commands for changing the audio mode
Enabled in all screens.
■ Command for changing to the handsfree mode
Enabled in all screens.
■ Command for changing to the navigation mode
Enabled in all screens.
Voice
command
Phrase Function
AM [ ] AM Sets to AM mode
FM [ ] FM Sets to FM mode
SAT [ ] Satellite radio Sets to SAT mode
CD
*
[] CD Sets to CD mode
USB
*
[] USB Sets to USB mode
iPod
*
[] iPod Sets to iPod mode
BTA [ ] Bluetooth
audio, [] BTA
Sets to Bluetooth audio mode
AUX
*
[] Auxiliary,
[] ox, [] AUX
Sets to AUX mode
Audio OFF Audio off Turns the audio system off
Play
Play
Play
Play
Play
Play
Play
Play
Play
Play Play
Radio Radio Sets to radio mode (Changes to
the last mode used: FM, AM, or
satellite radio.)
* Enabled only when operation is possible
Voice
command
Phrase Function
Phone Handsfree, Phone Sets to handsfree mode
Voice
command
Phrase Function
Navigation Navigation Changes to the Navigation screen
Voice
command
Phrase Function

Other 299
Other Operations
■ Commands available with AM radio
Enabled when the audio mode is AM radio.
■ Commands available with FM radio
Enabled when the audio mode is FM radio.
■ Commands available with SAT radio
Enabled when the audio mode is SAT radio.
* Some commands may not be recognized depending on the convenience of
SAT radio station.
Voice
command
Phrase Function
Seek up Seek up Tunes in the higher frequency
direction
Seek down Seek down Tunes in the lower frequency
direction
AM frequency Frequency
<Frequency>
Tunes using a frequency
AM preset
number
Preset <Number> Tunes using a preset number
Voice
command
Phrase Function
Seek up Seek up Tunes in the higher frequency
direction
Seek down Seek down Tunes in the lower frequency
direction
FM frequency Frequency
<Frequency>
Tunes using a frequency
FM preset
number
Preset <Number> Tunes using a preset number
FM FM Changes the band
Voice
command
Phrase Function
SAT search
channel
Channel <Number> Tunes using a channel number
SAT preset
number
Preset <Number> Tunes using a preset number
Search type Type <pop, rock,
classical, more music
channels, latin &
world, dance &
electronic, jazz, blues
& standards, christian,
country, hip-hop, r & b,
sports, talk, news &
npr, entertainment,
family & health,
religion, comedy,
traffic & weather>
Tunes using a type
SAT Satellite radio Changes the band

300 Other
Other Operations
■ Commands available with CD operation
Enabled when the audio mode is CD.
■ Commands available with MP3/WMA and Bluetooth
audio
Enabled when the audio mode is MP3/WMA or Bluetooth audio.
■ Commands available with USB
Enabled when the audio mode is USB.
Voice
command
Phrase Function
Track up Next track, Track up Selects the next track
Track down Previous track, Track
down
Selects the current track (cues)
Show list Show list Displays the list screen
Track number Track <Number> Selects using a track number
Voice
command
Phrase Function
Track up Next track, Track up Selects the next track
Track down Previous track or Track
down
Selects the current track (cues)
Folder up Next folder, Folder up Plays from the start of the next
folder
Folder down Previous folder, Folder
down
Plays from the start of the
previous folder
Show list Show list Displays the list screen
Voice
command
Phrase Function
Track up Next track, Track up Selects the next track
Track down Previous track, Track
down
Selects the current track (cues)
Folder up Next folder or Folder
up
Plays from the start of the next
folder
Folder down Previous folder, Folder
down
Plays from the start of the
previous folder
Show list Show list Displays the list screen
Search folder Folder J <Folder
Name>
Searches for a folder

Other 301
Other Operations
■ Commands available with iPod
Enabled when the audio mode is iPod.
■ Commands available in handsfree mode
Enabled when the audio mode is handsfree.
Voice
command
Phrase Function
Track up Next track, Track up Selects the next track
Track down Previous track, Track
down
Selects the current track (cues)
Folder up Next folder or Folder
up
Plays from the start of the next
playlist
Folder down Previous folder, Folder
down
Plays from the start of the
previous playlist
Show list Show list Displays the list screen
Search artist Artist J <Artist
Name>
Searches using an artist
Search genre Genre J <Genre
Name>
Searches using a genre
Search playlist Playlist J <Playlist
Name>
Searches using a playlist
Shuffle On/Off Shuffle Plays randomly
Voice
command
Phrase Function
Call name Call <Phone Name> J
<1~3> J <Home,
Work, Mobile, Other>
J <Yes, Yeah, Yep>,
<No, Nope>
Makes a call by using the phone
book
Call name
location
Call <Phone Name>
<Home, Work, Mobile,
Other> J <Yes, Yeah,
Yep>, <No, Nope>
Makes a call by using the phone
book and specifying a location
Speed dial Speed dial J
<Number> J <Yes,
Yeah, Yep>, <No,
Nope>
Makes a call by using the Speed
dial list
Speed dial <Number>
J <Yes, Yeah, Yep>,
<No, Nope>
Makes a call by specifying a speed
dial number
History History J Outgoing
[], Incoming
[] J <Number>
J <Yes, Yeah, Yep>,
<No, Nope>
Makes a call by using the call
history
Call
Call

302 Other
Other Operations
• If there are multiple candidates in the phone book, up to 3 are read out in a
list.
• If there are multiple names that match exactly, the first candidate to be found
is read out.
• If there are locations of the same name in the phone book, the first candidate
to be found is read out.
Dial number Dial <Number(0~9,
Plus, Hash or Star)> J
Call, Delete
Makes a call by entering a
telephone number
Dial [] J
<Number(0~9, Plus,
Hash, Star)> J Call,
Delete
Redial Redial J <Yes, Yeah,
Yep>, <No, Nope>
Makes a call by using the
outgoing call history
Voice
command
Phrase Function
Number

Other 303
Other Operations
■ Commands available in navigation mode
Enabled when the audio mode is navigation.
NOTE
• Do not press (Main Unit/Steering Wheel Switch) without pressing the “I Agree” button on the Caution screen. Otherwise, Navigation commands cannot be used.
Quick Commands
Voice command Phrase Function
Accommodation
*
Accommodation Narrows down POI search targets to
accommodations
Accommodation along
route
Accommodation along route Searches for accommodations along
the route
Accommodation at my
destination
Accommodation at my destination Searches for accommodations around
the destination
Accommodation near
here
Accommodation near here Searches for accommodations around
the current position
Address Address Transits to the screen that allows you
to search for the destination by
reading the address
Avoid Avoid Transits to the screen that allows you
to set detour routes
Delete route Delete route Deletes the route that has been set
Favorite Favorite Selects the conditions to set the
destination from your favorite spots
Find Find Transits to the destination search
screen
Help Help Transits to the voice recognition
mode’s help screen

304 Other
Other Operations
History History Sets the destination from the search
history results
Info Info Reads the route information that has
been set (after the voice recognition
mode is turned off )
More More Transits to the information list
reception screen
Parking
*
Parking Narrows down POI search targets to
parking lots
Parking along route Parking along route Searches for parking lots along the
route
Parking at my
destination
Parking at my destination Searches for parking lots around the
destination
Parking near here Parking near here Searches for parking lots around the
current position
Place Place Selects POI search as the destination
search method (POI search method
searches only for petrol stations,
accommodations, parking lots and
restaurants.)
Gas station
*
Gas station Narrows down POI search targets to
gas stations
Gas station along route Gas station along route Searches for gas stations along the
route
Gas station at my
destination
Gas station at my destination Searches for gas stations around the
destination
Gas station near here Gas station near here Searches for gas stations around the
current position
Voice command Phrase Function

Other 305
Other Operations
* Searches for candidates close to your vehicle's position.
Restaurant
*
Restaurant Narrows down POI search targets to
restaurants
Restaurant along route Restaurant along route Searches for restaurants along the
route
Restaurant at my
destination
Restaurant at my destination Searches for restaurants around the
destination
Restaurant near here Restaurant near here Searches for restaurants around the
current position
Route Route Transits to the route editing screen
Where am i Where am i Displays the vehicle position
information
Voice command Phrase Function

306 Other
Other Operations
Full Commands
Voice command Phrase Function
Accept Accept Accepts questions (such as talkback)
Accommodation along
route
[ , , , ] [ , ] Accommodation [, ,
, ] [ ] route
Searches for accommodations along
the route
[ , , , ] [ , ] Hotel [ , , , ]
[] route
[ , , , ] [ , ] Motel [ , , , ]
[] route
[ , , , ] [ , ] Guest house [, , ,
] [ ] route
Accommodation at my
destination
[ , , , ] [ , ] Accommodation [, ] [,
] destination
Searches for accommodations around
the destination
[ , , , ] [ , ] Hotel [, ] [, ]
destination
[ , , , ] [ , ] Motel [, ] [, ]
destination
[ , , , ] [ , ] Guest house [, ] [,
] destination
Find Go to Search for Look for a an along around
near on the
Find Go to Search for Look for a an along around near on
the
Find Go to Search for Look for a an along around near on
the
Find Go to Search for Look for a an along around near
on the
Find Go to Search for Look for a an at near my
the
Find Go to Search for Look for a an at near my the
Find Go to Search for Look for a an at near my the
Find Go to Search for Look for a an at near my
the

Other 307
Other Operations
Accommodation near
here
[, , , ] [] Accommodation [] here Searches for accommodations around
the current position
[, , , ] []
Accommodation nearby
[, , , ] [] Accommodation around here
[, , , ] [] Accommodation in the <neighborhood,
vicinity, area>
[, , , ] [] Hotel [] here
[, , , ] [] Hotel nearby
[, , , ] [] Hotel around here
[, , , ] [] Hotel in the <neighborhood, vicinity, area>
[, , , ] [] Hotel around here
[, , , ] [] Hotel in the <neighborhood, vicinity, area>
Accommodation
*
[, , , ] Accommodation Narrows down POI search targets to
accommodations
[, , , ] [] Motel
[, , , ] [] Hotel
Address [ , , , ] [ ] Address Transits to the screen that allows you
to search for the destination by
reading the address
Along route Along route Narrows down the selected POI
search candidates to places along the
route
On route
On the way
Along the way
At my destination [ , , , ] [ , ] Destination Narrows down the selected POI
search candidates to places around
the destination
Voice command Phrase Function
Find Go to Search for Look for an near
Find Go to Search for Look for an
Find Go to Search for Look for an
Find Go to Search for Look for an
Find Go to Search for Look for an near
Find Go to Search for Look for an
Find Go to Search for Look for an
Find Go to Search for Look for an
Find Go to Search for Look for an
Find Go to Search for Look for an
Find Go to Search for Look for
Find Go to Search for Look for a
Find Go to Search for Look for a
Find Go to Search for Look for an
At Near Close to Around my the

308 Other
Other Operations
Avoid Avoid Transits to the screen that allows you
to set detour routes
Bypass
Back Back Transits to the previous screen
Bottom [ , , , ] [ ] [ ] Bottom Transits to the bottom of the list
Cancel Cancel Exits from the voice recognition mode
and transits to the map, main or other
menu.
Change city Change [] city Changes the city name in the address
currently being recognized (in the
voice recognition mode)
Change [] town
Change house number Change [] house number Changes the house number in the
address currently being recognized (in
the voice recognition mode)
Change street in line 1 Change [] street in line 1 Changes the city name listed in the
first line of the list and currently being
recognized (on the screen that allows
you to select a list when addresses are
recognized in the voice recognition
mode)
Change street in line 2 Change [] street in line 2 Changes the city name listed in the
second line of the list and currently
being recognized (on the screen that
allows you to select a list when
addresses are recognized in the voice
recognition mode)
Voice command Phrase Function
Go Jump Move Scroll to the
the
the
the
the
the

Other 309
Other Operations
Change street in line 3 Change [] street in line 3 Changes the city name listed in the
third line of the list and currently
being recognized (on the screen that
allows you to select a list when
addresses are recognized in the voice
recognition mode)
Change street in line 4 Change [] street in line 4 Changes the city name listed in the
fourth line of the list and currently
being recognized (on the screen that
allows you to select a list when
addresses are recognized in the voice
recognition mode)
Change street Change [] street Changes the street name in the
address currently being recognized (in
the voice recognition mode)
Delete route Delete [, ] route Deletes the route that has been set
Delete Delete
Destination Destination Sets the selected route as the
destination
Down [ , , ] Down Moves the list on the list screen one
page down
Favorite [ , , , ] [ ] Favorite Selects the conditions to set the
destination from your favorite spots
[] Favorites
Find Find Transits to the destination search
screen
Go to
Search []
Look for
Voice command Phrase Function
the
the
the
my the
Page Scroll Move
Find Select Search for Look for a
Find
for

310 Other
Other Operations
Go map [ ] [ ] [ ] Map [ ] Transits to the Map screen
Show
[] []
map
Go Go Reflects the selected route and starts
the navigation guidance
Half Half Reduces the detour distance set on
the avoid route screen by half
Help Help Transits to the voice recognition
mode’s help screen
History [ ] [ ] History Sets the destination from the search
history results
House number House number Transits to the house number
reception screen (when searching for
the address)
Street number
Less Less Reduces the detour distance set (on
the avoid route screen)
Line 1 [ ] 1 Selects the item listed in the first line
of the list (on the screen where the list
is displayed)
First []
Line 2 [ ] 2 Selects the item listed in the second
line of the list (on the screen where
the list is displayed)
Second []
Line 3 [ ] 3 Selects the item listed in the third line
of the list (on the screen where the list
is displayed)
Third []
Line 4 [ ] 4 Selects the item listed in the fourth
line of the list (on the screen where
the list is displayed)
Fourth []
Voice command Phrase Function
Go to the screen
me the
Find in
Line
line
Line
line
Line
line
Line
line

Other 311
Other Operations
Middle [ , , , ] [ ] [ ] Middle Transits to the middle of the list (on
the screen where the list is displayed)
More More Transits to the information list
reception screen
Near here [ ] Here Narrows down the selected POI
search candidates to places along the
route
Nearby
Around here
In the neighborhood
New route New route Registers the selected destination as a
new destination
Next Next Transits to the next screen
No No Rejects questions or other contents
spoken to you
Nope
Nop
Parking along route [ , , , ] [ ] Parking [ ] [ , , ,
] [ ] route
Searches for parking lots along the
route
[, , , ] [] Car park [ ] [ , , ,
] [ ] route
Parking at my
destination
[, , , ] [] Parking [] [, ] [, ]
destination
Searches for parking lots around the
destination
[, , , ] [] Car park [, ] [, ]
destination
Voice command Phrase Function
Go Jump Move Scroll to the
Near
Find Go to Search for Look for a lot along around near
on the
Find Go to Search for Look for a lot along around near
on the
Find Go to Search for Look for a lot at near my the
Find Go to Search for Look for a at near my the

312 Other
Other Operations
Parking near here [ , , , ] [ ] Parking [] [ ] here Searches for parking lots around the
current position
[, , , ] []
Parking
[]
nearby
[, , , ] [] Parking [] around here
[ , , , ] [ ] Parking [] in the <neighborhood, vicinity,
area>
[, , , ] [] Car park [] here
[, , , ] [] Car park nearby
[, , , ] [] Car park around here
[, , , ] [] Car park in the <neighborhood, vicinity, area>
Parking
*
[, , , ] [] Parking [ ] Narrows down POI search targets to
parking lots
[, , , ] [] Car park
Gas station along route [ , , , ] [ ] Gas station [ , , , ]
[] route
Searches for gas stations along the
route
[, , , ] [] Petrol [ ] [ , , ,
] [] route
Gas station at my
destination
[, , , ] [] Gas station [, ] [, ]
destination
Searches for gas stations around the
destination
[, , , ] [] Petrol [ ] [, ] [, ]
destination
Gas station near here [ , , , ] [ ] Gas station [] here Searches for gas stations around the
current position
[, , , ] [] Petrol [] [] here
[, , , ] [] Petrol [] nearby
[, , , ] [] Gas station nearby
[, , , ] [] Petrol [] around here
[, , , ] [] Petrol [] in the <neighborhood,
vicinity, area>
Voice command Phrase Function
Find Go to Search for Look for a lot near
Find Go to Search for Look for a lot
Find Go to Search for Look for a lot
Find Go to Search for Look for a lot
Find Go to Search for Look for a near
Find Go to Search for Look for a
Find Go to Search for Look for a
Find Go to Search for Look for a
Find Go to Search for Look for a lot
Find Go to Search for Look for a
Find Go to Search for Look for a along around near on
the
Find Go to Search for Look for a station along around near
on the
Find Go to Search for Look for a at near my the
Find Go to Search for Look for a station at near my the
Find Go to Search for Look for a near
Find Go to Search for Look for a station near
Find Go to Search for Look for a station
Find Go to Search for Look for a
Find Go to Search for Look for a station
Find Go to Search for Look for a station

Other 313
Other Operations
Gas station
*
[, , , ] [] Gas station Narrows down POI search targets to
gas stations
[, , , ] []
Petrol
[]
Place [ , , , ] [ ] Place Selects POI search as the destination
search method (POI search method
searches only for petrol stations,
accommodations, parking lots and
restaurants.)
[, , , ] Places
[, , , ] [] Point of interest
[, , , ] [] P O I
Read out Read [] out Reads the search results on the list
displayed on the screen
Restaurant along route [ , , , ] [ ] Restaurant [, , , ]
[] route
Searches for restaurants along the
route
[, , , ] [] Food [ , , , ] [ ]
route
Restaurant at my
destination
[, , , ] [] Restaurant at [, ] destination Searches for restaurants around the
destination
[, , , ] Food [, ] [, ] destination
Restaurant near here [ , , , ] [ ] Restaurant [] here Searches for restaurants around the
current position
[, , , ] Food [] here
[, , , ] [] Restaurant nearby
[, , , ] Food nearby
[, , , ] [] Restaurant around here
[, , , ] Food around here
[, , , ] [] Restaurant in the <neighborhood, vicinity ,
area>
[, , , ] Food in the <neighborhood, vicinity , area>
Restaurant
*
[, , , ] [] Restaurant Narrows down POI search targets to
restaurants
[, , , ] Food
Voice command Phrase Function
Find Go to Search for Look for a
Find Go to Search for Look for a station
Find Go to Search for Look for a
Find Go to Search for Look for
Find Go to Search for Look for a
Find Go to Search for Look for a
it
Find Go to Search for Look for a along around near on
the
Find Go to Search for Look for a along around near on the
Find Go to Search for Look for a my the
Find Go to Search for Look for at near my the
Find Go to Search for Look for a near
Find Go to Search for Look for near
Find Go to Search for Look for a
Find Go to Search for Look for
Find Go to Search for Look for a
Find Go to Search for Look for
Find Go to Search for Look for a
Find Go to Search for Look for
Find Go to Search for Look for a
Find Go to Search for Look for

314 Other
Other Operations
* Searches for candidates close to your vehicle's position.
• Commands on the touch screen that cannot be operated have their colors toned down.
Route info Route info Reads the route information that has
been set (after the voice recognition
mode is turned off )
Route information
Route summary
Info Info
Information
Route [ ] Route Transits to the route editing screen
Street center [ ] Center Sets the center of the street as the
address (when addresses are
recognized in the voice recognition
mode)
[] Midpoint
Top [ , , , ] [ ] [ ] Top Transits to the top of the list (on the
screen where the list is displayed)
Up [ , , ] Up Moves the list one page up (on the
screen where the list is displayed)
Waypoint Waypoint Registers the selected destination as a
relay point
Where am i Where am i Displays the vehicle position
information (When there is a self-car
location in the location besides the
road, this function can't be used.)
Yes Ye s Accepts questions or other contents
spoken to you
Ye p
Ye ah
Voice command Phrase Function
My
Street
Street
Go Jump Move Scroll to the
Page Scroll Move

Other 315
Other Operations
■ Other Commands
Enabled in the Main Menu.
Voice command Phrase Function
Time [ ] Time, What time is it now Reads out the current time
Cancel Cancel Closes the voice recognition screen
Help Help Displays the help screen
Back [ ] Back Returns to the previous screen
Repeat Repeat Repeats the guidance voice
Change Change, Next Changes the display screen
What's the
Go

316 Other
Other Operations
■ Radio Frequency Lists
AM frequency:
Frequency
(530~1710)
Rule
530 five thirty
540 five forty
550 five fifty
560 five sixty
570 five seventy
580 five eighty
590 five ninety
600 six hundred
610 six ten
620 six twenty
630 six thirty
640 six forty
650 six fifty
660 six sixty
670 six seventy
680 six eighty
690 six ninety
700 seven hundred
710 seven ten
720 seven twenty
730 seven thirty
740 seven forty
750 seven fifty
760 seven sixty
770 seven seventy
780 seven eighty
790 seven ninety
800 eight hundred
810 eight ten
820 eight twenty
830 eight thirty
840 eight forty
850 eight fifty
860 eight sixty
870 eight seventy
880 eight eighty
890 eight ninety
900 nine hundred
910 nine ten
920 nine twenty
930 nine thirty
940 nine forty
950 nine fifty
960 nine sixty
970 nine seventy
Frequency
(530~1710)
Rule
980 nine eighty
990 nine ninety
1000 one thousand
1010 ten ten
1020 ten twenty
1030 ten thirty
1040 ten forty
1050 ten fifty
1060 ten sixty
1070 ten seventy
1080 ten eighty
1090 ten ninety
1100 eleven hundred
1110 eleven ten
1120 eleven twenty
1130 eleven thirty
1140 eleven forty
1150 eleven fifty
1160 eleven sixty
1170 eleven seventy
1180 eleven eighty
1190 eleven ninety
1200 twelve hundred
1210 twelve ten
Frequency
(530~1710)
Rule

Other 317
Other Operations
1220 twelve twenty
1230 twelve thirty
1240 twelve forty
1250 twelve fifty
1260 twelve sixty
1270 twelve seventy
1280 twelve eighty
1290 twelve ninety
1300 thirteen hundred
1310 thirteen ten
1320 thirteen twenty
1330 thirteen thirty
1340 thirteen forty
1350 thirteen fifty
1360 thirteen sixty
1370 thirteen seventy
1380 thirteen eighty
1390 thirteen ninety
1400 fourteen hundred
1410 fourteen ten
1420 fourteen twenty
1430 fourteen thirty
1440 fourteen forty
1450 fourteen fifty
Frequency
(530~1710)
Rule
1460 fourteen sixty
1470 fourteen seventy
1480 fourteen eighty
1490 fourteen ninety
1500 fifteen hundred
1510 fifteen ten
1520 fifteen twenty
1530 fifteen thirty
1540 fifteen forty
1550 fifteen fifty
1560 fifteen sixty
1570 fifteen seventy
1580 fifteen eighty
1590 fifteen ninety
1600 sixteen hundred
1610 sixteen ten
1620 sixteen twenty
1630 sixteen thirty
1640 sixteen forty
1650 sixteen fifty
1660 sixteen sixty
1670 sixteen seventy
1680 sixteen eighty
1690 sixteen ninety
Frequency
(530~1710)
Rule
1700 seventeen hundred
1710 seventeen ten
Frequency
(530~1710)
Rule

318 Other
Other Operations
FM frequency:
Frequency
(87.7~107.9)
Rule
87.7 eighty seven [point] seven
87.9 eighty seven [point] nine
88.1 eighty eight [point] one
88.3 eighty eight [point] three
88.5 eighty eight [point] five
88.7 eighty eight [point] seven
88.9 eighty eight [point] nine
89.1 eighty nine [point] one
89.3 eighty nine [point] three
89.5 eighty nine [point] five
89.7 eighty nine [point] seven
89.9 eighty nine [point] nine
90.1 ninety point one
90.3 ninety point three
90.5 ninety point five
90.7 ninety point seven
90.9 ninety point nine
91.1 ninety one [point] one
91.3 ninety one [point] three
91.5 ninety one [point] five
91.7 ninety one [point] seven
91.9 ninety one [point] nine
92.1 ninety two [point] one
92.3 ninety two [point] three
92.5 ninety two [point] five
92.7 ninety two [point] seven
92.9 ninety two [point] nine
93.1 ninety three [point] one
93.3 ninety three [point] three
93.5 ninety three [point] five
93.7 ninety three [point] seven
93.9 ninety three [point] nine
94.1 ninety four [point] one
94.3 ninety four [point] three
94.5 ninety four [point] five
94.7 ninety four [point] seven
94.9 ninety four [point] nine
95.1 ninety five [point] one
95.3 ninety five [point] three
95.5 ninety five [point] five
95.7 ninety five [point] seven
95.9 ninety five [point] nine
96.1 ninety six [point] one
96.3 ninety six [point] three
96.5 ninety six [point] five
96.7 ninety six [point] seven
Frequency
(87.7~107.9)
Rule
96.9 ninety six [point] nine
97.1 ninety seven [point] one
97.3 ninety seven [point] three
97.5 ninety seven [point] five
97.7 ninety seven [point] seven
97.9 ninety seven [point] nine
98.1 ninety eight [point] one
98.3 ninety eight [point] three
98.5 ninety eight [point] five
98.7 ninety eight [point] seven
98.9 ninety eight [point] nine
99.1 ninety nine [point] one
99.3 ninety nine [point] three
99.5 ninety nine [point] five
99.7 ninety nine [point] seven
99.9 ninety nine [point] nine
100.1 one hundred point one
100.3 one hundred point three
100.5 one hundred point five
100.7 one hundred point seven
100.9 one hundred point nine
101.1 one oh one [point] one
101.3 one oh one [point] three
101.5 one oh one [point] five
Frequency
(87.7~107.9)
Rule

Other 319
Other Operations
101.7 one oh one [point] seven
101.9 one oh one [point] nine
102.1 one oh two [point] one
102.3 one oh two [point] three
102.5 one oh two [point] five
102.7 one oh two [point] seven
102.9 one oh two [point] nine
103.1 one oh three [point] one
103.3 one oh three [point] three
103.5 one oh three [point] five
103.7 one oh three [point] seven
103.9 one oh three [point] nine
104.1 one oh four [point] one
104.3 one oh four [point] three
104.5 one oh four [point] five
104.7 one oh four [point] seven
104.9 one oh four [point] nine
105.1 one oh five [point] one
105.3 one oh five [point] three
105.5 one oh five [point] five
105.7 one oh five [point] seven
105.9 one oh five [point] nine
106.1 one oh six [point] one
106.3 one oh six [point] three
Frequency
(87.7~107.9)
Rule
106.5 one oh six [point] five
106.7 one oh six [point] seven
106.9 one oh six [point] nine
107.1 one oh seven [point] one
107.3 one oh seven [point] three
107.5 one oh seven [point] five
107.7 one oh seven [point] seven
107.9 one oh seven [point] nine
Frequency
(87.7~107.9)
Rule

320 Other
Other Operations
■ XM Channel Lists
Channel
(1~255)
Rule
1one
2two
3three
4four
5 five
6six
7seven
8eight
9nine
10 ten
11 eleven
12 twelve
13 thirteen
14 fourteen
15 fifteen
16 sixteen
17 seventeen
18 eighteen
19 nineteen
20 twenty
21 twenty one
22 twenty two
23 twenty three
24 twenty four
25 twenty five
26 twenty six
27 twenty seven
28 twenty eight
29 twenty nine
30 thirty
31 thirty one
32 thirty two
33 thirty three
34 thirty four
35 thirty five
36 thirty six
37 thirty seven
38 thirty eight
39 thirty nine
40 forty
41 forty one
42 forty two
43 forty three
44 forty four
45 forty five
46 forty six
Channel
(1~255)
Rule
47 forty seven
48 forty eight
49 forty nine
50 fifty
51 fifty one
52 fifty two
53 fifty three
54 fifty four
55 fifty five
56 fifty six
57 fifty seven
58 fifty eight
59 fifty nine
60 sixty
61 sixty one
62 sixty two
63 sixty three
64 sixty four
65 sixty five
66 sixty six
67 sixty seven
68 sixty eight
69 sixty nine
70 seventy
Channel
(1~255)
Rule

Other 321
Other Operations
71 seventy one
72 seventy two
73 seventy three
74 seventy four
75 seventy five
76 seventy six
77 seventy seven
78 seventy eight
79 seventy nine
80 eighty
81 eighty one
82 eighty two
83 eighty three
84 eighty four
85 eighty five
86 eighty six
87 eighty seven
88 eighty eight
89 eighty nine
90 ninety
91 ninety one
92 ninety two
93 ninety three
94 ninety four
Channel
(1~255)
Rule
95 ninety five
96 ninety six
97 ninety seven
98 ninety eight
99 ninety nine
100 one hundred
101 one oh one
102 one oh two
103 one oh three
104 one oh four
105 one oh five
106 one oh six
107 one oh seven
108 one oh eight
109 one oh nine
110 one ten
111 one eleven
112 one twelve
113 one thirteen
114 one fourteen
115 one fifteen
116 one sixteen
117 one seventeen
118 one eighteen
Channel
(1~255)
Rule
119 one nineteen
120 one twenty
121 one twenty one
122 one twenty two
123 one twenty three
124 one twenty four
125 one twenty five
126 one twenty six
127 one twenty seven
128 one twenty eight
129 one twenty nine
130 one thirty
131 one thirty one
132 one thirty two
133 one thirty three
134 one thirty four
135 one thirty five
136 one thirty six
137 one thirty seven
138 one thirty eight
139 one thirty nine
140 one forty
141 one forty one
142 one forty two
Channel
(1~255)
Rule

322 Other
Other Operations
143 one forty three
144 one forty four
145 one forty five
146 one forty six
147 one forty seven
148 one forty eight
149 one forty nine
150 one fifty
151 one fifty one
152 one fifty two
153 one fifty three
154 one fifty four
155 one fifty five
156 one fifty six
157 one fifty seven
158 one fifty eight
159 one fifty nine
160 one sixty
161 one sixty one
162 one sixty two
163 one sixty three
164 one sixty four
165 one sixty five
166 one sixty six
Channel
(1~255)
Rule
167 one sixty seven
168 one sixty eight
169 one sixty nine
170 one seventy
171 one seventy one
172 one seventy two
173 one seventy three
174 one seventy four
175 one seventy five
176 one seventy six
177 one seventy seven
178 one seventy eight
179 one seventy nine
180 one eighty
181 one eighty one
182 one eighty two
183 one eighty three
184 one eighty four
185 one eighty five
186 one eighty six
187 one eighty seven
188 one eighty eight
189 one eighty nine
190 one ninety
Channel
(1~255)
Rule
191 one ninety one
192 one ninety two
193 one ninety three
194 one ninety four
195 one ninety five
196 one ninety six
197 one ninety seven
198 one ninety eight
199 one ninety nine
200 two hundred
201 two oh one
202 two oh two
203 two oh three
204 two oh four
205 two oh five
206 two oh six
207 two oh seven
208 two oh eight
209 two oh nine
210 two ten
211 two eleven
212 two twelve
213 two thirteen
214 two fourteen
Channel
(1~255)
Rule

Other 323
Other Operations
215 two fifteen
216 two sixteen
217 two seventeen
218 two eighteen
219 two nineteen
220 two twenty
221 two twenty one
222 two twenty two
223 two twenty three
224 two twenty four
225 two twenty five
226 two twenty six
227 two twenty seven
228 two twenty eight
229 two twenty nine
230 two thirty
231 two thirty one
232 two thirty two
233 two thirty three
234 two thirty four
235 two thirty five
236 two thirty six
237 two thirty seven
238 two thirty eight
Channel
(1~255)
Rule
239 two thirty nine
240 two forty
241 two forty one
242 two forty two
243 two forty three
244 two forty four
245 two forty five
246 two forty six
247 two forty seven
248 two forty eight
249 two forty nine
250 two fifty
251 two fifty one
252 two fifty two
253 two fifty three
254 two fifty four
255 two fifty five
Channel
(1~255)
Rule
324 Other
Reference
Useful Information
If the Following Messages Appear
If the following messages appear, check by referring to the cause and action below.
Message Cause Action
Common operations
Temperature is too high.
Restart after a few minutes.
The temperature inside the unit is abnormally high. Wait until the temperature decreases.
Temperature is too low.
Restart after a few minutes.
The temperature inside the unit is abnormally low. Wait until the temperature increases.
Program loading is necessary.
Please insert SD card.
The “SD memory card” containing the update program
is not inserted.
Insert the “SD memory card” containing the update
program.
Unable to read program.
Please check SD card or the program.
Cannot read the “SD memory card” for some reason. Check the “SD memory card”.
Installing failed. Failed to install the software. Install again.
No map data found.
Please insert the unit's dedicated SD card again.
The “SD memory card” containing the map data is not
inserted.
Insert the “SD memory card” containing the map data.
Unable to read data.
Please check SD card.
Cannot read the “SD memory card” for some reason. Check the “SD memory card”.
Unable to read map data.
Please check SD card.
An “SD memory card” other than the one containing
the map data is inserted.
Insert the “SD memory card” containing the map data.
Map/application authorization failed.
Please check SD card.
Failed to authorize the map or application. Check the “SD memory card”.
Please insert a SD card. The “SD memory card” is missing. Insert an “SD memory card”.

Other 325
Reference
In HD radio mode
iPod full.
Tags cannot be stored.
There is no space remaining in the iPod memory. Connect an iPod with space remaining in its memory.
No HD Radio signal available. The HD radio reception is poor. Try to receive the signal again in a location free from
obstructions.
Saving the HD Radio tag failed. Failed to save the tag information. Acquire the tag information again.
Storing tag information.
Please wait…
Cannot save the tag information because of an error. Acquire the tag information again.
The maximum of 50 HD Radio tags have been stored.
Please connect your iPod to transfer these tags before
storing more tags.
Cannot save the tag information because the
maximum number of tags that can be saved in the
unit has been reached.
Connect an iPod and transfer the tag information that
is saved in the unit to the iPod.
In SAT mode
Check Antenna The XM antenna has disconnected. Check the connection of the XM antenna.
Check XM Tuner The XM tuner has disconnected. Check the connection of the XM tuner.
No Signal Displayed when the XM satellite radio signal is lost
(while accessing).
Try to receive the signal again in a location free from
obstructions.
Channel Off Air Displayed when the tuned XM channel is not currently
broadcasting.
Select a channel that is currently broadcasting.
Channel Unavailable Displayed when the tuned XM channel cannot be
received.
Select a channel that can be received.
Channel Unauthorized Displayed when you are not authorized to receive the
tuned XM channel, or while the code is being updated.
Select a channel that can be received.
There is not the input number. Displayed when the channel does not exist. Select a channel that can be received.
Incorrect code. Please try again. The parental lock code is incorrect. Enter the correct number.
Message Cause Action

326 Other
Reference
In CD or MP3/WMA mode
Check DISC. The disc is dirty or damaged. The inserted disc is dirty or upside down. Check the
disc for dirt and check its orientation.
If the disc is dirty, clean it. If the disc is upside down,
orient it correctly. Do not use scratched or warped
discs.
DISC Error. The CD•MP3/WMA player is not operating for some
reason.
Eject the disc.
Error (temperature is too high). The temperature of the CD•MP3/WMA player is
abnormally high.
Wait until the temperature decreases without
performing any operations.
*
No music files found. No playable music data is recorded on the CD-R/RW
disc.
Insert a CD-R/RW disc on which playable music data is
recorded.
No support. Non-supported music data is recorded, or license-
controlled music data is detected.
Insert a CD-R/RW disc on which playable music data is
recorded.
Message Cause Action

Other 327
Reference
In USB mode
Check USB. Playback failure or communication abnormality. Reconnect the USB memory.
No music files found. No playable music data is stored in the USB memory. Connect a USB memory in which playable music data
is stored.
No support files. No supported files are stored in the USB memory. Check the files.
Error • Because playback stopped due to a factor in the
main unit. (File access failure etc.)
• Because an over current was detected.
Stop using the device for a short time and then try
again.
Authorization Error.
Your deviceis not authorized to play this DivX
protected video.
The files are copyright-protected. DivX files purchased
with a registration code other than the code of this
unit cannot be played.
Check the files.
This DivX rental has used ** of ** views.
Continue?
[Yes]/[No]
Displays the remaining views for the file. Follow the instructions on the screen.
Rental Expired.
Your device is not authorized
to play this DivX protected video.
The view limit has been reached. Connect a USB memory that contains a video file with
remaining views.
Currently this function is disabled. A function was selected that cannot be used while the
vehicle is in motion.
Park the vehicle and apply the parking brake.
Reading INDEX ** % The file reading percentage display. Do not operate until the file reading is complete.
Video framerate not supported. The video frame rate is not supported. Connect a USB memory in which playable video files
are stored.
Video resolution not supported. The video resolution is not supported. Connect a USB memory in which playable video files
are stored.
Audio format not supported. No playable audio format is stored in the USB memory. Connect a USB memory in which a playable audio
format is stored.
No video files found. No playable video files are stored in the USB memory. Connect a USB memory in which playable video files
are stored.
Message Cause Action

328 Other
Reference
In iPod mode
iPod error. Playback failure or communication abnormality. Reconnect the iPod.
Please check the iPod firmware version. A communication error, a playback error, the iPod
software is not supported, or a control target error.
Connect a playable iPod. Reconnect the iPod.
No music files found. No playable music data is stored in the iPod. Connect an iPod in which playable music data is
stored.
Searching iPod.
Please wait...
Displayed if play is not possible when the iPod source
is selected.
Also displayed when waiting for skip when up/down is
initially operated.
Wait for a few moments before operating.
iPod authorization failed. Failed to authorize the iPod, or reauthorization is
required.
Reconnect the iPod.
Message Cause Action

Other 329
Reference
In Bluetooth Audio mode
No music files found. No playable music data is stored in the portable
device.
Connect a portable device in which playable music
data is stored.
In handsfree mode
Transfer failed. Displayed when phonebook transfer failed. Transfer the phonebook again.
Connection failed. Displayed when phone connection failed. Connect the phone again.
The part of telephone book data was not able to
transfer
Displayed when a portion of the phonebook data
could not be transferred.
Transfer the phonebook again.
Telephone call transferring is failed. Displayed when call transfer was not successful. Perform call transfer again.
Messages not retrieved. Displayed when automatic message transfer failed.
Touch (Message Transfer) on the
Messages screen to transfer the message.
Displayed when the phone does not support the MAP
profile.
Connect a phone which supports the MAP profile
before using.
The message could not be retrieved. Displayed when message retrieval failed.
Touch (Message Transfer) to
perform transfer again.
Unable to dial Displayed when call dialing failed. Check that the phone is connected correctly.
Unable to transfer contacts.
The Phone is in use
Displayed if the phone was in use when manual
phonebook transfer was executed.
Finish using the phone before transferring the
phonebook.
In picture mode
No data No displayable image data is recorded on the SD
memory card.
Insert an SD memory card on which displayable image
data is recorded.
Updating failed. Displayed when updating the Opening screen failed. Perform Opening screen update again.
Please wait... Displayed when image data that is 5 MB or larger is
being read.
Do not operate until the data reading is complete.
* If this happens, wait for a brief period. When the temperature inside the device returns to normal, the message disappears and playback starts. If the message does not
disappear even after waiting a long time, contact your SUBARU dealer.
Message Cause Action
Message Transfer
Message Transfer

330 Other
Reference
Message Cause Action
In Voice Control System
Please repeat. Displayed when the voice command could not be
recognized.
Speak the command again.
Voice recognition mode has been cancelled. Displayed when the voice recognition mode is ended. -
That command is not available at this time. Displayed when it is not possible to change the audio
mode.
Check that the disc has been inserted correctly.
Check that the device has been connected correctly.
That command is not available at this time. Displayed when it is not possible to change to the
navigation mode.
Check that the SD card containing the map data has
been inserted correctly.
Check that a language other than Russian is selected
for the language setting.
If the problem is still not resolved, please contact the
nearest SUBARU dealer.
That command is not available at this time. Displayed when that data does not exist.
Displayed when the voice command cannot be used.
Use the command only when the corresponding data
exists.
Speak the name of the data again.
Speak a permitted voice command again.
That command is not available at this time. Displayed when the connected device is not a
supported product.
Use when a supported product is connected.
That frequency is not available. Displayed when that frequency is not available. Speak the command again.
There is no corresponding data. Displayed when the corresponding data does not
exist.
Use the command only when the corresponding data
exists.
That channel cannot be selected. Displayed when the requested channel data does not
exist.
Use the command only when the channel data exists.
The call cannot be placed.
There is no phone number information.
Displayed when no phone number data is registered
in the phonebook.
Register in the phonebook before using.
(Phonebook name) (Location) is not in the
phonebook.
Displayed when the phone number data is not
registered in the designated location.
Register in the phonebook before using.

Other 331
Reference
The phonebook is empty. Displayed when there is no data registered in the
phonebook.
Register in the phonebook before using.
The call cannot be placed.
There is no phone number information.
Displayed when that information does not exist. Speak the information again.
You can't add more digits. Displayed when the maximum number of telephone
number digits has been exceeded.
Make a call to the entered phone number or delete
digits before entering.
There are no phones set up to make calls. Displayed when a Bluetooth-supporting phone is not
registered.
Check that a Bluetooth-supporting phone is
registered.
The phone is not connected.
Please check the phone.
Displayed when a Bluetooth-supporting phone is not
connected.
Check that a Bluetooth-supporting phone has been
connected.
Please check the usb. Displayed when USB is disconnected. Check that USB is connected correctly.
Please check the ipod. Displayed when the iPod battery is depleted.
Displayed when the iPod is disconnected.
Check the iPod battery level.
Check that the iPod is connected correctly.
Please check the phone. Displayed when the phone is disconnected.
Displayed when the phone battery is depleted.
Displayed when the phone link is disconnected.
Check the phone battery level.
Check that the phone is connected correctly.
Loading Voice Recognition… Displayed when voice recognition cannot yet be
started.
Wait for a few moments before operating.
* When a correct command is recognized, the system speaks back the same voice command.
Message Cause Action
332 Other
Reference
When You Think There Is a Malfunction
A slight change in operation may be mistaken for a malfunction. Please check the items in the following table first.
If the unit does not improve even after taking the appropriate action, contact your SUBARU dealer for an inspection.
Condition Possible cause Action
The screen is dark for a brief period when the power is
turned on at low temperatures.
This is a characteristic of TFTs. This is not a malfunction. Wait for a brief period.
The display is distorted for a brief period after the
power is turned on.
This is a characteristic of TFT backlighting. This is not a malfunction. The display will stabilize after
a brief period.
No sound comes out. The volume is poorly adjusted. Turn the VOL button to adjust the volume.
The music is muted in the following cases.
• When the voice guidance function is operating.
• When talking in handsfree mode.
This is not a malfunction. The music can be heard
again when the voice guidance finishes or the
handsfree mode is turned off.
Sound comes out of only one side (left or right, front or
rear).
The volume is poorly adjusted. Check the balance and fader adjustments.
Sound quality does not change even after making
adjustments.
The adjusted sound quality band is not included in the
radio broadcast or disc.
Check by changing the radio station or disc.
Cannot insert a disc into the deck. The power is not turned on. Turn the vehicle ignition switch to “ACC” or “ON”.
A disc is already inserted and you are trying to insert a
second disc.
Eject the previously inserted disc before inserting the
new disc.
Cannot play a disc. There is water condensation inside the device. Stop using the device for a short time and then try
again.
The disc is significantly scratched or warped. Insert a different disc.
The disc is very dirty. Clean the disc.
The disc is upside down. Insert the disc in the correct orientation.
A non-supported disc type is inserted. Insert a supported disc into the deck.

Other 333
Reference
Audio is output, but not video (even when the vehicle
is stopped).
The parking brake is not applied. Apply the parking brake.
Neither audio nor video is output. The vehicle ignition switch is not turned on. Turn the vehicle ignition switch to “ACC” or “ON”.
There are dots that are always lit on the screen. At least 99.99% of the pixels on TFT panels function
correctly, but 0.01% of the pixels may not light or may
stay lit.
This is not a defect, so please use the device in this
condition.
Condition Possible cause Action
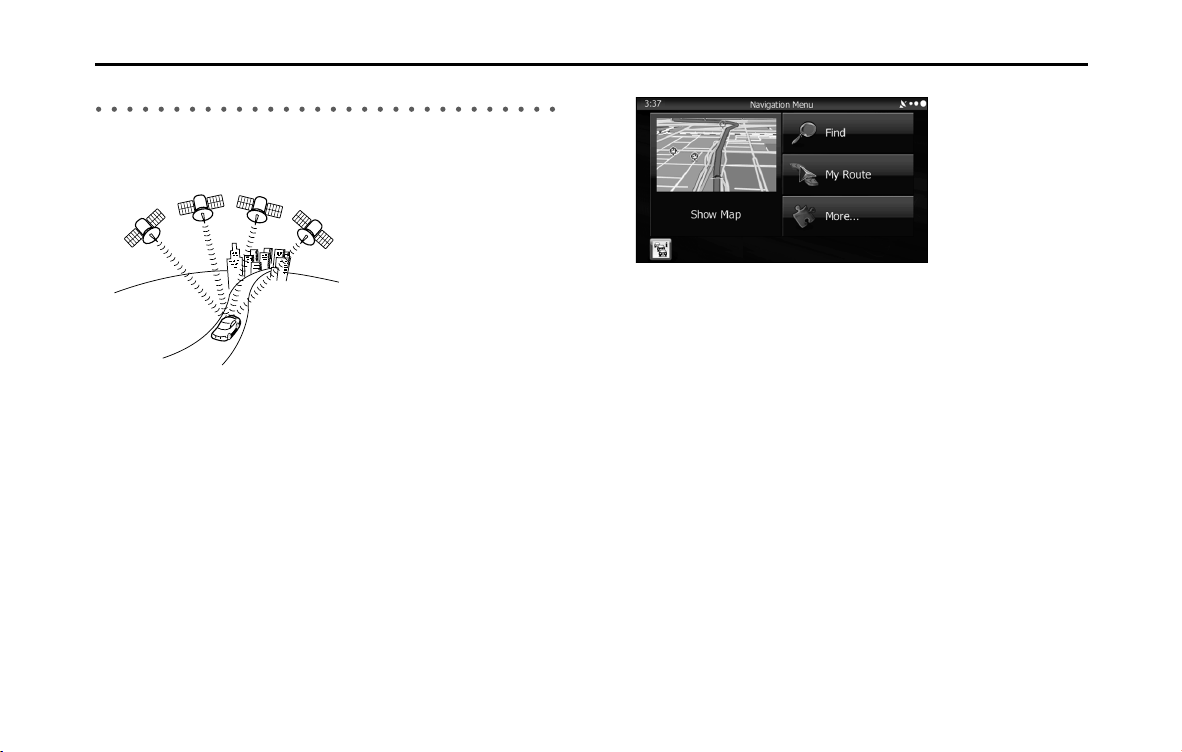
334 Other
Reference
Glossary
To enhance your enjoyment of this product, please familiarize yourself
with the following terms.
• GPS (Global Positioning System)
GPS is a system that detects the current location (latitude, longitude,
altitude) by receiving radio waves from 4 or more GPS satellites in
normal situations, or sometimes from 3 satellites.
These satellites are launched and managed by the US Department of
Defense mainly for military use, but they are also open for private
use. This unit performs navigation using GPS information, various
sensors, and road map data.
• Wide area map, detailed map
The wide area map is a map of a large area, and the detailed map is a
map of a small area. The scales of the maps are 1/20,480,000,
1/10,240,000, 1/5,120,000, 1/ 2,560,000, 1/1,280,000, 1/640,000,
1/320,000, 1/160,000, 1/80,000, 1/40,000, 1/20,000, 1/10,000, and
1/5,000.
• Positioning
The quality of the GPS positioning is displayed in the top right of the
menu screen. The greater the number of displayed symbols, the
higher the precision of the GPS positioning.
Other 335
Reference
• 2D positioning and 3D positioning
GPS calculates positions using triangulation.
The distance to the satellite can be determined when the radio wave
from that satellite is received, and the current location can be
measured by receiving radio waves from 3 satellites.
However, because there is a margin of error in the GPS satellites and
navigation unit, positioning is performed in only the 2 dimensions of
latitude and longitude when radio waves from only 3 satellites can
be received. The precision will be lower in this case. When radio
waves from 4 or more GPS satellites are received, positioning is
performed in the 3 dimensions of latitude, longitude, and altitude.
3D positioning is more precise than 2D positioning, and it reduces
the margin of error in the vehicle location display.
About Trademarks
• This product uses the NetFront FlexUI of ACCESS Co., Ltd.
ACCESS, the ACCESS logo and NetFront are the trademarks and
registered trademarks of ACCESS Co., Ltd. in Japan, the USA and
other countries.
© 2010 ACCESS CO., LTD. All rights reserved.
Some parts of the software in this product contain modules
developed by the Independent JPEG Group.
• NAVTEQ ON BOARD is a trademark of NAVTEQ in the USA and other
countries.
© 1993 - 2010 NAVTEQ. All rights reserved.
Actual position
Signals do not cross at one point
Position determined by 2D positioning

336 Other
Reference
• Tone and balance
The audio systems utilize SRSFOCUS™ and SRS TruBass
®
audio
enhancement technologies, under license from SRS Labs, Inc., in all
mode except AM radio mode.
FOCUS, TruBass, SRS and symbol are trademarks of SRS Labs, Inc.
FOCUS and TruBass technologies are incorporated under license
from SRS Labs, Inc.
SRS FOCUS™ raises the audio image from non-optimally placed
speakers up to the natural listening height at ear level.
SRS TruBass
®
enhances the perception of bass frequencies to
provide deep, rich bass response from any size speaker.