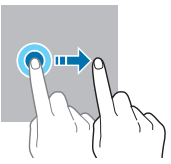
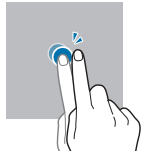
Dragging Tap and hold an item and drag it to the target position.
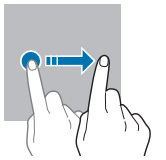
Swiping Swipe upwards, downwards, to the left, or to the right
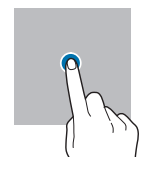
Tapping and holding Tap and hold the screen for approximately 2 seconds.
Double-tapping Double-tap the screen.
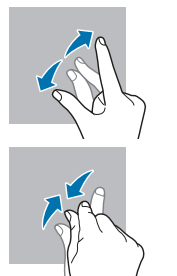
Spreading and pinching Spread two fingers apart or pinch on the screen
The device may not recognise touch inputs close to the edges of the screen, which are outside of the touch input area.
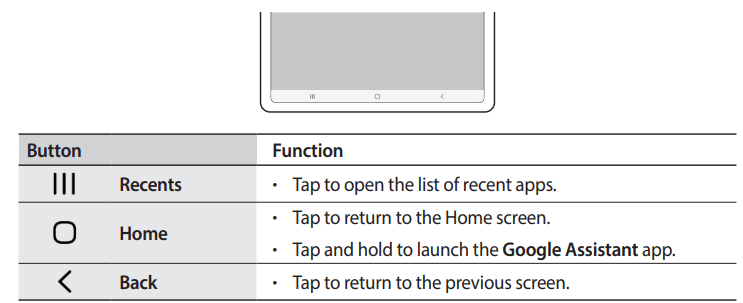
Navigation bar (soft buttons)
When you turn on the screen, the soft buttons will appear on the navigation bar at the bottom of the screen. The soft buttons are set to the Recents button, Home button, and Back button by default. The functions of the buttons can change according to the app currently being used or usage environment.
Hiding the navigation bar
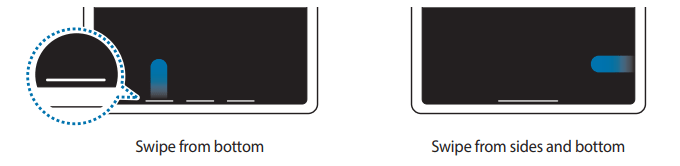
View files or use apps on a wider screen by hiding the navigation bar. Launch the Settings app, tap Display → Navigation bar, and then tap Swipe gestures under Navigation type. The navigation bar will be hidden and the gesture hints will appear. Tap More options and select an option you want.
If you want to hide the gesture hints at the bottom of the screen, tap the Gesture hints switch to deactivate it.
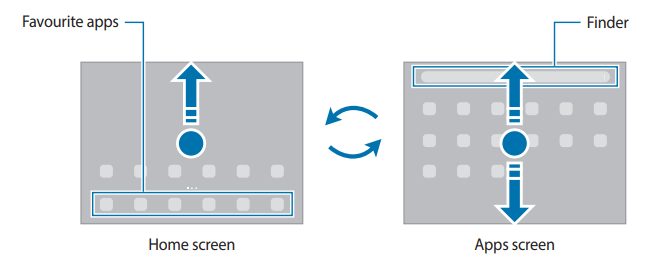
Home screen and Apps screen The Home screen is the starting point for accessing all of the device’s features. It displays widgets, shortcuts to apps, and more. The Apps screen displays icons for all apps, including newly installed apps.
Switching between Home and Apps screens
On the Home screen, swipe upwards to open the Apps screen. To return to the Home screen, swipe upwards or downwards on the Apps screen. Alternatively, tap the Home button or the Back button.
If you add the Apps button on the Home screen, you can open the Apps screen by tapping the button. On the Home screen, tap and hold an empty area, tap Settings, and then tap the Show Apps screen button on Home screen switch to activate it. The Apps button will be added at the bottom of the Home screen. Editing the Home screen
On the Home screen, tap and hold an empty area, or pinch your fingers together to access the editing options. You can set the wallpaper, add widgets, and more. You can also add, delete, or rearrange Home screen panels.
Adding panels: Swipe to the left, and then tap .
Moving panels: Tap and hold a panel preview, and then drag it to a new location.
Deleting panels: Tap on the panel.
Wallpapers: Change the wallpaper settings for the Home screen and the locked screen.
Widgets: Widgets are small apps that launch specific app functions to provide information and convenient access on your Home screen. Select a widget and tap Add. The widget will be added on the Home screen.
Settings: Configure settings for the Home screen, such as the screen layout.
Apps and features
Installing or uninstalling apps
Galaxy Store
Purchase and download apps. You can download apps that are specialised for Samsung Galaxy devices.
Launch the Galaxy Store app. Browse apps by category or tap to search for a keyword.
This app may not be available depending on the service provider or model
To change the auto update settings, tap —► Auto update apps, and then select an option.
Play Store
Purchase and download apps.
Launch the Play Store app. Browse apps by category or search for apps by keyword.
To change the auto update settings, tap —► Settings —► Auto-update apps, and then select an option.
Managing apps
Uninstalling or disabling apps
Tap and hold an app and select an option.
• Uninstall: Uninstall downloaded apps.
• Disable: Disable selected default apps that cannot be uninstalled from the device.
Some apps may not support this feature.
Enabling apps
Launch the Settings app, tap Apps —► —► Disabled —► OK, select an app, and then tap Enable.
S Pen
Using the S Pen • Do not bend or apply excessive pressure with the S Pen while using it. The S Pen may be damaged or the nib may be deformed. • Do not hard press on the screen with the S Pen. The pen nib may be deformed. • If there is a magnet near the device, some S Pen actions, such as tapping the touchscreen, may not work. • If you use the S Pen at sharp angles on the screen, the device may not recognise the S Pen actions. • If the S Pen is not working properly, take it to a Samsung Service Centre.
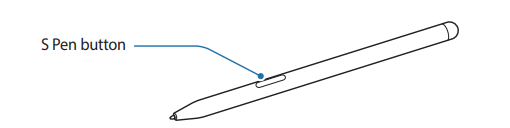
Air command Air command is a menu that provides S Pen features and quick access to frequently used apps. To open the Air command panel, hover the S Pen over the screen and press the S Pen button. Alternatively, hover the S Pen over the screen and tap the Air command icon with the S Pen. Select a function or app on the Air command panel.
Create note: Create notes easily in a pop-up window. You can also launch this feature by double-tapping the screen while pressing and holding the S Pen button. Refer to Samsung Notes for more information.
View all notes: View all notes in the Samsung Notes app.
Smart select: Use the S Pen to select an area and perform actions, such as sharing or saving. Refer to Smart select for more information.
Screen write: Capture screenshots to write or draw on them or crop an area from the captured image. You can also capture the current content and the hidden content on an elongated page, such as a webpage. Refer to Screen write for more information.
Live messages: Instead of text message, create and send a unique message by recording your actions while handwriting or drawing a live message and saving it as an animated file. Refer to Live messages for more information.
AR Doodle: Record fun videos with virtual handwriting or drawings on faces or anywhere else. Refer to AR Doodle for more information.
Translate: Hover the S Pen over a word to translate it. Refer to Translate for more information.
PENUP: Post your artwork, view others’ artwork, and get useful drawing tips.
Bixby Vision: Use the Bixby Vision features to search for similar images, detect and translate text, and more. Refer to Bixby Vision for more information.
Glance: Reduce an app to a thumbnail and hover the S Pen over the thumbnail to open the app in full screen view. Refer to Glance for more information.
Colouring: Add colours to images provided by PENUP using the S Pen.
Write on calendar: Launch the Calendar app and write or draw on the screen. Refer to Write on calendar for more information.
Add shortcuts: Add shortcuts to frequently used apps to the Air command panel.
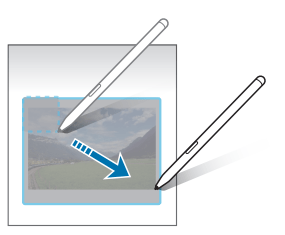
Smart select
Use the S Pen to select an area and perform actions, such as sharing or saving. You can also select an area from a video and capture it as a GIF animation. 1. When there is content you want to capture, such as a part of an image, open the Air command panel and tap Smart select. 2. Select a desired shape icon on the toolbar and drag the S Pen across the content you want to select. 3. Select an option to use with the selected area.
• Extract text: Extract text from the selected area. • Pin to screen: Pin the selected area to the screen. • : Automatically changes the appearance of the selected area. • : Write or draw on the selected area. • : Share the selected area with others. • : Save the selected area in Gallery.
Contacts
Introduction
Create new contacts or manage contacts on the device.
Adding contacts
Creating a new contact
1 Launch the Contacts app and tap+.
2 Select a storage location.
3 Enter contact information and tap Save.
Importing contacts
Add contacts by importing them from other storages to your device.
Launch the Contacts app and tap —► Manage contacts —► Import or export contacts—► Import
Follow the on-screen instructions to import contacts.
Syncing contacts with your web accounts
Sync your device contacts with online contacts saved in your web accounts, such as your Samsung account.
Launch the Settings app, tap Accounts and backup —► Manage accounts and select the account to sync with.
Tap Sync account and tap the Contacts switch to activate it.
Camera
Introduction
Take pictures and record videos using various modes and settings.
Camera etiquette
Do not take pictures or record videos of other people without their permission.
Do not take pictures or record videos where legally prohibited.
Do not take pictures or record videos in places where you may violate other people's privacy.
Taking pictures
1. Launch the Camera app.
You can also launch the app by pressing the Side key twice quickly or dragging to the left on the locked screen.
Some camera features are not available when you launch the Camera app from the locked screen or when the screen is turned off while the screen lock method is set.
The camera automatically shuts off when unused.
Some methods may not be available depending on the service provider or model.
2. Tap the image on the preview screen where the camera should focus.
To adjust the brightness of pictures, drag the adjustment bar that appears above or below the circular frame.
3. Tap to take a picture.
To change the shooting mode, drag the shooting modes list to the left or right, or swipe to the left or right on the preview screen.
The preview screen may vary depending on the shooting mode and which camera is being used.
When you take pictures or videos with a high resolution or a high zoom ratio, the focus may not be clear if the subject is close. Take pictures or videos from a good distance.
If pictures you take appear blurry, clean the camera lens and try again.
Make sure that the lens is not damaged or contaminated. Otherwise, the device may not work properly in some modes that require high resolutions.
Your device’s camera features a wide-angle lens. Minor distortion may occur in wide-angle pictures or videos and does not indicate device performance problems.
The maximum capacity for recording a video may vary depending on the resolution.
The camera may fog up or form condensation if the device is exposed to sudden changes in air temperature, due to the difference in temperature outside and inside the camera cover. Try to avoid such conditions when planning to use the camera. If fogging does occur, allow the camera to dry naturally at room temperature before taking pictures or recording videos, otherwise results may look blurry.
Photo mode
The camera adjusts the shooting options automatically depending on the surroundings to capture pictures easily.
On the shooting modes list, tap PHOTO and tap to take a picture.
Scene optimiser
When the camera recognises the subject, the scene optimiser button will change and the optimised colour and effect will be applied.
If this feature is not activated, tap on the preview screen and tap the Scene optimiser switch to activate it.
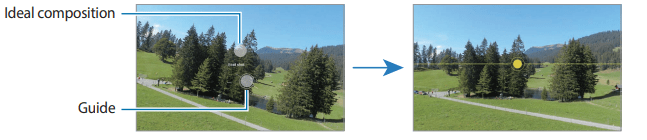
Shot suggestions
The camera suggests the ideal composition for the picture by recognising the position and angle of your subject.
On the preview screen, tap and tap the Shot suggestions switch to activate it.
1. On the shooting modes list, tap PHOTO.
A guide will appear on the preview screen.
2. Point the guide at the subject.
The camera recognises the composition, and the recommended composition appears on the preview screen.
3. Move the device so the guide matches the recommended composition.
When the ideal composition is achieved, the guide will change to yellow.
4. Tap to take a picture.
Gallery
Introduction
View images and videos stored in your device. You can also manage images and videos by album or create stories.
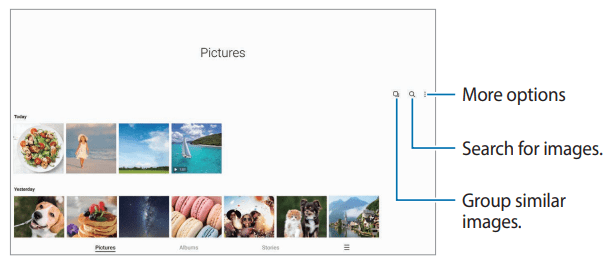
Using Gallery
Launch the Gallery app. Grouping similar images Launch the Gallery app and tap to group similar images and display only the best shots as a preview of the images. When you tap the image preview, you can view all the images in the group. Viewing videos Launch the Gallery app and select a video to play. To view other files, swipe to the left or right on the screen. Cropping enlarged images
Launch the Gallery app and select an image.
Spread two fingers apart on the area you want to save and tap . The cropped area will be saved as a file
AR Zone
Introduction AR Zone provides you AR related features. Choose a feature and capture fun pictures or videos. Launching AR Zone Use the following methods to launch AR Zone:
Launch the AR Zone app.
Launch the Camera app and tap MORE → AR ZONE.
Some features may not be available depending on the service provider or model.
AR Doodle
Record fun videos with virtual handwriting or drawings on faces or anywhere else. When the camera recognises a face or space, the doodles on the face will follow the face as it moves, and the doodles in the space will be fixed in the same place even if the camera moves.
1. Launch the AR Zone app and tap AR Doodle.
When the camera recognises the subject, the recognition area will appear on the screen.
2. Write or draw in the recognition area.
If you switch to the rear camera, you can also write or draw outside the recognition area.
If you tapand then begin to doodle, you can record yourself doodling. 3. Tap to record a video. 4. Tap to stop recording the video.
You can view and share the video in Gallery.
Deco Pic
Capture pictures or videos with various stickers. Launch the AR Zone app and tap Deco Pic.
Bixby
Starting Bixby Press and hold the Side key to launch Bixby. The Bixby intro page will appear. After you select the language to use with Bixby, sign in to your Samsung account, and complete the setup by following the on-screen instructions, the Bixby screen will appear. Using Bixby While pressing and holding the Side key, say what you want to Bixby, and then release your finger from the key. Alternatively, say “Hi, Bixby” and say what you want. For example, while pressing and holding the Side key, say “How’s the weather today?” The weather information will appear on the screen. If you want to know the weather tomorrow, while pressing and holding the Side key, just say “Tomorrow?”
If Bixby asks you a question during a conversation, while pressing and holding the Side key, answer Bixby. Or, tap and answer Bixby.
If you are using headphones or Bluetooth audio devices, or start a conversation by saying "Hi, Bixby", you can continue the conversation without tapping the icon. Launch the Bixby app and tap —► Automatic listening —► Hands-free only.
Waking up Bixby using your voice
You can start a conversation with Bixby by saying "Hi, Bixby". Register your voice so that Bixby will respond to your voice when you say "Hi, Bixby".
Launch the Bixby app and tap —► Voice wake-up.
Tap the Wake with "Hi, Bixby" switch to activate it.
Follow the on-screen instructions to complete the setup.
Now you can say "Hi, Bixby" and start a conversation.
Communicating by typing text
If your voice is not recognised due to noisy environments or if you are in a situation where speaking is difficult, you can communicate with Bixby via text.
Launch the Bixby app and tap and then type what you want.
During the communication, Bixby also will answer you through text instead of voice feedback.
Multi window
Introduction Multi window lets you run two apps at the same time in the split screen view. You can also run multiple apps at the same time in the pop-up view. Some apps may not support this feature. Split screen view
Tap the Recents button to open the list of recently used apps.
Swipe to the left or right, tap an app’s icon, and then tap Open in split screen view.
On the apps list, select another app to launch.
Launching apps from the Edge panel
While using an app, drag the Edge panel handle towards the centre of the screen.
Tap and hold an app, drag it to the left, and then drop it where Drop here to open appears. The selected app will launch in the split screen view.
You can set to launch an app in the split screen view by tapping it once. Tap → and tap Tap under Open in split screen view. If you tap the Show recent apps switch to activate it, you can launch the recently used apps in the split screen view from the Edge panel.
Pop-up view
1. Tap the Recents button to open the list of recently used apps. 2. Swipe to the left or right, tap an app’s icon, and then tap Open in pop-up view. The app screen will appear in the pop-up view. If you tap the Home button while using a pop-up window, the window will be minimised and displayed as an app icon. To use the pop-up window again, tap the app icon.
Launching apps from the Edge panel
Drag the Edge panel handle towards the centre of the screen.
Tap and hold an app, drag it to the left, and then drop it where Drop here for pop-up view appears. The selected app will launch in the pop-up view.
Moving pop-up windows To move a pop-up window, tap the window’s toolbar and drag it to a new location.
Samsung Members
Samsung Members offers support services to customers, such as device problem diagnosis, and lets users submit questions and error reports. You can also share information with others in the Galaxy users’ community or view the latest news and tips. Samsung Members can help you solve any problems you might encounter while using your device.
PENUP
PENUP is a social network service for sharing artwork drawn with the S Pen. Post your artwork, view others’ artwork, and get useful drawing tips. Launch the PENUP app.
Calendar
Manage your schedule by entering upcoming events in your planner. Creating events 1. Launch the Calendar app and tap or double-tap a date. If the date already has saved events or tasks in it, tap the date and tap . 2. Enter event details and tap Save.
Syncing events with your accounts 1. Launch the Settings app, tap Accounts and backup → Manage accounts, and then select the account to sync with. 2. Tap Sync account and tap the Calendar switch to activate it. To add accounts to sync with, launch the Calendar app and tap → Add account. Then, select an account to sync with and sign in. When an account is added, a blue circle is displayed next to the account name.
Reminder
Register to-do items as reminders and receive notifications according to the condition you set.
To receive more accurate notifications, connect to a Wi-Fi or mobile network.
To use location reminders, the GPS feature must be activated. Location reminders may not be available depending on the model.
Starting Reminder Launch the Calendar app and tap → Reminder. The Reminder screen will appear and the Reminder app icon will be added to the Apps screen.
Creating reminders 1. Launch the Reminder app. 2. Tap Write a reminder or , enter the details, and then tap Save.
Completing reminders On the reminders list, select a reminder and tap Complete.
Restoring reminders
Restore reminders that have been completed.
On the reminders list, tap → Completed.
Select a category and tap Edit.
Select a reminder to restore and tap Restore.Reminders will be added to the reminders list and you will be reminded again.
Deleting reminders To delete a reminder, select a reminder and tap Delete. To delete multiple reminders, tap and hold a reminder, tick reminders to delete, and then tap Delete.
My Files
Access and manage various files stored in the device. Launch the My Files app. To check for unnecessary data and free up the device’s storage, tap Analyse storage. To search for files or folders, tap .
SmartThings
Control and manage smart appliances and Internet of Things (IoT) products with your tablet. To view more information, launch the SmartThings app and tap → How to use
Launch the SmartThings app.
Tap → Device.
Select a device and connect to it by following the on-screen instructions.
Connection methods may vary depending on the type of connected devices or the shared content.
The devices you can connect may vary depending on the region. Available features may differ depending on the connected device.
Connected devices’ own errors or defects are not covered by the Samsung warranty. When errors or defects occur on the connected devices, contact the device’s manufacturer
Sharing content
Share content by using various sharing options. The following actions are an example of sharing images.
Launch the Gallery app and select an image.
Tap and select a sharing method you want. You may incur additional charges when sharing files via the mobile network.
Quick Share Sharing content with nearby devices Share content with nearby devices via Wi-Fi Direct or Bluetooth, or with SmartThings supported devices.
Launch the Gallery app and select an image.
On the other device, open the notification panel, swipe downwards, and then tap (Quick Share) to activate it.
Tap → Quick Share and select a device to transfer the image to.
Accept the file transfer request on the other device. This feature does not support sharing videos with TVs or SmartThings supported devices. To watch videos on TV, use the Smart View feature.
Link Sharing Share large files. Upload files to the Samsung storage server and share them with others via a Web link.
Launch the Gallery app and select an image.
Tap → Share as link. The link for the image will be created.
Select a sharing option.
Samsung DeX
Introduction Samsung DeX is a service that allows you to use your tablet like a computer by connecting the tablet to an external display, such as a TV or monitor, or to the Keyboard Cover. Accomplish tasks you want done on your tablet quickly and easily on a large screen using a keyboard and mouse. While using Samsung DeX, you can simultaneously use your tablet.
Use only official Samsung DeX supported accessories that are provided by Samsung. Performance problems and malfunctions caused by using accessories that are not officially supported are not covered by the warranty.
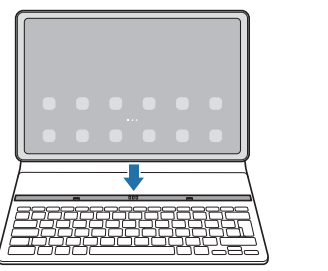
Connecting devices and starting Samsung DeX Connecting to the Keyboard Cover
Use your tablet like a computer by connecting the Keyboard Cover. Gently press the device until the device’s keyboard dock port connects with the connector of the Keyboard Cover. When you tap Start, the Samsung DeX screen will appear.
To set the device to switch to Samsung DeX automatically when connecting the Keyboard Cover, launch the Settings app, tap Advanced features → Samsung DeX, and then tap the Auto start when Book Cover Keyboard is connected switch to activate it.
While using the Keyboard Cover, you can easily launch Samsung DeX with a simple key combination (Fn + DeX).
You can also launch Samsung DeX from quick settings without Keyboard Cover. Swipe downwards on the notification panel and tap (DeX).
To use the device upright, attach the backside of the Keyboard Cover to the back of the device.
Wired connections to external displays You can connect your tablet to an external display using an HDMI adaptor (USB Type-C to HDMI).
Connect an HDMI adaptor to your tablet.
Connect an HDMI cable to the HDMI adaptor and to a TV or monitor’s HDMI port.
On your tablet’s screen, tap Start. Without changing your tablet’s screen, the Samsung DeX screen will appear on the connected TV or monitor.
To switch to Samsung DeX directly when connecting the HDMI adaptor, launch the Settings app, tap Advanced features → Samsung DeX, and then tap the Auto start when HDMI is connected switch to activate it.
Connecting to a TV wirelessly
You can use Samsung DeX by connecting your tablet to a TV wirelessly.
On your tablet, open the notification panel, swipe downwards, and then tap and hold (DeX).
Select a TV from the detected devices list and tap Start now. Some TVs will only be detected when its screen mirroring mode is turned on.
If the connection request window appears on the TV, accept the request.
Follow the on-screen instructions to complete the connection. When they are connected, the Samsung DeX screen will appear on the TV.
It is recommended to use a Samsung Smart TV manufactured after 2019.
Make sure that screen mirroring is supported on the TV you want to connect to.
Settings
Introduction
Customise device settings. Launch the Settings app. To search for settings by entering keywords, tap . You can also search for settings by selecting a tag under Suggestions.
Samsung account
Sign in to your Samsung account and manage it. On the Settings screen, tap Samsung account.
Connections
Options
Change settings for various connections, such as the Wi-Fi feature and Bluetooth.
On the Settings screen, tap Connections.
Wi-Fi: Activate the Wi-Fi feature to connect to a Wi-Fi network and access the Internet or other network devices. Refer to Wi-Fifor more information.
Bluetooth: Use Bluetooth to exchange data or media files with other Bluetooth-enabled devices. Refer to Bluetoothfor more information.
Flight mode: Set the device to disable all wireless functions on your device. You can use only non-network services.
Follow the regulations provided by the airline and the instructions of aircraft personnel. In cases where it is allowed to use the device, always use it in flight mode
Mobile networks: Configure your mobile network settings.
Data usage: Keep track of your data usage amount and customise the settings for the limitation. Set the device to automatically disable the mobile data connection when the amount of mobile data you have used reaches your specified limit.
You can activate the data saver feature to prevent some apps running in the background from sending or receiving data. Refer to Data saver (Mobile network enabled models) for more information.
You can also select apps to always use the mobile data even when your device is connected to a Wi-Fi network. Refer to Mobile data only apps (Mobile network enabled models) for more information.
Mobile Hotspot and Tethering: Use the device as a mobile hotspot to share the device's mobile data connection with other devices. For more information about the mobile hotspot, refer to Mobile Hotspot (Mobile network enabled models).
You may incur additional charges when using this feature.
More connection settings: Customise settings to control other features. Refer to More connection settings for more information.
Some features may not be available depending on the model.
Wi-Fi
Activate the Wi-Fi feature to connect to a Wi-Fi network and access the Internet or other network devices.
Connecting to a Wi-Fi network
1. On the Settings screen, tap Connections → Wi-Fi and tap the switch to activate it.
2. Select a network from the Wi-Fi networks list.
Networks with a lock icon require a password.
Once the device connects to a Wi-Fi network, the device will reconnect to that network each time it is available without requiring a password. To prevent the device from connecting to the network automatically, tap next to the network and tap the Auto reconnect switch to deactivate it.
If you cannot connect to a Wi-Fi network properly, restart your device's Wi-Fi feature or the wireless router.
Viewing the Wi-Fi network quality information
View the Wi-Fi network quality information, such as the speed and stability. On the Settings screen, tap Connections → Wi-Fi and tap the switch to activate it. The network quality information will appear under the Wi-Fi networks. If it does not appear, tap → Advanced and tap the Show network quality info switch to activate it.
The quality information may not appear depending on the Wi-Fi network.
If you make a request to a person who is connected to a secured Wi-Fi network to share its password, you can connect to the network without entering the password. This feature is available between the devices which have contacts each other and the screen of the other device must be turned on.
On the Settings screen, tap Connections → Wi-Fi and tap the switch to activate it.
Select a network from the Wi-Fi networks list.
Tap Request password.
Accept the share request on the other device. The Wi-Fi password is entered on your device and it is connected to the network.
Bluetooth Use Bluetooth to exchange data or media files with other Bluetooth-enabled devices.
Samsung is not responsible for the loss, interception, or misuse of data sent or received via Bluetooth.
Always ensure that you share and receive data with devices that are trusted and properly secured. If there are obstacles between the devices, the operating distance may be reduced.
Some devices, especially those that are not tested or approved by the Bluetooth SIG, may be incompatible with your device.
Do not use the Bluetooth feature for illegal purposes (for example, pirating copies of files or illegally tapping communications for commercial purposes). Samsung is not responsible for the repercussion of illegal use of the Bluetooth feature.
Pairing with other Bluetooth devices
On the Settings screen, tap Connections → Bluetooth and tap the switch to activate it. The detected devices will be listed.
Select a device to pair with. If the device you want to pair with is not on the list, set the device to enter Bluetooth pairing mode. Refer to the other device’s user manuals. Your device is visible to other devices while the Bluetooth settings screen is open.
Accept the Bluetooth connection request on your device to confirm. The devices will be connected when the other device accepts the Bluetooth connection request. To unpair the devices, tap next to the device name to unpair and tap Unpair.
Sending and receiving data
Many apps support data transfer via Bluetooth. You can share data, such as contacts or media files, with other Bluetooth devices. The following actions are an example of sending an image to another device.
Launch the Gallery app and select an image.
Tap → Bluetooth and select a device to transfer the image to. If the device you want to pair with is not in the list, request that the device turns on its visibility option.
Accept the Bluetooth connection request on the other device.
Data saver (Mobile network enabled models) Reduce your data usage by preventing some apps running in the background from sending or receiving data. On the Settings screen, tap Connections → Data usage → Data saver and tap the switch to activate it. When the data saver feature is activated, the icon will appear on the status bar. To select apps to use data without restriction, tap Allowed to use data while Data saver is on and select apps.
Mobile data only apps (Mobile network enabled models) Select apps to always use the mobile data even when your device is connected to a Wi-Fi network. For example, you can set the device to use only mobile data for apps that you want to keep secure or streaming apps that can be disconnected. Even if you do not deactivate the Wi-Fi feature, the apps will launch using the mobile data. On the Settings screen, tap Connections → Data usage → Mobile data only apps, tap the switch to activate it, and then tap the switches next to the apps you want. You may incur additional charges when using this feature.
Sound
Options Change settings for various sounds on the device. On the Settings screen, tap Sound.
Sound mode: Set the device to use sound mode or silent mode.
Temporary mute: Set the device to use silent mode for a certain period.
Ringtone: Change the call ringtone.
Notification sound: Change the notification sound.
System sound theme: Change the sound to use for certain actions, such as charging the device.
Volume: Adjust the device’s volume level.
System sound: Set the device to sound for actions, such as controlling the touchscreen.
Sound quality and effects: Set the device’s sound quality and effects. Refer to Sound quality and effects for more information.
Separate app sound: Set the device to play media sound from a specific app separately on the other audio device. Refer to Separate app sound for more information.
Some features may not be available depending on the model.
Sound quality and effects Set the device’s sound quality and effects. On the Settings screen, tap Sound → Sound quality and effects.
Dolby Atmos: Select a surround sound mode optimised for various types of audio, such as movies, music, and voice. With Dolby Atmos, you can experience moving audio sounds that flow all around you.
Dolby Atmos for gaming: Experience the Dolby Atmos sound optimised for games while playing games.
Equaliser: Select an option for a specific music genre and enjoy optimised sound.
UHQ upscaler: Enhance the sound resolution of music and videos when using wired earphones.
Adapt sound: Set the best sound for you.
Depending on the model, you must connect an earphone to use some features
Display
Change the display and the Home screen settings. On the Settings screen, tap Display.
Light / Dark: Activate or deactivate dark mode.
Dark mode settings: Reduce eye strain by applying the dark theme when using the device at night or in a dark place. You can set a schedule for applying dark mode.
The dark theme may not be applied in some apps.
Brightness: Adjust the brightness of the display.
Adaptive brightness: Set the device to keep track of your brightness adjustments and apply them automatically in similar lighting conditions.
Eye comfort shield: Reduce eye strain by limiting the amount of blue light emitted by the screen. You can set a schedule for applying this feature.
Font size and style: Change the font size and style.
Screen zoom: Make the items on the screen larger or smaller.
Screen timeout: Set the length of time the device waits before turning off the display’s backlight.
Edge panels: Change the settings for the Edge panel.
Navigation bar: Change the navigation bar settings. Refer to Navigation bar (soft buttons) for more information.
Touch sensitivity: Increase the touch sensitivity of the screen for use with screen protectors.
Screen saver: Set the device to launch a screensaver when the device is charging. Some features may not be available depending on the model.
Home screen
Configure settings for the Home screen, such as the screen layout. On the Settings screen, tap Home screen.
Lock screen
Options Change the settings for the locked screen. On the Settings screen, tap Lock screen.
Screen lock type: Change the screen lock method.
Smart Lock: Set the device to unlock itself when trusted locations or devices are detected. Refer to Smart Lock for more information.
Secure lock settings: Change screen lock settings for the selected lock method.
Wallpaper services: Set the device to use wallpaper services such as Dynamic Lock screen.
Clock style: Change the type and colour of the clock on the locked screen.
Roaming clock: Change the clock to show both the local and home time zones on the locked screen when roaming.
Widgets: Change the settings of the items displayed on the locked screen.
Contact information: Set the device to show contact information, such as your email address, on the locked screen.
Notifications: Set how to show notifications on the locked screen.
Shortcuts: Select apps to display shortcuts to them on the locked screen.
About Lock screen: View the Lock screen version and legal information.
The available options may vary depending on the screen lock method selected.
Some features may not be available depending on the model.
Smart Lock You can set the device to unlock itself and remain unlocked when trusted locations or devices are detected. For example, if you have set your home as a trusted location, when you get home your device will detect the location and automatically unlock itself. On the Settings screen, tap Lock screen → Smart Lock and follow the on-screen instructions to complete the setup.
This feature will be available to use after you set a screen lock method.
If you do not use your device for four hours or when you turn on the device, you must unlock the screen using the pattern, PIN, or password you set.
Biometrics and security
Options Change the settings for securing the device. On the Settings screen, tap Biometrics and security.
Face recognition: Set the device to unlock the screen by recognising your face. Refer to Face recognition for more information.
More biometrics settings: Change the settings for biometric data. You can also view the version of the biometrics security patch and check for updates.
Google Play Protect: Set the device to check for harmful apps and behaviour and warn about potential harm and remove them.
Security update: View the version of your device’s software and check for updates.
Find My Mobile: Activate or deactivate the Find My Mobile feature. Access the Find My Mobile website (findmymobile.samsung.com) to track and control your lost or stolen device.
Secure Folder: Create a secure folder to protect your private content and apps from others. Refer to Secure Folder for more information.
Secure Wi-Fi: Set the device to protect your data while using unsecured Wi-Fi networks. Refer to Secure Wi-Fi for more information.
Install unknown apps: Set the device to allow the installation of apps from unknown sources.
Encrypt SD card: Set the device to encrypt files on a memory card.
If you reset your device to the factory defaults with this setting enabled, the device will not be able to read your encrypted files. Disable this setting before resetting the device.
Other security settings: Configure additional security settings.
Some features may not be available depending on the service provider or model.
Accounts and backup
Options
Sync, back up, or restore your device’s data using Samsung Cloud. You can also sign in to accounts, such as your Samsung account or Google account, or transfer data to or from other devices via Smart Switch. On the Settings screen, tap Accounts and backup.
Manage accounts: Add your Samsung and Google accounts, or other accounts, to sync with.
Users: Set up additional user accounts for other users to use the device with personalised settings, such as email accounts, wallpaper preferences, and more. Refer to Users for more information.
This feature may not be available depending on the region or service provider.
Samsung Cloud: Back up your data and settings, and restore the previous device’s data and settings even when you do not have it. Refer to Samsung Cloud for more information.
Google Drive: Keep your personal information, app data, and settings safe on your device. You can back up your sensitive information. You must sign in to your Google account to back up data.
Smart Switch: Launch Smart Switch and transfer data from your previous device. Refer to Transferring data from your previous device (Smart Switch) for more information.
Regularly back up your data to a safe location, such as Samsung Cloud or a computer, so that you can restore it if the data is corrupted or lost due to an unintended factory data reset.
Users Set up additional user accounts for other users to use the device with personalised settings, such as email accounts, wallpaper preferences, and more. This feature may not be available depending on the region or service provider. Following types of user accounts are available:
Administrator: The administrator account is created only when setting up the device for the first time, and cannot be created more than one. This account has full control of the device including user account management. You can add or delete user accounts only when using this account.
Guest: This account allows guests to access the device. Information and data used during a guest session is temporarily stored. Each time you use this account, you are asked whether to continue the previous guest session or reset it.
New user: This account allows users to access their own apps and content, and customise the device settings that affect all accounts.
New restricted account: A restricted account can only access the apps and content allowed by the administrator account, and cannot use the services that require logging in. (Wi-Fi models)
Adding users
On the Settings screen, tap Accounts and backup → Users.
Tap Add user / Add user or profile and follow the on-screen instructions to set up a user account.
Adding restricted profiles (Wi-Fi models)
On the Settings screen, tap Accounts and backup → Users.
Tap Add user or profile → User (restricted profile) and follow the on-screen instructions to set up a user account.
Switching users
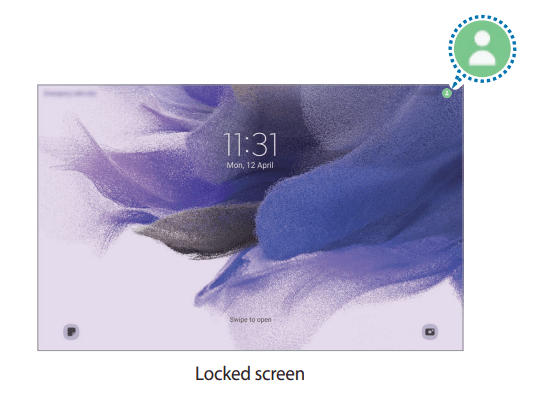
Tap the user account icon at the top of the locked screen and select an account to switch to. Managing users
When using the administrator account, you can delete accounts or change account settings. On the Settings screen, tap Accounts and backup → Users. To delete a user account, tap the user account you want to delete and tap Delete user. To change account settings, tap user account and change the settings.
Samsung Cloud
Back up your device’s data to Samsung Cloud and restore it later. Backing up data You can back up your device’s data to Samsung Cloud.
On the Settings screen, tap Accounts and backup and tap Back up data under Samsung Cloud.
Tick items you want to back up and tap Back up.
Tap Done.
Some data will not be backed up. To check which data will be backed up, on the Settings screen, tap Accounts and backup and tap Back up data under Samsung Cloud.
To view the backup data for other devices in your Samsung Cloud, on the Settings screen, tap Accounts and backup → Restore data → , and then select a device you want.
Restoring data
You can restore your backup data from Samsung Cloud to your device.
On the Settings screen, tap Accounts and backup.
Tap Restore data → and select a device you want.
Tick items you want to restore and tap Restore.
Advanced features
Options Activate advanced features and change the settings that control them. On the Settings screen, tap Advanced features.
Call & text on other devices: Use your device’s calling and messaging features on other devices signed in to your Samsung account.
Continue apps on other devices: Use your device’s apps on other devices signed in to your Samsung account.
Samsung DeX: Set the device to use like a computer. Refer to Samsung DeX for more information.
Android Auto: Connect your device to a vehicle and control some of your device’s features on the vehicle’s display.
Quick Share: Change the Quick Share settings.
S Pen: Change the settings for using the S Pen. Refer to S Pen for more information.
Side key: Select an app or feature to launch using the Side key. Refer to Setting the Side key for more information.
Motions and gestures: Activate the motion feature and configure settings. Refer to Motions and gestures for more information.
Bixby Routines: Add routines to automate settings that you use repeatedly. The device also suggests useful routines according to your frequent situations. Refer to Bixby Routines for more information.
Screenshots and screen recorder: Change the settings for screenshots and screen recorder.
Show contacts when sharing content: Set the device to display the people you contacted on the sharing options panel to allow you to share content directly.
Daily Board: Set the device to show a slideshow with selected features while charging. Refer to Daily Board for more information.
Accessories: Change the accessory settings.
Game Launcher: Activate the Game Launcher. Refer to Game Launcher for more information.
Some features may not be available depending on the service provider or model.
Motions and gestures
Activate the motion feature and configure settings. On the Settings screen, tap Advanced features → Motions and gestures.
Double tap to turn on screen: Set the device to turn on the screen by double-tapping anywhere on the screen while the screen is turned off.
Double tap to turn off screen: Set the device to turn off the screen by double-tapping an empty area on the Home screen or the locked screen.
Keep screen on while viewing: Set the device to prevent the display from turning off while you are looking at it.
Cover screen to mute: Set the device to mute certain sounds by using motions or gestures.
Palm swipe to capture: Set the device to capture a screenshot when you swipe your hand to the left or right across the screen. You can view the captured images in Gallery. It is not possible to capture a screenshot while using some apps and features.
Excessive shaking or an impact to the device may cause an unintended input for some features using sensors.
Digital Wellbeing and parental controls
View the history of your device usage and use features to prevent your device from interfering with your life. You can also set up parental controls for your children and manage their digital use. On the Settings screen, tap Digital Wellbeing and parental controls.
Screen time: Set goals for how much you use your device a day.
App timers: Limit the daily usage time for each app by setting a timer. When you reach the limit, the app will be deactivated and you cannot use it.
Focus mode: Activate focus mode to avoid distractions from your device and stay focused on what you want. You can use the apps you allowed to be used in focus mode.
Bedtime mode: Activate bedtime mode to reduce eye strain before sleeping and prevent your sleep from being disturbed.
Parental controls: Manage your children’s digital use.
Battery and device care
Introduction The device care feature provides an overview of the status of your device’s battery, storage, memory, and system security. You can also automatically optimise the device with a tap of your finger.
Optimising your device
On the Settings screen, tap Battery and device care → Optimise now. The quick optimisation feature improves device performance through the following actions.
Closing apps running in the background.
Managing abnormal battery usage.
Scanning for crashed apps and malware.
Using the auto optimisation feature
You can set the device to perform auto optimisation when your device is not in use. Tap → Automation → Auto optimise daily and tap the switch to activate it. If you want to set the time to perform auto optimisation, tap Time.
Battery Check the remaining battery power and time to use the device. For devices with low battery levels, conserve battery power by activating power saving features. On the Settings screen, tap Battery and device care → Battery.
Power saving mode: Activate power saving mode to extend the battery’s usage time.
Background usage limits: Limit battery usage for apps that you do not use often.
More battery settings: Configure advanced settings for the battery.
The usage time left shows the time remaining before the battery power runs out. Usage time left may vary depending on your device settings and operating conditions.
You may not receive notifications from some apps that use power saving mode
Storage Check the status of the used and available memory. On the Settings screen, tap Battery and device care → Storage. To delete files or uninstall apps that you do not use anymore, select a category. Then, tap and hold, or select, an item and tap Delete or Uninstall.
The actual available capacity of the internal memory is less than the specified capacity because the operating system and default apps occupy part of the memory. The available capacity may change when you update the device.
You can view the available capacity of the internal memory in the Specification section for your device on the Samsung website.
Memory On the Settings screen, tap Battery and device care → Memory. To speed up your device by stopping apps running in the background, tick apps from the apps list, and tap Clean now.
General management
Customise your device’s system settings or reset the device. On the Settings screen, tap General management.
Language: Select device languages. Refer to Adding device languages for more information.
Text-to-speech output: Change the settings for text-to-speech features used when TalkBack is activated, such as languages, speed, and more.
Date and time: Access and alter the settings to control how the device displays the time and date.
If the battery remains fully discharged, the time and date is reset.
Samsung Keyboard settings: Change the settings for the Samsung keyboard.
Keyboard list and default: Select a keyboard to use by default and change the keyboard settings.
Physical keyboard: Change the settings for an external keyboard.
Mouse and trackpad: Change the settings for an external mouse or trackpad.
Autofill service: Select an autofill service to use.
Reset: Reset your device’s settings or perform a factory data reset.
Contact us: Ask questions or view frequently asked questions.
Adding device languages
You can add languages to use on your device.
On the Settings screen, tap General management → Language → Add language. To view all the languages that can be added, tap → All languages.
Select a language to add.
To set the selected language as the default language, tap Set as default. To keep the current language setting, tap Keep current. The selected language will be added to your languages list. If you changed the default language, the selected language will be added to the top of the list.
To change the default language from your languages list, select the language you want and tap Apply. If an app does not support the default language, the next supported language in the list will be used.
Software update
Update your device’s software via the firmware over-the-air (FOTA) service. You can also schedule software updates. On the Settings screen, tap Software update.
Download and install: Check for and install updates manually.
Auto download over Wi-Fi: Set the device to download updates automatically when connected to a Wi-Fi network.
Last update: View information about the last software update. If emergency software updates are released for your device’s security and to block new types of security threats, they will be installed automatically without your agreement.
Security updates information
Security updates are provided to strengthen the security of your device and protect your personal information. For security updates for your model, visit security.samsungmobile.com.
The website supports only some languages.
About tablet
Access your device’s information. On the Settings screen, tap About tablet. To change your device’s name, tap Edit.
Status information: View various device information, such as the Wi-Fi MAC address and serial number.
Legal information: View legal information related to the device, such as safety information and the open source licence.
Software information: View the device’s software information, such as its operating system version and firmware version.
Battery information: View the device’s battery status and information.
Troubleshooting
Before contacting a Samsung Service Centre, please attempt the following solutions. Some situations may not apply to your device. You can also use Samsung Members to solve any problems you might encounter while using your device. When you turn on your device or while you are using the device, it prompts you to enter one of the following codes:
Password: When the device lock feature is enabled, you must enter the password you set for the device.
PIN: When using the device for the first time or when the PIN requirement is enabled, you must enter the PIN supplied with the SIM or USIM card. You can disable this feature by using the Lock SIM card menu.
PUK: Your SIM or USIM card is blocked, usually as a result of entering your PIN incorrectly several times. You must enter the PUK supplied by your service provider.
PIN2: When you access a menu requiring the PIN2, you must enter the PIN2 supplied with the SIM or USIM card. For more information, contact your service provider.
Your device displays network or service error messages
When you are in areas with weak signals or poor reception, you may lose reception. Move to another area and try again. While moving, error messages may appear repeatedly.
You cannot access some options without a subscription. For more information, contact your service provider.
Your device does not turn on When the battery is completely discharged, your device will not turn on. Fully charge the battery before turning on the device. The touchscreen responds slowly or improperly
If you attach a screen protector or optional accessories to the touchscreen, the touchscreen may not function properly.
If you are wearing gloves, if your hands are not clean while touching the touchscreen, or if you tap the screen with sharp objects or your fingertips, the touchscreen may malfunction.
The touchscreen may malfunction in humid conditions or when exposed to water.
Restart your device to clear any temporary software bugs.
Ensure that your device software is updated to the latest version.
If the touchscreen is scratched or damaged, visit a Samsung Service Centre.
Your device freezes or encounters a fatal error Try the following solutions. If the problem is still not resolved, contact a Samsung Service Centre.
Restarting the device If your device freezes or hangs, you may need to close apps or turn off the device and turn it on again. Forcing restart If your device is frozen and unresponsive, press and hold the Side key and the Volume Down key simultaneously for more than 7 seconds to restart it. Resetting the device If the methods above do not solve your problem, perform a factory data reset. Launch the Settings app and tap General management → Reset → Factory data reset → Reset → Delete all. Before performing the factory data reset, remember to make backup copies of all important data stored in the device.
Calls are not connected
Ensure that you have accessed the right cellular network.
Ensure that you have not set call barring for the phone number you are dialling.
Ensure that you have not set call barring for the incoming phone number.
Others cannot hear you speaking on a call
Ensure that you are not covering the built-in microphone.
Ensure that the microphone is close to your mouth.
If using an earphone, ensure that it is properly connected.
Sound echoes during a call Adjust the volume by pressing the Volume key or move to another area.
A cellular network or the Internet is often disconnected or audio quality is poor
Ensure that you are not blocking the device’s internal antenna.
When you are in areas with weak signals or poor reception, you may lose reception. You may have connectivity problems due to issues with the service provider’s base station. Move to another area and try again.
When using the device while moving, wireless network services may be disabled due to issues with the service provider’s network.
The battery does not charge properly (For Samsung-approved chargers)
Ensure that the charger is connected properly.
Visit a Samsung Service Centre and have the battery replaced.
The battery depletes faster than when first purchased
When you expose the device or the battery to very cold or very hot temperatures, the useful charge may be reduced.
Battery consumption will increase when you use certain features or apps, such as GPS, games, or the Internet.
The battery is consumable and the useful charge will get shorter over time.
Error messages appear when launching the camera Your device must have sufficient available memory and battery power to operate the camera app. If you receive error messages when launching the camera, try the following:
Charge the battery.
Free some memory by transferring files to a computer or deleting files from your device.
Restart the device. If you are still having trouble with the camera app after trying these tips, contact a Samsung Service Centre.
Picture quality is poorer than the preview
The quality of your pictures may vary, depending on the surroundings and the photography techniques you use.
If you take pictures in dark areas, at night, or indoors, image noise may occur or images may be out of focus.
Error messages appear when opening multimedia files If you receive error messages or multimedia files do not play when you open them on your device, try the following:
Free some memory by transferring files to a computer or deleting files from your device.
Ensure that the music file is not Digital Rights Management (DRM)-protected. If the file is DRM-protected, ensure that you have the appropriate licence or key to play the file.
Ensure that the file formats are supported by the device. If a file format is not supported, such as DivX or AC3, install an app that supports it. To confirm the file formats that your device supports, visit the Samsung website.
Your device supports pictures and videos captured with the device. Pictures and videos captured by other devices may not work properly.
Your device supports multimedia files that are authorised by your network service provider or providers of additional services. Some content circulated on the Internet, such as ringtones, videos, or wallpapers, may not work properly.
Bluetooth is not working well If another Bluetooth device is not located or there are connection problems or performance malfunctions, try the following:
Ensure that the device you wish to connect with is ready to be scanned or connected to.
Ensure that your device and the other Bluetooth device are within the maximum Bluetooth range (10 m).
On your device, launch the Settings app, tap Connections, and then tap the Bluetooth switch to re-activate it.
On your device, launch the Settings app, tap General management → Reset → Reset network settings → Reset settings → Reset to reset network settings. You may lose registered information when performing the reset.
If the tips above do not solve the problem, contact a Samsung Service Centre.
The screen brightness adjustment bar does not appear on the notification panel
Open the notification panel by dragging the status bar downwards, and then drag the notification panel downwards. Tap → Quick panel layout and tap the Show brightness control above notifications switch to activate it.
A connection is not established when you connect the device to a computer
Ensure that the USB cable you are using is compatible with your device.
Ensure that you have the proper driver installed and updated on your computer.
Your device cannot find your current location
GPS signals may be obstructed in some locations, such as indoors. Set the device to use Wi-Fi or a mobile network to find your current location in these situations.
Data stored in the device has been lost
Always make backup copies of all important data stored in the device. Otherwise, you cannot restore data if it is corrupted or lost. Samsung is not responsible for the loss of data stored in the device.
A small gap appears around the outside of the device case
This gap is a necessary manufacturing feature and some minor rocking or vibration of parts may occur.
Over time, friction between parts may cause this gap to expand slightly.
There is not enough space in the device’s storage
Delete unnecessary data, such as cache, using the device care feature or manually delete unused apps or files to free up storage space.
The Home button does not appear
The navigation bar containing the Home button may disappear while using certain apps or features. To view the navigation bar, drag upwards from the bottom of the screen.


 .
. on the panel.
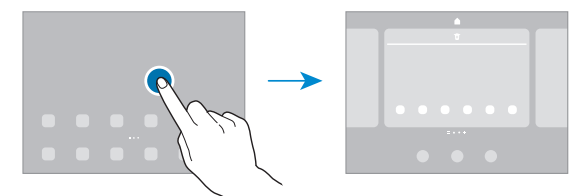
 to search for a keyword.
 —► Auto update apps, and then select an option.
 —► Settings —► Auto-update apps, and then select an option.
 with the S Pen.
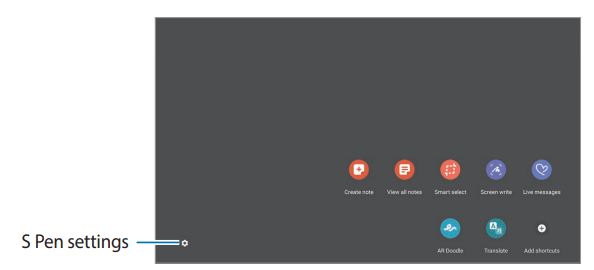
 : Automatically changes the appearance of the selected area.
 : Write or draw on the selected area.
 : Share the selected area with others.
 : Save the selected area in Gallery.
 to take a picture.
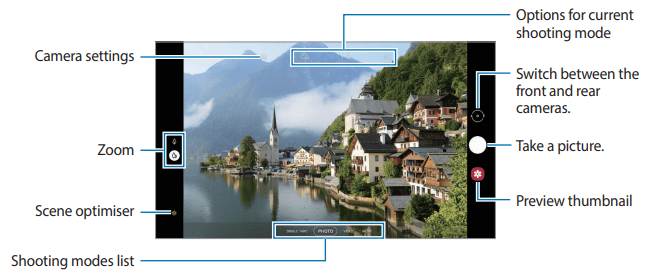
 to take a picture.
 to group similar images and display only the best shots as a preview of the images. When you tap the image preview, you can view all the images in the group.
 . The cropped area will be saved as a file
 and then begin to doodle, you can record yourself doodling.
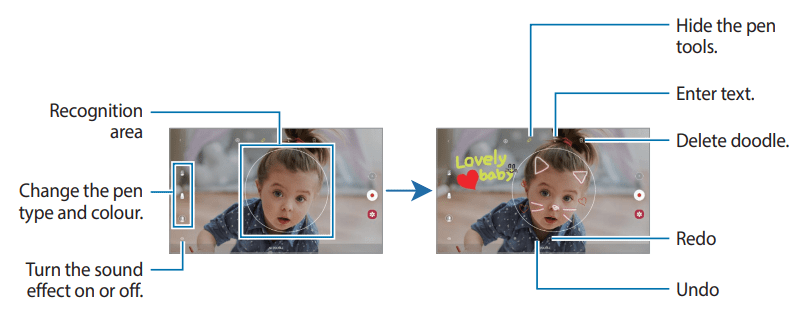
 to record a video.
 to stop recording the video.

 and then type what you want.
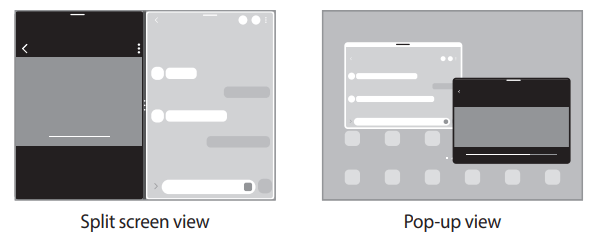
 →
→  and tap Tap under Open in split screen view. If you tap the Show recent apps switch to activate it, you can launch the recently used apps in the split screen view from the Edge panel.
 or double-tap a date.
 → Add account. Then, select an account to sync with and sign in. When an account is added, a blue circle is displayed next to the account name.
 → Reminder. The Reminder screen will appear and the Reminder app icon
  will be added to the Apps screen.
 , enter the details, and then tap Save.
 → Completed.
 .
. → How to use
 → Device.
 and select a sharing method you want.
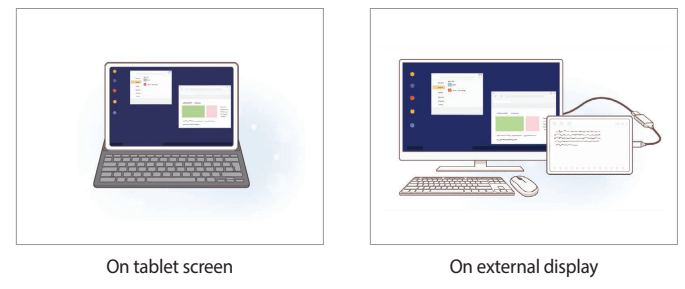
 (DeX).
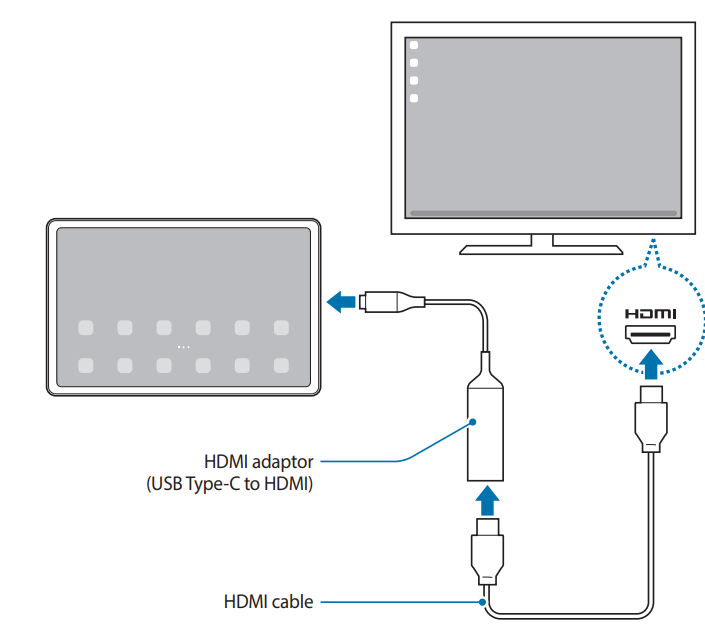
 next to the network and tap the Auto reconnect switch to deactivate it.
 → Advanced and tap the Show network quality info switch to activate it.
 next to the device name to unpair and tap Unpair.
 → Bluetooth and select a device to transfer the image to.
 icon will appear on the status bar.
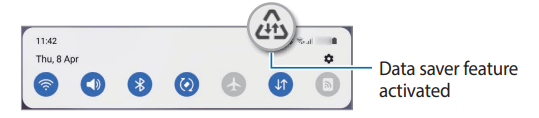
 , and then select a device you want.
 → All languages.
 → Quick panel layout and tap the Show brightness control above notifications switch to activate it.
