SuperSteam+
™
Oven
MODEL
SSC2489DS
SuperSteam+
™
Oven: Model SSC2489DS
OPERATION MANUAL
CUSTOMER ASSISTANCE (UNITED STATES ONLY) .......... 2
CUSTOMER ASSISTANCE (CANADA ONLY) .................. 3
US CONSUMER LIMITED WARRANTY ........................ 4
CANADA CONSUMER LIMITED WARRANTY ..................5
IMPORTANT SAFETY INSTRUCTIONS ..................... 6-7
IMPORTANT REGULATORY INFORMATION .................. 7
INFORMATION YOU NEED TO KNOW .................... 8-10
PRODUCT OVERVIEW ..... .............................. 11-12
BEFORE FIRST USE ...................................... 13-14
CONNECTING TO YOUR APPLIANCE ....................... 15
COOKING OPERATION .................................... 16-20
SETTING AND DEMO MODES ................................ 21
CLEANING.................................................. 22-23
BEFORE YOU CALL FOR SERVICE ........................... 24
TINSKB264MRR0 E
CUSTOMER ASSISTANCE UNITED STATES ONLY
REGISTER YOUR PRODUCT
Registering your new product is easy and offers benets that help you get the most
out of your Sharp product including:
9 Convenience: Ifyoueverneedwarrantysupport,yourproductinformationisalreadyonle.
9 Communication:StayuptodatewithimportantnoticationsandspecialoffersfromSHARP.
9 Support: Quickly access support content including Owner’s Manuals, FAQ’s,
How-toVideos,andmuchmore.
3 EASY WAYS TO REGISTER TODAY!
PRODUCT SUPPORT
If you have questions about the setup or operation of your product, please refer to
the corresponding section within this manual.
Additionally, visit www.sharpusa.com/support to access exclusive content about your
product including:
Æ FAQ’s and How-To Videos
Æ Find or Request Service
Æ Purchase an Extended Warranty
Æ Downloads including the Installation Guide, Spec Sheet, and Owner’s Manual
CONTACT US
If at any time you have questions or comments concerning your SHARP product,
please contact the SHARP Customer Assistance Center. We are available to
assist you through multiple contact methods for your convenience:
Scan this QR Code on your mobile device Visit http://www.sharpusa.com/register
ONLINE
Visit our sites to
learn more about
your product at
sharpusa.com and
sbl.sharpusa.com
See the Contact Us section on our sites U.S. | www.sharpusa.com/support Contact a Sharp Advisor on the phone
Contact a Sharp Advisor on the phone
CALL US
US 800-BE-SHARP
800-237-4277
Mon-Fri: 7am-7pm CST
Sat-Sun: 9am-7pm CST
CALL US
US 800-BE-SHARP
800-237-4277
Mon-Fri: 7am-7pm CST
Sat-Sun: 9am-7pm CST
EMAIL
Available 24/7
US: sharpusa.com
CHAT ONLINE
Mon-Fri: 7am-7pm CST
Sat-Sun: 9am-7pm CST
SCAN
Use the camera or
QR code scanning
application on your
mobile device
2E 2E

CUSTOMER ASSISTANCE CANADA ONLY
To aid in answering questions if you call for service or for reporting loss or theft,
please use the space below to record the model and serial number located on the
back side of the unit.
Model Number:
Serial Number:
Date of Purchase:
Dealer Name:
Address:
City:
Province:
Postal Code:
Telephone:
PRODUCT SUPPORT
If you have questions about the setup or operation of your product, please refer to
the corresponding section within this manual.
Additionally, visit http://sharp.ca/support-home.aspx to access exclusive content
about your product including:
Æ Find a Dealer
Æ Find Service Locations
Æ Downloads including the Installation Guide, Spec Sheet, and Owner’s Manual
CONTACT US
If at any time you have questions or comments concerning your SHARP product,
please contact the SHARP Customer Assistance Center. We are available to
assist you through multiple contact methods for your convenience:
http://sharp.ca/contact-emailus.aspx CA | sharp.ca/support-home.aspx Contact a Sharp Advisor on the phone
CALL US
CA 877-278-6709
Mon-Fri: 7am-7pm CST
EMAIL
Available 24/7
See the Contact Us
section on our site.
SUPPORT SITE
Product Downloads,
Service Locater, Where
to Buy, Toner Recycling
Program and more.
E3
US CONSUMER LIMITED WARRANTY
4E
SHARP ELECTRONICS CORPORATION (“Sharp”) warrants to the rst consumer purchaser (“Purchaserˮ) that this SHARP brand
product (“Productˮ), when shipped in its original container and sold or distributed in the United States by Sharp or an authorized
Sharp dealer or reseller, will be free from defective workmanship and materials and agrees that it will, at its option, either repair the
defect or replace the defective Product or part thereof with a new or remanufactured equivalent at no charge to the Purchaser for parts
or labor for the period(s) set forth below.
This limited warranty does not apply to any appearance items of the Product nor to the additional excluded item(s) set forth below
nor to any Product the exterior of which has been damaged or defaced, which has been subjected to misuse, abnormal service or
handling, or which has been altered or modied in design or construction.
In order to enforce the rights under this limited warranty, the Purchaser should follow the steps set forth below and provide proof of
purchase to the servicer.
The limited warranty described herein is in addition to whatever implied warranties may be granted to Purchasers by law. ALL
IMPLIED WARRANTIES INCLUDING THE WARRANTIES OF MERCHANTABILITY AND FITNESS FOR USE ARE
LIMITED TO THE PERIOD(S) FROM THE DATE OF PURCHASE SET FORTH BELOW. Some states do not allow limitations
on how long an implied warranty lasts, so the above limitation may not apply to you.
Neither the sales personnel of the seller nor any other person is authorized to make any warranties other than those described herein,
or to extend the duration of any warranties beyond the time period described above on behalf of Sharp.
The warranties described herein shall be the sole and exclusive warranties granted by Sharp and shall be the sole and exclusive
remedy available to the Purchaser. Correction of defects, in the manner and for the period of time described herein, shall constitute
complete fulllment of all liabilities and responsibilities of Sharp to the Purchaser with respect to the Product and shall constitute
full satisfaction of all claims, whether based on contract, negligence, strict liability or otherwise. In no event shall Sharp be liable,
or in any way responsible, for any damages or defects in the Product which were caused by repairs or attempted repairs performed
by anyone other than an authorized servicer. Nor shall Sharp be liable or in any way responsible for any incident or consequential
economic or property damage. Some states do not allow the exclusion of incidental or consequential damages, so the above exclusion
may not apply to you.
THIS LIMITED WARRANTY GIVES YOU SPECIFIC LEGAL RIGHTS. YOU MAY ALSO HAVE OTHER RIGHTS WHICH
VARY FROM STATE TO STATE.
THIS LIMITED WARRANTY IS VALID ONLY IN THE FIFTY (50) UNITED STATES, THE DISTRICT OF COLUMBIA AND
PUERTO RICO.
Your product model number &
description:
Model # SSC2489DS or Home Use SuperSteam+ Oven. (Be sure to have this information
available when you need service for your Product.)
Warranty period for this product: One (1) year parts and labor including in-home service.
Additional item(s) excluded from
warranty coverage (if any):
Non-functional accessories and light bulbs.
Where to obtain service: From a Sharp Authorized Servicer located in the United States. To nd the location of the
nearest Sharp Authorized Servicer, call Sharp toll free at 1-800-BE-SHARP (1-800-237-4277).
What to do to obtain service: In-home service is provided for one year from date of purchase. In-home service can be arranged
by calling 1-800-BE-SHARP. Be sure to have Proof of Purchase available.
TO OBTAIN SUPPLY, ACCESSORY OR PRODUCT INFORMATION, CALL 1-800-BE-SHARP or visit www.sharpusa.com.
SAVE THE PROOF OF PURCHASE AS IT IS NEEDED SHOULD YOUR OVEN EVER REQUIRE WARRANTY SERVICE.
CANADA CONSUMER LIMITED WARRANTY
Congratulations on your purchase!
Sharp Electronics of Canada Ltd. (“Sharp”) warrants to the rst purchaser for this Sharp brand product (“Product”), when shipped
in its original container and sold or distributed in Canada by Sharp or by an authorized Sharp dealer, and Product was not sold “as
is” or “sales nal” that the Product will during the applicable warranty period, be free from defects in material and workmanship,
and will within the applicable warranty period, either repair the defective Product or provide the rst purchaser a replacement of the
defective Product.
This warranty does not apply to any appearance items of the product nor to the additional excluded item(s) set forth below nor to any
product the exterior of which has been damaged or defaced, which has been subjected to improper voltage or other misuse, abnormal
service or handling, which has been altered or modied in design or construction, or if the serial number or model number afxed to
Product has been removed, defaced, changed, altered or tampered with.
How to get service: Should this Sharp product fail to operate during the warranty period, warranty service is provided by an Authorized
Sharp Service Centre or an Authorized Sharp Servicing Dealer. In home warranty service will be carried out to locations accessible
by on-road service vehicle and within 50 km of an authorized Sharp service centre. The servicer may if necessary take the unit for
repair at the servicer's facility. No other person (including any Sharp dealer or service centre) is authorized to extend, enlarge or
transfer this warranty on behalf of Sharp.
The express warranties in this limited warranty are, except for consumer purchasers domiciled in Quebec, in lieu of and, except to the
extent prohibited by applicable law, Sharp disclaims all other warranties and conditions, express or implied, whether arising by law,
statute, by course of dealing or usage of trade, including, without limitation, implied warranties or conditions of merchantability and/or
quality, tness for a particular use or purpose, and/or non-infringement. Limitations (not applicable to consumer purchasers domiciled
in Quebec to the extent prohibited under Quebec law): (a) Sharp shall not be liable for any incidental, special, consequential, economic,
exemplary or indirect damages of any kind or nature (including lost prots or damages for loss of time or loss of use or loss of data)
arising from or in any connection with the use or performance of a Product or a failure of a Product, even if Sharp is aware of or has
been advised of the possibility of such damages; (b) the remedies described in this limited warranty constitute complete fulllment
of all obligations and responsibilities of Sharp to the purchaser with respect to the Product and shall constitute full satisfaction of all
claims, whether based on contract, negligence, strict liability or otherwise. Some provinces may not allow the exclusion or limitation
of certain damages, or limits on the duration or voiding of implied warranties or conditions; in such provinces, the exclusions and
limits herein may not apply. This limited warranty is, except for consumer purchasers domiciled in Quebec, governed by the laws of
the Province in Canada in which the purchaser has purchased the Product. For consumer purchasers domiciled in Quebec this limited
warranty is governed by the laws of Quebec.
Your product model number &
description:
Model # SSC2489DS Home Use SuperSteam+ Oven. (Be sure to have this information available
when you need service for your product.)
Warranty period for this product: One (1) year parts and labor including in-home service.
Additional item(s) excluded from
warranty coverage (if any):
Non-functional accessories, reservoir, drip tray, base tray, rack, baking tray, perforated tray
and light bulb.
To obtain the name and address of the nearest Authorized Sharp Service Centre or Dealer, please contact:
SHARP ELECTRONICS OF CANADA LTD
335 Britannia Road East
Mississauga, Ontario
L4Z 1W9
(905) 568-7140
Website: www.sharp.ca
THIS LIMITED WARRANTY IS VALID ONLY IN CANADA
E55
6E 6
IMPORTANT SAFETY INSTRUCTIONS
READ ALL INSTRUCTIONS BEFORE USING
When using the appliance, basic safety precautions should be
followed, including the items stated in this section.
WARNING
To reduce the risk of burns, electric shock, re
or injury to persons:
1 Read all instructions before using the appliance.
2 Be sure your appliance is properly installed and
grounded by a qualied technician in accordance with
the provided Installation Manual. Have installer note
which fuse/circuit supplies power to the oven in the
fuse/circuit breaker panel.
3 Never use your appliance for warming or heating the
room.
4 Children should not be left alone or unattended in area
where appliance is in use. They should never be allowed
to sit or stand on any part of the appliance.
5 Wear proper apparel. Loose-tting or hanging garments
(necklaces, sleeves, scarves or ties) should never be worn
while using the appliance. Secure long hair so that it
does not risk contact with the oven.
6 Do not repair or replace any part of the appliance unless
specically recommended in the manual. All other
servicing should be referred to a qualied technician.
7 Flammable materials should not be stored in an oven
or near surface units.
8 DO NOT USE WATER ON GREASE FIRES!
Smother re or ame or use dry chemical or foam-type
extinguisher.
9 Use only dry potholders. Moist or damp potholders on
hot surfaces may result in burns from steam. Do not use
a towel or other bulky cloth.
10 Use care when opening door. Let hot air or steam escape
before removing or replacing food.
11 Do not heat unopened food containers. Buildup of
pressure may cause container to burst and result in
inju r y.
12 Keep oven vent ducts and all other openings on the
appliance unobstructed.
13 Always place oven racks in desired location while oven
is cool. If rack must be moved while oven is hot, use
caution in order to prevent burns.
14 Use this appliance only for its intended use as described
in this manual. Do not use corrosive chemicals or vapors
in this appliance. This appliance is specically designed
to heat, cook or dry food. It is not designed for industrial
or laboratory use.
15 Do not operate this appliance if it has a damaged cord
or plug, if it is not working properly or if it has been
damaged or dropped.
16 Do not store or use this appliance outdoors. Do not use
this product near water—for example, near a kitchen
sink, in a wet basement, near a swimming pool or similar
locations.
17 Do not immerse cord or plug in water.
18 Keep cord away from heated surfaces.
19 Do not climb or sit on the appliance.
20 Keep ngers and other objects and materials away from
the door of the appliance when closing.
21 When cleaning appliance, use only mild, nonabrasive
soaps or detergents applied with a sponge or soft cloth.
See cleaning instructions on pages 22-23.
22 To reduce the risk of re in the appliance cavity:
a Do not overcook food. Carefully attend appliance
when paper, plastic or other combustible materials
are placed inside the appliance to facilitate cooking.
b Remove wire twist-ties from oven safe cooking bags
before placing bags in appliance.
c
Do not use the appliance for storage purposes. Do
not leave paper products, cooking utensils or food
in the appliance when not in use.
d Foods containing a large amount of high alcohol
content can run the risk of igniting the steam in the
oven cavity during cooking as the alcohol evaporates
into the steam. Do not use the oven to prepare foods
with a large amount of high alcohol content. Use
caution when opening door after cooking.
23 If the appliance light fails, consult a SHARP
AUTHORIZED SERVICER.
SAVE THESE INSTRUCTIONS
WARNING
As a safety precaution, the oven will periodically exhaust steam
during use in various cooking modes to reduce the amount of steam buildup in
the cavity. The steam will exhaust from the air vent above the door, as pictured.
CAUTION
Stand clear and do not block vent during steam exhaustion. Steam
will be hot.
CONVECTION
BAKE
STEAM
SUPERSTEAM
GRILL
STEAM
BAKE
STEAM
PROOF
SUPERSTEAM
ROAST
MANUAL BACK
Air vent
opening

E7
IMPORTANT REGULATORY INFORMATION
CAUTION
Any changes or modications to the appliance
not expressly approved by the party responsible for compliance
could void the user’s authority to operate the appliance.
NOTE: This equipment has been tested and found to comply
with the limits for a Class B digital device, pursuant to Part 15 of
the FCC Rules. These limits are designed to provide reasonable
protection against harmful interference in a residential
installation. This equipment generates, uses and can radiate radio
frequency energy and, if not installed and used in accordance
with the instructions, may cause harmful interference to
radio communications. However, there is no guarantee that
interference will not occur in a particular installation. If this
equipment does cause harmful interference to radio or television
reception, which can be determined by turning the equipment off
and on, the user is encouraged to try to correct the interference
by one or more of the following measures:
• Reorient or relocate the receiving antenna.
• Increase the separation between the equipment and receiver.
• Connect the equipment to an outlet on a circuit different from
that to which the receiver is connected.
• Consult the dealer or an experienced radio/TV technician
for help.
SHARP Home Use SuperSteam+ Oven Model # SSC2489DS
This device complies with Part 15 of the FCC Rules. Operation
is subject to the following two conditions: (1) This device may
not cause harmful interference, and (2) this device must accept
any interference received, including interference that may cause
undesired operation.
Responsible Party:
Sharp Electronics Corporation
100 Paragon Drive, Montvale, NJ 07645
TEL: 1-800-BE-SHARP (or www.sharpusa.com)
This device complies with Part 15 of the FCC Rules. Operation
is subject to the following two conditions: (1) This device may
not cause harmful interference, and (2) this device must accept
any interference received, including interference that may cause
undesired operation.
• Contains/Contient FCC: RX3-B01
• Contains/Contient IC: 2878F-B01
CAUTION FOR WIRELESS LAN
CAUTION FOR USAGE ABOUT WI-FI
• If you are using in the following areas, the operation cannot
be guaranteed: near Bluetooth
®
wireless communications
devices using the same frequency (2.4 GHz) as this product
or specied low power wireless devices. There may also be
issues in locations with devices, such as microwave ovens,
that emit a magnetic eld; as well as in areas with static
electricity or radio disturbance, all of which can interfere
with the Wi-Fi signal.
• Wireless connection and performance cannot be guaranteed
for all routers or housing environments. In the following
places, it is possible the Wi-Fi cannot reach or is disconnected:
inside of a building made with concrete, reinforced metal, near
an obstruction (e.g., a wall) or near a wireless communications
device using the same frequency.
• Wireless LAN of this product corresponds to channels 1-13.
It is not available to communicate with routers set up to other
channels.
IMPORTANT SAFETY INSTRUCTIONS
CAUTION FOR PERSONAL INFORMATION
(RELATED TO SECURITY)
• Using a wireless LAN device has the possibility of
interception when using Wi-Fi, regardless of password setting.
• Depending on the location where you are connecting your
oven, ensure you have the right/authority to connect the
appliance to the available Wi-Fi network.
• If disposing of unit, giving or selling to a third party, be sure
to Reset Wi-Fi Settings as described in this manual. The
wireless LAN function of the unit should be initialized (reset)
in case of handover to a third party to avoid illegal access
from unauthorized parties.
MINIMUM REQUIREMENTS FOR WI-FI/ROUTER
SPECIFICATIONS:
• IEEE 802.11 b/g/n compatible WLAN
• 72.2Mbps receive and transmit PHY rate using 20MHz
bandwidth
• 150Mbps receive and transmit PHY rate using 40MHz
bandwidth
• 802.11i (WPA, WPA2). Open, shared key, and pair-wise key
authentication services
• Wi-Fi WPS support

8E
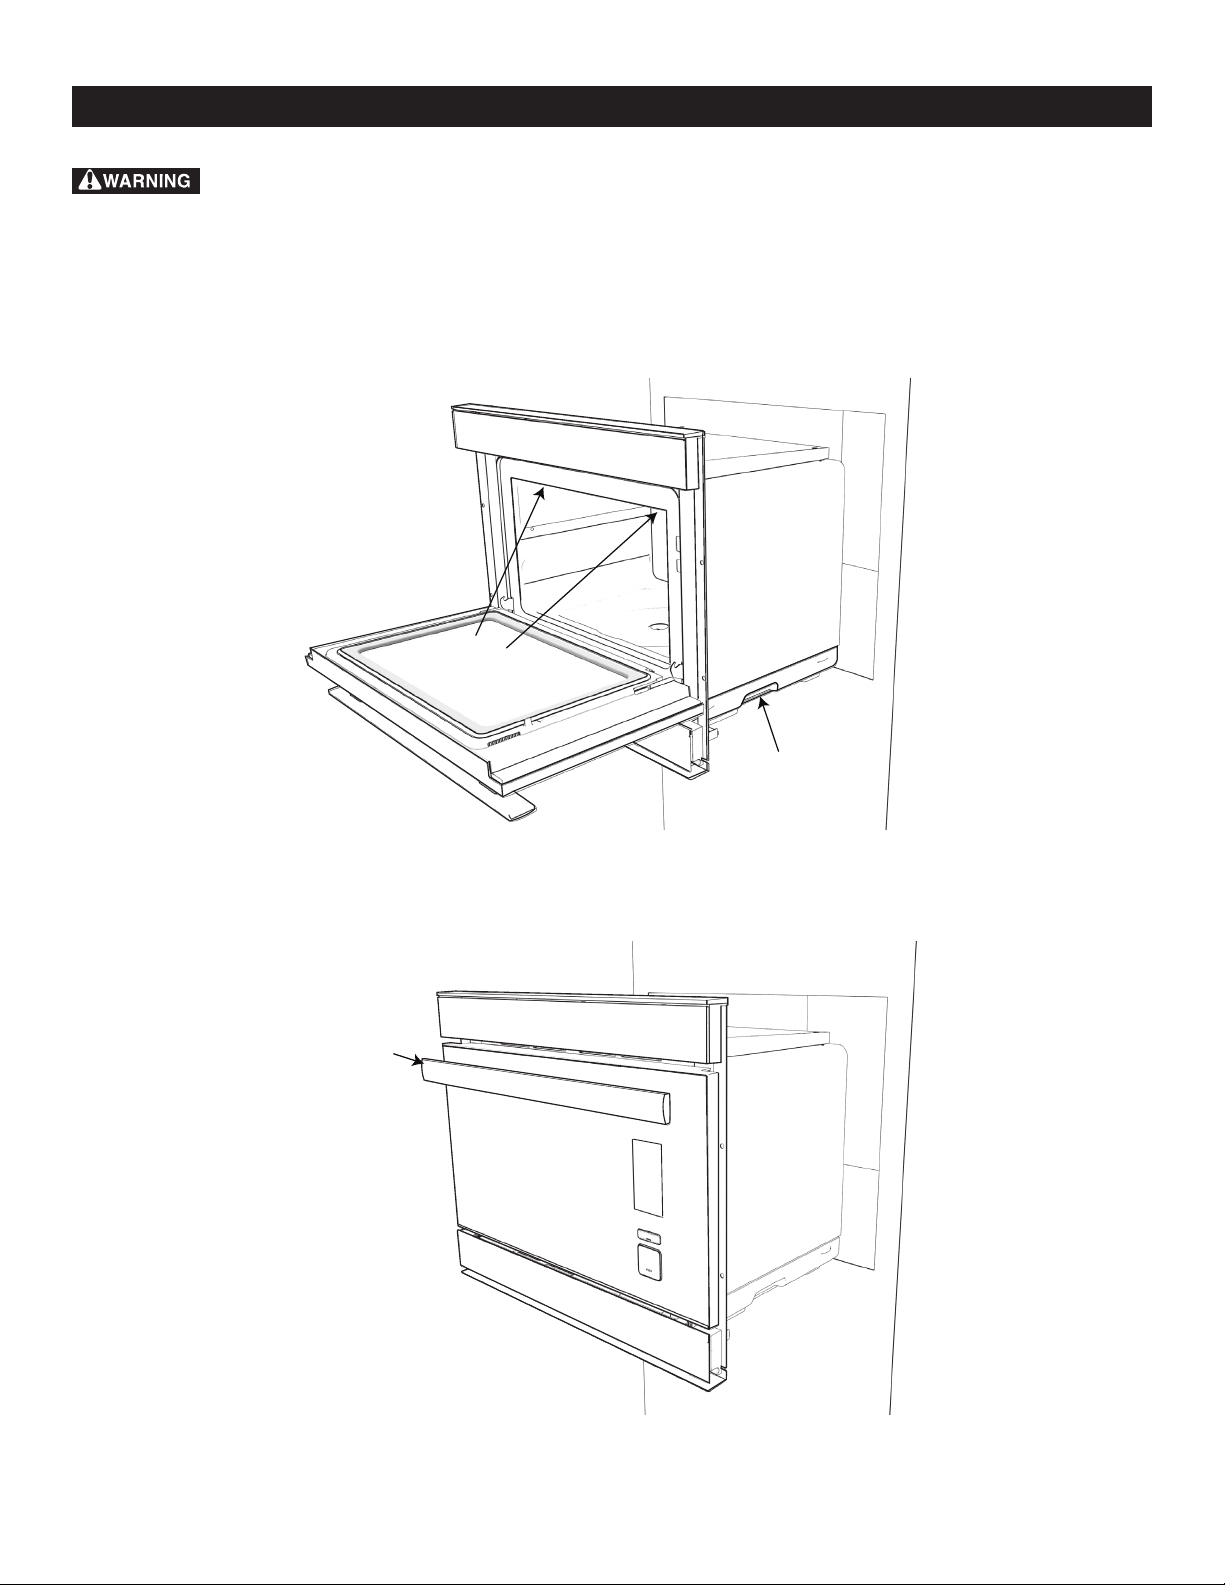
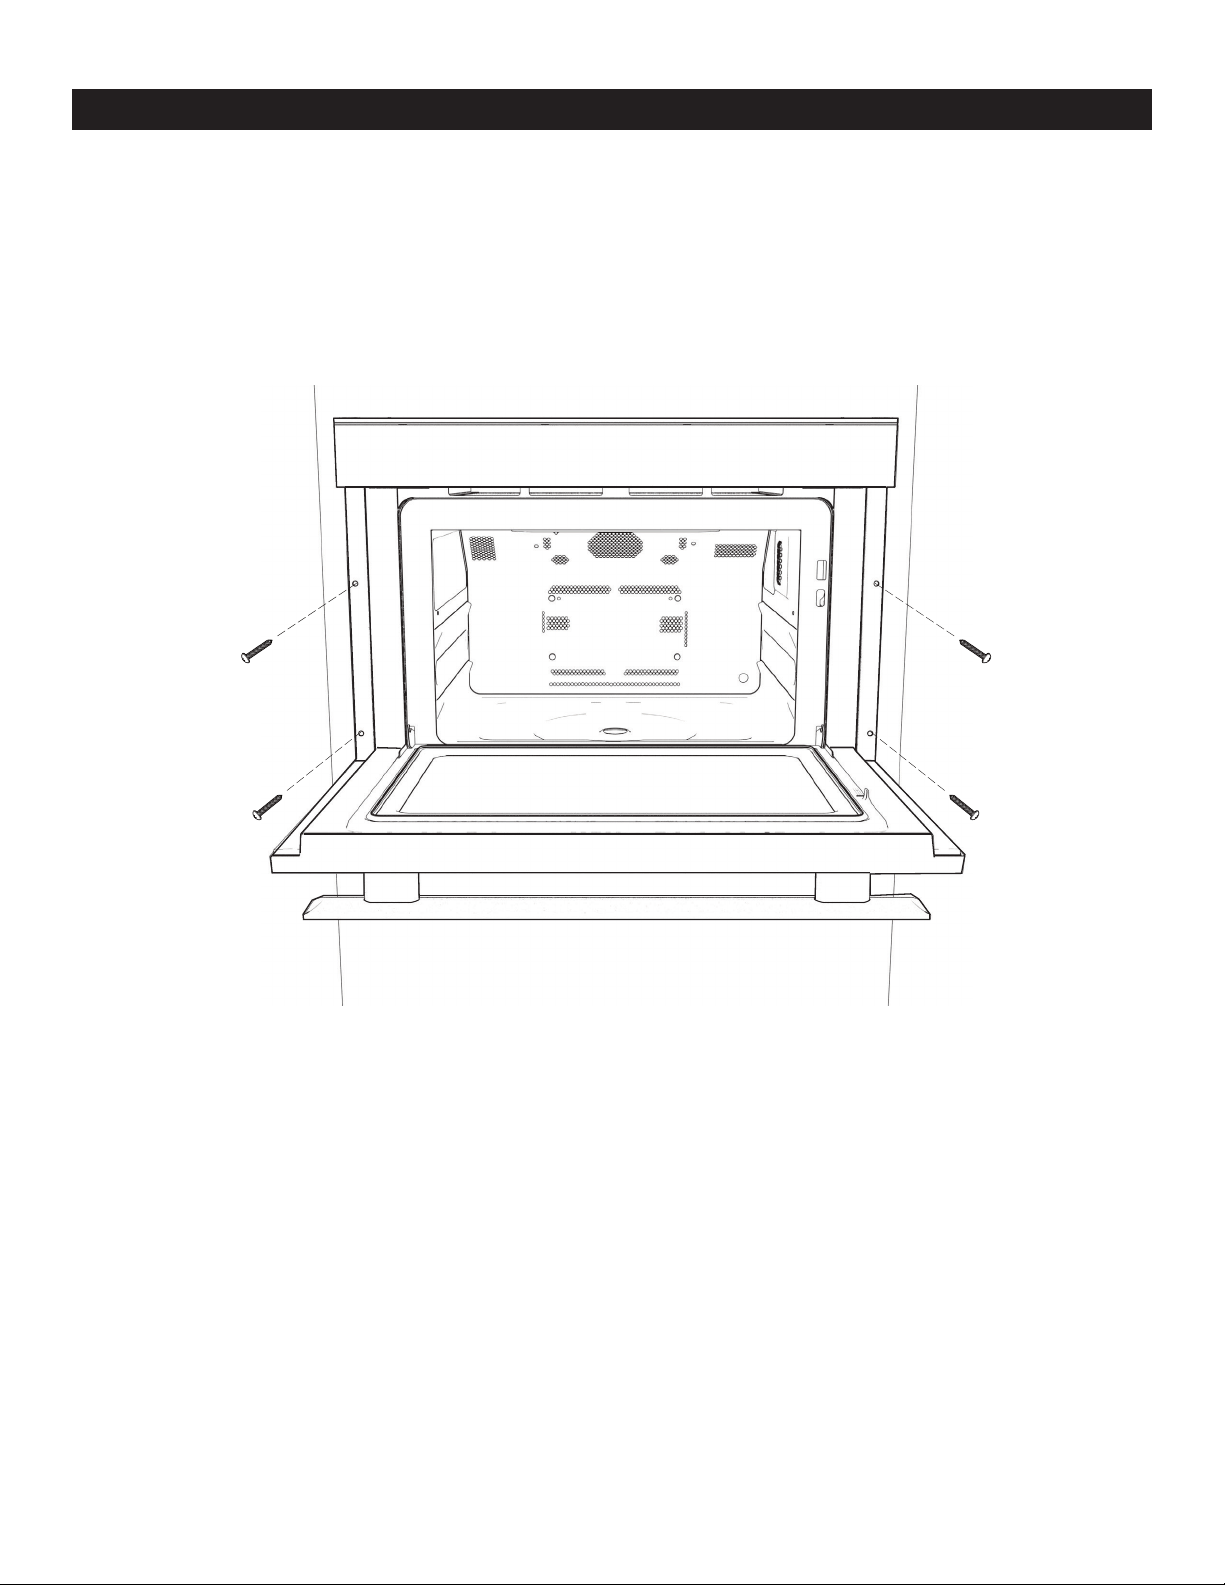
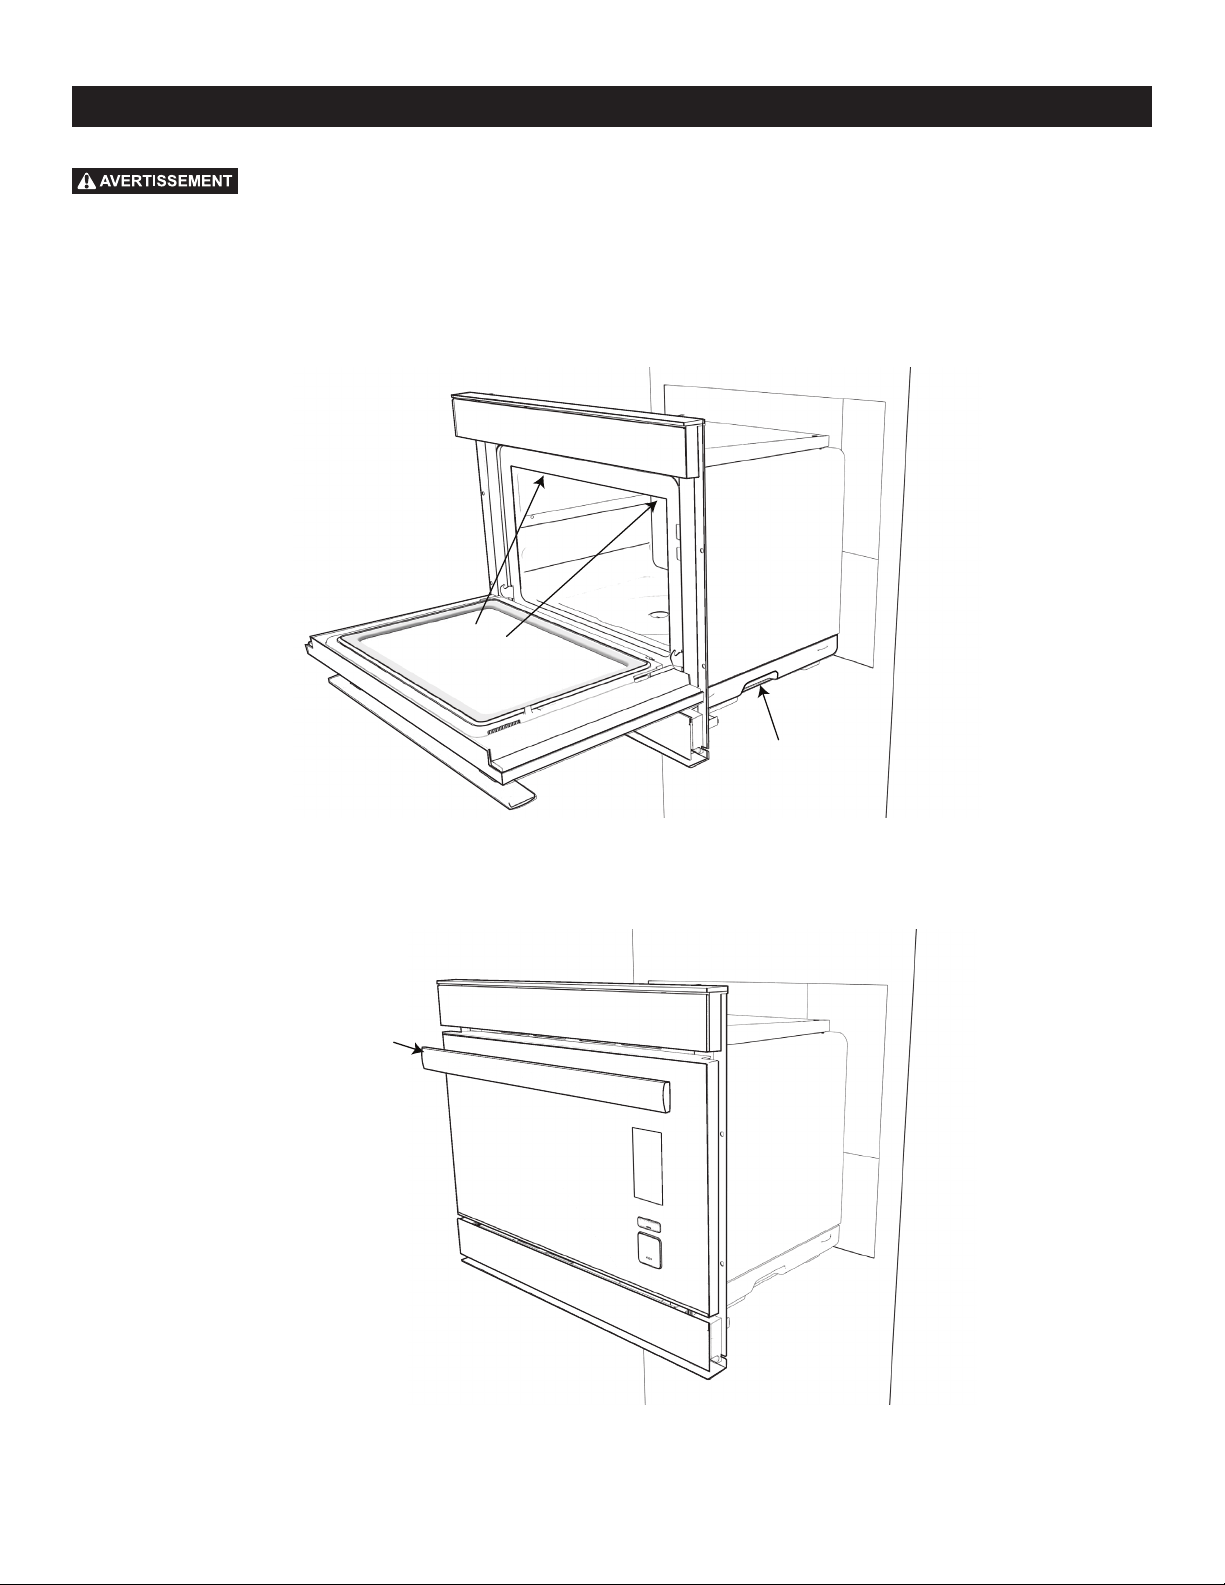
ABOUT UNPACKING AND EXAMINING
YOUR OVEN
1 Remove all packing materials from inside the oven.
2 Remove the feature sticker, if there is one. Check the oven for
any damage, such as misaligned or bent oven, damaged oven
seals and sealing surfaces, broken or loose door hinges and
latches and dents inside the cavity or on the front side of the
oven. If there is any damage, do not operate the oven. Contact
your dealer or a SHARP AUTHORIZED SERVICER.
3 Install or locate this appliance only in accordance with the
provided Installation Manual.
SEALING SURFACES OVEN CAVITY
DOOR SEALS DOOR L ATCHDOOR HINGES
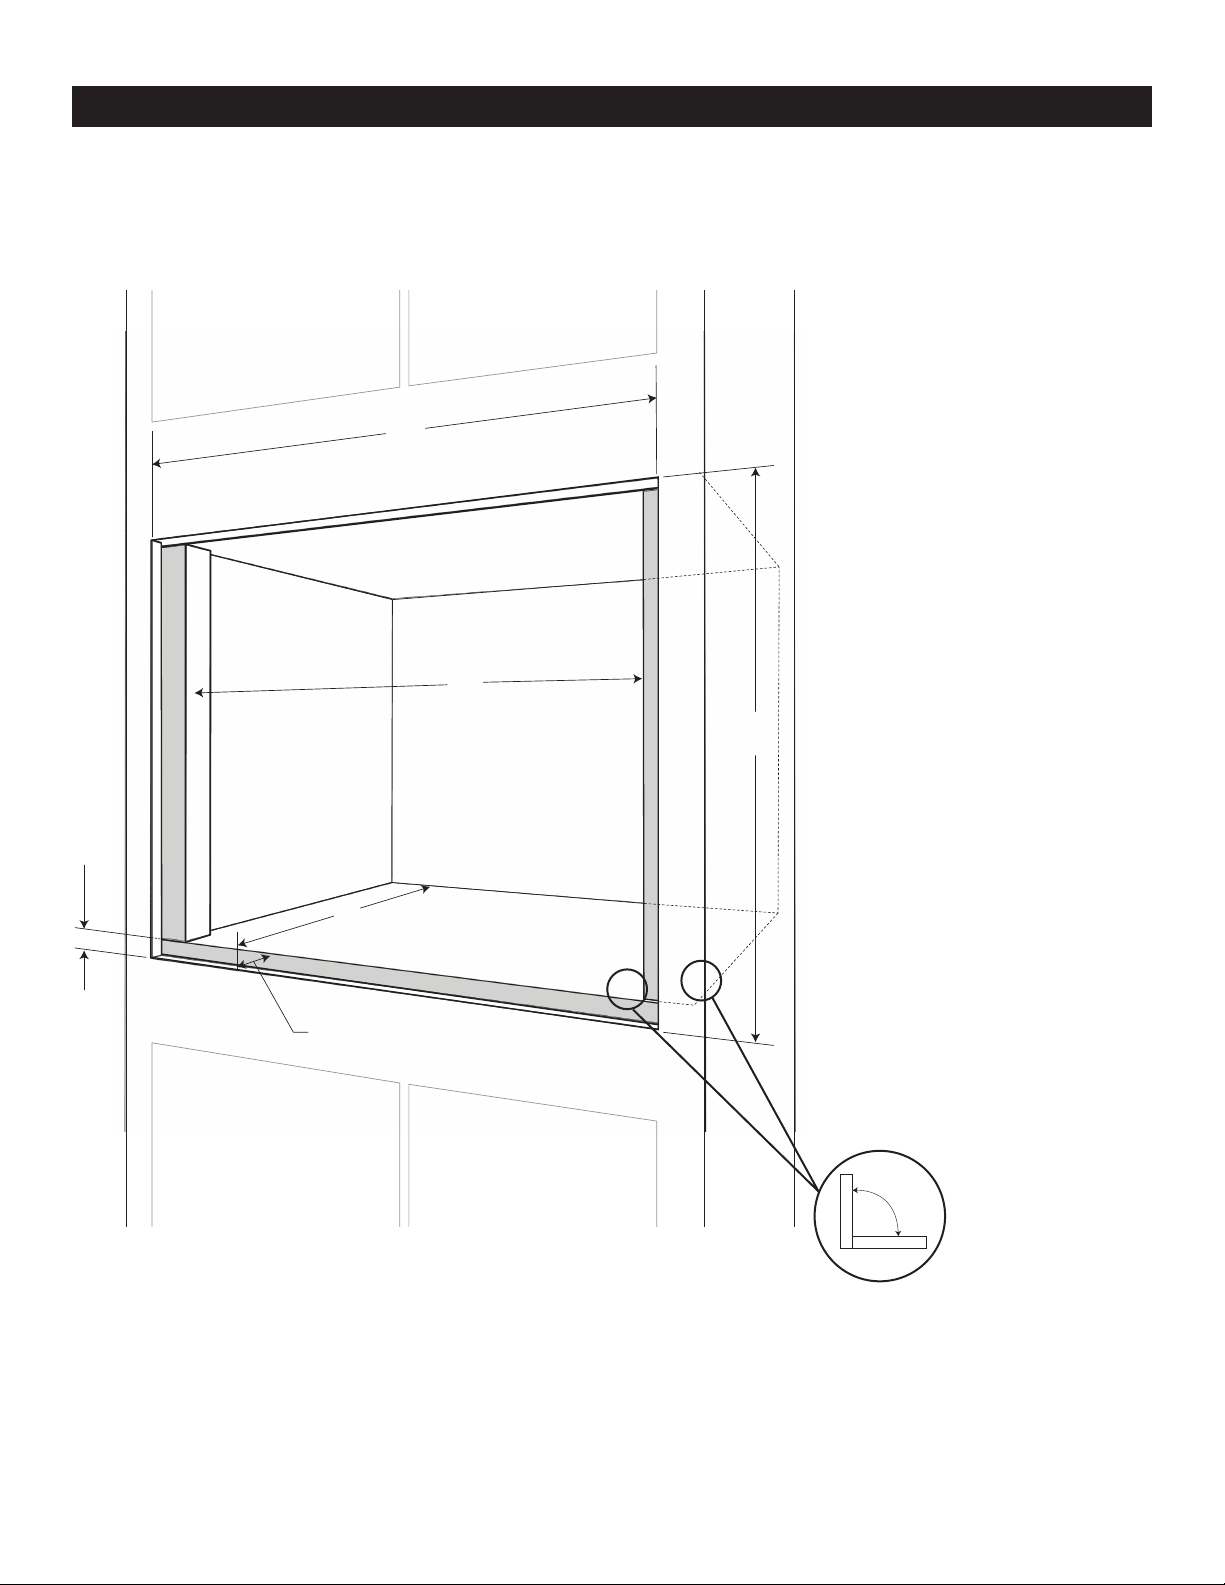
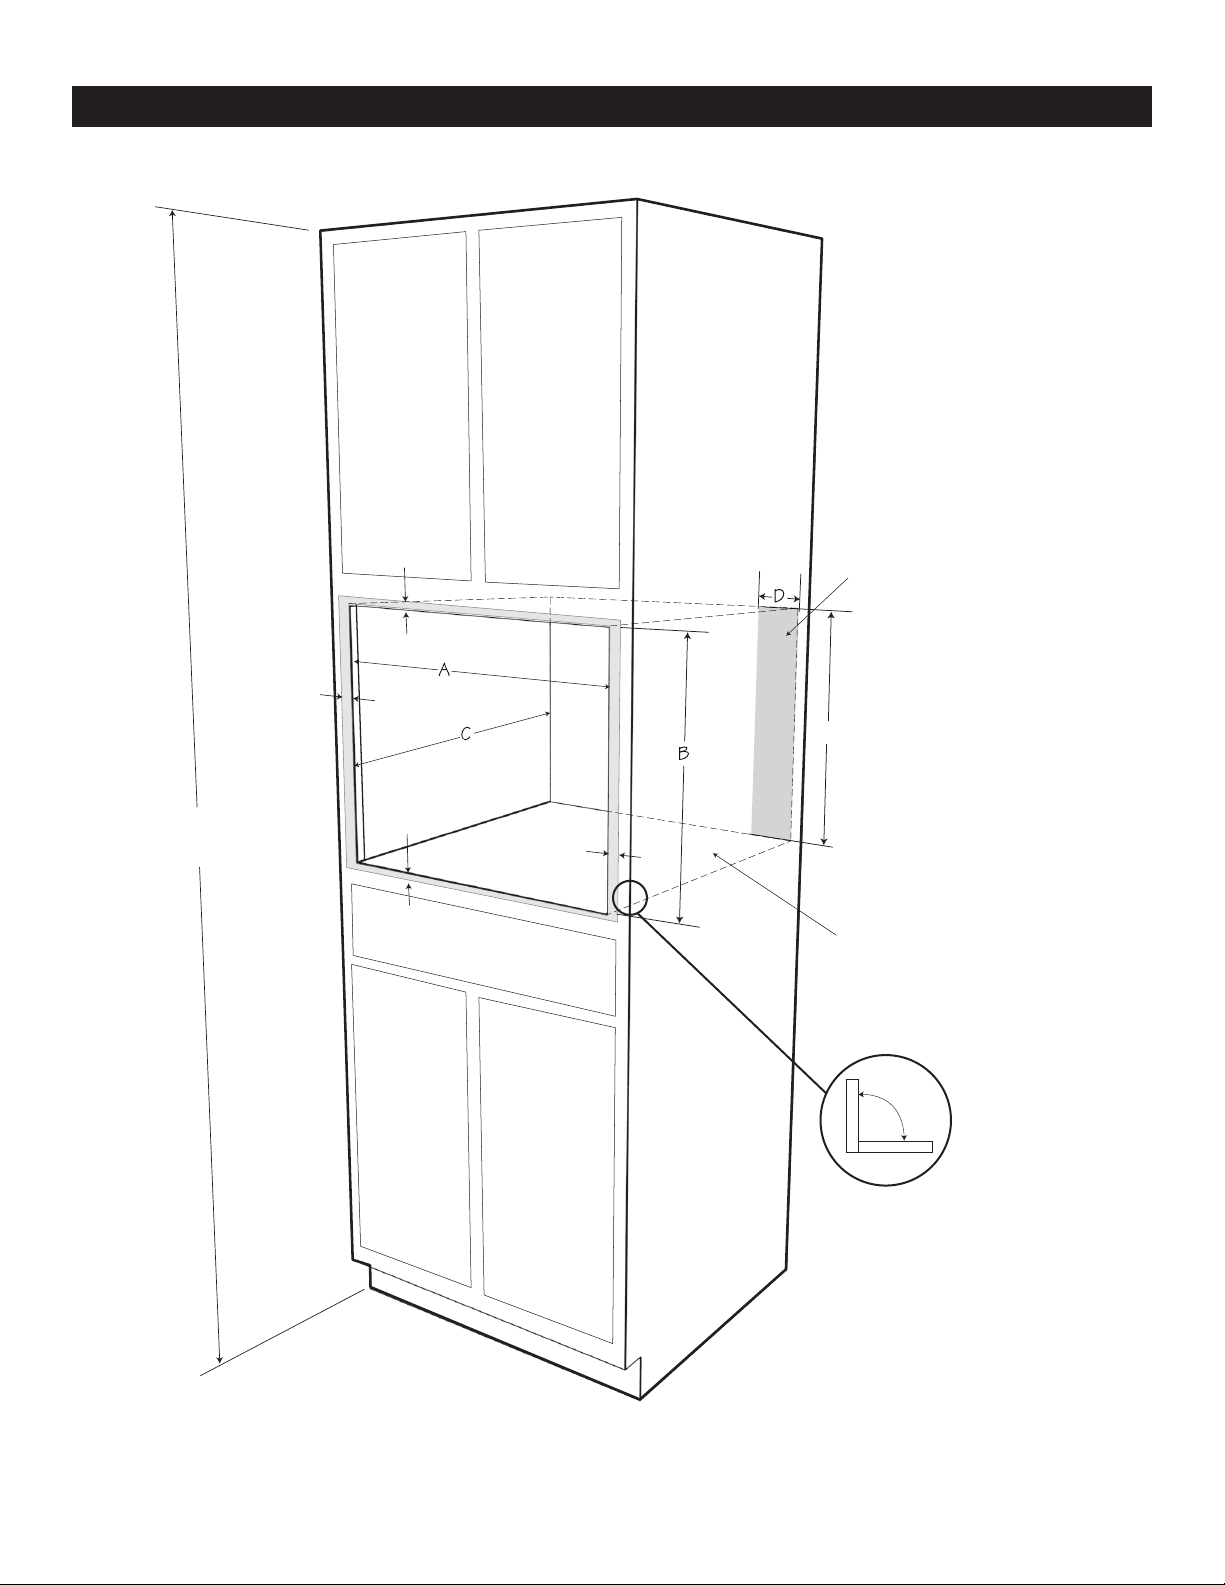
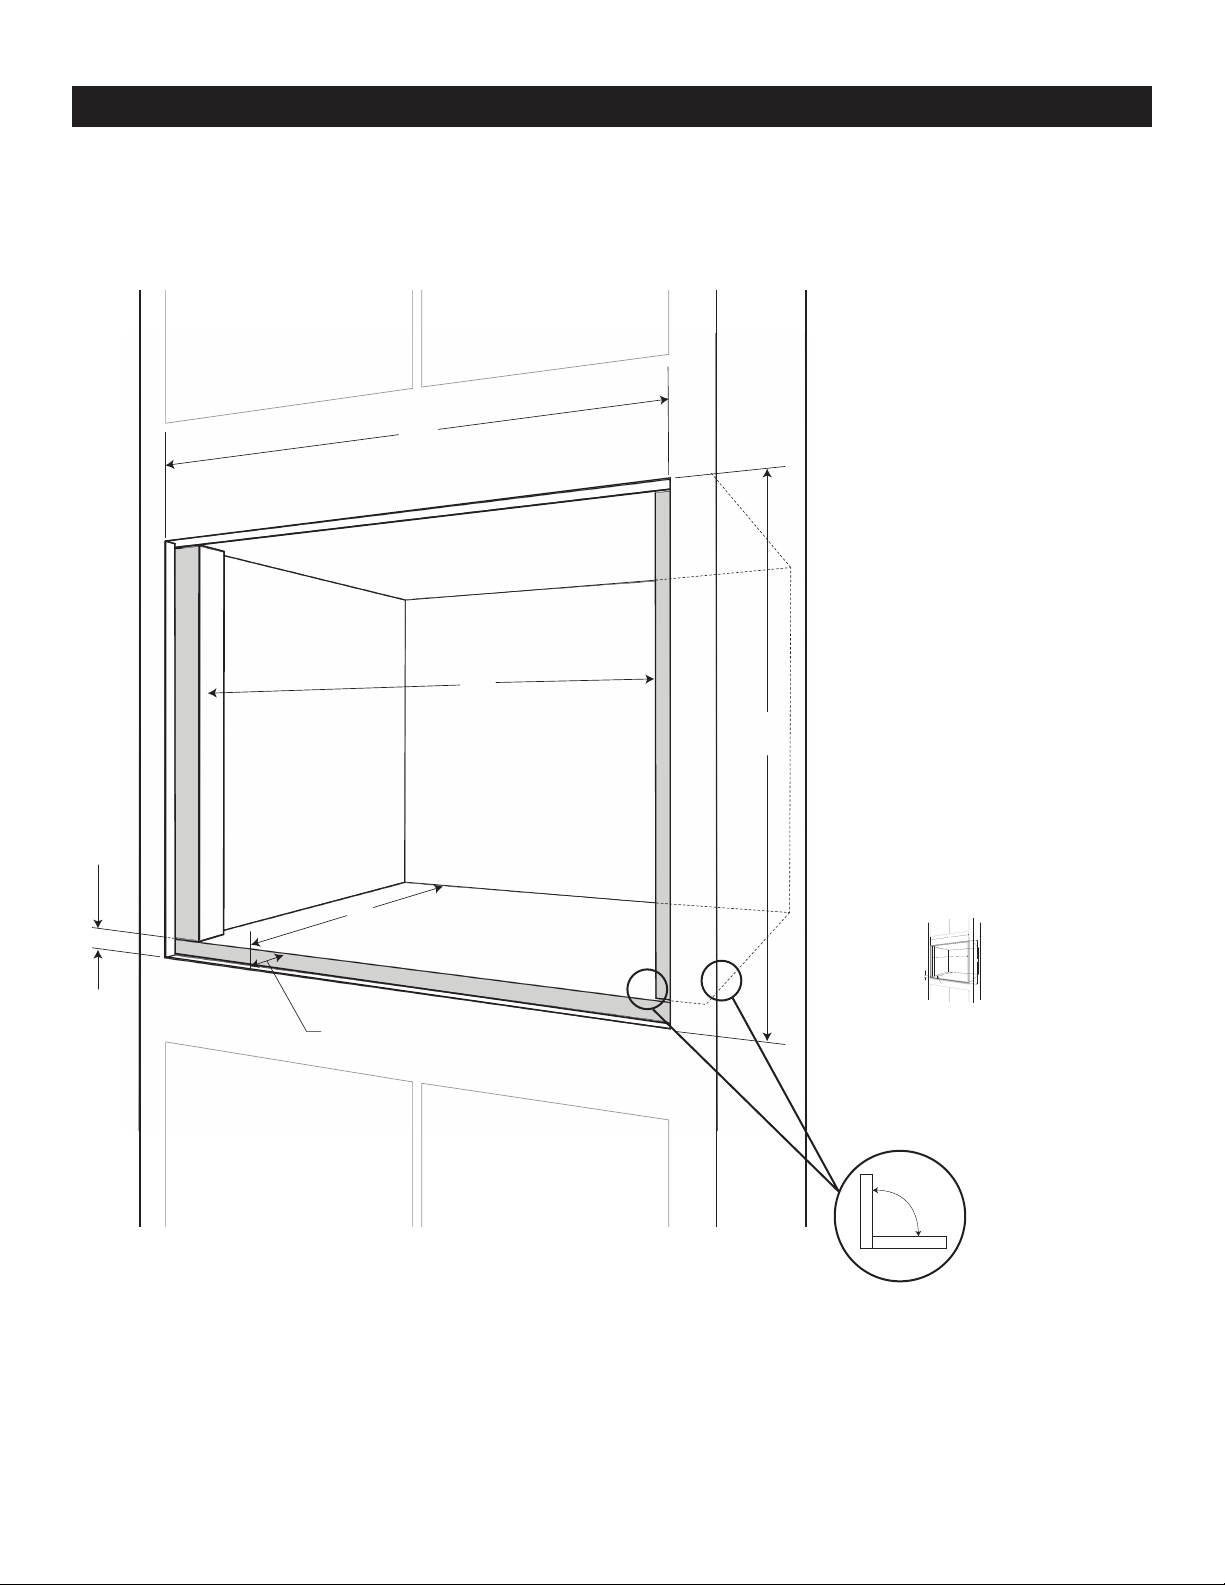
CHOOSING A LOCATION FOR YOUR OVEN
You will use your oven frequently, so plan its location for
ease of use. Your oven can be built into a cabinet or wall
by itself, or above any electric wall oven or above other
Microwave Drawer models that specify the combination of
this oven. The oven may be mounted below a 36” countertop,
including a cooktop or island. It cannot be built in above any
gas wall oven.
Min.
2"
(5.1 cm)
SuperSteam+ Oven
Cutout
Electric Wall Oven /
Warming Drawer /
Microwave Drawer
Cutout
Min.
36"
(91.5 cm)
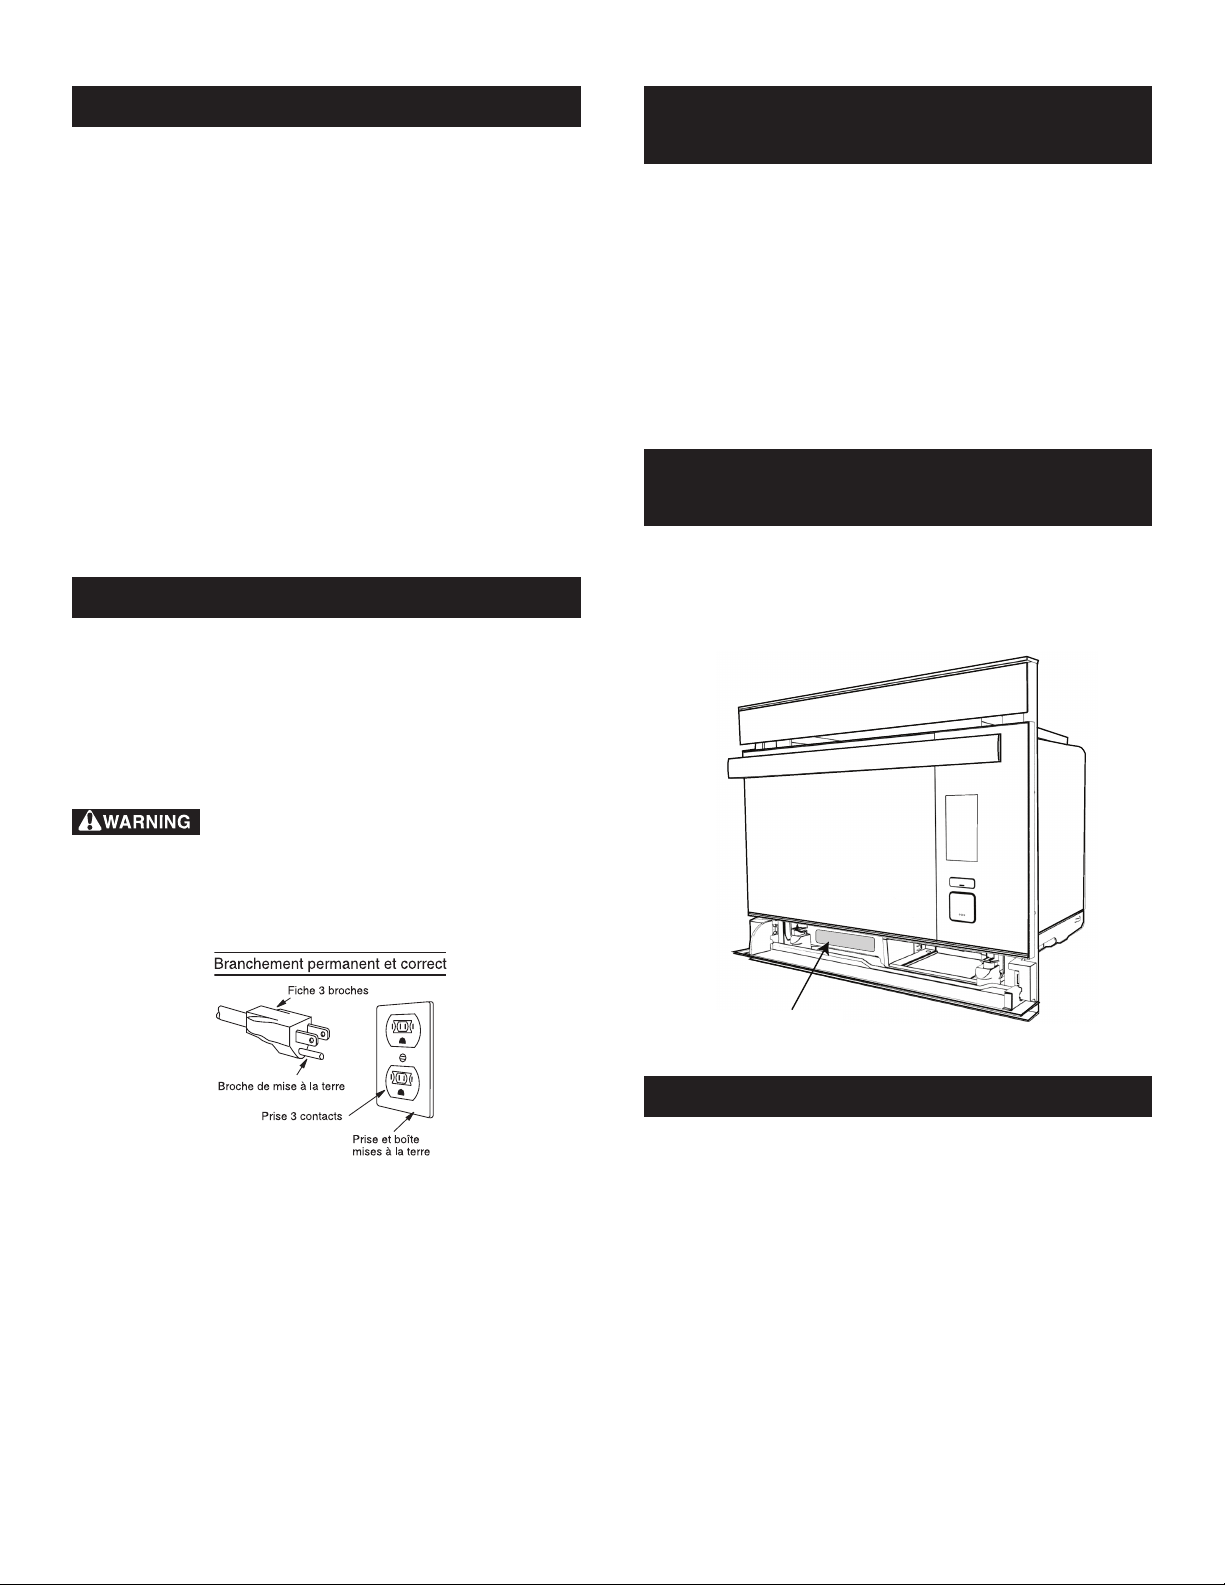
GROUNDING
INSTRUCTIONS
This appliance must be
grounded. The oven is
equipped with a cord having
a grounding wire with a
grounding plug. It must be
plugged into a wall receptacle
that is properly installed
and grounded in accordance
with the National Electrical
Code and local codes and
ordinances. In the event of an
electrical short circuit, grounding reduces risk of electric shock
by providing an escape wire for the electric current.
Improper use of the grounding plug can result
in a risk of electric shock. Do not use an extension cord. If the
power supply cord is too short, have a qualied electrician
or serviceperson install an outlet near the appliance.
If you have any questions about the grounding or electrical
instructions, consult a qualied electrician or service technician.
FOOD SAFETY
• Check foods to see that they are cooked to the United States
Department of Agricultureʼs recommended temperatures.
160˚F / 71˚C - For fresh pork, ground meat, boneless white
poultry, sh, seafood, egg dishes and frozen
prepared food.
165˚F / 74˚C - For leftover, ready-to-reheat refrigerated;
deli and carry-out “fresh” food.
170˚F / 77˚C - White meat of poultry.
180˚F / 82˚C - Dark meat of poultry.
To test for doneness, insert a meat thermometer in a thick or
dense area away from fat or bone.
• Accessible parts (e.g., oven door, oven cavity, dishes and
accessories) may become hot during use. Use dry potholders
or oven mitts when removing containers, food and oven
accessories from the oven, being careful not to touch the oven
cavity to prevent burns.
• Use care when opening door. Avoid steam burns by directing
steam away from the face and hands. Always stand back from
the oven when opening it.
• Slowly lift the farthest edge of a dish’s covering and oven
cooking bags away from the face.
• Stay near the oven while it is in use and check cooking
progress frequently so that there is no chance of overcooking
food.
• NEVER use the cavity for storing cookbooks or other items.
• Select, store and handle food carefully to preserve its high
quality and minimize the spread of foodborne bacteria.
INFORMATION YOU NEED TO KNOW
E9
• Do not touch the plug with wet hands when inserting or
removing from the outlet. Plug securely into the electric wall
receptacle and remove by gripping on the plug end. Never
pull using just the cord.
• During steaming, steam may come from the right side of
the vent.
• In the case of a grease re, DO NOT USE WATER. Smother
re or ame or use dry chemical or foam-type extinguisher.
• Never use your appliance for warming or heating the room.
• Loose-tting or hanging garments should never be worn while
using the appliance.
• Do not heat unopened food containers. Buildup of pressure
may cause container to burst and result in injury.
• Always place oven racks in desired location while oven is
cool. If rack must be moved while oven is hot, use caution in
order to prevent burns.
CHILDREN AND APPLIANCE SAFETY
Children below the age of 7 should use the oven with a
supervising person very near to them. Between the ages of 7
and 12, the supervising person should be in the same room.
The child must be able to reach the oven comfortably; if not,
he/she should stand on a sturdy stool.
At no time should anyone be allowed to lean or swing on the
oven door.
Children should be taught all safety precautions.
Don’t assume that because a child has mastered one cooking
skill he/she can cook everything.
Children need to learn that the oven is not a toy. Young children
should be supervised to ensure that they do not play with the
oven.
Children should not be left alone or unattended in area where
appliance is in use. They should never be allowed to sit or stand
on any part of the appliance.
Do not store toys or other items of interest to children in drawers
or in cabinet or counter areas near the oven so children will not
risk injury trying to reach them.
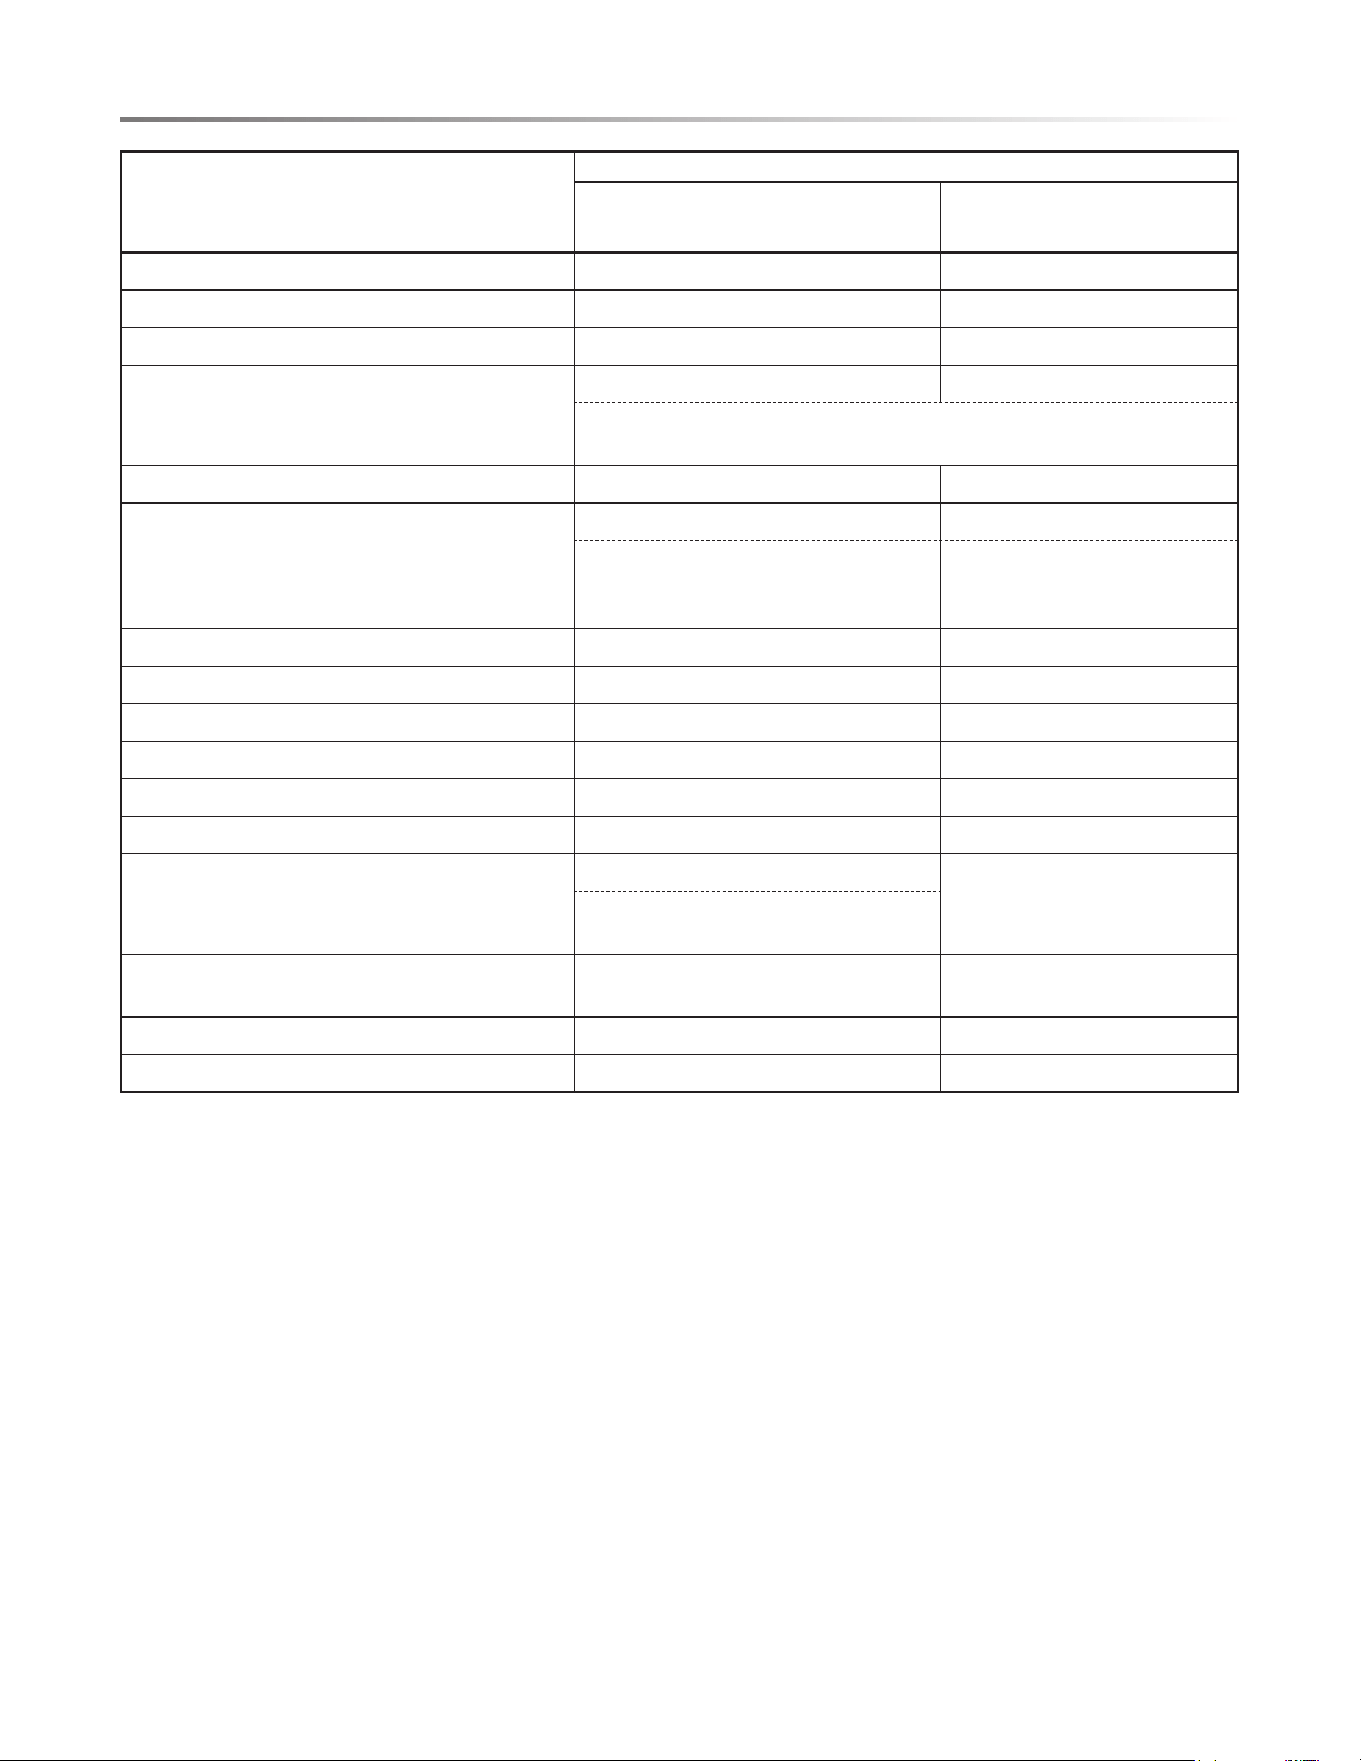
UTENSILS AND DISH COVERINGS
The chart on page 10 will help you decide which utensils and
coverings should be used in each mode.
INFORMATION YOU NEED TO KNOW
• Use care when removing items from the oven so that the
utensils, your clothes or accessories do not touch the door
projection.
• Do not touch around the oven light. This area will become
hot when the oven light is on.
• To avoid burns, always be careful of splashing grease from
the baking tray when removing roasted or grilled meats from
the oven.
• To avoid burns, always test food and container temperature and
stir before serving. Pay special attention to the temperature of
containers, foods and drinks. Do not drink beverage or soup
without checking the container’s temperature.
• Do not touch the oven door, outer cabinet, rear cabinet, oven
cavity, ventilation openings, accessories, dishes and the
escaping steam from the air vent openings during operation
because they will become hot.
• Do not operate the oven if reservoir cracks and water leaks.
Call a Sharp Authorized Service Center to purchase a
replacement part.
• After use, condensed water may be inside oven cavity,
especially on the oven oor. Dry any liquid residue with a
sponge and wipe out to keep the oven clean.
• Do not move the oven during its operation. If the oven needs
to be moved, always drain all water inside the oven using
the DRAIN WATER function (see page 23). After draining,
empty the drip tray.
• To prevent condensation, which could corrode the appliance,
do not leave cooked food in the oven for an extended period.
• Clean the oven at regular intervals and remove any food
deposits in the oven or on the door.
• Do not use for deep frying.
• ALWAYS use potholders to prevent burns when handling
utensils that are in contact with hot food. Enough heat from
the food can transfer through utensils to cause skin burns.
When using the Supersteam, Steam and Convection modes,
the cabinet, interior and door may be too hot to touch.
• Do not pour cold water on the tempered glass oven oor after
cooking as it might break. Do not use water to try to cool
down the oven interior after use.
• Do not pour cold water on the door as it might break.
• Do not touch hot surfaces.
• The use of accessory attachments not recommended by the
appliance manufacturer may cause injuries.
• The oven should not be left unattended during operation. Oven
temperatures that are too high or cooking times that are too
long may overheat foods resulting in a re.
• Do not insert ngers or objects in the steam outlets or air vent
openings. This may damage the oven and cause an electric
shock or a hazard.
• If any objects drop inside the air vent openings, turn off the
oven immediately, unplug and consult a Sharp Authorized
Servicer.
10E
UTENSILS - COVERINGS
COOKING MODE
SUPERHEATED STEAM
(STEAM ROAST &
STEAM GRILL) / CONVECTION
STEAM/STEAM BAKE
Aluminum Foil, Foil Containers YES YES
Metal YES YES
China, Ceramics, Porcelain, Pottery, Stoneware YES YES
Heat-resistant Glassware e.g., Pyrex
®
YES YES
Care should be taken if using ne glassware as it can break or crack if heated
suddenly.
Non-heat-resistant Glassware NO NO
Heat-resistant Plastic/Polystyrene NO YES
Check manufacturer's temperature range. Care must be taken as some
containers warp, melt or discolor
at high temperatures.
Plastic, Thermoset
®
NO YES
Microwave Plastic Wrap NO NO
Paper Towels, Paper Plates NO NO
Parchment Paper NO YES
Wax Paper NO NO
Roasting Rack YES NO
Roasting Bags YES NO
Roasting bags should only be used with
convection bake or steam roast.
Silver Dishes and Cooking Utensils or Containers
that might rust inside the oven
NO NO
Low Rack, High Rack, Baking Tray, Steam Basket YES YES
Silicone-based Cookware NO NO
ACCESSORIES
There are many heat-resistant accessories available for purchase. Evaluate carefully before you purchase so that they meet your needs.
Sharp is not responsible for any damage to the oven when accessories are used.
For automatic cooking, (see Smart Cook and Smart Recipe sections), use the recommended container in the cooking chart in this
operation manual.
INFORMATION YOU NEED TO KNOW
CONVECTION
BAKE
STEAM
SUPERSTEAM
GRILL
STEAM
BAKE
STEAM
PROOF
SUPERSTEAM
ROAST
MANUAL BACK
E11
PRODUCT OVERVIEW
1
10
9
8
7
2
3
4
5
6
PARTS
1 Air vent opening
2 Handle
3 Wi-Fi connecting
4 LCD display
5 Control panel
6 Drip tray (see page 13)
7 Reservoir lid (see page 13)
8 Reservoir (see page 13)
9 Stage light
10 Oven light
11 Anti-tip stubs
12 Tray guide
13 Upper level
14 Lower level
15 Door hinges
16 Latches
17 Air deector
18 Glass oven oor
19 Door gasket
ACCESSORIES
20 2 Trays
21 2 Racks
20
21
1918
11
15
17
12
16
13
14
12E
PRODUCT OVERVIEW
CONTROL PANEL
HOME PAGE MANUAL PAGE
19
20
21
22-23
16-18
15
CONVECTION
BAKE
STEAM
COOK
SUPERSTEAM
GRILL
STEAM
BAKE
STEAM
PROOF
SUPERSTEAM
ROAST
17-18
16
16
17
17
16
Numbers next to the control functions indicate pages on which there are feature descriptions and usage information.
STAGE LIGHT
The oven has an LED light that shines down to beautifully
illuminate your cuisine. This light is useful for checking
doneness after cooking to determine if more time is needed, or
for taking a photograph to share with your friends.
FOR BEST USE:
CAUTION
Always use caution when opening the oven door.
The oven door, oven interior, racks, trays, cooking dishes and
steam are extremely hot, and will cause injury if you touch any of
the interior or stand with your face directly in front of the exiting
steam. Use dry oven mitts or potholders to handle the trays.
1 Open the door completely and let it lie at horizontally after
cooking cycle has completed.
2 Carefully slide the cooking tray to rest in the bottom position
on the door. This is the optimal position to take advantage
of the stage light.
3 Slowly lift the farthest edge of a dish’s covering and oven safe
cooking bags away from the face.
4 Check food for doneness, using the United States Department
of Agriculture’s recommended temperatures.
5 If food requires additional cooking time, carefully slide the
tray back into the oven and follow the instructions on the
keypad to add additional cooking time.
6 Photograph food and share with your friends on social media
if desired.
7 When nished, remove the food and carefully slide the tray
back into position inside of the oven.
13
BEFORE FIRST USE
READ CAREFULLY BEFORE COOKING
WATER RESERVOIR
Filling the reservoir with fresh cold tap water is necessary for
all Steam functions in both Smart and Manual Cooking. Follow
the directions below before cooking.
1 Pull the reservoir toward you to remove.
2 Wash the reservoir and lid for rst time use.
3 Fill the reservoir with fresh cold tap water through the lid
to the 2 mark each time you begin to cook. Do not ll the
reservoir over the 2 mark.
Level 1
Level 2
4 Close the lid tightly.
5 Reinstall the reservoir, pushing it rmly into place.
6 After cooking, empty the reservoir and wash the reservoir
and the lid.
CONVECTION
BAKE
STEAM
SUPERSTEAM
GRILL
STEAM
BAKE
STEAM
PROOF
SUPERSTEAM
ROAST
MANUAL BACK
NOTES:
1 Do not use distilled water or any other liquid.
2 An insufcient amount of water in the reservoir may cause
an undesired result.
3 We recommend that you empty the reservoir every time after
cooking. Do not leave the reservoir lled with water in the
oven over a day.
4 If any messages regarding low levels of water in the water
reservoir (e.g., “Fill water reservoir”) show on the display
during cooking, remove reservoir and rell water.
5 Do not drop or damage the reservoir. Heat may cause the
reservoir to change shape. Do not use a damaged reservoir.
Call a Sharp Authorized Service Center to purchase a
replacement part.
6 There may be a few water drops when removing the reservoir.
Wipe the oven dry with a soft cloth.
7 Do not block the air holes on the lid of the reservoir. It will
cause trouble during cooking.
8 A small amount of water will drain into the drip tray when
the reservoir is removed. Empty after cooking
.
DRIP TRAY
The drip tray must be in the correct position while cooking.
For proper operation, follow the directions below.
The drip tray is packed with the oven. Place the drip tray under
the oven door as shown below. This drip tray collects the
condensation from the oven door.
To remove the drip tray: Pull the drip tray toward you with
both hands. Water should not be dripping before removing the
drip tray.
To replace the drip tray: Place the drip tray onto the right
and left hooks under the oven and push rmly as shown below.
CONVECTION
BAKE
STEAM
SUPERSTEAM
GRILL
STEAM
BAKE
STEAM
PROOF
SUPERSTEAM
ROAST
MANUAL BACK
If “Replace drip tray” or “Empty drip tray and replace” is shown
on the display, remove and replace the drip tray correctly.
Empty the drip tray each time after cooking. Empty, rinse
thoroughly, dry and replace. Cooking repeatedly without
emptying the drip tray may cause it to overow.
1 The oven will become very hot after cooking and draining
water functions.
2 Do not open the oven with your face close to the oven. Steam
from the oven may cause burns.
3 Wait until the oven has cooled before emptying the reservoir
and the drip tray. Then, wipe the oven cavity.
4 Do not touch the water directly as water in the drip tray may
be hot.
Before operating your new oven, read and understand this
operation manual completely.
Before the oven can be used, follow these steps:
1 Place the drip tray correctly. See Drip Tray section on this
page.
2 Close the door. Plug in the oven. Check that the display lights.
3 Follow directions in the NEW OVEN CLEAN section on
page 14 to clean the oven before rst use.

14E
BEFORE FIRST USE
operation for 20 minutes without preheat and food. You may
notice some smoke and odor during this process. This is normal
and the oven does not require servicing.
PREPARATION
1 Ventilate the room.
2 Fill the reservoir with fresh cold tap water and install.
3 Install the empty drip tray.
TO CLEAN THE OVEN BEFORE USE, FOLLOW THESE
STEPS.
1 Select CLEAN from the Home Screen.
2 Select NEW OVEN CLEAN from the list provided.
3 Insert all accessories (i.e., two trays, two racks) into the oven.
4 Fill the reservoir with fresh cold water. Replace reservoir
and press START.
5 Once NEW OVEN CLEAN is complete, use caution in
opening the oven.
1 The oven door, outer cabinet and oven cavity will become hot.
2 Do not open the oven with your face close to the oven. Steam
from the oven may cause burns.
STANDBY POWER
To activate the oven, open and close door or press manual, back
or clear.
The U.S. Department of Energy has set forth standards for
standby power and energy consumption in appliances during
periods of nonuse. In order to comply with these requirements,
the display on this unit will not be visible or active in initial
use or in periods of inactivity. This unit’s display will need to
be activated by the action of opening and closing the door or
by pressing manual, back or clear. Once the action has been
performed, the display will be fully visible and operational.
CLEAR
Press the CLEAR button to:
1 Return to Home Screen.
2 Cancel a program during cooking.
BACK
Press BACK if you want to go back to the previous page during
programming before pressing START. After pressing START,
it is not possible to return to a previous page.
NEW OVEN CLEAN
The steam generator heats the water that is used for cooking. It
should be cleaned before the rst use to get rid of any odor in
the oven cavity. Clean the oven with New Oven Clean in manual
E15
CONNECTING TO YOUR APPLIANCE
The next generation of SuperSteam+ Oven combines the
technological enhancements of smart home connectivity with
Sharp’s innovative fusion of superheated steam and convection
cooking oven design:
• Wi-Fi Connectivity
• Mobile App and Voice Control
• New GUI (Graphical User Interface) on oven
• Ability to Upload Favorite Recipes to the oven
Your SuperSteam+ Oven may be operated remotely through
a smart device using the SuperSteam+ Oven app in addition
to conventional operation in a non-connected capacity using
the Control Panel on the oven door. Please be aware that some
menu items are only available through download to the oven
using the app. To use the app, the appliance must be connected
to your home network.
WI-FI CONNECTIVITY
Your steam oven is equipped with Wi-Fi connectivity. The
connection is set up manually as outlined in the Wi-Fi
CONNECT GUIDE included with the appliance literature.
FAVORITES:
The SuperSteam+ Oven app lets you select and store your Favor-
ite Smart Cook and Smart Recipes in your FAVORITES section.
Click on the heart icon to add your most frequently prepared
dishes and upload the presets to your oven for convenience. You
may store up to 4 Favorites for Smart Cook and 4 Favorites for
Smart Recipe items at a time.
REMOTE START SAFETY INFORMATION
The oven is preset to Remote Start OFF. It must be turned ON
to utilize.
When using smart device operation to control the appliance
remotely, be sure to follow all safety procedures and guidelines
as instructed in the Operation Manual. Failure to do so may result
in personal injury, death or damage to property.
IMPORTANT NOTE:
• If you activate the appliance remotely, your oven will remain
ON and in cooking mode even if your smart device or home
Wi-Fi become disabled.
• Your oven's Wi-Fi menu will have a pad for CONNECTING
and a pad for PAIRING.
- CONNECTING may be used if a new router is installed in
the home and the oven needs to be connected to the Wi-Fi
network again.
- PAIRING may be used if you need to pair your oven to your
smart device again and your oven is already connected to
the Wi-Fi network.
ALWAYS ensure the oven cavity is prepared for cooking when
operating the oven remotely with the app. Risk of oven damage
or re could occur. NEVER use the oven interior as a storage
device for unrelated items or cook using the app remotely if the
cavity is not properly prepared.
OVEN DISPLAY PANEL OPERATION INACTIVITY NOTE
Condition 1: Non-Interaction with the oven after 20 Minutes
of Initiating Cycle
Any navigation taken on the Oven Display Panel is subject to a
20-minute inactivity countdown.
This simply means that after 20 minutes of non-interaction
with the oven, the Oven Display Panel will return to the HOME
screen (i.e., if the option SMART COOK is touched and no other
interaction is made for 20 minutes, the Oven Display Panel will
default back to the Home screen).
Condition 2: Non-Interaction with the oven after 20 Minutes
upon Preheat Completion
If a Preheat cycle has completed, it is subject to the 20-minute
inactivity countdown if no there is no interaction with the oven.
This simply means that after 20 minutes of non-interaction with
the oven, the Oven Display Panel will return to the HOME
screen.
However, if after the oven is preheated, the door is opened and
closed, there is a 10-minute inactivity countdown. (Note: the
10-minute inactivity countdown is only applicable after preheat-
ing and the door has been opened and closed.) If no interaction
with the oven is performed after the opening and closing of the
door after the preheat has completed, then the Oven Display
Panel will return to Home screen.
FIRMWARE UPDATES
From time to time, updates to the oven’s software will be
released. Notications will be sent via the SuperSteam+ Oven
app for these updates. The rmware updates will be available
on the product support page. Please visit www.sharpusa.com/
support for more information.
UNPAIRING YOUR DEVICE
To remove the pairing of your smart device with the oven,
perform the following steps in your app:
1 Select Prole.
2 Select My Appliances.
3 Swipe Left over the bar that lists your Sharp SuperSteam+
Oven Default.
4 Press the icon on the right to unpair the oven from the smart
device. This should remove the SuperSteam+ Oven from
your appliances list.

16E
The SuperSteam+ Oven encompasses multiple cooking functions
to allow for exibility and high performance for the best results.
The array of functions ranges from traditional dry heat
convection cooking to steam to superheated steam that provides
moisture and browning in tandem. Please see below for the
categories and capabilities of this unique oven.
• Cooking modes include manual, smart cook and smart recipe.
• Manual mode allows you to fully create your own culinary
experience.
• Smart cook guides you through quick and convenient preset
cooking options for commonly prepared snacks, meals and
desserts.
• Smart recipes are accessed through the app to guide you step
by step in creating delicious appetizers, side dishes, entrées
and desserts.
MANUAL COOK
The Manual cooking option allows you the freedom to choose
and explore the full range of cooking features the SuperSteam+
Oven has to offer. Each manual cooking option is equipped
with its specialized function to ensure optimum cooking
performance.
NOTE: SPEED COOKING—THE 25-25 RULE
Overall, food cooked in a “Convection Bake” and “Superheated
Steam” cook mode is usually done about 25% faster than it is
in a conventional oven. Simple Estimation–given a time and
temperature from a recipe instruction, reduce the temperature
by 25° and the time by 25%. Example: instruction given is 400°F
and 20 minutes. Convert to 375°F and 15 minutes.
IMPORTANT: All foods vary so always adjust accordingly for
doneness. Refer to required meat doneness guidelines.
THERE ARE 5 MAIN COOKING FUNCTIONS IN
MANUAL COOK:
1. STEAM COOK – STEAM GENERATOR CREATES
STEAM WHICH IS INSERTED INTO THE OVEN
Steam Cook lets you steam meals of vegetables and delicate
sh and meats. Pure steam retains nutrients and moistness.
This is ideal for broccoli, salmon, cod and chicken. This works
wonderfully to boil eggs or cook your favorite tamales.
Temperature 212°F - Pure steam
Steam Keep Warm is the best option for items such as
casseroles, vegetables and quiches that you want to retain
moisture while keeping warm.
Temperature 175°F - Using steam, controls the oven temperature.
Steam Refresh restores the original freshness to leftover dishes
such as French bread, hamburger, brown rice, spaghetti noodles
and broccoli.
Temperature 130°F - Using steam, controls the oven temperature.
COOKING OPERATION
STEAM COOK
2. STEAM BAKE – COMBINATION OF CONVECTION
HEAT AND STEAM
Steam Bake Breads creates delicious bread by injecting steam
into the oven during the preheat cycle to promote even rising
without the need for spritzing or handling hot pans of water. The
setting automatically switches to dry convection heat to produce
the desired light and airy interior and golden, crispy outer crust.
Temperature 400°F- 425°F
Steam Water Bath bakes creamy desserts such as cheesecake,
pudding and custard that normally require a water bath method
without handling hot pans of water.
Temperature 275°F - 300°F
STEAM BAKE
Steam Proof dough for breads. The proof function encourages
fermentation of dough by yeast through warm temperatures and
controlled humidity.
Temperature 100°F
STEAM PROOF
E17
COOKING OPERATION
3. CONVECTION BAKE - DRY HEAT
Convection Bake - Bake traditional and convenience food items
such as cookies, cakes, biscuits, pizzas and chicken nuggets
using dry heated air that circulates evenly throughout the oven.
Temperature 212°F- 485°F.
CONVECTION BAKE
4. SUPERSTEAM GRILL - SUPERCHARGED STEAM AT
485°F
SuperSteam Grill - Create delicious grilled and sautéed items
such as sh, vegetables, onions and steak. This setting works
like the broil function in a traditional oven for food that cooks
for shorter lengths of time at high heat. Give your dish the
benet of steam moistness with targeted superheated steam to
create browning.
Temperature 485°F
Top Convection Grilling
SUPERSTEAM GRILL
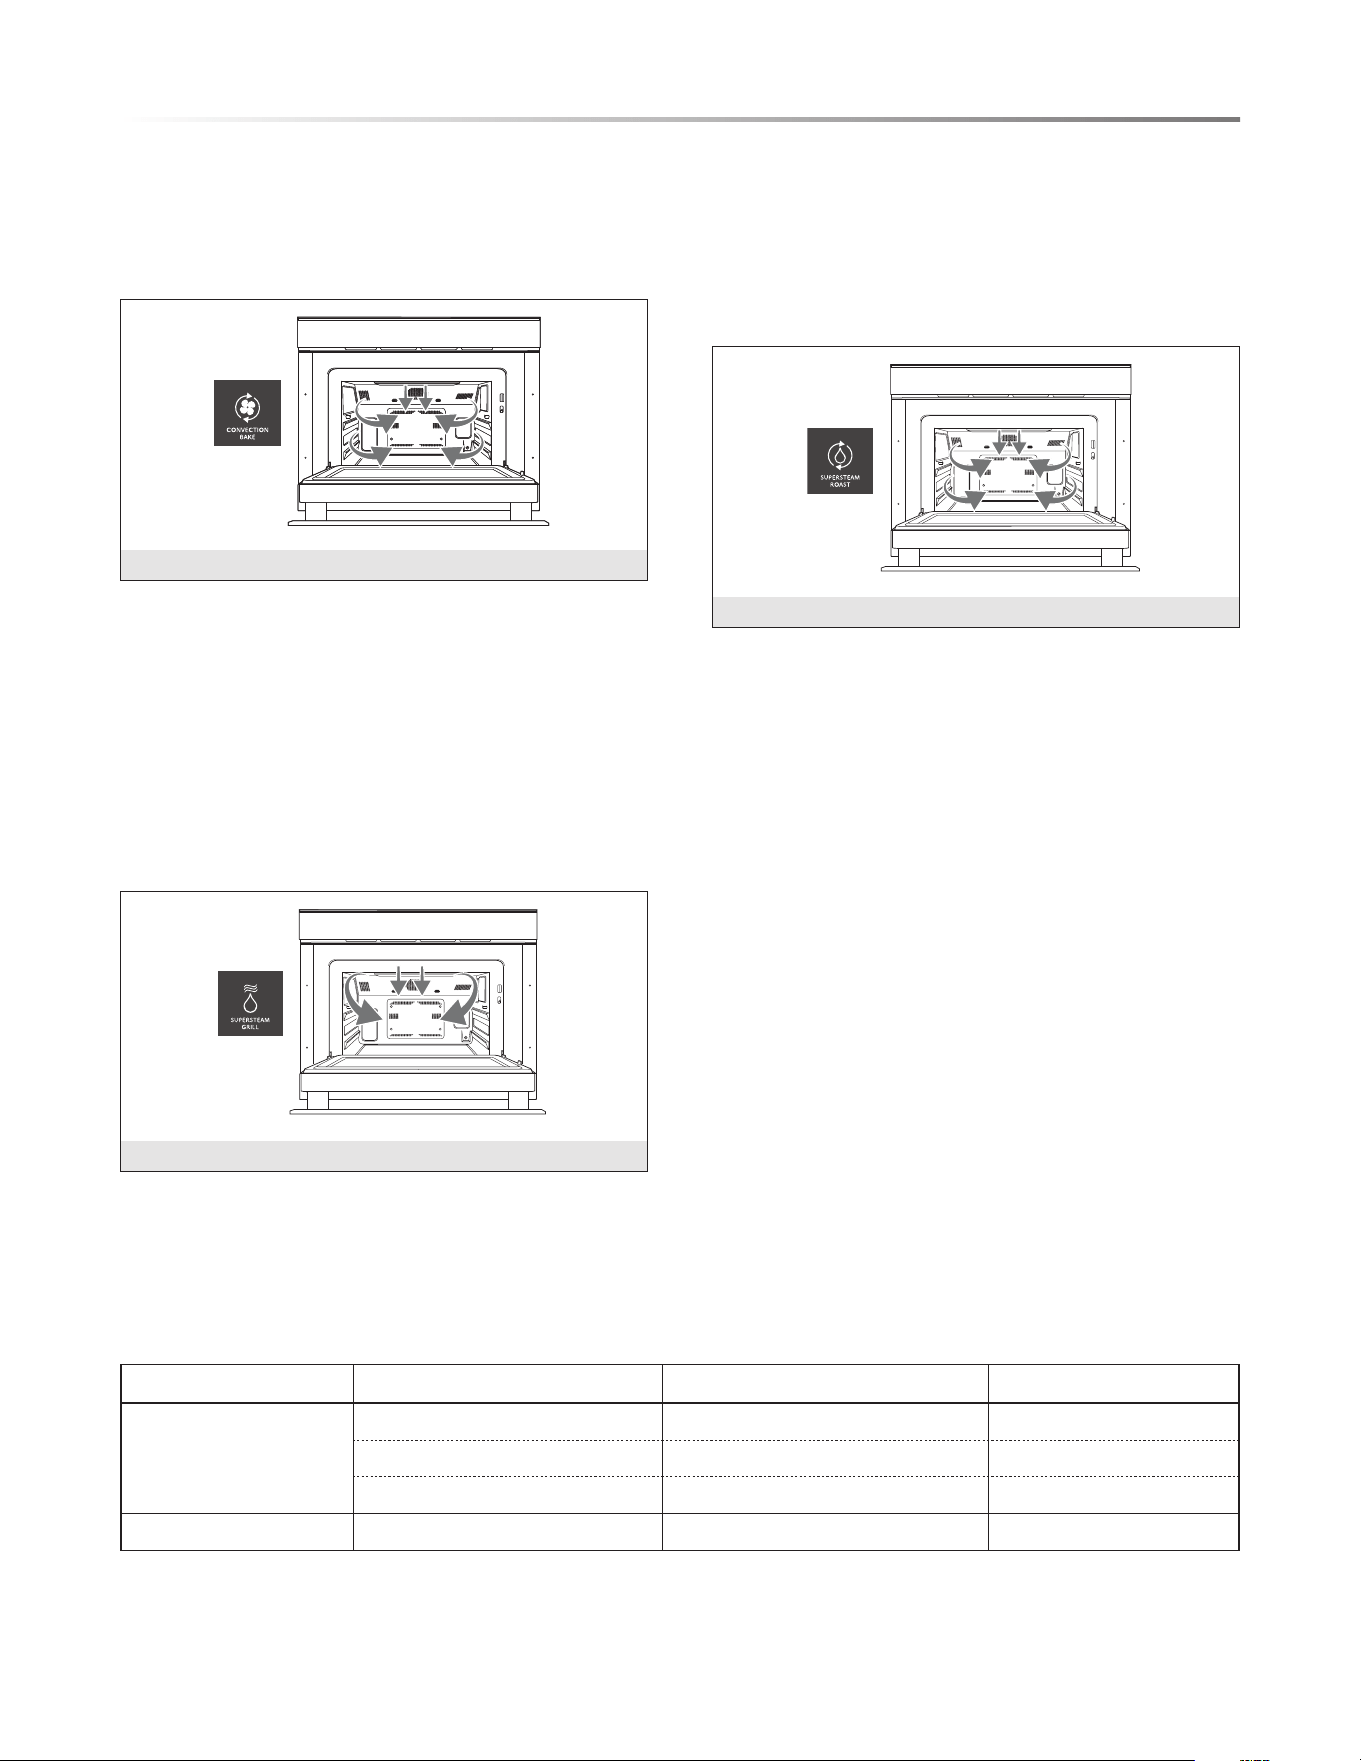
5. SUPERSTEAM ROAST - SUPERCHARGED STEAM AT
212°F - 485°F
SuperSteam Roast - Roast dishes such as chicken (whole), sweet
potato and beef or pork roast. Incorporating steam for food that
requires longer cooking times allows it to brown on the outside
while maintaining a moist and tender texture inside.
Temperature 212°F - 485°F
SUPERSTEAM ROAST
COOKING WITH STEAM
Overall, food cooked in a “Convection Bake” and “Superheated
Steam” cook mode is usually done about 25% faster than it is
in a conventional oven. Simple Estimation–given a time and
temperature from a recipe instruction, reduce the temperature
by 25° and the time by 25%.
Example: instruction given is 400°F and 20 minutes. Convert
to 375°F and 15 minutes.
IMPORTANT: All foods vary so always adjust accordingly
for doneness. Refer to required meat doneness guidelines. The
Sharp SuperSteam+ Oven also has several Smart Cook settings
that are preset cook modes, temperatures and times for a number
of select foods to help you to become familiar with the oven’s
cooking performance.
Steam options can be used for smart cook, manual cook and
smart recipe modes. See more information about using the
various steam options in the descriptions on page 16 in the
Manual Cooking section.
STEAM CHART
HOME PAGE MENU SETTING EXAMPLES TEMP SETTINGS
STEAM COOK
STEAM COOK Fish, Vegetables 212˚F
STEAM KEEP WARM Dinner Plate 175˚F
STEAM REFRESH Fresh Bread 130˚F
STEAM PROOF Bread Dough 100˚F
18E
COOKING OPERATION
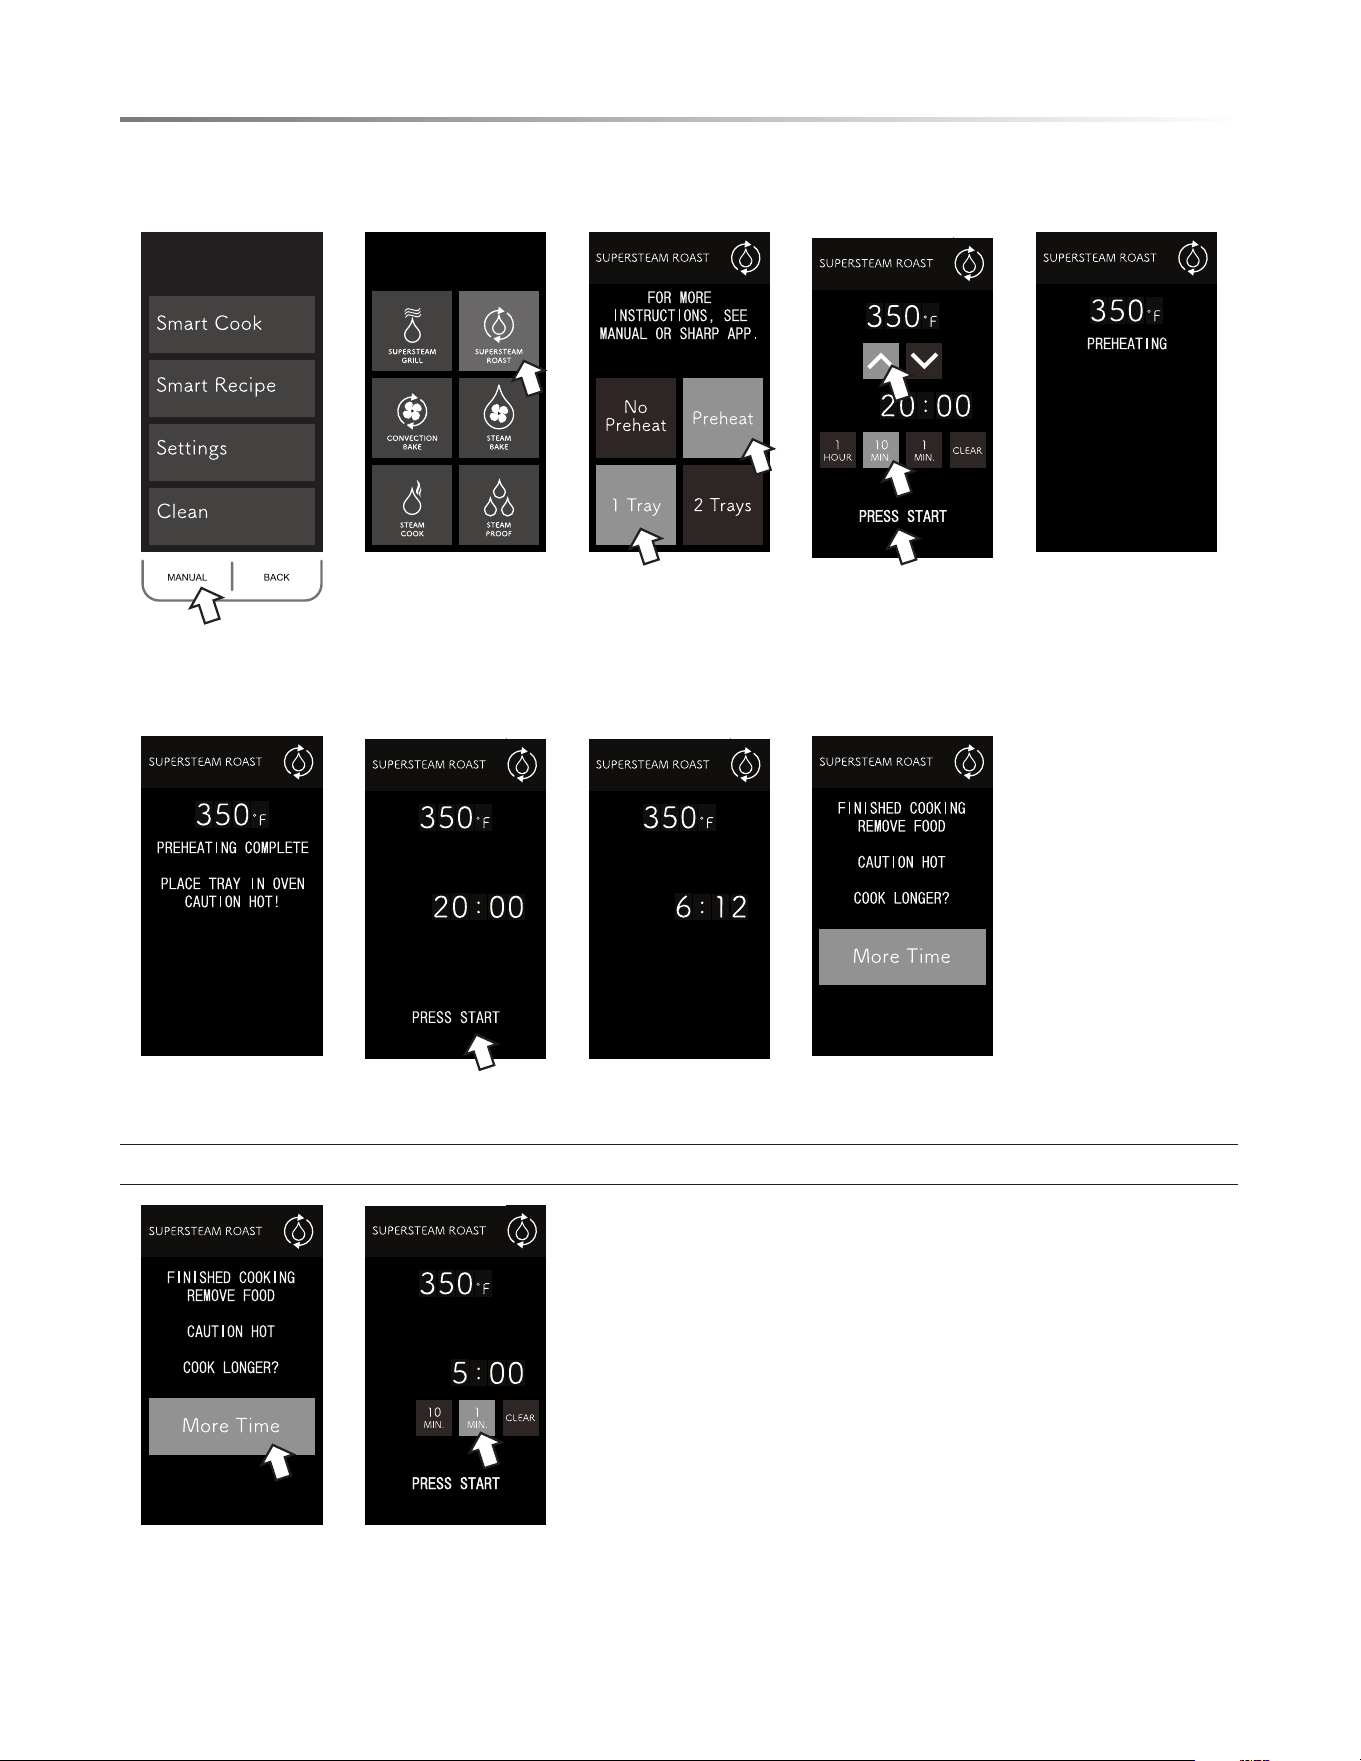
• To cook using SUPERSTEAM ROAST manually:
1. Press MANUAL. 2. Press
SUPERSTEAM
ROAST.
3. Select preheat
preference and
number of trays.
4. Select temperature
and time then press
START.
5. Oven is preheating.
6. Place food in the
oven.
7. Press START. 8. Cooking time
counts down.
9. Finished cooking.
Option for more cooking time:
10. To add more
cooking time, press
MORE TIME.
11. Press numbers to
add more time, then
press START.

E19
COOKING OPERATION
SMART RECIPE CHART
FOOD CATEGORY FOOD ITEM SERVING SIZE COOKING MODE
TOTAL COOK TIME
(MINUTES)
Main Dishes
Lemony Cedar Plank Salmon 2 SuperSteam Grill 8
Turkey Burgers 4 SuperSteam Grill 14
Baby Back Ribs 4
SuperSteam Roast 85
SuperSteam Grill 5
Stuffed Portabellas with Spinach 2 SuperSteam Roast 8
Side Dishes
Herb Roasted Fingerling Potatoes 4 SuperSteam Roast 25
Sweet Potato Salad 4 Steam 14
Roasted Brussels Sprouts 4 SuperSteam Roast 20
Parmesan Cauliower 4 SuperSteam Roast 15
Desserts
Mixed Berry Crumble 8 SuperSteam Roast 30
Chocolate Chip Zucchini Cake 9 Convection Bake 35
Chocolate Pots de Crème 4 SuperSteam Roast 25
Morning Glory Bread 8 Convection Bake 50
SMART RECIPE
Smart Recipe uses our app to guide you step by step in
discovering dishes that have been carefully created for the
SuperSteam+ Oven by our chef and tested in our Sharp Test
Kitchen. The oven comes preloaded with 12 menu presets
for cooking time and temperature (e.g., Lemony Cedar Plank
Salmon, Chocolate Pots de Crème and Stuffed Portabellas with
Spinach). As you experiment with new recipes on the app, you
will discover new favorites which you can upload to your oven
for easy access at the control panel (a total of 4 favorites may
be stored at one time).

20E
COOKING OPERATION
SMART COOK CHART
FOOD CATEGORY FOOD ITEM QTY / WEIGHT COOKING MODE
TOTAL COOK TIME
(MINUTES)
Snacks / Pizza
Fried Breaded Shrimp 16 SuperSteam Roast 10
Tater Tots
1
/2 bag SuperSteam Roast 20
Thin Crust 1-10" Convection Bake 15
Classic Crust 1-10" Convection Bake 18
Meat / Fish
Bacon (Thick-Cut) 6 slices SuperSteam Grill 10
Drummies /Wingette Pieces 1 lb SuperSteam Grill 25
Salmon 6 oz lets (2 each) Steam 14
Shrimp 20 (med 26/30 ct) Steam 5
Fresh Vegetables
Sweet Potatoes 4 SuperSteam Roast 40
Asparagus 1 lb (30 each) Steam 8
C a u l i o we r / Br o c c ol i 3 servings Steam 8
Zucchini / Squash 3 servings Steam 10
SMART COOK
Smart Cook guides you through quick and convenient preset
cooking options for weight, cooking time and temperature for
commonly prepared items. Your SuperSteam+ Oven comes
preloaded with 12 food presets (e.g., Tater Tots, Bacon and
Steamed Asparagus). More are available in the SuperSteam+
Oven app. The app also provides tips and creative ideas to help
you achieve the best results and discover new favorites which
you can upload to your oven for easy access at the control panel
(a total of 4 favorites may be stored at one time).
NOTE: The menus included in the automatic cooking options
include suggested amounts and average cooking times. Please
note that different brands of food items can vary in shape, size,
quantity and weight. Please be sure to monitor the food items
during cooking to ensure satisfactory completion of the selected
automatic menu item.

E21
SETTINGS AND DEMO MODES
SETTINGS
In the event that the electrical power supply to your oven should
be interr upted, your current input settings will be erased. Simply
reset the settings once power is reinstated to the oven.
SOUND
At the end of timed cook or touch of the screen, beeps will
sound. The audible signal can be turned off if you prefer quiet
operation. Sound is on by default.
TO TURN SOUND OFF
1 Press SETTINGS.
2 Press SOUND.
3 Press OFF.
4 Press CLEAR to exit.
TO RESTORE SOUND
1 Press SETTINGS.
2 Press SOUND.
3 Press ON.
4 Press CLEAR to exit.
CONTROL LOCK
The Control Lock prevents unwanted oven operation such as by
small children. The oven can be set so that the control panel is
deactivated or locked.
TO LOCK
1 Press SETTINGS.
2 Press CONTROL LOCK.
3 Hold BACK button for 3 seconds.
4 Display shows CONTROL LOCK IS ON.
TO UNLOCK
1 Hold BACK button for 3 seconds.
2 Display shows CONTROL LOCK IS OFF.
3 Press CLEAR to exit.
TEMP
The oven is preset to ˚F. To change, press SETTINGS then
TEMP. Once selection is made, press CLEAR to exit.
DEMO MODE
There are 2 demonstration options available within the Settings
menu for learning more about the SuperSteam+ Oven: Video
Demo and Working Demo.
VIDEO DEMO
Video Demo mode takes you on a guided tour of the Smart
Recipe mode for preparing Lemony Cedar Plank Salmon and
the Smart Cook mode to cook Chicken Drummies/Wingette
Pieces. The video demonstration will continue in a loop until
you press CLEAR to exit.
To enter Video Demo
1 Press SETTINGS.
2 Press DEMO.
3 Press VIDEO DEMO.
4 Press CLEAR to exit.
WORKING DEMO
Working Demo mode allows you to explore and learn the oven’s
different functions and cooking modes while the oven is not
operational in a cooking capacity. Working Demo mode must
be started on the Oven Panel (it cannot be started from the app),
but you may use your smart device to send commands to oven
from the app while the oven is in Working Demo mode. (In
Working Demo, the fan motor will still run, but the oven will
not produce heat.) The DEMO icon will appear on the display
panel until the steps are taken to turn OFF Working Demo mode.
To enter Working Demo Mode
1 At Home Page hold CLEAR until it beeps.
2 Press CLEAR 4 times rapidly.
3 The DEMO icon will appear on the screen.
4 Proceed in DEMO MODE.
To exit Working Demo Mode
1 Repeat steps 1 and 2.
2 The DEMO icon will be removed.
Note:
• Oven does not heat in Demo Mode.
• Display counts down quickly.
22E
CLEANING
The Sharp SuperSteam+ Oven offers many options to keep
the oven clean. From initial cleaning of your new oven to
periodic cleaning, the CLEAN menu helps to keep the oven in
peak operational condition and maintain a sparkling and fresh
appearance.
NEW OVEN CLEAN
This is to be used initially to clean the cavity and the
accessories that come with this oven before actual cooking. It is
recommended to use New Oven Clean before cooking in the oven
in order to ensure starting with fresh, clean cooking instruments.
1 Select CLEAN from the home page.
2 Select NEW OVEN CLEAN from the list provided.
3 Insert all accessories (i.e., two trays, two racks) into the
oven. Fill the reservoir with fresh cold water. Replace
reservoir and press START.
4 Once NEW OVEN CLEAN is complete, use caution in
opening the oven.
1 The oven door, outer cabinet and oven cavity will become hot.
2 Do not open the oven with your face close to the oven. Steam
from the oven may cause burns.
STERILE CLEANSE
The Sterile Cleanse function assists in cleaning specic items
that require extra care in cleanliness. The chart below lists the
items that can be used during this function.
1 Select CLEAN from the home page.
2 Select STERILE CLEANSE from the list provided.
3 Select desired level. Please see chart below for suggested
items to cleanse on upper or lower level.
4 Fill the reservoir with fresh cold water. Replace reservoir
and press START.
5 Once STERILE CLEANSE is complete, use caution in
opening the oven. The door, cabinet and oven may be very
hot. Do not open with your face close to the oven. The steam
from the oven may cause burns.
LEVEL SELECT
SUGGESTED ITEMS FOR
CLEANSING
Upper Level (Rack & Tray) Canning (Jars and Lids)
Lower Level (Tray)
Blanching
Small Cutting Boards
DESCALE
White or gray grains, also called scale, may form in the water
circuit inside the oven during steam generation, which could
cause the oven to malfunction. The Descale functions helps
to break down this scale and keep the oven clean and looking
like new.
1 Select CLEAN from the home page.
2 Select DESCALE from the list provided.
3 Fill the reservoir with a mixture of either water and citric
acid or lemon juice. Please see chart below for suggested
amounts. Replace the reservoir and press START.
4 Once oven has completed the cycle, allow the oven to
cool down. Then, wipe away any residue remaining with
a damp cloth.
5 Remove the reservoir, empty, rinse and rell with tap water.
Replace reservoir and press START.
6 Once the DESCALE function is complete, allow the oven
to cool down.
7 Once cool, wipe oven cavity to dry. Empty the drip tray.
MIXTURE AMOUNT
Water and Citric Acid
2
1
/4 cups water and 1 tablespoon
citric acid crystals. Dissolve
crystals into water and pour into
reservoir.
Water and Lemon Juice
2
1
/4 cups water and
1
/3 cup 100%
lemon juice (no pulp). If the
lemon juice contains pulp, please
strain. Stir well and pour into the
reservoir.
Please do not ll the reservoir with alternative cleaning agents
not specied in the chart above. Other cleaning agents may
damage your SuperSteam+ Oven.
OVEN STEAM CLEANING
The Oven Steam Clean function helps to loosen any grease, oil
or food residue. The steam will make the oven easy to clean;
however, it is not a self-cleaning function.
1 Select CLEAN from the home page.
2 Select OVEN CLEANING – STEAM from the list provided.
3 Fill the reservoir with fresh, cold water. Press START.
4 Once the OVEN CLEANING – STEAM function is complete,
allow the oven to cool down.
5 Once cool, wipe any residue remaining with a soft, damp
cloth.

E23
CLEANING
EXTERIOR
The outside surface is precoated metal and plastic. Clean the
outside with mild soap and water; rinse and dry with a soft
cloth. Do not use any type of household or abrasive cleaner.
STAINLESS STEEL SURFACE
The exterior should be wiped often with a soft damp cloth and
polished with a soft dry cloth to maintain its beauty. There
are also a variety of products designed especially for cleaning
and shining the stainless exterior of the oven. We recommend
that the cleaner be applied to a soft cloth and then carefully
used on the stainless exterior rather than sprayed directly on
to it. Follow package directions carefully.
FRONT SIDE OF THE OVEN
Wipe the window on both sides with a soft damp cloth to
remove any spills or spatters. Metal parts will be easier to
maintain if wiped frequently with a soft damp cloth. Avoid
the use of spray and other harsh cleaners as they may stain,
streak or dull the oven surface.
TOUCH CONTROL PANEL
If desired, the touch pads may be deactivated before cleaning.
See the Control Lock information on page 21 of this manual.
Wipe the panel with a cloth dampened slightly with water
only. Dry with a soft cloth. Do not scrub or use any sort of
chemical cleaners. Close oven and follow directions on page
21 for turning Control Lock off. Press CLEAR.
INTERIOR
Cleaning is easy because no heat is generated to the interior
surfaces; therefore, there is no baking and setting of spills
or spattering. To clean the interior surfaces, including oven
sealing surfaces, wipe with a soft damp cloth. DO NOT USE
ABRASIVE OR HARSH CLEANERS OR SCOURING
PADS. For heavier soil, use mild soap; wipe clean with a soft
damp cloth. Do not use any chemical oven cleaners.
ODOR REMOVAL
Occasionally, a cooking odor may remain in the oven. To
remove odor, combine 1 cup water with
1
/3 cup lemon juice
in a 2-cup glass. Boil for several minutes. Leave in the oven
until water cools. Wipe interior with a soft cloth.
WATER DRAINING
In the event of excess water being in the SuperSteam+ Oven
engine or a steam function that is interrupted during operation,
your oven may need to drain to reset itself.
An ATTENTION message will be displayed alerting the need
for the oven to drain the water.
Ensure that there is an empty reservoir. If not, empty the
reservoir and replace.
The draining of the water into the reservoir will take approxi-
mately 1 minute.
Once complete, detach the reservoir and discard the water.

24E
Please check the following before calling for service. It may save you time and expense.
PROBLEM
POSSIBLE CAUSE SOLUTION
1 Part or all of oven does
not operate.
• Power cord of oven is not completely
connected to the electrical outlet.
• Power outage.
• Fuse/circuit breaker at home doesn’t
work.
• Oven is in Demo Mode.
• Make sure the power cord is tightly connected to
the outlet.
• Check house lights to be sure. Call your local electric
company for service.
• Replace the fuse or reset the circuit breaker.
• See page 21 for how to cancel Demo Mode.
2 Food in oven is not
heated.
• No power to the appliance.
• Oven controls improperly set.
• Oven is in Demo Mode.
• See SOLUTION for PROBLEM 1.
• Check if the controls have been properly set.
• See page 21.
3 Oven light does not
work.
• Light bulb is loose or burned out. • Call for service.
4 Touch controls will not
operate.
• Control Lock is on. • See page 21 to unlock.
5 Display ashes.
• Power failure. • Press Clear pad and reset the clock. If the oven was
in use, you must reset the cooking function.
BEFORE YOU CALL FOR SERVICE
SHARP ELECTRONICS CORPORATION • 100 Paragon Drive • Montvale, New Jersey 07645 • USA
SHARP ELECTRONICS OF CANADA LTD • 335 Britannia Road East • Mississauga, Ontario • L4Z 1W9 • Canada

24F
Veuillez vérifier les points suivants avant d’appeler pour faire une demande de service. Ceci pourra vous faire économiser du
temps et de l’argent.
PROBLÈME CAUSE POSSIBLE SOLUTION
1 Une partie ou l’en-
semble du four
ne
fonctionne pas.
• Le cordon d’alimentation du four n’est pas
entièrement branché à la prise électrique.
• Panne de courant.
• Le fusible/disjoncteur ne fonctionne pas.
• Le four est en mode Démo.
• Assurez-vous que le cordon d’alimentation est bien
connecté à la prise.
• Vérifiez les lumières de la maison pour en être certain.
Appelez votre fournisseur d’électricité pour vérifier
le service.
• Remplacez le fusible pour réinitialiser le disjoncteur.
• Reportez-vous à la page 21 pour annuler le mode Démo.
2 La nourriture dans le
four n’est pas chaude.
• Aucune alimentation sur l’appareil.
• Les commandes du four ne sont pas bien
configurées.
• Le four est en mode Démo.
• Voir la SOLUTION au PROBLÈME 1.
• Vérifiez si les commandes ont été configurées
adéquatement.
• Reportez-vous à la page 21.
3 La lumière du four ne
fonctionne pas.
• L’ampoule n’est pas bien vissée ou est
brûlée.
• Appelez pour faire une demande de service.
4 Les commandes tactiles
ne fonctionnent pas.
• Le verrouillage des commandes est activé. • Reportez-vous à la page 21 pour le déverrouiller.
5 L’écran clignote.
• Panne de courant. • Appuyez sur effacer sur le clavier et réinitialisez
l’horloge. Si le four était en fonction, vous devez
relancer la fonction de cuisson.
AVANT DE COMMUNIQUER AVEC LE SERVICE DE RÉPARATION
SHARP ELECTRONICS CORPORATION • 100 Paragon Drive • Montvale, New Jersey 07645 • États-Unis
SHARP ELECTRONICS OF CANADA LTD • 335 Britannia Road East • Mississauga, Ontario • L4Z 1W9 • Canada

F23
NETTOYAGE
EXTÉRIEUR
La surface extérieure est recouverte de métal et de plastique.
Nettoyez l’extérieur à l’aide d’un savon doux et de l’eau;
rincez et séchez à l’aide d’un chiffon doux. N’utilisez aucun
produit de nettoyage abrasif.
SURFACE EN ACIER INOXYDABLE
L’extérieur doit être essuyé souvent à l’aide d’un chiffon
doux humide et poli à l’aide d’un chiffon doux sec pour
conserver son apparence. Il existe également une variété de
produits conçus spécialement pour nettoyer et faire briller
l’extérieur en acier inoxydable du four. Nous recommandons
que le produit de nettoyage soit appliqué sur un chiffon doux,
puis utilisé délicatement sur l’extérieur en acier inoxydable
plutôt que d’être vaporisé directement sur celui-ci. Suivez
soigneusement les instructions apparaissant sur l’emballage.
CÔTÉ AVANT DU FOUR
Essuyez la fenêtre de chaque côté à l’aide d’un chiffon doux
pour retirer les déversements ou les dégâts. Les pièces de
métal seront plus faciles à entretenir si elles sont essuyées
régulièrement à l’aide d’un chiffon doux humide. Évitez
l’utilisation d’un vaporisateur ou de nettoyants abrasifs
puisqu’ils peuvent tacher, marquer ou ternir la surface du four.
PANNEAU DE COMMANDE TACTILE
Si vous le souhaitez, vous pouvez désactiver les pavés tactiles
avant le nettoyage. Reportez-vous à la section Verrouillage du
panneau de commande à la page 21 de ce manuel. Essuyez
le panneau à l’aide d’un chiffon légèrement mouillé avec de
l’eau uniquement. Séchez à l’aide d’un chiffon doux. Ne frottez
pas et n’utilisez aucun produit chimique de nettoyage. Fermez
le four et suivez les directives apparaissant à la page 21 pour
désactiver le Verrouillage du panneau de commande. Appuyez
sur CLEAR (effacer).
INTÉRIEUR
Le nettoyage est simple car aucune chaleur n’est générée sur
les surfaces intérieures; de ce fait, les déversements et les
dégâts ne cuisent pas. Pour nettoyer les surfaces intérieures,
incluant les surfaces permettant de sceller l’intérieur du four,
essuyez à l’aide d’un chiffon doux humide. N’UTILISEZ
PAS DE NETTOYANTS ABRASIFS OU DE TAMPONS À
RÉCURER. Pour les saletés plus tenaces, utilisez un savon
doux; essuyez à l’aide d’un chiffon doux humide. N’utilisez
pas de produits nettoyants pour four.
ÉLIMINATION DES ODEURS
Il arrive parfois qu’une odeur de cuisson demeure dans le
four. Pour éliminer celle-ci, combinez 237 ml (1 tasse) d’eau
avec 78 ml (
1
/3 tasse) de jus de citron dans un verre pouvant
contenir 473 ml (2 tasses). Faites bouillir pendant plusieurs
minutes. Laissez dans le four jusqu’à ce que l’eau refroidisse
complètement. Essuyez l’intérieur à l’aide d’un chiffon doux.
VIDANGE DE L’EAU
Advenant qu’une quantité trop importante d’eau se retrouve dans
le moteur du four SuperSteam+ ou que la fonction de vapeur
soit interrompue durant son fonctionnement, votre four devra
peut-être être drainé pour se réinitialiser.
Un message d’AVERTISSEMENT sera affiché indiquant le
besoin de drainer le four du surplus d’eau.
Assurez-vous que le réservoir est vide. Si ce n’est pas le cas,
videz le réservoir et replacez-le.
Le drainage de l’eau dans le réservoir prendra environ 1 minute.
Une fois ceci terminé, détachez le réservoir et jetez l’eau.
22F
NETTOYAGE
Le four Sharp SuperSteam+ offre plusieurs options de nettoyage.
Du nettoyage initial de votre nouveau four au nettoyage
périodique, le menu CLEAN (nettoyage) vous aider à conserver
le four au meilleur de sa condition opérationnelle en plus
d’assurer une apparence propre et étincelante.
NEW OVEN CLEAN (NETTOYAGE D’UN FOUR NEUF)
Cette étape doit être effectuée initialement pour nettoyer la
cavité et les accessoires fournis avec le four avant de procéder à
la cuisson. Il est recommandé d’utiliser la fonction New Oven
Clean (nettoyage d’un four neuf) pour nettoyer le four afin de
vous assurer de cuisiner avec des instruments propres.
1 Sélectionnez CLEAN (nettoyer) sur la page d’accueil.
2 Sélectionnez NEW OVEN CLEAN (nettoyage d’un four neuf)
dans la liste apparaissant.
3 Insérez tous les accessoires (c’est-à-dire, les deux plateaux, les
deux grilles) dans le four. Remplissez le réservoir d’eau propre
froide. Replacez le réservoir et appuyez sur START (démarrer).
4 Une fois la fonction NEW OVEN CLEAN (nettoyage d’un four
neuf) est terminée, faites attention lorsque vous ouvrirez le four.
1 La porte du four, le châssis du four et la cavité du four
deviendront chauds.
2 N’ouvrez pas le four en tenant votre visage près de l’ouverture du
four. La vapeur provenant du four peut provoquer des brûlures.
STERILE CLEANSE (NETTOYAGE STÉRILE)
La fonction Sterile Cleanse (nettoyage stérilisé) permet de net-
toyer certains articles spécifiques nécessitant d’être très propres.
Le tableau ci-dessous contient une liste des articles pouvant être
utilisés durant cette fonction.
1 Sélectionnez CLEAN (nettoyer) sur la page d’accueil.
2 Sélectionnez STERILE CLEANSE (nettoyage stérilisé) dans
la liste apparaissant.
3 Sélectionnez le niveau désiré. Reportez-vous au tableau
ci-dessous pour voir les articles suggérés pour le nettoyage
sur le niveau supérieur et le niveau inférieur.
4 Remplissez le réservoir d’eau propre froide. Replacez le
réservoir et appuyez sur START (démarrer).
5 Une fois la fonction STERILE CLEAN (nettoyage stérilisé)
est terminée, faites attention lorsque vous ouvrirez le four. La
porte, le châssis et le four peuvent être très chauds. N’ouvrez
pas le four en tenant votre visage près de l’ouverture du four.
La vapeur provenant du four peut provoquer des brûlures.
SÉLECTION DU NIVEAU
ARTICLES SUGGÉRÉS POUR
LE NETTOYAGE
Upper Level (grille et plateau) Conserve (pots et couvercles)
Lower Level (plateau)
Blanchissage
Petites plaques à découper
DESCALE (DÉTARTRAGE)
Des grains blancs ou gris, aussi appelés dépôts calcaires, peuvent
se former dans le circuit d’alimentation en eau à l’intérieur du
four durant la génération de vapeur, ce qui pourrait provoquer une
défaillance du four. La fonction de détartrage permet de décomposer
ces dépôts calcaires et de garder le four propre et d’apparence neuve.
1 Sélectionnez CLEAN (nettoyer) sur la page d’accueil.
2 Sélectionnez DESCALE (détartrage) dans la liste apparaissant.
3 Remplissez le réservoir avec un mélange composé d’eau
et d’acide citrique ou de jus de citron. Reportez-vous au
tableau ci-dessous pour connaître les quantités suggérées.
Replacez le réservoir et appuyez sur START (démarrer).
4 Une fois que le four a terminé le cycle, laissez-le refroidir.
Essuyez ensuite les résidus restant avec un chiffon doux humide.
5 Retirez le réservoir, videz-le, rincez-le et remplissez-le d’eau du
robinet. Replacez le réservoir et appuyez sur START (démarrer).
6 Une fois que la fonction DESCALE (détartrage) est terminée,
laissez le four refroidir complètement.
7 Une fois refroidie, essuyez la cavité du four pour l’assécher.
Videz le plateau d’égouttement.
MÉLANGE QUANTITÉ
Eau et acide citrique
532 ml (2
1
/4 tasses) d’eau et 15 ml
(1 cuillère à soupe) de cristaux
d’acide citrique. Faites dissoudre
les cristaux dans l’eau et versez le
mélange dans le réservoir.
Eau et jus de citron
532 ml (2
1
/4 tasses) d’eau et 80 ml
(
1
/3 tasse) de jus de citron pur à
100 % (sans pulpe). Filtrez le jus
de citron si celui-ci contient de la
pulpe. Mélangez bien et versez dans
le réservoir.
Ne remplissez pas le réservoir avec d’autres agents de nettoyage
que ceux apparaissant dans le tableau ci-dessous. Ces derniers
pourraient endommager votre four SuperSteam+.
OVEN STEAM CLEANING (NETTOYAGE DU FOUR
À LA VAPEUR)
La fonction de nettoyage du four à la vapeur permet de détacher la
graisse, l’huile ou les résidus alimentaires. La vapeur facilitera le net-
toyage du four. Il ne s’agit pas cependant d’une fonction d’autonettoyage.
1 Sélectionnez CLEAN (nettoyer) sur la page d’accueil.
2 Sélectionnez OVEN CLEANING – STEAM (nettoyage du
four – vapeur) dans la liste apparaissant.
3 Remplissez le réservoir d’eau propre froide. Appuyez sur
START (démarrer).
4 Une fois que la fonction OVEN CLEANING – STEAM
(nettoyage du four – vapeur) est terminée, laissez le four
refroidir complètement.
5 Une fois le four refroidi, essuyez les résidus restant avec un
chiffon doux humide.

F21
PARAMÈTRES ET MODES DE DÉMONSTRATION
PARAMÈTRES
Si l’alimentation électrique du four est interrompue, vos paramètres
actuels seraient effacés. Réinitialisez simplement les paramètres au
retour de l’alimentation électrique.
SON
Des signaux sonores seront émis à la fin du temps de cuisson
ou lorsque l’écran est touché. Les signaux sonores peuvent être
désactivés si vous préférez un fonctionnement silencieux. Le son
est activé par défaut.
ÉTEINDRE LES SIGNAUX SONORES
1 Appuyez sur SETTINGS (paramètres).
2 Appuyez sur SOUND (son).
3 Appuyez sur OFF (désactiver).
4 Appuyez sur CLEAR (effacer) pour quitter.
POUR ACTIVER LES SIGNAUX SONORES
1 Appuyez sur SETTINGS (paramètres).
2 Appuyez sur SOUND (son).
3 Appuyez sur ON (activer).
4 Appuyez sur CLEAR (effacer) pour quitter.
VERROUILLAGE DES COMMANDES
Le verrouillage des commandes a pour but d’empêcher le fonction-
nement non désiré du four comme par de jeunes enfants. Le four
peut être configuré de façon à ce que le panneau de commande
soit désactivé ou verrouillé.
POUR VERROUILLER
1 Appuyez sur SETTINGS (paramètres).
2 Appuyez sur CONTROL LOCK (verrouillage des commandes).
3 Appuyez pendant 3 secondes sur le bouton BACK (retour).
4 L’écran affiche CONTROL LOCK IS ON (le verrouillage des
commandes est activé).
POUR DÉVERROUILLER
1 Appuyez pendant 3 secondes sur le bouton BACK (retour).
2 L’écran affiche CONTROL LOCK IS OFF (le verrouillage
des commandes est désactivé).
3 Appuyez sur CLEAR (effacer) pour quitter.
TEMPÉRATURE
Le four est configuré par défaut en Farenheit. Pour modifier
ceci, appuyez sur SETTINGS (paramètres), puis sur TEMP
(température). Une fois la sélection effectuée, appuyez sur CLEAR
(effacer) pour quitter.
DEMO MODE (MODE DÉMO)
Il existe deux options de démonstration disponibles dans le
menu Settings (paramètres) pour en savoir plus à propos du four
SuperSteam+ : Video Demo (démo vidéo) et Working Demo
(démo de fonctionnement).
VIDEO DEMO (DÉMO VIDÉO)
Le mode Video Demo (démo vidéo) vous fait faire une visite
guidée du mode Smart Recipe (recette intelligente) pour préparer
le Lemony Cedar Plank Salmon (saumon citronné sur planche de
cèdre) et le mode Smart Cook (cuisson intelligente) pour faire
la cuisson des Chicken Drummies/Wingettes Pieces (pilons et
cuisses de poulet). La démonstration vidéo continuera en boucle
jusqu’à ce que vous appuyez sur CLEAR (effacer) pour quitter.
Pour entrer dans le mode Video Demo (démo vidéo)
1 Appuyez sur SETTINGS (paramètres).
2 Appuyez sur DEMO (démo).
3 Appuyez sur VIDEO DEMO (démo vidéo).
4 Appuyez sur CLEAR (effacer) pour quitter.
WORKING DEMO (DÉMO DE FONCTIONNEMENT)
Le mode Working Demo (démo de fonctionnement) vous permet
d’explorer et d’apprendre les différentes fonctions et modes
de cuisson pendant que le four n’est pas en fonction. Le mode
Working Demo (démo de fonctionnement) doit être lancé sur
le panneau de commande du four (il ne peut pas être lancé dans
l’application), mais vous pouvez utiliser votre appareil intelligent
pour envoyer des commandes à partir de l’application pendant
que le four est en mode Working Demo (démo de fonctionne-
ment). (En mode Work Demo (démo de fonctionnement), le
moteur du ventilateur continuera de fonctionner, mais le four
ne produira aucune chaleur.) L’icône DEMO (démo) apparaîtra
sur le panneau d’affichage jusqu’à ce que les étapes soient prises
pour éteindre le mode Working Demo (démo de fonctionnement).
Pour entrer dans le mode Working Demo (démo de
fonctionnement)
1 À la page d’accueil, maintenez enfoncé le bouton CLEAR
(effacer) jusqu’à ce que vous entendiez un signal sonore.
2 Appuyez sur CLEAR (effacer) quatre fois rapidement.
3 L’icône DEMO (démo) apparaîtra à l’écran.
4 Procédez au DEMO MODE (mode démo).
Pour quitter le mode Working Demo (démo de fonctionnement)
1 Répétez les étapes 1 et 2.
2 L’icône DEMO (démo) disparaîtra.
Remarque:
• Le four ne chauffe pas en Demo Mode (mode démo).
• L’affichage effectue un compte à rebours rapide.

20F
FONCTIONNEMENT DE LA CUISSON
TABLEAU DE CUISSON INTELLIGENTE
CATÉGORIE
D’ALIMENT
RECETTE QTÉ / POIDS MODE DE CUISSON
DURÉE DE CUISSON
TOTALE (MINUTES)
Collations / pizza
Fried Breaded Shrimp
(crevettes panées frites)
16
SuperSteam Roast
(rôtissage SuperSteam)
10
Tater Tots (pommes de terre
râpées et frites)
1
/2 sac
SuperSteam Roast
(rôtissage SuperSteam)
20
Croute mince 1 à 10 po
Convection Bake
(cuisson à convection)
15
Croûte classique 1 à 10 po
Convection Bake
(cuisson à convection)
18
Viande / poisson
Bacon (coupe épaisse) 6 tranches
SuperSteam Grill
(gril SuperSteam)
10
Drummies /Wingette Pieces
(pilons et ailes de poulet)
454 g (1 lb)
SuperSteam Grill
(gril SuperSteam)
25
Saumon
Filets de 170 g (6 oz)
(2 portions)
Steam (vapeur) 14
Crevette 20 (moy 26/30) Steam (vapeur) 5
Légumes frais
Patates douces 4
SuperSteam Roast
(rôtissage SuperSteam)
40
Asperges 454 g (1 lb) (30 unités) Steam (vapeur) 8
Choux-fleurs / brocoli 3 portions Steam (vapeur) 8
Courgette / courge 3 portions Steam (vapeur) 10
SMART COOK (CUISSON INTELLIGENTE)
Le mode Smart Cook (cuisson intelligente) vous guide
rapidement à travers des options préréglées de cuisson, rapides
et pratiques, de temps de cuisson et de température pour des plats
courants. Votre four SuperSteam+ est équipé de 12 préréglages
(par exemple, Tater Tots, Bacon et Steamed Asparagus).
D’autres options sont disponibles dans l’application du four
SuperSteam+. L’application offre également des conseils et des
idées créatives pour vous aider à obtenir les meilleurs résultats
qui soient et découvrir de nouveaux plats favoris que vous pouvez
télécharger dans votre four pour y accéder facilement à partir
du panneau de commandes (un total de 4 favoris peuvent être
stockés simultanément).
REMARQUE: Les menus comprennent des options de cuisson
automatique incluant les quantités suggérées et les temps de cuisson
moyens. Veuillez noter que les aliments peuvent varier dans leur
forme, leur taille, leur quantité et leur poids. Assurez-vous de
surveiller les aliments durant la cuisson afin de vous assurer que les
articles du menu de sélection automatique soient cuits adéquatement.

F19
FONCTIONNEMENT DE LA CUISSON
TABLEAU DE RECETTES INTELLIGENTES
CATÉGORIE
D’ALIMENT
RECETTE
NOMBRE DE
PORTIONS
MODE DE CUISSON
DURÉE DE CUISSON
TOTALE (MINUTES)
Plats principaux
Lemony Cedar Plank Salmon
(saumon citronné sur planche de cèdre)
2
SuperSteam Grill
(grillade SuperSteam)
8
Turkey Burgers (burgers de dinde) 4
SuperSteam Grill
(grillade SuperSteam)
14
Baby Back Ribs (carrés de côtes levées) 4
SuperSteam Roast
(rôtissage SuperSteam)
85
SuperSteam Grill
(grillade SuperSteam)
5
Stuffed Portabellas with Spinach
(champignons portobellos farcis aux épinards)
2
SuperSteam Roast
(rôtissage SuperSteam)
8
Plats
d’accompagnement
Herb Roasted Fingerling Potatoes
(pommes de terre grelots rôties aux herbes)
4
SuperSteam Roast
(rôtissage SuperSteam)
25
Sweet Potato Salad
(salade à la patate douce)
4 Steam (vapeur) 14
Roasted Brussels Sprouts
(choux de Bruxelles rôtis)
4
SuperSteam Roast
(rôtissage SuperSteam)
20
Parmesan Cauliflower
(choux-fleurs au parmesan)
4
SuperSteam Roast
(rôtissage SuperSteam)
15
Desserts
Mixed Berry Crumble
(croustade aux petits fruits)
8
SuperSteam Roast
(rôtissage SuperSteam)
30
Chocolate Chip Zucchini Cake
(gâteau aux courgettes et aux pépites
de chocolat)
9
Convection Bake
(cuisson à convection)
35
Chocolate Pots de Crème
(pots de crème au chocolat)
4
SuperSteam Roast
(rôtissage SuperSteam)
25
Morning Glory Bread (pain gloire du matin)
8
Convection Bake
(cuisson à convection)
50
SMART RECIPE (RECETTES INTELLIGENTES)
Smart Recipe (recettes intelligentes) utilise notre application pour
vous guider étape par étape afin que vous découvriez des plats qui
ont été créés avec soin pour le four SuperSteam+ par notre chef
et testés dans notre Cuisine de test Sharp. Le four est équipé de
12 menus préréglés pour le temps de cuisson et la température
(par ex., Lemony Cedar Plank Salmon (saumon citronné sur planche
de cèdre), Chocolate Pots de Crème (pots de crème au chocolat) et
Stuffed Portabellas with Spinach (champignons portobellos farcis
aux épinards)). Au fur et à mesure que vous expérimentez avec de
nouvelles recettes dans l’application, vous découvrirez de nouveaux
plats favoris que vous pouvez télécharger dans votre four pour y
accéder facilement à partir du panneau de commandes (un total de
4 favoris peuvent être stockés simultanément).
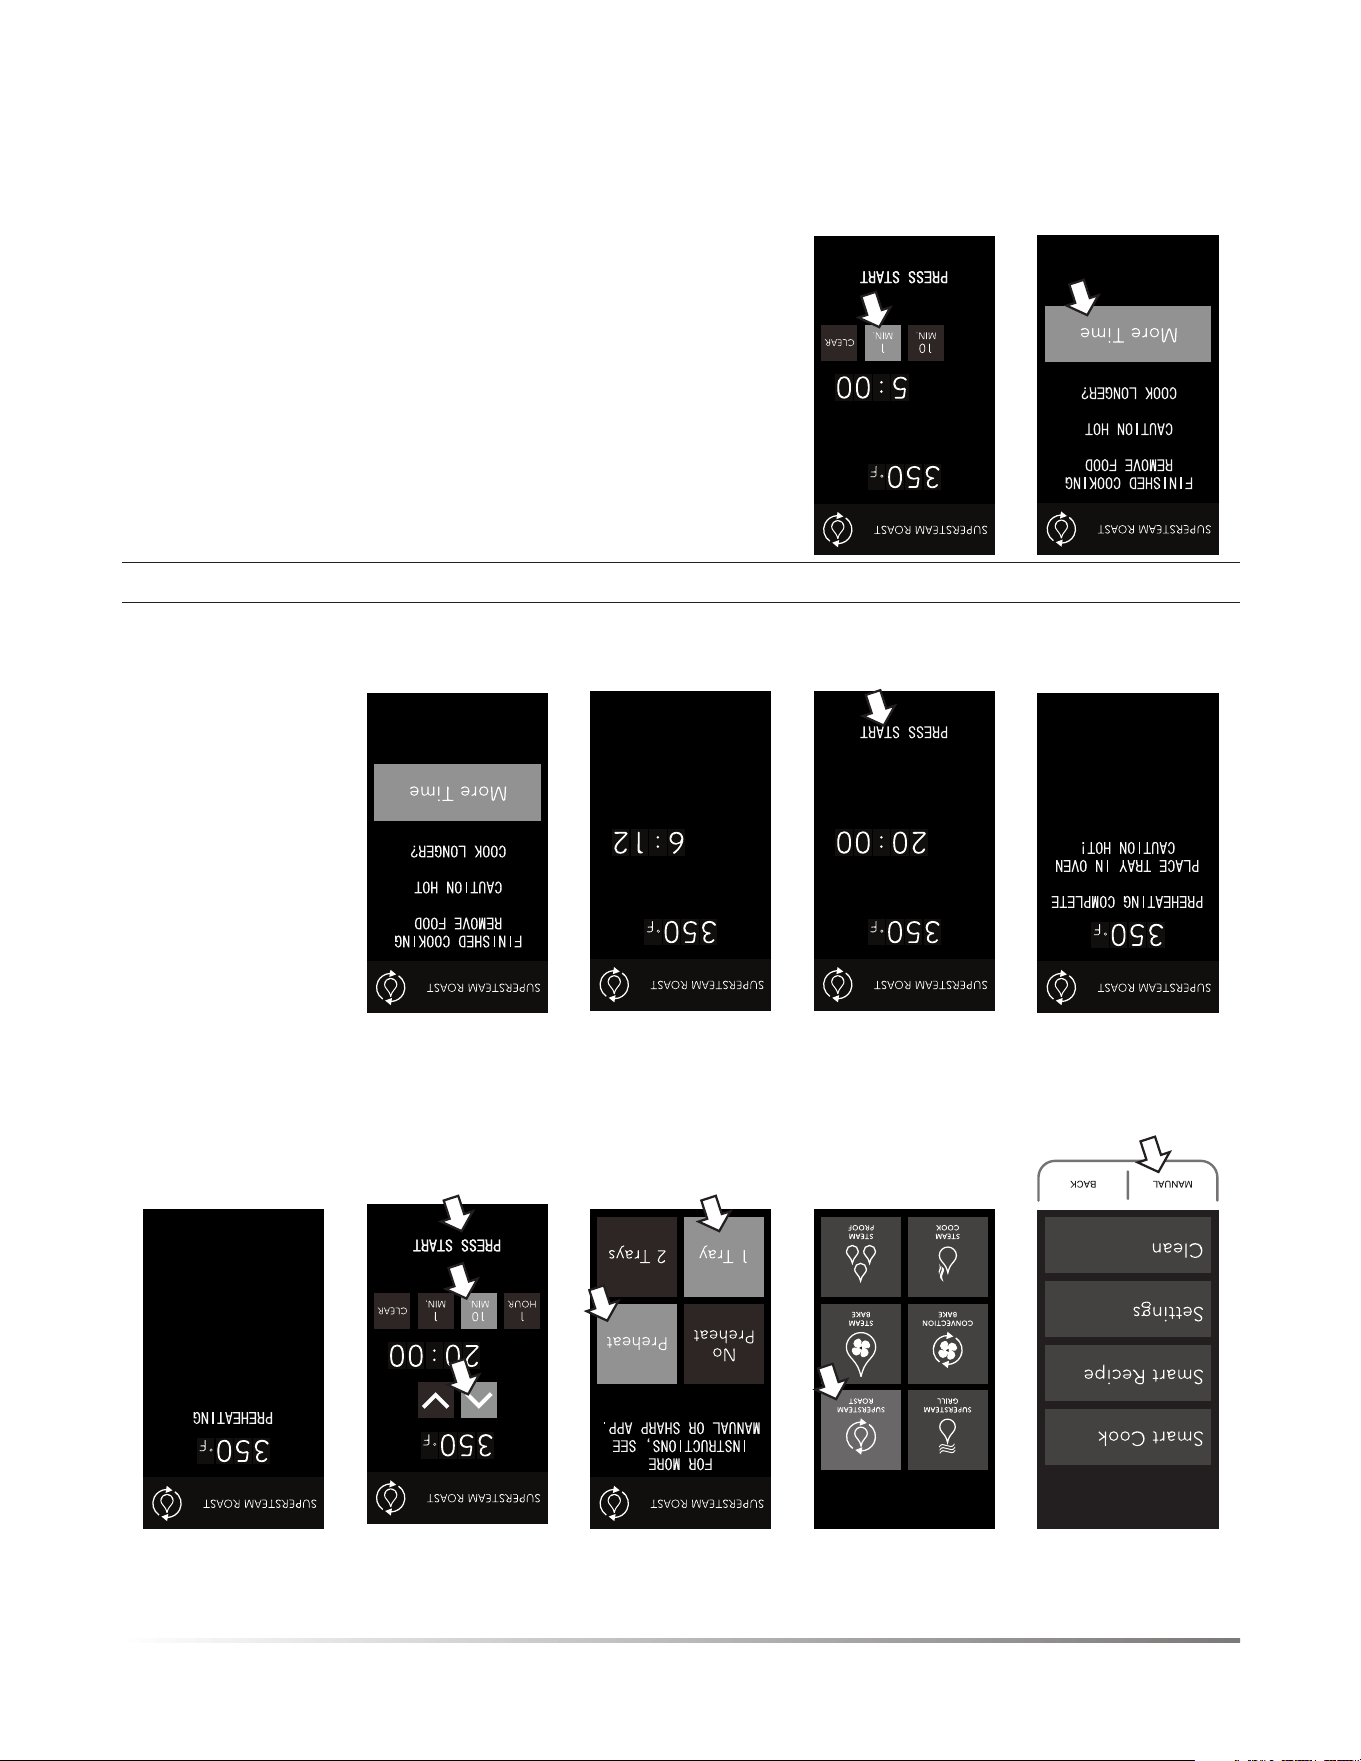
18F
FONCTIONNEMENT DE LA CUISSON
• Pour la cuisson en utilisant la fonction SUPERSTEAM ROAST (rôtissage SuperSteam) :
1. Appuyez sur
MANUAL (manuel).
2. Appuyez sur
SUPERSTEAM
ROAST (rôtissage
SuperSteam).
3. Sélectionnez la
préférence de
préchauffage et le
nombre de plateaux.
4. Sélectionnez la tem-
pérature et le temps,
puis appuyez sur
START (démarrer).
5. Le four est en
préchauffage.
6. Placez les aliments
au four.
7. Appuyez sur START
(démarrer).
8. Le temps de cuisson
effectue un compte à
rebours.
9. La cuisson est
terminée.
Option pour ajouter du temps de cuisson :
10. Pour augmenter le
temps de cuisson,
appuyez sur MORE
TIME (plus de
temps).
11. Appuyez sur les
chiffres pour ajou-
ter plus de temps,
puis appuyez sur
START (démarrer).
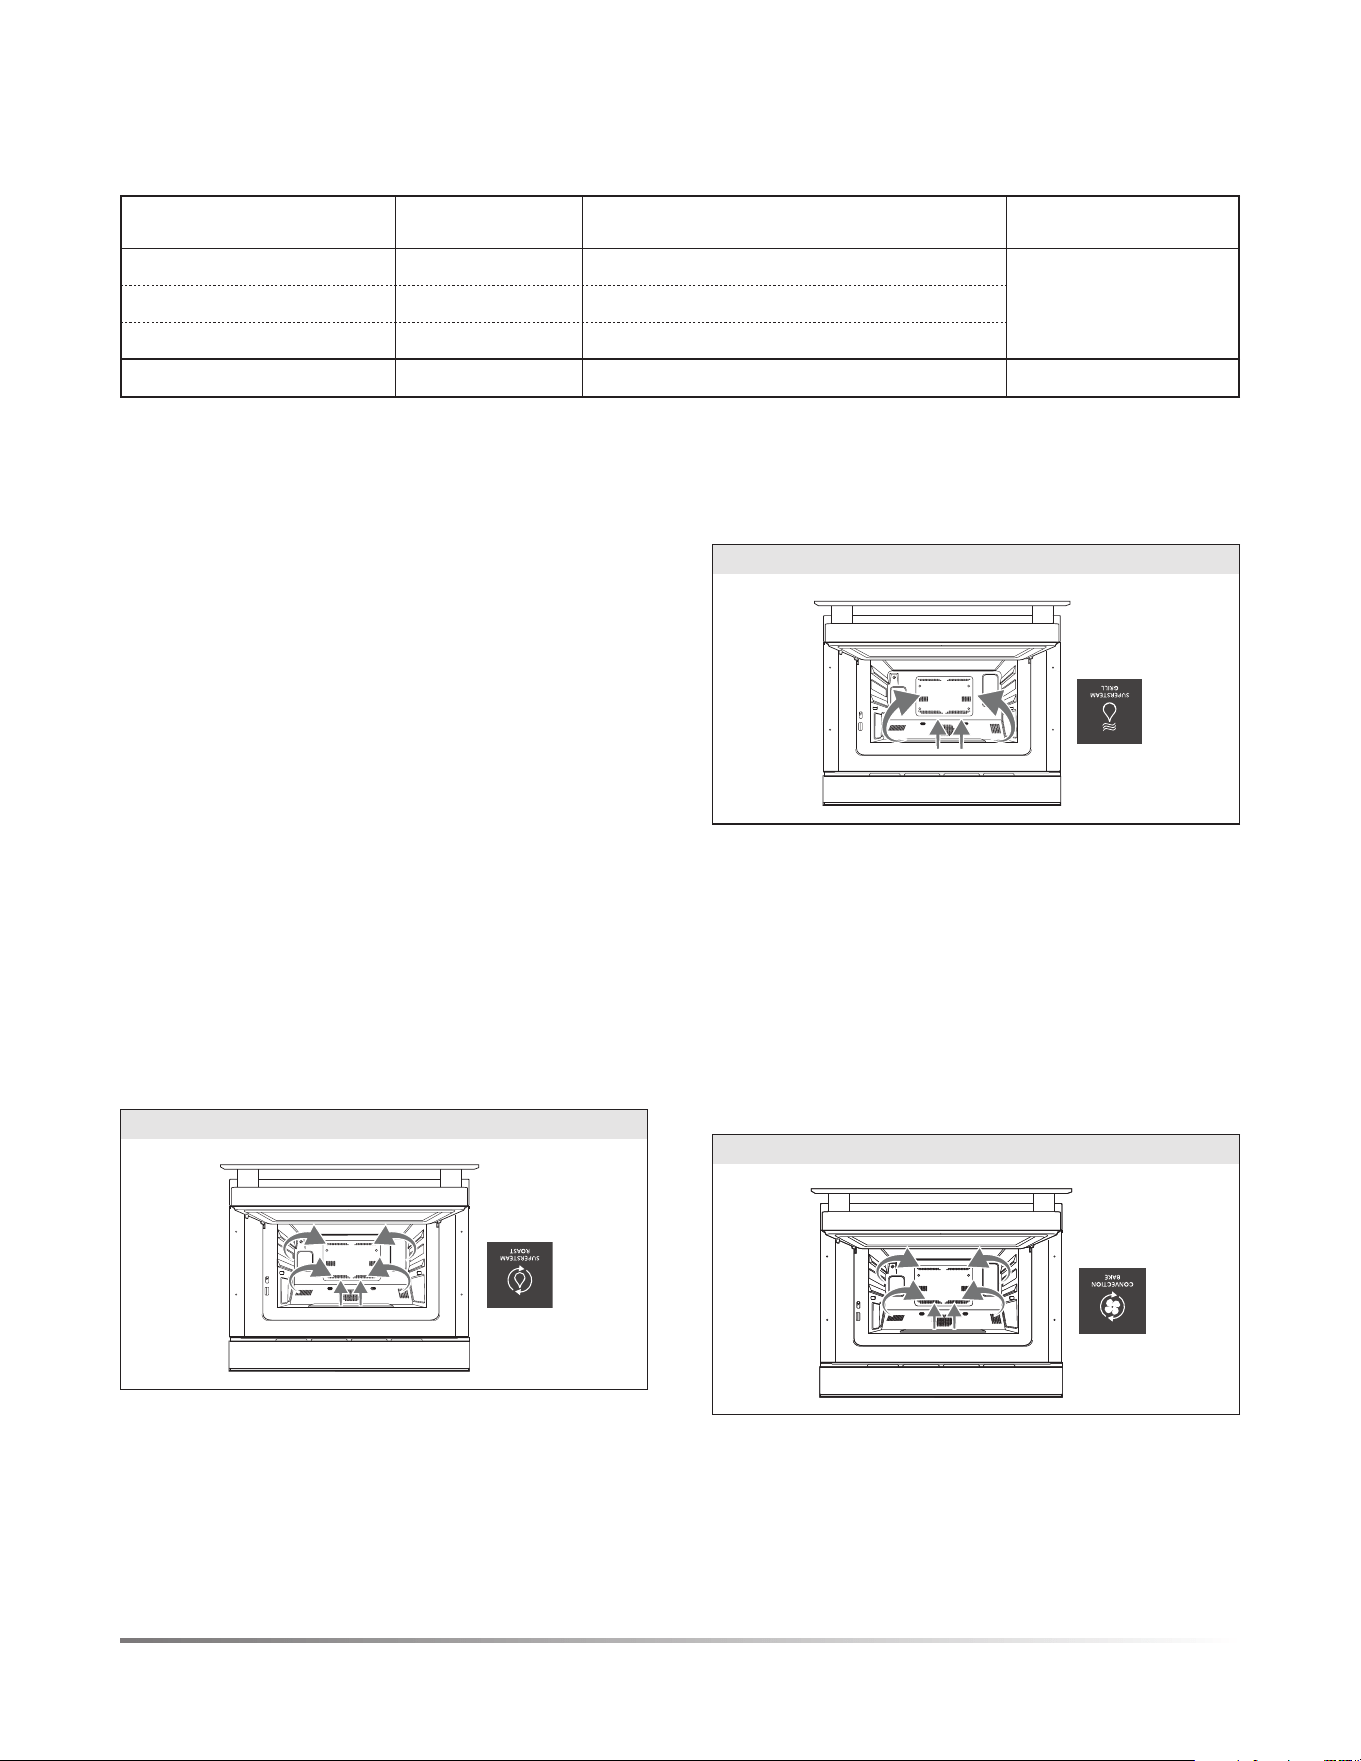
F17
FONCTIONNEMENT DE LA CUISSON
3. CONVECTION BAKE (CUISSON À CONVECTION) -
CHALEUR SÈCHE
Convection Bake (cuisson à convection) - Faites cuire des plats
traditionnels et pratiques comme des biscuits, des gâteaux, des
pizzas et des croquettes de poulet en utilisant la chaleur sèche
qui circule uniformément dans le four.
Température 100 ºC à 252 ºC (212 ºF à 485 ºF).
CONVECTION BAKE (CUISSON À CONVECTION)
4. SUPERSTEAM GRILL (GRILLAGE SUPERSTEAM) -
VAPEUR INTENSE À 252ºC (485ºF)
SuperSteam Grill (grillage SuperSteam) - Créez des plats grillés et
sautés délicieux comme du poisson, des légumes, des oignons et du
bifteck. Ce réglage fonctionne comme la fonction de rôtissage d’un
four traditionnel pour les aliments qui doivent cuire moins longtemps
à température élevée. Donnez à votre plat l’avantage de la tendreté
avec la vapeur en plus d’une vapeur ciblée intense pour griller.
Température 252 ºC (485 ºF)
Grillage supérieur à convection
SUPERSTEAM GRILL (GRIL SUPERSTEAM)
5. SUPERSTEAM ROAST (RÔTISSAGE SUPERSTEAM) -
VAPEUR INTENSE À 100ºC À 252ºC (212ºF À 485ºF)
SuperSteam Roast (rôtissage SuperSteam) - Grille des plats
comme le poulet (entier), les patates douces et les rôtis de bœuf
ou de porc. L’ajout de vapeur à des plats nécessitant une cuisson
plus longue permet de griller à l’extérieur tout en conservant
l’humidité et la tendreté à l’intérieur.
Température 100 ºC à 252 ºC (212 ºF à 485 ºF)
SUPERSTEAM ROAST (RÔTISSAGE SUPERSTEAM)
CUISSON AVEC LA VAPEUR
De façon générale, les aliments cuits dans les modes de cuisson
« Convection Bake » (cuisson à convection) et « Superheated
Steam » (vapeur intense) sont habituellement prêts 25 % plus
rapidement que dans un four conventionnel. Estimation simple,
selon le temps et la température des instructions d’une recette,
réduisez la température de 13 ºC (25 ºF) et le temps de 25 %.
Exemple : les instructions indiquent 204 ºC (400 ºF) et
20 minutes. Convertissez à 191 ºC (375 ºF) et à 15 minutes.
IMPORTANT : Tous les aliments varient. De ce fait, ajus-
tez-vous en conséquence. Reportez-vous aux directives de
cuisson des viandes. Le four Sharp SuperSteam+ offre également
plusieurs paramètres de cuisson intelligente qui sont des modes
de cuisson, des températures et des temps de cuisson préréglés
pour certains aliments qui vous permettront de vous familiariser
avec la performance de cuisson du four.
Les options de vapeur peuvent être utilisées pour les modes
de cuisson intelligente, de cuisson manuelle et de recettes
intelligentes. Pour de plus amples informations sur la façon
d’utiliser les différentes options de vapeur, reportez-vous aux
descriptions à la page 16 dans la section Cuisson manuelle.
TABLEAU DE LA CUISSON À LA VAPEUR
PAGE D’ACCUEIL RÉGLAGE DU MENU EXEMPLES RÉGLAGES DE TEMPÉRATURE
STEAM COOK
(cuisson vapeur)
STEAM COOK (cuisson vapeur) Poisson, légumes 100 ºC (212 ºF)
STEAM KEEP WARM (réchaud vapeur) Assiette de repas 79 ºC (175 ºF)
STEAM REFRESH (rafraîchissement à la vapeur)
Pain frais 54 ºC (130 ºF)
STEAM PROOF
(étuve à la vapeur)
Pâte à pain 38 ºC (100 ºF)

16F
Le four SuperSteam+ regroupe plusieurs fonctions de cuisson
offrant plus de flexibilité ainsi qu’une performance élevée pour
de meilleurs résultats.
La gamme de fonctions inclut la cuisson à convection sèche en
passant par la vapeur et la vapeur intense qui allie humidité et
grillage. Reportez-vous ci-dessous pour connaître les catégories
et les capacités de ce four unique.
• Les modes de cuisson comprennent les modes manuel, cuisson
intelligente et recette intelligente.
• Le mode manuel vous permet de créer votre propre expérience
culinaire.
• La cuisson intelligente vous guide à travers des options de
cuisson préréglées rapides et pratiques pour les collations,
repas et desserts préparés régulièrement.
• Les recettes intelligentes sont accédées par l’entremise de
l’application pour vous guider étape par étape afin de créer
des hors-d’œuvre, des plats d’accompagnement, des entrées
et des desserts délicieux.
CUISSON MANUELLE
L’option de cuisson manuelle vous offre la liberté de choisir et
d’explorer une gamme complète d’options de cuisson offertes
par le four SuperSteam+. Chaque option de cuisson manuelle est
équipée d’une fonction spécialisée pour assurer une performance
de cuisson optimale.
REMARQUE: VITESSE DE CUISSON – LA RÈGLE DU 25-25
De façon générale, les aliments cuits dans les modes de cuisson
« Convection Bake » (cuisson à convection) et « Superheated Steam »
(vapeur intense) sont habituellement prêts 25 % plus rapidement que
dans un four conventionnel. Estimation simple, selon le temps et la tem
-
pérature des instructions d’une recette, réduisez la température de 13 ºC
(25 ºF) et le temps de 25 %. Exemple : les instructions indiquent 204 ºC
(400 ºF) et 20 minutes. Convertissez à 191 ºC (375 ºF) et à 15 minutes.
IMPORTANT: Tous les aliments varient. De ce fait, ajustez-vous en
conséquence. Reportez-vous aux directives de cuisson des viandes.
IL EXISTE 5FONCTIONS DE CUISSON DANS LA
CUISSON MANUELLE:
1. STEAM COOK (CUISSON VAPEUR) – LE GÉNÉRATEUR
DE VAPEUR CRÉE DE LA VAPEUR QUI EST ENVOYÉE
DANS LE FOUR
Steam Cook (cuisson vapeur) vous permet de cuire à la vapeur
des légumes et des poissons et des viandes délicates. La vapeur
pure permet de conserver les nutriments et l’humidité. Ceci est
idéal pour les brocolis, le saumon, la morue et le poulet. Ce
mode est parfait pour faire cuire des œufs ou vos tamales favoris.
Température 100 ºC (212 ºF) - Vapeur pure
Steam Keep Warm (réchaud vapeur) est la meilleure option pour
les plats comme les casseroles, les légumes et les quiches pour
lesquelles vous souhaitez conserver l’humidité ainsi que le chaleur.
Température 79 ºC (175 ºF) - En utilisant la vapeur, contrôlez
la température du four.
Steam Refresh (rafraîchissement à la vapeur) redonne la
fraîcheur originale aux restants comme le pain français, le
hamburger, le riz brun, les spaghettis et le brocoli.
Température 54 ºC (130 ºF) - En utilisant la vapeur, contrôlez
la température du four.
FONCTIONNEMENT DE LA CUISSON
STEAM COOK (CUISSON VAPEUR)
2. STEAM BAKE (CUISSON VAPEUR) – COMBINAISON DE
CUISSON PAR CONVECTION ET PAR VAPEUR
Steam Bake Breads (pains à cuisson vapeur) crée un pain
délicieux en injectant de la vapeur dans le four durant le cycle
de préchauffage afin de permettre une levée uniforme sans devoir
vaporiser ou ajouter des plats remplis d’eau. Le réglage passe
automatiquement à la cuisson par convection sèche pour produire
une mie légère et une croute extérieure dorée croustillante.
Température 204 ºC à 218 ºC (400 ºF à 425 ºF)
Steam Water Bath (bain-marie à la vapeur) permet de cuire des
desserts crémeux comme du gâteau au fromage, du pudding et
de la crème pâtissière nécessitant habituellement un bain-maire
sans nécessiter de manipuler des plats remplis d’eau chaude.
Température 135 ºC à 149 ºC (275 ºF à 300 ºF)
STEAM BAKE (CUISSON À LA VAPEUR)
Steam Proof (étuve à la vapeur) pour la pâte à pain. La fonction
d’étuve favorise la fermentation de la pâte par la levure grâce à
une température tiède et une humidité contrôlée.
Température 38 ºC (100 ºF)
STEAM PROOF (ÉTUVE À LA VAPEUR)

F15
CONNEXION DE VOTRE APPAREIL
La nouvelle génération de four SuperSteam+ combine dans
un four les améliorations technologiques de la connectivité de
maison intelligente avec la technologie novatrice de vapeur
intense de Sharp et la cuisson à convection.
• Connectivité Wi-Fi
• Application mobile et commandes vocales
• Nouvelle interface utilisateur graphique (IUG) sur le four
• Capacité de téléverser vos recettes préférées dans le four
Votre four SuperSteam+ peut être opéré à distance à l’aide d’un
appareil intelligent utilisant l’application SuperSteam+ Oven en
plus de l’utilisation conventionnelle non connectée en utilisant le
panneau de commande sur la porte du four. Soyez avisé que certains
éléments du menu sont uniquement disponibles par téléchargement
vers le four à l’aide de l’application. Pour utiliser l’application,
l’appareil doit être connecté à votre réseau domestique.
CONNECTIVITÉ WI-FI
Votre four à vapeur est muni d’une connectivité Wi-Fi. La connexion
est configurée manuellement comme décrit dans le GUIDE DE
CONNEXION Wi-Fi inclus avec la documentation de l’appareil.
FAVORIS:
L’application SuperSteam+ Oven vous permet de sélectionner
et stocker vos Cuissons intelligentes et vos recettes intelligentes
préférées dans la section FAVORITES (favoris).
Cliquez sur l’icône du cœur pour ajouter les plats que vous préparez
le plus souvent et téléversez les préréglages vers votre four pour
faciliter les réglages. Vous pouvez stocker jusqu’à 4 éléments favoris
pour le mode Smart Cook (cuisson intelligente) et 4 éléments favoris
pour le mode Smart Recipe (recette intelligente) en même temps.
INFORMATION DE SÉCURITÉ SUR LE DÉMARRAGE
À DISTANCE
Le démarrage à distance du four est DÉSACTIVÉ. Il doit être
ACTIVÉ pour l’utiliser.
Lorsque vous utilisez un appareil intelligent pour contrôler
l’appareil à distance, assurez-vous de suivre toutes les procédures
et directives de sécurité comme indiqué dans le manuel d’utilisa-
tion. Le fait de ne pas respecter ces directives peut entraîner des
préjudices personnels, la mort ou des dommages à la propriété.
REMARQUE IMPORTANTE:
• Si vous activez l’appareil à distance, votre four restera en
MARCHE et en mode de cuisson même si votre appareil
intelligent ou votre Wi-Fi domestique se désactive.
• Le menu Wi-Fi de votre four aura une touche CONNECTING
(connexion) et une touche PAIRING (jumelage).
- La touche CONNECTING (connexion) peut être utilisée si
un nouveau routeur est installé dans la maison et le four
doit être connecté au réseau Wi-Fi à nouveau.
- La touche PAIRING (jumelage) peut être utilisée si vous
devez jumeler votre four avec votre appareil intelligent et
votre four est déjà connecté au réseau Wi-Fi.
Assurez-vous que la cavité du four est TOUJOURS prête pour
la cuisson lorsque vous opérez le four à distance à l’aide de
l’application. Ceci présente un risque de dommage ou d’incendie.
N’utilisez JAMAIS l’intérieur du four comme espace de
rangement pour des articles divers ou pour effectuer une cuisson
à distance si la cavité du four n’a pas été préparée adéquatement.
NOTE D’INACTIVITÉ DU FONCTIONNEMENT DU PANNEAU
DE COMMANDE DU FOUR
1
re
condition: Aucune interaction avec le four 20 minutes après
avoir lancé le cycle
Toute navigation prise sur le panneau d’affichage du four peut
être sujette à un compte à rebours d’inactivité de 20 minutes.
Ceci signifie simplement qu’après 20 minutes sans interaction
avec le four, le panneau de commande du four reviendra à l’écran
d’accueil (c’est-à-dire, si l’option SMART COOK (cuisson
intelligente) est touchée et qu’aucune autre interaction n’a lieu
pendant 20 minutes, le panneau de commande du four reviendra
par défaut à l’écran d’accueil).
2
e
condition: Aucune interaction avec le four 20 minutes après
avoir lancé l’achèvement du préchauffage
Si un cycle de préchauffage est complété, il est sujet à un compte à
rebours d’inactivité de 20 minutes s’il n’y a aucune autre interaction
avec le four. Ceci signifie simplement qu’après 20 minutes sans
interaction avec le four, le panneau de commande du four reviendra
à l’écran d’accueil.
Si la porte du four est ouverte et fermée une fois le four préchauffé,
il y aura un compte à rebours d’inactivité de 10 minutes.
(Remarque : Le compte à rebours d’inactivité de 10 minutes
est seulement applicable après le préchauffage et que la porte
ait été ouverte et fermée.) Si aucune interaction avec le four n’est
effectuée après l’ouverture et la fermeture de la porte une fois le
préchauffage terminé, le panneau d’affichage du four reviendra à
l’écran d’accueil.
MISE À JOUR DU MICROLOGICIEL
Des mises à jour du logiciel du four sont offertes à l’occasion.
Des notifications seront envoyées dans l’application
SuperSteam+ Oven pour ces mises à jour. Les mises à jour du
logiciel seront disponibles sur la page de soutien du produit.
Visitez http://sharp.ca/support-home.aspx pour de plus amples
informations.
DÉJUMELER VOTRE APPAREIL
Pour annuler le jumelage de votre appareil intelligent avec le
four, effectuez les applications suivantes dans votre application :
1 Sélectionnez Profil.
2 Sélectionnez Mes appareils.
3 Glissez vers la gauche sur la barre qui affiche votre four Sharp
SuperSteam+ par défaut.
4 Appuyez sur l’icône de droite pour annuler le jumelage du
four à votre appareil intelligent. Ceci devrait retirer le four
SuperSteam+ de votre liste d’appareils.

14F
AVANT LA PREMIÈRE UTILISATION
four. Nettoyez le four avec le processus de NEW OVEN CLEAN
(nettoyage d’un four neuf) dans le manuel d’utilisation pendant
20 minutes sans préchauffage et aliments. Vous pourriez détecter
un peu de fumée et des odeurs pendant ce processus. Ceci est
normal et le four n’a pas besoin d’être réparé.
PRÉPARATION
1 Aérez la pièce.
2 Remplissez le réservoir d’eau froide du robinet et installez-le.
3 Installez le plateau d’égouttement vide.
SUIVEZ LES ÉTAPES SUIVANTES POUR NETTOYER
LEFOUR AVANT L’UTILISATION.
1 Sélectionnez CLEAN (nettoyage) sur l’écran d’accueil.
2 Sélectionnez NEW OVEN CLEAN (nettoyage d’un four neuf)
dans la liste apparaissant.
3 Insérez tous les accessoires (c’est-à-dire, les deux plateaux,
les deux grilles) dans le four.
4 Remplissez le réservoir d’eau propre froide. Replacez le
réservoir et appuyez sur START (démarrer).
5 Une fois la fonction NEW OVEN CLEAN (nettoyage d’un four
neuf) est terminée, faites attention lorsque vous ouvrirez le four.
1 La porte du four, le châssis du four et la cavité du four devien-
dront chauds.
2 N’ouvrez pas le four en tenant votre visage près de l’ouverture du
four. La vapeur provenant du four peut provoquer des brûlures.
3 Suivez les directives dans la section NEW OVEN CLEAN
(nettoyage d’un four neuf) apparaissant sur cette page pour
nettoyer le four avant la première utilisation.
MODE DE VEILLE
Pour activer le four, ouvrez et fermez la porte ou appuyez sur
manual (manuel), back (retour) ou clear (effacer).
Le ministère de l’Énergie américain a établi des normes pour la
puissance absorbée et la consommation d’énergie au repos pour les
appareils. De manière à se conformer à ces exigences, l’affichage de
cette unité ne sera pas visible ou actif pour la première utilisation ou
en périodes d’inactivité. L’affichage de cette unité devra être activé
avec l’action d’ouvrir et en fermer la porte ou en appuyant sur le
bouton manual (manuel), back (retour) ou clear (effacer). Une fois
que l’action a été effectuée, l’affichage restera visible et fonctionnel.
CLEAR (EFFACER)
Appuyez sur le bouton CLEAR (effacer) pour :
1 Retournez à l’écran d’accueil.
2 Annulez un programme pendant la cuisson.
BACK (RETOUR)
Appuyez sur BACK (retour), si vous voulez retourner à la page
précédente pendant la programmation avant d’appuyer sur
START (démarrer). Après avoir appuyé sur START (démarrer),
il n’est plus possible de retourner à la page précédente.
NEW OVEN CLEAN (NETTOYAGE D’UN FOUR NEUF)
Le générateur de vapeur chauffe l’eau qui est utilisée pour la
cuisson. Il doit être nettoyé avant la première utilisation pour
enlever les odeurs qui peuvent être présentes dans la cavité du
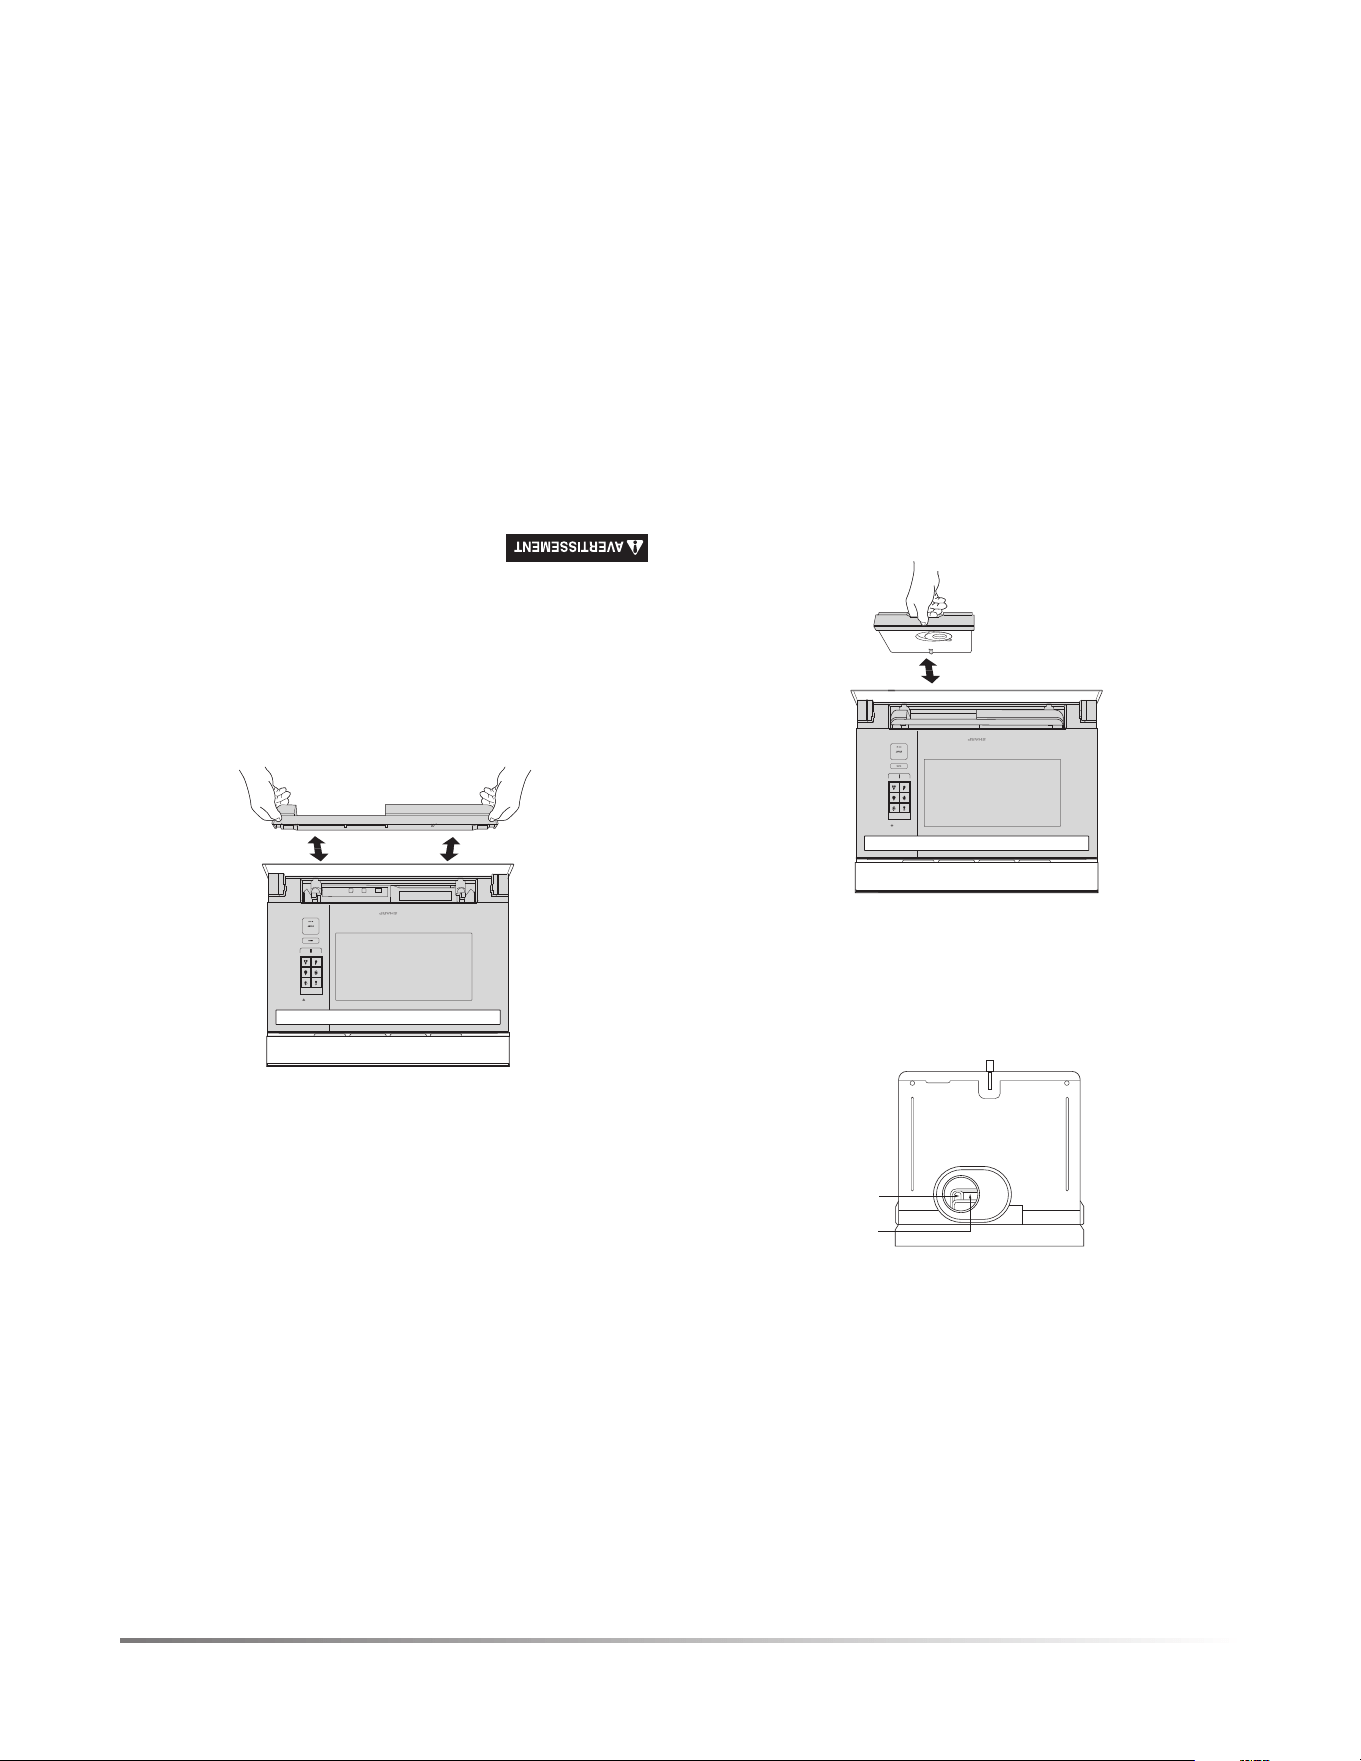
F13
AVANT LA PREMIÈRE UTILISATION
LISEZ ATTENTIVEMENT AVANT LA CUISSON
RÉSERVOIR D’EAU
Remplissez le réservoir avec de l’eau froide fraîche est nécessaire
pour toutes les fonctions à la vapeur dans les modes de cuisson
Smart (intelligent) et Manual (manuel). Suivre les directives
ci-dessous avant la cuisson.
1 Tirez le réservoir vers vous pour l’enlever.
2 Lavez le réservoir et le couvercle pour la première utilisation.
3 Remplissez le réservoir d’eau fraîche du robinet à travers le cou-
vercle jusqu’à la marque du 2 à chaque fois avant de commencer la
cuisson. Ne remplissez pas le réservoir au-delà de la marque du 2.
Niveau 1
Niveau 2
4 Fermez le couvercle hermétiquement.
5 Réinstallez le réservoir, en le poussant solidement en place.
6 Après la cuisson, videz le réservoir et lavez le réservoir et
le couvercle.
CONVECTION
BAKE
STEAM
SUPERSTEAM
GRILL
STEAM
BAKE
STEAM
PROOF
SUPERSTEAM
ROAST
MANUAL BACK
REMARQUES:
1 N’utilisez pas d’eau distillée ou d’autre type de liquide.
2 Les résultats pourraient être inattendus, s’il n’y a pas suffi-
samment d’eau dans le réservoir.
3 Nous recommandons que vous vidiez le réservoir chaque
fois après la cuisson. Ne laissez pas le réservoir rempli d’eau
pendant plus d’une journée.
4 Si des messages indiquant un niveau d’eau bas dans le réservoir
d’eau (par exemple, « Fill water reservoir » (Remplissez le réservoir
d’eau)) s’affichent à l’écran pendant la cuisson, enlevez le réservoir
et remplissez-le d’eau.
5 N’échappez pas ou n’endommagez pas le réservoir. La chaleur
peut faire changer la forme du réservoir. N’utilisez pas un
réservoir endommagé. Appelez un centre de service autorisé
Sharp pour acheter une pièce de remplacement.
6 Il peut y avoir quelques gouttes qui s’échappent lorsque vous
enlevez le réservoir. Essuyez le four à l’aide d’un chiffon doux.
7 Ne bloquez pas les trous d’air sur le couvercle du réservoir.
Cela provoquera des problèmes pendant la cuisson.
8 Une petite quantité d’eau s’égouttera dans le plateau d’égout-
tement lorsque le réservoir est enlevé. Videz après la cuisson
.
PLATEAU D’ÉGOUTTEMENT
Le plateau d’égouttement doit être correctement positionné
pendant la cuisson. Pour un fonctionnement approprié,
suivez les directives ci-dessous.
Le plateau d’égouttement est emballé avec le four. Placez le plateau
d’égouttement sous la porte du four comme illustré ci-dessous. Ce plateau
d’égouttement recueille la condensation provenant de la porte du four.
Pour enlever le plateau d’égouttement : Tirez le plateau
d’égouttement vers vous avec les deux mains. L’eau ne doit pas
s’égoutter avant d’enlever le plateau d’égouttement.
Pour remettre en place le plateau d’égouttement: Placez le
plateau d’égouttement sur les crochets droit et gauche sous le
four et poussez fermement comme illustré ci-dessous.
CONVECTION
BAKE
STEAM
SUPERSTEAM
GRILL
STEAM
BAKE
STEAM
PROOF
SUPERSTEAM
ROAST
MANUAL BACK
Si le message « Replace drip tray » (remettre le plateau d’égouttement)
ou Empty drip tray and replace (vider et remettre le plateau d’égout
-
tement), enlevez et remettre le plateau d’égouttement correctement.
Videz le plateau d’égouttement après chaque cuisson. Videz,
rincez complètement, séchez et remettez en place. Cuisiner
à plusieurs reprises sans vider le plateau d’égouttement peut
provoquer un débordement de celui-ci.
1 Le four deviendra très chaud après les fonctions de cuisson
et de vidange d’eau.
2 N’ouvrez pas le four en tenant votre visage près de l’ouverture du
four. La vapeur provenant du four peut provoquer des brûlures.
3 Attendez jusqu’à ce que le four refroidisse avant de vider le réser-
voir et le plateau d’égouttement. Essuyez ensuite la cavité du four.
4 Ne touchez pas l’eau directement, car l’eau dans le plateau
d’égouttement peut être chaude.
Avant d’utiliser votre nouveau four, lisez et assurez-vous de
comprendre complètement le manuel d’utilisation.
Suivez les étapes suivantes avant d’utiliser le four :
1 Placez correctement le plateau d’égouttement. Consultez la
section Plateau d’égouttement sur cette page.
2 Fermez la porte. Branchez le four. Assurez-vous que l’affi-
chage s’allume.
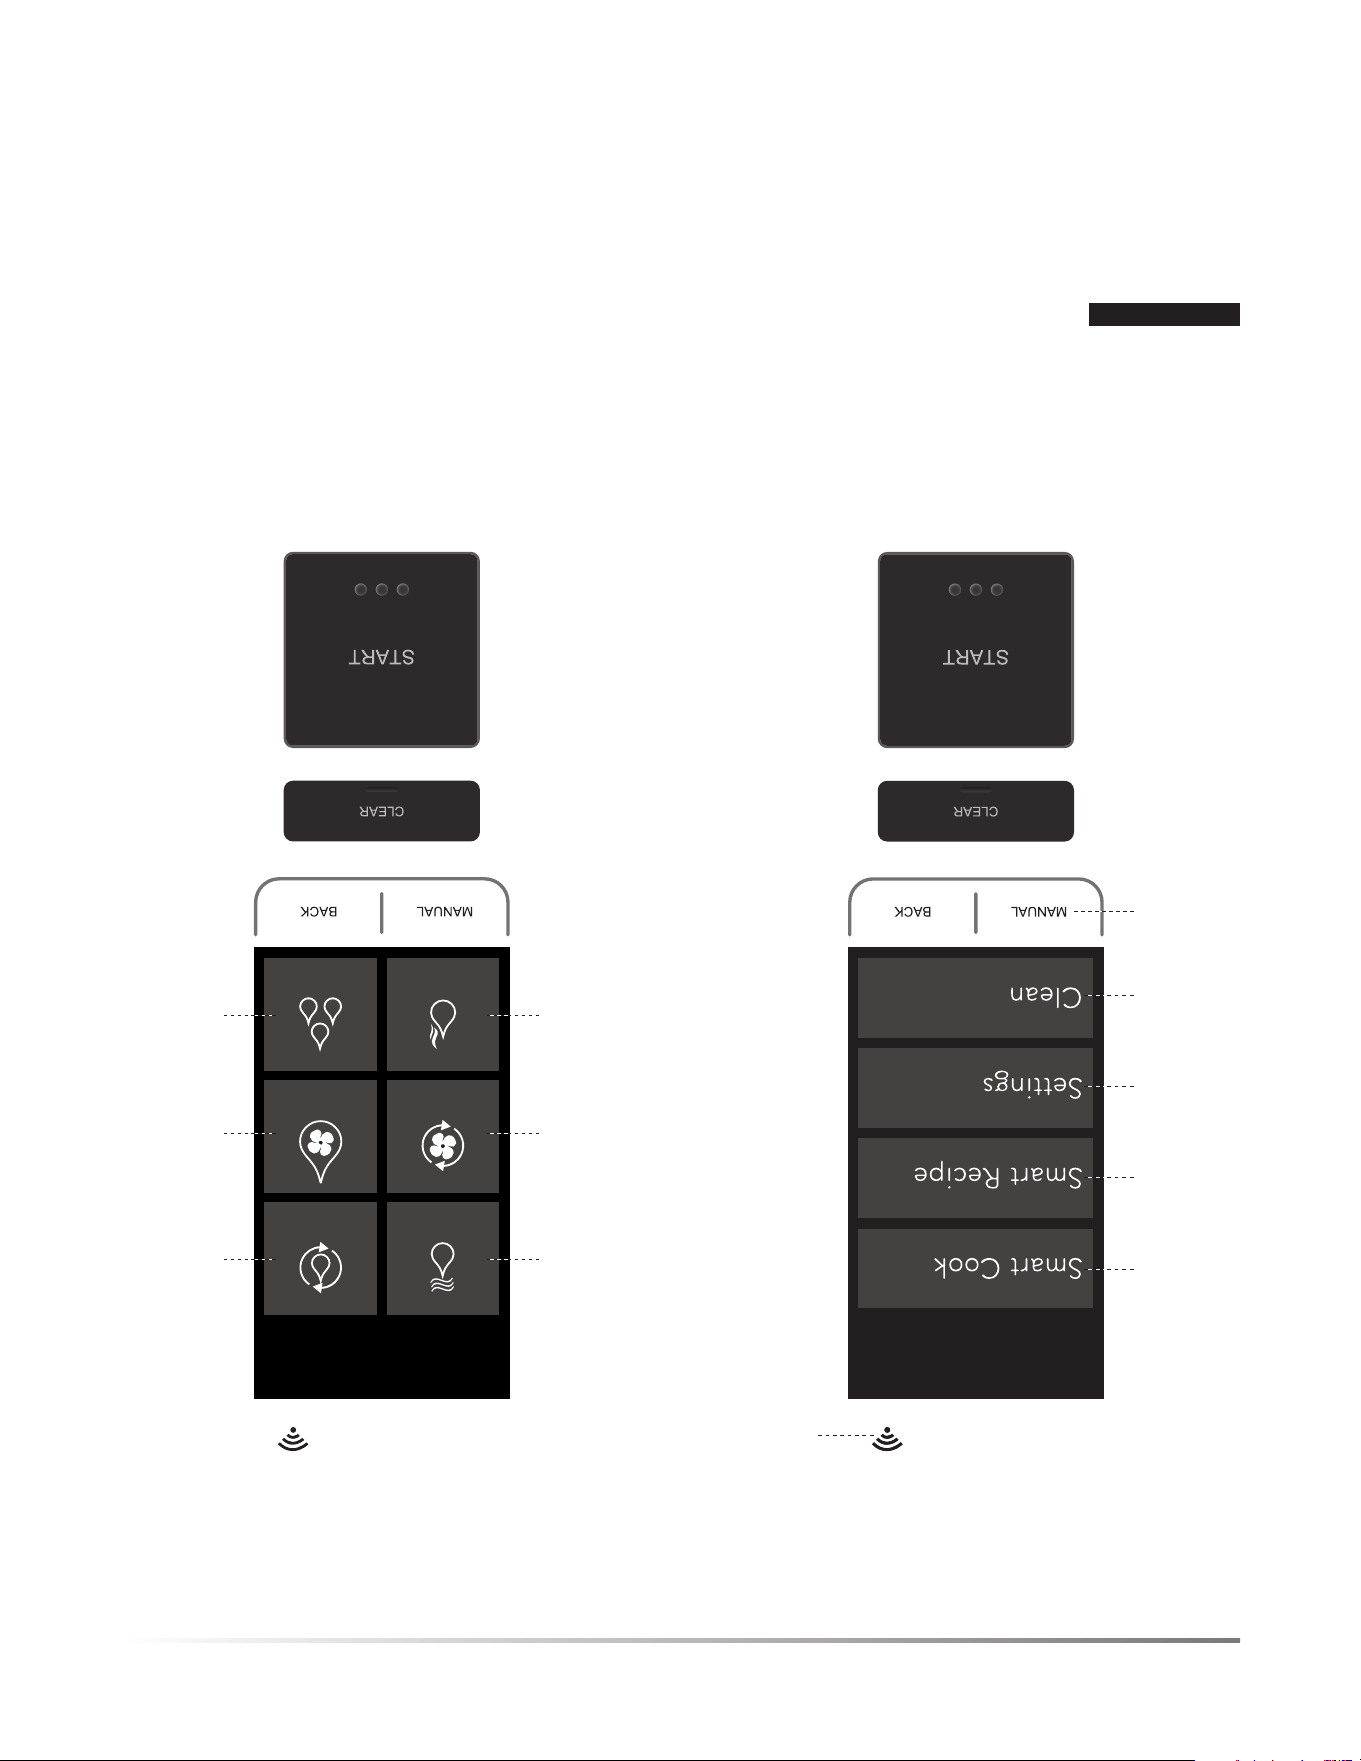
12F
APERÇU DU PRODUIT
PANNEAU DE COMMANDE
PAGE D’ACCUEIL PAGE DU MANUEL
19
20
21
22 -23
16 -18
15
CONVECTION
BAKE
STEAM
COOK
SUPERSTEAM
GRILL
STEAM
BAKE
STEAM
PROOF
SUPERSTEAM
ROAST
17-18
16
16
17
17
16
Les chiffres à côté des fonctions de contrôle indiquent les pages où les fonctions sont décrites et où il y a de l’information d’utilisation.
LAMPE D’APPOINT
Le four est muni d’une lampe d’appoint à DEL qui brillera de tous ses
éclats pour illuminer votre cuisine. Cette lampe est utile pour vérifier
le niveau de cuisson afin de déterminer si vous devez continuer à faire
cuire ou pour prendre une photographie pour partager avec vos amis.
POUR UNE MEILLEURE UTILISATION:
MISE EN GARDE
Soyez toujours prudent lorsque vous ouvrez la porte
du four. La porte du four, l’intérieur du four, les grilles, les plateaux, les
plats de cuisine et la vapeur sont extrêmement chauds et provoqueront
des blessures si vous les touchez à l’intérieur du four ou si vous placez
votre visage directement à l’avant de la vapeur qui sort. Utilisez des gants
de cuisine secs ou des poignées sèches pour manipuler les plateaux.
1 Ouvrez la porte complètement et laissez-la à l’horizontale
après que le cycle de cuisson soit complété.
2 Glissez soigneusement le plateau de cuisson pour le position-
ner dans le bas de la porte. C’est la position optimale pour
tirer profit de la lampe d’appoint.
3 Soulevez doucement les coins les plus éloignés du couvercle et
des sacs de cuisson au four pour diriger la vapeur loin du visage.
4 Assurez-vous que les aliments sont cuits selon les températures
recommandées par le ministère de l’Agriculture des États-Unis.
5 Si les aliments nécessitent un temps de cuisson additionnel,
glissez soigneusement le plateau à l’intérieur du four et suivez
les instructions sur le pavé numérique pour ajouter du temps de
cuisson additionnel.
6 Photographiez les aliments et partagez avec vos amis sur les
médias sociaux si désirés.
7 Lorsque terminé, enlevez les aliments et glissez soigneuse-
ment le plateau à nouveau à l’intérieur du four.
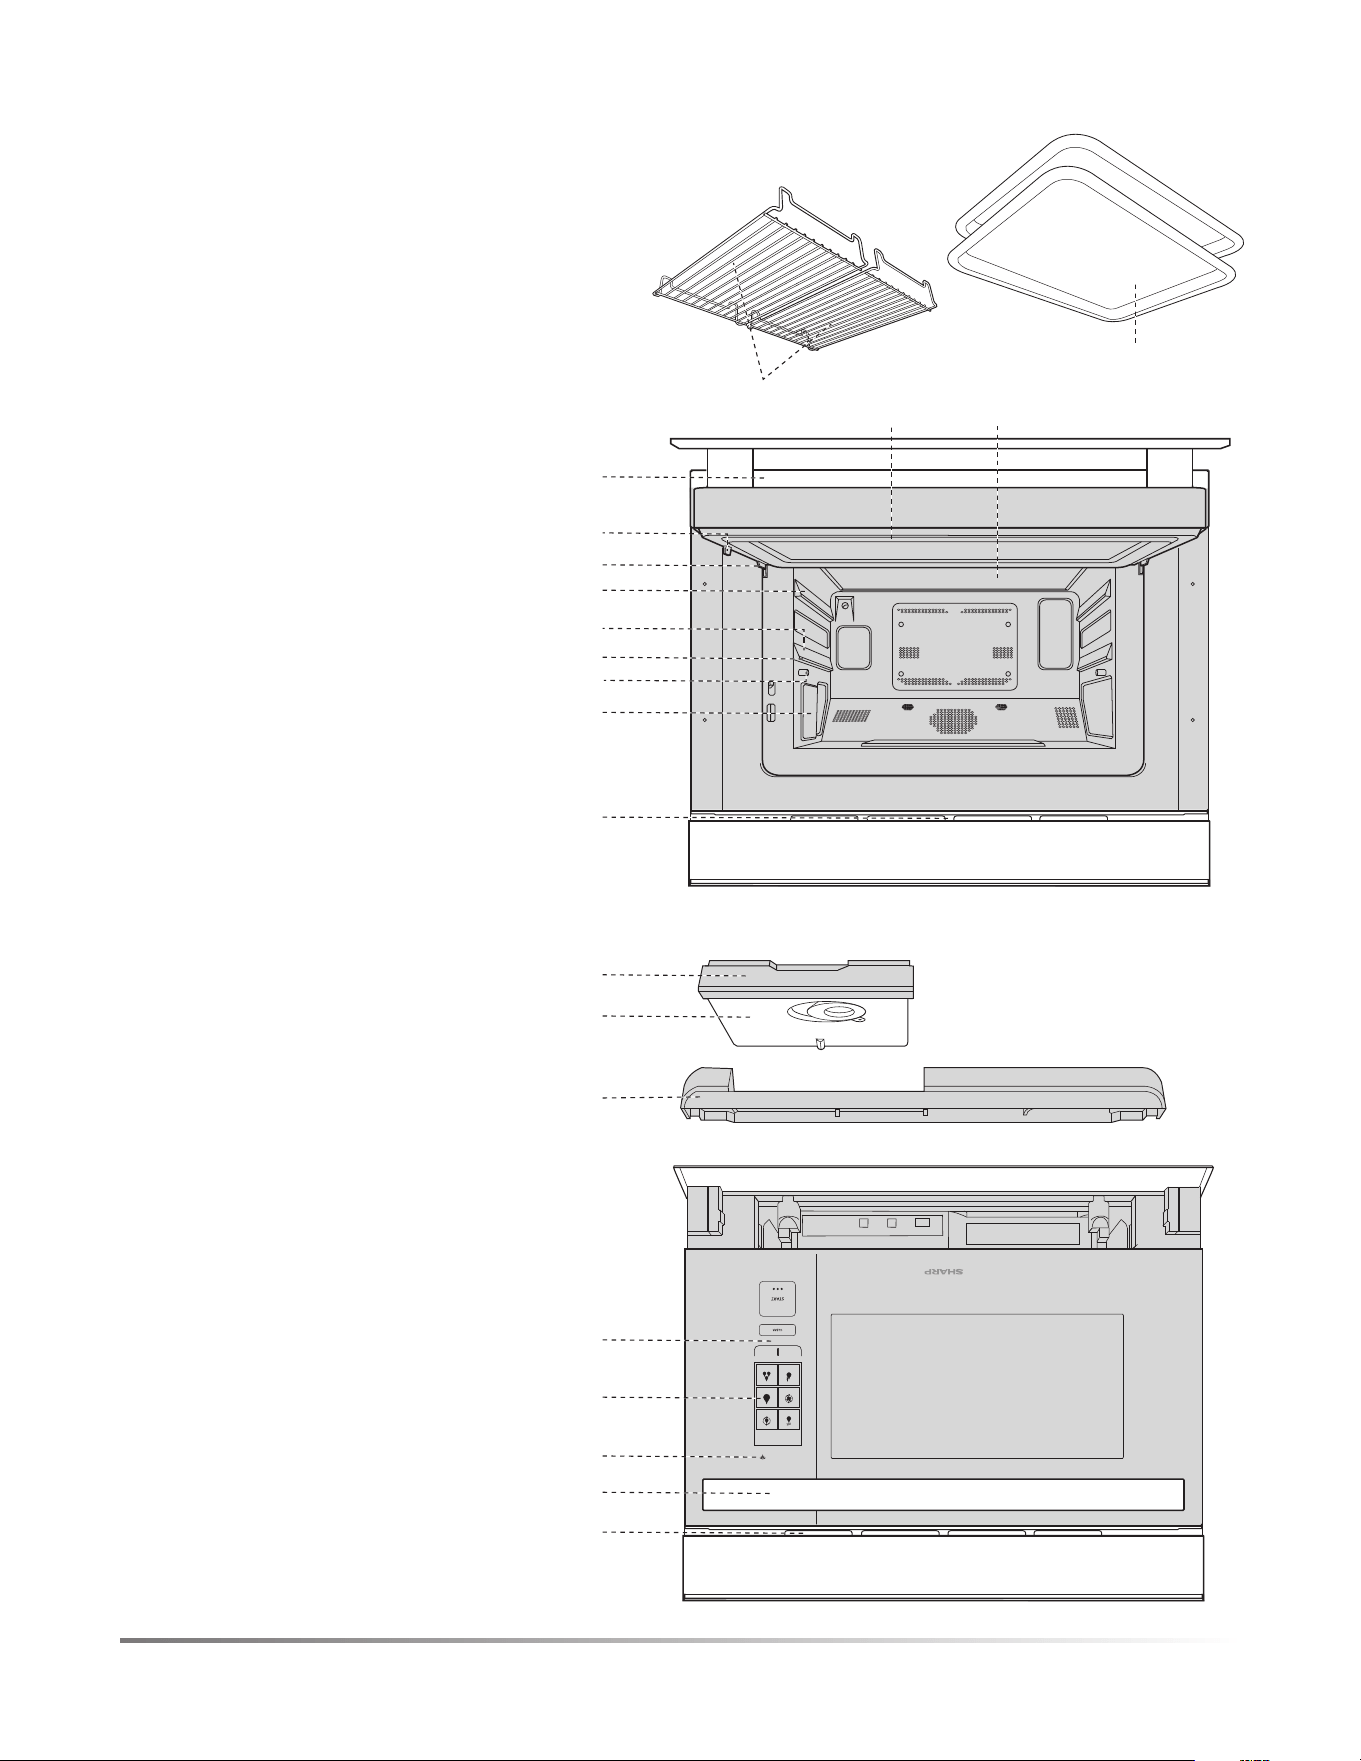
CONVECTION
BAKE
STEAM
SUPERSTEAM
GRILL
STEAM
BAKE
STEAM
PROOF
SUPERSTEAM
ROAST
MANUAL BACK
F11
APERÇU DU PRODUIT
1
10
9
8
7
2
3
4
5
6
PIÈCES
1 Ouverture de ventilation
2 Poignée
3 Connexion Wi-Fi
4 Affichage ACL
5 Panneau de commandes
6 Plateau d’égouttement
(voir la page 13)
7 Couvercle du réservoir
(voir la page 13)
8 Réservoir (voir la page 13)
9 Lampe d’appoint
10 Lampe du four
11 Pieds antibasculement
12 Guide de plateau
13 Niveau supérieur
14 Niveau inférieur
15 Charnières de la porte
16 Loquets
17 Déflecteur d’air
18 Porte du four en verre
19 Joint d’étanchéité de la porte
ACCESSOIRES
20 2 plateaux
21 2 grilles
20
21
1918
11
15
17
12
16
13
14
10F
USTENSILES - REVÊTEMENTS
MODE DE CUISSON
SUPERHEATED STEAM
(STEAM ROAST &
STEAM GRILL) / CONVECTION
STEAM/STEAM BAKE
Papier d’aluminium, récipients d’aluminium OUI OUI
Métal OUI OUI
Porcelaine, céramique, poterie, grès OUI OUI
Verre résistant à la chaleur, par exemple, Pyrex
®
OUI OUI
Des précautions doivent être prises si vous utilisez de la verrerie fine, car cela
peut la briser, la casser ou la fissurer si elle est chauffée trop rapidement.
Article en verre ne résistant pas à la chaleur NON NON
Polystyrène/plastique résistant à la chaleur NON OUI
Vérifiez la plage de température du
fabricant.
Des précautions doivent être
prises, car certains récipients se
déforment, fondent ou se déco-
lorent à haute température.
Plastique, Thermoset
®
NON OUI
Pellicule de plastique allant au micro-ondes NON NON
Essuie-tout, assiettes en papier NON NON
Papier parchemin NON OUI
Papier ciré NON NON
Plaque à rôtir OUI NON
Sacs à rôtir OUI NON
Les sacs à rôtir doivent être utilisés
uniquement avec la cuisson à convection
ou le rôtissage à la vapeur.
Les plats d’argent et les ustensiles ou les récipients de
cuisson qui peuvent se rouiller à l’intérieur du four
NON NON
Grille inférieure, grille supérieure, plateau de
cuisson, panier à vapeur
OUI OUI
Ustensiles de cuisine en silicone NON NON
ACCESSOIRES
Il existe plusieurs accessoires résistants à chaleur en vente libre. Évaluez soigneusement les accessoires avant votre achat de manière
à ce qu’ils correspondent à vos besoins. Sharp n’est pas responsable des dommages au four lorsque des accessoires sont utilisés.
Pour la cuisson automatique (consultez les sections Smart Cook et Smart Recipe), utilisez le récipient recommandé dans le tableau de
cuisson de ce manuel d’utilisation.
RENSEIGNEMENTS UTILES

F9
• Si des objets tombent dans les ouvertures de ventilation,
arrêtez le four immédiatement, débranchez-le et consultez
un centre de service autorisé Sharp.
• Ne touchez pas à la fiche avec les mains mouillées lorsque
vous insérez ou enlevez de la prise de courant. Branchez
solidement dans une prise de courant murale et retirez de la
prise en saisissant solidement la fiche. Ne débranchez pas en
tirant uniquement sur le cordon.
• Pendant l’utilisation en mode vapeur, la vapeur peut s’échap-
per du côté droit de la sortie.
• Dans le cas d’un incendie de friture, N’UTILISEZ PAS
D’EAU. Étouffez le feu ou les flammes ou utilisez un
extincteur avec agent chimique en poudre ou de type mousse.
• N’utilisez jamais votre appareil pour réchauffer ou chauffer la pièce.
• Des vêtements amples ou pendants ne devraient jamais être
portés pendant l’utilisation de l’appareil.
• Ne faites pas chauffer des récipients alimentaires non ouverts.
L’accumulation de pression peut faire éclater le récipient et
provoquer des blessures.
• Placez toujours les grilles de four dans la position désirée
lorsque le four est froid. Si vous devez les enlever lorsque
le four est chaud, soyez prudent pour empêcher les brûlures.
LES ENFANTS ET LA SÉCURITÉ AUTOUR DE L’APPAREIL
Les enfants de moins de 7 ans devraient utiliser le four avec la
supervision d’une personne à proximité. Entre l’âge de 7 à 12 ans,
la personne qui supervise doit être dans la même pièce.
L’enfant doit être en mesure d’atteindre le four de manière
confortable; dans le cas contraire, il doit se tenir debout sur un
tabouret solide.
En aucun moment une personne ne devrait se suspendre ou se
balancer sur la porte du four.
Les enfants devraient se faire enseigner les mesures de sécurité.
N’assumez pas que parce qu’un enfant a maîtrisé une compétence
de cuisine, qu’il peut cuire n’importe quoi.
Les enfants doivent savoir qu’un four n’est pas un jouet. Les
jeunes enfants doivent être supervisés afin de s’assurer qu’ils
ne jouent pas avec le four.
Les enfants ne devraient pas être laissés seuls ou sans surveil-
lance à l’endroit où l’appareil est en utilisation. On ne doit jamais
les laisser s’asseoir ou se tenir debout sur une partie de l’appareil.
Ne rangez pas de jouets ou d’autres articles d’intérêts pour les
enfants dans les tiroirs ou dans l’armoire ou la zone du comptoir
près du four de manière à ce que les enfants ne se blessent pas
en essayant de les atteindre.
USTENSILES ET REVÊTEMENTS DES PLATS
Le tableau de la page 10 vous aidera à décider quels ustensiles
et revêtements devraient être utilisés dans chaque mode.
RENSEIGNEMENTS UTILES
• Soyez prudent lorsque vous retirez des articles du four, de
manière à ce que les ustensiles, vos vêtements ou vos acces-
soires ne touchent pas à la projection de la porte.
• Ne touchez pas autour de la lampe du four. Cette zone devien-
dra chaude lorsque la lampe du four est allumée.
• Pour éviter les brûlures, soyez toujours prudent pour ne pas
répandre de la graisse provenant du plateau de cuisson lorsque
vous enlevez les viandes grillées ou rôties du four.
• Pour éviter les brûlures, toujours vérifiez la température des aliments
et des récipients avant de servir. Portez une attention spéciale à la
température des récipients, des aliments et des boissons. Ne buvez
pas de breuvage ou de soupe sans vérifier la température du récipient.
• Ne touchez pas à la porte du four, l’extérieur du châssis, l’arrière
du châssis, la cavité du four, les orifices de ventilation, les
accessoires, les plats et la vapeur s’échappant des ouvertures de
ventilation pendant l’utilisation parce qu’ils deviendront chauds.
• Ne faites pas fonctionner le four si les réservoirs se fissurent et
s’il y a une fuite d’eau. Appelez un centre de service autorisé
Sharp pour acheter une pièce de remplacement.
• Après l’utilisation, de l’eau de condensation peut s’accumuler
à l’intérieur de la cavité du four, spécialement sur la sole du
four. Essuyez et épongez tous les résidus liquides avec une
éponge pour garder le four propre.
• Ne déplacez pas le four pendant qu’il fonctionne. Si le four doit
être déplacé, toujours vidanger l’eau à l’intérieur du four en
utilisant la fonction DRAIN WATER (vidage d’eau)(voir la page
23). Après avoir effectué la vidange, videz le plateau d’égouttage.
• Pour éviter la condensation, qui pourrait faire rouiller l’ap-
pareil, ne laissez pas d’aliments cuits dans le four pendant
une période prolongée.
• Nettoyez le four à intervalle régulier et enlevez tous les dépôts
alimentaires dans le four et sur la porte.
• N’utilisez pas le four pour faire de la friture.
• Utilisez TOUJOURS des poignées pour éviter les brûlures
lorsque vous manipulez les ustensiles qui sont en contact avec
des aliments chauds. Suffisamment de chaleur peut être trans-
férée des aliments aux ustensiles pour provoquer des brûlures
à la peau. Lorsque vous utilisez les modes SuperSteam (vapeur
intense), Steam (vapeur) et Convection, le châssis, l’intérieur
et la porte peuvent devenir trop chauds au toucher.
• Ne versez pas d’eau froide sur la sole du four en verre trempé
après la cuisson, car elle peut se briser. N’utilisez pas d’eau
pour essayer de refroidir l’intérieur du four après l’utilisation.
• Ne versez pas d’eau froide sur la porte, car elle peut se briser.
• Ne touchez pas aux surfaces chaudes.
• L’utilisation d’accessoires non recommandés par le fabricant
de l’appareil peut provoquer des blessures.
• Le four ne doit pas être laissé sans surveillance pendant
l’utilisation. Des températures du four trop hautes ou des
temps de cuisson trop longs peuvent faire surchauffer les
aliments et provoquer un incendie.
• N’insérez pas les doigts ou des objets dans les ouvertures de
l’orifice de sortie de la vapeur ou les ouvertures de ventilation.
Ceci pourrait endommager le four et provoquer des décharges
électriques ou des dangers.
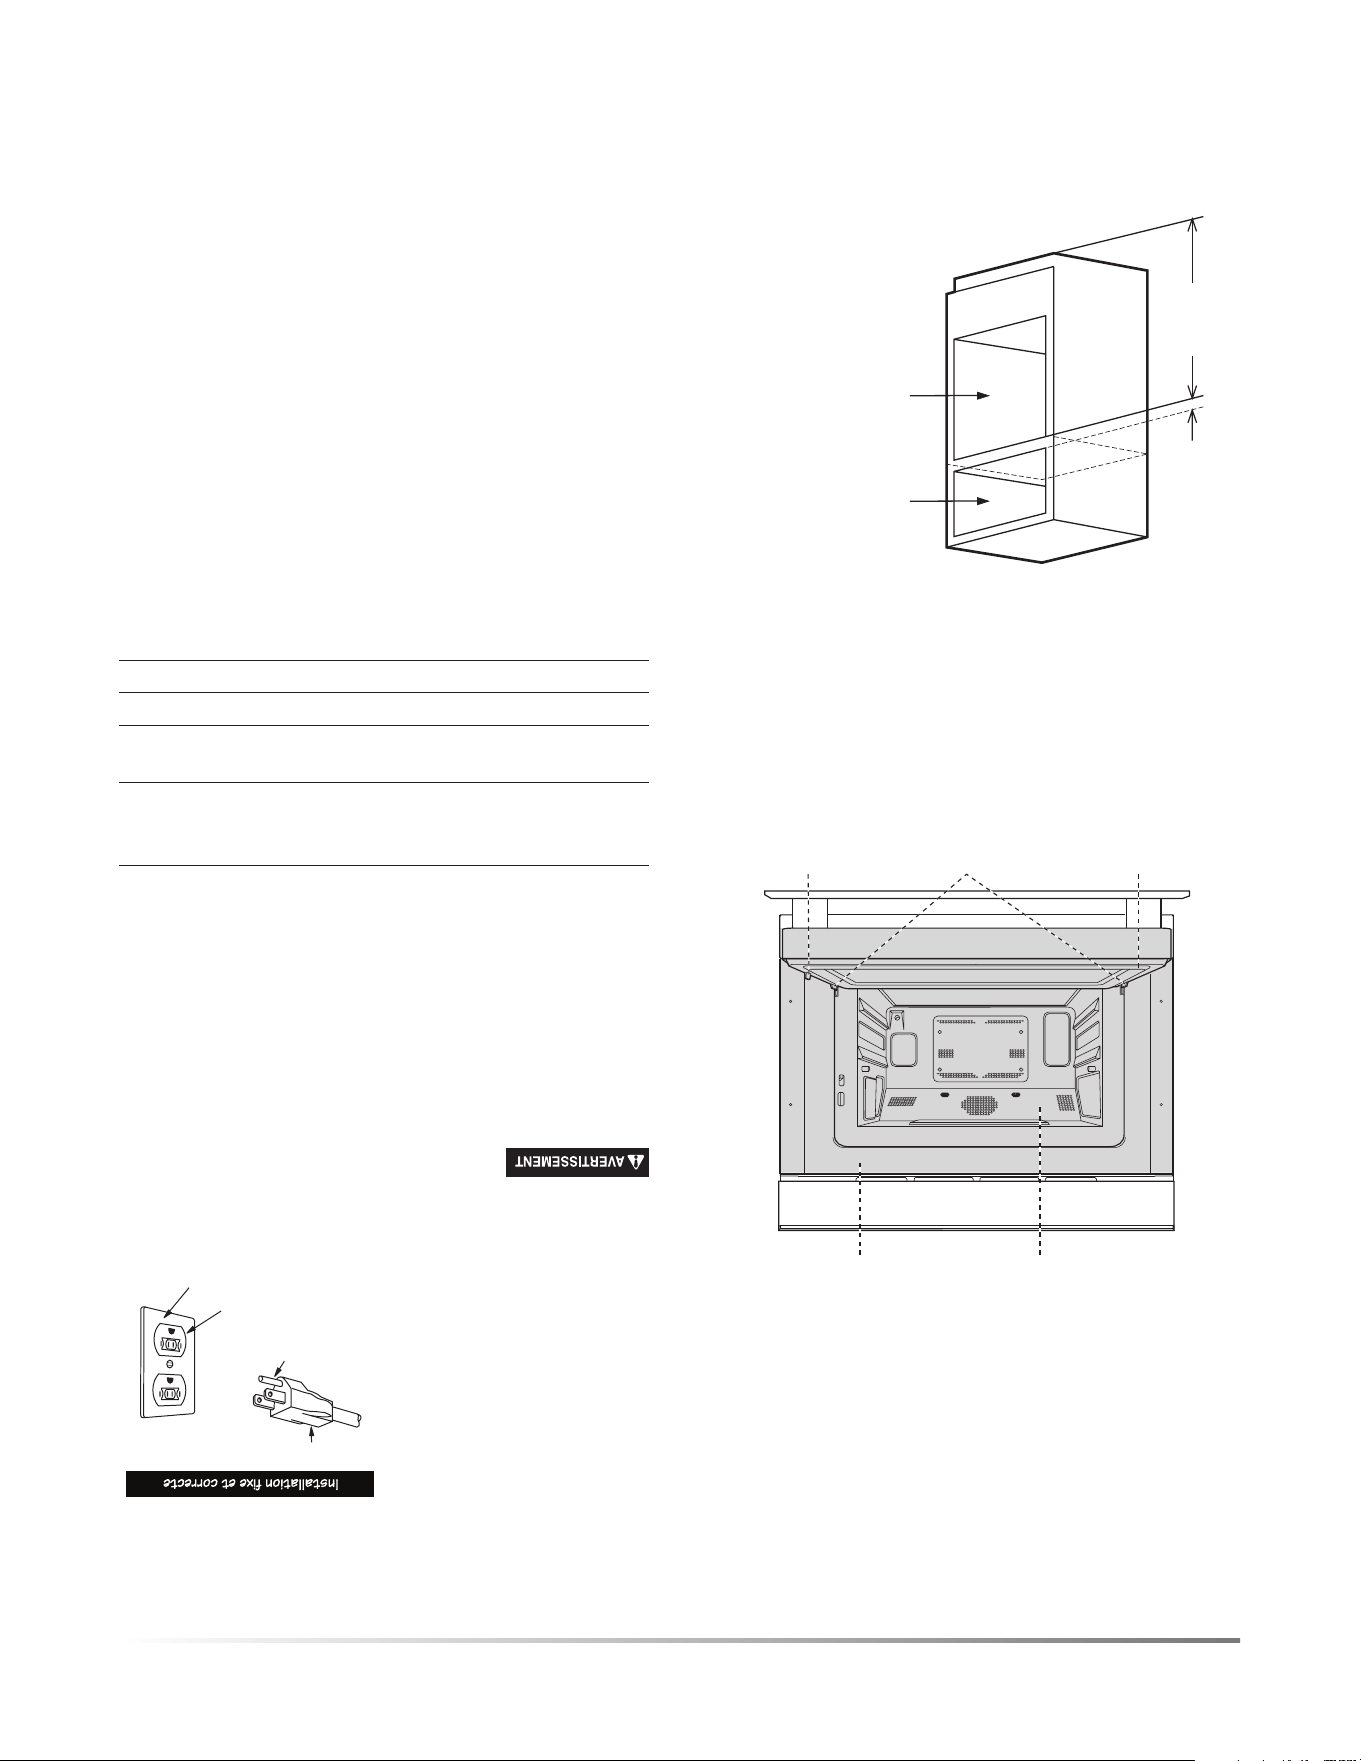
8F
DÉBALLAGE ET VÉRIFICATION DE VOTRE FOUR
1 Enlevez tout le matériel d’emballage à l’intérieur du four.
2 Enlevez les autocollants de démonstration, s’il y en a. Vérifiez
le four pour détecter les dommages possibles, comme un
four désaligné ou recourbé, des joints d’étanchéité et des
surfaces d’étanchéité du four endommagés, des loquets ou
des charnières de portes brisées ou non serrées et des bosses à
l’intérieur de la cavité sur l’avant du four. Si vous constatez des
dommages, ne faites pas fonctionner le four. Contactez votre
détaillant ou un CENTRE DE SERVICE AUTORISÉ SHARP.
3 Installez ou positionnez cet appareil uniquement d’après les
instructions du manuel d’installation fourni.
SURFACES D’ÉTANCHÉITÉ CAVITÉ DU FOUR
JOINTS D’ÉTANCHÉITÉ
DE LA PORTE
LOQUET
DE LA PORTE
CHARNIÈRES
DE LA PORTE
CHOIX D’UN EMPLACEMENT POUR VOTRE FOUR
Vous utiliserez souvent votre four, alors, prenez le temps de
planifier un emplacement pour faciliter l’utilisation. Votre four
peut être encastré dans une armoire ou dans un mur ou au-dessus
d’un four encastré ou au-dessus des modèles de tiroir à micro-
ondes qui se combinent à ce four. Le four peut être installé sous un
comptoir de cuisine, incluant une surface de cuisson ou un îlot de
cuisine. Il ne peut être encastré au-dessus d’un four mural au gaz.
Min.
5,1 cm
(2 po)
Gabarit du four
SuperSteam+
Gabarit du four
électrique mural/
tiroir réchaud/
tiroir à micro-ondes
Min.
91,5 cm
(36 po)
INSTRUCTIONS DE
MISE À LA TERRE
Cet appareil doit être mis à la
terre. Le four est équipé d’un
cordon avec fil de mise à la
terre et une fiche pour mise
à la terre. Il doit être branché
dans une prise murale instal-
lée correctement et mise à la
terre conformément au Code
national de l’électricité ainsi
qu’aux codes et règlements
locaux. Dans l’éventualité
d’un court-circuit, la mise à la terre réduit le risque d’électrocution
en fournissant un fil de sortie pour le courant électrique.
L’utilisation inappropriée de la prise de mise
à la terre peut entraîner un risque d’électrocution. N’utilisez
pas de rallonge. Si le cordon d’alimentation est trop court,
faites installer une prise de courant près de l’appareil par
un électricien ou un technicien qualié.
Si vous avez des questions concernant la mise à la terre ou les instruc-
tions sur l’électricité, consultez un électricien ou technicien qualifié.
INNOCUITÉ DES ALIMENTS
• Assurez-vous que les aliments sont cuits selon les températures
recommandées par le ministère de l’Agriculture des États-Unis.
160 ºF/71 ºC - Pour le porc frais, la viande hachée, le poulet
désossé, le poisson, les fruits de mer, les plats
à base d’œufs et les mets préparés congelés.
165 ºF/74 ºC -
Pour les restes de table, les plats prêts à manger;
les aliments frais et à apporter de l’épicerie.
170 ºF/77 ºC - Viande blanche de volaille.
180 ºF/82 ºC - Viande brune de volaille.
Pour vérifier la cuisson, insérez un thermomètre à viande dans
une zone épaisse ou dense loin du gras ou d’un os.
• Les pièces accessibles (par exemple, la porte du four, la cavité du four,
les plats et les accessoires) peuvent devenir chaudes pendant l’utilisation.
Utilisez des poignées ou des gants de cuisine secs lorsque vous retirez
des récipients, des aliments et des accessoires du four, assurez-vous de
ne pas toucher à la cavité du four pour éviter les brûlures.
• Faites attention lorsque vous ouvrez la porte. Évitez les
brûlures provoquées par la vapeur en dirigeant la vapeur en
direction opposée du visage et des mains. Tenez-vous toujours
loin du four lorsque vous ouvrez la porte.
• Soulevez doucement les coins les plus éloignés du couvercle et
des sacs de cuisson au four pour diriger la vapeur loin du visage.
• Restez près du four pendant l’utilisation et vérifiez le progrès de
cuisson fréquemment de manière à ne pas trop cuire les aliments.
• N’UTILISEZ jamais la cavité pour ranger des livres de cuisine
ou d’autres articles.
• Sélectionnez, rangez et manipulez les aliments avec soins
pour préserver leur qualité et minimiser la propagation des
bactéries alimentaires.
Fiche de terre à 3 broches
Broche de mise à la terre
Prise à 3 broches
Boîte de prise mise à la terre
Grounding adapter
Grounded receptacle box
Screw
Tab for grounding screw
RENSEIGNEMENTS UTILES

F7
INFORMATIONS RÉGLEMENTAIRES IMPORTANTES
MISE EN GARDE
Tous changements ou modifications à l’appareil
qui ne sont pas expressément approuvés par la partie responsable
de la conformité pourraient annuler le droit de l’utilisateur à
utiliser l’appareil.
REMARQUE: Cet équipement a été testé et est jugé conforme
aux limites d’appareil numérique de classe B, en vertu de la section
15 des règlements de la FCC. Ces limites sont conçues pour offrir
une protection raisonnable contre les interférences nuisibles dans
une installation résidentielle. Cet équipement génère, utilise
et peut émettre de l’énergie de radiofréquence et s’il n’est pas
installé et utilisé selon les instructions, elle peut provoquer des
interférences nuisibles aux radiocommunications. Cependant,
il n’y a aucune garantie qu’une interférence ne se produira pas
dans une installation particulière. Si cet équipement provoque une
interférence nuisible à la réception radio ou télévisuelle, ce qui
peut être déterminé en mettant en marche et en arrêt l’équipement,
l’utilisateur devrait essayer de corriger l’interférence en appliquant
l’une ou plusieurs des mesures suivantes :
• Réorienter ou relocaliser l’antenne de réception.
• Augmenter la séparation entre l’équipement et le récepteur.
• Brancher l’équipement dans une prise de courant occupant un
circuit différent de celui sur lequel le récepteur est branché.
• Consultez le détaillant ou un technicien en radiocommunica-
tion qualifié pour obtenir de l’aide.
Four SHARP SuperSteam+ pour la maison N
o
de modèle
SSC2489DS
Cet appareil se conforme avec la section 15 des règlements de la
FCC. Le fonctionnement est soumis aux deux conditions suivantes :
(1) Cet appareil ne peut pas provoquer d’interférence nuisible
(2) cet appareil peut accepter les interférences reçues, incluant les
interférences qui peuvent provoquer un fonctionnement non désiré.
Partie responsable :
Sharp Electronics Corporation
100 Paragon Drive, Montvale, NJ 07645
TÉL : 1-800-BE-SHARP (ou www.sharpusa.com)
Cet appareil se conforme avec la section 15 des règlements de
la FCC. Le fonctionnement est soumis aux deux conditions
suivantes : (1) Cet appareil ne peut pas provoquer d’interférence
nuisible (2) cet appareil peut accepter les interférences reçues,
incluant les interférences qui peuvent provoquer un fonction-
nement non désiré.
• Contient FCC : RX3-B01
• Contient IC : 2878F-B01
MISE EN GARDE POUR LE RÉSEAU SANS FIL
MISE EN GARDE D’UTILISATION DU WI-FI
• Si vous utilisez l’appareil dans les zones suivantes, le
fonctionnement ne peut être garanti : près d’appareil en
communication sans fil Bluetooth
®
utilisant la même fréquence
(2,4 GHz) que ce produit ou des appareils sans fil à faible
puissance spécifiques. Il peut aussi y avoir des problèmes dans
les endroits avec des appareils, comme des fours à micro-ondes,
qui émettent un champ magnétique; en plus des zones avec de
l’électricité statique ou avec de la perturbation radioélectrique,
tout ce qui peut interférer avec le signal Wi-Fi.
• La connexion sans fil et la performance ne peuvent être
garanties pour tous les routeurs ou tous les environnements
de maison. Dans les endroits suivants, il est possible que le
signal Wi-Fi ne puisse atteindre l’endroit ou se déconnecte : à
l’intérieur d’un bâtiment fabriqué en béton, en métal renforcé,
près d’une obstruction (par exemple, un mur) ou près d’appareil
de communication sans fil utilisant la même fréquence.
• Le réseau local sans fil de ce produit correspond aux canaux
1 à 13. Il n’est pas accessible en communication avec les
routeurs qui sont configurés avec d’autres canaux.
CONSIGNES DE SÉCURITÉ IMPORTANTES
MISE EN GARDE POUR LES RENSEIGNEMENTS PERSONNELS
(RELATIF À LA SÉCURITÉ)
• L’utilisation d’un appareil en réseau local sans fil offre la
possibilité d’intercepter la communication Wi-Fi, peu importe
la configuration du mot de passe.
• Selon l’emplacement où vous connectez votre four, assurez-
vous que vous avez les droits et l’accessibilité nécessaire pour
connecter l’appareil au réseau Wi-Fi disponible.
• Si vous jetez l’appareil, que vous le donnez ou que vous le vendez
à une autre personne, assurez-vous de réinitialiser les paramètres
Wi-Fi comme décrits dans ce manuel. La fonctionnalité du réseau
local sans fil de l’unité doit être initialisée (réinitialisée) dans
le cas d’un transfert à une tierce personne pour éviter un accès
illégal par des parties non autorisées.
EXIGENCES MINIMALES POUR LES SPÉCIFICATIONS DU
ROUTEUR/WI-FI:
• Réseau local sans fil compatible IEEE 802.11 b/g/n
• Un débit physique de réception et d’envoi à 72,2 Mbit/s
utilisant une bande passante à 20 MHz
• Un débit physique de réception et d’envoi à 150 Mbit/s
utilisant une bande passante à 40 MHz
• 802.11i (WPA, WPA2). Service d’authentification ouvert, à
clé secrète et à comparaisons appariées.
• Prise en charge Wi-Fi WPS

6F
CONSIGNES DE SÉCURITÉ IMPORTANTES
VEUILLEZ LIRE TOUTES LES INSTRUCTIONS AVANT D’UTILISER LE FOUR
Lorsque vous utilisez l’appareil, des mesures de sécurité de base
doivent être prises, incluant les éléments indiqués dans cette section.
AVERTISSEMENT
Pour réduire le risque de brûlure, de décharge
électrique, d’incendie et de blessures corporelles:
1 Lisez toutes les instructions avant d’utiliser l’appareil.
2 Assurez-vous que votre appareil est correctement installé
et mis à la terre par un technicien qualifié en conformité
avec le manuel d’installation fourni. L’installateur doit
noter ou inscrire le circuit/fusible d’alimentation du four
dans le tableau à disjoncteurs/fusible.
3 N’utilisez jamais votre appareil pour réchauffer ou
chauffer la pièce.
4 Les enfants ne devraient pas être laissés seuls ou sans
surveillance à l’endroit où l’appareil est en utilisation.
On ne doit jamais les laisser s’asseoir ou se tenir debout
sur une partie de l’appareil.
5 Portez des vêtements appropriés. Des vêtements amples
ou pendants (collier, manches, écharpes ou cravates)
ne devraient jamais être portés pendant l’utilisation de
l’appareil. Attachez les cheveux longs de manière à ce qu’il
n’y ait pas de risque qu’ils entrent en contact avec le four.
6 Ne réparez pas ou ne remplacez pas de pièces de l’appareil
à moins que cela ne soit spécifiquement mentionné dans
le manuel. Toutes les autres opérations de service doivent
être effectuées par un technicien qualifié.
7 Les matières inflammables ne doivent pas être rangées
dans le four ou près des éléments de surface.
8 N’UTILISEZ PAS D’EAU SUR DES FEUX DE FRITURE!
Étouffez le feu ou les flammes ou utilisez un extincteur avec
agent chimique en poudre ou de type mousse.
9 Utilisez uniquement des poignées sèches. Des poignées
humides ou mouillées sur des surfaces chaudes peuvent
entraîner des brûlures par la vapeur. N’utilisez pas de
serviette ou autre type de chiffon.
10 Faites attention lorsque vous ouvrez la porte. Laissez l’air et la
vapeur s’échapper avant d’enlever ou remplacer les aliments.
11 Ne faites pas chauffer des récipients alimentaires non
ouverts. L’accumulation de pression peut faire éclater
le récipient et provoquer des blessures.
12 Gardez dégagées toutes les conduites de ventilation et
toutes les autres ouvertures sur l’appareil.
13 Placez toujours les grilles de four dans la position désirée
lorsque le four est froid. Si vous devez les enlever lorsque
le four est chaud, soyez prudent pour empêcher les brûlures.
14 Utilisez cet appareil uniquement pour son utilisation
prévue décrite dans ce manuel. N’utilisez pas de produits
ou vapeurs chimiques corrosifs dans cet appareil. Cet
appareil est spécifiquement conçu pour chauffer, cuire
ou sécher les aliments. Il n’est pas conçu pour une
utilisation industrielle ou en laboratoire.
15 Ne faites pas fonctionner cet appareil si le cordon
ou la fiche sont endommagés, s’il ne fonctionne pas
correctement ou s’il a été endommagé ou s’il est tombé.
16 Ne rangez pas ou n’utilisez pas cet appareil à l’extérieur.
N’utilisez pas ce produit près de l’eau — par exemple,
près d’un évier de cuisine, dans un sous-sol humide,
près d’une piscine ou à des emplacements similaires.
17 Ne plongez pas le cordon ou la fiche dans l’eau.
18 Gardez le cordon loin des surfaces chaudes.
19 Ne grimpez pas ou ne vous asseyez pas sur l’appareil.
20 Gardez les doigts et autres objets et matériaux loin de
la porte de l’appareil lorsque vous la fermez.
21 Pour nettoyer l’appareil, utilisez uniquement des savons
ou détergents doux non abrasifs appliqués avec une
éponge ou un chiffon doux. Voir les instructions de
nettoyage aux pages 22 à 23.
22 Pour réduire le risque d’incendie dans la cavité de l’appareil :
a Ne faites pas trop cuire les aliments. Surveillez
attentivement l’appareil lorsque du plastique, du
papier ou d’autres matériaux combustibles sont placés
à l’intérieur de l’appareil pour faciliter la cuisson.
b Enlevez les attaches métalliques des sacs de cuisson
avant de placer les sacs dans l’appareil.
c N’utilisez pas l’appareil à des fins de rangement. Ne
laissez pas d’articles en papier, d’ustensiles de cuisson ou
d’aliments dans l’appareil lorsqu’il n’est pas en utilisation.
d Les aliments contenant une grosse quantité d’alcool
peuvent risquer d’allumer la vapeur dans la cavité du
four pendant la cuisson, car l’alcool s’évapore dans
la vapeur. N’utilisez pas le four pour préparer des
aliments contenant une grande quantité d’alcool. Soyez
prudent lorsque vous ouvrez la porte après la cuisson.
23 Si la lampe de l'appareil ne fonctionne plus, veuillez
consulter un CENTRE DE SERVICE AUTORISÉ
SHARP.
VEUILLEZ CONSERVER CES INSTRUCTIONS
AVERTISSEMENT
Comme mesure de sécurité, le four expulsera périodiquement
la vapeur pendant l’utilisation dans les différents modes de cuisson afin de réduire
la quantité de vapeur s’accumulant dans la cavité. La vapeur sera expulsée par
la sortie d’air au-dessus de la porte, comme illustré.
MISE EN GARDE
Ne restez pas à proximité et ne bloquez pas la sortie d’air
pendant l’expulsion de la vapeur. La vapeur sera chaude.
CONVECTION
BAKE
STEAM
SUPERSTEAM
GRILL
STEAM
BAKE
STEAM
PROOF
SUPERSTEAM
ROAST
MANUAL BACK
Ouverture de
ventilation

GARANTIE LIMITÉE POUR LES CONSOMMATEURS AU CANADA
Félicitations pour votre achat!
Sharp Electronics of Canada Ltd. (« Sharp ») offre une garantie au premier acheteur pour son produit de la marque Sharp (« Produit »),
lorsque livré dans son emballage original et vendu ou distribué au Canada par Sharp ou par un distributeur autorisé Sharp, à condition
que le Produit n’ait pas été vendu « en l’état » ou « vente finale », et de plus, Sharp garantie que le Produit pendant la période de
garantie applicable, sera exempt de défectuosités matérielles et de fabrication et que Sharp réparera ou remplacera le Produit défectueux
pendant la période de garantie pour le premier acheteur.
Cette garantie limitée ne s’applique pas à des éléments d’apparence du Produit, ni à aucun des éléments additionnels exclus énoncés
ci-dessous, ni à aucun Produit pour lesquels l’extérieur a été endommagé ou dégradé, qui a été soumis à une tension inappropriée
ou une autre mauvaise utilisation, une manipulation ou réparation anormale ou pour lequel le design ou la conception a été altéré ou
modifié ou si le numéro de série ou le numéro de modèle apposé au Produit a été enlevé, abîmé, modifié, altéré ou falsifié.
Comment obtenir le service: Dans le cas d’une défaillance de fonctionnement de ce produit Sharp au cours de la période de garantie,
le service de garantie est offert par un centre de service autorisé Sharp ou un concessionnaire de services Sharp autorisé. Le service
de garantie à domicile sera fourni dans les emplacements accessibles par le véhicule de service routier et dans un périmètre de 50 km
d’un centre de service autorisé Sharp. Le technicien du centre de service peut décider d’apporter l’unité au centre de service pour la
réparation. Aucun autre personne (incluant le détaillant ou le centre de service Sharp) n’est autorisé de prolonger, agrandir ou transférer
cette garantie au nom de Sharp.
Les garanties express dans cette garantie limitée sont, sauf pour les consommateurs acheteurs résidents du Québec, en lieu et place de
et, sauf dans la mesure où cela est interdit par la loi, Sharp rejette toute autre garantie et condition, expresse ou implicite, que ce soit
en vertu de la loi, de la pratique ou des usages du commerce, incluant, sans s’y limiter, les garanties conditions implicites de qualité
marchande et/ou de qualité, d’adéquation à un usage où a des fins spécifiques et/ou de garantie contre la contrefaçon. Les limitations
(ne s’appliquent pas aux consommateurs acheteurs résidents au Québec dans les mesures prévues par les lois du Québec) : (a) Sharp ne
sera pas responsable des dommages accessoires, spéciaux, consécutifs, économiques, punitifs ou indirects de quelque sorte ou nature
(incluant la perte de profit, de temps, d’utilisation ou de données) provenant de ou en relation avec l’utilisation ou la performance d’un
Produit ou la défaillance d’un Produit, même si Sharp est au courant ou a été avisé de la possibilité de tels dommages; (b) les correctifs
décrits dans cette garantie limitée constituent l’exécution intégrale de toutes les obligations et responsabilités de Sharp envers l’acheteur
en lien avec le Produit et constitue la pleine satisfaction de toutes les réclamations, que ce soit fondé sur un contrat, la négligence, la
responsabilité sans faute ou au autrement. Certaines provinces peuvent ne pas permettre les exclusions ou les limitations de certains
dommages ou limitations sur la durée ou l’annulation des garanties ou des conditions implicites; dans ces provinces, les exclusions et
limitations décrites dans la présente peuvent ne pas s’appliquer. Cette garantie limitée est, sauf pour les consommateurs acheteurs au
Québec, régie par les lois de la province du Canada dans laquelle l’acheteur a acheté le Produit. Pour les consommateurs acheteurs
résidents au Québec, cette garantie est régie par les lois du Québec.
Votre numéro de modèle et la
description du produit:
Modèle N
o
SSC2489DS Four SuperSteam+ pour la maison. (Assurez-vous d’avoir cette
information à portée de main lorsque vous avez besoin d’assistance pour votre produit.)
Période de garantie de ce produit: Un (1) an sur les pièces et la main-d’œuvre incluant le service à domicile.
Articles supplémentaires exclus
de la couverture de la garantie
(le cas échéant):
Accessoires non fonctionnels, réservoir, plateau d’égouttage, plateau de la base,
plaque à pâtisserie, plateau perforé et ampoule.
Pour obtenir le nom et l’adresse du centre de service autorisé ou détaillant Sharp le plus près, veuillez contacter :
SHARP ELECTRONICS OF CANADA LTD
335 Britannia Road East
Mississauga, Ontario
L4Z 1W9
(905) 568-7140
Site Web : www.sharp.ca
CETTE GARANTIE LIMITÉE EST VALIDE UNIQUEMENT AU CANADA
F5

US CONSUMER LIMITED WARRANTY
4F
SHARP ELECTRONICS CORPORATION (“Sharp”) warrants to the first consumer purchaser (“Purchaserˮ) that this SHARP brand
product (“Productˮ), when shipped in its original container and sold or distributed in the United States by Sharp or an authorized
Sharp dealer or reseller, will be free from defective workmanship and materials and agrees that it will, at its option, either repair the
defect or replace the defective Product or part thereof with a new or remanufactured equivalent at no charge to the Purchaser for parts
or labor for the period(s) set forth below.
This limited warranty does not apply to any appearance items of the Product nor to the additional excluded item(s) set forth below nor
to any Product the exterior of which has been damaged or defaced, which has been subjected to misuse, abnormal service or handling,
or which has been altered or modified in design or construction.
In order to enforce the rights under this limited warranty, the Purchaser should follow the steps set forth below and provide proof of
purchase to the servicer.
The limited warranty described herein is in addition to whatever implied warranties may be granted to Purchasers by law. ALL IMPLIED
WARRANTIES INCLUDING THE WARRANTIES OF MERCHANTABILITY AND FITNESS FOR USE ARE LIMITED TO THE
PERIOD(S) FROM THE DATE OF PURCHASE SET FORTH BELOW. Some states do not allow limitations on how long an implied
warranty lasts, so the above limitation may not apply to you.
Neither the sales personnel of the seller nor any other person is authorized to make any warranties other than those described herein,
or to extend the duration of any warranties beyond the time period described above on behalf of Sharp.
The warranties described herein shall be the sole and exclusive warranties granted by Sharp and shall be the sole and exclusive remedy
available to the Purchaser. Correction of defects, in the manner and for the period of time described herein, shall constitute complete
fulfillment of all liabilities and responsibilities of Sharp to the Purchaser with respect to the Product and shall constitute full satisfaction
of all claims, whether based on contract, negligence, strict liability or otherwise. In no event shall Sharp be liable, or in any way
responsible, for any damages or defects in the Product which were caused by repairs or attempted repairs performed by anyone other
than an authorized servicer. Nor shall Sharp be liable or in any way responsible for any incident or consequential economic or property
damage. Some states do not allow the exclusion of incidental or consequential damages, so the above exclusion may not apply to you.
THIS LIMITED WARRANTY GIVES YOU SPECIFIC LEGAL RIGHTS. YOU MAY ALSO HAVE OTHER RIGHTS WHICH
VARY FROM STATE TO STATE.
THIS LIMITED WARRANTY IS VALID ONLY IN THE FIFTY (50) UNITED STATES, THE DISTRICT OF COLUMBIA AND
PUERTO RICO.
Your product model number &
description:
Model # SSC2489DS or Home Use SuperSteam+ Oven. (Be sure to have this information
available when you need service for your Product.)
Warranty period for this product:
One (1) year parts and labor including in-home service.
Additional item(s) excluded from
warranty coverage (if any):
Non-functional accessories and light bulbs.
Where to obtain service:
From a Sharp Authorized Servicer located in the United States. To find the location of the
nearest Sharp Authorized Servicer, call Sharp toll free at 1-800-BE-SHARP (1-800-237-4277).
What to do to obtain service:
In-home service is provided for one year from date of purchase. In-home service can be arranged
by calling 1-800-BE-SHARP. Be sure to have Proof of Purchase available.
TO OBTAIN SUPPLY, ACCESSORY OR PRODUCT INFORMATION, CALL 1-800-BE-SHARP or visit www.sharpusa.com. SAVE
THE PROOF OF PURCHASE AS IT IS NEEDED SHOULD YOUR OVEN EVER REQUIRE WARRANTY SERVICE.

CUSTOMER ASSISTANCE CANADA ONLY
To aid in answering questions if you call for service or for reporting loss or theft,
please use the space below to record the model and serial number located on the
back side of the unit.
Model Number:
Serial Number:
Date of Purchase:
Dealer Name:
Address:
City:
Province:
Postal Code:
Telephone:
PRODUCT SUPPORT
If you have questions about the setup or operation of your product, please refer to
the corresponding section within this manual.
Additionally, visit http://sharp.ca/support-home.aspx to access exclusive content
about your product including:
Æ Find a Dealer
Æ Find Service Locations
Æ Downloads including the Installation Guide, Spec Sheet, and Owner’s Manual
CONTACT US
If at any time you have questions or comments concerning your SHARP product,
please contact the SHARP Customer Assistance Center. We are available to
assist you through multiple contact methods for your convenience:
http://sharp.ca/contact-emailus.aspx CA | sharp.ca/support-home.aspx Contact a Sharp Advisor on the phone
CALL US
CA 877-278-6709
Mon-Fri: 7am-7pm CST
EMAIL
Available 24/7
See the Contact Us
section on our site.
SUPPORT SITE
Product Downloads,
Service Locater, Where
to Buy, Toner Recycling
Program and more.
F3

CUSTOMER ASSISTANCE UNITED STATES ONLY
REGISTER YOUR PRODUCT
Registering your new product is easy and offers benets that help you get the most
out of your Sharp product including:
9 Convenience: Ifyoueverneedwarrantysupport,yourproductinformationisalreadyonle.
9 Communication:StayuptodatewithimportantnoticationsandspecialoffersfromSHARP.
9 Support: Quickly access support content including Owner’s Manuals, FAQ’s,
How-toVideos,andmuchmore.
3 EASY WAYS TO REGISTER TODAY!
PRODUCT SUPPORT
If you have questions about the setup or operation of your product, please refer to
the corresponding section within this manual.
Additionally, visit www.sharpusa.com/support to access exclusive content about your
product including:
Æ FAQ’s and How-To Videos
Æ Find or Request Service
Æ Purchase an Extended Warranty
Æ Downloads including the Installation Guide, Spec Sheet, and Owner’s Manual
CONTACT US
If at any time you have questions or comments concerning your SHARP product,
please contact the SHARP Customer Assistance Center. We are available to
assist you through multiple contact methods for your convenience:
Scan this QR Code on your mobile device Visit http://www.sharpusa.com/register
ONLINE
Visit our sites to
learn more about
your product at
sharpusa.com and
sbl.sharpusa.com
See the Contact Us section on our sites U.S. | www.sharpusa.com/support Contact a Sharp Advisor on the phone
Contact a Sharp Advisor on the phone
CALL US
US 800-BE-SHARP
800-237-4277
Mon-Fri: 7am-7pm CST
Sat-Sun: 9am-7pm CST
CALL US
US 800-BE-SHARP
800-237-4277
Mon-Fri: 7am-7pm CST
Sat-Sun: 9am-7pm CST
EMAIL
Available 24/7
US: sharpusa.com
CHAT ONLINE
Mon-Fri: 7am-7pm CST
Sat-Sun: 9am-7pm CST
SCAN
Use the camera or
QR code scanning
application on your
mobile device
2F
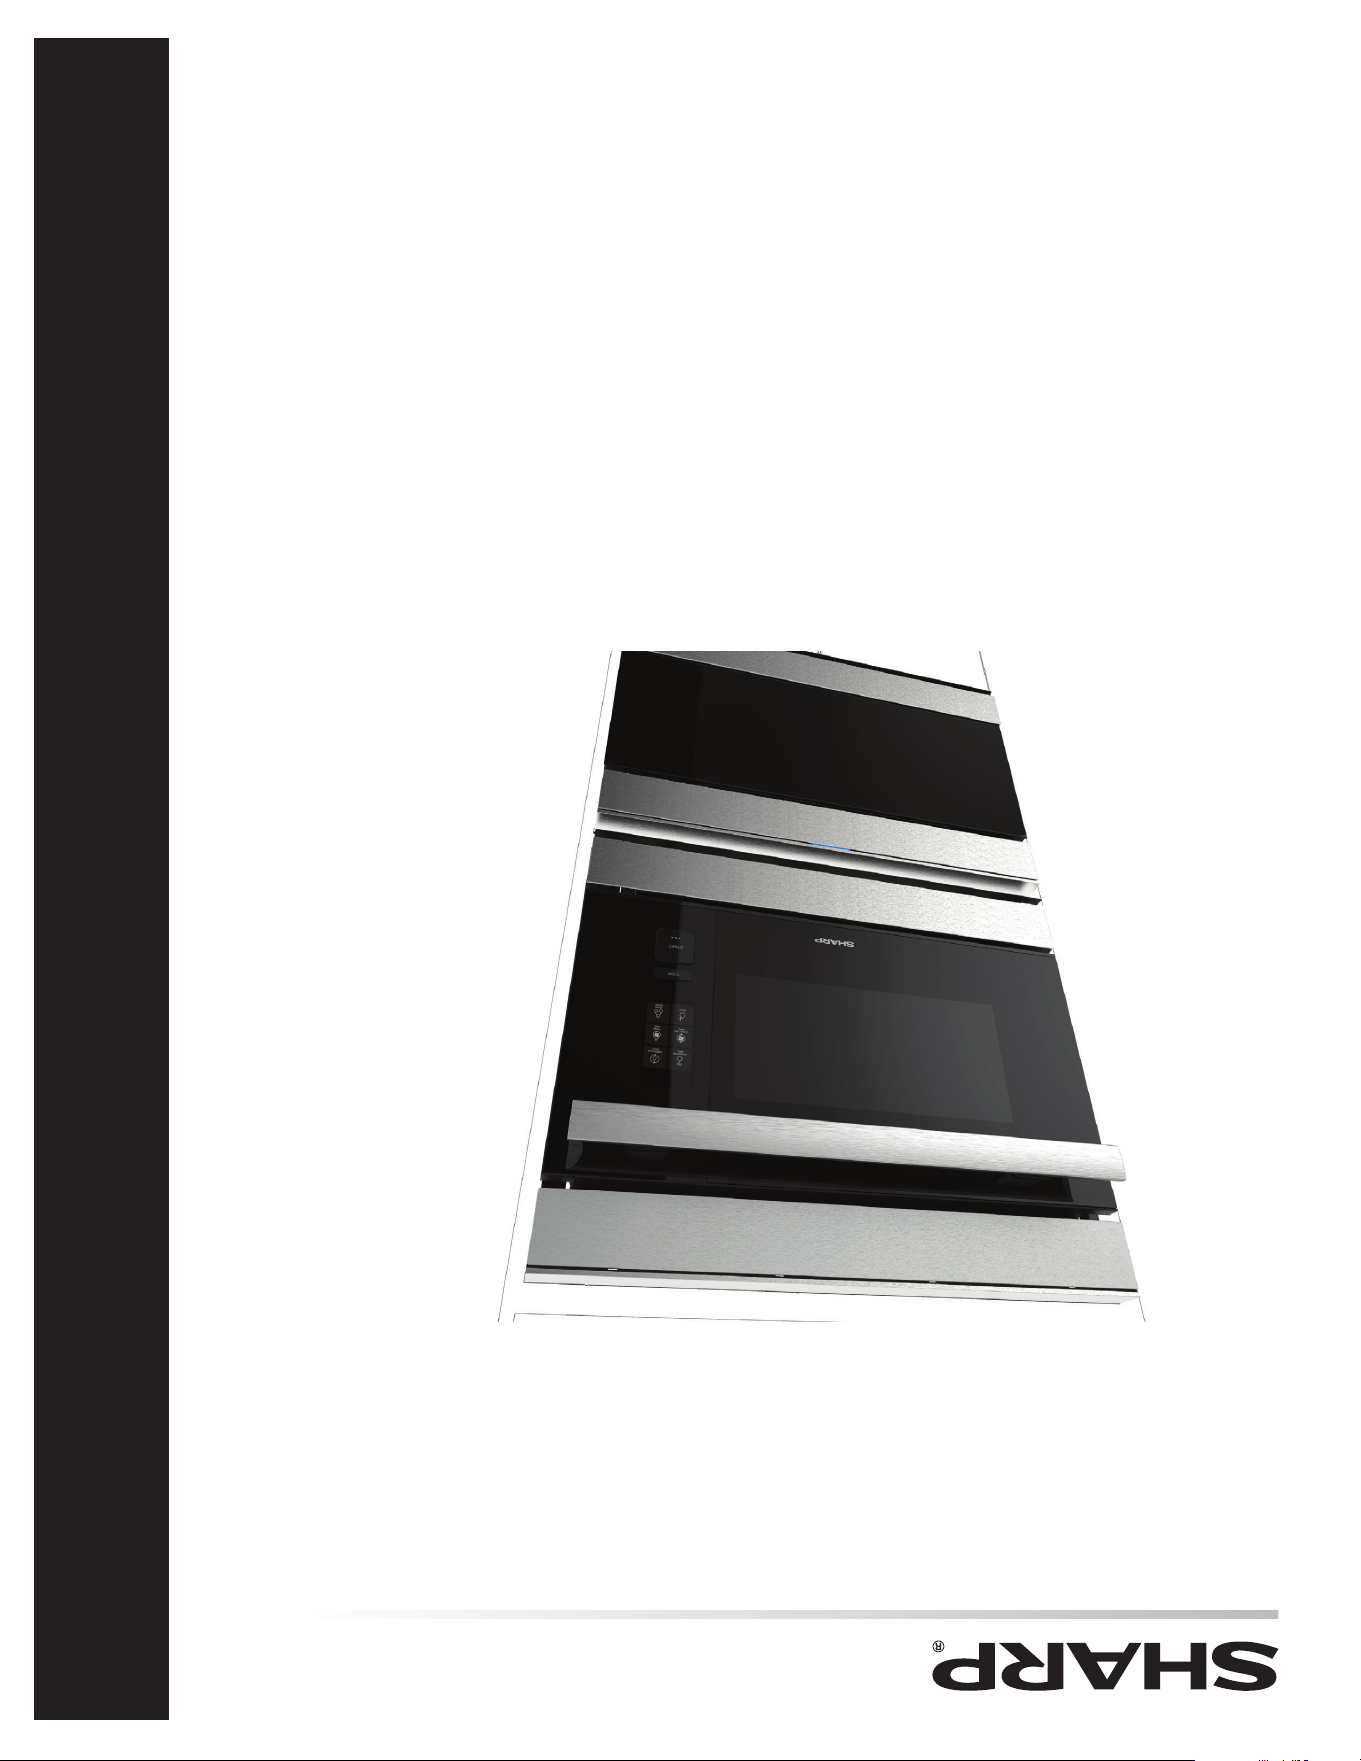
Four SuperSteam+
™
MODÈLE
SSC2489DS
Four
SuperSteam+
™
: Modèle SSC2489DS
MANUEL D’UTILISATION
F
ASSISTANCE À LA CLIENTÈLE (ÉTATS-UNIS UNIQUEMENT) .. 2
ASSISTANCE À LA CLIENTÈLE (CANADA UNIQUEMENT) ... 3
GARANTIE LIMITÉE POUR LES CONSOMMATEURS AUX
ÉTATS-UNIS ........................................ 4
GARANTIE LIMITÉE POUR LES CONSOMMATEURS AU CANADA ...
5
CONSIGNES DE SÉCURITÉ IMPORTANTES ............... 6-7
INFORMATIONS RÉGLEMENTAIRES IMPORTANTES ....... 7
RENSEIGNEMENTS UTILES ............................... 8-10
APERÇU DU PRODUIT .................................... 11-12
AVANT LA PREMIÈRE UTILISATION .................... 13-14
CONNEXION DE VOTRE APPAREIL ......................... 15
OPÉRATION DE CUISSON ................................. 16-20
RÉGLAGES ET MODES DE DÉMONSTRATION .............. 21
NETTOYAGE ............................................... 22-23
AVANT DE COMMUNIQUER AVEC LE SERVICE DE RÉPARATION
.....24
TINSKB264MRR0