
iD-Link DCS-5222L User Manual
Manual Overview
D-Link reserves the right to revise this publication and to make changes in the content hereof without obligation to notify any
person or organization of such revisions or changes. Information in this document may become obsolete as our services and
websites develop and change. Please refer to the www.mydlink.com website for the most current information.
Manual Revisions
Trademarks
D-Link and the D-Link logo are trademarks or registered trademarks of D-Link Corporation or its subsidiaries in the United
States or other countries. All other company or product names mentioned herein are trademarks or registered trademarks of
their respective companies.
Copyright © 2012 by D-Link Corporation.
All rights reserved. This publication may not be reproduced, in whole or in part, without prior expressed written permission
from D-Link Corporation.
Revision Date Description
1.0 December 23, 2011 DCS-5222L Revision A1 with rmware version 1.00
1.1 September 24, 2012 DCS-5222L Revision A1 with rmware version 1.10
Manual Overview

iiD-Link DCS-5222L User Manual
Manual Overview
Safety Instructions
Use the following safety guidelines to ensure your own personal safety and to help protect your product from
potential damage.
•Ifanyofthefollowingconditionsoccur,unplugtheproductfromtheelectricaloutletandreplacethepartor
contact the place of purchase:
•Thepowercable,extensioncable,orplugisdamaged.
•Anobjecthasfallenintotheproduct.
•Theproducthasbeenexposedtowater.
•Theproducthasbeendroppedordamaged.
•Theproductdoesnotoperatecorrectlywhenyoufollowtheoperatinginstructions.
•Donotspillfoodorliquidsonproduct,andneveroperatetheproductinawetenvironment.Iftheproduct
gets wet, see the appropriate section in your troubleshooting guide.
•Operatetheproductonlyfromthetypeofexternalpowersourceindicatedontheelectricalratingslabel.Ifyou
arenotsureofthetypeofpowersourcerequired,consultyourlocalpowercompany.
•Useonlythepoweradapterwiththeproduct.Usinganotheradapter,notrecommendedbythemanufacturer,
may damage the product and invalidate the warranty.
•Tohelppreventanelectricshock,plugtheproductintoproperlygroundedelectricaloutlets.
•Observepowerstripratings.Makesurethatthetotalampereratingofallproductspluggedintothepower
strip does not exceed 80 percent of the ampere ratings limit for the power strip.
•Tohelpprotectyourproductfromsudden,transientincreasesanddecreasesinelectricalpower,useasurge
suppressor, line conditioner, or uninterruptible power supply (UPS).
•Positionproductcablesandpowercablescarefully;routecablessothattheycannotbesteppedonortripped
over. Be sure that nothing rests on any cables. Do not modify power cables or plugs. Consult a licensed electrician
or your power company for site modications. Always follow your local/national wiring rules.

iiiD-Link DCS-5222L User Manual
Manual Overview
•Theproductisdesignedforindooruseonly,andmustalwaysbepositionedwhereitisnotexposedtodirect
sunlight or strong halogen light. Exposure to direct sunlight or halogen light may cause permanent damage to
the image sensor in the product.
Warnings
•STRANGULATION HAZARD! – Keep cords out of the reach of children. Keep and secure all cords a minimum of
3 feet away from a crib or other child sleeping area.
•Thisproductcontainssmallpartsthatmaycausechoking.Keep out of reach of children.
•Thisproductisnotatoy.Donotallowchildrentoplaywithit.
•TheproductisdesignedforIndoor Use Only!
•Theproductshouldnotbeusedinalocationwhereitcouldbecomewet!
•Ensuretheproductisxedsecurelyotherwiseitmayfallandcauseinjury!
•ThisproductisNOTintendedtoreplacepropersupervisionofchildren.Youmustcheckyourchild’sactivity
regularly, as this product will not alert parents to activity of children.
•Donotuseextensioncords.Onlyusethepoweradapterprovided.
•Donotusethisproductnearaheatsource.
THIS DEVICE REQUIRES THIRD-PARTY SERVICES AND PRODUCTS TO ACHIEVE FULL FUNCTIONALITY,
INCLUDING BUT NOT LIMITED TO, BROADBAND INTERNET SUBSCRIPTION SERVICES AND PRODUCTS;
MOBILE INTERNET SUBSCRIPTION SERVICES, COVERAGE AND PRODUCTS; CAMERA MANAGEMENT
SOFTWARE, AND; A NETWORK CONNECTION. D-LINK HAS NO CONTROL OVER SUCH SERVICES AND
PRODUCTS AND EXPRESSLY DISCLAIMS ANY AND ALL LIABILITY FOR THE FAILURE OF THE DEVICE OR ANY
FEATURE THEREOF RESULTING FROM THE FAILURE OF ANY THIRD-PARTY SERVICE OR PRODUCT.

ivD-Link DCS-5222L User Manual
Table of Contents
Manual Overview................................................................ i
ManualRevisions ........................................................................... i
Trademarks ...................................................................................... i
Safety Instructions ....................................................................... ii
Warnings ................................................................................. iii
Product Overview .............................................................. 1
Package Contents .........................................................................1
SystemRequirements ................................................................. 2
Introduction ................................................................................... 3
Features ............................................................................................4
HardwareOverview ..................................................................... 5
Front .......................................................................................... 5
Back............................................................................................ 6
Wireless Installation Considerations ...................................... 7
Installation ......................................................................... 8
Hardware Installation .................................................................. 8
Camera Installation Wizard .......................................................9
WPS - Push Button Setup .................................................10
mydlink Portal .................................................................11
Camera Status ..............................................................................12
Live Video ......................................................................................13
Camera Info ..................................................................................14
Playback .........................................................................................14
Conguration ...................................................................15
Conguration Utility .................................................................. 15
Live Video ......................................................................................16
Setup ...............................................................................................18
Setup Wizard ........................................................................18
Internet Connection Setup Wizard ..........................19
Network .................................................................................. 23
Wireless ..................................................................................25
DynamicDNS .......................................................................26
Image Setup .........................................................................27
Audio and Video ..................................................................28
Time and Date ...................................................................... 30
Video Clip ..............................................................................31
Snapshot ................................................................................32
SD Recording ........................................................................33
DigitalOutput ......................................................................34
MotionDetection ...............................................................35
Camera Control ...................................................................36
SDManagement .................................................................37
Maintenance ................................................................................38
Admin .....................................................................................38
System ....................................................................................40
Firmware Upgrade ..............................................................41
Status ..............................................................................................42
Device Info ............................................................................42
Log ...........................................................................................43
Table of Contents

vD-Link DCS-5222L User Manual
Table of Contents
Help .................................................................................................44
Conguring the DCS-5222L with a Router ................45
Troubleshooting ..............................................................51
Networking Basics ...........................................................55
Check your IP address ...............................................................55
Statically Assign an IP Address ..............................................56
Technical Specications - Remote Control Unit ............57
Technical Specications - I/O Terminal Application ......59
Technical Specications ..................................................60
Contacting Technical Support ........................................62
Warranty ...........................................................................63
Registration .....................................................................69
1D-Link DCS-5222L User Manual
Section 1 - Product Overview
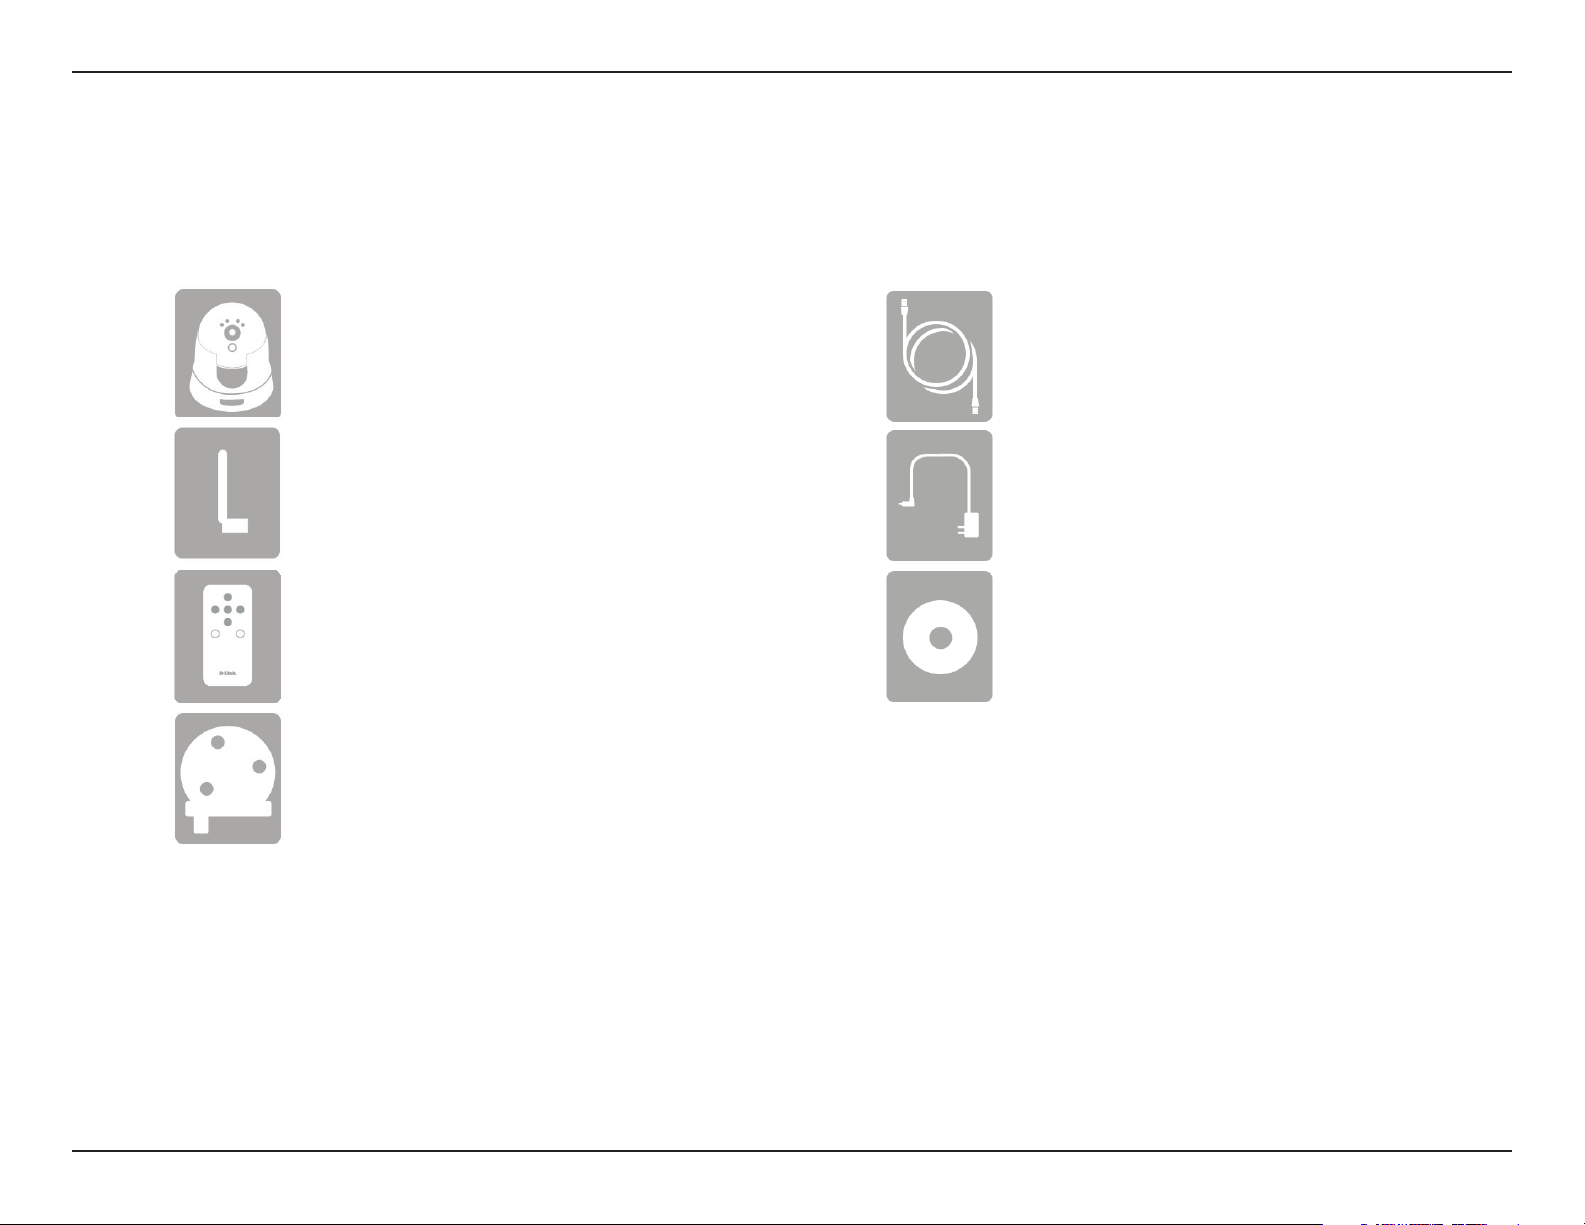
Package Contents
Note: Using a power supply with a dierent voltage rating than the one included with the DCS-5222L will cause damage and void the warranty for this
product. If any of the above items are missing from your package, please contact your retailer.
DCS-5222LNetworkCamera
Antenna (optional)
Remote Control
CameraBaseandMountingKit
Product Overview
CAT5 Ethernet Cable
Power Supply
CD-ROM

2D-Link DCS-5222L User Manual
Section 1 - Product Overview
System Requirements
Network Requirements •10/100Ethernetnetworkoran802.11n/g/bwirelessnetwork
CD Setup Wizard Requirements
•AnInternetconnection
•Arouterconnectedtoyourbroadbandmodem
Computer with the following:
•APCwithawiredconnectiontoyourrouter
•Windows®7(32/64bit),XP(32/64bit),Vista®(32/64bit),MacOS®X10.5orabove
Web-based Conguration Utility
Requirements
Browser Requirements:
•InternetExplorer7orhigher
•Firefox6.5orhigher
•Safari4orhigher
•Chrome8orhigher
Windows® Users:MakesureyouhavethelatestversionofJavainstalled.
Visit www.java.com to download the latest version.
mydlink Website Requirements
•BroadbandInternetconnection
•Computerwith:
•InternetExplorer7orhigher(ActiveX)
•Firefox6.5orhigher
•Safari4orhigher
•Chrome8orhigher

3D-Link DCS-5222L User Manual
Section 1 - Product Overview
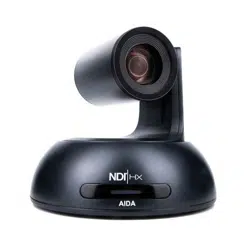
Congratulations on your purchase of the DCS-5222L Cloud Camera 5000. The DCS-5222L is a versatile solution for your small
oceorhome.TheDCS-5222Lisacompletesystemwithabuilt-inCPUandwebserverthattransmitshighqualityvideoimages
forsecurityandsurveillance.Itcanbeaccessedremotely,andcontrolledfromanyPC/Notebookoveryourlocalnetworkor
across the Internet via a web browser. The DCS-5222L features 802.11n wireless connectivity, allowing the camera to be placed
anywhere within range of your wireless network. The DCS-5222L comes with remote monitoring and motion detection features
for a complete and cost-eective home security solution.
Introduction

4D-Link DCS-5222L User Manual
Section 1 - Product Overview
Simple to Use
TheDCS-5222Lisastand-alonesystemwithabuilt-inCPU,requiringnospecialhardwareorsoftwaresuchasPCframegrabbercards.TheDCS-5222L
supportsbothActiveXmodeforInternetExplorerandJavamodeforotherbrowserssuchasFirefox,Chrome,andSafari.
Supports a Variety of Platforms
The DCS-5222L supports TCP/IP networking, HTTP, and other Internet related protocols. It can also be integrated easily into other Internet/Intranet
applications because of its standards-based features.
Web Conguration
UsingastandardWebbrowser,administratorscancongureandmanagetheNetworkCameradirectlyfromitsownWebpageviaIntranetorInternet.
Broad Range of Applications
Withtoday’shigh-speedInternetservices,theDCS-5222LNetworkCameracanprovideanidealsolutionforlivevideoovertheInternetandfor
remote monitoring. The DCS-5222L allow remote access from a Web browser for live image viewing and management of the network cameras
anytime, from anywhere in the world. The network cameras have a wide range of applications, including industrial and public monitoring of homes,
oces, banks, hospitals, child-care centers and amusement parks.
802.11n Wireless or Ethernet/Fast Ethernet Support
The DCS-5222L oers wireless 802.11n and Ethernet/Fast Ethernet connectivity, making the DCS-5222L easy to integrate into your existing
networkenvironment.TheDCS-5222Lworkswitha10MbpsEthernetbasednetworkor100MbpsFastEthernetbasednetworkfortraditionalwired
environments, and works with 802.11n routers or access points for added exibility. The Site Survey feature also allows you to view and connect to
any available wireless networks.
Remote Monitoring Utility
TheD-ViewCamapplicationaddsenhancedfeaturesandfunctionalityfortheNetworkCameraandallowsadministratorstocongureandaccess
theNetworkCamerafromaremotesiteviaIntranetorInternet.Otherfeaturesincludeimagemonitoring,recordingimagestoaharddrive,viewing
upto32camerasononescreen,andtakingsnapshots.NotethatD-ViewCamworksonWindows®computersonly.
IR LED for day and night functionality
The built-in infrared LEDs enables night time viewing of up to 16 feet (5 meters).
Features
5D-Link DCS-5222L User Manual
Section 1 - Product Overview
Hardware Overview
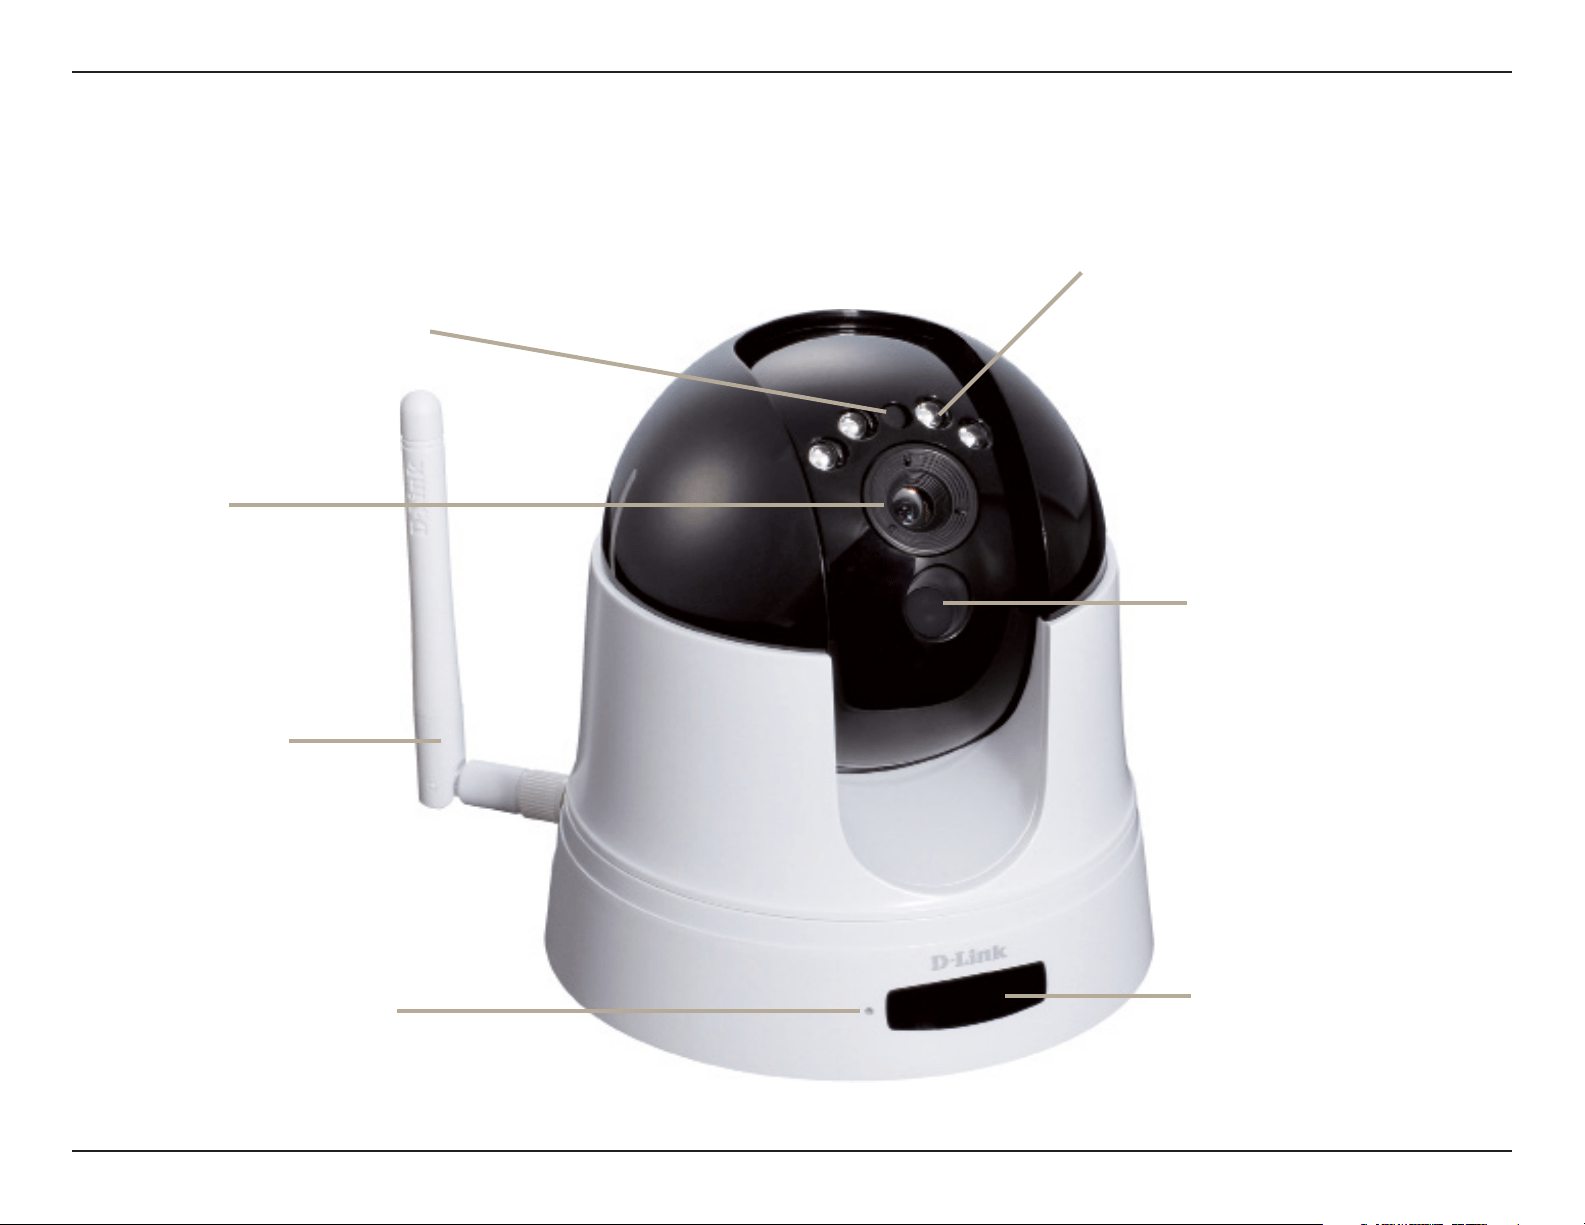
Front
IR LED for night vision
Light Sensor
Remote Control Receiver
External Antenna
(Optional)
Passive Infrared Sensor
(PIR) for motion detection
Microphone
Camera Lens
Toadjustthefocusofthe
camera view, the user
can manually rotate the
circular frame around
the lens clockwise or
counterclockwise
6D-Link DCS-5222L User Manual
Section 1 - Product Overview
Hardware Overview
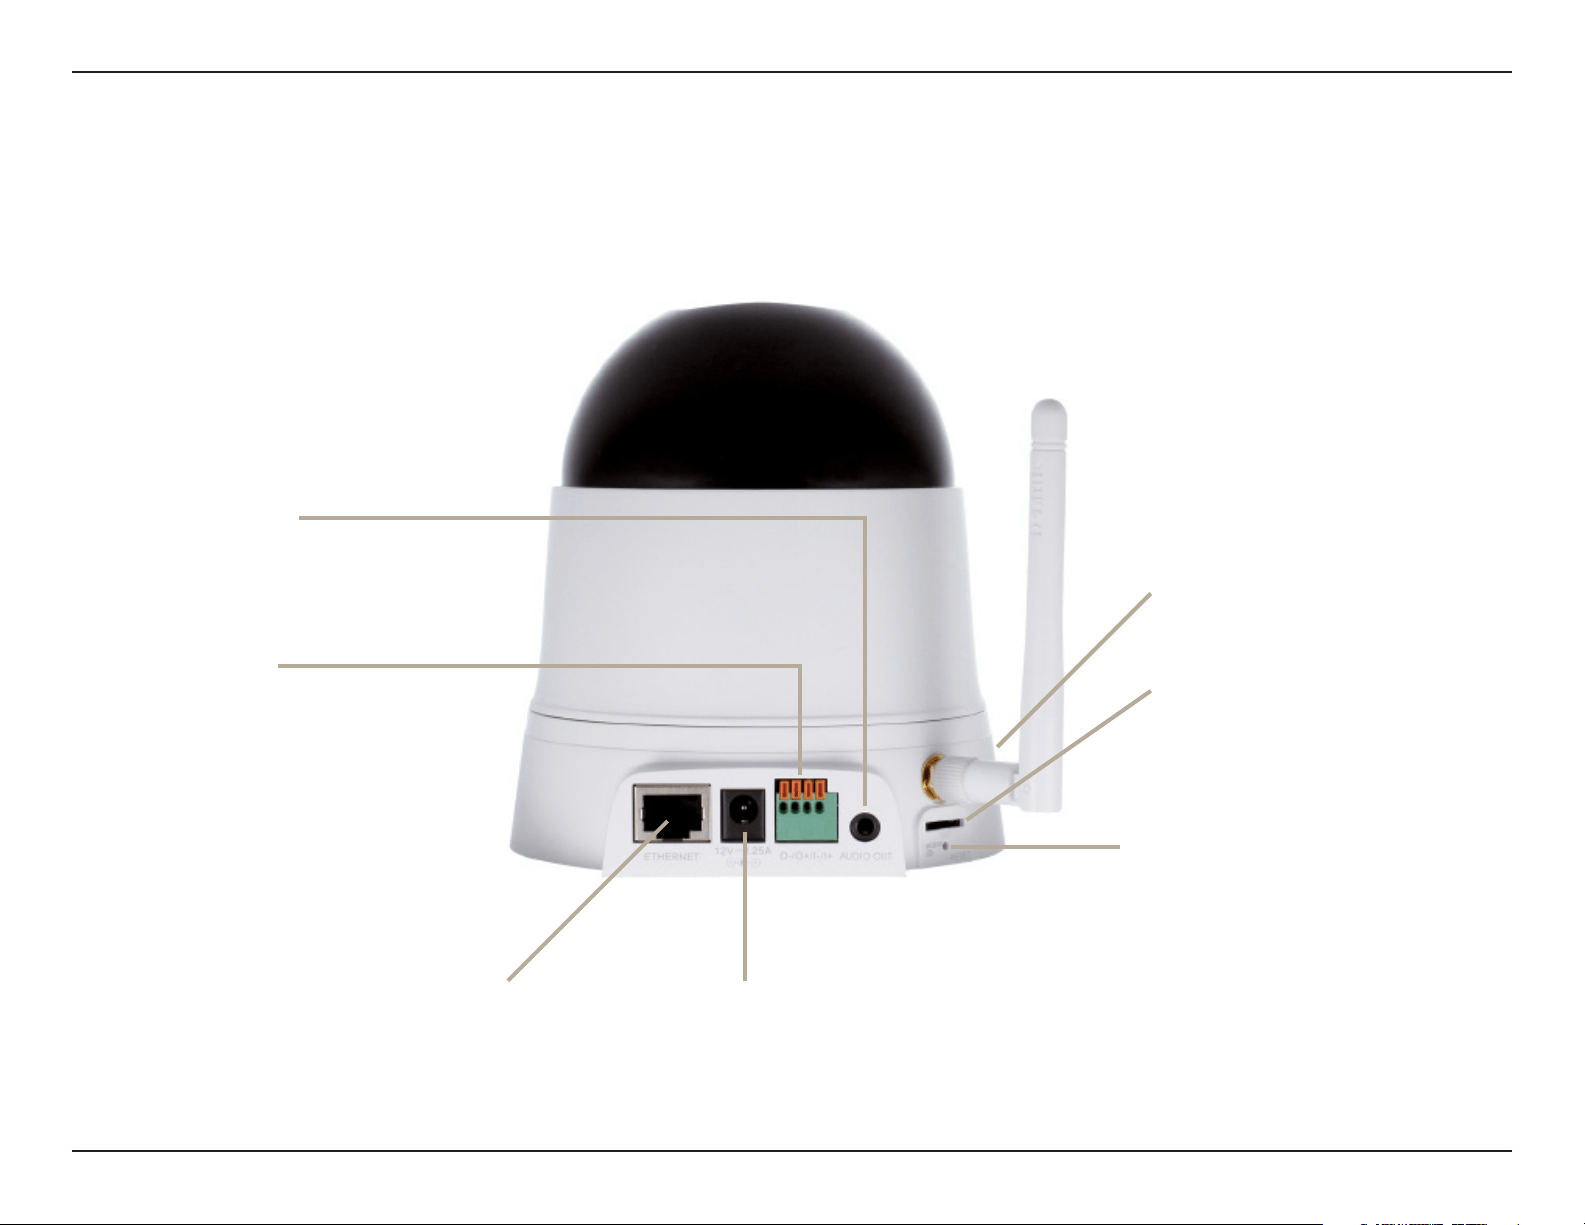
Back
Power Receptor
Connects to the power adapter.
Ethernet Port
Connects to a PC or network
through an Ethernet connection.
I/O Connector
The4-pin I/O connectorprovidesan
interface for photo-coupled switch
output and photo-coupled input. An
example of what can be done with
a digital input and digital output is
the connecting of a motion sensor
to the port, signalling the camera to
take a snapshot and trigger an alarm
connected to the port.
Audio Out
Connect headphones/speakers
to provide audio out.
Reset Button
Press and hold to reset to the default
factory settings.
WPS Button
Micro SD Slot
Used for storing recorded images
and video.

7D-Link DCS-5222L User Manual
Section 1 - Product Overview
Wireless Installation Considerations
TheD-LinkWirelessNetworkCameraletsyouaccessyournetworkusingawirelessconnectionfromanywherewithintheoperatingrangeofyour
wirelessnetwork.However,thenumber,thicknessandlocationofwalls,ceilings,orotherobjectsthatthewirelesssignalsmustpassthrough,may
limittherange.TypicalrangesvarydependingonthetypesofmaterialsandbackgroundRF(radiofrequency)noiseinyourhomeorbusiness.
The key to maximizing wireless range is to follow these basic guidelines:
1. Minimizethenumberofwallsandceilingsbetweenyouradapterandothernetworkdevices(suchasyourNetworkCamera)-
eachwallorceilingcanreduceyouradapter’srangefrom3-90feet(1-30meters).
2. Be aware of the direct line between network devices. A wall that is 1.5 feet thick (.5 meters), at a 45-degree angle appears to be
almost 3 feet (1 meter) thick. At a 2-degree angle, it looks over 42 feet (14 meters) thick. Position your devices so that the signal
will travel straight through a wall or ceiling (instead of at an angle) for better reception.
3. BuildingMaterialsmakeadierence.Asolidmetaldoororaluminumstudsmayweakenthewirelesssignal.Trytoposition
your access points, wireless routers, and other networking devices where the signal passes through drywall or open doorways.
Materialsandobjectssuchasglass,steel,metal,wallswithinsulation,water(shtanks),mirrors,lecabinets,brick,andconcrete
will degrade your wireless signal.
4. Keep your product at least 3-6 feet or 1-2 meters away from electrical devices or appliances that generate RF noise.
5. Ifyouareusing2.4GHzcordlessphonesorotherradiofrequencysources(suchasmicrowaveovens),yourwirelessconnection
maydegradedramaticallyordropcompletely.Makesureyour2.4GHzphonebaseisasfarawayfromyourwirelessdevicesas
possible. The base transmits a signal even if the phone in not in use.
8D-Link DCS-5222L User Manual
Section 2 - Installation
Hardware Installation
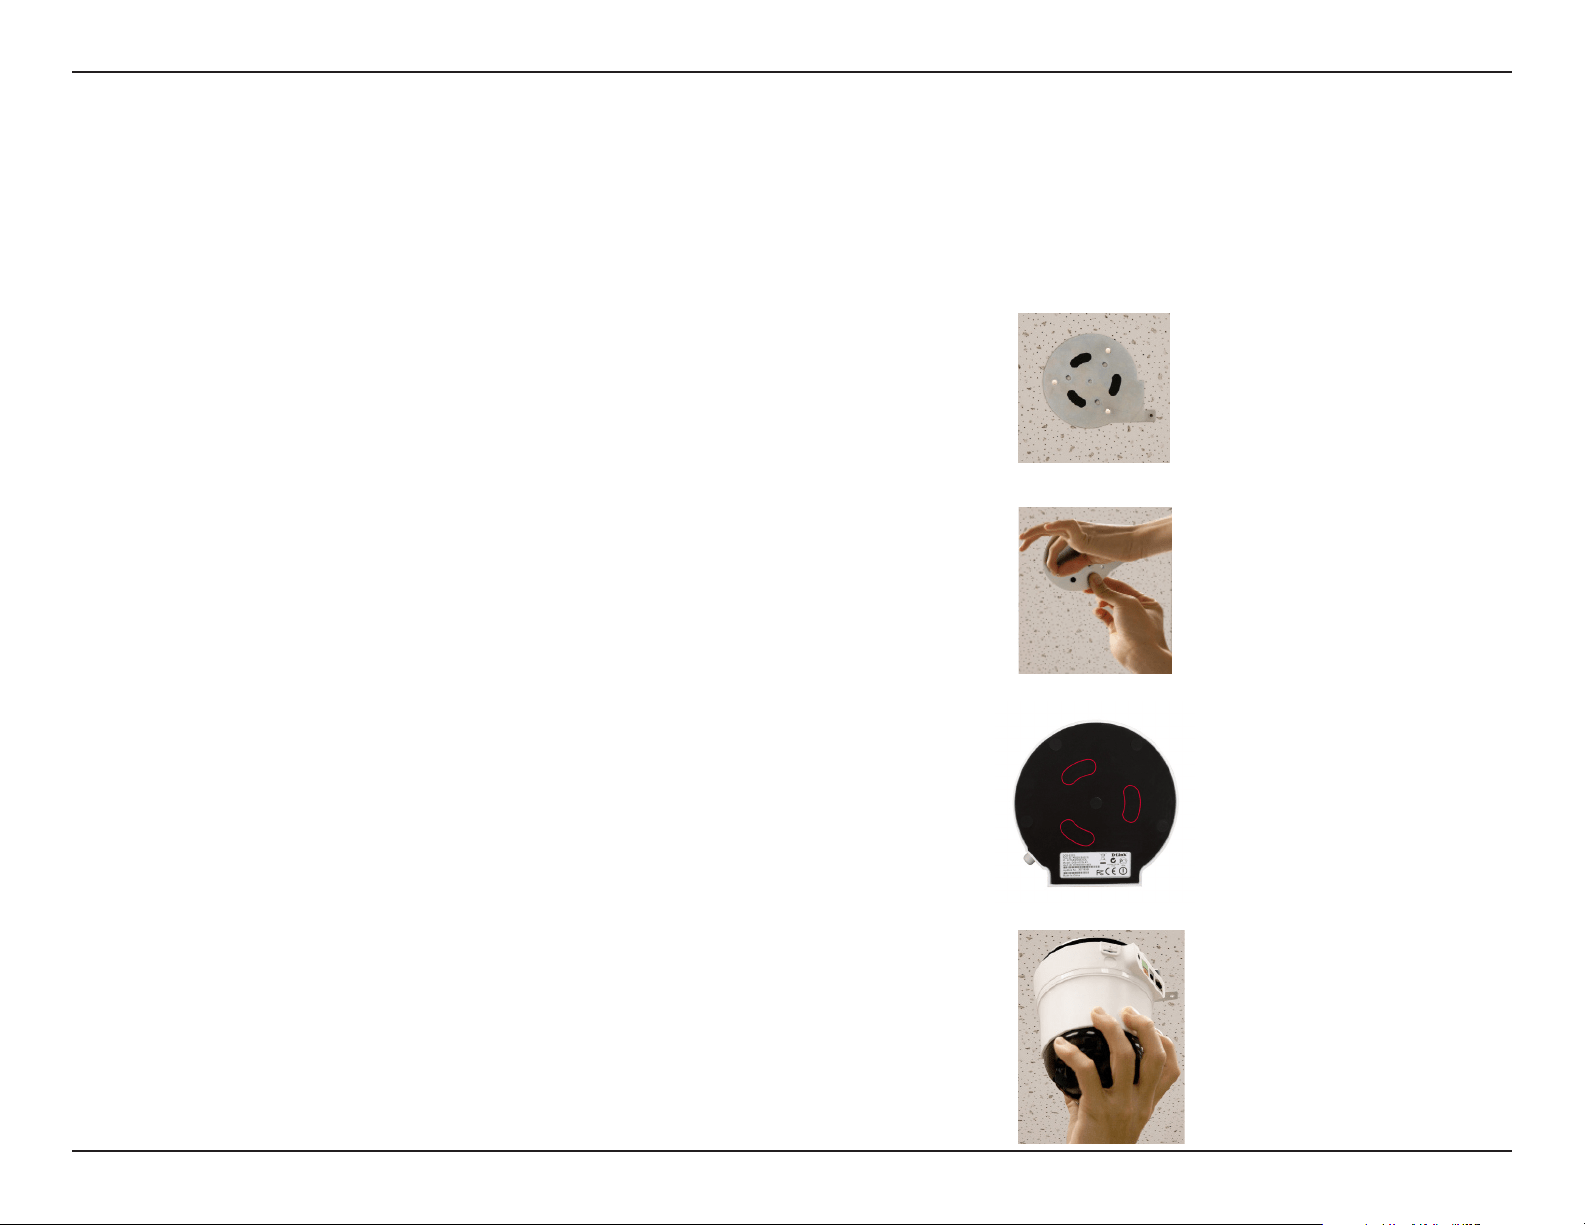
Wall and Ceiling Installation
4. Hold the IP camera rmly, place it against the plate and line up the camera slots at
thebottomofitsbasewiththeplate’sballcatches.Thenturnthecameraclockwise
untilit’ssecurelyinplace.
3. Turn over the camera and remove the three pieces of tape, outlined in red on the
photo, from the bottom. This reveals the slots which you use to fasten the camera
to the mount.
2. Use the provided screws and plastic anchors to screw the plate to the ceiling or wall.
The device can be mounted on a wall or a partition. To install,
1. Select the location on the ceiling or wall where you want to install the camera.
Place the provided metal plate in this location. The plate must be installed with its
three ball catches facing outwards.
9D-Link DCS-5222L User Manual
Section 2 - Installation
Installation
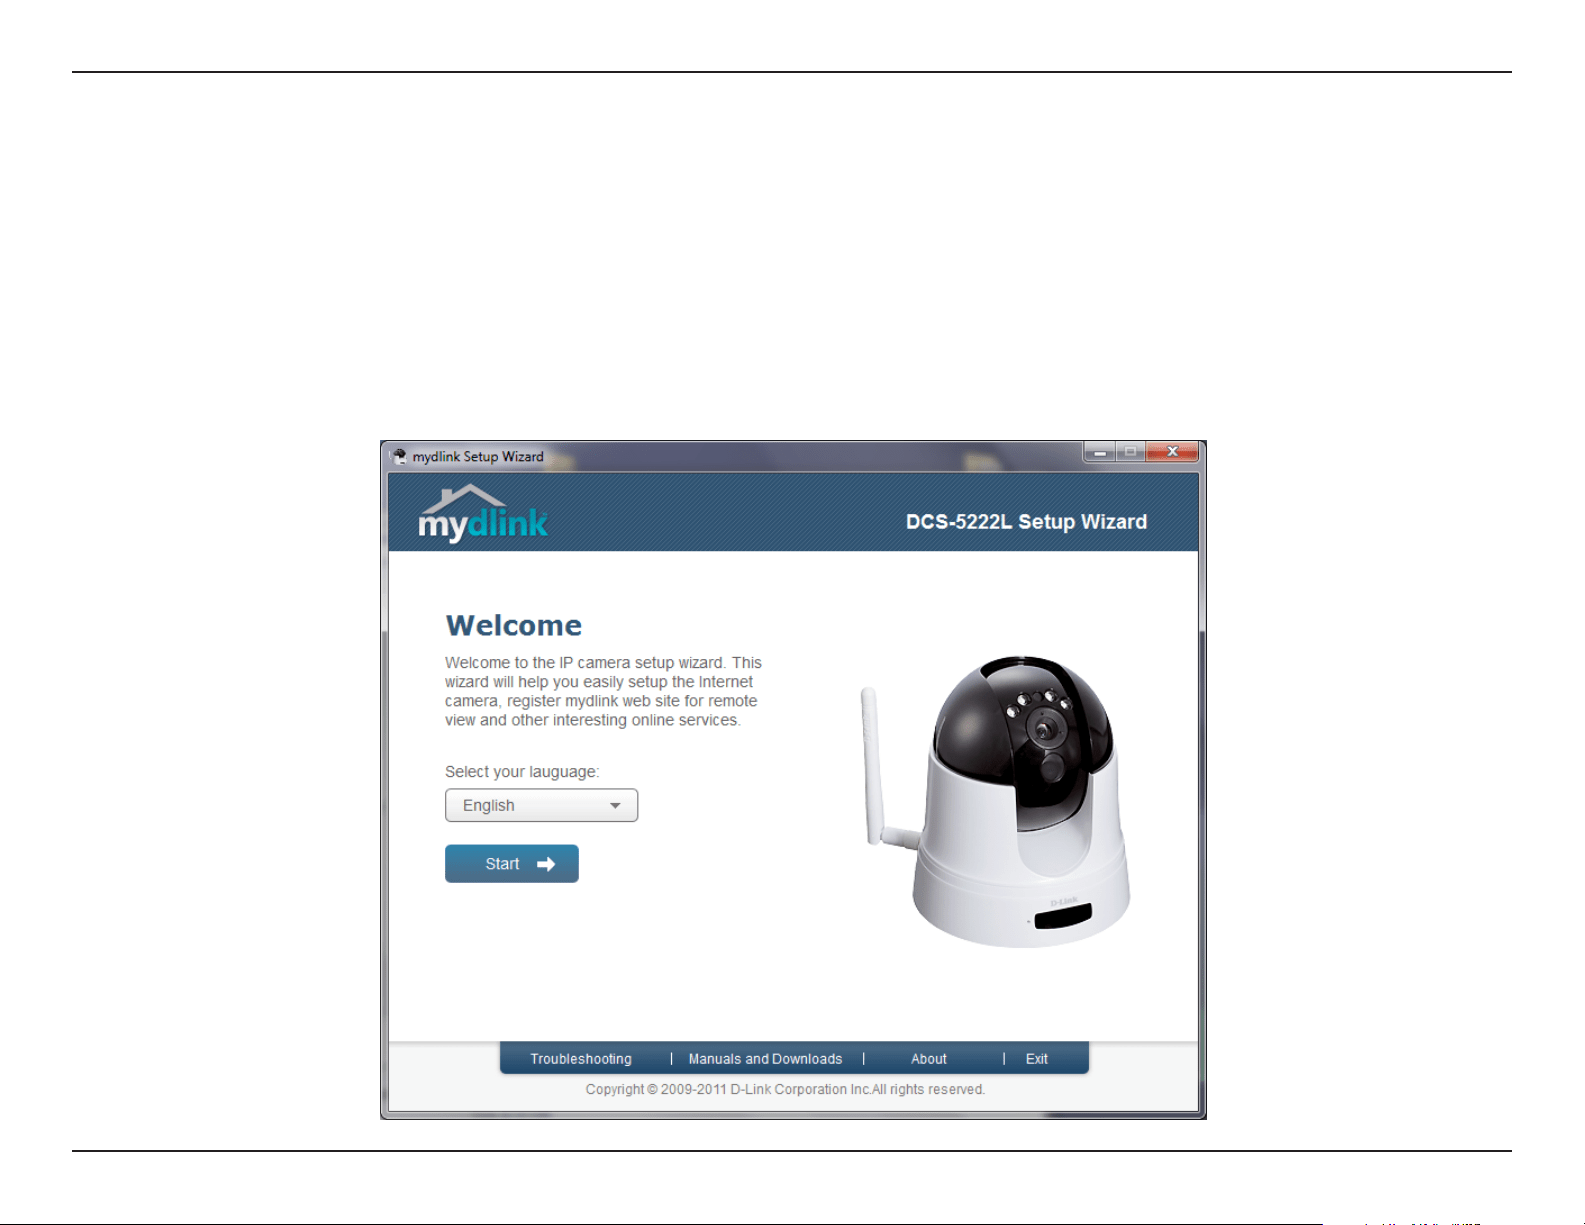
InserttheInstallationCD-ROMintoyourcomputer’sCDdrivetostarttheautorunprogram.Donotmountyourcamerauntilyouhaveconguredit.
The autorun program will open the Camera Installation Wizard. Simply click Start to go through the Installation Wizard, which will guide you through
the installation process from connecting your hardware, conguring your camera, and registering with mydlink.com.
Camera Installation Wizard
10D-Link DCS-5222L User Manual
Section 2 - Installation
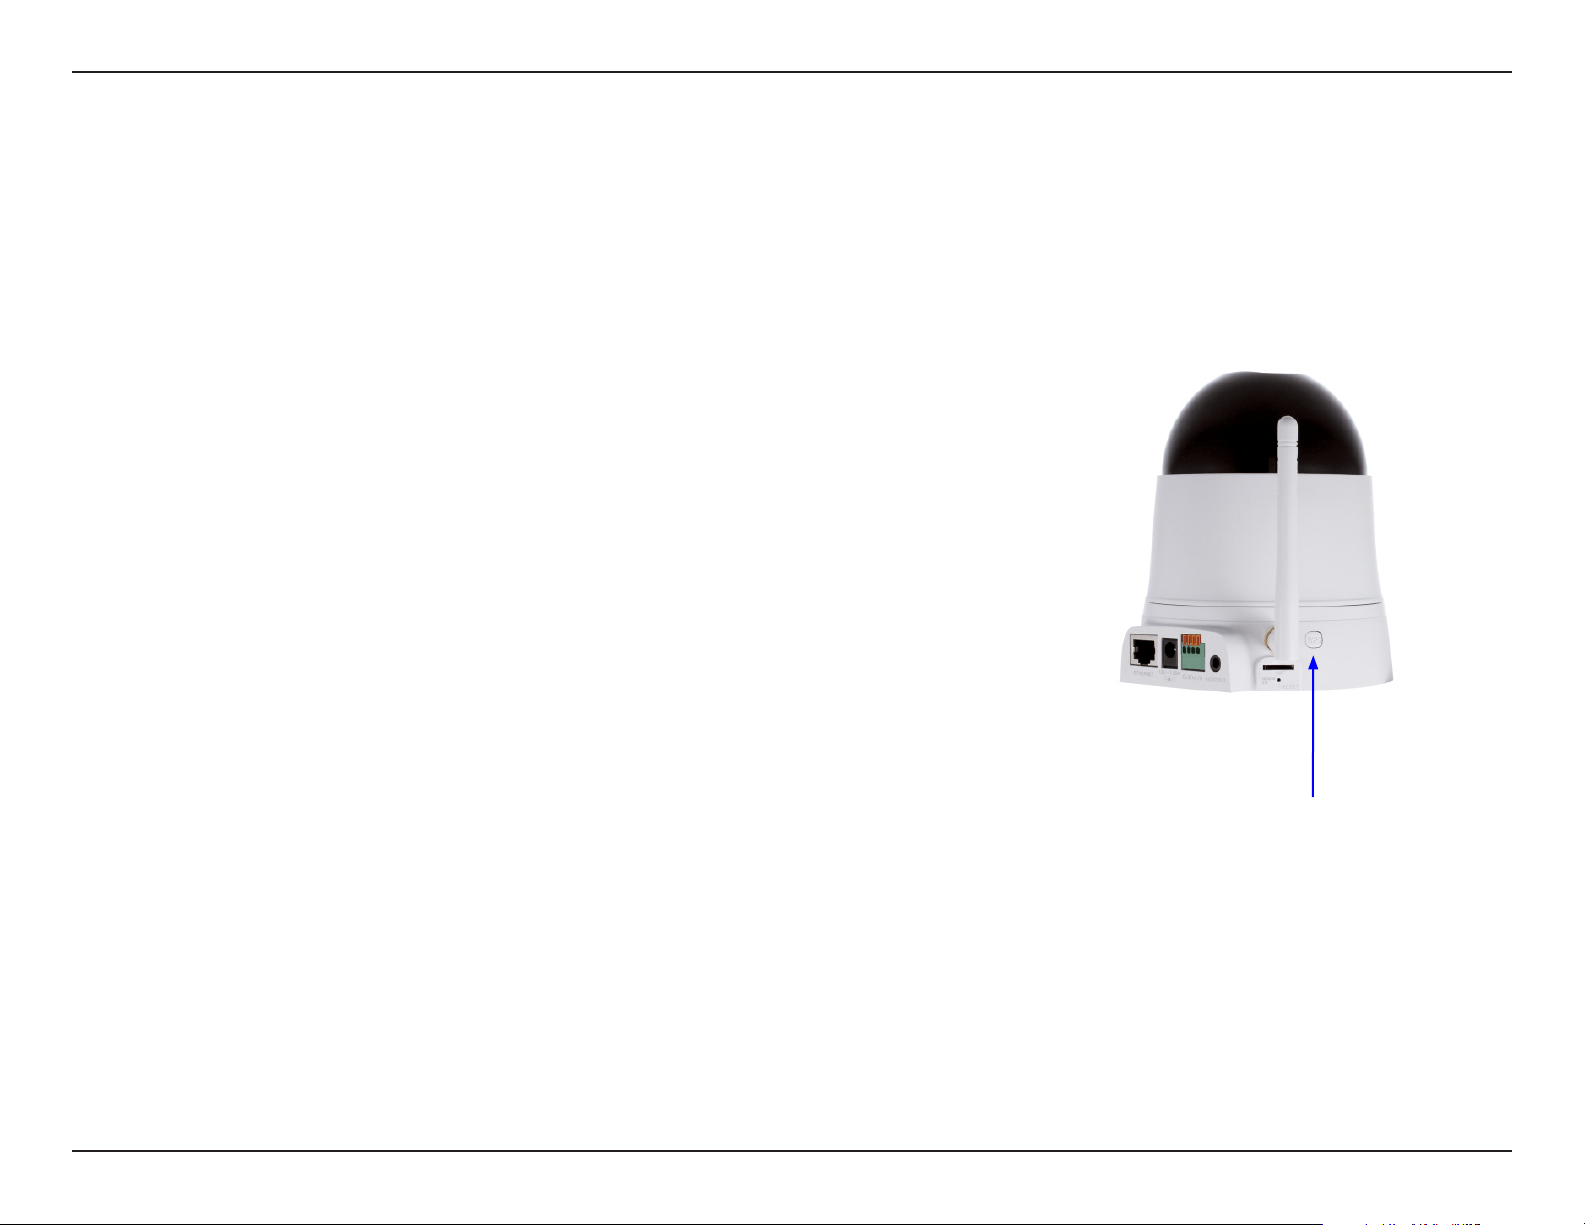
To create a WPS connection:
Step 1
Press and hold the WPS button for three seconds. The blue WPS status LED above
the button will blink.
Step 2
Press the WPS button on your router or access point within 120 seconds. The WPS
buttonisusuallyonthefrontorsideofyourrouter.Onsomeroutersandaccess
points, you may need to log in to the web interface and click on an on-screen
button to activate the WPS feature. If you are not sure where the WPS button is
onyourrouter/AP,pleaserefertoyourrouterorAP’sUserManual.
The DCS-5222L will automatically create a wireless connection to your router
or access point. While connecting, the green LED will ash and your camera will
reboot.
Note: Your camera contains an internal antenna and it is not necessary to attach
the external antenna unless you would like to boost your signal or install an outdoor
enclosure. You must select which antenna you want to use in the Setup > Wireless
section from the camera’s web conguration utility (internal is set by default).
WPS - Push Button Setup
Alternatively, you may create a connection to the camera using Wi-Fi Protected Setup (WPS).
WPS Button

11D-Link DCS-5222L User Manual
Section 3 - mydlink Portal
mydlink Portal
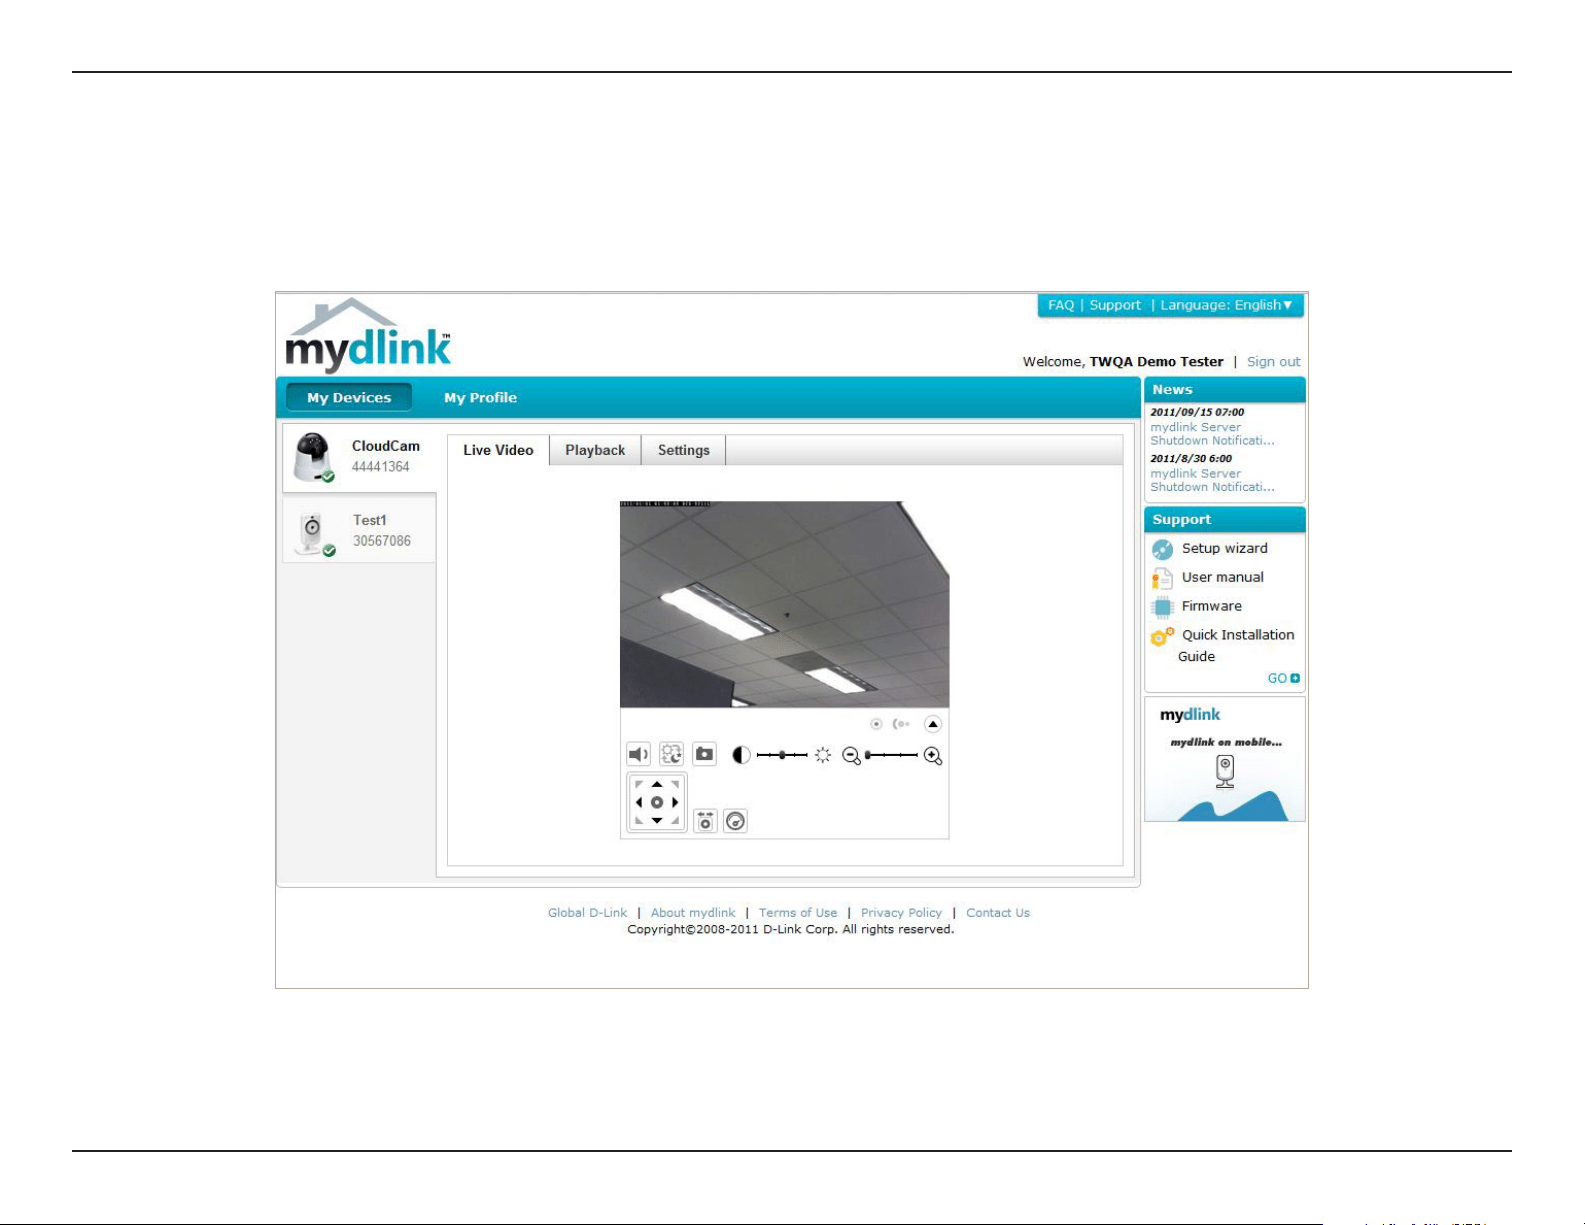
After registering your DCS-5222L camera with a mydlinkaccountintheCameraSetupWizard.Youwillbeabletoremotely
access your camera from the mydlink.com website. After signing in to your mydlink account, you will see a screen similar to
the following:
12D-Link DCS-5222L User Manual
Section 3 - mydlink Portal
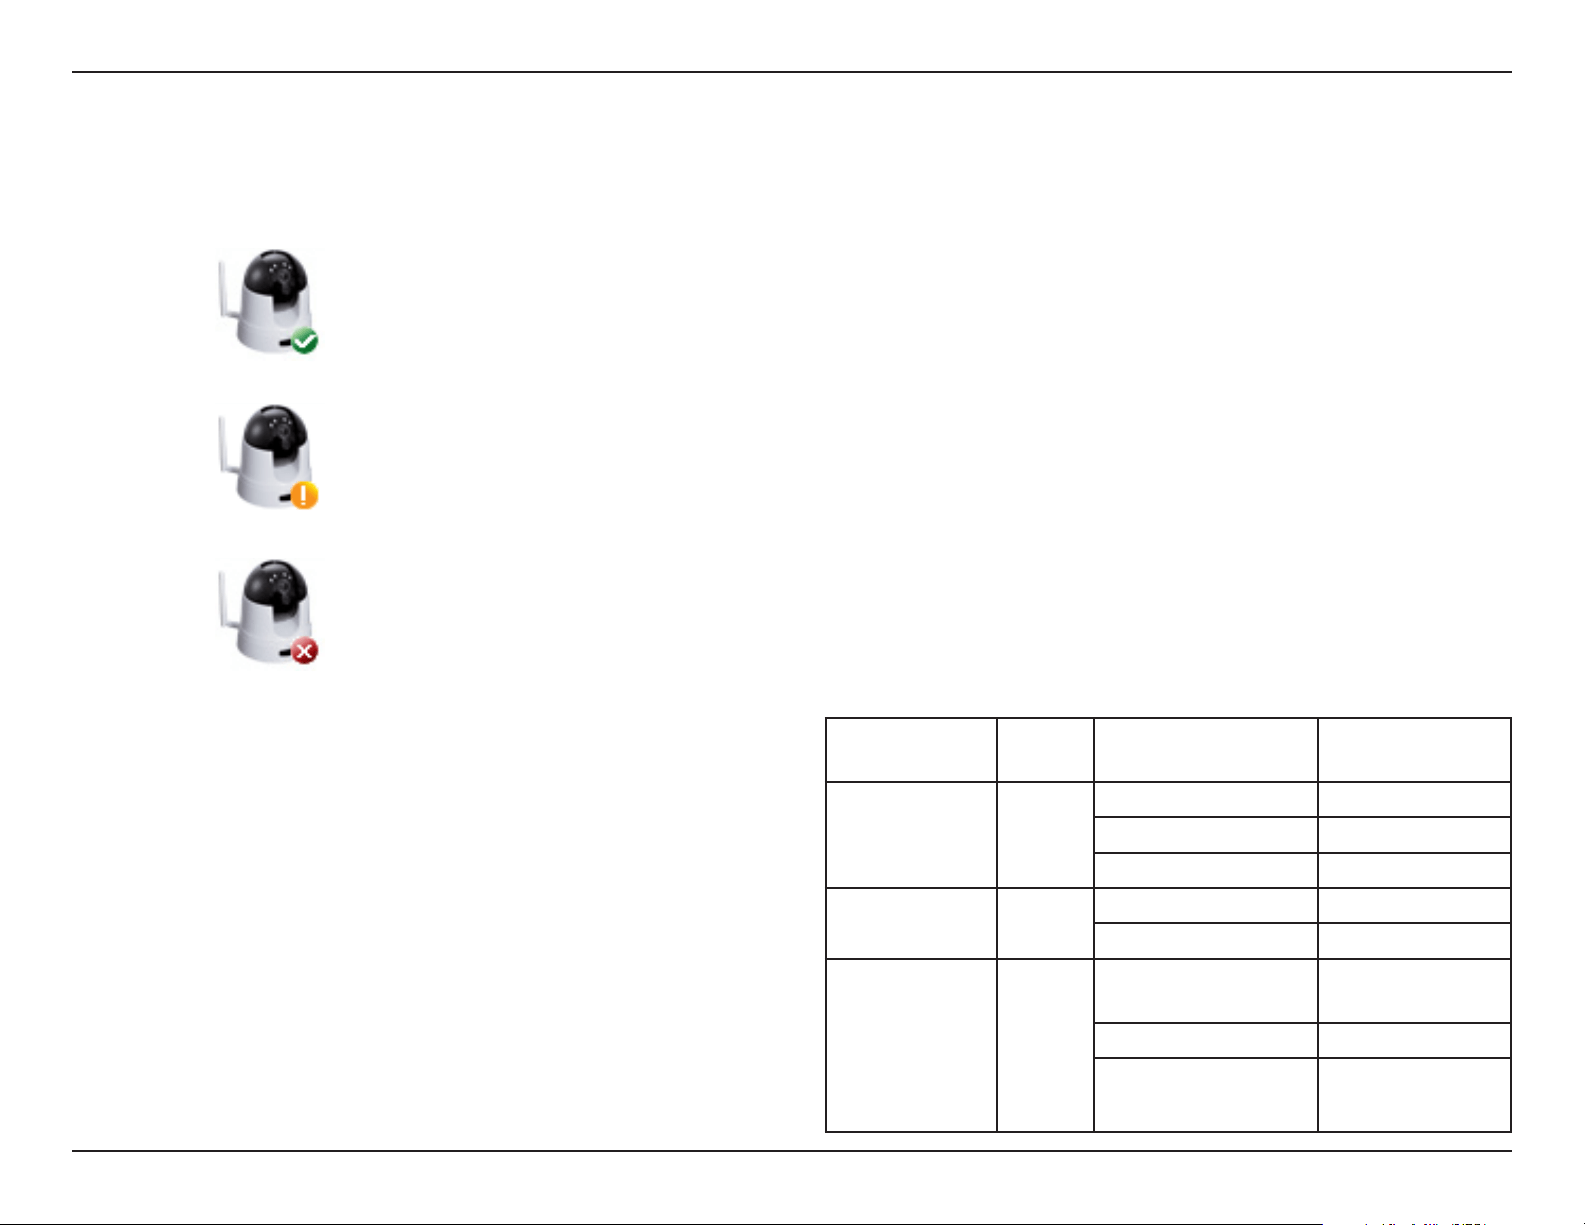
Camera Status
A green check mark indicates that your camera is online and ready to use.
A yellow exclamation point indicates that your camera is online, but the camera password
haschanged.Youwillneedtoenteryournewcamerapasswordtoaccessyourcameraagain.
If your camera is oine, try the following:
• ChecktomakesurethattheInternetconnectiontoyour
camera is working properly.
• Tryrestartingyourbroadbandrouter.
• Checkyourcamera’scable connections andmakesure
they are secure.
• ChecktomakesurethatthepowerLEDonyourcamera
is lit solid red.
If you still cannot access your camera, reset your camera and
runtheCameraSetupWizardagainfromtheCD-ROMincluded
in your package.
Theonlinestatusofeachcamerawillbedisplayed.Youronlinestatusmaybeoneofthefollowing:
A red x indicates that your camera is oine and currently cannot be accessed remotely.
LED Indicative Color Status Description
Link Green
O Link down
On Link up
Blinking Monitoring
Power Red
O PowerO
On PowerOn
WPS Blue
Blinking (1 sec
interval)
Setting is
on going
On Success
Blinking 10 seconds
(0.1secinterval)O
Fail / Standby
13D-Link DCS-5222L User Manual
Section 3 - mydlink Portal
Live Video
If the camera is available, a Live Video feed will be displayed. Video will be shown at full resolution if viewing your camera from
a PC on the same local network, or viewing your camera from a PC on a remote network.

14D-Link DCS-5222L User Manual
Section 3 - mydlink Portal
Camera Info
The Camera Info tab displays various details about your camera.
TheDeviceNameisauniquenamethatyoucangivetoyourdevice
to help you identify it. Clicking on the Device Name will open a
windowforyoutologintoyourcamera’scongurationinterface.
Then, it will open the Maintenance > Admin page where you can
changeyourDeviceName.
Displays the mydlink number of your device.
Displays the model name of your device.
DisplaystheMACaddressofyourdevice.
Displays the time and date that your device was added to mydlink.
Clicktocongureadvancedfeaturesforyourcamera.Youwillneed
to enter the username and password of your camera (not mydlink).
Click to remove the camera from mydlink. To add the camera back,
you will need to run the setup wizard from the CD.
Device Name:
mydlink No.:
Model Name:
MAC:
Camera activated on:
Advanced
Setting:
Delete Camera:
Search for a recording time after download or playback.
Search for clips
to view:
Playback
15D-Link DCS-5222L User Manual
Section 4 - Conguration
Conguration
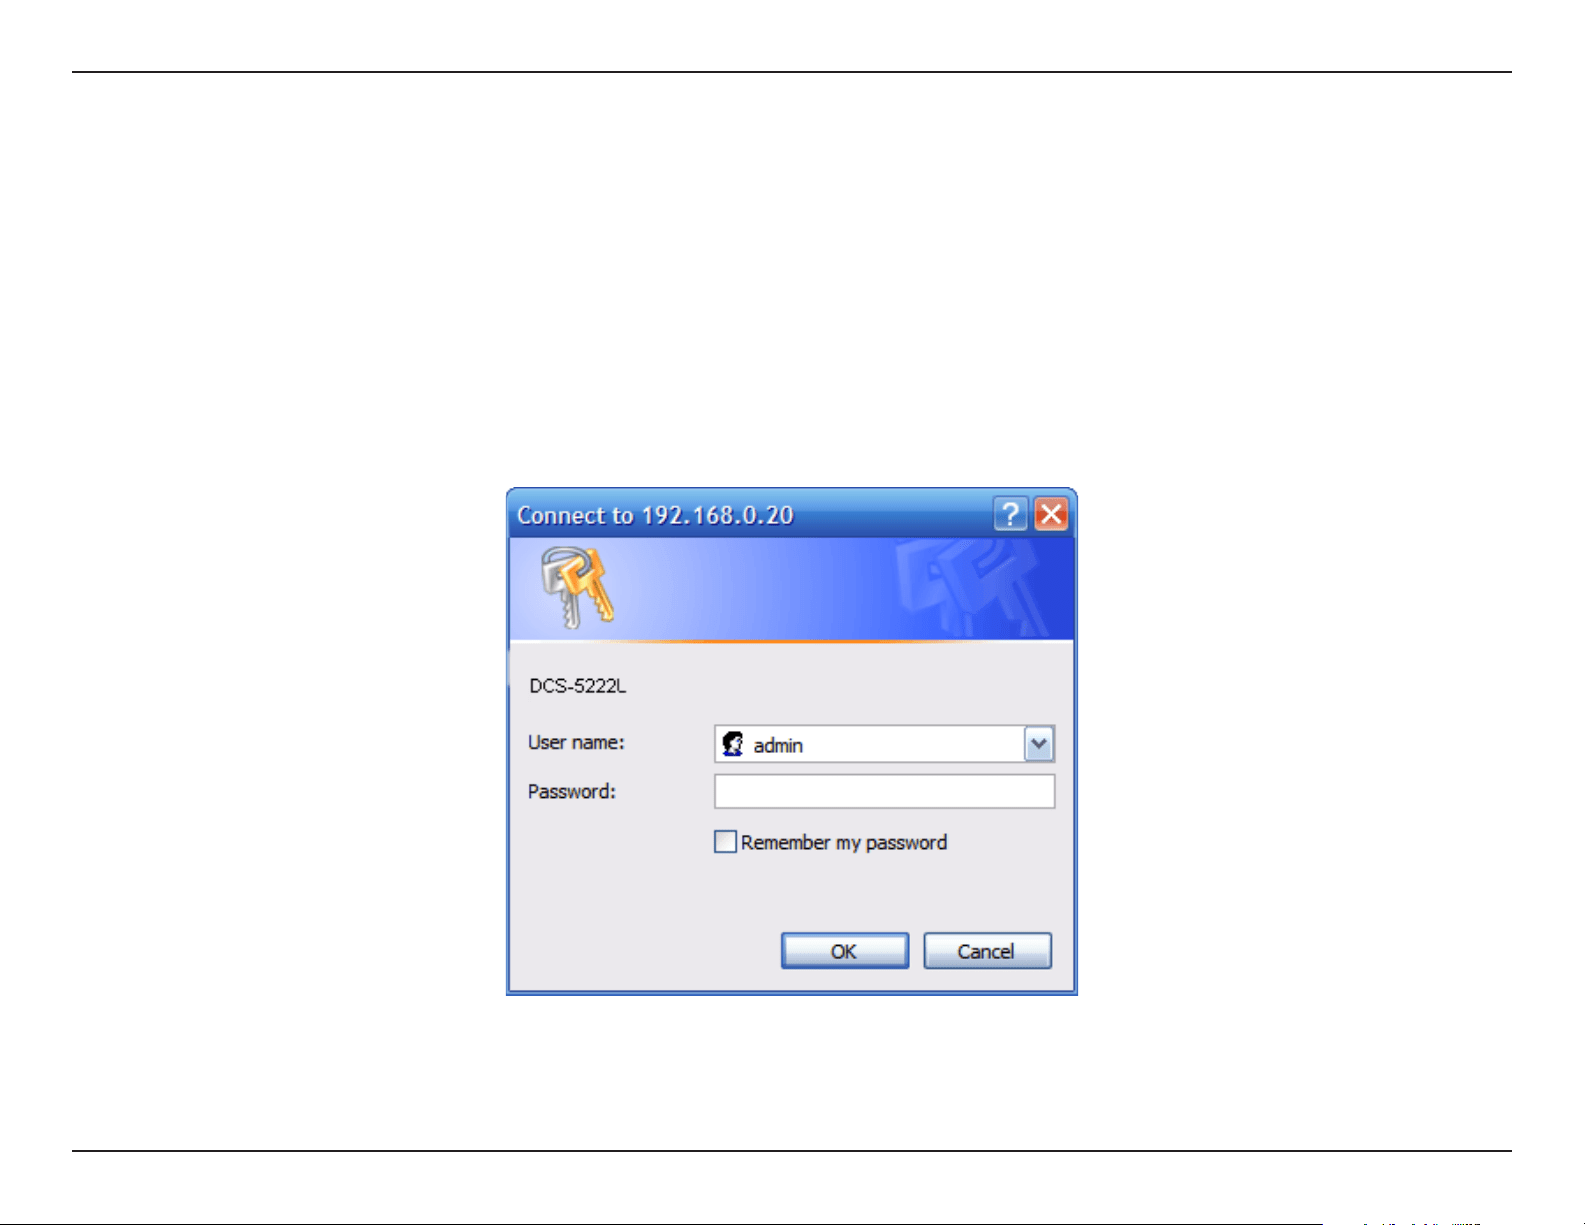
AftercompletingtheCameraInstallationWizard,youarereadytouseyourcamera.Thecamera’sbuilt-inWebconguration
utility is designed to allow you to easily access and congure your DCS-5222L. At the end of the wizard, click Go To Camera, or
enter the IP address of your camera into a web browser. To log in, enter your user name (admin) and the password you created
in the Installation Wizard. If you did not create a password, the default password is blank. After entering your password, click OK.
Conguration Utility
16D-Link DCS-5222L User Manual
Section 4 - Conguration
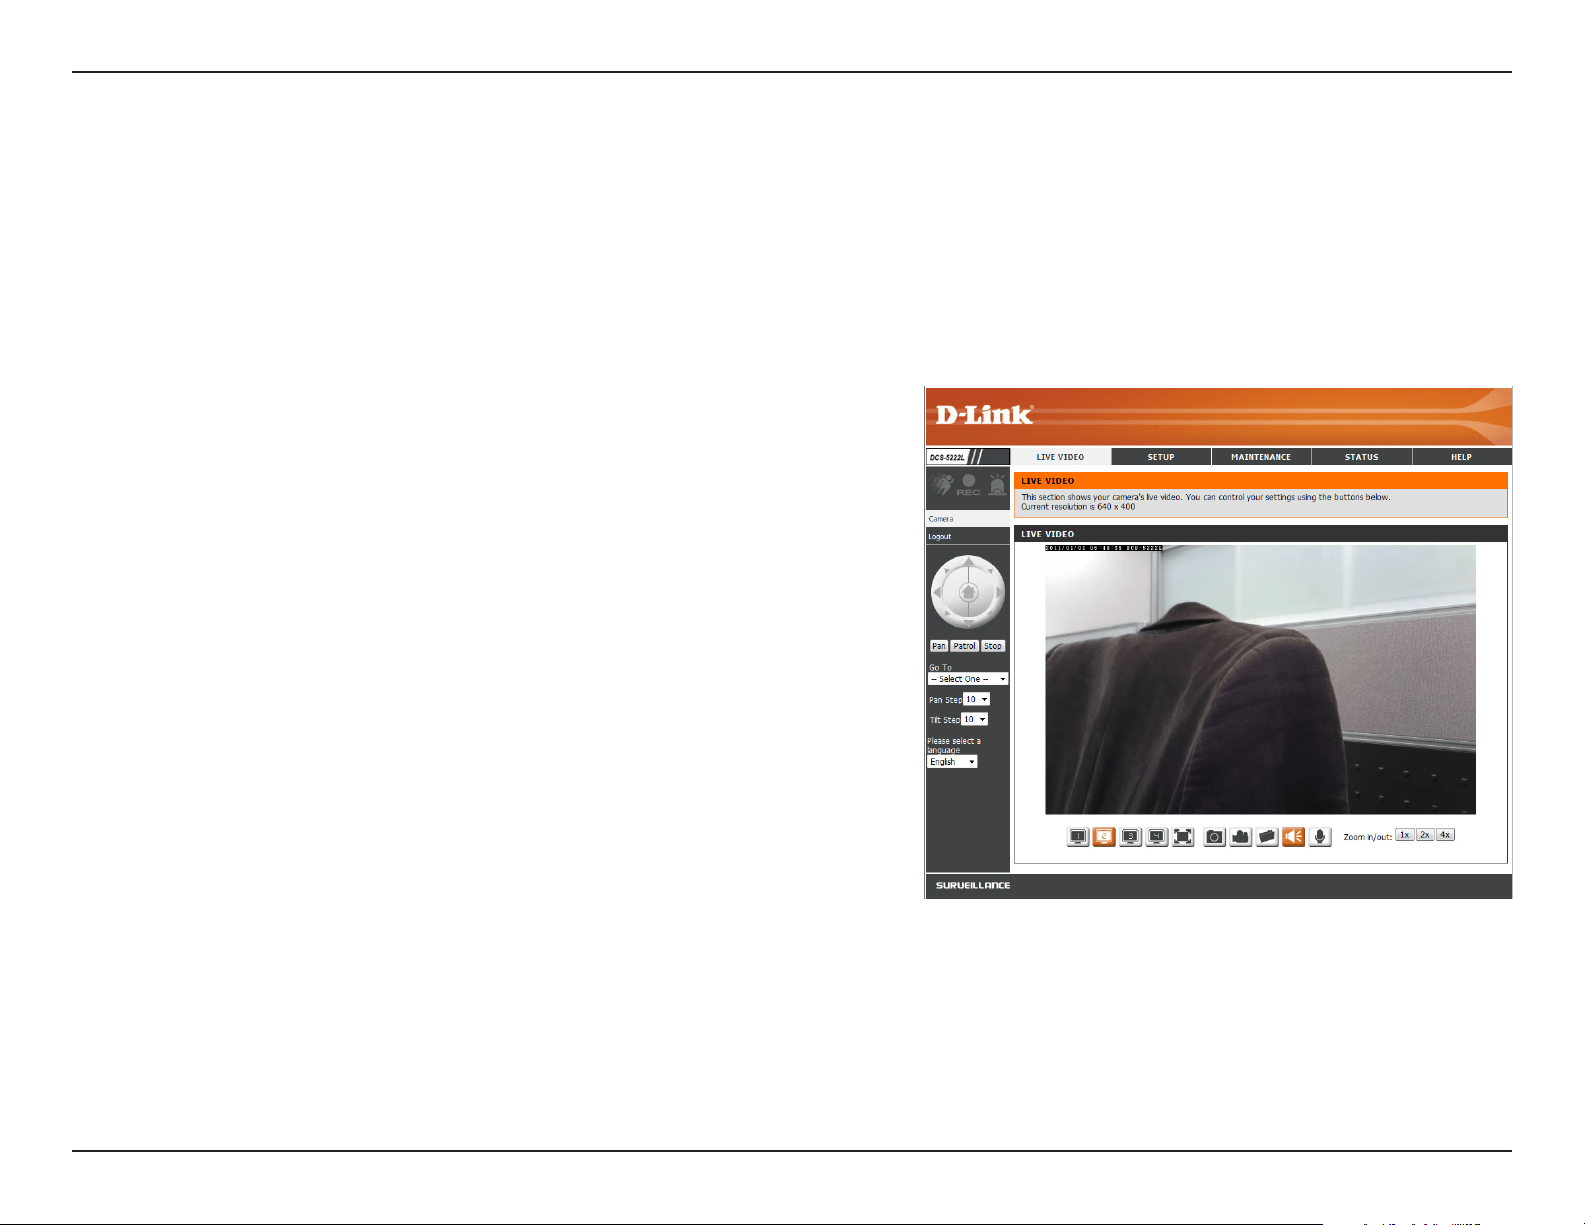
Live Video
PleasemakesurethatyouhavethelatestversionofJavaapplicationinstalledonyourcomputertoensureproperoperation
whenviewingthevideoinJavamode.TheJavaapplicationcanbedownloadedfreefromSun’swebsite(http://www.java.com).
Alivefeedfromthecameraisdisplayeduponloggingintothecamera’swebinterface.
Use the Pan / Tilt / ZoomActionPadtocontrolthecamera’smovement
and zoom. The large tree icon controls the zoom-in function. The small tree
icon on the right side controls the zoom-out function. The Home button
will move the camera to the “Home” preset position.
Selectfromthepresetdrop-downlisttoquicklymovethecameratothe
desired preset position. Please refer to Camera Control on page 36 to create
preset positions.
Thissettingcanchangethecamera’sPan/Tiltspeed.
Press this button and the camera will pan from left-most position to the
right-most position and then return to its original position.
This will stop pan and patrol.
Clickthisbuttontoquicklymovethecameratothedesiredpatrolsetup
according to preset positions. Please refer to Camera Control on page 36
to create preset positions.
The next page contains several icons which can be used to control the
camera’smainfunctions.
P/T/Z Action Pad:
Go To:
Pan/Tilt Speed:
Pan:
Stop:
Patrol:
17D-Link DCS-5222L User Manual
Section 4 - Conguration
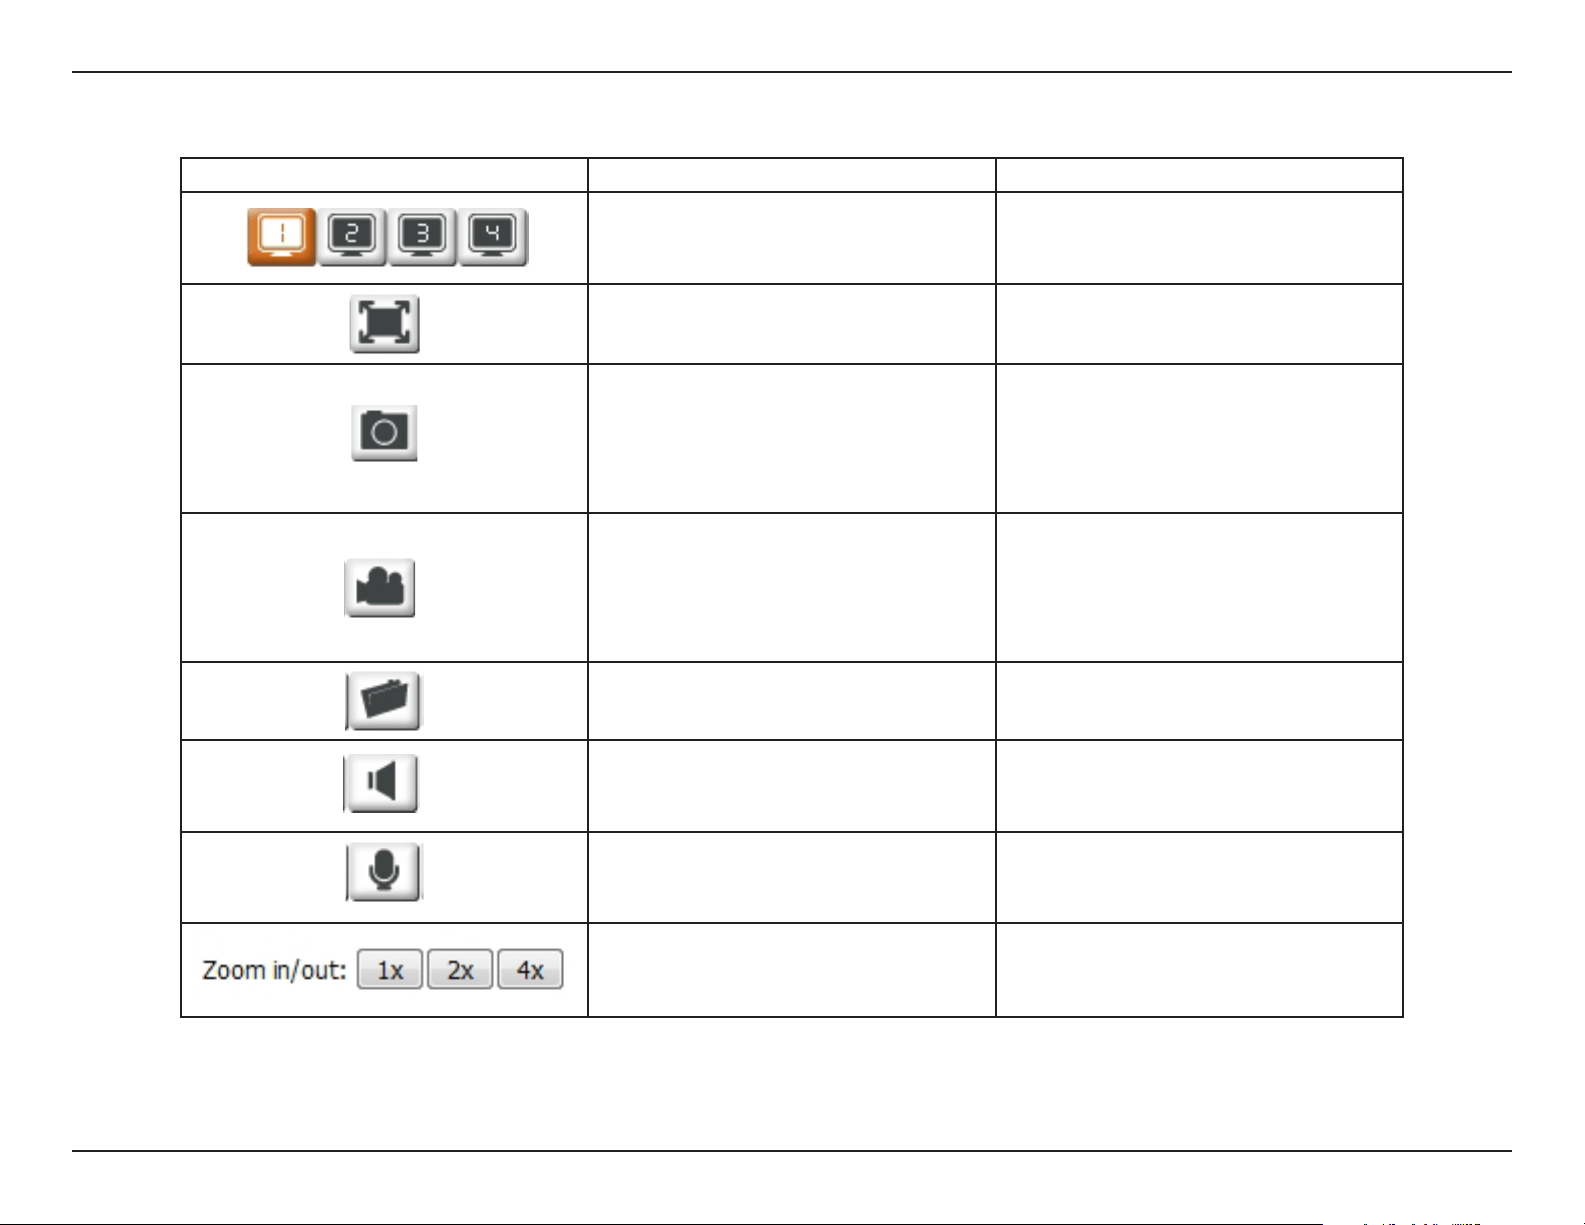
Icon Button Name Function
Prole Buttons
Use these buttons to switch between
video proles. Refer to page 38 for more
information on setting up proles.
Full Screen Button Displays the video at full screen.
Snapshot Button
Takes a snapshot of the image currently
displayed on the screen and will save
it to a le on the hard drive in a folder
specified using the Storage Folder
button.
Video Recording Button
Triggersthecamera’srecordingfunction.
This will record the video displayed on
the screen and will save it to a le on the
hard drive in a folder specied using the
Storage Folder button.
Storage Folder Button
Sets the location to save snapshots and
video recordings.
Listen Button
Sends the audio received from the
camera’s microphone to the PC’s
speakers. Click again to turn o.
Talk Button
Sends audio from a microphone
connected to your PC to the speakers
connected to the camera.
Zoom Buttons Zooms in or out.
18D-Link DCS-5222L User Manual
Section 4 - Conguration
Setup
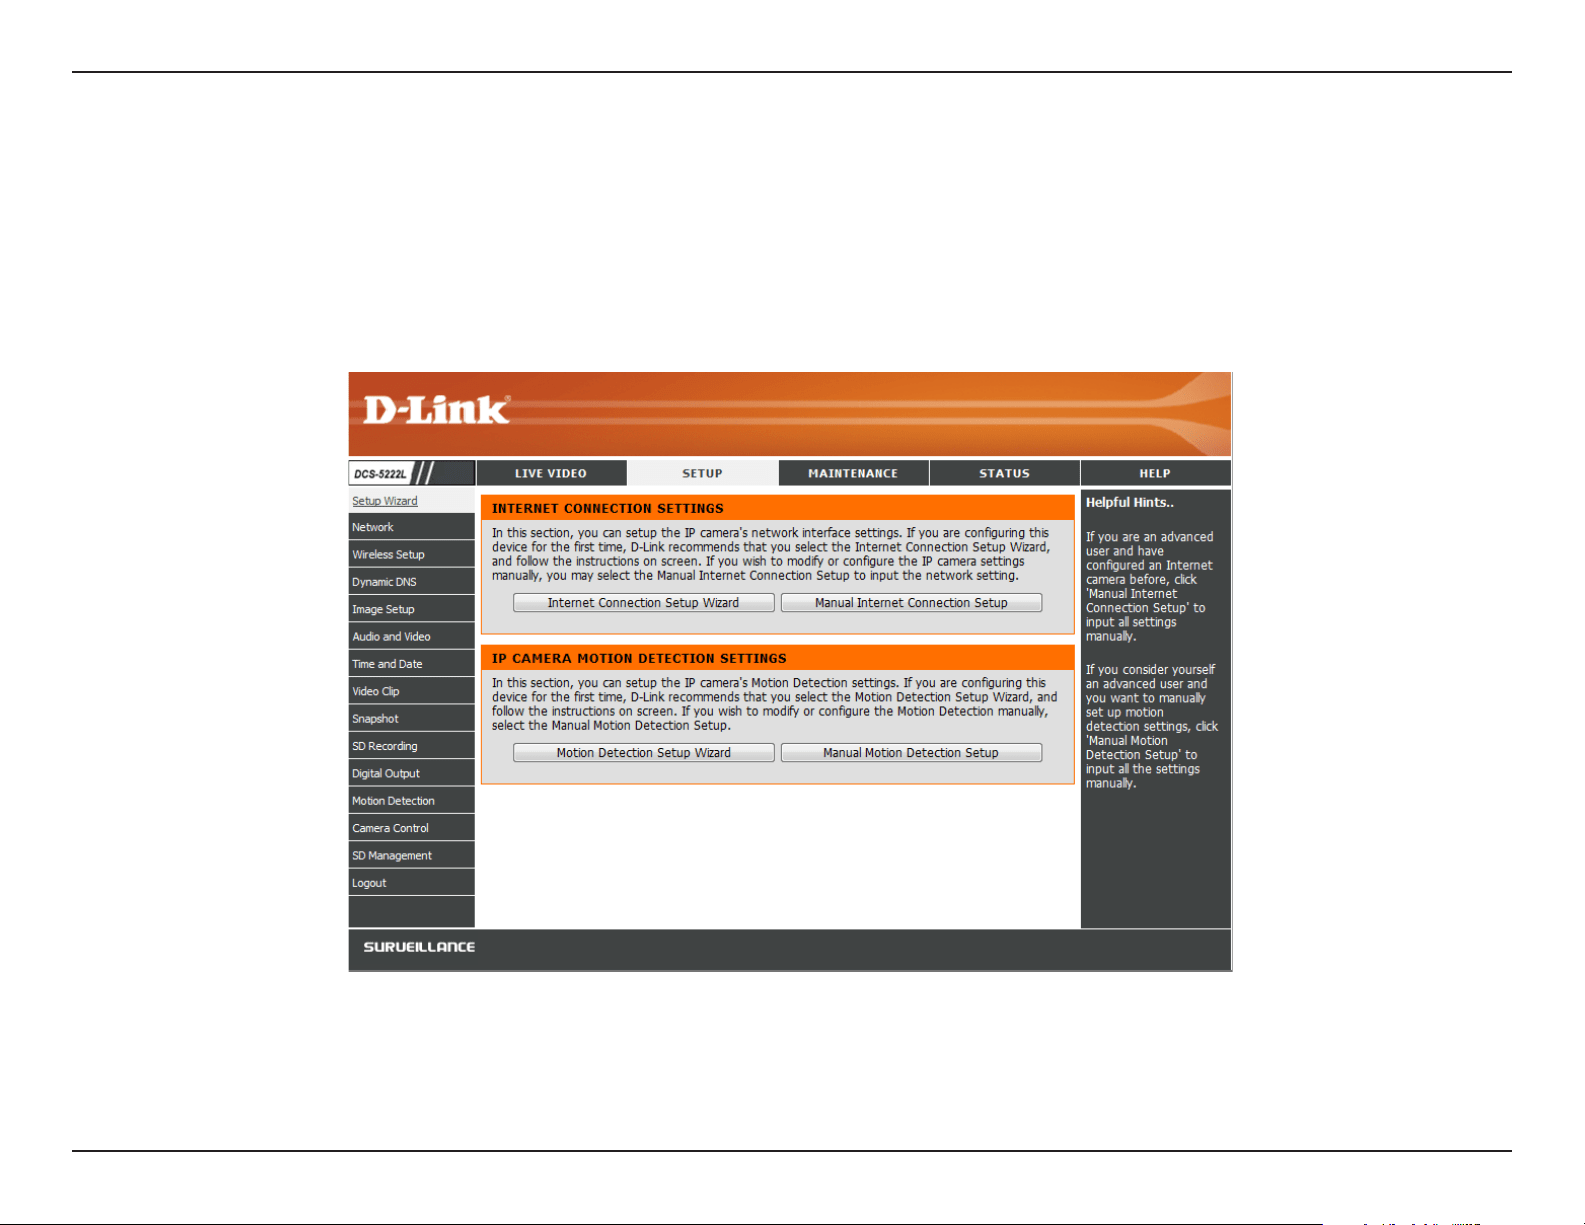
Setup Wizard
You maychoose tocongureyournetworkbyusingthe Internet Connection Setup Wizard that includes step-by-step
instructions to connect your camera to the Internet. Alternatively, you can manually congure your connection by clicking
Manual Internet Connection Setup.
19D-Link DCS-5222L User Manual
Section 4 - Conguration
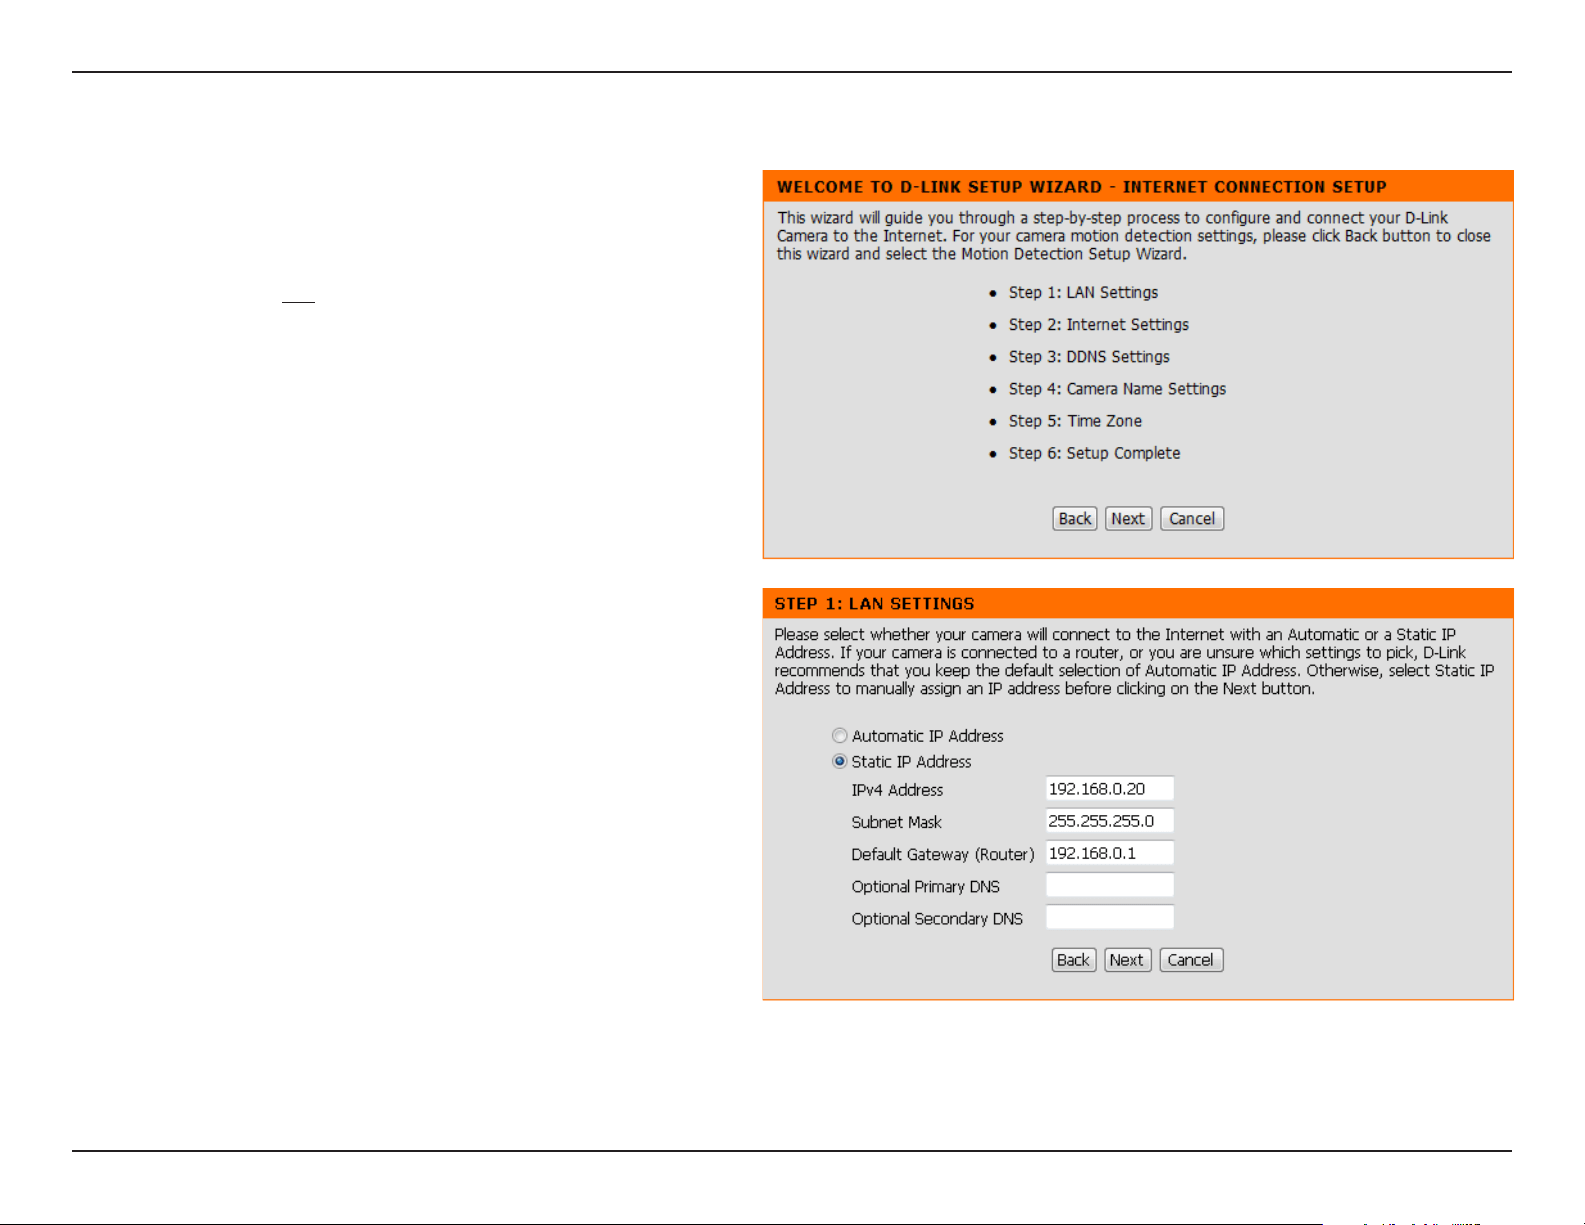
Internet Connection Setup Wizard
This wizard will guide you through a step-by-step process to
congure your new D-Link Camera and connect the camera to the
Internet.
Note: This wizard will not register your camera with mydlink.com.
Click Next to continue.
Select Automatic IP Address if you want your DHCP server (usually
enabled on your router) to assign the camera its IP settings. If you
want to manually assign the IP settings, select Static IP Address
and enter the following details:
Enter an IP address for your camera.
Enter the subnet mask of your network.
Enter the default gateway address. This is usually the
IP address of your router.
Enter the primary DNS server’s IP address. This is
usually the IP address of your router.
EnterthesecondaryDNSserver’sIPaddress.Thisis
optional.
Click Next to continue.
IP Address:
Subnet Mask:
Default Gateway:
Primary DNS:
Secondary DNS:
20D-Link DCS-5222L User Manual
Section 4 - Conguration
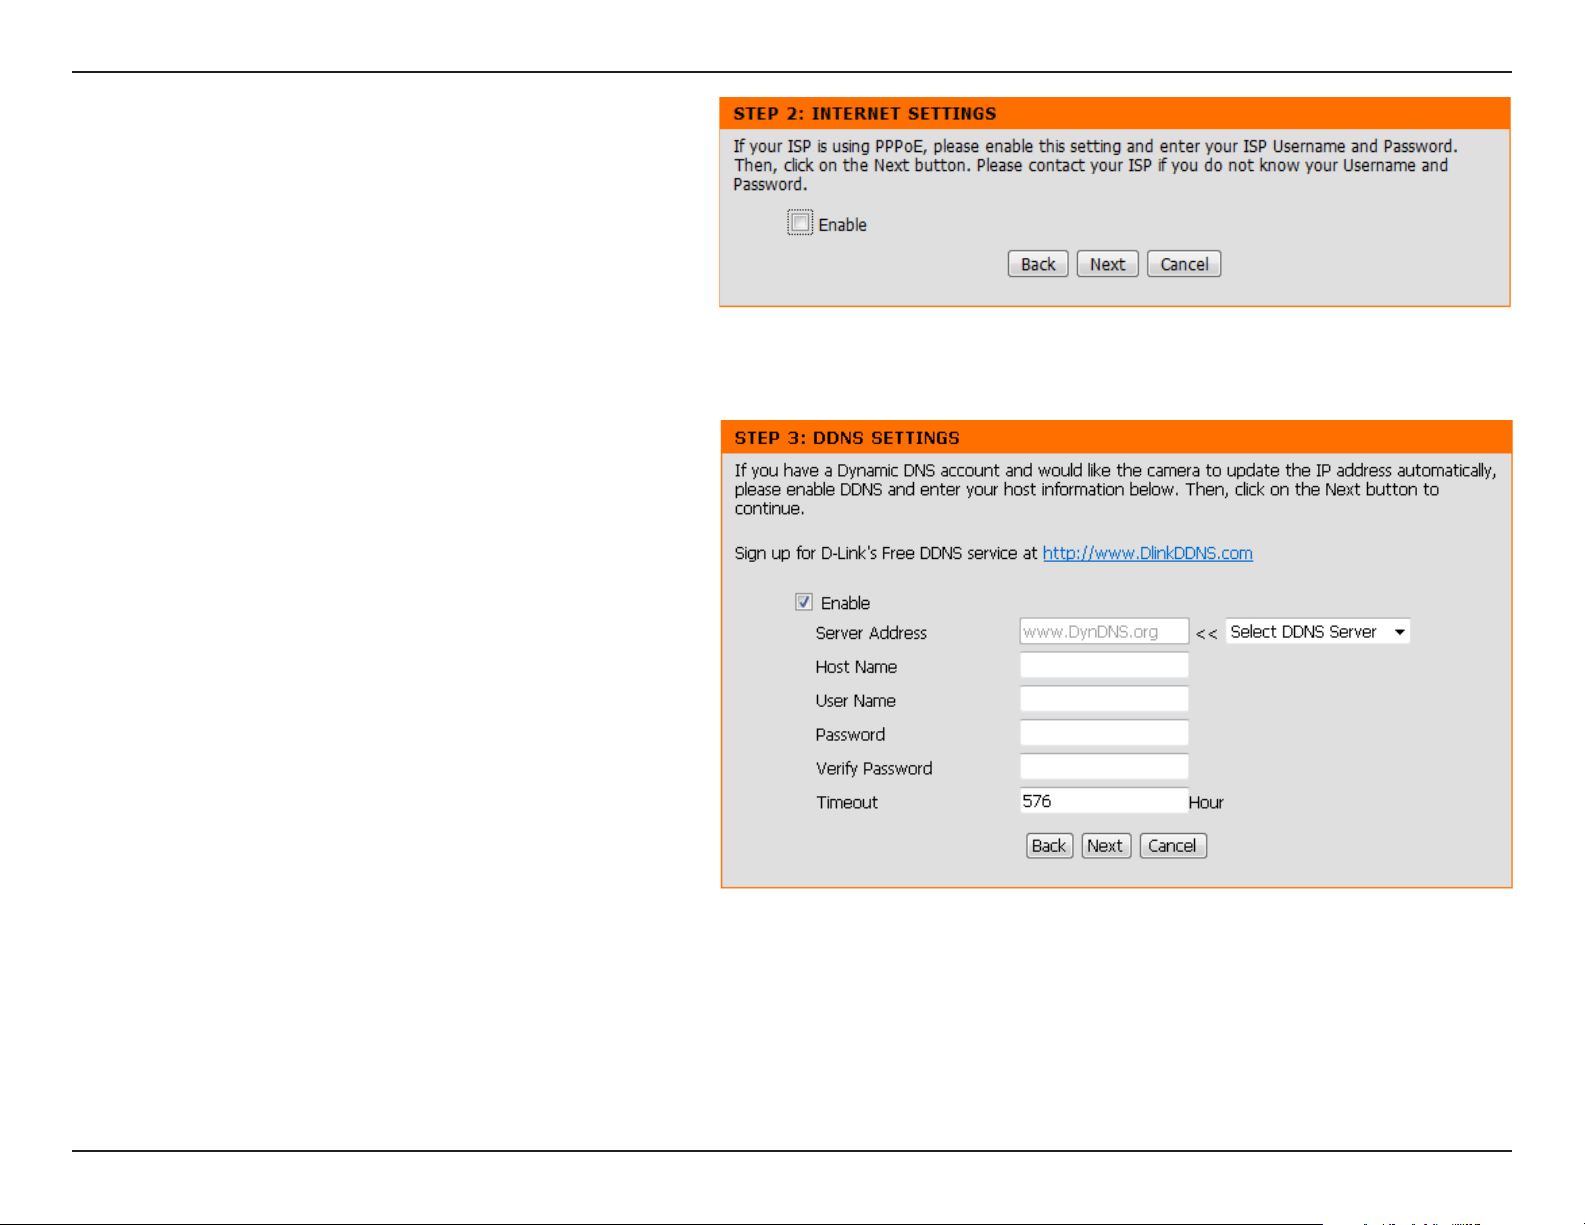
ADynamicDNSaccountallowsyoutoaccessyourcameraover
the Internet when you have an IP address that changes each
timeyouconnecttotheInternet.IfyouhaveaDynamicDNS
account, click Enable and enter the following details:
IfyouarerequiredtoconnectusingPPPoE,selectEnabled and
enter the Username and Password for your PPPoE connection.
Onlyselectthisoptionifyourcameraisdirectlyconnectedto
your broadband modem. If it is on a network with a router or
gateway, do not select.
Click Next to continue.
ClicktoenabletheDDNSfunction.
(Dynamic Domain Name Server) will hold a
DNS host name and synchronize the public
IP address of the modem when it has been
modied. The username and password are
requiredwhenusingtheDDNSservice.
SelectyourDynamicDNSServerfromthedrop
down menu.
EnterthehostnameoftheDDNSserver.
EnteryourusernameoremailaddressusedtoconnecttotheDDNS.
EnteryourpasswordusedtoconnecttotheDDNSserver.
YoucansetuphowoftenthecameranotiestheDDNSserverofitscurrentglobalIPaddressbyenteringawholenumberinhours.
Enable:
DDNS:
Server Address:
Host Name:
User Name:
Password:
Timeout:
21D-Link DCS-5222L User Manual
Section 4 - Conguration
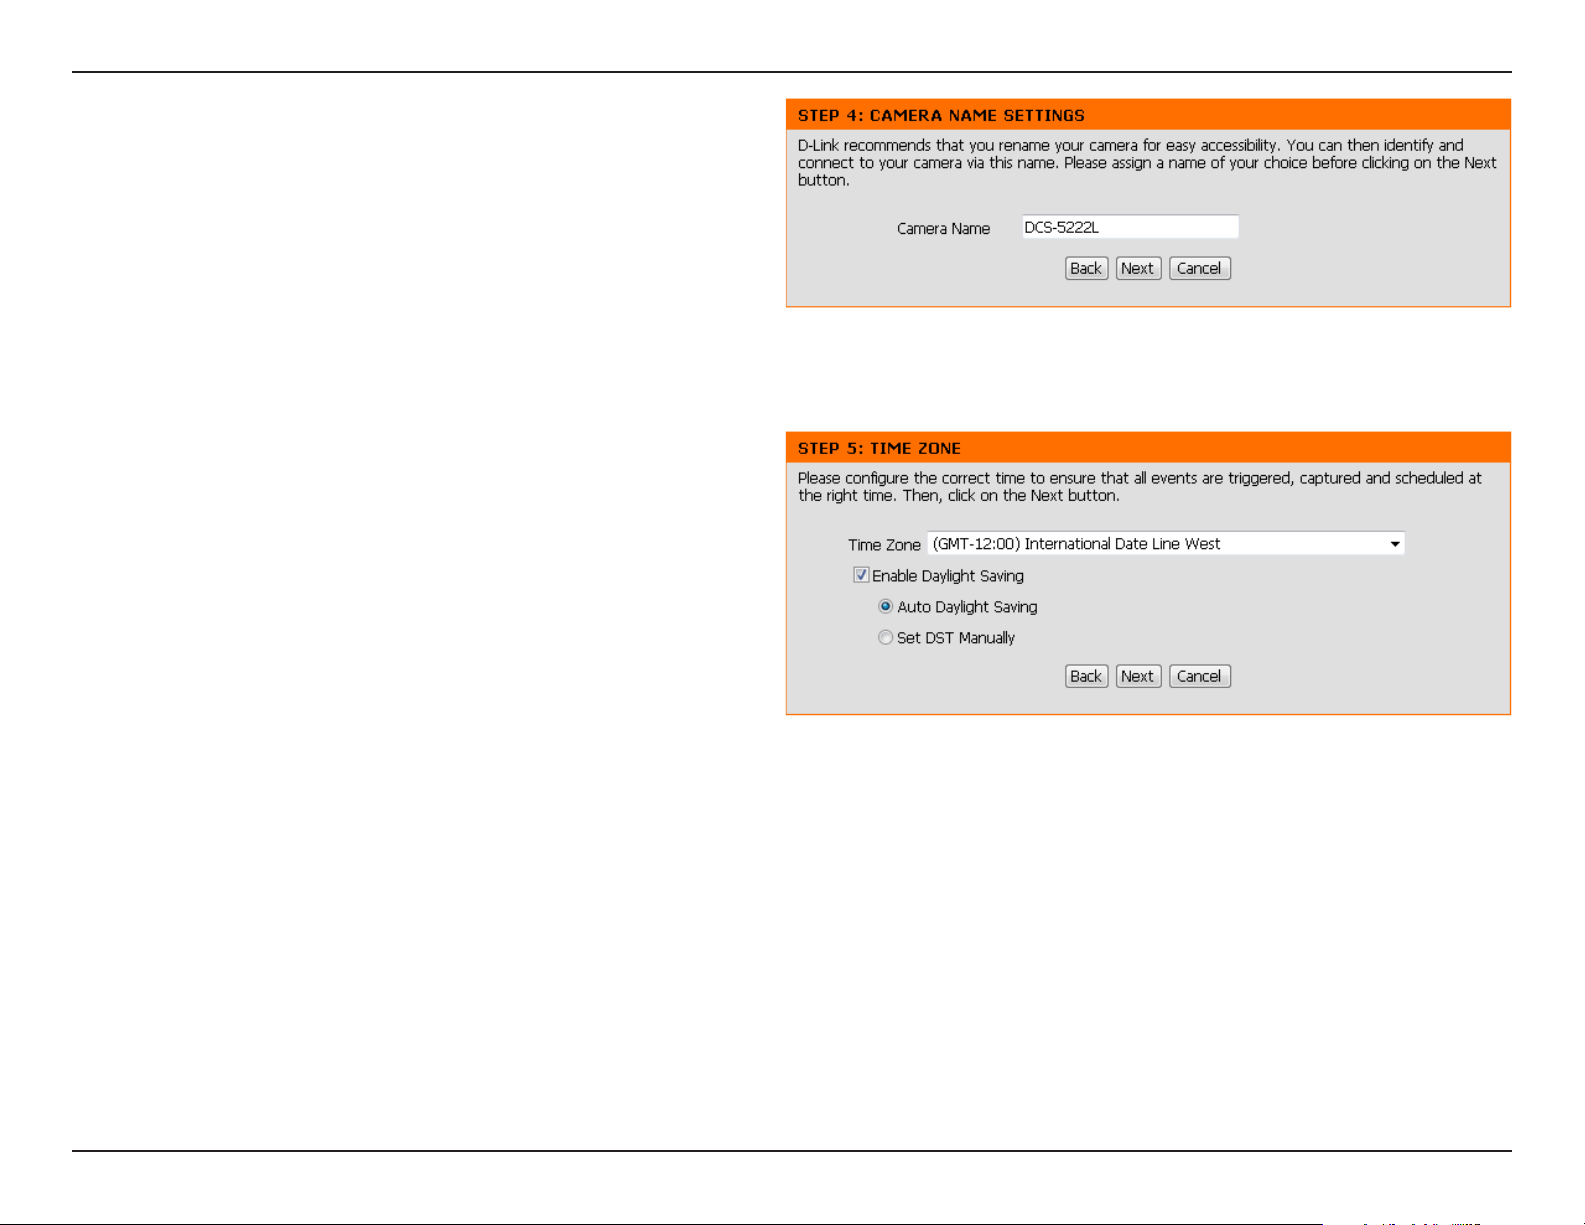
Createauniquenameforyourcamera.ClickNext to continue.
Select the time zone that the camera is in so that scheduled events
occur at the correct time. If your time zone observes daylight saving,
check the Enable Daylight Saving box and select Auto Daylight
Saving to have DST set automatically or select Set date and time
manually to enable drop-down menus so that you can set the start
and end time of daylight saving yourself.
Click Next to continue.
22D-Link DCS-5222L User Manual
Section 4 - Conguration
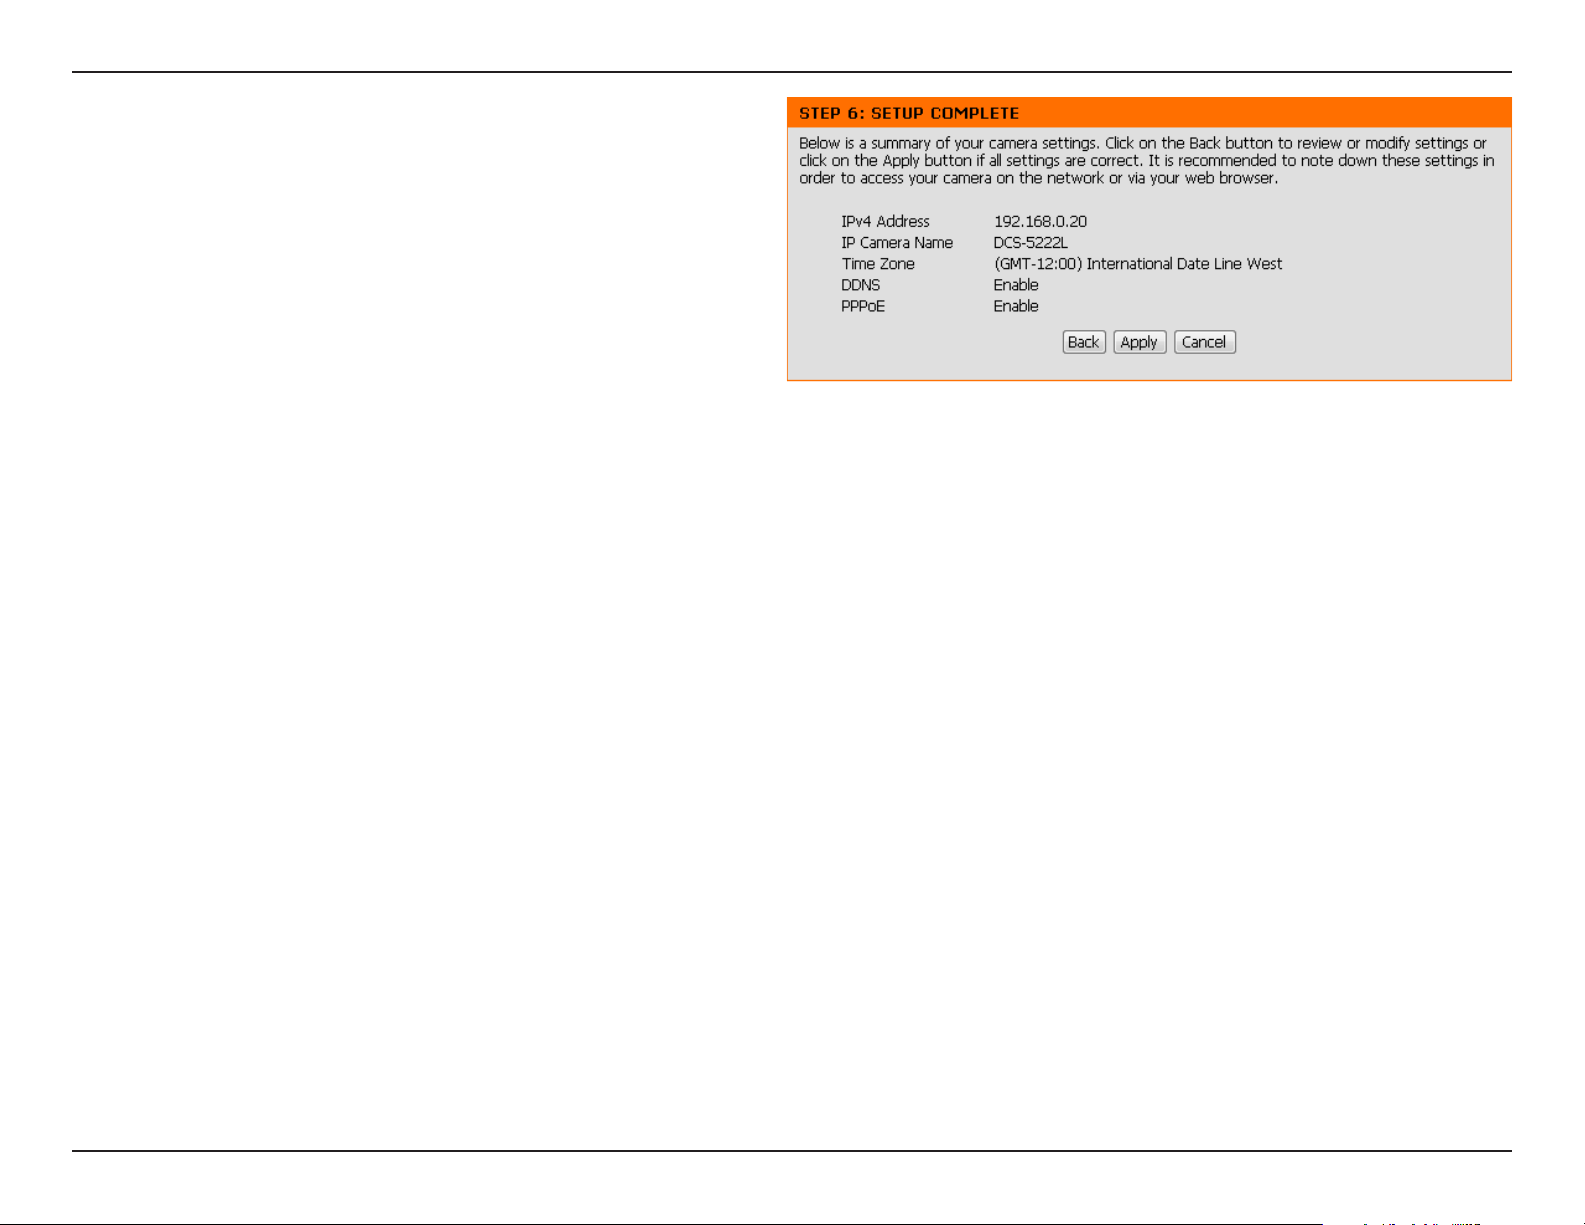
A summary of the options you selected is displayed for conrmation. If
you are happy with the selected conguration, click Apply otherwise
click Backtomaketherequiredchanges.
23D-Link DCS-5222L User Manual
Section 4 - Conguration
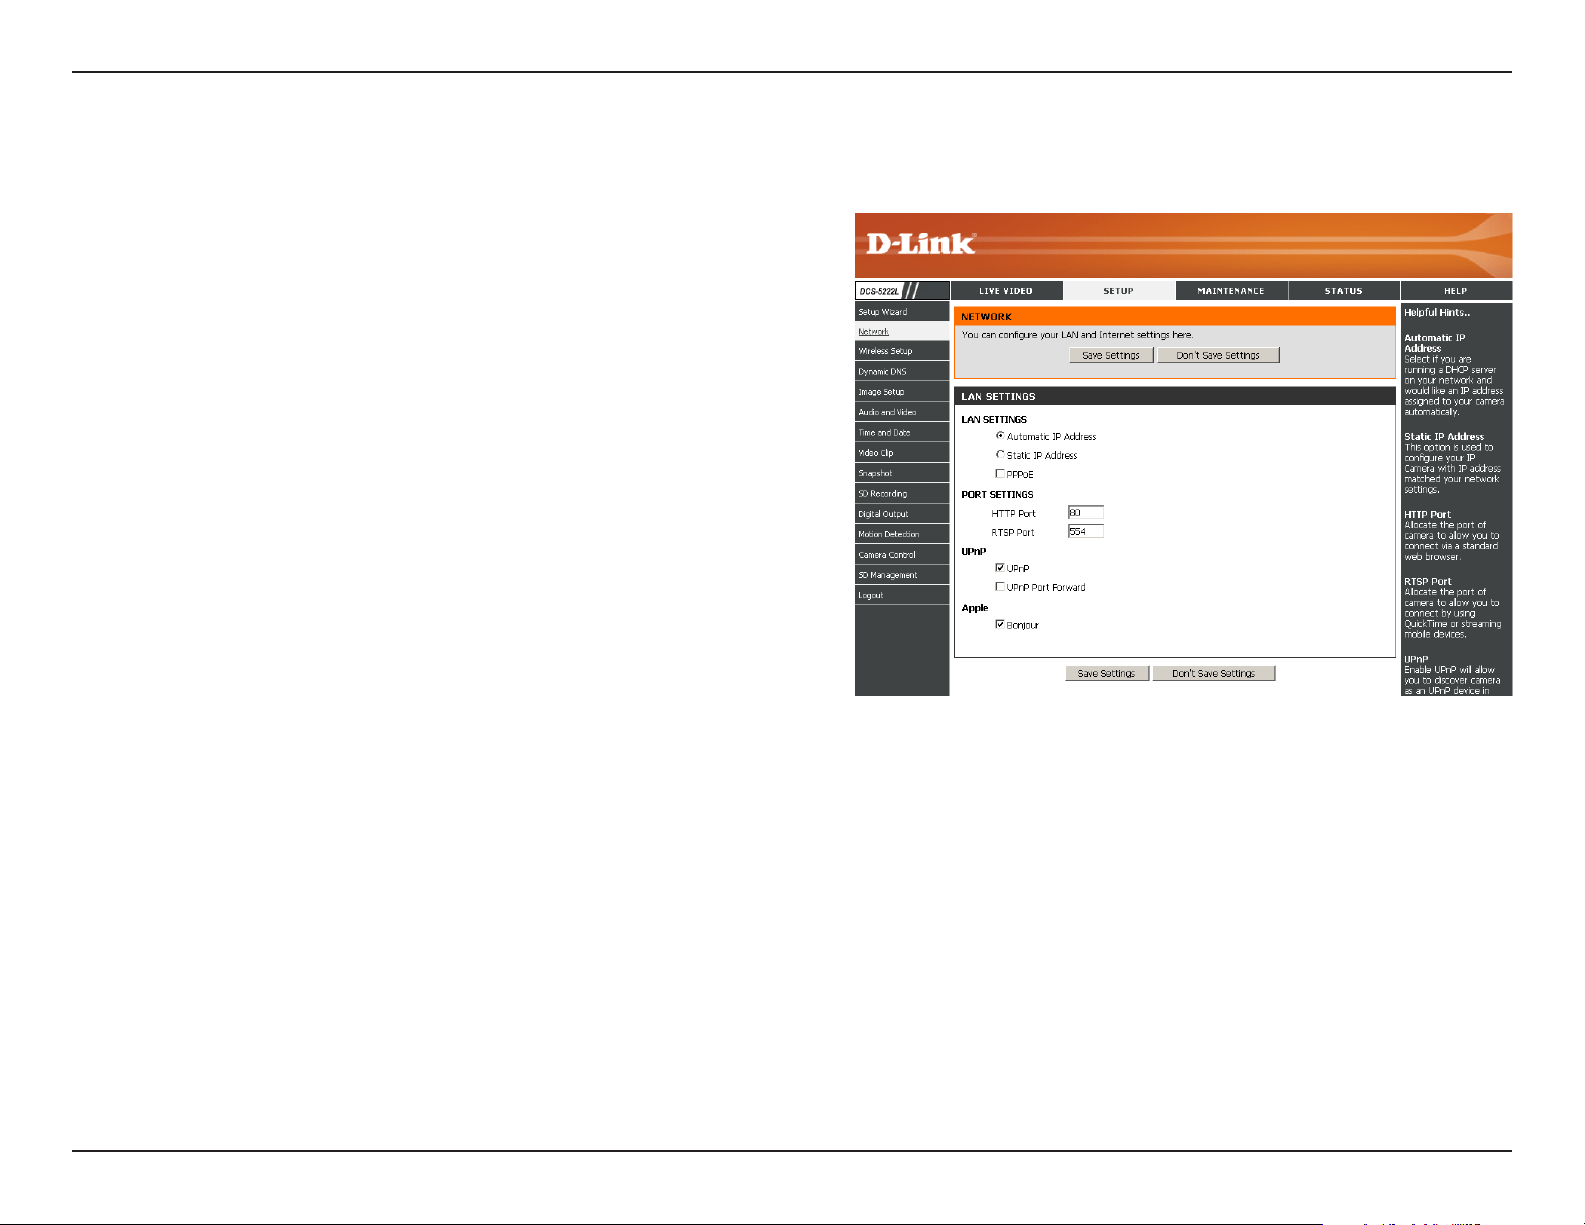
ThissectionallowsyoutocongureyourLANandInternetconguration.
Network
This option is used if you would like an IP address assigned
to your camera automatically by the DHCP server (router).
If the DHCP server does not exist you will need to manually
congure this setting.
Thisoptionisusedtomanuallycongureyourcamera’s
IP settings.
This option allocates the HTTP port of the camera.
This option allocates the RTSP port of the camera. The
RSTP port allows connections using QuickTime or other
supported media players.
UPnP™ (Universal Plug & Play) can be used to allow
discovery of a camera as a UPnP device in your network.
Enable this feature if your router supports UPnP. This
will allow the router to discover which ports are used
automatically without the need to manually open ports.
Enabling BonjourwillallowdiscoveryofcamerasbyMac
computers.
Automatic IP
Address Select:
Static IP Address:
HTTP Port:
RTSP Port:
UPnP Enable:
UPnP Port Forward:
Bonjour:

24D-Link DCS-5222L User Manual
Section 4 - Conguration
Note: You MUST also set up your router/gateway for Port Forwarding/Mapping; this will enable remote viewing of your camera via the Internet. Please refer
to your router’s instruction manual on how to open up ports (port forward). For additional help on conguring your camera to work with your router, please
refer to Appendix A: Installing the DCS-5222L on a Router Without UPnP. For installing multiple cameras, ONE port per camera must be opened on
your router, the Web server (HTTP) port. Also, some browsers may restrict some ports, such as 1 or 22, for security purposes. If you have problems accessing
your camera through HTTP, try using a port higher than 1024.
After making any changes, click the Save Settings button to save your changes, or click the Don’t Save Settings button to discard your changes.
25D-Link DCS-5222L User Manual
Section 4 - Conguration
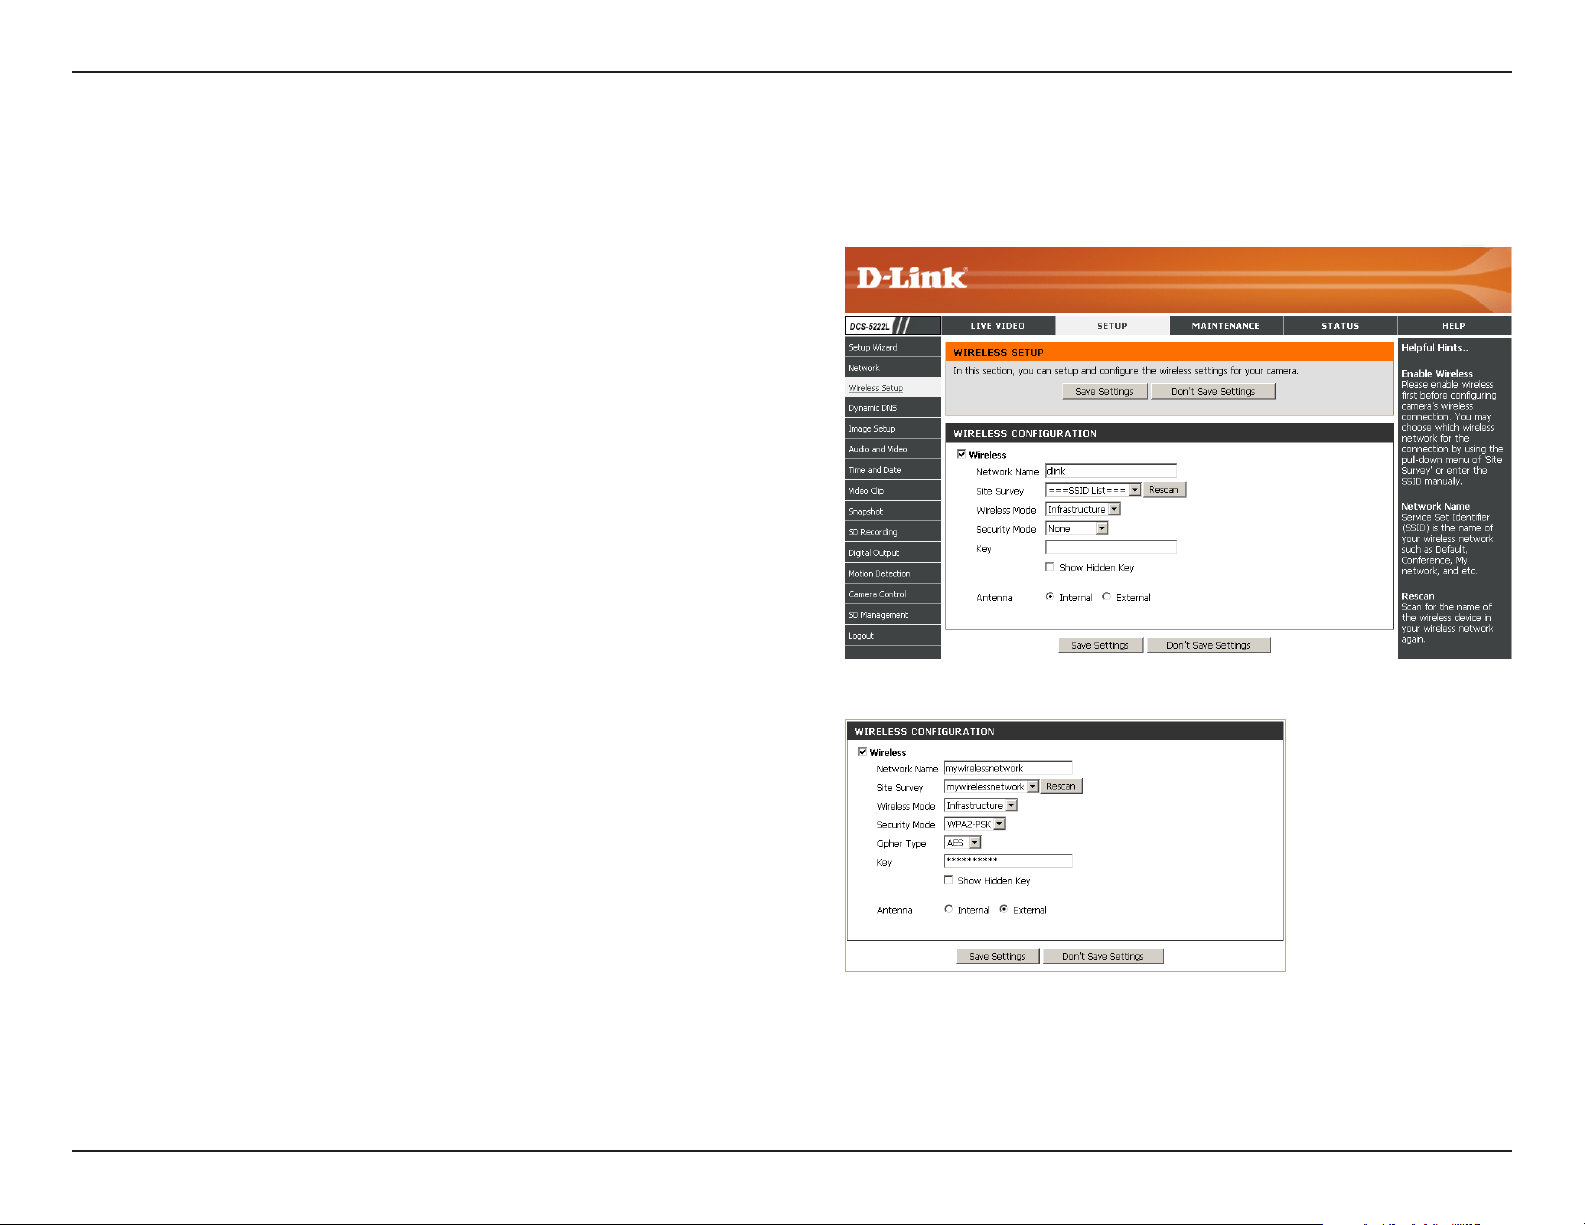
Wireless
Tocongureyourcamera’swirelesssettings,youmustenableWireless rst.YoumayunchecktheWirelessboxtodisablethewirelessfunctionsand
use only the Ethernet connection.
Click the Rescan button to scan for available wireless
networks. After scanning, select a wireless network from
the drop-down box that you want to connect to.
The name of the wireless network.
Use the drop-down box to select the mode of the wireless
network you wish to connect to. Infrastructure is normally
used to connect to an access point or router. Ad-Hoc is
usually used to connect directly to another computer.
If you are using Ad Hoc mode, select the channel of the
wireless network you wish to connect to, or select Auto.
Select the type of authentication you are using on your
wireless network (Open, Shared (WEP), WPA-PSK, or
WPA-PSK2).
If you are using WPA-PSK or WPA-PSK2 authentication,
you will need to specify whether your wireless network
uses TKIP or AES encryption. If you use Open or Shared
authentication, this setting will be automatically set for
you.
Enter the key or passphrase to access a secure network.
Check this box to display the key.
Select to use the internal or external wireless antenna.
Site Survey:
SSID:
Wireless Mode:
Channel:
Security Mode:
Cypher Type:
Key:
Show Hidden Key:
Antenna:
After making any changes, click the Save Settings button to save your changes, or click the Don’t Save Settings button to discard
your changes.
26D-Link DCS-5222L User Manual
Section 4 - Conguration
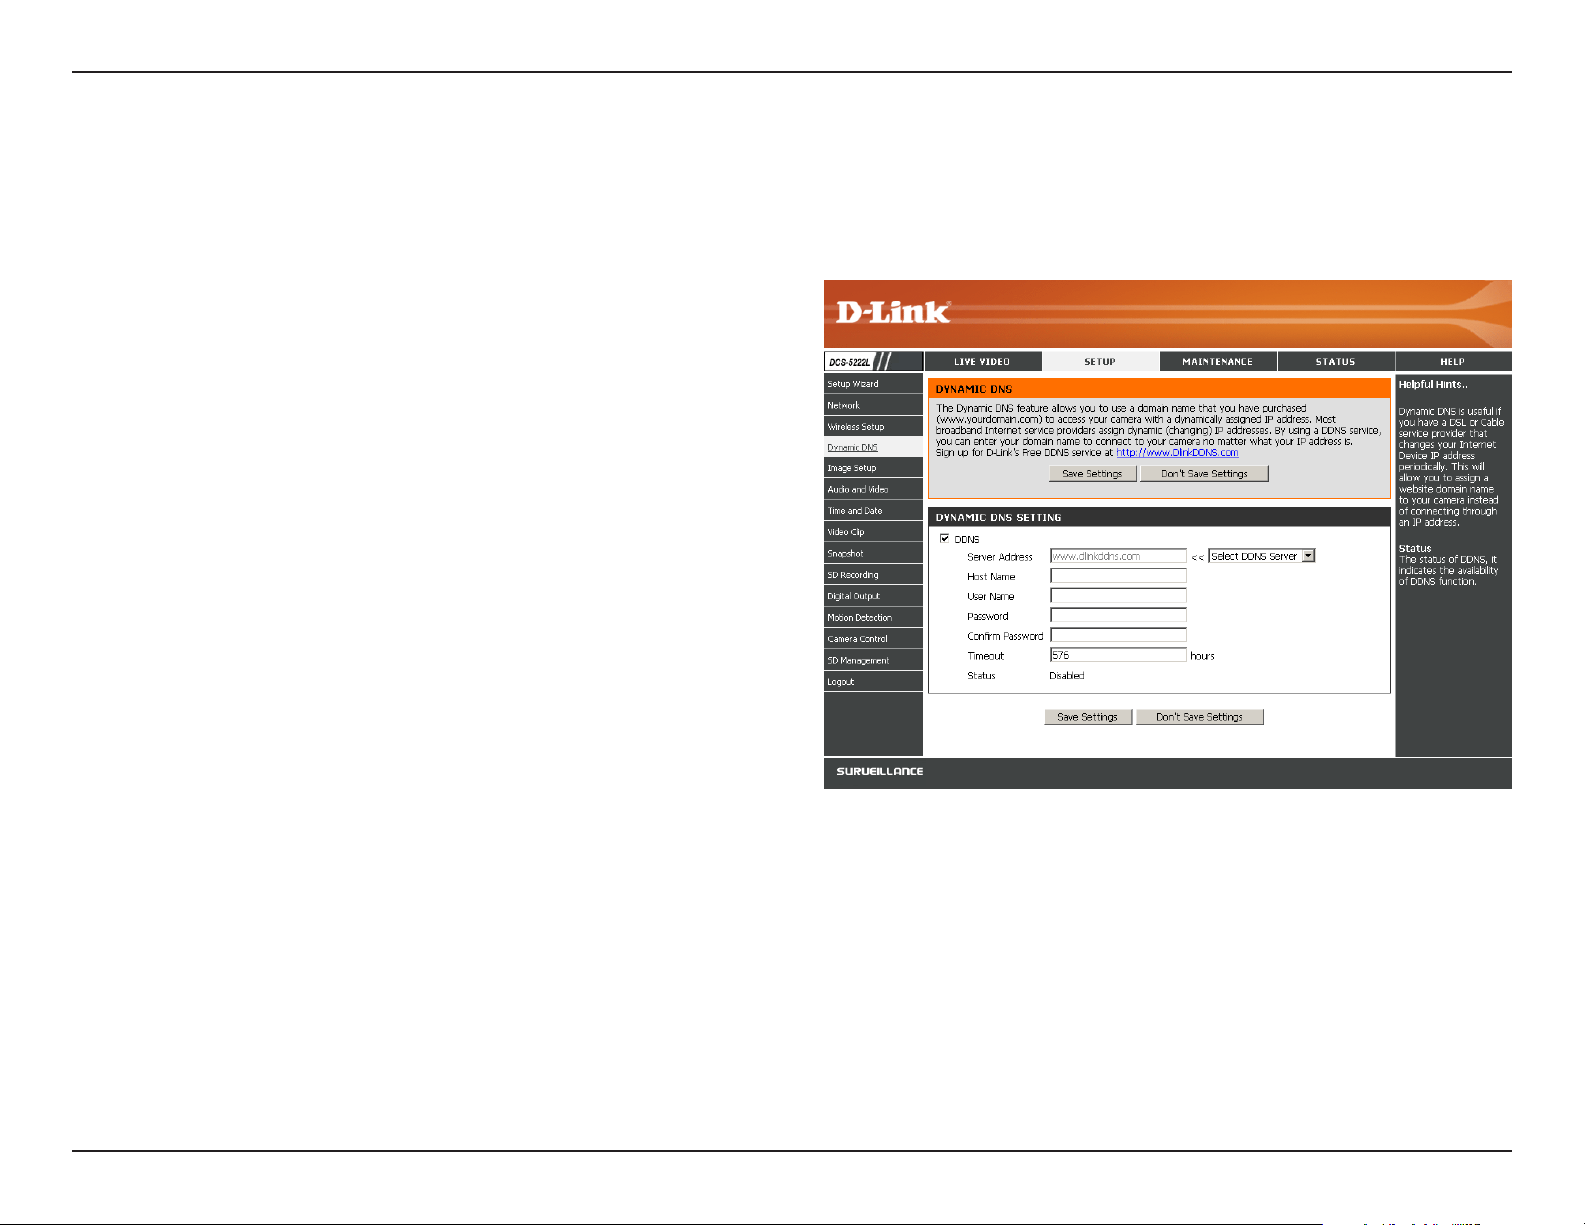
Dynamic DNS
ClicktoenabletheDDNSfunction.
SelectyourDynamicDNSServerfromthedrop-down
menu.
EnterthehostnameoftheDDNSserver.
Enter your username or e-mail address used to connect
totheDDNS.
Enter your password used to connect to the DDNS
server.
Enter your password again for verication.
YoucansetuphowoftenthecameranotiestheDDNS
server of its current global IP address by entering a
whole number in hours.
DisplaystheconnectionstatusofyourDDNSaccount.
DDNS:
Server Address:
Host Name:
User Name:
Password:
Conrm Password:
Timeout:
Status:
ThissectionallowsyoutoconguretheDDNSsettingforyourcamera.DDNSwillallowalluserstoaccessyourcamerausingadomainnameinstead
of an IP address.
27D-Link DCS-5222L User Manual
Section 4 - Conguration
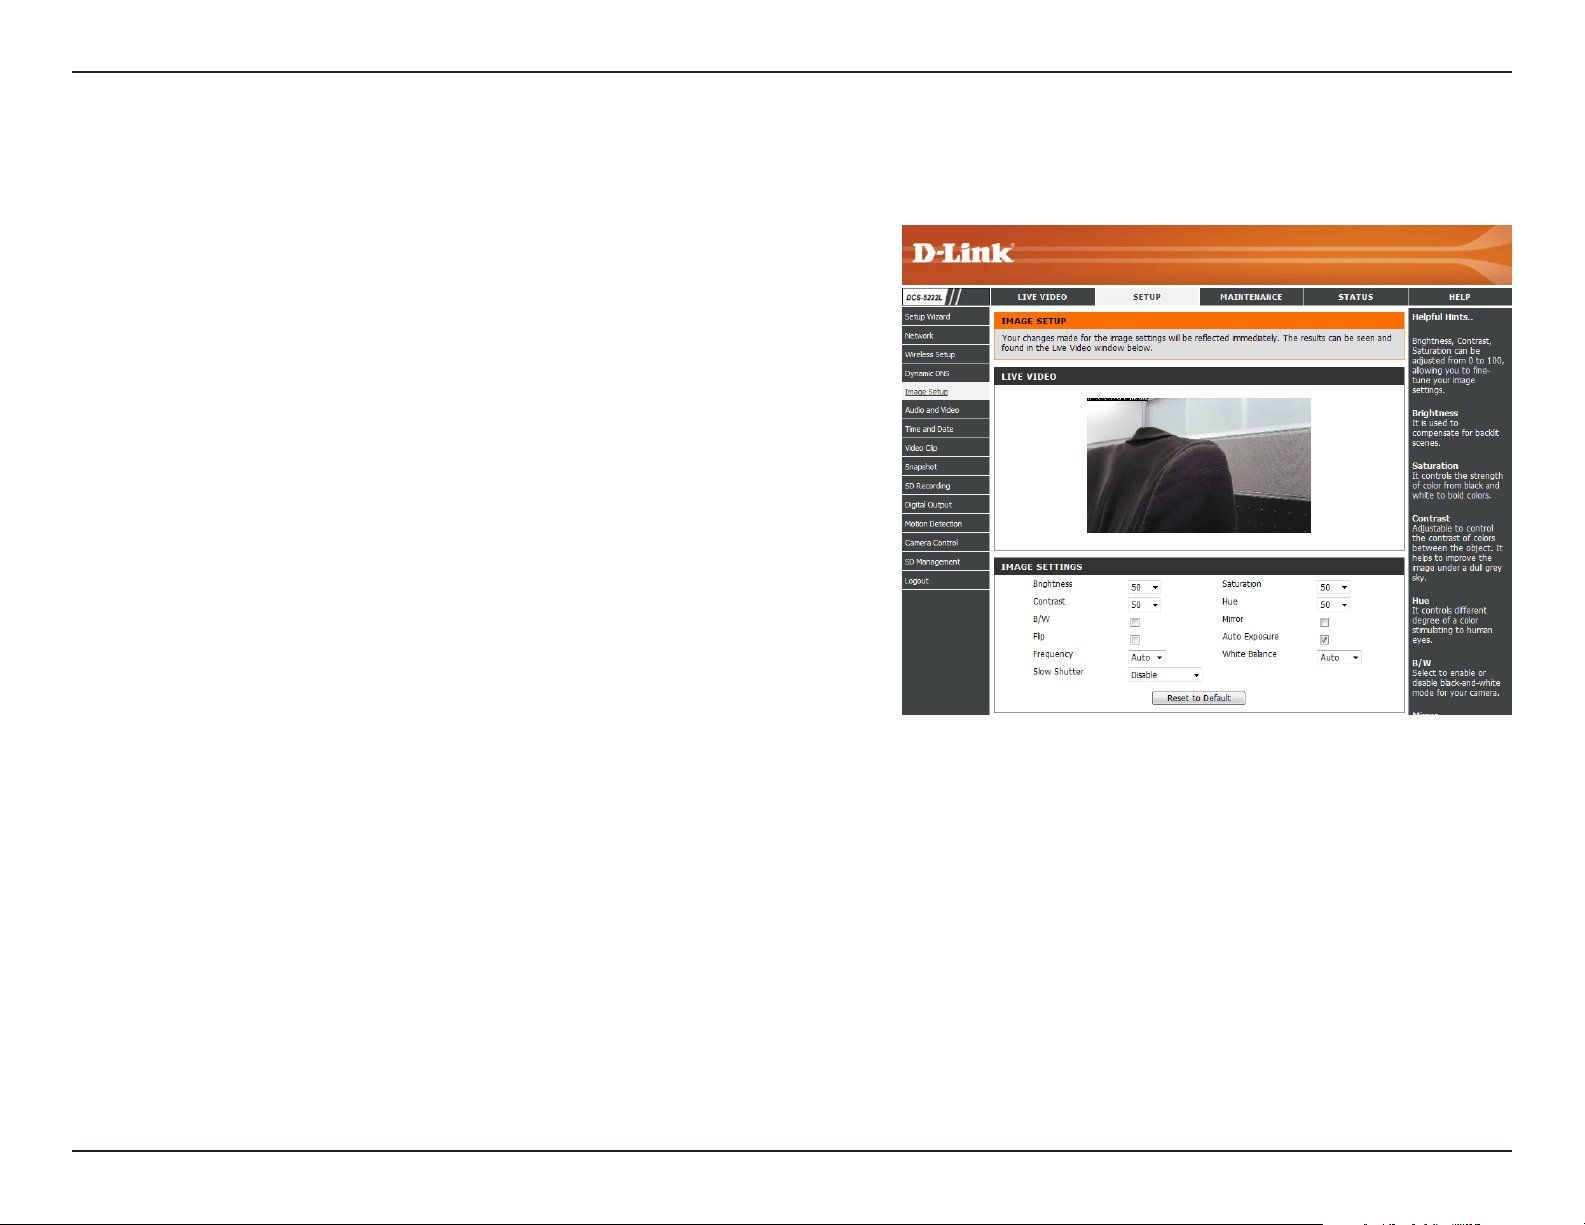
Thissectionallowsyoutoadjusttheimageandsensorsettingsforyourcamera.
Image Setup
Thisadjuststhebrightnessofthecameraimage.
Thisadjuststhecolorsaturation.Saturationcontrolsthestrengthof
color in the image.
Thisadjuststhecontrastofthecameraimage,makingadullimage
sharper or a bright image smoother.
This controls the dierent degree of color stimulation in the camera
image.
Thisoption adjusts the camerasensor’ssettingtoavoidtheimage
ickering under certain light sources, such as orescent lights. This is
set to Auto by default.
Youcanchangethewhitebalanceofthecameraimagebyselectinga
setting from the drop-down box. This is set to auto by default.
Click this checkbox to change the camera image into black and white.
This will ip the image vertically.
This will ip the image horizontally.
This can be used to allow manual control of the shutter speed. Select
slower shutter speeds when environment is dimly lit, faster speeds are
requiredwheninbrighterlighting.
Brightness:
Saturation:
Contrast:
Hue:
Frequency:
White Balance:
B/W:
Flip:
Mirror:
Slow Shutter:
Note: Mirror and Flip can be used if you have mounted the DCS-5222L on the ceiling.
28D-Link DCS-5222L User Manual
Section 4 - Conguration
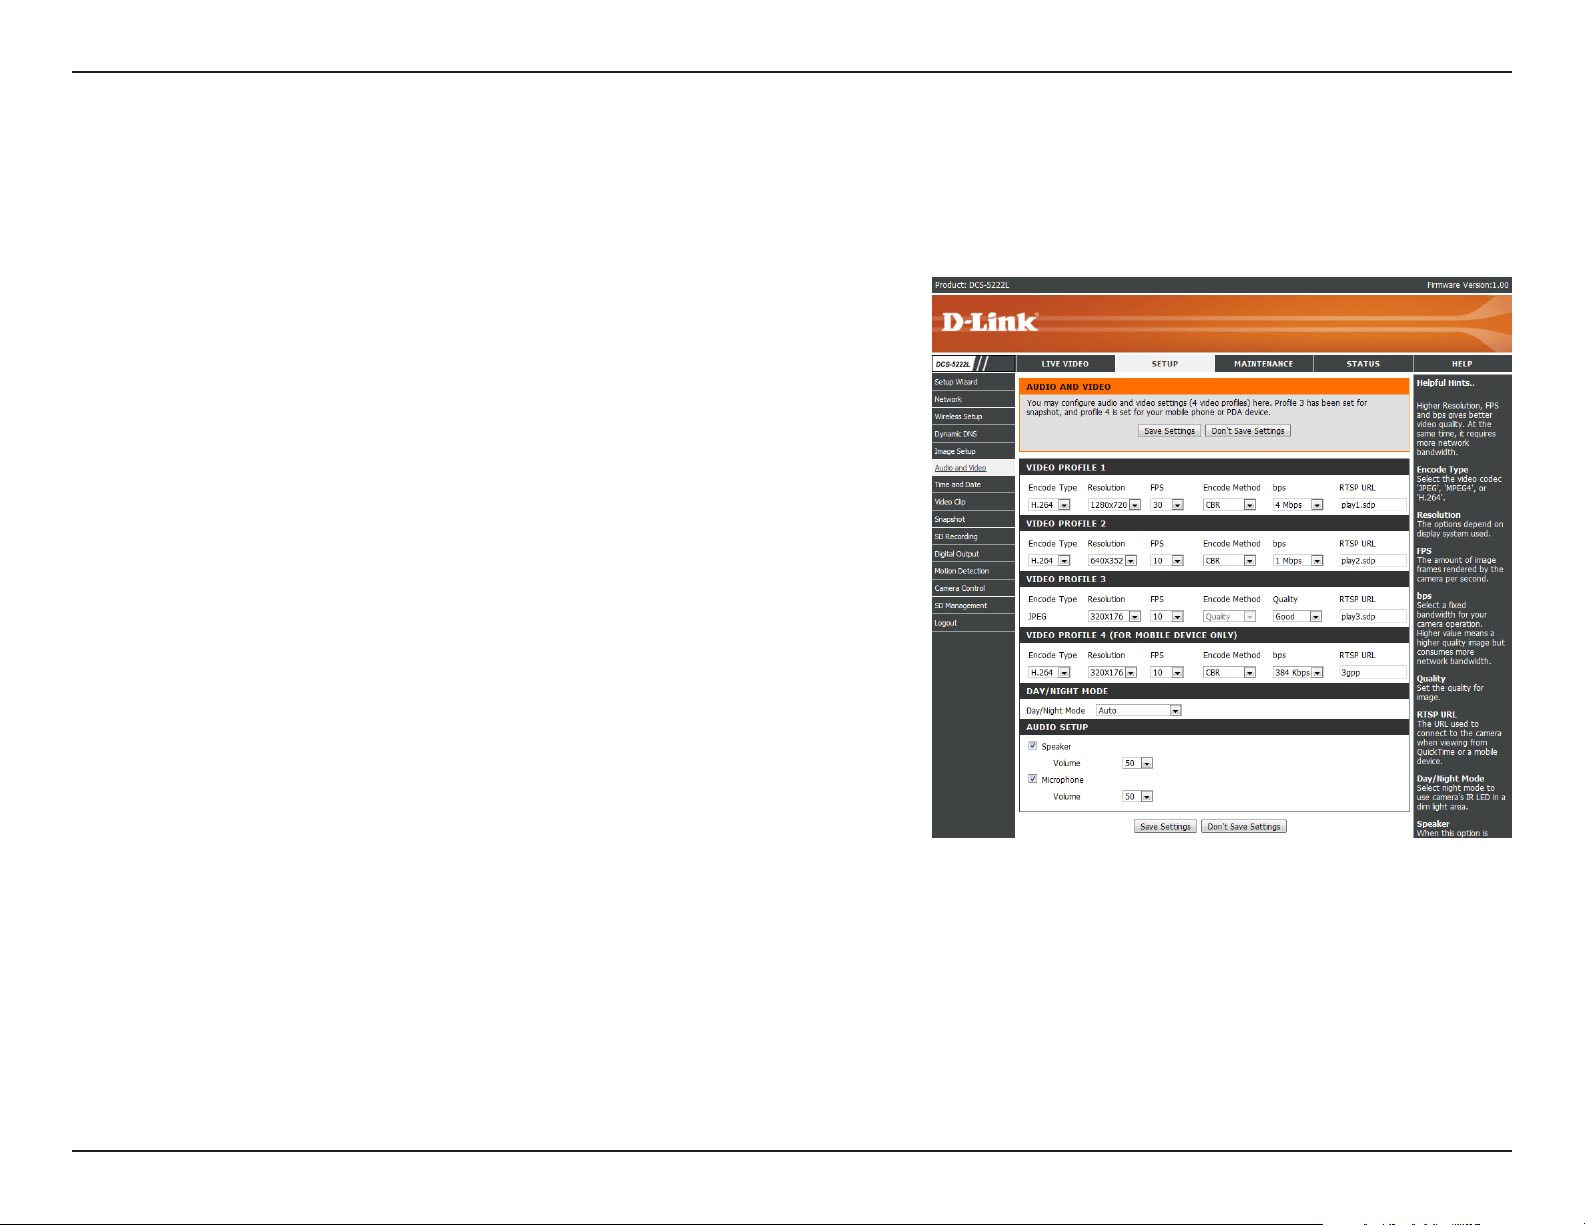
Audio and Video
Youmaycongurefourvideoproleswithdierentsettingsforyourcamera.Youmayalsosetupdierentprolesforyourcomputerandmobile
display. In addition, you may congure the audio (speakers and microphone) settings for your camera. There are three sensor output selections
(VGA,XGA,andSXGA).Note: Do not select SXGA if you want to turn on the motion detection feature.
Note: Video Prole 3 is always set to MJPEG as the Encode Type to ensure that at least one of the Video Proles are viewable by non-IE browsers. Video
Prole 4 is for mobile devices only, and always uses MPEG-4 as the Encode Type.
Video Prole:
Encode Type:
Resolution:
FPS:
bps:
Quality:
RTSP URL:
Day/Night
Mode:
Audio Setup:
This section allows you to change the Encode Type, Resolution,
FPS, and Quality.
The compression format used when viewing your camera.
Select the desired video resolution from the drop-down menu.
Thehighersettingcanobtainbetterquality.However,itwilluse
more resource within your network.
Select the optimal setting depending on your network status.
Please note that the higher setting can obtain better quality.
However, it will use more resources within your network.
Select the bitrate to assign the video. This is a constant bitrate. A
higher bitrate will result in better looking video at the expense of
a larger le size.
Selectoneofvelevelsofimagequality:Highest,High,Medium,
Low, and Lowest.
The URL used to connect to the camera when viewing from
QuickTime or a mobile device.
AllowsyoutocontroltheIRLEDsonthefrontofthecamera.Note
that when this option is enabled, live feed video will be in black
and white, and ICR lter will be activated.
Allowsyoutoenableordisableandadjustthevolumelevelofthe
speaker and microphone. If you select speaker, you must attach
external speakers to the audio port on the camera.

29D-Link DCS-5222L User Manual
Section 4 - Conguration
Note: Higher frame size, frame rate and bit rates will give you better video quality, but they will also require more network bandwidth. For best viewing
results on a mobile phone, we suggest setting the frame rate to 5 fps and the bit rate to 20 Kbps.
After making any changes, click the Save Settings button to save your changes, or click the Don’t Save Settings button to discard your changes.
30D-Link DCS-5222L User Manual
Section 4 - Conguration
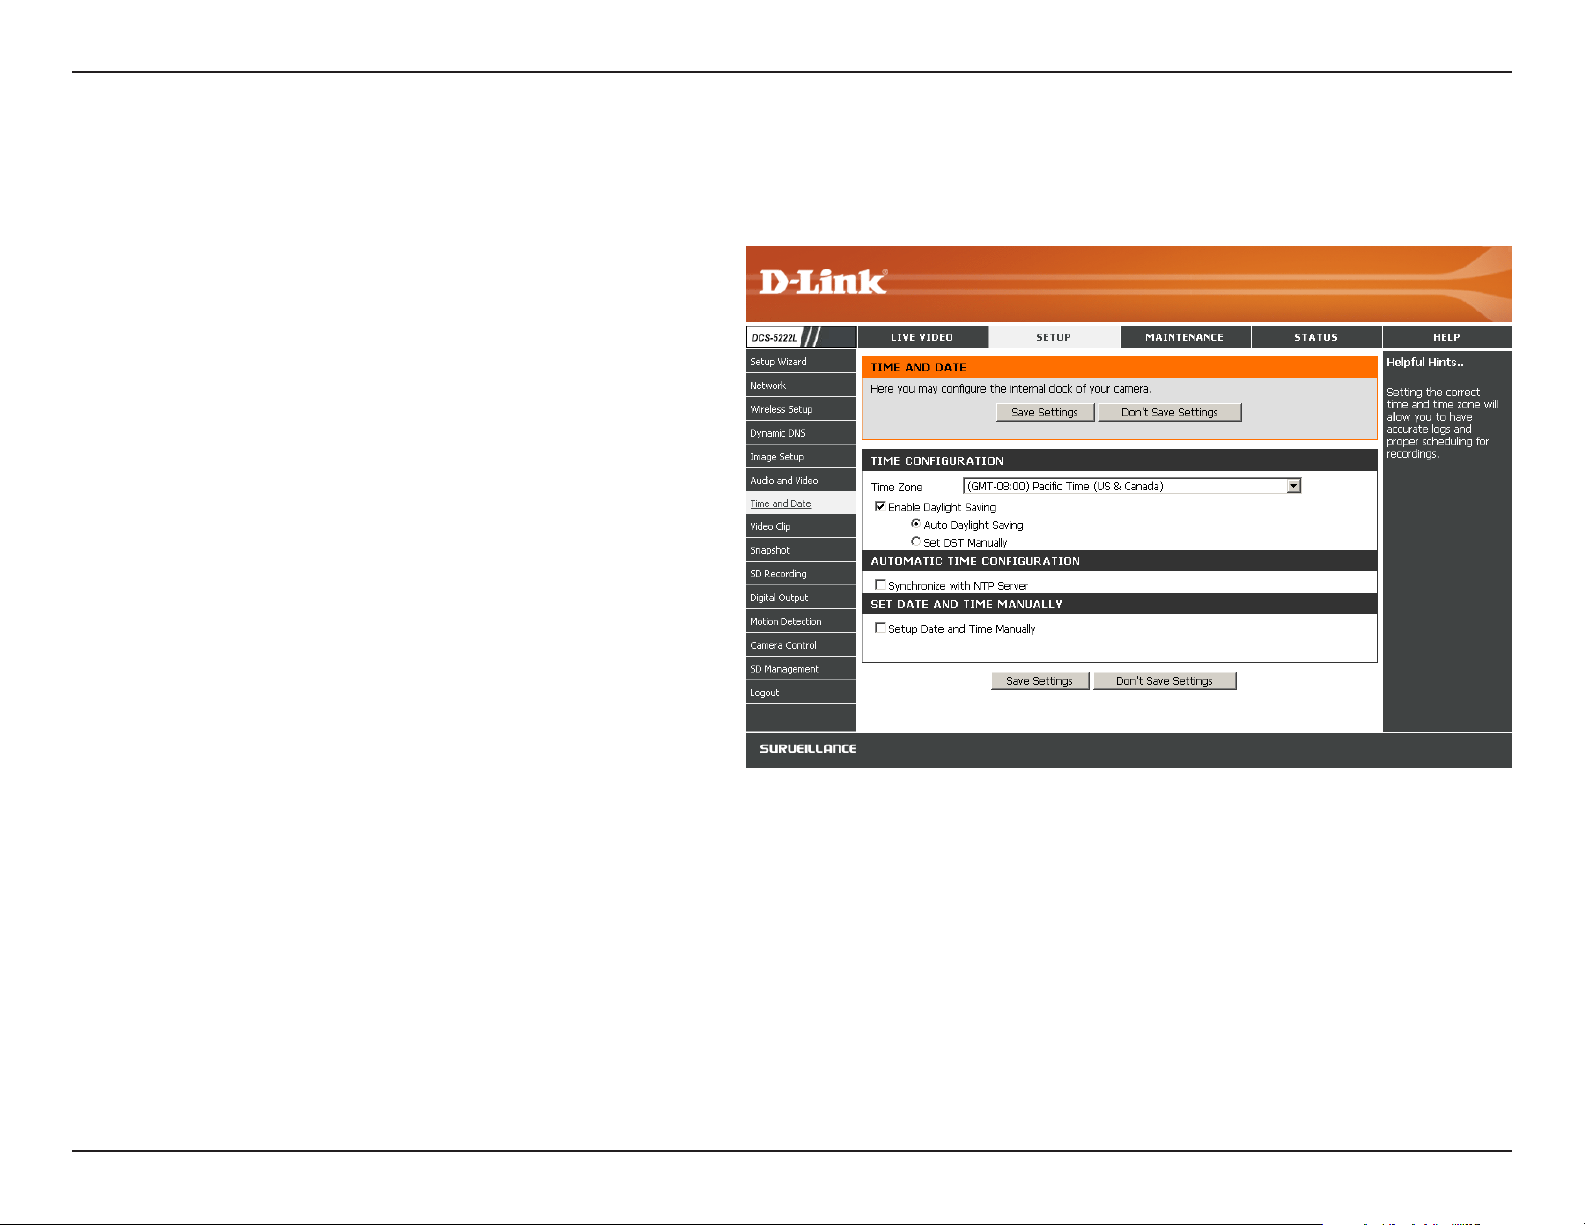
Time and Date
This section allows you to congure the settings of the internal system clocks for your camera.
Time Zone:
Enable Daylight
Saving:
Auto Daylight Saving:
Synchronize NTP
Server:
Set the Date and Time
Manually:
Copy your Computer’s
Time Settings:
Select the time zone for your region from
the drop-down menu.
Check this if the camera is in a region
where daylight saving is observed.
ThisoptionwilladjustDaylightSavingTime
automatically.
Network Time Protocol will synchronize
your camera with an Internet time server.
YoucanenteranIPaddressofaserveror
select from the drop-down menu.
Select this to set the time manually.
Click to synchronize the time information
from your PC.
After making any changes, click the Save Settings button to save your changes, or click the Don’t Save Settings button to discard your changes.
31D-Link DCS-5222L User Manual
Section 4 - Conguration
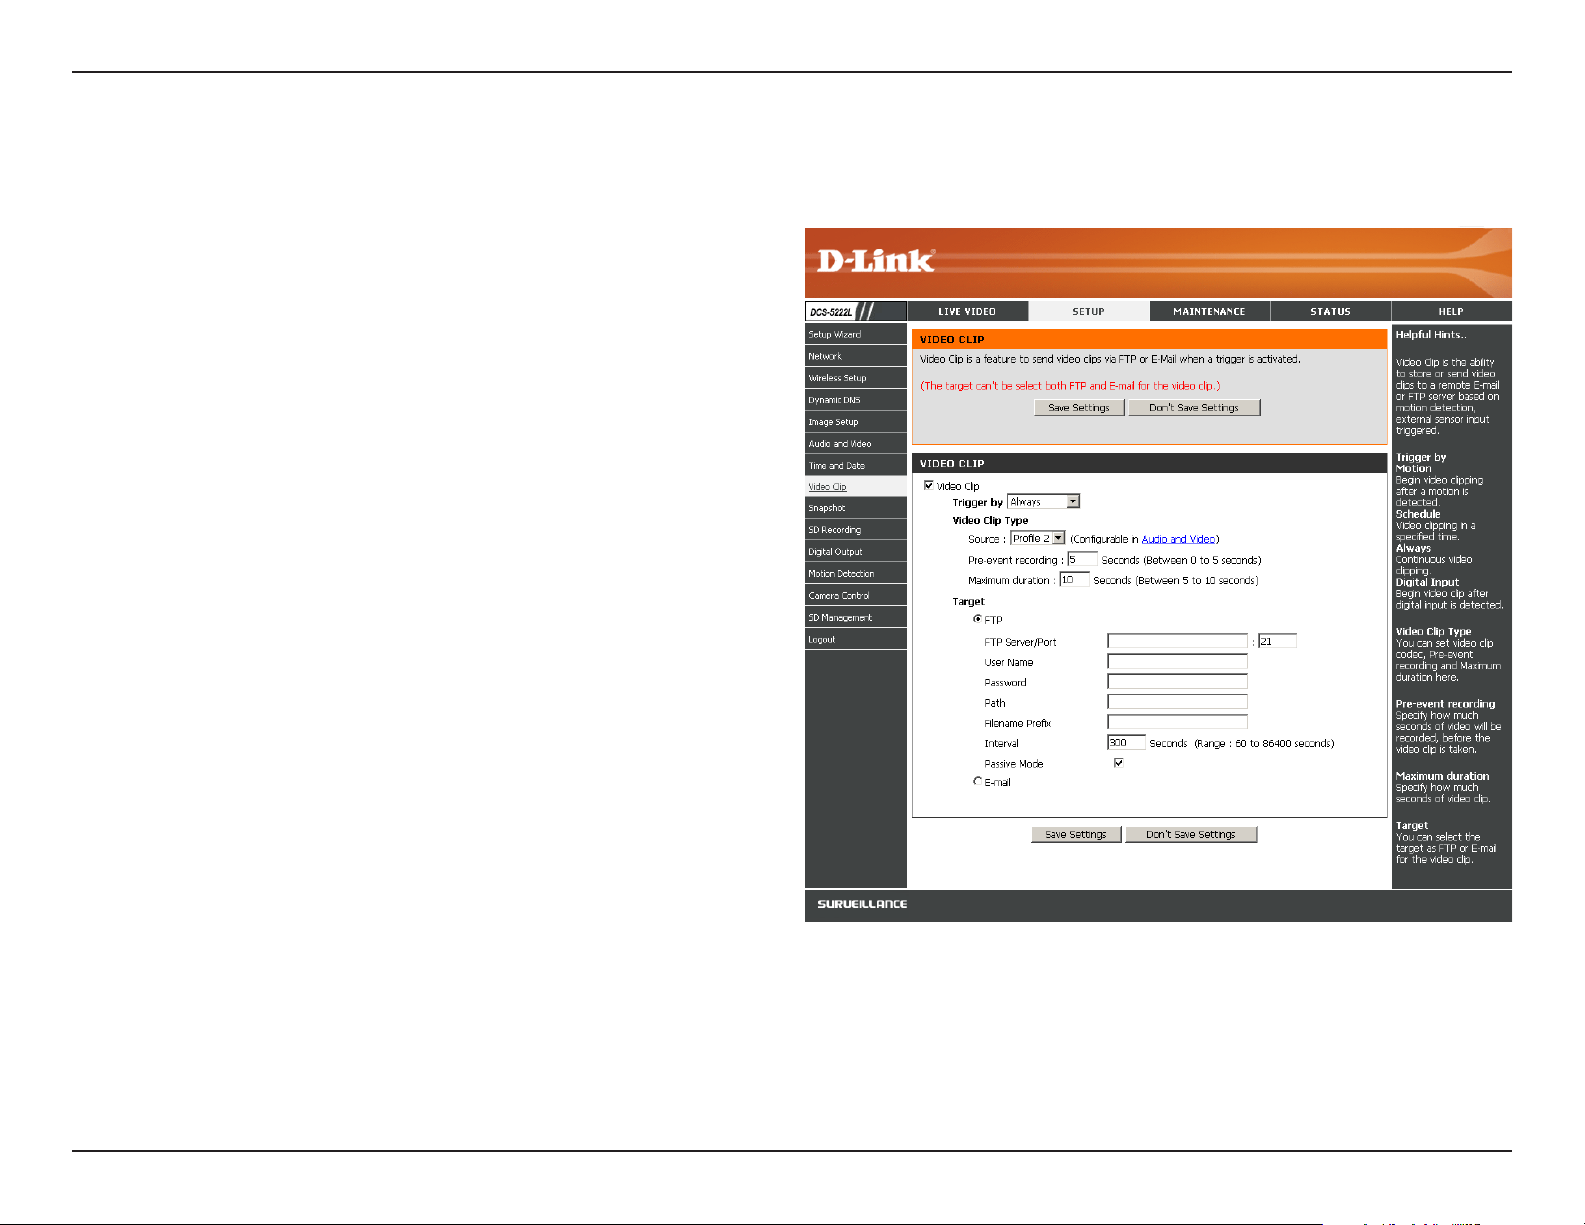
Video Clip
Video Clip:
Trigger By:
Video Clip Type:
Target:
Check this box to enable the Video Clip function.
Select whether the event is triggered by Motion,
Schedule or if the video is Always recording.
Displays the prole used for the recording and allows
you to specify the maximum duration of the video
clip and whether to start recording up to 5 seconds
before the event to ensure the event is captured.
Select where you want the video clip to be sent.
It may be uploaded to an FTP or sent to an email
address.
You will need to enter your FTP or email server/
account settings.
Video Clip is a feature to send video clips via FTP or Email when a trigger is activated.
After making any changes, click the Save Settings button to save
your changes, or click the Don’t Save Settings button to discard your
changes.
32D-Link DCS-5222L User Manual
Section 4 - Conguration
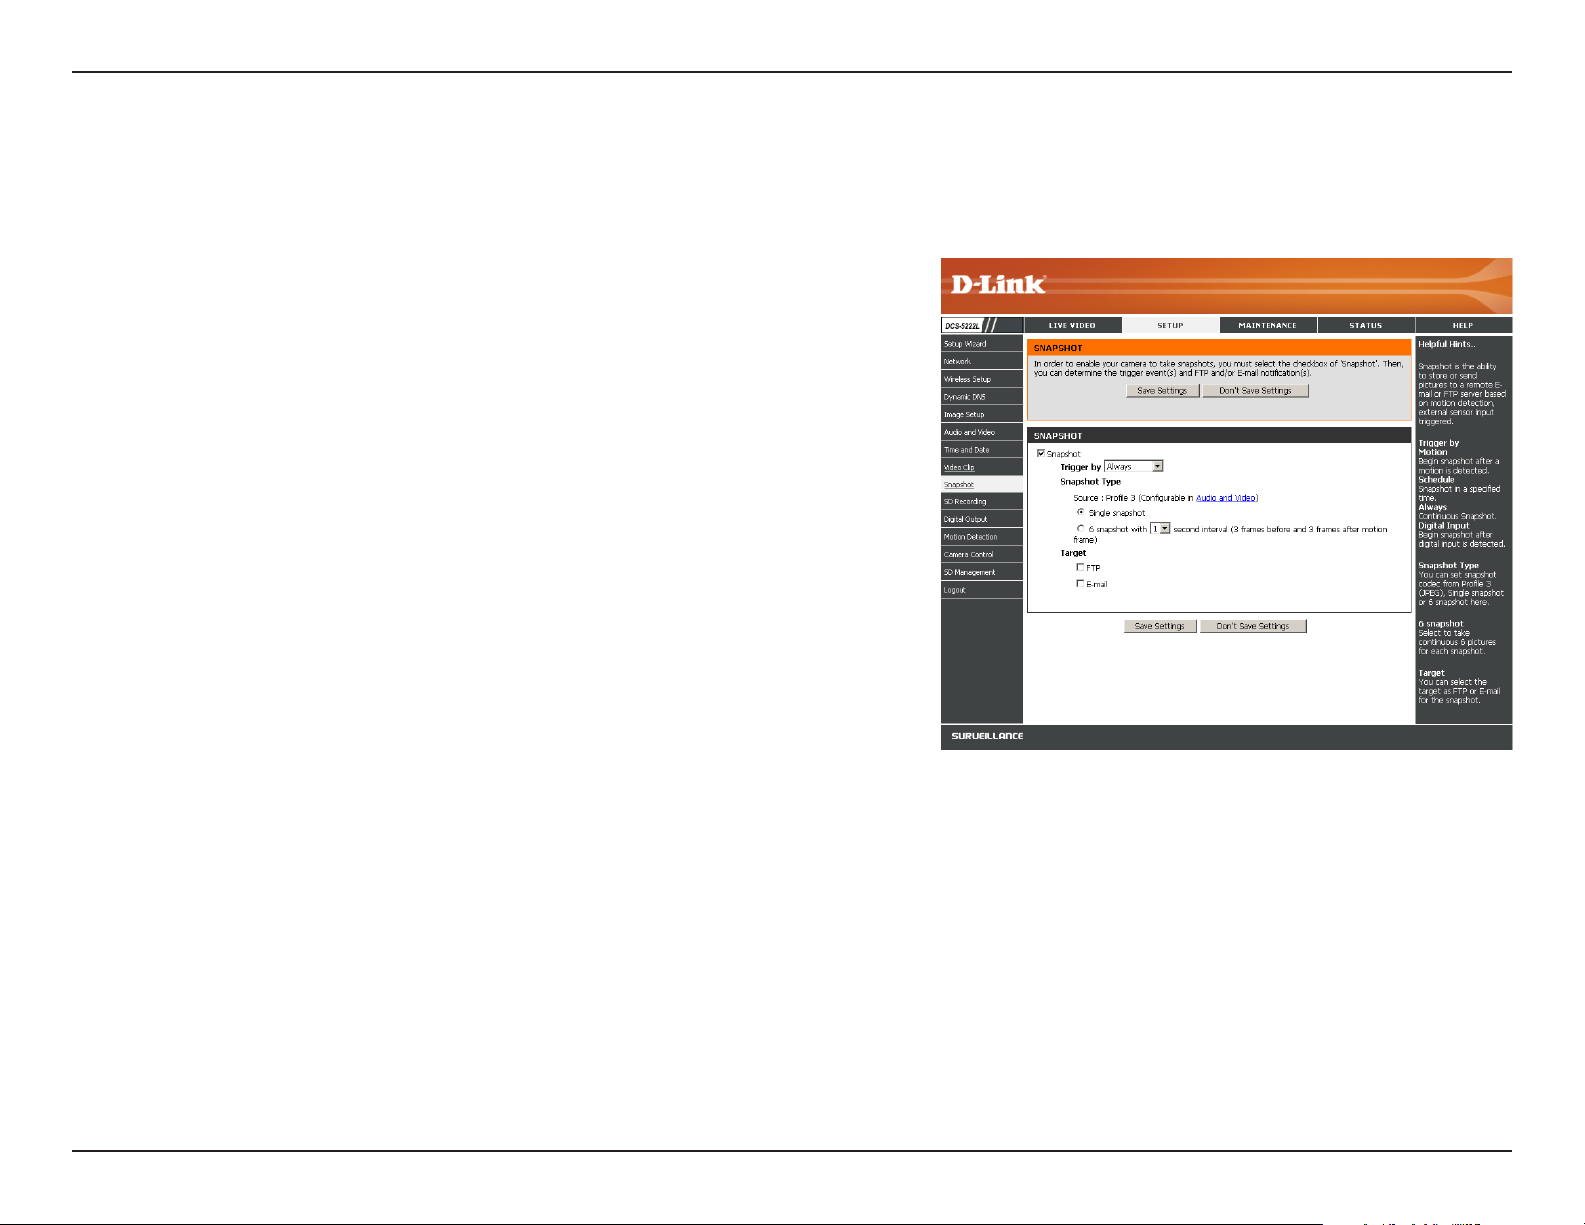
This allows you to set the camera to take snapshots when motion is detected. Snapshots can be sent to an e-mail address or to an FTP server.
Snapshot
Trigger by:
Snapshot Type:
Target:
Select the trigger event from the drop-down menu. Motion begins a
snapshotafteramotionisdetected;Schedule sends “snapshots” at a
speciedtime;Always provides continuous snapshots.
Select whether to take a single snapshot or to take 6 snapshots with a
1 second interval between them.
Select where you want the snapshot to be sent. It may be uploaded to
an FTP or sent to an email address.
YouwillneedtoenteryourFTPoremailserver/accountsettings.
After making any changes, click the Save Settings button to save your changes, or
click the Don’t Save Settings button to discard your changes.
33D-Link DCS-5222L User Manual
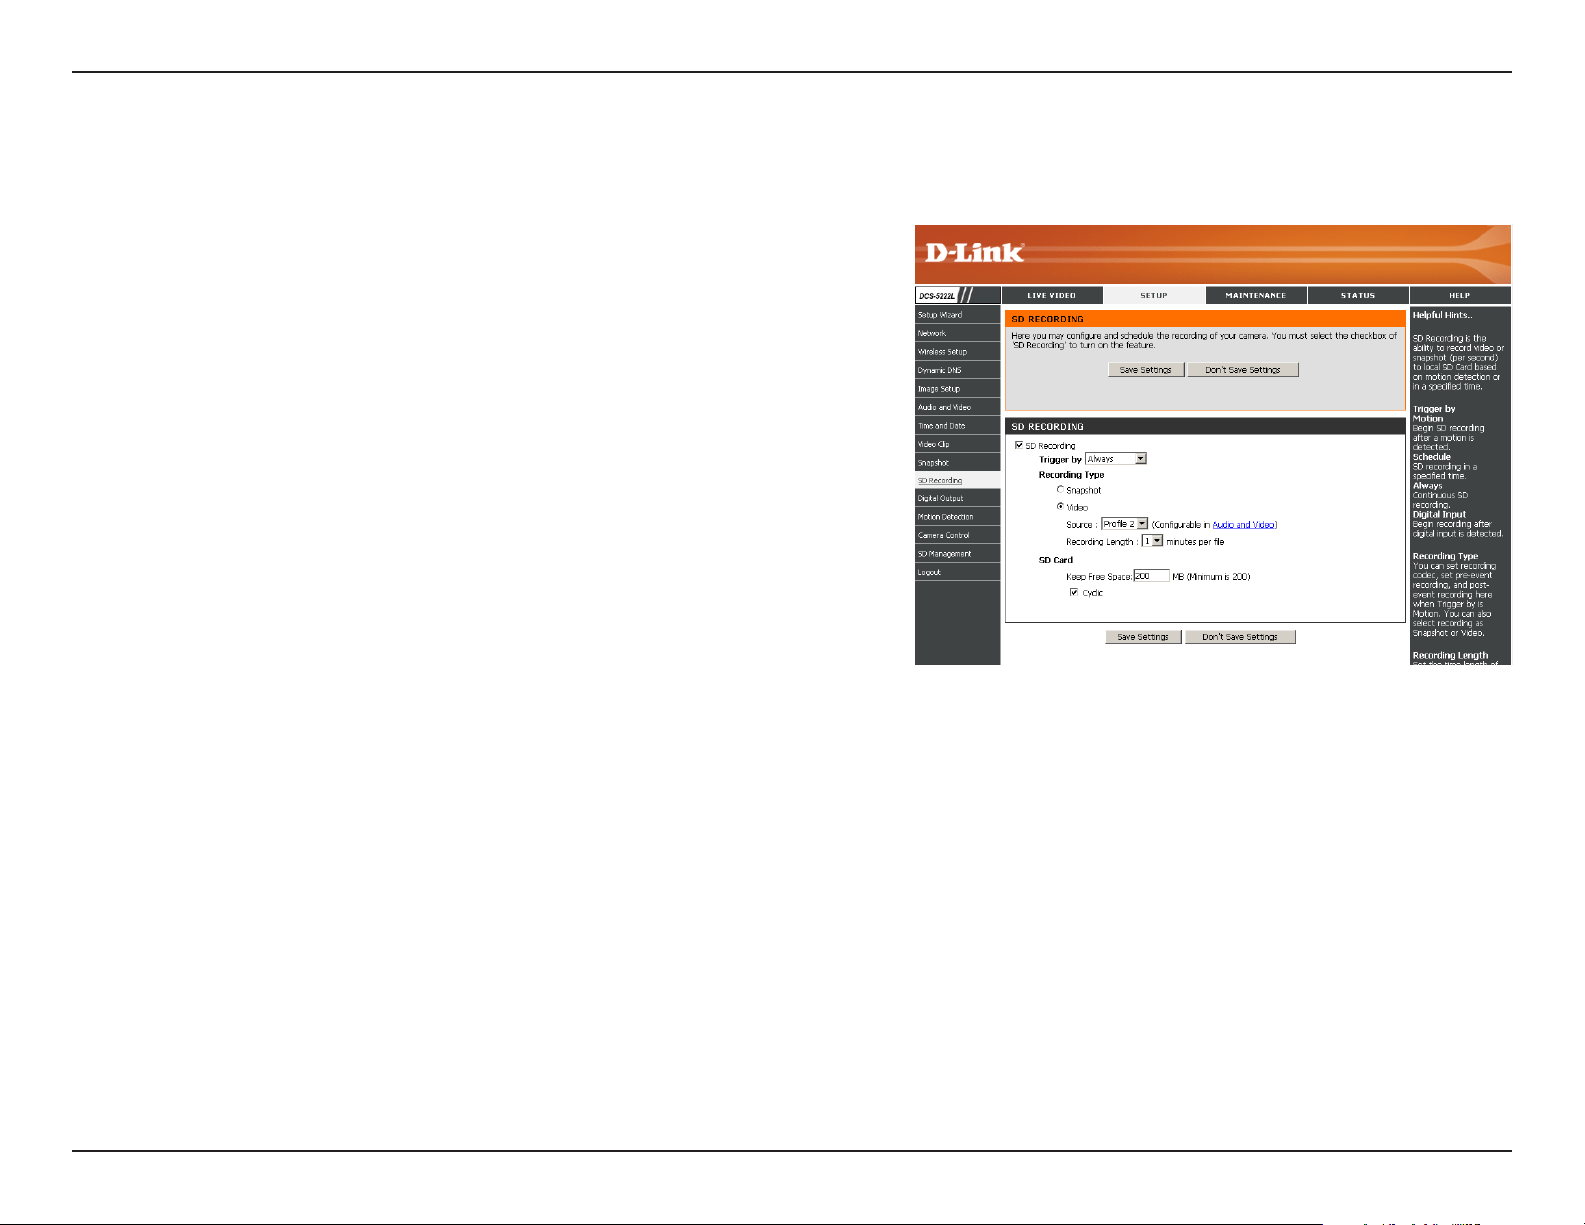
Section 4 - Conguration
Check this box to enable the recording feature. After enabling
recording, you will need to select a scheduling method.
Select this option if you have inserted an available SD card into the
camera.
Select the type of trigger event from the drop-down menu. Motion
beginsrecordingvideo/snapshotafteramotion is detected;
Schedulerecordsvideo/takessnapshotsataspeciedtime;Always
will record video/take snapshots continuously.
Select to record video or take a snapshot.
Select the length of time for each video le.
This sets the capacity of your local SD Card to prevent the system
from becoming unstable.
Selecting this option will cause the oldest le to be deleted when
thesystemrequiresstoragespacefornewles.
SD Recording
Enable
recording:
DS Card:
Trigger by:
Recording Type:
Recording
Length:
Keep Free Space:
Cyclic:
Thisoptionallowsyoutocongureandscheduletherecordingofyourcamera.YoucanthenrecordvideotoyourSDcard.
After making any changes, click the Save Settings button to save your changes, or click the Don’t Save Settings button to discard your changes.
34D-Link DCS-5222L User Manual
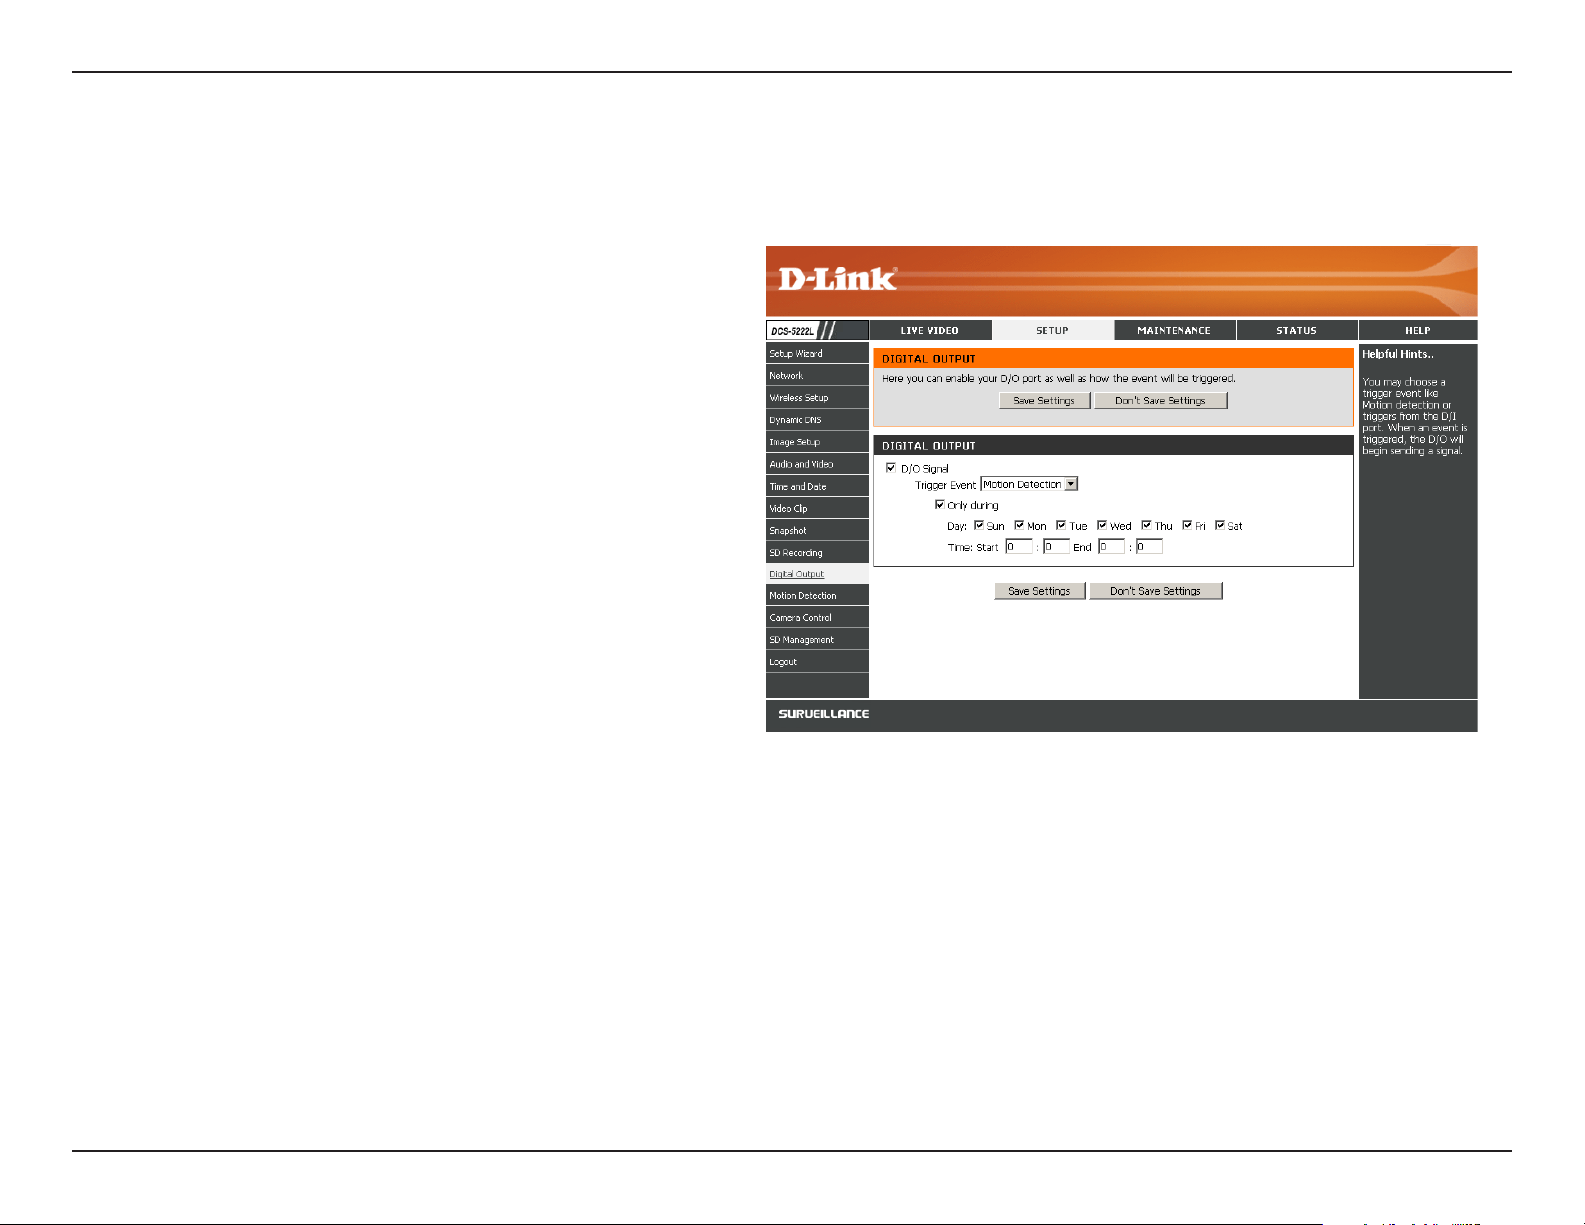
Section 4 - Conguration
Digital Output
Youcanenablethedigitaloutputportaswellascongureatriggerevent.
Motion Detection: When a motion detection is triggered.
D/I Signal: A trigger from the Digital Input port.
Note: Refer to page 59 for I/O Terminal Block information.
35D-Link DCS-5222L User Manual
Section 4 - Conguration
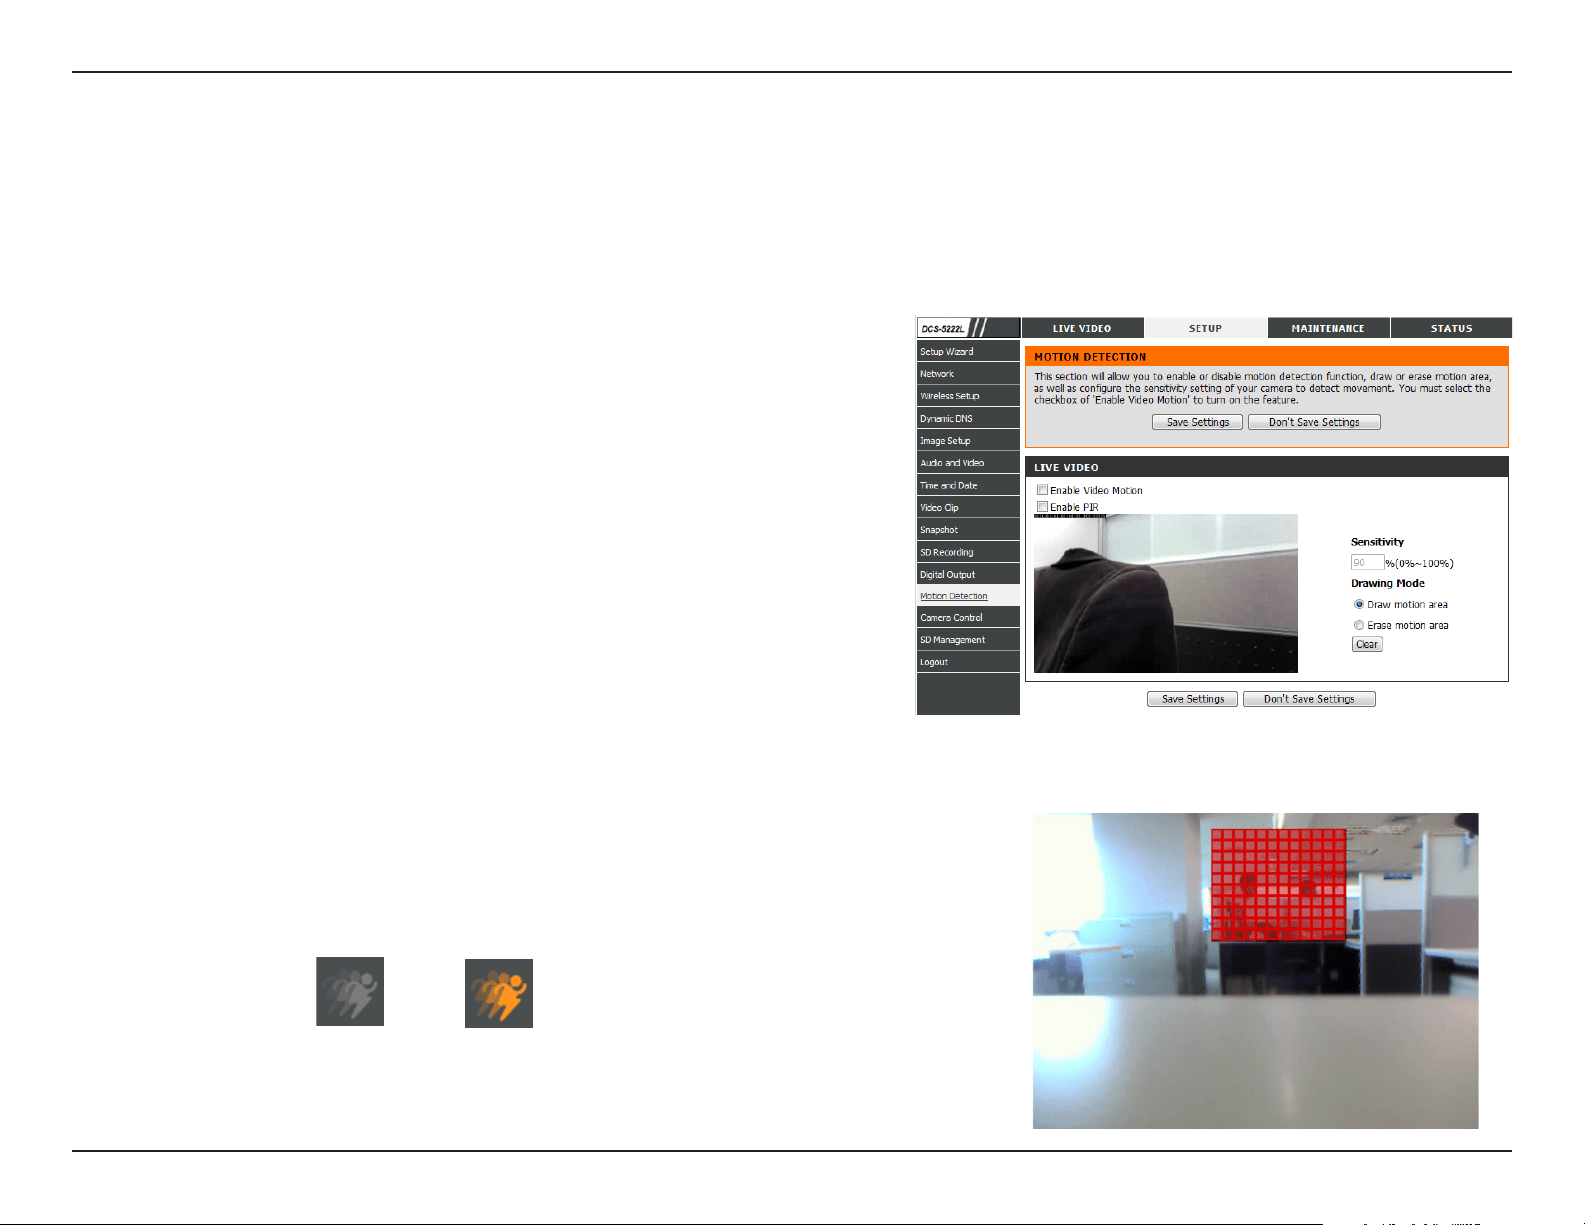
Motion Detection
Check this box to enable the motion detection feature of your camera.
When this option is selected, use PIR (passive infrared) to detect motion.
Thissettingadjustshowsensitivethecamerawillbetomotion,where
100% will be the most sensitive setting and 0% will be the least sensitive
setting.
Select Draw Motion Area to select the area of the picture to monitor
for movement to trigger recording or snapshot. Use your mouse to click
on the blocks that you would like to monitor for motion. Select Erase
Motion Area to remove the blocks and stop the camera from monitoring
that area of the picture.
Clicking this button will clear all motion detection zones.
ThisoptionallowsyoutosetupMotionDetectiononyourcamera.Inordertousemotiondetection,firstclicktheEnable Video Motion
checkbox.Next,clickonthevideowindowanddrawmotiondetectionzonesbyclickinganddraggingthemousecursor.Redareasindicate
areas that will be monitored for motion. The camera also has a PIR sensor which is used to detect motion using a special infrared sensor. PIR
isgoodatdetectingmotionfromlivesubjectssuchaspeopleandanimals.
Enable Video
Motion:
Enable PIR:
Sensitivity:
Drawing Mode:
Clear:
The motion notication will continue to blink as long as motion is detected. If no additional motion is
detected, it will return to its original state after eight seconds.
The red grid on the right indicates an area that has been selected for motion detection. When motion
isdetected,theLIVEVIDEOpagewilldisplayablinkingorangemotionvideoiconliketheonebelow.
No Motion Motion
After making any changes, click the Save Settings button to save your changes, or click the
Don’t Save Settings button to discard your changes.
Note: If the camera is set to SXGA mode in Audio and Video, Motion Detection is disabled.
36D-Link DCS-5222L User Manual
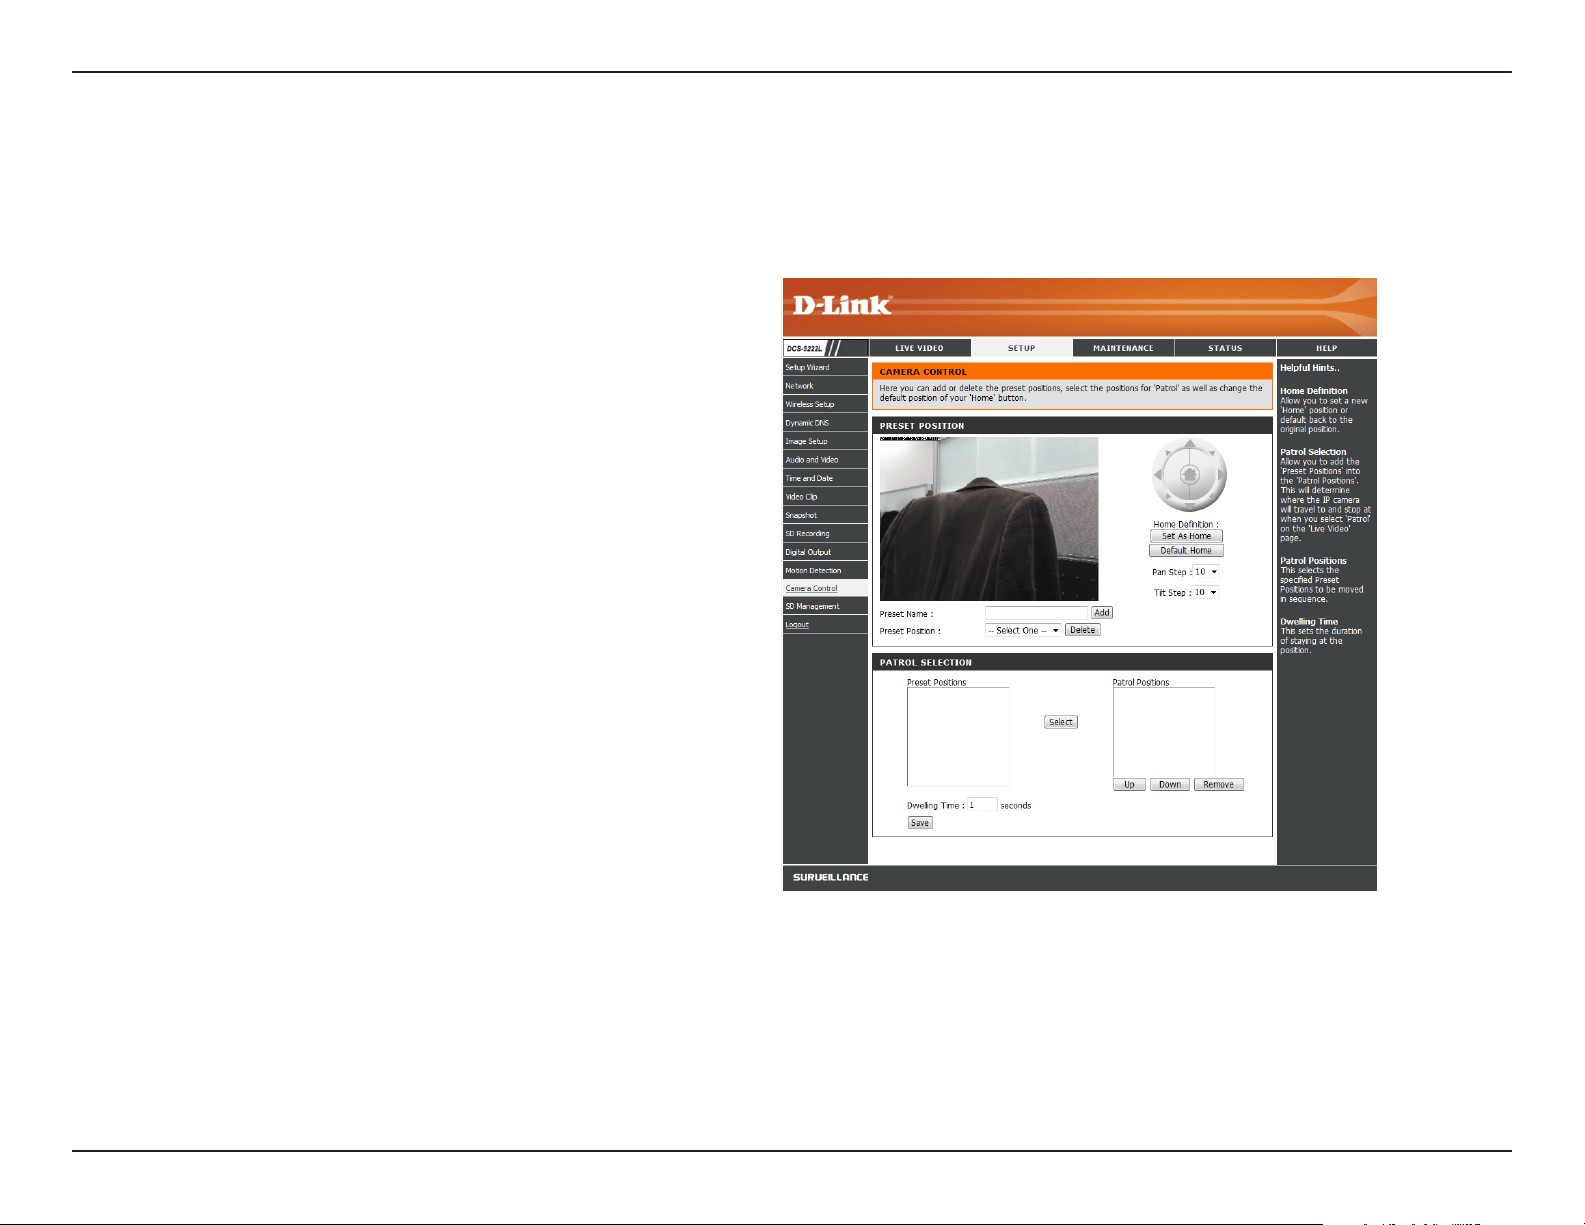
Section 4 - Conguration
Camera Control
Select the Preset Position from the drop-down menu to access settings that aect how the camera will pan and move to preset locations.
Click to set the current position as Home.
Click to set the Home position with the default setting.
Select the speed at which the camera will pan for a full
cycle from the drop-down list. Select a value between
0 and 10, 0 being the slowest setting.
Select the speed at which the camera will tilt for a
full cycle from the drop-down menu. Select a value
between 0 and 10, 0 being the slowest.
Enter a name for your camera location and click Add.
Select created presets from the drop-down menu. If you
want to delete an entry, select it and then click Delete.
To use the Auto Patrol feature, select the desired preset
positions from the Preset Locations list and add them to
the Patrol Positions list by clicking Select.Youcanthen
select the order in which the camera will patrol through
the preset locations by selecting a location and clicking
Up or Down. Click Remove to remove a location from
the list. Click Save when nished.
Set As Home:
Default Home:
Pan Step:
Tilt Step:
Preset Name:
Present
Position:
Patrol Selection:
37D-Link DCS-5222L User Manual
Section 4 - Conguration
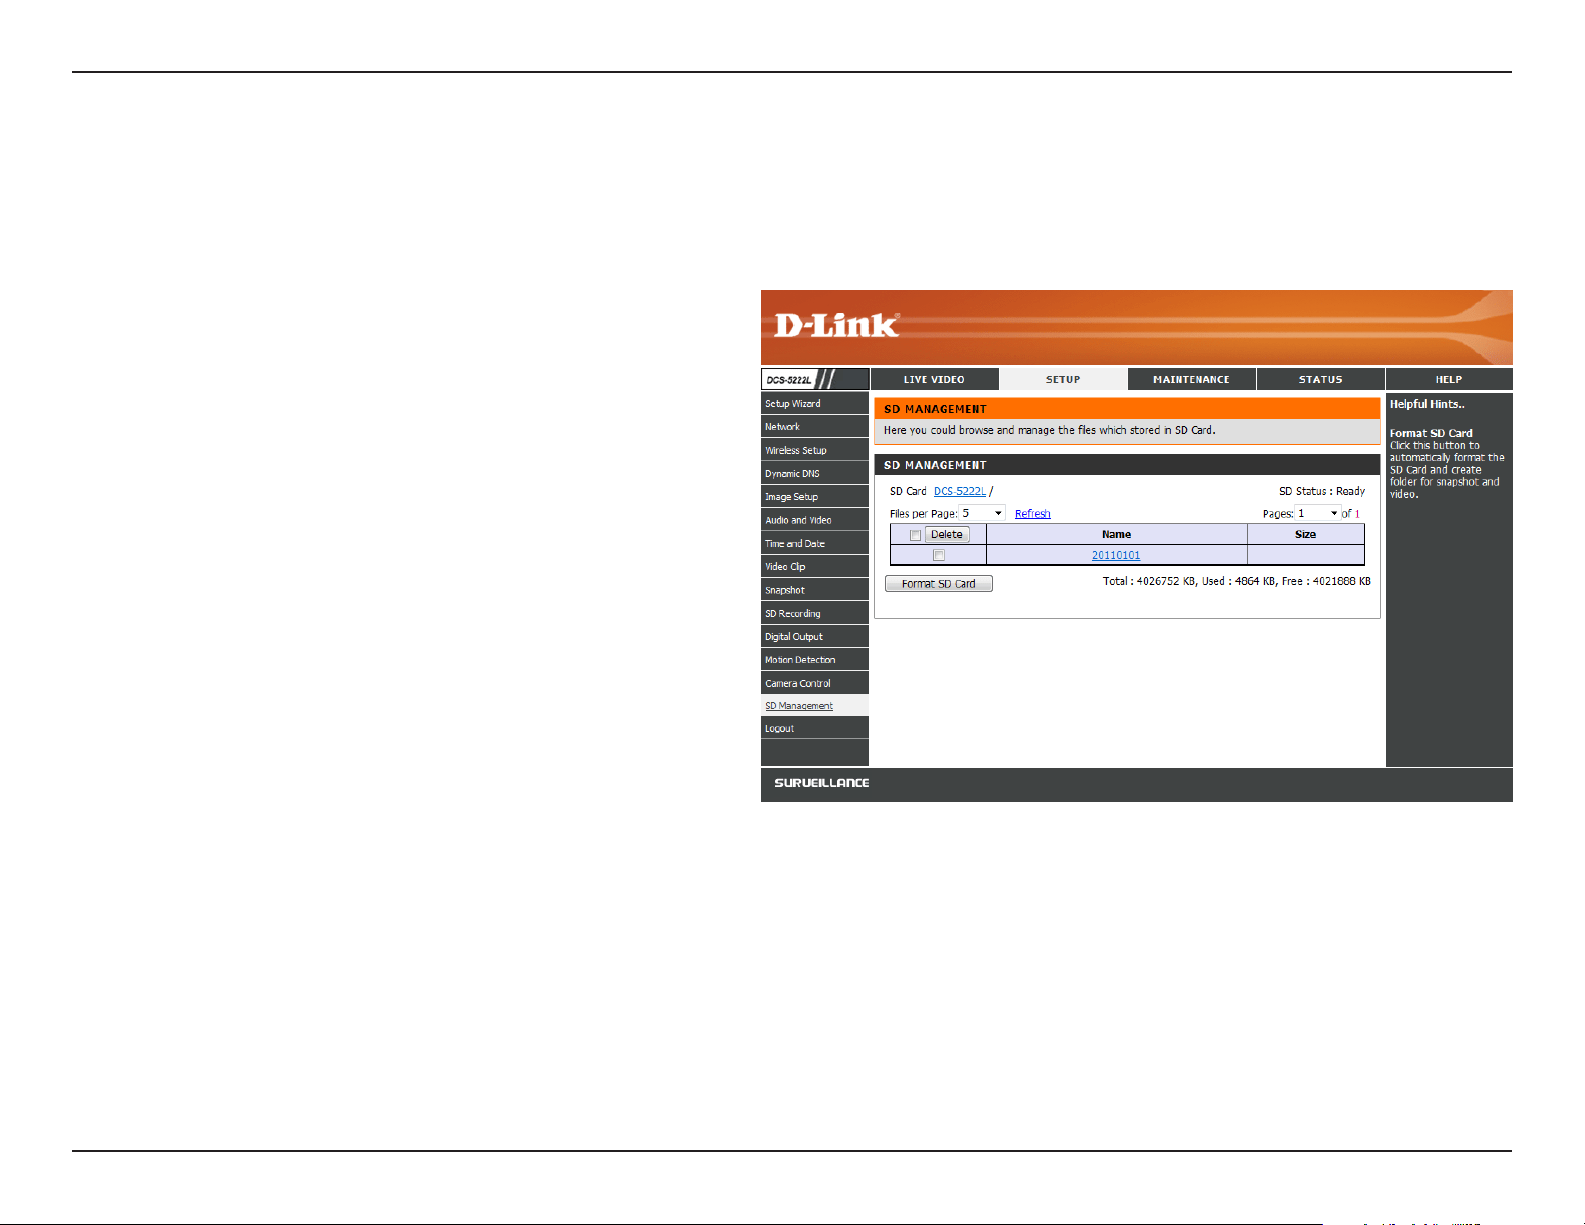
SD Management
This page allows you to browse and manage the recorded les on an SD card which is inserted into the camera.
Format SD Card:
Delete:
Name:
Size:
Refresh:
Files per page:
Pages:
Click to automatically format the SD Card and
create a folder for video. Formatting your SD
Card will erase all data currently saved.
Click the checkbox in front of the Delete button
to select all the les and catalogs below. The
Delete button is used to delete les or catalogs
which are selected.
The name of the le or catalog.
Thele’ssize.
Click to refresh the page.
Select the number of les to be displayed on a
single page. The maximum is 100 les.
Show the current and total pages.
38D-Link DCS-5222L User Manual
Section 4 - Conguration
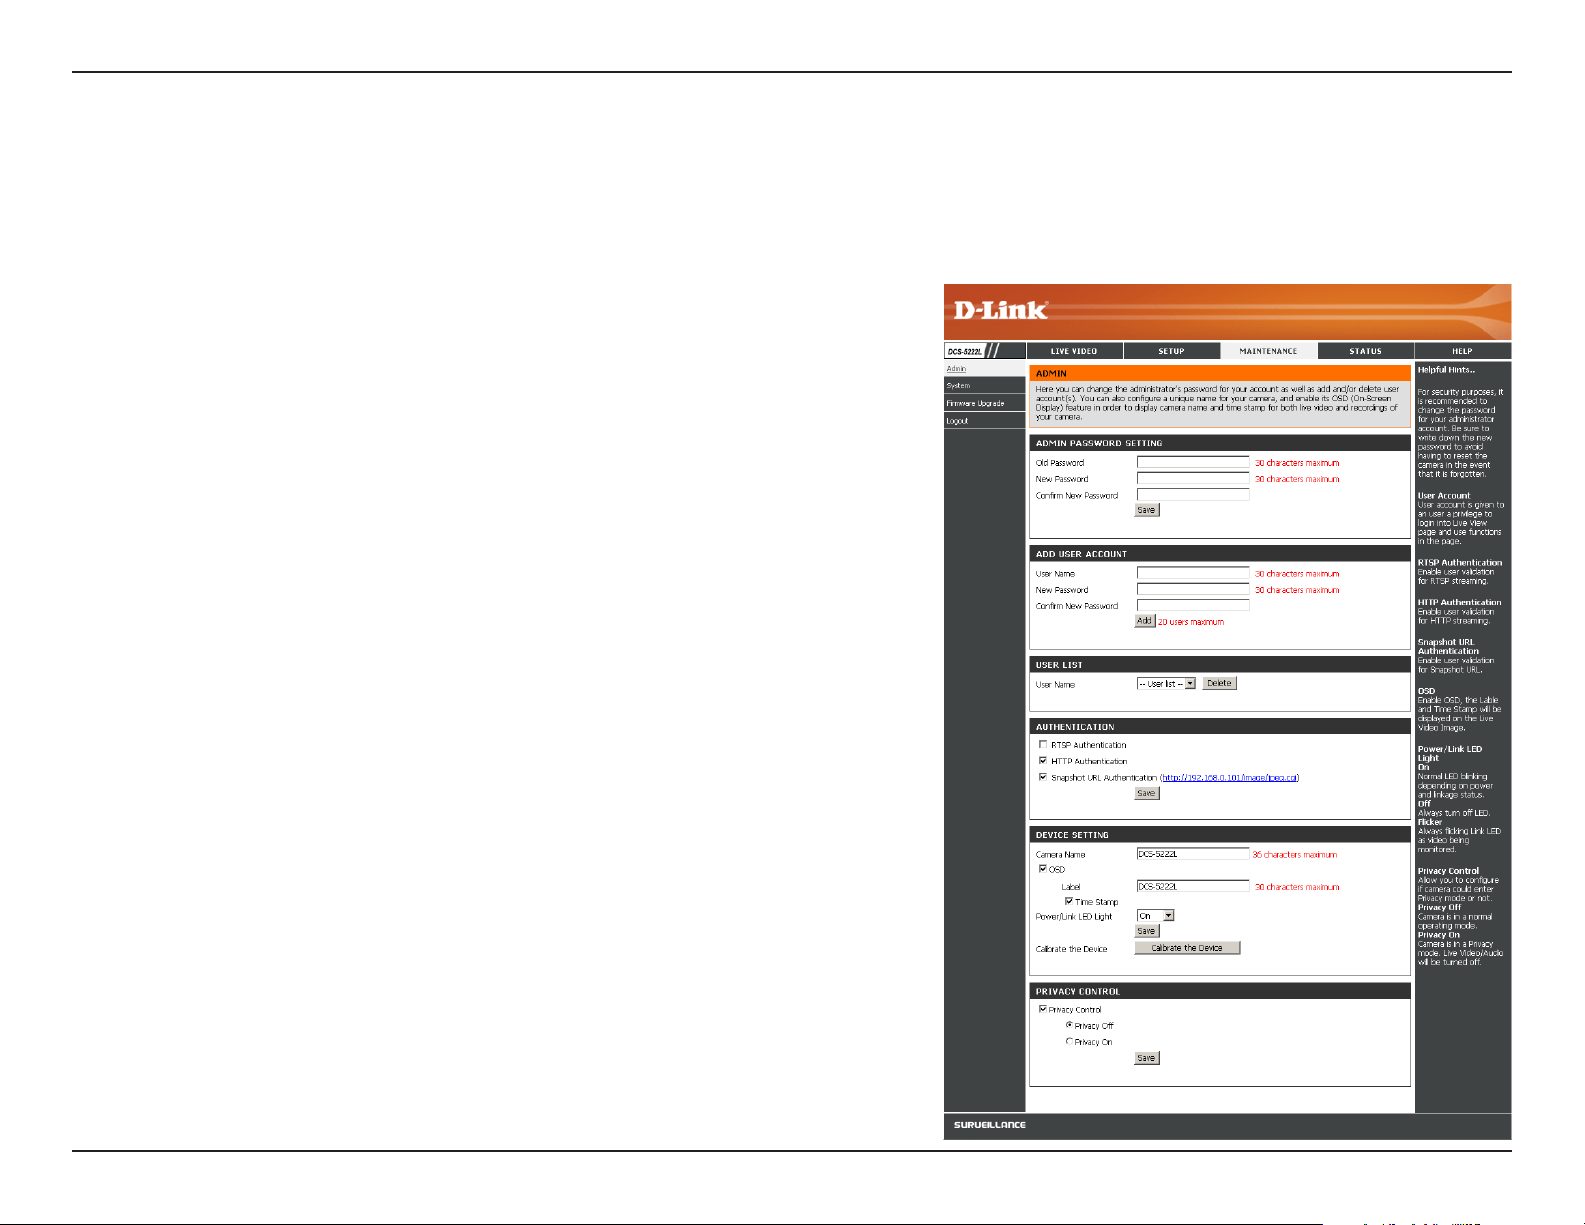
This section lets you change the admin password used to log
into the camera and change settings. After installing the camera
for the rst time, it is highly recommended that you change the
admin password for security purposes.
Enter the existing password, then enter your new password. Click
Save to apply your new settings.
Youmaycreateuseraccountstoallowothers tolog intoyour
camera to view the live feed. Users cannot change any settings.
EntertheUserNameyouwishtouseforthenewuseraccount
and then create a password for that account. Click Add to save
your account.
Select a user from the drop-down menu and click Delete to
remove the user account from having access to the camera
images.
Check to enable RTSP streaming.
Check to enable HTTP streaming.
Select Enable to allow access to the current camera snapshot
via the web address indicated.
Enter the name of your camera. This is useful if you have multiple
cameras.
Maintenance
Admin
Thissectionallowsyoutochangetheadministrator’spasswordandconguretheserversettingsforyourcamera.Youcanalsomanagetheuser
account(s) that access your camera.
Admin Password
Setting:
Add User Account:
User List:
RTSP Authentication:
HTTP Authentication:
Snapshot URL
Authentication:
Camera Name:

39D-Link DCS-5222L User Manual
Section 4 - Conguration
Enable OSD:
Label:
Time Stamp:
LED Light:
Calibrate the Device:
Privacy Mode:
ThiswillenabletheOnScreenDisplay(OSD)informationbartoappearwhenviewingvideo.
ThisisthetextlabelthatwillappearontheOSD.
Ifchecked,thecurrenttimewillbedisplayedontheOSD.
Thiswillturnthecamera’sfrontLEDindicatoronoro.
Clicking this button will calibrate the camera so that the P/T/Z apparatus functions correctly. The camera is automatically
calibratedwheneveritispoweredonandinitializedorreset.Shouldthecamera’span,tilt,andzoomfunctionsbeginto
behaveincorrectly,orifthedevicehasbeenjarredorhandledimproperly,youmayneedtorecalibratethecameramanually
by pressing this button.
Select on/o or schedule the privacy mode for your camera to ensure the privacy. When the privacy mode is turned on, the
camera hides the lens by rolling it back into the unit.
After making any changes, click the Save button to save your changes.

40D-Link DCS-5222L User Manual
Section 4 - Conguration
System
Click on the Save Conguration button to save the
current conguration to your hard drive.
To load a saved configuration, click on the Browse
button to select a conguration le from your hard drive.
Then, click the Load Conguration button to load the
new conguration.
Click this button to reset all settings to their factory
defaults. If you reset your settings, you will need to set
up your camera again.
Clicking the Reboot button will reboot your device.
Thisscreenallowsyoutosaveandrestorethecamera’scurrentconguration.Youcanalsoresetallsettingstofactorydefaultorrebootthedevice.
Save to Local Hard
Drive:
Load from Local
Hard Drive:
Restore to Factory
Defaults:
Reboot Device:
41D-Link DCS-5222L User Manual
Section 4 - Conguration
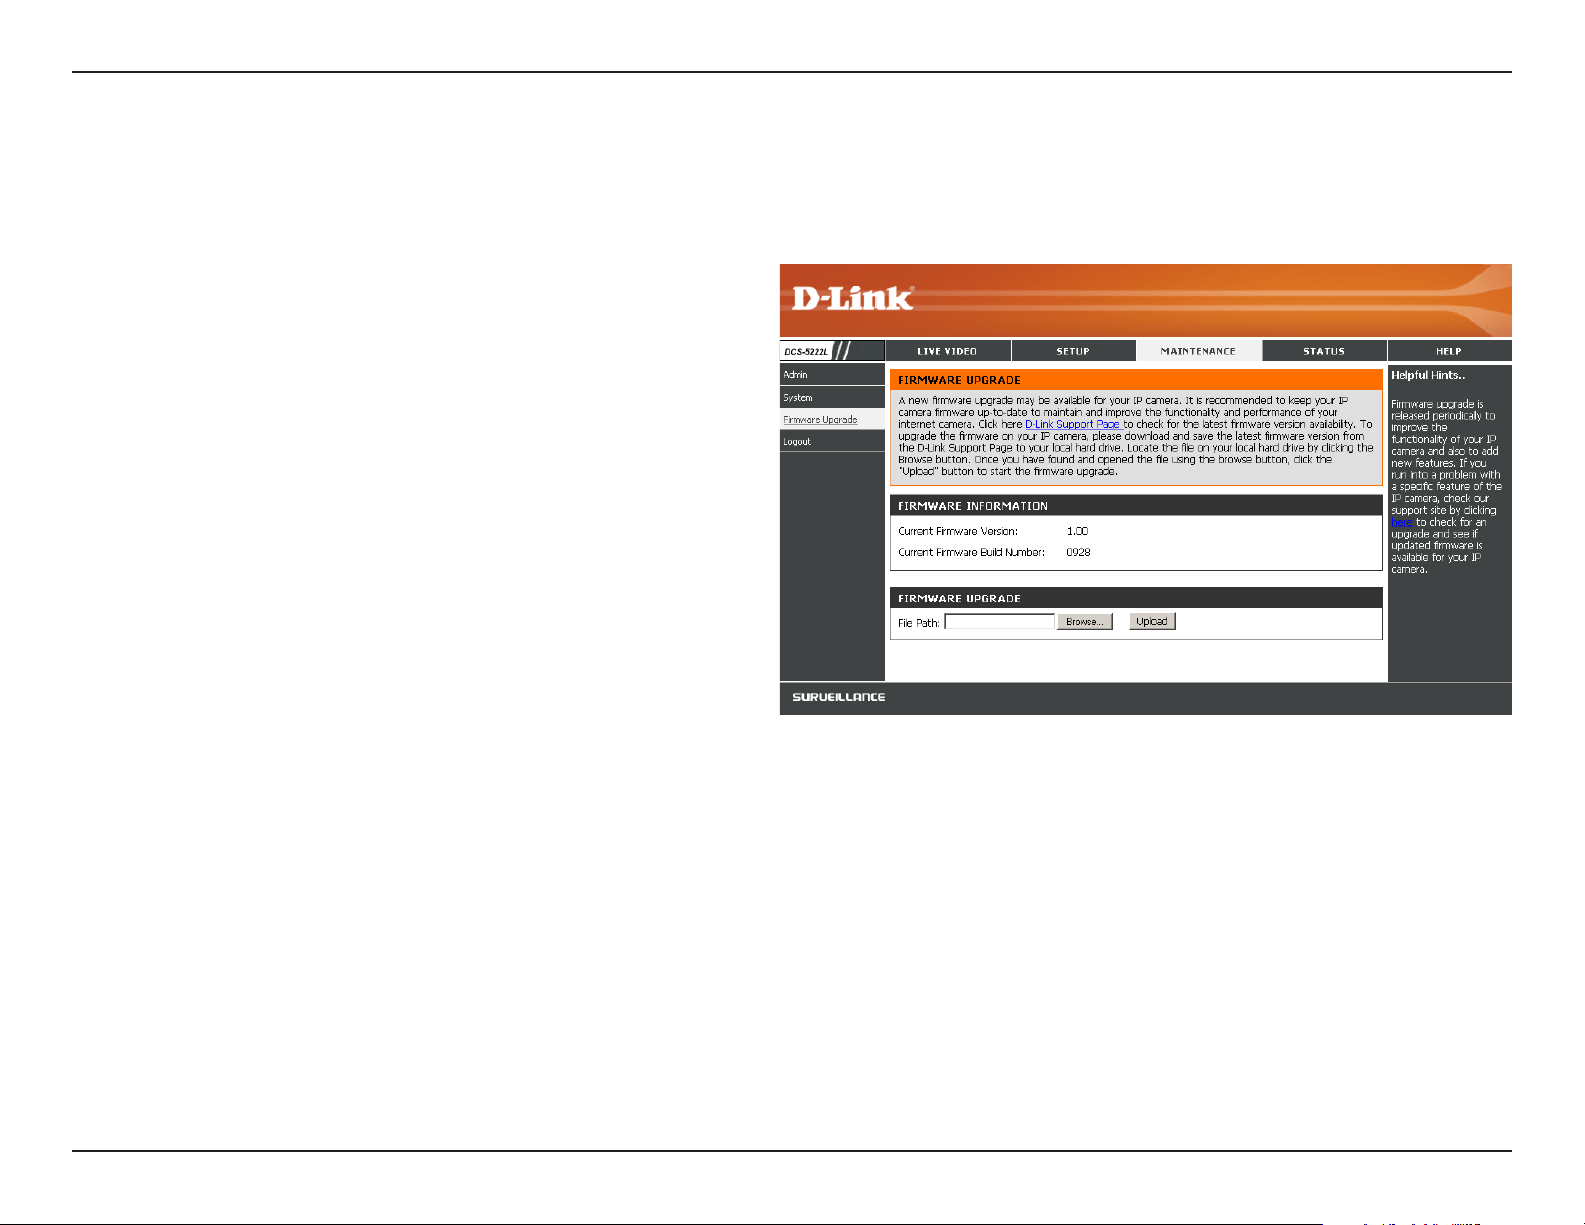
Firmware Upgrade
To upgrade your rmware, go to support.dlink.com and download
thelatestrmwaretoyourcomputer’sharddrive.ClickonBrowse,
select the rmware le, then click the Upload button. While the
rmware is being upgraded, do not turn o your computer or camera,
and do not disconnect your network connection from your computer
or camera. Upgrading the firmware will not change any of your
system settings, but it is recommended that you save your system
conguration before doing a rmware upgrade.
Note: It is recommended that you use a wired connection for your
computer and camera when upgrading the rmware.
Yourcurrentrmwareversionanddatewillbedisplayedonthispage.Youcanalsoupgradeyourrmwarewithanewversion.
42D-Link DCS-5222L User Manual
Section 4 - Conguration
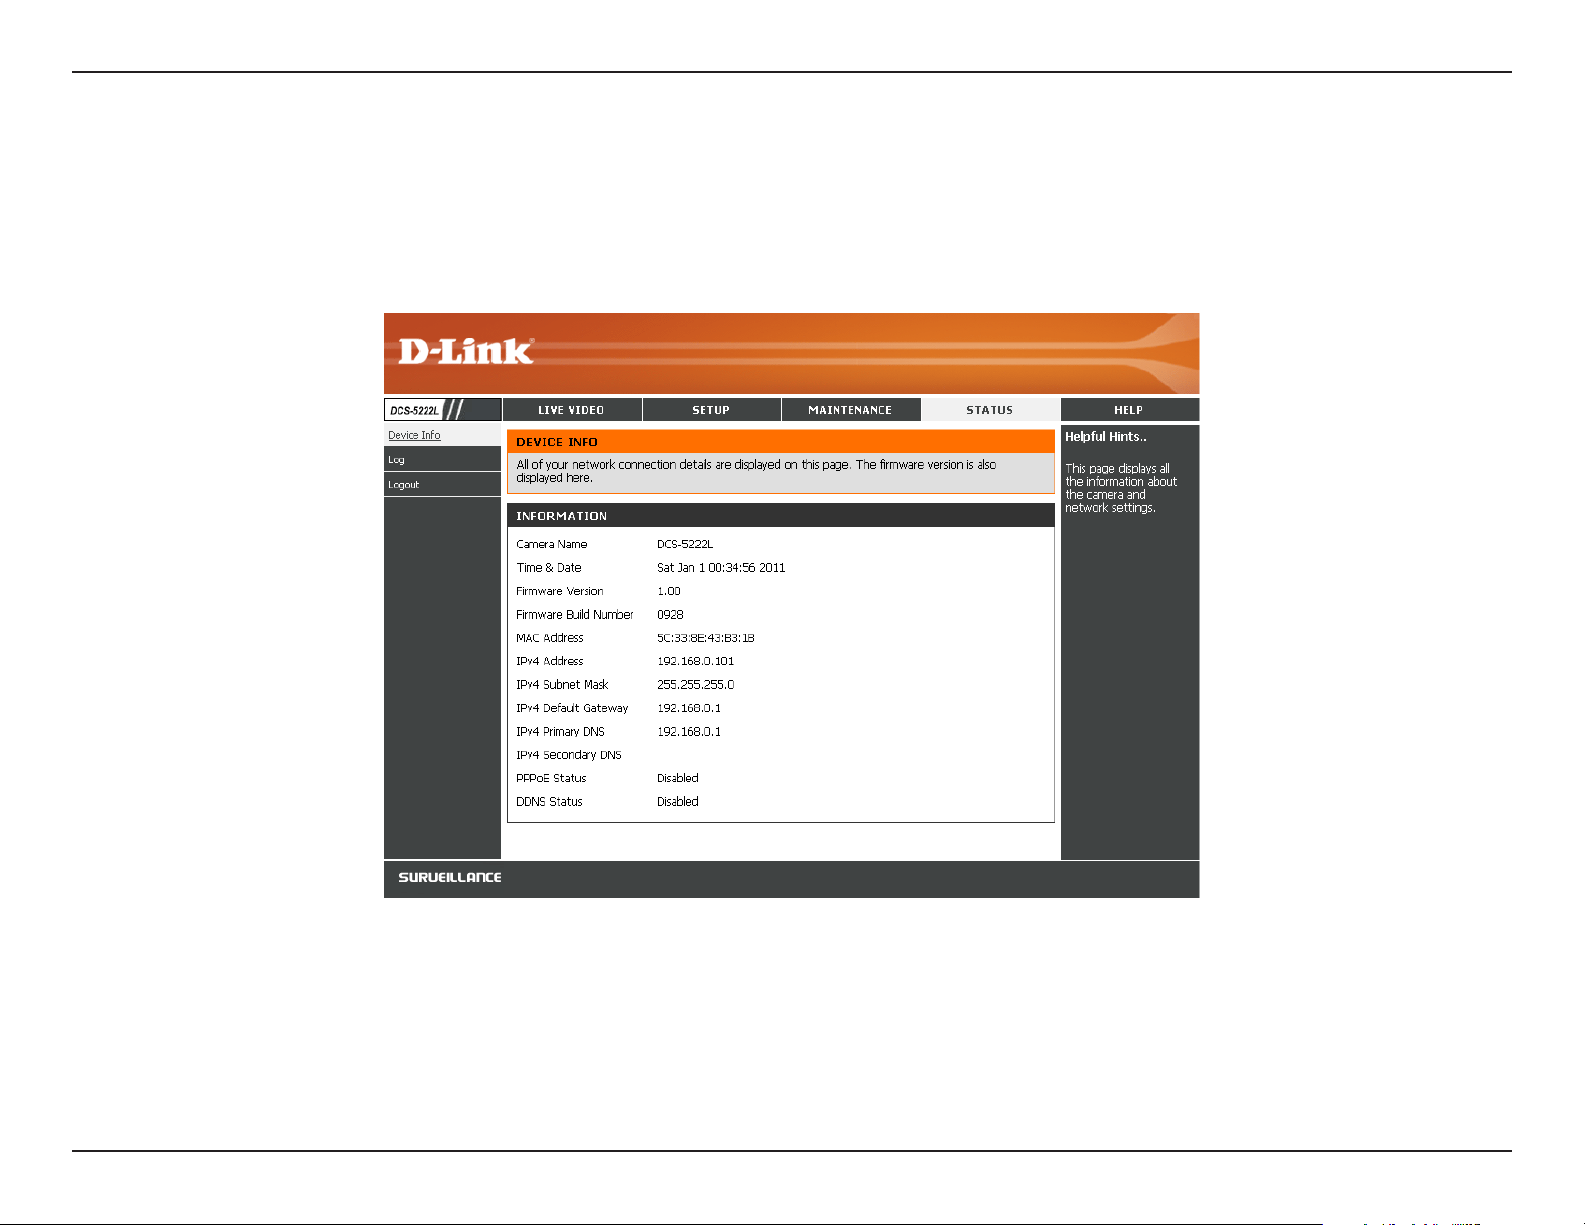
Status
This screen displays various information about your camera and its current settings.
Device Info
43D-Link DCS-5222L User Manual
Section 4 - Conguration
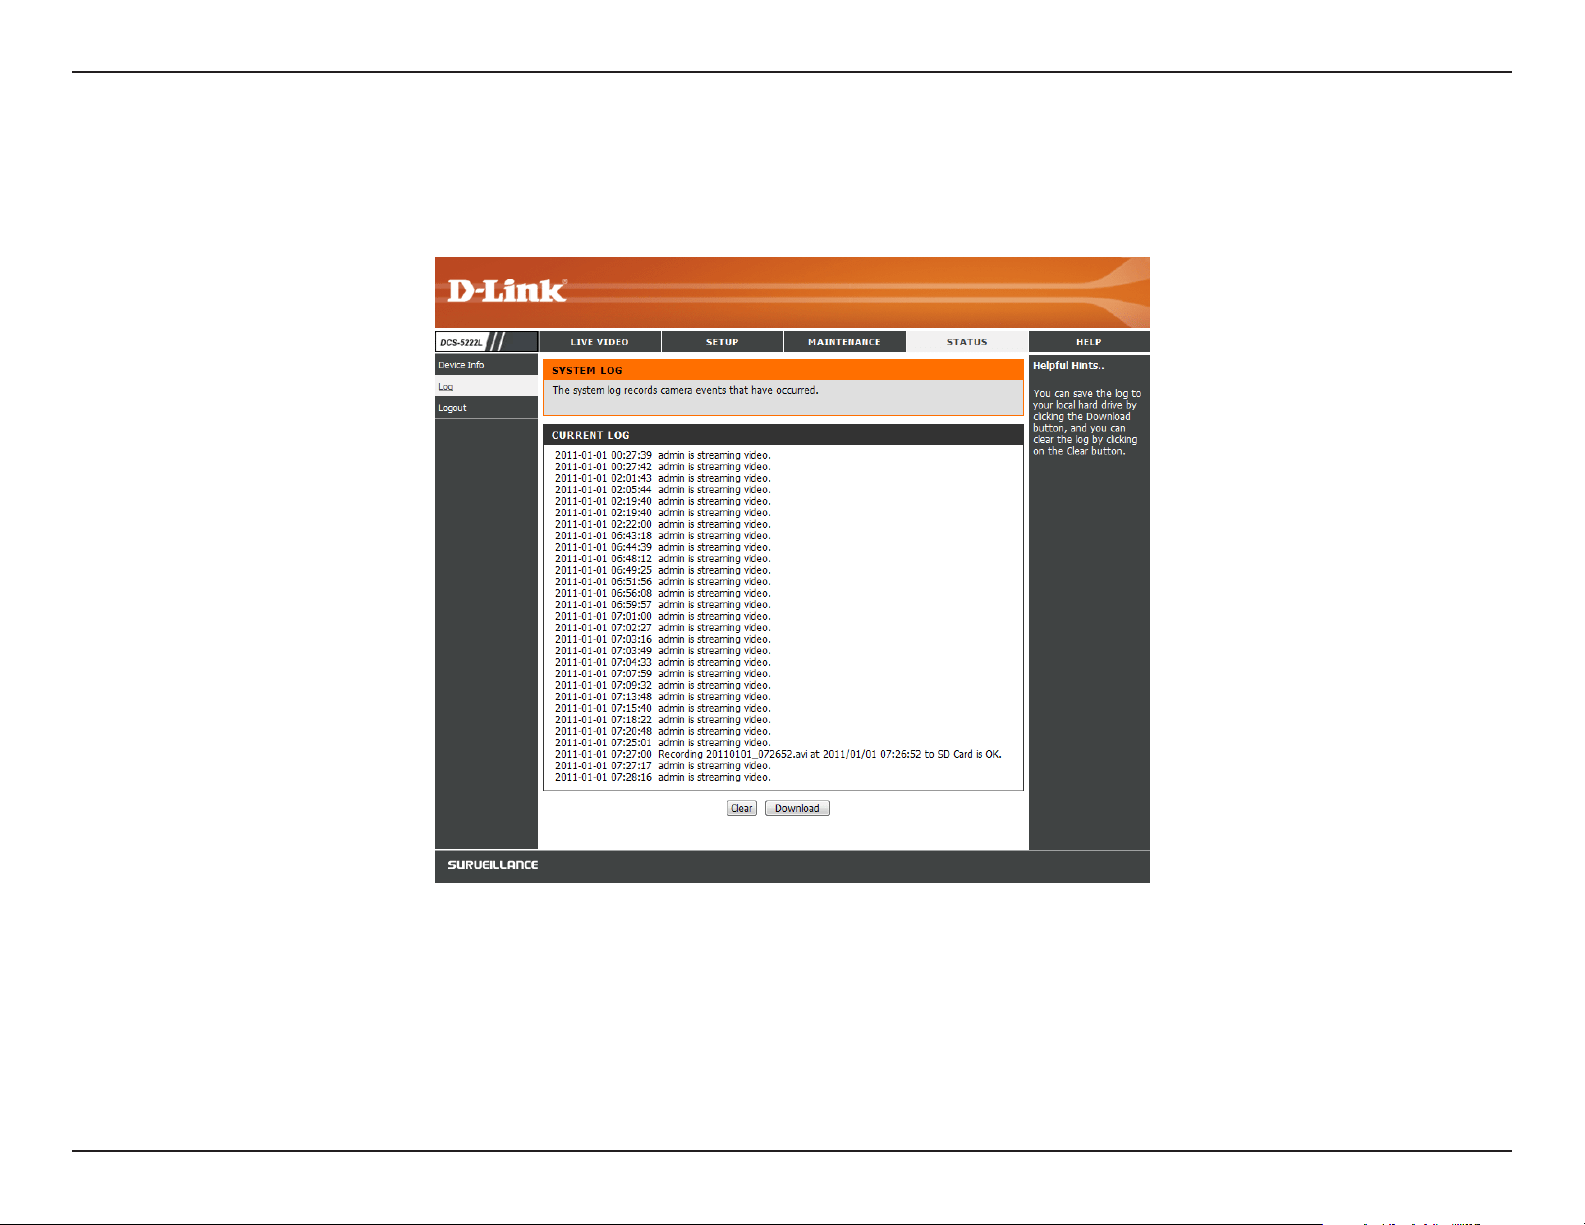
Thelogshowsyoualistofeventsthathavehappenedrecently.YoucandownloadthelogbyclickingtheDownload button, or you can empty the
log by clicking the Clear button.
Log
44D-Link DCS-5222L User Manual
Section 4 - Conguration
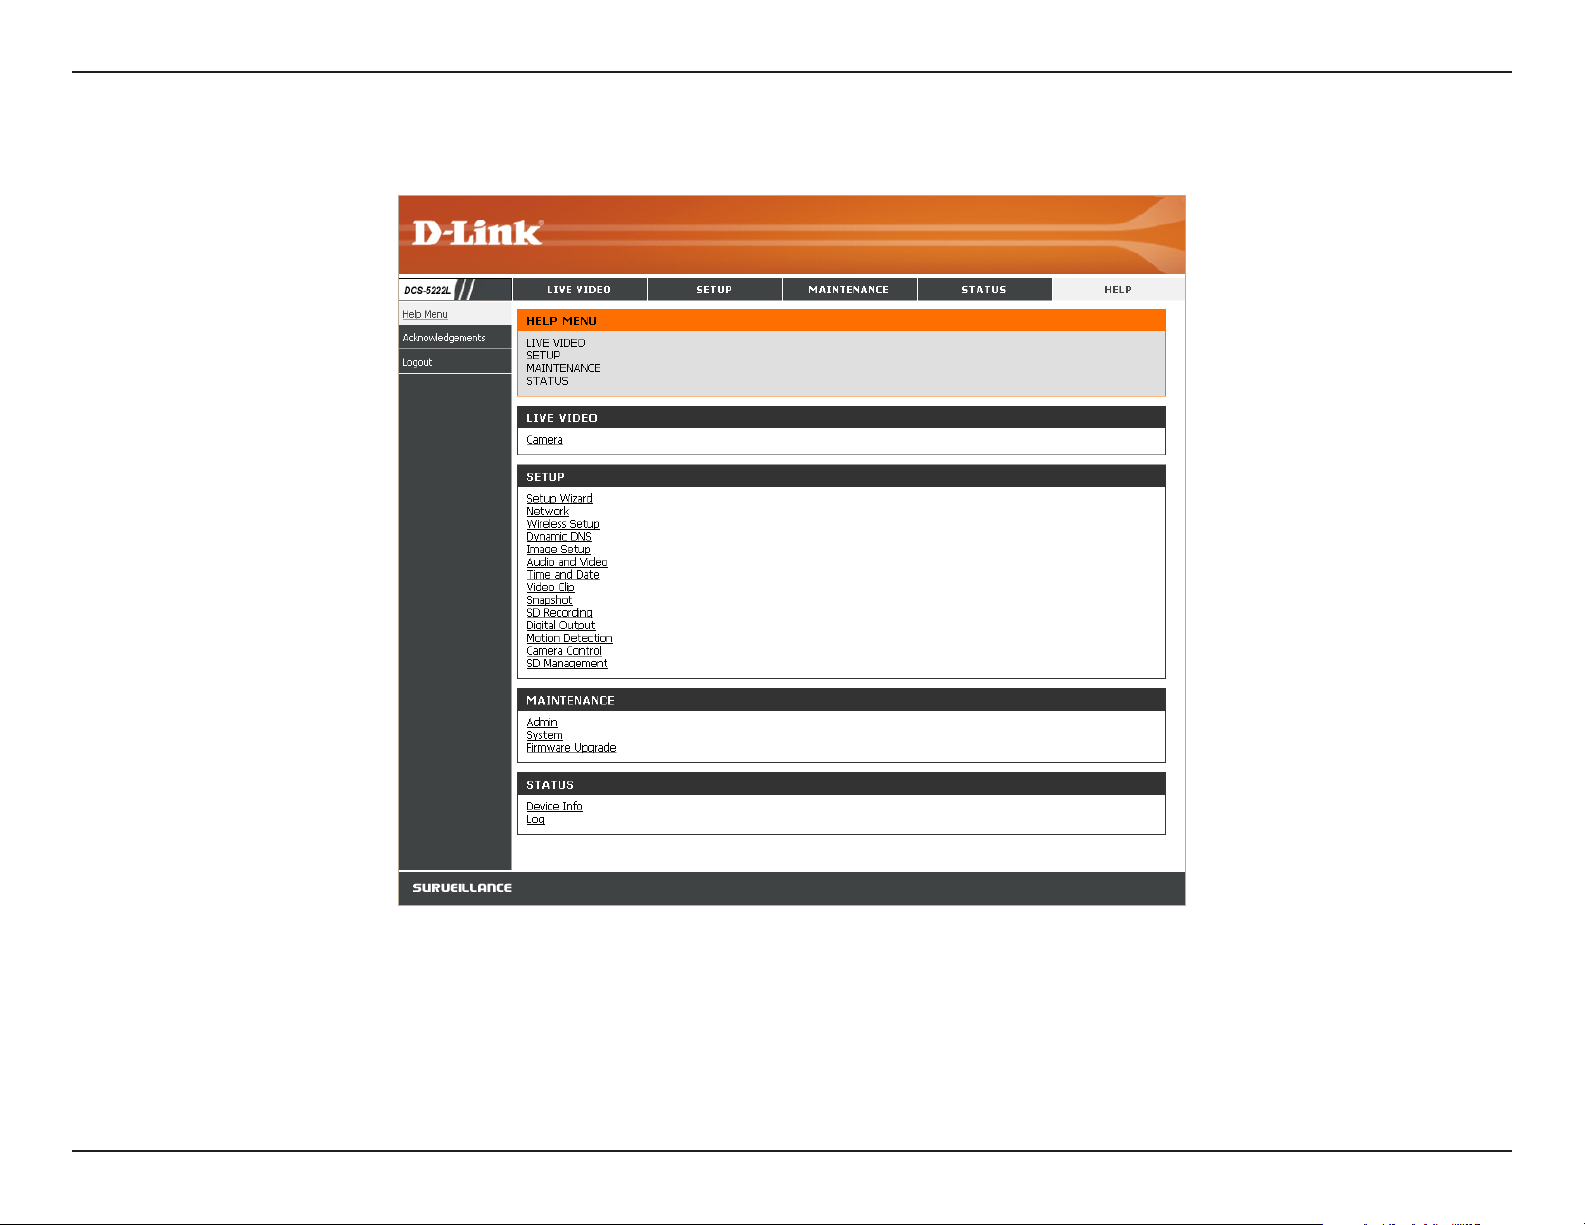
Help

45D-Link DCS-5222L User Manual
Section 5 - Security
D-Link’sDCS-5222LisaversatileandcosteectiveNetworkCameraoeringbothvideoandaudiomonitoring.Itcanalsoserveasapowerful
surveillance system in security applications. The DCS-5222L can be used with any wired or 802.11n/g wireless router. This section explains how to
view the camera from either the Internet or from inside your internal network.
ComponentsNeeded:
•1DCS-5222LNetworkCamera
•1EthernetCable
•AwiredorwirelessroutersuchastheD-LinkDIR-655WirelessRouter
•Ethernet-basedPCforsystemconguration
Setting up the DCS-5222L for Use Behind a Router
InstallingaDCS-5222LNetworkCameraonyournetworkisaneasy4–stepprocedure:
1. Assign a local IP address to your network camera.
2. View the network camera using your Internet Explorer web browser.
3. Access the router with your web browser.
4.Openvirtualserverportstoenableremoteimageviewing.
Note: These are manual steps; however, if you decide to use the wizard, it will perform every step automatically.
This section is designed to walk you through the setup process for installing your camera behind a router and enable remote video viewing. For
the basic setup of the DCS-5222L, follow the steps outlined in the Quick Installation Guide.
After you have completed the setup of the DCS-5222L outlined in the Quick Installation Guide you will have an operating camera that has an
assignedIPAddress.BecauseyouareusingaroutertosharetheInternetwithoneormorePCs,theIPAddressassignedtotheNetworkCamera
willbealocalIPAddress.ThisallowsviewingwithinyourLocalAreaNetwork(LAN)untiltherouterisconguredtoallowremoteviewingofthe
camera over the Internet.
Conguring the DCS-5222L with a Router
46D-Link DCS-5222L User Manual
Section 5 - Security
1. Assign a Local IP Address to Your Camera
Run the setup wizard from the CD included with the DCS-5222L. Follow the steps in the Quick Installation Guide to congure the DCS-5222L. The
camera will be assigned a local IP Address that allows it to be recognized by the router. Write down this IP Address for future reference.
OpenaWebbrowser.Intheaddressbar,typeintheIPAddressthatwasassignedtotheNetworkCamera.TheDCS-5222LLiveVideoPageappears
with a window displaying live video from the camera.
Click on the Setupbuttonontheleftside.ScrolltothebottomoftheNetworkSetuppagetodisplaytheportsusedbyHTTPandStreamingaudio
and video.
2. View the Network Camera Using Your Internet Explorer Web Browser
47D-Link DCS-5222L User Manual
Section 5 - Security
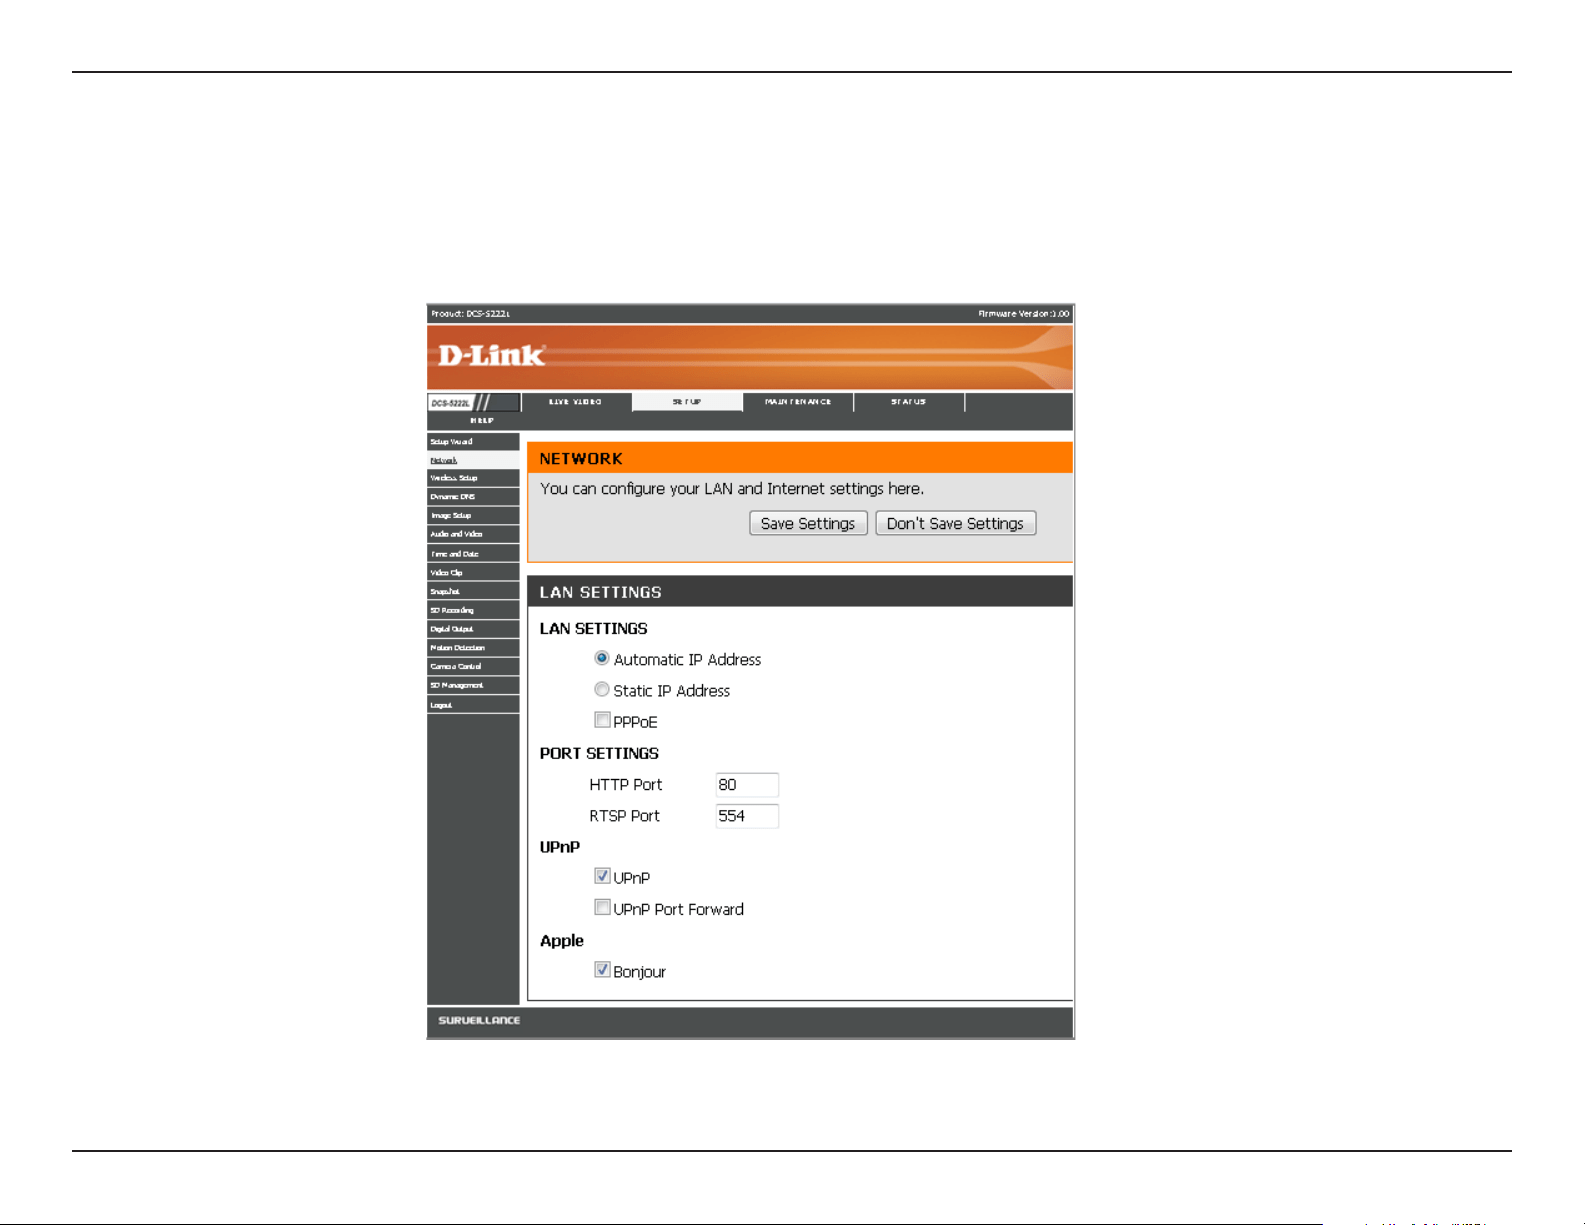
The Setup > Network page displays the port settings for your camera. If necessary, these ports can be changed if they are already in use by other
devices (e.g. in a multiple camera environment).
Note: Both the HTTP port and RTSP port are required to be opened for the DCS-5222L.
48D-Link DCS-5222L User Manual
Section 5 - Security
The following steps generally apply to any router that you have on your network. The D-Link DIR-655 is used as an example to clarify the conguration
process.Refertotherouter’susermanualformoreinformationonrouteroperationandconguration.
3. Access the Router with Your Web Browser
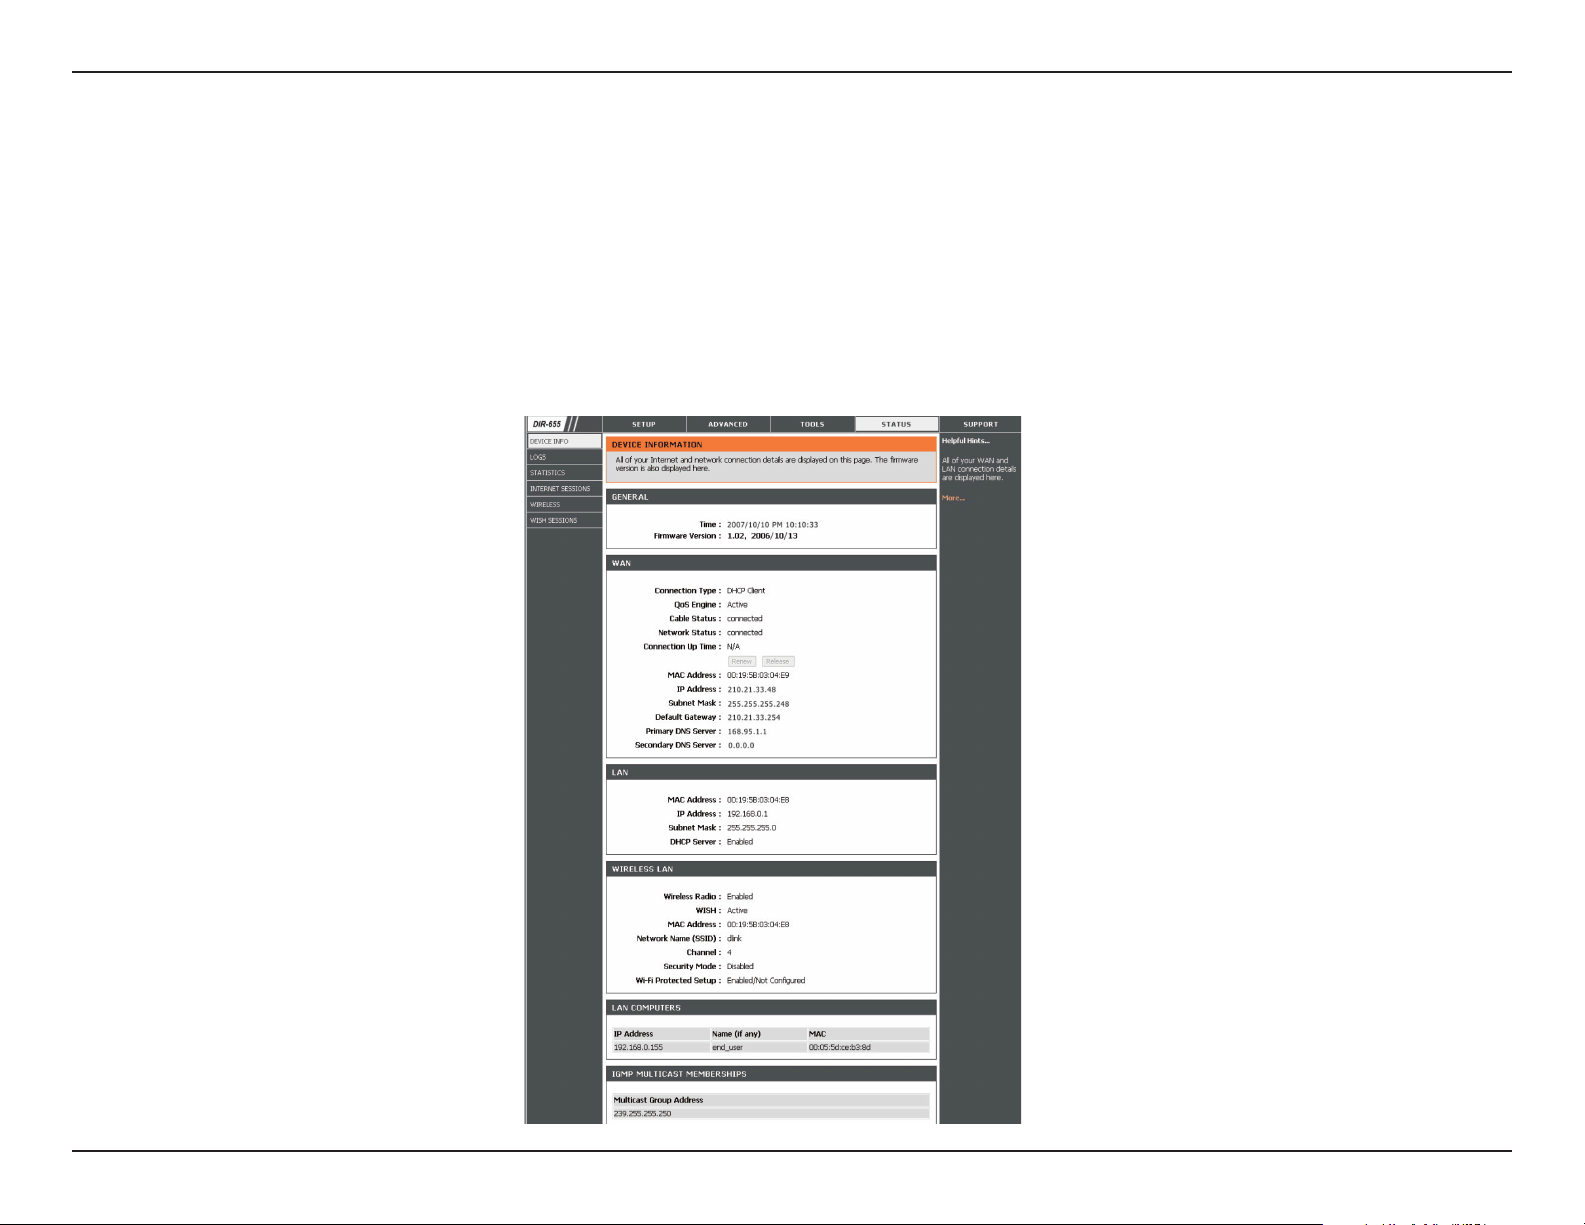
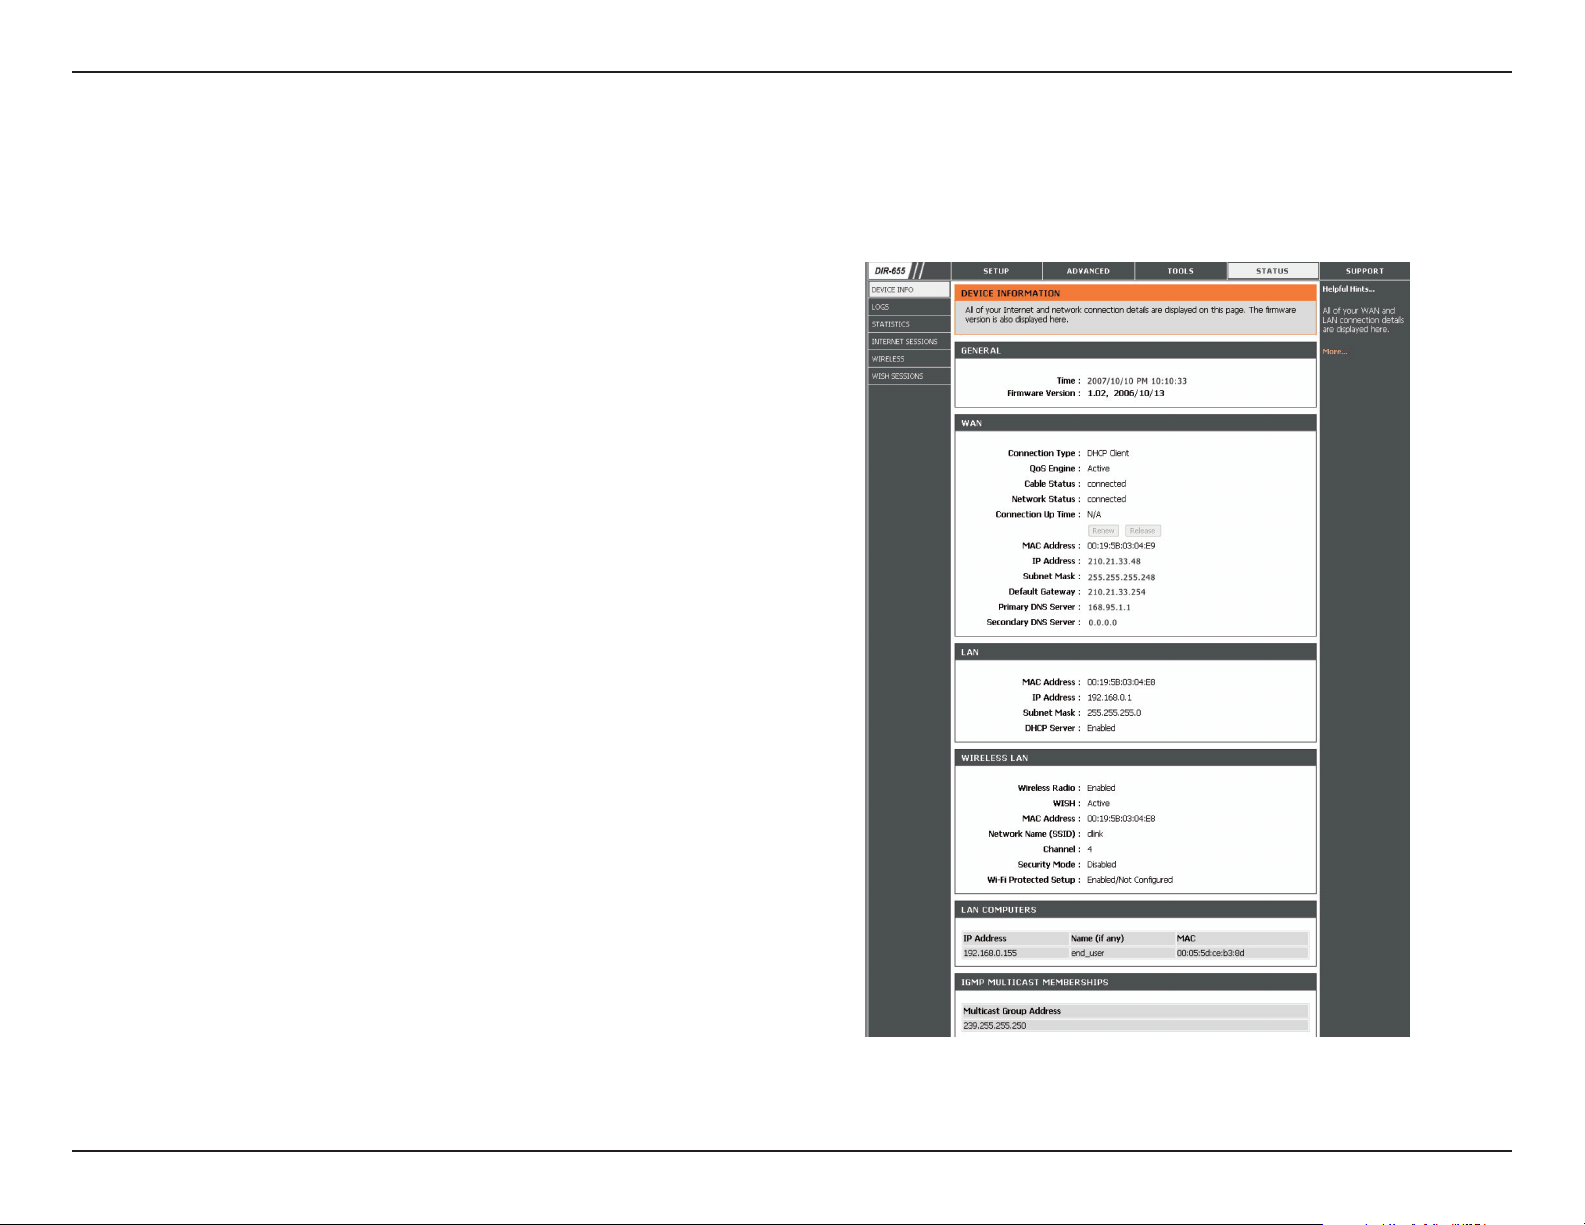
If you have cable or DSL Internet service, you will most likely have
adynamicallyassignedWANIPAddress.‘Dynamic’meansthatyour
router’sWANIPaddresscanchangefromtimetotimedependingon
yourISP.AdynamicWANIPAddressidentiesyourrouteronthepublic
networkandallowsittoaccesstheInternet.Tondoutyourrouter’s
WANIPAddress,gototheStatuspageonyourrouterandlocatethe
WANinformationforyourrouter(asshownonthenextpage).TheWAN
IP Address will be listed. This will be the address that you will need to
type into your web browser to view your camera over the Internet.
Router Set-Up and Installation
YourWANIPAddresswillbelistedontherouter’sStatus > Device
Info page.

49D-Link DCS-5222L User Manual
Section 5 - Security
Note: Because a dynamic WAN IP can change from time to time depending on your ISP, you may want to obtain a Static IP address from your ISP. A Static
IP address is a xed IP address that will not change over time and will be more convenient for you to use to access your camera from a remote location. The
Static IP Address will also allow you to access your camera attached to your router over the Internet.
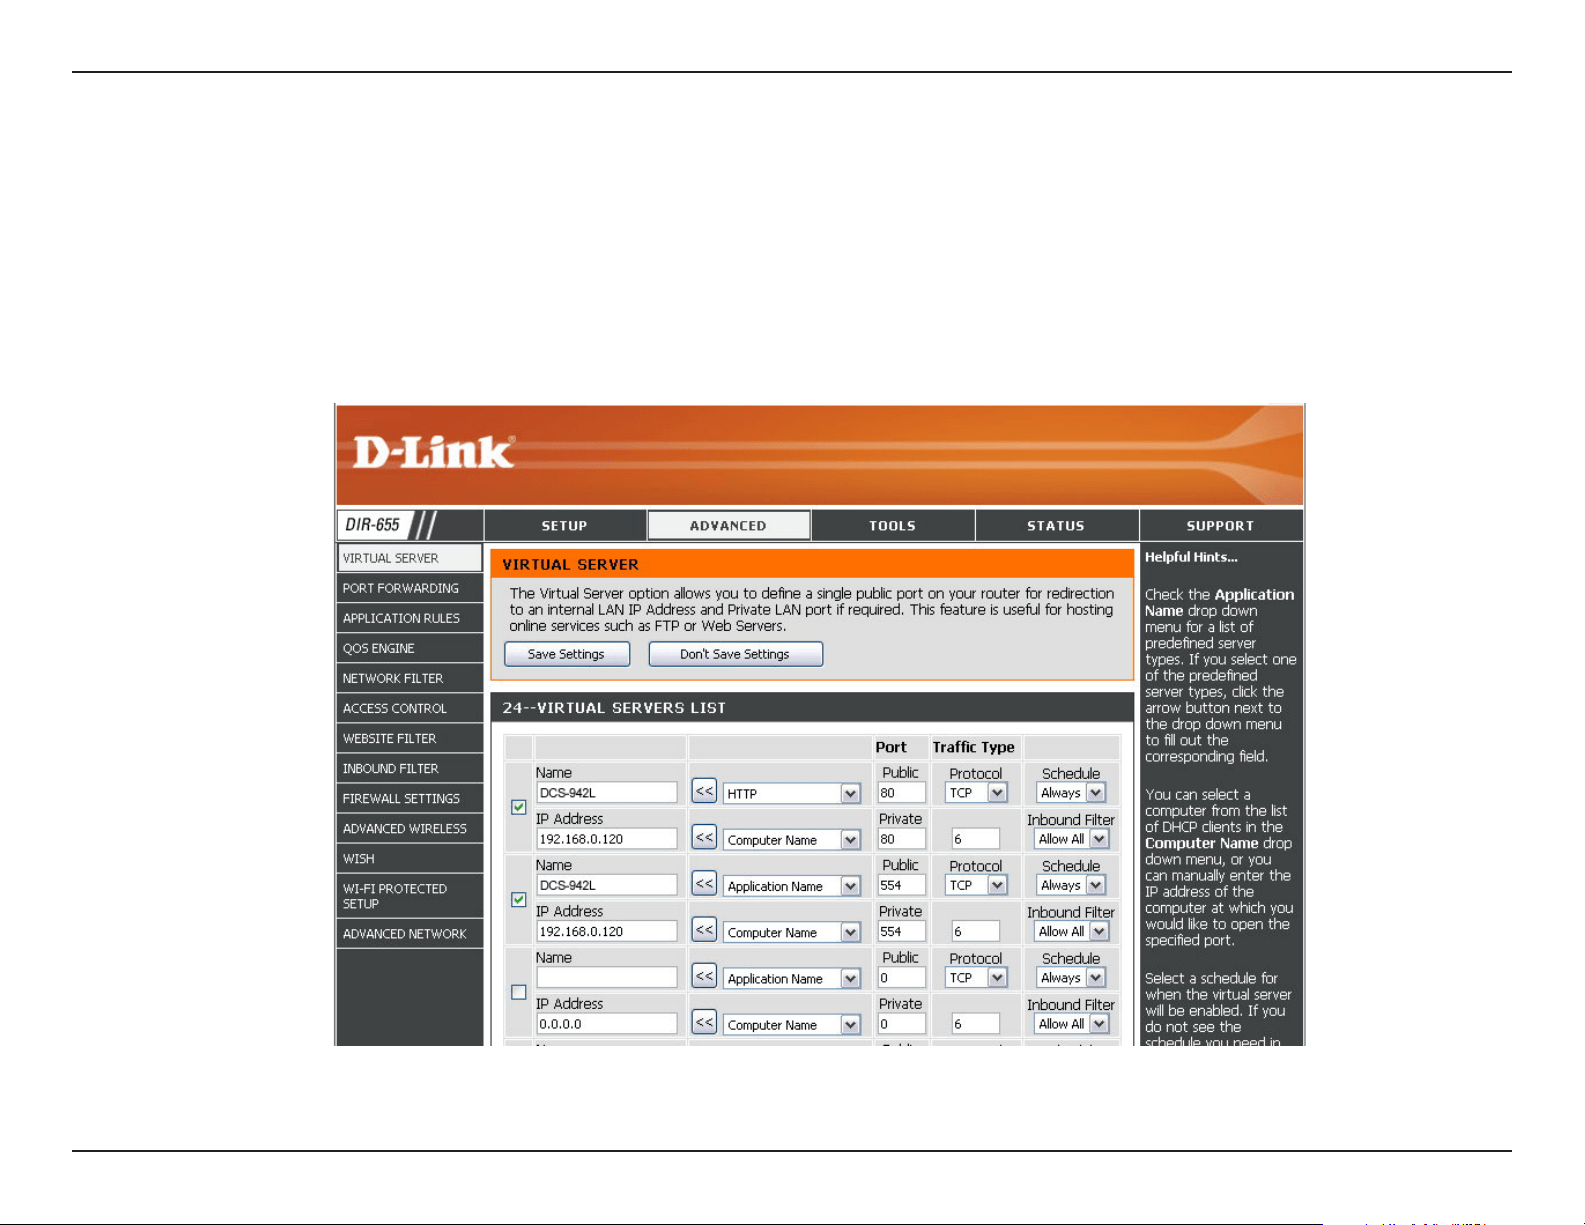
4. Open Ports to Enable Remote Image Viewing (Port Forwarding)
The rewall security features built into the DIR-655 router prevent users from accessing the video from the DCS-5222L over the Internet. The router
connects to the Internet over a series of numbered ports. The ports normally used by the DCS-5222L are blocked from access over the Internet.
Therefore, these ports need to be made accessible over the Internet. This is accomplished using the Virtual Server function on the DIR-655 router.
The Virtual Server ports used by the camera must be opened through the router for remote access to your camera. Virtual Server is accessed by
clicking on the Advanced tab of the router screen.
1. Click Enabled.
2. Enter a dierent name for each entry.
3. Enteryourcamera’slocalIPAddress(e.g.,192.168.0.120)inthePrivateIPeld.
4. Select TCP for HTTP port, both (TCP and UDP) for RTSP and both (TCP and UDP) for 5556 - 5559 ports.
5. If you are using the default camera port settings, enter 80 into the Public and Private Port section, click Apply.
6. Scheduling should be set to Always so that the camera images can be accessed at any time.
Followthesestepstocongureyourrouter’sVirtualServersettings:
50D-Link DCS-5222L User Manual
Section 5 - Security
Repeat the previous steps adding the port 554 to both the Public and Private Port sections. A check mark appearing before the entry name will
indicate that the ports are enabled.
Note: Some ISPs may block access to port 80 and other commonly used Internet ports to conserve bandwidth. Check with your ISP so that you can open
the appropriate ports accordingly. If your ISP does not pass trac on port 80, you will need to change the port the camera uses from 80 to something else,
such as 800. Not all routers are the same, so refer to your user manual for specic instructions on how to open ports.
Enter valid ports in the Virtual Server section of your router. Please make sure to check the box next to the camera name on the Virtual Server List
to enable your settings.

51D-Link DCS-5222L User Manual
Section 6 - Troubleshooting
Troubleshooting
This chapter provides solutions to problems that can occur during the installation and operation of the DCS-5222L.
1. What is Remote Access? How do I enable it?
Remote Access allows you to access your camera from any PC connected to the Internet through a web browser. This lets you view your camera
feedandmanageyourcamera’ssettingswhenyou’reawayfromhome.
ToenableRemoteAccess,simplygothroughtheCameraInstallationWizardincludedontheInstallationCDthatcameinyourpackage.Youcan
also download the wizard from http://support.dlink.com.
After going through the wizard, you should see Remote Status: Enabled on the summary page. If you see Remote Status: Disabled, make sure that:
...the front LED on your camera is lit solid green
...your Internet connection is working
...yourrouter’sLAN&WANconnectionsareworkingproperly
...your router has UPnP enabled (if your router does not support UPnP, please refer to Appendix A)
...your router can get a public IP
...your router is upgraded to the latest rmware
...you have tried rebooting your router by unplugging it, then plugging it back in
After checking the above items, you can click the Retry button to refresh the summary screen to see if Remote Access has been enabled.
2. What can I do if I forget my password?
If you forget your password, you will need to perform a hard reset of your camera. This process will change all your settings back to the factory defaults.
To reset your camera, please use an unfolded paperclip to press and hold the RESET button for at least 8 seconds while your camera is plugged in.

52D-Link DCS-5222L User Manual
Section 6 - Troubleshooting
3. In addition to using mydlink.com, is there another way to access my camera remotely over the Internet?
Yes,youcanaccessyourcameraovertheInternetthroughthefollowingURLaftersuccessfullyinstallingyourcamerathroughtheCameraInstallation
Wizard:
http://[mydlinkNo.].mydlink.com
Forexample,ifyourcamera’smydlinkNo.was12345678,youwouldbeabletoaccessyourcameraremotelybyopeningyourwebbrowserand
going to http://12345678.mydlink.com.
ThisURLwillopenawebpagewhereyouwillbeaskedtologinbyenteringyourcamera’spassword.Afterenteringyourpassword,yourcamera’s
Live View window will open, and you will be able to congure your camera as well.
4. Why does the LED not light up?
The power supply might be faulty. Conrm that you are using the provided DC 5V power supply for this network camera. Verify that the power
supply is correctly connected. If the camera is functioning normally, the LED may have been disabled. See page 39 for information about how to
enable the LED.
5. Why is the camera’s network connection unreliable?
Theremightbeaproblemwiththenetworkcable.Toconrmthatthecablesareworking,PINGtheaddressofaknowndeviceonthenetwork.If
thecablingisOKandyournetworkisreachable,youshouldreceiveareplysimilartothefollowing(…bytes=32time=2ms).
AnotherpossibleproblemmaybethatthenetworkdevicesuchasahuborswitchutilizedbytheNetworkCameraisnotfunctioningproperly.
Please conrm the power for the devices are well connected and functioning properly.
6. Why does the Network Camera work locally but not remotely?
This might be caused by the rewall protection. Check the Internet rewall with your system administrator. The rewall may need to have some
settingschangedinorderfortheNetworkCameratobeaccessibleoutsideyourlocalnetwork.Formoreinformation,pleaserefertothesection
about installing your camera behind a router on page 45.
MakesurethattheNetworkCameraisn’tconictingwithanyWebserveryoumayhaverunningonyournetwork.Thedefaultroutersettingmight
beapossiblereason.CheckthatthecongurationoftheroutersettingsallowtheNetworkCameratobeaccessedoutsideyourlocalnetwork.

53D-Link DCS-5222L User Manual
Section 6 - Troubleshooting
7. Why does a series of broad vertical white lines appear through out the image?
ItcouldbethattheCMOSsensor(asquarepanelsituatedbehindthelensthatmeasuresthelightsignalsandchangesitintoadigitalformatso
your computer can present it into an image that you are familiar with) has become overloaded when it has been exposed to bright lights such as
direct exposure to sunlight or halogen lights. Reposition the DCS-5222L camera into a more shaded area immediately, as prolonged exposure to
brightlightswilldamagetheCMOSsensor.
8. The camera is producing noisy images. How can I solve the problem?
The video images might be noisy if the camera is used in a very low light environment.
9. The images are poor quality, how can I improve the image quality?
Makesurethatyourcomputer’sdisplaypropertiesaresettoatleast6-bitcolor.Using16or256colorsonyourcomputerwillproducedithering
artifactsintheimage,makingtheimagelookasifitisofpoorquality.
ThecongurationontheNetworkCameraimagedisplayisincorrect.TheImageSetupsectiononpage27explainshowtoadjusttherelated-
parametersforimprovedimagessuchas:brightness,contrast,hueandlightfrequency.
10. Why are no images available through the Web browser?
ActiveXmightbedisabled.IfyouareviewingtheimagesfromInternetExplorermakesureActiveXhasbeenenabledintheInternetOptionsmenu.
YoumayalsoneedtochangethesecuritysettingsonyourbrowsertoallowtheActiveXplug-intobeinstalled.
If you are using Internet Explorer with a version number lower than 6, then you will need to upgrade your Web browser software in order to view
thestreamingvideotransmittedbytheNetworkCamera.
11. The PIR is not operating well, how can I improve the quality?
• ForthePassiveInfraredSensor(PIR)tofunctionproperlyitisrequiredtohavedirectlineofsitetotheobject.Whentheroomhasmanyobstacles
or the line of site is obstructed by glass, the PIR will not function properly.
• Whentheenvironmenttemperatureistoohigh,thePIRdetectionwillslowdownandshouldnotbemistakenforafaultyPIR.
• ThisNetworkCameracanonlybeinstalledindoors.DonotinstallthiscamerainaplacewhereIRinterferencecanbeaproblem.IRinterference
can be found close to glass doors or windows, where direct sunlight can cause interference or in the path of car headlights.

54D-Link DCS-5222L User Manual
Section 6 - Troubleshooting
• Donotinstallthiscameranexttoorinfrontofanairconditioneroutletorvent.
• DonotinstallthiscameraclosetowirelessdeviceswithhighfrequenciesasthePIRiseasilyaectedbyRFradiation.
• ThePIRfunctionsbestwhendetectinglateralmovements.Radialmovementscannotbedetectedaswellaslateralmovements.
• Donotinstallthiscameradirectlyunderanextremelybrightlight.ThePIRcannotfullysuppressabrightwhitelight.
• Anymovementsfromanobjectwithanormalbodytemperature,likehumansoranimals,canbedetected.Toavoidanymalfunctions,install
this camera at the proper height.
• Toavoidanymalfunctions,installthiscamerainanenvironmentwithanaveragetemperatureof25°C.Smallermovementsofanobjectcanbe
detectedwithinadistanceof2.5meters,attheheightofanaverageadult.Alargermovementofanobjectisrequiredfordetectionbetween
a distance of 2.5 and 5 meters.
• Installthiscameraonarm,static,anti-shocksurface.
55D-Link DCS-5222L User Manual
Appendix A - Networking Basics
Networking Basics
Check your IP address
After you install your new D-Link DCS-5222L camera, by default, the TCP/IP settings should be set to obtain an IP address from a DHCP server (i.e.
wireless router) automatically. To verify your IP address, please follow the steps below.
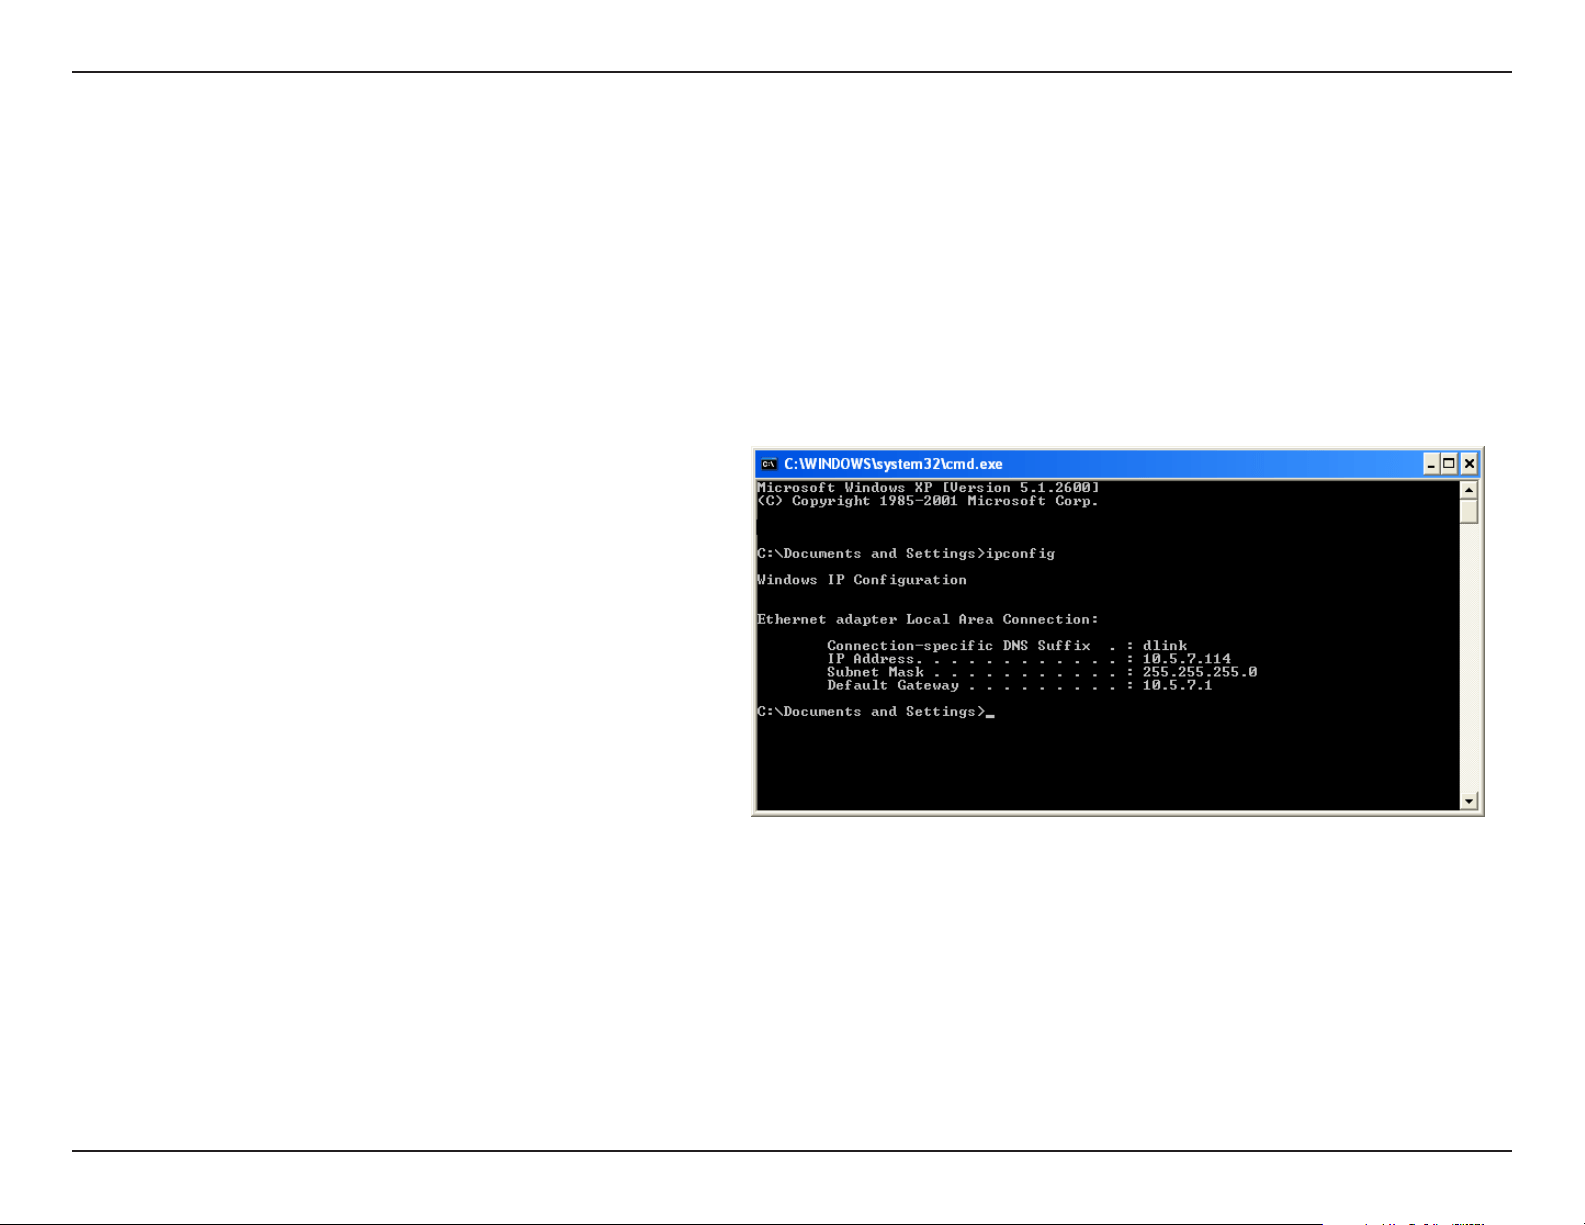
Click on Start > Run. In the run box type cmd and click OK.(Windows®7/Vista®userstypecmd in the Start Search box)
At the prompt, type ipcong and press Enter.
This will display the IP address, subnet mask and the default
gateway of your camera.
If the address is 0.0.0.0, check your camera installation, security
settings, and the settings on your router. Some rewall software
programsmayblockaDHCPrequestonnewlyinstalledcameras.
If you are connecting to a wireless network at a hotspot (e.g.
hotel, coee shop, airport), please contact an employee or
administrator to verify their wireless network settings.
56D-Link DCS-5222L User Manual
Appendix A - Networking Basics
Statically Assign an IP Address
If you are not using a DHCP capable gateway/router, or you need to assign a static IP address, please follow the steps below:
Step 1
Windows®7-ClickonStart > Control Panel > Network and Internet > Network and Sharing Center.
Windows®Vista-ClickonStart > Control Panel > Network and Internet > Network and Sharing Center > Manage Network Connections.
Windows®XP-ClickonStart > Control Panel > Network Connections.
Step 2
Right-click on the Local Area Connection which represents your network adapter and select Properties.
Step 3
Highlight Internet Protocol (TCP/IP) and click Properties.
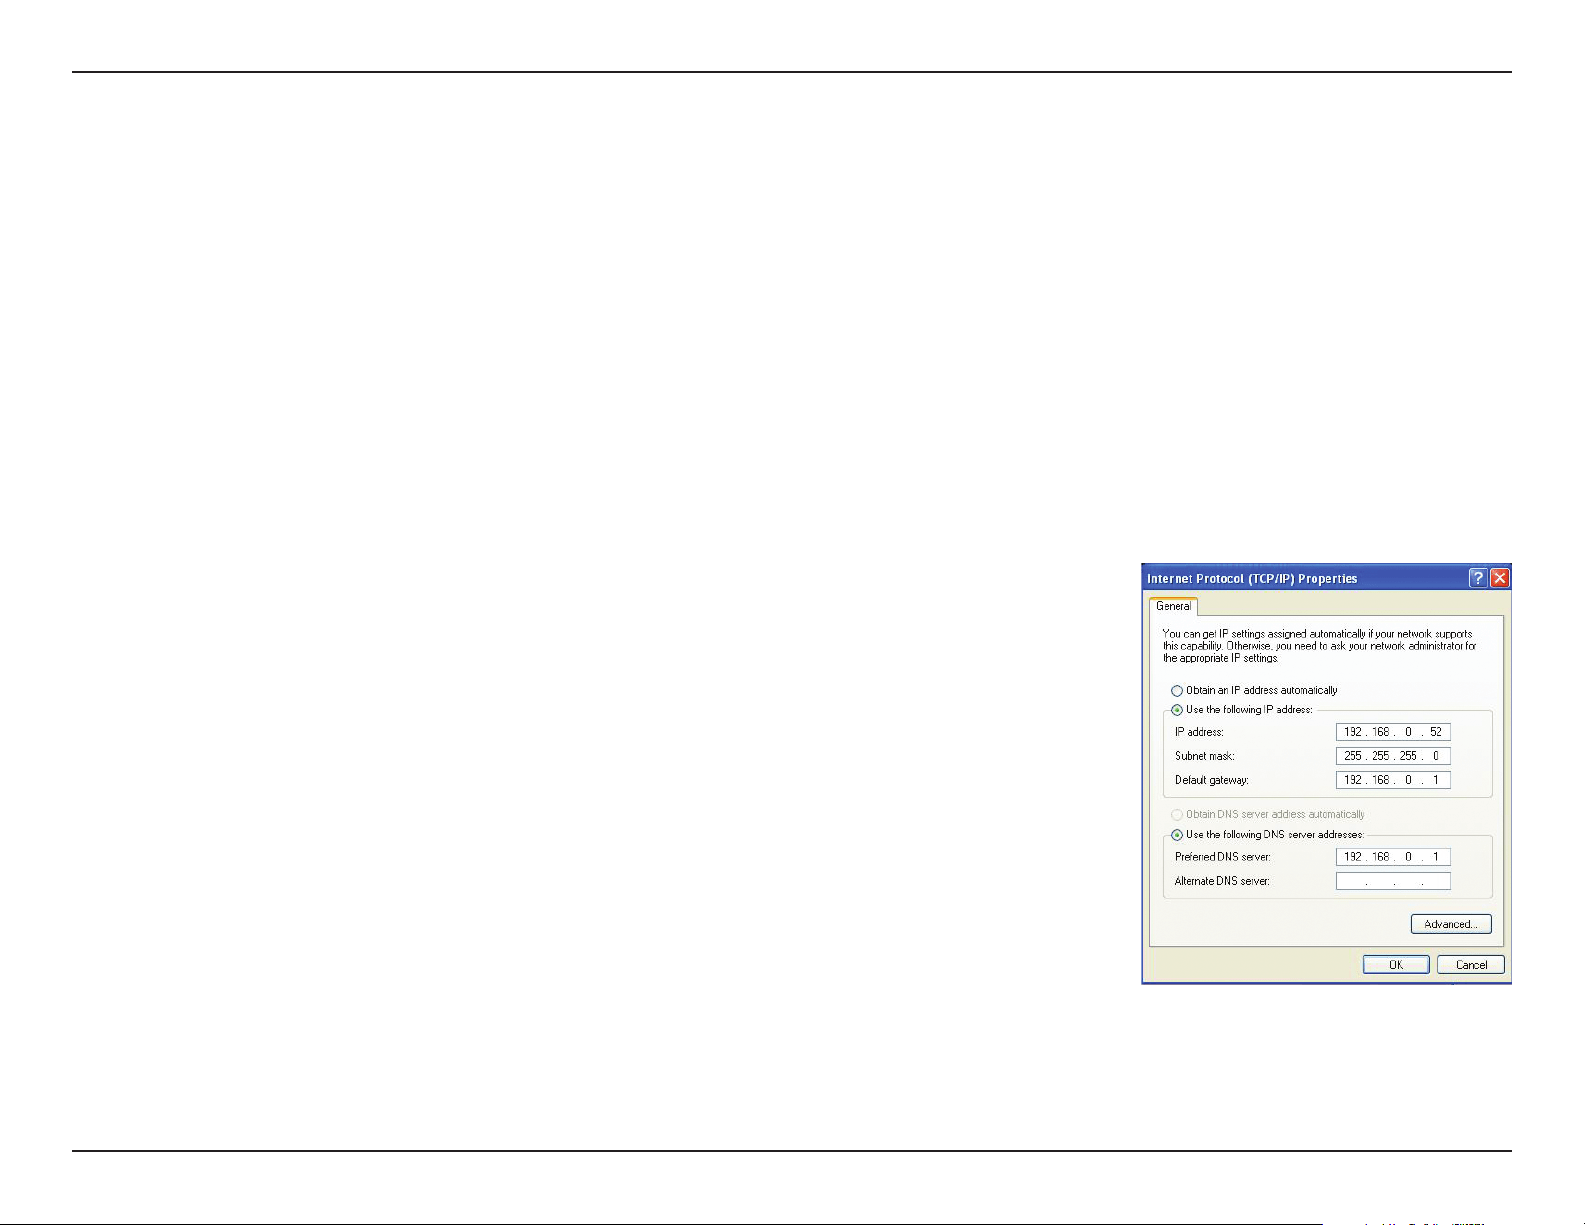
Step 4
Click Use the following IP address and enter an IP address that is on the same subnet as your network or
theLANIPaddressonyourrouter.
Example: Iftherouter´sLANIPaddressis192.168.0.1,makeyourIPaddress192.168.0.XwhereXisa
numberbetween2and99.Makesurethatthenumberyouchooseisnotinuseonthenetwork.SetDefault
GatewaythesameastheLANIPaddressofyourrouter(192.168.0.1).
SetPrimaryDNSthesameastheLANIPaddressofyourrouter(192.168.0.1).TheSecondaryDNSisnot
neededoryoumayenteraDNSserverfromyourISP.
Step 5
Click OK twice to save your settings.
57D-Link DCS-5222L User Manual
Appendix A - Technical Specications
Technical Specications - Remote Control Unit
Features
• RemoteController
• Codesystem:NEC
• IRtransmitterfrequency:38KHz
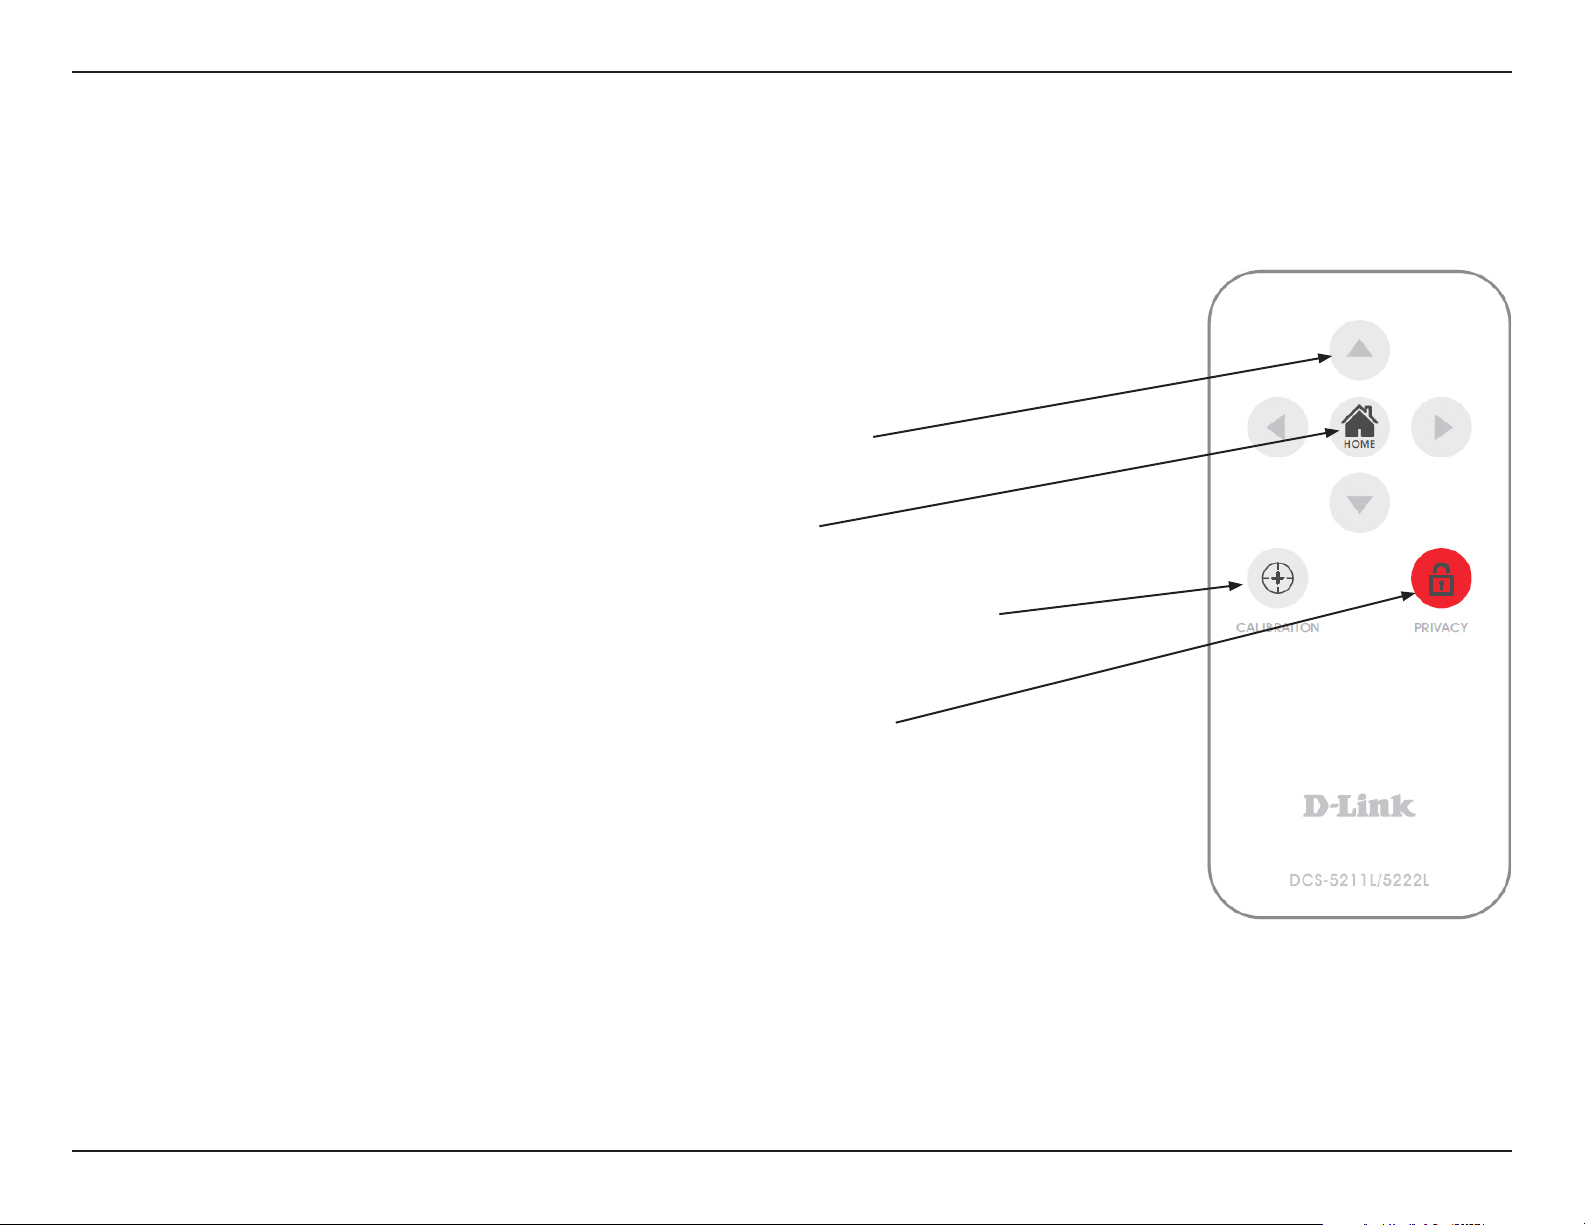
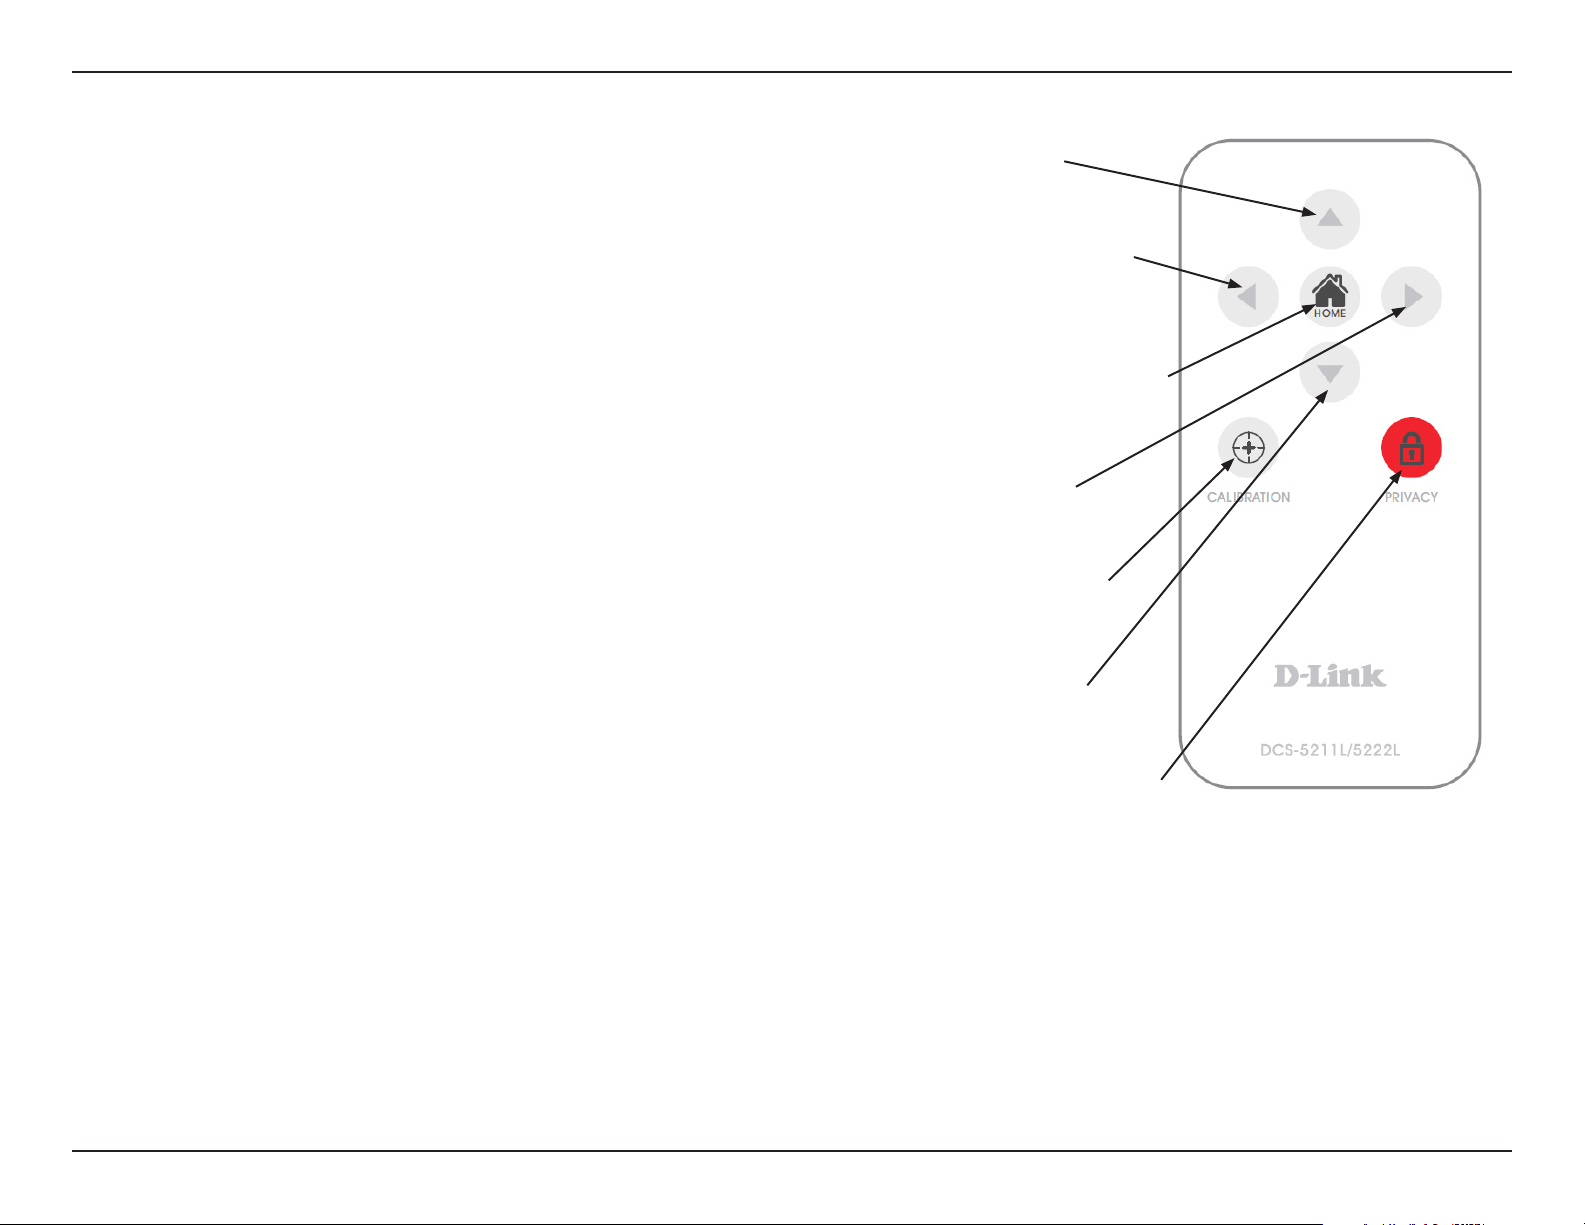
Pan/ tilt direction key
Pressing the pan/tilt direction keys (up, down, left, right) will move the camera
Home key
Pressing the Home key will move the camera to the home position.
Calibration key
Pressing the Calibration key will calibrate both the pan and tilt positions by moving from end
to end and will go to the corrected home position.
Privacy key
Pressing the privacy key will tilt the camera to the privacy position (privacy mode).
Pressing it again will tilt the camera back to the previous position.
58D-Link DCS-5222L User Manual
Appendix A - Technical Specications
Matrix Index Key Name Key Code Function
(1,2) ...................................................................................................................................... Up 44 Tilt up
(2,1) ..................................................................................................................................... Left 4C Pan to the left
(2,2) ................................................................................................................................ Home 06 Return to home position
(2,3) ................................................................................................................................. Right 40 Pan to the right
(3,1) ...................................................................................................................... Calibration 07 Calibrate home position
(3,2) ................................................................................................................................ Down 48 Tilt down
(3,3) .............................................................................................................................. Privacy 0E Tilt to privacy position.
59D-Link DCS-5222L User Manual
Appendix A - Technical Specications
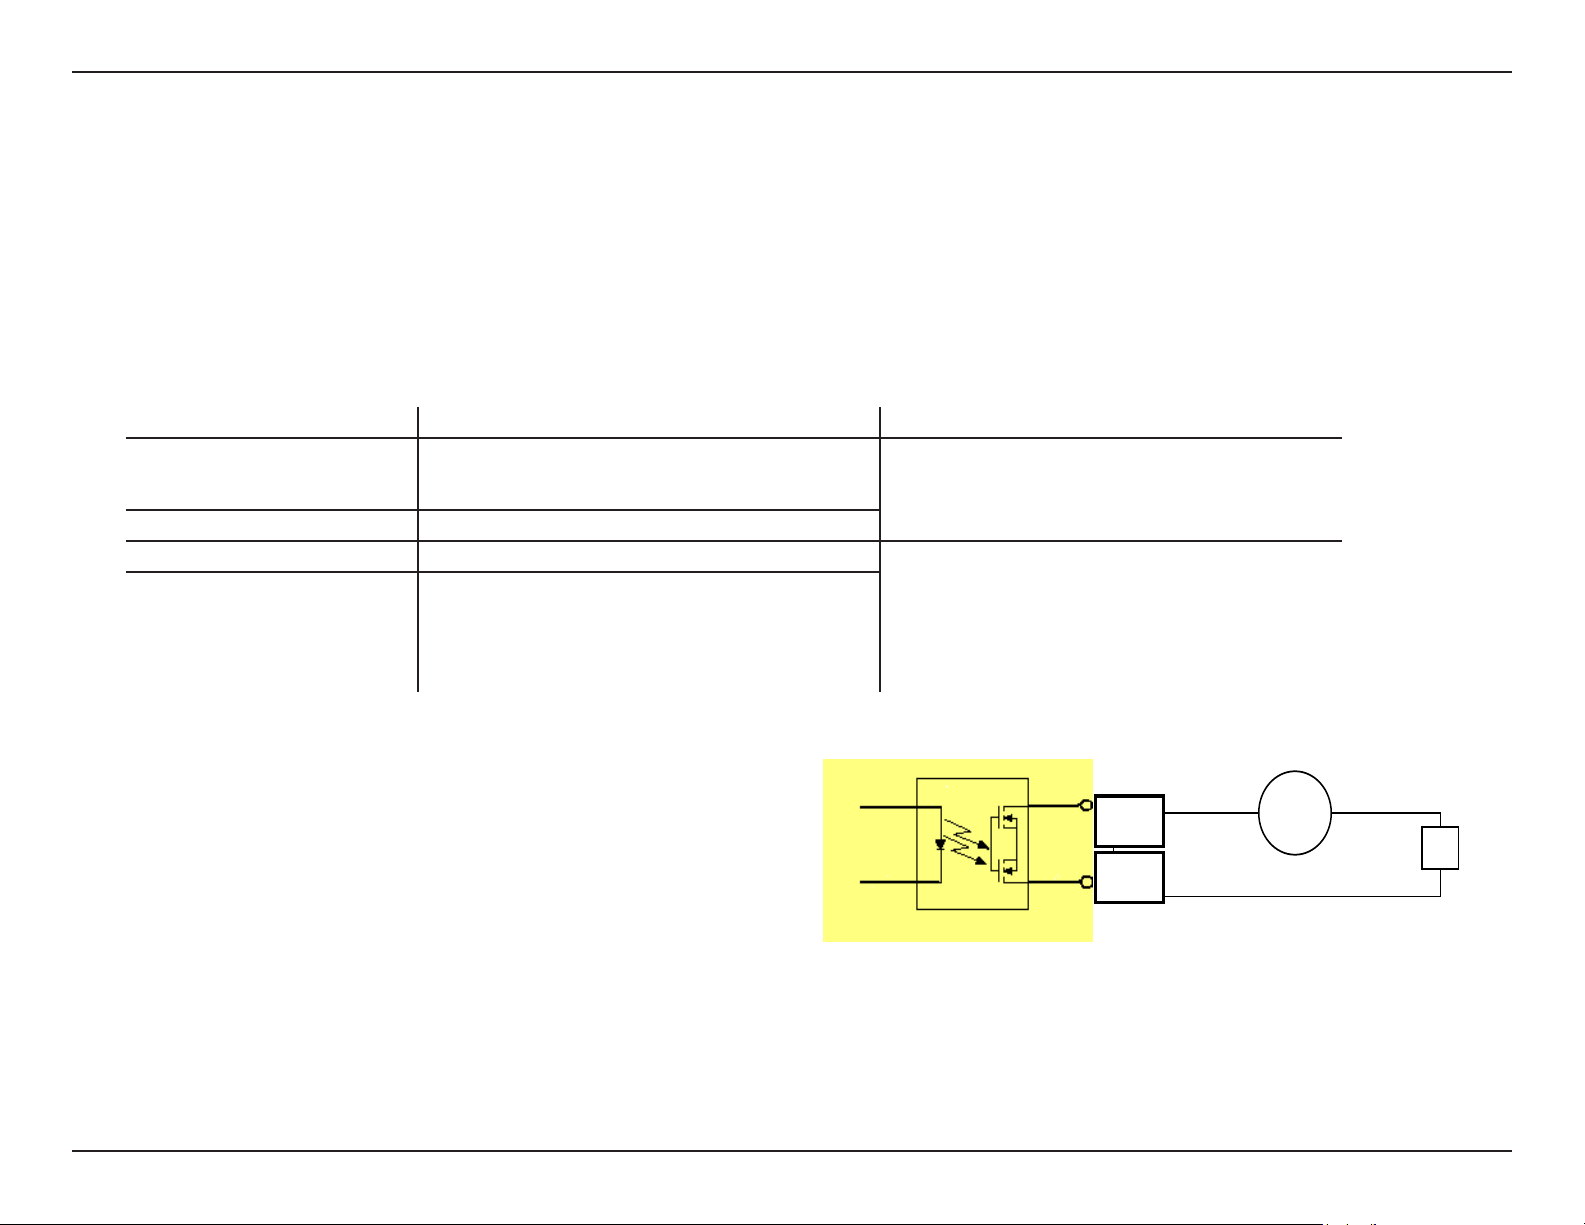
Technical Specications - I/O Terminal Application
TheI/OTerminalApplicationistypicallyusedinassociationwithprogrammingscriptsfordevelopingapplicationsformotiondetection,eventtriggering,
alarmnoticationviae-mail,andavarietyofexternalcontrolfunctions.The4-pinI/OTerminalBlockislocatedontherearpanelandprovidesthe
interface of a photo-coupled switch output and a photo-coupled input.
Connector Pin Assignment
Sign FUNCTION SPECIFICATION
DO- Photo-RelayOUTPUT(NormalOpen) Close circuit current max. 70 mA AC, or 100 mA DC.
On-Resistancemax.30Ohm.
Opencircuitblockingvoltage
max. 240VAC or 340VDCDO+ Photo-RelayOUTPUT(Common)
DI- Photo-RelayINPUT(-) Active High voltage 2.5~25VDC
Inactive Dropout voltage 0~1.5 VDC
Internal on-current has limit at 7mA
to protect the photo-relay.
DI+ Photo-RelayINPUT(+)
Monitoring and Controlling
Byenteringhttprequestsinyourbrowser’sURLeld,itispossibleto:
•Monitorthestatusofdigitalinput.
•Drivetheoutputswitchonoro.
Interface Schematic
Outputdevice(load)isdrivenbyanexternalACorDCpowersupply.
Input device (active control device) has an independent power supply.
DO-
DO+
AC/ DC
Load

60D-Link DCS-5222L User Manual
Appendix A - Technical Specications
Technical Specications
Networking Protocol
• IPv4,ARP,TCP,UDP,ICMP
• DHCPClient
• NTPClient(D-Link)
• DNSClient
• DDNSClient(D-Link)
• SMTPClient
• FTPClient
• HTTPServer
• UPNPPortForwarding
• LLTD
• PPPoE
• RTP(RealTimeProtocol)
• RTCP(RealTimeControlProtocol)
• RTSP(RealTimeStreamingProtocol)
• 3GPP(Videoonly)
LAN
•10/100BASE-TXport
•IEEE802.3compliant
•IEEE802.3ucompliant
•SupportsFull-Duplexoperation
•MDI/MDIXauto-negotiation
•802.3xFlowControlsupportforFull-Duplexmode
Wireless Connectivity
• 802.11g/nwirelesswithWEP/WPA/WPA2Security
• WPSSupport
Sensor
• 1/4inchWXGA(1280x800)
Lens
• Focallength:4.57mm,F1.9
Microphone
• Signal/noiseratio:40dB+/-3dB,Omni-directional
Reset Button
• Resettofactorydefault
Video Codec
•H.264/MPEG4/MJPEGtripleformatcompressionsimultaneously
•JPEGforstillimage
Video Features
• Adjustableimagesizeandquality
• Timestampandtextoverlay
• FlipandMirror
• Fullycongurablemotiondetectionwindow
Maximum Resolution
• 1280x720
Audio Codec
• PCM/ADPCM
Light Sensitivity
• 1[email protected]
Digital Zoom
• Upto4X

61D-Link DCS-5222L User Manual
Appendix A - Technical Specications
3A Control
• AGC(AutoGainControl)
• AWB(AutoWhiteBalance)
• AES(AutoElectronicShutter)
Power
• Input:100-240VAC,50/60Hz
• Output:12VDC,1.25A
• Poweredbyanexternalpoweradapter
• Maximumpowerconsumption
DCS-5222L:10.5W@motoron;8.2W@motoro
Dimensions (WxDxH)
• 114.0mmx114.0mmx125.0mm(withoutbracketandstand)
Weight
• 540g(withoutbracketandstand)
Operation Temperature
• 0˚to40˚C(32˚to104˚F)
Storage Temperature
• -20˚to70˚C(-4˚to158˚F)
Humidity
• 20-80%RHnon-condensing
Emission (EMI), Safety & Other Certications
•FCCClassB
•IC
•C-Tick
•CE

62D-Link DCS-5222L User Manual
Appendix B - Contacting Technical Support
Contacting Technical Support
U.S. and Canadian customers can contact D-Link technical support through our web site or by phone.
Before you contact technical support, please have the following ready:
•Modelnumberoftheproduct(e.g.DCS-5222L)
•HardwareRevision(locatedonthelabelonthebottomoftheNetworkCamera(e.g.revA1))
•SerialNumber(s/nnumberlocatedonthelabelonthebottomoftheNetworkCamera).
YoucanndsoftwareupdatesanduserdocumentationontheD-Linkwebsiteaswellasfrequentlyaskedquestionsand
answers to technical issues.
For customers within the United States:
Phone Support:
(877) 453-5465
Internet Support:
http://support.dlink.com
For customers within Canada:
Phone Support:
(800) 361-5265
Internet Support:
http://support.dlink.ca

63D-Link DCS-5222L User Manual
Appendix C - Warranty
Warranty
Subjecttothetermsandconditionssetforthherein,D-LinkSystems,Inc.(“D-Link”)providesthisLimitedWarranty:
• OnlytothepersonorentitythatoriginallypurchasedtheproductfromD-Linkoritsauthorizedresellerordistributor,and
• OnlyforproductspurchasedanddeliveredwithintheftystatesoftheUnitedStates,theDistrictofColumbia,U.S.Possessions
orProtectorates,U.S.MilitaryInstallations,oraddresseswithanAPOorFPO.
Limited Warranty:
D-Link warrants that the hardware portion of the D-Link product described below (“Hardware”) will be free from material defects in workmanship
and materials under normal use from the date of original retail purchase of the product, for the period set forth below (“Warranty Period”), except
as otherwise stated herein.
• Hardware(excludingpowersuppliesandfans):One(1)year
• Powersuppliesandfans:One(1)year
• Sparepartsandsparekits:Ninety(90)days
Thecustomer’ssoleandexclusiveremedyand the entireliabilityof D-Linkanditssuppliers under this LimitedWarrantywill be,at
D-Link’soption,torepairorreplacethedefectiveHardwareduringtheWarrantyPeriodatnochargetotheoriginalownerortorefundtheactual
purchasepricepaid.AnyrepairorreplacementwillberenderedbyD-LinkatanAuthorizedD-LinkServiceOce.Thereplacementhardware
need not be new or have an identical make, model or part. D-Link may, at its option, replace the defective Hardware or any part thereof with any
reconditionedproductthatD-Linkreasonablydeterminesissubstantiallyequivalent(orsuperior)inallmaterialrespectstothedefectiveHardware.
Repaired or replacement hardware will be warranted for the remainder of the original Warranty Period or ninety (90) days, whichever is longer,
andissubjecttothesamelimitationsandexclusions.Ifamaterialdefectisincapableofcorrection,orifD-Linkdeterminesthatitisnotpractical
to repair or replace the defective Hardware, the actual price paid by the original purchaser for the defective Hardware will be refunded by D-Link
upon return to D-Link of the defective Hardware. All Hardware or part thereof that is replaced by D-Link, or for which the purchase price is refunded,
shall become the property of D-Link upon replacement or refund.

64D-Link DCS-5222L User Manual
Appendix C - Warranty
Limited Software Warranty:
D-Linkwarrantsthatthesoftwareportionoftheproduct(“Software”)willsubstantiallyconformtoD-Link’sthencurrentfunctionalspecications
for the Software, as set forth in the applicable documentation, from the date of original retail purchase of the Software for a period of ninety (90)
days (“Software Warranty Period”), provided that the Software is properly installed on approved hardware and operated as contemplated in its
documentation. D-Link further warrants that, during the Software Warranty Period, the magnetic media on which D-Link delivers the Software will
befreeofphysicaldefects.Thecustomer’ssoleandexclusiveremedyandtheentireliabilityofD-LinkanditssuppliersunderthisLimitedWarranty
willbe,atD-Link’soption,toreplacethenon-conformingSoftware(ordefectivemedia)withsoftwarethatsubstantiallyconformstoD-Link’s
functional specications for the Software or to refund the portion of the actual purchase price paid that is attributable to the Software. Except as
otherwiseagreedbyDLinkinwriting,thereplacementSoftwareisprovidedonlytotheoriginallicensee,andissubjecttothetermsandconditions
of the license granted by D-Link for the Software. Replacement Software will be warranted for the remainder of the original Warranty Period and is
subjecttothesamelimitationsandexclusions.Ifamaterialnon-conformanceisincapableofcorrection,orifD-Linkdeterminesinitssolediscretion
that it is not practical to replace the non-conforming Software, the price paid by the original licensee for the non-conforming Software will be
refundedbyD-Link;providedthatthenon-conformingSoftware(andallcopiesthereof)isrstreturnedtoD-Link.Thelicensegrantedrespecting
any Software for which a refund is given automatically terminates.
Non-Applicability of Warranty:
TheLimitedWarrantyprovidedhereunderforHardwareandSoftwareportionsofD-Link’sproductswillnotbeappliedtoanddoesnotcoverany
refurbishedproductandanyproductpurchasedthroughtheinventoryclearanceorliquidationsaleorothersalesinwhichD-Link,thesellers,or
theliquidatorsexpresslydisclaimtheirwarrantyobligationpertainingtotheproductandinthatcase,theproductisbeingsold“As-Is”withoutany
warranty whatsoever including, without limitation, the Limited Warranty as described herein, notwithstanding anything stated herein to the contrary.
Submitting A Claim:
The customer shall return the product to the original purchase point based on its return policy. In case the return policy period has expired and
the product is within warranty, the customer shall submit a claim to D-Link as outlined below:
• Thecustomermustsubmitwiththeproductaspartoftheclaima writtendescriptionof the HardwaredefectorSoftware
nonconformance in sucient detail to allow D-Link to conrm the same, along with proof of purchase of the product (such as a
copy of the dated purchase invoice for the product) if the product is not registered.
• ThecustomermustobtainaCaseIDNumberfromD-LinkTechnicalSupport(USA1-877-453-5465orCanada1-800-361-5265),who
will attempt to assist the customer in resolving any suspected defects with the product. If the product is considered defective, the
customermustobtainaReturnMaterialAuthorization(“RMA”)numberbycompletingtheRMAform.EntertheassignedCaseID
Numberathttps://rma.dlink.com/(USAonly)orhttps://rma.dlink.ca(Canadaonly).

65D-Link DCS-5222L User Manual
Appendix C - Warranty
• AfteranRMAnumberisissued,thedefectiveproductmustbepackagedsecurelyintheoriginalorothersuitableshippingpackage
oensurethatitwillnotbedamagedintransit,andtheRMAnumbermustbeprominentlymarkedontheoutsideofthepackage.
Do not include any manuals or accessories in the shipping package. D-Link will only replace the defective portion of the product
and will not ship back any accessories.
•Thecustomerisresponsibleforallin-boundshippingchargestoD-Link.NoCashonDelivery(“COD”)isallowed.ProductssentCOD
willeitherberejectedbyD-LinkorbecomethepropertyofD-Link.Productsshallbefullyinsuredbythecustomerandshipped
to D-Link Systems, Inc.
• USA residentssendto17595Mt.Herrmann,FountainValley,CA92708.D-Linkwillnotbeheldresponsibleforanypackagesthat
are lost in transit to D-Link. The repaired or replaced packages will be shipped to the customer via UPS Ground or any common
carrier selected by D-Link. Return shipping charges shall be prepaid by D-Link if you use an address in the United States, otherwise
wewillshiptheproducttoyoufreightcollect.Expeditedshippingisavailableuponrequestandprovidedshippingchargesare
prepaidbythecustomer.D-Linkmayrejectorreturnanyproductthatisnotpackagedandshippedinstrictcompliancewiththe
foregoingrequirements,orforwhichanRMAnumberisnotvisiblefromtheoutsideofthepackage.Theproductowneragreesto
payD-Link’sreasonablehandlingandreturnshippingchargesforanyproductthatisnotpackagedandshippedinaccordance
withtheforegoingrequirements,orthatisdeterminedbyD-Linknottobedefectiveornon-conforming.
• Canadian residents sendtoD-LinkNetworks,Inc.,2525MeadowvaleBoulevardMississauga,Ontario,L5N5S2Canada.D-Linkwill
not be held responsible for any packages that are lost in transit to D-Link. The repaired or replaced packages will be shipped to
the customer via Purolator Canada or any common carrier selected by D-Link. Return shipping charges shall be prepaid by D-Link
if you use an address in Canada, otherwise we will ship the product to you freight collect. Expedited shipping is available upon
requestandprovidedshippingchargesareprepaidbythecustomer.D-Linkmayrejectorreturnanyproductthatisnotpackaged
andshippedinstrictcompliancewiththeforegoingrequirements,orforwhichanRMAnumberisnotvisiblefromtheoutsideof
thepackage.TheproductowneragreestopayD-Link’sreasonablehandlingandreturnshippingchargesforanyproductthatis
notpackagedandshippedinaccordancewiththeforegoingrequirements,orthatisdeterminedbyD-Linknottobedefectiveor
non-conforming.RMAphonenumber:1-800-361-5265HoursofOperation:Monday-Friday,9:00AM–9:00PMEST
What Is Not Covered:
The Limited Warranty provided herein by D-Link does not cover:
Productsthat,inD-Link’sjudgment,havebeensubjectedtoabuse,accident,alteration,modication,tampering,negligence,misuse,faultyinstallation,
lack of reasonable care, repair or service in any way that is not contemplated in the documentation for the product, or if the model or serial number
hasbeenaltered,tamperedwith,defacedorremoved;Initialinstallation,installationandremovaloftheproductforrepair,andshippingcosts;
Operationaladjustmentscoveredintheoperatingmanualfortheproduct,andnormalmaintenance;Damagethatoccursinshipment,duetoact
ofGod,failuresduetopowersurge,andcosmeticdamage;Anyhardware,software,rmwareorotherproductsorservicesprovidedbyanyone
otherthanD-Link;andProductsthathavebeenpurchasedfrominventoryclearanceorliquidationsalesorothersalesinwhichD-Link,thesellers,
ortheliquidatorsexpresslydisclaimtheirwarrantyobligationpertainingtotheproduct.

66D-Link DCS-5222L User Manual
Appendix C - Warranty
While necessary maintenance or repairs on your Product can be performed by any company, we recommend that you use only an Authorized D-Link
ServiceOce.ImproperorincorrectlyperformedmaintenanceorrepairvoidsthisLimitedWarranty.
Disclaimer of Other Warranties:
EXCEPTFORTHELIMITEDWARRANTYSPECIFIEDHEREIN,THEPRODUCTISPROVIDED“AS-IS”WITHOUTANYWARRANTYOFANYKINDWHATSOEVER
INCLUDING,WITHOUTLIMITATION,ANYWARRANTYOFMERCHANTABILITY,FITNESSFORAPARTICULARPURPOSEANDNONINFRINGEMENT.
IFANYIMPLIEDWARRANTYCANNOTBEDISCLAIMEDINANYTERRITORYWHEREAPRODUCTISSOLD,THEDURATIONOFSUCHIMPLIEDWARRANTY
SHALLBELIMITEDTOTHEDURATIONOFTHEAPPLICABLEWARRANTYPERIODSETFORTHABOVE.EXCEPTASEXPRESSLYCOVEREDUNDERTHE
LIMITEDWARRANTYPROVIDEDHEREIN,THEENTIRERISKASTOTHEQUALITY,SELECTIONANDPERFORMANCEOFTHEPRODUCTISWITHTHE
PURCHASEROFTHEPRODUCT.
Limitation of Liability:
TOTHEMAXIMUMEXTENTPERMITTEDBYLAW,D-LINKISNOTLIABLEUNDERANYCONTRACT,NEGLIGENCE,STRICTLIABILITYOROTHERLEGAL
OREQUITABLETHEORYFORANYLOSSOFUSEOFTHEPRODUCT,INCONVENIENCEORDAMAGESOFANYCHARACTER,WHETHERDIRECT,SPECIAL,
INCIDENTALORCONSEQUENTIAL(INCLUDING,BUTNOTLIMITEDTO,DAMAGESFORLOSSOFGOODWILL,LOSSOFREVENUEORPROFIT,WORK
STOPPAGE,COMPUTERFAILUREORMALFUNCTION,FAILUREOFOTHEREQUIPMENTORCOMPUTERPROGRAMSTOWHICHD-LINK’SPRODUCT
ISCONNECTEDWITH,LOSSOFINFORMATIONORDATACONTAINEDIN,STOREDON,ORINTEGRATEDWITHANYPRODUCTRETURNEDTOD-LINK
FORWARRANTYSERVICE)RESULTINGFROMTHEUSEOFTHEPRODUCT,RELATINGTOWARRANTYSERVICE,ORARISINGOUTOFANYBREACHOF
THISLIMITEDWARRANTY,EVENIFD-LINKHASBEENADVISEDOFTHEPOSSIBILITYOFSUCHDAMAGES.THESOLEREMEDYFORABREACHOF
THEFOREGOINGLIMITEDWARRANTYISREPAIR,REPLACEMENTORREFUNDOFTHEDEFECTIVEORNONCONFORMINGPRODUCT.THEMAXIMUM
LIABILITYOFD-LINKUNDERTHISWARRANTYISLIMITEDTOTHEPURCHASEPRICEOFTHEPRODUCTCOVEREDBYTHEWARRANTY.THEFOREGOING
EXPRESSWRITTENWARRANTIESANDREMEDIESAREEXCLUSIVEANDAREINLIEUOFANYOTHERWARRANTIESORREMEDIES,EXPRESS,IMPLIED
ORSTATUTORY.
Governing Law:
This Limited Warranty shall be governed by the laws of the State of California. Some states do not allow exclusion or limitation of incidental or
consequentialdamages,orlimitationsonhowlonganimpliedwarrantylasts,sotheforegoinglimitationsandexclusionsmaynotapply.This
Limited Warranty provides specic legal rights and you may also have other rights which vary from state to state.
Trademarks:
D-LinkisaregisteredtrademarkofD-LinkCorporation/D-LinkSystems,Inc.Othertrademarksorregisteredtrademarksarethepropertyoftheir
respective owners.

67D-Link DCS-5222L User Manual
Appendix C - Warranty
Copyright Statement:
Nopartofthispublicationordocumentationaccompanyingthisproductmaybereproducedinanyformorbyanymeansorusedtomakeany
derivative such as translation, transformation, or adaptation without permission from D-Link Corporation/D-Link Systems, Inc., as stipulated by the
UnitedStatesCopyrightActof1976andanyamendmentsthereto.Contentsaresubjecttochangewithoutpriornotice.
Copyright ©2012 by D-Link Corporation/D-Link Systems, Inc. All rights reserved.
CE Mark Warning:
ThisisaClassBproduct.Inadomesticenvironment,thisproductmaycauseradiointerference,inwhichcasetheusermayberequiredtotake
adequatemeasures.
FCC Statement:
ThisequipmenthasbeentestedandfoundtocomplywiththelimitsforaClassBdigitaldevice,pursuanttopart15oftheFCCRules.Theselimitsare
designedtoprovidereasonableprotectionagainstharmfulinterferenceinaresidentialinstallation.Thisequipmentgenerates,uses,andcanradiate
radiofrequencyenergyand,ifnotinstalledandusedinaccordancewiththeinstructions,maycauseharmfulinterferencetoradiocommunication.
However,thereisnoguaranteethatinterferencewillnotoccurinaparticularinstallation.Ifthisequipmentdoescauseharmfulinterferencetoradio
ortelevisionreception,whichcanbedeterminedbyturningtheequipmentoandon,theuserisencouragedtotrytocorrecttheinterferenceby
one or more of the following measures:
• Reorientorrelocatethereceivingantenna.
• Increasetheseparationbetweentheequipmentandreceiver.
• Connecttheequipmentintoanoutletonacircuitdierentfromthattowhichthereceiverisconnected.
• Consultthedealeroranexperiencedradio/TVtechnicianforhelp.
FCC Caution:
Anychangesormodicationsnotexpresslyapprovedbythepartyresponsibleforcompliancecouldvoidtheuser’sauthoritytooperatethis
equipment.
ThisdevicecomplieswithPart15oftheFCCRules.Operationissubjecttothefollowingtwoconditions:
(1) This device may not cause harmful interference, and
(2) this device must accept any interference received, including interference that may cause undesired operation.
Ifthisdeviceisgoingtobeoperatedin5.15~5.25GHzfrequencyrange,thenitisrestrictedinindoorenvironmentonly.

68D-Link DCS-5222L User Manual
Appendix C - Warranty
IMPORTANT NOTICE:
FCC Radiation Exposure Statement:
ThisequipmentcomplieswithFCCradiationexposurelimitssetforthforanuncontrolledenvironment.Thisequipmentshouldbeinstalledand
operatedwithminimumdistance20cmbetweentheradiator&yourbody.Thistransmittermustnotbeco-locatedoroperatinginconjunction
with any other antenna or transmitter.
Theavailabilityofsomespecicchannelsand/oroperationalfrequencybandsarecountrydependentandarermwareprogrammedatthefactory
to match the intended destination. The rmware setting is not accessible by the end user.
For detailed warranty information applicable to products purchased outside the United States, please contact the corresponding local D-Link
oce.
Industry Canada Statement:
ThisdevicecomplieswithRSS-210oftheIndustryCanadaRules.Operationissubjecttothefollowingtwoconditions:
(1) This device may not cause harmful interference, and
(2) this device must accept any interference received, including interference that may cause undesired operation.
IMPORTANT NOTE:
Radiation Exposure Statement:
ThisequipmentcomplieswithCanadaradiationexposurelimitssetforthforanuncontrolledenvironment.Thisequipmentshouldbeinstalledand
operated with minimum distance 20cm between the radiator and your body.
This device has been designed to operate with an antenna having a maximum gain of 2 dB. Antenna having a higher gain is strictly prohibited per
regulationsofIndustryCanada.Therequiredantennaimpedanceis50ohms.

Appendix D - Registration
69D-Link DCS-5222L User Manual
Version 1.1
September 24, 2012
Product registration is entirely voluntary and failure to complete or return this form will not diminish your warranty rights.
Registration