www.philips.com/welcome
BDL4235DL
User Manual (English)
BDL4235DL
ii
Safety Instructions
Safety precautions and maintenance
WARNING: Use of controls, adjustments or
procedures other than those specied in this
documentation may result in exposure to shock,
electrical hazards and/or mechanical hazards.
Read and follow these instructions when connecting
and using your display:
Operation:
• Keepthedisplayoutofdirectsunlightandawayfromstovesorany
otherheatsources.
• Removeanyobjectthatcouldfallintoventilationholesorprevent
propercoolingofthedisplay’selectronics.
• Donotblocktheventilationholesonthecabinet.
• Whenpositioningthedisplay,makesurethepowerplugandoutlet
areeasilyaccessible.
• Whenturningoffthedisplaybydetachingthepowercord,wait6
secondsbeforere-attachingthepowercordfornormaloperation.
• EnsuretheuseofanapprovedpowercordprovidedbyPhilipsat
alltimes.Ifyourpowercordismissing,pleasecontactyourlocal
servicecenter.
• Donotsubjectthedisplaytoseverevibrationorhighimpact
conditionsduringoperation.
• Donotknockordropthedisplayduringoperationor
transportation.
Maintenance:
• Toprotectyourdisplayfrompossibledamage,donotputexcessive
pressureontheLCDpanel.Whenmovingyourdisplay,graspthe
frametolift;donotliftthedisplaybyplacingyourhandorngers
ontheLCDpanel.
• Unplugthedisplayifyouarenotgoingtouseitforanextensive
periodoftime.
• Unplugthedisplayifyouneedtocleanitwithaslightlydampcloth.
Thescreenmaybewipedwithadryclothwhenthepowerisoff.
However,neveruseorganicsolvent,suchas,alcohol,orammonia-
basedliquidstocleanyourdisplay.
• Toavoidtheriskofshockorpermanentdamagetotheset,do
notexposethedisplaytodust,rain,wateroranexcessivelymoist
environment.
• Ifyourdisplaybecomeswet,wipeitwithdryclothassoonas
possible.
• Ifaforeignsubstanceorwatergetsinyourdisplay,turnthepower
offimmediatelyanddisconnectthepowercord.Thenremovethe
foreignsubstanceorwater,andsendtheunittothemaintenance
center.
• Donotstoreorusethedisplayinlocationsexposedtoheat,direct
sunlightorextremecold.
• Inordertomaintainthebestperformanceofyourdisplayand
ensurealongerlifetime,westronglyrecommendusingthedisplayin
alocationthatfallswithinthefollowingtemperatureandhumidity
ranges.
- Temperature:0-40°C32-104°F
- Humidity:20-80%RH
IMPORTANT:Alwaysactivateamovingscreensaverprogramwhen
youleaveyourdisplayunattended.Alwaysactivateaperiodicscreen
refreshapplicationiftheunitwilldisplayunchangingstaticcontent.
Uninterrupteddisplayofstillorstaticimagesoveranextendedperiod
maycause“burnin”,alsoknownas“after-imaging”or“ghostimaging”,on
yourscreen.Thisisawell-knownphenomenoninLCDpaneltechnology.
Inmostcases,the“burnedin”or“after-imaging”or“ghostimaging”will
disappeargraduallyoveraperiodoftimeafterthepowerhasbeen
switchedoff.
WARNING:Severe“burn-in”or“after-image”or“ghostimage”
symptomswillnotdisappearandcannotberepaired.Thisisalsonot
coveredunderthetermsofyourwarranty.
Service:
• Thecasingcovershouldbeopenedonlybyqualiedservice
personnel.
• Ifthereisanyneedforrepairorintegration,pleasecontactyour
localservicecenter.
• Donotleaveyourdisplayunderdirectsunlight.
Ifyourdisplaydoesnotoperatenormally,
havingfollowedtheinstructionssetoutinthis
document,pleasecontactatechnicianoryour
localservicecenter..

BDL4235DL
iii
Read and follow these instructions
when connecting and using your Public
Information Display:
• Unplugthedisplayifyouarenotgoingtouseitforanextensive
periodoftime.
• Unplugthedisplayifyouneedtocleanitwithaslightlydampcloth.
Thescreenmanybewipedwithadryclothwhenthepowerisoff.
However,neverusealcohol,solventsorammonia-basedliquids.
• Consultaservicetechnicianifthedisplaydoesnotoperatenormally
whenyouhavefollowedtheinstructionsinthismanual.
• Thecasingcovershouldbeopenedonlybyqualiedservice
personnel.
• Keepthedisplayoutofdirectsunlightandawayfromstovesorany
otherheatsources.
• Removeanyobjectthatcouldfallintotheventsorpreventproper
coolingofthedisplay’selectronics.
• Donotblocktheventilationholesonthecabinet.
• Keepthedisplaydry.Toavoidelectricshock,donotexposeitto
rainorexcessivemoisture.
• Ifturningoffthedisplaybydetachingthepowercable,waitfor6
secondsbeforere-attachingthepowercablefornormaloperation.
• Toavoidtheriskofshockorpermanentdamagetothesetdonot
exposethedisplaytorainorexcessivemoisture.
• Whenpositioningthedisplay,makesurethepowerplugandoutlet
areeasilyaccessible.
• IMPORTANT:Alwaysactivateascreensaverprogramduringyour
application.Ifastillimageinhighcontrastremainsonthescreenfor
anextendedperiodoftime,itmayleavean‘after-image’or‘ghost
image’onthefrontofthescreen.Thisisawell-knownphenomenon
thatiscausedbytheshortcomingsinherentinLCDtechnology.In
mostcasestheafterimagewilldisappeargraduallyoveraperiod
oftimeafterthepowerhasbeenswitchedoff.Beawarethatthe
after-imagesymptomcannotberepairedandisnotcoveredunder
warranty.
Regulatory Information
CE Declaration of Conformity
Wedeclareunderourresponsibilitythattheproductisinconformity
withthefollowingstandards:
• EN60950-1:2006+A11:2009+A1:2010+A12:2011(Safety
requirementofInformationTechnologyEquipment).
• EN55022:2010(RadioDisturbancerequirementofInformation
TechnologyEquipment).
• EN55024:2010(ImmunityrequirementofInformationTechnology
Equipment).
• EN61000-3-2:2006+A1:2009+A2:2009(LimitsforHarmonic
CurrentEmission).
• EN61000-3-3:2008(LimitationofVoltageFluctuationandFlicker)
• EN50581:2012(Technicaldocumentationfortheassessmentof
electricalandelectronicproductswithrespecttotherestrictionof
hazardoussubstances)
followingprovisionsofdirectivesapplicable.
• 2006/95/EC(LowVoltageDirective).
• 2004/108/EC(EMCDirective).
• 2009/125/EC(ErP,Energy-relatedProductDirective,ECNo.
1275/2008and642/2009Implementing)
• 2011/65/EU(RoHSDirective)andisproducedbyamanufacturing
organizationonISO9000level.
BDL4235DL
iv
Federal Communications Commission (FCC)
Notice (U.S. Only)
Thisequipmenthasbeentestedandfoundtocomply
withthelimitsforaClassBdigitaldevice,pursuantto
Part15oftheFCCRules.Theselimitsaredesigned
toprovidereasonableprotectionagainstharmful
interferencewhentheequipmentisoperatedina
commercialenvironment.Thisequipmentgenerates,
usesandcanradiateradiofrequencyenergyand,
ifnotinstalledandusedinaccordancewiththe
instructionsmanual,maycauseharmfulinterferenceto
radiocommunications.Operationofthisequipmentin
aresidentialareaislikelytocauseharmfulinterference
inwhichcasetheuserwillberequiredtocorrectthe
interferenceathisownexpense.
Changesormodicationsnotexpresslyapprovedby
thepartyresponsibleforcompliancecouldvoidthe
user’sauthoritytooperatetheequipment.
UseonlyanRFshieldedcablethatwassuppliedwiththedisplaywhen
connectingthisdisplaytoacomputerdevice.
Topreventdamagewhichmayresultinreorshockhazard,donot
exposethisappliancetorainorexcessivemoisture.
THISCLASSBDIGITALAPPARATUSMEETSALLREQUIREMENTS
OFTHECANADIANINTERFERENCE-CAUSINGEQUIPMENT
REGULATIONS.
ThisdevicecomplieswithPart15oftheFCCRules.
Operationissubjecttothefollowingtwoconditions:
(1)thisdevicemaynotcauseharmfulinterference,
and(2)thisdevicemustacceptanyinterference
received,includinginterferencethatmaycause
undesiredoperation.
Polish Center for Testing and Certication
Notice
Theequipmentshoulddrawpowerfromasocketwithanattached
protectioncircuit(athree-prongsocket).Allequipmentthatworks
together(computer,display,printer,andsoon)shouldhavethesame
powersupplysource.
Thephasingconductoroftheroom’selectricalinstallationshouldhave
areserveshort-circuitprotectiondeviceintheformofafusewitha
nominalvaluenolargerthan16amperes(A).
Tocompletelyswitchofftheequipment,thepowersupplycablemust
beremovedfromthepowersupplysocket,whichshouldbelocated
neartheequipmentandeasilyaccessible.
Aprotectionmark“B”conrmsthattheequipmentisincompliance
withtheprotectionusagerequirementsofstandardsPN-93/T-42107
andPN-89/E-06251.
Electric, Magnetic and Electronmagnetic
Fields (“EMF”)
1. Wemanufactureandsellmanyproductstargetedatconsumers,
which,likeanyelectronicapparatus,ingeneralhavetheabilityto
emitandreceiveelectromagneticsignals.
2. OneofourleadingBusinessPrinciplesistotakeallnecessaryhealth
andsafetymeasuresforourproducts,tocomplywithallapplicable
legalrequirementsandtostaywellwithintheEMFstandards
applicableatthetimeofproducingtheproducts.
3. Wearecommittedtodevelop,produceandmarketproductsthat
causenoadversehealtheffects.
4. Weconrmthatifitsproductsarehandledproperlyfortheir
intendeduse,theyaresafetouseaccordingtoscienticevidence
availabletoday.
5. WeplayanactiveroleinthedevelopmentofinternationalEMFand
safetystandards,enablingustoanticipatefurtherdevelopmentsin
standardizationforearlyintegrationinitsproducts.
BDL4235DL
v
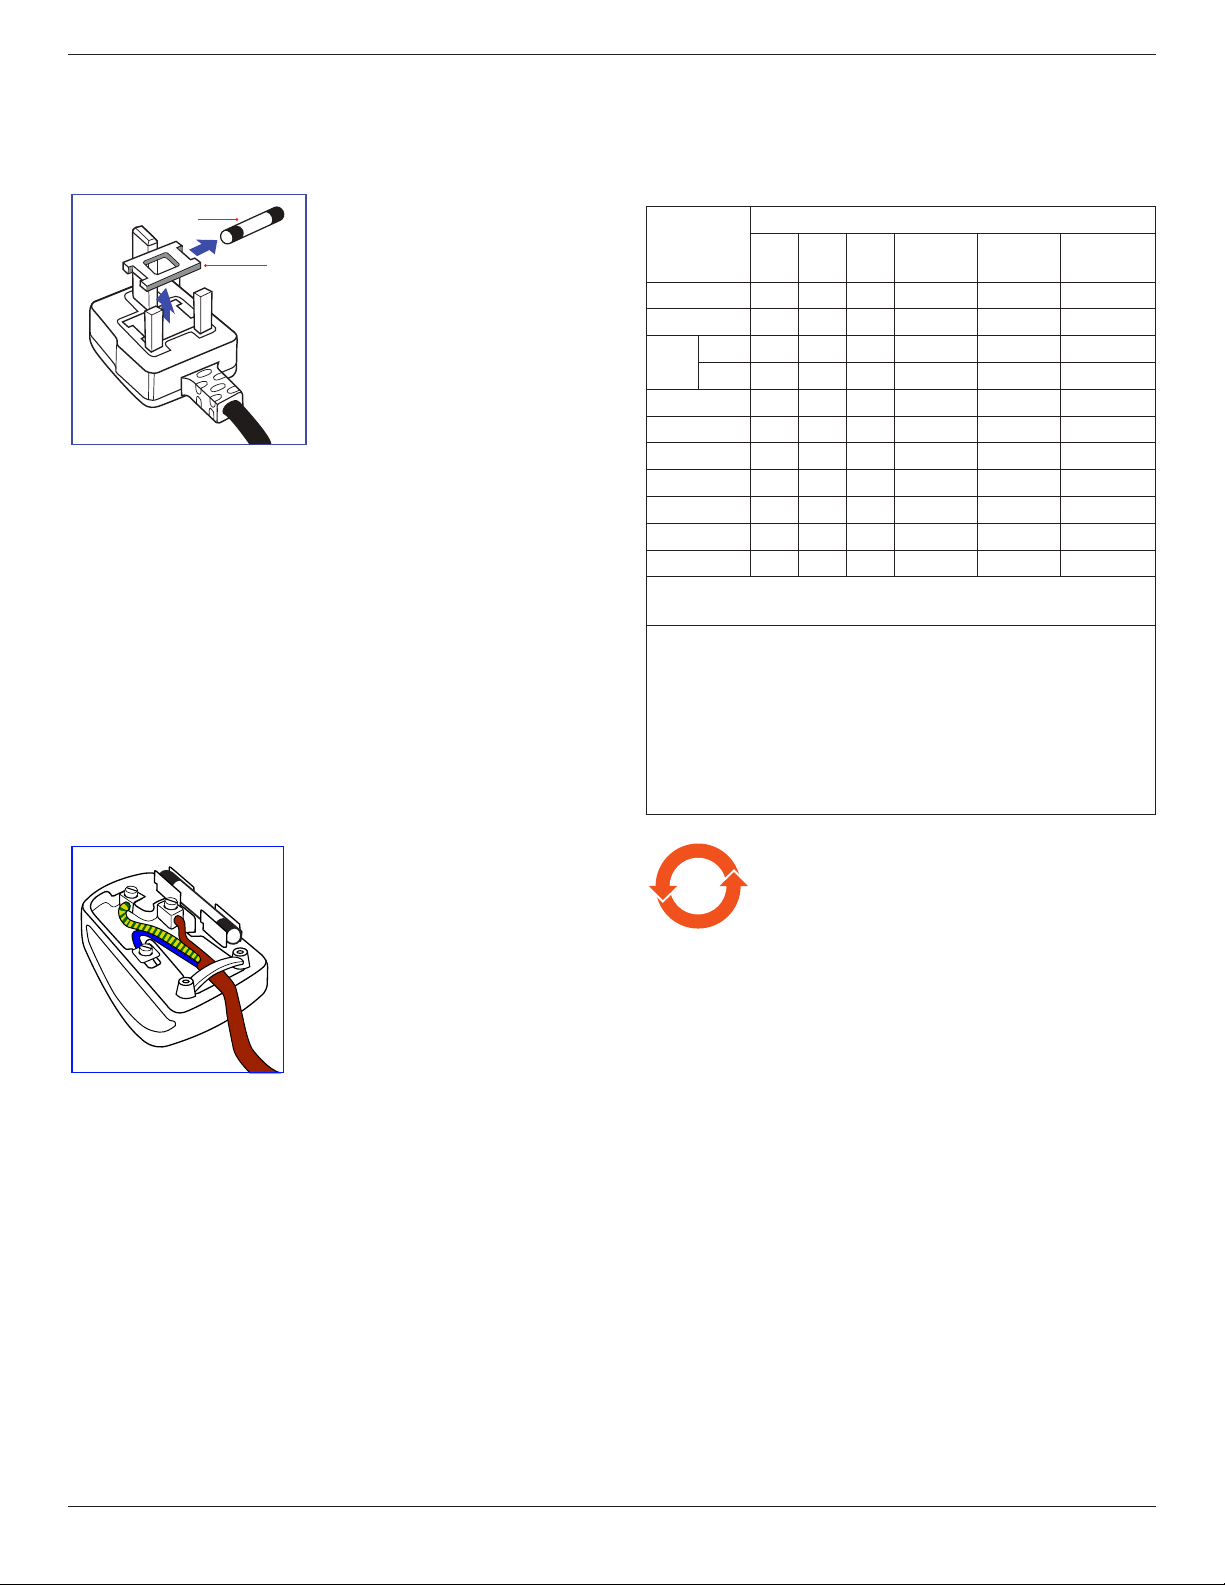
Information for U.K. only
WARNING – THIS APPLIANCE MUST BE EARTHED.
Important:
(A)
(B)
Thisapparatusissuppliedwithanapprovedmoulded13Aplug.To
changeafuseinthistypeofplugproceedasfollows:
1. Removefusecoverandfuse.
2. FitnewfusewhichshouldbeaBS13625A,A.S.T.A.orBSIapproved
type.
3. Retthefusecover.
Ifthettedplugisnotsuitableforyoursocketoutlets,itshouldbecut
offandanappropriate3-pinplugttedinitsplace.
Ifthemainsplugcontainsafuse,thisshouldhaveavalueof5A.Ifaplug
withoutafuseisused,thefuseatthedistributionboardshouldnotbe
greaterthan5A.
NOTE: Theseveredplugmustbedestroyedtoavoidapossibleshock
hazardshoulditbeinsertedintoa13Asocketelsewhere.
How to connect a plug
Thewiresinthemainsleadarecolouredinaccordancewiththe
followingcode:
BLUE–“NEUTRAL”(“N”)
BROWN–“LIVE”(“L”)
GREEN&YELLOW–“EARTH”(“E”)
1. TheGREEN&YELLOWwiremustbeconnectedtotheterminalin
theplugwhichismarkedwiththeletter“E”orbytheEarthsymbol
orcolouredGREENorGREEN&YELLOW.
2. TheBLUEwiremustbeconnectedtotheterminalwhichismarked
withtheletter“N”orcolouredBLACK.
3. TheBROWNwiremustbeconnectedtotheterminalwhich
markedwiththeletter“L”orcolouredRED.
Beforereplacingtheplugcover,makecertainthatthecordgripis
clampedoverthesheathofthelead–notsimplyoverthethreewires.
China RoHS
中国电子信息产品污染控制标识要求
本产品有毒有害物质或元素的名称及含量标识表:
零部件名称
有毒有害物质或元素
铅
(Pb)
汞
(Hg)
镉
(Cd)
六价铬
(Cr 6+)
多溴联苯
(PBBs)
多溴二苯醚
(PBDEs)
塑料外框 O O O O O O
后壳 O O O O O O
LCD
面板
CCFL X X O O O O
LED X O O O O O
电源基板 X O O O O O
主基板 X O O O O O
按键基板 X O O O O O
底座 O O O O O O
电源线 X O O O O O
其他线材 X O O O O O
遥控器 X O O O O O
*:电路板组件包括印刷电路板及其构成的零部件,如电阻、电容、
集 成 电 路 、连 接 器 等 。
○:表示该有害物质在该部件所有均质材料中的含量均在SJ/
T11363-2006《电子信息产品中有毒有害物质的限量要求》规定的
限 量 要求以下。
×:表示该有害物质至少在该部件的某一均质材料中的含量超出
SJ/ T11363-2006《电子信息产品中有毒有害物质的限量要求》规定
的限量要求;
备注:以上“×”的部件,部分含有有害物质超过是由于目前行业
技术水平所限,暂时无法实现替代或减量化。
10
环保使用期限
在产品本体上标示的该标志表示环境保护使用期限为
10
年。
电子信息产品的环境保护使用期限是指电子信息产品中所含的有
毒有害物质或元素不会向外部泄漏或出现突然变异,并且电子信
息产品的用户在使用该电子信息产品时也不会对环境造成严重污
染或对人体、财产带来严重损害的期限。
在环境保护期限中,请按照使用说明书使用本产品。
本环境保护使用不覆盖易损件:电池。
《废弃电子产品回收处理管理条例》提示性说明
为了更好地关爱及保护地球,当用户不再需要此产品或产品寿命
终止时,请遵守国家废弃电器电子产品回收处理相关法律规定,
将其交给当地具有国家认可的回收处理资质的厂商进行回收处
理。
BDL4235DL
vi
中国能源效率标识
根据中国大陆《能源效率标识管理办法》,本显示器
符合以下要求
能源效率 (cd/W) >1.05
能效等级 1 级
能效标准 GB 21520-2008
详细有关信息请查阅中国能效标识网: http://www.
energylabel.gov.cn/
North Europe (Nordic Countries)
Information
Placering/Ventilation
VARNING:
FÖRSÄKRADIGOMATTHUVUDBRYTAREOCHUTTAG
ÄRLÄTÅTKOMLIGA,NÄRDUSTÄLLERDINUTRUSTNING
PÅPLATS.
Placering/Ventilation
ADVARSEL:
SØRGVEDPLACERINGENFOR,ATNETLEDNINGENSSTIKOG
STIKKONTAKTERNEMTTILGÆNGELIGE.
Paikka/Ilmankierto
VAROITUS:
SIJOITALAITESITEN,ETTÄVERKKOJOHTOVOIDAAN
TARVITTAESSAHELPOSTIIRROTTAAPISTORASIASTA.
Plassering/Ventilasjon
ADVARSEL:
NÅRDETTEUTSTYRETPLASSERES,MÅDUPASSEPÅAT
KONTAKTENEFORSTØMTILFØRSELERLETTEÅNÅ.
End-of-Life Disposal
YournewPublicInformationDisplaycontainsmaterialsthatcanbe
recycledandreused.Specializedcompaniescanrecycleyourproductto
increasetheamountofreusablematerialsandtominimizetheamount
tobedisposedof.
Pleasendoutaboutthelocalregulationsonhowtodisposeofyour
olddisplayfromyourlocalPhilipsdealer.
(For customers in Canada and U.S.A.)
Thisproductmaycontainleadand/ormercury.Disposeofinaccordance
tolocal-stateandfederalregulations.Foradditionalinformationon
recyclingcontactwww.eia.org(ConsumerEducationInitiative)
Waste Electrical and Electronie Equipment-
WEEE
Attention users in European Union private households
Thismarkingontheproductoronitspackaging
illustratesthat,underEuropeanDirective2012/19/
EUgoverningusedelectricalandelectronicappliances,
thisproductmaynotbedisposedofwithnormal
householdwaste.Youareresponsiblefordisposalof
thisequipmentthroughadesignatedwasteelectrical
andelectronicequipmentcollection.Todetermine
thelocationsfordroppingoffsuchwasteelectrical
andelectronic,contactyourlocalgovernmentofce,
thewastedisposalorganizationthatservesyour
householdorthestoreatwhichyoupurchasedthe
product.
Attention users in United States:
PleasedisposeofaccordingtoallLocal,StateandFederalLaws.Forthe
disposalorrecyclinginformation,contact:www.mygreenelectronics.com
orwww.eiae.org.
End of Life Directives-Recycling
YournewPublicInformationDisplaycontainsseveral
materialsthatcanberecycledfornewusers.
PleasedisposeofaccordingtoallLocal,State,and
Federallaws.
AsanENERGYSTARPartner,wehavedetermined
thatthisproductmeetstheENERGYSTARguidelines
forenergyefciency.

BDL4235DL
vii
Table Of Contents
4.6.1. Playingmusicles..................................12
4.6.2. Playingmovieles.................................13
4.6.3. Playingphotoles.................................13
5. Change your settings ............................................ 14
5.1. QuickPictureandSound..................................14
5.2. Settings........................................................................14
5.2.1. Picturemenu............................................14
5.2.2. Soundmenu.............................................15
5.2.3. Generalsettingsmenu........................16
5.3. NetworkSettings...................................................16
6. Input mode ..............................................................17
7. Pixel Defect Policy .................................................18
7.1. PixelsandSub-pixels............................................18
7.2. TypesofPixelDefects+DotDenition. 18
7.3. BrightDotDefects...............................................18
7.4. DarkDotDefects.................................................19
7.5. ProximityofPixelDefects................................19
7.6. PixelDefectTolerances......................................19
7.7. MURA..........................................................................19
8. Cleaning and Troubleshooting .............................20
8.1. Cleaning......................................................................20
8.2. Troubleshooting......................................................21
9. Technical Specications ........................................22
1. Unpacking and Installation ..................................... 1
1.1. Unpacking.....................................................................1
1.2. PackageContents.....................................................1
1.3. InstallationNotes......................................................1
1.4. MountingonaWall.................................................2
1.5. MountinginPortraitPosition.............................3
1.5.1. Howtousethelogoguiderfor
portraitposition........................................3
1.5.2. Howtoremovethelogo.....................3
2. Parts and Functions ................................................. 4
2.1. ControlPanel..............................................................4
2.2. Input/OutputTerminals.........................................5
2.3. RemoteControl........................................................6
2.3.1. Generalfunctions.....................................6
2.3.2. Insertingbatteriesintheremote
control.............................................................7
2.3.3. Handlingtheremotecontrol.............7
2.3.4. Operatingrangeoftheremote
control.............................................................7
3. Connection ............................................................... 8
3.1. ConnectingExternalEquipments....................8
3.2. ConnectingMultipleDisplays............................9
3.2.1. RS232Ccontrolconnection
(optional).......................................................9
3.2.2. IRconnection(optional)......................9
3.3. IRPass-throughConnection(optional).......9
3.4. Wire-connectingtoNetwork
(optional)....10
4. Operation ................................................. ...............11
4.1. WatchtheConnectedVideoSource.........11
4.2. ChangePictureFormat......................................11
4.3. SelectyourPreferredPictureSettings.......11
4.4. SelectyourPreferredSoundSettings........11
4.5. PlayMultimediaFiles............................................11
4.5.1. PlayMultimedialesviaLocalArea
Network.....................................................11
4.5.2. Playlesfromdisplay...........................11
4.5.3. PlaymultimedialesfromUSB
device...........................................................12
4.6. Playoptions...............................................................12
BDL4235DL
1
1. Unpacking and Installation
1.1. Unpacking
• Thisproductispackedinacarton,togetherwiththestandardaccessories.
• Anyotheroptionalaccessorieswillbepackedseparately.
• Duetothesizeandweightofthisdisplayitisrecommendedfortwopeopletomoveit.
• Afteropeningthecarton,ensurethatthecontentsarecompleteandingoodcondition.
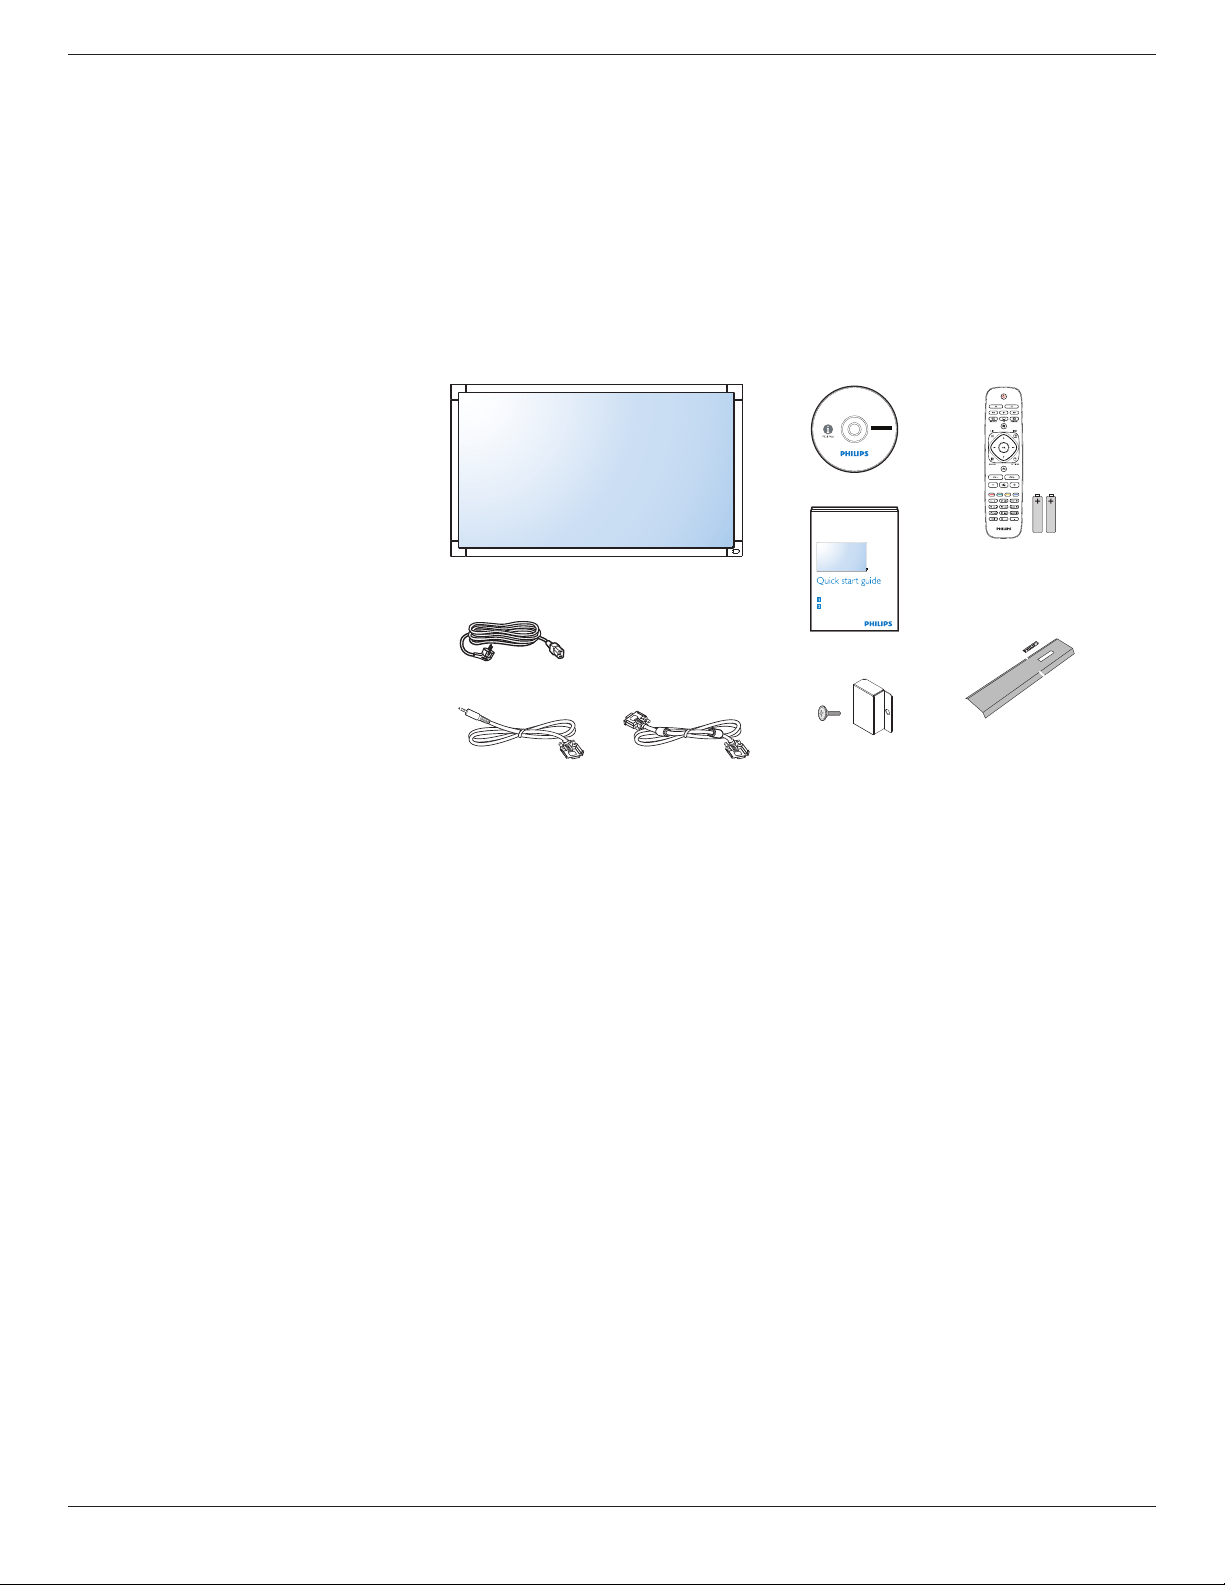
1.2. Package Contents
Pleaseverifythatyoureceivedthefollowingitemswithyourpackagecontent:
• LCDdisplay
• CDROM
• RemotecontrolwithAAAbatteries
• Powercord(1.8m)
• VGAcable(1.8m)
• RS232cable(1.8m)
• Quickstartguide
• Logoguider
• Powerswitchcover
• ScrewforPowerswitchcover(M3,
8mmx1)
Register your product and get support at
www.philips.com/welcome
Kurzanleitung / Guía rápida / Guide de démarrage rapide / Guida rapida /
Instrukcja szybkiego uruchomienia / Краткое руководство по запуску /
Hızlı başlangiç kılavuzu / 快速入门指南 / 快速入門指南
Installation / Installation / Instalación / Installation / Installazione / Instalacja /
Установка / Kurulum / 安装 / 安裝
Connect / Verbindungsfähigkeit / Conectividad / Connectivité / Connettività /
Połączenia / Подключение / Bağlantı / 连接性 / 連接性
LCD Display
LCD-Display / Pantalla LCD / Écran LCD / Display LCD /
Wyświetlacz LCD / ЖК-монитор / LCD Ekran / 监视器 / 監視器
BDL4235DL
* The supplied power cord varies depending on destination.
Power Cord
Remote Control
and AAA Batteries
VGA Cable
CD ROM
RS232 Cable
Quick Start Guide
Logo Guider
Power switch cover
and screw (M3x8) x1
NOTES:
• Forallotherregions,applyapowercordthatconformstotheACvoltageofthepowersocketandhasbeenapprovedbyandcomplieswiththe
safetyregulationsoftheparticularcountry.
• Keepthepackageboxandpackingmaterialforshippingthedisplay.
1.3. Installation Notes
• Duetothehighpowerconsumption,alwaysusetheplugexclusivelydesignedforthisproduct.Ifanextendedlineisrequired,pleaseconsultyour
serviceagent.
• Theproductshouldbeinstalledonaatsurfacetoavoidtipping.Thedistancebetweenthebackoftheproductandthewallshouldbemaintained
forproperventilation.Avoidinstallingtheproductinthekitchen,bathroomoranyotherplaceswithhighhumiditysoasnottoshortentheservicelife
oftheelectroniccomponents.
• Theproductcannormallyoperateonlyunder3000minaltitude.Ininstallationsataltitudesabove3000m,someabnormalitiesmaybeexperienced.
BDL4235DL
2
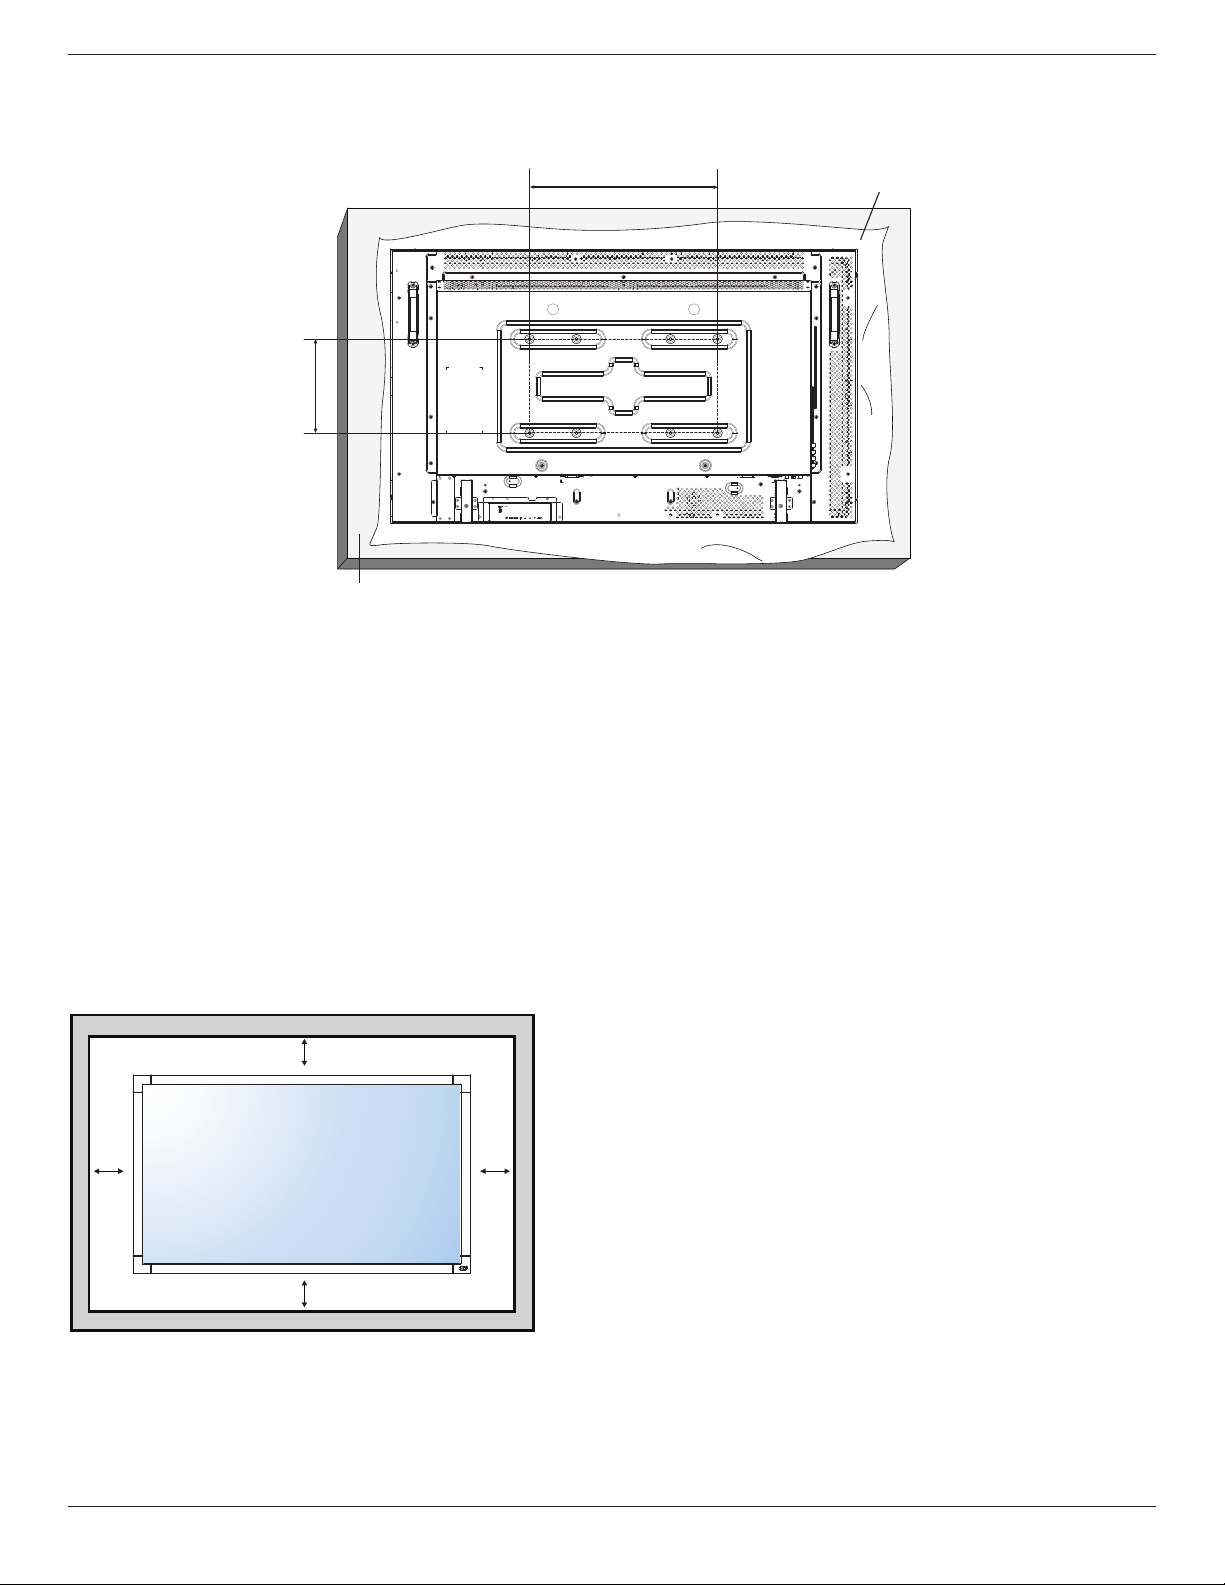
1.4. Mounting on a Wall
Tomountthisdisplaytoawall,youwillhavetoobtainastandardwall-mountingkit(commerciallyavailable).Werecommendusingamountinginterface
thatcomplieswithUL1678standardinNorthAmerica.
400
200
Protective Sheet
Table
1. Layaprotectivesheetonatable,whichwaswrappedaroundthedisplaywhenitwaspackaged,beneaththescreensurfacesoasnottoscratchthe
screenface.
2. Ensureyouhaveallaccessoriesformountingthisdisplay(wallmount,ceilingmount,tablestand,etc).
3. Followtheinstructionsthatcomewiththebasemountingkit.Failuretofollowcorrectmountingprocedurescouldresultindamagetotheequipment
orinjurytotheuserorinstaller.Productwarrantydoesnotcoverdamagecausedbyimproperinstallation.
4. Forthewall-mountingkit,useM6mountingscrews(20mmlongplusthethicknessofthemountingbracket)andtightenthemsecurely.
Caution:
Topreventthedisplayfromfalling:
• Forwallorceilinginstallation,werecommendinstallingthedisplaywithmetalbracketswhicharecommerciallyavailable.Fordetailedinstallation
instructions,refertotheguidereceivedwiththerespectivebracket.
• Tolessentheprobabilityofinjuryanddamageresultingfromfallofthedisplayincaseofearthquakeorothernaturaldisaster,besuretoconsultthe
bracketmanufacturerforinstallationlocation.
Ventilation Requirements for enclosure locating
Toallowheattodisperse,leavespacebetweensurroundingobjectsasshowninthediagrambelow.
100 mm 100 mm
100 mm
100 mm
BDL4235DL
3
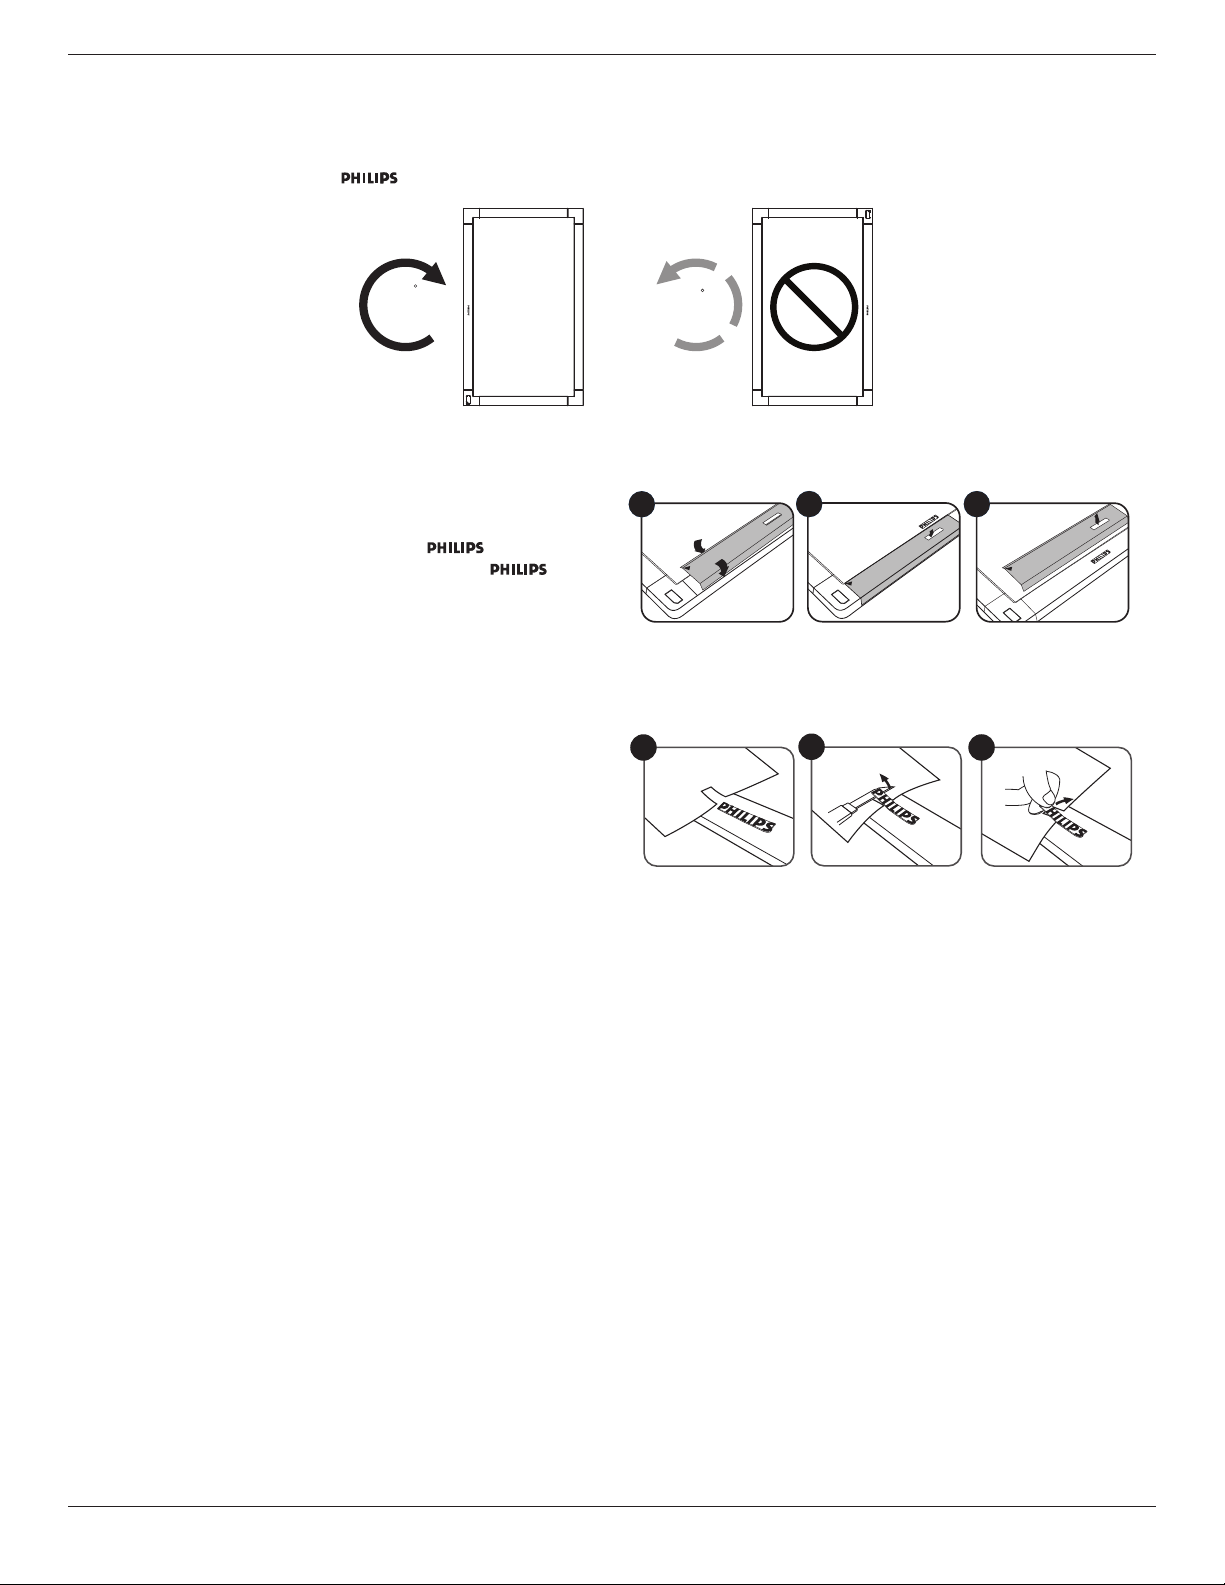
1.5. Mounting in Portrait Position
Thisdisplaycanbeinstalledinportraitposition.
1. Removethetablestand,ifattached.
2. Rotate90degreesclockwise.The“ ”logoshouldbeontheLEFTsidewhenfacingthedisplay.
90
90
1.5.1. How to use the logo guider for portrait position
1. Puttheguideronthelower-leftcornerofthefrontbezelofthedisplay.
Folddownbothofitsedges.
2. Peelofftheprotectivelmatthebackofthe“ ”logosticker.
Holdandpresstheguiderwithyourlefthand.Putthe“ ”logo
stickerwithitsadhesivesidedownintothelogoholewithyourright
hand,andpresstomakeitsticktightlyontothefrontbezel.
3. Removetheguider.
1 2 3
1.5.2. How to remove the logo
1. Prepareapieceofpaperwithacuttingareaoflogoasaprotectorto
preventthefrontbezelfromscratching.
2. Usingaknife,carefullyremovethelogostickerwiththepaperplacing
beneath.
3. Tearoffthelogosticker.
1
2
3
NOTE: Wheninstallingthedisplayonawall,pleaseconsultaprofessionaltechnicianforproperinstallation.Weacceptnoliabilityforinstallationsnot
performedbyaprofessionaltechnician.
BDL4235DL
4
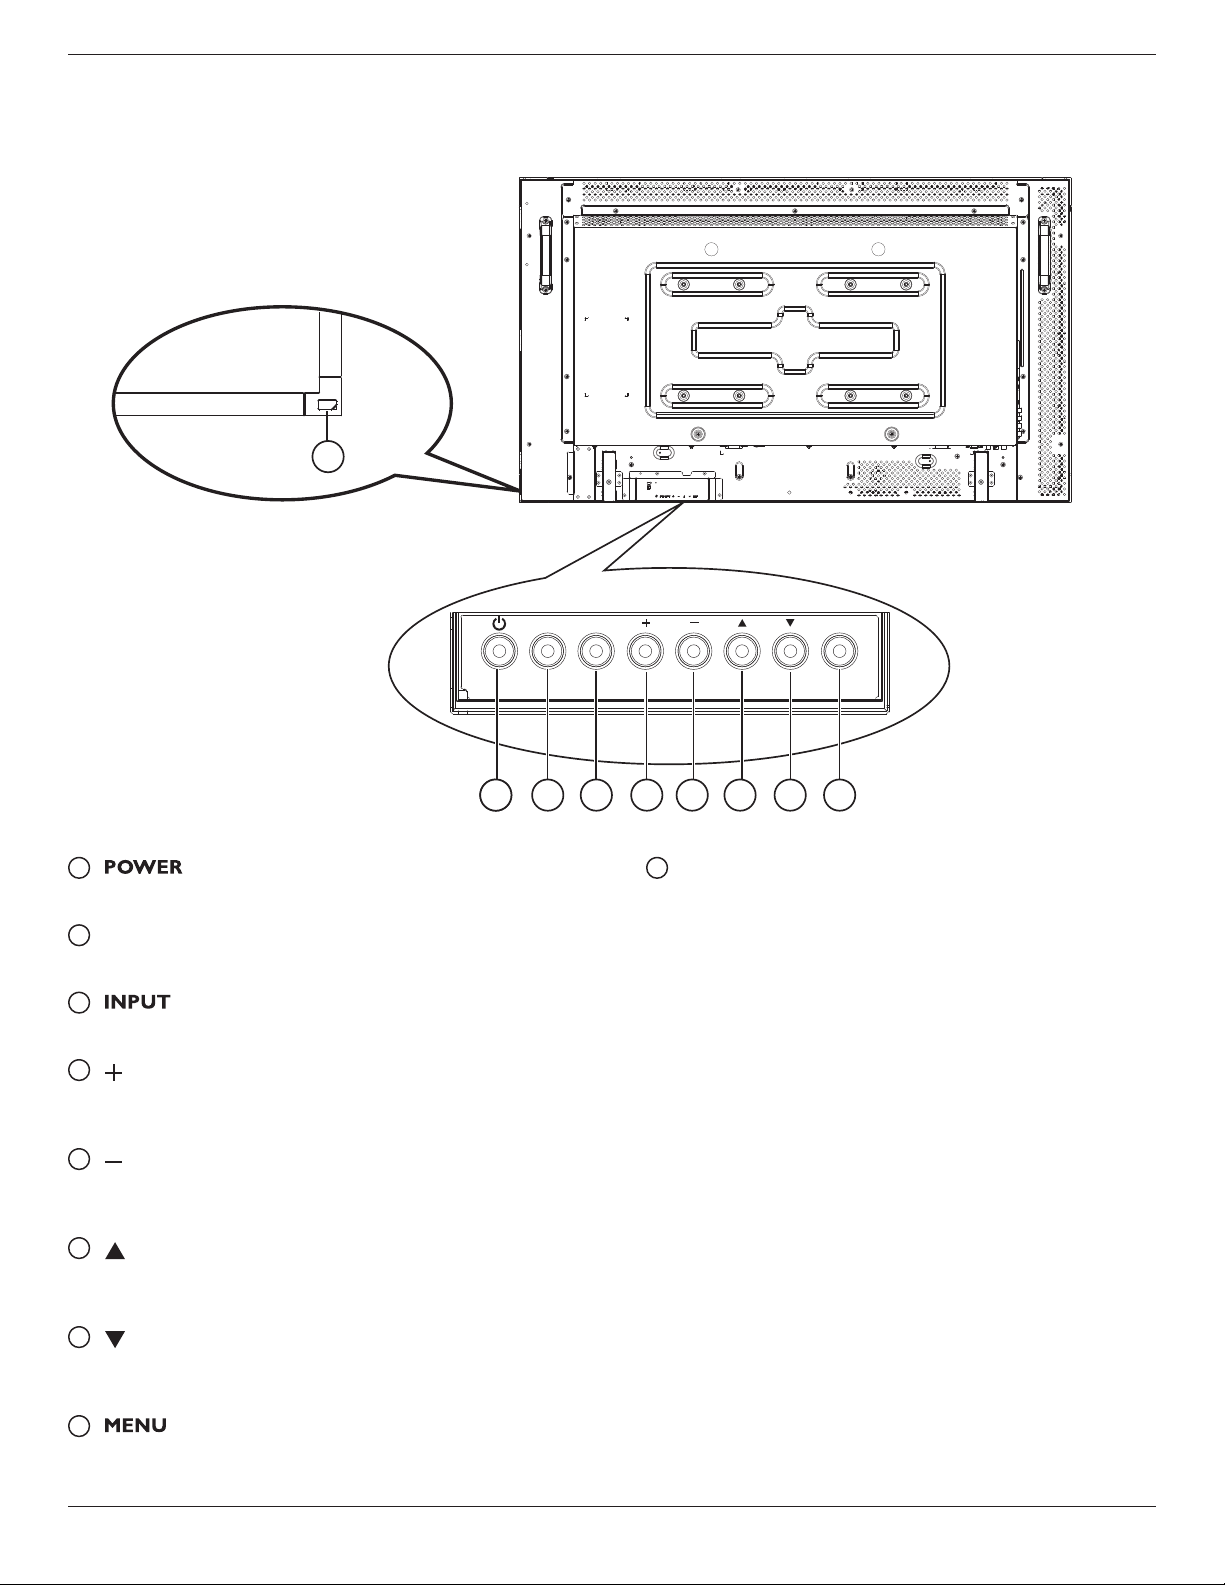
2. Parts and Functions
2.1. Control Panel
MUTE
INPUT MENU
1 2 3 4 5 6 7 81
9
1
[ ] button
Presstoswitchthedisplayonoroff.
2
[MUTE] button
SwitchtheaudiomuteON/OFF.
3
[ ] button
Presstoselectinputsource.
4
[ ] button
PresstoincreasetheadjustmentwhileOSDmenuison,orto
increasetheaudiooutputlevelwhileOSDmenuisoff.
5
[ ] button
PresstodecreasetheadjustmentwhileOSDmenuison,orto
decreasetheaudiooutputlevelwhileOSDmenuisoff.
6
[ ] button
Presstomovethehighlightbaruptoadjusttheselecteditemwhile
OSDmenuison.
7
[ ] button
Presstomovethehighlightbardowntoadjusttheselecteditem
whileOSDmenuison.
8
[ ] button
PresstoaccesstheOSDmenu.
9
Remote control sensor and power status indicator
• Receivescommandsignalsfromtheremotecontrol.
- Lightsgreenwhenthisdisplayisturnedon
- Lightsredwhenthisdisplayisinstandbymode
- Lightsoffwhenthemainpowerofthisdisplayisturnedoff
BDL4235DL
5
2.2. Input/Output Terminals
INOUT
INOUT
8
1 2 3 4 5 6 7
LRL R
9
10
11
12
13
14
15
16
1
AC IN
ACpowerinput.
2
MAIN POWER SWITCH
Mainpoweron/offswitch.
3
HDMI IN
HDMIvideo/audioinput.
4
DVI IN
DVI-Dvideoinput.
5
RJ-45
LANcontrolfunctionfortheuseofremotecontrolsignalfrom
controlcenter.
6
VGA IN (D-Sub)
VGAvideoinput.
7
COMPONENT IN (RCA)
ComponentYPbPrvideosourceinput.
8
AUDIO IN (RCA)
AudioinputfromexternalAVdevice.
9
AUDIO OUT (RCA)
AudiosignaloutputtoconnectyourexternalAVdevice.
10
AUDIO IN (3.5mm)
AudioinputfromyourPC.
11
SPDIF OUT
DigitalaudiosignaloutputtoconnectyourexternalAVdevice.
12
IR OUT /
13
IR IN (3.5 mm)
IRsignaloutput/inputfortheloop-throughfunction.
NOTES:
• Thisdisplay’sremote
controlsensorwillstopworkingifthejack
[IR IN]isconnected.
• ToremotelycontrolyourA/Vdeviceviathisdisplay,referto
page9forIR Pass Throughconnection.
14
RS232C OUT /
15
RS232C IN (2.5 mm)
RS232Cnetworkoutput/inputfortheloop-throughfunction.
16
USB PORT
ConnectyourUSBstoragedevice.
BDL4235DL
6
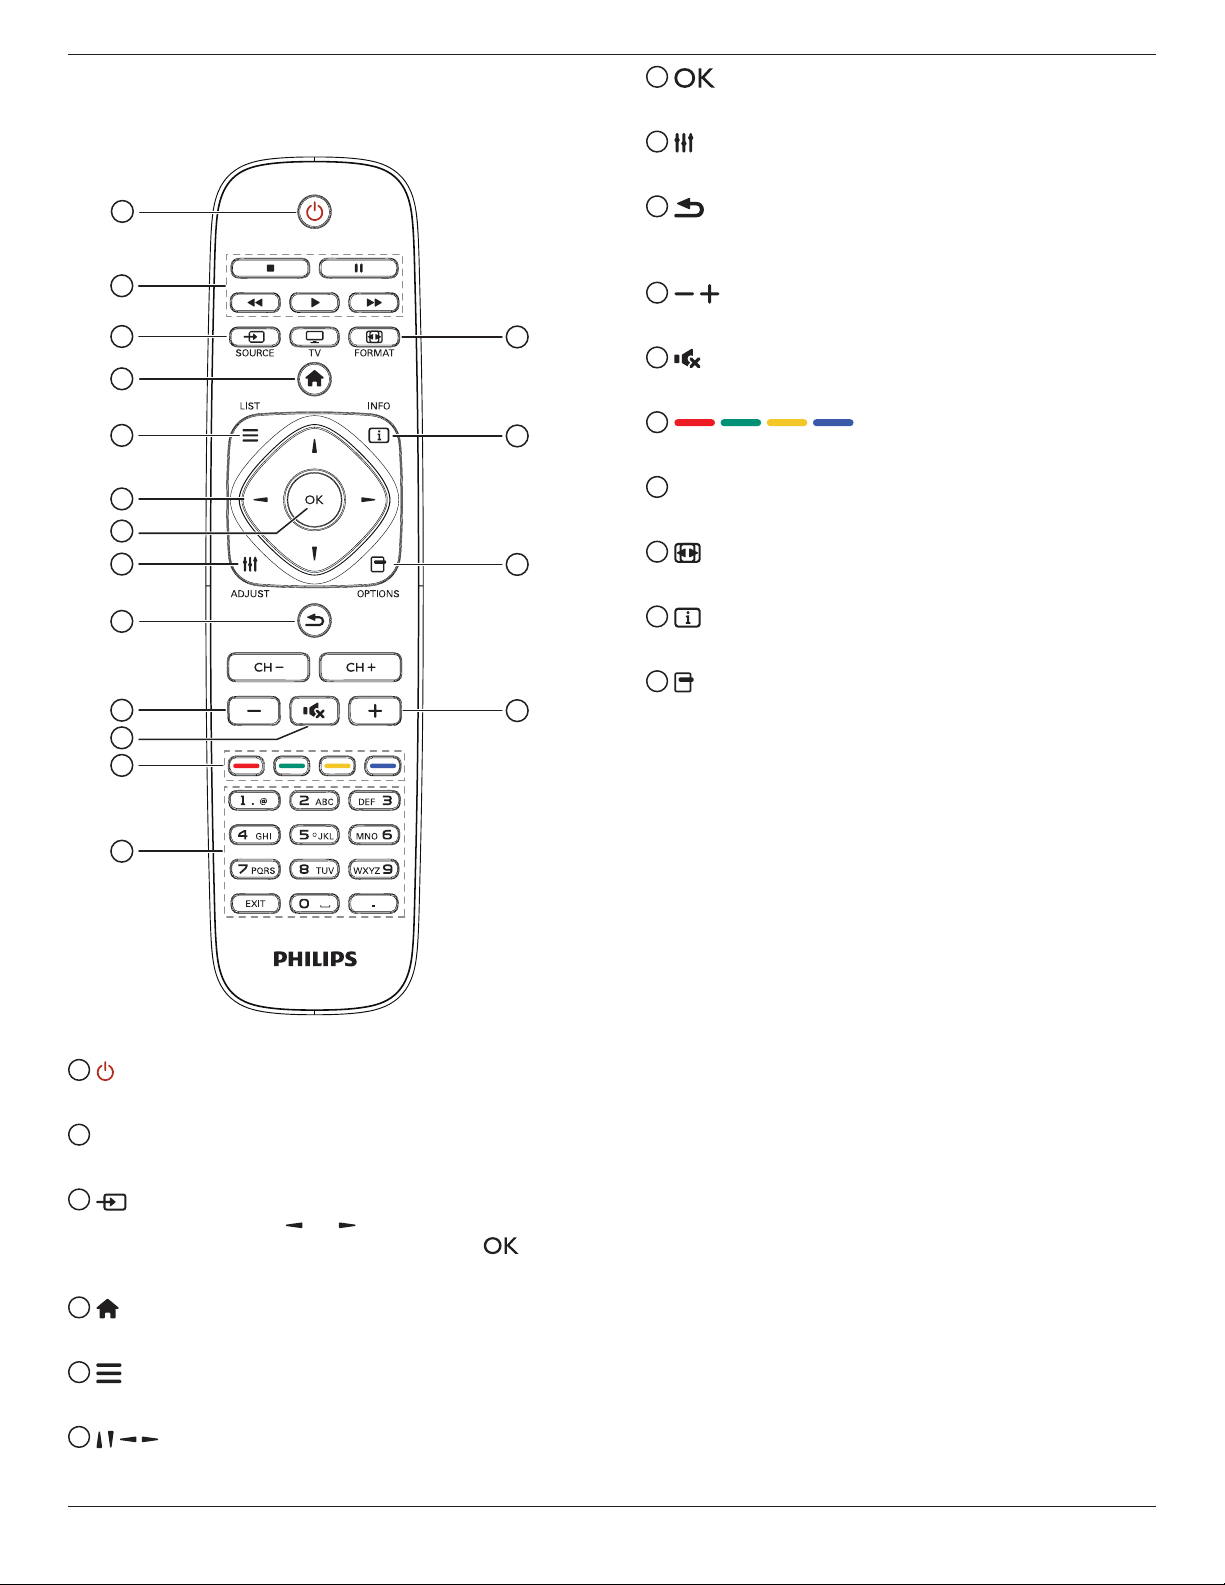
2.3. Remote Control
2.3.1. General functions
1
14
15
16
10
2
3
4
5
6
7
8
9
11
10
12
13
1
POWER button
Switchthisdisplayonoroff.
2
PLAY buttons
Controlplaybackofmediales.
3
SOURCE button
Selectinputsource.Press[ ]or[ ]buttontoselectfromUSB,
Network,HDMI,DVI,YPbPr,AV,orVGA.Press[ ]button
toconrmandexit.
4
HOME button
AccesstheOSDmenu.
5
LIST
Nofunction.
6
NAVIGATION buttons
Navigatethroughmenusandselectitems.
7
button
Conrmanentryorselection.
8
ADJUST button
Accesscurrentlyavailableoptions,pictureandsoundmenus.
9
BACK button
Returntothepreviousmenupageorexitfromtheprevious
function.
10
VOLUME button
Adjustvolume.
11
MUTE button
Presstoturnthemutefunctionon/off.
12
COLOR buttons
Selecttasksoroptions.
13
NUMERIC buttons
Entertextfornetworksetting.
14
FORMAT button
Changepictureformat.
15
INFO button
Displayinformationaboutcurrentactivity.
16
OPTIONS
Accesscurrentlyavailableoptions,pictureandsoundmenus.
.
BDL4235DL
7
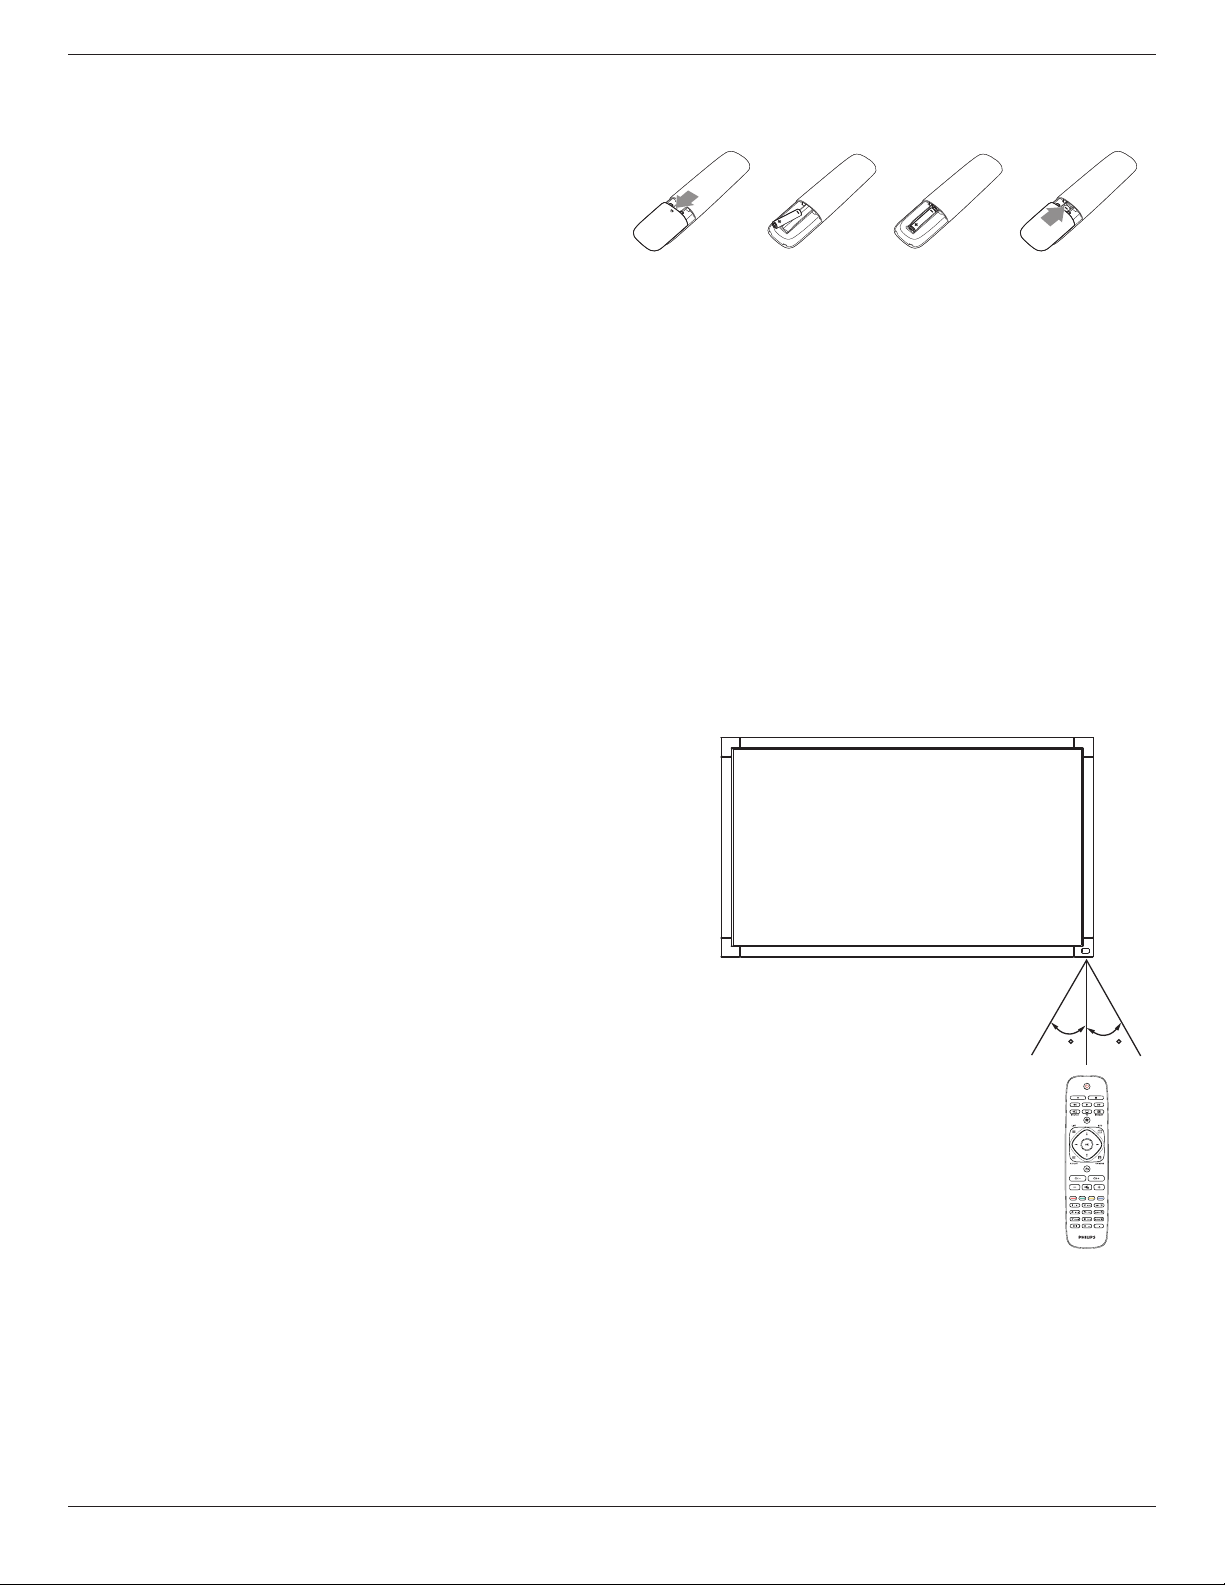
2.3.2. Inserting batteries in the remote control
Theremotecontrolispoweredbytwo1.5VAAAbatteries.
Toinstallorreplacebatteries:
1. Pressandthenslidethecovertoopenit.
2. Alignthebatteriesaccordingtothe(+)and(–)indicationsinsidethe
batterycompartment.
3. Replacethecover.
Caution:
Theincorrectuseofbatteriescanresultinleaksorbursting.Besuretofollowtheseinstructions:
• Place“AAA”batteriesmatchingthe(+)and(–)signsoneachbatterytothe(+)and(–)signsofthebatterycompartment.
• Donotmixbatterytypes.
• Donotcombinenewbatterieswithusedones.Itcausesshorterlifeorleakageofbatteries.
• Removethedeadbatteriesimmediatelytopreventthemfromliquidleakinginthebatterycompartment.Don’ttouchexposedbatteryacid,asitcan
damageyourskin.
NOTE: Ifyoudonotintendtousetheremotecontrolforalongperiod,removethebatteries.
2.3.3. Handling the remote control
• Donotsubjecttostrongshock.
• Donotallowwaterorotherliquidtosplashtheremotecontrol.Iftheremotecontrolgetswet,wipeitdryimmediately.
• Avoidexposuretoheatandsteam.
• Otherthantoinstallthebatteries,donotopentheremotecontrol.
2.3.4. Operating range of the remote control
Pointthefrontoftheremotecontroltowardthisdisplay’sremotecontrolsensorwhen
pressingabutton.
Usetheremotecontrolwithinadistanceoflessthan10m/33ftfromthisdisplay’ssensor,
andahorizontalandverticalangleoflessthan30degrees.
NOTE: Theremotecontrolmaynotfunctionproperlywhentheremotecontrolsensor
onthisdisplayisunderdirectsunlightorstrongillumination,orwhenthereisan
obstacleinthepathofsignaltransmission.
30 30
BDL4235DL
8
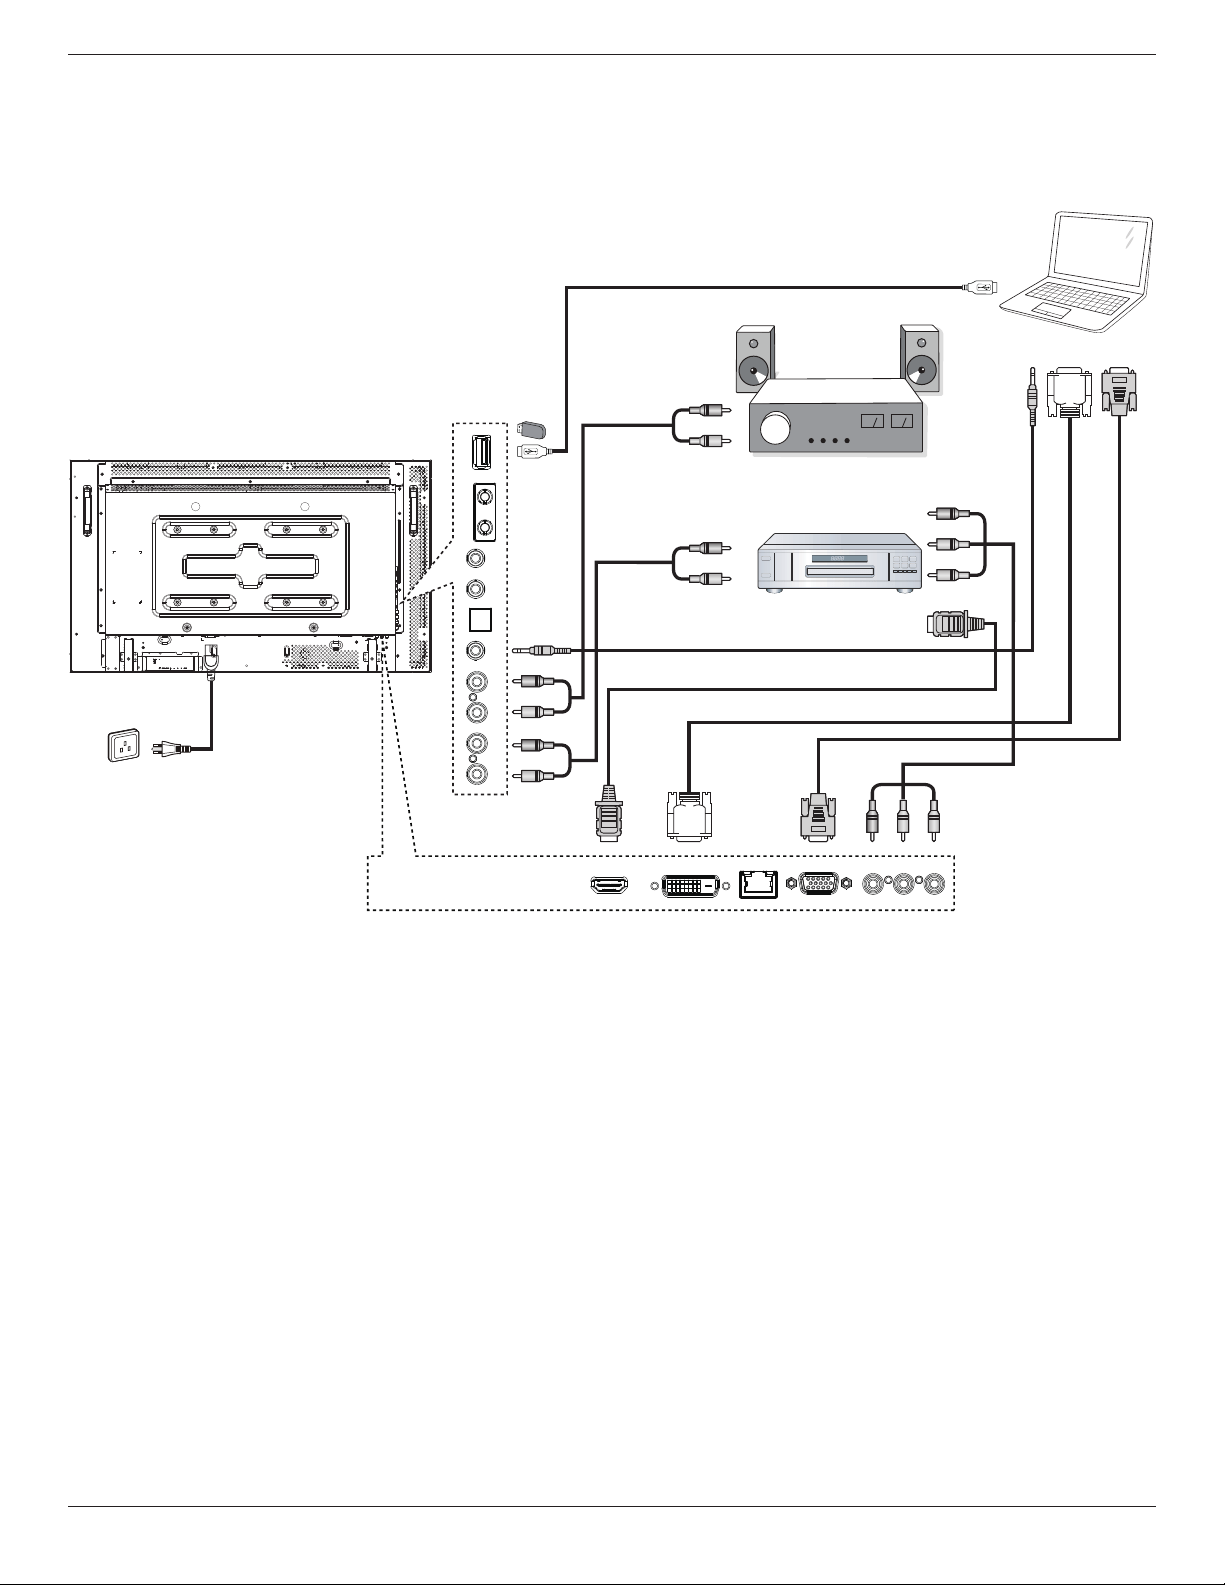
3. Connection
NOTE: Theperipheralsandcablesshownareforexamplepurposesonly.
3.1. Connecting External Equipments
DVD / VCR / VCD
PC
STEREO AMPLIFIER
COMPONENT OUT (YPbPr)
AUDIO OUT
DVI OUT
VGA OUT
USB
AUDIO OUT
AUDIO IN
HDMI OUT
AC IN
Y Pb Pr
R
L
R
L
USB
AUDIO OUT
USB
RS232C
INOUT
IR
INOUT
AUDIO IN
PC LINE
IN
SPDIF
HDMI IN DVI IN RJ-45 VGA IN COMPONENT IN
BDL4235DL
9
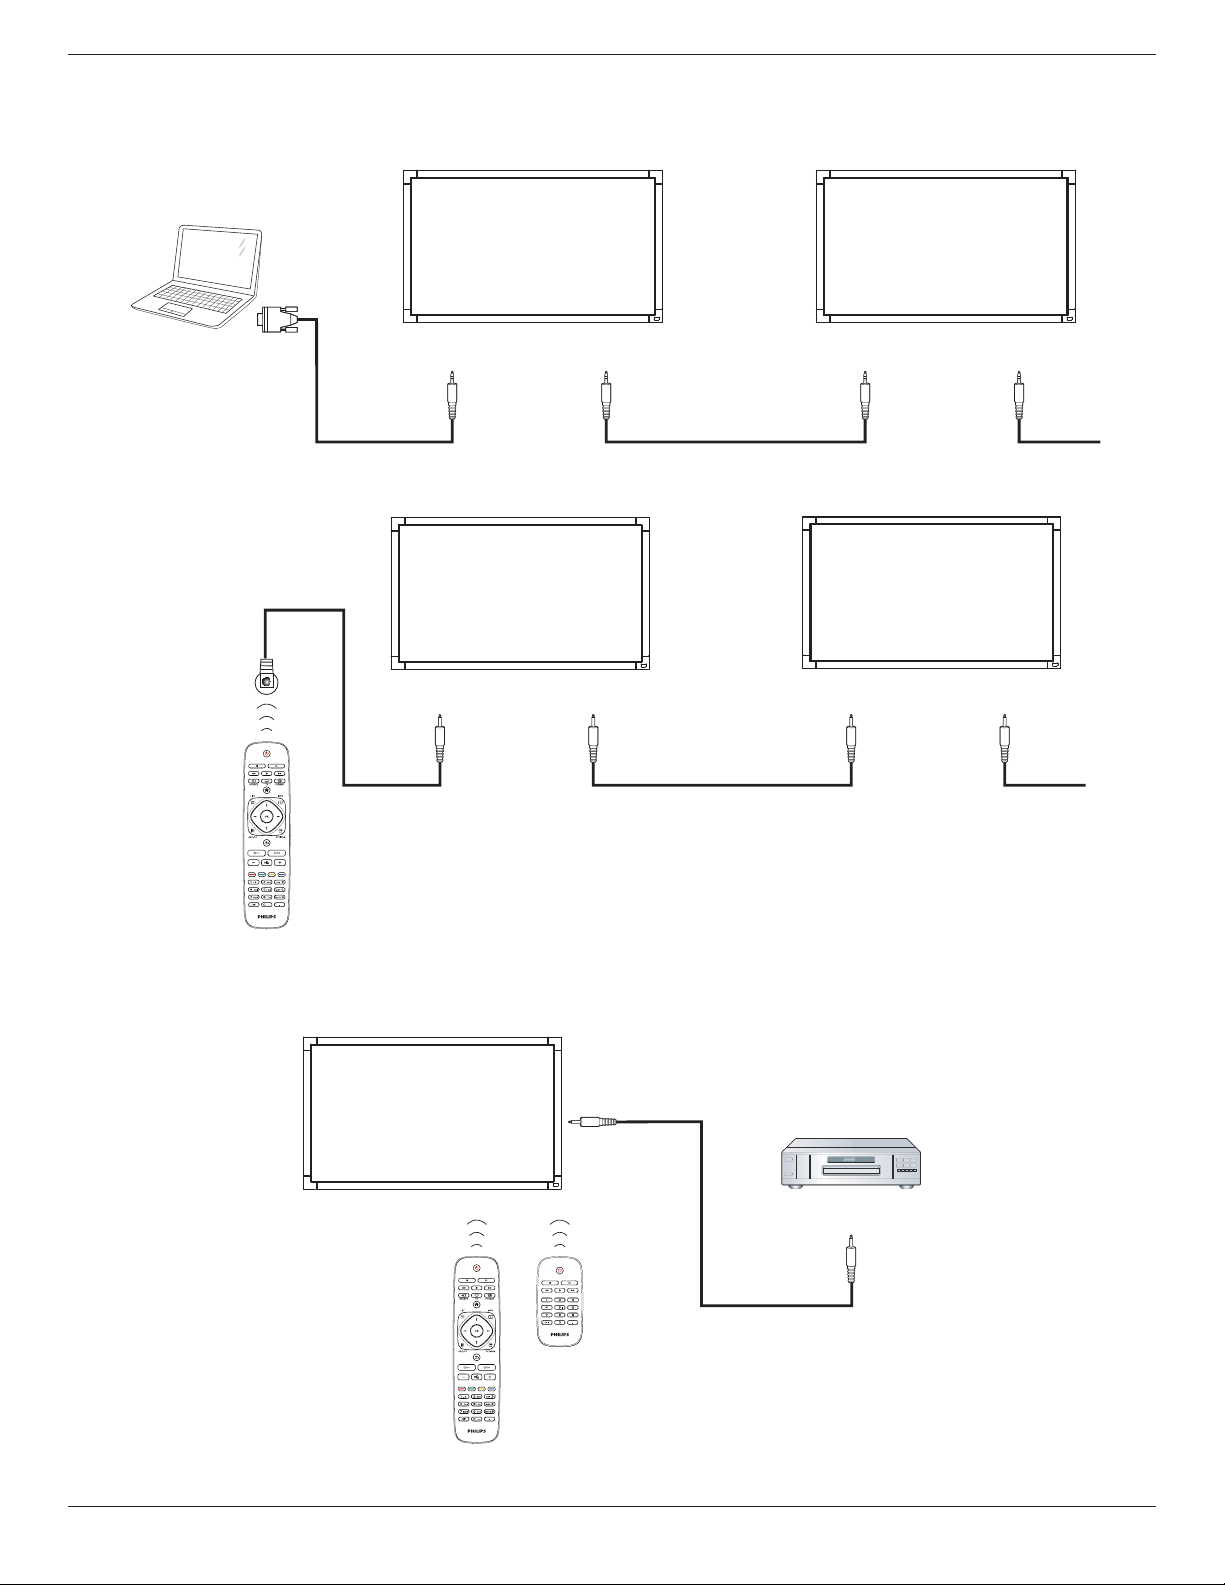
3.2. Connecting Multiple Displays
3.2.1. RS232C control connection (optional)
PC
DISPLAY 1 DISPLAY 2
[RS232C IN]
[RS-232C]
[RS232C OUT]
[RS232C IN] [RS232C OUT]
3.2.2. IR connection (optional)
DISPLAY 1 DISPLAY 2
[IR IN] [IR OUT] [IR IN]
External
IR Receiver
[IR OUT]
NOTE: Thisdisplay’sremotecontrolsensorwillstopworkingifthe[IR IN]isconnected.
3.3. IR Pass-through Connection (optional)
DISPLAY
DVD / VCR / VCD
(DVD / VCR / VCD)
(BDL4235EL)
Remote Control
[IR OUT]
[IR IN]
BDL4235DL
10
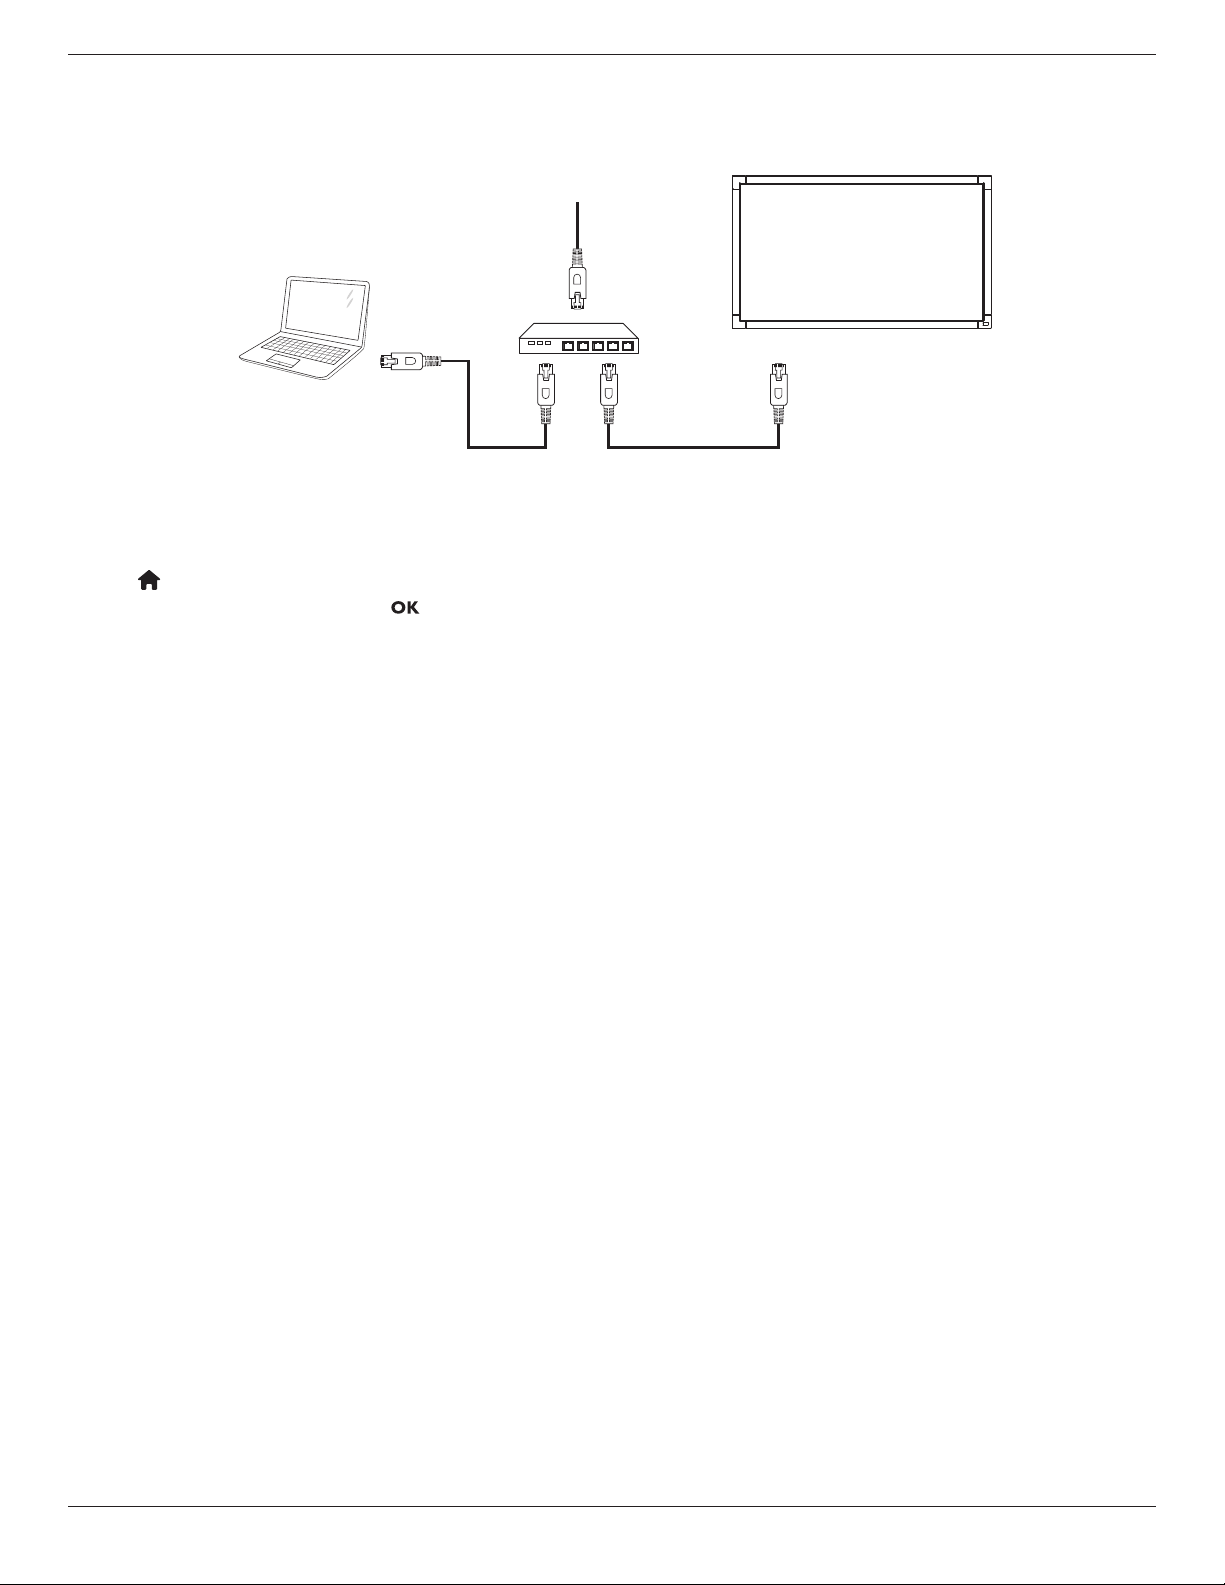
3.4. Wire-connecting to Network
(optional)
Ifyouconnectthisdisplaytoahomenetwork,youcanplayphotos,musicandvideosfromyourcomputer.SeePlay multimedia les (Page11)formore
detail.
PC
[RJ-45]
[RJ-45]
ROUTER
INTERNET
To setup the network:
1. SwitchontherouterandswitchonitsDHCPsetting.
2. ConnecttheroutertothisdisplaywithanEthernetcable.
3.
Press buttonontheremotecontrol,thenselect{Setup}.
4. Select{Connect to network},thenpress button.
5. Followtheon-screeninstructionstoinstallthenetwork.
6. Waitforthisdisplaytondthenetworkconnection.
7. Ifyouareprompted,agreetothe“End User Licence Agreement”.
NOTE: ConnectingwithashieldedCAT-5EthernetcabletocomplywiththeEMCdirective.
BDL4235DL
11
4. Operation
NOTE: Thecontrolbuttondescribedinthissectionismainlyonthe
remotecontrolunlessspeciedotherwise.
4.1. Watch the Connected Video Source
Seepage8forexternalequipmentsconnection.
1. Press
button.
2. Press
or buttontoselectadevice,thenpress button.
4.2. Change Picture Format
Youcanchangethepictureformattosuitthevideosource.Eachvideo
sourcehasitsavailablepictureformats.
Theavailablepictureformatsdependonthevideosource:
1. Press
button.
2. Press
or buttontoselectapictureformat,thenpress button.
• {Auto zoom}:Enlargethepicturetollthescreen.
RecommendedforminimalscreendistortionbutnotforHDor
PC.
• {Movie expand 16:9}:Scale4:3formatto16:9.Not
recommendedforHDorPC.
• {Wide screen}:Showswidescreenformatcontentunstretched.
NotrecommendedforHDorPC.
• {Unscaled}:ProvidemaximumdetailforPC.Onlyavailable
whenPCmodeisselectedinthe{Picture}menu.
• {4:3}:Displaytheclassic4:3format.
4.3. Select your Preferred Picture Settings
1. Whilethisdisplayisplayingvideosource,press
button.
2. Press
or buttontoselect
,thenpress button.
3. Press or
buttontoselectanoption,thenpress button:
• {Personal}:Applyyourpersonalisedpicturesettings.
• {Vivid}:Richanddynamicsettings,idealfordaytimeviewing.
• {Natural}:Naturalpicturesettings.
• {Standard}:Defaultsettingsthatsuitmostenvironmentsand
typesofvideo.
• {Movie}:Idealsettingsformovies.
• {Photo}:Idealsettingsforphotos.
• {Energy saving}:Settingsthatconservethemostenergy.
4.4. Select your Preferred Sound Settings
1. Whilethisdisplayisplayingvideosource,press
button.
2. Press
or buttontoselect
,thenpress button.
3. Press or
buttontoselectanoption,thenpress button:
• {Personal}:Applyyourpersonalisedsoundsettings.
• {Original}:Settingsthatsuitmostenvironmentsandtypesof
audio.
• {Movie}:Idealsettingsformovies.
• {Music}:Idealsettingsforlisteningtomusic.
• {Game}:Idealsettingsforgames.
• {News}:Idealsettingsforspokenaudio,suchasthenews.
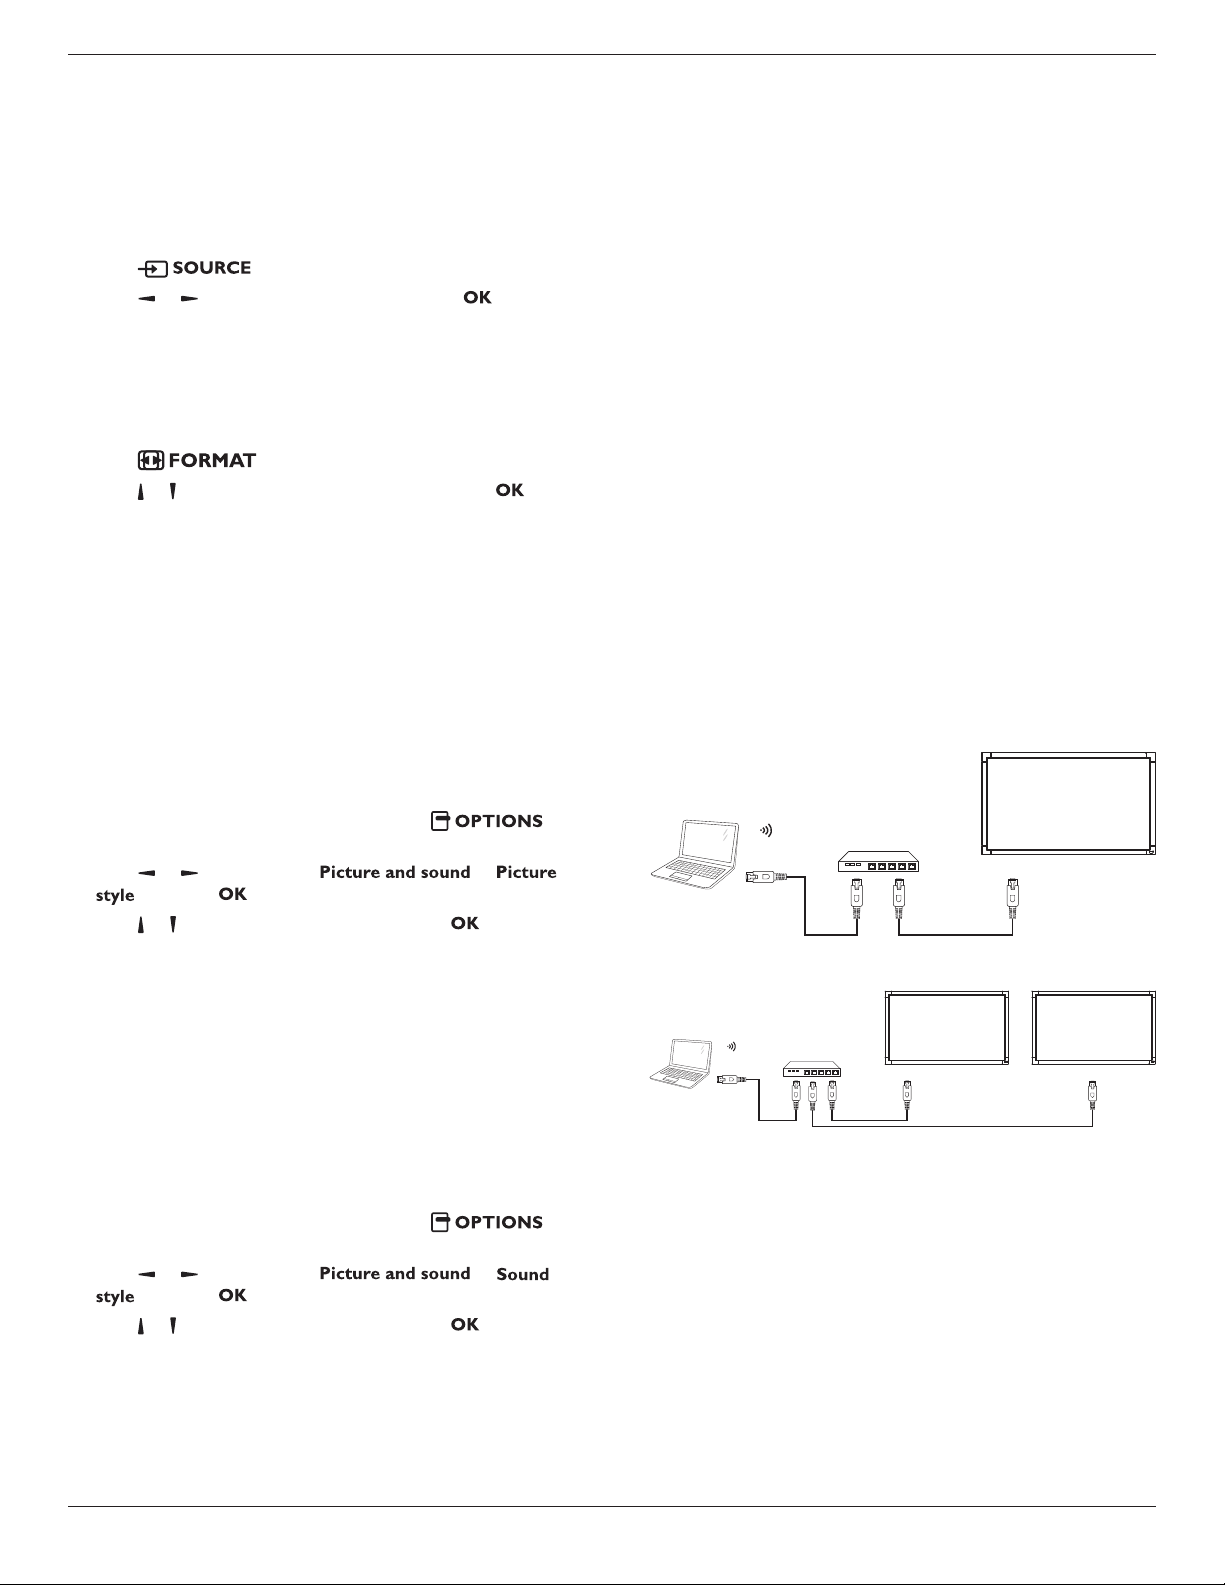
4.5. Play Multimedia Files
Youcanplayvideos,photos,andmusiconyourdisplayfrom:
• Yourcomputerconnectedthroughyourhomenetwork.
• AUSBdeviceconnectedtothisdisplay.
4.5.1. Play Multimedia files via Local Area
Network
Toplaylesfromcomputer,youwillneed:
• Awiredhomenetwork,connectedwithaUniversalPlugandPlay
(uPnP)router.
• Optional:ALANcablethatconnectsyourdisplaytoyourhome
network.
• Amediaserverrunningonyourcomputer.
• Appropriatesettingsonyourcomputerrewalltoallowyoutorun
themediaserver.
Set up the network
1. Connectyourdisplayandthecomputertothesamehomenetwork.
Seepage10forconnectingyourdisplaytoanetwork.
2. Switchonyourcomputerandtherouter.
NOTE: IftheapparatusdoesnotreturntoDLNAmodedueto
externalelectricaldisturbances(e.g.electrostaticdischarge),user
interventionisrequired.
Single Display Setup
PC
[RJ-45]
[RJ-45]
ROUTER
or
Multiple Displays Setup
PC
[RJ-45]
[RJ-45]
ROUTER
[RJ-45]
or
4.5.2. Play files from display.
Set up media sharing
1. Installamediaserveronyourcomputertosharemediales.These
aresomemediaservers:
• ForPC:WindowsMediaPlayer11(orhigher)orTVersity
• ForMac:Twonky
2. Switchonmediasharingonyourcomputerusingthemediaserver.
Formoreinformationonhowtosetupthemediaserver,referto
thewebsiteofthemediaserver.

BDL4235DL
12
Play les
1. Press
button.
2. Select[Browse network],thenpress button.
3. Selectalefromthecontentbrowser,thenpress buttonto
startplaying.
4. PressthePlay buttonsontheremotecontroltocontrolplaying.
Tips:
• Selectthetopbartolteryourlesbytype.
• Select[Sort]toarrangethelesbyalbumname,artist,orother
elds.
• Toclearthelistofofinemediaservers,press
button,thenselect[Clear ofine servers]andpress button.
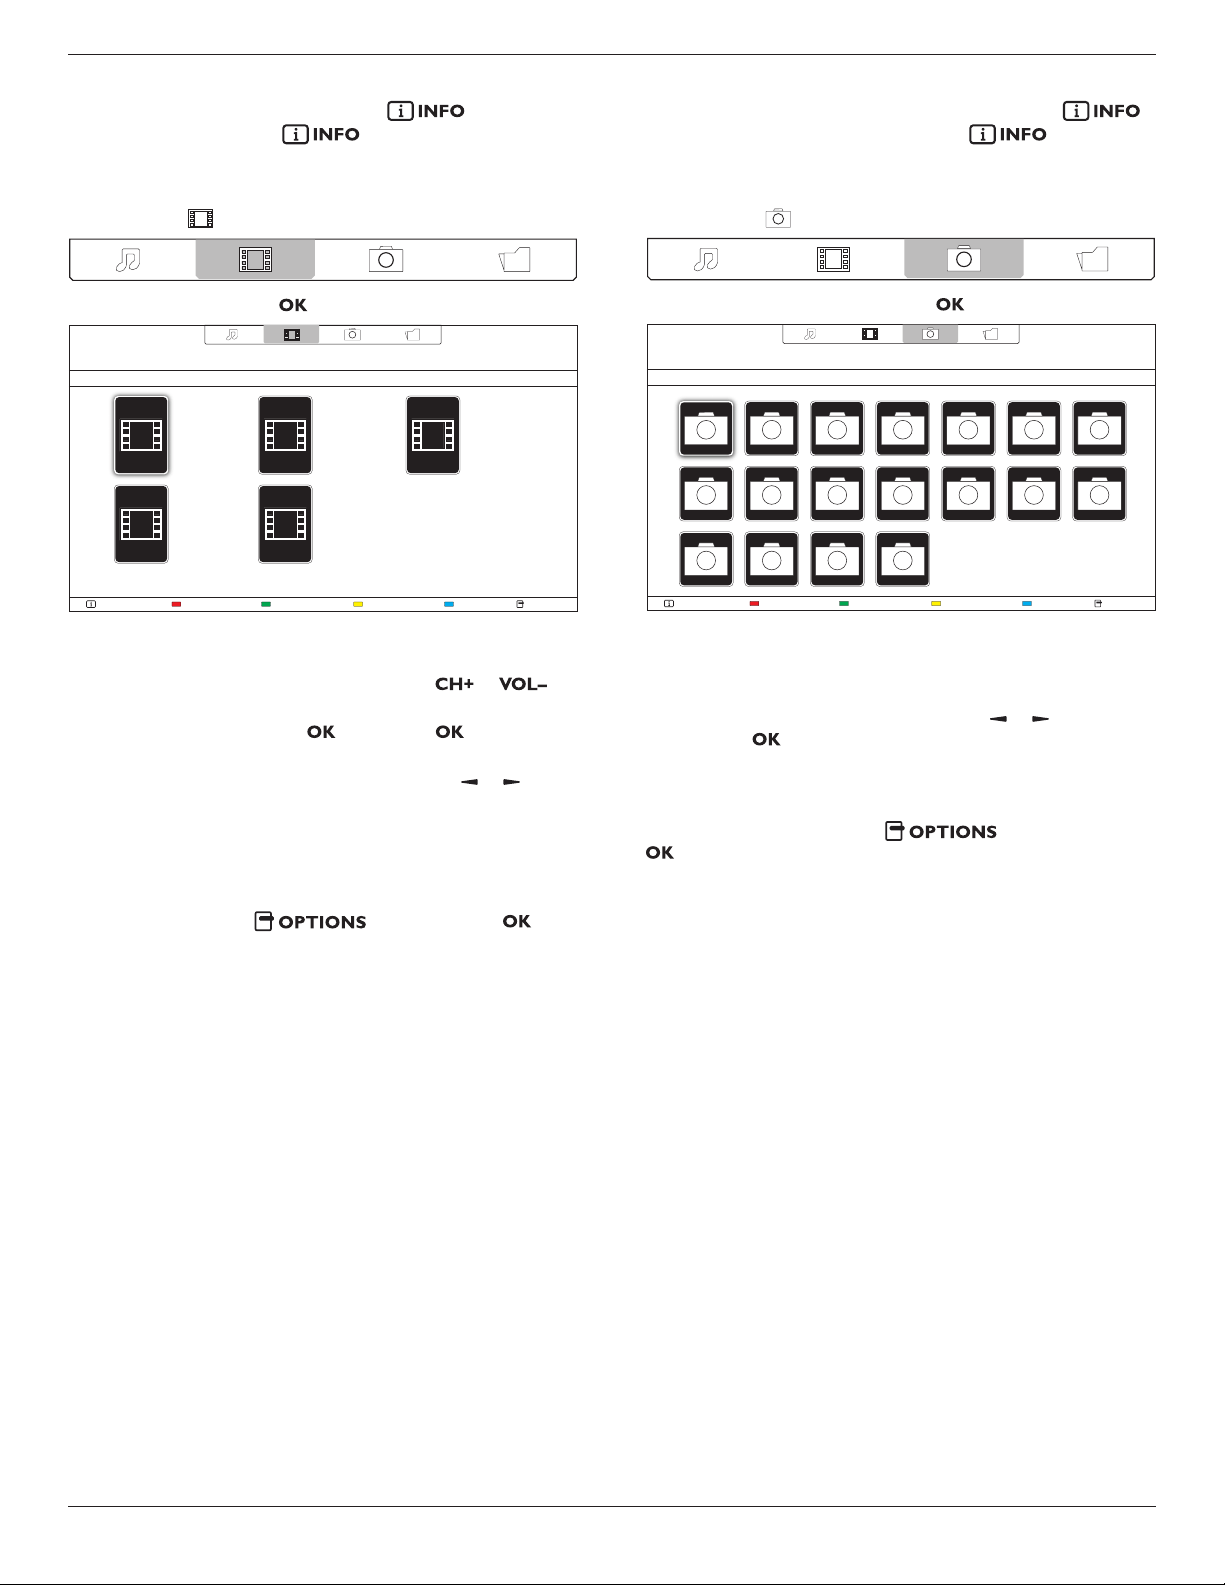
4.5.3. Play multimedia files from USB device
Thisdisplaycanplaymusic,movie,orphotolesfromyourUSBdevice.
1. ConnectyourUSBdevicetotheUSBportonthisdisplay.
AUDIO OUT
USB
RS232C
INOUT
IR
INOUT
AUDIO IN
PC LINE
IN
SPDIF
USB
2. Press
button,selectUSB,thenpress button.
3. TheconnectedUSBdeviceisdetectedautomaticallyforallits
playableles,whichwillbeautomaticallysortedinto3types:
, ,and .
Help
4. Pressthe
BACKbuttontogouptothetoplayerinthescreen.
Press
buttontoselecttheletype.Press buttontoenter
itsplaylist.
5. Selecttheleyouwant.Press buttontostartplaying.
6. Followtheon-screeninstructiontocontroltheplayoption.
7. PressthePLAYbuttons(
H F G I J
)tocontrolplaying.
Supported le system:
• FAT32
Supported le format:
• Music:MP3,WMA,M4A,AAC,AC3
• Movie:AVI,MP4,MOV,RM/RMVB
• Photo:JPEG,BMP,GIF
Caution:
• ThemanufacturerisnotresponsibleiftheUSBdeviceisnot
supported,norisitresponsiblefordamagetoorlossofdatainthe
device.
• DonotoverloadtheUSBport.IfyouconnectaUSBstorage
devicethatconsumesmorethan500mApower,makesurethatitis
connectedtoitsownexternalpowersupply.
4.6. Play options
4.6.1. Playing music files
1. SelectMusic inthetopbar.
2. Selectonemusictrack,thenpress button.
HelpUSB deviceSortPlay All OptionsInfo
05:051. Funky music
• Toplayallthetracksinafolder,selectonemusicle,thenselect
{Play All}.
• Toskiptothenextorprevioustrack,press or
button.
• Topausethetrack,press button.Press buttonagainto
resumeplayback.
•
Toskipbackwardorforward10seconds,press or button.
• Tosearchbackwardorforward,press
G
or
J
button,
pressrepeatedlytotogglebetweendifferentspeeds.
• Tostopthemusic,press
H
button.
Music options
Whileyouplaymusic,press button,thenpress
buttontoselectanoption:
• {Repeat}:Select{Repeat}toplayatrackoranalbumrepeatedly,or
select{Playonce}toplayatrackonce.
• {Media Server}:Whenyouplaycontentfromamediaserver,you
canselectanothermediaserver.
• {Shufe On}/{Shufe Off}:Enableordisablerandomplayoftracks.
BDL4235DL
13
NOTE:Toviewinformationaboutasong(forexample,title,artistor
duration),selectthesong,thenpress button.Tohide
theinformation,press buttonagain.
4.6.2. Playing movie files
1. SelectMovie inthetopbar.
2. Selectavideo,thenpress button.
HelpUSB devicePlay All OptionsInfo
The Movie
11:22:33
88.88MB
2013-05-05
The Movie
11:22:33
88.88MB
2013-05-05
The Movie
11:22:33
88.88MB
2013-05-05
The Movie
11:22:33
88.88MB
2013-05-05
The Movie
11:22:33
88.88MB
2013-05-05
• Toplayallthevideosinafolder,selectonevideole,thenselect
{Play All}.
• Toskiptothenextorpreviousvideo,press or
button.
• Topausethevideo,press button.Press buttonagainto
resumeplayback.
•
Toskipbackwardorforward10seconds,press or button.
• Tosearchbackwardorforward,press
G
or
J
button,
pressrepeatedlytotogglebetweendifferentspeeds.
• Tostopthevideo,press
H
button.
Movie options
Whileplayingvideo,press button,thenpress
buttontoselectanoption:
• {Subtitles}:Selecttheavailablesubtitlesettings.
• {Subtitle Language}:Selectthelanguageforsubtitlesifavailable.
• {Character Set}:Selectthecorrectcharactersetforthesubtitles.
• {Audio Language}:Selectanaudiolanguage.
• {Repeat}:Select{Repeat}toplaythevideolerepeatedlyor{Play
once}toplaythevideoleonce.
• {Media server}:Whenyouplaycontentfromamediaserver,you
canselectanothermediaserver.
• {Shufe On}/{Shufe Off}:Enableordisablerandomplayofvideo
les.
• {DivX(R) VOD}:DisplaytheDivXregistrationandderegistration
codesforthisdisplay.
NOTE:Toviewinformationaboutavideo(forexample,playedposition,
duration,title,ordate),selectthevideo,thenpress
button.Tohidetheinformation,press buttonagain.
4.6.3. Playing photo files
1. SelectPhoto inthetopbar.
2. Selectaphotothumbnail,thenpress button.
HelpUSB deviceSortPlay All OptionsInfo
Start a slideshow
Iftherearemultiplephotosinafolder,selectaphoto,thenselect{Play
All}.
•
Toskiptothepreviousornextphoto,press or button,and
thenpress button.
• Tostoptheslideshow,press
H
button.
Slideshow options
Whileyouplayaslideshow,press button,thenpress
buttontoselectanoption:
• {Shufe Off}/{Shufe On}:Enableordisablerandomdisplayof
picturesintheslideshow.
• {Repeat}:Select{Repeat}towatchaslideshowrepeatedlyor{Play
once}towatchonce.
• {Slideshow Time}:Selectthedisplayingtimeforeachphotointhe
slideshow.
• {Slideshow Transitions}:Selectthetransitionfromonephototothe
next.
• {Media Server}:Whenyouplaycontentfromamediaserver,you
canselectanothermediaserver.

BDL4235DL
14
5. Change your settings
Using the remote control:
1. Press buttontodisplaytheOSDmenu.
2.
Press ,or buttontoselect{Setup}.Press buttontoenter.
Setup
Source
3.
Press , , ,or buttontoselect{Quick picture and sound},
{Settings},{Connect to network},or{Network settings}.Press
buttontoenter.
Connect to network
Quick picture and
sound
Network settingsSettings
4.
Press , , ,or buttontoselectitsmenuitemortoadjustits
value.Press buttontoconrm.
5.
Press buttontogobacktothepreviousmenulayer.
6. Press buttontoexittheOSDmenu.
Using this display’s control buttons:
MUTE
INPUT MENU
1. Press buttontodisplaytheOSDmenu.
2. Press[ ][ ][ ]or[ ]buttontoselectmenuitemoradjustits
value.
3. Press buttontoconrmmenuselectionandenterits
submenu.
4. Press buttontoexittheOSDmenu.
5.1. Quick Picture and Sound
Youcanselectpictureandsoundsettingswiththehelpofthesettings
assistant,whichdemonstratestheeffectofyourchosensetting
immediately.
1. Press buttontodisplaytheOSDmenu.
2. Select{Setup}.Press button.
3. Select{Quick picture and sound}.Press button.
4. Select{Continue},thenpress button
5. Followtheon-screeninstructionstochooseyourpreferredsettings.
5.2. Settings
5.2.1. Picture menu
Picture style
Restore style
Backlight contrast
Colour
Sharpness
Noise reduction
MPEG artifact reducti...
Digital Crystal Clear
Advanced
Game or computer
Foramat and edges
Picture
Sound
General settings
Picture style
Selectapredenedpicturesetting.

BDL4235DL
15
Restore style
Restorethelast-selectedpredenedpicturesetting.
Backlight contrast
Adjustthebrightnessofthisdisplay’sbacklight.
Colour
Adjustthecoloursaturationofthepicture.
Sharpness
Adjustthesharpnessofthepicture.
Noise reduction
Selecttheamountofnoisereductionforthepicture.
MPEG artifact reduction
Smoothentransitionsandhazinessinthedigitalpicture.
Digital Crystal Clear
Fine-tuneeachpixeltomatchsurroundingpixelsandproduceabrilliant,
high-denitionimage.
• {Advanced sharpness}:Enablesuperiorsharpness,especiallyon
linesandcontoursinthepicture
• {Dynamic contrast}:Dynamicallyenhancethedetailsinthe
dark,mediumandlightareasofthepicture.
• {Dynamic backlight}:Selectabacklightleveltooptimisedynamic
powerconsumptionandpicturecontrast.
• {Colour enhancement}:Dynamicallyenhancethevividnessand
detailsofcolours.
Advanced
Accessadvancedsettingssuchasgamma,tintsettingsandvideocontrast
settings.
• {Gamma}:Adjustthenon-linearsettingforpictureluminance
andcontrast.
• {Tint}:Changethecolourbalance.
• {Custom tint}:Customisecolourbalancesetting.Onlyavailable
if{Tint}
{Custom}isselected.
• {Video contrast}:Adjustvideocontrast.
• {Brightness}:Adjustscreenbrightness.
Game or computer
Whenviewingcontentfromaconnectedgameconsole,select{Game}
toapplygamesettings.WhenacomputerisconnectedthroughHDMI,
select{Computer}.
Makesurethat{Format and edges}
{Picture format}
{Unscaled}
isselectedsoastoviewmaximumdetail.
Format and edges
Accessadvancedsettingstocontrolthedisplayingformatofthepicture.
• {Picture format}:Changethepictureformat.
• {Screen edges}:Changethepicturesize.
• {Picture shift}:Ifavailable,movethepositionofthepicture.
5.2.2. Sound menu
Sound style
Restore style
Bass
Treble
Surround mode
Audio out
Advanced
Picture
Sound
General settings
Sound style
Accesspredenedsoundsettings.
Restore style
Restorethelast-selectedpredenedsoundsetting.
Bass
Adjustthebasslevelofthespeakerandheadphones.
Treble
Adjustthetreblelevelofthespeakerandheadphones.
Surround mode
Selectasurroundsoundmodetoenhanceyouraudioexperience.
Audio out
Adjustaudiooutputvolume.
Advanced
Accessadvancedsettingstoenhanceyouraudioexperience.
• {Auto volume leveling}:Enablethereductionofsuddenvolume
changes.
• {Speaker settings}:Turnonorofftheinternalspeakers.
• {Clear sound}:Enhancesoundquality.
• {Audio out format}:Selectthetypeofaudiooutputthrough
thedigitalaudiooutputconnector.
• {Audio out leveling]:Settheoutputlevelforstereoaudio.
Select{Less}foracertainamountoflossinintensityorsignal
strength.Select{More}fornolossinintensityorsignalstrength.
• {Audio out delay}:Automaticallysynctheimageonthisdisplay
totheaudiofromaconnectedhometheatre.
• {Audio out offset}:Adjustthesettingforaudiooutputdelay.
Availableif{Audio out delay}isswitchedon.
BDL4235DL
16
5.2.3. General settings menu
Menu language
Monitor id
Eco mode
Auto search
Clock
USB scheduling
Sleep timer
Auto switch off
Local KB lock
RC lock
Factory settings
Picture
Sound
General settings
Menu language
SelectlanguageusedforOSDmenus.
Monitor id
SettheIDnumberforcontrollingthisdisplayviatheRS232C
connection.EachdisplaymusthaveauniqueIDnumberwhenmultiple
setsofthisdisplayareconnected.
Eco mode
Setthisdisplaytoreducethepowerconsumptionautomatically.
Auto search
Choosetoletthisdisplaydetectanddisplayavailablesignalsources
automatically.
Clock
Adjustclocksettings.
USB scheduling
Thisfunctionallowsyoutoprogramupto3differentscheduledtime
intervalsforthisdisplaytoactivate,andautoplayUSBmedialeofyour
setting.
Afterchangingthe{Clock}optioninthe{General settings}menu,you
needtosetthis{USB scheduling}again.
Sleep timer
Switchoffthisdisplayafteraspeciedtime.
Auto switch off
Setthetimeforthisdisplaytobeswitchedoffafteraperiodofno
activity.Pressanykeyontheremotecontroltodisablethisfunction.
Local KB lock
Choosetoenableordisablethekeyboard(controlbuttons)functionof
thisdisplay.
• {Unlock}:Enablethekeyboardfunction.
• {Lock all}:Lockallkeyboardfunction.
• {Lock but volume}:Disableallthekeyboardfunctionexceptthe
and button.
• {Lock but power}:Disableallthekeyboardfunctionexceptthe
button.
RC lock
Choosetoenableordisablethebuttonfunctionoftheremotecontrol.
• {Unlock}:Enablethebuttonfunction.
• {Lock all}:Lockallbuttonfunction.
• {Lock but volume}:Disableallthebuttonfunctionexceptthe
button.
• {Lock but power}:Disableallthebuttonfunctionexceptthe
button.
NOTE:Todisablethelockfunctionfrom[Local KB lock]or[RC
lock]item,pressbuttons
1 9 9 8 ontheremote
control.
Factory settings
Resetallyourcustomizedsettingstothefactorydefaults.
5.3. Network Settings
View network settings
Network settings
Static IP Configuration
Digital Media Renderer ..
View network settings
Viewconnectednetworkstatus.
Network settings
Selecthowthisdisplayshouldassignaddressestothenetwork
resources.
Static IP Conguration
Assign{IP address},{Netmask},{Gateway},{DNS1},and{DNS2}for
thisdisplay.
Digital Media Renderer - DMR
ReceivemultimedialesfromSmartPhonesorTabletsconnectedto
yournetwork.

BDL4235DL
17
6. Input mode
PC Resolution:
Standard
Resolution
ActiveResolution
RefreshRate PixelRate AspectRatio StandforMode
HPixels VLines
VGA 640
480 60Hz 25.175MHz
4:3 VideoGraphicArray480 72Hz 31.5MHz
480 75Hz 31.5MHz
WVGA 720 400 70Hz 33.75MHz 16:9 WideVideoGraphicArray
SVGA 800
600 60Hz 40MHz
4:3 SuperVGA
600 75Hz 49.5MHz
XGA 1024
768 60Hz 65MHz
4:3 ExtendedGraphicArray
768 75Hz 78.75MHz
WXGA 1280 768 60Hz 79.5MHz 5:3 WideXGA
WXGA 1280 800 60Hz 79.5MHz 16:10 WideXGA
SXGA 1280 1024 60Hz 108MHz 5:4 SuperXGA
WXGA 1360 768 60Hz 85.5MHz 16:9 WideXGA
UXGA 1600 1200 60Hz 162MHz 4:3 UltraXGA
HD1080 1920 1080 60Hz 148.5MHz 16:9 HD1080
SDTV Resolution:
Standard
Resolution
ActiveResolution
RefreshRate PixelRate AspectRatio StandforMode
HPixels VLines
480i
720 480
29.97Hz 13.5MHz
4:3 ModiedNTSCStandard
480p 59.94Hz 27MHz
576i
720 480
25Hz 13.5MHz
4:3 ModiedPALStandard
576p 50Hz 27MHz
HDTV Resolution:
Standard
Resolution
ActiveResolution
RefreshRate PixelRate AspectRatio StandforMode
HPixels VLines
720p 1280 720
50Hz
74.25MHz 16:9 NormallyDVBMode
60Hz
1080i 1920 1080
25Hz
74.25MHz 16:9 NormallyATSCMode
30Hz
1080p 1920 1080
50Hz
148.5MHz 16:9 NormallyATSCMode
60Hz
• ThePCtextqualityisoptimuminHD1080mode(1920×1080,60Hz).
• YourPCdisplayscreenmightappeardifferentdependingonthemanufacturer(andyourparticularversionofWindows).
• CheckyourPCinstructionbookforinformationaboutconnectingyourPCtoadisplay.
• Ifaverticalandhorizontalfrequency-selectmodeexists,select60Hz(vertical)and31.5KHz(horizontal).Insomecases,abnormalsignals(suchas
stripes)mightappearonthescreenwhenthePCpoweristurnedoff(orifthePCisdisconnected).Ifso,pressthe[ ]buttontoenterthe
videomode.Also,makesurethatthePCisconnected.
• WhenhorizontalsynchronoussignalsseemirregularinRGBmode,checkPCpowersavingmodeorcableconnections.
• ThisdisplaysettingstablecompliestotheIBM/VESAstandards,andbasedontheanaloginput.
• TheDVIsupportmodeisregardedassametothePCsupportmode.
• Thebesttimingfortheverticalfrequencytoeachmodeis60Hz.
BDL4235DL
18
7. Pixel Defect Policy
Westrivetodeliverthehighestqualityproductsandusesomeoftheindustry’smostadvancedmanufacturingprocesseswhilstpracticingstringentquality
control.However,pixelorsub-pixeldefectsonthePDP/TFTpanelsusedinPlasma-&LCD-displaysaresometimesunavoidable.Nomanufacturercan
guaranteethatallpanelswillbefreefrompixeldefects,butPhilipsguaranteesthatanyPlasma-&LCD-displayswithanunacceptablenumberofdefects
willberepairedduringthewarrantyperiodinlinewithyourlocalguaranteeconditions.
ThisnoticeexplainsthedifferenttypesofpixeldefectsanddenestheacceptabledefectlevelfortheLCDscreen.Inordertoqualifyforrepairunder
warranty,thenumberofpixeldefectsmustexceedacertainlevelasshowninthereferencetable.IftheLCDscreeniswithinspecicationawarranty
exchange/claimbackwillberefused.Additionally,becausesometypesorcombinationsofpixeldefectsaremorenoticeablethanothers,Philipssetseven
higherqualitystandardsforthose.
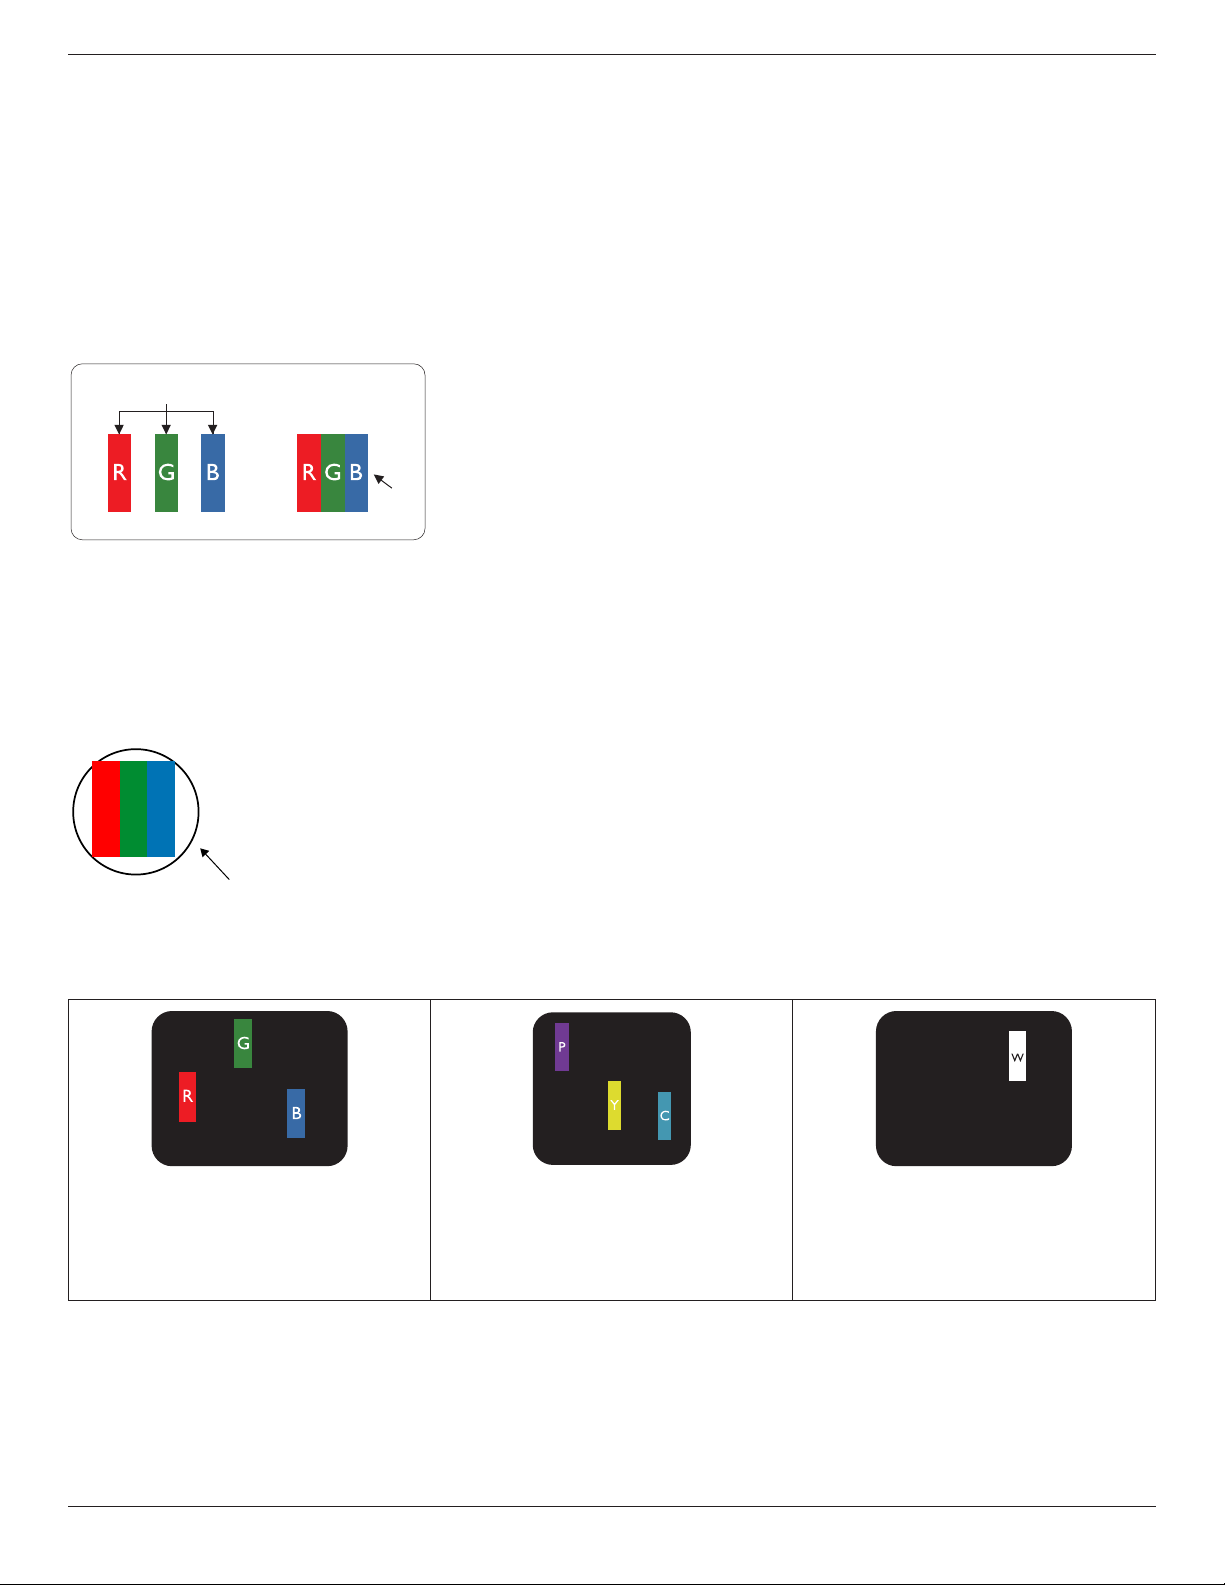
7.1. Pixels and Sub-pixels
subpixel
pixel
Apixel,orpictureelement,iscomposedofthreesub-pixelsintheprimarycolorsofred,greenand
blue.Manypixelstogetherformanimage.Whenallsub-pixelsofapixelarelit,thethreecolored
sub-pixelstogetherappearasasinglewhitepixel.Whenallaredark,thethreecoloredsub-pixels
togetherappearasasingleblackpixel.Othercombinationsoflitanddarksub-pixelsappearas
singlepixelsofothercolors.
7.2. Types of Pixel Defects + Dot Definition
Pixelandsub-pixeldefectsappearonthescreenindifferentways.Therearethreecategoriesofpixeldefectsandseveraltypesofsub-pixeldefectswithin
eachcategory.
Dot denition = What is a defective “Dot”? :
Oneormoredefective,adjacentsub-pixelaredenedasone“dot”.Theno.ofdefectivesub-pixelsarenotrelevanttodeneadefectivedot.Thismeans
thatadefectivedotcanconsistofone,twoorthreedefectivesub-pixelswhichcanbedarkorlit.
RR G B
Onedot=OnePixel;consistsofthreesub-pixelsofRed,Green,andBlue.
7.3. Bright Dot Defects
Brightdotdefectsappearaspixelsorsub-pixelsthatarealwayslitor“on”.Thesearetheexamplesofbrightdotdefects:
Onelitred,greenorbluesubpixel Twoadjacentlitsubpixels:
Red+Blue=Purple
Red+Green=Yellow
Green+Blue=Cyan(LightBlue)
Threeadjacentlitsubpixels(onewhitepixel)

BDL4235DL
19
7.4. Dark Dot Defects
Blackdotdefectsappearaspixelsorsub-pixelsthatarealwaysdarkor“off”.Thesearetheexamplesofblackdotdefects:
Onedarkdot Twoadjacentdarkdots=1pairofdarkdots Twodarkdots,specicationsdenesthe
minimumdistancebetweendarkdots
7.5. Proximity of Pixel Defects
Becausepixelandsub-pixelsdefectsofthesametypethatarenearbyoneanothermaybemorenoticeable,Philipsalsospeciestolerancesforthe
proximityofpixeldefects.Inthetablebelowyoucanndspecicationsabout:
• Allowedamountofadjacentdarkdots=(adjacentdarkdots=1pairofdarkdots)
• Minimumdistancebetweendarkdots
• Totalno.ofalldefectivedots
7.6. Pixel Defect Tolerances
Inordertoqualifyforrepairduetopixeldefectsduringthewarrantyperiod,aPDP/TFTpanelinaPhilipsPlasma/LCD-displaymusthavepixelorsub-
pixeldefectsexceedingthetoleranceslistedinthefollowingtable.
BRIGHTDOTEFFECT ACCEPTABLELEVEL
1litsubpixel 2
BLACKDOTEFFECT ACCEPTABLELEVEL
1darksubpixel 10
TOTALDOTDEFECTSOFALLTYPES 12
NOTE: *1or2adjacentsubpixeldefects=1dotdefect
7.7. MURA
Darkspotsorpatchesmayoccasionallyappearonsomeliquidcrystaldisplay(LCD)panels.ThisisknownwithintheindustryasMura,whichisaJapanese
termfor“unevenness.”Itisusedtodescribeanirregularpatternorareainwhichunevenscreenuniformityappearsundercertainconditions.Muraisa
resultofthedeteriorationoftheliquidcrystalalignmentlayerandismostcommonlycausedbylong-termoperationunderhighambienttemperatures.It
isanindustry-widephenomenonandMuraisnotrepairable.Itisalsonotcoveredbyourwarrantyterms.
MurahasbeenaroundsincetheintroductionofLCDtechnologyandwithscreensgettingbiggerandinoperation24/7,manydisplaysarerunninginlow
lightconditions.ThisalladdstothepossibilityofMuraaffectingdisplays.
HOW TO SPOT MURA
TherearemanysymptomsofMuraandalsomultiplecauses.Severalofthesearelistedbelow:
• Impuritiesorforeignparticlesinthecrystalmatrix
• UnevendistributionofLCDmatrixduringmanufacturing
• Non-uniformluminancedistributionofthebacklight
• Panelassemblyinducedstress
• FlawswithintheLCDcells
• Thermalinducedstress–hightemperatureoperationoverlongperiodsoftime
HOW TO AVOID MURA
AlthoughwecannotguaranteethecompleteeradicationofMuraeverytime,ingeneraltheappearanceofMuracanbeminimizedbythesemethods:
• Lowerthebacklightbrightness
• Useascreensaver
• Reducetheambienttemperaturearoundtheunit

BDL4235DL
20
8. Cleaning and Troubleshooting
8.1. Cleaning
Caution When Using the Display
• Donotbringyourhands,faceorobjectsclosetotheventilationholesofthedisplay.Thetopofthedisplayisusuallyveryhotduetothehigh
temperatureofexhaustairbeingreleasedthroughtheventilationholes.Burnsorpersonalinjuriesmayoccurifanybodypartsarebroughttoo
close.Placinganyobjectnearthetopofthedisplaycouldalsoresultinheatrelateddamagetotheobjectaswellasthedisplayitself.
• Besuretodisconnectallcablesbeforemovingthedisplay.Movingthedisplaywithitscablesattachedmaydamagethecablesandthuscausere
orelectricshock.
• Disconnectthepowerplugfromthewalloutletasasafetyprecautionbeforecarryingoutanytypeofcleaningormaintenanceprocedure.
Front Panel Cleaning Instructions
• Thefrontofthedisplayhasbeenspeciallytreated.Wipethesurfacegentlyusingonlyacleaningclothorasoft,lint-freecloth.
• Ifthesurfacebecomesdirty,soakasoft,lint-freeclothinamilddetergentsolution.Wringtheclothtoremoveexcessliquid.Wipethesurfaceof
thedisplaytoremovedirt.Thenuseadryclothofthesametypetodry.
• Donotscratchorhitthesurfaceofthepanelwithngersorhardobjectsofanykind.
• Donotusevolatilesubstancessuchasinsertsprays,solventsandthinners.
Cabinet Cleaning Instructions
• Ifthecabinetbecomesdirty,wipethecabinetwithasoft,drycloth.
• Ifthecabinetisextremelydirty,soakalint-freeclothinamilddetergentsolution.Wringtheclothtoremoveasmuchmoistureaspossible.Wipe
thecabinet.Useanotherdryclothtowipeoveruntilthesurfaceisdry.
• Donotallowanywaterordetergenttocomeintocontactwiththesurfaceofthedisplay.Ifwaterormoisturegetsinsidetheunit,operating
problems,electricalandshockhazardsmayresult.
• Donotscratchorhitthecabinetwithngersorhardobjectsofanykind.
• Donotusevolatilesubstancessuchasinsertsprays,solventsandthinnersonthecabinet.
• DonotplaceanythingmadefromrubberorPVCnearthecabinetforanyextendedperiodsoftime.

BDL4235DL
21
8.2. Troubleshooting
Symptom Possible Cause Remedy
No picture is displayed 1. Thepowercordisdisconnected.
2. Themainpowerswitchonthebackofthe
displayisnotswitchedon.
3. Theselectedinputhasnoconnection.
4. Thedisplayisinstandbymode.
1. Pluginthepowercord.
2. Makesurethepowerswitchisswitchedon.
3. Connectasignalconnectiontothedisplay.
Interference displayed on the display or audible
noise is heard
Causedbysurroundingelectricalappliancesor
uorescentlights.
Movethedisplaytoanotherlocationtoseeisthe
interferenceisreduced.
Color is abnormal Thesignalcableisnotconnectedproperly. Makesurethatthesignalcableisattachedrmly
tothebackofthedisplay.
Picture is distorted with abnormal patterns 1. Thesignalcableisnotconnectedproperly.
2. Theinputsignalisbeyondthecapabilitiesof
thedisplay.
1. Makesurethatthesignalcableisattached
rmly.
2. Checkthevideosignalsourcetoseeifit
isbeyondtherangeofthedisplay.Please
verifyitsspecicationswiththisdisplay’s
specicationsection.
Display image doesn’t ll up the full size of the
screen
Thezoommodeisnotcorrectlyset. UsetheZoommodeorCustomzoomfunction
intheScreenmenutonetunedisplaygeometry
andtimefrequencyparameter.
Can hear sound, but no picture Improperlyconnectedsourcesignalcable. Makesurethatbothvideoinputsandsound
inputsarecorrectlyconnected.
Can see picture but no sound is heard 1. Improperlyconnectedsourcesignalcable.
2. Volumeisturnedallthewaydown.
3. [MUTE]isturnedon.
4. Noexternalspeakerconnected.
1. Makesurethatbothvideoinputsandsound
inputsarecorrectlyconnected.
2. Press[ ]or[ ]buttontohearsound.
3. SwitchMUTEoffbyusingthe
[ ]
button.
4. Connectexternalspeakersandadjustthe
volumetoasuitablelevel.
Some picture elements do not light up Somepixelsofthedisplaymaynotturnon. Thisdisplayismanufacturedusinganextremely
highlevelofprecisiontechnology:however,
sometimessomepixelsofthedisplaymaynot
display.Thisisnotamalfunction.
After-Images can still be seen on the display
after the display is powered off. (Examples
of still pictures include logos, video games,
computer images, and images displayed in 4:3
normal mode)
Astillpictureisdisplayedforanoverextended
periodoftime
Donotallowastillimagetobedisplayedfor
anextendedperiodoftimeasthiscancausea
permanentafter-imagetoremainonthedisplay.
BDL4235DL
22
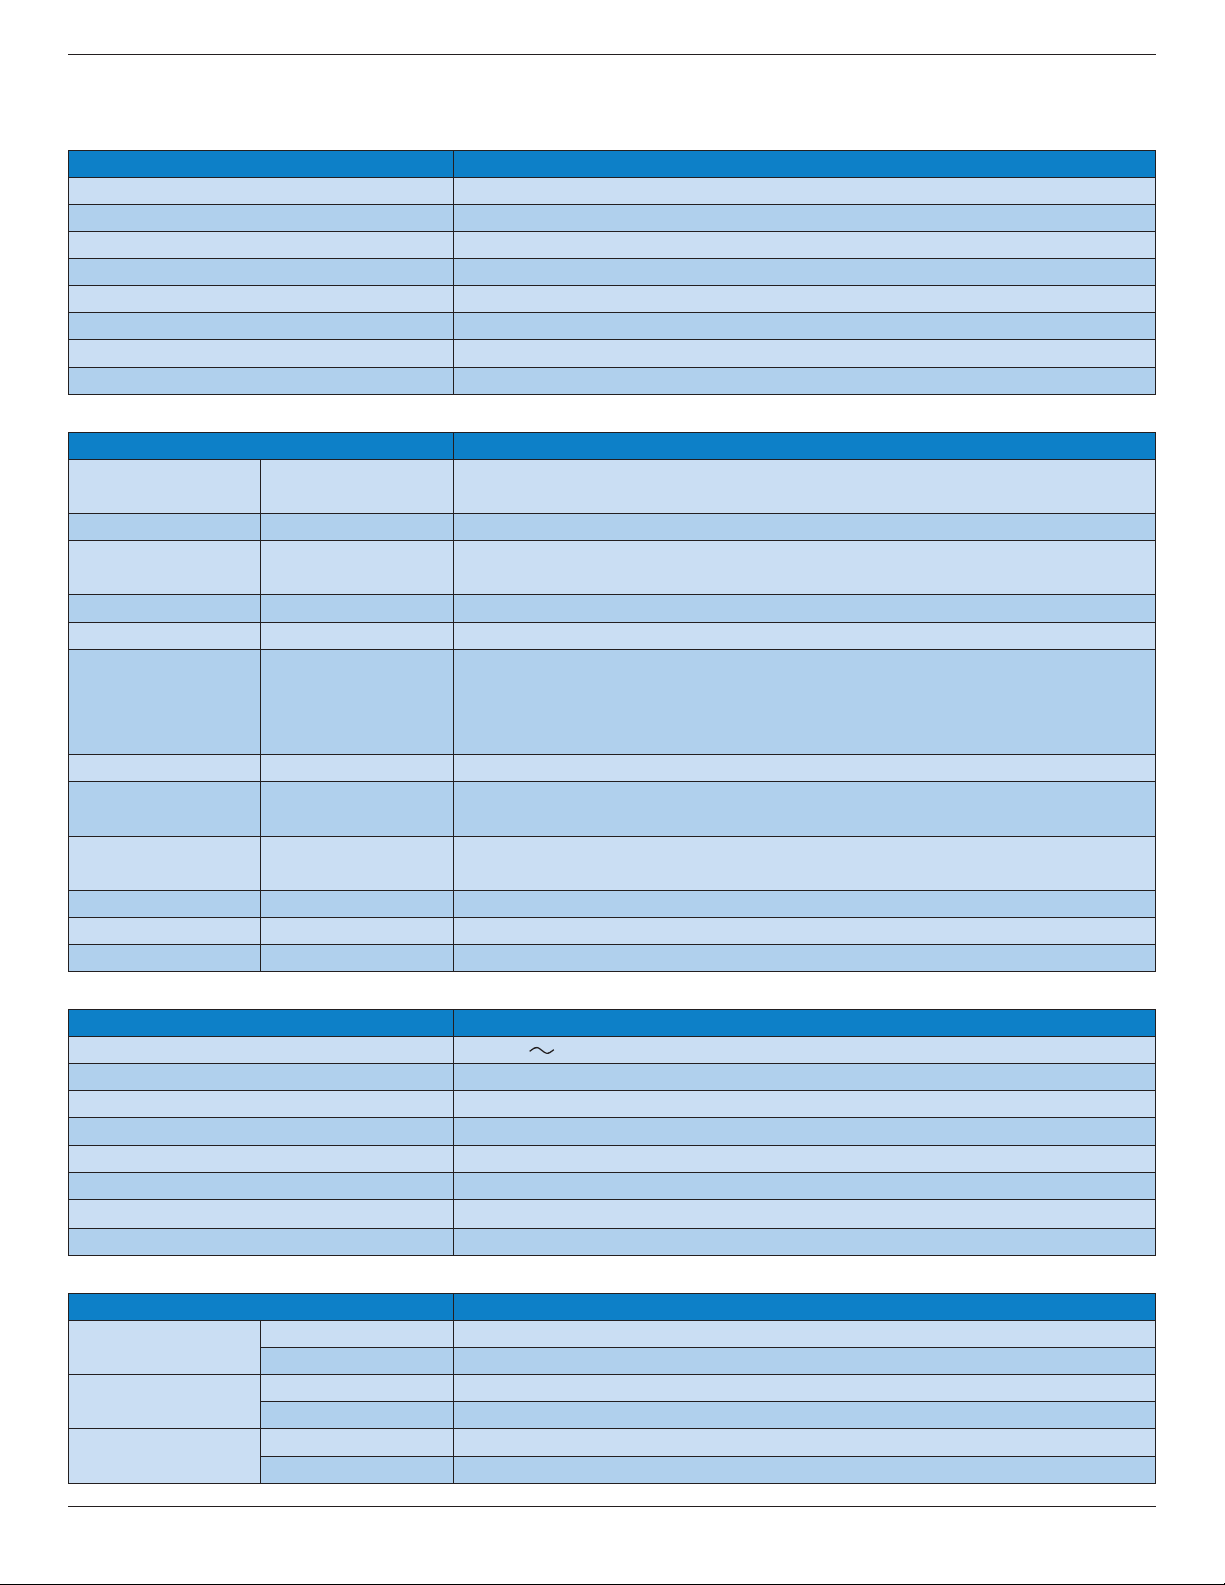
9. Technical Specifications
Display:
Item Specications
ScreenSize(ActiveArea) 42”(viewable41.92”/106.48cm)
AspectRatio 16:9
NumberofPixels 1920(H)×1080(V)
PixelPitch 0.4833(H)×0.4833(V)[mm]
DisplayableColors 16.7Millioncolors
Brightness 400cd/m²
ContrastRatio(Typical) 1000:1
ViewingAngle 178degrees
In/Out Terminals:
Item Specications
SpeakerOutput InternalSpeakers 7W(L)+7W(R)[RMS]/8Ω,1Way1SpeakerSystem
82dB/W/M/160Hz~13KHz
AudioOutput RCAJack×2 0.5V[rms](Normal)/2Channel(L+R)
AudioInput 3.5mmStereo×1
RCAJack×2
0.5V[rms](Normal)/2Channel(L+R)
RS232CInput/Output 2.5mm×2 TXD+RXD(1:1)
LAN RJ-45Jack×1(8pin) 10/100LANPort
HDMIInput HDMIJack×1
(TypeA)(19pin)
DigitalRGB:TMDS(Video+Audio)
MAX:
Video:720p,1080p,1920×1080/60Hz(WUXGA)
Audio:48KHz/2Channel(L+R)
SupportsLPCMonly
DVI-DInput DVI-Djack DigitalRGB:TMDS(Video)
VGAInput D-SubJack×1(15pin) AnalogRGB:0.7V[p-p](75Ω),H/CS/V:TTL(2.2kΩ),SOG:1V[p-p](75Ω)
MAX:720p,1080p,1920×1080/60Hz(WUXGA)
ComponentInput RCAJack×3 Y:1V[p-p](75Ω),Pb:0.7V[p-p](75Ω),Pr:0.7V[p-p](75Ω)
MAX:480i,576i,480p,576p,720p,1080i,1080p
SPDIFOutput SPDIFPort SerialdigitalaudiooutputwheninputisHDMI
IRInput/Output 3.5mm×2 IRpassthroughorIRdaisychain
USBInput USB×1(TypeA) USB2.0,forashdisk
General:
Item Specications
PowerInput 100-240V 50-60Hz,2.5AMax
PowerConsumption(Max.) 106W
PowerConsumption(Typical) 80W
PowerConsumption(EPA6.0) 51.5W
PowerConsumption(Standby&Off) <0.5W
Dimensions[W×H×D] 991.6×584.0×113.9mm
Weight 15.21Kg
GrossWeight 21.1Kg
Environmental Condition:
Item Specications
Temperature
Operational 5~40°C
Storage -20~60°C
Humidity
Operational 20~80%RH(Nocondensation)
Storage 10~90%RH(Nocondensation)
Altitude
Operational 0~3,000m
Storage/Shipment 0~9,000m

© 2013 Koninklijke Philips N.V. All rights reserved.
Philips and the Philips Shield Emblem are registered trademarks of
Koninklijke Philips N.V. and are used under license from
Koninklijke Philips N.V.
Specications are subject to change without notice.