Honda 2021 REBEL 300 Street Cruiser
Product's Documents
Below are documents related to this product, you can read online or download:
- Owner's manual - (English) Read Online | Download pdf
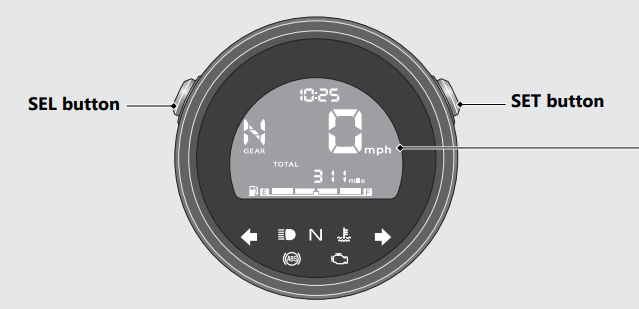
Display Check
When the ignition switch is turned to the ON position, initial animation will show. If any part of these displays does not come on when it should, have your dealer check for problems
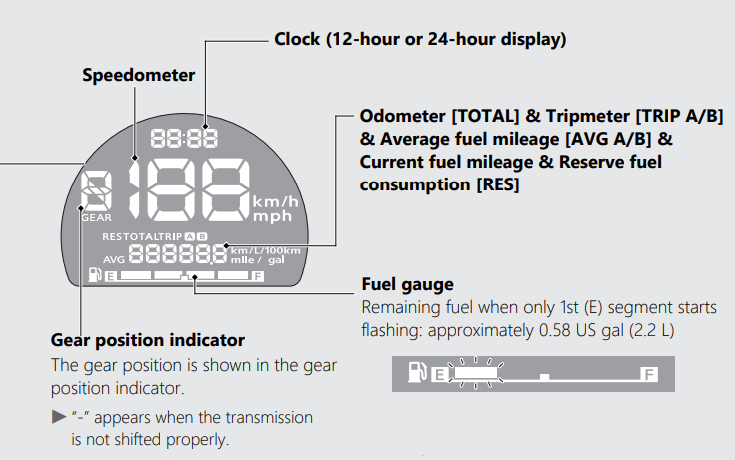
Odometer [TOTAL] & Tripmeter [TRIP A/B] & Current fuel mileage & Average fuel mileage [AVG A/B] & Reserve fuel consumption [RES]
The SEL button switches between the odometer, tripmeter A, tripmeter B, average fuel mileage A, average fuel mileage B, current fuel mileage and reserve fuel consumption.
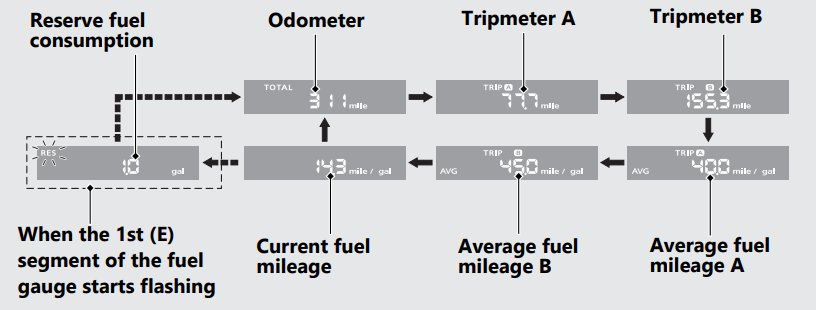
When the 1st (E) segment of the fuel gauge starts flashing, the odometer, tripmeter A, tripmeter B, average fuel mileage A, average fuel mileage B or current fuel mileage switches to the reserve fuel consumption.
Odometer [TOTAL]
Total distance ridden. When “------” is displayed, go to your dealer for service.
Tripmeter [TRIP A/B]
Distance ridden since tripmeter was reset. When “-----.-” is displayed, go to your dealer for service.
Average fuel mileage [AVG A/B]
The average fuel mileage A will be based on tripmeter A. Displays the average fuel mileage A since tripmeter A was reset. The average fuel mileage B will be based on tripmeter B. Displays the average fuel mileage B since tripmeter B was reset. Display range: 0.0 to 299.9 mile/gal (L/100km or km/L)
When “---.-” is displayed except for the above-mentioned cases, go to your dealer for service.
Current fuel mileage
Displays the current instant fuel mileage. Display range: 0.0 to 299.9 mile/gal (L/100km or km/L)
When “---.-” is displayed except for the above-mentioned cases, go to your dealer for service.
Reserve fuel consumption [RES]
Displays the fuel consumption since the 1st (E) segment of the fuel gauge starts flashing. When the 1st (E) segment of the fuel gauge starts flashing, the odometer, tripmeter A, tripmeter B, average fuel mileage A, average fuel mileage B or current fuel mileage switches to the reserve fuel consumption. You should refill the tank as soon as possible. Display range: 0.0 to 99.9 gal (gallon) or 0.0 to 99.9 L (liters)
After refueling more than the reserve amount, the display returns to normal.
When “---.-” is displayed, go to your dealer for service.
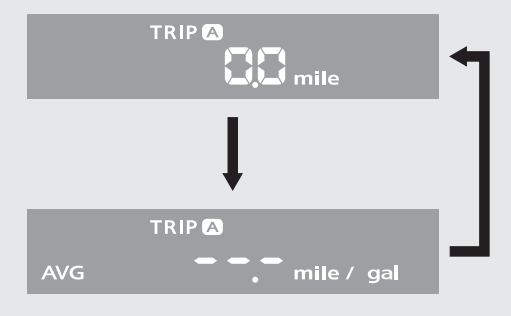
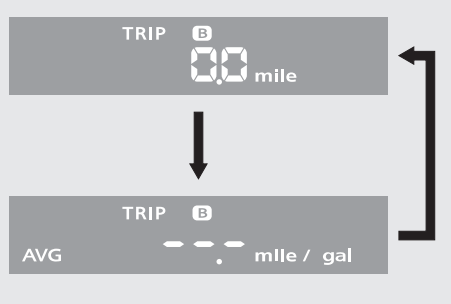
To reset the tripmeter [TRIP A/B] and average fuel mileage [AVG A/B]
To reset the tripmeter A and average fuel mileage A together, press and hold the SET button while the tripmeter A or average fuel mileage A is displayed.

When they are reset, reset display appears at each indication. Then, the display returns to the last selected indication.
To reset the tripmeter B and average fuel mileage B together, press and hold the SET button while the tripmeter B or average fuel mileage B is displayed.
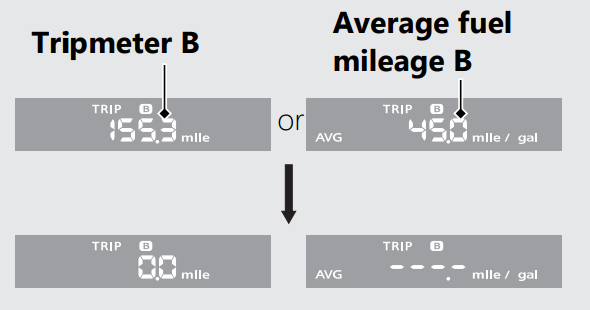
When they are reset, reset display appears at each indication. Then, the display returns to Operation Guide the last selected indication.
Display Setting
Following items can be changed sequentially.
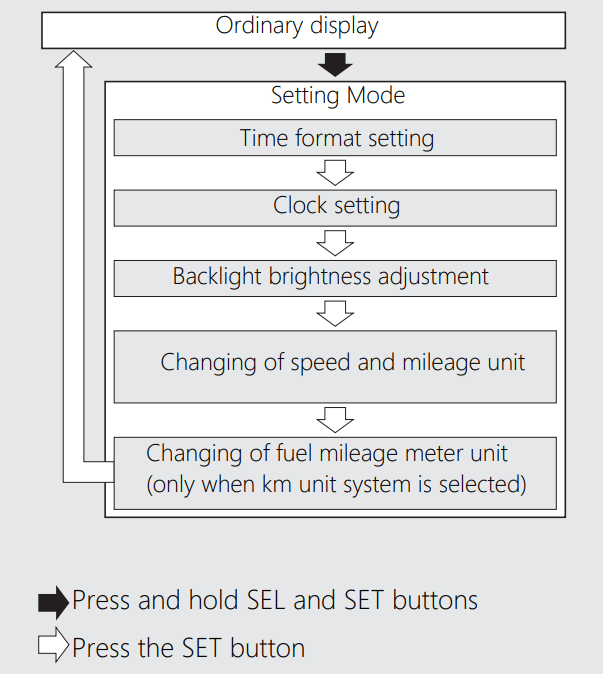
In addition, to move the ordinary display at display setting.
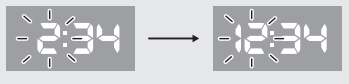
1 Time format setting:
You can switch the time format between 12 hour format or 24 hour format.
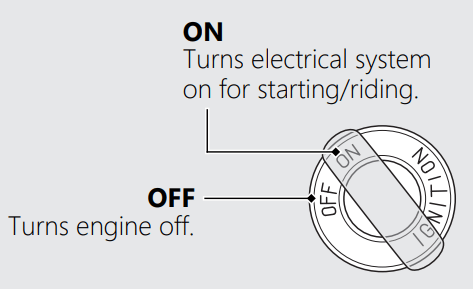
1. Turn the ignition switch to the ON position.
2. Press and hold SEL and SET buttons until the current time format start flashing.

3. Press SEL button to select “12 hr” or “24 hr”.
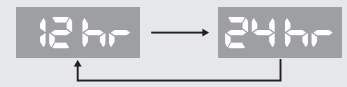
4. Press SET button. The time format is set, and then the display moves to the clock setting.
2. Clock setting:
1. Press SEL button until the desired hour is displayed.
Press and hold SEL button to advance the hour quickly.
2. Press SET button. The minute digits start flashing.
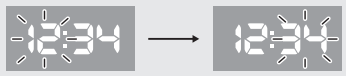
3. Press SEL button until the desired minute is displayed.
Press and hold SEL button to advance the minute quickly.

4. Press SET button. The clock is set, and then the display moves to the backlight brightness adjustment.
3 Backlight brightness adjustment:
You can adjust the brightness to one of five levels.
1. Press SEL button. The brightness is switched.
2. Press SET button. The backlight is set, and then the display moves the changing of the speed and mileage unit.
4 Changing of speed and mileage unit:
1. Press SEL button to select either “mph” and “mile” or “km/h” and “km”.
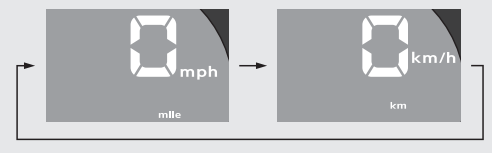
2. When the “km/h” for speed and “km” for mileage are selected
Press SET button. The speed and mileage unit is set, and then the display moves to the changing of fuel mileage meter unit.
When the “mph” for speed and “mile” for mileage are selected
Press SET button. The speed and mileage unit is set, and then the display returns to the ordinary display
5. Changing of fuel mileage meter unit:
Press SEL button to select “km/L” or “L/ 100km” .

Press SET button. The fuel mileage meter unit is set, and then the display moves to the ordinary display.
The established setting can also be set by turning the ignition switch to the OFF position.
The control is automatically switched from the setting mode to the ordinary display if the button is not pressed for about 30 seconds. Even in this case, established setting is maintained.
If one of these indicators does not come on when it should, have your dealer check for problems.
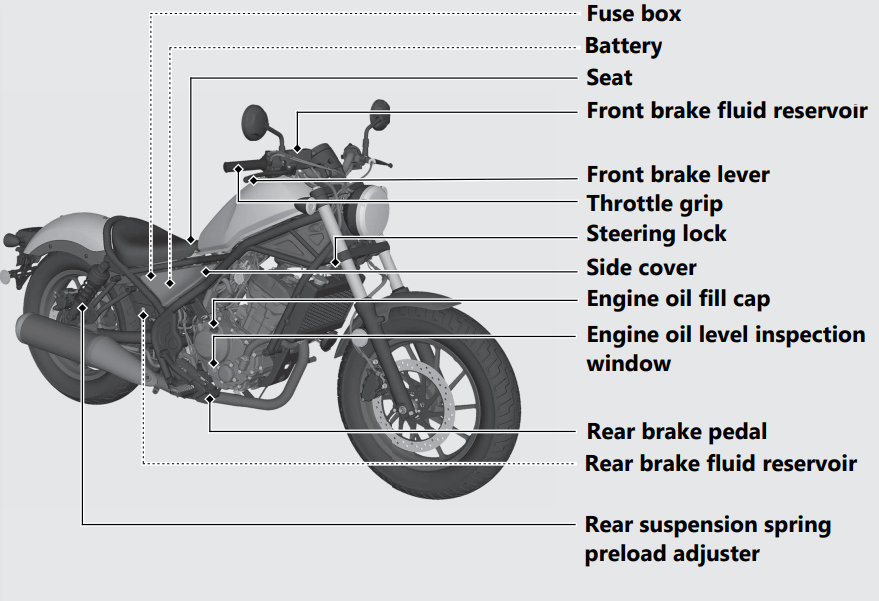
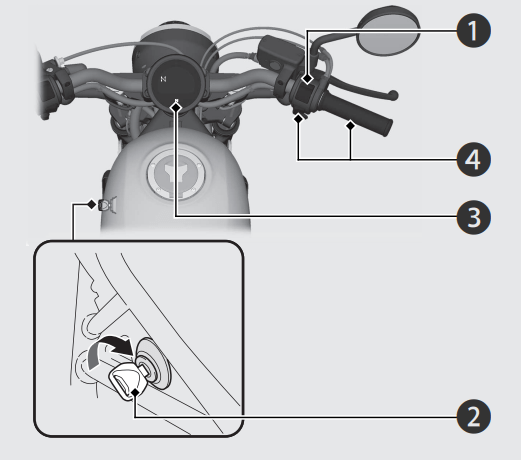
Steering Lock
Lock the steering when parking to help prevent theft.
A U-shaped wheel lock or similar device is also recommended.
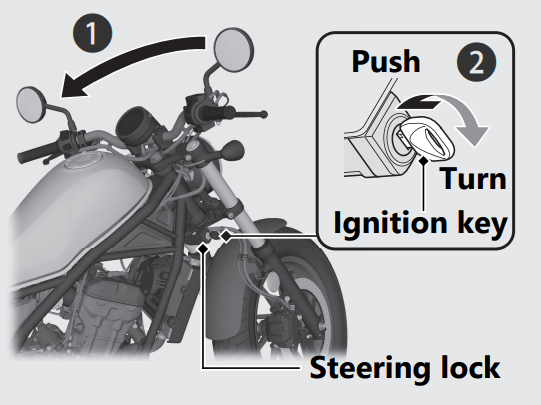
Locking
1. Turn the handlebar all the way to the left.
2. Insert the ignition key in the steering lock.
3. Push the ignition key down, and turn it 180 degrees clockwise.
Jiggle the handlebar if the lock is difficult to engage.
4. Remove the ignition key. #
Unlocking
Insert the ignition key, push it in, and turn it 180 degrees counterclockwise.
Start your engine using the following procedure, regardless of whether the engine is cold or warm.
NOTICE
If you cannot start the engine:
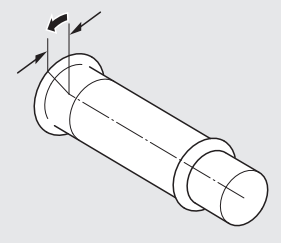
With the throttle slightly open (about 1/8 in (3 mm), without freeplay) while starting the engine.
About 1/8 in (3 mm), without freeplay
If the engine does not start:
Your vehicle transmission has 6 forward gears in a one-down, five-up shift pattern.
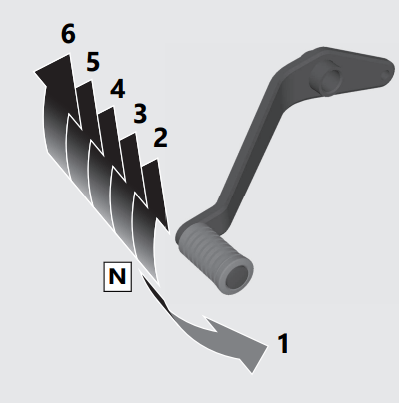
If you put the vehicle in gear with the side stand down, the engine will shut off.
Recommended Shift Points
Shifting Up
| From 1st to 2nd | 12 mph (20 km/h) |
| From 2nd to 3rd | 19 mph (30 km/h) |
| From 3rd to 4th | 25 mph (40 km/h) |
| From 4th to 5th | 31 mph (50 km/h) |
| From 5th to 6th | 37 mph (60 km/h) |
Shifting Down
| From 6th to 5th | 28 mph (45 km/h) |
| From 5th to 4th | 22 mph (35 km/h) |
| From 4th to 3rd | 16 mph (25 km/h) |
NOTICE
Improper shifting can damage the engine, transmission, and drive train. Also, coasting or towing the vehicle for long distances with the engine off can damage the transmission.
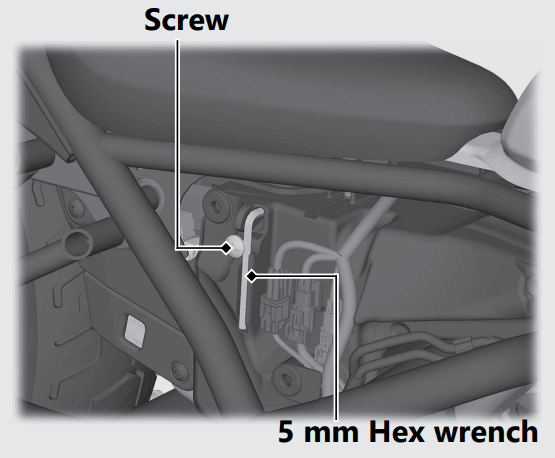
Tool
The 5 mm Hex wrench is stored behind the right side cover.
To remove the 5 mm Hex wrench, loosen the screw with a coin.
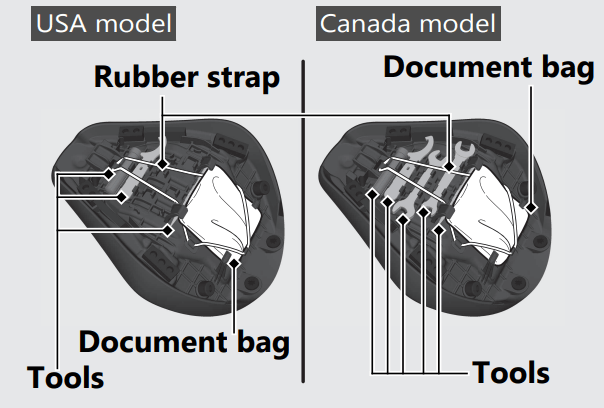
The tools are stored on the underside of the seat.
Store the tools and secure them with the rubber strap as shown.
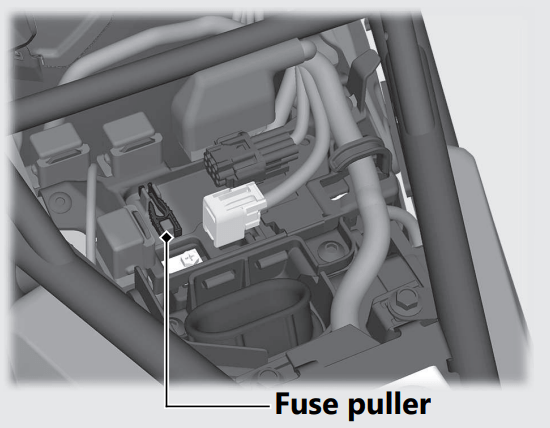
The fuse puller is stored on the battery cover under the seat.
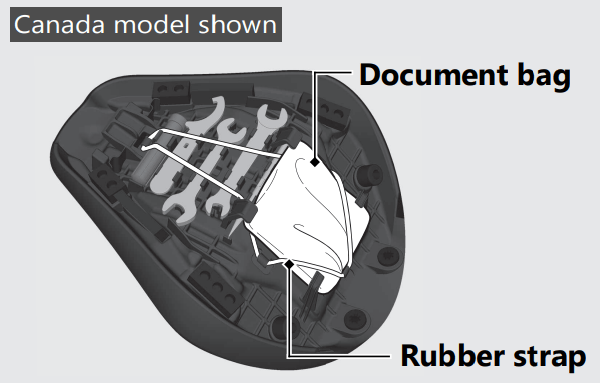
Document Bag
The document bag is stored on the underside of the seat.
Store the document bag and secure it with the rubber strap as shown.
BATTERY
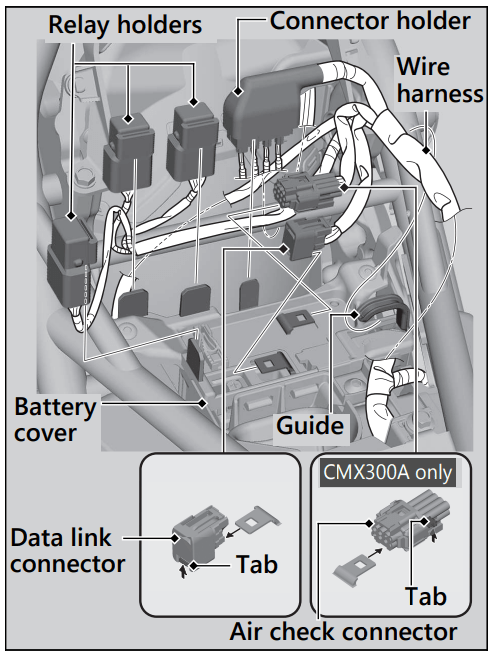
Removal
Make sure the ignition switch is in the OFF position.
1. Remove the seat. 2
2. Remove the data link connector while pressing its tab from the battery cover.
3. CMX300A only Remove the air check connector while pressing its tab from the battery cover.
4. Remove the connector holder and relay holders from the battery cover.
5. Release the wire harness from the guide on the battery cover.
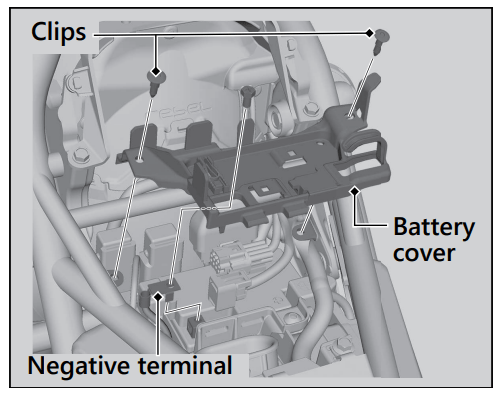
6. Remove the clips.
7. Disconnect the negative - terminal from the battery.
8. Pull up the battery cover.
9. Disconnect the positive + terminal from the battery.
10. Remove the battery taking care not to drop the terminal nuts.
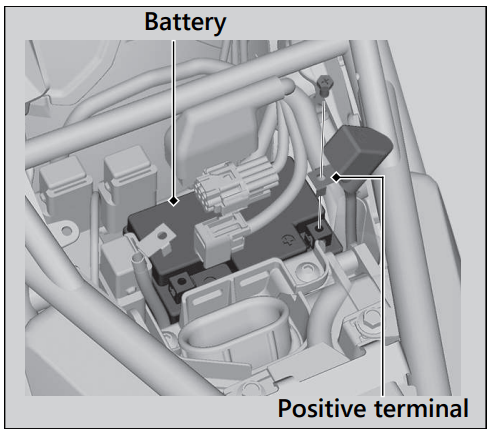
Installation
Install the parts in the reverse order of removal. Always connect the positive + terminal first. Make sure that bolts and nuts are tight.
Make sure the clock information is correct after the battery is reconnected.
CLIP
Removal
1. Press down on the center pin to release the lock.
2. Pull the clip out of the hole.
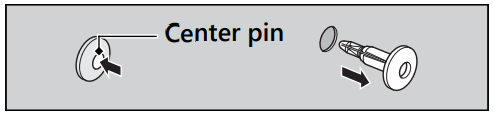
Installation
1. Push the bottom of the center pin.
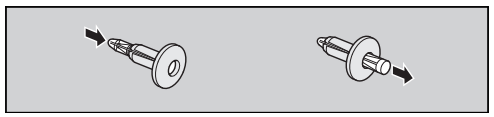
2. Insert the clip into the hole.
3. Press down on the center pin to lock the clip.
HARNESS BAND CLIP
Removal
Pull the harness band clip while pressing both sides of the anchor.
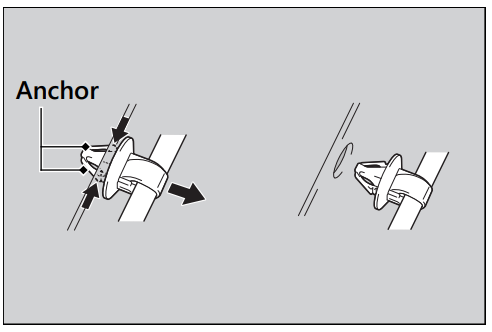
Installation
Install the harness band clip until it seats properly.
SEAT
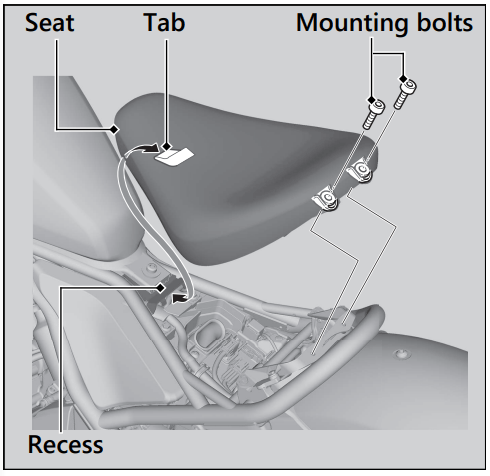
Removal
1. Pull the rear corners of the seat up, then remove the mounting bolts using the provided 5 mm Hex wrench.
2. Pull the seat back and up.
Installation
1. Insert the tab into the recess.
2. Install and tighten the mounting bolts securely. Make sure that the seat is locked securely in position by pulling it up lightly.
SIDE COVER
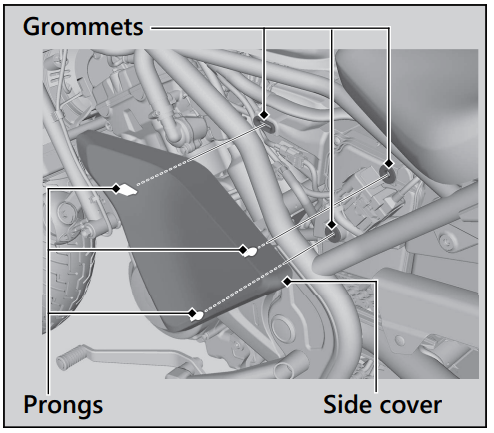
The right and left side covers can be removed in the same way.
Removal
1. Grasp the side cover.
2. Remove the prongs from the grommets.
3. Remove the side cover.
Installation
Install the parts in the reverse order of removal.
Checking the Engine Oil
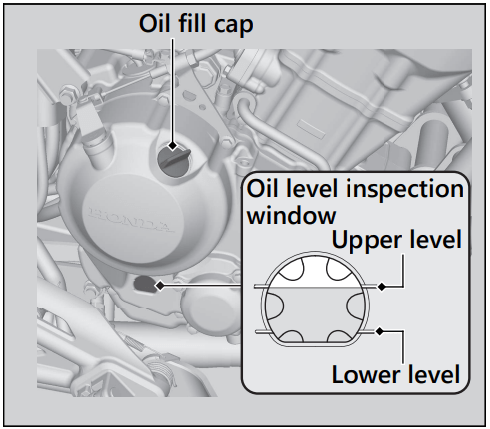
Adding Engine Oil
If the engine oil is below or near the lower level mark, add the recommended engine oil.
1. Remove the oil fill cap. Add the recommended oil until it reaches the upper level mark.
2. Securely reinstall the oil fill cap.
NOTICE Overfilling with oil or operating with insufficient oil can cause damage to your engine. Do not mix different brands and grades of oil. They may affect lubrication and clutch operation.
Checking the Coolant
Check the coolant level in the reserve tank while the engine is cold.
If the coolant level is dropping noticeably or the reserve tank is empty, you likely have a serious leak. Have your vehicle inspected by your dealer.
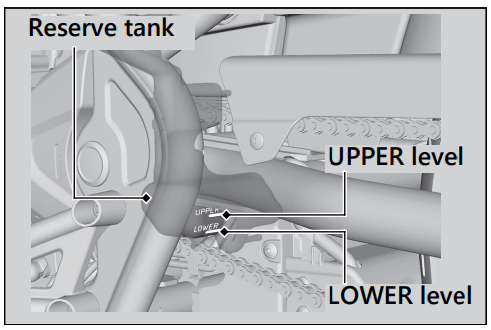
Adding Coolant
If the coolant level is below the LOWER level mark, add the recommended coolant until the level reaches the UPPER level mark.
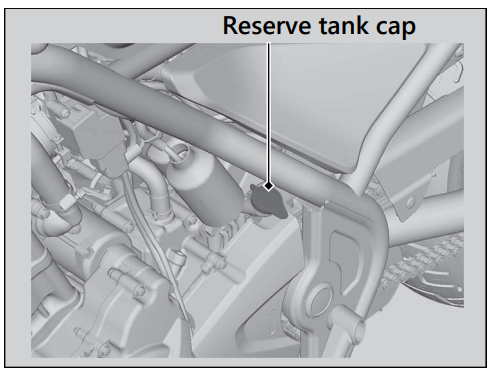
Add fluid only from the reserve tank cap and do not remove the radiator cap.
1. Remove the reserve tank cap and add fluid while monitoring the coolant level.
2. Securely reinstall the reserve tank cap.
WARNING
Checking Brake Fluid
1. Place your vehicle in an upright position on a firm, level surface.
2. Check that the brake fluid reservoir is horizontal and that the fluid level is:
Front above the LOWER level mark.
Rear between the LOWER level and UPPER level marks.
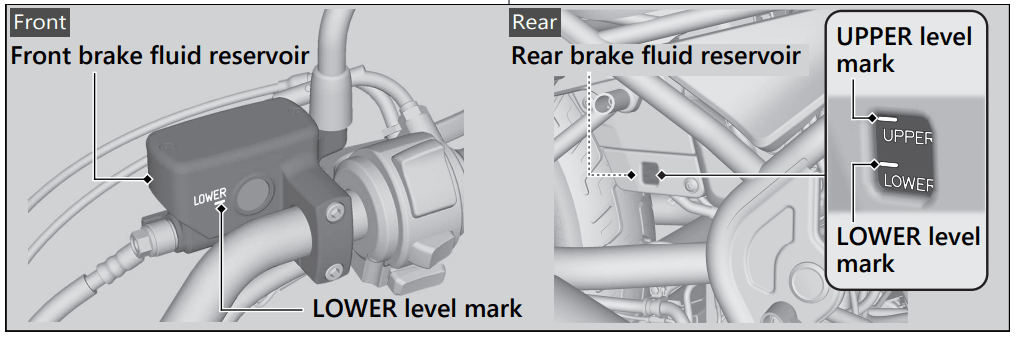
If the brake fluid level in either reservoir is below the LOWER level mark or the brake lever and pedal freeplay becomes excessive, inspect the brake pads for wear. If the brake pads are not worn, you most likely have a leak. Have your vehicle inspected by your dealer.
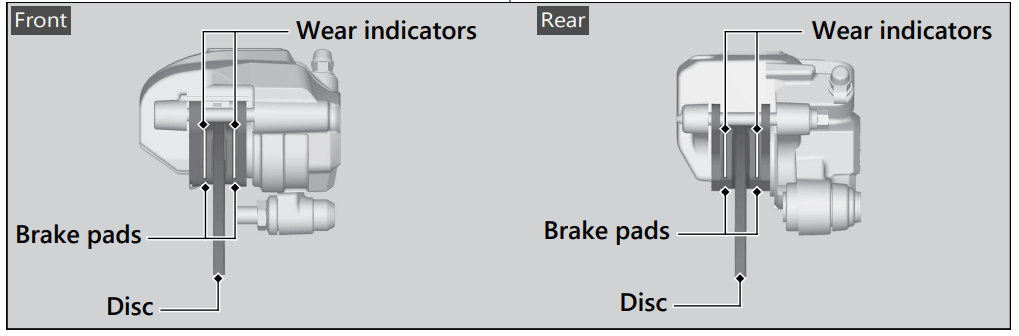
Inspecting the Brake Pads
Check the condition of the brake pad wear indicators.
The pads need to be replaced if a brake pad is worn to the indicator.
1. Front Inspect the brake pads from below the brake caliper.
2. Rear Inspect the brake pads from the rear right of the vehicle.
If necessary have the pads replaced by your dealer.
Always replace both left and right brake pads at the same time.
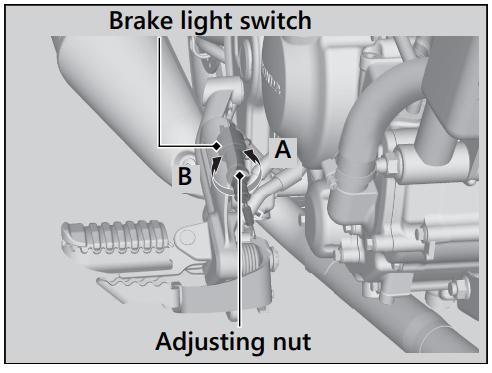
Adjusting the Brake Light Switch
Check the operation of the brake light switch. Hold the brake light switch and turn the adjusting nut in the direction A if the switch operates too late, or turn the nut in the direction B if the switch operates too soon.
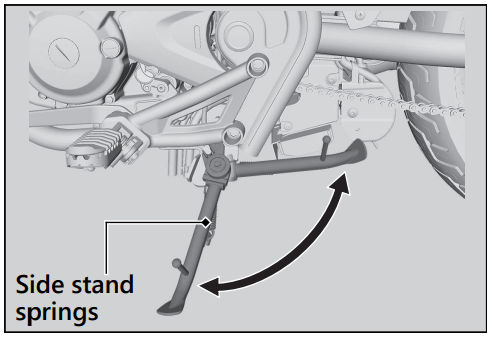
Checking the Side Stand
Inspecting the Drive Chain Slack
Check the drive chain slack at several points along the chain. If the slack is not constant at all points, some links may be kinked and binding. Have the chain inspected by your dealer.
1. Shift the transmission to Neutral. Stop the engine.
2. Place your vehicle on its side stand on a firm, level surface.
3. Check the slack in the lower half of the drive chain midway between the sprockets.
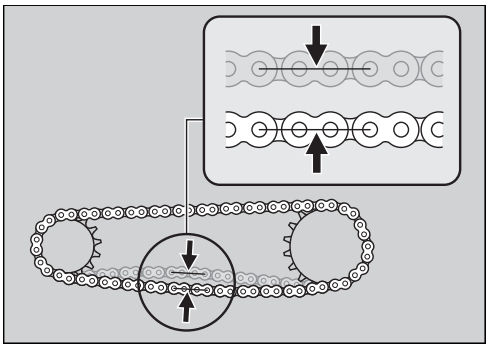
4. Roll the vehicle forward and check that the chain moves smoothly.
5. Inspect the sprockets.
6. Clean and lubricate the drive chain.
Checking the Clutch
Checking the Clutch Lever Freeplay
Check the clutch lever freeplay
Freeplay at the clutch lever: 3/8 - 13/16 in (10 - 20 mm)
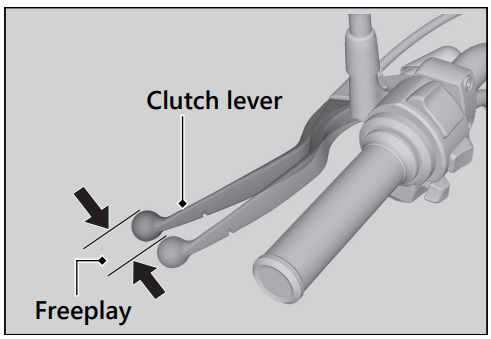
Check the clutch cable for kinks or signs of wear. If necessary have it replaced by your dealer.
Lubricate the clutch cable with a commercially available cable lubricant to prevent premature wear and corrosion.
NOTICE Improper freeplay adjustment can cause premature clutch wear.
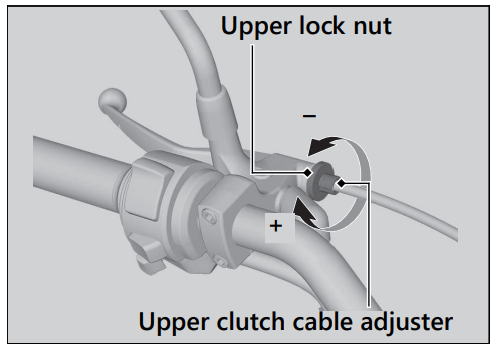
Adjusting the Clutch Lever Freeplay
Upper Adjustment
Attempt adjustment with the upper clutch cable adjuster first.
1. Loosen the upper lock nut.
2. Turn the upper clutch cable adjuster until the freeplay is 3/8 - 13/16 in (10 - 20 mm).
3. Tighten the upper lock nut and check the freeplay again.
Lower Adjustment
If the upper clutch cable adjuster is threaded out near its limit, or the correct freeplay cannot be obtained, attempt adjustment with the lower clutch cable adjusting nut.
1. Loosen the upper lock nut and turn the upper clutch cable adjuster all the way in (to provide maximum freeplay). Tighten the upper lock nut.
2. Loosen the lower lock nut.
3. Turn the lower adjusting nut until the clutch lever freeplay is 3/8 - 13/16 in (10 - 20 mm).
4. Tighten the lower lock nut and check the clutch lever freeplay.
5. Start the engine, pull the clutch lever in, and shift into gear. Make sure the engine does not stall and the vehicle does not creep. Gradually release the clutch lever and open the throttle. Your vehicle should move smoothly and accelerate gradually.
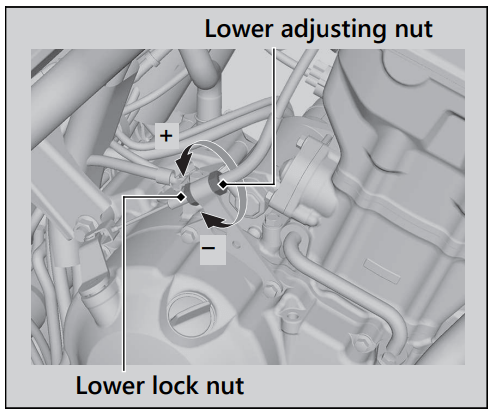
If proper adjustment cannot be obtained or the clutch does not work correctly, see your dealer.
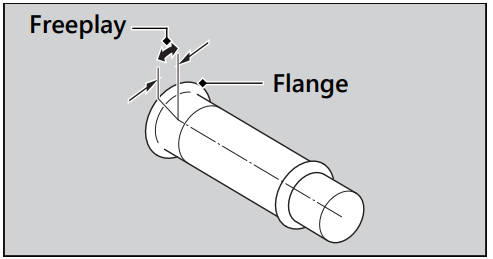
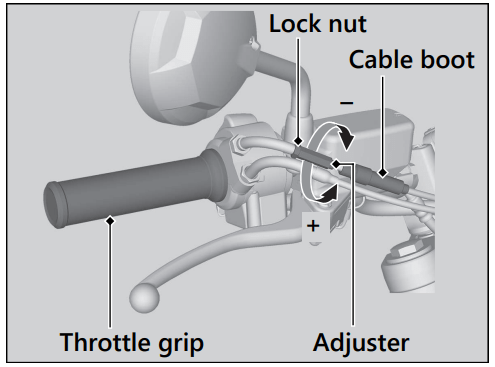
Checking the Throttle
With the engine off, check that the throttle rotates smoothly from fully closed to fully open in all steering positions and throttle freeplay is correct. If the throttle does not move smoothly, close automatically, or if the cable is damaged, have the vehicle inspected by your dealer.
Freeplay at the throttle grip flange: 1/16 - 1/4 in (2 - 6 mm)
Adjusting the Throttle Freeplay
1. Slide the cable boot.
2. Loosen the lock nut.
3. Turn the adjuster until the freeplay is 1/16 - 1/4 in (2 - 6 mm).
4. Tighten the lock nut, return the cable boot, and inspect the throttle action again.
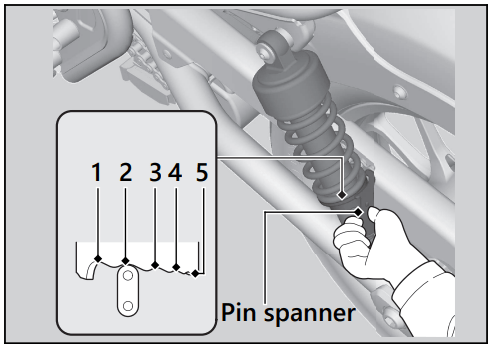
Adjusting the Rear Suspension
Spring Preload
You can adjust the spring preload by the adjuster to suit the load or the road surface. Turn the adjuster using the provided pin spanner.
Position 1 is for a decrease spring preload (soft), or turn the position 3 to 5 increase spring preload (hard). The standard position is 2.
NOTICE
Starter Motor Operates But Engine Does Not Start
Check the following items:
If the indicator lamp is on, contact your dealer as soon as possible.
Starter Motor Does Not Operate
Check the following items:
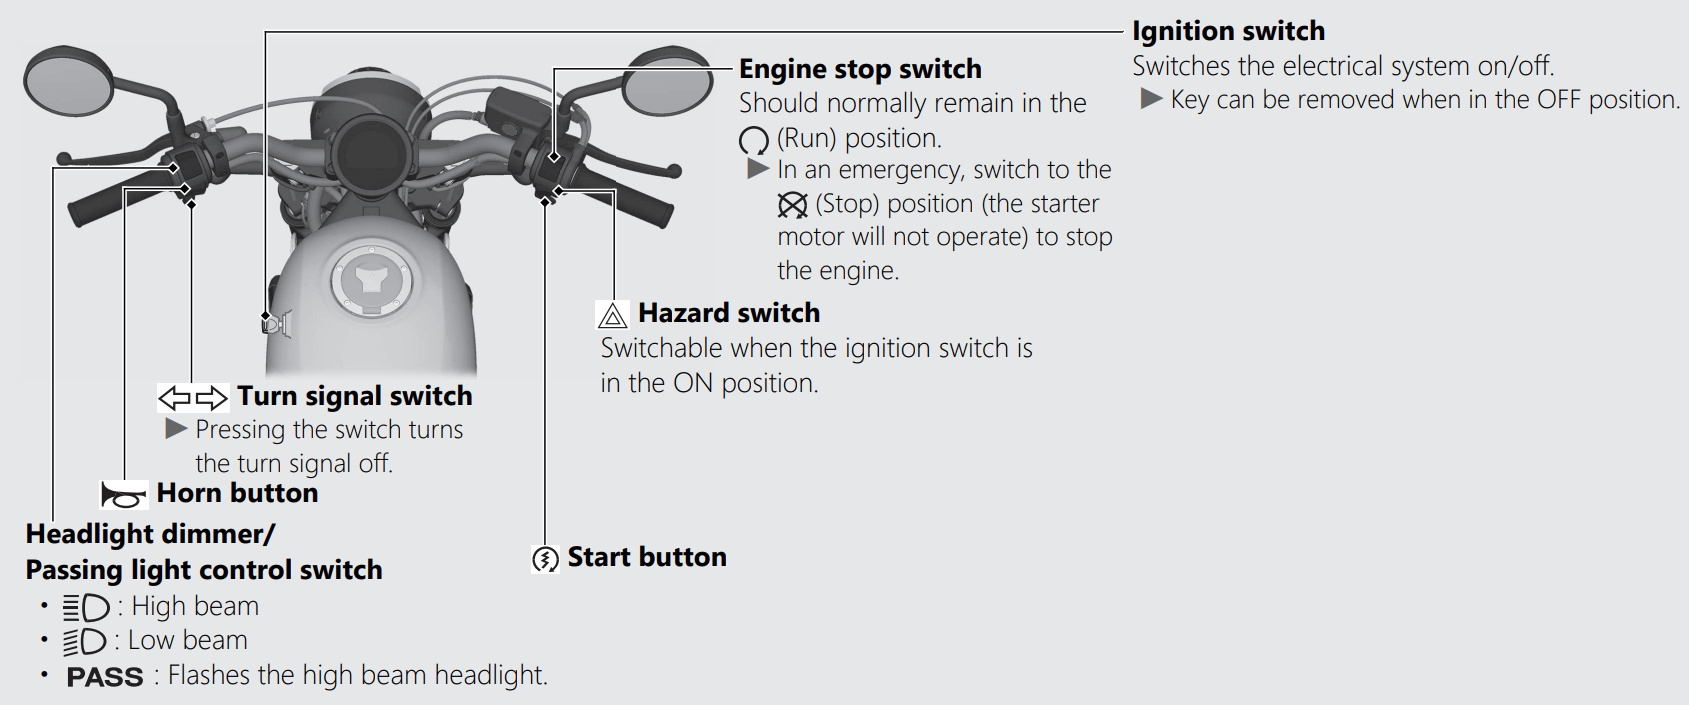
 (Run) position.
 If the problem continues, have your vehicle inspected by your dealer.
The engine is overheating when the following occurs:
NOTICE Continuing to ride with an overheated engine can cause serious damage to the engine.
1. Stop the engine using the ignition switch, and then turn the ignition switch to the ON position.
2. Check that the radiator fan is operating, and then turn the ignition switch to the OFF position.
If the fan is not operating:
Suspect a fault. Do not start the engine. Transport your vehicle to your dealer.
If the fan is operating:
Allow the engine to cool with the ignition switch in the OFF position.
3. After the engine has cooled, inspect the radiator hose and check if there is a leak.
If there is a leak:
Do not start the engine. Transport your vehicle to your dealer.
4. Check the coolant level in the reserve tank.
Add coolant as necessary.
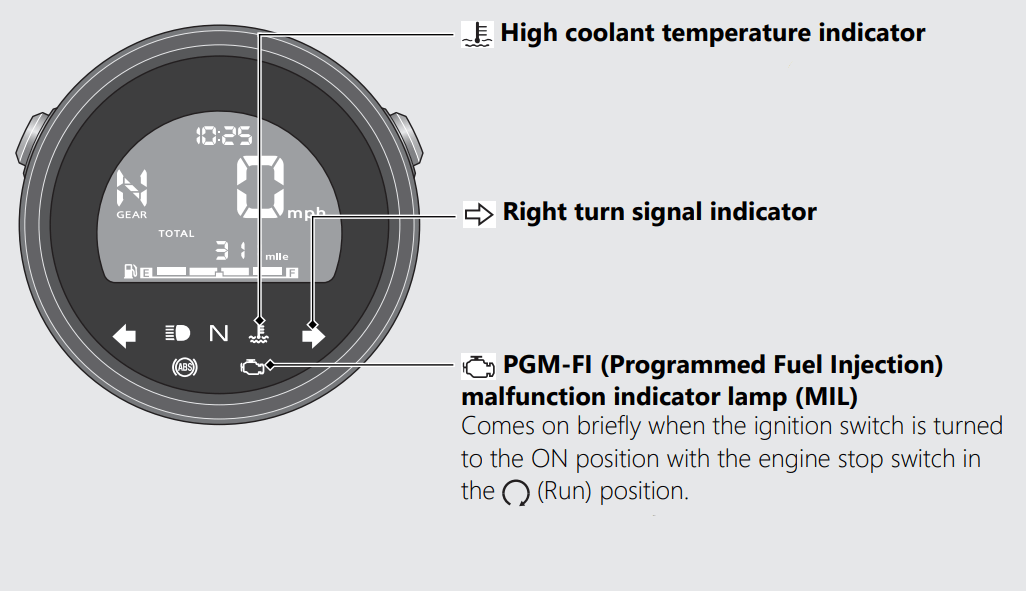
5. If 1-4 check normal, you may continue riding, but closely monitor the high coolant temperature indicator.
PGM-FI (Programmed Fuel Injection) Malfunction Indicator Lamp (MIL)
If the indicator comes on while riding, you may have a serious problem with the PGM-FI system. Reduce speed and have your vehicle inspected by your dealer as soon as possible.
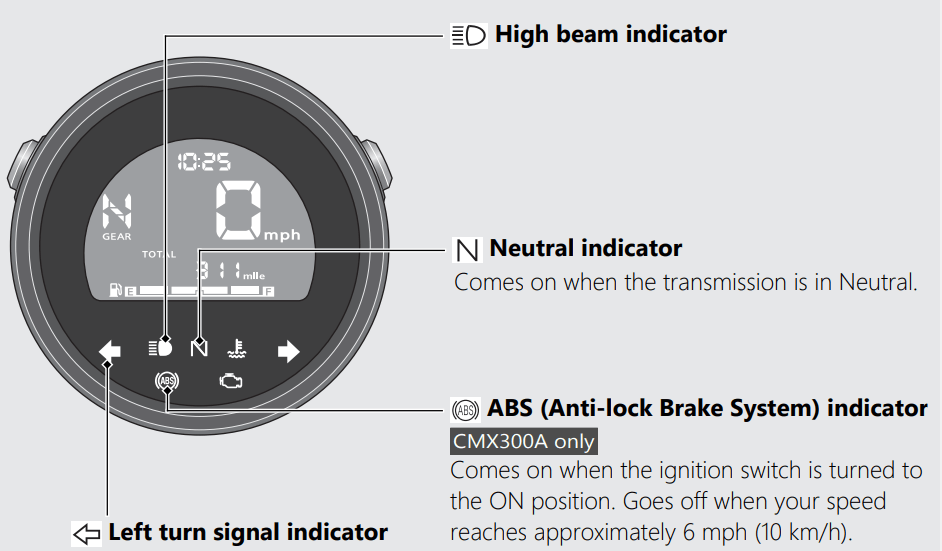
ABS (Anti-lock Brake System) Indicator
CMX300A only
If the indicator operates in one of the following ways, you may have a serious problem with the ABS. Reduce your speed and have your vehicle inspected by your dealer as soon as possible.
If the ABS indicator stays on, your brakes will continue to work as a conventional system, but without the anti-locking function.
The ABS indicator may flash if you turn the rear wheel while the rear wheel is lifted off the ground. In this case, turn the ignition switch to the OFF position, and then to the ON position again. The ABS indicator will go off after your speed reaches 19 mph (30 km/h).
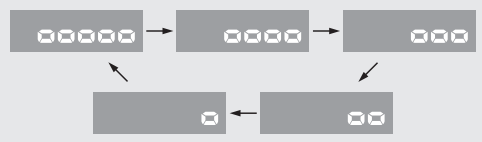
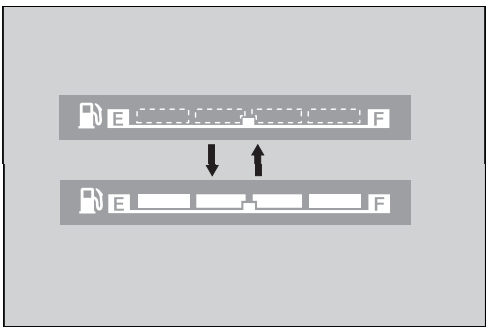
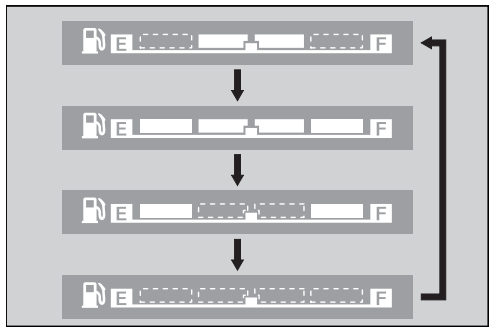
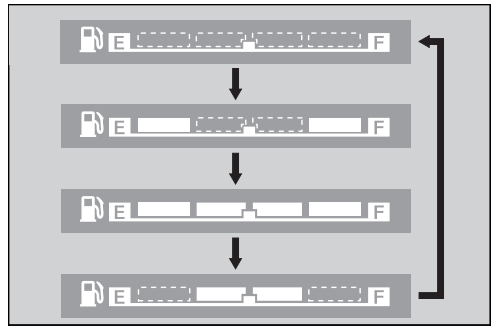
Fuel Gauge Failure Indication
If the fuel system has an error, the fuel gauge indicators will be displayed as shown in the illustrations.
If this occurs, see your dealer as soon as possible.
Repairing a puncture or removing a wheel requires special tools and technical expertise. We recommend you have this type of service performed by your dealer. After an emergency repair, always have the tire inspected/replaced by your dealer.
Emergency Repair Using a Tire Repair Kit
If your tire has a minor puncture, you can make an emergency repair using a tubeless tire repair kit.
Follow the instructions provided with the emergency tire repair kit.
Riding your vehicle with a temporary tire repair is very risky. Do not exceed 30 mph (50 km/h). Have the tire replaced by your dealer as soon as possible.
WARNING
Riding your vehicle with a temporary tire repair can be risky.
If the temporary repair fails, you can crash and be seriously injured or killed. If you must ride with a temporary tire repair, ride slowly and carefully and do not exceed 30 mph (50 km/h) until the tire is replaced.
Battery Goes Dead
Charge the battery using a motorcycle battery charger.
Remove the battery from the vehicle before charging.
Do not use an automobile-type battery charger, as these can overheat a motorcycle battery and cause permanent damage. If the battery does not recover after recharging, contact your dealer.
NOTICE Jump starting using an automobile battery can damage your vehicle's electrical system and is not recommended. Bump starting is also not recommended.
Burned-out Light Bulb
All light bulbs on the vehicle are LEDs. If there is an LED which is not turned on, see your dealer for servicing.
Blown Fuse
Fuse Box Fuses
1. Remove the battery cover.
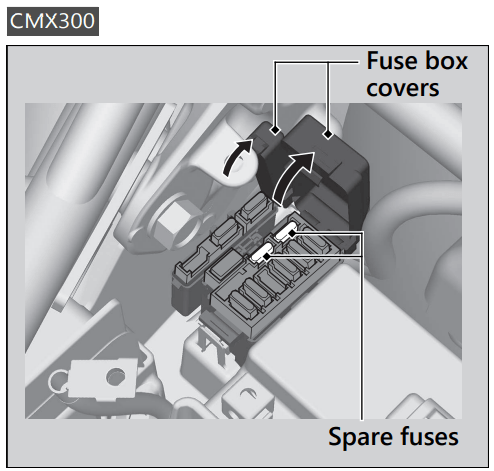
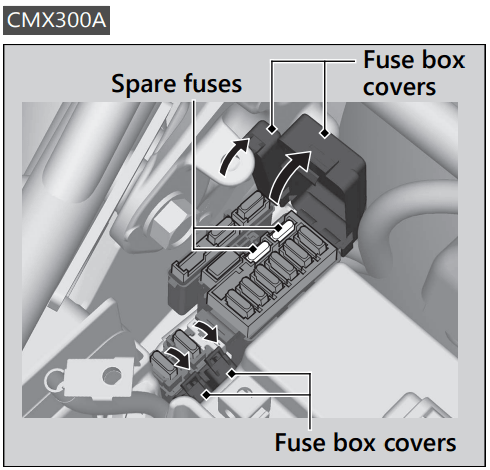
2. Open the fuse box covers.
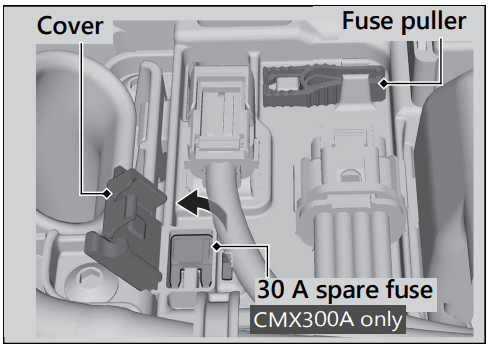
3. Pull the fuses out one by one with the fuse puller and check for a blown fuse. Always replace a blown fuse with a spare fuse of the same rating.
The fuse puller is stored on the battery cover.
CMX300
Spare fuses are provided in the fuse box.
CMX300A
Spare fuses are provided in the fuse box and on the battery cover (to access the spare fuse, open the cover).
4. Close the fuse box covers.
5. Reinstall parts in the reverse order of removal.
Main Fuse
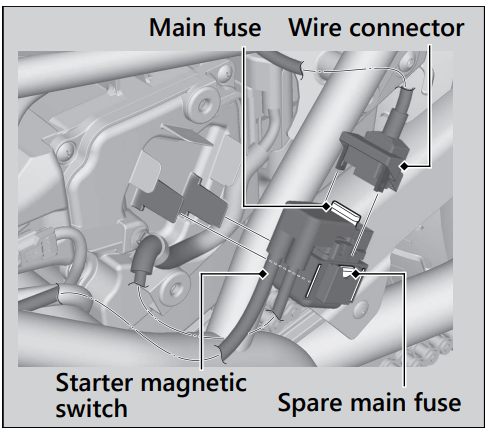
1. Remove the left side cover.
2. Remove the starter magnetic switch from the air cleaner housing cover, then disconnect the wire connector of the starter magnetic switch.
3. Pull the main fuse out and check for a blown fuse. Always replace a blown fuse with a spare fuse of the same rating.
Spare main fuse is provided in the starter magnetic switch.
4. Reinstall parts in the reverse order of removal.
NOTICE If a fuse fails repeatedly, you likely have an electrical problem. Have your vehicle inspected by your dealer.
If the fuel pump filter is clogged, unstable engine operation will occur intermittently while riding.
Even if this symptom occurs, you can continue to ride your vehicle.
If unstable engine operation occurs even if sufficient fuel is available, have your vehicle inspected by your dealer as soon as possible.