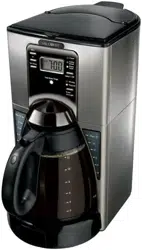
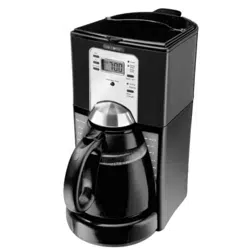
User Manual Coffeemaker
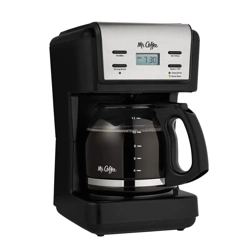
PARTS DIAGRAM
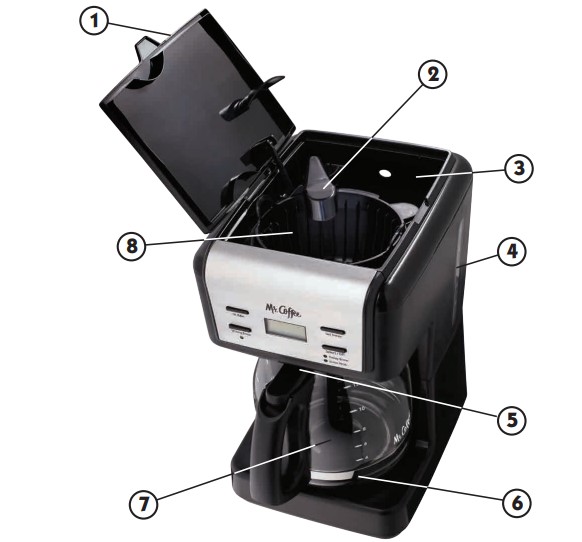
- Brew Basket Lid
- Shower Head
- Water Reservoir
- Water Window
- Grab-A-Cup Auto Pause
- Warming Plate
- Decanter
- Lift & Clean Filter Basket
Control Panel
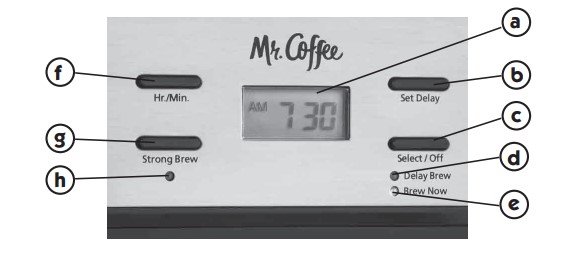
a Clock Display
b Set Delay Button
c Select / Off Button
d Delay Brew Indicator
e Brew Now Indicator
f Hr./Min. button
g Strong Brew Button
h Strong Brew Indicator
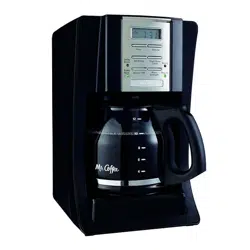
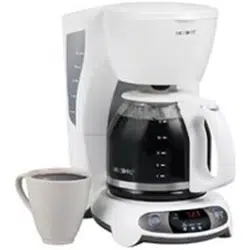
Coffeemaker Extras (not included with all models)

COFFEEMAKER FEATURES AND BENEFITS
Your new MR. COFFEE® coffeemaker has the following features:
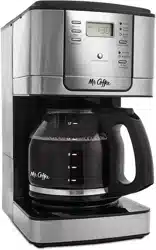
- Brewing Capacity – 12 cups – Glass decanter series
- Lift & Clean Filter Basket – Pull it out, wash it off, done.
- Grab-A-Cup Auto Pause – When you need a cup before brewing is finished carefully remove the decanter (for no more than 30 seconds) and grab-a-cup auto pause feature will automatically activate, temporarily stopping the flow of coffee into the carafe.
- Water Windows – Show amount of water in the reservoir for accurate filling.
- Non-Stick Warming Plate – This feature allows you to keep your coffee hot after brewing. The non-stick attribute prevents the decanter from sticking to the surface of the warming plate.
- Strong Brew Selector- Pump up flavor to strong if you like it bolder tasting.
- Water Filtration System (not included with all models) – Great tasting coffee begins with great water! Improves the taste of your coffee by removing up to 97% of the chlorine from the water you use for brewing.
- Cord Storage – Safely stores excess cord to keep your countertop neat.
- Two-Hour Auto Shut-Off – Keeps your coffee hot for two hours, then automatically shuts off.
- Programmable Controls:
– Clock – The clock serves as a handy kitchen clock and allows you to set the Delay Brew feature.
– Delay Brew – Would you like to wake up to a fresh pot of coffee? The timer allows you to preset when you would like the coffeemaker to automatically begin brewing your coffee, up to 24 hours in advance
CLEAN YOUR COFFEEMAKER BEFORE USING THE FIRST TIME
Make sure your first cup of coffee is as good as can be by cleaning your MR. COFFEE® Coffeemaker before its first use. Just follow these simple steps:
- Wash the decanter, decanter lid and the filter basket in a mixture of mild detergent and water. Rinse each thoroughly (please refer to the parts diagram listed above).
- Replace all the parts and close the lid. Then, run a brew cycle with water only, without adding coffee and coffee filter.
- When brewing is complete, turn your coffeemaker off, discard the water in the decanter and rinse the decanter, decanter lid, and filter basket.
Your coffeemaker is now ready to use. Enjoy it!

SETTING THE CLOCK AND DELAY BREW TIME
To Set the Clock:
- Plug the power cord into a standard electrical outlet. The clock will flash on the control panel to indicate that the time has not been set yet.
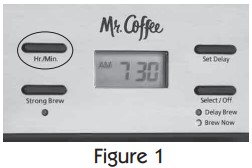
- Press and hold the HR./MIN. button until you reach the current time. The AM and PM will light up on the left side of the display (Figure 1).
NOTE: Pressing any button before setting the clock will cause the clock to start keeping time from 12:00 a.m. You must set the clock if you want to use the Delay Brew feature.
To Set the Delay Brew Time:
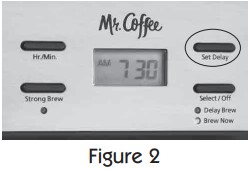
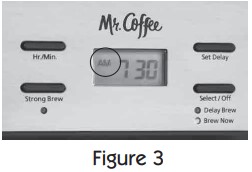
- While the display is in the clock mode, simply press the SET DELAY button (Figure 2) and, while the Delay Brew Indicator LED is flashing, set the brew time by pressing the HR./MIN. button. The AM and PM will light up on the left side of the display (Figure 3).
- Press the SET DELAY button to set the time. The display will change to the current time.
NOTE: To activate the DELAY BREW cycle, see the “Brewing Coffee Later” section.
- To check the programmed time, push the SET DELAY button. The display will show the time you have programmed the coffee to brew. If you press the SET DELAY button again or wait a few seconds , the display will switch back .
PREPARING FOR USE
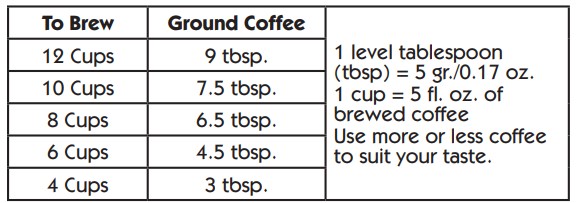
Selecting and Measuring Ground Coffee:
- For best results, use a level tablespoon for ground coffee measurement.
- Make sure you use medium grind coffee for a perfect brew.
A. Suggested Coffee Measurement Chart:
B. Water Filtration System (Not Included with all models)
Congratulations! You are the owner of a MR. COFFEE® water filtration system. This carbon-based water filter improves the taste of your coffee by removing up to 97% of the chlorine from the water you may use to brew your coffee.
First, look for the MR. COFFEE® Filtration Friendly symbol  on the bottom of your filter basket. If you do not see this symbol, please call 1-800-672-6333.
To use the water filtration system in your MR. COFFEE® Coffeemaker, please follow these steps:
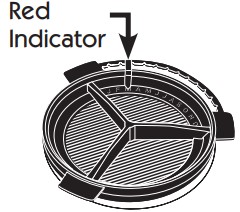
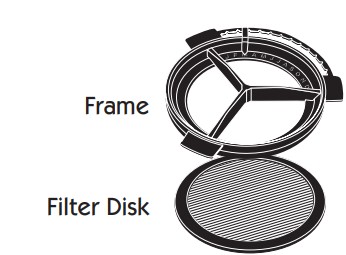
- Align the red indicator on the frame to the letter that corresponds with the month that you are using the disk for the first time. This serves to remind you to change the disk every month (approx. 30 brewing cycles).
- Rinse the water filter in fresh water before first use.
- Follow “Adding Water and Coffee” Instructions
- When you are done brewing your coffee, rinse the water filter with fresh water. Do not put your water filter in the dishwasher.
C. Adding Water and Ground Coffee:
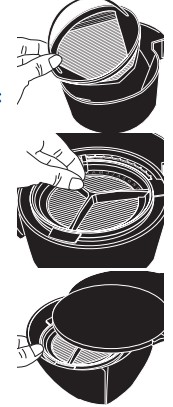
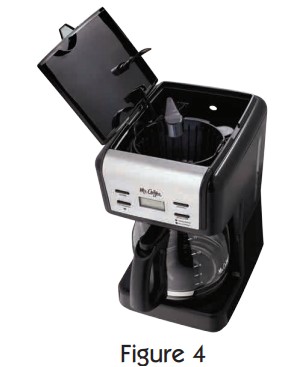
- Open the brew basket lid. For your convenience, you can lift out the removable filter basket.
- Place a MR. COFFEETM brand 10-12 cup paper basket-style filter or a MR. COFFEETM permanent filter into the removable filter basket (Figure 4).
- Add the desired amount of coffee and gently shake to level the coffee. See the “Suggested Coffee Measurement Chart”.
- After following instructions in the Water Filtration System, place the MR. COFFEETM water filter in the basket, making sure that the side marked “this side up” faces you and that the water filter is level.
- Be sure the filter basket is properly centered and all the way down in the brew basket and close the lid.
- Fill the decanter with cold, fresh water to the desired capacity (1 cup equals 5 ounces). For easy and accurate filling, the water markings on the glass decanter and on the dual water windows show the amount of water needed to make the corresponding desired number of cups. Do not fill past the “12 cup MAX line” or water will flow out of the overfill hole in the back of the coffeemaker. The amount of coffee brewed will always be slightly less than the amount of water poured in the water reservoir. This is due to the minimum absorption of water by the coffee grounds.
- Lift the brew basket lid and pour the water into the water reservoir. Close the lid and place the empty decanter onto the warmer plate.
CAUTION: Make sure the decanter is fully placed on the warming plate or the water and the grounds will overflow from the filter basket. An overflow may cause personal injury or damage to property.
BREWING COFFEE NOW
- After completing the steps in the “Adding Water and Ground Coffee” section and with the decanter and the filter basket securely in place, turn the coffeemaker on by pressing the SELECT button once. The Brew Now green light will turn on and pulse to signal that the coffeemaker is on and brewing (Figure 5).

- To enjoy a more full flavored cup of coffee, press the STRONG BREW button once. The STRONG amber light will turn on (Figure 6).

- The coffeemaker will beep 3 times when brewing is complete. The green Brew Now Indicator will stay on for 2 hrs to show that the warming plate is on. After 2 hrs it will automatically shut off and the coffeemaker will beep 3 times. Note: Warming plate will be hot for those 2 hrs. Tip: To turn off the beep function, press and hold Set Delay button for 5 seconds. It will beep to indicate the function is turned off. To activate the beep function, press the Set Delay button and hold for 5 seconds. It will beep twice to indicate that the beep function is activated again.
- After the used coffee grounds have cooled, carefully remove the filter basket and discard them.
- Make sure the decanter is empty before starting to brew coffee.
- Be sure to turn your coffeemaker off when no longer using it.
BREWING COFFEE LATER
- You must first set the time when you would like the coffeemaker to begin brewing your coffee as described in “Setting the Clock and the Delay Brew Timer” section.
- Prepare your coffeemaker as described in “Adding Water and Ground Coffee” section.
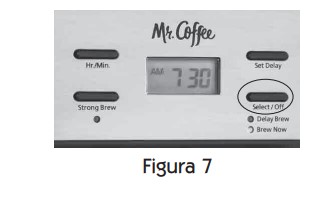
- To activate DELAY BREW and program your coffeemaker to brew coffee at a later time, press the Select / Off button twice (Figure 7). The amber Set Delay light will turn on. The coffeemaker is now set to automatically brew coffee at the pre-set later time. At this time, if you would like a strong brew, you can press the STRONG Brew button to activate. Note: The coffeemaker will remain in strong brew until you change it back to regular strength by pressing the Strong Brew button or until you unplug the machine.
- At the pre-set time, the green BREW NOW light will turn on and the DELAY BREW amber light will turn off, indicating the brewing has started in the selected brew strength.
- The coffeemaker warmer plate will keep your coffee hot for 2 hours and then automatically turn off.
As a safety feature, your coffeemaker will NOT start again automatically the next day. If you want your coffee to brew at the same time the following day, simply add a new filter, coffee and water and set DELAY BREW, by repeating Steps 2 and 3 above. To cancel DELAY BREW: Press the Select / Off button once. Then the Delay Brew indicator will turn off. (Figure 7).
CLEANING AND MAINTAINING YOUR COFFEEMAKER
Daily Cleaning:
- Allow your coffeemaker to cool before cleaning. Remove the filter basket, permanent filter (not included in all models), decanter and decanter lid and wash them in a solution of hot water and mild liquid soap.
- Never use abrasive cleansers, steel wool pads or other abrasive materials. Dishwasher top rack safe parts: glass decanter and lid, filter basket and permanent filter.
- The water filtration disk (not included in all models) is not dishwasher safe.
Decalcifying your MR. COFFEE® Coffeemaker
Minerals (calcium/limestone) found in water will leave deposits in your coffeemaker and will affect it performance. It’s recommended that you regularly remove these deposits by using MR. COFFEE® Cleaner or vinegar. MR. COFFEE® Cleaner is available at many retail stores or by calling the MR. COFFEE® brand Consumer Service Department at 1-800-MR COFFEE (1-800-672-6333).
- Follow package instructions to prepare one batch of MR. COFFEE® Cleaner. Pour the mixture into the water reservoir. Before decalcifying, remove the water filtration disk from the machine.
- Place an empty MR. COFFEE® 10-12 cup basket-style paper filter or MR. COFFEE® permanent filter into the filter basket and close the brew basket lid.
- Place the empty decanter back in the unit, centered on the warming plate.
- Brew three cups of cleaning solution through the coffeemaker.
- Turn the coffeemaker off and let stand for 30 minutes.
- Run the remainder of the cleaning solution through the coffeemaker.
- Discard the cleaning solution and rinse the decanter thoroughly with clean water.
- Fill the water reservoir with clean, fresh water.
- Place the empty decanter back on the coffeemaker, centered on the warming plate.
- Remove and discard the paper filter used during the cleaning cycle. If a MR. COFFEE® permanent filter was used during cleaning, remove it and rinse it thoroughly before replacing it in the filter basket.
- Begin brewing and allow the full brew cycle to complete.
- Repeat Steps 8 through 11 one more time.
Your coffeemaker is now clean and ready to brew the next pot of delicious, hot coffee!
Water Filtration Disk Replacement: (not included in all models)
- Your water filtration disk will need to be replaced once a month (approx. 30 brew cycles). If the machine will not be in use for an extended period of time, rinse the water filter with running water and clean the coffeemaker before use.
Cleaning the Decanter:
Hard water can leave a whitish stain on the decanter, and coffee may then turn this stain brown. To remove decanter stains:
- Fill the decanter with a solution of equal parts water and vinegar and let the solution stand in the decanter for approximately 20 minutes.
- Discard the solution, then wash and rinse the decanter
Do not use harsh abrasive cleaners that may scratch the decanter, scratches may cause the decanter to break.
TROUBLESHOOTING YOUR COFFEEMAKER
Your MR. COFFEE® Coffeemaker has been carefully designed to give you many years of trouble-free service. In the unlikely event that your new coffeemaker does not operate satisfactorily, please review the following potential problems and try the steps recommended BEFORE you call an Authorized Sunbeam Service Center.
THE “BREW NOW”/ON LIGHT DOES NOT LIGHT UP
- The appliance is unplugged.
- There’s a power outage.
- WAIT FOR POWER TO BE RESTORED.
THE COFFEE IS NOT BREWING
- The appliance is unplugged.
- There’s a power outage.
- WAIT FOR POWER TO BE RESTORED.
- The water reservoir is empty.
- The filter basket is not properly inserted.
- INSERT FILTER BASKET CORRECTLY.
- The decanter is not placed all the way on the warming plate.
- PLACE DECANTER CORRECTLY ON WARMER PLATE.
THE COFFEEMAKER ONLY BREWS WATER
- There are no coffee grounds in the filter basket.
- ADD THE DESIRED AMOUNT OF COFFEE TO THE FILTER.
THE COFFEEMAKER BREWS SLOWLY
- The coffeemaker needs cleaning.
- CLEAN COFFEEMAKER AS DESCRIBED IN “CLEANING AND MAINTAINING” SECTION.
THE FILTER BASKET OVERFLOWS
- The filter basket is not properly inserted.
- INSERT FILTER BASKET CORRECTLY.
- The decanter is not placed all the way on the warming plate.
- PLACE DECANTER CORRECTLY ON WARMING PLATE.
- The decanter lid is not on decanter.
- PLACE LID ON THE DECANTER.
- Too many coffee grounds were placed in the filter.
- REMOVE FILTER, DISCARD GROUNDS. IF PAPER FILTER, REPLACE. IF PERMANENT FILTER, RINSE. BEGIN BREWING PROCESS AGAIN.
- The decanter was removed from the warming plate for more than 30 seconds.
- TURN OFF AND UNPLUG THE UNIT. ALLOW TO COOL. WIPE UP THE SPILL. DO NOT SET HOT DECANTER BACK ON THE WET WARMING PLATE OR IT MIGHT CRACK.
THE COFFEE IS NOT HOT
- There’s a power outage.
- WAIT FOR POWER TO BE RESTORED.
THE COFFEE IS NOT HOT
- Select / Off button has been activated.
- FOR BEST RESULTS, BREW A FRESH POT OF COFFEE.
THE COFFEE TASTES BAD
- Coffee grounds other than for an automatic drip coffeemaker were used.
- USE COFFEE GRIND RECOMMENDED FOR AUTOMATIC DRIP COFFEEMAKERS.
- The ground coffee-towater ratio was unbalanced.
- USE CORRECT GROUND COFFEE-TO-WATER RATIO.
- The coffeemaker needs cleaning.
- CLEAN COFFEEMAKER AS DESCRIBED IN “CLEANING AND MAINTAINING YOUR COFFEEMAKER” SECTION.
THE GROUNDS ARE IN THE COFFEE
- The filter is not properly seated in the basket.
- SEAT FILTER PROPERLY WITHIN THE FILTER BASKET.
- The filter collapsed.
- REMOVE FILTER AND REPLACE.