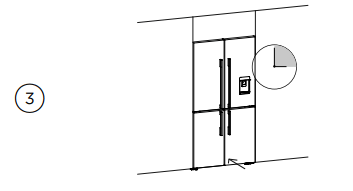
When you turn your refrigerator on for the first time, the cooling system will automatically cool all compartments to their set temperatures within 2-3 hours.
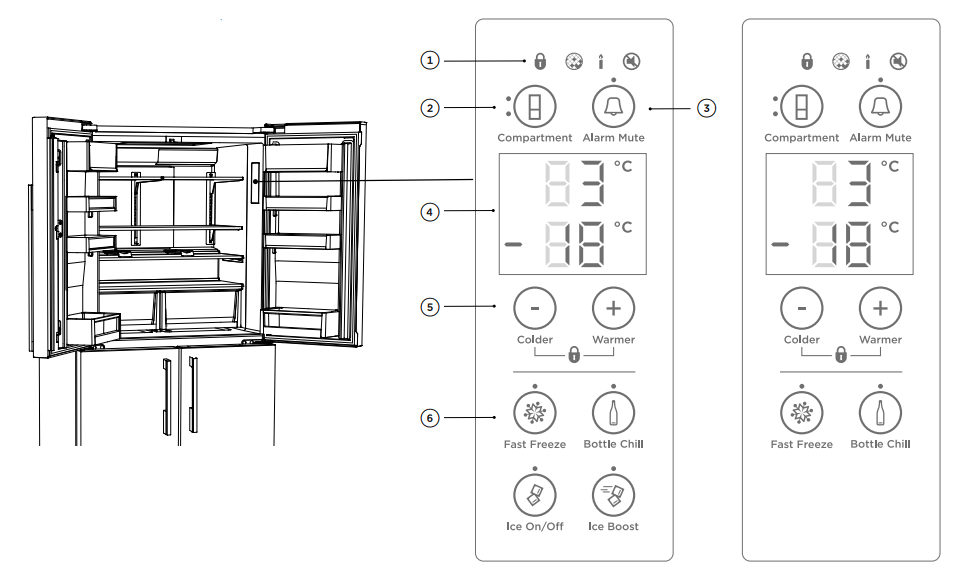
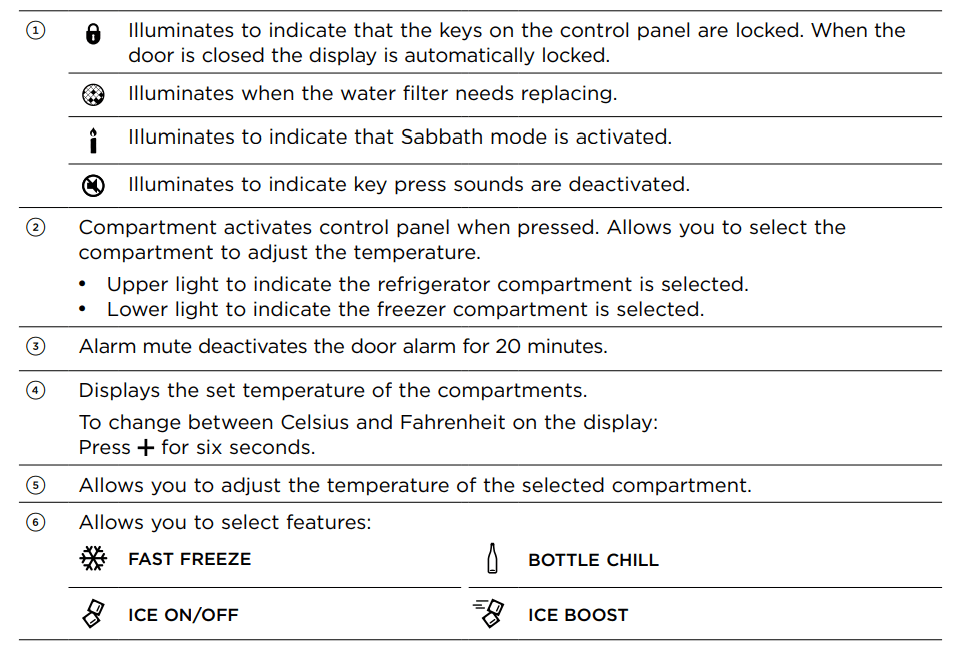
The internal control panel enables you to change and control the temperature of all compartments accurately and independently. The internal control panel default setting is to show the set temperature for the fresh food compartment.
For common foodstuffs, the factory default setting provides the optimum setting for foodcare.
How to adjust the temperature — Fresh food compartment
Press once.
The fresh food compartment light will illuminate.
Press to increase the temperature,
press to decrease the temperature.
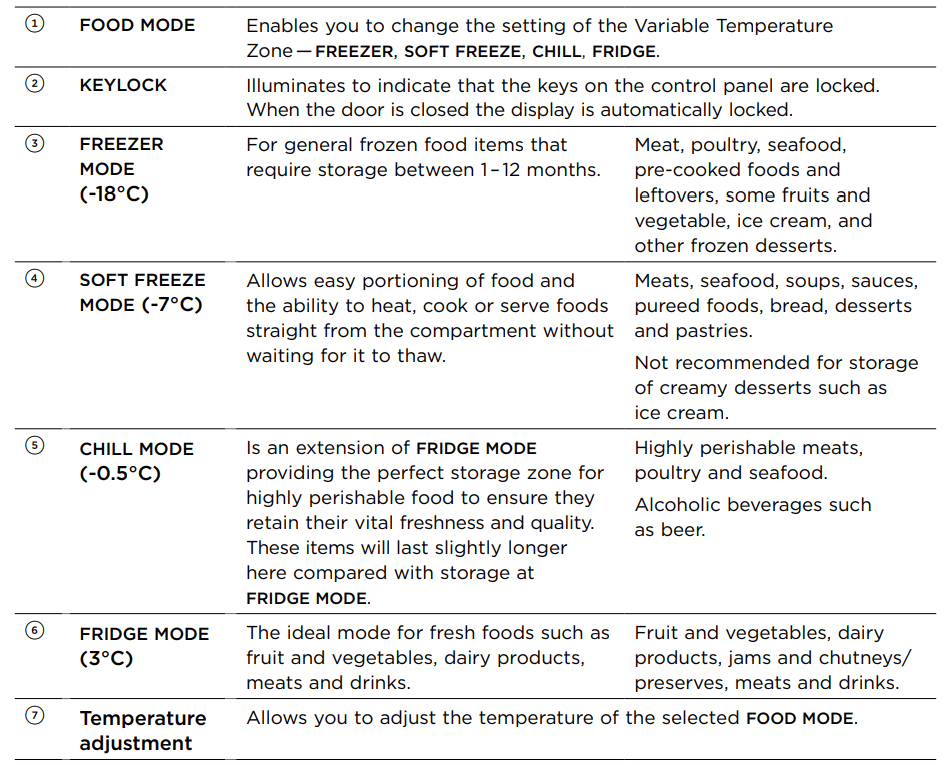
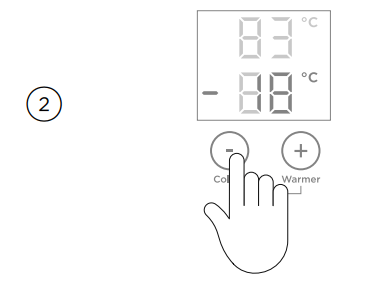
How to adjust the temperature — Frozen food compartment
Press twice to adjust the frozen food compartment temperature.
The frozen food compartment light will illuminate
Press to increase the temperature,
press to decrease the temperature.
Water-dispensing models only
Using your water dispenser
Ensure you have followed the steps outlined in your installation guide prior to your first use of the water dispenser.
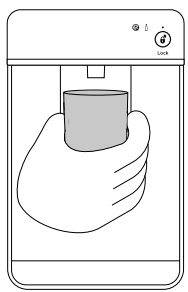
Dispensing
Your water dispenser is designed for one-handed operation.
To dispense water, gently press the dispensing pad with a glass or container.
To stop the flow of water, simply pull your glass or container away from the dispensing pad.
Pressing hard against the dispensing pad will not increase the flow or dispense more water.
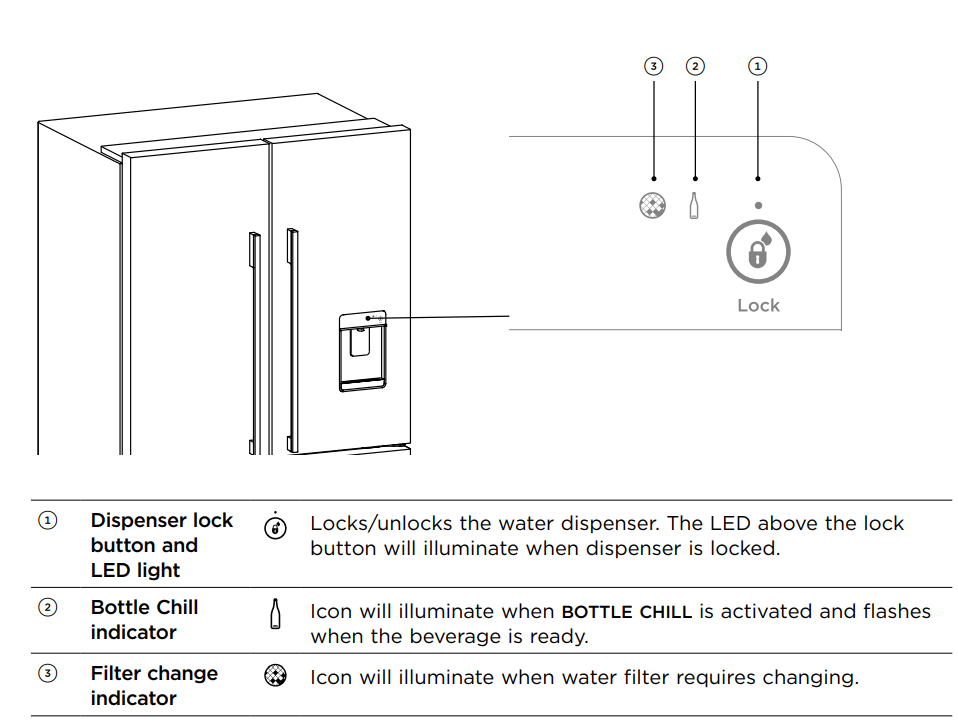
Dispenser lock
The DISPENSER LOCK is located on the external display and can be activated to prevent water from being dispensed. This is useful when you are cleaning the external display or when there are small children around.
To activate/deactivate DISPENSER LOCK, press for four seconds.
When activated the light above the button will illuminate.
When the dispenser pad is pressed, several beeps will sound to alert the user that water cannot be dispensed.
Water filter
The water supplied to your refrigerator is filtered to remove impurities through a filter located internally at the top right corner of the refrigerator. Replace your filter cartridge every 6 months.
There is a replacement indicator icon on the internal control panel and external display which will appear when the filter needs replacing. The icon will flash, as a reminder, when water is dispensed.
Replacement filter cartridges are available from your Fisher & Paykel dealer, online or from a Fisher & Paykel service technician. The details of the replacement filter cartridge are labelled on the cartridge.
Changing the water filter cartridge
Guidance of how to replace your water filter and reset your indicator icon can be found at fisherpaykel website/water-filter.
Information about your ice maker
Your automatic ice maker will produce approximately eight cubes of ice every 3 – 4 hours, depending on the freezer compartment temperature and the number of door openings.
The ice cube tray will fill with water. When cubes are frozen, they will be ejected from the ice tray into the ice storage bin. Ice making will continue until the storage bin is full. Ice making will resume once you start to use the stored ice.
Your Ice & Water product comes with a smaller ice bin inside the larger freezer bin. Attached to the ice storage bin is the scoop for the ice. This scoop provides hygienic access to the ice. If a large amount of ice is required, remove an ice storage bin and allow ice to fall into the larger bin. For maximum ice storage, level the stored cubes with the ice scoop.
If ice is not used often, old cubes will become cloudy, taste stale, will shrink and may stick together. Empty the ice storage bin periodically and wash in lukewarm water. Dry thoroughly and place back into the correct position.
Turn your ice maker off if:
There is no water supply for several hours.
You are removing the ice storage bin for a period of time.
You are going on holiday/vacation.
Manual ice system (where present)
An ice storage bin which sits inside the top freezer bin provides storage for and gives you access to clean, clear ice cubes. Attached to the ice storage bin is the ice scoop which provides hygienic access to ice.
To make ice
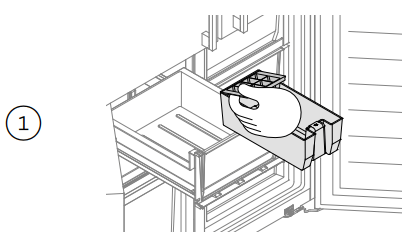
Take the ice tray from the top of the ice storage bin. Fill the tray with water. Carefully position the tray back onto the ice storage bin.
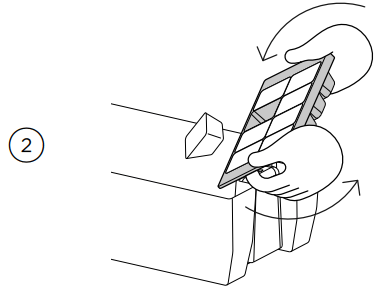
Once the ice is solid, take the ice tray off the ice storage bin and twist the ice tray at each end in opposite directions. Turn the ice tray over the ice storage bin to dislodge the cubes into the bin.
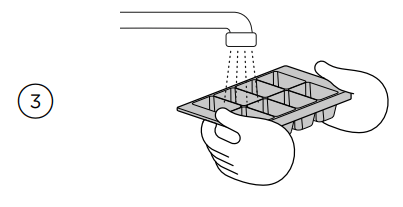
Fill the ice tray with clean water and repeat to fill the ice storage bin.
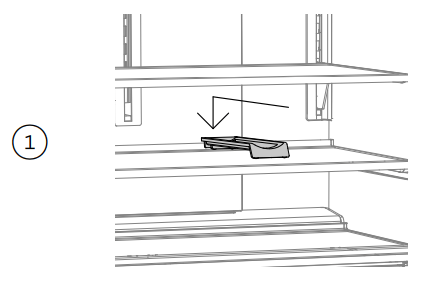
Bottle holder
Bottle holders can be used to store a variety of bottles. Unused bottle holders can be stacked up on top of one another so they do not take up unnecessary shelf space. Bottles are best stored with the neck of the beverage facing the front of the refrigerator.
To position the bottle holder in your refrigerator, slot the back edge of the bottle holder onto the back trim of any shelf in the fresh food compartment.
Glass shelves
Standard glass shelves can not be repositioned in your refrigerator.
The cantilever glass shelves are designed to be strong and versatile. The half-width and full-width shelves are removable and can be repositioned in your refrigerator.
Some models have glass shelving under the freezer bins. These can be removed if required. Refer to ‘Cleaning and care’ for details on how to remove glass shelves.
Humidity control lids
The control lids are fitted to the fruit and vegetable bins of your refrigerator.
These lids provide a humid microclimate to extend the storage times of fruit and vegetables.
The lids have specially designed grooves that retain moisture to prevent condensation from dripping onto the fruit and vegetables at times of high humidity
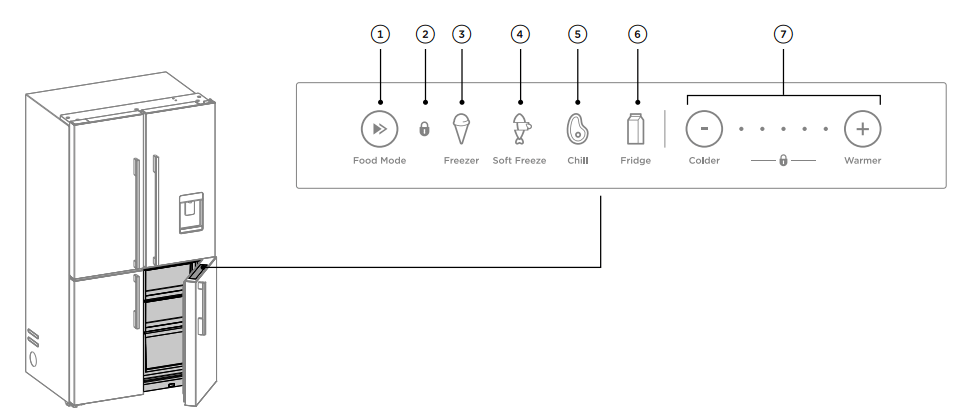
Variable temperature zone
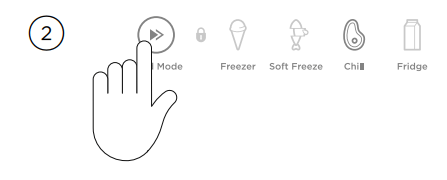
Changing the Food Mode
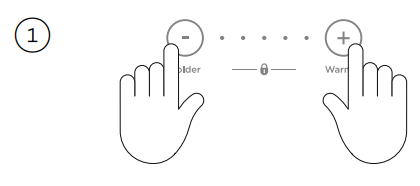
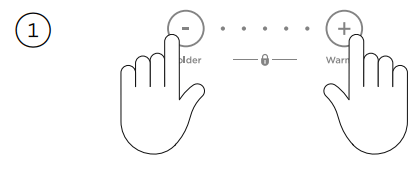
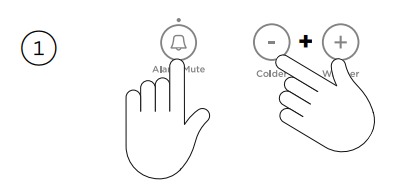
Unlock the Variable Temperature Zone display by pressing + and — together for four seconds.
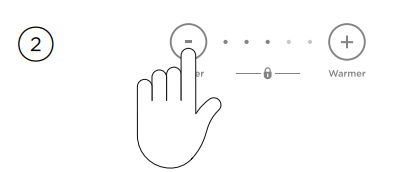
Change the mode by pressing . FOOD MODE scrolls from left to right (coldest setting to warmest setting). The FOOD MODE selected will illuminate. The Variable Temperature Zone display will automatically lock after 10 seconds or once the compartment is closed.
The default temperature for each FOOD MODE will show as one illuminated light in the centre of the scale.
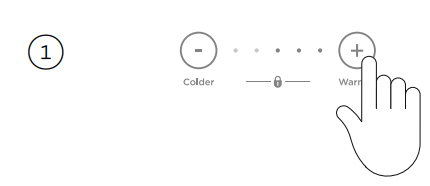
Adjusting the temperature
Each FOOD MODE will automatically default to the recommended temperature setting for this food mode. Once you have selected the required FOOD MODE the temperature can be adjusted as desired.
To increase the temperature of your selected FOOD MODE press +.
Each light displayed will increase the temperature setting slightly. When all three lights on the right are showing this is the warmest setting.
To decrease the temperature of your selected FOOD MODE press — .
Each light displayed will decrease the temperature setting slightly. When all three lights on the left are showing this is the coldest setting.
If you adjust the temperature for a FOOD MODE this adjustment will be remembered for the next time you use this FOOD MODE. For example if you select FREEZER as the FOOD MODE and adjust the temperature to the coldest setting, the next time you use the compartment as freezer it will remember your setting.
Key Lock
The Variable Temperature Zone display can be locked by pressing + and — together for three seconds.
When locked, the icon will illuminate.
Deactivate by pressing + and — together for four seconds.
Features
Fast Freeze
FAST FREEZE boosts freezing speed by dropping to its coldest temperature for 12 hours, helping retain freshness, texture and taste during the freezing process.
To activate, press on the internal display. The FAST FREEZE light will illuminate.
To deactivate before the 12 hours has elapsed, press again.
When FAST FREEZE is deactivated the light is off.
For best results activate the function before it is required. Alternatively, activate it when placing food into the freezer.
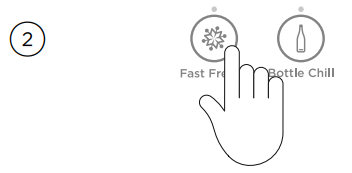
Bottle Chill
BOTTLE CHILL rapidly chills your beverages in the freezer for a set time of 15 minutes. Depending on bottle size, you may need to return it to the freezer and reset.
To activate, press on the control panel. The BOTTLE CHILL light will illuminate.
The icon will illuminate on the external display (Ice & Water models only).
An alarm will sound after 15 minutes to remind you to remove your beverage.
For non water-dispensing models
Open the fresh food compartment door and press any button on the control panel to silence the alarm.
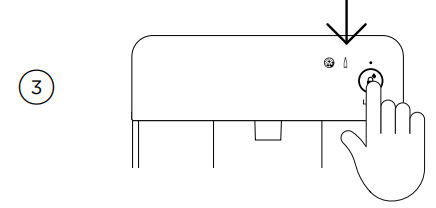
For water-dispensing models
The icon will flash on the external display.
Press on the external display to silence the alarm.
To deactivate BOTTLE CHILL before 15 minutes, press the button on the control panel.
When BOTTLE CHILL is deactivated, the light will not illuminate and the icon is not visible on the external display (Ice & Water model only).
IceOn/Off
ICE ON/OFF activates automatic ice - this is only available in the lower compartment. Your ice maker is designed to automatically dispense ice into the ice storage bin below until it detects the bin is full. The more ice you use, the more it makes. Before first use the automatic ice systems needs to be flushed.
To activate/deactive, press .
When the ice maker is activated the light will illuminate.
To flush the automatic icemaker
Press and hold and together for 4 seconds then close the door(s). The ice tray will flip twice and empty the water into the bin below. The ice tray will flip only after the doors are closed. Repeat the cycle to help remove any dust in the ice tray collected during manufacture and transport.
Empty the water in the bin and return the bin correctly. Ensure that the scoop is located in front of the bin.
Once your ice maker is turned on, discard the first 3 harvests of ice (8 cubes per harvest). This will flush away any impurities in the water line and ensure the best ice quality.
Carrying out the above steps after a holiday/vacation or extended periods of not using ice.
Ice Boost
ICE BOOST increases ice production by up to 30% and will automatically deactivate after 24 hours.
When you first turn your ice maker on, ICE BOOST is off.
To activate, press . The light above the button will illuminate.
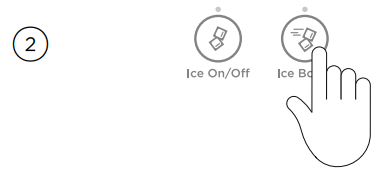
ICE BOOST will pause once your ice bin is full.
To manually deactivate press again. The light will not illuminate.
Activating ICE BOOST will automatically turn on ice making.
Deactivating ice making automatically deactivates ICE BOOST.
CLEANING AND CARE
Exterior
Clean all surfaces with liquid dishwashing detergent dissolved in warm water and a soft cloth. Rinse with clean water and dry with a clean, lint-free cloth.
Do not use any abrasive stainless steel cleaners, glass cleaners, solvents or scourer pads as these will damage the door surface.
For glass door products, clean the gap between the glass and the door or the handles with a toothbrush or small bottle/straw brush.
Door gasket
Clean the magnetic door gasket every three months with a toothbrush, and liquid detergent dissolved in warm water.
Cabinet surround
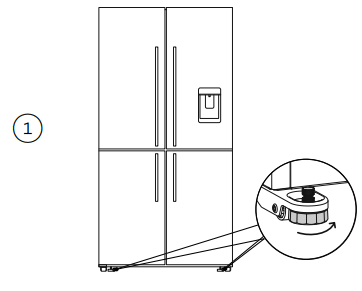
To maximise operating efficiency regularly vacuum the flooring around your refrigerator. Cleaning behind your refrigerator is required once or twice a year.
Wind up the feet and carefully ease the refrigerator out of its position. Switch off and unplug.
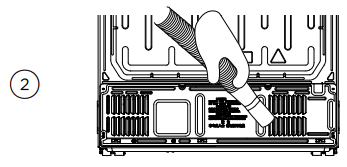
Vacuum the flooring behind your refrigerator and the rear compartment cover (where fitted) to remove dust.
Use a dry lint-free cloth to clean the refrigerator walls and surrounding cabinetry.
After cleaning, plug in and switch on. Push the refrigerator into position and wind feet down.
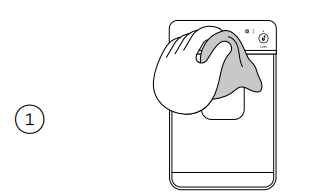
External display and water dispenser (Water-dispensing models only)
Activate the DISPENSER LOCK to prevent water from dispensing when cleaning, refer ‘Dipenser lock’ section for details.
Clean the pad and external display with a damp, soft lint-free cloth.
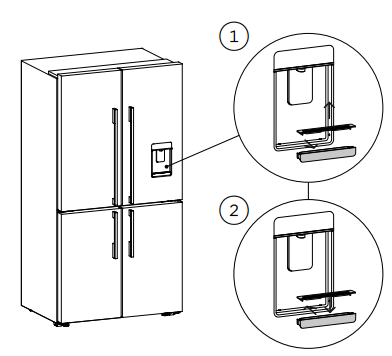
Drip tray (Water-dispensing models only)
Remove the drip tray from the dispenser panel.
Pull the two halves of the tray apart.
Clean with liquid detergent dissolved in water and a soft lint-free cloth.
Rinse with clean water and dry with a clean, lint-free cloth.
Securely clip the two halves together. Re-insert the drip tray back into the dispenser panel, rounded sides first.
Interior
Do not use harsh chemicals, abrasives, ammonia, chlorine, bleach, concentrated detergents, solvents or abrasive scouring pads on any part of your refrigerator. Some of these chemicals may dissolve, damage and/or discolour the interior of your refrigerator.
Remove the shelves from the cabinet and door. Wipe all interior surfaces, using only liquid dishwashing detergent dissolved in warm water or baking soda dissolved in warm water (add 1tsp of baking soda to every 500ml of water) and a soft lint-free cloth. Rinse with clean water and dry with a clean, lint-free cloth.
Add a few drops of vanilla essence or vinegar to the water before cleaning to help remove “stale refrigerator” smell.
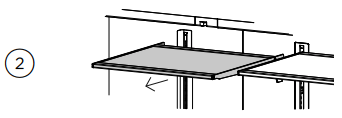
Glass shelves – Refrigerator
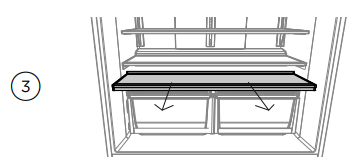
To remove
Hold the shelf firmly and pull the shelf towards you.
Lift the shelf up vertically.
Slide the shelf towards you.
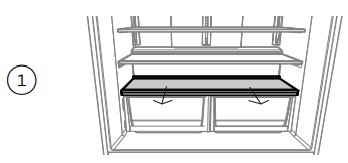
Cantilever glass shelves — half-width and full-width
To remove
Hold the front and back edge of the shelf firmly.
Push the shelf up vertically to dislodge from back support lugs.
Slide the shelf towards you.
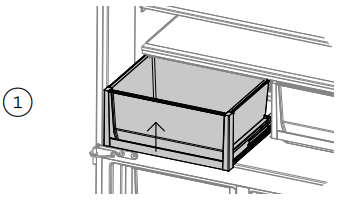
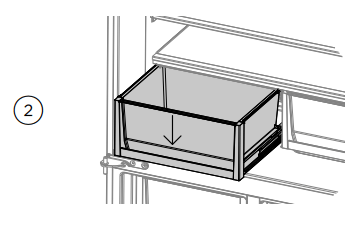
Fixed bins and Freezer bins
To remove
Remove food from the bin.
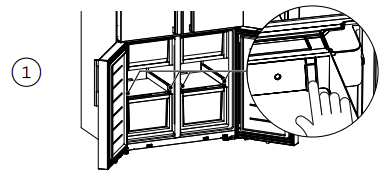
Hold the centre front of the bin handle. Lift vertically to unclip from the runners.
Pull bin towards you to remove from the refrigerator.
Push both runners back into the refrigerator.
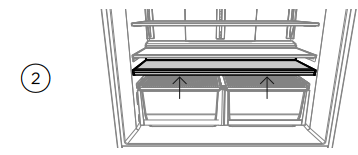
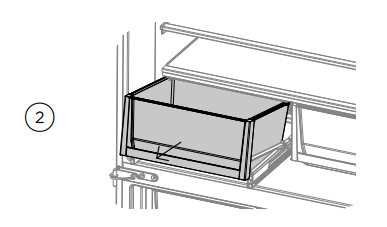
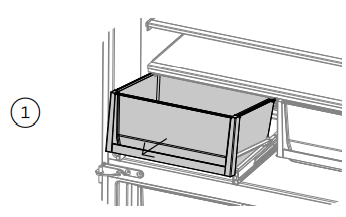
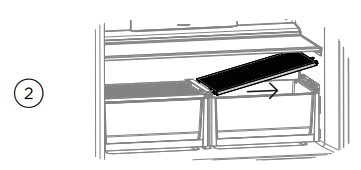
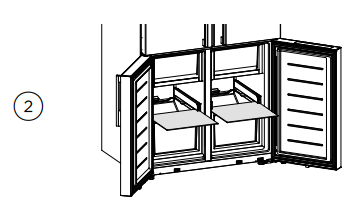
How to replace
Extend the runners out from the refrigerator. Place the bin on top of the runners.
Push the bin down slowly until you feel it clip.
Humidity control lid
To remove
Remove all shelving, follow the steps in section ‘Glass shelving’.
Hold the lid firmly and lift the outside edge of the lid up vertically
Slide the lid towards the outside wall of the fridge until the lid unclips from the centre bracket.
Pull the shelf towards you.
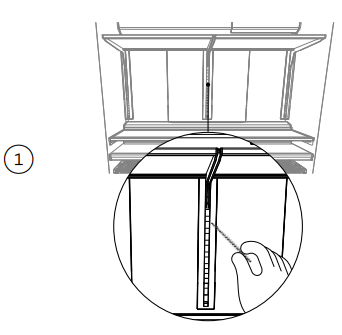
Support lugs
Remove all shelving, follow the steps in section ‘Glass shelves- Refrigerator’.
Clean the support lugs with liquid detergent dissolved in water and a tube brush or a clean lint-free cloth.
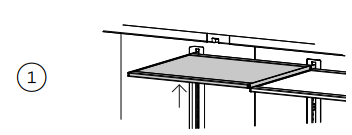
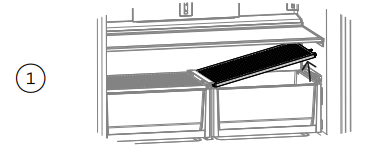
Glass shelves - Freezer (if present)
To remove
Remove the bin above the glass shelf, refer to ‘Fixed bins and Freezer bins’.
Push on the clips on both sides of the shelf.
Lift the shelf up to remove from the supports.
Ice storage bin
Clean your ice bin and discard any old ice in the bottom of the bin(s) regularly. Ensure that the ice scoop is placed in correct position in the bin, right hand side or at the front of the bin (model dependent).
MOVING OR STORING YOUR APPLIANCE
If your refrigerator is turned off for any reason, wait 10 minutes before turning it back on. This will allow the refrigeration system pressures to equalise before restarting.
Moving your refrigerator
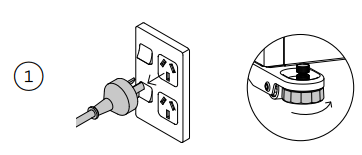
Turn off the refrigerator and unplug from the power point. Remove all food.
Turn the adjustable feet to the right as far as they will turn.
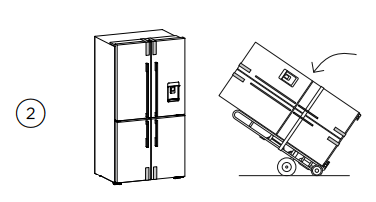
Ease the refrigerator out of its position. Tuck the power cord away, tape the shelves in place and tape the doors closed. If the cabinet needs to be placed at an angle or laid down, carefully lay it on its side (the left hand side when viewed from the front).
Relocate and install. If the refrigerator has been left on its side for any length of time, leave it standing upright as long as you can (a few hours) before turning on.
Take care when moving this refrigerator, ensure all obstacles are removed to prevent any physical impact that may cause damage.
Storing your Refrigerator
When storing your cleaned refrigerator, leave the doors open. This allows air to circulate and prevents the build up of bacteria and moulds.
Before using again, clean well using a mixture of warm water and a small amount of liquid dishwashing detergent. Rinse with clean water and dry with a soft lint-free cloth.
Holiday/Vacation time
Leave your refrigerator operating while you are on holiday/vacation.
TROUBLESHOOTING
If there is a problem with your refrigerator, please check the following points before contacting your local Fisher & Paykel trained and supported service technician or the Customer Care Centre.
Product parts and accessories can be purchased through Fisher & Paykel Customer Care Centre or online at fisherpaykel.com (this service is available to selected markets only).
All models
PROBLEM
POSSIBLE CAUSES
WHAT TO DO
Refrigerator does not operate
No electricity at power outlet.
Check that the plug is correctly connected and power switched on.
Check another refrigerator at the same outlet.
Check house fuse.
Light not working
Light not functioning.
The LED light cannot be serviced by the user. Contact your Fisher & Paykel Dealer or Fisher & Paykel trained and supported service technician.
Refrigerator not working.
Check refrigerator is turned on at wall.
Light and display not working
Product in SABBATH MODE.
Press and hold and together for four seconds.
Motor operates for long periods
Hot weather.
Minimise door openings to allow temperature to stabilise.
Frequent door openings.
Large amount of food recently added.
Temperature control set too low.
Refer to section ‘Temperature control'.
Doors not sealing properly.
Check that cabinet is level and gasket seals are clean.
Storage compartments
too warm
Temperature setting not correct.
Refer to section ‘Temperature control'.
Frequent door openings.
Minimise door openings to allow
Large amount of food recently added.
temperature to stabilise.
Food freezing in the refrigerator
Temperature setting not correct.
Refer to section ‘Temperature control'.
Food placed directly in front of air outlets.
Move chill sensitive foods away from the centre back of the shelves.
Unfamiliar noises
Cabinet not stable or level.
Refer to your Installation guide
Freezer is defrosting.
or ‘ActiveSmart™ sounds'.
Water in the vegetable bins
Condensation is formed by the water produced by fruit and vegetables.
A small amount of condensation is beneficial for fruit and vegetable storage.
Wipe out water with a cloth.
Exterior of cabinet is warm
This is normal.
Condensation on outside of refrigerator/ freezer
Not unusual during periods of high humidity.
Wipe dry.
Condensation inside fresh food compartment
Frequent or long door openings.
Minimise door openings.
Door gasket leaking.
Check that gasket is sitting flat and sealing tightly.
Not unusual during periods of high humidity.
Wipe dry.
Door out of alignment
With time and usage, movement may occur.
Refer to your installation guide.
Tray/bin does not slide in and out evenly
Packaging trapped.
Check to ensure no food or packaging is trapped behind the tray/bin.
Runners not extending fully.
Holding onto sides of tray/ bin, extend the runners fully by using a firm pull — this will reset the runner.
Refrigerator operating
inefficiently
Accumulation of dust on or behind the rear compartment cover.
Refer to section ‘Cleaning and care'.
If problem persists please contact Customer Care.
Cannot adjust temperature in frozen food compartment
Either BOTTLE CHILL, FAST FREEZE or ICE BOOST is activated.
Deactivate BOTTLE CHILL, FAST FREEZE or ICE BOOST if
function is not desired.
Ice & Water models only
PROBLEM
POSSIBLE CAUSES
WHAT TO DO
Automatic ice
maker does not work
Ice maker has not been turned on.
Switch on ice maker.
Bin is in the wrong way or there is no bin in place.
Place bin so scoop is on the left side.
Ice bin sits directly under ice maker on top left side of freezer.
Water supply turned off or not connected.
Connect water supply.
Freezer compartment not working.
Contact Customer Care.
Water pressure too low.
Check water pressure.
Water line kinked/squashed.
Check water line for kinks/squashing.
Filter clogged.
Water filter may need replacing.
Ice cubes have
odour/taste
Unsealed packages may be transmitting odour/taste.
Old cubes need to be discarded.
Ensure food packaging is sealed.
Interior of freezer needs cleaning.
Ice storage bin needs to be emptied and washed.
Clean refrigerator.
Poor taste from incoming water.
Filter may need to be replaced with new one.
Force 2-3 ice tray flips.
Slow ice cube freezing
Door may have been left ajar.
Close door.
Freezer compartment too warm.
Turn temperature to a colder setting.
Wet ice/
ice clumping
Low water pressure.
Check water pressure.
Filter blocked.
Replace filter.
Long freezer door openings.
Gently tap ice with scoop to unstick or, if large clumps occur, empty ice bin and make new ice.
High ambient temperature.
Ice bin left out of freezer compartment for a length of time.
Ice will stick together over time.
Filter warning light is flashing
Filter needs replacing.
Replace filter as soon as possible.
Ice build up inside freezer compartment
Freezer door not closing tightly.
Arrange items in freezer so door can close tightly.
Check and clean door gasket seal.
Ice maker makes unfamiliar sounds or seems too loud
Normal ice maker operation.
Refer to section ‘ActiveSmart™ sounds'.
Ice boost function not increasing rate of ice production
Ambient temperature very warm.
Minimise door openings.
Refrigerator is in high usage.
Water has poor taste/odour
Refrigerator not used for an extended period.
Dispense 4L of water so fresh water supply is replenished.
New filter installed.
Water dispenser
does not work
Water supply turned off or not connected.
Turn water on.
Press dispenser for four minutes to remove trapped air from water line and to fill the water system.
Supply line may be blocked.
Check supply for kinks or leaks.
On first installation there may be air in water system.
To remove air, run 3L of water through the dispenser.
Filter may be blocked and need replacing.
Replace filter (see your ‘Service & Warranty' document provided with your refrigerator).
dispenser lock activated.
Press and hold for four seconds.
Water frozen in tank.
Increase temperature to a warmer setting in fresh food compartment and freezer.
Water in first glass is warm
Water dispenser not used for extended period.
Discard first glass of water dispensed.
Tank capacity used recently.
Allow water time to cool.
Drips overflow drip-shelf
Air trapped in tank.
Flush 3L water through dispenser, stopping intermittently.
New filter installed.
Dispense 4L of water through the dispenser, and then another 4L after four minutes.

 once.
once.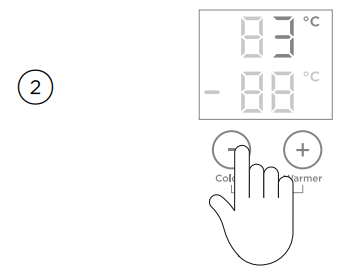
 to increase the temperature,
 to decrease the temperature.
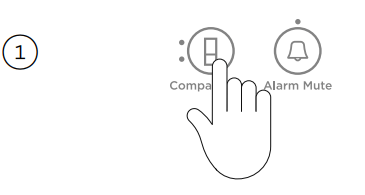
 Dispenser lock
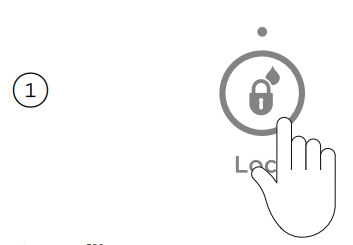
 on the internal control panel and external display which will appear when the filter needs replacing. The icon will flash, as a reminder, when water is dispensed.
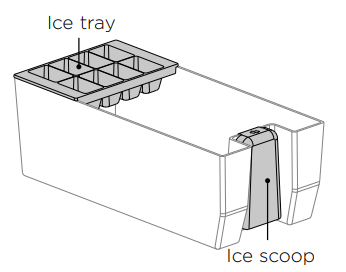
 . FOOD MODE scrolls from left to right (coldest setting to warmest setting). The FOOD MODE selected will illuminate. The Variable Temperature Zone display will automatically lock after 10 seconds or once the compartment is closed.
 icon will illuminate.
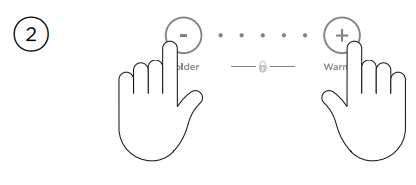
 Fast Freeze
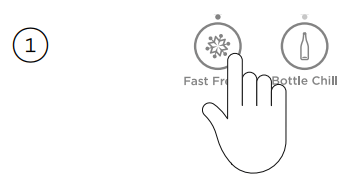
 Bottle Chill
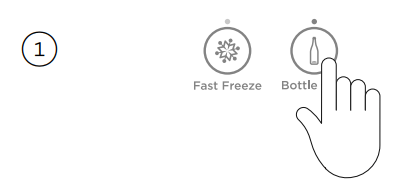

 on the external display to silence the alarm.
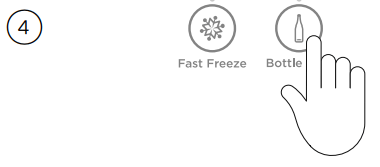
 IceOn/Off
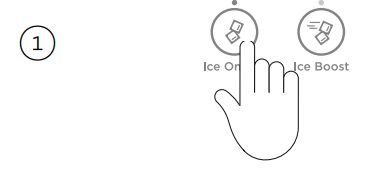
 and
and  together for 4 seconds then close the door(s). The ice tray will flip twice and empty the water into the bin below. The ice tray will flip only after the doors are closed. Repeat the cycle to help remove any dust in the ice tray collected during manufacture and transport.
 Ice Boost
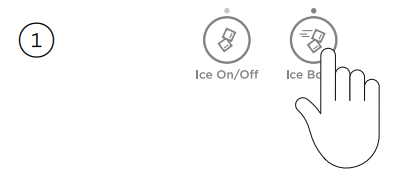
 and
and  together for four seconds.
 is flashing
 for four seconds.