
www.breville.com.au
Breville is a registered trademark of Breville Pty. Ltd. A.B.N. 98 000 092 928.
Copyright Breville Pty. Ltd. 2010.
Due to continued product improvement, the products illustrated/photographed
in this brochure may vary slightly from the actual product.
BDF500 Issue - B11
Australian Customers
Mail: PO Box 22
Botany NSW 2019
AUSTRALIA
Phone: 1300 139 798
Fax: (02) 9384 9601
Email:
Customer Service:
askus@breville.com.au
New Zealand Customers
Mail: Private Bag 94411
Botany Manukau 2163
Auckland NEW ZEALAND
Phone:
0800 273 845
Fax: 0800 288 513
Email:
Customer Service:
askus@breville.com.au
Breville Customer Service Centre
BDF500
the Smart Fryer
™
Instruction Booklet

CONGRATULATIONS
on the purchase of your new Breville
Smart Fryer
™

3
CONTENTS
4 Breville recommends safety first
6 Know your Breville
Smart Fryer™
8 Operating your Breville
Smart Fryer™
11 Cooking with your Breville
Smart Fryer™
17 Cooking techniques & tips
21 Care & cleaning
24 Recipes

4
BREVILLE RECOMMENDS SAFETY FIRST
At Breville we are very safety conscious. We design and manufacture consumer products with
the safety of you, our valued customer, foremost in mind. In addition we ask that you exercise
a degree of care when using any electrical appliance and adhere to the following precautions.
READ ALL INSTRUCTIONS
BEFORE USE AND SAVE FOR
FUTURE REFERENCE
• Carefully read all instructions before
operating and save for future reference.
• Remove any packaging material and
promotional stickers before using the
deep fryer for the first time.
• Do not place the deep fryer near
the edge of a bench or table during
operation. Ensure the surface is level,
clean and free of water.
• Do not place the deep fryer on or near
a hot gas or electric burner, or where it
could touch a heated oven.
• Place the deep fryer at least 20cm
away from walls and curtains. Provide
adequate space above and on all sides
for air circulation around the deep fryer.
• Do not use on metal surfaces, for
example, a sink drain board.
• Always insure the deep fryer is properly
assembled before use. Follow the
instruction provided in this book.
• To protect against electric shock, do
not immerse cord in water or any other
liquid.
• Ensure the deep fryer is completely dry
and free of water before adding any oil.
• Extreme caution must be used when
the deep fryer contains hot oil or other
liquid. Do not move the appliance
during cooking. Allow the deep fryer to
cool before removing oil or other liquid.
• Solid oil products, such as butter,
margarine or animal fats of any kind
should not be used in the deep fryer
as they may overheat and cause a fire
hazard.
• Do not touch hot surfaces.
• At no time should the deep fryer be left
unattended when in use.
• The deep fryer will generate a lot of heat
and steam during and after the cooking
process. To prevent the risk of burns, do
not touch or block the steam ventilation
area on the lid. Remove lid to reduce
condensation build up.
• Take care when opening the lid. This
product generate heat and steam at
high temperatures, which will escape
immediately when the lid is opened.
Avoid touching hot surfaces.
• Do not place anything on top of the deep
fryer when the lid is closed, when in use
and when stored.
• Always switch the deep fryer off at the
power outlet, then unplug and allow to
cool, if appliance is not in use, before
cleaning, before attempting to move the
appliance, disassembling, assembling
and when storing the appliance.
• Keep the appliance clean. Follow the
cleaning instructions provided in this
book.
• Do not immerse the deep fryer control
panel, element or cord in water or any
other liquid.
IMPORTANT SAFEGUARDS

5
BREVILLE RECOMMENDS SAFETY FIRST
5
IMPORTANT SAFEGUARDS FOR
ALL ELECTRICAL APPLIANCES
• Fully unwind the power cord before use.
• Do not let the power cord hang over
the edge of a bench or table, touch hot
surfaces or become knotted.
• To protect against electric shock do not
immerse the power cord, power plug or
appliance in water or any other liquid.
• The appliance is not intended for use
by persons (including children) with
reduced physical, sensory or mental
capabilities, or lack of experience and
knowledge, unless they have been given
supervision or instruction concerning
use of the appliance by a person
responsible for their safety.
• Children should be supervised to ensure
that they do not play with the appliance.
• It is recommended to regularly inspect
the appliance. To avoid a hazard do not
use the appliance if power cord, power
plug or appliance becomes damaged in
any way. Return the entire appliance to
the nearest authorised Breville Service
Centre for examination and/or repair.
• Any maintenance other than cleaning
should be performed at an authorised
Breville Service Centre.
• This appliance is for household use only.
Do not use this appliance for anything
other than its intended use. Do not use
in moving vehicles or boats. Do not use
outdoors. Misuse may cause injury.
SAVE THESE
INSTRUCTIONS
• The installation of a residual current
device (safety switch) is recommended
to provide additional safety protection
when using electrical appliances. It
is advisable that a safety switch with
a rated residual operating current
not exceeding 30mA be installed in
the electrical circuit supplying the
appliance. See your electrician for
professional advice.
• The appliance is not intended to be
operated by means of an external timer
or a separate remote control system.

KNOW
your Breville Smart Fryer
™
7
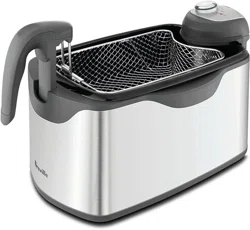
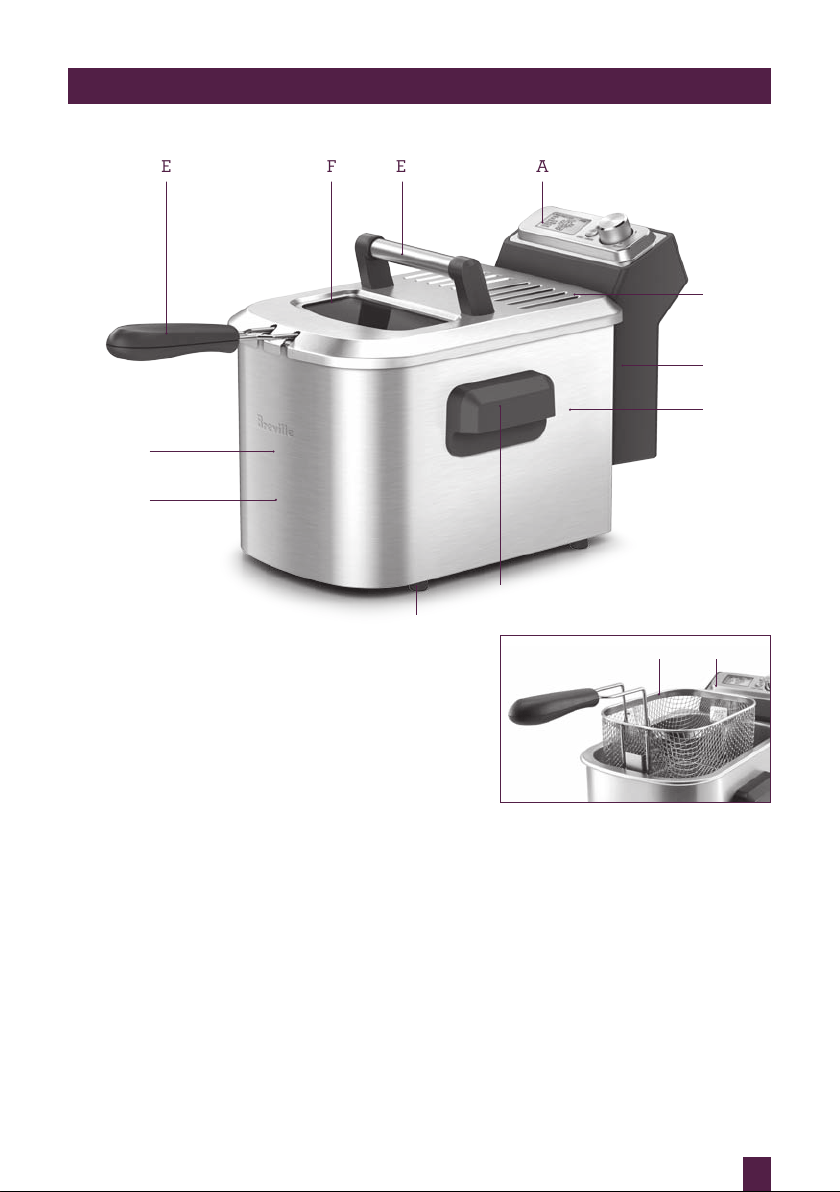
A
FE E
KNOW YOUR BREVILLE SMART FRYER™
A. LCD display
Indicates time, temperature plus
preprogrammed cooking functions for
your favourite dishes.
B. Mesh filter
Filter to minimize cooking odours.
C. Cord storage
D. ‘Cool Zone’ technology
Debris falls into cooler oil, preventing
excess burning and extending oil life.
E. Cool touch handles
F. Large viewing window
B
C
D
E
G
G. Large 4 litre capacity
Easy to disassemble and clean. 1-1.2kg
recommended cooking capacity.
H. Stainless steel exterior
High quality stainless steel cooking
surface. Ideal for the professional cook.
I. Non-skid feet
J. Frying basket with fold down handle
Handle folds inside basket for easy
storage.
K. Powerful 2200 watt removable element
H
I
J K

OPERATING
your Breville Smart Fryer
™

OPERATING YOUR BREVILLE SMART FRYER™
9
STEP 1
Remove lid from the deep fryer by grasping
the handle on top and lift off.
STEP 2
The wire frying basket has a hinged handle
for compact storage. Remove the basket
from the deep fryer. Extend and lock the
basket handle into position by squeezing the
two handle prongs together, pull back and
lock behind the two wire supports extending
from edge of basket.
STEP 3
Lift the control panel with attached element
upwards and away from the deep fryer.
STEP 4
Remove the inner frying bowl by grasping
the rim and lifting upwards.
STEP 5
To reassemble the deep fryer, reverse steps
1-4.
WARNING
When assembling your deep fryer for
use, please ensure the narrow tongues
in the control panel are inserted into the
corresponding grooves of the deep fryer
body. The deep fryer will not operate
unless correctly assembled.
BEFORE FIRST USE
Remove any promotional materials and
packaging materials before use. Wash the
lid, removable inner bowl, stainless steel
outer body and wire frying basket in hot
soapy water, rinse and dry thoroughly. Wipe
the element with a soft, damp cloth and dry
thoroughly. Reassemble and ensure the bowl
is completely free of water before adding
any oil.
1. Place the deep fryer on a dry, level
surface. Ensure the deep fryer is not too
close to the edge of the bench top, and
that the power cord or basket handle
does not extend over the edge.
2. Remove the frying basket from the deep
fryer and add oil to the bowl. Do not
add less than the minimum level mark
(2.5 litres) or exceed the maximum level
mark (4 litres).
IMPORTANT
NEVER exceed the maximum level mark
with oil (maximum is 4 litres). This
product must be filled with oil to the
exact marked level. The product will be
severely damaged if heated without oil
in the frying bowl.
3. Replace the lid.
4. Plug in the power cord. Ensure cord
is fully extended. Switch on at power
outlet and the deep fryer will beep once
for self checking, the display panel will
illuminate with white background light.
The deep fryer enters COOK mode.

10
OPERATING YOUR BREVILLE SMART FRYER™
5. To change temperature format, press
and hold the SCROLL/SELECT knob
for three seconds. If the temperature
format is set to Celsius, it will change to
Fahrenheit after pressing the SCROLL/
SELECT knob for three seconds. Change
the format one time per command.
To change the format again, release
the knob, and again press and hold
the SCROLL/SELECT knob for three
seconds.
NOTE
When the deep fryer is switched off
at the power outlet and then switched
back on, the cooking temperature
format display will default to the last
selected format, Celsius or Fahrenheit.
STAND BY MODE
When the deep fryer remains inactive for
10 minutes, it will enter stand by mode. The
white backlight will turn off and STANDBY
will display. The fryer will come out of stand
by mode by pushing any button or turning
the SCROLL/SELECT knob and then is
ready to start a cooking operation.

COOKING
with your Breville Smart Fryer
™
12
PAGE HEADER.....
COOKING WITH YOUR BREVILLE SMART FRYER™
COOK MODE
When the unit is turned on the first
selection available is cooking mode.
The display panel options will be
The default cooking mode will be
Selecting a different cooking mode will
change the time and temperature settings.
As each mode is selected, the times and
temperatures will update to show the default
time and temperature for each menu item.
The time and temperature in every mode
can be adjusted.
Turn the knob clockwise to scroll down
and anticlockwise to scroll up. Push the
SCROLL/SELECT knob to select a mode
and to move on to the next setting.
FRESH/FROZEN Setting
For CHIPS, FISH, NUGGETS, CALAMARI,
the next setting will be FRESH or FROZEN.
Highlight the desired option. The selected
option will display and the unselected
option will disappear. The FRESH/FROZEN
setting will automatically adjust the time
and temperature.
Time Setting
If cooking time is to be adjusted for a
selected cooking mode, push the
SCROLL/SELECT knob to move to the time
setting. Then turn the knob to adjust to the
time desired.
Initially the time will be displayed in
Minutes and Seconds and will be adjusted
in 30 second increments. Once the time
reaches 9 minutes 30 seconds, the time will
show in minutes only (the display will read
:10 MIN at 10 minutes). At this stage time
will change in 1 minute increments.
After the cooking mode has been selected,
the program will move onto the next
setting. To get back to the mode menu, the
SCROLL/SELECT knob must be pushed to
cycle through the other settings until the
program returns to the mode menu.
Temperature Setting
If temperature is to be adjusted for a
selected cooking mode, push the
SCROLL/SELECT knob to move to the
temperature setting. Then turn the knob
to increase or decrease the temperature.
Temperature can be adjusted in 5 degree
increments for both Celsius and Fahrenheit.

13
PAGE HEADER.....
COOKING WITH YOUR BREVILLE SMART FRYER™
START/CANCEL BUTTON
Press the START/CANCEL button to
confirm the chosen settings. When START/
CANCEL is pushed, the elements will turn
on, the display will turn orange, HEATING
will display and the actual temperature of
the oil will show. Pressing this button again
will cancel any operation and turn off the
elements. The HEATING display will turn
on whenever the elements are turned on.
Ready for Frying
Once the oil has been heated to the set
temperature the HEATING display will turn
off. Time, Temperature, the selected cooking
mode, PRESS TIMER and FRESH or
FROZEN will display. Place the basket with
food into the oil. Push the TIMER button to
start the timer. PRESS TIMER display will
disappear.
Completed Frying
When the timer has finished counting down
the fryer will beep. PRESS TIMER will
display. Push the TIMER button to reset for
cooking or START/CANCEL to turn off the
elements.
Note on adjusting temperature or time
during cooking
The set temperature can be adjusted during
the heating process. Press the SCROLL/
SELECT knob so that the arrow indicates
temperature. Turn the SCROLL/SELECT
knob and the display will change from
the actual temperature of the oil to the set
temperature. Turn the knob to adjust the
temperature and then press to confirm the
new temperature.
The set time can be adjusted during cooking
operation. Press the SCROLL/SELECT knob
so the arrow indicates time. Turn the knob to
adjust the time. Press the SCROLL/SELECT
knob to confirm the new time.
TIMER BUTTON
After the oil is heated, press the TIMER
button to start the timer.
Once the timer has finished counting down,
the alarm will sound. Push the TIMER
button to stop the alarm.
NOTE
When the timer finishes counting
down, the elements will not turn off.
They will remain on until the
START/CANCEL button is pushed.
When the timer is set but not started, PRESS
TIMER will display. As soon as the TIMER
button is pushed, the PRESS TIMER graphic
will disappear.
NOTE
If the TIMER button is pushed
without a set time instead of the timer
counting down it will count up to show
how long the ingredients have been
cooking.
NOTE
When the timer is counting up or
down and is pushed once, it will pause.
It will continue counting if pushed
again. To reset push the TIMER button
twice in rapid succession (double
click).

14
PAGE HEADER.....
COOKING WITH YOUR BREVILLE SMART FRYER™
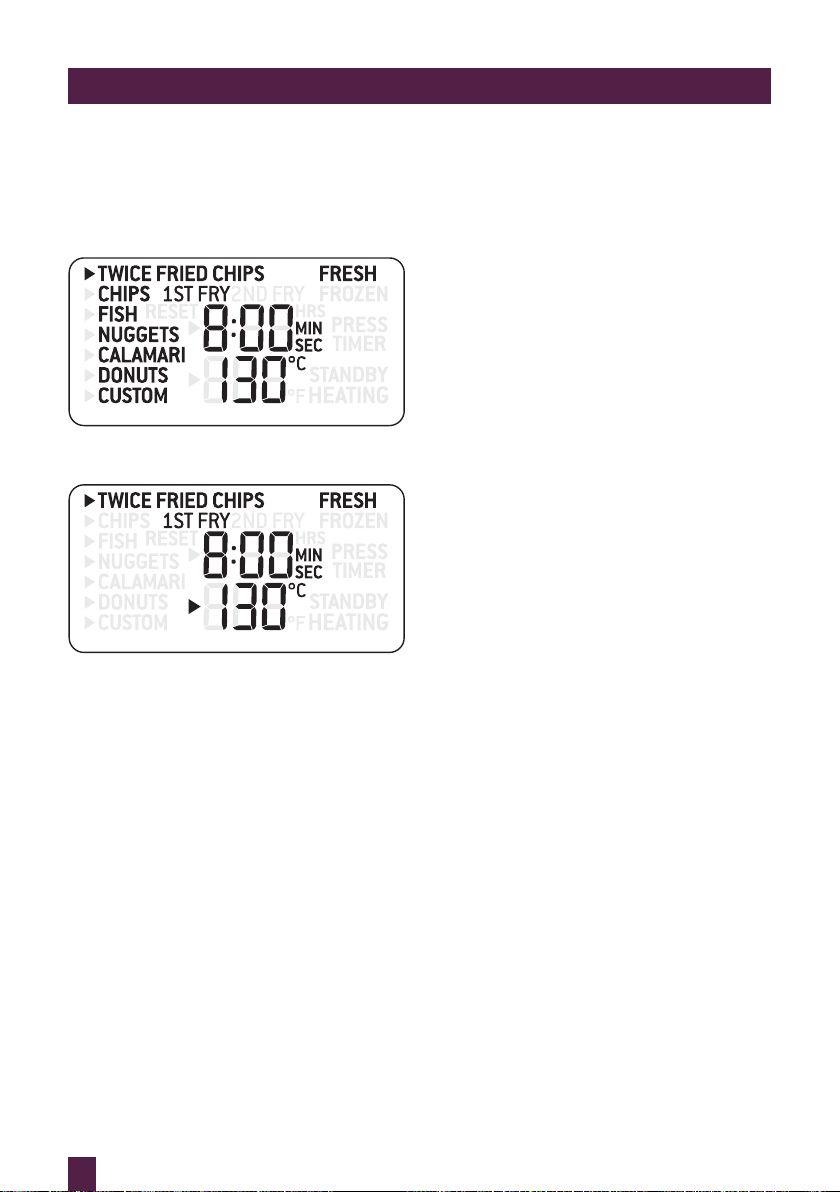
Twice Fried Chips
When TWICE FRIED CHIPS mode is
selected and confirmed by pressing the
SCROLL/SELECT knob, 1ST FRY/2ND FRY
displays.
1. Select 1ST FRY by highlighting and
pressing SCROLL/SELECT knob to
confirm. 1ST FRY flashes to indicate it is
the selected option. Once the selection
has been confirmed, the unselected
option display turns off. After TWICE
FRIED CHIPS and 1ST FRY have been
selected, the fryer will automatically set
the time and temperature.
NOTE
For TWICE FRIED CHIPS, FRESH is
the only available option as frozen
chips have been precooked.
2. Start the heating process by pushing the
START/CANCEL button. The display
will turn orange to indicate heating.
TWICE FRIED CHIPS, FRESH, 1ST FRY,
HEATING and the actual temperature of
the oil will be displayed.
The deep fryer will now preheat the oil.
Once the deep fryer has reached the
correct temperature, the deep fryer will
beep once to indicate it is ready to cook.
PRESS TIMER will display.
3. Lower the basket of fresh chips into the
oil and press the TIMER button. When
the TIMER button is pressed, the timer
will start to count down, and the cooking
process begins.
NOTE
The fryer is programmed to heat to
the correct overshoot temperature
because when the cooler chips are
lowered into the oil, the temperature
of the oil will fall. The overshoot
temperature ensures that the chips
cook at the optimal temperature,
even after they initially cause the oil
temperature to drop.
When the timer finishes counting down,
the alarm will sound to signal the end of
the cooking cycle. PRESS TIMER, TWICE
FRIED CHIPS, 1ST FRY and FRESH, the
time and temperature will be displayed.
4. Push the TIMER button to stop the
alarm and raise the basket. The deep
fryer will automatically begin to reheat.
Once the deep fryer has reached the
correct temperature, it is ready to
proceed.
NOTE
In TWICE FRIED CHIPS mode it
is possible to adjust the timer and
temperature once the timer has
started but it is not possible to switch
between 1ST FRY and 2ND FRY
At this point, the fryer is able to proceed to
either the 2ND FRY or to another 1ST FRY
of a second batch of chips, depending on
the total quantity to be fried. TWICE FRIED
CHIPS, FRESH, FIRST FRY, PRESS TIMER,
the time and cooking temperature display.
NOTE
If a second batch of chips is to be
cooked, Breville recommends to 1ST
FRY both batches and then proceed
to the 2ND FRY for both batches.
This process means less heating and
cooling of oil, providing better results
and is more time efficient.

15
PAGE HEADER.....
COOKING WITH YOUR BREVILLE SMART FRYER™
Proceeding to 2ND FRY
1. Empty the contents of the basket onto
a plate lined with paper towel to cool
slightly.
2. Push the SCROLL/SELECT knob.
1ST FRY starts to flash and 2ND
FRY is displayed. Turn the SCROLL/
SELECT knob to highlight 2ND FRY.
2ND FRY starts to flash to show it has
been highlighted. Press the SCROLL/
SELECT knob to confirm. 1ST FRY will
now disappear. The deep fryer will move
to the heating stage until the correct
temperature is reached. TWICE FRIED
CHIPS, FRESH, 2ND FRY, HEATING
and the actual temperature of the oil will
show.
When the oil has reached the correct
temperature, PRESS TIMER will display.
3. Fill the basket with the 1st fried chips.
Lower the basket into the deep fryer and
press the TIMER button. PRESS TIMER
will disappear. The timer will begin to
count down. When the timer finishes
counting down, the alarm will sound
to signal the end of the cooking cycle.
PRESS TIMER displays.
4. Press the TIMER button and raise the
basket. Allow to drain and cool, then
turn out into a lined bowl.
Repeating 1ST FRY with new batch of
fresh chips
1. Empty the contents of the basket onto a
plate lined with paper towel to cool.
2. Follow the instructions for 1ST FRY
above.
Custom Mode
The CUSTOM cooking mode has a default
setting of 5:00 minutes and 160°C. This
can be changed by turning the SCROLL/
SELECT knob to CUSTOM and then
changing either the time or temperature or
both. If the default setting in customer mode
are changed, the deep fryer will remember
the last settings that have been selected,
even after being unplugged.
NOTE
During and immediately after
cooking, steam may rise through the
filter vent openings in the lid. This is
normal, however avoid touching this
area during cooking to prevent steam
burns as the steam generated is at a
high temperature.
As the basket gets very hot, only use
the handle to hold or carry the basket
for serving. Ensure the basket handle
is locked into position.
Solid oil products, such as butter,
margarine or animal fats of any kind
should not be used in the deep fryer
as they may overheat and cause a fire
hazard.
Water and oil do not mix – never add
any water or other liquid to hot oil.
Even small amounts of water will
cause the oil to splatter.
The deep fryer will generate a lot of
heat and steam during and after the
cooking process. To prevent the risk
of burns, do not touch or block the
steam ventilation area on the lid.
Extreme caution must be used when
the deep fryer is filled with hot oil or
other liquid. Do not move the deep
fryer during cooking and allow it to
cool before removing oil.

16
NOTES

COOKING TECHNIQUES
& TIPS

18
PAGE HEADER.....
COOKING TECHNIQUES & TIPS
Foods should be crisp when deep fried.
If results are soggy, the oil isn’t hot enough.
This can be attributed to one or more of the
following:
• Not enough preheating time
• Temperature too low
• Too much food in the basket (do not fill
more than two thirds full)
• Do not use solid frying oil, only use
liquid oils
• Use good quality liquid oil. For best
results, use the below recommended oils.
The most suitable oil for deep frying
include:
All oils have different smoke points.
Smoke points are the point at which the fat
begins to break down into visible gaseous
products..
• The smoke point of different fats is
determined by the free fatty acid content
of the fat. Generally, the lower the free
fatty acid content the more stable the fat
and the higher the smoke point.
• Free fatty acid levels are generally lower
in refined vegetable oils with a smoke
point of around 230˚C. Where as animal
fats are around 190˚C.
• The smoke point of a deep-frying fat
is lowered every time it is used. Food
particles are always left behind after
cooking will also lower the smoke point
of the fat.
• Suitable oils for deep frying include:
Peanut oil, Vegetable oil, Canola oil,
Safflower oil and Rice Bran oil. Olive
oil is not recommended for deep frying
due to its low smoke-point temperature.
These oils are described below:
PEANUT OIL
Peanut oil is obtained from the kernels
of the ground nut or peanut. It has a
delicate flavour, nutty odour and has a high
smoke point. Peanut oil is high in mono-
unsaturated oil and vitamin E.
VEGETABLE OIL
A general term that refers to a blend of oils
extracted from various seeds and fruits.
Vegetable oil has a very mild flavour and
aroma. It is low in cholesterol and saturated
fats.
CANOLA OIL
Made from seeds of the canola plant. It is
relatively low in saturated fats, contains
Omega 3 fatty acids and has a bland, neutral
flavour.
SAFFLOWER OIL
The oil is extracted from the seeds of the
sunflower plant. It is pale yellow in colour
with virtually no flavour Sunflower oil is
high in polyunsaturated fats and low in
saturated fats.
RICE BRAN OIL
The oil is extracted from the germ and husk
of rice. It has a mild, nutty flavour and high
smoke point. It is high in vitamin E and
antioxidants.

19
PAGE HEADER.....
COOKING TECHNIQUES & TIPS
Method for the perfect chip
1. Peel and cut potatoes into an even 1cm
thickness.
2. Soak in cold water overnight, changing
the water 2 or 3 times to remove the
starch.
3. Drain and dry thoroughly with paper
towel.
4. Preheat oil 130°C.
5. Fry in small batches (500g) for
5 minutes or until potatoes are cooked
but not coloured.
6. Remove and drain on paper towel.
Spread out chips to a single layer and
cool in refrigerator for 30-60 minutes or
until cold.
7. Increase oil to 190°C.
8. Fry in small batches (500g) for
6 minutes or until crisp and golden.
Remove and drain on paper towel.
9. Season with sea salt flakes.
Types of potatoes that make the most
succulent chip include the following:
Bintje
Kennebec
Red rascal
Sebago
Russet
King Edward
When should I change the oil? What
should I look for?
It is recommended to change the oil every
week if deep fryer is used every day.
If using once or twice a week, the oil can be
changed every three weeks.
There are distinct indicators that will show
you when your oil is no longer deep frying
effectively. These include:
• The surface of the oil will begin to foam
once heated.
• Smoke will appear on the surface of the
oil before the recommended deep frying
temperatures are reached.
• Oils can develop an ‘off’ smell. This
indicates that the oil has become rancid.
• The oil’s odor is that of the foods you
have cooked eg seafood.
• The oil will change in viscosity, that is, it
will pour slowly and become thick with a
syrupy appearance.
Storage and preparation of used oil
Re-using your oil is best achieved if proper
methods are used after and during cooking.
1. Never season or salt food before or
during cooking as it will burn and
discolour the oil. This in turn shortens
the lifespan of your oil.
2. Cool oil completely before pouring
through a coffee filter or cloth to remove
food solids and debris.
3. Store in a sealed container either in the
refrigerator or in a cool dark cupboard.
4. Repeat the filtering and cleaning process
after each use.
5. Properly dispose of old used oil
according to council requirements.

20
PAGE HEADER.....COOKING TECHNIQUES & TIPS
COOKING GUIDE
FOOD TEMPERATURE APPROX.
COOKING TIME
Mushrooms 160°C 3-4 mins
Chicken pieces (crumbed) 175°C 12-15 mins
Chicken Strips 180°C 3-4 mins
Prawn Cutlets (raw, crumbed) 175°C 3-4 mins
Fish cakes or pieces 190°C 4-6 mins
Onion rings 190°C 2-4 mins
Potato wedges 170°C 7-10 mins
Spring rolls, small 180°C 4-6 mins
Fruit fritters 180°C 4-5 mins

CARE & CLEANING
for your Breville Smart Fryer
™

22
PAGE HEADER.....
CARE & CLEANING
ERROR MESSAGE
When the deep fryer needs to be reset a
RESET message will flash on the display.
To reset, allow the deep fryer to cool
completely, and then press the two red reset
buttons located above the cord storage area
at the back of the control panel.
If the Temperature Control detects oil
temperature to be less than -20°C it will
display the message ER1.
If the Temperature Control detects the oil
temperature to exceed 210°C the display will
show the message ER2. Reset the unit as per
above.
AUTO CUTOUT SAFETY FEATURE
Always add the required amount of oil
BEFORE switching the power on at the
power outlet. An Auto Cut-Out safety switch
will be activated if the deep fryer is turned
on without oil in the bowl. The fryer will
then need to be reset as above.
CLEANING
• Before cleaning, always ensure the deep
fryer is turned off and disconnected from
the power outlet.
• Ensure the deep fryer and oil are
completely cool. Oil will retain its
temperature for a long time after use.
Do not attempt to move or carry the
deep fryer, element or control panel
while they are hot.
• Wash the frying basket in hot, soapy
water. Rinse and dry thoroughly.
• Remove the control panel/element of the
deep fryer by lifting upwards. Place the
element onto kitchen paper to absorb
excess oil. Wipe element with a soft,
damp cloth and dry thoroughly.
• Grasp each side of the removable frying
bowl and lift upwards.
• Empty the cooled oil from the frying
bowl. Oil can be reused several times,
depending on the type of food cooked.
Filter the oil through a fine sieve.
NOTE
Oil should be filtered after each
use and stored in a clean, airtight
container in a cool area. Good quality
oil can be used several times. Do not
store the oil in the deep fryer. Discard
used oil in a sealed container with
household waste. Do not pour down a
sink or drain.
• Wash the lid, removable inner frying
bowl, stainless steel outer body and wire
frying basket in hot soapy water, rinse
and dry thoroughly The removable inner
bowl allows for easy cleaning. Wipe
the bowl with paper towel, then a damp
cloth and a little mild detergent. Finish
off with a clean damp cloth followed by a
clean dry cloth.

23
CARE & CLEANING
• The removable inner frying bowl, frying
basket and stainless steel outer body are
dishwasher safe.
NOTE
Do not use any abrasive cleaners, such
as steel wool to clean the surface of
your deep fryer as they will scratch
the surface.
• Wipe over the control panel with a soft,
damp cloth and a little mild detergent.
Finish off with a clean damp cloth and
dry thoroughly with a clean dry cloth.
• Reassemble the deep fryer for storage.
Do not place anything on top of the deep
fryer during storage.
IMPORTANT
Never immerse the deep fryer control
panel, element or cord in water or any
other liquid. Always turn the appliance
off at the power outlet and then unplug
cord before attempting to move the
appliance and before cleaning.

RECIPES

25
RECIPES
TASTY BUFFALO WINGS
Serves 8-10
INGREDIENTS
2kg chicken wings, wing tips removed
1 teaspoon salt
2 teaspoons paprika
½ teaspoon cayenne pepper
Hot sauce
125g butter
¾ cup Masterfoods Hot sauce
2 teaspoons Tobasco sauce
1 tablespoon white vinegar
1 tablespoon Worcestershire sauce
¼ teaspoon cayenne pepper
2 teaspoons garlic powder
1 teaspoon salt
Blue cheese sauce
¼ cup sour cream
¼ cup mayonnaise
80g blue cheese, coarsely chopped
1 small garlic clove, minced
Squeeze lemon juice
METHOD
1. To make the blue cheese sauce, combine
ingredients into a blender or food
processor and process until smooth.
Spoon into a small serving bowl.
2. Cut each wing in half and place into a
large bowl.
3. Combine salt, paprika and cayenne
pepper and mix well through the wings;
toss to coat lightly; Cover with cling film
and refrigerate for 30 minutes.
4. Fill the deep fryer with 4 litres of oil.
Heat oil in the deep fryer to 180°C.
place 6-8 wings into the basket, lower
and cook 6-7 minutes or until cooked
through and golden. Place onto a wire
rack over a lined tray to drain. Repeat
with remaining chicken, making sure to
reheat the oil between batches.
5. To make the hot sauce, melt butter
in a saucepan and add remaining
ingredients. Stir and bring to the boil.
Remove and set aside.
6. Place hot wings into a bowl and drizzle
over the sauce; toss to coat.
Serve immediately with celery sticks and blue
cheese sauce.

26
RECIPES
HONEY SESAME CHICKEN
Serves 4-6
INGREDIENTS
800g chicken breast fillet
1½ cups ice water
1 egg
¼ teaspoon salt
1 cup self raising flour
2/3 cup corn flour, plus extra for dusting
100g packet Vermicelli noodles
2 green onion, sliced for garnish.
Honey sauce
1 cup honey
L cup Shaoxing wine
2 tablespoons sesame seeds
2 green onions, finely sliced
METHOD
1. Fill deep fryer with 4 litres of oil. Preheat
to 180°C.
2. Slice chicken into 5mm thin strips,
cutting across the grain.
3. Combine water, egg and salt and whisk
together in a jug. Sift flours into a bowl
and slowly whisk in egg and water
mixture to form a smooth batter.
4. Working with small batches of chicken
at a time, dust chicken in corn flour
lightly and then dip into prepared batter.
5. Preheat oven 150°C.
6. With basket in lowered position,
use tongs to lower chicken pieces
individually into the hot oil. You should
only do about 8-10 strips at a time. Cook
approximately 2-3 minutes or until a
golden colour and batter is crisp.. Drain
on paper towel lined tray and place in
the oven to keep warm. Repeat with
remaining chicken and batter, making
sure to reheat the oil between each
batch.
7. Warm honey and Shaoxing wine
together in a small saucepan and
simmer until thick and syrupy. Tip
chicken into a large bowl and pour over
hot syrup. Sprinkle with sesame seeds
and toss to coat evenly.
8. Place vermicelli noodles into hot oil
and cook 20 seconds or until it puffs up.
Remove and place onto serving platter.
Top with honey sesame chicken and
garnish with slice green onions. Serve
immediately.
HOME MADE CHICKEN NUGGETS
Makes approx 25
INGREDIENTS
600g chicken breast fillet, diced
1 teaspoon salt
1 teaspoon ground white pepper
2 teaspoons dried parsley flakes
2 teaspoons garlic salt
2 eggs, beaten
1 cup plain flour
METHOD
1. Fill the deep fryer with 4 litres of oil. Set
deep fryer to NUGGETS/FRESH setting.
Line a baking tray with paper towel.
2. Place chicken into a food processor and
process until it breaks down and forms a
sticky paste. Transfer to a large bowl and
add salt, pepper, parsley and onion garlic
salt; mix well.
3. Roll tablespoon measures of chicken
mixture into nugget shape and coat
lightly in the flour.
4. Dip into beaten egg and coat again in
the flour.
5. Cook in batches of 6, shaking basket
regularly. Drain on paper towel and place
into the oven to keep warm.
6. Repeat with remaining chicken, making
sure to reheat the oil between each batch.
Serve hot with your favourite sauce.

27
RECIPES
BUTTERMILK FRIED CHICKEN
Serves 6-8
INGREDIENTS
3 cups butter milk
1 teaspoon each of salt, ground black pepper &
white pepper
2 tablespoons paprika
2 tablespoons dried parsley flakes
2.5kg chicken pieces
Coating
3 cups plain flour
2 tablespoons garlic salt
1 tablespoon cayenne pepper
1 teaspoon white pepper
METHOD
1. Combine butter milk with seasonings
and dried spices and mix well. Add
chicken and toss to coat in mixture.
Cover and refrigerate for 2 hours or
overnight.
2. Fill the deep fryer with 4 litres of oil.
Preheat oil to 160°C.
3. Line a baking tray with paper towel and
place a metal wire rack over the top.
4. Preheat oven 160°C.
5. Coat 3-4 marinated chicken pieces with
flour mix and place into basket. Cook
in deep fryer for 10-12 minutes or until
chicken is cooked through and coating
is golden and crisp. Drain on wire rack
and place in oven to keep warm. Repeat
with remaining chicken and flour mix,
making sure to reheat the oil between
batches.
Serve warm with coleslaw.
NOTE
For more even cooking, fry similar
sized chicken pieces in batches.
Drumsticks will take longer to cook
through to the bone cook larger pieces
first and keep warm in the oven while
cooking the rest.
POTATO SCALLOPS
Makes 6-8 as a side
INGREDIENTS
700g floury potatoes, peeled
2 cups self raising flour, plus extra for coating
Pinch bi-carb soda
1 teaspoon salt
½ teaspoon ground white pepper
2 cups water
Sea salt and malt vinegar to serve
METHOD
1. Fill the deep fryer with 4 litres of oil and
preheat 180°C.
2. Slice potatoes into 3mm thick slices and
place into a bowl of water with juice of a
lemon to prevent them from browning.
3. Sift flour, bi-carb, salt and pepper into a
large mixing bowl and pour in
1
3
⁄4 cups of the water. Mix to form a
smooth batter the consistency of thick
cream. Add remaining water if batter
becomes too thick. Set aside.
4. Drain potatoes and pat dry with paper
towel. Dust in extra flour, shaking off
excess.
5. Preheat oven 160°C.
6. With basket in lowered position, dip
4-5 floured slices into the batter. Using
tongs, carefully lower slices into hot
oil one at a time to prevent them from
sticking. Cook 2-3 minutes, turning
over half way or until batter has set and
is golden brown. Remove and drain on
paper towel. Place in oven to keep warm.
Repeat with remaining potatoes and
batter, allowing the oil to reheat between
each batch.
Serve hot sprinkled with sea salt and malt
vinegar.

28
RECIPES
REALLY GOOD BEER BATTERED
FISH
Serves 4-6
INGREDIENTS
1kg flat head fillets (or substitute with whiting or
blue eye cod), skin removed
1¼ cup self raising flour
¼ cup corn flour, plus extra for dusting
Pinch salt
1 egg, beaten
355ml cold beer of your choice
Sea salt to taste
METHOD
1. Fill deep fryer with 4 litres of oil. Set
deep fryer to FISH/FRESH setting.
2. Pat fillets dry with paper towel and place
onto a clean dry plate.
3. Combine flours in a large bowl and mix
well. Dust fillets lightly in corn flour,
making sure to shake off any excess
flour; return to plate.
4. Make a well in the centre of the flours
and add beaten egg and beer. Slowly stir
mixture from the centre out, making sure
that the flour is incorporated slowly.
5. The batter should be the consistency
of thick cream. If it is too thick, add a
little more beer or soda water. Cover and
stand for 15 minutes.
6. Preheat oven 160°C and line a baking
tray with paper towel.
7. Dip 2-3 fillets at a time into the batter
and carefully lower into the hot oil. Cook
2 minutes; turn over and cook a further
2 minutes or until batter is golden and
crisp. Remove and drain on a wire rack
sitting on a tray lined with paper towel.
8. Transfer to prepare tray and place
in oven to keep warm. Repeat with
remaining fish and batter, making sure
to reheat the oil between each batch.
Season with salt and serve hot with tar tare
sauce and lemon wedges.
CRISPY CRUMBED CALAMARI
Serves 4
INGREDIENTS
800g fresh cleaned large squid tubes
1 cup plain flour
Pinch sea salt
3 eggs, beaten
2 tablespoons milk
2 cups panko crumbs
2 cups fresh breadcrumbs (made from 14 thick
white sliced bread )
METHOD
1. Fill deep fryer with 4 litres of oil. Set
deep fryer to CALAMARI/FRESH
setting.
2. Slice tubes into 1cm thick rings and set
aside.
3. Combine flour and salt and place into a
shallow dish. Toss 5 or 6 squid rings into
flour and shake off excess.
4. Whisk beaten eggs and milk together
and dip squid into egg mixture.
5. Combine crumbs in a shallow tray and
toss squid into breadcrumb mixture. Set
aside and repeat with remaining squid
rings.
6. Arrange a small batch (approx 200g)
crumb squid rings into wire basket and
LOWER BASKET. Press timer and cook
2 minutes.
7. Shake basket halfway through cooking.
8. Drain on paper towel.
9. Repeat with remaining squid rings,
making sure to reheat oil between
batches.

29
RECIPES
SPICY SALT AND PEPPER SQUID
Serves 4-6
INGREDIENTS
15 small dried chillies, coarsely chopped
L cup sea salt
3 tablespoons Sichuaun peppercorns
2 tablespoon white peppercorns
400g rice flour (substitute with plain or
cornflour)
1.5kg medium whole squid, cleaned and peeled
3 egg whites
Finely sliced red chilli, lime wedges and
coriander to serve
METHOD
1. Place chillies, sea salt, Sichuaun and
white peppercorns into a large frying
pan and heat over medium heat for
5 minutes or until spices are fragrant
and crackling. Remove and cool
completely.
2. Grind cooled spices in a spice grinder
or pestle and mortar until finely ground.
Place flour and spices into a large snap
lock bag, mix well and set aside.
3. Clean squid by removing innards and
cutting off legs. Peel off skin and flap
and cut open tube to expose inside flesh.
Wash well and dry with paper towel.
4. Score inside of tube closely in a
criss-cross pattern and cut into strips
or squares.
5. Fill deep fryer with 4 litres of oil. Set
deep fryer to CALAMARI/FRESH
setting
6. Dip a small batch of squid into egg white
and toss through flour mix.
7. Shake off excess flour and place into
base of wire basket. Lower basket and
PRESS start timer.
8. Drain on paper towel and repeat with
remaining squid, eggs and flour.
Serve hot with sliced red chilli, lime wedges
and fresh coriander sprigs.
SESAME PRAWN TOASTS
Makes 24
INGREDIENTS
300g peeled green prawns
1 green onion, sliced
1cm piece ginger, finely grated
1 tablespoon Shaoxing wine
1 teaspoon sesame oil
Pinch white pepper and salt
1 egg white
2 teaspoons corn flour
12 slices white day old bread, crusts removed
½ cup sesame seeds
Hot chilli sauce to serve
METHOD
1. Place prawns, green onion, ginger,
Shaoxing wine, sesame oil, seasonings,
egg and corn flour into the bowl of a
food processor and pulse until it forms a
smooth paste. Set aside.
2. Cut each slice in half into 2 triangles and
spread prawn filling over evenly, making
sure to reach the edges of the bread.
3. Dip each triangle, prawn side down, into
sesame seeds to coat and set aside.
4. Fill deep fryer with 4 litres of oil. Preheat
to 180°C. Line a baking tray with paper
towel.
5. Deep fry 4-6 triangles at a time for
1 minute each side. Drain and repeat
with remaining bread, making sure to
reheat the oil between each batch.
Serve prawn toast with hot chilli sauce.

30
RECIPES
THAI FISH CAKES
Serves 6-8 as part of an appetiser
INGREDIENTS
600g white fish fillets, such as barramundi,
snapper and red fish fillets
2 tablespoons Thai red curry paste
1 tablespoon fish sauce
2 teaspoons white sugar
1 egg white
2 kaffir lime leaves, finely shredded
80g green beans, finely sliced
Dipping sauce
½ cup sugar
L cup white vinegar
1 tablespoon fish sauce
½ Lebanese cucumber, seeded and finely diced
1 long red chilli, finely chopped
METHOD
1. To make the dipping sauce; combine
sugar, vinegar and 2 tablespoons cold
water into a small saucepan. Stir over
medium high heat until sugar has
dissolved. Stir in fish sauce and cool
completely. Just before serving, stir
through cucumber and chilli.
2. Dice fish into large cubes and place
into the bowl of a food processor along
with curry paste, fish sauce, white sugar
and egg whites. Using the pulse button,
process ingredients until mixture is
smooth.
3. Tip mixture into a bowl and mix through
finely shredded kaffir lime leaves and
sliced green beans.
4. Wet hands with cold water and form
fish cake mixture into flat round shapes
3-4cm wide and place onto a lined
baking tray.
5. Fill deep fryer with 4 litres of oil. Preheat
to 180°C. Place 6-8 fishcakes into the hot
oil and cook 2-3 minutes or until golden
brown. Remove and drain on paper
towel. Repeat with remaining fish cakes,
making sure to reheat the oil between
batches.
Serve with dipping sauce and lime wedges.

31
RECIPES
VEGETARIAN THAI SPRING ROLLS
Makes approx 18
INGREDIENTS
100g dried vermicelli noodles
8 dried small shitake mushrooms
2 tablespoons peanut oil
3 garlic cloves, crushed
2cm piece ginger, peeled and grated
1 tablespoon finely chopped coriander root
2 carrots, grated
¼ Chinese cabbage (Wombok), finely shredded
¼ cup bamboo shoots, finely sliced
150g firm silken tofu, finely diced
3 tablespoons fish sauce
1 tablespoon sugar
2 kaffir lime leaves, finely shredded
L cup coriander leaves
250g large frozen spring roll wrappers, thawed
METHOD
1. Soak noodles and shitake mushrooms
in warm water for 5 minutes to soften.
Drain well. Cut noodles into 5cm lengths
and finely slice mushrooms; set aside.
2. Heat oil in a wok over high heat and stir
fry garlic and ginger for 1 minute. Add
carrot and toss until soften.
3. Add cabbage, bamboo shoots, tofu,
noodles, mushroom, fish sauce and
sugar and cook 3-4 minutes. Remove
from heat and stir through kaffir lime
leaves. Set aside to cool completely.
4. To make the spring rolls, place wrapper
onto a flat work surface with one
corner pointing towards you. Spoon a
2 tablespoons of filling in the centre of
the wrapper, brush the edges with cold
water. Roll up, tucking in the sides as
you do so to make a 12cm long cylinder.
Repeat with remaining filling and
wrappers. Cover completed spring rolls
with tea towel or cling film to prevent
them from drying out.
5. Fill deep fryer with 4 litres of oil and
preheat to 180°C. Place 3 spring rolls
into the basket and carefully lower them
into the oil. Cook for 2-3 minutes or until
golden and crisp. Drain on paper towel
and keep warm in a low oven.
6. Repeat with remaining spring rolls,
making sure to reheat the oil between
batches.
Serve warm with sweet chilli sauce.
NOTE
While assembling the spring rolls,
cover the store-bought wrappers with
a damp tea towel to stop them drying
out.
To freeze spring rolls, assemble as per
recipe. Place into a container lined
with cling film between each layer.
Cover and freeze for 1 month. Cook
in preheated oil for 5 minutes or until
golden and heated through.

32
RECIPES
ARANCINI BALLS WITH
MUSHROOM, THYME AND
TALEGGIO CHEESE
Makes 16
INGREDIENTS
2 ½ cups chicken stock
2 tablespoons olive oil
20g butter
1 onion, finely chopped
2 garlic cloves, crushed
¾ cup aborio rice (or vialone and canaroli rice)
2 tablespoons grated parmesan
Sea salt and freshly ground black pepper
120g Swiss brown mushrooms, trimmed and
finely chopped
1 teaspoon chopped thyme
20g taleggio cheese, finely diced
L cup dried breadcrumbs
METHOD
1. Place stock into a saucepan and warm
gently over low heat.
2. Heat half the oil and butter together in
a pan and cook onion and garlic over
medium heat for 3-4 minutes or until
softened. Remove half of the onion
mixture and set aside to cook with the
mushrooms.
3. Add rice and toss to coat for
1 minute. Pour in half the stock and stir
occasionally until all the stock has been
absorbed. Repeat with remaining stock
until the rice is cooked; stir in parmesan
and season with black pepper. Spoon
onto a flat tray; cover and cool in the
refrigerator.
4. Wipe out any rice remaining from
pan and add remaining oil and onion
mixture, mushroom and thyme. Cook
over medium heat until mushrooms have
softened and mixture is dry. Remove and
cool completely.
5. Roll tablespoons of risotto into a ball
and push a hole into the side. Spoon in
a little of the mushroom mixture and
taleggio cheese into the centre and roll
to enclose, using a little extra rice to
plug the hole. Coat balls in breadcrumbs
and refrigerate until required.
6. Fill deep fryer with 4 litres of oil. Preheat
to 190°C. Deep fry in batches for
1-1½ minutes or until golden brown and
heat through.
Season with sea salt and serve hot.

33
RECIPES
STUFFED ZUCCHINI FLOWERS
WITH FETA AND BASIL
Serves 4 as an entrée
INGREDIENTS
1 cup flour
Pinch salt
1 cup water
2 teaspoons olive oil
1 egg, separated
16 zucchini flowers
150g marinated goat’s cheese feta
1 tablespoon finely chopped basil
Salt and freshly ground black pepper
METHOD
1. Mix flour and salt together and whisk in
water, oil and egg yolk. Set aside to rest
for 30 minutes.
2. Fill deep fryer with 4 litres of oil and
preheat to 180°C.
3. Gently wash zucchini flowers and pat
dry with paper towel. Open each flower
and remove stamen from inside; Discard.
4. Mash goat’s feta and basil together and
season with freshly ground black pepper.
Spoon a teaspoonful into each flower
and press petals together to enclose.
5. Whisk egg white to soft peaks and
fold through batter. Coating one at
a time, dip each zucchini flower into
the batter and lower into the hot oil.
Cook in batches of 4 for 3-4 minutes or
until crisp and golden. Drain on paper
towel and season with salt. Repeat with
remaining batter and zucchini, making
sure to reheat the oil between batches.
Serve immediately.
JAPANESE MISO GLAZED
EGGPLANT
Serves 4-6
INGREDIENTS
2 tablespoons mirin
2 tablespoons sake
3 tablespoons shiro miso
2 tablespoons sugar
1 teaspoons sesame oil
6 Japanese eggplants
1 tablespoon sesame seeds
2 green onions, sliced
METHOD
1. Fill deep fryer with 4 litres of oil. Preheat
to 190°C.
2. Combine mirin and sake in a small
saucepan and bring to the boil over
medium high heat. Boil for 1-2 minutes
to cook off the alcohol. Remove and
stir in miso and sugar until thick and
smooth.
3. Reduce heat to low and return miso
mixture to the stove. Cook, stirring
occasionally for 5 minutes. Remove and
cool completely; stir in sesame oil and
set aside.
4. Slice eggplants in half lengthways and
score flesh in a criss-cross pattern. Pat
dry with paper towel.
5. Place 3-4 halves into the basket and
carefully lower them into the hot oil.
Cook 1-2 minutes. Remove and drain
on paper towel. Repeat with remaining
eggplant making sure to reheat the oil
between each batch.
6. Preheat a grill on High. Lay cooked
eggplant, cut side up, onto a baking tray
lined with baking paper, and brush with
miso glaze. Sprinkle with sesame seeds.
Grill for 2-3 minutes or until golden and
hot.
Serve immediately topped with slice green
onions.

34
RECIPES
DEEP FRIED SHREDDED BEEF
Serves 6
INGREDIENTS
600g beef fillet, trimmed
¼ cup light soy sauce
2 tablespoons Shaoxing wine
1 tablespoon fish sauce
1 teaspoon sesame oil
3 garlic cloves, crushed
2cm piece ginger, finely grated
½ cup corn flour
Ice berg lettuce cups and sliced green onion to
serve
Plum or hoisin sauce to serve
METHOD
1. Wrap the fillet in plastic wrap and place
into the freezer for 1 hour or until semi-
frozen. Remove plastic and cut the fillet
lengthways into six slices. Slice each
strip thinly across the grain so that you
have long thin strips the size of a match
stick.
2. Place into a bowl and stir in soy,
Shaoxing wine, fish sauce, sesame oil,
garlic and ginger. Cover and refrigerate
for 2 hours or preferably overnight.
3. Sift corn flour over beef and mix well.
Spread the beef out onto a tray and
refrigerate uncovered for 1 hour.
4. Fill deep fryer with 4 litres of oil. Preheat
to 180°C.
5. Have basket in lowered position. Deep
fry beef in small batches, separating the
beef with metal tongs. Cook 3-4 minutes
or until crisp and browned. Lift basket
and drain on paper towel. Repeat with
remaining beef, making sure to reheat
the oil between each batch.
6. To serve, place lettuce cups onto serving
plates and fill with a little sauce. Top
with crispy beef strips and sprinkle over
sliced green onions. Serve immediately.
YUMMY VEAL SCHNITZEL
Serves 6-8
INGREDIENTS
8 veal escalopes (approx 100g each)
1 cup dried breadcrumbs
1 cup panko crumbs
½ cup finely grated parmesan
3 teaspoons garlic salt
2 tablespoons dried parsley flakes
½ cup plain flour
3 eggs, beaten
Lemon wedges to serve
METHOD
1. Place veal between 2 layers of cling
film and pound with a meat mallet until
approximately 2mm thin.
2. Combine crumbs, parmesan, garlic salt
and parsley and mix well; transfer crumb
mixture to a flat plate.
3. Coat 1 veal steak in flour, shaking off any
excess and then dip into beaten egg.
4. Cover with crumb mixture, pressing
lightly so that the crumb sticks. Transfer
schnitzel to a clean plate and repeat with
remaining steaks, flour, egg and crumb.
5. Cover plate with cling film and
refrigerate for 30 minutes.
6. Fill deep fryer with 4 litres of oil. Preheat
to 180°C. Preheat oven 160°C and line a
baking tray with paper towel.
7. Deep fry 1 or 2 schnitzel at a time for
2 minutes; place onto prepared tray
and keep warm in oven. Repeat with
remaining schnitzel, making sure to
reheat the oil between batches.
Serve hot with wedges of lemon.
NOTE
Substitute with chicken for chicken
schnitzel.

35
RECIPES
CHOCOLATE CANNOLI WITH
ORANGE AND CHOCOLATE
RICOTTA CREAM
Makes 16
INGREDIENTS
3 cups plain flour
2 tablespoons cocoa
¼ cup caster sugar
¼ teaspoon salt
70g cold lard
2 eggs, beaten
2 tablespoons white vinegar
60ml Marsala
1 egg white, lightly whisked
Orange and chocolate ricotta cream
600g fresh ricotta, well drained of excess liquid
½ cup icing sugar, plus extra for dusting
Finely grated rind of an orange
1 tablespoon Grand Marnier
½ cup dark Lindt 70% chocolate, finely chopped
METHOD
1. Place flour, cocoa, sugar and salt into
the bowl of a food process and add
lard. Pulse until mixture resembles fine
breadcrumbs. Add eggs, white vinegar
and Marsala and pulse until dough just
comes together. Add an extra
1-2 tablespoons of water if dough is too
dry. Tip onto a lightly floured surface
and knead for 1-2 minutes until smooth
and elastic. Divide dough in two and
form into a disc. Cover with plastic wrap
and refrigerate for 2 hours.
2. Fill deep fryer with 4 litres of oil. Preheat
to 180°C and line a tray with paper
towel.
3. Unwrap one pastry disc and roll out until
about 1mm thick. Using an 8cm cutter,
cut out discs from dough. Working with
4 discs at a time, roll out each pastry disc
into an oval shape that will fit onto the
cannoli tube. The dough should now be
½ mm thick. Grease 4 cannoli tubes with
cooking spray and wrap each pastry disc
around the cannoli tubes, securing the
join with egg white and pressing down
on the centre to seal completely.
4. Fry 4 tubes at a time for 2-3 minutes
or until cannoli is golden and crisp.
Remove from oil and drain on paper
towel. Cool slightly.
5. While, still warm, remove cannoli shells
from the tubes by holding cannoli in the
centre and gently sliding cannoli from
the tube. Allow to cool completely.
6. Repeat with remaining dough and tubes,
making sure to reheat the oil between
batches.
7. To make the ricotta cream; lightly beat
ricotta and icing sugar until creamy
and soft. Fold through orange rind
and Grand Marnier. Spoon into a
piping bag with a large nozzle and fill
cooled cannoli tubes. Dip each end of
the cannoli into the finely chopped
chocolate and serve dusted with icing
sugar.
Serve with coffee.
NOTE
Unfilled cannoli tubes can be kept in
an air tight container for 3-4 days.

36
RECIPES
LITTLE CHOCOLATE FILLED
DONUTS
Makes 24
INGREDIENTS
2 teaspoons dry yeast
½ cup warm milk
2 tablespoons caster sugar
50g butter, melted
2L cups plain flour, plus extra for kneading
2 eggs, beaten
50g dark chocolate bits
Chocolate icing
125g butter
2 tablespoons cocoa powder
250g icing sugar
¼ cup milk
METHOD
1. Combine the yeast, milk and half the
sugar into a large bowl. Set aside for
5 minutes or until bubble appear on
the surface.
2. Add butter, flour, eggs and remaining
sugar. Using a butter knife, cut mixture
until a soft sticky dough forms.
3. Turn out onto a lightly floured surface
and knead for 3 minutes or until smooth.
Place into an oiled bowl, cover and stand
in a warm place for 30 minutes or until
doubled in size. Punch risen dough
and tip back onto a floured surface,
knead again for 2-3 minutes so that
the dough is smooth and very elastic.
Roll tablespoons of dough into balls
and place onto a baking tray lined with
baking paper. Push 2 chocolate bits into
the centre of each ball and roll to fully
enclose; set aside for 30 minutes to rise.
4. Fill deep fryer with 4 litres of oil. Set
deep fryer to DONUT/FRESH setting.
5. Place basket into lowered position and
carefully drop 4 or 5 balls into oil; cook,
turning over half way. Remove basket
and turn out donuts onto paper towel.
Repeat with remaining balls, making
sure to reheat oil between batches. Cool
donuts completely.
6. To make the icing, melt butter in a
saucepan over low heat and stir in cocoa.
Bring to the boil for 30 seconds and
remove. Stir in icing sugar and milk and
beat until smooth and glossy. Dip one
side of doughnuts into icing and cool
on a wire rack until set.

37
RECIPES
CINNAMON SUGARED POTATO
DONUTS
Makes 14
INGREDIENTS
1 tablespoon dried yeast
1 cup warm milk
¼ cup caster sugar, plus extra ½ teaspoon
½ cup cool mashed potato
2 cups plain flour
Pinch salt
2 tablespoons vegetable oil
½ cup caster sugar
1 tablespoon ground cinnamon
METHOD
1. Combine yeast, milk and
½ teaspoon of sugar into a large bowl.
Set aside for 5 minutes or until bubbles
appear on the surface.
2. Place remaining sugar, mashed potato,
flour and oil into a large mixing bowl
and pour in yeast mixture.
3. Using a butter knife, cut mixture until
it forms a sticky dough. Turn out onto a
lightly floured surface and knead for
5 minutes or until smooth. Place into an
oiled bowl, cover and stand in a warm
place for 30 minutes or until doubled in
size.
4. Punch risen dough and tip back onto a
floured surface, knead again for
5 minutes so that the dough is smooth
and very elastic.
5. Roll out dough to approximately 1 ½cm
thick. Use a 9cm round cutter to cut out
circles. Use a 3cm round cutter to cut
holes from the centre of the rounds to
make rings. Place rings onto a baking
tray lined with non-stick paper. Knead
remaining dough and repeat with cutters
until dough has been used up. Set aside
for 10-15 minutes or until risen.
6. Fill deep fryer with 4 litres of oil. Set
deep fryer to DONUTS/FRESH setting.
7. Place basket into lowered position and
carefully drop 3 rings into oil, cook
turning over half way, or until golden.
Remove basket and turn out onto paper
towel.
Dust warm donuts with combined sugar and
cinnamon and serve hot or cold.

38
RECIPES
COCONUT BANANA FRITTERS
WITH LIME & HONEY SYRUP
Serves 6
INGREDIENTS
1 cup rice flour, plus extra for dusting
¼ cup caster sugar
¼ cup shredded coconut
2 tablespoons sesame seeds
270ml can coconut milk
1/2 cup water
4 large bananas
Syrup
1/2 cup water
½ cup sugar
2 tablespoons honey
1 star anise
Grated rind and juice of 1 lime
METHOD
1. To make the syrup, place water, sugar,
honey, star anise and lime rind into a
saucepan. Bring to the boil over medium
high heat, stirring occasionally. Reduce
to a simmer and cook until reduced by
half and thick and syrupy. Remove and
stir in lime juice; cool completely.
2. Combine rice flour, sugar, coconut and
sesame seeds in a large bowl.
3. Stir in coconut milk and water to form a
smooth batter the consistency of thick
cream.
4. Fill deep fryer with 4 litres of oil. Preheat
to 180°C.
5. Peel and halve bananas lengthways. Dust
with extra rice flour, shaking off excess.
6. Coating one at a time, dip banana halves
into batter and gently lower the 2 halves
into the hot oil. Cook 2-3 minutes or
until golden. Remove and drain on paper
towel. Repeat with remaining banana
and batter, making sure to reheat the oil
between batches.
Serve hot bananas drizzled over with syrup
and a scoop of ice cream.
HOME MADE APPLE TURNOVERS
Makes 8
INGREDIENTS
600g green apples (about 4)
1 cinnamon stick
2 tablespoons brown sugar
Pinch ground nutmeg
10g butter
2 sheets frozen butter puff pastry, thawed
Cinnamon sugar to serve
METHOD
1. Place apples into a saucepan with
cinnamon stick and add enough water
to come half way up. Cook over medium
heat, stirring occasionally, for 8-10
minutes or until softened and all the
water has evaporated.
2. Stir in sugar, nutmeg and butter and
continue cooking until thickened and
completely soft and broken down.
Transfer to a bowl and chill in the
refrigerator until cold.
3. Cut each sheet of pastry into 4 squares
and fill one half of each square with
a large heaped tablespoon of apple
mixture. Brush edges with water and fold
over pastry to form a rectangle.
4. Using a fork, press around the edges
to seal.
5. Fill deep fryer with 4 litres of oil.
Preheat to 190°C and deep fry two apple
turnovers at a time for 21/2 minutes,
turning over half way.
6. Drain on paper towel and sprinkle with
cinnamon sugar. Repeat with remaining
apple turnovers, making sure to reheat
the oil between batches.
Serve hot with vanilla ice cream.

39
NOTES