
Page 1
INSTRUCTION MANUAL
0.9 CU. FT. PORTABLE WASHING MACHINE
Thank you for choosing BLACK+DECKER!
PLEASE READ BEFORE RETURNING THIS PRODUCT FOR
ANY REASON.
If you have a question or experience a problem with your BLACK+DECKER
purchase, go to www.blackanddecker.com/instantanswers
If you can’t find the answer or do not have access to the Internet, call
844-299-0879 from 10:30 a.m. to 6:30 p.m. EST Mon. - Fri. to speak with an
agent. Please have the catalog number available when you call.
SAVE THIS MANUAL FOR FUTURE REFERENCE.
CATALOG NUMBER
BPWM09W

Page 2

Page 3
CONTENTS
PRODUCT REGISTRATION
SAFETY INFORMATION
Important Safety Instructions ......................................................................................................................................... 4-6
Installation Warnings and Precautions ........................................................................................................................ 6-7
Grounding Instructions ...........................................................................................................................................................5
Usage and Maintenance Warnings and Cautions ..................................................................................................8-11
SET UP & USE
Parts & Features ........................................................................................................................................................................13
Installation Guide ................................................................................................................................................................15-19
Operation Guide ............................................................................................................................................................... 20-23
CLEANING & CARE ............................................................................................................................................. 24
TROUBLE SHOOTING & WARRANTY
Before You Call For Service ................................................................................................................................................25
Customer Service.....................................................................................................................................................................25
Troubleshooting........................................................................................................................................................................25
Limited Warranty .....................................................................................................................................................................25
Staple your receipt to your manual.
You will need it to obtain warranty service.
Thank you for purchasing our
BLACK+DECKER product. This
easy-to-use manual will guide you
in getting the best use of your
product.
Remember to record the model and
serial numbers. They are on a label
on the back of the product.
_____________________________
Model number
_____________________________
Serial number
_____________________________
Date of purchase

Page 4
SAFETY INFORMATION
DANGER
DANGER - Immediate hazards
which WILL result in severe
personal injury or death
WARNING
WARNING - Hazards or unsafe
practices which COULD result in
severe personal injury or death
CAUTION
CAUTION - Hazards or unsafe
practices which COULD result in
minor personal injury
1. Read all instructions before using the appliance.
2. Use this appliance only for its intended purpose as described in this owner’s
Manual.
3. Before use, the washer must be properly installed as described in this manual.
4. ALWAYS follow the fabric care instructions supplied by the garment
manufacturer.
5. Do not wash articles that have been previously cleaned in, washed in, soaked in,
or spotted with gasoline, dry-cleaning solvents, other flammable or explosive
substances as they give o vapors that could ignite or explode.
6. Do not allow children to play on or in the appliance. Close supervision of children
is necessary when the appliance is used near children.
7. Before the appliance is removed from service or discarded, remove the lid of the
washing compartment.
8. Do not reach into the appliance if the tub or agitator is moving.
9. Do not install or store this appliance where it will be exposed to the weather or
freezing temperatures.
10. Do not tamper with the controls.
11. Do not repair or replace any part of the appliance or attempt any servicing
unless it is specifically recommended in the user-maintenance instructions or in
published user-repair instructions that you understand and have the skills to carry
out.
12. Do not add gasoline, dry-cleaning solvents, or other flammable or explosive
substances to the wash water. These substances give o vapors that could ignite
or explode.
IMPORTANT SAFETY INSTRUCTIONS
WARNING
When using electrical appliances, basic safety precautions
should be followed, including the following:
READ ALL INSTRUCTIONS BEFORE USING THE UNIT

Page 5
SAFETY INFORMATION
13. Under certain conditions, hydrogen gas may be produced in a hot water system
that has not been used for 2 weeks or more. HYDROGEN GAS IS EXPLOSIVE.
If the hot water system has not been used for 2 weeks or more, before using a
washer or combination washer-dryer, turn on all hot water faucets and let the
water flow from each for several minutes. This will release any accumulated
hydrogen gas. As the gas is flammable, do not smoke or use an open flame
during this time.
14. Keep the area underneath and around your appliances free of combustible
materials (lint, paper, rags, etc.), gasoline, chemicals and other flammable vapors
and liquids.
15. Do not place items exposed to cooking oil in your washer. Items contaminated
with cooking oils may contribute to a chemical reaction that could cause a load to
catch fire.
16. This washer is not designed for maritime use or for mobile installations such as in
RVs, aircraft, etc.
17. Turn o the water faucets and unplug the washer if the machine is to be left for
an extended period of time, such as during vacations.
18. Packaging material can be dangerous for children. There is a risk of suocation!
Keep all package away from children.
19. Always check the inside of the washer for foreign objects before loading laundry.
Keep the lid closed when not in use.
SAVE THESE INSTRUCTIONS
HOUSEHOLD USE ONLY

Page 6
SAFETY INFORMATION
1. Plug the power cord into an AC 120V/60Hz wall socket rated at 15amps or higher.
Use the socket for this washer only.
2. Do not use an extension cord.
- Sharing a wall socket with other appliance, using a power strip, or extending the
power cord may result in electric shock or fire.
- Do not use an electric transformer. It may result in electric shock or fire.
- Ensure that the power voltage, frequency, and current match the product’s
specifications. Failing to do so may result in electric shock or fire.
3. Have this appliance installed by a qualified technician or service company.
- Failing to do so may result in electric shock, fire, explosion, problems with the
product, or injury.
4. Remove all foreign substances such as dust or water from the power plug
terminals and contact points using a dry cloth on a regular basis.
- Unplug the power plug and clean it with a dry cloth.
- Failing to do so may result in electric shock or fire.
5. Plug the power plug into the wall socket in the right direction so that the cord
runs towards the floor.
- If you plug the power plug into the socket in the opposite direction, the electric
wires within the cable may be damaged and this may result in electric shock or
fire.
6. Plug the power plug into the wall socket firmly. Do not use a damaged power
plug, or loosen wall socket.
- This may result in electric shock or fire.
7. Do not pull or excessively bend the power cord.
8. Do not twist or tie the power cord.
9. Do not hook the power cord over a metal object, place a heavy object on the
power cord, insert the power cord between objects, or push the power cord into
the space behind the appliance.
- This may result in electric shock or fire.
10. Do not pull the power cord when unplugging the power plug.
- Unplug the power plug by holding the plug.
- Failing to do so may result in electric shock or fire.
11. If the power plug or power cord are damaged, contact your nearest service
center.
12. Do not install this appliance near a heater or inflammable material.
13. Do not install this appliance in a humid, oily, or dusty location, or in a location
exposed to direct sunlight or water (rain drops).
14. Do not install this appliance in a location where gas may leak.
- This may result in electric shock or fire.
INSTALLATION WARNINGS AND
PRECAUTIONS

Page 7
SAFETY INFORMATION
15. If the washer is moved to a new location, have it checked and re-installed by a
qualified service technician.
- Failing to follow this warning may result in electric shock or fire.
16. Do not install on carpet. Install washer on a level and solid floor that can support
its weight.
- Failing to do so may result in abnormal vibrations, noise, or problems with the
product.
17. The washer is heavy. Two or more people may be needed to install and move the
appliance.
- Failing to do so may result in bodily or other injuries.
18. Store and install the washer where it will not be exposed to temperatures below
freezing or exposed to outdoor weather conditions.
- Failing to do so may result in serious leak damage.
19. Position the appliance so that the power plug is easily accessible.
- Failing to do so may result in electric shock or fire due to electric leakage.
20. To reduce the risk of injury to persons, adhere to all industry recommended safety
glasses.
- Failing to follow all of the safety warnings in this manual may result in property
damage, or injury to persons.
GROUNDING INSTRUCTIONS
This appliance must be grounded. In the event of malfunctionor breakdown,
grounding will reduce the risk of electric shock by providing a path of the last
resistance for electric current. This appliance is equipped with a cord having an
equipment-grounding conductor and a grounding plug. The plug must be plugged
into an appropriate outlet that is properly installed and grounded in accordance with
all local codes and ordinances.
Consult a qualified electrician or serviceman if:
1) The grounding instructions are not completely understood.
2) You are unsure that the appliance is properly grounded.
3) You have any questions about the grounding or electrical instructions.
Do not modify the plug provided with the appliance - if it will not fit the outlet, have a
proper outlet installed by a qualified electrician.
WARNING
Improper use of the grounding plug can result in a risk of electric shock.
WARNING
Improper connection of the equipment-grounding conductor can result in a risk of
electric shock. Check with a qualified electrician or serviceman if you are in doubt as
to whether the appliance is properly grounded.

Page 8
SAFETY INFORMATION
1. If the appliance is flooded, cut the power immediately and contact your nearest
service center.
2. If the appliance emits a strange noise, a burning smell, or smoke, unplug the
power plug immediately and contact your nearest service center.
- Failing to do so may result in electric shock or fire.
3. In the event of a gas leak (such as propane gas, LP gas, etc.), ventilate the area
immediately. Do not turn any appliance or light on or o.
- Do not use a ventilating fan.
- A spark may result in an explosion or fire.
4. Do not wash items contaminated with gasoline, kerosene, benzene, paint thinner,
alcohol, dry cleaning detergent or other flammable or explosive substances.
- This may result in electric shock, fire, or an explosion.
5. Do not force the washer lid open while the washer is operating (hightemperature
washing / drying / spinning).
- Water flowing out of the washer may cause burns or cause the floor to be
slippery. This may result in injury.
- Forcing the lid open can damage the product or cause injury.
6. Make sure to remove the packaging (sponge, styrofoam) attached to the bottom
of the washer before using it.
7. Do not insert your hand or a metal object under the washer.
- This may result in injury.
8. Do not attempt to operate this appliance if it is damaged, malfunctioning,
partially disassembled, or has missing or broken parts, including a damaged cord
or plug.
- This may result in electric shock, fire or death.
9. Do not touch the power plug with wet hands.
- This may result in electric shock.
10. Do not turn the appliance o by unplugging the power plug while the washer is in
operation.
- Plugging the power plug into the wall socket again may cause a spark and result
in electric shock or fire.
11. Keep all packaging material well out of the reach of children, as packaging
materials can be dangerous to children.
- If a child places a bag over its head, it may suocate.
12. Do not let children or inrm persons use this washer unsupervised.
- Failing to do so may result in electric shock, burns or injury.
USAGE AND MAINTENANCE
WARNINGS

Page 9
SAFETY INFORMATION
13. Do not attempt to repair, disassemble, or modify the appliance yourself.
- Do not use any fuse (such as cooper, steel wire, etc.) other than the standard
fuse.
- If you need to repair or reinstall the appliance, contact your nearest service
center.
- Failing to do so may result in electric shock, re, problems with the product, or
injury.
14. If any foreign substance such as water enters the appliance in any area other than
the tub, unplug the power plug and contact your nearest service center.
- Failing to do so may result in electric shock or re.
15. If the water supply hose comes loose from the faucet and oods the appliance,
unplug the power plug.
- Failing to do so may result in electric shock or re.
16. Do not mix chlorine bleach with ammonia or acids such as vinegar.
- Incorrect usage can produce poisonous gas, result in serious injury.
17. Do not reach into the washer while parts are moving. Before loading, unloading,
or adding items, press the START/PAUSE button and allow the basket to come
to complete stop before reaching inside.
- Failing to do so may result in electric shock, injury or re.
18. Do not allow children to play on or in the washer. Close supervision of children is
necessary when the washer is used near children. As children grow, teach them
the proper, safe use of all appliances.
- Failing to do so may result in serious injury to persons.
19. Keep laundry products out of children’s reach. Observe all warnings on product
labels and follow to do.
- Failing to do so may result in serious injury to persons.
20. Disconnect this appliance from the power supply before attempting any user
maintenance. Turning the controls to the OFF position does not disconnect this
appliance from the power supply.
- Failing to do so may result in electric shock, injury or re.
21. Do not clean the appliance by spraying water directly onto it.
22. Do not use benzene, thinner, or alcohol to clean the appliance.
- This may result in discoloration, deformation, damage, electric shock or re.

Page 10
SAFETY INFORMATION
1. Unplug the power plug when the appliance is not being used for long periods of
time or during a thunder/lightning storm.
- Failing to do so may result in electric shock or re.
2. Keep hands and foreign objects clear of the lid and latch area when closing the
lid.
- Failing to do so may result in personal injury.
3. If the washer is contaminated by a foreign substance such as detergent, dirt, food
waste, etc., unplug the power plug and clean the washer with a damp, soft cloth.
- Failing to do so may result in discoloration, deformation, damage or rust.
4. The clear portion of the lid can be broken by a strong impact. Take care when
using the washer.
- If the clear portion is cracked or broken, it may result in injury.
5. After a water supply failure or when reconnecting the water supply hose, open
the faucet slowly.
6. Open the faucet slowly after a long period of non-use.
- The air pressure in the water supply hose or the water pipe may result in
damage to a part or in water leakage.
7. If a drain error occurs during an operation, check if there is a draining problem.
- If the washer is used when it is ooded because of a draining problem, it may
result in electric shock or re due to electric leakage.
8. Do not insert your hand or a metal object under the washer.
- This may result in injury.
9. Insert the laundry into the washer completely so that laundry does not get
caught in the lid.
- If laundry gets caught in the lid, it may result in damage to the laundry or the
washer, or result in water leakage.
10. Ensure that the faucet is turned off when the washer is not being used.
- Ensure that the water supply hose connectors are properly tightened.
- Failing to do so may result in property damage or injury.
11. Open the faucet and check if the water supply hose connector is rmly tightened
and that there is no water leaking before using the product.
- If the water supply hose connectors are loose, it may result in water leakage.
12. Do not stand on top of the appliance or place objects (such as laundry, lighted
candles, lighted cigarettes, dishes, chemicals, metal objects, etc.) on the
appliance.
- This may result in electric shock, re, problems with the product, or injury.
13. Do not operate the appliance with wet hands.
- This may result in electric shock.
USAGE AND MAINTENANCE
CAUTIONS

Page 11
SAFETY INFORMATION
14. Do not spray volatile material such as insecticide onto the surface of the
appliance.
- As well as being harmful to humans, it may also result in electric shock, re, or
problems with the product.
15. Do not place an object that generates an electromagnetic eld near the washer.
- This may result in injury due to a malfunction.
16. Since the water drained during a high temperature wash or drying cycle is hot, do
not touch the water.
- This may result in burns or injury.
17. Do not wash, spin, or dry water-proof seats, mats, or clothing.
- Do not wash thick, hard mats even if the washer mark is on the care label.
- This may result in injury or damage to the washer, walls, oor, or clothing due to
abnormal vibrations.
18. Do not operate the washer when detergent dispenser is removed.
- This may result in electric shock or injury due to water leakage.
19. Do not insert your hand into the detergent dispenser after opening it.
- This may result in injury as your hand may be caught.
20. Do not place any non-laundry objects, such as shoes, food waste, or animals into
the washer.
- This can cause abnormal vibrations that can damage the washer, and, in the
case of pets, cause severe injury or death.
21. Do not press the buttons using sharp objects such as pins, knifes, ngernails, etc.
- This may result in electric shock or injury.
22. Do not wash laundry contaminated by oils, creams, or lotions usually found in
skincare shops or massage clinics.
- This may result in the rubber seal becoming deformed and water leakage.
23. Ensure that the water inlet pipe is connected and the tap is opened before
washing clothes.
24. Do not leave metal objects (safety pins, hair pins, etc.) or bleach in the tub for
long periods of time.
- This may cause the tub to rust.
- If rust appears on the surface of the tub, apply a neutral cleansing agent to the
surface and use a sponge to clean it. Never use a metal brush.
25. Do not use hot water from water cooling/heating devices.
- This may result in problems with the washer.
26. Do not use natural hand-washing soap in the washer.
- If it hardens and accumulates inside the washer, it may cause problems with the
product, discoloration, rust, or bad odors.
27. Do not wash large laundry items such as bedding in the washing net.
- Failing to do so may result in injury due to abnormal vibrations.
- Place smaller items, such as lace socks and lingerie in the washing net.
28. Do not use hardened detergent.
- If it accumulates inside the washer, it may result in water leakage.
29. Do not wash throw rugs or doormats.
- If you wash throw rugs or doormats, the sand will accumulate inside the washer.
- It may result in error such as no draining.
Page 12
SAFETY INFORMATION
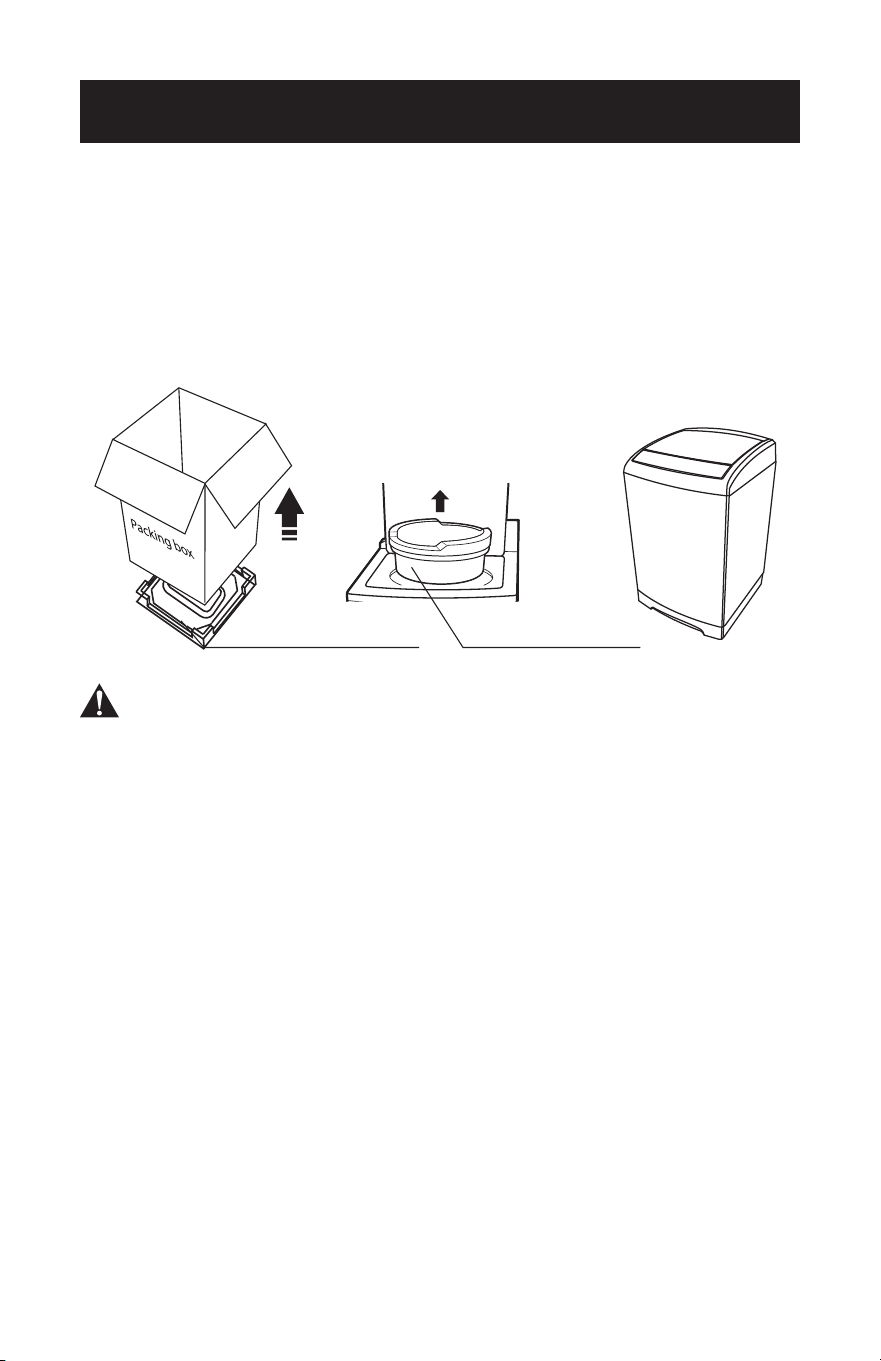
UNPACKING AND REMOVING SHIPPING
MATERIAL
Remove the packing box and lift the washer up and away from the foam base
cushion. Open the lid of washer to take out all accessories including protection foam.
Packaging materials can be dangerous to children; Keep all packaging material
(plastic bags, polystyrene, etc.) well out of children’s reach. Do not operate
this appliance on the foam base cushion. Failing to do so will result in serious
vibration.
Foam base cushion
Protection foam
Page 13
SET UP & USE
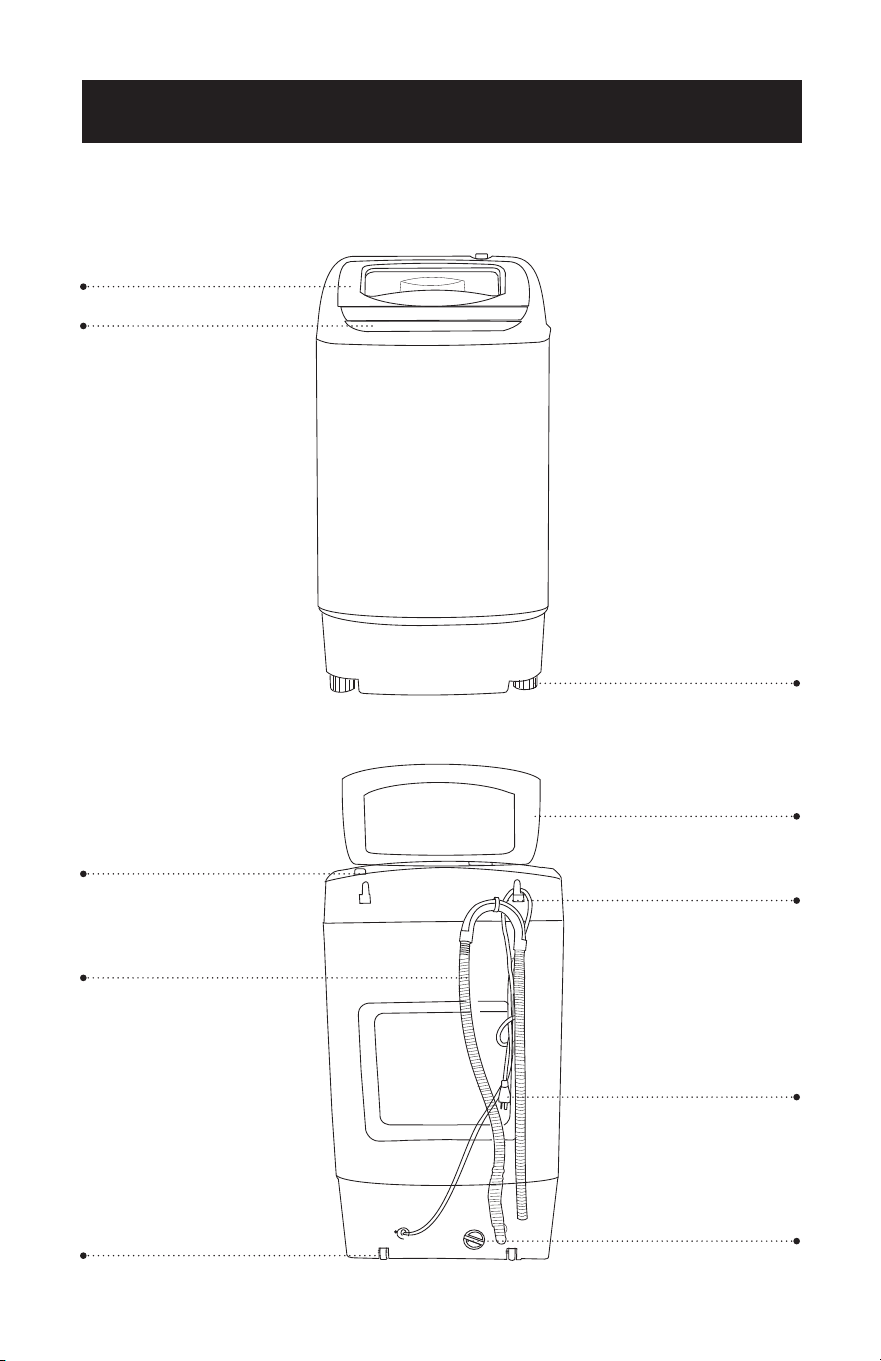
PARTS & FEATURES
Top lid
Control panel
Adjustable Legs
Top lid
Power cord
Pump filter
Cold water inlet
Drain hose
Rollers
Power cord wrap
Page 14
SET UP & USE
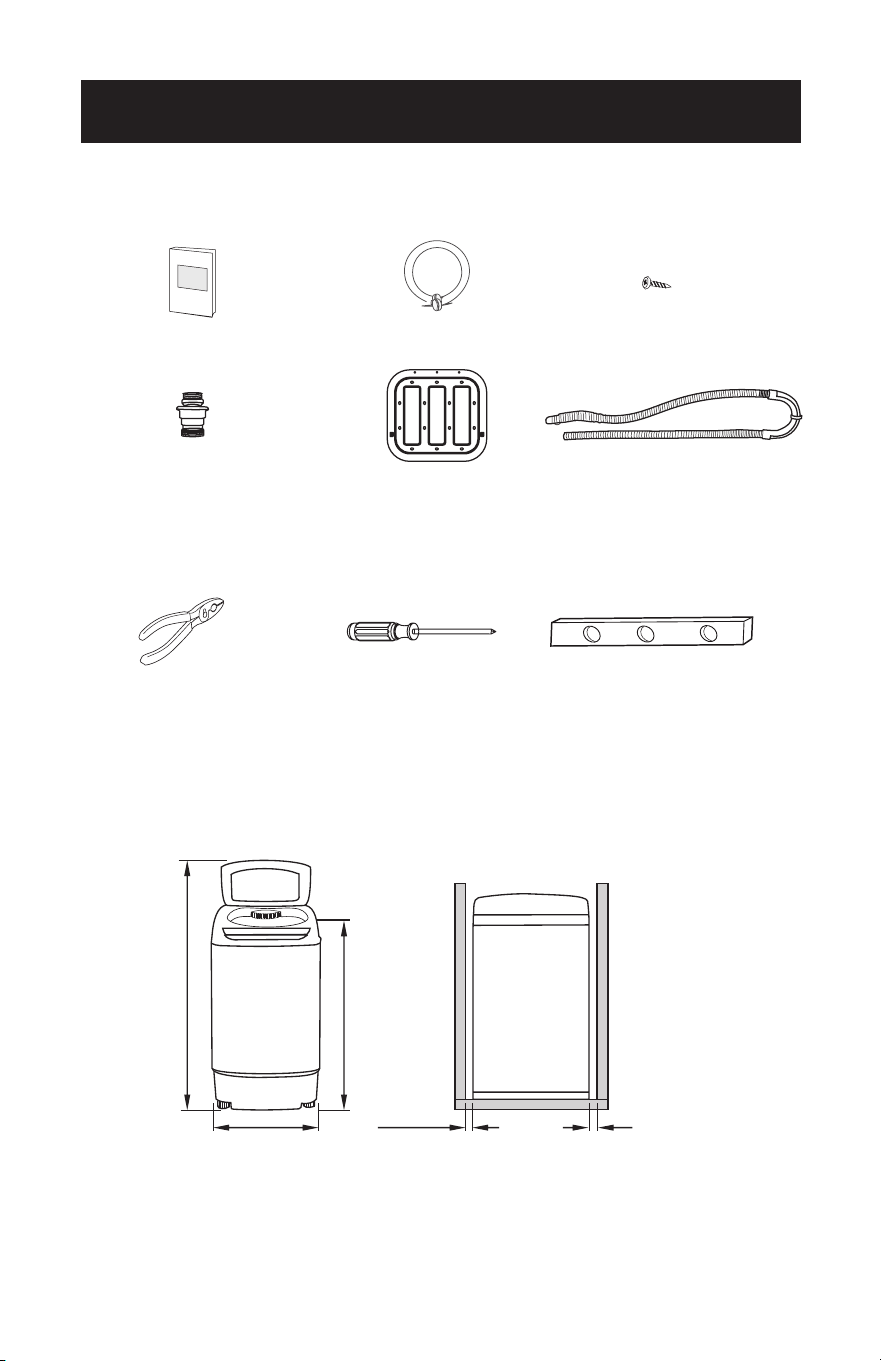
ACCESSORIES
TOOLS NEEDED IN INSTALLATION
KEY DIMENSIONS AND SPECIFICATIONS
Owner's manual Water supply hose
Quick connection adaptor
Bottom cover Drain hose
Bottom cover screw
LevelAdjustable pliers
or spanner wrench
Phillip screwdriver
17.7in.
450mm
26.8in.
680mm
41.3in.
1050mm
min 1in.
25mm
min 1in.
25mm
Owner's manual Water supply hose
Quick connection adaptor
Bottom cover Drain hose
Bottom cover screw
LevelAdjustable pliers
or spanner wrench
Phillip screwdriver
17.7in.
450mm
26.8in.
680mm
41.3in.
1050mm
min 1in.
25mm
min 1in.
25mm
Owner's manual Water supply hose
Quick connection adaptor
Bottom cover Drain hose
Bottom cover screw
LevelAdjustable pliers
or spanner wrench
Phillip screwdriver
17.7in.
450mm
26.8in.
680mm
41.3in.
1050mm
min 1in.
25mm
min 1in.
25mm

Page 15
SET UP & USE
CHOOSE THE PROPER LOCATION
FLOORING
For best performance, you must install your washer on a solidly constructed floor. Wood
floors may need to be reinforced to minimize vibration and/or unbalanced load situations.
- Carpeting and soft tile surfaces are contributing factors to vibration which can cause
your washer to move slightly during the spin cycle.
Do not install your washer in areas where water may freeze, since your washer
will always retain some water in its water valve, pump, and hose areas. Frozen
water can damage the belts, the pump, hoses, and other components. Never
install on a platform or weakly supported structure.
ELECTRIC
Use 120Volt 60Hz 15 Amps fuse or circuit breaker. Individual branch circuit serving
only for your washer is recommended.
Never use an extension cord.
GROUNDING
Electrical grounding is required for this washer.
This appliance must be grounded. In the event of malfunction or breakdown,
grounding will reduce the risk of electric shock by providing a path of least resistance
for electric current. This appliance is equipped with a power cord having a three-
prong grounding plug for use in a properly installed and grounded outlet. The plug
must be plugged into an appropriate outlet that is properly installed and grounded in
accordance with all local codes and ordinances.
An improperly connected equipment-grounding conductor can increase the
risk of electrical shock. Check with a qualified electrician or serviceman if you
are not sure whether the appliance is properly grounded. Do not modify the
plug provided with the appliance. If it does not fit the outlet, have a proper
outlet installed by a qualified electrician. To prevent unnecessary risk of fire,
electrical shock or personal injury, all wiring and grounding must be done
in accordance with the National Electrical Code ANSI/FNPA, No.70 Latest
Revision and local codes and ordinances. It is the personal responsibility of the
appliance owner to provide adequate electrical service for this appliance.
Never connect the ground wire to plastic plumbing lines, gas lines, or hot water
pipes.
Page 16
CHOOSE THE PROPER LOCATION
WATER
To correctly fill your washer in the proper amount of time, water pressure of 14 to
70psi (100 to 500 kPa) is required. Water pressure less than 14psi may cause water
valve failure, or may not allow the water valve to shot o completely, or may extend
the fill time beyond what your washer controls allow, causing your washer to turn o
and alarm error. A time limit is built into the controls to prevent flooding in your home
if a hose becomes loose.
The water faucet must be within 4 feet / 122cm of the back of your washer to match
the inlet hoses provided with your washer.
To avoid the possibility of water damage:
- Operate with cold water only.
- Have water faucets easily accessible.
- Turn o faucets when the washer is not in use.
- Periodically check that there is no leakage from the water inlet hose fittings.
DRAIN FACILITY
The recommended height of the standpipe is 35in. or 90cm. The drain hose must
be routed through the drain hose clip to the standpipe. The standpipe must be large
enough to accept the outside diameter of the drain hose.
INSTALL YOUR WASHER
Before installing, make sure there are rubber gaskets inside the
fittings at both ends of the water supply hoses.
If there are no water inlet hoses packed with the washer or if the
hoses are damaged, Call the Customer Satisfaction Center at
1-844-299-0879. Installing the water supply hoses without rubber
gaskets can cause water leakage. When you initially install the
washer, be sure to use new hoses. Failing to do so may result in
a water leakage or overflow and may damage your property. If a hose
is too short, replace the hose with a longer, high pressure hose.
Step 1: Move your washer to selected position
Tilt the unit back onto its rear rollers and push it forward as shown in the figure below.
Move the unit to a location as described in the previous Choose the Proper Location
section.
Make sure the location has a hard, level
surface without carpeting. There should
be no direct sunlight. Do not expose the
unit to freezing temperatures
(under 32° F or 0° C).
SET UP & USE
Coupling
Rubber
gasket
Front of the
washer
Back of the
washer
O
60~70
Page 17
SET UP & USE
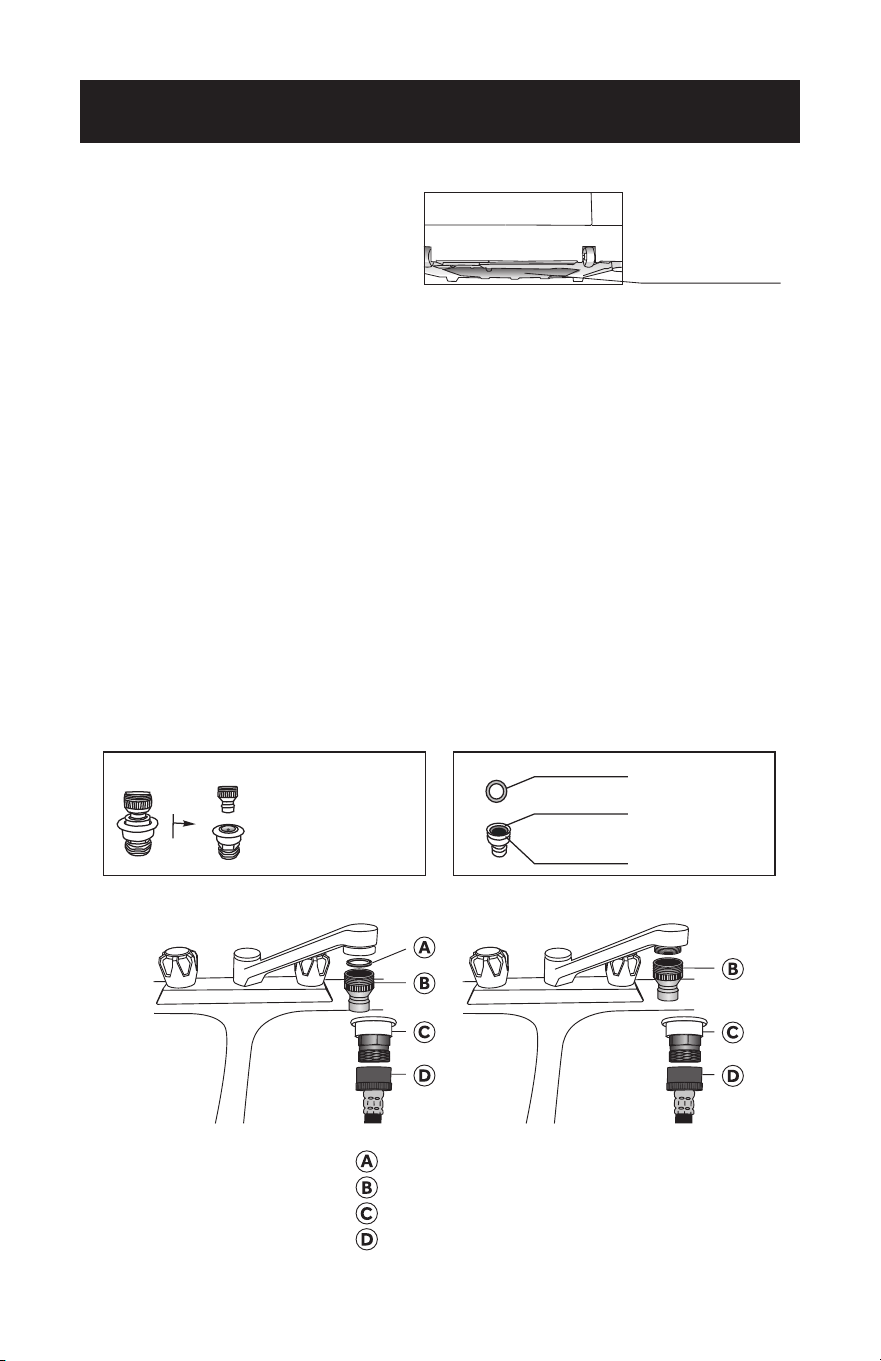
Step 2: Install the Bottom Cover
Slide the bottom cover into the slots
on bottom surface of the unit as in the
following figure, and fix it with two
screws attached with the unit.
Step 3: Connect the water hose
TEMPORARY CONNECTION
• The Quick Connection Adaptor is primarily for quick connection to a single faucet,
such as a typical kitchen sink, in cases where the washer is stored in a dierent
place than where it is used. (Skip this step if you are connecting the washer to a
sink with separate hot and cold faucets. See PERMANENT INSTALLATION section
below.) The adaptor consists of two parts that quickly connect or disconnect. One
part, the faucet fitting, is for connection to the faucet and the other part, the hose
fitting, connects to the COLD water hose of the washer.
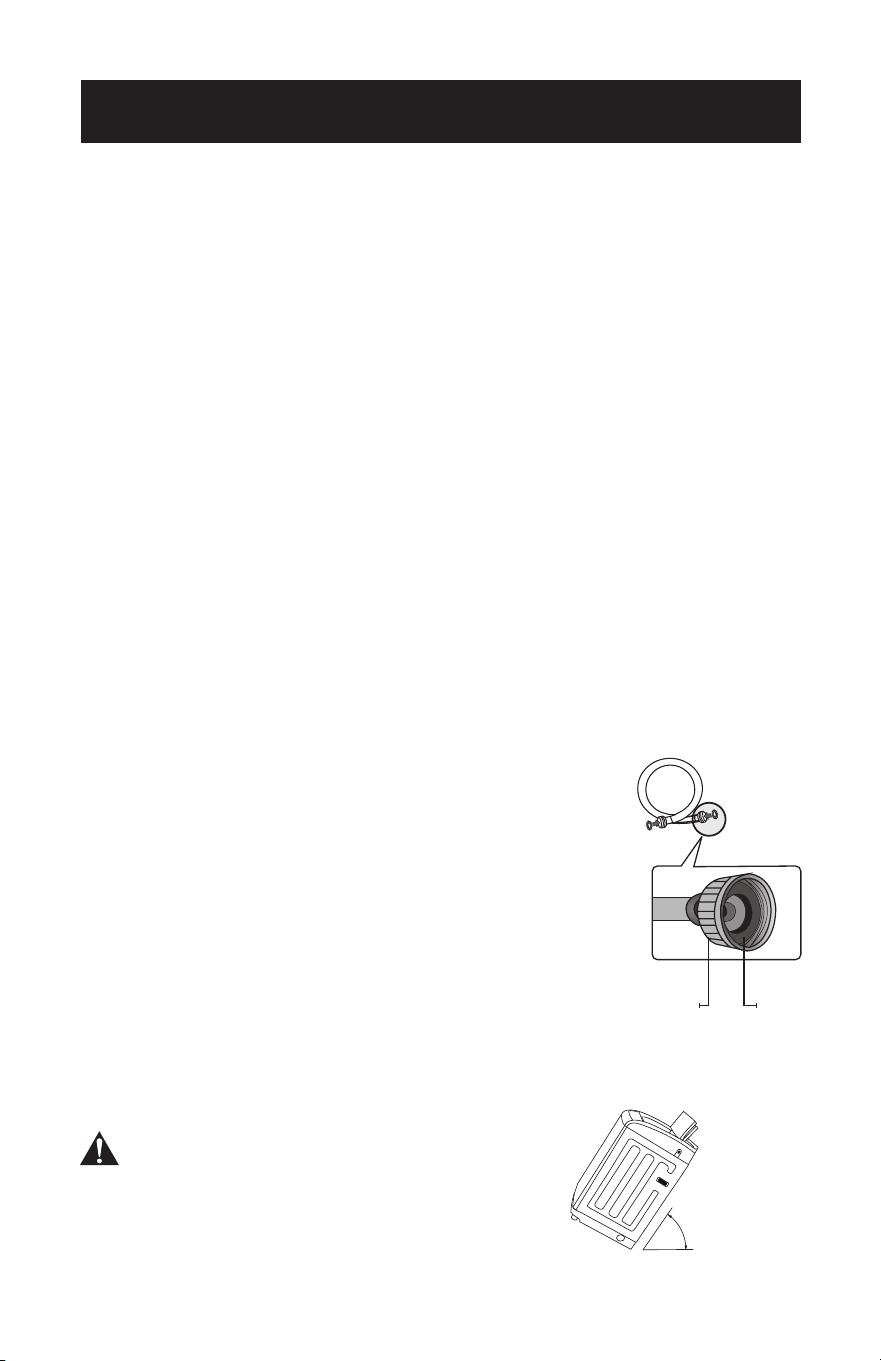
- Pull back on the white ring to free the faucet fitting from the adaptor for installation
into the faucet.
- Screw the end of the COLD water hose onto the base of the hose fitting.
- If the faucet has internal screw threads, unscrew the aerator if present from the tip
of the faucet. Then screw the faucet fitting into the faucet. Make sure that the black
rubber gasket is on the top of the adaptor before screwing it in.
- If the faucet has external screw threads, remove the gasket from the top of the
faucet fitting, and screw the fitting over the external threads.
- Pull back on the white ring to connect the two parts of the adaptor back together.
NOTE: When connected to a single faucet that can dispense either hot or cold
water, both hot and cold water can be run through the cold water line.
It is recommended to ONLY run COLD water washes with this machine.
Bottom Cover
Pull down on the white ring
to divide the adaptor into
two parts.
Top part: Faucet fitting
Bottom part: Hose fitting
Rubber gasket
Inner threads for outer threaded faucet.
Outer threads for inner threaded faucet
Cold
Internal Threads External Threads
Rubber Washer
Faucet Connector
Quick Connection Adaptor
Water Inlet Hose
Page 18
PERMANENT CONNECTION
• Connect the ends of the water supply hose to the COLD faucet.
• Tighten the fittings by hand until they are snug, and then tighten them an additional
two-thirds of a turn with a wrench/pliers.
When you fasten the fitting, do not fasten it too tightly or apply tape or
sealant to the faucet or water supply intake. This can damage the fitting. After
you have connected the water supply hose to the faucet, ensure that it is
connected securely by pulling the water supply hose downwards.
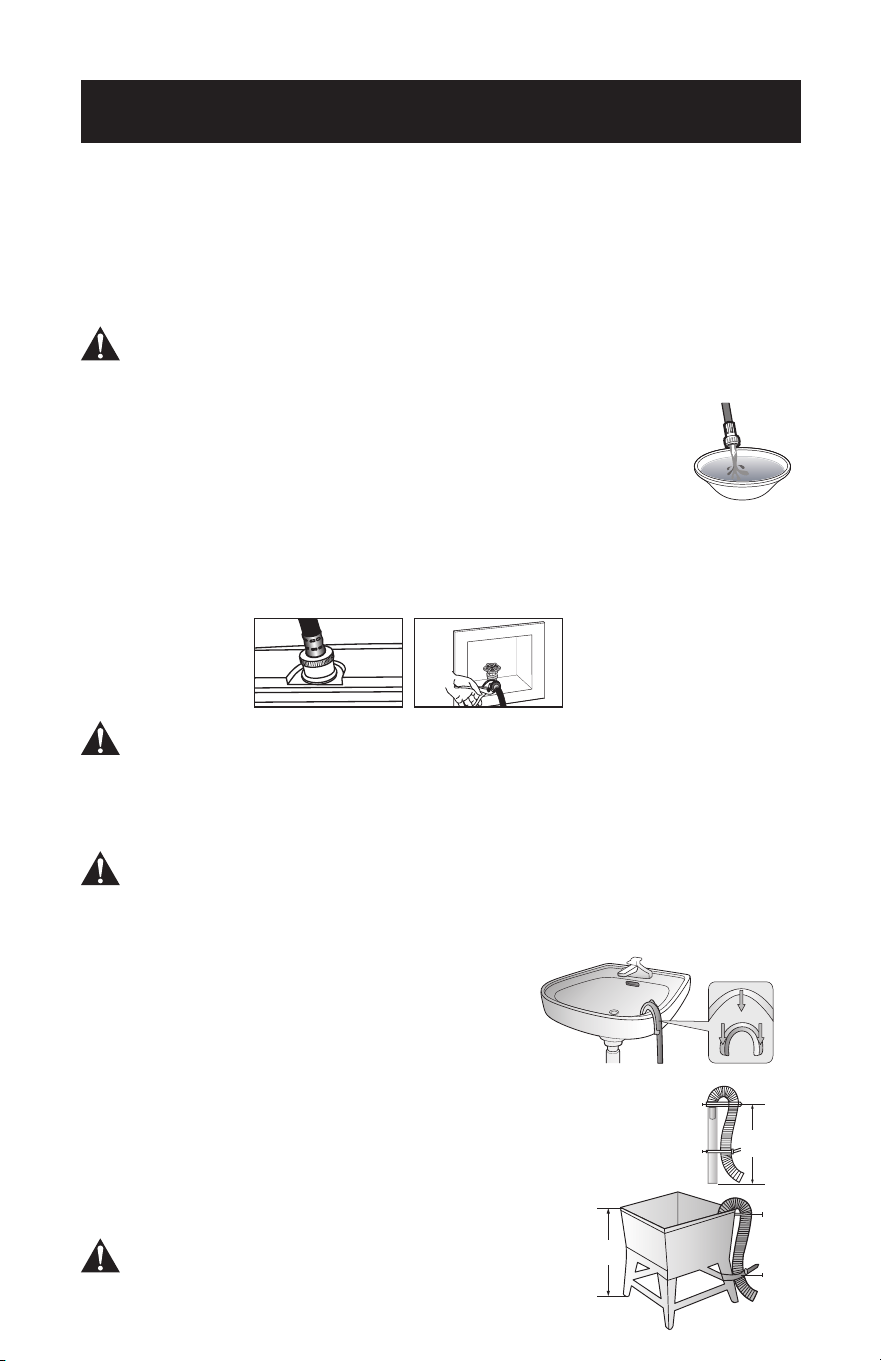
• Place the unconnected end of the hose into a bucket and open
the faucet connected to the water supply hose for 10 or 15
seconds to remove any foreign substances from the hose. Close
the faucet before continuing.
• Connect the end of the water supply hose to the water supply intake connection at
the top of the washer.
The hose connected to the COLD water source must be connected to the
COLD water supply intake.
• Tighten the fitting by hand until it is snug, and then tighten them an additional
two-thirds of a turn with a wrench/pliers.
Confirm that the water supply hose is not twisted or bent. If the hose is twisted
or bent, the hose can leak and cause electric shock due to the water leakage.
To ensure correct water usage, connect the COLD water faucet only.
• Turn on the COLD water supply and check all the water supply intake connections
and the faucet for water leaks.
Step 4: Connect the drain hose
Position the other end of the drain hose. It can be
positioned in three ways.
A. Over the edge of a wash basin. Secure the guide
to the side of the basin wall with a hook or to the
tap with a piece of string to prevent the drain
hose from moving.
B. In a standpipe The standpipe must be no shorter
than 32 in. (81cm) and no longer than 39 in. (100cm).
C. In a laundry tub. The laundry tub must be no shorter
than 32 in. (81cm) and no higher than 39 in. (100cm).
Make sure that the connection between the
drain hose and the wash basin, standpipe or
laundry tub is not airtight.
SET UP & USE
Cold
Pull down on the white ring
to divide the adaptor into
two parts.
Top part: Faucet fitting
Bottom part: Hose fitting
Rubber gasket
Inner threads for outer threaded faucet.
Outer threads for inner threaded faucet
Cold
Standpipe
Hose
Retainer
Tie
strap
39 in. Max
32 in. Min
Laundry tub
Hose
Retainer
Tie
strap
39 in. Max
32 in. Min
Cold
Pull down on the white ring
to divide the adaptor into
two parts.
Top part: Faucet fitting
Bottom part: Hose fitting
Rubber gasket
Inner threads for outer threaded faucet.
Outer threads for inner threaded faucet
Cold
Water Inlet
Connection
Cold Water Source
Connection
Page 19
SET UP & USE
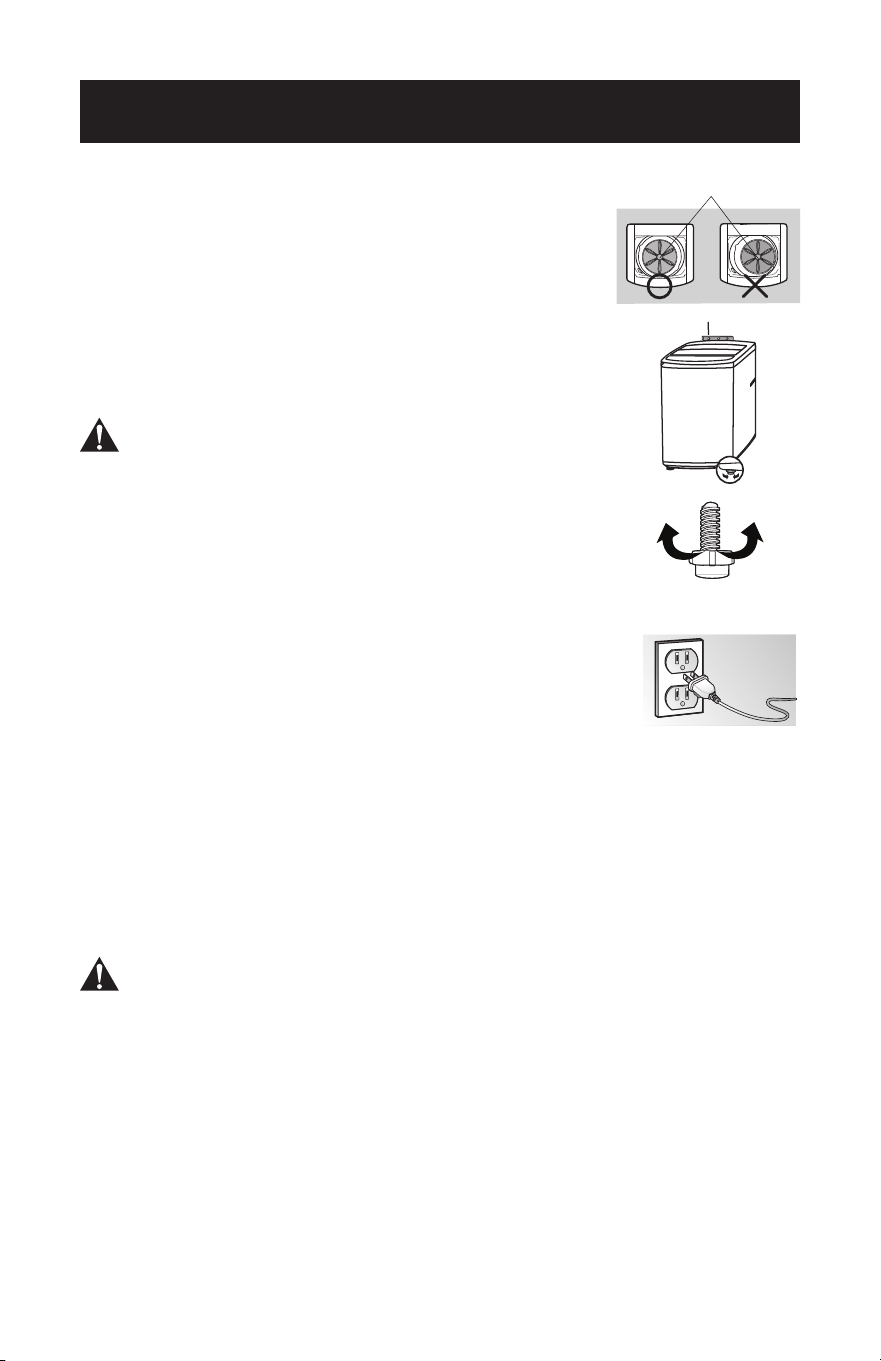
Step 5: Leveling your washer
See if the washer is level by checking the position of the tub
or using a leveling gauge.
1. Slide the washer into position.
2. Open the lid of the washer, and pour the water into the tub
to just below the pulsator level.
3. If the washer is level, the pulsator is positioned at the center
of the washer as shown in the figure above right. If not, level your
washer by turning the front leveling feet clockwise or
counterclockwise as necessary.
There is ONLY ONE adjustable leg as right figure
on this washer.
Step 6: Powering your washer
Plug the power cord into a 3-prong, well grounded 120 volt 60 Hz
approved electrical outlet protected by a 15-amp fuse or
comparable circuit breaker. Your washer is grounded through
the third prong of the power cord when plugged into a 3-prong
grounded electrical outlet.
Step 7: Running a test cycle
Run a test cycle as follows to check if your washer is properly installed.
1. Load about 3.5 pounds of laundry into the tub.
2. Press the Power button to turn on your washer.
3. Select the Rinse+Spin cycle as per guide on page 23.
4. Press the Start/Pause button to start the test cycle.
5. The washer should not rock or vibrate excessively when water is supplied or when
washing or spinning, and should drain well during the spin cycle.
If water leaks while water is being supplied or drained, check the water
connections. If the washer rocks and vibrates excessively, level your washer
again.
Step 8: Storing your washer
If you want to store your washer at another location, unplug it, drain any remaining
water from the drain pipe and hook the pipe onto the back of the washer. Disconnect
the water inlet hoses from the faucets and move washer to new location.
loosen lock
Adjustable legs
Leveling gauge
Pulsator

Page 20
CONTROL PANEL
1. Program
Press this button to select your desired washing program.
Heavy (light) Rapid (light)
Gentle (light) Soak (light)
Normal (light)
2. Load Size
Press this button to set your washing load size. Your water level throughout all
steps in the cycle.
3. Wash
Press the button to select the washing time.
4. Digital Display
The digital display will show and count down the wash cycle selected.
5. Rinse
Press the button to select the times of rinse.
6. Spin
Press the button to select the time of spin.
7. START/PAUSE
Press the START PAUSE / button once to the start the wash cycle. Press the button
during operation to pause the cycle. Press again to continue the cycle.
8. ON/OFF
Press the button once to turn ON the power of ON/OFF the washer. Press again to
turn OFF the unit.
SET UP & USE
Wash
Rinse
Spin
Start/Pause
ON/OFF
min/times
Program
Load Size
preset
Remain
(min)
1----small
2----medium
3----large
1 2 3 4 5 6 7 8
Page 21
SET UP & USE
WASHING A LOAD OF LAUNDRY
Operate with cold water only.
Step 1: Power on your washer
Press the ON/OFF button to power your wash on.
Step 2: Load your washer
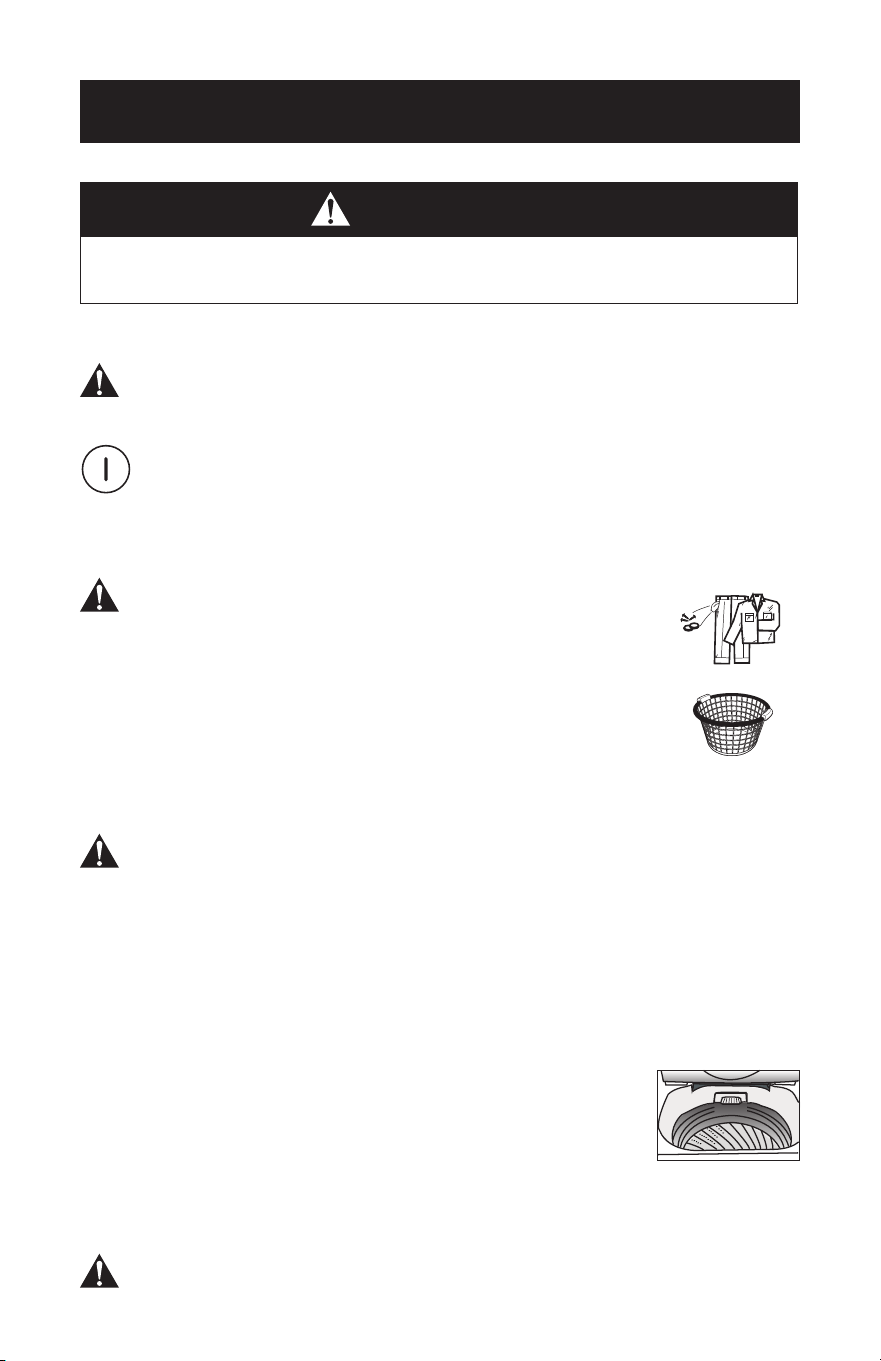
Before loading your laundry, be sure to take out coins, keys
and other hard objects, and close all zippers to prevent the
clothes from damage.
Sort laundry by fabric type, soil level, color and load size as needed.
Refer to the Fabric Care Chart in the APPENDIX. You can fill the tub
with dry, unfolded clothes ,but DO NOT OVERLOAD the tub. Load
the tub no more than 3/4 full.
To ensure good cleaning results do not overload the tub, especially when washing
heavily soiled loads. Never load the tub more than 3/4 full.
Overloading may reduce washing eciency, cause excess wear, and possibly
cause creasing or wrinkling of items in the load.
NOTE: To add a forgotten item:
1. Press the START/PAUSE button to pause the washer.
2. Wait for the tub to stop turning, then open the door.
3. Add the item, close the door, and then press the START PAUSE button. The cycle
will resume.
Step 3: Add detergent
This washer is designed for high eciency (HE) detergent only.
Add the recommended amount of detergent directly into basket
before starting your washer. the. The normal amount of detergent
to use is 1/4 to 1/2 of the maximum amount recommended by the
detergent manufacturer. Always reduce the amount of detergent
if the load is small or lightly soiled, or if your water is very soft . Never use more than
the maximum amount recommended by the detergent manufacturer.
Never pour any liquid bleach directly onto the load. It can cause fabric damage,
such as weakening of cloth fibers or color loss.
ON/OFF
Program
Wash
Rinse
Spin
min/times
Load Size
preset
Remain
(min)
1---- sma ll
2----medium
3---- lar ge
Wash
Rinse
min/times
Load Size
preset
Remain
(min)
1---- sma ll
2----medium
3---- lar ge
Wash
Spin
min/times
Load Size
preset
Remain
(min)
1---- sma ll
2----medium
3---- lar ge
Rinse
Spin
min/times
Load Size
preset
Remain
(min)
1---- sma ll
2----medium
3---- lar ge
Wash
Rinse
Spin
WARNING
To reduce the risk of electric shock, or injury to persons, read the
important safety instructions before operating this appliance.
Page 22
SET UP & USE
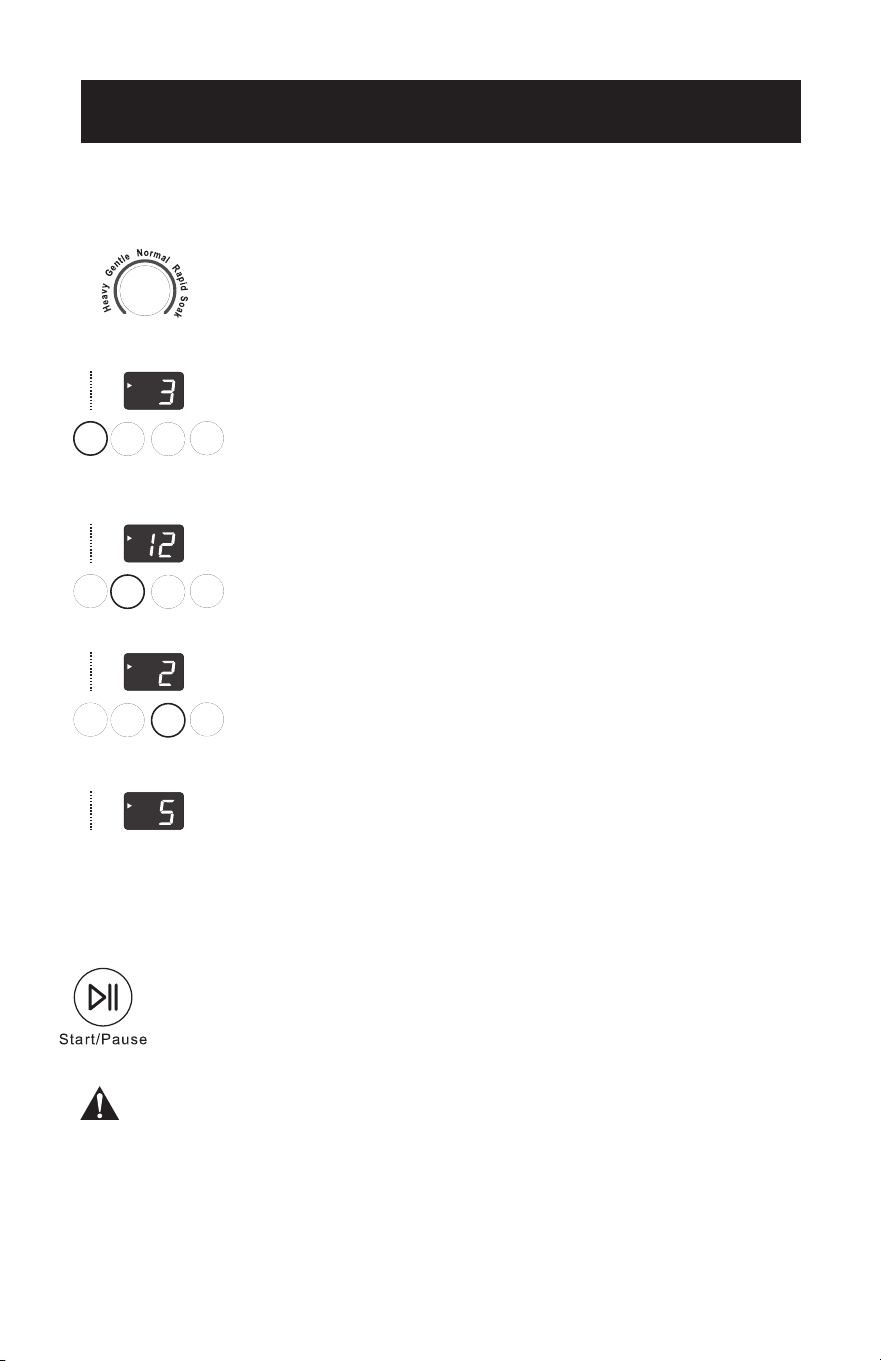
Step 4: Select your desired cycle and options
First, select your desired washing program.
Heavy (Light) Rapid (Light)
Gentle (Light) Soak (Light)
Normal (Light)
Second, select the water level based on a High, Medium or Low
load size. Press the load size button to change the water level
setting.
3--Large
2--Medium
1--Small
Third, user can freely select any combination among WASH,
RINSE and SPIN modes according to the dirty degree of clothes.
Detail operation methods are following: Continuously pressing the
washing button to select washing time. (1~20 minutes, or no wash
process)
Continuously pressing the rinse button to select rinse times.
(1~3 times, or no rinse process)
Continuously pressing the spin button to select the spin time.
(3~9 minutes or no spin process)
Step 5: Start the cycle
Press the START/PAUSE button to start the washing cycle. When the
washing cycle begins, the Estimated Time in minutes for the cycle to
complete will show and count down in the digital display. Or, if Delay Start
is set, the display will count down the hours until the cycle begins, and then
change to a minute countdown for the cycle.
When the washer is running, you should pause the program and wait for the
basket stopped completely before you open the door.
Program
Wash
Rinse
Spin
min/times
Load Size
preset
Remain
(min)
1---- sma ll
2----medium
3---- lar ge
Wash
Rinse
min/times
Load Size
preset
Remain
(min)
1---- sma ll
2----medium
3---- lar ge
Wash
Spin
min/times
Load Size
preset
Remain
(min)
1---- sma ll
2----medium
3---- lar ge
Rinse
Spin
min/times
Load Size
preset
Remain
(min)
1---- sma ll
2----medium
3---- lar ge
Wash
Rinse
Spin

Page 23
RINSE & SPIN CYCLE GUIDE
Energy eciency test program
“Normal” program is the most suitable program to wash soiled cotton or linen
clothes and is the most ecient program in terms of combined energy and water
consumption for washing that type of laundry.
SET UP & USE
Program
Load Size
Soak
time
(approx.)
Wash
Time
(approx.)
Rinse
Times
Final
Spin
Time
Total
Time
Default Scope
Normal Large
Sm – 12 min 1 5 min 31 min
Med – 12 min 1 5 min 31 min
Lg – 12 min 1 15 min 41 min
Heavy Large Sm, Med, Lg – 12 min 2 5 min 41 min
Gentle Large Sm, Med, Lg – 15 min 3 3 min 52 min
Rapid Large Sm, Med, Lg – 3 min 1 2 min 19 min
Soak Large Sm, Med, Lg 13 min 4 min 2 2 min 39 min
Page 24
CARE AND CLEANING
CLEANING AND MAINTENANCE
Cleaning the exterior
Turn o the water faucets after finishing the day’s washing.
This will shut o the water supply to your washer and prevent the unlikely
possibility of damage from escaping water.
Leave the lid open to allow the inside of your washer to dry out.
Use a soft cloth to wipe up all detergent, bleach or other pills as they occur.
Clean the following as recommended:
Control Panel - Clean with a soft, damp cloth. Do not use abrasive powders
or pads. Do not spray cleaners d cleaning irectly onto the panel.
Cleaning the interior
Clean the interior of your washer periodically to remove any dirt, soil, odor, mold,
mildew, or bacterial residue that may remain in your washer as a result of washing
clothes.
Failure to follow these instructions may result in unpleasant conditions,
including odors and/or permanent stains on your washer or laundry .Hard water
deposits may be removed, if needed. Use cleaners labeled “Washer safe”.
Tub clean
Run an Rapid cycle with some bleach every month to clean the tub.
This will also help to remove mold which may occur inside the washer.
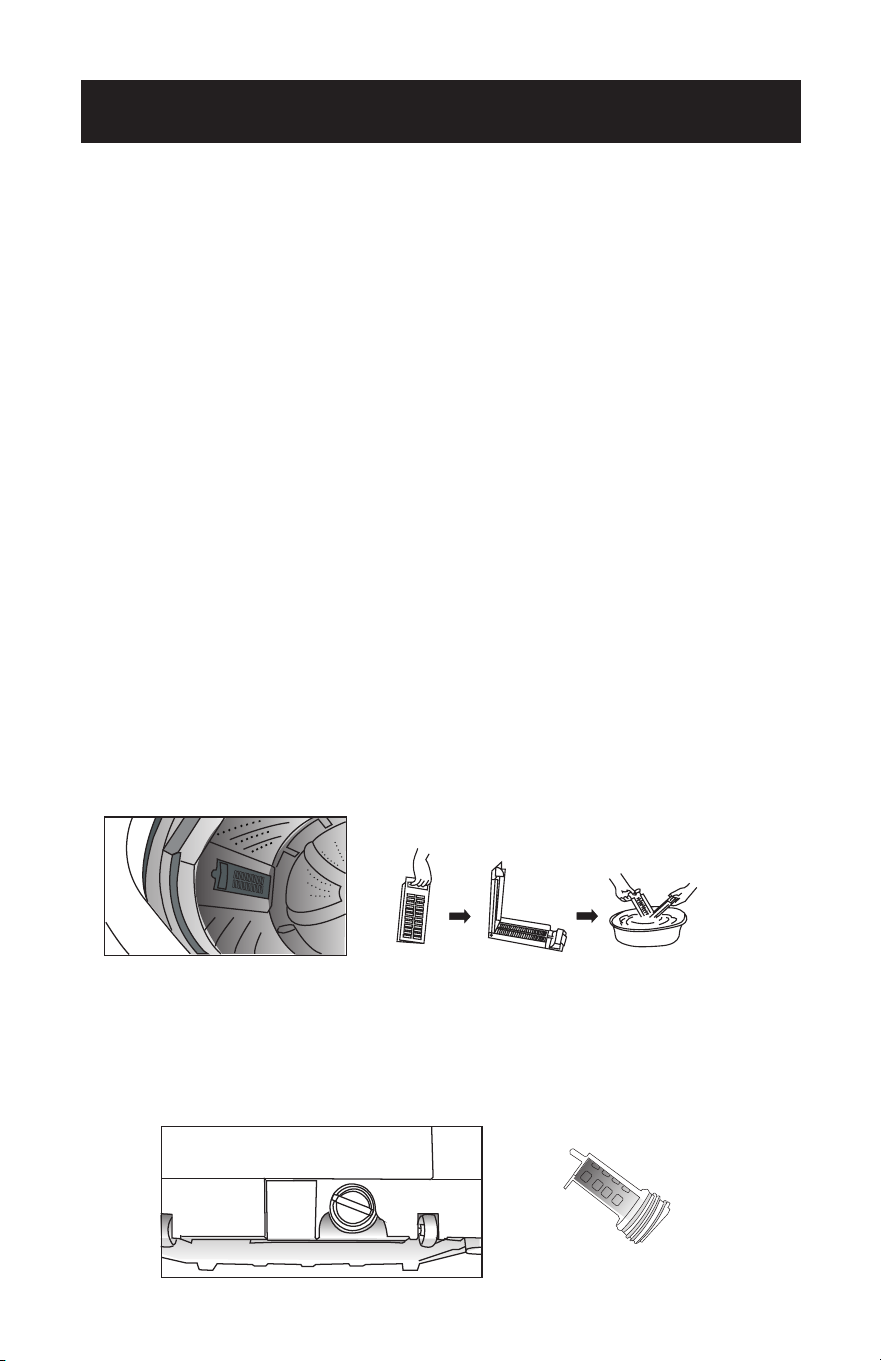
Lint filter clean
There is a built-in lint filter in your washer. It can help to collect lint during
washing cycle.
It is suggested to clean the lint filter every 10 cycles.
Take it out and clean the filter with water. Then place it back into the washer.
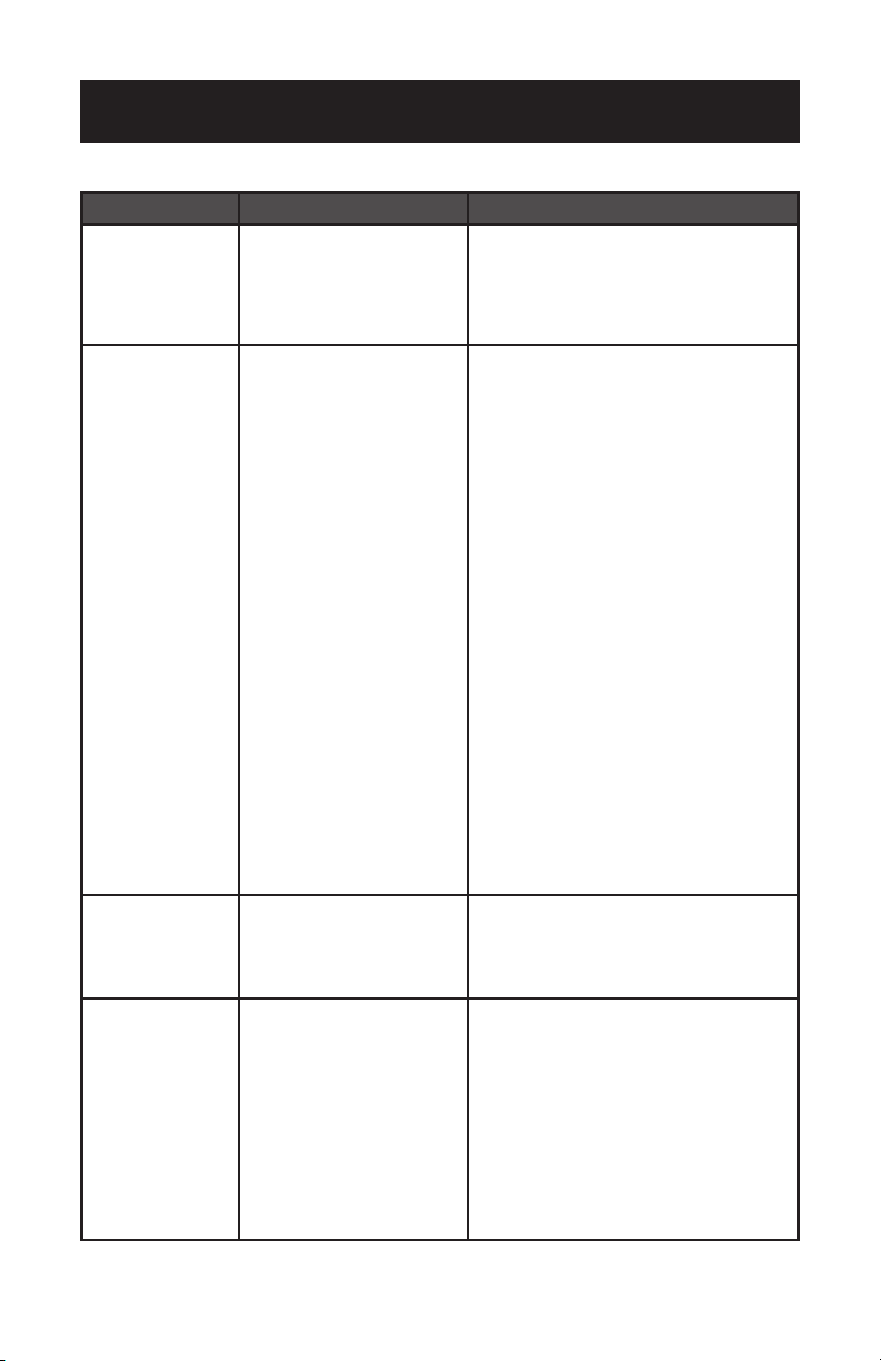
Pump filter clean
There is a built-in Pump filter in your washer. It can help to protect the pump
during washing cycle.
It is suggested to clean the lint filter every once every month.
It is suggested to clean the pump filter once every month.
Take the filter out and clean it with water. Then place it back into the washer.

Page 25
TROUBLESHOOTING & WARRANTY
BEFORE YOU CALL FOR SERVICE
IF THE UNIT FAILS TO OPERATE:
A) Check to make sure that the unit is plugged in securely. If it is not, remove the plug
from the outlet, wait 10 seconds and plug it in again securely.
B) Check for a blown circuit fuse or a tripped main circuit breaker. If these seem to be
operating properly, test the outlet with another appliance.
IF NONE OF THE ABOVE SOLVES THE PROBLEM, CONTACT OUR CUSTOMER
SATISFACTION CENTER. DO NOT TRY TO ADJUST OR REPAIR YOURSELF.
IMPORTANT
DO NOT RETURN THIS PRODUCT TO THE STORE
If you have a problem with this product, please contact the
W Appliance Co. Customer Satisfaction Center at
844-299-0879 or service@appliance.com.
DATED PROOF OF PURCHASE, MODEL # AND SERIAL #
REQUIRED FOR WARRANTY SERVICE

Page 26
TROUBLESHOOTING & WARRANTY
TROUBLESHOOTING
Troubleshoot your problem by using the chart below. If the unit still does not work
properly, contact W Appliance Co. customer service center or the nearest authorized
service center. Customer must never troubleshoot internal components.
SYMPTOMS POSSIBLE CAUSE SOLUTIONS
Thumping
sound
Heavy wash loads may
produce a thumping
sound. Washer load may
be out of balance.
This is normal. If sound continues,
washer is probably out of balance.
Stop and redistribute wash load.
Pause the cycle and redistribute the
load.
Vibrating noise Packaging materials
were not removed.
Wash load may be
unevenly distributed in
the tub. Not all leveling
feet are resting firmly
and evenly on the floor.
Floor not rigid enough.
See the UNPACKING AND
REMOVING SHIPPING MATERIAL
section in the installation
instructions. Pause the cycle and
redistribute the load. See Leveling
the Washer in the Installation
Instructions. Make sure that the
floor is solid and does not flex.
See Flooring in the Installation
Requirements.
Page 27
SYMPTOMS POSSIBLE CAUSE SOLUTIONS
Excessive
sudsing
Too much detergent or
incorrect detergent.
HE detergents are formulated
specifically for High-Eciency
washers and contain suds reducing
agents. Only use detergent with the
High-Eciency (HE) logo.
Water leaking Inlet hose connection
is loose at faucet or
washer.
House drain pipes are
clogged.
Drain hose has come out
of drain or is not inserted
far enough.
A large item such as
a pillow or blanket is
above the top of the tub.
Check hoses for leaks, cracks and
splits.
Check and tighten hose connections.
The washer pumps out water very
rapidly.
Check for water backing up out of
the drain pipe during drain. If water is
seen coming out of the drain, check
for proper drain hose installation and
check for restrictions in the drain .
Contact a plumber to repair drain
pipe.
Tie drain hose to inlet hose or
standpipe to prevent it from coming
out during drain. For smaller drain
pipes, insert the drain hose into the
pipe as far as the drain hose flange.
For larger drain pipes, insert the
drain hose into the pipe 1-2 in. past
the flange .
Stop the washer and check the load.
Make sure the load does not crest
above the top edge of the tub.
Rattling and
clanking noise
Foreign objects, such
as keys, coins, or safety
pins, may be in tub or
pump.
Stop washer, check tub and drain
filter for foreign objects.
If noise continues after washer is
restarted, call for service.
Wrinkling Washer not unloaded
promptly.
Washer overloaded.
Hot and cold water inlet
hoses are reversed.
Always remove items from the
washer as soon as the cycle is
complete.
The washer can be fully loaded, but
the tub should not be tightly packed
with items. The lid of the washer
should close easily.
Hot water rinse can set wrinkles
in garments. Check the inlet hose
connections.
TROUBLESHOOTING & WARRANTY

Page 28
TROUBLESHOOTING & WARRANTY
SYMPTOMS POSSIBLE CAUSE SOLUTIONS
Staining Washer was not
unloaded promptly.
Clothes were not
properly sorted.
Always remove items from the
washer as soon as possible after the
cycle is complete. Always wash dark
colors separately from light colors
and whites to prevent discoloration.
Never wash heavily soiled items
washed with lightly soiled items.
Wash cycle time
is longer than
usual
The washer
automatically adjusts
the wash time for the
amount of laundry, water
pressure and other
operating conditions.
This is normal. The washer adjust
cycle time automatically to provide
optimal results for the selected cycle.
The time remaining shown in the
display is only an estimate. Actual
time may vary.
Musty or
mildewy odor in
washer
Incorrect or too much
detergent has been used
Inside of tub was not
cleaned properly.
Use only High-Eciency (HE)
detergent in accordance with the
manufacturer’s instructions. Run an
Express cycle with bleach once a
month to clean tub and remove any
mold from inside washer.
Washer will not
turn ON
NOTE: If the washer
stopped during a
cycle due to a loss
of power, the washer
will resume the cycle
where it stopped
when the power is
restored.
Power cord is not
properly plugged in.
House fuse is blown,
circuit breaker has
tripped, or power outage
has occurred. House
fuse is blown, circuit
breaker has tripped, due
to multiple appliances
on one outlet.
Make sure that the plug is plugged
securely into a grounded,3-prong,
120-VAC, 60-Hz outlet. Reset
circuit breaker or replace fuse. Do
not increase fuse capacity. If the
problem is a circuit overload, have it
corrected by a qualified electrician.
Reset circuit breaker or replace
fuse. If more than one appliance
is connected to the outlet, call an
electrician to have an additional
circuit installed.

Page 29
TROUBLESHOOTING & WARRANTY
SYMPTOMS POSSIBLE CAUSE SOLUTIONS
Water leaks Over sudsing of
detergent.
Over sudsing may create leaks, and
may be caused by the type and
amount of detergent used. High-
Eciency detergent is the only
detergent recommended. Make sure
that detergent and any additives
are put into the correct dispenser
compartments. The normal amount
of detergent to use is 1/4 to ½ of the
maximum amount recommended by
the detergent manufacturer. Always
reduce the amount of detergent if
the load is small or lightly soiled, or
if your water bis very soft. Never use
more than the maximum amount
recommended by the detergent
manufacturer.
Poor stain
removal
Previously set stains. Articles that have previously been
washed may have stains that have
been set . These stains may be
dicult to remove and may require
hand washing or pre-treating to aid
in stain removal.
Washer will not
drain water
Kinked drain hose. Drain
located higher than 48
in. above the floor.
Ensure that the drain hose is not
kinked. Make sure that the drain
hose is no higher than 4 ft. above the
bottom of the washer and is no more
than 5 ft. away from the washer.
Page 30
TROUBLESHOOTING & WARRANTY
SYMPTOMS POSSIBLE CAUSE SOLUTIONS
Washer will not
operate
Water supply is turned
o . Control panel has
powered o due to
inactivity. Washer is
unplugged. Controls are
not set properly.
Lid is open.
Circuit breaker/fuse is
tripped/blown.
Control needs to be
reset.
START/PAUSE was not
pressed after a cycle
was set.
Extremely low water
pressure.
Washer is too cold.
Washer is running under
Delay start program.
This is normal. Press the POWER
button to turn the washer on.
Make sure cord is plugged securely
into a working outlet.
Turn both hot and cold faucets fully
on.
Make sure the cycle was set
correctly, close the lid and press the
START/PAUSE button.
The washer will not operate if the
lid is open. Close the lid and make
sure that nothing is caught under
the lid preventing it from closing
completely.
Check house circuit breakers/fuses.
Replace fuses or reset breaker. The
washer should be on a dedicated
branch circuit. The washer will
resume the cycle where it stopped
once power is restored.
Press the POWER button, then re-
select the desired cycle and press
the START/PAUSE button.
Press the POWER button then re-
select the desired cycle and press
the START/PAUSE button. The
washer will shut o if the START/
PAUSE button is not pressed within
ten minutes.
Check another faucet in the house
to make sure that household water
pressure is adequate.
If the washer has been exposed to
temperatures below freezing for
an extended period of time, allow
it to warm up before pressing the
POWER button. Otherwise, the
display will not come on.
It’s normal if the unit doesn’t operate
under Delay start function. It will
start automatically after the delay
time is out.
Page 31
TROUBLESHOOTING & WARRANTY
SYMPTOMS POSSIBLE CAUSE SOLUTIONS
Washer not
filling properly
Filter clogged.
Inlet hoses may be
kinked Insucient water
supply.
The washer lid is open.
Hot and cold inlet hoses
are reversed.
Water level is too low.
Water inlet valve
damaged.
Disassemble the water inlet hose and
clean the inlet point. Check that inlet
hoses are not kinked or clogged.
Make sure that both hot and cold
water faucets are turned on all the
way.
The washer will not operate if the
lid is open. Close the lid and make
sure that nothing is caught under
the lid preventing it from closing
completely. Check inlet hose
connections. Make sure the hot
water supply is connected to the
hot inlet valve, and the cold water
supply is connected to the cold inlet
valve.
This is a high eciency washer. The
water will not normally cover the
clothes.
The fill level is optimized for the
wash motion to achieve the best
wash performance.
Call to the service center for service.
Water leaks
every load
Hoses not installed
correctly.
Check all fill and drain hose
connections to ensure that they are
tight and secure.

Page 32
TROUBLESHOOTING & WARRANTY
ERROR CODE POSSIBLE CAUSE SOLUTIONS
E1 It takes over 30 minutes
to fill water but cannot
achieve its preset water
level.
Check for washer not filling
properly and water leakage.
E2 The top lid is open. Close the lid.
E3 The washer runs out of
balance for three times.
Redistribute the load.
E4 It takes over 10 minutes
to drain water and/or
cannot drain the washer
totally empty.
Ensure that the drain hose is not
kinked. Make sure that the drain
hose is no higher than 4 ft. above the
bottom of the washer and is no more
than 5 ft. away from the washer.
E5 The water fills too much
to exceed its preset level.
Call customer satisfaction center for
help.
Page 33
TROUBLESHOOTING & WARRANTY
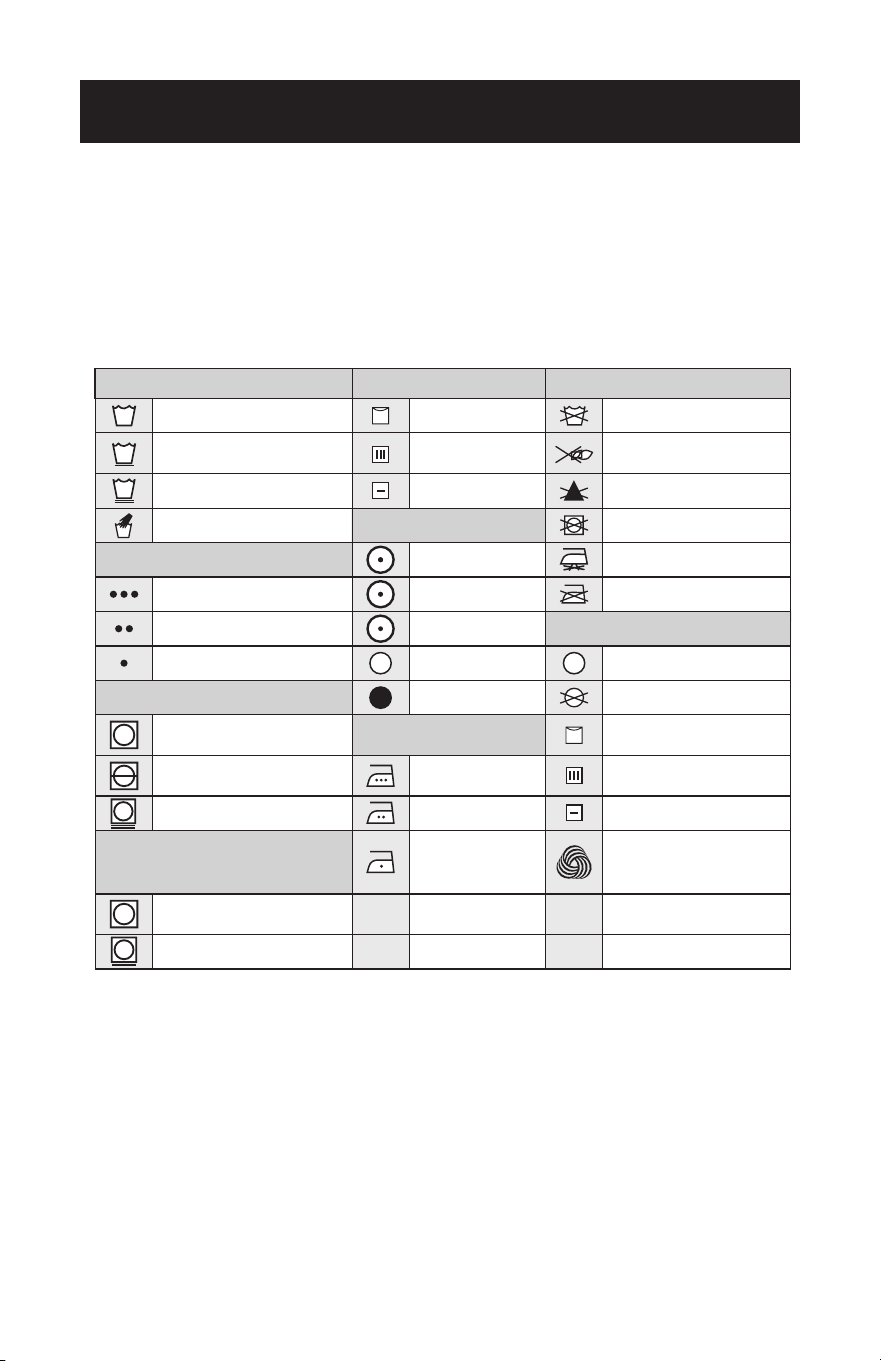
FABRIC CARE CHART
The following symbols provide garment care direction. The Clothing care labels
include symbols for washing, bleaching, drying and ironing, or dry cleaning when
necessary. The use of symbols ensures consistency among garment manufacturers
of domestic and imported items. Follow care label directions to maximize garment
life and reduce laundering problems.
Wash Cycle Special Instructions
Normal
Line Dry/ Hang to Dry
Permanent Press /
Resistant / Wrinkle Control
Wrinkle
Drip Dry
Gentle/Delicates
Dry Flat
Hand Wash
Water Temperature**
High
Hot
Medium
Warm Low
Cold
Any Heat
Bleach
No Heat/Air
Any Bleach (when needed)
Iron-Dry or Steam
Temperatures
Only Non-Chlorine
(color-safe)
Bleach (when needed)
High
Tumble Dry Cycle
Medium
Low
Gentle/ Delicates
Warning Symbols for laundering
Do Not Wash
Do Not Wring
Do Not Bleach
Do Not Tumble Dry
No Steam (added to iron)
Do Not Iron
Dry Clean
Do Not Dry Clean
Line Dry/ Hang to Dry
Drip Dry
Dry Flat
For machine-washable
wool. Loads should be
under 8 pounds.
Heat Setting
Normal
Permanent Press /
Resistant / Wrinkle Control
Wrinkle
Dryclean
** The number of dots represent appropriate wash water temperatures for various
items. The temperature range for Hot is 105°-125°F/41°-52°C, for Warm 85°-105°F/29°-
41°C and for Cold 60°-85°F/16°-29°C.(Wash water temperature must be a minimum
of 60°F/16°C for detergent activation and eective cleaning.)The clothes washer can
not ensure these temperatures because the actual temperature of the water entering
your washer depends on water heater settings and regional water supply
temperatures.
For example, cold water entering the home in the northern states during winter may
be 40°F/4°C which is too cold for eective cleaning. In this situation, you will need
to adjust the water temperature by selecting a warm setting, adding some hot water
to the MAX FILL line, or using your Washer’s heating option, if available.

Page 34
LIMITED WARRANTY
Any repair, replacement, or warranty service,
and all questions about this product should be
directed to W Appliance Co. at 844-299-0879
from the USA or Puerto Rico.
W Appliance Co. warrants to the original purchaser
that the product will be free from defects in material,
parts and workmanship for the period designated
for this product. The warranty commences the day
the product is purchased and covers up to a period
of 1 year (12 months) for labor/1 year (12 months) for
parts (manufacturing defects only)/carry in service.
W Appliance Co. agrees that it will, at its option,
replace the defective product with either a new
or remanufactured unit equivalent to your original
purchase during the warranty period.
Exclusions: This warranty does not apply to the
below:
1. If the appearance or exterior of
the product has been damaged or
defaced, altered or modified in design or
construction.
2. If the product original serial number
has been altered or removed or cannot
be readily determined.
3. If there is damaged due to power line
surge, user damage to the AC power
cord or connection to improper voltage
source.
4. If damage is due to general misuse,
accidents or acts of God.
5. If repair attempts are done by
unauthorized service agents, use of
parts other than genuine parts or parts
obtained from persons other than
authorized service companies.
6. On units that have been transferred
from the original owner.
7. On products that have been purchased
as refurbished, like new, second-hand, in
a “As-Is” or “Final Sale” terms.
8. To products used in a commercial or
rental setting.
9. To products used in settings other than
ordinary household use or used other
than in accordance with the provided
instructions.
10. To damages for service calls for
improper installations.
11. To glass parts and other accessory items
that are included with the unit.
12. Transportation and shipping costs
associated with the replacement of the
unit.
13. Service calls to instruct you how to use
your product.
14. Service calls to repair or replace the
house fuse, reset the circuit breaker or
correct the wiring in the house.
REPAIR OR REPLACEMENT AS PROVIDED UNDER
THIS WARRANTY IS THE EXCLUSIVE REMEDY OF
THE CUSTOMER; W Appliance Co. SHALL NOT BE
LIABLE FOR ANY INCIDENTAL OR CONSEQUENTIAL
DAMAGES FOR BREACH OF ANY EXPRESS OR
IMPLIED WARRANTY ON THIS PRODUCT, EXCEPT
TO THE EXTENT PROHIBITED BY APPLICABLE LAW.
ANY IMPLIED WARRANTY OF MERCHANTABILITY
OF FITNESS FOR A PARTICULAR PURPOSE ON THIS
PRODUCT IS LIMITED TO THE DURATION OF THE
WARRANTY.
Some states do not allow the exclusion or limitations of
incidental or consequential damages, or limitations on
how long the warranty lasts. In these cases the above
exclusions or limitations may not apply to you. This
warranty gives you specific legal rights and you may
also have other rights which vary from state to state.
Obtaining Service: To obtain service, product literature,
supplies or accessories please call
844-299-0879 to create a ticket for exchange/repair.
Please make sure to provide the date of purchase,
model number and a brief description of the problem.
Our customer service representative
will contact you or send detailed return instructions.
W Appliance Co. does not warrant that the appliance will work
properly in all environmental conditions, and makes no warranty
and representation, either implied or expressed, with respect
to the quality, performance, merchantability, or fitness for a
particular purpose other than the purpose identified within this
user’s manual. W Appliance Co. has made every eort to ensure
that this user’s manual is accurate and disclaims liability for any
inaccuracies or omissions that may have occurred. Information in
this user’s manual is subject to change without notice and does
not represent a commitment on the part of W Appliance Co.. W
Appliance Co. reserves the right to make improvements to this
user’s manual and/or to the products described in this user’s
manual at any time without notice. If you find information in this
manual that is incorrect, misleading, or incomplete, please contact
us at 844-299-0879.
W Appliance Co.
1356 Broadway
New York, NY 10018

Page 35

Page 36
BLACK & DECKER, BLACK+DECKER, the BLACK & DECKER and
BLACK+DECKER logos and product names and the orange and black color
scheme are trademarks of The Black & Decker Corporation, used under license.
All rights reserved.
Product in this box may differ slightly from that pictured. Does not affect
function. Not all accessories shown in photography are included in this
package.
Imported by W Appliance, Inc., 1356 Broadway, New York, NY 10018
December 2017 Printed in China