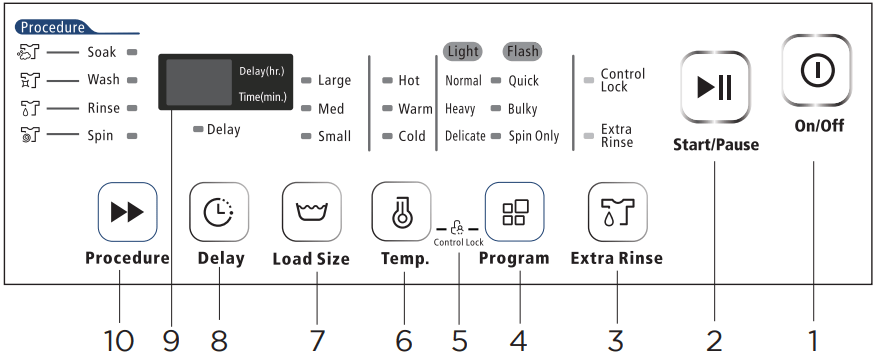
Press the On/Off button once to turn ON the power to the washer. Press again to turn OFF the unit.
2. Start/Pause
Press Start/Pause button once to start the wash cycle. Press again during operation to PAUSE the cycle. Press again to continue the cycle.
3. Extra Rinse
Press the Extra Rinse button to select an additional rinse cycle.
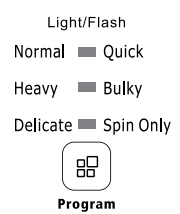
4. Program
Press the Program button to select from the following:
Normal (light) Quick (Flash)
Heavy (light) Bulky (Flash)
Delicate (light) Spin Only (Flash)
5. Control Lock
Use this option to disable the controls. This feature can prevent children from changing cycles or powering off the machine. The washer can only be locked during a cycle. To activate this function after starting the washer, press and hold the Temp and Program buttons at the same time. The control lock indicator light will turn on. To cancel this function select the Temp and Program buttons again.
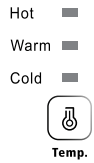
6. Temperature
Press this button to select the water temperature for washing Cold, Warm or Hot temperature selections.
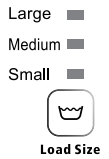
7. Load Size
Press Load Size to select Small, Medium or Large. This will determine the water level throughout the wash cycle
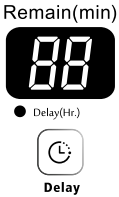
8. Delay
You can delay the start of the wash cycle up to 24 hours. Activate Delay by pressing the button to add 1 hour to the start time each time you press the button. The digital display will show the amount of hours remaining until the wash cycle is programed to start.
9. Digital Display
The digital display will show and count down the estimated minutes for the wash cycle selected. If delay start is set, the display will indicated the amount of hours until the wash cycle is to begin.
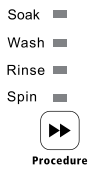
10. Procedure
Press this button to select different cycles: Soak, Wash, Rinse and Spin. The light will illuminate next to the selected cycles or combination of cycles.
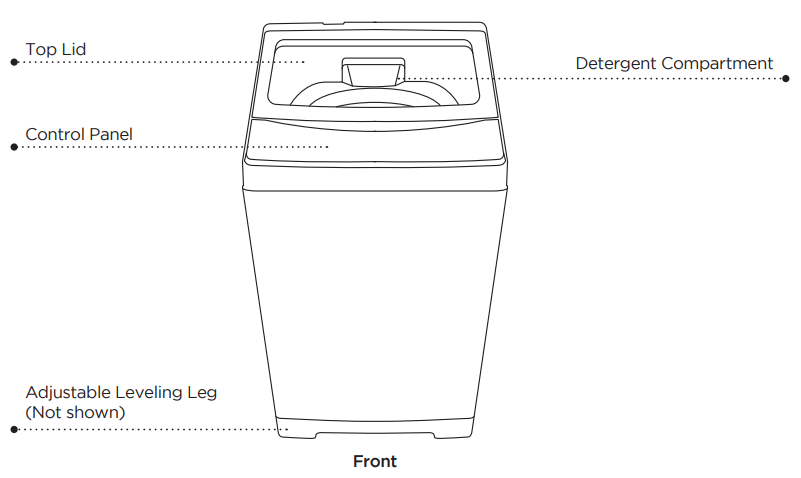
WASHING A LOAD OF LAUNDRY
Step 1: Power on your washer
Press the ON/OFF button to power your washer on.
Step 2: Load your washer
WARNING: Before loading your laundry, be sure to take out coins, keys and other hard objects, and close all zippers to prevent the clothes from damage.
Sort laundry by fabric type, soil level, color and load size as needed. You can fill the tub with dry, unfolded clothes ,but DO NOT OVERLOAD the tub. Load the tub no more than 3/4 full.
To ensure good cleaning results do not overload the tub, especially when washing heavily soiled loads. Never load the tub more than 3/4 full.
WARNING: Overloading may reduce washing efficiency, cause excess wear, and possibly cause creasing or wrinkling of items in the load.
NOTE: To add a forgotten item:
Press the START/PAUSE button to pause the washer.
Wait for the tub to stop turning, then open the door.
Add the item, close the door, and then press the START PAUSE button. The cycle will resume.
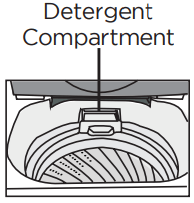
Step 3: Add detergent
This washer is designed for high efficiency (HE) detergent only.
Add the recommended amount of detergent directly into the detergent compartment before starting your washer. The normal amount of detergent to use is 1/4 to 1/2 of the maximum amount recommended by the detergent manufacturer. Always reduce the amount of detergent if the load is small or lightly soiled, or if your water is very soft . Never use more than the maximum amount recommended by the detergent manufacturer.
WARNING: Never pour any liquid bleach directly onto the load. It can cause fabric damage, such as weakening of cloth fibers or color loss.
Step 4: Select your desired cycle and options
Select your desired wash program by pressing the program button repeatedly. The indicator light will illuminate as shown next to the selected cycle below. If Normal is selected there will be a steady light. If Quick is selected the light will flash.
Normal (steady light) Quick (Flashing light)
Heavy (steady light) Bulky (Flashing light)
Delicate (steady light) Spin Only (Flashing light)
The Spin Only cycle can help remove some moisture from clothing to reduce drying time.
Press the Load Size button to choose the water level setting based on a Small, Medium or Large sized load.
Select your desired wash cycles by repeatedly pressing the Procedure button to choose the cycle or combination of cycles: Wash /Rinse /Spin (default setting), Spin, Wash, Wash/Rinse, Rinse/Spin, Soak/Wash/Rinse/Spin
A steady light will indicate the selected cycle(s)
Press the temperature button to select cold, warm or hot water for the wash cycle.
Note: The temperature setting is for the wash cycle only. The rinse cycle is cold water.
To delay the start of your washer up to 24 hours press the Delay button to activate. The number shown on the digital display will indicate when the wash cycle will start. 1 hour will be added to the start time each time you press the Delay button up until 24 hours. Pressing the delay button to exceed 24 hours will deactivate the delay function and the display will turn off.
To cancel the Delay Start function after it has started, power off the unit to reset all functions before restarting the washer.
Press the extra rinse button to add one more rinse.
Step 5: Start the cycle
Press the START/PAUSE button to start the washing cycle. When the washing cycle begins, the Estimated Time in minutes for the cycle to complete will show and count down in the digital display. Or, if Delay Start is set, the display will count down the hours until the cycle begins, and then change to a minute countdown for the cycle.
WARNING: When the washer is running, you should pause the program and wait for the tub to stop completely before you open the lid.
Control Lock
Press and hold the TEMP and PROGRAM buttons simultaneously to activate this function. When Control Lock is activated, the indicator light will turn on. The control panel buttons will not function except for POWER and the ability to deactivate Control Lock by pressing and holding the TEMP and PROGRAM buttons again.
CARE AND CLEANING
Cleaning the exterior
Turn off the water faucets after finishing the day’s washing.
This will shut off the water supply to your washer and prevent the unlikely possibility of damage from escaping water.
Leave the lid open to allow the inside of your washer to dry out.
Use a soft cloth to wipe up all detergent, bleach or other pills as they occur.
Clean the following as recommended:
Control Panel - Clean with a soft, damp cloth. Do not use abrasive powders or pads. Do not spray cleaners directly onto the panel.
Cleaning the interior
Clean the interior of your washer periodically to remove any dirt, soil, odor, mold, mildew, or bacterial residue that may remain in your washer as a result of washing clothes.
Failure to follow these instructions may result in unpleasant conditions, including odors and/or permanent stains on your washer or laundry .Hard water deposits may be removed, if needed. Use cleaners labeled “Washer safe”.
Tub clean
Run an Rapid cycle with some bleach every month to clean the tub.
This will also help to remove mold which may occur inside the washer.
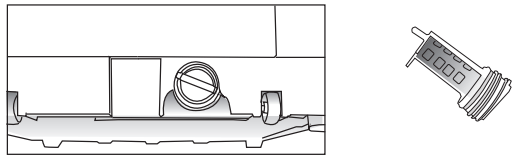
Lint filter clean
There is a built-in lint filter in your washer. It can help to collect lint during washing cycle.
It is suggested to clean the lint filter every 10 cycles.
Take it out and clean the filter with water. Then place it back into the washer.
Press down to remove snap back into place to re-insert
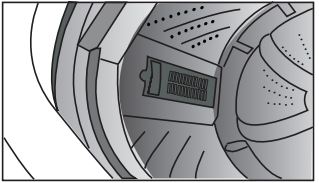
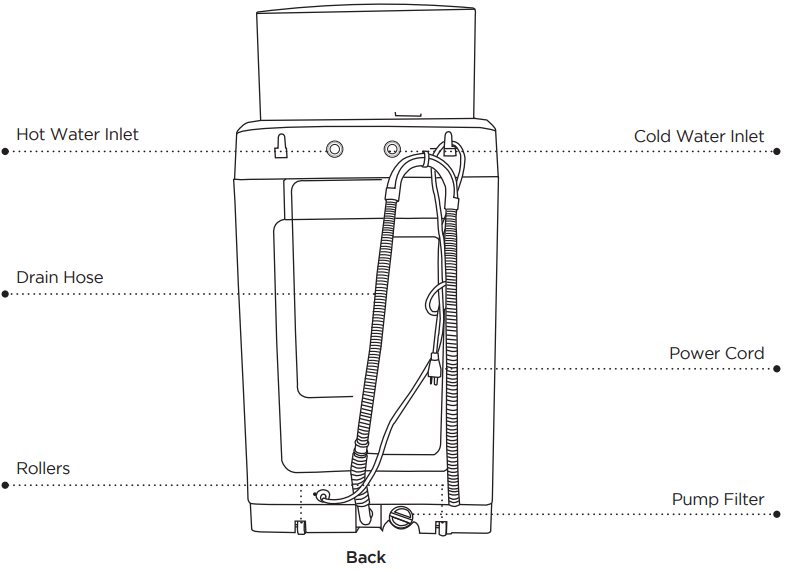
Pump filter clean
There is a built-in Pump filter located in the back of your washer. It can help to protect the pump during washing cycle.
It is suggested to clean the lint filter every once every month.
It is suggested to clean the pump filter once every month.
Remove the filter by turning it to the left. Rinse it with water and re-insert it by turning it to the right.
TROUBLESHOOTING
BEFORE YOU CALL FOR SERVICE
IF THE UNIT FAILS TO OPERATE:
A) Check to make sure that the unit is plugged in securely. If it is not, remove the plug from the outlet, wait 10 seconds and plug it in again securely.
B) Check for a blown circuit fuse or a tripped main circuit breaker. If these seem to be operating properly, test the outlet with another appliance.
IF NONE OF THE ABOVE SOLVES THE PROBLEM, CONTACT OUR CUSTOMER SATISFACTION CENTER. DO NOT TRY TO ADJUST OR REPAIR YOURSELF.
TROUBLESHOOTING
SYMPTOMS
POSSIBLE CAUSE
SOLUTIONS
Thump
Heavy wash loads may produce a thumping sound. Washer load may be out of balance.
This is normal. If sound continues, washer is probably out of balance. Stop and redistribute wash load. Pause the cycle and redistribute the load.
Vibrating noise
Packaging materials were not removed.
Wash load may be unevenly distributed in the tub. Not all leveling feet are resting firmly and evenly on the floor. Floor not rigid enough.
See the UNPACKING AND REMOVING SHIPPING MATERIAL section in the installation instructions. Pause the cycle and redistribute the load. See Leveling the Washer in the Installation Instructions. Make sure that the floor is solid and does not flex. See Flooring in the Installation Requirements..
Excessive sudsing
Too much detergent or incorrect detergent.
HE detergents are formulated specifically for High-Efficiency washers and contain suds reducing agents. Only use detergent with the High-Efficiency (HE) logo.
Water leaking
Inlet hose connection is loose at faucet or washer.
House drain pipes are clogged.
Drain hose has come out of drain or is not inserted far enough.
A large item such as a pillow or blanket is above the top of the tub.
Check hoses for leaks, cracks and splits.
Check and tighten hose connections. The washer pumps out water very rapidly.
Check for water backing up out of the drain pipe during drain. If water is seen coming out of the drain, check for proper drain hose installation and check for restrictions in the drain . Contact a plumber to repair drain pipe.
Tie drain hose to inlet hose or standpipe to prevent it from coming out during drain. For smaller drain pipes, insert the drain hose into the pipe as far as the drain hose flange. For larger drain pipes, insert the drain hose into the pipe 1-2 in. past the flange .
Stop the washer and check the load. Make sure the load does not crest above the top edge of the tub.
Rattling and clanking noise
Foreign objects, such as keys, coins, or safety pins, may be in tub or pump.
Stop washer, check tub and drain filter for foreign objects.
If noise continues after washer is restarted, call for service.
Wrinkling
Washer not unloaded promptly.
Washer overloaded.
Hot and cold water inlet hoses are reversed.
Always remove items from the washer as soon as the cycle is complete.
The washer can be fully loaded, but the tub should not be tightly packed with items. The lid of the washer should close easily.
Hot water rinse can set wrinkles in garments. Check the inlet hose connections.
Staining
Washer was not unloaded promptly.
Clothes were not properly sorted.
Always remove items from the washer as soon as possible after the cycle is complete. Always wash dark colors separately from light colors and whites to prevent discoloration. Never wash heavily soiled items washed with lightly soiled items.
Wash cycle time is longer than usual
The washer automatically adjusts the wash time for the amount of laundry, water pressure and other operating conditions.
This is normal. The washer adjust cycle time automatically to provide optimal results for the selected cycle.The time remaining shown in the display is only an estimate. Actual time may vary.
Musty or mildewy odor in washer
Incorrect or too much detergent has been used Inside of tub was not cleaned properly.
Use only High-Efficiency (HE) detergent in accordance with the manufacturer’s instructions. Run an Express cycle with bleach once a month to clean tub and remove any mold from inside washer.
Washer will not turn ON
NOTE: If the washer stopped during a cycle due to a loss of power, the washer will resume the cycle where it stopped when the power is restored.
Power cord is not properly plugged in. House fuse is blown, circuit breaker has tripped, or power outage has occurred. House fuse is blown, circuit breaker has tripped, due to multiple appliances on one outlet.
Make sure that the plug is plugged securely into a grounded,3-prong, 120-VAC, 60-Hz outlet. Reset circuit breaker or replace fuse. Do not increase fuse capacity. If the problem is a circuit overload, have it corrected by a qualified electrician. Reset circuit breaker or replace fuse. If more than one appliance is connected to the outlet, call an electrician to have an additional circuit installed.
Water leaks
Over sudsing
Over sudsing may create leaks, and may be caused by the type and amount of detergent used. HighEfficiency detergent is the only detergent recommended. Make sure that detergent and any additives are put into the correct dispenser compartments. The normal amount of detergent to use is 1/4 to ½ of the maximum amount recommended by the detergent manufacturer. Always reduce the amount of detergent if the load is small or lightly soiled, or if your water bis very soft. Never use more than the maximum amount recommended by the detergent manufacturer.
Poor stain removal
Previously set stains.
Articles that have previously been washed may have stains that have been set . These stains may be difficult to remove and may require hand washing or pre-treating to aid in stain removal.
Washer will not drain water
Kinked drain hose. Drain located higher than 48 in. above the floor.
Ensure that the drain hose is not kinked. Make sure that the drain hose is no higher than 4 ft. above the bottom of the washer and is no more than 5 ft. away from the washer.
Washer will not operate
Water supply is turned off . Control panel has powered off due to inactivity. Washer is unplugged. Controls are not set properly.
Lid is open.
Circuit breaker/fuse is tripped/blown.
Control needs to be reset.
START/PAUSE was not pressed after a cycle was set.
Extremely low water pressure.
Washer is too cold.
Washer is running under Delay start program.
This is normal. Press the POWER button to turn the washer on.
Make sure cord is plugged securely into a working outlet.
Turn both hot and cold faucets fully on.
Make sure the cycle was set correctly, close the lid and press the START/PAUSE button.
The washer will not operate if the lid is open. Close the lid and make sure that nothing is caught under the lid preventing it from closing completely.
Check house circuit breakers/fuses.
Replace fuses or reset breaker. The washer should be on a dedicated branch circuit. The washer will resume the cycle where it stopped once power is restored.
Press the POWER button, then reselect the desired cycle and press the START/PAUSE button.
Press the POWER button then reselect the desired cycle and press the START/PAUSE button. The washer will shut off if the START/ PAUSE button is not pressed within ten minutes.
Check another faucet in the house to make sure that household water pressure is adequate.
If the washer has been exposed to temperatures below freezing for an extended period of time, allow it to warm up before pressing the POWER button. Otherwise, the display will not come on.
It’s normal if the unit doesn’t operate under Delay start function. It will start automatically after the delay time is out.
Washer not filling properly
Filter clogged. Inlet hoses may be kinked Insufficient water supply.
The washer lid is open. Hot and cold inlet hoses are reversed.
Water level is too low.
Water inlet valve damaged.
Disassemble the water inlet hose and clean the inlet point. Check that inlet hoses are not kinked or clogged.
Make sure that both hot and cold water faucets are turned on all the way.
The washer will not operate if the lid is open. Close the lid and make sure that nothing is caught under the lid preventing it from closing completely. Check inlet hose connections. Make sure the hot water supply is connected to the hot inlet valve, and the cold water supply is connected to the cold inlet valve.
This is a high efficiency washer. The water will not normally cover the clothes.
The fill level is optimized for the wash motion to achieve the best wash performance.
Call to the service center for service.
Water leaks every load
Hoses not installed correctly.
Check all fill and drain hose connections to ensure that they are tight and secure.
ERROR CODE
POSSIBLE CAUSE
SOLUTIONS
E1
It takes over 30 minutes to fill water but cannot achieve its preset water level.
Check troubleshooting for washer not filling properly and water leakage.
E2
It takes over 10 minutes to drain the water but the washer is not completely drained.
Check troubleshooting for Washer will not drain water.
 Press the ON/OFF button to power your washer on.

 Press the START/PAUSE button to start the washing cycle. When the washing cycle begins, the Estimated Time in minutes for the cycle to complete will show and count down in the digital display. Or, if Delay Start is set, the display will count down the hours until the cycle begins, and then change to a minute countdown for the cycle.
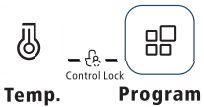 Press and hold the TEMP and PROGRAM buttons simultaneously to activate this function. When Control Lock is activated, the indicator light will turn on. The control panel buttons will not function except for POWER and the ability to deactivate Control Lock by pressing and holding the TEMP and PROGRAM buttons again.