User Manual
Description of the appliance

Note Due to unceasing modification of our products your refrigerator may be slightly different from this Instruction Manual but its functions and using methods remain the same
Using your appliance
This section tells you how to use most of the useful features. We recommend that you read through them carefully before using the appliance.
1. Using your refrigerator compartment
The refrigerator compartment is su itable for storing meat, vegetables and fruit. It is recommended that food is packed in sealed containers or wrapped in polythene food wrap to avoid loosing moisture or allowing flavours to mix.
Caution! Never close the refrigerator door while the shelves, crisper and/or telescopic slides are extended. It may cause damage to the fridge.
Glass shelves and Door racks
The refrigerator compartment is 5 several different door racks .which are suitable for the storage of eggs, canned liquid, bottled drinks and packed food.. They can be placed at different heights according to your seeds. Before removing the door shelves please remove all food items to avoid spillage.
- When you remove the shelves, gently pull them forward until the shelf comes clear of the shelf guides.
- When you return the shelves, make sure there is no obstacle behind and gently push the shelf back into the position.
Crispers
The crisper, mounted on telescopic vegetables and fruit.
When you remove the crisper pull it forwards and lift off the sliders. Remember to remove all food first.
Once you have removed the drawers, ensure the slides are pushed back fully.
Bottle holder operation
The bottle holder can be used fo hold bottles, cans and tall containers in place. it can be used on the middle and lower door racks and can be moved side to side as required.
Note: All the door racks and covers are completely removable for cleaning.
2. Using your freezer compartment
The freezer compartment is suitable for storage of foods required to be frozen, such as meat, ice cream and others.
Caution! Ensure that bottles are not left in the freezer for longer than needed as freezing may cause the bottle to break.
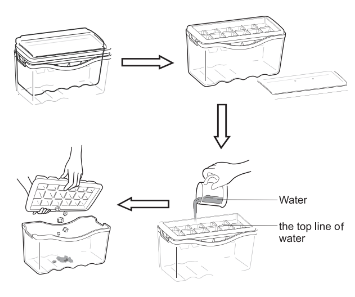
3. Using your ice box
- It is used for making ice and storing ice cubes.
- It is a removable accessory which can be taken out to save space. There is an ice maker cover to keep the ice maker clean.
Note: If the ice maker is used for the first time or has not been used for a long time, please clean it before using.
- Place the integrative ice maker on level and take down the cover.
- Pour water into the ice tray and Pour water into the ice trays and the water level shall not exceed the top line as the follow picture shows.
- Place the ice maker in its original position. When ice cubes form, you can take out the ice cubes for direct use or drop off the ice cubes into the ice storing box for future use.
Drawers
The drawers, mounted on telescopic large quantities of frozen food.
- The method of removal of the drawers is the same as the crisper in the refrigerator chamber.
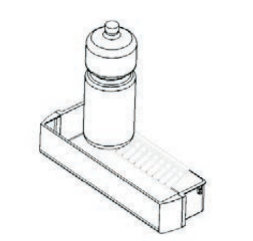
3. Water Dispenser
The water dispenser located in the fridge door, is for storing drinking water. With thi appliance you can obtain chilled water easily without opening the refrigerator. Yo should be informed of following tips.
Before using this appliance for the first time, you should use it as follows.
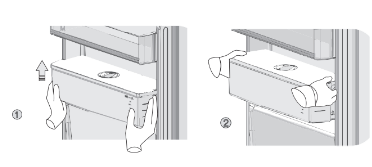
- Hold the two sides of the water tank tightly, lift up and put out of the water tank.
- Unscrew the head, then clean head ,lids and the water tank.
Caution! Drain the water tank befor you take it down!
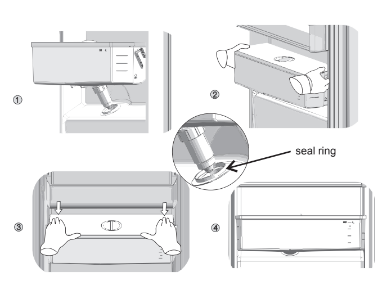
After cleaning, please assemble the parts including the head, water tank and lids as follows:
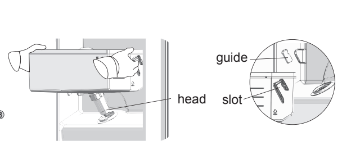
- Put the seal ring in order first ( the seal ring can not turn up), then insert the head into the hole.
- Hold the two sides of the water tank tightly, fit the water tank along the guids on the door.
- Push the two sides of the water tank downward as the picture shows.
- When you hear clicks by both sides and at the same time the both sides of the water tank is closed to the door liner, It means the installation is completed.
Before you fill the drinking water into the water tank, ensure that the water tank is steady and in a correct position.
Caution!
Fill with water up to 4L ( which is suggested) and not above the level. Otherwise, it may overflow when the lids is closed.
We recommend that you fill the water by the following ways.
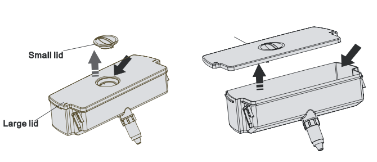
- Remove the small lid and fill water from the inlet of the larger lid.
- Remove the cover of the rank, and then fill water inside directly.
Warning!
Don’t touch the other parts of the appliance when filling water, it may cause the water leakage.
- Make sure the cover of the water tank is fitted on.
- Close the fridge door and check the dispenser.
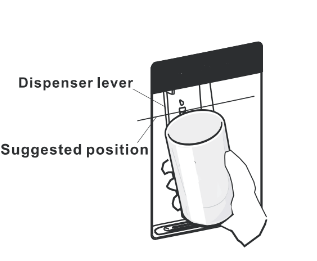
Water Dispenser
You should use the correct cups to receive water underneath the water dispenser.
Warning!
Don’t push the dispenser lever forward without cup, it may cause water leakage from the dispenser.
Cleaning
- Put the water tank out of the door carefully and then wash the tank, lid, and head lightly in water.
- After you have successfully cleaned the appliance, you should dry it fully. Also regularly clear the receiving tank to avoid slillage .

Helpful hints and tips
Energy saving tips
- We recommend that you follow the tips below to save energy.
- Try to avoid keeping the door open for long periods in order to conserve energy.
- Ensure the appliance is away from any sources of heat. (Direct sunlight, electric oven or cooker etc.)
- Don't set the temperature colder than necessary.
- Don't store warm food or evaporative liquid in the appliance.
- Place the appliance in a well ventilated, humidity free, room. Please refer to Installing your new appliance chapter.
- The diagram shows the correct combination for the drawers, crisper and shelves. Do not adjust the combination as this is designed to be the most energy efficient configuration.
Hints for fresh food refrigeration
- Do not place hot food directly into the refrigerator, the internal temperature will increase resulting in the compressor having to work harder and will consume more energy.
- Do cover or wrap the food, particularly if it has a strong flavor.
- Place food properly so that air can circulate freely around it.
Hints for refrigeration
- Meat (All Types) Wrap in polythene food: wrap and place on the glass shelf above the vegetable drawer. Always follow food storage times and use by dates suggested by manufacturers.
- Cooked food, cold dishes, etc.: They should be covered and may be placed on any shelf.
- Fruit and vegetables: They should be stored in the special drawer provided.
- Butter and cheese: Should be wrapped inairtight foil or plastic film wrap.
- Milk bottles: Should have a lid and be stored in the door racks.
Hints for freezing
- When first starting-up or after a period out of use, let the appliance run at least 2 hours on the higher settings before putting food in the compartment.
- Prepare food in small portions to enable it to be rapidly and completely frozen and to make it possible to subsequently thaw only the quantity required.
- Wrap up the food in aluminum foil or polyethylene food wraps which are airtight.
- Do not allow fresh, unfrozen food to touch the food which is already frozen to avoid partially thawing the frozen food.
- Iced products, if consumed immediately after removal from the freezer compartment, will probably cause frost burns to the skin.
- It is recommended to label and date each frozen package in order to keep track of the storage time.
Hints for the storage of frozen food
- Ensure that frozen food has been stored correctly by the food retailer.
- Once defrosted, food will deteriorate rapidly and should not be re-frozen. Do not exceed the storage period indicated by the food manufacturer.
Switching off your appliance
If the appliance needs to be switched off for an extended period, the following steps should be taken prevent mould on the appliance.
- Remove all food.
- Remove the power plug form the mains sockets
- Clean and dry interior thoroughly
- Ensure that all the doors are wedged open slightly to allow air to circulate
Cleaning and care
For hygienic reasons the appliance (including exterior and interior accessories) should be cleaned regularly at least every two months.
Caution! The appliance must not be connected to the mains during cleaning. Danger of electrical shock! Before cleaning switch the appliance off and remove the plug from the mains socket.
Exterior cleaning
- To maintain good appearance of your appliance, you should clean it regularly. -Wipe the digital panel and display panel with a clean, soft cloth.
- Spray water onto the cleaning cloth instead of spraying directly on the surface of the appliance. This helps ensure an even distribution of moisture to the surface.
- Clean the doors, handles and cabinet surfaces with a mild detergent and then wiped dry with a soft cloth.
Caution!
- Don't use sharp objects as they are likely to scratch the surface.
- Don't use Thinner, Car detergent, Clorox, ethereal oil, abrasive cleansers or organic solvent such as Benzene for cleaning. They may damage the surface of the appliance and may cause fire.
Interior cleaning
You should clean the appliance interior regulary. It will be eaiser to clean when food stocks are low.
- Wipe the inside of the fridge freezer with a weak solution of bicarbonate of soda, and then rinse with warm water using a wrung-out sponge or cloth.
- Wipe completely dry before replacing the shelves and baskets. Thoroughly dry all surfaces and removable parts.
Although this appliance automatically defrosts, a layer of frost may occur on the refrigerator's interior walls if the door is opened frequently or kept opentoo long. If the frost is too thick wait until food stocks are low and proceed as follows:
- Remove existing food and accessories baskets, unplug the appliance from the mains power and leave the doors open. Ventilate the room thoroughly to accelerate the thawing process.
- When defrosting is completed, clean your freezer as described above.
Caution! Don't use sharp objects to remove frost from the refrigerator. Only after the interior is completely dry should the appliance be switched back on and plugged back into the mains socket.
Door seal cleaning
Take care to keep door seals clean. Sticky food and drinks can cause seals to stick to the cabinet and tear when you open the door. Wash seal with a mild detergent and warm water. Rinse and dry it thoroughly after cleaning.
Caution! Only after the door seals are completely dry should the appliance be powered on.
Replacing the LED light
Warning: The LED light should not be replaced by the user. If the LED light is faulty, contact the customer helpline for assistance. To replace the LED light, the following steps c an be used:
- Unplug your appliance.
- Remove light cover by pushing up and out.
- Hold the LED cover with one hand and pull it with the other hand while pressing the connector latch.
- Replace LED light and snap it correctly in to place.
Troubleshooting
If you experience a problem with your appliance or are concerned that the appliance is not functioning correctly, you can carry out some easy checks before calling for service, please see below. You can carry out some easy checks according to this section before calling for service.
Warning! Don't try to repair the appliance yourself. If the problem persists after you have made the checks mentioned below, contact a qualified electrician, authorized service engineer or the shop where you purchased the product.
Appliance is not working correctly
- Check whether the power cord is plugged into the power outlet properly.
- Check the fuse or circuit of your power supply, replace if necessary.
- The ambient temperature is too low. Try setting the chamber temperature to a colder level to solve this problem.
- It is normal that the refrigerator is not operating during the automatic defrost cycle, or for a short time after the appliance is switched on to protect the compressor
Odours from the compartments
- The interior may need to be cleaned
- Some food, containers or wrapping cause odours
Noise from the appliance
The sounds below are quite normal:
- Compressor running noises.
- Air movement noise from the small fan motor in the fridge compartment or other compartments.
- Gurgling sound similar to water boiling.
- Popping noise during automatic defrosting.
- Clicking noise before the compressor starts.
Other unusual noises are due to the reasons below and may need you to check and take action:
- The cabinet is not level.
- The back of appliance touches the wall.
- Bottles or containers fallen or rolling
The motor runs continuously
It is normal to frequently hear the sound of the motor, it will need to run more when in following circumstances:
- Temperature setting is set colder than necessary
- A large quantity of warm food has recently been stored within the appliance.
- The temperature outside the appliance is too high.
- Doors are kept open too long or too often.
- After your installing the appliance or it has been switched off for a long time.
A layer of frost occurs in the compartment
Check that the air outlets are not blocked by food and ensure food is placed within the appliance to allow sufficient ventilation. Ensure that door is fully closed. To remove the frost, please refer to cleaning and care chapter.
Temperature inside is too warm
You may have left the doors open too long or too frequently; or the doors are kept open by some obstacle; or the appliance is located with insufficient clearance at the sides, back or top.
Disposal of the appliance
It is prohibited to dispose of this appliance as household waste.
Packaging materials
Packaging materials with the recycle symbol are recyclable. Dispose of the packaging into a suitable waste collection container to recycle it.
Before disposal of the appliance
- Pull out the mains plug from the mains socket.
- Cut off the power cord and discard with the mains plug.
Warning! Refrigerators contain refrigerant and gases in the insulation. Refrigerant and gases must be disposed of professionally as they may cause eye injuries or ignition. Ensure that tubing of the refrigerant circuit is not damage prior to proper disposal.