EN (GB) (IE)
INSTRUCTIONS FOR USE
OF AN UPRIGHT FRIDGE
FREEZER
THANK YOU FOR WELCOMING OUR APPLIANCE INTO YOUR HOME
We are happy that you have chosen a Hisense appliance. Hisense is here to empower
you and all your adventures with our cutting-edge technology and modern home
appliances made of high-quality materials. Because we are working tirelessly on energy
efficiency, by purchasing our appliance, you too are contributing to more sustainable
future.
For full use of our services, warranty and other important information, please consider
to register your Hisense appliance online on our website:
https://www.hisense-europe.com
We hope our appliance will meet and exceed your expectations.
Link to the EU EPREL database
The QR code on the energy label supplied with the appliance provides a web link to
the registration of this appliance in the EU EPREL database. Keep the energy label for
reference together with the user manual and all other documents provided with this
appliance. It is possible to find information related to the performance of the product
in the EU EPREL database using the link https://eprel.ec.europa.eu and the model name
and product number that you can find on the rating plate of the appliance. For more
detailed information about the energy label, visit www.theenergylabel.eu.
The appliance is intended solely for household use.
The refrigerator is intended for storing fresh food at temperatures above 0°C.
The freezer is intended for freezing fresh food and for long-term storage of frozen food
(up to one year, depending on the type of food).
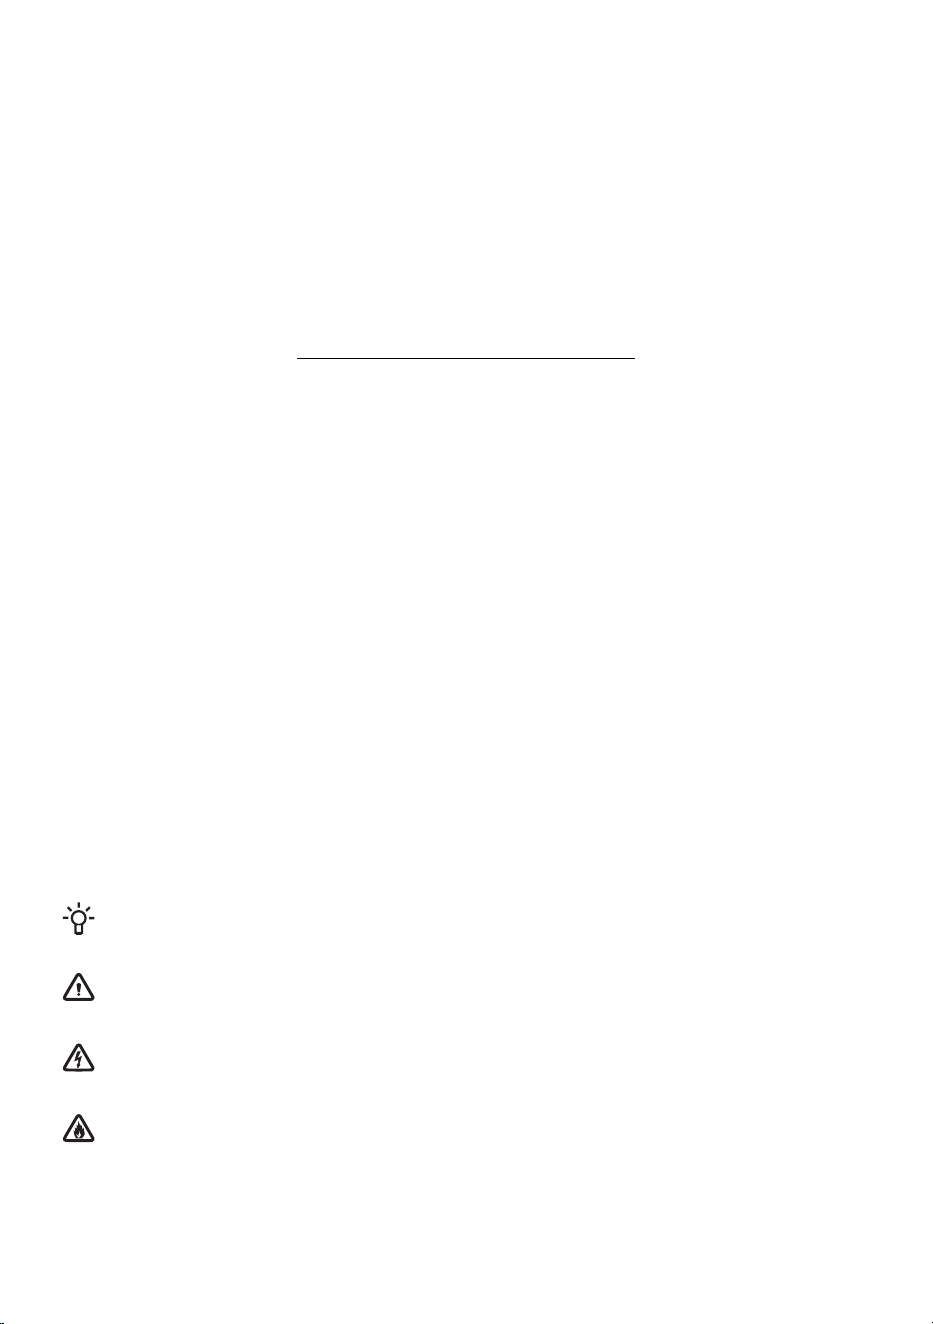
The following symbols are used throughout the manual and they have the following meanings:
INFORMATION!
Information, advice, tip, or recommendation
WARNING!
Warning – general danger
ELECTRIC SHOCK!
Warning – danger of electric shock
DANGER OF FIRE!
Warning – danger of fire

Contents
5Important notes and precautions ..........................................................................................
5Before using the appliance for the first time .............................................................................
5Important safety instructions ....................................................................................................
7Important information on the use of appliance .........................................................................
9Advice for saving power with refrigeration appliances .......................................................
10Installation and connection ....................................................................................................
10Selecting the room ....................................................................................................................
11Appliance placement ................................................................................................................
13Connecting the appliance .........................................................................................................
14Description of the appliance ..................................................................................................
15Operating the appliance .........................................................................................................
15Switching the appliance on/off .................................................................................................
16Adjusting the temperature in the appliance ..............................................................................
17Intensive freezing (freezer compartment) ..................................................................................
17Intensive cooling (refrigerator compartment) ............................................................................
18Ice maker/cold water dispenser operation ...............................................................................
19Eco function(Recommended setting ) .......................................................................................
19Holiday mode (prolonged absence) ..........................................................................................
19Water storage tank alarm ..........................................................................................................
20Open door alarm .......................................................................................................................
20Child Lock .................................................................................................................................
21Appliance interior equipment ................................................................................................
21Shelves .....................................................................................................................................
21Fruit and vegetables drawer (CrispZone) * ..............................................................................
21Door racks ................................................................................................................................
21Air distribution system (MultiFlow) * .........................................................................................
22Water storage tank ...................................................................................................................
22Icemaker/cold water dispenser .................................................................................................
26Storing food in the refrigerator ..............................................................................................
26Important warnings regarding food storage .............................................................................
26Avoid contamination of food .....................................................................................................
27Freezing and storing frozen food ..........................................................................................
27Freezing procedure ...................................................................................................................
27Important warnings on freezing ................................................................................................
27Storing industrially frozen food .................................................................................................
27Frozen food storage time ..........................................................................................................
28Thawing frozen food .................................................................................................................
29Defrosting the appliance ........................................................................................................
29Automatic refrigerator defrosting ..............................................................................................
29Defrosting a NoFrost freezer .....................................................................................................
30Cleaning the appliance ...........................................................................................................
31Troubleshooting ......................................................................................................................
34Information about appliance noise .......................................................................................
3

Important notes and precautions
Before using the appliance for the first time
Before connecting the appliance to the power mains, please read carefully the instructions for use
which describe the appliance and its correct and safe use. The instructions apply to several appliance
types/models; thus, settings or equipment may be described herein which is not available in your
appliance. We recommend saving this instruction manual for future reference and attach it to the
appliance if it is sold in the future.
Check for any damage or irregularities on your appliance. If you find your appliance is damaged, notify
the retailer from which you have purchased the appliance.
Before connecting the appliance to the power mains, let the appliance rest in a vertical position for a
minimum of 2 hours. This will reduce the possibility of operation faults due to the effect of transport
on the cooling system.
Important safety instructions
DANGER OF FIRE!
WARNING! Risk of fire/flammable materials.
The appliance must be connected to the power mains and grounded in compliance with the effective
standards and regulations.
WARNING! Do not locate multiple portable socket-outlets or
portable power supplies at the rear of the appliance.
Before cleaning the appliance, unplug it from the power mains (unplug the power cord from the wall
outlet).
ELECTRIC SHOCK!
WARNING! If the supply cord is damaged, it must be
replaced by the manufacturer, its service agent or similarly
qualified persons in order to avoid a hazard.
ELECTRIC SHOCK!
WARNING! When positioning the appliance, ensure the
supply cord is not trapped or damaged.
ELECTRIC SHOCK!
If LED lighting does not work, call a service technician. Do not attempt a repair of the LED lighting
yourself, as there is danger of contact with high voltage!
WARNING!
WARNING! Do not use electrical appliances inside the food
storage compartments of the appliance, unless they are of
the type recommended by the manufacturer.
5

WARNING!
WARNING! Do not use mechanical devices or other means
to accelerate the defrosting process, other than those
recommended by the manufacturer.
WARNING!
WARNING! To avoid any hazard resulting from poor stability
of the appliance, make sure it is installed as instructed.
Freeze burn hazard
To avoid freeze burn, never put frozen food in your mouth and do not touch frozen food.
Safety of children and vulnerable persons
The appliance is not intended for use by persons (including
children) with reduced physical, sensory or mental capabilities,
or lack of experience and knowledge, unless they have been
given supervision or instruction concerning use of the appliance
by a person responsible for their safety.
Children should be supervised to ensure that they do not play
with the appliance.
Cleaning and user maintenance shall not be made by children
without supervision.
Remove the packaging intended to protect the appliance or
particular parts during transport and keep it outside the reach
of children. It presents danger of injury or suffocation.
When removing a used appliance, disconnect the power cord,
remove the door, and leave the shelves in the appliance. This
will prevent children from locking themselves in the appliance.
For European markets only
This appliance can be used by children aged from 8 years and
above and persons with reduced physical, sensory or mental
capabilities or lack of experience and knowledge if they have
been given supervision or instruction concerning use of the
appliance in a safe way and understand the hazards involved.
Children shall not play with the appliance.
6
Cleaning and user maintenance shall not be made by children
without supervision.
Children aged from 3 to 8 years are allowed to load and unload
refrigerating appliances.
Warning regarding the refrigerant
The appliance contains a small amount of an environmentally
friendly yet flammable gas R600a. Make sure that no parts of
the cooling system are damaged. A gas leak is not hazardous
to the environment, but it could cause eye injury or fire.
In case of a gas leak, ventilate the room thoroughly, disconnect
the appliance from the power mains, and call a service
technician.
Important information on the use of appliance
WARNING! This appliance is intended to be used in household
and similar applications such as:
• staff kitchen areas in shops, offices and other working
environments;
• farm houses and by clients in hotels, motels and other
residential type environments;
• bed and breakfast type environments;
• catering and similar non-retail applications.
WARNING!
WARNING! Keep ventilation openings, in the appliance
enclosure or in the built-in structure, clear of obstruction.
The appliance may not be used outdoors and it may not be exposed to rain.
Do not store explosive substances such as aerosol cans with
a flammable propellant in this appliance.
If the appliance will be out of use for an extended period of time, switch it off using the relevant button,
and unplug it from the power mains. Empty the appliance, defrost it, clean it, and leave the door ajar.
In case of an error or power supply failure, do not open the freezer compartment unless the freezer
has not operated for over 16 hours. After this period, use the frozen food or provide sufficient cooling
(e.g. a replacement appliance).
7

Technical information on the appliance
Rating plate can be found in the appliance interior. It indicates data on voltage, gross and net volume,
type and amount of refrigerant, and information on the climate classes.
If the language on the rating plate is not the language of your choice or the language of your country,
replace it with the one supplied.
WARNING!
WARNING! Do not damage the refrigerant circuit.
8

Advice for saving power with refrigeration
appliances
• Install the appliance as specified in the instruction manual.
• Do not open the door more often than necessary.
• Occasionally make sure air circulation underneath the appliance is unobstructed.
• If the gasket is damaged or does not provide a perfect seal for any reason, have it replaced as
soon as possible.
• Store the food in tightly sealed containers or appropriate packaging.
• Before placing the food in the refrigerator, allow it to cool down to room temperature.
• Defrost frozen food in the refrigerator compartment.
• To make use of the entire freezer compartment interior volume, remove some of the drawers as
described in the instruction manual.
• Defrost your conventional freezer when an approximately 3–5 millimetre layer of frost or ice has
built up on the refrigerated surfaces.
• Make sure the layout of shelves in the compartment is uniform and that the food is placed so that
the air can freely circulate in the appliance interior (observe the recommended placement of food
as described in the instructions).
• In appliances with a fan, do not block the fan slots or vents.
• If you do not need the fan or the ionizer, switch them off to reduce power consumption.
9
Installation and connection
Selecting the room
• Install the appliance in a dry and well ventilated room. The appliance will operate correctly if the
environment temperature is in the interval specified in the table. The appliance class is indicated
on the rating plate / label with the basic information on the appliance.
Relative humidityAmbient temperature range °CClassDescription
≤75%
+10 to +32SN
Extended temper-
ate
+16 to +32NTemperate
+16 to +38STSubtropical
+16 to +43TTropical
INFORMATION!
This appliance is not intended to be used as a build-in appliance.
INFORMATION!
Do not place an appliance in a room where temperature can drop to below 5 °C as this may
cause abnormal appliance operation or failure!
• After the installation, the appliance mains plug should be accessible!
• Do not place the appliance near appliances or devices radiating heat, such as a cooker, a stove,
a radiator, water heater etc., and do not expose it to direct sunlight. The appliance should stand
at least 3 cm away from an electric or gas cooker or at least 30 cm away from an oil or solid fuel
stove. If the distance between such source of heat and the appliance is smaller, use an insulating
panel.
10
Appliance placement
Appliance installation should be carried out by at least two persons to avoid any personal injury or
damage to the appliance.
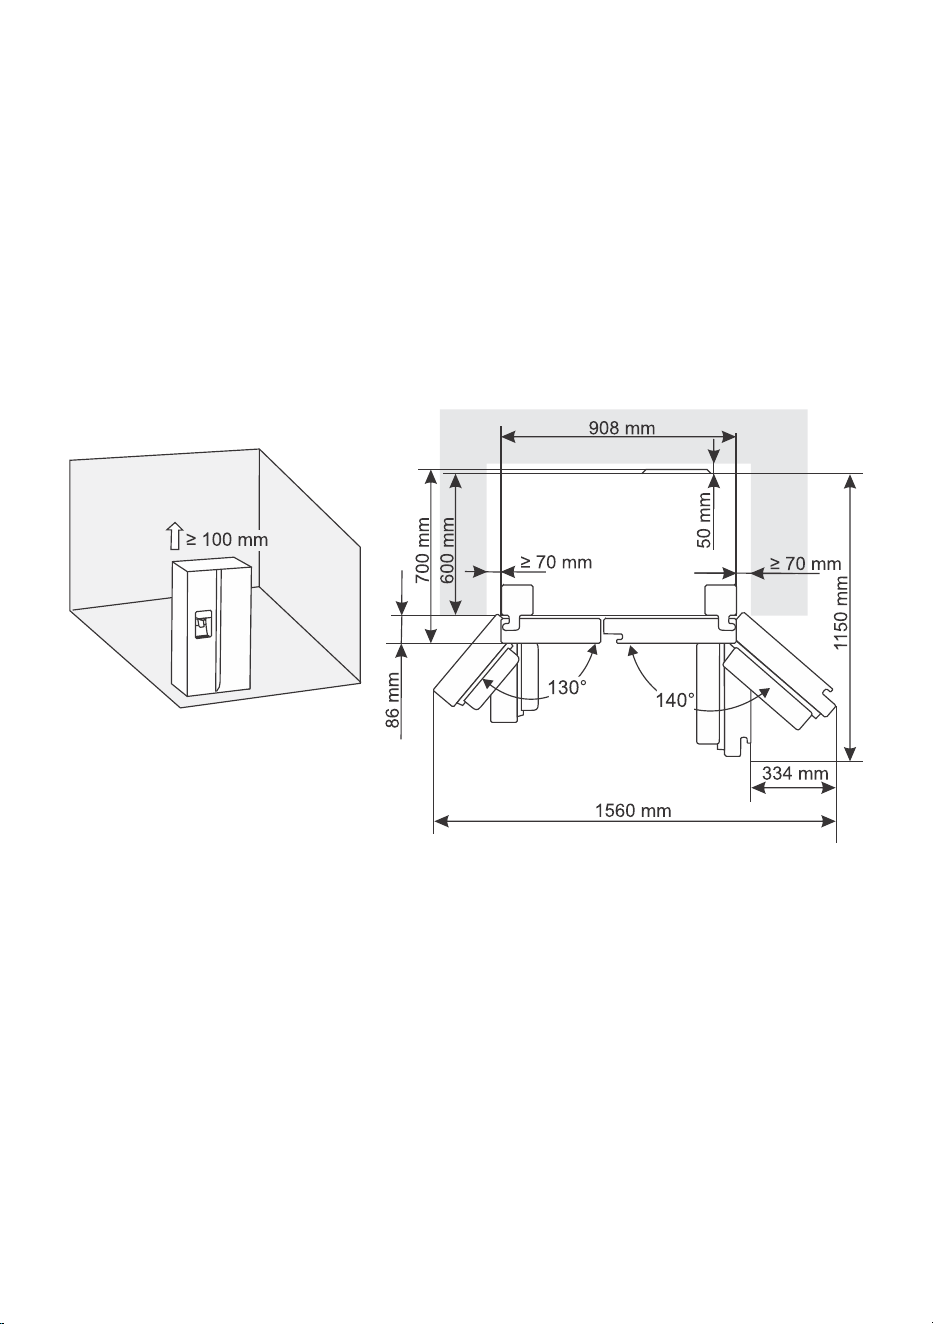
• The appliance is intended for free-standing installation. To reach the rated/minimum power
consumption, always provide 50 mm of clearance between the wall and the back of the appliance,
and 100 mm above the appliance. Also allow adequate air circulation on either side of the appliance
and above it.
• The appliance can also be placed adjacent to or between kitchen cabinets or cupboards, or
adjacent to a wall. In case of such placement, the appliance will operate flawlessly; however,
power consumption could increase. Observe the minimum clearance above and behind the
appliance, as indicated in the figure.
• Take into account the space or clearance required to open the appliance door, in order to allow
the drawers and shelves to be pulled out or removed (see installation diagram).
11
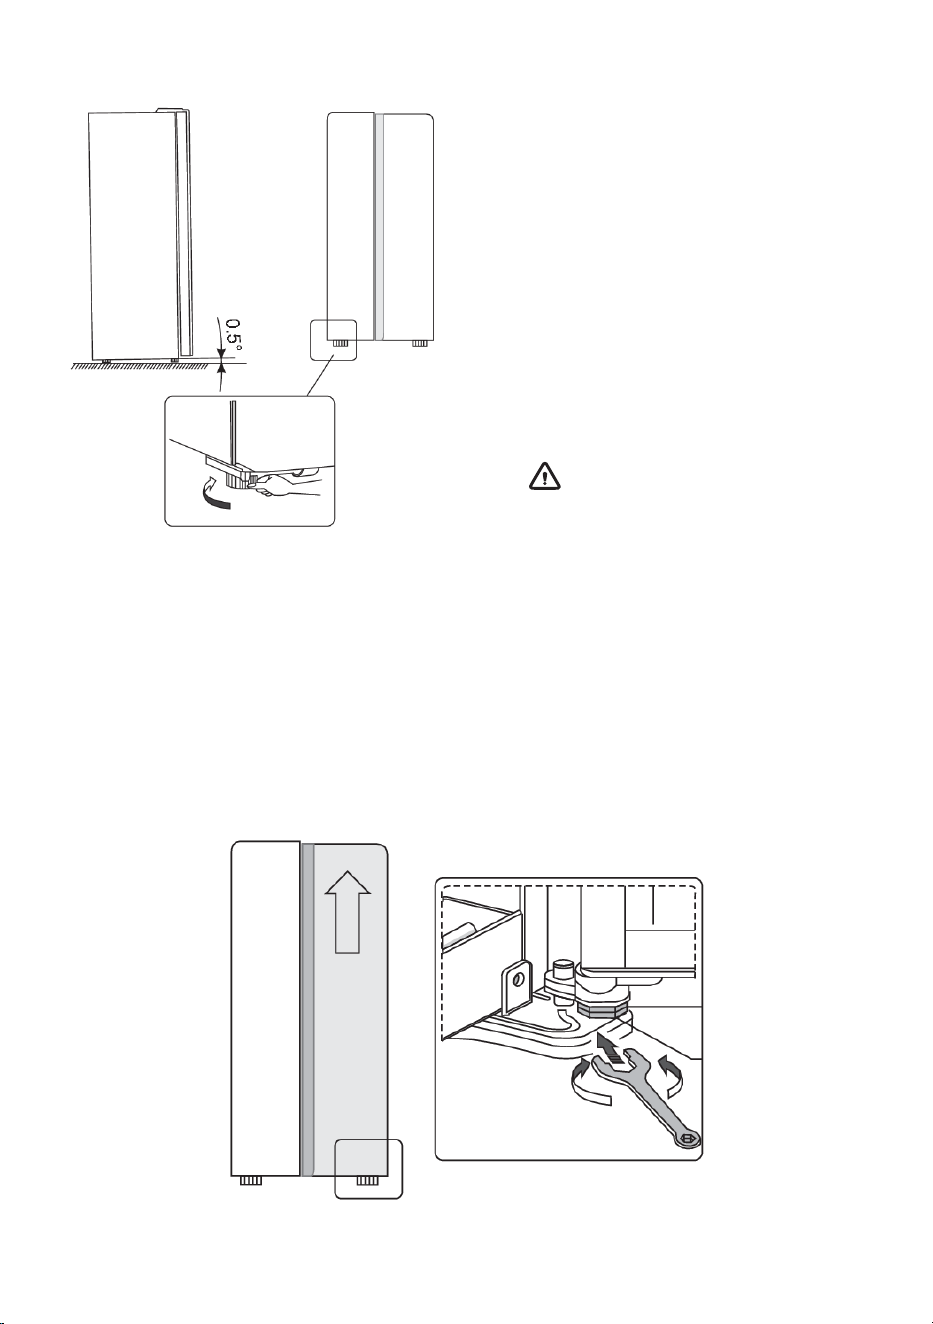
Appliance setup
• To ensure that the appliance will stand
horizontally and that sufficient air circulation
is provided behind the appliance, the feet
at the bottom of the appliance may need
to be adjusted. The height of the feet can
be adjusted with your fingers or using an
appropriate wrench.
• Allow the door to close automatically. Then
turn the adjustable feet so that the upper
part of the appliance is tilted backwards by
about 10 mm or by 0.5°.
• When you want to move the appliance,
raise the feet again so that the appliance
can move freely on rotating rollers. After
moving the appliance to the desired
position, re-align it.
WARNING!
Attention! Use the rotating rollers only
to move the appliance forward and
backward, as they do not function as
wheels. If you push the appliance to
one side or the other, it can damage
the floor and the rollers.
Adjusting the appliance door
If you find that the door of the appliance is not completely aligned (that the door of the freezer
compartment and the refrigerator compartment are not at the same level), you can use the supplied
tool to adjust the height of the door.
If the freezer door is higher than the refrigerator door. First, use the supplied tool to turn the screw on
the lower hinge counterclockwise to raise the door. Then fix the nut with a screwdriver.
12
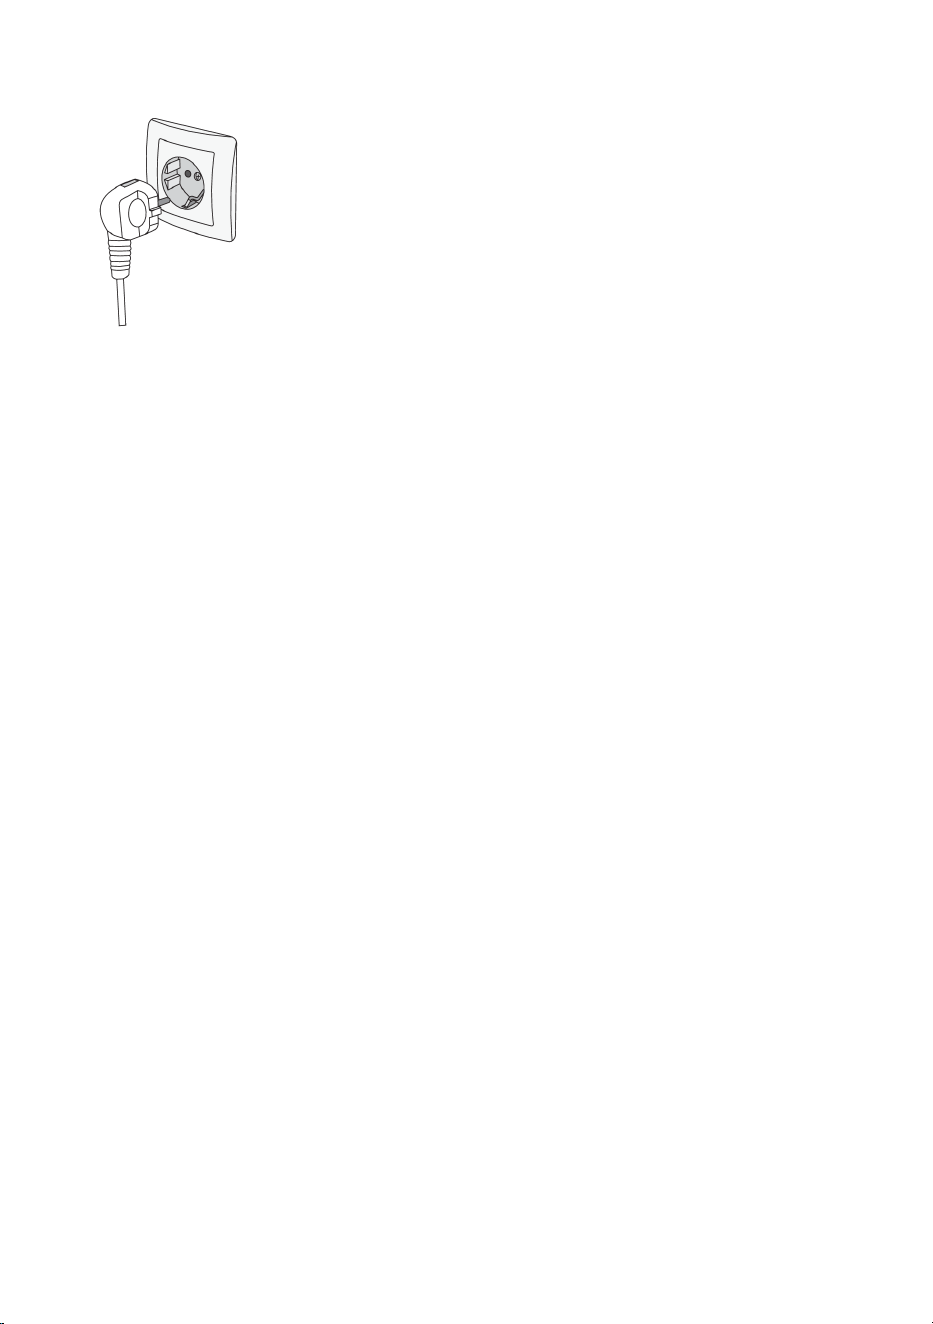
Connecting the appliance
• Connect the appliance to the power mains using the power cord.
The wall outlet should be fitted with a ground contact (safety socket).
Nominal voltage and frequency are indicated on the rating plate/label
with basic information on the appliance.
• The appliance must be connected to the power mains and grounded
in compliance with the effective standards and regulations. The
appliance will withstand short-term deviations from the nominal
voltage, but not more than +/- 6%.
13
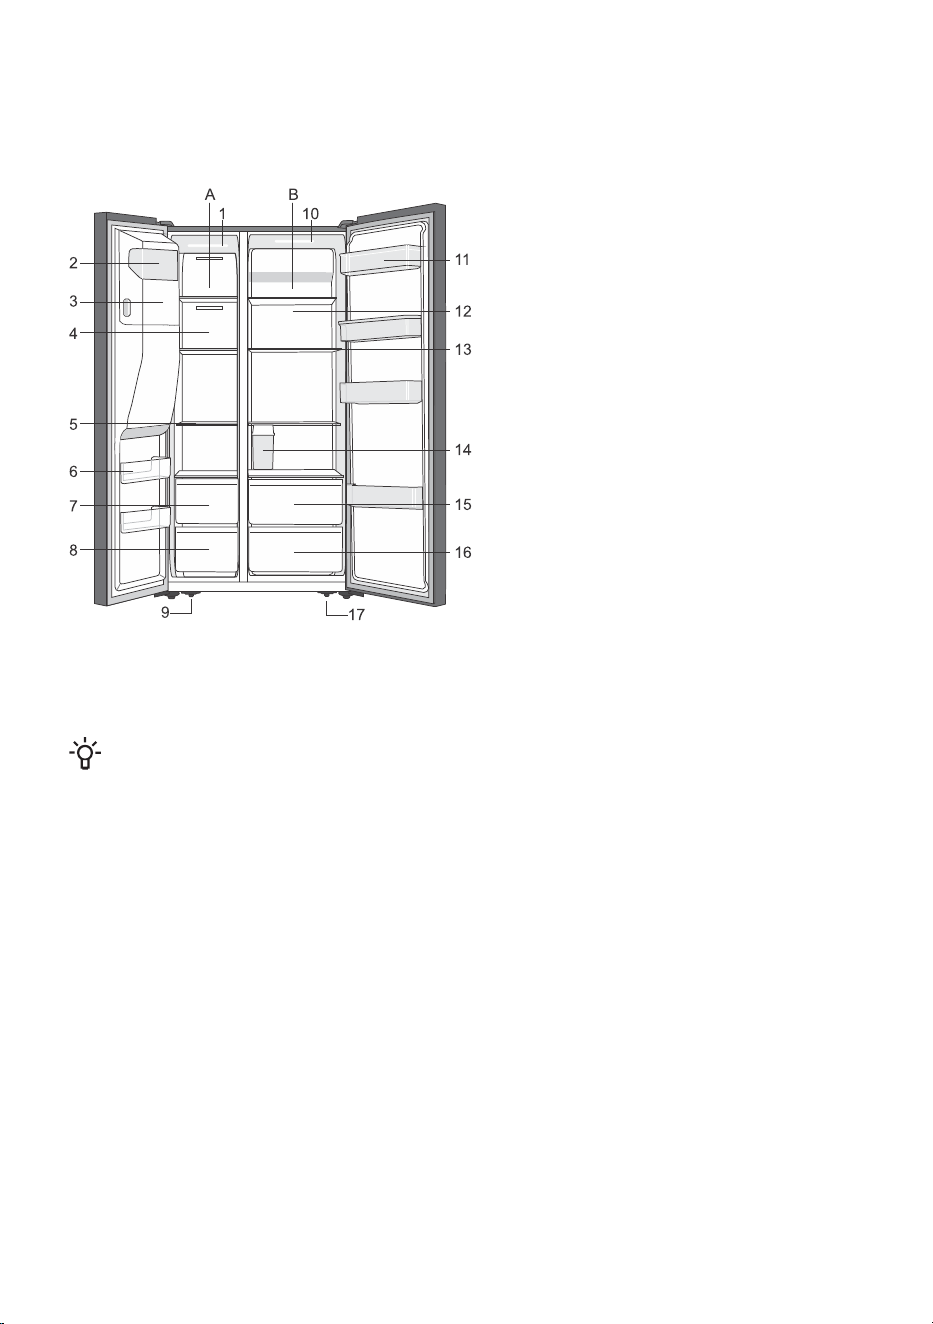
Description of the appliance
Appliance interior equipment may change according to the appliance model.
This product contains a light source of energy efficiency class G.
A Freezer
1. LED light in the freezer compartment
2. Icemaker front cover
3. Ice tray
4. Freezer air circulation duct cover
5. Freezer shelf
6. Freezer door shelf
7. Top freezer drawer
8. Bottom freezer drawer
9. Left adjustable foot at the bottom of the
appliance
B Refrigerator
10. LED light in the refrigeration compartment
11. Refrigerator door shelf
12. Refrigerator air circulation duct cover
13. Refrigerator shelf
14. Water storage tank
15. Top refrigerator drawer
16. Bottom refrigerator drawer
17. Right adjustable foot at the bottom of the
appliance
NOTE!
Due to occasional changes to our products, it is possible that your refrigerator will differ slightly
from the refrigerator described in these instructions for use, but its functions and methods of
use remain the same.
14
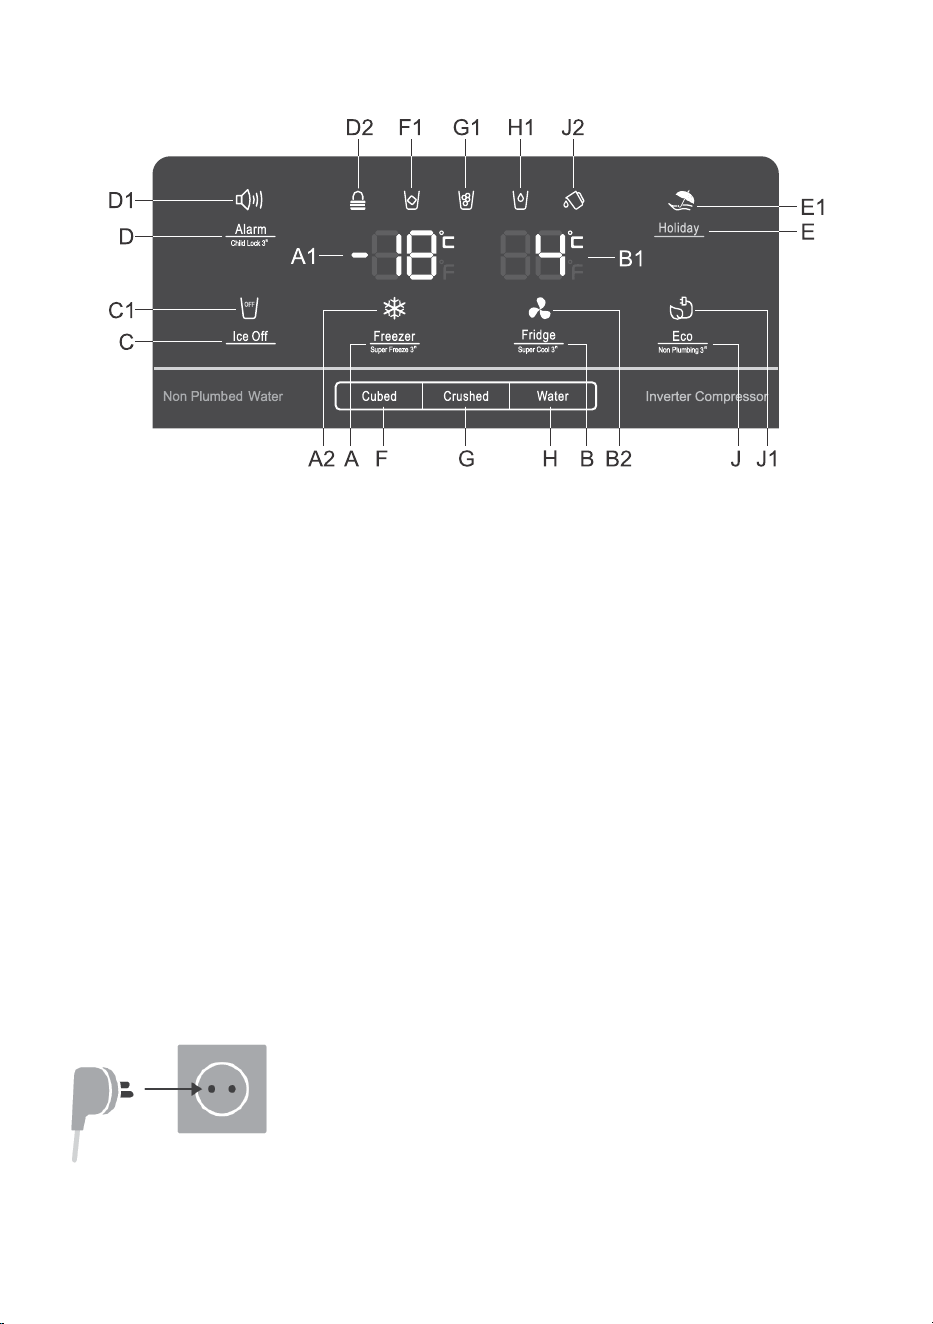
Operating the appliance
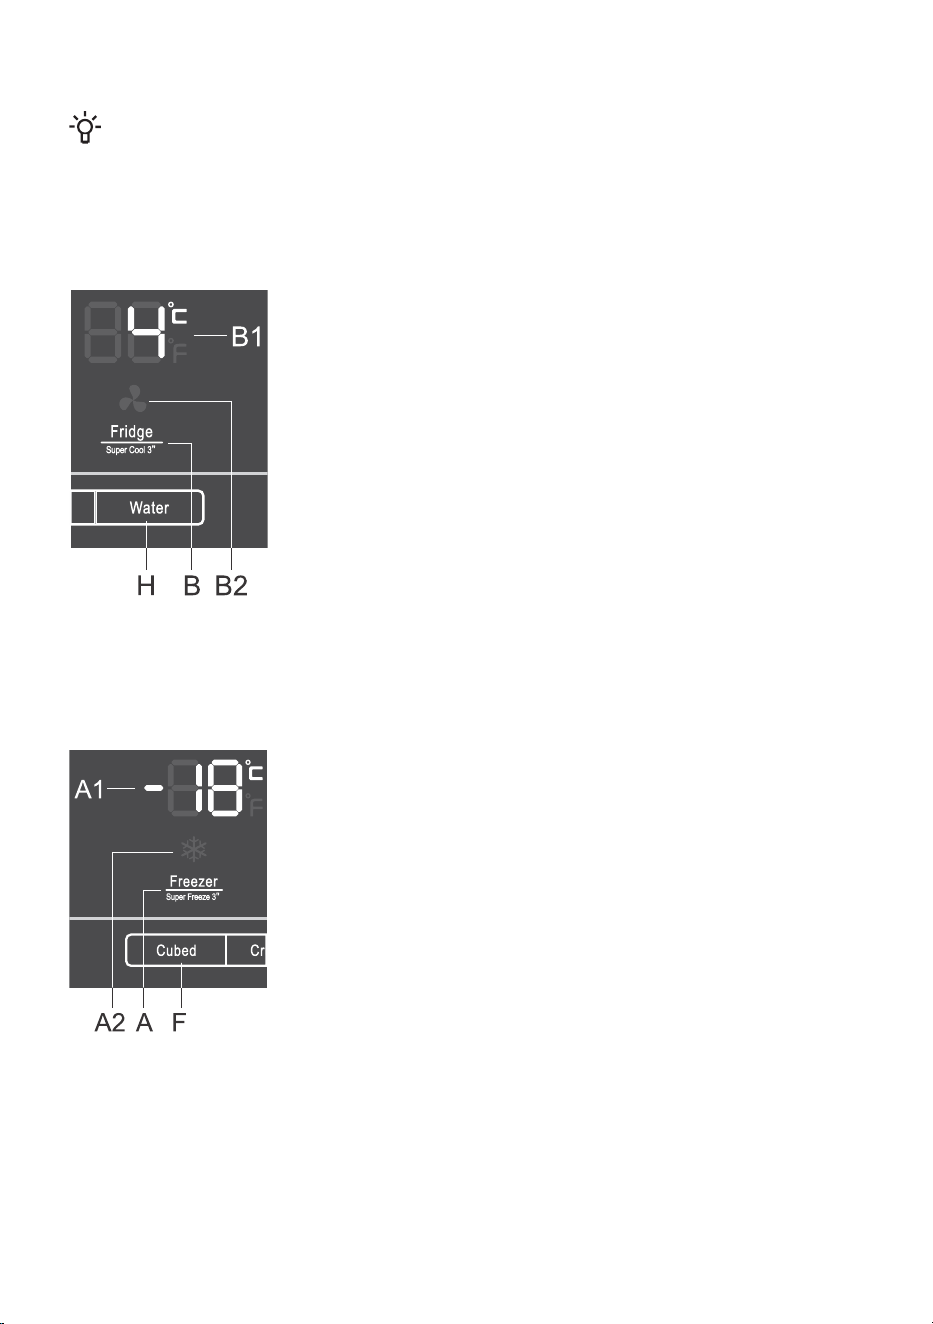
Freezer compartment temperature setting key and intensive freezing on/off keyA
Freezer compartment set temperature displayA1
Intensive freezing (fast freeze) function indicatorA2
Refrigerator compartment temperature setting key and intensive cooling on/off keyB
Refrigerator compartment temperature displayB1
Intensive cooling (super cool) function indicatorB2
Icemaker on/off keyC
Icemaker operation indicator (when the symbol C1 is on, icemaker is switched off)C1
Alarm off and child lock on/off key (child lock)D
Alarm operation indicatorD1
Child lock operation indicatorD2
Long absence on/off key (holiday mode)E
Long absence function indicator (holiday mode)E1
Key for making ice cubesF
Ice cube making indicatorF1
Key for making crushed iceG
Crushed ice making indicatorG1
Cold water supply keyH
Cold water filling indicatorH1
Eco function on/off key (eco mode) and water storage tank alarm off keyJ
Eco function indicator (eco mode)J1
Water storage tank alarm indicatorJ2
Switching the appliance on/off
Power on: To switch on the appliance, plug the power cord into the
power mains outlet.
Power off: To switch off the appliance, unplug the power cord from the
power mains outlet.
15
Adjusting the temperature in the appliance
INFORMATION!
• Appliance temperature is preset at the factory to the recommended setting, i.e. 4°C for the
refrigerator compartment and -18°C for the freezer compartment.
• After the appliance is switched on, it may take several hours for the set temperature to be
reached. Do not place any food into the refrigerator before the temperature drops to the
selected setting.
The temperature in the refrigerator compartment can be set with the
B key. Press the B key until the B1 display shows the desired
temperature.
• The temperature in the refrigerator compartment can be set in the range from +2 °C to + 8 °C.
• Each time you press the B key you reduce the setting by 1 °C. After three seconds of inactivity,
the setting is automatically saved as the last set temperature of the refrigerator compartment.
• Recommended temperature setting is 4°C.
The temperature in the freezer compartment can be set with the A key.
Press the A key until the A1 display shows the desired temperature.
• The temperature in the freezer compartment can be set in the range from -14°C to -24°C.
• Each time you press the A key you reduce the setting by 1 °C. After three seconds of inactivity,
the setting is automatically saved as the last set temperature of the freezer compartment.
• Recommended temperature setting is -18°C.
16
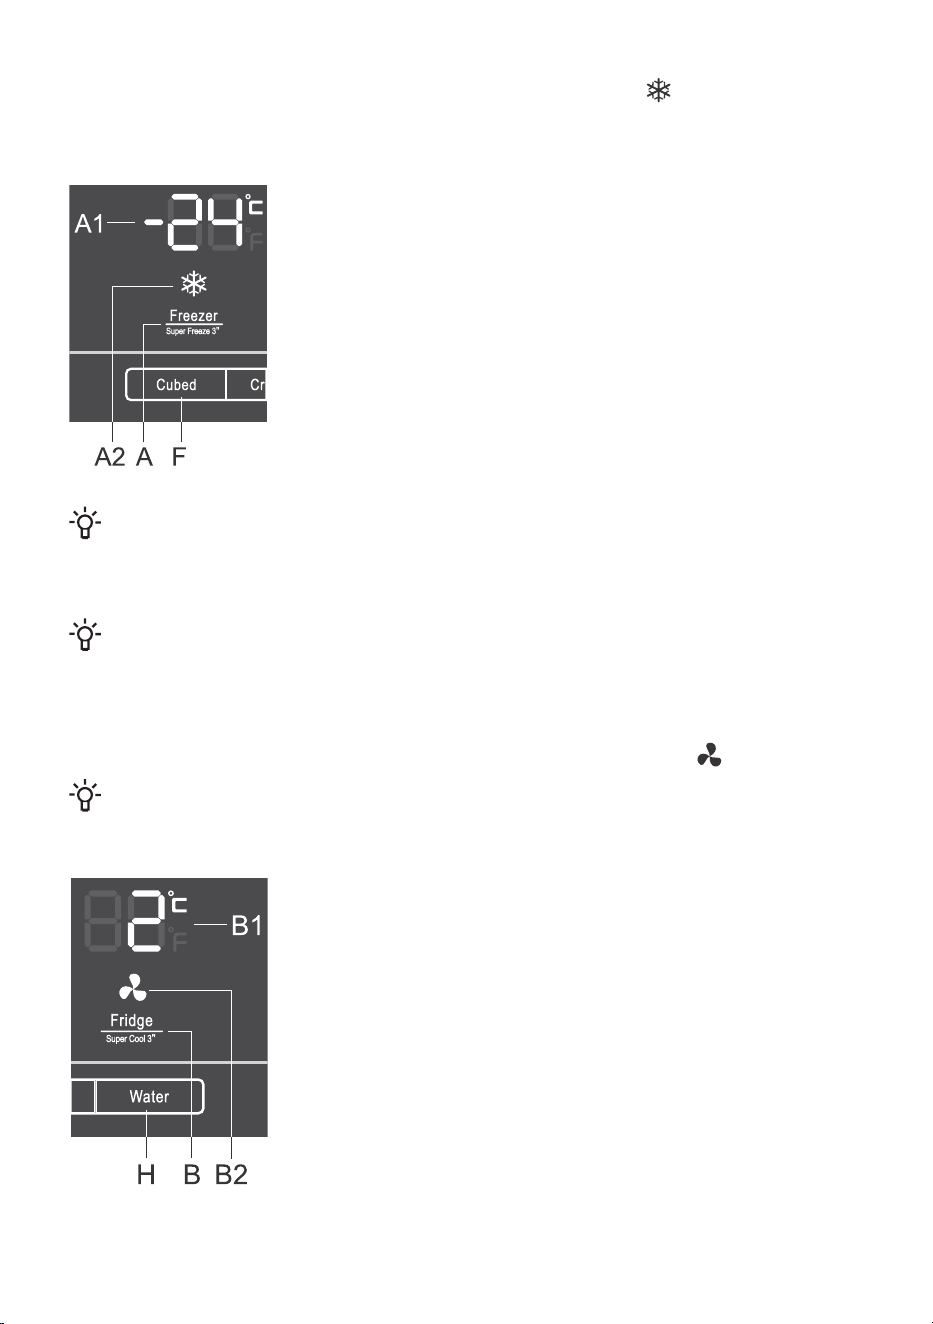
Intensive freezing (freezer compartment) ( )
• Use this setting after switching on the appliance for the first time, before cleaning, or before
inserting a large amount of food.
Power on: switch on the intensive freezing by long pressing (3 seconds)
the A key. The display will show A2 and indicate the value -24 °C.
Power off: switch off the intensive freezing by long pressing (3 seconds)
the A key again.
If the setting is not deactivated manually, it will be deactivated
automatically (after about a day). The setting returns to the last saved
state.
INFORMATION!
• When the intensive freezing (fast freeze) function is activated, the appliance will operate with
maximum power. During this time, operation may be temporarily somewhat louder.
INFORMATION!
• When the intensive freezing (super freeze) function is activated, temperature may be lower
both in the refrigerator and the freezer compartment.
Intensive cooling (refrigerator compartment) ( )
INFORMATION!
Use this setting after switching on the appliance for the first time, before cleaning, or before
inserting a large amount of food.
Power on: switch on the intensive cooling by long pressing (3 seconds)
the B key. The display will show B2 and indicate the value 2 °C.
Power off: switch off the intensive cooling by long pressing (3 seconds)
the B key again.
If the setting is not deactivated manually, it will be deactivated
automatically (after about three hours). The setting returns to the last
saved state.
17
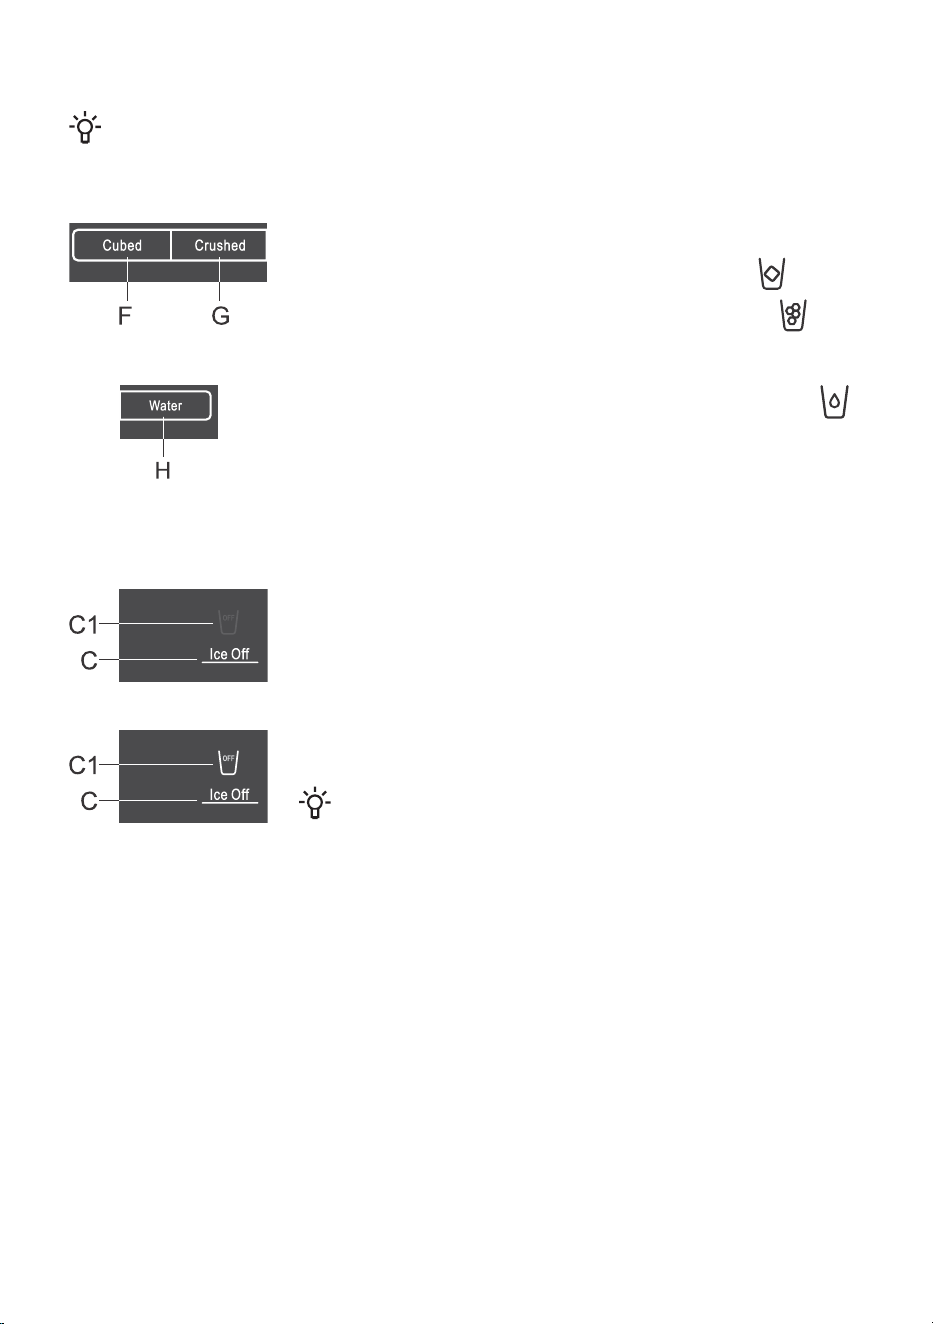
Ice maker/cold water dispenser operation
INFORMATION!
• When you open the freezer door or when the child lock is switched on, the device will not
work.
You have two options for making ice:
•
Ice cubes: press F. The following symbol will light up .
•
Crushed ice: press G. The following symbol will light up .
If you need cold water, press H. The following symbol will light up .
Switching the icemaker on/off
If you do not need ice, turn off this function to save water and electricity.
Power on: Switch on the icemaker by pressing C. The symbol C1 will
not be displayed.
Power off: Switch off the icemaker by pressing C. The following symbol
will light up C1.
INFORMATION!
When the following symbol is displayed C1, ice making will be
disabled, but you can still dose the ice that is already made in the
ice bucket, and you can still pour cold water by pressing H.
18
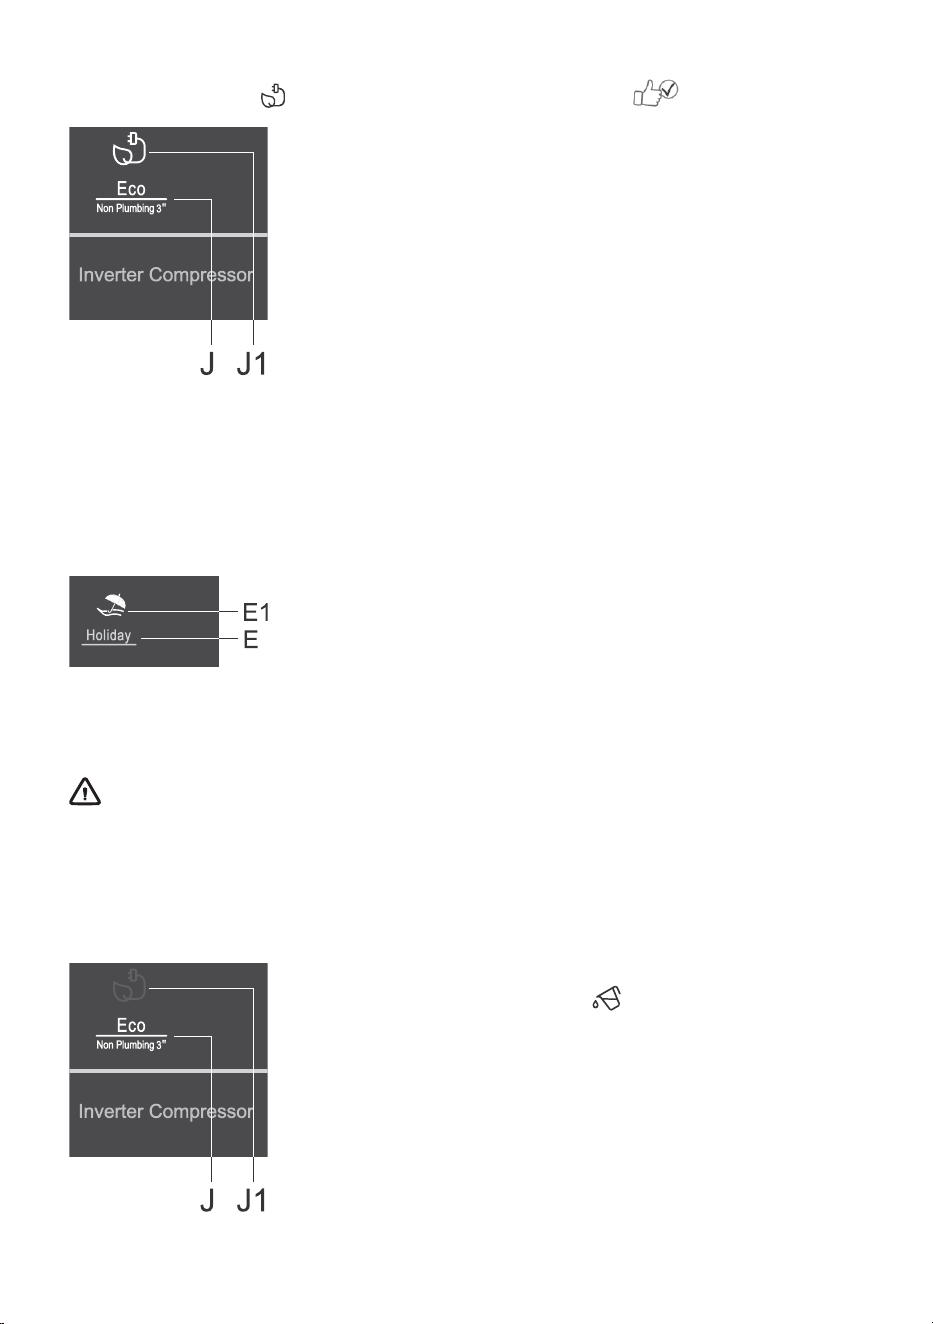
Eco function ( ) (Recommended setting )
Power on: turn on the Eco function by pressing J. The display will show
J1.
Power off: the Eco function can be switched off by pressing the J key
again until the symbol J1 goes out.
The Eco function will also be deactivated when you change the refrigerator or freezer compartment
temperature setting, or when you activate any of the other extra functions.
Holiday mode (prolonged absence)
Use this function when you are away for a long period of time, for example when you are going on
holiday or taking a long business trip.
Power on: turn on the function by pressing E. The display will show E1.
• When this function is activated, the refrigerator compartment temperature will be set to 15°C and
the freezer compartment temperature will be set to -18°C.
WARNING!
Before activating this function, empty the refrigerator compartment, as any perishables left in
this compartment may spoil.
Power off: turn off the function by pressing the E key again until the symbol E1 goes out.
Water storage tank alarm
If the water storage tank is not installed correctly or if it is not installed
at all, the following symbol lights up .
Switching off the alarm:
• You can turn off the alarm by pressing J and holding it for 3 seconds.
19
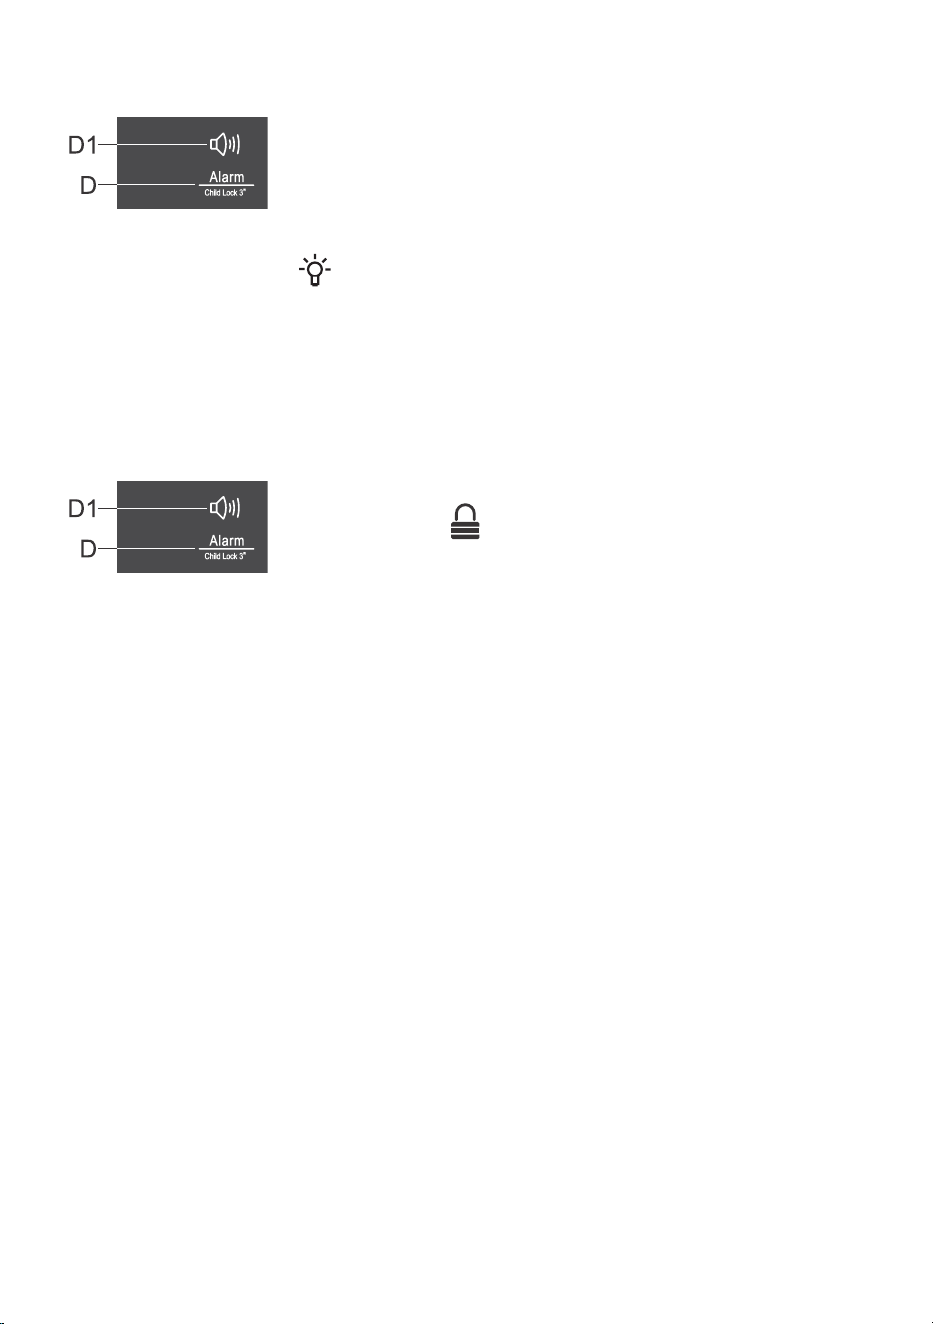
Open door alarm
If the door is open for too long, an acoustic alarm (repetitive beep) will
be activated and the following symbol will light up D1. The beep will
continue sounding for 10 minutes, at a rate of three times per minute.
Switching off the alarm: Turn off the acoustic alarm by closing the door.
The symbol D1 will remain lit until you turn it off by pressing D.
INFORMATION!
If you leave the door open for more than 10 minutes, the alarm will
no longer be sounded. Appliance operation will switch to safe mode
in order to provide sufficient cooling and prevent food spoilage
despite the open door.
Child Lock
Power on: activate the child lock by long pressing (3 seconds) D, until
the display shows .
This function locks the entire control panel, including the icemaker/cold
water dispenser.
Power off: to deactivate the function, press the key again for a long time
D.
In the event of a power failure, the function is not preserved.
20

Appliance interior equipment
( * Equipment depends on the model)
Shelves
Empty shelves can be rearranged as you see fit across the guides in the appliance interior without
having to remove them from the appliance. To move or remove a shelf from the appliance, pull it
towards you, lift it up at the front and then move or pull it out of the appliance. Store quickly perishable
food at the back of the shelf where the temperature is the lowest.
Fruit and vegetables drawer (CrispZone) *
The drawers at the bottom of the refrigerator are meant for storing fruits and vegetables. They provide
humidity and prevent the food from drying out.
• Pulling out the bin:
- Pull out the bin as far as it will go. Then, lift the front part and
pull it out completely.
Door racks
The inside of the door of the refrigerator and freezer compartment is
equipped with shelves designed for storing small packages.
You may lay out the racks as desired by lifting them slightly from the
grooves that hold them in place and moving them to the desired spot,
making sure to fit them in the grooves there.
The lower shelf on the door of the refrigerator compartment is designed
for storing bottles.
Maximum load on each door shelf is 5 kg.
Air distribution system (MultiFlow) *
• Advanced MultiFlow system evenly distributes the air and equalizes the temperature throughout
the refrigerator. This system also allows placing any type of food on any shelf in the fridge, as
there are not temperature differences between them.
21

Water storage tank
Water for the icemaker and the cold water dispenser is stored in the water storage tank. To add water
to the water storage tank, follow these instructions:
Pull out the water storage tank.
Lift the small cap on the front, then pour water directly into the storage
tank.
WARNING!
Only pour drinking water into the water storage tank.
Reinstall the water storage tank on the refrigerator shelf.
Icemaker/cold water dispenser
By pressing "cubed" (ice cubes), "crushed" (crushed ice) or "water", you can choose whether ice
(and in what form) or cold water comes from the dispenser.
After selecting the type of ice, gently press on the lever of the dispenser with a cup or glass. Ice will
come out of the appliance. Make sure that the cup or glass is pressed against the machine so that
the ice falls into it.
INFORMATION!
• If you select ice cubes after the crushed ice function has been selected, an even smaller
amount of the remaining crushed ice may fall into the cup or glass.
• Do not remove the cup or glass from under the dispenser as soon as you have poured the
desired amount of water or obtained the desired amount of ice. Wait another 2 to 3 seconds
to prevent spillage.
• The water from the dispenser is cold, not ice cold. If you want cooler water with ice, first
pour ice into the glass and then fill it with water from the machine.
22
WARNING!
• Do not pull out the lever as this may damage or break the lever spring.
• To prevent the ice shredder motor from overheating, do not dose the ice for longer than one
minute during normal use.
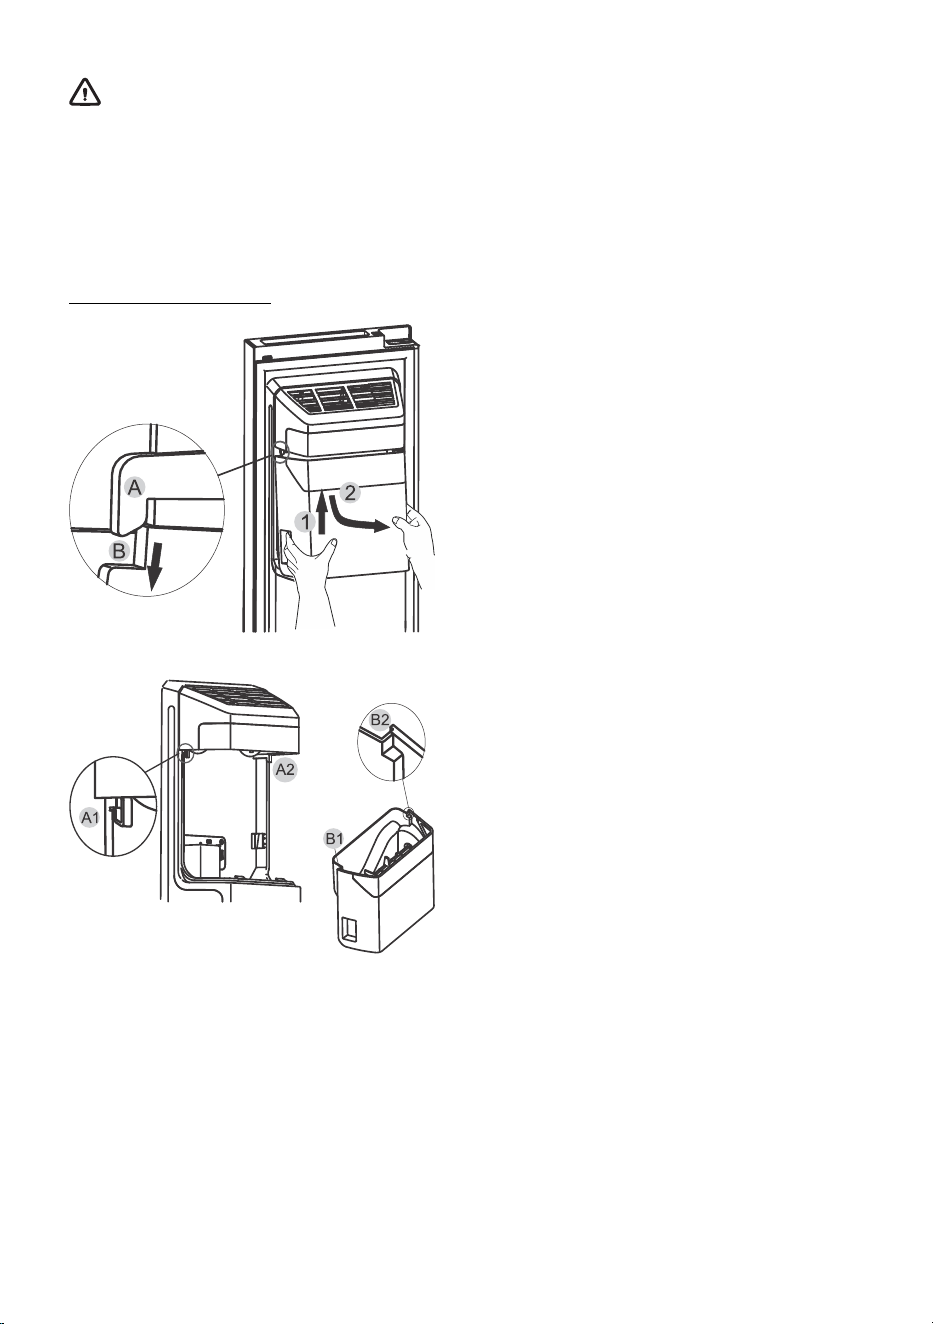
Using the ice bucket
To remove the ice bucket: please grab the handle as shown in the figure below. Then lift it up and
slowly pull it out to prevent any injuries.
Removing the ice bucket:
1. Lift the ice bucket.
2. Slowly pull out the ice bucket.
When returning the ice bucket to its place,
make sure that the two side grooves (A1 and
B1) on the ice bucket lock into the couplings
(A1 and A2).
23
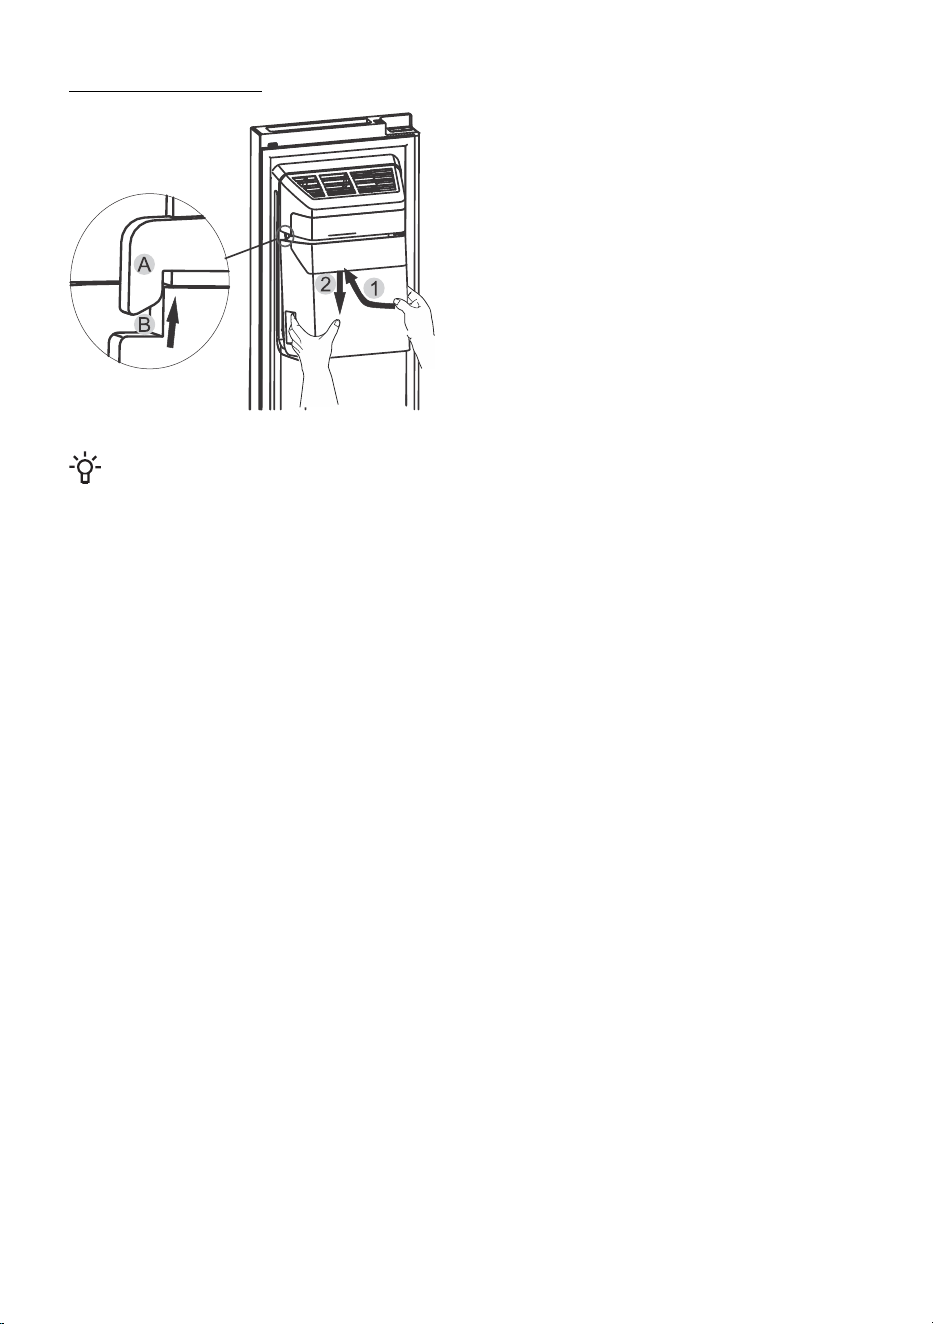
Installing the ice bucket:
1. Push the ice bucket upwards and make
sure that the two side grooves (B1 and B2)
on the ice bucket lock into the couplings
(A1 and A2).
2. Pull the ice bucket downwards and make
sure it sits firmly in the holder.
INFORMATION!
• When the icemaker drops ice cubes into the bucket, all the sounds you hear are part of
normal operation.
• If you do not remove the ice from the bucket for a long time, the cubes may stick together.
In this case, please remove all the ice and empty the bucket.
• If the refrigerator is switched off for too long, the ice in the bucket will melt and water from
the refrigerator may flow from the refrigerator to the floor. To prevent this, remove all ice from
the bucket.
• If you cannot remove the ice from the bucket, check if the ice is stuck in the chute and remove
it if necessary. You can also pull out the ice bucket to check if multiple ice cubes have stuck
together and remove them.
• The first quantity of ice cubes produced after installation will be smaller, as there is still air
in the water hoses. During normal use, this air will be expelled from the hose.
• Wash the ice bucket with a mild detergent, then rinse and dry thoroughly. Do not use harsh
or abrasive cleaners or solvents.
24
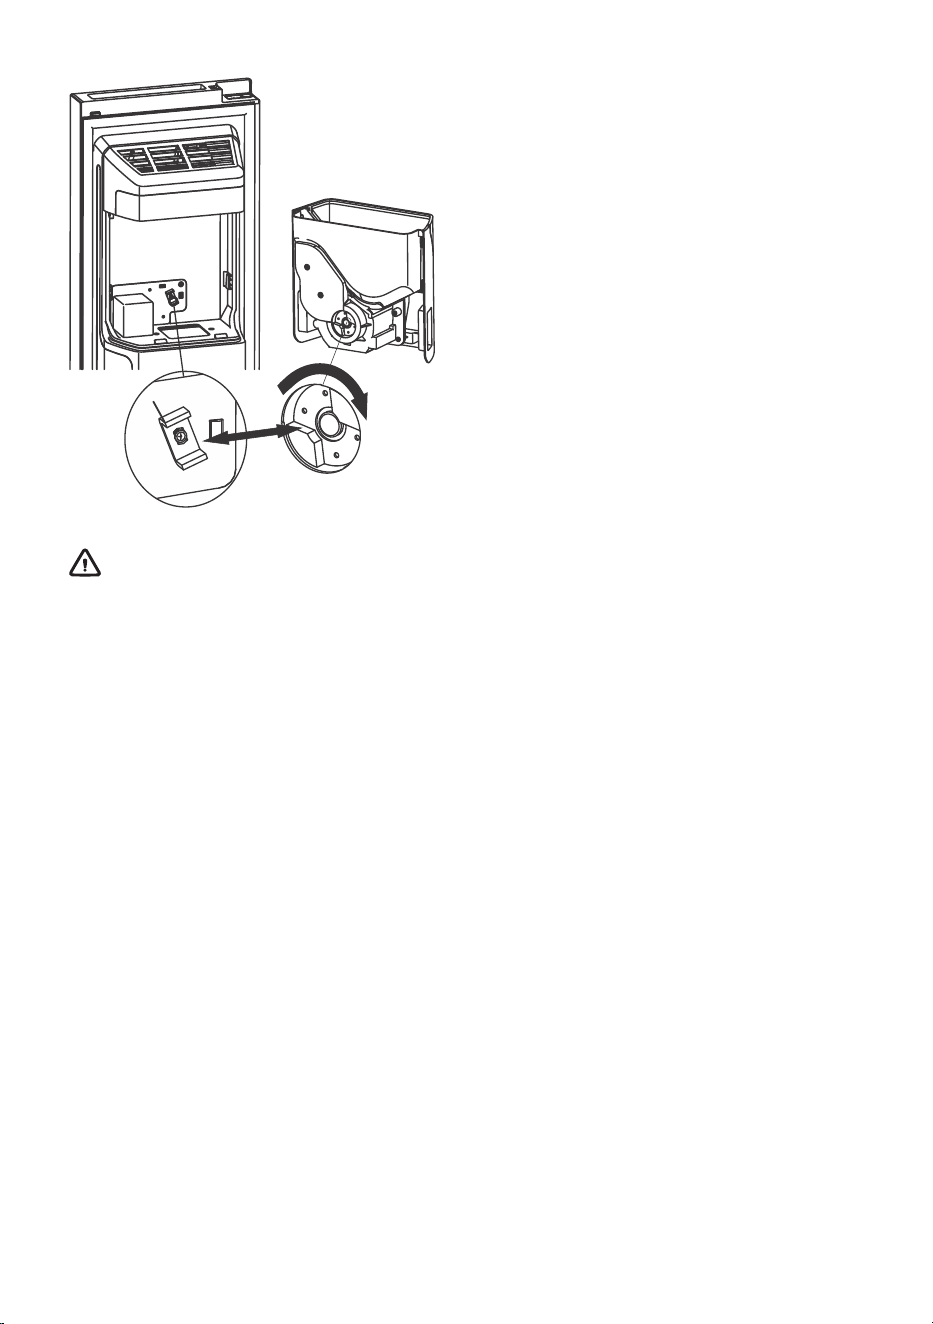
Before reinstalling the ice bucket, please check
that the couplings are at the correct angle to fit
each other. If not, move the ice bucket coupling
to such an angle that it will match the motor
coupling.
WARNING!
• Do not insert fingers, hands, or any unsuitable objects into the chute or ice bucket, as this
may result in injury or property damage.
• Do not allow children to climb the icemaker/cold water dispenser or pull on the ice bucket,
as this may result in injury.
25

Storing food in the refrigerator
Important warnings regarding food storage
INFORMATION!
Correct use of the appliance, appropriate packaging, maintaining the right temperature, and
observing the food hygiene standards have a decisive impact on the quality of food storage.
Observe the expiry dates for the food, indicated on the packaging.
Food stored in the refrigerator should be kept in closed containers or in appropriate packaging
to prevent it from emitting or receiving odours and humidity.
Do not store inflammable, volatile, and explosive substances in the refrigerator.
Bottles with high alcohol content should be tightly sealed and stored in an upright position.
Some organic solutions, essential oils in lemon and orange peel, butter acid, etc. may damage
the plastic surfaces in case of a prolonged contact, causing damage and premature ageing of
these materials.
Unpleasant odour warns of lacking cleanliness of the appliance or perished contents (see chapter
Cleaning the Appliance).
If you are leaving home for a longer period of time, remove perishables from the refrigerator.
Avoid contamination of food
To avoid contamination of food, please respect the following instructions:
• Opening the door for long periods can cause a significant increase of the temperature in the
compartments of the appliance.
• Regularly clean surfaces that can come in contact with food and accessible drainage systems.
• Store raw meat and fish in suitable containers in the refrigerator, so that it is not in contact with
or drip onto other food.
• If the refrigerating appliance is left empty for long periods, switch off, defrost, clean, dry, and leave
the door open to prevent mould developing within the appliance.
26
Freezing and storing frozen food
Freezing procedure
INFORMATION!
Maximum amount of fresh food that may be inserted at once is specified on the appliance rating
plate. If the amount of food to be frozen exceeds the indicated amount, the quality of freezing
will be inferior; in addition, the quality of the food already frozen will deteriorate.
• Activate the super freeze function 24 hours before freezing fresh food:
-
by long pressing (3 seconds) , until the following symbol lights up .
• Then you can put fresh food in the freezer area.
Make sure the fresh food is not in contact with the food that is already frozen.
• When freezing smaller amounts of food (1-2 kilograms), activating the super freeze function is not
required.
Important warnings on freezing
INFORMATION!
Only use the freezer to freeze food appropriate for freezing. Always use quality and fresh food.
Select the most suitable packaging for the food and use the packaging correctly.
Make sure the packaging is air and water tight so that the food does not dry out and loose its
vitamins.
Indicate the type of food, amount, and date of freezing on the packaging.
It is important that the food freezes quickly. Therefore, smaller packages are recommended.
Refrigerate the food before freezing.
Storing industrially frozen food
• When storing and using frozen food, observe the manufacturer's instructions. Temperature and
expiry date are indicated on the packaging.
• Only choose food with undamaged packaging, stored in freezers at temperatures of –18 °C or
lower.
• Do not purchase food covered in frost as this indicates it has been partly thawed several times
and that it is of inferior quality.
• Protect the food from thawing during transport. In case of an increase in temperature, storage
time will be shorter and quality will deteriorate.
Frozen food storage time
Recommended storage time in the freezer
Storage lifeType of food
from 10 to 12 monthsFruit, beef
from 8 to 10 monthsVegetables, veal, poultry
from 6 to 8 monthsVenison
27

Table continued from last page
Storage lifeType of food
from 4 to 6 monthsPork
4 monthsFinely chopped or minced meat
3 monthsBread, pastas, cooked dishes, whitefish
2 monthsOffal
1 monthSmoked sausage, bluefish
Thawing frozen food
• Thawing is an important step in storing food preserved by freezing. Food must be thawed in the
correct way.
• Suitable methods of thawing food are:
- in the refrigerator;
- in cold water;
- in a microwave or conventional oven with a suitable thaw program.
• Some frozen products can be prepared without needing to thaw them first. The manufacturer will
state this on the packaging.
• The food needs to be packed in small portions. In this way the food thaws faster.
• Use partially or completely thawed food as quickly as possible. The bacteria in thawed food are
reactivated and the food will spoil rapidly. This applies in particular to fruit, vegetables and
ready-made food.
• Do not refreeze partially or completely thawed food.
28

Defrosting the appliance
Automatic refrigerator defrosting
Refrigerator does not need defrosting because the ice on the back interior wall is thawed automatically.
Any accumulated ice will melt when the compressor unit is inactive. Drops will flow through an opening
in the refrigerator rear wall into a tray fitted above the compressor, from where they will evaporate.
Make sure the opening in the back wall in the refrigerator interior is never blocked by food or any other
object.
If an excessive layer of ice is formed on the rear wall of refrigerator interior (3–5 mm), switch off the
appliance and defrost the appliance manually.
Defrosting a NoFrost freezer
• The NoFrost freezer will defrost automatically. Any frost layer that may build up occasionally will
disappear automatically.
29

Cleaning the appliance
WARNING!
Before cleaning, unplug the appliance from the mains - unplug the appliance and remove the
connection cable from the socket.
• Use a soft cloth to clean all surfaces. Cleaners that contain abrasive substances, acids, or solvents
are not suitable for cleaning as they may damage the surface.
Clean the appliance exterior with water or a mild solution of suds.
Lacquer-coated and aluminium surfaces may be cleaned with lukewarm water to which you have
added a mild detergent. Use of cleaners with low alcohol content is allowed (e.g. window cleaners).
Do not use cleaners containing alcohol for cleaning plastic materials.
Appliance interior can be cleaned with lukewarm water to which you can add some vinegar.
• Do not wash the parts of appliance interior equipment in a dishwasher as they may be damaged.
• Frost or ice build-up, 3–5 mm thick, will increase power consumption. Therefore, it should be
regularly removed (does not apply to NO FROST freezers). Do not use any sharp objects, solvents,
or sprays.
• After cleaning, switch the appliance back on and insert the food.
30
Troubleshooting
Cause or remedy:Problem:
Appliance is connected to
the power mains but it does
not work.
• Make sure there is voltage in the power outlet and that the appli-
ance is switched on.
Cooling system operates
continuously for a long peri-
od of time:
• Too high environment temperature.
• Door opened too frequently or too long.
• Door not closed correctly (possible impurities on the seal, mis-
aligned door, damaged seal etc.).
• Too much fresh food inserted at once.
• The sensor in the refrigerator is blocked by fresh food. Allow air
to circulate around the sensor (only some models have it).
Excessive build-up of ice on
the back wall of refrigerator
interior can be a result of the
following:
• door opened too frequently or too long.
• Warm food placed in the refrigerator.
• Food or containers in contact with the back interior wall of the
refrigerator.
• Poor door sealing.
• If the seal is dirty or damaged, clean or replace it.
Build-up of ice or frost in the
freezer interior:
• The door has been opened for too long or too frequently.
• The door is not properly closed.
• The door has a poor seal (the gasket is dirty, the door is not
properly aligned, the gasket is damaged etc.).
• Manually defrost the appliance.
Condensate (dew) on the
shelf above the drawers:
• This is transient phenomenon which cannot be entirely avoided
in periods of high environment temperature and humidity. It sub-
sides when temperature and humidity are normalized. We recom-
mend cleaning the drawers more frequently and wiping the
droplets occasionally.
• Open the humidity control slider.
• Put food in bags or other packaging with a good seal.
Droplets on the refrigerator
compartment back wall.
• This is normal. The refrigerator compartment is defrosted auto-
matically, which results in droplets of water that flows through an
opening in the refrigerator compartment back wall into a tray
above the compressor unit, from which it evaporates.
Water is dripping/leaking
from the refrigerator:
• Clogged water discharge opening or water dripping past the water
gutter.
• Clean the blocked opening, e.g. using a plastic straw.
• If a thick layer of ice builds up, defrost the appliance manually
(see Defrosting the Appliance).
31
Table continued from last page
Cause or remedy:Problem:
Door is difficult to open:
• If you are trying to open the freezer door after just having closed
it, this could be difficult to do. As you open the door, some cool
air escapes from the appliance and it is replaced by warm air from
the environment. When this air is cooled, negative pressure is
generated which results in problems as you try to open the door.
After a few minutes, the condition is normalized and the door can
be easily opened again.
Appliance sides are warm:
• This is normal. There are pipes and tubes installed in the appliance
sides, which tend to heat up during appliance operation.
LED lighting does not work:
• If LED lighting does not work, call a service technician.
• Do not attempt a repair of the LED lighting yourself, as there is
danger of contact with high voltage!
Ec or Er appears on the dis-
play unit:
• The touch keys do not respond. Call a service centre for repair.
• Until the appliance is repaired by a service technician, the appli-
ance will operate in safe mode. The appliance will automatically
preserve the most suitable temperature for each compartment.
E0 will appear on the display
unit:
• The humidity and ambient temperature sensor is defective. Call
a service centre to fix the problem. The appliance will operate in
safe mode until it is repaired by a service technician. The appliance
will automatically maintain the most suitable temperature for each
compartment.
E1 will appear on the display
unit:
• The temperature sensor of the refrigerator is defective. Call a
service centre to fix the problem. The appliance will operate in
safe mode until it is repaired by a service technician. The appliance
will automatically maintain the most suitable temperature for each
compartment.
E3 appears on the display
unit:
• The temperature sensor of the freezer is malfunctioning. Call a
service centre to fix the problem. The appliance will operate in
safe mode until it is repaired by a service technician. The appliance
will automatically maintain the most suitable temperature for each
compartment.
E4 appears on the display
unit:
• Evaporator sensor is defective. Call a service center to fix the
problem. The appliance will operate in safe mode until it is repaired
by a service technician. The appliance will automatically maintain
the most suitable temperature for each compartment.
32

Table continued from last page
Cause or remedy:Problem:
• The temperature sensor of the icemaker is defective. Call a service
centre to fix the problem. The appliance will operate in safe mode
until it is repaired by a service technician. The appliance will
automatically maintain the most suitable temperature for each
compartment.
E9 appears on the display
unit:
Eb will appear on the display
unit:
• The icemaker is defective. Call a service centre to fix the problem.
If the above tips do not resolve your problem, call the nearest authorized service centre and state the
type, model, and serial number indicated on the appliance rating plate or label located in the appliance
interior.
33

Information about appliance noise
Cooling in refrigerator freezers is made possible by a cooling system that also includes a compressor
(and a fan with some appliances), which generates some noise. The level of noise depends on
installation, proper use, and age of the appliance.
• After connecting the appliance to the power mains, compressor operation, or the sound of flowing
liquid, may be somewhat louder. This is not a sign of malfunction and it will not affect the useful
life of the appliance. In time, appliance operation and this noise will become quieter.
• Sometimes, unusual or loud noises may appear during appliance operation; these are mostly the
result of improper installation:
- The appliance must stand level and stable on a solid base.
- The appliance may not be in contact with a wall or adjacent furniture.
- Make sure the interior equipment sits firmly in its place and that the noise is not caused by
rattling cans, bottles or other containers placed next to each other.
• Due to the higher workload on the cooling system when the door is opened more frequently or
for a longer time, when a large amount of fresh food is introduced or when intensive freezing or
cooling functions are activated, the appliance can temporarily generate more noise.
34
Environment protection
Packaging is made of environmentally friendly materials that can be recycled, disposed of, or destroyed
without any hazard to the environment.
Removing an obsolete appliance
To protect the environment, take the obsolete appliance to an authorized home appliance collection
centre.
Before doing so, do the following:
• disconnect the appliance from the power mains;
• do not allow children to play with the appliance.
The symbol on the product or its packaging indicates that the product should not be treated as
normal household waste. The product should be taken to an authorized collection centre for waste
electric and electronic equipment processing. Correct disposal of the product will help prevent any
negative effects on the environment and health of people which could occur in case of incorrect
product removal. For detailed information on removal and processing of the product, please contact
the relevant municipal body in charge of waste management, your waste disposal service, or the store
where you bought the product.
35

Spare parts
Spare parts for the appliance you have purchased are available for 10 years. During this time, original
spare parts will be available to ensure the correct operation of your appliance.
The list of spare parts is available on the website:
https://partners.gorenje.com/GSD/gsd_public.aspx
36
Your notes
37

Your notes
38

Your notes
39
922406-a3