
Blu-ray Disc
Guide
TM

VAIO
®
Blu-ray Disc™ Disclaimers, Notes, Warnings
NOTICE
© 2007 Sony Electronics Inc. Reproduction in whole or in part without written per-
mission is prohibited. All rights reserved. This manual and the software described
herein, in whole or in part, may not be reproduced, translated, or reduced to any
machine readable form without prior written approval.
SONY ELECTRONICS INC. PROVIDES NO WARRANTY WITH REGARD TO
THIS MANUAL, ANY SOFTWARE REFERENCED HEREIN, OR OTHER INFOR-
MATION CONTAINED HEREIN AND HEREBY EXPRESSLY DISCLAIMS ANY
IMPLIED WARRANTIES OF MERCHANTABILITY OR FITNESS FOR ANY PAR-
TICULAR PURPOSE WITH REGARD TO THIS MANUAL, THE SOFTWARE, OR
SUCH OTHER INFORMATION. IN NO EVENT SHALL SONY ELECTRONICS
INC. BE LIABLE FOR ANY INCIDENTAL, CONSEQUENTIAL, OR SPECIAL DAM-
AGES, WHETHER BASED ON TORT, CONTRACT, OR OTHERWISE, ARISING
OUT OF OR IN CONNECTION WITH THIS MANUAL, THE SOFTWARE, OR
OTHER INFORMATION CONTAINED HEREIN OR THE USE THEREOF.
SONY CANNOT WARRANT THAT THE FUNCTIONS DESCRIBED IN THIS
GUIDE WILL BE UNINTERRUPTED OR ERROR-FREE. SONY ALSO ASSUMES
NO RESPONSIBILITY, AND SHALL NOT BE LIABLE FOR ANY DAMAGES TO,
OR VIRUSES THAT MAY INFECT, YOUR COMPUTER EQUIPMENT, OR OTHER
PROPERTY ON ACCOUNT OF YOUR ACCESS TO, USE OF, OR BROWSING IN
ANY DESCRIBED WEB SITE, OR YOUR DOWNLOADING OF ANY MATERIALS,
DATA, TEXT, IMAGES, VIDEO, OR AUDIO FROM ANY DESCRIBED WEB SITE.
WEB SITE INFORMATION IS OBTAINED FROM VARIOUS SOURCES AND MAY
BE INACCURATE. COPIES OF COPYRIGHTED INFORMATION MAY ONLY BE
MADE FOR LEGALLY PERMISSIBLE PURPOSES.
Sony Electronics Inc. reserves the right to make any modification to this manual or
the information contained herein at any time without notice. The software described
herein is governed by the terms of a separate user license agreement.
This manual references software owned by Sony and licensed by third parties. Use
of such software is subject to the terms and conditions of license agreements
enclosed with the product that accompanies such software. Some of the software
may not be transported or used outside the United States. Software specifications
are subject to change without notice and may not necessarily be identical to current
retail versions.
Sony, VAIO, the VAIO logo and like.no.other are trademarks or registered trade-
marks of Sony Electronics.
Blu-ray Disc and Blu-ray Disc logo are trademarks of Blu-ray Disc Association.
Microsoft, Windows, and the Windows logo are trademarks or registered trade-
marks of the Microsoft Corporation.
All other trademarks are trademarks or registered trademarks of their respective
owners.

Contents
What is Blu-ray Disc™ Media? ....................................................... 1
Benefits of Blu-ray Technology ....................................................... 1
Simplicity .................................................................................... 2
Storage Capacity ........................................................................ 2
Compatibility ............................................................................... 3
Flexibility and Interactivity ........................................................... 3
What do I need to experience Blu-ray technology? ........................ 4
TV / Monitor ................................................................................ 4
Audio .......................................................................................... 4
Notes .................................................................................... 5
Blu-ray Disc Compatible Programs ................................................. 6
Roxio
®
Easy Media Creator ............................................................ 7
Creating a Data Disc .................................................................. 8
Easy Archive ............................................................................. 10
Click to DVD BD ............................................................................ 12
Automatic Mode(s) .................................................................... 13
Automatic Mode (Video Mode) Description ........................ 13
Automatic Mode (Simple Menu Mode) Description ............ 15
Edit Mode ................................................................................. 17
InterVideo
®
WinDVD
®
BD for VAIO
®
............................................ 20
Additional Information ........................................................ 21
Frequently asked Questions ......................................................... 22
Footnotes ...................................................................................... 26


1
Blu-ray Disc
™
Guide
What is Blu-ray Disc
™
Media?
Blu-ray Disc™ media (BD), is a revolutionary new media format
developed by a group of the world’s leading consumer electronics,
personal computer, and media manufacturers.
The Blu-ray format was developed to meet the entertainment and
storage demands of the “High Definition” era that the entire world
is rapidly moving to embrace. Blu-ray technology brings to market
a new high definition media, which can not only store high
definition video, but also high definition audio. In addition, Blu-ray
Disc media have the storage capacity for enormous amounts of
data.
Benefits of Blu-ray Technology
The benefits of Blu-ray technology include:
Simplicity Storage Capacity
Compatibility Flexibility / Interactivity

2
Simplicity
Blu-ray technology makes the task of choosing which basic media
type to use easy with only three different formats to choose from.
They include:
• BD-R (Blu-ray Disc Recordable) - Recordable format for HD
video recording and PC data storage.
• BD-RE (Blu-ray Disc Re-writable) - Rewritable format for HD
video recording and PC data storage.
• BD-ROM (Blu ray Disc Read Only Memory) - Read only format
for HD movies, music, software, games, etc.
These discs are available with a storage capacity of 25 GB
1
(single
layer) and 50 GB
1
(dual layer).
Storage Capacity
The chart below clearly demonstrates the enormous storage
capacity of a Blu-ray Disc when compared to CDs and DVDs.
Blu-ray Disc offers five times the capacity of DVDs without
compromising quality.
Note: Blu-ray Disc™ storage capacity totals are for high-definition
content.
Media
BD Dual Layer 50 GB
BD
25 GB
DVD Dual Layer
8.5 GB
DVD 4.7 GB
CD
700 MB
Storage Capacity
1

3
What does this mean for me?
The limited capacity of DVDs results in video and audio files being
compressed to fit on a disc. This causes a quality reduction in the
picture and/or sound. The greater capacity of BD discs allows for
pristine picture quality and virtually full spectrum audio.
Compatibility
Blu-ray Disc™ offers a convergence of technology and
compatibility among a new generation of high definition movies,
video players, video recorders, personal computers, and gaming
systems.
And what about your current library of DVDs and CDs? The
Blu-ray Disc generation of home entertainment products will be
backward-compatible with your CDs, DVDs, and other optical disc
formats.
Flexibility and Interactivity
The technology built into each Blu-ray disc gives you, and industry
professionals creating high definition content, the tools to create a
viewing experience that up until now has not been possible for
home entertainment. For example:
• Multiple video layers can now be on the screen at the same
time. A presentation layer, customizable by a studio, allows the
content creator to place graphics on the screen on top of the
video or alongside it. Sitting on top of that layer is the Blu-ray
navigation layer that will allow you to interact with the menu
while the video is playing.
• Support for Java applications allows the video layer to be
re-sizable providing even greater flexibility. Imagine the
possibility of watching a movie and playing an interactive game
related to the movie—all at the same time.

4
What do I need to experience Blu-ray
technology?
To fully appreciate Blu-ray’s video and audio output capabilities
2
,
you would need the following:
TV / Monitor
For the best experience and output to a HD TV or monitor (HDCP
monitor), do the following:
• Output to a high definition television/monitor using HDMI or
DVI-D
3
connection.
• Use a Blu-ray Disc player. (See the program “InterVideo
®
WinDVD
®
BD for VAIO
®
” included with your computer.)
Audio
For the best experience and output to an audio system, do the
following:
• Use a high-quality A/V receiver or sound decoder device with a
quality set of 5.1 or 7.1 surround sound speakers.
Note: Your VAIO
®
computer comes equipped with a HDMI™ or
DVI-D HDCP connection, depending on the model you purchased.
Note: If your computer has HDMI output, use HDMI to your TV/
monitor as the sound source. Otherwise, use the S/PDIF output.

5
Notes
• The content of certain Blu-ray Disc™ movies may require a
HDCP compliant monitor. If your TV/monitor has a HDMI™
connection, it should support the HDCP content protection
functionality.
• If you connect to your TV/monitor using DVI, check your
display’s user manual to see if it is HDCP compliant.
• Analog connections such as Composite and S-Video are able
to output BD content, but only at standard definition resolutions.
• Higher capacity analog connections, such as VGA, are able to
output BD content, but may be limited to a lower quality if the
disc manufacturer limits the video resolution for non-HDCP
compliant displays.
• To maximize picture quality of Blu-ray Disc recorded content on
compatible external displays, Sony recommends setting the
display resolution to 1080p or 720p and disabling dual display
mode.
• When powering your VAIO notebook computer with a battery,
the power management features of the system can limit CPU
and video functions, interrupt tasks with warning messages, or
may cause the system to suspend or hibernate before tasks are
completed. Therefore, Sony recommends that you use your AC
adapter for demanding tasks like burning data to DVD or Blu-
ray Disc media, playback of Blu-ray Disc recorded content, and
high end graphic functions such as 3D rendering to maximize
display quality and to avoid possible disruption of operations.

6
Blu-ray Disc Compatible Programs
Sony has included three Blu-ray Disc compatible software
programs to the VAIO
®
package of factory-installed software for
select VAIO personal computers. They are provided to give you
the tools you need to experience Blu-ray Disc technology. The
included programs are:
•Roxio
®
Easy Media Creator — Backup up large amounts of
data to recordable optical discs.
• Click to DVD BD — Capture, edit, and save videos in BDAV
and BDMV format
4
.
• InterVideo
®
WinDVD
®
BD for VAIO — Software BD player
combining all of the features of a standard BD player with
advanced functionality
2
.
Note: Sony supports the lawful use of technology and does not
endorse or encourage the use of our products for purposes other
than those permitted by copyright laws.

7
Roxio
®
Easy Media Creator
Roxio
®
Easy Media Creator is perfect for backing up large
amounts of data to recordable optical discs. The version of Roxio
Media Creator installed on your VAIO computer supports the cre-
ation of data discs using Blu-ray Disc™ technology.
You can also protect your important music, video, and data files by
using the Easy Archive feature to transfer and store files on high-
capacity Blu-ray discs
4
.

8
Creating a Data Disc
Before you begin
If you plan to use a BD-R (write once) disc when creating a data
disc, you should consider whether you want the disc left open
(appendable) or closed (non appendable) at the end of a recording
session.
• To leave the disc open, choose the option I would like to use
discs for more than one recording. Selecting this option
allows you to record multiple times to a single disc. However,
fewer drives may be able to read the disc. Use this option if you
expect to make many small recordings on high capacity discs,
or if you do not need to share your discs.
• To close the disc, choose I only need to use discs for one
recording. Selecting this option allows you to record only one
time to a disc. However, a larger number of drives will be able
to read the disc. Use this option if you typically fill your discs
during a single recording session or wish to use the disc on
more than one computer.
To create a data disc
1 Start Roxio
®
Easy Media Creator.
From the Windows
®
Taskbar, click the Start button. Point to All
Programs, Roxio, click Easy Media Creator, and then click
Home.
2 From the Project Menu on the left side of the screen, click Data.
Then select Data Disc.
3 Click the Destination Selection combo box, located in the control
panel across the bottom of the screen, and select a recorder drive
from the available list.
4 Insert a blank Blu-ray Disc™ media into the selected recorder
drive.
Note: To open a saved Data Disc project, go to the main menu
and select File, Open Saved Project, and locate the project file
you would like to open. By default, saved projects are stored in
your My Documents folder with a.sonic file name extension.

9
5 If desired, type a name for your disc in the Volume Label text box
located at the top of the project window.
6 Add files to your disc by the following methods:
• Click the Add Data button and from the Select files and
folders to add screen, locate and select the files/folders you
wish to add. If desired, rename the selected file/folder in the
File Name text box, and then click the Add button.
• Drag files and folders directly from a directory window and
drop them in the project window display area.
Project window display area notes
• Click a column heading to sort the data in ascending or
descending order.
7 From the Project Menu, click Tools | Disc Information. Review
the Inserted Disc information and make sure that the data in your
current project will fit on the disc. If the data will not fit, select one
or more files and click the Remove button in the control box.
8 Click Save to save the file/folder list. Once saved, the list can be
easily accessed at a later time.
9 Click the Continue button to begin recording data to your disc.
A progress screen displays and will inform you when the project
has completed.
10 Click the Done button to return to the project window. Remove the
disc from the drive and store in a safe place.
Note: If your disc already contains files and they do not display in
the project window, you can add the files by clicking the Load
Disc button.
• Use the control box to
manage or remove files and
folders in the list.
Note: Removing files/folders from a Data Disc project will not
remove the files/folders from your hard drive.
10
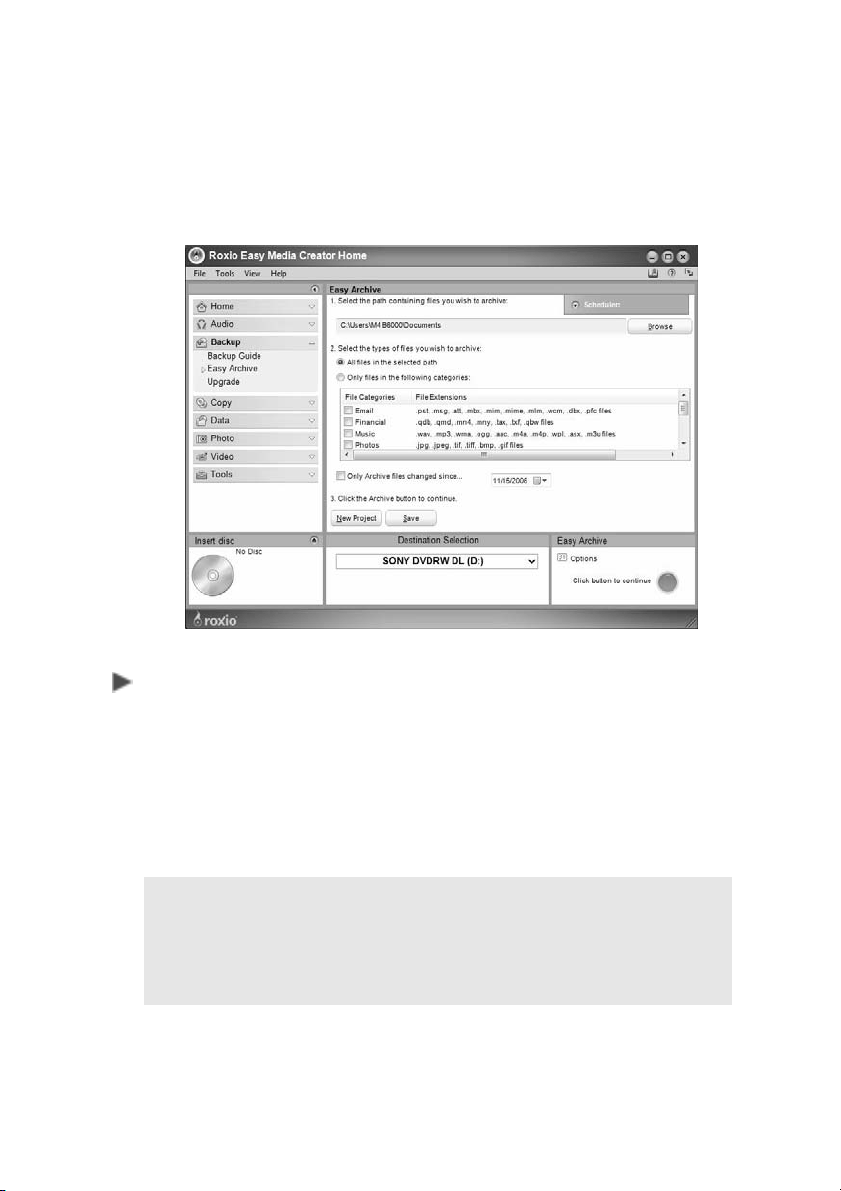
Easy Archive
The Easy Archive project lets you easily backup important files to a
disc or hard drive. An Easy Archive project can be scheduled to
run whenever it's convenient. Large archive projects are
automatically spread across as many discs as you need.
To use Easy Archive
1 From the Project Menu on the left side of the screen, click Backup.
Then click Easy Archive.
2 Select a destination drive. If the destination is a disc drive, insert a
blank or rewritable disc.
3 Carefully read the on-screen instructions and select the file
categories to archive.
4 Click the Easy Archive button located in the Control Panel across
the bottom of the screen to run the project now.
5 Click the Done button to return to the project window.
Note: To schedule this project, click the Scheduler button and
select the desired archive frequency by choosing an option from
the Scheduling options drop-down list. Click the Save button and
enter a project name and then click OK. The project name and
scheduled run date displays in the Scheduler.

11
Additional Information
Roxio
®
Easy Media Creator is designed to be used for both Blu-ray
Disc™ and standard definition functionality such as CD burning,
standard DVD burning, etc. For additional information about the
Roxio Easy Media Creator features available to you, refer to the
Help file
5
.
To open the Help file
Do one of the following:
• From the main menu, click Help.
• Click the Help/Tutorial icon located on the Welcome banner.
• Press the F1 key on your keyboard.
12
Click to DVD BD
With Click to DVD BD you can easily create your own discs using
the Blu-ray optical disc drive in your VAIO computer system.
Click to DVD BD allows you to do the following:
• Automatically capture and record videos and pictures to a disc
using the Automatic Mode(s).
• Append videos to the disc created by Click to DVD BD using
the Automatic Mode (Simple Menu). Content will be saved as
BDAV format to Blu-ray disc and DVD-VR format to DVD.
• Write High Definition videos that have been recorded by a HDV
device to DVD or Blu-ray disc with HD quality using the HD
Disc Mode (Data Disc).
Note: After creating a Blu-ray Disc with Click to DVD BD, you can
view the results with InterVideo
®
WinDVD
®
BD for VAIO
®
. Simply
start InterVideo WinDVD BD for VAIO, insert the disc in the BD
drive, and then click the Play button.
13
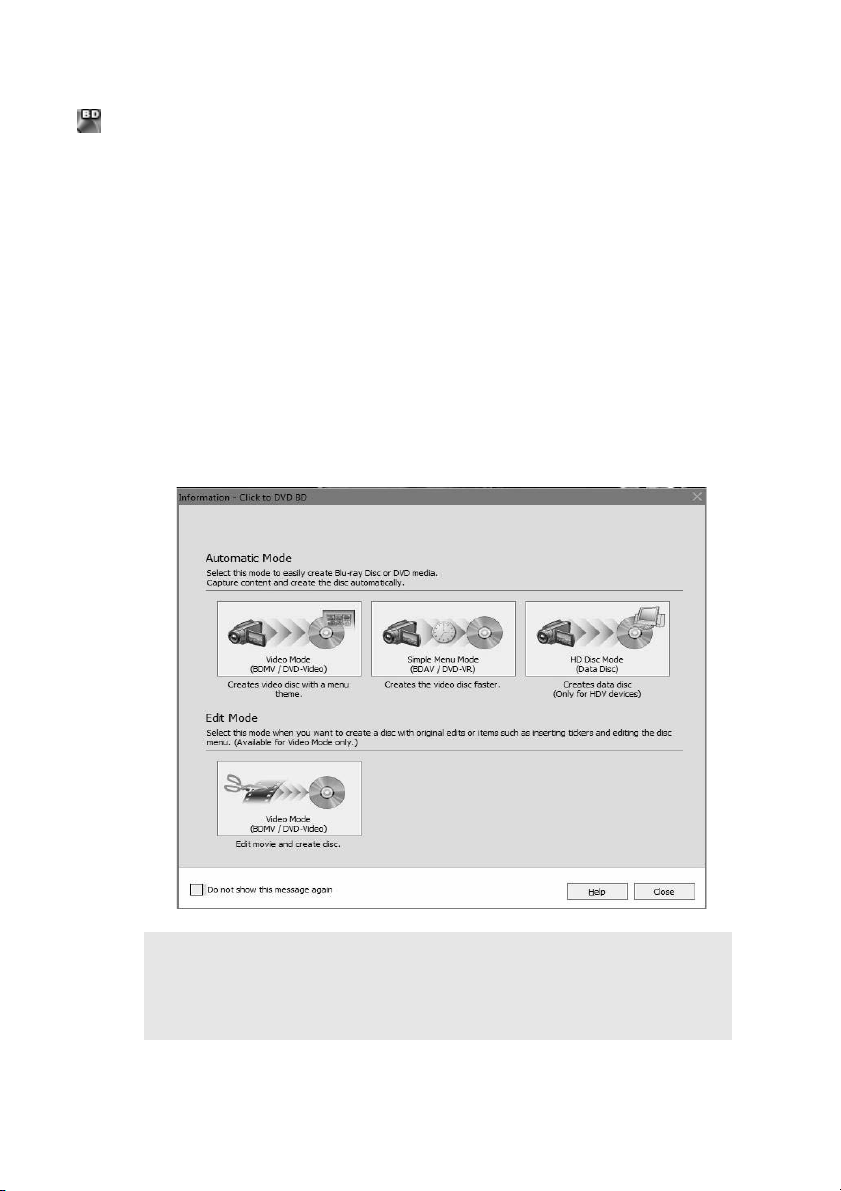
Automatic Mode(s)
Both Automatic Mode (Video Mode) and Automatic Mode (Simple
Menu Mode) can be used to create discs usable with Blu-ray play-
back devices. These modes allow you to automatically capture
videos and pictures and record them to disc.
Automatic Mode (Video Mode) Description
The Automatic Mode (Video Mode) allows you to create discs with
titles and menus for captured images. You can also record
imported pictures to a disc and create slide shows. Discs created
in Video Mode can be played on most disc players. Data is saved
on Blu-ray discs in the BDMV format.
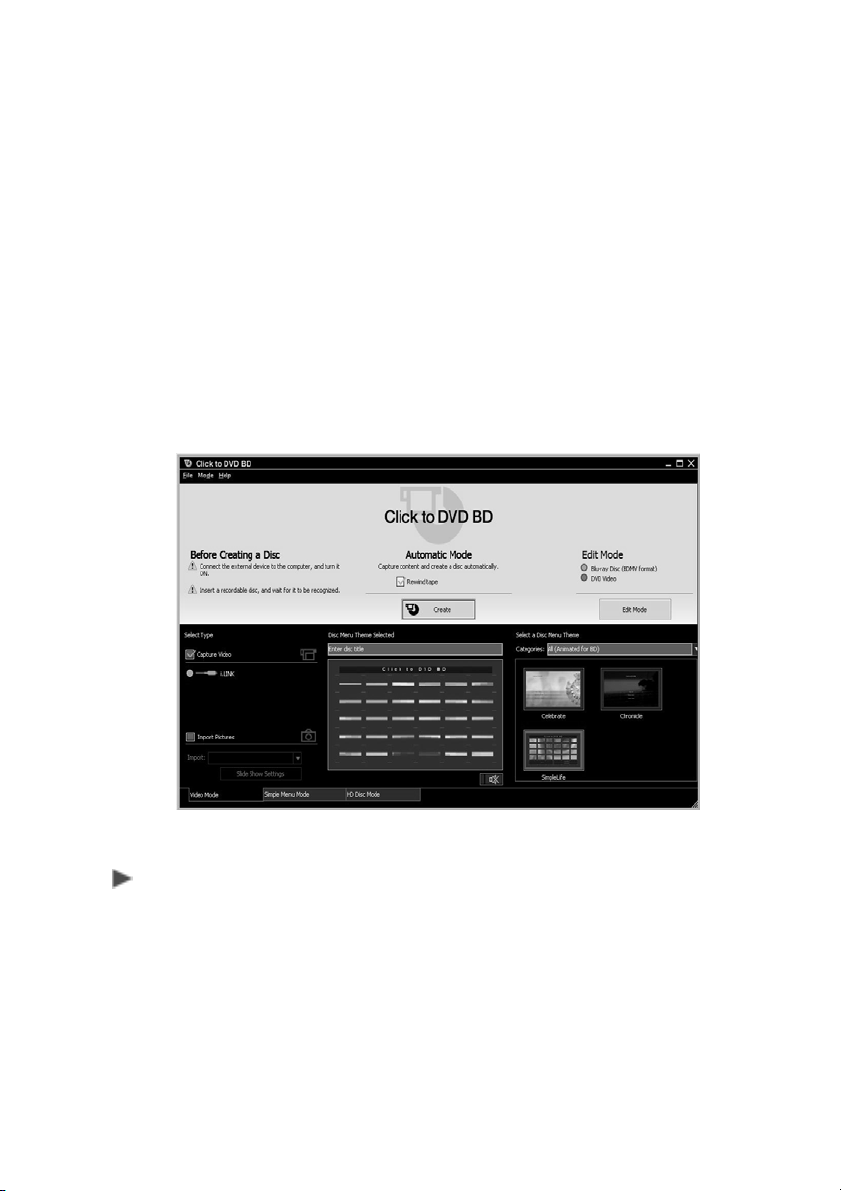
Steps to Set Up Automatic Mode (Video Mode)
1 Click the Video Mode tab.
2 Connect an external device to your computer.
• When connected to a digital camcorder or MICROMV
device, set the device’s power switch to Play/Edit or VCR/
VTR.

14
• When connected to an analog video device, turn the
device’s power to the ON position.
3 Select the source material category.
• Click the Capture Video check box and then click to
specify the connection method for your computer and
external device (i.LINK or Analog
6
).
• When importing digital pictures that have been captured
with a digital camera, click the Import Pictures check box.
Insert the media containing the pictures into the computer,
and select the drive name from the Import drop down list.
To access the slide show settings, click the Slide Show
Settings button.
4 Specify a theme.
• Enter the title of your disc in the text field. A list of
preinstalled themes displays.
• From the Menu, click on the theme you wish to use for
your disc.
5 Click the Create button.
• The process from capturing video to writing it to disc is
performed automatically. Once the writing has completed,
a notification message appears. The time required to
create a disc depends on the type of computer you are
using and the recording format.
• Once the disc has been successfully created follow the To
copy or To complete instructions listed below.
• To copy, click on the Copy button to repeat disc
creation.
• To complete this operation, click the Close button
and remove the ejected disc.
15
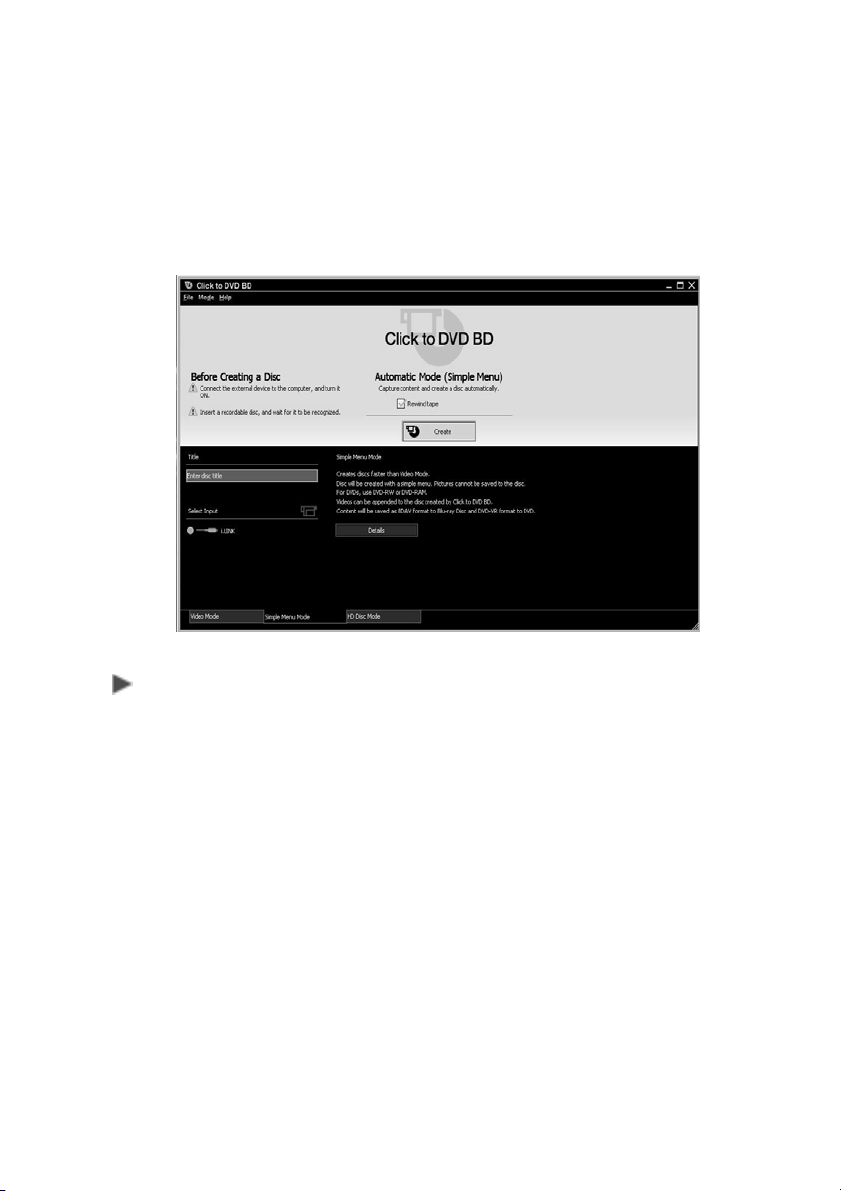
Automatic Mode (Simple Menu Mode) Description
The Automatic Mode (Simple Menu Mode) allows you to create
discs in much less time than in Video Mode. This Mode does not
allow you to import pictures. Data is saved on Blu-ray discs in the
BDAV format.
Steps to Set Up Automatic Mode (Simple Menu Mode)
1 Click the Simple Menu Mode tab.
2 Connect an external device to your computer.
• When connected to a digital camcorder, set the device’s
power switch to Play/Edit or VCR/VTR.
• When connected to an analog video device, turn the
device’s power to the ON position.
3 Select the external device connection you wish to use.
4 Enter a title for the disc in the text box.

16
5 Click the Create button.
• The process from capturing video to writing it to disc is
performed automatically. Once the writing has completed
a notification message should appear. The time required
to create a disc depends on the type of computer you are
using and the recording format.
• Once the disc has been successfully created follow the To
copy or To complete instructions listed below.
• To copy, click on the Copy button to repeat disc
creation.
• To complete this operation, click the Close button
and remove the ejected disc.
Note: If the title is too long, some playback devices may only
display part of it. If you use a Blu-ray disc, the title may appear by
changing the Blu-ray disc character code in Automatic Mode
(Simple Menu Mode).
17
Edit Mode
The Edit Mode allows you to collect and edit video and pictures.
You can also edit a disc menu. Use this mode to create discs with
the maximum originality. Data is saved on Blu-ray discs in the
BDMV format.
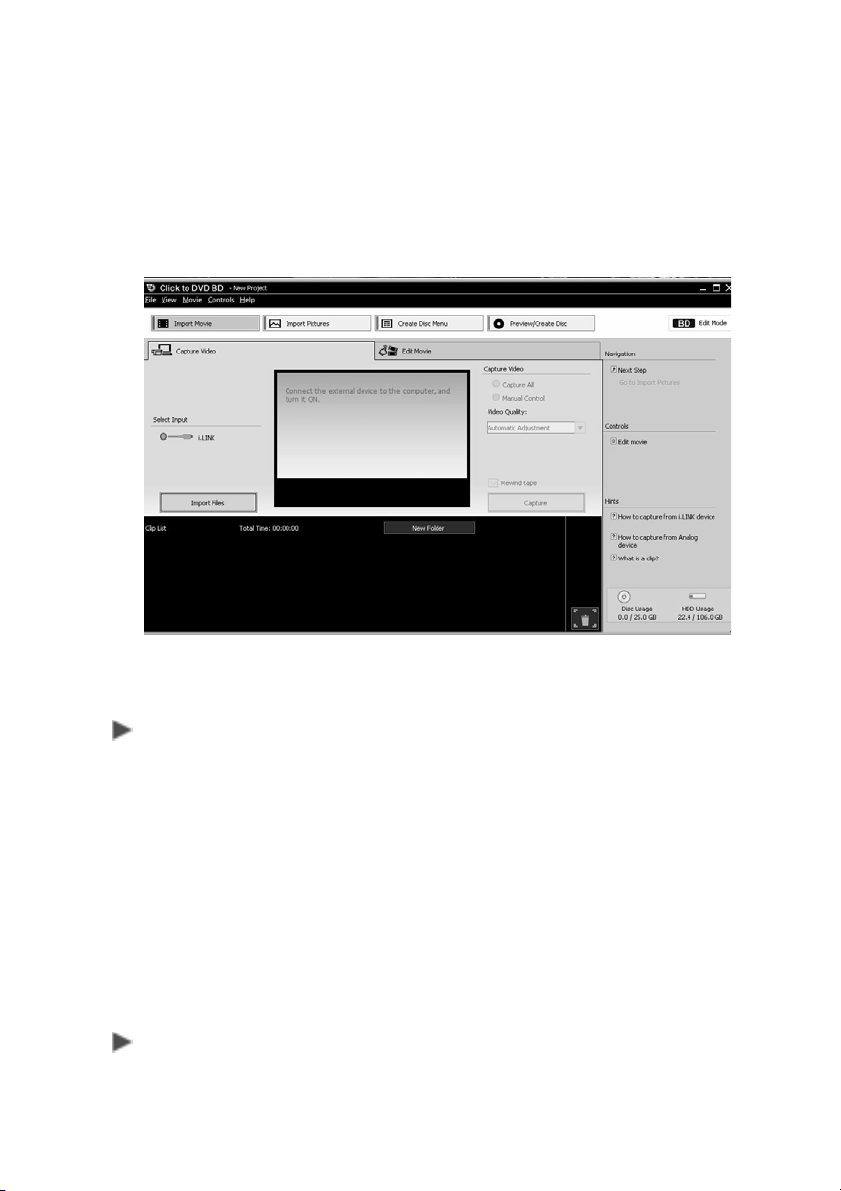
To Capture Video
1 Click Import Movie.
2 Capture Video.
• When using a DV,HDV, or MICROMV device select
Capture All, and click Capture.
• When importing video files click Import Files. A dialog box
appears, select a video file, and click the Open button.
• When importing from an HD disc click Import Video From
HD disc from the Movie menu. Files on the HD disc are
automatically added to a Clip list.
To Edit Movie
1 Click the Edit Movie tab.

18
2 Edit Movie.
You can divide clips, change their order, and add titles, etc.
• Insert a Title: Select a clip from the Clip list, and click the
Add Title button. The Create Title Wizard appears. You
can insert titles on top of the clip, or before or after the clip.
• Divide Clips: From the clip list, choose a clip to divide,
and use the play control buttons to play the clip. Once the
scene you wish to split appears, pause the clip, and click
the Divide button.
• Rearranging Clips: From the clip list, click on the clips to
rearrange, and drag them to the desired position.
• Deleting Clips: From the clip list, click on the clips to
delete, and then drag them to the recycle bin.
To Create Disc Menu
1 Click Create Disc Menu.
2 Select a Theme: A list of preinstalled themes are displayed. Select
the theme you wish to use.
• Themes are registered for each category. You can click on
the Categories drop-down list to display a list of them to
switch to.
To Edit Disc Menu
1 Click the Edit Disc Menu tab.
2 The current menu is displayed in the Disc Menu Structure area.
Click on a disc menu listed. A preview of that disc menu appears.
• Configuring Text: In the disc menu, click on the text that
is surrounded by a dotted line. After entering text, click on
an area outside the dotted line to finalize the change. Font,
styles, etc. can be changed. Click the Text button, and
configure the settings that appear.
• Changing Link Thumbnails: The images that appear in
the disc menu can be changed by clicking on them.
• Selecting Chapters to Display on the Menu: The
chapter menu displays links to each of the chapters in that

19
video. To display a selective amount of chapters in the
video list, click the Chapter button, and then select
chapters from the video list that appears.
• Configure the introduction Movie: Click the
Introduction Movie button, and configure settings that
appear.
Preview and Create Disc
1 Click Preview/Create Disc.
2 Insert a disc into the drive.
3 Click the Create button.
• Once the writing has completed a notification message
should appear. The time required to create a disc depends
on the type of computer you are using or the recording
format.
• Once the disc has been successfully created follow the To
copy or To complete instructions listed below.
• To copy, click on the Copy button to repeat disc
creation.
• To complete this operation, click the Close button
and remove the ejected disc.

20
InterVideo
®
WinDVD
®
BD for VAIO
®
InterVideo
®
WinDVD
®
BD for VAIO
®
is an easy-to-use software BD
player combining the features of a standard BD player with
advanced functionality, such as time-stretching, zooming, panning,
and thumbnail bookmarks only possible on a software BD player
3
.
The WinDVD BD for VAIO player supports playback of Blu-ray Disc
technology
2
. Play your BD discs in WinDVD BD for VAIO and take
advantage of the advanced playback features that it offers.
To play a Blu-ray movie disc that you created, use InterVideo
®
WinDVD
®
BD for VAIO
®
2
.
1 Insert the recorded Blu-ray disc into the optical disc drive of your
computer.
Note: Windows
®
Media Center, Windows
®
Media Player, and
InterVideo for VAIO currently do not support the use of the Blu-ray
Disc™ format. You must use InterVideo WinDVD BD for VAIO.

21
2 Start InterVideo WinDVD BD for VAIO from any of the following:
Windows
®
Taskbar
• From the Windows Taskbar, click the Start button and point to
All Programs, InterVideo WinDVD, and then click InterVideo
WinDVD BD for VAIO.
Media Center
a From the Windows Taskbar, click the Start button, and then
click Windows Media Center on the Start menu. Media
Center opens.
b From the Media Center Start menu, select VAIO, and then
WinDVD BD. Media Center will minimize to allow WinDVD BD
for VAIO PC to run.
3 Once InterVideo WinDVD BD for VAIO starts, the recorded
Blu-ray disc plays automatically.
4 Use the transport controls of WinDVD BD for VAIO PC to navigate
through the various created titles of the recorded Blu-ray disc.
Additional Information
For additional information about the features of WinDVD
®
BD for
VAIO
®
, including step-by-instructions on their use, please refer to
the help file
5
.
To open the Help file
Do one of the following:
• Click the Help icon located in the upper right corner of the
screen.
• Press the F1 key on your keyboard.
• Right click anywhere on the WinDVD BD for VAIO
screen and
select Help
from the popup menu.

22
Frequently asked Questions
Question What are the Blu-ray Disc™ formats?
Answer BD-ROM—Read only format for HD movies,
music, software, games, etc.
BD-R—Recordable format for video
recording and PC data storage.
BD-RE—Recordable format for video
recording and PC data storage.
Question What kind of data can be stored on a
Blu-ray disc.
Answer Any form of data available on a personal
computer can be stored to a Blu-ray Disc,
including text documents, images, video
files, and audio files. Using the appropriate
software or operating support tools, a
Blu-ray Disc can offer the functionality of a
large removable hard disk drive.
Question Can I record video to a Blu-ray Disc using a
personal computer?
Answer Yes. With a BD compatible computer and
the appropriate software, such as Click to
DVD BD (included in your factory-installed
software package), you can edit standard
and high definition video (for example from
a camcorder) and then record it to Blu-ray
Disc media.

23
Question How much data can I fit on Blu-ray Disc™
media?
Answer
A single layer disc can hold 25 GB
1
.
A dual layer disc can hold 50 GB
1
.
Blu-ray Disc includes support for multi-layer
discs, which should allow for storage up to
100 GB
1
- 200 GB
1
of data in the future.
Question How much video can I fit on a Blu-ray Disc?
Answer Up to 9 hours of high definition (HD) video
on a 50 GB
1
disc.
Up to 23 hours of standard definition (SD)
video on a 50 GB
1
disc.
Question Will Blu-ray discs require a cartridge?
Answer No, the development of low cost hard-
coating technologies has made the
cartridges obsolete. Blu-ray will instead rely
on a hard-coating for protection.
Question Will Blu-ray players be backwards
compatible with DVD?
Answer Yes, several leading consumer electronics
companies are marketing products that can
read/write CDs, DVDs, and Blu-ray discs
using a BD/DVD/CD compatible optical
drive.

24
Question What video codecs will Blu-ray support?
Answer MPEG-2 - enhanced for HD, also used for
playback of DVDs and HD recordings.
MPEG-4 AVC - part of the MPEG-4
standard also known as H.264 (High Profile
and Main Profile)
2
.
SMPTE VC-1 - standard based on
Microsoft
®
Windows
®
Media Video (WMV)
technology
2
.
Please note that this simply means that
Blu-ray players will have to support
playback of these video codecs, it will be up
to the movie studios to decide which video
codec(s) they use for their releases.

25
Question What audio codecs will Blu-ray support?
Answer Linear PCM (PLPCM) - offers up to 8
channels of uncompressed audio.
Dolby
®
Digital (DD) - format used for DVDs,
offers 5.1 channel surround sound.
Dolby Digital Plus (DD+) - extension of DD,
offers increased bitrates and 7.1 channel
surround sound.
Dolby TrueHD - extension of MLP Lossless,
offers lossless encoding of up to 8 channels
of audio.
DTS Digital Surround - format used for
DVDs, offers 5.1 surround sound.
DTS-HD - extension of DTS, offers
increased bitrates and up to 8 channels of
audio.
Please note that this simply means that
Blu-ray players will have to support
playback of these audio codecs, it will be up
to the movie studios to decide which audio
codec(s) they use for their releases.

26
Blu-ray Disc™ Guide
Footnotes
1 One GB equals approximately one billion bytes, a
portion of which may be used for disc management
functions
2 As with other optical media devices, circumstances
may limit compatibility or prevent Blu-ray disc play-
back. VAIO computers may not support movie
playback on packaged media recorded in AVC or
VC1 formats at high bit rates. VAIO desktop systems
require a compatible high-definition display for high
definition playback. Playback of AACS protected
media may require an HDCP compliant output and
HDCP compliant display.
3 Requires HDTV with HDMI connector and equivalent
display capability. Image quality may vary
4 Video recording to Blu-ray Disc media is done by
MPEG2 format only.
5 Does not contain all documentation contained in the
retail version. Such documentation is available
online.
6 The analog input is not available on all models.


© 2007 Sony Electronics, Inc.
Printed in China
3-097-394-11 *309739411*