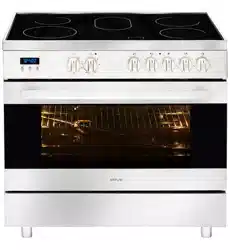

CAFC95X
CAFC95B
OPERATION MANUAL
APPLIANCES
FOR LIVING

Congratulations, you are now the proud owner of an ARTUSI cooking appliance. Thank you for purchasing ARTUSI
and welcome to the ARTUSI Family.
This instruction manual has been specially created to inform you of the full range of features your ARTUSI appliance
has to offer and serves as an introduction to getting the very best out of your ARTUSI appliance.
We present detailed information on each of the features your ARTUSI appliance consists of. Once you have read
this section you will be able to choose the most appropriate settings for your appliance when cooking different
types of food.
We ask you to read the instructions in this booklet very carefully as this will allow you to get the best results from
using your appliance. KEEP THE DOCUMENTATION OF THIS PRODUCT FOR FUTURE REFERENCE.
TO REGISTER YOUR PRODUCT WITH ARTUSI, PLEASE FILL OUT THE WARRANTY CARD AT THE END OF
THIS BOOKLET AND POST IT TO: REPLY PAID 83617
LEICHHARDT NSW 2040
Dear Artusi Customer, please read this user manual carefully before using the product and, keep it permanently at
your disposal.
Note: This user manual is prepared for more than one model. Some of the features specified in this Manual may not
be available on your appliance.
All our appliances are only for domestic use, not for commercial use. Products marked with (*) are optional.
“THIS APPLIANCE SHALL BE INSTALLED IN ACCORDANCE WITH THE REGULA TIONS FORCE AND ONLY USED
IN A WELL VENTILATED SPACE. READ THE INSTRUCTIONS BEFORE INSTALLING OR USING THIS APPLIANCE”
“Conforms with the WEEE Regulations.”

ACKNOWLEDGMENT
Thank you for purchasing our product. We hope you enjoy using
the many features and benefits it provides. Before using this
product please study this entire Instruction Manual carefully. Keep
this manual in a safe place for future reference. Ensure that other
people using the product are familiar with these instructions as
well.
WARNING
When the oven is first switched on, it may give off
an
unpleasant smell. This is due to the bonding
agent
used for the insulating panels within the
oven. This is
completely normal, if it does occur,
you merely have wait
for the smell to clear before
putting food into the oven.
The appliance and its accessible parts become
hot
during use.
Care should be taken to avoid touching heating
elements.
Children less than 8 years of age shall be kept
away
unless continuously supervised.
This appliance can be used by children aged from
8 years
and above and persons with reduced physical, sensory or
mental capabilities or lack of experience and knowledge if
they have been given supervision or instruction concerning
use of the appliance in a safe way and understand the
hazards involved. Children shall not play with the
appliance. Cleaning and user maintenance shall not be
made by children without supervision.
Do not use harsh abrasive cleaners or sharp metal scrapers
to clean the oven door glass
since they can scratch the
surface, which may result in shattering of the glass.
The hob surface is of glass-ceramic: if the surface is
cracked, switch off the appliance to avoid the possibility of
electric shock.
For the models equipped with a facility to use a temperature
2

sensing probe: Only use the temperature probe
recommended for this oven.
Do not allow children to go near the oven when it is
operating, especially when the grill is on.
Ensure that the appliance is switched off before replacing
the oven lamp to avoid the possibility of electric shock.
The means for disconnection must be incorporated in the
fixed wiring in accordance with the wiring specifications.
This appliance is not intended for use by persons (including
children) with reduced physical, sensory or mental
capabilities, or lack of experience and knowledge, unless
they have been given supervision or instruction concerning
use of the appliance by person responsible for their safety.
Never use steam cleaners to clean your cooking range.
For models with induction hobs : metallic objects such as
knives, forks, spoons and lids should not be placed on the hob
surface since they can get hot.
For models with induction hobs : After use, switch off the hob
element by its control and do not rely on the pan detector.
For the models with a lid : any spillage should be removed
from the lid before opening. The hob surface should be
allowed to cool before closing the lid.
3

Installation instructions -1 Instructions for use -
Installation instructions
13 44
Safety precautions………………………………………….……… 5
Before installing……………………………………………………
Appliance……………………………………………………...……… 5
Installation……………………………………………………..……
Fitting the adjustable feet………………………………………...... 7
Fitting the splash guard……………………………………………
Positioning and leveling…………………………………………… 8
Electrical connection……………………………………………
Stability brakets………………………………………………….. 11
... 9
..
. 5
. 7
.
. 8
.
..
..
..
4
42

Safety precautions
This manual is valid for several models. Variations
in details for each cooker are possible.
The safe operation of this appliance can only be
guaranteed if it has been professionally assembled
and installed in accordance with these instructions.
The individual who assembled and installed the
appliance is liable for damage or faults resulting
from incorrect assembly or installation.
All installation and adjustment work, must be
undertaken by an authorized expert and carried
out in accordance with the currently applicable
rules and regulations of the local electricity supply
company.
Shut off the supply of electricity before carrying
out any work.
Electrical appliances must always be earthed.
If an extractor hood is to be fitted, it must be
fitted according to the associated assembly
instructions. Ensure that the hood is fitted at
least 650 mm clear of the hob.
Before installing
Appliance
Unpacking
Check the condition of the appliance after
unpacking
it. Do not connect the appliance if it has
been
damaged in transport.
Dispose of packaging in an environmentally-
friendly
manner.
5
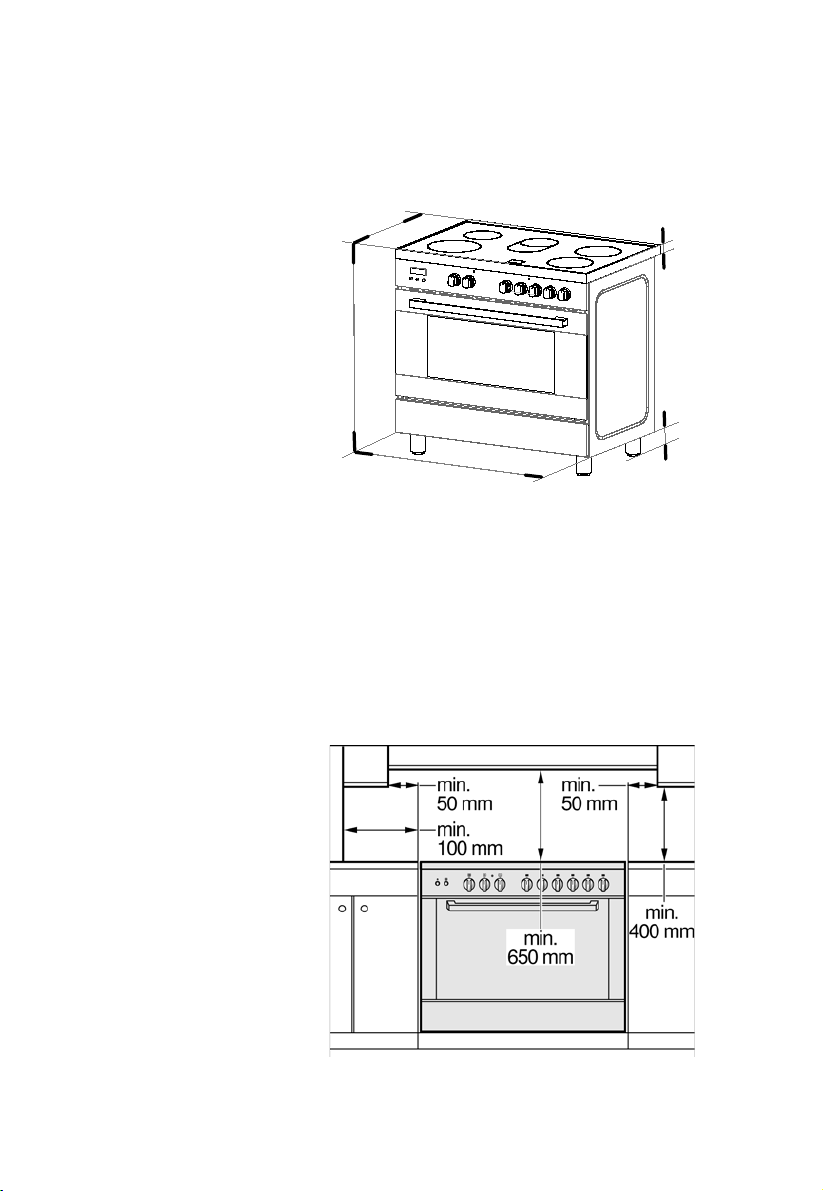
Appliance dimensions Note the specified dimensions.
A=89-149 mm
40 mm
A
895 mm
597 mm
769 mm
.
Adjacent units Adjacent units must be made of non-combustible
material. The fronts of adjacent units must be
resistant to temperatures up to at least 90 °C. If the
appliance is fitted close to other units, the minimum
distances specified in the picture must be maintained.
6
Installation
This appliance is always supplied with a set of
adjustable feet and, depending on the model, with a
splash guard.
The appliance may also be used without the splash
guard.
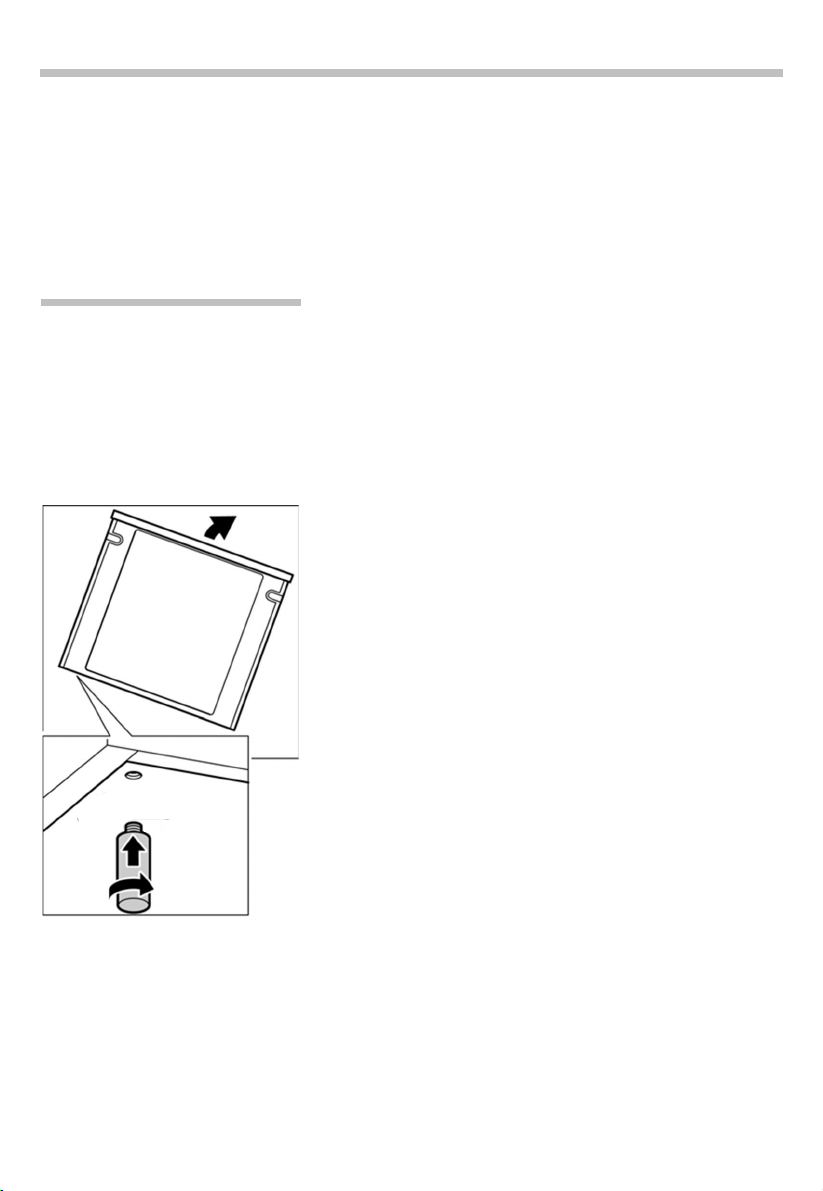
Fitting the adjustable feet
Beforehand:
Remove all parts that are not permanently fixed.
Remove the accessories from the oven.
Proceed as follows:
Tilt the appliance by raising one side slightly from
the floor.
With the plates in position, screw the adjustable
feet into the mounting holes on the underneath of
the appliance.
Repeat the process on the other side.
You can make the final adjustments to the feet in
order to level the appliance once the
electricity
supply ha been connected.
If it is necessary to pull the appliance, screw the
adjustable feet in fully. Make the final settings only
when the other installation tasks have been
completed.
7

Positioning and levelling
Positioning the appliance
When installing the appliance, make sure that there
is enough space in the final installation location to
pull
the appliance forwards for cleaning and
maintenance
work.
The ground underneath must be hard and stable.
The wall immediately behind the appliance must be
made from non-flammable material, e.g. tiles.
If you need to pull the appliance in order to position
it,
make sure that the adjustable feet are screwed
in
fully.
Levelling the appliance
Level the appliance once all other work has been
completed.
To do this, turn the adjustable feet.
Fitting the splash guard
.
.
.
aftermarket
covers.
8
Electrical connection
This appliance must be earthed by law. Before connecting the appliance to the
electrical supply, check that the earth system in your house is working correctly.
Check that unit voltage and power, marked on the rating plate applied on the
appliance, are correct for the supply. It is necessary that the feeding network is
protected by a powerful switch able to disconnect completely the network with a
contacts separation of at least 3 mm. Be sure that the earth wire green/yellow is
notinterrupted by the switch.
WARNING: THIS APPLIANCE MUST BE EARTHED
In order to avoid hazard, any electrical work performed on this equipment or its
associated wiring should only be done by persons authorised by the manufacturer
orsimilary qualified persons.
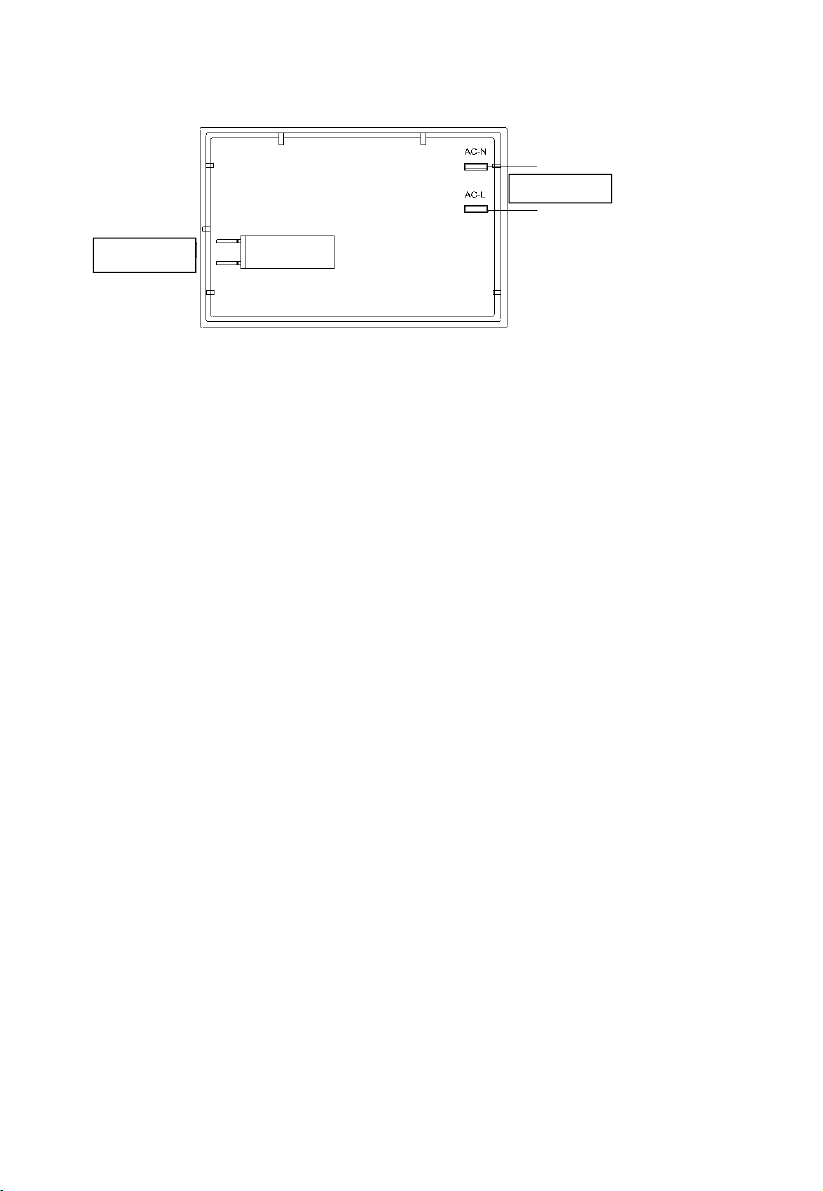
Replacement or mounting of the power cord
The mains cable is replaced via the rear backboard.
The mains cable must be of the following type:
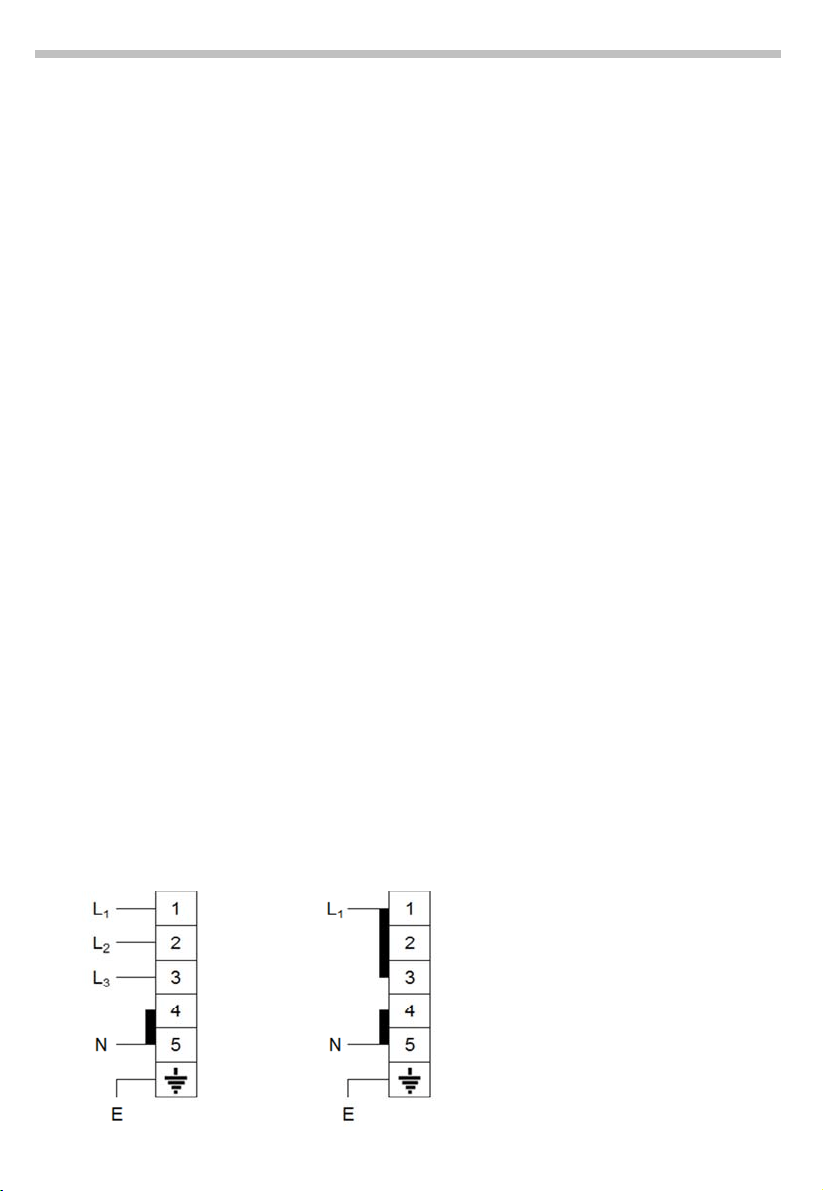
380-
H05
H05
V
H05
H07
-415V 3N~
RR-F
VV-F 5×2
RN-F
RN-F
2.5mm2
220-240V
H05RR-F
H05VV-F
H05RN-F
H07RN-F
3×4mm2
9
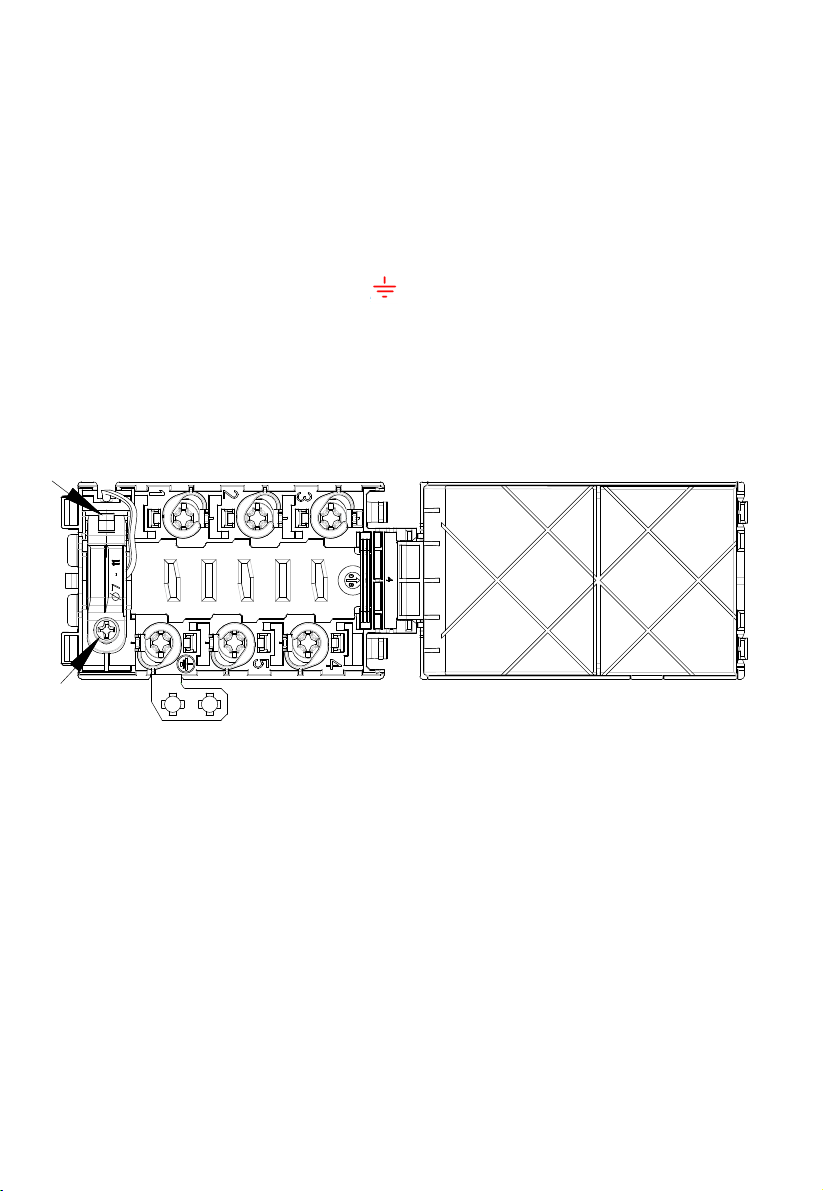
Connect the yellow-green wire to the terminal.
This wire must be at least 10 mm
longer than the
other wires.
Connect the blue neutral wire to terminal N.
Connect the brown power wire to
terminal L.
Leave the mains cable slightly overlong so that you
can pull out the appliance for
cleaning purposes.
Proceed as follows:
Remove the rear backboard.
Undo the screw on the terminal block that fixes
the cable in place.
Loosen the screw contacts and replace the cable
with a new one of the same length.
The cable must comply with the stipulated specifi-
cations.
10
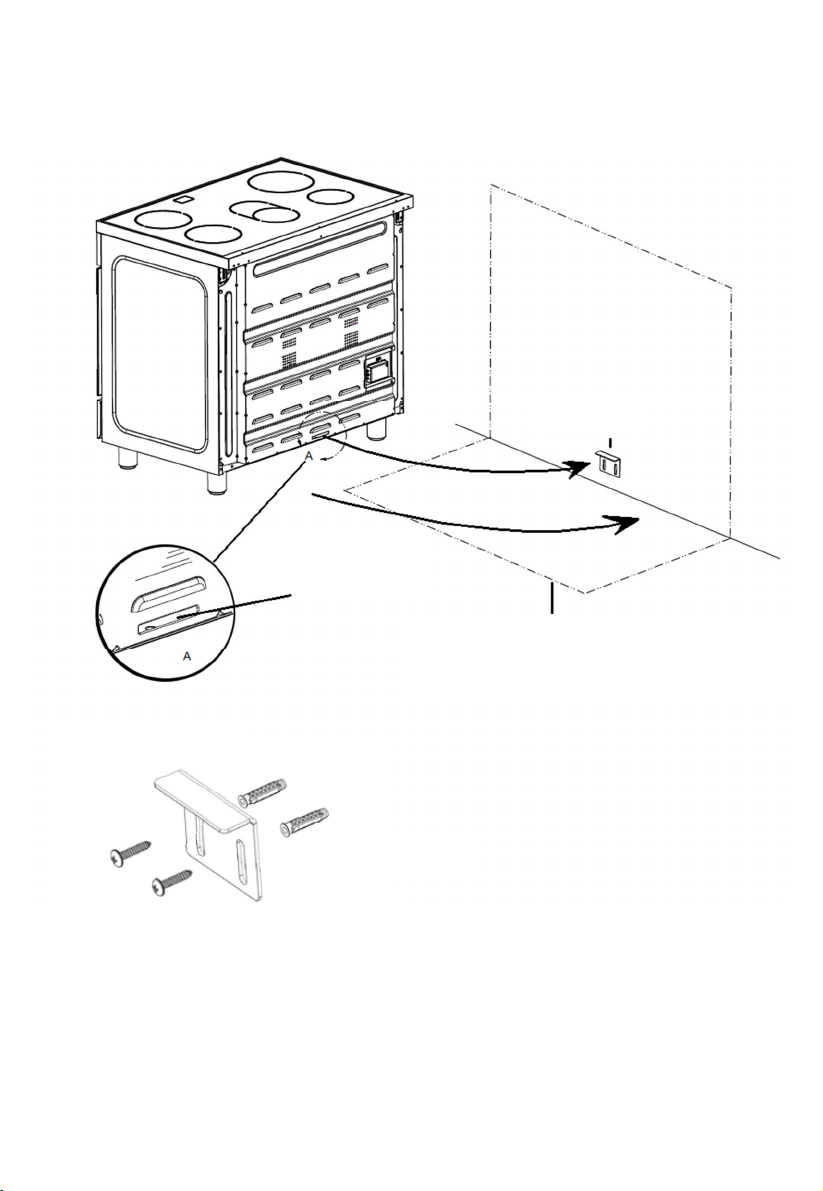
Stability bracket
Dtted line shing the psitin
the er hen ied
raet
all iing
isting slt in
rear er
11

Instructions for use
Important information ……………………………….…………….... 13
Safety precautions .......................................................................... 14
Property damage .............................................................................16
Your new appliance…………………………………......................... 17
.... 18
The oven …………………………….…………………...................... 20
Using programmer of cooking ……………………………………….. 24
The storage compartment ............................................................... 27
Before using for the first time ……………………………………... 28
Baking out the oven ….....................................................................
Using the rotisserie.......................................................................... 30
Cleaning and care ………………………………………………..….. 33
Catalytic cooking compartment panels ……………………………... 33
Using the correct cleaning agent ………………………………….…. 34
Cleaning the interior glass of the oven ……………………………… 35
Removing and fitting the appliance door……………………………. 36
Faults and the after-sales service……………………………………. 39
Replacing the oven light bulb ......................................................... 40
Tips and tricks ………………………………………………………... 41
Tips for saving energy .................................................................... 4
Tips on using the hob ...................................................................... 41
Tips on using the oven ................................................................... 41
Tips for using your appliance .......................................................... 42
Boiling and frying ............................................................................ 4
Baking tips ...................................................................................... 43
Tips on using the rotisserie .…….................................................... 4
12
28
1
2
3
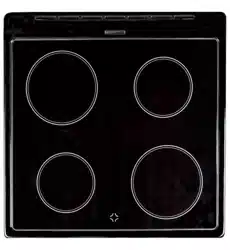
Ceramic hob

Important information
Read the instructions for use carefully.
This will enable you to operate your appliance
safely
and correctly.
This manual is valid for several models. Variations in
details for each cooker are possible.
Please keep the instruction manual, installation
instructions and the various accessories in a safe
place. Please pass on these manuals and
accessories to the new owner if you sell the
appliance.
Transport damage
Check the appliance for damage after unpacking
it. Do not connect the appliance if it has been
damaged
in transport.
Environmentally-friendly
disposal
Dispose of packaging in an environmentally-
friendly
manner.
This appliance is labelled in accordance with
European Directive 2012/19/EU on Waste
Electrical
and Electronic Equipment WEEE.
Connections Have a licensed professional carry out the electric
connection .
Assembly instructions are supplied with the
appliance.
Any damage caused by the appliance being
incorrectly connected is not covered under the
guarantee. We assume no liability for damage and
faults caused by connection and setting errors.
¦
13

Safety precautions
This appliance is intended for domestic use only.
This appliance must only be used for food
preparation.
Adults and children must not operate the appliance
without supervision if:
they do not have the physical or mental ability;
or they lack the knowledge and experience
required to operate the appliance safely and
correctly.
Never let children play with the appliance.
Never drag, push or move the device once
unpacked.
The appliance should be lifted and
placed in the
positiondesiredinordertoprevent
accidental
damage to the floor.
Open the cover plate when the oven is working.
Do not use harsh abrasive cleaners or sharp
metal scrapers to clean the oven door glass
since they can scratch the surface, which may
result in shattering of the glass.
Donotusesteamcleanerstocleanthe appliance.
Hot surfaces Risk of burns.
Never touch the hob plates, the surfaces of the
cooking
compartment, the heating elements or the
oven
steam outlets when they are hot.
Children must be kept at a safe distance from the
appliance at all times.
Open the appliance door carefully. Hot steam may
escape.
If the hob plates are in operation for a prolonged
period,
the areas between them can become hot.
Risk of fire.
Never leave flammable objects on the hob or in
the
storage compartment, or keep them in the
cooking
compartment.
Risk of short-circuit.
Never trap the mains cable of electrical
appliances in
the appliance door when it is hot or
pull the cable over
the
hob plates when they
are hot. The cable .
14

Overheated oil and fat
Risk of fire.
Ov
erheated oil or fat can ignite very quickly.
Never leave fat or oil to heat unattended. Should the
oil ignite, do not try to put it out by pouring water on it.
Cover the pan immediately with a lid or plate. Switch
off the hob plate. Allow the cookware to cool down
on the hob plate.
High-proof alcohol Be careful with food that is prepared using drinks with
a high alcohol content (e.g. cognac, rum).
Alcohol evaporates at high temperatures. In
unfavourable circumstances, the alcoholic vapours
could catch fire in the appliance.
Risk of burns.
Only use small quantities of drinks with a high alcohol
content and open the appliance door carefully.
Repairs Risk of electrocution.
Incorrect repairs are dangerous.
Repairs may only be carried out by one of our
experienced after-sales engineers.
Risk of electrocution.
Never replace a damaged power cable yourself.
Power cables may only be replaced by one of our
experienced after-sales engineers.
Switch off the circuit breaker in the fuse box if the
appliance is faulty.
15

Property damage
Damage to the hob Only use the hob plates if cookware is placed on
them.
Do not heat empty pots or pans. This will damage the
pan base.
Do not allow saucepans to boil dry, in particular
enamel and aluminium saucepans.
The pan base must be clean, dry and flat.
With electric hotplates, it is possible that not enough
heat is drawn off and the pans become red hot.
Please follow the manufacturer's instructions when
using special cookware. Aluminium foil and plastic
containers can melt and stick on hot burners.
Do not use a roasting dish which has to be heated
using two burners. This will cause heat to
accumulate. This could damage the appliance.
Please note that appliances with a hob cover may
only be used with the hob cover open.
16
Damage to the oven Never cook meals on the floor of the cooking
compartment. Do not leave the baking tray on the
cooking compartment floor. Do not cover it with
aluminium foil.
Do not place oven or cookware on the oven floor.
This will cause heat accumulation. The baking and
roasting times will no longer be correct and the
enamel will be damaged.
Never pour water directly into a hot oven. This will
damage the enamel.
When making very moist fruit flans, do not put too
much on the baking tray. Fruit juice dripping from the
baking tray leaves stains that cannot be removed.
Do not stand or sit on the open oven door.
Damage to the fronts of
adjacent units
Only leave the oven to cool down with the door
closed. The fronts of adjacent units may eventually
become damaged even if you only leave the oven
door open slightly.
If the oven door seal is very dirty, the appliance door
will no longer close properly during operation. The
fronts of adjacent units will become damaged over
time. Keep the seal clean.
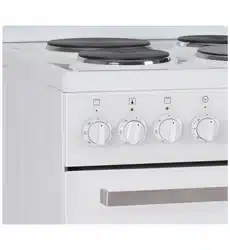
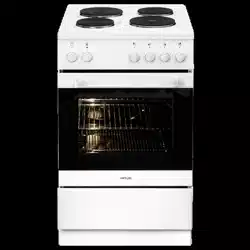
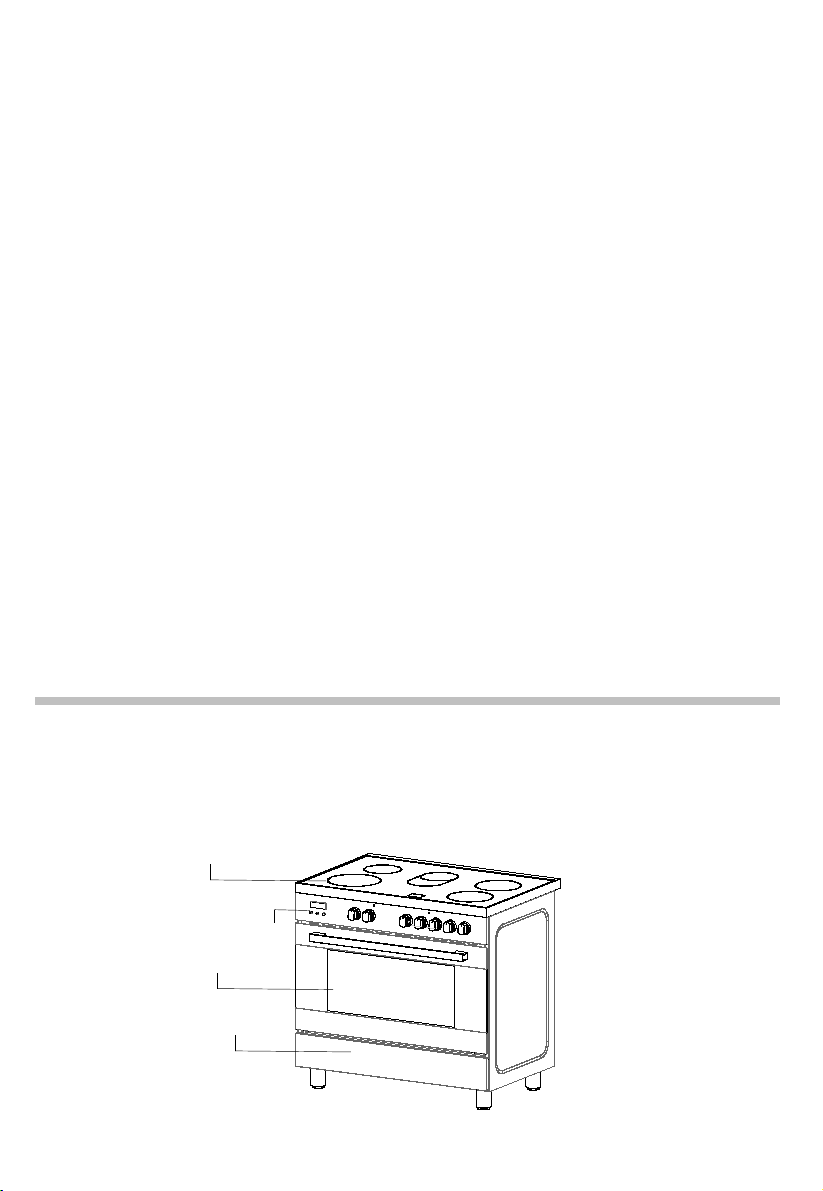
Your new
appliance
Get to know your appliance. You will find information
about the control panel and
hob, as well as the oven,
types of heating and accessories.
Hob
Control panel
Oven
Storage
17
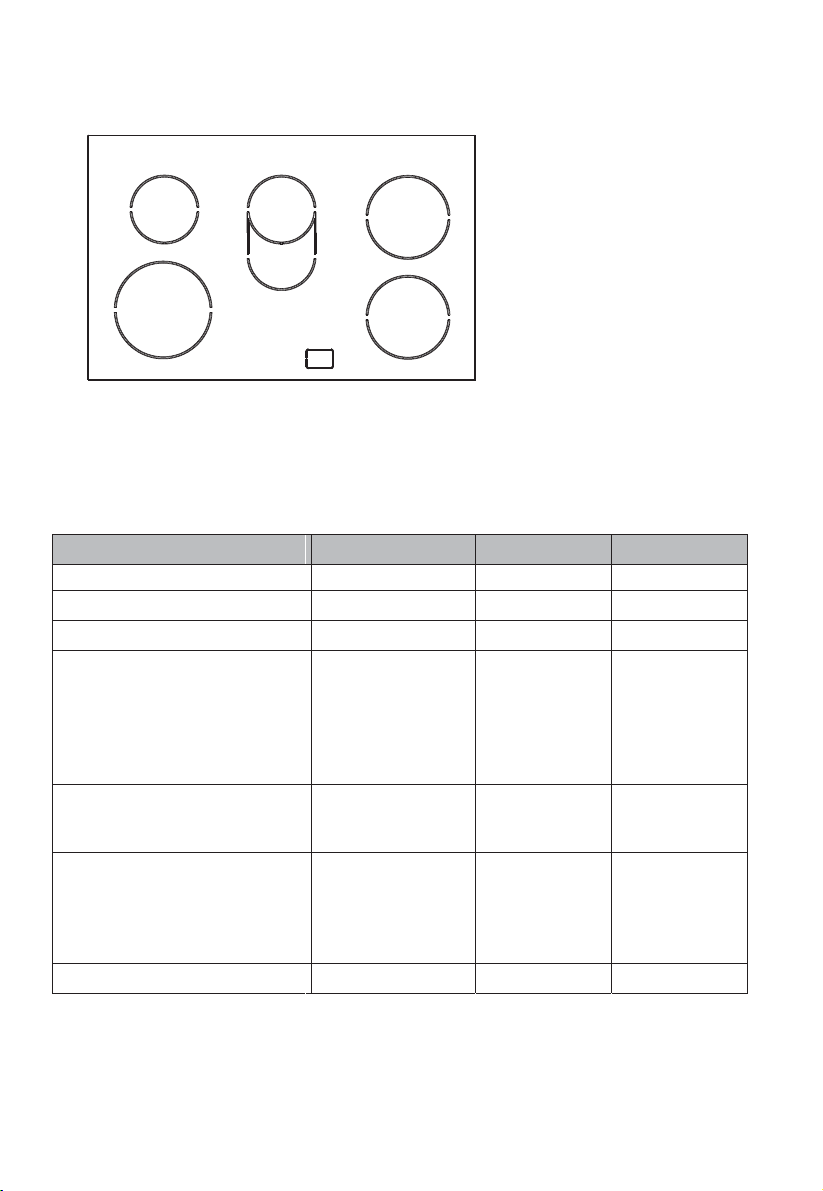
Ceramic hob
HOB TOTAL 9.0KW
OVEN TOTAL 2.94KW
Maximum Power 11.94KW
Voltage
220-240V~
50-60Hz
380-415V 3N~50-60Hz
. 1000/
.
.
.
.
2
1
5
3
4
Cooktop
1 =
2 =
3 =
4 =
cm
5 L
26,0
cm
EC electric cooking
1= 190,5
Wh/kg
Wh/kg
Wh/kg
Wh/kg
Wh/kg
EC electric hob
206,6
Wh/kg
/
Table for domestic electric hob in according to the Delegated
Regulation (UE) n° 65/2014 Energy Consumption calculated
according to standard EN 60350-2: 2013-07
18

.
.
.
.
.
.
.
..
.
.
.
.
.
.
sing the ing h
.
.
.
.
.
.
.
.
.
.
.
.
..
.
F
.
.
..
.
D
.
F
.
.
.
.
prtant
.
ttentin
.
.
Heat
Intensity
Use
0 0 Off
1 - 2 1 Very slow
For melting butter, chocolate, etc.
For heating small amounts of liquid.
3 - 4 2 Low
For heating larger amounts of liquid.
For preparing slow-cooking creams and sauces.
5 - 6 3
Medium-
Low
For thawing frozen foods and cooking stews,
cooking at
boilin
g
or lower temperatures.
7 - 8 4 Medium For boiling foods, roasting delicate meats and fish.
9 - 10 5 High
For braising chops and steaks, for large meat
soups.
11 6 Very High For boiling large amounts of water and frying.
Pos.
F F D
19

The oven (according to the models )
Always keep small children away from the oven while it is in use.
Before cooking for the first time switch the oven on and allow it to heat up while empty. At this
point you may notice a slightly odour, this is perfectly normal and occurs as the protective
covering which surrounds the insulating panels is gently removed. This covering is designed
for transit purposes only and its removal will not affect the performance of your oven.
Prior to use simply wipe the oven interior with a damp cloth, it is then ready for cooking.
20

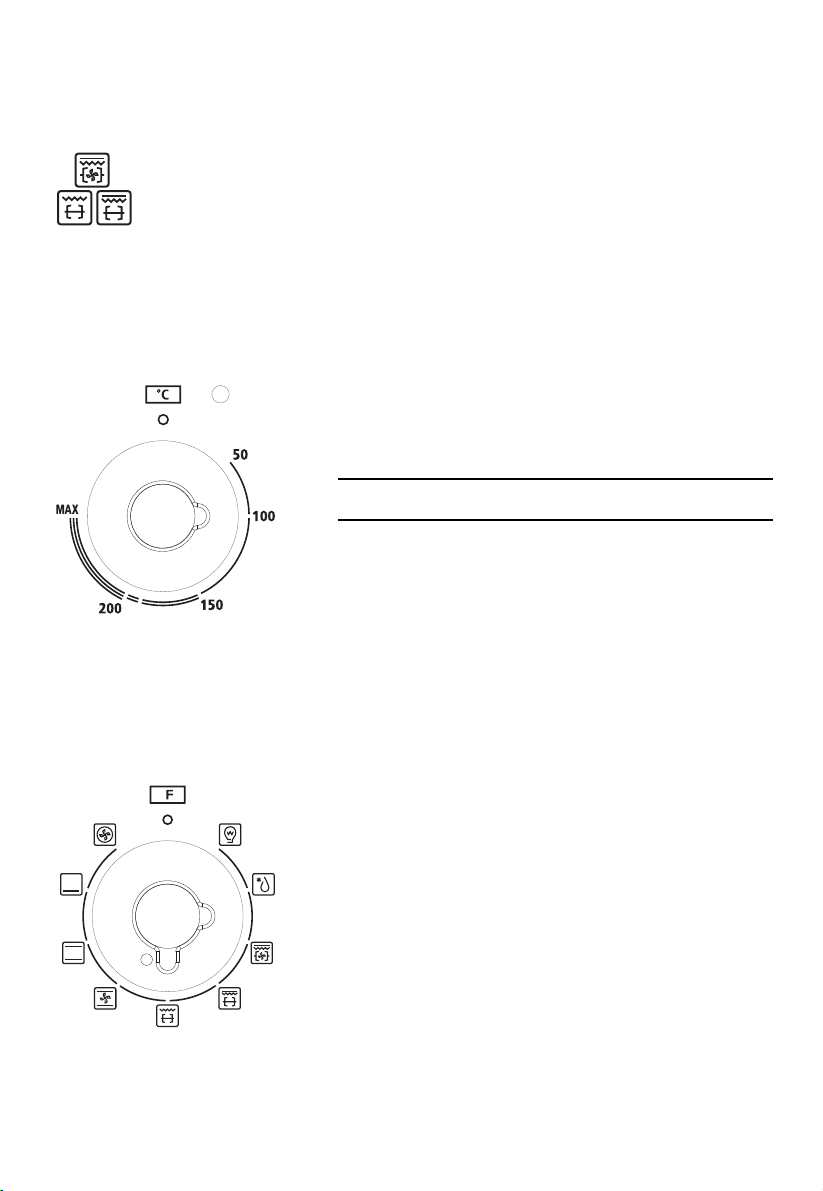
Knobs control
COOKING METHODS (according to models)
ELECTRICAL OVEN : conventional oven (from 50 to MAX)
MULTIFUNCTION OVEN : conventional cooking, fan cooking, lower element, grill,
fan assisted grill.
Lighting the oven
Defrosting
Conventional cooking : top and bottom heating elements are used together.
Preheat the oven for about ten minutes. This method is ideal for all
traditional roasting and baking.
For sealing red meats, roast beef, leg of lamb, game, bread, foil-wrapped food
(papillotes), flaky pastry. Mid sheld position recommended.
Fan assisted multilevel oven
Cooking of similar or different foods placed on different shelves (up to 2
levels at a time).
Fan cooking : both top and bottom heating elements are used and the fan
circulates the air inside the oven. Recommended for poultry, pastries, fish
and vegetables. Heat penetrates the food better and both the cooking and
preheating times are reduced. Different foods can be cooked at the same time in
one or more positions. This function provides even heat distribution and does not
mix the smells. Allow about ten minutes extra when cooking foods at the same time.
Lower element : using the lower element. Ideal for cooking all pastry based
dishes.
This allows you to cook dry tart pastry without over cooking the fruit filling. Use
this for flans, quiches, tarts, p and any cooking that needs more heat and
radiation from below.
Grill : Caution: In this function, the adjustment knob of the temperature
must be set in the position indicated with "G".
Success is guaranteed for mixed grills, kebabs and au gratin dishes. Five minutes
preheating is required to get the element hot. Use the grill when the door is closed.
autin n this untin the adustent n
the teperature ust e set in the psitin indiated ith
.
.
.
.
Using the top level element.
21
Slide the drip tray under the shelf to collect the juices. Make sure that the food
is not too close to the grill. Turn the food over halfway through cooking.
Rotisserie (in option) : the top heating element is used in conjunction
with the rotisserie providing the real flavour of a traditional roast.
Control knob for oven
Use this control knob to set the heat output of the
oven
Funtin seletr arding t the dels
rill
S
22
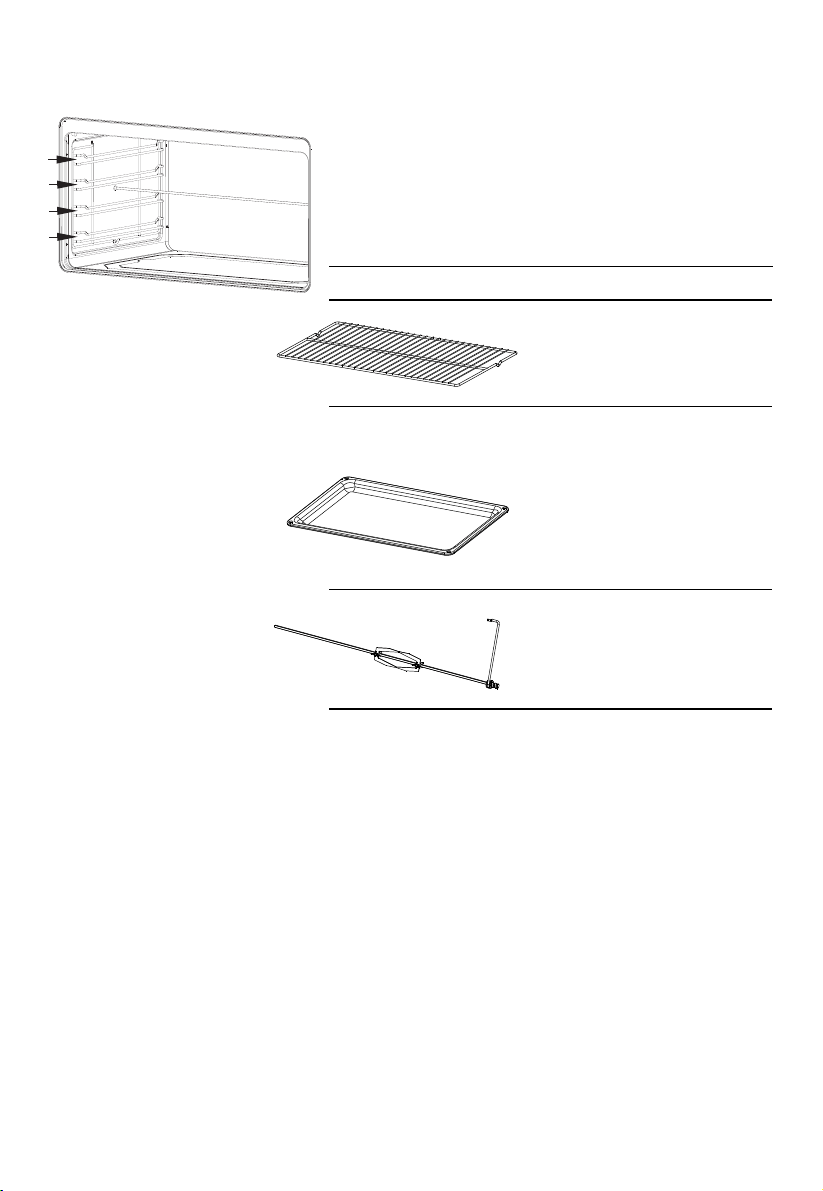
Oven Accessories
The accessories can be inserted in the oven in
different shelf positions.
You can pull the accessories two-thirds of the
way out .
.
You can buy accessories from the after-sales
service or from specialist retailers.
Accessory Description
Baking and roasting shelf
For ovenware, cake tins,
roasts, grilling and frozen
meals.
Enamelled baking tray
For moist cakes, pastries,
frozen meals and
large
roasts. Can also be
inserted underneath the
wire rack or rotisserie
and used as a drip tray to
.
Rotisserie
For roasts and large
pieces of poultry. Use only
in combination with the
enamelled baking tray.
1
2
3
4
23
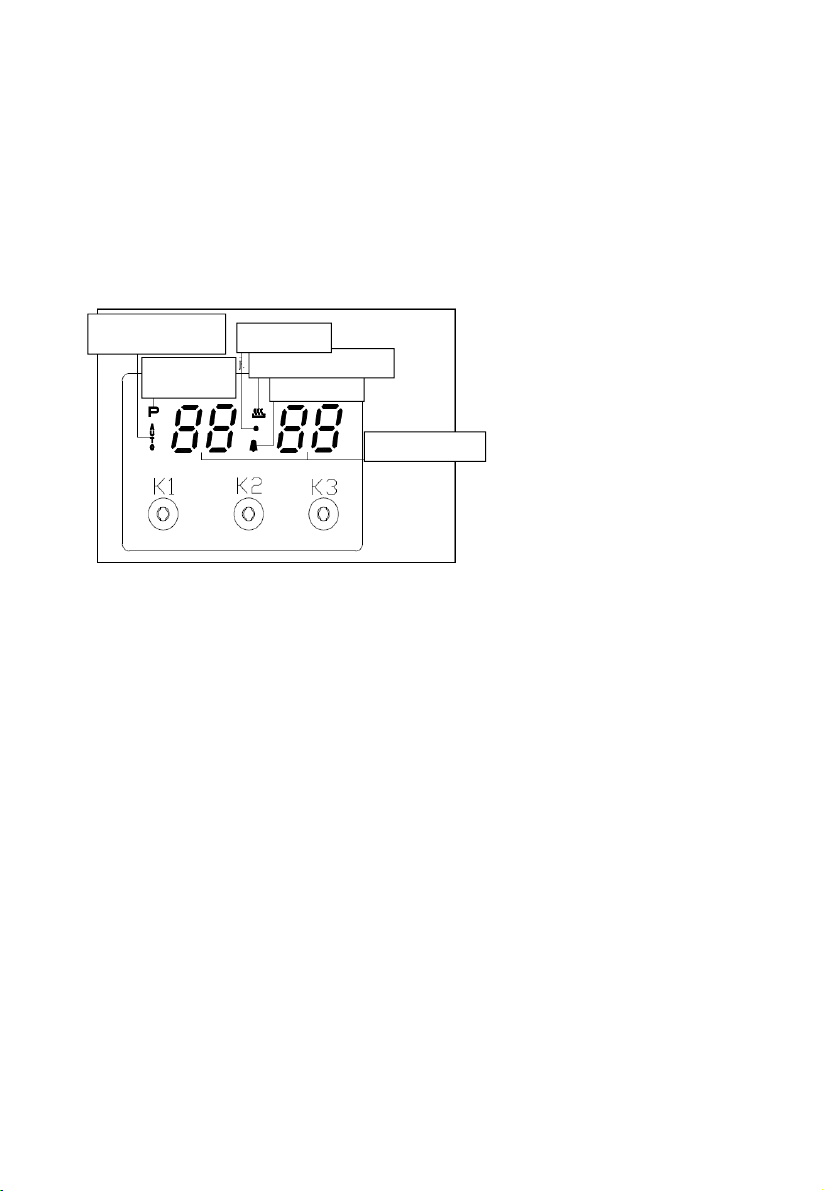
Using the programmer of cooking arding t dels
ain untins(r
se dels)
.
settingtimer.
.
peratin anel and nstrutins r se dels
ist untins
.
.
.
n nstrutins
.
.
.
.
.
.
.
.
24
ntrl Funtin and nstrutins
.
、ie dustent ater tarting up
: .
.
. .
、lar and u Funtin
.
.
. .
.
.
、utprgraing etting and nstrutins
①
.
.
.
..
.
.
25

dustent range r ntinuus tie > ut hurs
dustent range r end tie present tie< end tie= present tie hurs
eet this standard end tie
present tie ntinuus tie
:.
.
.
.
.
te
. .
.
.
.
.
.
.
.
.
.
.
.
.
.
26
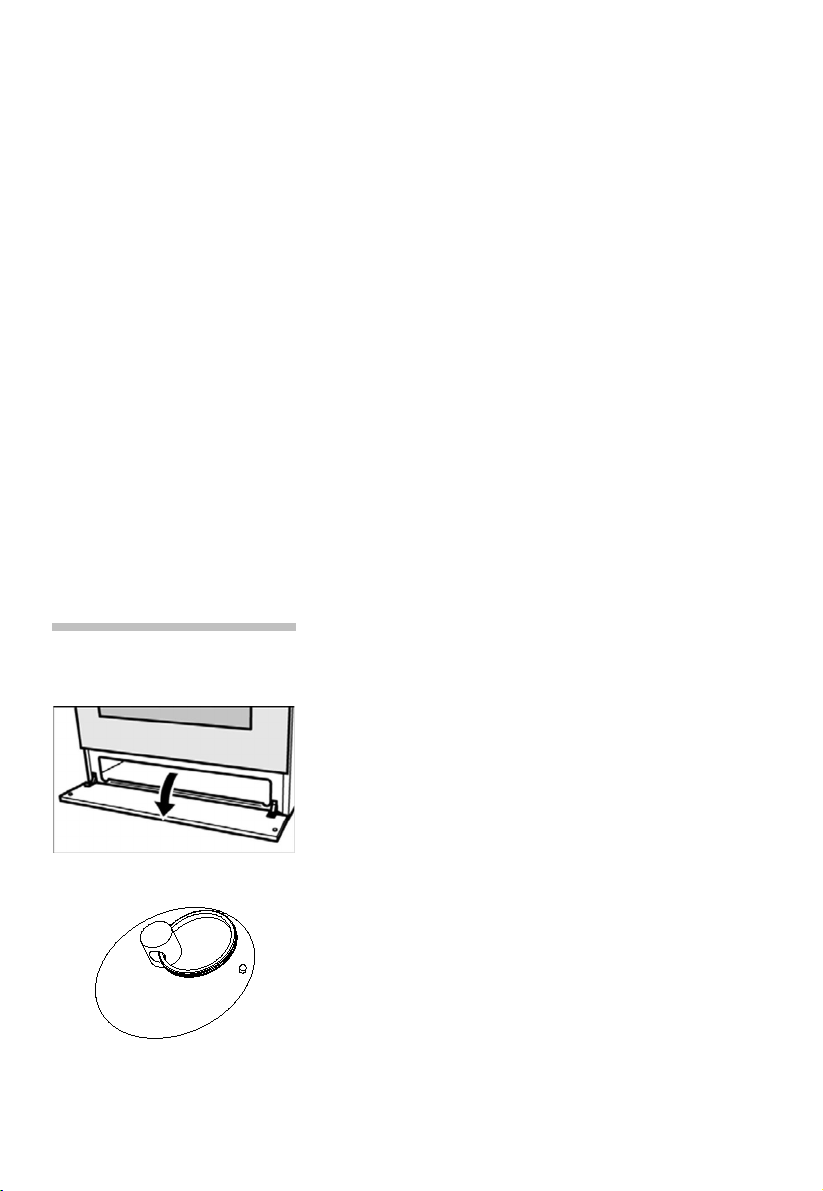
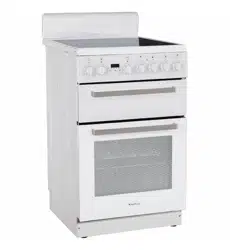
The storage compartment
Open the storage compartment by folding down
the
fascia panel.
This compartment can be used to store hob or
oven
accessories.
.
Risk of fire.
Never leave combustible items in the storage
compartment.
tarting tie end tie ntinuus tie
.
.
.
. >
. .
.
.
.
.
、
anel Funtin
.
.
27

Before using for the first time
Please read the following instructions before using
your appliance for the first time.
Remove the appliance packaging and dispose of this
appropriately.
Baking out the oven
Cooking compartment
initial cleaning
Remove the accessories from the cooking
compartment.
Completely remove any leftover packaging, e.g.
small pieces of polystyrene, from the cooking
compartment.
Some parts are covered with a protective film.
Remove this film.
1. Clean the outside of the appliance with a soft,
damp cloth.
2. If the hook-in racks have already been fitted,
unhook and remove them. For information on
removing the racks, see the section Removing
and refitting hook-in racks.
3. Clean the cooking compartment with warm
soapy.
eating up the en
arding t the del
To remove the new cooker smell, heat up the oven
when it is empty and closed.
.Put the switch in position
..
.
.
.
..
.
.
28

Heating up the grill
1.Put the switch in position grill
.
.
Rinsing cooking
compartment after initial
cleaning
Clean the cooking compartment with hot
soapy
water. Refit the hook-in racks.
29

Using the rotisserie
The rotisserie can be used to cook joints such as
rolled joints and poultry with excellent results. The
meat is roasted thoroughly and evenly.
The rotisserie function only when the switch
is in position grill.
Preparing joints Place the joint as centrally as possible on the rotiss-
erie and secure it at both ends with the retaining clips.
You can also truss the joint with string. With poultry,
bind the ends of the wings underneath the back and
the thighs against the body. This will prevent them
from becoming too dark.
Pierce the skin on the underside of the wings to allow
the fat to escape.
30
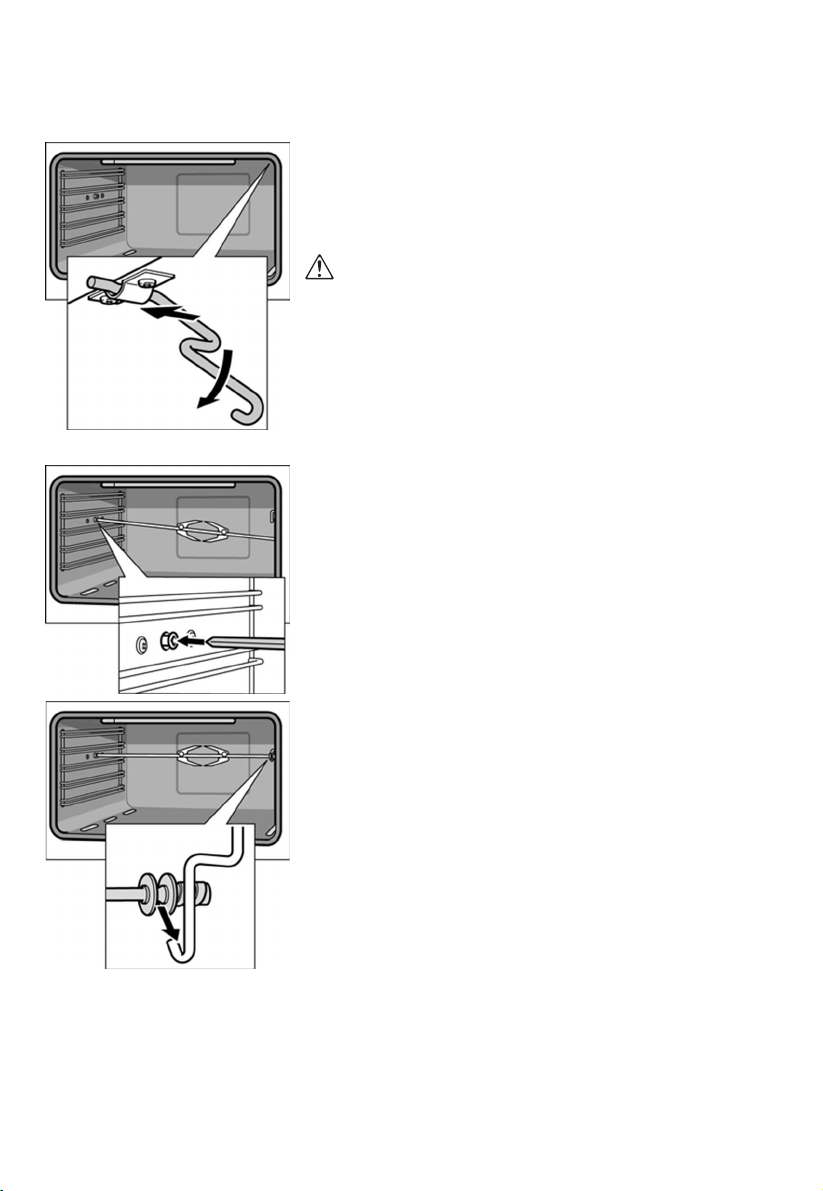
Inserting
the
rotisserie
Insert
the
rotisserie
as
follows:
1. Hook the rotisserie into the bracket on the ceiling
of the cooking compartment.
If you require to preheat the oven, hook in the
holder before preheating.
Risk of burns
Never touch the hot surfaces of the cooking
compartment or the heating elements.
Children must be kept at a safe distance from the
appliance at all times.
Open the appliance door carefully. Hot steam may
escape.
2. If the oven has been preheated, only attach the
rotisserie if you are using an oven cloth or wearing
(thermal) oven gloves. To attach it, slide one
end into the recessed adapter in the left-hand side
panel of the cooking compartment.
3. Hook the other end into the holder.
4. Pour a little bit of water into the baking tray and
slide this into shelf position 1 to collect the run-off
fat.
31

Removing the rotisserie
Risk of burns.
Never touch the hot surfaces of the cooking
compartment or the heating elements.
Children must be kept at a safe distance from the
appliance at all times.
Open the appliance door carefully. Hot steam may
escape.
Risk of burns.
Never touch the rotisserie or other accessories
directly when they are hot.
Always wear oven gloves or heat-resistant gloves
when handling hot accessories.
Remove the rotisserie as follows:
1. Carefully open the appliance door. Carefully
remove the rotisserie from the holder.
2. Carefully withdraw the rotisserie from the
recessed adapter in the side panel and remove it
from the oven.
3. Take out the baking tray.
32

Cleaning and care
Never use high-pressure cleaners or steam jets. Risk
of short circuit.
Never use caustic or abrasive cleaning agents.
These could damage the surface. If such an agent
gets on the front of the appliance, wipe it off
immediately with water.
Do not clean any surfaces of the appliance while they
are hot.
Switching on the oven
lighting
To make it easier to clean the oven, you can switch
on the oven lighting.
To switch on the lighting, press the function button for
oven lighting until it locks into place.
Catalytic cooking compartment panels
The catalytic cooking compartment panels are
coated with self-cleaning enamel.
The surfaces clean themselves while the oven is in
operation. Larger splashes will only be removed after
the oven has been used several times.
Self-cleaning surfaces The rear and side walls are protected with catalytic
panelling.
Never clean these surfaces with oven cleaner.
Slight discolouration of the enamel does not affect
automatic self-cleaning.
33

Using the correct cleaning agent
Do not use cleaning agents that contain abrasive
substances or acids, or cleaning aids such as steel
wool or stainless steel sponges. These could damage
the surfaces.
Appliance parts Cleaning agent and cleaning aid
Appliance door glass panel
Use glass cleaner.
Risk of injury.
The lower edge of the door may have sharp edges.
Clean the door and glass panels with care.
Do not use a glass scraper.
Control panel and knobs
Wipe with a damp, soft cloth.
Seal
(on the cooking
compartment)
Use warm soapy water.
Hook-in racks
Use warm soapy water.
Cooking compartment
Enamelled surfaces
Appliance exterior
Stainless steel surfaces
Glass cover
(in front of the oven lighting)
Use warm soapy water; Dry off with a soft cloth.
Use warm soapy water; Dry off with a soft cloth.
Always remove flecks of limescale, grease, starch
and albumin (e.g. egg white) immediately.
Special stainless steel cleaners are available from
the after-sales service or specialist shops.
Use warm soapy water.
Pan support
Use warm soapy water.
Do not clean the pan supports in the dishwasher.
Appliance parts Cleaning agent and cleaning aid
Accessory
Soak in hot soapy water. Clean with a brush
or sponge.
34
Cleaning the interior glass of the oven
The interior glass of the oven door can be removed:
with the door in the semi-open position, use both
hands to remove the glass .After cleaning, refit the
the glass by proseeding in reverse order.
Note
In some models, the glass is screenprinted.
In this case, when refitting the glass make sure the
screenprinted part is legible when the oven door
is
opened.
he interir glass the en
..
..
.
Fig 9
Fig 9A
35
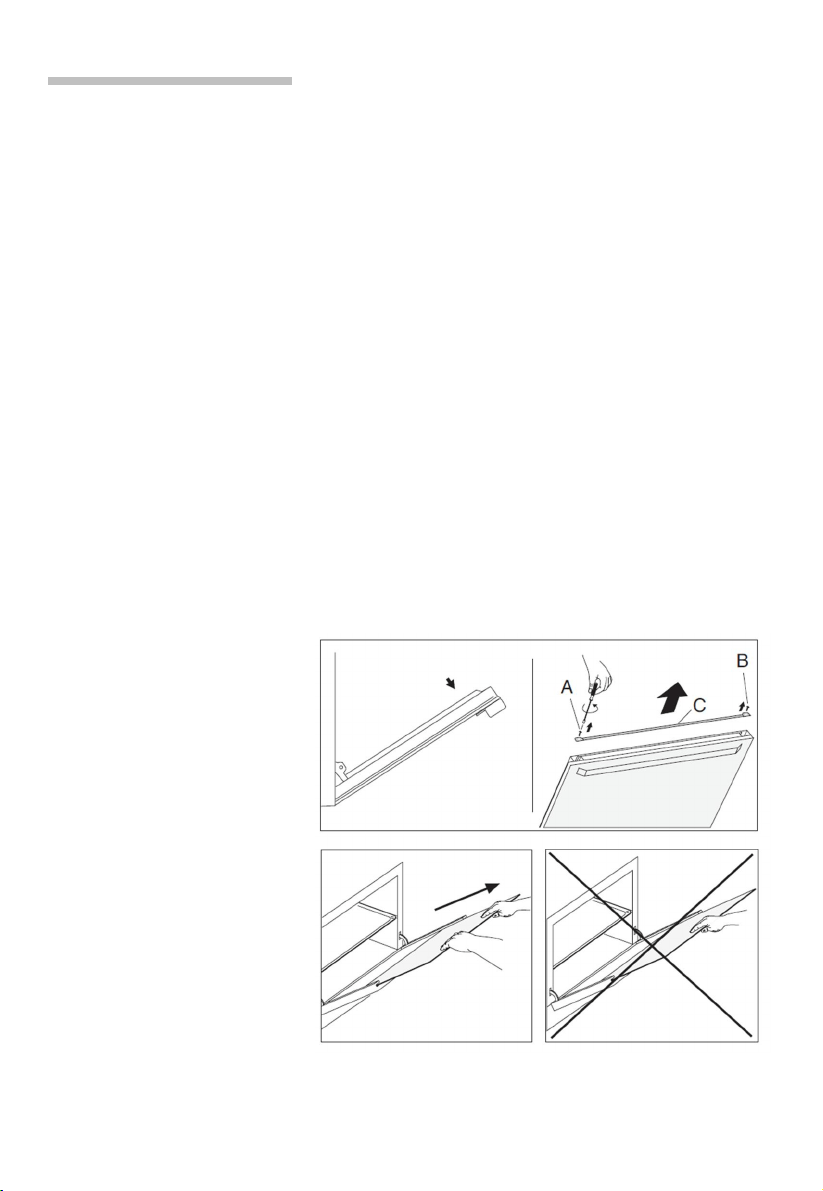
Removing and fitting the appliance door
You can remove the appliance door for easier
cleaning.
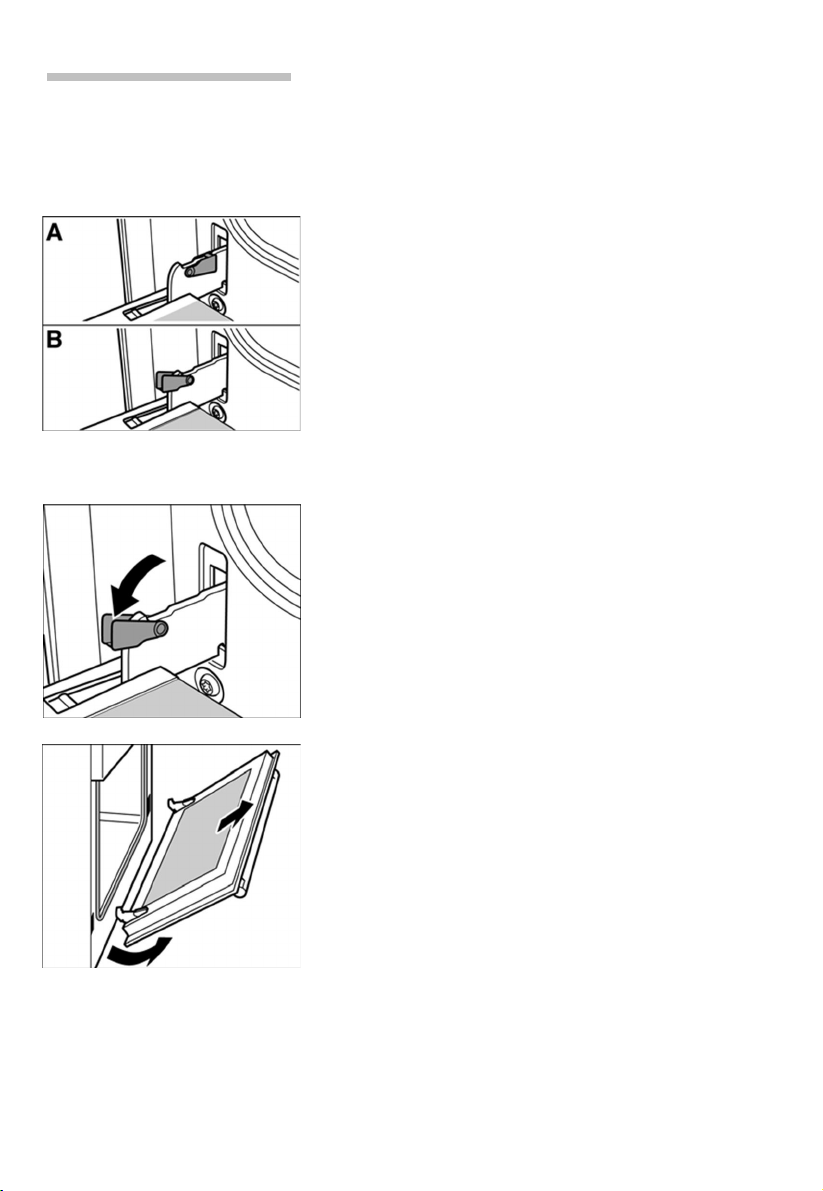
The hinges of the appliance door are each secured
by a locking lever.
When the locking lever is folded in (A), the appliance
door is secured. It cannot be unhinged.
If the locking lever is open (B), only the hinge is
secured, and you can remove the appliance door.
Risk of injury.
Do not reach inside the hinge.
Removing the appliance
door
Proceed as follows:
1. Open the appliance door.
2. Lift up the locking levers on both sides.
3. Close the appliance door until you feel resistance
at an angle of around 15° (in relation to the closed
appliance door).
4. Grip the door on either side with both hands.
5. Close the appliance door a little further.
6. Lift the door upwards and at an angle to remove it.
Do not disassemble the door.
36

Fitting the appliance door Proceed as follows:
1. Hold the appliance door at an angle.
2. Insert both hinges, left and right, into the supports.
3. Position the door so that the hinge grooves
engage on both sides.
4. Open the appliance door.
5. Fold in the locking levers on both sides.
6. Close the appliance door.
37
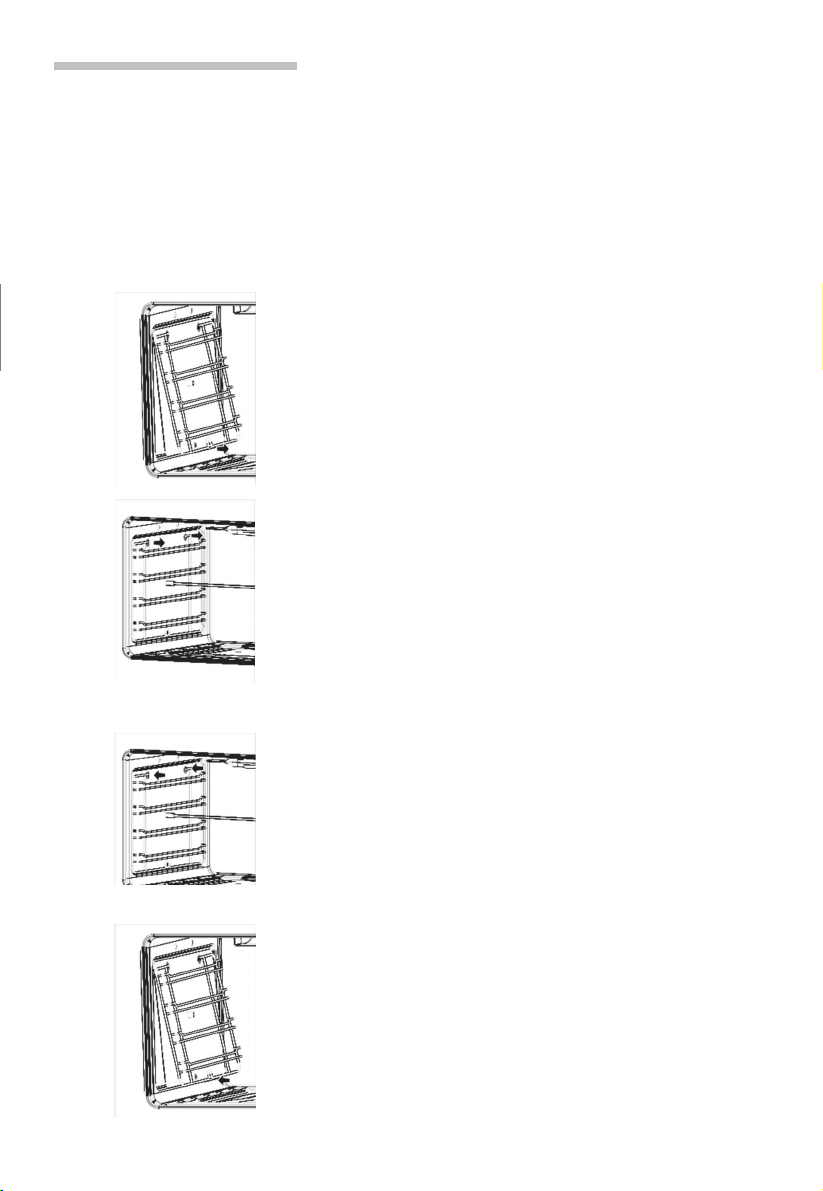
Removing and inserting the Hook-in racks
You can remove the Hook-in racks in order to clean
them separately.
The Hook-in racks are all fixed to the walls of the
cooking compartment at four points.
Removing the Hook-in
racks
To remove the Hook-in racks, proceed as follows:
1.
Undo the screw on the bottom the Hook-in rack.
The lower hooks of the Hook
-
in
rack are released.
2.
Take hold of the top of the Hook-in rack and screw
on the screw on the bottom the Hook-in rack again.
Inserting the Hook-in rack To reinsert the Hook-in racks, proceed as follows:
1. Insert the upper hooks into the drill holes in the
side panel.
2. Pull the Hook-in rack slightly downwards and insert
the lower hooks into the drill holes.
38

Faults and the after-sales service
Malfunctions often have simple explanations.
Please read the following notes before calling the
aftersales service.
Fault Possible cause Remedial action
The door panel steams up when
the oven is hot.
Normal occurrence;
caused by the
difference in
temperature.
Not possible; this has no
effect on oven performance.
.
The appliance does not work. Defective circuit
breaker
Look in the fuse box and
check that the circuit breaker
for the appliance is in
working order.
All dishes that are prepared in
the oven become burnt very
quickly.
Power cut Check whether the kitchen
light works, for example.
Thermostat faulty Call the after-sales service.
The oven lighting has failed. Oven light is faulty Replace the oven light.
(see section "Replacing
oven light")
Repairs may only be carried out by fully trained after-
sales service engineers.
If your appliance is not repaired professionally, you
may be exposing yourself to substantial risks.
39
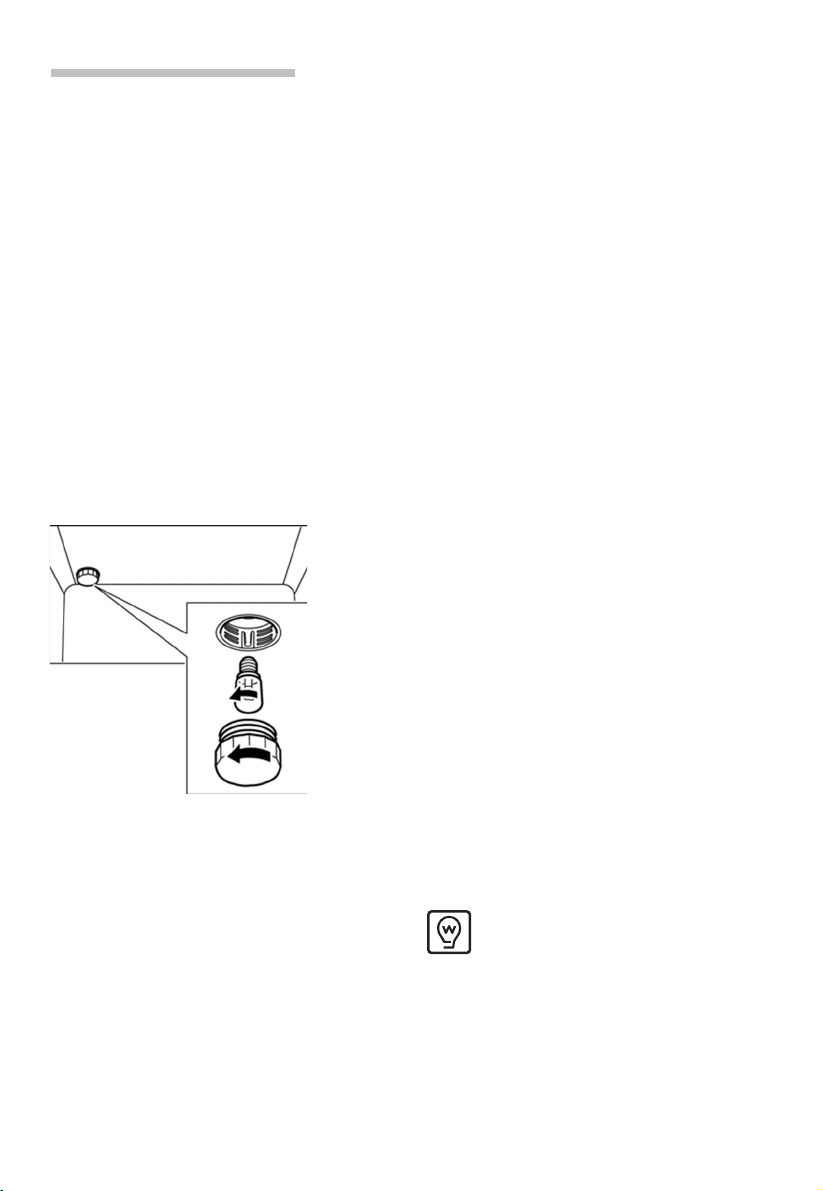
Replacing the oven light bulb
WARNING: Ensure that the appliance is switched
before replacing the lamp to avoid the
possibility of electric shock
If the oven light bulb fails, it must be replaced.
Replacement heat-resistant bulbs can be obtained
from the after-sales service or from specialist
retailers. Please specify the SN number
of your appliance. Do not use any other type
of bulb.
Proceed as follows:
1. Switch off the relevant circuit breaker.
2. Open the appliance door.
3. Lay a tea towel in the cooking compartment if it is
cold to prevent damage.
4. Unscrew the glass cover from the bulb inside the
cooking compartment by turning it anti-clockwise.
5. Replace the bulb with one of the same type.
Voltage: 230 V
Power: 25 W
Thread: E14
Temperature resistance: 300°C
6. Screw on the glass cover again.
7. Remove the tea towel and switch the circuit
breaker back on.
Turn the oven switch or your control panel in
position
in order to check whether the
oven lighting is working properly.
40
Tips and tricks
The following are tips and tricks to help you when
cooking food in your appliance.
Tips for saving energy
Here are a few tips for saving energy when using
the
hob and oven.
Tips on using the hob
Suitable cookware
diameter
Cookware with lids Use cookware with a flat bottom.
If possible, use cookware with lids to save energy.
Less water
To reduce the cooking time for e.g. vegetables
and
potatoes, use less water.
Tips on using the oven
Several cakes
It is best to bake several cakes one after the other.
The oven is still warm. This reduces the baking
time
for the second cake. You can also place two
cake tins
next to each other.
Using residual heat Where longer cooking times are used, you can switch
the oven off 10 minutes before the end of the cooking
time and use the residual heat to finish cooking.
Closing the appliance door Always keep the appliance door closed when it is in
operation. If you need to open the appliance door,
close it again as soon as possible. Otherwise, the
temperature will drop and the oven will need to
heat
itselfupagain.
"
".
41
ceramic

Tips for using your appliance
The following tips relate to ovenware and cooking
and explain what to do if something goes wrong.
General tips Since a lower temperature allows more even
browning.
Clean the appliance and accessories after each
use,
once they have cooled down.
Always place baking tins or ovenware in the centre
of
the wire rack.
Always place cookware in the middle of the
hotplate
on the hob.
Boiling and frying
Cookware For dishes which require a lot of liquid, use deep-
sided pots so that they do not boil over.
The pan base must be clean, dry and flat.
42

Baking tips
How to confirm whether your
sponge cake is cooked
through.
Approximately 10 minutes before the end of the
baking time stated in the recipe, pierce the highest
point of the cake with a wooden skewer. If no cake
mixture sticks to the wood, the cake is ready.
The cake collapses.
Next time, use less liquid or bake at a slightly lower
temperature. Note the stirring times indicated in the
recipe.
The cake has risen high in the
middle and less around the
edges.
The cake is too dark on the
top.
Do not grease the edges of the baking tin. After
baking, carefully loosen the cake using a knife.
Place the cake lower in the oven and bake at a lower
temperature for slightly longer.
The cake is too dry.
Make tiny holes in the finished cake using a cocktail
stick. Then pour fruit juice or an alcoholic drink over
the cake. Next time, bake at a slightly higher
temperature for less time.
The bread or cake looks good
but it is streaked with water
inside.
The pastries are not evenly
browned.
Next time, use less liquid and bake at a lower
temperature for slightly longer. For cakes with a moist
topping: Pre-bake the base first. Sprinkle the base
with almonds and breadcrumbs and then pour the
topping on. Take care to follow recipes and baking
times.
Set the temperature slightly lower. Excess
greaseproof paper can affect the air circulation.
Always cut the greaseproof paper down to the size of
the baking tray.
Tips on using the
rotisserie
Place the joint as centrally as possible on the rotiss-
erie and secure it at both ends with the retaining clips.
You can also truss the joint with string. With
poultry,
bind the ends of the wings underneath the
back and
the thighs against the body. This will
prevent them
from becoming too dark.
Pierce the skin on the underside of the wings to
allow
the fat to escape.
43
44

Warranty Card
Worldwide Appliances Pty Limited
A.B.N. 45868077422
Oce:
48-50 Moore Street, Leichhardt N.S.W 2040
Post:
Locked Bag 3000, Annandale, N.S.W 2038
P: 1300 694 583
WARRANTY REGISTRATION
Your ongoing satisfaction with your artusi
product is important to us. We ask that you
complete the enclosed Warranty Registration
Card and return it to us so that we have a record
of the artusi product purchased by you.
PRIVACY
Worldwide Appliances respects your
privacy and is committed to handling your
personal information in accordance with the
National Privacy Principles and the Privacy
Act 1988 (Cth). A copy of the Worldwide
Appliances Privacy Policy is available at
www.artusi.com.au. Worldwide Appliances will
not disclose any personal information set out
in the Warranty Registration Card (“Personal
Information”) without your consent unless
required by:
1. law;
2. any Worldwide Appliances related company;
3. any service provider which provide services
to artusi or assist artusi in providing services
(including repair and warranty services) to
customers. Our purpose in collecting the
Personal Information is
to keep a record of the artusi product purchased
by you, in order to provide a better warranty
service to you in the unlikely event that there is
a problem with your artusi product. Worldwide
Appliances may contact you at any one or more
of the address, email address or telephone
numbers set out in the Warranty Registration
Card. Please contact artusi on 1300 694
583 should you not wish to be contacted by
Worldwide Appliances.
WARRANTY
1. Warranty
Worldwide Appliances warrants that each artusi
product will remain, for a period of either 12
months or 24 months of warranty. All Warranties
are valid from the original date of purchase, And
warranty claims must be accompanied by the
proof of purchase.
24 months warranty products:
All Built-in Appliances – Limited to Ovens,
Gas, Induction and Electric Cooktops, and All
Rangehoods
Freestanding Cookers - Gas and Electric Models
(900mm Width)
artusi.com.au
Dishwashers - Freestanding, Fully Integrated,
Semi Integrated and built-in
12 months warranty products:
Freestanding Cookers - Gas and Electric Models
in 50cm, 54cm and 60cm Widths
Portable Appliances* – Benchtop Models and
Portable Gas Models
2. What is not Covered by the Warranty.
The Warranty does not apply if an artusi product
is defective by a factor other than a defect arising
in the manufacture of the artusi product, including
but not limited to:
(a) damage through misuse (including failure
to maintain, service or use with proper care),
neglect, accident or ordinary wear and tear
(including deterioration of parts and accessories
and glass breakage);
(b) use for purpose for which the artusi product
was not sold or designed;
(c) use or installation which is not in accordance
with any specied instructions for use or
installation;
(d) use or operation after a defect has occurred or
been discovered;
(e) damage through freight, transportation or
handling in transit (other than when Worldwide
Appliances is responsible);
(f) damage through exposure to chemicals, dusts,
residues, excessive voltage, heat, atmospheric
conditions or other forces or environmental
factors outside the control or Worldwide
Appliances;
(g) repair, modication or tampering by the
purchaser or any person other than Worldwide
Appliances, an employee of Worldwide
Appliances or an authorised artusi service
contractor*;
(h) use of parts, components or accessories
which have not been supplied or specically
approved by artusi.
(i) damage to surface coatings caused by cleaning
or maintenance using products not recommended
in the artusi product handbook provided to the
purchaser upon purchase of the artusi product;
(j) damage to the base of an electric oven due to
items having been placed on the base of the oven
cavity or covering the base, such as aluminium
foil (this impedes the transfer of heat from the
element to the oven cavity and can result in
irreparable damage); or
(k) damages, dents or other cosmetic
imperfections not aecting the performance of the
artusi in respect of an artusi product purchased
as a “factory second” or from display
The Warranty does not extend to light globes
used in artusi products.
3. Domestic Use
Each artusi product is made for domestic use.
This Warranty may not extend to artusi products
used for commercial purposes.
Continued over...
4
Please complete and send to ARTUSI at: REPLY PAID 83617
LEICHHARDT NSW 2040
Last Name: First Name:
Address:
State: Postcode: Email:
Home Phone: Mobile:
Purchase Date: / / (Please attach proof of purchase to validate warranty)
MODEL NUMBER
SERIAL NUMBER
(if you cannot locate the serial number please call ARTUSI on 1300 694 583)
1
2
3
4
WARRANTY REGISTRATION CARD
01052013
01032014
4. Time for Claim under the Warranty
You must make any claim under this Warranty
within twenty eight (28) days after the occurrence
of an event which gives rise to a claim pursuant
to the Warranty, by booking a service call on the
telephone number below.
5. Proof of Purchase
Customers must retain proof of purchase in order
to be eligible to make a warranty claim in respect
of an artusi product.
6. Claiming under the Warranty
Customers will bear the cost of claiming under
this Warranty unless Worldwide Appliances
determines the expenses are reasonable, in which
case the customer must claim those expenses
by providing written evidence of each expense
to Worldwide Appliances at the address on the
Warranty Registration Card.
7. Statutory Rights
(a) These terms and conditions do not aect your
statutory rights.
(b) The limitations on the Warranty set out in this
document do not exclude or limit the application
of the consumer guarantees set out in the Act or
any other equivalent or corresponding legislation
in the relevant jurisdiction where to do so would:
(i) contravene the law of the relevant jurisdiction;
or
(ii) cause any part of the Warranty to be void.
(c) Worldwide Appliances excludes indirect or
consequential loss of any kind (including, without
limitation, loss of use of the artusi product) and
(other than expressly provided for in these terms
and conditions) subject to all terms,
conditions and warranties implied by custom, the
general law, the Act or other statute.
(d) The liability of Worldwide Appliances to you
for a breach of any express or non-excludable
implied term, condition or warranty is limited at
the option of Worldwide Appliances to:
(i) replacing or repairing the defective part of the
artusi product;
(ii) paying the cost of replacing or repairing the
defective part of the artusi product;
(iii) replacing the artusi product; or
(iv) paying the cost of replacing the artusi
product.
(e) Our goods come with guarantees that cannot
be excluded under the Australian Consumer
Law. You are entitled to a replacement or refund
for a major failure and for compensation for any
other reasonably foreseeable loss or damage.
You are also entitled to have the goods repaired
or replaced if the goods fail to be of acceptable
quality and the failure does not amount to a
major failure.
8. Defects
Any part of an artusi product deemed to be
defective and replaced by Worldwide Appliances
is the property of Worldwide Appliances.
Worldwide Appliances reserves the right to
inspect and test artusi products in order to
determine the extent of any defect and the
validity of a claim under the Warranty.
*To locate your closest artusi authorised service
agent please contact us on 1300 652 100 or visit
www.artusi.com.au
ALL SERVICE CALLS MUST BE BOOKED
THROUGH AN AUTHORISED DEALER OR
WARRANTY DEPARTMENT ON 1300 652 100
OR stokesaps.com.au/artusi-service
01032014
Warranty Card continued
artusi.com.au
Warranty Card tear off


ARTUSI.COM.AU
P: 1300 649 583
NSW & ACT (HEAD OFFICE)
48-50 MOORE STREET
LEICHHARDT
F 02 8569 4699
QLD
1/42 CAVENDISH ROAD
COORPAROO
F 07 3397 0850
VIC, TAS & SA
1211 TOORAK ROAD
CAMBERWELL
F 03 9809 2155
WA & NT
UNIT 10/55 HOWE STREET
OSBORNE PARK
F 08 9201 9188
NZ
PO BOX 11.160
SOCKBURN CHRISTCHURCH
F 03 344 5906
ARTUSI OFFICES ARE OPEN DAILY FROM 9AM–5PM AND SATURDAYS 10AM–4PM
DISCLAIMER
Worldwide Appliances PTY LTD, trading as ARTUSI, is continually seeking ways to improve the design specifications, aesthetics and production
techniques of its products. As a result alterations to our products and designs take place continually. Whilst every effort is made to produce
information and literature that is up to date, this brochure should not be regarded as an infallible guide to the current specifications, nor does it
constitute an offer for the sale of any particular product. Product dimensions indicated in our literature is indicative only. Actual product only
should be used to define dimension cutouts. Distributors, and retailers are not agents of ARTUSI and are not authorised to bind ARTUSI by any
express or implied undertaking or representation.