Loading ...
Loading ...
5
THERMOSTAT OVERVIEW
Before you begin using your thermostat, you should be familiar with its features, display and
the location/operation of the thermostat buttons and switches.
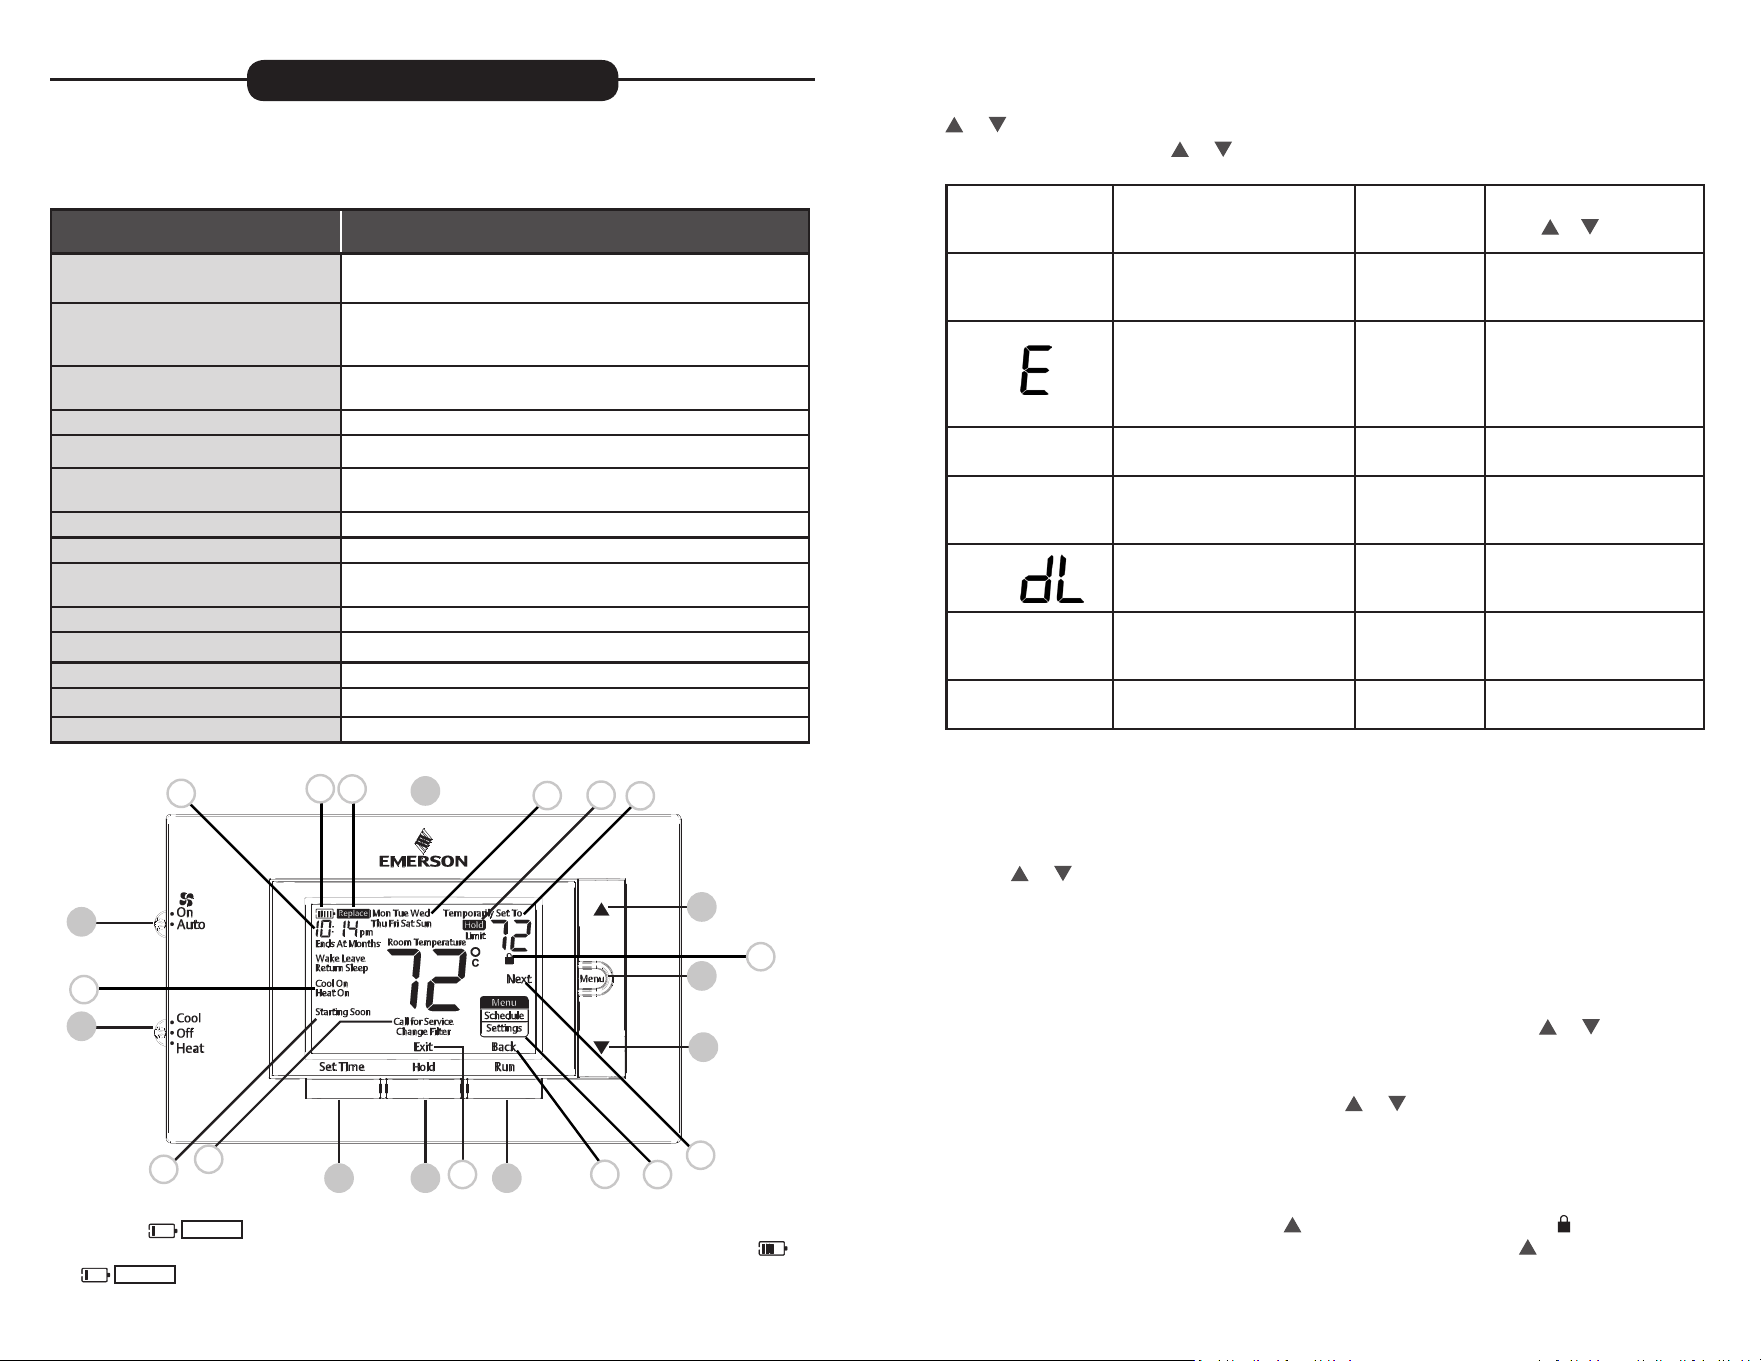
THERMOSTAT BUTTONS
AND SWITCHES
THE DISPLAY
1.) Fan Switch 10.) Thermostat is protecting the equipment from short cycling
(5-minute delay)
2.) System Switch 11.) Indicates that the system is running in cool, heat or auxiliary
mode (The auxiliary will run in Heat mode when the heat
pump cannot maintain the set temperature.)
3.) Backlight Button (located on the top
of the thermostat
12.) Displays the current time
4.) Set Correct Time 13.) Battery status indicator
5.) Hold a Permanent Temperature 14.) Low battery indicator
6.) Cancels Hold – Returns to
Programmed Schedule
15.) Day of the week used when programming a schedule
7.) Raises Temperature Setting 16.) Permanent hold (bypassing the schedule)
8.) Access Menu Options 17.) Temperature setpoint
9.) Lowers Temperature Setting 18.) Appears when the keypad is locked (to prevent unwanted
changes)
19.) Next (Menu button) is used to navigate within a menu
20.) Access the schedule and customize thermostat features
21.) Back (Run button) is used to navigate within a menu
22.) Exit (Hold button) returns to the home screen
23.) SEE TROUBLESHOOTING
1
2
3
4 5 6
7
8
9
10
11
12
13
14
15
17
18
19
20
21
22
16
23
USING THE THERMOSTAT
Whenever
“
Replace
”
appears in the display, new premium brand AA alkaline batteries
should be installed. If the house will be unoccupied for an extended period and either
“
”
or “
Replace
” is displayed, install new batteries before leaving.
6
USER MENU
To customize thermostat settings, press the Menu button from the home screen. Use the
or buttons to highlight Settings and press Next. Use Next and Back to navigate
through menu items. Press or to change the setting.
User’s Menu #
(Press Menu button
and release)
Description
Default Setting
(ashing icons)
Settings
(Press or )
01
Schedule Type (set as either
7-Day, 5-1-1 Day or Non
Programmable)
5
7 – 7 Day
5 – 5-1-1 Day
0 – Non-Programmable
02
Early Start (starts heating
or cooling early so your
programmed temperature is
reached by the programmed
time)
OFF
On – start early
OFF – start at program
period time
03
Fahrenheit or Celsius °F
°F – Fahrenheit
°C – Celsius
04
Temperature Display Ad-
justment (adjust the Room
Temperature)
0 -5 to +5
05
Continuous Display Light
(keep the backlight always on –
“C” wire required)
OFF
On – always on
OFF – momentarily
06
Change Air Filter (set up a
monthly reminder)
OFF
1 to 12 – reminder time
(months)
OFF – no lter reminder
07
Keypad Lock (prevent unwant-
ed changes to the thermostat)
OFF
On – disable buttons
OFF – all buttons are active
THERMOSTAT OPERATION
Set Current Time and Day
Note: Time icons will ash at initial power up or after a reset.
1.) Press Set Time
2.) Use or to adjust the hour
3.) Press Next to advance to set the minutes and day of the week
4.) Press Exit when nished.
The default program is 5-1-1 Day, but can be setup as a 7-Day or Non-Programmable
thermostat (refer to the User Menu above)
• Hold Temperature (bypassing the schedule) – With the System Switch set to Heat or
Cool, momentarily press the Hold button. Hold will be displayed. Use or to adjust the
temperature. The thermostat will hold the room temperature at the selected setting until
you press Run to start program operation again.
• Program Override (Temporary Hold) – Press or until the desired temperature is
displayed. The thermostat will override the schedule until the next programmed time
period with a minimum override of 2 hours. Then the thermostat will automatically revert
to the program.
• Keypad Lockout – To prevent unwanted changes, the buttons can be disabled.
To turn this feature On, press and hold and the Menu button unl the icon appears
(this can also be turned on in the menu). To turn O, press and hold and the Menu but-
ton for 3 seconds.
Loading ...