Your new cooktop has sealed gas burners. There are no burner parts under the cooktop to clean, disassemble or adjust. Your cooktop has three different burner sizes: small, large and dual-flame.
WARNING: To prevent flare-ups, do not use the cooktop without all burner caps and all burner grates properly positioned. WARNING: To prevent burns, do not touch burner caps orgrates while hot. Turn the cooktop off and allow the burners to cool.
The burner parts must be correctly positioned for the cooktop to function properly. If the burner parts are not correctly positioned, one or more of the following problems may occur:
Burner flames are too high.
Flames shoot out of burners.
Burners do not ignite.
Burner flames light unevenly.
Burner emits gas odor.
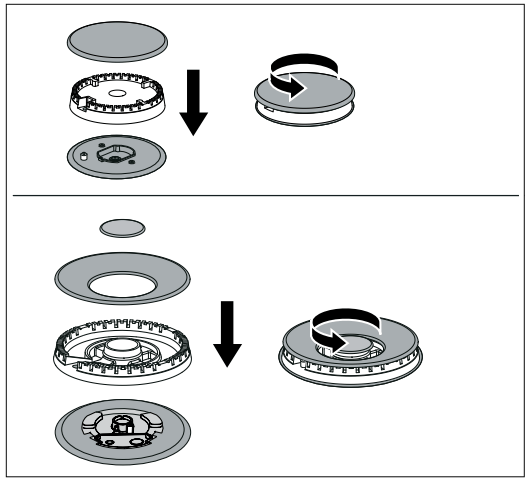
Burner Cap and Burner Base Placement
After electrical connection is complete, place each burner base on the corresponding location on the cooktop. One of the three bars on the burner base should line up with the notch and prevent the base from rotating. The small hole or cutout near the edge should also line up with the igniter. Pay special attention to avoid damaging the igniter during installation of the base. See Illustration below.
Once each base is located and resting evenly, place each burner cap on its correct burner base. See Illustration.
Place burner cap gently on top of base so that the prongs of the burner base fit snugly into the groove of the burner cap.
If the maintop is removed by a certified installer (for example to check electrical or piping connection) the panhead screws that were removed must be re-installed to ensure proper functionality of burners.
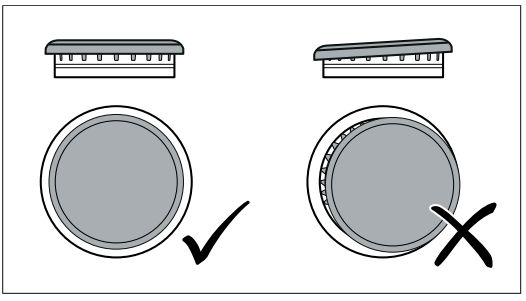
Checking Burner Cap Placement
Check to make sure that there is no gap between the burner cap and burner base. See illustration below for correct and incorrect placements of the burner cap.
You may gently try to move the burner cap from side to side to check if it is properly placed. If properly placed, the cap will click from side to side as the prongs hit the groove ridge.
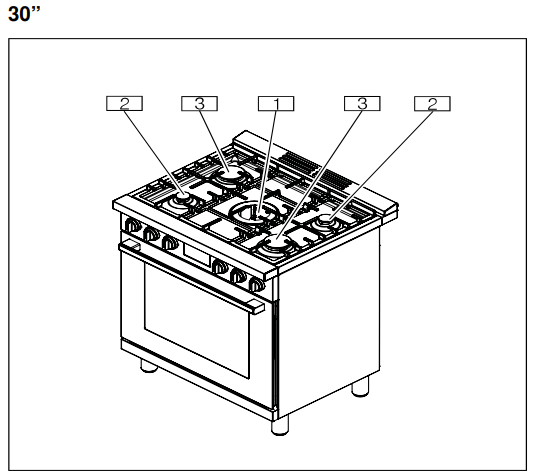
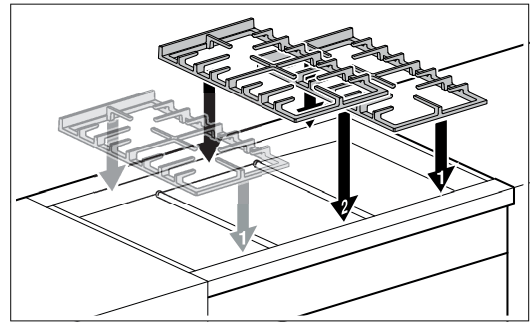
Install Grates
First position the outer grates, followed by the the central grate. If you only have two grates, the order in which you position them is not relevant.
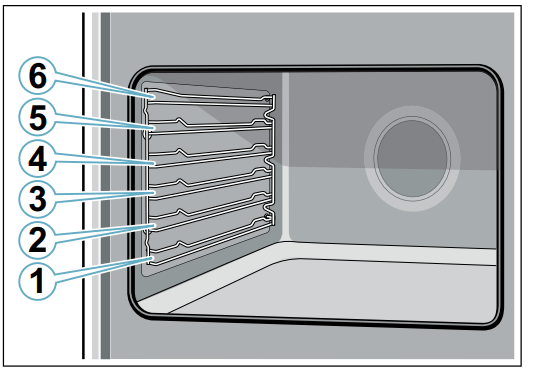
Inserting Racks
CAUTION
To avoid burns, place oven racks in desired positions before turning oven on. Always use oven mitts when the oven is warm. If a rack must be moved while the oven is hot, do not let oven mitts contact hot heating elements.
Use caution when removing oven racks from the lowest rack position to avoid contact with the hot oven door.
To avoid possible injury or damage to the appliance, ensure racks are installed exactly per installation instructions and not backwards or upside down.
The wire rack can be inserted into the cooking compartment at six different levels. Always push accessories in fully so that they do not touch the door panel. Make sure that you always insert the accessories into the cooking compartment the right way round.
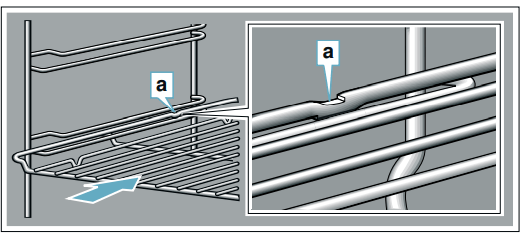
Flat Rack
The rack is designed with a stop so it will stop before coming completely out of the oven and not tilt. To insert wire rack into oven:
Grasp rack firmly on both sides.
Insert rack (see picture).
Tilt rack up to allow stop into rack guide.
Bring rack to a horizontal position and push the rest of the way in. Rack should be straight and flat, not crooked.
To remove Flat Rack from Oven:
Grasp rack firmly on both sides and pull rack toward you.
When the stop is reached, tilt rack up and pull the rest of the way out.
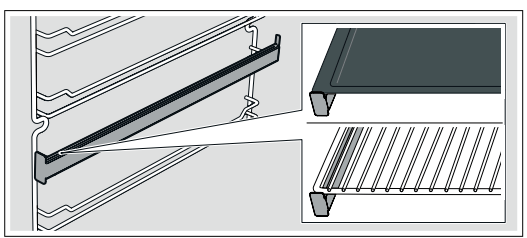
Telescopic Rail
WARNING - RISK OF BURNS: The telescopic shelves become hot when the appliance is in use. You must take great care to avoid burning yourself when they are pulled out.
The telescopic rails allow you to pull accessories out completely. When inserting the baking tray and roasting shelf, ensure that it locks into place in front of the tab on the telescopic rails
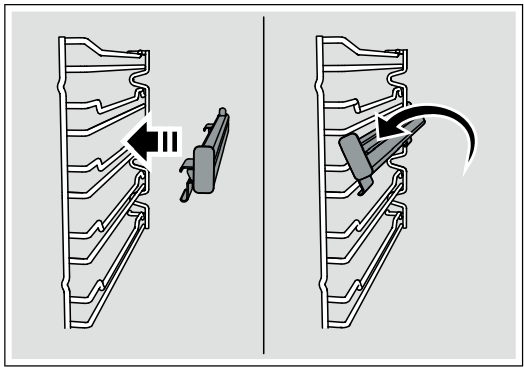
To insert Telescopic Rail into Oven:
1. Hang the upper part of the rail into the rack.
2. Clip the lower part of the rail into the rack
3. Slide the movable part of the telescopic rack in and out a few times to make sure it is able to move freely and that the non-moving part of the telescopic rack is securely anchored.
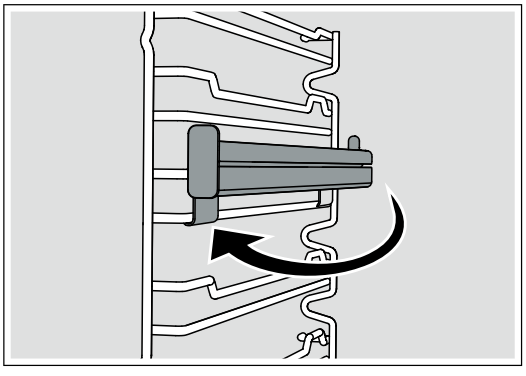
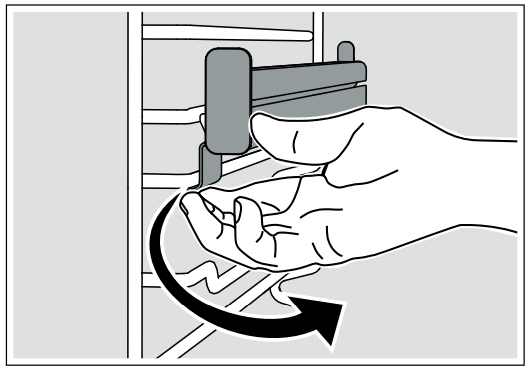
To Remove Telescopic Rail from the Oven:
1. Pull the lower part of the rail away from the rack.
2. Hang the upper part of the rail out of the rack.
Operating the cooktop
Before Using the Appliance for the First Time
Remove all packing materials and literature from the cooktop surface.
Wipe with a clean, damp sponge and dry.
There may be a slight odor during the first several uses. This is normal and will disappear.
Optimum cooking results depend on the proper cookware being selected and used. See “Choosing Cookware - Cookware Recommendations”.
Read all safety precautions and Use and Care Manual information prior to operating.
About the Appliance
Use the cooktop for surface cooking applications such as boiling, frying, simmering, steaming and sautéing.
WARNING: The burning of gas cooking fuel can create small amounts of carbon monoxide, benzene, formaldehyde and soot. To minimize exposure to these substances, the burners should be adjusted by a certified installer or authorized servicer to ensure proper combustion. Ensure proper ventilation with an open window or use a ventilation fan or hood when cooking with gas. Always operate the unit according to the instructions in this manual.
Control Knobs
The cooktop has one control knob for each burner. Push in and turn to the left to light and set the desired heat setting.
WARNING: Failure to operate knobs properly may result in personal injury and damage to the appliance.
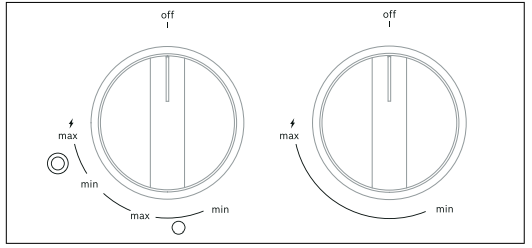
The cooktop has standard burner controls.
Symbol
Meaning
off
Cooking zone switched off
min
Minimum power
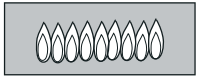
max
Maximum power
Inner flame switched on
Inner and outer flame switched on
To operate
Select the appropriate control knob, push in and turn counterclockwise to the desired flame setting. With this motion, burner sparking and gas flow will be initiated. Once the flame appears keep the knob pressed in fully for 2-3 seconds before releasing.
Note: It is normal that sparks will appear at all burners. Turn off by turning the control knob clockwise to off.
In Case of Power
Failure In the event of a power failure, the burners may be lit by an alternate flame source. Hold a lit flame source next to the burner gas exit ports, turn the corresponding knob to max position, and remove flame source immediately upon burner lighting.
Flame Failure Safety System
Your rangetop is equipped with a safety system that cuts off the gas flow in case of flame extinguishes by accident, i.e. because of a strong draft or high amount of spillage – so preventing an escape of unburned gas.
This systems requires certain burner start procedure, see above, which means that the knob has to be pressed in completely for some seconds until the thermocouple at burner is heated up by flame and keeps the gas flow.
Normal Operation - Electronic Ignition
The cooktop uses electronic igniters to light the burners. There is no pilot light. Each burner has its own igniter. All igniters are activated when a control knob is pushed.
CAUTION: To avoid possible injury or damage to the appliance, ensure grates are installed exactly per installation instructions and not backwards or upside down.
The igniter should be clean and dry for proper operation.
Avoid getting water or food on the igniter.
If the igniter is wet or soiled, it may spark without igniting the burner, or even spark continuously when a flame is present.
Note: If the burner does not light within 4 seconds, turn the burner off. Check to see that the burner cap is positioned correctly on the burner base and the igniter is clean and dry. Wait at least 5 minutes before igniting the burner again. If a burner still fails to ignite, see “Before Calling for Service”.
Griddle
To cook most foods on the griddle, the surface must be pre-heated. The burner power may require adjustment if the griddle is used for a long time.
Before First Use
Before using your new griddle, wash it in hot, soapy water, rinse and dry.
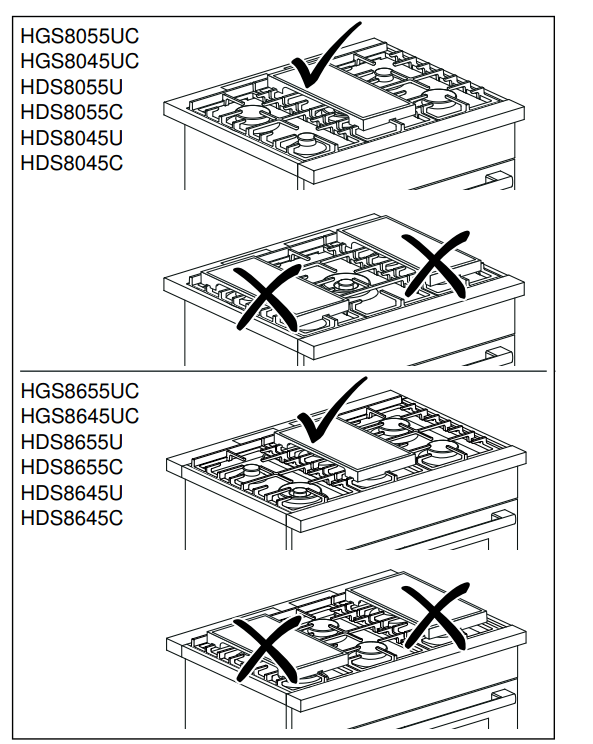
Installing the Griddle
The griddle is customized to fit only on the grates illustrated below.
WARNING: Place and remove the griddle only when all grates and the griddle have cooled down and all burners are off.
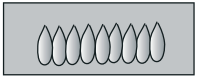
Typical flame characteristics
The burner flame should be blue in color and stable with no yellow tips, excessive noise or fluttering. It should burn completely around the burner cap.
Checking the flame characteristics:
Yellow flames: Further adjustment is required.
Yellow tips on outer cones: Normal for propane gas.
Soft blue flames: Normal for natural gas.
Orange flames: Can be normal if certain types of humidifiers are used in the home. Flames should return to blue without the humidifier running.
If the flame is completely or mostly yellow, verify that the regulator is set for the correct fuel. Retest after adjustment.
Some yellow streaking is normal during the initial startup. Allow the appliance to operate for 4–5 minutes and reevaluate before making adjustments.
Foreign particles in the gas line may cause an orange flame during initial use. This should disappear with use. Check the burner to make sure that port holes are not obstructed. If the ports are clogged
Note: An audible "pop" may be heard when the burner is turned off manually. The "popping" may be louder with propane gas than with natural gas. This is normal.
Getting the Most Out of Your Appliance
Cooking suggestions for best results
Boil water in covered pot on High using largest burner for best results. If water boils over, turn to a lower setting.
When melting chocolate or butter, use smallest burner with a water bath for best results.
When simmering, bring food to a boil first. Stir well to be sure all the food is boiling, then cover and reduce the flame to the desired setting to simmer.
There should be steam and slight quivering of the liquid’s surface while simmering.
Use a lid to keep a more constant cooking temperature and heat food faster.
Check the food occasionally to see if the control knob should be turned to a lower or higher setting.
It is normal to stir food occasionally.
Center the pan over the burner before turning the burner on.
Use proper cookware.
Refer to the settings recommendations in the following chart for suggested settings.
The table lists the optimal heating setting for various dishes. The temperature and cooking time depend on the amount, composition and temperature of the food. Setting ranges are indicated for this reason. Try using the lower values at first. During cooking heat may be increased.
Notes Regarding Cookware
The following information and tips have been provided to help you save energy and avoid damaging your cookware.
Suitable Cookware
Burner
Recommended pan base diameter
Small burner
5” - 8” (127 - 203 mm)
Large burner
7” - 9 1 / 2” (178 - 240 mm)
Dual-flame burner
7” - 11“ (178 - 280 mm)
Pans with a diameter of less than 4.7” (120 mm) or more than 11.0” (280 mm) should not be used. If you do use larger pans, these should not protrude beyond the edges of the appliance.
Cookware Recommendations
Note: When using certain pots or pans, a slight and temporary deformation of the steel cooking surface may occur. This is normal and does not affect the functionality of the appliance.
Proper Cookware
Aluminum or copper bottomed pans conduct heat evenly.
Steel pan, if not combined with other metals, may cook unevenly.
Cast-iron cookware absorbs heat slowly and cooks more evenly at low-to-medium settings.
Flat heavy bottoms pans provide even heat and stability.
DO NOT USE pans that are thin, warped, dented or ridged as they heat unevenly.
Information for Use
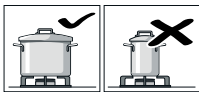
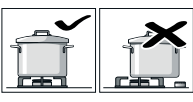
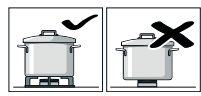
Use cooking vessels of appropriate size for the particular burner. Don't use small cooking vessels on large burners. The flame shouldn't come in contact with the sides of the cooking vessel.
Don't use any deformed cooking vessels that don't stand solidly on the cooktop. The vessels could tip over. Only use cooking vessels with flat and thick bottoms.
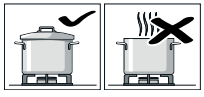
Don't cook without a lid or if the lid is not on all the way. The majority of the heat is lost.
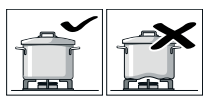
Place the cooking vessel in the center of the burner, otherwise it may tip over. Don't place large pots on the burners near the stove controls. They could overheat and become damaged.
Place the pots on the pan supports, never directly onto the burners. Prior to use, ensure that the pan supports and lids of the gas burners are positioned correctly.
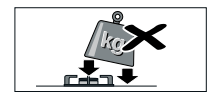
Handle vessels carefully on the cooktop. Don't bang the cooktop and don't place any heavy weights on it.
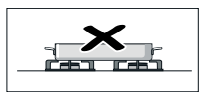
Never heat a cooking vessel (e.g. roasting tin, pan, cooking stone) with multiple burners, except of the griddle plate. The resulting accumulation of heat causes damage to the appliance.
Cleaning and Maintenance-Cooktop
Cleaning
The entire cooktop can be safely cleaned by wiping with a soapy sponge, then rinsing and drying. If stubborn soil remains, follow the recommended cleaning methods below.
Cleaning recommendations:
Always keep the appliance area clear and free from combustible materials, gasoline, and other flammable vapors and liquids.
Always use the mildest cleaner that will do the job. Use clean, soft cloths, sponges or paper towels.
Rub stainless steel finishes in the direction of the grain. Wipe area dry to avoid water marks.
Before cleaning, be certain the burners are turned off and the grates and burners are cool.
Do not clean removable cooktop parts in any self cleaning oven or dishwasher.
Do not obstruct air flow around cooktop burners, range backguard and door area.
After cleaning, place all parts in their proper positions before using cooktop.
For proper burner performance, keep igniters clean and dry.
Keep the igniter ports clean for proper lighting performance of the burners. It is necessary to clean these when there is a boilover or when the burner does not light even though the electronic igniters click.
Do not use flammable cleansers such as lighter fluid.
Do not use chlorine based cleaners.
Always test cleaners on a small inconspicuous area first.
CAUTION: All igniters spark when any single burner is turned on. Do not touch any of the burners when the cooktop is in use.
Cleaning Guidelines
The cleaners recommended below and on the following page indicate a type and do not constitute an endorsement of a particular brand. Use all products according to package directions.
Cooktop part / material
Suggested cleaners
Important reminders
Burner base / aluminum alloy
Detergent and hot water; rinse and dry thoroughly.
Stiff nylon bristle tooth brush to clean port openings.
Abrasive cleansers: Brillo® or S.O.S.® pads. Rinse and dry
Do not scratch or gouge the port openings.
Clean ports with a wire or straightened paper clip.
Do not use a toothpick that may break off.
Do not soak burner bases
Burner cap / porcelain enamel
Detergent and hot water; rinse and dry thoroughly.
Nonabrasive Cleansers: Omit ammonia, Fantastic®, Formula 409®.
Mild Abrasive Cleansers: Bon Ami®, Ajax®, Comet®.
Liquid cleaners: Bar Keeper's Friend®, Soft Scrub®.
Bar Keeper's Friend Soft Cleanser Liquid®.
Reassemble. Make sure that the cap is seated on the base.
Acidic and sugar-laden spills deteriorate the porcelain enamel.
Remove soil immediately after unit has cooled enough to touch.
Do not use wet sponge or towel on hot porcelain.
Do not soak burner caps.
Always apply minimal pressure with abrasive cleaners.
Dry thoroughly after cleaning.
Control knobs and bezels
Detergent and hot water; rinse and dry thoroughly.
To remove knobs, pull outward.
Do not soak knobs.
Do not use abrasive scrubbers or cleansers, such as Bon Ami®, Ajax®, or Comet®. They may permanently damage the finish or remove graphics.
Exterior finish / stainless steel
Nonabrasive Cleaners: Hot water and detergent, Fantastic®, Formula 409®. Rinse and dry immediately.
Cleaner Polish: Stainless Steel Magic® to protect the finish from staining and pitting; enhances appearance.
Hard water spots: Household white vinegar.
Mild Abrasive Cleaners: Bon Ami®.
Heat discoloration: Bar Keepers Friend®
Do not use steel wool pads. They will scratch the surface.
Stainless steel resists most food stains and pit marks providing the surface is kept clean and protected.
Never allow food stains or salt to remain on stainless steel for any length of time.
Rub lightly in the direction of the grain.
Chlorine or chlorine compounds in some cleaners are corrosive to stainless steel. Check ingredients on label before using.
Grates and grate bridge / porcelain enamel on cast iron
Nonabrasive cleaners: Hot water and detergent, Fantastic®, Formula 409®. Rinse and dry immediately.
Mild abrasive cleaners: Bon Ami® and Soft Scrub®.
Abrasive cleaners for stubborn stains: soap-filled steel wool pad.
You may also clean the burner grates in the dishwasher. Remove any burnton food prior to placing the burner grates in the dishwasher. Place them on the lowest rack of dishwasher and use the dishwasher manufacturer's recommended detergent.
The grates are heavy; use care when lifting. Place on a protected surface for cleaning.
Blisters/ crazing/ chips are common due to the extreme temperatures on grate fingers and rapid temperature changes.
Acidic and sugar-laden spills deteriorate the enamel. Remove soil immediately after unit has cooled enough to touch.
Abrasive cleaners, used too vigorously or too often can eventually mar the enamel.
Do not clean in a self-cleaning oven
Igniters / ceramic
Carefully wipe with a cotton swab dampened with water or Formula 409®.
Gently scrape soil off with a toothpick.
Avoid excess water on the igniter. A damp igniter will prevent burner from lighting.
Remove any lint that may remain after cleaning.
Burnt-on Dirt
For hard-to-remove, burnt-on dirt, you can order a cleaning gel from our online shop, from your specialist retailer or our Customer Service (item number 00311859). It is suitable for pan supports and the stainless steel recess. If necessary, let the dirt soak overnight. Follow the instructions on the cleaning agent.
NOTICE: DAMAGE TO THE SURFACE - Do not use the cleaning gel on the burner parts.
Operating the Oven
Before Using the Appliance for the First Time
There may be a slight odor during the first several uses. This is normal and will disappear.
Read all safety precautions and Use and Care Manual information prior to operating.
Setting the time
Once the appliance is connected to a power supply, flashes on the display. Set the time.
Use the or button to set the time.
Press the button.
Note: Once the period allowed for setting the time on the clock has elapsed, the time will automatically be saved.
The time has now been set.
Prepping the oven
Remove the accessories and the rack guides from the cooking compartment.
Completely remove any leftover packaging, e.g. small pieces of polystyrene, from the cooking compartment.
Remove protection film from parts.
Clean the outside of the appliance with a soft, damp cloth.
Clean the oven cavity with hot soapy water.
Initial start up
In order to prevent excess smoke and odor from manufacturing oils, heat up the oven for the first time when it is empty and closed.
Note: Make sure that there is no leftover packaging, such as polystyrene pellets, in the oven cavity. Before heating the appliance, wipe the smooth surfaces in the oven cavity with a soft, damp cloth. Keep the kitchen ventilated while the appliance is heating.
Operate the cooktop burners to ensure they all light and air is out the gas system. Follow instructions
Turn off the cooktop burners.
Operate the oven by firmly pushing in the oven temperature control knob and holding for two seconds. The cooling fan will come on and the sparking will be heard.
Turn the knob counter-clockwise to bake 500°F and release. The oven will begin to heat and the ignition sparking will stop after a few seconds.
After about one hour, turn the oven temperature control clockwise to off.
Push in and turn the oven temperature control knob clockwise to Broil and release
After about 10 minutes, turn the knob clockwise to off.
Once oven has cooled wipe out with hot soapy water and replace rack guides.
Note: When the appliance is heating up for the first time, you may hear crackling noises coming from the oven.
Cleaning the accessories
Before using the accessories, clean them thoroughly using a cloth and warm soapy water
Fitting the telescopic rack set
Instructions on fitting the telescopic rack set are enclosed with the set.
About the Appliance
Oven control panel
Buttons
Note: You only need to press lightly on the buttons to operate them.
Display
Control knobs
WARNING: Failure to operate knobs properly may result in personal injury and damage to the appliance.WARNING Failure to operate knobs properly may result in personal injury and damage to the appliance.
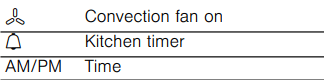
Oven
Set the temperature for the bake burner or the broiler using the control knob for the oven.
Symbol
Meaning
off
Oven switched off
250-500
Oven baking temperature
broil
Switching on the gas broiler
To operate: Push the oven temperature control knob in firmly and turn counter clockwise to bake or clockwise to broil. The sparking will start with this motion and ignite the flame at according burner. Turn off by turning the control knob clockwise to off.
Notes
The oven has a push and turn feature to limit gas flow if the control is not pressed firmly in for a few seconds prior to turning the oven to the desired temperature.
Broil has only one setting, at the positon marked broil.
Do not try to turn the oven control knob from broil to bake temperatures clockwise, or from bake temperatures to broil counter-clockwise. The control needs to go to off then change to bake or broil.
Time-setting Options
Setting the electronic clock
To set the clock the oven must be switched off.
Press and hold the button until : flashes.
Change the time using the or buttons.
Press button.
Setting the short-term timer
The short-term timer has no effect on how the oven operates. The duration of the short-term timer can be set from 30 seconds to 23 hours and 59 minutes.
Press the button. The symbol flashes and the display shows .
Use the or buttons to set the desired time for the timer. An audible signal sounds once the time has elapsed.
Switching off the signal tone
Press any button to switch off the audible signal.
Note: After 7 minutes, the audible signal will stop automatically. Changing the signal tone Three different signal tones are available.
Press and hold the and buttons at the same time for approximately two seconds.
Press the button. The signal tone that is currently selected is shown in the display, e.g. "Tone 1".
Press the button to select a different signal tone.
Press the button.
Cleaning and Maintenance-Oven
To avoid electrical shock hazard, before servicing the appliance, switch power off at the service panel and lock the panel to prevent the power from being switched on accidentally
Cleaning the Oven
Avoid These Cleaners
Do not use commercial oven cleaners such as Easy Off®. They may damage the oven finish or parts.
Chlorine or chlorine compounds in some cleansers are corrosive to stainless steel. Check ingredients on label.
Never use scouring pads or abrasive cleaners.
Oven cleaning guide
Part
Recommendations
Flat rack
Clean with soapy water. Rinse thoroughly and dry, or gently rub with cleansing powder or soapfilled pads as directed.
Telescopic rail
Clean with soapy water. Rinse thoroughly and dry, or gently rub with cleansing powder or soapfilled pads as directed. Avoid getting cleansing powder in the telescopic slides. Re-lubrication may become necessary. Use only high-temperature food-grade lubricants to re-lubricate slides.
Fiberglass gasket
Do not clean the door gasket – The door gasket is essential for a good seal. Care should be taken not to rub, damage or move the gasket.
Glass
Clean with soapy water or glass cleaner. Apply Fantastik® or Formula 409® to a clean sponge or paper towel and wipe clean. Avoid using powder cleaning agents, steel wool pads and oven cleaners.
Painted surfaces
Clean with soapy water or apply Fantastik® or Formula 409® to a clean sponge or paper towel and wipe clean. Avoid using powder cleaning agents, steel wool pads and oven cleaners.
Porcelain surfaces
Immediately wipe up acid spills like fruit juice, milk and tomatoes with a dry cloth when surface is cool enough to touch. Do not use a moistened sponge/cloth on hot porcelain. When cool, clean with soapy water or apply Bon-Ami® or Soft Scrub® to a damp sponge. Rinse and dry. For stubborn stains, use soap-filled pads. It is normal for porcelain to show fine lines with age due to exposure to heat and food soil.
Stainless steel surfaces (HGS8.55UC, HDS8.55.)
Never allow food stains or salt to remain on stainless steel for any length of time. Always wipe or rub in the direction of the grain. Clean with a soapy sponge, then rinse and dry, or wipe with Fantastik® or Formula 409® sprayed onto a paper towel. Protect and polish with Stainless Steel Magic® and a soft cloth. Remove water spots with a cloth dampened with white vinegar. Use Bar Keeper´s Friend® to remove heat discoloration. Chlorine or chlorine compounds in some cleansers are corrosive to stainless steel. Check the ingredients on the label.
Black stainless surfaces (HGS8.45UC, HDS8.45.)
For black stainless steel and antifingerprint surfaces, use a soft, dry towel. For stubborn dirt, use warm water diluted with a nonabrasive, mild cleansing soap. Never use stainless steel polish.
Plastic & controls
When cool, clean with soapy water, rinse and dry.
Probe (HDS8..5.)
Wipe with soapy water. Do not submerge. Do not wash in the dishwasher.
Printed areas (words & numbers)
Do not use abrasive cleaners or petroleum based solvents.
Cleaning Self-cleaning Surfaces
CAUTION: Do not use oven cleaner on the self-cleaning surfaces. These will damage the surfaces. If oven cleaner does get onto these surfaces, dab it off immediately using water and a sponge cloth. Do not rub the surface and do not use abrasive cleaning aids.
Use a microfiber cloth with soapy water to clean the upper and lower part of the self-cleaning surfaces.
Set the bake burner to the highest temperature.
Press to switch on air recirculation.
Switch off the appliance after one hour.
If the side, self-cleaning surfaces are particularly dirty, remove these from the cooking compartment. Note: The self-cleaning surface on the back panel must remain in the cooking compartment.
Wash the self-cleaning surfaces with hot soapy water.
Rinse and dry the self-cleaning surfaces.
Insert the self-cleaning surfaces into the cooking compartment.
Set the bake burner to 350°F.
Press to switch on air recirculation.
Switch off the appliance after one hour.
Maintenance
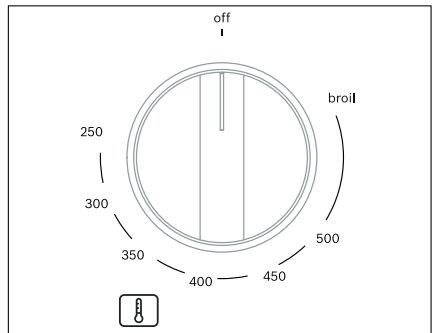
How to Remove the Rack Guides and Self-cleaning Surfaces
The rack guides are fixed to the side panels of the cooking compartment at three points. The self-cleaning surfaces are fixed with the rack guides.
When the oven is cool, grip the front of the rack guide and pull it round to the middle of the cooking compartment. The front hook of the rack guide will come out of the hole.
Swing the rack guide round further and pull it out of the rear holes in the side panel.
Remove the rack guides from the cooking compartment.
Replace the self-cleaning surfaces and rack guides in the reverse order in which they were removed.
How to Remove the Oven Door Glass
WARNING
Make sure oven is cool and power to the oven has been turned off before removing the door. Failure to do so could result in electrical shock or burns.
The glass panels are big, heavy and parts are fragile. Use both hands to remove the glass. Handle carefully to avoid breakage.
Failure to grasp the glass firmly and properly could result in personal injury or product damage.
Do not place the glass on sharp or pointed objects as this could break the glass. Lay on a flat, smooth surface, positioned so that the glass cannot fall over.
CAUTION: Wear gloves to avoid cutting fingers on broken glass.
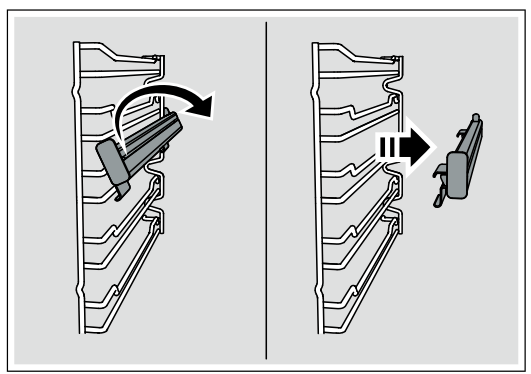
For easier cleaning the internal glass panes of the door can be removed.
Open the oven door fully.
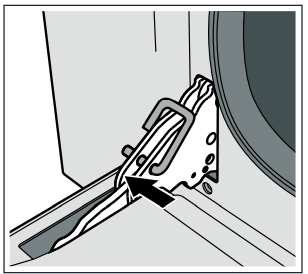
Lock the two hinges on the left and right using the locking pin.The locking pins must be fully inserted into the holes in the hinge
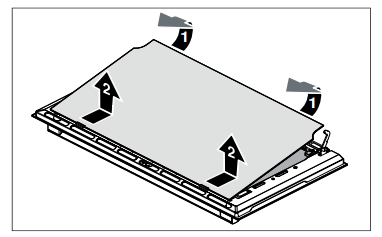
Remove the internal glass pane by pulling the rear part gently upwards, following the movement indicated by the arrows (1). This way, the first 2 pins attached to the rear of the glass detach from their housings in the oven door. Then, push the glass pane slightly towards the cooking compartment and pull it upwards (2). This way, the other 2 pins attached to the front of the glass detach from their housings in the oven door. CAUTION: Move the glass pane slow to avoid damage to the glass and the cooking compartment frame.
Remove the intermediate glass pane by lifting it upwards.
Clean the external glass pane and the panes removed previously. Use absorbent kitchen roll. In case of stubborn dirt, wash with a damp sponge and neutral detergent.
Reinsert the middle panel. Notes
If the Low-E symbol can be read, the middle panel is inserted correctly.
Make sure that the panel is seated correctly. All rubber mounts must lay flat against the outer panel.
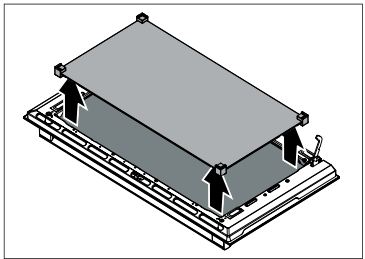
Reposition the internal glass pane. First insert the front part into the two clips and the 2 pins in the front into their housings. Then insert the 2 pins in the rear into their housings in the oven door by applying slight pressure. CAUTION: Do not use with intermediate glass pane not correctly re-fitted.
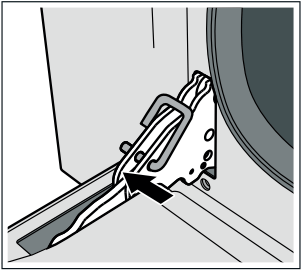
Remove the locking pins and close the oven door.
How to Remove the Oven Door
WARNING
Make sure the oven is cool and the power to the oven has been turned off before removing the door. Failure to do so could result in electrical shock or burns.
The oven door is heavy and parts of it are fragile. Use both hands to remove the oven door. The door front is glass. Handle carefully to avoid breaking.
Grasp only the side of the oven door. Do not grasp the handle as it may swing in your hand and cause damage or injury.
Failure to grasp the oven door firmly and properly could result in personal injury or product damage.
To avoid injury from the hinge bracket snapping closed, make sure that both levers are securely in place before removing the door. Also, do not force the door open or closed – this could damage the hinge or result in injury.
Do not place the removed door down on sharp or pointed objects as this could break the glass. Lay on a flat, smooth surface, positioned so that the door cannot fall over.
To avoid injury or damage, make sure that you read the above WARNING before attempting to remove the oven door.
Open the oven door to its fully open position.
Lock the two hinges on the left and right using the locking pin. The locking pins must be fully inserted into the holes in the hinges.
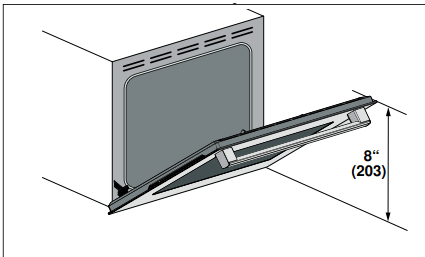
Close the oven door until it catches on the hinge stop levers, locking the hinges at the correct angle for door removal. The door can be removed when it is pulled up from the open position by about 8 inches (203 mm). This takes the tension off the spring-loaded hinges so that the door can be easily lifted out. . CAUTION - RISK OF PINCHING: Closing the door by 8" (203 mm) takes the pressure off the spring. If this is not done, the door can still be removed but the latch will now slam shut and will pinch or cut your hand.
The door is heavy. Use both hands to firmly grip it by the sides. Do not grip the door by the handle. Keeping the angle of the door the same, lift the door straight up approximately 3/4" (19 mm) to unhook the hinges from the slots, and then pull it out towards you until the hinges are clear of the oven housing.
Place the door in a convenient and stable location for cleaning.
Refit the door in the reverse order in which it was removed.
Replacing an Cven Light
CAUTION - WHEN REPLACING AN OVEN LIGHT:
Make sure the appliance and lights are cool and that the power to the appliance has been turned off before replacing the light bulb(s). Failure to do so may result in electrical shock or burns.
Wear gloves.
The lenses must be in place when using the appliance.
The lenses serve to protect the light bulb from breaking.
The lenses are made of glass. Handle carefully to avoid breaking. Broken glass may cause an injury.
The light socket is live when the door is open.
Bulb specifications:
Voltage: 120 V;
Power: 40 W;
Fitting: G9;
Temperature resistance: 575°F (300°C)
To change the bulb:
Allow the cooking compartment to cool down.
Open the appliance door.
Place a cloth in the oven cavity to prevent damage.
Remove the racks and rack guides.
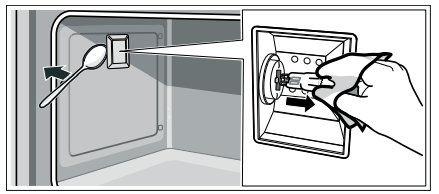
Remove the glass cover. To do this, open the glass cover at the front with your hand. Should you experience difficulties removing the glass cover, use a spoon to help.
Remove the oven light bulb.
Replace the oven light bulb with a bulb of the same type.
Replace the glass cover for the oven light bulb.
Replace rack guides and racks.
Remove the cloth.
Switch the circuit breaker back on.
Check that the oven lighting is working again.
Troubleshooting
Before Calling for Service - Before calling Customer Service, consider the suggestions and instructions below:
Problem
Suggestion
Burner(s) do not light/igniters do not spark
Ensure that the gas shut-off valve is in the “ON” position and the gas supply to the house is not shut off.
Ensure that the burner caps and burner bases and the burner ports are not clogged. Clear ports with a wire or straightened paper clip if clogged.
Make sure the igniters are clean and dry.
Check the power supply. It should be properly grounded with the correct polarity. Ensure that the unit is fully plugged in to the outlet and the circuit breaker is not tripped.
Cooktop burner(s) do not start correctly, Flame extinguishes at burner as soon knob is released
Probable reason is, that the push in time was to short or the pushing was too soft. Push in the knob completely, once flame appears keep it pushed in at that complete position for 3-5 seconds.
If than flame does not hold, check the burner for being clean and parts attached in right manner.
Note: : There has to be a flame towards the brown pin at burner, which is the thermocouple.
Burner flame goes out unexpectedly
Ensure that there is no draft in the room.
Sparks appear on the wrong burner
No fault: On starting one burner on all burners sparks will be generated.
The igniters spark even though the knobs are in the off position
When the electrical power connection has been activated at the first power-up or reconnected after an outage, the igniters may spark once or twice, even though all burner knobs are in the “OFF” position.
Cooking results are not what was expected
Check the level of the cooktop burner during installation.
Cooking pan does not fit on the surface being used.
The cookware is not the recommended type or size. See "Notes regarding cookware" and "Baking pans and dishes"
Oven door feels hotter as before remove the oven door glass for cleaning
Check if the oven door glass is right way round (low-E symbol can be read).
Oven door is not balanced
Check if inner door glass is present/ has been inserted during reassembly
If the oven is cold with the oven control set to bake or broil.
Check a cooktop burner for a few minutes to be sure gas is flowing to the range. If not, check your LP gas tank or or insulation valve in installation to be open. If gas is available at cooktop burners, probably the start procedure of oven burner was not executed correctly. Make sure that in start procedure the knob is pressed in fully and listen for sparks and gas flow to the according burner.
The push and turn feature may be preventing gas flow. Be sure to follow the instructions ~ Page 20 i.e. Press the control knob in for a few seconds (this gets gas flowing), then turn to bake of broil and release. This lights the gas.
The automatic start procedure will stop after 10 sec (no more sparking), than you can check whether flame is generated by opening appliance door (bake burner visible through holes in bottom sheet, broil burner is free). If no flame visible- keep open oven door for 5 minutes, than close and try again.
Broil setting cannot be changed.
This is correct, broil has only one setting, marked by the word broil. To reduced or increasing broiling intensity, move the rack up or down. Follow the instructions for racks
Oven control knob can turn from Broil to bake temperatures.
This is correct. The control knob can only be turned from broil to bake, or vice versa, via the off position.


 flashes on the display. Set the time.
  or
or  button to set the time.
  button.
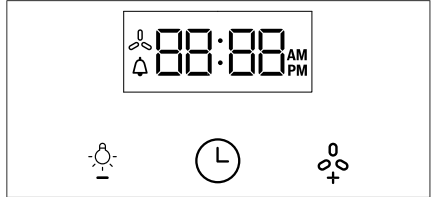

 .
. 
 . CAUTION - RISK OF PINCHING: Closing the door by 8" (203 mm) takes the pressure off the spring. If this is not done, the door can still be removed but the latch will now slam shut and will pinch or cut your hand.