user manual
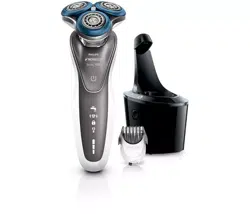
General description
- Pop-up trimmer
- Trimmer release slide
- Shaving unit
- Shaving unit release button
- On/off button
- Handle
- Socket for small plug
- Charging stand (S7782 only)
- Power plug
- Small plug
- Protection cap (S7788, S7786 only)
- Travel case (S7783, S7782 only)
- Quick Clean Pod Cartridge (S7783, S7782 only)
- Quick Clean Pod (S7783, S7782 only)
- Cleaning brush
Introduction
Congratulations on your purchase and welcome to Philips! To fully benefit from the support that Philips offers
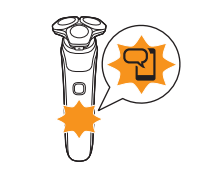
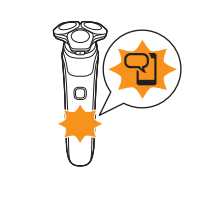
What do the icons on my product handle mean?
| Icon |
Behavior |
Meaning |
 |
Pulsing |
The cleaning program is in progress. |
 |
Flashing slowly when you remove the
shaver from the Quick Clean Pod
during the cleaning program |
The cleaning program was interrupted. If you put the shaver back into the Quick Clean Pod within four seconds, the cleaning program resumes automatically. |
 |
Flashing when you switch off the product |
Clean the shaver in the Quick Clean Pod. |
 |
Lights up continuously |
The cleaning program is in progress. |
 |
Flashing quickly when you remove the shaver from the Quick Clean Pod or press the on/off button during the cleaning program |
The cleaning program was stopped. If you wish to continue, you need to restart the cleaning cycle by putting the shaver into the Quick Clean Pod and pressing the on/off button. |
 |
Lights up |
The SenseIQ technology is actively detecting your shaving behavior. |
 |
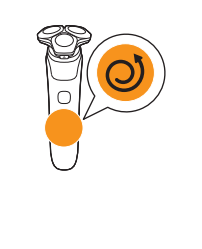
Lights up green |
The correct shaving motion (circular movements) was used. |
 |
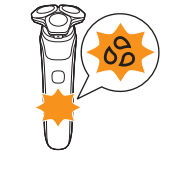
Lights up orange |
Your shaving motion can be improved. See the app for details and advice. |
 |
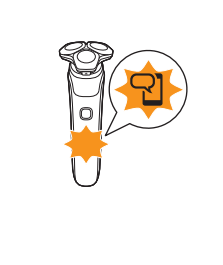
Lights up |
Open the app. Either there is a notification waiting for you or you need to sync your shaves to prevent data loss (see 'How do I connect my shaver and smartphone?'). |
|
Flashing slowly |
No connection is established between your shaver and smartphone see 'How do I connect my shaver and smartphone?'). |
|
Flashing quickly |
An error has occurred (e.g. the motor is blocked). Check the app for details. |
 |
Flashing |
The product must be disconnected from the power outlet before you can switch it on (see ''Unplug for use' symbol '). |
 |
Flashing when you press the on/off button |
The travel lock is activated (see 'Storage and travel'). |
 |
Lights up when you pick up the product |
The number of bars lit up show the remaining battery charge. |
 |
Bottom light flashing orange |
The battery is almost empty (see 'How do I charge my product?'). |
 |
Lights flashing in sequence |
The product is charging. |
 |
Lights up continuously |
The product is fully charged. |
What does the icon on my Quick Clean Pod mean?
| Icon |
Behavior |
Meaning |
 |
Becomes visible on the Quick Clean Pod |
The Quick Clean Pod Cartridge needs to be replaced. |
How do I charge my product?
Charge the product before you use it for the first time and when the bottom light of the battery status indicator flashes orange, indicating that the battery is almost empty. Charging takes approx. 1 hour.
Quick Charge: After approx. 5 minutes of charging, the battery contains enough energy for one shave.
When the product is fully charged it has a cordless operating time of up to 60 minutes.
Charging with the power cord
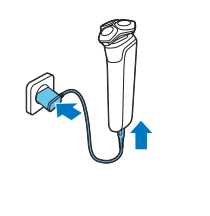
1. Make sure that the product is switched off.
2. Insert the small plug into the product and put the power plug in the wall outlet.
- While the product is in quick charge mode, the lights of the battery status indicator light up one after the other. After approximately 5 minutes, the bottom light of the battery status indicator flashes. The battery now contains enough energy for one shave.
- While the product charges, first the bottom light of the battery status indicator flashes and then lights up continuously. Next the second light flashes and then lights up continuously, and so on until the product is fully charged.
- When the product is fully charged, all three battery status indicator lights light up continuously. After approx. 30 minutes, the light goes out automatically.
3. After charging, remove the power plug from the power outlet and pull the small plug out of the product.
Charging in the charging stand (S7782 only)
- Make sure that the product is switched off.
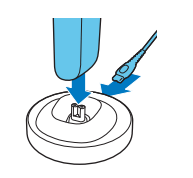
- Put the small plug in the charging stand and put the power cord in the power outlet.
- Put the product in the charging stand.
- After charging, remove the power cord from the power outlet and pull the small plug out of the charging stand.
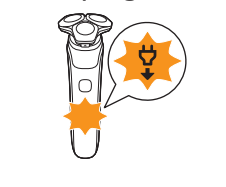
'Unplug for use' symbol
The 'unplug for use' symbol flashes to remind you to disconnect the power cord from the power outlet and remove the small plug from the product before you switch it on.
How do I use my product?
Always check the product and all accessories before using. Do not use the product or any accessory if it is damaged, as this may cause injury. Always replace a damaged part with one of the original type.
Use this product for its intended household use as described in this manual.
For hygienic reasons, the product should only be used by one person.
SenseIQ technology
This product is equipped with SenseIQ technology which intelligently detects your beard density and shaving technique. For a better technique, you can get personalized shaving advice in the app.
You get advice in 2 ways: guided shaves in real time and synchronized shaves. We advise you to start with the guided shave to enhance your shaving experience.
- Correct handling of your product will contribute to the best shaving results.
- Follow the advice obtained from the synchronized shaves and the personalized programs.
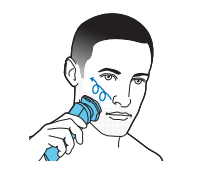
Shaving
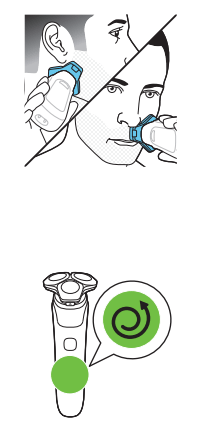
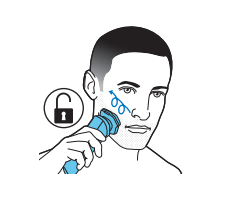
You can use this product either wet or dry, or even in the shower. For a wet shave, apply some water and shaving foam or gel to your skin and rinse the shaving heads under the tap with warm water before following the steps below.
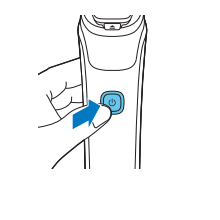
1. Switch on the product.
2. Move the shaving heads over your skin in circular movements to catch all hairs growing in different directions. Make sure each shaving head is fully in contact with the skin. Exert gentle pressure for a close, comfortable shave.
3. Switch off and clean the product after each use.
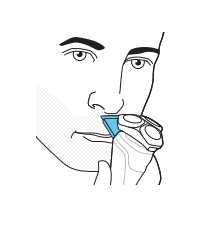
4. Use the narrow sides of the shaving unit to shave in hard-to-reach areas such as along your jawline and under your nose.
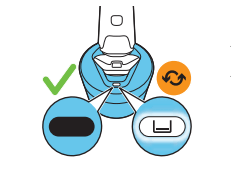
SenseIQ: When you have finished shaving you receive feedback on the handle. The Motion Control sensor icon lights up in various colors, giving you feedback on your overall shave.
- When you shave in the correct motion circular movements), the Motion Control sensor icon lights up green.
- When your shaving motion can be improved, the Motion Control sensor icon lights up orange. See the app for details and advice.
21- Day adaptation process
- 21 Day Trial and Conversion Process. It is a fact that your skin and beard need time to adjust to a new grooming system.
- Use your new shaver exclusively for 3 weeks to fully enjoy the closeness of a Philips Norelco shave.
- At first you may not get as close a shave as you expect, or your face may even become slightly irritated. This is normal since your beard and skin will need time to adjust. Invest 3 weeks and you'll soon experience the full joy of your new shaver.
- Stick with it! If you alternate shaving methods during the adjustment period, it may make it more difficult to adapt to the Philips Norelco shaving system.
- If you are still not convinced after 21 days, Philips Norelco will refund you the full purchase price as long as the request is received within 45 days of purchase.
Cleaning reminder
When you switch off the product, the cleaning reminder flashes to remind you to clean the product.
- Clean the product and attachments after each use (see 'How do I clean my shaver?') to prevent clogging and damage.
- Clean the shaving heads thoroughly once a month or when the product does not shave as well as it used to.
Synchronize your shaves
This shaver stores your shave data so you don't need to take your smartphone with you when you shave.
When the data storage is almost full, the notification symbol flashes. To prevent data loss, synchronize the shaver with the app (see How do I connect my shaver and smartphone?').
- Make sure you are close to the shaver and open the app.
- The app connects automatically and synchronizes your last shaves.
Trimming
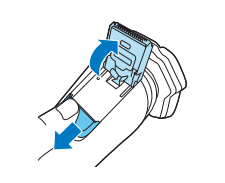
You can use the pop-up trimmer to groom your sideburns and moustache.
1. Push the trimmer release slide downwards to open the trimmer.
2. Switch on the product.
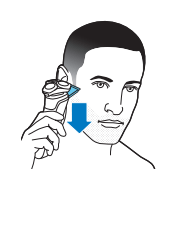
3. Hold the trimmer perpendicular to the skin and move it downwards while exerting gentle pressure.
4. You can also use the trimmer under your nose.
5. Switch off the product and clean the trimmer after each use to prevent clogging and damage (see 'How do I clean my shaver?').
6. Close the trimmer.
Storage and travel
- Be sure the product is switched off. Remove the power cord from power outlet and the product before storing it in a safe, dry location where it will not be crushed, banged, or subject to damage.
- Do not wrap cord around the product when storing.
- Store cord and other accessories in a safe location where these will not be cut or damaged.
- Do not place or store the product where it can fall or be pulled into a tub or sink, water or other liquid while plugged in.
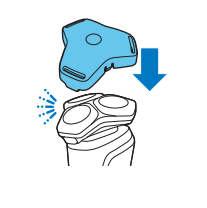
- Put the protection cap (S7788 and S7786 only) on the shaver to protect it.
- Store the product in the pouch (S7783 and S7782 only)
- Alternative, store the product on the charging stand (S7782 only).
Travel lock
You can lock the shaver when you are going to travel to prevent it from switching on accidentally.
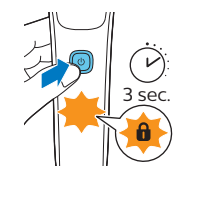
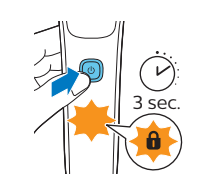
Activating the travel lock
Press the on/off button for 3 seconds to use the travel lock mode.
When the travel lock is activated, the travel lock symbol flashes.
Deactivating the travel lock
Press the on/off button for 3 seconds.
Once the travel lock is deactivated, the product switches on automatically.
How do I clean my shaver?
Clean the product and the attachments after each use for optimal performance.
Cleaning the shaver with water
Clean the shaver after each use to prevent clogging and damage.
Never dry the shaving unit with a towel or tissue, as this may damage the shaving heads.
While rinsing the shaving unit, water may drip out of the base of the shaver. This is a normal occurrence.
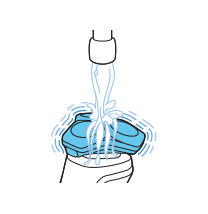
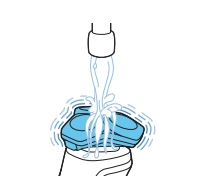
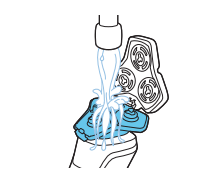
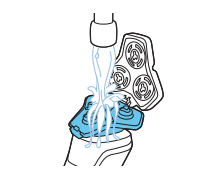
1. Switch on the shaver.
2. Rinse the shaving unit with warm water.
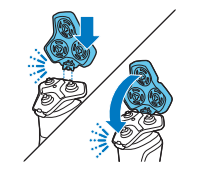
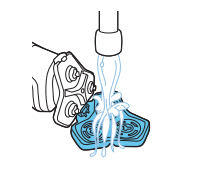
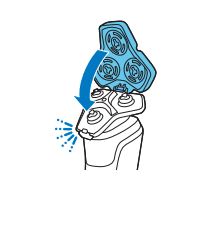
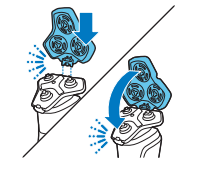
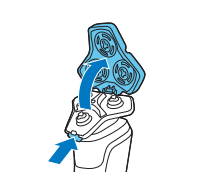
3. Switch off the shaver. Press the release button to open the shaving unit.
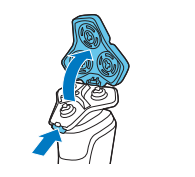
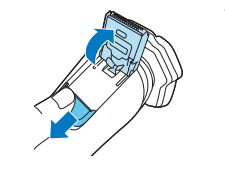
4. Rinse the hair chamber with warm water.
5. Rinse the shaving head holder warm water.
6. Carefully shake off excess water and let the shaving head holder air-dry completely.
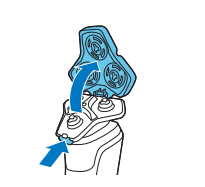
7. Close the shaving unit.
Thorough cleaning
We advise you to clean the shaving heads thoroughly once a month or when the shaver does not shave as well as it used to.
1. Make sure that the appliance is switched off and disconnected from the wall socket.
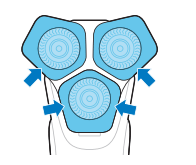
2. Press the release buttons on the shaving unit and pull the shaving head holder off the shaving unit.
3. Rinse the hair chamber and shaving head holder with warm water.
4. Remove the shaving heads. For detailed instructions, see 'How do I replace the shaving heads?.'
5. Clean the cutter and guard with warm water.
6. Shake off excess water.
7. Put the shaving heads back into the shaving unit. For detailed instructions, see 'How do I replace the shaving heads?.'

8. Insert the hinge of the shaving head holder into the slot in the top of the shaving unit and close the shaving unit.
Cleaning the pop-up trimmer
Clean the trimmer after each use to prevent clogging and damage.
Never dry the trimmer teeth with a towel or tissue, as this may damage the trimmer teeth.
1. Make sure that the appliance is switched off and disconnected from the wall socket.
2. Push the trimmer release slide down to open the pop-up trimmer.
3. Switch on the appliance and rinse the pop- up trimmer with warm water.
4. After cleaning, switch off the appliance.
5. Carefully shake off excess water and let the pop-up trimmer air dry.

6. Close the trimmer.

Tip: For optimal performance, lubricate the teeth of the pop-up trimmer with a drop of mineral oil every six months (oil not included).
How do I use the Quick Clean Pod? (S7783 and S7782 only)
Preparing the Quick Clean Pod for use
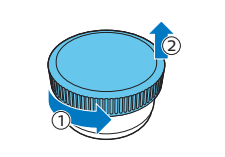
1. Twist and remove the top of the Quick Clean Pod.
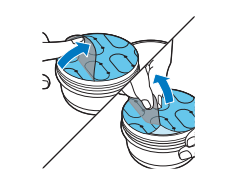
2. Twist the lid off of the Quick Clean Pod Cartridge.
3. Lift the tab on the seal and pull it by the corner to remove the seal from the Quick Clean Pod Cartridge.
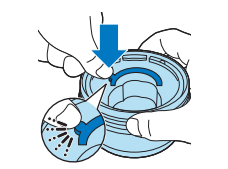
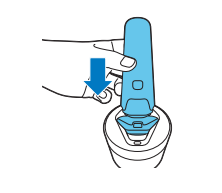
4. Press the small circular piece on the handle of the Quick Clean Pod Cartridge to break the snap hook on the handle.
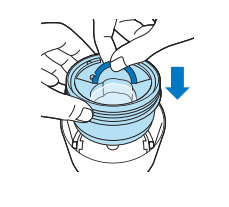
5. Place the Quick Clean Pod Cartridge into the Quick Clean Pod.
6. Put the top of the Quick Clean Pod back onto the base and turn it clockwise until you hear a click.
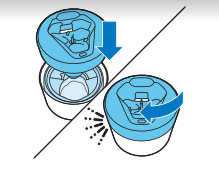
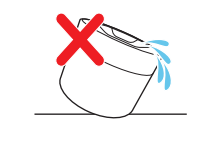
Do not tilt the Quick Clean Pod to prevent leakage.
Using the Quick Clean Pod
Note: If you use the shaver with shaving foam, shaving gel or pre-shave products, thoroughly rinse the shaving heads before you use the Quick Clean Pod (see 'How do I clean my shaver?').
Always shake excess water off the shaver before you place it in the Quick Clean Pod.
1. Place the shaver upside down into the Quick Clean Pod. The shaver automatically detects that it is in the Quick Clean Pod.
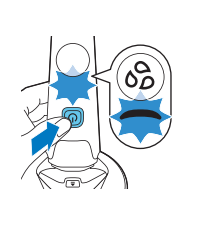
2. Switch on the shaver to start the cleaning program.
Each cleaning program takes approximately one minute. During the cleaning program the cleaning symbol lights up continuously and the blue icon pulses.
The shaver handle vibrates twice quickly when the cleaning program is finished.
3. Let the shaver air-dry completely in the Quick Clean Pod before storing it.
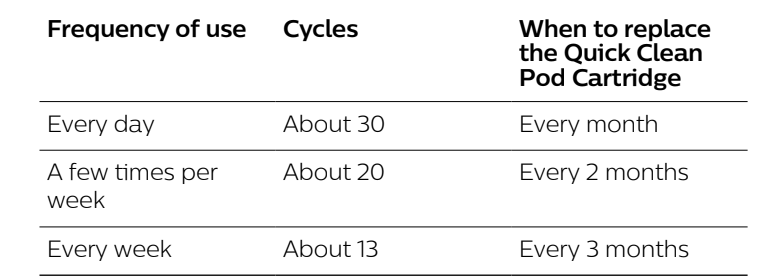
Replacing the Quick Clean Pod Cartridge
Replace the Quick Clean Pod Cartridge immediately when the cartridge replacement icon on the Quick Clean Pod becomes visible or follow the table below.
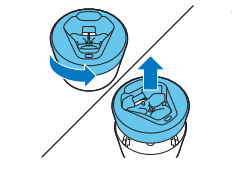
1. Twist and remove the top of the Quick Clean Pod.
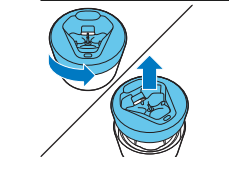
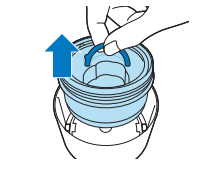
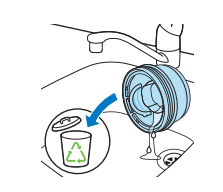
2. Lift the Quick Clean Pod Cartridge out of the Quick Clean Pod by the handle.
3. Pour any remaining fluid down a drain and recycle the empty cartridge in accordance with local waste regulations.
4. Place a new Quick Clean Pod Cartridge into the Quick Clean Pod (see 'Preparing the Quick Clean Pod for use').

How do I connect my shaver and smartphone?
Note: Make sure your smartphone is equipped with Bluetooth® 4.1 or higher.
This shaver is compatible with Bluetooth® 4.1 and higher to connect to the app. When you have paired your shaver and smartphone,
Bluetooth on your shaver is switched on automatically, even when the shaver is switched off. This allows your shave data to be synced later so you don't need to take your smartphone with you when you shave.
The first few times you switch on the shaver, the notification symbol flashes if no connection is established with a smartphone.

You can switch off Bluetooth on your shaver by activating the travel lock (see 'Storage and travel').
Pair the shaver and smartphone
You can use the app to synchronize your shave data, change your personal settings and get routine-based coaching.
The app is compatible with a wide range of iPhone and AndroidTM smartphones.

More information is available at www.philips.com.
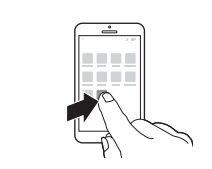
1. Download the app
2. Make sure Bluetooth on you smartphone is switched on.
3. Switch on the shaver.
4. Open the app and follow the instructions to start the pairing process.
5. Once paired, the shaver and app connect automatically when the app is open and Bluetooth on your phone is switched on.
Notification symbol
The shaver is equipped with a notification symbol. The notification symbol lights up when there is an important message for you in the app. When it lights up, simply open the app on your smartphone and follow the easy tips that the app gives you.
Unpair the shaver and smartphone
You can pair your shaver with only one smartphone at a time. To unpair your shaver from your smartphone (e.g. when you get a new smartphone), follow these steps:
Unpair the shaver: press and hold the on/off button on the handle for approx. 10 seconds to remove the bond between shaver and app.
Unpair your smartphone:
- Go to the settings on your smartphone and select Bluetooth.
- Tap on the name of the shaver.
- Tap 'forget' or 'unpair'.
How do I replace the shaving heads?
For maximum shaving performance, replace the shaving heads once a year. Replace damaged shaving heads immediately.Always replace the shaving heads with original
Philips Norelco shaving heads (see Accessories').
Replacing the shaving heads
1. Switch off the shaver.
2. Press the release buttons on the shaving unit and pull the shaving head holder off the shaving unit.
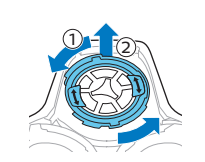
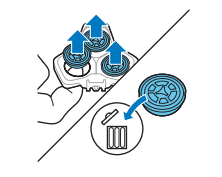
3. Turn the retaining rings counterclockwise and remove them. Place them aside in a safe place.
4. Remove the shaving heads from the shaving head holder.
Discard the used shaving heads immediately to avoid mixing them with the new shaving heads.
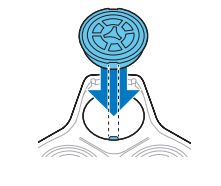
5. Place new shaving heads in the holder.
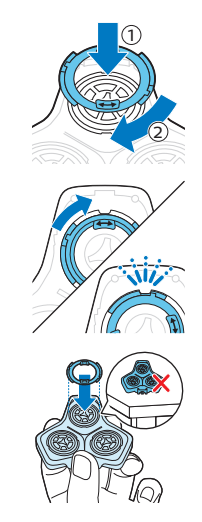
6. Place the retaining rings back onto the shaving heads and turn them clockwise to reattach the retaining ring.
- Each retaining ring has two recesses that fit exactly into the projections of the shaving head holder. Turn the ring clockwise until your hear a click to indicate that the ring is fixed.
7. Insert the hinge of the shaving head holder into the slot in the top of the shaving unit and close the shaving unit.