B00XBC3BF0
B01D7PG5EO
B07GPSQKV9
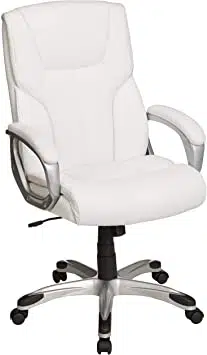
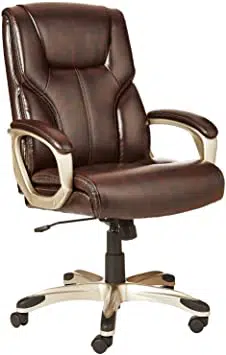
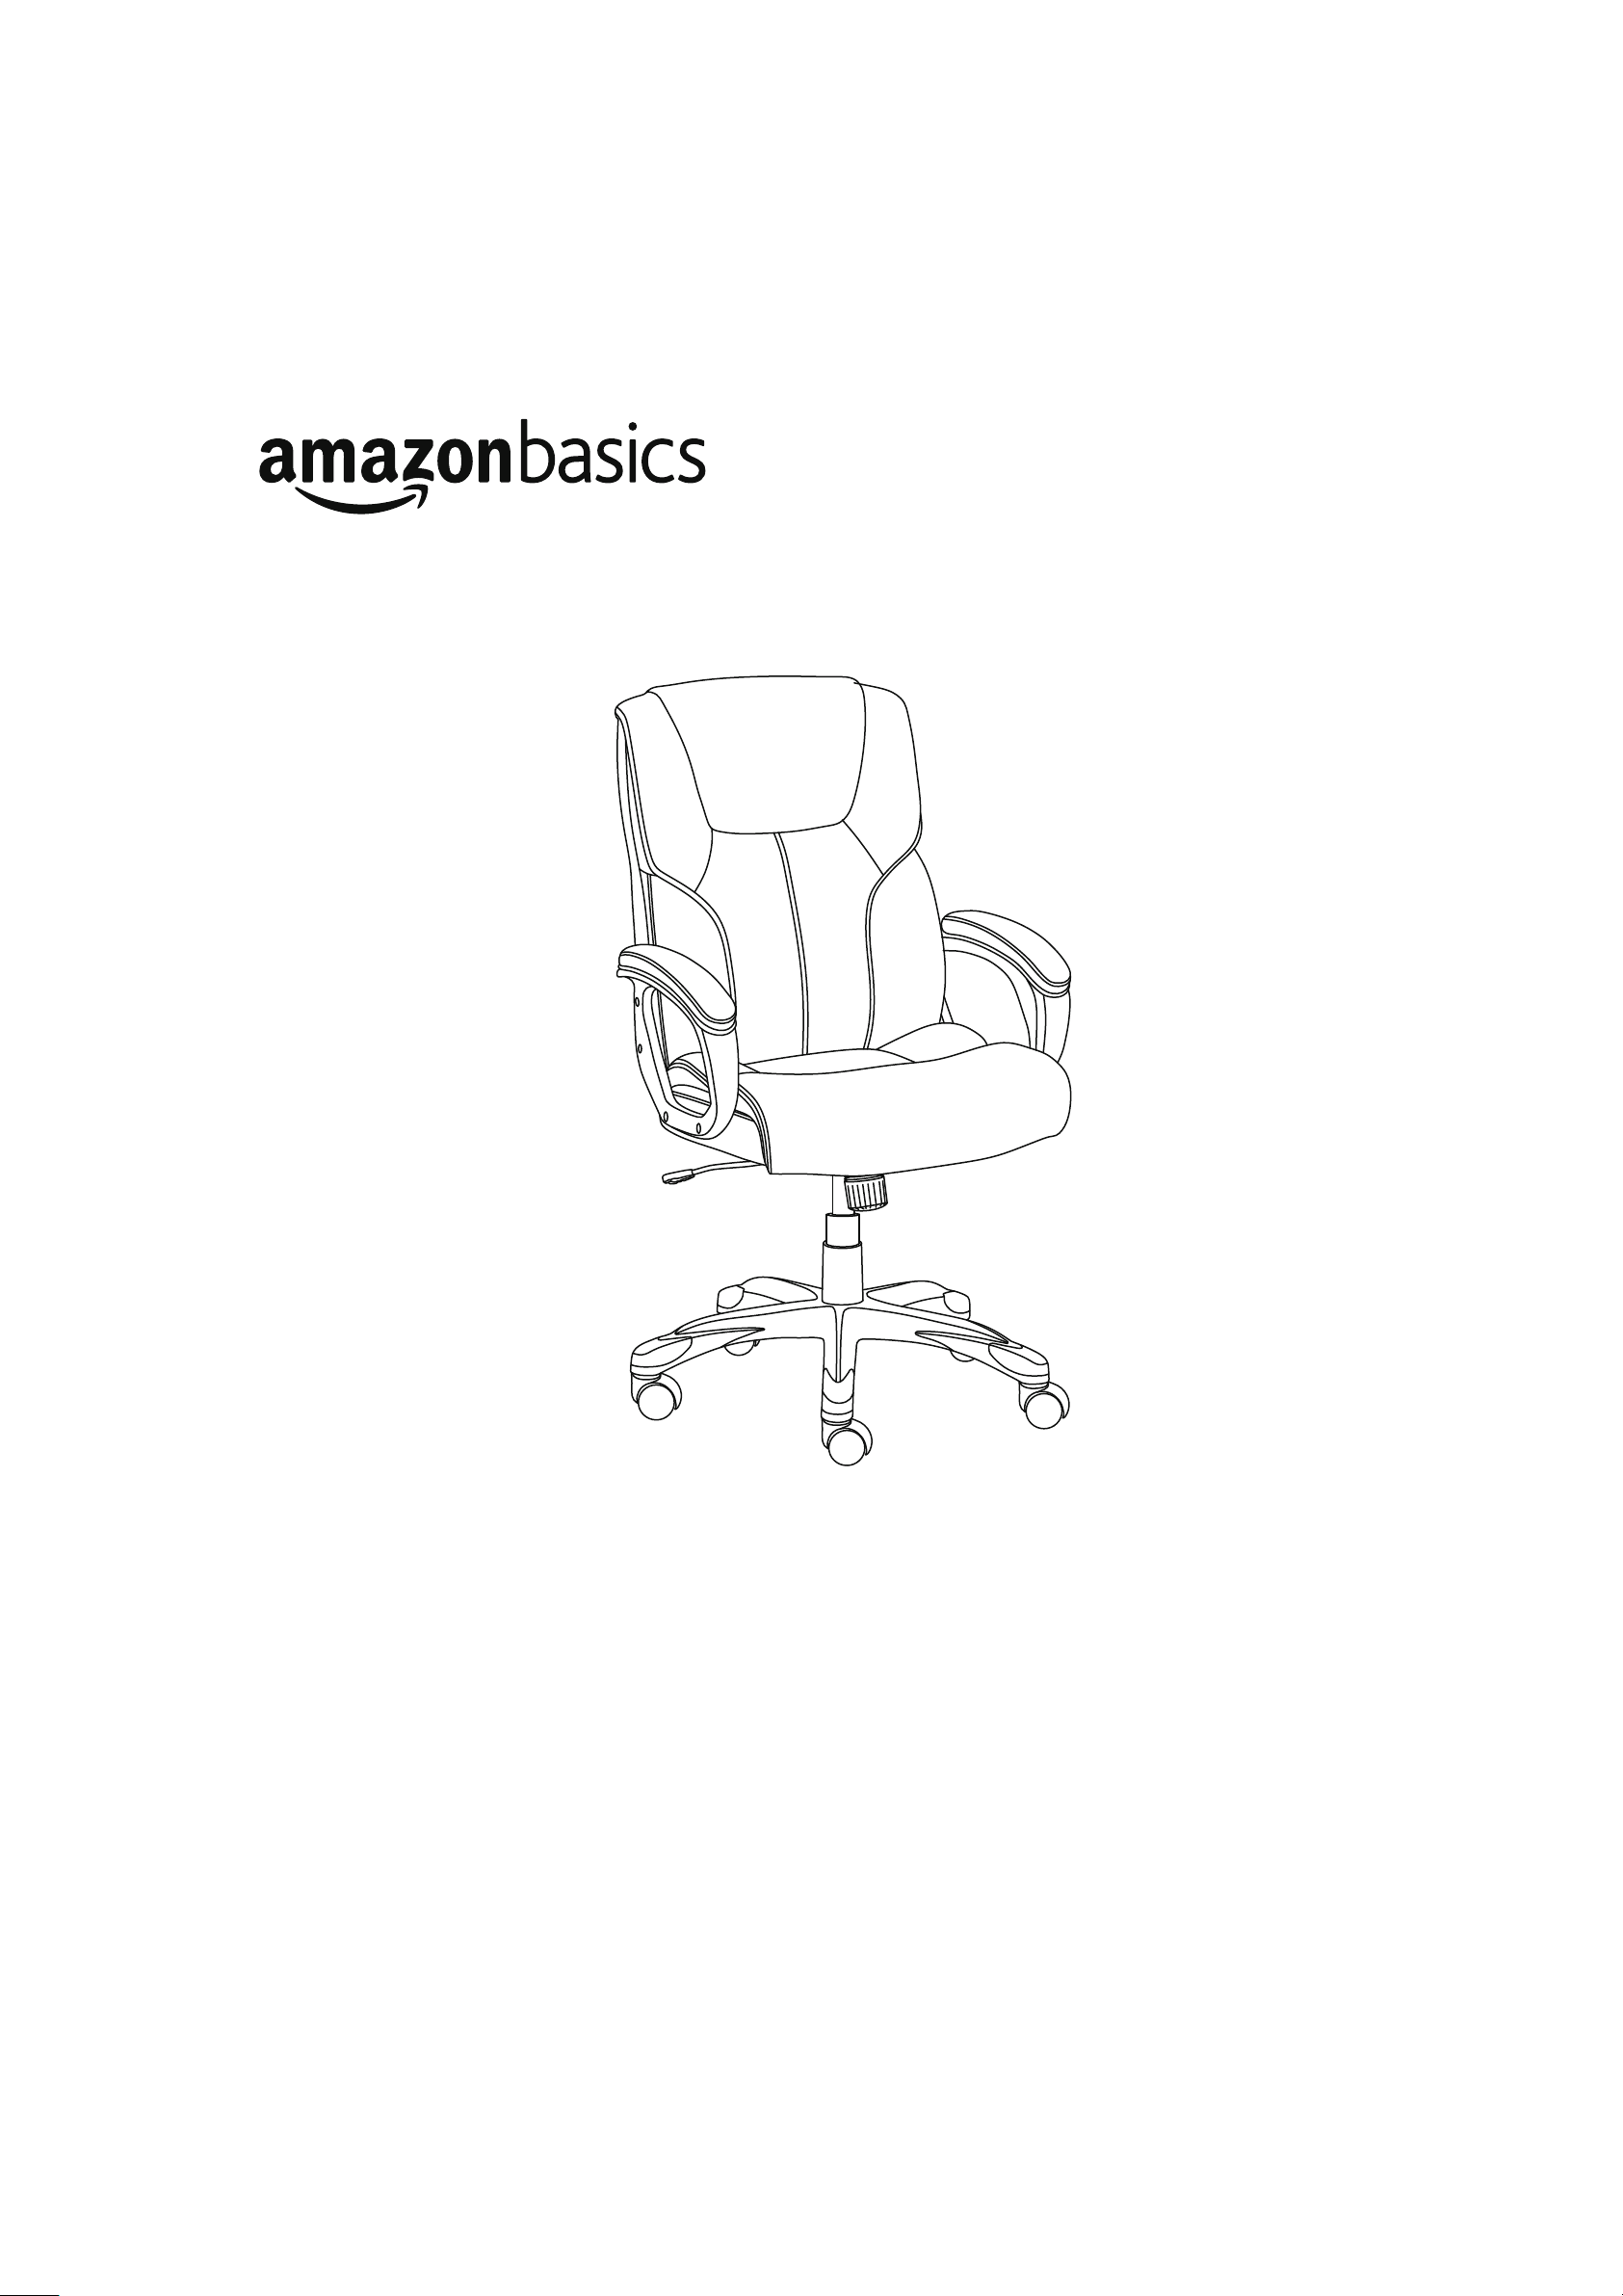
AmazonBasics High-Back Executive Chair
AmazonBasics Fauteuil de bureau à dossier haut
AmazonBasics Silla ejecutiva con respaldo alto
Amazon
ハイバックエグゼクティブチェア

2
English. . . . . . . . . . . . . . . . . . . . . . 3
Français. . . . . . . . . . . . . . . . . . . . 14
Español . . . . . . . . . . . . . . . . . . . .
25
日本語 . . . . . . . . . . . . . . . . . . . .
36
http://www.amazon.com/dp/B01D7PG5EO
http://www.amazon.com/dp/B00XBC3BF0
3
English
Instruction Manual · English
English
Contents
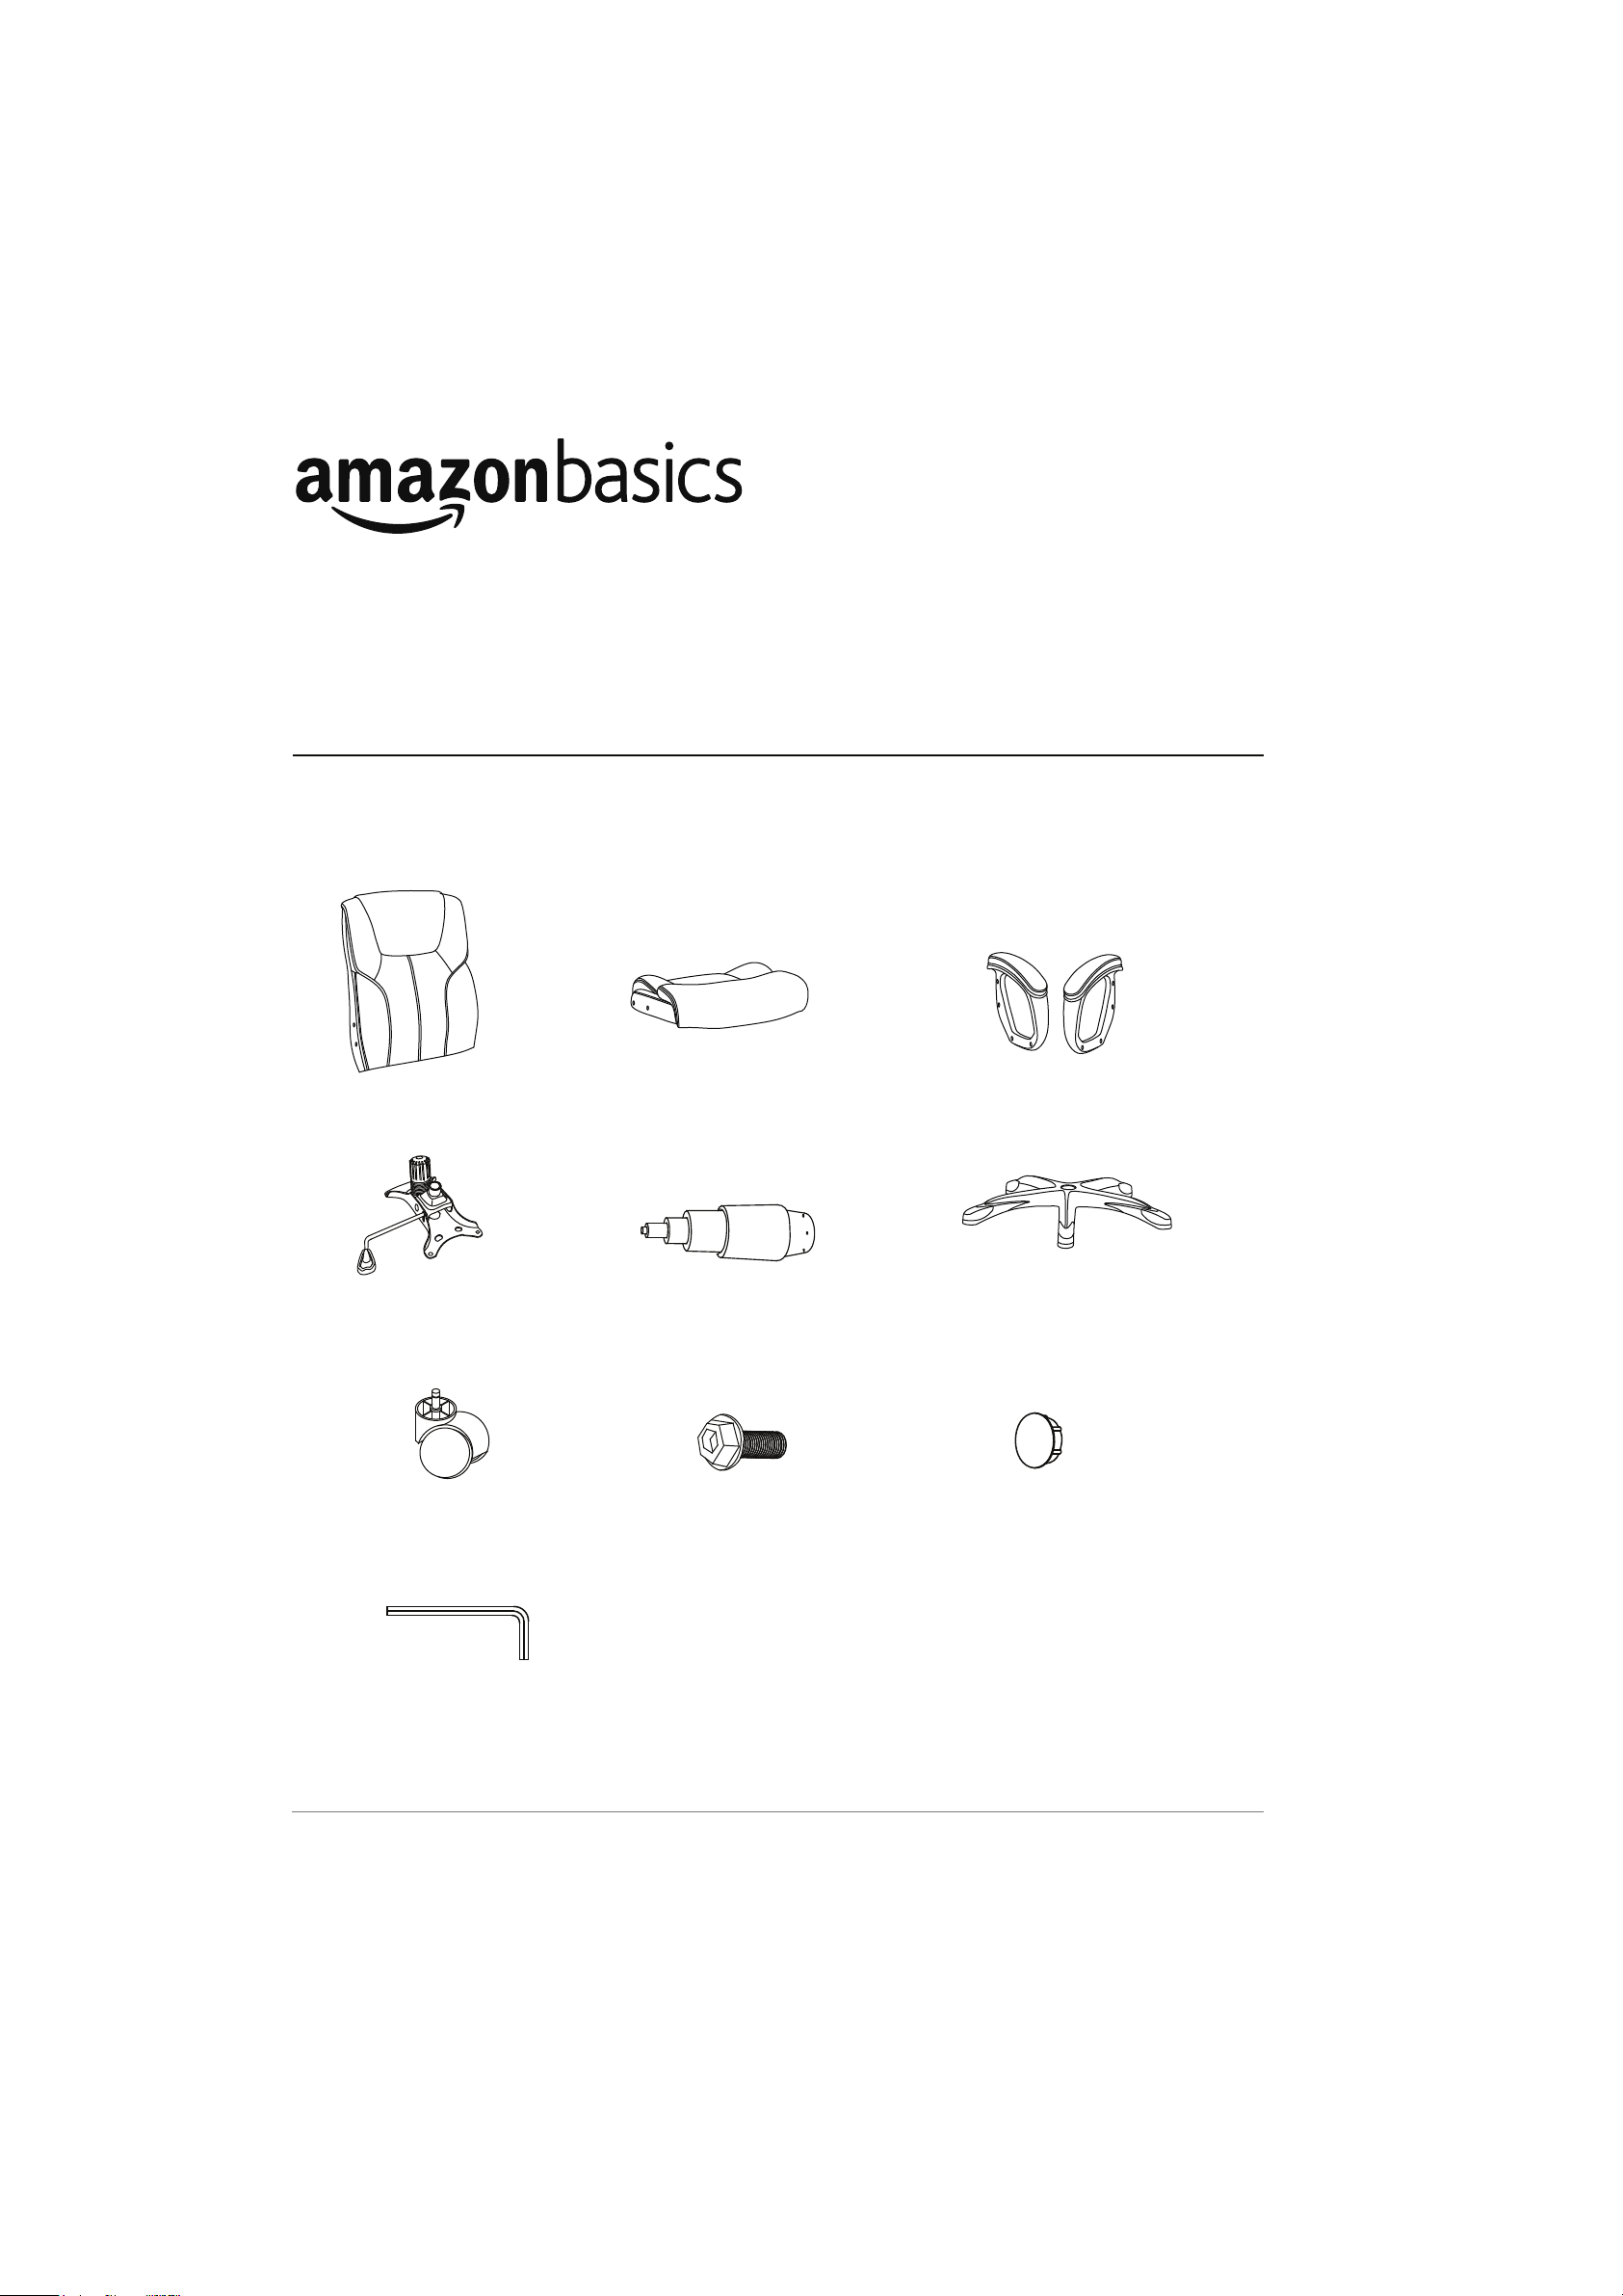
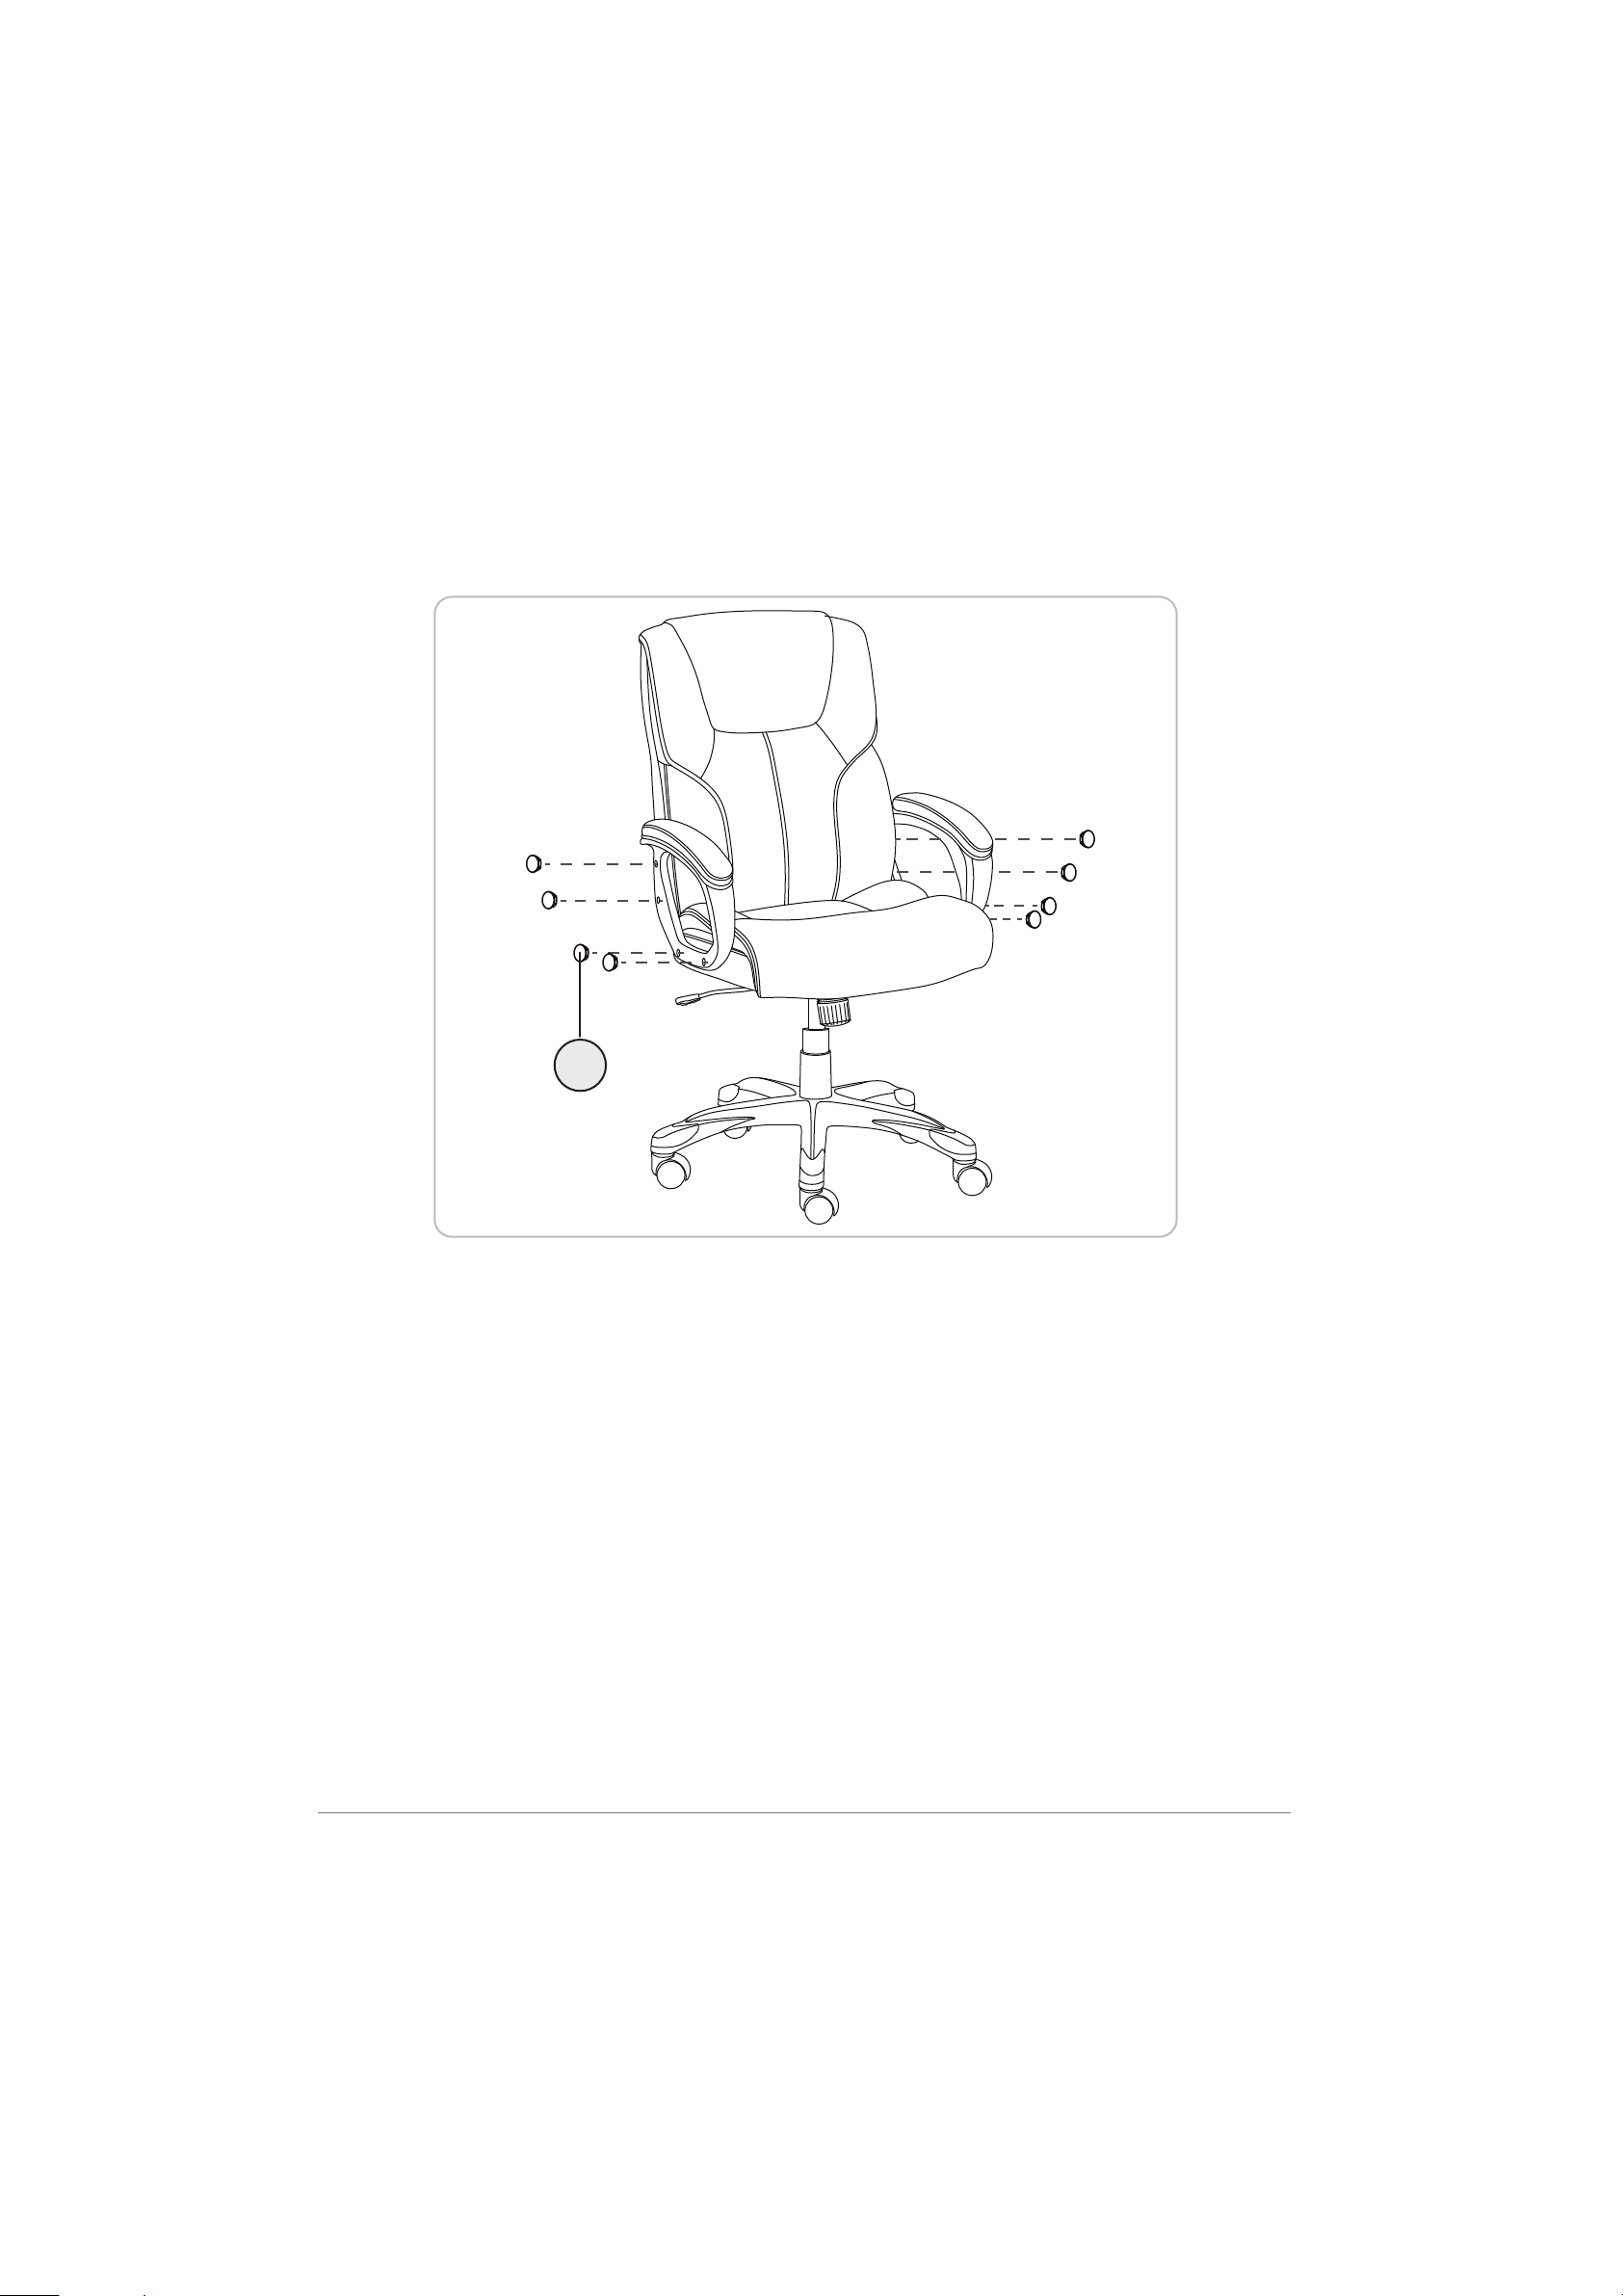
Make sure that the package contains the following parts:
A (3/4” bolts) (12)
C (Wrench) (1)
Back cushion (1)
Seat cushion (1)
Arms (2)
Seat plate (1)
Lift (1)
Star base (1)
Casters (5)
B (Plastic caps) (8)
AmazonBasics High-Back Executive Chair

4
Assembly Instructions
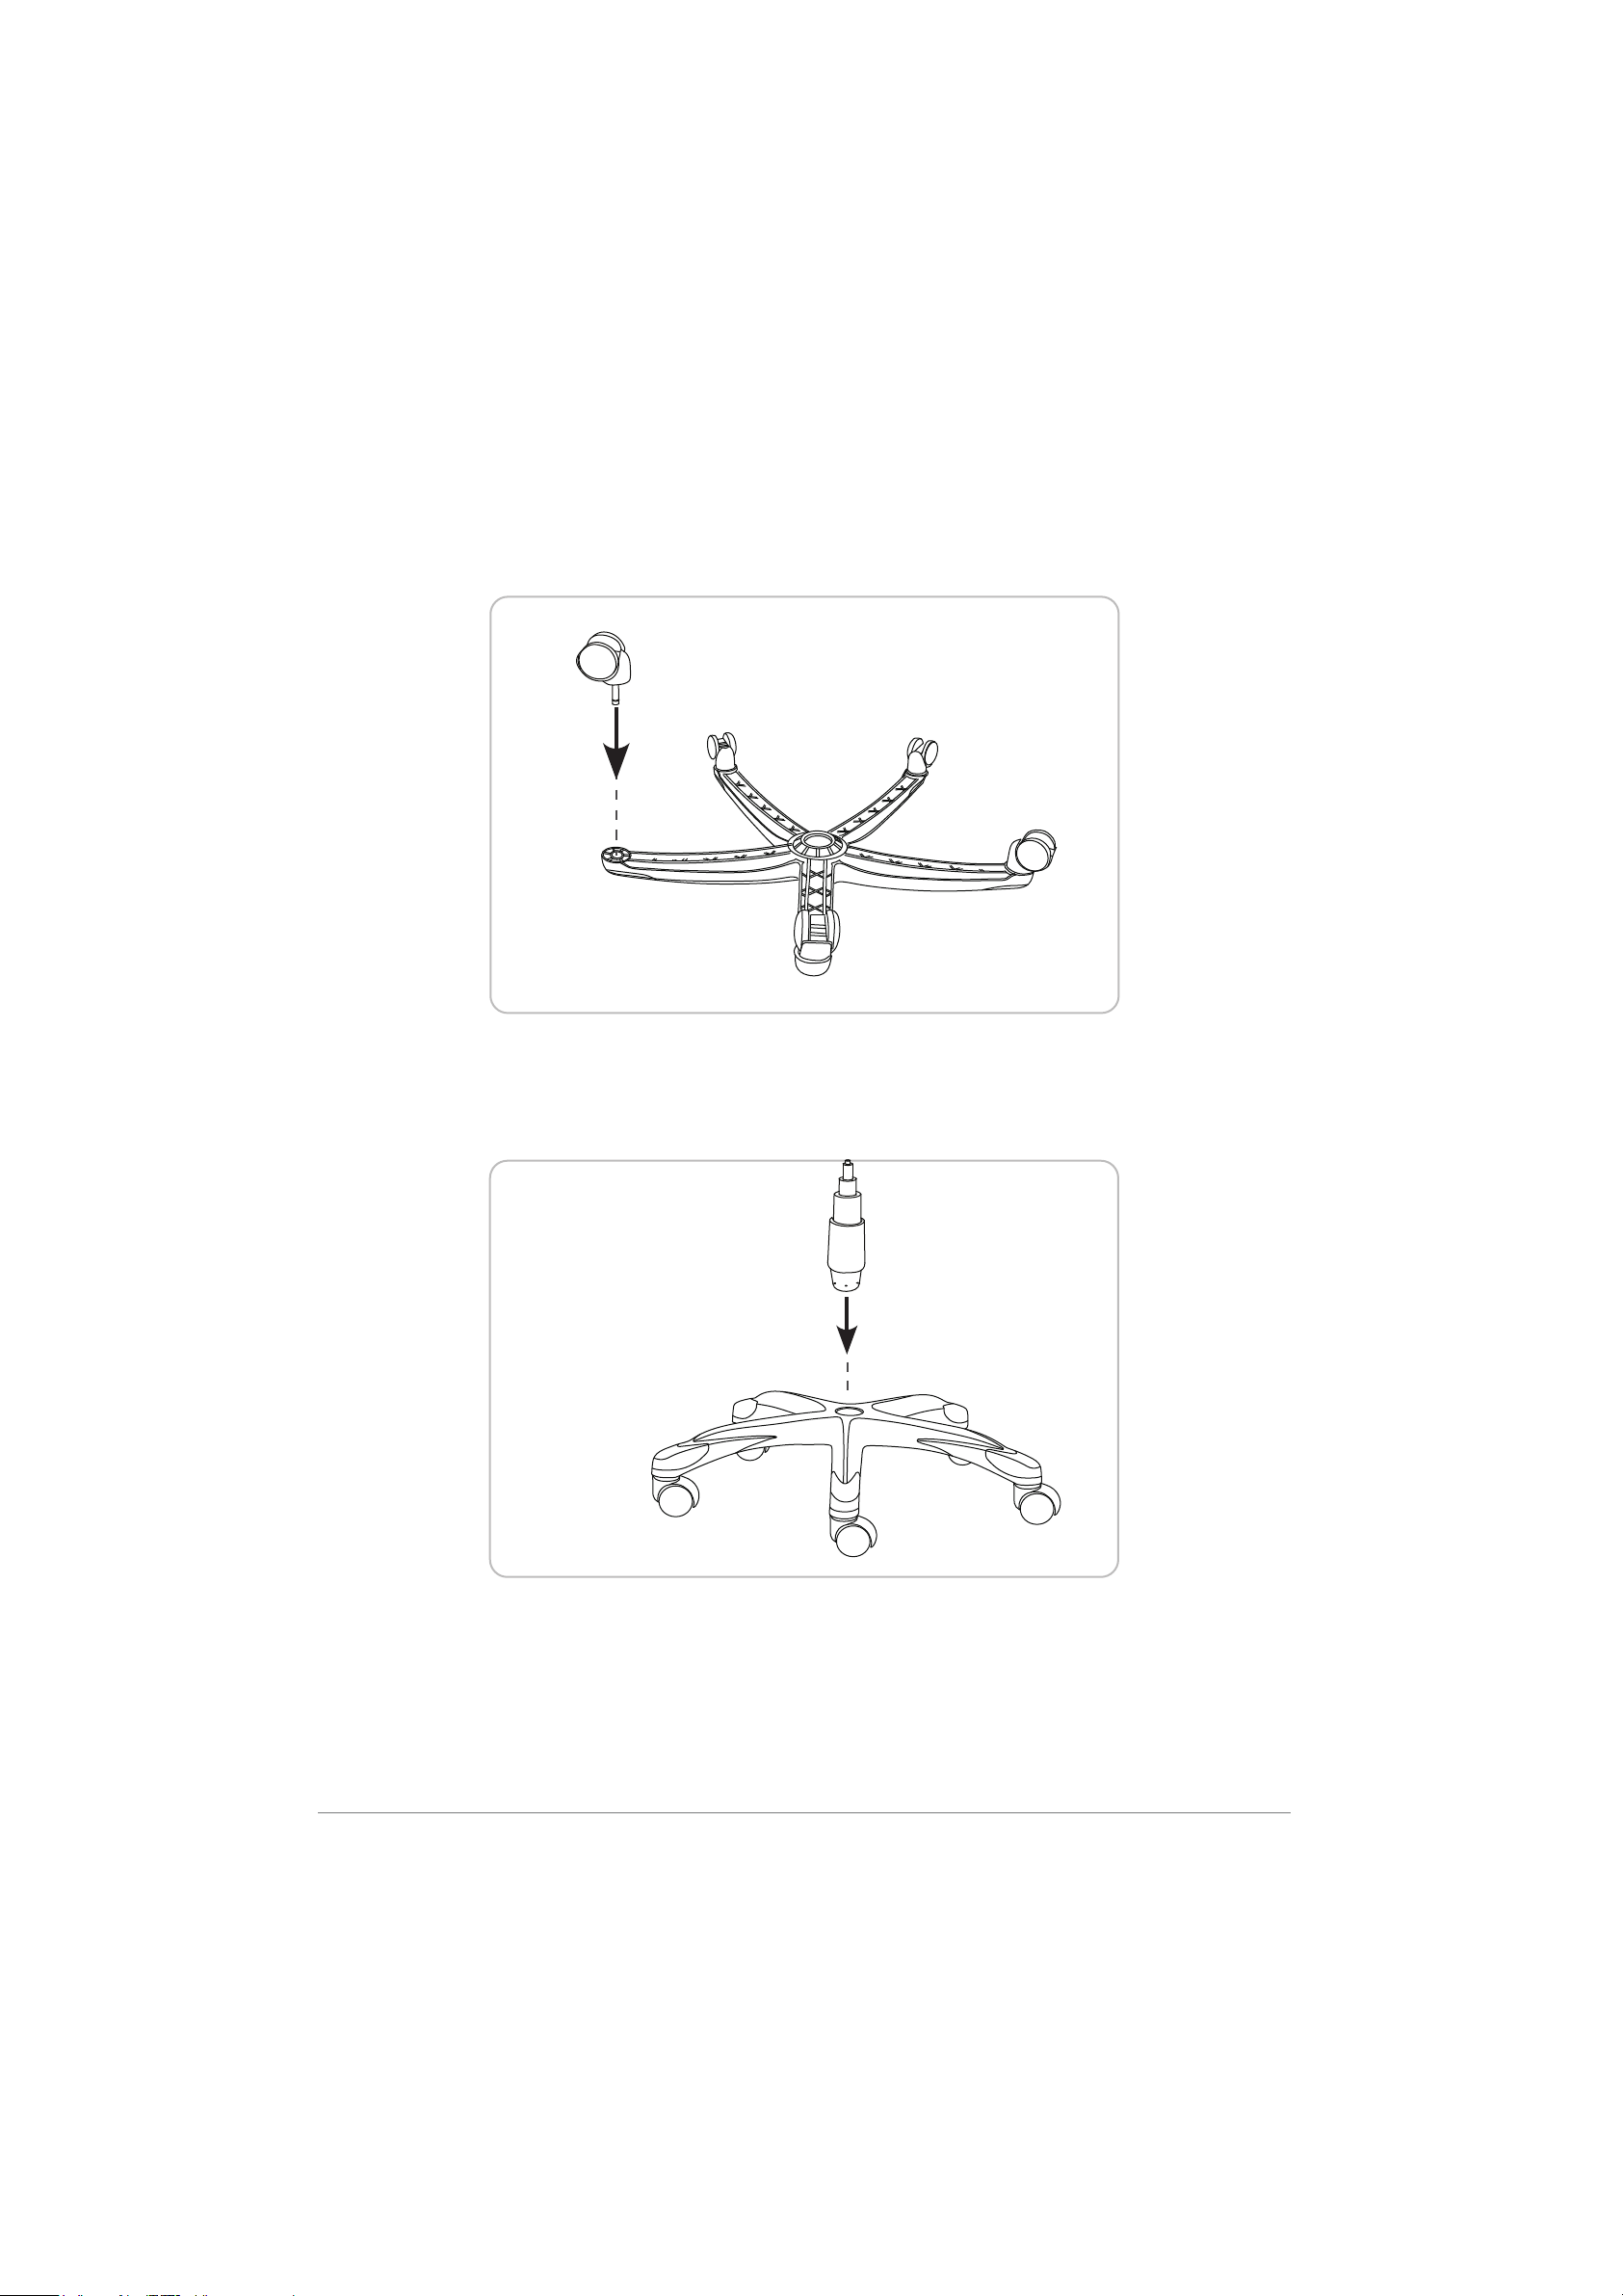
Step 1: Turn the star base upside down, then press the casters into the holes at the end of each
base leg.
Step 2: Turn the star base upright and insert the lift into the center hole of the star base. The lift
cover should be placed over the lift.
5
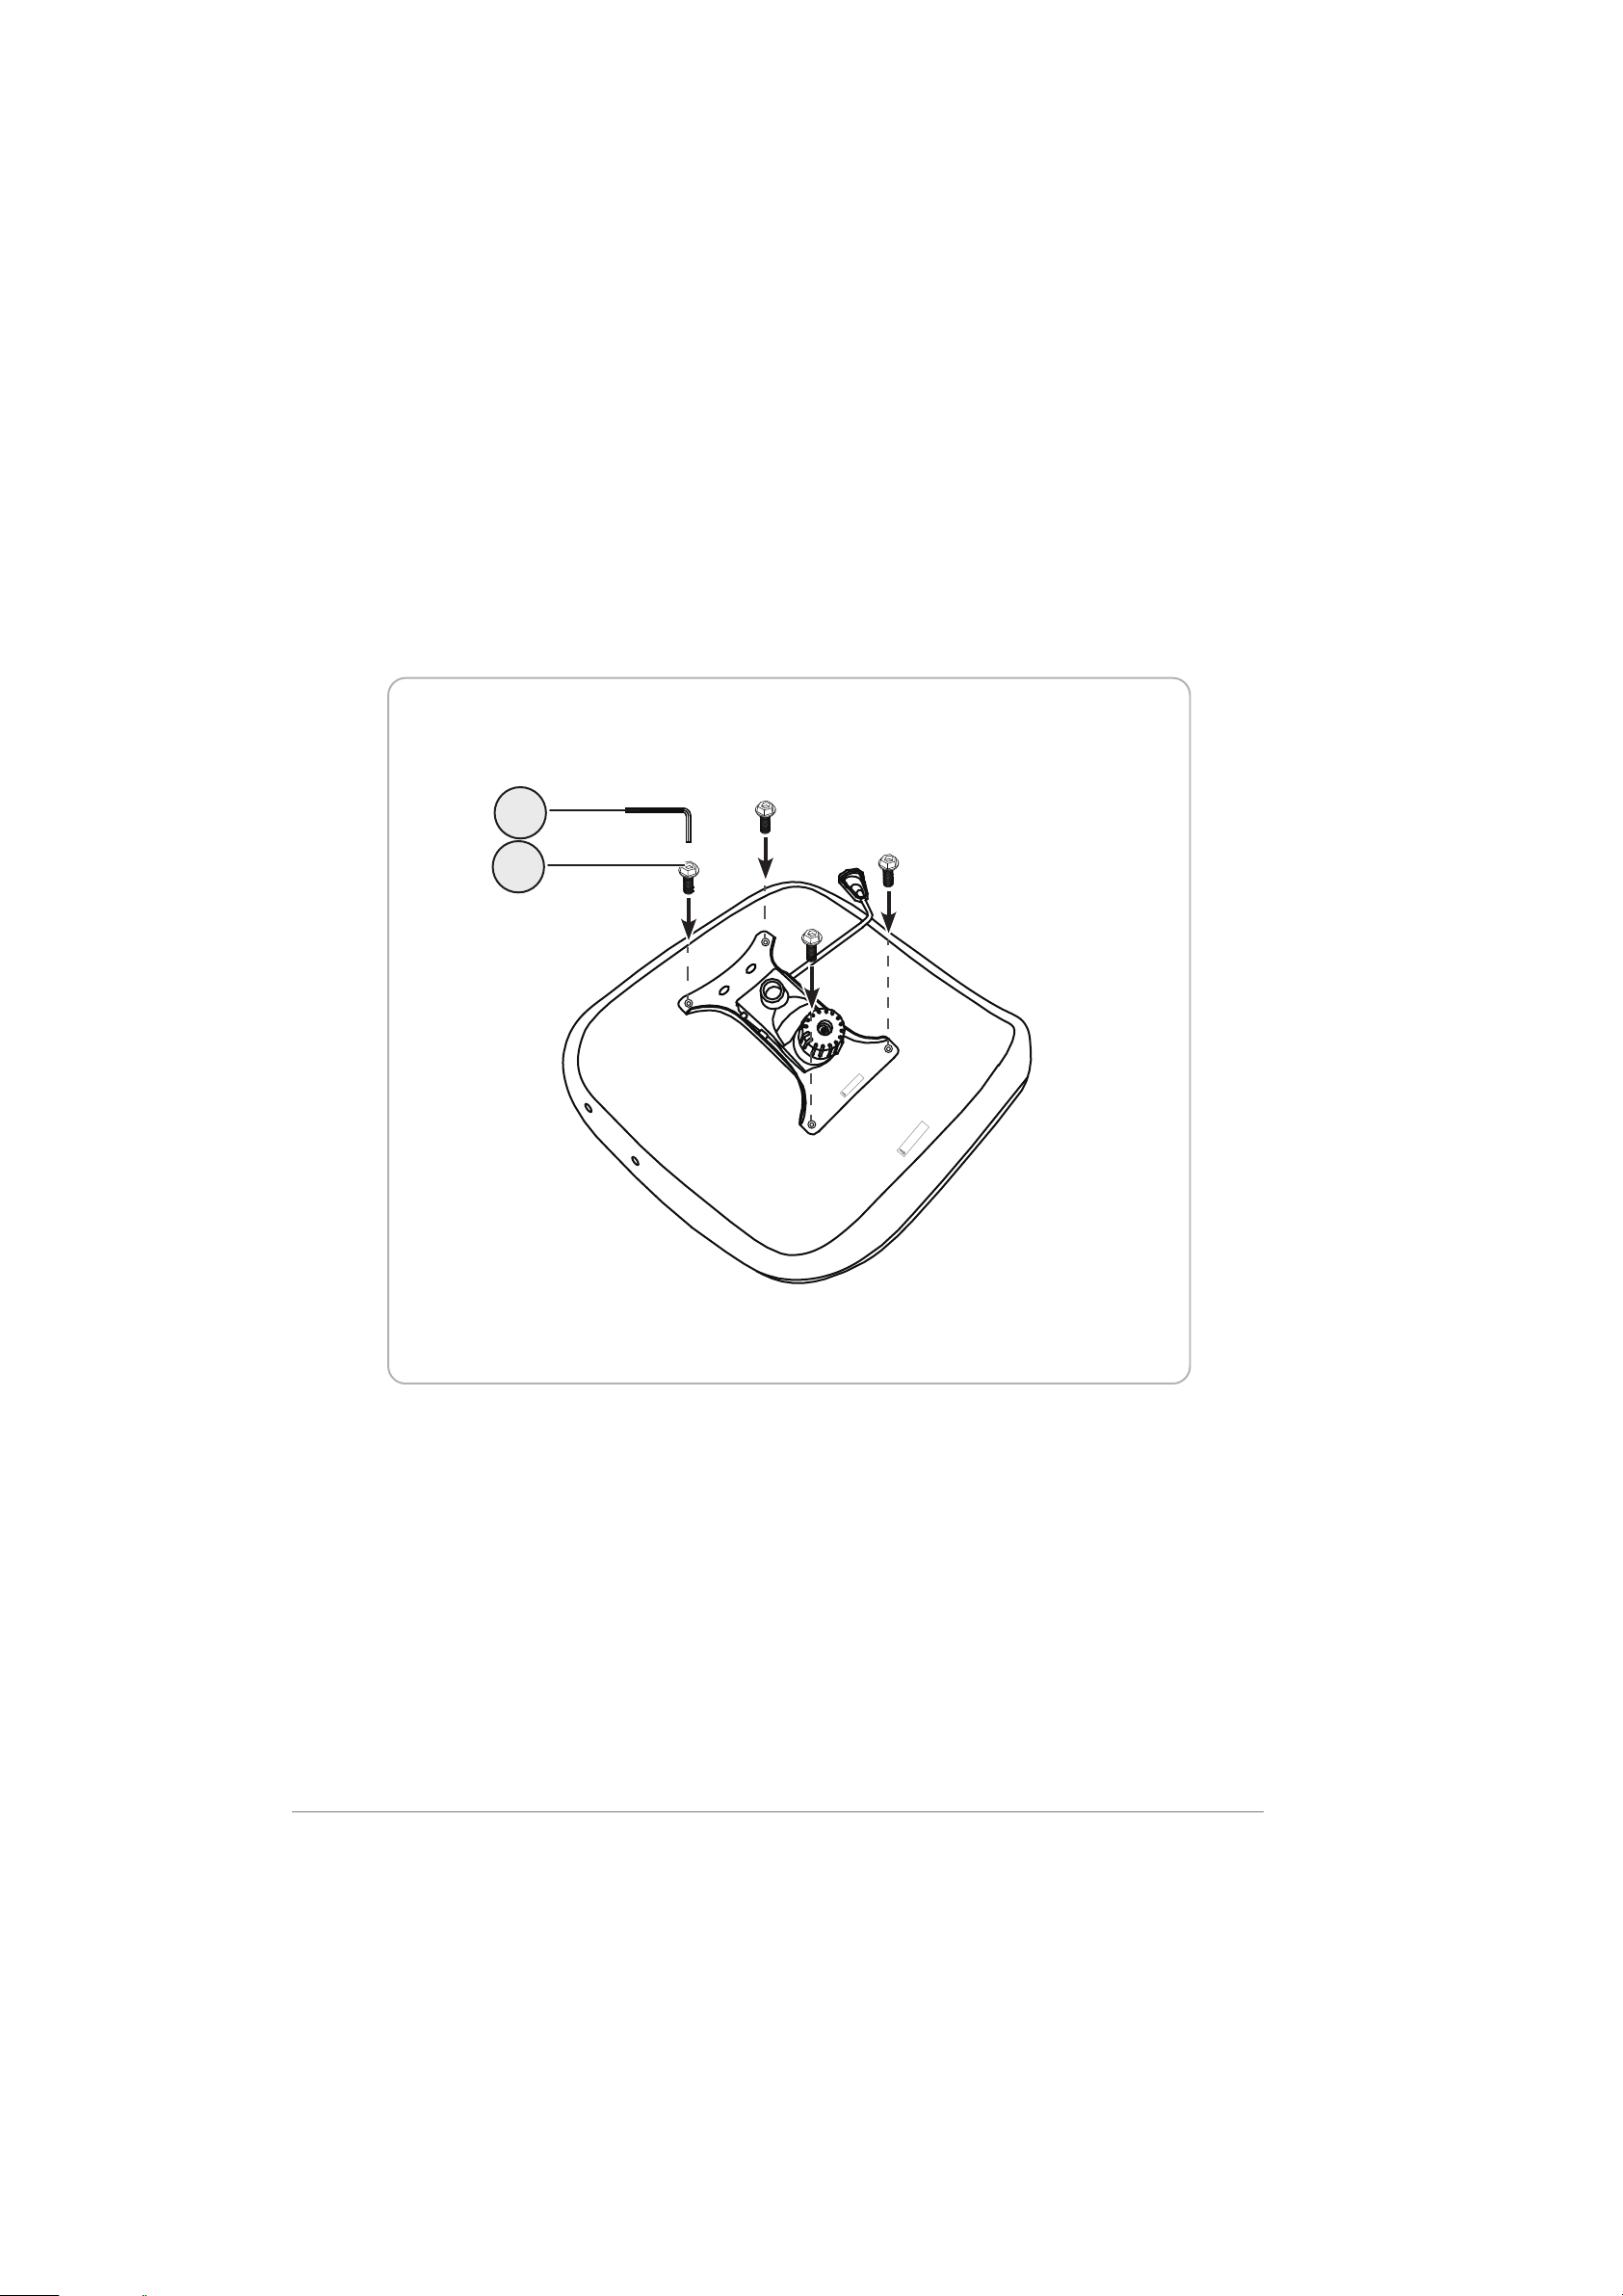
Step 3: Align the seat plate over the pre-drilled holes underneath the seat cushion. Make sure
that the front of the seat plate is facing the front of the seat cushion.
Attach the seat plate to the seat cushion using four(A) bolts. Tighten all the bolts with the
wrench , being careful not to miss-thread the bolts or damage the seat.
FRONT
FRONT
A
C
(C)

6
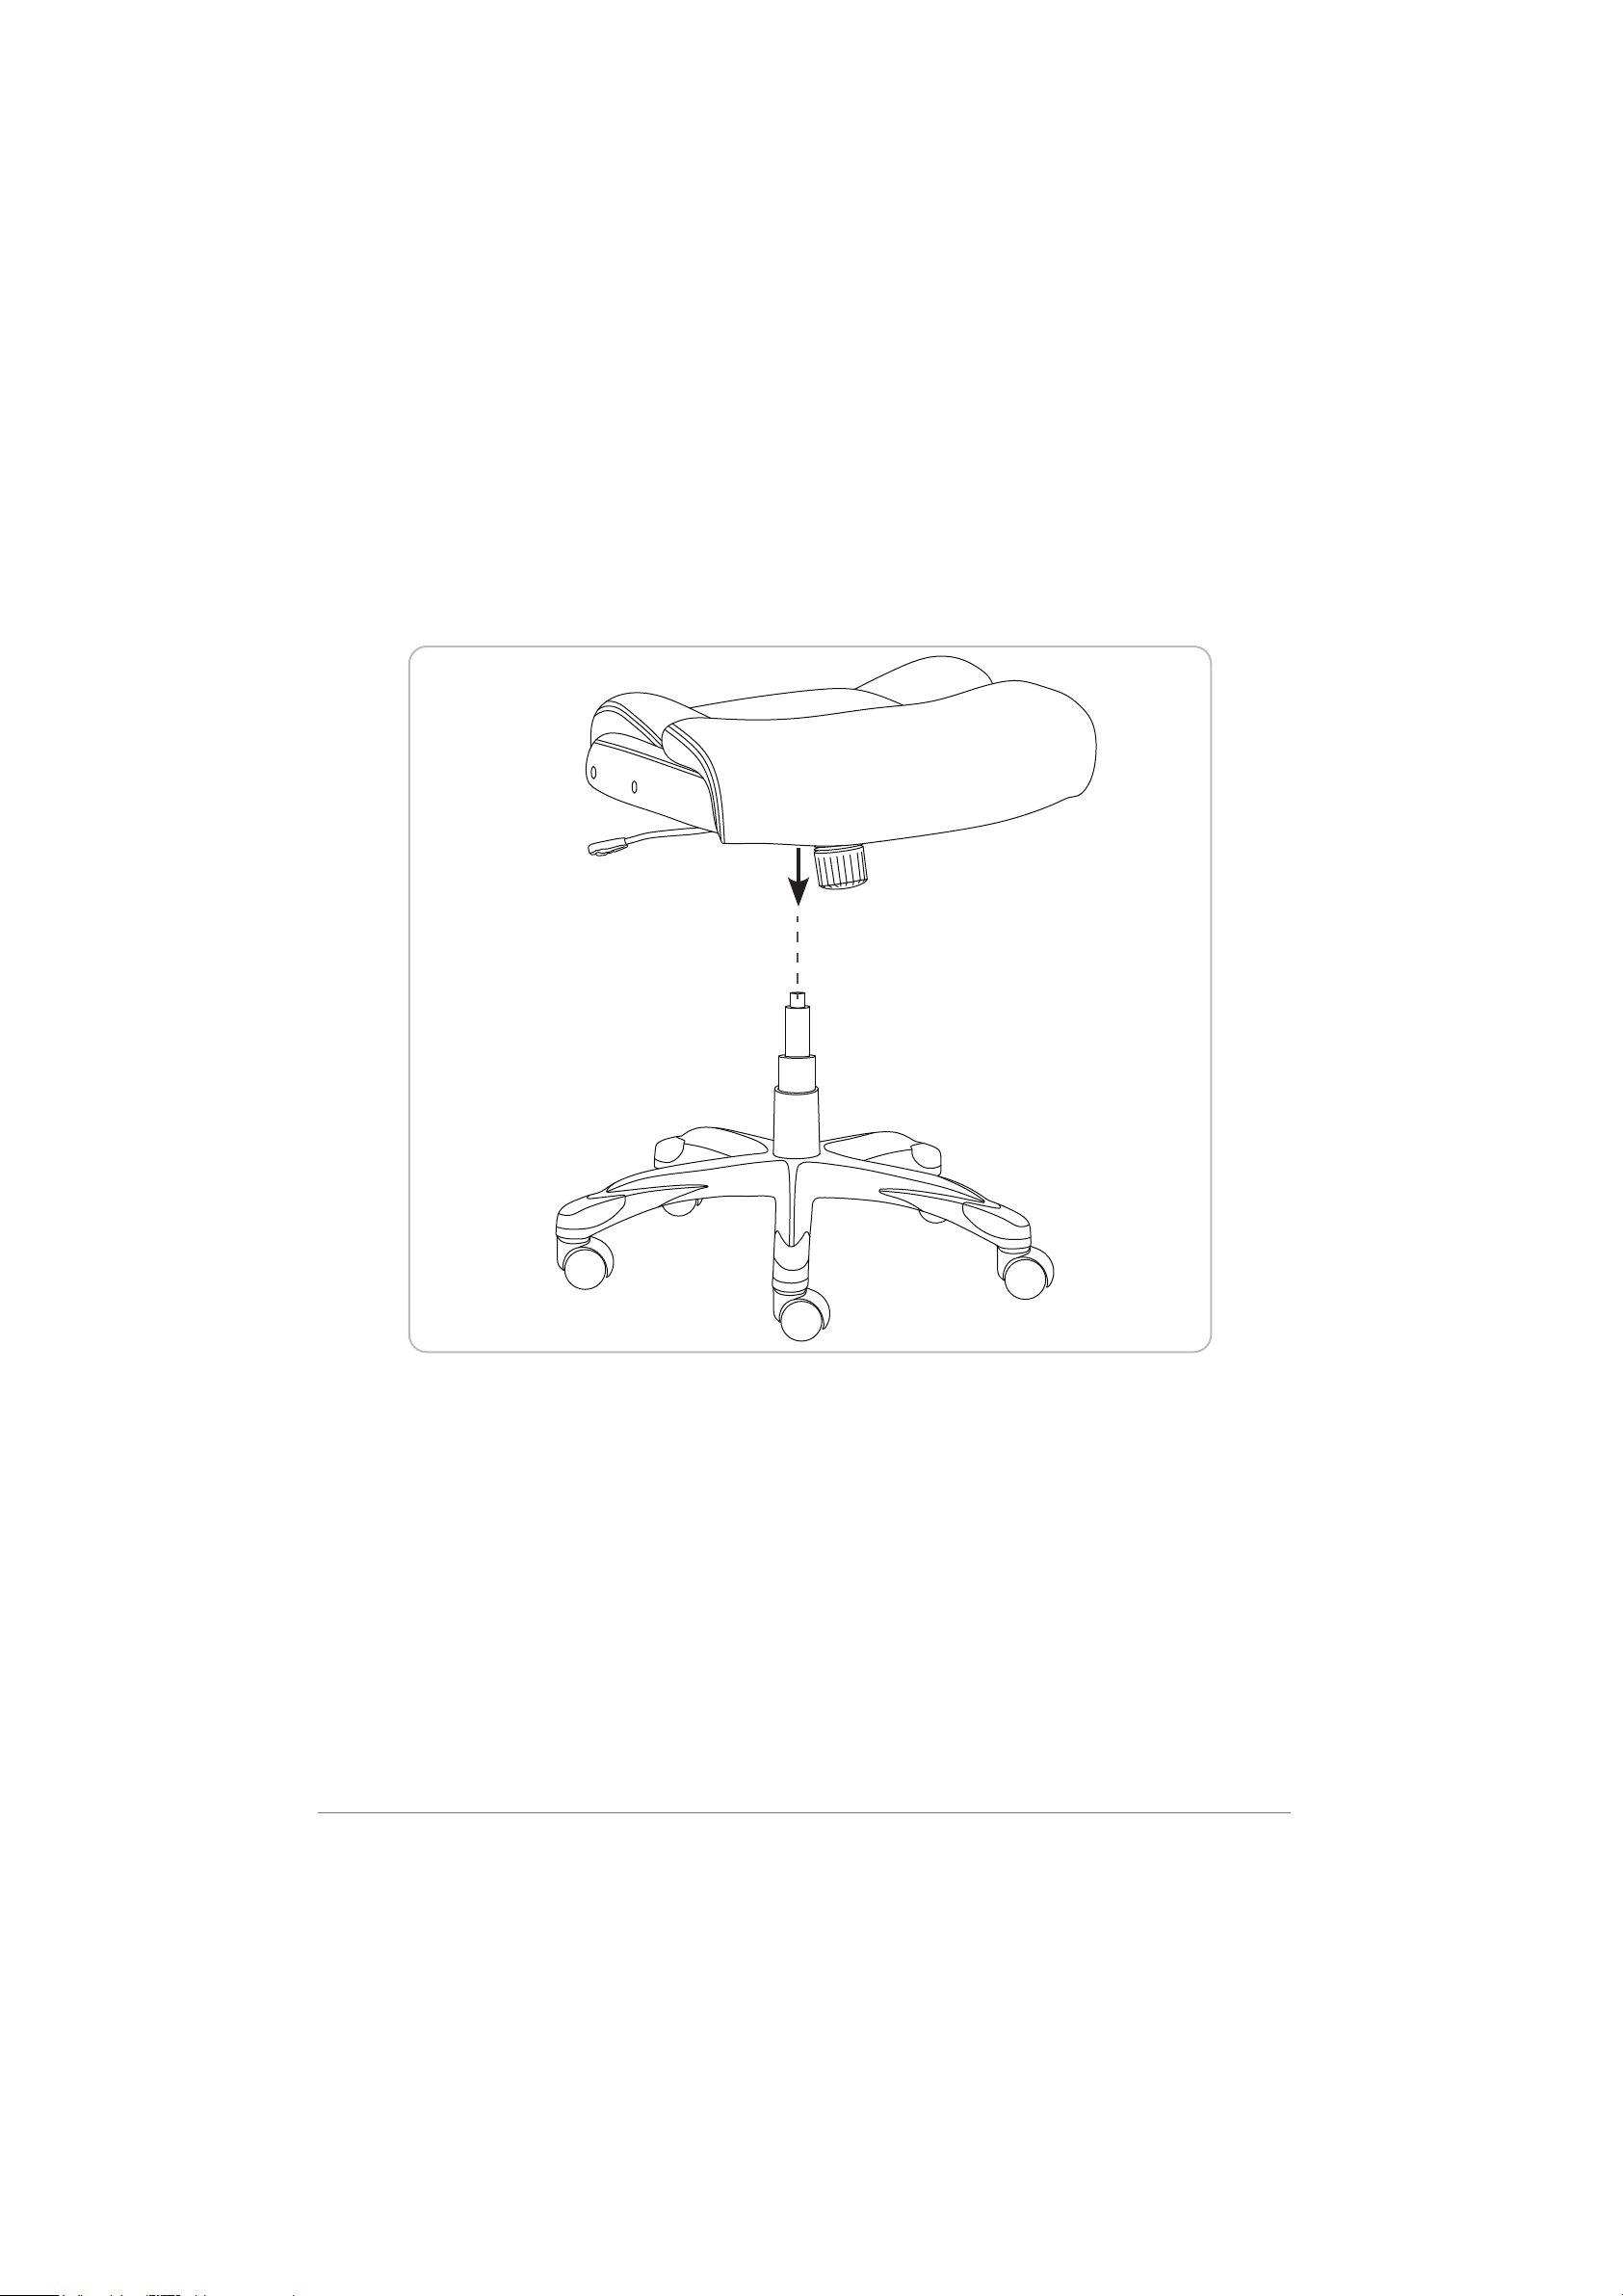
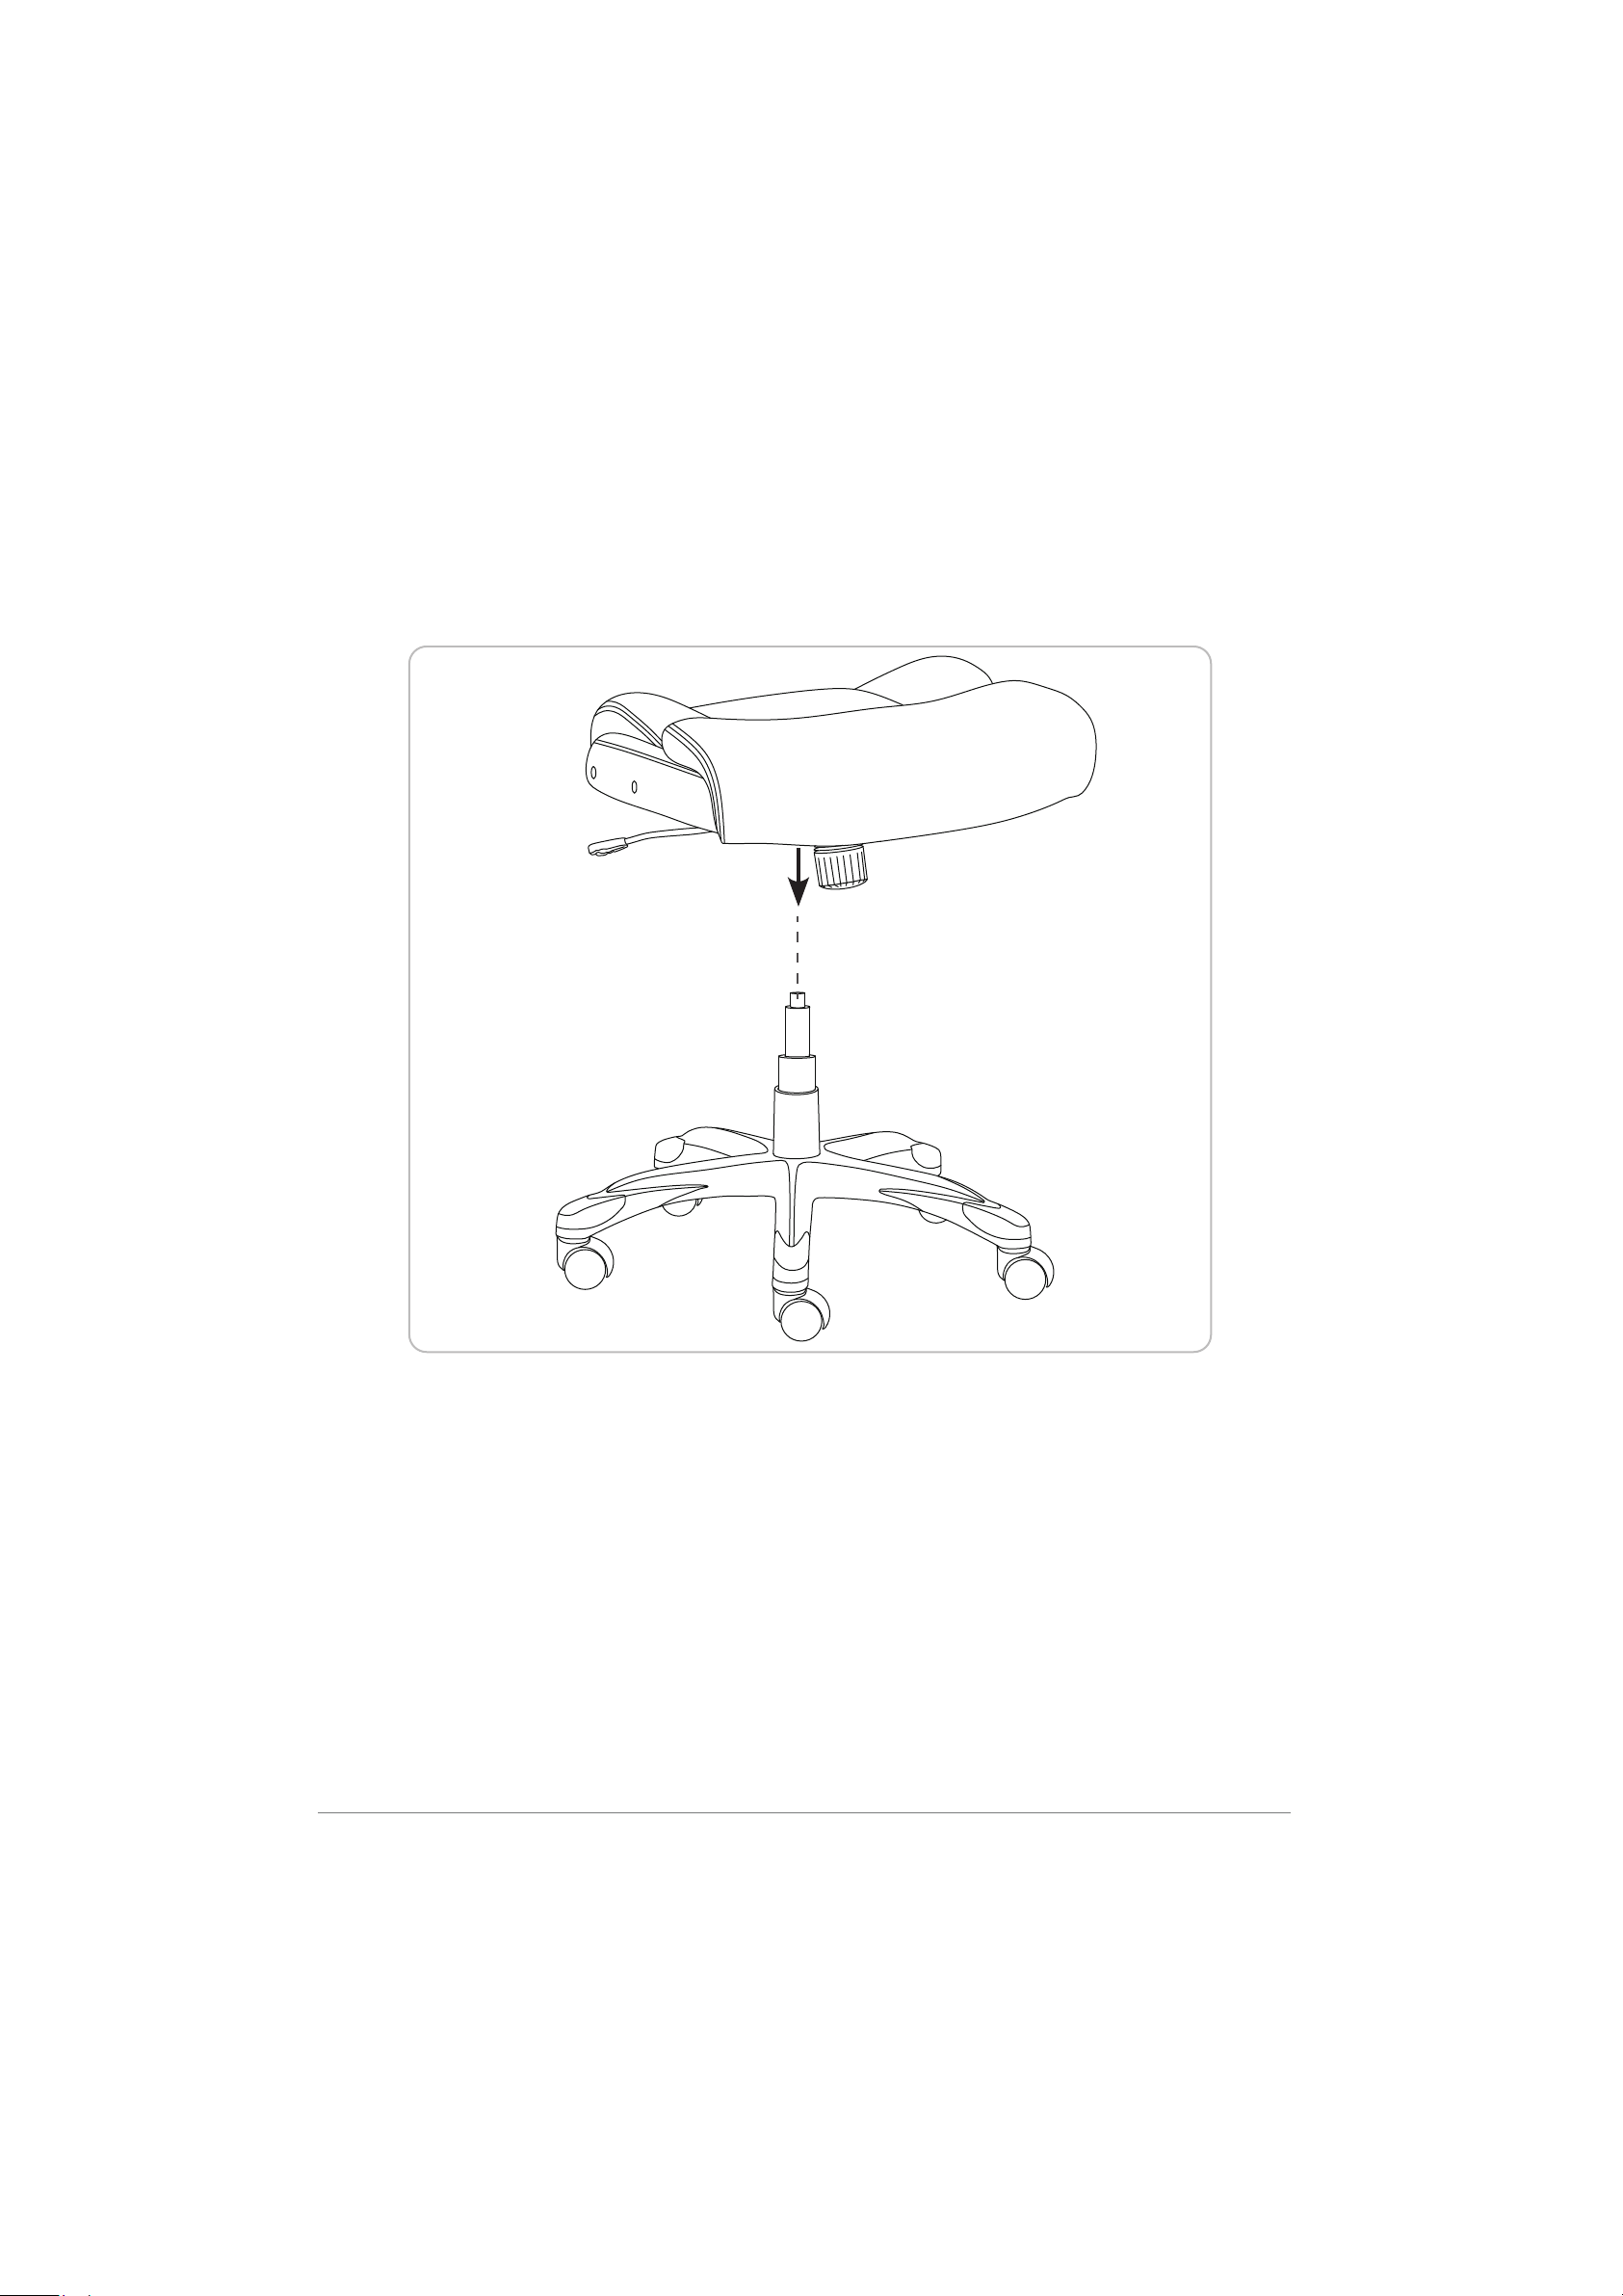
Step 4: Turn the seat cushion upright and align the center hole of the seat plate over the lift,
then push the seat cushion down onto the lift firmly until the connection is secure.

7
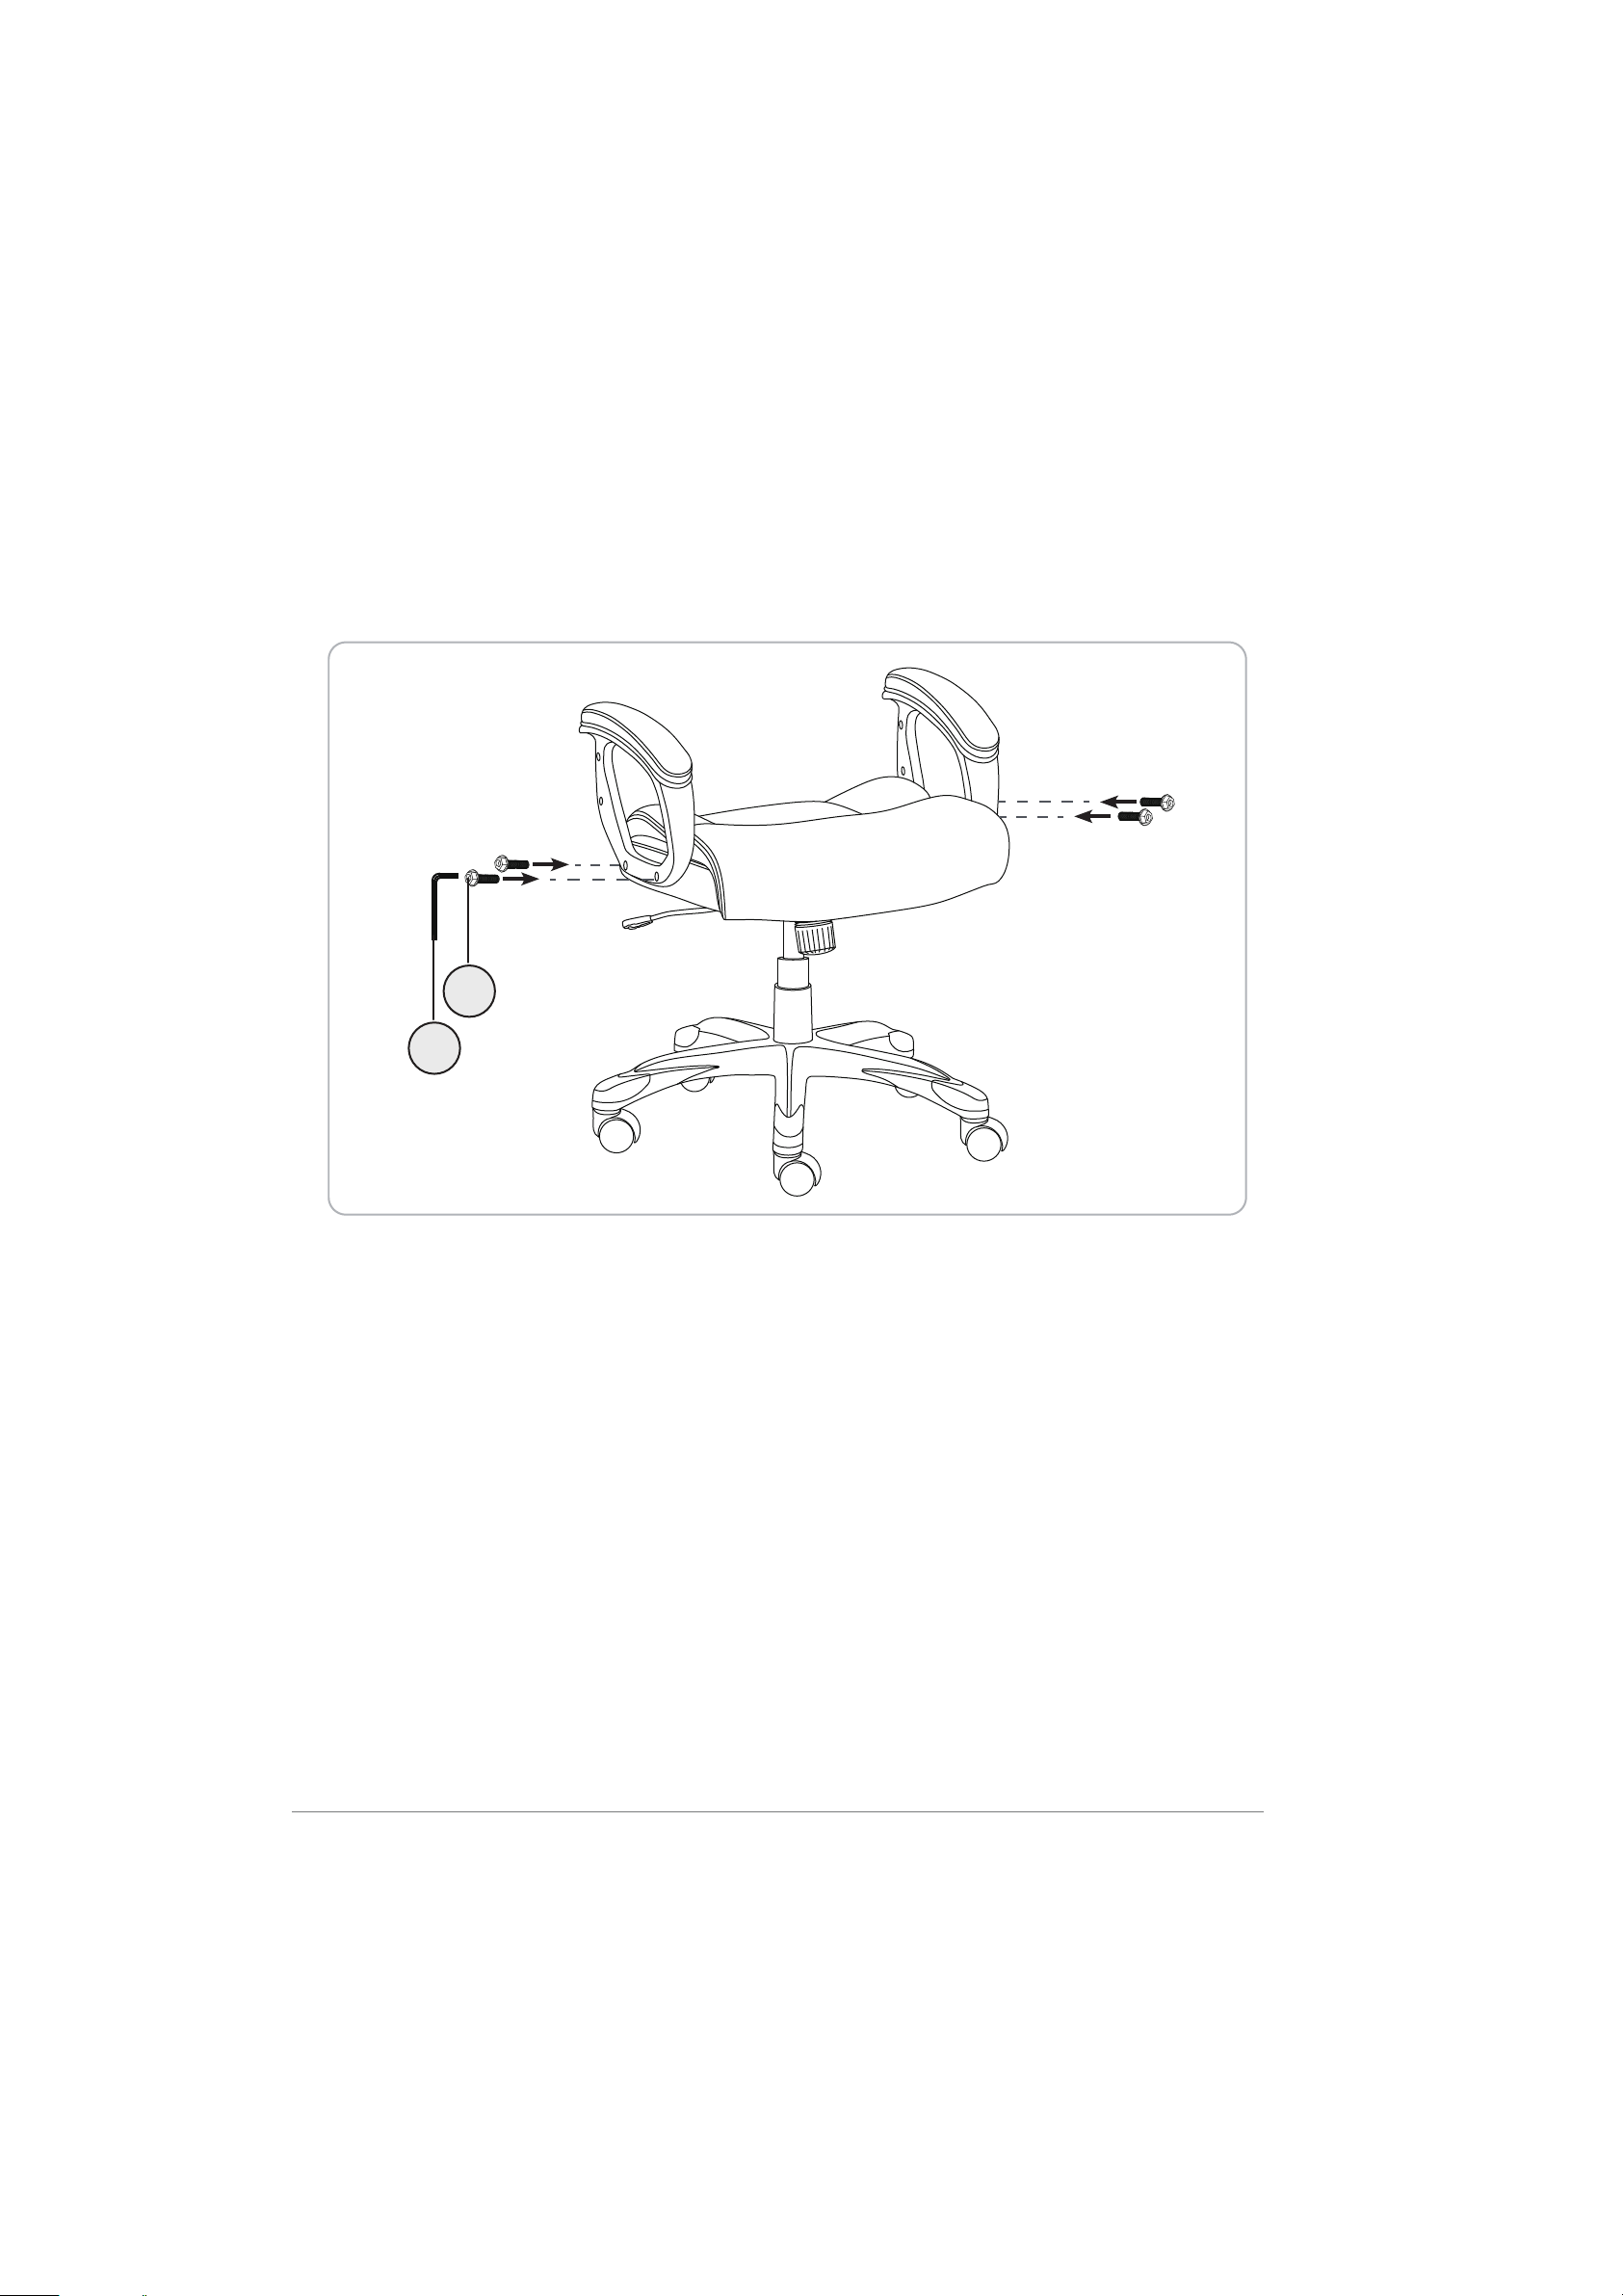
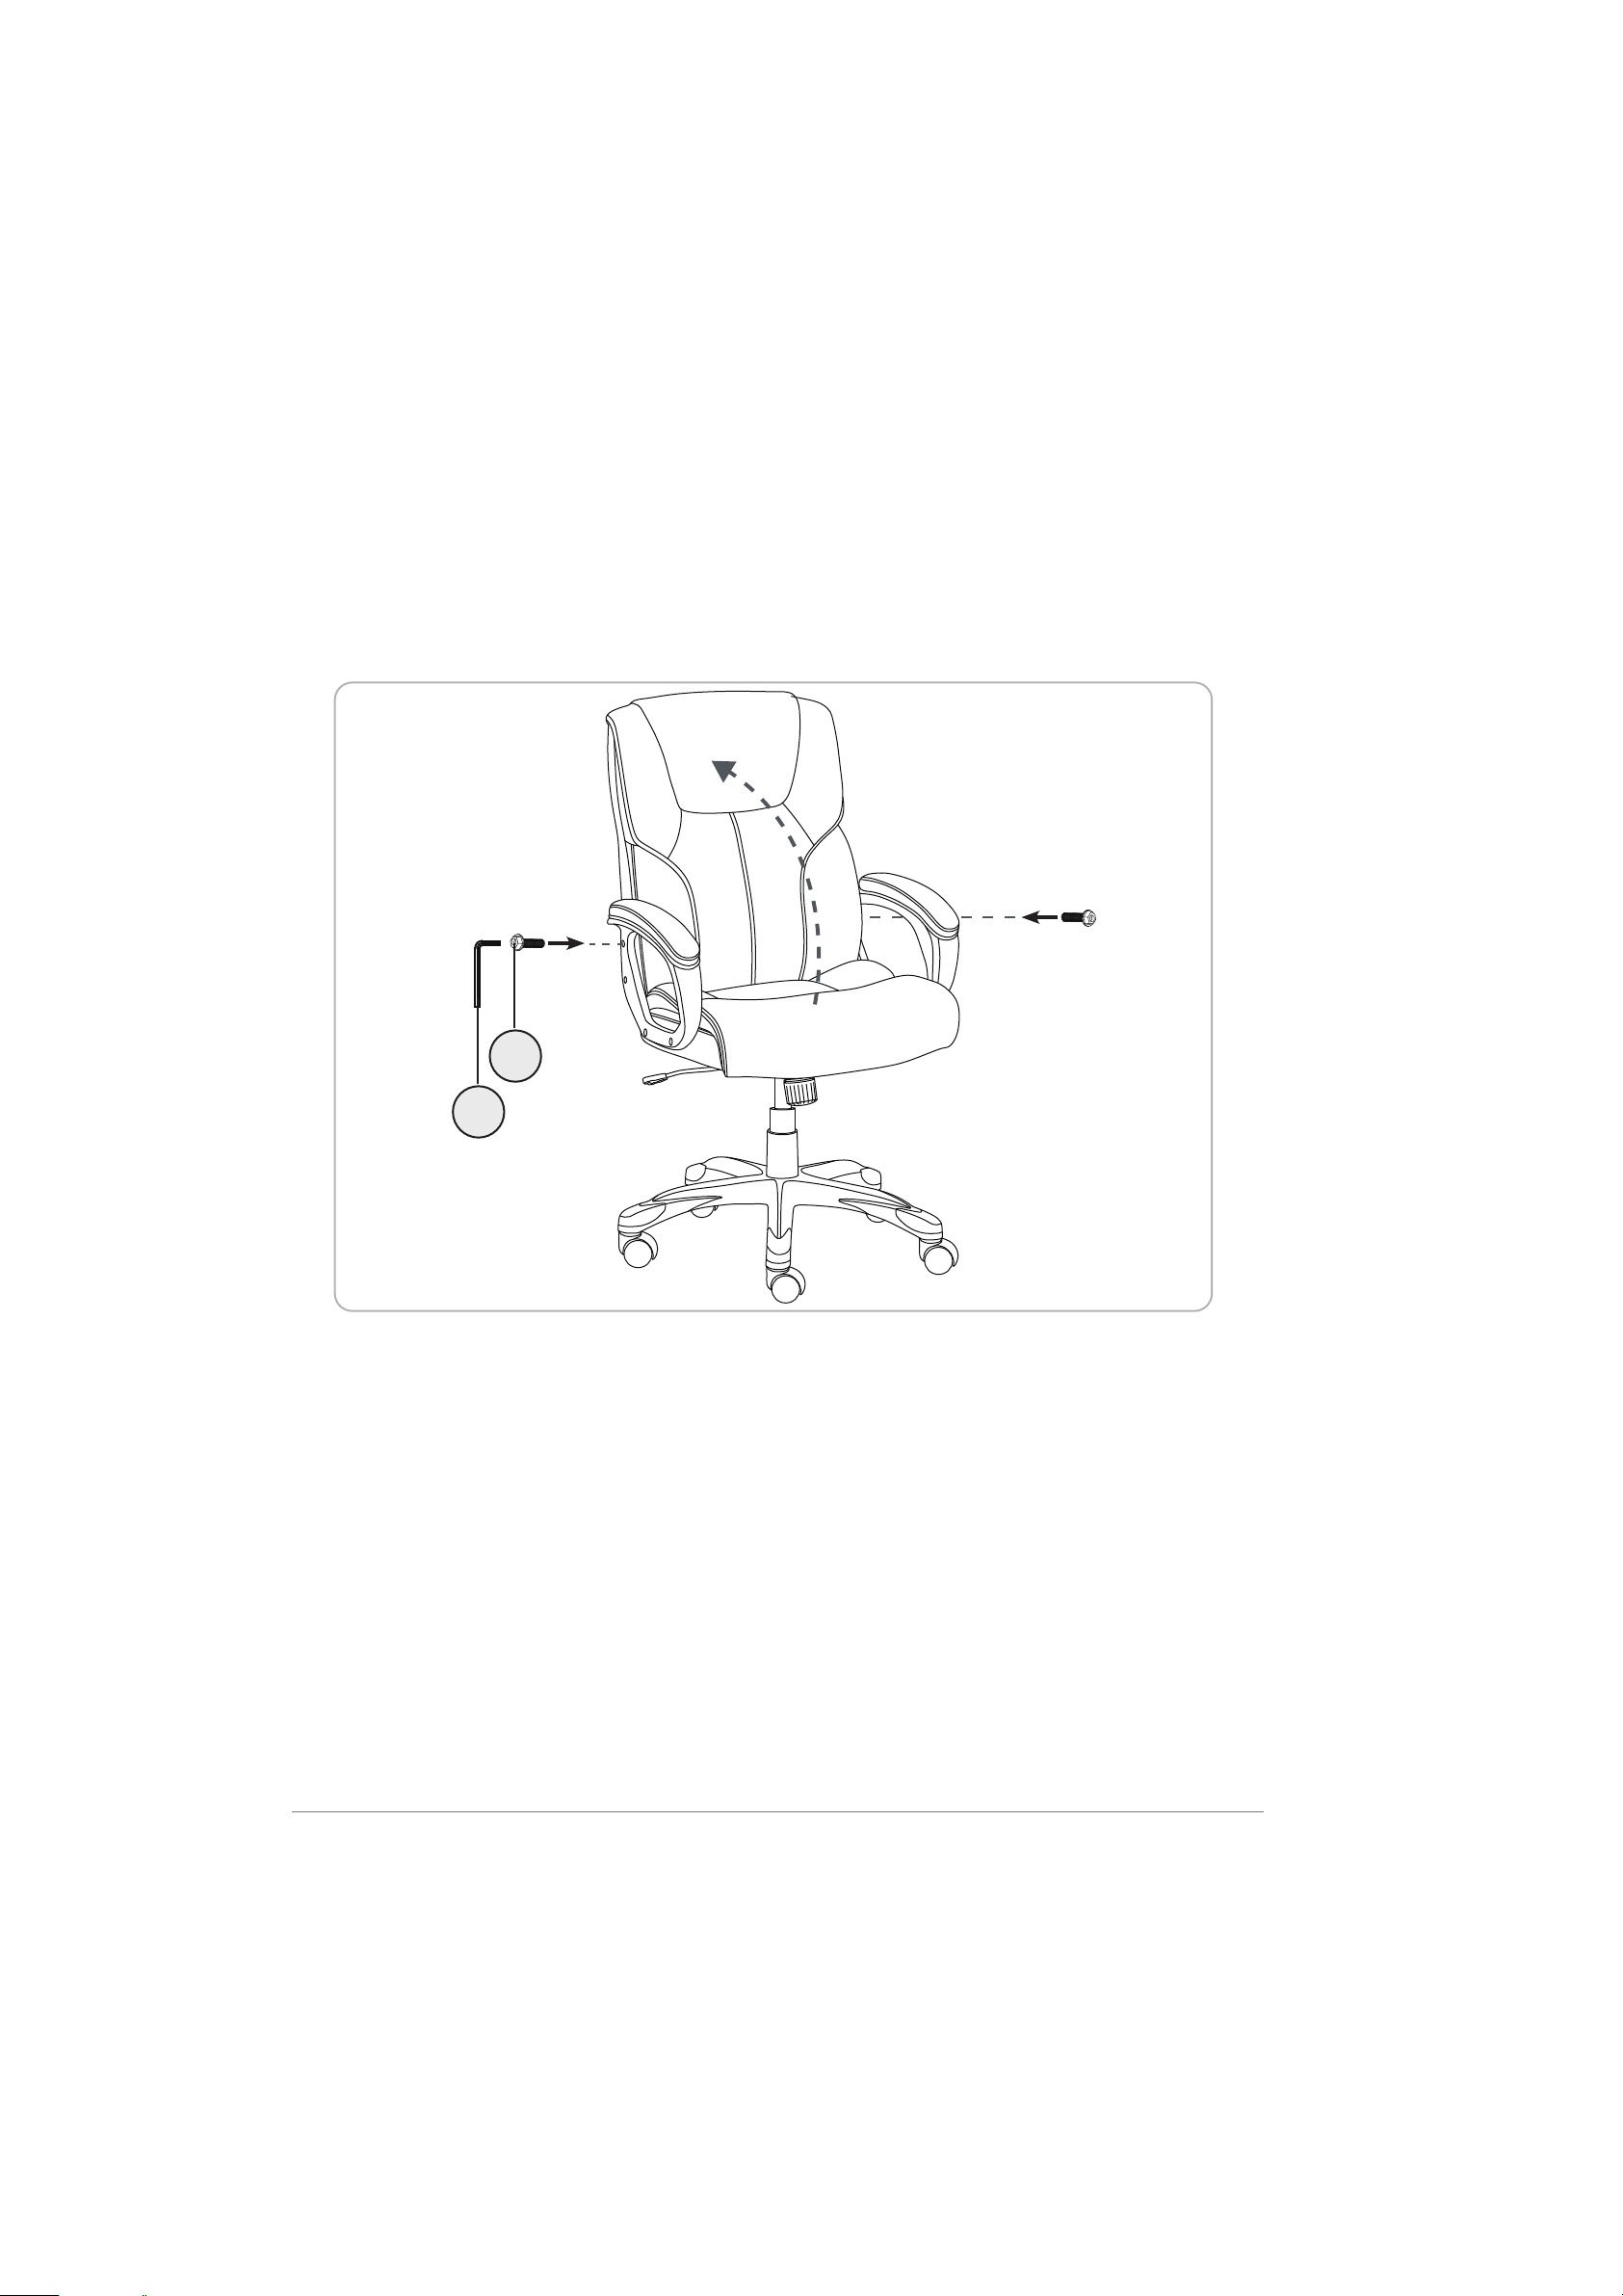
Step 5: Attach the arms to the seat cushion with four (A) bolts, using the wrench .
Note: Arm rests are labeled with an "L"
(left) or "R" (right) to show which sides
they should be placed on.
A
C
(C)

8
Step 6: Lay the back cushion on the seat of the chair with the top of the cushion toward the
front.
Attach the back cushion to the arms by inserting two (A) bolts in the lower holes with the
wrench (C). Do not tighten the bolts fully.
A
C

9
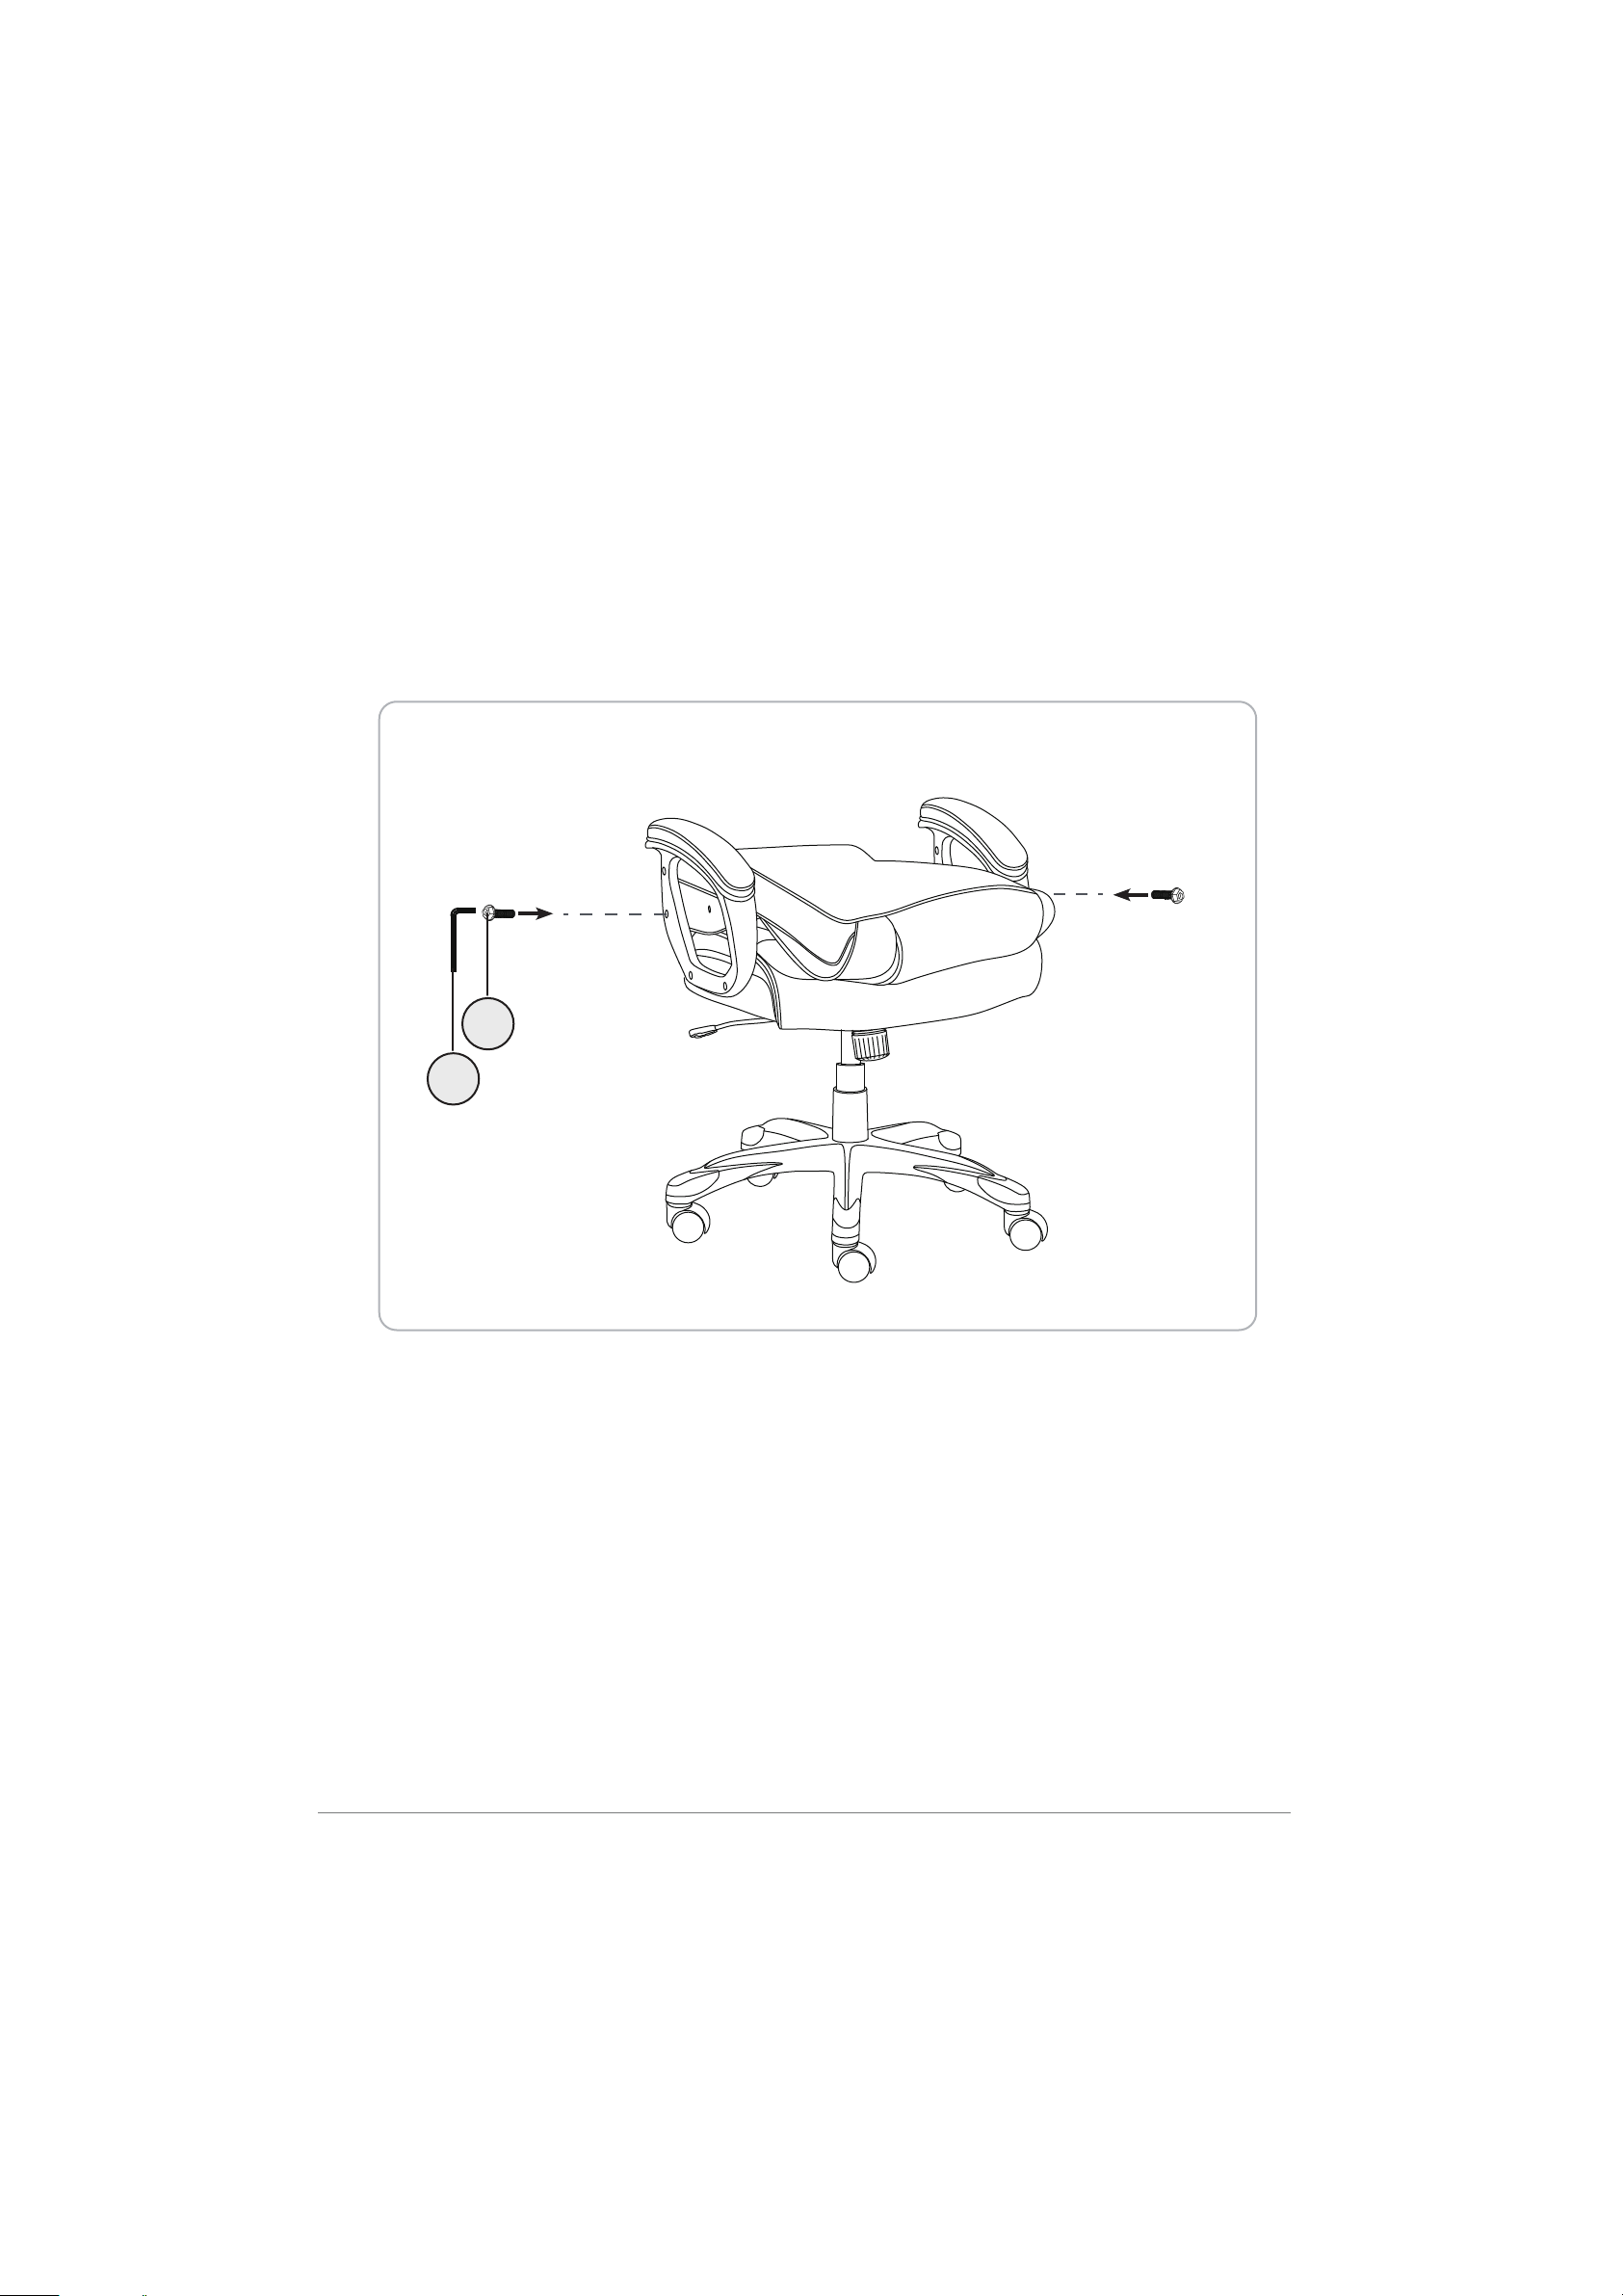
Step 7: Rotate the back of the chair up, then secure it with the top two (A) bolts. Fully
tighten all the bolts.
A
C
10
Step 8: Press the plastic caps (B) into the arm holes to cover the bolts.
Caution:
For your safety, before using your chair, make sure that all of the bolts are fully tightened.
Keep the enclosed wrench and check the bolts periodically to make sure they remain securely
tightened.
B

11
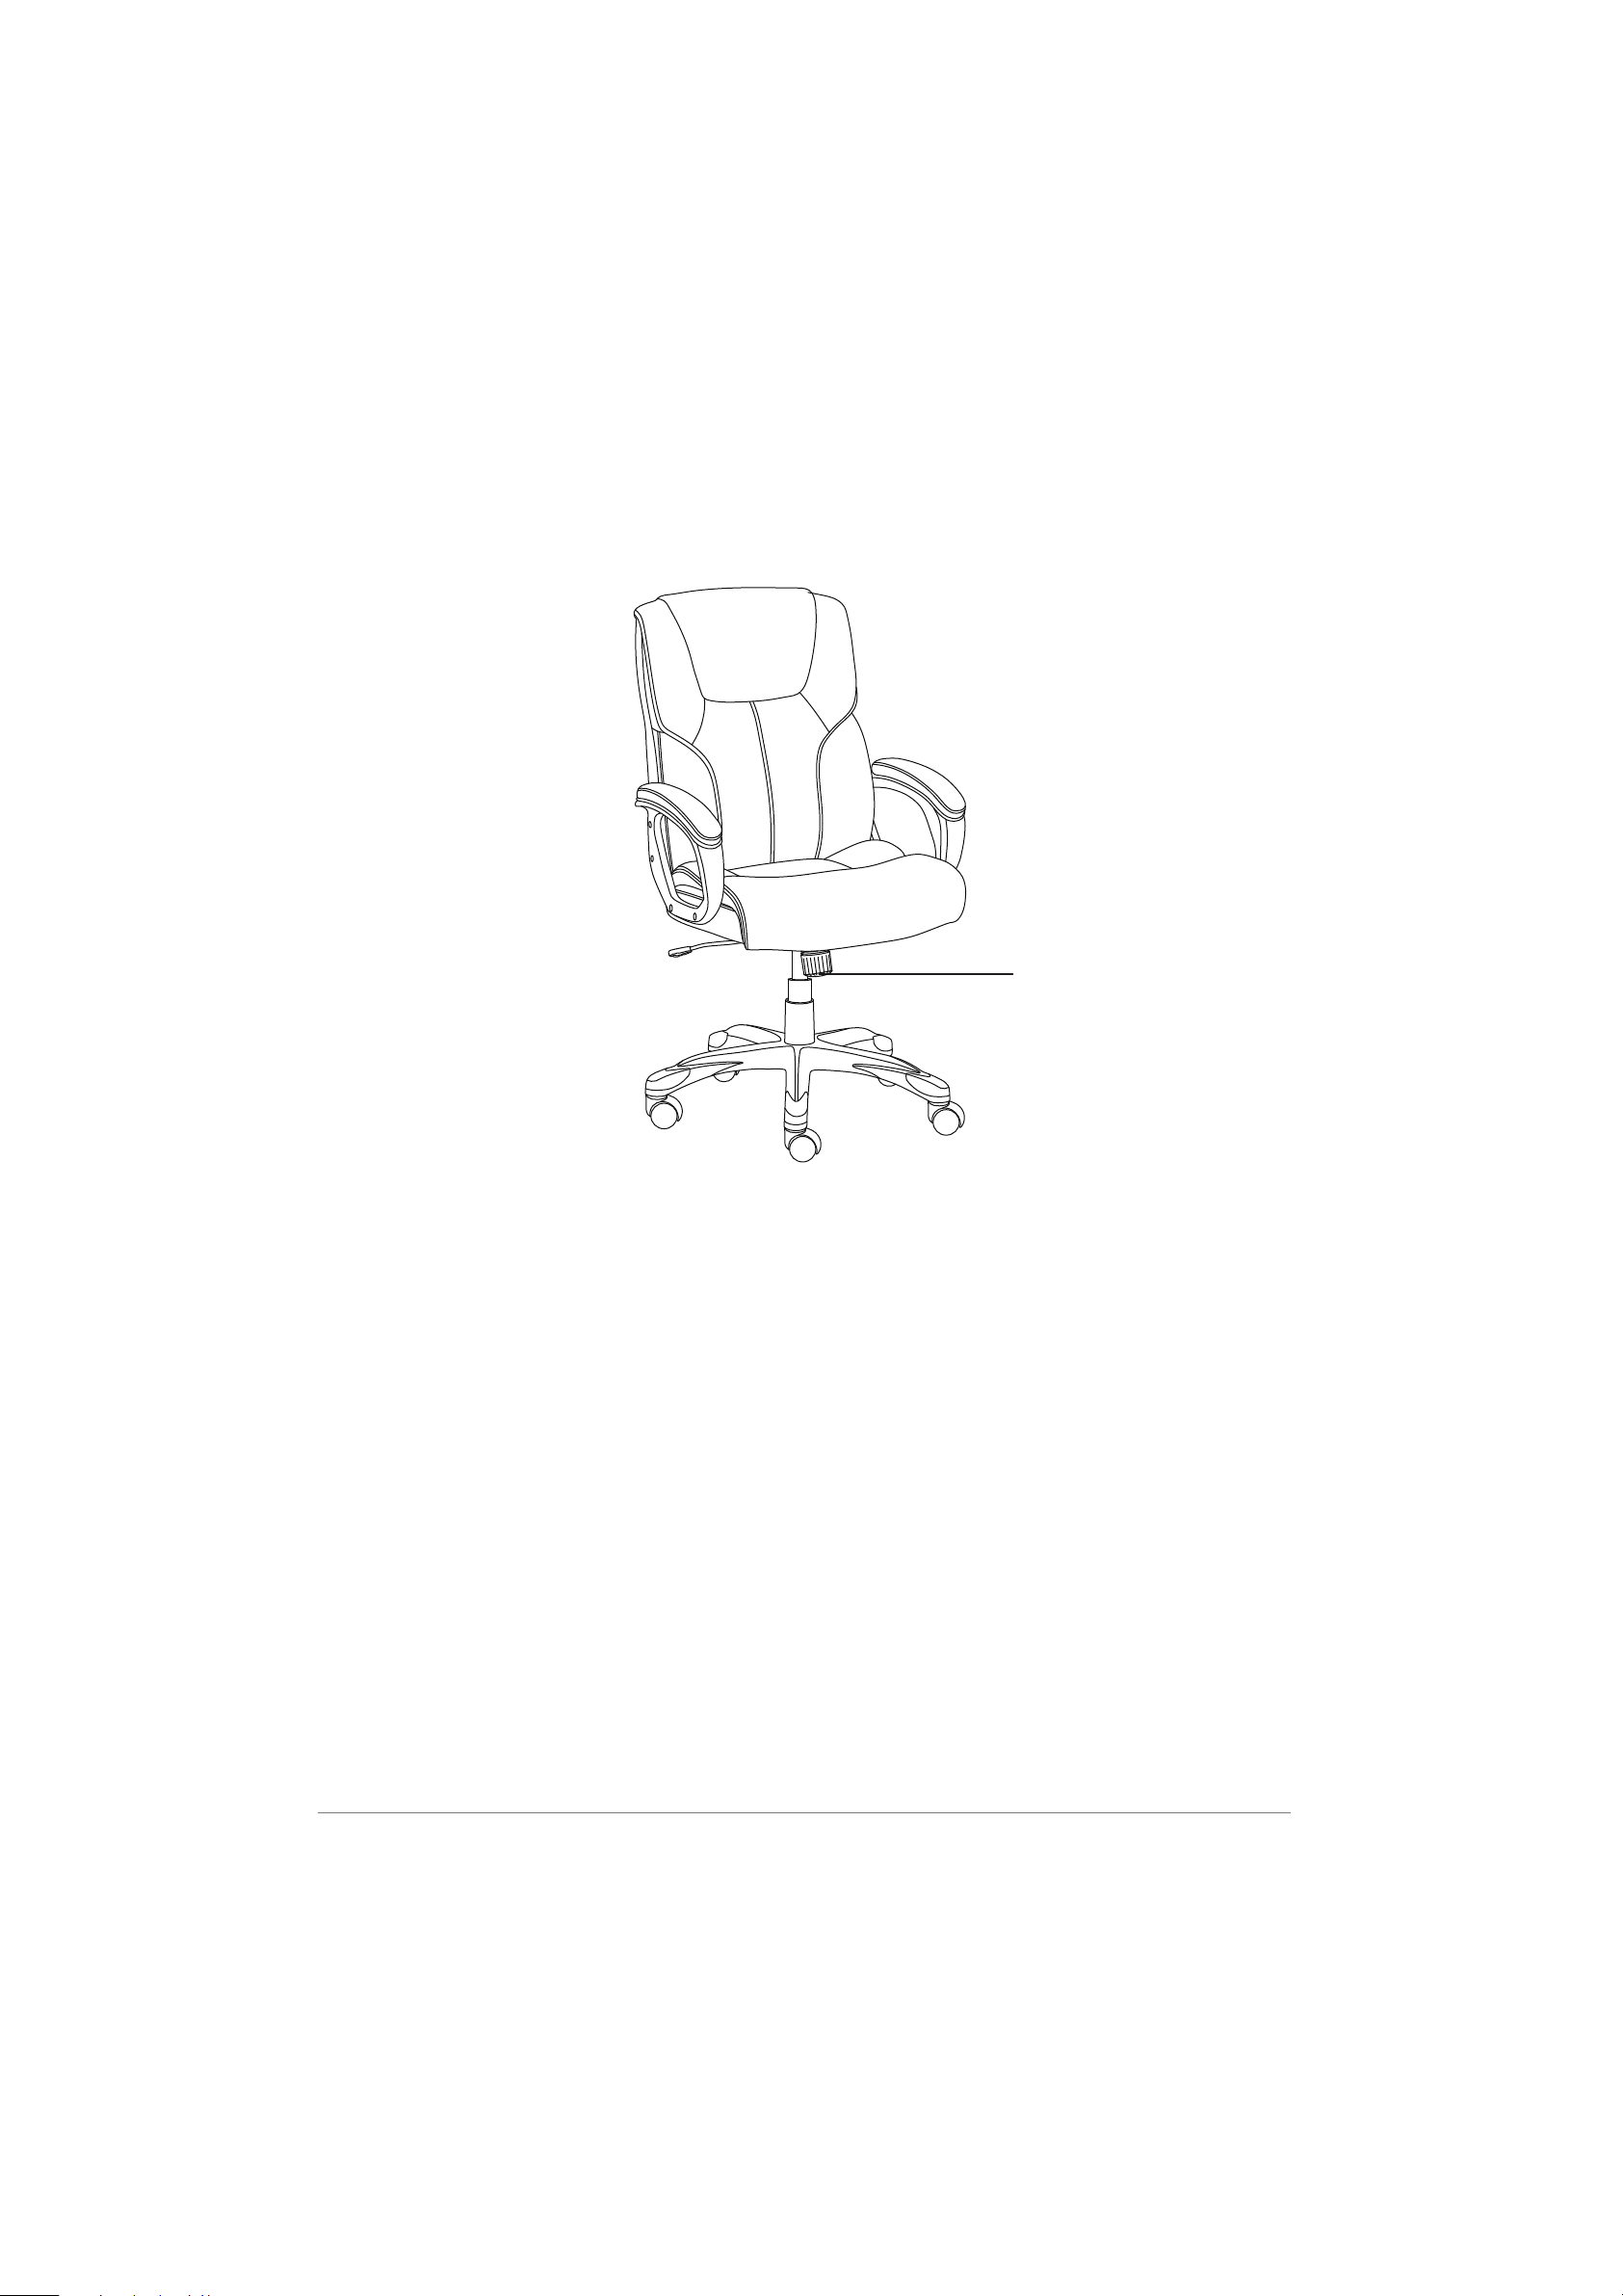
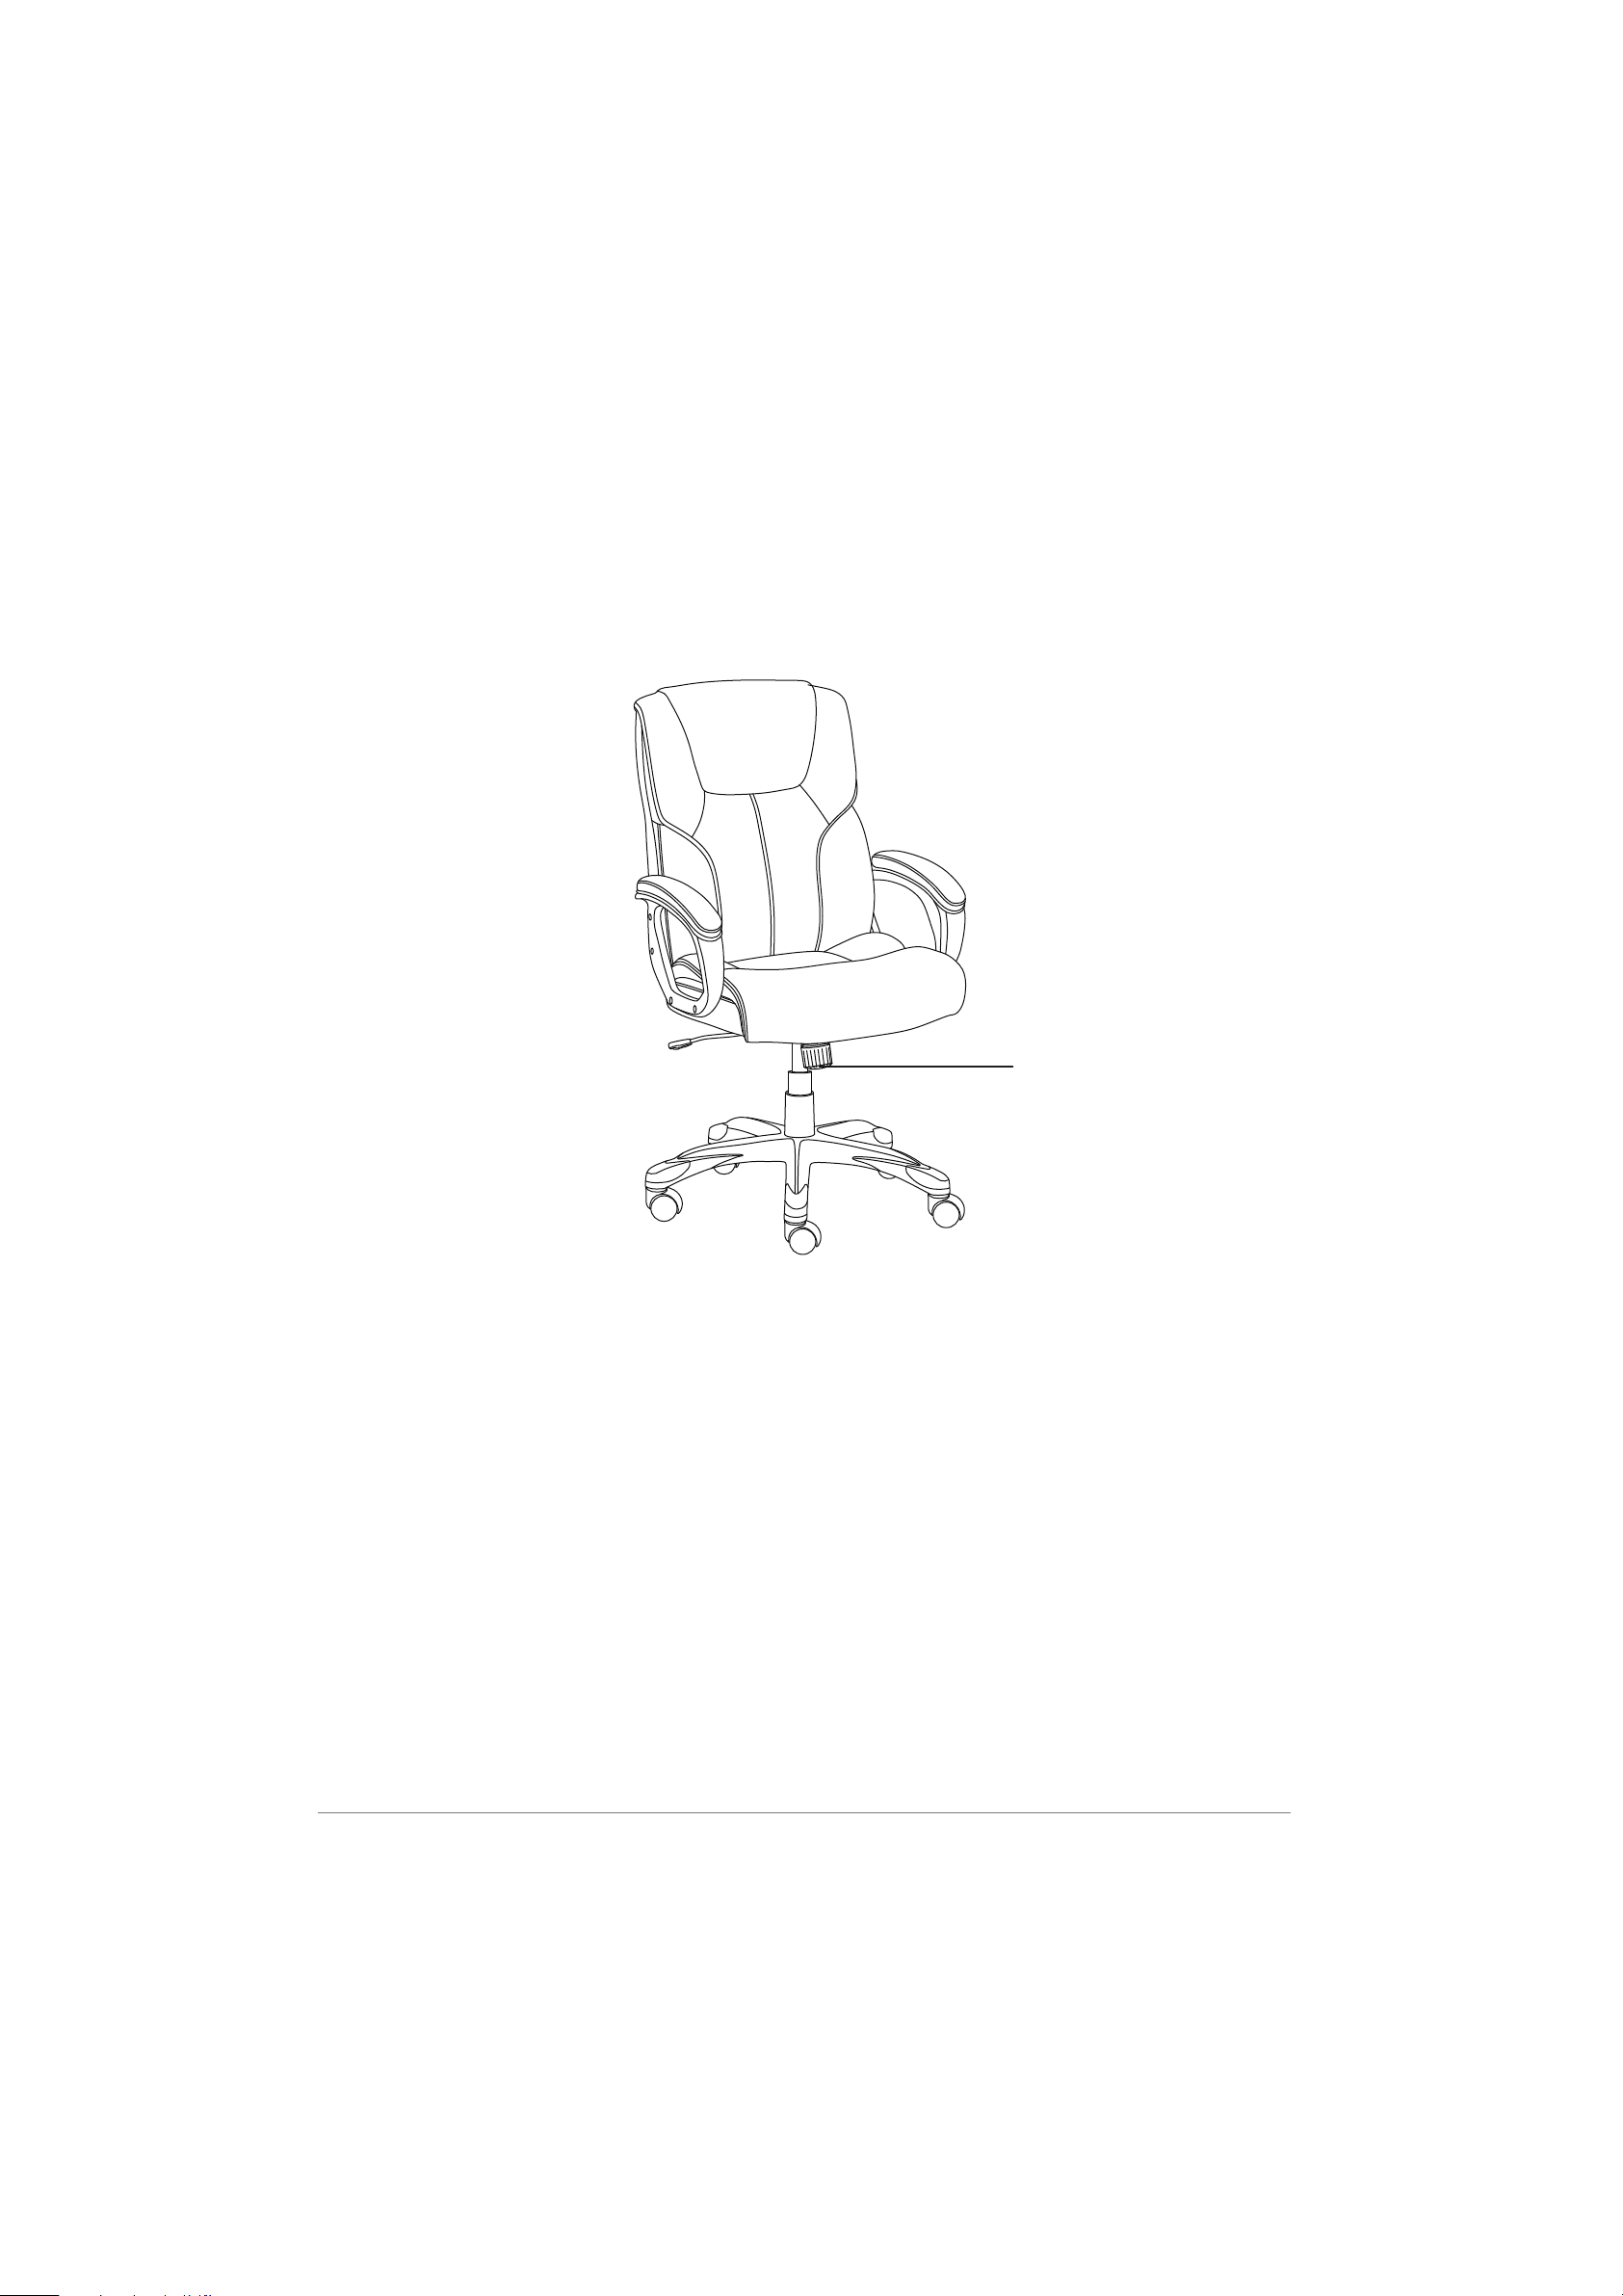
Adjustments
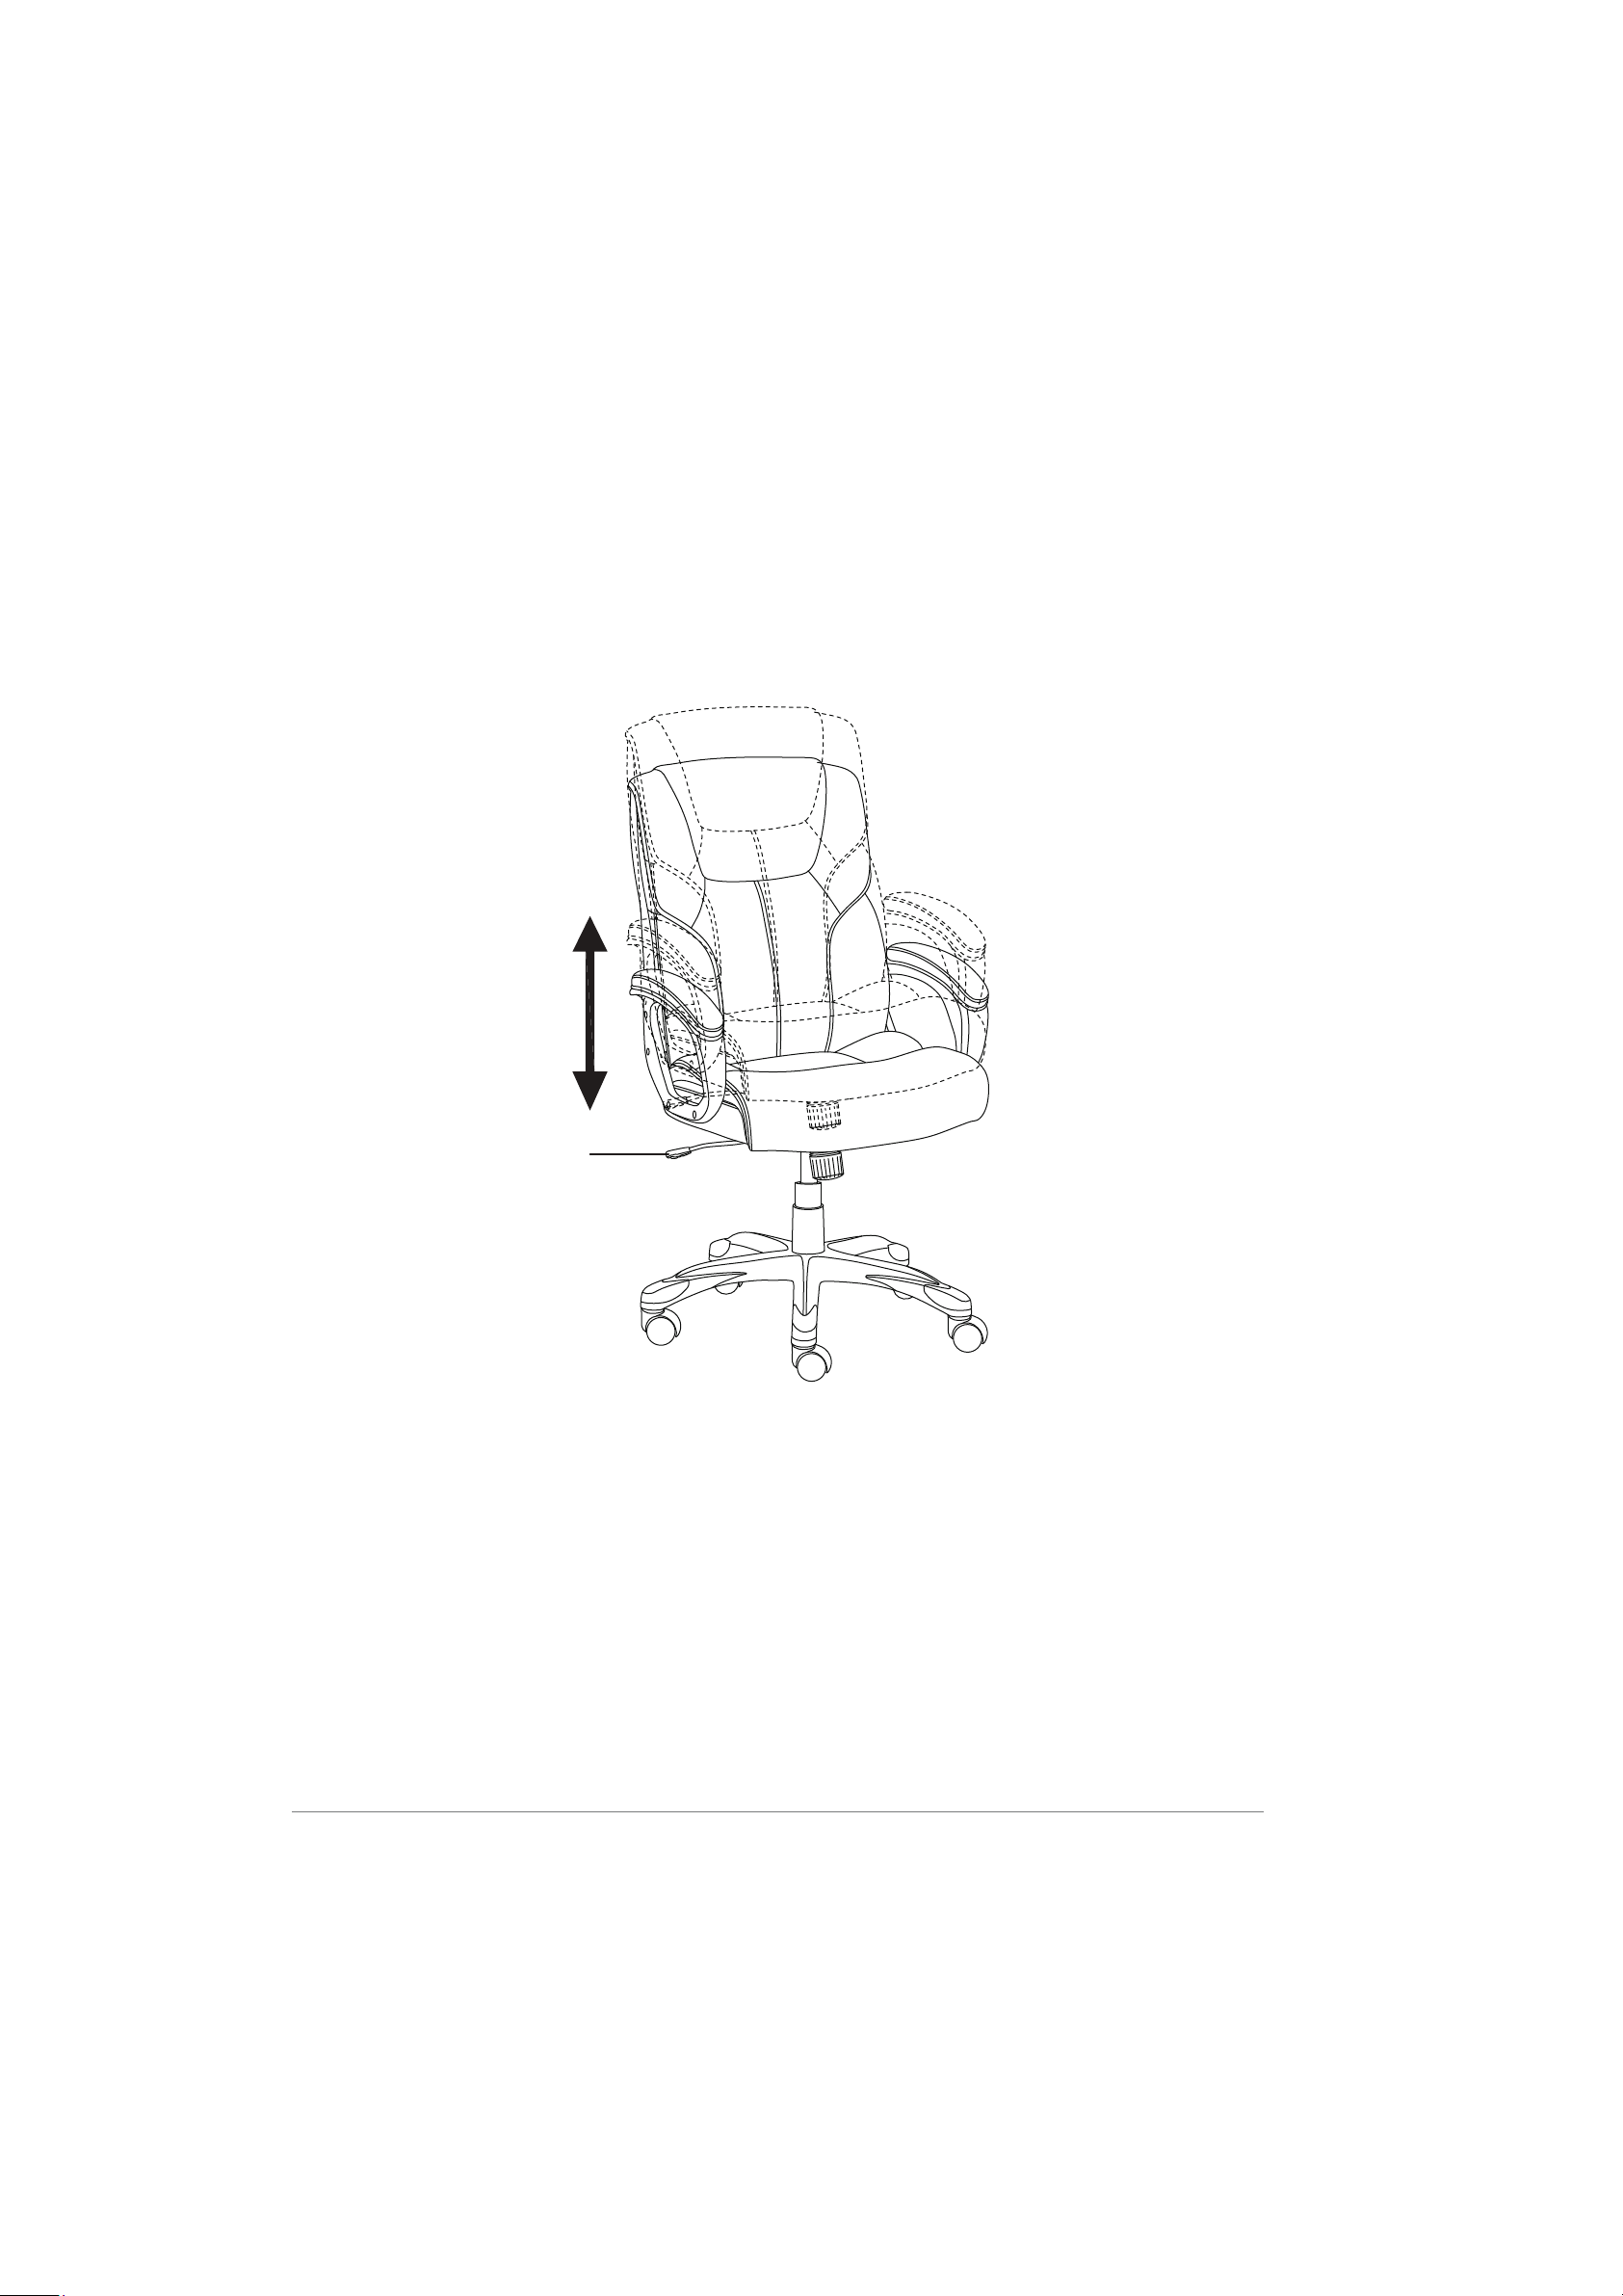
Adjusting the seat height
To raise your seat, lean forward to lift your body weight from the seat, then pull up the control
handle.
To lower the seat, pull up the control handle while you're seated.
Control
handle
12
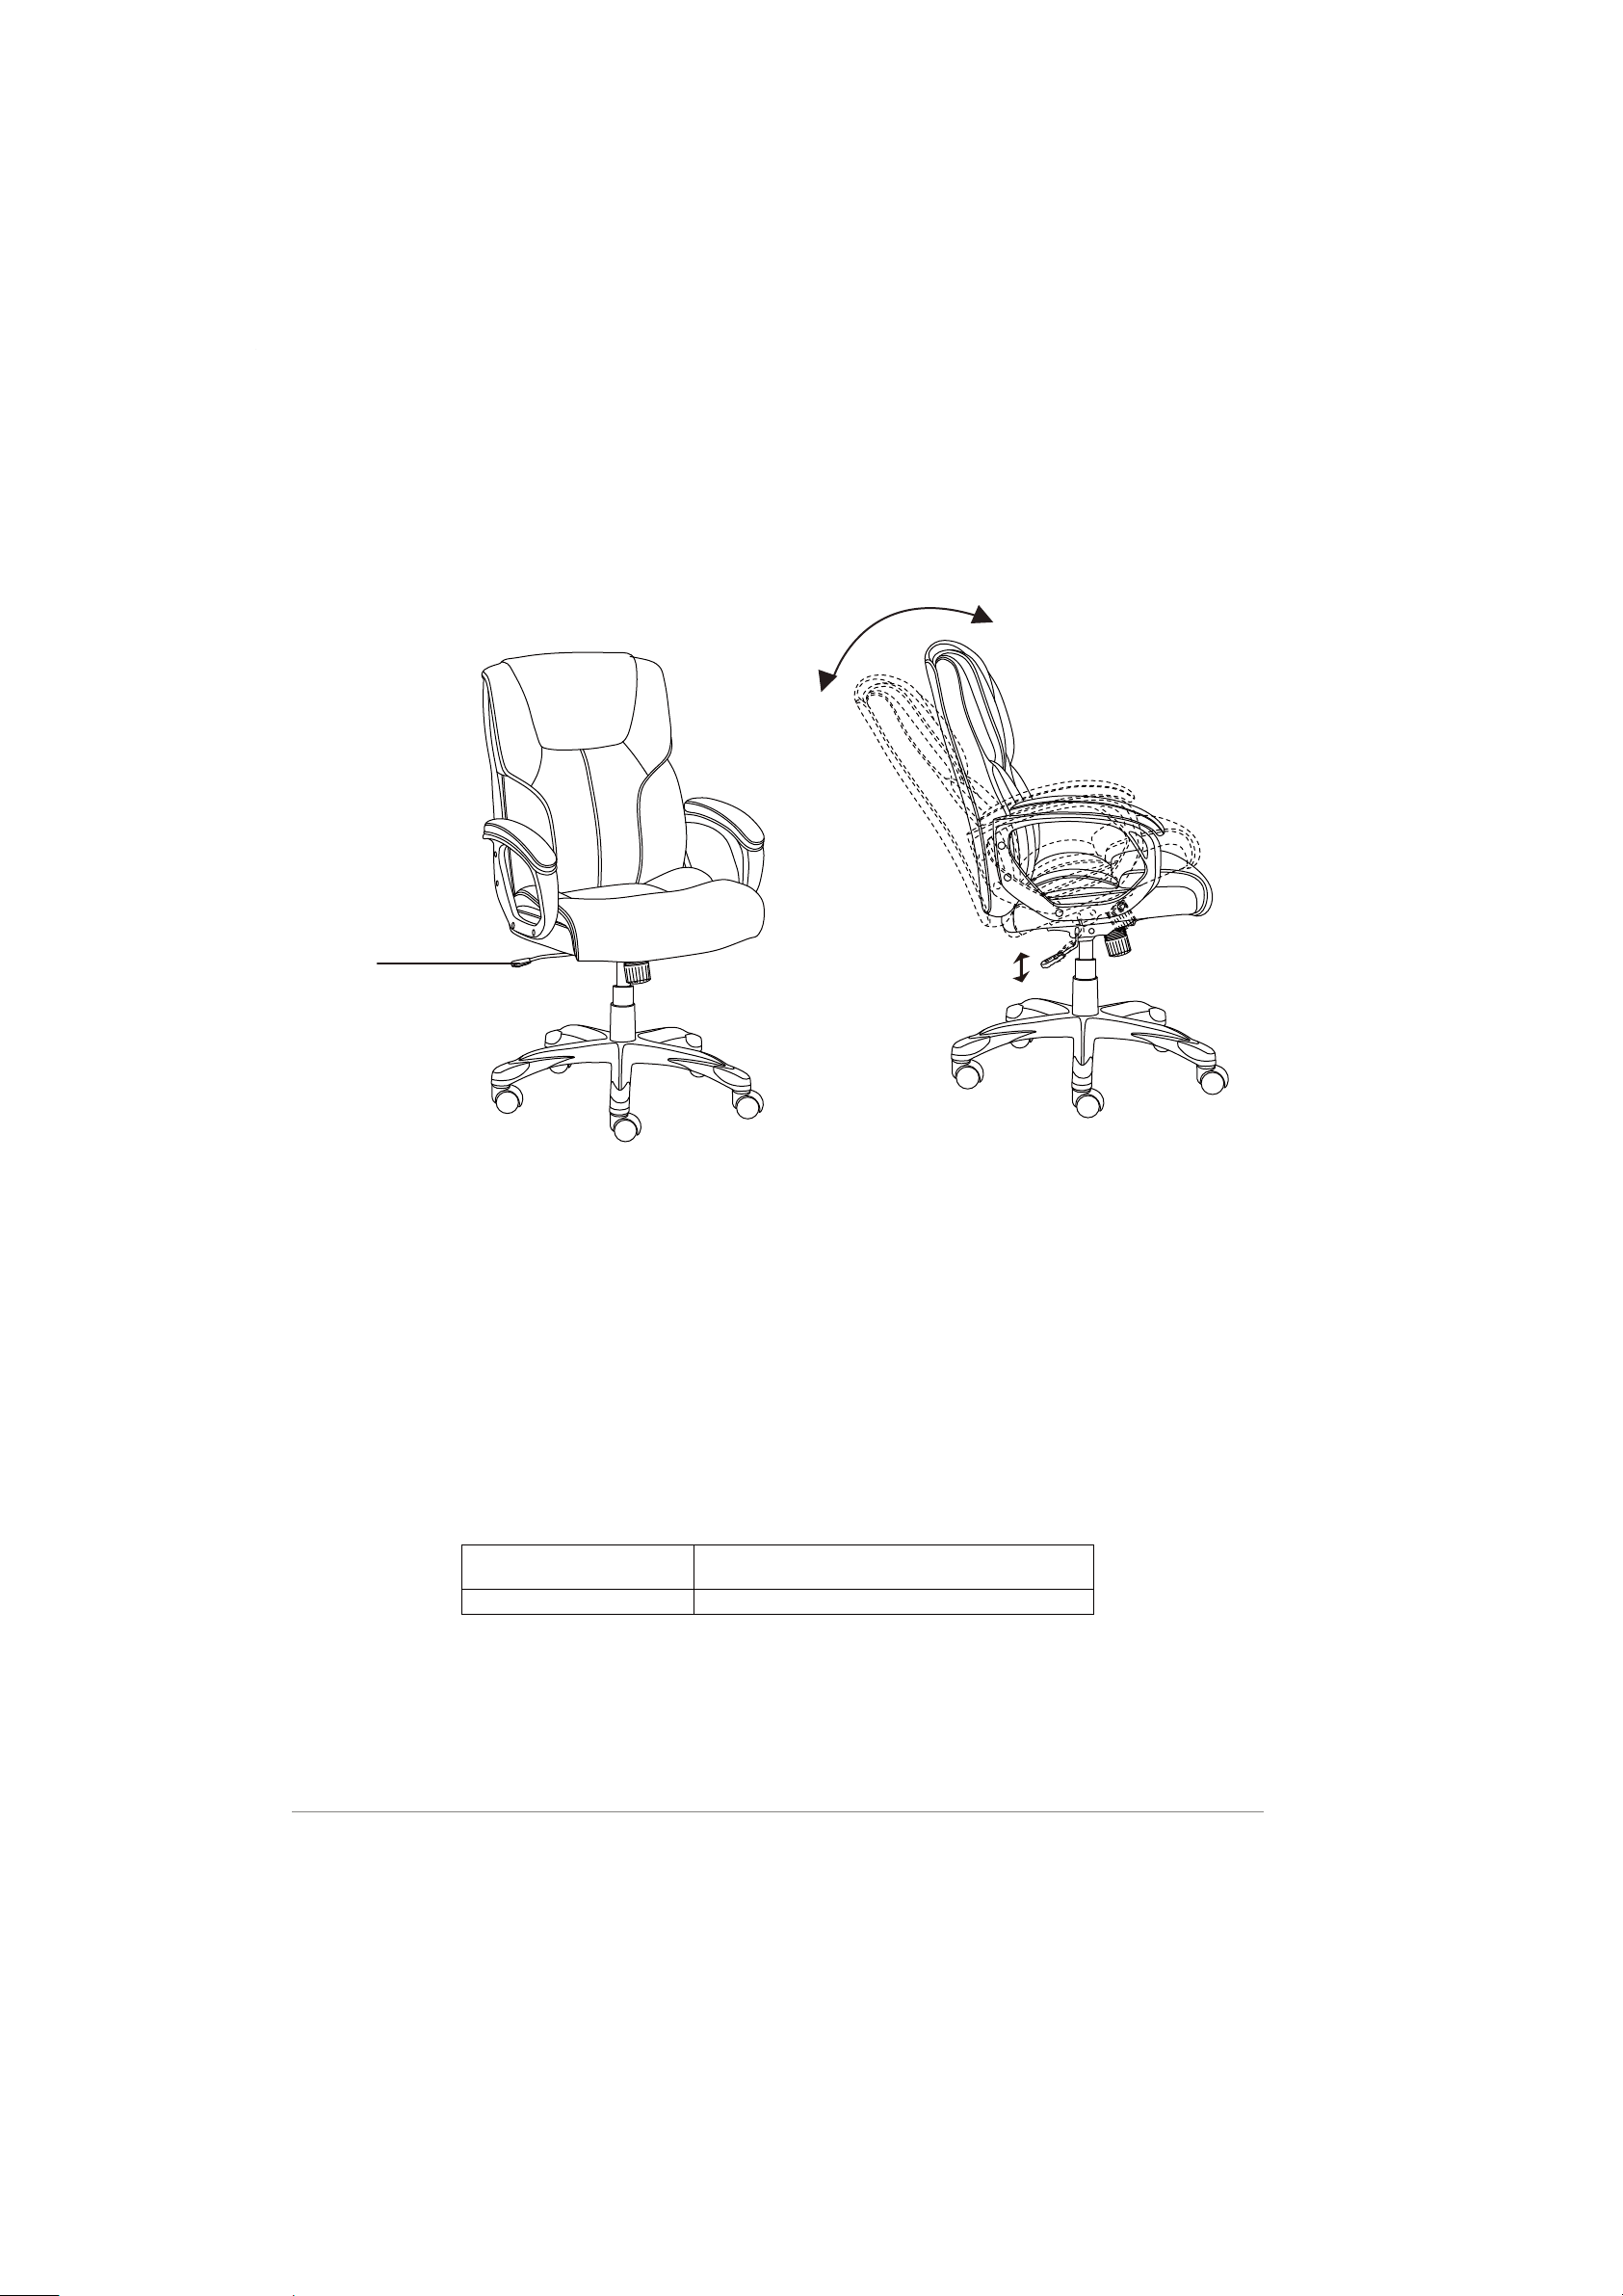
Adjusting the tilt tension
Turn the tilt knob clockwise to make it easier to rock your chair backwards.
Turn the tilt knob counter-clockwise to make it harder to rock your chair backwards.
Note: If your chair won't tilt back, pull out the control handle.
Tilt knob

13
Operating the tilt lockout
To let your chair tilt back, pull the control handle out.
To stop your chair from tilting, sit forward, then push the control handle in.
Safety and Compliance
• Use care when handling.
• Please read the instructions completely before assembly.
• Remove all parts from the carton and ensure all parts are included prior to assembly.
• Assemble the chair on the carton or carpet to prevent scratching the chair.
• Be careful not to cross-thread bolts.
• Do not use power tools.
Specifications
Dimensions (H x D x W) 41.73-45.47 x 29.13 x 26.18 inches
(106 - 115.5 x 74 x 66.5cm)
Maximum load weight 275 lbs. (124.7 kg)
Control
handle
ATTENTION: ALL REPAIR WORK OR EXCHANGE FOR THE HEIGHT ADJUSTABLE GAS LIFT MUST BE
DONE BY SPECIALISTS.

14
English
Manuel d’utilisation • Français
English
Contenu de l’emballage
Assurez-vous que l'emballage contient les éléments suivants :
A (Boulons ¾ po) (12)
C (Clé) (1)
Coussin de dossier (1)
Coussin du siège (1)
Accoudoirs (2)
Plaque de siège (1)
Dispositif de levage (1)
Piétinement (1)
Roulettes (5)
B (Capuchons en plastique) (8)
AmazonBasics Fauteuil de bureau à dossier haut
15
Instructions de montage
Étape 1 : Retournez le piétinement, puis appuyez sur les roulettes pour les insérer dans les
trous situés à l’extrémité de chaque aile d’appui.
Étape 2 : Mettez à la verticale le piétinement, puis insérez le dispositif de levage dans le trou
central du piétinement. Le couvercle du dispositif de levage doit être placé sur le dispositif
de levage.

16
Étape 3 : Alignez la plaque de siège sur les trous percés à l’avance sous le coussin du siège.
Assurez-vous que l’avant de la plaque de siège se trouve en regard de l'avant du coussin du siège.
Fixez la plaque de siège sur le cousin du siège à l’aide de quatre boulons (A). Serrez les boulons
à l’aide de la clé (C), en veillant à ne pas enfiler les boulons de travers ou endommager le siège.
FRONT
FRONT
A
C
17
Étape 4 : Mettez le cousin du siège à la verticale, puis alignez le trou central de la plaque de
siège sur le dispositif de levage. Ensuite, appuyez fermement le coussin du siège sur le
dispositif de levage jusqu’à ce les deux se verrouillent solidement.
18
Étape 5 : Fixez les accoudoirs sur le coussin du siège à l’aide de quatre boulons (A) au moyen
de la clé (C).
Remarque : Les accoudoirs portent
l’indication « L » (gauche) ou « R »
(droite) pour indiquer les côtés sur
lesquels ceux-ci doivent être placés.
A
C
19
Étape 6 : Posez le coussin de dossier sur le siège du fauteuil avec la partie supérieure du
coussin orientée vers l’avant.
Fixez le coussin de dossier sur les accoudoirs en insérant deux boulons (A) dans les trous
inférieurs à l’aide de la clé (C). Ne serrez pas entièrement les boulons.
A
C
20
Étape 7 : Tournez le dossier du fauteuil vers le haut, puis fixez-le solidement à l’aide des
deux boulons (A) supérieurs. Serrez entièrement tous les boulons.
A
C

21
Étape 8 : Appuyez sur les capuchons en plastique (B) pour les insérer les trous des accoudoirs
afin de couvrir les boulons.
Attention :
Pour votre sécurité, avant d’utiliser votre fauteuil, assurez-vous que tous les boulons sont
entièrement serrés.
Conservez la clé fournie et vérifiez régulièrement les boulons afin de vous assurer que ceux-ci
sont solidement serrés.
B

22
Réglages
Réglage de la hauteur du siège
Pour monter votre siège, penchez-vous vers l’avant pour soulevez le poids de votre
corps du siège, puis tirez la poignée de commande vers le haut.
Pour abaisser le siège, tirez la poignée de commande vers le haut pendant que vous
êtes assis.
Poignée de
commande
23
Réglage de la tension d’inclinaison
Tournez le bouton du dispositif de levage dans le sens des aiguilles d’une montre afin de
faciliter l’inclinaison de votre fauteuil vers l’arrière. Tournez le bouton du dispositif de levage
dans le sens inverse des aiguilles d’une montre afin d’empêcher l’inclinaison de votre fauteuil
vers l’arrière.
Remarque : Si votre fauteuil ne s’incline pas vers l’arrière, tirez la poignée de commande vers l’extérieur.
Bouton d’inclinaison

24
Utilisation du verrouillage de l’inclinaison
Pour faire incliner votre fauteuil vers l’arrière, tirez la poignée de commande vers l’extérieur.
Pour arrêter l’inclinaison de votre fauteuil, asseyez-vous et penchez-vous vers l’avant, puis
tirez la poignée de commande vers l’intérieur.
Sécurité et conformité
• Manipulez ce produit avec précaution.
• Veuillez lire l’intégralité des instructions avant de procéder au montage.
• Retirez de l’emballage tous les éléments, et assurez-vous qu’ils sont complets avant de procéder
au montage.
• Montez le fauteuil sur le carton d’emballage ou sur un tapis afin de ne pas faire des rayures sur
le fauteuil.
• Attention à ne pas enfiler les boulons de travers.
• N’utilisez pas d’outils électriques.
Spécifications
Dimensions (L x H x P)
41,73 à 45,47 x 29,13 x 26,18 pouces
(106 à 115,5 x 74 x 66,5 cm)
Charge maximale 124,7 kg (275 lb)
Poignée de
commande
Attention : Les travaux de reparation ou de remplacement du verin a hauteur reglable doivent
imperativement etre effectues par des specialistes.

25
English
Manual de instrucciones • Español
English
Contenido
Asegúrese de que el paquete contiene las siguientes piezas:
A (pernos 3/4") (12)
C (llave) (1)
Cojín trasero (1)
Cojín de asiento (1)
Brazos (2)
Placa del asiento (1)
Elevador (1)
Base de estrella (1)
Ruedecitas (5)
B (tapas de plástico) (8)
AmazonBasics Silla ejecutiva con respaldo alto

26
Instrucciones de montaje
Paso 1: Gire la base de estrella y póngala boca abajo, luego empuje las ruedecitas dentro
de los agujeros de los extremos de cada pata base.
Paso 2: Dele la vuelta a la base y póngala en la posición correcta. Inserte el elevador en el
agujero central de la base de estrella. La cubierta del elevador debe ir sobre el elevador.

27
Paso 3: Alinee la placa del asiento sobre los orificios previamente taladrados que hay debajo del
cojín de asiento. Asegúrese de que la parte frontal de la placa del asiento está de cara a la parte
frontal del cojín de asiento.
Fije la placa del asiento al cojín de asiento con cuatro (A) pernos. Coloque todos los pernos con
la llave (C), teniendo cuidado de no atornillarlos bien o de dañar el asiento.
FRONT
FRONT
A
C

28
Paso 4: Ponga el cojín de asiento derecho y alinee el orificio central de la placa del asiento
sobre el elevador. A continuación empuje hacia abajo con firmeza el cojín de asiento sobre
el elevador hasta que quede conectado de forma segura.

29
Paso 5: Fije los brazos al cojín del asiento con cuatro (A) pernos y con ayuda de la llave (C).
Nota: Los reposabrazos están marcados
con una "L" (izquierda) o una "R" (derecha)
para que sepa en qué lugar colocarlos.
A
C

30
Paso 6: Coloque el cojín trasero en el asiento de la silla con la parte superior del cojín hacia
el frente.
Fije el cojín trasero a los brazos insertando dos (A) pernos en los orificios inferiores con la
llave (C). No apriete los pernos del todo.
A
C

31
Paso 7: Suba la parte trasera de la silla hacia arriba y fíjela con los dos (A) pernos superiores.
Apriete los pernos del todo.
A
C

32
Paso 8: Coloque a presión las tapas de plástico (B) en los agujeros de los brazos para cubrir
los pernos.
Precaución:
Para su seguridad, antes de utilizar su silla, asegúrese de que todos los pernos están bien apretados.
Conserve la llave y compruebe los pernos con regularidad para asegurarse de que están bien apretados.
B

33
Ajustes
Cómo regular la altura del asiento.
Para elevar el asiento, inclínese hacia delante para retirar su peso corporal del asiento y luego
tire hacia arriba de la manivela de control.
Para bajar el asiento, tire hacia arriba de la manivela mientras está sentado.
Manivela
de control

34
Cómo regular la tensión de inclinación
Gire la rueda de inclinación en el sentido de las agujas del reloj para que sea más fácil reclinar
el asiento hacia atrás.
Gire la rueda de inclinación en el sentido contrario al de las agujas del reloj para que sea más
difícil reclinar el asiento hacia atrás.
Nota: Si su silla no se inclina hacia atrás, tire de la manivela de control.
Rueda de inclinación

35
Cómo funciona el bloqueo de la inclinación
Si quiere dejar que su silla se incline hacia atrás, tire hacia afuera de la manivela de control.
Si quiere que deje de inclinarse, siéntese hacia delante y empuje la manivela hacia dentro.
Seguridad y conformidad
• Tenga cuidado al manejar el producto.
• Lea las instrucciones de seguridad al completo antes de proceder al montaje.
• Quite todos los cartones y asegúrese de que no falta ninguna pieza antes de proceder al
montaje.
• Monte la silla sobre el cartón o sobre moqueta o alfombra para no arañar el producto.
• Tenga cuidado de no forzar los pernos.
• No utilice herramientas eléctricas.
Especificaciones
Dimensiones
(alto x ancho x fondo)
41.73-45.47 x 29.13 x 26.18 in
(106 – 115.5 x 74 x 66.5 cm)
Peso máximo de carga 275 lbs. (124.7 kg)
Manivela
de control
Atención: Cualquier trabajo de reparación o recambio del gato neumático debe ser llevado a cabo
por especialistas.

36
English
取扱説明書 - 日本語
English
内容
パッケージに以下のパーツが含まれていることを確認してください:
A (3/4インチ ボルト) (12)
C (レンチ) (1)
背もたれクッション (1)
シートクッション (1)
ひじ掛け (2)
シートプレート (1)
リフト (1)
星型ベース (1)
キャスター (5)
B (プラスチックキャップ) (8)
Amazonハイバックエグゼクティブチェア

37
組み立て手順
ステップ1:星型ベースを逆さにして、ベースの脚の先にある穴にキャスターをはめ込みます。
ステップ2:星型ベースを正常に戻し、中央にある穴にリフトを差し込みます。
リフトの上にリフトカバーをリフトにかぶせてください。

38
ステップ3:シートクッションのドリル穴を頼りにシートプレートの位置を決めます。
シートプレートの「前」とシートクッションの「前」が一致するよう確認してください。
ボルト (A) のうちの4つを使用してシートプレートをシートクッションに取り付けます。
レンチ (C) を使用して、ねじ山やシートを壊さないよう注意しながら全てのボルトを締め
てください。
FRONT
FRONT
A
C
39
ステップ 4:シートクッションを正常に戻し、シートプレートの中央の穴をリフトに合わ
せてリフトをシートクッションにしっかり押しこんでください。

40
ステップ5:レンチ (C) を使用して、ボルト (A) のうちの4つでひじ掛けをシートクッション
に取り付けます。
注意::ひじ掛けには左右を示す為 L (左)
と R (右)のラベルがついているので、
それに従って左右を決めてください。
A
C

41
ステップ6:背もたれクッションを、背もたれの上が前を向くようにしてシートに乗せます。
ボルト (A) 2つを使って背もたれクッションをひじ掛けの下の穴にとりつけ、レンチ (C) で軽
く締めます。ボルトはまだ完全に締めないでください。
A
C

42
ステップ7:背もたれを立てて、上の穴にボルト (A) 2つで固定します。全てのボルトをしっ
かり締めます。
A
C

43
ステップ8:プラスチックキャップ (B) を穴に押し込んでひじ掛けのボルトを隠します。
警告:
安全の為、ご使用前に全てのボルトがしっかりしまっていることを確認してください。
備え付けのレンチは保存し、定期的に全てのボルトがしっかりしまっているかを確認す
る為に使用してください。
B
44
調節・調整
シートの高さを変える
シートを上げるには、体を前に倒してシートにかかる体重をなくしてからコントロールハンド
ルを引き上げてください。
シートを下げるには、座った状態でコントロールハンドルを引き上げてください。
コントロールハンドル

45
傾斜角度の調節
傾斜ノブを時計回りにまわすとイスを後ろに倒しやすくなります。
傾斜ノブを反時計回りにまわすとイスを後ろに倒しにくくなります。
注意:イスが後ろに倒れない場合は、コントロールハンドルを外に引いてください。
傾斜ノブ
46
傾斜ロックアウトの操作
イスを後方に倒すには、コントロールハンドルを外に引いてください。
倒れるのを防ぐには、前倒しに座った状態でコントロールハンドルを押し込みます。
安全および守るべきこと
• 取り扱いには注意を。
• 組み立てる前に説明書を全部読んでください。
• 組み立てる前に箱から全てのパーツを取り出し、全てのパーツが揃っていることを確認してください。
• イスに傷がつかぬよう、箱またはじゅうたんの上で組み立ててください。
• ねじ山を傷つけぬようご注意ください。
• パワーツールは使用しないでください。
規格
寸法(高さ x 幅 x 奥行き)106-115.5 x 74 x 66.5センチ
床耐荷重
124.7 キロ
コントロー
ルハンドル
注意:全ての修理および高さ調節ガスリフトの交換は必ず専門家にお任せください。’

V2 14-0865
Amazon.com/AmazonBasics