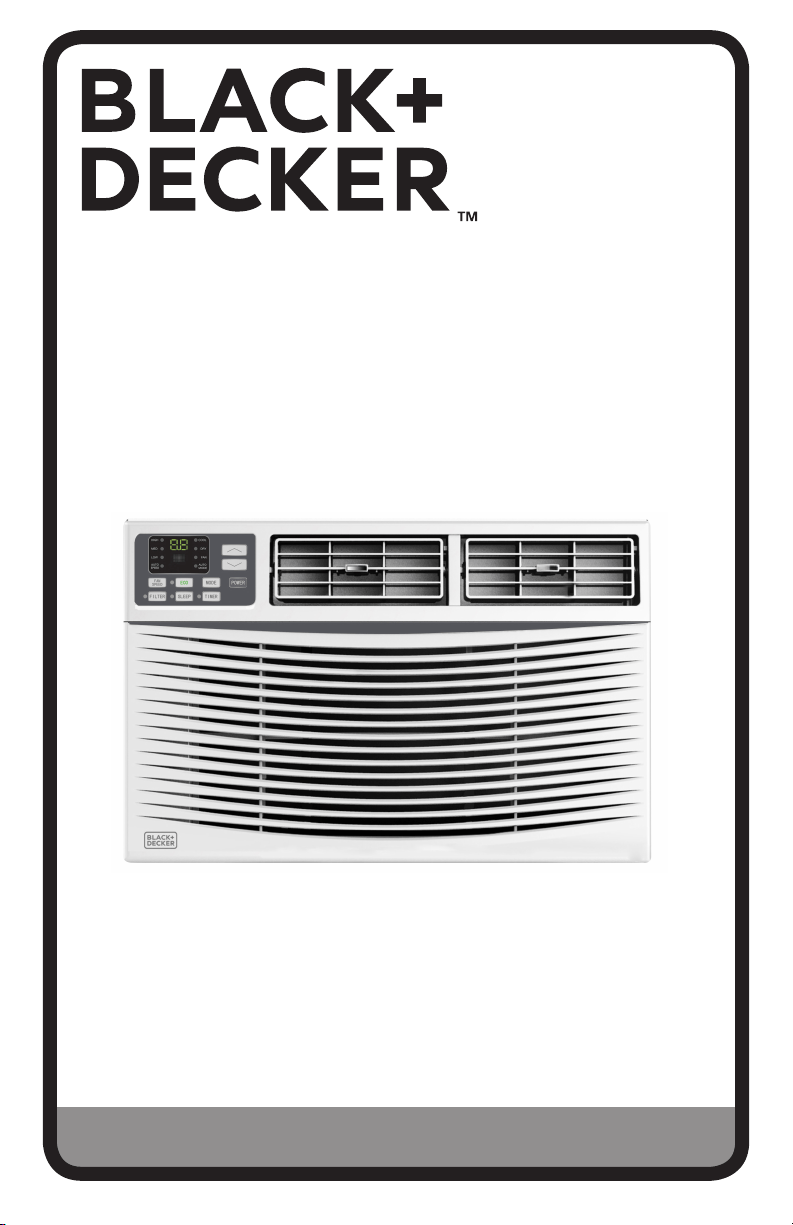
INSTRUCTION MANUAL
6,000, 8,000, 10,000 & 12,000 BTU
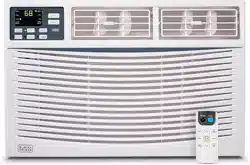
ELECTRONIC WINDOW AIR CONDITIONER
Thank you for choosing BLACK+DECKER!
PLEASE READ BEFORE RETURNING THIS PRODUCT FOR
ANY REASON.
If you have a question or experience a problem with your BLACK+DECKER
purchase, go to www.blackanddecker.com/instantanswers
If you can’t find the answer or do not have access to the Internet, call
844-299-0879 from 10:30 a.m. to 6:30 p.m. EST Mon. - Fri. to speak with an
agent. Please have the catalog number available when you call.
SAVE THIS MANUAL FOR FUTURE REFERENCE.
CATALOG NUMBER
BWAC06WT
BWAC08WT
BWAC10WT
BWAC12WT

Page 2
Thank you for purchasing our
BLACK+DECKER product. This
easy-to-use manual will guide you
in getting the best use of your air
conditioner.
Remember to record the model and
serial numbers. They are on a label
on the rear.
Staple your receipt to your manual.
You will need it to obtain warranty service.
Model number
Serial number
Date of purchase
PRODUCT REGISTRATION
CONTENTS
SAFETY INFORMATION
Important Safety Instructions ..........................................................................................................................................3-7
Grounding Instructions .........................................................................................................................................................5
Safety Guidelines ....................................................................................................................................................6
Power Cord Operation .......................................................................................................................................... 7
SET UP & USE
Parts Included ............................................................................................................................................................................ 8
Installation & Assembly ...................................................................................................................................9-13
Control Panel ..................................................................................................................................................... 15-16
Remote Control ................................................................................................................................................ 17-18
CLEANING & CARE ...............................................................................................................................................19
TROUBLE SHOOTING & WARRANTY
Before You Call For Service ............................................................................................................................. 20
Customer Service ................................................................................................................................................. 20
Troubleshooting ............................................................................................................................................... 21-22
Limited Warranty ...................................................................................................................................................................23
Page 3
SAFETY INFORMATION
IMPORTANT SAFETY INSTRUCTIONS
1. Air conditioner must be connected to proper electrical outlet with
the correct electrical outlet with the correct electrical supply.
2. Proper grounding must be ensured to reduce the risk of shock and
fire. DO NOT CUT OR REMOVE THE GROUNDING PRONG. If you do
not have a three-prong electric receptacle outlet in the wall, have a
certified electrician install the proper receptacle. The wall receptacle
MUST be properly grounded.
3. Do not operate air conditioner if power cord is frayed or otherwise
damaged. Avoid using it if there are any cracks or abrasion damage
along the length, plug connector or if the unit malfunctions or is
damaged in any manner. Contact an authorized service technician
for examination, repairs or adjustments.
4. DO NOT USE AN ADAPTER OR AN EXTENSION CORD.
5. Do not block airflow around the air conditioner.
6. Always unplug the air conditioner before servicing it or moving it.
7. Do not install or use the air conditioner in any area where the
atmosphere contains combustible gases or where the atmosphere is
oily or sulphurous. Avoid any chemical coming in contact with your
air conditioner.
8. Do not place any object on the top of the unit.
9. Do not use the air conditioner near a bathtub, shower or wash basin.
SAVE THESE INSTRUCTIONS
HOUSEHOLD USE ONLY
WARNING
WARNING - Hazards or unsafe
practices which COULD result in
severe personal injury or death
DANGER
DANGER - Immediate hazards
which WILL result in severe
personal injury or death
CAUTION
CAUTION - Hazards or unsafe
practices which COULD result in
minor personal injury
WARNING
When using electrical appliances, basic safety precautions
should be followed, including the following

Page 4
HANDLING ALKALINE BATTERIES
1. Should fluid from the battery accidentally get into your eyes, there is a threat
of loss of eyesight, do not rub them. Immediately rinse your eyes with clean tap
water and then consult a physician immediately.
2. Do not put the battery in a fire, expose it to heat, dismantle or modify it. If the
insulation or safety valve is damaged, the battery may leak fluid, overheat or
explode.
3. Do not insert the battery with the poles reversed. Doing so may cause some
abnormality or a short and the battery may leak fluid, overheat or explode.
4. Keep the battery out of the reach of children. If the battery is swallowed, contact a
physician immediately.
5. If the alkali fluid gets in your mouth, rinse your mouth with water and contact a
physician immediately.
6. If the alkali fluid gets on your skin or clothes, it may burn your skin, thoroughly
rinse the aected area with tap water.
7. Do not mix new and old batteries or other makes of batteries. The dierent
attributes may cause the battery to leak fluid, overheat or explode.
8. This battery was not made to be recharged. Recharging this battery may damage
the insulation or internal structure and may cause the battery to leak fluid,
overheat or explode.
9. Do not damage or remove the label on the exterior of the battery. Doing so may
cause the battery to short, leak fluid, overheat or explode.
10. Do not drop, throw or expose the battery to extreme impact. Doing so may cause
the battery to leak fluid, overheat or explode.
11. Do not alter the shape of the battery. If the insulation or safety valve is damaged,
the battery may leak fluid, overheat or explode.
12. Immediately remove batteries when they have lost all power. Leaving the batteries
in the unit for a long time may cause the batteries to leak fluid, overheat or
explode due to gas that is generated by the batteries.
13. Remove the batteries from the unit when not using the unit for an extended
period of time. The batteries may leak fluid, overheat or explode due to gas that is
generated by the batteries.
14. Do not apply solder directly to the batteries. The heat may cause the batteries to
leak fluid, overheat or explode.
15. Do not get the batteries wet. Doing so may cause the batteries to overheat
16. Store batteries someplace out of direct sunlight where the temperature and
humidity are not high. Not doing so may cause the batteries to leak fluid, overheat
or explode. Also, it may cause the life and performance of the batteries to decline.
17. Follow the regulations of the local government when disposing of these batteries.
SAVE THESE INSTRUCTIONS
HOUSEHOLD USE ONLY
WARNING
When handling alkaline batteries, basic safety precautions
should be followed, including the following
SAFETY INFORMATION
Page 5
GROUNDING INSTRUCTIONS
ELECTRICAL REQUIREMENTS
The electrical requirements are a 115 volt 60 Hz, AC only, 15 amp. It is
recommended that a separate circuit serving only the product be provided. The
product is equipped with a 3-wire cord having a 3-prong grounding plug. It must
be plugged into a wall receptacle that is properly installed and grounded.
This appliance must be grounded. In the event of an electrical short circuit,
grounding reduces risk of electric shock by providing an escape wire for the
electric current. The cord provided with this appliance is equipped with a
grounding wire and a grounding plug. The plug must be plugged into an outlet
that is properly installed and grounded.
Avoid the use of three prong adapters or cutting o the third grounding prong
in order to accommodate a two prong outlet. This is a dangerous practice since
it provides no eective grounding for the air conditioner and may result in shock
hazard.
Consult a qualified electrician or serviceman if:
1) The grounding instructions are not completely understood.
2) You are unsure that the appliance is properly grounded.
3) You have any questions about the grounding or electrical instructions.
POWER SUPPLY CORD
1. Avoid the use of an extension cord because of potential safety hazards under
certain conditions. Have a qualified electrician or serviceman to install an
outlet near the appliance.
2. If it is absolutely necessary to use longer cord sets or an extension cord,
extreme care must be exercised.
a) Use only a grounding type 3-wire extension cord that has a 3-blade
grounding plug and a 3-slot receptacle that will accept the plug on the
appliance.
b) The marked electrical rating of the cord set or extension cord must equal
to or greater than the electrical rating of the appliance. The longer cord
should be arranged so that it will not drape over the counter top or table
top where it can be pulled on by children or tripped over unintentionally.
NOTE: Neither BLACK+DECKER nor the dealer can accept any liability for damage to the
product or personal injury resulting from failure to observe the electrical connection
procedures.
SAFETY INFORMATION
WARNING
Improper use of the grounding plug can result in a risk
of electric shock.
SAFETY GUIDELINES
To prevent injury to the user or other people and property damage, the following
instructions must be followed. Incorrect operation due to ignoring of instructions
may cause harm or damage.
Page 6
ALWAYS DO THIS NEVER DO THIS ENERGY SAVE
• Your air conditioner should
be used in such a way
that it is protected from
moisture. e.g. condensation,
splashed water, etc. Do
not place or store your air
conditioner where it can
fall or be pulled into water
or any other liquid. Unplug
immediately.
• Always transport your air
conditioner in a vertical
position and stand on a
stable, level surface during
use.
• Turn o the product when
not in use.
• Always contact a qualified
person to carry out
repairs. If the supply cord
is damaged it must be
repaired by a qualified
technician.
• Keep an air path of at least
12 inches all around the unit
from walls, furniture and
curtains.
• If the air conditioner is
knocked over during use,
turn o the unit and unplug
from the power supply
immediately.
• Do not operate your air
conditioner in a wet room
such as a bathroom or
laundry room.
• Do not touch the unit with
wet or damp hands or when
barefoot.
• Do not press the buttons
on the control panel with
anything other than your
fingers.
• Do not remove any fixed
covers. Never use this
appliance if it is not working
properly, or if it has been
dropped or damaged.
• Never use the plug to start
and stop the unit.
• Always use the switch on the
control panel to start or shut
o the unit.
• Do not cover or obstruct the
inlet or outlet grilles.
• Do not use hazardous
chemicals to clean or come
into contact with the unit.
Do not use the unit in the
presence of inflammable
substances or vapour such
as alcohol, insecticides,
petrol,etc.
• Do not allow children to
operate the unit unsupervised.
• Do not use this product for
functions other than those
described in this instruction
manual.
• Use the unit in the
recommended room size.
• Locate the unit where
furniture cannot obstruct
the air flow.
• Keep blinds/curtains
drawn.
• Keep the filters clean.
• Keep doors and windows
closed to keep cool air in
and warm air out.
SAFETY INFORMATION
Page 7
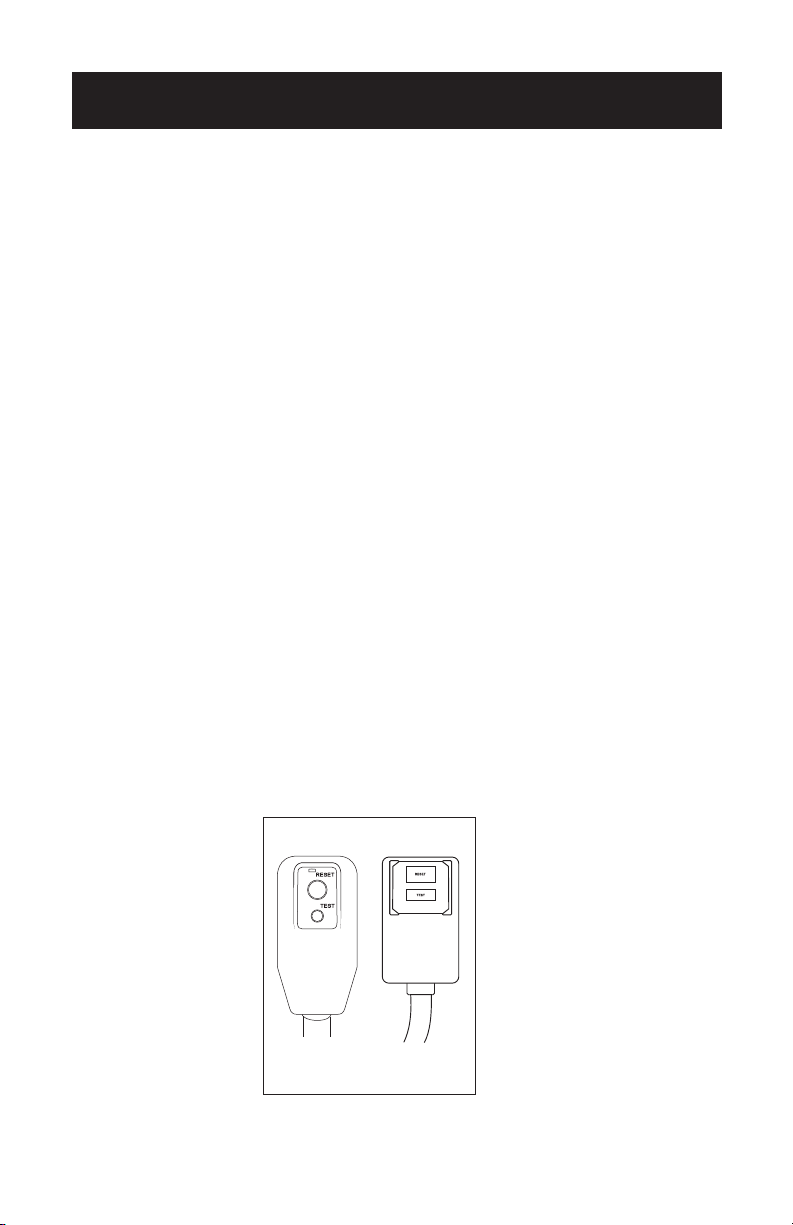
LCDI POWER CORD AND PLUG
This air conditioner is equipped with an LCDI (Leakage Current Detection and
Interruption) power cord that is required by UL. This power supply cord contains
state-of-the-art electronics that sense leakage current. If the cord is damaged and
leakage occurs, power will be disconnected from the unit.
The test and reset buttons on the LCDI Plug are used to check if the plug is
functioning properly.
To test the plug:
1. Plug power cord into a grounded 3 prong outlet.
2. Press RESET (on some units a green light will turn on).
3. Press the TEST button, the circuit should trip and cut all power to the air
conditioner (on some units a green light may turn o).
4. Press the RESET button for use. You will hear a click and the A/C is not ready for
use.
NOTES:
• The RESET button must be engaged for proper use.
• The power supply cord must be replaced if it fails to trip when the TEST button is
pressed and the unit fails to reset.
• Do not use the power supply cord as an ON/OFF switch. The power supply cord
is designed as a protective device.
• A damaged power supply cord must be replaced with a new power supply cord.
• The power supply cord contains new user serviceable parts. Opening the
tamper-resistant case voids all warranty and performance claims.
NOTE: Your units power cord and plug may dier from the one shown.
SAFETY INFORMATION
Page 8
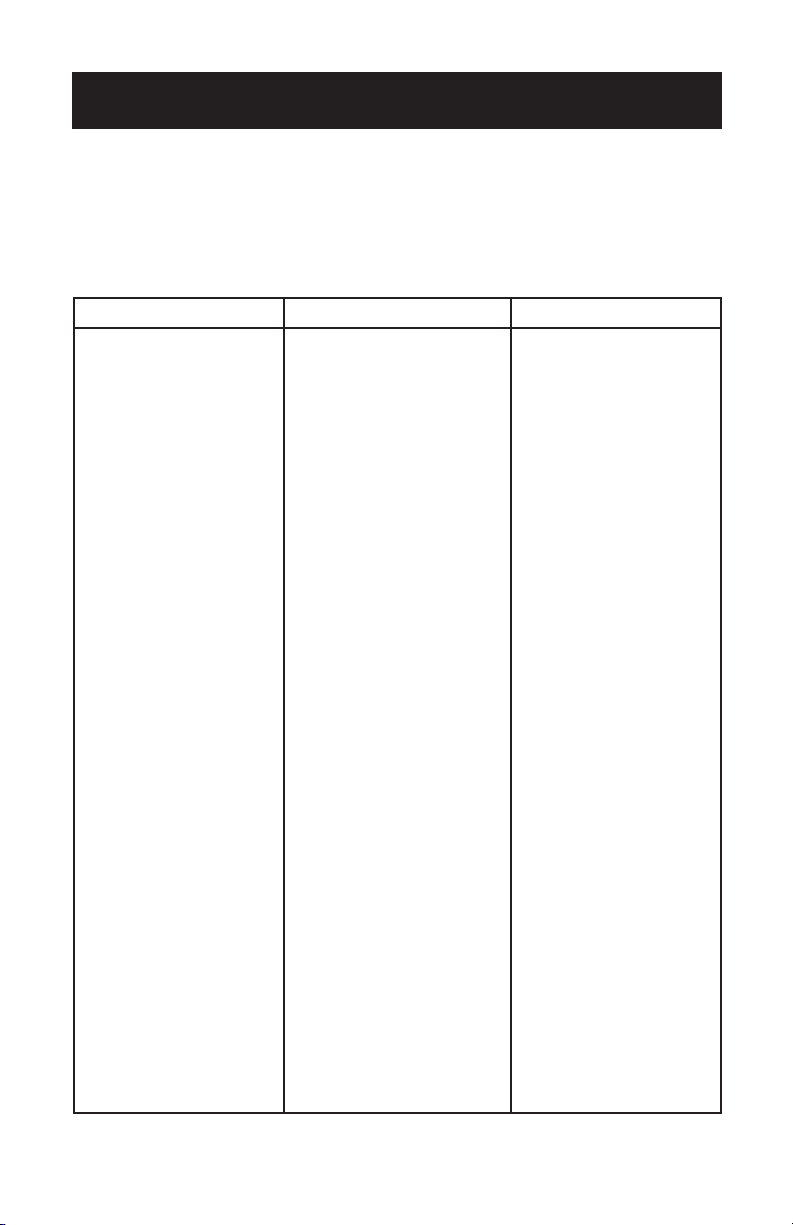
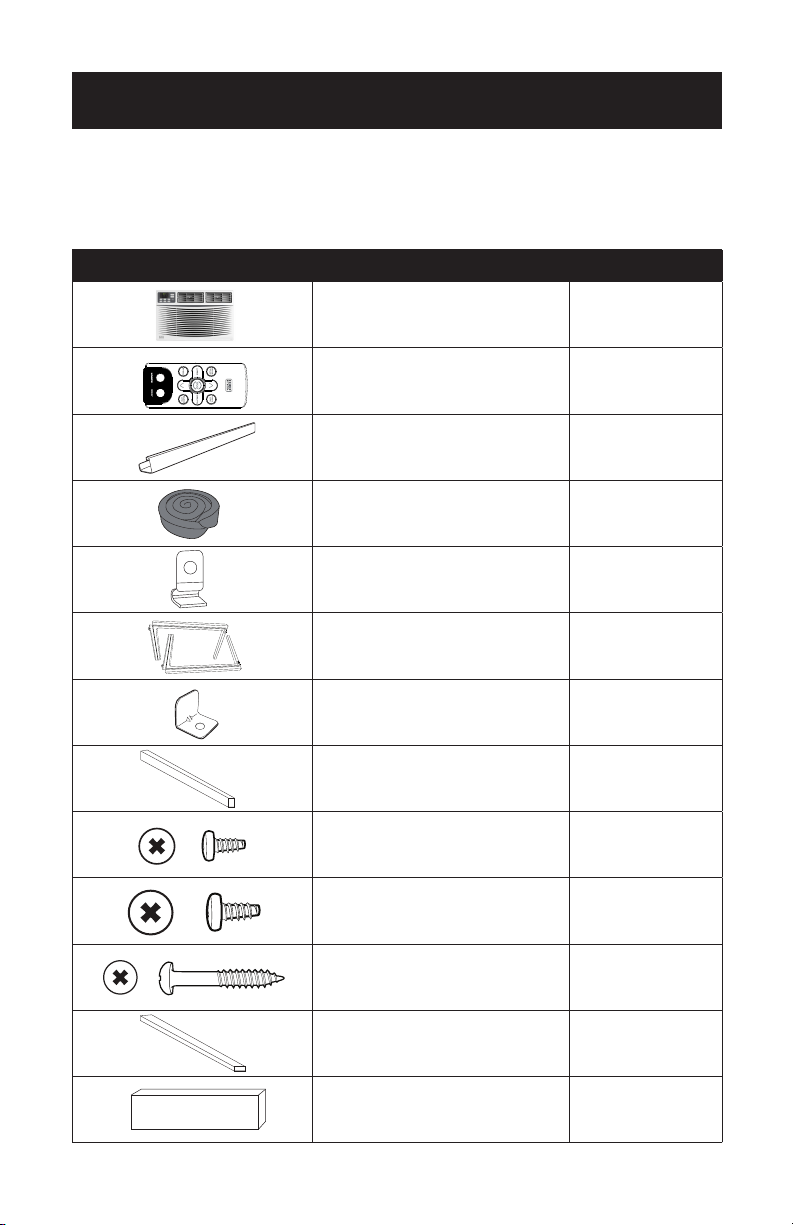
PARTS INCLUDED
(appearance may vary)
SET UP & USE
IMAGE PART QUANTITY
Window Air Conditioner 1
Remote Control 1
Top Mounting Rail 1
Sponge Window Sash Seal 1
Frame Lock 2
Filler Panels
(Marked Left & Right)
2
Sash Lock 1
Sponge Window Sash Seal 1
3/8” Screws
(only included with
BWAC06WT & BWAC08WT)
4
1/2” Screws 3
3/4” Screws 4
Foam Top Window Gasket
(For use as needed)
1
Insulation Strip (sponge) 2
Page 9
INSTALLATION & ASSEMBLY FOR 6K & 8K
Some assembly is required for your new air conditioner. Please read and follow
these instructions carefully.
1. This air conditioner is designed
to be installed in a standard
double-hung window with a
window width between 23”
and 36” (584mm - 914mm).
2. The air conditioner can be
installed without the accordion
panels to fit in a narrow
window opening. See the
window dimensions.
3. The lower sash (the lower part of the window that moves up and down) must allow
for 14.5” of vertical clearance when open. (See Fig. 1)
4. All supporting parts must be secured to firm wood, masonry or metal.
5. The electrical outlet must be within reach of the power cord.
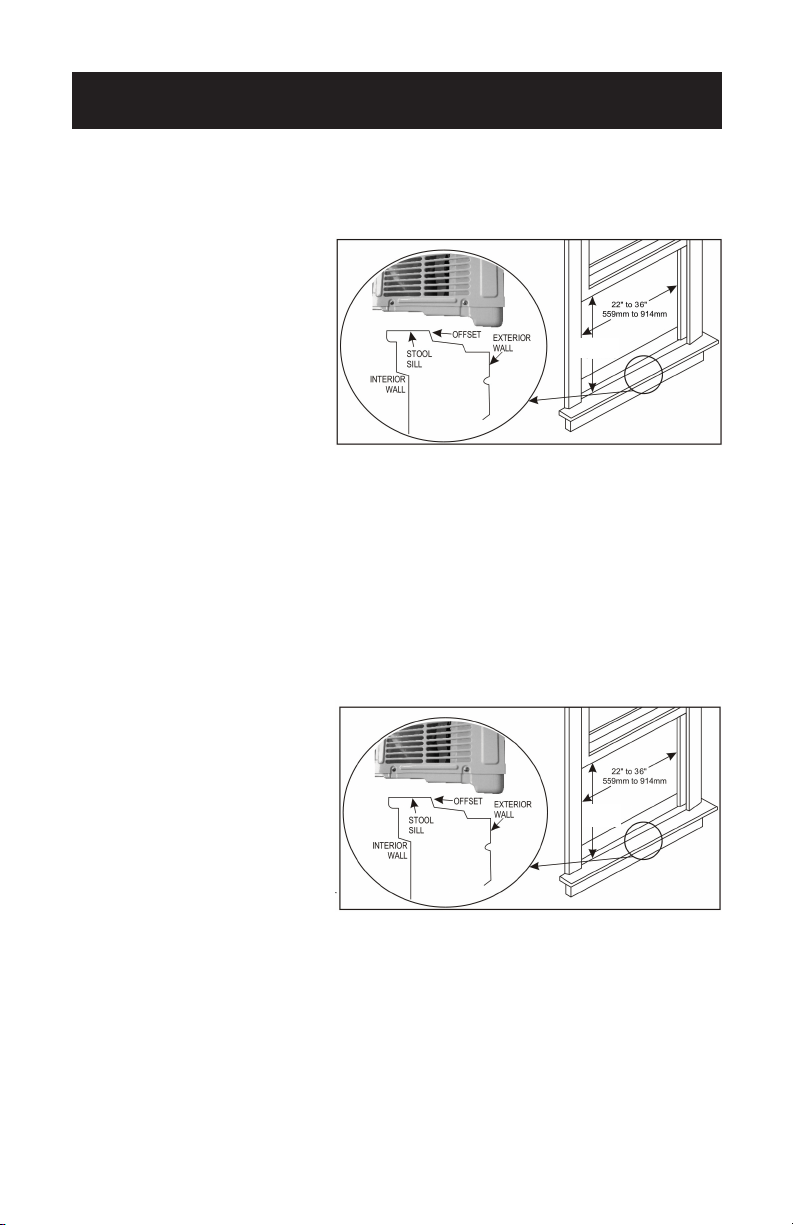
INSTALLATION & ASSEMBLY FOR 10K & 12K
Some assembly is required for your new air conditioner. Please read and follow
these instructions carefully.
1. This air conditioner is designed
to be installed in a standard
double-hung window with a
window width between 22”
and 36” (559mm - 914mm).
2. The air conditioner can be
installed without the accordion
panels to fit in a narrow
window opening. See the
window dimensions.
3. The lower sash (the lower part of the window that moves up and down) must allow
for 16” of vertical clearance when open. (See Fig. 2)
4. All supporting parts must be secured to firm wood, masonry or metal.
5. The electrical outlet must be within reach of the power cord.
NOTE: Save the product packaging and installation instructions for future reference.
Store the air conditioner in the product box when not in use for an extended
amount of time.
SET UP & USE
Fig. 2
Fig. 1
14.5”
(368mm)
16”
(406mm)

Room Side
Page 10
SET UP & USE
TOP RAIL ASSEMBLY (ONLY FOR 6K & 8K)
The top rail must be assembled prior to installing the air conditioner in the window.
Tools Needed: Phillips screwdriver
1. Remove the air conditioner from the box and place on a hard flat surface.
2. Remove top rail from the bottom of the packaging material.
3. Align the hole in the top rail with those in the top of the unit. (See Fig. 3)
4. Secure the top rail to the unit with the 3/8” screws. (See Fig. 4)
NOTE: For safety reasons, all 4 screws must be used to attach top rail.
CAUTION
When handling the unit, be careful to avoid cuts from the sharp metal edges and
aluminum fins on the front and rear coils
Fig. 3
Fig. 4
Page 11
SET UP & USE
HOW TO INSTALL
NOTE: Top rail and sliding panels at each side are oset to provide the proper pitch to
the rear of 5/16”. This is necessary for proper condensed water utilization and
drainage. If you are not using the side panels for any reason, this pitch to the
rear must still be maintained.
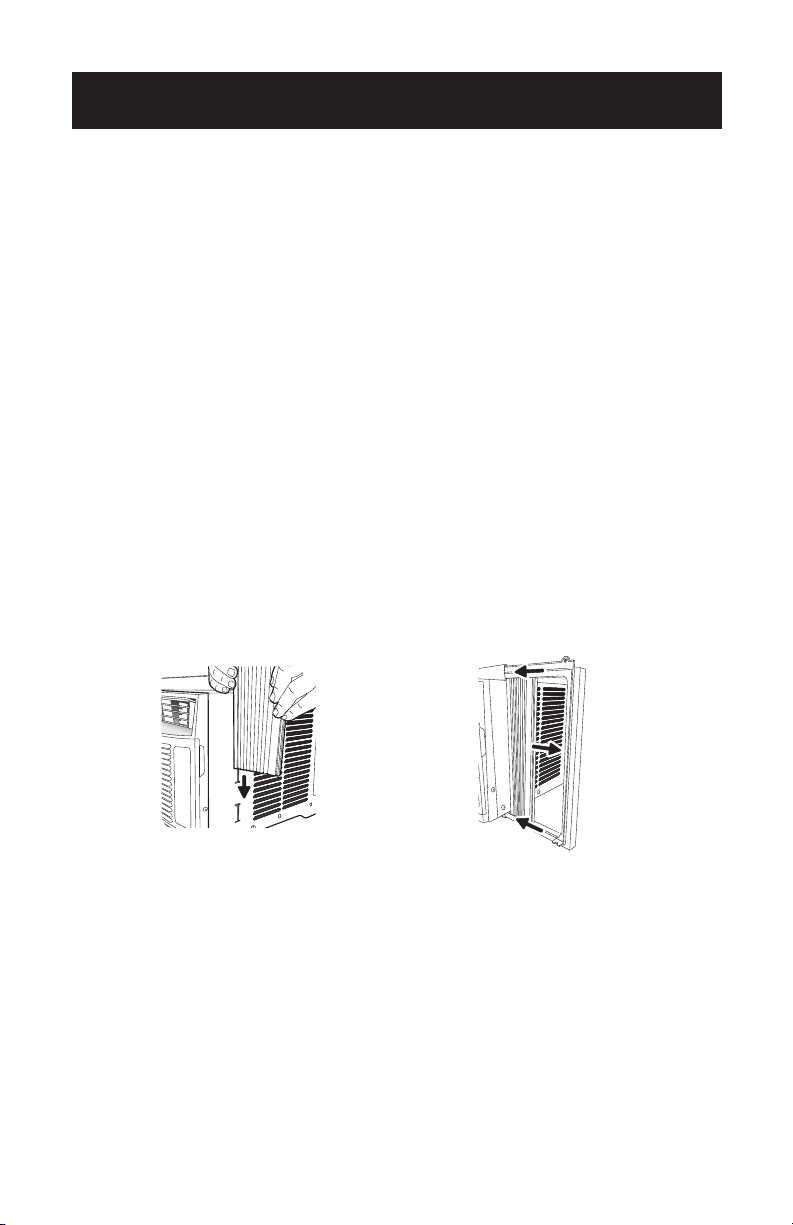
1. Place unit on floor, a bench or a table. There is a left and right window filler panel -
be sure to use the proper panel for each side. When installed, the flange for securing
the panel in place to the window sill will be facing into the room.
A. Hold the accordion panel in one hand and gently pull back the center to
free the open end.
B. Slide the free end of the panel into the cabinet. Slide the panel down. Be
sure to leave enough space to slip the top and bottom of the frame
into the rails on the cabinet. (See Fig. 5)
C. Once the panel has been installed on the side of the cabinet, make sure it
sits securely inside the frame channel by making slight adjustments.
Slide the top and bottom ends of the frame into the top and bottom rails
of the cabinet. (See Fig. 6)
D. Slide the panel all the way in and repeat on the other side.
NOTE: Once installed, the accordian panel cannot be removed without detaching the
frame from the air conditioner.
2. Keep a firm grip on the air conditioner. Carefully place the unit into the window
opening so the bottom of the air conditioner frame is against the window sill.
Carefully close the window behind the top rail of the unit.
CLICK
Fig. 5 Fig. 6
Page 12
SET UP & USE
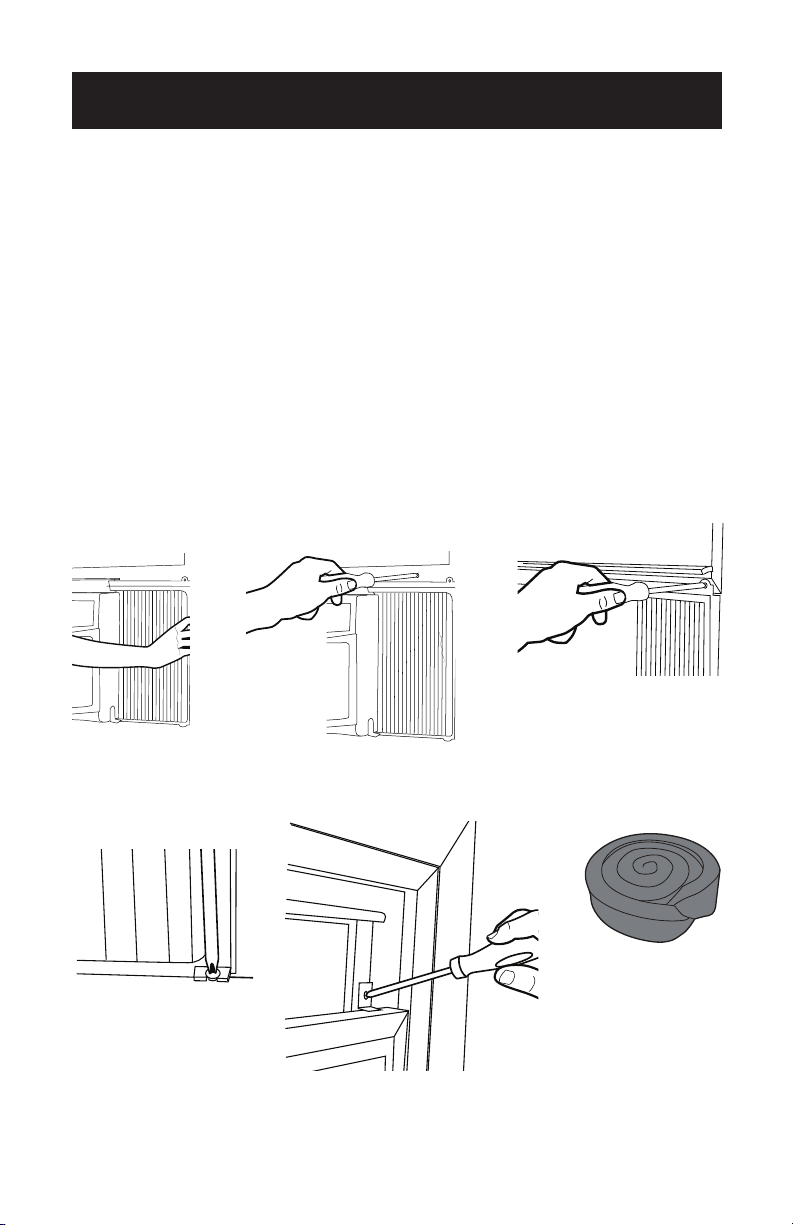
3. Extend the side panels out against the window frame. (See Fig. 7)
4. Drive three 1/2” locking screws through filler panel holes into window sash on both
left and right sides. (See Fig. 8 & 9)
5. Place the frame lock between the frame extensions and the window sill. Drive 3/4”
locking screws through the frame lock and into the sill on both left and right sides.
(See Fig. 10)
NOTE: To prevent window sill from splitting, drill 1/8” pilot holes before driving
screws.
6. To secure lower sash in place, attach right angle sash lock with two 3/4” screws.
(See Fig. 11)
7. Cut foam seal strip and insert in the window space between the upper and lower
sashes.
(See Fig. 12)
Fig. 7
Fig. 10
Fig. 9
Fig. 11 Fig. 12
Fig. 8
Page 13
SET UP & USE
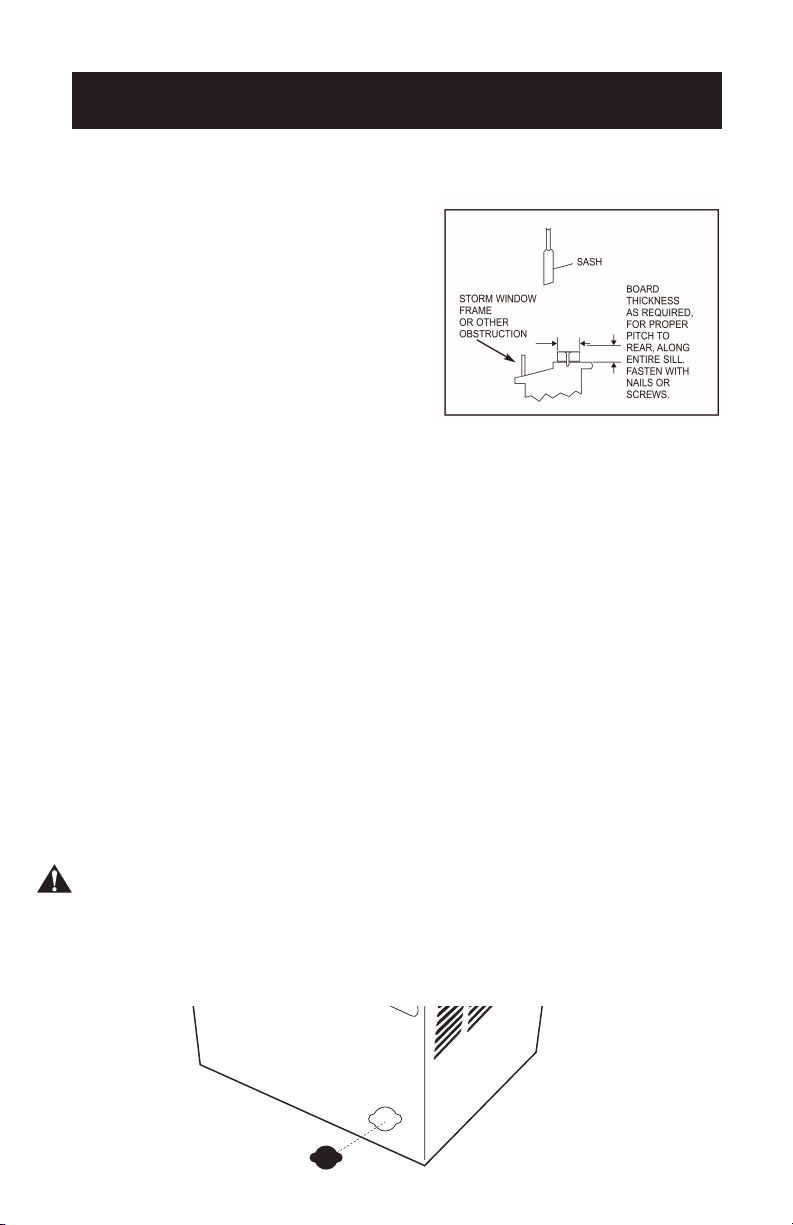
IF A/C IS BLOCKED BY STORM WINDOW
Add wood or remove storm window
before air conditioner is installed.
(See Fig. 13)
If storm window frame must remain,
be sure the drain holes or slots are not
caulked or painted shut. Accumulated
rain water or condensation must be
allowed to drain out.
REMOVING A/C FROM WINDOW
• Turn A/C o and disconnect power cord.
• Remove sash seal from between windows and unscrew safety lock.
• Remove screws installed through frame and frame lock.
• Close (slide) side panels into frame.
• Keeping a firm grip on air conditioner, raise sash and carefully “rock” air
conditioner backward to drain any condensate water in base of unit. Be careful
not to spill any remaining water while lifting unit from window. Store parts WITH
air conditioner.
WINTER STORAGE – BEFORE REMOVING AIR
CONDITIONER FROM WINDOW
To store the air conditioner when it is not in use for an extended period of time,
remove the black rubber drain plug found on the lower left hand corner of the back
of the air conditioner. (see fig. 14) This will allow you to remove any water that has
collected inside the bottom of the unit while it is still outdoors. To make access easier
to the drain plug, collapse the side filler panels toward the AC unit.
CAUTION: Be sure to maintain support of the air conditioning unit as you reach to
remove the drain plug.
Once water has been removed, replace drain plug by aligning inside of plug with
cutout in wall of unit and push firmly until plug is completely sealed to the opening.
Store air conditioner in dry environment and cover with plastic or place it back in the
original box.
Fig. 13
Fig. 14

Page 14
SET UP & USE
AIR CONDITIONER USE
Operating your air conditioner properly helps you obtain the best possible results.
This section explains proper air conditioner operation.
IMPORTANT:
• If you turn o the air conditioner, wait at least 3 minutes before turning it back on.
This prevents the air conditioner from blowing a fuse or tripping a circuit breaker.
• Do not try to operate your air conditioner in the cooling mode when outside
temperature is below 65˚F (18˚C). The inside evaporator coil will freeze up and the
air conditioner will not operate properly.
NOTE: In the event of a power failure, your air conditioner will operate at the previous
settings when the power is restored.
Page 15
SET UP & USE
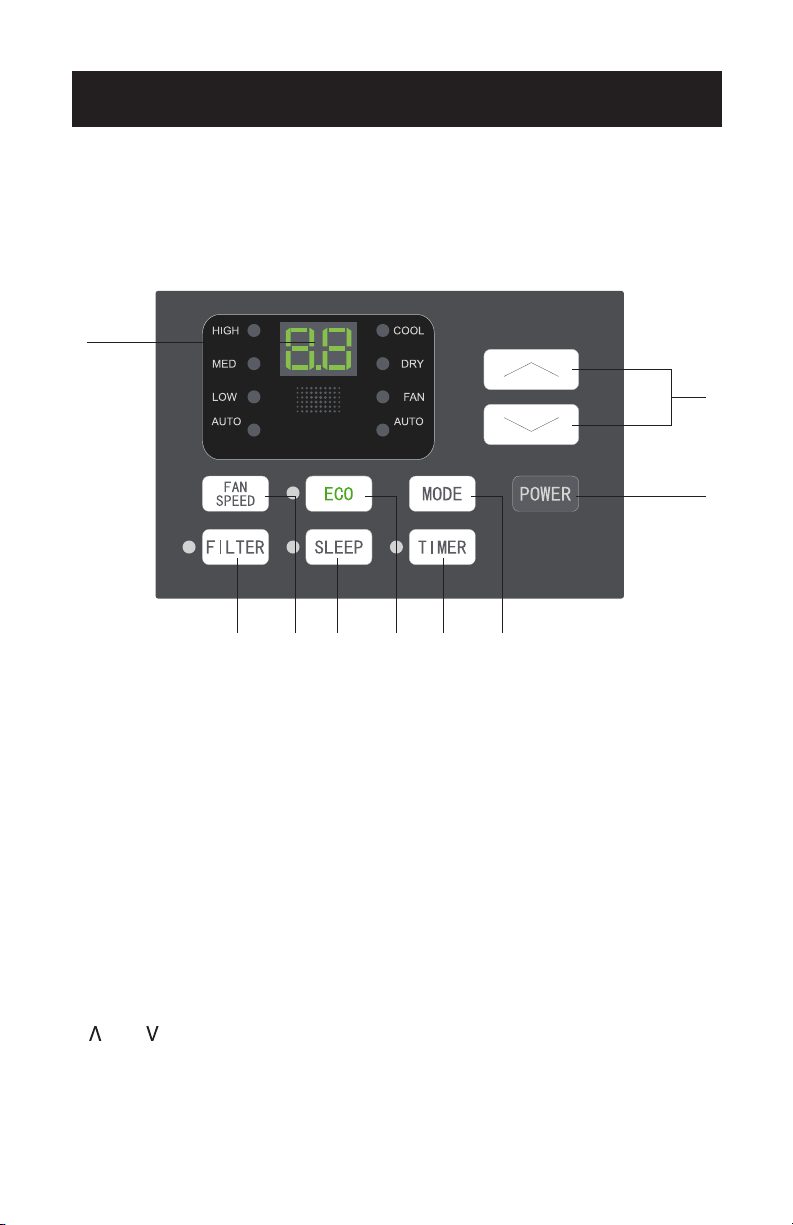
CONTROL PANEL
NOTE: This display always shows the room temperature in Fan Mode except when
setting the Set temperature or the Timer.
NORMAL OPERATING SOUNDS
• You may hear a pinging noise caused by water hitting the condenser, or rainy
days, or when the humidity is high. This design feature helps remove moisture and
improve eciency.
• You may hear the thermostat click when the compressor cycles on and o.
• Water will collect in the base pan during rain or days of high humidity. The water
may overflow and drip from the outside part of the unit.
• The fan may run even when the compressor is not on.
1. DIGITAL DISPLAY: When in operation mode (Cool, Dry, Fan and Auto) the set
temperature will be displayed. Time will be displayed when using the timer button.
2. AND BUTTON: Use these buttons on the control panel and remote to increase
or decrease the set temperature or timer. Temperature range: 61˚F~88˚F or
16˚C~31˚C.
3. POWER BUTTON: Turns the air conditioner on and o.
SPEED
MODE
1
2
3
456789
Page 16
SET UP & USE
4. MODE BUTTON: Press the mode button to cycle through the various modes: Cool,
Dry, Fan and Auto.
Cool Mode: The cooling function allows the air conditioner to cool the room and at
the same time reduces air humidify. Press the MODE button to activate the COOL
mode. To optimize the function of the air conditioner, adjust the temperature and
the speed by pressing the button indicated.
Dry Mode: This function reduces the humidity of the air to make the room more
comfortable. Press MODE button to set the DRY mode. An automatic function of
alternating cooling cycles and fan will be activated.
Fan Mode: Allows the air conditioner to help with room ventilation. Press MODE
button to set the FAN mode. With pressing FAN SPEED button, the speed changes
in the following sequence: Hi, Med and Lo in FAN mode. The remote control also
stores the speed that was set in the previous mode of operation. In AUTO mode,
the unit automatically chooses the fan speed and the mode of operation (COOL,
DRY or FAN).
5. TIMER BUTTON: Use these buttons on the control panel and remote to set the
timer.
Timer O: The timed stop is programmed by pressing TIMER button. Set the stop
time by pressing the button “ “ or “ “ until the stop time displayed is to your
choosing. Then press TIMER button again.
Timer On: When the unit is o, press TIMER button once and set the desired
temperature by pressing the button “ ” or “ ”. Press TIMER button a second time
and set the stop time by pressing the button “ ” or “ ”. Press TIMER button a third
time to confirm the setting.
NOTE: Timer can be set to automatically turn o or on from 30 minutes to 24
hours. Each press of the “ ” or “ ” buttons will increase or decrease the
timer. The timer can be set in 30 minute increments below 10 hours and
1 hour increments for 10 hours of above. The SET light will turn on while
setting. To cancel the set function, press the TIMER button again.
6. ECO BUTTON: When the unit is in ECO mode, the indicator light on the display will
turn on. In ECO mode, the compressor will turn o once the room is cooled to the
set temperature but fan will continue to run in 10 minute segments. The compressor
will turn back on when the room temperature rises above the user set temperature.
7. SLEEP BUTTON: Press the SLEEP button and the sleep light will illuminate after 10
seconds and all other indicator lights will be o. In SLEEP mode, the air conditioner
will automatically adjust the temperature and fan speed to make the room more
comfortable during the night. The set temperature will automatically raise by 1˚C
(1.8˚F) every 30-60 minutes and at most change six times or reaches a maximum
temperature of 28˚C (82˚F).
8. FAN SPEED BUTTON: Press the FAN SPEED button to choose the fan speed
options. You can choose Hi, Med, Low in FAN mode.
9. FILTER BUTTON: After the compressor works for 500 total hours, the filter check
light will turn on to remind the user to clean the filter. When the filter check light is
o, it is useless to press the filter check button. When the filter check light is on, it
can be turned o by pressing the filter check button.
Page 17
SET UP & USE
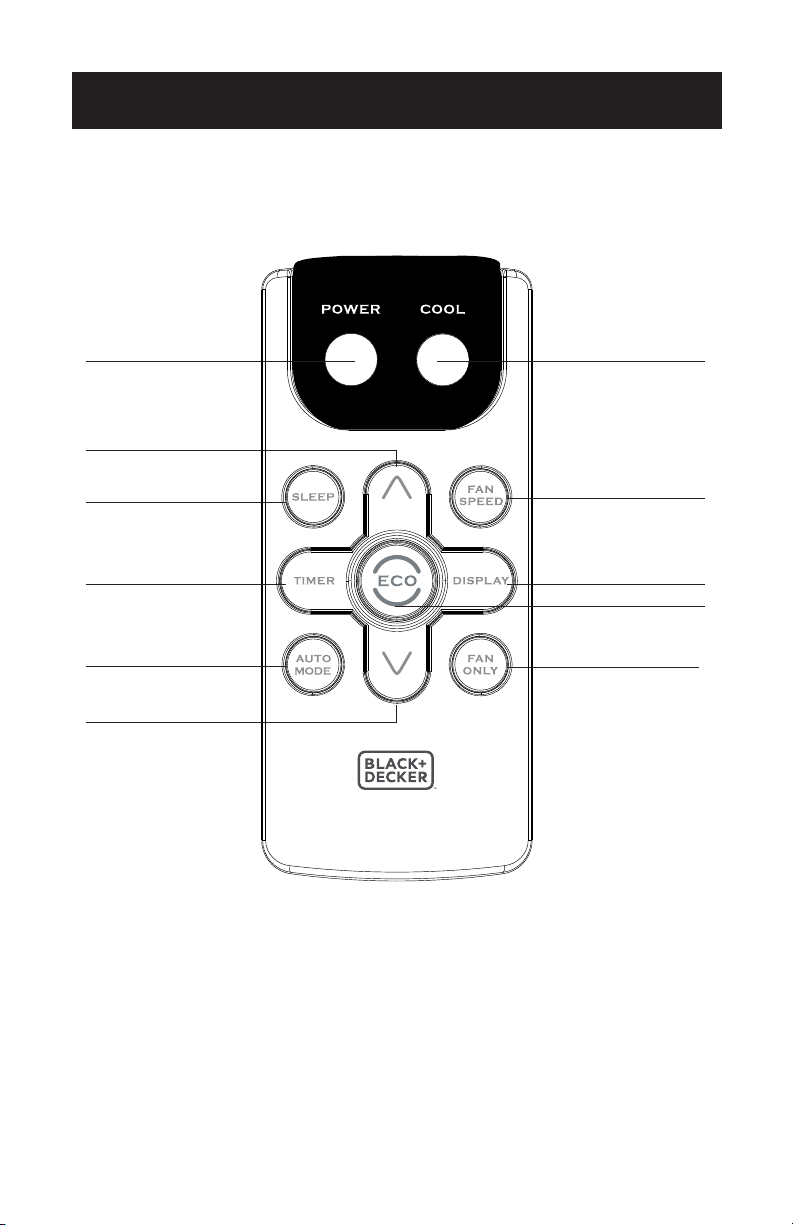
REMOTE CONTROL
1
3
4
5
6
3
2
7
8
9
10
INSERTING OR REPLACING THE BATTERIES
Removing the cover on the rear of the remote control:
Insert two R03 “AAA” 1.5V batteries (not included) in the correct position (see
instructions inside the battery compartment).
Replace the cover
If the remote control unit is replaced or disposed of, the batteries must be
removed and discarded in accordance with current legislation as they are harmful
to the environment.
NOTE: Do not mix old and new batteries or dierent types of AAA batteries.
Page 18
SET UP & USE
1. POWER: Turns the air conditioner on and o.
2. COOL: Press the COOL button to COOL mode.
3. AND : Use these buttons on the control panel and remote to increase or
decrease the set temperature or timer. Temperature range: 61˚F~88˚F or 16˚C~31˚C.
4. SLEEP: Press the SLEEP button, the sleep light will be on after 10 seconds, and
all the left lights will be o. In SLEEP mode, the air conditioner will automatically
adjust the temperature and fan speed to make the room more comfortable during
the night. The set temperature will automatically raise by 1˚C every 30-60 minutes
and at most change six times until the set temperature is 28˚C. And every running
time depends on the set temperature.
5. TIMER: Use these buttons on the control panel and remote to set the timer.
Timer O: The timed stop is programmed by pressing TIMER button. Set the stop
time by pressing the button “ “ or “ “ until the stop time displayed is to your
choosing. Then press TIMER button again.
Timer On: When the unit is o, press TIMER button once and set the desired
temperature by pressing the button “ ” or “ ”. Press TIMER button a second time
and set the stop time by pressing the button “ ” or “ ”. Press TIMER button a third
time to confirm the setting.
NOTE: Timer can be set to automatically turn o or on from 30 minutes to 24
hours. Each press of the “ ” or “ ” buttons will increase or decrease the
timer. The timer can be set in 30 minute increments below 10 hours and
1 hour increments for 10 hours of above. The SET light will turn on while
setting. To cancel the set function, press the TIMER button again.
6. AUTO: Press AUTO button to enter into AUTO mode directly. In this mode the
fan speed and the temperature are set automatically according to the room
temperature (tested by the temperature sensor which is incorporated in the indoor
unit).
7. FAN SPEED: Press the FAN button to choose the fan speed options. You can
choose between 3 speeds and auto mode. Three fan speeds are Hi, Med and Lo.
8. DISPLAY: To press the DISPLAY button, it can switch o/on all lights of LED display.
9. ECO: When the unit is in ECO mode, the indicator light on the display will turn
on. In ECO mode, the compressor will turn o once the room is cooled to the set
temperature but fan will continue to run in 10 minute segments. The compressor
will turn back on when the room temperature rises above the user set temperature.
10. FAN ONLY: Press the FAN ONLY button to FAN ONLY mode.
Page 19
SET UP & USE
CARE AND CLEANING
Clean your air conditioner to keep it looking new and to minimize dust build up.
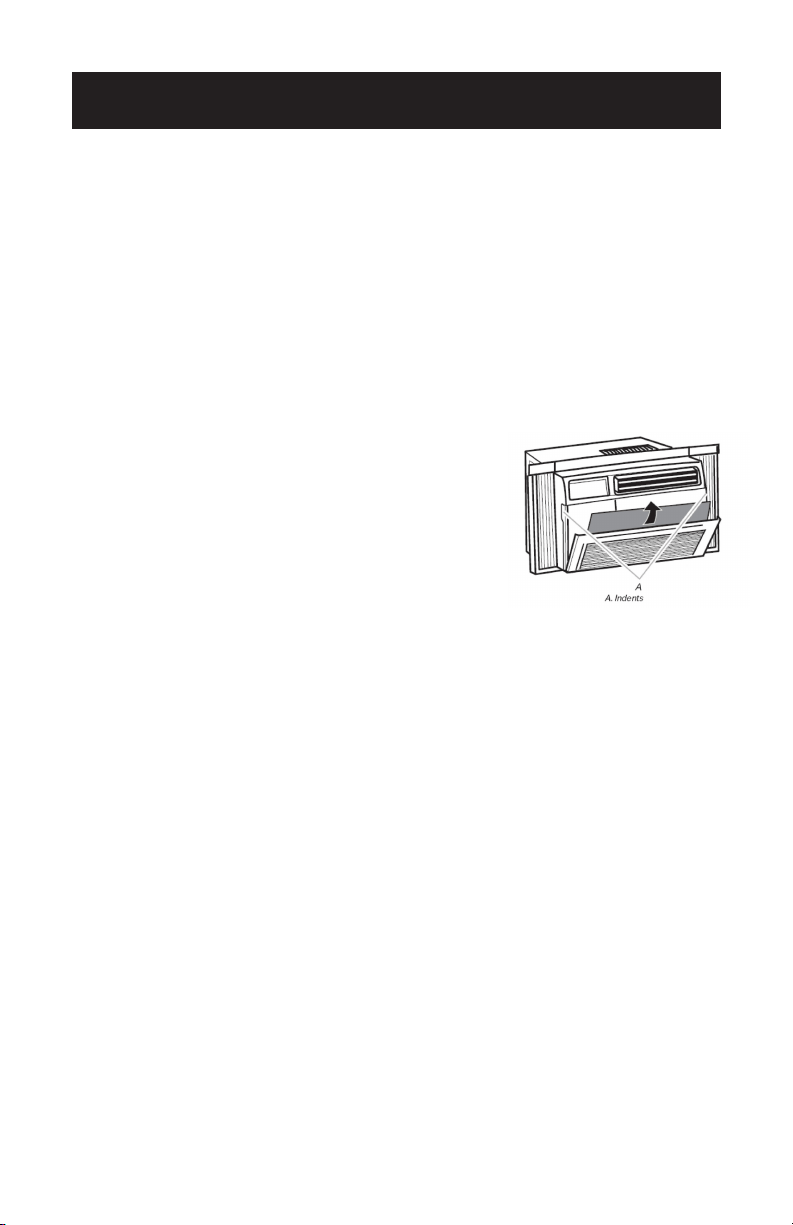
AIR FILTER CLEANING
The air filter should be checked at least once every month to see if it needs cleaning.
Trapped particles and dust can build up in the filter and may decrease airflow as well
as cause the cooling coils to accumulate frost. To clean the air filter:
1. Remove the filter by pulling down on the indents of the
filter door on the front of the unit (See Fig. 15).
2. Wash the filter using liquid dish soap and warm water.
Rinse the filter thoroughly. Gently shake the filter to
remove excess water.
3. Let the filter dry completely before placing it into
the air conditioner.
4. If you do not wish to wash the filter, you may
vacuum the filter to remove the dust and other particles.
WEAR AND TEAR
To minimize wear and tear on the air conditioner, always wait at least 3 minutes
before changing modes. This will help prevent the compressor from overheating and
the circuit breaker from tripping.
CABINET CLEANING
To clean the air conditioner cabinet:
• Unplug the air conditioner to prevent shock or a fire hazard. The cabinet and front
panel of the air conditioner may be dusted with an oil free cloth or washed with a
cloth dampened in a solution of warm water and mild liquid soap. Rinse thoroughly
with a damp cloth and wipe dry.
• Never use harsh cleaners, wax or polish on the cabinet front.
• Be sure to wring excess water from the cloth before wiping around the controls.
Excess water in or around the controls may cause damage to the air conditioner.
Fig. 15

Page 20
TROUBLESHOOTING & WARRANTY
BEFORE YOU CALL FOR SERVICE
IF THE AIR CONDITIONER FAILS TO OPERATE:
A) Check to make sure that the air conditioner is plugged in securely. If it is not,
remove the plug from the outlet, wait 10 seconds and plug it in again securely.
B) Check for a blown circuit fuse or a tripped main circuit breaker. If these seem
to be operating properly, test the outlet with another appliance.
IF NONE OF THE ABOVE SOLVES THE PROBLEM, CONTACT A QUALIFIED
TECHNICIAN. DO NOT TRY TO ADJUST OR REPAIR THE AIR CONDITIONER
YOURSELF.
CUSTOMER SERVICE
IMPORTANT
DO NOT RETURN THIS PRODUCT TO THE STORE
If you have a problem with this product, please contact the
W Appliance Co. Customer Satisfaction Center at
844-299-0879 or service@appliance.com.
DATED PROOF OF PURCHASE, MODEL # AND SERIAL #
REQUIRED FOR WARRANTY SERVICE
Page 21
TROUBLESHOOTING & WARRANTY
Troubleshoot your problem by using the chart below. If the air conditioner still does
not work properly, contact W Appliance Co. customer service center. Customers
must never troubleshoot internal components.
TROUBLE POSSIBLE CAUSE POSSIBLE REMEDY
The air
conditioner will
not start
The air conditioner is
unplugged
• Make sure the air conditioner plug
is pushed completely into the
outlet.
The fuse is blown/circuit
breaker is tripped
• Check the house fuse/circuit
breaker box and replace the fuse
or reset the breaker.
Power failure • The unit will automatically restart
when power is restored.
• There is a protective time delay
(approx. 3 minutes) to prevent
tripping of the compressor
overload. For this reason, the unit
may not start normal cooling for 3
minutes after it is turned back on.
The current interrupter device
is tripped
• Press the RESET button located on
the power cord plug.
• If the RESET button will not stay
engaged, discontinue use of the air
conditioner and contact a qualified
service technician.
The air
conditioner does
not cool as it
should
Air flow is restricted • Make sure there are no curtains,
blinds or furniture blocking the
front of the air conditioner.
The temperature control may
not be set correctly.
• Lower the set thermostat
temperature.
The air filter is dirty • Clean the filter. See the Cleaning &
Care section of the manual.
The room may be too warm • Please allow time for the room to
cool down after turning on the air
conditioner.
Cold air is escaping • Check for open furnace registers
and cold air returns.
The cooling coils are frozen • See “Air Conditioner Freezing Up”
below.
The air
conditioner is
freezing up
Ice blocks the air flow and
stops the air conditioner from
cooling the room
• Set the MODE dial to HIGH FAN or
HIGH COOL and set the thermostat
to a higher temperature.
The remote
control is not
working
The batteries are inserted
incorrectly.
The batteries may be dead
• Check the position of the batteries.
• Replace the batteries.

Page 22
TROUBLESHOOTING & WARRANTY
TROUBLE POSSIBLE CAUSE POSSIBLE REMEDY
Water is dripping
outside
Hot and humid weather • This is normal.
Water is dripping
inside the room
The air conditioner is not
correctly tilted outside
• For proper water drainage, make
sure the air conditioner is slightly
tilted downward from the front of
the unit to the rear.
Water collects in
the base pan
Moisture removed from the air
is draining into the base pan
• This is normal for a short period
in areas with low humidity and
normal for a longer period in areas
with high humidity.

Page 23
TROUBLESHOOTING & WARRANTY
LIMITED WARRANTY
Any repair, replacement, or warranty service,
and all questions about this product should be
directed to W Appliance Co. at 844-299-0879
from the USA or Puerto Rico.
W Appliance Co. warrants to the original purchaser
that the product will be free from defects in material,
parts and workmanship for the period designated for
this product. The warranty commences the day the
product is purchased and covers up to a period of 1
year (12 months) for labor/1 year (12 months) for parts
(manufacturing defects only)/and a total of 5 years
(60 months) for compressor parts only.
W Appliance Co. agrees that it will, at its option,
replace the defective product with either a new
or remanufactured unit equivalent to your original
purchase during the warranty period.
Exclusions: This warranty does not apply to the
below:
1. If the appearance or exterior of
the product has been damaged or
defaced, altered or modified in design or
construction.
2. If the product original serial number
has been altered or removed or cannot
be readily determined.
3. If there is damaged due to power line
surge, user damage to the AC power
cord or connection to improper voltage
source.
4. If damage is due to general misuse,
accidents or acts of God.
5. If repair attempts are done by
unauthorized service agents, use of
parts other than genuine parts or parts
obtained from persons other than
authorized service companies.
6. On units that have been transferred
from the original owner.
7. On products that have been purchased
as refurbished, like new, second-hand, in
a “As-Is” or “Final Sale” terms.
8. To products used in a commercial or
rental setting.
9. To products used in settings other than
ordinary household use or used other
than in accordance with the provided
instructions.
10. To damages for service calls for
improper installations.
11. To glass parts and other accessory items
that are included with the unit.
12. Transportation and shipping costs
associated with the replacement of the
unit.
13. Food loss for loss due to product
failure or delay in service, repair or
replacement.
14. Service calls to instruct you how to use
your product.
15. Service calls to repair or replace the
house fuse, reset the circuit breaker or
correct the wiring in the house.
REPAIR OR REPLACEMENT AS PROVIDED UNDER
THIS WARRANTY IS THE EXCLUSIVE REMEDY OF
THE CUSTOMER; W Appliance Co. SHALL NOT BE
LIABLE FOR ANY INCIDENTAL OR CONSEQUENTIAL
DAMAGES FOR BREACH OF ANY EXPRESS OR
IMPLIED WARRANTY ON THIS PRODUCT, EXCEPT
TO THE EXTENT PROHIBITED BY APPLICABLE LAW.
ANY IMPLIED WARRANTY OF MERCHANTABILITY
OF FITNESS FOR A PARTICULAR PURPOSE ON THIS
PRODUCT IS LIMITED TO THE DURATION OF THE
WARRANTY.
Some states do not allow the exclusion or limitations
of incidental or consequential damages, or limitations
on how long the warranty lasts. In these cases the
above exclusions or limitations may not apply to you.
This warranty gives you specific legal rights and you
may also have other rights which vary from state to
state.
Obtaining Service: To obtain service, product
literature, supplies or accessories please call
844-299-0879 to create a ticket for exchange/repair.
Please make sure to provide the date of purchase,
model number and a brief description of the problem.
Our customer service representative
will contact you or send detailed return instructions.
W Appliance Co. does not warrant that the appliance will work
properly in all environmental conditions, and makes no warranty
and representation, either implied or expressed, with respect
to the quality, performance, merchantability, or fitness for a
particular purpose other than the purpose identified within this
user’s manual. W Appliance Co. has made every eort to ensure
that this user’s manual is accurate and disclaims liability for any
inaccuracies or omissions that may have occurred. Information in
this user’s manual is subject to change without notice and does
not represent a commitment on the part of W Appliance Co.. W
Appliance Co. reserves the right to make improvements to this
user’s manual and/or to the products described in this user’s
manual at any time without notice. If you find information in this
manual that is incorrect, misleading, or incomplete, please contact
us at 844-299-0879.
W Appliance Co.
1356 Broadway
New York, NY 10018

Page 24
BLACK & DECKER, BLACK+DECKER, the BLACK & DECKER and
BLACK+DECKER logos and product names and the orange and black color
scheme are trademarks of The Black & Decker Corporation, used under license.
All rights reserved.
Product in this box may differ slightly from that pictured. Does not affect
function. Not all accessories shown in photography are included in this
package.
Imported by W Appliance, Inc., 1356 Broadway, New York, NY 10018
March 2017 Printed in China
This device complies with part 15 of the FCC rules. Operation is subject to the
following two conditions: 1) This device may not cause harmful interference, and 2)
This device must accept any interference received, including interference that may
cause undesired operation. This equipment has been tested and found to comply
with the limits for a Class B digital device, pursuant to Part 15 of the FCC rules. These
limits are designed to provide reasonable protection against harmful interference
in a residential installation. This equipment generates, uses and can radiate radio
frequency energy and, if not installed and used in accordance with the instructions,
may cause harmful interference to radio communications. However, there is no
guarantee that the interference will not occur in a particular installation. If this
equipment does cause harmful interference to radio or television reception, which
can be determined by turning the equipment o and on, the user is encouraged to
try to correct the interference by one or more of the following measures: a) Reorient
or relocate the receiving antenna. b) Increase the separation between the equipment
and the receiver. c) Connect the equipment into an outlet dierent from that
which the receiver is connected. d) Consult the dealer or an experienced radio/TV
technician for help.