
INSTRUCTION MANUAL
WINDOW AIR CONDITIONER
SUPPORT BRACKET
Thank you for choosing BLACK+DECKER!
PLEASE READ BEFORE RETURNING THIS PRODUCT FOR
ANY REASON.
If you have a question or experience a problem with your BLACK+DECKER
purchase, go to www.blackanddecker.com/instantanswers
If you can’t find the answer or do not have access to the Internet, call
844-299-0879 from 10:30 a.m. to 6:30 p.m. EST Mon. - Fri. to speak with an
agent. Please have the catalog number available when you call.
SAVE THIS MANUAL FOR FUTURE REFERENCE.
CATALOG NUMBER
BAB-2438
Requires No Drilling, Tools,
Fasteners or Hardware
(For Single, Double Hung Windows Only. Sizes 24”-38” wide.)

Page 2
Thank you for purchasing our
BLACK+DECKER product. This
easy-to-use manual will guide you
in getting the best use of your air
conditioner support bracket.
Remember to record the model
and serial numbers. They are on a
label on the rear.
Staple your receipt to your manual.
You will need it to obtain warranty service.
Model number
Serial number
Date of purchase
PRODUCT REGISTRATION
SAFETY INFORMATION
IMPORTANT SAFETY INSTRUCTIONS
1. Read the enclosed instructions to ensure the safe and proper
method of installing the BLACK+DECKER A/C Bracket.
2. Make sure the width of the window is no less than 24” and no
greater than 38”.
3. Install the A/C Bracket from inside.
4. Not for use on dormers. Ensure there is 10” of clearance below
window.
5. Do not fully lean out of window.
6. Do not overload the A/C Bracket in excess of its maximum capacity
of 200 lbs.
7. To ensure a proper t, place one clip on the bottom of each side
curtain and attach to the left and right wings to help secure side
curtains in place.
8. There might be occasions when objects such as awnings, signage,
lighting and masonry structures below a window may obstruct and
prevent the proper installation of the A/C Bracket.
9. The A/C Bracket does not reduce, eliminate or mitigate the
requirements of any air conditioner manufacturer in the mounting
and installation thereof
SAVE THESE INSTRUCTIONS
HOUSEHOLD USE ONLY
Page 3
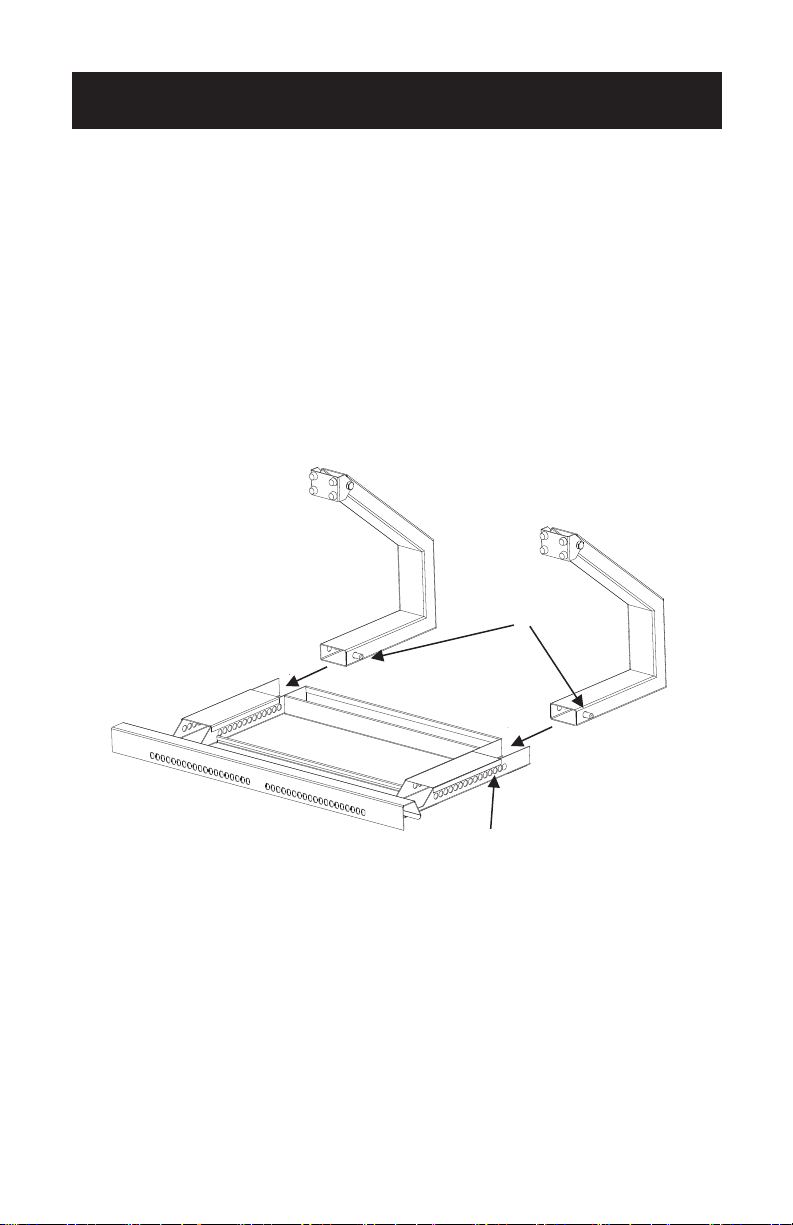
STEP 1
Place bracket upside down.
Attach Legs: Slide leg into support rail while pressing BOTH spring buttons. Release
button so that it extends out from the inner or outer hole of support rail. Repeat for
second leg.
It’s advisable to initially use the third hole.
NOTE: The spring button will only lock into an inner or outer hole (Not both). When
adjusting the legs, the buttons will alternate and snap into only one hole at a
time (Inside or outside).
SET UP & USE
spring button
Note: Set spring button
in third hole for initial
setup.
Page 4
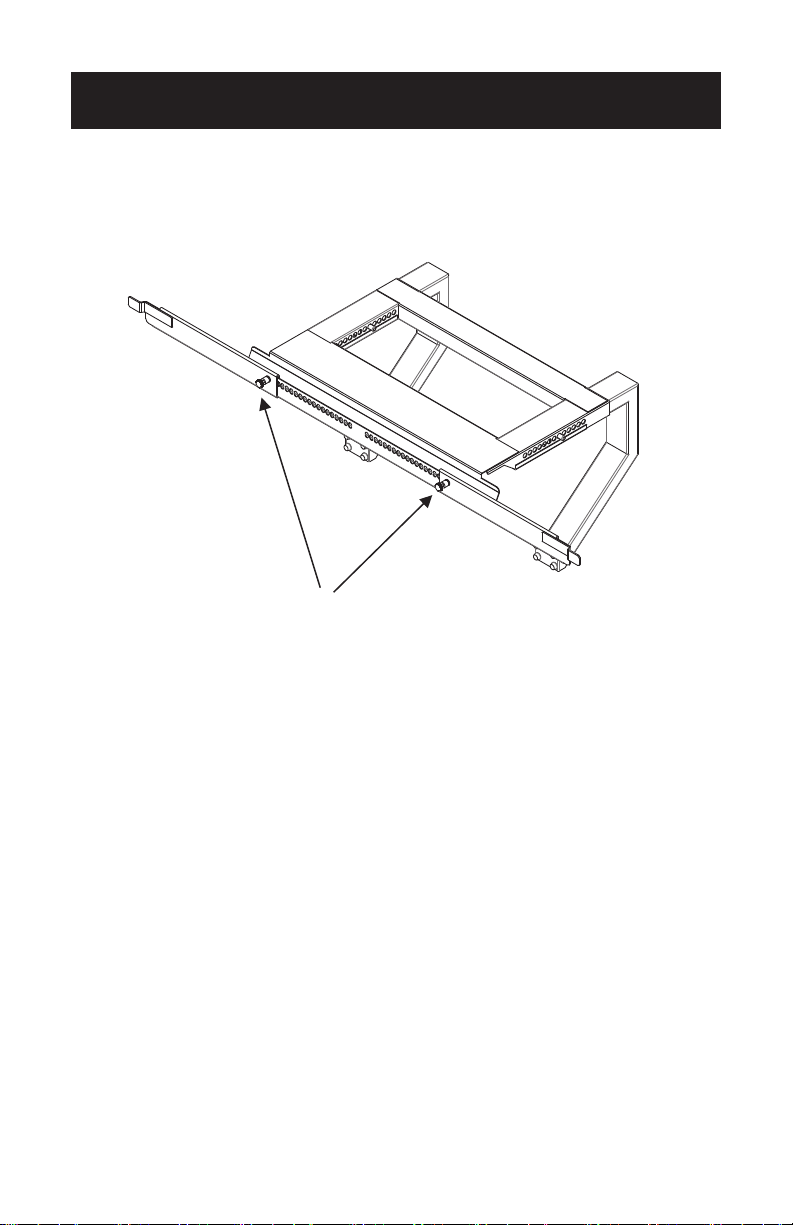
STEP 2
Prepare Sill Stop Wings: Slide wings (left and right) onto frame as shown in diagram.
SET UP & USE
Lock pins pull out to release and
push in to lock into slotted holes.
Left Wing
Right Wing
Page 5
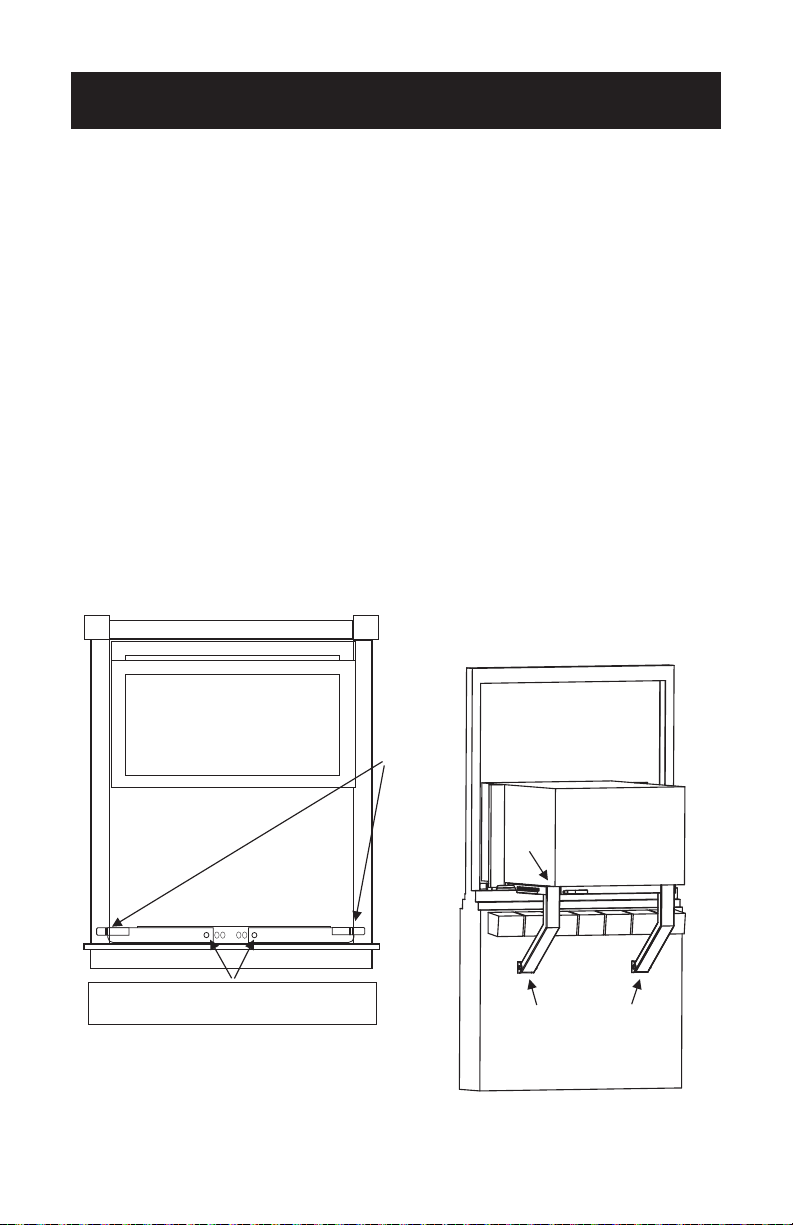
STEP 3
Place in window: Rest bracket on the bottom sill.
Adjust each Sill Stop Wing outward until the steel tabs are securely positioned
against the front OUTER WINDOW FRAME.
THIS IS MANDATORY FOR PROPER SUPPORT OF A/C.
TO ENSURE PROPER DRAINAGE, THE TOPSHELF A/C BRACKET SHOULD BE
INSTALLED WITH A SLIGHT TILT ABOUT 1/4” to 1/2” DOWNWARD TOWARD
THE OUTSIDE. MAKE SURE THE FOOT PADS ARE RESTING ON A FLAT, STABLE
SURFACE. ENSURE THAT THE SIDING MATERIAL IS CAPABLE OF WITHSTANDING,
WITHOUT DAMAGE, THE LOAD CREATED BY THE FOOT PADS PRESSING
AGAINST THE SURFACE.
This is done by pressing both spring buttons and sliding leg to rmly secure against
exterior surface.
Ensure spring buttons are fully seated in hole.
NOTE: Requires clearance of 10” below window.
SET UP & USE
*
Place A/C Unit on Support Bracket: Install
your A/C in accordance wit h t h e
manufacturer's instructions and local and
state ordinances. Be sure to provide a means
to prevent the single or double hung sash
from being opened above air conditioner.
Lock each pin into the closest slot on
the frame rail.
TILT TO
BACK
FOOT PADS
FLAT AGAINST
SURFACE.
Sill
Stop
Wings
Page 6
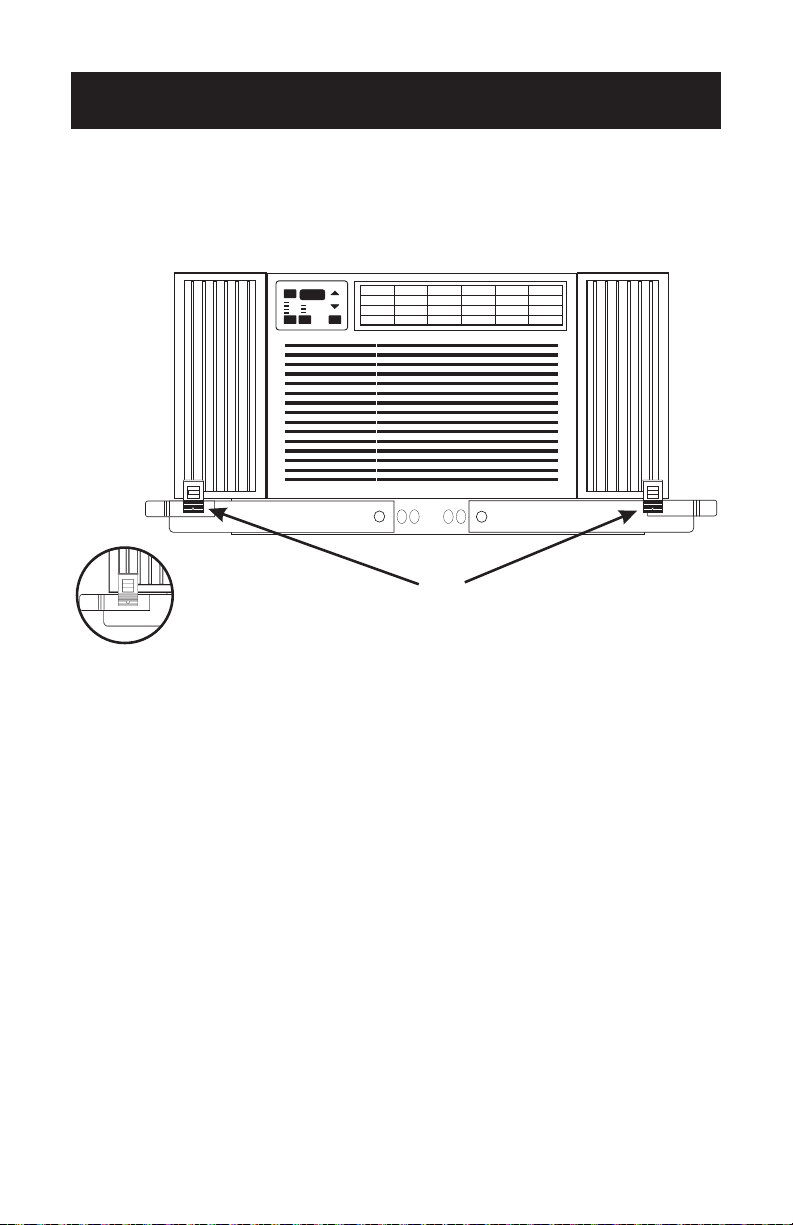
OPTIONAL CLIP INSTALLATION
SET UP & USE
POWER
72
Auto
High
Med
Low
Cool
Energy Saver
Fan Only
To ensure a proper fit, place one clip on the bottom of each side curtain
and attach to the left and right wings to help secure side curtains in place.

Page 7
TROUBLESHOOTING & WARRANTY
LIMITED WARRANTY
Any repair, replacement, or warranty service,
and all questions about this product should be
directed to W Appliance Co. at 844-299-0879
from the USA or Puerto Rico.
W Appliance Co. warrants to the original purchaser
that the product will be free from defects in material,
parts and workmanship for the period designated for
this product. The warranty commences the day the
product is purchased and covers up to a period of 2
year (24 months) for labor/2 year (24 months) for
parts (manufacturing defects only).
W Appliance Co. agrees that it will, at its option,
replace the defective product with either a new
or remanufactured unit equivalent to your original
purchase during the warranty period.
Exclusions: This warranty does not apply to the
below:
1. If the appearance or exterior of
the product has been damaged or
defaced, altered or modied in design or
construction.
2. If the product original serial number
has been altered or removed or cannot
be readily determined.
3. If there is damaged due to power line
surge, user damage to the AC power
cord or connection to improper voltage
source.
4. If damage is due to general misuse,
accidents or acts of God.
5. If repair attempts are done by
unauthorized service agents, use of
parts other than genuine parts or parts
obtained from persons other than
authorized service companies.
6. On units that have been transferred
from the original owner.
7. On products that have been purchased
as refurbished, like new, second-hand, in
a “As-Is” or “Final Sale” terms.
8. To products used in a commercial or
rental setting.
9. To products used in settings other than
ordinary household use or used other
than in accordance with the provided
instructions.
10. To damages for service calls for
improper installations.
11. To glass parts and other accessory
items that are included with the unit.
12. Transportation and shipping costs
associated with the replacement of
the unit.
13. Food loss for loss due to product
failure or delay in service, repair or
replacement.
14. Service calls to instruct you how to use
your product.
15. Service calls to repair or replace the
house fuse, reset the circuit breaker or
correct the wiring in the house.
REPAIR OR REPLACEMENT AS PROVIDED UNDER
THIS WARRANTY IS THE EXCLUSIVE REMEDY OF
THE CUSTOMER; W Appliance Co. SHALL NOT BE
LIABLE FOR ANY INCIDENTAL OR CONSEQUENTIAL
DAMAGES FOR BREACH OF ANY EXPRESS OR
IMPLIED WARRANTY ON THIS PRODUCT, EXCEPT
TO THE EXTENT PROHIBITED BY APPLICABLE LAW.
ANY IMPLIED WARRANTY OF MERCHANTABILITY
OF FITNESS FOR A PARTICULAR PURPOSE ON THIS
PRODUCT IS LIMITED TO THE DURATION OF THE
WARRANTY.
Some states do not allow the exclusion or limitations
of incidental or consequential damages, or limitations
on how long the warranty lasts. In these cases the
above exclusions or limitations may not apply to you.
This warranty gives you specic legal rights and you
may also have other rights which vary from state to
state.
Obtaining Service: To obtain service, product
literature, supplies or accessories please call
844-299-0879 to create a ticket for exchange/repair.
Please make sure to provide the date of purchase,
model number and a brief description of the problem.
Our customer service representative
will contact you or send detailed return instructions.
W Appliance Co. does not warrant that the appliance will work
properly in all environmental conditions, and makes no warranty
and representation, either implied or expressed, with respect
to the quality, performance, merchantability, or tness for a
particular purpose other than the purpose identied within this
user’s manual. W Appliance Co. has made every effort to ensure
that this user’s manual is accurate and disclaims liability for any
inaccuracies or omissions that may have occurred. Information
in this user’s manual is subject to change without notice and
does not represent a commitment on the part of W Appliance
Co.. W Appliance Co. reserves the right to make improvements
to this user’s manual and/or to the products described in this
user’s manual at any time without notice. If you nd information
in this manual that is incorrect, misleading, or incomplete, please
contact us at 844-299-0879.
W Appliance Co.
1356 Broadway
New York, NY 10018

Page 8
BLACK & DECKER, BLACK+DECKER, the BLACK & DECKER and BLACK+DECKER
logos and product names and the orange and black color scheme are trademarks of The
Black & Decker Corporation, used under license. All rights reserved.
Product in this box may differ slightly from that pictured. Does not affect function.
Not all accessories shown in photography are included in this package.
Imported by W Appliance, Inc., 1356 Broadway, New York, NY 10018
June 2016 Printed in China

