Register your product and get support at
www.philips.com/welcome
Specifications are subject to change without notice
© 2013 Koninklijke Philips Electronics N.V.
All rights reserved.
HR1851_WEU_UM_V1.0
3140 035 37441
HR1851
1 2 3
1
1
2
7
10
11
5
8
6
a
b
c
d
e
k
i
f
l
j
h
m
g
3
4
9
2
English
1 Introduction
Congratulations on your purchase and welcome to Philips! To fully benet from the support that
Philips offers, register your product at www.philips.com/welcome.
The appliance only works when all parts are properly assembled and the lid is properly locked in
place with the clamps.
For recipes, go to www.philips.com/kitchen.
2 Important
Read this user manual carefully before you use the appliance and save it for future reference.
Danger
• Never immerse the motor unit in water or any other
liquid, nor rinse it under the tap.
• Do not clean the motor unit in the dishwasher.
Warning
• Check if the voltage indicated on the base of the
appliance corresponds to the local mains voltage before
you connect the appliance.
• Do not use the appliance if the plug, the mains cord or
other components are damaged.
• If the mains cord is damaged, you must have it replaced
by Philips, a service center authorised by Philips or
similarly qualied persons in order to avoid a hazard.
• This appliance shall not be used by children. Keep the
appliance and its cord out of reach of children.
• This appliance can be used by persons with reduced
physical, sensory or metal capabilities or lack of
experience and knowledge if they have been given
supervision or instruction concerning use of the
appliance in a safe way and if they understand the
hazards involved.
• Children should be supervised to ensure that they do
not play with the appliance.
• Never let the appliance operate unattended.
• Do not use the appliance if the rotating sieve or the
protecting cover is damaged or has visible cracks and
contact the nearest Philips service center.
• Never reach into the feeding tube with your ngers or
an object while the appliance is running. Only use the
pusher for this purpose.
• Do not touch the small blades in the base of the sieve.
They are very sharp.
• To ensure that the appliance stands stably, keep the
surface on which the appliance stands and the bottom
of the appliance clean.
• Do not reach into the sieve through the pulp outlet of
the pulp collector.
• Switch off the appliance and disconnect from supply
before changing accessories or approaching parts that
move in use. Always disconnect the appliance from the
supply if it is left unattended and before assembling,
disassembling or cleaning.
Caution
• This appliance is intended for household use only.
• Never use any accessories or parts from other
manufacturers or that Philips does not specically
recommend. If you use such accessories or parts, your
guarantee becomes invalid.
• Make sure all parts are correctly mounted before you
switch on the appliance.
• Only use the appliance when both clamps are locked.
• Only unlock the clamps after you have switched off the
appliance and the sieve has stopped rotating.
• Do not remove the pulp container when the appliance
is in operation.
• Do not operate the juicer for more than 40 seconds at
a time when you juice heavy loads and let it cool down
to room ambient for next operation. None of the
recipes in this user manual constitute heavy load.
• Always unplug the appliance after use.
• Noise level = 86 dB [A]
Electromagnetic elds (EMF)
This Philips appliance complies with all applicable standards and regulations regarding exposure to
electromagnetic elds.
Recycling
Your product is designed and manufactured with high quality materials and components, which can
be recycled and reused.
When you see the crossed-out wheel bin symbol attached to a product, it means the product is
covered by the European Directive 2002/96/EC:
Never dispose of your product with other household waste. Please inform yourself about the local
rules on the separate collection of electrical and electronic products. The correct disposal of your old
product helps prevent potentially negative consequences on the environment and human health.
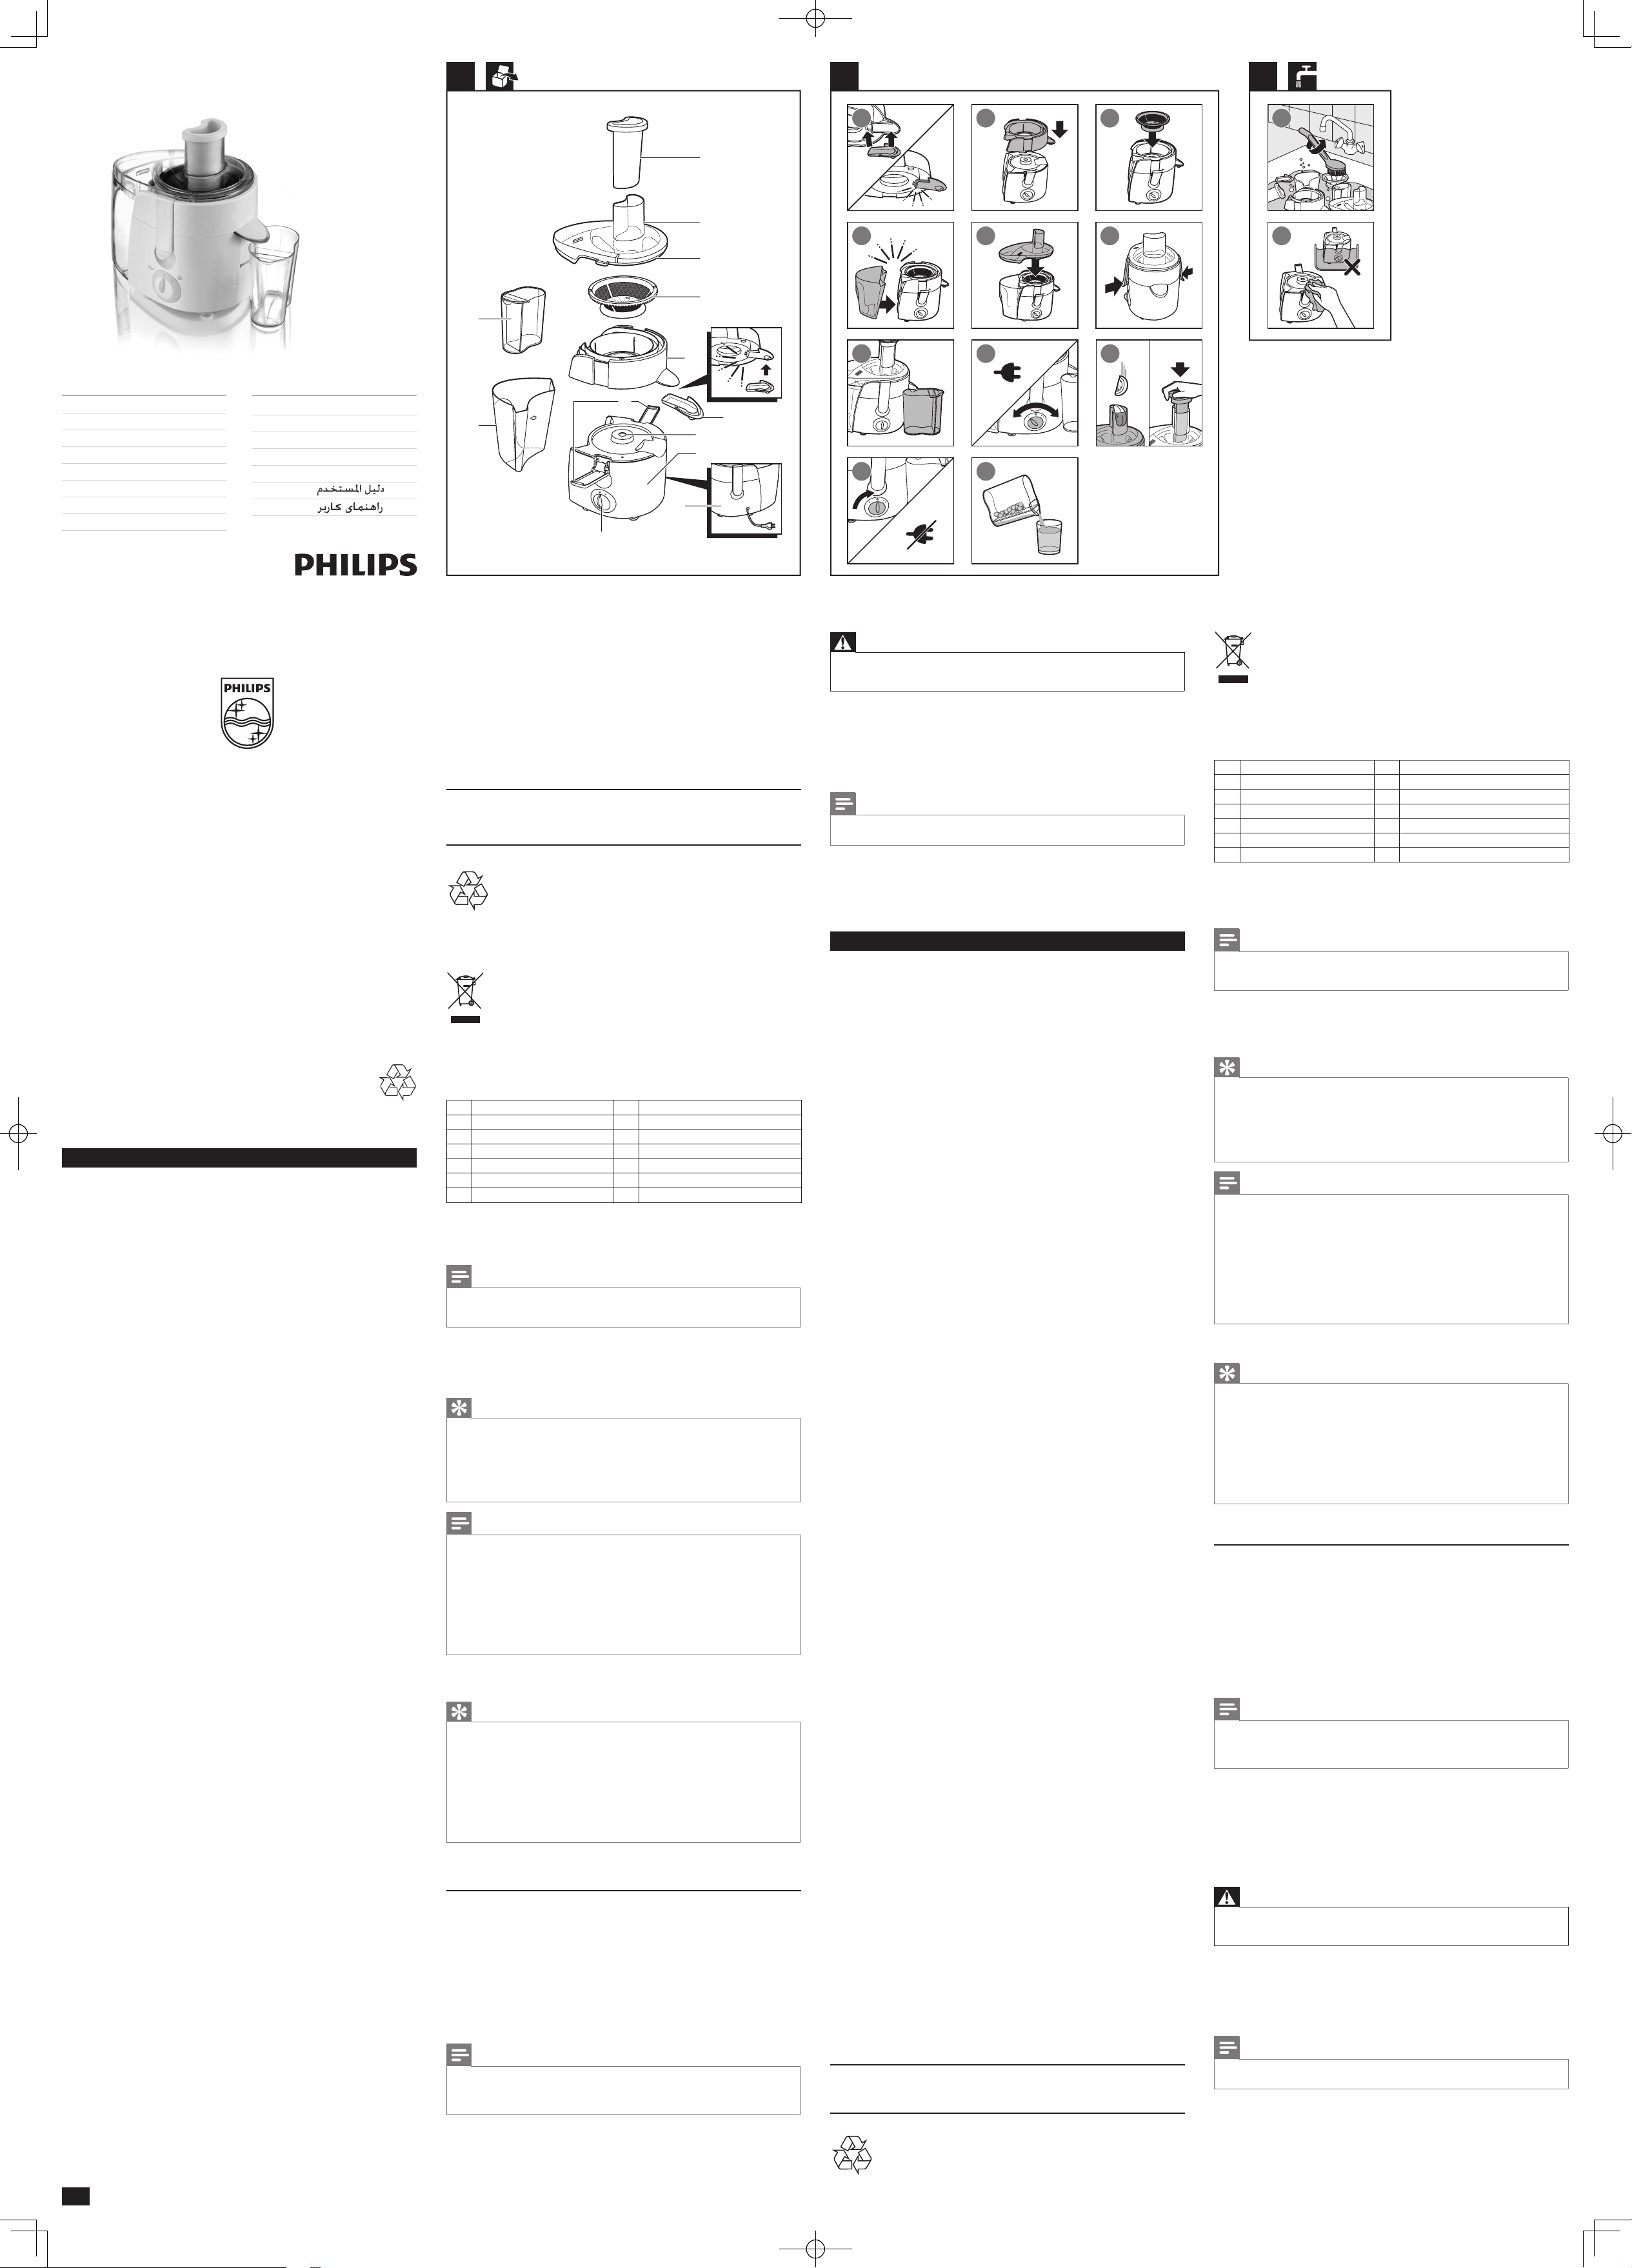
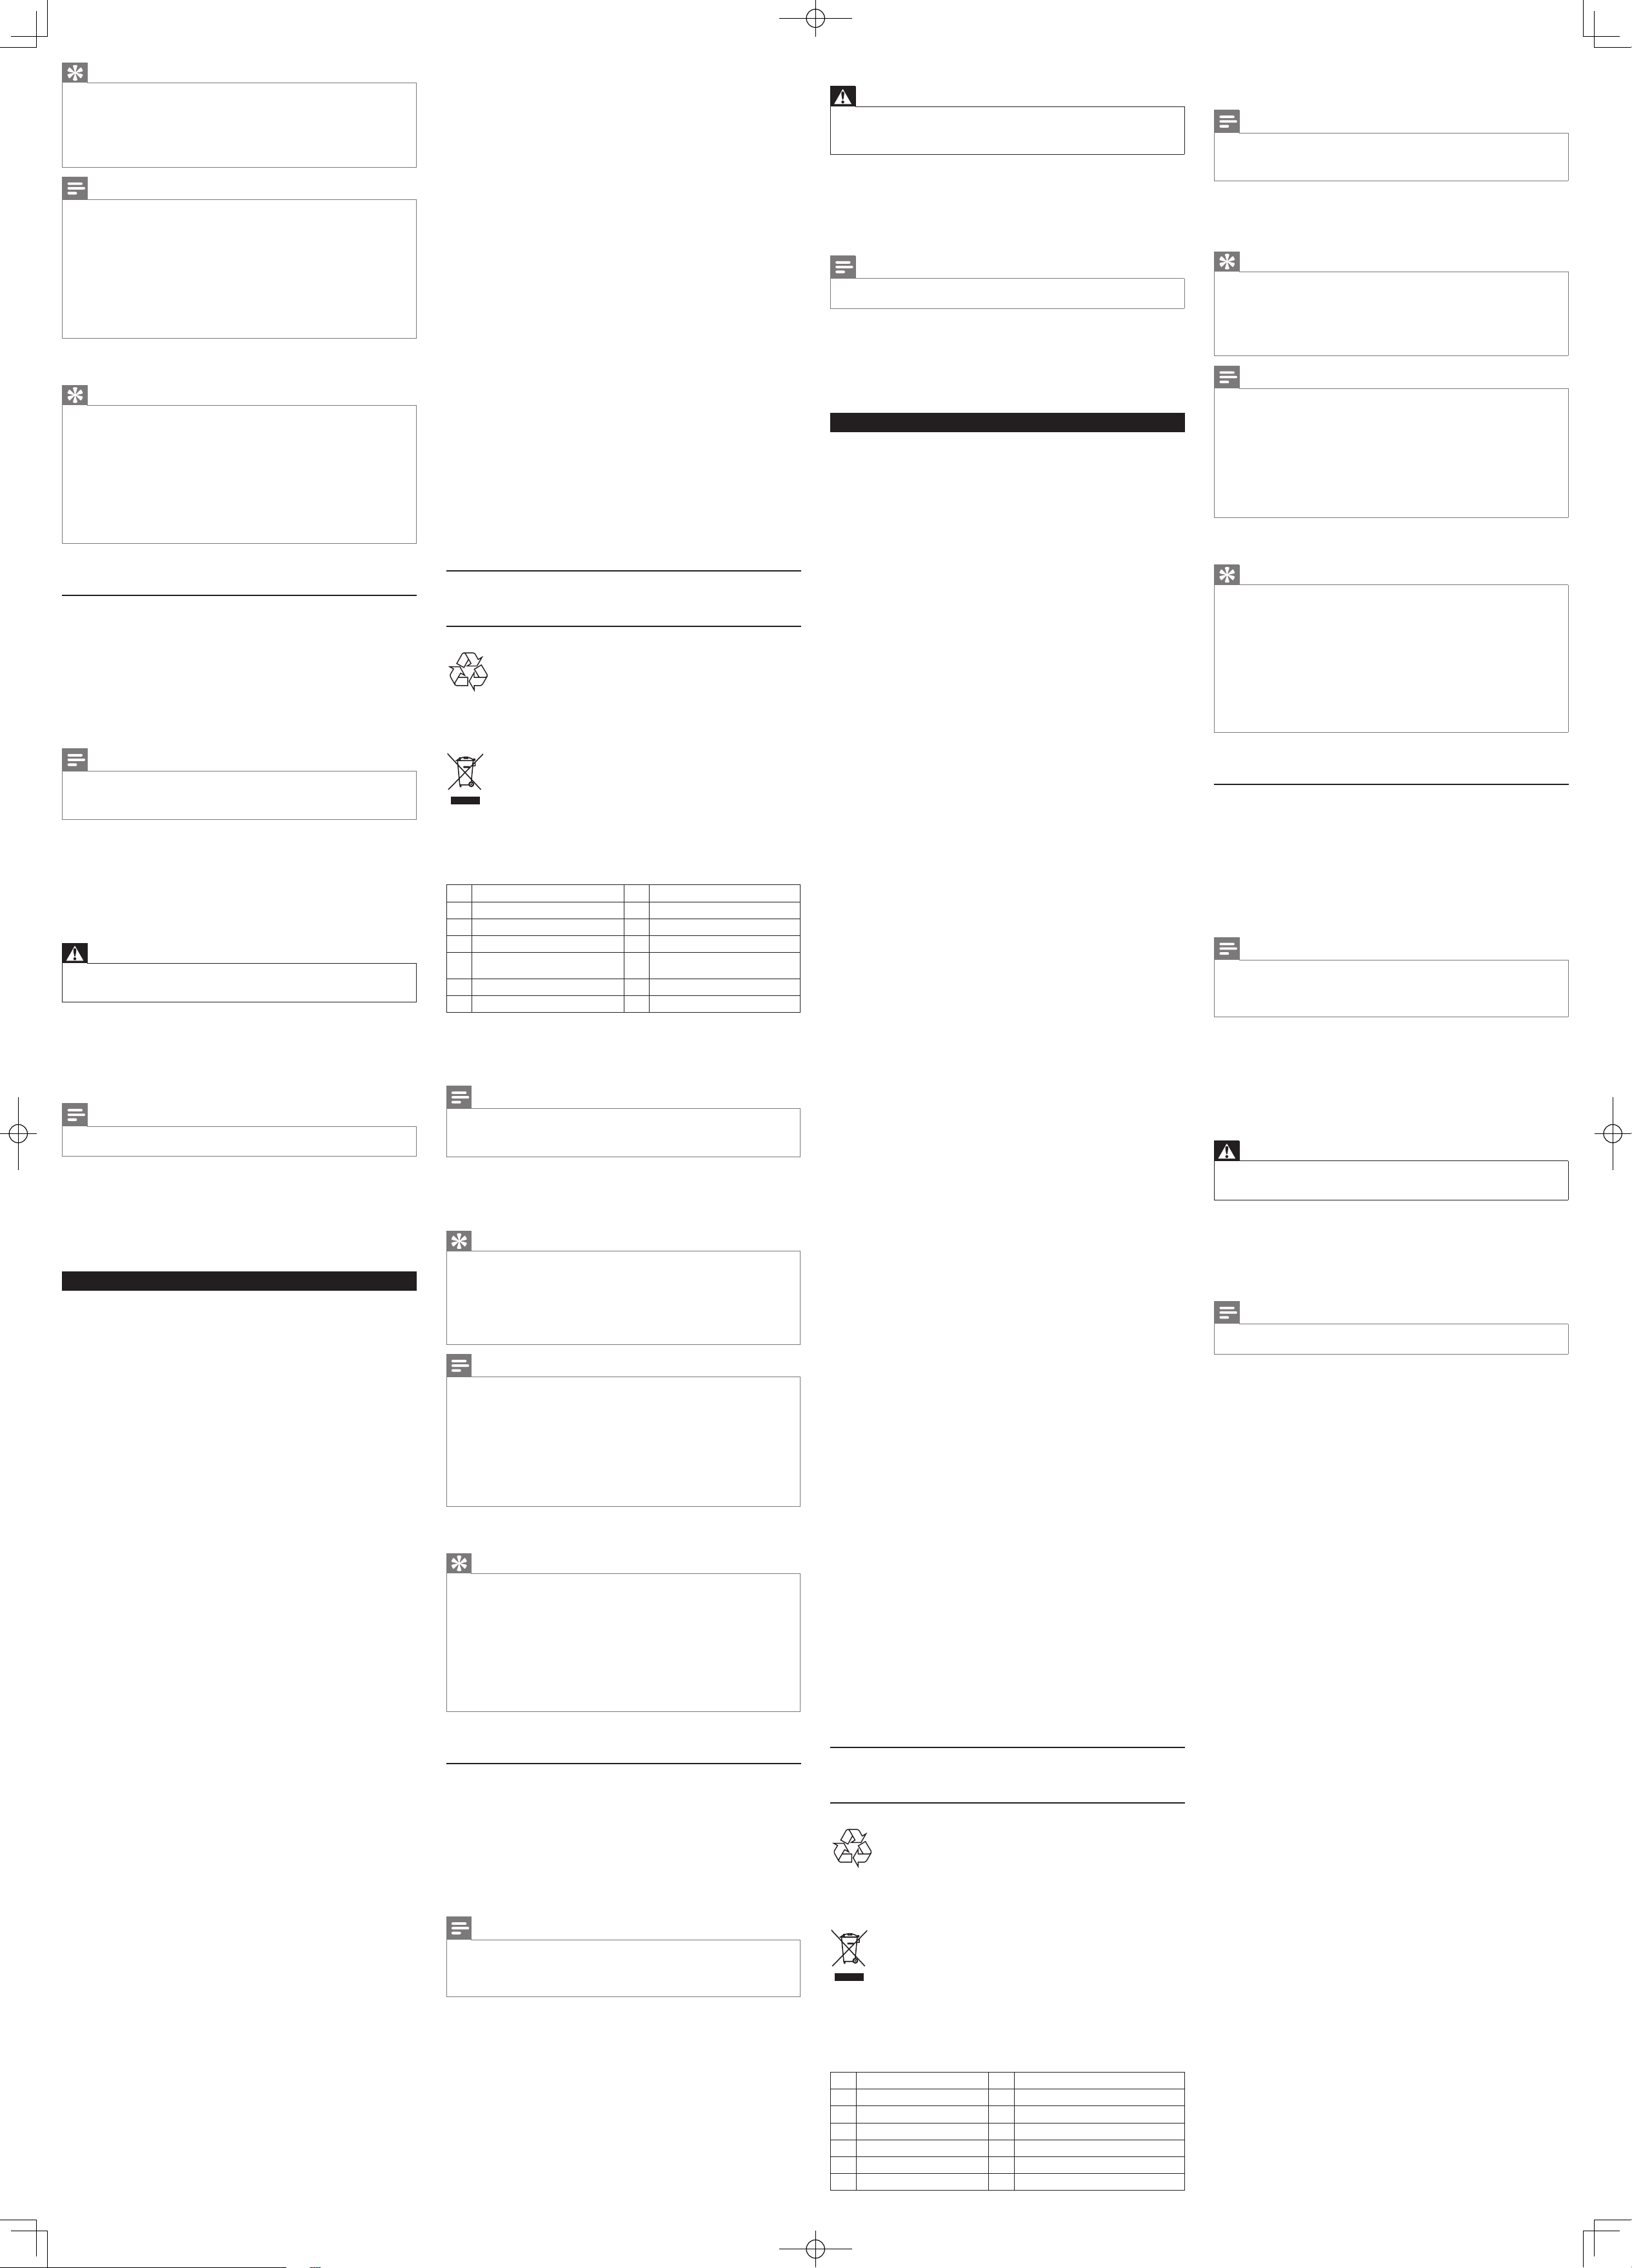
3 Overview (fig.1)
a
Pusher
h
Motor unit
b
Feeding tube
i
Clamps
c
Lid
j
Driving shaft
d
Sieve
k
Spout
e
Pulp collector
l
Juice jug with detachable foam separator
f
Pulp container
m
Cord storage compartment
g
Control knob
4 Preparing for use
Thoroughly clean the parts that come into contact with food before using the appliance
(see chapter ‘Cleaning’).
Note
• Always check the sieve before use. If you detect any cracks or damage, do not use the appliance and
contact the nearest Philips service center or take the appliance to your dealer.
• Make sure the clamps on either side of the lid are locked into position.
5 Using the juicer (fig.2)
Before you start, make sure that you assemble according to g. 2.
You can use the juicer for fruit and vegetable juice.
Tip
• Turn the control knob to setting 1 (low speed) or 2 (normal speed) to switch on the appliance.
Speed 1 is especially suitable for soft fruits and vegetables such as watermelons, grapes, tomatoes
and cucumbers. Speed 2 is suitable for all other kinds of fruit and vegetables such as apples, carrots
and beetroots.
• Drink the juice immediately after you have extracted it. If it is exposed to air for some time, the juice
loses its taste and nutritional value.
• To keep your juice fresh longer, put a cover on the juice jug after juicing.
• To extract the maximum amount of juice, always press down the pusher slowly.
Note
• This appliance only functions if all parts have been properly mounted and the lid has been properly
locked in place with the clamps.
• Do not operate the juicer for more than 40 seconds at a time when you juice heavy loads and let it
cool down to room ambient for next operation. None of the recipes in this user manual constitute
heavy load.
• Do not exert too much pressure on the pusher, as this could affect the quality of the end result. It
could even cause the sieve to come to a halt.
• Never insert your ngers or an object into the feeding tube.
• If the pulp container becomes full during use, switch off the appliance, carefully remove the pulp
container and empty it. Reassemble the empty pulp container before you continue juicing.
• After you have processed all ingredients and the juice ow has stopped, pour the juice from the jug into
the glass. If the foam separator is in the juice jug, the foam is removed from the juice.
6 Tips for juicing
Tip
• Use fresh fruit and vegetables, as they contain more juice. Pineapples, beetroots, celery stalks, apples,
cucumbers, carrots, spinach, melons, tomatoes and grapes are particularly suitable for processing in
the juice extractor.
• You do not have to remove thin peels or skins. Only remove thick peels, e.g. those of oranges,
pineapples and uncooked beetroots.
• If you want to juice fruits with stones, remove the stone before juicing.
• Apple juice turns brown very quickly. To slow down this process, add a few drops of lemon juice.
• Fruits that contain starch, such as bananas, papayas, avocados, gs and mangoes are not suitable for
processing in the juice extractor. Use a food processor, blender or hand blender to process these fruits.
• Leaves and leaf stalks of e.g. lettuce can also be processed in the juice extractor.
• The juicer is not suitable for processing very hard and/or brous or starchy fruits or vegetables such
as sugar cane.
7 Healthy recipe
Horseradish soup
Ingredients:
• 80g butter
• 1 liter vegetable broth
• 50ml horseradish juice (approx. 1 root)
• 250ml whipping cream
• 125ml white wine
• Lemon juice
• Salt
• 3-4 tbsps our
1 Peel the horseradish with a knife.
2 Juice the horseradish.
Note
• This appliance can process 3kg of horseradish in approx. 2 minutes (not including the time required
to remove the pulp). When you juice horseradish, switch off and unplug the appliance and remove
the pulp from the pulp container, the lid and the sieve after you have processed 1kg. When you have
nished processing the horseradish, switch off the appliance and let it cool down to room temperature.
3 Melt the butter in a pan.
4 Slightly sauté the our.
5 Add the broth.
6 Add the horseradish juice.
7 Add the whipping cream and white wine.
8 Add lemon juice and salt to taste.
Når et produkt bærer et affaldsspandssymbol med et kryds på, betyder det, at produktet er
underlagt det europæiske direktiv 2002/96/EC:
Bortskaf aldrig produktet sammen med andet husholdningsaffald. Sørg for at kende de lokale regler
om separat indsamling af elektriske og elektroniske produkter. Korrekt bortskaffelse af udtjente
produkter er med til at forhindre negativ påvirkning af miljøet og menneskers helbred.
3 Oversigt (fig. 1)
a
Nedstopper
h
Motorenhed
b
Påfyldningsrør
i
Låseklemmer
c
Låg
j
Drivaksel
d
Si
k
Udløbstud
e
Frugtkødsopsamler
l
Saftkande med aftagelig skumseparator
f
Frugtkødsbeholder
m
Rum til ledningsopbevaring
g
Kontrolknap
4 Klargøring
Sørg for at rengøre de dele, der kommer i berøring med mad, inden du bruger apparatet
(se afsnittet "Rengøring").
Bemærk
• Kontroller altid sien før brug. Hvis du konstaterer nogen former for revner eller skader, må apparatet
ikke anvendes. Kontakt det nærmeste Philips-servicecenter, eller tag apparatet med hen til din forhandler.
• Sørg for, at låseklemmerne på begge sider af låget er korrekt fastlåst.
5 Brug af juiceren (fig. 2)
Før du starter, skal du sørge for at samle apparatet som vist i Fig. 2.
Du kan bruge juiceren til frugt- og grøntsagsjuice.
Tip
• Drej kontrolknappen til indstilling 1 (lav hastighed) eller 2 (normal hastighed) for at tænde for
apparatet. Hastighed 1 er specielt velegnet til bløde frugter og grøntsager, f.eks. vandmeloner, vindruer,
tomater og agurker. Hastighed 2 er velegnet til alle andre slags frugt og grøntsager, f.eks. æbler,
gulerødder og rødbeder.
• Drik juicen umiddelbart efter, at den er presset. Hvis juicen kommer i kontakt med luft i et stykke tid,
forringes smagen, og en del af vitaminerne går tabt.
• For at holde juicen frisk i længere tid kan du lægge et låg på juicekanden efter presning af juice.
• Du får mest mulig saft ud af presningen ved at trykke nedstopperen langsomt ned.
Bemærk
• Dette apparat fungerer kun, hvis alle dele er samlet korrekt, og låget er låst rigtigt på plads med
låseklemmerne.
• Lad ikke juiceren køre i mere end 40 sekunder ad gangen, når du presser større mængder, og lad
den køle ned til stuetemperatur, før den bruges igen. Ingen af opskrifterne i denne brugervejledning
indeholder store mængder.
• Læg ikke for meget pres på nedstopperen, da dette kan påvirke kvaliteten af det endelige resultat. Du
kan også risikere, at sien går i stå.
• Stik aldrig ngre eller genstande ned i påfyldningsrøret.
• Hvis frugtkødsbeholderen bliver fyldt op under brug, skal du slukke for apparatet og forsigtigt tage
beholderen ud og tømme den. Sæt den tomme frugtkødsbeholder på plads, før du tænder for
juiceren igen.
• Når du har presset alle ingredienserne, og saftstrømmen er stoppet, hælder du saften fra kanden op i
glassene. Hvis skumseparatoren er i juicekanden, bliver skummet siet fra juicen.
6 Tip til presning
Tip
• Brug frisk frugt og grønt, da det indeholder mere saft. Ananas, rødbeder, bladselleri, æbler, agurker,
gulerødder, spinat, meloner, tomater og vindruer er særligt velegnede til at presse i juiceren.
• Det er ikke nødvendigt at fjerne tynde skræller. Fjern kun tykke skræller som f.eks. på appelsiner,
ananas og rå rødbeder.
• Hvis du skal presse frugt med sten i, skal stenene fjernes først.
• Æblejuice bliver hurtigt brunlig. Processen kan forsinkes ved at tilsætte et par dråber citronsaft.
• Frugt, der indeholder stivelse, som f.eks. bananer, papayaer, avocadoer, gner og mangoer, er ikke
velegnede til presning i juiceren. Anvend i stedet en foodprocessor, blender eller stavblender til at
presse disse frugter.
• Blade og stængler fra f.eks. salat kan også presses i saftpresseren.
• Juiceren egner sig ikke til presning af meget hårde og/eller ber- eller stivelsesholdige frugter eller
grøntsager som f.eks. sukkerrør.
7 Sund opskrift
Peberrodssuppe
Ingredienser:
• 80 g smør
• 1 liter grøntsagsbouillon
• 50 ml peberrodsjuice (ca. 1 peberrod)
• 250 ml piskeøde
• 125 ml hvidvin
• Citronsaft
• Salt
• 3-4 spsk mel
1 Skræl peberroden med en kniv.
2 Pres peberroden.
Bemærk
• Dette apparat kan presse 3 kg peberrod på ca. 2 minutter (ekskl. den tid det tager at fjerne
frugtkødet). Når du presser peberrod, skal du slukke apparatet og fjerne frugtkødet fra
frugtkødsbeholderen, låget og sien, når du har presset 1 kg. Når du er færdig med at presse
peberroden, skal du slukke for apparatet og lade det køle ned til stuetemperatur.
3 Smelt smørret i en gryde.
4 Sauter melet.
5 Tilsæt bouillon.
6 Tilsæt peberrodssaft.
7 Tilsæt piskeøde og hvidvin.
8 Tilsæt citronsaft og salt efter behag.
8 Rengøring (fig. 3)
Advarsel
• Brug aldrig skuresvampe eller skrappe rengøringsmidler som f.eks. benzin, acetone eller lignende til
rengøring af apparatet.
• Motorenheden må aldrig kommes ned i vand eller andre væsker eller skylles under vandhanen.
Rengøring er lettest straks efter brug.
1 Sluk for apparatet, tag stikket ud af stikkontakten, og vent, indtil sien holder op med at rotere.
2 Fjern de aftagelige dele fra motorenheden.
3 Vask disse dele med en opvaskebørste i varmt vand tilsat lidt opvaskemiddel, og skyl dem
under vandhanen.
4 Rengør motorenheden med en fugtig klud.
Bemærk
• Brug en blød børste til rengøring af sien.
• Du kan også rengøre alle dele undtagen motorenheden i opvaskemaskinen.
9 Reklamationsret og service
Hvis du har behov for service eller har et problem, kan du besøge Philips' websted på www.philips.com
eller kontakte Philips Kundecenter i dit land (telefonnummeret ndes i folderen "World-Wide
Guarantee"). Hvis der ikke ndes et kundecenter i dit land, bedes du kontakte din lokale Philips-
forhandler.
8 Cleaning (fig.3)
Warning
• Never use scouring pads, abrasive cleaning agents or aggressive liquids such as petrol or acetone to
clean the appliance.
• Never immerse the motor unit in water or any other liquid, nor rinse it under the tap.
Cleaning is easier immediately after use.
1 Switch off the appliance, remove the plug from the wall socket and wait until the sieve has
stopped rotating.
2 Remove the detachable parts from the motor unit.
3 Clean these parts with a cleaning brush in warm water with some washing-up liquid and
rinse them under the tap.
4 Clean the motor unit with a damp cloth.
Note
• Use a soft brush to clean the sieve.
• You can also clean all parts except the motor unit in the dishwasher.
9 Guarantee & service
If you need service or information or if you have a problem, please visit the Philips website at www.
philips.com or contact the Philips Consumer Care Center in your country (you can nd its phone
number in the worldwide guarantee leaet). If there is no Consumer Care Center in your country,
go to your local Philips dealer.
Dansk
1 Indledning
Tillykke med dit køb, og velkommen til Philips! Hvis du vil have fuldt udbytte af den support, som
Philips tilbyder, kan du registrere dit produkt på www.philips.com/welcome.
Apparatet virker kun, når alle dele er korrekt samlet, og låget er korrekt fastlåst med låseklemmerne.
Du kan nde opskrifter på www.philips.com/kitchen.
2 Vigtigt
Læs denne brugsvejledning omhyggeligt igennem, inden apparatet tages i brug, og gem den til
eventuelt senere brug.
Fare
• Motorenheden må aldrig kommes ned i vand eller
andre væsker eller skylles under vandhanen.
• Rengør ikke motorenheden i opvaskemaskinen.
Advarsel
• Før der sluttes strøm til apparatet, kontrolleres det, om
den indikerede netspænding på apparatets basisenhed
svarer til den lokale netspænding.
• Brug ikke apparatet, hvis stik, netledning eller andre dele
er beskadigede.
• Hvis netledningen beskadiges, må den kun udskiftes af
Philips, et autoriseret Philips-serviceværksted eller en
tilsvarende kvaliceret fagmand for at undgå enhver risiko.
• Dette apparat må ikke bruges af børn. Hold apparatet
og ledningen uden for børns rækkevidde.
• Dette apparat kan bruges af personer med reducerede
fysiske, sensoriske eller mentale evner eller manglende
erfaring og viden, hvis de er blevet instrueret i sikker
brug af apparatet og forstår de medfølgende risici.
• Apparatet bør holdes uden for børns rækkevidde for at
sikre, at de ikke kan komme til at lege med det.
• Lad aldrig apparatet køre uden opsyn.
• Brug ikke apparatet, hvis den roterende si eller
beskyttelsesdækslet er beskadiget eller har synlige revner.
Kontakt det nærmeste Philips-servicecenter.
• Stik aldrig ngre eller køkkenredskaber ned i
påfyldningstragten, mens apparatet kører. Brug kun
nedstopperen til dette formål.
• Undlad at berøre de små skær i bunden af sien. De er
meget skarpe.
• For at sikre at apparatet står stabilt, skal du holde overaden,
hvor apparatet står, og bunden af apparatet rent.
• Stik aldrig hånden ned i sien gennem
frugtkødsopsamlerens udgang til frugtkød.
• Sluk for apparatet, og tag stikket ud af stikkontakten,
før du skifter tilbehør eller kommer i nærheden af
dele, der bevæger sig under brug. Tag altid stikket ud
af stikkontakten, hvis det efterlades uden opsyn, og før
samling, adskillelse eller rengøring.
NB!
• Dette apparat er kun beregnet til almindelig
husholdningsbrug.
• Brug aldrig tilbehør eller dele fra andre fabrikanter eller
tilbehør/dele, som ikke specikt er anbefalet af Philips.
Hvis du anvender en sådan type tilbehør eller dele,
annulleres garantien.
• Kontrollér, at alle dele er sat korrekt på, inden juiceren
tændes.
• Spænd altid begge låseklemmer, inden du bruger juiceren.
• Låseklemmerne må først løsnes, når du har slukket
for apparatet, og sien er holdt op med at rotere.
• Fjern ikke beholderen til frugtkødet, mens juiceren kører.
• Lad ikke juiceren køre i mere end 40 sekunder ad gangen,
når du presser større mængder, og lad den køle ned til
stuetemperatur, før den bruges igen. Ingen af opskrifterne i
denne brugervejledning indeholder store mængder.
• Tag altid stikket ud, efter du har brugt apparatet.
• Støjniveau = 86 dB [A]
Elektromagnetiske felter (EMF)
Dette Philips-apparat overholder alle branchens gældende standarder og regler angående
eksponering for elektromagnetiske felter.
Genanvendelse
Dit produkt er udviklet og fremstillet med materialer og komponenter af høj kvalitet, som kan genbruges.
NL Gebruiksaanwijzing
NO Brukerhåndbok
PT Manual do utilizador
SV Användarhandbok
TR Kullanım kılavuzu
AR
FA
EN User manual
DA Brugervejledning
DE Benutzerhandbuch
EL Εγχειρίδιο χρήσης
ES Manual del usuario
FI Käyttöopas
FR Mode d’emploi
IT Manuale utente
1/3
• Μην αγγίζετε τις μικρές αιχμηρές λεπίδες στη βάση
του σουρωτηριού. Είναι πολύ κοφτερές.
• Για να βεβαιωθείτε ότι η συσκευή θα είναι σταθερή,
διατηρείτε καθαρή την επιφάνεια όπου είναι
τοποθετημένη, καθώς και τη βάση της συσκευής.
• Μην αγγίζετε το σουρωτήρι μέσω της εξόδου
πολτού του συλλέκτη πολτού.
• Πριν αλλάξετε εξαρτήματα ή πλησιάσετε
κινούμενα μέρη της συσκευής, απενεργοποιήστε
τη και αποσυνδέστε την από την τροφοδοσία.
Να αποσυνδέετε πάντα τη συσκευή από την
τροφοδοσία όταν την αφήνετε αφύλακτη, καθώς και
πριν τη συναρμολόγηση, την αποσυναρμολόγηση ή
τον καθαρισμό της.
Προσοχή
• Αυτή η συσκευή προορίζεται για οικιακή χρήση
μόνο.
• Μην χρησιμοποιείτε ποτέ εξαρτήματα ή μέρη από
άλλους κατασκευαστές ή που η Philips δεν συνιστά
ρητώς. Αν χρησιμοποιήσετε τέτοια εξαρτήματα ή
μέρη, η εγγύησή σας καθίσταται άκυρη.
• Βεβαιωθείτε ότι όλα τα εξαρτήματα είναι σωστά
τοποθετημένα πριν ενεργοποιήσετε τη συσκευή.
• Να χρησιμοποιείτε τη συσκευή μόνο όταν και τα
δύο κουμπώματα έχουν ασφαλίσει στη θέση τους.
• Απασφαλίστε τα κουμπώματα μόνο αφού
απενεργοποιήσετε τη συσκευή και το σουρωτήρι
σταματήσει να περιστρέφεται.
• Μην αφαιρείτε το δοχείο πολτού όταν η συσκευή
είναι σε λειτουργία.
• Μην λειτουργείτε τον αποχυμωτή για περισσότερο
από 40 δευτερόλεπτα τη φορά όταν αποχυμώνετε
μεγάλη ποσότητα φρούτων και αφήστε τον να
κρυώσει σε θερμοκρασία δωματίου για την επόμενη
λειτουργία. Καμία από τις συνταγές σε αυτό το
εγχειρίδιο χρήσης δεν περιλαμβάνει μεγάλη
ποσότητα φρούτων.
• Να αποσυνδέετε πάντα τη συσκευή από το ρεύμα
μετά τη χρήση.
• Επίπεδο θορύβου = 86 dB [A]
Ηλεκτρομαγνητικά πεδία (EMF)
Η συγκεκριμένη συσκευή της Philips συμμορφώνεται με όλα τα ισχύοντα πρότυπα και τους
κανονισμούς σχετικά με την έκθεση σε ηλεκτρομαγνητικά πεδία.
Ανακύκλωση
Το προϊόν σας έχει σχεδιαστεί και κατασκευαστεί με υλικά και εξαρτήματα υψηλής
ποιότητας, τα οποία μπορούν να ανακυκλωθούν και να ξαναχρησιμοποιηθούν.
Όταν δείτε το σύμβολο του διαγραμμένου κάδου με ρόδες πάνω σε προϊόν, τότε αυτό το
προϊόν καλύπτεται από την Ευρωπαϊκή οδηγία 2002/96/ΕΚ:
Μην απορρίπτετε ποτέ αυτό το προϊόν μαζί με άλλα απορρίμματα του σπιτιού σας.
Ενημερωθείτε για τους τοπικούς κανονισμούς σχετικά με την ξεχωριστή συλλογή
ηλεκτρικών και ηλεκτρονικών προϊόντων. Η σωστή απόρριψη του παλιού σας προϊόντος θα
βοηθήσει στην αποτροπή τυχόν αρνητικών επιπτώσεων στο περιβάλλον και στην ανθρώπινη
υγεία.
3 Επισκόπηση (εικ.1)
a
Εξάρτημα ώθησης
h
Μονάδα μοτέρ
b
Στόμιο τροφοδοσίας
i
Κουμπώματα
c
Καπάκι
j
Άξονας
d
Σίτα
k
Στόμιο
e
Δοχείο συλλογής πολτού
l
Κανάτα χυμού με αποσπώμενο
διαχωριστή αφρού
f
Δοχείο πολτού
m
Χώρος αποθήκευσης καλωδίου
g
Διακόπτης
4 Προετοιμασία για χρήση
Πριν χρησιμοποιήσετε τη συσκευή, καθαρίστε σχολαστικά τα μέρη της που θα έρθουν σε
επαφή με τρόφιμα (δείτε το κεφάλαιο "Καθαρισμός").
Σημείωση
• Να ελέγχετε πάντα τη σήτα πριν τη χρησιμοποιήσετε. Αν εντοπίσετε ρωγμές ή φθορές, μην
χρησιμοποιήσετε τη συσκευή και επικοινωνήστε με το πλησιέστερο εξουσιοδοτημένο κέντρο
σέρβις της Philips ή απευθυνθείτε στον αντιπρόσωπο σας.
• Βεβαιωθείτε ότι τα κουμπώματα έχουν ασφαλίσει σωστά σε κάθε πλευρά του καπακιού.
5 Χρήση του αποχυμωτή (εικ. 2)
Πριν ξεκινήσετε, βεβαιωθείτε ότι έχετε κάνει τη συναρμολόγηση σύμφωνα με την εικ. 2.
Μπορείτε να χρησιμοποιείτε τον αποχυμωτή για χυμούς φρούτων και λαχανικών.
Συμβουλή
• Γυρίστε το διακόπτη ελέγχου στη ρύθμιση 1 (χαμηλή ταχύτητα ) ή 2 (κανονική ταχύτητα) για
να ενεργοποιήσετε τη συσκευή. Η ταχύτητα 1 ενδείκνυται για μαλακά φρούτα και λαχανικά
όπως καρπούζια, σταφύλια, ντομάτες και αγγούρια. Η ταχύτητα 2 ενδείκνυται για όλα τα άλλα
είδη φρούτων και λαχανικών όπως μήλα, καρότα και παντζάρια.
• Πιείτε τον χυμό αμέσως μόλις τον φτιάξετε. Αν εκτεθεί στον αέρα για κάποια ώρα, χάνει τη
γεύση του και την θρεπτική του αξία.
• Για να διατηρήσετε το χυμό φρέσκο για μεγαλύτερο χρονικό διάστημα, τοποθετήστε ένα
κάλυμμα στην κανάτα χυμού μετά την αποχύμωση.
• Για εξαγωγή της μέγιστης ποσότητας χυμού, να πιέζετε πάντα το εξάρτημα ώθησης αργά προς
τα κάτω.
Σημείωση
• Η συσκευή θα λειτουργήσει μόνο όταν όλα τα εξαρτήματα έχουν τοποθετηθεί σωστά και το
καπάκι έχει κλειδώσει καλά στη θέση του με τα κουμπώματα.
• Μην λειτουργείτε τον αποχυμωτή για περισσότερο από 40 δευτερόλεπτα τη φορά όταν
αποχυμώνετε μεγάλη ποσότητα φρούτων και αφήστε τον να κρυώσει σε θερμοκρασία
δωματίου για την επόμενη λειτουργία. Καμία από τις συνταγές σε αυτό το εγχειρίδιο χρήσης
δεν περιλαμβάνει μεγάλη ποσότητα φρούτων.
• Μην ασκείτε μεγάλη πίεση στο εξάρτημα ώθησης, γιατί αυτό μπορεί να επηρεάσει την ποιότητα
του τελικού αποτελέσματος. Μπορεί ακόμη και να μπλοκάρει το σουρωτήρι.
• Ποτέ μην βάζετε τα δάχτυλά σας ή κάποιο αντικείμενο μέσα στο στόμιο τροφοδοσίας.
• Αν το δοχείο πολτού γεμίσει κατά τη διάρκεια της χρήσης, απενεργοποιήστε τη συσκευή,
αφαιρέστε προσεχτικά το δοχείο πολτού και αδειάστε το. Τοποθετήστε ξανά το άδειο δοχείο
πολτού προτού συνεχίσετε.
• Αφού επεξεργαστείτε όλα τα υλικά και σταματήσει η ροή χυμού, σερβίρετε το χυμό από την
κανάτα στο ποτήρι. Αν ο διαχωριστής αφρού βρίσκεται μέσα στην κανάτα χυμού, τότε ο αφρός
διαχωρίζεται από το χυμό.
6 Συμβουλές για την παρασκευή χυμών
Συμβουλή
• Να χρησιμοποιείτε φρέσκα φρούτα και λαχανικά: περιέχουν πολύ περισσότερο χυμό. Ο ανανάς,
τα παντζάρια, οι μίσχοι του σέλινου, τα μήλα, τα αγγούρια, τα καρότα, το σπανάκι, τα πεπόνια, οι
ντομάτες και τα σταφύλια είναι ιδιαίτερα κατάλληλα για επεξεργασία στον αποχυμωτή.
• Δεν χρειάζεται να αφαιρείτε τις λεπτές φλούδες ή τις ίνες. Να αφαιρείτε μόνο τις χοντρές
φλούδες, π.χ. του πορτοκαλιού, του ανανά και των παντζαριών.
• Εάν θέλετε να αποχυμώσετε φρούτα με κουκούτσια, αφαιρέστε τα κουκούτσια πριν από την
αποχύμωση.
• Ο χυμός του μήλου σκουραίνει πάρα πολύ γρήγορα. Για να επιβραδύνετε αυτήν τη διαδικασία,
προσθέστε μερικές σταγόνες λεμονιού.
• Τα φρούτα που περιέχουν άμυλο, όπως η μπανάνα, η παπάγια, το αβοκάντο, το σύκο και
το μάνγκο δεν είναι κατάλληλα για επεξεργασία στη μονάδα παρασκευής χυμού. Για την
επεξεργασία αυτών των φρούτων χρησιμοποιήστε κουζινομηχανή, μπλέντερ ή μπλέντερ χειρός.
• Στον αποχυμωτή μπορείτε επίσης να επεξεργαστείτε φύλλα και κοτσάνια π.χ. μαρουλιού.
• Ο αποχυμωτής δεν είναι κατάλληλος για επεξεργασία φρούτων ή λαχανικών που είναι πολύ
σκληρά, που περιέχουν χοντρές ίνες ή άμυλο, όπως τα ζαχαροκάλαμα.
7 Υγιεινές συνταγές
Σούπα με χρένο
Υλικά:
• 80 γρ. βούτυρο
• 1 λίτρο ζωμό λαχανικών
• 50 ml χυμό χρένου (περίπου 1 ρίζα)
• 250 ml κρέμα σαντιγί
• 125 ml λευκό κρασί
• Χυμός λεμονιού
• Αλάτι
• 3-4 κ. σ. αλεύρι
1 Ξεφλουδίστε το χρένο με ένα μαχαίρι.
2 Στείψτε το χρένο.
5 Verwenden des Entsafters (Abb. 2)
Bevor Sie beginnen, vergewissern Sie sich, dass Sie die Teile gemäß Abbildung 2 montieren.
Sie können den Entsafter für Frucht- und Gemüsesaft verwenden.
Tipp
• Drehen Sie den Regler auf Stufe 1 (niedrige Geschwindigkeit) oder Stufe 2 (normale
Geschwindigkeit), um das Gerät einzuschalten. Stufe 1 eignet sich besonders für weiches Obst/
Gemüse, z. B. Wassermelonen, Weintrauben, Tomaten und Gurken. Stufe 2 eignet sich für alle Obst-
und Gemüsesorten, z. B. Äpfel, Möhren und rote Beete.
• Trinken Sie den Saft sofort nach der Zubereitung. Die Säfte verlieren ihren Geschmack und ihren
Nährwert, wenn sie einige Zeit an der Luft stehen.
• Um Ihren Saft länger frisch zu halten, decken Sie die Saftkanne nach dem Entsaften ab.
• Um eine hohe Saftausbeute zu erzielen, sollten Sie den Stopfer stets langsam drücken.
Hinweis
• Das Gerät arbeitet nur, wenn alle Teile richtig montiert sind und der Deckel mithilfe der Klemmen
fest aufgesetzt ist.
• Lassen Sie das Gerät beim Entsaften großer Mengen nicht länger als 40 Sekunden in einem
Arbeitsgang laufen, und lassen Sie es zur nächsten Inbetriebnahme auf Raumtemperatur abkühlen.
Keines der Rezepte in diesem Benutzerhandbuch sieht große Mengen vor.
• Wenden Sie nicht zu viel Druck auf den Stopfer an, da dies das Ergebnis beeinträchtigen könnte. Es
könnte sogar dazu führen, dass das Sieb anhält.
• Stecken Sie keinesfalls Ihre Finger oder Gegenstände in die Einfüllöffnung.
• Bei vollem Fruchteischbehälter während des Betriebs schalten Sie das Gerät aus, nehmen Sie den
Behälter vorsichtig ab, und entleeren Sie ihn. Setzen Sie den entleerten Fruchteischbehälter wieder
in das Gerät, bevor Sie mit dem Entsaften fortfahren.
• Nachdem Sie alle Zutaten verarbeitet haben und kein Saft mehr ausießt, gießen Sie den Saft aus der
Kanne in ein Glas. Bendet sich das Schaumsieb in der Saftkanne, wird der Schaum vom Saft entfernt.
6 Tipps zum Entsaften
Tipp
• Verwenden Sie frisches Obst und Gemüse, da diese mehr Saft enthalten. Der Entsafter eignet sich
besonders zum Verarbeiten von Ananas, roter Beete, Stangensellerie, Äpfeln, Gurken, Karotten, Spinat,
Melonen, Tomaten und Weintrauben.
• Sie müssen die Schalen nicht unbedingt entfernen. Entfernen Sie nur dicke Schalen, z. B. die von
Orangen, Ananas und roher roter Beete.
• Entfernen Sie vor dem Entsaften von Steinobst alle Steine.
• Apfelsaft wird schnell braun. Sie können diesen Vorgang verzögern, indem Sie dem Apfelsaft einige
Tropfen Zitronensaft beifügen.
• Stärkehaltige Früchte (z. B. Bananen, Papayas, Avocados, Feigen und Mangos) sind zum Entsaften in
diesem Gerät nicht geeignet. Verwenden Sie für solche Früchte eine Küchenmaschine, einen Mixer
oder einen Stabmixer.
• Blätter und Stiele (z. B. Strünke von Blattsalat) können ebenfalls in diesem Entsafter verarbeitet
werden.
• Der Entsafter eignet sich nicht zum Verarbeiten von besonders hartem, faserigem und stärkehaltigem
Obst und Gemüse (z. B. Zuckerrohr).
7 Gesunde Rezept
Meerrettichsuppe
Zutaten:
• 80 g Butter
• 1 Liter Gemüsebrühe
• 50 ml Meerrettichsaft (ca. 1 Wurzel)
• 250 ml Schlagsahne
• 125 ml Weißwein
• Zitronensaft
• Salz
• 3 - 4 EL Mehl
1 Schälen Sie den Meerrettich mit einem Messer.
2 Entsaften Sie den Meerrettich.
Hinweis
• Dieses Gerät kann 3 kg Meerrettich in ca. 2 Minuten verarbeiten (abzüglich der Zeit zum Entfernen
des Fruchteischs). Wenn Sie Meerrettich entsaften, schalten Sie das Gerät aus, und trennen Sie es
von der Stromversorgung, um das Fruchteisch aus dem Fruchteischbehälter, dem Deckel und dem
Sieb zu entfernen, nachdem Sie 1 kg verarbeitet haben. Wenn Sie die Verarbeitung des Meerrettichs
abgeschlossen haben, schalten Sie das Gerät aus, und lassen Sie es auf Raumtemperatur abkühlen.
3 Lassen Sie die Butter in einer Pfanne zergehen.
4 Braten Sie das Mehl leicht an.
5 Geben Sie die Suppenbrühe dazu.
6 Geben Sie den Meerrettichsaft dazu.
7 Geben Sie die Schlagsahne und den Weißwein dazu.
8 Schmecken Sie alles mit Zitronensaft und Salz ab.
8 Reinigung (Abb. 3)
Warnung
• Benutzen Sie zum Reinigen des Geräts keine Scheuerschwämme und -mittel oder aggressive
Flüssigkeiten wie Benzin oder Azeton.
• Tauchen Sie die Motoreinheit niemals in Wasser oder andere Flüssigkeiten; spülen Sie sie auch nicht
unter ießendem Wasser ab.
Am einfachsten lässt sich das Gerät unmittelbar nach dem Gebrauch reinigen.
1 Schalten Sie das Gerät aus, ziehen Sie den Netzstecker aus der Steckdose, und warten Sie, bis
das Sieb zum Stillstand gekommen ist.
2 Entfernen Sie die abnehmbaren Teile von der Motoreinheit.
3 Reinigen Sie diese Teile mit der Bürste in warmem Spülwasser, und spülen Sie sie unter
ießendem Wasser ab.
4 Reinigen Sie die Motoreinheit mit einem feuchten Tuch.
Hinweis
• Reinigen Sie das Sieb mit einer weichen Bürste.
• Sie können sämtliche Teile mit Ausnahme der Motoreinheit auch im Geschirrspüler reinigen.
9 Garantie und Kundendienst
Benötigen Sie weitere Informationen oder treten Probleme auf, wenden Sie sich bitte an Ihren
Philips Händler, oder setzen Sie sich mit einem Philips Service-Center in Ihrem Land in Verbindung
(Sie nden die Telefonnummer in der internationalen Garantieschrift). Besuchen Sie auch die Philips
Website (www.philips.com). Sollte es in Ihrem Land kein Service-Center geben, wenden Sie sich
bitte an Ihren lokalen Philips Händler.
Ελληνικά
1 Εισαγωγή
Συγχαρητήρια για την αγορά σας και καλωσορίσατε στη Philips! Για να επωφεληθείτε πλήρως
από την υποστήριξη που προσφέρει η Philips, δηλώστε το προϊόν σας στη διεύθυνση www.
philips.com/welcome.
Η συσκευή λειτουργεί μόνο όταν όλα τα μέρη έχουν συναρμολογηθεί σωστά και το καπάκι
έχει ασφαλίσει σωστά στη θέση του με τα κουμπώματα.
Για συνταγές, επισκεφθείτε τη διεύθυνση www.philips.com/kitchen.
2 Σημαντικό
Διαβάστε προσεκτικά το παρόν εγχειρίδιο χρήσης προτού χρησιμοποιήσετε τη συσκευή και
κρατήστε το για μελλοντική αναφορά.
Κίνδυνος
• Μην βυθίζετε ποτέ το μοτέρ σε νερό ή σε
οποιοδήποτε άλλο υγρό, ούτε να το ξεπλένετε με
νερό βρύσης.
• Μην καθαρίζετε το μοτέρ στο πλυντήριο πιάτων.
Προειδοποίηση
• Ελέγξτε αν η τάση που αναγράφεται στη βάση της
συσκευής αντιστοιχεί στην τοπική τάση ρεύματος
πριν συνδέσετε τη συσκευή.
• Μην χρησιμοποιείτε τη συσκευή αν το φις, το
καλώδιο ή άλλα μέρη της συσκευής έχουν φθαρεί.
• Αν το καλώδιο υποστεί φθορά, θα πρέπει να
αντικατασταθεί από τη Philips, από κάποιο κέντρο
επισκευών εξουσιοδοτημένο από τη Philips ή
από εξίσου εξειδικευμένα άτομα, προς αποφυγή
κινδύνου.
• Αυτή η συσκευή δεν πρέπει να χρησιμοποιείται από
παιδιά. Κρατήστε τη συσκευή και το καλώδιό της
μακριά από παιδιά.
• Αυτή η συσκευή μπορεί να χρησιμοποιηθεί από
άτομα με περιορισμένες σωματικές, αισθητήριες
ή διανοητικές ικανότητες ή από άτομα χωρίς
εμπειρία και γνώση, με την προϋπόθεση ότι τη
χρησιμοποιούν υπό επιτήρηση ή ότι έχουν λάβει
οδηγίες σχετικά με την ασφαλή της χρήση και
κατανοούν τους ενεχόμενους κινδύνους.
• Τα παιδιά πρέπει να επιβλέπονται, ώστε να μην
παίζουν με τη συσκευή.
• Μην αφήνετε ποτέ τη συσκευή να λειτουργεί χωρίς
επίβλεψη.
• Μην χρησιμοποιείτε τη συσκευή αν το
περιστρεφόμενο σουρωτήρι ή το προστατευτικό
κάλυμμα έχει φθαρεί ή έχει ορατές ρωγμές. Στην
περίπτωση αυτή, επικοινωνήστε με το πλησιέστερο
εξουσιοδοτημένο κέντρο επισκευών της Philips.
• Ποτέ μην βάζετε τα δάχτυλά σας ή κάποιο
αντικείμενο μέσα στο στόμιο τροφοδοσίας ενώ
λειτουργεί η συσκευή. Χρησιμοποιήστε μόνο το
εξάρτημα ώθησης για αυτόν το σκοπό.
Σημείωση
• Αυτή η συσκευή μπορεί να επεξεργαστεί 3 κιλά χρένο σε περίπου 2 λεπτά (χωρίς το
χρόνο που απαιτείται για την αφαίρεση του πολτού). Αφού αποχυμώσετε 1 κιλό χρένο,
απενεργοποιήστε τη συσκευή και αποσυνδέστε το φις από την πρίζα για να αφαιρέσετε
τον πολτό από το δοχείο πολτού, το καπάκι και το σουρωτήρι. Όταν ολοκληρώσετε την
επεξεργασία του χρένου, απενεργοποιήστε τη συσκευή και αφήστε τη να κρυώσει σε
θερμοκρασία δωματίου.
3 Λιώστε το βούτυρο σε ένα τηγάνι.
4 Σοτάρετε ελαφρά το αλεύρι.
5 Προσθέστε το ζωμό.
6 Προσθέστε το χυμό χρένου.
7 Προσθέστε την κρέμα γάλακτος και το λευκό κρασί.
8 Προσθέστε το χυμό λεμονιού και αλάτι για γεύση.
8 Καθαρισμός (εικ. 3)
Προειδοποίηση
• Μην καθαρίζετε τη συσκευή με συρμάτινα σφουγγαράκια, στιλβωτικά καθαριστικά ή υγρά όπως
πετρέλαιο ή ασετόν.
• Μην βυθίζετε ποτέ το μοτέρ σε νερό ή σε οποιοδήποτε άλλο υγρό, ούτε να το ξεπλένετε με
νερό βρύσης.
Ο καθαρισμός είναι ευκολότερος αμέσως μετά τη χρήση.
1 Απενεργοποιήστε τη συσκευή, αποσυνδέστε το φις από την πρίζα και περιμένετε μέχρι
να σταματήσει να περιστρέφεται το σουρωτήρι.
2 Αφαιρέστε τα αποσπώμενα μέρη από τη μονάδα μοτέρ.
3 Καθαρίστε αυτά τα εξαρτήματα με ένα βουρτσάκι καθαρισμού σε ζεστό νερό με λίγο
υγρό απορρυπαντικό και ξεπλύντε τα με νερό βρύσης.
4 Καθαρίστε το μοτέρ με ένα υγρό πανί.
Σημείωση
• Καθαρίστε το σουρωτήρι με ένα μαλακό βουρτσάκι.
• Μπορείτε επίσης να καθαρίσετε όλα τα μέρη της συσκευής, εκτός από το μοτέρ, στο πλυντήριο
πιάτων.
9 Εγγύηση και επισκευή
Αν χρειάζεστε επισκευή ή πληροφορίες ή αν αντιμετωπίζετε κάποιο πρόβλημα, επισκεφτείτε
τη διαδικτυακή τοποθεσία της Philips στη διεύθυνση www.philips.com ή επικοινωνήστε με το
Κέντρο Εξυπηρέτησης Καταναλωτών της Philips στη χώρα σας (θα βρείτε το τηλέφωνο στο
φυλλάδιο της διεθνούς εγγύησης). Αν δεν υπάρχει Κέντρο Εξυπηρέτησης Καταναλωτών στη
χώρα σας, απευθυνθείτε στον τοπικό αντιπρόσωπο της Philips.
Deutsch
1 Einführung
Herzlichen Glückwunsch zu Ihrem Kauf und willkommen bei Philips. Um das Kundendienstangebot
von Philips vollständig nutzen zu können, sollten Sie Ihr Produkt unter www.philips.com/welcome
registrieren.
Das Gerät funktioniert nur, wenn alle Teile richtig montiert sind und der Deckel mit den Klemmen
fest verriegelt ist.
Rezepte nden Sie unter www.philips.com/kitchen.
2 Wichtig
Lesen Sie diese Bedienungsanleitung vor dem Gebrauch des Geräts aufmerksam durch, und
bewahren Sie sie für eine spätere Verwendung auf.
Gefahr
• Tauchen Sie die Motoreinheit niemals in Wasser oder
andere Flüssigkeiten; spülen Sie sie auch nicht unter
ießendem Wasser ab.
• Reinigen Sie die Motoreinheit nicht im Geschirrspüler.
Warnhinweis
• Prüfen Sie vor Inbetriebnahme, ob die Spannungsangabe
an der Unterseite des Geräts mit der örtlichen
Netzspannung übereinstimmt.
• Benutzen Sie das Gerät nicht, wenn der Netzstecker, das
Netzkabel oder ein anderes Teil des Geräts defekt oder
beschädigt ist.
• Um Gefährdungen zu vermeiden, darf ein defektes
Netzkabel nur von Philips, einem von Philips
autorisierten Service-Center oder einer ähnlich
qualizierten Person ersetzt werden.
• Dieses Gerät sollte nicht von Kindern verwendet
werden. Halten Sie das Gerät und das Netzkabel
außerhalb der Reichweite von Kindern.
• Dieses Gerät kann von Personen mit verringerten
physischen, sensorischen oder psychischen Fähigkeiten
oder Mangel an Erfahrung und Kenntnis verwendet
werden, wenn sie bei der Verwendung beaufsichtigt
wurden oder Anweisung zum sicheren Gebrauch des
Geräts erhalten und die Gefahren verstanden haben.
• Achten Sie darauf, dass Kinder nicht mit dem Gerät
spielen.
• Lassen Sie das eingeschaltete Gerät niemals
unbeaufsichtigt.
• Verwenden Sie das Gerät nicht, wenn das drehende
Sieb oder die Schutzabdeckung beschädigt ist oder
sichtbare Sprünge aufweist, und wenden Sie sich an ein
Philips Service-Center in Ihrer Nähe.
• Greifen Sie unter keinen Umständen bei laufendem
Gerät mit der Hand oder einem Gegenstand in die
Einfüllöffnung. Verwenden Sie dazu nur den Stopfer.
• Vermeiden Sie jede Berührung mit den kleinen
Raspelklingen am Boden des Siebs. Diese sind sehr
scharf.
• Halten Sie die Arbeitsäche, auf der das Gerät steht,
und die Unterseite des Geräts sauber, damit es nicht
rutschen kann.
• Greifen Sie nicht durch den Auslass des
Fruchteischbehälters in das Sieb.
• Schalten Sie das Gerät aus, und trennen Sie es von der
Stromversorgung, bevor Sie Zubehörteile austauschen
oder Teile anfassen, die sich bei Gebrauch bewegen.
Trennen Sie das Gerät immer von der Stromversorgung,
wenn Sie es unbeaufsichtigt lassen und bevor Sie es
zusammensetzen, auseinandernehmen oder reinigen.
Vorsicht
• Dieses Gerät ist nur für den Gebrauch im Haushalt
bestimmt.
• Verwenden Sie niemals Zubehör oder Teile, die
von Drittherstellern stammen bzw. nicht von Philips
empfohlen werden. Wenn Sie diese(s) Zubehör oder
Teile verwenden, erlischt Ihre Garantie.
• Prüfen Sie, bevor Sie das Gerät einschalten, ob alle Teile
korrekt montiert sind.
• Benutzen Sie das Gerät nur, wenn beide Klemmen fest
verriegelt sind.
• Lösen Sie die beiden Klemmen erst, nachdem Sie das
Gerät ausgeschaltet haben und das Sieb zum Stillstand
gekommen ist.
• Nehmen Sie den Fruchteischbehälter nicht ab, solange
das Gerät in Betrieb ist.
• Lassen Sie das Gerät beim Entsaften großer Mengen
nicht länger als 40 Sekunden in einem Arbeitsgang
laufen, und lassen Sie es zur nächsten Inbetriebnahme
auf Raumtemperatur abkühlen. Keines der Rezepte in
diesem Benutzerhandbuch sieht große Mengen vor.
• Ziehen Sie nach jedem Gebrauch den Netzstecker aus
der Steckdose.
• Geräuschpegel: Lc = 86 dB [A]
Elektromagnetische Felder
Dieses Philips Gerät erfüllt sämtliche Normen und Regelungen bezüglich der Exposition in
elektromagnetischen Feldern.
Recycling
Ihr Gerät wurde unter Verwendung hochwertiger Materialien und Komponenten entwickelt und
hergestellt, die recycelt und wiederverwendet werden können.
Bendet sich das Symbol einer durchgestrichenen Abfalltonne auf Rädern auf dem Gerät, bedeutet
dies, dass für dieses Gerät die Europäische Richtlinie 2002/96/EG gilt.
Entsorgen Sie dieses Produkt nie mit dem restlichen Hausmüll. Bitte informieren Sie sich über
die örtlichen Bestimmungen zur getrennten Entsorgung von elektrischen und elektronischen
Produkten. Durch die korrekte Entsorgung Ihrer Altgeräte werden Umwelt und Menschen vor
möglichen negativen Folgen geschützt.
3 Überblick (Abb. 1)
a
Stopfer
h
Motoreinheit
b
Einfüllöffnung
i
Klemmen
c
Deckel
j
Antriebsachse
d
Sieb
k
Ausgießer
e
Fluchteischbehälter
l
Saftbehälter mit abnehmbarem
Schaumsieb
f
Fruchteischbehälter
m
Kabelfach
g
Drehschalter
4 Für den Gebrauch vorbereiten
Reinigen Sie Teile, die in Kontakt mit Lebensmitteln kommen, gründlich, bevor Sie das Gerät
verwenden (Siehe Kapitel "Reinigung").
Hinweis
• Prüfen Sie das Sieb stets vor dem Gebrauch. Verwenden Sie ihn nicht, wenn er einen Sprung aufweist
oder in irgendeiner Hinsicht beschädigt ist. Wenden Sie sich in diesem Fall an das nächste Philips
Service Center oder Ihren Philips Händler.
• Achten Sie darauf, dass die Klemmen an beiden Seiten des Deckels fest verriegelt sind.

2/33140 035 37451
Español
1 Introducción
Enhorabuena por su compra y bienvenido a Philips. Para aprovechar al máximo la asistencia que
ofrece Philips, registre el producto en www.Philips.com/welcome.
El aparato solo funciona si se han montado bien todas las piezas y se ha jado correctamente la
tapa por medio de los cierres de sujeción.
Para recetas, vaya a www.philips.com/kitchen.
2 Importante
Antes de usar el aparato, lea atentamente este manual de usuario y consérvelo por si necesitara
consultarlo en el futuro.
Peligro
• No sumerja nunca la unidad motora en agua u otros
líquidos, ni la enjuague bajo el grifo.
• No limpie la unidad motora en el lavavajillas.
Advertencia
• Antes de conectar el aparato, compruebe si el voltaje
indicado en la base del mismo se corresponde con el
voltaje de red local.
• No utilice el aparato si el enchufe, el cable de
alimentación u otros componentes están dañados.
• Si el cable de alimentación está dañado, debe ser
sustituido por Philips o por un centro de servicio
autorizado por Philips, con el n de evitar situaciones de
peligro.
• Este aparato no debe ser utilizado por los niños.
Mantenga el aparato y el cable fuera del alcance de los
niños.
• Este aparato puede ser usado por personas con su
capacidad física, psíquica o sensorial reducida y por
quienes no tengan los conocimientos y la experiencia
necesarios, si han sido supervisados o instruidos acerca
del uso del aparato de forma segura y siempre que
sepan los riesgos que conlleva su uso.
• Asegúrese de que los niños no jueguen con este
aparato.
• No deje nunca el aparato en funcionamiento sin
vigilancia.
• No utilice el aparato si el tamiz giratorio o la cubierta
protectora están dañados o tienen grietas visibles y
póngase en contacto con el centro de servicio de
Philips más cercano.
• No introduzca nunca los dedos ni ningún otro objeto
en el oricio de entrada mientras el aparato esté
funcionando. Para ello, utilice únicamente el empujador.
• No toque las pequeñas cuchillas de la base del tamiz.
Están muy aladas.
• Para asegurarse de que el aparato se mantiene estable,
mantenga la supercie en la que va a colocarlo y la
parte inferior del aparato limpias.
• No toque el tamiz a través de la salida de la pulpa del
colector de pulpa.
• Apague el aparato y desenchúfelo de la fuente de
alimentación antes de cambiar los accesorios o tocar
alguna de las piezas que está en movimiento durante
su funcionamiento. Desenchufe siempre el aparato de
la fuente de alimentación si lo va a dejar desatendido y
antes de montarlo, desmontarlo o limpiarlo.
Precaución
• Este aparato es sólo para uso doméstico.
• No utilice nunca accesorios ni piezas de otros
fabricantes o que Philips no recomiende
especícamente. Si lo hace, quedará anulada su garantía.
• Antes de encender el aparato, asegúrese de que todas
las piezas están bien montadas.
• Utilice el aparato solo con los cierres de sujeción
cerrados.
• Abra los cierres de sujeción solamente cuando haya
apagado el aparato y el tamiz haya dejado de girar.
• No quite el depósito de pulpa cuando el aparato esté
en funcionamiento.
• No utilice la licuadora durante más de 40 segundos
seguidos cuando procese cantidades grandes, y deje que
se enfríe a temperatura ambiente para el próximo uso.
Ninguna de las recetas que aparecen en este manual de
usuario requiere cantidades grandes.
• Desenchufe siempre el aparato después de usarlo.
• Nivel de ruido Lc = 86 dB [A]
Campos electromagnéticos (CEM)
Este aparato de Philips cumple los estándares y las normativas aplicables sobre exposición a
campos electromagnéticos.
Reciclaje
El producto ha sido diseñado y fabricado con materiales y componentes de alta calidad que
pueden reciclarse y reutilizarse.
Cuando vea el símbolo de cubo de basura tachado en un producto, signica que cumple la
Directiva europea 2002/96/EC:
Nunca se deshaga del producto con el resto de la basura doméstica. Infórmese de la legislación
local sobre la recogida selectiva de productos eléctricos y electrónicos. El desecho correcto de un
producto usado ayuda a evitar consecuencias potencialmente negativas para el medio ambiente y
la salud humana.
3 Vista general (Fig. 1)
a
Empujador
h
Unidad motora
b
Oricio de entrada
i
Cierres de sujeción
c
Tapa
j
Eje motor
d
Tamiz
k
Boquilla
e
Colector de pulpa
l
Jarra para zumo con separador de espuma
desmontable
f
Depósito de pulpa
m
Compartimento para guardar el cable
g
Rueda de control
4 Preparación para su uso
Limpie bien las piezas que vayan a entrar en contacto con los alimentos antes de usar el aparato
(consulte el capítulo "Limpieza").
Nota
• Compruebe siempre el tamiz antes de usarla. Si detecta cualquier grieta o daño no utilice el aparato
y póngase en contacto con el centro de servicio más cercano de Philips o lleve el aparato a su
distribuidor.
• Compruebe que los dos cierres estén bien encajados en su sitio a cada lado de la tapa.
5 Uso de la licuadora (Fig. 2)
Antes de comenzar, asegúrese de que realiza el montaje según la g. 2.
Puede utilizar la licuadora para preparar zumo de frutas y verduras.
• Älä koskaan käytä muita kuin Philipsin valmistamia tai
suosittelemia lisävarusteita tai -osia. Jos käytät muita osia,
takuu ei ole voimassa.
• Varmista, että kaikki osat ovat kunnolla paikallaan, ennen
kuin käynnistät laitteen.
• Käytä laitetta vain silloin, kun molemmat kiinnikkeet ovat
suljettuina.
• Avaa kiinnikkeet vasta, kun laitteen virta on katkaistu ja
siivilä on pysähtynyt.
• Älä poista jäteastiaa, kun laite on käynnissä.
• Käytä mehulinkoa enintään 40 sekuntia kerrallaan,
kun mehustat suuria määriä, ja anna laitteen jäähtyä
huoneenlämpöön ennen seuraavaa käyttöä. Tällaista
tilannetta ei aiheudu noudattaessasi tämän käyttöoppaan
ohjeita.
• Irrota pistoke pistorasiasta aina käytön jälkeen.
• Käyttöääni = 86 dB [A]
Sähkömagneettiset kentät (EMF)
Tämä Philips-laite vastaa kaikkia sähkömagneettisia kenttiä (EMF) koskevia standardeja ja säännöksiä.
Kierrätys
Tuotteen suunnittelussa ja valmistuksessa on käytetty laadukkaita materiaaleja ja osia, jotka voidaan
kierrättää ja käyttää uudelleen.
Jos tuotteeseen on merkitty roskasäiliö, jonka yli on vedetty rasti, se tarkoittaa, että tuotetta koskee
EU-direktiivi 2002/96/EY:
Älä hävitä tuotetta muun kotitalousjätteen mukana. Ota selvää paikallisista sähkölaitteiden ja
elektronisten laitteiden erillistä keräystä koskevista säädöksistä. Hävittämällä vanhan tuotteen oikein
voit ehkäistä mahdollisia ympäristö- ja terveyshaittoja.
3 Yleiskuvaus (kuva 1)
a
Syöttöpainin
h
Runko
b
Syöttöaukko
i
Kiinnikkeet
c
Kansi
j
Akseli
d
Siivilä
k
Kaatonokka
e
Jätteenkeräin
l
Mehukannu, jossa irrotettava vaahdonerotin
f
Jätesäiliö
m
Säilytyspaikka johdolle
g
Valitsin
4 Käyttöönoton valmistelu
Puhdista hyvin kaikki ruoan kanssa kosketuksiin joutuvat osat ennen laitteen käyttöä (katso kohta
Puhdistaminen).
Huomautus
• Tarkista siivilä aina ennen käyttöä. Jos siinä on säröjä tai se on muuten vaurioitunut, älä käytä laitetta.
Ota yhteys lähimpään Philipsin palvelukeskukseen tai vie laite Philipsin jälleenmyyjälle.
• Varmista, että kumpikin kannen kiinnike on lukittu paikalleen.
5 Mehulingon käyttäminen (kuva 2)
Kokoa laite ennen käyttöä kuvan 2 mukaisesti.
Voit käyttää mehulinkoa hedelmä- ja vihannesmehujen valmistamiseen.
Vihje
• Käynnistä laite kääntämällä valitsin asentoon 1 (hidas nopeus) tai 2 (normaali nopeus). Nopeus 1 sopii
erityisesti pehmeille hedelmille, marjoille ja vihanneksille, kuten vesimelonille, rypäleille, tomaateille
ja kurkuille. Nopeus 2 sopii muille hedelmille ja vihanneksille, kuten omenoille, porkkanoille ja
punajuurille.
• Juo mehu välittömästi valmistuksen jälkeen. Jos mehu seisoo pidempään, se menettää makuaan ja
ravintoarvoaan.
• Mehu säilyy tuoreena pidempään, kun asetat kannen mehun päälle mehustamisen jälkeen.
• Saat puristettua raaka-aineista eniten mehua painamalla syöttöpaininta alas hitaasti.
Huomautus
• Tämä laite käynnistyy vain, jos kaikki osat on asennettu oikein ja kansi on lukittu kiinnikkeillä.
• Käytä mehulinkoa enintään 40 sekuntia kerrallaan, kun mehustat suuria määriä, ja anna laitteen jäähtyä
huoneenlämpöön ennen seuraavaa käyttöä. Tällaista tilannetta ei aiheudu noudattaessasi tämän
käyttöoppaan ohjeita.
• Älä paina syöttöpaininta liian voimakkaasti, koska se voi heikentää mehun laatua. Se voi myös tukkia
siivilän.
• Älä työnnä sormia tai apuvälineitä syöttösuppiloon.
• Jos jäteastia täyttyy käytön aikana, katkaise laitteesta virta, poista astia varovasti ja tyhjennä se. Aseta
tyhjä jäteastia paikalleen, ennen kuin jatkat mehun valmistusta.
• Kun olet käsitellyt kaikki ainekset eikä mehua enää valu laitteesta, kaada mehu kannusta lasiin. Jos
vaahdonerotin on mehukannussa, vaahto poistetaan mehusta.
6 Mehustusvihjeitä
Vihje
• Käytä tuoreita hedelmiä ja vihanneksia, koska ne sisältävät enemmän mehua. Mehun valmistukseen
sopivat erityisen hyvin ananas, punajuuri, varsiselleri, omena, kurkku, porkkana, pinaatti, meloni,
tomaatti ja rypäleet.
• Ohuita kuoria ei tarvitse poistaa. Vain paksummat kuoret, kuten appelsiinin, ananaksen ja
kypsentämättömien punajuurten kuoret, on poistettava.
• Jos haluat tehdä mehua kivellisistä hedelmistä, poista kivet ennen mehustamista.
• Omenamehu tummuu nopeasti. Voit hidastaa tummumista lisäämällä mehuun muutaman tipan
sitruunamehua.
• Mehulingolla ei voi käsitellä paljon tärkkelystä sisältäviä hedelmiä, kuten banaania, papaijaa, avokadoa,
viikunaa ja mangoa. Käytä näiden hedelmien käsittelyyn monitoimikonetta, tehosekoitinta tai
sauvasekoitinta.
• Voit käyttää mehulingossa myös lehtiä ja lehtivarsia, kuten lehtisalaattia.
• Mehulinko ei sovellu erittäin kovien, kuituisten tai tärkkelyspitoisten hedelmien tai vihannesten, kuten
sokeriruo'on, käsittelyyn.
7 Terveellinen resepti
Piparjuurikeitto
Ainekset:
• 80 g voita
• 1 litra kasvislientä
• 50 ml piparjuurimehua (noin 1 juuri)
• 2,5 dl vispikermaa
• 125 ml valkoviiniä
• Sitruunamehua
• Suola
• 3-4 rkl jauhoja
1 Kuori piparjuuri veitsellä.
2 Purista piparjuuren mehu.
Huomautus
• Laite pystyy käsittelemään 3 kg piparjuurta noin 2 minuutissa (mukaan ei ole laskettu soseen
poistamista). Piparjuuren mehustaminen vaatii soseen poistamisen 1 kg:n juureserän jälkeen. Katkaise
virta ja irrota virtajohto ennen kuin poistat soseen keräysastiasta, kannesta ja siivilästä. Kun lopetat
ainesten käsittelemisen, katkaise laitteesta virta ja anna sen jäähtyä huoneenlämpöiseksi.
3 Sulata voi kattilassa.
4 Ruskista jauhot kevyesti.
5 Lisää kasvisliemi.
6 Lisää piparjuurimehu.
7 Lisää vispikerma ja valkoviini.
8 Lisää sitruunamehu ja mausta suolalla.
8 Puhdistaminen (kuva 3)
Vakava varoitus
• Älä käytä naarmuttavia tai syövyttäviä puhdistusaineita tai -välineitä laitteen puhdistamiseen (kuten
bensiiniä tai asetonia).
• Älä upota runkoa veteen tai muuhun nesteeseen. Älä myöskään huuhtele sitä vesihanan alla.
Puhdistaminen sujuu helpommin heti käytön jälkeen.
1 Katkaise laitteesta virta, irrota pistoke pistorasiasta ja odota, että siivilä pysähtyy.
2 Irrota irrotettavat osat rungosta.
3 Puhdista nämä osat puhdistusharjan avulla. Käytä lämmintä vettä ja astianpesuainetta. Huuhtele
osat vesihanan alla.
4 Pyyhi runko puhtaaksi kostealla liinalla.
Huomautus
• Puhdista siivilä pehmeällä harjalla.
• Runkoa lukuun ottamatta kaikki osat voi pestä astianpesukoneessa.
9 Takuu & huolto
Jos haluat lisätietoja tai laitteen kanssa tulee ongelmia, tutustu Philipsin verkkosivustoon osoitteessa
www.philips.com tai kysy neuvoa Philipsin kuluttajapalvelukeskuksesta (puhelinnumero on
kansainvälisessä takuulehtisessä). Jos maassasi ei ole kuluttajapalvelukeskusta, ota yhteys paikalliseen
Philips-jälleenmyyjään.
Consejo
• Gire el botón de control a la posición 1 (velocidad baja) o 2 (velocidad normal) para encender el
aparato. La velocidad 1 es especialmente adecuada para frutas y verduras blandas, tales como sandía,
uvas, tomates o pepinos. La velocidad 2 es adecuada para otros tipos de fruta y verduras, tales como
manzanas, zanahorias o remolachas.
• Beba el zumo nada más hacerlo. Si queda expuesto al aire libre durante un tiempo, el zumo perderá
su sabor y su valor nutritivo.
• Para mantener el zumo en estado óptimo durante más tiempo, coloque una tapa en la jarra para
zumo después de licuar.
• Para conseguir la máxima cantidad de zumo, presione el empujador despacio.
Nota
• El aparato solo funciona si se han montado todas las piezas correctamente y si la tapa se ha cerrado
bien con los cierres de sujeción.
• No utilice la licuadora durante más de 40 segundos seguidos cuando procese cantidades grandes,
y deje que se enfríe a temperatura ambiente para el próximo uso. Ninguna de las recetas que
aparecen en este manual de usuario requiere cantidades grandes.
• No ejerza demasiada presión con el empujador, ya que esto podría afectar a la calidad del resultado
nal. Podría provocar que el tamiz se detuviera.
• No introduzca los dedos ni ningún objeto por el oricio de entrada.
• Si el depósito de pulpa se llena durante el uso, apague el aparato, quite con cuidado el depósito de
pulpa y vacíelo. Vuelva a colocar el depósito de pulpa vacío antes de seguir haciendo zumo.
• Una vez que haya procesado todos los ingredientes y haya dejado de salir zumo, vierta el zumo de
la jarra en el vaso. Si el separador de espuma está en la jarra para zumo, se eliminará la espuma del
zumo.
6 Consejos de licuado
Consejo
• Utilice frutas y verduras frescas, ya que contienen más zumo. La licuadora es especialmente adecuada
para procesar piñas, remolachas, ramas de apio, manzanas, pepinos, zanahorias, espinacas, melones,
tomates y uvas.
• Ya no tiene que quitar las pieles o cáscaras nas. Solo es necesario quitar las cáscaras gruesas, como
las de las naranjas, las piñas y las remolachas crudas.
• Si desea licuar frutas con hueso, quite el hueso antes de licuar la fruta.
• El zumo de manzana se oxida muy rápidamente. Para retrasar este proceso, añada unas gotas de
zumo de limón.
• Las frutas que tienen fécula, como el plátano, la papaya, el aguacate, los higos o el mango, no son
adecuadas para procesarlas en la licuadora. Utilice un robot de cocina o una batidora de varilla para
procesar este tipo de fruta.
• Las hojas y los tallos, por ejemplo de lechuga, también se pueden procesar en la licuadora.
• La licuadora no es adecuada para procesar frutas muy duras, brosas o con fécula, como la caña de
azúcar.
7 Receta saludable
Sopa de rábano picante
Ingredientes:
• 80 g de mantequilla
• 1 litro de caldo de verduras
• 50 ml de zumo de rábano picante (aprox. 1 raíz)
• 250 ml de nata montada
• 125 ml de vino blanco
• Zumo de limón
• Sal
• 3-4 cucharadas de harina
1 Pele el rábano picante con un cuchillo.
2 Procese el rábano picante en la licuadora.
Nota
• Este aparato puede procesar 3 kg de rábano picante en aprox. 2 minutos (sin incluir el tiempo
necesario para retirar la pulpa). Después de haber procesado 1 kg de rábano picante, apague y
desenchufe el aparato para retirar la pulpa del depósito de pulpa, de la tapa y del tamiz. Cuando
acabe de procesar el rábano picante, apague el aparato y deje que se enfríe a temperatura ambiente.
3 Derrita la mantequilla en una cacerola.
4 Saltee brevemente la harina.
5 Añada el caldo.
6 Añada el zumo de rábano picante.
7 Añada la nata montada y el vino blanco.
8 Añada el zumo de limón y sal al gusto.
8 Limpieza (Fig. 3)
Advertencia
• No utilice estropajos, agentes abrasivos ni líquidos agresivos, como gasolina o acetona, para limpiar
el aparato.
• No sumerja nunca la unidad motora en agua u otros líquidos, ni la enjuague bajo el grifo.
La limpieza es más fácil si se realiza inmediatamente después de usar el aparato.
1 Apague el aparato, desenchúfelo de la red y espere hasta que el tamiz haya dejado de girar.
2 Quite todas las piezas desmontables de la unidad motora.
3 Lave estas piezas en agua templada con algo de detergente líquido con ayuda de un cepillo.
Enjuáguelas bajo el grifo.
4 Limpie la unidad motora con un paño húmedo.
Nota
• Utilice un cepillo suave para limpiar el tamiz.
• También puede lavar todas las piezas en el lavavajillas, a excepción de la unidad motora.
9 Garantía y servicio
Si necesita ayuda, información o si tiene algún problema, visite la página Web de Philips en www.
philips.com o póngase en contacto con el Servicio de Atención al Cliente de Philips en su país
(hallará el número de teléfono en el folleto de la garantía). Si no hay Servicio de Atención al Cliente
en su país, diríjase al distribuidor Philips local.
Suomi
1 Johdanto
Onnittelut ostoksestasi ja tervetuloa Philips-tuotteen käyttäjäksi! Käytä hyväksesi Philipsin tuki ja
rekisteröi tuote osoitteessa www.Philips.com/welcome.
Laite toimii vain, kun kaikki osat on asetettu paikalleen oikein ja kansi on lukittu kiinnikkeiden avulla.
Reseptejä on osoitteessa www.philips.com/kitchen
2 Tärkeää
Lue tämä käyttöopas huolellisesti ennen käyttöä ja säilytä se myöhempää tarvetta varten.
Vaara
• Älä upota runkoa veteen tai muuhun nesteeseen. Älä
myöskään huuhtele sitä vesihanan alla.
• Älä pese runkoa astianpesukoneessa.
Varoitus
• Tarkasta, että laitteen pohjassa oleva jännitemerkintä
vastaa paikallista verkkojännitettä, ennen kuin liität
laitteen pistorasiaan.
• Älä käytä laitetta, jos sen pistoke, virtajohto tai jokin muu
osa on viallinen.
• Jos virtajohto on vahingoittunut, se on oman
turvallisuutesi vuoksi hyvä vaihdattaa Philipsin
valtuuttamassa huoltoliikkeessä tai muulla
ammattitaitoisella korjaajalla.
• Lapset eivät saa käyttää laitetta. Pidä laite ja sen johto
poissa lasten ulottuvilta.
• Laitetta voivat käyttää myös henkilöt, joiden fyysinen
tai henkinen toimintakyky on rajoittunut tai joilla ei
ole kokemusta tai tietoa laitteen käytöstä, jos heitä
on neuvottu laitteen turvallisesta käytöstä tai tarjolla
on turvallisen käytön edellyttämä valvonta ja jos he
ymmärtävät laitteeseen liittyvät vaarat.
• Pienten lasten ei saa antaa leikkiä laitteella.
• Älä jätä laitetta käyntiin ilman valvontaa.
• Jos havaitset pyörivässä siivilässä tai suojakannessa
säröjä tai muita vaurioita, älä käytä laitetta. Ota yhteys
lähimpään Philipsin valtuuttamaan huoltoliikkeeseen.
• Älä työnnä sormiasi tai esineitä syöttösuppiloon, kun laite
on käynnissä. Käytä tähän tarkoitukseen syöttöpaininta.
• Älä koske siivilän alaosassa oleviin pieniin leikkuuteriin.
Ne ovat hyvin teräviä.
• Pidä laitteen pohja ja alusta puhtaana, jotta laite pysyy
tukevasti pystyssä.
• Älä työnnä sormiasi siivilään jätteenkeräimen jäteaukon
kautta.
• Katkaise laitteesta virta ja irrota virtajohto pistorasiasta
ennen kuin vaihdat lisäosia tai aiot koskea osiin, jotka
liikkuvat käytössä. Irrota laitteen virtajohto pistorasiasta,
kun laitetta ei käytetä sekä ennen laitteen kokoamista,
purkamista ja puhdistamista.
Varoitus
• Tämä laite on tarkoitettu vain kotitalouksien käyttöön.
Français
1 Introduction
Félicitations pour votre achat et bienvenue chez Philips ! Pour proter pleinement de l'assistance
offerte par Philips, enregistrez votre appareil à l'adresse suivante : www.philips.com/welcome.
L'appareil fonctionne uniquement lorsque tous les éléments sont correctement assemblés et que le
couvercle est correctement verrouillé à l'aide des brides.
Vous trouverez des recettes sur notre site web www.philips.com/kitchen.
2 Important
Lisez attentivement ce mode d'emploi avant d'utiliser l'appareil et conservez-le pour un usage
ultérieur.
Danger
• Ne plongez jamais le bloc moteur dans l'eau, ni dans
d'autres liquides et ne le rincez pas.
• Ne passez pas le bloc moteur au lave-vaisselle.
Avertissement
• Avant de brancher l'appareil, vériez que la tension
indiquée sur le socle correspond à la tension secteur
locale.
• N'utilisez pas l'appareil si la che, le cordon
d'alimentation ou d'autres éléments sont endommagés.
• Si le cordon d'alimentation est endommagé, il doit
être remplacé par Philips, par un Centre Service Agréé
Philips ou par un technicien qualié an d'éviter tout
accident.
• Cet appareil ne doit pas être utilisé par des enfants.
Tenez l'appareil et le cordon hors de portée des
enfants.
• Cet appareil peut être utilisé par des personnes dont les
capacités physiques, sensorielles ou intellectuelles sont
réduites ou des personnes manquant d'expérience et
de connaissances, à condition que ces personnes soient
sous surveillance ou qu'elles aient reçu des instructions
quant à l'utilisation sécurisée de l'appareil et qu'elles
aient pris connaissance des dangers encourus.
• Veillez à ce que les enfants ne puissent pas jouer avec
l'appareil.
• Ne laissez jamais l'appareil fonctionner sans surveillance.
• N'utilisez pas l'appareil si le ltre rotatif ou le couvercle
de protection est endommagé ou ssuré, et contactez
le Centre Service Agréé Philips le plus proche.
• Ne mettez jamais vos doigts ou tout autre objet dans la
cheminée de remplissage lorsque l'appareil est en cours
de fonctionnement. Utilisez exclusivement le poussoir à
cet effet.
• Ne touchez pas les petites lames à la base du ltre. Elles
sont très coupantes.
• Pour garantir une position stable de l'appareil, assurez-
vous que la surface sur laquelle l'appareil repose et le
fond de l'appareil restent toujours propres.
• N'essayez jamais d'accéder au tamis via l'unité
d'écoulement de la pulpe du récepteur de pulpe.
• Éteignez l'appareil et débranchez-le de l'alimentation
avant de changer les accessoires ou d'approcher les
éléments qui bougent pendant l'utilisation. Débranchez
toujours l'appareil de l'alimentation s'il n'est pas utilisé
et avant de l'assembler, de le désassembler ou de le
nettoyer.
Attention
• Cet appareil est destiné à un usage domestique
uniquement.
• N'utilisez jamais d'accessoires ou de pièces d'un
autre fabricant ou n'ayant pas été spéciquement
recommandés par Philips. L'utilisation de ce type
d'accessoires ou de pièces entraîne l'annulation de la
garantie.
• Avant de mettre l'appareil en marche, assurez-vous que
tous les composants ont été correctement montés.
• Utilisez l'appareil uniquement lorsque les deux brides
sont verrouillées.
• Déverrouillez les brides uniquement après avoir éteint
l'appareil et jusqu'à l'arrêt complet du ltre.
• Ne retirez pas le récepteur de pulpe lorsque l'appareil
est en cours de fonctionnement.
• Ne faites pas fonctionner la centrifugeuse pendant
plus de 40 secondes sans interruption lorsque vous
pressez une grande quantité de fruits/légumes et laissez-
la refroidir à température ambiante avant de continuer.
Aucune des recettes présentées dans ce mode
d'emploi n'inclut de grandes quantités de fruits/légumes.
• Débranchez toujours l'appareil après utilisation.
• Niveau sonore = 86 dB [A]
Champs électromagnétiques (CEM)
Cet appareil Philips est conforme à toutes les normes et à tous les règlements applicables relatifs à
l'exposition aux champs électromagnétiques.
Recyclage
Cet appareil a été conçu et fabriqué avec des matériaux et des composants de haute qualité
pouvant être recyclés et réutilisés.
La présence du symbole représentant une poubelle barrée indique que le produit est conforme à
la directive européenne 2002/96/CE :
Ne jetez pas ce produit avec les ordures ménagères ordinaires. Renseignez-vous sur les
dispositions en vigueur dans votre région concernant la collecte séparée des appareils électriques
et électroniques. La mise au rebut citoyenne de votre ancien produit permet de protéger
l'environnement et la santé.
3 Présentation (fig. 1)
a
Poussoir
h
Bloc moteur
b
Cheminée de remplissage
i
Brides
c
Couvercle
j
Axe d'entraînement
d
Filtre
k
Bec verseur
e
Récepteur de pulpe
l
Réservoir avec séparateur de pulpe amovible
f
Récepteur de pulpe
m
Rangement du cordon
g
Bouton de commande
4 Avant utilisation
Avant d'utiliser l'appareil, nettoyez soigneusement les parties qui entrent en contact avec des
aliments (voir le chapitre « Nettoyage »).
Remarque
• Vériez toujours le ltre avant de l'utiliser. Si vous remarquez des ssures ou dommages, n'utilisez
pas l'appareil et contactez le Centre Service Agréé Philips le plus proche ou déposez l'appareil chez
votre revendeur.
• Assurez-vous que les brides sont bien xées de chaque côté du couvercle.
5 Utilisation de la centrifugeuse (fig. 2)
Avant de commencer, assurez-vous que vous avez effectué le montage conformément à la g. 2.
Vous pouvez utiliser la centrifugeuse pour préparer des jus de fruits ou de légumes.
Conseil
• Réglez le bouton de commande sur la position 1 (vitesse basse) ou sur la position 2 (vitesse
normale) pour allumer l'appareil. La vitesse 1 convient pour les fruits et les légumes tendres tels que
les melons, les raisins, les tomates et les concombres. La vitesse 2 convient pour tous les autres types
de fruits et légumes tels que les pommes, les carottes et les betteraves.
• Buvez le jus immédiatement après l'avoir extrait. S'il reste exposé à l'air un certain temps, le jus perd
sa saveur et sa valeur nutritionnelle.
• Pour que votre jus reste frais plus longtemps, placez un couvercle sur le pichet une fois le jus pressé.
• Pour extraire un maximum de jus, appuyez lentement sur le poussoir.
Remarque
• Cet appareil fonctionne seulement si tous les composants ont été correctement montés et si le
couvercle a été verrouillé à l'aide des brides.
• Ne faites pas fonctionner la centrifugeuse pendant plus de 40 secondes sans interruption lorsque
vous pressez une grande quantité de fruits/légumes et laissez-la refroidir à température ambiante
avant de continuer. Aucune des recettes présentées dans ce mode d'emploi n'inclut de grandes
quantités de fruits/légumes.
• N'exercez pas une pression trop forte sur le poussoir car vous risqueriez d'altérer la qualité du
résultat, voire de bloquer le ltre.
• Ne mettez jamais vos doigts ou tout autre objet dans la cheminée.
• Si le récepteur de pulpe se remplit entièrement en cours d'utilisation, éteignez l'appareil, retirez le
récepteur de pulpe avec précaution et videz-le. Replacez le récepteur de pulpe avant de reprendre la
préparation du jus de fruit.
• Après avoir pressé tous les fruits et légumes et lorsque le jus ne s'écoule plus, versez le jus dans un
verre. Si le séparateur de pulpe se trouve dans le pichet, la pulpe est séparée du jus.
6 Conseils pour l'extraction de jus
Conseil
• Utilisez des fruits et des légumes frais, car ils contiennent plus de jus. La centrifugeuse est
particulièrement adaptée à l'extraction de jus d'ananas, de betteraves, de céleris, de pommes, de
concombres, de carottes, d'épinards, de melons, de tomates et de raisins.
• Il n'est pas nécessaire de retirer les peaux nes. N'ôtez que les peaux épaisses, p. ex. celle des
oranges, ananas et betteraves crues.
• Pour les fruits à noyau, il est recommandé d'enlever le noyau avant de les presser.
• Le jus de pommes brunit très rapidement. Pour ralentir ce processus, ajoutez quelques gouttes de
jus de citron.
• Les fruits contenant de l'amidon tels que les bananes, papayes, avocats, gues et mangues ne
conviennent pas pour un traitement en centrifugeuse. Utilisez un robot ménager, un blender ou un
mixeur plongeant pour ces fruits.
• Les feuilles de salade peuvent être traitées dans la centrifugeuse.
• N'utilisez pas la centrifugeuse pour la préparation de fruits ou légumes trop durs, breux ou
amylacés tels que la canne à sucre.
7 Recette saine
Soupe au raifort
Ingrédients :
• 80 g de beurre
• 1 litre de bouillon de légumes
• 50 ml de jus de raifort (environ 1 racine)
• 250 ml de crème fraîche
• 125 ml de vin blanc
• Jus de citron
• Sel
• 3 à 4 cuillères à soupe de farine
1 Pelez le raifort à l'aide d'un couteau.
2 Pressez le raifort pour en extraire le jus.
Remarque
• Cet appareil peut presser 3 kg de raifort en 2 minutes environ (le temps nécessaire pour retirer
la pulpe n'est pas pris en compte). Une fois que vous avez pressé 1 kg de raifort, éteignez et
débranchez l'appareil, puis retirez la pulpe du récepteur de pulpe, ainsi que le couvercle et le ltre.
Une fois que vous avez ni de presser le raifort, éteignez l'appareil et laissez-le refroidir.
3 Faites fondre le beurre dans une casserole.
4 Faites-y revenir légèrement la farine.
5 Ajoutez le bouillon.
6 Ajoutez le jus de raifort.
7 Ajoutez la crème fraîche et le vin blanc.
8 Ajoutez le jus de citron et salez à votre goût.
8 Nettoyage (fig. 3)
Avertissement
• N'utilisez jamais d'éponges à récurer, de produits abrasifs ou de détergents agressifs tels que
l'essence ou l'acétone pour nettoyer l'appareil.
• Ne plongez jamais le bloc moteur dans l'eau, ni dans d'autres liquides et ne le rincez pas.
Il est plus facile de nettoyer l'appareil immédiatement après son utilisation.
1 Éteignez l'appareil, retirez la che de la prise murale et patientez jusqu'à l'arrêt complet du
ltre.
2 Retirez les parties amovibles du bloc moteur.
3 Nettoyez ces éléments à l'eau chaude savonneuse avec une brosse et rincez-les sous le
robinet.
4 Nettoyez le bloc moteur avec un chiffon humide.
Remarque
• Utilisez une brosse douce pour nettoyer le ltre.
• Vous pouvez également nettoyer tous les éléments au lave-vaisselle à l'exception du bloc moteur.
9 Garantie et service
Si vous rencontrez un problème ou si vous souhaitez obtenir des informations ou faire
réparer votre appareil, rendez-vous sur le site Web de Philips à l'adresse www.philips.com
ou contactez le Service Consommateurs Philips de votre pays (vous trouverez le numéro
de téléphone correspondant dans le dépliant de garantie internationale). S'il n'existe pas de
Service Consommateurs Philips dans votre pays, renseignez-vous auprès de votre revendeur Philips.
Italiano
1 Introduzione
Congratulazioni per l'acquisto e benvenuto in Philips! Per trarre il massimo vantaggio dall'assistenza
fornita da Philips, registrare il proprio prodotto sul sito www.philips.com/welcome.
L'apparecchio funziona solo se tutte le parti sono montate correttamente e se il coperchio è
debitamente bloccato con gli appositi ganci.
Per le ricette, andare su www.philips.com/kitchen.
2 Importante
Prima di utilizzare l'apparecchio, leggere attentamente il presente manuale e conservarlo per
eventuali riferimenti futuri.
Pericolo
• Non immergere mai il motore nell'acqua o in altri liquidi
e non risciacquarlo sotto l'acqua del rubinetto.
• Non pulite il gruppo motore in lavastoviglie.
Avviso
• Prima di collegare l'apparecchio alla presa di corrente,
controllate che la tensione indicata sulla base
dell'apparecchio corrisponda a quella della rete locale.
• Non usate l'apparecchio nel caso in cui il cavo di
alimentazione, la spina o altri componenti risultassero
danneggiati.
• Se il cavo di alimentazione è danneggiato deve
essere sostituito da Philips, da un centro di assistenza
autorizzato Philips o da persone qualicate al ne di
evitare possibili danni.
• Questo apparecchio non deve essere usato dai bambini.
Tenete l'apparecchio e il cavo di alimentazione fuori
dalla portata dei bambini.
• Questo apparecchio può essere usato da persone con
capacità mentali, siche o sensoriali ridotte, prive di
esperienza o conoscenze adatte a condizione che tali
persone abbiano ricevuto assistenza o formazione per
utilizzare l'apparecchio in maniera sicura e capiscano i
potenziali pericoli associati a tale uso.
• Adottare le dovute precauzioni per evitare che i
bambini giochino con l'apparecchio.
• Non lasciate mai in funzione l'apparecchio senza
sorveglianza.
• Se il setaccio rotante o il coperchio sono danneggiati o
presentano crepe visibili, non utilizzare l'apparecchio e
contattare il centro di assistenza Philips più vicino.
• Quando l'apparecchio è in funzione, non mettere mai le
dita o qualsiasi altro oggetto nell'apertura di inserimento
cibo. Per questa operazione, utilizzare solo il pestello.
• Non toccare le piccole lame poste alla base del setaccio.
Sono molto aflate.
• Per assicurarsi che l'apparecchio sia stabile, mantenere la
supercie su cui poggia il dispositivo e la parte inferiore
di quest'ultimo pulite.
• Non mettere la mano nel setaccio attraverso l'apertura
di uscita del raccoglitore della polpa.
8 Pulizia (fig. 3)
Avvertenza
• non usate prodotti o sostanze abrasive o detergenti aggressivi, come benzina o acetone, per pulire
l'apparecchio.
• Non immergere mai il motore nell'acqua o in altri liquidi e non risciacquarlo sotto l'acqua del
rubinetto.
La pulizia risulta più semplice se effettuata subito dopo l'uso.
1 Spegnere l'apparecchio, togliere la spina dalla presa di corrente e aspettare che il setaccio
smetta di ruotare.
2 Rimuovere i pezzi smontabili del gruppo motore.
3 Lavate questi pezzi con una spazzola fornita, utilizzando acqua calda con l'aggiunta di
detergente liquido per i piatti, poi risciacquateli sotto l'acqua corrente.
4 Pulite il gruppo motore con un panno umido.
Nota
• Pulire il setaccio usando una spugna morbida.
• potete lavare tutti i componenti (eccetto il motore) in lavastoviglie.
9 Garanzia e assistenza
Per ricevere ulteriori informazioni, richiedere assistenza o risolvere eventuali problemi, visitate il sito
Web Philips all'indirizzo www.philips.com oppure contattate il centro assistenza clienti Philips di
zona (il numero di telefono è riportato nell'opuscolo della garanzia). Se nel proprio paese non è
presente alcun centro di assistenza clienti, rivolgersi al proprio rivenditore Philips.
Nederlands
1 Introductie
Gefeliciteerd met uw aankoop en welkom bij Philips! Als u volledig wilt proteren van de
ondersteuning die Philips biedt, kunt u uw product registreren op www.philips.com/welcome.
Het apparaat werkt alleen indien alle onderdelen goed bevestigd zijn en het deksel goed met de
klemmen vergrendeld is.
Ga voor recepten naar www.philips.com/kitchen.
2 Belangrijk
Lees deze gebruiksaanwijzing zorgvuldig door voordat u het apparaat gaat gebruiken. Bewaar de
gebruiksaanwijzing om deze zo nodig later te kunnen raadplegen.
Gevaar
• Dompel de motorunit nooit in water of een andere
vloeistof en spoel deze ook niet onder de kraan af.
• Maak de motorunit niet schoon in de vaatwasmachine.
Waarschuwing
• Controleer of het voltage aangegeven op de onderkant
van het apparaat overeenkomt met de plaatselijke
netspanning voordat u de stekker in het stopcontact
steekt.
• Gebruik het apparaat niet indien de stekker, het snoer
of andere onderdelen beschadigd zijn.
• Indien het netsnoer beschadigd is, moet het worden
vervangen door Philips, een door Philips geautoriseerd
servicecentrum of personen met vergelijkbare
kwalicaties om gevaar te voorkomen.
• Dit apparaat buiten bereik van kinderen houden. Houd
het apparaat en het snoer buiten bereik van kinderen.
• Dit apparaat kan worden gebruikt door personen
met verminderde lichamelijke, zintuiglijke of geestelijke
capaciteiten of weinig ervaring en kennis, mits zij
toezicht of instructie hebben ontvangen aangaande
veilig gebruik van het apparaat, en zij de gevaren van het
gebruik begrijpen.
• Houd toezicht op jonge kinderen om te voorkomen
dat ze met het apparaat gaan spelen.
• Laat het apparaat nooit zonder toezicht werken.
• Gebruik het apparaat niet als de draaiende zeef of
de beschermkap beschadigd is of zichtbare barsten
vertonen en neem contact op met het dichtstbijzijnde
Philips-servicecentrum.
• Steek nooit uw vingers of een voorwerp in de
vultrechter terwijl het apparaat in werking is. Gebruik
alleen de stamper voor dit doel.
• Raak de kleine messen onder in de zeef niet aan. Deze
zijn heel scherp.
• Houd het oppervlak waarop het apparaat staat en de
bodem van het apparaat schoon om er zeker van te
zijn dat het apparaat stabiel staat.
• Raak de zeef niet aan via de pulpafvoeropening van de
pulpverzamelaar.
• Schakel het apparaat uit en haal de stekker uit het
stopcontact voor u accessoires verwisselt of in de buurt
komt van onderdelen die tijdens gebruik bewegen. Trek
altijd de stekker uit het stopcontact als u het apparaat
onbeheerd achterlaat en voordat u het apparaat in
elkaar zet, uit elkaar haalt of schoonmaakt.
Let op
• Dit apparaat is uitsluitend bedoeld voor huishoudelijk
gebruik.
• Gebruik nooit accessoires of onderdelen van andere
fabrikanten of die niet speciek zijn aanbevolen door
Philips. Als u dergelijke accessoires of onderdelen
gebruikt, vervalt de garantie.
• Zorg dat alle onderdelen op de juiste wijze zijn
gemonteerd voordat u het apparaat inschakelt.
• Gebruik het apparaat alleen wanneer beide
dekselklemmen vergrendeld zijn.
• Ontgrendel de klemmen pas nadat u het apparaat hebt
uitgeschakeld en de zeef tot stilstand is gekomen.
• Verwijder de pulpopvangbak niet terwijl het apparaat
loopt.
• Laat de sapcentrifuge bij een zware belasting niet
langer dan 40 seconden achtereen werken en laat het
apparaat vervolgens afkoelen tot kamertemperatuur
voordat u verder gaat. Geen van de recepten in deze
gebruiksaanwijzing vormen een zware belasting.
• Haal na gebruik altijd de stekker uit het stopcontact.
• Geluidsniveau = 86 dB [A]
Elektromagnetische velden (EMV)
Dit Philips-apparaat voldoet aan alle normen en voorschriften met betrekking tot blootstelling aan
elektromagnetische velden.
Recycling
Uw product is vervaardigd van kwalitatief hoogwaardige materialen en onderdelen die kunnen
worden gerecycled en hergebruikt.
Wanneer een product is voorzien van een symbool van een afvalcontainer met een kruis
erdoorheen, valt het product onder de Europese richtlijn 2002/96/EG:
Gooi het product nooit weg met ander huishoudelijk afval. Informeer u over de lokale regels inzake
gescheiden afvalophaling van elektrische en elektronische toestellen. Een goede afvalverwerking
van uw oude product draagt bij tot het voorkomen van mogelijke schade voor het milieu en de
volksgezondheid.
3 Overzicht (fig.1)
a
Stamper
h
Motorunit
b
Vultrechter
i
Klemmen
c
Deksel
j
Aandrijfas
d
Zeef
k
Tuit
e
Pulpverzamelaar
l
Sapkan met uitneembare schuimscheider
f
Pulpopvangbak
m
Snoeropbergruimte
g
Bedieningsknop
• Spegnere l'apparecchio e disconnetterlo
dall'alimentazione prima di sostituire gli accessori
o di toccare le parti che si muovono durante l'uso.
Disconnettere sempre l'apparecchio dall'alimentazione
se viene lasciato incustodito e prima di montarlo,
smontarlo o pulirlo.
Attenzione
• Questo apparecchio è destinato esclusivamente all'uso
domestico.
• Non utilizzare mai accessori o parti di altri produttori
oppure componenti non consigliati in modo specico
da Philips. In caso di utilizzo di tali accessori o parti, la
garanzia si annulla.
• Prima di accendere l'apparecchio, controllare che tutte
le parti siano state montate correttamente.
• Quando si usa l'apparecchio, controllare che entrambi i
ganci siano bloccati.
• Sbloccare i morsetti solo dopo aver spento
l'apparecchio e quando il setaccio ha smesso di ruotare.
• Non togliere il contenitore per la polpa mentre
l'apparecchio è in funzione.
• Non utilizzare la centrifuga per più di 40 secondi alla
volta durante la centrifuga con quantità abbondanti
di ingredienti e lasciarla raffreddare a temperatura
ambiente prima di riutilizzarla. Le ricette riportate nel
presente manuale dell'utente non prevedono quantità
abbondanti di ingredienti.
• Dopo l'utilizzo, scollegare sempre l'apparecchio.
• Livello di rumorosità = 86 dB [A]
Campi elettromagnetici (EMF)
Questo apparecchio Philips è conforme a tutti gli standard e alle norme relativi all'esposizione ai
campi elettromagnetici.
Riciclaggio
Questo prodotto è stato progettato e realizzato con materiali e componenti di alta qualità che
possono essere riciclati e riutilizzati.
Se su un prodotto si trova il simbolo di un bidone con ruote, ricoperto da una X, vuol dire che il
prodotto soddisfa i requisiti della Direttiva Comunitaria 2002/96/CE.
Non smaltire questo prodotto con i riuti domestici. Informarsi sui regolamenti locali per la raccolta
differenziata dei prodotti elettrici ed elettronici. Il corretto smaltimento dei prodotti usati aiuta a
prevenire l'inquinamento ambientale e possibili danni alla salute.
3 Panoramica (Fig. 1)
a
Pestello
h
Gruppo motore
b
Apertura inserimento cibo
i
Ganci
c
Coperchio
j
Albero motore
d
Setaccio
k
Beccuccio
e
Raccogli-polpa
l
Brocca per il succo con separatore di
schiuma rimovibile
f
Recipiente polpa
m
Vano portacavo
g
Manopola di comando
4 Preparazione per l'uso
Pulire a fondo le parti a contatto con il cibo prima di utilizzare l'apparecchio (consultare il capitolo
"Pulizia").
Nota
• Prima dell'uso controllare sempre il setaccio. Nel caso di rotture o incrinature, non usare
l'apparecchio e contattare il centro assistenza Philips più vicino oppure portare l'apparecchio presso
un rivenditore autorizzato.
• Controllare che i ganci siano ben chiusi su entrambi i lati del coperchio.
5 Uso della centrifuga (fig. 2)
Prima di iniziare, assemblare le parti come indicato nella Fig. 2.
La centrifuga può essere utilizzata per succhi di frutta e di verdura.
Suggerimento
• Per accendere l'apparecchio, ruotate la manopola di comando sull'impostazione 1 (bassa velocità)
o 2 (velocità normale). La velocità 1 è particolarmente indicata per frutta e verdure tenere come
anguria, uva, pomodori e cetrioli. La velocità 2 è invece indicata per tutti gli altri tipi di frutta e
verdura, come mele, carote e barbabietole.
• Bere il succo immediatamente dopo averlo spremuto. Se esposto all'aria, il succo perde gran parte
del suo sapore e del valore nutritivo.
• Per mantenere il succo fresco più a lungo, posizionare un coperchio sul bicchiere per succo dopo
l'estrazione.
• Per estrarre la massima quantità di succo, premete il pestello lentamente.
Nota
• L'apparecchio funziona solo se tutte le parti sono state montate correttamente e se il coperchio è
stato debitamente bloccato con gli appositi morsetti.
• Non utilizzare la centrifuga per più di 40 secondi alla volta durante la centrifuga con quantità
abbondanti di ingredienti e lasciarla raffreddare a temperatura ambiente prima di riutilizzarla. Le
ricette riportate nel presente manuale dell'utente non prevedono quantità abbondanti di ingredienti.
• Non esercitare troppa pressione sul pestello, poiché questa azione potrebbe ripercuotersi sulla
qualità del succo erogato. E potrebbe persino bloccare il setaccio.
• Non inserire mai le dita o altri oggetti nell'apertura di inserimento cibo.
• Se il recipiente della polpa si riempie durante l'uso, spegnere l'apparecchio, rimuoverlo con cautela e
svuotarlo. Dopo averlo svuotato, rimontare il recipiente per la polpa prima di continuare a spremere
il succo.
• Dopo aver centrifugato tutti gli ingredienti e quando non esce più succo, versare il succo nei bicchieri.
Se il separatore di schiuma è posizionato all'interno della brocca, la schiuma viene eliminata dal succo.
6 Suggerimenti per un succo squisito
Suggerimento
• Usare frutta e verdura fresca poiché contiene più succo. Ananas, barbabietole, gambi di sedano, mele,
cetrioli, carote, spinaci, meloni, pomodori e uva sono particolarmente adatti per essere inseriti nella
centrifuga.
• Non è necessario rimuovere le bucce sottili. Rimuovere solo le bucce più spesse, come quelle di
arance, ananas e barbabietole crude.
• Se desiderate spremere frutta con noccioli rimuoveteli prima di spremere la frutta.
• Il succo di mela annerisce rapidamente. Per rallentare questo processo, aggiungere alcune gocce di
limone.
• I frutti che contengono amido, come banane, papaya, avocado, chi e manghi non si prestano ad
essere centrifugati. Per la lavorazione di questi frutti, utilizzare un robot da cucina, un frullatore o un
frullatore a immersione.
• Con questo apparecchio è possibile utilizzare anche le foglie e i piccioli (ad esempio di lattuga).
• Questo apparecchio non è adatto per centrifugare frutta o verdura particolarmente dura e/o
brosa/ricca d'amido, come la canna da zucchero.
7 Ricetta sana
Zuppa di rafano
Ingredienti:
• 80 g di burro
• 1 litro di brodo vegetale
• 50 ml di succo di rafano (all'incirca 1 radice)
• 250 ml di panna montata
• 125 ml di vino bianco
• Succo di limone
• Sale
• 3-4 cucchiai di farina
1 Pelare il rafano con un coltello.
2 Estrarre il succo di rafano.
Nota
• Questo apparecchio può lavorare 3 kg di rafano in circa 2 minuti (senza contare il tempo
necessario a rimuovere la polpa). Quando si centrifuga il rafano, spegnere l'apparecchio, scollegare
l'alimentazione e rimuovere la polpa dal contenitore, il coperchio e il setaccio dopo aver lavorato
1 kg di prodotto. Al termine della lavorazione, spegnere l'apparecchio e lasciarlo raffreddare a
temperatura ambiente.
3 Fate sciogliere il burro in una padella.
4 Aggiungere la farina ottenendo un sauté.
5 Aggiungere il brodo.
6 Aggiungere il succo di rafano.
7 Aggiungere la panna montata e il vino bianco.
8 Aggiungete il succo di limone e il sale a piacere.
4 Klaarmaken voor gebruik
Maak de onderdelen die in contact komen met voedsel grondig schoon voordat u het apparaat
gebruikt (zie hoofdstuk 'Schoonmaken').
Opmerking
• Controleer de zeef voor ieder gebruik. Als u barstjes of beschadigingen ontdekt, gebruik het apparaat
dan niet en neem contact op met het dichtstbijzijnde Philips-servicecentrum of breng het apparaat
naar uw dealer.
• Zorg ervoor dat de klemmen aan beide zijden van het deksel goed vergrendeld zijn.
5 De sapcentrifuge gebruiken (fig. 2)
Controleer voor u begint of u alles in elkaar zet volgens g. 2.
U kunt de sapcentrifuge gebruiken voor fruit- en groentesap.
Tip
• Draai de bedieningsknop naar stand 1 (lage snelheid) of 2 (normale snelheid) om het apparaat in te
schakelen. Snelheid 1 is met name geschikt voor zacht fruit en zachte groenten zoals watermeloen,
druiven, tomaten en komkommer. Snelheid 2 is geschikt voor alle andere soorten fruit en groenten
zoals appels, wortels en rode bieten.
• Drink het sap meteen nadat u het hebt gemaakt. Als het enige tijd aan lucht wordt blootgesteld,
verliest het sap zijn smaak en voedingswaarde.
• Het sap blijft langer vers als u de kan na gebruik afdekt.
• Om zoveel mogelijk sap te verkrijgen, moet u de stamper altijd langzaam naar beneden duwen.
Opmerking
• Dit apparaat werkt alleen als alle onderdelen op de juiste wijze zijn gemonteerd en het deksel goed
met de klemmen vergrendeld is.
• Laat de sapcentrifuge bij een zware belasting niet langer dan 40 seconden achtereen werken en
laat het apparaat vervolgens afkoelen tot kamertemperatuur voordat u verder gaat. Geen van de
recepten in deze gebruiksaanwijzing vormen een zware belasting.
• Oefen niet te veel druk uit op de stamper, omdat dit een negatief effect kan hebben op de kwaliteit
van het sap. De zeef kan er zelfs door tot stilstand komen.
• Steek nooit uw vingers of een voorwerp in de vultrechter.
• Als de pulpopvangbak tijdens gebruik vol raakt, schakel het apparaat dan uit, verwijder de
pulpopvangbak voorzichtig en leeg deze. Bevestig de lege pulpopvangbak weer aan het apparaat
voordat u verder gaat met sap bereiden.
• Verwerk alle ingrediënten en wacht totdat er geen sap meer uit de tuit stroomt. Giet het sap vanuit
de kan in het glas. Als de schuimscheider in de sapkan zit, wordt het schuim van het sap verwijderd.
6 Tips voor het maken van sap
Tip
• Gebruik verse groenten en fruit, omdat hier meer sap in zit. Ananas, rode biet, bleekselderij, appel,
komkommer, wortel, spinazie, meloen, tomaat en druif zijn bij uitstek geschikt om te verwerken in
een sapcentrifuge.
• U hoeft dunne schilletjes en vliesjes niet te verwijderen. Verwijder alleen dikke schillen zoals van
sinaasappels, ananas en ongekookte rode bieten.
• Als u vruchten met pitten wilt verwerken tot sap, verwijder de pit dan voordat u de vruchten in het
apparaat doet.
• Appelsap wordt heel snel bruin. U kunt dit proces vertragen door een paar druppels citroensap toe
te voegen.
• Vruchten zoals bananen, papaja's, avocado's, vijgen en mango's bevatten zetmeel en zijn niet geschikt
voor verwerking in de sapcentrifuge. Gebruik een keukenmachine, blender of handblender om deze
vruchten te verwerken.
• Bladeren en bladstelen van bijvoorbeeld sla kunnen ook in de sapcentrifuge worden verwerkt.
• De sapcentrifuge is niet geschikt voor het verwerken van zeer harde en/of vezelrijke of zetmeelrijke
vruchten en groenten, zoals suikerriet.
7 Gezond recept
Mierikswortelsoep
Ingrediënten:
• 80 g boter
• 1 liter groentebouillon
• 50 ml mierikswortelsap (ongeveer 1 wortel)
• 250 ml ongeklopte slagroom
• 125 ml witte wijn
• Citroensap
• Zout
• 3-4 eetlepels bloem
1 Schil de mierikswortel met een mes.
2 Pers de mierikswortel uit.
Opmerking
• Dit apparaat kan 3 kg mierikswortel verwerken in ongeveer 2 minuten (de tijd voor het verwijderen
van de pulp wordt hier niet bij gerekend). Als u mierikswortelsap maakt, moet u het apparaat
uitschakelen, de stekker uit het stopcontact halen en de pulp uit de pulpopvangbak, het deksel en
de zeef verwijderen nadat u 1 kg hebt verwerkt. Schakel het apparaat uit en laat het afkoelen tot
kamertemperatuur als u klaar bent met het verwerken van de mierikswortel.
3 Smelt de boter in een pan.
4 Sauteer de bloem kort.
5 Voeg de bouillon toe.
6 Voeg het mierikswortelsap toe.
7 Voeg de slagroom en witte wijn toe.
8 Voeg citroensap en zout toe naar smaak.
8 Schoonmaken (fig. 3)
Waarschuwing
• Gebruik nooit schuursponzen, schurende schoonmaakmiddelen of agressieve vloeistoffen zoals
benzine of aceton om het apparaat schoon te maken.
• Dompel de motorunit nooit in water of een andere vloeistof en spoel deze ook niet onder de kraan af.
Het apparaat is direct na gebruik gemakkelijker schoon te maken.
1 Schakel het apparaat uit, haal de stekker uit het stopcontact en wacht totdat de zeef tot
stilstand is gekomen.
2 Verwijder de afneembare onderdelen van de motorunit.
3 Maak deze onderdelen met een schoonmaakborstel schoon in warm water met een beetje
afwasmiddel en spoel ze daarna af onder de kraan.
4 Maak de motorunit schoon met een vochtige doek.
Opmerking
• Gebruik een zachte borstel om de zeef schoon te maken.
• Alle onderdelen, behalve de motorunit, kunnen in de vaatwasmachine worden schoongemaakt.
9 Garantie & service
Als u informatie nodig hebt of als u een probleem hebt, ga dan naar de Philips-website
(www.philips.com) of neem contact op met het Philips Consumer Care Center in uw
land (u vindt het telefoonnummer in het 'worldwide guarantee'-vouwblad). Als er geen
Consumer Care Centre in uw land is, ga dan naar uw Philips-dealer.
• Små barn ska övervakas så att de inte kan leka med
apparaten.
• Lämna inte apparaten obevakad när den används.
• Använd inte apparaten om den roterande silen eller
skyddshöljet är skadade eller har synliga sprickor och
kontakta närmaste Philips-serviceombud.
• Stoppa inte ned ngrarna eller något föremål i
matningsröret när apparaten är igång. Använd bara
pressklossen för det här ändamålet.
• Rör inte de små knivbladen i botten på silen. De är
mycket vassa.
• Håll ytan som apparaten står på och apparatens botten
ren så att apparaten står stadigt.
• Rör inte vid silen genom fruktköttsuppsamlarens utlopp.
• Stäng av apparaten och dra ut strömsladden innan
du byter något tillbehör eller rör vid delar som rör sig
under användning. Dra alltid ur strömsladden om du
lämnar apparaten obevakad och innan du monterar, tar
isär och rengör den.
Varning
• Apparaten är endast avsedd för hushållsbruk.
• Använd aldrig tillbehör eller delar från andra tillverkare,
eller delar som inte uttryckligen har rekommenderats
av Philips. Om du använder sådana tillbehör eller delar
gäller inte garantin.
• Kontrollera att alla delar sitter rätt innan du startar
apparaten.
• Använd bara apparaten när båda spännena är uppfällda.
• Fäll inte ned spännena förrän du har stängt av apparaten
och silen har slutat rotera.
• Ta inte bort fruktköttsbehållaren när apparaten är igång.
• Använd inte juicemaskinen längre än 40 sekunder om
du pressar stora mängder, och låt maskinen svalna
ordentligt innan du använder den igen. Du bör inte
använda stora mängder för de recept som nns angivna
i den här användarhandboken.
• Dra alltid ut nätsladden efter användning.
• Ljudnivå = 86 dB [A]
Elektromagnetiska fält (EMF)
Den här Philips-produkten uppfyller alla tillämpliga standarder och regler gällande exponering av
elektromagnetiska fält.
Återvinning
Produkten är utvecklad och tillverkad av högkvalitativa material och komponenter som både kan
återvinnas och återanvändas.
Symbolen med en överkryssad soptunna som nns på produkten innebär att produkten följer
EU-direktivet 2002/96/EG:
Kassera aldrig produkten med annat hushållsavfall. Ta reda på de lokala reglerna om separat
insamling av elektriska och elektroniska produkter. Genom att kassera dina gamla produkter på rätt
sätt kan du bidra till att minska möjliga negativa effekter på miljö och hälsa.
3 Översikt (bild 1)
a
Presskloss
h
Motorenhet
b
Matningsrör
i
Spännen
c
Lock
j
Drivaxel
d
Sil
k
Pip
e
Fruktköttsuppsamlare
l
Juicekanna med löstagbar skumseparator
f
Fruktköttsbehållare
m
Sladdförvaringsutrymme
g
Kontrollvred
4 Förberedelser inför användning
Rengör noga de delar som kommer i kontakt med mat innan du använda apparaten (se kapitlet
”Rengöring”).
Kommentar
• Kontrollera alltid silen före användning. Om apparaten är sprucken eller skadad ska du inte använda
den. Kontakta istället närmaste Philips-serviceombud eller ta med apparaten till din återförsäljare.
• Kontrollera att spännena på båda sidor om locket är låsta på plats.
5 Använda juicemaskinen (bild 2)
Innan du börjar monterar du enheten enligt bild 2.
Du kan använda juicemaskinen för frukt- och grönsaksjuice.
Tips
• Slå på apparaten genom att vrida kontrollvredet till inställning 1 (låg hastighet) eller 2 (normal hastighet).
Hastighet 1 är lämplig för mjuka frukter och grönsaker som vattenmelon, vindruvor, tomat och gurka.
Hastighet 2 är lämplig för alla andra frukter och grönsaker som äpplen, morötter och rödbetor.
• Drick juicen direkt efter att du har pressat den. Om juicen får stå förlorar den smak och näring.
• Sätt på locket på juicekannan efter pressningen så hålls juicen fräsch längre.
• Tryck alltid ned pressklossen sakta så får du ut så mycket juice som möjligt.
Kommentar
• Apparaten fungerar bara om alla delar har monterats korrekt och om locket har låsts ordentligt med
spännena.
• Använd inte juicemaskinen längre än 40 sekunder om du pressar stora mängder, och låt maskinen
svalna ordentligt innan du använder den igen. Du bör inte använda stora mängder för de recept som
nns angivna i den här användarhandboken.
• Tryck inte för hårt med pressklossen eftersom det kan påverka kvaliteten på juicen. Det kan även
leda till att silen stannar.
• Stick aldrig in ngrar eller något föremål i matningsröret.
• Om fruktköttsbehållaren blir full under användning stänger du av apparaten och tar försiktigt bort
behållaren och tömmer den. Sätt tillbaka den tomma fruktköttsbehållaren innan du fortsätter att
pressa juice.
• När du har kört alla ingredienser och det inte kommer mer juice häller du juicen från kannan ned i
glaset. Om skumseparatorn sitter i juicekannan tas skummet bort från juicen.
6 Tips för juicepressning
Tips
• Använd färska frukter och grönsaker, eftersom de är saftigare. Ananaser, rödbetor, selleristjälkar,
äpplen, gurkor, morötter, spenat, meloner, tomater och druvor är särskilt lämpliga att köra i
juicemaskinen.
• Du behöver inte ta bort tunna skal. Ta bort bara tjocka skal från t.ex. apelsiner, ananaser och okokta
rödbetor.
• Om du vill pressa frukt med kärnor tar du bort kärnorna först.
• Äppeljuice mörknar snabbt. Du kan sakta ned processen genom att tillsätta några droppar citronjuice.
• Frukter som innehåller stärkelse, till exempel bananer, papaya, avokador, kon och mangor är inte
lämpliga att köra i juicemaskinen. Använd en matberedare, mixer eller mixerstav om du vill göra juice
av sådana frukter.
• Blad och bladskaft av t.ex. sallad kan också köras i juicemaskinen.
• Juicemaskinen är inte lämplig för att pressa mycket hårda och/eller trådiga eller stärkelserika frukter
eller grönsaker, t.ex. sockerrör.
7 Hälsosamt recept
Pepparrotsoppa
Ingredienser:
• 80 g smör
• 1 liter grönsaksbuljong
• 50 ml pepparrotsjuice (ungefär 1 rot)
• 250 ml vispgrädde
• 125 ml vitt vin
• Citronjuice
• Salt
• 3–4 msk mjöl
1 Skala pepparroten med en kniv.
2 Pressa pepparroten.
Kommentar
• Den här apparaten kan behandla 3 kg pepparrot på cirka 2 minuter (tiden som behövs för att ta
bort fruktköttet är inte inräknad). När du pressar pepparrot: stäng av och koppla ur apparaten och ta
bort fruktköttet från fruktköttsbehållaren, locket och silen när du har pressat 1 kg. När du har pressat
klart pepparroten stänger du av apparaten och låter den svalna till rumstemperatur.
3 Smält smöret i en stekpanna.
4 Fräs mjölet lätt.
5 Tillsätt buljongen.
6 Tillsätt pepparrotsjuicen.
7 Tillsätt vispgrädden och det vita vinet.
8 Tillsätt citronjuice och salt efter smak.
Norsk
1 Innledning
Gratulerer med kjøpet, og velkommen til Philips! Hvis du vil dra full nytte av støtten som Philips
tilbyr, kan du registrere produktet ditt på www.philips.com/welcome.
Apparatet fungerer bare når alle delene er riktig satt sammen og lokket er låst på plass med klemmene.
For oppskrifter kan du gå til www.philips.com/kitchen.
2 Viktig
Les denne brukerveiledningen nøye før du bruker apparatet, og ta vare på den for senere referanse.
Fare
• Motorenheten må aldri senkes ned i vann eller annen
væske, og den må heller ikke skylles under rennende vann.
• Ikke rengjør motorenheten i oppvaskmaskinen.
Advarsel
• Før du kobler til apparatet, må du kontrollere at
spenningen som er angitt nederst på apparatet,
stemmer overens med nettspenningen.
• Apparatet må ikke brukes hvis det er skade på støpselet,
nettledningen eller andre deler.
• Hvis nettledningen er ødelagt, må den skiftes ut av Philips,
et servicesenter som er godkjent av Philips, eller lignende
kvalisert personell for å unngå farlige situasjoner.
• Dette apparatet skal ikke brukes av barn. Oppbevar
apparatet og ledningen utilgjengelig for barn.
• Dette apparatet kan brukes av personer med nedsatt
sanseevne eller fysisk eller psykisk funksjonsevne, eller
personer med manglende erfaring eller kunnskap, dersom
de får instruksjoner om sikker bruk av apparatet eller tilsyn
som sikrer sikker bruk, og hvis de er klar over risikoen.
• Pass på at barn er under tilsyn, slik at de ikke leker med
apparatet.
• Ikke la apparatet stå på uten tilsyn.
• Ikke bruk apparatet hvis den roterende silen eller det
beskyttende dekselet er skadet eller har synlige sprekker.
Ta kontakt med nærmeste Philips-servicesenter.
• Stikk aldri ngre eller gjenstander ned i materøret mens
apparatet er i gang. Bruk bare stapperen til dette.
• Ikke berør de små knivbladene nederst i silen. De er
veldig skarpe.
• Sørg for at underlaget som apparatet står på, og
undersiden av apparatet, holdes rent for å sikre at
apparatet står støtt.
• Ikke før hånden inn i silen gjennom fruktkjøttutgangen i
fruktkjøttoppsamleren.
• Slå av apparatet og koble fra strømforsyningen før
du endrer tilbehør eller nærmer deg deler som
rører på seg under bruk. Koble alltid apparatet fra
strømforsyningen hvis det står uten tilsyn og før du
foretar montering, demontering eller rengjøring.
Forsiktig
• Dette apparatet skal kun brukes i husholdningen.
• Ikke bruk tilbehør eller deler fra andre produsenter eller
som Philips ikke spesikt anbefaler. Hvis du bruker slikt
tilbehør eller slike deler, blir garantien ugyldig.
• Kontroller at alle delene er riktig montert før du slår på
apparatet.
• Bruk apparatet bare når begge klemmene er låst.
• Bare lås opp klemmene når du har slått av apparatet og
silen har sluttet å rotere.
• Ikke ta av fruktkjøttbeholderen mens apparatet er i gang.
• Ikke bruk juiceren i mer enn 40 sekunder om gangen når du
presser store mengder, og la den avkjøles til romtemperatur
før du tar den i bruk igjen. Ingen av oppskriftene i denne
brukerhåndboken innebærer pressing av store mengder.
• Koble alltid fra apparatet etter bruk.
• Støynivå = 86 dB [A]
Elektromagnetiske felt (EMF)
Dette Philips apparatet overholder alle aktuelle standarder og forskrifter for eksponering for
elektromagnetiske felt.
Resirkulering
Produktet er utformet og produsert med materialer og deler av svært høy kvalitet som kan
resirkuleres og gjenbrukes.
Når et produkt er merket med en søppeldunk med kryss over, betyr det at produktet dekkes av
EU-direktiv 2002/96/EF:
Produktet skal ikke kastes sammen med annet husholdningsavfall. Gjør deg kjent med lokale
bestemmelser om avfallsdeponering av elektriske og elektroniske produkter. Hvis du deponerer
gamle produkter riktig, bidrar du til å forhindre negative konsekvenser for helse og miljø.
3 Oversikt (fig. 1)
a
Stapper
h
Motorenhet
b
Materør
i
Klemmer
c
Lokk
j
Drivaksel
d
Sil
k
Tut
e
Fruktkjøttoppsamler
l
Juicemugge med avtakbar skumseparator
f
Fruktkjøttbeholder
m
Oppbevaringsrom for ledningen
g
Kontrollbryter
4 Før bruk
Rengjør grundig delene som kommer i kontakt med mat, før du bruker apparatet (se avsnittet
Rengjøring).
Merknad
• Kontroller alltid silen før bruk. Hvis du oppdager sprekker eller skader, må du ikke bruke apparatet, men
ta kontakt med nærmeste Philips-servicesenter. Du kan også ta med deg apparatet til forhandleren.
• Kontroller at klemmene på hver side av lokket er låst på plass.
5 Bruke juiceren (fig. 2)
Før du begynner må du kontrollere at du monterer i henhold til g. 2.
Du kan bruke juiceren til frukt og grønnsaksjuice.
Tips
• Vri kontrollbryteren til innstilling 1 (lav hastighet) eller 2 (normal hastighet) for å slå på apparatet. Hastighet
1 passer bra til myk frukt og myke grønnsaker, for eksempel vannmelon, druer, tomater og agurk. Hastighet
2 passer bra til alle andre typer frukt og grønnsaker, for eksempel epler, gulrøtter og rødbeter.
• Drikk juicen umiddelbart etter at du har presset den. Hvis juicen utsettes for luft over en lengre
periode, mister juicen smaken og næringsverdien.
• Hvis du vil holde juicen fersk lenger, kan du sette på et deksel på juicemuggen etter juicepressingen.
• Du bør alltid presse stapperen sakte ned for å få mest mulig juice.
Merknad
• Apparatet virker bare hvis alle delene er riktig montert og lokket er ordentlig festet med klemmene.
• Ikke bruk juiceren i mer enn 40 sekunder om gangen når du presser store mengder, og la
den avkjøles til romtemperatur før du tar den i bruk igjen. Ingen av oppskriftene i denne
brukerhåndboken innebærer pressing av store mengder.
• Ikke bruk for mye makt på stapperen. Det kan påvirke kvaliteten på sluttresultatet. Det kan også føre
til at silen stopper.
• Stikk aldri ngrene eller gjenstander ned i materøret.
• Hvis fruktkjøttbeholderen blir full under bruk, slår du av apparatet, fjerner forsiktig fruktkjøttbeholderen
og tømmer den. Sett den tomme fruktkjøttbeholderen inn igjen før du fortsetter med pressingen.
• Når du har presset alle ingrediensene og det ikke kommer ut mer juice, heller du juicen fra muggen
og over i et glass. Hvis skumskilleren er i juicekannen, fjernes skummet fra juicen.
6 Tips til pressing av juice
Tips
• Bruk friske frukter og grønnsaker, siden de inneholder mer juice. Ananas, rødbeter, selleristenger, epler,
agurk, gulrot, spinat, meloner, tomater og druer er spesielt egnet for behandling i juiceren.
• Du trenger ikke skrelle frukt eller grønnsaker med tynt skall. Bare tykt skall, for eksempel skallet på
appelsiner, ananas og rå rødbeter, må fjernes.
• Hvis du vil lage juice av frukt med steiner, fjerner du steinene før du begynner.
• Eplejuice blir brun svært raskt. For å forsinke denne prosessen kan du ha i noen dråper med sitronsaft.
• Frukt som inneholder stivelse, for eksempel banan, papaya, avokado, ken og mango, passer ikke til bruk
i juicepressen. Bruk en foodprocessor, hurtigmikser eller stavmikser for å tilberede disse frukttypene.
• Blad og bladstilker fra for eksempel salat kan også presses i sitruspressen.
• Saftsentrifugen er ikke egnet til frukt og grønnsaker som er veldig harde, eller som har mange bre
eller mye stivlse, for eksempel sukkerrør.
7 Sunn oppskrift
Pepperrotsuppe
Ingredienser:
• 80 g smør
• 1 liter grønnsaksbuljong
• 50 ml pepperrotjuice (ca. 1 rot)
• 250 ml kremøte
• 125 ml hvitvin
• Sitronsaft
• Salt
• 3-4 ss mel
1 Skrell pepperroten med en kniv.
2 Press pepperroten.
Merknad
• Dette apparatet kan tilberede 3 kg pepperrot på cirka 2 minutter (ikke inkludert tiden det tar
å fjerne fruktkjøttet). Når du presser pepperrot, må du slå av og koble fra apparatet og fjerne
fruktkjøttet fra fruktkjøttbeholderen, lokket og at silen når du har presset 1 kg. Når du er ferdig med
å bearbeide pepperrot, slår du av apparatet og lar det avkjøles til romtemperatur.
3 Smelt smøret i en stekepanne.
4 Sauter melet lett.
5 Tilsett buljongen.
6 Tilsett pepperrotjuicen.
7 Tilsett kremøte og hvitvin.
8 Tilsett sitronsaft og salt etter smak.
8 Rengjøring (fig. 3)
Advarsel
• Bruk aldri skurebørster, skuremidler eller væsker som bensin eller aceton til å rengjøre apparatet.
• Motorenheten må aldri senkes ned i vann eller annen væske, og den må heller ikke skylles under
rennende vann.
Det er enklere å rengjøre umiddelbart etter bruk.
1 Slå av apparatet, trekk ut støpselet fra stikkontakten, og vent til silen har sluttet å rotere.
2 Fjern de avtakbare delene fra motorenheten.
3 Rengjør disse delene med en rengjøringsbørste i varmt vann med litt oppvaskmiddel, og skyll
dem i rennende vann.
4 Tørk av motorenheten med en fuktig klut.
Merknad
• Bruk en myk børste når du rengjør silen.
• Du kan også vaske alle delene unntatt motorenheten i oppvaskmaskinen.
9 Garanti og service
Hvis du trenger service eller informasjon, eller hvis du har problemer, kan du besøke webområdet
til Philips på www.philips.com eller ta kontakt med Philips' forbrukerstøtte der du bor (du nner
telefonnummeret i garantiheftet). Hvis det ikke er noen kundestøtte der du bor, kan du gå til den
lokale Philips-forhandleren.
Português
1 Introdução
Parabéns pela compra do seu produto e bem-vindo à Philips! Para usufruir de todas as vantagens
da assistência oferecida pela Philips, registe o seu produto em www.philips.com/welcome.
O aparelho funciona apenas quando todas as peças estão devidamente montadas e quando a
tampa está xa correctamente com os grampos.
Para consultar receitas, vá a www.philips.com/kitchen.
2 Importante
Leia cuidadosamente este manual do utilizador antes de utilizar o aparelho e guarde-o para
consultas futuras.
Perigo
• Nunca mergulhe o motor em água ou noutro líquido,
nem o enxagúe à torneira.
• Não lave o motor na máquina de lavar loiça.
Aviso
• Verique se a voltagem indicada na base do aparelho
corresponde à voltagem eléctrica local, antes de ligar o
aparelho.
• Não utilize o aparelho se a cha, o o de alimentação
ou outros componentes estiverem danicados.
• Se o cabo eléctrico estiver danicado, este deve ser sempre
substituído pela Philips, por um centro de assistência
autorizado pela Philips ou por pessoal com qualicação
equivalente para se evitarem situações de perigo.
• Este aparelho não pode ser utilizado por crianças.
Mantenha o aparelho e o cabo fora do alcance das
crianças.
• Este aparelho pode ser utilizado por pessoas com
capacidades físicas, sensoriais ou mentais reduzidas,
ou com falta de experiência e conhecimento, caso
sejam supervisionadas ou lhes tenham sido dadas
instruções relativas à utilização segura do aparelho e se
compreenderem os perigos envolvidos.
• As crianças devem ser supervisionadas para garantir
que não brincam com o aparelho.
• Nunca deixe o aparelho a funcionar sem vigilância.
• Não utilize o aparelho se o coador rotativo ou a tampa
de protecção estiverem danicados ou tiverem fendas
visíveis, e contacte o centro de assistência da Philips
mais próximo.
• Nunca introduza os dedos ou um objecto no tubo dos
alimentos com o aparelho em funcionamento. Utilize
apenas o pressor para este m.
• Não toque nas pequenas lâminas da base do coador.
Estas são muito aadas.
• Para se assegurar de que o aparelho permanece estável,
mantenha a superfície em que o aparelho assenta e a
parte inferior do aparelho limpas.
• Não introduza os dedos no coador através da saída de
polpa do colector para a polpa.
• Desligue o aparelho e desconecte-o da alimentação
antes de mudar os acessórios ou alcançar peças que
se movem durante a utilização. Desligue sempre o
aparelho da alimentação, se o deixar sem supervisão e
antes de o montar, desmontar ou limpar.
Atenção
• Este aparelho destina-se apenas a uso doméstico.
• Nunca utilize quaisquer acessórios ou peças de outros
fabricantes ou que a Philips não tenha especicamente
recomendado. Se utilizar tais acessórios ou peças, a
garantia perderá a validade.
• Certique-se de que todas as peças estão
correctamente montadas antes de ligar o aparelho.
• O aparelho só pode ser utilizado com os dois grampos
fechados.
• Desbloqueie os grampos apenas depois de desligar o
aparelho e do coador estar totalmente parado.
• Não retire o recipiente para a polpa com o aparelho a
trabalhar.
• Não utilize a centrifugadora durante mais de
40 segundos de cada vez, quando extrair sumo
em grandes quantidades e deixe-a arrefecer até à
temperatura ambiente antes da próxima utilização.
Nenhum das receitas neste manual do utilizador
representa uma carga de grande quantidade.
• Desligue sempre da corrente após cada utilização.
• Nível de ruído = 86 dB [A]
Campos electromagnéticos (CEM)
Este aparelho Philips cumpre todas as normas e regulamentos aplicáveis relativos à exposição a
campos electromagnéticos.
Reciclagem
O produto foi concebido e fabricado com materiais e componentes de alta qualidade, que podem
ser reciclados e reutilizados.
Quando observar o símbolo de um caixote do lixo traçado axado num produto, signica que o
produto é abrangido pela Directiva Europeia 2002/96/CE:
Nunca elimine este produto juntamente com os resíduos domésticos. Informe-se sobre o sistema
de recolha selectiva local relativamente a produtos eléctricos e electrónicos. A eliminação correcta
do seu produto antigo ajuda a evitar potenciais consequências nocivas para o ambiente e para a
saúde pública.
3 Visão geral (fig. 1)
a
Pressor
h
Motor
b
Tubo dos alimentos
i
Grampos
c
Tampa
j
Veio do motor
d
Coador
k
Bico
e
Colector para a polpa
l
Jarro de sumo com separador de espuma
destacável
f
Recipiente para a polpa
m
Compartimento para arrumação do o
g
Botão de controlo
4 Preparar para a utilização
Lave cuidadosamente as peças que entram em contacto com os alimentos antes de utilizar o
aparelho (consulte o capítulo "Limpeza").
Nota
• Verique sempre o coador antes de utilizar. Se detectar alguma fenda ou dano, não utilize o aparelho
e contacte o centro de assistência Philips mais próximo ou leve o aparelho ao seu revendedor.
• Certique-se de que os grampos de ambos os lados da tampa estão devidamente xos.
5 Utilizar a centrifugadora (fig. 2)
Antes de começar, assegure-se de que montou o aparelho de acordo com a g. 2.
Pode utilizar a centrifugadora para extrair sumo de fruta e legumes.
Dica
• Rode o botão de controlo para a denição 1 (baixa velocidade) ou 2 (velocidade normal) para ligar
o aparelho. A velocidade 1 destina-se especialmente a fruta e vegetais macios como melancias, uvas,
tomates e pepinos. A velocidade 2 é adequada a todos os outros tipos de fruta e vegetais como
maçãs, cenouras e beterrabas.
• Beba o sumo imediatamente depois da extracção. Se estiver exposto ao ar durante algum tempo, o
sumo perde sabor e valor nutricional.
• Para manter o seu sumo fresco durante mais tempo, tape o jarro de sumo depois da extracção.
• Para extrair o máximo de sumo, deve empurrar o pressor lentamente.
Nota
• Este aparelho funciona apenas se todas as peças forem montadas correctamente e se a tampa
estiver bloqueada correctamente com os grampos.
• Não utilize a centrifugadora durante mais de 40 segundos de cada vez, quando extrair sumo em
grandes quantidades e deixe-a arrefecer até à temperatura ambiente antes da próxima utilização.
Nenhum das receitas neste manual do utilizador representa uma carga de grande quantidade.
• Não exerça demasiada pressão no pressor, pois isto poderá afectar a qualidade do resultado nal.
Isto poderia provocar uma paragem do coador.
• Nunca introduza os seus dedos ou qualquer objecto dentro do tubo dos alimentos.
• Se o recipiente para a polpa encher durante a utilização, desligue o aparelho, remova
cuidadosamente o recipiente para a polpa e esvazie-o. Volte a montar o recipiente para a polpa vazio
antes de continuar a fazer o sumo.
• Quando tiver preparado todos ingredientes e o uxo de sumo parar, verta o sumo do jarro para o
copo. Se o separador de espuma estiver no jarro do sumo, a espuma é removida do sumo.
6 Sugestões para extracção de sumo
Dica
• Utilize fruta e legumes frescos, pois estes contêm mais sumo. Ananás, beterraba, aipo, maçã, pepino,
cenoura, espinafres, melão, tomate e uvas são particularmente indicados para processar nesta
centrifugadora.
• Não é necessário remover cascas nas. Retire apenas cascas grossas, por ex. de laranja, ananás e
beterraba crua.
• Se quiser espremer frutos com caroços, retire o caroço antes de espremer.
• O sumo de maçã ca castanho muito rapidamente. Para atrasar este processo, adicione algumas
gotas de sumo de limão.
• Frutas com amido, como banana, papaia, abacate, go e manga não são adequadas ao processamento
com a centrifugadora. Utilize um robot de cozinha, uma liquidicadora ou uma varinha para
processar estes frutos.
• As folhas e os talos, por exemplo no caso da alface, também podem ser processados no espremedor.
• A centrifugadora não é própria para preparar frutos ou legumes muito duros e/ou brosos ou com
muito amido, como é o caso da cana-de-açúcar.
7 Receita saudável
Sopa de rábano
Ingredientes:
• 80 g de manteiga
• 1 litro de caldo de legumes
• 50 ml de sumo de rábano (aprox. 1 raiz)
• 250 ml de natas para bater
• 125 ml de vinho branco
• sumo de limão
• Sal
• 3-4 c. de sopa de farinha
1 Descasque o rábano com uma faca.
2 Extraia o sumo do rábano.
Nota
• Este aparelho pode processar 3 kg de rábano em aprox. 2 minutos (não inclui o tempo necessário
para retirar a polpa). Quando extrair sumo de rábano, desligue o aparelho, remova a cha da tomada
e retire a polpa do recipiente para a polpa, da tampa e do coador depois de processar 1 kg. Quando
terminar de processar o rábano, desligue o aparelho e deixe-o arrefecer até à temperatura ambiente.
3 Derreta a manteiga numa frigideira.
4 Salteie levemente a farinha.
5 Adicione o caldo.
6 Adicione o sumo de rábano.
7 Junte as natas e o vinho branco.
8 Adicione o sumo de limão e tempere com sal a gosto.
8 Limpeza (fig. 3)
Aviso
• Nunca utilize esfregões, agentes de limpeza abrasivos ou líquidos agressivos, tais como petróleo ou
acetona, para limpar o aparelho.
• Nunca mergulhe o motor em água ou noutro líquido, nem o enxagúe à torneira.
É mais fácil limpar o aparelho imediatamente após cada utilização.
1 Desligue o aparelho, retire a cha da tomada eléctrica e aguarde que o coador pare de rodar.
2 Retire as peças amovíveis do motor.
3 Lave estas peças com uma escova de limpeza em água morna com um pouco de detergente
líquido e enxagúe à torneira.
4 Limpe o motor com um pano húmido.
Nota
• Utilize uma escova macia para limpar o coador.
• Também pode limpar todas as peças, excepto o motor, na máquina de lavar loiça.
9 Garantia e assistência
Se precisar de assistência ou informações ou se tiver algum problema, visite o Web site da Philips
em www.philips.com ou contacte o Centro de Apoio ao Cliente da Philips no seu país (pode
encontrar o número de telefone no folheto da garantia mundial). Se não existir um Centro de
Apoio ao Cliente no seu país, dirija-se a um representante local Philips.
Svenska
1 Introduktion
Vi gratulerar till ditt köp och hälsar dig välkommen till Philips! Genom att registrera din produkt på
www.philips.com/welcome kan du dra nytta av Philips support.
Apparaten fungerar bara om alla delar har satts ihop på rätt sätt och locket har satts fast ordentligt
med spännena.
Recept nns på www.philips.com/kitchen.
2 Viktigt
Läs användarhandboken noggrant innan du använder apparaten och spara den för framtida bruk.
Fara
• Sänk aldrig ned motorenheten i vatten eller någon
annan vätska och skölj den inte under kranen.
• Diska inte motorenheten i diskmaskinen.
Varning
• Kontrollera att den nätspänning som anges på
apparatens undersida stämmer överens med den lokala
nätspänningen innan du kopplar in apparaten.
• Använd inte apparaten om stickkontakten, nätsladden
eller någon annan komponent är skadad.
• Om nätsladden är skadad måste den bytas ut av Philips,
ett av Philips auktoriserade serviceombud eller av annan
behörig personal för att undvika olyckor.
• Den här apparaten får inte används av barn. Håll
apparaten och dess sladd utom räckhåll för barn.
• Apparaten kan användas av personer med olika
funktionshinder eller av personer som inte har kunskap
om hur apparaten används om det sker under tillsyn eller
om de har informerats om hur apparaten används på ett
säkert sätt och om de eventuella medförda riskerna.
3/33140 035 37461
8 Rengöring (bild 3)
Varning
• Använd aldrig skursvampar, slipande rengöringsmedel eller vätskor som bensin eller aceton till att
rengöra enheten.
• Sänk aldrig ned motorenheten i vatten eller någon annan vätska och skölj den inte under kranen.
Det är lättast att göra ren juicemaskinen direkt efter användning.
1 Stäng av apparaten, dra ut stickkontakten ur vägguttaget och vänta tills silen har slutat rotera.
2 Ta bort de löstagbara delarna från motorenheten.
3 Rengör de här delarna med en rengöringsborste i varmt vatten med lite diskmedel och skölj
dem under kranen.
4 Torka av motorenheten med en fuktad trasa.
Kommentar
• Använd en mjuk borste när du rengör silen.
• Du kan även diska alla delar utom motorenheten i diskmaskinen.
9 Garanti och service
Om du behöver service, information eller hjälp med ett problem kan du gå till Philips
webbplats på www.philips.com eller kontakta Philips kundtjänst i ditt land (telefonnumret nns i
garantibroschyren). Om det inte nns någon kundtjänst i ditt land kan du vända dig till din lokala
Philips-återförsäljare.
Türkçe
1 Giriş
Ürünümüzü tercih ettiğiniz için teşekkür ederiz, Philips dünyasına hoş geldiniz! Philips'in sunduğu
destekten tam olarak yararlanmak için, ürününüzü www.philips.com/welcome adresinde kaydettirin.
Cihaz ancak tüm parçaları doğru olarak takıldığında ve kapağı kıskaçlarla yerine tam olarak
kilitlendiğinde çalışır.
Yemek tarieri için www.philips.com/kitchen adresine gidin.
2 Önemli
Cihazı kullanmadan önce bu kullanım kılavuzunu okuyun ve gelecekte de başvurmak üzere saklayın.
Tehlike
• Motor ünitesini kesinlikle suya veya başka bir sıvıya
batırmayın veya muslukta durulamayın.
• Motor ünitesini bulaşık makinesinde yıkamayın.
Uyarı
• Cihazı prize takmadan önce, cihazın üzerinde belirtilen
voltajın yerel şebeke voltajı ile uygun olduğundan emin olun.
• Elektrik şi, kablosu veya diğer parçaları hasarlıysa, cihazı
kesinlikle kullanmayın.
• Cihazın elektrik kablosu hasarlıysa, bir tehlike oluşmasını
önlemek için kablonun mutlaka Philips'in yetki verdiği bir
servis merkezi veya benzer şekilde yetkilendirilmiş kişiler
tarafından değiştirilmesini sağlayın.
• Bu cihaz çocuklar tarafından kullanılmalıdır. Cihazı
ve kablosunu çocukların erişemeyecekleri yerlerde
muhafaza edin.
• Bu cihazın ziksel, motor ya da zihinsel becerileri
gelişmemiş veya bilgi ve tecrübe açısından yetersiz
olan kişiler tarafından kullanımı sadece bu kişilerin
nezaretinden sorumlu kişilerin bulunması veya bu
kişilere güvenli kullanım talimatlarının sağlanması ve olası
tehlikelerin anlatılması durumunda mümkündür.
• Küçük çocukların cihazla oynamaları engellenmelidir.
• Cihazı kendi halinde çalışır durumdayken bırakmayın.
• Döner elek veya koruyucu kapak hasarlıysa ya da
görünür çatlak varsa cihazı kullanmayın ve en yakın
Philips servis merkezine başvurun.
• Cihaz çalışırken parmaklarınızı ya da başka cisimleri asla
besleme borusunun içine sokmayın. Bunun için yalnızca
malzeme iticisini kullanın.
• Eleğin tabanında bulunan küçük bıçaklara dokunmayın.
Bu kısımlar çok keskindir.
• Cihazın sabit durması için cihazın üzerinde durduğu
yüzeyi ve cihazın altını temiz tutun.
• Süzgece, posa toplayıcının posa çıkışından erişmeye
çalışmayın.
• Cihazı kapatın ve aksesuarları değiştirmeden ya da kullanım
sırasında hareket eden parçalara yaklaşmadan önce güç
kaynağı bağlantısını kesin. Cihaz gözetimsiz bırakılacaksa ve
montaj, parçalara ayırma veya temizlemeden önce cihazın
güç kaynağı bağlantısını mutlaka kesin.
Dikkat
• Bu cihaz sadece evde kullanım için tasarlanmıştır.
• Başka üreticilere ait olan veya Philips tarafından özellikle
tavsiye edilmeyen aksesuar ve parçaları kesinlikle
kullanmayın. Bu tür aksesuar veya parça kullanırsanız,
garantiniz geçerliliğini yitirir.
• Cihazı çalıştırmadan önce tüm parçaların cihaza doğru
yerleştirildiğinden emin olun.
• Cihazı her iki kıskaç da kapalıyken kullanın.
• Mandalları yalnızca cihazı kapattıktan sonra ve süzgecin
dönmesi durduğunda açın.
• Posa kabını cihaz çalışırken yerinden çıkarmayın.
• Bol miktarda meyve sıkılırken cihazı 40 saniyeden fazla
çalıştırmayın ve bir sonraki kullanım için oda sıcaklığına
gelene kadar cihazın soğumasını bekleyin. Bu kullanım
kılavuzundaki tarierin hiçbiri bol miktarda malzemeye
göre verilmemiştir.
• Kullanımdan sonra cihazın şini mutlaka çekin.
• Gürültü düzeyi = 86 dB [A]
Elektromanyetik alanlar (EMF)
Bu Philips cihazı, elektromanyetik alanlara maruz kalmaya ilişkin geçerli tüm standartlara ve
düzenlemelere uygundur.
Geri dönüşüm
Ürününüz geri dönüştürülebilen ve yeniden kullanılabilen yüksek kaliteli malzeme ve bileşenler
kullanılarak üretilmiştir.
Ürünün, üzerinde çarpı işareti bulunan bir tekerlekli çöp kutusu simgesi taşıması, bu ürünün 2002/96/
EC sayılı Avrupa Direkti kapsamında olduğu anlamına gelir:
Bu ürünü kesinlikle diğer evsel atıklarla birlikte atmayın. Lütfen, elektrikli ve elektronik ürünlerin ayrı
toplanması ile ilgili yerel kurallar hakkında bilgi edinin. Eskiyen ürününüzün atık işlemlerinin doğru
biçimde gerçekleştirilmesi, çevre ve insan sağlığı üzerinde olumsuz etkilere yol açılmasını önlemeye
yardımcı olur.
3 Genel bilgiler (şek.1)
a
Malzeme itici
h
Motor ünitesi
b
Besleme tüpü
i
Klips
c
Kapak
j
Döner mil
d
Süzgeç
k
Musluk
e
Posa toplayıcı
l
Ayrılabilir köpük ayırıcılı meyve suyu sürahisi
f
Posa kabı
m
Kablo saklama bölmesi
g
Kontrol düğmesi
4 Cihazı kullanıma hazırlama
Cihazı kullanmadan önce, gıdayla temas edecek parçaları iyice temizleyin (bkz.'Temizlik' bölümü).
Not
• Kullanmadan önce her zaman eleği kontrol edin. Hasar veya çatlaklar varsa, cihazı kullanmayın ve en
yakın yetkili Philips servisine veya bayisine başvurun.
• Kıskaçların kapağın iki tarafında yerlerine kilitlendiğinden emin olun.
5 Meyve sıkacağının kullanımı (şek. 2)
Başlamadan önce, montajı doğru bir şekilde yaptığınızdan emin olmak için bkz. şek. 2.
Meyve sıkacağını meyve ve sebzelerin suyunu sıkmak için kullanabilirsiniz.
İpucu
• Kontrol düğmesini 1 (düşük hız) veya 2 (normal hız) ayarına getirerek cihazı çalıştırın. Hız 1, özellikle
karpuz, üzüm, domates ve salatalık gibi yumuşak meyve ve sebzeler için uygundur. Hız 2, elma, havuç
ve pancar gibi diğer meyve ve sebze çeşitleri için uygundur.
• Sıktığınız meyve sularını hemen için. Bir süre havayla temas etmesi halinde, meyve suyu hem tadını
hem de besin değerini kaybeder.
• Meyve suyunuzun daha uzun süre taze kalabilmesi için meyve suyu sıkma işleminden sonra meyve
suyu sürahisi üzerine bir kapak yerleştirin.
• Maksimum miktarda meyve su elde etmek için yiyecek iticiyi mümkün olduğunca yavaş bastırın.
Not
• Cihaz ancak parçaları düzgün bir şekilde takıldığında ve kapağı mandallarla yerine tam olarak
sabitlendiğinde çalışır.
• Bol miktarda meyve sıkılırken cihazı 40 saniyeden fazla çalıştırmayın ve bir sonraki kullanım için oda
sıcaklığına gelene kadar cihazın soğumasını bekleyin. Bu kullanım kılavuzundaki tarierin hiçbiri bol
miktarda malzemeye göre verilmemiştir.
• Elde edilecek sonucun kalitesini etkileyebileceğinden, malzeme iticiye çok fazla baskı uygulamayın. Bu
durum eleğin durmasına bile sebep olabilir.
• Besleme tüpüne kesinlikle parmaklarınızı veya başka bir cismi sokmayın.
• Posa kabı kullanım esnasında dolarsa, cihazı durdurun, posa kabını dikkatle çıkarın ve boşaltın. Boş posa
kabını yerine cihazı çalıştırmadan önce yerleştirin.
• Tüm malzemeleri sıktıktan ve meyve suyu akışı durduktan sonra meyve suyunu sürahiden bardağa
dökün. Köpük ayırıcısı meyve suyu sürahisindeyse, köpük meyve suyundan ayrılır.
6 Meyve sıkmak için ipuçları
İpucu
• Daha sulu olmasını sağlayacağı için taze meyve ve sebze kullanın. Özellikle ananas, pancar, kereviz sapı,
elma, salatalık, havuç, ıspanak, kavun, domates ve üzüm meyve sıkacağında sıkmak için uygundur.
• İnce kabukları soymanıza gerek yoktur. Sadece portakal, ananas ve pişmemiş pancar gibi kalın
kabukluları soyun.
• Meyveleri çekirdekleriyle sıkmak istiyorsanız, çekirdekleri sıkmadan önce çıkarın.
• Elma suyu çok hızlı kararır. Bu süreci yavaşlatmak için birkaç damla limon suyu ekleyin.
• Muz, papaya, avokado, incir ve mango gibi meyveler nişasta içerdiklerinden meyve sıkacağında işlem
görmeye uygun değildir. Bu meyvelerin suyunu sıkmak için mutfak robotu, blender veya el blenderi
kullanın.
• Marul gibi yapraklı sebzeler de meyve sıkacağında işlem görebilir.
• Şeker kamışı gibi çok sert ve/veya lii ya da nişastalı meyve ve sebzeler katı meyve sıkacağında
sıkılmaya uygun değildir.
7 Sağlıklı tarif
Yaban turpu çorbası
Malzemeler:
• 80 g tereyağı
• 1 litre sebze suyu
• 50 ml yaban turpu suyu (yaklaşık 1 kök)
• 250 ml krem şanti
• 125 ml beyaz şarap
• Limon suyu
• Tuz
• 3-4 yemek kaşığı un
1 Bir bıçakla yaban turpunu soyun.
2 Yaban turpunun suyunu çıkarın.
Not
• Bu cihaz 3 kg yaban turpunu yaklaşık 2 dakikada (posayı atmak için gereken süre dahil değildir)
sıkabilir. Yaban turpunun suyunu çıkardıktan sonra, cihazı kapatıp şini prizden çıkarın ve 1 kg yaban
turpu suyu elde ettikten sonra posa kabı, kapak ve süzgeçteki posayı temizleyin. İşlem bittiğinde, cihazı
kapatın ve soğuyarak oda sıcaklığına dönmesini bekleyin.
3 Yağı bir tavada eritin.
4 Hafçe unu soteleyin.
5 Sebze suyunu ekleyin.
6 Yaban turpu suyunu ekleyin.
7 Krem şantiyi ve beyaz şarabı ekleyin.
8 Tat vermek için limon suyu ve tuz ekleyin.
8 Temizleme (şek. 3)
Uyarı
• Cihazı temizlemek için bulaşık süngeri, aşındırıcı temizlik malzemeleri veya benzin ya da aseton gibi
zarar verebilecek sıvılar kullanmayın.
• Motor ünitesini kesinlikle suya veya başka bir sıvıya batırmayın veya muslukta durulamayın.
Kullanımdan hemen sonra temizlemek daha kolaydır.
1 Cihazı kapatın, şini prizden çekin ve süzgecin dönmesi durana kadar bekleyin.
2 Çıkarılabilir parçaları motor ünitesinden çıkarın.
3 Bu parçaları, temizleme fırçasını kullanarak az miktarda bulaşık deterjanıyla ılık suda yıkayın ve
musluk altında durulayın.
4 Motor ünitesini nemli bezle silerek temizleyin.
Not
• Eleği temizlemek için yumuşak bir fırça kullanın.
• Motor ünitesi hariç tüm parçaları bulaşık makinesinde de yıkayabilirsiniz.
9 Garanti ve Servis
Servise veya bilgiye ihtiyacınız ya da bir sorununuz varsa lütfen www.philips.com adresindeki Philips
web sitesini ziyaret edin veya ülkenizdeki Philips Müşteri Destek Merkezi'yle iletişim kurun (telefon
numaralarını dünya çapında garanti kitapçığında bulabilirsiniz). Ülkenizde Müşteri Merkezi yoksa, yerel
Philips satıcınıza gidin.
1
Philips !Philips
. www.philips.com/welcome
.
.www.philips.com/kitchen
2
.
•
.
•.
•
.
•
.
•
Philips
Philips
.
•
.
.
•
.
•.
•.
•
.Philips
•
. .
• .
.
•
.
•.
•
.
.
•.
•
. Philips
.
•.
•.
•
.
•.
• 40
.
.
•.
•]A[ 86 =
•
.
.
• .
.
•
.
•
.
•
.
.
•.
• Philips
.
.
•
.
•
.
•
.
•
.
•
. 40
.
.
•.
•]A[ 86 =
)EMF(
. Philips
.
. EC/2002/96
.
. .
)1 ( 3
a
h
b
i
c
j
d
k
e
l
f
m
g
4
.) "" (
.
. Philips
.
)2 ( 5
. 2
.
1 . )( 2 )( 1
2 .
.
.
.
.
.
.
. 40
. .
.
.
.
.
.
.
.
6
.
.
.
.
.
. .
.
.
.
./
7
:
• 80
• 1
•) 1 ( 50
• 250
• 125
•
•
• 3-4
1 .
2 .
3 )( 2
1 .
. .
3 .
4 .
5 .
6 .
7 .
8 .
)3 ( 8
.
.
.
1 . .
2 .
3 .
4 .
.
.
9
www.philips.com Philips
( Philips
. Philips .)
)EMF(
.
.
:EC/2002/96
.
.
.
)1 ( 3
a
h
b
i
c
j
d
k
e
l
f
m
g
4
.)"" (
.
.
Philips
.
)2 ( 5
.2
.
. )( )(
.
.
.
.
.
.
.
40
.
.
.
.
.
.
.
.
.
6
.
.
.
.
.
.
.
.
.
.
. /
7
:
• 80
•
•)
( 50
• 250
• 125
•
•
• 3-4
1 .
2 .
.)
(
. .
3 .
4 .
5 .
6 .
7 .
8 .
)3 ( 8
.
.
.
1 .
2 .
3 .
4 .
.
.
9
www.philips.com Philips
.)( Philips
. Philips
1
! . Philips
. www.philips.com/welcome Philips
.
. www.philips.com/kitchen
2
.
•
.
•.
•
.
•
.
•
Philips Philips
.
• .
.
•
.
•
.
•.
•
. Philips