2
ENGLISH
TABLE OF CONTENTS
3 IMPORTANT PRECAUTIONS
3 Electrical Power Related Precautions
4 Precautions in installing the Product
4 Precautions in Moving the Product
5 Precautions in Using/Cleaning the
Product
5 On Disposal (Hg lamp used in LGD
monitor only.)
6 LICENSES
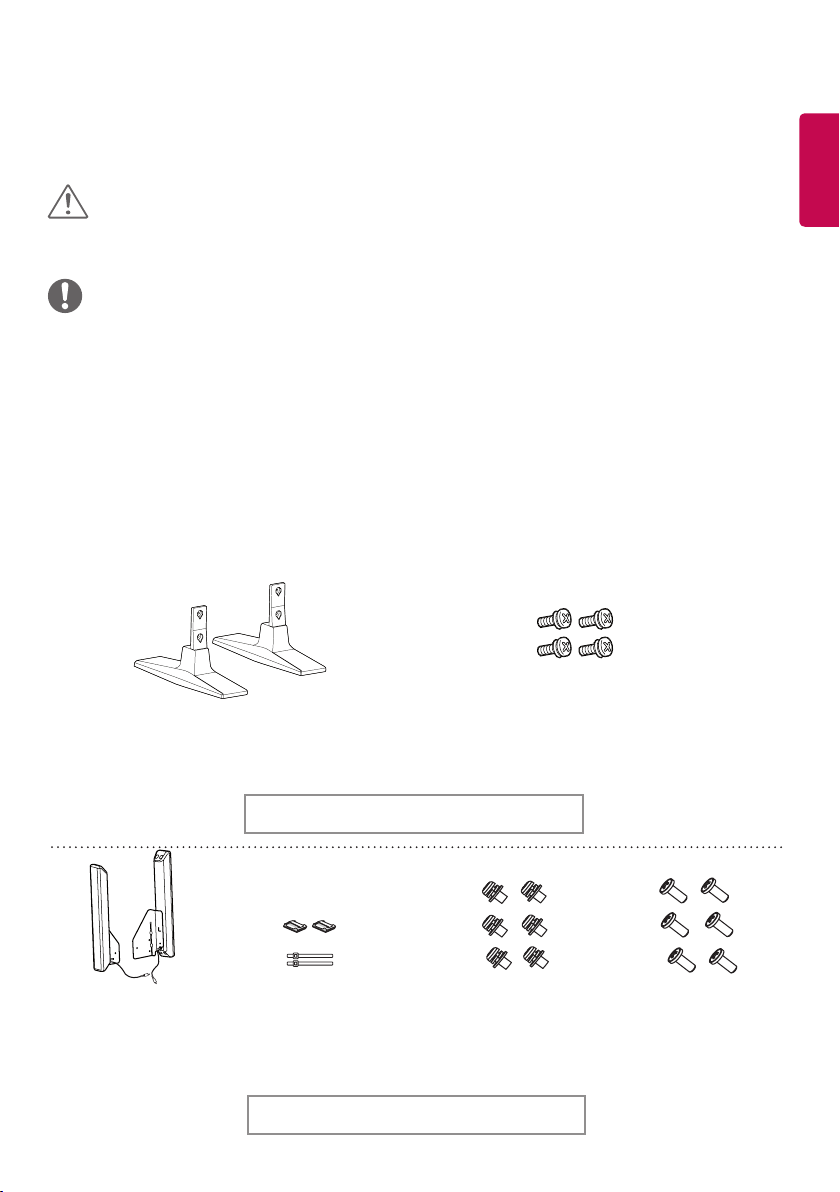
7 ASSEMBLY AND PREPARATION
7 Optional Accessories
9 Parts and Buttons
9 Connecting the Stand
10 Connecting the Speakers
10 Connecting IR & Light Sensor
11 Portrait Layout
12 Attaching and Removing the LG Logo
Bracket
13 Installing on a Wall
15 REMOTE CONTROL
17 Displaying the Device Name
Connected to an Input Port
17 White Balance Adjust Menu
18 MAKING CONNECTIONS
18 Connecting to a PC
18 External Device Connection
20 Daisy Chain Monitors
21 TROUBLESHOOTING
24 PRODUCT SPECIFICATIONS

3
ENGLISH
IMPORTANT PRECAUTIONS
Please read these safety precautions carefully before using the
product.
WARNING
Failure to follow those warnings may result in death, serious
injury or damage to the product or other property.
Electrical Power Related Precautions
• Use only the power cord supplied with the unit or another
manufacturer's authorized cord.
► Failure to do so may result in fire or electrical shock or damage to
the product.
• Use only a properly grounded plug and receptacle.
► If you do not you may be electrocuted or injured, or the product
might be damaged.
• Do not use a damaged or loose plug.
► This may cause electrical shock or fire.
• Operate the display only from a power source (i.e., voltage)
indicated in the product specification.
► Otherwise the product can be damaged, fire can occur or you may be
electrocuted. If you are not sure what type of power supply you have,
consult a certified electrician.
• In the presence of thunder and lightning, never touch the power
cord and signal cable because it can be very dangerous.
► It can cause electric shock.
• Do not connect several extension cords, electrical appliances
or electrical heaters to a single outlet. Use a power strip with a
grounding terminal designed for exclusive use with the computer.
► A fire can break out due to overheating
.
• Do not touch the power plug with wet hands. Additionally, if
the cord pin is wet or covered with dust, dry the power plug
completely or wipe dust off before plugging in the cord.
► You may be electrocuted due to excess moisture.
• If you don’t intend to use the product for a long time, unplug the
power cable from the product.
► Dust accumulation on the cord can cause a fire. Insulation
deterioration can cause electric leakage, electric shock, or fire.
• Insert the power plug firmly so it cannot come loose.
► A loose connection can cause fire.
• Hold the plug when pulling out the power cable. Do not pull the
plug out by the wire. Do not bend the power cord with excessive
force or put heavy objects on the power cord.
► The power line can be damaged, which may cause electric shock
or fire.
WARNING
• Do not insert metal or other conductive materials into the product
openings. Additionally, do not touch the power cable right after
plugging into the wall input terminal.
► You may be electrocuted.
• The appliance coupler is used as the disconnect device.
• Please make sure the device is installed near the wall outlet to
which it is connected and that the outlet is easily accessible.
• Do not unplug the power cord while the product is in use.
► Electrical shock can damage the product
.
• As long as this unit is connected to the AC wall outlet, it is not
disconnected from the AC power source even if the unit is turned
off.
WARNING
• Indoor Use Only.

4
ENGLISH
Precautions in installing the Product
• Keep away from heat sources like heaters or open flames.
► Electrical shock, fire, malfunction or deformation may occur.
• Keep the packing anti-moisture material or vinyl packing out of
the reach of children.
► Anti-moisture material is harmful if swallowed. If swallowed by
mistake, force the patient to vomit and visit the nearest hospital.
Additionally, vinyl packing can cause suffocation. Keep it out of the
reach of children.
• Do not put heavy objects on the product or sit upon it.
► If the product collapses or is dropped, you may be injured. Children
must pay particular attention.
• Do not leave the power or signal cable where someone can trip
over it.
► The passerby can falter, which can cause electrical shock, fire, product
breakdown, or injury.
• Install the product in a neat and dry place. Do not use near water.
► Dust or moisture can cause electrical shock, fire, or product damage.
• Do not add accessories that have not been designed for this
display.
• If you smell smoke or other odors or hear a strange sound from the
product unplug the power cord and contact LG Customer Service.
► If you continue to use without taking proper measures, electrical
shock or fire can occur.
• If you dropped the product or the case is broken, turn off the
product and unplug the power cord.
► If you continue to use without taking proper measures, electrical
shock or fire can occur. Contact LG Customer Service.
• Do not drop an object on or apply impact to the product. Do not
throw any toys or objects at the product.
► It can cause injury to humans, problems to the product, and damage
the display.
• Keep out of reach of children and do not place toys near the
product.
• Make sure the product ventilation hole is not blocked. Install the
product more than 10 cm from the wall.
► If you install the product too close to the wall, it may be deformed or
fire can break out due to internal heat build-up.
• Do not cover the product with cloth or other material (e.g., plastic)
while plugged in.
► The product can be deformed or fire can break out due to internal
overheating.
• Place the product on a flat and stable surface that is large enough
to support the product.
► If the product is dropped, you may be injured or the product may
be broken.
• Install the product where no electromagnetic interference occurs.
• Keep the product away from direct sunlight.
► The product can be damaged.
Precautions in Moving the Product
• Make sure to turn off the product.
► You may be electrocuted or the product can be damaged.
• Make sure to remove all cables before moving the product.
► You may be electrocuted or the product can be damaged.
• When lifting or moving the product, do not hold it upside down
while holding only the stand.
► This may cause the product to fall resulting in damage or injury.
• Do not shock the product when moving it.
► You may be electrocuted or the product can be damaged.
• Make sure the panel faces forward and hold it with both hands
to move.
► If you drop the product, the damaged product can cause electric
shock or fire.
• Do not place the product face down.
► This may damage the TFT-LCD screen.
WARNING
WARNING
• Do not place the product on the floor.
► Small children and others may trip over it.
• Do not install this product on a wall if it could be exposed to oil
or oil mist.
► This may damage the product and cause it to fall.
• For displays with glossy bezels the user should consider the
placement of the display as the bezel may cause disturbing
reflections from surrounding light and bright surfaces.
5
ENGLISH
WARNING
Precautions in Using/Cleaning the
Product
• Do not attempt to disassemble, repair, or modify the product
yourself.
► Fire or electric shock can occur.
► Contact LG Customer Service for repair.
• When cleaning the product, unplug the power cord and scrub
gently with a soft cloth to prevent scratching. Do not clean with a
wet cloth or spray water or other liquids directly onto the product.
An electric shock may occur. (Do not use chemicals such as
benzene, paint thinners, or alcohol.)
• Keep the product away from water.
► Fire or electric shock accident can occur.
• Avoid high temperatures and humidity.
• Do not put or store flammable substances near the product.
► There is a danger of explosion or fire.
• Keep the product clean at all times.
• Take a comfortable and natural position when working with the
product.
• Take a regular break when working with the product for a long
time.
• Do not press on the panel with a hand or sharp object such as nail,
pencil, or pen, or make a scratch on it.
• Keep proper distance from the product and rest from time-to-time.
► Your vision may be impaired if you look at the product too closely
or for too long.
• Set the appropriate resolution by referring to the User’s Guide.
• Keep small accessories out of the reach of children.
• Displaying a still image for long time on the monitor may leave
persistent image or stain on the monitor screen. To avoid this
problem, use a screen saver and power off when this product is not
used. Persistent image or screen burn caused by long time usage
are not covered by the warranty on this product.
• Do not use products using high voltage around the monitor. (e.g.,
a bug zapper.)
► The monitor may malfunction due to the electrical discharge.
• Spray water onto a soft cloth 2 to 4 times, and use it to clean the
front frame; wipe in one direction only. Too much moisture may
cause staining.
On Disposal (Hg lamp used in LGD
monitor only.)
• The fluorescent lamp used in this product contains a small amount
of mercury.
• Do not dispose of this product with general household waste.
• Disposal of this product must be carried out in accordance to the
regulations of your local authority.

6
ENGLISH
LICENSES
Supported licenses may differ by model. For more information of the licenses, visit www.lg.com.
The terms HDMI and HDMI High-Definition Multimedia Interface, and the HDMI
logo are trademarks or registered trademarks of HDMI Licensing LLC in the United
States and other countries.
This DivX Certified® device has passed rigorous testing to ensure it plays DivX®
video. To play purchased DivX movies, first register your device at vod.divx.com.
Find your registration code in the DivX VOD section of your device setup menu.
DivX Certified® to play DivX® video up to HD 1080p, including premium content.
DivX®, DivX Certified®and associated logos are trademarks of DivX, LLC and are
used under license.
Covered by one or more of the following U.S. patents: 7,295,673; 7,460,668;
7,515,710; 7,519,274.
Manufactured under license from Dolby Laboratories. Dolby and the double-D
symbol are trademarks of Dolby Laboratories.
• The warranty will not cover any damage caused by using the product in an excessively dusty environment.
NOTE
7
ENGLISH
LICENSES
Supported licenses may differ by model. For more information of the licenses, visit www.lg.com.
ASSEMBLY AND PREPARATION
Optional Accessories
Without prior notice, optional accessories are subject to change to improve the performance of the product,
and new accessories may be added. The illustrations in this manual may differ from the actual product and
accessories.
Cable Holders/
Cable Ties
Screws
Diameter 4.0 mm x Pitch 0.7 mm x
Length 10 mm (including spring washer)
Speakers
SP-2100
Stand kit
Speaker kit
Screws
Diameter 4.0 mm x
Pitch 0.7 mm x Length 8 mm
(including spring washer)
Screws
Diameter 4.0 mm x
Pitch 1.6 mm x
Length 10 mm
• Always use genuine components to ensure safety and product performance.
• The product warranty will not cover damage or injury caused by the use of unauthorized components.
CAUTION
• The accessories provided with your product may vary depending on the model or region.
• Product specifications or contents in this manual may be changed without prior notice due to upgrade of
product functions.
• SuperSign Software and Manual
- Downloading from the LG Electronics website.
- Visit the LG Electronics website (http://partner.lge.com) and download the latest software for your model.
NOTE
Stand
ST-200T
8
ENGLISH
• Cable holder/Cable tie may not be available in some areas or for some models.
• Optional accessories are available for some models. If necessary, please purchase them separately.
• Pixel sensor is sold separately. You can obtain additional accessories from your local retail store.
• Before you attach the OPS kit or Media Player, connect the cable to the port.
• Please turn off the power before connecting or removing the Wi-Fi dongle kit.
NOTE
Screws
Card (Easy Setup Guide)
KT-OPSA
OPS kit
Connecting
Cable
Power Cord
Pixel sensor kit
KT-SP0
Wi-Fi Dongle kit
AN-WF500
9
ENGLISH
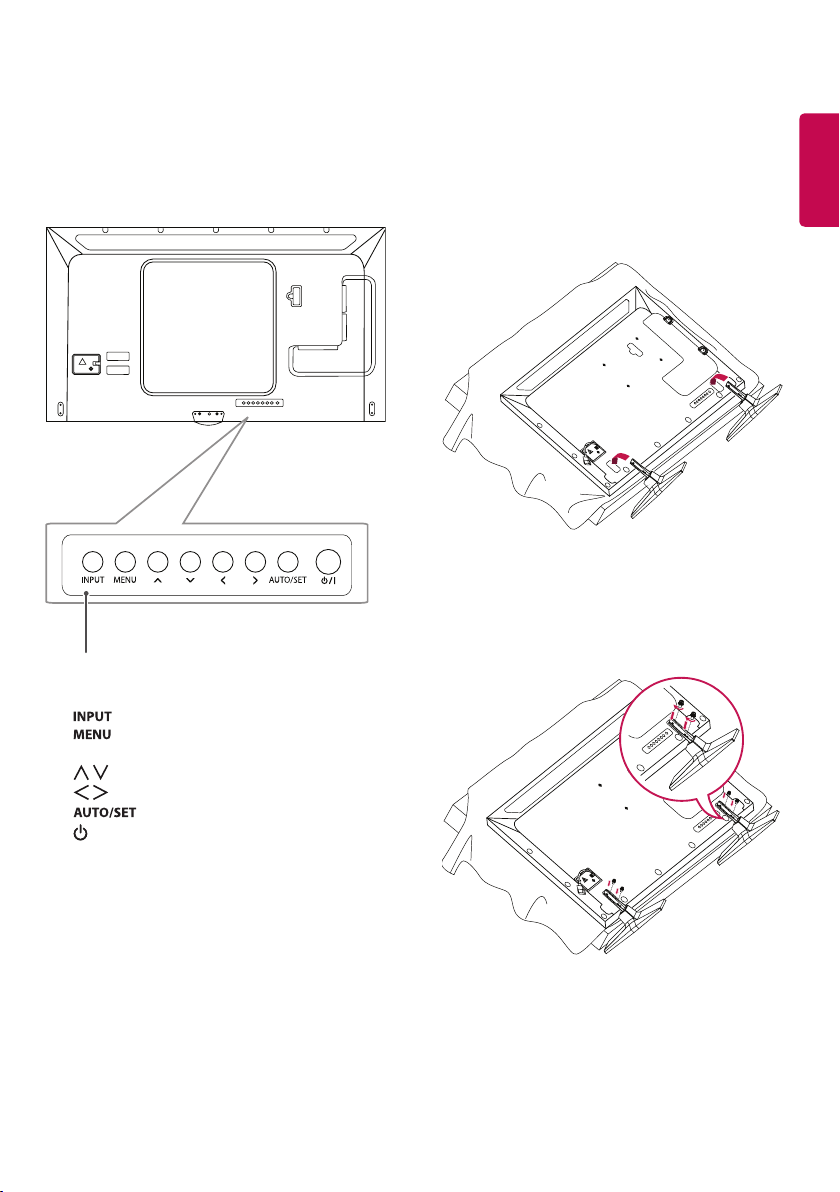
Parts and Buttons
- The image may be different according to the
model
Buttons
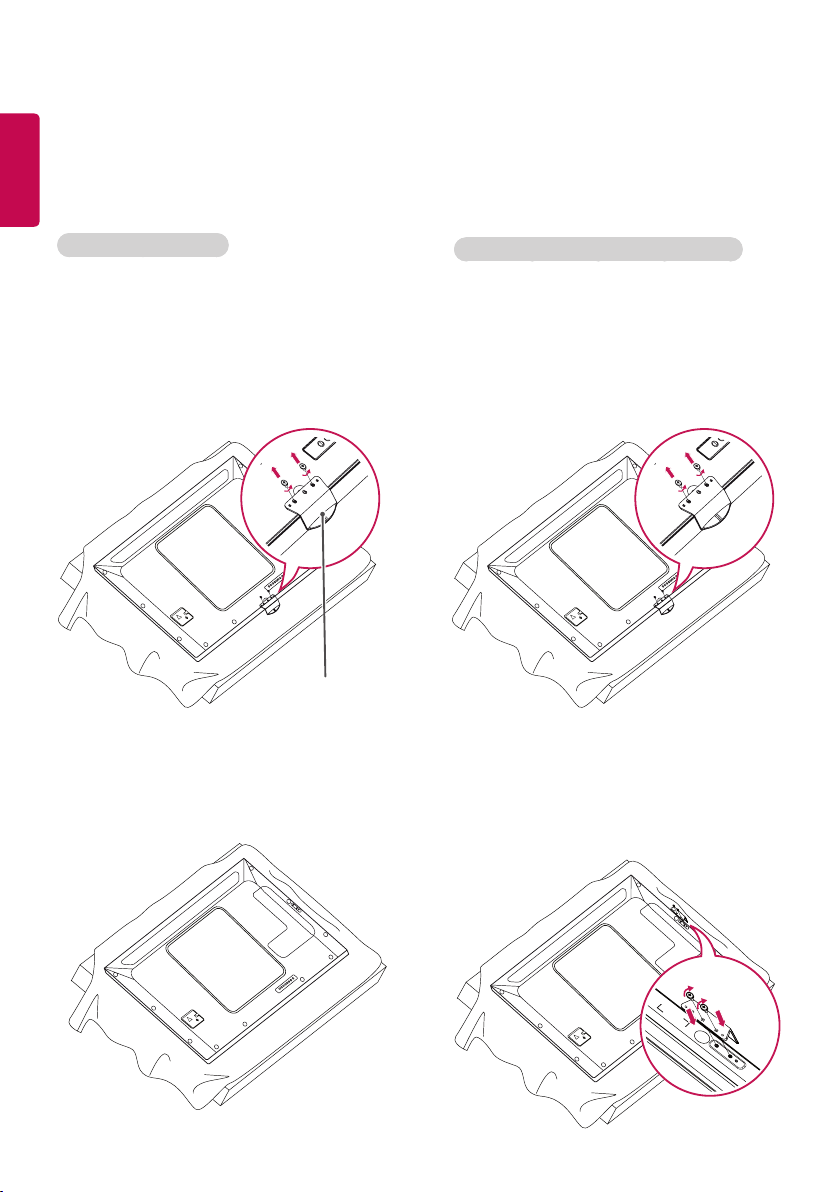
Connecting the Stand
- For certain models only.
- The image may be different according to the
model
1
y
Changes the input source.
y
Accesses the main menus, or saves your
input and exits the menus.
y
Adjust the up and down.
y
Moves left and right.
y
Displays the current signal and mode.
y
/I
Turns the power on or off.
2

10
ENGLISH
Connecting the Speakers
- For certain models only.
- The image may be different according to the
model.
1 Connect an input signal cable before installing
the speakers.
3 Connect the speaker cables noting the correct
polarity. Use cable holders and cable ties to
organize the speaker cables.
2 Mount the speakers by using screws as
shown below. Make sure the power cable is
disconnected before making a connection.
Connecting IR & Light Sensor
When you connect the cable to the product, the
feature for receiving remote control signals is
activated. The IR & light sensor is magnetic. Attach
it to the front edge of the product for use.
[Front]
• Turn off the power before removing the cable.
Connecting or removing the speaker cable
while turned on may result in no sound.
NOTE
CAUTION CAUTION
• The signal strength of the IR and Light sensor
will decrease if the sensor is not placed in front
of the product.
NOTE
11
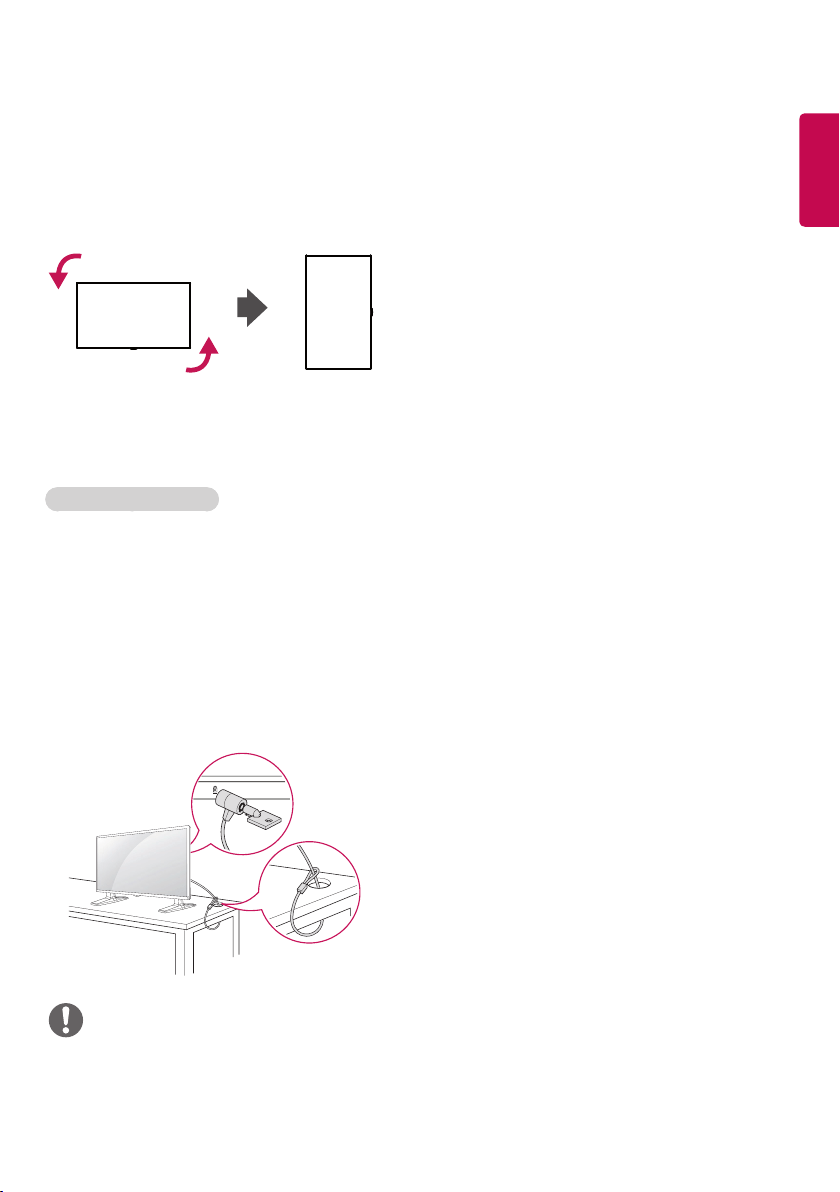
ENGLISH
Portrait Layout
When installing in a portrait layout, rotate the
monitor counterclockwise 90 degrees (when facing
the screen).
(This is not available for all models.)
The Kensington security system connector is
located at the back of the monitor. For more
information on installation and use of this system,
refer to the manual provided with the Kensington
security system or visit
http://www.kensington.
com
.
Connect the Kensington security system cable
between the monitor and a table.
Using Kensington Lock
• The Kensington security system is optional. You
can obtain additional accessories from most
electronics retail stores.
NOTE
12
ENGLISH
Attaching and Removing the LG Logo Bracket
- For certain models only.
- The image may be different according to the model.
Removing the LG Logo
1 Lay a clean cloth on the floor, and then put
the monitor on it with the screen face down.
Remove the two screws that secure the LG
Logo Bracket to the bottom of the rear side of
the monitor using a screwdriver.
2 After removing the screws, remove the LG
Logo. When re-attaching the LG Logo, follow
the process in reverse order.
Attaching the LG Logo on the right side
1 Lay a clean cloth on the floor, and then put
the monitor on it with the screen face down.
Remove the two screws that secure the LG
Logo Bracket to the bottom of the rear side of
the monitor using a screwdriver.
2 After removing the screws, remove the LG
Logo. Attach the LG Logo Bracket with the two
screws, aligning it with the holes at the right
side.
LG Logo Bracket
13
ENGLISH
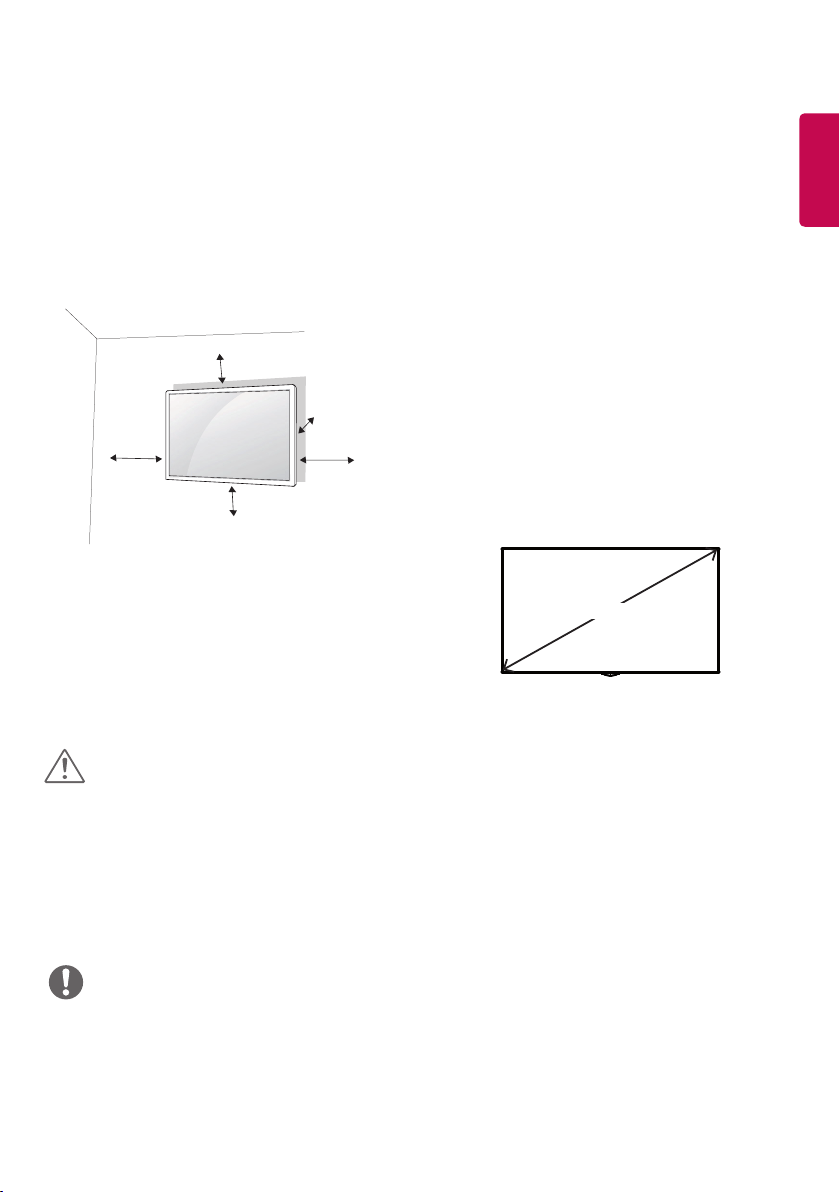
Installing on a Wall
For proper ventilation, allow a clearance of 10
cm on each side and from the wall. Detailed
installation instructions are available from your
dealer, see the optional Tilt Wall Mounting Bracket
Installation and Setup Guide.
To install your monitor on a wall, attach a wall
mounting bracket (optional part) to the back of the
monitor.
Make sure that the wall mounting bracket is
securely fixed to the monitor and to the wall.
1 Use only screws and wall mounting brackets
that conform to VESA standards.
2 Screws which are longer than standard length
may damage the inside of the monitor.
3 A non-VESA standard screw may damage
the product and cause the monitor to fall. LG
Electronics is not liable for any accidents related
to the use of non-standard screws.
4 Please use VESA standard as below.
• 785 mm and above
* Fixing screws: Diameter 6.0 mm x Pitch
1.0 mm x Length 12 mm
10 cm
10 cm
10 cm
10 cm
10 cm
• Disconnect the power cord before moving or installing the monitor to avoid risk of electric shock.
• If you install the monitor on a ceiling or slanted wall, it may fall and result in injury. Use an authorized LG wall
mount and contact your local dealer or qualified personnel to assist with the installation.
• Do not over tighten the screws as this may damage the monitor and void your warranty.
• Use only screws and wall mounting brackets that meet the VESA standard. Any damage or injuries caused by
misuse or use of improper accessories are not covered by the warranty.
CAUTION
• The wall mount kit includes the installation guide and all necessary parts.
• The wall mounting bracket is optional. You can obtain additional accessories from your local dealer.
• The length of screws required may differ depending on the wall mount. Be sure to use the correct length.
• For more information, please refer to the guide provided with the wall mount.
NOTE
785 mm
14
ENGLISH
Securing the monitor to a wall (optional)
(Procedure may differ depending on the model.)
1 Insert and tighten the eyebolts, or brackets and
bolts on the back of the monitor.
- If there are already bolts inserted in the
eyebolts’ position, remove the other bolts first.
2 Mount the wall brackets with the bolts to the
wall. Match the location of the wall bracket and
the eyebolts on the rear of the monitor.
3 Connect the eyebolts and wall brackets tightly
with a sturdy cord.
Make sure the securing cord is horizontal with
the flat surface.
• Make sure that children do not climb on or hang from the monitor.
CAUTION
• If the monitor is not positioned in a sufficiently stable location, there is a danger that it will fall. Many injuries,
particularly to children, can be avoided by taking simple precautions such as:
» Using cabinets or stands recommended by the manufacturer.
» Only using furniture that can safely support the monitor.
» Ensuring the monitor is not overhanging the edge of the supporting furniture.
» Not placing the monitor on tall furniture (for example, cupboards or bookcases) without anchoring both
the furniture and the monitor to a suitable support.
» Not placing cloth or other materials between the monitor and supporting furniture.
» Educating children about the dangers of climbing on furniture to reach the monitor or its controls.
WARNING
• Use a platform or cabinet that is large and strong enough to support the monitor securely.
• Brackets, bolts, and cords are sold separately. You can obtain additional accessories from your local retail
store.
• The illustration shows a general example of installation and may look different from the actual product.
NOTE
15
ENGLISH
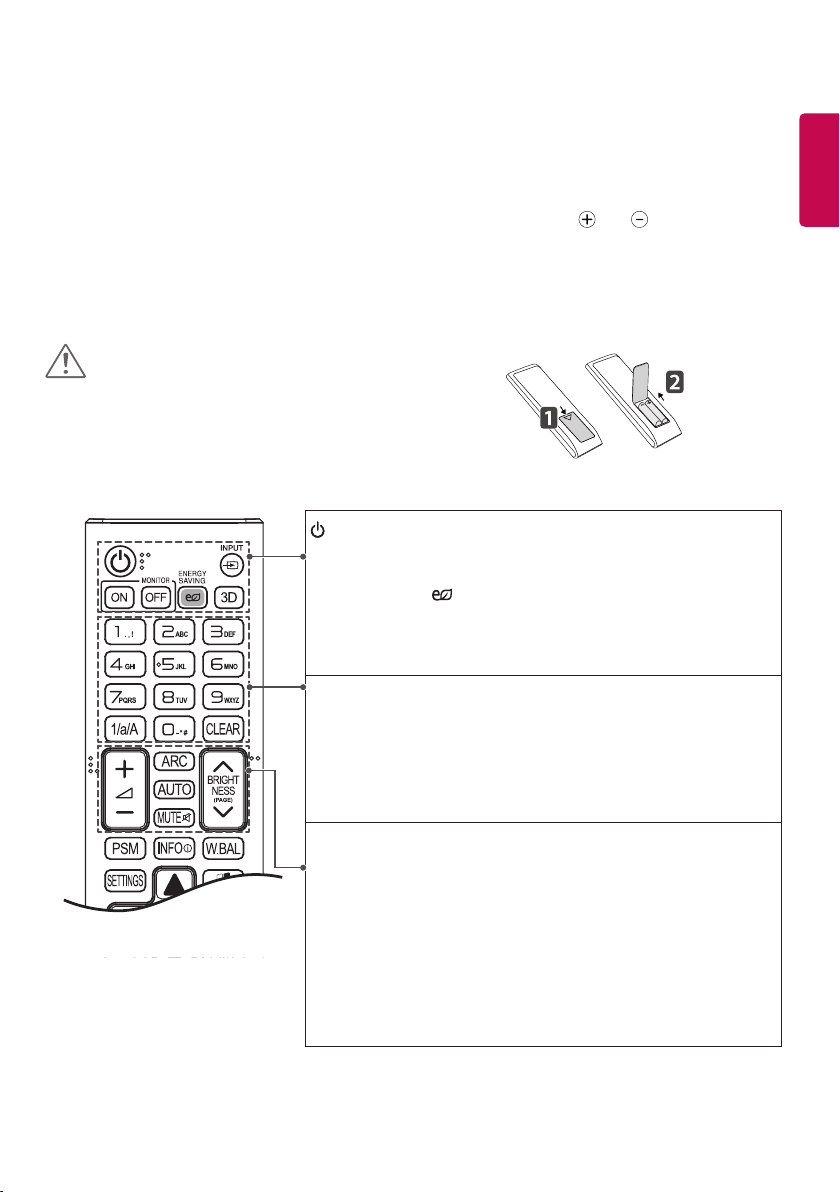
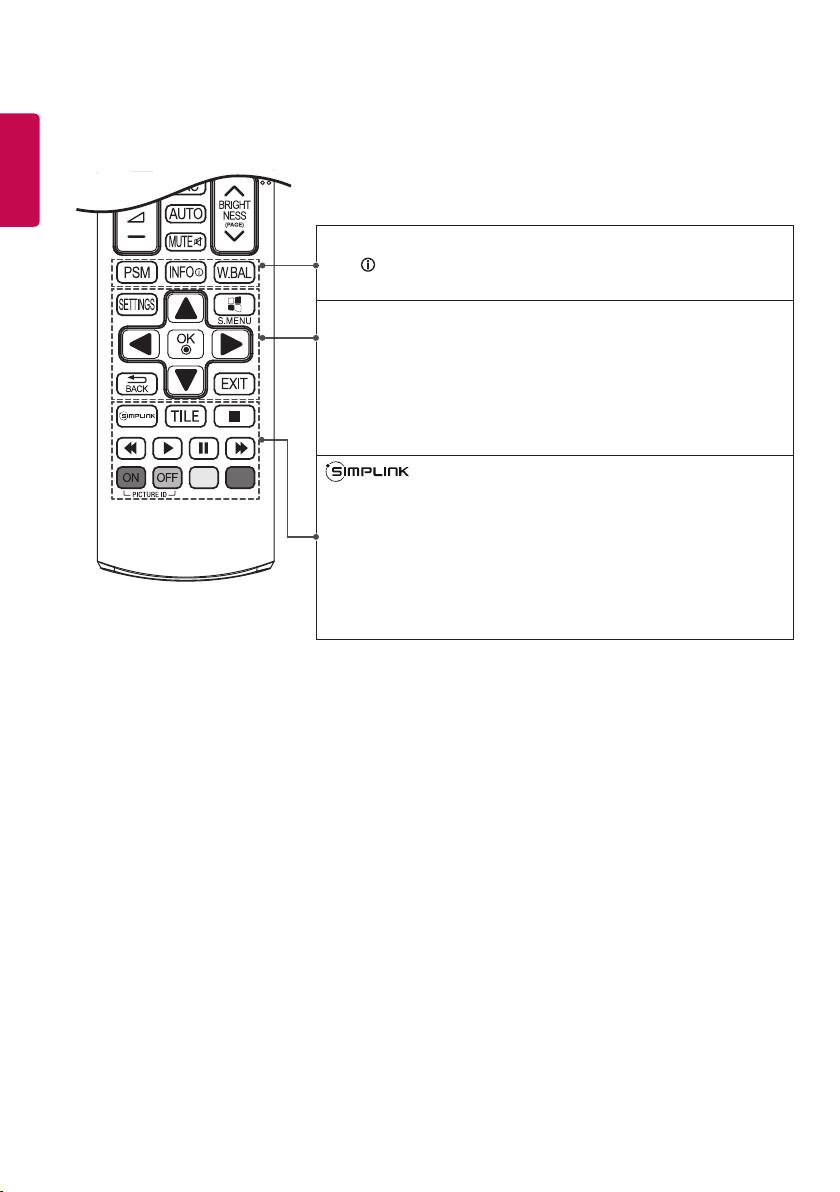
REMOTE CONTROL
The descriptions in this manual are based on the buttons on the remote control. Please read this manual
carefully to use the monitor correctly.
To install batteries, open the battery cover, place batteries (1.5 V AAA) matching and terminals to the
labels inside the compartment, and close the battery cover.
To remove the batteries, perform the installation actions in reverse. The illustrations may differ from the actual
accessories.
• Do not mix old and new batteries, as this may
damage the remote control.
• Be sure to point the remote control toward the
remote control sensor on the monitor.
CAUTION
ID
BACK
TILE
ON
OFF
EXIT
(POWER) Turns the monitor on or off.
MONITOR ON Turns the monitor on.
MONITOR OFF Turns the monitor off.
ENERGY SAVING( ) Reduces power consumption by adjusting peak
screen brightness.
INPUT Selects the input mode.
3D Used for viewing 3D videos. (This model does not support this.)
1/a/A Toggles between numerical and alphabetical.
(Depending upon the model, this feature may not be supported.)
Number and Alphabet buttons
Enters numerical or alphabetical characters depending upon the setting.
(Depending upon the model, this feature may not be supported.)
CLEAR Deletes the entered numerical or alphabetical character.
(Depending upon the model, this feature may not be supported.)
Volume Up/Down Button Adjusts the volume.
ARC Selects the Aspect Ratio mode.
AUTO Automatically adjusts picture position and minimizes image
instability (available for RGB input only). (Depending upon the
model, this feature may not be supported.)
MUTE Mutes all sounds.
BRIGHTNESS Adjust the brightness by pressing the Up and Down
buttons on the remote control. In USB mode, the OSD
menu has the Page function to move to the next file list.
(Depending upon the model, this feature may not be
supported.)
16
ENGLISH
PSM Selects the Picture Mode.
INFO Views the information of the currently program and the screen.
W.BAL Enters the White Balance menu.
SETTINGS Accesses the main menus or saves your input and exit menus.
S.MENU SuperSign menu key (Depending upon the model, this feature
may not be supported.)
Navigation Buttons Scrolls through menus or options.
OK Selects menus or options and confirms your input.
BACK Allows you to move back one step in the user interaction function.
EXIT Quit all OSD tasks and applications.
Allows you to control various multimedia devices to enjoy
multimedia simply by using the remote control through the
SimpLink menu. (Depending upon the model, this feature
may not be supported.)
TILE Selects the TILE Mode.
PICTURE ID ON/OFF When the Picture ID number matches the Set ID
number, you can control whichever monitor you
want in multi-display format.
USB Menu Control Buttons Controls media playback.

17
ENGLISH
Displaying the Device Name
Connected to an Input Port
Display which devices are connected to which
external input ports.
1 Access the Input list screen and press the red
(input label) button on the remote control.
2 You can assign an input label for every input
except USB.
• External inputs supported HDMI, DVI-D,
DISPLAYPORT, OPS,
RGB
• Labels available PC, DTV
• The input labels are displayed on the Input Label
screen or at the top left of the screen when you
change the external input setting.
• For DTV/PC-compatible signals, such as
1080p 60 Hz, the screen settings may change
according to the input label. The Just Scan
option is available if a PC is connected as an
external device.
NOTE
White Balance Adjust Menu
Press the W.BAL button on the remote control.
y
R-Gain Adjusts the level of red. The higher
the number, the redder the set.
Decrease the number if the screen
looks too red.
y
G-Gain Adjusts the level of green. The
higher the number, the greener
the set. Decrease the number if the
screen looks too green.
y
B-Gain Adjusts the level of blue. The
higher the number, the bluer the set.
Decrease the number if the screen
looks too blue.
y
Backlight Adjusts the brightness. The
higher the number, the brighter
the set. This works in the same
way as the backlight of the user
menu.
y
Reset Resets the white balance value to the
factory settings.

18
ENGLISH
MAKING CONNECTIONS
You can connect various external devices to your monitor. Change the input mode and select the external
device you want to connect.
For more information about external device connections, see the user manual provided with each device.
Connecting to a PC
Some of the cables are not provided.
This monitor supports the Plug & Play* feature.
* Plug & Play: a feature that enables a PC to recognize devices attached by the user without device
configuration or user intervention when powering up.
External Device Connection
Connect a HD receiver, DVD, or VCR player to the monitor and select an appropriate input mode.
Some of the cables are not provided. For the best picture and sound quality, connecting external devices to
your monitor using HDMI cables is recommended.

19
ENGLISH
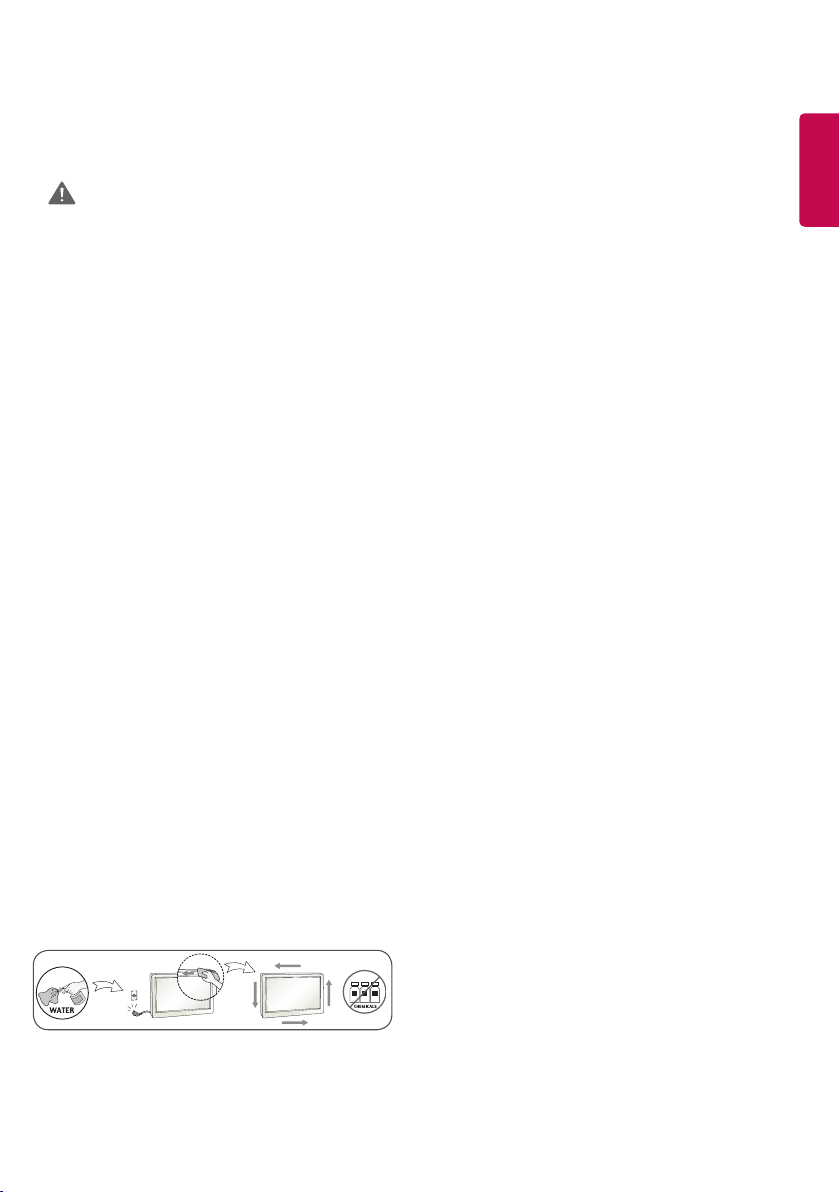
• Connect the signal input cable and tighten it by turning the screws clockwise.
• Do not press the screen with your finger for a prolonged period as this may result in temporary distortion on
the screen.
• Avoid displaying static images on the screen for a long period of time to prevent image burn. Use a
screensaver if possible.
• A wireless communication device near your monitor can affect the image.
CAUTION
• For the best image quality, using the monitor with HDMI connection is recommended.
• To comply with the standard specifications of the product, use a shielded interface cable with a ferrite core,
such as a DVI cable.
• If you turn the monitor on when the set is cold, the screen may flicker. This is normal.
• Sometimes red, green, or blue spots may appear on the screen. This is normal.
• Use a High Speed HDMI®/
TM
cable.
• Use a certified cable with the HDMI logo attached. If you do not use a certified HDMI cable, the screen may
not display or a connection error may occur.
• Recommended HDMI Cable Types
- High-Speed HDMI®/
TM
Cable
- High-Speed HDMI®/
TM
Cable with Ethernet
• If you cannot hear any sound in HDMI mode please check your PC settings. Some PCs require you to change
the default audio output to HDMI manually.
• If you want to use HDMI-PC mode, you must set your PC/DTV to PC mode.
• You may experience compatibility issues if you use HDMI-PC mode.
• Make sure the power cable is disconnected.
• If you connect a gaming device to the monitor, use the cable provided with the gaming device.
• It is recommended to use the speakers that are provided as optional accessories.
• High Speed HDMI®/
TM
cables transmit a HD signal up to 1080p and higher.
• Use the standard Macintosh adapter since an incompatible adapter is available in the market. (Different
signaling system)
• Apple computers may require an adapter to connect to this monitor. Call or visit their web site for more
information.
NOTE
20
ENGLISH
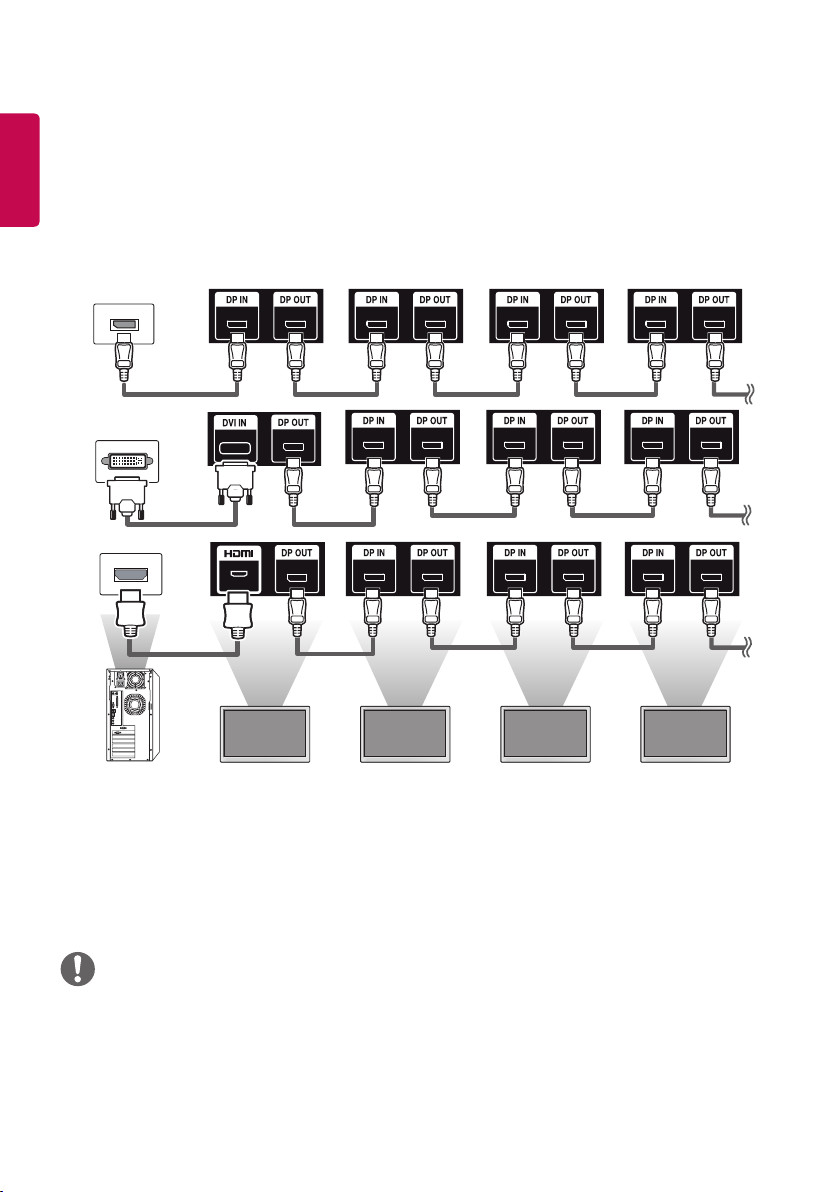
• If the signal is stable and there is no cable loss, in general, up to 100 monitors can be connected via the DP
Out port (at the recommended resolution). If you want to connect more than this number of monitors, use
a booster.
• If you set the tile mode using DVI or HDMI, you will not be able to watch HDCP-encrypted content.
• If the signal cable between the product and your PC is too long, make sure to use the booster or optical
cable.
NOTE
Daisy Chain Monitors
To use different products connected to each other, connect one end of the signal input cable (DP Cable) to the
DP Out connector of Monitor 1 and connect the other end to the DP In connector of the other product.
* DP Cable - Use a DP cable that is certified to DP1.1a (SST) or higher.
Monitor 1 Monitor 2 Monitor 3 Monitor 4
21
ENGLISH
TROUBLESHOOTING
No image is displayed
Problem Action
Is the product power cord connected? y Check if the power cord is correctly plugged into the power
outlet.
Does the Out of range message
appear?
y The signal from the PC (video card) is out of the vertical or
horizontal frequency range of the product. Adjust the frequency
range by referring to the Specifications in this manual.
* Maximum resolution: 1920 x 1080 (60 Hz)
Does the No Signal message appear? y The signal cable between PC and product is not connected.
Check the signal cable.
y Access the input menu to check the input signal.
The Unknown Product message appears when the product is connected.
Problem Action
Did you install the driver? y Check if the Plug & Play function is supported by referring to the
video card user manual.
The screen image looks abnormal.
Problem Action
Is the screen position wrong? y Check if the video card resolution and frequency are supported
by the product. If the frequency is out of range, set to the
recommended resolution in the Control Panel Display Setting
menu.
The screen is displayed abnormally. y The proper input signal is not connected to the signal port.
Connect the signal cable that matches with the source input
signal.
After-image appears on the product.
Problem Action
After-image appears when the
product is turned off.
y If you use a fixed image for a long time, the pixels may be
damaged. Use the screen-saver function.
y When a dark image is displayed on the screen after an image
with high contrast (black and white or gray), this may cause
image sticking. This is normal for LCD screen products.
22
ENGLISH
• The software-related contents may be changed without prior notice due to upgrade of the product
functions.
NOTE
Screen color is abnormal.
Problem Action
Screen has poor color resolution (16
colors).
y Set the number of colors to more than 24 bits (true color). Select
Control Panel - Display - Settings - Color Table menu in Windows.
Screen color is unstable or
mono-colored.
y Check the connection status of the signal cable. Or, re-insert the
PC video card.
Do black spots appear on the screen? y Several pixels (red, green, white, or black color) may appear
on the screen, which can be attributable to the unique
characteristics of the LCD panel. This is not a malfunction of the
LCD.
The operation does not work normally.
Problem Action
The power suddenly turned off. y Is the Timer set?
y Check the power control settings. Power interrupted.
The audio function does not work.
Problem Action
No sound? y See if the audio cable is connected properly.
y Adjust the volume.
y See if the sound is set properly.
Sound is too dull. y Select the appropriate equalizer sound.
Sound is too low. y Adjust the volume.
23
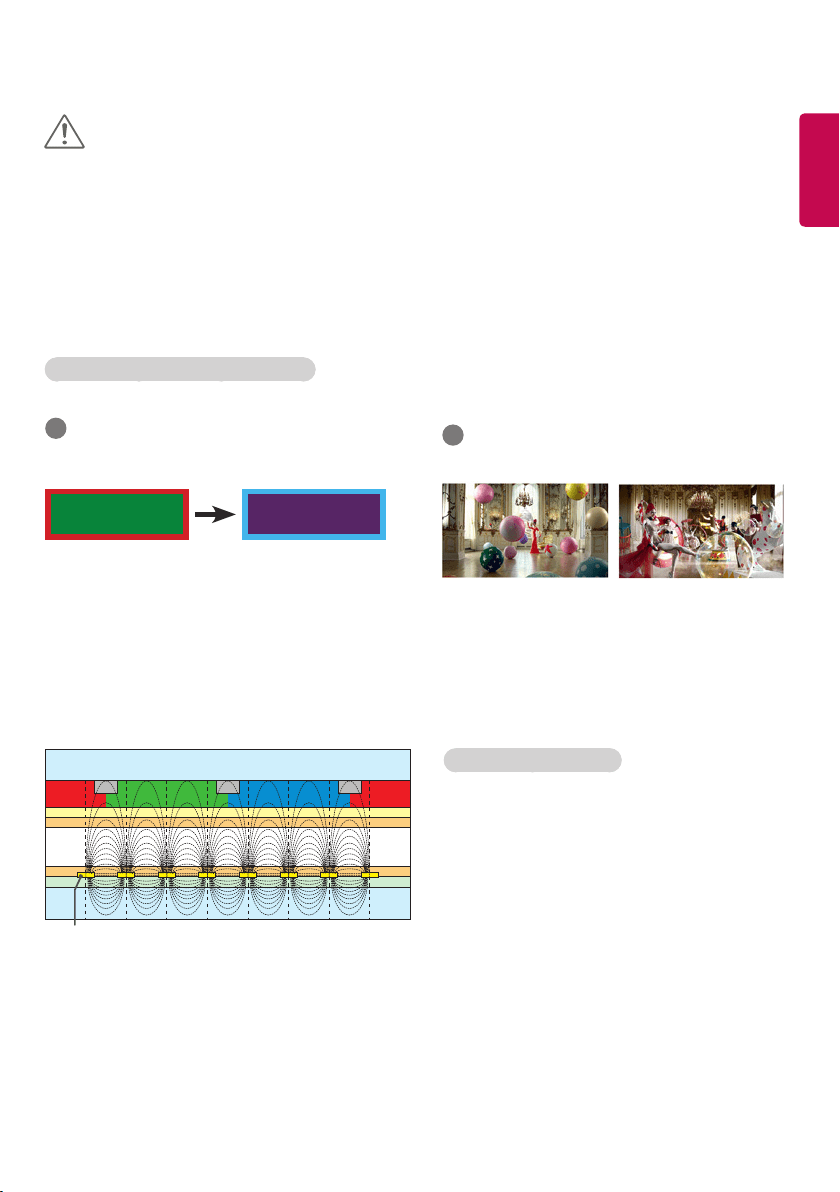
ENGLISH
What is image sticking?
When the LCD panel displays a static image for an
extended period of time, it can cause a voltage
difference between the electrodes that operate
the liquid crystals. When the voltage difference
between the electrodes builds up over time, liquid
crystals have a tendency to remain aligned in
one direction. During this process, a previously
displayed image remains visible. This phenomenon
is referred to as image sticking.
BM BM BM
CFCFCF
OC
PI
PI
TFT Layers
Glass
Glass
LC
CF
I D : UPM123
PW : ******
I D : UPM123
PW : ******
ITO or MoTi Pixel Layer
Recommended operating conditions
1
Change the background and the character
colors using the same time interval.
When changing colors, using complementary
colors helps to prevent image sticking.
2
Change the image using the same time
interval.
Make sure that the characters or images before
changing the image remain in the same location
after changing the image.
• Image sticking does not occur when using constantly changing images but may occur when using a fixed
image for an extended period of time. Therefore, it is recommended that you use the instructions below
to decrease the likelihood of image sticking occurring when using a fixed image. It is recommended that
you change the screen at least once every 12 hours at the very minimum; if done more frequently, the
prevention of image sticking is more effective.
CAUTION
ID: UPM 123
PW: ****
ID: UPM 123
PW: ****
24
ENGLISH
PRODUCT SPECIFICATIONS
The product specifications below may be changed without prior notice due to upgrade of product functions.
“ ” refers to alternating current (AC), and “ ” refers to direct current (DC).
LCD screen Screen type Thin Film Transistor (TFT)
Liquid Crystal Display (LCD) Screen
Video signal Maximum resolution 1920 x 1080 @ 60 Hz
- This may not be supported on some OS or graphic card
types.
Recommended
resolution
1920 x 1080 @ 60 Hz
- This may not be supported on some OS or graphic card
types.
Horizontal frequency RGB 30 kHz to 83 kHz
HDMI/OPS/DVI-D/DISPLAYPORT 28.1 kHz to 83 kHz
Vertical frequency RGB 50 Hz to 75 Hz
HDMI/OPS/DVI-D/DISPLAYPORT 50 Hz to 60 Hz
Synchronization Separate Sync, Digital
Input/ Output ports SPEAKER OUT,AUDIO IN/OUT,LAN, PIXEL SENSOR, HDMI,
IR&LIGHT SENSOR, DP IN/OUT, DVI-D, USB, RGB,
RS-232C IN/OUT
Embedded battery Applied
Environmental
Conditions
Operating Temperature
Operating Humidity
0 °C to 40 °C
10 % to 80 %
Storage Temperature
Storage Humidity
-20 °C to 60 °C
5 % to 85 %
* Applicable only for models that support the speakers
Audio/AUDIO RMS Audio Output 10 W + 10 W (R + L)
Input Sensitivity 0.7 Vrms
Speaker Impedance 8 Ω
25
ENGLISH
LCD screen Pixel pitch 0.4833 mm (H) x 0.4833 mm (V)
Power Rated power AC 100-240 V~ 50/60 Hz 1.2 A
Power consumption On Mode 110 W Typ
Sleep Mode (DISPLAYPORT) ≤ 0.7 W
Sleep Mode (HDMI,DVI-D,RGB) ≤ 1.0 W
Off Mode ≤ 0.5W
Dimensions (Width
x Height x Depth) /
Weight
Head 948.7 mm x 555.3 mm x 31.7 mm / 12.5 kg
Head + Stand 948.7 mm x 617.7 mm x 298.3 mm / 13.9 kg
Head + Speaker 948.7 mm x 555.3 mm x 81.3 mm / 13.3 kg
Head + Speaker + Stand 948.7 mm x 617.7 mm x 298.3 mm / 14.7 kg
LCD screen Pixel pitch 0.55926 mm (H) x 0.55926 mm (V)
Power Rated power AC 100-240 V~ 50/60 Hz 1.6 A
Power consumption On Mode 125 W Typ
Sleep Mode (DISPLAYPORT) ≤ 0.7 W
Sleep Mode (HDMI,DVI-D,RGB) ≤ 1.0 W
Off Mode ≤ 0.5W
Dimensions (Width
x Height x Depth) /
Weight
Head 1094.6 mm x 637.4 mm x 31.7 mm / 15.6 kg
Head + Stand 1094.6 mm x 699.7 mm x 298.3 mm / 17.0 kg
Head + Speaker 1094.6 mm x 637.4 mm x 81.3 mm / 16.4 kg
Head + Speaker + Stand 1094.6 mm x 699.7 mm x 298.3 mm / 17.8 kg
42SH7DB
49SH7DB
26
ENGLISH
LCD screen Pixel pitch 0.630 mm (H) x 0.630 mm (V)
Power Rated power AC 100-240 V~ 50/60 Hz 1.7 A
Power consumption On Mode 140 W Typ
Sleep Mode (DISPLAYPORT) ≤ 0.7 W
Sleep Mode (HDMI,DVI-D,RGB) ≤ 1.0 W
Off Mode ≤ 0.5W
Dimensions (Width
x Height x Depth) /
Weight
Head 1230.4 mm x 713.7 mm x 31.7 mm / 20.7 kg
Head + Stand 1230.4 mm x 776.1 mm x 298.3 mm / 22.1 kg
Head + Speaker 1230.4 mm x 713.7 mm x 81.3 mm / 21.5 kg
Head + Speaker + Stand 1230.4 mm x 776.1 mm x 298.3 mm / 22.9 kg
55SH7DB

27
ENGLISH
HDMI / OPS / DVI-D / DISPLAYPORT (PC)
Support Mode
Resolution
Horizontal
frequency (kHz)
Vertical frequency
(Hz)
640 x 480 31.469 59.94
800 x 600 37.879 60.317
1024 x 768 48.363 60
1280 x 720 44.772 59.855
1366 x 768 47.7 60
1280 x 1024 63.981 60.02
1680 x 1050 65.290 59.954
1920 x 1080 67.5 60
• PC resolutions available for the Input
Label option in RGB/ HDMI/ OPS / DVI-D /
DISPLAYPORT input modes: 640 x 480/60 Hz,
1280 x 720/60 Hz, 1920 x 1080/60 Hz; 480p,
720p, and 1080p DTV resolutions.
• Vertical frequency The product display
functions by the screen image changing dozens
of times every second like a fluorescent lamp.
The vertical frequency or refresh rate is the
number of image displays per second. The unit
is Hz.
• Horizontal frequency The horizontal interval
is the time taken to display one horizontal line.
When 1 is divided by the horizontal interval,
the number of horizontal lines displayed every
second can be tabulated as the horizontal
frequency. The unit is kHz.
• DISPLAYPORT does not support YCbCr 4:2:2.
NOTE
RGB(PC) mode
Resolution
Horizontal
frequency (kHz)
Vertical
frequency (Hz)
720 x 400 31.468 70.8
640 x 480 31.469 59.94
800 x 600 37.879 60.317
1024 x 768 48.363 60
1280 x 720 44.772 59.855
1280 x 960 60 60
1152 x 864 57.717 59.934
1280 x 1024 63.981 60.02
1920 x 1080 67.5 60
HDMI / OPS/ DISPLAYPORT (DTV) Support
Mode
Resolution
Horizontal
frequency (kHz)
Vertical frequency
(Hz)
480/60P 31.5 60
576/50P 31.25 50
720/50P 37.5 50
720/60P 45 60
1080/50i 28.1 50
1080/60i 33.75 60
1080/50P 56.25 50
1080/60P 67.5 60
Make sure to read the Safety Precautions
before using the product.
The model and serial numbers of the set are
located on the back and one side of the set.
Record it below should you ever need service.
MODEL
SERIAL
Temporary noise is normal when powering ON
or OFF this device.
WARNING - This equipment is compliant with
Class A of CISPR 32. In a residential environment
this equipment may cause radio interference.