
SAVE THIS MANUAL FOR REFERENCE
You will need this manual for safety
instructions, operating procedures, and Warranty.
The original sales receipt is required for warranty service.
YF60VRX21-SP
21" CORDLESS LAWN MOWER
3-IN-1 SELF PROPELLED
OPERATOR’S MANUAL
Our Customer Service staff is ready to provide assistance.
In the case of a damaged or missing part, most replacement parts ship directly from
Merotec USA in Atlanta or from one of our service partners in the US.
For immediate help with assembly, or for additional product information, email support@
MerotecUSA.com or call 866-902-9690 M-F 8:30am – 5:00pm ET. More information can be
found on www.YardForceUSA.com.

2
TABLE OF CONTENTS
Description of Product Parts ....................................................................................................................7
Intended use………………………………....................................................................................................7
Technical Specications……………........................................................................................…………......7
Safety Information………...................................................................................................………………....8
Assembly …………...........................................................................................…………………………..13
Adjustment ………............................................................................................…………………………..14
Operation……………………………...........................................................................................…………14
Maintenance and Storage ...............................………………..........................................................……16
Troubleshooting ..................................................................................................…………………………17
Warranty .................................................................................................................................................18
WARNING
1. For safe operation,read and understand the instruction manual.
2. To reduce the risk of electric shock, do not expose to water or operate on wet ground.
3. Replace damaged parts immediately.
4. Disconnect and remove battery prior to servicing.
5. Remove the battery pack before servicing or removing blade.
6. Do not reach under blade guard. Go across slopes,not up and down. Do not operate within
100 ft. of people or animals.
7. Do not mow when children or others are around. Keep safety devices(guards, shields,
switches etc. in place and working.
8. Look down and behind before and while moving backwards.
9. Remove objects that could be thrown by the blade.
10. To reduce the risk of eye injury, wear safety glasses.
11. Meet CPSC blade safety requirements.
12. Use only 60V Li-ion battery YF60VRX4.0-BAT & YF60VRX2.5-BAT and battery charger
YF60VRX4A-CHG & YF60VRX2A-CHG.
3
Fig. 1
Fig. 2 Fig. 3
Fig. 4
11 12 13 14 15
A
B
C
I
J
H
K
G F
D
E
1
2
3
4
5
6
7
8
9
10
4
Fig. 5
Fig. 7
Fig. 9
Fig. 11
Fig. 6
Fig. 8
Fig. 10
Fig. 12
1
2
3
5
Fig. 14
Fig. 16
Fig. 18
1
2
Fig. 20
Fig. 15
Fig. 19
Fig. 17
Fig. 13
1
2
3
1
2

6
Fig. 22
Fig. 23
Fig. 21

7
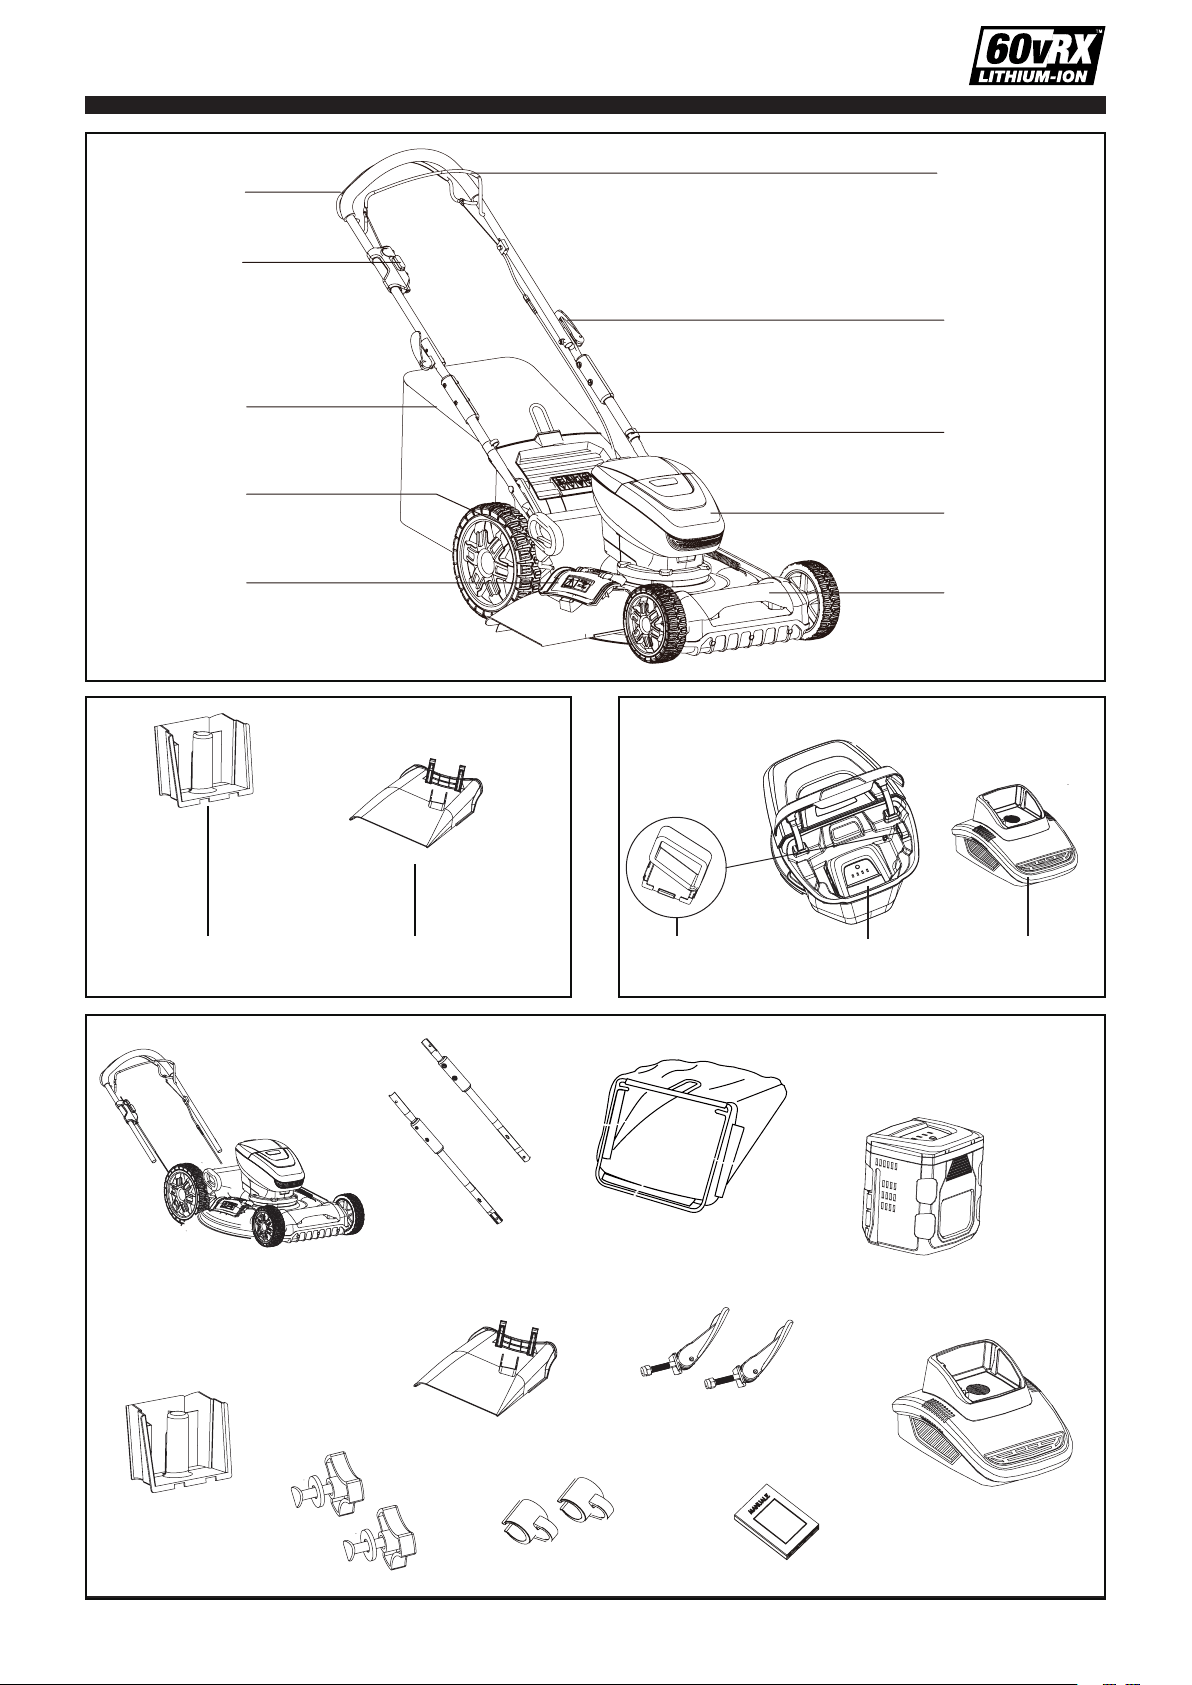
DESCRIPTION OF PRODUCT PARTS
Parts list (See Fig. 1, Fig. 2 & Fig. 3)
1. Self-propelled switch lever
2. Safety lock button
3. Grass bag
4. Height adjustment knob
5. Side discharge guard
6. Front bumper handle
7. Power head
8. Cable clip
9. Handle quick-release knob
10. Operator presence control bar
11. Mulching plug
12. Side discharge deector
13. Safety key
14. Battery pack
15. Battery charger
NOTICE!
1. Remove everything from carton except the
cordless Lawn Mower.
2. Open carton completely by cutting each corner
from top to bottom.
3. Remove the lawn mower from carton.
Delivery list (See Fig.4)
A. Main machine x 1
B. Lower handle x 2
C. Grass bag x 1
D. Battery pack x 1
E. Charger x 1
F. Manual x 1
G. Cable clip x 2
H. Lower handle xing knob x 2
I. Mulching plug
J. Side discharge deector x 1
K. Handle quick-release knob x 2
Carefully remove the machine and parts from its
packaging. Identify all the parts packaged in the
carton against the parts list. Please contact our
customer service center (Monday - Friday 8:30AM
- 5:00PM ET) at
(866) 902-9690
if anything is
missing.
WARNING!
If any parts are damaged or
missing, do not operate this tool until the missing
parts are replaced. Failure to heed this warning
could result in serious personal injury.
NOTE!
Always recycle the packaging in
accordance with local recycling schemes.
TECHNICAL SPECIFICATIONS
Item No. YF60VXR21-SP
Voltage/Capacity 60 V d.c. / 4.0 Ah Li-ion
Deck Size 21 "
Cutting Size 20 "
Cutting Height 7 positions: 1.25 "- 3.75"
Self-Propelled Yes
Grass Bag Capacity 2.0 Bushels/ 65L
No-load Speed 3100 RPM
Booster Function Yes (3500 RPM)
Wheel Size 8 " Front/ 12 " Rear
Charger
Input: 100~240 V, 50/60 Hz,
Output: 63 V d.c., 4.0 A
Charging Time 60 Minutes
Weight 86 lbs
Battery Pack Type YF60VRX4.0-BAT
Charger Type YF60VRX4A-CHG
INTENDED USE
This cordless lawn mower has been designed for
cutting lawn areas in private house and hobby
gardens.
The machine is to be used only for its prescribed
purpose, any other use is deemed to be a
case of misuse. The user/operator and not the
manuafacturer will be liable for any damage or
injuries of any kind caused as a result of this.
Please note that our equipment has not been
designed for use in commercial, trade or industrial
applications. Our warranty will be voided if the
machine is used in commercial, trade or industrial
businesses or for equivalent purposes.
8
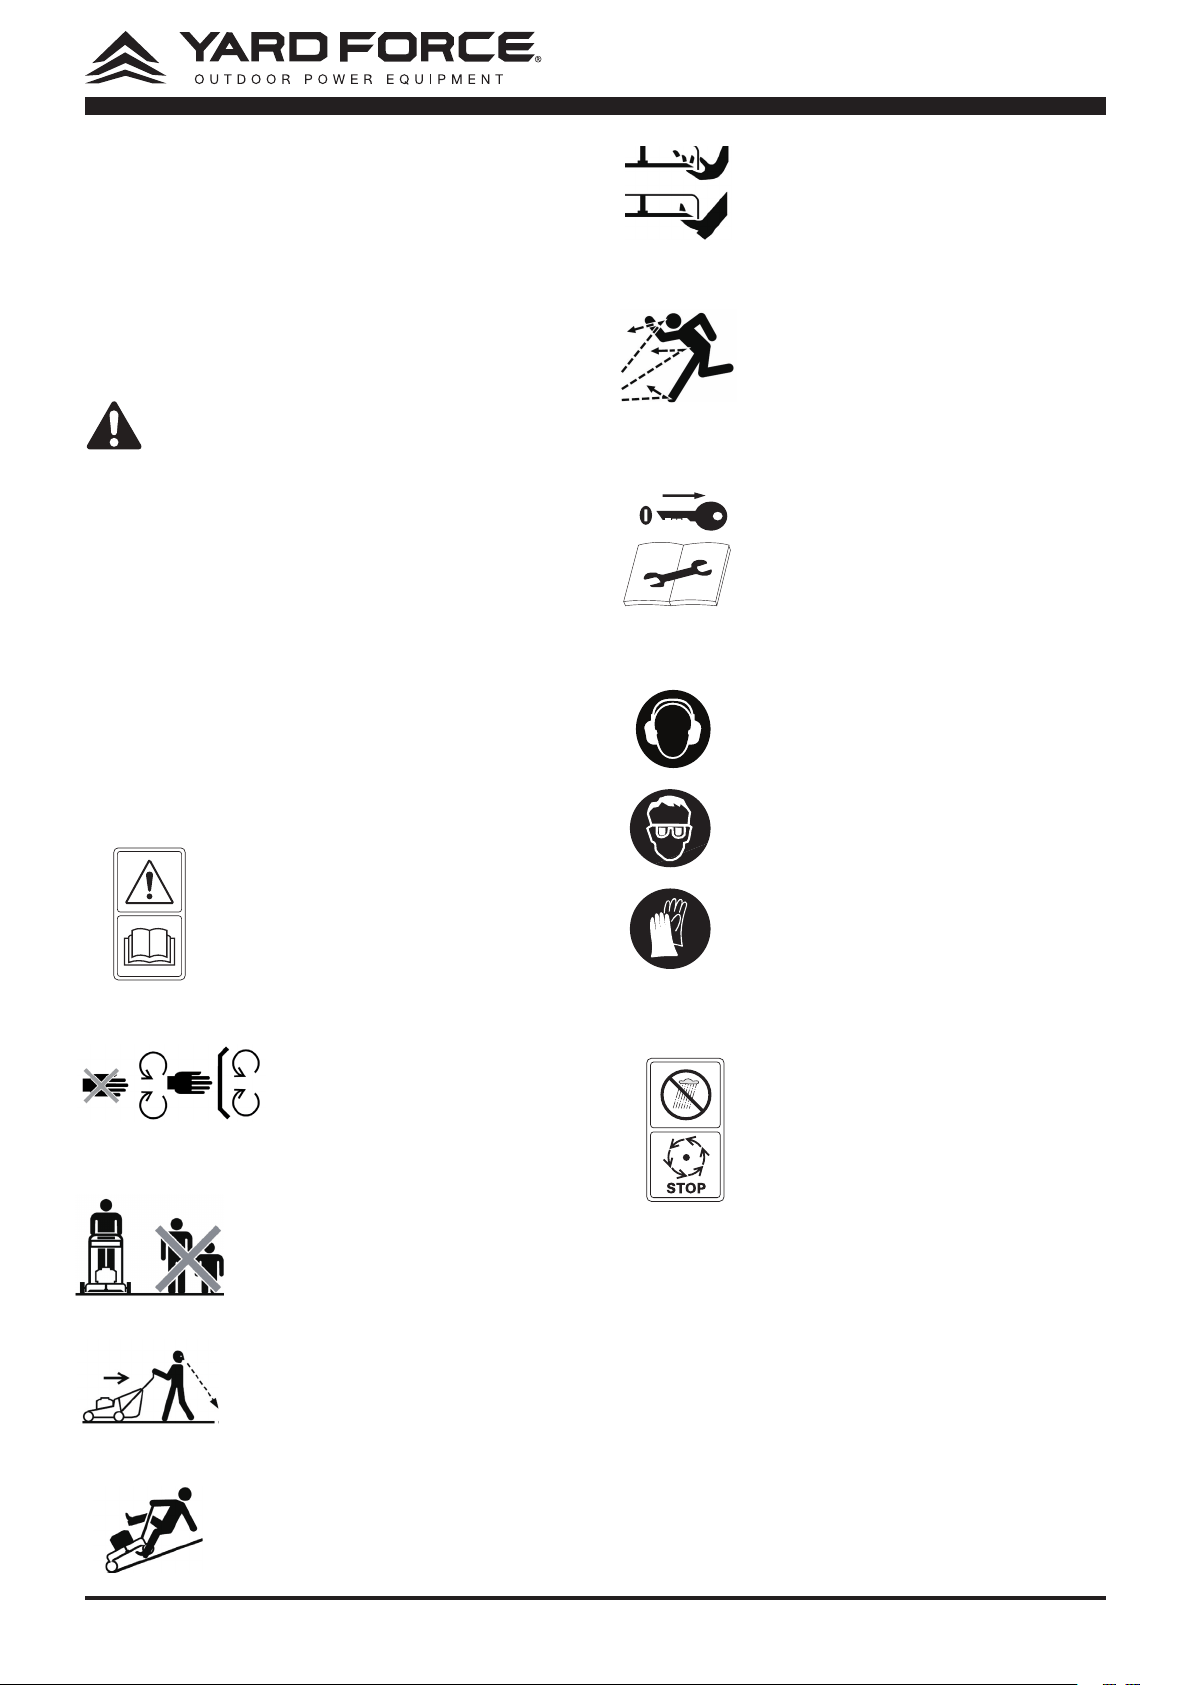
Do not expose and operate the
tool in rain.
Wait until all machine components
have completely stopped before
touching them. The blades
continue to rotate after the
machine is switched o, a rotating
blade can cause injury.
Remove disabling device before
maintenance.
Look behind while backing.
Do not open or remove
safety shields while engine
is running.
Steep slope hazard.
Severing of toes or ngers
rotary mower blade.
Thrown or ying objects
whole body exposure.
requirement of wearing ear
protection, eye protection and
gloves when using the product.
To reduce the risk of injury, user
must read instruction manual
carefully.
Keep bystanders away.
SAFETY SYMBOLS
The purpose of safety symbols is to attract your
attention to possible dangers. The safety symbols
and the explanations with them deserve your
careful attention and understanding. The symbol
warnings do not, by themselves, eliminate any
danger. The instructions and warnings they give
are no substitutes for proper accident prevention
measures.
WARNING
: Be sure to read and understand
all safety instructions in this Operator’s Manual,
including all safety alert symbols such as
“
DANGER
,” “
WARNING
,” and “
CAUTION
” before
using this tool. Failure to follow all instructions
listed below may result in electric shock, re, and/
or serious personal injury.
SAFETY INSTRUCTIONS
This page depicts and describes safety symbols
that may appear on this product. Read,
understand, and follow all instructions on the
machine before attempting to assemble and
operate.
9
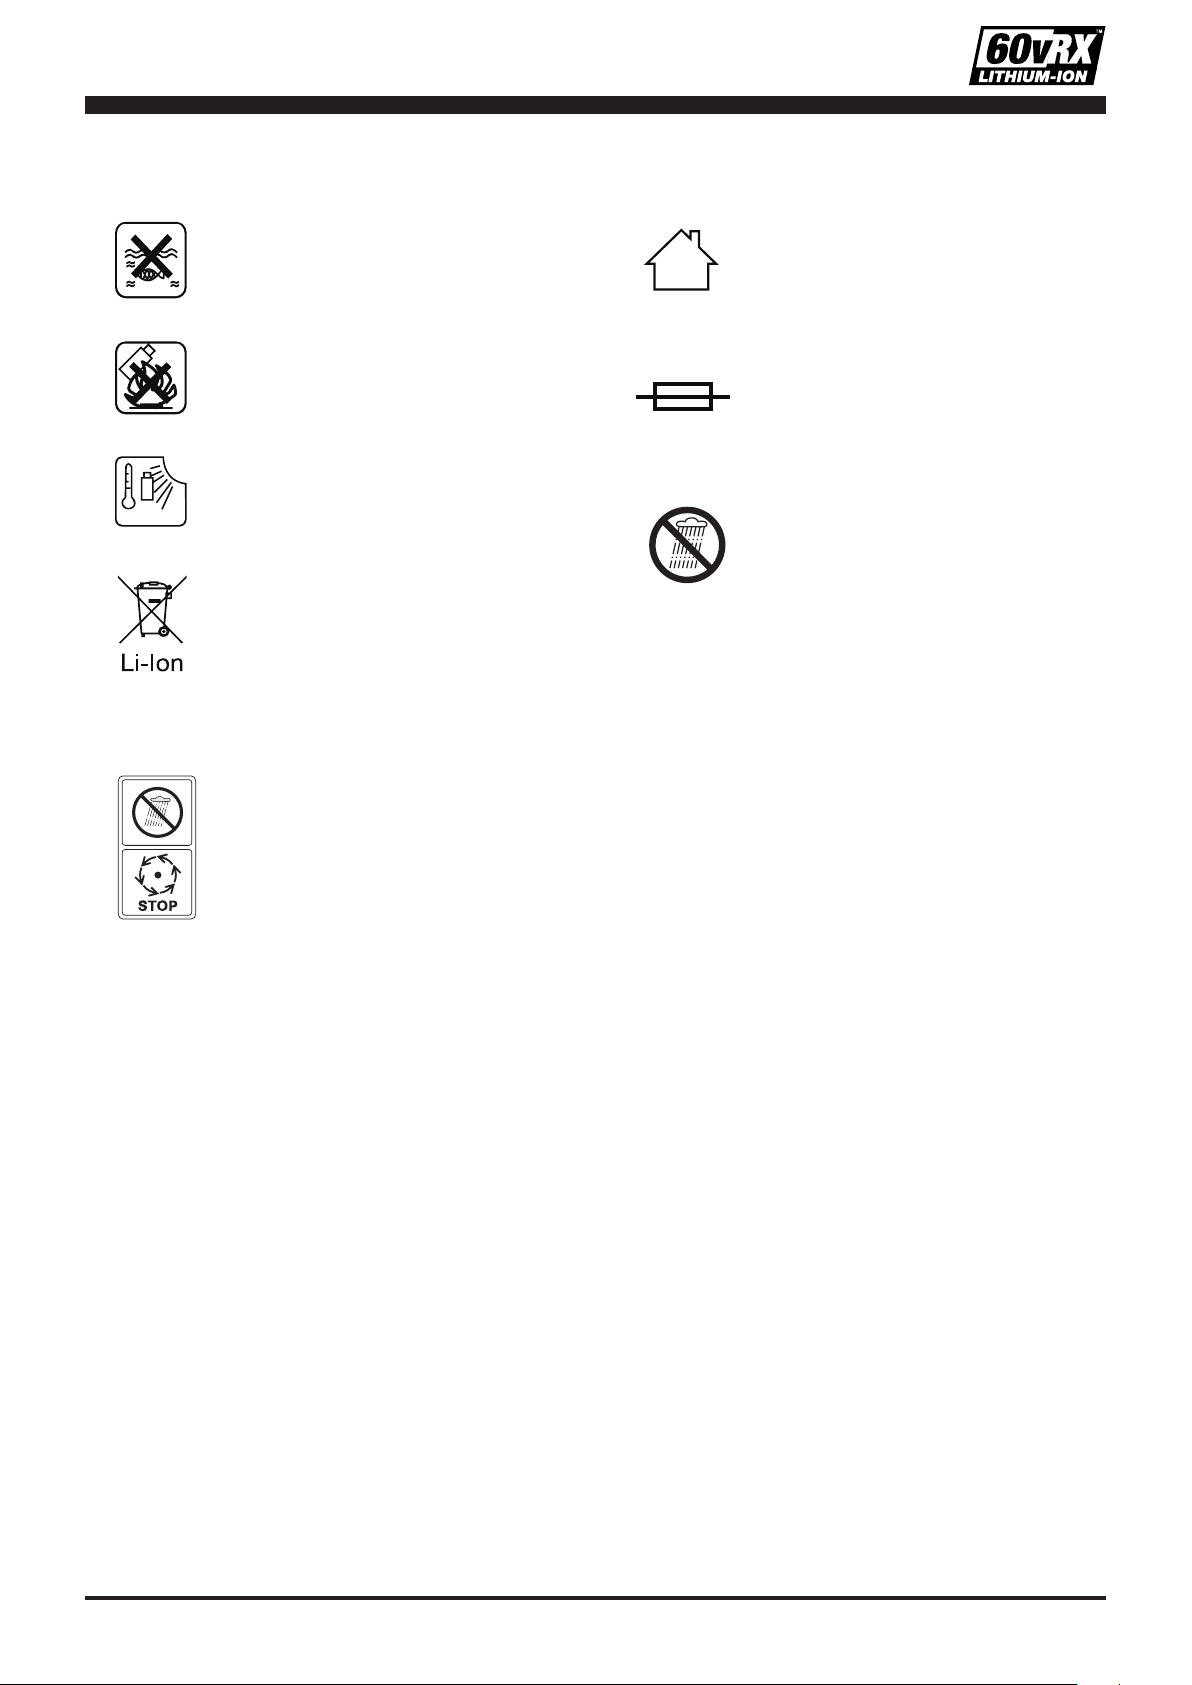
Do not expose and operate the
tool in rain.
Wait until all machine components
have completely stopped before
touching them. The blades
continue to rotate after the
machine is switched o, a rotating
blade can cause injury.
Warning symbols on the battery pack
Warning symbols on the charger
Batteries contain Li-ion. Waste
batteries should be sorted for eco-
friendly. Do not dispose of waste
batteries as unsorted municipal
waste.
Do not throw into water
Do not litter to re.
Do not subject the battery to strong
sunlight over long periods and do
not leave it on a heater (max. 113
˚
F).
The charger is for indoor use only.
Protective 4 A limited.
Do not expose and operate the tool
in rain.
max. 113
˚
F
T4A

10
SAFETY RULES FOR LAWN MOWER
IMPORTANT SAFETY INSTRUCTIONS
READ ALL INSTRUCTIONS BEFORE USING
MOWER
WARNING:
When using lawn mowers,
basic safety precautions should always be
followed to reduce the risk of re, electric shock,
and personal injury, including the following:
1. Avoid Dangerous Environment - Don't use
lawn mowers in damp or wet locations.
2. Don't Use In Rain.
3. Keep Children Away - All visitors should be
kept a safe distance from work area.
4. Dress Properly - Do not wear loose clothing
or jewelry. They can be caught in moving
parts. Use of rubber gloves and footwear is
recommended when working outdoors.
5. Use Safety Glasses - Always use face or dust
mask if operation is dusty.
6. Use Right Appliance - Do not use lawn
mower for any job except that for which it is
intended.
7. Don't Force Lawn Mower - It will do the job
better and safer at the rate for which it was
designed.
8. Don't Overreach - Keep proper footing and
balance at all times.
9. Stay Alert - Watch what you are doing. Use
common sense. Do not operate lawn mower
when you are tired.
10. Disconnect battery pack when not in use,
before cleaning or servicing, when changing
accessories such as blades, and the like.
11. Store Idle Lawn Mower Indoors - When not
in use, lawn mower should be stored in an
indoor dry and locked-up place - out of reach
of children.
12. Maintain Lawn Mower With Care - Keep
cutting edges sharp and clean for best and
safest performance.
13. Follow instructions for lubricating and
changing accessories.
14. Inspect lawn mower cord periodically and if
damaged, have it repaired by an authorized
service facility. Inspect extension cords
periodically and replace if damaged. Keep
handles dry, clean, and free from oil and
grease.
15. Keep guards in place and in working order.
16. Keep blades sharp.
17. Keep hands and feet away from cutting area.
18. Objects struck by the lawn mower blade can
cause severe injuries to persons. The lawn
should always be carefully examined and
cleared of all objects prior to each mowing.
19. If lawn mower strikes a foreign object, follow
these steps:
1) Stop lawn mower. Release the switch.
2) Unplug battery pack.
3) Inspect for damage.
4) Repair any damage before restarting and
operating the lawn mower.
20. Use identical replacement blades only.
21. Use only genuine spare parts. Only these
spare parts are designed and suitable for
the product. The use of other spare parts not
only voids the warranty, but also endanger
yourself and your environment.
WARNING:
Battery posts, terminals
and related accessories contain lead and lead
compounds, chemicals known to the State of
California to cause cancer and birth defects
or other reproductive harm. Wash hands after
handling.For more information, go to www.
P65Warnings.ca.gov.
SAVE THESE INSTRUCTIONS
Training
1. Read the instructions carefully. Make sure
you understand the instructions and are
familiar with the controls and the correct use
of the product.
2. Never allow children or people unfamiliar
with these instructions to use the product.
Local regulations can restrict the age of the
operator.
3. Never operate the product while people,
especially children, or pets are nearby.
4. Keep in mind that the operator or user
is responsible for accidents or hazards
occurring to other people or their property.
Preparation
1. While operating the product always wear
substantial footwear and long trousers. Do
not operate the product when barefoot or
wearing open sandals. Avoid wearing clothing
that is loose tting or that has hanging cords
or ties.
2. Thoroughly inspect the area where the
product is to be used and remove all objects
which can be thrown by the product.

11
3. Before using, always visually inspect to
see that the blade, blade bolt and the blade
assembly are not worn or damaged. Replace
worn or damaged components in sets to
preserve balance. Replace damaged or
unreadable labels.
General Operation
1. Use the tool only with specically designated
battery packs. Use of any other battery packs
may create a risk of injury and re.
2. Operate the product only in daylight or in
good articial light.
3. Do not expose tool and charger to rain or wet
conditions. Water entering a tool or charger
will increase the risk of electric shock.
4. Avoid operating the product in wet grass.
5. Always be sure of your footing on slopes.
6. Walk, never run.
7. For wheeled rotary mowers, Mow across the
face of slopes, never up and down.
8. Exercise extreme caution when changing
direction on slopes.
9. Do not mow excessively steep slopes.
10. Use extreme caution when reversing or
pulling the product towards you.
11. Stop the blade(s) if the appliance has to
be tilted for transportation when crossing
surfaces other than grass, and when
transporting the product to and from the area
to be mowed.
12. Never operate the appliance with defective
guards or shields, or without safety devices,
for example deectors and/or grass catchers,
in place.
13. Switch on the motor carefully according to
instructions and with feet well away from the
blade(s).
14. Do not tilt the product when switching on the
motor, except if the product has to be tilted
for starting. In this case, do not tilt it more
than absolutely necessary and lift only the
part, which is away from the operator. Always
ensure that both hands are in the operating
position before returning the appliance to the
ground.
15. Do not start the machine when standing in
front of the discharge opening.
16. Do not put hands or feet near or under
rotating parts. Keep clear of the discharge
opening at all times.
17. Do not transport the product while the cutting
blade is running.
18. Switch o and remove the key/battery pack
from the machine. Make sure that all moving
parts have come to a complete stop.
• whenever you leave the product,
• before clearing blockages or unclogging
chute,
• before checking, cleaning or working on the
product,
• after striking a foreign object. Inspect the
product for damage and make repairs before
restarting and operating the product;
19. If the product starts to vibrate abnormally
(check immediately)
• inspect for damage,
• replace or repair any damaged parts,
• check for and tighten any loose parts.
20. Use only with the battery packs and chargers
listed below:
Battery pack Charger
YF60VRX4.0-BAT YF60VRX4A-CHG
SPECIAL OPERATION SAFETY FOR THE
CHARGER
1. Recharge only with the charger specied
by the manufacturer. Do not use the original
charger on other li-ion batteries or on any
other type of battery—re or explosion may
occur.
2. Check the battery charger, cable and plug
each time before using. Do not use the
battery charger when defects are detected.
Do not open the battery charger yourself and
have it repaired only by qualied personnel
using original spare parts.
3. The charger is designed to use standard
household 100~240 V, 50/60 Hz power
source. The charger’s plug must match the
outlet. Never modify the plug in any way.
Unmodied plugs and matching outlets will
reduce risk of electric shock.
4. Do not abuse the cord of charger. Never use
the cord for carrying, pulling or unplugging
the charger. Keep cord away from heat, oil,
sharp edges or moving parts. Damaged or
entangled cords increase the risk of electric
shock.
5. Make sure the charger cord is located so
that it will not be stepped on, tripped over, or
otherwise subjected to damage or stress.
6. Keep the battery charger clean.
Contamination may cause the danger of
electric shock.
7. Protect the battery charger from rain and
moisture. The penetration of water in a

12
battery charger increases the risk of electric
shock.
8. Do not operate the battery charger on easily
inammable surfaces (e.g. paper, textiles,
etc.) or in combustible environments. There
is danger of re due to the heating of the
battery charger during charging.
9. The temperature range over which the
battery pack can be charged is typically 41
˚
F
- 113
˚
F. Therefore, charging eorts outside
the prescribed temperature range may
automatically be blocked by the protection
circuitry of the battery pack. Longest life and
best performance can be obtained if the
battery pack is charged in the normal room
condition.
10. Disconnect charger from the power supply
when not in use. This will reduce the risk of
electric shock or damage to the charger if
metal items should fall into the opening.
11. The charger is for indoor use only.
SPECIAL OPERATION SAFETY FOR THE
BATTERY PACK
1. The Li-ion battery pack is not fully charged
at the factory. Before attempting to use it ,it
must be fully charged rstly.
2. The battery pack should be recharged when
it fails to produce sucient power on jobs
which were easily done previously. DO NOT
CONTINUE using product with its battery in a
depleted condition.
3. Do not charge the battery in an air
temperature below 41
˚
F or above 113
˚
F.
This is important and will prevent serious
damage to the battery. Longest life and best
performance can be obtained if the battery is
charged when air temperature is about 68
˚
F.
4. When the machine continues to be used and
the battery temperature is above 113
˚
F, the
battery can not be charged, even you put on
the charger. Let the machine cool for some
times and wait the temperature reduced, it
can be charged again .
5. Protect the battery pack against heat, e.g.
including against continuous sun irradiation
and re. There is a danger of explosion.
6. Do not carry individual battery packs in your
pockets or bags, as they could short-circuit
against other metal items.
7. If an exposed li-ion battery pack dose start a
re, it wll burn even more violently if it comes
into contact with water or even the moisture
in the air. DO NOT throw water on a burning
li-ion battery! A re extinguisher must be
used.
8. If the battery pack becomes too hot to the
touch during charging, disconnect and switch
o immediately. Contact Service Centre
directly.
9. Do not open the battery yourself. There is
danger of a short circuit.
10. When battery pack is not in use, keep it
away from other metal objects, lie paperclips,
coins, keys, nails, screws or other small
metal objects, that can make a connection
from one terminal to another. Shorting the
battery terminals together may cause burns
or a re.
MAINTENANCE AND STORAGE
1. Keep all nuts, bolts and screws tight to be
sure the product is in safe working condition.
2. Check the grass collector frequently for wear
or deterioration.
3. Be careful during adjustment of the product
to prevent entrapment of the ngers between
moving blades and xed parts of the product.
4. Always allow the product to cool down before
storing.
5. When servicing the blades, be aware that
even though the power source is switched
o, the blades can still be moved.
6. Replace worn or damaged parts for safety.
Use only genuine replacement parts and
accessories.
7. DO NOT attempt to open the charger
and battery pack. There are no customer
serviceable parts inside. Return to any
authorized service center.
8. Store the appliance with battery pack
fully charged at the room temperature
(around 68
˚
F).
9. Every deep discharge cycle decrease the
capacity of battery pack. To prolong battery
life, recommend to charge the battery every
6 months, which over extended periods of
time without use.
Service
a) Have your tool repaired by an authorized
service agent. This tool is manufactured
in accordance with the relevant safety
regulations. To avoid danger, equipment must
only be repaired by qualied technicians.
b) Only use parts and accessories made for this
machine by the manufacturer. Failure to do
so can result in personal injury.
13
RESIDUAL RISKS
Even if you are operating this product in
accordance with all the safety requirements,
potential risks of injury and damage remain. The
following dangers can arise in connection with the
structure and design of this product:
- Health defects resulting from vibration
emission if the product is being used over
long periods of time or not adequately
managed and properly maintained.
- Injuries and damage to property due to
broken application tools or the sudden impact
of hidden objects during use.
- Danger of injury and property damage
caused by ying objects.
Warning!
This product produces an
electromagnetic eld during operation! This eld
may under some circumstances interfere with
active or passive medical ivmplants. To reduce
the risk of serious or fatal injury, we recommend
persons with medical implants to consult their
doctor and the medical implant manufacturer
before operating this product!
ASSEMBLY
Install the handle
1. Insert the lower handle to the two side
brackets on the mower deck. Use
corresponding holes on the brackets when
attaching lower handle pin for a suitable
handle height desired. Fasten the lower
handle to the lawn mower by using lower
handle xing knobs, tighten by hand to
secure it.(See Fig. 5 & 6).
2. Attach the upper handle into place and attach
it to lower handle by using handle quick-
release knobs. Make sure that the handle is
securely locked in position. (See Fig. 7)
Fitting cable clips
Locate the cable into the cable clip and then clip
securely onto the handle. (See Fig. 8)
Assemble grass bag and t it onto the mower
1. Slip the vinyl clip bindings over the frame.
(See Fig. 9)
2. Lift the rear ap with one hand and locate the
grass bag onto the hooks. Release the rear
ap, make sure to secure the grass bag in
position. (See Fig. 10)
Installing the mulching plug
NOTE:
Switch o the tool and make sure that the
blade has stopped completely.
1. Lift the rear ap with one hand and push the
mulching plug into the rear discharge chute
until it is locked in place. Make sure that the
mulching plug is locked in position.
(
See Fig.
11
)
.
2. Release the rear ap, it will close back to
cover the mulching plug.
3. If you want disassemble the mulching plug,
hold the handle of the mulching plug, press
down the hook with nger, meanwhile lift it
upward slightly and pull it out.
Installing the side discharge deector
NOTE:
Switch o the tool and make sure that the
blade has stopped completely.
1. Keep the mulching plug in the rear discharge
chute.
2. Lift the side discharge guard with one hand
and hook in the side discharge deector with
the other hand. (See Fig. 12)
3. Release the side discharge guard to secure
the deector in position. (See Fig. 13)
To convert the mower
WARNING!
Before changing any
accessory, switch o the tool and make sure that
the blade has stopped completely!
NOTE:
This lawn mower has three functions.
These functions can be converted by changing
accessory setting as described above. Please
see the following chart for detail.
Mulching
plug
Grass
bag
Side
discharge
chute
Rear bagging * × √ ×
Mulching * √ × ×
Side discharge* √ × √
“√”: installed “×”: uninstalled
* The following information:
1. Rear bagging: the grass has been cut and
collected by grass bag.
2. Mulching: mulch the grass, by cutting into
small pieces which then degrade and fertilise
the lawn.
3. Side discharge: the grass has been cut and
distributed to the side of the machine.

14
ADJUSTMENT
WARNING:
Never operate the cutting
height adjustment handle roughly. Switch o the
tool and make sure that the blade has stopped
completely.
Adjust the cutting height
The cutting height is centrally adjusted by the
height adjustment knob.
Dierent cutting heights can be selected as
follow:
1. Pull the adjusting handle outwards. (See Fig.
14)
2. Move it forwards or backwards to select the
desired cutting height.
3. Return adjusting handle back into plate.
Make sure the lever be secured in position.
From position 1 to position 7, the cutting
height ranges from 1.25 " to 3.75 ".
OPERATION
To insert the battery pack (See Fig. 15)
1. Open the battery pack guard and hold it in
place.
2. Align the groove on the battery pack with the
corresponding ribs in the receptacle of the
device.
3. Depress the battery pack with moderate force
until it was locked in place .
4. Close the guard.
WARNING:
Make sure that the tool is
“POWER OFF”.
To remove the battery pack from the tool
1. Open the battery pack guard and hold it in
place.
2. Depress the releasing/locking button. The
battery pack will pop up automatically.
3. Lift and hold the battery pack while pressing
the releasing/locking button again, and then
remove the battery pack. (See Fig. 16
)
Note!
The second operation that needs to be
performed when removing the battery pack is
to avoid any misoperations at work, especially
for the 60VRX hand-held tools, in case the
battery pack falls and hurts consumers.
Safty Key
The machine is tted with a safety key, this
prevents the accidental start up of cordless lawn
mower.
The safety key has been design to totally disable
the lawn mower when the key is removed. (See
Fig. 17)
To Switch ON:
- Depress the safety lock button and keep it in
place. Whilst pulling the operator presence
control bar towards the handle and hold it in
position. The motor will start to work, blade
will rotate. Then release the safety lock
button. (See Fig. 18
)
CAUTION!
1. Do not start the motor in high grass!
For high grass, before you start the lawn
mower, lift the head of the mower a little, after
the mower be start then put down to cut the
high grass.
2. Before starting the lawn mower, ensure
that the battery pack and safety key are
correctly installed in place.
3. Before operating the device, remove stones,
loose pieces of wood and other objects from
the cutting area.
To Switch OFF:
1. Release the operator presence control bar.
WARNING:
The blade will rotate on for several seconds after
the tool has been switched o.
Use self-propel function with the blade cutting
(See Fig. 19)
1. Start the mower follow the steps above.
2. While holding the operator presence control
bar with one hand, then also engage the self-
propel switch lever and the machine will then
start to move automatically.
3. To stop the moving lawn mower, just release
the self-propel bail.
Operate the lawn mower
Operation on a slope.
NOTE:
Slopes are a major factor related to slip
and-fall accidents, which can result in severe
injury.

15
WARNING:
Always be sure of your footing
on slopes. Operation on slopes requires extra
caution. If you feel uneasy on a slope, do not
mow it.
DO:
- Mow across the face of slopes; never mow
up and down. Exercise extreme caution when
changing direction on slopes.
- Watch for holes, ruts, rocks, hidden objects,
or bumps which can cause you to slip or trip.
Tall grass can hide obstacles.
DO NOT:
- Do not mow near drop-os, ditches or
embankments; you could lose your footing or
balance.
- Do not mow slopes greater than 15 degrees.
- Do not mow on wet grass. Unstable footing
could cause slipping.
Mower overload protection
To prevent overload conditions, do not try to
remove too much grass at one time. Slow down
your cutting pace or raise the cut height. Your
mower has built-in overload circuit protection.
When the mower is overloaded, the motor will
shut down.
Check to see if grass has collected beneath the
deck and clean it if necessary, then restart the
mower.
Battery high temperature protection
The battery pack will generate heat during
operation. The heat dissipates more slowly in hot
weather. If the battery temperature exceeds more
than 158
˚
F during operation, the protection circuit
will immediately shut down the mower to protect
the battery pack to avoid any damages. Release
the bail handle, wait until the battery pack cools
down, then restart the mower.
Emptying the grass bag
When the grass bag full indicator start to trail
during cutting grass, it is time to empty the grass
bag.
NOTE:
Before taking o the grass bag, switch
OFF the power and wait until the blade has come
to a stop.
1. To take o the grass bag, use one hand to lift
up rear ap and the other hand to grab onto
the carry handle. The rear ap automatically
falls down after removed the grass bag.
2. Empty the grass debris in the grass bag, and
attach grass bag back to the mower.
NOTE:
If any grass residue is caught in the
discharge chute, clean it using a brush. Do not
remove grass debris in the mower chassis or
on the blade by hand or your feet. Instead use
suitable tools such as a brush or broom. To
ensure that the cut grass can be collected into
grass bag, the discharge opening and inside the
mower chassis must be cleaned of any blockage.
Charging the battery pack
NOTE:
Remove the battery pack from the
charger after it has been fully charged.
NOTE:
Battery should be fully charged before
rst use.
NOTE:
Make sure the mains voltage is the same
as rating label which is located on the charger.
Connect the charger to a power supply. The red
LED will light up.
1. To insert the battery pack into the charger,
align the raised ribs of the battery pack with
the grooves of the charger then push it in.
(See Fig. 20)
2. The green LED light of the charger will ash
continuously during normal charging.
3. After charging is complete, the green LED
will light up.
Power indicator (Fig. 21)
This Li-Ion battery pack is equipped with a power
indicator which is used to show the battery pack’s
remaining charge. Press the power indicator
button to check battery charge as below. The
LEDs will stay lit for approximately 4 seconds.
To obtain the best life from the battery
1. Never allow the battery to completely
discharge before recharging. The battery
pack should be placed on the charger
whenever the battery pack is noticeably
running down or the tool no longer performs
a task it previously performed.
2. Avoid conducting short charges. Make sure
that the battery is fully charged each time
by allowing the charger to complete its full
charging cycle.
3. Avoid allowing loose items like screws or
nails etc. to be stored with battery packs as
these or similar items can short battery packs

16
and cause a re or explosion.
4. Always unplug the charger when not in use
and store in a dry and secure place.
5. Avoid charging or storing your battery in
temperatures below 41°F(5°C) and above
113°F(45°C).
6. After use, allow the battery to pack to cool
down for approximately 30 minutes before
attempting to recharge.
MAINTENANCE AND STORAGE
WARNING
!
Before performing any maintenance or cleaning
work, always ensure that the battery pack/safety
key has been removed and wait until the blade
has stopped completely and the tool has cooled
down.
Cleaning
Cleaning the product
– Use a soft brush to remove any accumulated
dust and debris. Wear safety glasses to
protect your eyes whilst cleaning.
– Wipe down the product enclosure with a
slightly damp cloth. Do not spray the unit
with water. Ingress of water may destroy the
switch unit and the electric motor.
Maintenance
NOTE:
Always wear gardening gloves when
handling or working near the sharp blades.
1) Keep all nuts, bolts and screws tight to be
sure that the machine is in safe working
condition.
2) Check the grass bag frequently for wear or
deterioration.
3) Examine the machine and replace worn or
damaged parts for safety.
Removing/Installing the blade (See Fig. 22 &
Fig. 23)
1. Using a wrench of correct size locate on the
blade bolt nut.
2. Wearing heavy gloves hold the blade xed
and turn the wrench anti-clockwise and
remove the bolt.
3. Fitting the replacement blade correctly with
marking facing up and align pegs correctly
then t the bolt and retighten the bolt securely
to torque 15- 23 ft. lb.
WARNING
!
Replace or re-sharpen the mowing blade at
the end of the mowing season. Always have
the mowing blade re-sharpened or replaced
by a customer service center (measurement
of imbalance).
Unbalanced blades will cause the lawn
mower to vibrate violently-risk of accident!
Battery Maintenance:
Use the following procedures to enable optimum
usage of the battery:
1. Protect the battery against moisture and
water.
2. Store the battery only with in a temperature
range from 31
˚
F to 113
˚
F. As an example,
do not leave the battery in the lawn mower in
direct sunlight.
3. Clean the battery occasionally with a soft,
clean and dry brush.
4. If you do not use the product for a long time,
please charge and discharge the battery pack
once every 6 months.
Storage and transport
After cleaning the unit thoroughly, store it in a dry
room and allow the motor to cool down.
1. Release the Handle Quick release levers,
and fold the handles down.
2. Position the lower handle lock pin into the
mower bracket. Lock the handles in place by
closing the quick release handle.
3. The machine only can be stored at.
NOTE:
Remove the safety key and battery packs. Ensure
cables are not trapped when folding/unfolding the
handle.
Transport
Use the original packaging to ship whenever
possible.

17
TROUBLE SHOOTING
WARNING
!
Before performing any repair work, always ensure that the battery pack/safety key has been removed
and wait until the blade has stopped completely and the tool has cooled down .
WARNING
!
Always wear heavy duty gloves when adjusting or cleaning ,especially when handling sharp objects.
Fault/malfuncti
on
Cause Remedy
Mower fails to start Safety key is not inserted Insert safety key
Battery is not correctly inserted Remove the battery and reinsert
Mower standing in high grass Start motor on shorter grass or already
mowed area ;change cutting height if
necessary
The mower housing is clogged Clean housing so that the blade can
move freely
Battery has no power check and recharge battery
Mower stops working /
loses power
Cutting height is improper Adjust the cutting height
Discharge chute/ housing is blocked Clean the discharge chute/ housing
Cutting blade is worn or damaged Replace with New blade from dealer
service centre
Battery performance decreasing
Mower Overloaded -Red light
displayed switch box
Check the battery performance and
charge it if necessary
Wait until reset occurs – Green light
displayed on switchbox
Grass bag is not lled
suciently
Cutting height is too Low Adjust and increase cutting height
The lawn / grass is wet Allow the lawn to dry
Discharge chute/ housing is blocked Clean the discharge chute/ housing
Underside of the mower deck is
clogged.
Clean the underside of the mower deck
Cutting blade is worn or damaged. Replace it by the customer service
center
Mower vibrating at high-
er speed
Cutting blade is unbalanced Balance the blade by grinding each
cutting edge equality
Blade is Loosened /incorrectly tted Tighten the blade bolt
Mower does not mulch
properly
Cutting height set to low
Deck has wet grass on underside of
deck
Adjust cutting height
Clean underside of deck and wait until
grass is dry
Mower cuts unevenly The blade is damaged
Blade is assembled incorrectly
Sharpen the blade or replace
Re-assemble blade correctly

18
WARRANTY
Product Warranty
Please keep your original purchase receipt in a safe place as proof of purchase.
Warranty coverage for this product must be veried by the original purchase receipt.
The warranty period begins on the day that the product was purchased from an authorized retailer of
Yard Force products. Warranty coverage only applies to the original purchaser and is not transferrable.
Warranty coverage is only provided on products purchased from authorized Yard Force retailers.
Warranty only applies to products purchased and OPERATED in the USA. Any product purchased or
operated outside of the USA is not covered by any warranty.
(1) Five-Year Warranty on Yard Force Outdoor Power Equipment and
Three- Year Warranty on 60vRX Battery Pack and Adapter
The Yard Force Outdoor Power Equipment has a 5-Year Limited Warranty and 60vRX Battery Pack and
Charger has a 3-Year Limited Warranty from the date of purchase against manufacturer defects for res-
idential use only. Commercial use voids the warranty. This warranty does not cover accidental damage,
unreasonable use, normal wear and tear, neglect or non-compliance with the Operating, Safety and
Maintenance Instructions. All service, outside of normal maintenance as described in this manual, must
be done by an authorized service technician. Any unauthorized service or changes to the original cong-
uration of this product will void the warranty. All parts and accessories used on and with this product must
be manufactured and/or authorized by Merotec Inc.
(2) Ninety-Day Warranty – Accessories
The accessories included with the lawn mower including blade, mulching plug and mulching deector,
and other similar parts are warranted against manufacturer defects for residential use only for a period
of 90 days from date of purchase. Warranty does not cover loss of use or other consequential damages
arising from any of the above, nor does it cover repairs made or attempted by unauthorized persons.
This warranty is void if the product is used for commercial, rental or industrial purposes.
Certain parts, attachments and accessories are subject to normal wear and tear and are excluded from
the warranty.
Service and Warranty Claims Process
Contact the Yard Force Support Center toll-free at
(866) 902-9690 Monday-Friday between 8:30 AM
and 5:00 PM Eastern Time
for service and warranty support.
Yard Force Service Support agents can help you troubleshoot problems over the phone to get you back
up and running as quickly as possible. In the situation where service or warranty inspection is needed,
please follow these steps:
1. Call Yard Force at
(866) 902-9690 Monday-Friday between 8:30 AM and 5:00 PM Eastern Time
.
2. Send in proof-of-purchase and serial number (if applicable) to conrm warranty Coverage as directed
by Yard Force.
3. If service or a warranty evaluation is requested, Yard Force will provide an RGA number that should be
used in all communications with Yard Force and is required to be indicated on the product itself and on
the outside of the box.
4. All shipments to Yard Force must have an RGA number. Any shipment received that does not have an
RGA number clearly marked on the outside of the box will be refused.
5. All shipments must be sent pre-paid, Yard Force does not pay for any shipping costs for service or
warranty evaluation. Yard Force is not responsible for any packages that are lost by carrier. We recom-
mend that shipments are made by a carrier that provides tracking and delivery conrmation.
For more information or to ask questions, please call toll-free
(866) 902-9690
Monday-Friday between 8:30 AM and 5:00 PM Eastern Time
.
SAVE THESE INSTRUCTIONS

Need Help?
Please do not return the product to the place of purchase yet.
We’re here to help and take care of all your needs.
Contact our Customer Care Center in
Atlanta, GA for help with:
Product assembly or use
Missing or damaged parts
Troubleshooting
You can also visit our website to download
owner's manuals and get additional product information.
Visit www.YardForceUSA.com, or call our
toll free hotline: 1-866-902-9690 M-F 8:30am – 5:00pm ET
1-866-902-9690 [email protected]
Merotec Inc.
3655 Kennesaw North Industrial Parkway, Kennesaw, GA 30144
© Copyright 2020 Merotec Inc.
Made in China at a SUMEC manufacturing facility.
MADE IN CHINA