
49-85220 07-15 GE
Safety Information ............2
Warranty ........................7
Assistance / Accessories ......8
Using The Cooktop
In Case of a Power Failure .........10
Surface Burners ...................10
Griddle ............................12
Using The Oven
Oven Controls .....................14
Oven Air Vents ....................15
Special Features ..................16
Sabbath Mode ....................17
Cooking Modes ...................18
Cookware Guidelines ..............18
Aluminum Foil and Oven Liners ....18
Oven Racks .......................19
Broil Drawer ......................19
Cooking Guide ....................20
Care and Cleaning
Cleaning the Oven ................21
Cleaning the Cooktop .............22
Cleaning the Door and Drawer .....25
Maintenance ......................26
Troubleshooting Tips .........30
Ranges
Single Oven Gas
Write the model and serial
numbers here:
Model # __________________
Serial # ___________________
You can find the rating label on the
front behind the range drawer.
In Canada contact us at:
www.GEAppliances.ca
For a Spanish version of this
manual, visit our website at
GEAppliances.com.
Para consultar una version
en español de este manual
de instrucciones, visite
nuestro sitio de internet
GEAppliances.com.
Owner’s Manual
2
49-85220
- Do not store or use gasoline or other flammable vapors and liquids in the vicinity of this or any other
appliance.
- WHAT TO DO IF YOU SMELL GAS
Ŷ Do not try to light any appliance.
Ŷ Do not touch any electrical switch; do not use any phone in your building.
Ŷ Immediately call your gas supplier from a neighbor’s phone. Follow the gas supplier’s instructions.
Ŷ If you cannot reach your gas supplier, call the fire department.
- Installation and service must be performed by a qualified installer, service agency or the gas supplier.
WARNING If the information in this manual is not followed exactly, a fire or
explosion may result, causing property damage, personal injury or death.
SAFETY INFORMATION
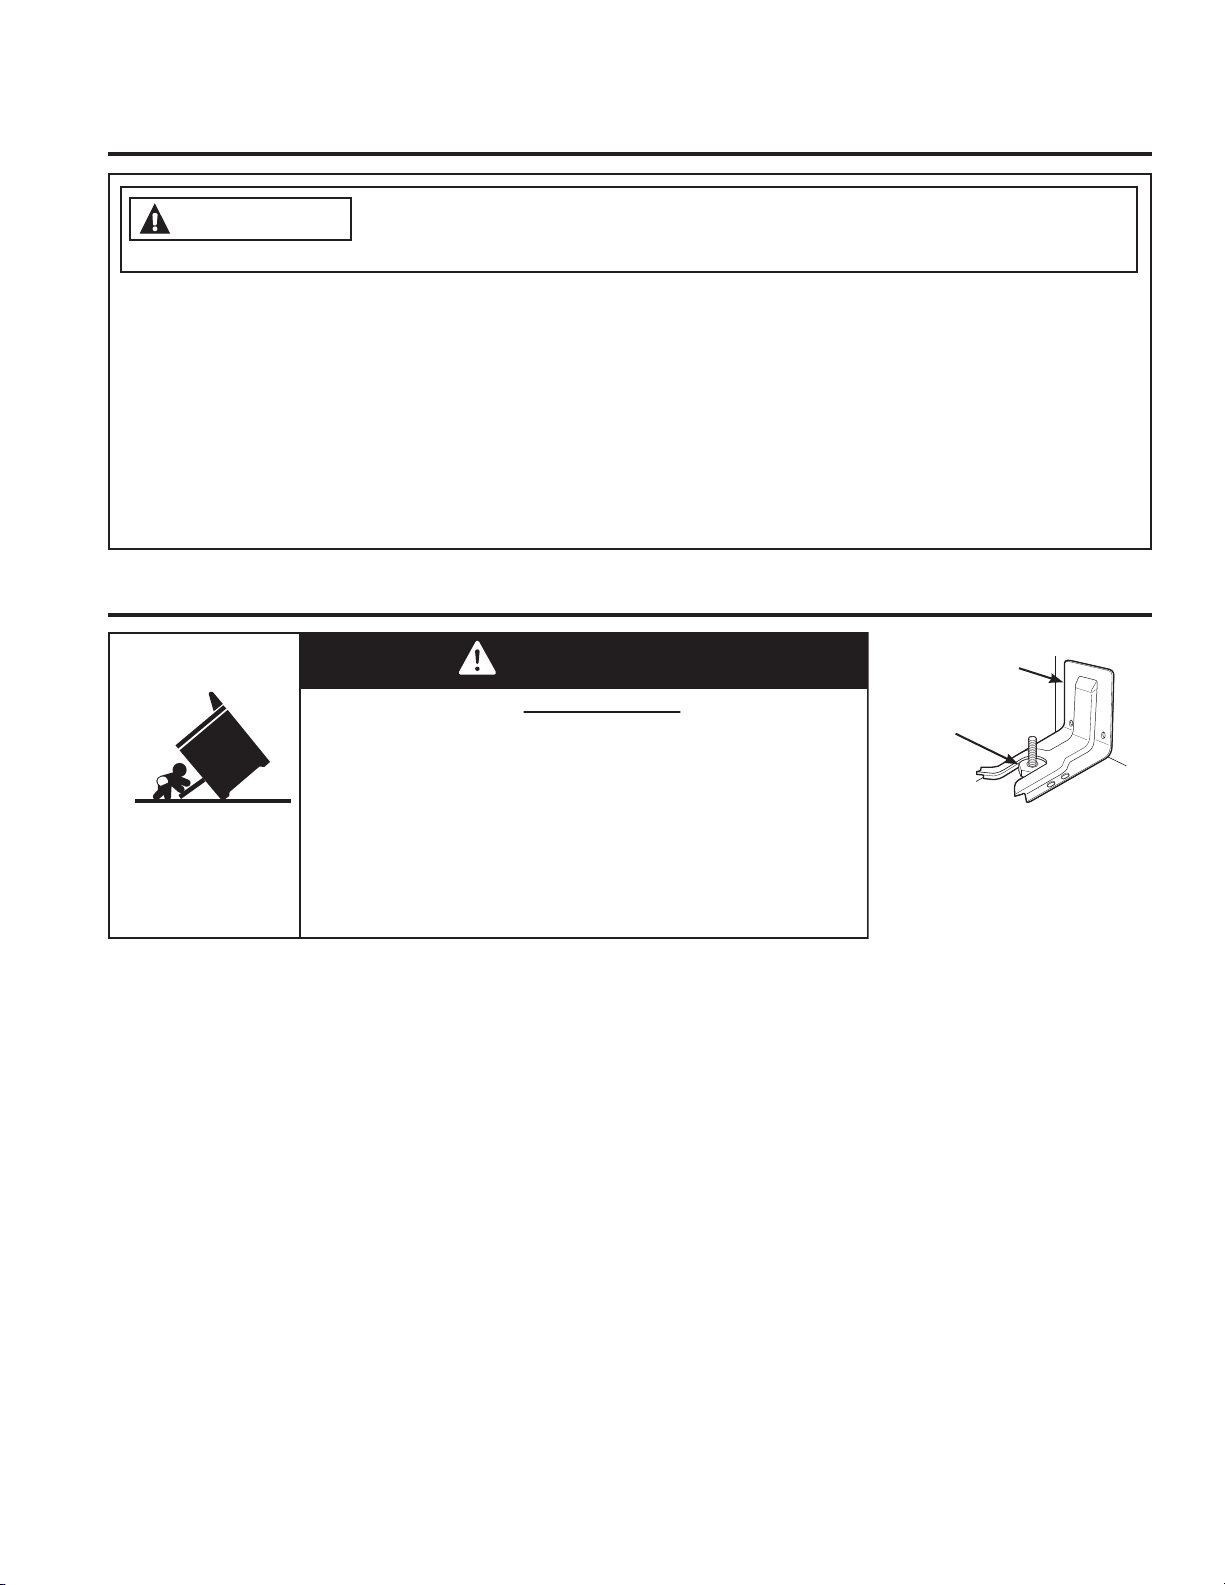
ANTI-TIP DEVICE
To reduce the risk of tipping
the range, the range must
be secured by a properly
installed anti-tip bracket.
See installation instructions
shipped with the bracket for complete details before attempting to install.
To check if the bracket is installed and engaged properly, look underneath the range to see that the rear
leveling leg is engaged in the bracket. On some models, the storage drawer or kick panel can be removed
for easy inspection. If visual inspection is not possible, slide the range forward, confirm the anti-tip bracket
is securely attached to the floor or wall, and slide the range back so the rear leveling leg is under the
anti-tip bracket.
If your range is removed for cleaning, servicing or any reason, be sure the anti-tip device is reengaged
properly when the range is replaced. Failure to take this precaution could result in tipping of the range and
can result in death or serious burns to children or adults.
Never completely remove the leveling legs or the range will not be secured to the anti-tip device properly.
A child or adult can tip the range and be killed.
Verify the anti-tip bracket has been properly installed
and engaged.
Ensure the anti-tip bracket is re-engaged when the range
is moved.
Do not operate the range without the anti-tip bracket in
place and engaged.
Failure to follow these instructions can result in death or
serious burns to children or adults.
Tip-Over Hazard
WARNING
Anti-Tip Bracket
Leveling
Leg
IMPORTANT SAFETY INFORMATION
READ ALL INSTRUCTIONS BEFORE USING
READ AND SAVE THESE INSTRUCTIONS

49-85220
3
GENERAL SAFETY INSTRUCTIONS
WARNING
STATE OF CALIFORNIA PROPOSITION 65 WARNING
The California Safe Drinking Water and Toxic Enforcement Act requires the Governor of California to
publish a list of substances known to the state to cause cancer, birth defects, or other reproductive harm,
and requires businesses to warn customers of potential exposure to such substances.
WARNING This product contains one or more chemicals known to the Sate of California to
cause cancer, birth defects or other reproductive harm.
Self-clean ovens can cause low-level exposure to some of these substances, including carbon monoxide,
during the cleaning cycle. Exposure can be minimized by venting with an open window or using a
ventilation fan or hood.
SAFETY INFORMATION
WARNING NEVER use this
appliance as a space heater to heat or warm
the room. Doing so may result in carbon
monoxide poisoning and overheating of the
oven.
Ŷ Use this appliance for its intended purpose as
described in this owner’s manual.
Ŷ Have your range installed and properly grounded
by a qualified installer in accordance with the
provided installation instructions.
Ŷ Any adjustment and service should be performed
only by a qualified gas range installer or service
technician. Do not attempt to repair or replace
any part of your range unless it is specifically
recommended in this manual.
Ŷ Your range is shipped from the factory set for
use with natural gas. It can be converted for use
with propane gas. If required, these adjustments
must be made by a qualified technician in
accordance with the installation instructions and
local codes. The agency performing this work
assumes responsibility for the conversion.
Ŷ Have the installer show you the location of the
range gas shut-off valve and how to turn it off if
necessary.
Ŷ Plug your range into a 120-volt grounded outlet
only. Do not remove the round grounding
prong from the plug. If in doubt about the
grounding of the home electrical system, it is
your responsibility and obligation to have an
ungrounded outlet replaced with a properly
grounded, three prong outlet in accordance with
the National Electrical Code. Do not use an
extension cord with this appliance.
Ŷ Before performing any service, unplug the range
or disconnect the power supply at the household
distribution panel by removing the fuse or
switching off the circuit breaker.
Ŷ Be sure all packing materials are removed from
the range before operating to prevent ignition of
these materials.
Ŷ Avoid scratching or impacting glass doors,
cooktops, or control panels. Doing so may lead
to glass breakage. Do not cook on a product with
broken glass. Shock, fire, or cuts may occur.
Ŷ Do not leave children alone or unattended in an
area where an appliance is in use. They should
never be allowed to climb, sit or stand on any
part of the appliance.
Ŷ
CAUTION Do not store items of
interest to children in cabinets above an oven
- children climbing on the oven to reach items
could be seriously injured.
READ AND SAVE THESE INSTRUCTIONS
4
49-85220
Ŷ Do not store or use flammable materials in
an oven or near the cooktop, including paper,
plastic, pot holders, linens, wall coverings,
curtains, drapes and gasoline or other flammable
vapors and liquids.
Ŷ Never wear loose-fitting or hanging garments while
using the appliance. These garments may ignite if
they contact hot surfaces causing severe burns.
Ŷ
Do not let cooking grease or other flammable
materials accumulate in or near the range. Grease
in the oven or on the cooktop may ignite.
SAFETY INFORMATION
GENERAL SAFETY INSTRUCTIONS (CONT.)
WARNING
Ŷ Never block the vents (air openings) of the
range. They provide the air inlets and outlets that
are necessary for the range to operate properly
with correct combustion. Air openings are located
at the rear of the cooktop, at the top and bottom
of the oven door, and at the bottom of the range
under the warming drawer, lower oven drawer or
kick panel.
Ŷ Use only dry pot holders—moist or damp pot
holders on hot surfaces may result in burns
from steam. Do not let pot holders touch surface
burners, burner grate, or oven heating element.
Do not use a towel or other bulky cloth in place
of pot holders.
Ŷ Do not touch the heating elements or the interior
surface of the oven. These surfaces may be hot
enough to burn even though they are dark in
color. During and after use, do not touch, or let
clothing or other flammable materials contact any
interior area of the oven; allow sufficient time for
cooling first. Other surfaces of the appliance may
become hot enough to cause burns. Potentially
hot surfaces include the burners, grates, oven
vent opening, surfaces near the opening, and
crevices around the oven door.
Ŷ Do not heat unopened food containers. Pressure
could build up and the container could burst,
causing an injury.
Ŷ Cook food thoroughly to help protect against
foodborne illness. Minimum safe food
temperature recommendations can be found
at www.IsItDoneYet.gov and www.fsis.usda.
gov. Use a food thermometer to take food
temperatures and check several locations.
Ŷ Do not allow anyone to climb, stand or hang on
the oven door, drawer or cooktop. They could
damage the range or tip it over causing severe
injury or death.
KEEP FLAMMABLE MATERIALS AWAY FROM THE OVEN
Failure to do so may result in fire or personal injury.
WARNING
Ŷ 'RQRWXVHZDWHURQJUHDVHILUHV1HYHUSLFNXS
a flaming pan. Turn the controls off. Smother a
flaming pan on a surface burner by covering the
pan completely with a well-fitting lid, cookie sheet,
or flat tray. If necessary, use a multi-purpose dry
chemical or foam-type fire extinguisher.
Ŷ ,IWKHUHLVDILUHLQWKHRYHQGXULQJEDNLQJ
smother the fire by closing the oven door and
turning the oven off or by using a multi-purpose
dry chemical or foam type fire extinguisher.
Ŷ ,IWKHUHLVDILUHLQWKHRYHQGXULQJVHOIFOHDQWXUQ
the oven off and wait for the fire to go out. Do
not force the door open. Introduction of fresh air
at self-clean temperatures may lead to a burst of
flame from the oven.
IN THE EVENT OF A FIRE, TAKE THE FOLLOWING
STEPS TO PREVENT INJURY AND FIRE SPREADING
WARNING
IMPORTANT SAFETY INFORMATION
READ ALL INSTRUCTIONS BEFORE USING
READ AND SAVE THESE INSTRUCTIONS
49-85220
5
SAFETY INFORMATION
Ŷ 1HYHUOHDYHWKHVXUIDFHEXUQHUVXQDWWHQGHGDW
medium or high heat settings. Foods, especially
oily foods, may ignite resulting in fire that could
spread to surrounding cabinets.
Ŷ 1HYHUOHDYHRLOXQDWWHQGHGZKLOHIU\LQJ,IDOORZHG
to heat beyond its smoking point, oil may ignite
resulting in fire that may spread to surrounding
cabinets. Use a deep fat thermometer whenever
possible to monitor oil temperature.
Ŷ 7RDYRLGRLOVSLOORYHUDQGILUHXVHWKHPLQLPXP
amount of oil when using a shallow pan-frying
and avoid cooking frozen foods with excessive
amounts of ice.
Ŷ 8VHSURSHUSDQVL]HDQGDYRLGSDQVWKDWDUH
unstable or easily tipped. Select cookware that is
matched to the size of the burner. Burner flames
should be adjusted so that they do not extend
beyond the bottom of the pan. Excessive flame
may be hazardous.
Ŷ $OZD\VXVHWKH/,7(SRVLWLRQZKHQLJQLWLQJWKH
top burners and make sure the burners have
ignited.
Ŷ :KHQXVLQJJODVVFHUDPLFFRRNZDUHPDNHVXUH
it is suitable for cooktop service; others may
break because of sudden change in temperature.
Ŷ 7RPLQLPL]HWKHSRVVLELOLW\RIEXUQVLJQLWLRQRI
flammable materials and spillage, the handle of a
container should be turned toward the center of
the range without extending over nearby burners.
Ŷ 'RQRWXVHDZRNZLWKDURXQGPHWDOVXSSRUW
ring. The ring may trap heat and block air to the
burner resulting in a carbon monoxide hazard.
Ŷ 'RQRWDWWHPSWWROLIWWKHFRRNWRS'RLQJVRPD\
damage the gas tubing to the surface burners
resulting in a gas leak and risk of fire.
Ŷ :KHQGLVDEOLQJ/RFN&RQWURORQVRPHPRGHOV
make sure the surface controls are set to the
OFF position. This will prevent unintended gas
flow from the burners.
Ŷ 'RQRWXVHDOXPLQXPIRLOWRFRYHUWKHJUDWHVRU
line any part of the cooktop. Doing so may result
in carbon monoxide poisoning, overheating of the
cooktop surfaces, or a potential fire hazard.
COOKTOP SAFETY INSTRUCTIONS
WARNING
OVEN SAFETY INSTRUCTIONS
WARNING
WARNING NEVER cover any slots,
holes, or passages in the oven bottom or
cover an entire rack with materials such as
aluminum foil or oven liners. Doing so blocks
air flow through the oven and may cause
carbon monoxide poisoning. Never place foil
or oven liners on the oven bottom. They can
trap heat causing risk of smoke or fire.
Ŷ Stand away from the range when opening the
oven door. Hot air or steam which escapes can
FDXVHEXUQVWRKDQGVIDFHDQGRUH\HV
Ŷ Never place cooking utensils, pizza or baking
stones, or any type of foil or liner on the oven
floor. These items can trap heat or melt, resulting
in damage to the product and risk of shock,
smoke or fire.
Ŷ Place oven racks in desired location while oven
is cool. If rack must be moved while oven is hot,
be careful to avoid touching hot surfaces.
Ŷ Do not leave items such as paper, cooking
utensils, or food in the oven when not in use.
Items stored in an oven can ignite.
Ŷ Do not leave items on the cooktop near the oven
vent. Items may overheat resulting in a risk of fire
or burns.
Ŷ Never broil with door open. Open-door broiling is
not permitted due to overheating of control knobs.
READ AND SAVE THESE INSTRUCTIONS
6
49-85220
SAFETY INFORMATION
The self-cleaning feature operates the oven at
temperatures high enough to burn away food soils in
the oven. Follow these instructions for safe operation.
Ŷ Do not touch oven surfaces during self-clean
operation. Keep children away from the oven
during self-cleaning. Failure to follow these
instructions may cause burns.
Ŷ Before operating the self-clean cycle, remove
pans, shiny metal oven racks, and other utensils
from the oven. Only porcelain-coated oven racks
may be left in the oven.
Ŷ Before operating the self-clean cycle, wipe
grease and food soils from the oven. Excessive
amount of grease may ignite leading to smoke
damage to your home.
Ŷ If the self-cleaning mode malfunctions, turn the
oven off and disconnect the power supply. Have
it serviced by a qualified technician.
Ŷ Do not use oven cleaners. No commercial oven
cleaner or oven liner protective coating of any kind
should be used in or around any part of the oven.
Ŷ Do not clean the door gasket. The door gasket is
essential for a good seal. Care should be taken
not to rub, damage or move the gasket.
Ŷ IMPORTANT: The health of some birds is
extremely sensitive to the fumes given off during
the self-cleaning cycle of any range. Move birds
to another well-ventilated room.
Ŷ Do not leave paper products, plastics, canned
food, or combustible materials in the drawer.
They may ignite.
Ŷ Do not touch the heating element or the interior
surface of the drawer. These surfaces may be
hot enough to cause burns.
Ŷ Use care when opening the drawer. Open the
drawer a crack and let hot air or steam escape
before removing or replacing food. Hot air or
steam that escapes can cause burns to hands,
IDFHDQGRUH\HV
Ŷ Do not use aluminum foil to line the broil drawer.
Foil is an excellent heat insulator and will trap
heat beneath it. This will upset the performance
of the drawer and potentially cause a fire hazard.
SELF-CLEANING OVEN SAFETY INSTRUCTIONS
BROIL DRAWER SAFETY INSTRUCTIONS
(on some models)
(on some models)
WARNING
WARNING
IMPORTANT SAFETY INFORMATION
READ ALL INSTRUCTIONS BEFORE USING
READ AND SAVE THESE INSTRUCTIONS

49-85220
7
WARRANTY
Staple your receipt here. Proof of the original purchase
date is needed to obtain service under the warranty.
Thank You! ... for your purchase of a GE Brand appliance.
GE Gas Range Warranty
GEAppliances.com
All warranty service is provided by our Factory Service Centers, or an authorized Customer Care
®
technician.
7RVFKHGXOHVHUYLFHRQOLQHYLVLWXVDWZZZJHDSSOLDQFHVFRPVHUYLFHBDQGBVXSSRUWRUFDOO*(&$5(6
3OHDVHKDYH\RXUVHULDOQXPEHUDQG\RXUPRGHOQXPEHUDYDLODEOHZKHQFDOOLQJIRUVHUYLFH
Servicing your appliance may require the use of the onboard data port for diagnostics. This gives a GE factory
service technician the ability to quickly diagnose any issues with your appliance and helps GE improve its products
by providing GE with information on your appliance. If you do not want your appliance data to be sent to GE, please
advise your technician not to submit the data to GE at the time of service.
For the period of one year from the date of the original purchase, GE will provide any part of the range which fails due
to a defect in materials or workmanship. During this limited one-year warranty, GE will also provide, free of charge, all
labor and in-home service to replace the defective part.
What GE will not cover:
Ŷ Service trips to your home to teach you how to use
the product.
Ŷ Improper installation, delivery, or maintenance.
Ŷ Failure of the product if it is abused, misused,
modified, or used for other than the intended purpose
or used commercially.
Ŷ 5HSODFHPHQWRIKRXVHIXVHVRUUHVHWWLQJRIFLUFXLW
breakers.
Ŷ Damage to the product caused by accident, fire,
floods, or acts of God.
Ŷ Damage to finish, such as surface rust, tarnish, or small
EOHPLVKHVQRWUHSRUWHGZLWKLQKRXUVRIGHOLYHU\
Ŷ Incidental or consequential damage caused by
possible defects with this appliance.
Ŷ Damage caused after delivery.
Ŷ Product not accessible to provide required service.
Ŷ 6HUYLFHWRUHSDLURUUHSODFHOLJKWEXOEVH[FHSWIRU/('
lamps.
EXCLUSION OF IMPLIED WARRANTIES
<RXUVROHDQGH[FOXVLYHUHPHG\LVSURGXFWUHSDLUDVSURYLGHGLQWKLV/LPLWHG:DUUDQW\$Q\LPSOLHGZDUUDQWLHV
including the implied warranties of merchantability or fitness for a particular purpose, are limited to one year or the
shortest period allowed by law.
This warranty is extended to the original purchaser and any succeeding owner for products purchased for home use
within the USA. If the product is located in an area where service by a GE Authorized Servicer is not available, you
may be responsible for a trip charge or you may be required to bring the product to an Authorized GE Service location
for service. In Alaska, the warranty excludes the cost of shipping or service calls to your home.
Some states do not allow the exclusion or limitation of incidental or consequential damages. This warranty gives you
specific legal rights, and you may also have other rights which vary from state to state. To know what your legal rights
are, consult your local or state consumer affairs office or your state’s Attorney General.
Warrantor: General Electric Company. Louisville, KY 40225
Extended Warranties: Purchase a GE extended warranty and learn about special discounts that are available while
your warranty is still in effect. You can purchase it online anytime at
ZZZJHDSSOLDQFHVFRPVHUYLFHBDQGBVXSSRUWVKRSIRUH[WHQGHGVHUYLFHSODQVKWP
RUFDOOGXULQJQRUPDOEXVLQHVVKRXUV*(&RQVXPHU+RPH6HUYLFHVZLOOVWLOOEHWKHUHDIWHU\RXU
warranty expires.
Register Your Appliance: 5HJLVWHU\RXUQHZDSSOLDQFHRQOLQHDW\RXUFRQYHQLHQFH
ZZZJHDSSOLDQFHVFRPVHUYLFHBDQGBVXSSRUWUHJLVWHU
Timely product registration will allow for enhanced communication and prompt service under the terms of your warranty,
should the need arise. You may also mail in the pre-printed registration card included in the packing material.
8
49-85220
Schedule Service: Expert GE repair service is only
one step away from your door. Schedule your service
RQOLQHDWZZZJHDSSOLDQFHVFRPVHUYLFHBDQGBVXSSRUW
RUFDOO*(&$5(6GXULQJQRUPDO
business hours.
Parts and Accessories: Individuals qualified to service
their own appliances can have parts or accessories sent
directly to their homes (VISA, MasterCard and Discover
FDUGVDUHDFFHSWHG2UGHURQOLQHWRGD\KRXUVHYHU\GD\
RUE\SKRQHDWGXULQJQRUPDOEXVLQHVVKRXUV
Instructions contained in this manual cover procedures
to be performed by any user. Other servicing generally
should be referred to qualified service personnel. Caution
must be exercised, since improper servicing may cause
unsafe operation.
Real Life Design Studio: GE supports the Universal
Design concept of products, services and environments
that can be used by people of all ages, sizes and
capabilities. We recognize the need to design for a wide
range of physical and mental abilities and impairments.
For details of GE’s Universal Design applications, including
kitchen design ideas for people with disabilities, check out
our website today. For the hearing impaired, please call
7''*($&
Contact Us: Contact us on our website with all the
details including your phone number, or write to:
General Manager, Customer Relations
GE Appliances, Appliance Park Louisville, KY 40225
ASSISTANCE / ACCESSORIES
Try the GE Appliances website (www.geappliances.com/service_and_support/KRXUVDGD\DQ\GD\RIWKH
\HDU)RUJUHDWHUFRQYHQLHQFHDQGIDVWHUVHUYLFH\RXFDQQRZGRZQORDG2ZQHU¶V0DQXDOVRUGHUSDUWVRUHYHQ
schedule service online.
Have a question or need assistance with your appliance?
Accessories
Looking For Something More?
GE offers a variety of accessories to improve your cooking and maintenance experiences!
To place an order visit us online at:
www.GEApplianceParts.com (U.S.) or www.GEAppliances.ca (Canada)
or call 800.626.2002 (U.S.) 800.661.1616 (Canada)
The following products and more are available:
Removing Protective Shipping Film and Packaging Tape
NOTE:5HPRYHDOOSURWHFWLYHSDFNLQJEHIRUHRSHUDWLQJ
the range.
Carefully grasp a corner of the protective shipping film
with your fingers and slowly peel it from the appliance
surface. Do not use any sharp items to remove the
film. If adhesive residue remains, remove it by applying
dish soap and water with a soft cloth.
Accessories
1LFNHO)ODW5DFN :%;
5HLQIRUFHG1LFNHO)ODW5DFN :%;
6HOI&OHDQ)ODW5DFN :%;
1LFNHO([WHQVLRQ5DFN :%;
6HOI&OHDQ([WHQVLRQ5DFN :%;
%URLOHU3DQô´[ó´[ò³ :%;*
5RDVWLQJ5DFN$FFHVVRU\ :%;
&RRNWRS&HQWHU*UDWH :%;
1RQVWLFN$OXPLQXP*ULGGOH :%;
5HYHUVLEOH&DVW,URQ*ULGGOH :%;
Cleaning Supplies
&LWUX6KLQH6WDLQOHVV6WHHO:LSHV :;;
6WDLQOHVV6WHHO3ROLVKLQJ&ORWK :;;
Cerama Bryte
®
%XUQW2Q*UHDVH5HPRYHU :;;

49-85220
9
Notes
10
49-85220
These flames are too
large for the pot
In Case of a Power Failure
Surface Burners
USING THE COOKTOP: In Case of a Power Failure / Surface Burners
In the event of a power failure, the oven is inoperable
and no attempt should be made to operate it. However,
the surface burners may be lit with a match. Using
extreme caution, hold a lit match near the ports beneath
the surface burner cap, then slowly turn the knob to the
/,7(SRVLWLRQ2QFHOLWVXUIDFHEXUQHUVZLOOFRQWLQXHWR
operate normally.
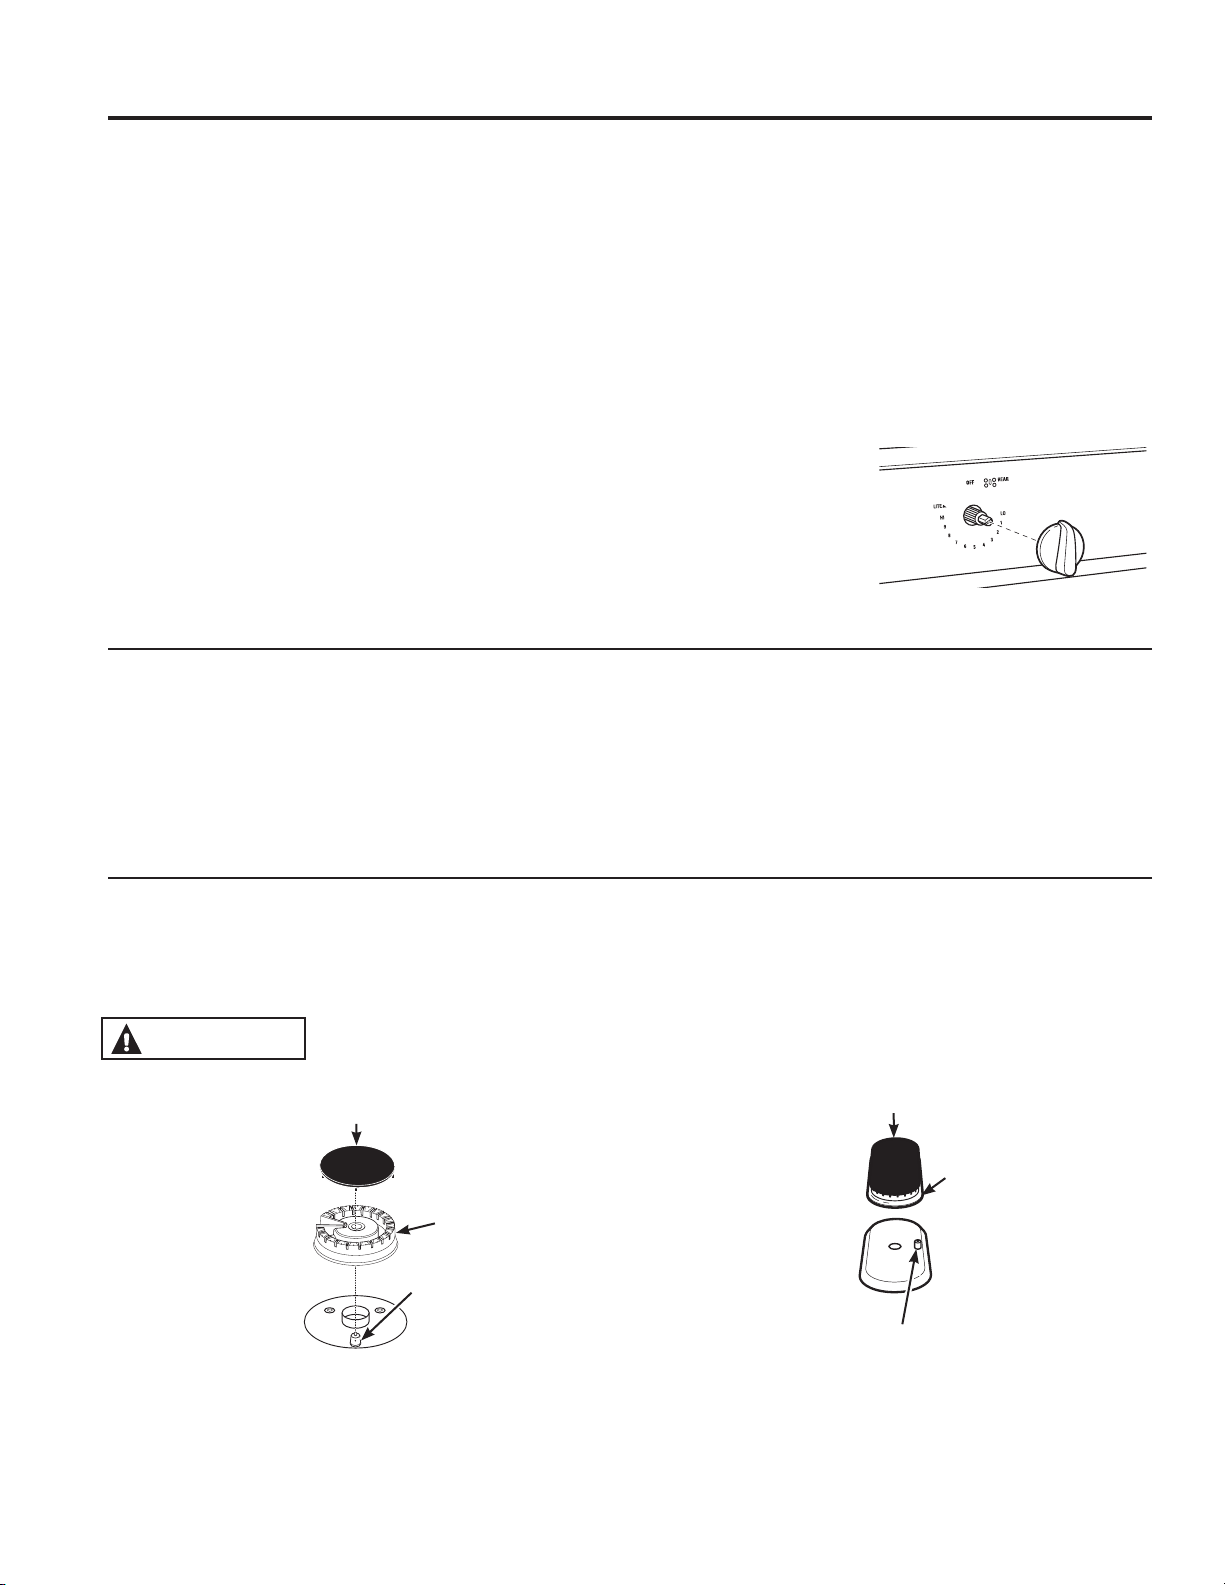
Lighting a Surface Burner
WARNING Burners should be operated
only when covered by cookware. Burner flames
not covered by cookware present a risk of fire or
clothing ignition. Never let flames extend beyond the
sides of the cookware. Failure to comply may result
in serious injury.
Make sure all burners are in their correct locations and
fully assembled before attempting to operate any burner.
Select a burner and find its control knob. Push the knob
LQDQGWXUQLWWRWKH/,7(SRVLWLRQ
You will hear a clicking noise—
the sound of the electric spark
igniting the burner. When one
EXUQHULVWXUQHGWR/,7(DOO
burners will spark. Sparking will
continue as long as the knob
UHPDLQVDW/,7(2QFHJDVLV
ignited, turn the knob to adjust
the flame size.
Using the Surface Burners
NOTES:
Ŷ 'RQRWRSHUDWHWKHEXUQHUIRUDQH[WHQGHGSHULRGRI
time without cookware on the grate. The finish on the
grate may discolor or chip without cookware to absorb
the heat.
Ŷ 'RQRWDWWHPSWWRGLVDVVHPEOHDQ\EXUQHUZKLOHDQRWKHU
burner is on. Damage to the product may occur.
Ŷ %HVXUHWKHEXUQHUVDQGJUDWHVDUHFRROEHIRUH\RXSODFH
your hand, a pot holder or cleaning materials on them.
Your rangetop has sealed gas burners that offer
convenience, cleanability and flexibility for a wide range
of cooking applications.
The smallest burner is the simmer burner. A simmer
EXUQHUWXUQHGGRZQWR/2SURYLGHVSUHFLVHFRRNLQJ
performance for foods such as delicate sauces that
require low heat for a long cooking time.
The extra-large burner is designed to quickly bring
large amounts of liquid to a boil. Some models have a
32:(5%2,/VHWWLQJHVSHFLDOO\GHVLJQHGIRUXVHZLWK
cookware with a diameter of 11 inches or larger.
Selecting a Flame Size
Watch the flame, not the knob, as you adjust heat. When
rapid heating is desired, the flame size should match the
size of the cookware you are using. Flames larger than
the bottom of the cookware will not heat faster and may
be hazardous.
Push the control knob in and
turn it to the LITE position.
49-85220
11
Surface Burners (Cont.)
USING THE COOKTOP: Surface Burners
Stove Top Grills
Do not use an after-market stove top grill on your
gas surface burners. A stove top grill will cause
incomplete combustion resulting in carbon monoxide
levels above allowable standards. This could be
hazardous to your health.
Using a Wok
8VHRQO\DIODWERWWRPHGZRNZLWKDGLDPHWHURI
inches or less. Make sure the wok bottom sits flat on
the grate.
Do not use a wok support ring. Placing the ring over the
burner or grate may cause the burner to work improperly,
resulting in carbon monoxide levels above allowable
standards. This could be hazardous to your health.
Use a flat-bottomed wok.
Do not use stove top grills
Top-of-Range Cookware
Aluminum: Medium-weight cookware is recommended
because it heats quickly and evenly. Most foods brown
evenly in an aluminum skillet. Use saucepans with tight-
fitting lids when cooking with minimum amounts of water.
Stainless Steel: This metal alone has poor heating
properties and is usually combined with copper,
aluminum or other metals for improved heat distribution.
Combination metal skillets usually work satisfactorily if
they are used with medium heat or as the manufacturer
recommends.
Cast-Iron: If heated slowly, most skillets will give
satisfactory results.
Enamelware: Under some conditions, the enamel of some
cookware may melt. Follow the cookware manufacturer’s
recommendations for cooking methods.
Glass: There are two types of glass cookware—those
for oven use only and those for top-of-range cooking
(saucepans, coffee and teapots). Glass conducts heat
very slowly.
Heatproof Glass Ceramic: Can be used for either surface
or oven cooking. It conducts heat very slowly and cools very
slowly. Check the cookware manufacturer’s directions to be
sure it can be used on gas ranges.
12
49-85220
USING THE COOKTOP: Griddle
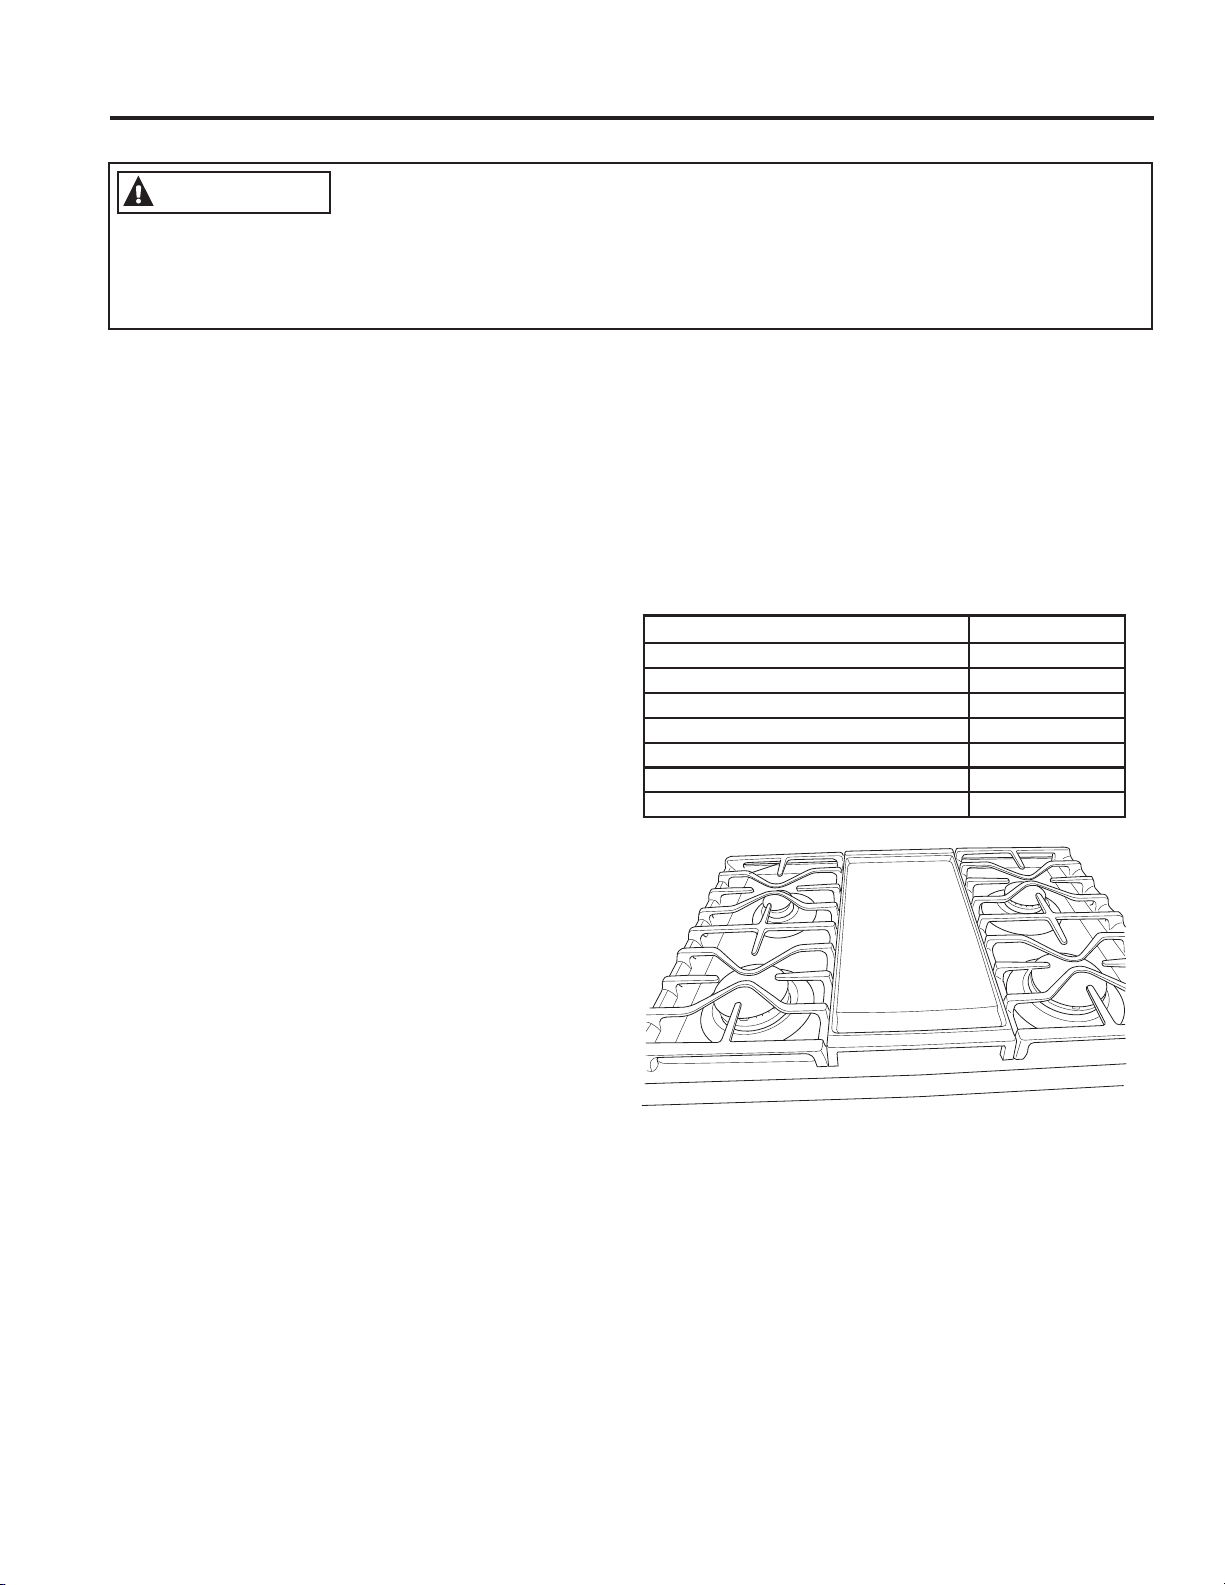
Griddle (on some models)
Using Your Nonstick Aluminum Griddle
WARNING Fire Hazard
Ŷ Use care when cooking greasy foods. Spilled grease may result in fire.
Ŷ Never place any items on the griddle when it is not in use. Heat from surrounding burners can heat the
griddle and may result in fire.
Ŷ Place and remove the griddle only when griddle is cool and all surface burners are turned OFF.
Your griddle provides an extra-large cooking surface for
meats, pancakes and other foods usually prepared in
a skillet. Before first use, rinse with hot water and dry
thoroughly. For instruction on how to clean the griddle,
see the Cleaning the Cooktop section.
Griddle Precautions:
Ŷ 'RQRWXVHRLORQWKHJULGGOHIRUH[WHQGHGOHQJWKVRI
WLPH3HUPDQHQWVWDLQLQJDQGRUFUD]HOLQHVRQWKH
surface could result.
Ŷ Do not overheat the griddle/HDYLQJWKHJULGGOH
burner on at Hi for an extended amount of time
without food can damage the nonstick coating.
Ŷ 8VHRQO\SODVWLFQ\ORQZRRGHQXWHQVLOVRU
SilverStone
®
kitchen tools to prevent marring of the
coating.
Ŷ 1HYHUXVHNQLYHVRUFXWIRRGRQWKHJULGGOH
Ŷ 'RQRWXVHPHWDOXWHQVLOVZLWKVKDUSSRLQWVRUURXJK
sharp edges which might damage the griddle surface.
Ŷ 6WRUHFDUHIXOO\WRSUHYHQWVFUDWFKLQJ
Ŷ 'RQRWSODFHWKHJULGGOHLQDPLFURZDYHRYHQ
Ŷ ,IVRPHWKLQJKDVVSLOOHGXQGHUWKHJULGGOHLWVKRXOGEH
FOHDQHGXSDVVRRQDVSRVVLEOHWRSUHYHQW³EDNHGRQ´
food soil.
Ŷ 'RQRWDOORZJUHDVHWRDFFXPXODWHXQGHUWKHJULGGOH
as it can be a fire hazard. Clean under the griddle with
hot, soapy water as soon as it is cool.
Ŷ 'RQRWFOHDQ\RXUJULGGOHLQWKHGLVKZDVKHU
Ŷ 'RQRWFOHDQWKHJULGGOHLQWKHVHOIFOHDQLQJRYHQ
Doing so will damage the nonstick coating. For
instructions on how to clean the griddle, see the
Cleaning the Cooktop section of this manual.
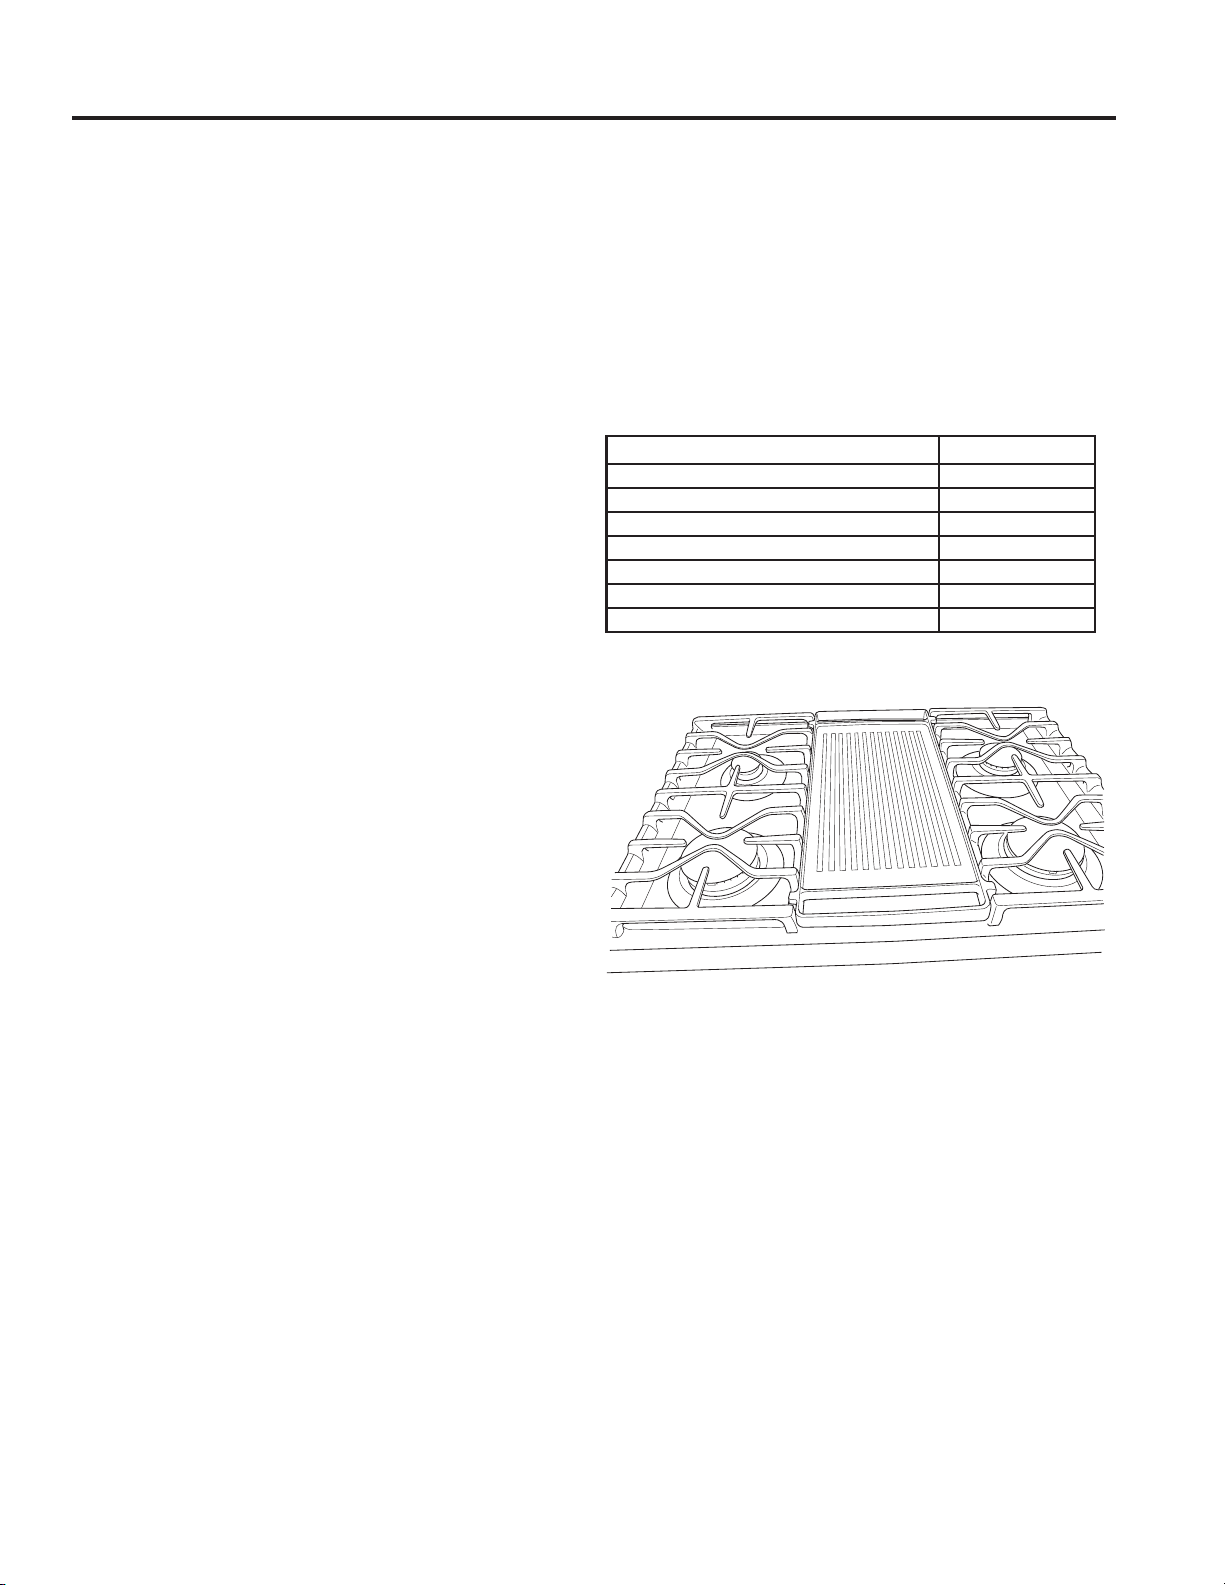
Griddle Placement
This griddle can only be used over the center oval
burner. To position the griddle, remove the center grate
(if present) and replace it with the griddle. Do not turn on
the oval burner until you are certain the griddle has been
positioned correctly.
Preheating the griddle3UHKHDWIRUPLQXWHVRQ
Hi before placing food on the griddle and then turn heat
down to the cook setting.
Type of Food Cook Setting
Bacon Med
%UHDNIDVW6DXVDJH/LQNV Med
Fried Eggs /R
Hamburgers Med-Hi
Hot Sandwiches (such as Grilled Cheese) Med
Pancakes 0HG/R
Warming Tortillas 0HG/R
Nonstick Aluminum Griddle
Replace the center grate (if present) with the
Nonstick Aluminum Griddle
49-85220
13
USING THE COOKTOP: Griddle
Griddle (on some models) (Cont.)
Using Your Preseasoned Reversible Cast-Iron Griddle
The ribbed side of the reversible griddle can be used for
food normally grilled.
Your griddle provides an extra-large cooking surface for
meats, pancakes and other foods usually prepared in
a skillet. Before first use, rinse with hot water and dry
thoroughly. Prepare the surface with cooking spray or
vegetable oil.
Griddle Precautions:
Ŷ 'RQRWSODFHWKHJULGGOHLQDPLFURZDYHRYHQ
Ŷ 'RQRWFOHDQ\RXUJULGGOHLQWKHGLVKZDVKHU
Ŷ ,IVRPHWKLQJKDVVSLOOHGXQGHUWKHJULGGOHLWVKRXOGEH
FOHDQHGXSDVVRRQDVSRVVLEOHWRSUHYHQW³EDNHGRQ´
food soil.
Ŷ 'RQRWDOORZJUHDVHWRDFFXPXODWHXQGHUWKHJULGGOH
as it can be a fire hazard. Clean under the griddle with
hot, soapy water as soon as it is cool.
Griddle Placement
This griddle can only be used over the center oval
burner. To position the griddle, remove the center grate
(if present) and replace it with the griddle. Do not turn on
the oval burner until you are certain the griddle has been
positioned correctly.
Preheating the griddle3UHKHDWIRUPLQXWHVRQ
Hi before placing food on the griddle and then turn heat
down to the cook setting.
Type of Food Cook Setting
Bacon Med
%UHDNIDVW6DXVDJH/LQNV Med
Eggs /R
Grilled Cheese 0HG/R
Hamburgers 0HG/R
Pancakes 0HG/R
Warming Tortillas /R
Cook settings may need to be reduced if the griddle is used for an
extended time.
Preseasoned Reversible Cast-Iron Griddle
Replace the center grate (if present) with the
Preseasoned Cast-Iron Reversible Griddle

14
49-85220
2
2
187
Oven Controls
USING THE OVEN: Oven Controls
Convection
Non Convection
478
4
35
5
3
6
6
9
9
11 10
49-85220
15
1. Convection Bake (on some models):
Convection cooking uses increased air circulation
to improve performance when baking on multiple
racks. See the Cooking Modes section for more
information.
2. Traditional Cooking Modes: Your oven has
the following traditional cooking modes: Bake, Broil
+LDQG%URLO/R6HHWKH&RRNLQJ0RGHVVHFWLRQIRU
more information.
3. Clean (on some models): There are two
cleaning modes: Self Clean and Steam Clean.
See the Cleaning the Oven section for important
information about using these modes.
4. Start: Must be pressed to start any cooking,
cleaning or timed function.
5. Cancel/Off: &DQFHOV$//RYHQRSHUDWLRQVH[FHSW
the clock and timer.
6. Cook Time: Counts down cooking time and turns
off the oven when the cooking time is complete.
Program the desired cooking mode and temperature
and press Start. Then, press the Cook Time pad
and use the number pads to program a cooking
time in hours and minutes. Then, press Start again.
This can only be used with Traditional Bake and
Convection Bake.
7. Clock: Sets the oven clock time and clock display
RQVRPHPRGHOV7RVHWWKHFORFNGLVSOD\RQRII
press the Set Clock pad (on some models) once. If
your model does not have a Set Clock pad, see the
Special Features section for instructions on how to
adjust the clock display. To set the clock time, press
both the + and -SDGVDQGKROGIRUVHFRQGVRU
press the Set Clock pad until the display is flashing.
Use the + and - pads to adjust the clock. Press
Start to save the time.
8. Timer: Works as a countdown timer. Press the
Timer pad and the + and - pads to program the
time in hours and minutes. Press the Start pad.
The oven will continue to operate when the timer
countdown is complete. To turn the timer off, press
the Timer pad.
9. Delay Time: Delays when the oven will turn on.
Use this to set a time when you want the oven to
start. Press the Delay Time pad, and use the + and
- pads to program the time of day for the oven to
turn on. Then press the desired cooking mode pad,
use the + and - pads to adjust the temperature, then
press Start. After Start has been pressed, a cook
time may also be programmed if desired. Once the
Delay Time has been programmed, the start time
set for the oven will be displayed until that time is
reached. Then, either the cook time (if programmed)
or the temperature will be displayed. Delay Time
can only be used with Traditional Bake, Convection
Bake, and the Clean modes (on some models).
NOTE: When using the delay time feature, foods
that spoil easily—such as milk, eggs, fish, stuffings,
poultry, and pork—should not be allowed to sit
at room temperature for more than 1 hour before
or after cooking, as this may promote the growth
of harmful bacteria. Be sure that the oven light is
off, because heat from the bulb will speed harmful
bacteria growth.
10. Oven Light (on some models): Turns the
oven light on or off.
11. Lock Controls (on some models):/RFNV
out the control so that pressing the pads does not
activate the controls. Press and both the + and -
SDGVDQGKROGIRUVHFRQGVWRORFNRUXQORFNWKH
control. Cancel/Off is always active, even when the
control is locked.
Oven Controls (Cont.)
USING THE OVEN: Oven Controls / Oven Air Vents
Oven Air Vents
Vent appearance and location vary.
Never block the vents (air openings) of the range. They
provide the air inlet and outlet that are necessary for the
range to keep cool and operate properly with correct
combustion.
Air openings are located at the rear of the cooktop, at
the top and bottom of the oven door, and at the bottom
of the range.

16
49-85220
Special Features
USING THE OVEN: Special Features / Sabbath Mode
There are several different special features on your range. To change the settings of these special features:
Ŷ 3UHVVWKHBake and Broil pads at the same time and hold for three seconds.
Ŷ ³6)´ZLOODSSHDULQWKHGLVSOD\
Ŷ )RULQVWUXFWLRQVRQKRZWRVHOHFWGLIIHUHQWIHDWXUHVUHIHUWRWKHVHFWLRQEHORZWKDWFRUUHVSRQGVWRWKHVSHFLDO
feature of interest.
Ŷ :KHQWKHFKDQJHKDVEHHQPDGHSUHVVWKHStart key to save the change and exit the special features menu.
Adjust the Oven Temperature
This feature allows the oven baking temperature to be
DGMXVWHGXSWR)KRWWHURUGRZQWR)FRROHU8VH
this feature if you believe your oven temperature is too
hot or too cold and wish to change it. This adjustment
affects every cooking mode except broil.
After entering the special features menu, press the Bake
pad to enter the temperature adjustment mode. A number
EHWZHHQDQGZLOOGLVSOD\8VHWKH+ or - pads to
set the desired temperature adjustment. Press the Start
pad to save the temperature adjustment.
12-Hour Auto Shut-Off and Sabbath
12-hour auto shut-off turns off the oven after 12 hours
of continuous operation. The 12-hour auto shut-off may
EH³RQ´RU³R))´)RUGHWDLOVRQWKH³V$E´RSWLRQVHHWKH
Sabbath Mode Section. Enter into the special features
menu as outlined above and repeatedly press the Set
Clock pad until the desired setting is displayed. If your
model does not have a Set Clock pad, then repeatedly
press the Cook Time pad until the desired setting is
displayed. Press the Start pad to save the setting.
Clock Display (on some models)
This feature specifies if the time of day is displayed.
7KHFORFNGLVSOD\PD\EH³RQ´RU³R))´,I\RXUPRGHO
has a Set Clock pad, see the Oven Controls section for
instructions on adjusting the display. If your model does
not have a Set Clock pad, enter into the special features
menu as outlined above. Press the Timer pad to see the
current setting. Press the Timer pad again to change the
setting. Press the Start pad to save the display setting.
Increment/Decrement Speed
A setting (i.e. temperature) may be rapidly adjusted
by pressing and holding the + or - pad. To adjust the
LQFUHPHQWGHFUHPHQWVSHHGHQWHULQWRWKHVSHFLDO
features menu as outlined above. Press the + pad to
increase the speed or press the - pad to decrease the
VSHHG6HWWLQJVYDU\IURPVORZHVWWRIDVWHVW
Press the Start pad to save the speed setting.

49-85220
17
Sabbath Mode
USING THE OVEN: Sabbath Mode
The Sabbath mode feature complies with standards set forth by Star K. Only continuous baking or timed baking is
allowed in the Sabbath mode. All tones are disabled in the Sabbath mode; however the oven light is not disabled, so
the light should be removed to ensure it does not come on when the door is opened. Cooking in the Sabbath mode
is a two-step process, first the Sabbath mode must be set and then the bake mode must be set.
Setting the Sabbath Mode
Press the Bake and Broil pads at the same time and
KROGIRUWKUHHVHFRQGV³6)´ZLOODSSHDULQWKHGLVSOD\
Press the Set ClockSDGXQWLO³6$E´DSSHDUVLQWKH
display and then press Start. If your model does not
have a Set Clock pad, then press the Cook Time pad
XQWLO³6$E´DSSHDUVLQWKHGLVSOD\DQGWKHQSUHVVStart.
$VLQJOHEUDFNHW³@´ZLOODSSHDULQWKHGLVSOD\LQGLFDWLQJ
that the Sabbath mode is set. Continuous bake or timed
bake can now be set as outlined below.
Start a Continuous Bake
Press BakeLIDWHPSHUDWXUHRWKHUWKDQ)LVGHVLUHG
then press the + or - pads to adjust the temperature in
GHJUHHLQFUHPHQWVWKHQSUHVVStart. After a delay, a
VHFRQGEUDFNHW³@>´ZLOODSSHDULQWKHGLVSOD\LQGLFDWLQJ
that the oven is baking.
Adjusting the Temperature
Press Bake, then press the + or - pads to adjust the
WHPSHUDWXUHLQGHJUHHLQFUHPHQWVWKHQSUHVVStart.
An oven thermometer can be used if some indication of
temperature setting is desired.
Start a Timed Bake
Press Cook Time, then press the + or - pads to adjust
the cook time in one minute increments. Press Bake,
LIDWHPSHUDWXUHRWKHUWKDQ)LVGHVLUHGWKHQSUHVV
the + or -SDGVWRDGMXVWWKHWHPSHUDWXUHLQGHJUHH
increments, then press Start. After a delay, a second
EUDFNHW³@>´ZLOODSSHDULQWKHGLVSOD\LQGLFDWLQJWKDWWKH
oven is baking. When the cook time expires the display
ZLOOFKDQJHEDFNWRDVLQJOHEUDFNHW³@´LQGLFDWLQJWKDWWKH
oven is no longer baking.
Exit the Sabbath Mode
Exiting the Sabbath mode should be done after the
Sabbath is over. Press Cancel/Off to end any bake
mode that may be running. Press Bake and Broil pads
DWWKHVDPHWLPHDQGKROGIRUWKUHHVHFRQGV³6)´ZLOO
appear in the display. Press the Set Clock pad until
³2Q´DSSHDUVLQWKHGLVSOD\DQGWKHQSUHVVStart. If your
model does not have a Set Clock pad, then press the
Cook TimeSDGXQWLO³2Q´DSSHDUVLQWKHGLVSOD\DQG
then press Start. The display will change from a single
EUDFNHW³@´WRWKHWLPHRIGD\LQGLFDWLQJWKDWWKH6DEEDWK
mode has been exited.
Sabbath Mode Power Outage Note
If a power outage occurs during when the oven is in
Sabbath mode, the unit will return to Sabbath mode
when power is restored, however the oven will return to
the off state even if it was in the middle of a bake cycle
when the power outage occurred.

18
49-85220
Your new oven has a variety of cooking modes to help you get the best results. These modes are described below.
5HIHUWRWKH&RRNLQJ*XLGHVHFWLRQIRUUHFRPPHQGDWLRQVIRUVSHFLILFIRRGV5HPHPEHU\RXUQHZRYHQPD\SHUIRUP
differently than the oven it is replacing.
Bake
The bake mode is for baking and roasting. This mode
uses heat only from the lower burner. When preparing
baked goods such as cakes, cookies and pastries,
always preheat the oven before inserting food. Follow
recipe recommendations for food placement. If no
guidelines are provided, center food in the oven. To use
this mode, press the Bake pad, use the + and - pads to
adjust the temperature, then press Start.
Broiling Modes
Always broil with the oven door and drawer closed.
Monitor food closely while broiling. Use caution when
broiling on the upper rack positions as placing food
closer to the broil burner increases smoking, spattering,
and the possibility of fats igniting.
Try broiling foods that you would normally grill. Adjust
rack positions to adjust the intensity of the heat to the
food. Place foods closer to the broil burner when a
seared surface and rare interior is desired. Thicker foods
and foods that need to be cooked through should be
EURLOHGRQDORZHUUDFNSRVLWLRQRUE\XVLQJWKH%URLO/R
mode.
Broil Hi
The Broil Hi mode uses intense heat from the upper
burner to sear foods. Use Broil Hi for thinner cuts of
PHDWDQGRUIRRGV\RXSUHIHUOHVVGRQHRQWKHLQWHULRU
To use this mode press the Broil pad once and then
press Start. It is not necessary to preheat when using
this mode.
Broil Lo
7KH%URLO/RPRGHXVHVOHVVLQWHQVHKHDWIURPWKHXSSHU
burner to cook food thoroughly while also browning the
VXUIDFH8VH%URLO/RIRUWKLFNHUFXWVRIPHDWDQGRUIRRGV
that you would like cooked all the way through. To use
this mode press the Broil pad twice and then press Start.
It is not necessary to preheat when using this mode.
Convection Bake (on some models)
The Convection Bake mode is intended for baking
on multiple racks at the same time. This mode uses
air movement from the convection fan to enhance
cooking evenness. Your oven is equipped with Auto
5HFLSH&RQYHUVLRQVRLWLVQRWQHFHVVDU\WRDGMXVWWKH
temperature when using this mode. To use this mode
press the Conv Bake pad, use the + and - pads to
adjust the temperature, and then press Start. Always
preheat when using this mode.
Cookware Guidelines
The material, finish and size of cookware affect baking
performance.
Dark, coated and dull pans absorb heat more readily
than light, shiny pans. Pans that absorb heat more
readily can result in a browner, crisper and thicker crust.
If using dark and coated cookware check food earlier
than the minimum cook time. If undesirable results are
obtained with this type of cookware consider reducing
RYHQWHPSHUDWXUHE\)QH[WWLPH
Ŷ 6KLQ\SDQVFDQSURGXFHPRUHHYHQO\FRRNHGEDNHG
goods such as cakes and cookies.
Ŷ *ODVVDQGFHUDPLFSDQVKHDWVORZO\EXWUHWDLQKHDW
well. These types of pans work well for dishes such
as pies and custards.
Ŷ $LULQVXODWHGSDQVKHDWVORZO\DQGFDQUHGXFHERWWRP
browning.
Ŷ .HHSFRRNZDUHFOHDQWRSURPRWHHYHQKHDWLQJ
Cooking Modes
USING THE OVEN: Cooking Modes / Cookware / Aluminum Foil and Oven Liners
CAUTION Do not use any type of foil or oven liner to cover the oven bottom. These items can block
airflow or melt, resulting in damage to the product and risk of carbon monoxide poisoning, smoke or fire.
Damage from improper use of these items is not covered by the product warranty.
Foil may be used to catch spills by placing a sheet on a lower rack, several inches below the food. Do not use more
IRLOWKDQQHFHVVDU\DQGQHYHUHQWLUHO\FRYHUDQRYHQUDFNZLWKDOXPLQXPIRLO.HHSIRLODWOHDVW´IURPRYHQZDOOV
to prevent poor heat circulation.
Aluminum Foil and Oven Liners
49-85220
19
Oven Racks
USING THE OVEN: Oven Racks / Broil Drawer
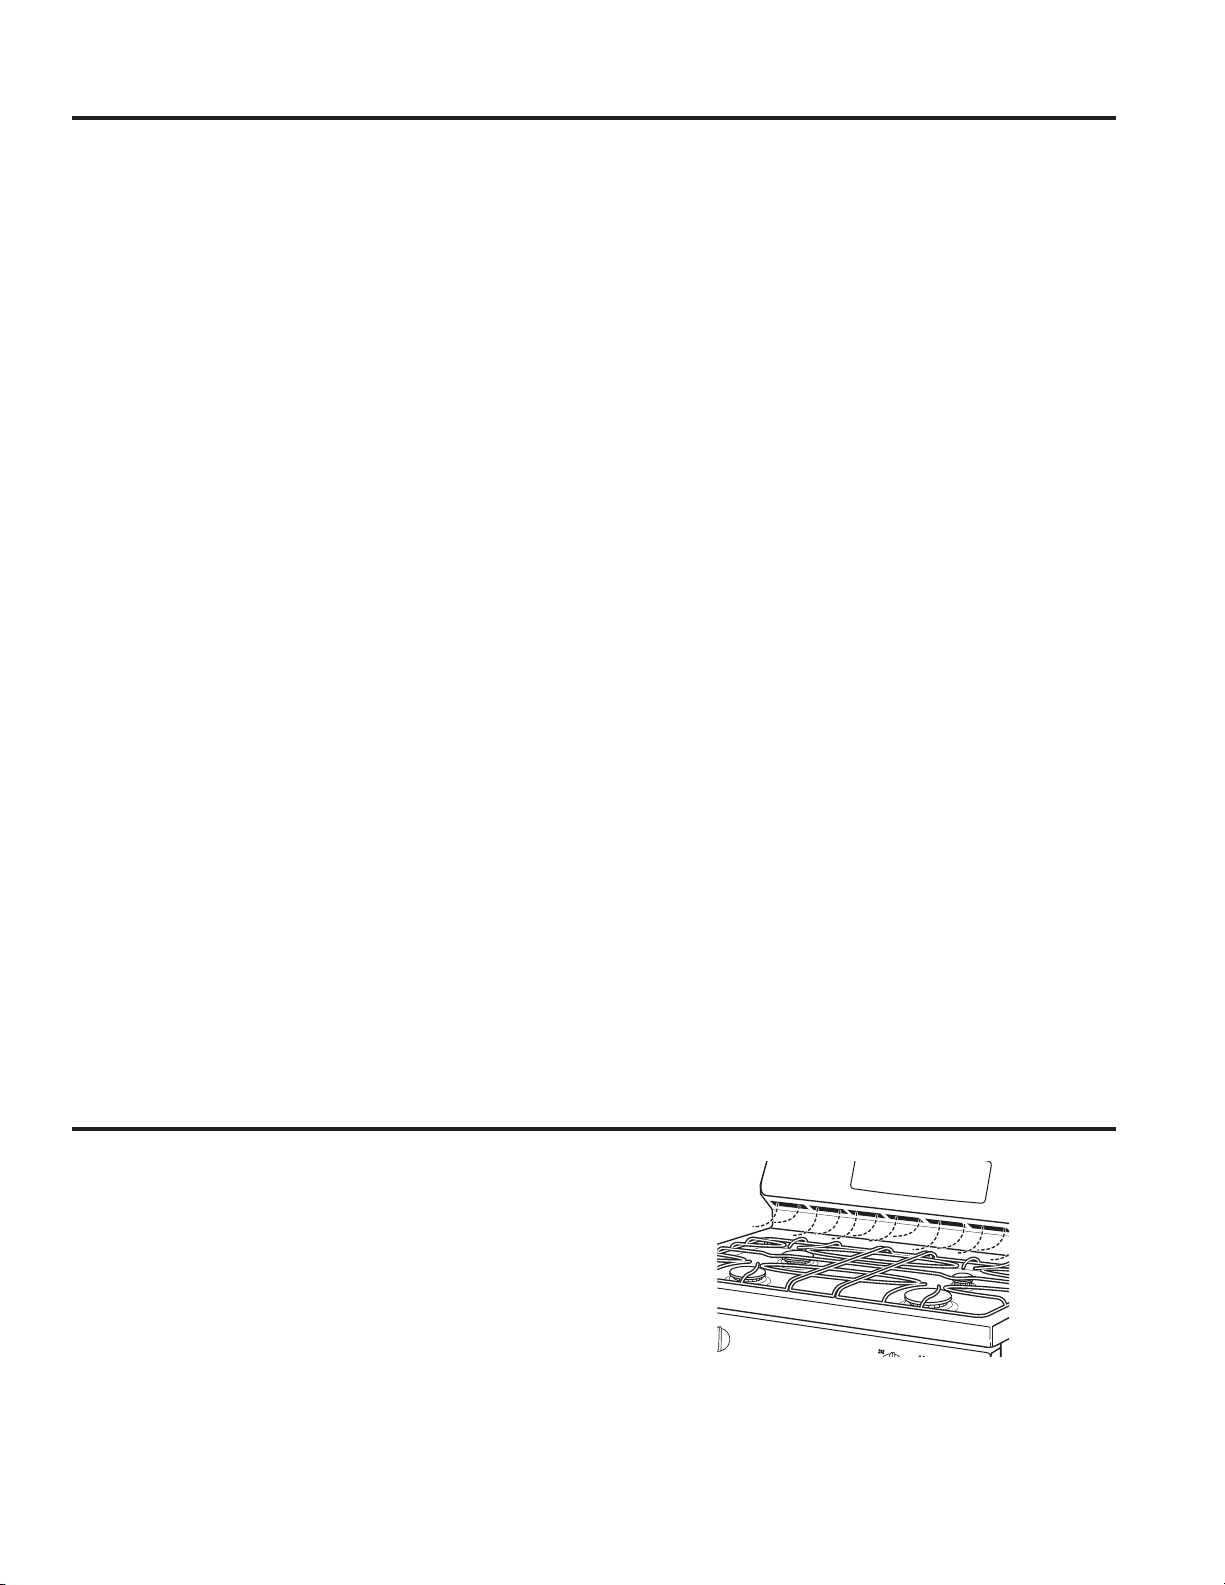
Rack Positions
Your oven has six rack positions in the main oven.
5HFRPPHQGHGUDFNSRVLWLRQVIRUYDULRXVW\SHVRI
foods are provided in the Cooking Guide. Adjusting
the rack position is one way to impact cooking results.
For example, if you would prefer darker tops on cakes,
muffins or cookies, try moving food one rack position
higher. If you find foods are too brown on top, try moving
them down next time.
When baking with multiple pans and on multiple racks,
ensure there is sufficient space between pans to allow
air to flow. This may improve cooking evenness.
Removing and Replacing Racks
When placing and removing cookware, pull the rack out
to the bump (stop position) on the rack support.
To remove a rack, pull it toward you until it reaches the
stop position, tilt up the front of the rack and pull it out.
To replace a rack, place the curved end of the rack onto
the rack supports. Tilt up the front of the rack and push
the rack in until it stops. Then lay the rack flat and push
it in until it is all the way into the oven.
5DFNVPD\EHFRPHGLIILFXOWWRVOLGHHVSHFLDOO\DIWHUD
self-clean cycle. To improve sliding conditions, use a soft
cloth or paper towel to rub vegetable oil on the left and
ULJKWHGJHVRIWKHUDFNVDQGRUUDFNVXSSRUWV
NOTE:5HPRYHXQXVHGUDFNVZKHQXVLQJWKHRYHQIRU
faster preheat, improved efficiency and optimal cooking
performance.
6HHWKH$VVLVWDQFH$FFHVVRULHVVHFWLRQIRULQVWUXFWLRQV
on ordering additional racks.
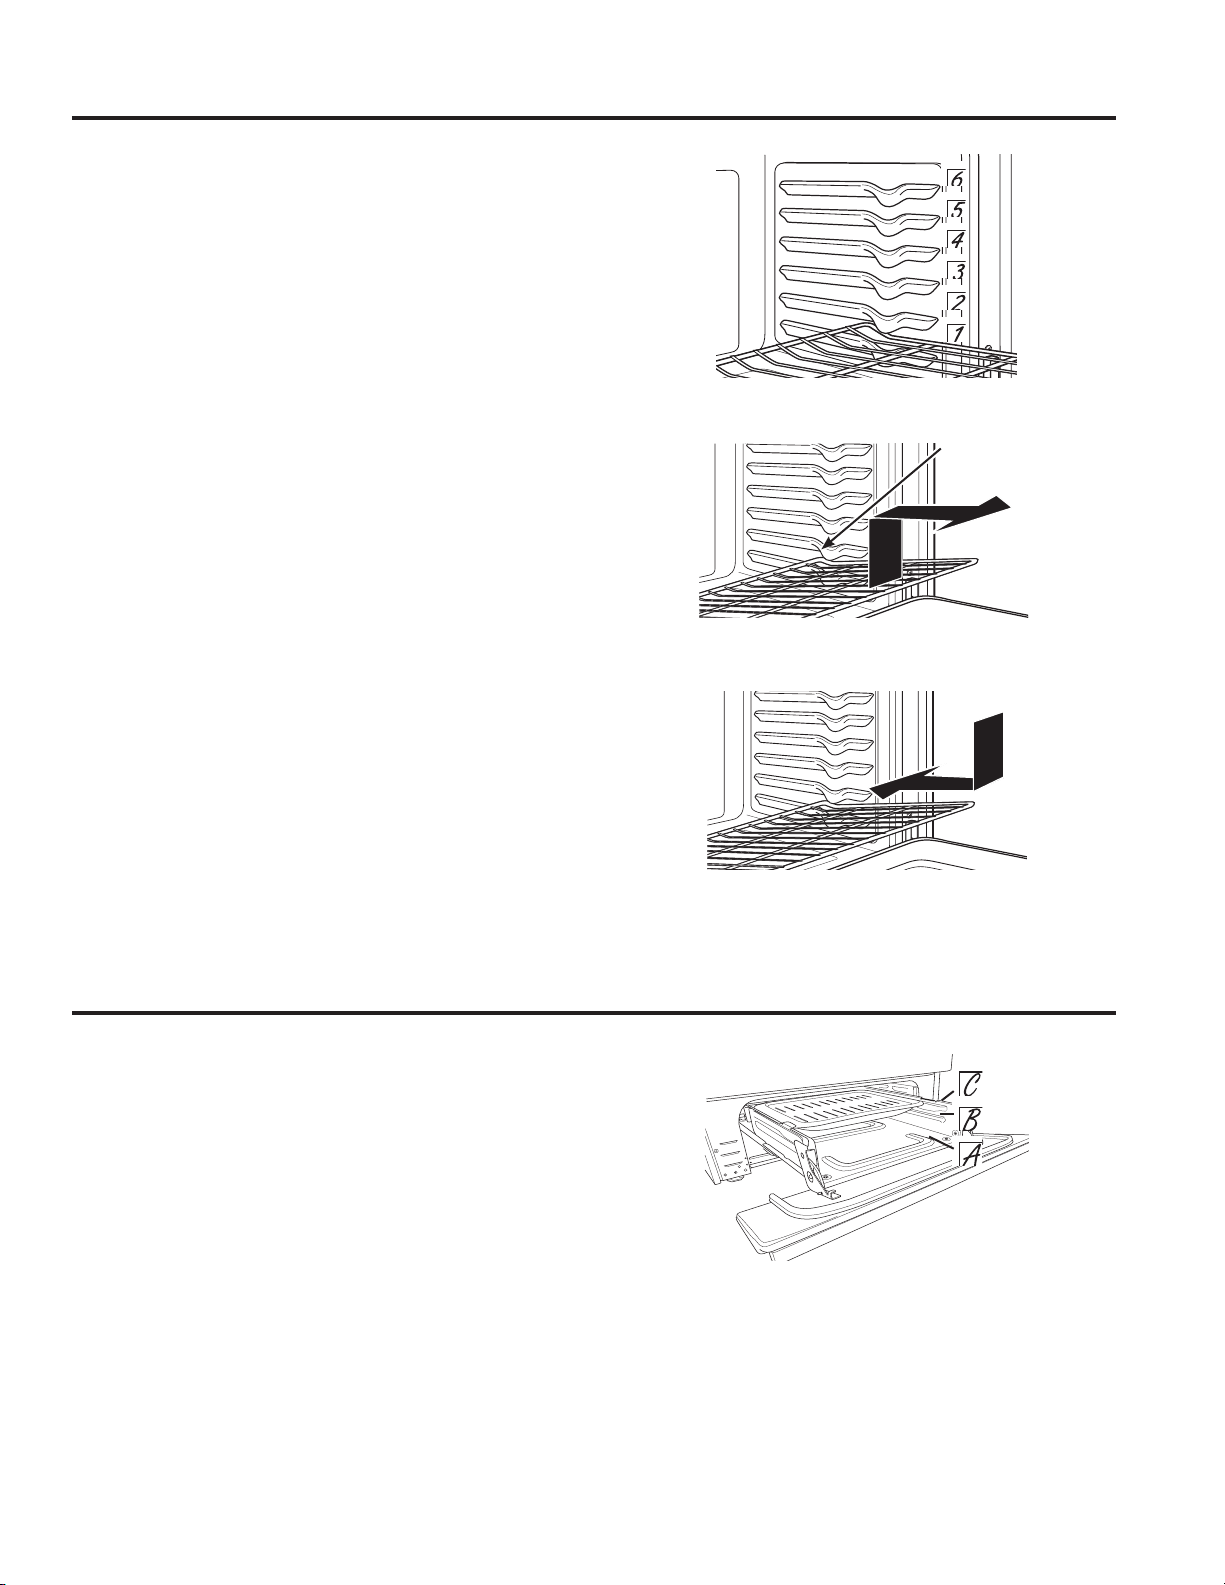
Always use the broil pan and grid that comes with your
range.
The broil drawer has the three broiling positions shown
to the right. To broil in position B or C, slide the pan into
the drawer such that the handles rest on the supports.
For broiling in position A, place the pan directly on the
bottom of the broil drawer. For better searing, use the
rack positions that places the food closest to the broil
EXUQHU0RYHIRRGGRZQRUXVH%URLO/RPRGHIRUPRUH
GRQHQHVVOHVVVHDULQJ
Broil Drawer (on some models)
Rack positions
Removing racks
Replacing racks
Broil drawer positions (on some models)
Rack stop
position
20
49-85220
Cooking Guide
USING THE OVEN: Cooking Guide
FOOD TYPE
RECOMMENDED
MODE(S)
RECOMMENDED RACK
POSITION(S) ADDITIONAL SUGGESTIONS
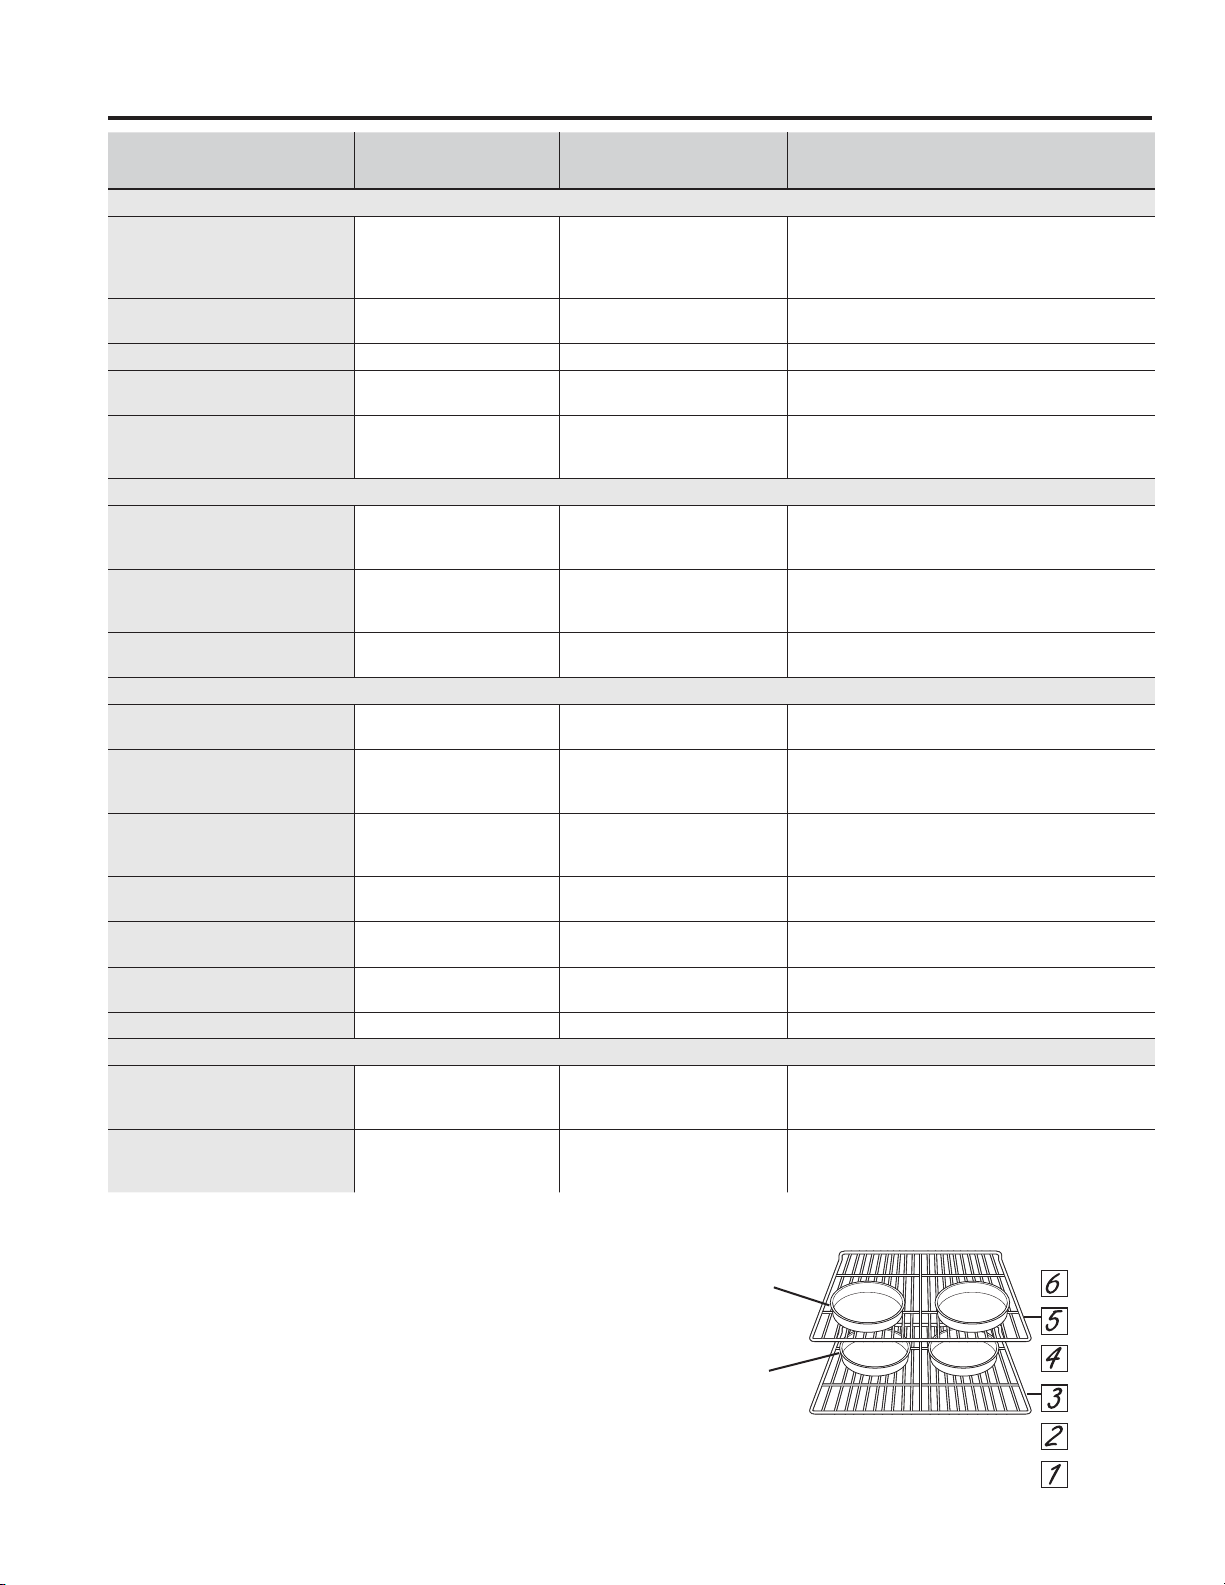
Baked Goods
/D\HUFDNHVVKHHWFDNHV
bundt cakes, muffins, quick
breads, biscuits, scones on
D6LQJOH5DFN
Bake RU Use shiny cookware.
/D\HUFDNHVRQ0XOWLSOH
5DFNV
Bake
Convection Bake
DQG
Ensure adequate airflow
(see illustration below).
Chiffon cakes (angel food) Bake 2 Use shiny cookware.
Cookies, biscuits, scones on
D6LQJOH5DFN
Bake RU Use shiny cookware.
Cookies, biscuits, scones on
0XOWLSOH5DFNV
Convection Bake
Bake
5DFNVDQG
5DFNVDQG
Ensure adequate airflow. Switch food
location partially through cooking for more
even cooking results.
Beef & Pork
Hamburgers Broil Hi RU&
Use a broil pan; move food down for more done-
QHVVOHVVVHDULQJ:DWFKIRRGFORVHO\ZKHQEURLO-
ing. Center food under burner.
Steaks & Chops Broil Hi RU&
Use a broil pan; move food down for more done-
QHVVOHVVVHDULQJ:DWFKIRRGFORVHO\ZKHQEURLO-
ing. Center food under burner.
5RDVWV Bake RU
/HDYHXQFRYHUHGXVHDORZVLGHGSDQVXFK
as a broil pan. Preheating is not necessary.
Poultry
Whole chicken Bake RU
/HDYHXQFRYHUHGXVHDORZVLGHGSDQ
such as a broil pan.
Bone-in chicken breasts,
legs, thighs
%URLO/R
Bake
RU%
If breaded or coated in sauce avoid Broil
Hi modes. Broil skin side down first.
Watch food closely when broiling.
Boneless chicken breasts
%URLO/R
Bake
RU%
0RYHIRRGGRZQIRUPRUHGRQHQHVVOHVV
VHDULQJDQGXSIRUJUHDWHUVHDULQJEURZQLQJZKHQ
broiling.
Whole turkey Bake 1 or 2
/HDYHXQFRYHUHGXVHDORZVLGHGSDQ
such as a broil pan.
Turkey Breast Bake RU
/HDYHXQFRYHUHGXVHDORZVLGHGSDQ
such as a broil pan.
Fish %URLO/R
RU&LQFKWKLFNRUOHVV
RU%!LQFK
Watch food closely when broiling.
Casseroles Bake RU
Frozen Convenience Foods
Pizza, potato products,
chicken nuggets, appetizers
RQD6LQJOH5DFN
Bake RU Use shiny cookware.
Pizza, potato products,
chicken nuggets, appetizers
RQ0XOWLSOH5DFNV
Bake
Convection Bake
DQG
DQG
Use shiny cookware.
Switch food location partially through
cooking for more even cooking results.
:KHQEDNLQJIRXUFDNHOD\HUVDWDWLPHVWDJJHUWKH
pans as shown to the right so that one pan is not directly
above another.
Cook food thoroughly to help protect against
foodborne illness. Minimum safe food temperature
recommendations for food safety can be found at
www.IsItDoneYet.gov. Make sure to use a food
thermometer to take food temperatures.
NOTE:5HPRYHXQXVHGUDFNVZKHQXVLQJWKHRYHQIRU
faster preheat, improved efficiency and optimal cooking
performance.
Front
Placement
Rear
Placement

49-85220
21
Be sure all controls are off and all surfaces are cool before cleaning any part of the oven.
Oven Exterior
Do not use oven cleaners, abrasive cleansers, strong
liquid cleansers, steel wool, plastic scouring pads or
cleaning powders on the interior or exterior of the oven.
&OHDQZLWKPLOGVRDSDQGZDWHURUDVROXWLRQRI
YLQHJDUDQGZDWHU5LQVHZLWKFOHDQZDWHUDQGGU\ZLWKD
soft cloth. When cleaning surfaces, make sure that they
are at room temperature and not in direct sunlight.
Spillage of marinades, fruit juices, tomato sauces and
basting liquids containing acids may cause discoloration
and should be wiped up as soon as hot surfaces cool,
then clean and rinse.
Cleaning the Oven
CARE AND CLEANING: Cleaning the Oven
Oven Racks
All oven racks may be cleaned by hand with an abrasive
cleaner or steel wool. Self-clean (black) oven racks may
remain in the oven during the self-clean cycle. Nickel-
plated (silver) racks should not remain in the oven during
the self clean cycle. Doing so will tarnish the racks. If
either type of rack is left in the oven during a self-clean
cycle, the rack may become difficult to slide.
After cleaning the racks, use a soft cloth or paper towel
to rub a small amount of vegetable oil on the left and
right edges of the rack. This will ensure the racks are
easy to slide in and out of the oven
Oven Interior
The interior of your new oven can be cleaned manually
or by using the Steam Clean or Self Clean modes
(on some models).
Spillage of marinades, fruit juices, tomato sauces and
basting liquids containing acids may cause discoloration
and should be wiped up as soon as hot surfaces cool,
then clean and rinse.
Manual Cleaning
Do not use oven cleaners, abrasive cleaners, strong
liquid cleansers, steel wool, scouring pads or cleaning
powders on the interior of the oven. Clean with mild
VRDSDQGZDWHURUDVROXWLRQRIYLQHJDUDQGZDWHU
5LQVHZLWKFOHDQZDWHUDQGGU\ZLWKDVRIWFORWK:KHQ
cleaning surfaces, make sure that they are at room
temperature and not in direct sunlight.
Steam Clean Mode (on some models)
The Steam Clean feature is for cleaning light soil from
your oven at a lower temperature than Self Clean.
To use the Steam Clean feature:
1. Start with the oven at room temperature.
2. Wipe excess grease and soils from the oven.
3RXURQHFXSRIZDWHURQWRWKHERWWRPRIWKHRYHQ
&ORVHDQGODWFKWKHGRRU
3UHVVWKHSteam Clean pad and then press Start.
<RXFDQQRWRSHQWKHGRRUGXULQJWKHPLQXWH6WHDP
Clean cycle. At the end of the Steam Clean cycle, unlatch
the door, soak up the remaining water, and wipe the
moisture-softened soil from the oven walls and door.
Self Clean Mode (on some models)
5HDGWKH6HOI&OHDQLQJ2YHQ6DIHW\,QVWUXFWLRQVDWWKH
beginning of this manual before using Self Clean Mode.
Self clean uses very high temperatures to clean the
RYHQLQWHULRU)RUDPRGHUDWHO\VRLOHGRYHQUXQDKRXU
VHOIFOHDQF\FOH)RUDKHDYLO\VRLOHGRYHQUXQDKRXU
self-clean cycle. Only self-clean (black) racks and grates
may remain in the oven during the self-clean cycle. All
other items, including nickel plated (silver) racks, should
be removed. If nickel plated racks are left in the oven
during a self-clean cycle, the racks will tarnish. If either
type of rack is left in the oven during a self-clean cycle,
the rack may become difficult to slide. See the Oven
5DFNVVHFWLRQIRUOXEULFDWLRQLQVWUXFWLRQV
IMPORTANT: The health of some birds is extremely
sensitive to the fumes given off during the self-cleaning
cycle of any range. Move birds to another well-
ventilated room.
To use the Self Clean feature:
1. Start with the oven at room temperature.
2. Wipe excess grease and soils from the oven and
interior door.
5HPRYHDOOLWHPVRWKHUWKDQVHOIFOHDQEODFN
racks and grates, if desired. See Cleaning the
Cooktop to determine if your grates may be self-
cleaned and for important details regarding grate
placement.
&ORVHDQGODWFKWKHGRRU
3UHVVWKHSelf CleanSDGVHWDWLPHEHWZHHQ
DQGKRXUVDQGWKHQSUHVVStart.
You cannot open the door during the self-clean cycle. If
the oven is too hot, you will not be able to slide the latch.
At the end of the self-clean cycle, allow the oven to cool,
unlatch the door and wipe any ash out of the oven.
22
49-85220
Control Panel and Knobs
Wipe the control panel after each use of the oven with
a damp cloth. For cleaning, use mild soap and water or
DVROXWLRQRIYLQHJDUDQGZDWHU5LQVHZLWKFOHDQ
water. Polish dry with a soft cloth.
Do not use abrasive cleansers, strong liquid cleansers,
plastic scouring pads or oven cleaners on the control
panel—they will damage the finish.
Stainless Steel Surfaces (on some models)
Do not use a steel wool pad; it will scratch the surface.
To clean the stainless steel surface, use warm sudsy
water or a stainless steel cleaner or polish. Always wipe
the surface in the direction of the grain. Follow the cleaner
instructions for cleaning the stainless steel surface.
Cleaners with oxalic acid such as Bar Keepers Friend
6RIW&OHDQVHUZLOOUHPRYHVXUIDFHUXVWWDUQLVKDQG
small blemishes. Use only a liquid cleanser free of grit
and rub in the direction of the brush lines with a damp,
soft sponge.
To inquire about purchasing cleaning products
including stainless steel appliance cleaner or polish,
UHDGWKH$VVLVWDQFH$FFHVVRULHVVHFWLRQVDWWKH
beginning of this manual.
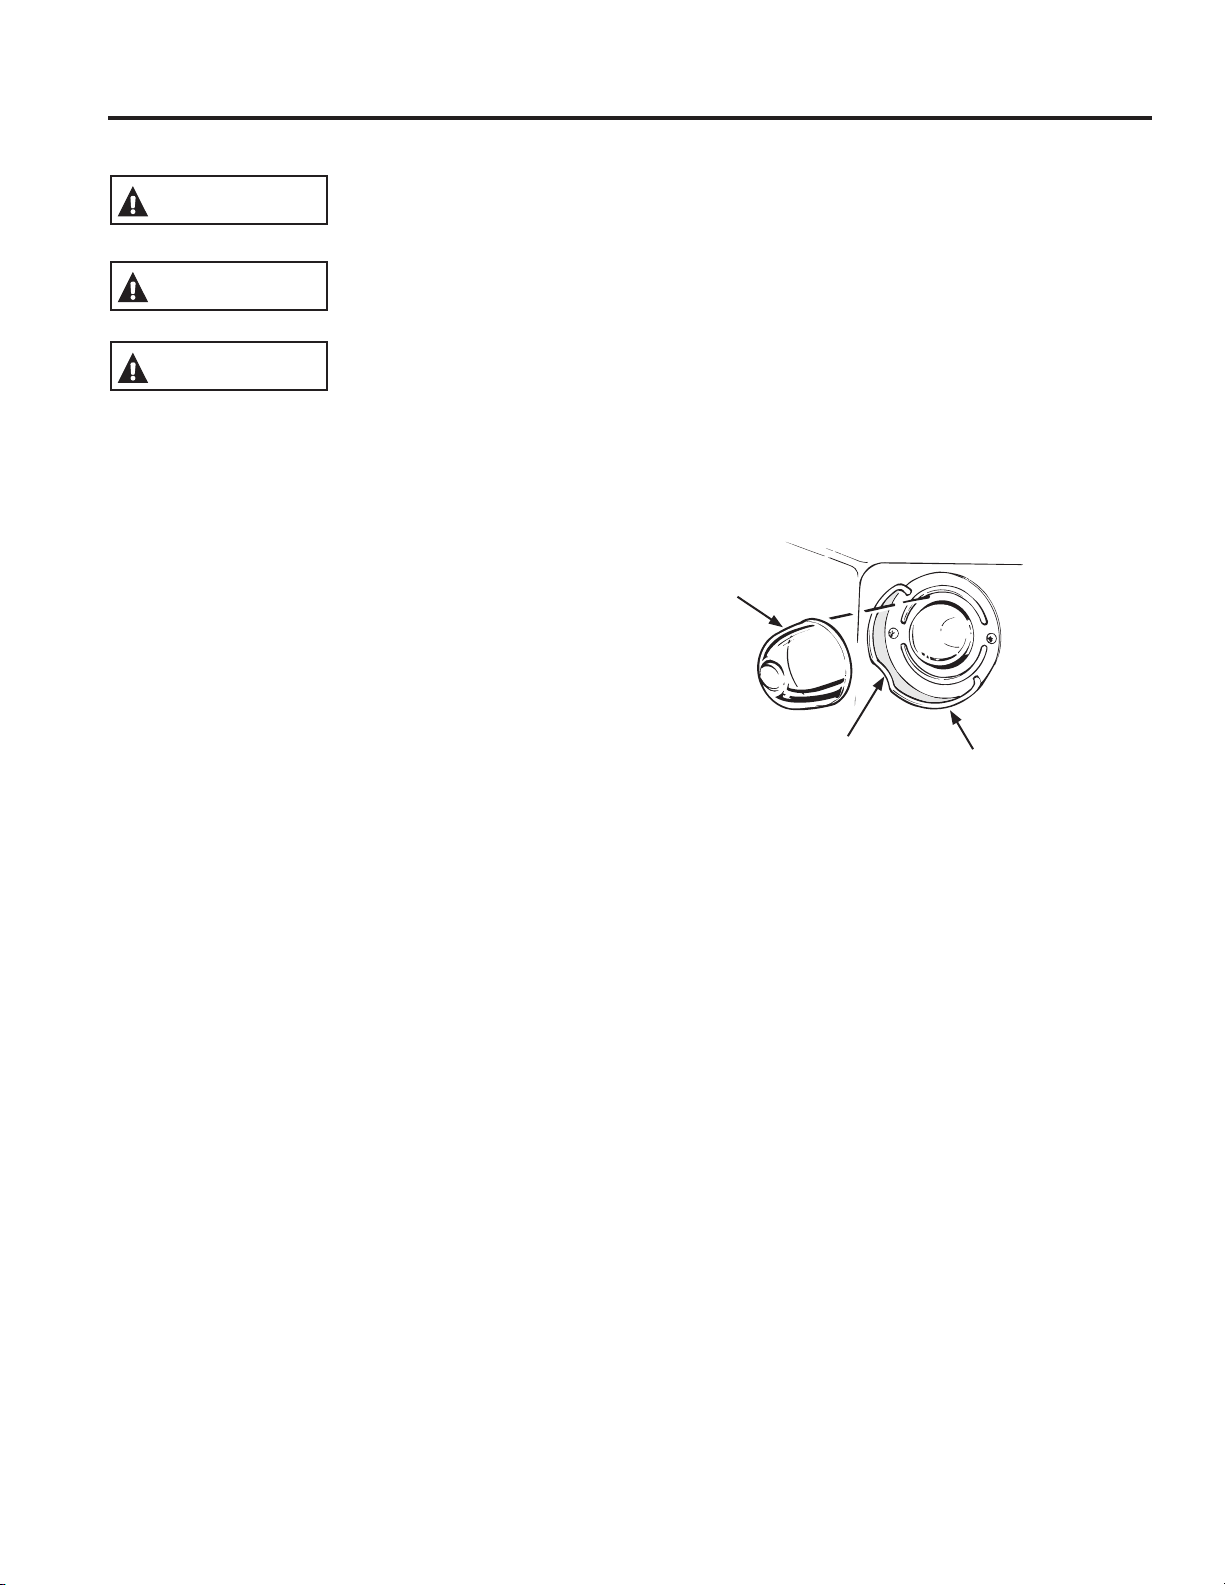
For easier cleaning, the control knobs may be removed
by pulling them directly outwards once the knobs are in
the OFF position. Do not pull knobs up or down or hang
objects on them. This can damage the gas valve shaft.
The knobs can be washed by hand with soap and water
or in a dishwasher.
To replace knobs after cleaning, align the hole on
the knob backside with
the gas valve shaft
and push inward until
the knob is securely
fastened. All knobs are
interchangeable
Surface burner knob
Cleaning the Cooktop
CARE AND CLEANING: Cleaning the Cooktop
Cleaning the Surface Burners
Turn all controls off. Allow the cooktop to cool before removing grates and burner parts. When removing the burner
FDSVDQGKHDGVUHPHPEHUWKHLUVL]HDQGORFDWLRQ5HSODFHWKHPLQWKHVDPHORFDWLRQDIWHUFOHDQLQJ
Removing Surface Burners
CAUTION Do not attempt to remove oval burner cap from burner head.
Round Burner
The burner cap and burner head can be lifted off the
cooktop and separated from one another.
Oval Burner (on some models)
The burner cap is permanently attached to the burner
head. The cap and head assembly can be lifted off the
cooktop.
Cooktop Surface
Do not use oven cleaners, abrasive cleansers, strong
liquid cleansers, steel wool, plastic scouring pads, or
cleaning powders on the cooktop surface. Clean with a
PLOGVRDSDQGZDWHURUDVROXWLRQRIYLQHJDUDQG
ZDWHU5LQVHZLWKFOHDQZDWHUDQGGU\ZLWKDVRIWFORWK
When cleaning surfaces, make sure that they are at
room temperature and not in direct sunlight.
Spillage of marinades, fruit juices, tomato sauces and
basting liquids containing acids may cause discoloration
and should be wiped up as soon as hot surfaces cool,
then clean and rinse.
If your model has a stainless steel cooktop surface,
refer to the Stainless Steel Surface cleaning instructions
featured in the Control Panel and Knobs section.
Round Burner Cap
(Removable)
Electrode
Burner Head
Oval Burner Cap
(Non-Removable)
Oval Burner
Head
Electrode
49-85220
23
Cleaning the Cooktop (Cont.)
CARE AND CLEANING: Cleaning the Cooktop
Burner cap is
properly seated.
Burner cap is
NOT properly seated.
Burner cap is
NOT properly seated.
Cleaning the Surface Burners (Cont.)
Cleaning the Burner Caps
Wash burner caps in hot, soapy water and rinse with
clean water. You may scour with a plastic scouring pad
to remove burned-on food particles. The round burner
caps may also be cleaned in your dishwasher.
Cleaning the Burner Heads
Wash the burner heads routinely, especially after bad
VSLOORYHUVZKLFKFRXOGFORJWKHEXUQHURSHQLQJV/LIW
EXUQHUVRIIZKHQFRRO:DVKZLWKKRWVRDS\ZDWHU5LQVH
with clean water. For more stubborn stains, use a brush
with plastic bristles.
NOTE: Do not use steel wool or scouring pads to clean
the burner parts as these may clog the openings. Never
wash burner heads in your dishwasher. Doing so may
cause them to discolor.
The ports in the burner heads must be kept clean at all
times for an even, unhampered flame.
Clogged or dirty burner ports or electrodes will not allow
the burner to operate properly.
For proper ignition, make sure the small hole in the notch
that fits over the electrode is kept open. A sewing needle
or wire twist-tie works well to unclog it.
Replacing Surface Burners
Before replacingWKHEXUQHUFDSVKHDGVDQGRYDOKHDG
cap assembly, shake out excess water and allow them to
dry thoroughly.
5HSODFHEXUQHUKHDGVLQWKHFRUUHFWORFDWLRQVDFFRUGLQJ
to size. Ensure each cap is properly seated on the
burner head, as pictured below.
CAUTION Do not operate the cooktop
without all burner parts and grates in place.
Any spill on or around an electrode must be carefully
cleaned. Avoid hitting the electrode with anything hard or
it could be damaged.
The electrode of the spark igniter is exposed
when the burner head is removed. When one
EXUQHULVWXUQHGWR/,7(DOOWKHEXUQHUVVSDUN
Do not attempt to disassemble or clean around
any burner while another burner is on.
Round hole in
burner head must
be kept clear
Electrode

24
49-85220
Cleaning the Cooktop (Cont.)
CARE AND CLEANING: Cleaning the Cooktop
Griddles (on some models)
Nonstick Aluminum Griddle: Wash your griddle with
dish soap and hot water. If necessary, scrub with a
non-abrasive plastic pad.
Griddle Precautions:
Ŷ If something has spilled under the griddle, it should
be cleaned up as soon as possible to prevent the
spill from getting baked onto the cooktop.
Ŷ Do not allow grease to accumulate under the griddle
as it can be a fire hazard. Clean under the griddle
with hot, soapy water as soon as it is cool.
Ŷ Do not wash your griddle in the dishwasher.
Ŷ 'RQRWFOHDQWKHJULGGOHLQWKHVHOIFOHDQLQJRYHQ
Doing so will damage the nonstick coating.
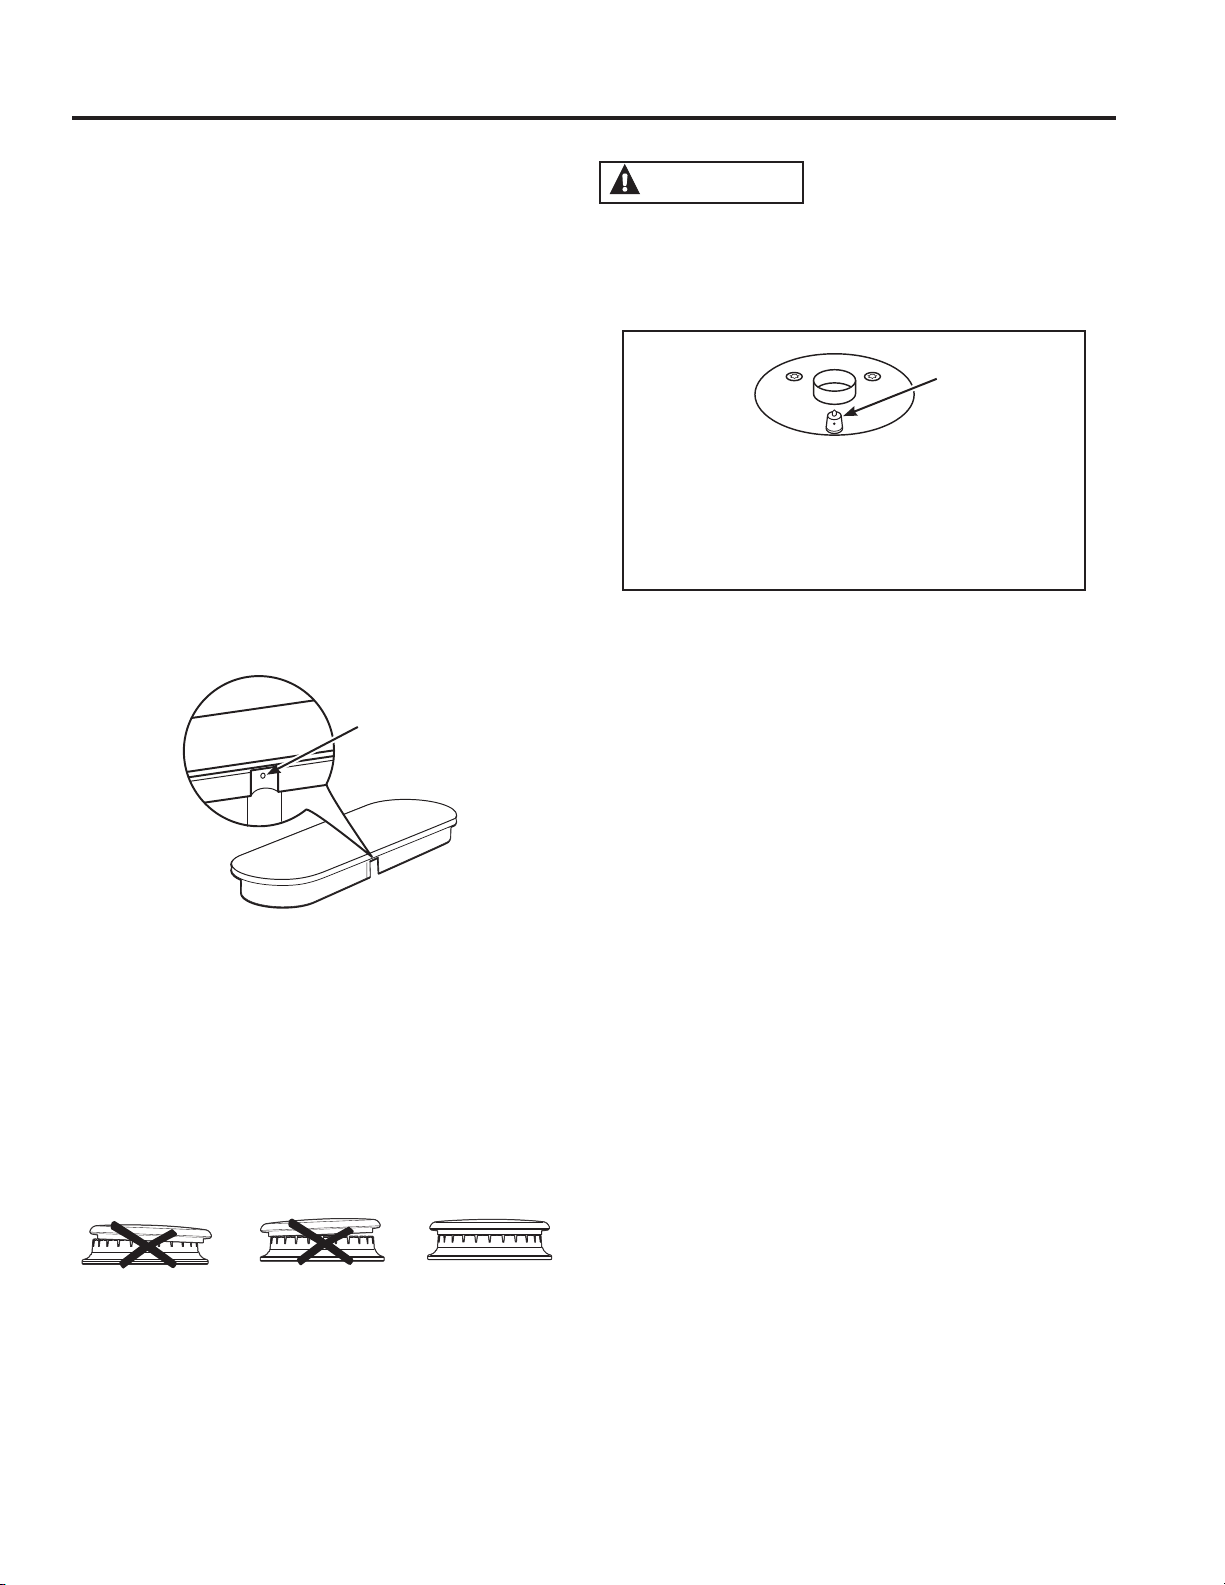
Grate Support Bumpers (on some models)
If any of the rubber grate support bumpers in the cooktop
are missing or damaged, replacement parts can be
REWDLQHGE\FDOOLQJ*(&$5(6
To insert the new bumpers, simply place the
cone-shaped end of the bumper into the hole in the
cooktop and push down while gently twisting the bumper.
Grate Support Bumpers
Burner Grates
Manual Cleaning
Grates should be washed in hot, soapy water and
rinsed with clean water. To soften burned-on food,
place grates in a solution containing ¼-cup of
household ammonia for several hours. Afterward, scrub
grates with a plastic scouring pad soaked in hot, soapy
ZDWHU5LQVHZHOODQGGU\
Self Clean Mode (on some models)
If your grates do not have rubber bumpers on their
bottom surface, they may be cleaned in the oven using
the self-clean cycle. Do not attempt to clean your grates
in the oven if your grates have rubber bumpers. Doing
so will destroy the rubber bumpers and may affect the
function of your surface burners.
Porcelain-coated grates may gradually dull if continually
exposed to self-clean temperatures.
If your oven is equipped with self-clean (black) racks,
it is recommended to follow the instructions for placing
grates on racks. If your oven is equipped with nickel-
plated (silver) racks, it is recommended to follow the
instructions for placing grates on the oven bottom.
Nickel-plated racks should not remain in the oven during
the self clean cycle. Doing so will tarnish the racks. If
either type of rack is left in the oven during a self-clean
cycle, the rack may become difficult to slide. See the
2YHQ5DFNVHFWLRQIRUOXEULFDWLRQLQVWUXFWLRQV
NOTE: When placing or removing grates from the oven,
do not slide the grates on the racks or oven bottom. Doing
so could damage the enamel on the racks or oven bottom.
To self-clean your grates on self-clean racks:
,QVHUWUDFNVLQSRVLWLRQVDQGRUSRVLWLRQVDQG
2. Gently place one grate on each rack.
To self clean your grates on the oven bottom:
5HPRYHDOORYHQUDFNV
2. Gently place one grate on the center of the oven
bottom with the grate oriented in the upright position.
Stack remaining grate(s) as shown below. Do not
place or stack grates in any other configuration.
Once the grates are placed in the oven, operate the
self-clean cycle per the instruction in the Cleaning the
Oven section.
NOTE: Use caution when removing the grates from the
oven after the self-clean cycle has ended. The grates
may still be hot.
Once the self-clean cycle is complete, the grates may
carefully be removed. You may notice a white residue on
the grates. Wipe it off with a damp sponge. If white spots
SHUVLVWZHWWKHVSRQJHZLWKDVROXWLRQRIYLQHJDU
and water and wipe the grates again.
When replacing the grates on the cooktop, be sure to
locate them correctly. Grates should fit securely into the
cooktop.

49-85220
25
Cleaning the Door and Drawer
CARE AND CLEANING: Cleaning the Door and Drawer
Cleaning the Oven Door
Cleaning the Door Interior
Do not allow excess water to run into any holes or slots
in the door .
Wipe dish soap over any baked-on spatters on the glass.
Use a single sided safety razor blade to clean it off. Then
wipe over the glass with a soapy cloth to remove any
residue and dry off.
The area outside the gasket can be cleaned with a
soap-filled plastic scouring pad. Do not rub or clean
the door gasket - it has an extremely low resistance to
abrasion.
If you notice the gasket becoming worn, frayed or
damaged in any way or if it has become displaced on the
door, you should have it replaced.
Cleaning the Door Exterior
If a stain on the door vent trim is persistent, use a mild
abrasive cleaner and a sponge-scrubber for best results.
Do not use this method on any other surface.
Stainless Steel Surfaces (on some models)
Do not use a steel wool pad; it will scratch the surface.
To clean the stainless steel surface, use warm sudsy
water or a stainless steel cleaner or polish. Always wipe
the surface in the direction of the grain. Follow the cleaner
instructions for cleaning the stainless steel surface.
Cleaners with oxalic acid such as Bar Keepers Friend
6RIW&OHDQVHUZLOOUHPRYHVXUIDFHUXVWWDUQLVKDQG
small blemishes. Use only a liquid cleanser free of grit
and rub in the direction of the brush lines with a damp,
soft sponge.
To inquire about purchasing cleaning products
including stainless steel appliance cleaner or polish,
UHDGWKH$VVLVWDQFH$FFHVVRULHVVHFWLRQVDWWKH
beginning of this manual.
Removable Storage Drawer (on some models)
The storage drawer is a good place to store cookware
and bakeware. Do not store plastics or flammable
material in the drawer.
The storage drawer may be removed for cleaning under
the range. Clean the storage drawer with a damp cloth or
sponge. Never use harsh abrasives or scouring pads.
Removing the Storage Drawer:
1. Pull drawer straight out until it stops.
2. Tilt the front of the drawer upward and pull the drawer
free of the range.
Replacing the Storage Drawer:
5HVWWKHGUDZHUVOLGHVRQWKHUDQJHVWRSV
2. Push directly backward until the drawer drops into
place.
6OLGHWKHGUDZHUDOOWKHZD\LQWRWKHRYHQ
The storage drawer may be removed for cleaning
under the range.
26
49-85220
Maintenance
SHOCK OR BURN HAZARD: Before replacing oven light bulb, disconnect the electrical
power to the oven at the main fuse or circuit breaker panel. Failure to do so may result in
electric shock or burn.
WARNING
BURN HAZARD: The glass cover and bulb should be removed when cool. Touching hot
glass with bare hands or a damp cloth can cause burns.
Before replacing your oven light bulb, disconnect the electrical power to the range at the
main fuse or circuit breaker panel. Be sure to let the light cover and bulb cool completely.
The oven light bulb is covered with a removable glass cover that is held in place with a
EDLOVKDSHGZLUH5HPRYHWKHRYHQGRRULIGHVLUHGWRUHDFKWKHFRYHUHDVLO\6HHWKH
/LIW2II2YHQ'RRUVHFWLRQIRUGHWDLOHGRYHQGRRUUHPRYDOLQVWUXFWLRQV
CAUTION
CAUTION
Oven Light
Replacing the Light Bulb:
1. Disconnect electrical power to the range.
2. Hold the glass cover stable, so it doesn’t fall when
released.
6OLGHQHDUWKHLQGHQWRIWKHFRYHUKROGHUXQWLOWKH
cover is released. Do not remove any screws to
release the glass cover.
5HSODFHEXOEZLWKDZDWWKRXVHKROGDSSOLDQFH
bulb. Do not touch hot bulb with hand or wet
cloth. Only remove bulb when it is cool.
+ROGJODVVFRYHUVWDEOHRYHUQHZEXOE
3XOOWKHZLUHFRYHUKROGHUQHDUWKHLQGHQWXQWLOWKH
indent in the wire cover holder is located in the indent
of the glass cover.
&RQQHFWHOHFWULFDOSRZHUWRUDQJH
Wire cover holder
Indent
Glass cover
CARE AND CLEANING: Maintenance
49-85220
27
Maintenance (Cont.)
CARE AND CLEANING: Maintenance
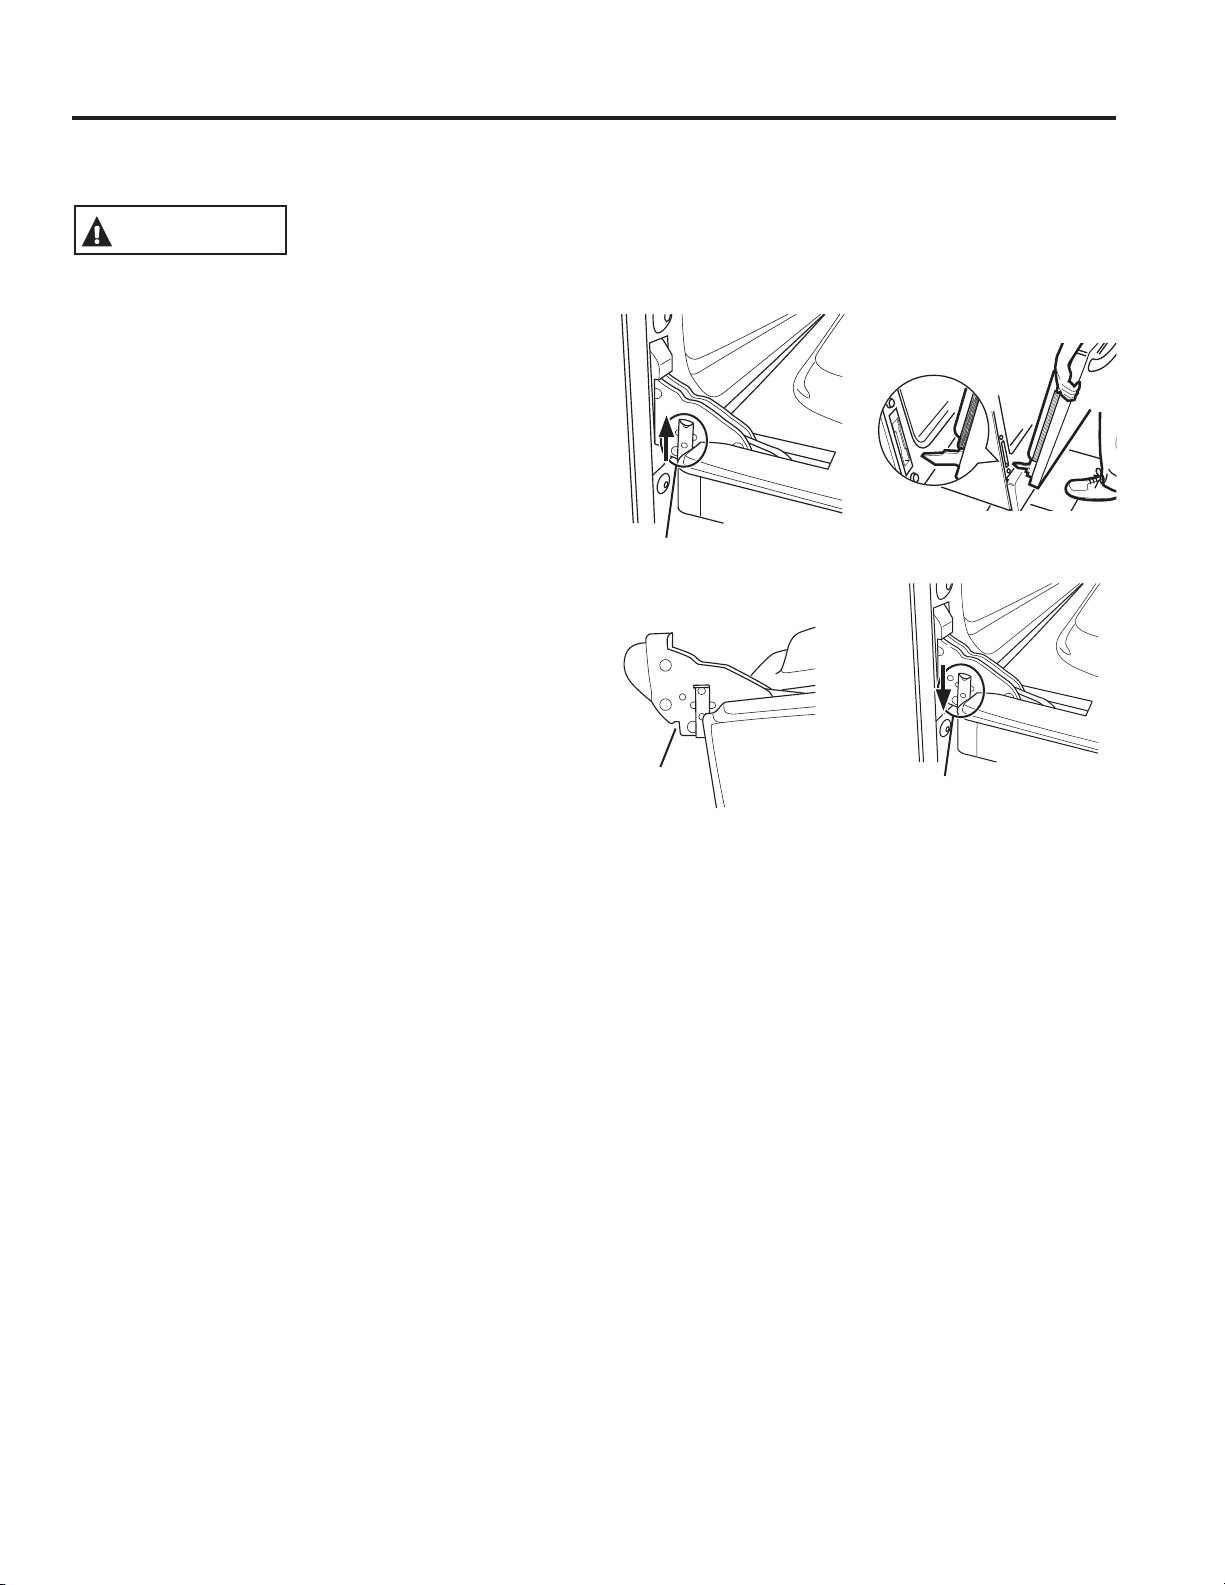
Removing the Door:
1. Fully open the oven door.
2. On each hinge, slide the hinge lock up, making sure it
snaps into its fully raised position.
)LUPO\JUDVSERWKVLGHVRIWKHGRRUQHDUWKHKDQGOH
&ORVHWKHGRRUXQWLOWKHWRSRIWKHGRRULV
DSSUR[LPDWHO\´IURPWKHUDQJHIUDPH
/LIWGRRUXSDQGDZD\IURPWKHUDQJHXQWLOERWKKLQJH
arms are clear of the slots in the range frame.
Replacing the Door:
1. Firmly grasp both sides of the door near the handle.
2. With the door at the same angle as the removal
position, rest the notch in the bottom of the left hinge
arm on the bottom edge of the left hinge slot. The
notch in the hinge arm must be fully seated onto the
ERWWRPRIWKHVORW5HSHDWIRUWKHULJKWVLGH
)XOO\RSHQWKHGRRU,IWKHGRRUZLOOQRWIXOO\RSHQWKH
KLQJHDUPVDUHQRWVHDWHGFRUUHFWO\/LIWWKHGRRURII
the range and repeat Step 2.
3XVKWKHKLQJHORFNVGRZQWRWKHORFNHGSRVLWLRQ
&ORVHWKHRYHQGRRU
Pull hinge locks up to unlock
Notch
Push hinge locks down to lock
Removal position
Lift-Off Oven Door
The door is very heavy. Be careful when removing and lifting the door. Do not lift the door by the handle.
If improperly removed, oven door hinges may suddenly close and can cause personal injury
to appendages near the hinge. Follow instructions below to avoid a risk of injury when
removing and re-installing the oven door.
WARNING

28
49-85220
Notes

49-85220
29
Notes
30
49-85220
TROUBLESHOOTING TIPS
Save time and money! Review the charts on the following pages first and you may not need to call for service.
Problem Possible Cause What To Do
My new oven doesn't
cook like my old one.
Your new oven has a different cooking system
from your old oven and therefore may cook
differently than your old oven.
For the first few uses, follow your recipe times
and temperatures carefully and use rack
positions recommended in the Cooking Guide.
If you still think your new oven is too hot or too
cold, you can adjust the temperature yourself
to meet your specific cooking preference. See
the Special Features section.
Food does not bake
properly
Oven controls improperly set. See the Cooking Modes section.
Rack position is incorrect. See the Cooking Guide.
Rack is not level. See the Installation Instructions for directions
on leveling your range.
Incorrect cookware or cookware of improper
size being used.
See the Cookware section.
Oven temperature needs adjustment. See the Special Features section.
Food does not broil
properly
Oven controls improperly set. Make sure you select the appropriate broil
mode. See the Cooking Guide.
Improper rack position being used. See Cooking Guide for rack position
suggestions.
Cookware not suited for broiling. Use a pan specifically designed for broiling.
Aluminum foil on the broil pan has not been
fitted properly or slit to drain grease.
If using aluminum foil on broil pan, wrap tightly
and add slits conforming to those in the pan to
allow grease to drain.
Oven temperature too
hot or too cold
Oven temperature needs adjustment. See the Special Features section.
Oven and/or display
appears not to work
A fuse in your home may be blown or the
circuit breaker tripped.
5HSODFHWKHIXVHRUUHVHWWKHFLUFXLWEUHDNHU
Oven controls improperly set. See the Using the Oven section.
Oven is in Sabbath Mode. Verify, that the oven is not in Sabbath Mode.
See the Special Features section.
The clock is turned off. See the Oven Controls or Special Features
section.
“Crackling” or
“popping” sound
This is the sound of the metal heating and
cooling during both the cooking and cleaning
functions.
This is normal.
Range is making a
“clicking” noise when
using my oven.
Your range has been designed to maintain a
tighter control over your oven's temperature.
You may hear your oven's heating elements
"click" on and off more frequently than in
older ovens to achieve better results during
baking, broiling, and self-clean cycles.
This is normal.
Sometimes the
oven takes longer to
preheat to the same
temperature
Cookware, food, and/or number of racks in
oven.
Cookware, food, and racks in the oven will
FDXVHGLIIHUHQFHVLQSUHKHDWWLPHV5HPRYH
excess items to reduce preheat time.
Troubleshooting tips ... Before you call for service
49-85220
31
Problem Possible Cause What To Do
Oven light does not
work
Light bulb is loose or defective. Tighten or replace bulb. See the Maintenance section for
instructions on how to replace the bulb.
Oven will not self-clean The temperature is too high to set
a self-clean operation.
Allow the oven to cool.
Oven controls improperly set. See the Cleaning the Oven section.
Excessive smoking
during clean cycle
Excessive soil or grease. Press the Cancel/Off pad. Allow the oven to cool below
the unlocking temperature. Wipe the excess soil and
reset the clean cycle.
Oven not clean after a
clean cycle
Oven controls improperly set. See the Cleaning the Oven section.
Oven was heavily soiled. Clean up heavy spillovers before starting the clean cycle.
Heavily soiled ovens may need to self-clean again or for
a longer period of time.
Strong “burning” or
“oily” odor emitting
from the vent
This is normal in a new oven and
will disappear in time.
To speed the process, set a self-clean cycle for a
PLQLPXPRIKRXUV6HHWKH&OHDQLQJWKH2YHQ VHFWLRQ
This is temporary.
Excessive smoking
during broiling
Food too close to burner element. /RZHUWKHUDFNSRVLWLRQRIWKHIRRG
Oven latch will not open. The temperature inside the
oven has not dropped below the
unlocking temperature.
Press the Cancel/Off pad. Allow the oven to cool below
the unlocking temperature.
"LOCK DOOR" flashes
in the display
The self-clean or steam-clean cycle
has been selected but the door is
not locked.
/RFNWKHRYHQGRRU
“F— and a number
or letter” flash in the
display
You have a function error code. Press the Cancel/Off pad. Allow the oven to cool for one
hour. Put the oven back into operation. If the function code
UHSHDWVGLVFRQQHFWDOOSRZHUWRWKHRYHQIRUDWOHDVW
seconds and then reconnect power. If the function error code
repeats again, call for service.
Clock flashes due to a
power outage
Power outage or surge 5HVHWWKHFORFN,IWKHRYHQZDVLQXVH\RXPXVWUHVHW
it by pressing the Cancel/Off pad, setting the clock and
resetting any cooking function.
Lock Controls or
Control Lockout feature
is activated
If LOC ON appears in the display, the range control is
locked. Turn this feature off to use the range. See the
Oven Controls section.
Surface Burners do not
light
Plug on range is not completely
inserted in the electrical outlet.
Make sure electrical plug is plugged into a live, properly
grounded outlet.
Gas supply not connected or
turned on.
See the Installation Instructions that came with your
range.
A fuse in your home may be blown
or the circuit breaker tripped.
5HSODFHWKHIXVHRUUHVHWWKHFLUFXLWEUHDNHU
Burner parts not replaced correctly. See the Care and Cleaning section.
Burner slots near the electrode, or
the round lighter port on the oval
burner, may be clogged.
5HPRYHWKHEXUQHUVDQGFOHDQWKHP&KHFNWKH
electrode area for burned-on food or grease. See the
Care and Cleaning section.
Food residue on electrode /LJKWO\SROLVKIODWWLSRIHOHFWURGHZLWKQDLOILOHRU
sandpaper until shiny.
Troubleshooting tips ... Before you call for service
TROUBLESHOOTING TIPS

32
49-85220
Troubleshooting tips ... Before you call for service
TROUBLESHOOTING TIPS
Problem Possible Cause What To Do
Top burners do not
burn evenly
Improper burner assembly. Make sure the burner caps are seated correctly. See the Care and
Cleaning section.
Burner slots on the side of the
burner may be clogged.
5HPRYHWKHEXUQHUVIRUFOHDQLQJ6HHWKH&DUHDQG&OHDQLQJ
section.
Burner flames are
very large or yellow
Improper air to gas ratio. If range is connected to Propane gas, contact the technician
who installed your range or made the conversion.
Surface burners light
but bake and broil
burners do not.
Gas to the oven burners may
have been shut off.
The oven gas shut-off is located on the gas regulator near the
JDVOLQHDWWDFKPHQWWR\RXUUDQJH/RFDWHLWDQGIOLSWKHOHYHU
My oven door glass
appears to be
"tinted" or have a
"rainbow" color.
The inner oven glass is coated
with a heat barrier to reflect
the heat back into the oven to
prevent heat loss and keep the
outer door cool while baking.
This is normal. Under certain light or angles, you may see this
tint or rainbow color.
Drawer does not slide
smoothly or drags
The drawer is out of alignment. Fully extend the drawer and push it all the way in. See the Care
and Cleaning of the range section.
Drawer is over-loaded or load is
unbalanced.
5HGXFHZHLJKWRUUHGLVWULEXWHGUDZHUFRQWHQWV
Lever is
shown closed.
PULL TO OPEN.
Sealed burner models

295D1703P001 29-5979 09-15 ATS
Sécurité ...............................2
Garantie ...............................7
Assistance / Accessoires ............8
Utilisation de la surface de cuisson
En cas de panne de courant ............ 10
Brûleurs de surface .................... 10
Plaque chauffante .....................12
Utilisation du four
Commandes du four ................... 14
Évents du four ......................... 15
Fonctions spéciales ....................16
Mode sabbat ...........................17
Modes de cuisson ......................18
Directives relatives aux ustensiles
de cuisson .............................18
Papier d'aluminium et protections
pour four .............................. 18
Grilles de four ..........................19
Tiroir du gril ............................19
Guide de cuisson .......................20
Entretien et nettoyage
Nettoyage du four ......................21
Nettoyage de la surface
de cuisson .............................22
Nettoyage de la porte et du tiroir ....... 25
Entretien ...............................26
Enregistrement du produit .......29
Dépannage ......................... 32
Cuisinières
à gaz à four simple
Inscrivez ici les numéros de modèle
et de série :
Nº de modèle _________________
Nº de série ___________________
Vous trouverez ces numéros sur une
étiquette située à l'arrière de la porte
du tiroir de la cuisinière.
Manuel de
l'utilisateur
ÉLECTROMÉNAGERS GE
Modèles
JCGB660
JCGB700
JCGB720
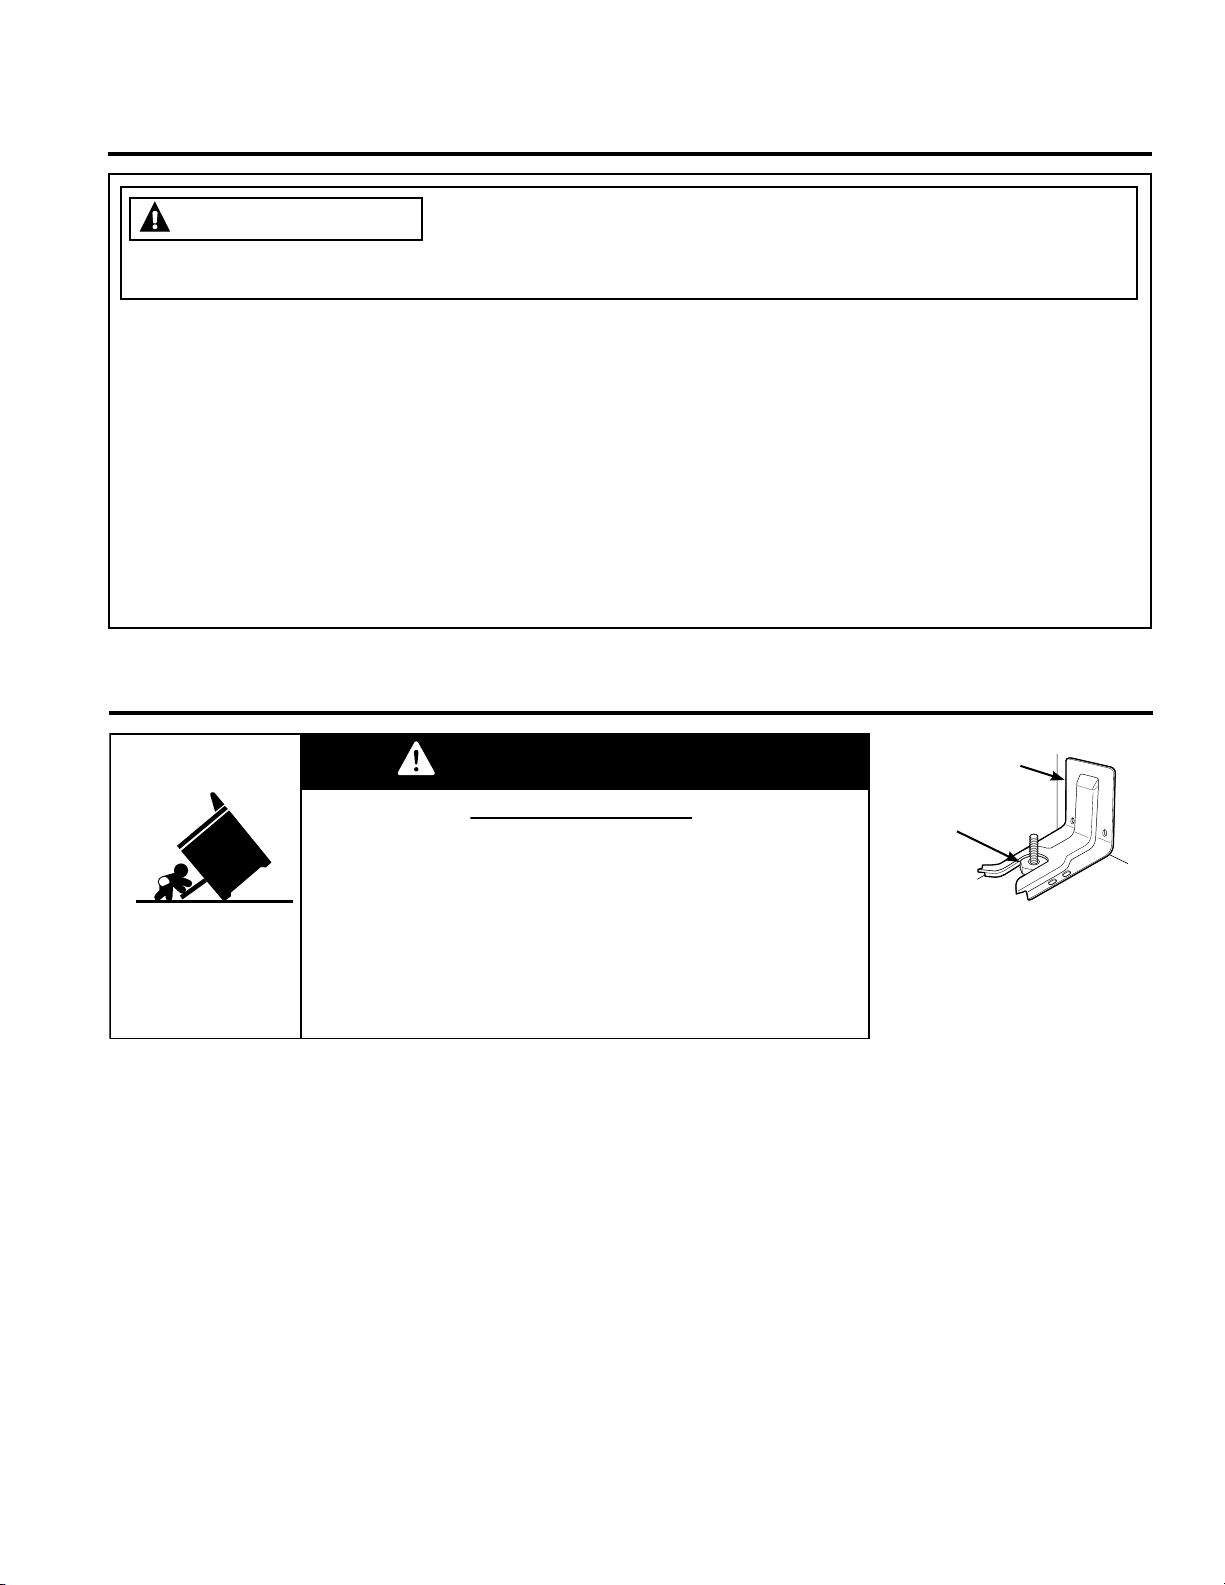
2
29-5979
- Ne rangez pas ou n'utilisez pas d'essence ou d'autres vapeurs et liquides inflammables à proximité de cet
appareil ou de tout autre appareil électroménager.
- QUE FAIRE SI VOUS DÉTECTEZ UNE ODEUR DE GAZ
■ N'essayezpasd'allumerunappareil,quelqu'ilsoit.
■ Netouchezàaucuncommutateurélectrique;n'utilisezaucuntéléphonedevotredomicile.
■ Appelezimmédiatementvotrefournisseurdegazdepuisletéléphoned'unvoisin.Suivezlesinstructionsde
votre fournisseur de gaz.
■ Sivousnepouvezjoindrevotrefournisseurdegaz,appelezlespompiers.
- L'installation ainsi que les réparations doivent être effectuées par un installateur ou une entreprise de service
qualifiés,oulefournisseurdegaz.
AVERTISSEMENT
Si l'information contenue dans ce manuel n'est pas suivie à la lettre,
il pourra en résulter un incendie ou une explosion entraînant des dommages matériels, des blessures,
voire la mort.
SÉCURITÉ
DISPOSITIF ANTIBASCULEMENT
Afinderéduirelesrisquesde
renversement,lacuisinière
doit être fixée correctement
aumoyendusupport
antibasculement.
Reportez-vous aux instructions d'installation fournies avec le support avant d'entreprendre l'installation.
Pourvérifierquelesupportestbieninstalléetenclenché,regardezsouslacuisinièrepourvoirsilepieddemiseà
niveauestinsérédanslesupport.Surcertainsmodèles,letiroirderangementoulaplaquedeprotectionpeuvent
êtreretirésafindefaciliterl'inspection.Siunevérificationvisuellenepeutêtreeffectuée,glissezlacuisinièrevers
l'avant,vérifiezquelesupportantibasculementestsolidementfixéauplancherouaumur,etreplacezlacuisinière
pourquelepieddemiseàniveauarrièrereposesouslesupportantibasculement.
Sivotrecuisinièredoitêtredéplacéepourêtrenettoyée,réparéeoupourtouteautreraison,assurez-vousquele
dispositifantibasculementestbienréenclenchélorsquelacuisinièreestremiseenplace.Lenon-respectdeces
consignespourraitentraînerlebasculementdelacuisinière,cequipourraitcauserdebrûluresgraves,voirelamort,
aux enfants ou adultes à proximité.
Neretirezjamaiscomplètementlespiedsdemiseàniveau,carlacuisinièreneseraitpasbienfixéeausupport
antibasculement.
Un enfant ou un adulte peut faire basculer la cuisinière et en mourir.
Assurez-vous que le support antibasculement est installé
solidement et qu’il est bien enclenché.
Assurez-vous que le support antibasculement est réenclenché
lorsque la cuisinière est déplacée.
N’utilisez pas la cuisinière lorsque le support antibasculement
n’est pas installé/enclenché.
Le non-respect de cette consigne peut entraîner la mort ou de
sérieuses blessures chez les enfants et les adultes.
Risque de basculement
AVERTISSEMENT
Support
antibasculement
Pied de
mise à
niveau
CONSIGNES DE SÉCURITÉ IMPORTANTES
LISEZ TOUTES LES INSTRUCTIONS AVANT D’UTILISER VOTRE APPAREIL.
LISEZ ET CONSERVEZ CES INSTRUCTIONS
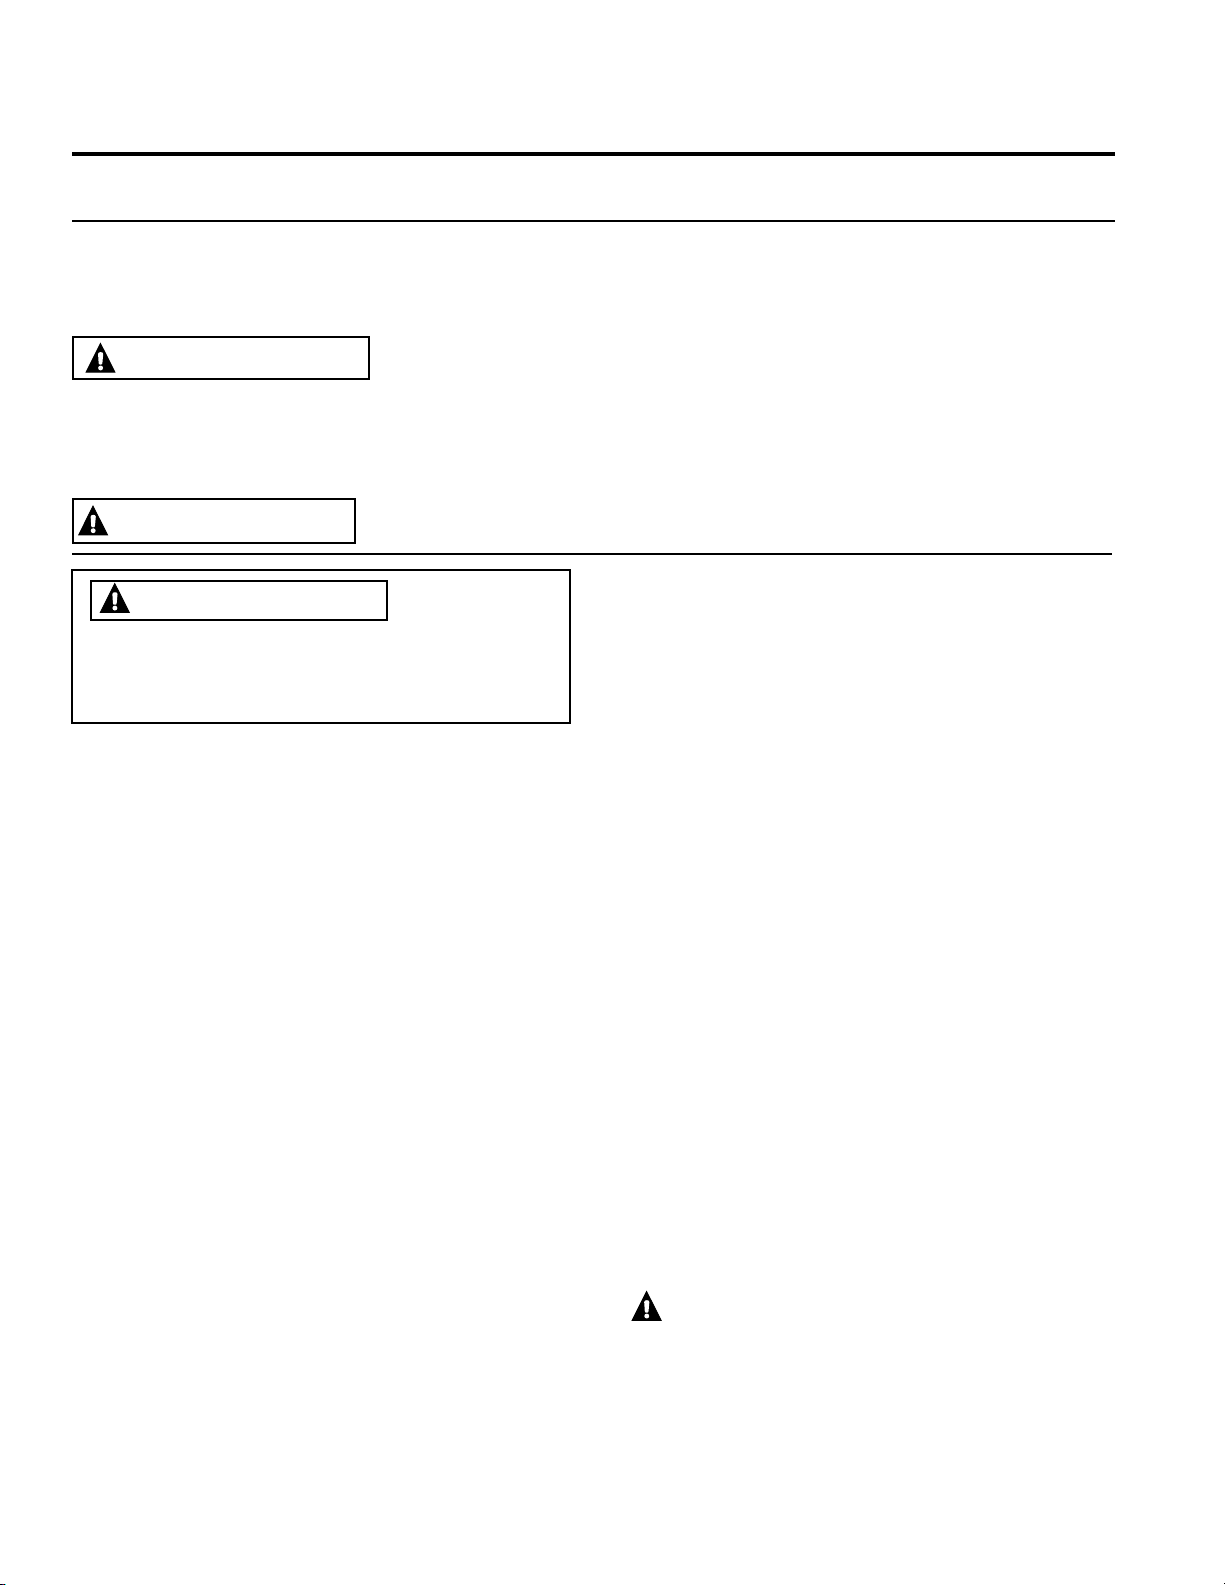
29-5979
3
CONSIGNES DE SÉCURITÉ GÉNÉRALES
AVERTISSEMENT
AVERTISSEMENT RELATIF À LA PROPOSITION 65 DE LA CALIFORNIE
LaSafeDrinkingWaterandToxicEnforcementActdelaCalifornieexigequelegouverneurdecetÉtatpublieune
listedessubstancesconnuespouvantentraînerlecancer,desanomaliescongénitalesoud'autresproblèmesliés
ausystèmereproducteuretexigequelesentreprisespréviennentlesclientsdesdangerspossiblesqu’entraîneune
exposition à de telles substances.
AVERTISSEMENT
Ceproduitcontientunouplusieursproduitschimiquesreconnusparl'Étatdela
Californiecommepouvantcauserlecancer,desanomaliescongénitalesoud'autresanomaliesausystèmereproductif.
Lescuisinièresautonettoyantespeuventcauserunefaibleexpositionàcertainesdecessubstances,ycomprisle
monoxydedecarbone,pendantlecycledenettoyage.L'expositionàcegazpeutêtreréduiteparlaventilationdela
pièce(ouvertured'unefenêtre,utilisationd'unventilateuroud'unehotte).
SÉCURITÉ
AVERTISSEMENT
NE vous servez
JAMAIS de cet appareil comme d’un radiateur
pour chauffer ou réchauffer une pièce. Cela peut
entraîner une intoxication par le monoxyde de
carbone et une surchauffe du four.
■ Cetappareilnedoitêtreutiliséuniquementqu'aux
fins prévues et décrites dans ce manuel.
■ Faitesinstalleretmettrevotrecuisinièreàlaterrepar
uninstallateurqualifié,conformémentauxinstructions
d'installation fournies.
■ Lesréglagesetlesréparations,quelsqu'ilssoient,
ne doivent être effectués que par un installateur de
cuisinièresàgazoupardestechniciensqualifiés.
Netentezpasderéparerouderemplacerunepièce
delacuisinière,saufsicelaestspécifiquement
recommandé dans ce manuel.
■ Votrecuisinièreestprérégléeenusinepourune
utilisationaugaznaturel.Ellepeutêtreconvertie
pouruneutilisationauGPL.Cesréglages,s'ilssont
nécessaires,doiventêtreeffectuésparuntechnicien
qualifié,conformémentauxinstructionsd'installation
et aux codes locaux. L'entreprise qui effectue ce
travail assume la responsabilité de la conversion.
■ Demandezàl'installateurdevousmontrer
l'emplacementdurobinetdegazdelacuisinièrepour
pouvoir le fermer si nécessaire.
■ Nebranchezvotrecuisinièrequesuruneprisemise
àlaterrede120V.Necoupezouneretirezpasla
brochedemiseàlaterredelafiche.Sivousavez
undouteconcernantlamiseàlaterredusystème
électriquedevotredomicile,vousavezl'obligationet
la responsabilité personnelle de faire remplacer une
prise non mise à la terre par une prise à trois alvéoles
miseàlaterre,conformémentauCodenationalde
l'électricité.N’utilisezpasdecordonprolongateur
avec cet appareil.
■ Avantd'effectueruneréparation,débranchezla
cuisinièreoucoupezsonalimentationélectriqueau
niveau du tableau de distribution de votre domicile
(fusibleoudisjoncteur).
■ Afind'éviterqu'ilnes'enflamme,assurez-vous
que tout le matériel d'emballage a été enlevé de la
cuisinièreavantdelafairefonctionner.
■Évitezderayeroudefrapperlesportesenverre,les
surfaces de cuisson ou les tableaux de commande.
Celapourraitamenerleverreàsecasser.Ne
cuisinez pas sur un appareil dont le verre est brisé.
Unchocélectrique,unincendieoudescoupures
pourraient en résulter.
■ Nelaissezpaslesenfantsseulsousanssurveillance
à proximité d'un appareil électroménager en cours
d'utilisation.Ilsnedevraientjamaisêtreautorisésà
grimper,s'asseoirousetenirdeboutsuraucunedes
parties de l'appareil.
■
ATTENTION Nerangezpasd'objets
pouvant intéresser les enfants dans les armoires
situéesau-dessusdelacuisinière–lesenfants
s'exposeraient à de graves blessures s'ils grimpaient
surlacuisinièrepourlesatteindre.
LISEZ ET CONSERVEZ CES INSTRUCTIONS
4
29-5979
SÉCURITÉ
■ N'obstruezjamaislesévents(ouverturesd'air)dela
cuisinière.Ilspermettentàl'aird'entreretdesortir,
ce qui est nécessaire à une bonne combustion et
donc,aubonfonctionnementdelacuisinière.Les
ouverturesd'airsontsituéesàl'arrièredelasurface
decuisson,enhautetenbasdelaportedufour,au
basdelacuisinièresousletiroir-réchaud,sousle
tiroir de cuisson ou la plaque de protection.
■ Utilisezuniquementdespoignéessèches.Lavapeur
émisepardespoignéeshumidesencontactavec
unesurfacechaudepourraitvousbrûler.Nelaissez
pas les poignées isolantes entrer en contact avec les
brûleurs,lagrilledubrûleuroul'élémentchauffantdu
four.N'utilisezpasdetorchonoud'autretissuépaisà
la place de poignées.
■ Netouchezpaslesélémentschauffantsoulasurface
intérieuredufour.Cessurfaces,bienquedecouleur
foncée,peuventêtresuffisammentchaudespour
causerdesbrûlures.Pendantetaprèsl'utilisation,
netouchezpasl'intérieurdufouretnelaissezaucun
tissu ou matériau inflammable entrer en contact avec
celui-ci.Laissezd'abordlefourrefroidir.D'autres
surfaces de l'appareil peuvent devenir suffisamment
chaudespourcauserdesbrûlures.Lessurfacesqui
peuventêtrechaudescomprennentlesbrûleurs,
lesgrilles,lesouverturesdesévents,lessurfaces
situées autour de ces ouvertures et de même que les
interstices situés autour de la porte de four.
■ Nefaitespaschaufferderécipientsfermés.La
pression accumulée risquerait de faire éclater le
récipient et de causer des blessures.
■ Faitesbiencuirelesalimentspouréviterlesmaladies
d'origine alimentaire. Pour connaître la température
minimaleetsécuritairedesaliments,visitezlessites
Webauwww.IsItDoneYet.govetwww.fsis.usda.gov.
Utilisezunthermomètrepourconnaîtrelatempérature
desaliments,envousassurantdeprendrecette
température à plusieurs endroits sur l'aliment.
■ Nelaissezpersonnegrimper,setenirous'accrocher
àlaportedufour,autiroirouàlasurfacedecuisson.
Celapourraitendommagerlacuisinièreoulafaire
basculer,cequipourraitcauserdesblessuresgraves,
voire la mort.
CONSIGNES DE SÉCURITÉ IMPORTANTES
LISEZ TOUTES LES INSTRUCTIONS AVANT D’UTILISER VOTRE APPAREIL.
LISEZ ET CONSERVEZ CES INSTRUCTIONS
CONSIGNES DE SÉCURITÉ GÉNÉRALES (SUITE)
AVERTISSEMENT
■ N'entreposezpasetn'utilisezpasdematières
inflammablesdansunfourouprèsdelasurfacede
cuisson,notammentdupapier,duplastique,des
poignées,dutissu,desrevêtementsmuraux,des
rideaux,desdraperiesettouttypedevapeuroude
liquide inflammable.
■ Neportezjamaisdevêtementsamplesouqui
pendentlorsquevousutilisezcetappareil.Ces
vêtements pourraient prendre feu au contact des
surfaceschaudesetcauserdegravesbrûlures.
■ Nelaissezpasdegraissedecuissonoud'autres
produitsinflammabless'accumuleràl'intérieurouprès
du four. La graisse dans le four ou sur la surface de
cuisson peut prendre feu.
CONSERVEZ LES MATÉRIAUX INFLAMMABLES À
BONNE DISTANCE DU FOUR
Sinon, vous pourriez subir de graves blessures ou déclencher un incendie.
AVERTISSEMENT
■ Neversezpasd’eausurunfeudefriture.N'essayez
jamaisdesouleverunustensiledecuissonenfeu.
Arrêtezl'appareil.Étouffezlesflammesdel'ustensilesitué
surlebrûleurdesurface,enlerecouvrantcomplètement
d'uncouverclededimensionappropriée,d'uneplaqueà
biscuitsoud'unplateau.Utilisezunextincteurchimique
ouàmousseàusagegénéral,aubesoin.
■ Siunfeusedéclenchedanslefourpendantlacuisson,
étouffez les flammes provenant du four en fermant la
porte et en arrêtant le four ou en utilisant un extincteur
chimiqueouàmousse,àusagesmultiples.
■ Siunfeusedéclenchedanslefourpendant
l'autonettoyage,arrêtezlefouretattendezquelefeu
s'éteigne. Ne tentez pas d'ouvrir la porte par la force.
L'introduction d'air frais dans le four lorsque celui-ci
estàunetempératured'autonettoyagepeutprovoquer
laprojectiond'unjetdeflammes.
EN CAS D'INCENDIE, SUIVEZ LES ÉTAPES CI-DESSOUS
POUR ÉVITER LES BLESSURES ET EMPÊCHER
L'INCENDIE DE SE PROPAGER
AVERTISSEMENT
29-5979
5
SÉCURITÉ
■ Nelaissezjamaissanssurveillancelesbrûleurs
desurfaceàdesréglagesmoyensouélevés.Les
aliments,particulièrementlesalimentshuileux,
peuvent s'enflammer et causer un incendie qui
pourrait se propager aux armoires environnantes.
■ Nelaissezjamaisl'huilesanssurveillancelorsque
vousfaitesfriredesaliments.Siellechauffetrop
etdégagedelafumée,l'huilepeuts'enflammeret
causerunincendiequisepropageraitjusqu'aux
armoiresenvironnantes.Utilisezunthermomètreà
friture,lorsquecelaestpossible,poursurveillerla
températuredel'huile.
■ Pouréviterlesprojectionsd'huileetlesincendies,utilisez
laquantitéminimaled'huilelorsquevousfaitesfriredes
aliments dans une casserole peu profonde et évitez de
cuire des aliments surgelés comportant trop de glace.
■ Utilisezdesustensilesdedimensionsappropriées.
Évitezlesustensilesdecuissonquinesontpas
stablesouquibasculentfacilement.Choisissezun
ustensilequicorrespondàladimensiondubrûleur.
Lesflammesdubrûleurdevraientêtrerégléesde
façonànepasdépasserlefonddel'ustensile.Des
flammes trop intenses peuvent être dangereuses.
■ UtiliseztoujourslapositionLITE(allumage)lorsque
vousallumezlesbrûleurssupérieursetassurez-vous
quelesbrûleurssesontbienallumés.
■ Lorsquevousutilisezdesustensilesdecuissonen
vitrocéramique,assurez-vousqu'ilssontcompatibles
aveccettesurfacedecuissonàdéfautdequoi,ils
pourraient se casser à la suite d'une variation subite
de la température.
■ Pourminimiserlesrisquesdebrûlure,decombustion
dematériauxinflammablesetdedébordement,la
poignée du récipient devrait être dirigée vers le centre
delacuisinière,sanstoutefoislaplacerau-dessus
desbrûleurs.
■ N'utilisezpasdewokdotéd'unanneau-supporten
métal.L'anneaupourraitemprisonnerlachaleuret
empêcherl'aird'atteindrelesbrûleurs,cequipourrait
entraînerl'émissiondemonoxydedecarbone.
N'essayezpasdesouleverlasurfacedecuisson.
Celapourraitendommagerleconduitd'alimentation
engazdesbrûleursdesurfaceetconduireàunefuite
de gaz et un risque d'incendie.
■ Lorsquevousdésactivezledispositifdeverrouillage
descommandes(certainsmodèles),assurez-vous
que les commandes de la surface de cuisson sont à
lapositiond'arrêt(OFF).Celaempêcheralesfuitesde
gazaccidentellesdesbrûleurs.
■ N'utilisezpasdepapierd'aluminiumpourcouvrir
les grilles ou recouvrir une quelconque partie de
lasurfacedecuisson.Celapeutentraînerune
intoxicationparmonoxydedecarbone,unesurchauffe
des surfaces de cuisson ou un risque d'incendie.
CONSIGNES DE SÉCURITÉ POUR LA SURFACE
DE CUISSON
LISEZ ET CONSERVEZ CES INSTRUCTIONS
AVERTISSEMENT
CONSIGNES DE SÉCURITÉ POUR LE FOUR
AVERTISSEMENT
NE couvrez JAMAIS
les fentes, les trous ou passages d’air situés au bas
du four. NE recouvrez JAMAIS totalement une grille
avec des matériaux tels que du papier d’aluminium
ou des protections pour four. Vous bloqueriez la
circulation de l’air à travers le four, ce qui pourrait
entraîner une intoxication par monoxyde de
carbone. Ne placez jamais de papier d'aluminium
ou de protection sur la sole du four. Ces matériaux
pourraient piéger la chaleur et entraîner la
production de fumée ou déclencher un incendie.
■ Tenez-vousàl'écartdelacuisinièrelorsquevous
ouvrezlaportedufour.Del'airchaudoudelavapeur
s'échappantdufourpourraitbrûlervosmains,votre
visageet/ouvosyeux.
■ Neplacezjamaisd'ustensilesdecuisson,despierres
decuissonouàpizza,dupapierd'aluminiumou
d'autrestypesdeprotectionsurlasoledufour.Ilssont
susceptiblesderetenirlachaleuroudefondre,cequi
pourraitendommagerlacuisinièreouprovoquerun
chocélectrique,delafuméeouunincendie.
■ Disposezlesgrillesàl’emplacementdésirélorsque
lefourestfroid.Sivousdevezdéplacerunegrille
lorsquelefourestchaud,prenezgardedenepas
toucherlessurfaceschaudes.
■ Nelaissezpasd'articlescommedupapier,des
ustensiles de cuisine ou des aliments dans le
four lorsque celui-ci n'est pas utilisé. Les articles
entreposés dans le four pourraient s'enflammer.
■ Nelaissezriensurlasurfacedecuissonprèsde
l'éventdufour.Cesarticlespourraientsurchaufferet
causerunrisqued'incendieoudebrûlures.
■ Nefaitesjamaisgrillerd'alimentslorsquelaportedu
fourestouverte.Enraisondurisquedesurchauffe
desboutonsdecommande,onnedoitpasfairegriller
d'aliments avec la porte ouverte.
AVERTISSEMENT
6
29-5979
SÉCURITÉ
Lafonctiond'autonettoyagerèglelefouràune
températuresuffisammentélevéepourbrûlerlesrésidus
alimentairesprésentsdanslefour.Suivezcesconsignes
pourunautonettoyagesécuritaire.
■ Netouchezpasauxsurfaceschaudesdufourpendant
l'autonettoyage.Gardezlesenfantsàbonnedistance
dufourpendantl'autonettoyage.Lenon-respectdeces
instructions pourrait causer des blessures.
■ Avantd'utiliserleprogrammed'autonettoyage,retirez
lescasseroles,lesgrillesdefourmétalliquesbrillantes
ettoutautreustensiledufour.Seuleslesgrillesde
four avec revêtement en porcelaine peuvent être
laissées dans le four.
■ Avantdelancerleprogrammed'autonettoyage,
essuyezlagraisseetlesrésidusalimentairesdufour.
Unexcèsdegraissepourraitprendrefeuetlafumée
pourrait endommager votre domicile.
■ Silafonctiond'autonettoyagefonctionnemal,
éteignezlefouretcoupezl'alimentation.Contactez
untechnicienqualifiépourfaireréparerl'appareil.
■ N'utilisezpasdeproduitsdenettoyagepourfour.
N'utilisezpasdeproduitcommercialdenettoyage
pour four ou de revêtement protecteur pour four sur
aucune des parties internes ou externes du four.
■ Nenettoyezpaslejointdelaporte.Cejointest
essentielpourassurerunebonneétanchéitédela
porte.Prenezsoindenepasfrotter,d'endommager
oudedéplacerlejoint.
■ IMPORTANT :Certainsoiseauxsontextrêmement
sensibles aux fumées dégagées pendant
l’autonettoyaged’unecuisinière.Déplacez-lesdans
uneautrepiècebienaérée.
■ Nelaissezpasd'articlesenpapier,enplastique,
d'aliments en boîtes de conserve ou de matériaux
combustibles dans le tiroir. Ils pourraient s'enflammer.
■ Netouchezpasl'élémentchauffantoulasurface
intérieuredutiroir.Cessurfacespeuventêtreassez
chaudespourcauserdesbrûlures.
■ Faitespreuvedeprudencelorsquevousouvrezle
tiroir.Entrouvrezletiroiretlaissezl'airchaudoula
vapeurs'échapperavantd'enleverouderemettredes
aliments.Del'airchaudoudelavapeurs'échappant
dufourpourraitbrûlervosmains,votrevisageet/ou
vosyeux.
■ N'utilisezpasdepapierd'aluminiumpourrecouvrirle
tiroir du gril. Le papier d'aluminium est un excellent
isolantthermiqueetretientlachaleur.Ilaffectela
performance du tiroir et peut présenter un risque
d'incendie.
CONSIGNES DE SÉCURITÉ POUR LE FOUR
AUTONETTOYANT
(certains modèles)
INSTRUCTIONS DE SÉCURITÉ POUR LE TIROIR
DU GRIL
(certains modèles)
CONSIGNES DE SÉCURITÉ IMPORTANTES
LISEZ TOUTES LES INSTRUCTIONS AVANT D’UTILISER VOTRE APPAREIL.
LISEZ ET CONSERVEZ CES INSTRUCTIONS
AVERTISSEMENT
AVERTISSEMENT

29-5979
7
GARANTIE
Agrafez votre facture ici. Une preuve de la date d’achat
d’origine est requise pour obtenir des services sous garantie.
Merci! ... d'avoir acheté un électroménager de marque GE.
Garantie de la cuisinière à gaz GE
www.electromenagersGE.ca
Toutes les réparations sous garantie sont effectuées par nos Centres de réparation ou par nos réparateurs agréés Customer Care
®
.
Pour faire la demande d'une réparation en ligne, visitez le www.electromenagersge.ca/soutien/ ou appelez au 1-800-561-3344.
Veuillez avoir les numéros de série et de modèle de votre appareil à portée de main lorsque vous appelez pour obtenir un service.
La réparation de votre appareil peut nécessiter l'utilisation d'un accès embarqué aux données pour déterminer le diagnostic. Cela
permet à un technicien de réparation GE de diagnostiquer rapidement tout problème avec votre appareil et aide GE à améliorer
ses produits en lui fournissant de l'information sur votre appareil. Si vous ne voulez pas que les données de votre appareil soient
transmises à GE, veuillez aviser le technicien de ne pas transmettre de données à GE au moment de la réparation.
Pendant une période de un an à compter de la date d’achat d’origine, MC Commercial remplacera toute pièce de la cuisinière
qui se révèle défectueuse en raison d’un vice de matériau ou de fabrication. Au
cours de cette garantie limitée d'un an,
MC Commercial fournira également, sans frais, toute la main-d’œuvre pour le remplacement de la pièce défectueuse à domicile.
Ce que MC COMMERCIAL ne couvre pas :
■ Toute visite à votre domicile pour vous expliquer le
fonctionnement de l’appareil.
■ L'installation, la livraison ou l'entretien inappropriés de
l'appareil.
■ Toute défectuosité du produit lorsqu’il a été utilisé de façon
abusive ou inadéquate, modifié ou employé à toute autre fin
que celle pour laquelle il a été conçu, ou utilisé à des fins
commerciales.
■ Le remplacement des fusibles ou le réenclenchement des
disjoncteurs.
■ Tout dommage au produit attribuable à un accident, à un
incendie, à une inondation ou à une catastrophe naturelle.
■ Tout dommage au revêtement, comme de la rouille sur la
surface, le ternissement et les petits défauts non signalés
au cours des 48 heures suivant la livraison de l'appareil.
■ Tout dommage accessoire ou indirect, causé par des
défaillances possibles de l'appareil.
■ Tout dommage causé après la livraison.
■ Tout produit auquel il n’est pas possible d'accéder pour
effectuer les réparations nécessaires.
■ La réparation ou le remplacement d'ampoules, à l'exception
de DEL.
EXCLUSIONS DES GARANTIES IMPLICITES
Votre seul et unique recours est de faire réparer le produit dans le cadre de cette garantie limitée. Toute garantie implicite, incluant
la garantie de qualité marchande ou d’aptitude du produit à un usage particulier, est limitée à un an ou à la période la plus courte
autorisée par la loi.
Cette garantie est offerte à l’acheteur initial, ainsi qu’à tout propriétaire subséquent d’un produit acheté en vue d’une utilisation
domestique au Canada. Si le produit se situe dans une zone où aucun réparateur agréé par MC Commercial n'est disponible, vous
devrez peut-être assumer les frais de déplacement de celui-ci ou apporter le produit à un atelier de réparation agréé par
MC Commercial.
Dans certaines provinces, il est interdit d’exclure ou de limiter les dommages indirects ou accessoires. La présente garantie
vous confère des droits juridiques spécifiques. Vous pouvez bénéficier d'autres droits, qui varient d'une province à l'autre. Pour
connaître les droits dont vous bénéficiez dans votre province, contactez le bureau des Relations avec les consommateurs de votre
région ou de votre province.
Garant : MC Commercial Inc., Burlington, Ontario
Garanties prolongées : Procurez-vous une garantie prolongée GE et informez-vous au sujet des rabais spéciaux offerts tout au
long de la durée de votre garantie. Vous pouvez vous la procurer en ligne en tout temps à
http://www.geappliances.ca/en/support/purchase-extended-warranty/
http://www.electromenagersge.ca/fr/soutien/achat-d-une-garantie-prolongee/
Vous pouvez également téléphoner au 1-800-561-3344 durant les heures normales de bureau. Les services à domicile
GE seront
toujours disponibles après expiration de votre garantie.
Enregistrez votre appareil : Enregistrez votre nouvel appareil en ligne au moment qui vous convient le mieux!
http://www.geappliances.ca/en/support/register-your-appliance/
http://www.electromenagersge.ca/fr/soutien/enregistrez-votre-electromenager/
L'enregistrement de votre produit dans les délais prescrits permet une meilleure communication et un service rapide, selon les
modalités de votre garantie, si besoin est. Vous pouvez également envoyer par courrier la carte d'enregistrement préimprimée qui
se trouve dans l'emballage de votre appareil.
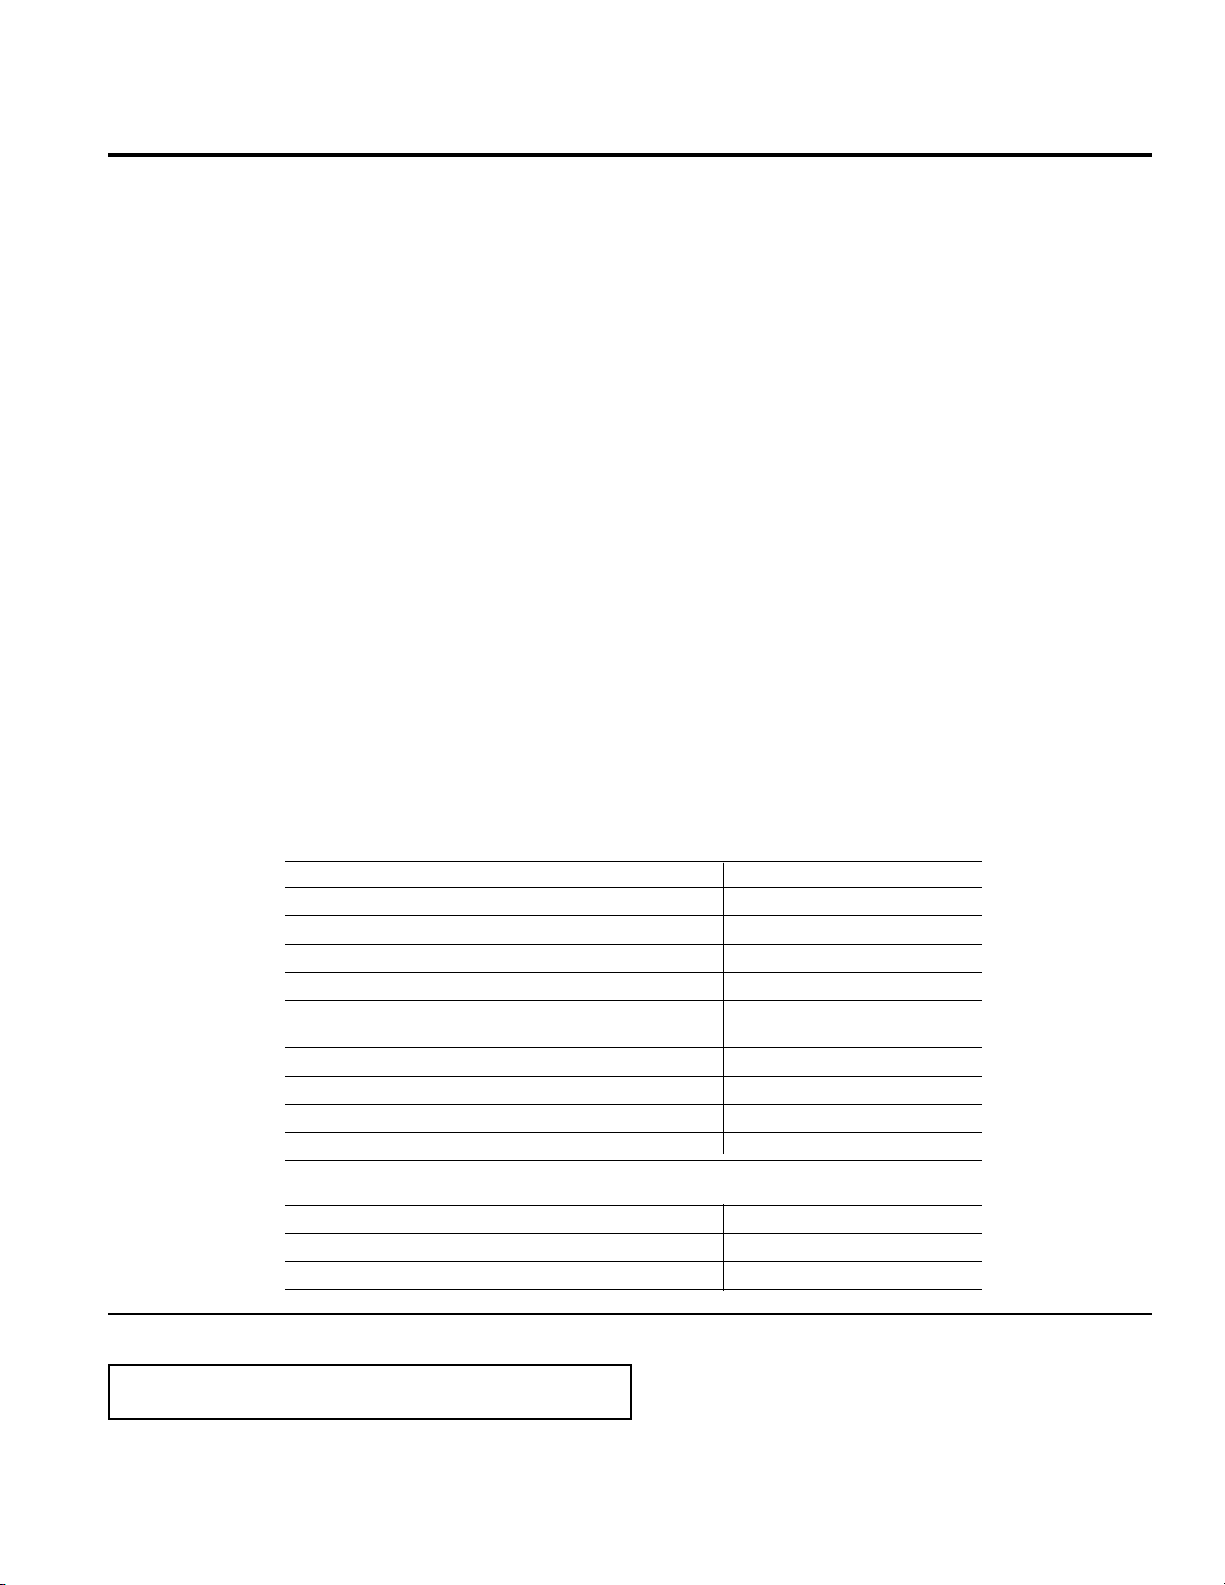
8
29-5979
Demande de réparation : Pourbénécierduservicede
réparationdeGE,ilsuftdenouscontacter.Vouspouvez
également effectuer une demande de réparation en ligne au
www.electromenagersge.ca/soutien/ouentéléphonantau
1-800-561-3344durantlesheuresnormalesdebureau.
Pièces et accessoires : Les personnes possédant les
compétences nécessaires pour réparer elles-mêmes leur
appareilpeuventrecevoirlespiècesetlesaccessoires
directementàlamaison(lescartesVISA,MasterCardet
Discoversontacceptées).Commandezenligne24heures
sur24,touslesjours,oupartéléphoneau1-800-661-1616
pendantlesheuresd'ouverturenormales.
Les directives stipulées dans le présent manuel comportent des
procéduresquen’importequelutilisateurpeuteffectuer.Les
autrestypesderéparationdoiventgénéralementêtreconfiés
àuntechnicienqualifié.Faitespreuvedeprudence,carune
réparation ou un entretien mal effectué peut rendre l'utilisation
de l'appareil dangereuse.
Contactez-nous : CommuniquezavecnoussurnotresiteWeb
enfournissanttouslesdétails,ycomprisvotrenuméro
detéléphone,ouécrivezà:
General Manager, Customer Relations
MC Commercial Inc.
1 Factory Lane
Moncton (Nouveau-Brunswick)
E1C 9M3
ASSISTANCE / ACCESSOIRES
VisitezlesiteWebdesélectroménagersGE(www.electromenagersge.ca/soutien/),ouvert24heuressur24,touslesjours!Pour
unserviceencorepluspratiqueetrapide,vouspouvezmaintenanttéléchargerdesmanuels,commanderdespiècesoumême
faire une demande de réparation en ligne.
Vous avez des questions ou besoin d'assistance concernant votre
appareil?
Accessoires
Vous manquez de quelque chose?
GE propose une panoplie d'accessoires qui permettent d'améliorer votre expérience de cuisson et de
nettoyage!
Pourpasserunecommande,visiteznotresiteWebà:
www.GEAppliancesParts.com(É.-U.)ouwww.electromenagersge.ca(Canada)
ouencore,téléphonezau1-800-626-2002(É.-U.)1-800-661-1616(Canada)
Lesproduitssuivants,etd'autres,sontofferts:
Retrait de la pellicule protectrice et du ruban adhésif d'emballage
REMARQUE :Enleveztoutlematérield’emballageavant
d'utiliserlacuisinière.
Attrapezsoigneusementundescoinsdelapellicule
protectrice avec vos doigts et décollez-la doucement de la
surfacedel'appareil.N'utilisezaucunobjetcoupantpour
enleverlapellicule.Sidesrésidusd'adhésifrestentcollés,
retirez-les en appliquant du détergent à vaisselle et de l'eau
àl'aided'unchiffondoux.
Accessoires
Grilleplateennickel WB48X20249
Grilleplaterenforcéeennickel WB48X20783
Grilleplaterésistantàl'autonettoyage WB48X21508
Grillecoulissanteennickel WB39X10040
Grillecoulissanterésistantàl'autonettoyage WB48X21543
Lèchefrite(12¾pox1¼pox16½po) WB48X10056G
(32,4cmx3,2cmx41,9cm)
Grillederôtissage WB48X5108
Grillecentraledesurfacedecuisson WB31X24737
Plaquechauffanteantiadhésiveenaluminium WB31X24738
Plaquechauffanteréversibleenfonte WB31X24998
Fournitures de nettoyage
LingettesCitruShinepouracierinoxydable WX10X10007
Chiffondepolissagepourl'acierinoxydable WX10X307
NettoyantdegraissecalcinéeCeramaBryte
MD
WX10X320

29-5979
9
Notes
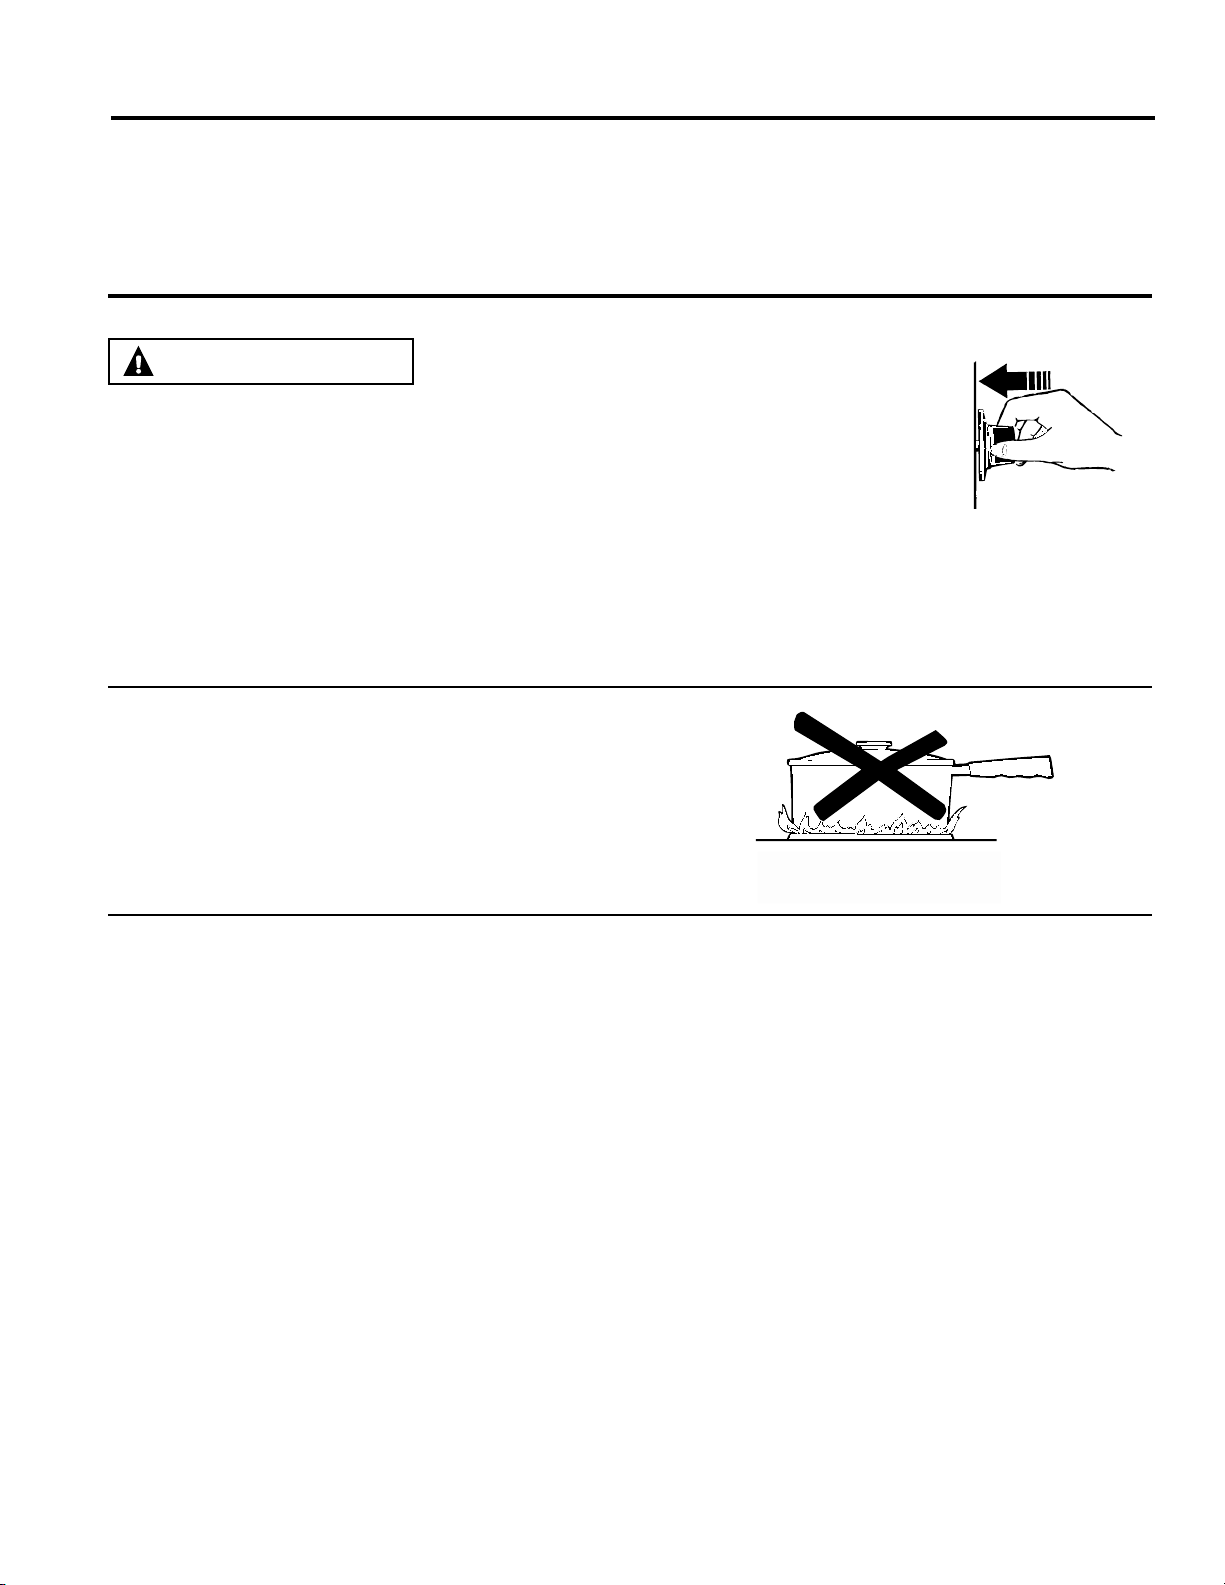
10
29-5979
Ces flammes sont trop grandes
pour l'ustensile.
En cas de panne de courant
Brûleurs de surface
UTILISATION DE LA SURFACE DE CUISSON : En cas de panne de courant / Brûleurs de surface
Encasdepannedecourant,lefournefonctionnerapas.
N'essayezpasdevousenservir.Enrevanche,ilestpossible
d'allumerlesbrûleursdelasurfacedecuissonavecune
allumette.Enprenantdegrandesprécautions,tenezune
allumetteprèsdesorificessetrouvantsouslebrûleur,puis
tournezlentementleboutonàlapositionLITE(allumage).
Unefoisallumés,lesbrûleurscontinuerontàfonctionner
normalement.
Pour allumer un brûleur de surface
Les brûleurs doivent
être utilisés uniquement lorsqu'ils sont recouverts
d'ustensiles de cuisson. Les flammes des brûleurs non
couvertes par un ustensile de cuisson peuvent présenter
des risques d'incendie ou d'inflammation des vêtements.
Ne laissez jamais les flammes dépasser des côtés de
l'ustensile de cuisson. Sinon, vous pourriez subir de
graves blessures.
Assurez-vousquetouslesbrûleurssontaubonendroitetbien
assemblés avant de les allumer.
Choisissezunbrûleuretrepérezleboutondecommande
correspondant.Appuyezsurleboutondecommandeet
tournez-leàlapositionLITE(allumage).
Vousentendrezunpetit«clic»
produit par l'étincelle électrique
lorsqu'elleallumelebrûleur.
Lorsquevousmettezunbrûleursur
LITE(allumage),touslesbrûleurs
produisentdesétincelles.Des
étincelles sont produites tant que
le bouton demeure positionné sur
LITE(allumage).Lorsquelegaz
estallumé,tournezleboutonpour
ajusterladimensiondesflammes.
Utilisation des brûleurs de surface
REMARQUES :
■ Nefaitespasfonctionnerlebrûleurpendantunedurée
prolongée sans ustensile sur la grille. Le revêtement de la
grille peut se décolorer ou s'écailler sans ustensile pour
absorberlachaleur.
■ N'essayezpasdedémonterunbrûleurlorsqu'unautre
brûleurestallumé.Celapourraitendommagerl'appareil.
■ Assurez-vousquelesbrûleursetlesgrillessontfroidsavant
d'yposervotremain,unepoignéeisolanteouunchiffonde
nettoyage.
Votresurfacedecuissonestéquipéedebrûleursaugaz
pratiques,facilesànettoyeretpolyvalents,quipeuventêtre
utilisés pour une large gamme de cuissons.
Lepluspetitestunbrûleurdemijotage.Lebrûleurdemijotage
régléàlapositionLO(bas)procureunrendementdecuisson
tout indiqué pour les aliments requérant un temps de cuisson
prolongéàfeudoux,commelessauces.
Letrèsgrandbrûleurestconçupourfairebouillirrapidement
degrandesquantitésdeliquide.Certainsmodèlescomportent
leréglagePOWERBOIL
MD
conçu spécialement pour les
ustensilesdecuissonde11po(27,9cm)etplus.
Sélectionner une dimension de flamme
Regardezlesflammes,etnonlebouton,lorsquevousréglez
lachaleur.Lorsquevoussouhaitezunemontéeenchaleur
rapide,faitescorrespondreladimensiondesflammesdu
brûleurauxdimensionsdel'ustensileutilisé.Desflammesplus
largesquelefonddel'ustensileneleferontpaschaufferplus
vite et peuvent être dangereuses.
Appuyez sur le bouton de
commande et tournez-le à la
position LITE (allumage).
AVERTISSEMENT
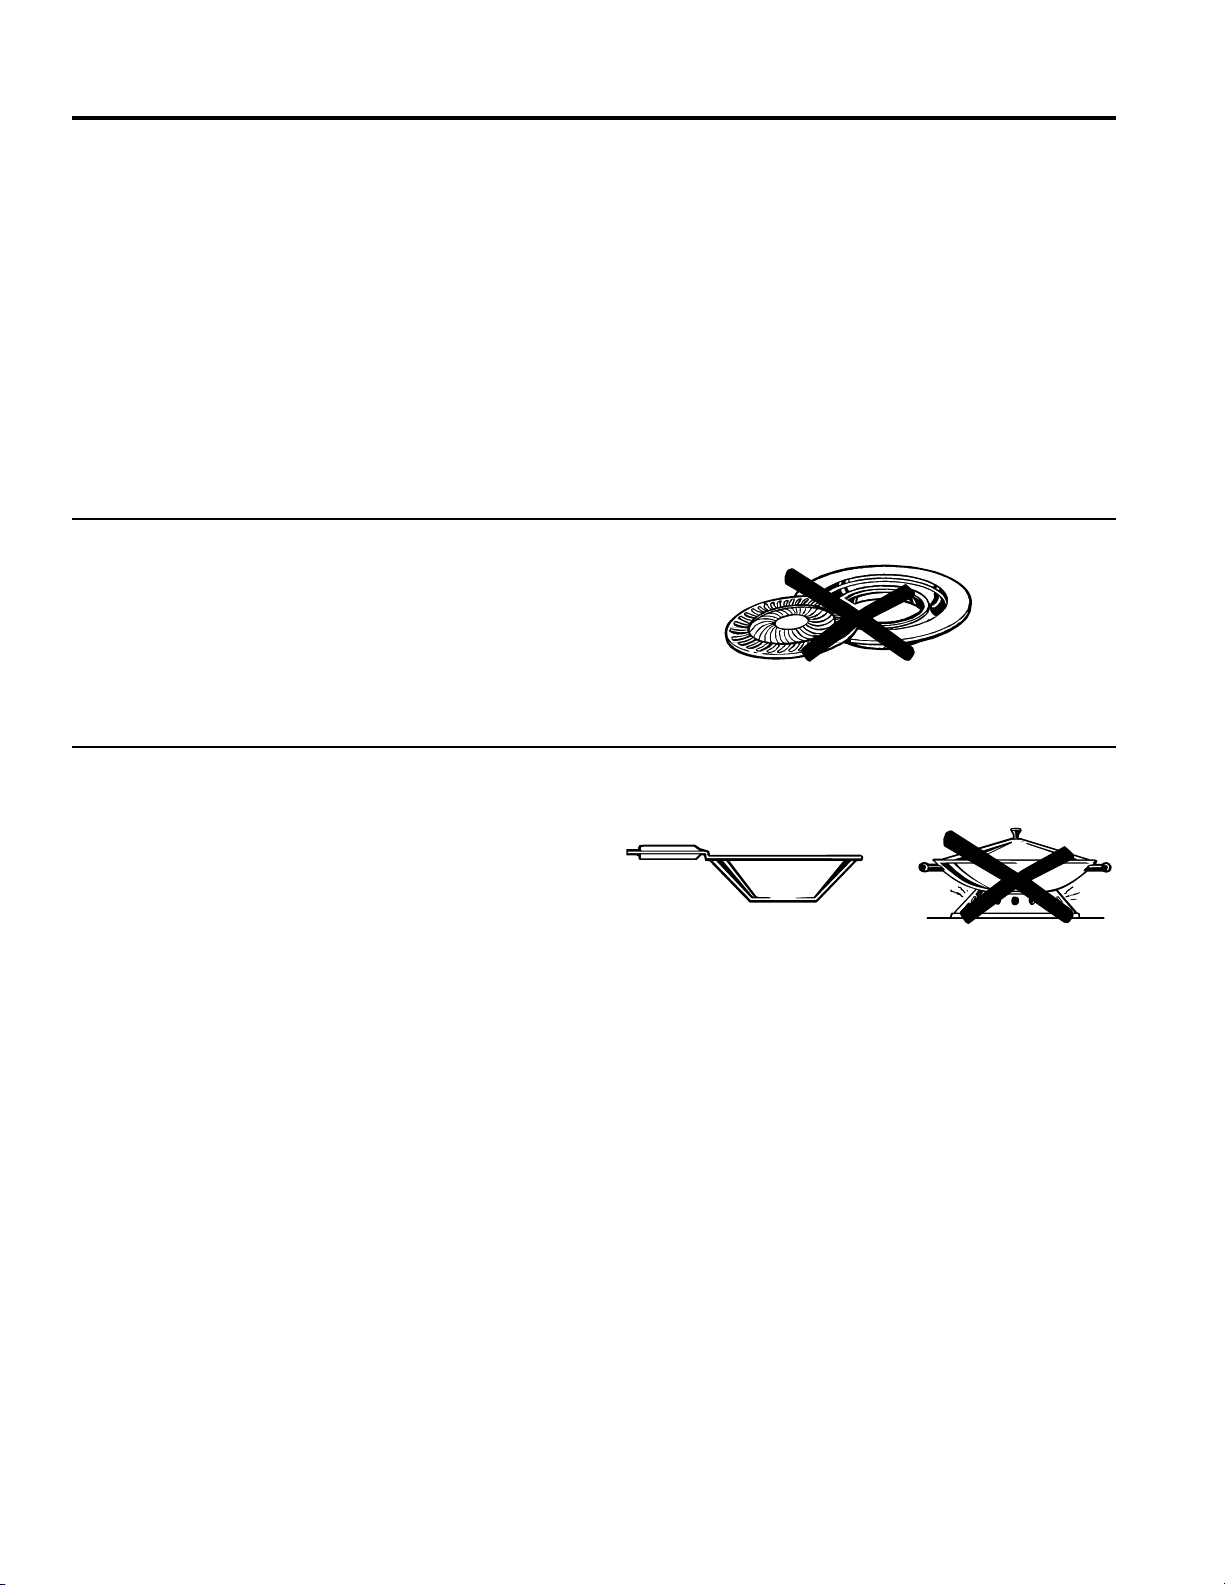
29-5979
11
Brûleurs de surface (suite)
UTILISATION DE LA SURFACE DE CUISSON : Brûleurs de surface
Utilisation d'un wok
Utilisezseulementunwokàdessousplatde14po(35,6cm)
oumoins.Assurez-vousquelewokestposébienàplatsur
la grille.
N’utilisezpasdesupportpourwok.Mettrelesupportsurun
brûleurouunegrillepeutentraînerunmauvaisfonctionnement
dubrûleuretengendrerunniveaudemonoxydedecarbone
supérieuràceluiautoriséparlesnormesactuelles.Ceci
pourrait présenter des risques pour votre santé.
Utilisez un wok à fond plat.
Grilles pour dessus de cuisinière
N'utilisezpasunegrillepourdessusdecuisinièredu
commercesurvosbrûleursàgaz.Cetypedegrillepourrait
compromettre la combustion et produire des niveaux de
monoxydedecarbonesupérieursauxnormes.Cecipourrait
présenter des risques pour votre santé.
N'utilisez pas de grilles pour
dessus de cuisinière.
Ustensiles pour surface de cuisson
Aluminium :Lesustensilesdepoidsmoyensont
recommandés,carilschauffentplusrapidementetdemanière
plus uniforme. La plupart des aliments dorent uniformément
dans une poêle en aluminium. Utilisez des casseroles avec des
couverclesbienajustéslorsquevouscuisinezavecunepetite
quantité d'eau.
Acier inoxydable :Lorsqu'ilestutiliséseul,cemétalconduit
mallachaleur.Ilestgénéralementcombinéaucuivre,à
l'aluminium ou à d'autres métaux pour améliorer ses propriétés
deconductiondelachaleur.Lespoêlesenalliagesont
généralementsatisfaisantessiellessontutiliséesàmoyenne
chaleur,commeilestrecommandéparlefabricant.
Fonte :Siellessontchaufféeslentement,laplupartdespoêles
donnent des résultats de cuisson satisfaisants.
Émail :Danscertainesconditions,l'émaildecertains
ustensilesdecuissonpeutfondre.Suivezlesrecommandations
dufabricantconcernantlesméthodesdecuisson.
Verre :Ilexistedeuxtypesd'ustensileenverre:ceux
recommandés pour les fours et ceux pour les surfaces de
cuisson(casseroles,cafetièresetthéières).Leverreconduit
trèslentementlachaleur.
Vitrocéramique résistant à la chaleur :Ellepeutêtreutilisée
aveclefouroulasurfacedecuisson.Cematériauconduitla
chaleuretrefroidittrèslentement.Vérifiezlesinstructionsdu
fabricant de l'ustensile pour vous assurer qu'il peut être utilisé
avecunecuisinièreàgaz.
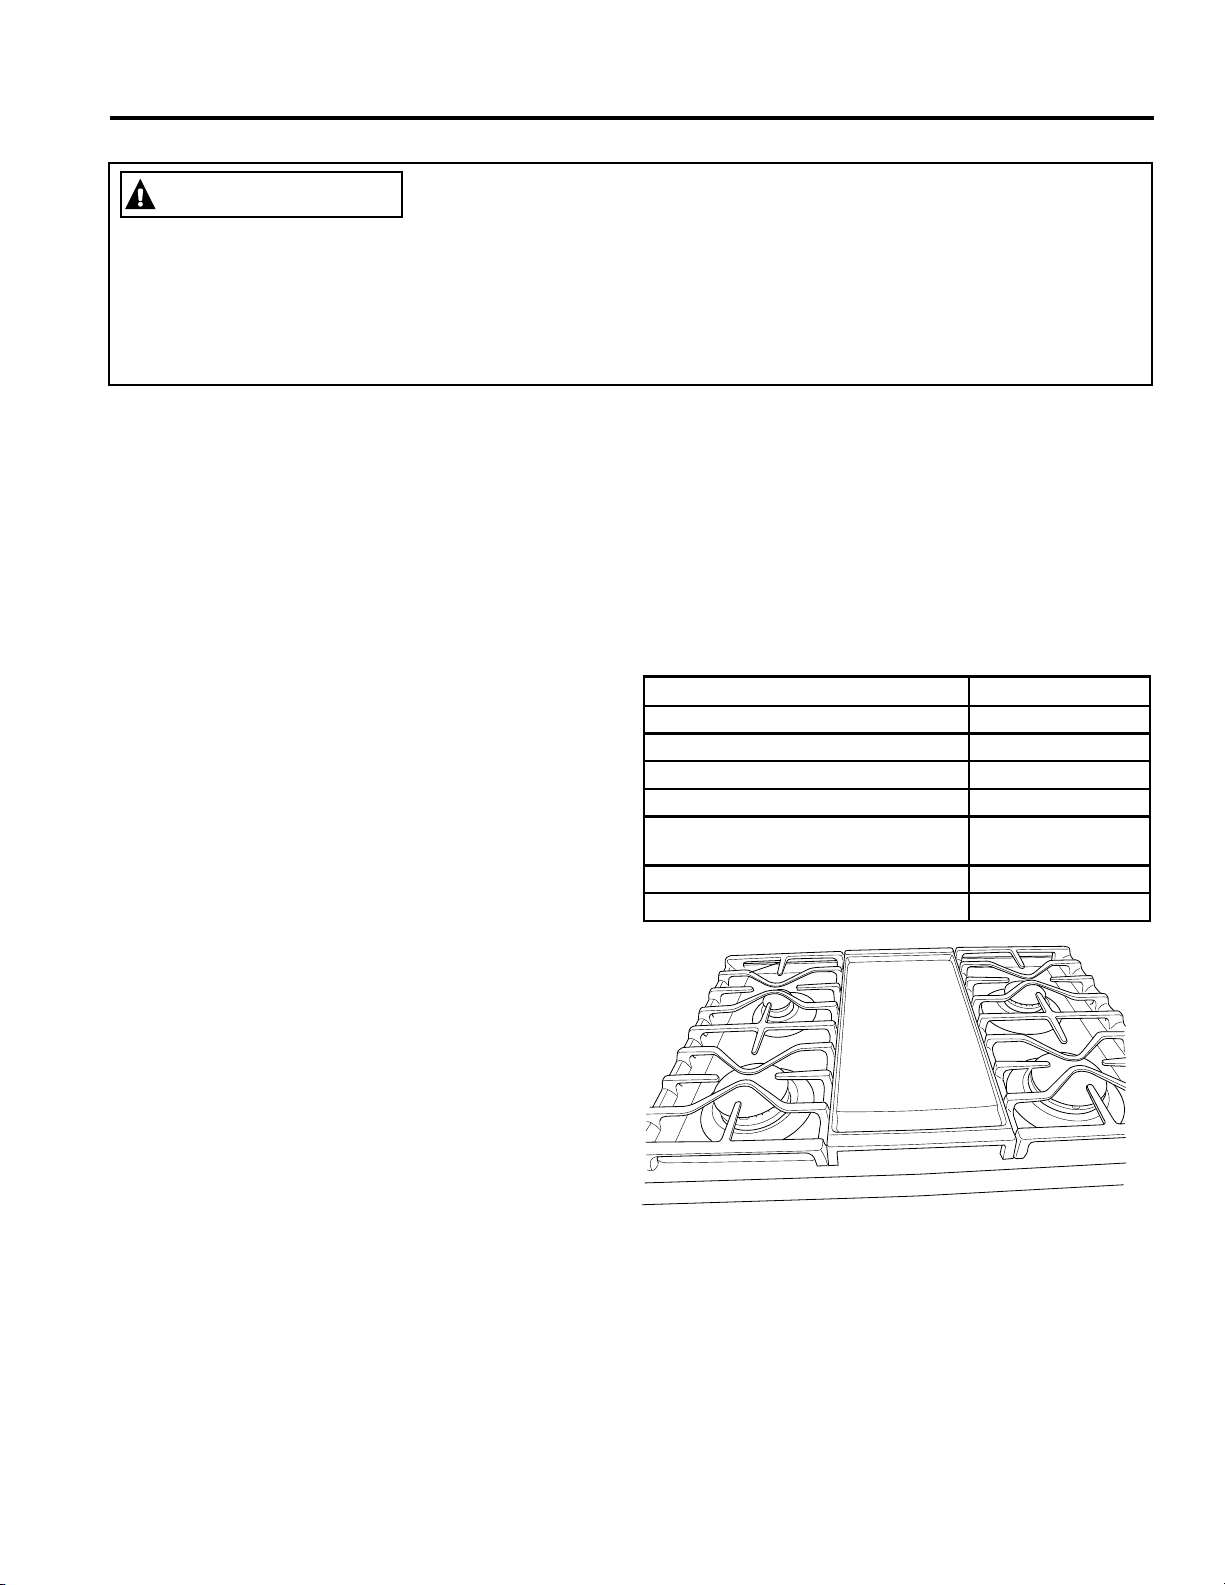
12
29-5979
UTILISATION DE LA SURFACE DE CUISSON : Plaque chauante
Plaque chauffante (certains modèles)
Plaque chauffante antiadhésive en aluminium
Risque d'incendie
■ Faitespreuvedeprudencelorsquevouscuisinezdesalimentsgras.Lesprojectionsdegraissepeuventprovoquer
un incendie.
■ Nedéposezaucunobjetsurlaplaquechauffantelorsquecelle-cin'estpasutilisée.Lachaleurdégagéeparles
brûleurs autour de la plaque chauffante peut chauffer celle-ci et provoquer un incendie.
■ N'installez et n'enlevez la plaque chauffante que lorsqu'elle est froide et que tous les éléments de surface sont en
position d'arrêt (OFF).
Votreplaquechauffanteprocureunesurfacedecuissonde
grandedimensionpourlesviandes,lescrêpesetd'autres
alimentshabituellementpréparésdansunepoêleàfrire.
Avantlapremièreutilisation,rincezlaplaqueàl'eauchaudeet
asséchez-lacomplètement.Pourobtenirdesinstructionssurle
nettoyagedelaplaquechauffante,reportez-vousàlasection
«Nettoyagedelasurfacedecuisson».
Précautions à prendre avec la plaque chauffante :
■ N'utilisezpasd'huilesurlaplaquechauffantependant
uneduréeprolongée.Celapourraitprovoquerdestaches
indélébiles et/ou des fissures à la surface de la plaque.
■ Ne surchauffez pas la plaque chauffante. Laisser
longtempslebrûleurdelaplaquechauffanteauréglage
dechaleurélevé(Hi)sansyplacerd'alimentspeut
endommagerlerevêtementantiadhésif.
■ N'utilisezquedesustensilesenplastique,nylonoubois,
oudesustensilesSilverStone
®
pournepasrayerle
revêtement.
■ N'utilisezjamaisdecouteauxetnecoupezriensurla
plaquechauffante.
■ Évitezd'utiliserdesustensilesàboutpointuoutranchants
qui pourraient endommager la surface de la plaque
chauffante.
■ Prenezgardedenepaslarayerlorsquevouslarangez.
■ Nemettezpaslaplaquechauffanteaufouràmicro-ondes.
■ Siquelquechoses'estrenversésouslaplaquechauffante,
nettoyez-laaussivitequepossiblepouréviterqueleproduit
renversénebrûle.
■ Nelaissezpaslagraisses’accumulersouslaplaque
chauffante,celaprésenteunrisqued'incendie.Nettoyez
ledessousdelaplaquechauffanteavecdel'eauchaude
savonneuse une fois qu'elle a refroidi.
■ Nelavezpaslaplaquechauffanteaulave-vaisselle.
■ Nenettoyezpaslaplaquechauffantedanslefour
autonettoyant.Celapourraitendommagerlerevêtement
antiadhésif.Pourobtenirdesinstructionssurlenettoyage
delaplaquechauffante,reportez-vousàlasection
«Nettoyagedelasurfacedecuisson».
Positionnement de la plaque chauffante
Laplaquechauffantepeutuniquementêtreutiliséesurle
brûleurovaleducentre.Pourplacerlaplaquechauffante,
retirezlagrillecentrale(lecaséchéant)etremplacez-lapar
laplaquechauffante.Allumezlebrûleurovaleuniquement
lorsquevousêtreassuréquelaplaquechauffanteaétéplacée
correctement.
Préchauffer la plaque–Préchauffezlaplaquede
2à5minutesavantd'ydéposerlesaliments,puisabaissez
la température à la température de cuisson.
Types d'aliments Réglage de cuisson
Bacon Med(moyen)
Chapeletsdesaucisses Med(moyen)
Œufs poêlés Lo(bas)
Galettesdebœufhaché Med-Hi(moyen-élevé)
Sandwicheschauds(telsqueles
sandwichesaufromagefondant)
Med(moyen)
Crêpes Med-Lo(moyen-bas)
Réchaufferdestortillas Med-Lo(moyen-bas)
Plaque chauffante antiadhésive en aluminium
Remplacez la grille centrale (le cas échéant) par la
plaque chauffante antiadhésive en aluminium.
AVERTISSEMENT
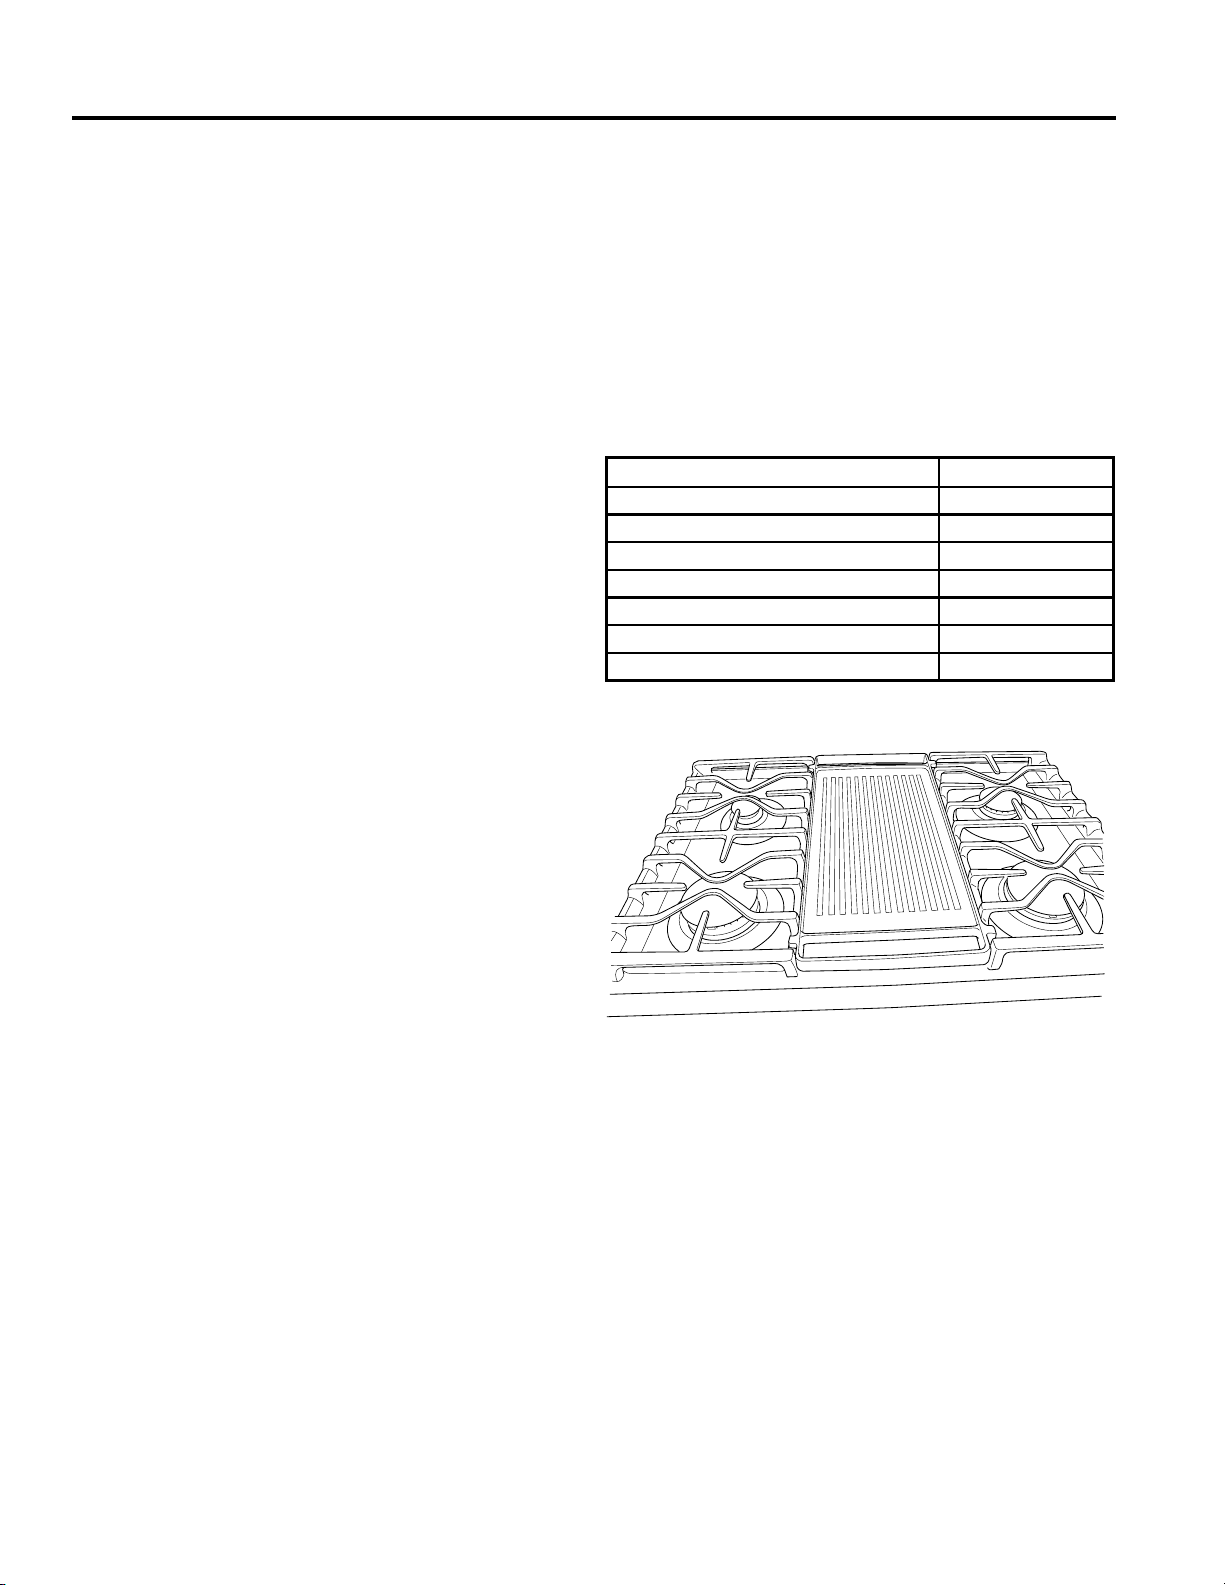
29-5979
13
UTILISATION DE LA SURFACE DE CUISSON : Plaque chauante
Plaque chauffante (certains modèles) (suite)
Utilisation de votre plaque chauffante réversible en fonte prétraitée
Lecôténervurédelaplaquechauffanteréversiblepeutêtre
utilisépourlacuissondesalimentsquisonthabituellement
grillés.
Votreplaquechauffanteprocureunesurfacedecuissonde
grandedimensionpourlesviandes,lescrêpesetd'autres
alimentshabituellementpréparésdansunepoêleàfrire.
Avantlapremièreutilisation,rincezlaplaqueàl'eauchaude
etasséchez-lacomplètement.Enduisezlasurfaced'huile
végétale ou de cuisson en vaporisateur.
Précautions à prendre avec la plaque chauffante :
■ Nemettezpaslaplaquechauffanteaufouràmicro-ondes.
■ Nelavezpaslaplaquechauffanteaulave-vaisselle.
■ Siquelquechoses'estrenversésouslaplaquechauffante,
nettoyez-laaussivitequepossiblepouréviterqueleproduit
renversénebrûle.
■ Nelaissezpaslagraisses’accumulersouslaplaque
chauffante,celaprésenteunrisqued'incendie.Nettoyez
ledessousdelaplaquechauffanteavecdel'eauchaude
savonneuse une fois qu'elle a refroidi.
Positionnement de la plaque chauffante
Laplaquechauffantepeutuniquementêtreutiliséesurle
brûleurovaleducentre.Pourplacerlaplaquechauffante,
retirezlagrillecentrale(lecaséchéant)etremplacez-lapar
laplaquechauffante.Allumezlebrûleurovaleuniquement
lorsquevousêtreassuréquelaplaquechauffanteaétéplacée
correctement.
Préchauffer la plaque–Préchauffezlaplaquede
2à5minutesavantd'ydéposerlesaliments,puisabaissez
la température à la température de cuisson.
Types d'aliments Réglage de cuisson
Bacon Med(moyen)
Chapeletsdesaucisses Med(moyen)
Œufs Lo(bas)
Sandwichaufromagefondant Med-Lo(moyen-bas)
Galettesdebœufhaché Med-Lo(moyen-bas)
Crêpes Med-Lo(moyen-bas)
Réchaufferdestortillas Lo(bas)
Il vous faudra peut-être réduire le réglage de la température de la
plaquechauffantesicelle-ciestutiliséependantunelonguepériode.
Plaque chauffante réversible en fonte prétraitée
Remplacez la grille centrale (le cas échéant) par la
plaque chauffante réversible en fonte prétraitée.
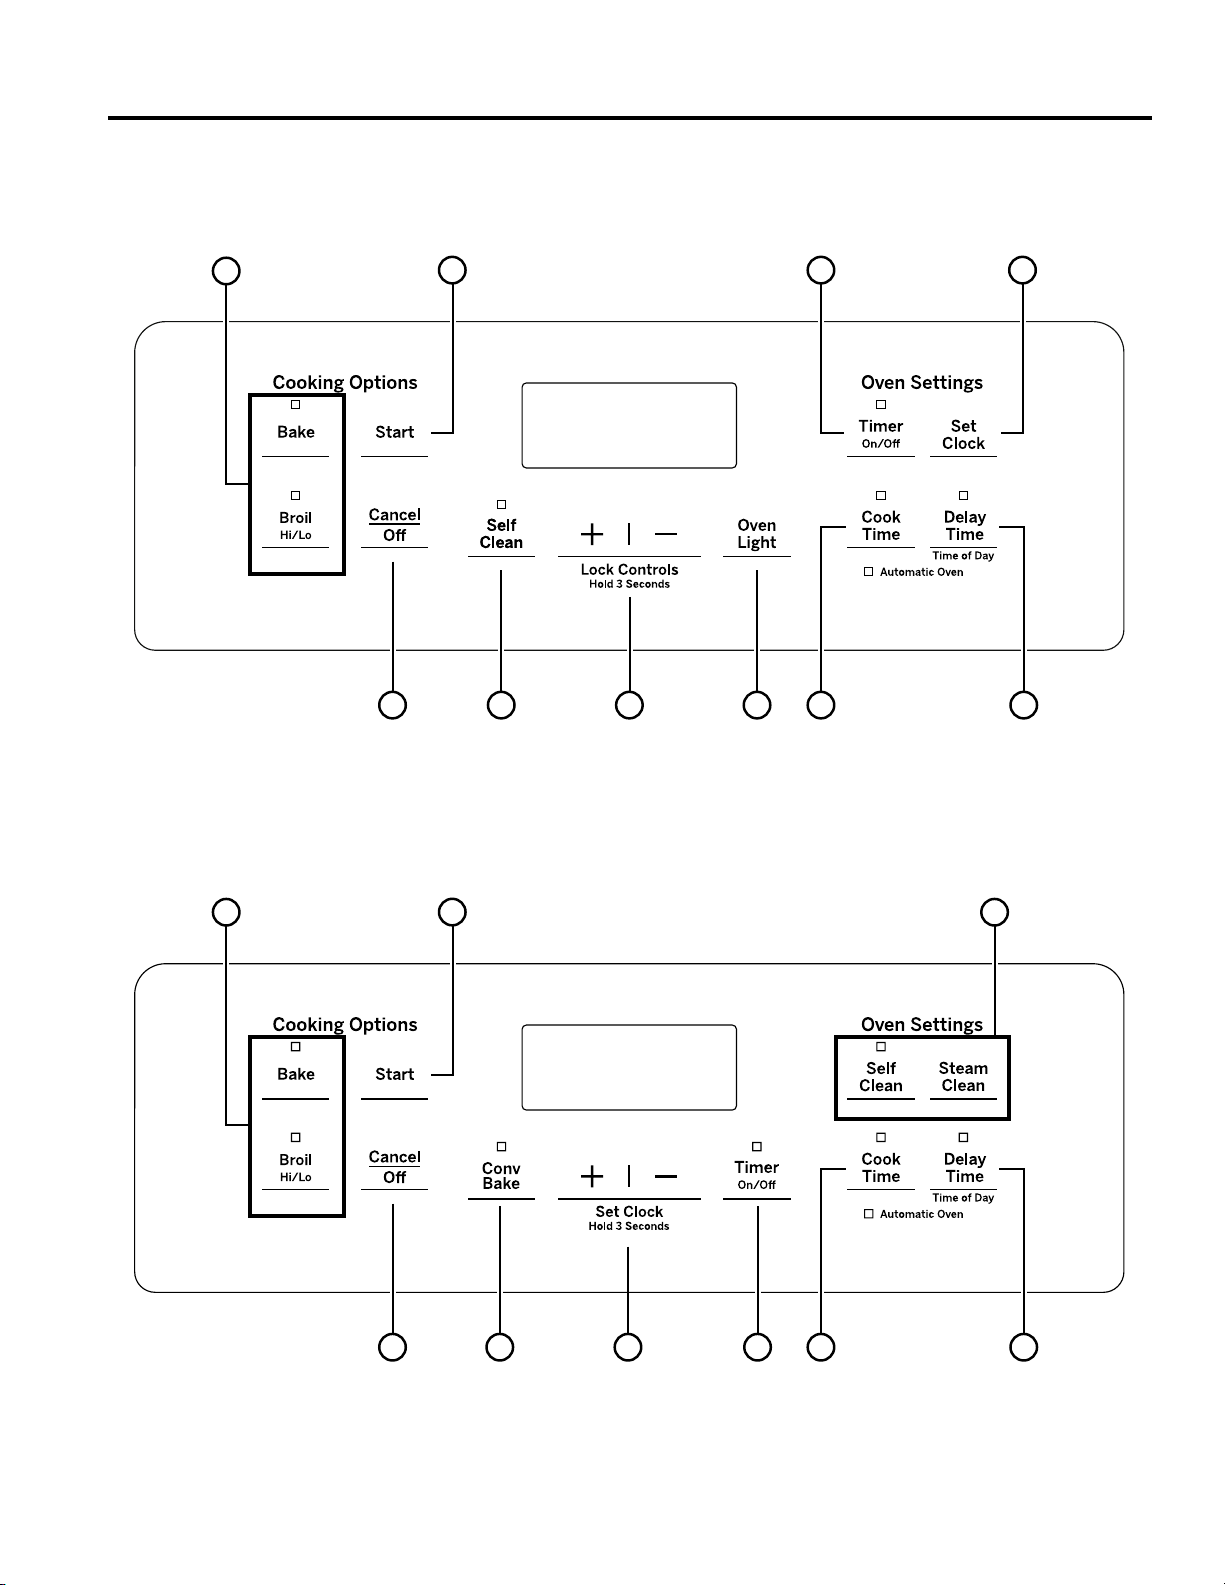
14
29-5979
2
2
1 87
Commandes du four
UTILISATION DU FOUR : Commandes du four
À convection
Sans convection
4 78
4
35
5
3
6
6
9
9
11 10
29-5979
15
1. Conv Bake (cuisson à convection) (certains
modèles) : La cuisson à convection fait appel à une
circulationd'airaccruedanslefour,cequiaméliorele
rendement de la cuisson lorsqu'on utilise plusieurs grilles.
Veuillezvousreporteràlasection«Modesdecuisson»
pour plus de détails.
2. Modes de cuisson conventionnels : Votrefour
proposelesmodesdecuissonconventionnelssuivants:
cuissonaufour(Bake),grilàtempératureélevée(BroilHi)et
grilàbassetempérature(BroilLo).Veuillezvousreporterà
lasection«Modesdecuisson»pourplusdedétails.
3. Nettoyage (certains modèles) : Votrefourcomporte
deuxmodesdenettoyage:autonettoyage(SelfClean)
etnettoyageàlavapeur(SteamClean).Consultez
lasection«Nettoyagedufour»pourobtenirdes
renseignements importants sur ces modes.
4. Start (mise en marche) : Vousdevezappuyer
surcettetouchepourcommencerchaquefonctionde
cuisson,denettoyageoufonctionminutée.
5. Cancel/Off (annuler/arrêt) : Appuyezsurcettetouche
pourannulerTOUTESlesfonctionsdufour,saufl'horloge
et la minuterie.
6. Cook Time (durée de cuisson) : Permet d'effectuer le
décompte de la durée de cuisson et éteint le four lorsque la
duréedecuissonestcomplétée.Sélectionnezlemodede
cuissondésiréainsiquelatempérature,puisappuyezsur
Start(miseenmarche).AppuyezsurlatoucheCook Time
(duréedecuisson),etutilisezlepavénumériquepour
programmerladuréedecuissonenheuresetenminutes.
PuisappuyezdenouveausurStart(miseenmarche).
Cettefonctionnepeutêtreutiliséequ'enmodeCuisson
conventionnelleouCuissonàconvection.
7. Set Clock (réglage de l'horloge) : Permet de régler
l'horlogedufouretl'affichagedel'horloge(certains
modèles).Pourdéfinirl'affichagedel'horloge(on/off),
appuyezsurlatoucheSet Clock(réglagedel'horloge)
(certainsmodèles)unefois.Silemodèledevotrecuisinière
nedisposepasdelatoucheSet Clock(réglagede
l'horloge),reportez-vousàlasection«Fonctionsspéciales»
pourobtenirdesinstructionssurlafaçonderéglerl'affichage
del'horloge.Pourréglerl'heure,maintenezlestouches + et
- enfoncéespendant3secondesouappuyezsurlatouche
Set Clock(réglagedel'horloge)jusqu'àcequel'afficheur
clignote.Servez-vousdestouches+ et - pour régler
l'heure.AppuyezsurlatoucheStart (miseenmarche)pour
confirmerl'heure.
8. Timer (minuterie) : Sertdeminuterie.Appuyezsurla
toucheTimer(minuterie)etsurlessymboles+ et - pour
programmerlesheuresetlesminutes.Appuyezsur
latoucheStart(miseenmarche).Lefourcontinuede
fonctionner lorsque le décompte de la minuterie tombe
àzéro.Pourarrêterlaminuterie,appuyezsurlatouche
Timer(minuterie).
9. Delay Time (cuisson différée) : Permet de régler
l'heuredemiseenmarchedufour.Utilisezcettetouche
pourréglerl'heureàlaquellevousvoulezquelefourse
metteenmarche.AppuyezsurlatoucheDelay Time
(cuissondifférée)etutilisezlestouches+ et - pour
programmerl'heureàlaquellelefourdoitsemettreen
marche.Ensuite,appuyezsurlatouchedumodede
cuissondésiré,puissurlestouches+ et- pour régler la
température,etappuyezsurStart(miseenmarche).
AprèsavoirappuyésurStart(miseenmarche),unedurée
de cuisson peut également être programmée. Lorsque la
cuissondifféréeaétéprogrammée,l’heuredemiseen
marchedifféréeseraaffichéejusqu'àl'atteintedecette
heure.Ensuite,soitladuréedecuisson(siprogrammée)
oulatempératureseraaffichée.Lacuissondifféréene
peutêtreutiliséequ'enmodeCuissonconventionnelle,
CuissonàconvectionetAutonettoyage(certainsmodèles).
REMARQUE : Lorsque vous utilisez la fonction de
cuissondifférée, lesalimentsrapidementpérissables,
commelelait,lesœufs,lepoisson,lafarce,lavolaille
ouleporc,nedoiventpasêtrelaissésàtempérature
ambiantependantplusd’uneheureavantouaprèsla
cuisson afin d'éviter la prolifération de bactéries nocives.
Assurez-vousquelalampedufourestéteinte:lachaleur
provenantdel'ampouleaccélèrelaproliférationdeces
bactéries.
10. Oven Light (lampe du four) (certains modèles) :
Appuyezsurcettetouchepourallumerouéteindrela
lampe du four.
11. Lock Controls (verrouillage des commandes)
(certains modèles) : Permet de verrouiller les
commandesdefaçonàcequelestouchesn'activent
aucunefonction.Appuyezsurlestouches+ et - et
maintenez-lesenfoncéespendant3secondespour
verrouiller ou déverrouiller les commandes. La fonction
Cancel/Off(annuler/arrêt)esttoujoursactive,même
lorsque les commandes sont verrouillées.
Commandes du four (suite)
UTILISATION DU FOUR : Commandes du four / Évents du four
Évents du four
N'obstruezjamaislesévents(ouverturesd'air)delacuisinière.
Ilspermettentàl'aird'entreretdesortir,cequiestnécessaire
àunrefroidissementadéquat,etdoncaubonfonctionnement
delacuisinière.
Lesouverturesd'airsontsituéesàl'arrièredelasurfacede
cuisson,enhautetenbasdelaportedufourdemêmequ'au
basdelacuisinière.
L'aspect et l'emplacement de l'évent
peuvent varier selon le modèle du four.

16
29-5979
Fonctions spéciales
UTILISATION DU FOUR : Fonctions spéciales / Mode sabbat
Votrecuisinièreoffredenombreusesfonctionsspéciales.Pourmodifierlesréglagesdecesfonctionsspéciales:
■ AppuyezsimultanémentsurlestouchesBake (cuissonaufour)etBroil(gril),etmaintenez-lesenfoncéespendant
trois secondes.
■ Lamention«SF»s'afficheàl'écran.
■ Pourobtenirdesinstructionssurlafaçondesélectionnerlesdifférentesfonctions,reportez-vousàlasectionci-dessous.
■ Lorsquelechangementaétéeffectué,appuyezsurlatoucheStart(miseenmarche)pourlesauvegarderetretournerau
menu des fonctions spéciales.
Réglage de la température du four
Cettefonctionpermetderéglerlatempératuredecuissonau
fourjusqu'à35°F(1,7°C)pluschaudeouplusfroide.Utilisez
cette fonction si vous pensez que la température de votre four
esttropélevéeoutropbasseetquevoussouhaitezlamodifier.
Ceréglageaffectetouslesmodesdecuisson,sauflacuisson
au gril.
Unefoisdanslemenudesfonctionsspéciales,appuyezsurla
toucheBake (cuissonaufour)pourentrerlavaleurderéglage
delatempérature.Unnombrevariantentre35et-35°F
s'affiche.Réglezlatempératuredésiréeàl'aidedestouches
+ ou -.AppuyezsurlatoucheStart(miseenmarche)pour
sauvegarderlavaleurd'ajustementdelatempérature.
Arrêt automatique après 12 heures et mode
sabbat
Lafonctiond'arrêtautomatiquedufouraprès12heureséteint
lefourauboutde12heuresdefonctionnementcontinu.
Lafonctiond'arrêtautomatiqueaprès12heurespeutêtre
activée(«on»)oudésactivée(«oFF»).Pourplusdedétails
surl'option«sAb»,reportez-vousàlasectionportantsurle
modesabbat.Affichezlemenudesfonctionsspécialescomme
indiquéci-dessusetappuyezsurlatoucheSet Clock(réglage
del'horloge)jusqu'auréglagedésiré.Silemodèledevotre
cuisinièrenedisposepasdelatoucheSet Clock(réglagede
l'horloge),appuyezsurCook Time(duréedecuisson)jusqu'au
réglagedésiré.AppuyezsurlatoucheStart(miseenmarche)
pour enregistrer les réglages.
Clock Display (affichage de l'horloge)
(certains modèles)
Cettefonctionpermetdeprécisersivousdésirezfaireafficher
ounepasfaireafficherl'heuresurl'horloge.L'affichagede
l'horlogepeutêtreactivé(«on»)oudésactivé(«oFF»).Si
lemodèledevotrecuisinièrenedisposepasd'unetouche
Set Clock(réglagedel'horloge),reportez-vousàlasection
«Commandesdufour»pourobtenirdesinstructionssurla
façonderéglerl'affichagedel'horloge.Silemodèledevotre
cuisinièrenedisposepasdelatoucheSet Clock(réglage
del'horloge),ouvrezlemenudesfonctionsspécialescomme
indiquéci-dessus.AppuyezsurlatoucheTimer(minuterie)
pourvoirleréglageactuel.Appuyezdenouveausurlatouche
Timer(minuterie)pourmodifierleréglage.Appuyezsurla
toucheStart(miseenmarche)pourenregistrerlenouveau
réglage.
Rapidité de l'augmentation ou de la diminution
des réglages
Lesréglages(ex.:température)peuventêtreajustés
rapidementenappuyantsurlatouche+ ou - et en la
maintenant enfoncée. Pour régler la vitesse de l'augmentation/
ladiminutiondesréglages,affichezlemenudesfonctions
spécialescommeindiquéci-dessus.Appuyezsurlatouche
+pouraugmenterlavitessedesréglagesouappuyezsurla
touche- pour la diminuer. La vitesse des réglages varie de 1
(lapluslente)à5(laplusrapide).AppuyezsurlatoucheStart
(miseenmarche)pourenregistrerleréglagedelavitesse.

29-5979
17
Mode sabbat
UTILISATION DU FOUR : Mode sabbat
LemodesabbatdevotrecuisinièreestconformeauxnormesénoncéesparStarK.Seulelacuissoncontinueoulacuisson
minutéeestautoriséeenmodesabbat.Touslessignauxsonoressontdésactivésenmodesabbat.Toutefois,lalumièredufour
n'estpasdésactivée.Pouréviterqu'ellenes'allumelorsquevousouvrezlaportedufour,ilvousfautdoncvousassurerderetirer
lalampedufour.Lacuissonenmodesabbatestunprocessusendeuxétapes:vousdevezd'abordréglerlacuisinièreenmode
sabbat,puisréglerlemodedecuisson.
Activer le mode sabbat
AppuyezsimultanémentsurlestouchesBake (cuissonau
four)etBroil(gril)etmaintenez-lesenfoncéespendanttrois
secondes.Leslettres«SF»apparaissentsurl'afficheur.
AppuyezsurlatoucheSet Clock(réglagedel'horloge)jusqu'à
cequeleslettres«SAb»s'affichent,puisappuyezsurStart
(miseenmarche).Silemodèledevotrecuisinièrenedispose
pasdelatoucheSet Clock(réglagedel'horloge),appuyez
surlatoucheCook Time(duréedecuisson)jusqu'àceque
leslettres«SAb»s'affichent,puisappuyezsurStart(miseen
marche).Uncrochetfermant(«]»)s'afficherapourindiquer
que le four est en mode sabbat. Une cuisson continue ou une
cuisson minutée peut maintenant être définie comme indiqué
ci-dessous.
Démarrer une cuisson continue
AppuyezsurBake (cuissonaufour)sivoussouhaitez
programmerlefouràunetempératureautreque350°F
(176,7°C),puisappuyezsur+ ou -pourajusterlatempérature
parincrémentsde25°F(14°C);appuyezensuitesurStart
(miseenmarche).Aprèsuncertaindélai,unsecondcrochet
(«][»)s'afficherapourindiquerquelefourestenmodede
cuisson.
Réglage de la température du four
AppuyezsurBake (cuissonaufour)puissur+ ou - pour
ajusterlatempératureparincrémentsde25°F(14°C),et
appuyezsurStart(miseenmarche).Unthermomètredefour
peutêtreutilisésivoussouhaitezprogrammerlacuissonàune
certaine température.
Démarrer une cuisson minutée
AppuyezsurCook Time(duréedecuisson),puissurlatouche
+ ou - pour régler la durée de cuisson par incréments d'une
minute.AppuyezsurBake (cuissonaufour)sivoussouhaitez
programmerlefouràunetempératureautreque350°F
(176,7°C),puisappuyezsur+ ou -pourajusterlatempérature
parincrémentsde25°F(14°C);appuyezensuitesurStart
(miseenmarche).Aprèsuncertaindélai,unsecondcrochet
(«][»)s'afficherapourindiquerquelefourestenmodede
cuisson.Lorsqueladuréedecuissonestécoulée,unseul
crochet(«]»)seradenouveauaffichépourindiquerquele
four n'est plus en mode de cuisson.
Quitter le mode sabbat
Quitterlemodesabbatnedevraitêtrefaitqu'aprèslapériode
dusabbat.AppuyezsurCancel/Off(annuler/arrêt)pour
mettre fin à tout mode de cuisson qui pourrait être en cours
d'exécution.AppuyezsimultanémentsurlestouchesBake
(cuissonaufour)etBroil(gril),etmaintenez-lesenfoncées
pendanttroissecondes.Leslettres«SF»apparaissentsur
l'afficheur.AppuyezsurlatoucheSet Clock(réglagede
l'horloge)jusqu'àcequeleslettres«On»s'affichent,puis
appuyezsurStart(miseenmarche).Silemodèledevotre
cuisinièrenedisposepasdelatouche«SetClock»(réglage
del'horloge),appuyezsurlatoucheCook Time(duréede
cuisson)jusqu'àcequeleslettres«On»s'affichent,puis
appuyezsurStart(miseenmarche).Lecrochet(«]»)
apparaissantsurl'afficheurseraremplacéparl'heuredujour
pour indiquer que vous avez quitté le mode sabbat.
Remarque sur les pannes de courant en mode
sabbat
Siunepannedecourantsurvientlorsquelefouresten
modesabbat,l'appareilreviendraaumodesabbatlorsque
l'alimentationserarétablie,maislefourseraéteintmême
s'il était en mode cuisson lorsque la panne de courant est
survenue.

18
29-5979
Votrenouveaufouroffredenombreuxmodesdecuissonpourvousaideràobtenirdemeilleursrésultats.Cesmodesdecuisson
sontdécritsci-dessous.Reportez-vousàlasection«Guidedecuisson»pourobtenirdesrecommandationsspécifiquesà
chaquetyped'aliments.N'oubliezpasquevotrenouveaufourpeutoffrirunfonctionnementdifférentdeceluidevotreancienfour.
Cuisson au four
Le mode de cuisson au four permet de cuire et de rôtir les
aliments.Cemodeutiliseuniquementlachaleurprovenantdu
brûleurinférieur.Lorsdelacuissondeproduitsdeboulangerie,
commelesgâteaux,lesbiscuitsetlespâtisseries,préchauffez
toujourslefouravantd'yinsérerlesaliments.Suivezles
recommandations de la recette pour disposer les aliments dans
lefour.Siaucunedirectivespécifiquen'estindiquée,placezles
alimentsaucentredufour.Pouractivercemode,appuyezsur
latoucheBake(cuissonaufour),puisutilisezlestouches+
et -pourréglerlatempérature.Enfin,appuyezsurStart(mise
enmarche).
Modes de cuisson au gril
Utiliseztoujourslacuissonaugrilaveclaportedufouret
sontiroirfermés.Surveillezlesalimentsdeprèslorsquevous
utilisezlegril.Lorsquevousutilisezlegril,faitespreuvede
prudencesivosalimentssontdéposéssurlagrillesupérieure;
àcetteposition,laproductiondefuméepeutêtreaccrue,
leplatpeutprojeterdeséclaboussuresetlesgraspeuvent
s'enflammer.
Utilisez le gril pour des aliments susceptibles d'être grillés.
Réglezlapositiondesgrillesdefaçonàajusterl'intensitédela
chaleursurvosaliments.Placezlesalimentsprèsdubrûleur
dugrillorsquevoussouhaitezquelasurfacedevosaliments
soit rôtie et que l'intérieur soit saignant. Les aliments plus épais
et les aliments qui doivent être cuits à point doivent être grillés
sur une grille située à une position inférieure ou en utilisant le
modedecuissonaugrilàbassetempérature(BroilLo).
Gril à température élevée
Lemodedecuissonaugrilàtempératureélevée(BroilHi)fait
usagedelachaleurintensegénéréeparlebrûleursupérieur
pour rôtir les aliments. Utilisez ce mode de cuisson pour les fines
coupes de viandes et/ou des aliments qui doivent rester tendres à
l'intérieur.Pourutilisercemodedecuisson,appuyezunefoissur
latoucheBroil (gril),puissurlatoucheStart(miseenmarche).
Cemodedecuissonn'exigepasdepréchaufferlefour.
Gril à basse température
Lemodedecuissonaugrilàbassetempérature(BroilLo)
utiliseunechaleurmoinsintensegénéréeparlebrûleur
supérieur pour cuire à point les aliments tout en brunissant leur
surface. Utilisez ce mode pour les coupes de viande épaisses
ou les aliments qui doivent être cuits à point. Pour utiliser ce
modedecuisson,appuyezdeuxfoissurlatoucheBroil(gril),
puisappuyezsurlatoucheStart(miseenmarche).Cemode
decuissonn'exigepasdepréchaufferlefour.
Cuisson à convection (certains modèles)
Le mode de cuisson à convection est destiné à la cuisson
simultanée de nombreux aliments déposés sur plusieurs grilles.
Cemodedecuissonutiliseledéplacementdel'airproduitparle
ventilateurdeconvectionpouruniformiserlacuisson.Votrefour
estéquipédelafonctionConversionautomatiqueAutoRecipe
pourconvection,parconséquent,iln'estpasnécessairederégler
la température lorsque vous utilisez ce mode. Pour activer le
modedecuissonàconvection,appuyezsurlatoucheConv Bake
(cuissonàconvection),puisutilisezlestouches+ et - pour régler
latempérature.Enfin,appuyezsurStart(miseenmarche).Ce
modedecuissonexigetoujoursdepréchaufferlefour.
Directives relatives aux ustensiles de cuisson
Lematériau,lefinietlatailledel'ustensiledecuissonontune
incidence sur le rendement de la cuisson.
Lescasserolesfoncées,recouvertesd'unenduitetmates
absorbentplusdechaleurquelescasserolesminceset
brillantes. Les casseroles qui absorbent plus facilement la
chaleurproduisentdescroûtesbrunes,croustillantesetplus
épaisses.Sivousutilisezdesustensilesdecuissonfoncés
etrecouvertsd'unenduit,vérifiezlacuissonavantletemps
prescritdanslarecette.Sivousobtenezdemauvaisrésultats
aveccetyped'ustensiledecuisson,réduisezlatempératuredu
fourde25°F(14°C)laprochainefois.
■ Lescasseroleslustréespermettentdecuireuniformément
lesaliments,commelesgâteauxetlesbiscuits.
■ Lescasserolesenverreouencéramiqueseréchauffent
lentement,maisconserventlachaleurpluslongtemps.Ces
typesd'ustensilesdecuissonconviennentparfaitementaux
tartes et croustades.
■ Lesustensilesdecuissonisolésseréchauffentlentement
et peuvent réduire le brunissement des aliments.
■ Gardezlesustensilesdecuissonproprespourfavoriser
une cuisson uniforme.
Modes de cuisson
UTILISATION DU FOUR : Modes de cuisson / Ustensiles de cuisson / Papier d'aluminium et protections pour four
ATTENTION
Ne recouvrez pas la sole du four de papier d'aluminium ni de protection pour four d'aucune
sorte. Ils sont susceptibles de bloquer la circulation d'air ou de fondre, ce qui pourrait endommager la cuisinière ou
provoquer une intoxication par monoxyde de carbone, de la fumée ou un incendie. Les dommages résultant d'une
utilisation inappropriée de ces articles ne sont pas couverts par la garantie de la cuisinière.
Onpeututiliserdupapierd'aluminiumpourrecueillirleséclaboussuresenposantunefeuillesurunegrilleinférieure,quelques
centimètressouslesaliments.N'utilisezpasplusdepapierqu'iln'enfautetnecouvrezjamaisentièrementunegrilledefouravec
dupapierd'aluminium.Placezlepapierd'aluminiumàaumoins1-1/2po(3,8cm)desparoisdufourafind'éviterunemauvaise
circulationdelachaleur.
Papier d'aluminium et protections pour four
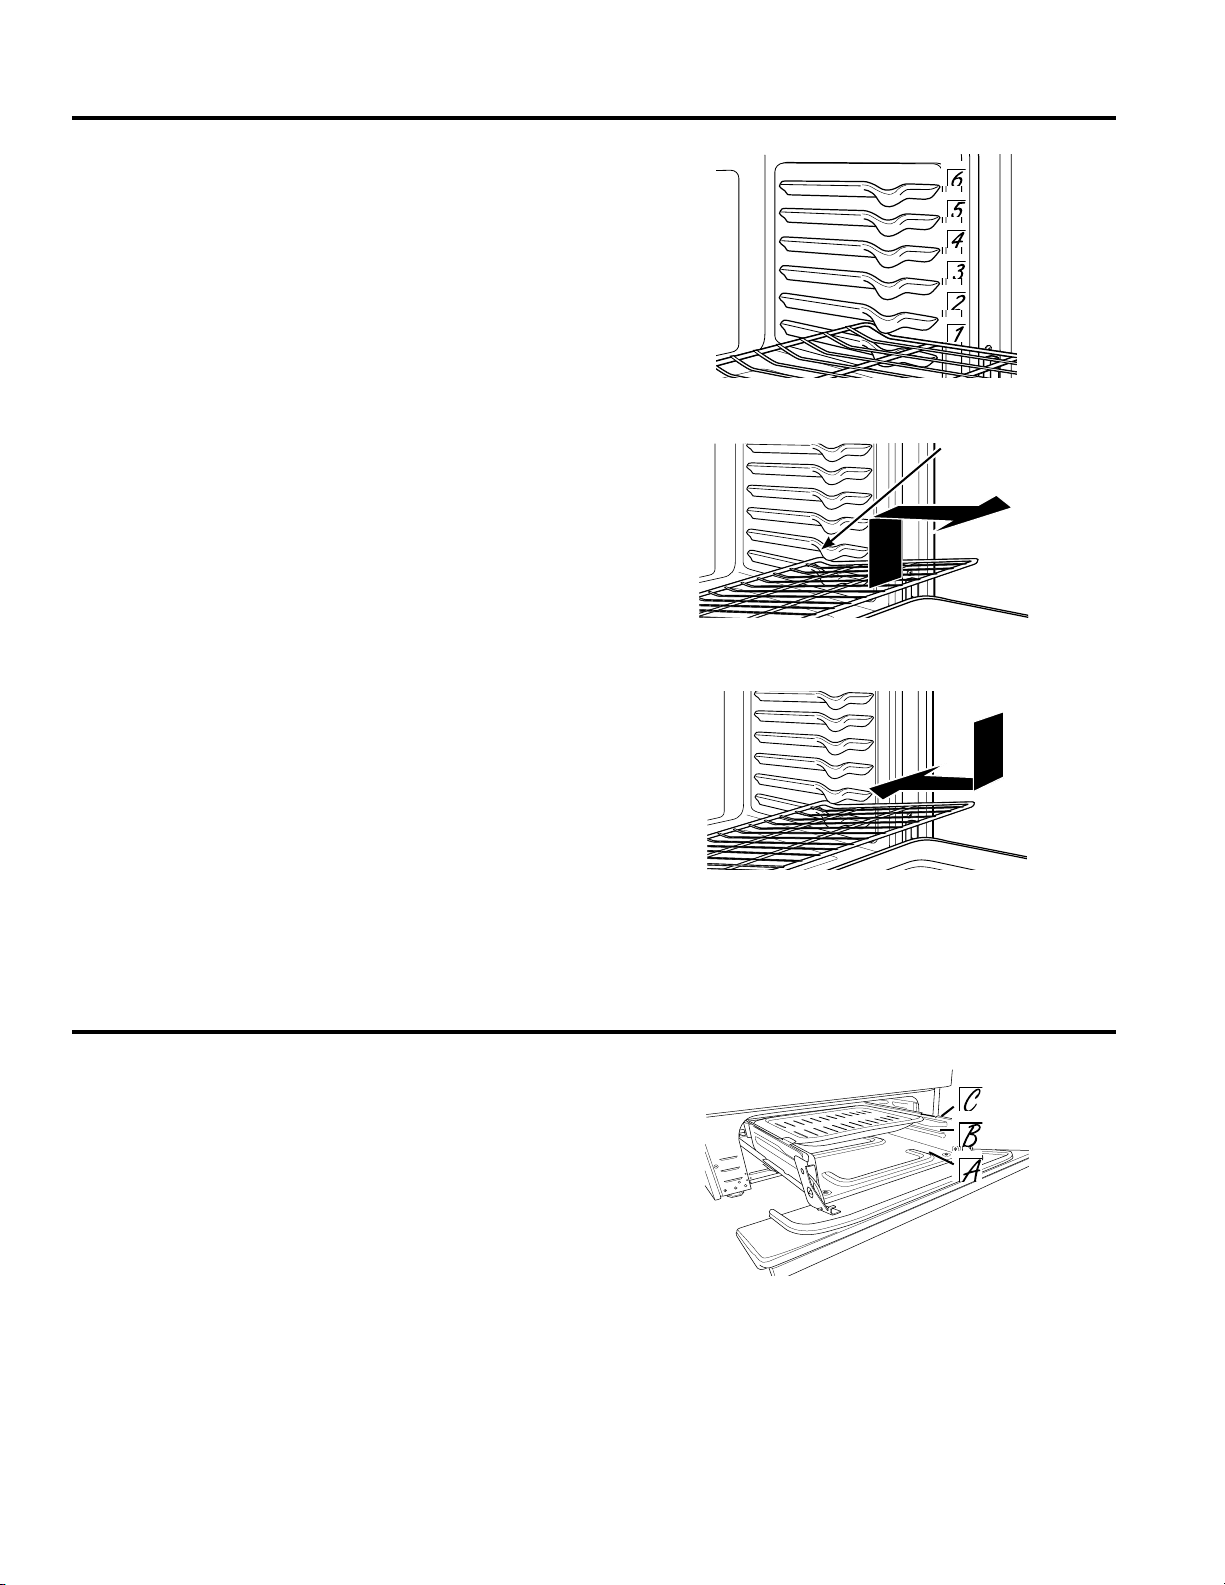
29-5979
19
Grilles de four
UTILISATION DU FOUR : Grilles de four / Tiroir du gril
Positions de la grille
Votrefourprincipalpossèdesixpositionsdegrille.LeGuide
de cuisson contient des recommandations quant à la position
desgrillesàutiliserenfonctiondestypesd'alimentsàcuire.
Le réglage de la position de la grille est une façon d'optimiser
lerendementdelacuisson.Parexemple,sivouspréférezque
vosgâteaux,vosmuffinsouvosbiscuitssoienttrèsbrunis,
placezlagrilleàuncransupérieur.Sivosalimentsbrunissent
trop,placezvotregrilleàuncraninférieurlaprochainefois.
Lors de la cuisson avec de nombreuses casseroles et de
nombreusesgrilles,assurez-vousquel'espaceentreles
casseroles est suffisant pour favoriser une bonne circulation
d'air.Celapeutaméliorerl'uniformitédelacuisson.
Retrait et remise en place des grilles
Lorsque vous mettez des ustensiles de cuisson dans le four ou
lesenretirez,tirezlesgrillesjusqu'àlabutéed'arrêtdusupport
de grille.
Pourretirerunegrille,tirez-laversvousjusqu'àlaposition
d'arrêt,puissoulevez-laparl'avantetretirez-ladufour.
Pourlaremettredanslefour,placezlapartierecourbéede
la grille sur les supports de grille. Inclinez la partie avant de
lagrille,puispoussez-lajusqu'àsapositiond'arrêt.Mettezla
grilleàplatetpoussez-lajusqu'àcequ'ellesoitbieninsérée
jusqu'aufonddufour.
Lesgrillespeuventêtredifficilesàfaireglisser,tout
particulièrementaprèsunautonettoyage.Pouraméliorerleur
glissement,appliquezdel'huilevégétalesurunchiffondouxou
unessuie-tout,puisenduisezd'huilelescôtésdroitetgauche
desglissièreset/oudesgrilles.
REMARQUE :Pouraccélérerlepréchauffage,améliorer
l'efficacitédelacuissonetobtenirunfonctionnementoptimal,
retirez les grilles non utilisées.
Reportez-vousàlasection«Assistance/Accessoires»
pour des instructions sur la façon de commander des grilles
supplémentaires.
Utiliseztoujourslalèchefriteetlagrillefourniesavecvotre
cuisinière.
Le tiroir du gril dispose des trois positions de cuisson au gril
illustréesàdroite.PourutiliserlegrilauxpositionsBouC,
faitesglisserlalèchefritedansletiroirdemanièreàceque
ses poignées s'appuient sur les supports. Pour utiliser le gril à
lapositionA,placezlalèchefritedirectementaufonddutiroir
degril.Pourgrillerdavantage,utilisezlespositionsdegrille
rapprochantlepluslesalimentsdubrûleurdugril.Abaissezles
aliments dans le four ou utilisez le mode de cuisson au gril à
basse température pour une cuisson plus en profondeur/moins
grillée.
Tiroir du gril (certains modèles)
Positions de la grille
Retrait des grilles
Remise en place des grilles
Positions du tiroir du gril (certains modèles)
Position d'arrêt
de la grille
20
29-5979
Guide de cuisson
UTILISATION DU FOUR : Guide de cuisson
TYPE D'ALIMENT
MODE(S) DE CUISSON
RECOMMANDÉ(S)
POSITION(S) DE GRILLE
RECOMMANDÉE(S) SUGGESTIONS ADDITIONNELLES
Produits de boulangerie et pâtisseries
Gâteauxàétages,gâteaux
plats,gâteauxBundt,muffins,
painsàpréparationrapide,
biscuits,paincuitengalettes
sur une seule grille
Cuissonaufour 4ou5 Utilisezunustensiledecuissonaunibrillant.
Gâteaux à étages* sur
plusieurs grilles
Cuissonaufour
Cuissonàconvection
3et5
Assurezunecirculationd'airadéquate
(reportez-vousàl'illustrationci-dessous).
Gâteaux des anges Cuissonaufour 2 Utilisez un ustensile de cuisson au fini brillant.
Biscuits,painscuitsen
galettes sur une seule grille
Cuissonaufour 3ou4 Utilisezunustensiledecuissonaunibrillant.
Biscuits,painscuitsen
galettes sur plusieurs grilles
Cuissonàconvection
Cuissonaufour
2grilles–3et5
3grilles–2,4et6
Assurezunecirculationd'airadéquate.Déplacezlégèrementles
aliments pendant la cuisson pour garantir une cuisson uniforme.
Bœuf et porc
Galettesdebœufhaché Gril à température élevée 6ouC
Utilisezunelèchefrite;abaissezlesalimentsdanslefourpourune
cuissonplusenprofondeur/moinsgrillée.Vérifiezfréquemmentles
alimentslorsquevousutilisezlegril.Centrezlesalimentssouslebrûleur.
Biftecksetcôtelettes Gril à température élevée 6ouC
Utilisezunelèchefrite;abaissezlesalimentsdanslefourpourune
cuissonplusenprofondeur/moinsgrillée.Vérifiezfréquemmentles
alimentslorsquevousutilisezlegril.Centrezlesalimentssouslebrûleur.
Rôtis Cuissonaufour 2ou3
Necouvrezpas;utilisezunustensilemoinsprofond,commeune
lèchefrite.Lepréchauffagen'estpasnécessaire.
Volaille
Poulet entier Cuissonaufour 2ou3
Necouvrezpas;utilisezunustensilemoinsprofond,commeune
lèchefrite.
Poitrines,cuisses,hautsde
cuisse de poulet
Gril à basse température
Cuissonaufour
4ouB
Pourlesalimentspanésoucouvertsdesauce,évitezlemodeGrilà
température élevée. Grillez l'aliment avec la peau vers le bas en premier.
Vérifiezfréquemmentlesalimentslorsquevousutilisezlegril.
Poitrines de poulet
désossées
Gril à basse température
Cuissonaufour
4ouB
Abaissezlesalimentsdanslefourpourunecuissonplusen
profondeur/moinsgrillée,etdisposez-lesplushautdanslefourpour
les griller et les brunir davantage.
Dindeentière Cuissonaufour 1 ou 2
Necouvrezpas;utilisezunustensilemoinsprofond,
commeunelèchefrite.
Poitrine de dinde Cuissonaufour 2ou3
Necouvrezpas;utilisezunustensilemoinsprofond,
commeunelèchefrite.
Poisson Gril à basse température
6ouC(épaisseurde1/2po
[1,3cm]oumoins)
5ouB(épaisseur>1/2po
[1,3cm])
Vérifiezfréquemmentlesalimentslorsquevousutilisezlegril.
Mets mijotés Cuissonaufour 3ou4
Aliments préparés surgelés
Pizzas,produitsdepommes
deterre,croquettesde
poulet,hors-d'œuvresurune
seule grille
Cuissonaufour 4ou5 Utilisez un ustensile de cuisson au fini brillant.
Pizzas,produitsdepommes
deterre,croquettesde
poulet,hors-d'œuvresur
plusieurs grilles
Cuissonaufour
Cuissonàconvection
3et5
2,4et6
Utilisez un ustensile de cuisson au fini brillant.
Déplacezlégèrementlesalimentspendantlacuissonpourgarantir
une cuisson uniforme.
*Lorsdelacuissonsimultanéedequatreétagesdegâteau,
décalezlesmoulescommelemontrel'illustrationàdroite,de
façon à ce qu'ils ne soient pas un au-dessus de l'autre.
Faitesbiencuirelesalimentspouréviterlesmaladiesd'origine
alimentaire. Pour connaître la température minimale et
sécuritairedesaliments,visitezlesiteWebàl'adresse
www.IsItDoneYet.gov.Assurez-vousd'utiliserunthermomètre
pour connaître la température des aliments.
REMARQUE :Pouraccélérerlepréchauffage,améliorer
l'efficacitédufouretobtenirunrendementdecuissonoptimal,
retirez les grilles non utilisées.
Positionnement
à l'avant
Positionnement
à l'arrière

29-5979
21
Assurez-vousquetouslesboutonssontenpositiond'arrêtetquetouteslessurfacessontfroidesavantdenettoyerlefour.
Nettoyage du four
ENTRETIEN ET NETTOYAGE : Nettoyage du four
Surfaces extérieures du four
N'utilisezpasdenettoyantpourfour,denettoyantabrasif,de
nettoyantliquidefort,delained'acier,detamponàrécureren
plastiqueoudepoudreàrécurerpournettoyerl'extérieurou
l'intérieur du four. Utilisez un savon doux et de l'eau ou une
solution à parts égales de vinaigre et d'eau. Rincez le four à
l’eauclaireetasséchez-leavecunchiffondouxetpropre.Lors
dunettoyagedessurfaces,assurez-vousqu'ellessontàla
température ambiante et qu'elles ne sont pas exposées aux
rayonsdirectsdusoleil.
Leséclaboussuresdemarinade,jusdefruit,saucetomate
etjusdecuissoncontiennentdesélémentsacidesqui
peuventcauserunedécoloration.Ellesdoiventdoncêtre
immédiatementessuyéesetrincées.
Grilles de four
Touteslesgrillesdefourpeuventêtrenettoyéesàlamain
avecunnettoyantabrasifoudelalained'acier.Lesgrilles
noirescompatiblesavecl'autonettoyagepeuventêtrelaissées
danslefourpendantl’autonettoyage,sansrisquerd'être
endommagées.Lesgrillesdefournickeléesargentéesne
doiventpasêtrelaisséesdanslefourdurantl'autonettoyage
pour éviter qu'elles ne ternissent. Les grilles laissées dans le
fourpendantl'autonettoyage,quelquesoitleurtype,peuvent
devenir plus difficiles à faire glisser.
Aprèslesavoirsoumisesàunautonettoyage,appliquezde
l'huilevégétalesurunchiffondouxouunessuie-tout,puis
enduisezd'huilelescôtésdroitetgauchedesglissièreset/
oudesgrilles.Celafaciliteraleurglissementlorsquevous
désirerez les sortir du four ou les remettre en place.
Intérieur du four
L'intérieurdevotrenouveaufourpeutêtrenettoyéàlamain
ouenutilisantlesfonctionsdenettoyageàlavapeurou
d'autonettoyage(certainsmodèles).
Leséclaboussuresdemarinade,jusdefruit,saucetomate
etjusdecuissoncontiennentdesélémentsacidesqui
peuventcauserunedécoloration.Ellesdoiventdoncêtre
immédiatementessuyéesetrincées.
Nettoyage manuel
N'utilisezpasdenettoyantpourfour,denettoyantabrasif,de
nettoyantliquidefort,delained'acier,detamponàrécurerou
de poudre à récurer à l'intérieur du four. Utilisez un savon doux
et de l'eau ou une solution à parts égales de vinaigre et d'eau.
Rincezlefouràl’eauclaireetasséchez-leavecunchiffon
douxetpropre.Lorsdunettoyagedessurfaces,assurez-vous
qu'elles sont à la température ambiante et qu'elles ne sont pas
exposéesauxrayonsdirectsdusoleil.
Nettoyage à la vapeur (certains modèles)
Lafonctiondenettoyageàlavapeurestconçuepournettoyer
lessaletéslégèresdansvotrefouràunetempératureinférieure
àcelledel'autonettoyage.
Utilisationdelafonctiondenettoyageàlavapeur:
1.Allumezlefouràlatempératureambiante.
2.Enleveztoutexcédentdesaletéetd'huiledufour.
3.Versezunetassed'eaudanslefonddufour.
4.Fermezetverrouillezlaporte.
5.AppuyezsurlatoucheSteam Clean(nettoyageà
lavapeur),puisappuyezsurlatoucheStart(miseen
marche).
Vousnepouvezpasouvrirlaportependantlecyclede
nettoyageàlavapeurd'uneduréede30minutes.Àlafindu
cycledenettoyageàlavapeur,enleveztoutexcédentd'eau
etessuyezlasaletégorgéed'humiditéquisetrouvesurles
parois et la porte à l'aide d'une éponge.
Autonettoyage (certains modèles)
Lisezlesinstructionsrelativesàl'autonettoyagedufour
au début de ce manuel avant d'utiliser cette fonction.
L'autonettoyageutilisedestempératurestrèsélevéespour
nettoyerl'intérieurdufour.Silefourestmodérémentsale,
programmezuncycled'autonettoyagede3heures.S'ilest
trèssale,programmezuncyclede5heures.Seulesles
grillescompatiblesavecl'autonettoyage(noires)peuvent
êtrelaisséesdanslefourpendantl’autonettoyage,sans
risquerd'êtreendommagées.Touslesautreséléments,y
comprislesgrillesnickelées(argentées),doiventêtreretirés.
Lesgrillesnickeléeslaisséesdanslefourpendantuncycle
d'autonettoyageterniront.Lesgrilleslaisséesdanslefour
pendantl'autonettoyage,quelquesoitleurtype,peuvent
devenir plus difficiles à faire glisser. Reportez-vous à la section
«Grillesdefour»pourdesinstructionssurleurlubrification.
IMPORTANT :Certainsoiseauxsontextrêmementsensibles
auxfuméesdégagéespendantl’autonettoyaged’une
cuisinière.Déplacez-lesdansuneautrepiècebienaérée.
Utilisationdelafonctiond'autonettoyage:
1.Allumezlefouràlatempératureambiante.
2.Enleveztoutexcédentdesaletéetd'huilequise
trouvent à l'intérieur du four et de la porte.
3.Retireztouslesélémentsautresquelesgrillesnoires
compatiblesavecl'autonettoyage,sidésiré.Reportez-
vousàlasection«Nettoyagedelasurfacedecuisson»
pourdéterminersivosgrillespeuventêtreautonettoyées
et pour obtenir des détails importants concernant le
positionnement de la grille.
4.Fermezetverrouillezlaporte.
5.AppuyezsurlatoucheStelf Clean(autonettoyage),
sélectionnezuntempsdenettoyagesituéentre
3et5heures,puisappuyezsurlatoucheStart
(miseenmarche).
Vousnepouvezpasouvrirlaportependantlecycle
d'autonettoyage.Silefourestchaud,vousnepourrezpas
faireglisserleloquet.Àlafinducycled'autonettoyage,laissez
refroidirlefour,déverrouillezlaporteetessuyezlescendres
qui se trouvent dans le four.
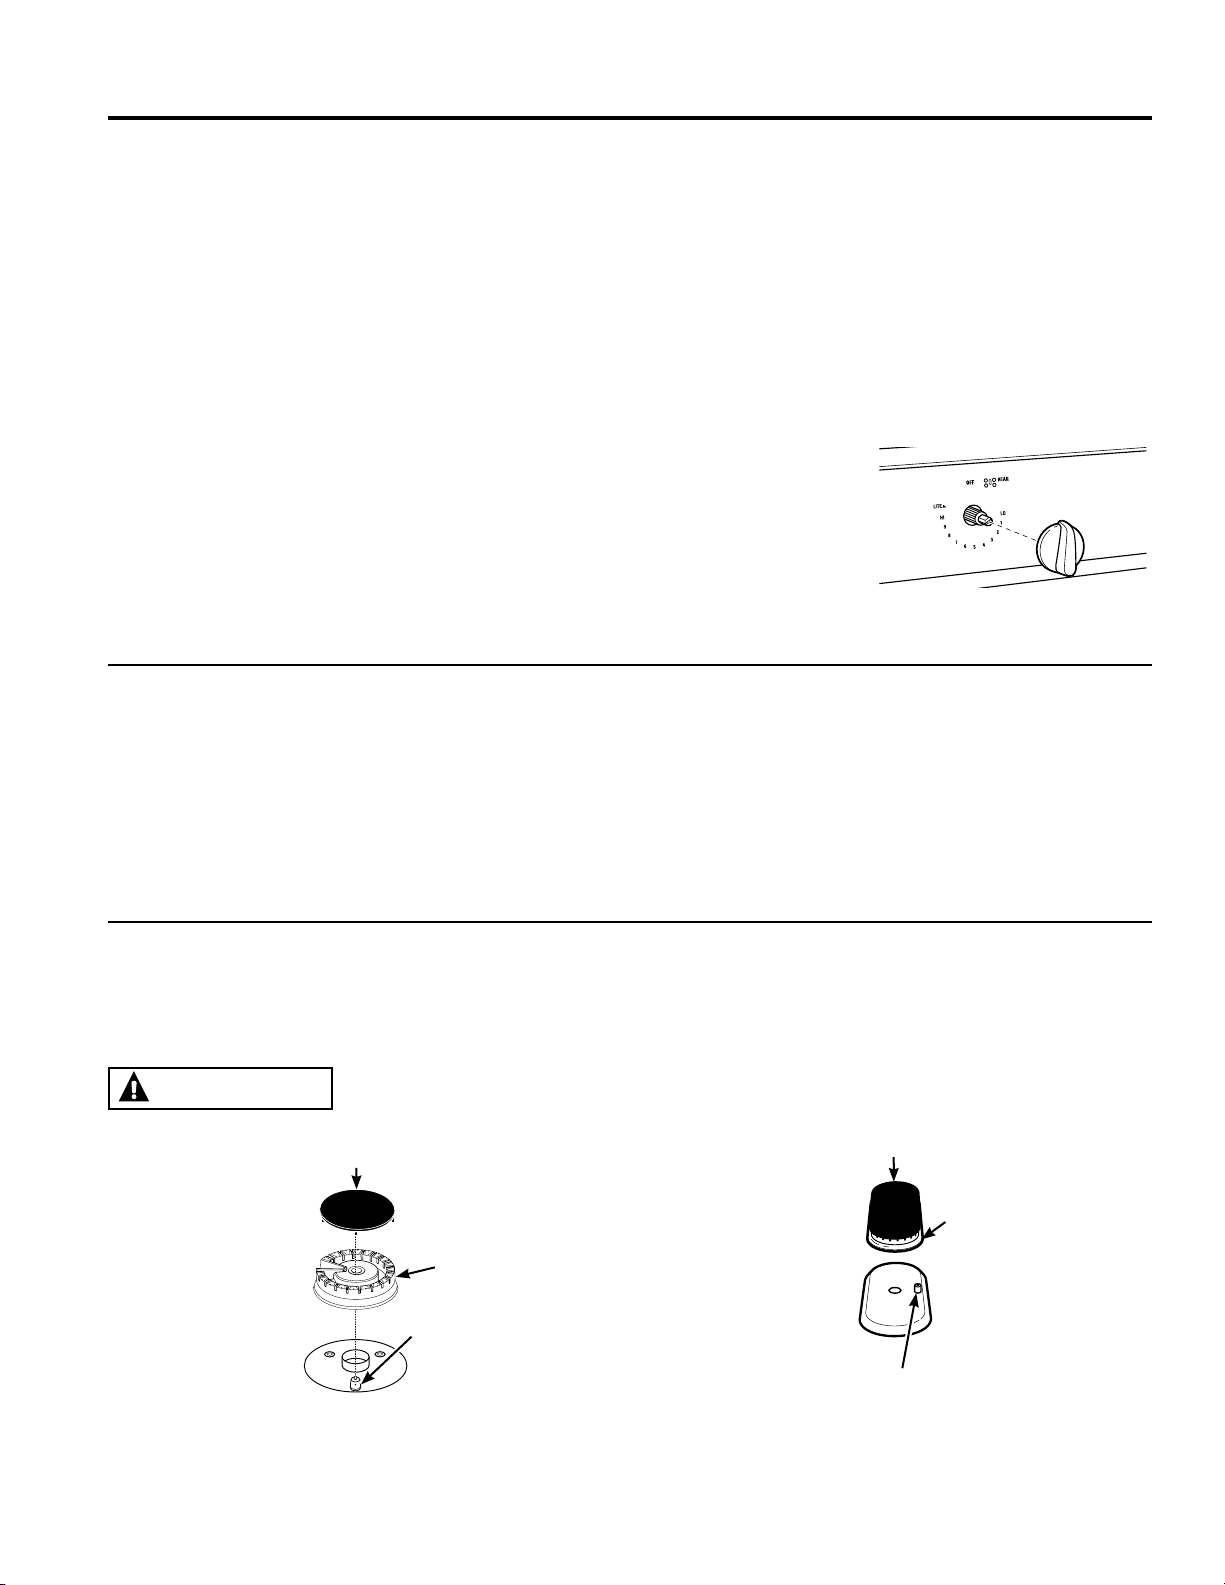
22
29-5979
Tableau de commande et boutons
Aprèschaqueutilisation,essuyezletableaudecommande
avecunchiffonhumide.Pourlenettoyage,utilisezunsavon
doux et de l'eau ou une solution à parts égales de vinaigre et
d'eau.Rincezavecdel'eaufroide.Séchezenpolissantàl'aide
d'unchiffondoux.
N'utilisezpasdenettoyantabrasif,denettoyantliquidefort,de
tamponàrécurerenplastiqueoudenettoyantpourfoursurle
tableau de commande. Ils endommageraient son revêtement.
Surfaces en acier inoxydable (certains modèles)
N'utilisezpasdetamponenlained'acier;ilraieraitlasurface.
Pournettoyerlasurfaceenacierinoxydable,utilisezdel'eau
tièdesavonneuseouunproduitdenettoyageouàpolirpour
acierinoxydable.Essuyeztoujourslasurfacedanslesens
dugrain.Suivezlesinstructionsdunettoyantpoursurfaceen
acierinoxydable.
Lesnettoyantscontenantdel'acideoxaliquecommeBar
KeepersFriendSoftCleanser
MC
permettent d'éliminer la
rouille,leternissementetlespetitsdéfautsdelasurfacedu
four.Utilisezuniquementlesnettoyantsliquidessansgranule
et frottez dans le sens du grain avec une éponge douce et
humide.
Pourtoutequestionconcernantl'achatdeproduitsde
nettoyage,notammentdesnettoyantsetdesagentsde
polissagepourappareilsenacierinoxydable,reportez-vousà
lasection«Assistance/accessoires»audébutdecemanuel.
Pourfaciliterlenettoyage,lesboutonsdecommandepeuvent
être enlevés en les tirant vers vous en ligne droite une fois
qu'ilssontenpositiond'arrêt(OFF).Ne tirez pas sur les
boutonsverslehautoulebasetn'yaccrochezpasd'objets.
Celapeutendommagerl'axedurobinetàgaz.Lesboutons
peuventêtrelavésàlamaindansunesolutionsavonneuse,
ou au lave-vaisselle.
Pourremettrelesboutonsenplaceaprèsleurnettoyage,
alignezletrouàl'arrièredubouton
avec l'arbre du robinet à
gazetpoussez-lejusqu'à
ce qu'il soit solidement
fixé.Touslesboutonssont
interchangeables.
Bouton de brûleur de surface
Nettoyage de la surface de cuisson
ENTRETIEN ET NETTOYAGE : Nettoyage de la surface de cuisson
Surface de cuisson
N'utilisezpasdenettoyantpourfour,denettoyantabrasif,de
nettoyantliquidefort,delained'acier,detamponàrécureren
plastiqueoudepoudreàrécurerpournettoyerlasurfacede
cuisson. Utilisez un savon doux et de l'eau ou une solution
àpartségalesdevinaigreetd'eau.Rincezlefouràl’eau
claireetasséchez-leavecunchiffondouxetpropre.Lors
dunettoyagedessurfaces,assurez-vousqu'ellessontàla
température ambiante et qu'elles ne sont pas exposées aux
rayonsdirectsdusoleil.
Leséclaboussuresdemarinade,jusdefruit,saucetomate
etjusdecuissoncontiennentdesélémentsacidesqui
peuventcauserunedécoloration.Ellesdoiventdoncêtre
immédiatementessuyéesetrincées.
Silemodèledevotrecuisinièredisposed'unesurfacede
cuissonenacierinoxydable,reportez-vousauxinstructions
concernantlenettoyagedessurfacesenacierinoxydable
quisetrouvedanslasection«Tableaudecommandeet
boutons».
Nettoyage des brûleurs de surface
Metteztouteslescommandesenpositiond'arrêt(OFF).Laissezlasurfacedecuissonrefroidiravantd'enleverlesgrilleset
lescomposantsdesbrûleurs.Avantderetirerleschapeauxetlestêtesdebrûleur,remarquezleurtailleetleuremplacement.
Remettez-lesauxmêmesemplacementsaprèslesavoirnettoyés.
Retrait des brûleurs de surface
ATTENTION
Ne tentez pas de retirer le chapeau de brûleur ovale de la tête de brûleur.
Brûleur rond
Lechapeauetlatêtedubrûleurpeuventêtreretirésdela
surface de cuisson et séparés l'un de l'autre.
Brûleur ovale (certains modèles)
Lechapeaudubrûleurestfixéenpermanenceàlatêtedu
brûleur.Lechapeauetlatêtedubrûleurpeuventêtresoulevés
enuneseulepièce.
Chapeau de brûleur
rond (amovible)
Électrode
Tête de brûleur
Chapeau de brûleur
ovale (non amovible)
Tête de
brûleur
ovale
Électrode
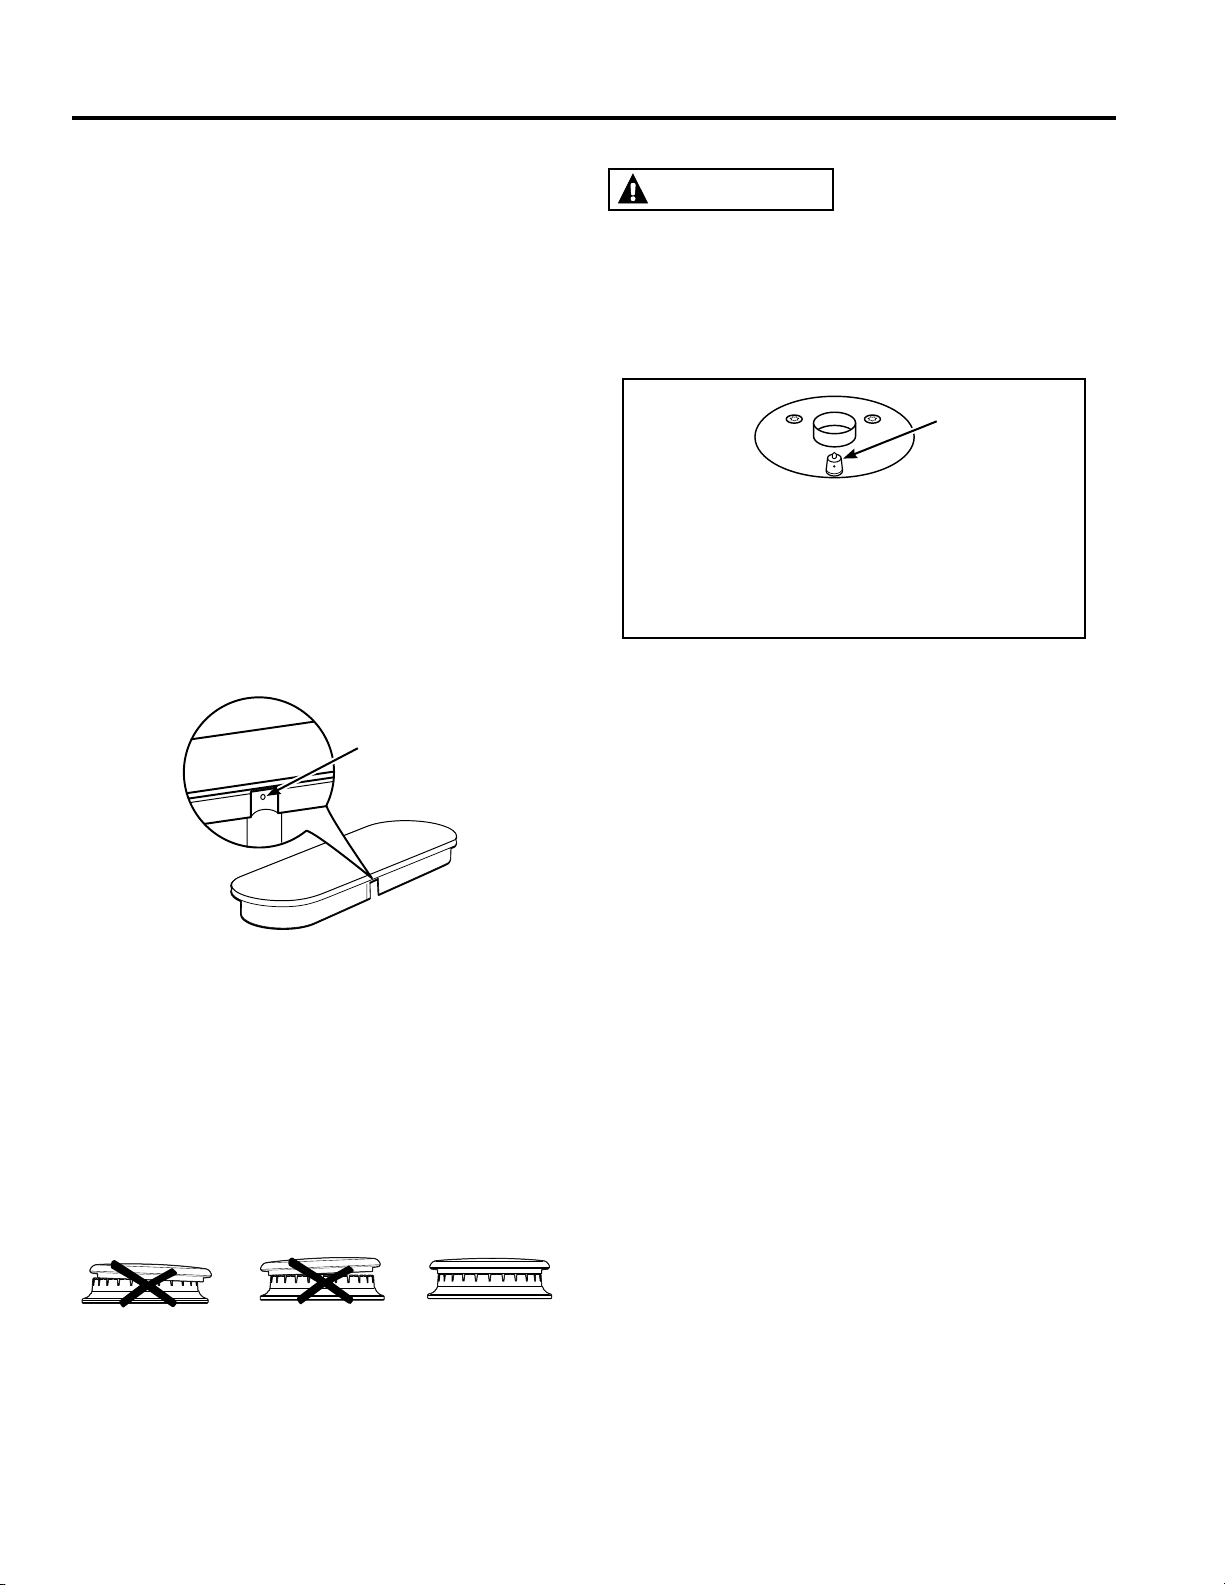
29-5979
23
Nettoyage de la surface de cuisson (suite)
ENTRETIEN ET NETTOYAGE : Nettoyage de la surface de cuisson
Le chapeau du
brûleur est bien
installé.
Le chapeau du
brûleur N'EST PAS
bien installé.
Le chapeau du
brûleur N'EST PAS
bien installé.
Nettoyage des brûleurs de surface (suite)
Nettoyage des chapeaux des brûleurs
Nettoyezleschapeauxdesbrûleursdansdel'eauchaude
savonneuseetrincez-lesavecdel'eaupropre.Vouspouvez
les frotter à l'aide d'un tampon à récurer en plastique pour
retirerlesalimentsbrûlés.Leschapeauxdesbrûleursronds
peuventégalementêtrenettoyésaulave-vaisselle.
Nettoyage des têtes de brûleurs
Nettoyezrégulièrementlestêtesdebrûleur,particulièrement
en cas de grosses éclaboussures qui pourraient obstruer les
orificesdesbrûleurs.Nelesenlevezquelorsqu'ellessont
froides.Nettoyez-lesavecdel'eauchaudesavonneuse.Rincez
avec de l'eau froide. Utilisez une brosse en plastique pour les
tachestenaces.
REMARQUE : N'utilisez pas de laine d'acier ou de tampons à
récurerpournettoyerlespiècesdesbrûleurs,celarisquerait
d'obstruerleursouvertures.Nenettoyezjamaislestêtesde
brûleuraulave-vaisselle.Lesdétergentspourlave-vaisselle
entraînerontladécolorationdestêtesdebrûleur.
Lesorificesdestêtesdebrûleurdoiventêtrepropresentout
temps pour que les flammes soient uniformes.
Desorificesouélectrodesobstruésousalesempêchentles
brûleursdefonctionnercorrectement.
Pourunbonallumage,veillezàcequelepetitorificedela
sectionquiseposesurl’électrodenesoitpasobstrué.Pourle
désobstruer,uneaiguilleàcoudreouunlientorsadésuffisent.
Remise en place des brûleurs de surface
Avantderemettre en placeleschapeauxetlestêtesde
brûleur,ainsiquel'ensembletête/chapeaudubrûleurovaleen
place,secouez-lespourenleverl'excèsd'eau,puisfaites-les
biensécher.
Replacezlestêtesdebrûleurauxemplacements
correspondantàleursdimensions.Assurez-vouschaque
chapeauestcorrectementplacésurlatêtedubrûleur,comme
illustré ci-dessous.
ATTENTION
Ne faites pas fonctionner
la surface de cuisson sans que toutes les pièces des
brûleurs et les grilles ne soient en place.
Toutalimentrenversésurouautourd'uneélectrodedoitêtre
nettoyéavecprécaution.Prenezgardedenepasfrapper
uneélectrodeavecquelquechosededurquipourrait
l'endommager.
L’électrodedel’allumeurparétincelleestexposéelors
duretraitdelatêtedebrûleur.Lorsquevousmettez
unbrûleursurLITE(allumage)touslesbrûleurs
produisentdesétincelles.N'essayezpasdedémonter
oudenettoyerunbrûleurlorsqu'unautrebrûleur
fonctionne.
Les orifices ronds
des têtes de
brûleur doivent
être exempts de
résidus en tout
temps.
Électrode
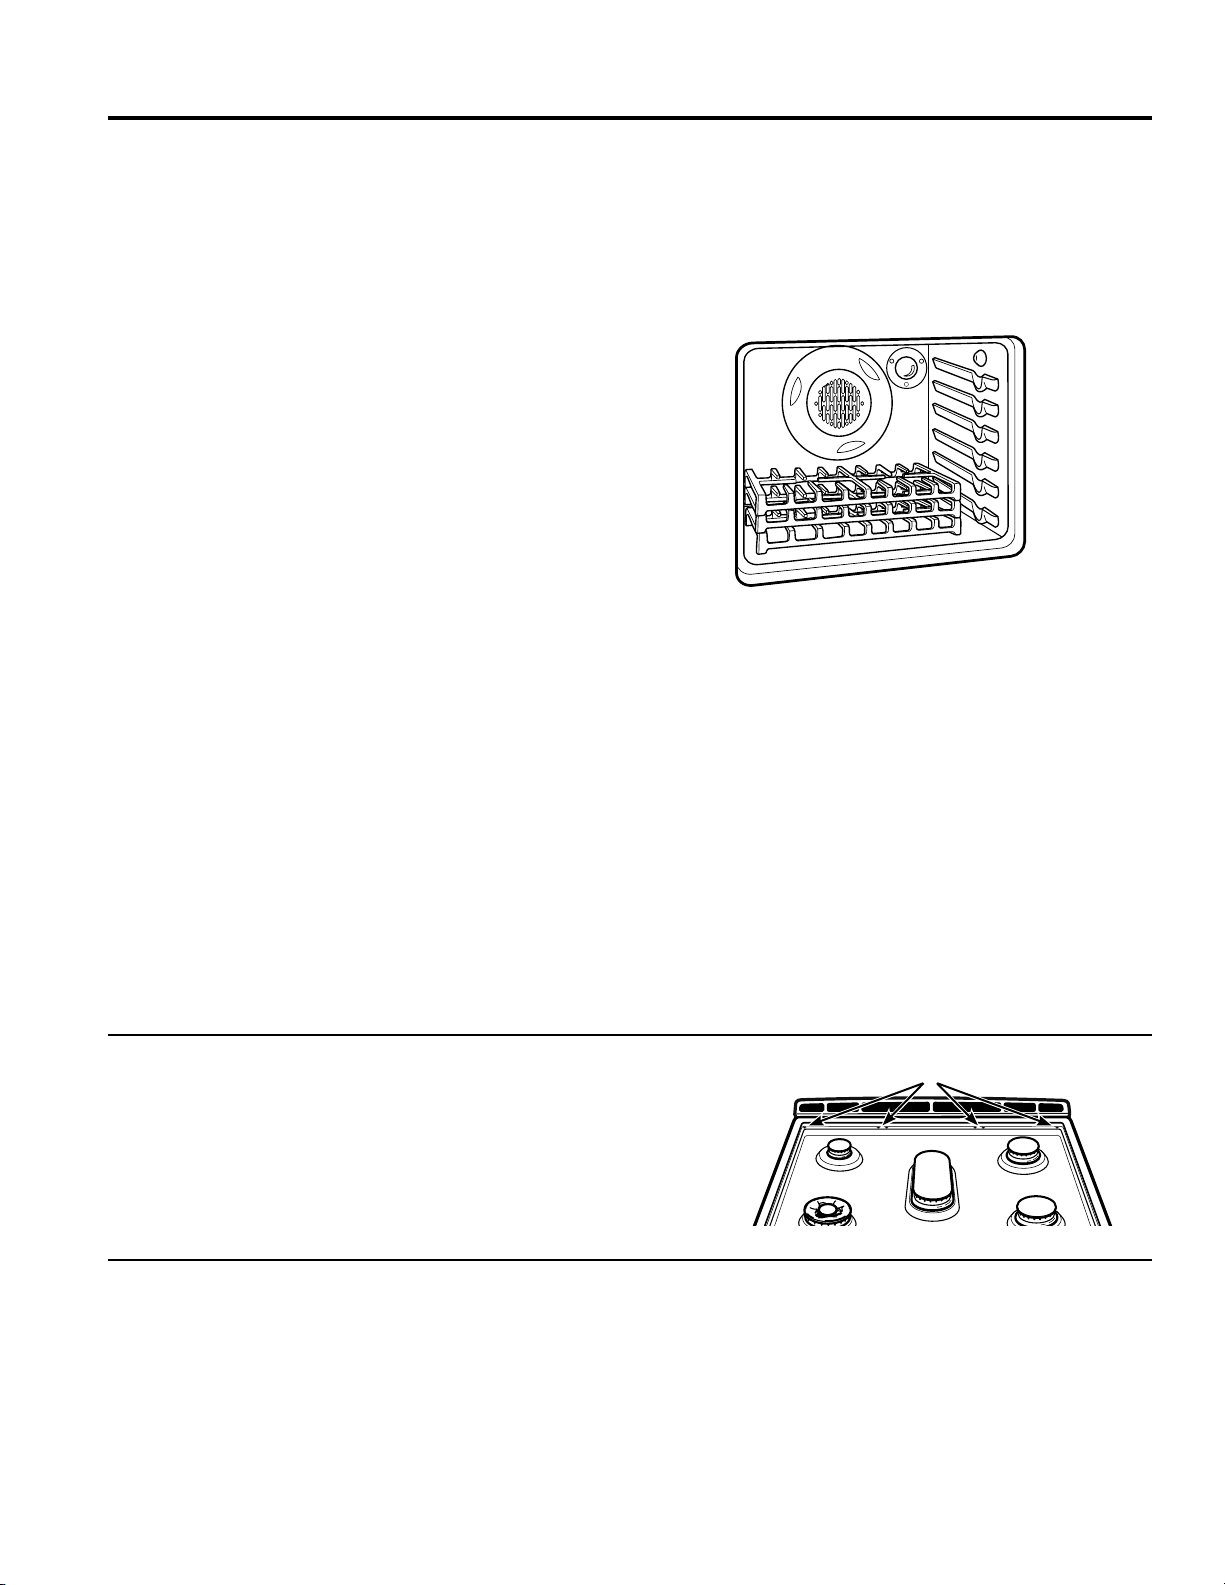
24
29-5979
Nettoyage de la surface de cuisson (suite)
ENTRETIEN ET NETTOYAGE : Nettoyage de la surface de cuisson
Plaques chauffantes (certains modèles)
Plaque chauffante antiadhésive en aluminium :Nettoyezla
plaquechauffanteavecunesolutiondedétergentàvaisselleet
d'eauchaude.Aubesoin,frottezavecuntamponnonabrasif
en plastique.
Précautions à prendre avec la plaque chauffante :
■ Siquelquechoses'estrenversésouslaplaquechauffante,
nettoyez-laaussivitequepossiblepouréviterqueleproduit
renversénebrûlesurlasurfacedecuisson.
■ Nelaissezpaslagraisses’accumulersouslaplaque
chauffante,celaprésenteunrisqued'incendie.Nettoyez
ledessousdelaplaquechauffanteavecdel'eauchaude
savonneuse une fois qu'elle a refroidi.
■ Nelavezpaslaplaquechauffanteaulave-vaisselle.
■ Nenettoyezpaslaplaquechauffantedanslefour
autonettoyant.Celapourraitendommagerlerevêtement
antiadhésif.
Butées des supports de grille de brûleur (certains modèles)
Siuneouplusieursbutéesdessupportsdegrilledelasurface
decuissonsontmanquantesouendommagées,ilestpossible
d'enobtenirdenouvellesenappelantau1-800-561-3344.
Pourinsérerdenouvellesbutées,ilsuffitd'insérerleurpartie
coniquedansl'orificedelasurfacedecuisson,puisdepousser
légèrementlabutéeeneffectuantunmouvementdetorsion.
Butées des supports de grille de brûleur
Grilles de brûleur
Nettoyage manuel
Lesgrillesdebrûleurdoiventêtrelavéesàl'eauchaude
savonneuse,puisrincéesàl'eauclaire.Pourramollirles
alimentsbrûlés,placezlesgrillesdansunesolutioncontenant
¼tasse(60mL)d'ammoniaquedomestiquependantplusieurs
heures.Ensuite,récurezlesgrillesavecuntamponabrasifen
plastiquedansuneeauchaudesavonneuse.Rincezetessuyez.
Autonettoyage (certains modèles)
Sivosgrillesdebrûleurnesontpasdotéesdebutéesen
caoutchoucsurledessous,ellespeuventêtrenettoyées
danslefouraumoyendelafonctiond'autonettoyage.Siles
grillessontdotéesdebutéesencaoutchouc,netentezpas
delesnettoyeraveclafonctiond'autonettoyage.Celapourrait
endommagerlesbutéesencaoutchoucetainsicompromettre
lefonctionnementdesbrûleurs.
Lesgrillesdebrûleurrecouvertesdeporcelainepeuvent
progressivementseternirsivouslesexposezrégulièrement
auxtempératuresatteinteslorsdel'autonettoyage.
Sivotrefourestéquipédegrilles(noires)compatiblesavec
l'autonettoyage,ilestrecommandédesuivrelesinstructions
concernantlepositionnementdesgrillesdanslefour.Sivotrefour
estéquipédegrillesnickelées(argentées),ilestrecommandé
de suivre les instructions concernant leur positionnement sur la
soledufour.Lesgrillesdefournickeléesargentéesnedoivent
pasêtrelaisséesdanslefourdurantl'autonettoyagepouréviter
qu'elles ne ternissent. Les grilles laissées dans le four pendant
l'autonettoyage,quelquesoitleurtype,peuventdevenirplus
difficilesàfaireglisser.Reportez-vousàlasection«Grillesde
four»pourdesinstructionssurleurlubrification.
REMARQUE : Lorsque vous placez ou retirez les grilles de
brûleurdufour,nelesfaitespasglissersurlesgrillesdufour
ousurlasole.Celapourraitendommagerl'émaildesgrillesou
de la sole.
Pour nettoyer vos grilles de brûleur sur des grilles
compatibles avec l'autonettoyage :
1. Utilisezlespositions1,3et5oulespositions2et4.
2. Placezdélicatementuneseulegrilledebrûleurpargrillede
four.
Pour nettoyer vos grilles de brûleur sur la sole du four :
1. Retirez les grilles du four.
2. Placezdélicatementunegrilledebrûleuraucentredela
soledufourenl'orientantfaceau-dessus(voirl'illustration
ci-dessous).Empilezlesgrillesdebrûleurrestantes.Ne
placezpasetn'empilezpaslesgrillesdebrûleurdansune
autre configuration.
Unefoisquelesgrillesdebrûleurontétéplacéesdanslefour,
activezlecycled'autonettoyageensuivantlesinstructionsde
lasection«Nettoyagedufour».
REMARQUE : Faitespreuvedeprudencelorsquevousretirez
lesgrillesdufourunefoisl'autonettoyageterminé.Lesgrilles
peuventêtreencoretrèschaudes.
Unefoislecycled'autonettoyageterminé,lesgrillesdebrûleur
peuvent être soigneusement enlevées. Un résidu de couleur
blanchepeutapparaîtresurlesgrilles.Essuyezcesrésidus
avecuneépongehumide.Sidestracesblanchespersistent,
immergez l'éponge dans une solution à parts égales de
vinaigreetd'eauetessuyezlesgrillesdebrûleurdenouveau.
Lors de la remise en place des grilles sur la surface de
cuisson,assurez-vousdelespositionnercorrectement.Les
grilles doivent reposer correctement sur la surface de cuisson.
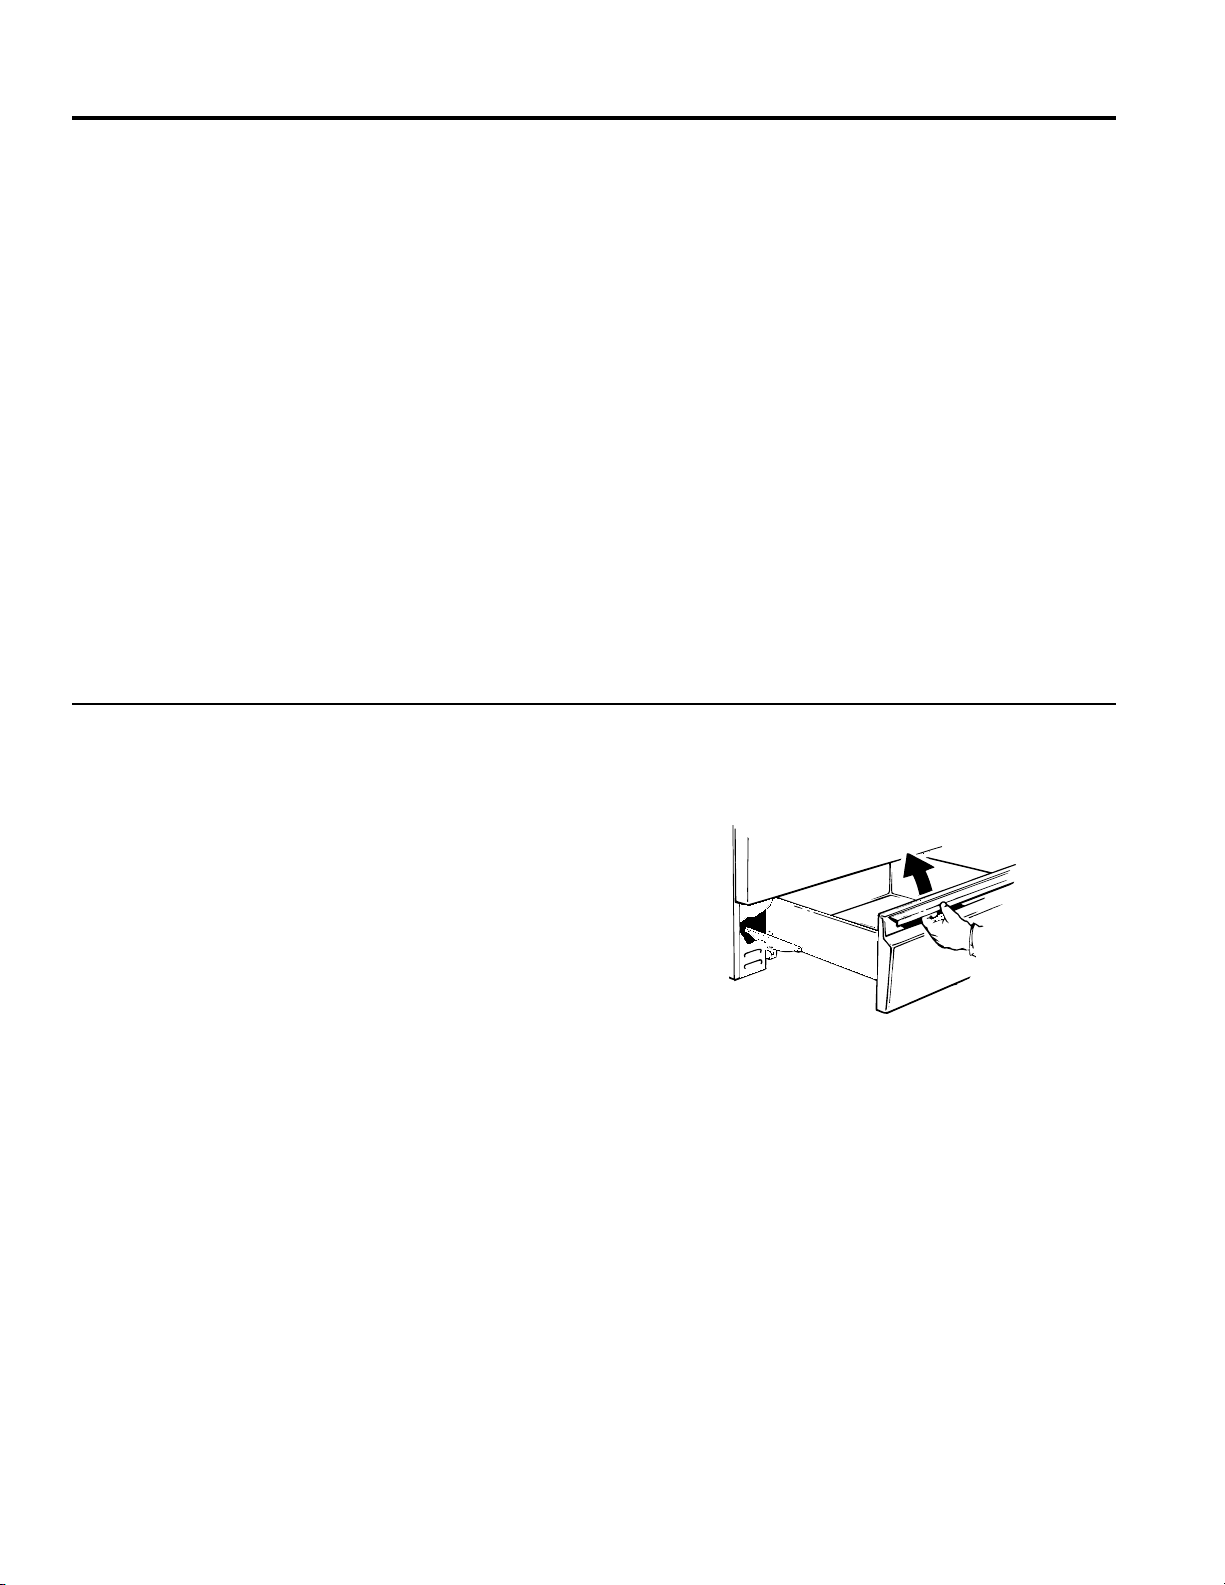
29-5979
25
Nettoyage de la porte et du tiroir
ENTRETIEN ET NETTOYAGE : Nettoyage de la porte et du tiroir
Nettoyage de la porte du four
Nettoyage de l'intérieur de la porte
Ne laissez pas d'eau couler dans les orifices ou les fentes de
la porte.
Essuyezavecdudétergentàvaissellelestachesbrûléesqui
se trouvent sur la vitre. Utilisez un grattoir à lame de rasoir
simplepourlesnettoyer.Essuyezensuitelavitreavecun
chiffonsavonneuxpourenlevertoutrésiduetpourpermettre
desécher.
Lazonesituéeautourdujointpeutêtrenettoyéeàl'aided'un
tampon à récurer en plastique imbibé de savon. Ne frottez et
nenettoyezpaslejointdeporte.Ilprésenteunetrèsfaible
résistance à l'abrasion.
Sivousconstatezquelejointestuséouendommagéde
quelquemanièrequecesoit,ouqu'ils'estdéplacésurlaporte,
vous devez le faire remplacer.
Nettoyage de l'extérieur de la porte
Siunetachepersistesurlesgarnituresdesévents,utilisezun
nettoyantabrasifdouxetlecôtégrattoird'uneépongepourde
meilleursrésultats.N'utilisezpascetteméthodesuraucune
autre surface.
Surfaces en acier inoxydable (certains modèles)
N'utilisezpasdetamponenlained'acier;ilraieraitlasurface.
Pournettoyerlasurfaceenacierinoxydable,utilisezdel'eau
tièdesavonneuseouunproduitdenettoyageouàpolirpour
acierinoxydable.Essuyeztoujourslasurfacedanslesens
dugrain.Suivezlesinstructionsdunettoyantpoursurfaceen
acierinoxydable.
Lesnettoyantscontenantdel'acideoxaliquecommeBar
KeepersFriendSoftCleanser
MC
permettent d'éliminer la
rouille,leternissementetlespetitsdéfautsdelasurfacedu
four.Utilisezuniquementlesnettoyantsliquidessansgranule
et frottez dans le sens du grain avec une éponge douce et
humide.
Pourtoutequestionconcernantl'achatdeproduitsde
nettoyage,notammentdesnettoyantsetdesagentsde
polissagepourappareilsenacierinoxydable,reportez-vousà
lasection«Assistance/accessoires»audébutdecemanuel.
Tiroir de rangement amovible (certains modèles)
Le tiroir de rangement est un bon endroit pour entreposer les
ustensilesdecuisineetdecuisson.Nerangezpasd'objetsen
plastique ou en matériau inflammable dans ce tiroir.
Ilestpossiblederetirerletiroirderangementpournettoyer
souslacuisinière.Nettoyezletiroirderangementàl'aided'un
chiffonoud'uneépongehumides.N’utilisezjamaisdeproduits
abrasifs ni de tampons à récurer.
Retrait du tiroir de rangement :
1. Tirezletiroirversvousjusqu'àsabutéed'arrêt.
2. Soulevezversvousl'avantdutiroirettirez-lepourle
dégageretlesortirdelacuisinière.
Remise en place du tiroir de rangement :
1. Placezlesglissièresdutiroirsurlesbutéesd'arrêtdela
cuisinière.
2. Appuyezdirectementversl'arrièrejusqu'àcequeletiroir
tombe en place.
3. Poussezletiroirjusqu'aufonddelacuisinière.
Il est possible de retirer le tiroir de rangement pour
nettoyer sous la cuisinière.
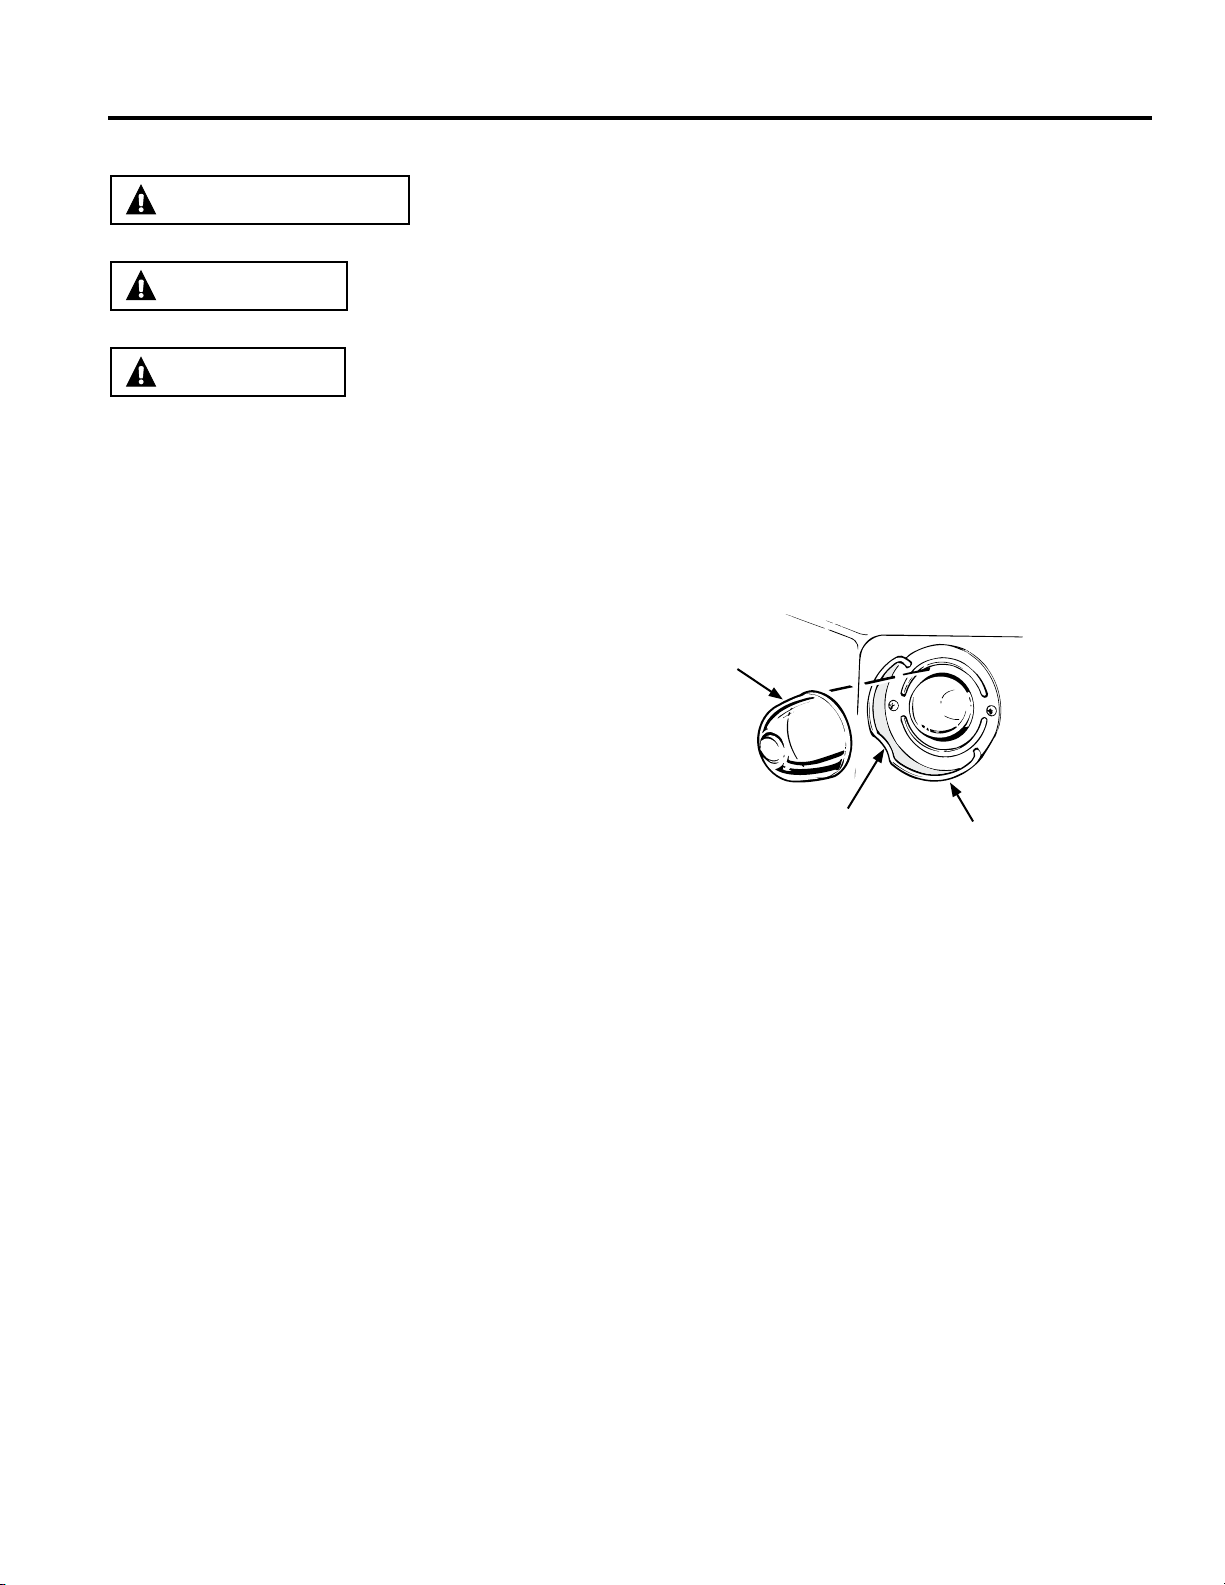
26
29-5979
Entretien
RISQUE DE CHOC ÉLECTRIQUE OU D'INCENDIE :Avantderemplacerl'ampoule,
coupezl'alimentationdufourauniveaudutableaudedistribution(disjoncteursoufusibles).
Lenon-respectdecetteconsignepeutentraînerunchocélectriqueoudesbrûlures.
AVERTISSEMENT
RISQUE DE BRÛLURE : L'ampoule et le couvre-ampoule en verre doivent être retirés
lorsqu'ilssontfroids.Toucherleverrechaudàmainnueouavecunchiffonhumidepeut
causerdesbrûlures.
Avantderemplacerl'ampoule,coupezl'alimentationdelacuisinièreauniveaudutableau
dedistribution(disjoncteursoufusibles).Assurez-vousdelaisserlecouvre-ampouleet
l'ampoulerefroidircomplètement.
L'ampoule du four est protégée par un couvre-ampoule amovible en verre qui est
maintenuparunfilmétalliqueenformed'anse.Retirezlaportedufour,sivousle
souhaitez,pouratteindrelecouvre-ampouleplusfacilement.Reportez-vousàlasection
«Retraitdelaportedufour»pourdesinstructionsdétailléessurlafaçond'enleverla
porte de votre four.
ATTENTION
ATTENTION
Lampe du four
Remplacement de l'ampoule :
1. Coupezl'alimentationélectriquedelacuisinière.
2. Placez votre main sous le couvre-ampoule pour qu'il ne
tombe pas une fois dégagé.
3. Faitesglisserlefilderetenueàproximitédel'encochedu
couverclejusqu'àcequelecouverclesoitlibéré.Ne retirez
aucune vis pour enlever le couvre-ampoule en verre.
4. Remplacezl'ampouleparuneampoulede40Wpour
appareil électroménager. Ne touchez pas l'ampoule
chaude avec vos mains ou un chiffon humide. Ne
retirez l'ampoule que lorsqu'elle est froide.
5. Tenezlecouvre-ampouleenverreau-dessusdelanouvelle
ampoule.
6. Tirezlefilderetenueducouvre-ampoulesituéprèsde
l'encochejusqu'àcequel'encochesurlesupportdu
couvercleducouvre-ampoulesetrouvedansl'encochedu
couvre-ampoule.
7. Rétablissezl'alimentationélectriquedufour.
Fil de retenue du
couvre-ampoule
Encoche
Couvre-ampoule
en verre
ENTRETIEN ET NETTOYAGE : Entretien
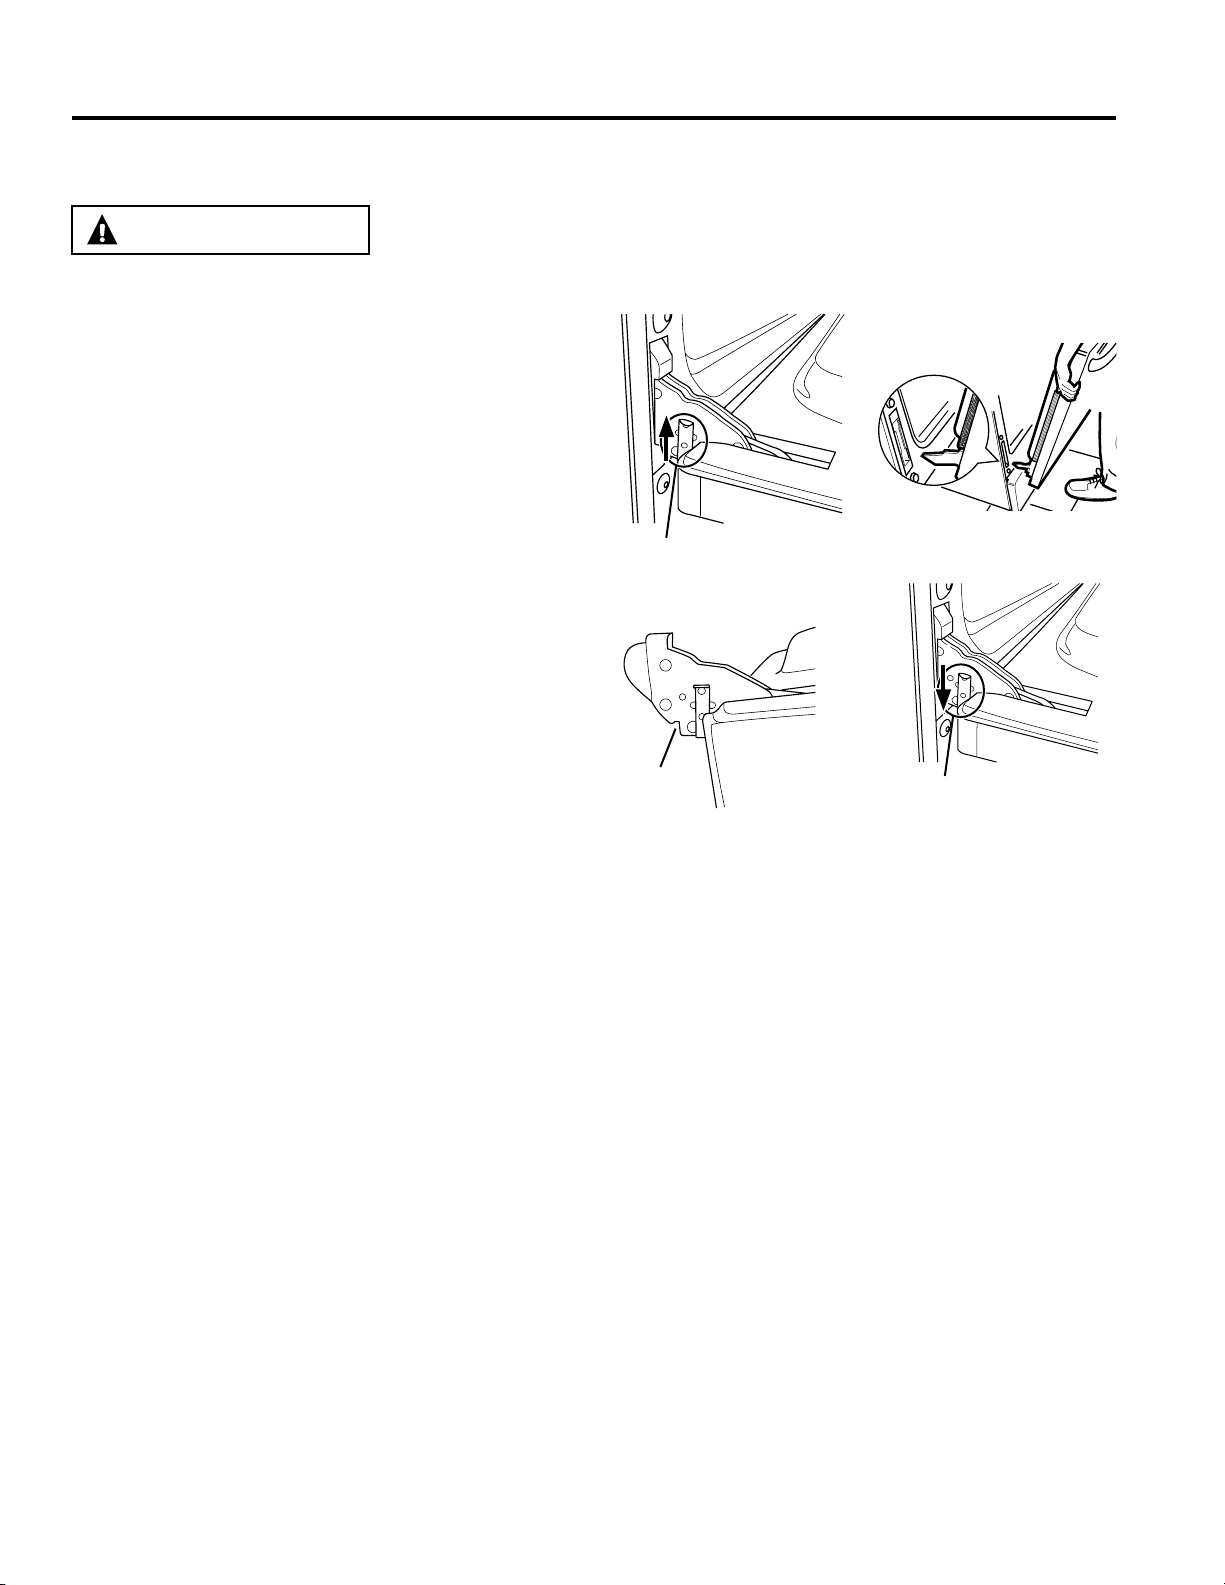
29-5979
27
Entretien (suite)
ENTRETIEN ET NETTOYAGE : Entretien
Retrait de la porte :
1. Ouvrezcomplètementlaportedufour.
2. Surchaquecharnière,faitesglisserleloquetdecharnière
verslehautenvousassurantqu'ils'enclencheenposition
levée.
3. Saisissezfermementlaporteparlesdeuxcôtés,à
proximité de la poignée.
4. Fermezlaportejusqu'àcequelehautdelaportesoità
environ3po(7,6cm)ducadredufour.
5. Soulevezlaporteenladégageantdufourjusqu'àceque
lesbrasdecharnièresortentdesfentesducadredefour.
Remise en place de la porte :
1. Saisissezfermementlaporteparlesdeuxcôtés,à
proximité de la poignée.
2. Aveclaporteinclinéeselonl'angledelapositionderetrait,
faitesreposerlesencochesdesbrasdecharnièregauche
surlebasdesfentesdecharnièregauche.Lesencoches
desbrasdecharnièredoiventêtrebienenplace,dansle
bas des fentes. Répétez la même procédure du côté droit.
3. Ouvrezcomplètementlaporte.Silaportenes'ouvrepas
complètement,lesbrasdescharnièresnereposentpas
correctementdanslesencoches.Soulevezlaporteet
répétez l'étape 2.
4. Poussezlesdispositifsdeverrouillagedecharnièreversle
bas en position de verrouillage.
5. Fermezlaportedufour.
Tirez les dispositifs de verrouillage
de charnière vers le haut pour les
déverrouiller.
Encoche
Poussez les dispositifs de
verrouillage de charnière vers
le bas pour les verrouiller.
Position de retrait
Retrait de la porte du four
Laporteesttrèslourde.Faitesattentionlorsquevouslasoulevezpourlaretirer.Nesoulevezpaslaporteparsapoignée.
Silaporten'estpasretiréecorrectement,lescharnièrespourraientsefermersubitementet
causerdesblessures.Suivezlesinstructionsci-dessouspouréviterlesrisquesdeblessure
pendant le retrait et la réinstallation de la porte du four.
AVERTISSEMENT

28
29-5979
Notes

29-5979
29
OWNERSHIP REGISTRATION
P.O. BOX 1780
MISSISSAUGA, ONTARIO
L4Y 4G1
(FOR CANADIAN CONSUMERS ONLY -
POUR RÉSIDENTS CANADIENS SEULEMENT)
Please place in envelope and mail to:
Veuillez mettre dans une enveloppe et envoyez à :
30
29-5979
CUT ALONG THIS LINE AND RETURN CARD – THANKS
DÉCOUPEZ ICI ET ENVOYEZ LA FICHE – MERCI
For Canadian
Customers
Pour les
consommateurs
canadiens
OWNERSHIP REGISTRATION CERTIFICATE – FICHE D’INSCRIPTION DU PROPRIÉTAIRE
Please register your product to enable us to contact you in
the remote event a safety notice is issued for this product
and to allow for efficient communication under the terms of
our warranty, should the need arise.
REGISTER ON-LINE:
www.geappliances.ca
ENREGISTREMENT SUR INTERNET À :
www.electromenagersge.ca
MAIL TO:
P.O. BOX 1780, MISSISSAUGA
POSTEZ À :
ONTARIO, L4Y 4G1
MR. / M.
MRS. / MME
MISS/MLLE
MS.
FIRST NAME / PRÉNOM
LAST NAME / NOM
STREET NO / N
O
RUE STREET NAME / RUE
APT.NO/APP./RR#
CITY / VILLE
PROVINCE
AREA CODE/
IND. RÉG.
TELEPHONE/TÉLÉPHONE E-MAIL/COURRIEL
DID YOU PURCHASE A SERVICE CONTRACT FOR THIS APPLIANCE?
AVEZ-VOUS ACHETÉ UN CONTRAT DE SERVICE POUR CET APPAREIL ?
YES/OUI
NO/NON
IF YES/SI OUI
: EXPIRATION
Y/A M
D/J
NAME OF SELLING DEALER / NOM DU MARCHAND
INSTALLATION DATE / DATE D’INSTALLATION
Y/A M D/J
CORRESPONDENCE
ENGLISH
CORRESPONDANCE
FRANÇAIS
I do not wish to receive any promotional offers regarding this product.
Je ne désire pas recevoir d’offres promotionnelles concernant ce produit
.
MODEL / MODÈLE
SERIAL / SÉRIE
Veuillez enregistrer votre produit afin de nous permettre de
communiquer avec vous si jamais un avis de sécurité concernant
ce produit était émis et de communiquer facilement avec vous en
vertu de votre garantie, si le besoin s’en fait sentir.
POSTAL CODE/CODE POSTAL

29-5979
31
Notes
32
29-5979
CONSEILS DE DÉPANNAGE
Économisez du temps et de l’argent! Reportez-vous au tableau suivant pour éviter tout appel de service qui ne serait pas
nécessaire.
Problème Causes possibles Solutions
Mon nouveau four ne cuit
pas les aliments comme
mon ancien four
Votre nouveau four est doté d'un système de
cuisson différent de celui de votre ancien four; par
conséquent, il peut cuire les aliments différemment.
Pourlapremièreutilisation,respectezlestemps
et les températures indiqués dans votre recette et
utilisez les positions de grille recommandées dans
leGuidedecuisson.Sivouspenseztoujoursque
votrefourchauffetropounechauffepasassez,
vouspouvezajusterlatempératurevous-même.
Reportez-vousàlasection«Fonctionsspéciales».
Les aliments ne cuisent
pas correctement
Les commandes du four sont mal réglées. Reportez-vousàlasection«Modesdecuisson».
La position de la grille est incorrecte. Reportez-vous au Guide de cuisson.
La grille n'est pas de niveau. Reportez-vous aux instructions d'installation pour
connaîtrelafaçondemettrevotrecuisinièreà
niveau.
Ustensile de cuisson inapproprié ou de dimensions
inadéquates.
Reportez-vous à la section sur les ustensiles de
cuisson.
La température du four doit être ajustée. Reportez-vousàlasection«Fonctionsspéciales».
Les aliments ne grillent
pas correctement
Les commandes du four sont mal réglées. Assurez-vousdesélectionnerlemodedecuissonau
gril approprié. Reportez-vous au Guide de cuisson.
Position de grille inappropriée. Reportez-vous au Guide de cuisson pour des
suggestions sur la position des grilles.
Un ustensile de cuisson inapproprié pour le gril est
utilisé.
Utilisez un ustensile de cuisson conçu pour le gril.
Le papier d'aluminium sur la lèchefrite n'a pas été
installé correctement, ou percez des ouvertures
pour laisser s'écouler la graisse.
Sivousutilisezunefeuilled'aluminiumsur
lalèchefrite,enveloppezcettedernière
hermétiquementetpercezdesfentescorrespondant
à celles de la poêle pour permettre à la graisse de
se drainer.
Température du four trop
chaude ou trop froide
La température du four doit être ajustée. Reportez-vousàlasection«Fonctionsspéciales».
Le four ne fonctionne pas
et/ou l'afficheur indique
qu'il ne fonctionne pas
Un fusible de votre domicile peut être grillé ou le
disjoncteur s’est déclenché.
Remplacezlefusibleouréenclenchezledisjoncteur.
Les commandes du four sont mal réglées. Reportez-vousàlasection«Utilisationdufour».
Le four est en mode sabbat. Assurez-vousquelefourn'estpasenmodesabbat.
Reportez-vousàlasection«Fonctionsspéciales».
L'horloge est désactivée. Reportez-vousàlasection«Commandesdufour»
ou«Fonctionsspéciales».
Bruits de crépitement ou
de craquement
Ces sons proviennent du métal qui chauffe et
refroidit pendant les fonctions de cuisson et
d'autonettoyage.
Celaestnormal.
La cuisinière émet un
cliquetis lorsque j'utilise
le four
Votre four a été conçu pour maintenir avec
précision sa température. Les éléments chauffants
peuvent ainsi émettre plus souvent des clics que
les anciens modèles de four, cela afin d'optimiser la
cuisson, le grillage et l'autonettoyage.
Celaestnormal.
Il arrive que le four
prenne plus de temps
à préchauffer pour
atteindre la même
température
Ustensiles de cuisson, aliments et/ou nombre de
grilles dans le four.
Laquantitéd'ustensilesdecuisson,d'alimentset
de grilles contenus dans le four entraînera des
différencesdanslestempsdepréchauffage.Retirez
les éléments en trop pour diminuer le temps de
préchauffage.
Conseils de dépannage ... Avant de contacter le service de dépannage
29-5979
33
Problème Causes possibles Solutions
La lampe du four ne
fonctionne pas
L'ampoule est mal serrée ou elle est
grillée.
Resserrez ou remplacez l'ampoule. Reportez-vous à la section
«Entretien»poursavoircommentremplacerl'ampoule.
L'autonettoyage ne
fonctionne pas
La température du four est trop élevée
pour programmer l'autonettoyage.
Laissez le four refroidir.
Les commandes du four sont mal
réglées.
Reportez-vousàlasection«Nettoyagedufour».
Fumée excessive pendant
l'autonettoyage
Saleté ou graisse excessive. Appuyezsurtouche Cancel/Off (annuler/arrêt).Laissezla
température du four redescendre en dessous de la température
dedéverrouillage.Nettoyezl'excèsdesaletéetreprogrammez
l'autonettoyage.
Le four n'est pas propre
après l'autonettoyage
Les commandes du four sont mal
réglées.
Reportez-vousàlasection«Nettoyagedufour».
Le four était très sale. Nettoyezleséclaboussuresimportantesavantdelancer
l'autonettoyage.Lesfourstrèssalespeuventnécessiterun
secondautonettoyageouunautonettoyagepluslong.
Forte odeur de brûlé
ou d'huile provenant de
l'évent
Cela est normal pour un nouveau four
et disparaît avec le temps.
Pouraccélérerceprocessus,programmezunautonettoyage
d'aumoins3heures.Reportez-vousàlasection«Nettoyagedu
four».Ceciesttemporaire.
Fumée excessive en mode
de cuisson au gril
Les aliments sont trop près du brûleur. Abaissezlagrilledanslefour.
Le verrou de la porte ne
s'ouvre pas
La température à l'intérieur du four
n'est pas redescendue en dessous de
la température de déverrouillage.
AppuyezsurlatoucheCancel/Off(annuler/arrêt).Laissezla
température du four redescendre en dessous de la température
de déverrouillage.
Le message « LOCK
DOOR » (verrouiller
la porte) clignote sur
l'afficheur
L'autonettoyage ou le nettoyage à la
vapeur a été sélectionné, mais la porte
n'est pas verrouillée.
Verrouillezlaportedufour.
La lettre « F— » suivie
d'un chiffre ou d'une lettre
clignotent sur l'afficheur
Il s'agit d'un code d'erreur de fonction. AppuyezsurlatoucheCancel/Off(annuler/arrêt).Laissezle
fourrefroidirpendantuneheure.Rallumezlefour.Silecode
d'erreurs'affichedenouveau,coupezl'alimentationdufour
pendantaumoins30secondes,puisrétablissez-la.Silecode
d'erreurréapparaît,contactezunservicededépannage.
L'horloge clignote à la
suite d'une panne de
courant
Coupure de courant ou surtension Remettezl'horlogeàl'heure.Silefourétaitencoursd'utilisation,
vousdevezlereprogrammerenappuyantsurlatouche
Cancel/Off (annuler/arrêt),enremettantl'horlogeàl'heureeten
reprogrammantlafonctiondecuissonchoisie.
Le verrouillage des
commandes est activé
SiLOC ON(verrouillé)s'affiche,celasignifiequeles
commandesdelacuisinièresontverrouillées.Désactivez
cette fonction pour utiliser le four. Reportez-vous à la section
«Commandesdufour».
Les brûleurs de surface ne
s'allument pas
La fiche de la cuisinière n'est pas
complètement insérée dans la prise
électrique.
Assurez-vousquelaficheélectriqueestbranchéesuruneprise
soustension,correctementmiseàlaterre.
L'alimentation en gaz n'est pas
raccordée ou n'est pas ouverte.
Consultezlesinstructionsd'installationfourniesavecvotre
cuisinière.
Un fusible de votre domicile peut être
grillé ou le disjoncteur s’est déclenché.
Remplacezlefusibleouréenclenchezledisjoncteur.
Les pièces des brûleurs n'ont pas été
replacées correctement.
Reportez-vousàlasection«Entretienetnettoyage».
Les fentes du brûleur près de
l'électrode, ou le port rond de l'allumeur
sur le brûleur ovale sont peut-être
obstrués.
Retirezlesbrûleursetnettoyez-les.Vérifiezautourdel'électrode
s'ilyadelagraisseoudesalimentsbrûlés.Reportez-vousàla
section«Entretienetnettoyage».
Résidus d'aliments sur l'électrode Polissezlégèrementl'emboutplatdel'électrodeavecunelimeà
onglesoudupapierdeverrejusqu'àcequ'ildeviennebrillant.
Conseils de dépannage ... Avant de contacter le service de dépannage
CONSEILS DE DÉPANNAGE
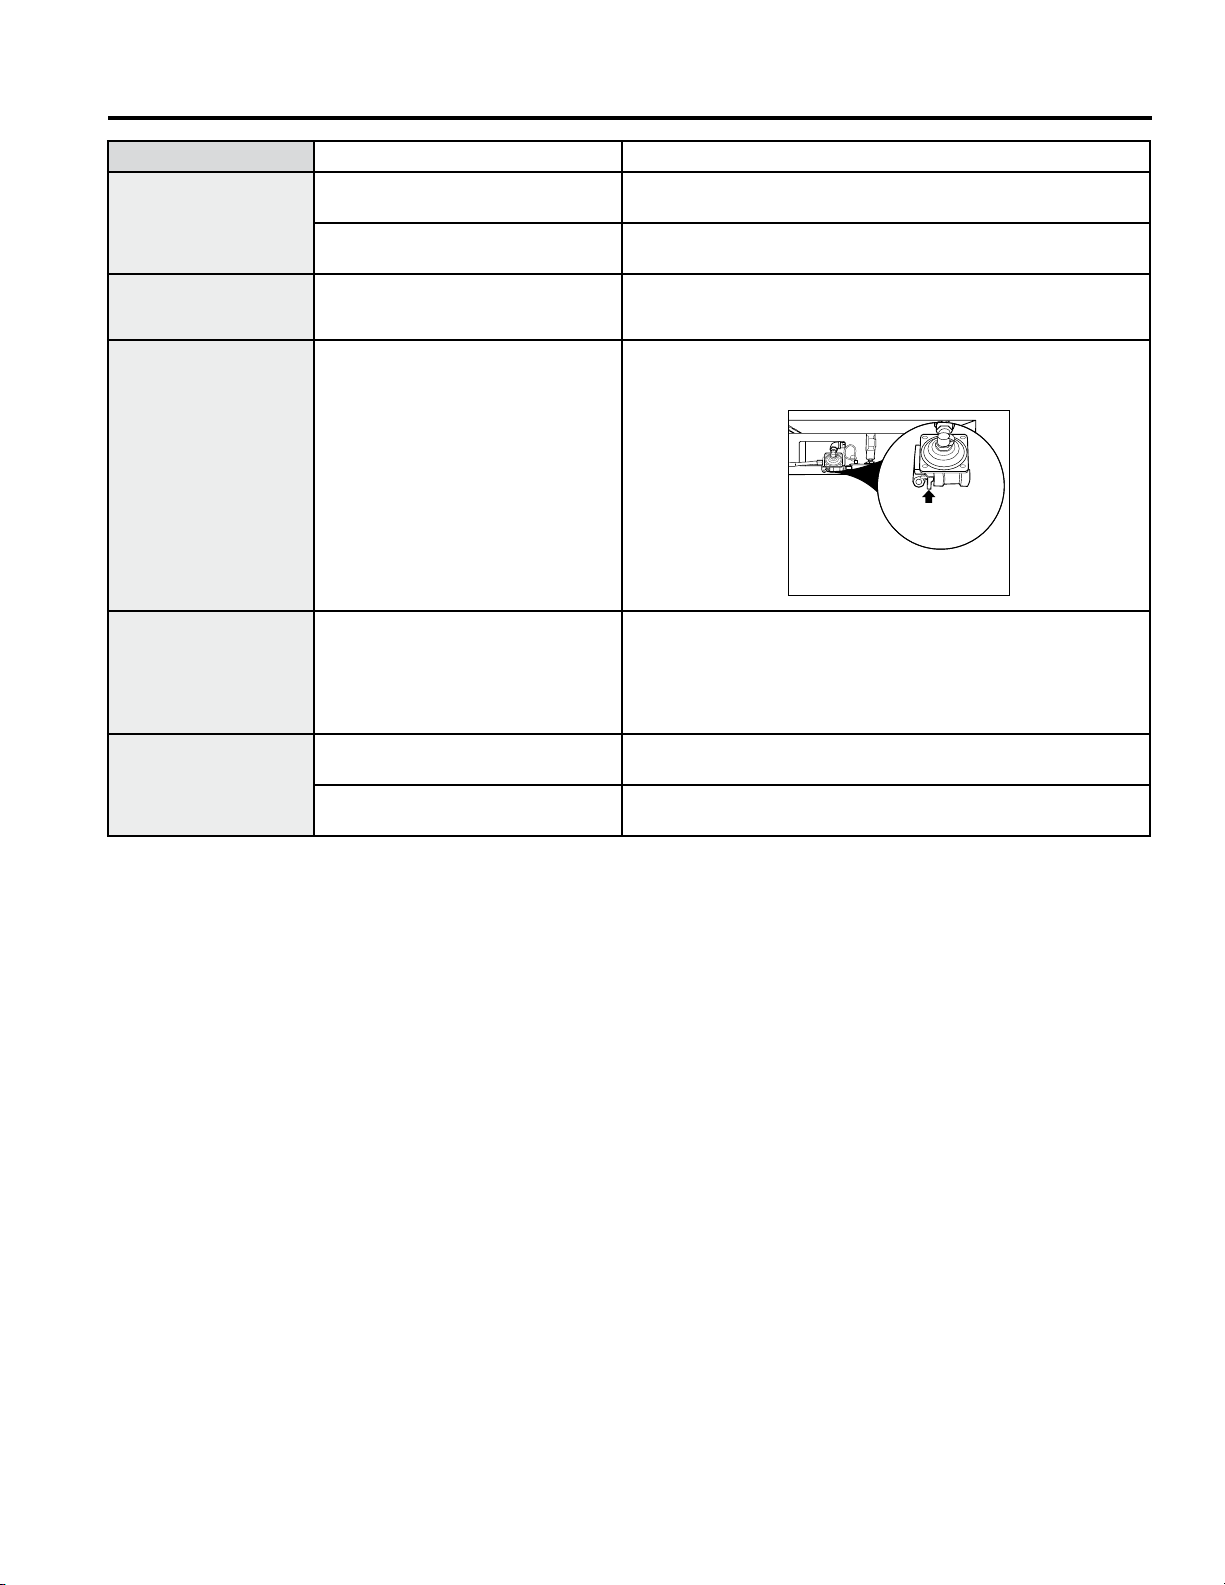
34
29-5979
Conseils de dépannage ... Avant de contacter le service de dépannage
CONSEILS DE DÉPANNAGE
Problème Causes possibles Solutions
Les brûleurs supérieurs
ne brûlent pas
uniformément
Le brûleur n'est pas bien installé. Assurez-vousqueleschapeauxdebrûleursontinstalléscorrectement.
Reportez-vousàlasection«Entretienetnettoyage».
Les orifices latéraux du brûleur
peuvent être bouchés.
Retirezlesbrûleurspourlesnettoyer.Reportez-vousàlasection
«Entretienetnettoyage».
Les flammes des
brûleurs sont trop
grandes ou jaunes
Le rapport air/gaz est inapproprié. Silacuisinièreestraccordéeaugazpropane,contactezletechnicien
quiainstallévotrecuisinièreoueffectuélaconversion.
Les brûleurs de surface
s'allument mais les
brûleurs du four et du
gril ne s'allument pas
L'alimentation en gaz des brûleurs
du four a peut-être été fermée.
Le robinet d'alimentation en gaz du four est situé sur le régulateur de
gaz,àproximitéduraccorddelaconduitedegazdelacuisinière.
Localisez-le et abaissez le levier.
La vitre de ma porte de
four semble teintée ou
présente un arc-en-ciel.
Le verre intérieur de la porte du four
est revêtu d'une barrière thermique
qui réfléchit la chaleur dans le four
pour prévenir la perte de chaleur et
pour garder l'extérieur de la porte
froide pendant la cuisson.
Celaestnormal.Danscertainesconditionsd'éclairageetselonl'angle
devue,ilestpossibledepercevoiruneteinteoulescouleursde
l'arc-en-ciel.
Le tiroir ne glisse pas
bien ou se bloque
Le tiroir n'est pas bien aligné. Ouvrez-leaumaximum,puisrepoussez-lecomplètement.
Reportez-vousàlasection«Entretienetnettoyage»delacuisinière.
Le tiroir est trop chargé ou sa charge
est mal répartie.
Diminuezlepoidsducontenudutiroirourépartissezmieuxle
contenu.
Levier
illustré en
position
fermée.
TIREZ POUR OUVRIR.
Modèles à brûleurs scellés