

2
3
en-us
Table of contents
en-us Operating instructions
(
Safety Definitions 6
(
IMPORTANT SAFETY INSTRUCTIONS 7
Risk of fire, electrical shock, or serious injury 7
GROUNDING INSTRUCTIONS 8
Safe Operation 8
Child Safety 9
Proper Care and Maintenance 9
ƒ
Causes of Damage 10
*
Getting Started 11
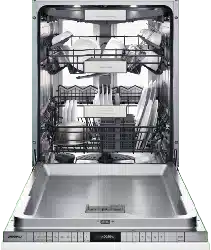
Appliance overview 11
Operating panel 12
Dishwasher interior components 12
Info button 12
Time setting 12
Switching on the appliance for the first time 13
Settings 14
+
Water softening system / special salt 15
Water hardness table 15
Adjusting the water softening system 15
Using special salt 16
Detergent with a salt component 16
Switching off water softening system 16
,
Rinse Aid 16
Adding rinse aid 16
Setting the amount of rinse aid used 17
Switching off rinse aid refill indicator 17
-
Loading the Dishwasher 18
Dishware material 18
Glass and silverware damage 18
Loading the racks 19
Recommended loading pattern 19
Loading the silverware basket 20
Rack accessories 21
Unloading the dishwasher 24
Adjusting the height of the rack 24
Upper rack with side levers 24
Removing/Installing third rack 25
Removing/Installing upper rack* 26
Removing/Installing lower rack 27
.
Detergent 28
Adding detergent 28
Combination detergent 29
/
Dishwasher Cycles 30
0
Dishwasher Cycle Options 31
Intensive Zone 31
Power 31
Half Load 31
Extra Dry 31
Wash Cycle Information 32
1
Operating the Dishwasher 33
Protection against unintentional operation 33
Operating the touch buttons 33
Opening the door 33
Changing the settings 33
AquaSensor 34
Time display 34
Sensor setting 34
extraDry 34
Eco forecast 34
Auto Power Off 34
EmotionLight 34
Remaining time projection 35
infoLight 35
Changing start wash cycle 35
Tone volume 35
Button volume 35
Child-proof lock 35
Greeting 36
Factory setting 36
Switching the appliance on 36
Delay start time 36
Wash cycle end 36
Switching off the appliance 37
Interrupting the wash cycle 37
Terminating the wash cycle 37
Changing the wash cycle 37
2
Care and Maintenance 38
Cleaning the dishwasher 38
Special salt and rinse aid 38
Filters 38
Spray arms 40
Drain pump 40
Preparing your unit for vacation 41
Winterizing your unit 41

4
en-us
3
Troubleshooting 41
Error message 41
Fault table 42
4
Customer Service 49
‡
Statement of Limited Product Warranty 49
What this Warranty Covers & Who it Applies to: 49
How Long the Warranty Lasts 49
Repair/Replace as Your Exclusive Remedy 50
Out of Warranty Product 50
Warranty Exclusions 50
How to Obtain Warranty Service 51
5
Installation and connection 51
Parts included 51
Safety instructions 51
Delivery 52
Technical specifications 52
Installation 52
Drain connection 52
Water supply connection 52
Hot water connection 53
Electrical connection 53
Removing the appliance 53
Transporting the appliance 54
Securing the appliance against frost 54

5
en-us
&RQJUDWXODWLRQVDQG7KDQN<RXIURP*DJJHQDX
3KRQH
0DLQ6WUHHW6XLWH
,UYLQH&$
7KDQN\RXIRUVHOHFWLQJD*DJJHQDXGLVKZDVKHU<RXKDYHMRLQHGWKHPDQ\FRQVXPHUV
7KLVPDQXDOZDVZULWWHQZLWK\RXUVDIHW\DQGFRQYHQLHQFHLQPLQGDQGWKHLQIRUPDWLRQFRQWDLQHGKHUHLQLVYHU\LPSRUWDQW
7ROHDUQHYHQPRUHDERXW\RXUGLVKZDVKHUDQGDYDLODEOHDFFHVVRULHVDVZHOODVPDQ\RWKHUWRSTXDOLW\
3OHDVHFRQWDFWXVLI\RXKDYHDQ\TXHVWLRQVRUFRPPHQWV
ZKRGHPDQGTXLHWDQGVXSHULRUSHUIRUPDQFHIURPWKHLUGLVKZDVKHUV
:HKLJKO\UHFRPPHQGWKDW\RXUHDGWKLVPDQXDOEHIRUH\RXXVH\RXUGLVKZDVKHUIRUWKHILUVWWLPH
*DJJHQDXDSSOLDQFHVYLVLWRXUZHEVLWHDWZZZJDJJHQDXXVDFRP
*DJJHQDX
86$
LQIR#JDJJHQDXXVDFRP
ZZZJDJJHQDXXVDFRP
6
en-us Safety Definitions
(
Safety Definitions
Safety Definitions
9 WARNING
This indicates that death or serious injuries may
occur as a result of non-observance of this
warning.
9 CAUTION!
This indicates that minor or moderate injuries may
occur as a result of non-observance of this
warning.
NOTICE: This indicates that damage to the appliance
or property may occur as a result of non-compliance
with this advisory.
Note: This alerts you to important information and/or
tips.
7
9 IMPORTANT SAFETY INSTRUCTIONS
READ AND SAVE THESE INSTRUCTIONS
(
IMPORTANT SAFETY INSTRUCTIONS
This dishwasher is provided with Installation
Instructions and this Use and Care Manual.
Read and understand all instructions before
using the dishwasher.
This dishwasher is intended for use up to a
maximum altitude of 13,000 ft (4,000 meters)
above sea level.
To reduce the risk of fire, electrical shock,
or serious injury, observe the following:
Risk of fi re, el ect r i cal shock, or seri ous injury
9 WARNING
Risk of injury or death!
Misuse of the dishwasher can result in
serious injury or death. Do not use the
dishwasher in any way not covered in this
manual or for any purpose other than
those explained in the following pages.
9 WARNING
Risk of injury!
Severe injury and/or product damage
could result from the use of unauthorized
service technicians or non-original
replacement parts. All repairs must be
performed by an authorized service
technician using only original equipment
factory replacement parts.
9 WARNING
Risk of electrical shock or fire!
Electrical shock or fire could result if the
electrical supply for the dishwasher
covered in this manual is incorrectly
installed or if the dishwasher has been
improperly grounded. Do not use the
dishwasher covered in this manual unless
you are certain the electrical supply has
been correctly installed and the
dishwasher has been properly grounded.
9 WARNING
Health hazard!
Never use harsh chemicals to clean your
dishwasher. Some bleach-based products
can damage your dishwasher and may
present health hazards!

9 IMPORTANT SAFETY INSTRUCTIONS
READ AND SAVE THESE INSTRUCTIONS
8
GROUNDING INSTRUCTIONS
This appliance must be grounded to a metal,
permanent wiring system or an equipment
grounding conductor must be run with the
circuit conductors and connected to the
equipment grounding terminal or lead on the
dishwasher. See the Installation Instructions
included with this dishwasher for more
information on electrical requirements.
9 WARNING
Risk of electric shock!
This appliance must be grounded. In the
event of a malfunction or breakdown,
grounding will reduce the risk of electric
shock by providing a path of least
resistance for electric current. This
appliance is equipped with a cord having
an equipment-grounding conductor.
Improper connection of the equipment-
grounding conductor can result in risk of
electric shock. Check with a qualified
electrician if you are in doubt whether the
appliance is properly grounded.
Safe Operation
Use this dishwasher only for its intended
function, which is the washing of household
dishware and kitchenware rated as dishwasher
safe.
Use only detergents or rinsing agents
recommended for use in a dishwasher, and
keep them out of the reach of children.
9 CAUTION!
When loading items to be washed:
■ Locate sharp items so they are not
likely to damage the door seal.
■ Load knives and other sharp utensils
with their HANDLES UP to reduce the
risk of cut-type injuries.
■ Do not wash plastic items unless they
are marked “dishwasher safe” or the
equivalent. For plastic items not so
marked, check the manufacturer’s
recommendations.
■ Do not operate your dishwasher unless
all enclosure panels are in place.
■ Do not tamper with or override
controls and interlocks.
Do not abuse, sit or stand on the door or dish
racks of the dishwasher.

9
9 IMPORTANT SAFETY INSTRUCTIONS
READ AND SAVE THESE INSTRUCTIONS
9 WARNING
Risk of injury!
To avoid risk of injury, always use caution
when opening the door during or
following a wash cycle as hot water or
steam may escape. Do not fully open the
door until water noises have stopped and
steam has subsided.
To reduce risk of injury, do not allow
children to play in or on the dishwasher.
When children become old enough to
operate the appliance, it is the
responsibility of the parents/legal
guardians to ensure the children are
instructed in safe practices by qualified
persons.
NSF/ANSI 184 Certified residential
dishwashers are not intended for licensed
food establishments.
Child Safety
To reduce risk of injury, do not allow children
to play in or on the dishwasher.
When children become old enough to operate
the appliance, it is the responsibility of the
parents/legal guardians to ensure the children
are instructed in safe practices by qualified
persons.
Proper Care and Maintenance
9 WARNING
Risk of explosion!
Under certain conditions, hydrogen gas
may be produced in a hot water system
that has not been used for two weeks or
more. Hydrogen gas is explosive. Before
using a dishwasher that is connected to a
hot water system that has been unused
for two weeks or longer, turn on all hot
water faucets and let the water flow from
each for several minutes. This will release
any accumulated hydrogen gas. As the
gas is explosive, do not smoke or use an
open flame during this time.
Remove the dishwasher door to the washing
compartment when removing an old
dishwasher for service or discarding.
To avoid floor damage and possible mold
growth, do not allow wet areas to remain
around or under the dishwasher.
Note: To avoid dishwasher damage, do not
allow water to remain in your dishwasher
systems through extended periods of freezing
temperatures. Freezing temperatures can
damage the water fill valve and potentially
other components of your dishwasher.
NOTICE: It is highly recommended for the
end user to become familiar with the
procedure to shut off the incoming water
supply and the procedure to shut off the
incoming power supply. See the Installation
Instructions or contact your installer for more
information.

10
en-us Causes of Damage
State of California Proposition 65 Warning:
9 WARNING
This product can expose you to chemicals
including vinyl chloride, which is known
to the State of California to cause cancer
and birth defects or other reproductive
harm. For more information go to
www.P65Warnings.ca.gov.
ƒ
Causes of Damage
Causes of Damage
NOTICE: ▯Never use steam cleaning products to clean
your dishwasher. The manufacturer will not be liable
for the possible damages or consequences.
▯ To avoid possible dishwasher damage, do not use
harsh chemicals, abrasive cleaners, scouring pads
(metal or plastic), or abrasive cloths/paper towels to
clean your dishwashers exterior door panel. Your
dishwasher's exterior door panel can be damaged by
doing so.
▯ To avoid dishwasher damage, do not load the
dishwasher with paper products, plastic bags,
packing materials or anything other than normal,
dishwasher safe dishware and kitchenware.
▯ Protect your dishwasher from the elements. Protect
against freezing to avoid possible damage to the fill
valve. Damage caused by freezing is not covered by the
warranty.
11
Getting Started en-us
*
Getting Started
Getting Start ed
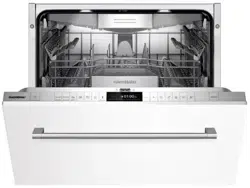
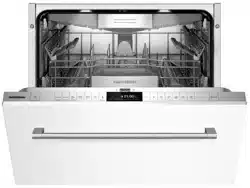
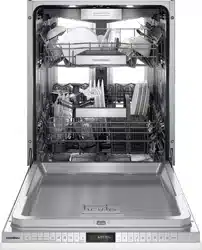
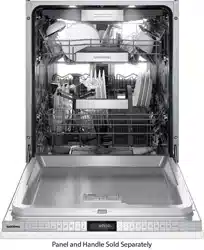
Appliance overview
67$57
UHVHWVHF
VHF
K
PLQ
UHVHWVHFVHFW

12
en-us Getting Started
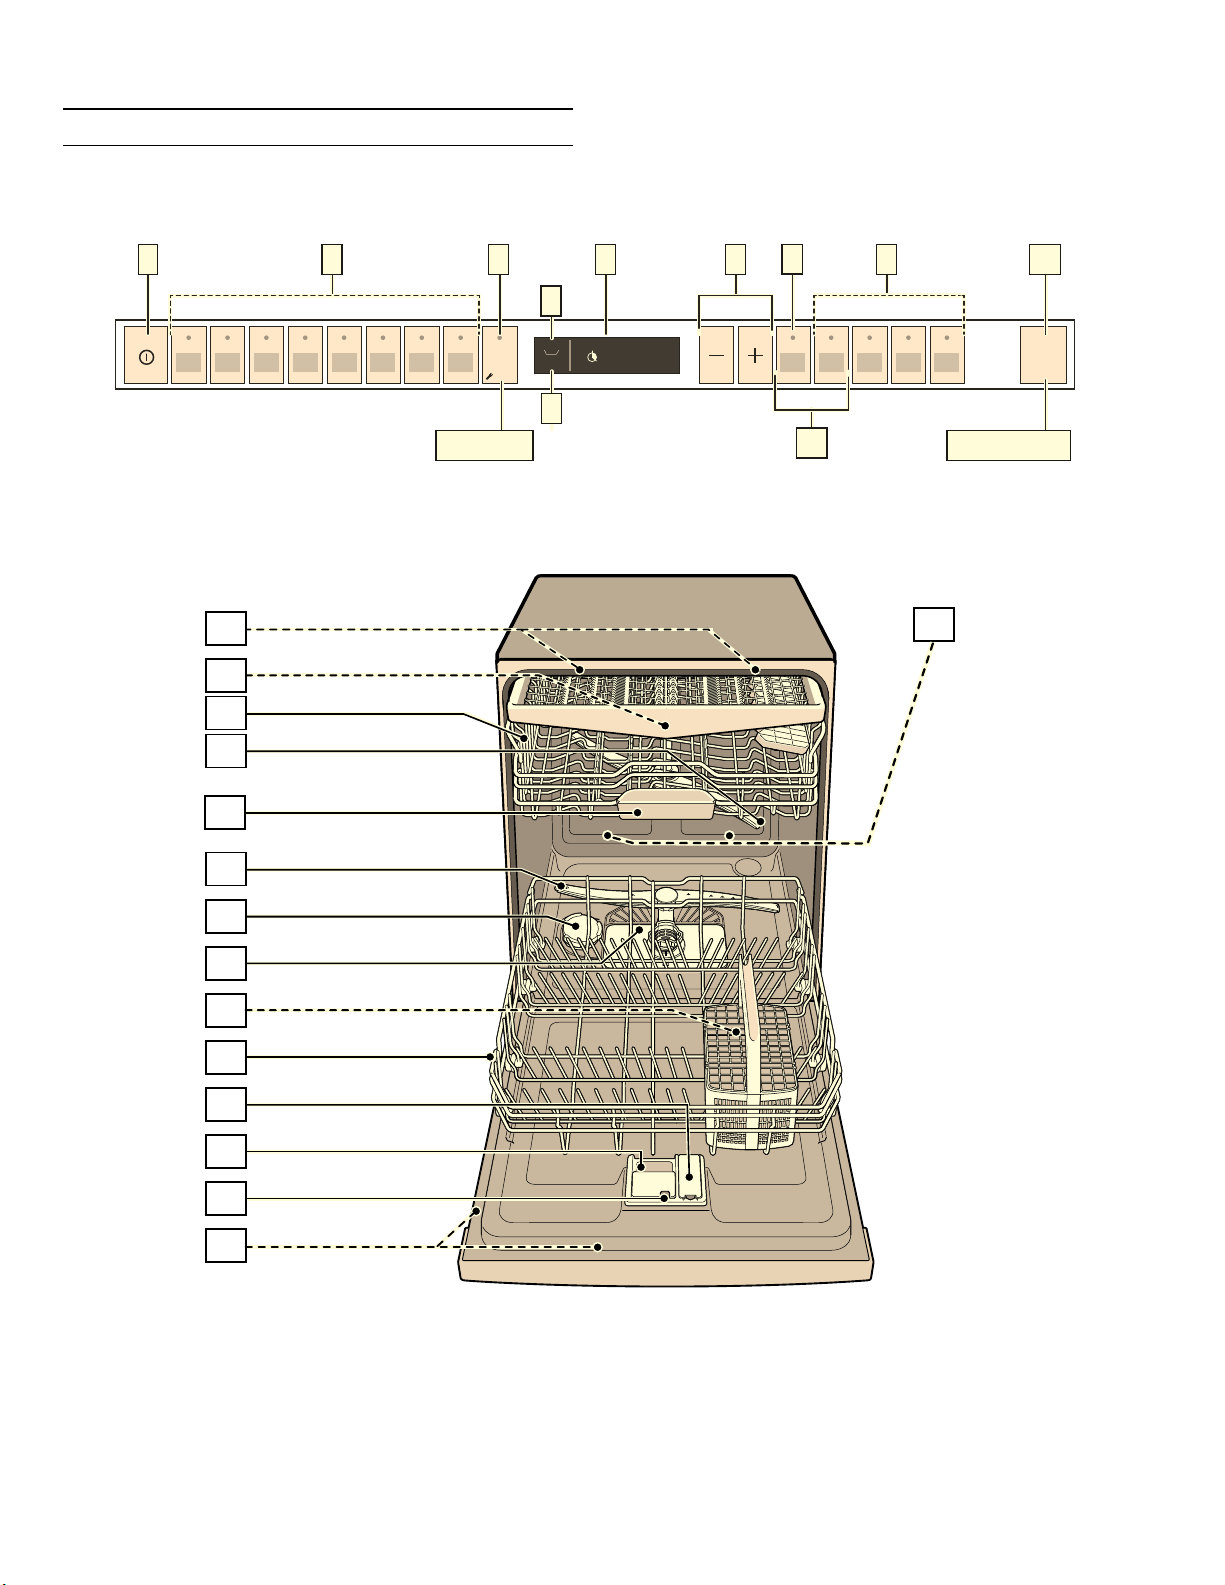
The numbers stated below refer to the overview images
on the previous page of this manual.
Operating panel
Note: Some of the wash cycles and options will vary by
model.
Dishwasher interior components
* optional feature which may or may not be included with
your dishwasher.
Info button (
Info but t on
The Info button ( can be used to display additional wash
cycle information.
1. Press the Info button (8.
2. Press the wash cycle button.
Information on the selected wash cycle is indicated
on the display window at the top @.
3. To leave, press Info button ( 8.
Time setting
Ti me set t i ng
When the appliance is switched on for the first time, the
time starts at 12:00 o’clock.
Set the time as follows:
1. Open the door.
2. Switch on ON/OFF switch (.
3. Press Info button ( 8 for 3 seconds until the
following text is indicated on the display window at
the top @:
Scroll with < >
Set with - +
Leave with t 3 sec.
4. Keep pressing button > )* until the time setting is
indicated on the display window at the top @.
5. Make the setting with setting buttons + - X. If the
selection buttons + - X are held down, the set
values are changed in 10-minute increments.
6. Press and hold the Info button (8 for 3 seconds.
The selected setting has now been stored.
Note: If the appliance was disconnected from the power
supply for a prolonged period, the time starts at 12:00
o’clock. Set the time.
( On/Off button
0 Wash cycles**
8 Info button (
@ Digital display
H Rinse aid refill indicator
P Salt refill indicator
X Selection buttons
` Delay start button
h Wash cycle options**
)" START button
)* < > button
1" Interior light *
1* Third rack*
12 Upper rack
1: Upper spray arm
1B Detergent tab tray
1J Lower spray arm
1R Dispenser for special salt
1Z Filters
1b Silverware basket *
1j Lower rack
9" Rinse aid dispenser
9* Detergent dispenser
92 Lock for detergent dispenser
9: Rating plate

13
Getting Started en-us
Switching on the appliance for the first
time
When the dishwasher is switched on for the first time,
you are taken directly to the settings for switching on
the appliance for the first time. The following text is
indicated on the display window at the top @:
Scroll with < >
Set with + -
Leave with t 3 sec.
The required settings for switching on the appliance for
the first time are listed in the table below.
Change the setting as follows:
1. Keep pressing button > )* until the required setting
is displayed.
2. Make the selection with setting buttons + - X.
3. Press and hold the Info button (8 for 3 seconds.
The selected setting has now been stored.
Settings
Switching on the appliance for
the first time
Factory setting Infotext
by pressing Info button (
Language American English Language selection.
Time format 24h 12h or 24h.
Time setting 12:00 Set the current time.
Water soft setting °E 0 - 8 soft Setting water hardness. When using Multitabs, select the
lowest setting.
Rinse aid setting Level 5 Amount of rinse aid affects drying.

14
en-us Getting Started
Settings
The dishwasher has been preset with certain settings
for your convenience. You can change these factory
setting.
Change the setting as follows:
1. Open the door.
2. Switch on ON/OFF switch (.
3. Press Info button ( 8 for 3 seconds until the
following text is indicated on the display window at
the top @:
Scroll with < >
Set with - +
Leave with t 3 sec.
4. Keep pressing button > )* until the required setting
is displayed.
5. Make the selection with setting buttons + - X.
6. Press and hold the Info button ( 8 for 3 seconds.
The chosen setting has now been stored.
You have the option of resetting all changed settings
back to the original factory settings.
Note: When you reset your dishwasher to the factory
settings, you are taken directly to the settings for
switching on the appliance for the first time.
Setting Factory setting Infotext
by pressing Info button (
Time setting 12:00 Set the current time.
Time format 24h 12h or 24h.
Time display Time Show end of wash cycle with display "Finish in" or "Finish at".
Language American English Language selection.
Water hardness °E 0 Setting water hardness. When using Multitabs, select the lowest
setting.
Rinse aid disp. Level 5 Amount of rinse aid affects drying. When using Multitabs, select
setting 0.
Sensor setting Standard Adjustment of soiling detection for optimum cleaning result.
Extra dry Off Improved drying for glasses and plasticware.
Eco forecast Off Show the water and energy consumption.
Auto Power Off Off Appliance automatically switches off at end of rinsing process.
Emotion Light * On Interior light.
Front display * On The front display can be selected.
Remaining time proj. * On While wash cycle is running, status information is projected onto
floor.
Infolight * On Light is projected to signal an active wash cycle.
Start wash cycle Auto 130-150° F When switching on, the last selected wash cycle appears.
Tone volume * Level 2 Volume of signal at end of wash cycle.
Button volume Level 2 Volume when using buttons.
Child-proof lock * Off Activated child-proof lock impedes opening of door.
Eco drying * On Door opens automatically at the end of the wash cycle.
Greeting On When switching on the appliance, the brand logo can be
deselected.
Factory setting Reset Resetting to the factory setting.
* depending on the features of your dishwasher
15
Water softening system / special salt en-us
+
Water softening system / special salt
Water softening system / special salt
To ensure good rinsing results, the dishwasher requires
soft water, i.e. water which is low in lime, otherwise
limescale will be deposited on the utensils and interior
container. Tap water above 7° dH (1.2 mmol/l) must be
softened. The water is softened with special salt
(regeneration salt) in the water softening system
of the dishwasher. The setting and therefore the
required amount of salt depends on the degree of
hardness of your tap water (see following water
hardness table).
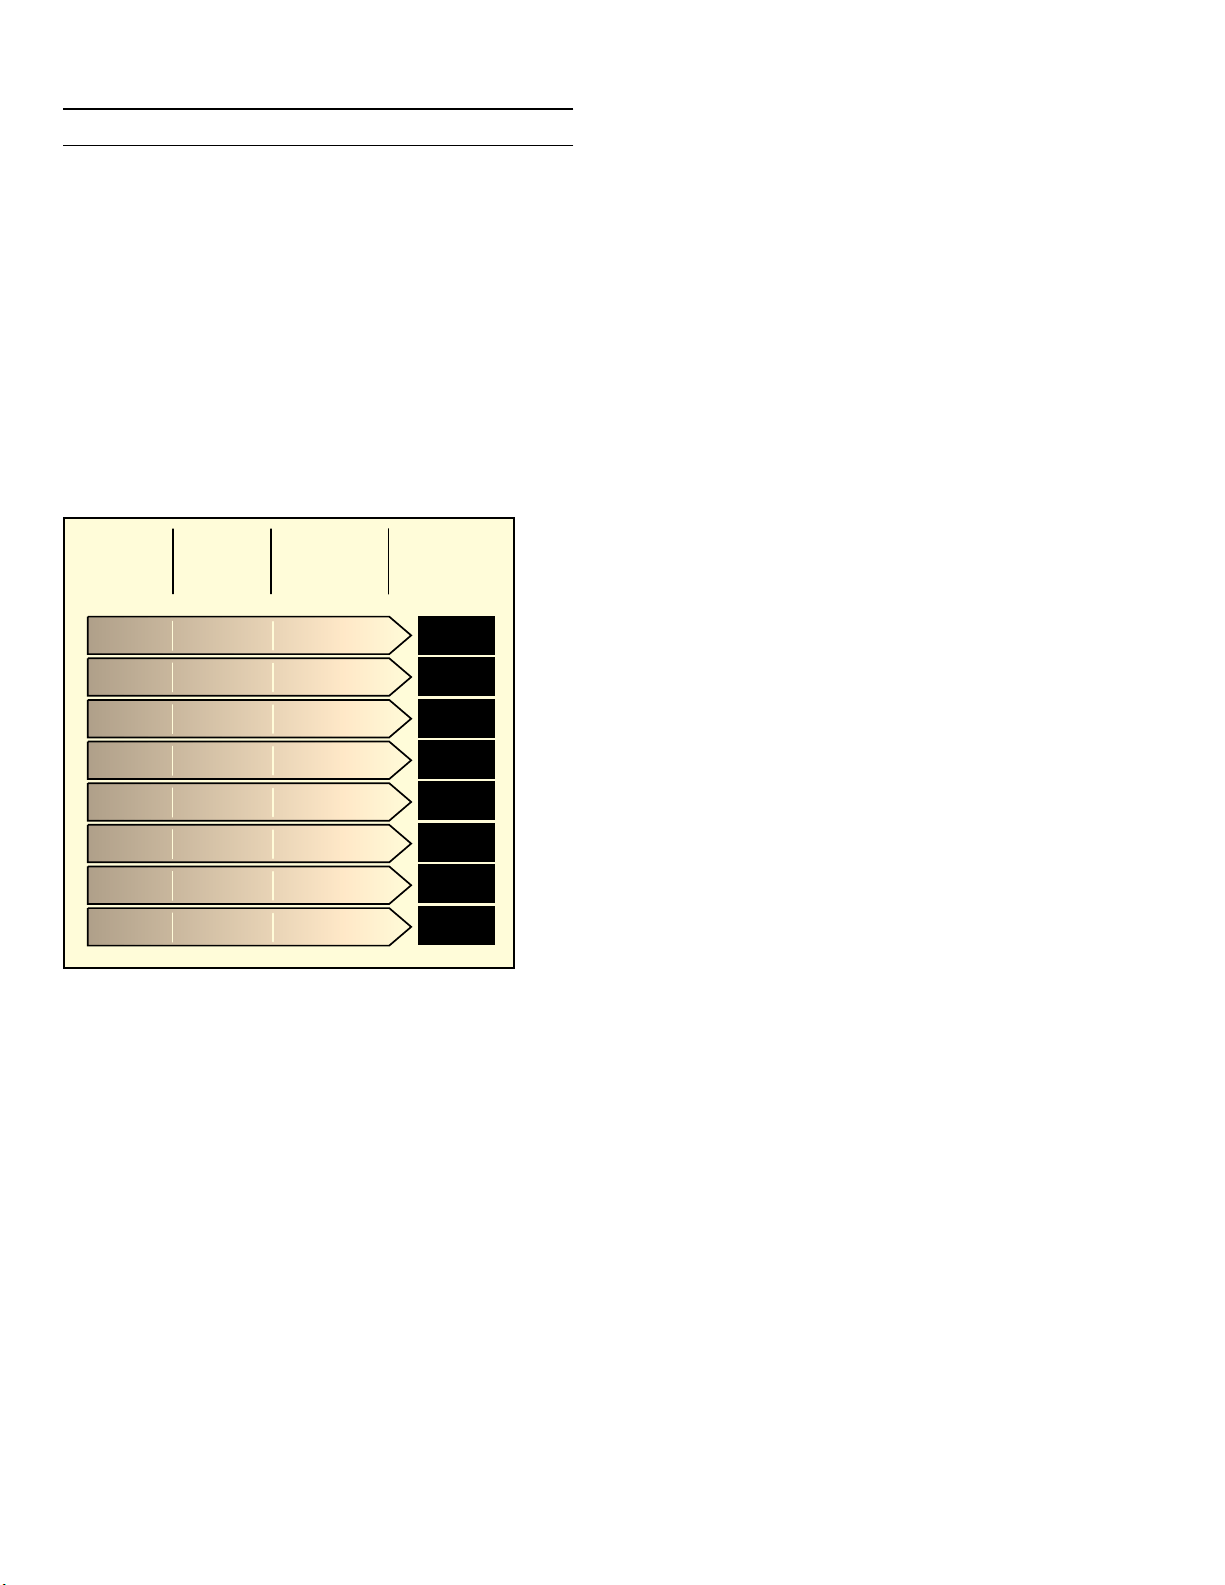
Water hardness table
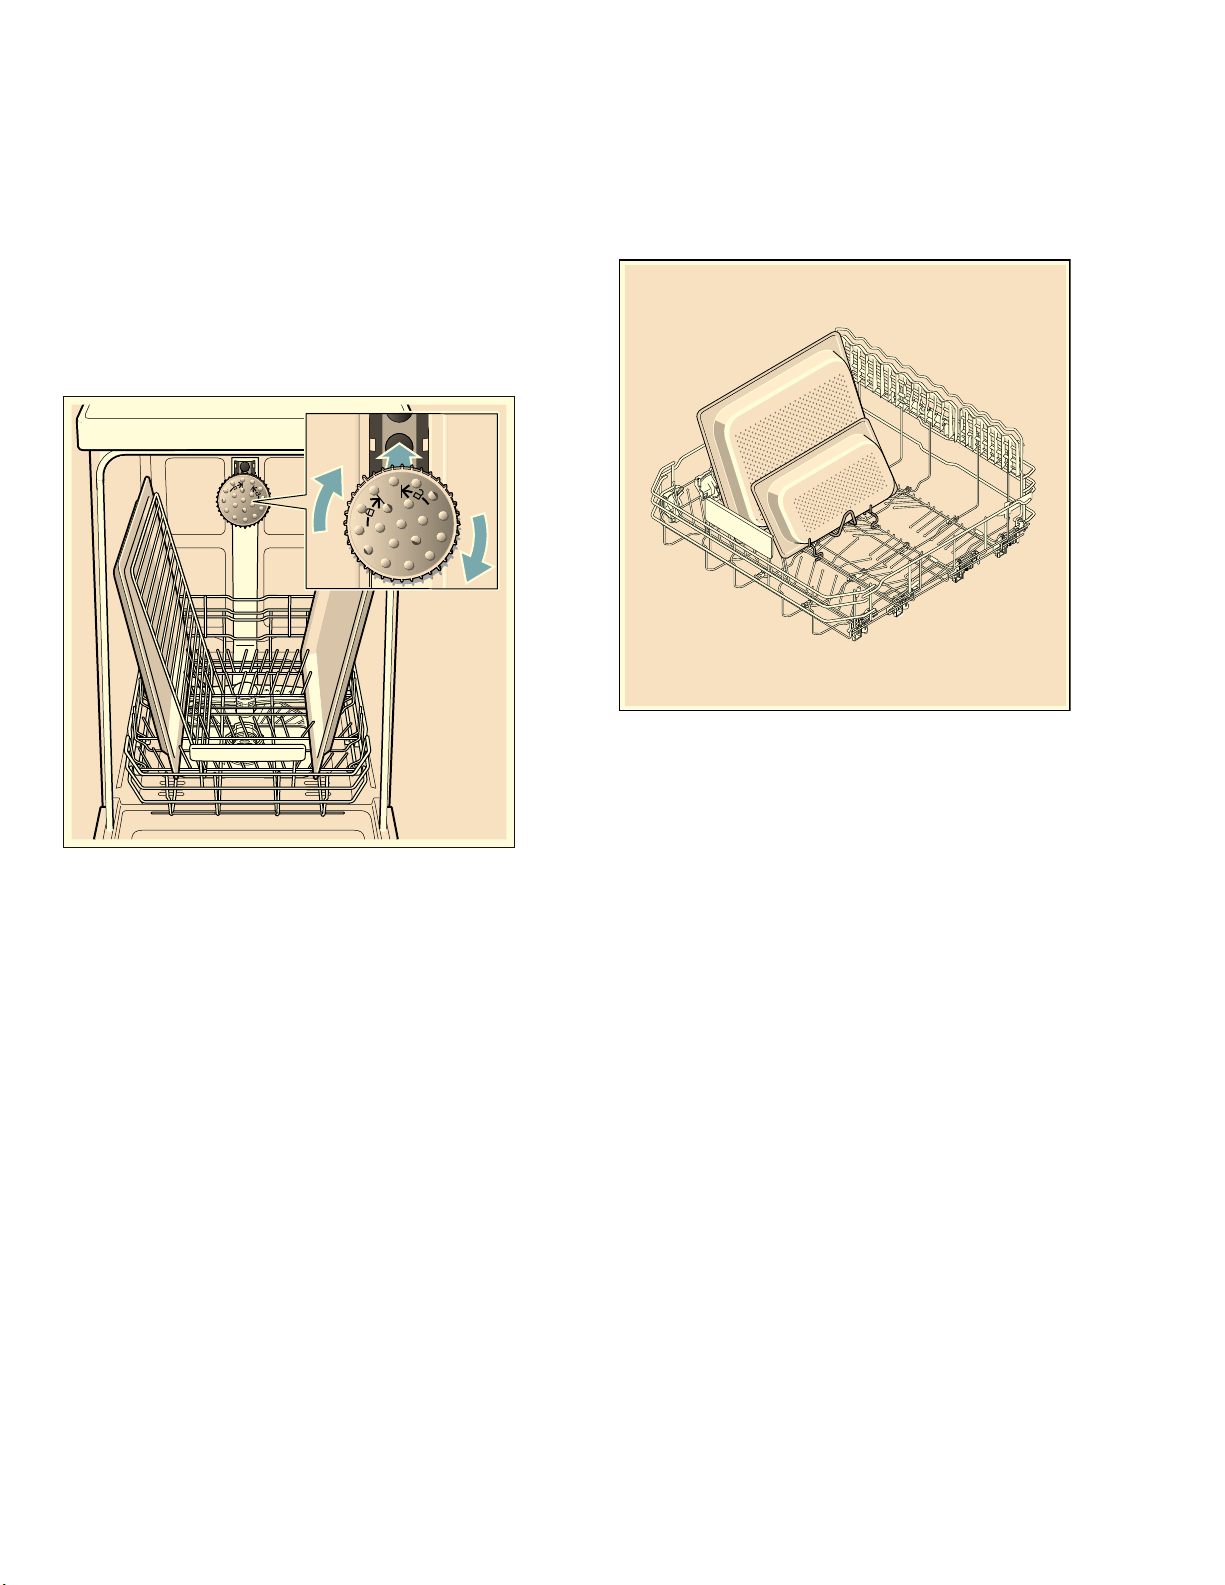
Adjusting the water softening system
The amount of salt dispensed can be set from 0 to 62°E.
Salt is not required at the set value 0-8.
Set the softening system as follows:
1. Ask your local water utility company for the water
hardness value of the tap water.
2. Required setting can be found in the water hardness
table.
3. Open the door.
4. Switch on ON/OFF switch (.
5. Press Info button ( 8 for 3 seconds until the
following text is indicated on the display window at
the top @:
Scroll with < >
Set with - +
Leave with t 3 sec.
6. Keep pressing button > )* until the water hardness
is indicated on the display window at the top @.
7. Make the selection with setting buttons + - X.
8. Press and hold the Info button (8 for 3 seconds.
The chosen setting has now been stored.
:DWHU
KDUGQHVV
YDOXH(
VRIW
PHGLXP
KDUG
Ȣ
Ȣ
Ȣ
Ȣ
Ȣ
Ȣ
Ȣ
Ȣ
PPROO
Ȣ
Ȣ
Ȣ
Ȣ
Ȣ
Ȣ
Ȣ
Ȣ
6HWYDOXH
RQWKH
PDFKLQH
+DUGQHVV
UDQJH
KDUG
KDUG
PHGLXP
PHGLXP
VRIW
16
en-us Rinse Aid
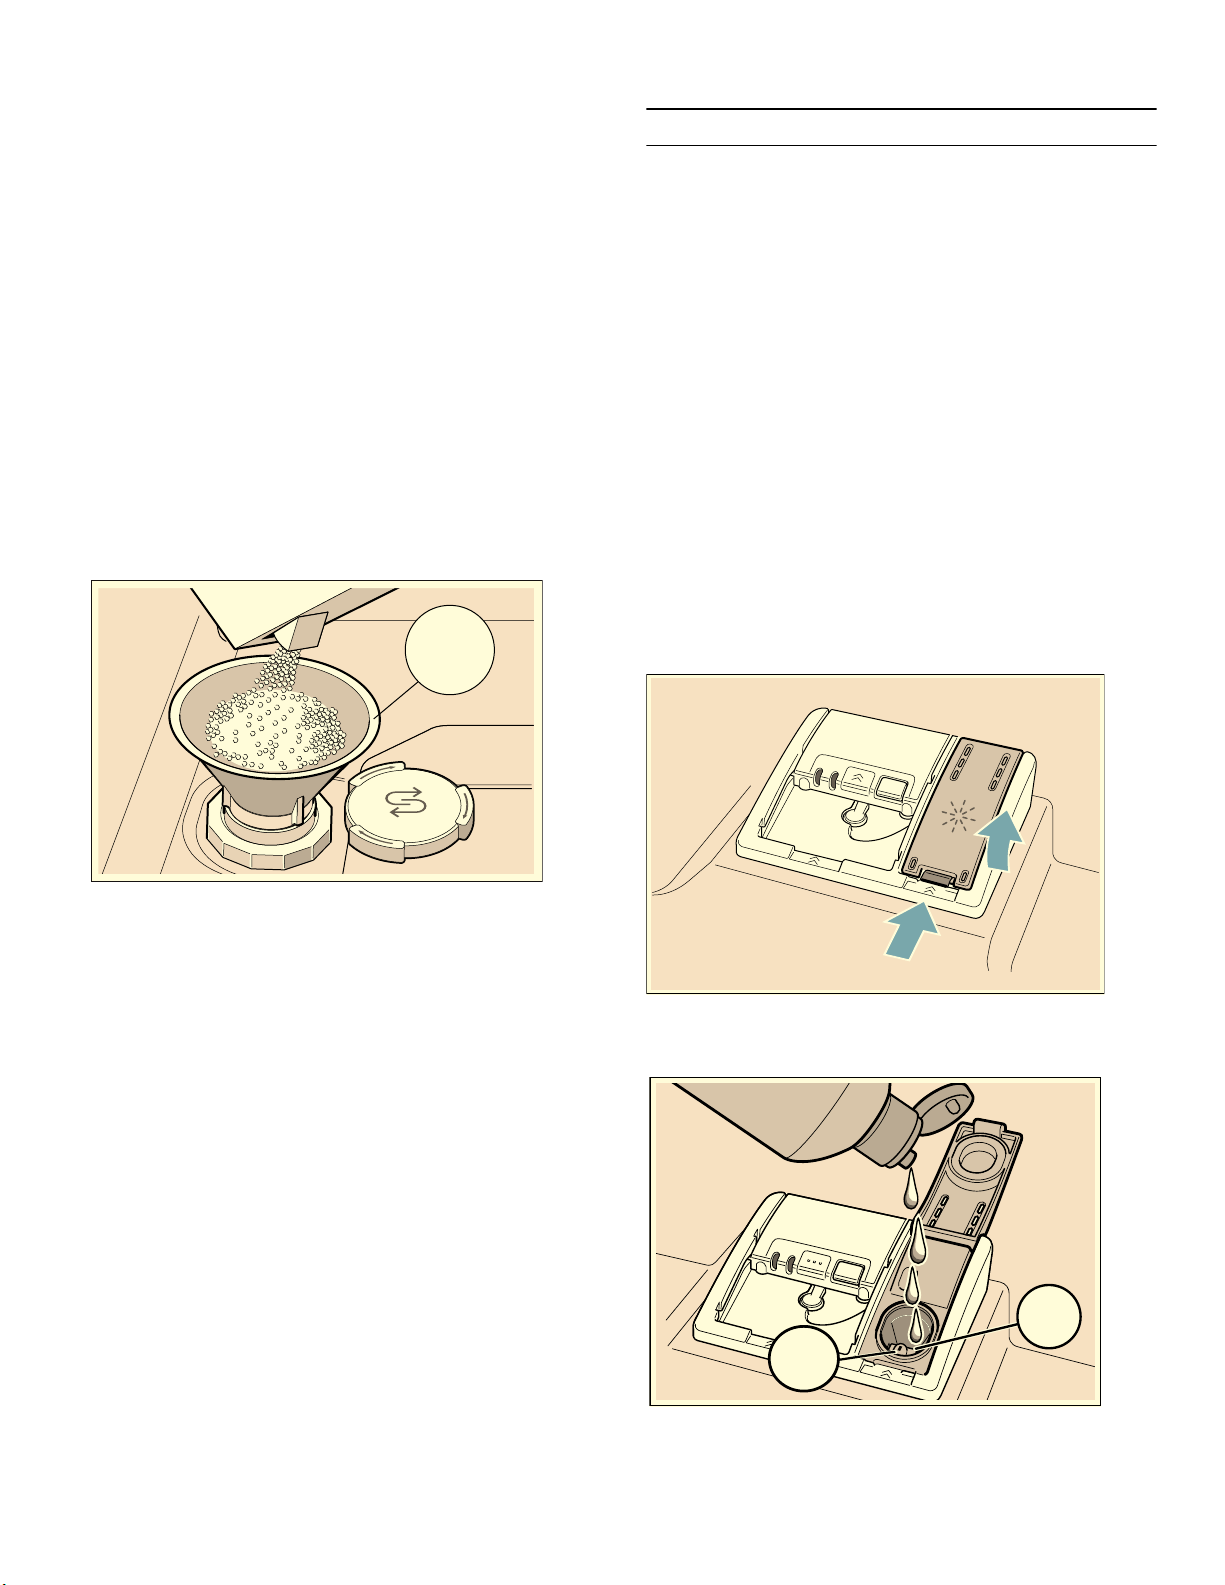
Using special salt
As soon as the low salt indicator P lights up on the
digital display, salt should be topped off. Refilling the
salt dispenser should be done before switching on the
appliance. This ensures that extra salt water is washed
out and will not corrode the rinsing tank.
NOTICE: Detergent will destroy the water softening
system! Never pour detergent into the salt dispenser.
Top off the salt as follows:
1. Undo the screw plug on the dispenser 1R.
2. Fill the dispenser with water (required only when
switching on the appliance for the first time).
3. Add salt as illustrated (do not use table salt or tablets).
The water is displaced and runs out.
For more information about buying dishwasher salt,
please contact Customer Service 1-800-944-2904.
Using detergents with salt component
Det er ge nt with a sal t component
If combined detergents with a salt component
are used, special salt can usually be omitted up
to a water hardness of 21° dH (37° fH, 26° Clarke,
3.7 mmol/l). If the water hardness is over 21° dH, salt
must be used.
Switching off low salt indicator / water
softening system
Switching of f wat er sof t eni ng syst em
If the use of combined detergents with a salt
component impairs the low salt indicator P on the
control panel or the text on the display window at the
top @ (enough salt for x rinse cycles), the displays
can be switched off.
Proceed as described under “Setting water softening
system” and set the value to 0-8. The water softening
system and salt refill indicator are now switched off.
,
Rinse Aid
Rinse Aid
As soon as the low rinse aid indicator H lights up on
the control panel, rinse aid should be topped off.
The rinse aid is required for stain-free utensils and clear
glasses. Use only rinse aid which the manufacturer
designates as safe to use in domestic dishwashers.
Combined detergents with rinse aid component may be
used with soft to moderately hard water only (0-2 bands
on test strip or up to an °E value of 20). For moderately
hard to hard water (3 to 4 bands on test strip or °E value
of 21 or higher), rinse aid must be used.
Adding rinse aid
NOTICE: To avoid oversudsing or clogging, do not
overfill the rinse aid dispenser 9". Wipe up any spills
with a damp cloth.
1. Open the rinse aid dispenser 9" by pressing on the
latch of the lid and pulling it open.
2. Add liquid rinse aid to the dispenser 9" until it is
full. Do not overfill. Avoid spilling into air vent hole.
PD[
WFOU
BJS

17
Rinse Aid en-us
3. Close the lid. Lid must be fully closed until it clicks in
order to seal.
4. Wipe up any excess rinse aid that may have puddled
when the dispenser reservoir is full.
This prevents excessive frothing during the next wash
cycle. The indicator light will go out a few moments
after the dishwasher door is shut.
Tip: For easier pouring, remove lid from the rinse aid
bottle.
NOTICE: Do not fill the rinse aid dispenser 9" with
detergent. Doing so will damage the dishwasher.
Setting the amount of rinse aid used
The amount of rinse aid to be dispensed can be set from
0 to 6. Set the amount of rinse aid to be dispensed to 5
to obtain a very good drying result. Do not change the
amount of rinse aid unless there are streaks or water
stains on the utensils. Set a lower level to avoid streaks.
Set a higher level to avoid water stains.
Set the amount of rinse aid as follows:
1. Open the door.
2. Press on ON/OFF button (.
3. Press Info button ( 8 for 3 seconds until the
following text is indicated on the display window at
the top @:
Scroll with < >
Set with - +
Leave with t 3 sec.
4. Keep pressing button > )* until the rinse aid
dispenser is indicated on the display window at the
top @.
5. Make the selection with setting buttons + - X.
6. Press and hold the Info button (8 for 3 seconds.
The chosen setting has now been stored.
Note: Do not change the amount of rinse aid unless
there are streaks (select lower setting) or water stains
(select higher setting) visible on the utensils.
Switching off rinse aid refill
indicator
If the use of combined detergents with a rinse aid
component impairs the low rinse aid indicator H on
the control panel (enough rinse aid for x rinse cycles),
the displays can be switched off.
Proceed as described under “Setting amount of rinse
aid” and select setting 0.
NOTICE: Using no rinse aid or setting the dispenser
to 0 may result in longer cycle times consuming more
energy and water. The higher temperatures can damage
fine china or glassware.
18
en-us Loading the Dishwasher
-
Loading the Dishwasher
Loading the Dishwasher
Dishware material
Note: Before using your dishwasher for the first time,
check the information in this section. Some items are
not dishwasher-safe and should be hand washed; others
require special loading.
Glass and silverware damage
Causes:
▯ Glass type.
▯ Type of dishwasher detergent.
▯ Water temperature of the wash cycle.
Recommendation:
▯ Use only glasses and porcelain which
the manufacturer designates as dishwasher-safe.
▯ Use a detergent which protects silverware.
▯ Use less intensive wash cycles and take glass and
silverware out of the dishwasher as soon as possible
after the wash cycle ends.
Recommended Precaution
Aluminum Colored anodized aluminum may
fade over time. Minerals in your
water may cause the aluminum to
darken or spot. This can usually
be removed with a soap-filled
steel wool pad.
China, Crystal,
Stoneware
Some hand-painted utensils may
discolor, fade or spot. Hand wash
these utensils. Position fragile
glassware so that it will not topple
over or come in contact with other
utensils during the wash cycle.
Glass Make sure to use dishwasher-
safe glass. Milk glass may
discolor or become yellow.
Non-stick Coatings Apply a light coating of vegetable
oil to non-stick surfaces after
drying.
Plastics Make sure the plasticware is
dishwasher-safe.
Stainless Steel,
Sterling Silver and
Silver Plates
Load these so they do not come
in contact with other metals,
stainless steel dishwasher tank
walls or the inner door.
Not
Recommended
Reason
Acrylic Crazing or small cracks
throughout the acrylic, may occur.
Adhesive-
Joined Pieces
Adhesives that join materials such
as plastic, wood, bone, steel,
copper, tin, etc. may loosen.
Bone-Handled
Utensils
Handles may separate.
Iron Iron will rust. Hand wash and dry
immediately.
Non-Dishware
Items
Your dishwasher is intended for
use in cleaning ONLY standard
household dishware and
kitchenware.
Pewter, Brass,
Bronze
These items will tarnish. Hand
wash and dry immediately.
19
Loading the Dishwasher en-us
Loading the racks
For best dishwashing results, observe the following
when loading the dishwasher:
▯ Do not pre-wash items with loosely attached food
soil.
▯ Remove all food particles, bones, toothpicks and
excessive grease.
▯ Pre-treat items having burned-on, baked-on or
starchy soils.
▯ Load dishes in the dishwasher racks so the insides
of bowls, pots and pans are facing the spray arms.
▯ Avoid nesting and contact points between dishes.
▯ Separate items of dissimilar metals. Use care to not
block movement of the spray arms.
▯ Only wash household dishware and kitchenware
rated as dishwasher-safe.
Refer to the Dishware Materials section for more
information about dishware suitability.
NOTICE: To avoid dishwasher damage, do not load
the dishwasher with paper products, plastic bags,
packing materials or anything other than normal,
dishwasher safe dishware and kitchenware.
Loading the upper rack
Ensure items do not protrude through the bottom of the
racks and block the spray arms.
Note: When pushing the upper rack 12 into the
dishwasher, push it until it stops against the back of the
tub so the upper rack spray arm 1: connects to the
water supply at the back of the tub. Do not push racks in
using the door.
Loading the lower rack
Place large items in the lower rack 1j. Load pots, pans
and bowls upside down. Do not block the vent hole with
tall baking sheets. Load these items on the right side of
the dishwasher.
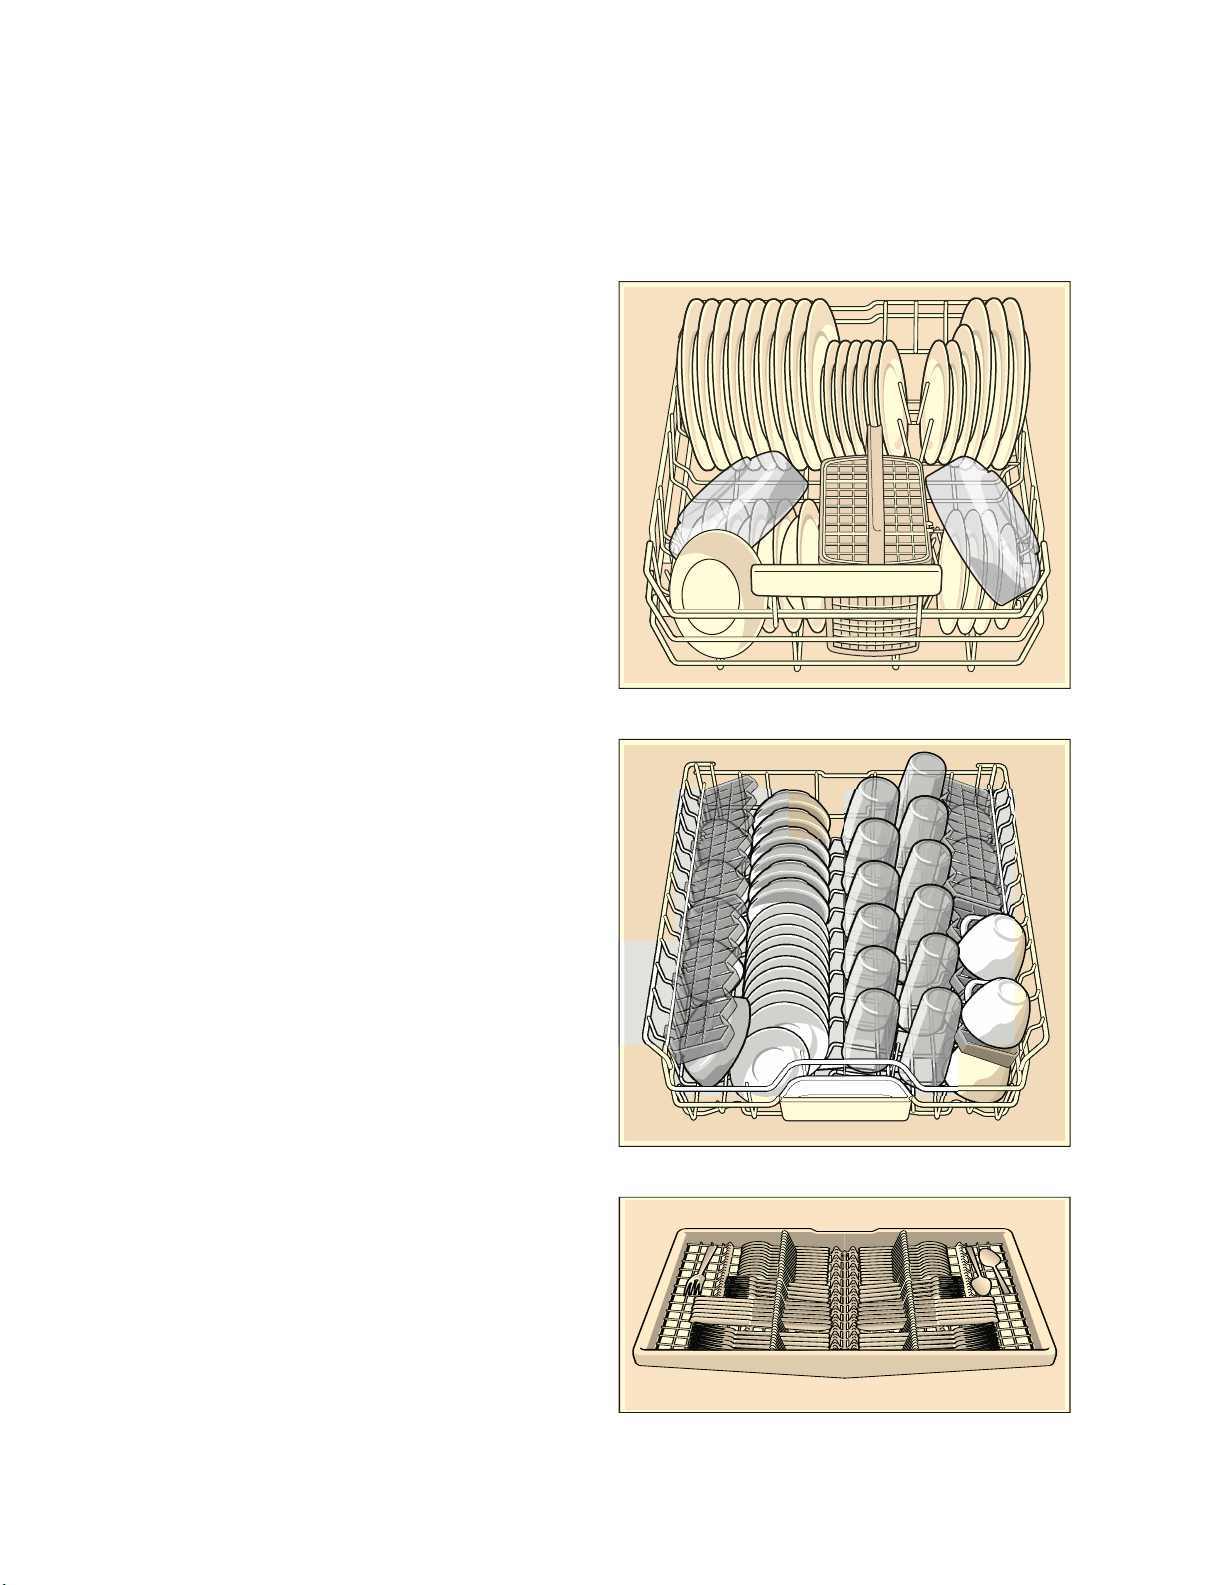
Recommended loading pattern
Note: Folding the cup shelves down will allow the cups
to sit at an increased angle and reduce water pooling on
cup bottoms.
Lower rack - 12 place setting
Upper rack - 12 place setting
Third rack - 12 place setting
20
en-us Loading the Dishwasher
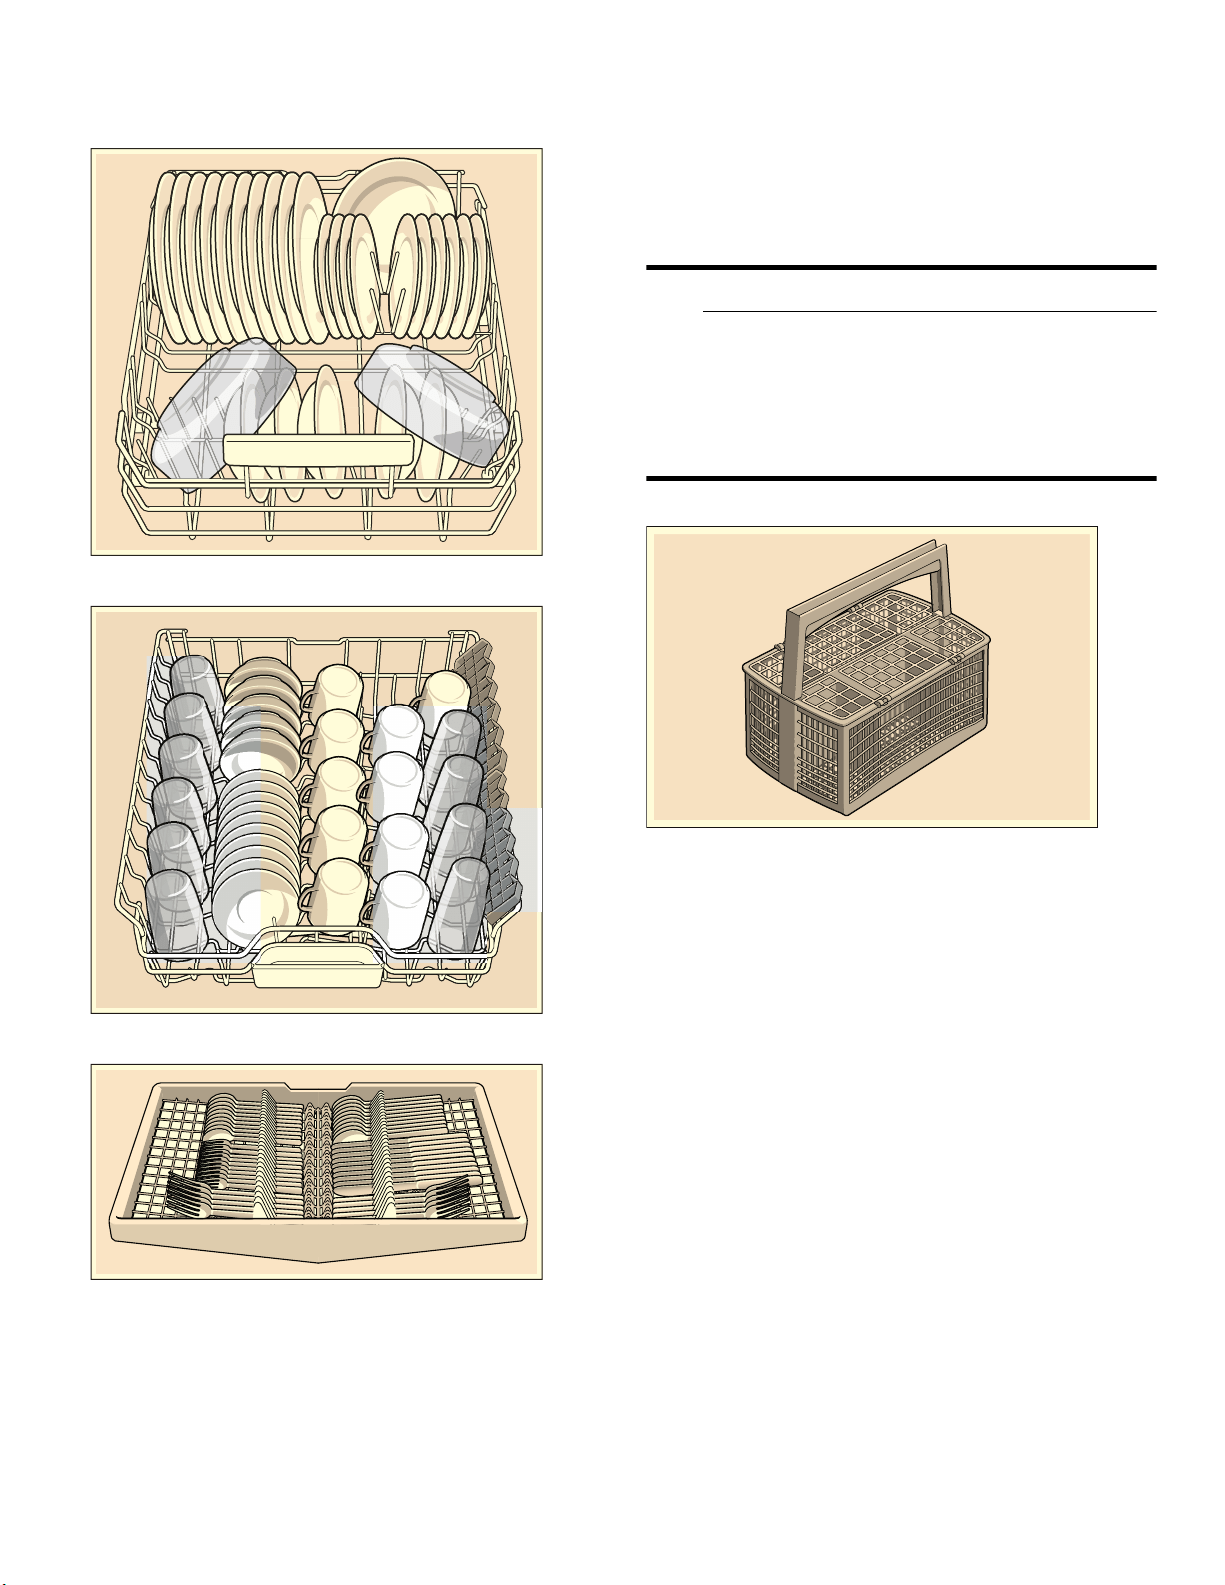
Lower rack - 10 place setting
Upper rack - 10 place setting
Third rack - 10 place setting
Loading the silverware basket
Place knives and sharp utensils with their handles up
and forks and spoons with their handles down. If large
or oddly-shaped items are loaded in the silverware
basket, be sure they do not nest together.
9 WARNING
Risk of injury!
The sharp points and edges of knives and other
sharp utensils can cause serious injury. Load
knives and other sharp utensils with edges down.
Do not allow children to handle or play near
knives and sharp utensils.
* optional feature which may or may not be included with
your dishwasher.
21
Loading the Dishwasher en-us
Suggested loading patterns
Rack accessories
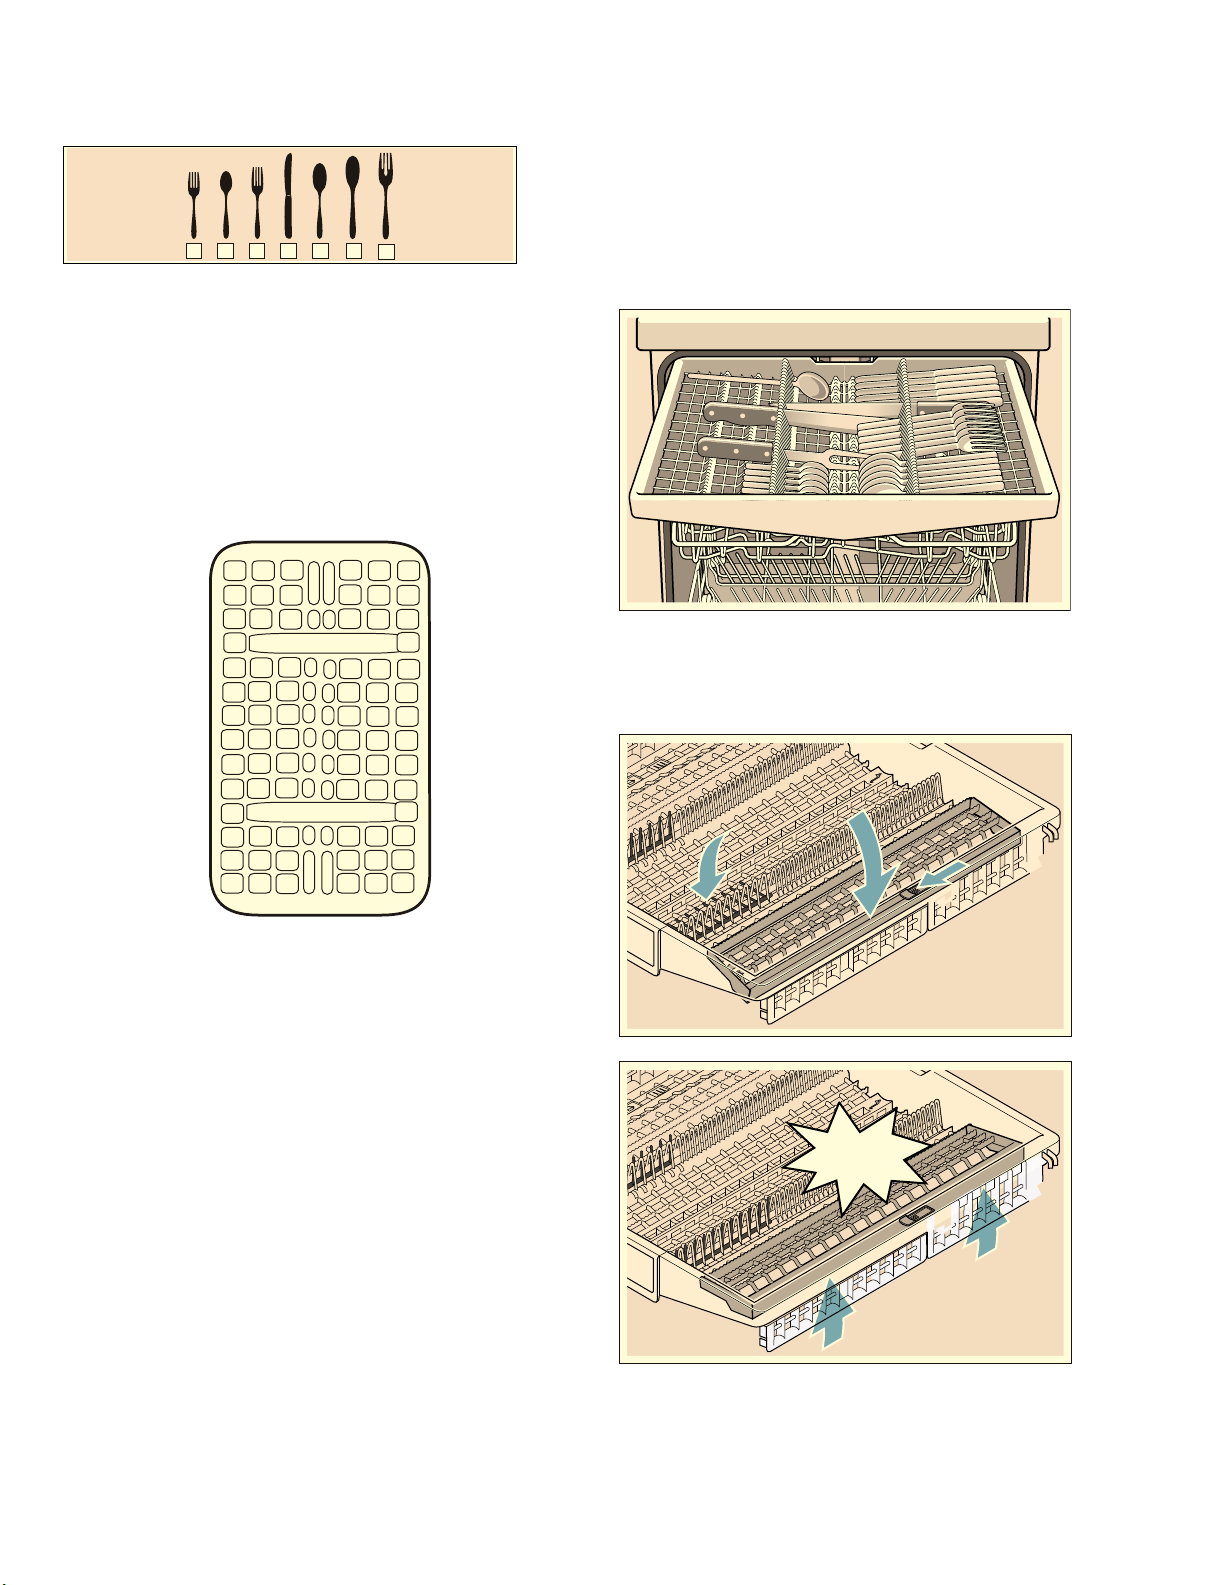
Third rack *
The third rack 1* horizontally positions knives,
spatulas and other oversized tools for improved
cleaning and easier loading and unloading. Arrange
cutlery in third rack 1* as illustrated.
Depending on the features of your dishwasher, you can
fold down the side shelves to provide more room for
taller items of silverware. The front rows of prongs can
be folded down to provide room for wider handles.
* optional feature which may or may not be included with
your dishwasher.
1 Salad fork
2 Teaspoon
3 Dinner fork
4 Knife
5 Tablespoon
6 Serving spoon
7 Serving fork
&/,&.
22
en-us Loading the Dishwasher
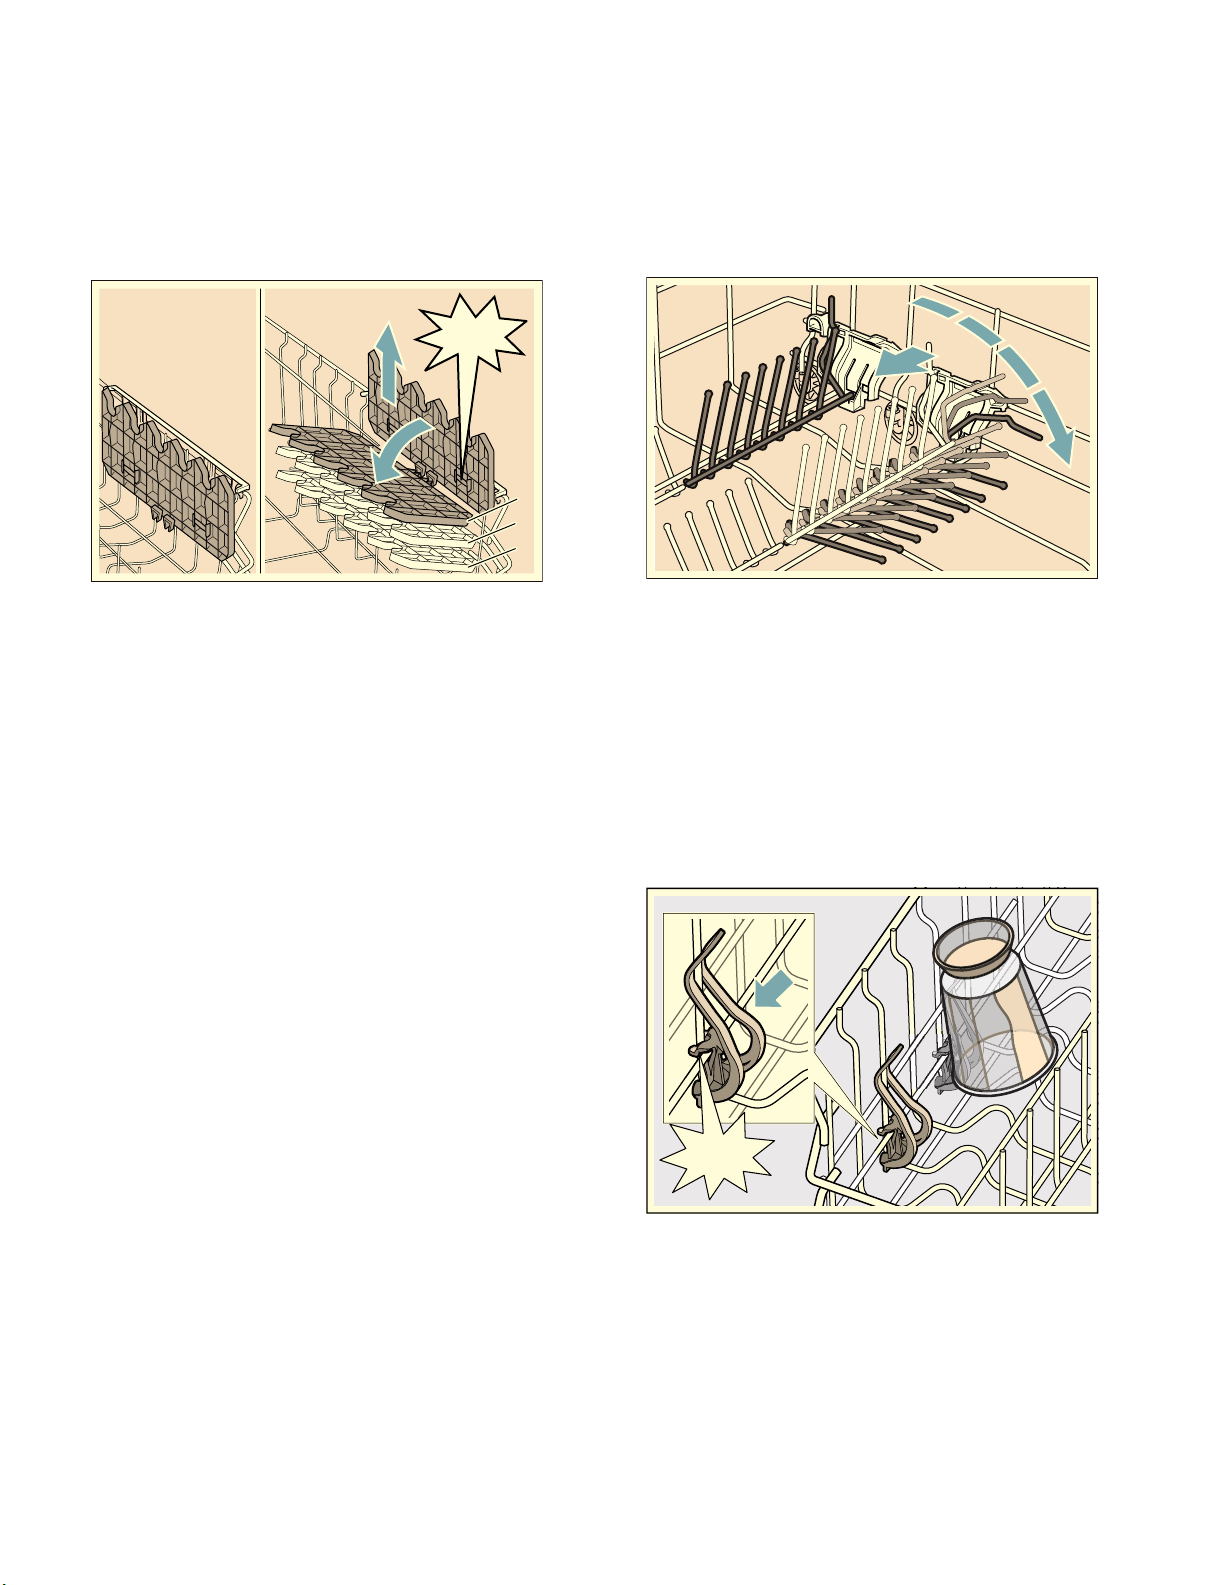
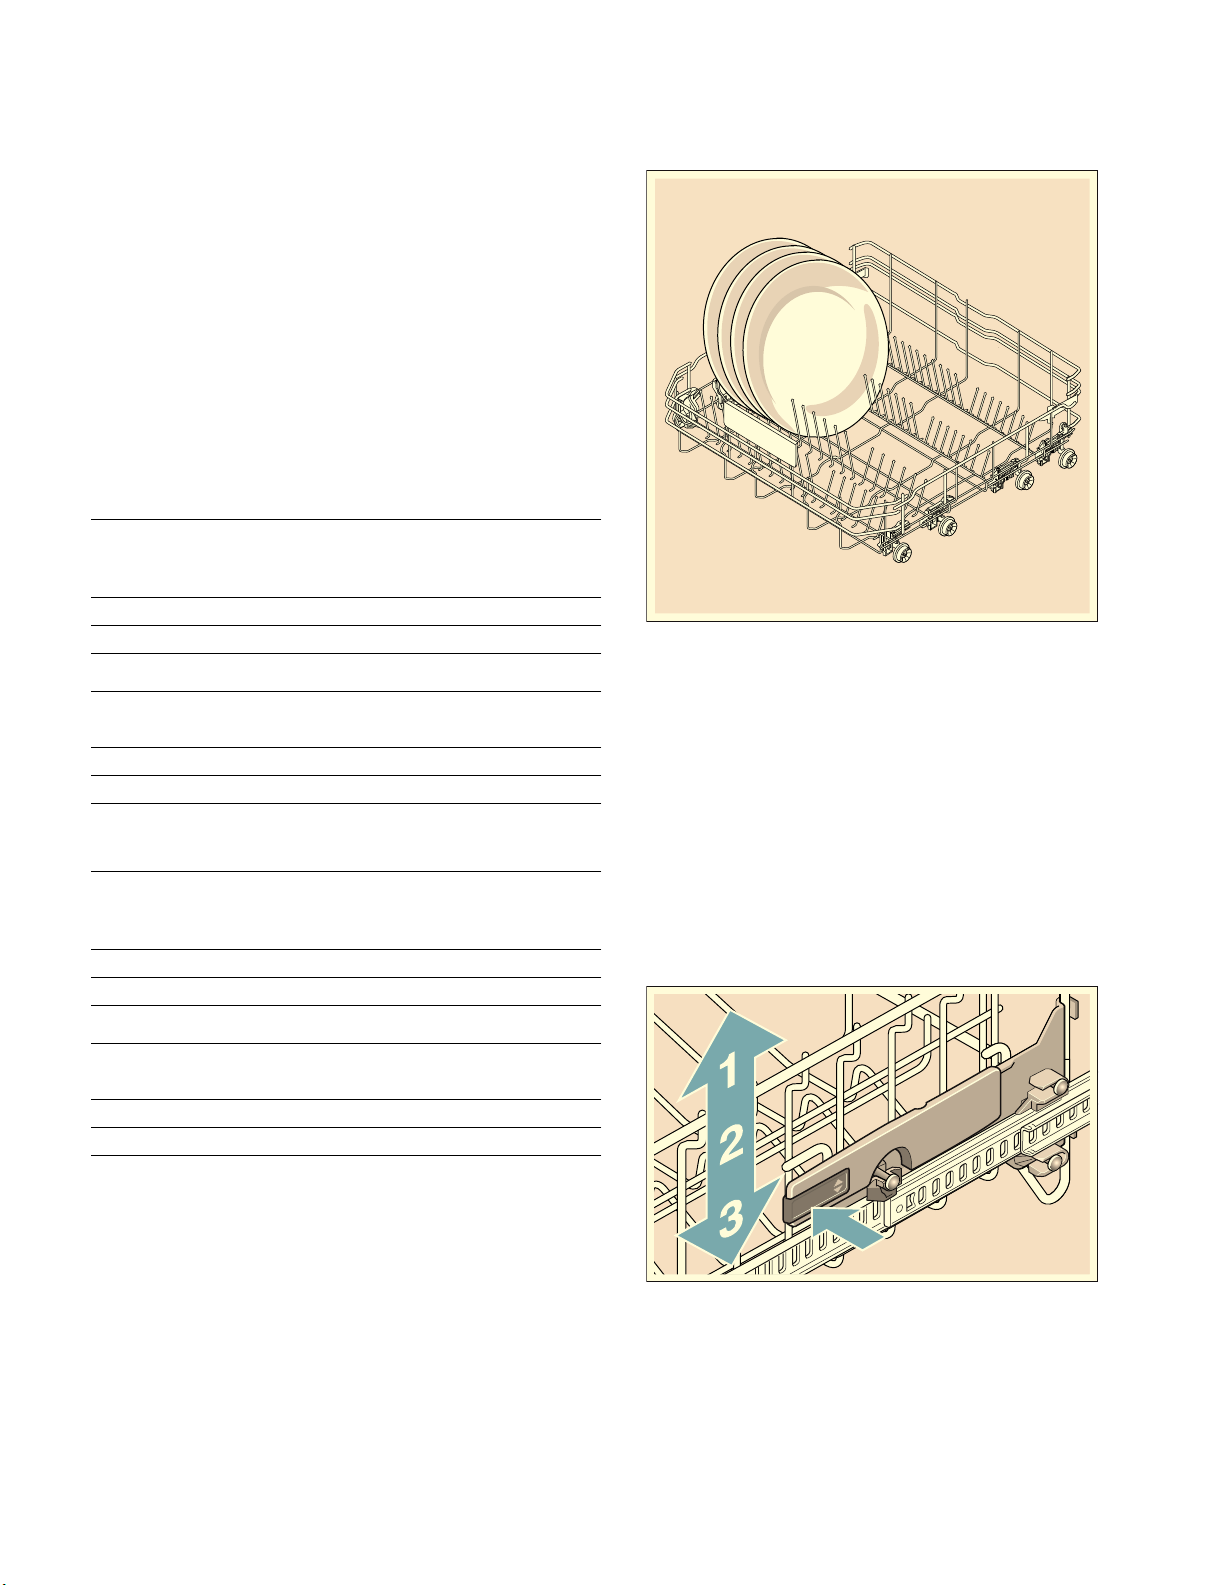
Cup shelves *
The cup shelves and the space underneath can be used
for small cups and glasses or for larger items of
silverware, such as wooden spoons or serving spoons
or forks. If you do not require the cup shelf, it can be
folded up.
Adjust the height of the cup shelves as follows:
1. Position the cup shelf vertically and pull upwards.
2. Push cup shelf at a slight angle downwards to the
required height (1, 2, or 3).
3. Engage cup shelf.
Cup shelf “clicks” into position.
* optional feature which may or may not be included with
your dishwasher.
Flip tines*
Depending on the features of your dishwasher, the tines
can be folded down. This facilitates arrangement of
pots, bowls and glasses..
Fold down the flip tines as follows:
1. Pull flip tine gently forward and release it from the
notch (1).
2. Push the flip tine downward to the desired
position (2).
To fold up, push flip tines into an upright position until
the holder engages in the notch.
* optional feature which may or may not be included with
your dishwasher.
Plastic item clips*
Light-weight plastic accessories (cups, lids, etc.) can be
held securely by the plastic item clips.
Press the plastic item clip against the rack as shown
until it clicks.
* optional feature which may or may not be included with
your dishwasher.
&/,&.
&/,&.
23
Loading the Dishwasher en-us
Extra tall item sprinkler *
Large trays or grills as well as large plates (gourmet
plates, pasta plates, dinner plates) can be cleaned with
this spray head.
Insert the spray head as follows:
1. Remove upper rack 12.
2. Insert spray head as illustrated and turn to the right.
Spray head is engaged.
Notes
▯ Keep the vent hole on the tub’s left side clear by
placing tall items such as plastic cutting boards and
tall baking sheets on the lower rack’s right side or
center.
▯ Ensure that the dishwasher is always operated with
upper rack 12 or extra tall item sprinkler.
To ensure that the spray jet can reach all parts, arrange
the baking sheets as illustrated (max. 2 baking sheets
and 2 grills).
NOTICE: To avoid dishwasher damage, do not reinstall
the upper rack 12 without removing the extra tall item
sprinkler (B).
* optional feature which may or may not be included with
your dishwasher.
Gastronorm insert *
Gast r onor m insert
Helps you stack several Gastronorm drawers, trays
or similar large flat utensils at an angle in the lower
rack.
You can remove the insert if required.
* optional feature which may or may not be included with
your dishwasher.
24
en-us Loading the Dishwasher
Unloading the dishwasher
When unloading the dishwasher, it is recommended to
unload the lower rack first. Next, unload the silverware
basket followed by the upper rack, and then the third
rack.
Note: Dishes are more likely to chip when unloading
before cooling.
Adjusting the height of the rack *
Ad j u s t i n g the hei ght of the rack
If required, the height of the upper rack 12 can be
adjusted to create more space for taller utensils either
in the upper or lower rack.
Appliance height 32 in (81.5 cm)
Appliance height 35 in (86.5 cm)
Arrange large plates up to a diameter of 12.2 in/13.4* in
(31/34* cm) in the lower basket 1j as illustrated.
* optional feature which may or may not be included with
your dishwasher.
Upper rack with side levers
1. Pull out upper rack 12.
2. Hold the sides of the rack along the upper edge.
This prevents it from suddenly dropping.
3. To lower the upper rack; press in both levers on the
left and right on the outside of the rack. The upper
rack lowers.
4. To lift the upper rack; grip the sides of the upper rack
along the upper edge and lift.
5. Ensure that both sides of the upper rack are at the
same height.
6. Push in upper rack.
With silverware
basket
Upper rack Lower rack
Setting 1 max. ø 8.6 in (22 cm) 12.2 in (31 cm)
Setting 2 max. ø 9.6 in (24.5 cm) 10.8 in (27.5 cm)
Setting 3 max. ø 10.6 in (27 cm) 9.8 in (25 cm)
With third rack Upper rack Lower rack
Setting 1 max. ø 6.3 in (16 cm) 12.2 in (31 cm)
Setting 2 max. ø 7 in (18.5 cm) 10.8 in (27.5 cm)
Setting 3 max. ø 8.2 in (21 cm) 9.8 in (25 cm)
With silverware
basket
Upper rack Lower rack
Setting 1 max. ø 9.4 in (24 cm) 13.4 in (34 cm)
Setting 2 max. ø 10.4 in (26.5 cm) 12 in (30.5 cm)
Setting 3 max. ø 11.4 in (29 cm) 11 in (28 cm)
With third rack Upper rack Lower rack
Setting 1 max. ø 7 in (18 cm) 13.4 in (34 cm)
Setting 2 max. ø 8 in (20.5 cm) 12 in (30.5 cm)
Setting 3 max. ø 9 in (23 cm) 11 in (28 cm)
25
Loading the Dishwasher en-us
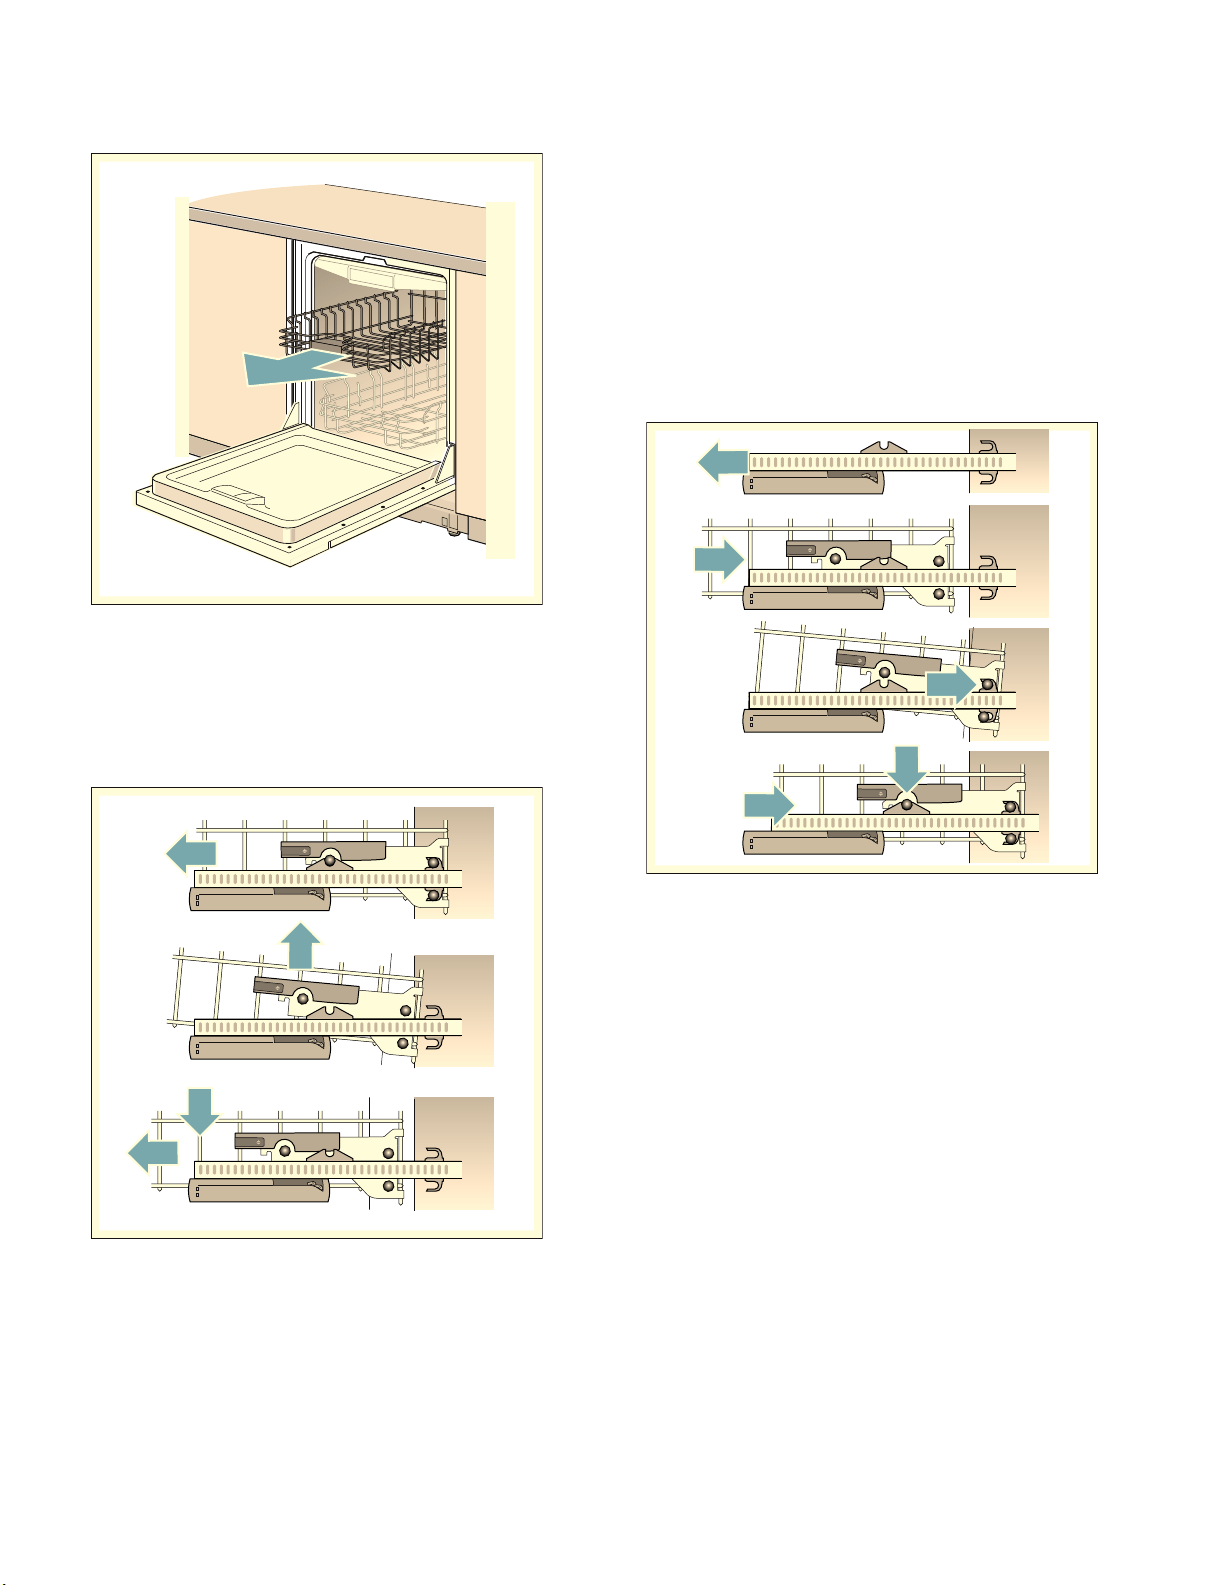
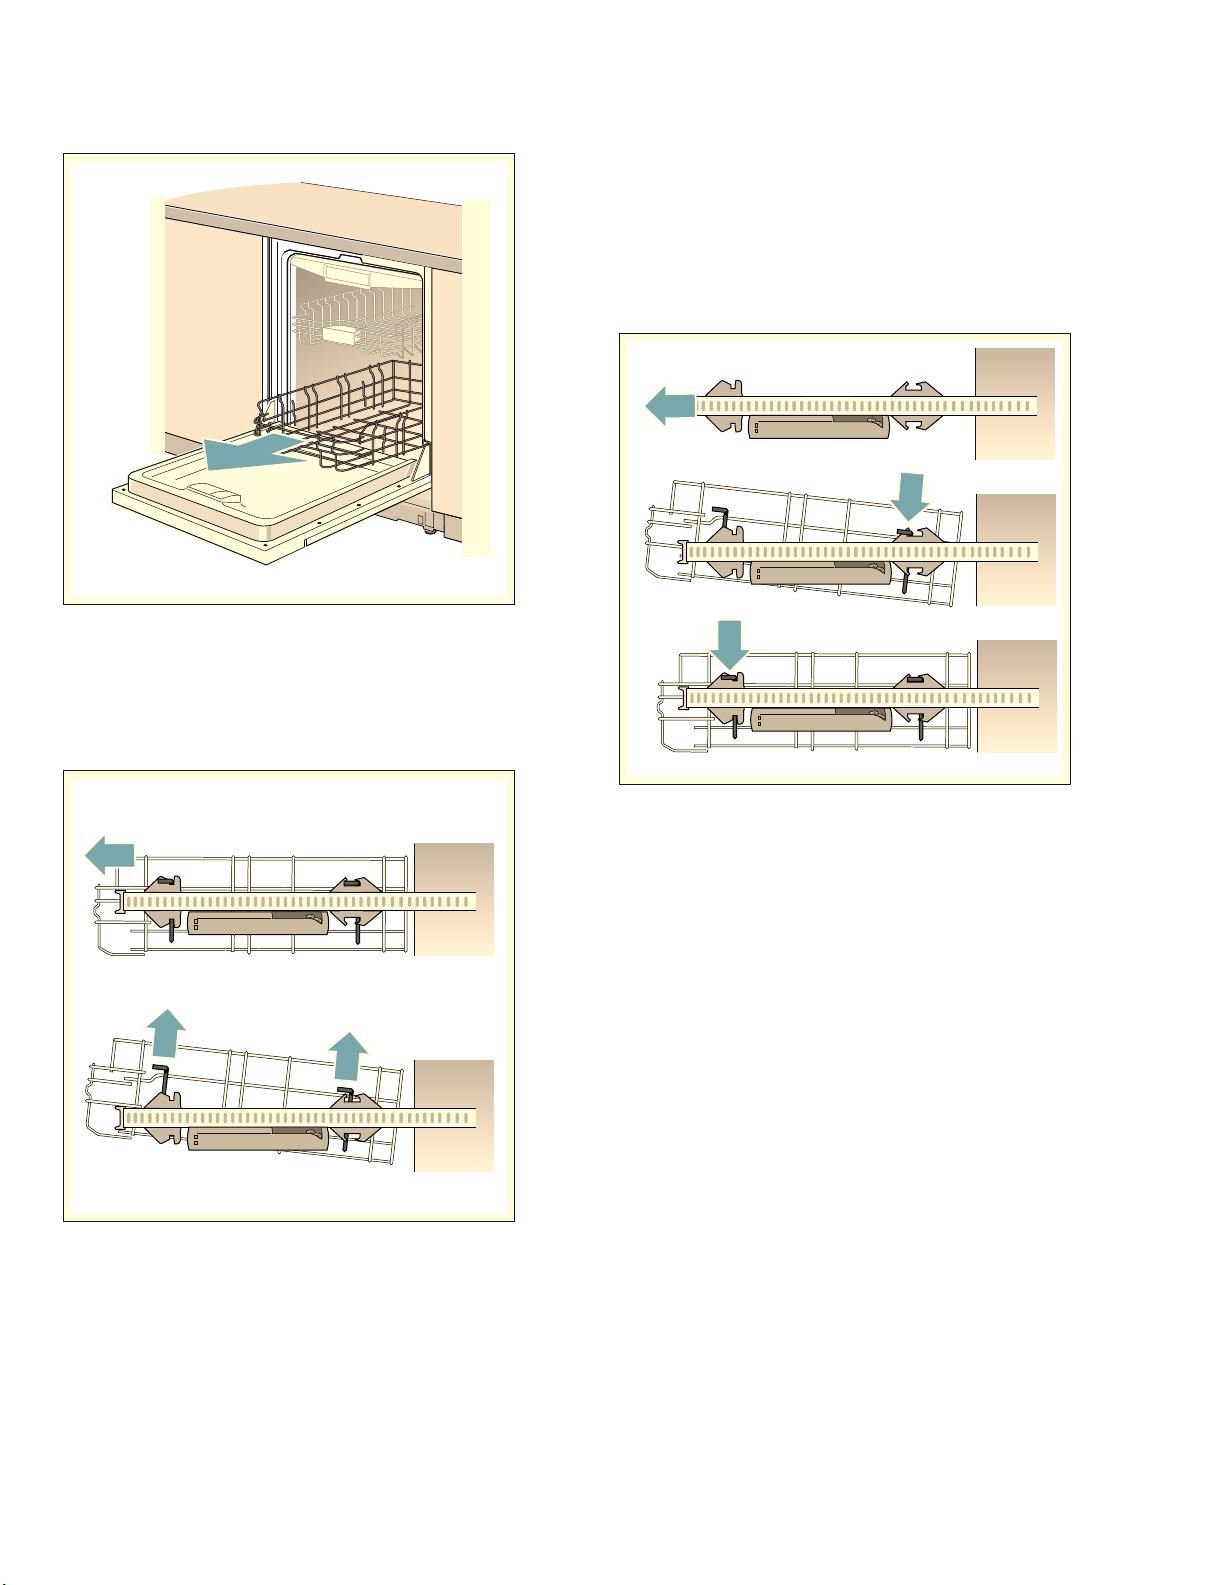
Removing/Installing third rack
Removing third rack 1*:
1. Pull out third rack all the way (1).
2. Lift front of the third rack out of the catch (2).
3. Pull out third rack forwards and lower (3).
Installing third rack 1*
1. Pull out third rack rails all the way (1).
2. Insert third rack (2). In doing so, note the position of
the detent pins (as illustrated in Step 2).
3. Lift third rack slightly and insert rear detent pins into
the lower locking hooks on the rails (3).
4. Lower third rack and press the front detent pins into
the notch (4). Third rack “clicks” into position.
5. Push in third rack.
26
en-us Loading the Dishwasher
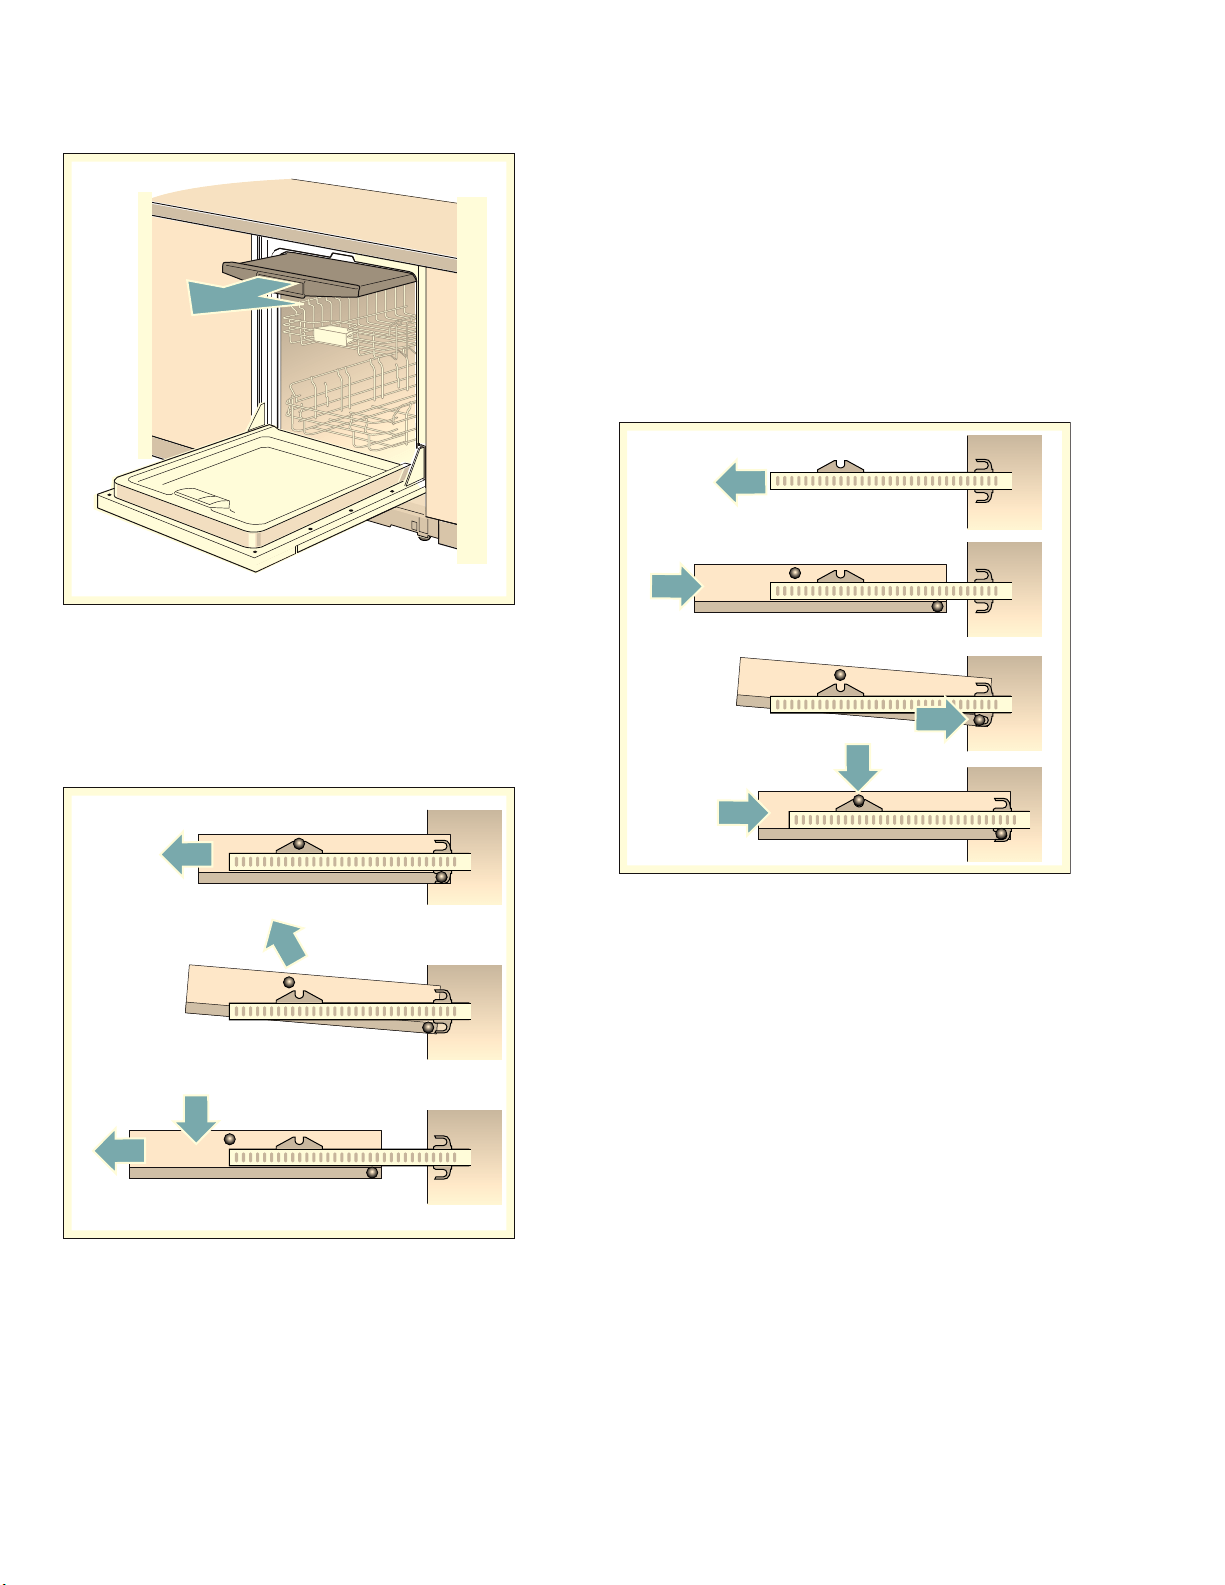
Removing/Installing upper rack*
Removing upper rack 12:
1. Pull out upper rack all the way (1).
2. Lift front of the upper rack out of the catch (2).
3. Pull out upper rack forwards and lower (3).
Installing upper rack 12:
1. Pull out upper rack rails all the way (1).
2. Insert upper rack (2). In doing so, note the position
of the detent pins (as illustrated in Step 2).
3. Lift upper rack slightly and insert rear detent pins
into the locking hooks (3).
4. Lower upper rack and press into the front notch (4).
Upper rack “clicks” into position.
5. Push in upper rack.
27
Loading the Dishwasher en-us
Removing/Installing lower rack
Removing lower rack 1j:
1. Pull out lower rack all the way (1).
2. Lift lower rack first out of the front and then out of
the rear holders (2).
Installing lower rack 1j:
1. Pull out lower rack rails all the way (1).
2. Insert lower rack into the rear holders (2).
3. Lower lower rack at the front and place in the front
holders (3).
4. Push in lower rack.
28
en-us Detergent
.
Detergent
Detergent
Use only detergent specifically designed for
dishwashers. For best results, use fresh powdered
dishwashing detergent or detergent tabs.
NOTICE: To avoid damage to dishwasher or dishware:
▯ Do not use hand dishwashing products in your
dishwasher.
▯ Do not use too much detergent if your water is soft.
Using too much detergent with soft water may cause
etching in glassware and fine china.
▯ To best protect glassware, use a wash cycle with low
temperatures or a specific glass-care cycle
(depending on the model) and use a detergent that
includes etch protection.
Note: If you do not know the hardness of your water
supply, use 15 ml of detergent. Increase the amount if
necessary to the least amount required to get your
kitchenware clean.
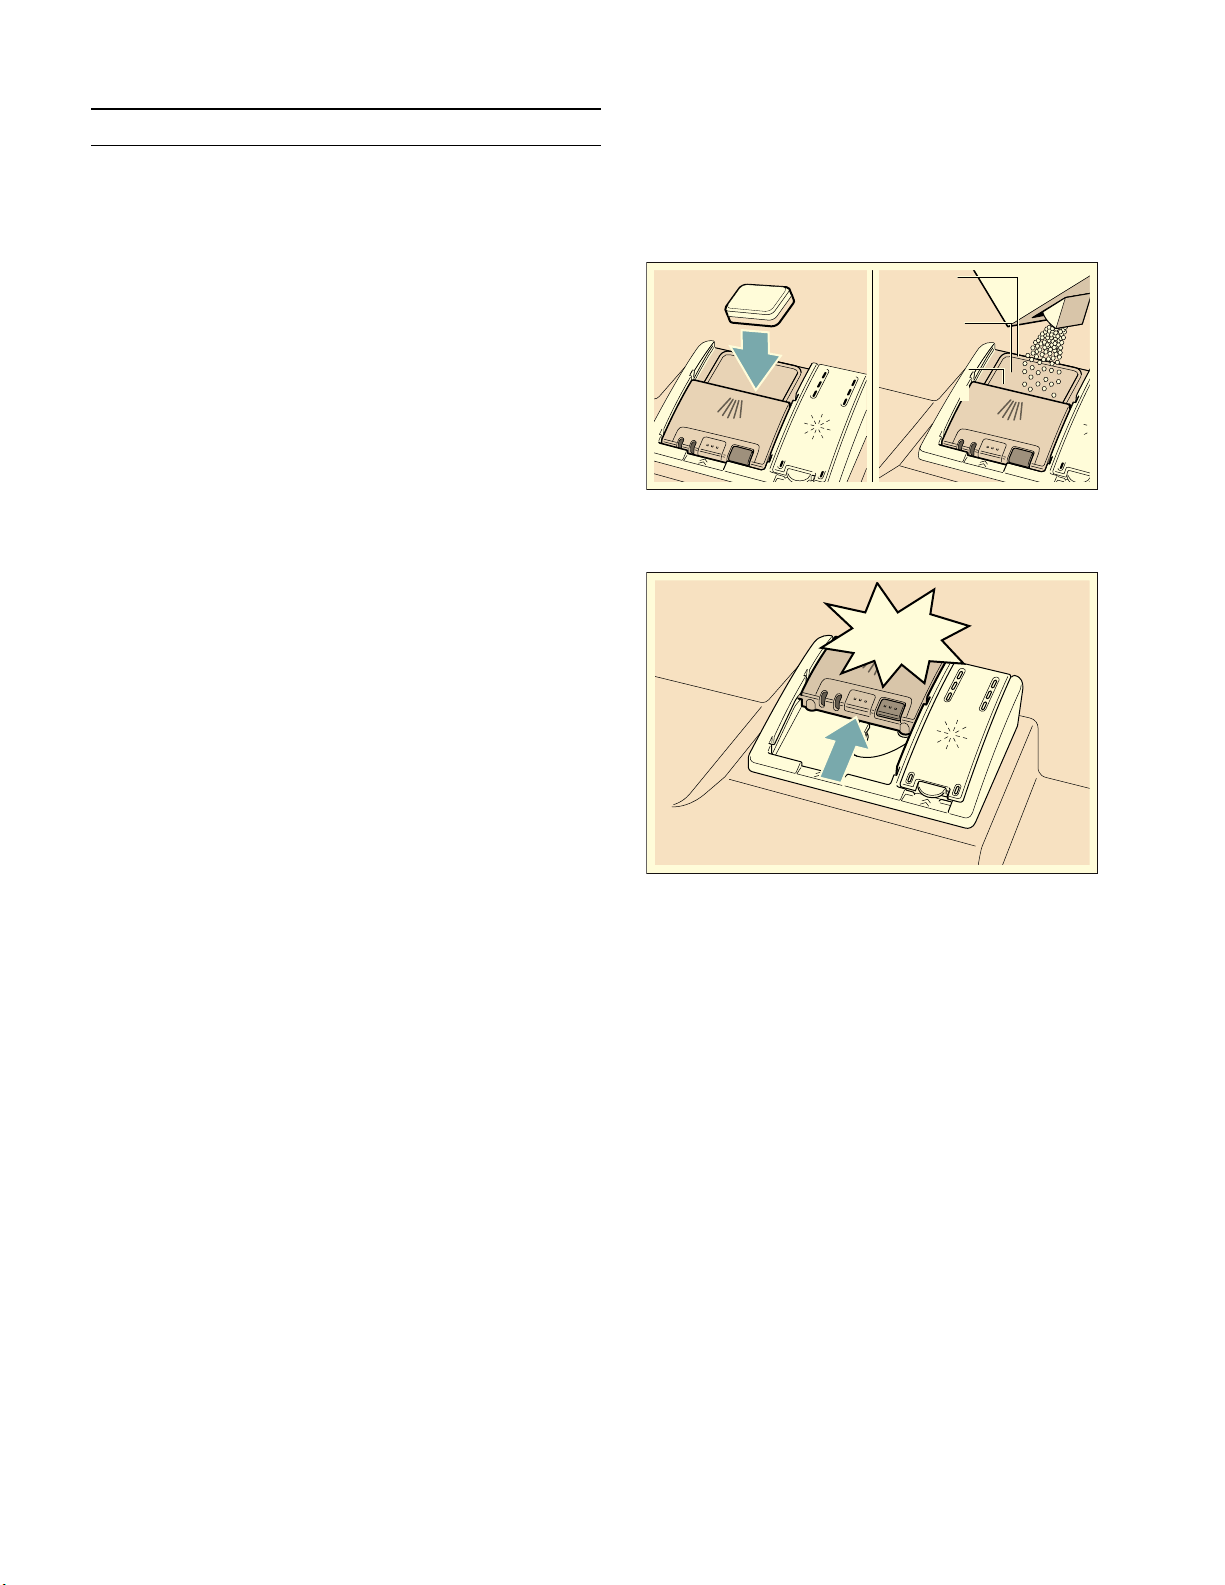
Adding detergent
1. If the detergent dispenser 9* is still closed, actuate
locking bar 92 to open it.
2. Pour detergent into the dry detergent dispenser 9*
only. Do not overfill the detergent dispenser.
When using detergent tabs, lay them such that they
do not come in contact with the cover, insert a
detergent tab flat, not on its side.
Note:Do not place detergent tabs in the tab tray 1B.
Place tabs or other detergent forms directly in the
detergent dispenser 9*.
3. Dosage: see manufacturer’s instructions on
the packaging. Use graduated detergent dispenser.
Usually 1¼ to 1½ tablespoons (20 ml–25 ml) are
adequate for normal soiling. If using tablets, one
tablet is adequate.
4. Close cover on the detergent dispenser.
Cover “clicks” into position.
The detergent dispenser opens automatically at the
optimum time depending on the wash cycle. The
powder or liquid detergent is distributed in the
appliance and is dissolved, the detergent tab falls
into the detergent tab tray where it dissolves in
doses.
Tip: If the utensils are only lightly soiled, slightly less
than the indicated amount of detergent is usually
adequate.
Suitable detergents and care products can be
purchased online via our website or via customer
service (see back page).
WEVS
êWEVS
PO
êWEVS
PO
PO
&/,&.

29
Detergent en-us
Combination detergent
Apart from conventional single function detergents, a
number of products are offered with additional
functions. These products contain not only the
detergent but also rinse aid and salt replacement
substances (3in1) and, depending on the combination
(4in1, 5in1, ...), additional components such as glass
protection or stainless steel cleaner. Combination
detergents function only up to a specific degree of
hardness (usually 21°dH). Over this limit salt and rinse-
aid must be added.
As soon as combined detergents are used, the rinse
programme is adjusted automatically to ensure the best
possible rinsing and drying result.
Notes
▯ If you want to add more utensils after the wash cycle
has started, do not use the detergent tab tray 1B as
a handle for the upper rack. The detergent tab could
already be there and you will touch the partially
dissolved tab.
▯ Do not place small parts for washing in the detergent
tab tray 1B; this prevents the detergent tab from
dissolving evenly.
▯ You will obtain optimum rinsing and drying results
by using single function detergents and applying salt
and rinse aid separately.
▯ If wash cycles are short, detergent tabs may not have
full cleaning effect due to different dissolving
properties and there may even be undissolved
detergent residue. It is recommended to use washing
powder for these wash cycles.
▯ The dosing of a detergent tab is adequate for the
“Intensive” wash cycle (for some models). When
using washing powder, you can apply some of this
cleaning agent to the inside of the appliance’s door.
▯ Even if the rinse-aid and/or salt refill indicator is lit,
the rinse cycle will run correctly with combined
detergents.
▯ If using detergents in a water-soluble protective
cover: Take hold of the cover with dry hands only
and put the detergent into an absolutely dry
detergent dispenser only, otherwise the detergent
may stick.
▯ If you switch from combined detergents to single
function detergents, ensure that the water softening
system and amount of rinse aid have been set to
the correct value.
▯ Biological/eco detergents: Detergent products
identified as “Bio” or “Eco” (to protect the
environment) usually use lower quantities of active
agents or completely dispense with certain
substances. The cleaning effect of such products
may occasionally be restricted.
30
en-us Dishwasher Cycles
/
Dishwasher Cycles
Dishwasher Cycles
Note: In order to save energy, it is recommended to set
the Auto Power Off feature to “After one minute”.
Note: The Energy Guide label was based on the Normal or Regular soil sensing cycle as follows: The unit was tested
without any rinse aid (liquid) in the rinse aid dispenser 9". A single dose of detergent was inserted into the
detergent dispenser 9*, with no detergent being used in the prewash. The unit was not subjected to truncated
testing per the definitions in the test procedure. We recommend that dish loads such as the one in the energy
certification test have the rack position set in the highest position.
Wash cycle Recommended use Possible wash cycle option
AUTO
150 - 160° F
This cycle cleans items having baked-on or hard dried-on
food soils. These items may require soaking or hand
scouring.
all
AUTO Wash
130 - 150° F
This cycle is appropriate for mixed loads.
It is optimised according to the soiling with the aid of
sensors.
all
AUTO Delicate
113 - 122° F
This cycle is appropriate for delicate dishwasher items.
It is optimised according to the soiling with the aid of
sensors.
all
Regular
(see note at bottom of
table)
Recommended for daily, regular or typical use to
completely wash a full load of normally soiled dishes.
all
Note: In order to obtain
optimal performance with
minimum energy
consumption, it is
recommended to disable all
available options and
settings, except Auto Power
Off
1-Hour Wash
Cleans freshly soiled dishes with easy to remove soils.
This cycle reduces cycle time while still including drying.
Extra Dry
Quick Wash
Cleans lightly soiled dishes with easy to remove food
soils.
Extra Dry
Glass Care
A cycle for lightly soiled dishes which is ideal for
temperature sensitive dishes or silverware. In this cycle
the temperature is reduced to help prevent dishes from
becoming damaged. It is especially helpful to reduce a
cloudy or etched appearance on glasses.
Note: Some glasses are more prone to etching due to the
glass manufacturing process.
all
Rinse
Use this cycle if you need to pre-rinse dishes to avoid
odors. Place unrinsed dishes inside the dishwasher and
select the Rinse cycle. Uses less water than hand rinsing
and very low energy.
I

31
Dishwasher Cycle Options en-us
0
Dishwasher Cycle Options
Dishwasher Cycle Opti ons
Intensive Zone Ï
Intensive Zon e
Perfect for a mixed load. You can wash very soiled pots
and pans in the lower rack together with normally soiled
utensils in the upper rack. The spray pressure in the
lower rack is intensified, the rinsing temperature is
increased slightly.
Power ¥
Po wer
The cycle time is reduced significantly in the Power
option. The energy consumption is increased by up to
30% due to more intensive heating.
Half Load §
Hal f Load
If you have only a few items to wash (e.g. glasses, cups,
plates), you can switch to “half load”. This will save
water, energy and time. It is recommended to put a little
less detergent in the detergent dispenser than for a full
load.
Extra Dry ½
Ex t r a Dry
An increased temperature during the final rinse and an
extended drying phase ensure that even plastic parts
dry better. There is a slight increase in the energy
consumption.

32
en-us Dishwasher Cycle Options
Wash Cycle Information
To save energy, this dishwasher has EcoSense where
the sensors in the dishwasher automatically adjust the
cycle length, temperature and water changes based on
the amount of food soil and the incoming water
temperature. The “Smart Control” makes decisions that
can cause the cycle time and water usage to adjust
intermittently. Wash cycle times are based on 120°F
(49° C) water supply. If your household water supply is
different than 120°F (49° C), your dishwasher’s cycle
times may be impacted.
Note: Only sanitizing cycles have been designed to meet the requirements of Section 6 of the NSF/ANSI Standard
for Residential Equipment for soil removal and sanitization efficacy. There is no intention, either directly or indirectly,
to imply that all cycles have passed sanitization performance tests.
AUTO
Delicate
113-122°F
AUTO
Wash
130-150°F
AUTO*
150-160°F
Regular 1-Hour
Wash
Quick
Wash
Glass Care Rinse
Cycle time
in min.
80 - 85 105 - 130 110 - 135 130 - 135 60 30 70 9
Water cons.
in L (gal)
9.0-14.2
(2.4-3.8)
9.4-20.2
(2.5-5.3)
18.6-24.2
(4.9-6.4)
8.5-20.6
(2.2-5.4)
14.3 (3.8) 10.5 (2.8) 13 (3.4) 4.1 (1.1)
Wash temp.
in °F (°C)
113-122
(45-50)
127-150
(53-66)
150-160
(66-71)
113-131
(45-55)
122 (50) 113 (45) 122 (50) incoming
Rinse temp.
in °F (°C)
144 (62) 153-162
(67-72)
162 (72) 147-156
(64-69)
158 (70) 127 (53) 140 (60) incoming
Intensive Zone
Cycle time
in min.
95-105 120-145 125-145 145-150 N/A N/A 85 N/A
Water cons.
in L (gal)
9.3-14.5
(2.5-3.8)
9.4-20.2
(2.5-5.3)
18.6-24.2
(4.9-6.4)
8.5-20.6
(2.2-5.4)
N/A N/A 13 (3.4) N/A
Rinse temp.
in °F (°C)
144 (62) 153-162
(67-72)
162 (72) 147-156
(64-69)
N/A N/A 140 (60) N/A
Power
Cycle time
in min.
60-70 75-90 95-110 95-105 N/A N/A 60 N/A
Water cons.
in L (gal)
9.2-12.5
(2.4-3.3)
16.1-20.0
(4.3-5.3)
16.3-20.5
(4.3-5.4)
16.6-21.1
(4.4-5.6)
N/A N/A 13.3 (3.5) N/A
Rinse temp.
in °F (°C)
144 (62) 162 (72) 162 (72) 162 (72) N/A N/A 140 (60) N/A
Half Load
Cycle time
in min.
75-80 95-105 115 110-120 N/A N/A 65 N/A
Water cons.
in L (gal)
9.0-12.2
(2.4-3.2)
10.2-16.5
(2.7-4.4)
17.9 (4.8) 10.9-14
(2.9-3.7)
N/A N/A 12 (3.2) N/A
Rinse temp.
in °F (°C)
144 (62) 158-162
(70-72)
162 (72) 156 (69) N/A N/A 140 (60) N/A
Extra Dry
Cycle time
in min.
115-125 125-150 130-150 140-155 70 50 100 N/A
Water cons.
in L (gal)
9.3-14.5
(2.5-3.8)
9.4-20.2
(2.5-5.3)
18.6-24.2
(4.9-6.4)
8.5-20.6
(2.2-5.4)
14.3 (3.8) 10.5 (2.8) 13 (3.4) N/A
Rinse temp.
in °F (°C)
162 (72) 162 (72) 162 (72) 162 (72) 162 (72) 162 (72) 162 (72) N/A
*sanitize

33
Operating the Dishwasher en-us
1
Operating the Dishwasher
Operati ng the Dishwasher
Note: With hidden controls, the door must be opened
before changing settings and closed after changing
settings.
9 WARNING
Risk of injury!
To avoid risk of injury, always use caution when
opening the door during or following a wash cycle
as hot water or steam may escape. Do not fully
open the door until water noises have stopped
and steam has subsided.
To reduce risk of injury, do not allow children to
play in or on the dishwasher.
When children become old enough to operate the
appliance, it is the responsibility of the parents/
legal guardians to ensure the children are
instructed in safe practices by qualified persons.
Protection against unintentional
operation
Your dishwasher is equipped with a function that helps
to prevent unintentional operation (e.g. by children).
After starting the dishwasher, the dishwasher door has
to be closed within 4 seconds, otherwise the operation
will be paused. There will be a signal on the control
panel advising you to press the Start button again and
close the door.
This function will be activated when:
▯ pressing Start to begin a wash cycle
▯ setting Delay time and pressing Start
▯ opening the door while Delay time is active
▯ opening the door during a wash cycle.
Note: This function cannot be deactivated.
Operating the touch buttons
Buttons are sensitive and should be touched gently.
Avoid any grease or food particles resting on the
buttons as they could activate the dishwasher.
Wiping and cleaning can also activate the dishwasher.
For best results, use bare, clean hands when touching
the buttons.
To clean the touch buttons wipe them with a dry or
slightly damp cloth.
Opening the door
To open the door, press the upper middle part of the
door. The appliance opens automatically.
If you have activated the child-proof lock, press twice in
quick succession at the upper middle part of the door.
Changing the settings
The dishwasher has been preset with certain settings
for your convenience. You can change these factory
settings.
Change the setting as follows:
1. Open the door.
2. Switch on ON/OFF button (.
3. Press Info button ( 8 for 3 seconds until the
following text is indicated in the digital display @:
Scroll with < >
Set with - +
Leave with t 3 sec.
4. Keep pressing button >)* until the required setting
is indicated in the digital display @.
5. Make the selection with setting buttons + -X.
6. Press and hold the Info button (8 for 3 seconds.
The chosen setting has now been stored.
Tip: If you change several settings, first make all
changes in succession. Now press the Info button ( 8
for 3 seconds. This saves all set values in the appliance.

34
en-us Operating the Dishwasher
AquaSensor *
Aq u a Sensor
* optional feature which may or may not be included
with your dishwasher
The AquaSensor is an optical measuring device which
measures the cleanliness of the rinse water.
The AquaSensor is used according to the wash cycle. If
the AquaSensor is active, “clean” rinse water can be
transferred to the next rinse and water consumption can
be reduced by 0.8–1-5 gal (3–6 liters). If the rinse water
is not yet clear, the water is drained and is replaced with
fresh water. In the automatic wash cycles the
temperature and running time can also be adjusted to
the degree of soiling.
Time display
The wash cycle time is determined during the wash
cycle by the water temperature, the amount of dishes, as
well as the degree of soiling and may vary (depending
on the selected wash cycle). You can change the time
display into time of day or hours/minutes so that the
remaining cycle time of the wash cycle appears in the
display window “Finish at” (for example 15:20 o’clock)
or “Finish in” (for example 3:25 hours).
Sensor setting
The wash cycle sequence is optimized in Auto wash
cycles with the aid of sensors. The sensors adjust the
wash cycle strength of Auto wash cycles depending on
the amount and type of soiling. You can adjust the
sensitivity of the sensors in 3 stages.
Standard: This setting is ideal for a mixed load and
heavily soiled utensils, but also saves energy and water.
Sensitive: This setting adjusts the wash cycle strength
for the effective removal of food remnants, even if the
amount of soiling is low. The energy and water
consumption is adjusted accordingly.
Very sensitive: This setting adjusts the wash cycle
strength for difficult conditions of use, for example
firmly dried on food remnants. This setting is
recommended if using biological or eco detergents
which contain lower amounts of active agents. The
energy and water consumption is adjusted accordingly.
extraDry
The final rinse uses a higher temperature which
improves the drying result. The cycle time may increase
slightly. (Caution if utensils are delicate!) You can
switch the extraDry function on or off. There is a slight
increase in energy consumption.
Eco forecast
When Eco forecast is activated, the average water and
energy consumption of the selected wash cycle is
briefly displayed in the digital display @.
AutoPowerOff
(Switching off automatically after the
end of the wash cycle)
Au t o Power Off
To save energy, the dishwasher is switched off 1 minute
after the wash cycle ends. You can also change this
setting.
Possible settings are:
▯ off: The appliance does not switch off automatically.
▯ After one minute: The appliance switches off after
1 minute. This is the most energy efficient setting.
▯ After two hours: The appliance switches off after
2 hours.
EmotionLight *
Emot i onLi ght
The EmotionLight 1" is on when the door is open
irrespective of whether the On/Off switch ( is
switched on or off. When the door is closed, the
EmotionLight is off. You can switch the EmotionLight on
or off.
Note: Note that when the door is open the EmotionLight
is automatically switched off after 1 hour.
* optional feature which may or may not be included with
your dishwasher.

35
Operating the Dishwasher en-us
Remaining time projection
(Optical display while the wash cycle is
running) *
Remai ni ng time pr oj ect i on
While wash cycle is running, an optical display
(additional cycle information) is indicated on the floor
under the appliance door. If the base panel is pulled
forwards or if the appliance is installed at eye-level with
flush furniture front, the display is not visible.
You can switch the optical display on or off.
* optional feature which may or may not be included with
your dishwasher.
Infolight *
infoLight
While the wash cycle is running, a light spot shines
on the floor under the appliance door. Do not open the
appliance door until the light point is no longer visible
on the floor. If the appliance door is not completely
closed, the light spot flashes *. If the appliance
is installed at eye-level, with flush furniture front,
the light point is not visible. You can switch the Infolight
on or off.
In darkened rooms, some light scattering may be visible.
This is normal and cannot be changed.
* optional feature which may or may not be included with
your dishwasher.
Changing start wash cycle
You can change the “Start wash cycle” setting.
Tone volume
The end of the wash cycle is indicated by a buzzer. You
can also change this setting.
Button volume
When you are operating the dishwasher, a signal
sounds whenever a button is pressed. You can control
the volume of the signal. If you do not like the button
volume, you can switch it off.
Child-proof lock *
Chi l d- pr oof lock
The dishwasher features an electronic child-proof lock.
The child-proof lock protects children from potential
hazards which the dishwasher poses.
You can switch the child-proof lock on or off. When the
child-proof lock is on, it is difficult to open the door.
* optional feature which may or may not be included with
your dishwasher.

36
en-us Operating the Dishwasher
Greeting
When you switch on the dishwasher, the brand logo
appears. You can switch off the brand logo.
Factory setting
You can reset all settings to the factory setting.
Switching the appliance on
1. Turn the water supply on fully.
2. Open the door.
3. Switch on On/Off switch (.
The AUTO 130 - 150° F wash cycle has been preset
as a default whenever the appliance starts. This wash
cycle remains selected if no other wash cycle button
0 is pressed.
4. Press Start button )".
5. Close the door.
Wash cycle sequence starts.
Note: Your dishwasher is protected against
unintentional operation. If the appliance door remains
open for more than 4 seconds after pressing the Start
button, the operation will be paused. Press the Start
button again and close the appliance door.
Delay start time
You can delay the start of the wash cycle by up to
24 hours. Depending on the setting of the time display,
the end of cycle is indicated with “Finish in” (for
example 3h 25m) or “Finish at” (for example 15:20
hours).
1. Open the door.
2. Switch on On/Off switch (.
3. Select wash cycle 0.
4. Press Delay start button `.
5. Keep pressing the setting buttons + - X until the
displayed time corresponds with your requirements.
6. Press Start button )", timer programming is
activated.
7. To delete the Delay start time, press Start button )"
for about 3 seconds.
8. Close the door.
Note: Your dishwasher is protected against
unintentional operation. If the appliance door remains
open for more than 4 seconds after pressing the Start
button, the operation will be paused. Press the Start
button again and close the appliance door.
Wash cycle end
* The wash cycle has ended when “Finished” is
indicated on the digital display @.
* The end of the wash cycle is displayed on the floor –
provided the optical display is switched on and is
visible.
* optional feature which may or may not be included with
your dishwasher.

37
Operating the Dishwasher en-us
Switching off the appliance
Short time after the end of the wash cycle:
1. Press On/Off button (.
2. Remove the dishes when they have cooled down.
9 WARNING
Risk of injury!
To avoid risk of injury, always use caution when
opening the door during or following a wash cycle
as hot water or steam may escape. Do not fully
open the door until water noises have stopped
and steam has subsided.
To reduce risk of injury, do not allow children to
play in or on the dishwasher.
When children become old enough to operate the
appliance, it is the responsibility of the parents/
legal guardians to ensure the children are
instructed in safe practices by qualified persons.
Interrupting the wash cycle
9 CAUTION!
Expansion (overpressure) may cause the
appliance door to open and/or water to escape! If
the door was opened on an appliance which has a
hot water connection or is heated, always leave
the door ajar for several minutes and then close.
1. Open the door.
2. Switch off On/Off switch (.
The LED’s go out. The wash cycle is saved.
3. To continue the wash cycle, switch on the On/Off
switch ( again.
4. Close the door.
Note: Your dishwasher is protected against
unintentional operation. If the appliance door remains
open for more than 4 seconds after pressing the Start
button, the operation will be paused. Press the Start
button again and close the appliance door.
Terminating the wash cycle (Reset)
Ter minating the wash cy cl e
1. Open the door.
2. Press the Start button )" and hold for 3 seconds
The digital display @ shows: "Program was
terminated".
3. Close the door.
The wash cycle sequence lasts approx. 1 min. The
digital display @ shows: “Finished”.
4. Open the door.
5. Switch off On/Off switch (.
6. Close the door.
Changing the wash cycle
When the Start button ( has been pressed, the wash
cycle cannot be changed. The only way a wash cycle can
be changed is by terminating the wash cycle (Reset).
38
en-us Care and Maintenance
2
Care and Maintenance
Care and Maintenance
A regular inspection and maintenance of your machine
will help to prevent faults. This saves time and prevents
future problems.
Cleaning the dishwasher
▯ Check rinsing compartment for grease and limescale
deposits.
If you find such deposits:
▯ Fill detergent dispenser 9* with detergent. Start
the appliance without utensils in the wash cycle with
the highest rinsing temperature.
9 WARNING
Health hazard due to detergents containing
chlorine!
Always use chlorine-free detergents.
▯ Regularly wipe the front of the appliance with a damp
cloth - water and a small amount of liquid soap is
adequate.
▯ For black stainless steel and anti-fingerprint
surfaces, use a soft, dry towel. For stubborn dirt, use
warm water diluted with a non-abrasive, mild
cleansing soap. Never use stainless steel polish.
▯ For stainless steel appliances (excluding black
stainless and anti-fingerprint), use a stainless steel
polish to seal and protect the surface.
▯ Clean the outer edges of the inside door panel
regularly to remove debris that may collect from
normal loading. If spots begin to appear on the
stainless steel, make sure the rinse aid dispenser is
full and functioning properly.
▯ Clean the door seal regularly with a damp cloth to
remove food particles that may collect from normal
loading and cause odor. A soiled door seal may not
seal properly.
NOTICE: ▯Never use a steam cleaner to clean your
dishwasher. The manufacturer is not liable for any
resulting damage.
▯ Do not use sponges as they could scratch the
surfaces.
▯ Do not use bleach-based wipes as they could
damage the surface or printing.
▯ Never use stainless steel polish on a black stainless
finish or anti-fingerprint surfaces.
9 WARNING
Use caution when removing parts for cleaning as
some debris may be sharp.
Special salt and rinse aid
Top off the salt and/or rinse aid as soon as the refill
indicators on the fascia P and H are lit.
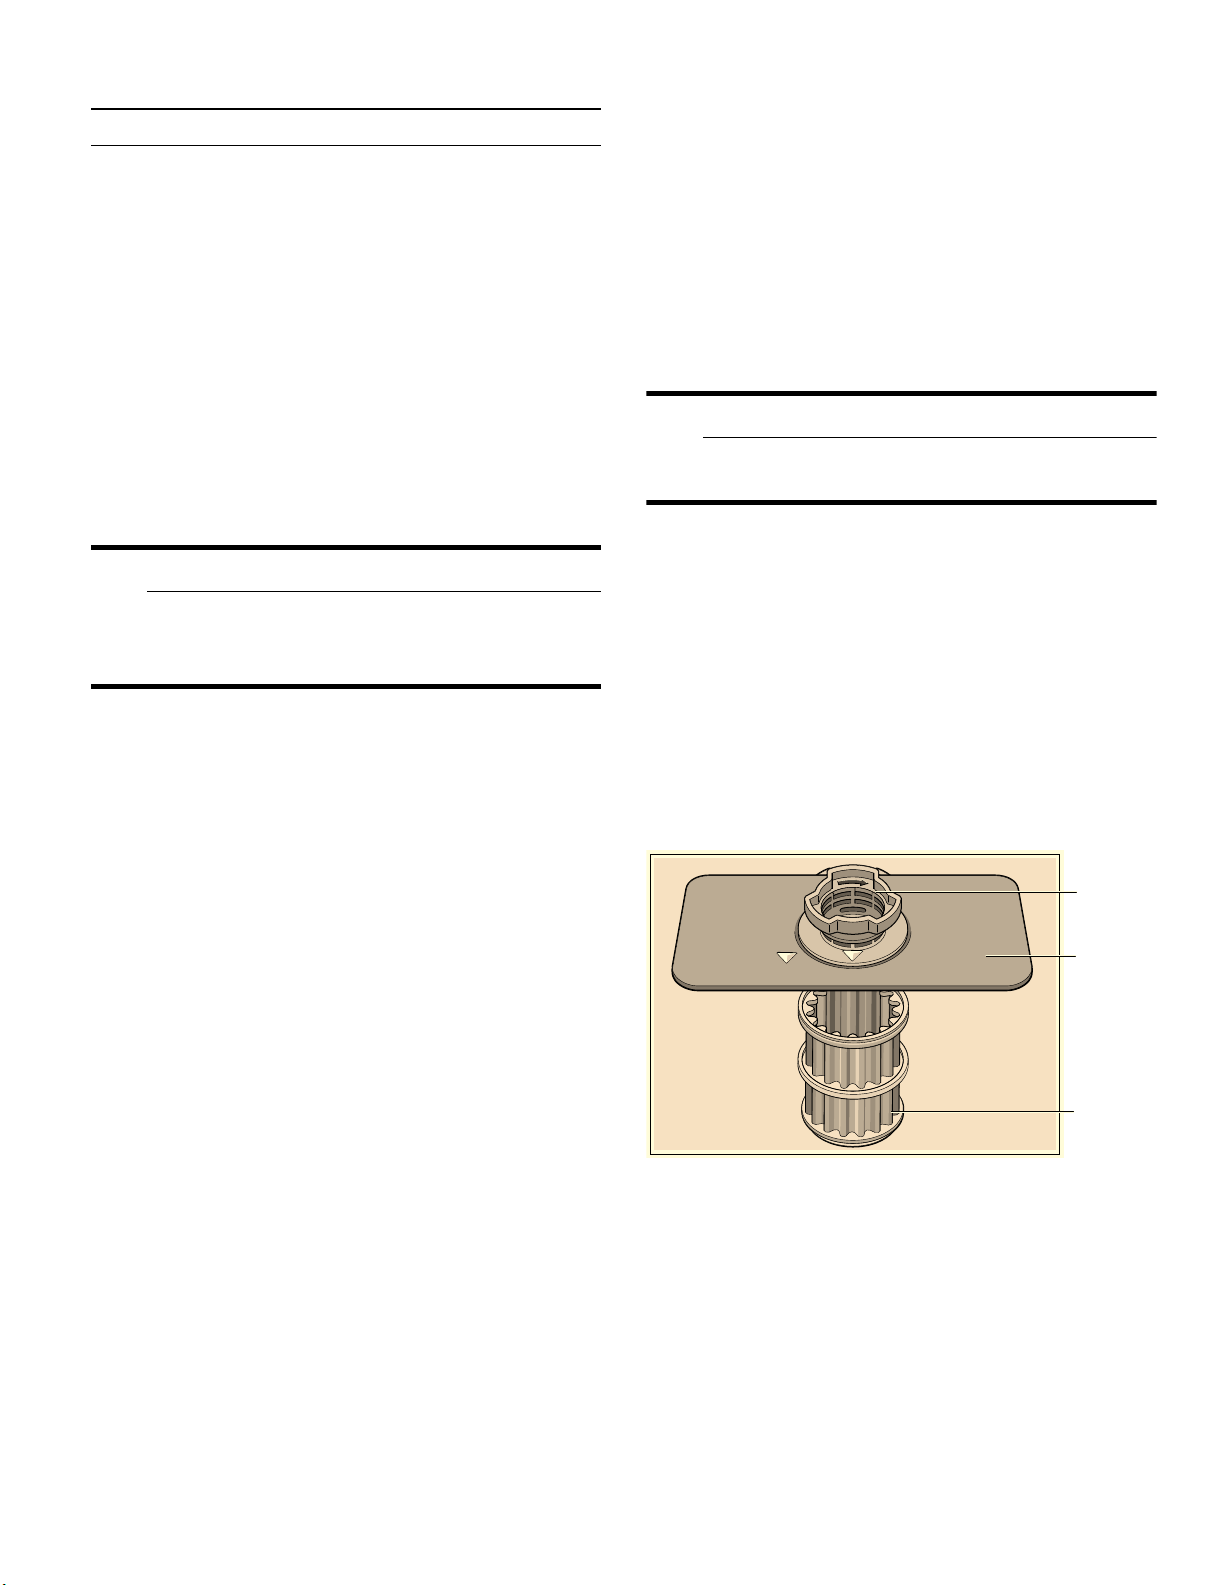
Filters
Filter components
The filter system 1Z consists of three parts.
A Large Object Trap
Prevents objects that should not be placed in
your dishwasher from damaging the dishwasher
pump system or clogging your household drain.
B Flat Fine Filter
Prevents food particles from entering the wash
chamber and directs particles toward the micro
filter.
C Micro Filter
Directs the smallest of particles to the household
plumbing drain.
$
%
&
39
Care and Maintenance en-us
Cleaning intervals
The filter system 1Z is designed to minimize
maintenance while providing premium cleaning
performance and minimum energy consumption.
Depending on use habits and water hardness, the filter
system will require some maintenance to sustain
premium cleaning performance.
Your filter system may need to be cleaned when:
▯ You notice food soils remaining on the filter system
or objects trapped in the Large Object Trap.
▯ A drop in cleaning performance or a gritty film forms
on the dishware.
When washing normally attached food soils that have
been scraped before loading, in a household that runs
the dishwasher every other day, your filter should be
cleaned:
Note: Clean the filter after washing loads with large
amounts of food soils or loads with a heavy starch
content to maintain optimal performance.
To check or clean the filter system:
1. After each wash cycle check the filters for residue.
2. Unscrew the Large Object Trap as illustrated and
remove the entire filter system.
3. Remove the microfilter from the fine filter for easier
cleaning.
4. Rinse the filters under running water and use a soft
brush to clean.
Note:do not use abrasive brushes or steel wool, etc.,
as they may damage the filter.
5. Reinstall the filter system in reverse sequence and
lock into place by screwing the Large Object Trap
until the marking arrows align.
Cleaning interval Usage
3- 6 times a year light to average use
8-12 times a year heavy use
40
en-us Care and Maintenance
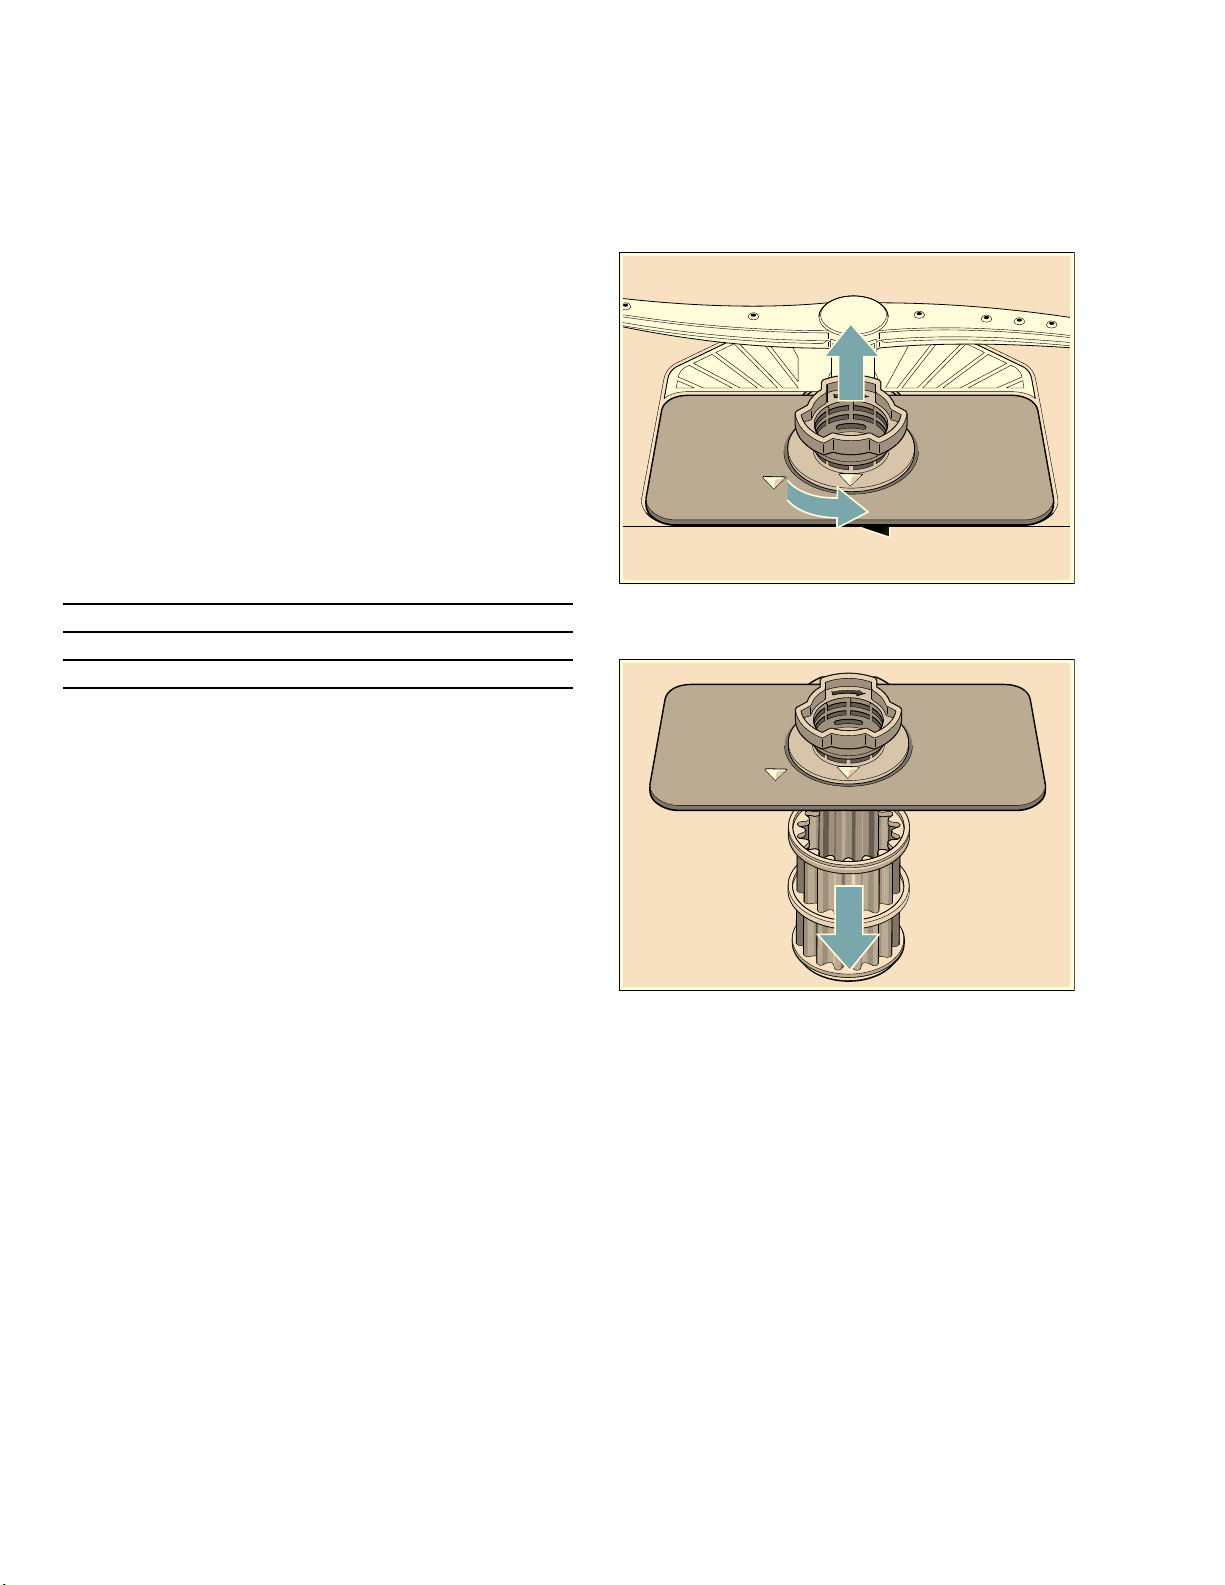
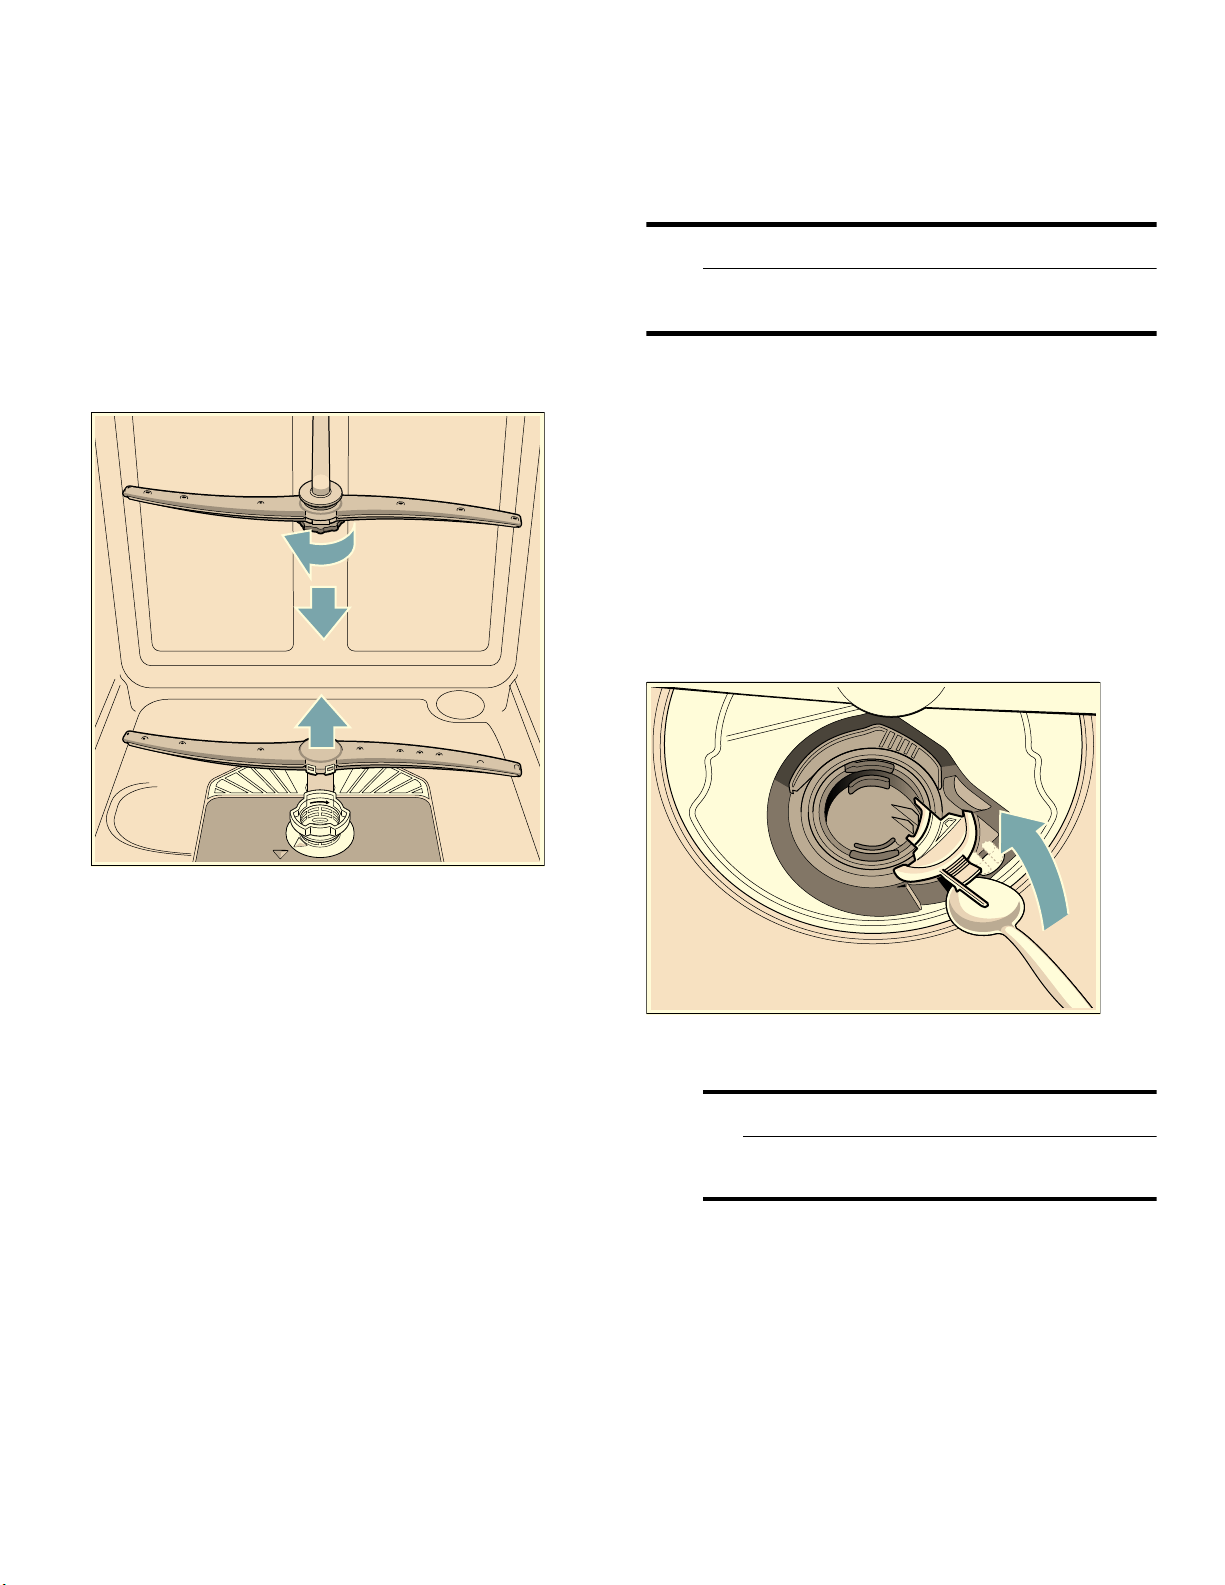
Spray arms
Limescale and contaminants in the rinsing water may
block nozzles and bearings on the spray arms 1:
and 1J.
1. Check outlet nozzles on the spray arms
for blockages.
2. Unscrew the upper spray arm 1: (1) and remove
downwards (2).
3. Remove the lower spray arm 1J upwards.
4. Clean spray arms under running water.
5. Re-engage or screw on spray arms.
Drain pump
Large food remnants in the rinsing water not retained by
the filters may block the waste water pump. In this case:
9 WARNING
Use caution when removing parts for cleaning as
some debris may be sharp.
1. Disconnect the appliance from the power supply.
2. Take out upper rack 12 and lower rack 1j.
3. Remove the filters 1Z.
4. Scoop out standing water - use a sponge if
necessary.
5. Using a spoon, pry off the pump cover (as shown)
until it clicks, then grip the cover and pull upward
until it resists and then pull forward (1). Remove
cover completely.
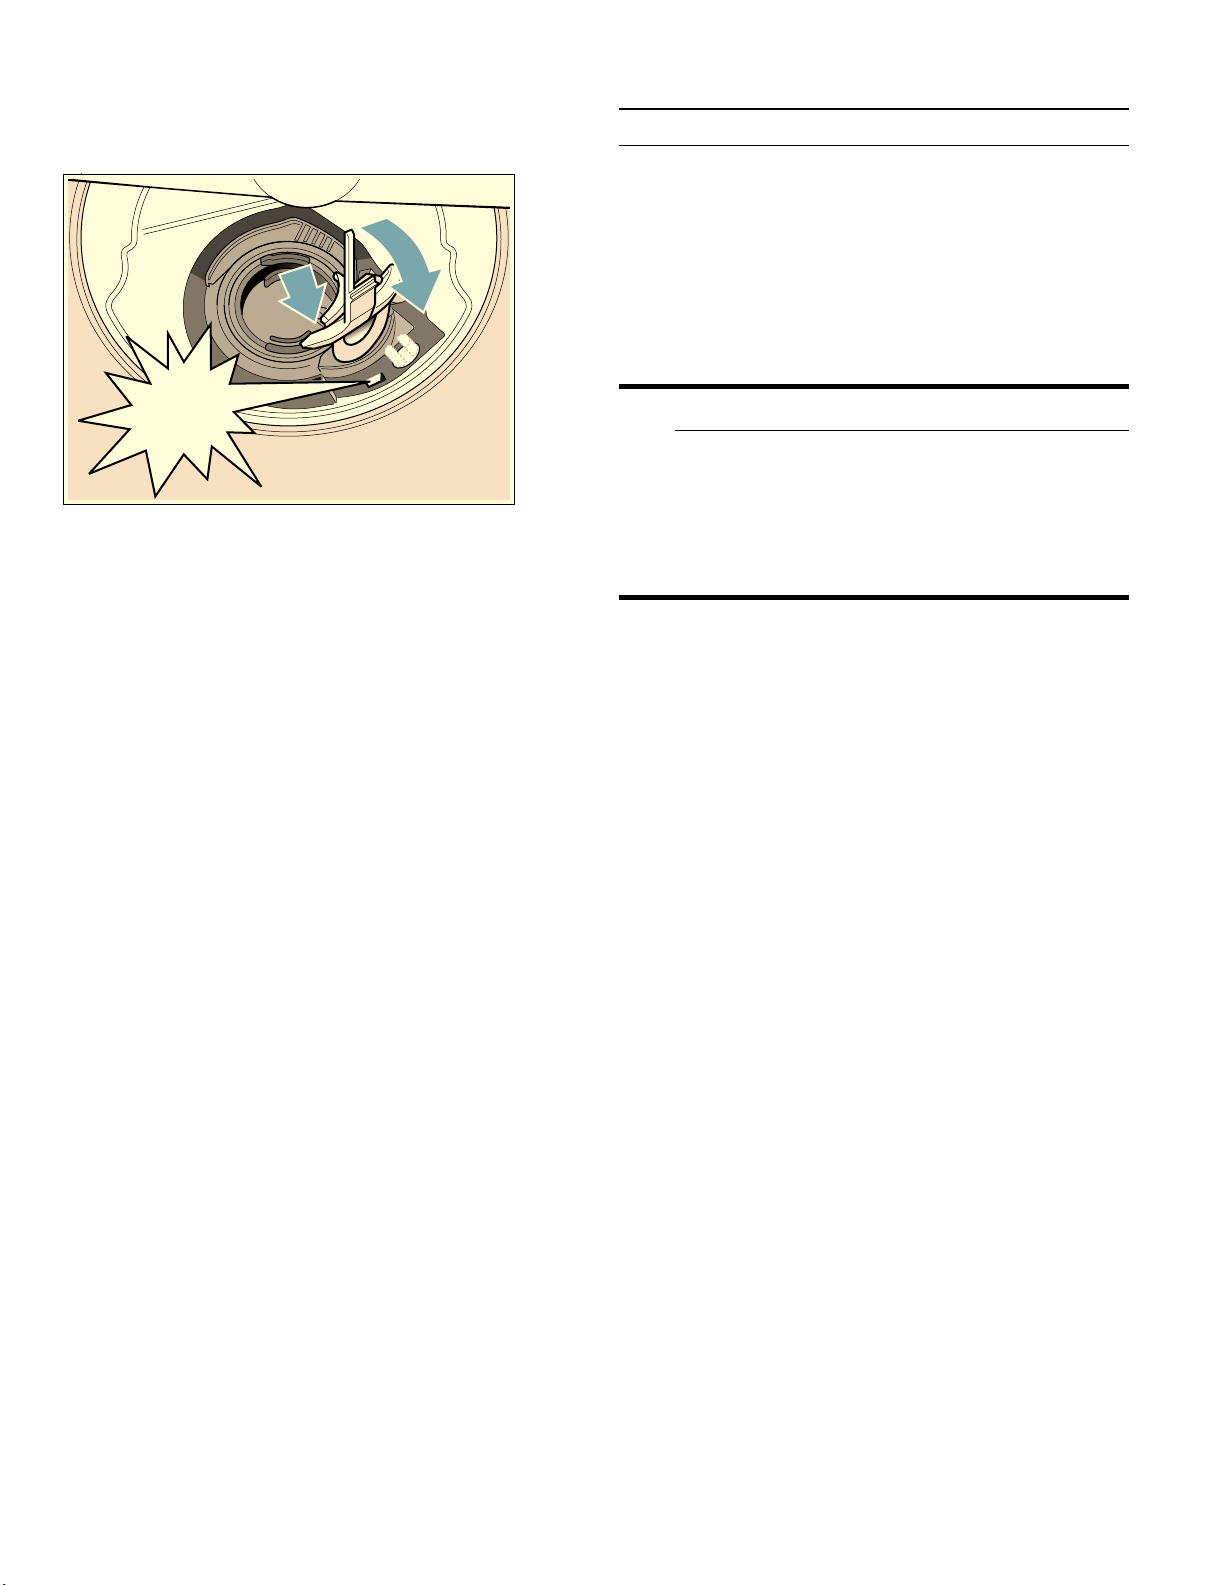
6. Check inner compartment and remove any foreign
objects.
9 WARNING
Use caution when removing parts for cleaning as
some debris may be sharp.
41
Troubleshooting en-us
7. Place pump cover in the original position (2) and
press down until it engages (3).
8. Place cover in the original position, press down and
engage.
9. Reinstall filters.
10. Re-insert racks.
Note: The drain pump will not work properly if the drain
pump cover is not snapped in completely until it clicks.
Preparing your unit for vacation
NOTICE: Before leaving for vacation during warmer
weather, besides turning off the main valve, also turn off
water supply at the nearest point to the dishwasher. Do
not leave soiled dishware in unit and leave door slightly
open. During colder weather, please follow the
instructions for winterizing your unit below.
Winterizing your unit
NOTICE: If your dishwasher will be unused for a
period of time in a location that experiences freezing
temperatures (holiday home or through a vacation
period), have your dishwasher winterized by a
professional service.
3
Troubleshooting
Troubleshooti ng
Dishwashers may occasionally exhibit problems that are
unrelated to a malfunction of the dishwasher itself. The
following information may help you with a dishwasher
problem without involving a repair professional.
Note: If the appliance stops during dishwashing or does
not start for any obvious reason, first run the cancel
wash cycle function (Reset).
9 WARNING
Improper repairs or use of non-original
replacement parts may cause considerable
damage and put the user at considerable risk!
Always have repairs carried out by authorized
technicians. If a component has to be replaced,
always use original replacement parts.
Error message
Some faults are indicated at the top of the display
window @ and on the front display * ): and possible
remedies are offered (for example Filter system soiled
(E22) -->Clean filters).
* optional feature which may or may not be included with
your dishwasher.
&OLFN
42
en-us Troubleshooting
Fault table
Fault Cause Remedial action
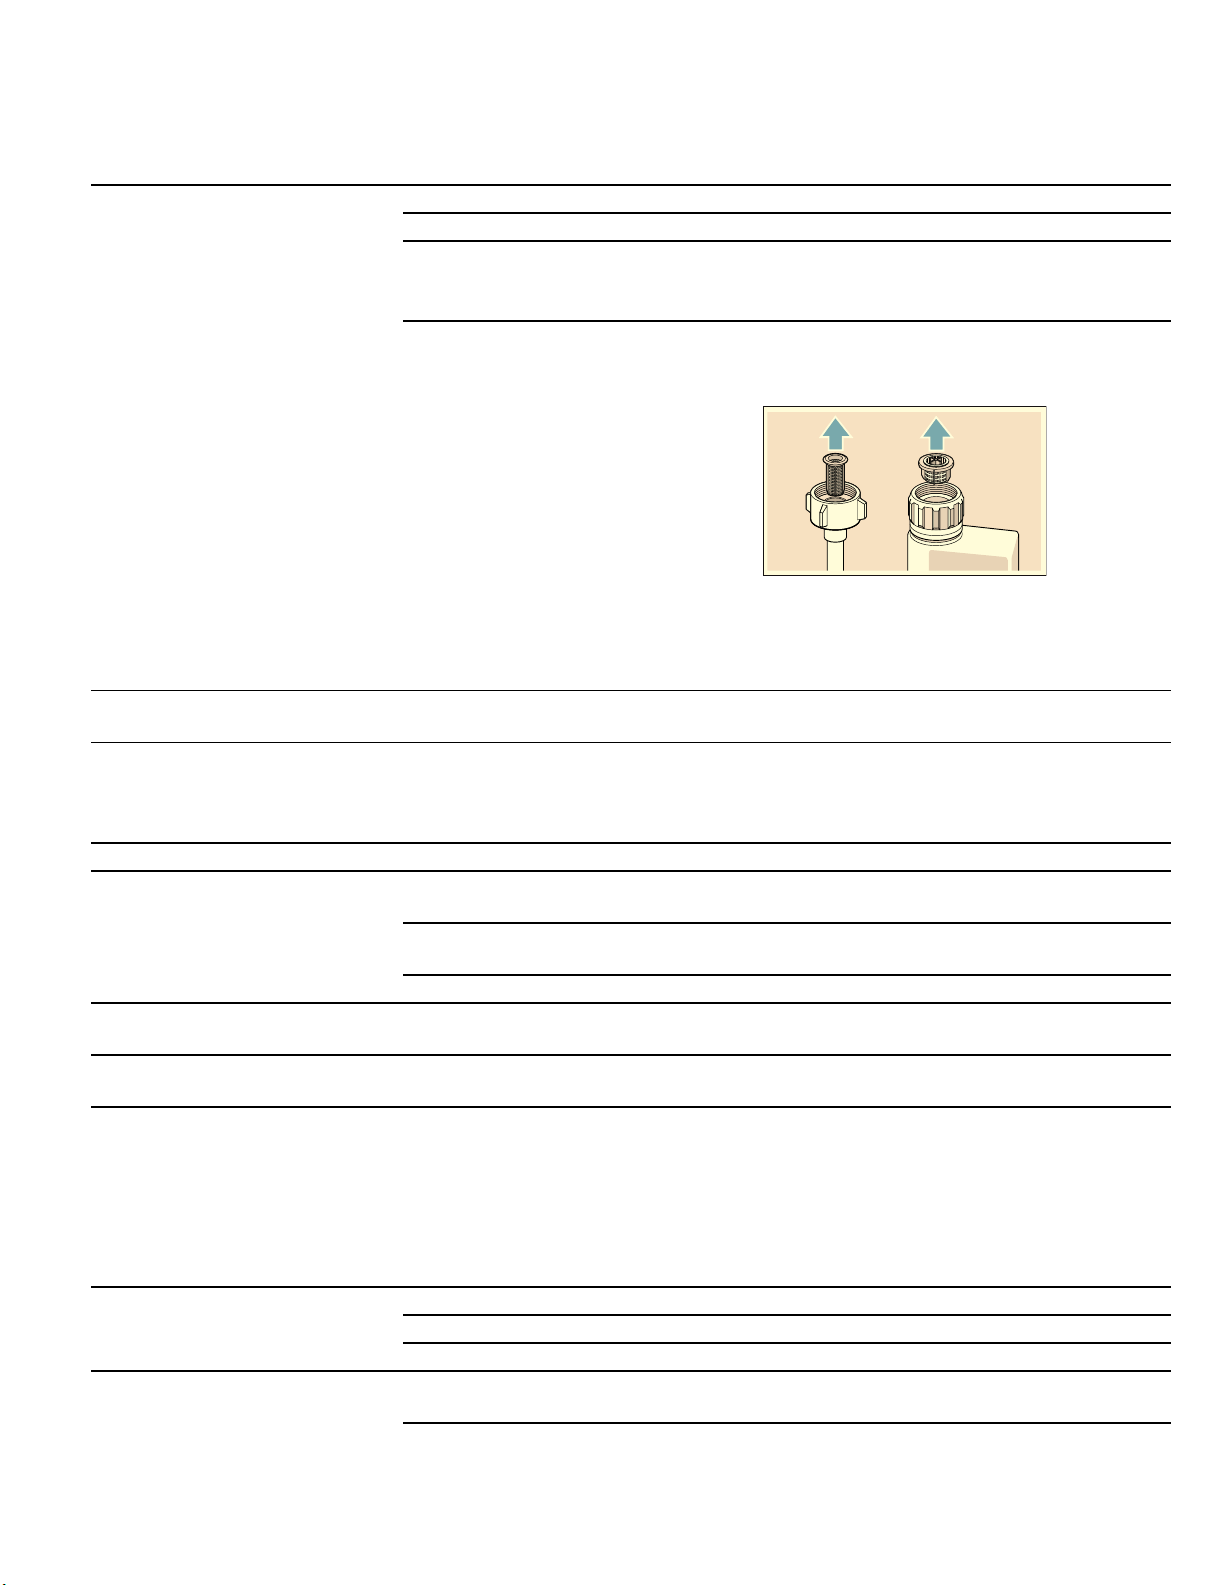
Error code “:‚‰ is lit. Supply hose kinked. Install supply hose without kinks.
Tap turned off. Turn on the tap.
Tap jammed or calcified. Turn on the tap.
Flow rate must be min. 10 l/min. when water
supply is open.
Filter in the water supply blocked. Switch off the appliance and pull out the
mains plug. Turn off the tap. Unscrew water
connection.
Clean filter in the supply hose. Screw water
connection on again. Check for leaks.
Reconnect power supply. Switch on the
appliance.
Error code “:‹ˆ is lit. Intake opening (on right inside of
appliance) covered by dishes.
Arrange dishes so that the intake opening is
not obstructed.
Error code “:‚ƒ is lit. Heating element calcified or soiled. Clean appliance with dishwasher cleaning
agent or descaler. Operate the dishwasher
with water softening system and check the
setting.
Error code “:ƒƒ is lit. Filters 1Z are soiled or blocked. Clean filters.
Error code “:ƒ… is lit. Waste-water hose kinked or blocked. Install hose without kinks, remove any
residue.
Siphon connection still sealed. Check connection to siphon and open if
required.
Cover on the drain pump loose. Lock cover correctly.
Error code “:ƒ† is lit. Drain pump blocked or cover on the
drain pump is not locked in position.
Clean pump and lock cover correctly.
Error code “:ƒˆ is lit. Mains voltage too low. Not an appliance fault, have the mains
voltage and electrical installation checked.
A different error code is
indicated on the digital display.
(“:‹‚ to “:„‹)
A technical fault has probably
occurred.
Switch off appliances with the ON/OFF
switch (. After a short time restart the
appliance.
If the problem recurs, turn off the tap and
pull out the mains plug.
Call customer service and mention the error
code.
Refill indicator for salt P and/
or rinse-aid H is lit.
No rinse aid. Refill rinse aid.
No salt. Refill with special salt.
Sensor does not detect salt tablets. Use different special salt.
Refill indicator for salt P and/
or rinse-aid H is not lit.
Refill indicator switched off. Activation/deactivation ~ "
,
Rinse Aid", ~ "
+
Water softening system / special salt"
There is still enough special salt/
rinse aid available.
Check refill indicator, levels.
43
Troubleshooting en-us
Water is left in the appliance at
the end of the wash cycle.
Filter system or area under the filters
1Z is blocked.
Clean filters and area underneath.
Wash cycle has not ended yet. Wait until wash cycle ends or reset.
Dishes not dry. No or too little rinse aid in the
dispenser.
Refill rinse aid.
Wash cycle selected without drying. Select wash cycle with drying.
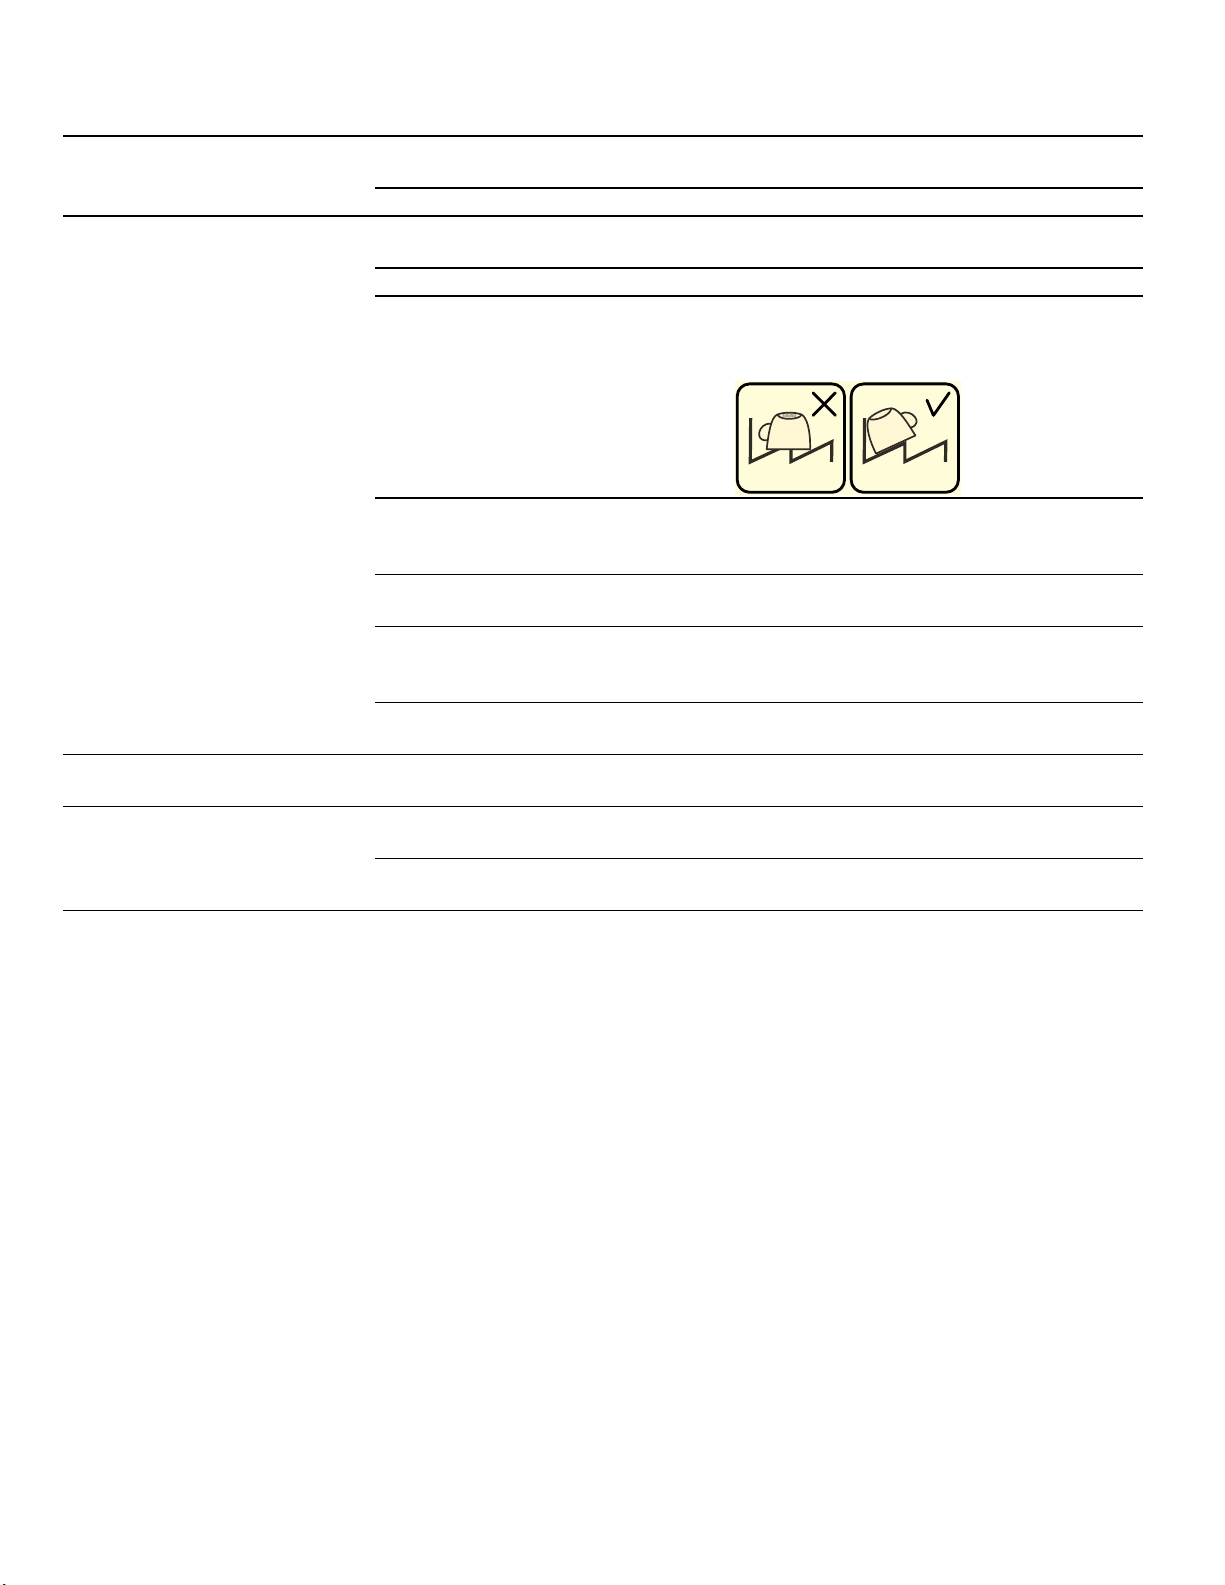
Water collecting in depressions on
the dishes and silverware.
Arrange dishes in a sloping position,
arrange affected dishes as sloping as
possible.
The combined detergent used has a
poor drying performance
Use different combination detergent with
better drying performance. Use of rinse aid
also increases the drying performance.
extraDry to increase drying not
activated.
Activate extraDry.
Dishes were removed too early or
drying process had not ended yet.
Wait until wash cycle ends or wait until 30
min after wash cycle ends before removing
dishes.
The eco rinse aid used has a limited
drying performance.
Use a proprietary rinse aid. Eco products
may have limited effectiveness.
Plastic dishes not dry. Special properties of plastic. Plastic has a lower heat storage capacity
and therefore dries less well.
Silverware not dry. Silverware not arranged properly in
the silverware basket.
Separate silverware if possible, prevent
contact points.
Silverware not arranged properly in
the third rack.
Arrange silverware properly and separate if
possible.
Appliance interior wet after rinse
cycle.
No appliance fault. On account of the “Condensation drying”
principle, water droplets are physically
induced and required in the container. The
humidity in the air condenses on the inner
walls of the dishwasher, drains and is
pumped out.
Fault Cause Remedial action

44
en-us Troubleshooting
Food soils on the dishes. Dishes placed too closely together,
racks overfilled.
Arrange dishes with adequate clearance
between them ensuring that the spray jets
can reach the surface of the dishes. Prevent
contact points.
Spray arm rotation obstructed. Arrange dishes so that the spray arm can
rotate without obstruction.
Spray arm nozzles are blocked. Clean the spray arm nozzles.
Filters 1Z dirty. Clean filters.
Filters 1Z inserted incorrectly and/
or not engaged.
Insert and engage filters correctly.
Rinse wash cycle too weak. Select a more intensive rinse cycle.
Increase sensitivity of the sensors.
Dishes precleaned too intensely;
sensors therefore decide on weak
wash cycle sequence. Stubborn
soiling cannot be completely
removed.
Do not prerinse dishes. Remove only large
food soils.
Increase sensitivity of the sensors.
Recommended wash cycle "Regular" or
Intensive.
Tall narrow containers in corner areas
are not rinsed adequately.
Do not place hollow containers too
obliquely and do not place in the corner
area.
Upper rack 12 on right and left not
set to same height.
Set upper rack to same height using side
levers.
Dishwasher seems to run a long
time
Incoming water is not warm enough. Before starting a cycle, run hot water faucet
at the sink closest to the dishwasher.
Cycle time can vary due to soil and
water conditions.
Sensors in the dishwasher automatically
increase the cycle time to ensure a good
wash when heavy soil is detected.
Rinse aid dispenser 9" is empty. Add rinse aid.
Dishwasher connected to cold water
supply.
Note:Check the typical wash cycle
length.
Verify dishwasher is connected to hot water
supply plumbing.
Detergent residue. Detergent dispenser cover 9*
blocked by dishes and therefore does
not open fully.
Dishes must not be placed above the
detergent tab tray 1B. These may block the
lid of the detergent dispenser and prevent it
from opening fully.
Do not place dishes or fragrance dispenser
in the detergent tab tray.
Detergent dispenser cover 9*
blocked by the detergent tab.
Detergent tab must be inserted flat and not
upright.
Detergent tab used in the quick or
short wash cycle.
Dissolving time of the detergent is
not reached in the selected short
wash cycle.
Dissolving time of detergent tab too long for
a quick or short wash cycle.
Use a detergent powder or select a more
intensive wash cycle.
Washing effect and dissolving
performance are reduced after a
prolonged storage time or detergent
is very lumpy.
Change detergent.
Fault Cause Remedial action
45
Troubleshooting en-us
Water stains on plastic parts. Droplet formation on plastic surface
is physically unavoidable. After
drying, water stains are visible.
Use a more intensive wash cycle (more
water changes).
Arrange dishes in a sloping position.
Use rinse aid.
If required, increase softening setting.
Washable or water-soluble
coatings in the container or on
the door.
Detergent substances are deposited.
These coatings cannot usually be
removed with chemicals (appliance
cleaner, ...).
Change detergent brand.
Clean appliance mechanically.
If there is a “white coating” on the
container floor, the water softening
system has been set very low.
Increase softening setting and change
detergent if required.
Salt dispenser cover 1R not closed. Close salt dispenser cover correctly.
Only for glasses: Initial glass
corrosion – can only apparently be
wiped off.
See “Glass and silverware damage”.
White, stubborn coatings;
limescale on the dishes,
container or door.
Detergent substances are deposited.
These coatings cannot usually be
removed with chemicals (appliance
cleaner, ...).
Change detergent brand.
Clean appliance mechanically.
Hardness range incorrectly set or
water hardness greater than
8.9 mmol/l.
Set water softening system according to
instructions for use or top up salt.
3 in 1 detergent or bio/eco detergent
not effective enough.
Set water softening system according to
instructions for use or use separate
detergents (proprietary detergent, salt,
rinse aid).
Underdosing of detergent. Increase detergent dosage or change
detergent.
Too weak rinse cycle selected. Select a more intensive rinse cycle.
Tea or lipstick residue on the
dishes.
Too low rinsing temperature. Select wash cycle with higher washing
temperature.
Too little or unsuitable detergent. Use suitable detergent at correct dosage.
Dishes precleaned too intensely;
sensors therefore decide on weak
wash cycle sequence. Stubborn
soiling cannot be completely
removed.
Do not prerinse dishes. Remove only large
food soils.
Increase sensitivity of the sensors.
Recommended wash cycle "Regular"
Colored (blue, yellow, brown),
difficult to remove to non-
removable coatings in the
appliance or on stainless steel
dishes.
Film formation consisting of
ingredients from vegetables (e.g.
cabbage, celery, potatoes, noodles,
...) or the tap water (e.g. manganese).
Can be partly removed with machine cleaner
or by mechanical cleaning. Coatings are
harmless.
Film formation caused by metallic
components on silver or aluminum
silverware.
Can be partly removed with machine cleaner
or by mechanical cleaning.
Colored (yellow, orange, brown),
easily removable deposits inside
the appliance (mainly in the floor
area)
Film formation consisting of
ingredients from food soils and
substances from the tap water
(limescale), “soapy”
Check function of the water softening
system (refill with salt) or, if using combined
detergents (tablets), activate water
softening system.
Discoloration of the plastic parts
inside the appliance.
Plastic parts inside the appliance may
become discolored during the
service life of the dishwasher.
Discoloration is normal and will not impair
the function of the dishwasher.
Fault Cause Remedial action

46
en-us Troubleshooting
Plastic parts discolored. Too low rinsing temperature. Select wash cycle with higher washing
temperature.
Dishes precleaned too intensely;
sensors therefore decide on weak
wash cycle sequence. Stubborn
soiling cannot be completely
removed.
Do not prerinse dishes. Remove only large
food soils.
Increase sensitivity of the sensors.
Recommended wash cycle "Regular"
Removable streaks on glasses,
glasses with metallic appearance
and silverware.
Too much rinse aid. Set rinse aid amount to lower setting.
No rinse aid added or setting too low. Add rinse aid and check dosage
(recommended setting 4–5).
Detergent residue in the final rinse
wash cycle section. Detergent
dispenser cover blocked by dishes
(cover does not open fully).
Detergent dispenser cover must not be
obstructed by dishes.
Do not place dishes or fragrance dispenser
in the detergent tab tray.
Dishes precleaned too intensely;
sensors therefore decide on weak
wash cycle sequence. Stubborn
soiling cannot be completely
removed.
Do not prerinse dishes. Remove only large
food soils.
Increase sensitivity of the sensors.
Recommended wash cycle “Regular”
Initial or existing, irreversible
clouding of glass.
Glasses not dishwasher-proof, only
suitable for dishwasher.
Use dishwasher-proof glasses.
Avoid long steam phase (standing time after
wash cycle ends).
Use wash cycle at lower temperature.
Set water softening system according to the
water hardness (if required one setting
lower).
Use detergent with glass protection
component.
Rust spots on the silverware. Silverware not adequately rust-
resistant. Knife blades are frequently
more severely affected.
Use corrosion-resistant silverware.
Silverware will also rust if rusting
parts are rinsed at the same time (pan
handles, damaged utensil baskets,
etc.).
Do not wash rusting parts.
Salt content in the rinsing water too
high, as salt dispenser lock not
fastened firmly or salt was spilled
while being refilled.
Fasten salt dispenser lock firmly or remove
spilled salt.
Appliance cannot be switched
on or operated.
Malfunction. Disconnect appliance from the power
supply; pull out the mains plug or switch off
the fuse. Wait at least 5 seconds, then
connect the appliance to the power supply.
Fault Cause Remedial action
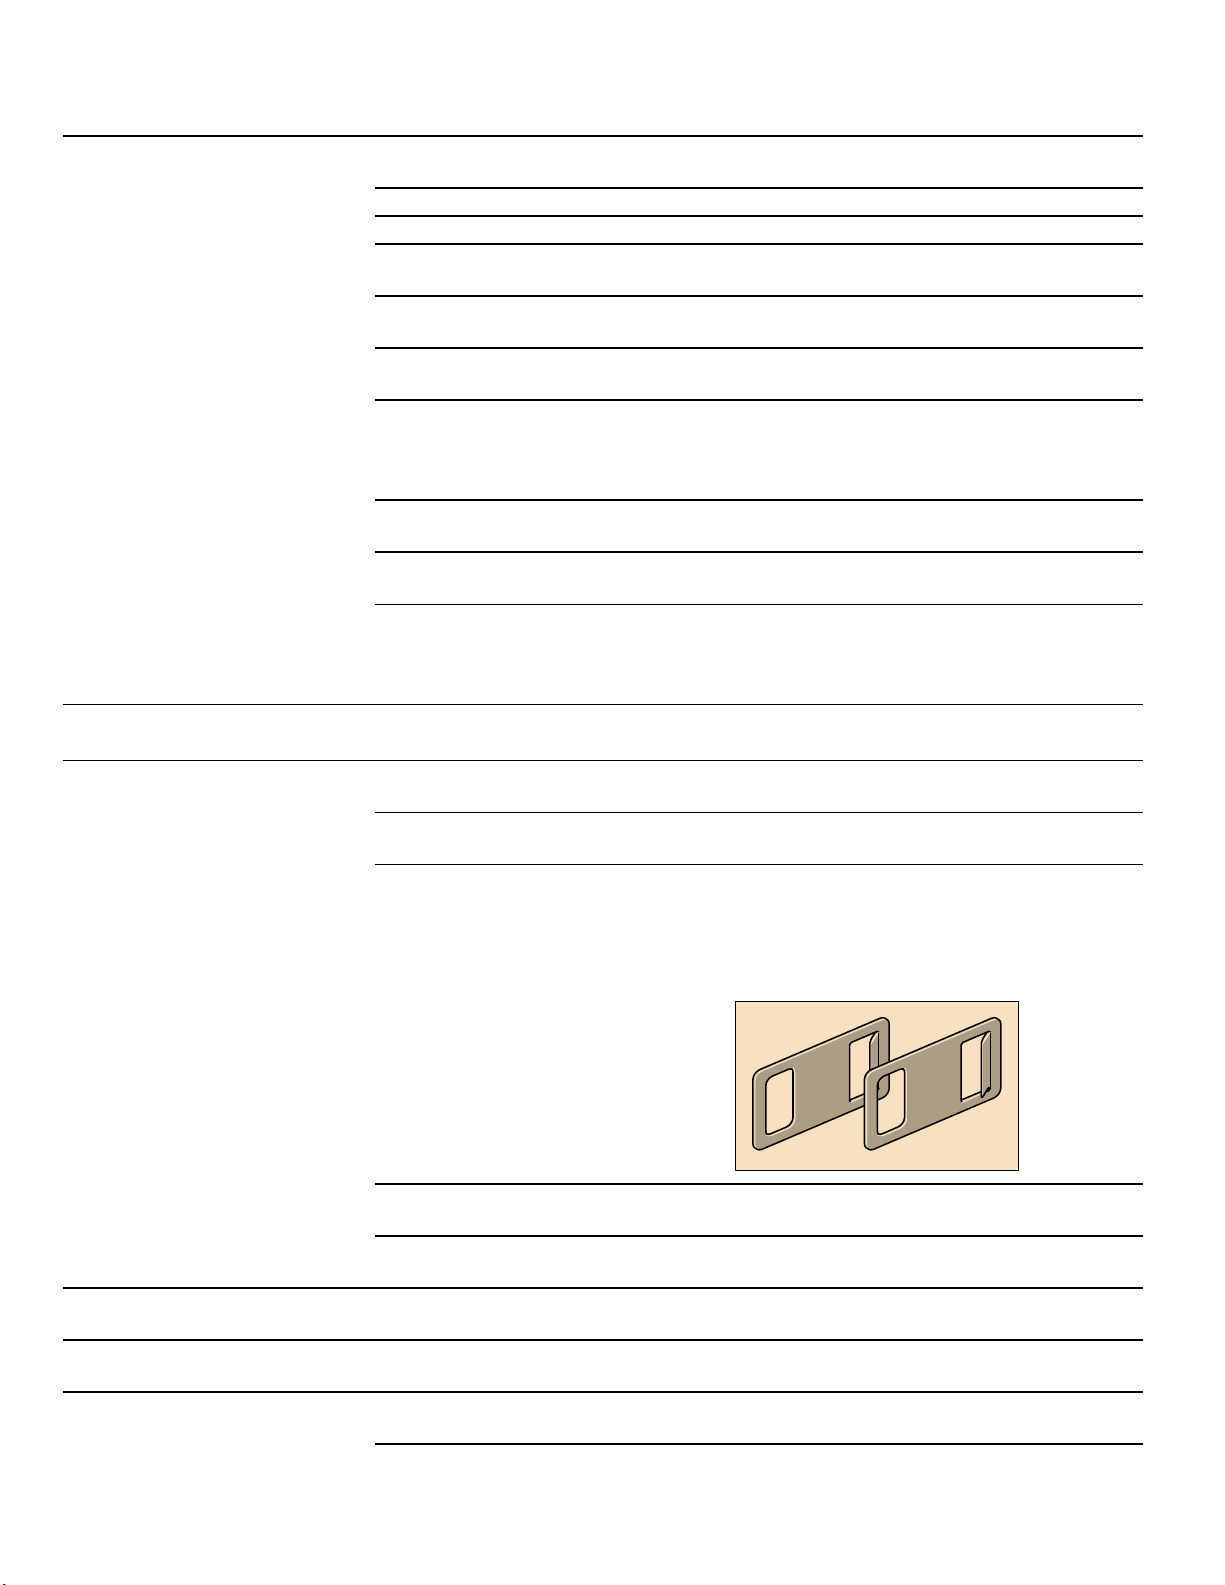
47
Troubleshooting en-us
Appliance does not start. Mains fuse may have been blown or
circuit breaker tripped.
Check mains fuse or circuit breaker.
Door may not be properly latched. Press the main power switch to turn unit on.
Unit may not be turned on. Shut door completely.
Delay start may be engaged. To reset, refer to “Delay start” section in this
manual.
Child lock is activated. Deactivate the child lock. Refer to “Child
Lock” section in this manual if applicable.
The door may have been closed
without first selecting a cycle.
Select a cycle and close the door.
Power cord not inserted. Ensure that the power cord is plugged all
the way into the back of the appliance and
into the socket. Check that the socket
functions.
The water supply may not be
connected.
Check and turn on water supply.
The appliance door has not been shut
properly.
Close the door.
The door has been open for more
than 4 seconds after pressing the
START button.
Press the START button again and close the
appliance door within 4 seconds (see
“Protection against unintentional
operation”).
Wash cycle starts automatically. You did not wait until wash cycle
ended.
Perform reset.
(see “Canceling the wash cycle“).
Door does not open. Door is not set correctly. Set the door correctly with the aid of the
installation instructions.
Child lock is activated. Press twice in quick succession at the top
of the door in the middle.
Appliance is disconnected from the
mains.
Check mains plug and fuses.
Attach supplied emergency release to upper
right and left of the furniture panel and open
the door by gently pulling the emergency
release.
Door and door seal dirty. Clean door and door seal with a damp cloth
and a little washing-up liquid.
Automatic door opening system not in
home position.
After closing the door, wait one second until
it can be opened again.
Door does not close. Automatic door opening system not in
home position.
After opening the door, wait one second
until it can be closed again.
Cover on the detergent
dispenser cannot be closed.
Detergent dispenser or cover guide
blocked by sticky detergent residue.
Remove detergent residue.
Detergent residue in the
detergent dispenser 9* or in
the detergent tab tray 1B.
Spray arms blocked by dishes,
therefore detergent is not rinsed out.
Ensure that the spray arms can rotate freely.
The detergent dispenser was damp
when filled.
Pour detergent into the dry detergent
dispenser only.
Fault Cause Remedial action
48
en-us Troubleshooting
--------
Appliance stops in the wash
cycle or wash cycle is
interrupted.
Door not closed properly. Close the door.
Do not place dishes or fragrance
dispenser in the detergent tab tray.
Upper rack presses against the door
and prevents door from being closed
securely.
Check whether rear panel is being pressed
in, e.g. by socket or by hose holder which
has not been removed.
Power and/or water supply
interrupted.
Restore power and/or water supply.
Filling valves making striking
noises.
Depends on domestic installation, as
appliance is not defective. No effect
on appliance function.
No remedial action possible.
Knocking or rattling noise. Spray arm strikes the dishes, dishes
not positioned correctly.
Position dishes so that the spray arms do
not strike the dishes.
If there is a low load, the water jets
strike the washing tank directly.
Load the appliance with more dishes or
distribute the dishes more evenly in the
dishwasher.
Light dishes move during the wash
cycle.
Arrange light dishes securely.
Unusual foam formation. Handwash liquid in the rinse aid
dispenser.
Immediately refill rinse aid dispenser with
rinse aid.
Rinse aid spilled. Remove rinse aid with a cloth.
Fault Cause Remedial action

49
Customer Service en-us
4
Customer Service
Customer Servi ce
Your dishwasher requires no special care other than
that described in the Care and Maintenance section of
this manual. If you are having a problem with your
dishwasher, before calling for service please refer to the
Troubleshooting Guide section of the manual. If service
is necessary, contact your dealer or installer or an
authorized service center. Do not attempt to repair the
appliance yourself. Any work performed by unauthorized
personnel may void the warranty.
If you are having a problem with your dishwasher and
are not pleased with the service you have received,
please take the following steps until the problem is
corrected to your satisfaction:
1. Contact your installer or the Gaggenau
®
authorized
service provider in your area.
2. E-mail us from the customer service section of our
website, www.gaggenau-usa.com
3. Call us at 877-442-4436
4. Write us:
Gaggenau
®
1901 Main Street, Suite 600
Irvine, CA 92614
USA
Please be sure to include your model information as
well as an explanation of the problem and the date it
started. You will find the model and serial number
information on the label located on the edge of the
dishwasher door. Please make a copy of your invoice
and keep it with this manual. The customer may be
required to show proof of purchase to validate warranty
coverage.
‡
Statement of Limited Product Warranty
Statement of Limited Product Warr anty
What this Warranty Covers & Who it
Applies to:
The limited warranty provided by BSH Home Appliances
(Gaggenau
®
) in this Statement of Limited Product
Warranty applies only to the Gaggenau appliance
(“Product”) sold to you, the first using purchaser,
provided that the Product was purchased:
▯ for your normal, household (non-commercial) use,
and has in fact at all times only been used for normal
household purposes;
▯ new at retail (not a display, “as is”, or previously
returned model), and not for resale, or commercial
use; and
▯ within the United States or Canada, and has at all
times remained within the country of original
purchase. The warranties stated herein apply only to
the first purchaser of the Product and are not
transferable.
Gaggenau reserves the right to request proof of
purchase at the time any warranty claim is submitted to
confirm that the Product falls within the scope of this
limited product warranty.
Please make sure to return your registration card; while
not necessary to effectuate warranty coverage, it is the
best way for Gaggenau to notify you in the unlikely event
of a safety notice or product recall.
How Long the Warranty Lasts
Gaggenau warrants that the Product is free from
defects in materials and workmanship for a period of
seven hundred thirty (730) days (2 years) from the date
of purchase. The foregoing timeline begins to run upon
the date of purchase, and shall not be stalled, tolled,
extended, or suspended, for any reason whatsoever.
This Product is also warranted to be free from cosmetic
defects in material and workmanship (such as scratches
of stainless steel, paint/porcelain blemishes, chip,
dents, or other damage to the finish of the Product), for
a period of thirty (30) days from the date of purchase or
closing date for new construction. This cosmetic
warranty excludes slight color variations due to inherent
differences in painted and porcelain parts, as well as
differences caused by kitchen lighting, product location,
or other similar factors. This cosmetic warranty
specifically excludes any display, floor, “As Is”, or “B”
stock appliances.

50
en-us Statement of Limited Product Warranty
Repair/Replace as Your Exclusive
Remedy
During this warranty period, Gaggenau or one of its
authorized service providers will repair your Product
without charge to you (subject to certain limitations
stated herein) if your Product proves to have been
manufactured with a defect in materials or workmanship.
If a reasonable number attempts to repair the Product
have been made without success, then Gaggenau will
replace your Product (upgraded models may be
available to you, in Gaggenau’s sole discretion, for an
additional charge). All removed parts and components
shall become the property of Gaggenau at its sole
option. All replaced and/or repaired parts shall assume
the identity of the original part for purposes of this
warranty and this warranty shall not be extended with
respect to such parts. Gaggenau’s sole liability and
responsibility hereunder is to repair manufacturer-
defective Product only, using a Gaggenau-authorized
service provider during normal business hours. For
safety and property damage concerns, Gaggenau highly
recommends that you do not attempt to repair the
Product yourself, or use an unauthorized servicer;
Gaggenau will have no responsibility or liability for
repairs or work performed by a non-authorized servicer.
If you choose to have someone other than an authorized
service provider work on your Product, THIS WARRANTY
WILL AUTOMATICALLY BECOME NULL AND VOID.
Authorized service providers are those persons or
companies that have been specially trained on
Gaggenau products, and who possess, in Gaggenau’s
opinion, a superior reputation for customer service and
technical ability (note that they are independent entities
and are not agents, partners, affiliates or
representatives of Gaggenau). Notwithstanding the
foregoing, Gaggenau will not incur any liability, or have
responsibility, for the Product if it is located in a remote
area (more than 100 miles from an authorized service
provider) or is reasonably inaccessible, hazardous,
threatening, or treacherous locale, surroundings, or
environment; in any such event, if you request,
Gaggenau would still pay for labor and parts and ship
the parts to the nearest authorized service provider, but
you would still be fully liable and responsible for any
travel time or other special charges by the service
company, assuming they agree to make the service call.
Out of Warranty Product
Gaggenau is under no obligation, at law or otherwise, to
provide you with any concessions, including repairs,
pro-rates, or Product replacement, once this warranty
has expired.
Warranty Exclusions
The warranty coverage described herein excludes all
defects or damage that are not the direct fault of
Gaggenau, including without limitation, one or more of
the following:
▯ Use of the Product in anything other than its normal,
customary and intended manner (including without
limitation, any form of commercial use, use or
storage of an indoor product outdoors, use of the
Product in conjunction with air or water-going
vessels);
▯ Any party’s willful misconduct, negligence, misuse,
abuse, accidents, neglect, improper operation,
failure to maintain, improper or negligent installation,
tampering, failure to follow operating instructions,
mishandling, unauthorized service (including self-
performed “fixing” or exploration of the appliance’s
internal workings);
▯ Adjustment, alteration or modification of any kind;
▯ A failure to comply with any applicable state, local,
city, or county electrical, plumbing and/or building
codes, regulations, or laws, including failure to
install the product in strict conformity with local fire
and building codes and regulations;
▯ Ordinary wear and tear, spills of food, liquid, grease
accumulations, or other substances that accumulate
on, in, or around the Product;
▯ Any external, elemental and/or environmental forces
and factors, including without limitation, rain, wind,
sand, floods, fires, mud slides, freezing
temperatures, excessive moisture or extended
exposure to humidity, lightning, power surges,
structural failures surrounding the appliance, and
acts of God.

51
Installation and connection en-us
In no event shall Gaggenau have any liability or
responsibility whatsoever for damage to surrounding
property, including cabinetry, floors, ceilings, and other
structures or objects around the Product. Also excluded
from this warranty are Products on which the serial
numbers have been altered, defaced, or removed;
service visits to teach you how to use the Product, or
visits where there is nothing wrong with the Product;
correction of installation problems (you are solely
responsible for any structure and setting for the
Product, including all electrical, plumbing or other
connecting facilities, for proper foundation/flooring,
and for any alterations including without limitation
cabinetry, walls, floors, shelving, etc.); and resetting of
breakers or fuses.
TO THE EXTENT ALLOWED BY LAW, THIS
WARRANTY SETS OUT YOUR EXCLUSIVE REMEDIES
WITH RESPECT TO PRODUCT, WHETHER THE
CLAIM ARISES IN CONTRACT OR TORT (INCLUDING
STRICT LIABILITY, OR NEGLIGENCE) OR
OTHERWISE. THIS WARRANTY IS IN LIEU OF ALL
OTHER WARRANTIES, WHETHER EXPRESS OR
IMPLIED. ANY WARRANTY IMPLIED BY LAW,
WHETHER FOR MERCHANTABILITY OR FITNESS
FOR A PARTICULAR PURPOSE, OR OTHERWISE,
SHALL BE EFFECTIVE ONLY FOR THE PERIOD THAT
THIS EXPRESS LIMITED WARRANTY IS EFFECTIVE.
IN NO EVENT WILL THE MANUFACTURER BE LIABLE
FOR CONSEQUENTIAL, SPECIAL, INCIDENTAL,
INDIRECT, “BUSINESS LOSS”, AND/OR PUNITIVE
DAMAGES, LOSSES, OR EXPENSES, INCLUDING
WITHOUT LIMITATION TIME AWAY FROM WORK,
HOTELS AND/OR RESTAURANT MEALS,
REMODELLING EXPENSES IN EXCESS OF DIRECT
DAMAGES WHICH ARE DEFINITIVELY CAUSED
EXCLUSIVELY BY BSH, OR OTHERWISE. SOME
STATES DO NOT ALLOW THE EXCLUSION OR
LIMITATION OF INCIDENTAL OR CONSEQUENTIAL
DAMAGES, AND SOME STATES DO NOT ALLOW
LIMITATIONS ON HOW LONG AN IMPLIED
WARRANTY LASTS, SO THE ABOVE LIMITATIONS
MAY NOT APPLY TO YOU. THIS WARRANTY GIVES
YOU SPECIFIC LEGAL RIGHTS, AND YOU MAY ALSO
HAVE OTHER RIGHTS WHICH VARY FROM STATE TO
STATE. No attempt to alter, modify or amend this
warranty shall be effective unless authorized in writing
by an officer of BSH.
How to Obtain Warranty Service
To obtain warranty service for your Product, you should
contact the nearest Gaggenau authorized service
center.
5
Installation and connection
Installation and connecti on
The dishwasher must be connected correctly, otherwise
it will not function properly. The specifications
for the inlet and outlet as well as the electrical
connected loads must correspond with the required
criteria as specified in the following paragraphs or in
the installation instructions.
Install the appliance in the correct sequence:
1. Checking appliance on delivery
2. Installation
3. Drainage connection
4. Tap water connection
5. Electrical connection
Parts included
If you have any complaints, contact the dealer from
whom you purchased the appliance or our customer
services department.
▯ Dishwasher
▯ User manual
▯ Installation instructions
▯ Quick reference guide*
▯ Warranty*
▯ Installation materials
▯ Steam guard plate*
▯ Rubber apron*
▯ Power cord
* depending on the features of your dishwasher
Safety instructions
Please refer to the Important Safety Instructions for
installation that are included in the separate Installation
Instructions for your appliance.

52
en-us Installation and connection
Delivery
Your dishwasher has been checked
thoroughly in the factory to ensure that it is in working
order. This may cause small water stains. These will
disappear after the first wash cycle.
Technical specifications
▯ Weight:
up to 132 lbs (60 kg)
▯ Voltage:
120 V, 60 Hz
▯ Connected load:
1,300 W.
▯ Circuit breaker:
12 A
▯ Power input:
off mode (Po)* 0.50 W.
left on mode (Pl)* 50 W.
*according to regulations (EU) nos. 1016/2010 and
1059/2010.
Additional functions and settings may increase the
power input.
▯ Water pressure:
at least 0.05 MPa (0.5 bar), maximum 1 MPa (10 bar).
At a higher water pressure:
connect pressure-reducing valve ahead.
▯ Inlet rate:
minimum 10 litres/minute
▯ Water temperature:
Cold water.
Hot water:
Maximum temperature 140° F (60 °C).
▯ Capacity:
12–15 place settings (depending on the features of
your dishwasher).
Installation
The required installation dimensions can be
found in the installation instructions. Level
the appliance with the aid of the height-adjustable feet.
Ensure that the appliance is situated
securely on the floor.
▯ A built-under or integrated appliance which is
installed subsequently as a free-standing appliance
must be secured to prevent it from overturning, e.g.
by screwing it to the wall or by installing it under a
continuous worktop which is screwed to adjacent
cupboards.
▯ The appliance can easily be installed in a fitted
kitchen between wooden and plastic walls.
Drain connection
1. The required work sequence can be
found in the installation instructions. If required, fit
a siphon with a drain connection.
2. Connect the drain hose to the drain
connection of the siphon with the enclosed parts.
Ensure that the drain hose is not kinked, crushed
or twisted and that there is no cover
plate in the drainage to prevent the drain water from
flowing out!
Water supply connection
1. Fasten the water supply connection to the tap
according to the installation instructions using
the enclosed parts.
Ensure that the water supply connection is not
kinked, crushed or twisted.
2. When replacing the appliance, always use a new
water supply hose.
Water pressure:
At least 7.25 PSI (0.5 bar), maximum 145 PSI (10 bar).
At a higher water pressure:
connect pressure-reducing valve ahead.
Inlet rate:
Minimum 2.65 gallons/minute (10 liters/minute)
Water temperature:
Cold water.
Hot water:
Maximum temperature 140° F (60 °C).

53
Installation and connection en-us
Hot water connection *
Hot wat er connect i on
The dishwasher can be connected to cold or hot water
up to max. 140° F (60 °C). Connection to hot water is
recommended if the hot water can be supplied by
energetically favourable means and from a suitable
installation, e.g. solar heating system with circulation
line. This will save energy and time. The “Hot water”
setting allows you to adjust your dishwasher optimally to
operation with hot water. It is recommended to have a
water temperature (temperature of the incoming water)
of at least 104° F (40 °C) and no more than 140° F
(60 °C). It is not recommended to connect the
appliance to hot water if the water is supplied from an
electric boiler.
To change the setting:
1. Open the door.
2. Switch on ON/OFF switch (.
3. Press Info button ( 8 for 3 seconds until the
following text is indicated on the display window at
the top @:
Scroll with < >
Set with - +
Leave with t 3 sec.
4. Keep pressing the button > )* until water
connection appears of the display window at the top
@.
5. Make the selection with setting buttons + -X.
6. Press and hold the Info button (8 for 3 seconds.
The chosen setting has now been stored.
* optional feature which may or may not be included with
your dishwasher.
Electrical connection
▯ Connect the appliance to an 120 V, 60 Hz alternating
current only, via a correctly installed outlet with
protective grounding conductor. See rating plate for
required fusing 9:.
▯ The outlet must be near the appliance and freely
accessible after the installation.
If the plug is not freely accessible, an allpole
disconnector with a contact opening of at least 3 mm
must be fitted on the installation side to satisfy the
relevant safety instructions.
▯ The connection may be modified by technicians only.
▯ A power cord extension may be purchased from
customer service only.
▯ Use only a residual current operated circuit-breaker
which features the symbol ‚. Only this extension
guarantees compliance with the currently valid
regulations.
▯ The appliance features a water damage protection
system. Please note the system will function only
when the power supply is connected.
Removing the appliance
Also observe the sequence of worksteps here.
1. Disconnect the appliance from the power supply.
2. Turn off the tap.
3. Undo the drain water and water supply connection.
4. Loosen fastening screws for the cabinet parts.
5. If fitted, remove the base panel.
6. Pull out the appliance, carefully pulling the hose
behind.

54
en-us Installation and connection
Transporting the appliance
Empty the dishwasher and secure loose parts.
Drain the appliance according to the following steps:
1. Turn on the tap.
2. Open the door.
3. Switch on ON/OFF button (.
4. Select wash cycle with the highest temperature.
The estimated wash cycle duration is indicated on
the digital display @.
5. Press START button )".
6. Close the door.
Wash cycle sequence starts.
7. Open the door after approx. 4 minutes.
8. Press START button )" until “Program was
terminated”/“Ready in one minute.” is indicated at
the digital display @.
9. Close the door.
10. Open the door after approx. 1 minute.
The digital display @ indicates; “Finished”.
11. Switch off ON/OFF switch (.
12. Turn off the tap, disconnect supply hose and drain
water.
Note: Transport appliance upright only. This prevents
residual water from running into the machine control
and damaging the wash cycle sequence.
Securing the appliance against frost
If the appliance is in a room where there is a risk of frost
(e.g. holiday home), empty the appliance completely
(see “Transporting the appliance”).
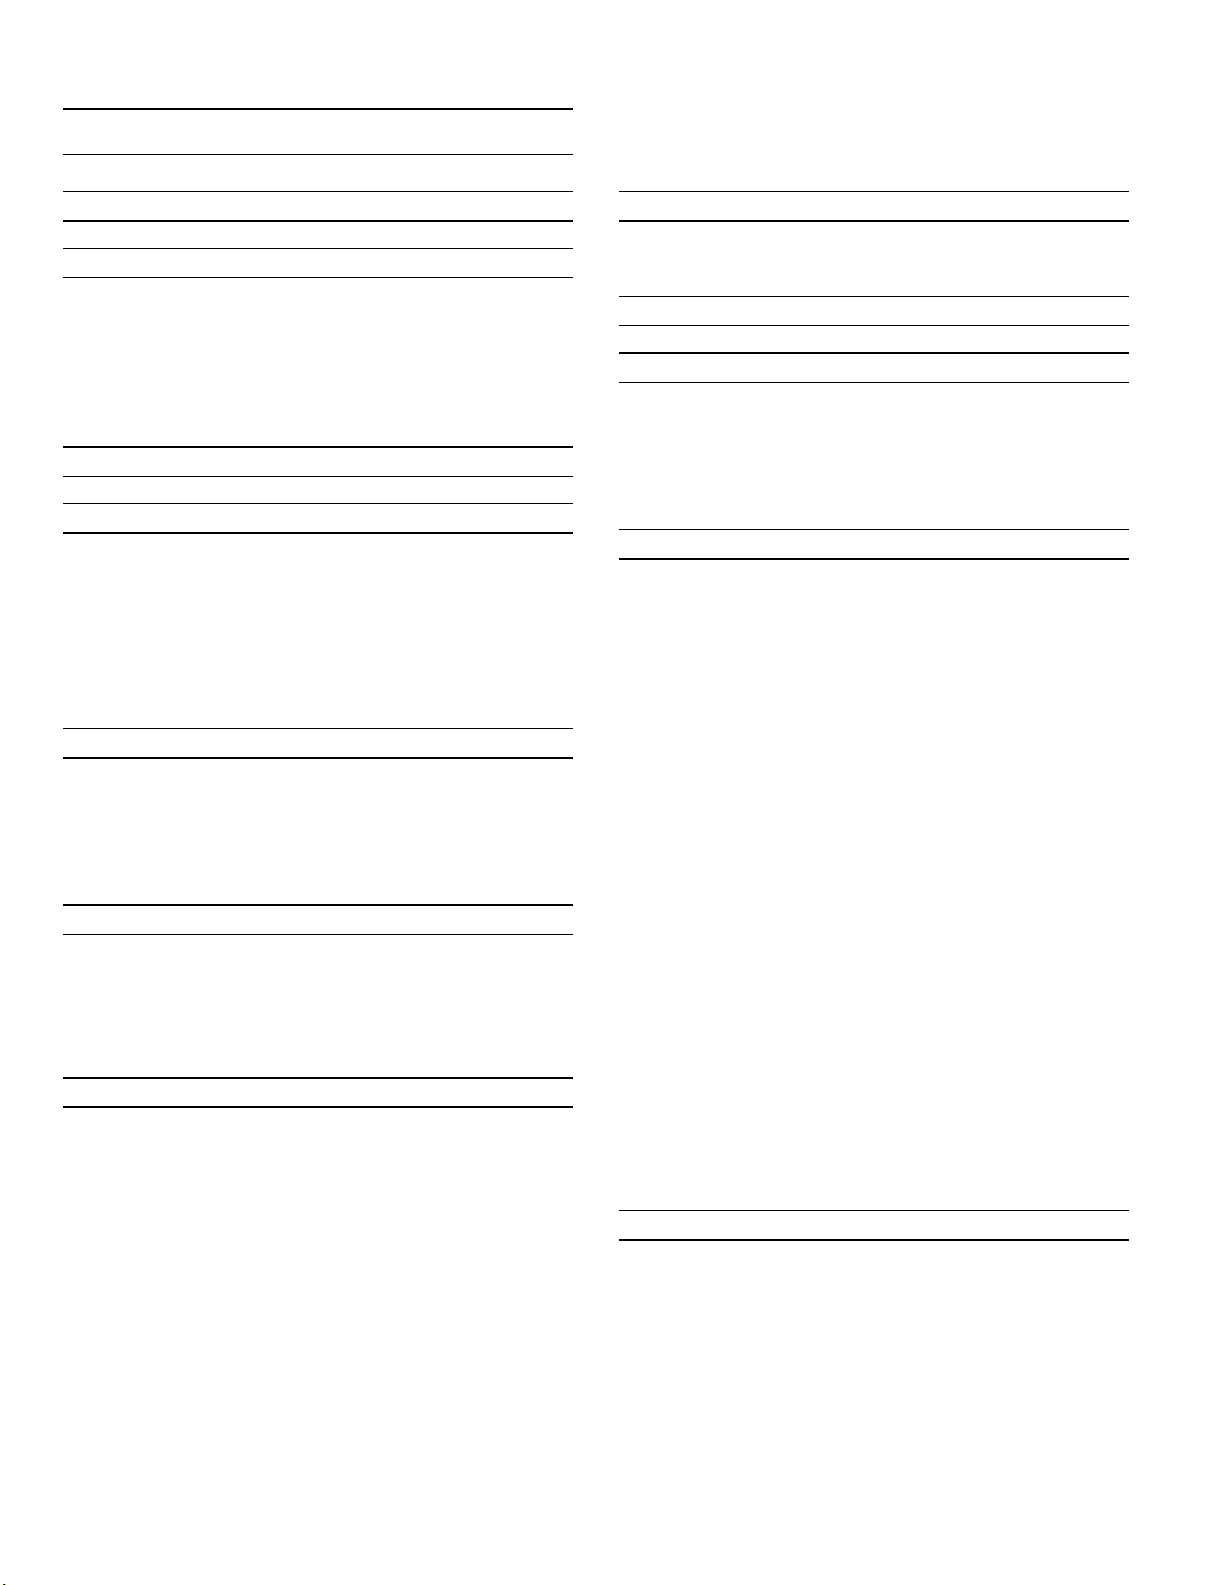
55
Installation and connection fr-ca
Table des matières
fr-ca Notice d'utilisation
(
Indications de sécurité 58
(
CONSIGNES DE SÉCURITÉ IMPORTANTES 59
Risque d'incendie, de choc électrique,
ou de blessures graves 59
INSTRUCTIONS DE MISE À LA TERRE 60
Fonctionnement normal 60
Sécurité pour enfants 61
Entretien et maintenance corrects 61
ƒ
Causes de pannes 62
*
Mise en marche 63
Vue d'ensemble de l'appareil 63
Panneau de commande 64
Composants internes du lave-vaisselle 64
Bouton Information 64
Réglage de l'heure 64
Première mise sous tension de l'appareil 65
Réglages 66
+
Système d'adoucissement de l'eau / sels 67
Tableau de dureté de l'eau 67
Réglage du système d'adoucissement de l'eau 67
Utilisation des sels spéciaux 68
Détergent chargé en sels 68
Éteindre le système d'adoucissement de l'eau 68
,
Produit de rinçage 69
Ajout d'agent de rinçage 69
Réglage de la quantité de produit
de rinçage utilisé 70
Éteindre l'indicateur d'agent de remplissage
de rinçage 70
-
Chargement du lave-vaisselle 71
Matériaux lavables au lave-vaisselle 71
Dégâts causés à la verrerie et l'argenterie 71
Chargement des paniers 72
Mode de chargement recommandé 72
Chargement du panier à ustensiles 73
Accessoires de panier 74
Retrait de la vaisselle 76
Réglage de la hauteur du panier 77
Panier supérieur avec leviers latéraux 77
Retirer/installer le troisième panier 78
Retirer/installer le panier supérieur * 79
Retirez/installez le panier inférieur 80
.
Détergent 81
Ajout de détergent 81
Détergent multifonctionnels 82
/
Cycles du lave-vaisselle 83
0
Options de cycles du lave-vaisselle 84
Zone intensive 84
Puissance 84
Chargement partiel 84
Extra sec 84
Informations sur le cycle de lavage 85
1
Mise en marche du lave-vaisselle 87
Protection contre une opération involontaire 87
Utilisation des boutons tactiles 87
Ouvrir la porte 87
Modification des réglages 87
AquaSensor 88
Affichage de l'heure 88
Réglage des capteurs 88
extraDry (extraSec) 88
Impact écologique 88
Auto Power Off (arrêt automatique) 88
EmotionLight 89
Projection du temps restant 89
infoLight 89
Changer le début du cycle de nettoyage 89
Volume de la sonnerie 89
Bouton de volume 89
Sécurité enfants 89
Message de bienvenue 89
Réglages d'usine 90
Mise sous tension de l'appareil 90
Temps de Départ différé 90
Fin du cycle de lavage 91
Mise hors tension de l'appareil 91
Interruption du cycle de lavage 91
Arrêt du cycle de lavage 92
Changement du cycle de lavage 92
2
Entretien et maintenance 92
Nettoyer le filtre du lave-vaisselle 92
Sels et agent de rinçage 93
Filtres 93
Bras gicleurs 94
Pompe pour eaux résiduaires 95
Rangement de l'appareil en cas d'inactivité 95
Préparation de l'appareil pour l'hiver 95

56
fr-ca Installation and connection
3
Dépannage 96
Message d'erreur 96
Tableau des défaillances 97
4
Service à la clientèle 105
‡
Déclaration de la garantie limitée du produit 105
Ce que couvre cette garantie
et à qui elle s'applique : 105
Durée de la garantie 106
Réparer/Remplacer, comme recours exclusif 106
Produit hors garantie 107
Exclusions de garantie 107
Comment bénéficier d'un service de garantie 108
5
Installation et raccordement 108
Pièces incluses 108
Consignes de sécurité 108
Livraison 109
Données techniques 109
Installation 109
Raccordement du boyau d'évacuation 109
Raccordement à l'eau courante 110
Raccordement d’eau chaude 110
Raccordement électrique 111
Dépose de l'appareil 111
Transport de l'appareil 111
Protection de l'appareil contre le gel 111

57
Installation and connection fr-ca
)pOLFLWDWLRQVHWPHUFLGH*DJJHQDX
3KRQH
0DLQ6WUHHW6XLWH
,UYLQH&$
0HUFLG·DYRLUFKRLVLXQODYHYDLVVHOOH*DJJHQDX9RXVUHMRLJQH]OHVQRPEUHX[FRQVRPPDWHXUVTXLH[LJHQWXQ
&HJXLGHDpWppFULWHQYXHGHODVpFXULWpHWGXF{WpSUDWLTXHHWO·LQIRUPDWLRQFRQWHQXHLFLHVWWUqVLPSRUWDQWH
3RXUHQFRQQDvWUHG·DYDQWDJHVXUOHODYHYDLVVHOOHHWOHVDFFHVVRLUHVGLVSRQLEOHVDLQVLTXHVXUOHVDXWUHV
3RXUWRXWHTXHVWLRQRXWRXWFRPPHQWDLUH
UHQGHPHQWVLOHQFLHX[HWVXSpULHXUG·XQODYHYDLVVHOOH
1RXVUHFRPPDQGRQVGHOLUHFHJXLGHDYDQWG·XWLOLVHUOHODYHYDLVVHOOHODSUHPLqUHIRLV
DSSDUHLOV*DJJHQDXGHKDXWHTXDOLWpYLVLWHUOHVLWHZZZJDJJHQDXXVDFRP
*DJJHQDX
86$
LQIR#JDJJHQDXXVDFRP
ZZZJDJJHQDXXVDFRP

58
fr-ca Indications de sécurité
(
Indications de sécurité
Indicati ons de sécuri t é
9 AVERTISSEMENT
Ceci indique des risques de blessures graves ou
mortelles en cas de non-respect de cette mise en
garde.
9 ATTENTION !
Ceci indique des risques de blessures mineures
ou de gravité moyenne en cas de non-respect de
cette mise en garde.
AVIS : Ceci indique un risque d'endommagement de
l'appareil ou de biens en cas de non respect de ces
consignes.
Remarque : Ceci vous signale des informations et/ou
indications importantes.

59
9 CONSIGNES DE SÉCURITÉ IMPORTANTES
LISEZ ET CONSERVEZ CES INSTRUCTIONS
(
CONSIGNES DE SÉCURITÉ IMPORTANTES
Ce lave-vaisselle est livré avec des instructions
de montage et ce Manuel d'utilisation et
d'entretien. Lisez et assurez-vous d'avoir bien
assimilé toutes les instructions avant d'utiliser
le lave-vaisselle.
Ce lave-vaisselle est conçu pour une utilisation
jusqu'à une altitude de 13 000 pieds (4000 m)
au-dessus du niveau de la mer.
Pour réduire le risque d'incendie, de choc
électrique, ou de blessures graves,
respectez les consignes suivantes :
Risque d' i ncen di e, de choc él ect r i que, ou de bl es s ur es gr av es
9 AVERTISSEMENT
Risque de blessure ou de décès !
La mauvaise utilisation du lave-vaisselle
peut causer des blessures graves ou
mortelles. Évitez d'utiliser le lave-
vaisselle d'une manière non conforme aux
directives énoncées dans ce manuel ou à
d'autres fins que celles énoncées dans
les pages suivantes.
9 AVERTISSEMENT
Risque de blessures !
La réparation de l'appareil par des
techniciens d'entretien non qualifiés ou
l'utilisation de pièces de rechange non
originales peuvent causer des blessures
graves ou endommager l'équipement.
Tous les travaux de réparation doivent
être effectués par un technicien
d'entretien qualifié utilisant uniquement
des pièces de rechange d'origine.
9 AVERTISSEMENT
Risque de choc électrique ou
d'incendie !
Un choc électrique ou un incendie peut
survenir si l'alimentation électrique du
lave-vaisselle décrit dans le présent
manuel est mal installée ou s'il n'est pas
correctement mis à la terre. Le lave-
vaisselle décrit dans ce manuel ne doit
pas être utilisé à moins d'être certain de
la bonne installation de l'alimentation
électrique et de la mise à la terre
correcte du lave-vaisselle.
9 AVERTISSEMENT
Risque pour la santè !
N'utilisez jamais des produits chimiques
agressifs pour nettoyer votre lave-
vaisselle. Certains produits contenant du
chlore peuvent endommager le lave-
vaisselle et présenter des risques pour la
santé!

9 CONSIGNES DE SÉCURITÉ IMPORTANTES
LISEZ ET CONSERVEZ CES INSTRUCTIONS
60
INSTRUCTIONS DE MISE À LA TERRE
Cet équipement doit être mis à la terre au
niveau d'un système de câblage permanent en
métal, ou un conducteur de mise à la masse
d'équipement doit être intégré aux
conducteurs d'alimentation et connecté au
terminal de mise à la masse de l'équipement
ou à la broche de raccordement du lave-
vaisselle. Voir la rubrique Instructions de
montage fournie pour avoir plus d'informations
sur les exigences électriques.
9 AVERTISSEMENT
Risque de choc électrique !
Cet appareil doit être mis à la terre. En
cas de dysfonctionnement, la mise à la
terre réduira le risque de choc électrique
en fournissant une voie de moindre
résistance au courant électrique. Cet
appareil est équipé d'un câble disposant
d'un conducteur de mise à la terre.
La mauvaise connexion du conducteur de
mise à la terre peut provoquer un risque
de choc électrique. En présence d'un
électricien qualifié, vérifiez, en cas de
doute, si l'appareil est correctement mis
à la terre.
Fonctionnement normal
Utilisez ce lave-vaisselle uniquement aux fins
spécifiées, notamment le lavage de vaisselle et
d'ustensiles de cuisine indiqués comme
lavables au lave-vaisselle.
Utilisez uniquement des détergents ou des
produits de rinçage recommandés pour un
lave-vaisselle, puis tenez-les hors de la portée
des enfants.
9 ATTENTION !
Lors du chargement de vaisselle à laver :
■ identifiez les objets tranchants pour
éviter qu'ils n'endommagent le joint de
la porte.
■ les couteaux et autres ustensiles
tranchants doivent être placés debout,
les POIGNÉES EN HAUT, afin de
réduire le risque de coupures.
■ ne lavez pas les objets en plastique,
sauf s'ils portent l'inscription « lavable
au lave-vaisselle » ou une indication
équivalente. Pour les objets en
plastique ne portant pas cette
indication, consultez les
recommandations de leurs fabricants
respectifs.
■ évitez de mettre votre votre lave-
vaisselle en marche à moins que tous
les panneaux ne soient en place.
■ ne touchez pas ou ne passez pas outre
les commandes et verrouillages.
Évitez de vous asseoir, de vous appuyez ou
d'utiliser de manière abusive la porte ou les
paniers à vaisselle du lave-vaisselle.

61
9 CONSIGNES DE SÉCURITÉ IMPORTANTES
LISEZ ET CONSERVEZ CES INSTRUCTIONS
9 AVERTISSEMENT
Risque de blessures !
Pour éviter des risques de blessures,
faites toujours attention lorsque vous
ouvrez la porte pendant ou après un
cycle de lavage car des rejets d'eau
chaude ou de vapeur peuvent survenir.
N'ouvrez pas complètement la porte avant
que les bruits d'eau n'aient cessés et que
la vapeur ne soit dissipée.
Pour réduire le risque de blessure,
interdisez aux enfants de jouer dans ou
sur le lave-vaisselle.
À l'âge adulte leur permettant d'utiliser la
machine, les enfants sont sous la
responsabilité de leurs parents/tuteurs
légaux qui doivent s'assurer qu'ils sont
suffisamment instruits sur les bonnes
pratiques par des personnes qualifiées.
Les lave-vaisselle domestiques certifiés NSF/
ANSI 184 ne sont pas destinés aux
établissements de services alimentaires
agréés.
Sécurité pour enfants
Pour réduire le risque de blessure, interdisez
aux enfants de jouer dans ou sur le lave-
vaisselle.
À l'âge adulte leur permettant d'utiliser la
machine, les enfants sont sous la
responsabilité de leurs parents/tuteurs légaux
qui doivent s'assurer qu'ils sont suffisamment
instruits sur les bonnes pratiques par des
personnes qualifiées.
Entretien et maintenance corrects
9 AVERTISSEMENT
Risque d’explosion !
Sous certaines conditions, de
l'hydrogène gazeux peut se créer dans un
système d'eau chaude inutilisé pendant
deux semaines ou plus. L'hydrogène
gazeux est de nature explosive. Avant
d'utiliser un lave-vaisselle connecté à un
système d'eau chaude inutilisé pendant
deux semaines ou plus, ouvrez tous les
robinets d'eau chaude et laissez l'eau
s'écouler pendant plusieurs minutes.
Tout l'hydrogène gazeux accumulé sera
ainsi évacué. Compte tenu de la nature
explosive du gaz, évitez de fumer ou
d'utiliser des flammes nues à ce moment.
Retirez la porte du lave-vaisselle menant au
compartiment de nettoyage lors du retrait d'un
ancien lave-vaisselle dans le cadre de
l'entretien ou de la mise au rebut.
Pour éviter d'endommager le plancher et la
propagation des moisissures, les alentours et
le dessous du lave-vaisselle ne doivent pas
rester humides.
Remarque : Afin de ne pas endommager le
lave-vaisselle, évitez de laisser l'eau pénétrer
dans les systèmes de votre appareil pendant
de longues périodes à des températures de
gel. Par temps de gel, la vanne de remplissage
d'eau ainsi que d'autres composants de votre
lave-vaisselle peuvent s'endommager.
AVIS : Il est vivement recommandé à
l'utilisateur final de se familiariser avec les
procédures d'arrêt de l'alimentation en eau
ainsi qu'avec les procédures d'arrêt de
l'alimentation électrique entrante. Consultez
les instructions de montage ou contactez votre
installateur pour de plus amples informations.

62
fr-ca Causes de pannes
Avertissement issue de la proposition 65 de
l’État de la Californie :
9 AVERTISSEMENT
Ce produit peut vous exposer à des
produits chimiques, comme du chlorure
de vinyle, reconnus par l’État de la
Californie comme causant le cancer, des
malformations congénitales ou d’autres
effets nocifs sur la reproduction. Pour de
plus amples renseignements, consultez
www.P65Warnings.ca.gov.
ƒ
Causes de pannes
Causes de pannes
AVIS
▯ N'utilisez jamais de nettoyants à vapeur pour laver
votre lave-vaisselle. Le fabricant n'est pas
responsable des conséquences ou des dommages
éventuels.
▯ Pour éviter toute possibilité d'endommager le lave-
vaisselle, n'utilisez pas des produits chimiques
acides, des nettoyants abrasifs, des tampons à
récurer (métalliques ou plastiques), ou des éponges/
essuie-tout abrasifs pour nettoyer le panneau de
porte extérieure de votre lave-vaisselle. Ceci peut
endommager le panneau de porte extérieur de votre
lave-vaisselle.
▯ Afin de ne pas endommager le lave-vaisselle, n'y
chargez pas d'objets en papier, de sacs en plastique,
de matériaux d'emballage ou autre chose que des
ustensiles ou articles de cuisine normaux.
▯ Protégez votre lave-vaisselle des éléments. Protégez-le
du gel afin d'éviter d'endommager la soupape de
remplissage. Les dégâts causés par le gel ne sont pas
couverts par la garantie.
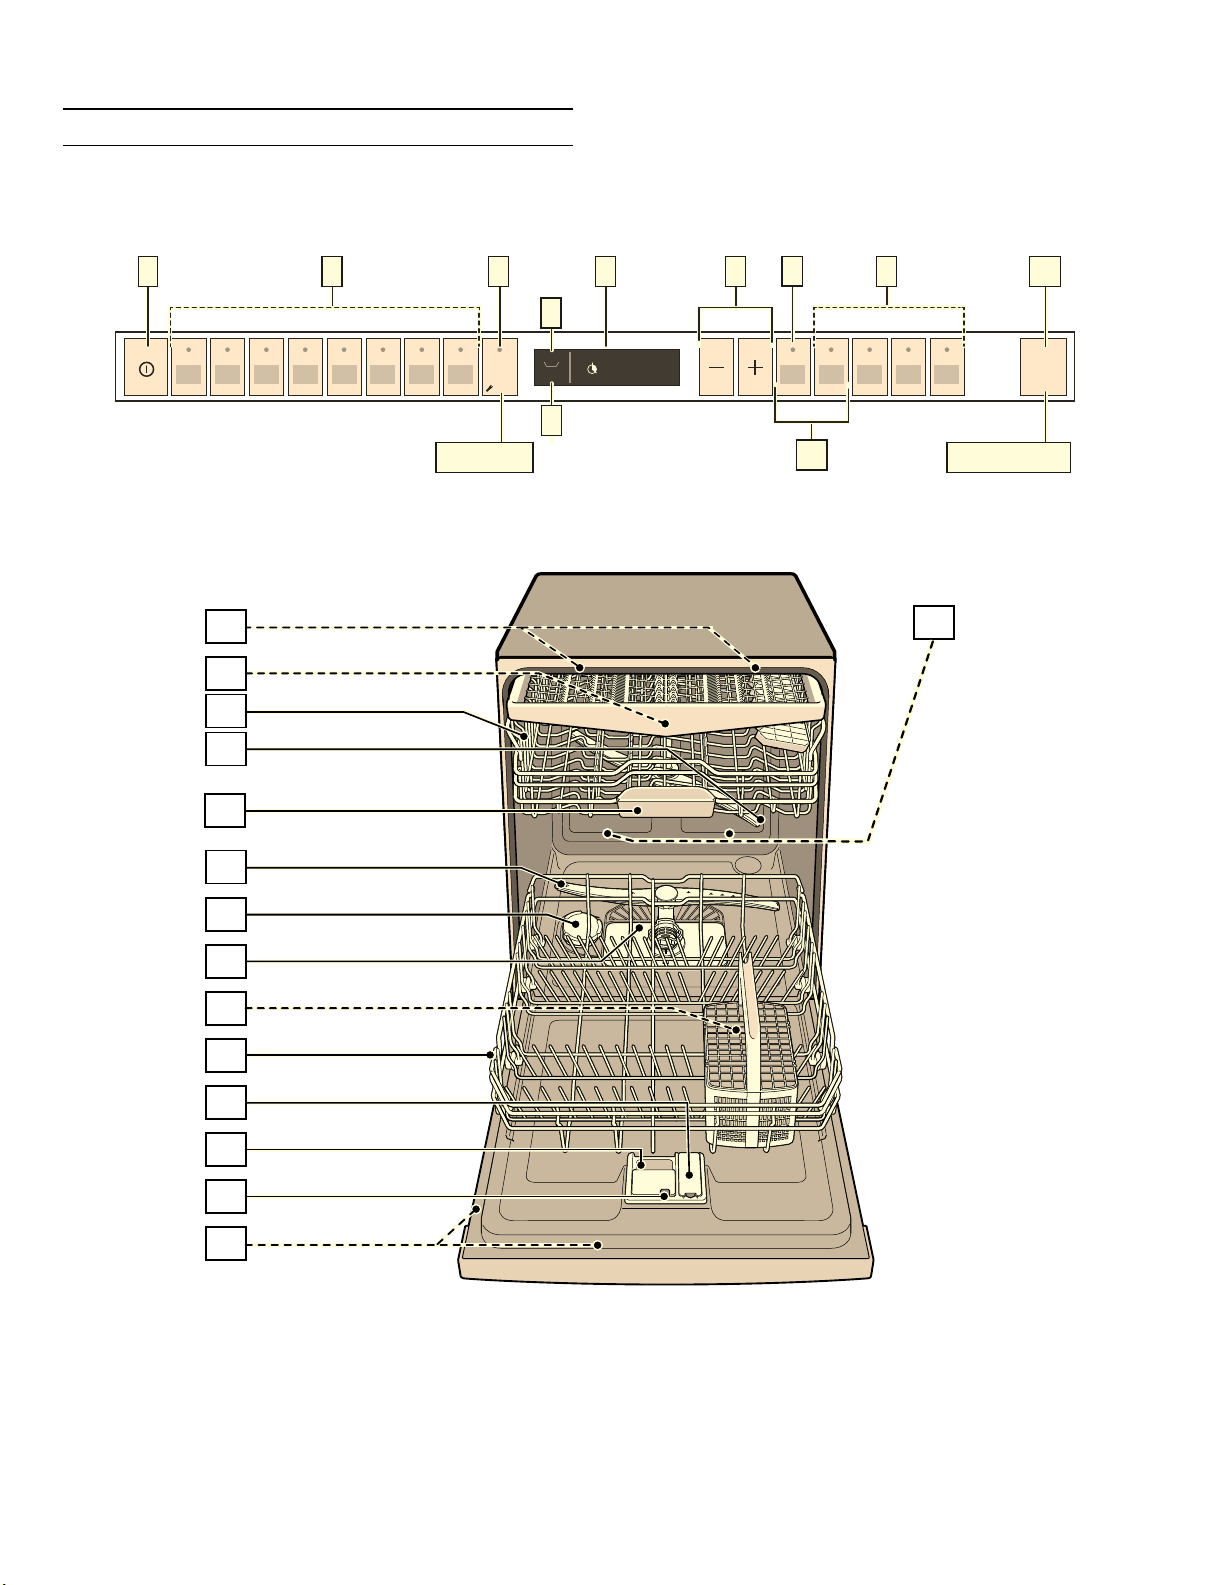
63
Mise en route fr-ca
*
Mise en marche
Mise en route
Vue d'ensemble de l'appareil
67$57
UHVHWVHF
VHF
K
PLQ
UHVHWVHFVHFW

64
fr-ca Mise en route
Les numéros mentionnés ci-dessous font référence aux
images d'aperçu sur la page précédente du présent
manuel.
Panneau de commande
Remarque : Certains cycles et options de nettoyage
varient selon le modèle.
Composants internes du lave-vaisselle
* option facultative qui peut être ou ne pas être incluse
avec votre lave-vaisselle.
Bouton Information (
Bout on Informat i on
Le bouton Information ( peut-être utilisé pour afficher
des informations supplémentaires sur le cycle de
lavage.
1. Appuyez sur le bouton (8.
2. Appuyez sur le bouton de cycle de lavage.
Les informations concernant le cycle de lavage
sélectionné sont affichées dans la fenêtre
d'affichage supérieure @.
3. Pour sortir, appuyez sur le bouton Information ( 8.
Réglage de l'heure
Régl age de l ' heur e
Lorsque l'appareil est branché pour la première fois,
l'heure affichée est 12:00.
Réglez l'heure comme suit :
1. Ouvrez la porte.
2. Appuyez sur le bouton MARCHE/ARRÊT (.
3. Appuyez sur le bouton Information ( 8 durant
3 secondes jusqu'à ce que le message suivant soit
affiché dans la fenêtre d'affichage supérieure @ :
Faites défiler avec < >
Choisissez avec - +
Maintenez durant t 3 sec.
4. Maintenez le bouton > )* enfoncé jusqu'à ce que
l'heure soit affichée dans la fenêtre d'affichage
supérieure@.
5. Effectuez le réglage à l'aide des boutons + - X. Si
vous maintenez les boutons de sélection + - X
enfoncés, les valeurs changent par palier de
10 minutes.
6. Appuyez et maintenez le bouton Information enfoncé
(8 pendant 3 secondes.
Les paramètres sélectionnés ont été sauvegardés.
Remarque : Si l'appareil a été déconnecté de
l'alimentation électrique pour une période prolongée,
l'heure affichée est 12:00. Réglez l'heure.
( Interrupteur Marche/Arrêt
0 Touches de programmation **
8 Bouton Information (
@ Affichage digital
H Indicateur de remplissage de liquide de rinçage
P Indicateur de remplissage de sel
X Touches de réglage
` Départ différé
h Fonctions supplémentaires **
)" Touche DÉMARRAGE
)* Touche < >
1" Éclairage intérieur *
1* Tiroir à couverts *
12 Panier à vaisselle supérieur
1: Bras d'aspersion supérieur
1B Coupelle interceptrice des pastilles
1J Bras d'aspersion inférieur
1R Réservoir de sel spécial
1Z Filtres
1b Panier à couverts*
1j Panier à vaisselle inférieur
9" Réservoir de liquide de rinçage
9* Compartiment à détergent
92 Verrou de fermeture du compartiment à détergent
9: Plaque signalétique

65
Mise en route fr-ca
Première mise sous tension de
l'appareil
Lorsque le lave-vaisselle est mis sous tension pour la
première fois, celui-ci vous invite à définir les
paramètres requis après une première mise sous
tension. Le message suivant est indiqué dans la fenêtre
d'affichage supérieure @ :
Faites défiler avec < >
Choisissez avec + -
Maintenez durant t 3 sec.
Les paramètres à définir lors de la première mise sous
tension de l'appareil sont énumérés dans le tableau ci-
dessous.
Changez les paramètres comme suit :
1. Appuyez sur le bouton > )* jusqu'à ce que le
paramètre désiré soit affiché.
2. Effectuez le réglage à l'aide des boutons + - X.
3. Appuyez et maintenez le bouton Information enfoncé
(8 pendant 3 secondes.
Les paramètres sélectionnés ont été sauvegardés.
Réglages
Première mise sous tension de
l'appareil
Réglages d'usine Texte informatif
en appuyant sur le bouton Information (
Langue Anglais (États-Unis) Sélection de la langue.
Format d'affichage de l'heure. 24 h 12 h ou 24 h
Réglage de l'heure 12:00 Réglage de l'heure actuelle.
Dureté de l'eau °E 0 Réglage de la dureté de l'eau. Lorsque vous utilisez des
comprimés tout-en-un, sélectionnez la valeur la plus basse.
Distrib. de produit de rinçage Niveau 5 La quantité de produit de rinçage utilisé affecte le séchage.
66
fr-ca Mise en route
Réglages
Le lave-vaisselle a été configuré avec certains
paramètres pour votre confort. Il est possible de
modifier ces réglages d'usine.
Changez les paramètres comme suit :
1. Ouvrez la porte.
2. Appuyez sur le bouton MARCHE/ARRÊT (.
3. Appuyez sur le bouton Information ( 8 durant 3
secondes jusqu'à ce que le message suivant soit
affiché dans la fenêtre d'affichage supérieure @ :
Faites défiler avec < >
Choisissez avec - +
Maintenez durant t 3 sec.
4. Appuyez sur le bouton > )* jusqu'à ce que le
paramètre désiré soit affiché.
5. Effectuez le réglage à l'aide des boutons + - X.
6. Appuyez et maintenez le bouton Information enfoncé
( 8 pendant 3 secondes.
Les paramètres sélectionnés ont été sauvegardés.
Il est possible de restaurer les paramètres d'usine si
vous désirez réinitialiser tous les paramètres modifiés.
Remarque : Lorsque vous restaurez les paramètres
d'usine de votre lave-vaisselle celui-ci vous invite à
définir les paramètres comme s'il s'agissait d'une
première mise sous tension.
Paramètre Réglages d'usine Texte informatif
en appuyant sur le bouton Information (
Réglage de l'heure 12:00 Réglage de l'heure actuelle.
Format d'affichage de
l'heure.
24 h 12 h ou 24 h
Affichage de l'heure Heure Afficher l'heure de la fin du cycle via le message « Fin dans » ou
« Fin à ».
Langue Anglais (États-Unis) Sélection de la langue.
Dureté de l'eau °E 0 Réglage de la dureté de l'eau. Lorsque vous utilisez des
comprimés tout-en-un, sélectionnez la valeur la plus basse.
Distrib. de produit de
rinçage
Niveau 5 La quantité de produit de rinçage utilisé affecte le séchage.
Sélectionnez 0 si vous utilisez des comprimés tout-en-un.
Réglage du capteur Standard Réglage de la détection de souillure pour l'obtention de résultats
de lavage optimaux.
Extra sec Arrêt Séchage amélioré pour les verres et la vaisselle en plastique.
Impact écologique Arrêt Affiche la consommation d'eau et d'électricité.
Extinction automatique Arrêt L'appareil s'éteint automatiquement à la fin du rinçage.
Éclairage d'ambiance * Marche Éclairage intérieur*
Affichage de devant * Marche L'affichage de devant peut être sélectionné.
Proj. temps restant. * Marche Le temps restant est projeté au sol durant le cycle de lavage.
Lumière d'info* Marche De la lumière est projetée pour signaler qu'un lavage est en
cours.
Début du cycle de
nettoyage
Auto 55 °C à 65° C
(130 à 150 °F)
Lorsqu'activé, le dernier cycle de nettoyage sélectionné apparaît.
Volume de la sonnerie* Niveau 2 Volume du signal sonore à la fin du cycle de lavage.
Bouton de volume Niveau 2 Règle le volume lors de l'utilisation de divers boutons.
Sécurité enfants* Arrêt L'activation de la sécurité enfants empêche l'ouverture de la
porte.
Séchage éco* Marche La porte s'ouvre automatiquement à la fin du cycle de lavage.
Message de bienvenue Marche Vous pouvez supprimer l'affichage du logo de la marque à la mise
sous tension de l'appareil.
Réglages d'usine Réinitialiser Restaurer les réglages d'usine.
*selon les fonctions de votre lave-vaisselle
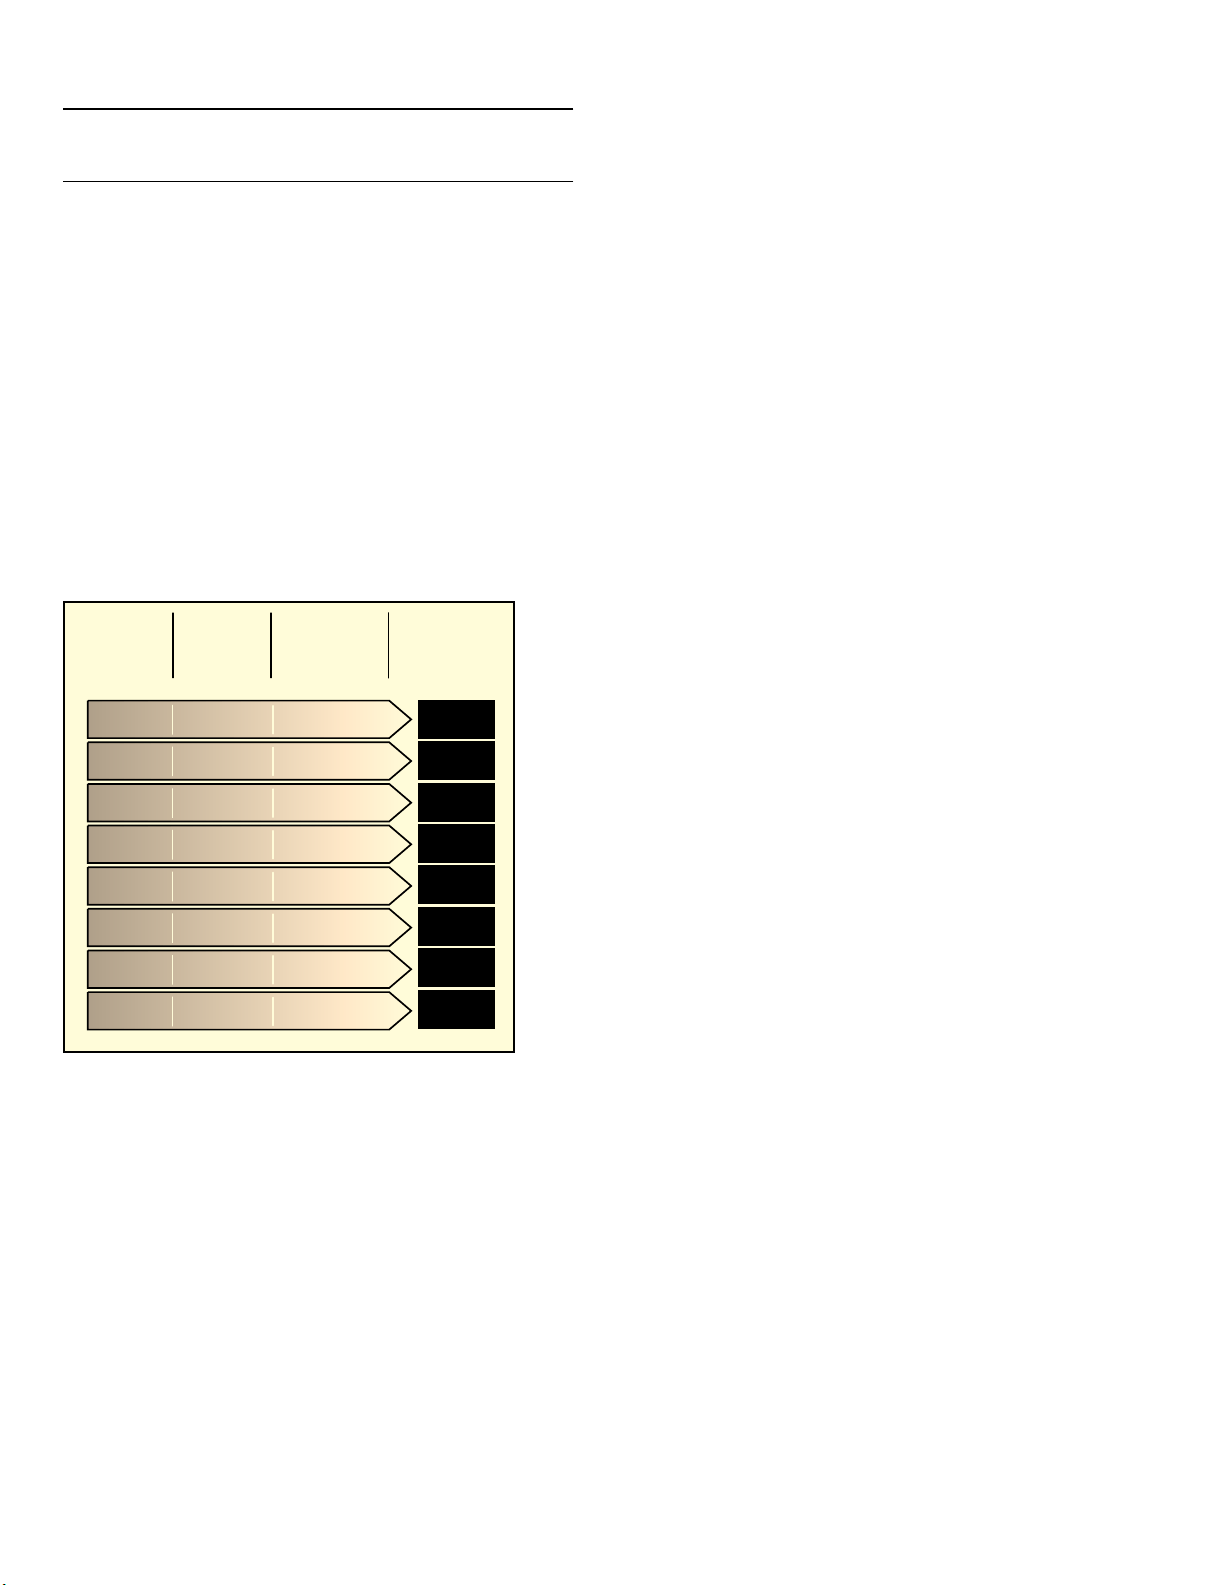
67
Système d'adoucissement de l'eau / sels fr-ca
+
Système d'adoucissement de l'eau /
sels
Système d'adoucissement de l' eau / sels
Afin d'obtenir un bon rinçage, le lave-vaisselle a besoin
d'une eau douce, c.-à-d. d'une eau pauvre en calcaire, à
défaut de quoi des dépôts de calcaire se formeront sur
les ustensiles ainsi qu'à l'intérieur de bac de lavage..
L'eau courante au-dessus de 12,5 °fH (1.2 mmol/l) doit
être adoucie. L'adoucissement de l'eau s'obtient grâce
à des sels spéciaux (sels de régénération) déposés
dans le système d'adoucissement de l'eau du lave-
vaisselle. Le réglage et par conséquent la quantité de
sels spéciaux à déposer dépendent du niveau de dureté
de votre eau courante (voir le tableau de dureté de l'eau
ci-après).
Tableau de dureté de l'eau
Réglage du système d'adoucissement
de l'eau
La quantité de sels déposés peut être réglée de 0 à
62°E. Les sels ne sont pas requis pour les valeur de 0 à
8.
Réglez le système d'adoucissement comme suit :
1. Demandez le degré de dureté de votre eau courante
à votre fournisseur d'eau.
2. Le réglage à effectuer se trouve dans le tableau de
dureté de l'eau.
3. Ouvrez la porte.
4. Appuyez sur le bouton MARCHE/ARRÊT (.
5. Appuyez sur le bouton Information ( 8 durant 3
secondes jusqu'à ce que le message suivant soit
affiché dans la fenêtre d'affichage supérieure @ :
Faites défiler avec < >
Choisissez avec - +
Maintenez durant t 3 sec.
6. Maintenez le bouton > )* enfoncé jusqu'à ce que la
dureté de l'eau soit affichée dans la fenêtre
d'affichage supérieure@.
7. Effectuez le réglage à l'aide des boutons + - X.
8. Appuyez et maintenez le bouton Information enfoncé
(8 pendant 3 secondes.
Les paramètres sélectionnés ont été sauvegardés.
9DOHXUGH
ODGXUHWp
GHOHDX(
GRXFH
PR\HQQH
GXUH
Ȣ
Ȣ
Ȣ
Ȣ
Ȣ
Ȣ
Ȣ
Ȣ
PPROO
Ȣ
Ȣ
Ȣ
Ȣ
Ȣ
Ȣ
Ȣ
Ȣ
'pILQLUOD
YDOHXUVXU
ODPDFKLQH
1LYHDXGH
GXUHWp
GXUH
GXUH
PR\HQQH
PR\HQQH
GRXFH
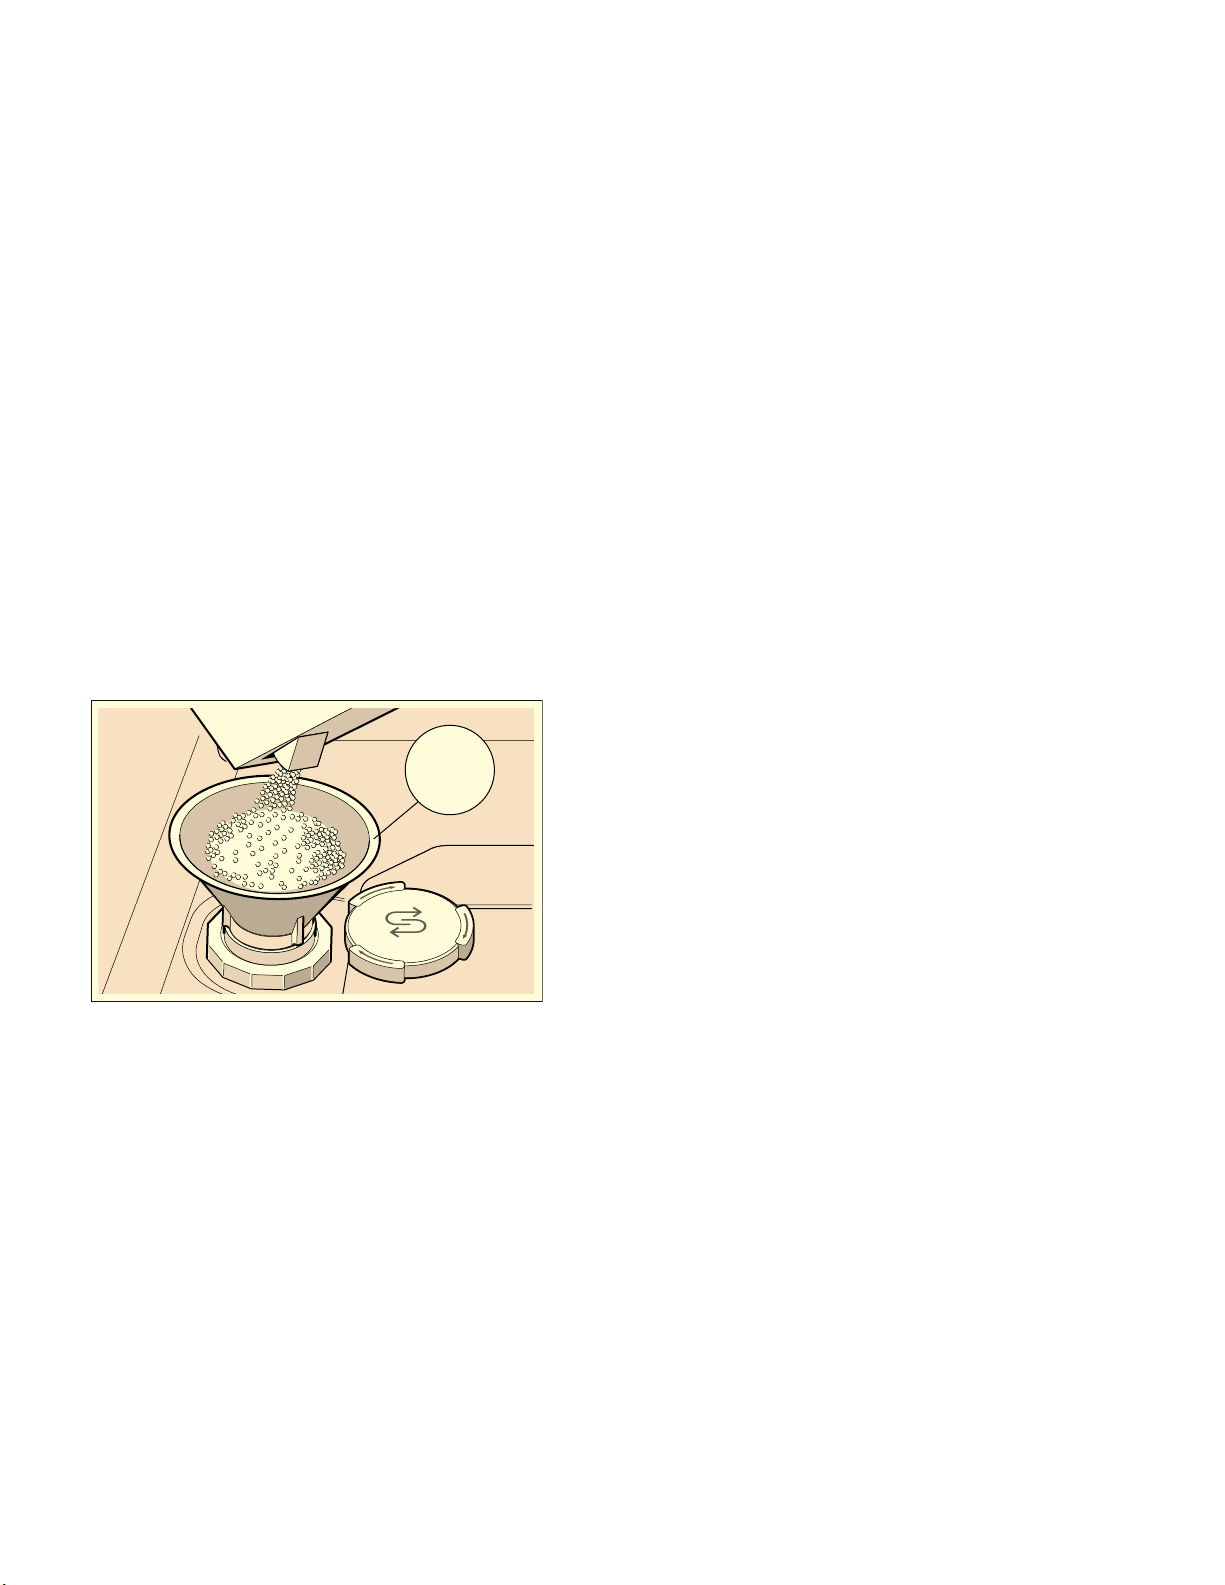
68
fr-ca Système d'adoucissement de l'eau / sels
Utilisation des sels spéciaux
Remplissez au maximum le réservoir à sels dès que
l'indicateur du niveau de sels P s'allume sur l'écran.
Remplissez toujours le réservoir au maximum avant de
mettre l'appareil sous tension. Cela permet d'assurer
l'évacuation immédiate du surplus d'eau salée,
prévenant ainsi le risque de corrosion dans le réservoir
de rinçage.
AVIS : Le détergent endommage le système
d'adoucissement de l'eau!Ne versez jamais de détergent
dans le distributeur de sels.
Remplissez les sels comme suit :
1. Retirez le bouchon à vis du distributeur 1R.
2. Remplissez le distributeur d'eau (opération requise
uniquement lors de la première mise sous tension de
l'appareil).
3. Ajoutez les sels tel qu'illustré (n'utilisez pas de sel de
table ou de comprimés).
L'eau est évacuée.
Pour en savoir plus sur l'achat de sels pour le lave-
vaisselle, veuillez contacter le service à la clientèle (1-
800-944-2904).
Utilisation de détergents chargés en
sels
Dét er gent char gé en sel s
Si vous utilisez un détergent chargé en sels, les sels
spéciaux ne sont pas requis si la dureté de l'eau ne
dépasse pas 375 ppm (37 °fH, 21 °dH, 26 °Clarke, 3,7
mmol/l). Si la dureté de l'eau dépasse 375 ppm, des
sels doivent être utilisés.
Éteindre l'indicateur de niveau bas de
sels/le système d'adoucissement de
l'eau
Ét e i n dr e le sy st ème d' adouci s s ement de l'eau
Si l'utilisation de détergents chargés en sels empêche
le bon fonctionnement de l'indicateur du niveau de sel
P sur le panneau de contrôle ou l'affichage du texte
sur la fenêtre d'affichage supérieure @ (suffisamment
de sels pour X rinçages), il est possible de désactiver
ces affichages.
Procédez tel que décrit dans « Réglage du système
d'adoucissement de l'eau » et définissez la valeur entre
0 et 8. Le système d'adoucissement de l'eau et
l'indicateur de remplissage des sels sont maintenant
activés.
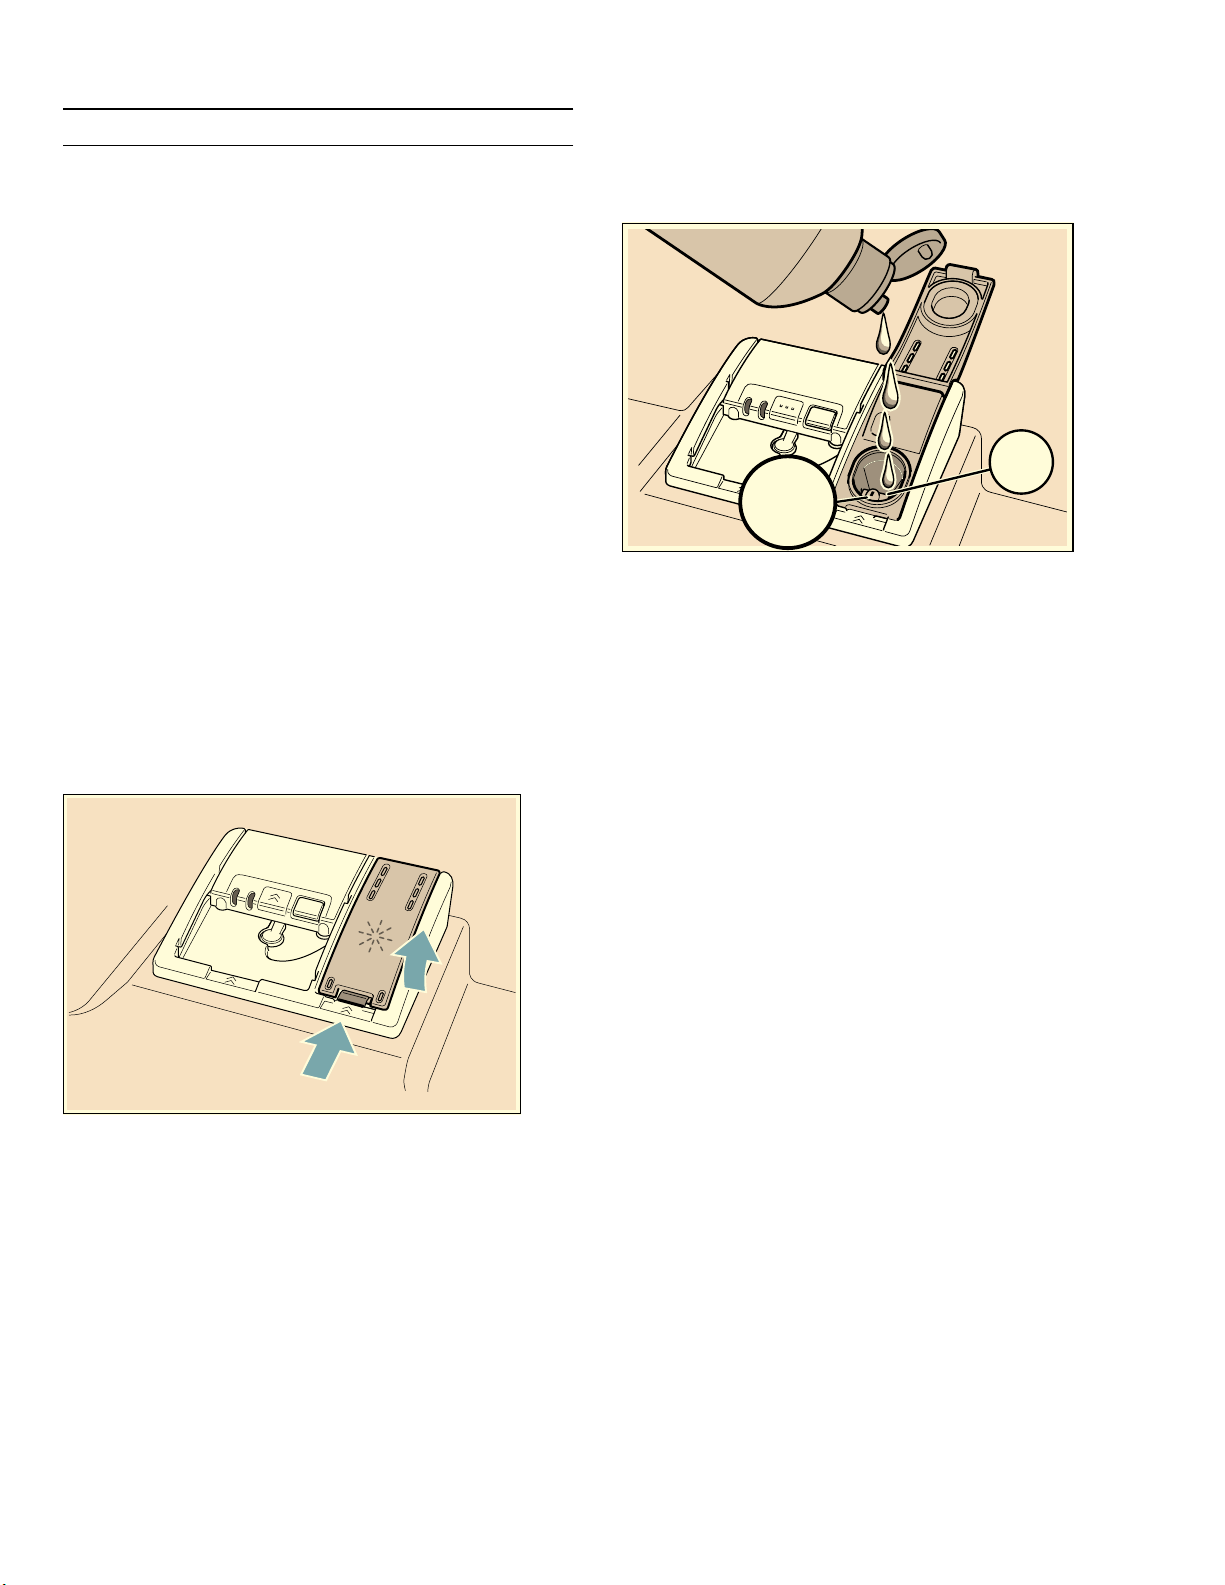
69
Produit de rinçage fr-ca
,
Produit de rinçage
Produit de ri nçage
Dès que l'indicateur de niveau d'agent de rinçage
Hs'allume sur le panneau de contrôle, remplissez ce
dernier immédiatement. L'agent de rinçage est
nécessaire pour enlever les taches sur les ustensiles et
verres. N'utilisez qu'un agent de rinçage recommandé
par le constructeur comme étant sans risque pour une
utilisation avec un lave-vaisselle domestique. Vous
pouvez utiliser des détergents pourvus d'un agent de
rinçage avec de l'eau douce ou modérément dure
uniquement (0 à 2 sur une bandelette d'analyse ou
jusqu'à 114,2 mg/l). Avec de l'eau modérément dure à
dure (3 à 4 sur une bandelette d'analyse ou 119,91 mg/
l), il faut utiliser un agent de rinçage.
Ajout d'agent de rinçage
AVIS : Pour prévenir les excès de mousse ou
l'engorgement, ne remplissez pas le distributeur de
produit de rinçage au-delà de sa capacité 9". Essuyez
les débordement à l'aide d'un chiffon humide.
1. Ouvrez le distributeur de liquide de rinçage 9" en
appuyant sur le loquet du couvercle et en tirant sur
celui-ci.
2. Remplissez le distributeur 9" de produit de rinçage
liquide jusqu'à pleine capacité. Il ne doit pas
déborder. Évitez tout déversement dans le trou
d'aération.
3. Fermez le couvercle. Le couvercle doit être
hermétiquement fermé jusqu'à l'encliquetage du
loquet, pour garantir son étanchéité.
4. Essuyez tout excédent de produit de rinçage déversé
lorsque le réservoir est plein.
Ceci évite la formation de mousse excessive lors du
prochain cycle de lavage. Le témoin lumineux
s'éteindra peu après la fermeture de la porte du lave-
vaisselle.
Conseil : Pour verser plus facilement, retirez le
couvercle de la bouteille de produit de rinçage.
AVIS : Ne pas remplir le distributeur de rinçage
auxiliaire 9" avec de la lessive. Sinon, vous pourriez
endommager le lave-vaisselle.
PD[
3XUJHXU
GDLU

70
fr-ca Produit de rinçage
Réglage de la quantité de produit de
rinçage utilisé
La quantité d'agent de rinçage pouvant être distribuée
peut être réglée sur une valeur comprise entre 0 et 6.
Choisissez 5 pour obtenir un très bon rinçage. Ne
changez pas la quantité d'agent de rinçage, sauf si des
traces de calcaire ou des taches d'eau demeurent sur
les ustensiles. Choisissez une valeur inférieure pour
éviter les traces de calcaire. Choisissez une valeur
supérieure pour éviter les taches d'eau.
Réglez la quantité d'agent de rinçage comme suit :
1. Ouvrez la porte.
2. Appuyez sur le bouton MARCHE/ARRÊT (.
3. Appuyez sur le bouton Information ( 8 durant 3
secondes jusqu'à ce que le message suivant soit
affiché dans la fenêtre d'affichage supérieure @ :
Faites défiler avec < >
Choisissez avec - +
Maintenez durant t 3 sec.
4. Maintenez le bouton > )* enfoncé jusqu'à ce que le
distributeur d'agent de rinçage soit affiché dans la
fenêtre d'affichage supérieure@.
5. Effectuez le réglage à l'aide des boutons + - X.
6. Appuyez et maintenez le bouton Information enfoncé
(8 pendant 3 secondes.
Les paramètres sélectionnés ont été sauvegardés.
Remarque : Ne changez pas la quantité d'agents de
rinçage, sauf si des traces de calcaire (sélectionnez une
valeur inférieure) ou des taches d'eau (sélectionne une
valeur supérieure) demeurent sur les ustensiles.
Éteindre l'indicateur d'agent de
remplissage de rinçage
Si l'utilisation de détergents pourvus d'agent de rinçage
empêche le bon fonctionnement de l'indicateur de
niveau d'agent de rinçage bas H sur le panneau de
contrôle ou l'affichage du texte sur la fenêtre
d'affichage supérieure (suffisamment d'agent de
rinçage pour X rinçages), il est possible de désactiver
ces affichages.
Procédez comme décrit dans « Réglage de la quantité
d'agents de rinçage » et sélectionnez0.
AVIS : En utilisant aucun produit de rinçage ou le
réglage du distributeur à 0 peut conduire à des durées
de cycle plus longues, ce qui consommera plus
d'énergie et plus d'eau. Les températures plus élevées
peuvent endommager la porcelaine fine ou la verrerie.
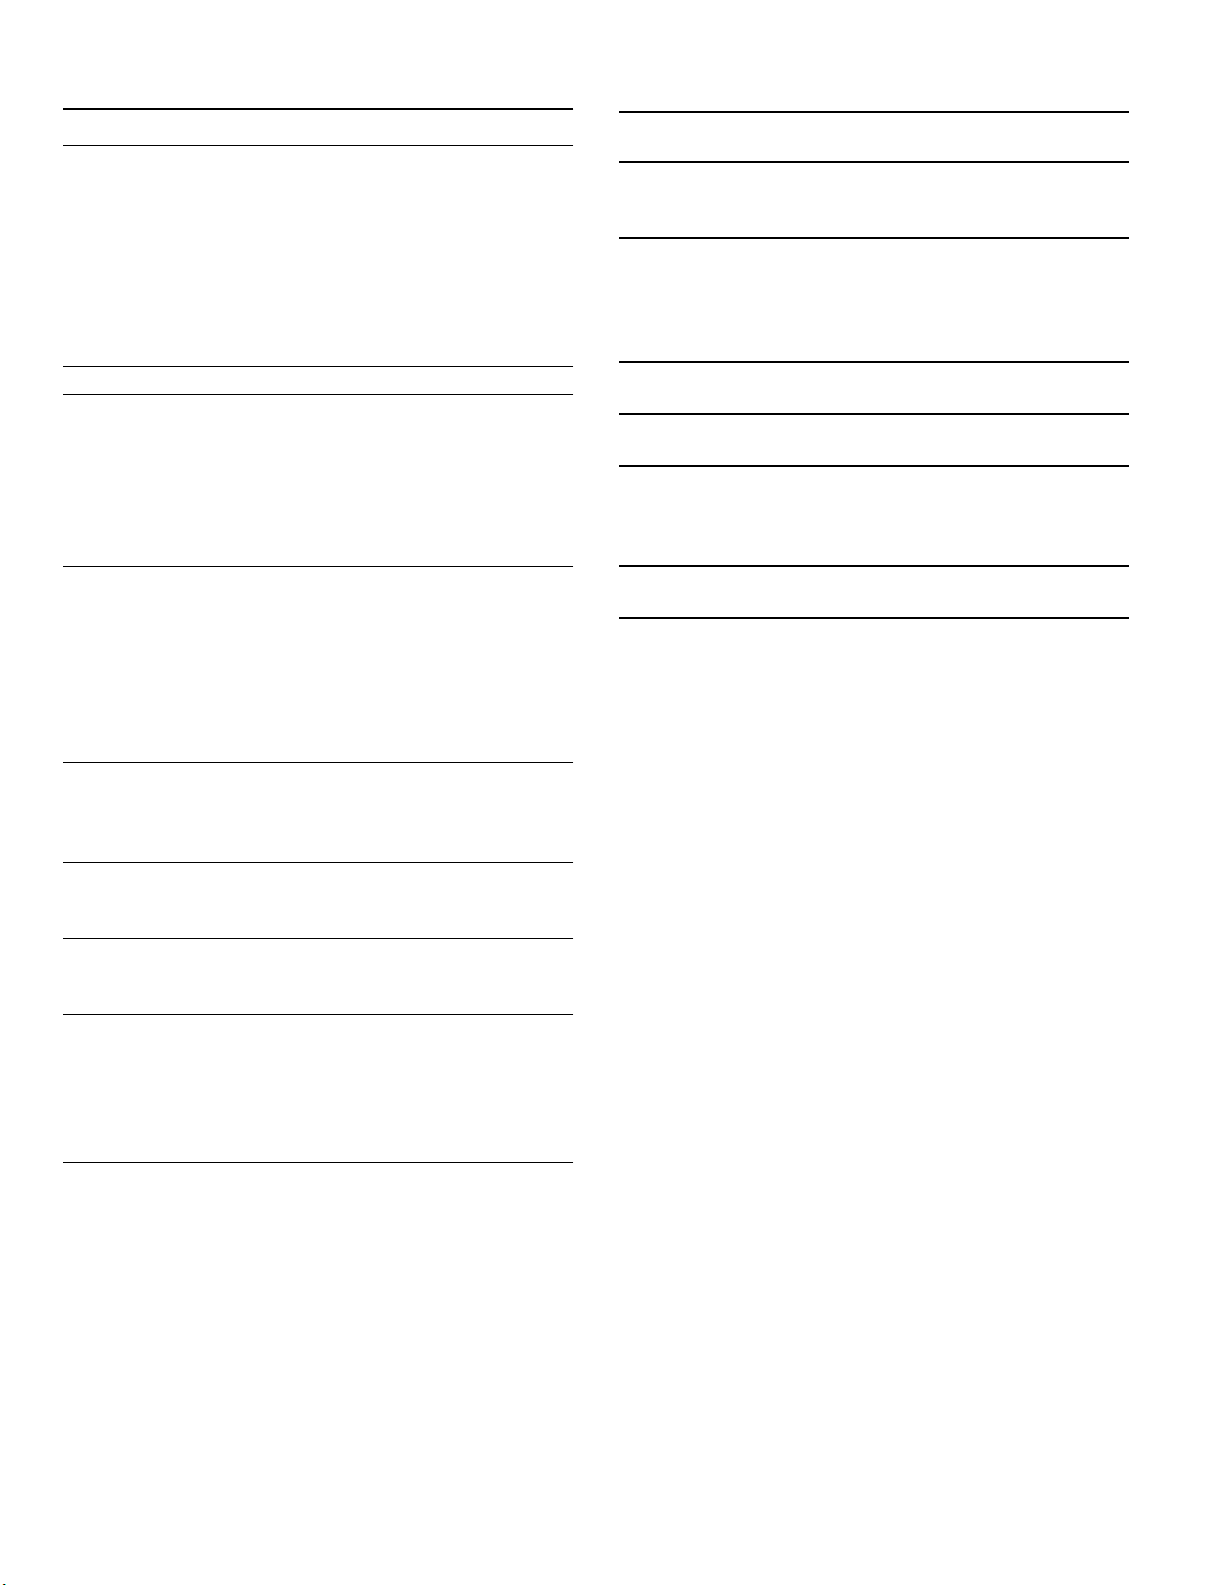
71
Chargement du lave-vaisselle fr-ca
-
Chargement du lave-vaisselle
Chargement du lave-vaisselle
Matériaux lavables au lave-vaisselle
Remarque : Avant la première utilisation de votre lave-
vaisselle, vérifiez les informations énoncées dans la
présente rubrique. Certains objets ne peuvent pas être
lavés au lave-vaisselle et doivent l'être à la main ;
d'autres doivent être chargés de manière spéciale.
Dégâts causés à la verrerie et
l'argenterie
Causes :
▯ Type de verrerie.
▯ Type de détergent pour lave-vaisselle.
▯ Température de l'eau du cycle de lavage.
Recommandations :
▯ Veuillez n'utiliser que de la verrerie et de la
porcelaine ayant été désignées par le fabricant
comme pouvant être lavées au lave-vaisselle.
▯ Utilisez un détergent qui protège l'argenterie.
▯ Utilisez des cycles de lavage moins intensifs et
sortez la verrerie et l'argenterie du lave-vaisselle dès
que possible une fois le cycle de lavage terminé.
Recommandé Précaution
Aluminium L'aluminium anodisé et coloré
peut se décolorer au fil du temps.
Les minéraux présents dans l'eau
peuvent ternir ou tacher
l'aluminium. En général, ils sont
éliminés à l'aide d'un tampon en
laine d'acier imbibé de savon.
Porcelaine, cristal,
grès
Certains ustensiles peints à la
main peuvent se décolorer ou se
tacher. Lavez ces ustensiles à la
main. Positionnez la verrerie
fragile de manière à ce qu'elle ne
bascule pas ou n'entre pas en
contact avec d'autres ustensiles
au cours du cycle de nettoyage.
Verre Assurez-vous d'utiliser du verre
lavable au lave-vaisselle. Le verre
de lait peut se décolorer ou
jaunir.
Revêtements anti-
adhésifs
Appliquez une légère couche
d'huile végétale aux surfaces anti-
adhésives après séchage.
Plastiques Assurez-vous que les articles
plastiques sont lavables au lave-
vaisselle.
Acier inoxydable,
argent sterling et
métal argenté
Chargez ces objets de manière à
ce qu'ils n'entrent pas en contact
avec d'autres métaux, les parois
de la cuve du lave-vaisselle en
acier inoxydable ou la porte
intérieure.
Non
Recommandé
Raison
Acrylique Des craques ou de petites
fissures peuvent survenir sur
l'acrylique.
Pièces
assemblées par un
adhésif
Les adhésifs permettant
d'assembler des matériaux
comme le plastique, le bois, l'os,
l'acier, le cuivre, l'étain, etc.
peuvent perdre en adhérence.
Ustensiles à
poignée en os
Les poignées peuvent se séparer.
Fer Le fer va rouiller. Lavez à la main
et séchez immédiatement.
Articles autres que
la vaisselle
Votre lave-vaisselle est destiné au
nettoyage de vaisselle et
d'articles de cuisine standards
UNIQUEMENT.
Potin, laiton,
bronze
Ces articles terniront.Lavez à la
main et séchez immédiatement.
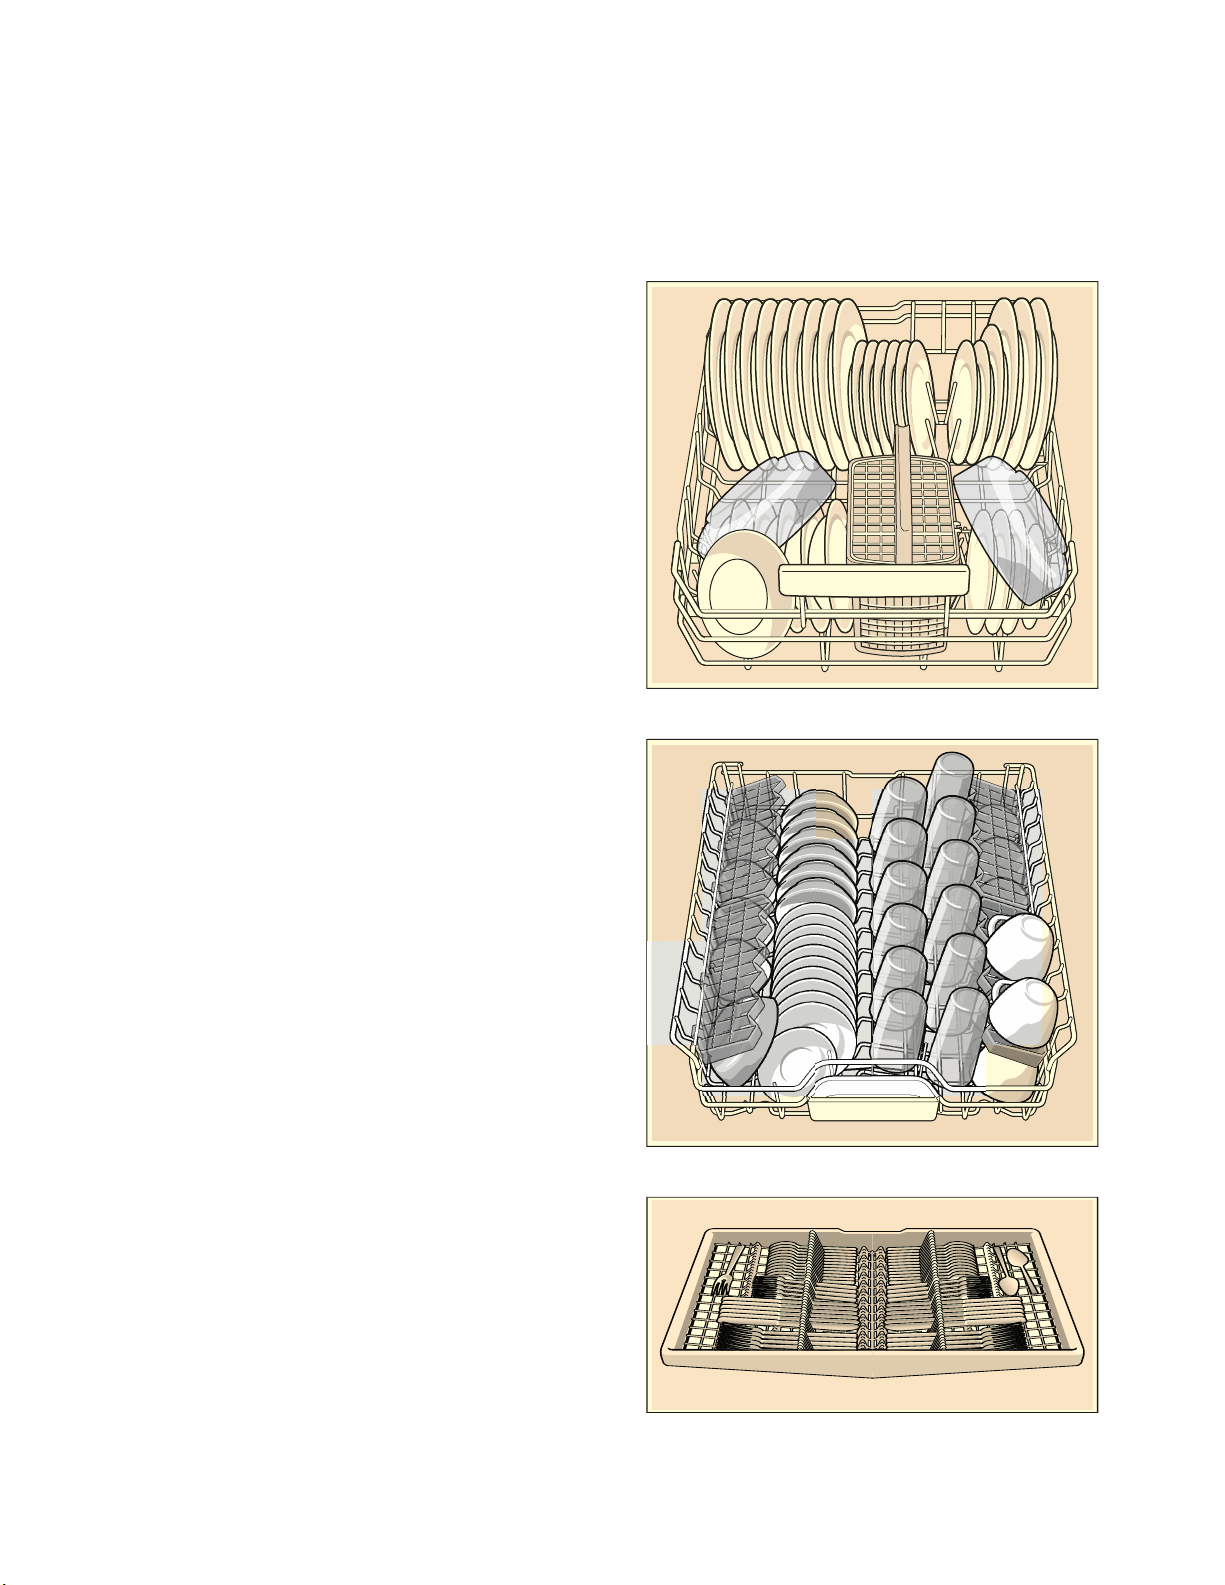
72
fr-ca Chargement du lave-vaisselle
Chargement des paniers
Pour obtenir les meilleurs résultats, respectez les
instructions suivantes lors du chargement de la
vaisselle :
▯ Les articles avec de légères incrustations de résidus
alimentaires ne doivent pas être pré-lavés.
▯ Retirez toutes les particules d'aliments, os, cure-
dents et excès de graisse.
▯ Pré-lavez les articles souillés par les matières
brûlées, cuites ou féculeuses.
▯ Chargez les plats dans les paniers du lave-vaisselle
de telle sorte que les parois internes des bols,
chaudrons et casseroles font face aux bras gicleurs.
▯ Évitez l'emboîtement et les points de contact entre
les plats.
▯ Séparez les objets à base de métaux différents.
Veillez à ne pas bloquer les bras gicleurs.
▯ Lavez uniquement la vaisselle et les articles de
cuisine indiqués comme lavables au lave-vaisselle.
Reportez-vous à la rubrique Matériaux lavables au
lave-vaisselle pour plus d'informations sur la
vaisselle adaptée.
AVIS : Afin de ne pas endommager le lave-vaisselle,
n'y chargez pas des objets en papier, des sacs en
plastique, des matériaux d'emballage ou tout article
autre qu'un article normal, de la vaisselle ou des
ustensiles de cuisine lavables au lave-vaisselle.
Chargement du panier supérieur
Assurez-vous que les articles ne saillent pas du fond
des paniers et ne bloquent les bras gicleurs.
Remarque : Lors de l'insertion du panier
supérieur 12 dans le lave-vaisselle, poussez-le jusqu'à
ce qu'il se bute contre la paroi arrière du bac à laver.
Ainsi, le bras gicleur du panier supérieur 1: se
connecte à l'alimentation en eau à l'arrière du bac à
laver. Ne poussez pas les paniers à l'aide de la porte.
Chargement du panier inférieur
Placez les objets volumineux dans le panier
inférieur 1j. Chargez les chaudrons, casseroles et
bols à l'envers. Ne bloquez pas le trous de ventilation
avec de grandes plaques à pâtisserie. Chargez ces
objets du côté droit du lave-vaisselle.
Mode de chargement recommandé
Remarque : Le repliage des étagères à tasses permet
aux tasses d'être disposée selon un angle accru et de
réduire les accumulations d'eau au fond de celles-ci.
Panier inférieur - 12 emplacements
Panier supérieur - 12 emplacements
Troisième panier - 12 emplacements
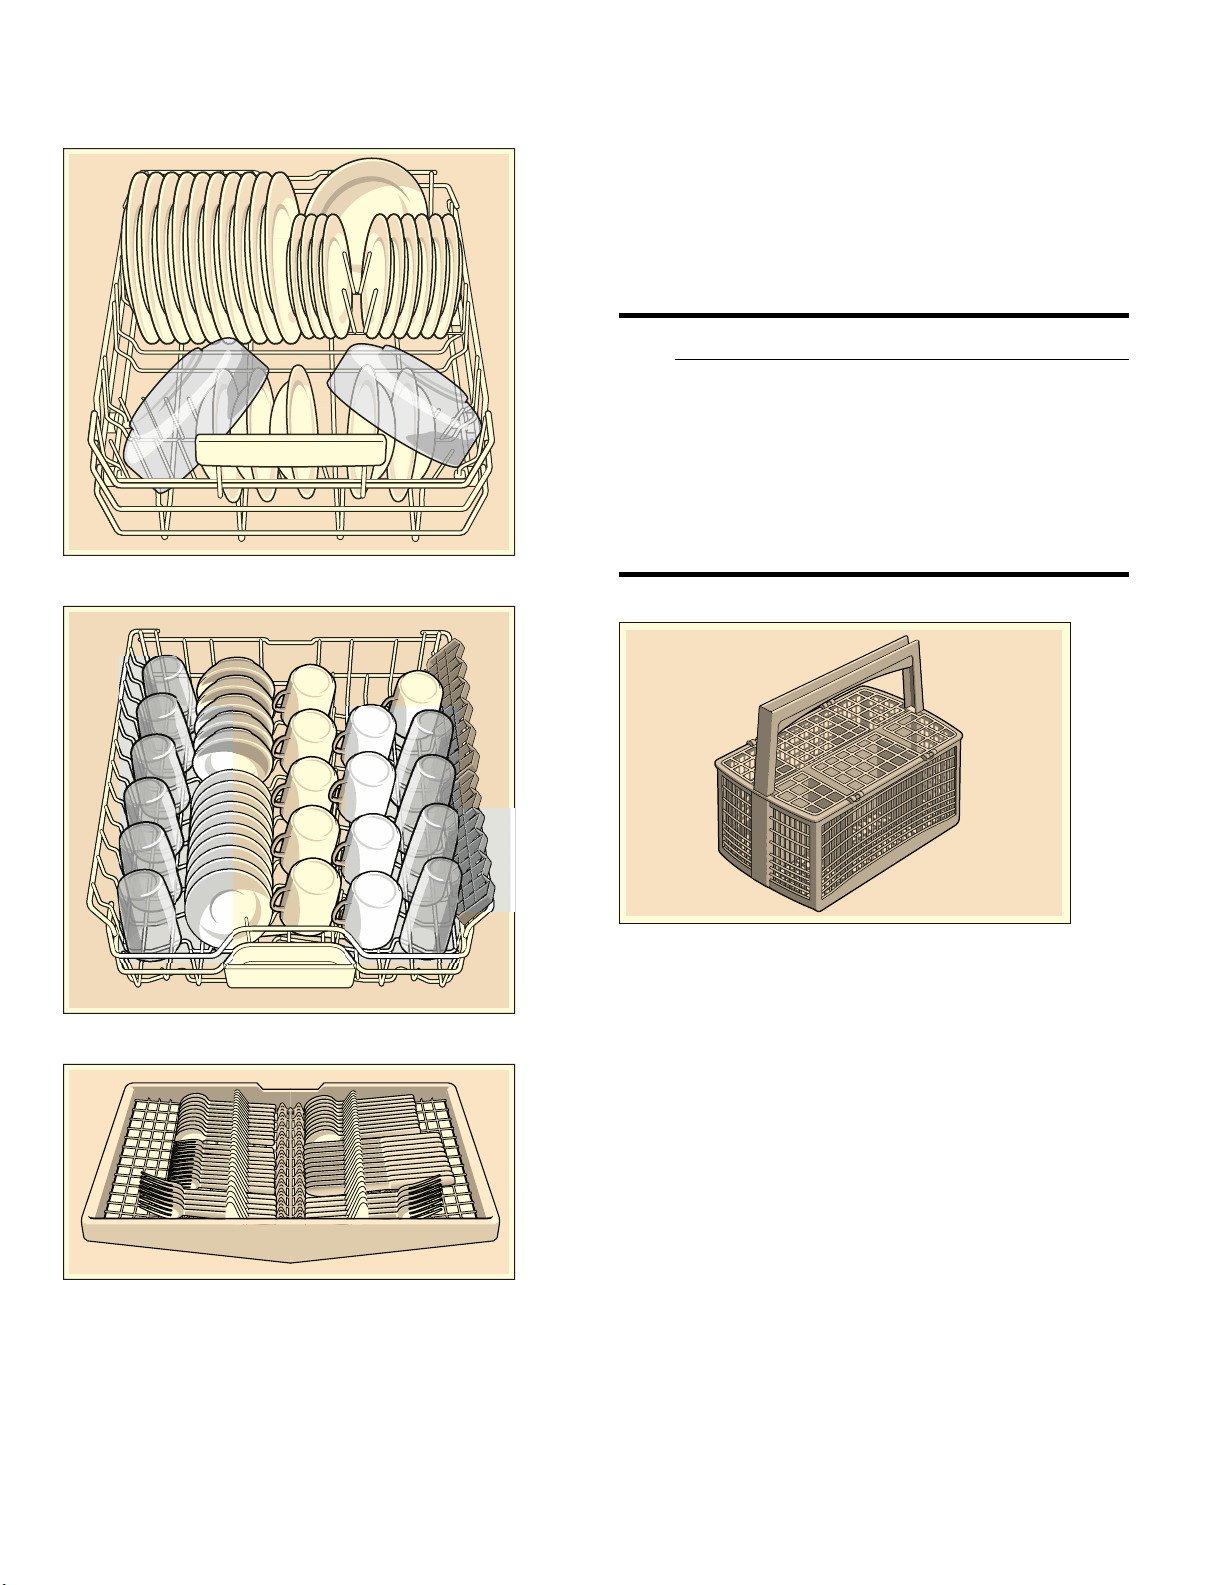
73
Chargement du lave-vaisselle fr-ca
Panier inférieur - 10 emplacements
Panier supérieur - 10 emplacements
Troisième panier - 10 emplacements
Chargement du panier à ustensiles
Les couteaux et ustensiles tranchants doivent être
placés avec les poignées en haut, les cuillères et
fourchettes avec les poignées en bas. Si des objets
volumineux ou aux formes irrégulières sont chargés
dans le panier à ustensiles, veillez à ce qu'ils ne
s'entassent pas.
9 AVERTISSEMENT
Risque de blessures !
Les points et bords tranchants des couteaux et
autres ustensiles coupants peuvent causer des
blessures graves. Lors du chargement, les
pointes des couteaux et autres ustensiles
tranchants doivent être tournés vers le bas. Les
enfants ne doivent pas utiliser ou jouer près des
couteaux et ustensiles tranchants.
* option facultative qui peut être ou ne pas être incluse
avec votre lave-vaisselle.
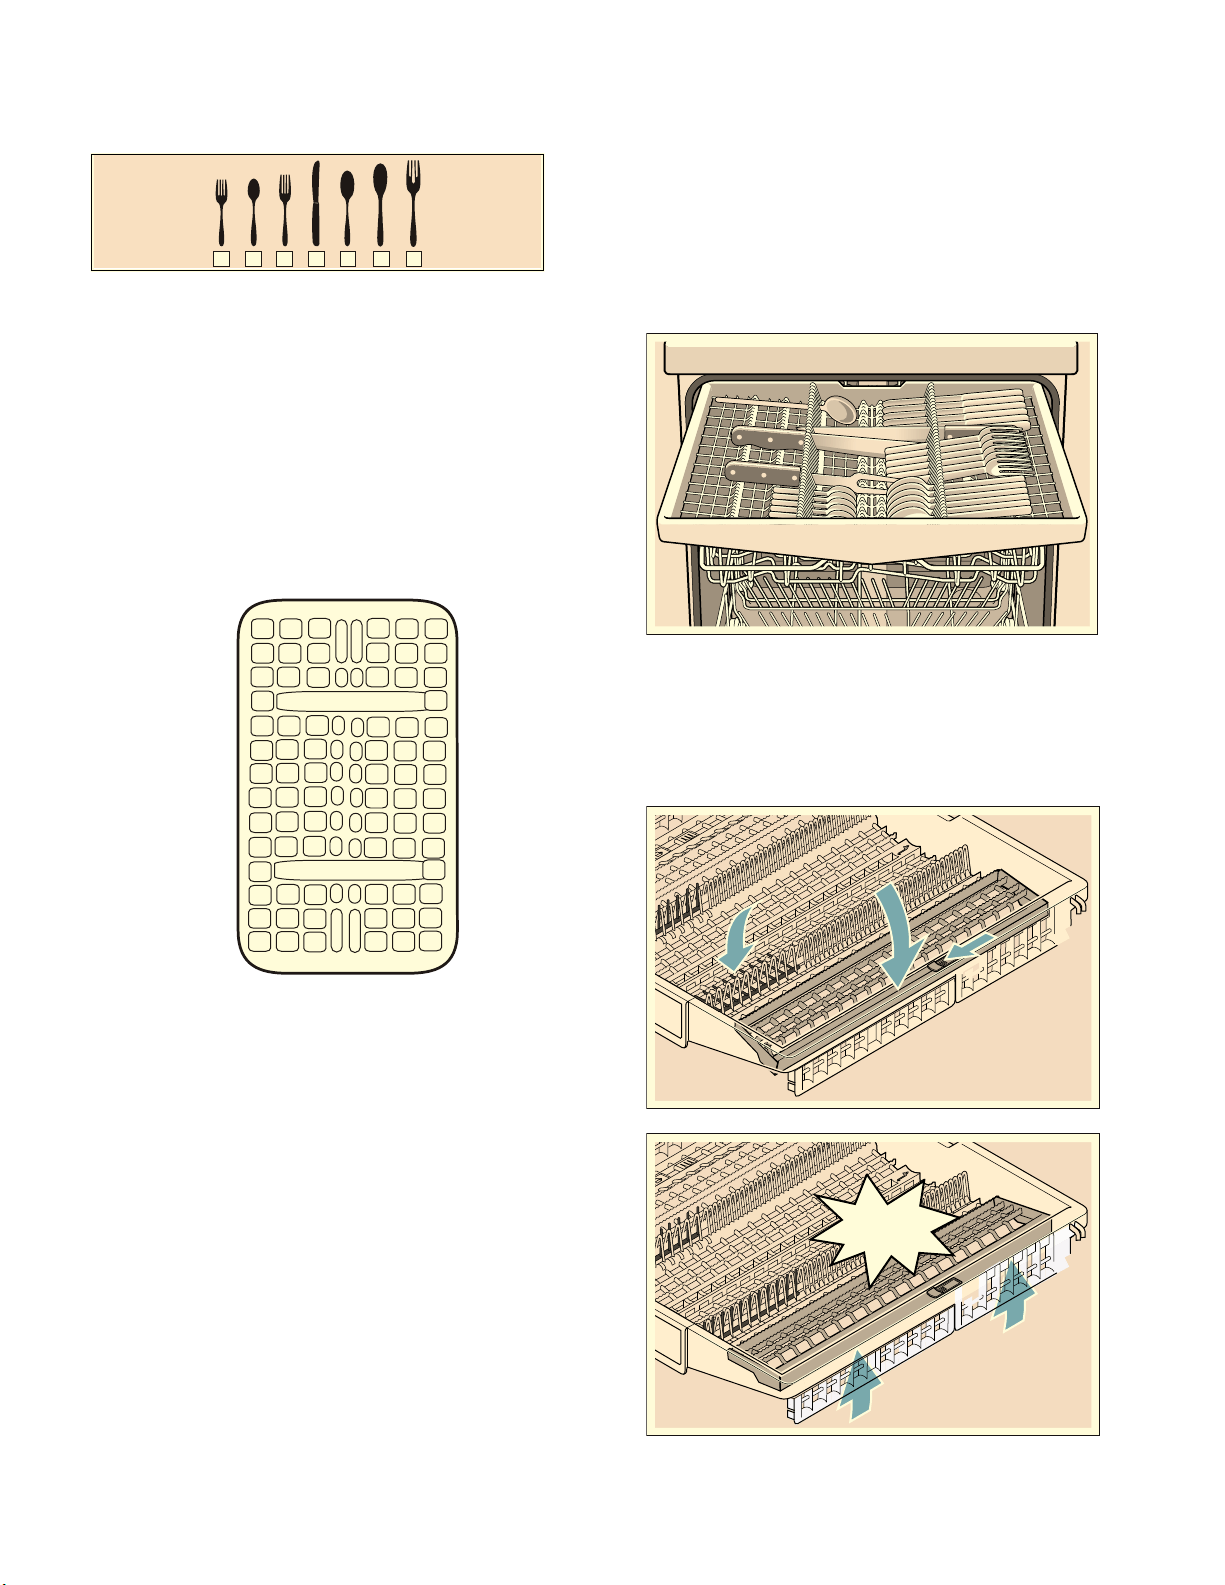
74
fr-ca Chargement du lave-vaisselle
Profils de chargement suggérés
Accessoires de panier
Troisième panier *
Le troisième panier 1* permet de placer
horizontalement les couteaux, spatules et autres outils
de grande taille pour un meilleur nettoyage et un
chargement et déchargement faciles. Disposez la
coutellerie dans le troisième panier 1* tel qu'illustré.
En fonction des caractéristiques de votre lave-vaisselle,
vous pouvez replier les étagères latérales pour libérer
de l'espace pour les articles d'argenterie de taille plus
imposante. Les rangées de séparateurs à l'avant
peuvent être repliées afin de libérer de l'espace pour
les poignées plus larges.
* option facultative qui peut être ou ne pas être incluse
avec votre lave-vaisselle.
1 Fourchette à salade
2 Cuillère à café
3 Fourchette de table
4 Couteau
5 Cuillère à soupe
6 Cuillère à servir
7 Fourchette à servir
&/,&.
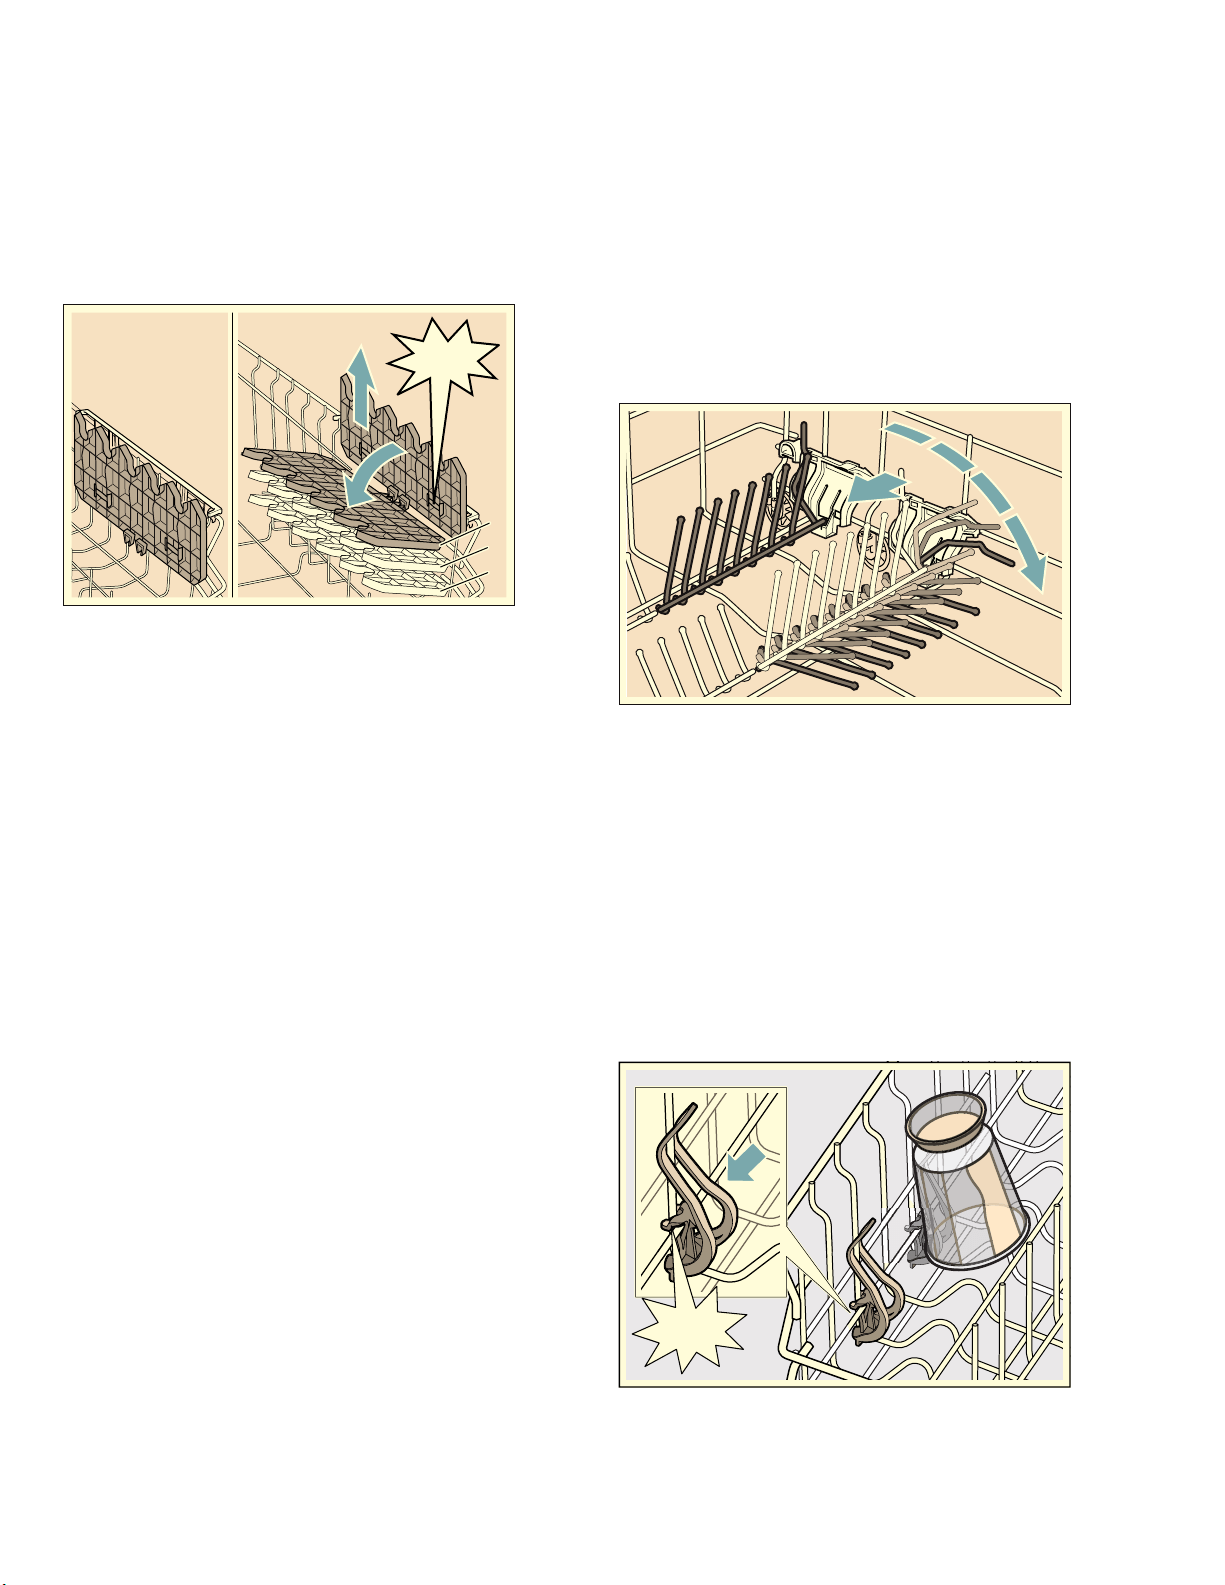
75
Chargement du lave-vaisselle fr-ca
Étagère à tasses *
Les étagères à tasses ainsi que l'espace qui se trouve
sous celles-ci peuvent être utilisés pour les petites
tasses et les verres, ainsi que les articles d'argenterie
plus grands, comme les cuillères en bois, les cuillères
et les fourchettes à servir. Si vous n'avez pas besoin de
l'étagère à tasses, celle-ci peut être repliée.
Ajuster la hauteur de l'étagère à tasses comme suit :
1. Placez l'étagère dans une position verticale et tirez
vers le haut.
2. Poussez l'étagère vers le bas avec un léger angle
jusqu'à la hauteur désirée (1, 2, ou 3).
3. Insérer l'étagère à tasses.
L'étagère s'encliquette dans sa position.
* option facultative qui peut être ou ne pas être incluse
avec votre lave-vaisselle.
Dents rabattables *
Selon les caractéristiques de votre lave-vaisselle, les
dents peuvent être rabattues Ceci facilite la disposition
des chaudrons, des bols et des verres.
Rabattez les dents comme suit :
1. Tirez légèrement la dent rabattable vers vous et
libérez-la de son encoche (1).
2. Poussez la dent rabattable vers le bas à la position
désirée (2).
Pour les élever, poussez les peignes rabattables dans
une position verticale jusqu'à ce que le support
s'encliquette dans l'encoche.
* option facultative qui peut être ou ne pas être incluse
avec votre lave-vaisselle.
Pinces pour objets en plastique *
Les pinces pour objets en plastique permettent
d'accrocher fermement les accessoires de plastique
légers (gobelets, couvercles, etc.).
Pressez la pince pour objets en plastique contre le
panier tel qu'indiqué, jusqu'à ce qu'il s'encliquette.
* option facultative qui peut être ou ne pas être incluse
avec votre lave-vaisselle.
&/,&.
&/,&.
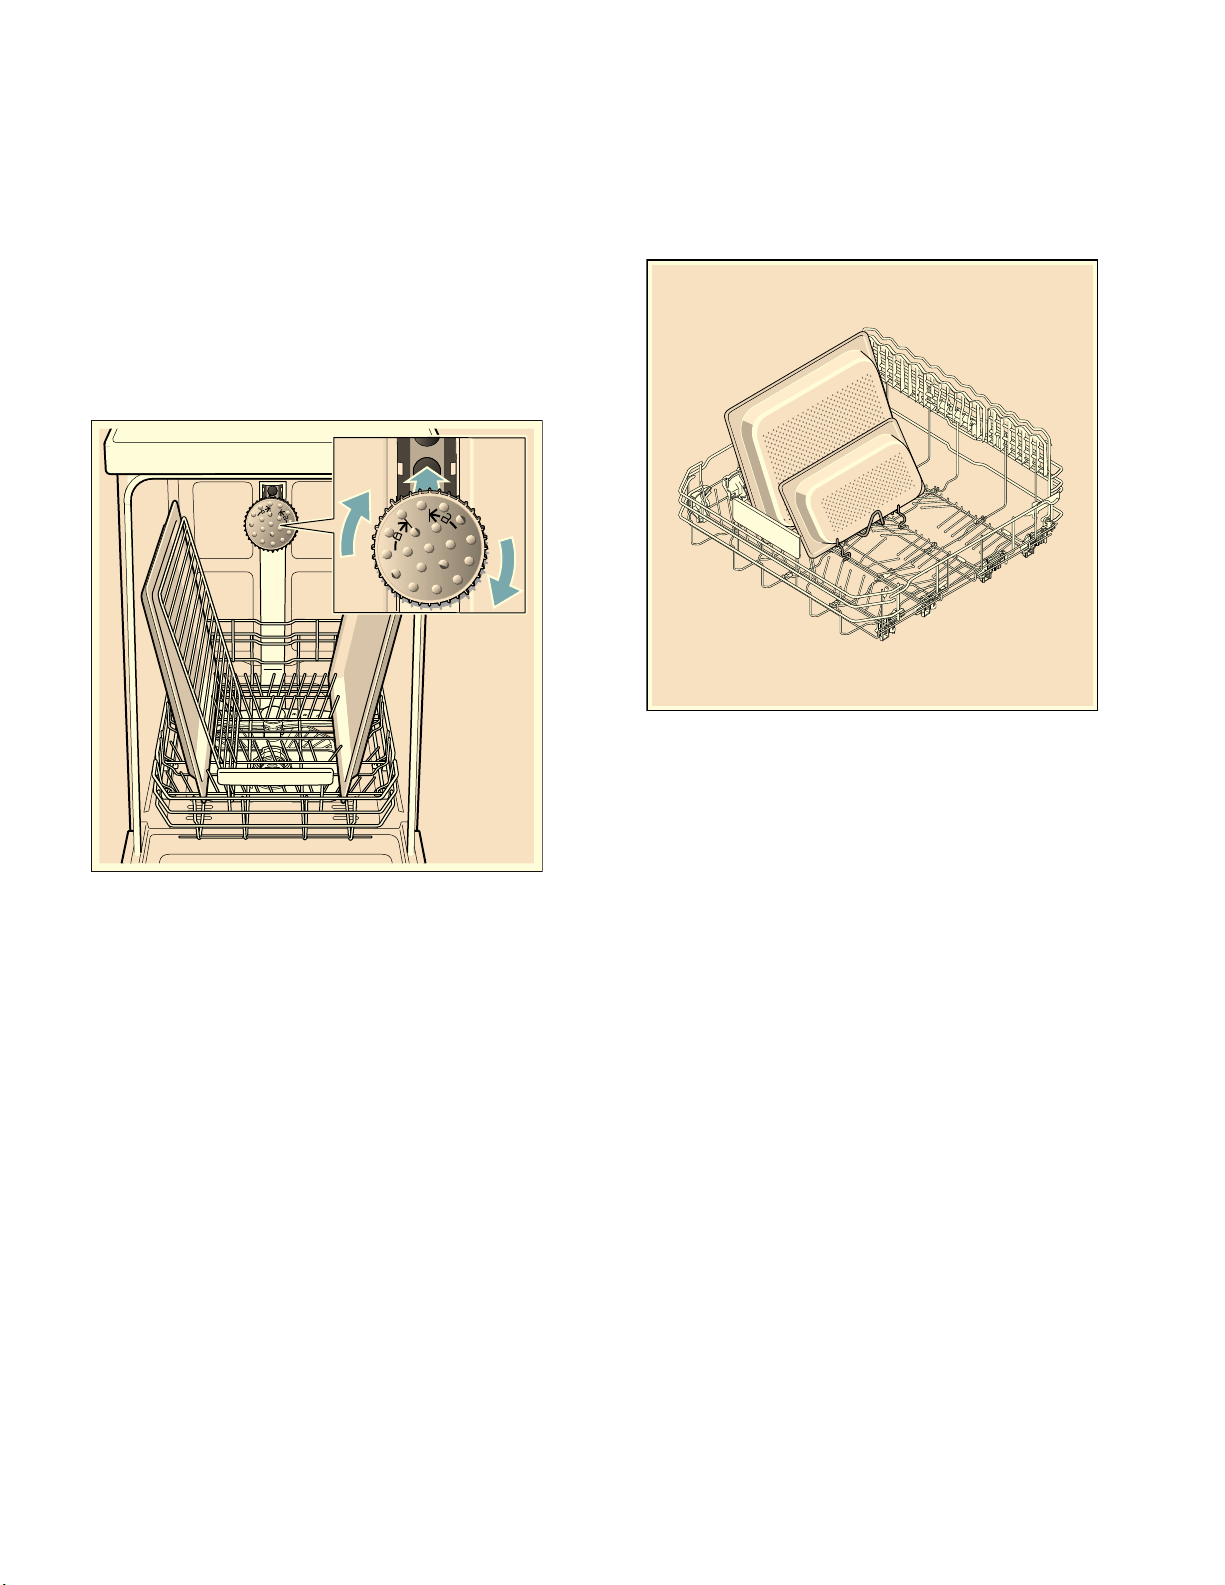
76
fr-ca Chargement du lave-vaisselle
Gicleur pour objets extra hauts *
Les plateaux, les grilles ainsi que les grandes assiettes
(plats à pâtes, assiettes creuses, assiettes à dîner)
peuvent être nettoyés avec cette tête de lavage.
Insérez la tête de lavage comme ceci :
1. Retirez le panier supérieur 12.
2. Insérez la tête de lavage comme montré dans
l'illustration et tournez-la vers la droite.
La tête de lavage est maintenant engagée.
Remarques
▯ Gardez dégagé l'orifice de ventilation sur le côté
gauche de la cuve à détergent en plaçant les articles
de grande taille comme les planches à découper en
plastique et les grandes plaques à pâtisserie au
centre ou sur le côté droit du panier inférieur.
▯ Assurez-vous que le lave-vaisselle est toujours utilisé
avec le panier supérieur 12 ou la tête de nettoyage
pour très grands objets.
Pour vous assurer que le jet de la tête de nettoyage
atteigne tous les éléments, disposez les plaques à
pâtisserie suivant l'illustration (2 plaques à pâtisserie et
2 grilles au maximum).
AVIS : Pour éviter d'endommager le lave-vaisselle, ne
remontez pas le panier supérieur 12 sans avoir retiré
le gicleur pour objets très grands(B).
* option facultative qui peut être ou ne pas être incluse
avec votre lave-vaisselle.
Pièce pour récipients Gastro Norm*
Pi è c e pou r réci pi ent s Gast r o Nor m
Cette pièce vous permet d'empiler plusieurs récipients
Gastro Norm ou ustensiles plats similaires selon un
certain angle sur le panier inférieur.
Vous pouvez retirer cette pièce au besoin.
* option facultative qui peut être ou ne pas être incluse
avec votre lave-vaisselle.
Retrait de la vaisselle
Lors du retrait de la vaisselle, il est recommandé de
décharger le panier inférieur au préalable. Ensuite,
déchargez le panier à couverts suivi par le panier
supérieur et le 3ème panier.
Remarque : Les plats sont plus susceptibles de
s'ébrécher lorsqu'ils sont déchargés avant d'être
refroidis.

77
Chargement du lave-vaisselle fr-ca
Réglage de la hauteur du panier*
Régl age de la haut eur du pa ni er
Au besoin, la hauteur du panier supérieur 12 peut
être ajustée pour libérer plus d'espace pour les
ustensiles de grande taille, dans le panier supérieur
comme inférieur.
Hauteur de l'appareil 81,5 cm (32 po)
Hauteur de l'appareil 86,5 cm (32 po)
Disposez les plats et assiettes d'un diamètre compris
entre 31 et 34 cm (12,2 po - 13,4 po) dans le panier
inférieur 1j tel qu'illustré.
* option facultative qui peut être ou ne pas être incluse
avec votre lave-vaisselle.
Panier supérieur avec leviers latéraux
1. Sortez le panier supérieur12.
2. Saisissez les côtés du panier par le bord supérieur.
Ceci permet d'éviter toute chute soudaine.
3. Pour abaisser le panier supérieur, appuyez sur les
deux leviers à gauche et à droite à l'extérieur de
celui-ci. Le panier supérieur s'abaisse.
4. Pour soulever le panier supérieur, saisissez-le par les
côtés de son bord supérieur.
5. Assurez-vous que les deux côtés du panier supérieur
sont à la même hauteur.
6. Insérez le panier supérieur en le poussant.
Avec panier à
couverts
Panier
supérieur
Panier inférieur
Configuration 1
ø max.
22 cm
(8,6 po)
31 cm
(12,2 po)
Configuration 2
ø max.
24,5 cm
(9,6 po)
27,5 cm
(10,8 po)
Configuration 3
ø max.
27 cm
(10,6 po)
25 cm
(9,8 po)
Avec le troisième
panier
Panier
supérieur
Panier inférieur
Configuration 1
ø max.
16 cm
(6,3 po)
31 cm
(12,2 po)
Configuration 2
ø max.
18,5 cm
(7 po)
27,5 cm
(10,8 po)
Configuration 3
ø max.
21 cm
(8,2 po)
25 cm
(9,8 po)
Avec panier à
couverts
Panier
supérieur
Panier inférieur
Configuration 1
ø max.
24 cm
(9,4 po)
34 cm
(13,4 po)
Configuration 2
ø max.
26,5 cm
(10,4 po)
30,5 cm
(12 po)
Configuration 3
ø max.
29 cm
(11,4 po)
28 cm
(11 po)
Avec le troisième
panier
Panier
supérieur
Panier inférieur
Configuration 1
ø max.
18 cm
(7 po)
34 cm
(13,4 po)
Configuration 2
ø max.
20,5 cm
(8 po)
30,5 cm
(12 po)
Configuration 3
ø max.
23 cm
(9 po)
28 cm
(11 po)
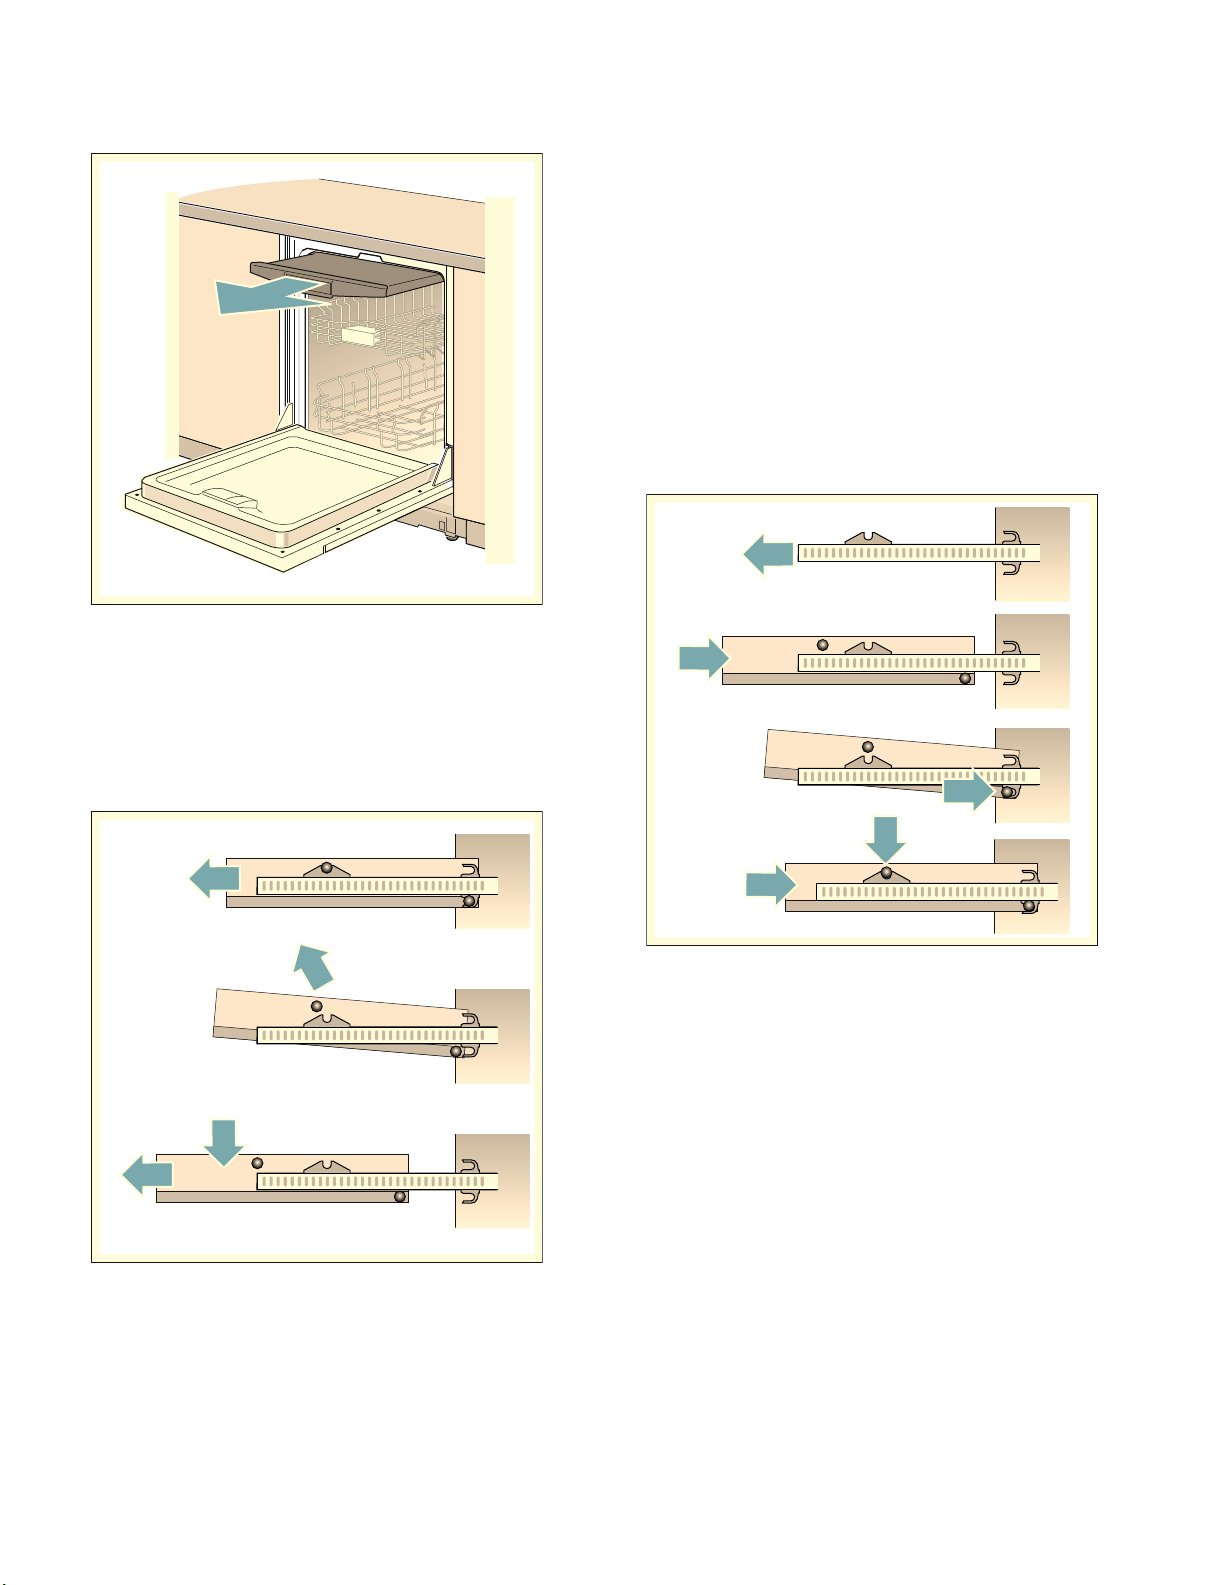
78
fr-ca Chargement du lave-vaisselle
Retirer/installer le troisième panier
Retirez le troisième panier 1* :
1. Sortez le troisième panier jusqu'au bout (1).
2. Soulevez l'avant du troisième panier hors de
l'encoche (2).
3. Sortez le troisième panier et abaissez-le (3).
Installez le troisième panier 1*
1. Sortez les glissières du troisième panier jusqu'au
bout (1).
2. Insérez le troisième panier (2). Ce faisant, remarquez
la position des crans (tel qu'illustré à l'étape 2).
3. Soulevez légèrement le troisième panier, puis
insérez les crans à l'arrière dans les crochets de
verrouillage inférieurs des rails (3).
4. Abaissez le troisième panier, puis appuyez sur les
crans à l'avant (4). Le troisième panier s'encliquette
alors dans sa position.
5. Insérez le troisième panier en le poussant.
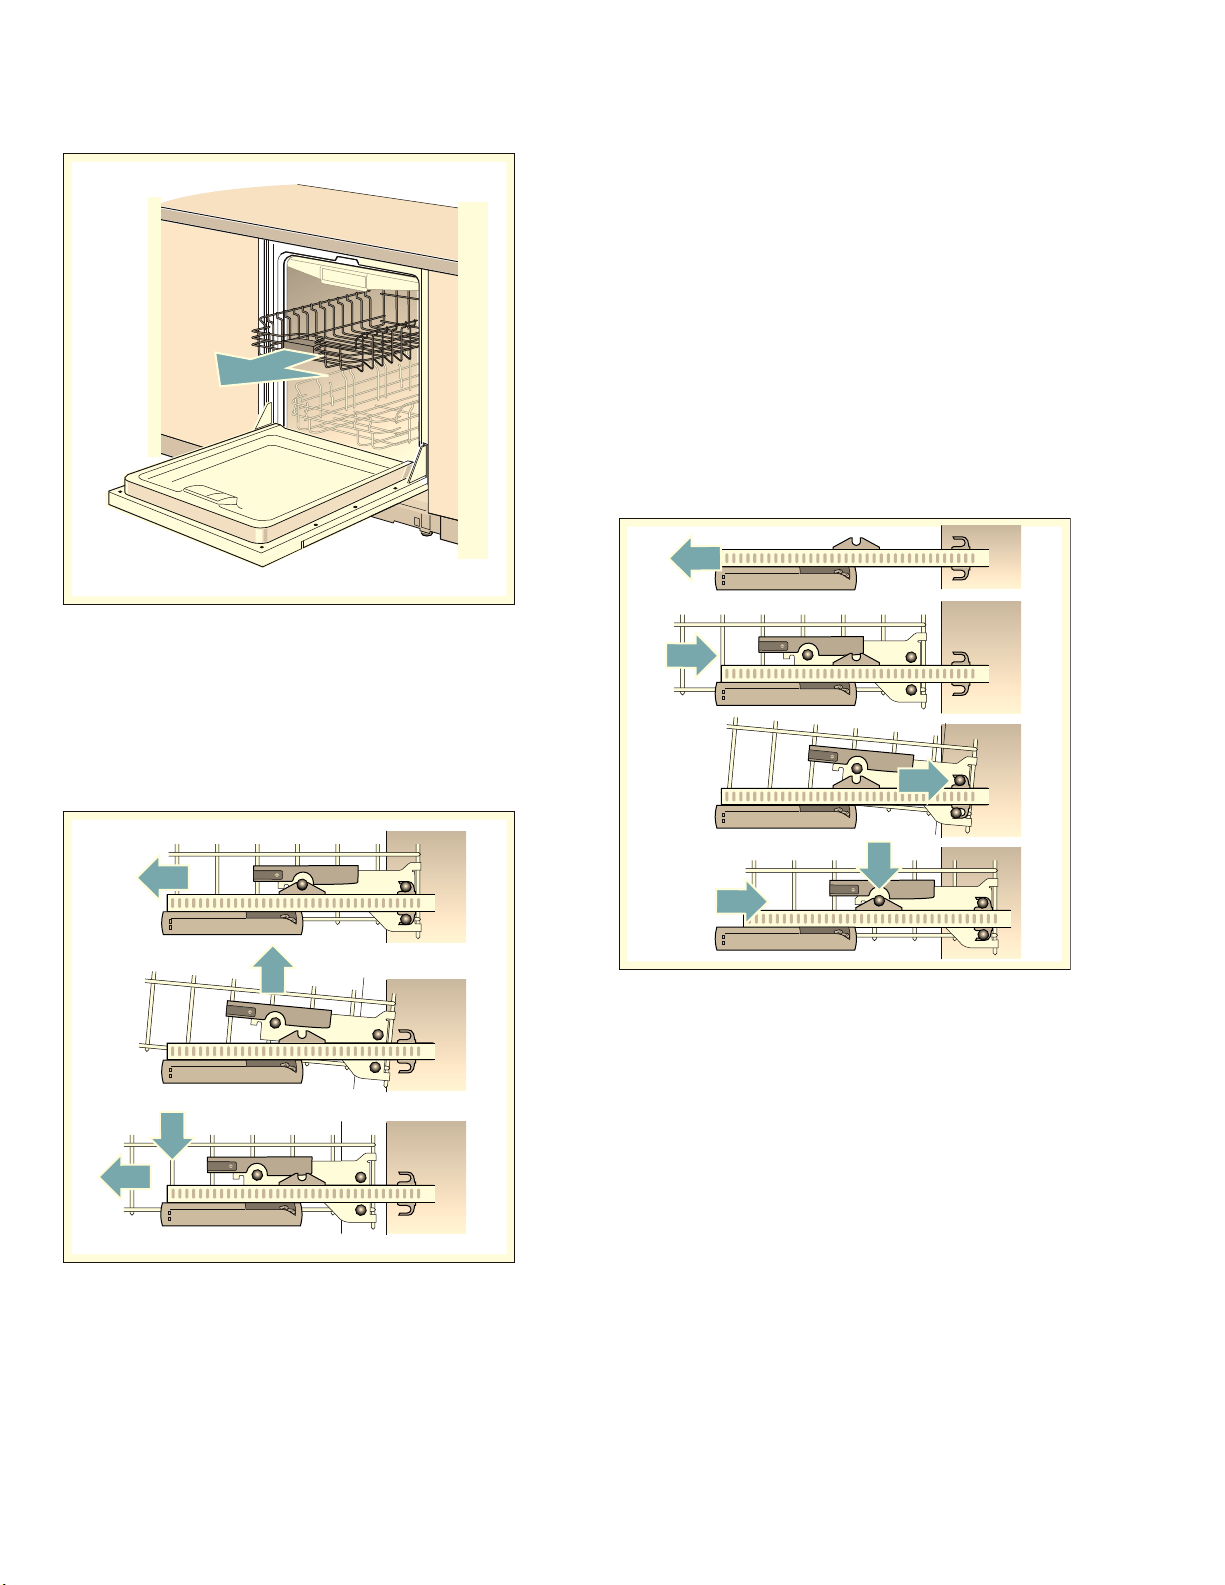
79
Chargement du lave-vaisselle fr-ca
Retirer/installer le panier supérieur *
Retirez le panier supérieur 12 :
1. Sortez le panier supérieur jusqu'au bout (1).
2. Soulevez l'avant du panier supérieur hors de
l'encoche (2).
3. Sortez le panier supérieur et abaissez-le (3).
Installez le panier supérieur 12 :
1. Sortez les glissières du panier supérieur jusqu'au
bout (1).
2. Insérez le panier supérieur (2). Ce faisant,
remarquez la position des crans (tel qu'illustré à
l'étape 2).
3. Soulevez légèrement le panier, supérieur, puis
insérez les crans à l'arrière dans les crochets de
verrouillage (3).
4. Abaissez le panier supérieur, puis appuyez sur
l'encoche à l'avant (4). Le panier supérieur
s'encliquette alors dans sa position.
5. Insérez le panier supérieur en le poussant.
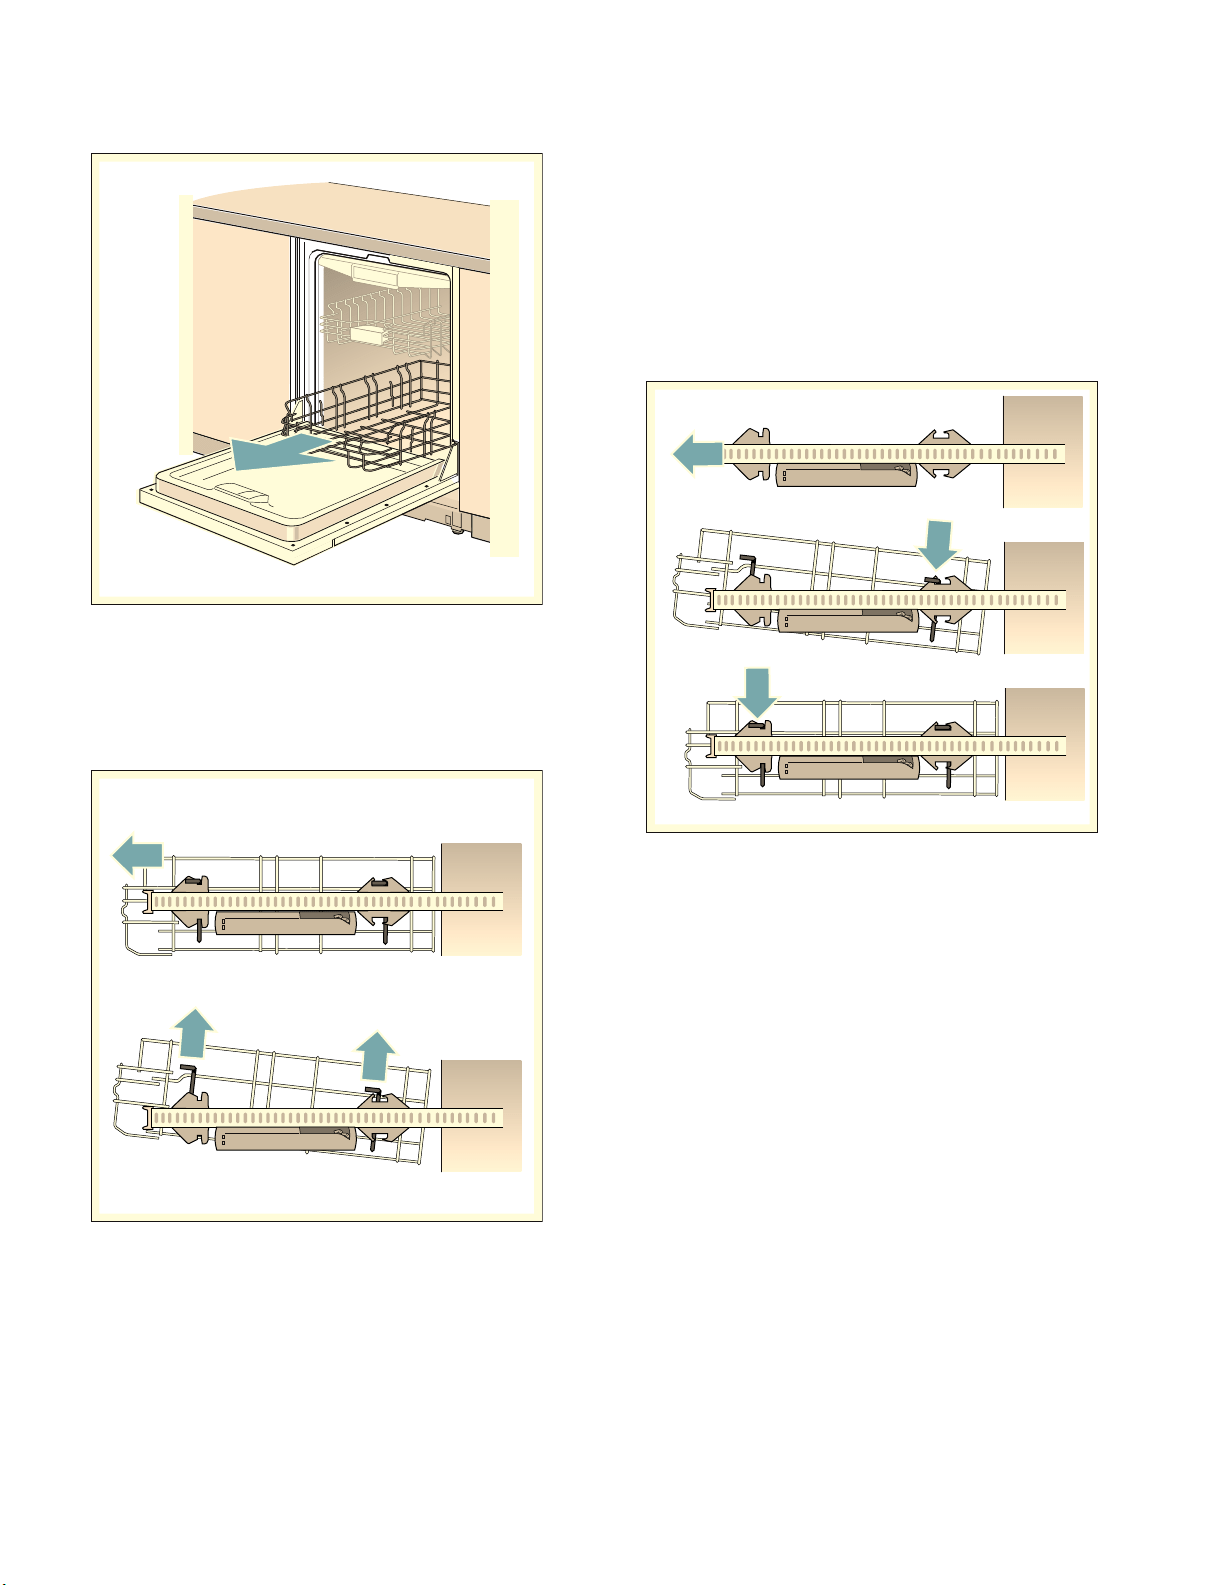
80
fr-ca Chargement du lave-vaisselle
Retirez/installez le panier inférieur
Retirez/installez le panier inférieur 1j :
1. Sortez le panier inférieur jusqu'au bout (1).
2. Soulevez le panier supérieur, d'abord par le devant,
puis par l'arrière (2).
Installez le panier inférieur 1j :
1. Sortez les glissières du panier inférieur jusqu'au
bout (1).
2. Insérez le panier inférieur dans les supports à
l'arrière (2).
3. Soulevez le panier supérieur, par le devant et
positionnez-le dans les support de devant (3).
4. Insérez le panier inférieur en le poussant.
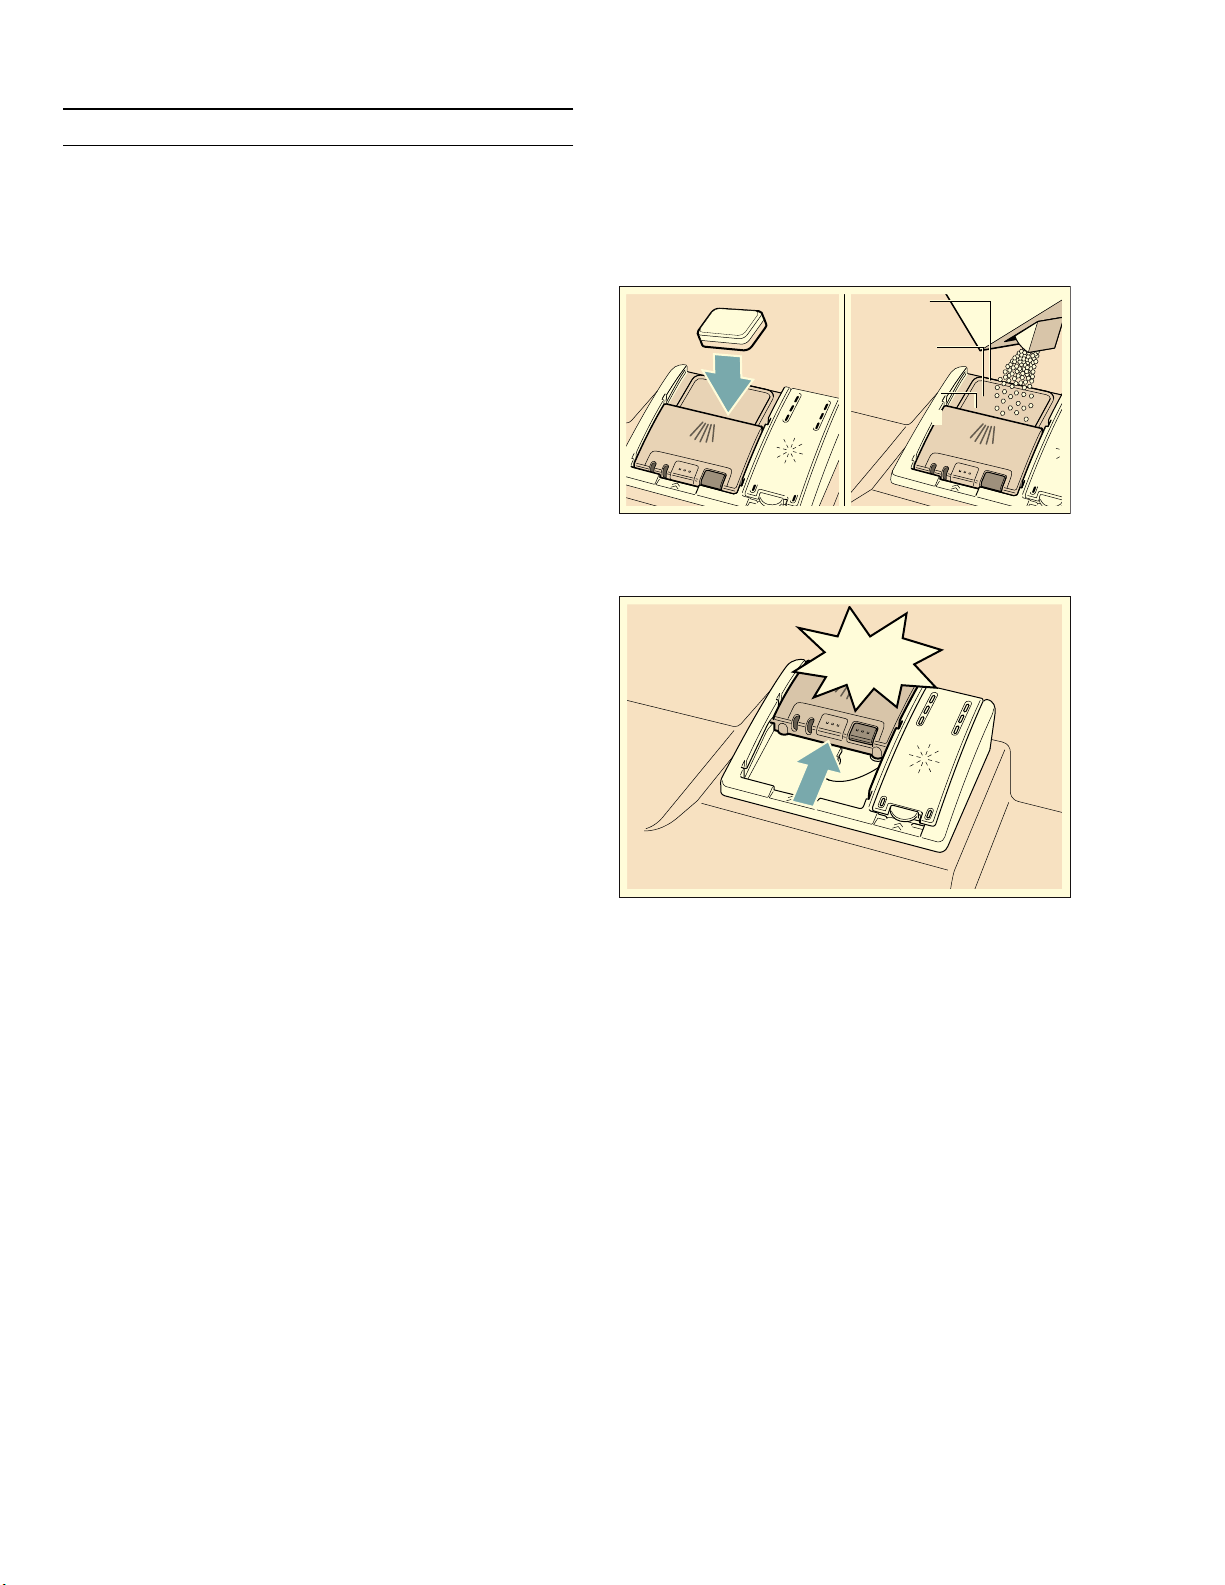
81
Détergent fr-ca
.
Détergent
Détergent
Utilisez uniquement un détergent spécialement conçu
pour les lave-vaisselle. Pour de meilleurs résultats,
utilisez un détergent pour lave-vaisselle en poudre ou
des comprimés détergents.
AVIS : Pour éviter d'endommager le lave-vaisselle :
▯ évitez d'utiliser des détergents pour vaisselle à la
main dans votre lave-vaisselle.
▯ N'utilisez pas trop de détergent si l'eau utilisée est
douce. L'utilisation d'une quantité excessive de
détergent avec une eau douce peut rayer la verrerie
et la porcelaine fine.
▯ Pour mieux protéger le verre, utilisez un cycle de
nettoyage avec une température peu élevée ou un
cycle conçu spécifiquement pour le verre (selon le
modèle) et utilisez un détergent avec une protection
contre les marquages.
Remarque : Si vous ignorez la dureté de votre eau,
utilisez 15 ml de détergent. Si nécessaire, ajoutez la
quantité minimale nécessaire au nettoyage impeccable
de vos ustensiles de cuisine.
Ajout de détergent
1. Si le distributeur de détergent 9* demeure fermé,
actionnez la barre de verrouillage 92 pour l'ouvrir.
2. Ne versez du détergent que dans le distributeur de
détergent sec9*. Ne remplissez pas le distributeur
de détergent outre mesure.
En cas d'utilisation de comprimés détergents,
placez-les de telle sorte qu'ils n'entrent pas en
contact avec le couvercle. Insérez-les à plat et non
sur leur côté.
Remarque : Ne placez pas les comprimés
détergents dans le compartiment à détergent 1B.
Placez les comprimés ou d'autres formes de
détergent directement dans le distributeur de
détergent 9*.
3. Dosage : voir les instructions du fabricant sur
l’emballage. Utilisez un distributeur de détergent
gradué.
1¼ à 1½ cuillères à soupe (20 ml–25 ml) suffisent
pour un degré de saleté normal. Si vous utilisez des
comprimés, un seul suffit.
4. Fermez le couvercle du distributeur de détergent.
Le couvercle s'encliquette dans sa position.
Le distributeur de détergent s'ouvre
automatiquement au moment opportun selon le cycle
de lavage. Le détergent liquide ou en poudre est
dispersé dans l'appareil et dissout, les comprimés
détergents tombent dans le bac à détergent où ils se
dissolvent progressivement.
Conseil : Si les ustensiles sont peu souillés, une
quantité de détergent légèrement inférieure à celle
recommandée est suffisante.
Vous pouvez acheter les détergents et les produits
d'entretien appropriés via notre site Internet ou notre
service à la clientèle (voir au dos du manuel).
WEVS
êWEVS
PO
êWEVS
PO
PO
&/,&.

82
fr-ca Détergent
Détergent multifonctionnels
En plus des détergents conventionnels, il existe des
produits multifonctionnels. Ces produits contiennent
non seulement du détergent, mais aussi un agent de
rinçage et des substances qui remplacent les sels (3 en
1), ou selon leur composition (4 en 1, 5 en 1, etc.), un
agent de protection contre les taches sur les verres ou
encore un nettoyant pour les ustensiles en acier
inoxydable. Les détergents combinés ne fonctionnent
que jusqu'à un certain degré de dureté de l'eau
(généralement 375 ppm). Pour une dureté supérieure,
des sels ainsi qu'un agent de rinçage doivent être
utilisés.
Le programme de rinçage est ajusté automatiquement
dès l'utilisation de détergents combinés pour assurer le
meilleur rinçage est le meilleur séchage possibles.
Remarques
▯ Si vous souhaitez ajouter davantage d'ustensiles une
fois le cycle de nettoyage démarré, n'utilisez pas le
compartiment 1B à comprimés détergents comme
poignée du panier supérieur. Il se peut que le
comprimé partiellement dissout s'y trouve déjà et
que vous le touchiez.
▯ Ne placez pas de petits éléments à laver dans le
compartiment à comprimés détergents 1B, car ceci
empêche le comprimé de se dissoudre
convenablement.
▯ Vous obtiendrez les meilleurs résultats de rinçage et
de séchage en utilisant des détergents classiques,
ainsi que de sels et un agent de rinçage de manière
séparée.
▯ Si les cycles de lavage sont courts, les comprimés
détergents peuvent ne pas avoir assez de temps pour
agir convenablement en raison de leur forme soluble.
Des résidus de détergent peuvent même subsister à
la fin du cycle. Il est recommandé d'utiliser une
poudre détergente pour ces cycles de lavage.
▯ Le dosage d'un comprimé détergent est suffisant
pour un cycle de lavage « Intensif » (pour certains
modèles). Lorsque vous utilisez de la poudre
détergente, vous pouvez en appliquer à l'intérieur de
l'appareil.
▯ Même si l'indicateur de recharge de sels/d'agent de
rinçage est allumé, le cycle de rinçage s'effectuera
correctement avec les détergents combinés.
▯ Si vous utilisez un détergent avec une pellicule
soluble dans l'eau : saisissez le détergent avec les
mains sèches et placez-le dans un distributeur de
détergent parfaitement sec, sans quoi le détergent
risque de coller.
▯ Si vous passez de détergents combinés à des
détergents classiques, assurez-vous que la valeur du
système d'adoucissement de l'eau et la quantité
d'agent de rinçage ont été réglés en conséquence.
▯ Détergents bio/écologiques : un détergent désigné
comme « bio » ou « écologique » (respectueux de
l'environnement) contient généralement une quantité
moindre d'agents actifs ou est même parfois
complètement exempt de certaines substances. Le
pouvoir nettoyant de ces produits peut parfois être
moindre.
83
Cycles du lave-vaisselle fr-ca
/
Cycles du lave-vaisselle
Cycles du lave-vaisselle
Remarque : Afin d'économiser de l'énergie, il est
recommandé de régler l'option Arrêt automatique sur
« Après 1 minute ».
Remarque : L'étiquetage Energy Star se base sur le cycle de détection du niveau de saleté Normal ou Régulier
comme suit : l'unité a été avec un distributeur de produit de rinçage (liquide) vide9". Une seule dose de détergent a
été introduite dans le distributeur de détergent 9*, aucun détergent n'étant utilisé dans le cycle de prélavage.
L'appareil n'a pas été soumis à un processus d'essai tronqué tel que stipulé par les définitions décrites dans la
procédure d'essai. Nous recommandons, pour les chargements de vaisselle tel que celui décrit dans le test de
certification en matière de performance énergétique, que le panier soit placé à la position la plus élevée.
Cycle de nettoyage Usage recommandé Option du cycle de
nettoyage possible
AUTO
65 - 70 °C
Ce cycle de lavage nettoie les objets ayant servi à une
cuisson au four, ou ceux souillés avec des aliments collés,
durs et séchés. Il peut être nécessaire de laisser tremper
ou de frotter préalablement ces ustensiles.
tout
Lavage AUTO
55 - 65 °C
Ce cycle convient aux chargements composés
d'ustensiles souillés à des degrés divers.
Il est optimisé selon le degré de souillure grâce à l'aide
des capteurs.
tout
AUTO délicat
45 - 50 °C
Ce cycle convient aux ustensiles délicats.
Il est optimisé selon le degré de souillure grâce à l'aide
des capteurs.
tout
Normal
(voir la note au bas du
tableau)
Recommandé pour une utilisation quotidienne, régulière
ou typique pour le lavage complet d'un chargement plein
de vaisselle à souillure normale.
tout
Remarque : Pour obtenir un
rendement optimal avec une
consommation minimale
d'énergie, il est recommandé
de désactiver toutes les
options et tous les
paramètres disponibles à
l'exception de l'option Arrêt
automatique.
Lavage d'1 heure
Nettoie les plats fraîchement souillés et faciles à nettoyer.
Ce cycle a une durée réduite, mais il comprend malgré
tout un cycle de séchage.
Extra sec
Lavage rapide
Nettoie les plats légèrement souillés et faciles à nettoyer. Extra sec
Verre
Un cycle pour les plats légèrement souillés, idéal pour les
plats ou l'argenterie sensibles à la température. Pour ce
cycle, la température est réduite pour éviter
d'endommager des ustensiles. Il est particulièrement utile
pour éviter de ternir ou d'ébrécher les verres.
Remarque : Certains verres sont plus susceptibles d'être
ébréchés que d'autres en raison de leur procédé de
fabrication.
tout
Rinçage
Utilisez ce cycle si vous désirez faire un rinçage préalable
de vos plats afin d'éviter les odeurs. Placez les plats non
rincés dans le lave-vaisselle et sélectionnez le cycle
Rinçage. Utilisez moins d'eau que le nécessite un lavage
manuel et une puissance très faible.
I

84
fr-ca Options de cycles du lave-vaisselle
0
Options de cycles du lave-vaisselle
Options de cycles du lave-vaisselle
Zone intensive Ï
Zon e intensive
Idéal pour un chargement mixte. Vous pouvez nettoyer
les chaudrons et les poêles fortement souillés dans le
panier inférieur avec des ustensiles souillés
normalement dans le panier inférieur. La pression du jet
dans le panier inférieur est augmentée et la température
de séchage est légèrement plus élevée.
Puissance ¥
Pu i s s a n c e
La durée du cycle est réduite de manière significative
en choisissant l'option Puissance. La consommation
énergétique est augmentée de 30 % en raison du
chauffage intense.
Chargement partiel §
Char gement par t i el
Si vous n'avez que peu de vaisselle à laver (des verres,
des tasses et des assiettes) vous pouvez choisir l'option
Chargement partiel. Ceci permettra d'économiser de
l'eau, de l'énergie et du temps. Il est recommandé
d'utiliser légèrement moins de détergent que pour un
chargement complet.
Extra sec ½
Ex t r a sec
Une température de séchage accrue lors du rinçage
final ainsi qu'une phase de séchage plus longue
permettent d'assurer un meilleur séchage, y compris de
la vaisselle en plastique. La consommation énergétique
de cette option est légèrement plus élevée.
85
Options de cycles du lave-vaisselle fr-ca
Informations sur le cycle de lavage
Pour économiser de l'énergie, ce lave-vaisselle dispose
d'un système EcoSense dans lequel les capteurs du
lave-vaisselle ajustent automatiquement les variations
de longueur, de température et d'eau du cycle en
fonction du niveau de souillure alimentaire et de la
température de l'eau entrante. Les décisions prises par
le « Contrôle intelligent » peuvent causer un ajustement
intermittent du temps et de l'eau utilisée pour le cycle.
Les temps du cycle de lavage sont définis en fonction
température d'alimentation en eau de 120°F (49° C). Si la
température d'alimentation en eau de votre maison est
autre que 120°F (49° C), les temps de cycle de votre
lave-vaisselle peuvent être affectés.
AUTO
délicat
45 - 50 °C
Lavage
AUTO
55 - 65 °C
AUTO*
65 - 70 °C
Normal Lavage d'1
heure
Lavage
rapide
Verre Rinçage
Temps de
cycle
en min.
80 - 85 105 - 130 110 - 135 130 - 135 60 30 70 9
Consom.
d'eau en L
(gal)
9,0 - 14,2
(2,4 - 3,8)
9,4 - 20,2
(2,5 - 5,3)
18,6 - 24,2
(4,9 - 6,4)
8,5 - 20,6
(2,2 - 5,4)
14,3 (3,8) 10,5 (2,8) 13 (3,4) 4,1 (1,1)
Temp. de
nettoyage en
°C (°F)
45 - 50
(113 - 122)
53 - 66
(127 - 150)
66 - 71
(150 - 160)
45 - 55
(113 - 131)
50 (122) 45 (113) 50 (122) entrant
Temp. de
rinçage en
°C (°F)
62 (144) 67 - 72
(153 - 162)
72 (162) 64 - 69
(147 - 156)
70 (158) 53 (127) 60 (140) entrant
Zone intensive
Temps de
cycle
en min.
95 - 105 120-145 125-145 145-150 s/o s/o 85 s/o
Consom.
d'eau en L
(gal)
9,3 - 14,5
(2,5 - 3,8)
9,4 - 20,2
(2,5 - 5,3)
18,6 - 24,2
(4,9 - 6,4)
8,5 - 20,6
(2,2 - 5,4)
s/o s/o 13 (3,4) s/o
Temp. de
rinçage en
°C (°F)
62 (144) 67 - 72
(153 - 162)
72 (162) 64 - 69
(147 - 156)
s/o s/o 60 (140) s/o
Puissance
Temps de
cycle
en min.
60 - 70 75 - 90 95 - 110 95 - 105 s/o s/o 60 s/o
Consom.
d'eau en L
(gal)
9,2 - 12,5
(2,4 - 3,3)
16,1 - 20,0
(4,3 - 5,3)
16,3 - 20,5
(4,3 - 5,5)
16,6 - 21,1
(4,4 - 5,6)
s/o s/o 13,3 (3,5) s/o
Temp. de
rinçage en
°C (°F)
62 (144) 72 (162) 72 (162) 72 (162) s/o s/o 60 (140) s/o
Chargement
partiel
Temps de
cycle
en min.
75 - 80 95 - 105 115 110 - 120 s/o s/o 65 s/o
Consom.
d'eau en L
(gal)
9,0 - 12,2
(2,4 - 3,2)
10,2 - 16,5
(2,7 - 4,4)
17,9 (4,8) 10,9 - 14
(2,9 - 3,7)
s/o s/o 12 (3,2) s/o
Temp. de
rinçage en
°C (°F)
62 (144) 70 - 72
(158-162)
72 (162) 69 (156) s/o s/o 60 (140) s/o
*désinfecter

86
fr-ca Options de cycles du lave-vaisselle
Remarque : Seuls les cycles de désinfection ont été mis en place de manière à respecter les exigences de la
Section 6 de la norme NSF/ANSI relative aux Équipements à usage résidentiel destinés à l'élimination de salissures
et à la désinfection efficace. À cet effet, aucune indication ne spécifie, directement ou indirectement, que tous les
cycles ont passé avec succès les tests de performance en matière de désinfection.
Extra sec
Temps de
cycle
en min.
115 - 125 125 - 150 130 - 150 140 - 155 70 50 100 s/o
Consom.
d'eau en L
(gal)
9,3 - 14,5
(2,5 - 3,8)
9,4 - 20,2
(2,5 - 5,3)
18,6 - 24,2
(4,9 - 6,4)
8,5 - 20,6
(2,2 - 5,4)
14,3 (3,8) 10,5 (2,8) 13 (3,4) s/o
Temp. de
rinçage en
°C (°F)
72 (162) 72 (162) 72 (162) 72 (162) 72 (162) 72 (162) 72 (162) s/o
AUTO
délicat
45 - 50 °C
Lavage
AUTO
55 - 65 °C
AUTO*
65 - 70 °C
Normal Lavage d'1
heure
Lavage
rapide
Verre Rinçage
*désinfecter

87
Mise en marche du lave-vaisselle fr-ca
1
Mise en marche du lave-vaisselle
Mise en marche du lave-vaisselle
Remarque : Avec les fonctions masquées, la porte doit
être ouverte avant le changement des réglages et
fermée une fois ces réglages effectués.
9 AVERTISSEMENT
Risque de blessures !
Pour éviter des risques de blessures, faites
toujours attention lorsque vous ouvrez la porte
pendant ou après un cycle de lavage car des
rejets d'eau chaude ou de vapeur peuvent
survenir. N'ouvrez pas complètement la porte
avant que les bruits d'eau n'aient cessés et que la
vapeur ne soit dissipée.
Pour réduire le risque de blessure, interdisez aux
enfants de jouer dans ou sur le lave-vaisselle.
À l'âge adulte leur permettant d'utiliser la
machine, les enfants sont sous la responsabilité
de leurs parents/tuteurs légaux qui doivent
s'assurer qu'ils sont suffisamment instruits sur
les bonnes pratiques par des personnes
qualifiées.
Protection contre une opération
involontaire
Votre lave-vaisselle est équipé d'une fonction qui aide à
empêcher toute utilisation involontaire (par exemple par
des enfants).
Après le démarrage du lave-vaisselle, la porte doit être
fermée dans les 4 secondes qui suivent ou l'opération
sera interrompue. Un signal apparaîtra alors sur le
panneau de contrôle, vous invitant à appuyer de
nouveau sur le bouton Départ et à fermer la porte.
Cette fonction s'active lorsque :
▯ vous appuyez sur Départ pour lancer un cycle de
lavage
▯ vous réglez le Départ différé et appuyez sur Départ
▯ vous ouvrez la porte alors que le Départ différé est
enclenché
▯ vous ouvrez la porte au cours d'un cycle de lavage
Remarque : Il est impossible de désactiver cette
fonction.
Utilisation des boutons tactiles
Les boutons sont sensibles et doivent être légèrement
touchés. Évitez que la graisse ou les particules
d'aliments ne se déposent sur les boutons, cela peut
activer le lave-vaisselle.
L'essuyage et le nettoyage peuvent également activer le
lave-vaisselle. Pour un rendement optimal, touchez les
boutons avec des mains nues et propres.
Pour nettoyer les boutons tactiles, essuyez-les avec un
chiffon sec ou légèrement humide.
Ouvrir la porte
Pour ouvrir la porte, appuyez sur la partie centrale de
celle-ci. L'appareil s'ouvre automatiquement.
Si vous avez activé la sécurité enfants, appuyez deux
fois rapidement sur la partie centrale haute de la porte.
Modification des réglages
Le lave-vaisselle a été configuré avec certains
paramètres pour votre confort. Il est possible de
modifier ces réglages d'usine.
Changez les paramètres comme suit :
1. Ouvrez la porte.
2. Appuyez sur le bouton MARCHE/ARRÊT (.
3. Appuyez sur le bouton Information ( 8 durant 3
secondes jusqu'à ce que le message suivant soit
affiché dans l'affichage digital @ :
Faites défiler avec < >
Choisissez avec - +
Maintenez durant t 3 sec.
4. Maintenez le bouton >)* enfoncé jusqu'à ce que le
paramètre désiré soit affiché dans l'affichage digital
@.
5. Effectuez le réglage à l'aide des boutons + -.X.
6. Appuyez et maintenez le bouton Information enfoncé
(8 pendant 3 secondes.
Les paramètres sélectionnés ont été sauvegardés.
Conseil : Si vous souhaitez modifier plusieurs
paramètres, commencez par les modifier un par un.
Appuyez ensuite sur le bouton Information ( 8 durant
3 secondes. Ceci sauvegarde toutes les valeurs définies
dans l'appareil.

88
fr-ca Mise en marche du lave-vaisselle
AquaSensor *
Aq u a Sensor
* option facultative qui peut être ou ne pas être incluse
avec votre lave-vaisselle
L'AquaSensor est un outil de mesure optique qui évalue
la propreté de l'eau de rinçage.
L'AquaSensor est utilisé en fonction du cycle de lavage.
Si l'AquaSensor est activé, l'eau de rinçage « propre »
peut être réutilisée pour le prochain rinçage et la
consommation d'eau peut ainsi être réduite de 0,8 à
1,5 gal (3 à 6 litres). Si l'eau de rinçage n'est pas
encore propre, celle-ci est évacuée et remplacée par de
l'eau claire. Pour les cycles de lavage automatiques, la
température ainsi que la durée du cycle peuvent
également être ajustées en fonction du degré de
souillure.
Affichage de l'heure
La durée du cycle de lavage est déterminée par la
température de l'eau lors du cycle de lavage, la quantité
de vaisselle, ainsi que son degré de souillure. Elle peut
aussi varier selon le cycle de lavage choisi. Vous pouvez
choisir d'afficher l'heure ou les heure/minutes restantes
(« Fin à 15:20 » ou « Fin dans 3:25 », par exemple) avant
la fin du cycle dans la fenêtre d'affichage.
Réglage des capteurs
La séquence des cycles de lavage Auto est optimisée
grâce aux capteurs. Ceux-ci ajustent la puissance des
cycles de lavage Auto selon le degré et le type de
souillure. Vous pouvez régler la sensibilité des capteurs
selon 3 niveaux.
Normal : ce réglage est idéal pour un chargement mixte
et des ustensiles fortement souillés. Il permet
également d'économiser de l'énergie et de l'eau.
Sensible : ce réglage ajuste la puissance du cycle de
lavage pour éliminer efficacement les restes de
nourriture, même si le degré de souillure est faible. La
consommation en énergie et en eau est ajustée en
conséquence.
Très sensible : ce réglage ajuste la puissance du cycle
de lavage pour éliminer les souillures les plus tenaces,
comme les restes de nourriture séchés. Ce réglage est
recommandé si vous utilisez des détergents biologiques
ou écologiques, lesquels contiennent une quantité
moindre d'agents actifs. La consommation en énergie et
en eau est ajustée en conséquence.
extraDry (extraSec)
Le rinçage final utilise une température supérieure qui
améliore le résultat de séchage. La durée du
programme peut augmenter légèrement. (Faites
attention avec les ustensiles délicats!) Vous pouvez
activer/désactiver la fonction extraDry (extraSec), qui
fait augmenter légèrement la consommation d'énergie.
Impact écologique
Lorsque la fonction Impact écologique est activée, la
consommation d'eau et énergétique moyenne du cycle
de lavage sélectionné est affichée un court instant dans
l'affichage digital @.
AutoPowerOff (Arrêt automatique à la
fin du cycle de lavage)
Au t o Power Off (arrêt aut omat i que)
Pour économiser de l'énergie, le lave-vaisselle est
arrêté 1 minute après la fin du cycle de lavage. Vous
pouvez également modifier ce paramètre.
Voici les réglages possibles :
▯ off (arrêt) : l'appareil ne s'éteint pas
automatiquement.
▯ After one minute (après une minute) : l'appareil s'éteint
après 1 minute. C'est le réglage le plus
éconergétique.
▯ After two hours (après deux heures) : l'appareil s'éteint
après 2 heures.

89
Mise en marche du lave-vaisselle fr-ca
EmotionLight*
Emot i onLi ght
L'EmotionLight 1" (lumiere d'ambiance) s'allume
lorsque la porte est ouverte, que l'appareil soit en
marche ou à l'arrêt (. Lorsque la porte est fermée,
l'EmotionLight est éteinte. Vous pouvez choisir d'activer
ou de désactiver l'EmotionLight.
Remarque : Veuillez remarquer que l'EmotionLight
s'éteint automatiquement après 1 heure si la porte est
ouverte.
* option facultative qui peut être ou ne pas être incluse
avec votre lave-vaisselle.
Projection du temps restant (affichage
lors du cycle de lavage)*
Pr oj e c t i o n du temps restant
Durant le cycle de lavage, des informations
supplémentaires sur le cycle sont projetées au sol, en
face de l'appareil. Si le panneau du socle est vers
l'avant ou si l'appareil est installé à la hauteur des yeux
avec têtière affleurante, l'affichage ne sera pas visible.
Vous pouvez activer ou désactiver cet affichage.
* option facultative qui peut être ou ne pas être incluse
avec votre lave-vaisselle.
Infolight *
infoLight
Durant le cycle de lavage, un point lumineux est projeté
au sol, sous la porte de l'appareil. N'ouvrez pas la porte
de l'appareil avant que le point ait disparu. Si la porte
de l'appareil n'est pas complètement fermée, le point
lumineux clignote*. Si l'appareil est installé à la hauteur
des yeux avec meuble affleurant, l'affichage ne sera pas
visible. Vous pouvez activer ou désactiver Infolight.
Dans des pièces sombres, une certaine diffusion de
lumière peut être visible. Cela est normal et ne peut pas
être modifié.
* option facultative qui peut être ou ne pas être incluse
avec votre lave-vaisselle.
Changer le début du cycle de nettoyage
Vous pouvez changer le réglage de début du cycle de
nettoyage.
Volume de la sonnerie
La fin du cycle de lavage est indiquée par un signal
sonore. Vous pouvez également modifier ce paramètre.
Bouton de volume
Un signal sonore est émis lorsque vous appuyez sur un
bouton du lave-vaisselle. Vous pouvez contrôler le
volume de ce signal sonore. Si vous ne souhaitez pas
avoir de signal sonore, vous pouvez le désactiver.
Sécurité enfants*
Séc ur i t é enf a nt s
Le lave-vaisselle est équipé d'un système de sécurité
enfants. Ce système empêche les enfants d'être
exposés aux divers dangers que représente le lave-
vaisselle.
Vous pouvez activer ou désactiver cette fonction.
Lorsque la sécurité enfant est activée, il est plus
difficile d'ouvrir la porte.
* option facultative qui peut être ou ne pas être incluse
avec votre lave-vaisselle.
Message de bienvenue
Lorsque vous mettez le lave-vaisselle sous tension, le
logo de la marque apparaît. Vous pouvez désactiver
l'affichage du logo de la marque.

90
fr-ca Mise en marche du lave-vaisselle
Réglages d'usine
Vous pouvez restaurer les réglages d'usine pour tous
les paramètres.
Mise sous tension de l'appareil
1. Ouvrez le robinet à fond.
2. Ouvrez la porte.
3. Appuyez sur le bouton MARCHE/ARRÊT (.
Le cycle automatique de 55 à 65 °C a été défini par
défaut au démarrage de l'appareil. Ce cycle de
lavage est sélectionné si vous n'appuyez sur aucun
autre bouton 0.
4. Appuyez sur le bouton DÉMARRER )".
5. Fermez la porte.
Le cycle de lavage démarre.
Remarque : Votre lave-vaisselle est protégé contre les
mises en marche involontaires. Si la porte de l'appareil
reste ouverte durant plus de 4 secondes après que vous
ayez appuyé sur le bouton Démarrer, l'opération est
suspendue. Appuyez de nouveau sur le bouton
Démarrer et fermez la porte de l'appareil.
Temps de Départ différé
Vous pouvez retarder le départ du cycle de lavage
jusqu'à 24 heures. Selon le réglage de l'affichage de
l'heure, la fin du cycle est indiquée par « Fin dans »
(3h25min, par exemple) ou « Fin à » (15:20, par
exemple).
1. Ouvrez la porte.
2. Appuyez sur le bouton Marche/Arrêt (.
3. Sélectionnez le cycle de lavage 0.
4. Appuyez sur le bouton Départ différé `.
5. Continuez à appuyer sur les boutons de réglage + -
X jusqu'à l'obtention du délai désiré.
6. Appuyez sur le bouton Départ )", le démarrage
différé est activé.
7. Pour effacer le temps de Départ différé appuyez sur
le bouton Départ )" pendant environ 3 secondes.
8. Fermez la porte.
Remarque : Votre lave-vaisselle est protégé contre les
mises en marche involontaires. Si la porte de l'appareil
reste ouverte durant plus de 4 secondes après que vous
ayez appuyé sur le bouton Démarrer, l'opération est
suspendue. Appuyez de nouveau sur le bouton
Démarrer et fermez la porte de l'appareil.
91
Mise en marche du lave-vaisselle fr-ca
Fin du cycle de lavage
*Le cycle de nettoyage est terminé lorsque « Terminé »
apparaît sur l'affichage digital @.
*Si la projection au sol est activée, la fin du cycle de
nettoyage est affichée au sol.
* option facultative qui peut être ou ne pas être incluse
avec votre lave-vaisselle.
Mise hors tension de l'appareil
Peu de temps après la fin du cycle de nettoyage :
1. Appuyez sur le bouton On/Off (Marche/Arrêt) (.
2. Fermez l'approvisionnement en eau.
3. Sortez la vaisselle lorsque ceux-ci ont refroidi.
9 AVERTISSEMENT
Risque de blessures !
Pour éviter des risques de blessures, faites
toujours attention lorsque vous ouvrez la porte
pendant ou après un cycle de lavage car des
rejets d'eau chaude ou de vapeur peuvent
survenir. N'ouvrez pas complètement la porte
avant que les bruits d'eau n'aient cessés et que la
vapeur ne soit dissipée.
Pour réduire le risque de blessure, interdisez aux
enfants de jouer dans ou sur le lave-vaisselle.
À l'âge adulte leur permettant d'utiliser la
machine, les enfants sont sous la responsabilité
de leurs parents/tuteurs légaux qui doivent
s'assurer qu'ils sont suffisamment instruits sur
les bonnes pratiques par des personnes
qualifiées.
Interruption du cycle de lavage
9 ATTENTION !
Une pression trop excessive peut provoquer
l'ouverture de la porte et le ruissellement d'eau!
Si la porte a été ouverte et que celle-ci est
chaude ou que le raccordement est chaud,
laissez-la toujours entrouverte quelques minutes,
puis fermez-la.
1. Ouvrez la porte.
2. Appuyez sur le bouton On/Off (Marche/Arrêt) (.
Les DEL s'éteignent. Le cycle de lavage a été
sauvegardé.
3. Pour poursuivre le cycle, appuyez de nouveau sur le
bouton On/Off (Marche/Arrêt) (.
4. Fermez la porte.
Remarque : Votre lave-vaisselle est protégé contre les
mises en marche involontaires. Si la porte de l'appareil
reste ouverte durant plus de 4 secondes après que vous
ayez appuyé sur le bouton Démarrer, l'opération est
suspendue. Appuyez de nouveau sur le bouton
Démarrer et fermez la porte de l'appareil.

92
fr-ca Entretien et maintenance
Arrêt du cycle de lavage
(réinitialisation)
Ar r ê t du cy cl e de lavage
1. Ouvrez la porte.
2. Appuyez sur le bouton DÉMARRER )" et
maintenez-le enfoncé durant 3 secondes.
Le message « Programme arrêté » apparaît sur
l'affichage digital @.
3. Fermez la porte.
Le cycle de lavage dure environ 1 minute. Le
message « Terminé » apparaît sur l'affichage digital
@.
4. Ouvrez la porte.
5. Appuyez sur le bouton MARCHE/ARRÊT (.
6. Fermez la porte.
Changement du cycle de lavage
Après avoir appuyé sur la touche Start )", il est
impossible de changer de cycle de lavage. Un
changement de cycle de lavage n’est possible que via
l’abandon d’un cycle de lavage (Réinitialisation (Reset)).
2
Entretien et maintenance
Entreti en et maintenance
Une inspection régulière et une maintenance de votre
appareil vous aideront à prévenir d'éventuelles pannes.
Ceci vous permet de sauver du temps et de parer à de
nouveaux problèmes.
Nettoyer le filtre du lave-vaisselle
▯ Recherchez dans le compartiment de rinçage
d'éventuelles traces de graisse ou de calcaire.
Si vous trouvez de tels dépôts :
▯ Remplissez le distributeur 9* de détergent. Lancez
un cycle de lavage sans aucun ustensile, à la
température la plus élevée possible.
9 AVERTISSEMENT
Risques pour la santé des détergents
contenant du chlore !
N'utilisez que des détergents sans chlore.
▯ Essuyez régulièrement le devant de l'appareil à l'aide
d'un chiffon légèrement humide; de l'eau et un peu
de savon liquide suffisent.
▯ Pour l'acier inox noir et les surfaces anti-empreintes,
utilisez un linge doux et sec.Pour la saleté tenace,
utilisez de l'eau tiède diluée avec du savon doux, non
abrasif. N'utilisez jamais de produit à polir pour inox.
▯ Avec des électroménagers en acier inoxydable (sauf
ceux en acier inox noir et les surfaces anti-
empreintes), utilisez un produit à polir pour acier
inoxydable pour sceller et protéger la surface.
▯ Nettoyez régulièrement les bords extérieurs du
panneau intérieur de la porte afin d'éliminer les
résidus déposés lors du chargement normal. Si des
taches apparaissent sur l'acier inoxydable, assurez-
vous que le distributeur de produit de rinçage est
rempli et fonctionne correctement.
▯ Nettoyez régulièrement le joint de la porte avec un
chiffon légèrement humide afin d'éliminer les
particules alimentaires déposées lors du chargement
normal et qui peuvent causer des odeurs. Un joint de
porte souillé peut empêcher le bon verrouillage de
celle-ci.
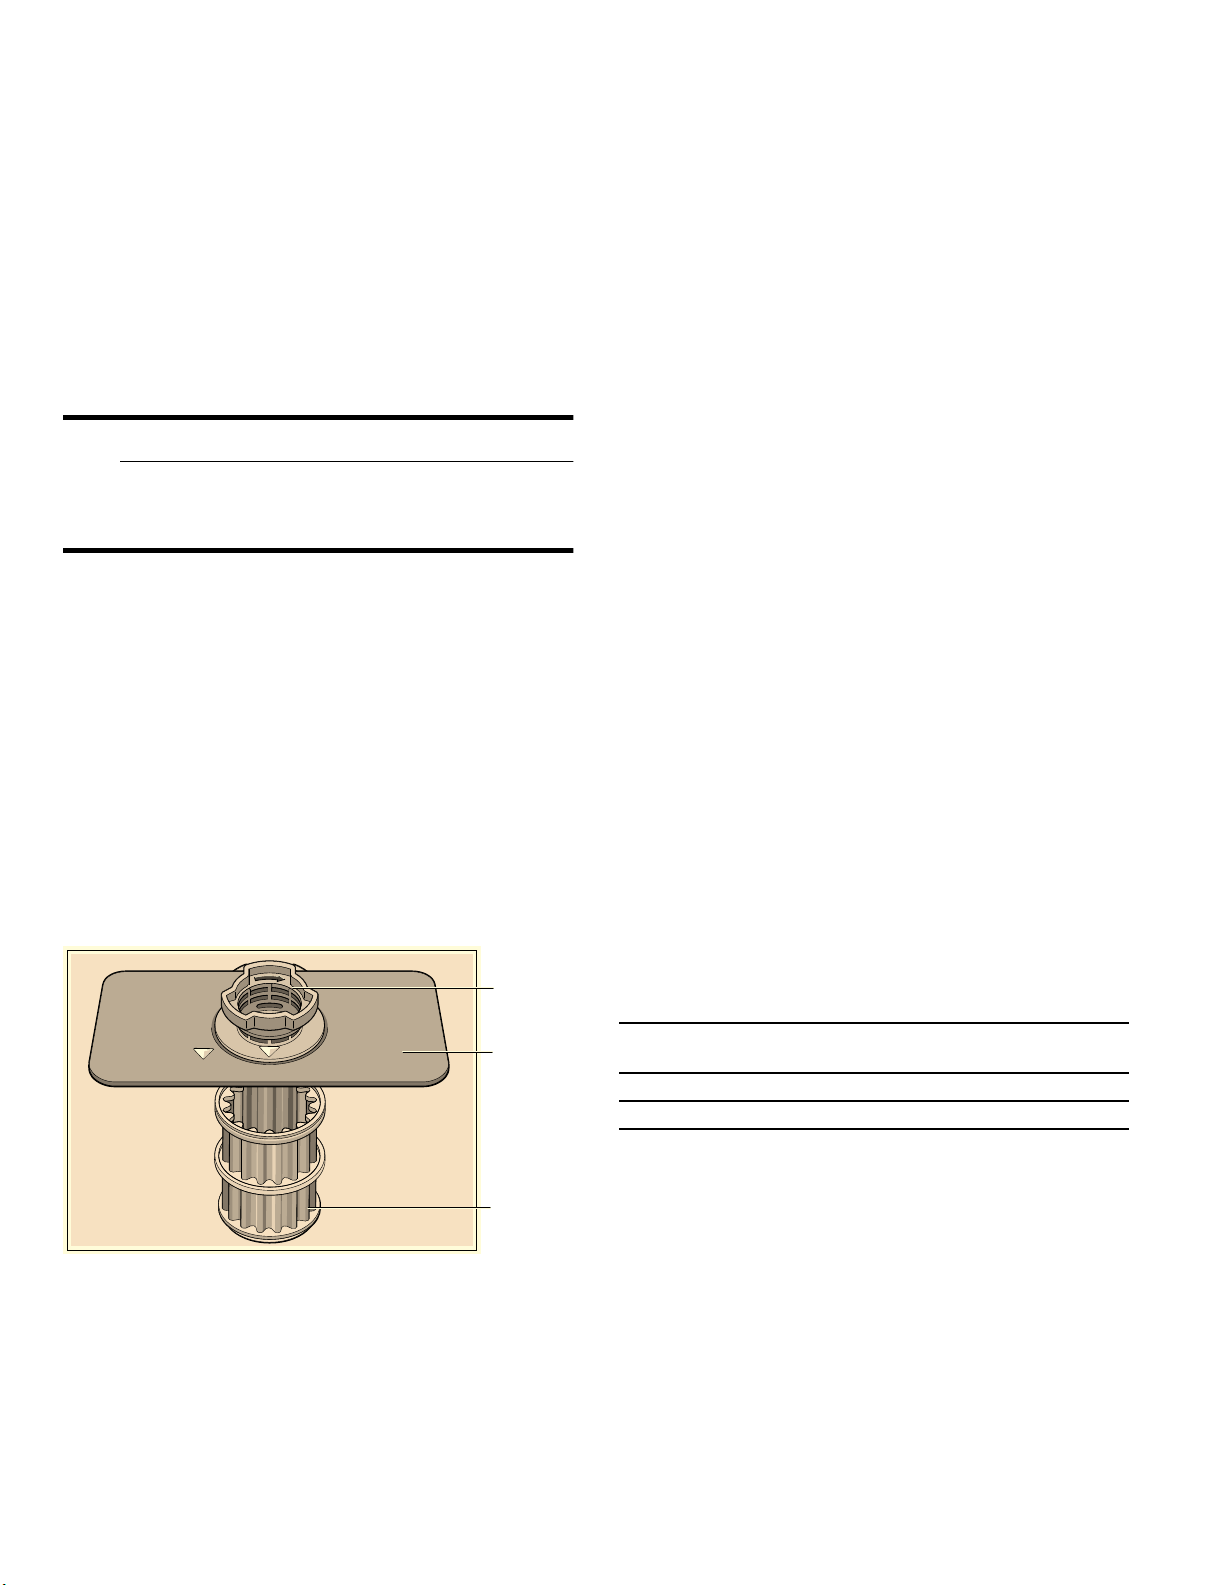
93
Entretien et maintenance fr-ca
AVIS : ▯N'utilisez jamais un nettoyeur à vapeur pour
laver votre lave-vaisselle. Le fabricant ne sera en
aucun cas responsable des dégâts causés.
▯ Évitez d'utiliser des éponges, elles pourraient rayer
les surfaces.
▯ N'utilisez pas de lingettes à base d'eau de javel, elles
pourraient endommager la surface ou l'impression.
▯ N'utilisez pas de produit à polir pour l'acier
inoxydable sur des surfaces en acier inox noir ou
anti-empreintes.
9 AVERTISSEMENT
Faites preuve de prudence lorsque vous
démontez les pièces pour le nettoyage, car
certains débris peuvent être tranchants.
Sels et agent de rinçage
Rechargez les sels et/ou l'agent de rinçage dès que les
indicateurs de recharge P s'allument sur la façade
H de l'appareil
Filtres
Éléments de filtrage
Le système de filtration 1Z est constitué de trois
éléments.
Intervalles de nettoyage
Le système de filtration 1Z est conçu de manière à
minimiser l'entretien tout en assurant un rendement de
nettoyage élevé et une faible consommation d'énergie.
Selon les habitudes d'utilisation et la dureté de l'eau, le
système de filtration nécessite un certain entretien afin
de garder son efficacité.
Vous pouvez nettoyer le système de filtration :
▯ lorsque vous y trouvez des résidus d'aliments ou si
des éléments sont retenus dans le filtre à gros
éléments.
▯ En cas de baisse d'efficacité ou si un film granuleux
se forme sur la vaisselle.
En cas de nettoyage de résidus alimentaires à
incrustation normale raclés avant l'insertion de la
vaisselle dans l'appareil, dans un ménage où le lave-
vaisselle fonctionne un jour sur deux, le filtre de
l'appareil doit être nettoyé :
Remarque : Nettoyez le filtre après le lavage d'une
vaisselle à grande quantité de résidus alimentaires ou
d'une vaisselle à forte teneur en fécule afin de garder un
rendement optimal.
$
%
&
A Filtre à gros éléments
Il empêche les objets qui ne devraient pas
être placés dans votre lave-vaisselle
d'endommager le système de pompage du
lave-vaisselle ou d'obstruer le système
d'évacuation de votre maison.
B Filtre fin plat
Il empêche les particules d'aliments d'entrer
dans la chambre de lavage et dirige ces
particules vers le micro-filtre.
C Micro-filtre
Il dirige les particules les plus petites vers le
système de plomberie de la maison.
Intervalle de
nettoyage
Utilisation
3 à 6 fois par an usage léger à moyen
8 à 12 fois par an usage intensif

94
fr-ca Entretien et maintenance
Pour vérifier ou nettoyer le système de filtration :
1. Recherchez des traces de résidus dans les filtres
après chaque cycle de lavage.
2. Dévissez le filtre à gros éléments tel qu'illustré et
retirez tout le système de filtration.
3. Retirez le microfiltre du filtre fin pour faciliter le
nettoyage.
4. Rincez les filtres sous l'eau courante et frottez-le
avec une brosse souple.
Remarque : n'utilisez pas de brosse abrasive ou de
laine d'acier, etc., car elles pourraient endommager
le filtre.
5. Remontez le système de filtration dans l'ordre
inverse et fixez le filtre à gros éléments en le vissant
jusqu'à ce que les flèches de marquage soient
alignées.
Bras gicleurs
Le calcaire et des contaminants dans l'eau de rinçage
peuvent bloquer les buses ainsi que les articulations
des bras de pulvérisation 1: et 1J.
1. Recherchez d'éventuelles obstructions des buses au
bout des bras de pulvérisation.
2. Dévissez le bras de pulvérisation supérieur 1: (1)
et retirez-le en tirant vers le bas (2).
3. Retirez le bras de pulvérisation inférieur 1J en le
tirant vers le haut.
4. Nettoyez les bras de pulvérisation à l'eau claire.
5. Remontez les bras de pulvérisation.
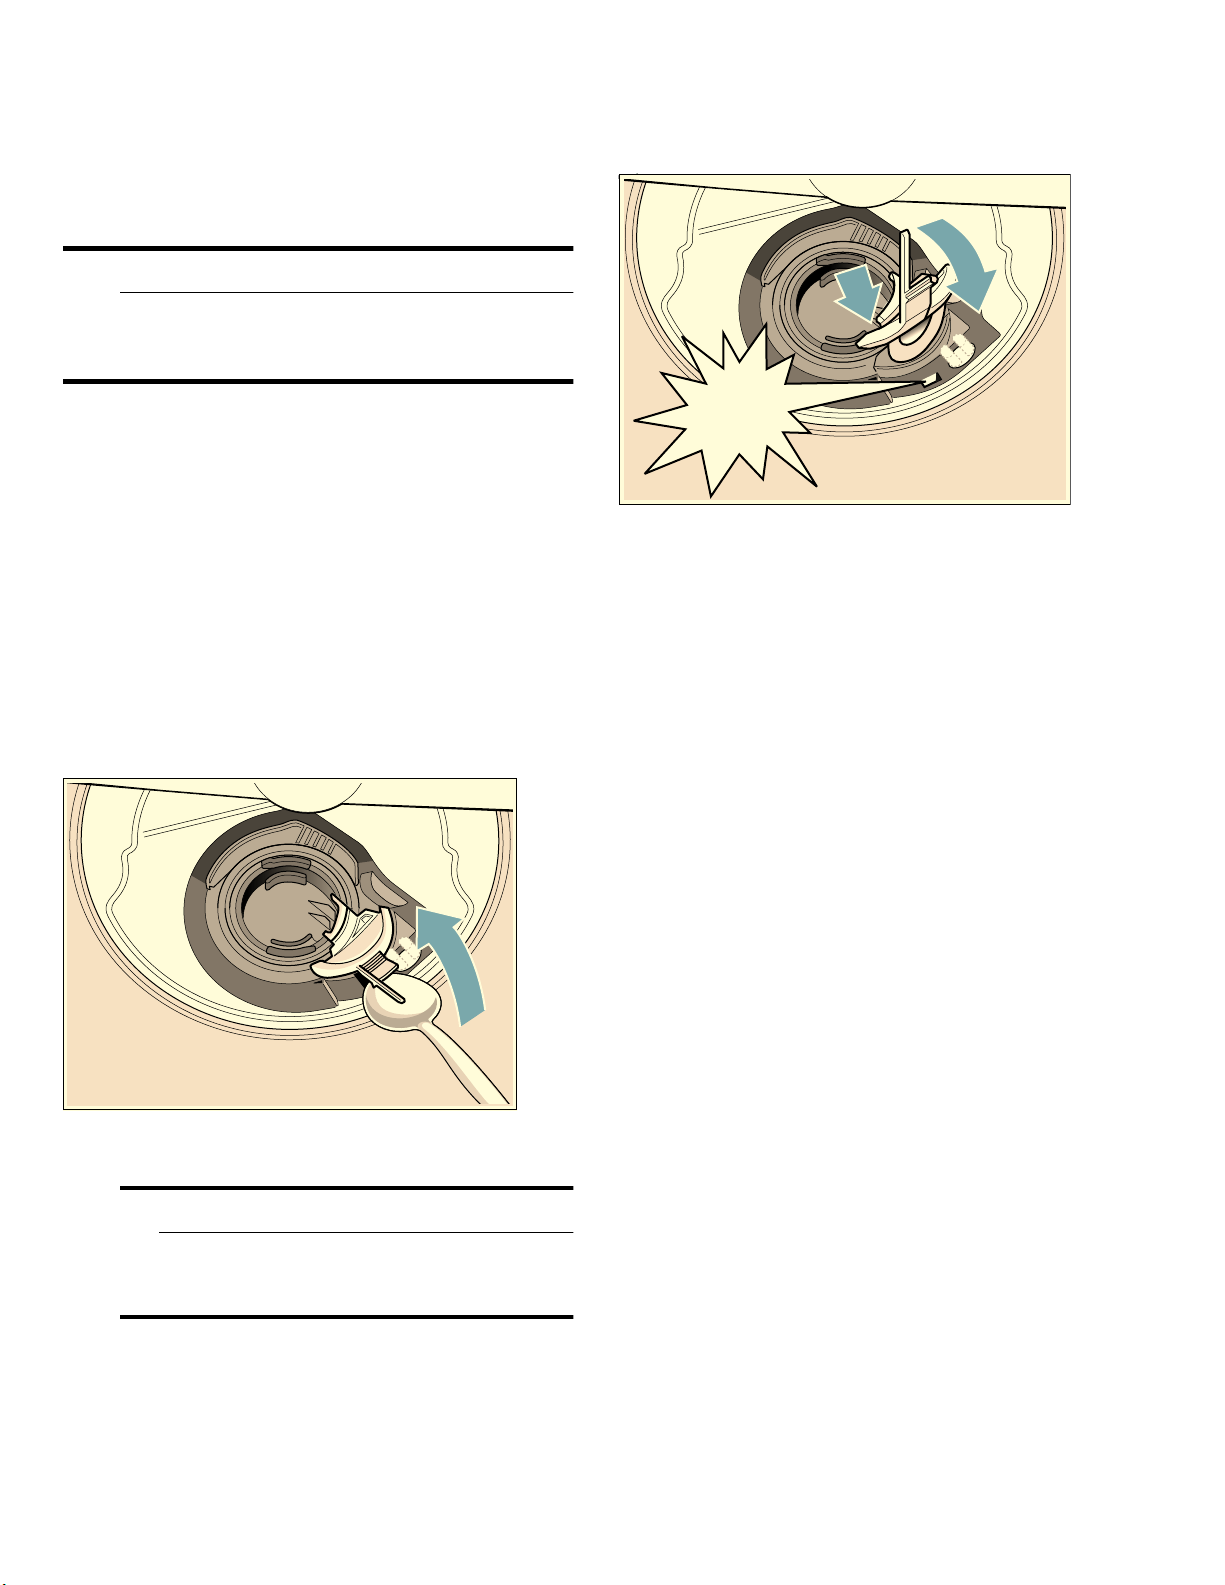
95
Entretien et maintenance fr-ca
Pompe pour eaux résiduaires
De gros résidus alimentaires présents dans l'eau de
rinçage et non retenus par les filtres peuvent obstruer la
pompe pour eaux résiduaires. Dans ce cas :
9 AVERTISSEMENT
Soyez prudent lorsque vous démontez les pièces
pour le nettoyage, car certains débris peuvent
être tranchants.
1. Débranchez l'appareil du réseau électrique.
2. Sortez le panier supérieur 12 ainsi que le panier
inférieur 1j.
3. Retirez les filtres 1Z.
4. Videz l'eau résiduelle avec un récipient approprié -
utilisez une éponge au besoin.
5. À l'aide d'une cuillère, débloquez le couvercle de la
pompe (tel qu'illustré) jusqu'à entendre un clic,
saisissez-le ensuite et tirez-le jusqu'à ce qu'une
légère résistance se fasse sentir, puis tirez-le vers
l'avant (1). Retirez complètement le couvercle.
6. Contrôlez le compartiment interne et éliminez tout
objet étranger.
9 AVERTISSEMENT
Soyez prudent lorsque vous démontez les pièces
pour le nettoyage, car certains débris peuvent
être tranchants.
7. Placez le couvercle de la pompe à sa position initiale
(2), appuyez jusqu'à ce qu'il s'encliquette(3).
8. Placez le couvercle à sa position initiale, appuyez et
bloquez-le.
9. Remontez les filtres.
10. Replacez les paniers.
Remarque : La pompe de vidange ne fonctionnera pas
correctement si elle n'est pas totalement insérée,
jusqu'à ce qu'elle émette un « clic ».
Rangement de l'appareil en cas
d'inactivité
AVIS : Par temps chaud, avant d'aller en vacances, en
plus de l'arrêt de la vanne principale, arrêtez également
l'alimentation en eau au point le plus proche du lave-
vaisselle. Ne pas laisser la vaisselle sale dans l'appareil
et laisser la porte légèrement ouverte. Par temps froid,
veuillez respecter les instructions suivantes relatives à
la préparation de l'appareil pour l'hiver.
Préparation de l'appareil pour l'hiver
AVIS : En cas d'inutilisation de votre lave-vaisselle
pour une période dans un emplacement aux
températures hivernales (maison de vacances ou
pendant une période de vacances), faites préparer votre
lave-vaisselle pour l'hiver par un personnel qualifié.
&OLFN

96
fr-ca Dépannage
3
Dépannage
Dépannage
Les lave-vaisselle peuvent occasionnellement présenter
des problèmes sans rapport avec un dysfonctionnement
dudit lave-vaisselle. Les informations suivantes peuvent
vous aider à résoudre un problème afférent au lave-
vaisselle sans la nécessité de recourir à un
professionnel.
Remarque : Si l'appareil s'arrête en cours de lavage,
ou s'il ne se met pas en route pour une raison
quelconque, lancez un cycle d'annulation
(Réinitialisation) en premier lieu.
9 AVERTISSEMENT
Des réparations inadaptées ou l'utilisation de
pièces qui ne sont pas d'origine peuvent
provoquer des dégâts considérables et mettre
en danger l'utilisateur !
Faites effectuer toute réparation par un
technicien qualifié. Si un élément doit être
remplacé, utilisez toujours des pièces d'origine.
Message d'erreur
Certaines défaillances sont indiquées dans la partie
supérieure de la fenêtre d'affichage @ ainsi que sur
l'affichage frontal*):. Des solutions possibles à ces
problèmes sont fournies (par exemple : Système de
filtration souillé (E22) --> Nettoyez les filtres).
* option facultative qui peut être ou ne pas être incluse
avec votre lave-vaisselle.
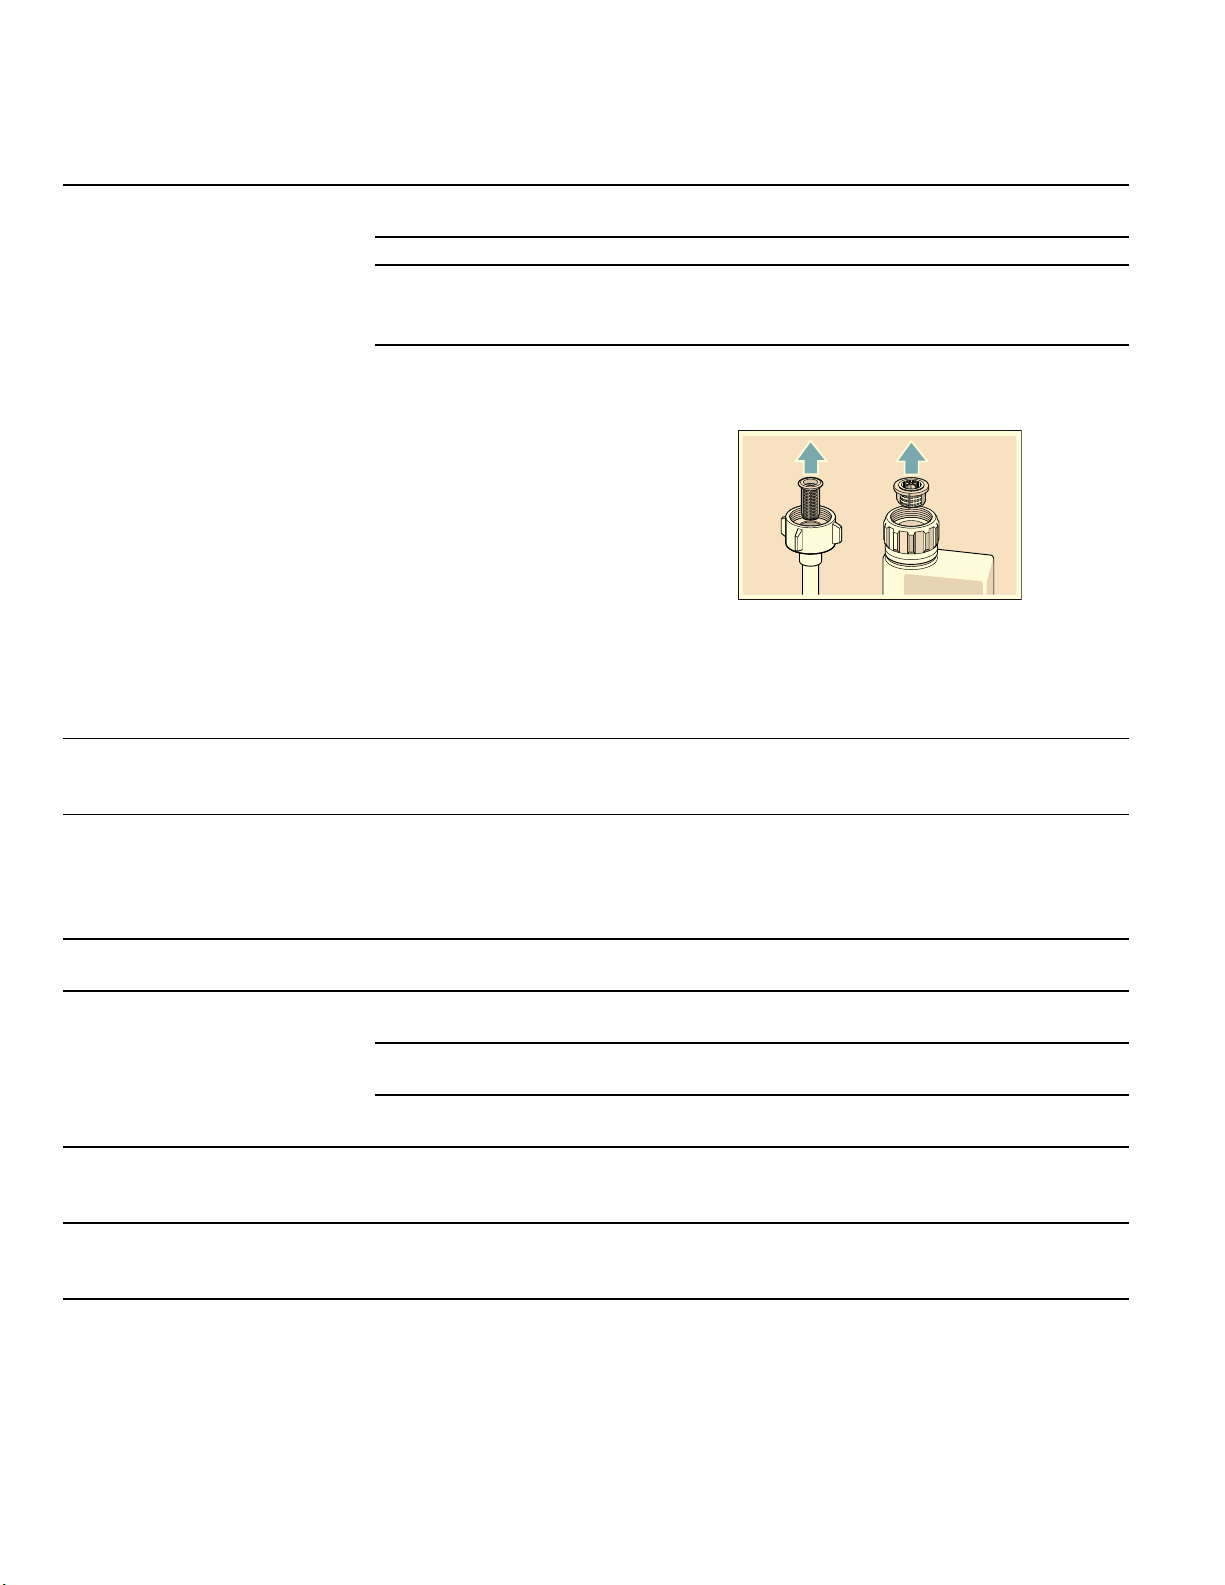
97
Dépannage fr-ca
Tableau des défaillances
Défaillance Cause Solution
Le code d'erreur “:‚‰ est
allumé.
Le tuyau d'alimentation est coudé ou
bouché.
Installez le tuyau d'alimentation sans
coudes.
Le robinet est fermé. Ouvrez le robinet.
Robinet obstrué ou entartré. Ouvrez le robinet.
Le débit doit être de 10 l/min lorsque
l'alimentation en eau est ouverte.
Le filtre du tuyau d'alimentation en
eau est bloqué.
Mettre l'appareil hors tension et
débrancher la prise d'alimentation.
Fermez le robinet. Débranchez le tuyau.
Nettoyez le filtre du tuyau d'alimentation
en eau. Raccordez le tuyau. Vérifiez la
présence d'éventuelles fuites.
Reconnectez l'appareil au réseau
électrique. Mettez l'appareil sous tension.
Le code d'erreur “:‹ˆ est
allumé.
L'ouverture de l'arrivée d'eau (sur le
côté droit de l'appareil) est obstruée
par de la vaisselle.
Disposez la vaisselle de manière à ce
qu'elle n'obstrue pas l'arrivée d'eau.
Le code d'erreur “:‚ƒ est
allumé.
Résistance calcinée ou entartrée. Nettoyez l'appareil à aide d'un produit de
nettoyage pour lave-vaisselle ou d'un
détartrant. Utilisez le lave-vaisselle avec le
système d'adoucissement de l'eau et
vérifiez son réglage.
Le code d'erreur “:ƒƒ est
allumé.
Les filtres 1Z sont souillés ou
obstrués.
Nettoyez les filtres.
Le code d'erreur “:ƒ… est
allumé.
Le tuyau d'évacuation d'eau usée est
coudé ou obstrué.
Installez le flexible d'alimentation sans
coudes et retirez les résidus.
Le raccord du siphon est scellé. Examinez le raccord du siphon et ouvrez-
le au besoin.
Le couvercle de la pompe de
drainage est mal fermé.
Fermez-le convenablement.
Le code d'erreur “:ƒ† est
allumé.
La pompe de drainage est obstruée
ou le couvercle de la pompe de
drainage est mal fermé.
Nettoyez la pompe et fermez le couvercle
convenablement
Le code d'erreur “:ƒˆ est
allumé.
Tension d’alimentation trop basse. Il ne s'agit pas d'une défaillance de
l'appareil. Faites vérifier la tension et
l'installation électrique.
Un code d'erreur différent est
affiché sur l'affichage digital.
(“:‹‚ à “:„‹)
Une défaillance technique a
probablement eu lieu.
Mettez l'appareil hors tension en appuyant
sur le bouton MARCHE/ARRÊT (.
Remettez l'appareil sous tension après un
court moment.
Si le problème persiste, fermez le robinet
et débranchez la prise d'alimentation.
Appelez le service à la clientèle et
mentionnez le code d'erreur.
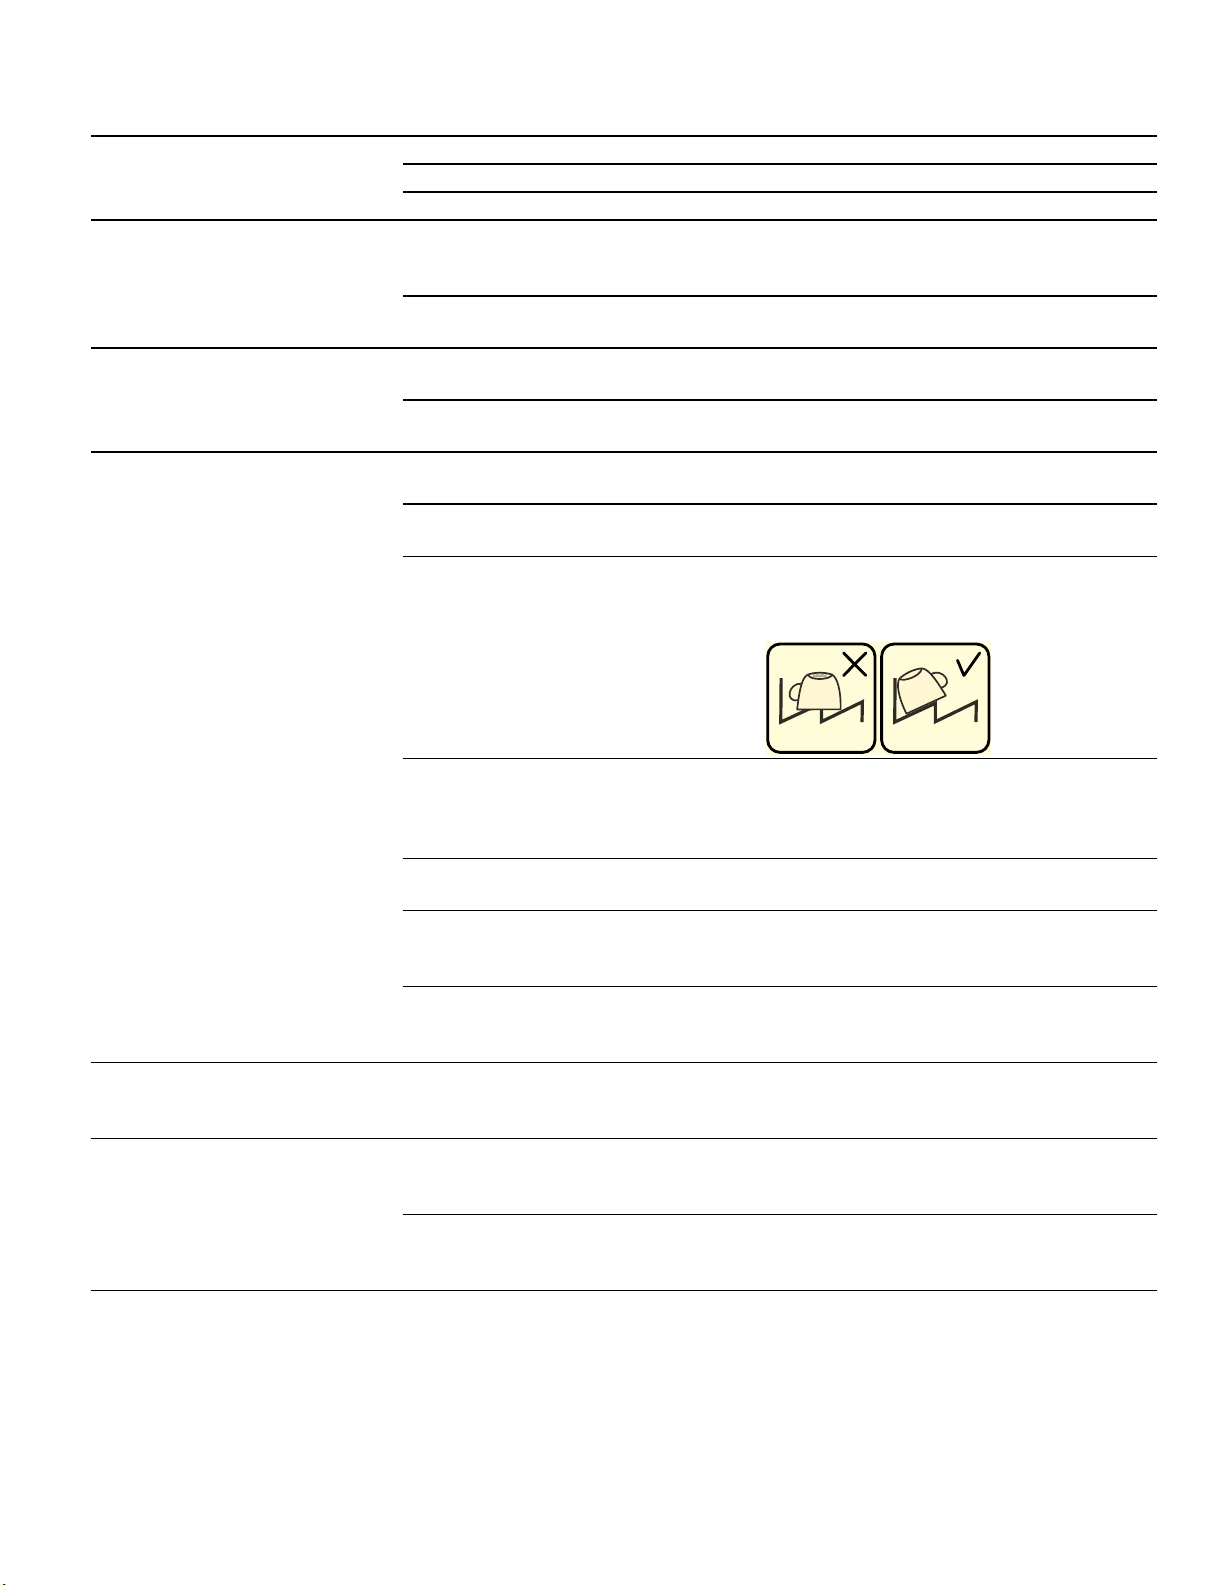
98
fr-ca Dépannage
L'indicateur de remplissage de
sels P et/ou d'agent de
rinçage H est allumé.
Pas d'agent de rinçage. Remplissez l'agent de rinçage.
Pas de sels. Remplir les sels.
Le capteur ne détecte pas les sels. Utiliser un autre type de sels.
L'indicateur de remplissage de
sels P et/ou d'agent de
rinçage H n'est pas allumé.
L'indicateur de remplissage est éteint. Activation/désactivation ~ "
,
Produit de
rinçage", ~ "
+
Système d'adoucissement
de l'eau / sels"
Il reste encore suffisamment de sels/
d'agent de rinçage.
Vérifiez le niveau des indicateurs de
remplissage.
Il reste de l'eau dans l'appareil à
la fin du cycle de lavage.
Le système de filtration ou l'espace
sous les filtres 1Z est obstrué.
Nettoyez les filtres ainsi que la zone se
trouvant sous ces derniers.
Le cycle de lavage n'est toujours pas
terminé.
Attendez la fin du cycle de lavage ou la
réinitialisation de ce dernier.
La vaisselle n'est pas sèche. Distributeur d'agent de rinçage vide
ou insuffisamment rempli.
Remplissez l'agent de rinçage.
Cycle de lavage sélectionné sans
séchage.
Sélectionnez un cycle de lavage avec
séchage.
Il reste de l'eau dans les creux de la
vaisselle et de l'argenterie.
Disposez la vaisselle de façon inclinée, en
particulier celle qui présente des dépôts
d'eau une fois le cycle de lavage terminé.
Le détergent tout en un a des
propriétés de séchage médiocres
Utilisez un autre détergent tout en un avec
de meilleures propriétés de séchage.
L'utilisation d'un agent de séchage
améliore également celui-ci.
extraSec pour améliorer le séchage
non activé.
Activez extraSec.
La vaisselle a été retirée trop tôt ou le
séchage n'est pas encore terminé.
Attendez la fin du cycle de lavage ou
attendez 30 minutes après la fin de celui-
ci avant de retirer la vaisselle.
L'agent de rinçage écologique a des
propriétés de séchage médiocres.
Utilisez un agent de rinçage classique.
Les produits écologiques peuvent avoir
une efficacité limitée.
La vaisselle en plastique n'est
pas sèche.
Le plastique a des propriétés
particulières.
Le plastique des propriétés
d'emmagasinage de la chaleur moindres
et sèche par conséquent moins bien.
L'argenterie n'est pas sèche. L'argenterie n'est pas disposée
correctement dans le panier prévu à
cet effet.
Séparez l'argenterie si possible, ceci afin
d'éviter les points de contact.
L'argenterie n'est pas disposée
correctement dans le troisième
panier.
Disposez l'argenterie correctement et
séparez-la si possible.
L'intérieur de l'appareil est
humide après le cycle de
rinçage.
Il ne s'agit pas d'une défaillance de
l'appareil.
Le principe de séchage par condensation
génère des gouttes d'eau requises à la
bonne exécution du processus. L'humidité
de l'air se condense sur les parois du lave-
vaisselle avant d'être évacuée.
Défaillance Cause Solution
99
Dépannage fr-ca
Traces de nourriture sur la
vaisselle.
Pas assez d'espace entre les
éléments, panier surchargé.
Disposez la vaisselle de manière adéquate
en laissant suffisamment d'espace entre
les éléments afin que les jets d'eau
puissent atteindre toute leur surface.
Évitez les points de contact.
La rotation du bras de pulvérisation
est entravée.
Disposez la vaisselle de sorte que le bras
de pulvérisation puisse tourner sans
entrave.
Les buses du bras de pulvérisation
sont bouchées.
Nettoyez les buses du bras de
pulvérisation.
Filtres 1Z encrassés. Nettoyez les filtres.
Filtres 1Z mal insérés et/ou non
insérés.
Insérez les filtres correctement.
Cycle de rinçage trop faible. Choisissez un cycle de rinçage plus fort.
Augmentez la sensibilité des capteurs.
Le prélavage a enlevé la majorité des
souillures, les capteurs ont alors
choisi de lancer un cycle de lavage
léger. Des souillures tenaces sont
impossibles à enlever.
N'effectuez pas de rinçage préalable de la
vaisselle. Ne retirez que le plus gros des
souillures.
Augmentez la sensibilité des capteurs.
Le cycle de lavage Normal ou Intensif est
recommandé.
Les récipients longs et étroits ne sont
pas bien rincés lorsqu'ils sont dans
les coins du panier.
Ne placez pas ce type de récipient de
manière trop oblique et ne les placez pas
dans les coins.
Le panier supérieur 12 n'est pas à la
même hauteur à gauche et à droite.
Repositionnez le panier supérieur de
manière horizontale à l'aide des leviers
latéraux.
Le lave-vaisselle semble
fonctionner trop longtemps
L'eau entrante n'est pas assez
chaude.
Avant de démarrer un cycle, ouvrez le
robinet d'eau chaude au niveau de l'évier
le plus proche du lave-vaisselle.
Le temps de cycle peut varier selon
l'état de souillure et de l'eau.
Les capteurs dans le lave-vaisselle
augmentent automatiquement le temps du
cycle pour assurer un bon lavage lorsque
la souillure est détectée.
Le distributeur de 9" produit de
rinçage est vide.
Ajoutez le produit de rinçage.
Lave-vaisselle connecté à
l'alimentation en eau froide.
Remarque : Vérifiez la durée
spécifique du cycle de lavage.
Vérifiez que le lave-vaisselle est connecté
à la plomberie d'alimentation en eau
chaude.
Défaillance Cause Solution

100
fr-ca Dépannage
Résidus de détergent. Le couvercle du distributeur 9* de
détergent est bloqué par la vaisselle
et ne peut pas s'ouvrir complètement.
La vaisselle ne doit pas être placée au-
dessus du compartiment détergent1B.
Cela peut bloquer le couvercle du
distributeur de détergent et l'empêcher de
s'ouvrir complètement.
Ne placez pas de vaisselle ou de
distributeur de parfum dans le
compartiment à détergent.
Le couvercle du distributeur à
détergent 9* est bloqué par le
comprimé détergent.
Le comprimé détergent doit être déposé à
plat et non sur le côté.
Comprimés détergents utilisés dans
le cycle de lavage court ou rapide.
Les comprimés détergents n'ont pas
le temps de se dissoudre
complètement dans le cycle de lavage
court ou rapide.
Le temps de dissolution des comprimés
détergents est trop long pour un cycle de
lavage court.
Utilisez un détergent en poudre ou
sélectionnez un cycle de lavage plus fort.
Les propriétés de nettoyage et de
dissolution sont réduites après un
temps d'entreposage prolongé ou si
le détergent est en morceaux.
Changez de détergent.
Taches d'eau sur les parties en
plastique.
La formation de gouttelettes sur les
surfaces en plastique est
physiquement impossible à éviter.
Des traces d'eau sont visibles après
le séchage.
Utilisez un cycle de lavage plus fort (avec
davantage de changements d'eau).
Disposez la vaisselle de manière inclinée.
Utilisez un agent de rinçage.
Au besoin, sélectionnez une valeur
d'adoucissement de l'eau plus élevée.
Dépôt de pellicules solubles à
l'intérieur de l'appareil ou sur la
porte.
Dépôt de substances du détergent.
Ces dépôts ne peuvent généralement
pas être retirés à l'aide de produits
chimiques (nettoyant pour lave-
vaisselle, etc.).
Changez de marque de détergent.
Nettoyez l'appareil à la main.
Si une pellicule blanche est présente
dans le fond de l'appareil, le système
d'adoucissement de l'eau a été réglé
sur une valeur trop faible.
Choisissez une valeur plus élevée et
changez de détergent si besoin.
Le couvercle du distributeur à sel 1R
n'est pas fermé.
Fermez convenablement le couvercle du
distributeur à sel.
Uniquement pour le verre : les débuts
de corrosion sur le verre ne peuvent
être qu'essuyés en apparence.
Voir « Dégâts causés à la verrerie et
l'argenterie ».
Défaillance Cause Solution
101
Dépannage fr-ca
Dépôts calcaires blancs et
tenaces sur la vaisselle, les
parois ou la porte.
Dépôt de substances du détergent.
Ces dépôts ne peuvent généralement
pas être retirés à l'aide de produits
chimiques (nettoyant pour lave-
vaisselle, etc.).
Changez de marque de détergent.
Nettoyez l'appareil à la main.
Le réglage de la dureté de l'eau est
incorrect ou la dureté de l'eau est
supérieure 800 ppm.
Réglez le système d'adoucissement de
l'eau selon les instructions ou remplissez
les sels.
Le détergent biologique/écologique 3
en 1 n'est pas assez efficace.
Réglez le système d'adoucissement de
l'eau selon les instructions ou utilisez des
détergents séparés ( détergent de
marque, sel, agent de rinçage).
Sous-dosage du détergent. Augmentez la quantité de détergent ou
changez de détergent.
Le cycle de rinçage sélectionné est
trop faible.
Choisissez un cycle de rinçage plus fort.
Résidus de thé ou de rouge à
lèvres sur la vaisselle.
La température de rinçage est trop
basse.
Sélectionnez un cycle de lavage avec une
température supérieure.
Pas assez de détergent ou détergent
inapproprié.
Utiliser un détergent et un dosage
appropriés.
Le prélavage a enlevé la majorité des
souillures, les capteurs ont alors
choisi de lancer un cycle de lavage
léger. Des souillures tenaces sont
impossibles à enlever.
N'effectuez pas de rinçage préalable de la
vaisselle. Ne retirez que le plus gros des
souillures.
Augmentez la sensibilité des capteurs.
Le cycle de lavage Normal est
recommandé.
Pellicules colorées (bleu, jaune,
marron) difficiles ou impossibles
à enlever sur les parois ou sur la
vaisselle en acier inoxydable.
Pellicule formée à partir de légumes
(chou, céleri, pommes de terre, pâtes,
etc.) ou de l'eau du robinet
(manganèse).
Peut-être partiellement retirée avec un
nettoyant pour lave-vaisselle ou par
nettoyage à la main. Ces pellicules sont
sans danger.
Leur formation peut être causée par
des éléments métalliques sur de
l'argent ou de l'argenterie en
aluminium.
Peut-être partiellement retirée avec un
nettoyant pour lave-vaisselle ou par
nettoyage à la main.
Dépôts colorés (jaune, orange,
marron) à l'intérieur de l'appareil
(principalement au fond) faciles
à enlever.
Pellicules savonneuses formées à
partir de souillures et de substances
provenant de l'eau du robinet
(calcaires).
Vérifiez le bon fonctionnement du système
d'adoucissement de l'eau (remplissez les
sels) ou, si vous utilisez un détergent tout
en un (comprimés), activez le système
d'adoucissement de l'eau.
Décoloration des pièces en
plastique à l'intérieur de
l'appareil.
Les pièces en plastique à l'intérieur
de l'appareil peuvent se décolorer au
fil de l'utilisation celui-ci.
Cette décoloration est normale et
n'empêchera pas le lave-vaisselle de
fonctionner correctement.
Pièces en plastique décolorées. La température de rinçage est trop
basse.
Sélectionnez un cycle de lavage avec une
température supérieure.
Le prélavage a enlevé la majorité des
souillures, les capteurs ont alors
choisi de lancer un cycle de lavage
léger. Des souillures tenaces sont
impossibles à enlever.
N'effectuez pas de rinçage préalable de la
vaisselle. Ne retirez que le plus gros des
souillures.
Augmentez la sensibilité des capteurs.
Le cycle de lavage Normal est
recommandé.
Défaillance Cause Solution
102
fr-ca Dépannage
Taches amovibles sur les verres,
verres et argenterie avec une
apparence métallique.
Trop d'agent de rinçage. Réglez la quantité d'agent de rinçage à
une valeur moins élevée.
Pas d'agent de rinçage ou valeur
définie trop faible.
Ajoutez de l'agent de rinçage et vérifiez le
dosage (valeurs recommandées 4 ou 5).
Résidus de détergent déposés au
cours du cycle de rinçage final. Le
couvercle du distributeur de
détergent est bloqué par la vaisselle
et ne peut pas s'ouvrir complètement.
Le couvercle du distributeur de détergent
ne doit pas être bloqué par la vaisselle.
Ne placez pas de vaisselle ou de
distributeur de parfum dans le
compartiment à détergent.
Le prélavage a enlevé la majorité des
souillures, les capteurs ont alors
choisi de lancer un cycle de lavage
léger. Des souillures tenaces sont
impossibles à enlever.
N'effectuez pas de rinçage préalable de la
vaisselle. Ne retirez que le plus gros des
souillures.
Augmentez la sensibilité des capteurs.
Le cycle de lavage Normal est
recommandé.
Verres ternis de manière
irréversible.
Verres non adaptés au lavage en lave-
vaisselle.
Utilisez des verres adaptés au lavage en
lave-vaisselle.
Évitez l'exposition prolongée à la vapeur
(phase ayant lieu une fois le cycle de
lavage terminé).
Utilisez un cycle de lavage à basse
température.
Réglez le système d'adoucissement de
l'eau selon la dureté de l'eau (choisissez
une valeur inférieur d'un point si besoin).
Utilisez un détergent contenant un agent
qui protège le verre.
Points de rouille sur l'argenterie. L'argenterie résiste mal à la rouille.
Les lames des couteaux sont
fréquemment plus sévèrement
touchées.
Utilisez de l'argenterie résistante à la
corrosion.
L'argenterie rouillera également si
des parties rouillées sont rincées en
même temps (poignées de
casseroles, paniers à ustensiles
endommagés, etc.).
Ne lavez pas les éléments rouillés.
Trop de sels dans l'eau de rinçage, à
cause du couvercle du distributeur de
sel qui n'a pas été fermé
convenablement ou parce que des
sels ont été versés à côté lors du
remplissage.
Fermez le couvercle du distributeur
convenablement ou retirez les sels versés
à côté.
L'appareil ne peut pas être mis
sous tension ou il ne fonctionne
pas.
Défaillance. Débranchez l'appareil du réseau
électrique, débranchez la fiche secteur ou
retirez le fusible. Attendez au moins 5
secondes, puis rebranchez l'appareil au
réseau électrique.
Défaillance Cause Solution
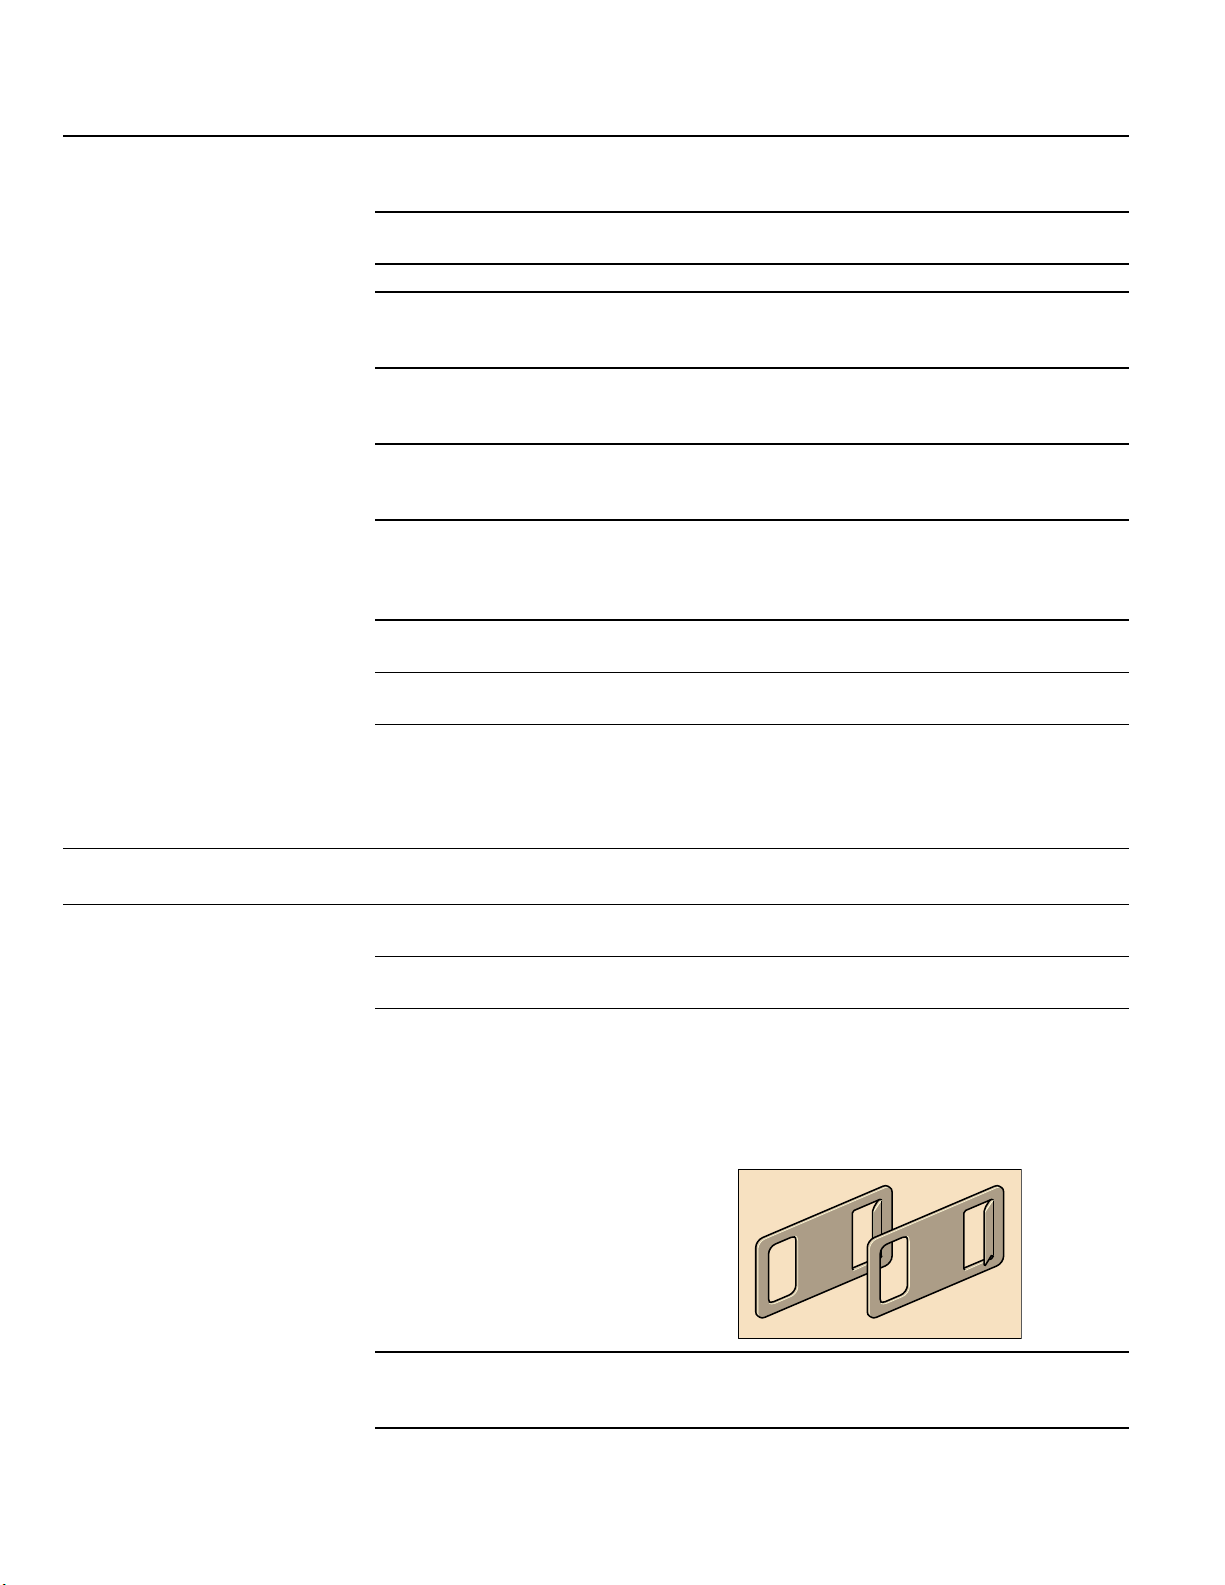
103
Dépannage fr-ca
L'appareil ne se met pas en
marche.
Le fusible de réseau a peut-être brûlé
ou le disjoncteur s'est peut-être
déclenché.
Vérifiez le fusible de réseau ou le
disjoncteur.
La porte peut ne pas être
correctement verrouillée.
Appuyez sur l'interrupteur d'alimentation
principale pour la mettre sous tension.
L'unité peut ne pas être allumée. Fermez complètement la porte.
Le démarrage retardé peut être
activé.
Pour le réinitialiser, veuillez vous référer à
la rubrique « Démarrage différé » de ce
manuel.
La sécurité enfants est activée. Désactivez la sécurité enfants. Veuillez
vous référer à la rubrique « Sécurité
enfants » de ce manuel, si besoin.
La porte a probablement été fermée
sans que le cycle ne soit
préalablement sélectionné.
Sélectionnez un cycle et fermez la porte.
Cordon d'alimentation non inséré. Assurez-vous que le cordon d'alimentation
est branché à la prise et raccordé à
l'arrière de l'appareil. Vérifiez que la prise
fonctionne.
Le lave-vaisselle n'est peut-être pas
connecté à l'alimentation en eau.
Vérifiez et rétablissez l'approvisionnement
en eau.
La porte n'est pas fermée
correctement.
Fermez la porte.
La portée est restée ouverte durant
plus de 4 secondes après avoir
appuyé sur le bouton DÉMARRER.
Appuyez à nouveau sur le bouton
DÉMARRER et fermez la porte de
l'appareil dans les 4 secondes qui suivent
(voir « Protection contre les utilisations
non désirées »).
Le cycle de lavage démarre
automatiquement.
Vous n'avez pas attendu la fin du
cycle de lavage.
Effectuez une réinitialisation.
(voir « Annulation du cycle de lavage »).
La porte ne s'ouvre pas. La porte n'est pas installée
convenablement.
Installez la porte correctement à l'aide des
instructions d'installation.
La sécurité enfants est activée. Appuyez deux fois rapidement sur la partie
centrale du haut de la porte.
L'appareil est déconnecté du secteur. Vérifiez la prise secteur et les fusibles.
Raccordez le dispositif de déverrouillage
de secours à gauche et à droite de la
partie supérieure de l'appareil et ouvrez la
porte en tirant doucement sur le dispositif
de déverrouillage de secours.
Porte et joints de porte souillés. Nettoyez la porte et le joint de porte à
l'aide d'un tissu humide légèrement
imbibé de produit de nettoyage.
Le système de fermeture automatique
de la porte n'est pas dans la position
de départ.
Après avoir fermé la porte, attendez une
seconde avant de pouvoir l'ouvrir à
nouveau.
Défaillance Cause Solution
104
fr-ca Dépannage
--------
La porte ne ferme pas. Le système de fermeture automatique
de la porte n'est pas dans la position
de départ.
Après avoir ouvert la porte, attendez une
seconde avant de pouvoir la fermer à
nouveau.
Le couvercle du distributeur de
détergent ne peut être fermé.
Le distributeur de détergent ou le
guide de son couvercle est bloqué
par des résidus collants de détergent.
Retirez les résidus de détergent.
Résidus de détergent dans le
distributeur de détergent 9* ou
dans le compartiment à
comprimé détergent 1B.
Les bras de pulvérisation sont
bloqués par la vaisselle et le
détergent ne peut être rincé.
Assurez-vous que les bras de pulvérisation
peuvent tourner librement.
Le distributeur de détergent était
humide lors du remplissage.
Ne versez du détergent que dans le
distributeur de détergent sec.
L'appareil s'arrête en cours de
cycle de lavage ou le cycle de
lavage est interrompu
La porte n'est pas fermée
correctement.
Fermez la porte.
Ne placez pas de vaisselle ou de
distributeur de parfum dans le
compartiment à détergent.
Le panier supérieur appuie contre la
porte et l'empêche de fermer
correctement.
Vérifiez si le panneau arrière est
éventuellement comprimé, par exemple
par une prise ou un support de flexible
n'ayant pas été retiré.
Coupure d'alimentation électrique et/
ou d'eau.
Rétablissez l'alimentation électrique ou
d'eau.
Les valves de remplissage font
un bruit important.
Cela dépend de votre installation
domestique et n'est pas une
défaillance de l'appareil. Aucun effet
sur le fonctionnement de l'appareil.
Pas de solution.
Bruits de chocs ou de casse. Le bras de pulvérisation heurte la
vaisselle, celle-ci n'est pas disposée
correctement.
Disposez la vaisselle de manière à ce que
le bras de pulvérisation ne la touche pas.
Si ces bruits surviennent alors que le
chargement est léger, il s'agit alors
des jets d'eau qui touchent la cuve de
lavage.
Chargez davantage l'appareil ou disposez
la vaisselle de manière plus uniforme dans
celui-ci.
La vaisselle légère bouge durant le
cycle de lavage.
Disposez la vaisselle légère de manière
sûre.
Formation de mousse
inhabituelle.
Nettoyez manuellement le liquide
dans le distributeur d'agent de
rinçage.
Remplissez immédiatement le distributeur
d'agent de rinçage.
Rincez l'agent de rinçage ayant
débordé.
Retirez l'agent de rinçage à l'aide d'un
tissu.
Défaillance Cause Solution

105
Service à la clientèle fr-ca
4
Service à la clientèle
Service à la clientèle
Votre lave-vaisselle ne nécessite pas d'entretien autre
que les mesures décrites dans la rubrique Entretien et
maintenance du présent manuel. En cas de défaillance
de votre lave-vaisselle, veuillez vous référer à la rubrique
Guide de dépannage du présent manuel, avant de
contacter le service client. Si la maintenance est
nécessaire, contactez votre revendeur ou installateur,
ou un centre de service agréé. N'essayez pas de réparer
votre appareil vous-même. Tout travail effectué par un
personnel non autorisé peut annuler la garantie.
En cas de problème avec votre lave-vaisselle et si vous
n'êtes pas satisfait du service que vous avez reçu,
veuillez suivre les étapes suivantes jusqu'à ce que le
problème soit résolu à votre entière satisfaction :
1. Contactez votre installateur ou le Fournisseur de
services agréé Gaggenau
®
de votre région.
2. Envoyez-nous un courriel à partir de la rubrique de
service à la clientèle de notre site Internet,
www.gaggenau-usa.com
3. Contactez-nous au 877-442-4436
4. Écrivez-nous :
Gaggenau
®
1901 Main Street, Suite 600
Irvine, CA 92614
USA
Veuillez vous assurer d'indiquer les informations
relatives à votre modèle ainsi qu'une explication du
problème et la date à laquelle celui-ci a débuté. Vous
trouverez les informations relatives au modèle et au
numéro de série sur l'étiquetage se trouvant à
l'extrémité de la porte du lave-vaisselle. Veuillez faire
une copie de votre facture et conservez-la avec ce
manuel. Pour bénéficier du service de garantie, il peut
être demandé au client de présenter une preuve d'achat
de l'équipement.
‡
Déclaration de la garantie limitée du
produit
Déclarati on de la garanti e li mitée du produit
Ce que couvre cette garantie et à qui
elle s'applique :
La garantie limitée fournie par BSH Home Appliances
(Gaggenau
®
) dans cet énoncé de garantie limitée
s’applique seulement à l'appareil Gaggenau (le
« Produit ») qui vous a été vendu à titre de premier
acheteur, dans la mesure que le produit a été acheté :
▯ pour vos besoins, personnels (non-commerciaux), et
qu'il a été utilisé, à tout moment, à des fins familiales
normales ;
▯ neuf au détail (pas en tant qu'objet exposé, « en
l'état », ou un modèle précédemment retourné), et
non pour la revente, ou pour une utilisation
commerciale ; et
▯ aux États-Unis ou au Canada, et est en tout temps
demeuré dans le pays d'achat. Les garanties
mentionnées dans le présent manuel s'appliquent
uniquement au premier acquéreur du Produit et ne
sont pas transférables.
Gaggenau se réserve le droit d’exiger une preuve
d’achat à chaque réclamation au titre de la garantie afin
de confirmer que le Produit tombe dans le champ
d’application de la présente garantie limitée.
Assurez-vous de retourner votre carte d'enregistrement ;
alors qu'il n'est pas nécessaire d'effectuer une
couverture de garantie, il s'agit toutefois du meilleur
moyen pour Gaggenau de vous contacter en cas
d'émission d'un avis de sécurité ou d'un rappel de
produit.

106
fr-ca Déclaration de la garantie limitée du produit
Durée de la garantie
Gaggenau garantit que le Produit est exempt de défauts
matériels et de défauts de production pour une période
de sept cent trent (730) jours (2 ans) à compter de la
date d'achat. La période susmentionnée commence à
partir de la date d'achat et ne saurait être limitée,
prolongée, ou interrompue pour quelque raison que ce
soit.
Ce Produit est également garanti contre tout défaut de
matériau et de fabrication apparent (tels les éraflures
sur l'acier inoxydable, les défauts d'aspect de la
peinture ou de la porcelaine, les ébréchures, les
bosselures, ou autres dégâts au fini du Produit),
pendant une période de trente (30) jours à compter de
la date d'achat ou de la date de clôture pour une
nouvelle construction. Cette garantie relative à
l'apparence exclut les légères variations de couleur
découlant des différences inhérentes aux pièces
peintes et en porcelaine, ainsi que découlant des
différences causées par l'éclairage de cuisine,
l'emplacement du produit ou d'autres facteurs
similaires. Cette garantie relative à l'apparence exclut
plus particulièrement tout appareil électroménager en
exposition, de plancher, « En l'état » ou de stock « B ».
Réparer/Remplacer, comme recours
exclusif
Pendant cette période de garantie, Gaggenau ou l'un de
ses fournisseurs de services agréés réparera
gratuitement votre Produit (sujet à certaines restrictions
susmentionnées) si celui-ci présente des défauts
matériels ou de fabrication. Si des tentatives de
réparation du Produit ont été entreprises, sans succès
toutefois, alors Gaggenau remplacera votre Produit (des
modèles améliorés peuvent être mis à votre disposition,
à la seule discrétion de Gaggenau, moyennant frais
supplémentaires). Toutes les pièces et tous les
composants retirés demeurent la propriété de
Gaggenau à sa seule discrétion. Toutes les pièces
remplacées et/ou réparées doivent assumer l'identité
de la pièce originale aux fins de la présente garantie et
cette dernière ne doit pas être prolongée en
considération de telles pièces. La seule responsabilité
de Gaggenau, en vertu des présentes, se limite à la
réparation des Produits défectueux au départ de l'usine,
par le biais d'un fournisseur de services Gaggenau
pendant les heures de travail normales. Pour des
considérations de sécurité et d'endommagement de
propriétés, Gaggenau vous recommande vivement de ne
pas essayer de réparer le Produit vous-même, ni de faire
appel à un agent d'entretien non autorisé ; Gaggenau
n'est en aucun cas responsable des réparations ou des
travaux effectués par un agent non qualifié. Si vous
faites appel à un agent d'entretien autre qu'un
fournisseur de services agréé pour la réparation de
votre Produit, CETTE GARANTIE EST AUTOMATIQUEMENT
ANNULÉE. Les fournisseurs de service agréés désignent
ces personnes ou entreprises ayant reçu des formations
spéciales sur les produits Gaggenau, et qui ont, de
l'avis de Gaggenau, une très bonne réputation en
matière de service à la clientèle et d'aptitude technique
(notez qu'elles sont des entités indépendantes et non
des agents, partenaires, sociétés affiliées ou
représentants de Gaggenau). Nonobstant ce qui
précède, Gaggenau n'encourra aucune responsabilité
pour le Produit si ce dernier est utilisé dans une zone
éloignée (à plus de 100 miles d'un fournisseur de
services agréé) ou s'il se trouve dans un environnement
raisonnablement inaccessible, à risque, menaçant, ou
hostile ; à cet effet, Gaggenau se chargera, à la
demande, du paiement des travaux et pièces, et les
enverra au fournisseur de services agréé le plus proche
de votre localité, mais vous serez entièrement
responsable des frais de déplacement ou d'autres frais
spéciaux encourus par l'entreprise de services, en
espérant qu'elle accepte d'intervenir pour la réparation.

107
Déclaration de la garantie limitée du produit fr-ca
Produit hors garantie
Gaggenau n'est pas tenu, légalement ou autrement, de
faire des concessions, y compris des réparations, des
partages de frais ou un remplacement du Produit une
fois que cette garantie a expirée.
Exclusions de garantie
La couverture de garantie décrite dans le présent
manuel exclut tous les défauts ou dommages dont
Gaggenau n'est pas directement responsable, y
compris, sans pour autant s'y limiter, l'un ou plusieurs
des points suivants :
▯ L'utilisation du Produit dans des conditions
anormales ou inhabituelles, (y compris, de façon non
exhaustive, toute forme d'utilisation commerciale,
l'utilisation ou le stockage à l'extérieur d'un produit
destiné à un usage interne, l'utilisation du Produit
conjointement à des réservoirs d'air ou d'eau
courante) ;
▯ Une faute intentionnelle d'un tiers, la négligence, la
mauvaise utilisation, l'utilisation abusive, des
accidents, l'exploitation inadéquate, le manque
d'entretien, la mauvaise installation, la falsification,
le non respect des instructions d'utilisation, la
manipulation sans précaution, les réparations non
autorisées ( y compris les réparations effectuées par
l'utilisateur ou l'étude du fonctionnement interne de
la machine par celui-ci) ;
▯ Réglage, modification ou altération de tout type ;
▯ Le non-respect des codes, règlements ou lois locaux,
étatiques ou départementaux applicables au système
électrique, à la plomberie et/ou aux bâtiments, y
compris la non-installation du produit conformément
aux règlements et codes de sécurité locaux
applicables au bâtiment et à la prévention des
incendies ;
▯ L'usure et la détérioration normales, les
déversements d'aliments et de liquides, les
accumulations de graisses ou d'autres substances
sur, dans ou autour du Produit ;
▯ Les forces et facteurs externes, élémentaires et/ou
environnementaux, y compris, mais sans limitation, la
pluie, le vent, le sable, les inondations, les incendies,
coulées de boue, températures de gel, moisissures
excessives ou l'exposition prolongée à l'humidité, la
foudre, les surtensions, défaillances de structure
autour de l'appareil, et catastrophes naturelles.
Gaggenau ne saurait en aucun cas être tenu pour
responsable de de tout dommage sur les propriétés
adjacentes, notamment les armoires, planchers,
plafonds et autres structures ou objets se trouvant aux
alentours du Produit. Également exclus de la garantie
sont les Produits dont les numéros de série ont été
modifiés, effacés ou enlevés ; appels de service pour
enseigner le fonctionnement du Produit ou les visites
pour lesquelles aucun problème avec le Produit n'a été
détecté ; correction de problèmes d’installation (le
consommateur est seul responsable pour toute
structure et tout réglage du Produit, incluant
l’électricité, la plomberie et autres connexions
nécessaires, pour une fondation/plancher approprié, et
pour toute modification incluant, sans limitation,
armoires, murs, planchers, tablettes, etc.) et la remise
de disjoncteurs ou le remplacement de fusibles.
DANS LA MESURE OÙ LA LOI L'AUTORISE, CETTE
GARANTIE DÉFINIT VOTRE RECOURS EXCLUSIF
QUANT AU PRODUIT, QUELLE QUE SOIT LA NATURE
DE LA DÉCLARATION, QU'IL S'AGISSE D'UN
CONTRAT OU D'UN PRÉJUDICE (INCLUANT LA
RESPONSABILITÉ ABSOLUE OU LA NÉGLIGENCE)
OU AUTREMENT. CETTE GARANTIE REMPLACE
TOUTE AUTRE GARANTIE, EXPRESSE OU ÉCRITE.
TOUTE GARANTIE IMPLICITEMENT VISÉE PAR LA
LOI, DE QUALITÉ MARCHANDE OU D'ADÉQUATION
POUR UN USAGE PARTICULIER, OU AUTREMENT NE
SERA EFFECTIVE QUE POUR LA PÉRIODE DE
VALIDITÉ DE LA PRÉSENTE GARANTIE. LE
FABRICANT NE SERA EN AUCUN CAS
RESPONSABLE DE TOUTE « PERTE COMMERCIALE »
IMMATÉRIELLE, PARTICULIÈRE, ACCESSOIRE,
INDIRECTE, ET/OU DES DOMMAGES PUNITIFS, DES
PERTES OU DES DÉPENSES, Y COMPRIS, SANS
LIMITATION, L'ABSENCE AU TRAVAIL, LES FRAIS
D'HOTÊLS ET/OU DE REPAS PRIS AU RESTAURANT,
LES DÉPENSES DE RESTRUCTURATION EN SUS
DES DOMMAGES DIRECTEMENT CAUSÉS PAR BSH,
OU AUTREMENT. CERTAINS ÉTATS N'AUTORISENT
PAS L'EXCLUSION OU LA LIMITATION DES
DOMMAGES IMMATÉRIELS OU ACCESSOIRES ET
D'AUTRES N'AUTORISENT PAS LES LIMITATIONS
SUR LA DURÉE DE LA GARANTIE IMPLICITE, IL EST
DONC POSSIBLE QUE LES RESTRICTIONS
SUSMENTIONNÉES NE VOUS CONCERNENT PAS.
CETTE GARANTIE VOUS ACCORDE DES DROITS
SPÉCIFIQUES LÉGAUX, LESQUELS PEUVENT
VARIER D'UN ÉTAT À L'AUTRE. Aucune modification,
changement ou amendement de cette garantie ne peut
entrer en vigueur sans le consentement écrit autorisé
par un officier de Gaggenau.

108
fr-ca Installation et raccordement
Comment bénéficier d'un service de
garantie
Pour obtenir un service sous garantie pour votre
Produit, contactez le centre de service autorisé
Gaggenau le plus proche de chez vous.
5
Installation et raccordement
Installati on et raccordement
Le lave-vaisselle doit être raccordé correctement sous
peine de ne pas fonctionner convenablement. Les
caractéristiques d'arrivée et d'écoulement d'eau, ainsi
que la puissance raccordée doivent correspondre aux
critères requis énoncés dans le paragraphe suivant ou
détaillés dans les instructions d'installation.
Installez l'appareil en suivant les étapes dans cet
ordre :
1. Inspectez l'appareil à sa réception
2. Installation
3. Raccordement de l'évacuation
4. Raccordement à l'eau courante
5. Raccordement électrique
Pièces incluses
En cas de réclamation, contactez votre revendeur ou
notre service après-vente.
▯ Lave-vaisselle
▯ Manuel d'utilisation
▯ Instructions d'installation
▯ Guide de référence rapide*
▯ Garantie*
▯ Matériel d'installation
▯ Rabat antivapeur*
▯ Tablier de caoutchouc*
▯ Cordon d'alimentation
*dépend de l'équipement de votre lave-vaisselle
Consignes de sécurité
Veuillez vous référer aux Consignes importantes de
sécurité pour l'installation, incluses dans le manuel
séparé Consignes d'installation, compris avec votre
lave-vaisselle.

109
Installation et raccordement fr-ca
Livraison
Votre lave-vaisselle a été inspecté minutieusement à
l'usine afin d'en assurer un état de fonctionnement
impeccable. Pour cette raison, de petites taches d'eau
peuvent être présentes. Celles-ci disparaîtront au
premier lavage.
Données techniques
▯ Poids :
jusqu'à 60 kg (132 lbs)
▯ Tension :
120 V, 60 Hz
▯ Puissance raccordée :
1 300 W.
▯ Disjoncteur :
12 A
▯ Puissance d'entrée :
à l'arrêt (Po)* 0,50 W.
en marche (Pl)* 50 W.
*selon les réglementations (EU) n° 1016/2010 et
1059/2010.
Des fonctions supplémentaires et certains
paramètres peuvent augmenter la puissance
d'entrée.
▯ Pression d'eau :
0,05 MPa (0,5 bar) minimum, 1 MPa (10 bar)
maximum.
Si la pression d'eau est supérieure :
raccordez la soupape de réduction de pression en
amont.
▯ Débit d'entrée :
10 litres/minute minimum
▯ Température de l'eau :
eau froide.
Eau chaude :
Température maximale de 60 °C (140 °F).
▯ Capacité :
configurations de 12 à 15 emplacements (dépend de
l'équipement de votre lave-vaisselle)
Installation
Les dimensions requises pour l'installation se trouvent
dans les instructions d'installation. Mettez l'appareil à
niveau à l'aide des pieds ajustables. Assurez-vous que
l'appareil est posé de manière sûre.
▯ Un appareil encastré ou intégré par la suite de façon
autostable doit être fixé (en le vissant au mur, ou en
l'installant sous un plan de travail fixe, lui-même vissé
aux placards adjacents) de manière sûre, ceci afin de
l'empêcher de se retourner
▯ L'appareil peut être facilement installé entre des
cloisons en bois et en plastique d'une cuisine
aménagée.
Raccordement du boyau d'évacuation
1. Les étapes à suivre pour le raccordement se trouvent
dans les instructions d'installation. Au besoin,
installez un siphon avec un raccord d'évacuation.
2. Raccordez le flexible d'évacuation au raccord
d'évacuation du siphon avec les pièces fournies.
Assurez-vous que le boyau d'évacuation n'est pas
coudé, compressé ou tordu, et que le système
d'évacuation n'est pas obstrué!

110
fr-ca Installation et raccordement
Raccordement à l'eau courante
1. Connectez le raccord d'eau courante au robinet en
suivant les instructions d'installation et en utilisant
les pièces fournies.
Assurez-vous que le raccord à l'arrivée l'eau courante
n'est pas coudé, compressé ou tordu.
2. Lors du remplacement de l'appareil, utilisez toujours
un nouveau flexible d'arrivée d'eau.
Pression d'eau :
7,25 PSI (0,5 bar) minimum, 145 PSI (10 bars)
maximum.
Si la pression d'eau est supérieure :
raccordez la soupape de réduction de pression en
amont.
Débit d'entrée :
2,65 gallons/minute (10 litres/minute) minimum
Température de l'eau :
eau froide.
Eau chaude :
Température maximale de 60 °C (140 °F).
Raccordement d’eau chaude*
Raccor dement d’ eau cha ude
Le lave-vaisselle peut être raccordé à une arrivée d'eau
froide ou chaude jusqu'à 60 °C (140 °F). Le
raccordement à l'eau chaude est recommandé si celle-ci
peut être fournie par un moyen plus économique en
énergie et par une installation adaptée, comme un
chauffe-eau solaire avec circuit de circulation. Ceci
permet d'économiser de l'énergie et du temps. Le
réglage « Eau chaude » vous permet d'ajuster au mieux
le fonctionnement de votre lave-vaisselle avec une
arrivée d'eau chaude. Il est recommandé d'avoir une
arrivée d'eau chaude à une température minimum de
40 °C (104 °F) et ne dépassant pas 60 °C (140 °F). Il
est déconseillé de raccorder l'appareil à une arrivée
d'eau chaude si celle-ci est fournie par un chauffe-eau
électrique.
Pour changer le réglage :
1. Ouvrez la porte.
2. Appuyez sur le bouton MARCHE/ARRÊT (.
3. Appuyez sur le bouton Information (8 durant 3
secondes jusqu'à ce que le message suivant soit
affiché dans la fenêtre d'affichage supérieure @:
Faites défiler avec < >
Choisissez avec - +
Maintenez durant t 3 sec.
4. Maintenez le bouton > )* enfoncé jusqu'à ce que le
raccordement à l'eau soit affiché dans la fenêtre
d'affichage supérieure@.
5. Effectuez le réglage à l'aide des boutons + -.X.
6. Appuyez et maintenez le bouton Information enfoncé
(8 pendant 3 secondes.
Les paramètres sélectionnés ont été sauvegardés.
* option facultative qui peut être ou ne pas être incluse
avec votre lave-vaisselle.

111
Installation et raccordement fr-ca
Raccordement électrique
▯ Raccordez l'appareil au courant alternatif d'une
tension de 120 V et d'une fréquence de 60 Hz via
une prise de courant correctement installée et mise
à la terre. Consultez la plaque signalétique pour
connaître le type de fusible qui convient9:.
▯ La prise de courant doit se situer à proximité de
l'appareil et être facilement accessible après
installation.
Si la prise n'est pas librement accessible, un
commutateur omnipolaire avec une ouverture des
contacts de 3 mm minimum doit être monté sur le
côté de l'installation pour satisfaire aux exigences de
sécurité.
▯ La modification du raccordement ne doit être
effectuée que par un technicien qualifié.
▯ Une extension de câble peut-être achetée,
uniquement auprès du service à la clientèle.
▯ Utilisez uniquement un disjoncteur différentiel
comprenant ce symbole ‚. Seul cette extension
garantit la conformité avec les réglementations
applicables actuellement.
▯ Cet appareil dispose d'un système de protection
contre les dégâts des eaux. Veuillez remarquer que
ce système fonctionnera uniquement si l'appareil est
raccordé au réseau électrique.
Dépose de l'appareil
Suivez les étapes de dépose décrites ci-après.
1. Débranchez l'appareil du réseau électrique.
2. Fermez le robinet.
3. Défaites le raccordement entre l'évacuation et
l'arrivée d'eau
4. Desserrez les vis de serrage des pièces du cabinet.
5. Si celui-ci est monté, retirez le panneau de socle.
6. Sortez l'appareil, tirez avec précaution sur le flexible
à l'arrière.
Transport de l'appareil
Videz le lave-vaisselle et sécurisez les pièces mobiles.
Videz l'appareil de son eau en suivant les étapes
suivantes :
1. Ouvrez le robinet.
2. Ouvrez la porte.
3. Appuyez sur le bouton MARCHE/ARRÊT (.
4. Sélectionnez le cycle de lavage avec la plus haute
température possible.
La durée estimée du cycle de lavage est indiquée sur
l'affichage digital @.
5. Appuyez sur le bouton DÉMARRER )".
6. Fermez la porte.
Le cycle de lavage démarre.
7. Ouvrez la porte après environ 4 minutes.
8. Appuyez sur le bouton DÉMARRER )" jusqu'à ce
que s'affichent « Programme annulé », puis « Prêt
dans une minute » dans l'affichage digital @.
9. Fermez la porte.
10. Ouvrez la porte après environ 1 minute.
L'affichage digital @ indique « Terminé ».
11. Appuyez sur le bouton MARCHE/ARRÊT (.
12. Fermez le robinet, déconnectez le boyau
d'alimentation et évacuez l'eau.
Remarque : En le transportant, tenez l'appareil debout,
à la verticale. Cela empêche l'eau résiduelle de couler à
l'intérieur de l'appareil et d'endommager son cycle de
lavage.
Protection de l'appareil contre le gel
Si l'appareil se trouve dans une pièce dans laquelle il
existe un risque de gel (comme une maison de
vacances), videz complètement l'appareil (voir
« Transport de l'appareil »).

*DJJHQDX
0DLQ6WUHHW6XLWH
,UYLQH&$
86$
3KRQH*$**(1$8
LQIR#JDJJHQDXXVDFRP
ZZZJDJJHQDXXVDFRP
*9001388909*
9001388909
(9806)