Documents: Go to download!
User Manual
- User Manual - (English, French)
- Product Spec Sheet - (English)
User manual Washer
Getting Started
Appliance overview
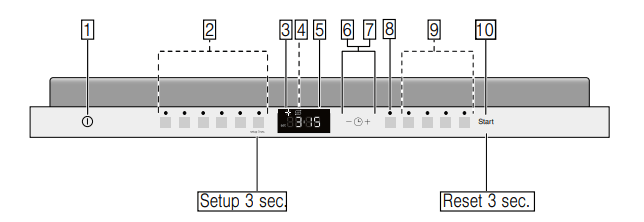
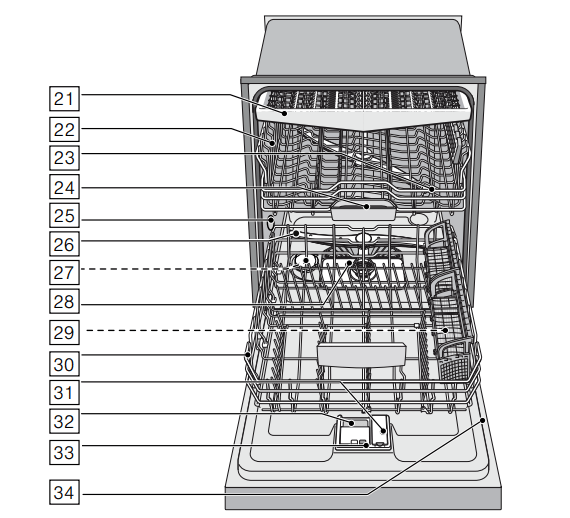
The numbers stated below refer to the overview images on the previous page of this manual.
Operating panel
- On/Off button
- Wash cycles**
- Rinse aid refill indicator
- Salt refill indicator
- Digital display
- Selection buttons
- Delay start button
- Remote start button
- Wash cycle options** )"
- START button
Note: Some of the wash cycles and options will vary by model.
Dishwasher interior components
21. Third rack
22. Upper rack
23. Upper spray arm
24. Detergent tab tray
25. Vent hole
26. Lower spray arm
27. Dispenser for special salt *
28. Filters
29. Silverware basket *
30. Lower rack
31. Rinse aid dispenser
32. Detergent dispenser
33. Lock for detergent dispenser
34. Rating plate
*optional feature which may or may not be included with your dishwasher.
Display indicators

Menu Overview
The dishwasher has been preset with certain settings for your convenience. You can change these factory settings.
Change the setting as follows:
1. Open the door.
2. Press the ON/OFF button 
3. Press and hold the  button for 3 seconds until
  is shown on the display window
4. Press the  button to access the individual settings.
5. Adjust the setting using the + and - buttons. 
6. Press and hold the  button for 3 seconds. The chosen setting has now been stored.
Note: If you want to change several settings, first make all your changes one after the other. Then press the  button for 3 seconds. All the settings will then be stored in the dishwasher.
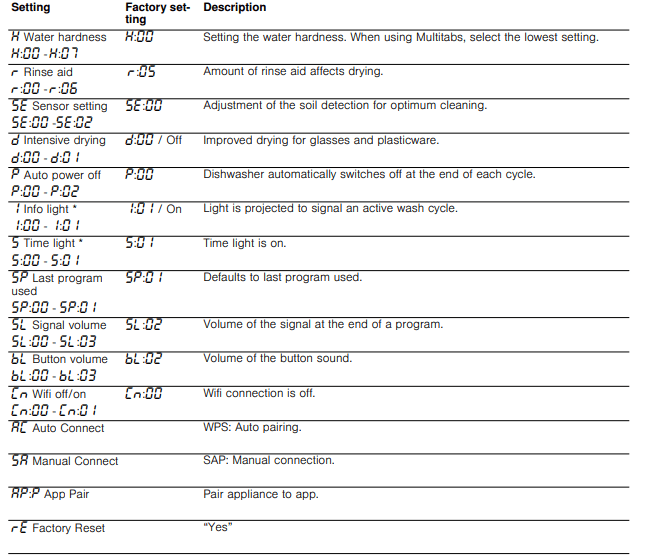
* optional feature which may or may not is included with your dishwasher.
Home Connect
This dishwasher is Wi-Fi capable and can be remotely controlled via a mobile device.
If your dishwasher does not connect to the home network. you can also operate the dishwasher manually by pressing the buttons.
Refer to the appliance overview for the location of the buttons. ~ "Appliance overview" on page 8
Wi-Fi 
You can activate the wireless network connection with  or deactivate it with
Activate Wi-Fi:
1. Press the ON/OFF button 
2. Press and hold the button  for 3 seconds.
In the display window  you will see
3. Press the button  repeatedly until
  appears in the display window
4. Use the setting button +  to activate Wi-Fi
5. Press and hold the button  for 3 seconds.
The chosen setting has now been stored in your dishwasher.
Note: Remote control of the dishwasher requires a stable wireless network connection.
Network login
To connect the dishwasher to your home network. you can choose between automatic  and manual network login
  . To do this. check to see if there is a WPS function on your router.
Automatic network login  : Connect to the home network using the WPS function of your router. During connection press the WPS button on the router.
Manual network login  : Connect your mobile device to the network (SSID):__________. password (key): __________. The network settings are then manually entered using the Home Connect App to connect to your home network.
Connect dishwasher to home network and app:
1. Switch on the ON/OFF switch 
2. Press and hold the button  for 3 seconds.
In the display window  you will see
3. Press the button  repeatedly until
 or
or  appears in the display window.
4. Start the connection with the setting button +  .
.
In the display window  you will see
  .
.
Following a successful connection to your home network  appears briefly in the display window
  .
.
The dishwasher then automatically starts a connection to the app. During connection  appears in the display window
  . Following a successful connection to the app
  appears in the display window
Observe the Home Connect documents supplied.
Note: The menu items  and
and  are not available until Wi-Fi has been activated.
Connect to the app
The setting  establishes the link between the dishwasher. app and your user account.
Note: This step should only be carried out if the dishwasher has not yet been automatically connected to the app.
Connect the dishwasher to the app:
1. Switch on the ON/OFF switch 
2. Press and hold the button  for 3 seconds.
In the display window  , you will see
3. Press the button  repeatedly until
  appears in the display window
  .
.
4. Start the connection with the setting button +  .
.
If the connection is successful. appears in the display window
Observe the Home Connect documents supplied.
Note: The menu item  is not available until there is a connection to the home network.
About data protection:
When your Home Connect dishwasher is connected for the first time to a WLAN network that is connected to the Internet. your Home Connect dishwasher transmits the following categories of data to the Home Connect server (initial registration):
- Unique appliance identification (consisting of appliance codes as well as the MAC address of the installed Wi-Fi communication module).
- Security certificate of the Wi-Fi communication module (to ensure a secure IT connection).
- The current software and hardware version of your dishwasher.
- Status of any previous resetting to factory settings.
This initial registration prepares the Home Connect functions for use and is activated the first time you use these Home Connect functions. Please note that the Home Connect functions can be used only in conjunction with the Home Connect App. Information on data protection can be accessed in the Home Connect App.
Remote start button
If the dishwasher is connected to the home network. you can activate the dishwasher's remote control. To do so. press the remote start button  .
.
If the dishwasher has not yet logged into Home Connect. perform automatic network login  by pressing the remote start button
  .
.
Observe the Home Connect documents supplied.
Notes
- To remotely control the dishwasher. the remote start button
 must be activated.
 - The remote start button
 goes out when the login process is complete.
 - Opening the door deactivates the remote control.
- If the connection to the router fails.
 flashes on the display.
Wi-Fi without a connection to the Home Connect server 
You can use the Home Connect App to disconnect from the Home Connect server.
The appliance is then locally connected to your mobile device without any connection to the Home Connect server.
Note: If you did not deactivate the connection to the Home Connect server. check your Internet connection.
Remote diagnostics
Customer Service can use remote diagnostics to access your appliance if you contact them. In the display window  you will see +
  . Confirm Customer Service access using the setting button
 .
.
Note: You can switch off remote diagnostics using the ON/OFF switch  or deactivate Customer Service access in the Home Connect app.
Water softening system / unique salt *
To ensure good rinsing results. the dishwasher requires soft water. i.e. water that is low in lime. otherwise, limescale will be deposited on the utensils and interior container. Tap water above 7° DH (1.2 mmol/l) must be softened. The water is softened with special salt (regeneration salt) in the water softening system of the dishwasher. The setting and therefore the required amount of salt depends on the degree of hardness of your tap water (see the following water hardness table).
* optional feature which may or may not is included with your dishwasher.
Adjusting the water softener settings
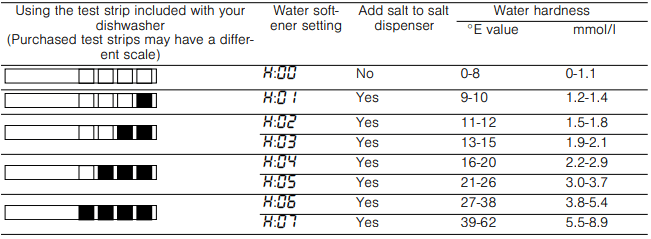
Adjusting the water-softening system
The amount of salt dispensed can be set from  to
to  Salt is not required at the set value
Set the softening system as follows:
1. Ask your local water utility company for the water hardness value of the tap water.
2. Required setting can be found in the water hardness table.
3. Open the door.
4. Press the ON/OFF button 
5. Press the Setup button for 3 seconds until  is shown on the display window
  .
.
6. Make the selection with setting buttons + -  .
.
7. Press and hold the Setup button for 3 seconds.
The chosen setting has now been stored.
Using special salt
As soon as the low salt indicator  lights up on the digital display. salt should be topped off. Refilling the salt dispenser should be done before switching on the appliance. This ensures that extra salt water is washed out and will not corrode the rinsing tank.
NOTICE: Detergent will destroy the water softening system! Never pour detergent into the salt dispenser.
Top off the salt as follows:
1. Undo the screw plug on the dispenser  .
.
2. Fill the dispenser with water (required only when switching on the appliance for the first time).
3. Add salt as illustrated (do not use table salt or tablets).
The water is displaced and runs out.
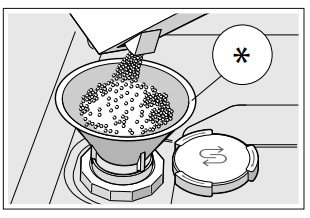
For more information about buying dishwasher salt. please contact Customer Service 1-800-944-2904.
Using detergents with salt component
If combined detergents with a salt component are used, special salt can usually be omitted up to water hardness of 21° DH (37° fH, 26° Clarke, 3.7 mmol/l). If the water hardness is over 21° dH, salt must be used.
Switching off the low salt indicator/water softening system
If the use of combined detergents with a salt component impairs the low salt indicator on the digital display  , the low salt indicator can be switched off.
Proceed as described under “Setting water softening system” and set the value to  . The water softening system and salt refill indicator are now switched off.
Rinse Aid
As soon as the low rinse aid indicator  lights up on the control panel, the rinse aid should be topped off.
The rinse aid is required for stain-free utensils and clear glasses. Use only rinse aid which the manufacturer designates as safe to use in domestic dishwashers. Combined detergents with rinse aid components may be used with soft to moderately hard water only (0-2 bands on a test strip or up to an °E value of 20). For moderately hard to hard water (3 to 4 bands on a test strip or °E value of 21 or higher), a rinse aid must be used.
Adding rinse aid
NOTICE: To avoid oversudsing or clogging, do not overfill the rinse aid dispenser  . Wipe up any spills with a damp cloth.
1. Open the rinse aid dispenser  by pressing on the latch of the lid and pulling it open.
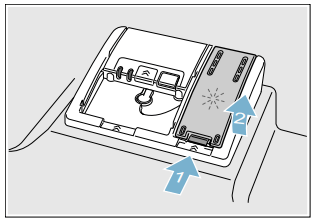
2. Add liquid rinse aid to the dispenser  until it is full. Do not overfill. Avoid spilling into the air vent hole.
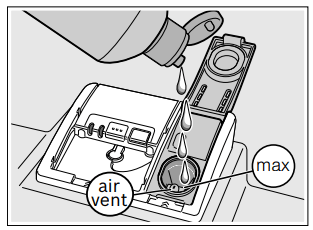
3. Close the lid. The lid must be fully closed until it clicks in order to seal.
4. Wipe up any excess rinse aid that may have puddled when the dispenser reservoir is full. This prevents excessive frothing during the next wash cycle. The indicator light will go out a few moments after the dishwasher door is shut.
This prevents excessive frothing during the next wash cycle. The indicator light will go out a few moments after the dishwasher door is shut.
Tip: For easier pouring. remove the lid from the rinse aid bottle.
NOTICE: Do not fill the rinse aid dispenser  with detergent. Doing so will damage the dishwasher.
Setting the amount of rinse aid used
The amount of rinse aid to be dispensed can be set from  . Set the amount of rinse aid to be dispensed to
  to obtain a very good drying result.
Do not change the amount of rinse aid unless there are streaks or water stains on the utensils. Set a lower level to avoid streaks. Set a higher level to avoid water stains.
Set the amount of rinse aid as follows:
1. Open the door.
2. Press the ON/OFF button  .
.
3. Press the Setup button for 3 seconds until  is shown on the display window
  .
.
4. Keep pressing the Setup button until the rinse aid setting is.  is displayed.
5. Change the setting with the setting buttons + -  .
.
6. Press and hold the Setup button for 3 seconds.
The chosen setting has now been stored.
Note: Do not change the amount of rinse aid unless there are streaks (select lower setting) or water stains (select higher setting) visible on the utensils.
Turning off the rinse aid indicator
Proceed as described in the section “Setting the amount of rinse aid used” and set the value to  . The rinse aid indicator is now turned off.
NOTICE: Using no rinse aid or setting the dispenser to  may result in longer cycle times consuming more energy and water. The higher temperatures and longer cycle times can damage fine china or glassware.
Loading the Dishwasher
Dishware material
Note: Before using your dishwasher for the first time. check the information in this section. Some items are not dishwasher-safe and should be hand washed; others require special loading.
Aluminum: Colored anodized aluminum may fade over time. Minerals in your water may cause the aluminum to darken or spot. This can usually be removed with a soap-filled steel wool pad.
China, Crystal, Stoneware: Some hand-painted utensils may discolor, fade or spot. Hand washes these utensils. Position fragile glassware so that it will not topple over or come in contact with other utensils during the wash cycle.
Glass: Make sure to use dishwasher-safe glass. Milk glass may discolor or become yellow.
Non-stick: Coatings Apply a light coating of vegetable oil to non-stick surfaces after drying.
Plastics: Make sure the plasticware is dishwasher-safe.
Stainless Steel, Sterling Silver, and Silver Plates: Load these so they do not come in contact with other metals, stainless steel dishwasher tank walls, or the inner door.
Acrylic: Crazing or small cracks throughout the acrylic, may occur.
AdhesiveJoined Pieces: Adhesives that join materials such as plastic, wood, bone, steel, copper, tin, etc. may loosen.
Bone-Handled Utensils: Handles may separate.
Iron: Iron will rust. Hand washes and dries immediately.
Non-Dishware Items: Your dishwasher is intended for use in cleaning ONLY standard household dishware and kitchenware.
Pewter, Brass, and Bronze: These items will tarnish. Hand washes and dries immediately.
Loading the racks
For best dishwashing results. observe the following when loading the dishwasher:
- Do not pre-wash items with loosely attached food soil.
- Remove all food particles. bones. toothpicks and excessive grease.
- Pre-treat items having burned on. baked-on or starchy soils.
- Load dishes in the dishwasher racks so the insides of bowls. pots and pans are facing the spray arms.
- Avoid nesting and contact points between dishes.
- Separate items of dissimilar metals. Use care to not block the movement of the spray arms.
- Only wash household dishware and kitchenware rated as dishwasher-safe.
Refer to the Dishware Materials section for more information about dishware suitability.
NOTICE: To avoid dishwasher damage. do not load the dishwasher with paper products. plastic bags. packing materials or anything other than normal. dishwasher-safe dishware and kitchenware.
Loading the upper rack
Ensure items do not protrude through the bottom of the racks and block the spray arms.
Note: When pushing the upper rack  into the dishwasher. push it until it stops against the back of the tub so the upper rack spray arm
  connects to the water supply at the back of the tub. Do not push racks in using the door.
Loading the lower rack
Place large items in the lower rack  . Load pots. pans and bowls upside down. Do not block the vent hole
  with tall baking sheets. Load these items on the right side of the dishwasher.
Care and Maintenance
A regular inspection and maintenance of your machine will help to prevent faults. This saves time and prevents future problems.
Cleaning the dishwasher
- Regularly wipe the front of the appliance with a damp cloth - water and a small amount of liquid soap is adequate.
- For stainless steel appliances (excluding black stainless), use a stainless steel polish to seal and protect the surface.
- Clean the outer edges of the inside door panel regularly to remove debris that may collect from normal loading. If spots begin to appear on the stainless steel, make sure the rinse agent is full and functioning properly.
- Clean the door seal regularly with a damp cloth to remove food particles that may collect from normal loading and cause odor. A soiled door seal may not seal properly.
NOTICES
- Never use a steam cleaner to clean your dishwasher.
- The manufacturer is not liable for any resulting damage.
- Do not use sponges as they could scratch the surfaces.
- Do not use bleach-based cleaners or wipes as they could damage the surface or printing.
- Do not use stainless steel polish on a black stainless finish.
Filters
Filter components
The filter system 28 consists of three parts
-897397.png)
A Large Object Trap
Prevents objects that should not be placed in your dishwasher from damaging the dishwasher pump system or clogging your household drain.
B Flat Fine Filter
Prevents food particles from entering the wash chamber and directs particles toward the micro filter.
C Micro Filter
Directs the smallest of particles to the household plumbing drain.
Cleaning intervals
The filter system 28 is designed to minimize maintenance while providing premium cleaning performance and minimum energy consumption.
Depending on use habits and water hardness, the filter system will require some maintenance to sustain premium cleaning performance.
Your filter system may need to be cleaned when:
- You notice food soils remaining on the filter system or objects trapped in the Large Object Trap.
- A drop in cleaning performance or a gritty film forms on the dishware.
When washing normally attached food soils that have been scraped before loading, in a household that runs the dishwasher every other day, your filter should be cleaned:
-357783.png)
Note: Clean the filter after washing loads with large amounts of food soils or loads with a heavy starch content to maintain optimal performance.
To check or clean the filter system:
- After each wash cycle check the filters for residue.
- Unscrew the Large Object Trap as illustrated and remove the entire filter system.
-527553.png)
- Remove the microfilter from the fine filter for easier cleaning.
-874466.png)
- Rinse the filters under running water and use a soft brush to clean.
- Note: do not use abrasive brushes or steel wool, etc., as they may damage the filter.
- Reinstall the filter system in reverse sequence and lock into place by screwing the Large Object Trap until the marking arrows align.
Spray arms
Limescale and contaminants in the rinsing water may block nozzles and bearings on the spray arms 23 and 26
- Check outlet nozzles on the spray arms for blockages.
- Unscrew the upper spray arm 23 (1) and remove downwards (2).
- Remove the lower spray arm 26 upwards.
-890657.png)
- Clean spray arms under running water.
- Re-engage or screw on spray arms.
Drain pump
Large food remnants in the rinsing water not retained by the filters may block the waste water pump. In this case:
- Disconnect the appliance from the power supply.
- Take out upper rack 22 and lower rack 30
- Remove the filters 28
- Scoop out standing water - use a sponge if necessary.
- Using a spoon, pry off the pump cover (as shown) until it clicks, then grip the cover and pull upward until it resists and then pull forward (1). Remove cover completely.

6. Check inner compartment and remove any foreign objects.
7. Place pump cover in the original position (2) and press down until it engages (3).
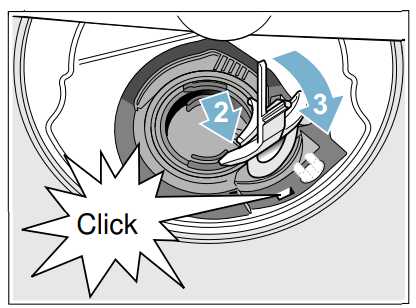
8. Place cover in the original position, press down and engage.
9. Reinstall filters.
10.Re-insert racks. Note: The drain pump will not work properly if the drain pump cover is not snapped in completely until it clicks.
Preparing your unit for vacation
NOTICE: Before leaving for vacation during warmer weather, besides turning off the main valve, also turn off water supply at the nearest point to the dishwasher. Do not leave soiled dishware in unit and leave door slightly open. During colder weather, please follow the instructions for winterizing your unit below.
Winterizing your unit
NOTICE: If your dishwasher will be unused for a period of time in a location that experiences freezing temperatures (holiday home or through a vacation period), have your dishwasher winterized by a professional service.
Troubleshooting
Dishwashers may occasionally exhibit problems that are unrelated to a malfunction of the dishwasher itself. The following information may help you with a dishwasher problem without involving a repair professional.
Note: If the appliance stops during dishwashing or does not start for any obvious reason, first run the cancel wash cycle function (Reset).
Error message
Some faults are indicated at the top of the display window 5and on the front display * 13 and possible remedies are offered (for example Filter system soiled (E22) -->Clean filters). * optional feature which may or may not be included with your dishwasher.
Error code E:18 is lit.
- Supply hose kinked.
- Install supply hose without kinks.
- Tap turned off.
- Turn on the tap.
- Tap jammed or calcified. Turn on the tap.
- Flow rate must be min. 10 l/min. when water supply is open.
Error code E:07 is lit.
- Intake opening (on right inside of appliance) covered by dishes.
- Arrange dishes so that the intake opening is not obstructed.
Error code E:22 is lit.
- Filters 1b are soiled or blocked.
- Clean filters.
Error code E:24 is lit.
- Waste-water hose kinked or blocked.
- Install hose without kinks, remove any residue.
- Siphon connection still sealed.
- Check connection to siphon and open if required.
- Cover on the drain pump loose.
- Lock cover correctly.
Error code E:25 is lit.
- Drain pump blocked or cover on the drain pump is not locked in position.
- Clean pump and lock cover correctly.
Error code E:27 is lit.
- Supply voltage too low.
- Not an appliance fault, have the mains voltage and electrical installation checked.
A different error code is indicated on the digital display. (E:01 to E:30)
- A technical fault has probably occurred.
- Switch off appliances with the ON/OFF switch 1 fter a short time restart the appliance. If the problem recurs, turn off the tap and pull out the mains plug. Call customer service and mention the error code.
Refill indicator for salt 4 and/or rinse-aid 3 is lit.
- No rinse aid - Refill rinse aid.
- No salt. - Refill with special salt.
- Sensor does not detect salt tablets. - Use different special salt.
Refill indicator for salt 4 and/or rinse-aid 3 is not lit.
- Refill indicator switched off.
- Activation/deactivation.
- There is still enough special salt/ rinse aid available.
- Check refill indicator, levels.
Water is left in the appliance at the end of the wash cycle.
- Filter system or area under the filters 28 is blocked.
- Clean filters and area underneath.
- Wash cycle has not ended yet.
- Wait until wash cycle ends or reset.
Dishes not dry.
- No or too little rinse aid in the dispenser. - Refill rinse aid.
- Wash cycle selected without drying. - Select wash cycle with drying.
- Water collecting in depressions on the dishes and silverware. - Arrange dishes in a sloping position, arrange affected dishes as sloping as possible.

- The combined detergent used has a poor drying performance.-- Use different combination detergent with better drying performance. Use of rinse aid also increases the drying performance.
- extraDry to increase drying not activated. Activate extraDry.
- Dishes were removed too early or drying process had not ended yet. - Wait until wash cycle ends or wait until 30 min after wash cycle ends before removing dishes.
- The eco rinse aid used has a limited drying performance. - Use a commercial brand of rinse aid. Eco products may have limited effectiveness.
Plastic dishes not dry.
Special properties of plastic. -- Plastics do not dry well because they do not hold heat.
Silverware not dry.
- Silverware not arranged properly in the silverware basket. -- Separate silverware if possible, prevent contact points. Silverware not arranged properly in the third rack. Arrange silverware properly and separate if possible.
Appliance interior wet after rinse cycle.
- No appliance fault. -- Dishwashers us “condensation drying,” where humid air condenses on tub walls so it can drain and be pumped out.
Food soils on the dishes.
- Dishes placed too closely together, racks overfilled. -- Arrange dishes with adequate clearance between them ensuring that the spray jets can reach the surface of the dishes. Prevent contact points.
- Spray arm rotation obstructed. -- Arrange dishes so that the spray arm can rotate without obstruction.
- Spray arm nozzles are blocked. -- Clean the spray arm nozzles.
- Filters 28 dirty. -- Clean filters.
- Filters 28 inserted incorrectly and/ or not engaged. -- Insert and engage filters correctly.
- Rinse wash cycle too weak. -- Select a more intensive rinse cycle. Increase sensitivity of the sensors.
- Dishes precleaned too intensely; sensors therefore decide on weak wash cycle sequence. Stubborn soiling cannot be completely removed. -- Do not prerinse dishes. Remove only large food soils. Increase sensitivity of the sensors. Recommended wash cycle "Regular" or Intensive.
- Tall narrow containers in corner areas are not rinsed adequately.-- Do not tilt containers and do not place in the corner area.
- Upper rack 22 on right and left not set to same height. -- Set upper rack to same height using side levers.
Dishwasher seems to run a long time.
- Incoming water is not warm enough. -- Before starting a cycle, run hot water faucet at the sink closest to the dishwasher.
- Cycle time can vary due to soil and water conditions.-- Sensors in the dishwasher automatically increase the cycle time to ensure a good wash when heavy soil is detected.
- Rinse aid dispenser 31 is empty.-- Add rinse aid.
- Dishwasher connected to cold water supply. Note: : Check the typical wash cycle length. -- Verify dishwasher is connected to hot water supply plumbing.
Detergent residue.
- Detergent dispenser cover 32blocked by dishes and therefore does not open fully. Dishes must not be placed above the detergent tab tray 24. These may block the lid of the detergent dispenser and prevent it from opening fully. Do not place dishes or fragrance dispenser in the detergent tab tray.
- Detergent dispenser cover 32 blocked by the detergent tab.-- Detergent tab must be inserted flat and not upright.
- Detergent tab used in the quick or short wash cycle. Dissolving time of the detergent is not reached in the selected short wash cycle -- Dissolving time of detergent tab too long for a quick or short wash cycle. Use a detergent powder or select a more intensive wash cycle.
- Washing effect and dissolving performance are reduced after a prolonged storage time or detergent is very lumpy. -- Change detergent
Water stains on plastic parts.
- Droplet formation on plastic surface is physically unavoidable. After drying, water stains are visible. -- Use a more intensive wash cycle (more water changes). Arrange dishes in a sloping position. Use rinse aid. If required, increase softening setting.
Washable or water-soluble coatings in the container or on the door.
- Detergent substances are deposited. These coatings cannot usually be removed with chemicals (appliance cleaner, ...). -- Change detergent brand. Clean appliance mechanically.
- If there is a “white coating” on the container floor, the water softening system has been set very low. -- Increase softening setting and change detergent if required.
- Salt dispenser cover 27 not closed. -- Close salt dispenser cover correctly.
- Only for glasses: Initial glass corrosion – can only apparently be wiped off. -- See “Glass and silverware damage”.
White limescale on the dishes, tub, racks or door.
- White residue coats dishwasher interior and racks wheels squeak from lime scale deposits in hard water. -- Use dishwasher cleaner every few months. If dishwasher has a water softener, increase the setting.
- Hard water kept 3 in 1 detergent or bio/eco detergent from being effective. -- Use separate dishwasher detergent, rinse aid and dishwasher softener salt (if dishwasher has a softener).
- Underdosing of detergent. -- Use more detergent or change to a more effective detergent.
- Rinse temperature is too low. -- Select a more intensive wash cycles with higher washing temperatures.
Tea or lipstick residue on the dishes.
- Too low rinsing temperature. -- Select wash cycle with higher washing temperature.
- Too little or unsuitable detergent. -- Use suitable detergent at correct dosage.
- Dishes precleaned too intensely; sensors therefore decide on weak wash cycle sequence. Stubborn soiling cannot be completely removed. -- Do not prerinse dishes. Remove only large food soils. Increase sensitivity of the sensors. Recommended wash cycle "Regular".
Colored (blue, yellow, brown), film in the dishwasher or on stainless steel cutlery/cookware.
- Film from mixture of food and mineral deposits. -- Can be partly removed with dishwasher cleaner or by mechanical cleaning.
- Film formed by oxidation of silver or aluminum cookware. -- Can be partly removed with dishwasher cleaner or by mechanical cleaning.
Colored (yellow, orange, brown), easily removable film inside the appliance (mainly in the floor area).
- Soapy film from mixture of food and hard water. -- Use water softener* - refill with salt or increase setting where necessary. Use dishwasher detergent instead of a 3 in 1 or Eco detergent.
Plastic parts stained or discolored.
- Plastic parts inside the appliance may become discolored during the service life of the dishwasher. -- Discoloration is normal and will not impair the function of the dishwasher.
- Too low rinsing temperature. -- Select wash cycle with higher washing temperature.
- Dishes precleaned too intensely; sensors therefore decide on weak wash cycle sequence. Stubborn soiling cannot be completely removed. -- Do not prerinse dishes. Remove only large food soils. Increase sensitivity of the sensors. Recommended wash cycle "Regular".
Removable streaks on glasses, glasses with metallic appearance and silverware.
- Too much rinse aid. -- Set rinse aid amount to lower setting.
- No rinse aid added or setting too low. -- Add rinse aid and check dosage (recommended setting 4–5).
- Detergent residue in the final rinse wash cycle section.Detergent dispenser cover blocked by dishes (cover does not open fully). -- Detergent dispenser cover must not be obstructed by dishes. Do not place dishes or fragrance dispenser in the detergent tab tray.
- Dishes precleaned too intensely; sensors therefore decide on weak wash cycle sequence. Stubborn soiling cannot be completely removed. -- Do not prerinse dishes. Remove only large food soils. Increase sensitivity of the sensors. Recommended wash cycle “Regular”.
Initial or existing, irreversible clouding of glass.
- Glasses not dishwasher-proof, only suitable for dishwasher. -- Use dishwasher-proof glasses. Avoid long steam phase (standing time after wash cycle ends). Use wash cycle at lower temperature. Set water softening system according to the water hardness (if required one setting lower). Use detergent with glass protection component.
Rust spots on the silverware.
- Silverware not adequately rust-resistant. Knife blades are frequently more severely affected. -- Use corrosion-resistant silverware.
- Silverware will also rust if rusting parts are rinsed at the same time (pan handles, damaged utensil baskets, etc.). -- Do not wash rusting parts.
- Salt content in the rinsing water too high, as salt dispenser lock not fastened firmly or salt was spilled while being refilled. -- Fasten salt dispenser lock firmly or remove spilled salt.
Appliance cannot be switched on or operated.
- Malfunction. -- Disconnect appliance from the power supply; pull out the mains plug or switch off the fuse. Wait at least 5 seconds, then connect the appliance to the power supply.
Appliance does not start.
- Mains fuse may have been blown or circuit breaker tripped. -- Check mains fuse or circuit breaker.
- Door may not be properly latched. Press the main power switch to turn unit on.
- Unit may not be turned on. -- Shut door completely.
- Delay start may be engaged. -- To reset, refer to “Delay start” section in this manual.
- Child lock is activated. -- Deactivate the child lock. Refer to “Child Lock” section in this manual if applicable.
- The door may have been closed without first selecting a cycle. -- Select a cycle and close the door.
- Power cord not inserted. -- Ensure that the power cord is plugged all the way into the back of the appliance and into the socket. Check that the socket functions.
- The water supply may not be connected. Check and turn on water supply.
- The appliance door has not been shut properly. -- Close the door.
- The door has been open for more than 4 seconds after pressing the START button. -- Press the START button again and close the appliance door within 4 seconds (see “Protection against unintentional operation”).
Wash cycle starts automatically.
- You did not wait until wash cycle ended. -- Perform reset. (see “Canceling the wash cycle“).
Cover on the detergent dispenser cannot be closed.
- Detergent dispenser or cover guide blocked by sticky detergent residue. -- Remove detergent residue.
Detergent residue in the detergent dispenser 32 or in the detergent tab tray 24.
- Spray arms blocked by dishes, therefore detergent is not rinsed out. -- Ensure that the spray arms can rotate freely.
- The detergent dispenser was damp when filled. -- Pour detergent into the dry detergent dispenser only.
Appliance stops in the wash cycle or wash cycle is interrupted.
- Door not closed properly. -- Close the door.
- Do not place dishes or fragrance dispenser in the detergent tab tray. Upper rack presses against the door and prevents door from being closed securely. -- Check whether rear panel is being pressed in, e.g. by socket or by hose holder which has not been removed.
- Power and/or water supply interrupted. -- Restore power and/or water supply.
Filling valves making striking noises.
- Depends on domestic installation, as appliance is not defective. -- No effect on appliance function. No remedial action possible.
Knocking or rattling noise.
- Spray arm strikes the dishes, dishes not positioned correctly. -- Position dishes so that the spray arms do not strike the dishes.
- If there is a low load, the water jets strike the washing tank directly. -- Load the appliance with more dishes or distribute the dishes more evenly in the dishwasher.
- Light dishes move during the wash cycle. -- Arrange light dishes securely.
Unusual foam formation.
- Handwash liquid in the rinse aid dispenser. -- Immediately refill rinse aid dispenser with rinse aid.
- Rinse aid spilled. -- Remove rinse aid with a cloth.
See other models: VCIN36GWS DWHD660WFP T30IF900SP MU30WSU MU30RSU
