User Guide Wireless Stereo Headset
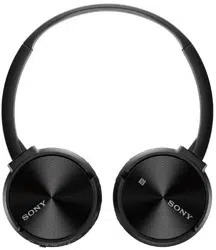
Parts and controls
Location and function of parts

1. Headband
2. Slider
Slide to adjust the length of the headband.
3.  left unit
RESET button
Resets and turns off the headset.
5. N-Mark
6.  right unit
7. Micro-USB port
Connect a computer to this port with the supplied micro-USB cable to charge the headset.
8. Microphone
Picks up the sound of your voice when talking on the phone.
9. POWER button
10. Built-in antenna
The BLUETOOTH antenna is built into the headset.
11. Indicator
Lights up in red during charging.
Lights up in red or blue to indicate the power or communication status of the headset.
12. VOL (volume) +/- buttons
The + button has a tactile dot.
13. Jog switch ( /
/  /
/  /
/  )
)
BLUETOOTH function indicator
The indicator flashes in red or blue to indicate the BLUETOOTH connection status.
○: Turns on in blue/●: Turns on in red/-: Turns off
○ ● ○ ● ○ ● ○ ● ○ ● ○ ●...
○ - - ○ - - ○ - - ○ - - ○ - - ○ - - ○ - - ○...
○ ○ - ○ ○ - ○ ○ - ○ ○ - ○ ○ - ○ ○ - ○ ○...
- Connected (HFP/HSP or A2DP)
○ - - - - - - - - - ○ - - - - - - - - -...
- Connected (HFP/HSP and A2DP)
○ - ○ - - - - - - - ○ - ○ - - - - - - -...
- Playing music or during a call (HFP/HSP or A2DP)
○ ○ - - - - - - - - ○ ○ - - - - - - - -...
- Playing music or during a call (HFP/HSP and A2DP)
○ ○ ○ - - - - - - - ○ ○ ○ - - - - - - -...
○ ○ ○ ○ ○ ○ ○ ○ ○ ○ ○...
Hint: When the remaining battery charge becomes low, the indicator turns from blue to red, except for pairing mode.
Charging the headset
Charging the headset
The headset contains a lithium ion rechargeable battery. Charge the headset using the supplied micro-USB cable.
- Connect the supplied micro-USB cable to the headset, and then connect the other end to a booted computer.
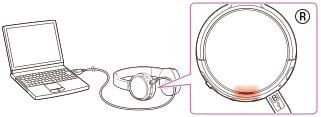
- Make sure that the indicator (red) lights up.
- Charging is completed in about 4 hours (*) and the indicator (red) goes off automatically.
* Time required for charging the empty battery to its full capacity.
Note
- If the headset detects a problem while charging due to following causes, the indicator (red) may turn off, although charging is not complete. In this case, charge again within the charging temperature range. If the problem persists, consult your nearest Sony dealer.
- Ambient temperature exceeds the charging temperature range of 5 °C – 35 °C (41 °F - 95 °F).
- There is a problem with the battery.
- If the headset is not used for a long time, the indicator (red) may not light up when you connect the micro-USB cable to charge the headset. In this case, do not disconnect the micro-USB cable from the headset: wait a few minutes until the indicator (red) lights up.
- If the headset is not used for a long time, the battery may be quickly depleted, however, after a few recharges, the battery life will improve.
- If you store the headset for a long time, charge the battery to its full capacity once every 6 months to avoid over discharge.
- If the headset is not used for a long time, it may take longer to charge the battery.
- If the life of the built-in rechargeable battery drops significantly, the battery should be replaced. Consult your nearest Sony dealer for replacement of the rechargeable battery.
- Avoid exposure to temperature extremes, direct sunlight, moisture, sand, dust or mechanical shock. Never leave the headset in a car parked in the sun.
- If the computer enters into hibernation mode while connected to the headset, charging will not be completed properly. Check the setting of the computer before charging. The indicator (red) will go off automatically if the computer enters into hibernation mode. Charge the headset again in this case.
- Use the supplied micro-USB cable only, and connect directly to a computer. Charging will not be completed properly by an indirect connection, such as via a USB hub.
Hint: If charging starts while the headset is turned on, the headset will turn off automatically.
Available operating time
The available operating time of the headset on fully-charged battery are as follows:
- Music playback time: Max. 30 hours (SBC/AAC)
- Communication time: Max. 30 hours
- Standby time: Max. 300 hours
The headset can be used for about 10 hours after 1 hour charging.
Note: Usage hours may be shorter depending on the Codec and the conditions of use.
Checking the remaining battery charge
You can check the remaining battery charge of the rechargeable battery.
When you turn on the headset by pressing the POWER button, the indicator (red) flashes. You can check the remaining battery charge by the number of times the indicator (red) flashes.
You can also check the remaining battery charge when the headset is turned on. Pressing the POWER button will cause the indicator to flash and show the remaining battery charge.
3 times: High
2 times: Medium
1 time: Low (needs to charge)
When the battery is almost empty
The indicator turns red. When the battery becomes empty, the headset sounds a warning beep and turns off automatically.
BLUETOOTH connection
What you can do with the BLUETOOTH function
The headset uses BLUETOOTH wireless technology, allowing you to listen to music or make phone calls wirelessly.
Listening to music
You can receive audio signals from a smartphone, mobile phone, or music player to enjoy music wirelessly.
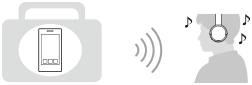
Talking on the phone
You can make and receive a call with your hands free, while leaving your smartphone or mobile phone in your bag or pocket.
How to make a wireless connection to BLUETOOTH devices
You can enjoy music and hands-free calling with the headset wirelessly by using your device’s BLUETOOTH function.
How to connect devices via the BLUETOOTH function differs depending on whether or not the device supports one-touch connection (NFC).
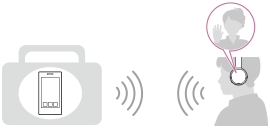
Connecting the headset to a device that supports one-touch connection (NFC)
By touching the headset to an NFC-compatible smartphone, the headset turns on automatically and then makes a BLUETOOTH connection. Touching the headset to the smartphone again will disconnect the connection.
Compatible smartphones
NFC-compatible smartphones with Android 2.3.3 or later installed (excluding Android 3.x)
NFC
NFC (Near Field Communication) is a technology enabling short-range wireless communication between various devices, such as smartphones and IC tags. Thanks to the NFC function, data communication - for example, BLUETOOTH pairing - can be achieved easily by simply touching NFC-compatible devices together (i.e., at the N-Mark symbol or location designated on each device).
Connecting to a device that does not support one-touch connection (NFC)
Pairing with a BLUETOOTH device: Pairing is the process required to create a link between BLUETOOTH devices to allow wireless connection. You must pair a device with the headset before you start using the headset.
Connecting the headset to a paired device: Once BLUETOOTH devices are paired, there is no need to pair them again. Connect a device already paired by the method that applies for that device.
Android devices not compatible with one-touch connection (NFC)
Pairing and connecting with an Android smartphone
Pairing is the process required to create a link between BLUETOOTH devices to allow wireless connection.
You must pair a device with the headset to be able to make a BLUETOOTH connection for the first time.
Before you start pairing operation, make sure that:
- The smartphone is placed within 1 m (3 feet) of the headset.
- The headset is charged sufficiently.
- The operating instructions of the smartphone is on hand.
1. Enter pairing mode on this headset.
When you pair the headset with a device for the first time after you bought it, or after you initialized the headset (the headset has no pairing information), press and hold the POWER button for about 2 seconds when the headset is turned off. The headset enters pairing mode automatically.
When you pair a 2nd or subsequent device (the headset has pairing information for other devices), press and hold the POWER button for about 7 seconds.

Make sure that the indicator flashes blue and red alternately after you release the button.
2. Unlock the screen of the Android smartphone.
3. Search for this headset on the smartphone.
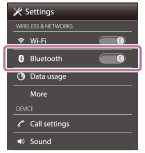
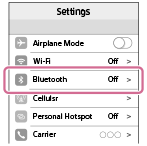
i. Select [Setting] - [Bluetooth].
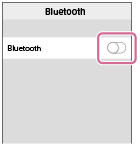
ii. Touch [ ] next to [Bluetooth].
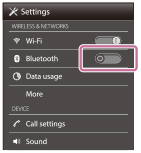
iii. Touch [Bluetooth].
4. Touch [Search for devices].
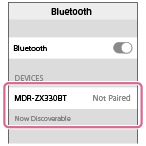
5. Touch [MDR-ZX330BT].
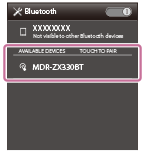
If passkey (*) input is required on the display of the smartphone, input “0000.”
The headset and the smartphone are paired with each other and connected.
If [MDR-ZX330BT] does not appear on the display, try again from step 3.
* A Passkey may be called a “Passcode,” a “PIN code,” or a “Password.”
Note
- If pairing is not established within about 5 minutes, pairing mode will be canceled and the headset will turn off. In this case, start over from step 1.
- Once BLUETOOTH devices are paired, there is no need to pair them again, except in the following cases:
- Pairing information has been deleted after repair, etc.
- The headset is already paired with 8 devices and another device is to be paired.
The headset can be paired with up to 8 devices. If a new device is paired after 8 devices are already paired, the paired device with the oldest connection time is replaced by the new one.
- When the pairing information for the headset has been deleted from the BLUETOOTH device.
- When the headset is initialized, all pairing information is deleted.
In this case, delete the pairing information of the headset from the BLUETOOTH device, and then pair them again.
- The headset can be paired with multiple devices, but can only play music from one paired device at a time.
Hint
- The above procedure is an example. For details, refer to the operating instructions supplied with your Android smartphone.
Connecting to a paired Android smartphone
1. Unlock the screen of the Android smartphone.
2. Turn on the headset.
Press and hold the POWER button for about 2 seconds.
Make sure that the indicator (blue) flashes after you release the button.
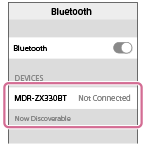
Check the connection status on the Android smartphone. If not connected, proceed to step 3.
3. Search for this headset on the smartphone.
i. Select [Setting] - [Bluetooth].
ii. Touch [] next to [Bluetooth].
iii. Touch [Bluetooth].
4. Touch [MDR-ZX330BT].

Hint
- The above procedure is an example. For details, refer to the operating instructions supplied with your smartphone.
- If the smartphone was connected with the headset the last time, an HFP/HSP connection is made when you turn on the headset. While the headset is on, you can make an A2DP connection (music playback) by pressing the button.
Note: If the headset tries to make a connection with a previously connected BLUETOOTH device, you may not be able to connect to the device you want to. If connection fails, terminate the BLUETOOTH connection from the device that was previously connected.
iPhone (iOS devices)
Pairing and connecting with an iPhone
Pairing is the process required to create a link between BLUETOOTH devices to allow wireless connection.
You must pair a device with the headset to be able to make a BLUETOOTH connection for the first time.
Before you start pairing operation, make sure that:
- The iPhone is placed within 1 m (3 feet) of the headset.
- The headset is charged sufficiently.
- The operating instructions of the iPhone is on hand.
1. Enter pairing mode on this headset.
When you pair the headset with a device for the first time after you bought it, or after you initialized the headset (the headset has no pairing information), press and hold the POWER button for about 2 seconds when the headset is turned off. The headset enters pairing mode automatically.
When you pair a 2nd or subsequent device (the headset has pairing information for other devices), press and hold the POWER button for about 7 seconds.
Make sure that the indicator flashes blue and red alternately after you release the button.
2. Unlock the screen of the iPhone.
3. Select the BLUETOOTH setting on the iPhone.
i. Select [Settings].
ii. Touch [Bluetooth].
iii. Touch [ ] to change it to [
 ].
].
4. Touch [MDR-ZX330BT].
If passkey (*) input is required on the display of the iPhone, input “0000.”
The headset and the iPhone are paired with each other and connected.
If [MDR-ZX330BT] does not appear on the display, try again from step 3.
* A Passkey may be called a “Passcode,” a “PIN code,” or a “Password.”
Note
- If pairing is not established within about 5 minutes, pairing mode will be canceled and the headset will turn off. In this case, start over from step 1.
- Once BLUETOOTH devices are paired, there is no need to pair them again, except in the following cases:
- Pairing information has been deleted after repair, etc.
The headset is already paired with 8 devices and another device is to be paired.
The headset can be paired with up to 8 devices. If a new device is paired after 8 devices are already paired, the paired device with the oldest connection time is replaced by the new one.
- When the pairing information for the headset has been deleted from the BLUETOOTH device.
- When the headset is initialized, all pairing information is deleted.
In this case, delete the pairing information of the headset from the BLUETOOTH device, and then pair them again.
- If the pairing information was deleted by initializing the headset, etc., delete from your iPhone the pairing information for the headset, and then pair them again.
- The headset can be paired with multiple devices, but can only play music from one paired device at a time.
Hint
- The above procedure is an example. For details, refer to the operating instructions supplied with your iPhone.
Connecting to a paired iPhone
1. Unlock the screen of the iPhone.
2. Turn on the headset.
Press and hold the POWER button for about 2 seconds.
Make sure that the indicator (blue) flashes after you release the button.
Check the connection status on the iPhone. If not connected, proceed to step 3.
3. Search for this headset on the iPhone.
i. Select [Settings].
ii. Touch [Bluetooth].
iii. Touch [] to change it to [].
4. Touch [MDR-ZX330BT].
Hint
- The above procedure is an example. For details, refer to the operating instructions supplied with your iPhone.
- If the iPhone was connected with the headset the last time, an HFP/HSP connection is made when you turn on the headset. While the headset is on, you can make an A2DP connection (music playback) by pressing the button.
Note: If the headset tries to make a connection with a previously connected BLUETOOTH device, you may not be able to connect to the device you want to. If connection fails, terminate the BLUETOOTH connection from the device that was previously connected.
Other BLUETOOTH devices
Pairing and connecting with other BLUETOOTH devices
Pairing is the process required to create a link between BLUETOOTH devices to allow wireless connection.
You must pair a device with the headset to be able to make a BLUETOOTH connection for the first time.
Before you start pairing operation, make sure that:
- The BLUETOOTH device is placed within 1 m (3 feet) of the headset.
- The headset is charged sufficiently.
- The operating instructions of the BLUETOOTH device is on hand.
1. Enter pairing mode on this headset.
When you pair the headset with a device for the first time after you bought it, or after you initialized the headset (the headset has no pairing information), press and hold the POWER button for about 2 seconds when the headset is turned off. The headset enters pairing mode automatically.
When you pair a 2nd or subsequent device (the headset has pairing information for other devices), press and hold the POWER button for about 7 seconds.
Make sure that the indicator flashes blue and red alternately after you release the button.
2. Perform the pairing procedure on the BLUETOOTH device to search for this headset.
[MDR-ZX330BT] will be displayed on the list of detected devices on the screen of the BLUETOOTH device. If not displayed, repeat from step 1.
3. Select [MDR-ZX330BT].
If passkey (*) input is required on the display of the BLUETOOTH device, input “0000.”
* A Passkey may be called a “Passcode,” a “PIN code,” or a “Password.”
4. Make the BLUETOOTH connection from the BLUETOOTH device.
Depending on the BLUETOOTH device, the headset may be connected with the device automatically as soon as they are paired.
Note
- If pairing is not established within about 5 minutes, pairing mode will be canceled and the headset will turn off. In this case, start over from step 1.
- When pairing with a BLUETOOTH device that cannot display a list of detected devices or that has no display, you may pair the device by setting both the headset and the BLUETOOTH device to pairing mode. At this time, if passkey is set other than “0000” on the BLUETOOTH device, pairing cannot be done with the headset.
- Once BLUETOOTH devices are paired, there is no need to pair them again, except in the following cases:
- Pairing information has been deleted after repair, etc.
The headset is already paired with 8 devices and another device is to be paired.
The headset can be paired with up to 8 devices. If a new device is paired after 8 devices are already paired, the paired device with the oldest connection time is replaced by the new one.
- When the pairing information for the headset has been deleted from the BLUETOOTH device.
When the headset is initialized, all pairing information is deleted.
In this case, delete the pairing information of the headset from the BLUETOOTH device, and then pair them again.
- The headset can be paired with multiple devices, but can only play music from one paired device at a time.
Hint
- The above procedure is an example. For details, refer to the operating instructions supplied with your BLUETOOTH device.
Connecting to a paired BLUETOOTH device
1. Turn on the headset.
Press and hold the POWER button for about 2 seconds.
Make sure that the indicator (blue) flashes after you release the button.
Check the connection status on the BLUETOOTH device. If not connected, proceed to step 2.
2. Make the BLUETOOTH connection from the BLUETOOTH device.
For details, refer to the operating instructions supplied with your BLUETOOTH device.
Hint
- The above procedure is an example. For details, refer to the operating instructions supplied with your BLUETOOTH device.
- If the BLUETOOTH device was connected with the headset the last time, an HFP/HSP connection is made when you turn on the headset. While the headset is on, you can make an A2DP connection (music playback) by pressing the button.
Note
- If the headset tries to make a connection with a previously connected BLUETOOTH device, you may not be able to connect to the device you want to. If connection fails, terminate the BLUETOOTH connection from the device that was previously connected.
Troubleshooting
Power
The headset is not turned on.
- Charge the battery of the headset.
- The headset cannot be turned on while charging the battery. Remove the micro-USB cable from the headset, and then turn on the headset again.
Charging
Charging cannot be done.
- Check that you are using the micro-USB cable supplied.
- Check that the micro-USB cable is connected to the headset and the computer firmly.
- Check that the computer is turned on.
- Check that the computer is not in standby, sleep or hibernation mode.
- When using Windows 8.1 update using Windows Update.
Charging time is too long.
- Check that the headset and the computer are directly connected, not via a USB hub.
The headset cannot be recognized by a computer.
- The micro-USB cable is not connected properly to the USB port of the computer. Connect the micro-USB cable again.
- Check that the headset and the computer are directly connected, not via a USB hub.
- A problem may have occurred with the connected USB port of the computer. Connect to another USB port if it is available.
- Try the USB connection procedure again in cases other than those stated above.
- Check that you are using the micro-USB cable supplied.
Sound
No sound
- Check that both the headset and the connected device (i.e., smartphone) are turned on.
- An A2DP BLUETOOTH connection is not made between the headset and the BLUETOOTH device. Use the BLUETOOTH device and make an A2DP BLUETOOTH connection.
- Turn up the volume of the headset and the connected device (i.e., smartphone).
- Check that the connected device is playing back.
- If you are connecting a computer to the headset, make sure the audio output setting of the computer is set for a BLUETOOTH device.
- Pair the headset and the BLUETOOTH device again.
Low sound level
- Turn up the volume of the headset and the connected device.
Low sound quality
- Turn down the volume of the connected device.
- Keep the headset away from a microwave oven, Wi-Fi, etc.
- Bring the headset and the BLUETOOTH device closer together. Remove any obstacles between the headset and the BLUETOOTH device.
- Keep the headset away from a TV.
- Switch the BLUETOOTH connection to A2DP by operating the BLUETOOTH device when HFP or HSP is set.
- If you connect a device with a built-in radio or tuner to the headset, broadcasts may not be received, or sensitivity may be reduced. Locate the headset farther away from the device and check that you can listen to the broadcasts satisfactorily.
- If you have previously connected the headset to this BLUETOOTH device, only an HFP/HSP BLUETOOTH connection may be made when the headset is turned on. If this happens, use the BLUETOOTH device and make an A2DP BLUETOOTH connection.
When you listen to music from a computer on the headset, sound quality may be poor for the first few seconds after a connection is made. This is caused by the computer transmitting music at sound quality for communications at first, and it is not a malfunction.
If the sound quality does not improve after a few seconds, press the button on the headset once during playback. Or, operate the computer to make an A2DP connection. Refer to the operating instructions supplied with your computer for computer operation.
Sound skips frequently during playback.
- Set the headset to the “Priority on stable connection” mode.
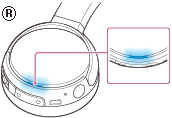
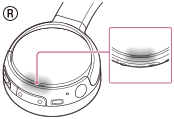
Remove any obstacles between the antenna of the BLUETOOTH device to be connected and the built-in antenna of the headset. The antenna of the headset is built into the part shown in the dotted line below.
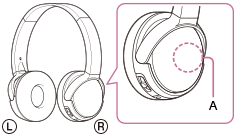
A: Location of the built-in antenna
- BLUETOOTH communications may be disabled, or noise or audio dropout may occur under the following conditions.
- There is a human body between the headset and the BLUETOOTH device. This situation may be improved by placing the BLUETOOTH device facing the antenna of the headset.
- There is an obstacle, such as metal or wall, between the headset and the BLUETOOTH device.
- A device using 2.4 GHz frequency, such as a Wi-Fi device, cordless telephone, or microwave oven, is in use near this headset.
Pairing
Pairing cannot be done.
- Bring the headset and the BLUETOOTH device within 1 m (3 feet) from each other.
- When you turn on the headset for the first time after purchasing, initializing, or repairing it, the headset enters pairing mode automatically. Pair the headset with a BLUETOOTH device. When you want to pair a 2nd or subsequent device, press and hold the POWER button of the headset for about 7 seconds to enter pairing mode.
- When you pair the headset with devices again after initializing or repairing the headset, information for pairing with the headset remaining on the iPhone or other device may prevent you from pairing them successfully. In this case, delete the pairing information of the headset from the device, and then pair them again.
One-touch connection (NFC)
Unable to connect the headset to a BLUETOOTH device with one-touch connection (NFC)
- Keep the smartphone close to the headset until the smartphone reacts. If you fail to connect, move the smartphone slowly on the N-Mark of the headset.
- Check that the NFC function of the smartphone is set to on.
- If the smartphone is in a case, remove it.
- NFC reception sensitivity varies depending on the device. If you repeatedly fail to connect the headset with a smartphone by one touch, connect it to the headset by on-screen operation on the smartphone.
- You cannot make a one-touch connection (NFC) while charging the battery because the headset cannot be turned on. Finish charging first, and then make the one-touch connection (NFC).
BLUETOOTH connection
Unable to make a BLUETOOTH connection
- Check that the headset is turned on.
- Check that the BLUETOOTH device is turned on and the BLUETOOTH function is on.
- Connection with the BLUETOOTH device may not be memorized on the headset. Make a BLUETOOTH connection from the BLUETOOTH device to the headset soon after pairing is complete.
- The BLUETOOTH device is in sleep mode.
- The BLUETOOTH connection is terminated. Make the BLUETOOTH connection again.
Distorted sound
- Keep the headset away from a microwave oven, Wi-Fi, etc.
The BLUETOOTH wireless communication range is short, or the sound skips.
- Remove any obstacles between the antenna of the BLUETOOTH device to be connected and the built-in antenna of the headset. The antenna of the headset is built into the part shown in the dotted line below.
A: Location of the built-in antenna
- BLUETOOTH communications may be disabled, or noise or audio dropout may occur under the following conditions.
- There is a human body between the headset and the BLUETOOTH device. This situation may be improved by placing the BLUETOOTH device facing the antenna of the headset.
- There is an obstacle, such as metal or wall, between the headset and the BLUETOOTH device.
- A device using 2.4 GHz frequency, such as a Wi-Fi device, cordless telephone, or microwave oven, is in use near this headset.
The headset does not operate properly.
- Reset the headset. Pairing information is not deleted by this operation.
- If you cannot use the headset even after resetting it, initialize the headset.
Phone calls
No voice from callers
- Check that both the headset and the connected device (i.e., smartphone) are turned on.
- Turn up the volume of the headset and the connected device (i.e., smartphone).
- Check that output of the BLUETOOTH device is set for the headset.
- Select an HFP or HSP BLUETOOTH connection by operating the BLUETOOTH device.
- If you are listening to music using the headset, stop playback, press the button on the headset and talk.
Low voice from callers
- Turn up the volume of the headset and the connected device.
Resetting or initializing the headset
Resetting the headset
If the headset cannot be turned on, or if it cannot be operated even when it is turned on, push the RESET button with a pointed object, such as a pin. The headset is reset, and turns off when it was on.
If the headset does not operate correctly even after resetting, initialize the headset to restore factory settings.
Initializing the headset to restore factory settings
Turn off the headset, then press and hold the POWER and / buttons simultaneously for more than 7 seconds.
The indicator (blue) flashes 4 times, and the headset is reset to the factory settings. All pairing information is deleted.
If the headset does not operate correctly even after initializing, consult your nearest Sony dealer.