User manual
HR2621, HR2650
HR2651, HR2652
HR2653, HR2655
HR2656, HR2657

2 ENGLISH
TABLE OF CONTENTS
Important 3
Introduction 6
General description 6
Before rst use 8
Preparing for use 8
Using the appliance 8
Trigger switch 8
Hand blender 9
XL chopper ( HR2621, HR2652, HR2653, HR2655,
HR2657 only) 12
Whisk (HR2621, HR2652, HR2655, HR2657 only) /
Mixer accessory (HR2653 only) 15
Spiralizer (HR2656, HR2657 only) 18
Soup container (HR2651, HR2655 only) 23
Bottle to go (HR2650, HR2651, HR2652, HR2653,
HR2655, HR2656, HR2657 only) 26
Cleaning 29
Storage 32
Recycling 32
Guarantee and support 32
Troubleshooting 32

3ENGLISH
Important
Read this user manual carefully before you use the appliance
and save it for future reference.
Danger
- Never immerse the motor unit in water or
any other liquid, nor rinse it under the tap.
Only use a moist cloth to clean the motor
unit.
Warning
- Check if the voltage indicated on the
appliance corresponds to the local mains
voltage before you connect the appliance.
- Do not use the appliance if the plug, the
mains cord or other parts are damaged or
have visible cracks.
- If the supply cord is damaged, it must be
replaced by Philips, its service agent or
similarly qualied persons in order to avoid
a hazard.
- Do not touch the cutting edges of the blade
units under any conditions, especially when
the appliance is plugged in. The cutting
edges are very sharp.
- Never use a chopper blade unit without a
chopper bowl.
- To avoid splashing, always immerse the
blender bar, the whisk (specic types only)
or the double whisk (specic types only)
into the ingredients before you switch on
the appliance, especially when you process
hot ingredients.
- If one of the blade unit gets stuck, unplug
the appliance before you remove the
ingredients that block the blade units.

4 ENGLISH
- Be careful when you pour hot liquid into the
beaker, as hot liquid and steam may cause
scalding.
- This appliance is intended for normal
household use only. It is not intended
for use in environments such as sta
kitchens of shops, oces, farms or other
work environments. Nor is it intended
to be used by clients in hotels, motels,
bed and breakfasts and other residential
environments.
- Never process hard ingredients like ice
cubes with the appliance.
- This appliance shall not be used by
children. Keep the appliance and its cord
out of reach of children.
- Appliances can be used by persons with
reduced physical, sensory or mental
capabilities or lack of experience and
knowledge if they have been given
supervision or instruction concerning use
of the appliance in a safe way and if they
understand the hazards involved.
- Children shall not play with the appliance.
Caution
- Always disconnect the appliance from the
mains if you leave it unattended and before
you assemble, disassemble, store or clean it.
- Switch o the appliance and disconnect
from power supply before changing
accessories or approaching parts that move
in use.
- Do not use the appliance with any of
the accessories longer than 3 minutes
without interruption. Let the appliance cool

5ENGLISH
down for 15 minutes before you continue
processing.
- None of the accessories is suitable for
use in the microwave, except the soup
container.
- Never use any accessories or parts from
other manufacturers or that Philips does
not specically recommend. If you use
such accessories or parts, your guarantee
becomes invalid.
- Keep the motor unit away from heat, re,
moisture and dirt.
- Only use this appliance for its intended
purpose as shown in the user manual.
- Never ll the beaker or XL chopper bowl
(specic types only) with ingredients that
are hotter than 80°C/175°F.
- Do not exceed the quantities and
processing times indicated in the table.
- Clean the blade unit of the blender bar
under the tap. Never immerse in water.
- After cleaning, let the blender bar dry.
Store it either horizontally or with the blade
pointing upwards. Make sure the blade
unit is completely dry before you store the
blender bar.
- Noise level: Lc = 85 dB(A)
Electromagnetic elds (EMF)
This Philips appliance complies with all applicable standards
and regulations regarding exposure to electromagnetic elds.

6 ENGLISH
Introduction
Congratulations on your purchase and welcome to Philips! To
fully benet from the support that Philips oers, register your
product at www.philips.com/welcome.
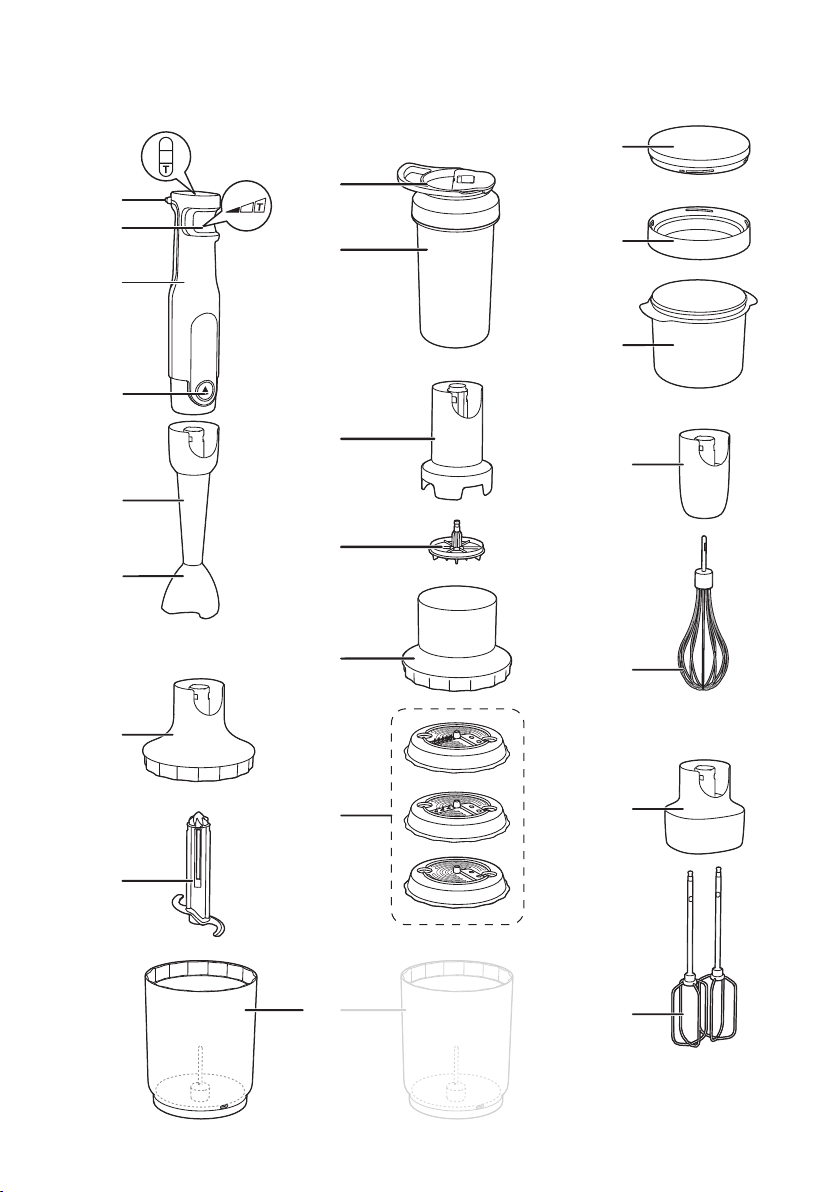
General description
Hand blender
1 Power cord
2 Trigger switch
3 Motor unit
4 Release button
5 Blender bar with integrated blade unit
6 Blade guard
XL chopper
(HR2621 HR2652 HR2653 HR2655 HR2657 only)
7 Gear unit for XL chopper
8 XL chopper blade
9 XL Chopper bowl (for XL chopper and spiralizer HR2656,
HR2657)
Spiralizer (HR2656, HR2657 only)
10 3 Spiralizer inserts (spaghetti, linguine, ribbon)
11 Feeding tube
12 Spiralizer driving plate
13 Spiralizer gear unit
Bottle to go (HR2650, HR2651, HR2652, HR2653,
HR2655, HR2656, HR2657 only)
14 Bottle
15 Lid
Soup container (HR2651, HR2655 only)
16 Lid
17 Cracker department
18 Soup container
Whisk (HR2621 HR2652 HR2655 HR2657 only)
19 Whisk gear unit
20 Whisk
Mixer accessory (HR2653 only)
21 Mixer accessory gear unit
22 Mixer accessory
7ENGLISH
e
b
a
c
d
f
n
o
r
g
h
i
u
v
s
t
j
m
l
k
q
p
8 ENGLISH
Before rst use
1 Thoroughly clean all parts that will come into food contact
before you use the appliance for the rst time (see chapter
‘Cleaning’).
Note
• Make sure all parts are completely dry before you start using the
appliance.
Preparing for use
1 Let hot ingredients cool down before you process them or
put them in the bottle to go or soup container (maximum
temperature 80°C).
2 Cut large ingredients into pieces of around 2 x 2 x 2 cm
before you process them.
3 Assemble the appliance properly before you put the plug
in the wall outlet.
Note
• Always unwind the power cord completely before you switch on
the appliance.
• Remove all packing material or labels before using.
Using the appliance
Use this appliance for its intended household use as described
in this manual.
Caution
• Avoid contact with moving parts. Keep hands and ngers away
from blades and out of container during operation or while
appliance is plugged in to prevent the possibility of severe injury
to persons and/or damage to the appliance.
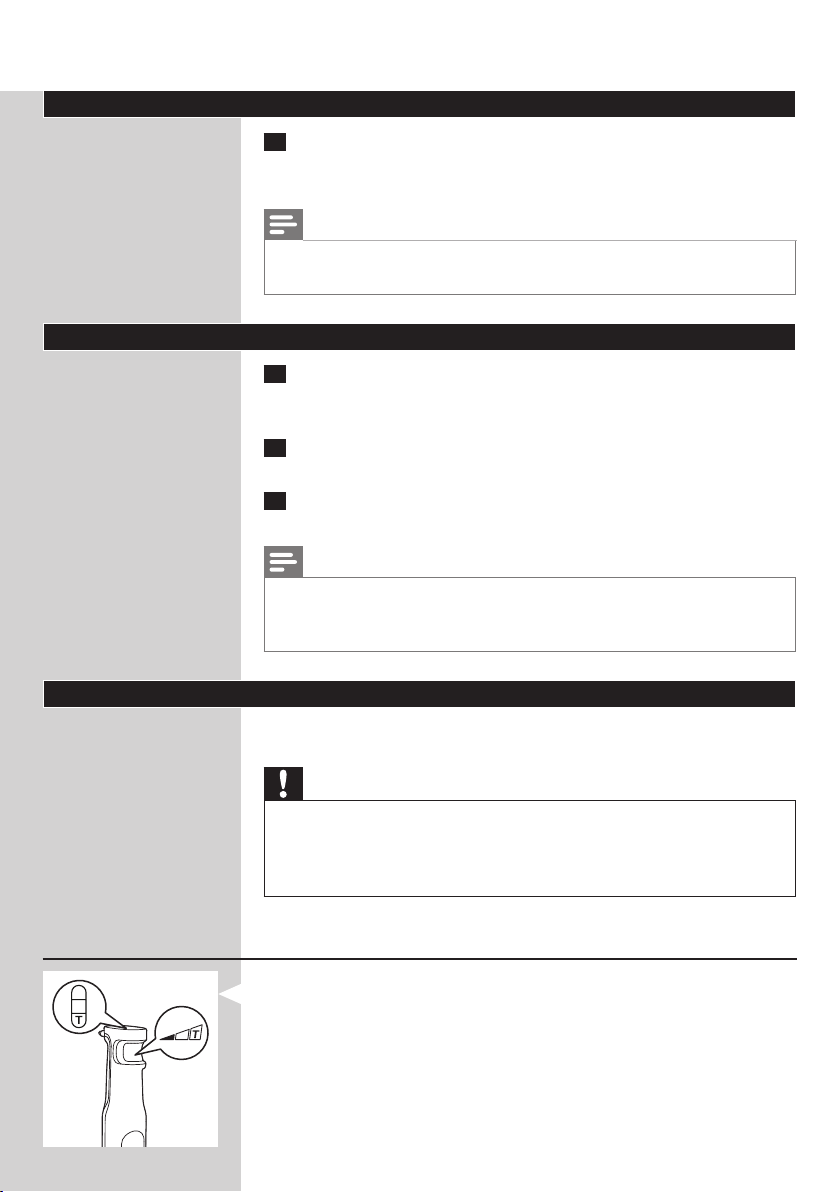
Trigger switch
This appliance is equipped with a trigger switch and a visual
speed indication on top of the device.
» The deeper you press, the higher the speed gets. The
speed indication on top shows you the “low speed
range”, medium speed range and “high speed range
marked with “T” (Turbo).
9ENGLISH
Hand blender
The hand blender is intended for:
- blending uids, e.g. dairy products, sauces, fruit juices,
soups, mixed drinks and shakes.
- mixing soft ingredients, e.g. pancake batter or mayonnaise.
- pureeing cooked ingredients, e.g. for making baby food.
- chopping nuts, fruits and vegetables.
Caution
• Do not process ingredients such as ice cubes, frozen ingredients
or fruits with stones (g. 1).
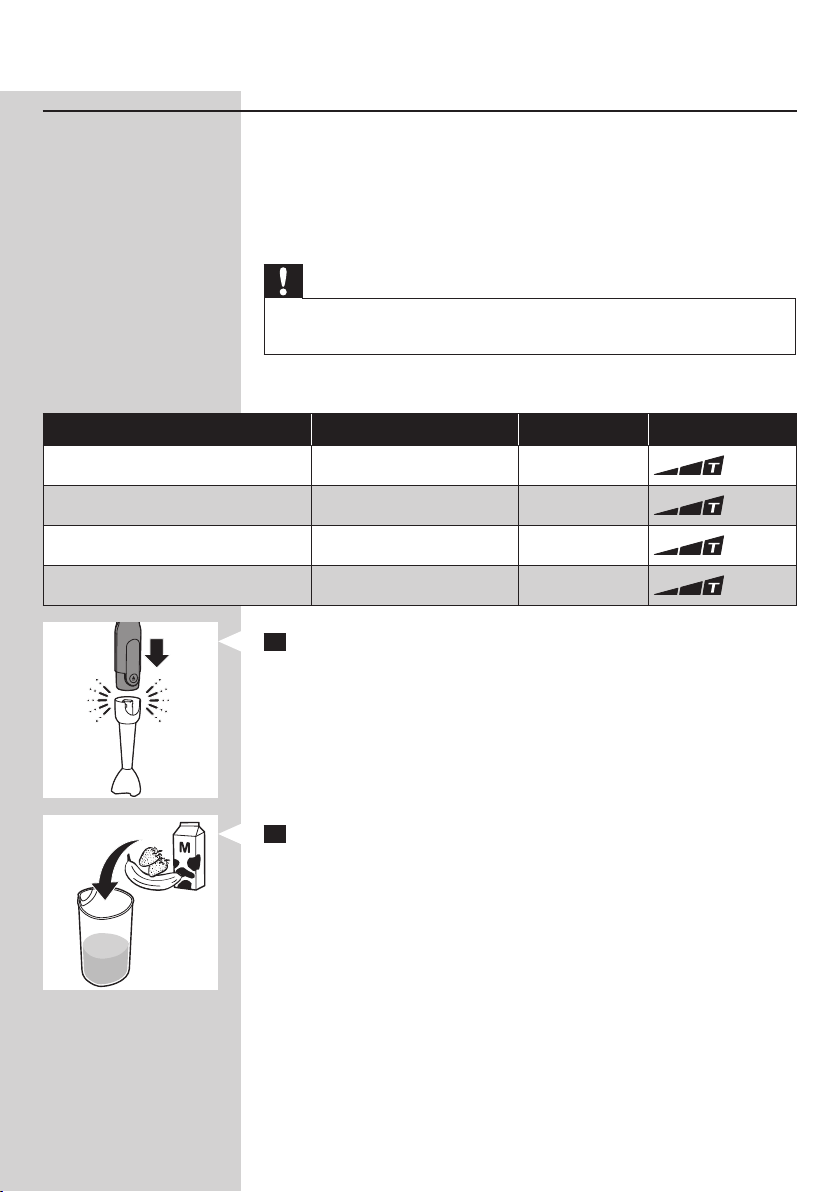
Blending quantities and processing times
Ingredients Blending quantity Time Speed
Fruits and vegetables 100 - 200 g 30 sec.
Baby food, soups, and sauces 100 - 400 ml 60 sec.
Batters 100 - 500 ml 60 sec.
Shakes and mixed drinks 100 - 1000 ml 60 sec.
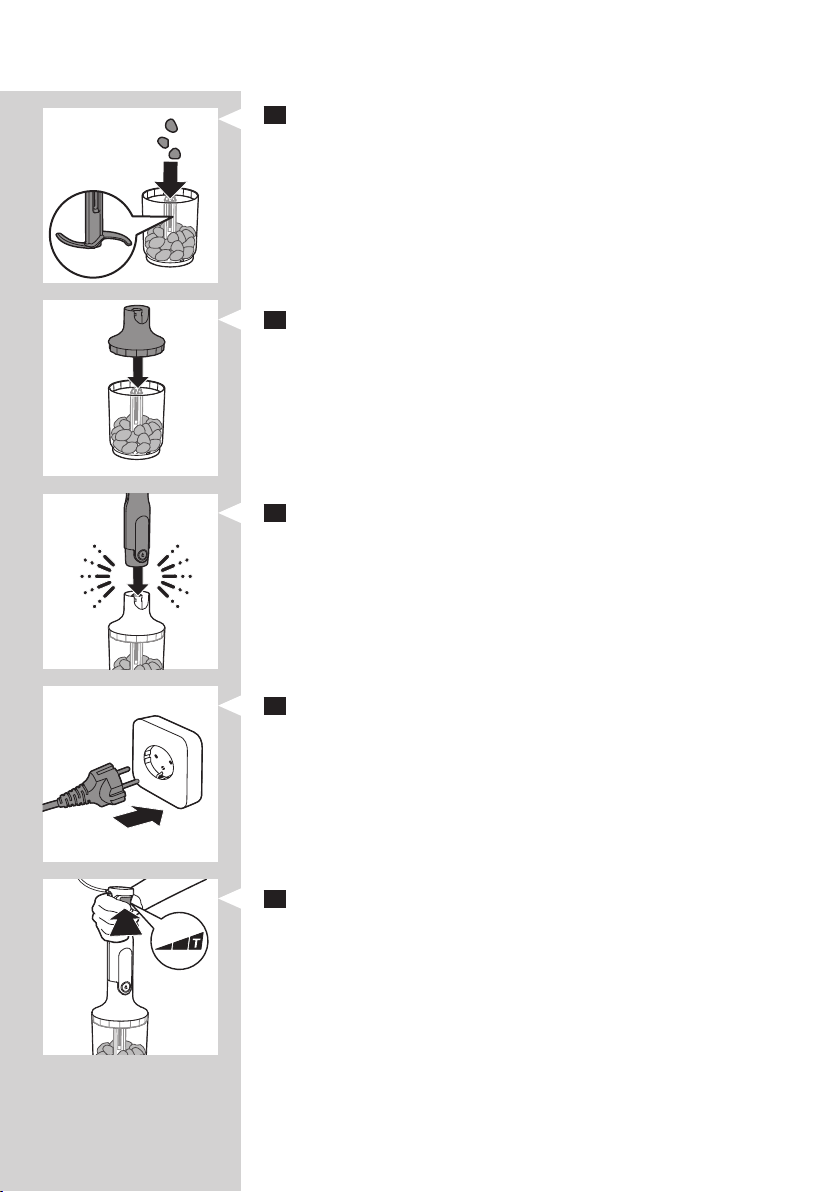
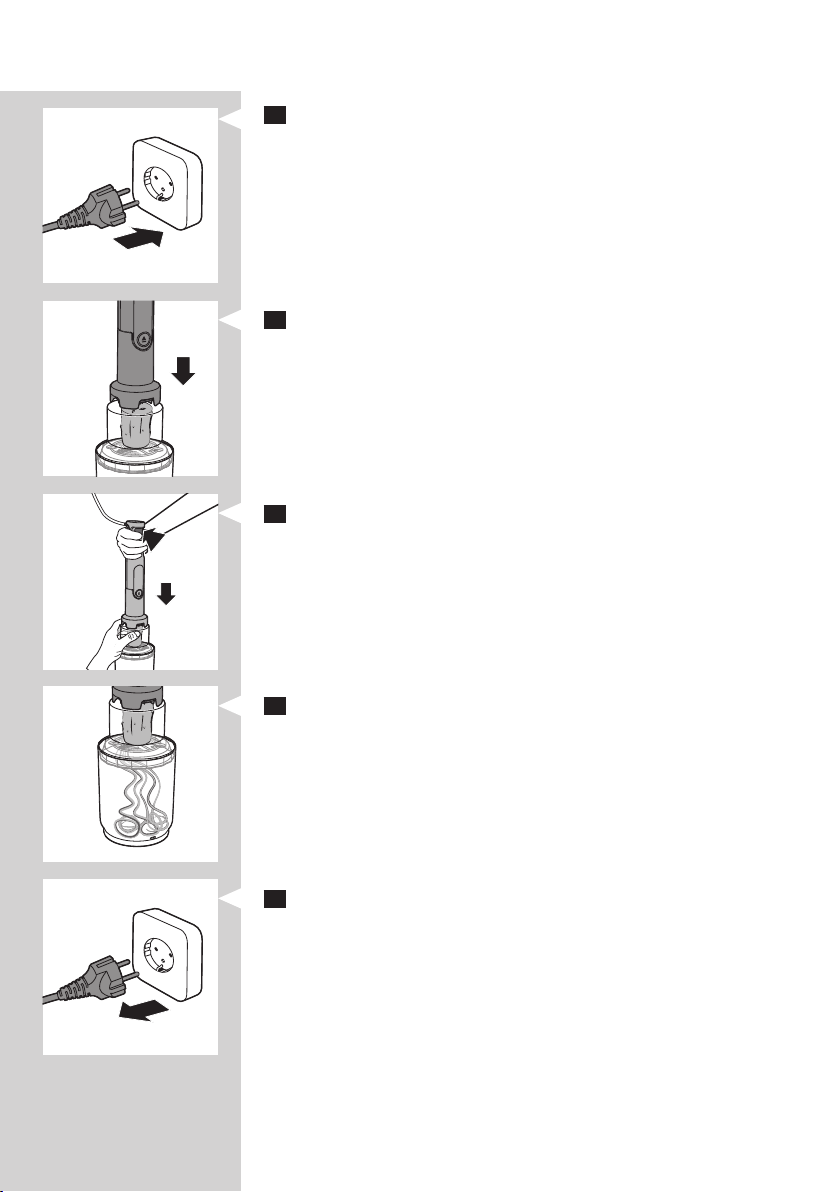
1 Attach the blender bar to the motor unit (“click”).
2 Put the ingredients into a beaker.
10 ENGLISH
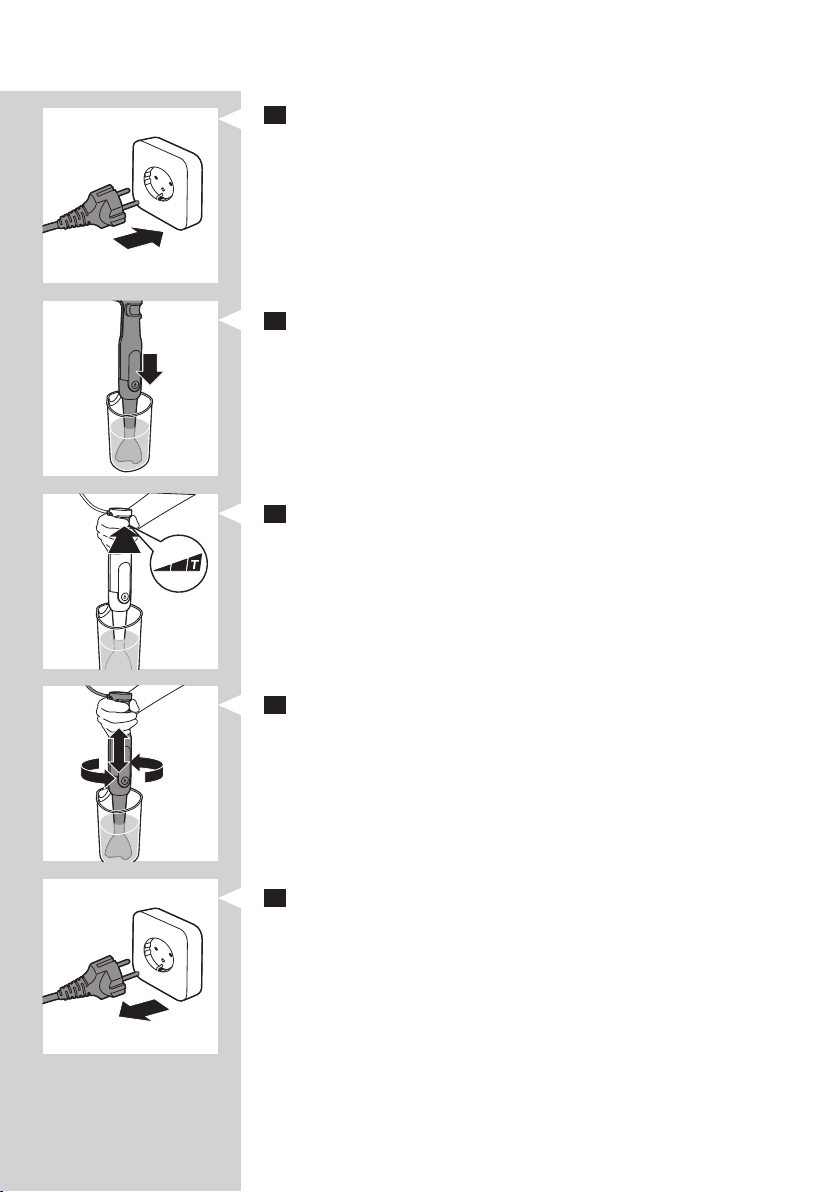
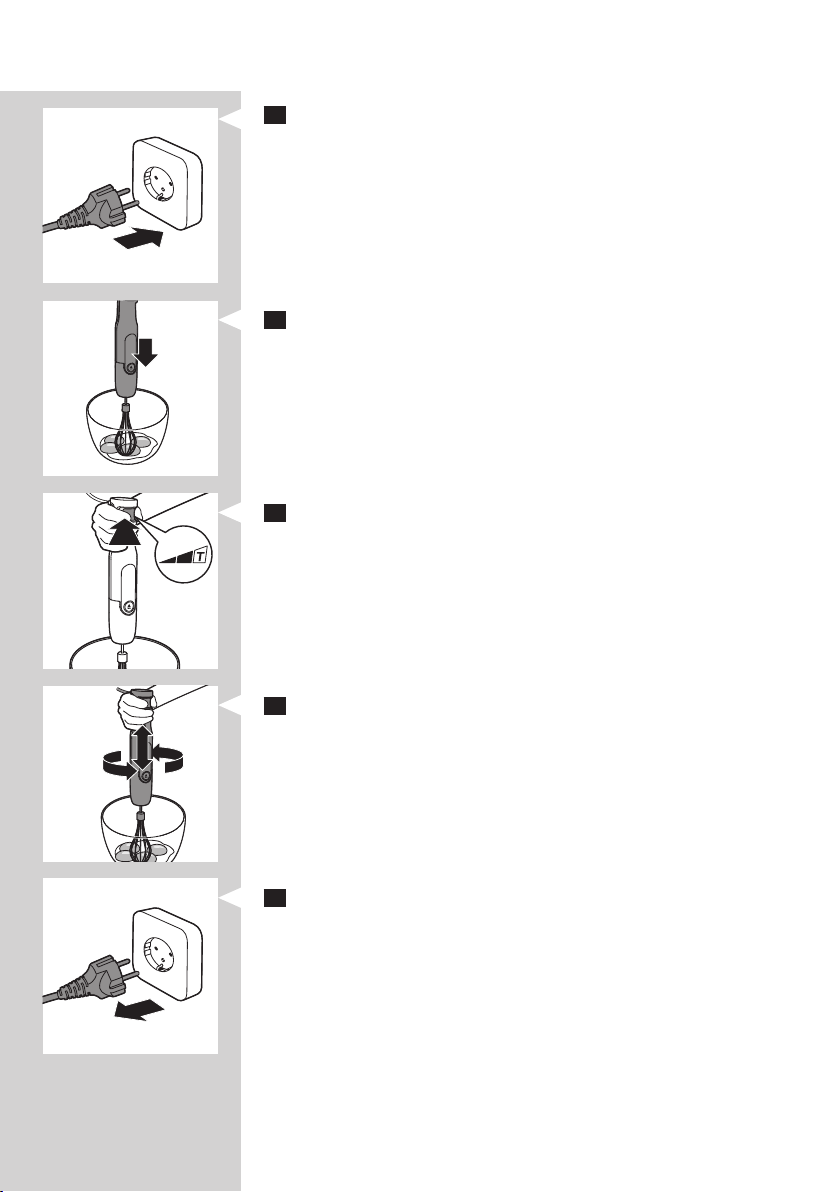
3 Put the plug in the wall outlet.
4 Immerse the blade guard completely in the ingredients in
order to avoid splashing.
5 Switch on the appliance by squeezing the trigger switch.
You can increase the speed by pressing the switch harder.
If you press the switch up to maximum, the blender will
work with Turbo speed.
6 Move the appliance slowly up and down and in circles to
blend the ingredients.
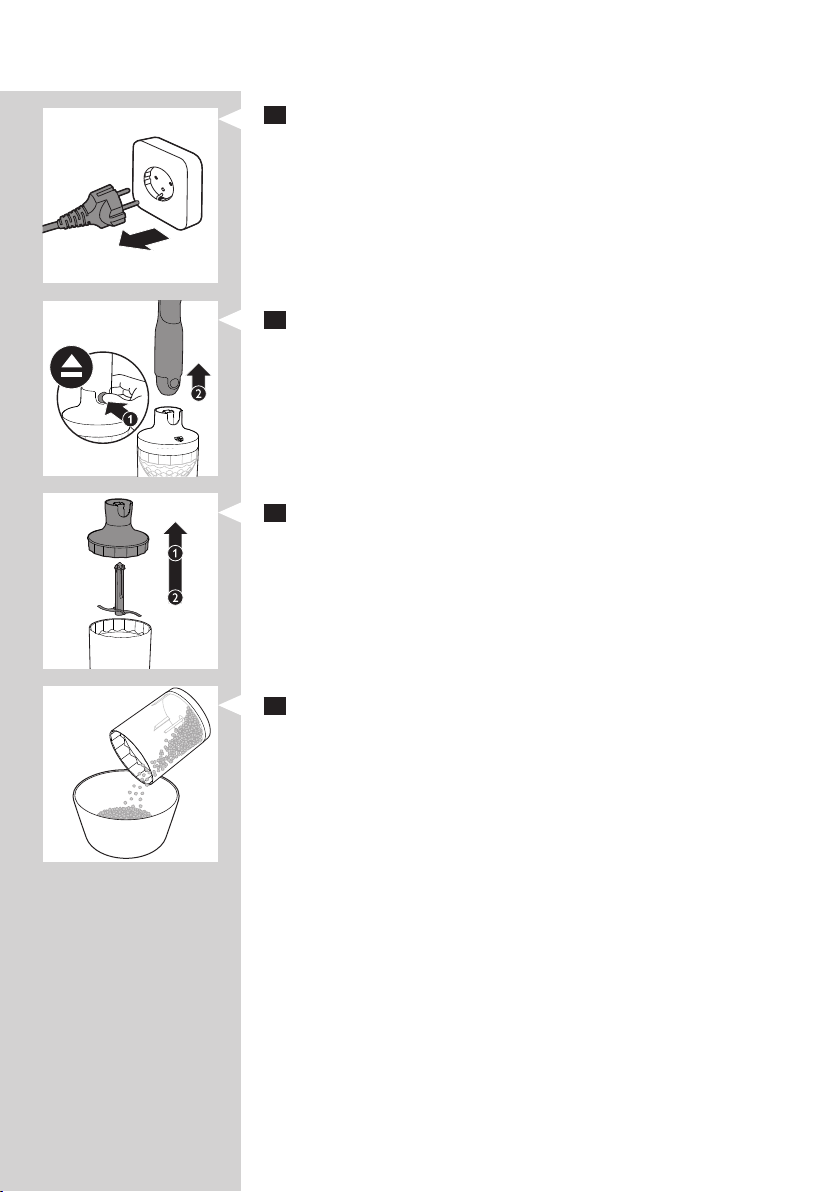
7 After you have nished blending, release the trigger switch
to turn the appliance o and unplug the appliance.
11ENGLISH
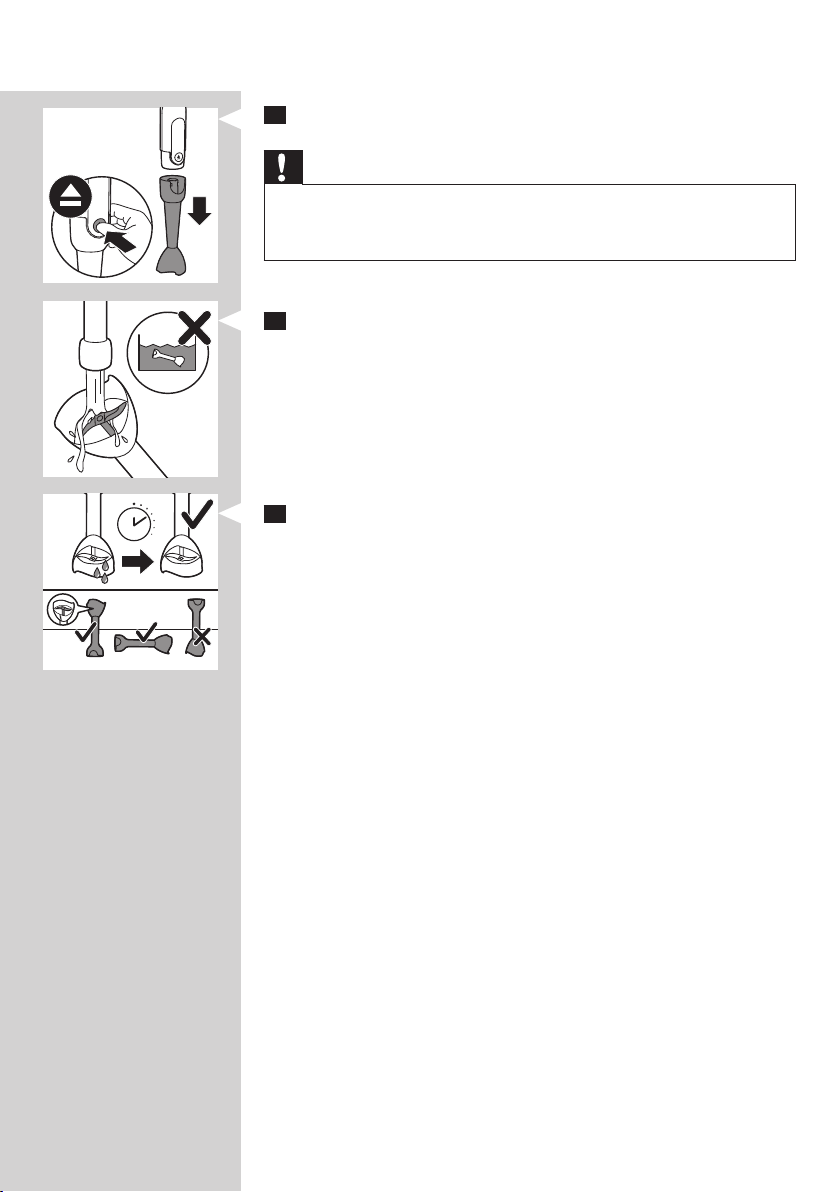
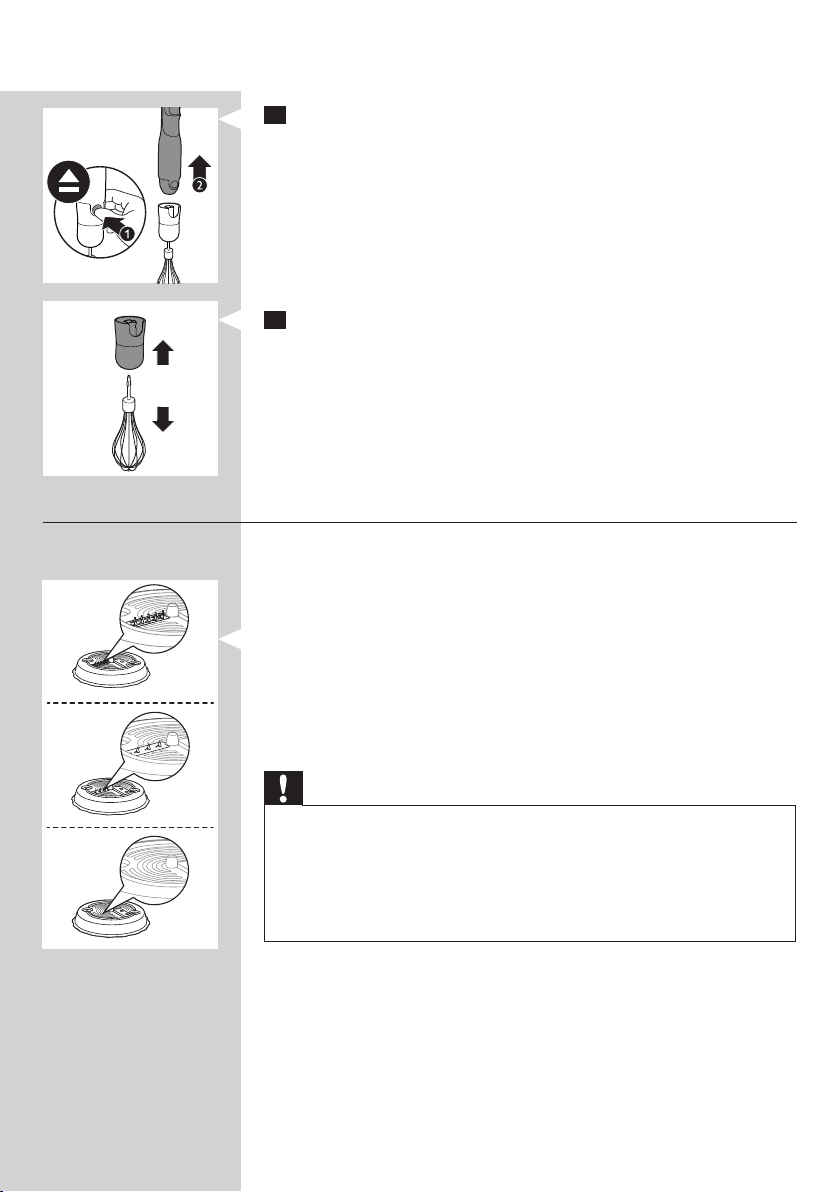
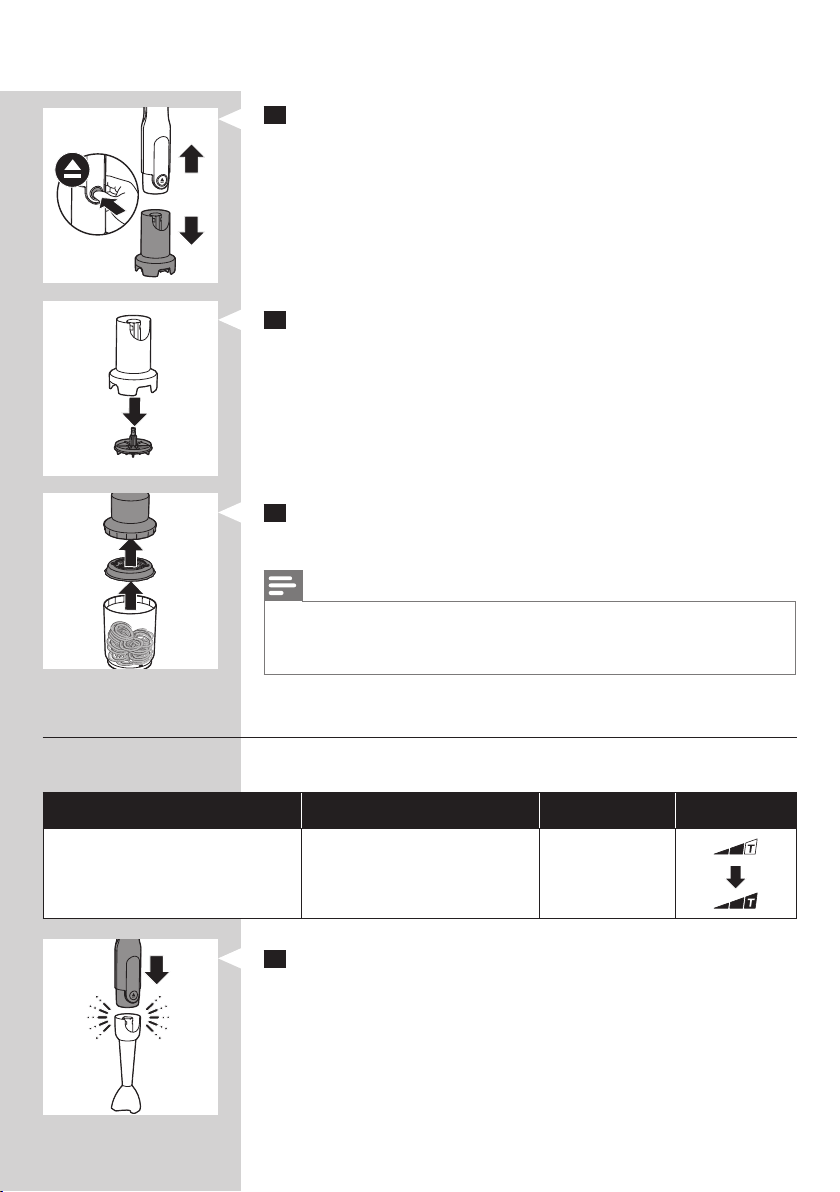
8 Remove the blender bar by pressing the release button.
Caution
• Blades are sharp. Handle carefully. Always unplug the appliance
rst. Never touch the blade itself when cleaning or clearing food
caught in blades.
9 For easy cleaning, rinse the bar immediately after use with
hot water. Do not immerse the bar completely in water.
10 Place the bar in an upright position with the blade guard
on top and let it dry for at least 10 minutes before storing.
12 ENGLISH
XL chopper ( HR2621, HR2652, HR2653, HR2655, HR2657 only)
The XL chopper is intended for chopping ingredients such as
nuts, raw meat, onions, hard cheese, boiled eggs, garlic, herbs,
dry bread, etc.
Caution
• Always unplug the appliance rst. Be very careful when you
handle the chopper blade unit, the cutting edges are very sharp.
Always hold the unit by the center plastic rod. Never touch the
blade itself. Be particularly careful when you insert or remove
the blade unit from the chopper bowl, when you empty the
chopper bowl, when clearing food caught in blades and during
cleaning.
• Do not process ingredients such as ice cubes, frozen ingredients
or fruits with stones.
Chopping quantities and processing times
Ingredients Chopping quantity Time Speed
Onions 200 g 5 x 1 sec.
Eggs 200 g 5 sec.
Meat 200 g 10 sec.
Herbs 30 g 10 sec.
Parmesan cheese 200 g 15 sec.
Nuts and almonds 200 g 30 sec.
Dark chocolate 100 g 20 sec.
Dry bread cubes 80 g 30 sec.
1 Put the blade unit in the XL chopper bowl.
13ENGLISH
2 Put the ingredients in the XL chopper bowl.
3 Put the gear unit for XL chopper on the chopper bowl.
4 Attach the motor unit onto the gear unit for XL chopper
(‘click’).
5 Put the plug in the wall outlet.
6 Press the trigger switch and let it operate until all
ingredients are cut.
14 ENGLISH
7 After you have nished chopping, release the trigger
switch to turn the appliance o and unplug the appliance.
8 Press the release button to remove the motor unit from
the gear unit.
9 Carefully remove the gear unit and the blade unit (g. 18).
10 Pour the chopped ingredients out (g. 19).
15ENGLISH
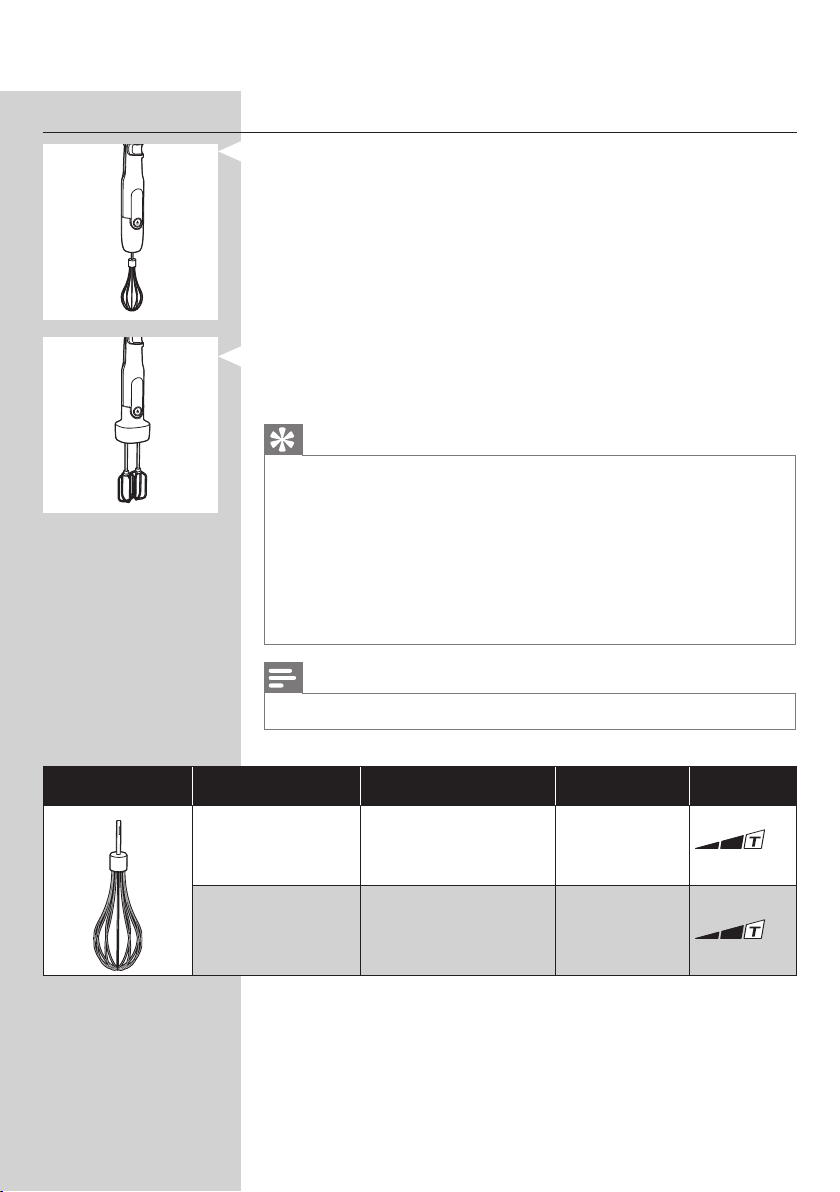
Whisk (HR2621, HR2652, HR2655, HR2657 only) /
Mixer accessory (HR2653 only)
The whisk is intended for whipping cream, whisking egg whites,
desserts etc.
The mixer accessory is intended for mixing all kinds of light
doughs, e.g. sponge cake, cake batter and for mashing
potatoes, whipping cream, whisking egg whites and desserts.
Tip
• If you want to process a small quantity, tilt the bowl slightly for a
quicker result.
• When you beat egg whit es, use a large bowl for the best result.
In order to get a good result the bowl and the tool must be
completely fat free and there must not be a rest of egg yolk in the
egg whites.
• To prevent splashing, start at a low speed and continue with a
higher speed after around 1 minute.
• When you whip cream, use a beaker to avoid splashing.
Note
• Do not use the whisk to prepare dough or cake mixture.
Whisking quantities and processing time.
Ingredients Whisking quantity Time Speed
Cream 250 g 70-90 sec
Egg whites 4 x 120 sec
16 ENGLISH
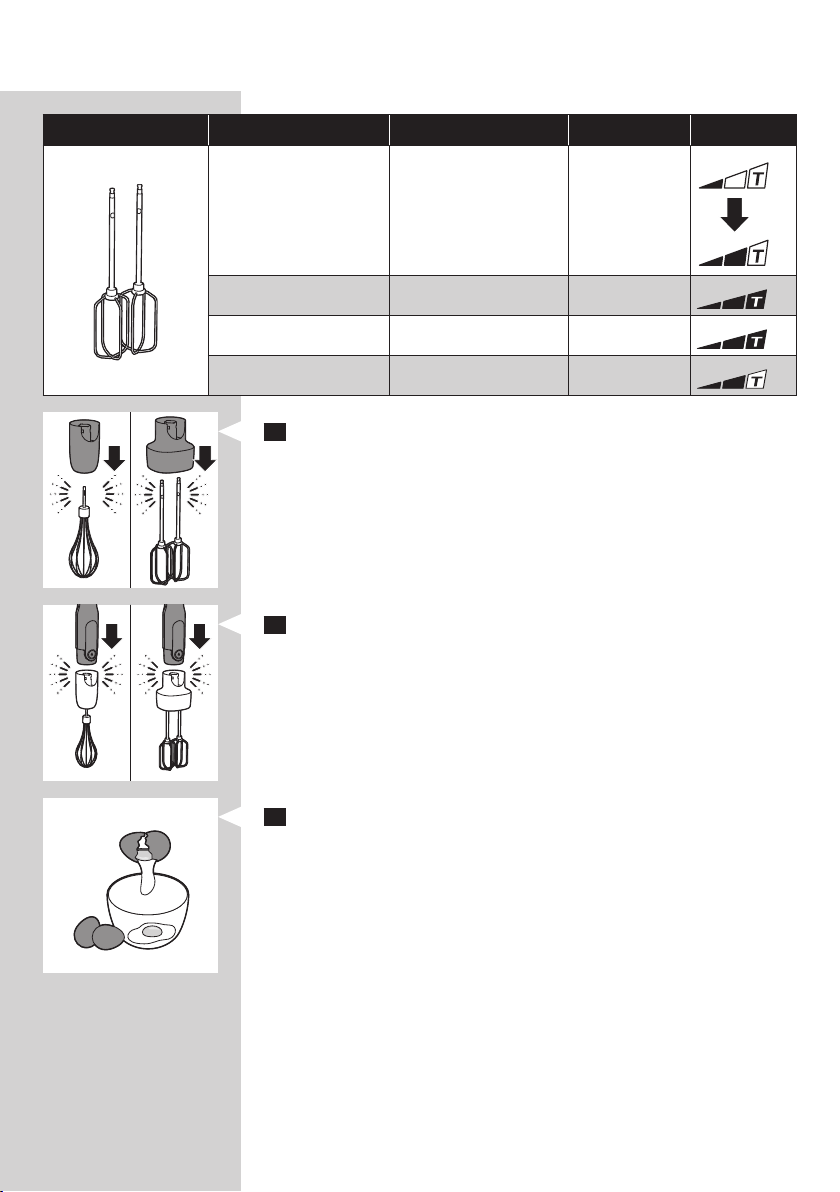
Mixing quantities and processing time.
Ingredients Mixing quantities Time Speed
Cream 200-250 ml 70-90 sec
Eggs 1-6 x 2-4 min
Cake batter 750 g 3-6 min
Cooked potatoes 750 g 30 sec
1 Attach the whisk to the whisk gear unit, or attach the mixer
accessory to the mixer accessory gear unit (‘click’).
2 Attach the whisk gear unit or the mixer gear unit to the
motor unit (‘click’).
3 Put the ingredients in a bowl.
17ENGLISH
4 Put the plug in the wall outlet.
5 Immerse the whisk or the mixer accessory in the
ingredients.
6 Press the trigger switch.
7 Move the appliance slowly in circles.
8 After you have nished the whisking/mixing, release the
trigger switch to turn the appliance o and remove the
plug from the wall outlet.
18 ENGLISH
9 Press the release button to remove the motor unit from
the gear unit.
10 To detach the whisk/mixer accessory from the gear unit,
pull the whisk/mixer accessory straight down out of the
gear unit.
Spiralizer (HR2656, HR2657 only)
The spiralizer is intended for creating spirals from dierent
vegetable, e.g. potatoes, carrots, cucumber, zucchini, white
radish, beet roots, turnips, etc.
3 Inserts:
The spiralizer has three dierent inserts which produce spirals
with dierent widths. The “Spaghetti” insert and the “Linguine”
inserts have two dierent knives, the plain knife cuts spiral
ribbons and the second knife unit with the small teeth divides
them into ne (Spaghetti) or thicker (Linguine) strips. The insert
for the wide ribbons only has one plain knife.
Caution
• Be very careful when you handle the inserts, the cutting edges
are very sharp. Always hold the inserts by the outer radius. Never
touch the blade itself. Be particularly careful when you insert or
remove the inserts from the chopper bowl. Grab the inserts with
two ngers by using the holes in the insert. Be very careful when
clearing food caught in blades and during cleaning.

19ENGLISH
Speed
Courgette
Sweet potatoes
Carrots (thicker
than 3 cm)
Radish
Cucumber
Potatoes
Vegetable preparation tips
- In order to get nice and long spirals, cut the vegetable into
straight cylinders with approximately the same height as
the feeding tube.
- Cut o each end of e.g. a cucumber/potato in order to have
a good contact with the driving plate and the cutting insert.
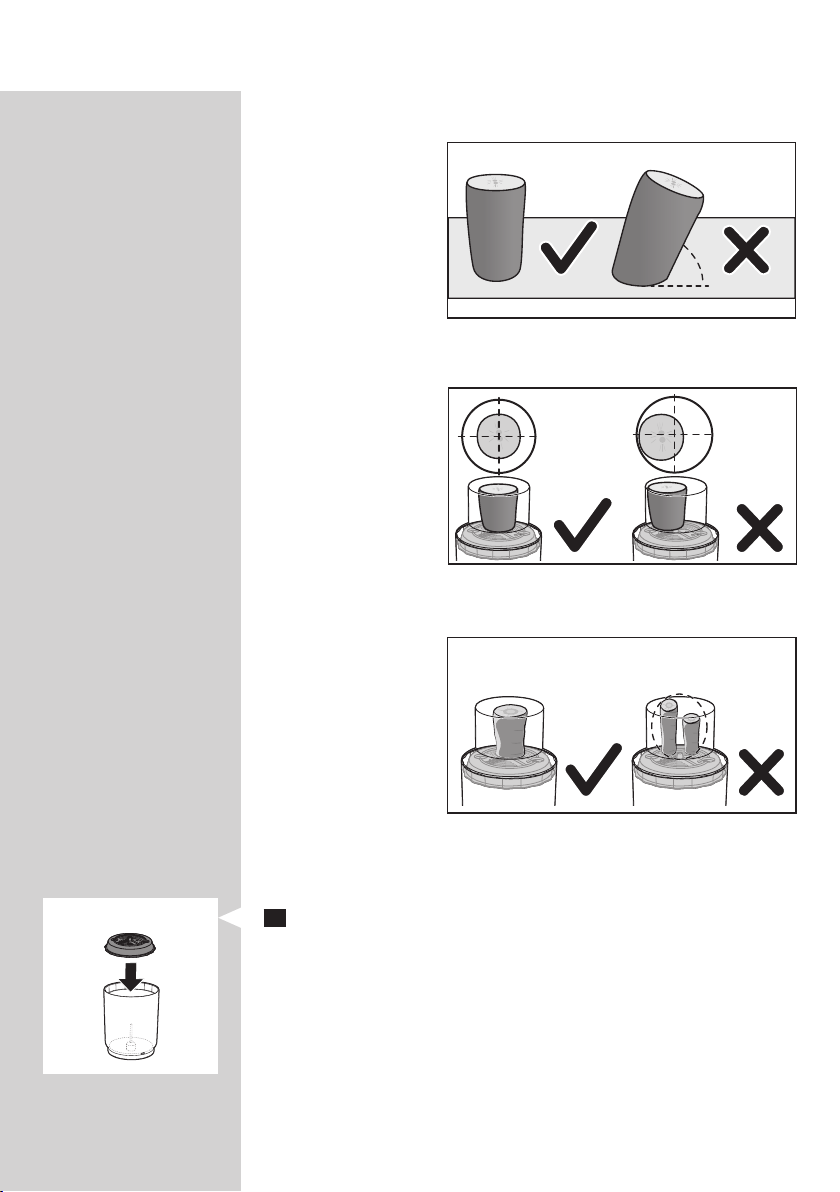
20 ENGLISH
- Only a straight cylinder will remain centered from the
beginning to the end of processing.
- Center the prepared vegetable by pressing it on the small
metal tube in the middle of the cutting insert.
- Never place more than one piece of vegetable at the same
time on the cutting inserts.
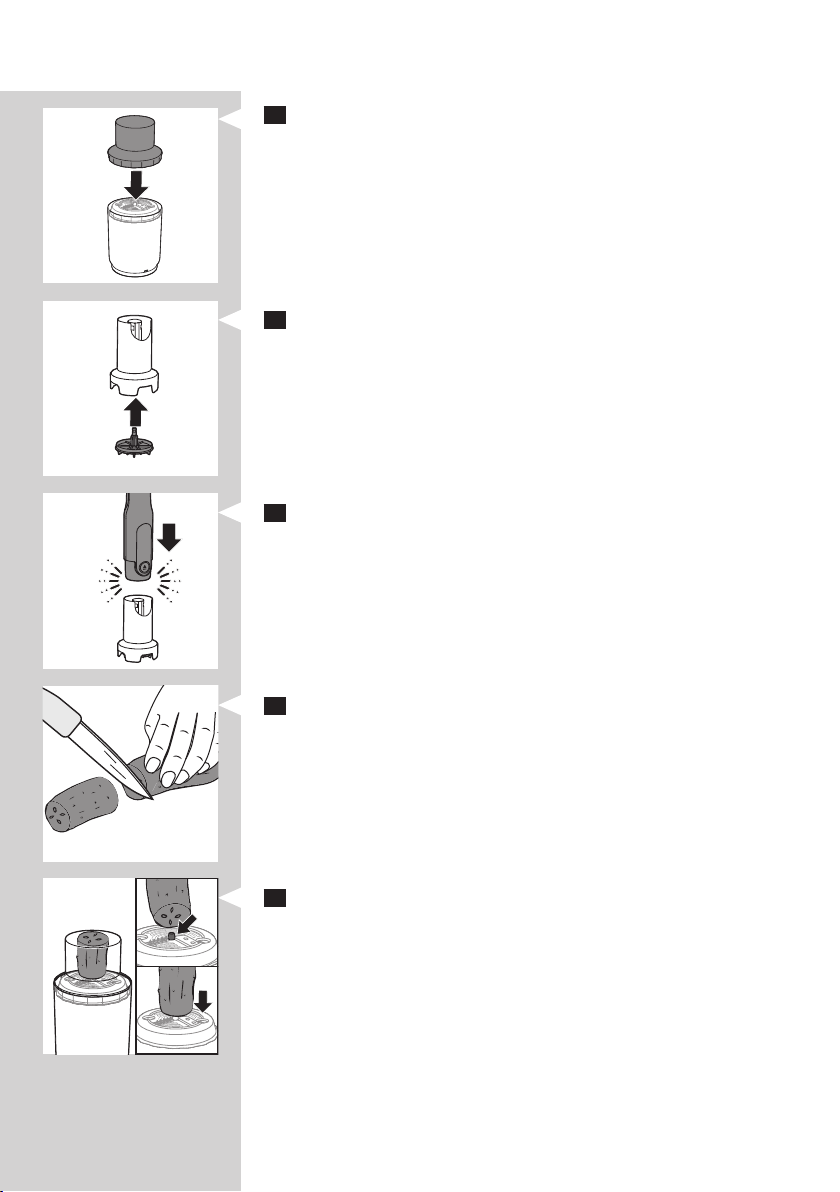
Using the spiralizer
1 Remove the chopping blade from the XL chopping bowl
and put one of the inserts in the XL chopper bowl.
21ENGLISH
2 Attach the translucent feeding tube onto the XL chopper
bowl.
3 Attach the driving plate to the spiralizer gear unit.
4 Attach the motor unit to the gear unit (g. 2).
5 Prepare the vegetable as described in the preparation tips.
6 Center the vegetable and press it onto the small metal
tube of the insert.
22 ENGLISH
7 Put the plug in the wall outlet.
8 Press the motor unit with attached gear unit and driving
plate onto the vegetable (g. 6).
9 Fix the chopper bowl and the feeding tube with one hand,
and press the trigger switch with the middle nger of the
other hand. Press down the vegetable at the same time.
10 The spirals are processed into the bowl.
11 After you have nished processing, release the trigger
switch to turn the appliance o and unplug the appliance.
23ENGLISH
12 Remove the gear unit by pressing the release button.
13 Remove the driving plate from the gear unit.
14 Remove the feeding tube and the insert, and then empty
the bowl.
Note
• If you want to make another batch, remove the remaining
vegetable from the driving plate or the insert.
• If you make larger quantities, empty the bowl before it’s full.
Soup container (HR2651, HR2655 only)
The Soup container is intended for directly blending the soup
in the container and to take outside.
Maximum quantity Time Speed
1. Cook veggies e.g. carrots,
potatoes in boiling water
for 20 minutes.
2. Cut into 2x2x2 cm pieces.
Carrots, potatoes: 200 g
Water:100 g
60 sec.
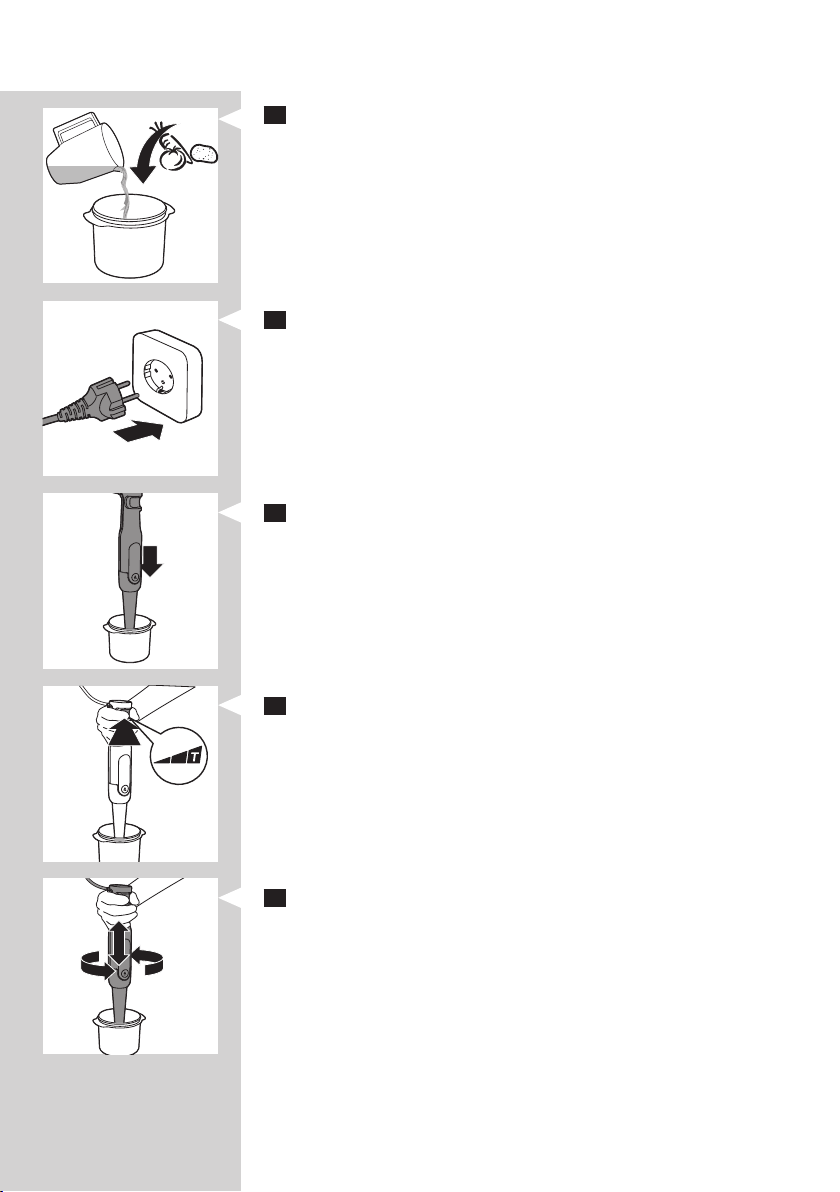
1 Attach the blender bar to the motor unit (“click”).
24 ENGLISH
2 Put the cooked ingredients into the container.
3 Put the plug in the wall outlet.
4 Immerse the blade guard completely in the ingredients in
order to avoid splashing.
5 Switch on the appliance by squeezing the trigger switch.
You can increase the speed by pressing the switch harder.
6 Move the appliance slowly up and down and in circles to
blend the ingredients.
25ENGLISH
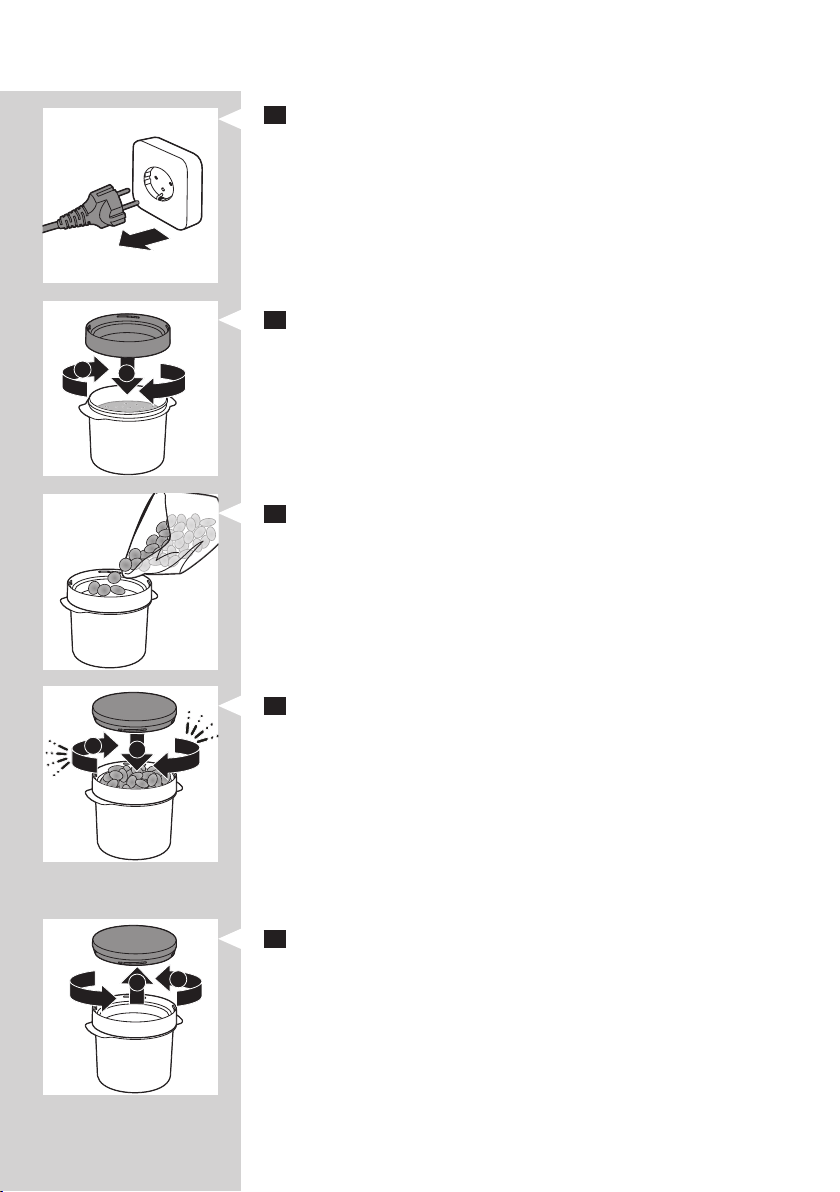
7 After you have nished blending, release the trigger switch
to turn the appliance o and unplug the appliance.
8 Attach the cracker compartment and x it by turning it
clockwise.
9 Fill in the cracker or other food which you will eat together
with the soup.
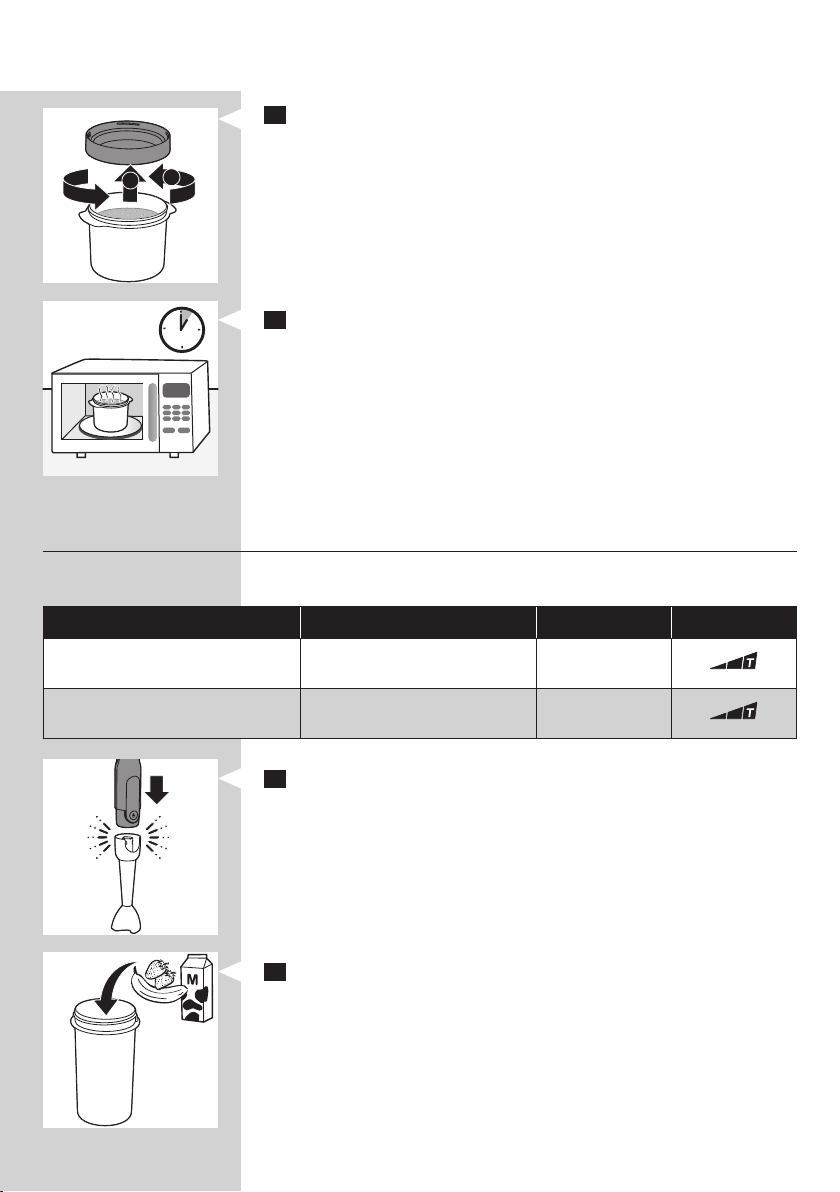
10 Attach the lid and close it by turning it clockwise.
Reheat the soup directly in the soup container:
1 Open the lid by turning it counterclockwise.
1
2
1
2
2
1
26 ENGLISH
2 Remove the cracker compartment by turning it
counterclockwise.
3 Place the opened container in the microwave and reheat
the soup.
Bottle to go (HR2650, HR2651, HR2652, HR2653, HR2655,
HR2656, HR2657 only)
The bottle to go is intended for directly blending the bottle and
to take to work.
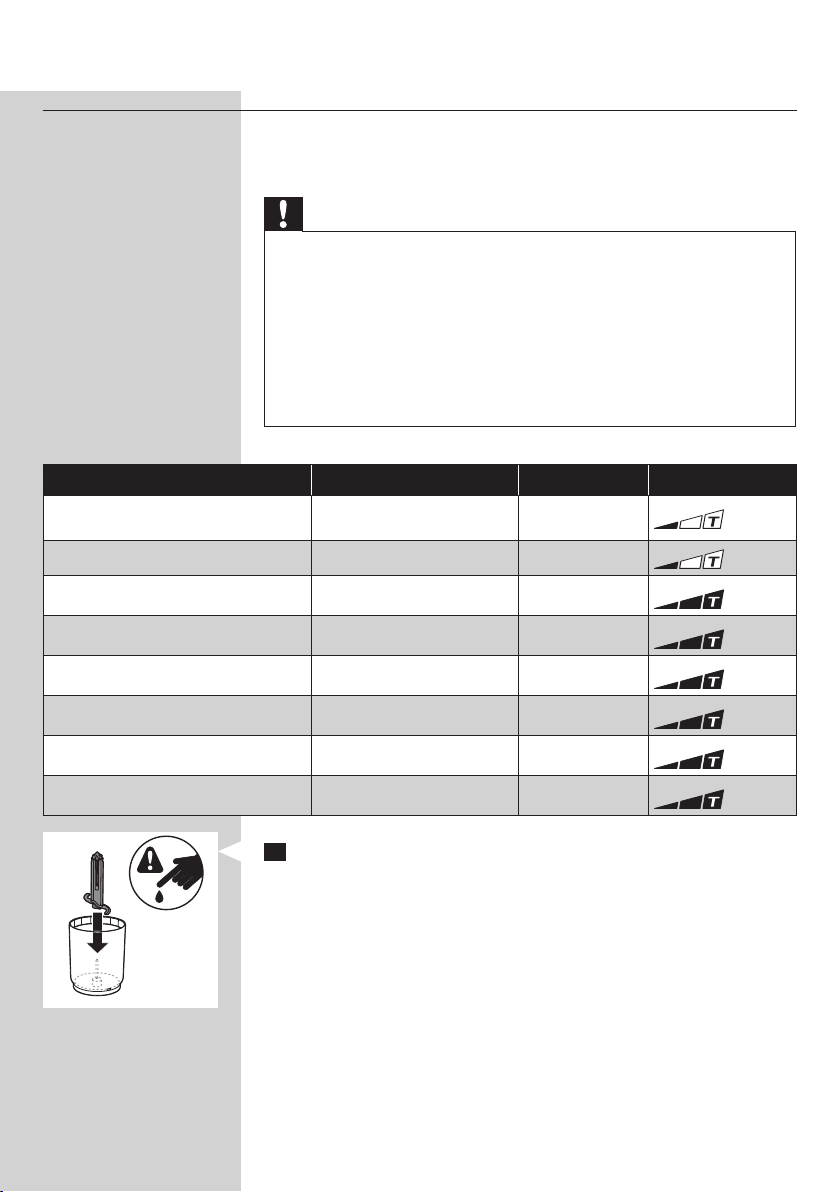
Maximum quantity Time Speed
Berries, banana
Milk, Juice
400 ml 60 sec.
Veggies
Juice
400 ml 60 sec.
1 Attach the blender bar to the motor unit (“click”).
2 Put the ingredients into the bottle.
2
1
27ENGLISH
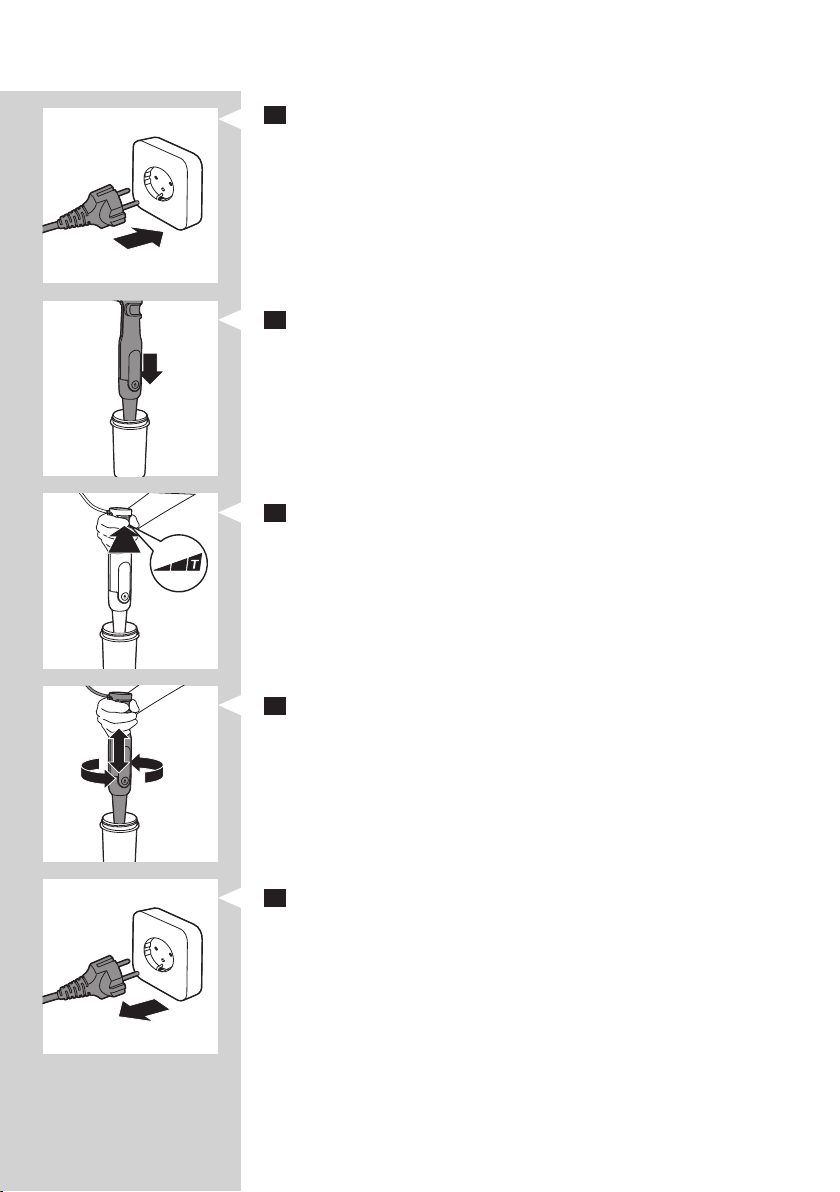
3 Put the plug in the wall outlet.
4 Immerse the blade guard completely in the ingredients in
order to avoid splashing.
5 Switch on the appliance by squeezing the trigger switch.
You can increase the speed by pressing the switch harder.
6 Move the appliance slowly up and down and in circles to
blend the ingredients.
7 After you have nished blending, release the trigger switch
to turn the appliance o and unplug the appliance.
28 ENGLISH
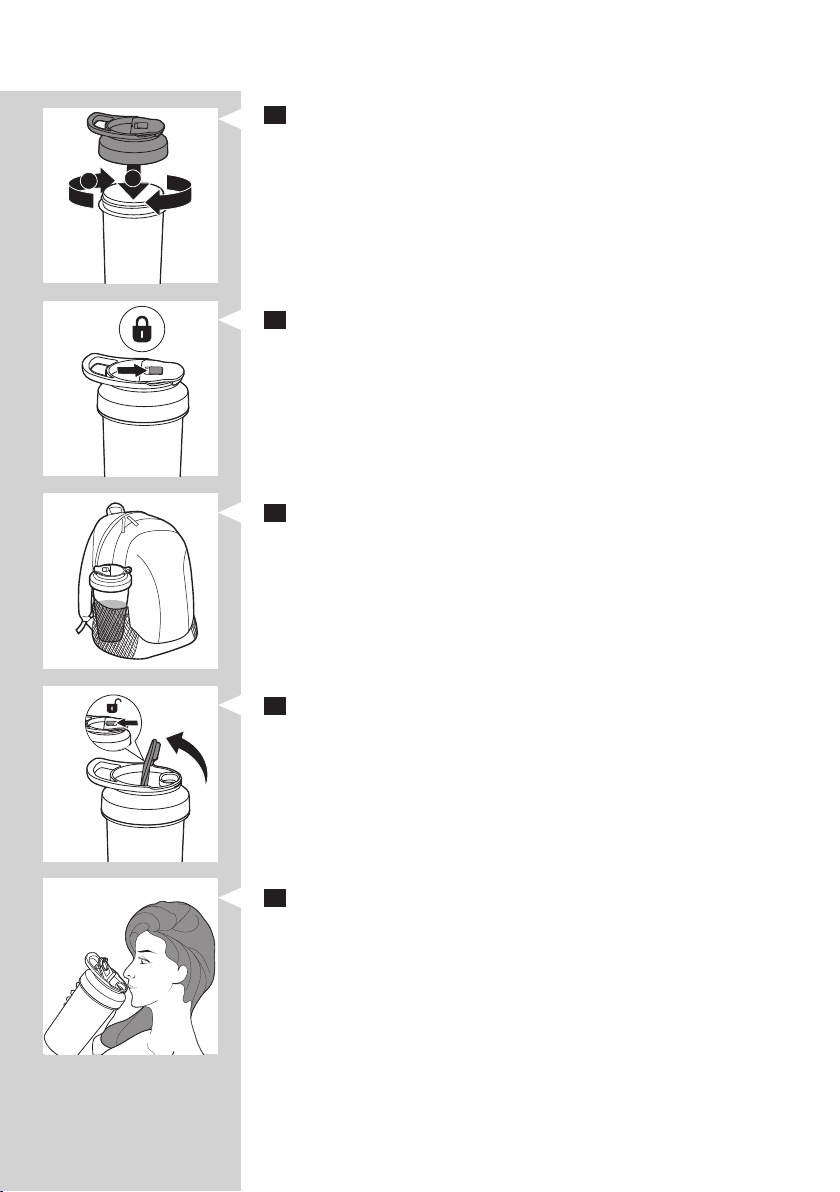
8 Attach the lid by turning it clockwise.
9 Close the drinking spout and lock it by pushing the locking
slider in the locking position.
10 Now you can take the bottle to go.
11 Open the drinking spout by pushing the locking slider to
the open position.
12 Enjoy your home made smoothie or shake.
1
2

29ENGLISH
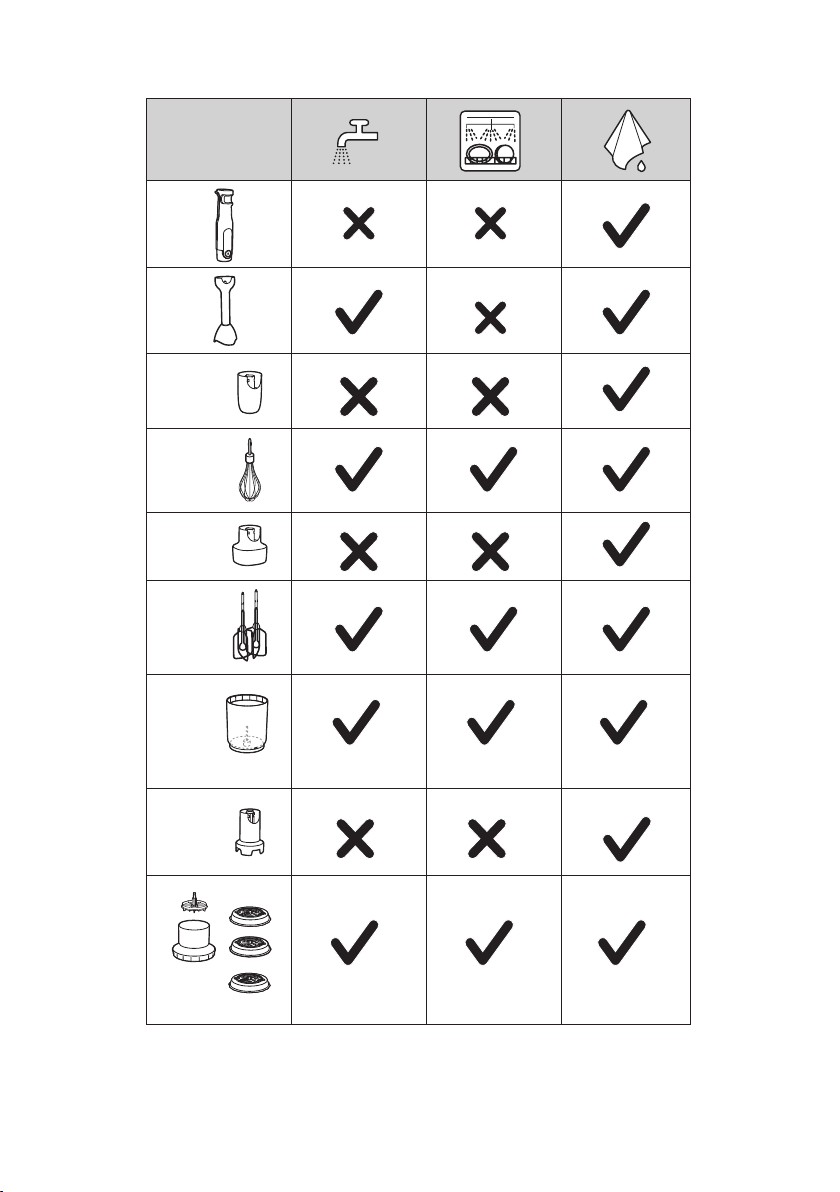
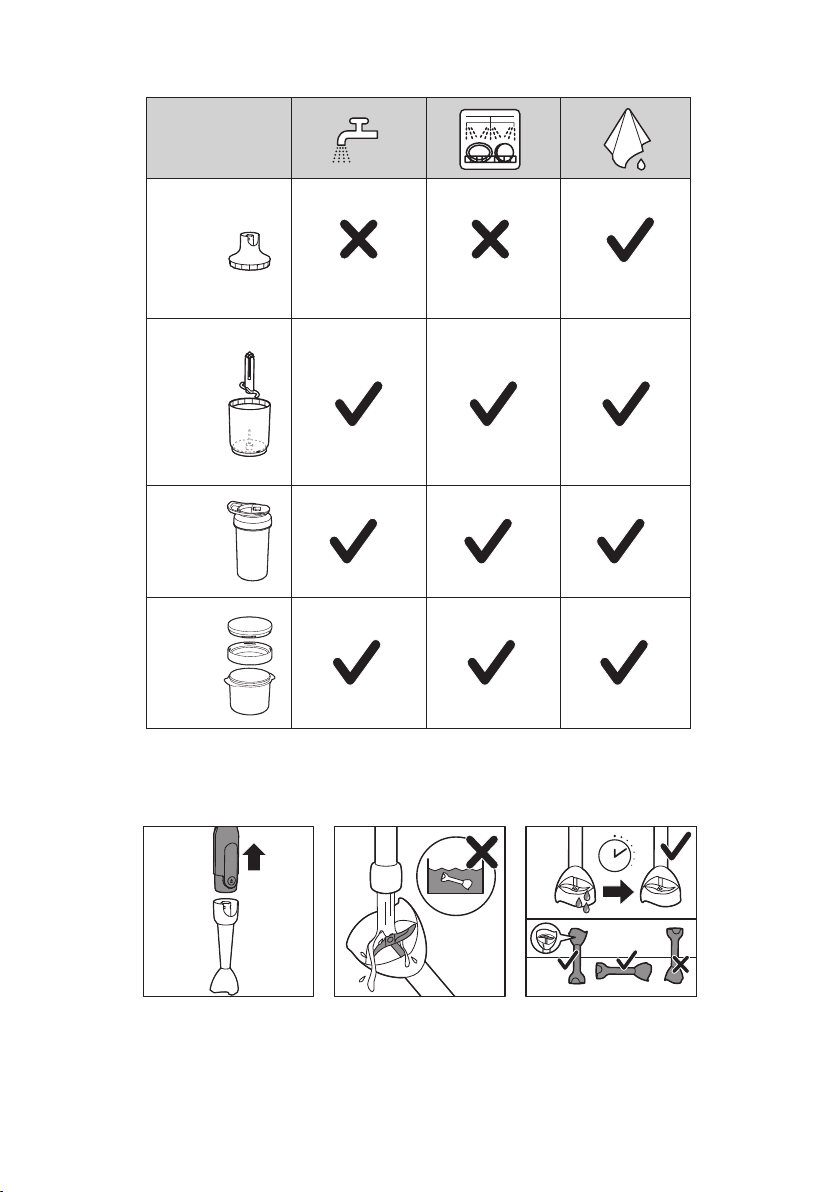
Cleaning
Caution
• Do not immerse the motor unit, the XL chopper gear unit, the
whisk gear unit and the mixer accessory gear unit in water or any
other liquids, nor rinse them under the tap. Use a moist cloth to
clean these parts. The blender bar blade and guard can be rinsed
under the tap. All other accessories are dishwasher proof.
• Never use scouring pads, abrasive cleaning agents or aggressive
liquids such as alcohol, gasoline or acetone to clean the
appliance.
1 Unplug the appliance.
2 Press the release button on the motor unit to remove the
accessory you have used.
3 Disassemble the accessory.
4 See the ‘Cleaning’ charts for further instructions.
30 ENGLISH
HR2656
HR2653
HR2653
HR2621
HR2652
HR2655
HR2657
HR2621
HR2652
HR2655
HR2657
HR2656
HR2657
HR2656
HR2657
31ENGLISH
HR2650
HR2651
HR2652
HR2653
HR2655
HR2656
HR2657
HR2651
HR2655
HR2621
HR2652
HR2653
HR2655
HR2657
HR2621
HR2652
HR2653
HR2655
HR2657
XL
XL

32 ENGLISH
Storage
1 Wind the power cord loosely around the heel of the motor
unit.
2 Store the appliance in a cool, dry place away from direct
sunlight or other heat source.
Recycling
- This symbol means that this product shall not be disposed
of with normal household waste (2012/19/EU).
- Follow your country’s rules for the separate collection of
electrical and electronic products. Correct disposal helps
prevent negative consequences for the environment and
human health.
Guarantee and support
If you need information or support, please visit
www.philips.com/support or read the separate worldwide
guarantee leaet.
Troubleshooting
This chapter summarizes the most common problems
you could encounter with the appliance. If you are unable
to solve the problem with the information below, visit
www.philips.com/support for a list of frequently asked
questions or contact the Consumer Care Center in your
country.
Problem Solution
The appliance makes a lot of noise,
produces an unpleasant smell,
feels hot to the touch or produces
smoke. What should I do?
The appliance may produce an unpleasant smell
or emit a little smoke if it has been used too long.
In this case you should switch o the appliance
and let it cool down for 60 minutes.
Is it possible to damage the
appliance by processing very hard
ingredients?
Yes, the appliance may get damaged if you
process very hard ingredients such as bones, fruit
with stones or frozen ingredients.
Why does the appliance suddenly
stop working?
Some hard ingredients may block the blade unit.
Release the trigger switch, unplug the appliance,
detach the motor unit and carefully remove the
ingredients that block the blade unit.


Specications are subject to change without notice
© 2019 Koninklijke Philips N.V.
All rights reserved.