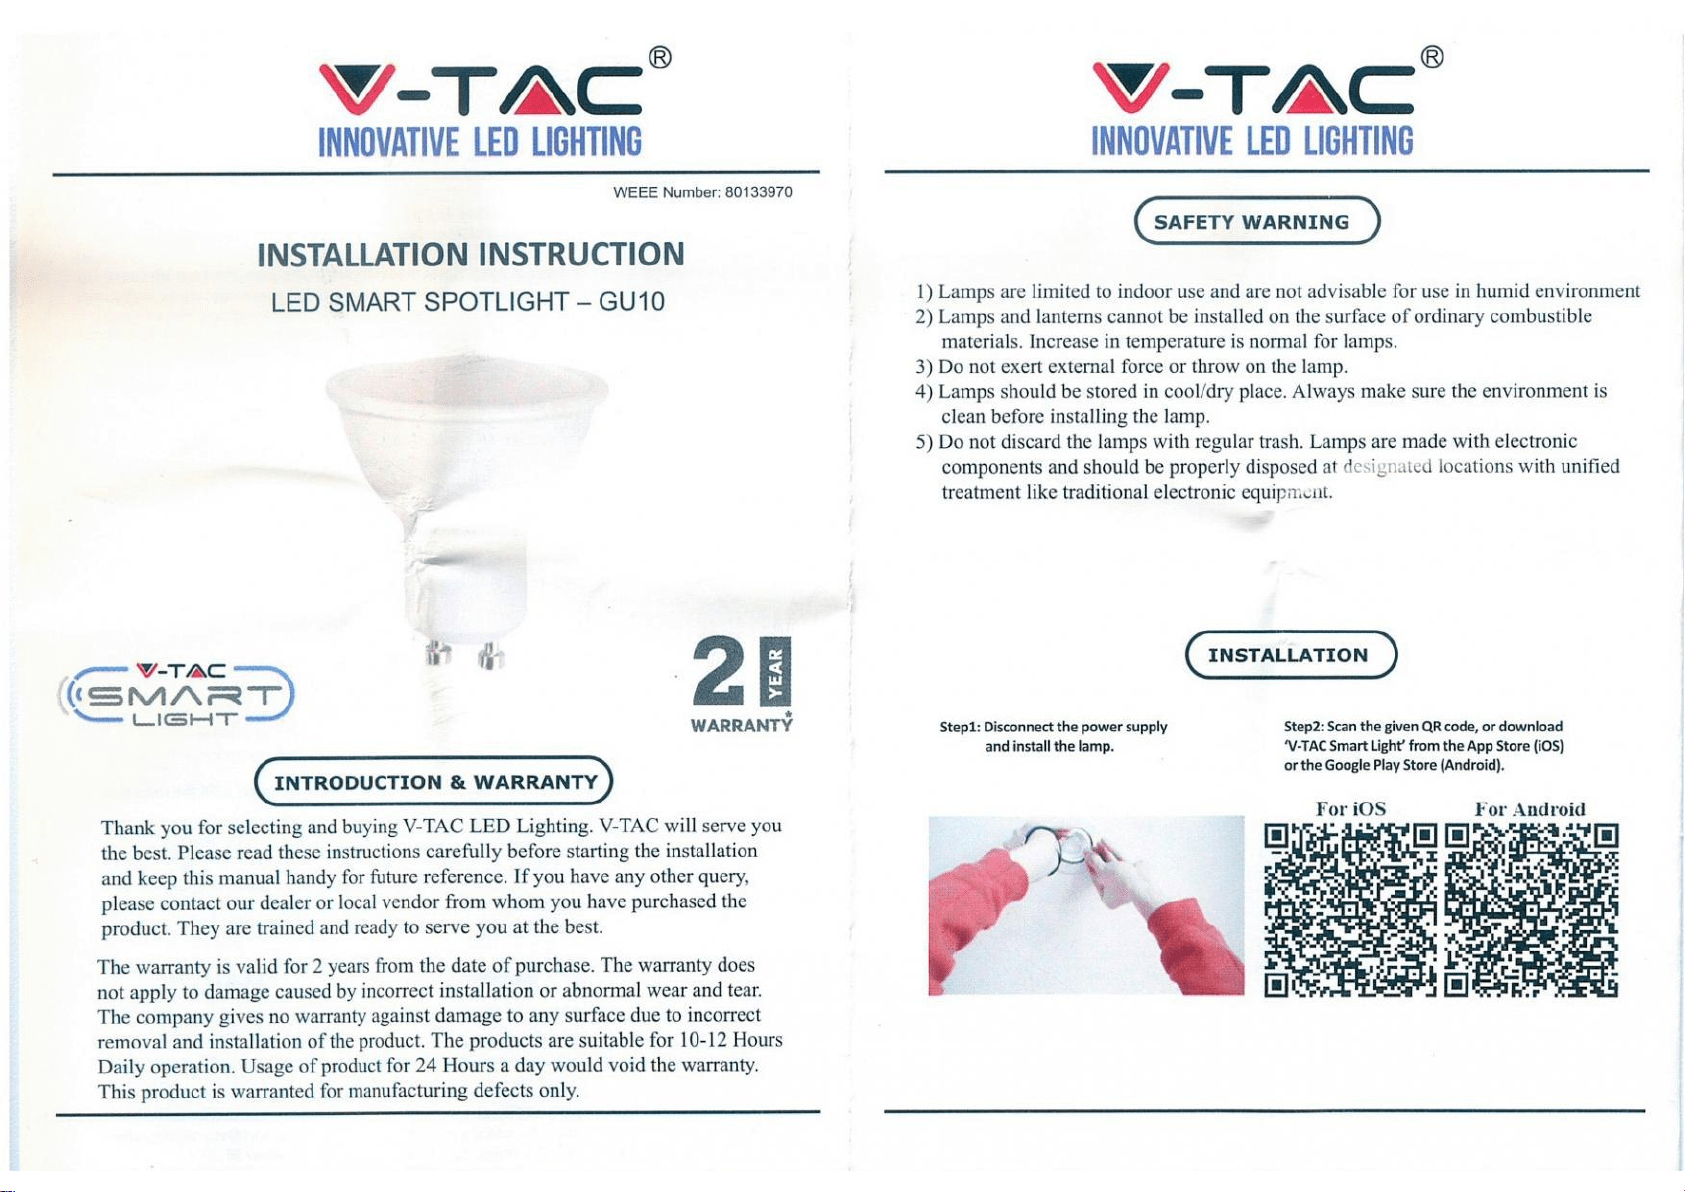
Thank you for selecting and buying V-TAC SMART LED Lighting. V-TAC will serve you the best. Please read
these instructions carefully before starting the installation and keep this manual handy for future reference.
If you have any other query, please contact our dealer or local vendor from whom you have purchased the
product. They are trained and ready to serve you at the best. The warranty is valid for 2 years from the date
of purchase. The warranty does not apply to damage caused by incorrect installation or abnormal wear
and tear. The company gives no warranty against damage to any surface due to incorrect removal and
installation of the product. The products are suitable for 10-12 Hours Daily operation. Usage of product for
24 Hours a day would void the warranty. This product is warranted for manufacturing defects only.
INTRODUCTION & WARRANTY
INSTRUCTION MANUAL
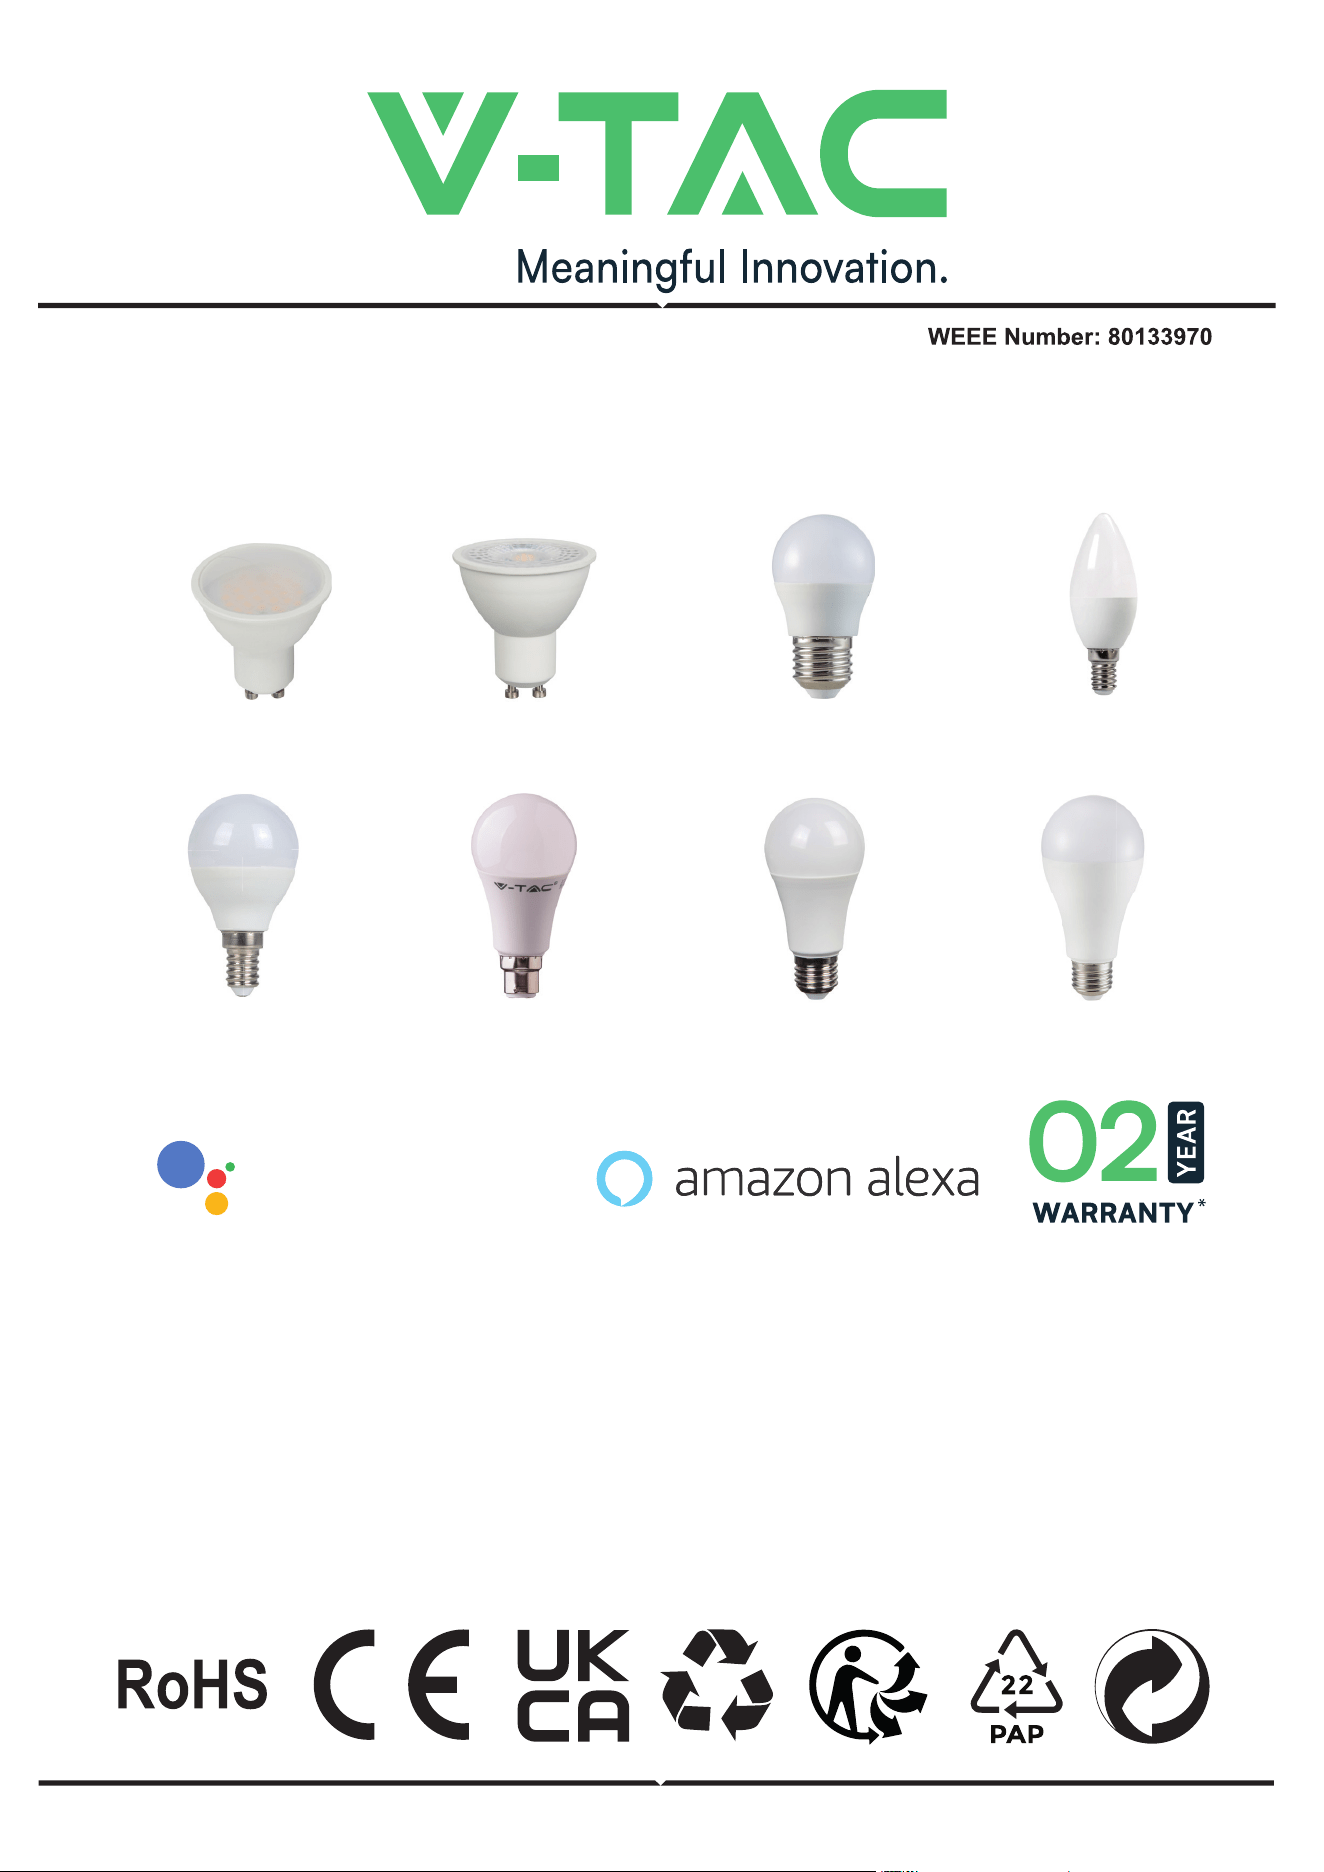
LED SMART LIGHT SERIES
GU10
Milky Cover
E14
P45
B22
A60
E27
A60
E27
A65
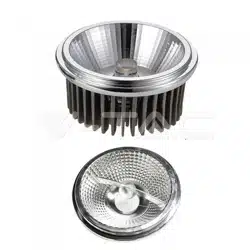
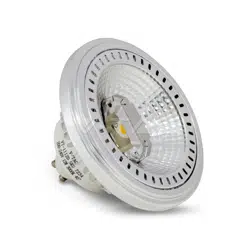
GU10
Lens
E27
G45
E14
Candle
WORKS WITH
works with the
Google Assistant
SAFETY WARNING
APP INSTALLATION INSTRUCTIONS
NOTE
MULTI-LANGUAGE
MANUAL QR CODE
Please scan the QR code
to access the manual in
multiple languages.
1. Lamps are limited to indoor use and are not advisable for use in humid environment
2. Lamp is to be used in well ventilated areas and normal installation.
3. Caution: This lamp is NOT to be used in a totally enclosed fixture which is not good for heat
emission. Please do not install the lamp in enclosed space as it will shield the wifi signal due
to which resulting in the poor functioning of the product.
4. Lamps and lanterns cannot be installed on the surface of ordinary combustible materials.
Increase in temperature is normal for lamps.
5. Do not exert external force or throw on the lamp.
6. Lamps should be stored in cool/dry place. Always make sure the environment is clean before
installing the lamp.
7. Do not discard the lamps with regular trash. Lamps are made with electronic components
and should be properly disposed at designated locations with unified treatment like tradition-
al electronic equipment.
1. This device requires Wi-Fi Frequency 2.4Ghz
2. Indoor use only
3. Operating frequency (maximum transmitted
power) 2400MHz-2483.5MHz (20dBm)
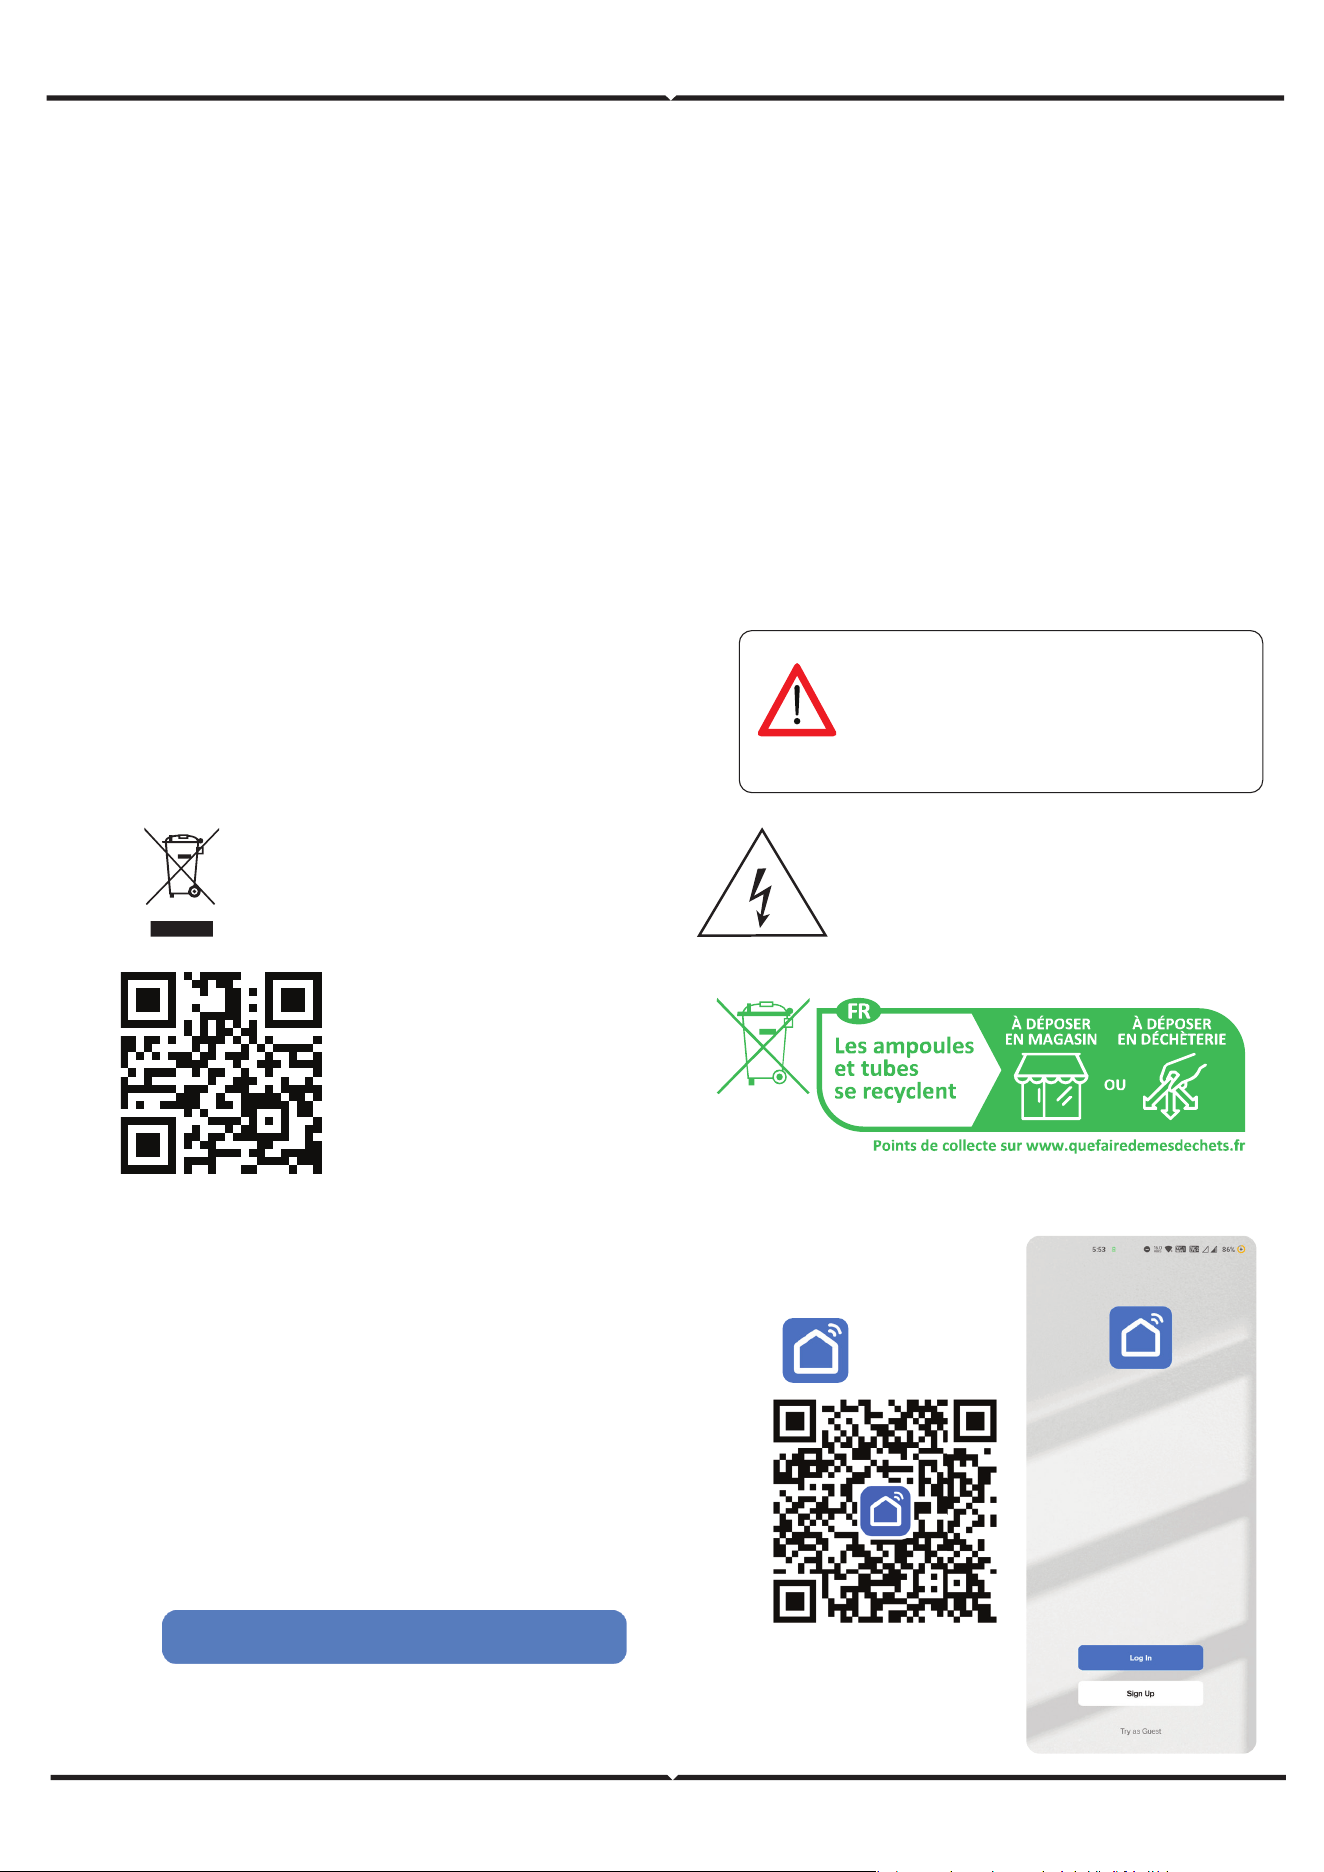
This marking indicates that this
product should not be disposed
of with other household wastes.
Caution, risk of electric shock.
Fig 1
Smart Life
Step 1: Turn the power button ON of the device. Then
follow the below instruction for the device.
Step 2: Scan the given QR code, or download “Smart
Life’ from the App Store (iOS) or the Google
Play Store (Android).
Step 3: Open the Smart Life app and tap on register
for creating a new account. If you already
have an existing account, please proceed to please
proceed to logging in.(Ref Fig 1)
This is the safety alert symbol. This symbol
alerts you to potential hazards that could
result in property damage and/or serious
bodily harm or death.
WARNING SYMBOLS USED
Click here to install Smart Life App
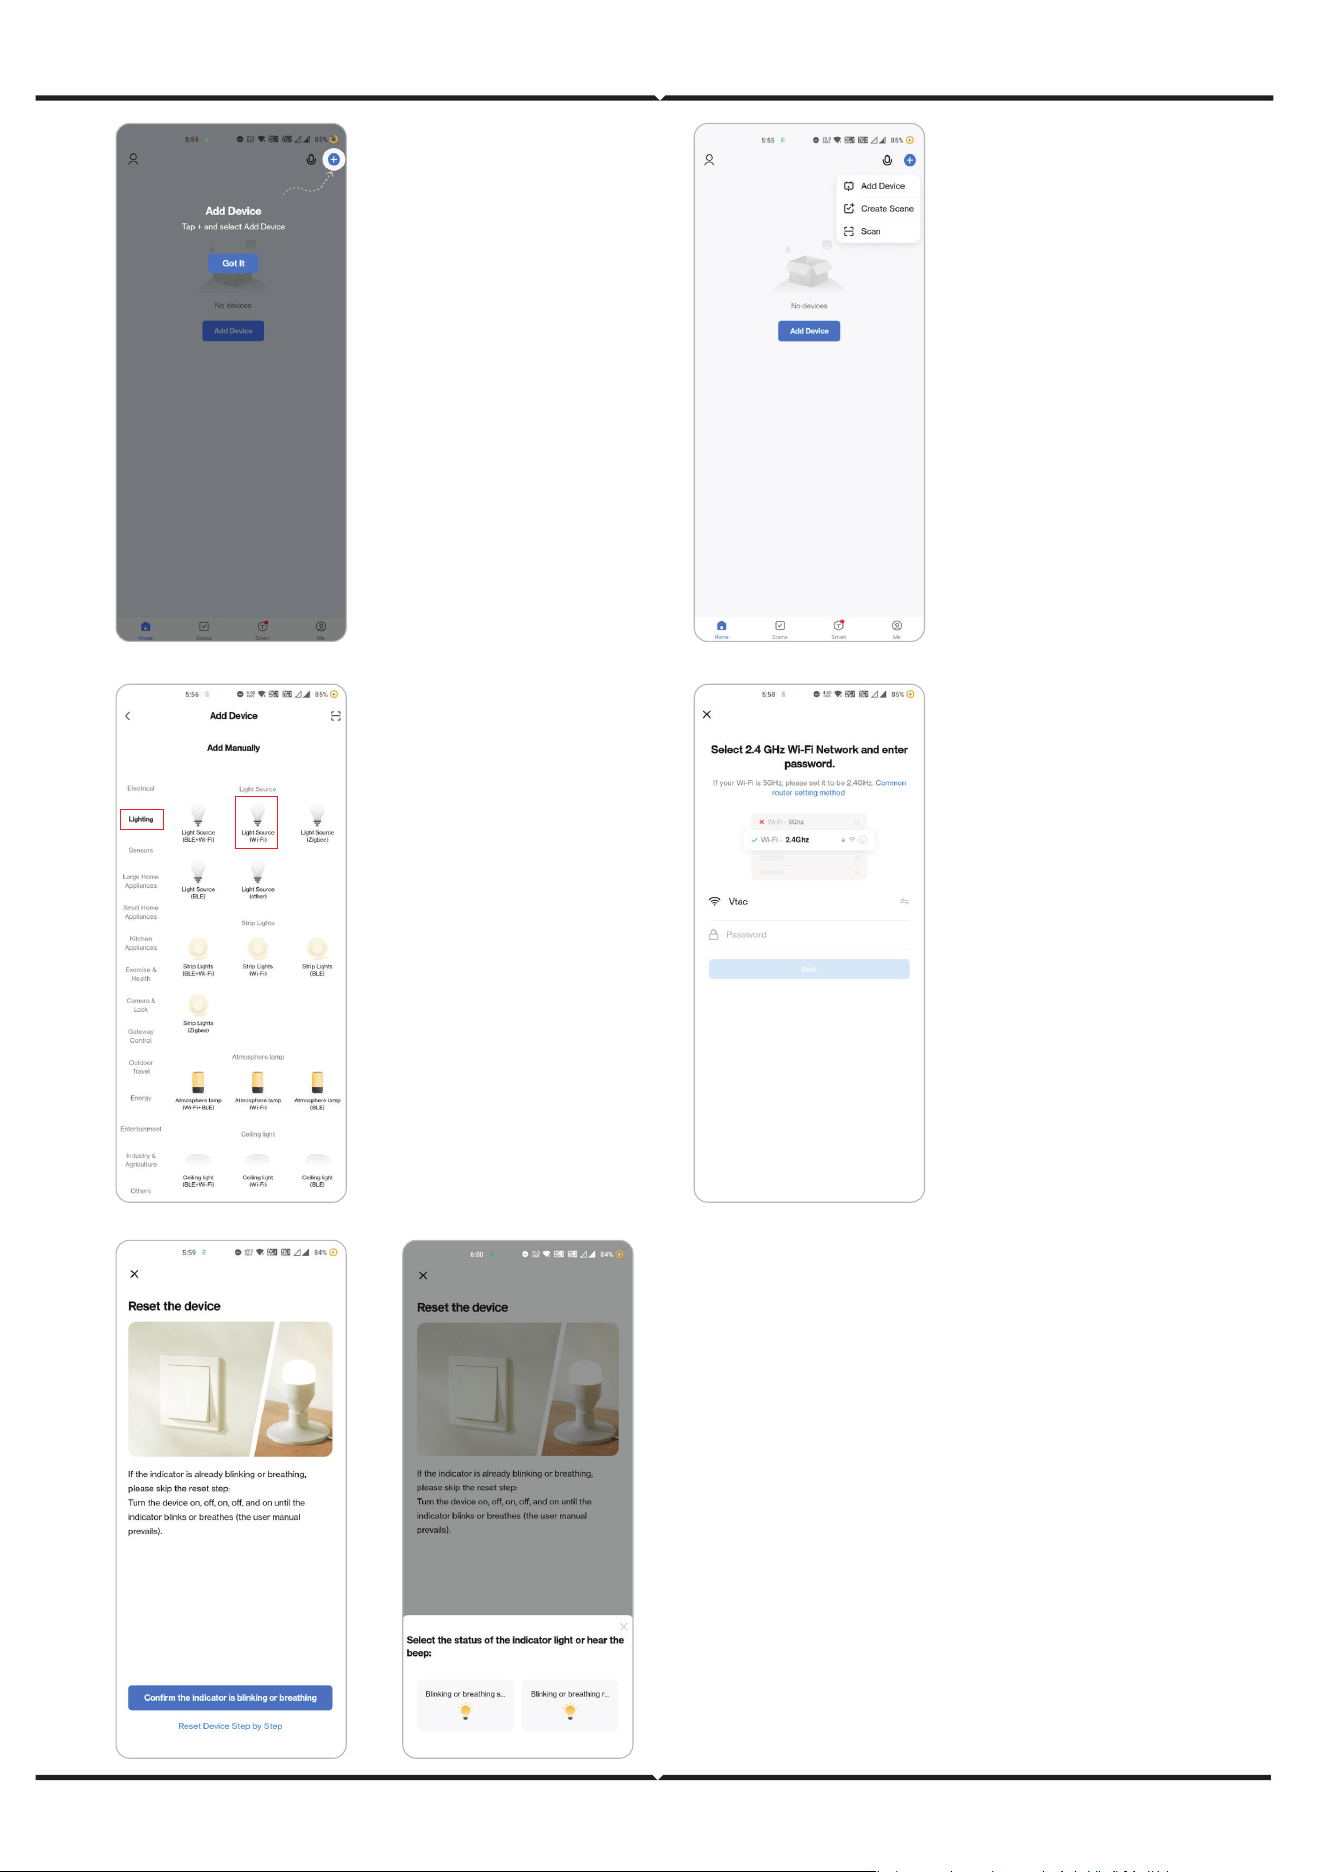
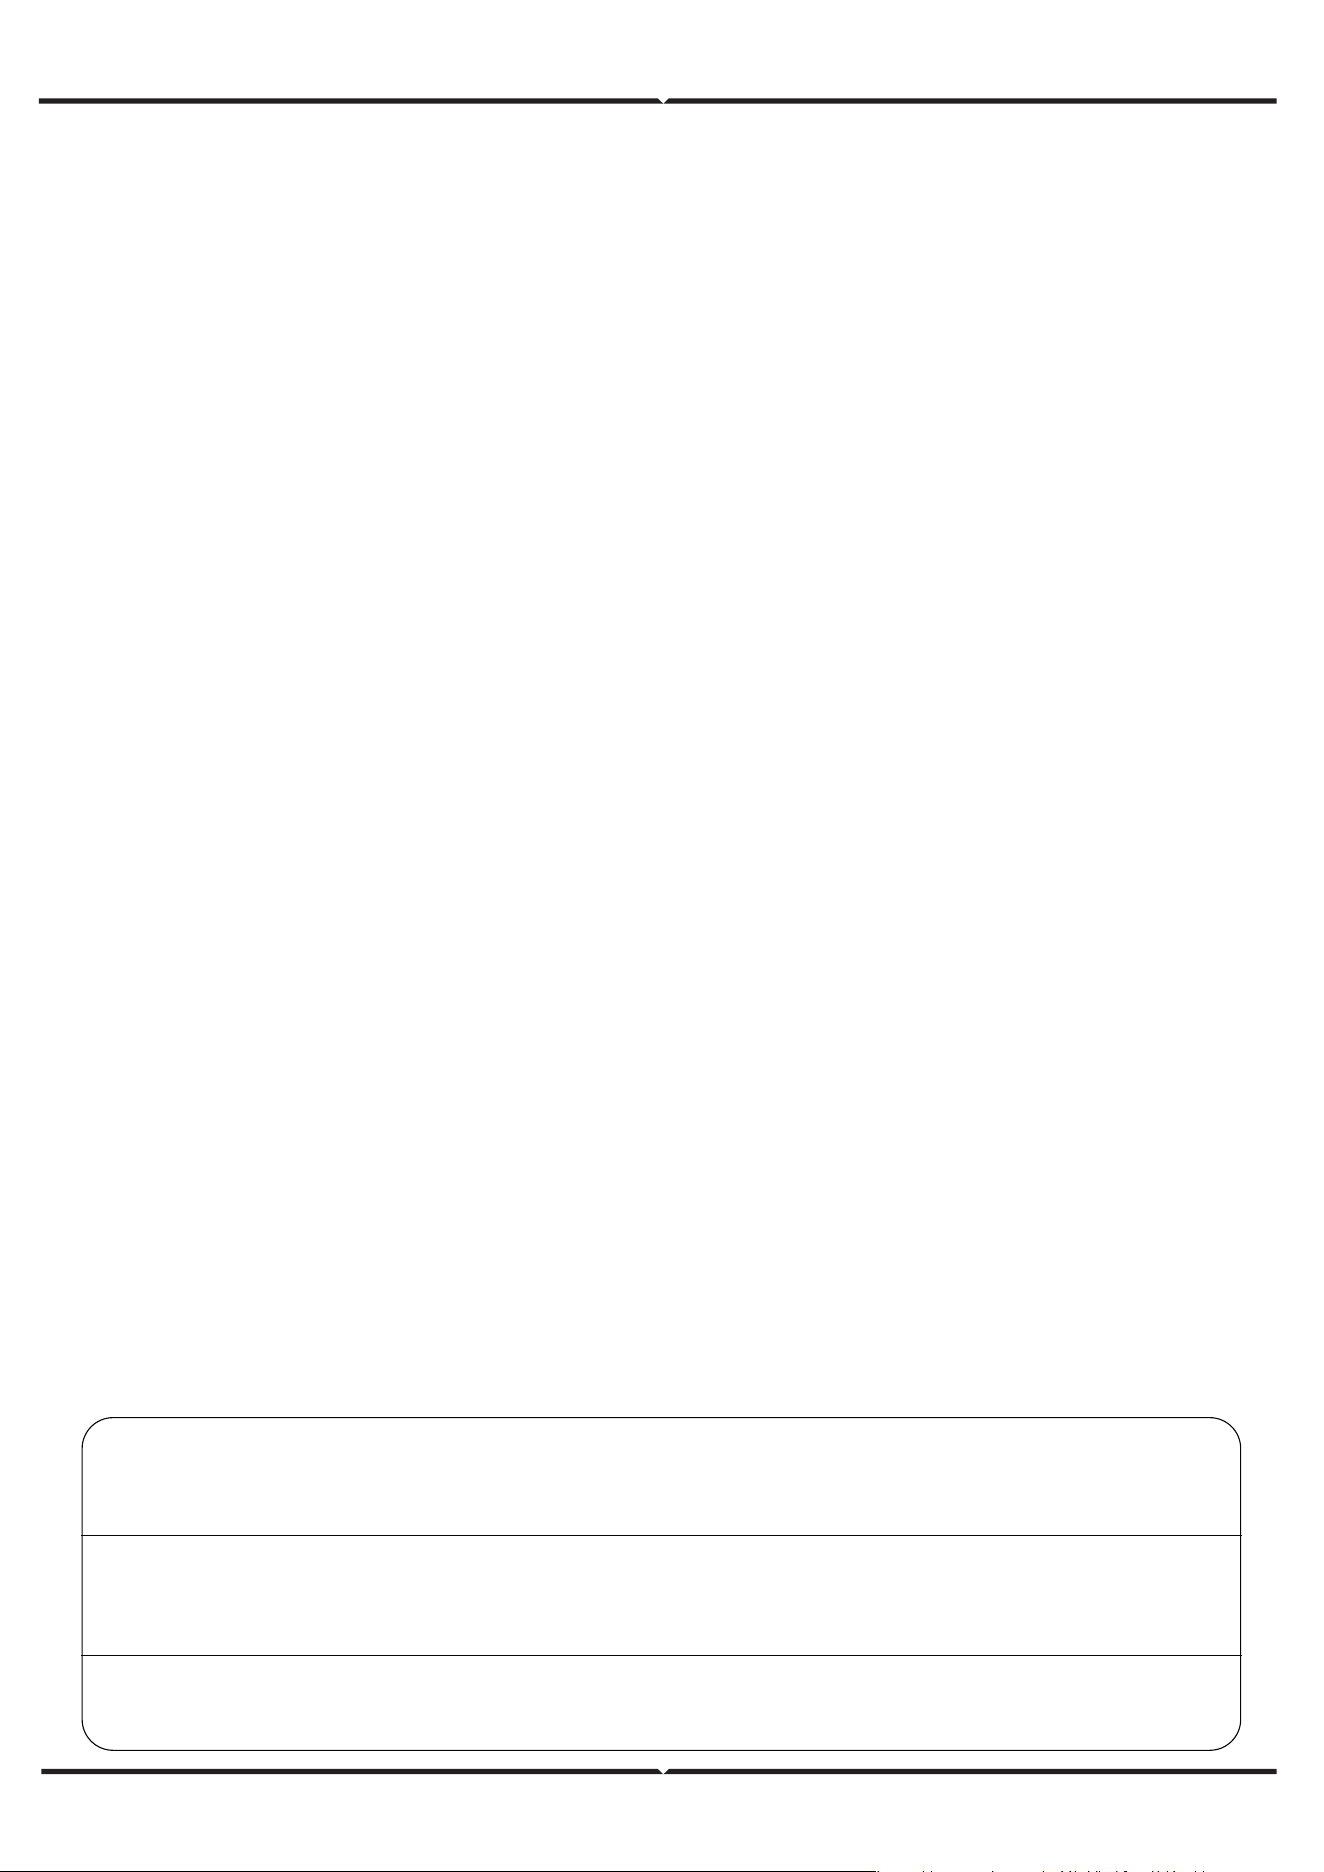
4. Enable Bluetooth
and Home Wifi for the
device to access your
wifi connection for
pairing
6. Click on the
Lighting
choose “Light
Source (Wi-Fi)“
7. Select 2.4GHz Wi-Fi
network and enter the
password
5. Click “Add a device” or
“+” in the top right corner.
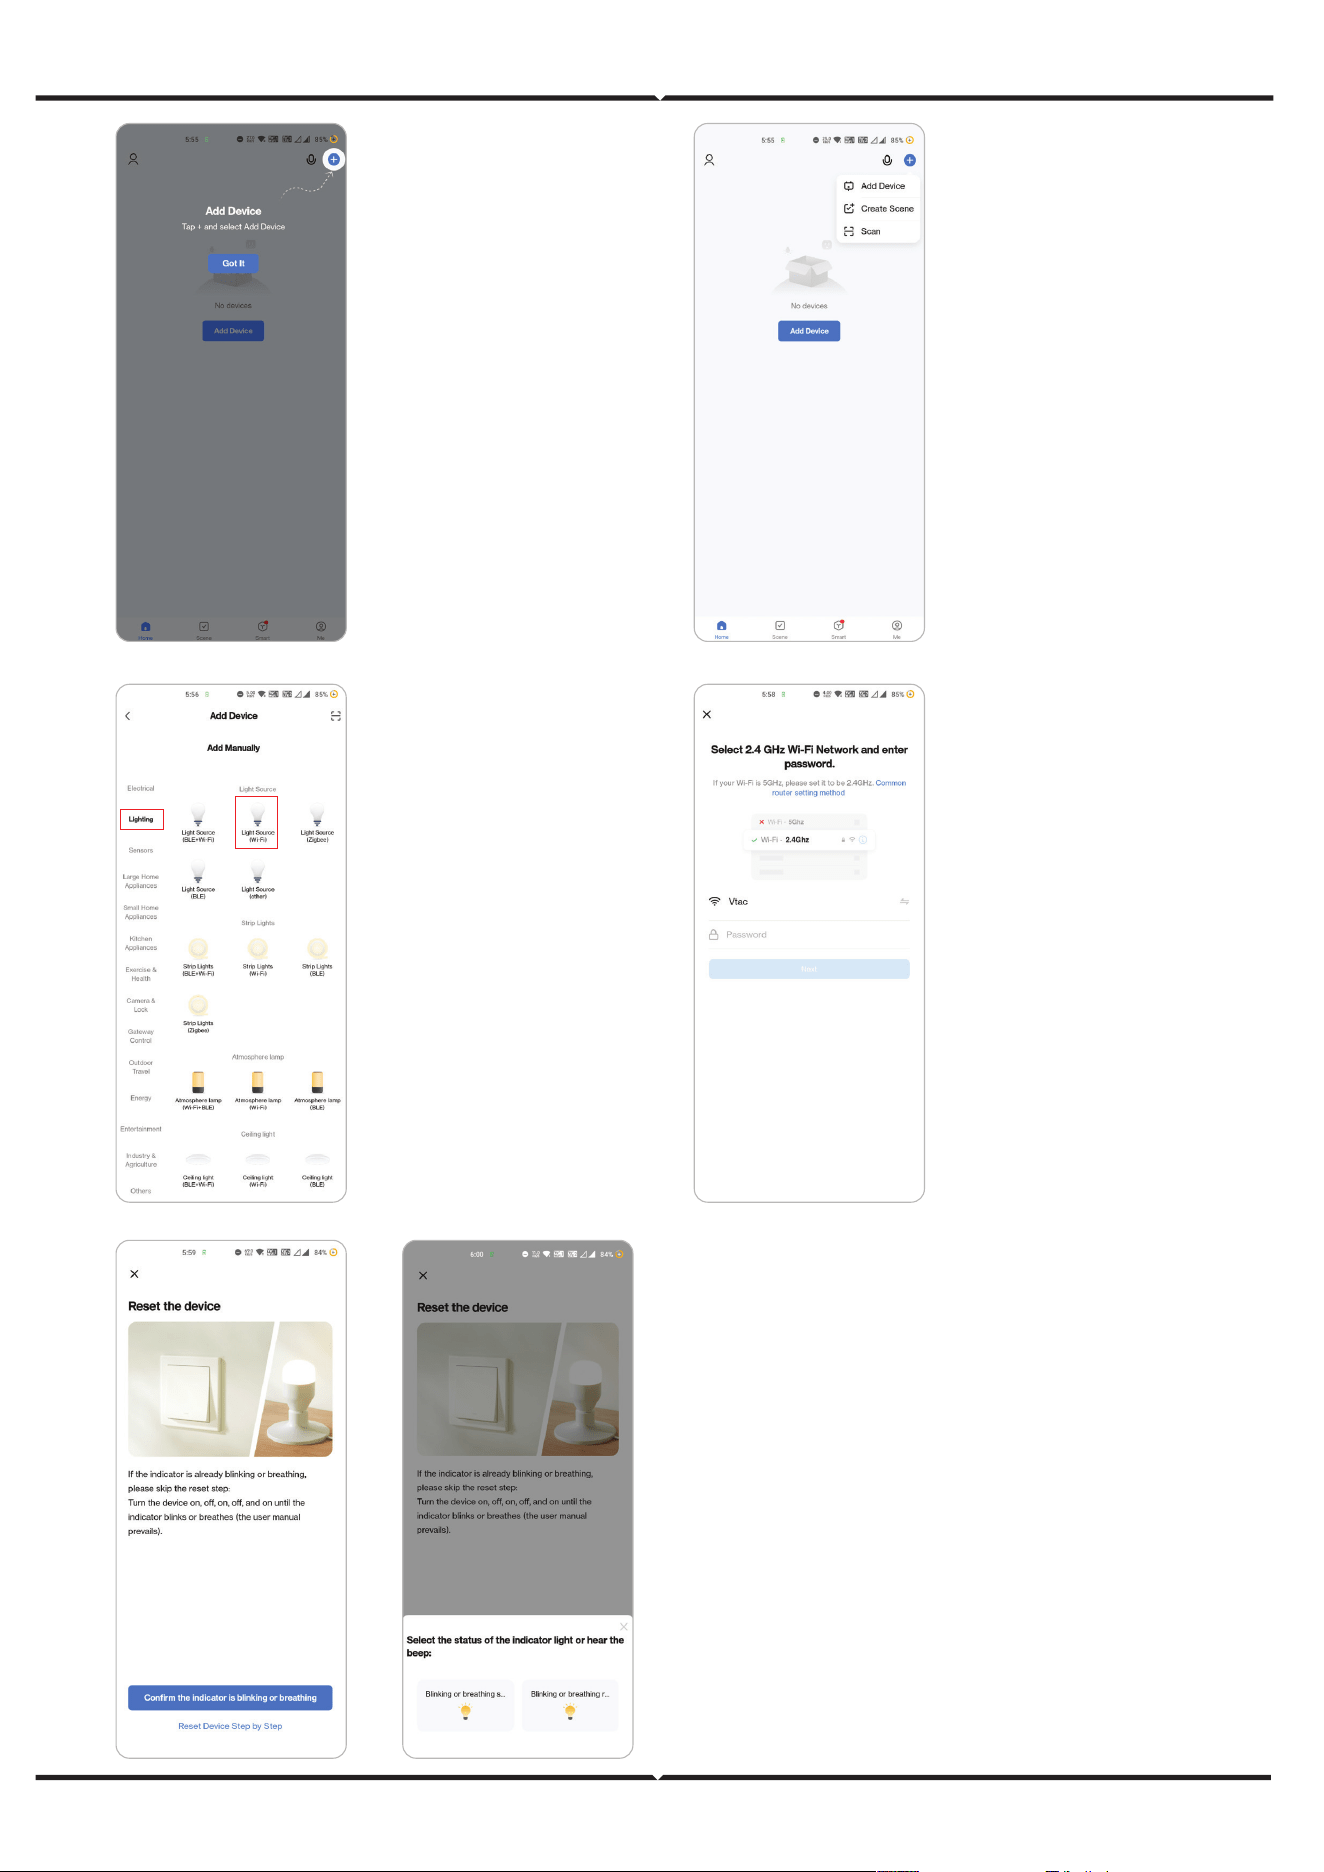
Step 7:
Smart Bulb oers two types of pairing modes:
1) EZ Mode - Light flashes rapidly
2) AP mode - Slow Flash or long brightness
How to enable/reset the smart bulb into pairing mode
Step 1: Switch ON the bulb, if the light is flashing rapidly
the device is in EZ mode. Please
proceed to pairing the smart device with the App. If not
please follow Step 2.
Step 2: Switch the bulb OFF-ON repeatedly 3 times with
short intervals of less than 2 seconds. Light flashes rapidly
indicating the device has entered pairing mode. Please
proceed to pairing the smart device with the App.
Note: Each time you switch the device OFF-ON repeated-
ly 3 times with short intervals of less than 2 seconds the
pairing mode of the device alternatively switches between
EZ mode and AP mode

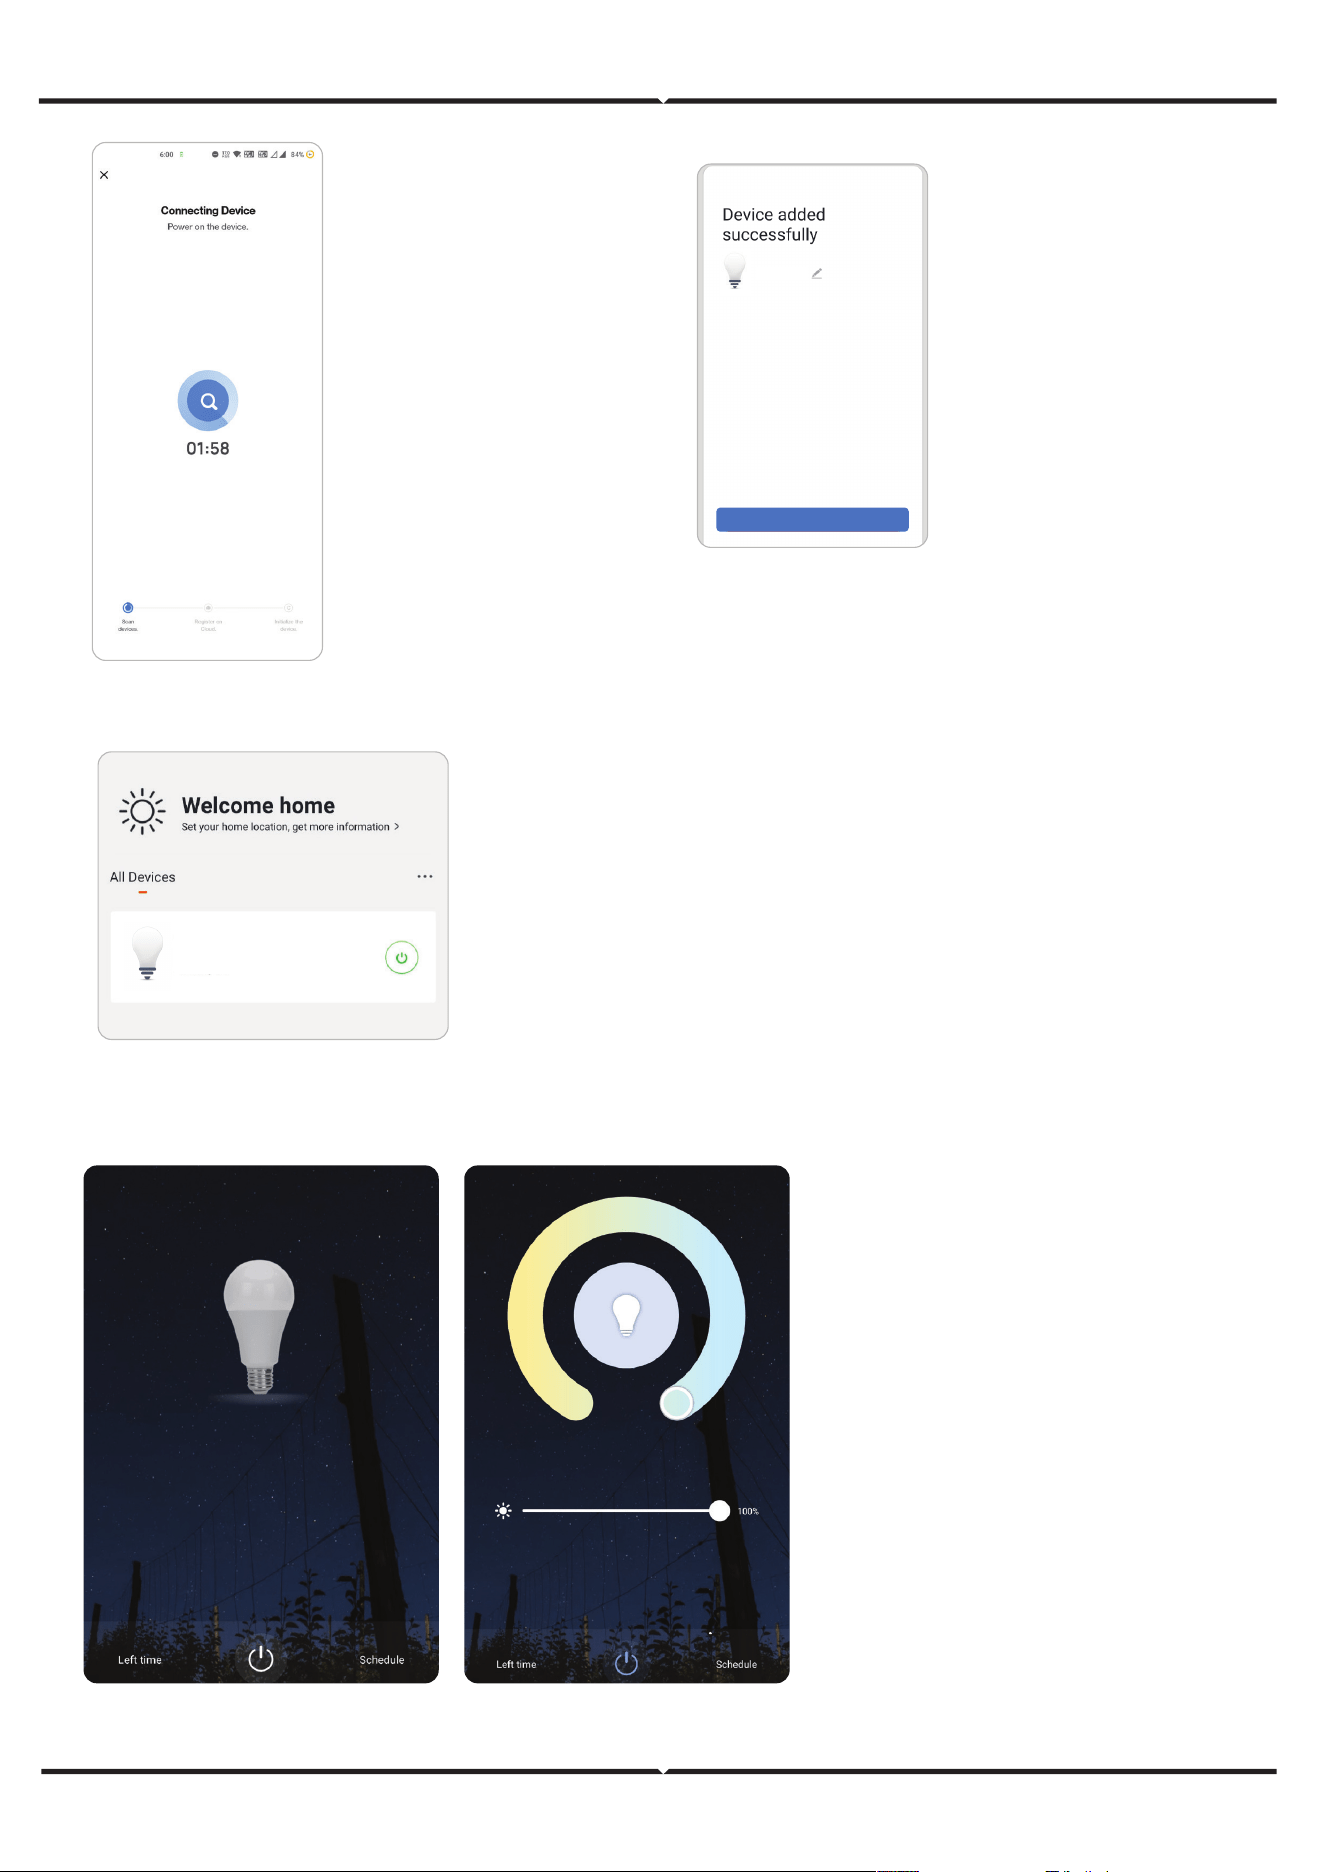
Step 8: Once you
have successfully
completed step 10,
you will be redirected
to below page,
where the App
searches, registers
and initializes the
device(lamp) (ref
image below).
Step 10: You can now start controlling your device with the
App. Tap the device name on the home page to
enter the controls and features of the device.
Step 13: Aer successfully pairing
the lamp with the app, you can
start controlling multiple features
of the lamp through your mobile-
on/o switch, changing the colour
temperature, timing & schedules,
dimming options, and more.
Step 9: Once your
device is successfully
added, rename the
device to your prefer-
ence.
Completed
Light
Light
Living Room
GOOGLE ASSISTANT SETTINGS
Step 1
Step 2
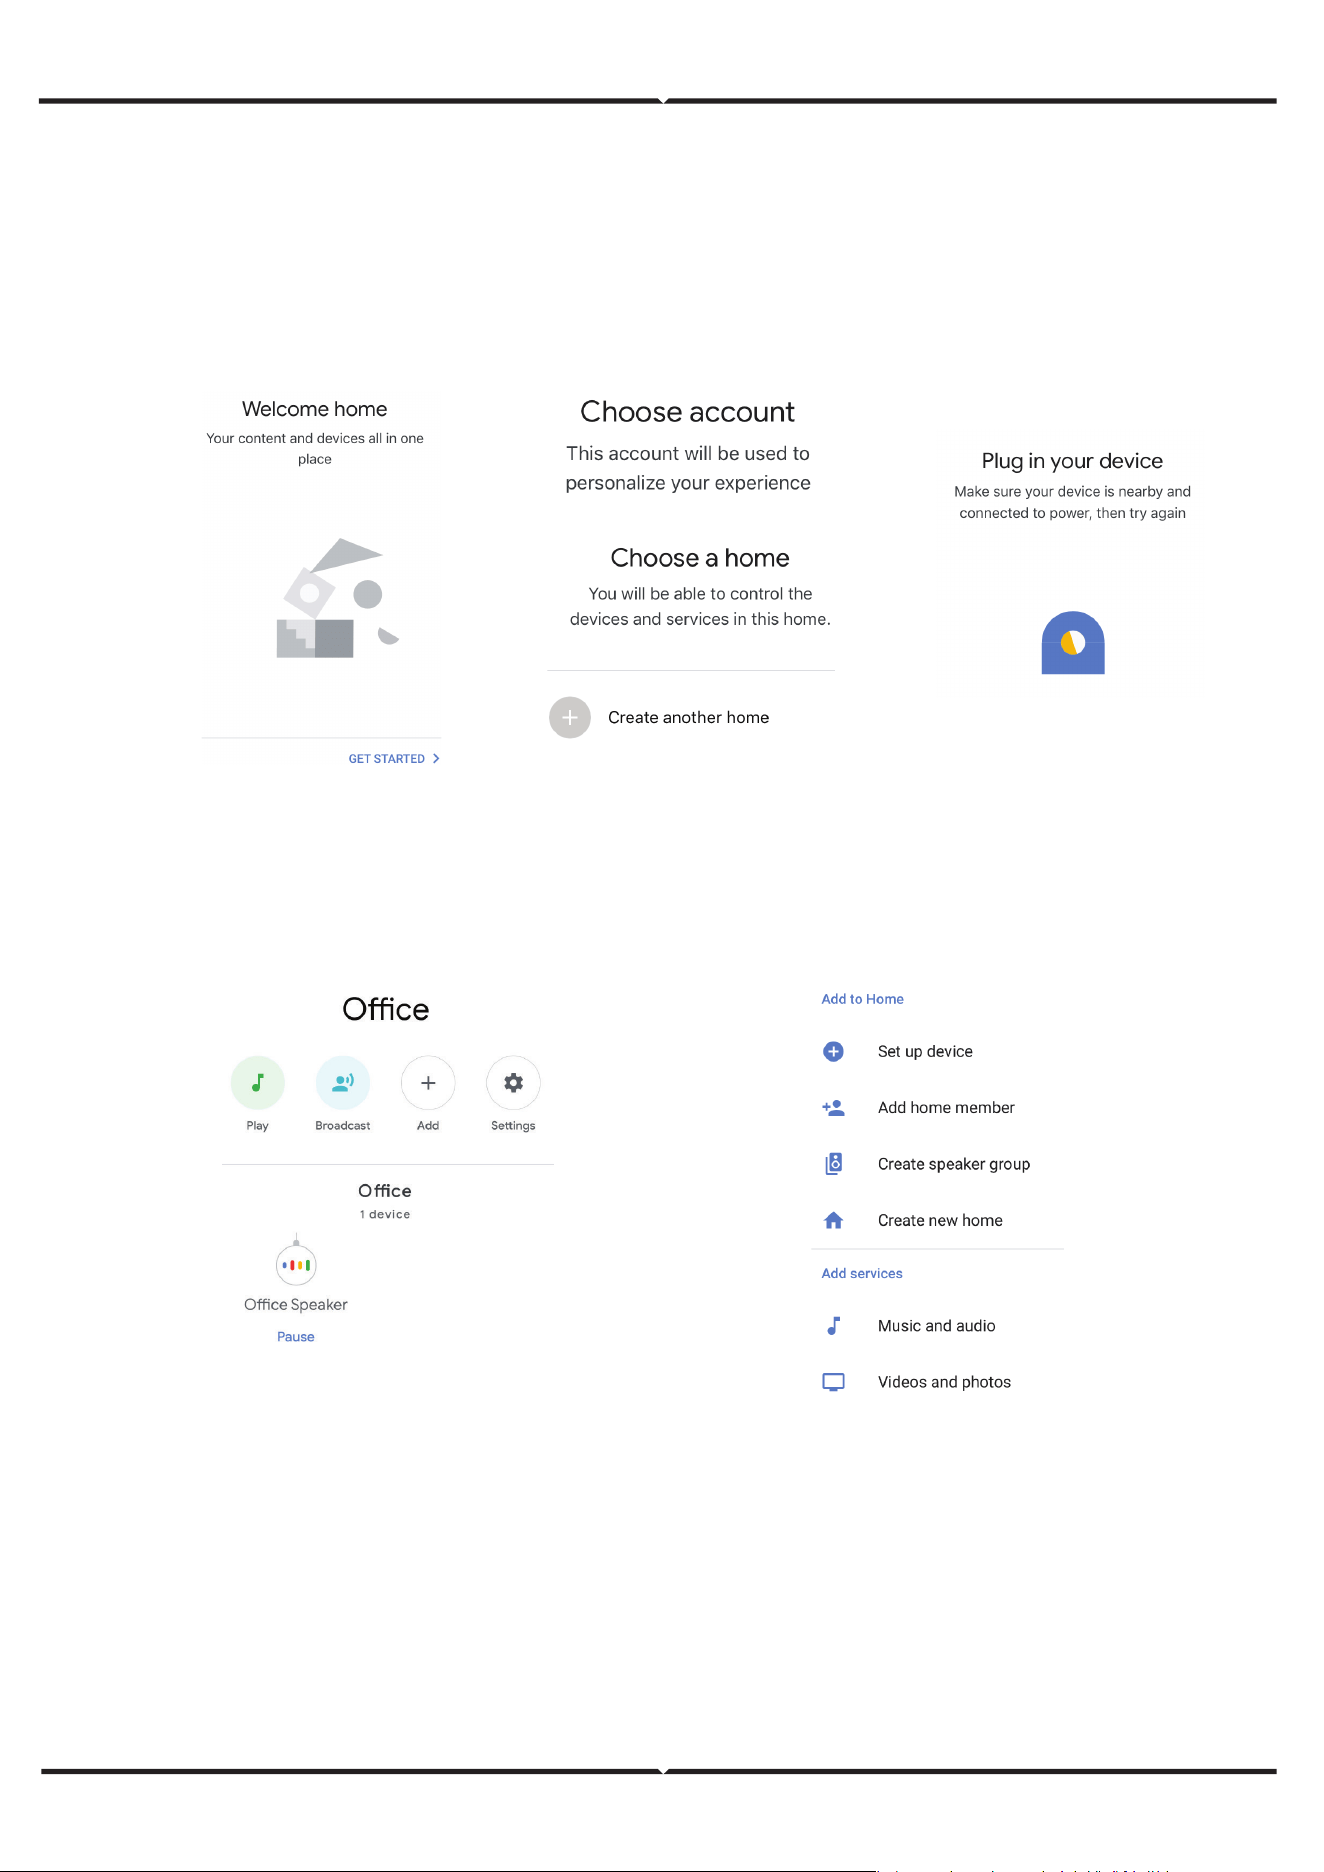
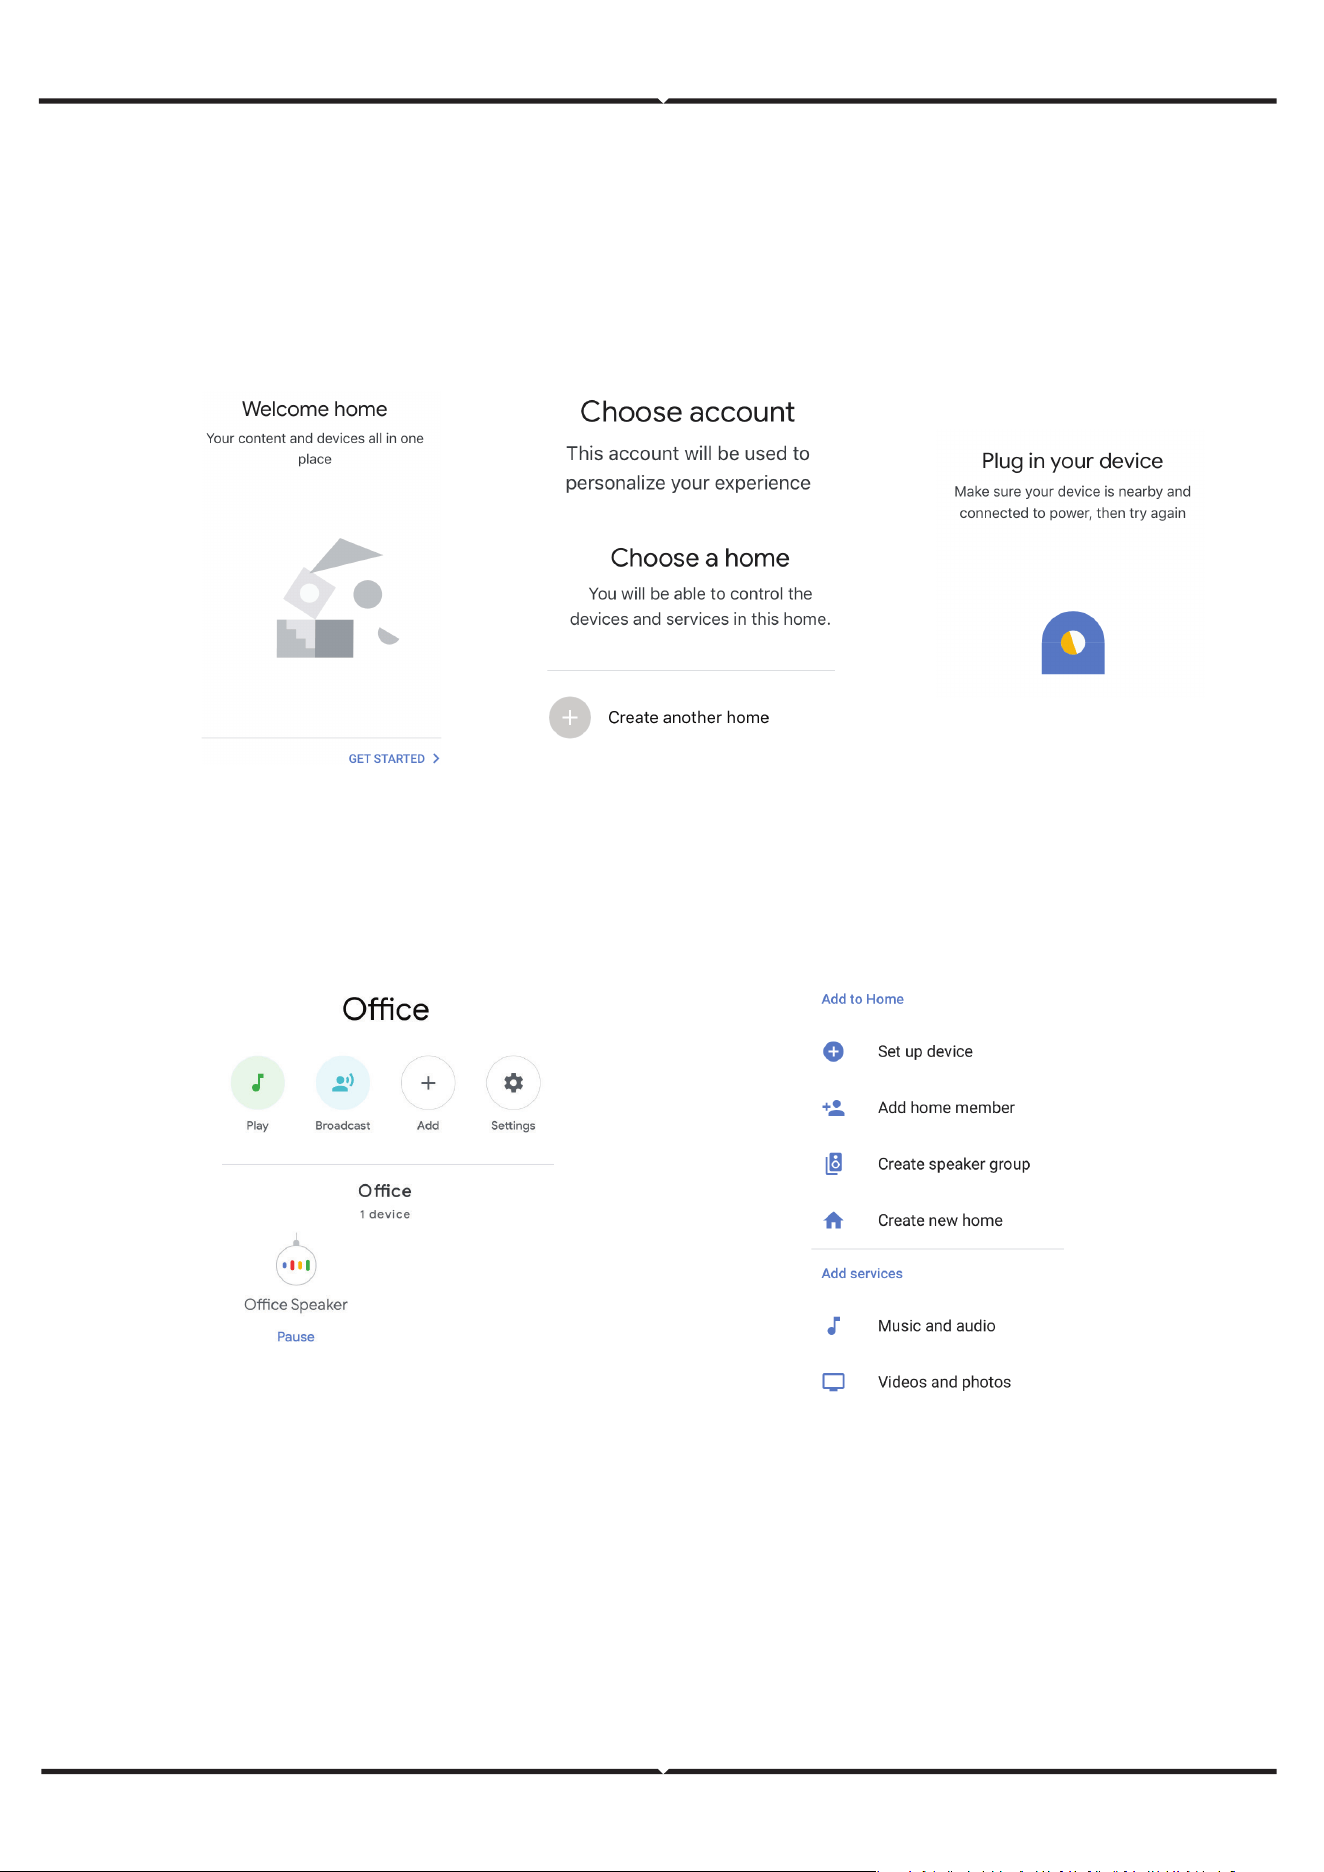
• Install the Google Assistant app via the App Store (iOS) or the Play Store (Android) and register.
If you already have an existing account with Google Assistant, please proceed to logging in.
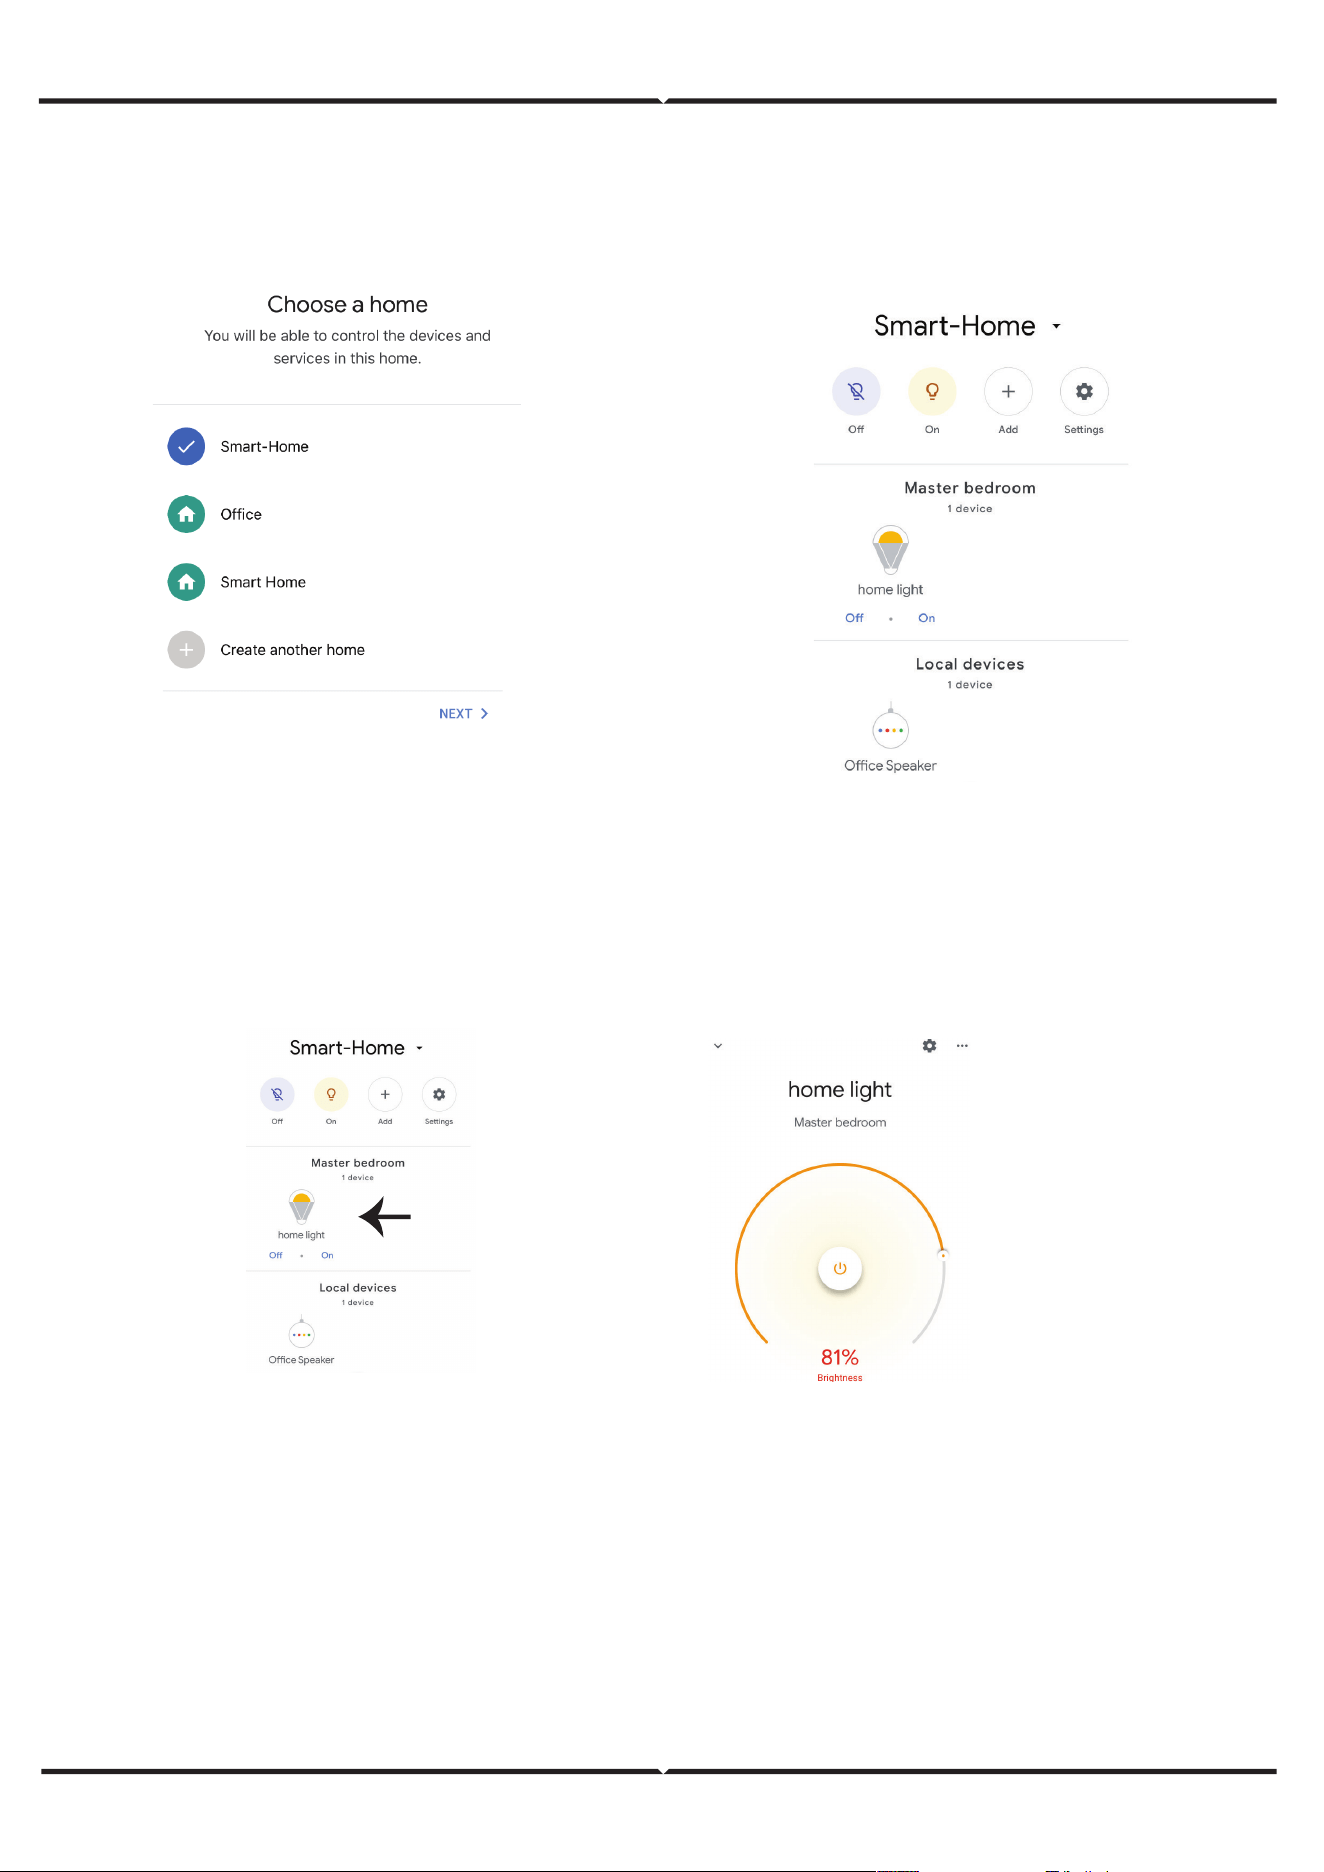
• Create a New Home/Choose from the existing home if any.
• Power ON the Google Assistant device and connect it to the App.(Then Proceed to step 2)
• Once you are on the Google home page, tap on the Add “+” icon– to add a new device and skill. And
then tap on Set up device as shown in below image.
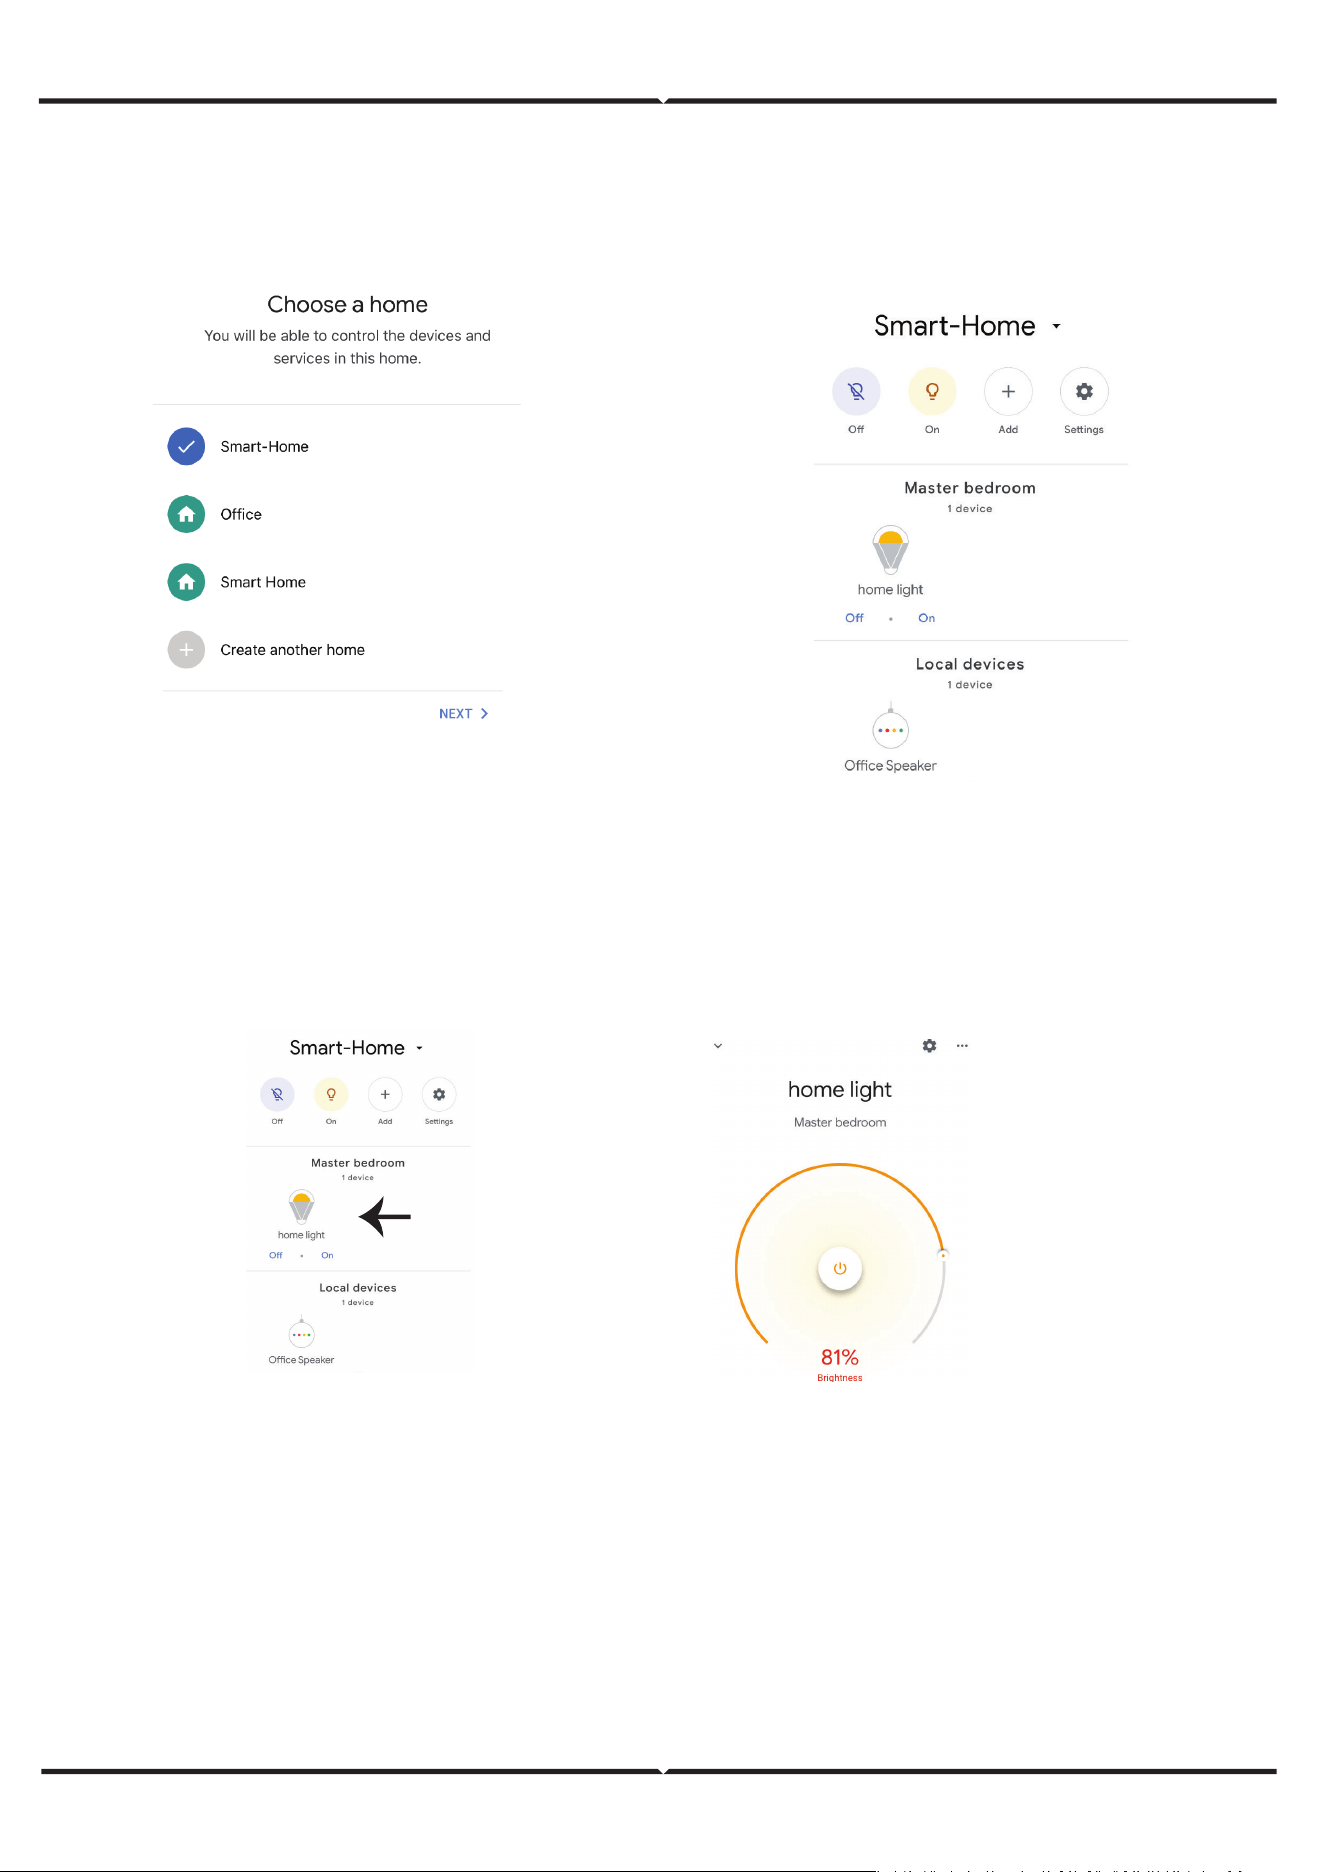
• Step 3: Make sure the Wifi Switch is paired with Smart Life app before starting, Tap on the arrow section
as highlighted in the below image.
• Step 4: Type “Smart Life” on the search bar and tap on the icon of “Smart Life”
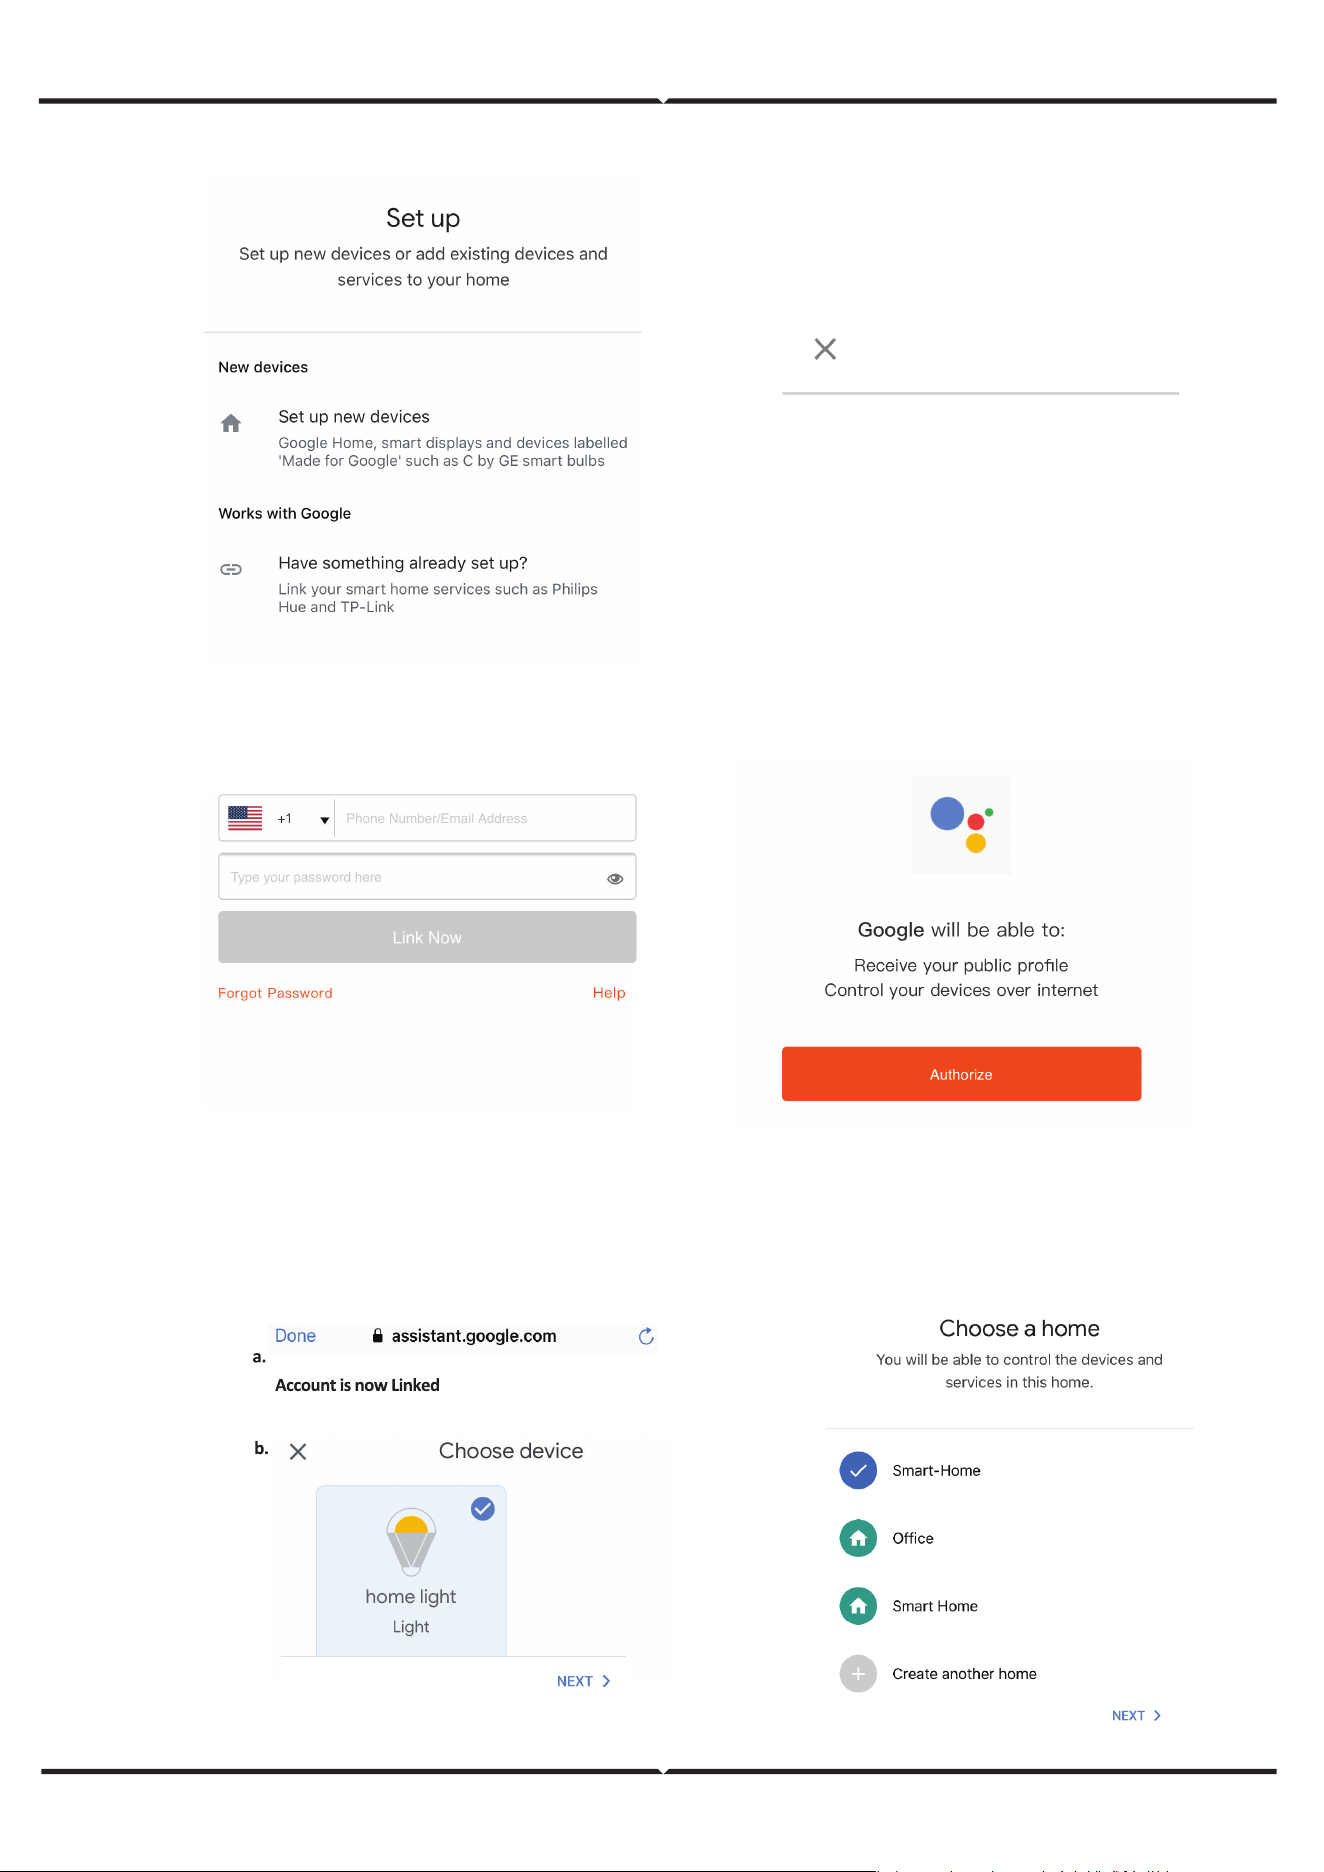
• Step 5: Sign In with your Smart Life Login credentials to Link the Smart Life device.
• Step 6: Tap on Authorize in order to proceed to linking the device.
a. Account will now be linked, please stay on the page you will be redirected in few seconds to select the
device to add to your home.
b. Select the device and tap on Next as show in image b.
Smart Life
Step 7

Step 8: Select the Home where you would like to add the Smart Life under. (Or) you can create a New home in
order to add the Smart Life to it.
Step 9: You have succesfully added Smart Life device to your Google Assistant App.
Step 10
a. You can turn the Lamp On/OFF by taping on On/O options as shown below. (OR) You can tap on
the Smart Lamp.
b. You will be redirected to page(as shown in image b) where you can control the lights “Power and
Dimming functionality”.
Google Commands
Now, you can control your smart device using voice commands on Google Assistant. Below are a few com-
mands you can use:
Ok, Google, turn on/o bedroom light,
Ok, Google, turn on/o Hall light.
THINGS TO REMEMBER BEFORE STARTING INSTALLATION
1. Smart Life App & Google Assistant App Ok, Google, set bedroom light to warm white.
2. Make sure you have Google Assistant Device
3. Smart Device - Lamp
4. Stable Wifi network
ALEXA SETTINGS
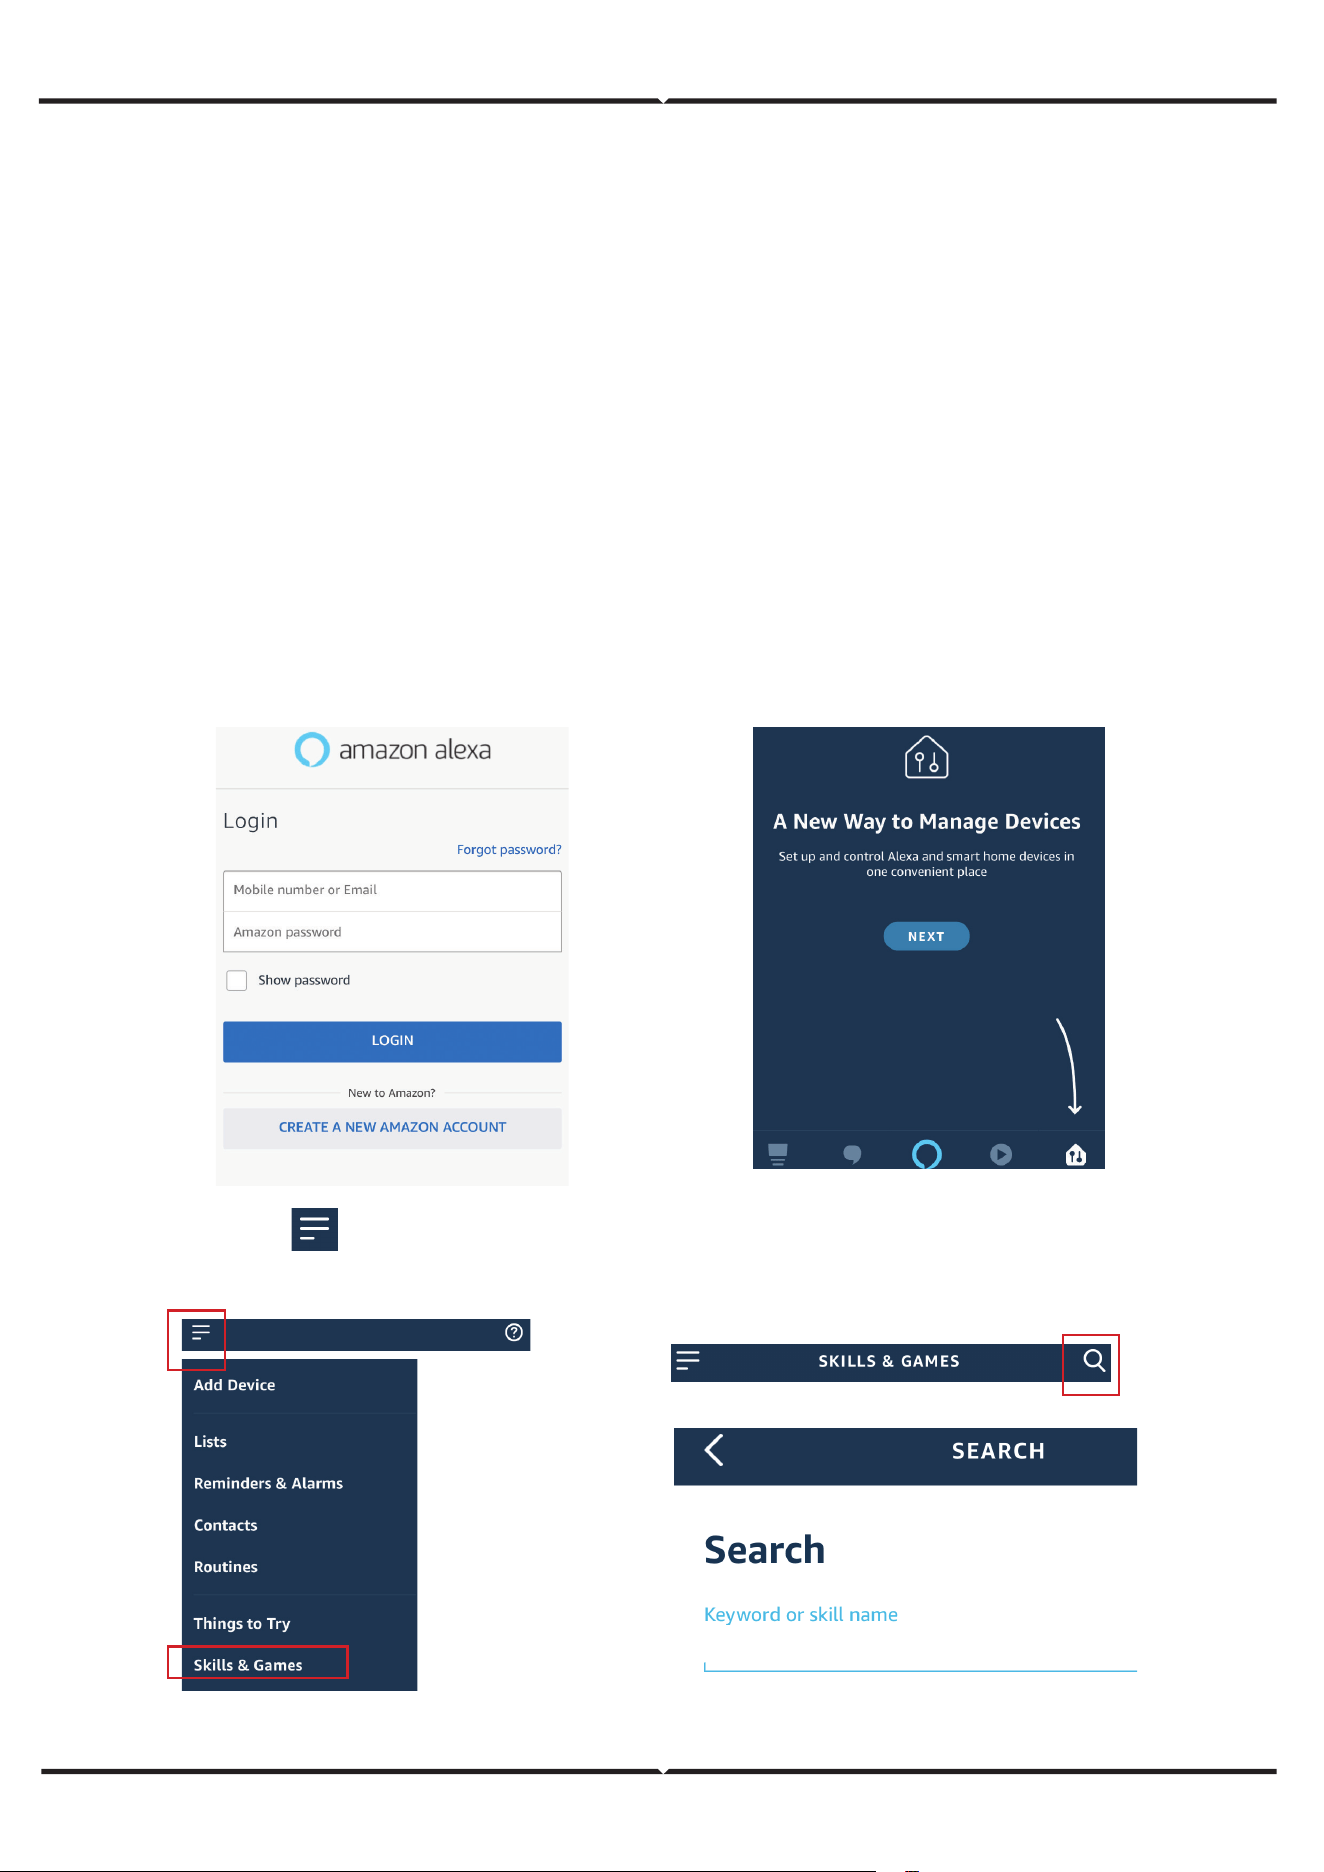
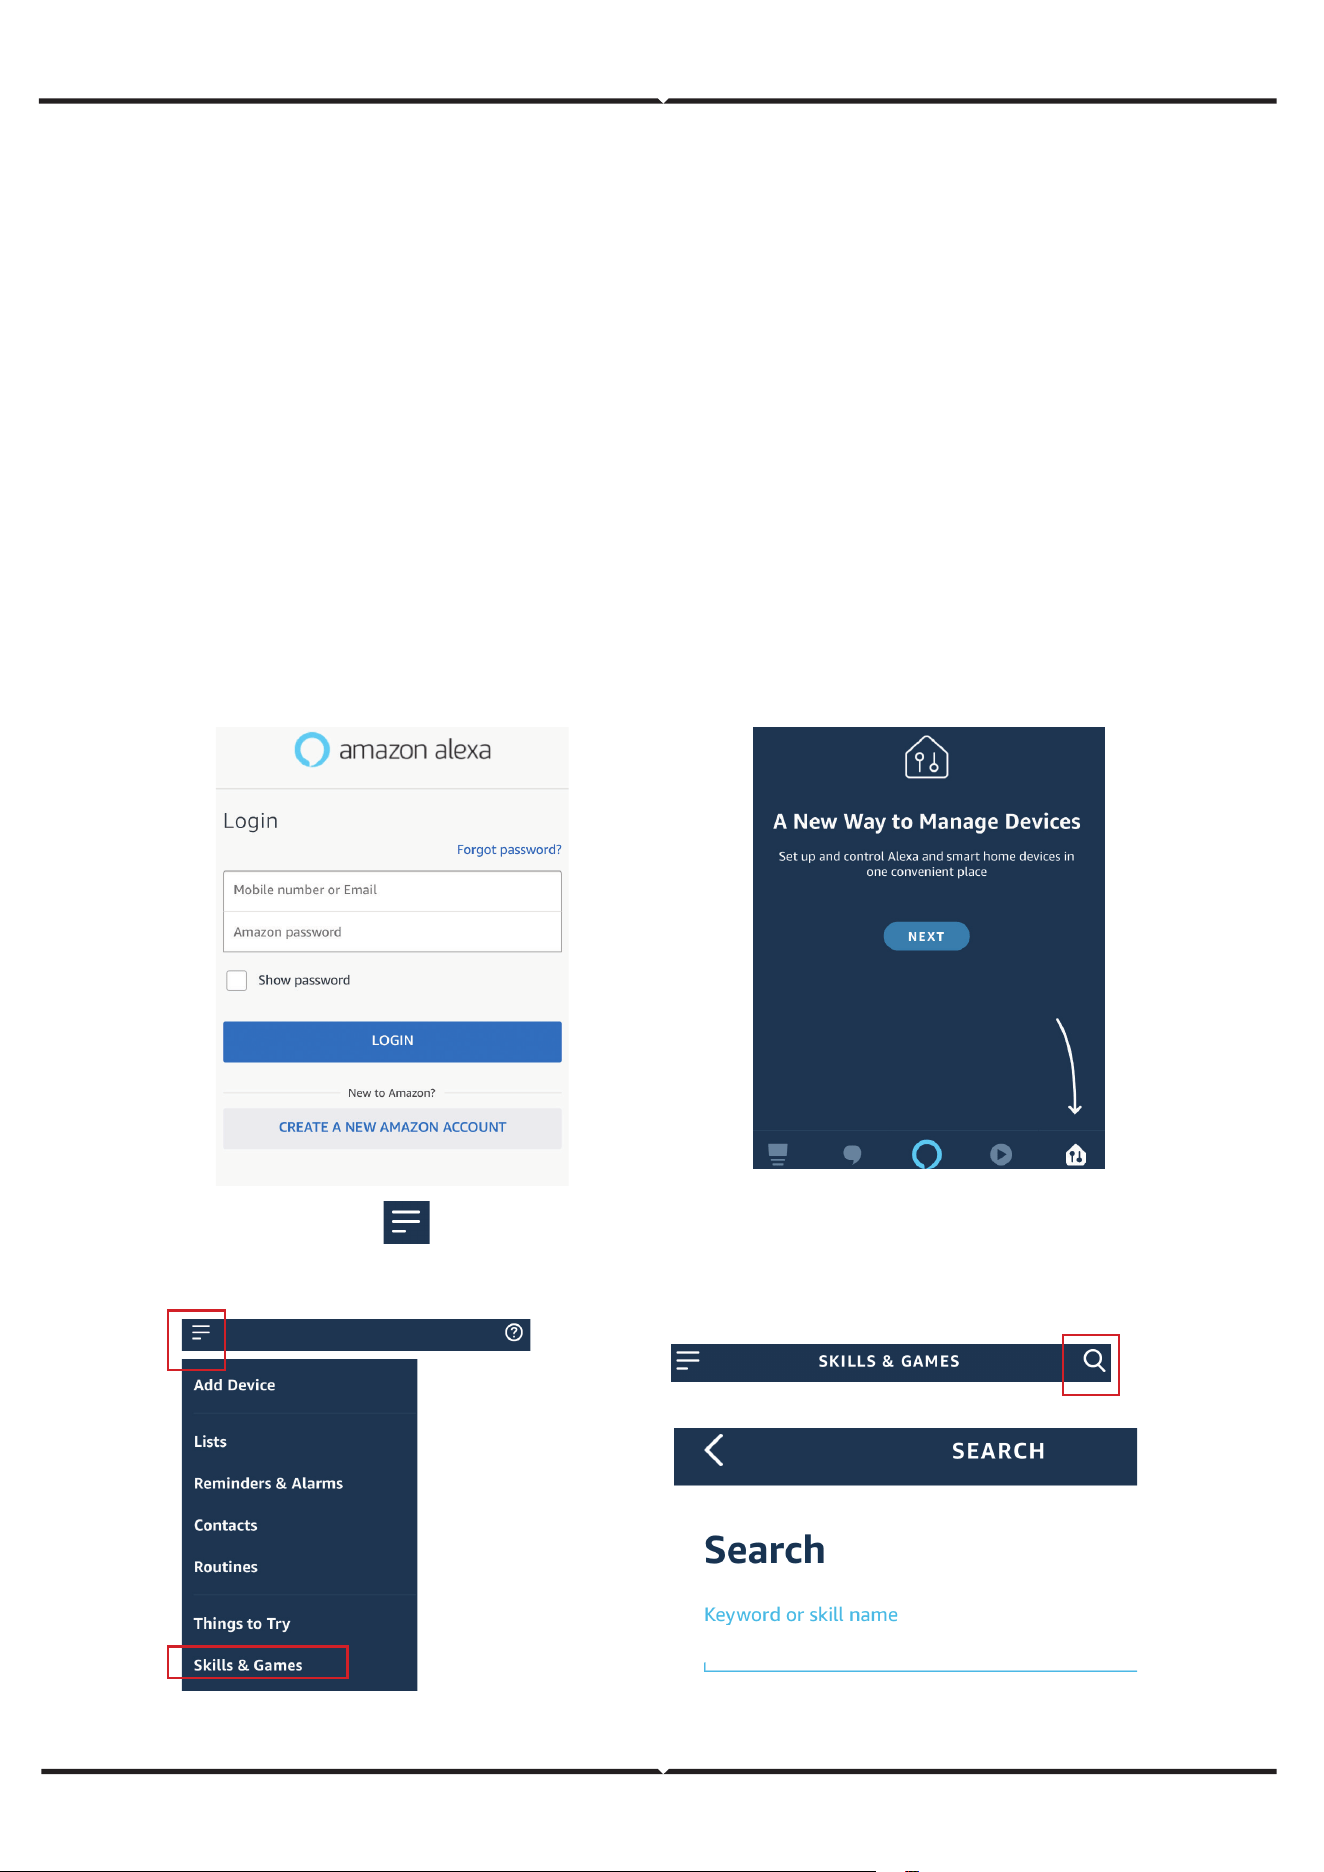
Step 1:Install the Amazon Alexa app via the App Store(iOS) or the Play Store (Android) and register. If you al-
ready have an existing account with Amazon Alexa, please proceed to logging in.
Step 2: Once you are on the Amazon Alexa home page, tap on the lower right icon –– where the arrow is
pointed–– to add a new device and skill.
Step 3: Tap on settings and tap on “skills and games” as shown below.
Step 4: Search for ‘Smart Life’ on the “Skills & Games” page as shown below.
Smart Life
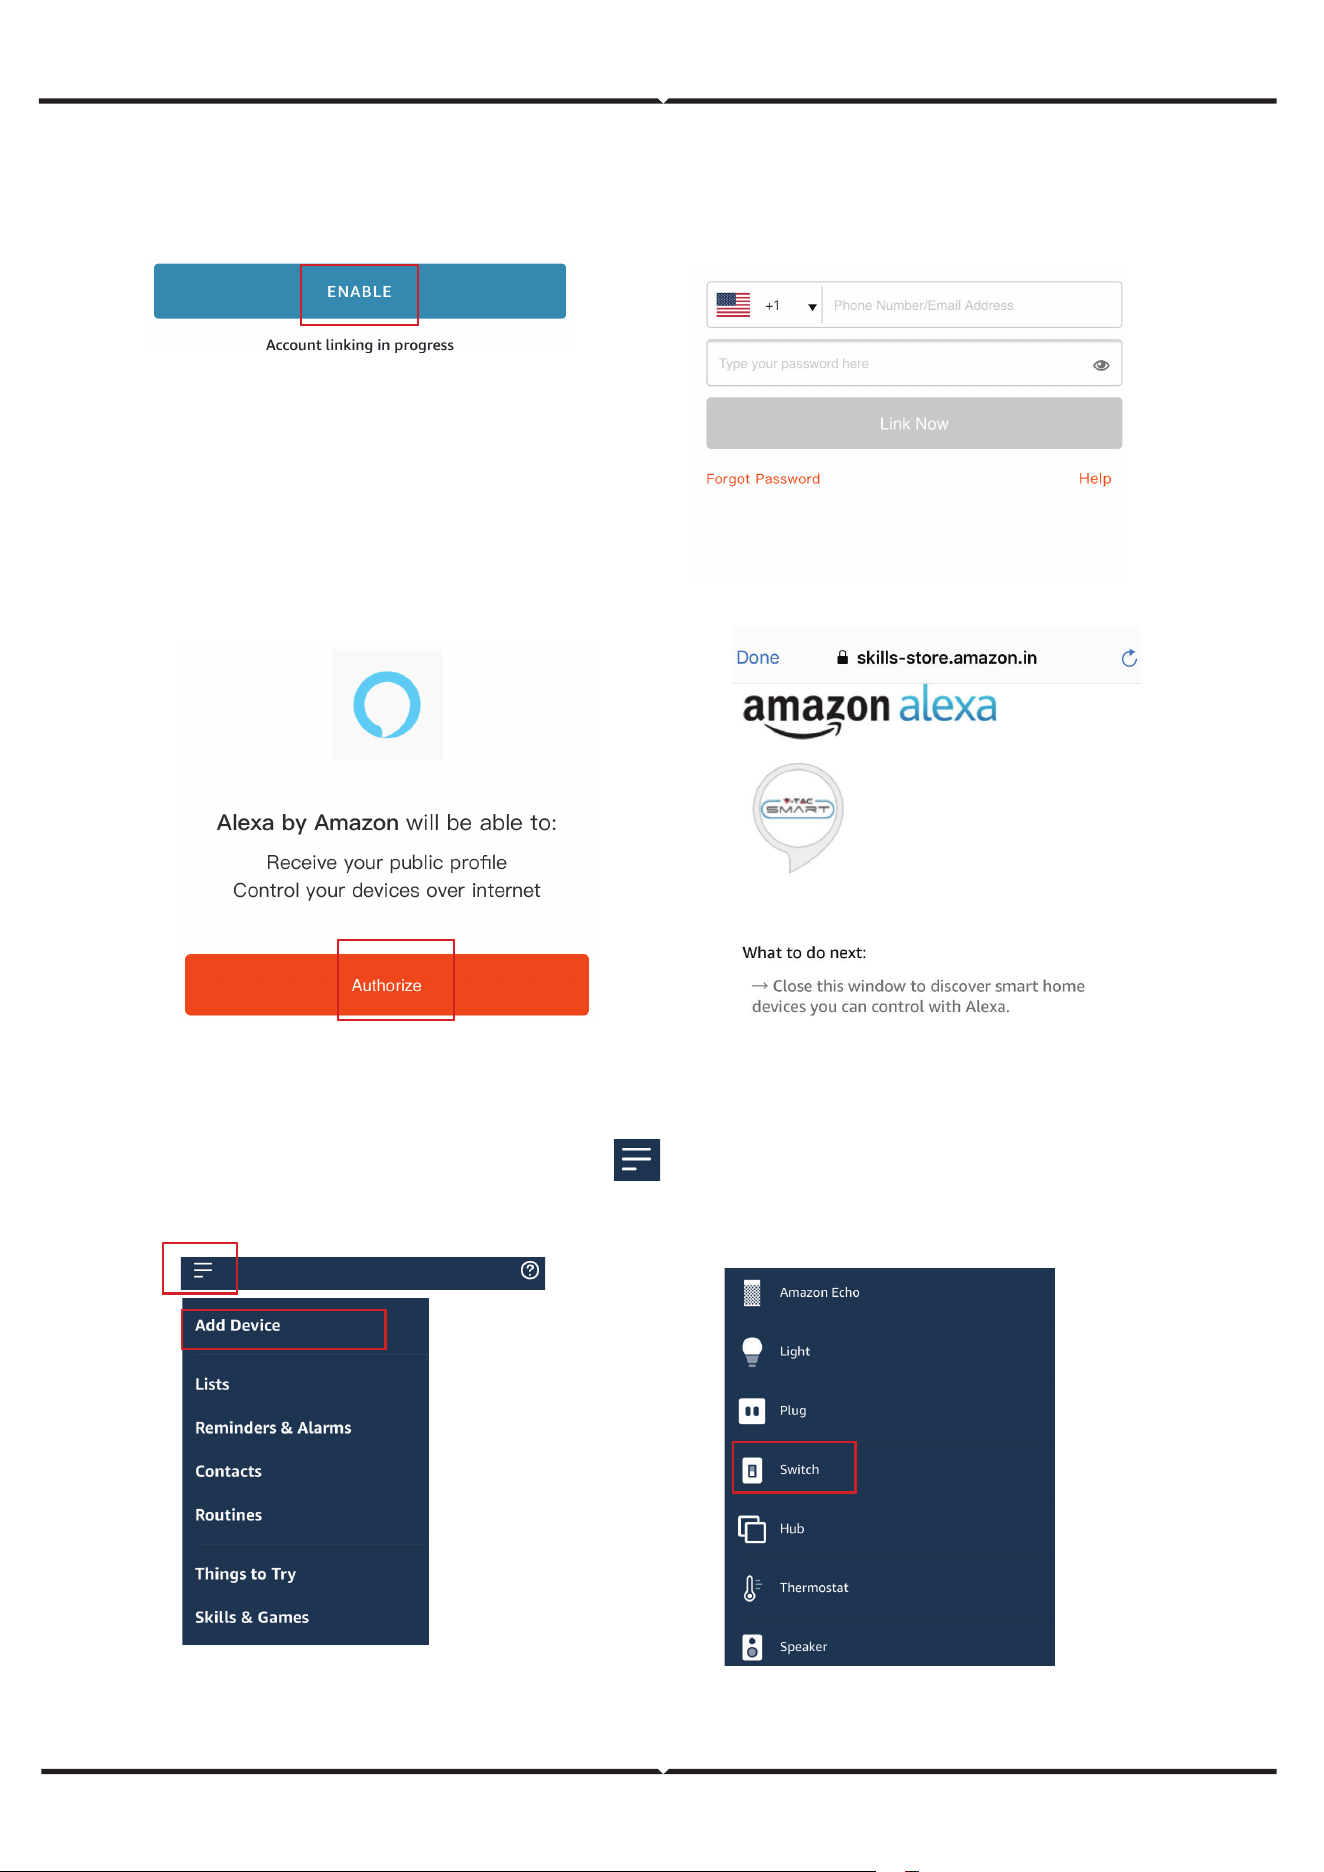
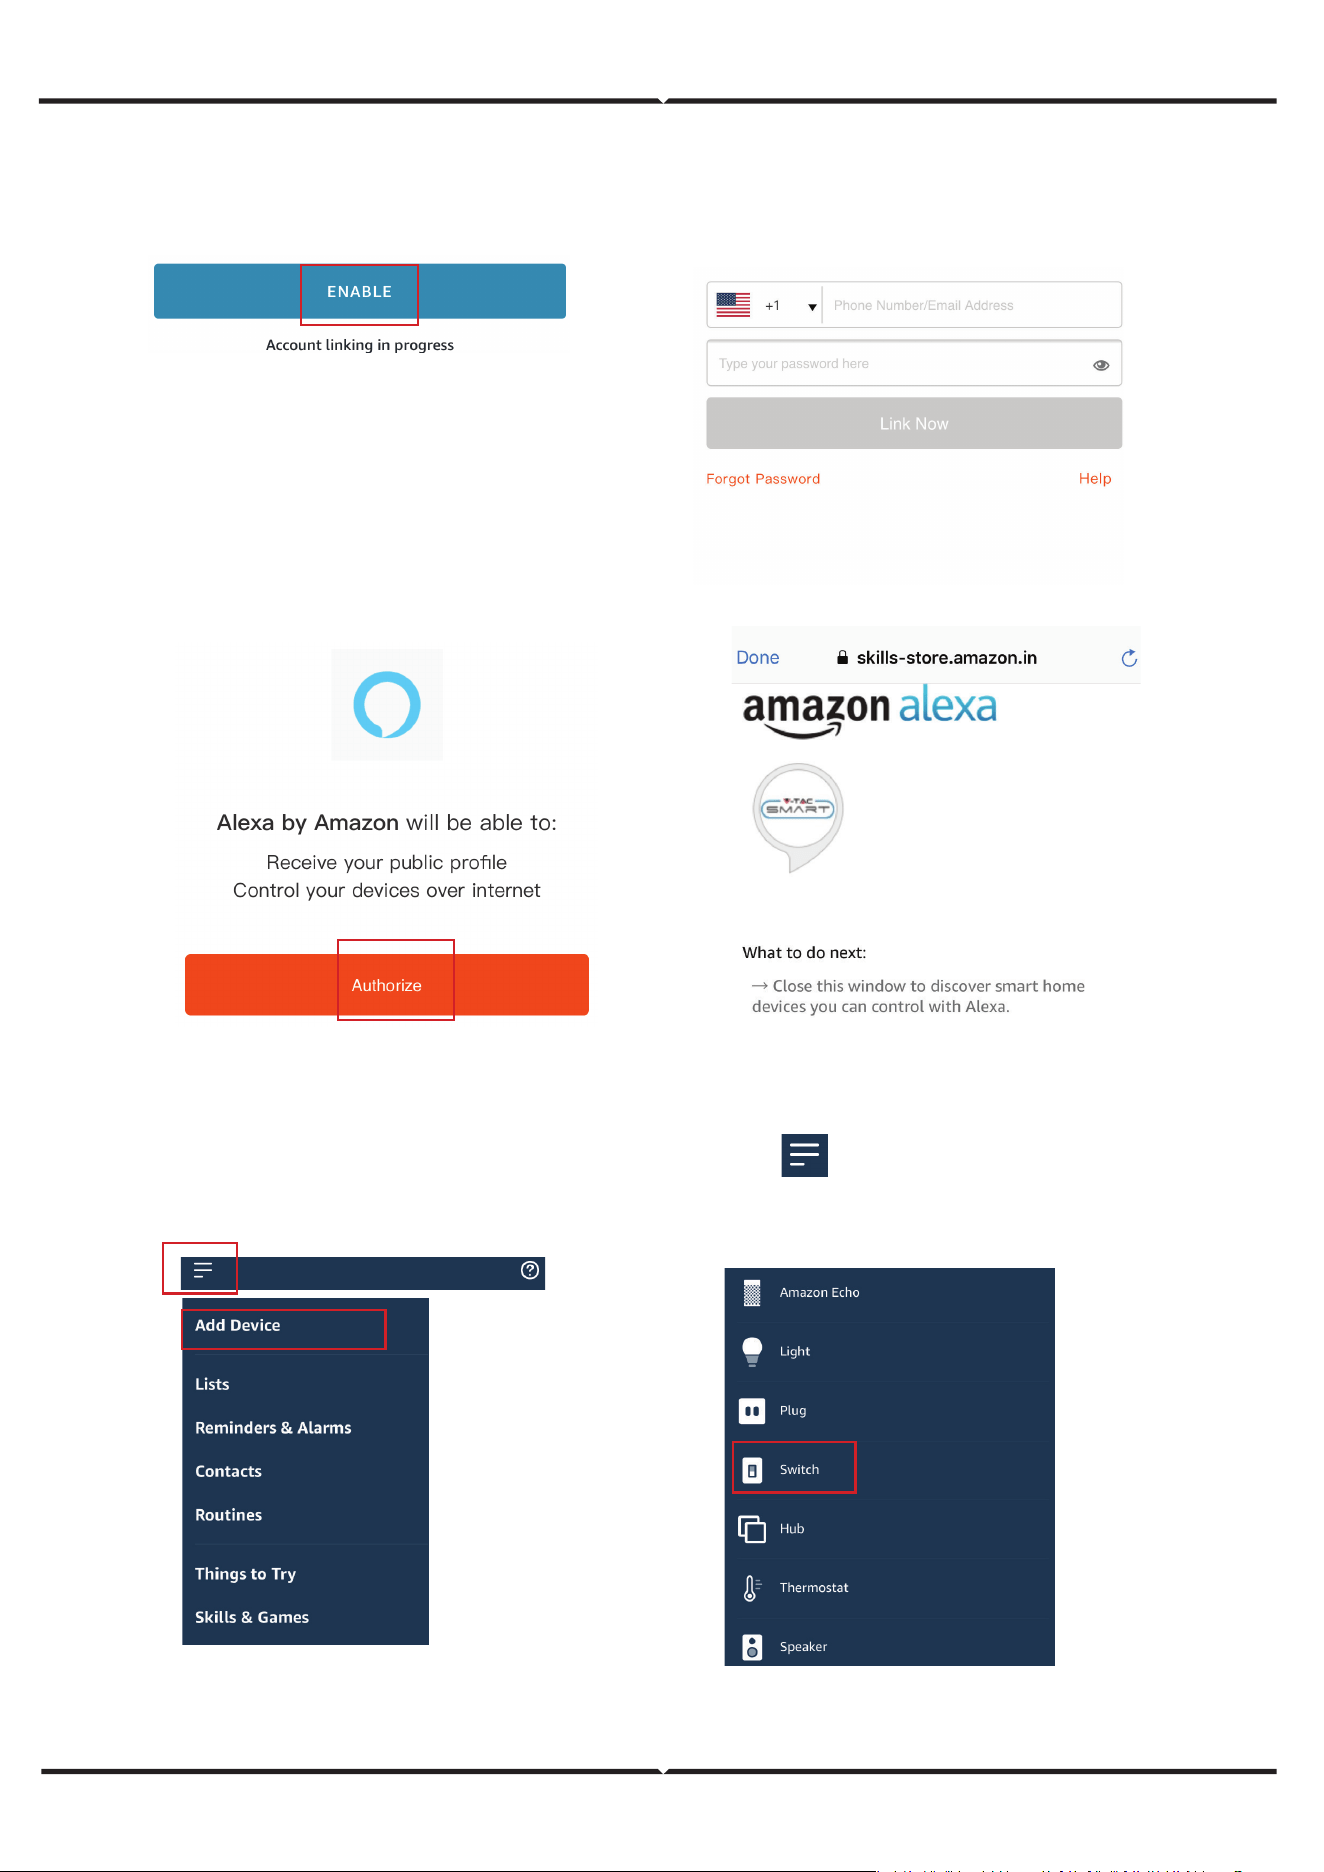
Step 5: Enable the Skill
Step 6: Enter your Smart Life login ID and password and tap on “Link Now”
Step 7: Once you tap on Link Now, you will be redirected to a new page requesting for authorization(Ref Im-
age below). Tap on “Authorize”
Step 8: You will receive confirmation of the account being linked successfully (Ref Image below)
Step 9: Discover your smart device on Alexa. Once you have enabled the skill
A) You can use voice command ”Alexa discover devices” to the Alexa device which you have.
B) To add device manually on home page tap on and tap on Add device , select the device
which you are adding and tap on discover device.
Note: Discovering the device must be done every time the device’s name is changed on the app.
Smart Life has been successfully linked.
ALEXA COMMANDS
Now, you can control your smart device using voice commands on Alexa.
Below are a few commands you can use:
THINGS TO REMEMBER BEFORE STARTING INSTALLATION
1. Smart Life App & Amazon Alexa App
2. Make sure you have Amazon Alexa Device(including Echo, Echo Tap, or Echo Dot)
3. Smart Device - Lamp
4. Stable Wifi network
IN CASE OF ANY QUERY/ISSUE WITH THE PRODUCT PLEASE REACH OUT TO US AT
SUPPORT@VTACEXPORTS.COM V-TAC HOUSE, KELPATRICK ROAD, SLOUGH, BERKSHIRE, SL1 6BW, UK.
IN CASE OF ANY QUERY/ISSUE WITH THE PRODUCT, PLEASE REACH OUT TO US AT: SUPPORT@V-TAC.EU
FOR MORE PRODUCTS RANGE, INQUIRY PLEASE CONTACT OUR DISTRIBUTOR OR NEAREST DEALERS.
V-TAC EUROPE LTD. BULGARIA, PLOVDIV 4000, BUL.L.KARAVELOW 9B
IN CASE OF ANY QUERY/ISSUE WITH THE PRODUCT, PLEASE REACH OUT TO US AT: [email protected]
FOR MORE PRODUCTS RANGE, INQUIRY PLEASE CONTACT OUR DISTRIBUTOR OR NEAREST DEALERS.
V-TAC WEST EUROPE LTD. GROUND FLOOR, 71 LOWER BAGGOT STREET, DUBLIN 02, IRELAND DO2 P593
WIFI MODULE SAFETY INSTRUCTIONS
SIMPLIFIED EU DECLARATION OF CONFORMITY
• Make sure that the Input voltage of this product is as prescribed by the manufacturer.
Other incoming voltages can cause the product to break down and potentially harm the
environment and your health.
• The wires must be connected correctly and in accordance with the colors of the wire and
the instructions given in the circuit diagram described in this instruction.
• Make sure before switching on that the power elements have a power lower than that
specified by the manufacturer.
• Make sure before plugging in that the led light voltage is suitable for configuration with
this product.
• This product is suitable for products manufactured by the company V-TAC, when
connected with products of other companies, V-TAC is not responsible for any adverse
consequences for your health.
Hereby, V-TAC declares that this radio equipment type LED Smart Bulb is in compliance with Directive
2014/53/EU.The full text of the EU declaration of conformity is available at the following internet address.
https://www.vtacexports.com/media/p-upload/certificates/DOC/EU/VT-1818-DOC-LED%20BULB-N-EU.pdf
Hi Alexa, Turn On/O bedroom light.
Hi Alexa, Turn On/O Hall Light.
EINFÜHRUNG & GARANTIE
Vielen Dank, dass Sie V-TAC SMART LED Lighting ausgewählt und gekauft haben. V-TAC wird Ihnen die
besten Dienste leisten. Bitte lesen Sie diese Anweisungen sorgfältig durch, bevor Sie mit der Installation
beginnen, und bewahren Sie diese Anleitung zum späteren Nachschlagen auf. Wenn Sie weitere Fragen
haben, wenden Sie sich bitte an unseren Händler oder an den lokalen Verkäufer, von dem Sie das
Produkt gekauft haben. Sie sind geschult und bereit, Sie bestmöglich zu bedienen. Die Garantie gilt für 2
Jahre ab dem Kaufdatum. Die Garantie gilt nicht für Schäden, die durch unsachgemäße Installation oder
abnormalen Verschleiß verursacht wurden. Das Unternehmen übernimmt keine Garantie für Schäden an
Oberflächen, die durch unsachgemäßen Aus- und Einbau des Produkts entstehen. Die Produkte sind für
einen täglichen Betrieb von 10-12 Stunden geeignet. Bei einer Nutzung des Produkts über 24 Stunden
pro Tag erlischt die Garantie. Für dieses Produkt wird nur eine Garantie für Herstellungsfehler gewährt.
GEBRAUCHSANWEISUNG
LED SMART LIGHT SERIE
GU10
Milchige Abdeckung
E14
P45
B22
A60
E27
A60
E27
A65
GU10
O
bjektiv
E27
G45
E14
Kerze
WORKS WITH
works with the
Google Assistant
SICHERHEITSWARNUNG
APP-INSTALLATIONSANWEISUNGEN
ANMERKUNG
1.
Die Lampen sind nur für Innenräume geeignet und sollten nicht in feuchter Umgebung
verwendet werden.
2. Die Lampe ist in gut belüfteten Bereichen und bei normaler Installation zu verwenden.
3. Vorsicht! Diese Lampe darf NICHT in einem völlig geschlossenen Raum verwendet werden, der
keine gute Wärmeabgabe ermöglicht. Bitte installieren Sie die Lampe nicht in einem geschlossenen
Raum, da sie das Wifi nalsignal abschirmt, was zu einer schlechten Funktion des Produkts führt.
4. Lampen und Laternen können nicht auf der Oberfläche von gewöhnlichen brennbaren
Materialien installiert werden. Eine Temperaturerhöhung ist bei Lampen normal.
5. Üben Sie keine äußere Kraft aus und werfen Sie nicht auf die Lampe.
6. Die Lampen sollten an einem kühlen und trockenen Ort gelagert werden. Vergewissern Sie sich
immer, dass die Umgebung sauber ist, bevor Sie die Lampe installieren.
7. Werfen Sie die Lampen nicht in den Hausmüll. Die Lampen bestehen aus elektronischen
Bauteilen und sollten wie herkömmliche elektronische Geräte ordnungsgemäß an dafür vorgesehenen
Orten entsorgt werden.
1. Dieses Gerät benötigt die Wi-Fi Frequenz 2.4Ghz
2. Nur für Innenräume geeignet
3. Betriebsfrequenz (maximale Sendeleistung)
2400MHz-2483.5MHz (20dBm)
Diese Kennzeichnung weist darauf hin,
dass dieses Produkt nicht mit anderen
Haushaltsabfällen entsorgt werden darf.
Vorsicht, Gefahr eines Stromschlags.
Abb. 1
Smart Life
Schritt 1: Schalten Sie den Netzschalter des Geräts
ein. Befolgen Sie dann die unten stehenden
Anweisungen für das Gerät.
Schritt 2: Scannen Sie den angegebenen QR-Code,
oder laden Sie „Smart Life“ aus dem App Store (iOS)
oder dem Google
Play Store (Android) herunter.
Schritt 3: Öffnen Sie die Smart Life-App und tippen
Sie auf Registrieren, um ein neues Konto zu
erstellen. Wenn Sie bereits
ein bestehendes Konto haben, fahren Sie bitte mit
der Anmeldung fort.(Siehe Abb. 1)
VERWENDETE WARNSYMBOLE
Dies ist das Symbol für Sicherheitswarnungen. Dieses
Symbol macht Sie auf mögliche Gefahren
aufmerksam, die zu Sachschäden und/oder schweren
Körperverletzungen oder zum Tod führen können.

4. Aktivieren Sie
Bluetooth und Home
Wifi, damit das Gerät
für die Kopplung auf
Ihre Wifi-Verbindung
zugreifen kann.
6. Klicken Sie auf die
Beleuchtung und
wählen Sie „Light
Source (Wi-Fi)“.
7. Wählen Sie das 2,4-
GHz-Wi-Fi-Netzwerk
und geben Sie das
Passwort ein.
5. Klicken Sie auf „Add
Device“ oder „+“ in der
oberen rechten Ecke.
Schritt 7:
Smart Bulb bietet zwei Arten von Kopplungsmodi:
1) EZ-Modus - Licht blinkt schnell
2) AP-Modus - Langsamer Blitz oder lange Helligkeit
So aktivieren Sie die intelligente Glühbirne im
Kopplungsmodus und setzen sie zurück
Schritt 1: Schalten Sie die Glühbirne ein. Wenn das Licht schnell blinkt,
befindet sich das Gerät im EZ-Modus. Bitte
Bitte fahren Sie mit der Kopplung des Smart-Geräts mit der App fort.
Falls nicht, folgen Sie bitte Schritt 2.
Schritt 2: Schalten Sie die Glühbirne 3-mal in kurzen Abständen von
weniger als 2 Sekunden aus und wieder ein. Die Lampe blinkt schnell
und zeigt damit an, dass das Gerät in den Pairing-Modus übergegangen
ist. Bitte fahren Sie mit dem Pairing des Smart-Geräts mit der App fort.
Hinweis: Jedes Mal, wenn Sie das Gerät 3-mal in kurzen Abständen von
weniger als 2 Sekunden AUS- und EIN-schalten, wechselt der Pairing-
Modus des Geräts abwechselnd zwischen EZ-Modus und AP-Modus.

Schritt 8: Wenn Sie
Schritt 10 erfolgreich
abgeschlossen
haben, werden Sie
auf die folgende
Seite weitergeleitet,
auf der die App das
Gerät (die Lampe)
sucht, registriert und
initialisiert (siehe
Abbildung unten).
Schritt 10: Sie können nun Ihr Gerät mit der App steuern.
Tippen Sie auf der Startseite auf den Gerätenamen, um
die Bedienelemente und Funktionen des Geräts
aufzurufen.
Schritt 13: Nachdem Sie die
Lampe erfolgreich mit der App
gekoppelt haben, können Sie
mehrere Funktionen der Lampe
über Ihr Mobiltelefon steuern:
Ein- und Ausschalten, Ändern der
Farbtemperatur, Zeit- und
Zeitpläne, Dimmoptionen und
mehr.
Schritt 9: Sobald Ihr
Gerät erfolgreich
hinzugefügt wurde,
benennen Sie das
Gerät nach Ihren
Wünschen um.
Completed
Light
Light
Living Room
GOOGLE ASSISTANT-EINSTELLUNGEN
Schritt 1
Schritt 2
- Installieren Sie die Google Assistant App über den App Store (iOS) oder den Play Store (Android) und registrieren Sie
sich. Wenn Sie bereits ein bestehendes Konto bei Google Assistant haben, fahren Sie bitte mit der Anmeldung fort.
- Erstellen Sie ein neues Zuhause / wählen Sie ein bereits vorhandenes Zuhause aus, falls vorhanden.
- Schalten Sie das Google Assistant-Gerät ein und verbinden Sie es mit der App (fahren Sie dann mit Schritt 2 fort).
• Sobald Sie sich auf der Google-Startseite befinden, tippen Sie auf das Symbol „+“, um ein neues Gerät
und eine neue Fähigkeit hinzuzufügen. Tippen Sie dann auf Gerät einrichten, wie in der Abbildung
unten gezeigt.
- Schritt 3: Vergewissern Sie sich, dass der Wifi-Switch mit der Smart Life-App gekoppelt ist, bevor Sie
beginnen. Tippen Sie auf den Pfeilbereich, wie in der Abbildung unten hervorgehoben.
- Schritt 4: Geben Sie „Smart Life“ in die Suchleiste ein und tippen Sie auf das Symbol von „Smart Life“.

- Schritt 5: Melden Sie sich mit Ihren Smart Life-Anmeldedaten an, um das Smart Life-Gerät zu verknüpfen.
- Schritt 6: Tippen Sie auf Autorisieren, um mit der Verknüpfung des Geräts fortzufahren.
a.
Bleiben Sie auf der Seite und Sie werden in wenigen Sekunden weitergeleitet, um das Gerät
auszuwählen, das Sie zu Ihrem Zuhause hinzufügen möchten.
b. Wählen Sie das Gerät aus und tippen Sie auf Weiter, wie in Abbildung b gezeigt.
Smart Life
Schritt 7
Schritt 8: Wählen Sie das Haus aus, unter dem Sie das Smart Life hinzufügen möchten. (Oder) Sie können ein
neues Haus erstellen, um
um das Smart Life zu diesem hinzuzufügen.
Schritt 9: Sie haben das Smart Life-Gerät erfolgreich zu Ihrer Google Assistant-App hinzugefügt.
Schritt 10
a.
Sie können die Lampe ein- und ausschalten, indem Sie wie unten gezeigt auf die Optionen
Ein/Aus tippen. (ODER) Sie können auf die intelligente Lampe tippen.
b. Sie werden zu einer Seite weitergeleitet (wie in Bild b), auf der Sie die „Strom- und
Dimmfunktion“ der Lampe steuern können.
Google-Befehle
Jetzt können Sie Ihr Smart-Gerät mit Sprachbefehlen über Google Assistant steuern. Nachfolgend finden
Sie einige Befehle, die Sie verwenden können:
Ok, Google, schalte das Licht im Schlafzimmer ein/aus.
Ok, Google, schalte das Flurlicht ein/aus.
DINGE, DIE VOR BEGINN DER INSTALLATION ZU BEACHTEN SIND
1. Smart Life App & Google Assistant App Ok, Google, stelle das Schlafzimmerlicht auf warmweiß.
2. Stellen Sie sicher, dass Sie ein Google Assistant-Gerät haben.
3.
Smart Device - Lampe
4. Stabiles Wifi netzwerk
ALEXA-EINSTELLUNGEN
Schritt 1: Installieren Sie die Amazon Alexa App über den App Store (iOS) oder den Play Store (Android)
und registrieren Sie sich. Wenn Sie bereits ein bestehendes Konto bei Amazon Alexa haben, fahren Sie
bitte mit der Anmeldung fort.
Schritt 2: Sobald Sie sich auf der Amazon Alexa-Startseite befinden, tippen Sie auf das Symbol unten
rechts - wo der Pfeil hinzeigt - um ein neues Gerät und einen Skill hinzuzufügen.
Schritt 3: Tippen Sie auf
Einstellungen und tippen Sie auf „Skill and Games“, wie unten gezeigt.
Schritt 4: Suchen Sie auf der Seite „Skills & Games“ nach „Smart Life“, wie unten dargestellt.
Smart Life
Schritt 5: Aktivieren Sie den Skill.
Schritt 6: Geben Sie Ihre Smart Life Anmelde-ID und Ihr Passwort ein und tippen Sie auf „Jetzt verbinden“.
Schritt 7: Sobald Sie auf „Jetzt verknüpfen“ tippen, werden Sie auf eine neue Seite weitergeleitet, auf der
Sie zur Autorisierung aufgefordert werden (siehe Abbildung unten). Tippen Sie auf „Autherize“.
Schritt 8: Sie erhalten eine Bestätigung, dass das Konto erfolgreich verknüpft wurde (siehe Abbildung
unten).
Schritt 9: Entdecken Sie Ihr Smart-Gerät auf Alexa. Sobald Sie den Skill aktiviert haben
A) Sie können den Sprachbefehl „Alexa Geräte entdecken“ für das Alexa-Gerät verwenden, das Sie besitzen.
und tippen Sie auf Gerät hinzufügen , wählen Sie das Gerät das Sie hinzufügen möchten, und tippen Sie auf Gerät erkennen.
B) Um ein Gerät manuell hinzuzufügen, tippen Sie auf der Startseite auf
Hinweis: Die Erkennung des Geräts muss jedes Mal durchgeführt werden, wenn der Gerätename in der App
geändert wird.
Smart Life has been successfully linked.
ALEXA COMMANDS
Now, you can control your smart device using voice commands on Alexa.
Below are a few commands you can use:
DINGE, DIE VOR BEGINN DER INSTALLATION ZU BEACHTEN SIND
1. Smart Life App & Amazon Alexa App
2. Stellen Sie sicher, dass Sie ein Amazon Alexa-Gerät haben (einschließlich Echo, Echo Tap oder
Echo Dot).
3. Intelligentes Gerät - Lampe
4.
Stabiles Wifi netzwerk
IM FALLE VON FRAGEN/PROBLEMEN MIT DEM PRODUKT WENDEN SIE SICH BITTE AN UNS
[email protected] V-TAC HOUSE, KELPATRICK ROAD, SLOUGH, BERKSHIRE, SL1 6BW, UK.
BEI FRAGEN/PROBLEMEN MIT DEM PRODUKT WENDEN SIE SICH BITTE AN UNS UNTER: [email protected] FÜR
WEITERE PRODUKTE, ANFRAGEN WENDEN SIE SICH BITTE AN UNSEREN DISTRIBUTOR ODER DEN
NÄCHSTGELEGENEN HÄNDLER. V-TAC EUROPE LTD. BULGARIEN, PLOVDIV 4000, BUL.L.KARAVELOW 9B
BEI FRAGEN/PROBLEMEN MIT DEM PRODUKT WENDEN SIE SICH BITTE AN UNS UNTER: [email protected] FÜR
WEITERE PRODUKTE, ANFRAGEN WENDEN SIE SICH BITTE AN UNSEREN DISTRIBUTOR ODER DEN NÄCHSTGELEGENEN
HÄNDLER. V-TAC WEST EUROPE LTD. ERDGESCHOSS, 71 LOWER BAGGOT STREET, DUBLIN 02, IRLAND DO2 P593
WIFI-MODUL SICHERHEITSHINWEISE
- Vergewissern Sie sich, dass die Eingangsspannung dieses Produkts der vom Hersteller
vorgeschriebenen Spannung entspricht. Andere Eingangsspannungen können zum Ausfall
des Geräts führen und möglicherweise die Umwelt und Ihre Gesundheit schädigen.
- Die Drähte müssen korrekt und in Übereinstimmung mit den Farben der Drähte und den
Anweisungen des in dieser Anleitung beschriebenen Schaltplans angeschlossen werden.
- Vergewissern Sie sich vor dem Einschalten, dass die Leistungselemente eine geringere als
die vom Hersteller angegebene Leistung haben.
- Vergewissern Sie sich vor dem Einstecken, dass die Spannung der LED-Leuchte für den
Betrieb mit diesem Produkt geeignet ist.
- Dieses Produkt ist für die von der Firma V-TAC hergestellten Produkte geeignet. Wenn es
mit Produkten anderer Firmen verbunden wird, ist V-TAC nicht für eventuelle negative
Folgen für Ihre Gesundheit verantwortlich.
VEREINFACHTE EU-KONFORMITÄTSERKLÄRUNG
Hiermit erklärt V-TAC, dass diese Funkanlage des Typs LED Smart Bulb der Richtlinie 2014/53/EU entspricht. Der
vollständige Text der EU-Konformitätserklärung ist unter der folgenden Internetadresse verfügbar.
https://www.vtacexports.com/media/ftp-upload/certificates/DOC/EU/VT-1818-DOC-LED%20BULB-N-EU.pdf
Hi Alexa, Schlafzimmerlicht ein-/ausschalten.
Hi Alexa, schalte das Flurlicht ein/aus.

Merci d'avoir choisi et acheté l'éclairage LED V-TAC SMART. V-TAC vous orira le meilleur service possible.
Veuillez lire attentivement ces instructions avant de commencer l'installation et conserver ce manuel à
portée de main pour référence ultérieure. Si vous avez d'autres questions, veuillez contacter notre reven-
deur ou le fournisseur local auprès duquel vous avez acheté le produit. Ils sont formés et prêts à vous servir
au mieux. La garantie est valable pendant 2 ans à compter de la date d'achat. La garantie ne s'applique pas
aux dommages causés par une installation incorrecte ou une usure anormale. La société n'ore aucune
garantie contre les dommages causés à toute surface en raison d'un démontage et d'une installation incor-
rects du produit. Les produits sont adaptés à une utilisation quotidienne de 10 à 12 heures. L'utilisation du
produit 24 heures sur 24 annulerait la garantie. Ce produit est garanti uniquement contre les défauts de
fabrication.
INTRODUCTION ET GARANTIE
MANUEL D'INSTRUCTIONS
SÉRIE DE LAMPES LED INTELLIGENTES
GU10
Milky Cover
E14
P45
B22
A60
E27
A60
E27
A65
GU10
Lens
E27
G45
E14
Candle
WORKS WITH
works with the
Google Assistant

AVERTISSEMENT DE SÉCURITÉ
REMARQUE
MULTILINGUE
MANUEL CODE QR
Veuillez scanner le code QR
pour accéder au manuel dans
plusieurs langues.
1. Les lampes sont réservées à un usage intérieur et ne sont pas recommandées dans les environnements
humides.
2. La lampe doit être utilisée dans des zones bien ventilées et installée de manière normale.
3. Attention : cette lampe ne doit PAS être utilisée dans un luminaire totalement fermé qui ne permet pas
une bonne dissipation de la chaleur. Veuillez ne pas installer la lampe dans un espace clos, car cela
bloquerait le signal wifi et entraînerait un mauvais fonctionnement du produit.
4. Les lampes et lanternes ne peuvent pas être installées sur la surface de matériaux combustibles ordi-
naires. L'augmentation de la température est normale pour les lampes.
5. N'exercez pas de force externe sur la lampe et ne la jetez pas.
6. Les lampes doivent être stockées dans un endroit frais et sec. Assurez-vous toujours que l'environne-
ment est propre avant d'installer la lampe.
7. Ne jetez pas les lampes avec les ordures ménagères. Les lampes sont composées de composants
électroniques et doivent être éliminées de manière appropriée dans des lieux désignés avec un traite-
ment unifié, comme les équipements électroniques traditionnels.
1. Cet appareil nécessite une fréquence Wi-Fi de 2,4
GHz.
2. À utiliser uniquement à l'intérieur.
3. Fréquence de fonctionnement (puissance maximale
transmise) : 2400 MHz-2483,5 MHz (20 dBm).
Ce marquage indique que ce
produit ne doit pas être jeté avec
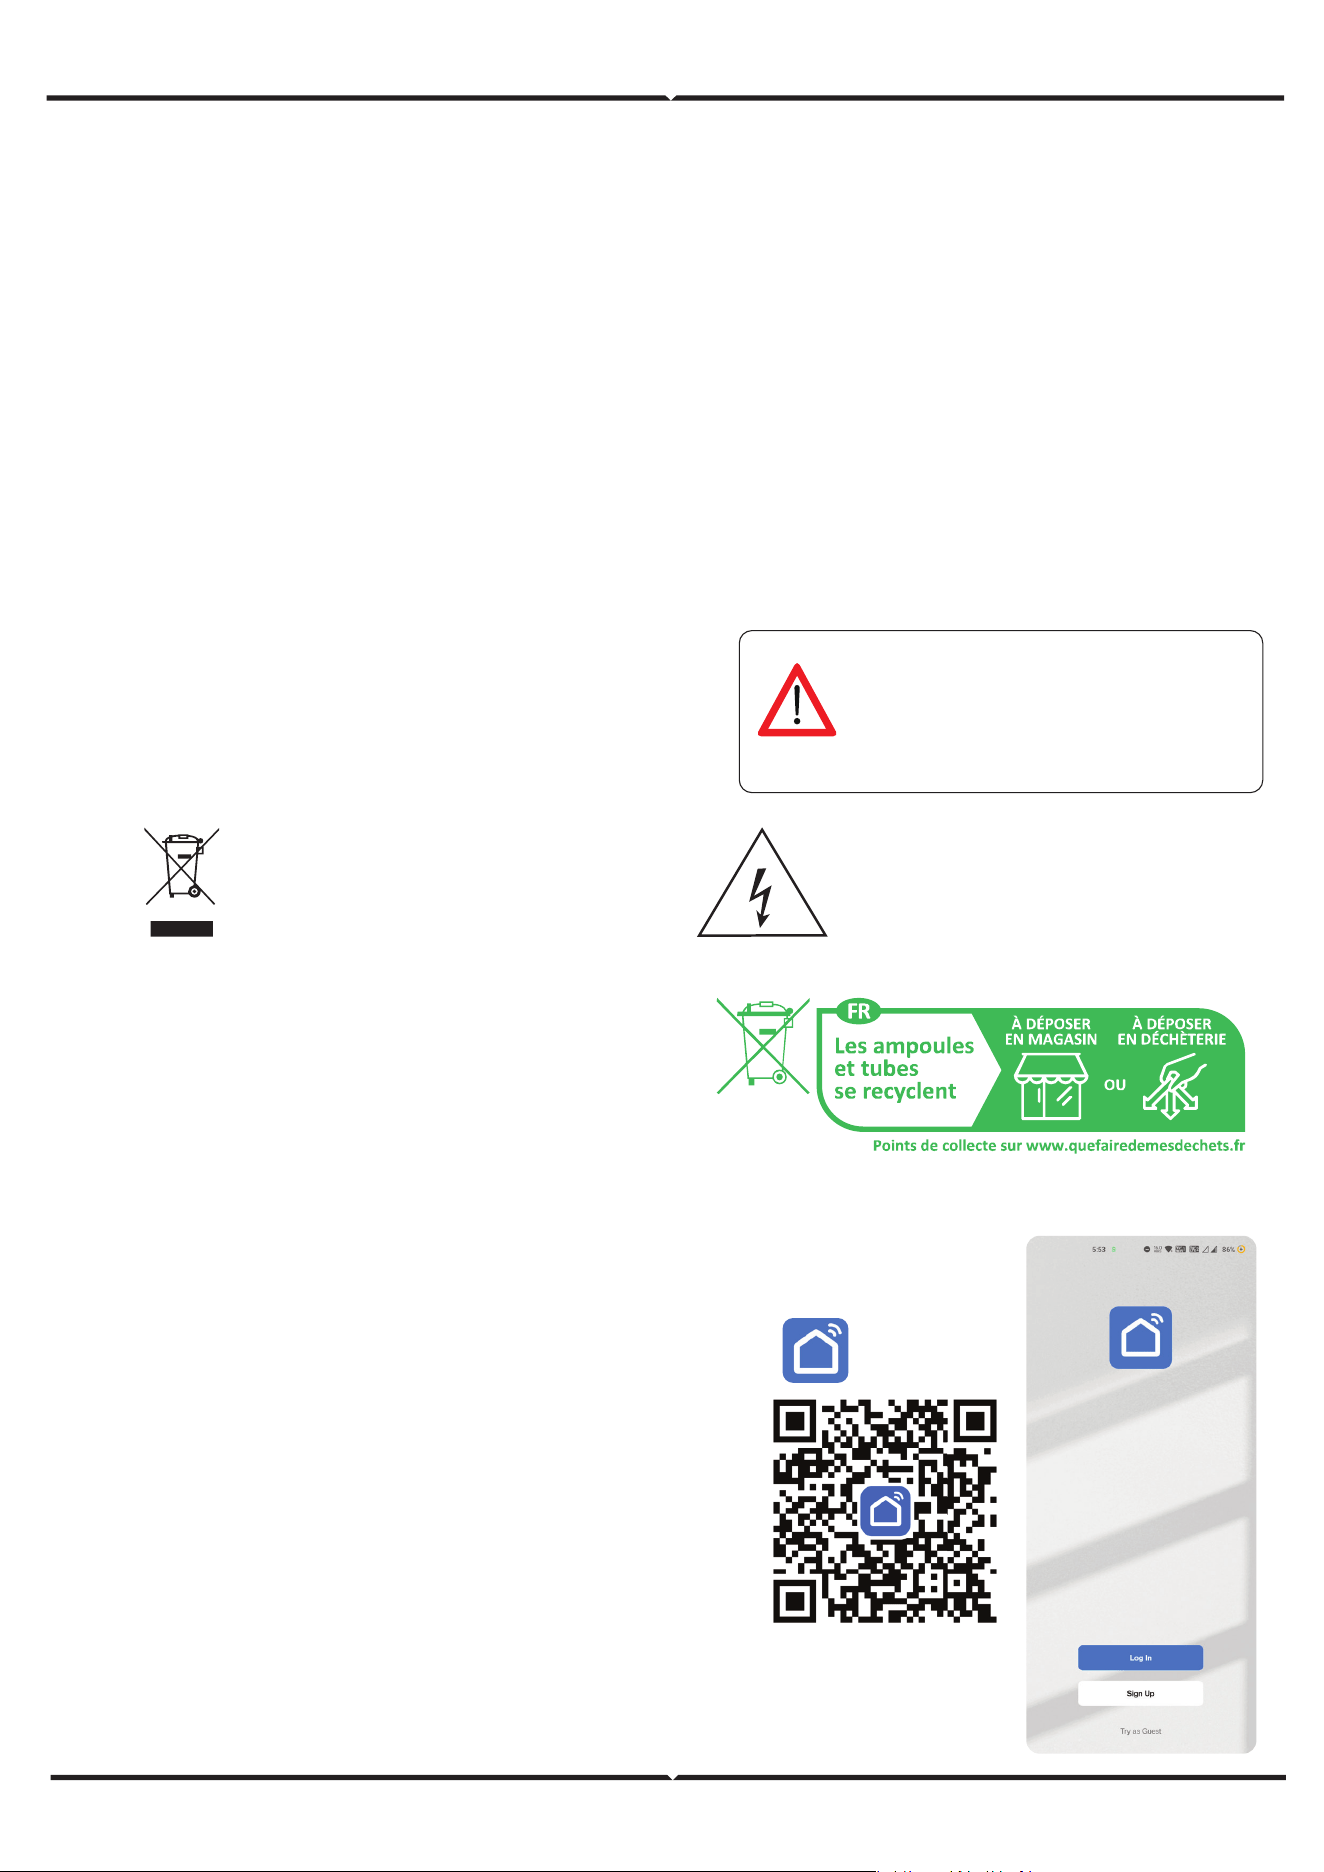
les autres déchets ménagers.
Attention, risque d'électrocution.
Fig 1
Smart Life
Étape 1 : Allumez l'appareil à l'aide du bouton d'alimen-
tation. Suivez ensuite les instructions ci-dessous pour
l'appareil.
Étape 2 : Scannez le code QR fourni ou téléchargez «
Smart Life » depuis l'App Store (iOS) ou le Google
Play Store (Android).
Étape 3 : Ouvrez l'application Smart Life et appuyez
sur « S'inscrire » pour créer un nouveau compte. Si
vous
possédez déjà un compte, veuillez vous connecter.
(Réf. Fig. 1)
Ceci est le symbole d'alerte de sécurité. Ce
symbole vous avertit des dangers potentiels
pouvant entraîner des dommages matériels
et/ou des blessures graves, voire mortelles.
SYMBOLES D'AVERTISSEMENT UTILISÉS
INSTRUCTIONS D'INSTALLATION DE L'APPLICATION
4. Activez le Bluetooth
et le Wi-Fi domestique
pour que l'appareil
puisse accéder à votre
connexion Wi-Fi afin
de procéder à
l'appairage.
6. Cliquez sur
Éclairage, puis
sélectionnez «
Source lumineuse
(Wi-Fi) ».
7. Sélectionnez le
réseau Wi-Fi 2,4 GHz et
entrez le mot de passe.
5. Cliquez sur « Ajouter un
appareil » ou sur le signe «
+ » dans le coin supérieur
droit.
Étape 7 :
L'ampoule intelligente propose deux types de modes
d'appairage :
1) Mode EZ - La lumière clignote rapidement.
2) Mode AP - Clignotement lent ou luminosité longue.
Comment activer/réinitialiser l'ampoule intelligente en mode
d'appairage
Étape 1 : Allumez l'ampoule. Si la lumière clignote rapidement,
l'appareil est en mode EZ. Veuillez
procéder à l'appairage de l'appareil intelligent avec l'application. Si
ce n'est pas le cas, veuillez suivre l'étape 2.
Étape 2 : Allumez et éteignez l'ampoule à trois reprises à intervalles
rapprochés de moins de 2 secondes. La lumière clignote rapide-
ment, indiquant que l'appareil est passé en mode d'appairage.
Veuillez procéder à l'appairage de l'appareil intelligent avec l'appli-
cation.
Remarque : chaque fois que vous allumez et éteignez l'appareil à
trois reprises à intervalles rapprochés de moins de 2 secondes, le
mode d'appairage de l'appareil bascule entre le mode EZ et le
mode AP.
Étape 8 : Une fois
que vous avez
terminé l'étape 10,
vous serez redirigé
vers la page ci-des-
sous, où l'application
recherche, enregistre
et initialise l'appareil
(lampe) (voir l'image
ci-dessous).
Étape 10 : Vous pouvez désormais commencer à contrôler
votre appareil à l'aide de l'application. Appuyez sur le nom de
l'appareil sur la page d'accueil pour
accéder aux commandes et aux fonctionnalités de l'appareil.
Étape 13 : Une fois la lampe
correctement appairée avec
l'application, vous pouvez com-
mencer à contrôler plusieurs
fonctionnalités de la lampe
depuis votre mobile :
allumer/éteindre, modifier la
température de couleur, régler la
minuterie et les programmations,
régler l'intensité lumineuse, etc.
Étape 9 : Une fois votre
appareil ajouté, renom-
mez-le selon vos
préférences.
Completed
Light
Light
Living Room

PARAMÈTRES DE L'ASSISTANT GOOGLE
Étape 1
Étape 2
• Installez l'application Google Assistant via l'App Store (iOS) ou le Play Store (Android) et inscriv-
ez-vous. Si vous disposez déjà d'un compte Google Assistant, veuillez vous connecter.
• Créez un nouveau domicile/Choisissez parmi les domiciles existants, le cas échéant.
• Allumez l'appareil Google Assistant et connectez-le à l'application. (Passez ensuite à l'étape 2)
• Une fois sur la page d'accueil de Google, appuyez sur l'icône « + » Ajouter pour ajouter un nouvel
appareil et une nouvelle compétence. Appuyez ensuite sur Configurer l'appareil comme indiqué dans
l'image ci-dessous.
• Étape 3 : Assurez-vous que le commutateur Wi-Fi est appairé avec l'application Smart Life avant de
commencer. Appuyez sur la section fléchée comme indiqué dans l'image ci-dessous.
• Étape 4 : Tapez « Smart Life » dans la barre de recherche et appuyez sur l'icône « Smart Life ».

• Étape 5 : Connectez-vous à l'aide de vos identifiants Smart Life pour associer l'appareil Smart Life.
• Étape 6 : Appuyez sur Autoriser pour poursuivre l'association de l'appareil.
a. Le compte sera alors associé. Veuillez rester sur cette page, vous serez redirigé dans quelques secondes vers
la page où vous pourrez sélectionner l'appareil à ajouter à votre domicile.
b. Sélectionnez l'appareil et appuyez sur Suivant comme indiqué dans l'image b.
Smart Life
Étape 7
Étape 8 : Sélectionnez le domicile auquel vous souhaitez ajouter Smart Life. (Ou) vous pouvez créer un nouveau
domicile afin d'y ajouter Smart Life.
Étape 9 : Vous avez ajouté avec succès l'appareil Smart Life à votre application Google Assistant.
Étape 10
a. Vous pouvez allumer/éteindre la lampe en appuyant sur les options On/O comme indiqué ci-des-
sous. (OU) Vous pouvez appuyer sur la lampe intelligente.
b. Vous serez redirigé vers la page (comme indiqué dans l'image b) où vous pourrez contrôler les
lumières « Fonctionnalité d'alimentation et de gradation ».

Commandes Google
Vous pouvez désormais contrôler votre appareil intelligent à l'aide de commandes vocales sur Google Assistant.
Voici quelques commandes que vous pouvez utiliser :
Ok, Google, allume/éteins la lumière de la chambre,
Ok, Google, allume/éteins la lumière du couloir.
POINTS À RETENIR AVANT DE COMMENCER L'INSTALLATION
1. Application Smart Life et application Google Assistant Ok, Google, règle la lumière de la chambre sur blanc
chaud.
2. Assurez-vous de disposer d'un appareil compatible avec Google Assistant.
3. Appareil intelligent - Lampe
4. Réseau Wi-Fi stable
PARAMÈTRES ALEXA
-
Étape 3 : Appuyez sur Paramètres, puis sur « Compétences et jeux » comme indiqué ci-dessous.
Étape 4 : Recherchez « Smart Life » sur la page « Compétences et jeux » comme indiqué ci-dessous.
Smart Life
Étape 1 : Installez l'application Amazon Alexa via l'App Store (iOS) ou le Play Store (Android) et inscrivez-vous.
Si vous possédez déjà un compte Amazon Alexa, connectez-vous.
Étape 2 : Une fois sur la page d'accueil d'Amazon Alexa, appuyez sur l'icône en bas à droite (indiquée par la
flèche) pour ajouter un nouvel appareil et une nouvelle compétence.

Étape 5 : Activer la compétence
Étape 6 : Entrez votre identifiant et votre mot de passe Smart Life, puis appuyez sur « Se connecter maintenant ».
-
Étape 9 : Découvrez votre appareil intelligent sur Alexa. Une fois que vous avez activé la compétence
A) Vous pouvez utiliser la commande vocale « Alexa, découvre les appareils » sur l'appareil Alexa dont vous disposez.
Smart Life has been successfully linked.
Étape 7 : Une fois que vous avez appuyé sur « Lier maintenant », vous serez redirigé vers une nouvelle page vous
demandant une autorisation (voir image ci-dessous). Appuyez sur « Autoriser ».
Étape 8 : Vous recevrez une confirmation indiquant que le compte a été lié avec succès (voir image ci-dessous).
B) Pour ajouter un appareil manuellement sur la page d'accueil, appuyez sur , puis sur Ajouter un appareil ,
sélectionnez l'appareil que vous souhaitez ajouter et appuyez sur Découvrir l'appareil.
Remarque : la découverte de l'appareil doit être eectuée à chaque fois que le nom de l'appareil est modifié
dans l'application.
COMMANDES ALEXA
POINTS À RETENIR AVANT DE COMMENCER L'INSTALLATION
1. Application Smart Life et application Amazon Alexa
2. Assurez-vous de disposer d'un appareil Amazon Alexa (y compris Echo, Echo Tap ou Echo Dot).
3. Appareil intelligent - Lampe
4. Réseau Wi-Fi stable
IN CASE OF ANY QUERY/ISSUE WITH THE PRODUCT PLEASE REACH OUT TO US AT
SUPPORT@VTACEXPORTS.COM V-TAC HOUSE, KELPATRICK ROAD, SLOUGH, BERKSHIRE, SL1 6BW, UK.
IN CASE OF ANY QUERY/ISSUE WITH THE PRODUCT, PLEASE REACH OUT TO US AT: SUPPORT@V-TAC.EU
FOR MORE PRODUCTS RANGE, INQUIRY PLEASE CONTACT OUR DISTRIBUTOR OR NEAREST DEALERS.
V-TAC EUROPE LTD. BULGARIA, PLOVDIV 4000, BUL.L.KARAVELOW 9B
IN CASE OF ANY QUERY/ISSUE WITH THE PRODUCT, PLEASE REACH OUT TO US AT: [email protected]
FOR MORE PRODUCTS RANGE, INQUIRY PLEASE CONTACT OUR DISTRIBUTOR OR NEAREST DEALERS.
V-TAC WEST EUROPE LTD. GROUND FLOOR, 71 LOWER BAGGOT STREET, DUBLIN 02, IRELAND DO2 P593
INSTRUCTIONS DE SÉCURITÉ RELATIVES AU MODULE WIFI
DÉCLARATION DE CONFORMITÉ SIMPLIFIÉE DE L'UE
• Assurez-vous que la tension d'entrée de ce produit est conforme aux spécifications du
fabricant. Toute autre tension d'entrée peut endommager le produit et nuire à
l'environnement et à votre santé.
• Les fils doivent être connectés correctement, en respectant les couleurs des fils et les
instructions fournies dans le schéma de câblage décrit dans ce mode d'emploi.
• Avant de mettre l'appareil sous tension, assurez-vous que les éléments de puissance
ont une puissance inférieure à celle spécifiée par le fabricant.
• Avant de brancher l'appareil, assurez-vous que la tension de la lumière LED est
adaptée à la configuration de ce produit.
• Ce produit est adapté aux produits fabriqués par la société V-TAC. En cas de
connexion avec des produits d'autres sociétés, V-TAC ne peut être tenu responsable
des conséquences néfastes pour votre santé.
Par la présente, V-TAC déclare que cet équipement radio de type ampoule LED intelligente est conforme à la direc-
tive 2014/53/UE. Le texte intégral de la déclaration de conformité UE est disponible à l'adresse Internet suivante.
https://www.vtacexports.com/media/p-upload/certificates/DOC/EU/VT-1818-DOC-LED%20BULB-N-EU.pdf
Vous pouvez désormais contrôler votre appareil intelligent à l'aide des commandes vocales d'Alexa.
Voici quelques commandes que vous pouvez utiliser :
Bonjour Alexa, allume/éteins la lumière de la chambre.
Bonjour Alexa, allume/éteins la lumière du couloir.