Loading ...
Loading ...
Loading ...
14
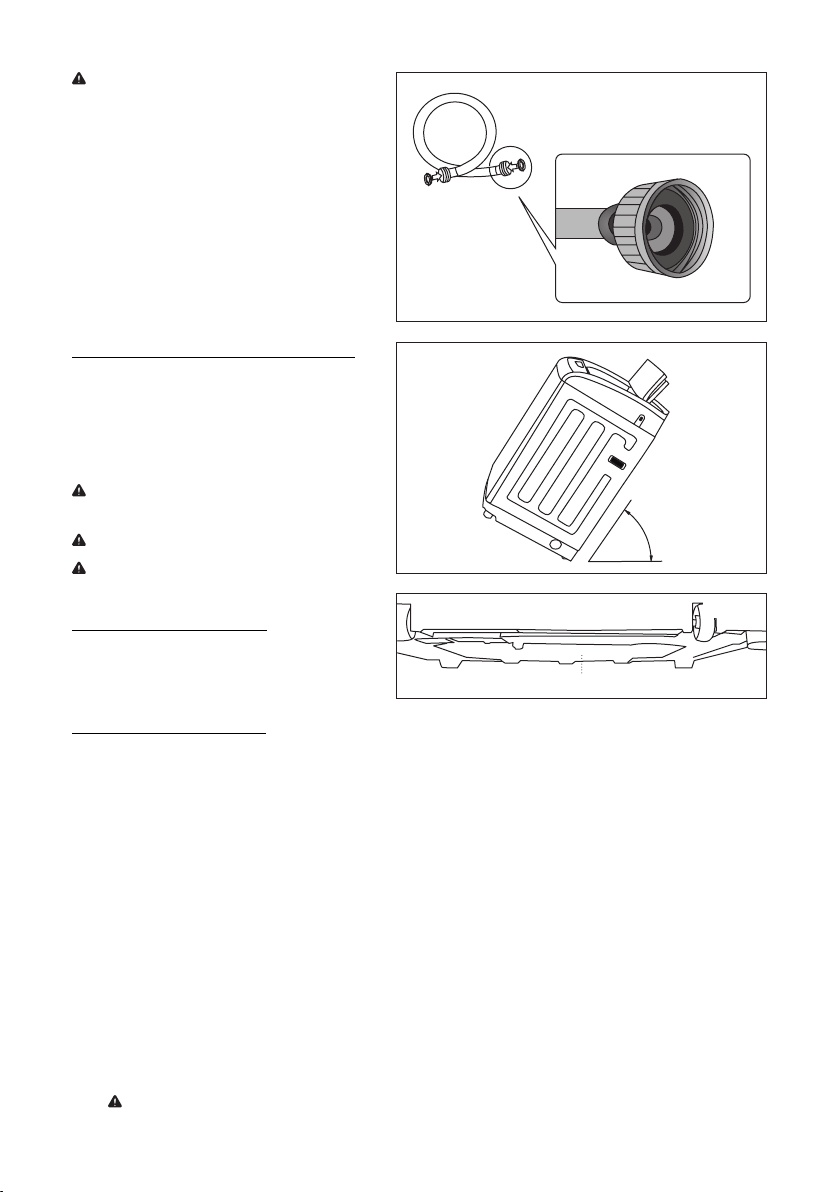
Figure 8
Figure 9
WARNING: Before installing, make sure there
are rubber gaskets inside the fittings at both
ends of the water supply hoses. (Refer to Figure
8.) If there are no water inlet hoses packed with
the washer or if the hoses are damaged, call
888-775-0202. Installing the water supply hoses
without rubber gaskets can cause water leakage.
When you initially install the washer, be sure to
use new hoses. Failing to do so may result in a
water leakage or overflow and may damage your
property. If a hose is too short, replace the hose
with a longer, high pressure hose.
Step 1: Move your Washer to Selected Position
Tilt the unit back onto its rear rollers and push
it forward as shown in the figure to your right.
(Refer to Figure 9.) Move the unit to a location as
described in the previous Location Requirements
section on page 12.
WARNING: Make sure the location has a hard,
level surface without carpeting.
WARNING: There should be no direct sunlight.
WARNING: DO NOT expose the unit to freezing
temperatures (under 32° F or 0° C).
Step 2: Install the Bottom Cover
Slide the bottom cover into the slots of the
bottom surface and screw in the provided screws.
(Refer to Figure 10.)
Step 3: Connect the Water Hose
1. The Quick Connection Adaptor is primarily for quick connection to a single faucet, such as a typical kitchen
sink, in cases where the washer is stored in a different place than where it is used. Skip this step if you are
connecting the washer to a sink with separate hot and cold faucets.
The adaptor consists of two parts that quickly connect or disconnect. One part, the faucet fitting, is for
connection to the faucet and the other part, the hose fitting, connects to the cold water hose of the
washer. (Refer to Figure 11 and 12 on page 16.)
• Pull back on the white ring to free the faucet fitting from the adaptor for installation into the faucet.
• Screw the end of the cold water hose onto the base of the hose fitting.
• If the faucet has internal screw threads, unscrew the aerator if present from the tip of the faucet.
Then screw the faucet fitting into the faucet. Make sure that the black rubber gasket is on the top of
the adaptor before screwing it in.
• If the faucet has external screw threads, remove the gasket from the top of the faucet fitting, and
screw the fitting over the external threads.
• Pull back on the white ring to connect the two parts of the adaptor back together.
NOTE: When connected to a single faucet, be sure to only run cold water washers.
60-70°
Back of
the Washer
Front of
the Washer
Figure 10
Bottom Cover
Loading ...
Loading ...
Loading ...