QUICK START GUIDE
WARNING: To reduce the risk of fire. electric shock. or injury to persons. read the IMPORTANT SAFETY INSTRUCTIONS. before operating this appliance.
This Use & Care Guide covers several different models. Your dryer may not have all of the cycles and features described.
USING AUTO CYCLES
Automatic Cycles automatically match g g the cycle setting to the type of load and adjust drying time for optimal performance.
See the Cycles information on the following pages for more detail on each cycle.
Clean the lint screen.
Place laundry in the dryer. Shut the door.
Press Power.
Select an Automatic Cycle.
Select the WRINKLE SHIELD feature. it desired.
Press and hold START to begin.
Tomake changes during an Automatic Cycle:
1. Press PAUSE/CANCEL.
2. Select DRYNESS LEVEL or Option.
3. Press and hold START to begin.
NOTE: For the Sanitize Cycle (on some models). to ensure sanitization. do not interrupt the cycle.
USING MANUAL CYCLES
Use Manual Cycles to seta drying time and temperature. See the Cycles information on the following pages for more detail on each cycle.
1. Clean the lint screen.
2. Place laundry in the dryer. Shut the door.
3. Press Power.
4. Select an Manual Cycle.
5. Press the Dry Time up or down buttons until the desired drying is displayed.
6. Press TEMPERATURE until the desired temperature glows.
7. Select the WRINKLE SHIELD feature. if desired.
8. Press and hold START to begin.
USING STEAM CYCLES (Steam models only)
Steam Cycles use water and heat to $$ reduce wrinkles and odors in dry items.
See the Cycles information on the following pages for more detail on each cycle.
1. Press Power.
2. Selecta Steam Cycle.
3. Press and hold START to begin.
To stop your dryer at any time
Press PAUSE/CANCEL twice or open the door.
To pause the dryer at any time
Open the door or press PAUSE/CANCEL once.
To restart the dryer
Close the door and press and hold START button until dryer starts.
Tips for Getting the Best Performance from Your Steam Dryer
- Results may vary depending on fabric. 100% cotton garments with wrinkle-free finish may yield better results than those without. 100% cotton items may require additional touching up after the Steam Cycle.
- Use of fabric softener sheet is not recommended with Steam Cycles. It may cause temporary staining on clothes.
- Itis not recommended to use Steam Cycles for items that have been starched. Wash any starched or new garments prior to using a Steam Cycle.
- The Refresh Cycle is best for smoothing out wrinkles and reducing odors from loads consisting of one to four dry items of wrinkle-free cotton. cotton-polyester blend. common knits. and synthetic garments.
- The Touch Up Cycle is best for smoothing out wrinkles from clothes that have been left in the dryer too long. For best results. do not overload the dryer.
- The Refresh Cycle time is set for 15 minutes and is not adjustable. Under certain environmental or installation conditions. you may experience under drying with the Refresh Cycle. Select Touch Up Cycle (20 min. default time) which can be customized to select High Temperature and/or additional cycle time by pressing the Timed Cycle Adjust More Time button.
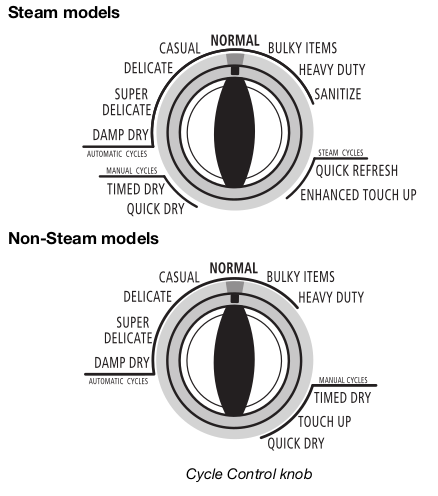
Cycles
NOTE: Not all cycles are available on all models.
Select the drying cycle that matches the type of load you are drying. See Automatic Preset or Manual Preset Cycle Settings chart.
Automatic Cycles
Automatic Cycles allow you to match the cycle to the load you are drying. See the following Automatic Preset Cycle Settings chart.
Each cycle dries certain fabrics at the recommended temperature.
Asensor detects the moisture in the load and automatically adjusts the drying time for optimal drying.
Sanitize
Use this cycle for items such as towels. bedding. children’s clothing. or other items needing to be sanitized. This cycle is designed to eliminate 99.9% of 3 common infectious bacteria. This cycle should be run to completion to ensure sanitization. For best results. do not interrupt cycle.

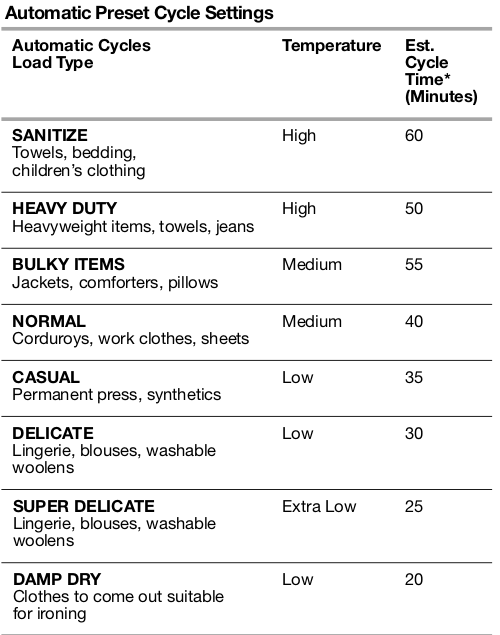
* Reset time to complete drying. if needed.
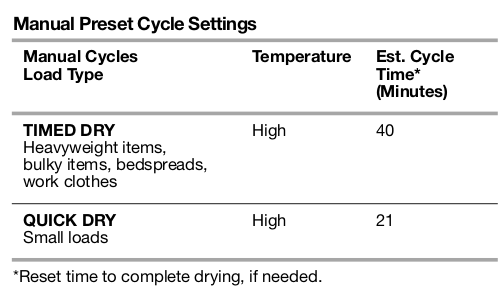
Manual Cycles
Use Manual Cycles to select a specific amount of drying time and a drying temperature. When a Manual Cycle is selected. the Estimated Time Remaining display shows the actual time remaining in your cycle. You can change the actual time in the cycle by pressing the DRY TIME up or down buttons.
Air Only
Use Timed Dry/Air Only temperature setting for items that require drying without heat such as rubber. plastic. and heat-sensitive fabrics. This chart shows examples of items that can be dried using Air Only.
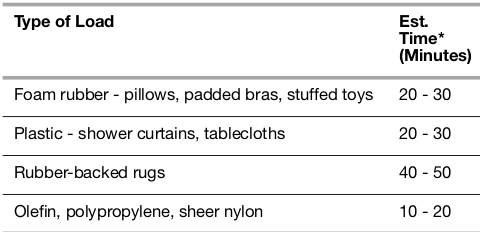
* Reset time to complete drying. if needed.
When using Air Only
Check that coverings are securely stitched Shake and fluff pillows by hand periodically during the cycle Dry item completely. Foam rubber pillows are slow to dry.
NOTE: Automatic Cycles are not available when using the Air Only setting.
Steam Cycles
In these cycles. a small amount of water is sprayed into the dryer drum after several minutes of tumbling with heat. The STEAM Status Light will come on while the water is sprayed into the drum.
The dryer will continue to tumble at High heat for the duration of the cycle. The Steam Cycles include Quick Refresh and Enhanced Touch Up. The heat setting and cycle time are not adjustable for the Quick Refresh Cycle. but can be adjusted for the Enhanced Touch Up Cycle.
NOTE: Results may vary depending on fabric. 100% cotton garments with wrinkle-free finish may yield better results than those without.
Use of a fabric softener sheet is not recommended with steam cycles as it may cause temporary staining on the clothes.
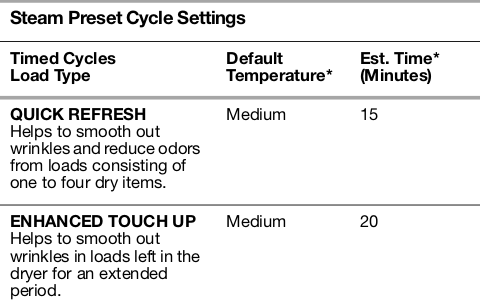
* The Enhanced Touch Up Cycle has a minimum dry time of 15 minutes and a maximum dry time of 40 minutes. Only the Medium and High temperature settings can be used for the Enhanced Touch Up Cycle.
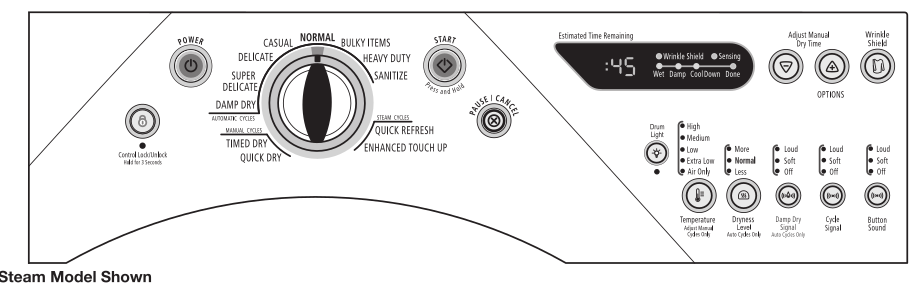
Additional Features

Drum Light
When pressed during a cycle. the Drum Light turns on and will remain on until pressed again. the door is opened and closed. or the door is left open for 20 minutes.
WRINKLE SHIELD Feature
When you are unable to remove a load of clothes from the dryer as soon as it stops. wrinkles can form. The WRINKLE SHIELD feature periodically tumbles. rearranges. and fluffs the load to help keep wrinkles from forming
Get up to 140 minutes of heat-free. periodic tumbling at the end of a cycle. Turn off at any time by pressing the WRINKLE SHIELD feature or opening the dryer door.
For the Casual Cycle. the WRINKLE SHIELD feature is preset to “ON.” The other cycles will retain the WRINKLE. SHIELD feature setting. (The Wrinkle Shield feature is preset to "ON" for the Casual Cycle. If selected for other cycles. it will remain "ON" the next time that cycle is selected.)
Damp Dry Signal
On some models. the Damp Dry Signal may be selected to alert you that your clothes are approximately 80% dry. This is useful when you want to remove lightweight items in a mixed load to avoid overdrying or remove partially dry items that may need ironing.
The DAMP DRY SIGNAL is useful when drying bedsheets/linens in a mixed load. When the signal goes off. open the door to stop the dryer. rearrange the load inside the dryer. close the door and restart the dryer to finish the drying cycle. Rearranging the load will aid in the drying process.
NOTE: The Damp Dry Signal is available only with the Automatic Cycles. The Damp Dry Signal is not a selectable option for the Sanitize cycle.
Cycle Signal
The End of Cycle Signal produces an audible sound when the drying cycle is finished.
Press until the desired volume (Loud. Soft. or Off) glows green.
NOTE: When the WRINKLE SHIELD feature is selected and the End of Cycle Signal is on. an audible sound will be emitted every 5 minutes until the clothes are removed. or the WRINKLE SHIELD feature is finished.
Button Sound
You can change the volume of the sound of the beeps. Press until the desired volume (Loud. Soft. or Off) glows green. The Power and Cancel buttons will still beep softly even when the Button Sound volume is set to Off.
Control Lock/Unlock
This feature allows you to lock your settings to avoid unintended use of the dryer. You can also use the Control Lock feature to avoid unintended cycle or option changes during dryer operation.
To enable the Control Lock feature when dryer is running:
Press and hold the CONTROL LOCK/UNLOCK button for 3 seconds. The control is locked when a single beep is heard and the Control Lock status light is on.
When the dryer is off. it is not necessary to press the Control On button before activating the Control Lock feature.
To unlock:
Press and hold the CONTROL LOCK/UNLOCK button for 3 seconds to turn this feature off.
NOTE: When the dryer is running and Control Lock is on. the dryer can be stopped by pressing the Pause/Cancel button. but cannot be restarted until the control is unlocked.
Changing Cycles, Options, and Modifiers
You can change Auto Cycles. Timed Cycles. Options. and Modifier. and anytime before pressing Start.
Three short tones sound if an unavailable combination is selected. The last selection will not be accepted.
Changing Cycles after pressing Start
1. Press PAUSE/CANCEL twice. This ends the current cycle.
2. Select the desired cycle and options.
3. Press and hold START. The dryer starts at the beginning of the new cycle.
NOTE: If you do not press Start within 5 minutes of selecting the cycle. the dryer automatically shuts off.
Changing Options and Modifiers after pressing Start
You can change an Option or Modifier anytime before the selected Option or Modifier begins.
1. Press PAUSE/CANCEL once.
2. Select the new Option and/or Modifier.
3. Press and hold START to continue the cycle.
NOTE: If you happen to press Pause/Cancel twice. the program clears and your dryer shuts down. Restart the selection process.
Changing the Preset Dryness Level Settings
If all your loads on all Auto Dry cycles are consistently not as dry as you would like. you may change the preset Dryness Level settings to increase the dryness. This change will affect all of your Auto Dry cycles.
Your Dryness Level settings can be adjusted to adapt to different installations. environmental conditions or personal preference. There are 3 drying settings:
1 (factory preset dryness level).
2 (slightly drier clothes. approximately 15% more drying time). and 3 (much drier clothes. approximately 30% more drying time).
1. The Dryness Level settings cannot be changed while the dryer is running.
2. Press and hold the Dryness Level button for 5 seconds. The dryer will beep. and “CF” will be displayed for 1 second followed by the current drying setting.
3. To select a new drying setting. press the Dryness Level key again until the desired drying setting is shown.
NOTE: While cycling through the settings. the current setting will not flash. but the other settings will flash.
4. Press START to save the drying setting.
5. The drying setting you selected will become your new preset drying setting for all Auto Dry cycles.
DRYER CARE
Cleaning the Dryer Location
Keep dryer area clear and free from items that would obstruct the flow of combustion and ventilation air.
Cleaning the Lint Screen
Every load cleaning
The lint screen is located in the door opening of the dryer. The control panel has an indicator light to remind you to clean the lint screen before each load. A screen blocked by lint can increase drying time
To clean
1. Pull the lint screen straight up. Roll lint off the screen with your fingers. Do not rinse or wash screen to remove lint. Wet lint is hard to remove.
[IMAGE]
2. Push the lint screen firmly back into place.
IMPORTANT
Do not run the dryer with the lint screen loose. damaged. blocked. or missing. Doing so can cause overheating and damage to both the dryer and fabrics. = [flint falls off the screen into the dryer during removal. check the exhaust hood and remove the lint. See "Venting Requirements.”
As needed cleaning
Laundry detergent and fabric softener residue can build up on the lint screen. This buildup can cause longer drying times for your clothes. or cause the dryer to stop before your load is completely dry. The screen is probably clogged if lint falls off while the screen is in the dryer.
Clean the lint screen with a nylon brush every 6 months. or more frequently. if it becomes clogged due to a residue buildup.
To wash
1. Roll lint off the screen with your fingers.
2. Wet both sides of lint screen with hot water.
3. Wet anylon brush with hot water and liquid detergent. Scrub lint screen with the brush to remove residue buildup.
4. Rinse screen with hot water.
5. Thoroughly dry lint screen with a clean towel. Replace screen in dryer.
Cleaning the Dryer Interior
To clean dryer drum
4. Make a paste with powdered laundry detergent and very warm water.
2. Apply paste to a soft cloth. OR Apply a liquid. nonflammable household cleaner to the stained area and rub with a soft cloth until all excess dye and stains are removed.
3. Wipe drum thoroughly with a damp cloth.
4. Tumble a load of clean cloths or towels to dry drum.
NOTE: Garments that contain unstable dyes. such as denim blue jeans or brightly colored cotton items. may discolor the dryer interior. These stains are not harmful to your dryer and will not stain future loads of clothes. Dry unstable dye items inside out to avoid transfer of dye.
Removing Accumulated Lint
From Inside the Dryer Cabinet
Lint should be removed every 2 years. or more often. depending on dryer usage. Cleaning should be done by a qualified person.
From the Exhaust Vent
Lint should be removed every 2 years. or more often. depending on dryer usage.
Vacation, Storage, and Moving Care
Install and store your dryer where it will not freeze. Because some water may stay in the hoses. freezing can damage your dryer. If storing or moving your dryer during freezing weather. winterize it.
Non-Use or Storage Care
Operate your dryer only when you are at home. If you will be on vacation or not using your dryer for an extended period of time. you should:
1. Unplug dryer or disconnect power.
2. Clean lint screen. See “Cleaning the Lint Screen.”
3. Turn off the water supply to the dryer. This helps to avoid unintended flooding (due to a water pressure surge) while you are away.
Moving care
For power supply cord-connected dryers:
1. Unplug the power supply cord.
2. Steam models only: Shut off water faucet.
3. Steam models only: Disconnect the water inlet hose from faucet. then drain the hose. Transport hose separately.
4. Make sure leveling legs are secure in dryer base.
5. Use masking tape to secure dryer door.
For direct-wired dryers:
- Disconnect power.
- Disconnect wiring.
- Steam models only: Shut off water faucet.
- Steam models only: Disconnect the water inlet hose from faucet. then drain the hose. Transport hose separately.
- Make sure leveling legs are secure in dryer base.
- Use masking tape to secure dryer door.
Reinstalling the dryer
Follow the “Installation Instructions” to locate. level. and connect the dryer.
Special Instructions for Steam Models
Water Inlet Hoses
Replace inlet hoses and hose screen after 5 years of use to reduce the risk of hose failure. Periodically inspect and replace inlet hoses if bulges. kinks. cuts. wear. or leaks are found.
When replacing your inlet hoses. record the date of replacement.
To winterize dryer
1. Unplug dryer or disconnect power.
2. Shut off water faucet.
3. Disconnect water inlet hose from faucet and drain.
Touse dryer again
1. Flush water pipes. Reconnect water inlet hose to faucet. Turn on water faucet.
2. Plug in dryer or reconnect power.
Changing the Drum Light
The dryer light automatically turns on inside the dryer drum when you open the door.
To change the drum light
- Unplug dryer or disconnect power.
- Open the dryer door. Locate the light bulb cover on the back wall of the dryer. Remove the screw located in the lower right corner of the cover. Remove the cover.
- Turn bulb counterclockwise. Replace the bulb with a 10-watt appliance bulb only. Replace the cover and secure with the screw.
- Plug in dryer or reconnect power.
TROUBLESHOOTING
First try the solutions suggested here and possibly avoid the cost of a service call... For additional recommendations, refer to your Installation Instructions.
Dryer Operation
Dryer will not run
Is the dryer door firmly closed?
Was the Start button firmly pressed?
- Large loads may require pressing and holding the Start button for 2-5 seconds
Has a household fuse blown. or has a circuit breaker tripped?
- There may be 2 household fuses or circuit breakers for the dryer. Check that both fuses are intact and tight. or that both circuit breakers have not tripped. Replace the fuse or reset the circuit breaker. If the problem continues. call an electrician
Is the correct power supply available?
- Electric dryers require 240-volt power supply. Check with a qualified electrician
Was a regular fuse used?
- Use a time-delay fuse.
Unusual sounds
Has the dryer had a period of non-use?
- If the dryer hasn't been used for a while. there may be a thumping sound during the first few minutes of operation Is a coin. button. or paper clip caught between the drum and front or rear of the dryer? Check the front and rear edges of the drum for small objects. Clean out pockets before laundering
Are the four legs installed. and is the dryer level front to back and side to side?
- The dryer may vibrate if not properly installed. See the Installation Instructions
Is the clothing knotted or balled up?
- When balled up. the load will bounce. causing the dryer to vibrate. Separate the load items and restart the dryer.
No heat
Has a household fuse blown. or has a circuit breaker tripped?
- The drum may be turning. but you may not have heat. Electric dryers use 2 household fuses or circuit breakers. Replace the fuse or reset the circuit breaker. If the problem continues. call an electrician.
Dryer displaying code message
“PF” (power failure). check the following:
Was the drying cycle interrupted by a power failure? Press and hold START to restart the dryer.
“L2” Diagnostic Code (low or no line voltage condition):
The drum will turn. but there may be a problem with your home power supply keeping the dryer's heater from turning on. The dryer will continue to run when this diagnostic code is present. Press any key to clear the code from the display and return to the estimated time remaining.
Try the following:
Check to see if a household fuse has blown or circuit breaker has tripped. Electric dryers use two household fuses or breakers. Replace the fuse or reset the circuit breaker.
Confirm the power cord is properly installed. Refer to “Electrical Connection” for details.
Select a Timed Dry heated cycle. and restart the dryer.
If the message persists. consult a qualified electrician.
“AF” (low airflow condition):
The dryer will continue to run when this diagnostic code is present. Press any key to clear the code from the display and return to the estimated time remaining.
Try the following:
- Clean lint screen
- Check to see if the vent run from the dryer to the wall is crushed or kinked
- Confirm the vent run from the dryer to the wall is free of lint and debris
- Confirm the exterior vent exhaust hood is free of lint and debris.
- Confirm your vent system falls within the recommended run length and number of elbows for the type of vent you are using. Refer to “Plan Vent System” in the Installation Instructions for details.
Select a Timed Dry heated cycle. and restart the dryer.
If the message persists. have your entire home venting run cleaned.
“E” Variable (E1. E2. E3) service codes:
Call for service.
Dryer Results
Clothes are not drying satisfactorily. drying times are too long. or loadis too hot
Is the lint screen clogged with lint?
- Lint screen should be cleaned before each load.
Has the Air Only temperature setting been selected?
- Select the right temperature for the types of garments being dried. See “Additional Features.”
Is the load too large and heavy to dry quickly?
- Separate the load to tumble freely.
Are clothes coming out of the Refresh cycle with damp or wet spots?
- Under certain environmental or installation conditions you may experience underdrying. Select the Touch Up cycle (20 min. default time). which can be customized by selecting High temperature and/or additional cycle time by pressing the Dry Time up button.
Is the exhaust vent or outside exhaust hood clogged with lint. restricting air movement?
- Run the dryer for 5-10 minutes. Hold your hand under the outside exhaust hood to check air movement. If you do not feel air movement. clean exhaust system of lint or replace exhaust vent with heavy metal or flexible metal vent. See the
Installation Instructions.
Are fabric softener sheets blocking the grille?
- Use only one fabric softener sheet. and use it only once.
Is the exhaust vent the correct length?
- Check that the exhaust vent is not too long or has too many turns. Long venting will increase drying times. See the Installation Instructions.
Is the exhaust vent diameter the correct size?
- Use 4" (102 mm) diameter vent material.
Is the dryer located in a room with temperature below 45°F qc)?
- Proper operation of dryer cycles requires temperatures above AB°F (7°C).
Is the dryer located in a closet?
- Closet doors must have ventilation openings at the top and bottom of the door. The front of the dryer requires a minimum of 1" (25 mm) of airspace. and. for most installations. the rear of the dryer requires 5" (127 mm). See the Installation Instructions.
Cycle time too short
Is the automatic cycle ending early?
- The load may not be contacting the sensor strips. Level the dryer. Change the dryness level setting on Automatic Cycles. Increasing or decreasing the dryness level will change the amount of drying time in a cycle.
Lint on load
Isthe lint screen clogged?
- Clean lint screen. Check for air movement.
Stains on load or drum
Was dryer fabric softener properly used?
- Add dryer fabric softener sheets at the beginning of the cycle. Fabric softener sheets added to a partially dried load can stain your garments. Do not use fabric softener sheets with steam cycles.
Drum stains are caused by dyes in clothing (usually blue jeans). These will not transfer to other clothing.
Loads are wrinkled
Was the load removed from dryer at the end of the cycle?
- Select Enhanced Touch Up Cycle to tumble the load with water and heat. This cycle is best for smoothing out wrinkles and reducing odors from loads consisting of wrinkle-free cotton. cotton polyester blends. common knits and synthetic garments.
NOTE: Refer to garment care label instructions. Dry clean only garments are not recommended.
Loads are still wrinkled following Steam Cycle?
- Make sure water is connected to the dryer. Check that water inlet hose is connected to both the faucet and dryer’s water inlet valve. Check that the water supply is turned on.
Was the dryer overloaded?
- Dry smaller loads that can tumble freely. Smaller loads of 1-4 garments yield best results with Quick Refresh Cycle. Results may also vary depending on fabric type. This cycle is best for reducing wrinkles and odors from loads consisting of wrinkle free cotton. cotton polyester blends. common knits and synthetics.
Odors
Have you recently been painting. staining. or varnishing in the area where your dryer is located?
- If so. ventilate the area. When the odors or fumes are gone from the area. rewash and dry the clothing.
Is water connected to the dryer?
- Check that water inlet hose is connected to both the faucet and dryer’s water inlet valve. Check that the water supply is. tumed on.
To remove odors left in garments after wearing. select Quick Refresh for small loads of 1-4 garments. This cycle is best for reducing wrinkles and odors from loads consisting of wrinkle free cotton. cotton polyester blends. common knits. and synthetics.