專用紙箱視角
RSX1500
SEATED STEPPER
OWNER’S MANUAL
PLEASE CAREFULLY READ THIS ENTIRE MANUAL BEFORE OPERATING YOUR NEW SEATED STEPPER
FITNESS

Table Of Contents
1
2
3
3
4
14
23
24
ATTENTION
THIS SEATED STEPPER IS INTENDED FOR RESIDENTIAL USE ONLY AND IS
WARRANTED FOR THIS APPLICATION. ANY OTHER APPLICATION VOIDS
THIS WARRANTY IN ITS ENTIRETY.
Product Registration
Important Safety Instructions
Important Electrical Instructions
Important Operation Instructions
RSX1500 Assembly Instructions
Operation of Your Console
General Maintenance
Manufacturer’s Limited Warranty

RSX1500 Seated Stepper
1
Record Your Serial Number
Please record the Serial Number of this tness product
in the space provided below.
Serial Number
Register Your Purchase
The self-addressed product registration card must be completed in full and returned to
XTERRA Fitness. You can also go to www.xterratness.com/warrantyreg.html
to register online.
Thank you for your purchase of this quality Seated Stepper from XTERRA Fitness. Your new
Seated Stepper has been manufactured by one of the leading tness manufacturers in the
world. XTERRA Fitness will do all we can to make your ownership experience as pleasant as
possible for many years to come. If you have questions, or if parts are missing or damaged,
or you require customer service, call (870)336-4286. Please have your model number and
serial number handy when you call.
Please take a moment to record where you purchased your machine, as well as the date of
purchase for future reference. We appreciate your condence in XTERRA Fitness and we
will always remember that you are the reason that we are in business. Please complete and
mail your registration card today and enjoy your new Seated Stepper.
Yours in Health,
XTERRA Fitness
Congratulations On Your New Seated Stepper and Welcome to the XTERRA Fitness
Family!
Product Registration
RSX1500_20210106
FITNESS
Purchase Location
Purchase Date

2
RSX1500 Seated Stepper
• To disconnect, turn all controls to the o position, then remove the plug from the outlet.
• Do not operate equipment on deeply padded, plush or shag carpet. Damage to both carpet and
equipment may result.
• Before beginning this or any exercise program, consult a physician. This is especially important for
persons over the age of 35 or persons with pre-existing health conditions.
• Keep hands away from all moving parts.
• The pulse sensors are not medical devices. Various factors, including the user’s movement, may aect the
accuracy of heart rate readings. The pulse sensors are intended only as exercise aids in determining heart
rate trends in general.
• Do not attempt to use your equipment for any purpose other than for the purpose it is intended.
• Wear proper shoes. High heels, dress shoes, sandals or bare feet are not suitable for use on your
equipment. Quality athletic shoes are recommended to avoid leg fatigue.
• User Weight Limit: 300 lbs.
Important Safety Instructions
When using an electrical appliance, basic precautions should always be followed, including the following:
Read all instructions before using this appliance.
DANGER - To reduce the risk of electric shock:
1. Always unplug this appliance from the electrical outlet immediately after using and before cleaning.
WARNING - To reduce the risk of burns, re, electric shock, or injury to persons:
1. An appliance should never be left unattended when plugged in. Unplug from outlet when not in use, and
before putting on or taking o parts.
2. Do not operate under blanket or pillow. Excessive heating can occur and cause re, electric shock, or injury
to persons.
3. This exercise equipment is not intended for use by persons with reduced physical, sensory or mental capa-
bilities, or lack of experience and knowledge.
4. Use this appliance only for its intended use as described in this manual. Do not use attachments not
recommended by the manufacturer.
5. Never operate this appliance if it has a damaged cord or plug, if it is not working properly, if it has been
dropped or damaged, or dropped into water. Return the appliance to a service center for examination and
repair.
6. Do not carry this appliance by supply cord or use cord as a handle.
7. Keep the cord away from heated surfaces.
8. Never operate the appliance with the air openings blocked. Keep the air openings free of lint, hair, and the
like.
9. Never drop or insert any object into any opening.
10. Do not use outdoors.
11. Do not operate where aerosol (spray) products are being used or where oxygen is being administered.
12. Connect this appliance to a properly grounded outlet only.
13. The appliance is intended for household use.
SAVE THESE INSTRUCTIONS - THINK SAFETY!
Fitness Equipment Safety Instructions
Failure to follow all guidelines may compromise the eectiveness of the exercise experience, expose
yourself (and possibly others) to injury, and reduce the longevity of the equipment.
WARNING: This product can expose you to chemicals including Toluene and Acrylamide which are
known to the State of California to cause cancer and birth defects or other reproductive harm.
For more information go to www.P65Warnings.ca.gov
RSX1500 Seated Stepper
3
WARNING!
• NEVER remove any cover without rst disconnecting AC power
supply.
• If A.C. voltage varies by ten percent (10%) or more, the performance
of your Seated Stepper may be aected. Such conditions are not
covered under your warranty. If you suspect the voltage is low,
contact your local power company or a licensed electrician for
proper testing.
• NEVER expose this Seated Stepper to rain or moisture. This product
is NOT designed for use outdoors, near a pool or spa, or in any
other high humidity environment. Maximum environmental ratings
are 40-120 degrees Fahrenheit, 95% humidity non-condensing (no
water droplets forming on surfaces).
• NEVER operate this Seated Stepper without reading and completely understanding the
results of any operational change you request from the computer.
• Understand that changes in resistance do not occur immediately. Set your desired level on
the computer console and release the adjustment key. The computer will obey the
command gradually.
• NEVER use your Seated Stepper during an electrical storm. Surges may occur in your
household power supply that could damage Seated Stepper components.
• Use caution while participating in other activities while using your Seated Stepper such
as watching television, reading, etc. These distractions may cause you to lose balance,
resulting in serious injury.
•
Important Electrical Instructions
Important Operation Instructions
The Seated Stepper is equipped with transport wheels, which are engaged when the rear of
the Seated Stepper is lifted.
Transportation
Plug-In
4
RSX1500 Seated Stepper
RSX1500 Assembly Pack Checklist
STEP 1
STEP 2
STEP 3
STEP 4
RSX1500 Seated Stepper
5
#129. 14/15m/m
Wrench ( 1 pc)
#130. Combination M5 Allen Wrench &
Phillips Head Screw Driver( 2 pcs)
STEP 5
TOOLS

6
RSX1500 Seated Stepper
RSX1500 Assembly Instructions
Console Mast & Stabilizers
1
Transport Wheels

RSX1500 Seated Stepper
7
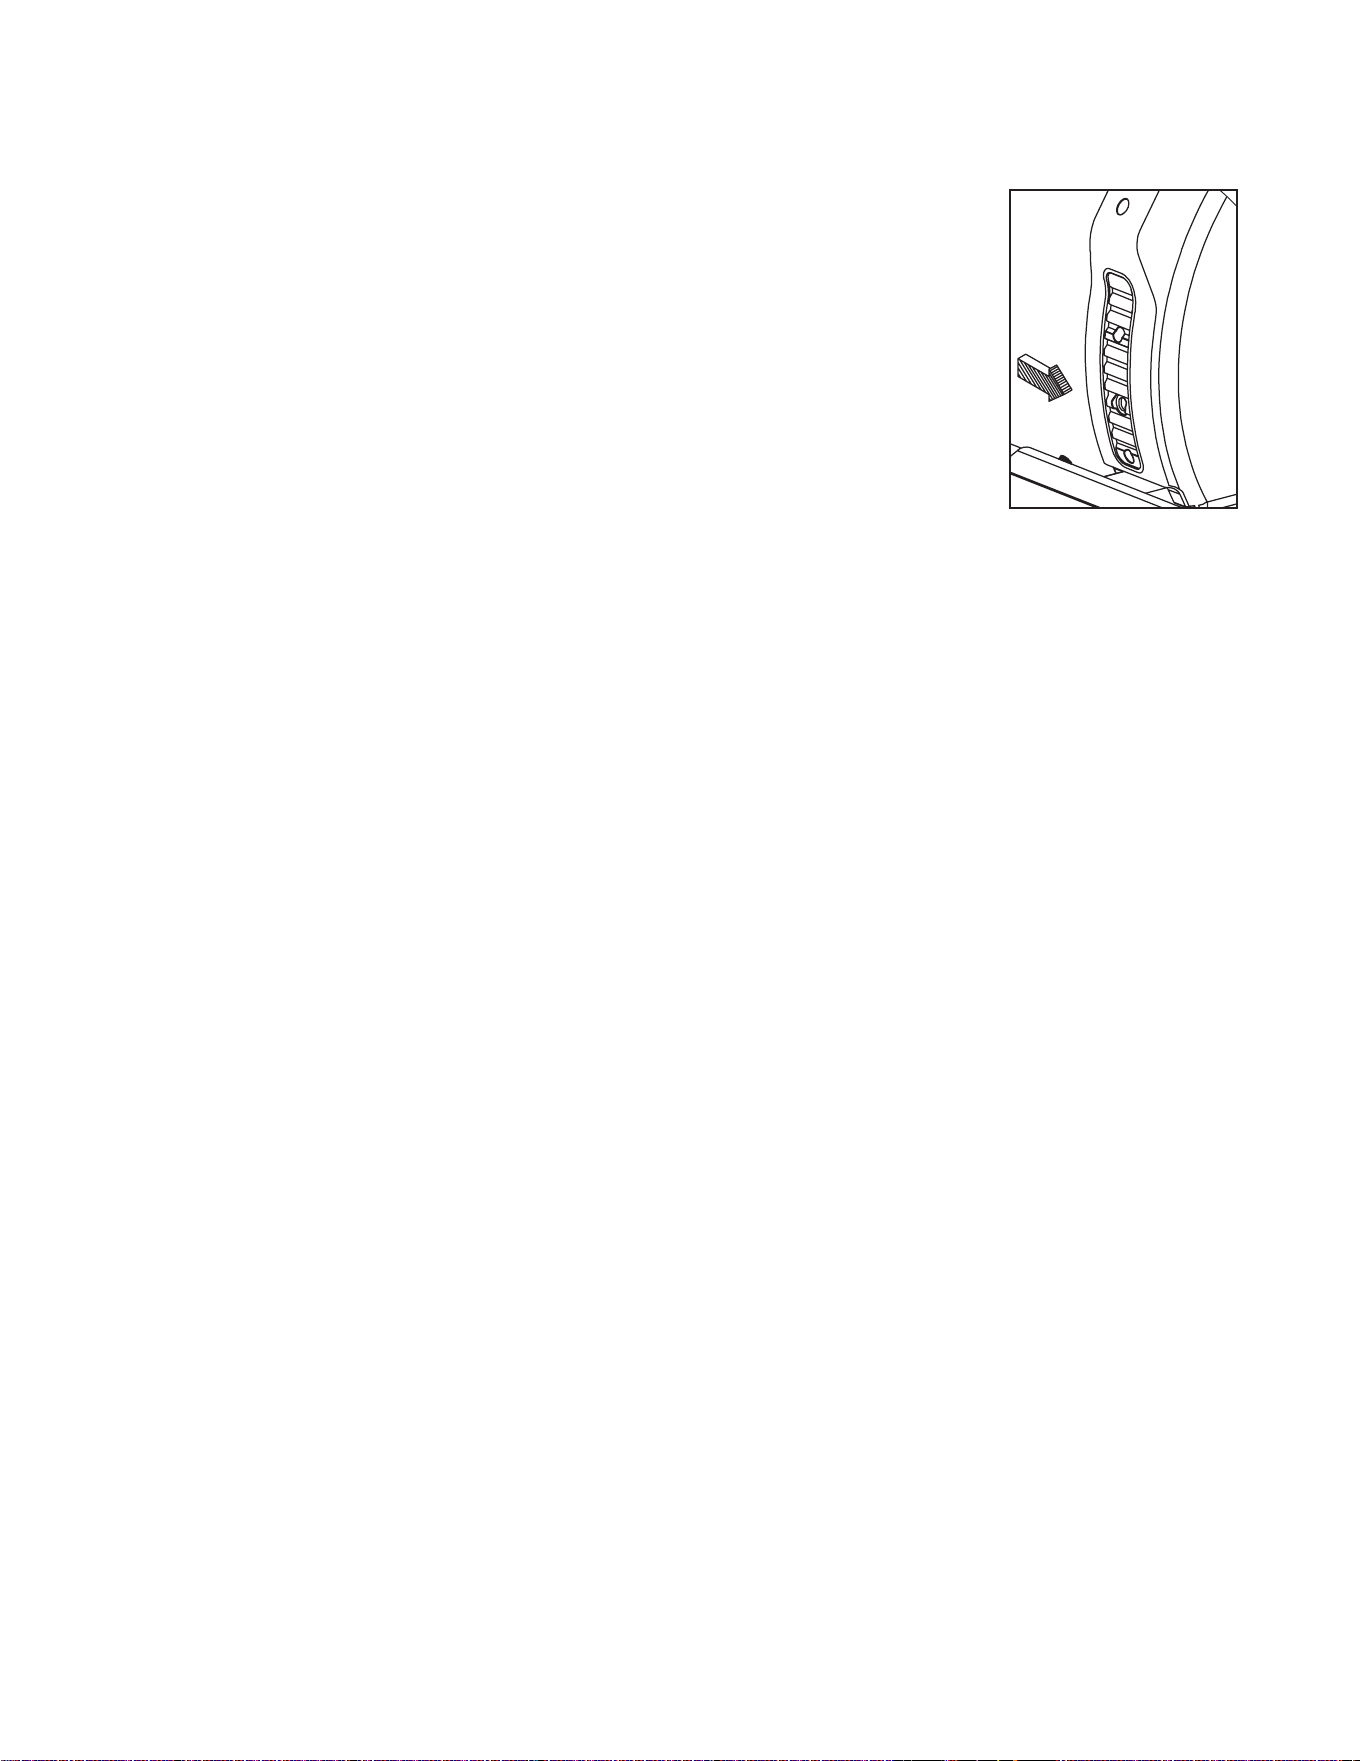
1. Use the Allen Wrench (#131) to tighten both front and rear Stabilizers
(#12,13) with 4 Socket Head Cap Bolts (#100), 4 Split Washers (#98)
and 4 Flat Washers (#99).
2. Connect the Computer Cable (#21) and Handpulse Wire (#26) in the
Console Mast (#2) with the wires from the Main Frame before you slide
the Console Mast onto the Main Frame. Be careful not to pinch any of
the wires during this step.
3. Insert the Console Mast (#2) onto the Main Frame (#1) and use the
Allen Wrench (#131) to tighten with 4 Socket Head Cap Bolts (#100), 4
Flat Washers (#99), 5 Split Washers (#98) and 1 Curved Washer (#101).
4. Connect the Console (#19) with the Computer Cable (#21) and
Handpulse Wire (#26) to the Console Mast (#2) and use Combination
M5 Allen Wrench & Phillips Head Screw Driver (#130) to secure with 4
Phillips Head Screws (#81).
RSX1500 Assembly Instructions
Console Mast & Stabilizers
1
Hardware Step 1
#131. 6x27x120L_L Allen
Wrench
#100. 5/16”x 3/4” Socket
Head Cap Bolts - 9pcs
#98. 5/16”x1.5T Split
Washers - 9pcs
#99. 4 5/16”x18x1.5T Flat
Washers - 8pcs
#101. 5/16”x19x1.5T
Curved Washer - 1pc
#130. Combination M5 Al-
len Wrench & Phillips Head
Screw Driver
#81. M5x12L Phillips Head
Screws - 4pcs
8
RSX1500 Seated Stepper
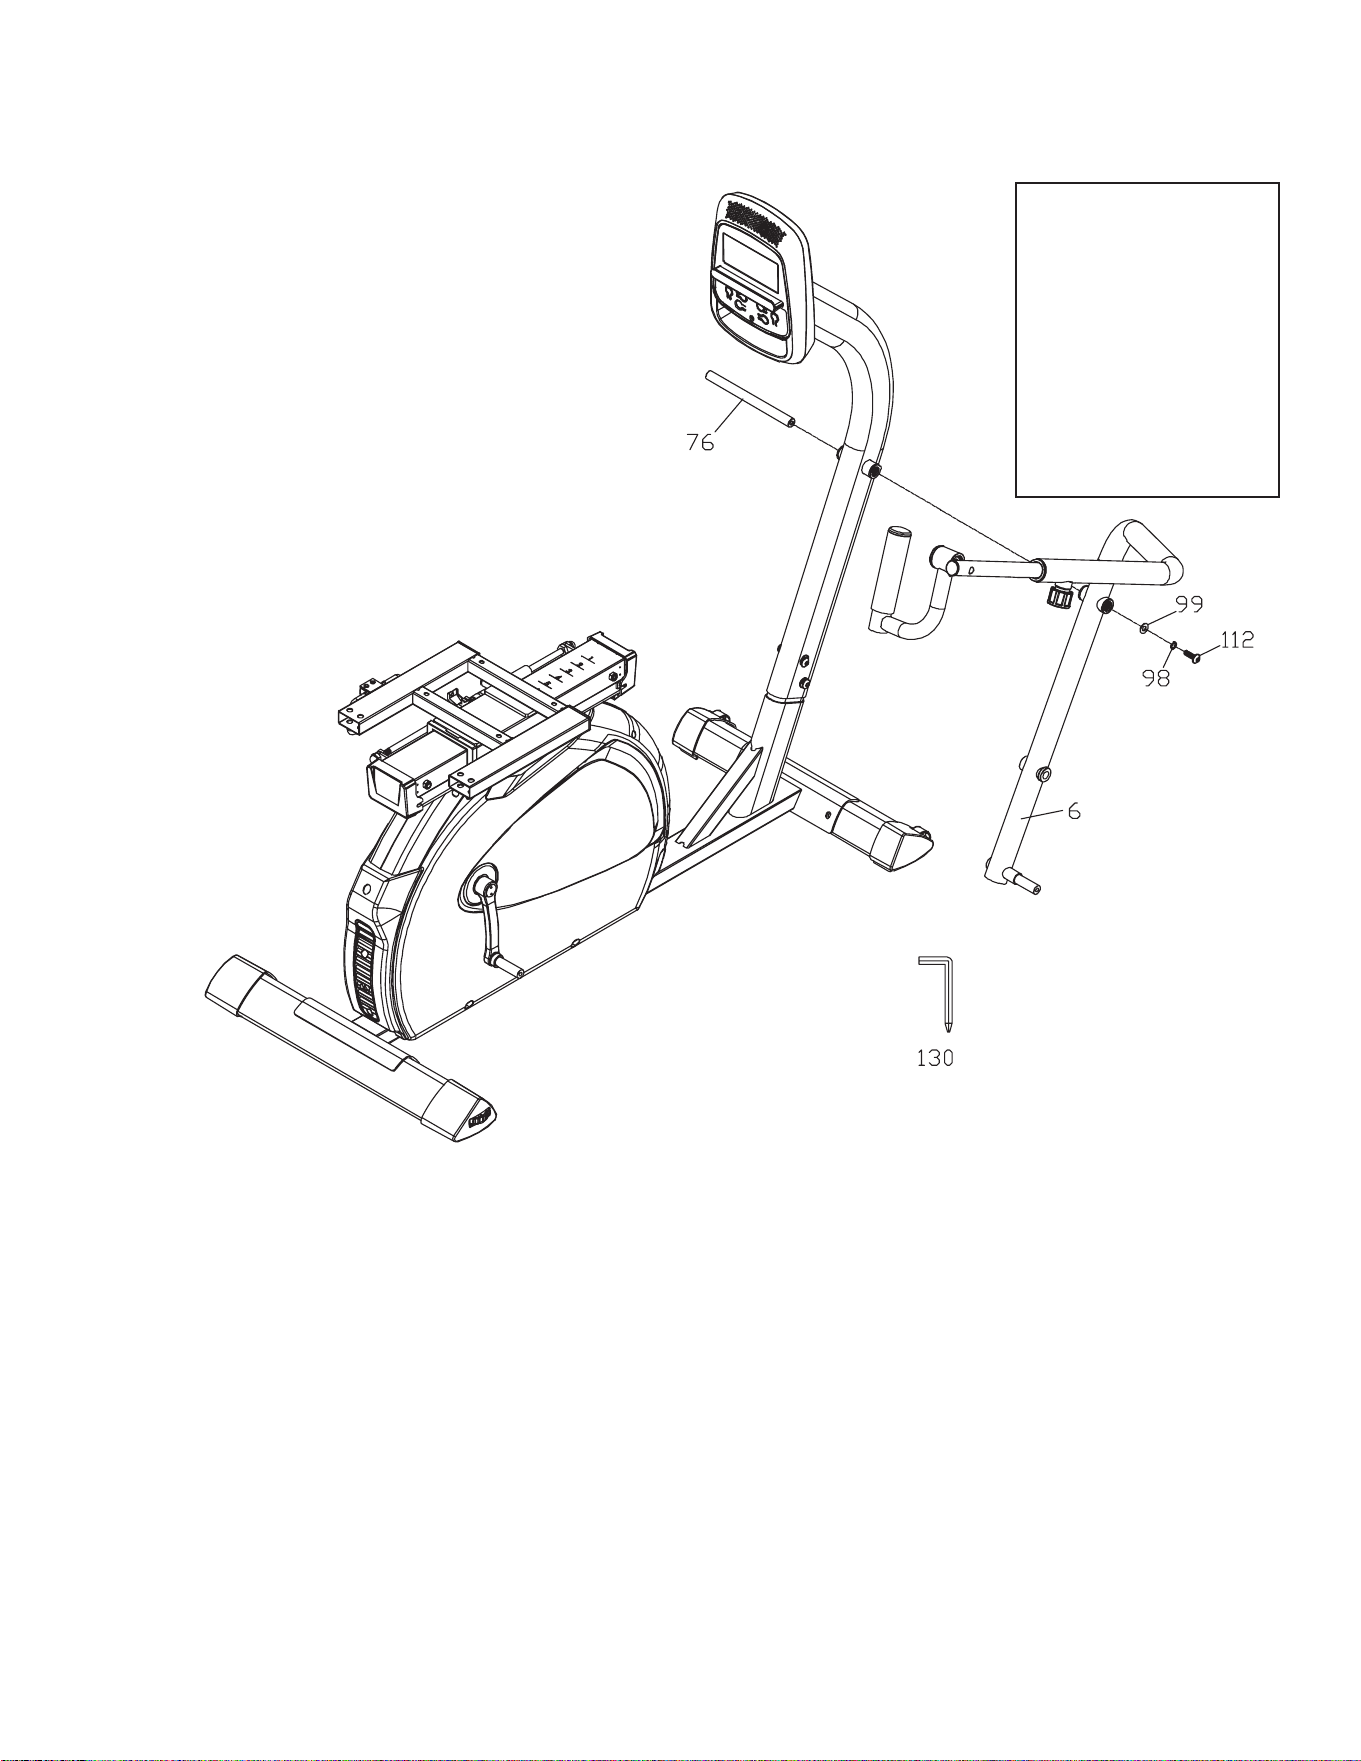
2
Right Swing Arm
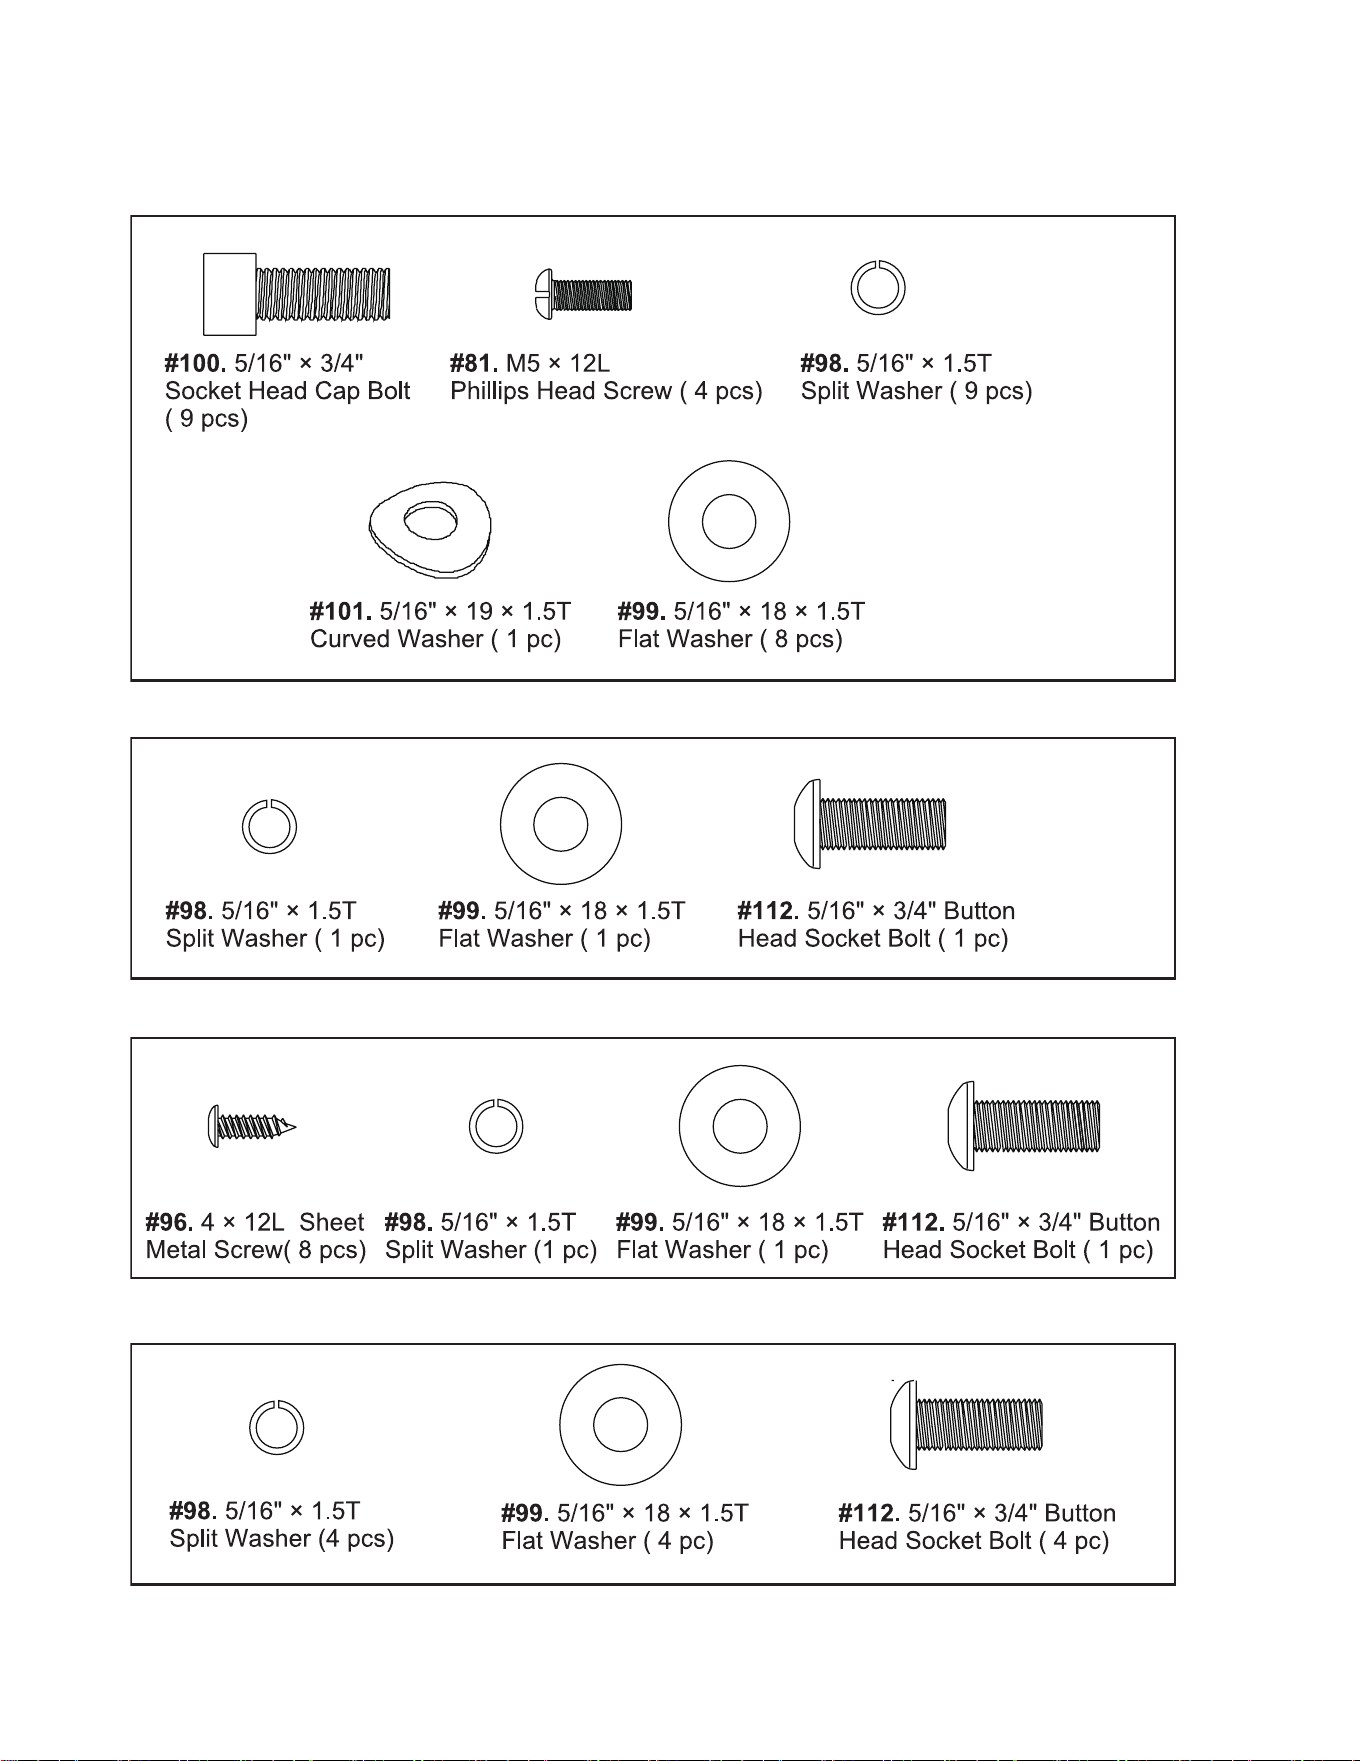
1. Insert the Handgrip Axle (#76) to slide through the Lower Handle Bar (R)(#6) and use Allen
Wrench & Phillips Head Screw Driver (#130) to secure with Button Head Socket Bolt (#112),
Split Washer (#98) and Flat Washer (#99).
#130. Combination M5
Allen Wrench & Phillips
Head Screw Driver
#112. 5/16”x3/4” Button
Head Socket Bolt - 1pc
#98. 5/16”x1.5T Split
Washer - 1pc
#99. 5/16”x18x1.5T Split
Washer - 1pc
Hardware Step 2
RSX1500 Seated Stepper
9
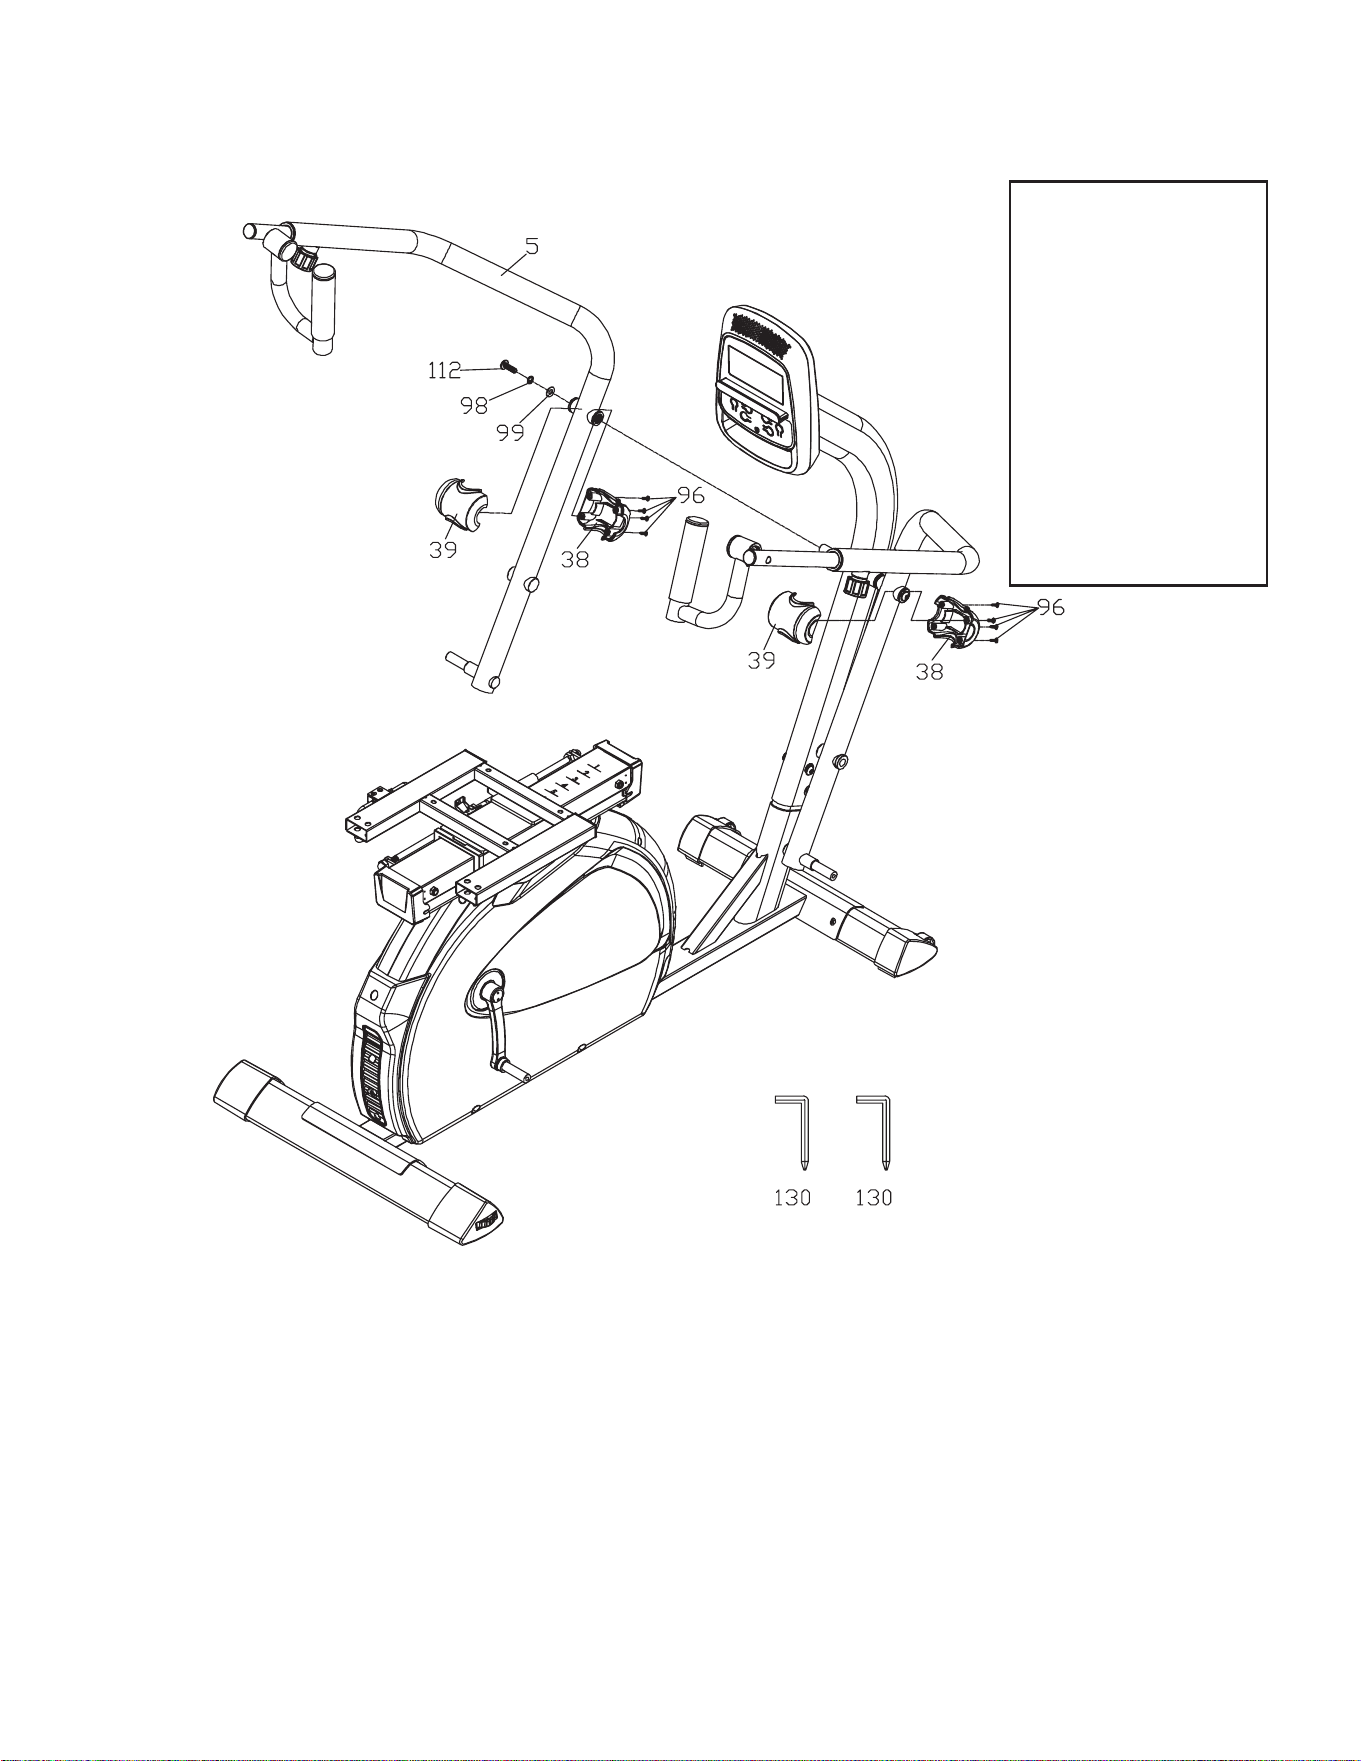
3
1.
2. Slide Lower Handle Bar (L) (#5) through the Handgrip Axle (#76) (Refer to assembly step 2) and
use 2 Allen Wrench & Phillips Head Screw Drivers (#130) to tighten 1 Button Head Socket Bolt
(#112) and 1 Split Washer (#98) and 1 Flat Washer (#99) and tighten each other.
3. Install Front Handle Bar Cover (#38) and Rear Handle Bar Cover (#39) on right and left Lower
Handle Bar (#6) & (#5) with 8 Sheet Metal Screws (#96) by using Allen Wrench & Phillips Head
Screw Driver (#130).
Upper Swing Arms
#130. Combination M5
Allen Wrench & Phillips
Head Screw Driver - 2 pcs
#112. 5/16”x3/4” Button
Head Socket Bolt - 1pc
#98. 5/16”x1.5T Split
Washer - 1pc
#99. 5/16”x18x1.5T Split
Washer - 1pc
#96. 4x12L Sheet Metal
Screws - 8pcs
Hardware Step 3
10
RSX1500 Seated Stepper
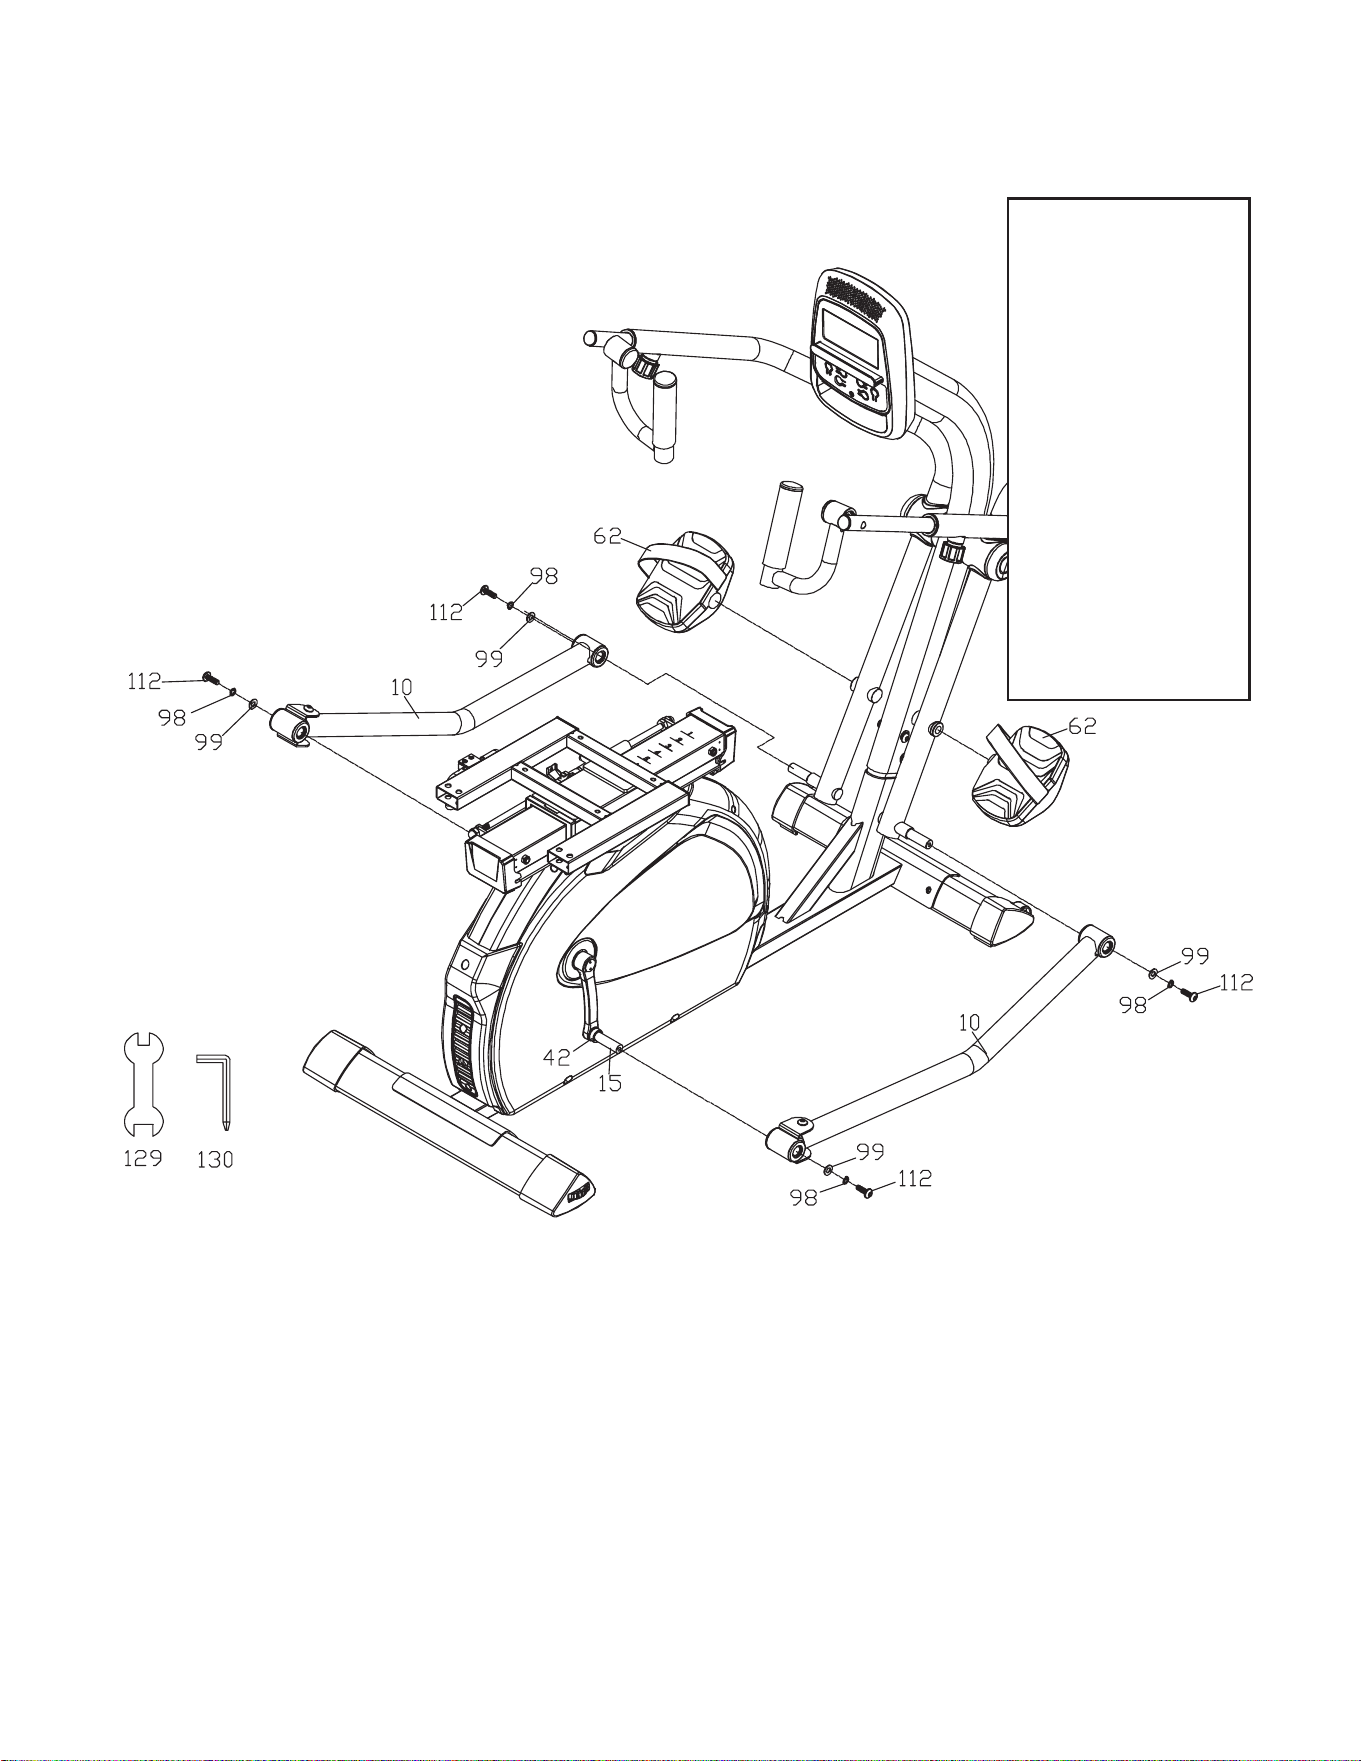
4
1. Make sure that the Powder metallurgy Bushings (#42) are to be mounted on the Crank Arm
(#15) before assembly.
2. Joint Pedal Bar Assembly (#10) with the crank axle and use the Allen Wrench & Phillips Head
Screw Driver (#130) to secure with 4 Button Head Socket Bolts (#112), 4 Flat Washers (#99)
and 4 Split Washers (#98).
3. Use Wrench (#129) to tighten pedal (#62) on the Lower Handle Bar.
Lower Crank Arms & Pedals
#99. 5/16” × 18 ×
1.5T_Flat Washers
- 4pcs
#98. 5/16” × 1.5T_
Split Washers -4pcs
#130. Combination
M5 Allen Wrench &
Phillips Head Screw
Driver
#112. 5/16”x3/4”
Button Head Socket
Bolts - 4pcs
#129. 14.15m/m
Wrench
Hardware Step 4
RSX1500 Seated Stepper
11
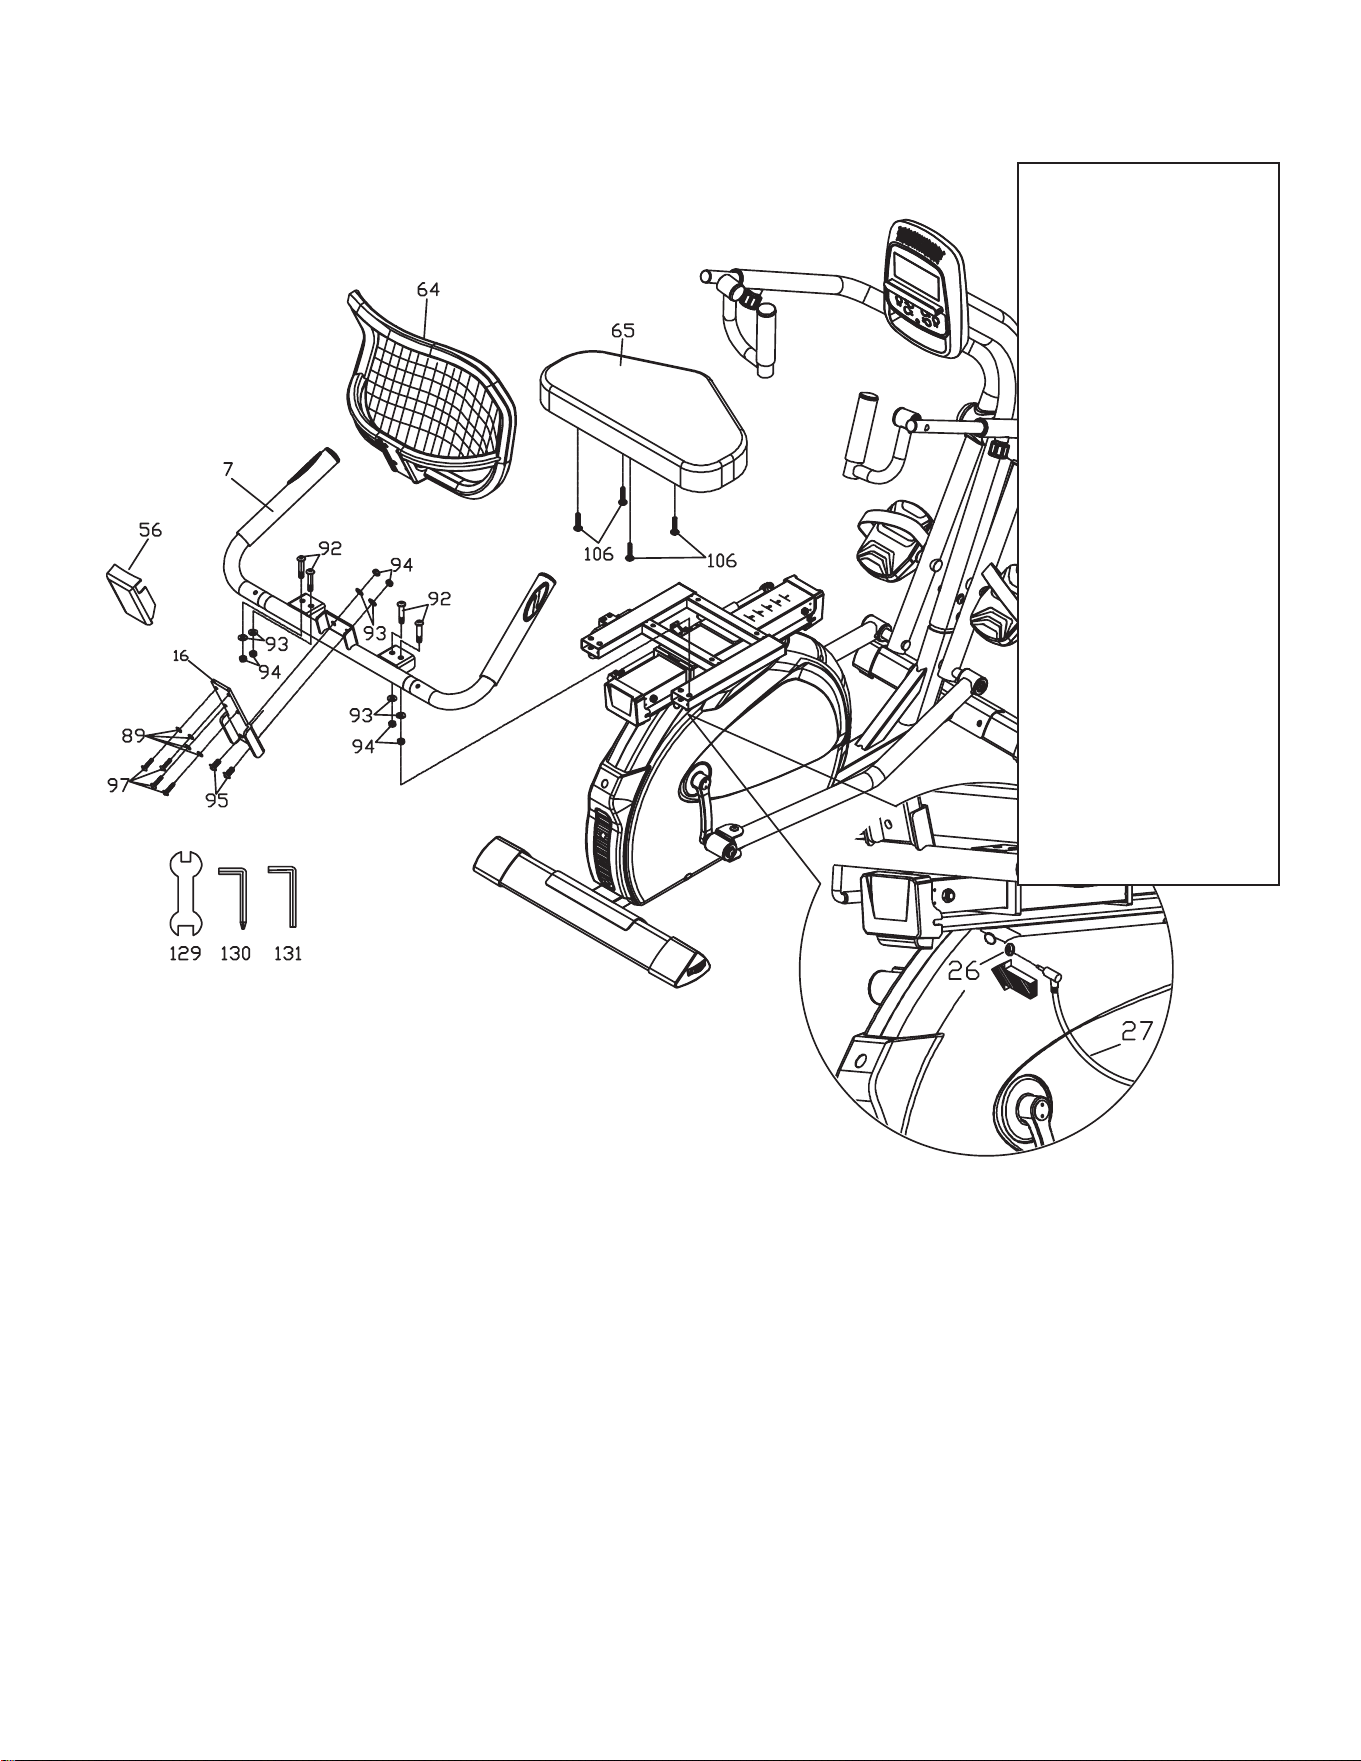
5
1. Install Seat (#65) on Sliding Seat Assembly and use Allen Wrench & Phillips Head Screw Driver
(#130) to secure with 4 Phillips Head Screws (#106).
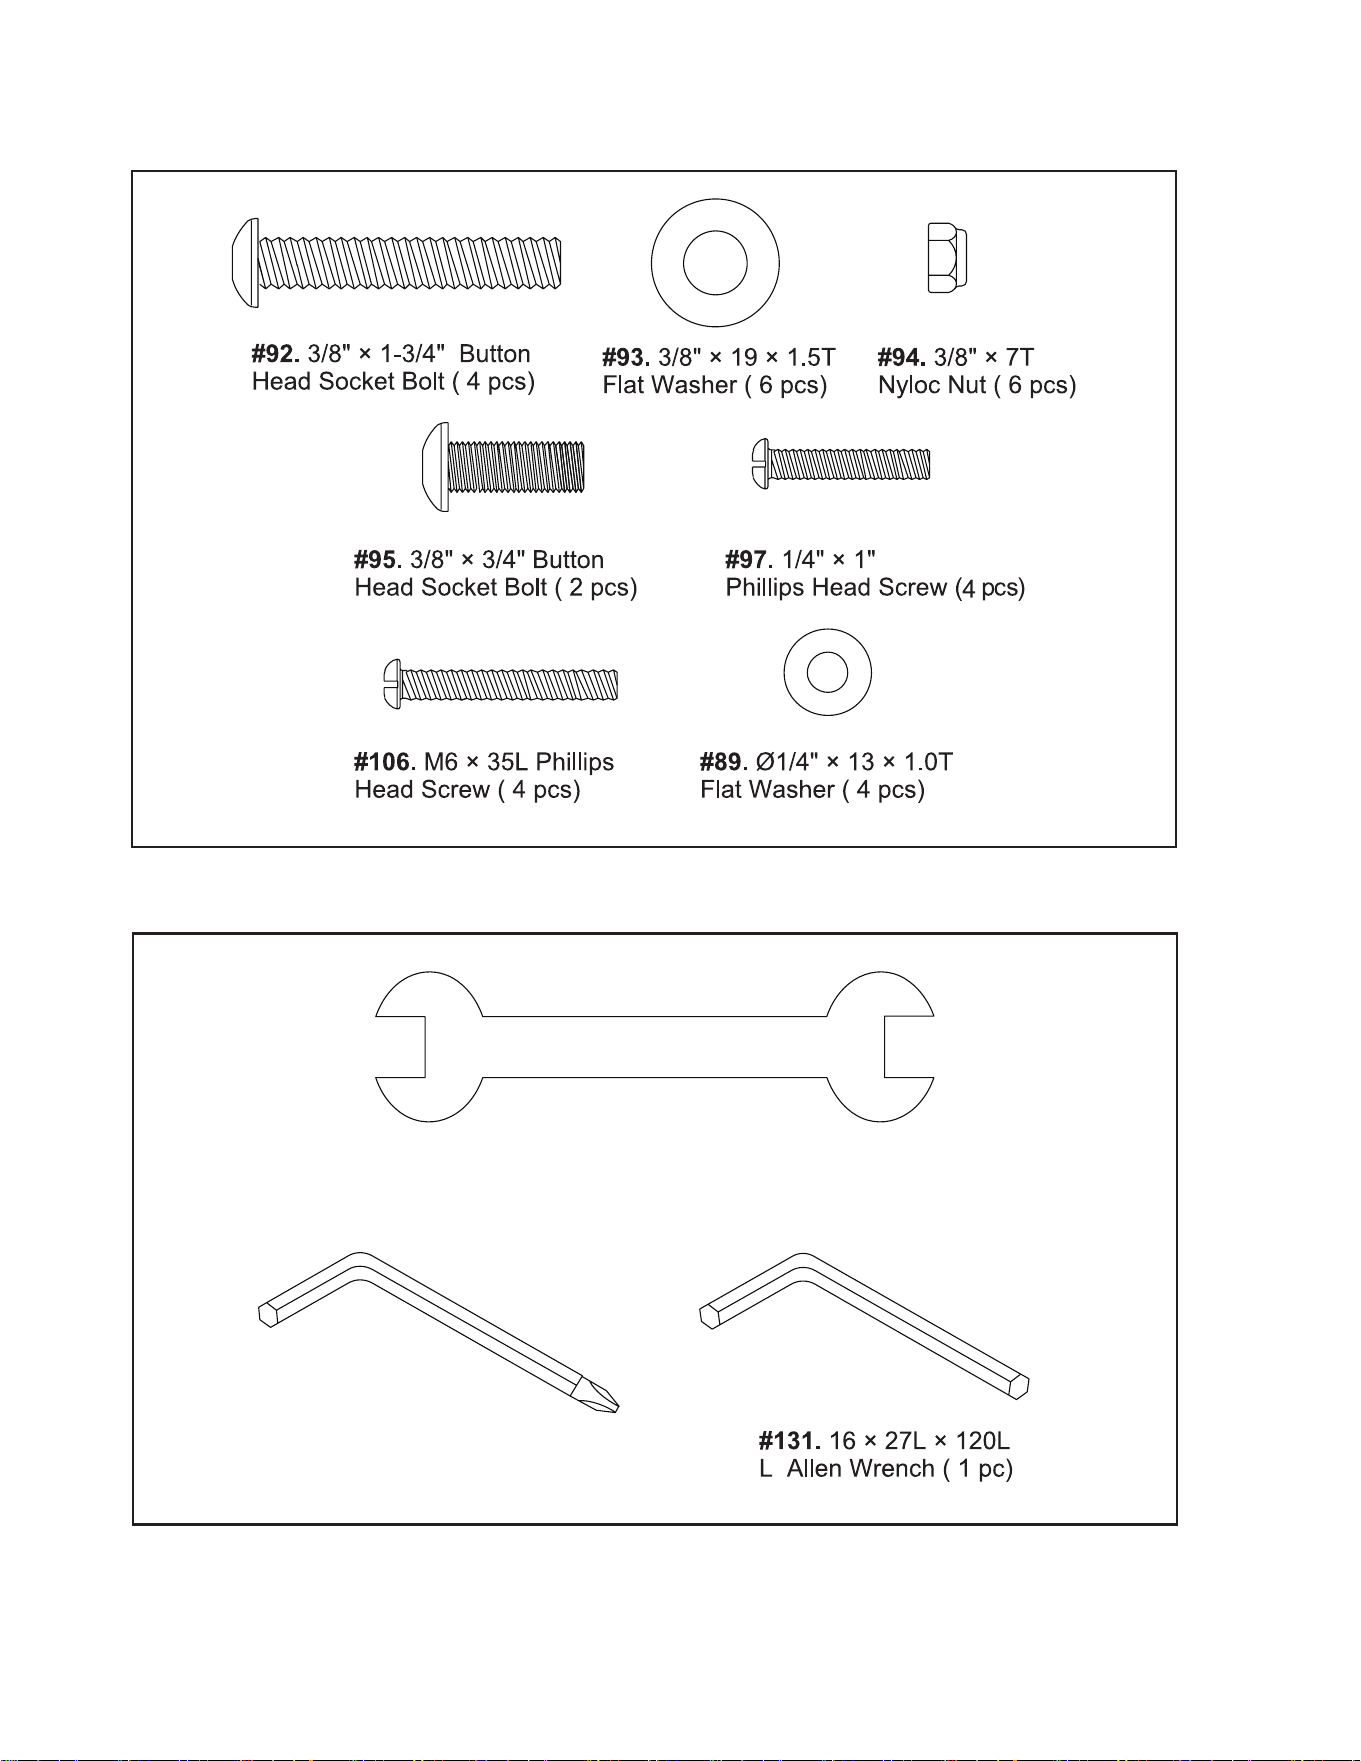
2. Install Handle Bar (#7) on the Sliding Seat Assembly by using Allen Wrench (#131) to tight 4 of
Button Head Socket Bolts (#92), going through Handle Bar (#7) and 4 Flat Washers (#93), then use
Wrench (#129) to tighten 4 Nyloc Nuts (#94).
3. Install Seat Back Fixing Plate (#16) on the Handle Bar (#7) by using Allen Wrench (#131) to tight 2
Button Head Socket Bolts (#95), going through Handle Bar (#7) and 2 Flat Washers (#93), then use
Wrench (#129) to tighten 2 Nyloc Nuts (#94).
4. Install Seatback (#64) on Seat Back Fixing Plate (#16) and use Allen Wrench & Phillips Head Screw
Driver (#130) to tighten with 4 Phillips Head Screws (#97) and 4 Flat Washers (#89) to secure Seat
Back Fixing Plate (#16) then with Seatback Cover (#56).
5. Connect Lower and Upper handpulse wires (#27,26).
Sliding Seat & Handbar, and Seatback
#130. Combination M5
Allen Wrench & Phillips
Head Screw Driver
#106. M6 × 35L_Phillips
Head Screws - 4pcs
#131. 6 × 27L × 120L_L
Allen Wrench
#92. 3/8” × 1-3/4” Button
Head Socket Bolts - 4pcs
#93. 3/8” × 19 × 1.5T Flat
Washers - 6pcs
#129. 14.15m/m Wrench
#94. 3/8” × 7T Nyloc Nuts
- 6pcs
#95. 3/8” × 3/4” Button
Head Socket Bolts - 2pcs
#97. 1/4” × 1” Phillips
Head Screws - 4pcs
#89. Ø1/4” × 13 × 1.0T_
Flat Washers - 4pcs
Hardware Step 5
12
RSX1500 Seated Stepper
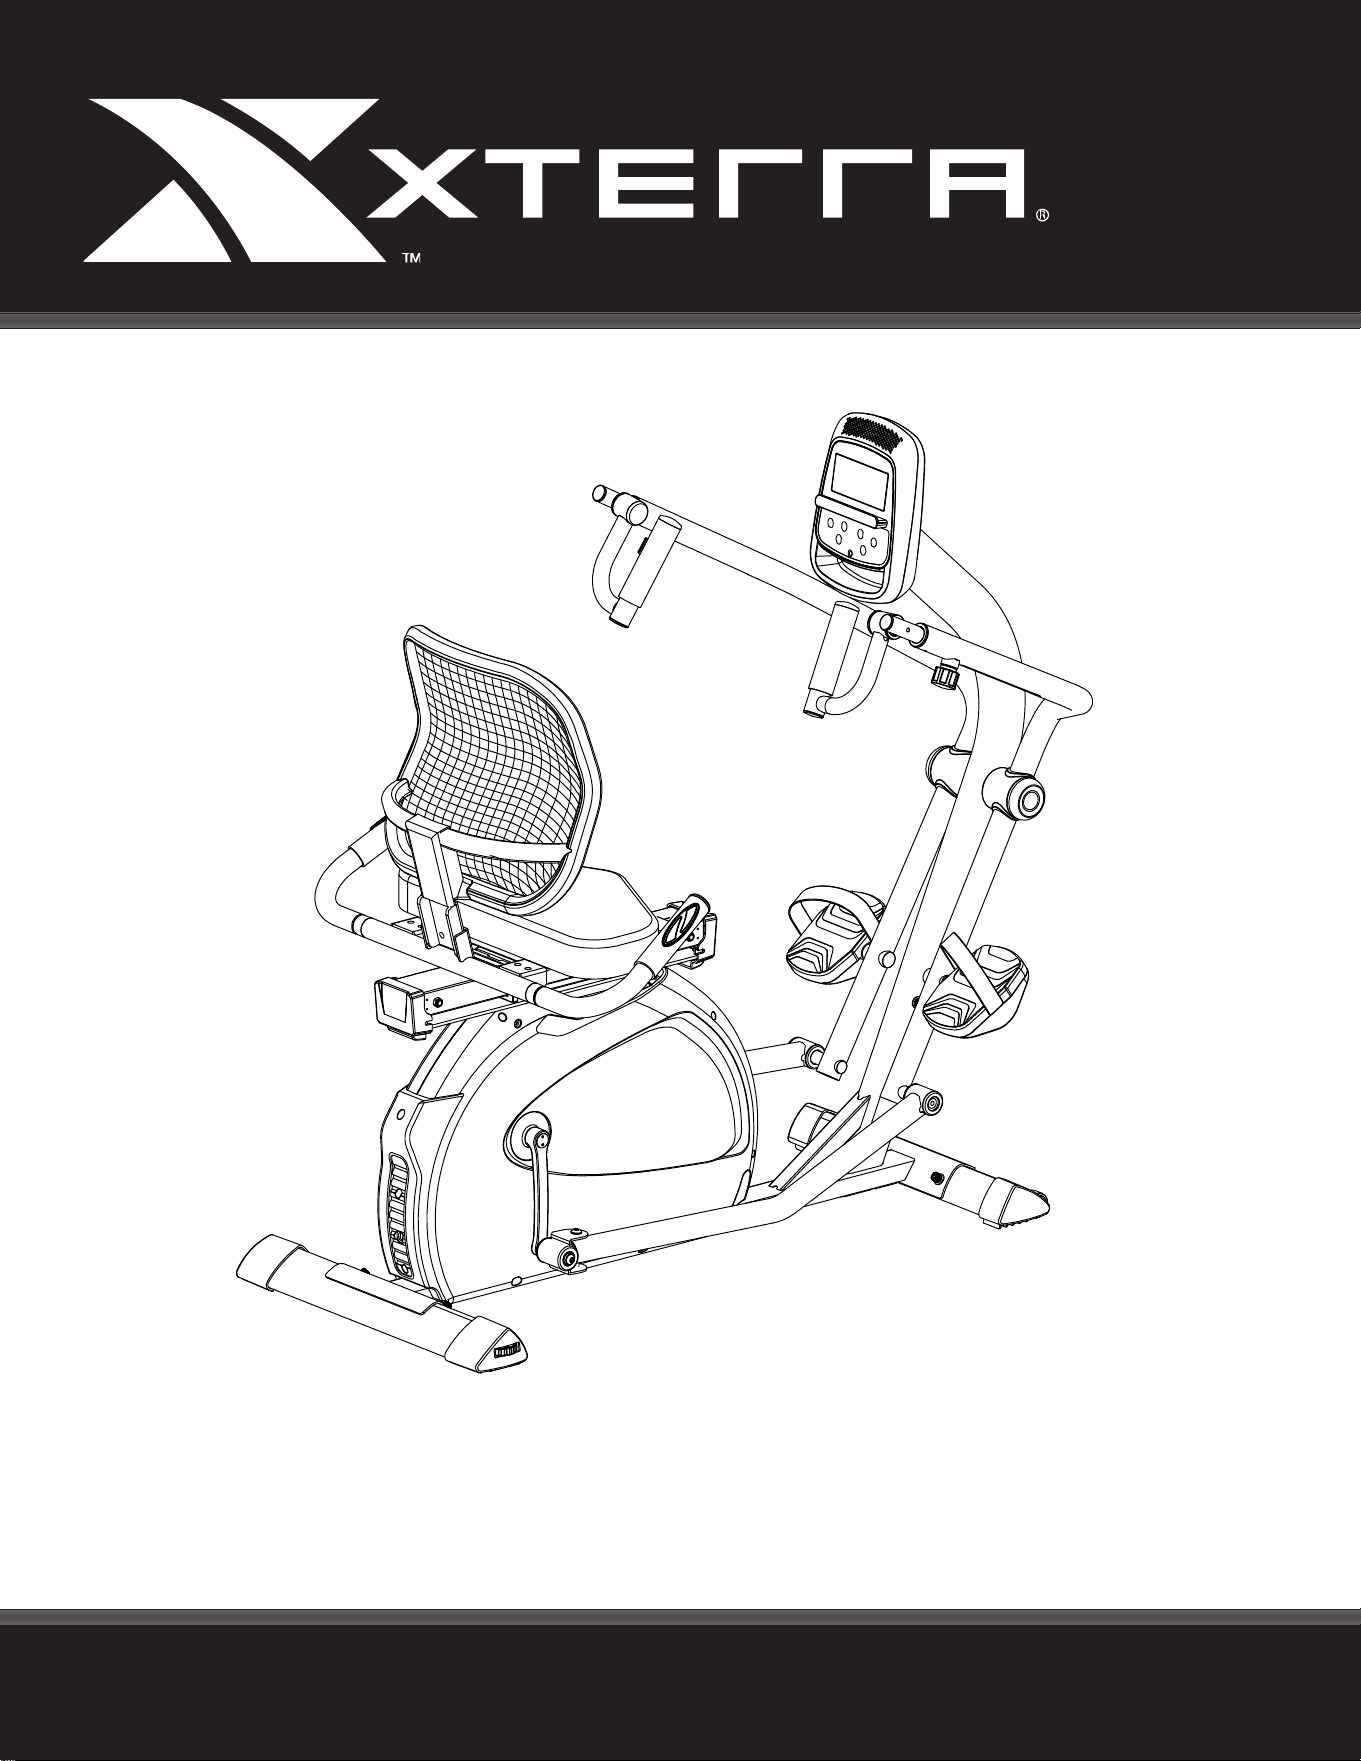
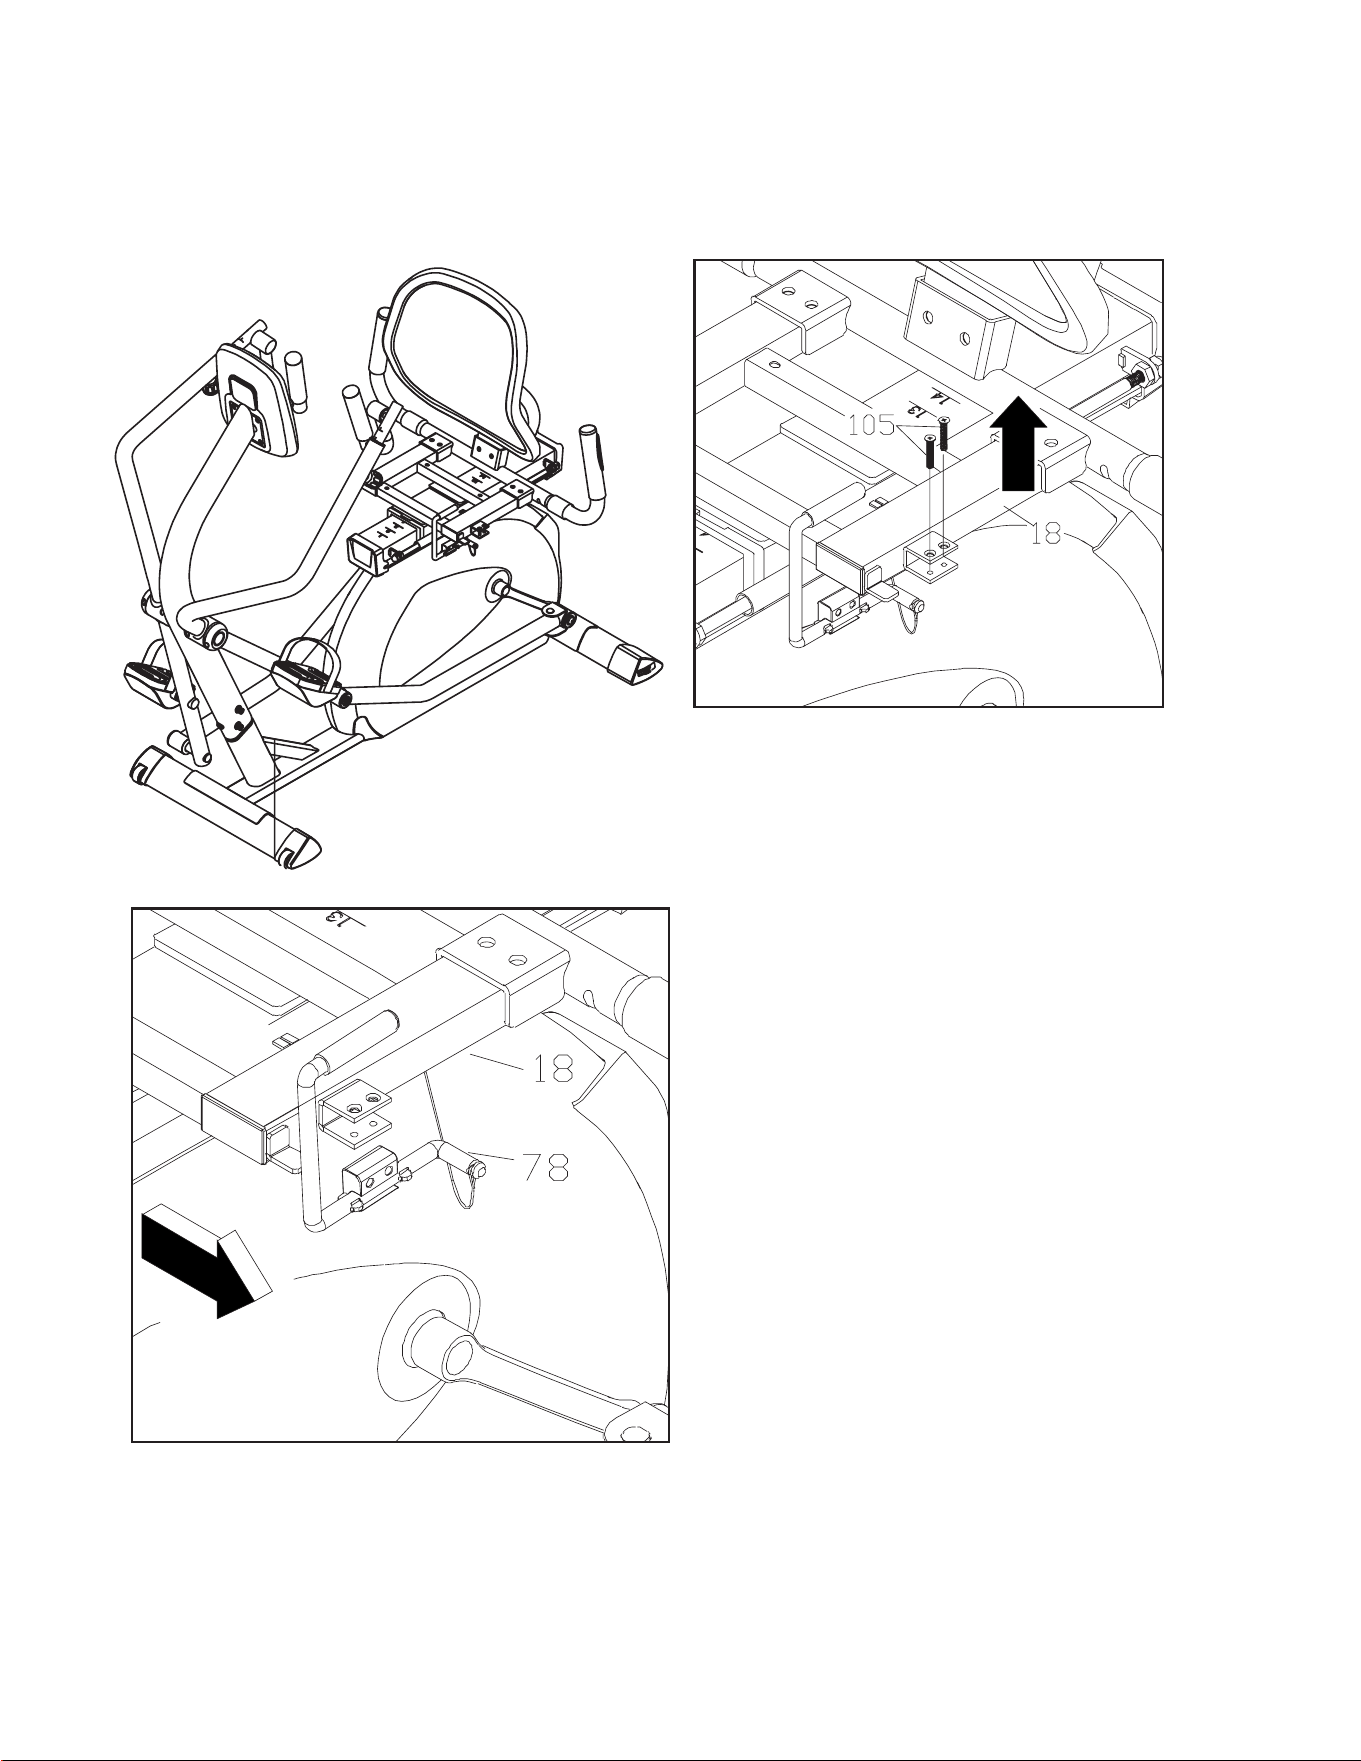
1. Use the Allen Wrench (#130) to
loosen the Flat Head Socket Screws
(#105) from Seat Assembly (#18)
2. Detach Lever (#78)from the
plastic tie that secures the handle
for shipping. Move out the Lever
(#78) from Seat Assembly (#18).
DO NOT CUT OR DETACH THE
METAL WIRE ON THE END OF
THE LEVER
6
Seat Adjustment Lever
RSX1500 Seated Stepper
13
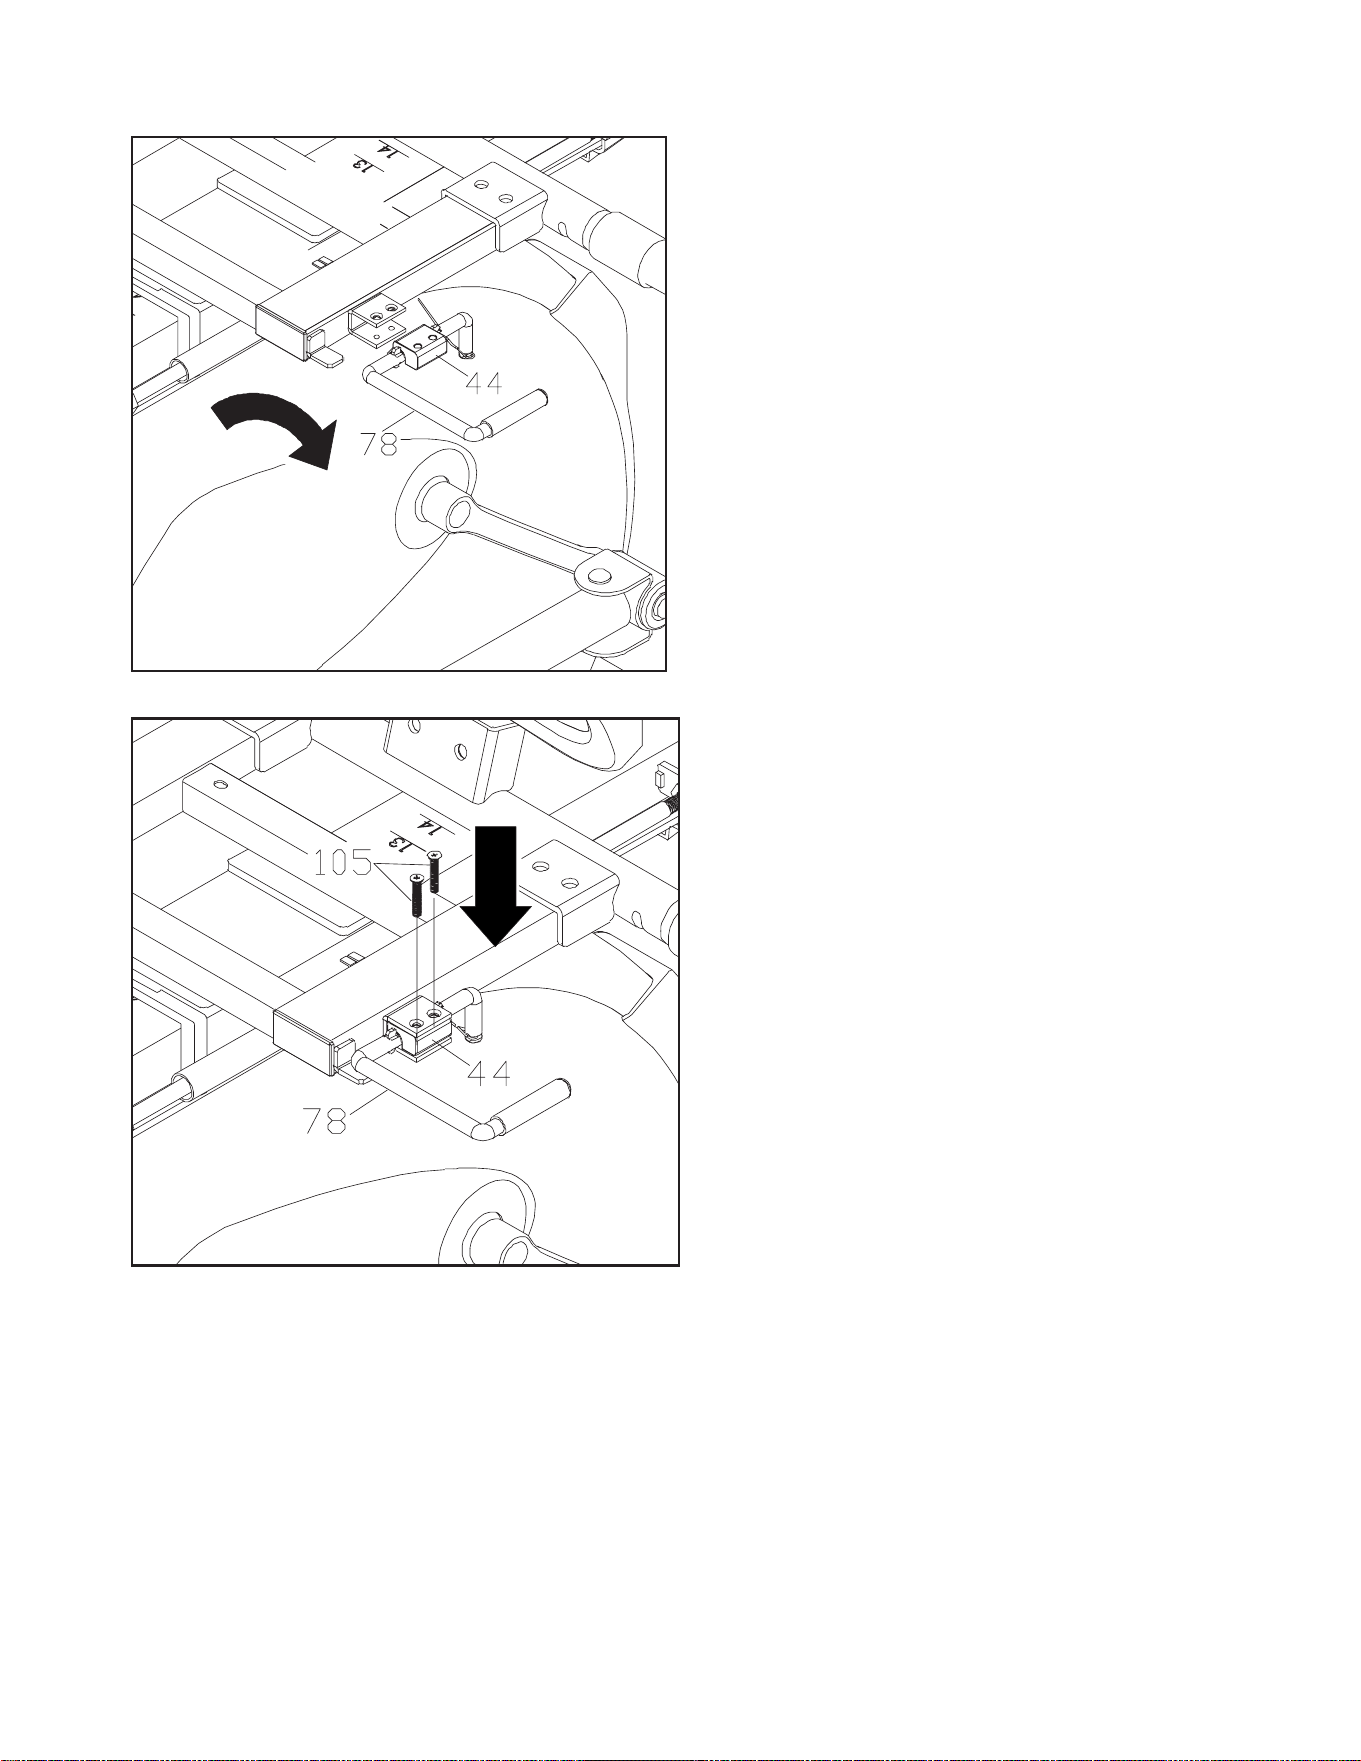
3. Turn the Lever (#78) and Lever An-
chor (#44) to 90 degrees as seen in
diagram so the Anchor can slide into
Seat Assembly (#18) with the holes
aligned.
4. Use the Allen Wrench (#130) to
secure the Flat Head Socket Screws
(#105), on the Seat Assembly (#18).
14
RSX1500 Seated Stepper
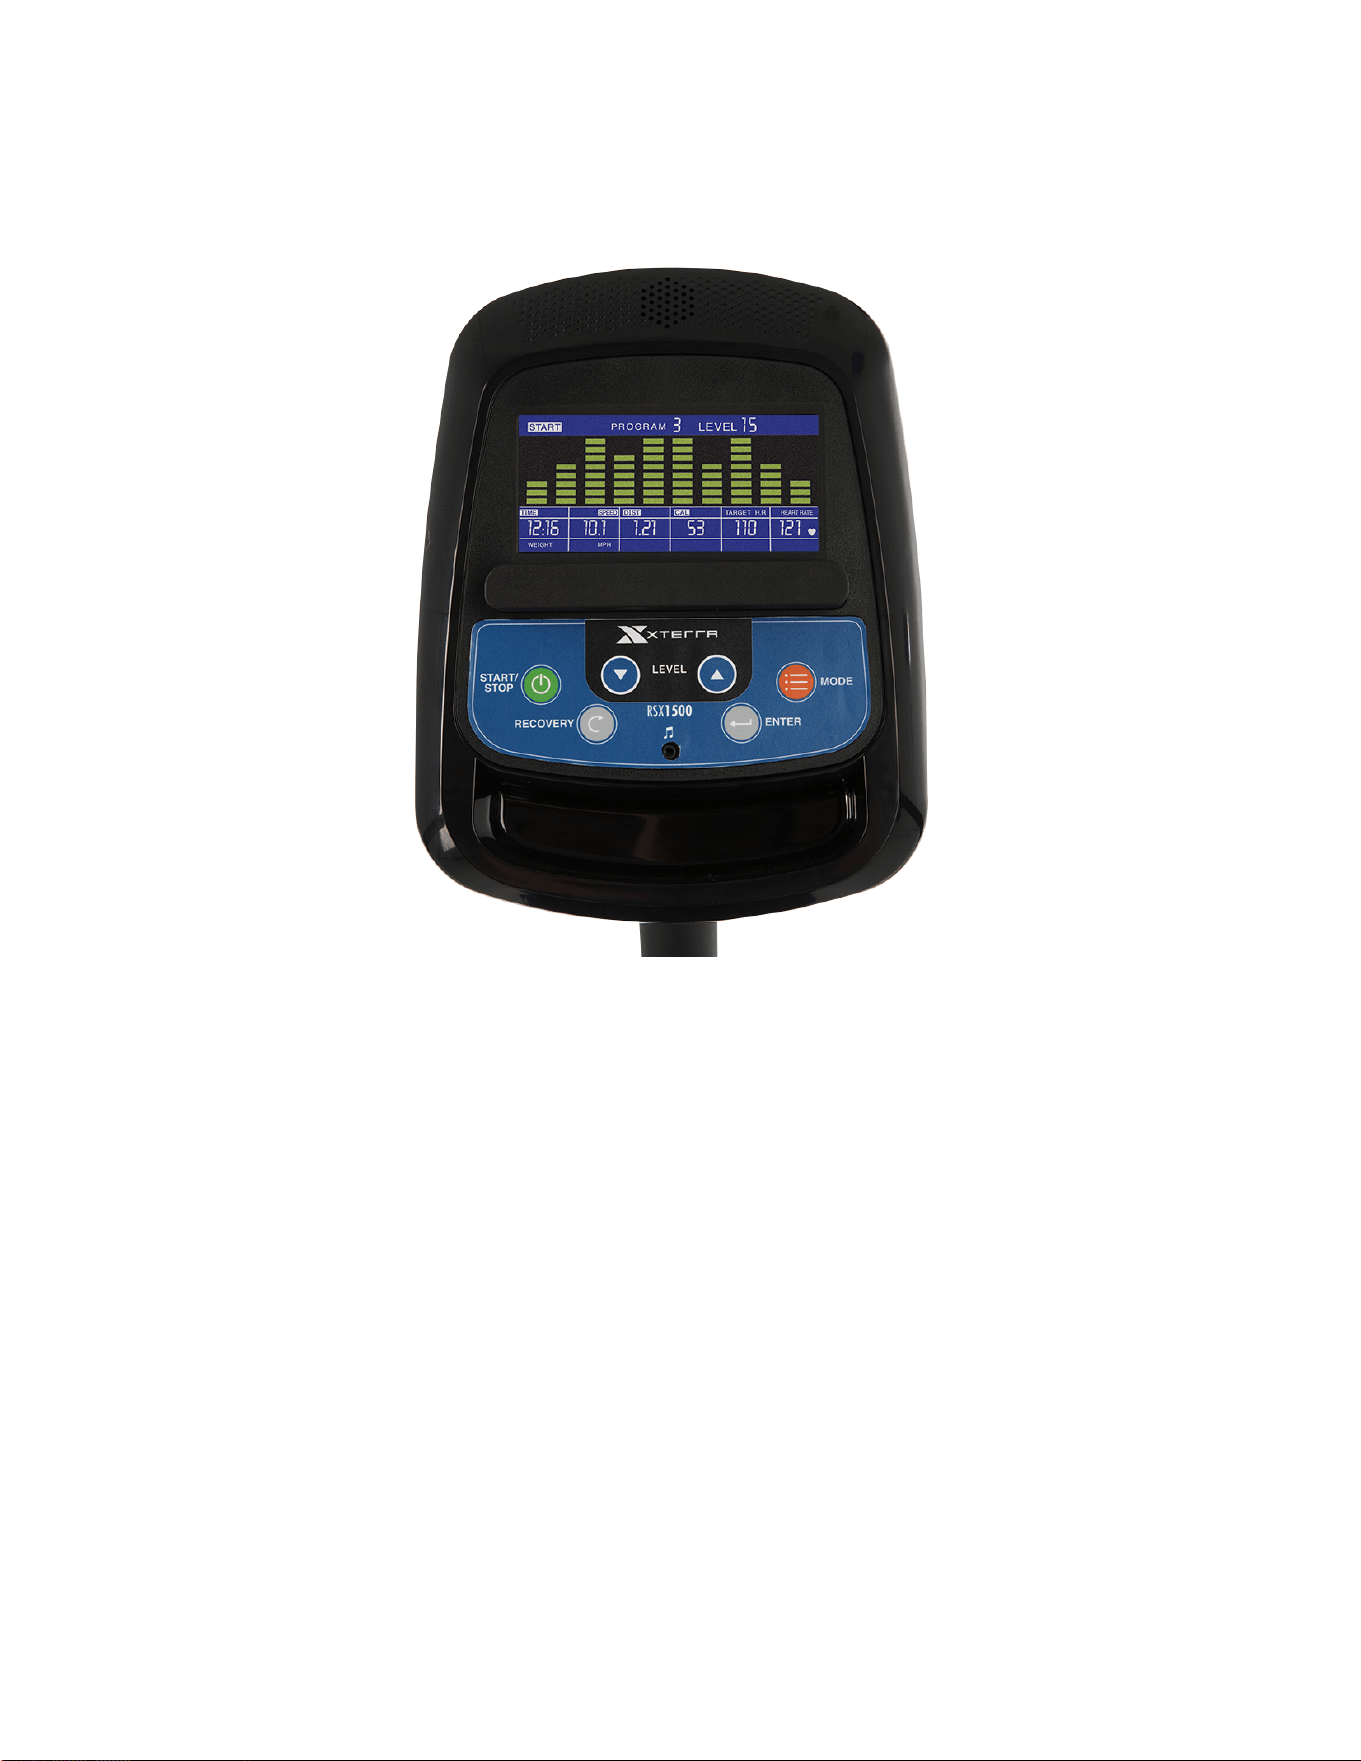
Operation of Your Console
RSX1500 Console
START / STOP:
1. Starts & Pauses workouts.
2. Starts body fat measurement.
3. Holding key for 3 seconds will reset all functions and values to zero.
DOWN: Decreases value of selected workout parameter: TIME, DISTANCE, etc. During the
workout it will decrease the resistance load.
UP: Increases value of selected workout parameter. During the workout it will increase the
resistance load.
ENTER: To input desired value or work out mode.
RECOVERY: Press to enter into heart rate Recovery function. Only works when the computer
is receiving a heart rate value. Recovery is an indication of Fitness Level. It is a one minute
measurement taken immediately after and exercise session and provides a score from 1 to 6.
A score of 1 is an indication of a high level of tness and a score of 6 indicates poor condition.
MODE: Press to switch display from RPM to SPEED, ODO to DIST, WATT to CALORIES.
Key Functions

RSX1500 Seated Stepper
15
Workout Selection
After power-up, use the UP / DOWN keys to select a workout program then pressing
ENTER. There are 6 basic workout programs: Manual, Pre-Programs, Watt Program,
Target Heart Rate program, Heart Rate Control Program and User Program.
Functions
SPEED: Displays current training speed. Maximum speed is 99.9 KM/H or MILE/H.
RPM: Displays current pedal rotations per minute.
TIME: Accumulates workout time from 00:00 to 99:59. Or users can preset the target time
desired.
DIST: Accumulates the workout distance form 0.00 up to 999.9 KM or Mile. Or users can
preset the target distance they want to reach.
ODO: Displays the total accumulated distance from 0.0 to 999.9KM or Mile.
CAL: Accumulates the calories burned from 0 to 9999. Or users can preset the target
Calories they want to burn.
WATT: Displays current watt.
HEART RATE: Displays the current heart rate in beats per minute.
TARGET H. R.: Users can preset their Target Heart Rate.
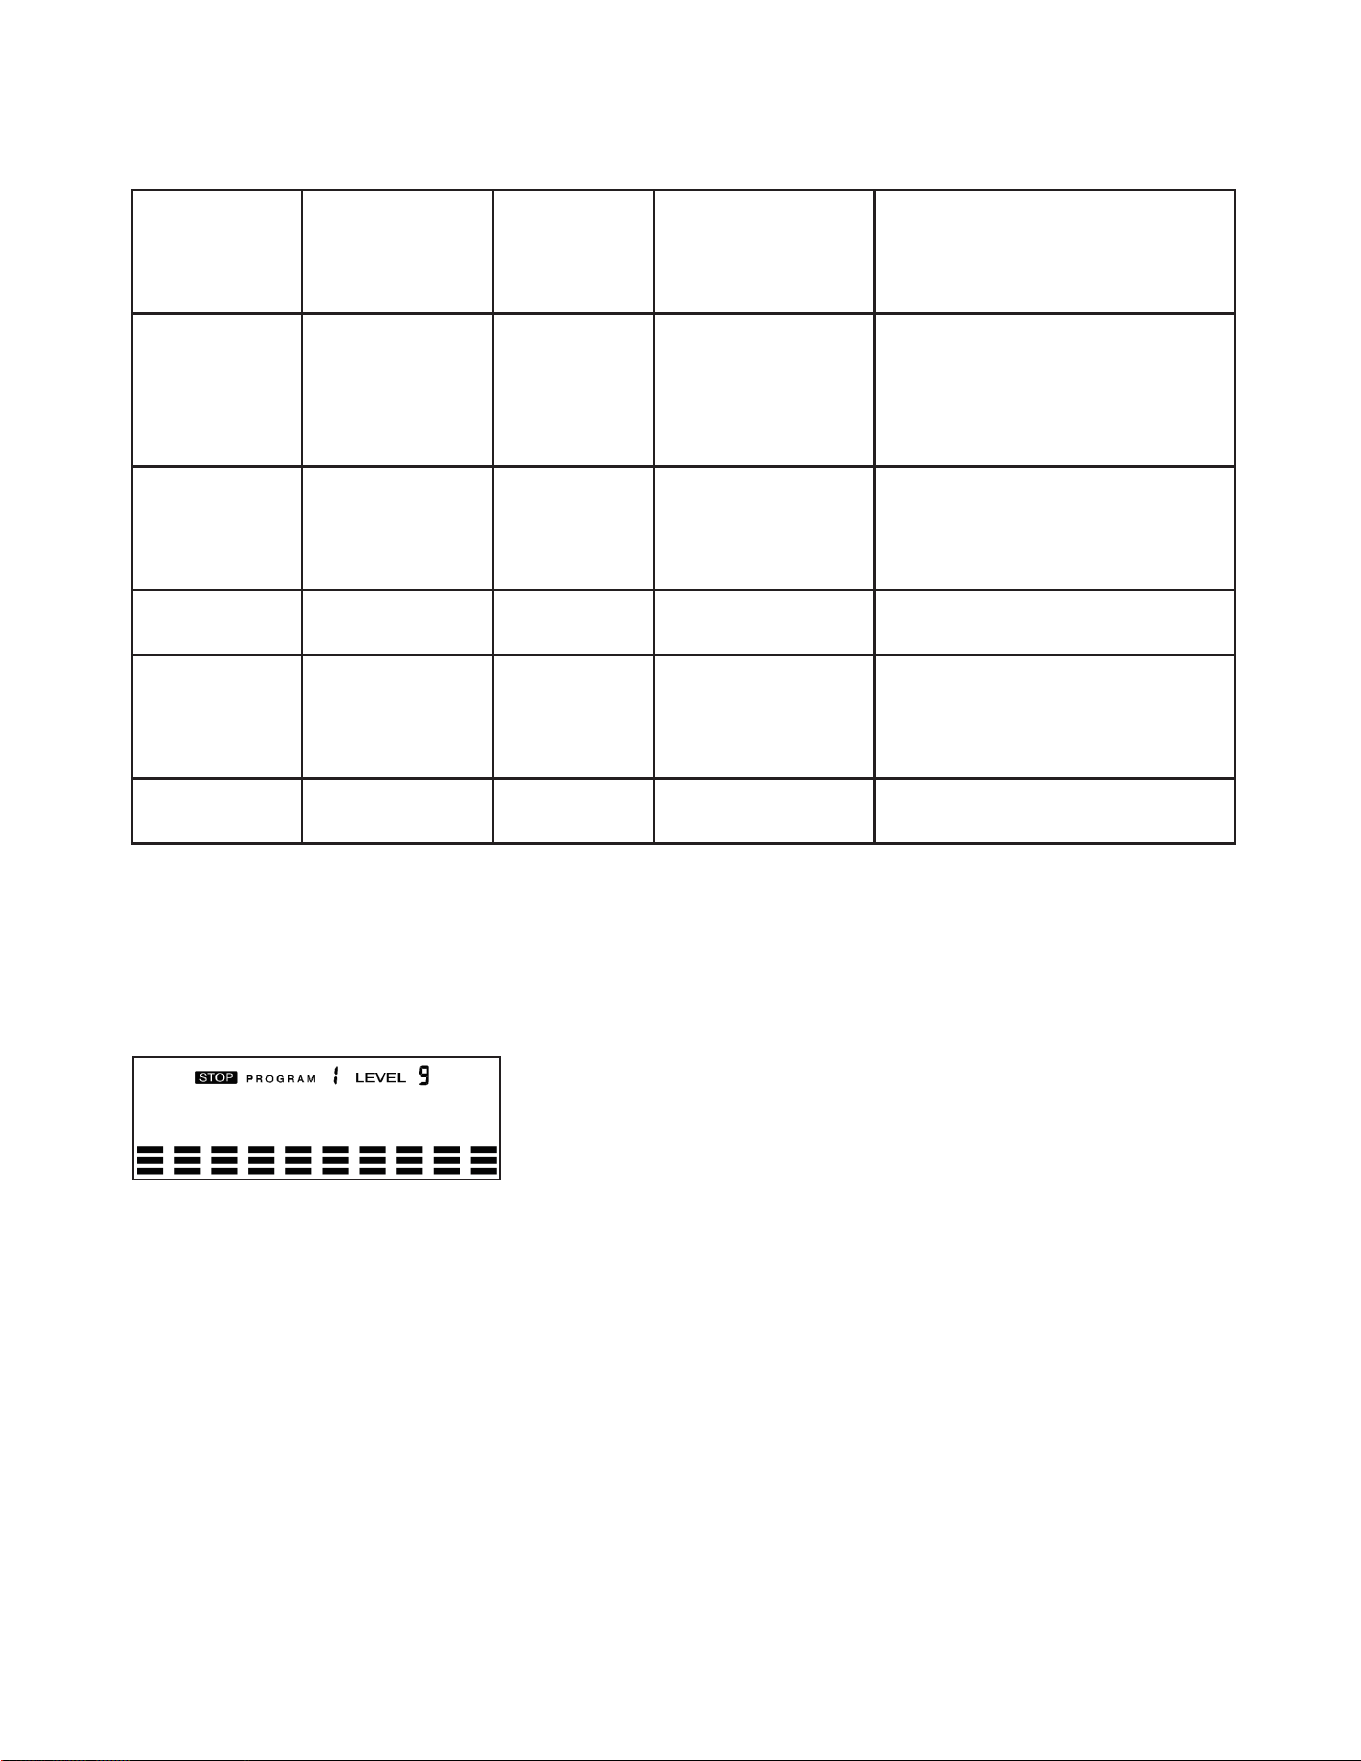
PROGRAM: There are 24 dierent programs to choose for training.
LEVEL: The programs have 24 levels of work displayed in 8 bars in each column. Each
column represents 1 minute workout (Unless time is changed to a new value for count down)
and each bar represents 3 levels of work.
Music: There is an audio-input port on the top of the monitor. Users can connect an MP3,
smart phone or other audio source to the port.
Workout Parameter
(TIME/DISTANCE/CALORIES/WATT/TARGET HEART RATE)
Setting Workout Parameters
After selecting desired workout program (Manual, Pre-set Programs, Watt Program, Target
Heart Rate, Heart Rate Control and User Program) you may pre-set several workout
parameters for desired results.
Note: Some parameters are not adjustable in certain programs. Time and Distance can not be
set up in the same workout.
Once a program has been selected pressing ENTER will make “Time” parameter ash.
Using UP / DOWN KEY you may set the desired time value. Press ENTER KEY to input value.
Flashing prompt will move to the next parameter. Continue use of UP / DOWN KEY. Press
START / STOP to start workout.
16
RSX1500 Seated Stepper
Time 0:00 - 99:00 00:00
± 1:00
1. When display is 0:00, Time
will count up.
2. When Time is 1:00 - 99:00,
it will count down to 0:00.
Distance 0.00 - 999.0 0.00
± 1.0
1. When display is 0.00,
Distance will count up.
2. When Distance is 1.0 -
990.0, it will count down to
0.00.
Calories 0 - 9995 0
± 5
1. When display is 0,
Calories will count up.
2. When Calories is 5 - 9995,
it will count down to 0.
Watt 40-250 100
± 5
User can set watt value only in
Watt control program.
Age 10-99 30
± 1
Target Heart Rate will be based
on Age. When heart rate ex-
ceeds Target Heart Rate, the
number of heart rate will ash.
Pulse 60-220 90
± 1
Setting Paramters for Target
Heart Rate.
More About Workout Parameters
Setting Parameters for the Manual Program
Select Manual using UP / DOWN KEY then press the ENTER KEY. The rst parameter,
“Time” will ash so value can be adjusted using UP / DOWN KEY. Press ENTER KEY to save
value & move to next parameter to be adjusted. **(If user sets up the target time to work-
out then the next parameter of Distance can not be adjusted) Continue through all
desired parameters, pressing START / STOP to start workout.
Note: When any One of the workout parameters counts down to zero the console emits a
beep sound and the workout stops automatically. Press START KEY to continue the workout
to reach the unnished workout goals set.
Program Operation
Manual Program

RSX1500 Seated Stepper
17
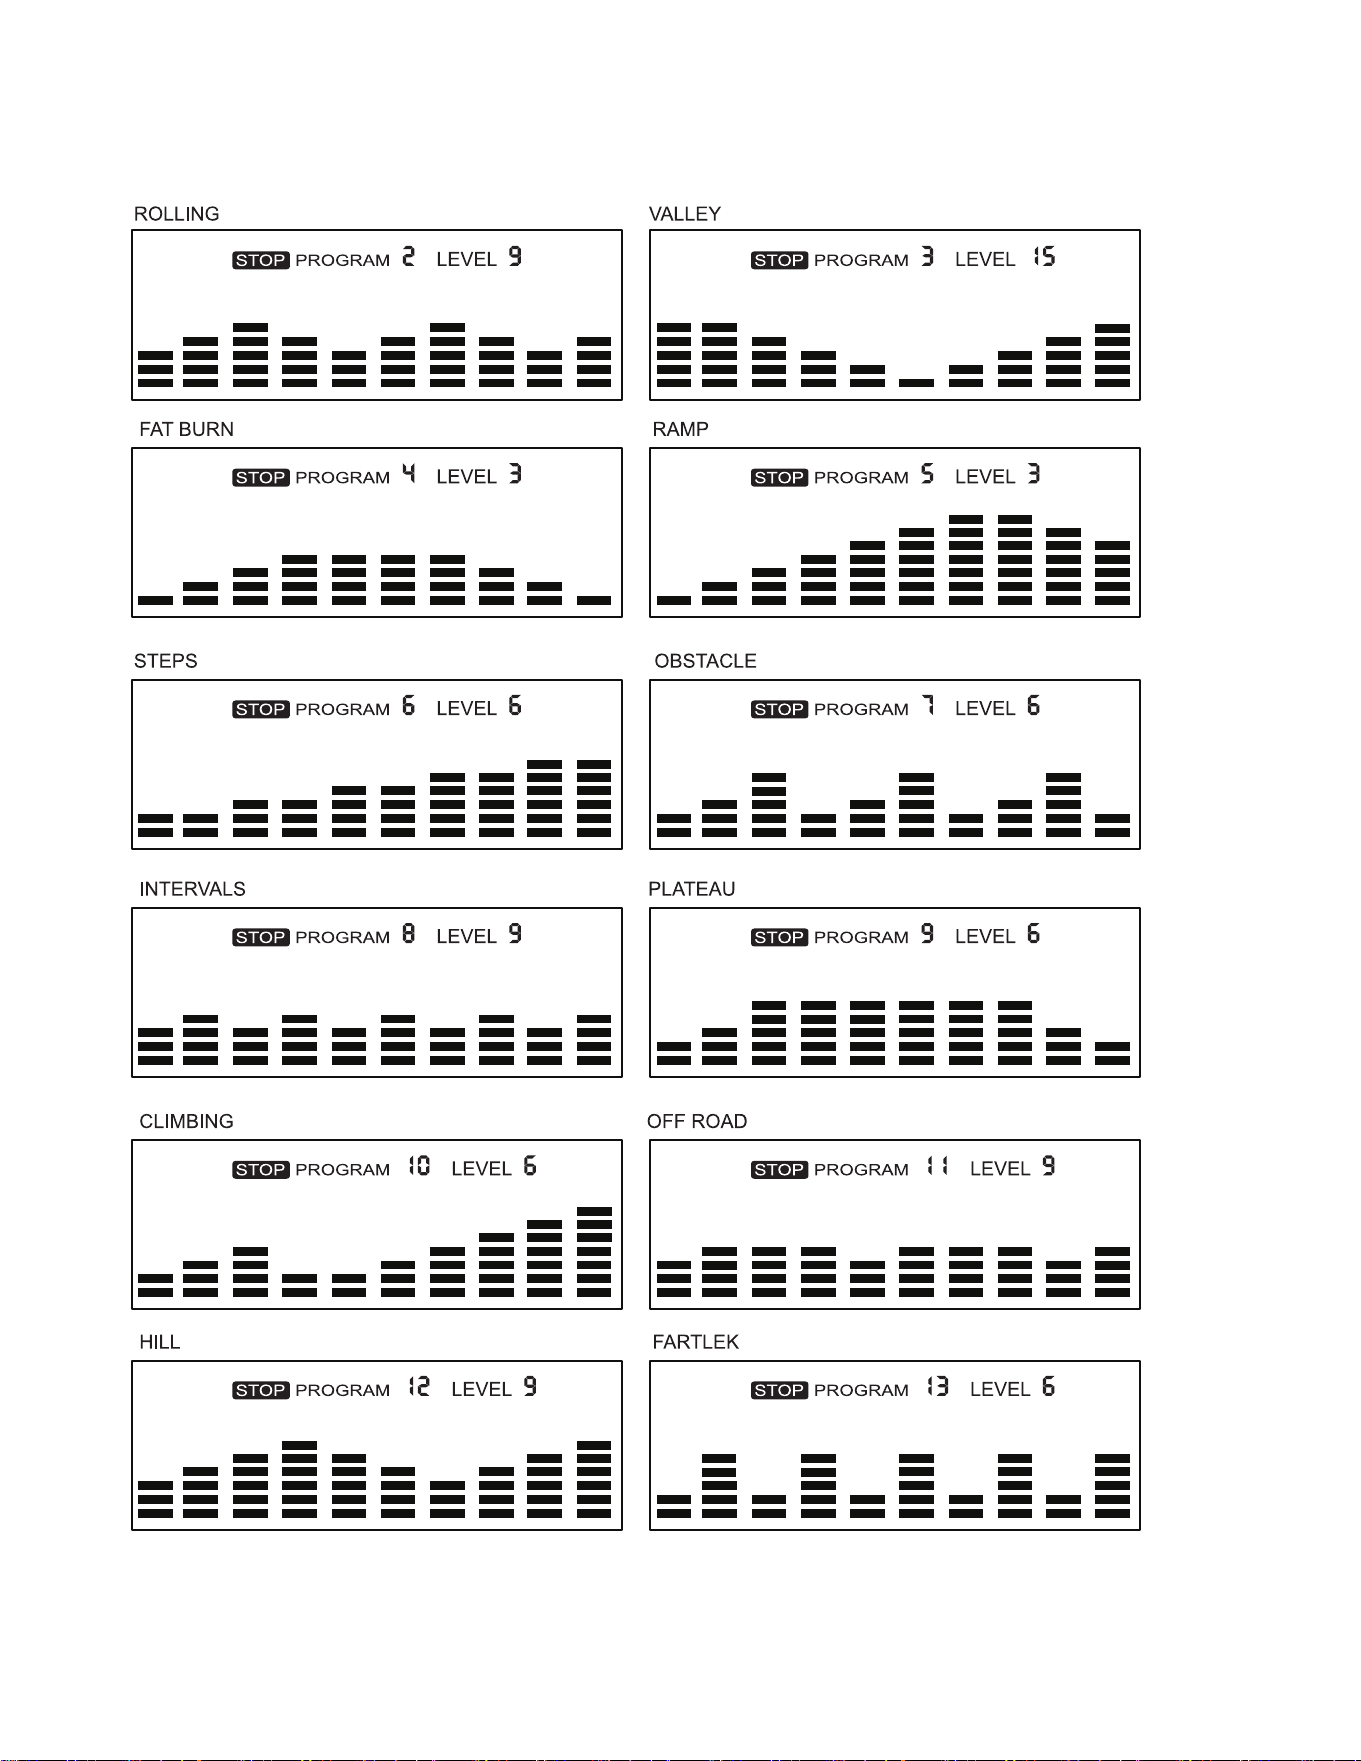
There are 12 pre-set program proles ready for use ROLLING, VALLEY, FAT BURN, RAMP,
STEPS, OBSTACLE, INTERVALS, PLATEAU, CLIMBING, OFF ROAD, HILL, FASTTREK.
All program proles have 24 levels of resistance. See page 13 to view the proles.
Setting Parameters for Pre-Set Programs
Select one of pre-set programs using UP / DOWN KEY then pressing ENTER KEY.
The rst parameter, “Time” will ash indicating the value can be adjusted using UP / DOWN
KEY. Press ENTER KEY to save value & move to next parameter to be adjusted. Continue
through all desired parameters, pressing START / STOP to start workout.
Workout in any Pre-Set Program
Users can exercise at dierent levels of intensity in dierent intervals as the proles ash.
Users may adjust the resistance level using the UP / DOWN keys during the workout.
Note: If user sets up the target time to workout then the next parameter of Distance can not
be adjusted. When any one of the workout parameters counts down to zero the console emits
a beep sound and the workout stops automatically. Press START KEY to continue the
workout to reach the unnished workout goals set.
Pre-Set Programs
18
RSX1500 Seated Stepper
Pre-Set Programs (P2 - P13)

RSX1500 Seated Stepper
19
Setting Parameters for Watt Control Programs
Select Watt Control Program using UP / DOWN KEY then press ENTER KEY. The rst
parameter “Time” will ash indicating the value can be adjusted using UP / DOWN KEY.
Press ENTER KEY to save value & move to next parameter to be adjusted. **(If user sets
up the target time to workout, then the next parameter of Distance can not be adjusted)
Continue through all desired parameters, pressing START / STOP to start workout.
Note: When any one of the workout parameters counts down to zero the console emits a
beep sound and the workout stops automatically. Press START KEY to continue the workout
to reach the unnished workout goals set. The computer will adjust the resistance load
automatically depending on the speed to maintain a constant watt value. User can use
UP / DOWN key to adjust the watt value during workout.
Watt Control Program
Setting Parameters for the Target Heart Rate Program
Select Target HR using UP / DOWN KEY then press ENTER KEY. The rst parameter “Time” will ash indicat-
ing the value can be adjusted using UP / DOWN KEY. Press ENTER KEY to save value & move to next param-
eter to be adjusted. **(If user sets up the target time to workout, then the next parameter of Distance can
not be adjusted) Continue through all desired parameters, pressing START / STOP to start workout.
Note: If your Pulse measurement is above or below (± 5) the TARGET HR setting, the
computer will adjust the resistance load automatically; it will check approximately every 10 seconds. If the heart
rate signal disappears, the computer will keep the resistance load
constant for 60 seconds then it will decrease the resistance load 1 level every 10s.
When any one of the workout parameters counts down to zero the console emits a beep sound and the workout
stops automatically. Press START KEY to continue the workout to reach the unnished workout goals set.
Target Heart Rate Program

20
RSX1500 Seated Stepper
Heart Rate Control Program
There are 4 selections for target pulse:
HRC- 55% TARGET H.R= 55% of (220-AGE)
HRC - 65% TARGET H.R= 65% of (220-AGE)
HRC - 75% TARGET H.R= 75% of (220-AGE)
HRC - 85% TARGET H.R= 85% of (220-AGE)
Setting Parameters for Heart Rate Control Programs
Select one of the Heart Rate Control Programs using UP / DOWN KEY then press
ENTER KEY. The rst parameter “Time” will ash indicating the value can be adjusted using UP / DOWN KEY.
Press ENTER KEY to save value & move to next parameter to be
adjusted. **(If user sets up the target time to workout, then the next parameter of
Distance can not be adjusted) Continue through all desired parameters, pressing START / STOP to start work-
out.
Note: If your Pulse measurement is above or below (± 5) the Target HR setting, the
computer will adjust the resistance load automatically; it will check approximately every 10 seconds. If the heart
rate signal disappears, the computer will keep the resistance load
constant for 60 seconds then it will decrease the resistance load 1 level every 10 seconds.
When any one of the workout parameters counts down to zero the console emits a beep sound and the workout
stops automatically. Press START KEY to continue the workout to reach the unnished workout goals set.
User Program
Four User Programs allow the user to create their own personal programs.
Setting Parameters for User Programs
Select “User” using UP / DOWN KEY then press ENTER KEY. The rst parameter, “Time” will ash indicating the
value can be adjusted using UP / DOWN KEY. Press ENTER KEY to save value & move to next parameter to
be adjusted. **(If user sets up the target time to workout, then the next parameter of Distance can not be
adjusted) Continue through all desired parameters.
After completing parameter set up, row 1 of the prole will be ashing. Use UP / DOWN KEY to adjust level then
press ENTER until nished (10 times total). Press START / STOP to start workout.
Note: When any one of the workout parameters counts down to zero the console emits a beep sound and the
workout stops automatically. Press START KEY to continue the workout to reach the unnished workout goals
set.
RSX1500 Seated Stepper
21
The old motto, “no pain, no gain”, is a myth that has been overpowered by the benets of
exercising comfortably. A great deal of this success has been promoted by the use of heart rate
monitors. With the proper use of a heart rate monitor, many people nd that their usual choice of
exercise intensity was either too high or too low and exercise is much more enjoyable by
maintaining their heart rate in the desired benet range.
To determine the benet range in which you wish to train, you must rst determine your predicted
Maximum Heart Rate. This can be accomplished by using the following formula: 220 minus your
age. This will give you the predicted Maximum Heart Rate (MHR) for someone of your age. To de-
termine the eective heart rate range for specic goals you simply calculate a percentage of your
MHR. Your heart rate training zone is 50% to 90% of your maximum heart rate. 60% of your MHR
is the zone that burns fat, while 80% is for strengthening the cardio vascular system. This 60% to
80% is the zone to stay in for maximum benet.
For someone who is 40 years old their
predicted target heart rate zone is calculated:
220 – 40 = 180 (maximum heart rate)
180 x .6 = 108 beats per minute
(60% of maximum)
180 X .8 = 144 beats per minute
(80% of maximum)
So for a 40 year old the training zone would be
108 to 144 beats per minute.
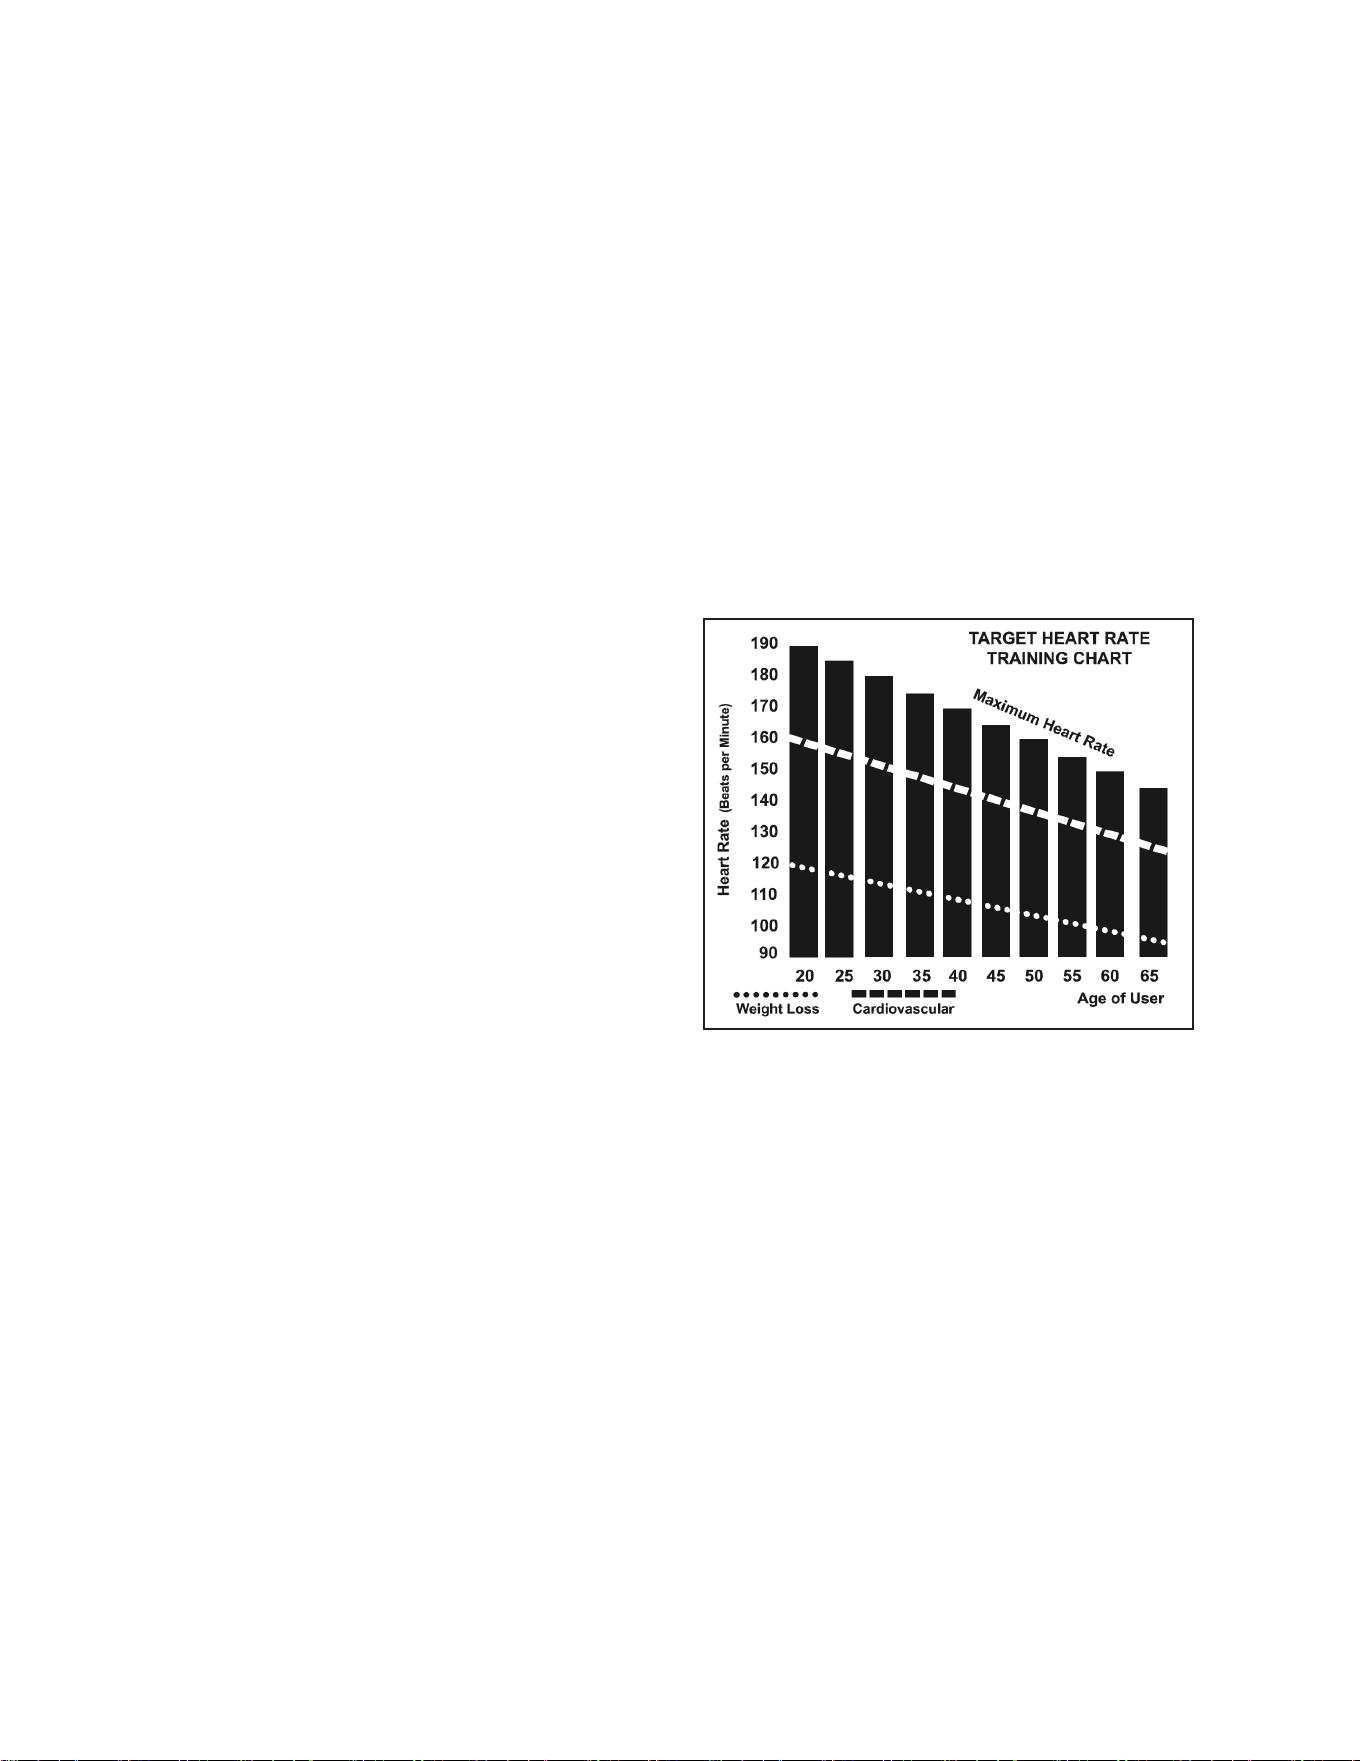
The two most popular reasons for, or goals, of ex-
ercise are cardiovascular tness (training for the
heart and lungs) and weight control. The black
columns on the chart above represent the MHR
for a person whose age is listed at the bottom of each column. The training heart rate, for either
cardiovascular tness or weight loss, is represented by two dierent lines that cut diagonally
through the chart. A denition of the lines’ goal is in the bottom left-hand corner of the chart. If your
goal is cardiovascular tness or if it is weight loss, it can be achieved by training at 80% or 60%,
respectively, of your MHR on a schedule approved by your physician. Consult your physician
before participating in any exercise program.
Heart Rate

22
RSX1500 Seated Stepper
Heart rate is important but listening to your body also has a lot of advantages. There are
more variables involved in how hard you should workout than just heart rate. Your stress
level, physical health, emotional health, temperature, humidity, the time of day, the last
time you ate and what you ate all contribute to the intensity at which you should
workout. If you listen to your body it will tell you all of these things.
The rate of perceived exertion (RPE), also known as the Borg scale, was developed by
Swedish physiologist G.A.V. Borg. This scale rates exercise intensity from 6 to 20
depending upon how you feel or the perception of your eort.
The scale is as follows:
Rating Perception of Eort
6 Minimal
7 Very,very light
8 Very,very light +
9 Very light
10 Very light +
11 Fairly light
12 Comfortable
13 Somewhat hard
14 Somewhat hard +
15 Hard
16 Hard +
17 Very hard
18 Very hard +
19 Very,very hard
20 Maximal
You can get an approximate heart rate level for each rating by simply adding a zero to
each rating. For example a rating of 12 will result in an approximate heart rate of 120
beats per minute. Your RPE will vary depending on the factors discussed earlier. If your
body is strong and rested, you will feel strong and your pace will feel comfortable. When
your body is in this condition, you are able to train harder and the RPE will support this. If
you are feeling tired and sluggish, it is because your body needs a break. In this
condition, your pace will feel dicult. Again, this will show up in your RPE and you
will train at the proper level for that day.
Rate of Perceived Exertion

RSX1500 Seated Stepper
23
1. Wipe down all areas in the sweat path with a damp cloth after each workout.
2. If a squeak, thump, clicking or rough feeling develops, the main cause is most likely one of
two reasons:
i. The hardware was not suciently tightened during assembly. All bolts that were
installed during assembly need to be tightened as much as possible. It may be
necessary to use a larger wrench than the one provided if you cannot tighten the bolts
suciently. The majority of calls to the service department for noise issues can be
traced to loose hardware or the rear rails being dirty.
ii. Dirt build-up on the rear rails and polyurethane wheels are also a source of noise.
Noise from build-up on the rails can cause a thumping sound that you would swear is
coming from inside the main body of the machine because noise travels and is am-
plied in the tubing of the frame. Clean the rails and wheels with a lint free cloth and
rubbing alcohol. Stubborn build-up can be removed with your thumbnail or a non-
metallic scraper, like the back edge of a plastic knife. After cleaning, apply a small
amount of lubricant on the rails with your ngers or a lint free cloth. You only need a
thin coat of lubrication, wipe o any excess.
3. If squeaks or other noises persist, check that the unit is properly leveled before calling the
service department.
General Maintenance
Your new Seated Stepper is engineered and manufactured to the strictest industry standards
and tolerances. All Seated Stepper trainers, no matter who the manufacturer, have a
multitude of moving linkages and parts. Be aware that even with the tightest mechanical
tolerances there still could be a slight amount of play between some parts. This inherent play
can result in slight noises during use such as clicks and small thumps. Please expect that the
Seated Stepper will not be completely silent.
Seated Stepper Noises

24
RSX1500 Seated Stepper
Manufacturer’s Limited Warranty
Eective August 21, 2018- Seated Stepper LIMITED WARRANTY
Home Use Limited Warranty
Frame & Brake
Lifetime
Parts
3 Years
XTERRA Fitness Inc. warrants all its home use Seated Stepper parts for a period of time listed below, from the date of retail sale, as deter-
mined by a sales receipt or in the absence of a sales receipt, eighteen (18) months from the original factory shipping date. XTERRA Fitness’
responsibilities include providing new or remanufactured parts, at XTERRA Fitness’ option, and technical support to our independent dealers
and servicing organizations. In the absence of a dealer or service organization, these warranties will be administered by XTERRA Fitness
directly to a consumer. The warranty period applies to the following components:
NORMAL RESPONSIBILITIES OF THE CONSUMER
This warranty applies only to products in ordinary household use. The consumer is responsible for the items listed below:
1. The warranty registration card must be completed and returned to the address listed on the card within 10 days of the original purchase
to validate the manufacturer’s limited warranty or register online at the XTERRA Fitness website.
2. Proper use of the Seated Stepper in accordance with the instructions provided in this manual, including maintenance.
3. Proper connection to a power supply of sucient voltage, replacement of blown fuses, repair of loose connections or defects in house/
facility wiring.
4. Expenses for making the Seated Stepper accessible for servicing, including any item that was not part of the Seated Stepper at the
time it was shipped from the factory.
5. Damages to the Seated Stepper nish during shipping, installation or following installation.
EXCLUSIONS
This warranty does not cover the following:
1. CONSEQUENTIAL, COLLATERAL, OR INCIDENTAL DAMAGES SUCH AS PROPERTY DAMAGE AND INCIDENTAL
EXPENSES RESULTING FROM ANY BREACH OF THIS WRITTEN OR ANY IMPLIED WARRANTY. Note: Some states do not allow
the exclusion or limitation of incidental or consequential damages, so this limitation or exclusion may not apply to you.
2. Service call reimbursement to the consumer. Service call reimbursement to the dealer that does not involve malfunction or defects in
workmanship or material, for units that are beyond the warranty period, for units that are beyond the service call reimbursement period,
for Seated Steppers not requiring component replacement, or Seated Steppers not in ordinary household use.
3. Damages caused by services performed by persons other than authorized XTERRA Fitness service companies, use of parts other than
original XTERRA Fitness parts, or external causes such as alterations, modications, abuse, misuse, accident, improper maintenance,
inadequate power supply, or acts of God.
4. Products with original serial numbers that have been removed or altered.
5. Products that have been; sold, transferred, bartered, or given to a third party.
6. Products that are used as store display models.
7. Products that do not have a warranty registration on le at XTERRA Fitness Inc. XTERRA Fitness reserves the right to request proof of
purchase if no warranty record exists for the product.
8. Product use in any environment other than a residential setting.
9. THIS WARRANTY IS EXPRESSLY IN LIEU OF ALL OTHER WARRANTIES EXPRESSED OR IMPLIED, INCLUDING THE
WARRANTIES OF MERCHANTABILITY AND/OR FITNESS FOR A PARTICULAR PURPOSE.
SERVICE
Keep your bill of sale. Twelve (12) months from the date on the bill of sale or eighteen (18) months from the date of factory shipping as
determined by the serial number establishes the warranty period should service be required. If service is performed, it is in your best interest
to obtain and keep all receipts. This written warranty gives you specic legal rights. You may also have other rights that vary from state to
state. Service under this warranty must be obtained by following these steps, in order:
1. Contact your selling authorized XTERRA Fitness dealer. OR
2. Contact your local authorized XTERRA Fitness service organization.
3. If there is a question as to where to obtain service, contact our service department at (870)336-4286.
4. XTERRA Fitness’ obligation under this warranty is limited to repairing or replacing, at XTERRA Fitness’ option, the product through one
of our authorized service centers. All repairs must be preauthorized by XTERRA Fitness. If the product is shipped to a service center
freight charges to and from the service center will be the customer’s responsibility. For replacement parts shipped while the product is
under warranty, the customer will be responsible for shipping and handling charges. For in-home service, the customer will be respon-
sible for a trip charge. There will be an additional trip charge if the customer is located over 100 miles from the nearest service center.
5. The owner is responsible for adequate packaging upon return to XTERRA Fitness. XTERRA Fitness is not responsible for damages in
shipping. Make all freight damage claims with the appropriate freight carrier. DO NOT SHIP ANY UNIT TO OUR FACTORY WITHOUT
A RETURN AUTHORIZATION NUMBER. All units arriving without a return authorization number will be refused.
6. For any further information, or to contact our service department by mail, send your correspondence to:
Product features or specications as described or illustrated are subject to change without notice. All warranties are made by
XTERRA Fitness, Inc. This warranty applies only in the 48 contiguous United States. NOTE: This does not include Alaska or Hawaii.
XTERRA Fitness, Inc.
P.O. Box 2037
Jonesboro, AR 72402-2037
Labor
1 Year

RSX1500 Seated Stepper
25
www.xterrafitness.com
©2021 All Rights Reserved. RSX1500 Owner’s Manual
3000 Nestle Road Jonesboro, AR 72401 - Phone:870-336-4286 - Fax:870-935-7611