Home
Bookmarks
Home
Philips
Philips BDL5588XC/00 User Manual
Page 25
User Manual - Page 25
For BDL5588XC/00.
Page 25/51
Page 1
Page 2
Page 3
Page 4
Page 5
Page 6
Page 7
Page 8
Page 9
Page 10
Page 11
Page 12
Page 13
Page 14
Page 15
Page 16
Page 17
Page 18
Page 19
Page 20
Page 21
Page 22
Page 23
Page 24
Page 25
Page 26
Page 27
Page 28
Page 29
Page 30
Page 31
Page 32
Page 33
Page 34
Page 35
Page 36
Page 37
Page 38
Page 39
Page 40
Page 41
Page 42
Page 43
Page 44
Page 45
Page 46
Page 47
Page 48
Page 49
Page 50
Page 51
Contents
Table of Contents
Search
Previous
Next
Troubleshooting
Bookmarks
Loading ...
Loading ...
Loading ...
BDL5588XC
15
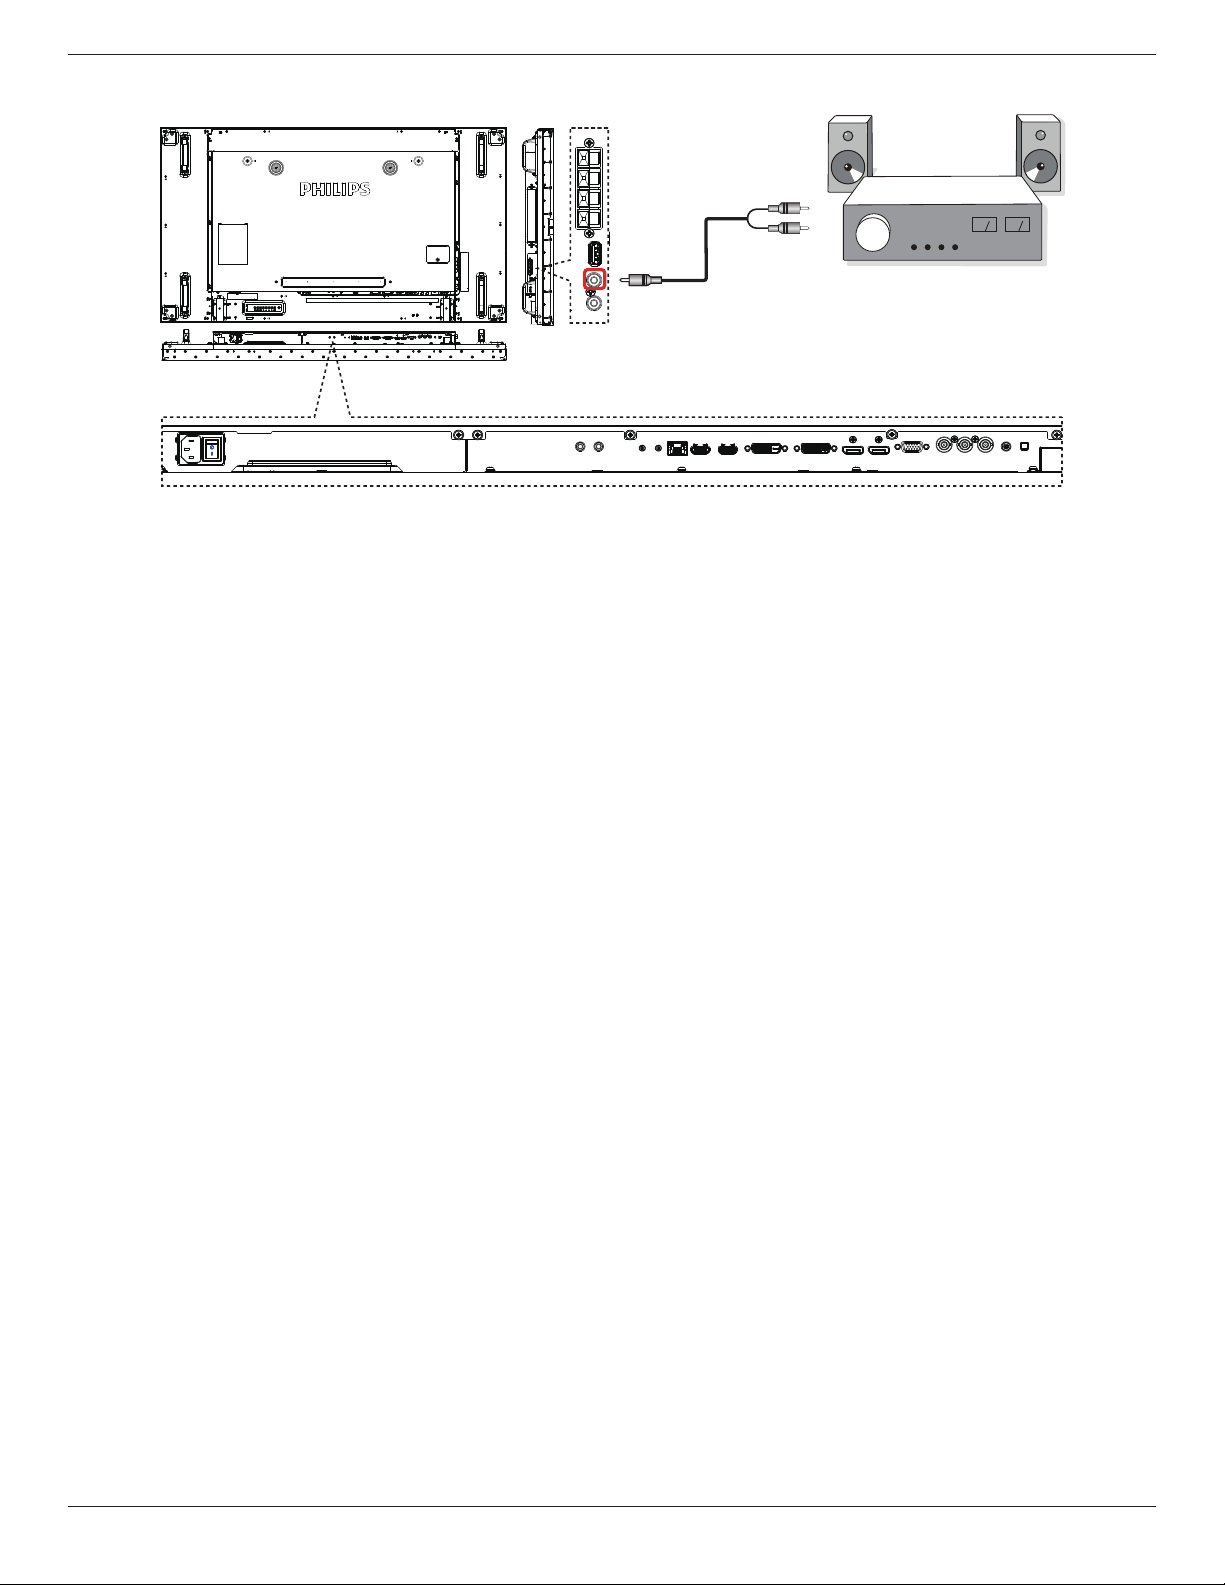
3.3.2.
Connecting an external audio de
vice
Stereo Amplifier
[AUDIO OUT]
Audio In
Loading ...
Loading ...
Loading ...
<
22
23
24
25
26
27
>
File type: PDF
File name: 34638077_bdl5588xc-00.pdf
File size: 26.53 MB
File Language: English
Pages: 51
Author: Philips
File created: 2018-01-10
Published: 2021-05-06
Updated: 2023-05-11
Verified by
Macy Effertz
on 2023-05-11
Download File
Table of Contents
×
1. Unpacking and Installation
11
1.1. Unpacking
11
1.2. Package Contents
11
1.3. Installation Notes
11
1.4. Installing and Removing Table Stands (optional)
12
1.5. Mounting on a Wall
13
1.5.1. VESA Grid
13
1.6. Mounting in Portrait Position
14
1.7. Operating Instructions of Edge Alignment Kit
15
1.7.1. Installing Edge Alignment Kit
15
1.8. Using of Edge Finishing Kit (Optional)
16
1.8.1. Installing Edge Finishing Kit
16
2. Parts and Functions
17
2.1. Control Panel
17
2.2. Input/Output Terminals
18
2.3. Remote Control
19
2.3.1. General functions
19
2.3.2. ID Remote Control
20
2.3.3. Inserting the batteries in the remote control
21
2.3.4. Handling the remote control
21
2.3.5. Operating range of the remote control
21
3. Connecting External Equipment
22
3.1. Connecting External Equipment (DVD/VCR/VCD)
22
3.1.1. Using COMPONENT video input
22
3.1.2. Using Video Source input
22
3.1.3. Using HDMI video input
23
3.2. Connecting a PC
23
3.2.1. Using VGA input
23
3.2.2. Using DVI input
23
3.2.3. Using HDMI input
24
3.2.4. Using DisplayPort input
24
3.3. Connecting Audio Equipment
24
3.3.1. Connecting external speakers
24
3.3.2. Connecting an external audio device
25
3.4. Connecting Multiple Displays in a Daisy-chain Configuration
26
3.4.1. Display control connection
26
3.4.2. Digital video connection
26
3.4.3. Analog video connection
27
3.4.4. IR daisy-chain Connection
27
3.5. IR connection
27
3.6. IR Pass-through Connection
28
3.7. Wire-connecting to Network
28
4. Operation
29
4.1. Watch the Connected Video Source
29
4.2. Change Picture Format
29
4.3. Play multimedia files via Local Area Network
29
4.3.1. Set up the network
29
4.3.2. How to use DLNA-DMP
29
4.3.3. How to use DLNA-DMR from PC
30
4.4. Play multimedia files from USB device
30
4.5. Play options
31
4.5.1. Playing music files
31
4.5.2. Playing movie files
31
4.5.3. Playing photo files
31
4.6. How to use Opera browser (HTML5)
31
5. Change your settings
33
5.1. Settings
33
5.1.1. Picture
33
5.1.2. Sound
34
5.1.3. Tiling
34
5.1.4. Network
37
5.1.5. General settings
37
5.1.6. Advanced
40
5.1.7. Help
40
6. USB device compatibility
41
7. Input Mode
43
8. Pixel Defect Policy
44
8.1. Pixels and Sub-Pixels
44
8.2. Types of Pixel Defects + Dot Definition
44
8.3. Bright Dot Defects
44
8.4. Dark Dot Defects
45
8.5. Proximity of Pixel Defects
45
8.6. Pixel Defect Tolerances
45
8.7. MURA
45
9. Cleaning and Troubleshooting
46
9.1. Cleaning
46
9.2. Troubleshooting
47
10. Technical Specifications
49
Search:
×
Search