Specications
Material
Plastic (PC, ABS), Glass
Water-resistance
O-ring, Buckle
Pressure-resistance
To a depth of up to 40 m (132 feet) underwater
Switches that can be externally operated
Power, Shutter, Playback, Zoom (W/T), Shooting mode, Underwater white
balance, Flash, Macro, Image size
Dimensions
Approx. 134 × 94 × 38 mm (5 3/8 × 3 3/4 × 1 1/2 in.) (w/h/d)
(excluding the projecting parts)
Mass
Approx. 260 g (9.2 oz.) (marine pack only)
Included items
Waterproof Case (1)
Hand strap (1)
LCD hood (1)
Front attachment A (for DSC-T77) (1)*
Rear attachment A (for DSC-T77) (1)*
*Attached to the waterproof case at purchase.
Front attachment B (for DSC-T700) (1)
Rear attachment B (for DSC-T700) (1)
Grease (1)
O-ring (1)
Desiccant (two-pack) (1)
Spacer (1)
Set of printed documentation
Optional accessories
Arm kit VCT-MP1K
Underwater video light HVL-ML20M (must be used together with arm kit
VCT-MP1K and “InfoLITHIUM” (M series) battery pack, (M series battery
charger))
O-ring kit ACC-MP101
(Check this icon on the package.)
Design and specications are subject to change without notice.
Maintenance
Aer recording in a location with a sea breeze, wash the marine pack thoroughly
in fresh water with the buckles fastened to remove salt and sand, then wipe with
a so dry cloth. It is recommended that you submerge the marine pack in fresh
water for about 30 minutes. If it is le with salt on it, metal portions may be
damaged or rust may form and cause water leakage.
If sun oil is on the marine pack, be sure to wash it o thoroughly using lukewarm
water.
Wipe the inside of the marine pack with a so dry cloth. Do not wash it with
water.
Be sure to perform the above maintenance each time you use the marine pack. Do
not use any type of solvent such as alcohol, benzine or thinner for cleaning, as this
might damage the surface nish of the marine pack.
When storing the marine pack
Attach the spacer supplied with the marine pack to prevent wear of the O-ring.
(See illustration )
Prevent dust from collecting on the O-ring.
Lightly coat the O-ring with grease and insert it into the seating groove, then store
the marine pack in a cool, well-ventilated location. Do not fasten the buckle.
Avoid storing the marine pack in a cold, very hot or humid place, or together with
naphthalene or camphor, as these conditions might damage the marine pack.
Preparation
Replacing the attachment
* If you are using the DSC-T77, the following steps are not required because
the attachment A for the DSC-T77 is already attached to the marine pack at
purchase.
1 Open the marine pack. (-1)
Press the two OPEN buttons together and release the buckle in the direction
of the arrow to open the marine pack body.
Notes
Take care not to lose the spacer as you will need it to store the marine pack.
2 Replace the attachments.
Detach the DSC-T77 front attachment A and rear attachment A (-
2)
Detach at the points marked and li the attachment by gripping the point
marked in the illustration.
Attach the DSC-T700 front attachment B and rear attachment B (-
2)
Press the points marked and then rmly insert the points marked in the
illustration.
Aer replacing the attachment, press the marine pack buttons several times to
check their operation.
Attach the DSC-T77 front attachment A and rear attachment A
again (-2)
Press the points marked and then rmly insert the points marked in
the illustration.
* Aer you remove the attachment from the marine pack and store it, it should
not be straightened before you store it. It can be damaged if stored while it is
deformed.
Preparing the O-ring and drip-proof packing
1 Remove the O-ring.
2 Coat the O-ring with grease.
Clean o any sand or dirt on the O-ring, in the seating groove, or on the marine
pack’s body where it touches the O-ring. Coat the O-ring with a light, even layer
of grease.
3 Attach the O-ring to the marine pack.
4 Check the drip-proof packing for any sand or dirt.
Notes
Do not remove or apply grease to the drip-proof packing.
e marine pack’s body may be scratched or water may leak if the cover is
closed with sand or dirt on the O-ring or drip-proof packing.
Be sure to read the separate O-ring Maintenance Manual.
Important details regarding handling of the O-ring are described in
this manual.
Preparing the digital still camera
Install the digital still camera in a low-humidity room or a similar
environment. Opening or closing the marine pack in hot or humid
locations may result in fogging of the front glass.
For details, refer to the operating instructions supplied with the digital still camera.
1 Remove the strap from the digital still camera.
2 Insert the battery pack and “Memory Stick Duo.”
Be sure to use a fully charged battery pack.
Be sure that the “Memory Stick Duo” has enough space to record images.
3 Lower the lens cover to turn on the power of the digital still camera.
Be careful not to touch the lens when lowering the lens cover.
4 Touch (Settings) in the HOME category and set the [Housing] to
[On].
Check that the [Housing] is set to [On].
Aer you set [Housing] to [On], digital still camera functions are limited to
the external button and functions of the following buttons on the LCD screen.
In the shooting mode:
HOME, MENU, Shooting mode, Underwater White Balance, Flash, Macro,
Image size
In the view mode:
HOME, MENU, Delete, Wide Zoom, Temporarily Rotated Display,
Play back/Stop (when playing back movies), To next image, To previous
image
Aer installing the digital still camera inside the marine pack, the HOME or
MENU button are disabled.
How to set the Housing
(Settings) [Main Settings] [Housing]
[On]
Check that the [Housing] is set to [On] and touch [BACK] and [×].
Check that the (Housing) appears on the screen.
5 Check the digital still camera’s lens and LCD screen for any dirt.
Notes
is disables use of the AF Illuminator.
When setting the [Housing] to [On], the AF illuminator is automatically set to [O]
and it cannot be used.
Installing the digital still camera inside the marine
pack
1 Put the supplied desiccant in the marine pack.
Place the desiccant into the front body desiccant space in the marine pack. en
hold the desiccant at the part on the front attachment. (-1)
* Place the supplied desiccant inside the marine pack one or two hours before
shooting.
2 Turn o the power of the digital still camera.
3 Install the digital still camera inside the marine pack. (-3)
Keep the lens cover of the digital still camera lowered. Closing the marine
pack by force while the lens cover is closed may cause a malfunction.
Always be sure to turn o the power when installing or removing the
digital still camera.
Check that the digital still camera is placed correctly.
4 Close the marine pack’s body and fasten the buckle. (-4)
Secure the marine pack’s body, and fasten the buckle until it clicks.
Notes
When closing the marine pack’s body, make sure that there is no debris, sand, hair
or any other foreign matter on the O-ring or in the seating groove. Water leakage
may result if any such foreign matter is caught in these places.
Attaching the accessories
Attaching the hand strap
We recommend attaching the hand strap (supplied) before using the marine pack.
(See illustration )
Notes
Be careful not to pinch the hand strap when you close the marine pack body. Water
may leak in if you do.
Attaching and detaching the LCD hood
Attaching the LCD hood (-)
1 Attach the supplied strap of the LCD hood to the marine pack.
2 Align the LCD hood with the attachment guide and press it rmly as
illustrated.
Notes
Be careful not to pinch the supplied strap of the LCD hood when you close the
marine pack body. Water may leak in if you do.
Detaching the LCD hood (-)
Spread the LCD hood and detach it from the guide.
Using the Marine pack
Recording
1 Turn on the power. (-1)
2 Set the recording statuses.
Press the control buttons of the marine pack to set the recording statuses.
Operating the control buttons
Press the control buttons slowly.
Icon display on the screen
Pressing the control button one time
e present settings are displayed next to each control button. (-2)
Pressing the control button two times
e present setting mode icon that changes by pressing the control button is
displayed in the center of the screen.
Press the control button repeatedly until the desired mode icon is displayed in the
center of the screen. (-2)
Mode available with the marine pack
Control
button 1
Control
button 2
Control
button 3
Control
button 4
Control
button 5
(Shooting
mode)
(Underwater
white balance)
(Flash)
(Macro)
(Image size)
All statuses
can be used.
*1
*2
*3
*1 When you are recording underwater images, it is recommended that you use the
(Underwater).
*2 You can set the Underwater white balance to (Underwater 1) and
(Underwater 2) only when the ash is set to Flash O. If you set the ash to
Flash On when the Underwater white balance is set to (Underwater 1) or
(Underwater 2), the Underwater white balance is automatically set to
(Auto).
*3 For details about recording movies, refer to the digital still camera operating
instructions.
Selecting the underwater white balance
Adjusts the color tone during (Underwater) mode.
(Auto)
e camera automatically adjusts color tones underwater so
they appear natural.
(Underwater 1)
Adjusts for underwater conditions where blue is strong.
(Underwater 2)
Adjusts for underwater conditions where green is strong.
(Flash)
Adjusts for use of ash underwater.
For details, refer to the operating instructions supplied with the digital still camera.
3 Press the shutter lever to record images. (-3)
Use the zoom (See illustration )
Press to the W side for wide-angle. (Subject appears farther away.)
Press to the T side for telephoto. (Subject appears closer.)
Notes
If you do not record any images for a certain time, the digital still camera turns
o automatically to prevent the battery pack from running out. To use the digital
still camera again, turn on the power again. For details, refer to the operating
instructions supplied with the digital still camera.
If you use the ash when the marine pack is attached, the shooting distance may
shorten depending on the situation. It is recommended to use the underwater
video light HVL-ML20M (optional).
Dust or debris on the glass surface inside the marine pack may be focused on in
the digital still camera’s “Magnifying glass mode.” In that event, remove the dust
or debris on the glass surface.
While you are recording movies, audio cannot be recorded correctly.
(Underwater) is not available with movie images.
Playback
You can play back images using the (Playback) button. You cannot hear the
sound.
1 Turn on the power. (-1)
2 Press the (Playback) button. (-2)
3 Select the desired image by pressing the control button 4 or 5.
(-3)
To the previous image by pressing the control button 4
To the next image by pressing the control button 5
4 Enlarge or reduce the playback image by using the zoom lever.
Reduce the image slowly by continuously pressing the zoom lever to the W side.
(-4)
Enlarge the image slowly by continuously pressing the zoom lever to the T side.
(-4)
During playback, the function of each button on the screen changes as shown in the
table below.
Control
button 1
Control
button 2
Control
button 3
Control
button 4
Control
button 5
(Shooting
mode)
(Underwater
white
balance)
(Flash)
(Macro)
(Image
size)
Still image
Delete
Wide Zoom
Temporarily
Rotated
Display
To next
image
To previous
image
Moving
image
(pause)
Delete Playback
To next
image
To previous
image
Moving
image
(playback)
Delete Stop
To next
image
To previous
image
While
playback
zoom
(upward)
(rightward)
(leward)
(downward)
BACK
Deleting
OK Exit
Removing the digital still camera
1 Turn o the power. (-1)
Always be sure to turn o the power when installing or removing the
digital still camera.
2 Press the two OPEN buttons together and release the buckle in
the direction of the arrow to open the marine pack body. (-2)
3 Remove the digital still camera from the marine pack.
When the digital still camera has been used for a long time, the digital still
camera heats up. Turn o the power and leave for a while to cool down before
removing the digital still camera from the marine pack.
Be careful not to drop the digital still camera when removing it.
4 Set the Housing setting of the digital still camera to [O].
Notes
Before opening the marine pack, rinse it with tap water or fresh water and then wipe
the water o with a so cloth. When opening it, be careful not to let any water from
your body, hair or wetsuit cus drip onto the digital still camera.
Before making a dive
Before recording images underwater, rst take the marine pack to a depth of
about 1 m (3.3 feet) and check that it operates properly and that there are no leaks,
then commence your dive.
Install the digital still camera in the marine pack before diving, and avoid opening
and closing the marine pack while on board boats or at the seashore as much as
possible. When installing the digital still camera, you should do it indoors and
ensure that there is low humidity.
Before using the marine pack, make sure that no debris has been caught between
the front and back halves of the marine pack’s body.
Before using the marine pack, always check the number of recordable images and
remaining battery life.
When you are recording the images underwater, we recommended that you use
the (Underwater).
Times that are suited for recording
e most suitable time for recording images is between 10:00 AM and 2:00 PM,
when the sun is directly overhead.
To record pictures in places where the sunlight does not reach well or at night,
please use the underwater video light HVL-ML20M (optional).
Troubleshooting
Symptom Cause/Corrective Actions
ere are drops of water
inside the marine pack.
ere are scratches or cracks on the O-ring.
Replace the O-ring with a new one.
e O-ring is not set correctly.
Place the O-ring evenly in the groove.
e buckle is not fastened.
Fasten the buckle until it clicks.
Desiccant is not dried adequately.
Use the adequately dried desiccant.
e recording function
does not work.
e battery pack has run out.
Charge the battery pack fully.
e “Memory Stick Duo” is full.
Insert another “Memory Stick Duo” or erase
unneeded data from the “Memory Stick Duo.”
e write-protect tab on the “Memory Stick Duo” is
set to LOCK.
Set the tab to the recording position or insert a
new “Memory Stick Duo.”
Pressing the Shooting
mode button, Underwater
white balance button, Flash
button, Macro button or
Image size button will not
switch modes.
e present setting appears on the screen by pressing
the button once.
Press the button again while viewing the present
setting on the screen.
e playback image is not
displayed in the color you
expected. (When recording
underwater)
e digital still camera may not be set to
(Underwater).
Check that the digital still camera is set to
(Underwater).
e underwater white balance may not be set
correctly.
Check the underwater white balance setting of the
digital still camera.
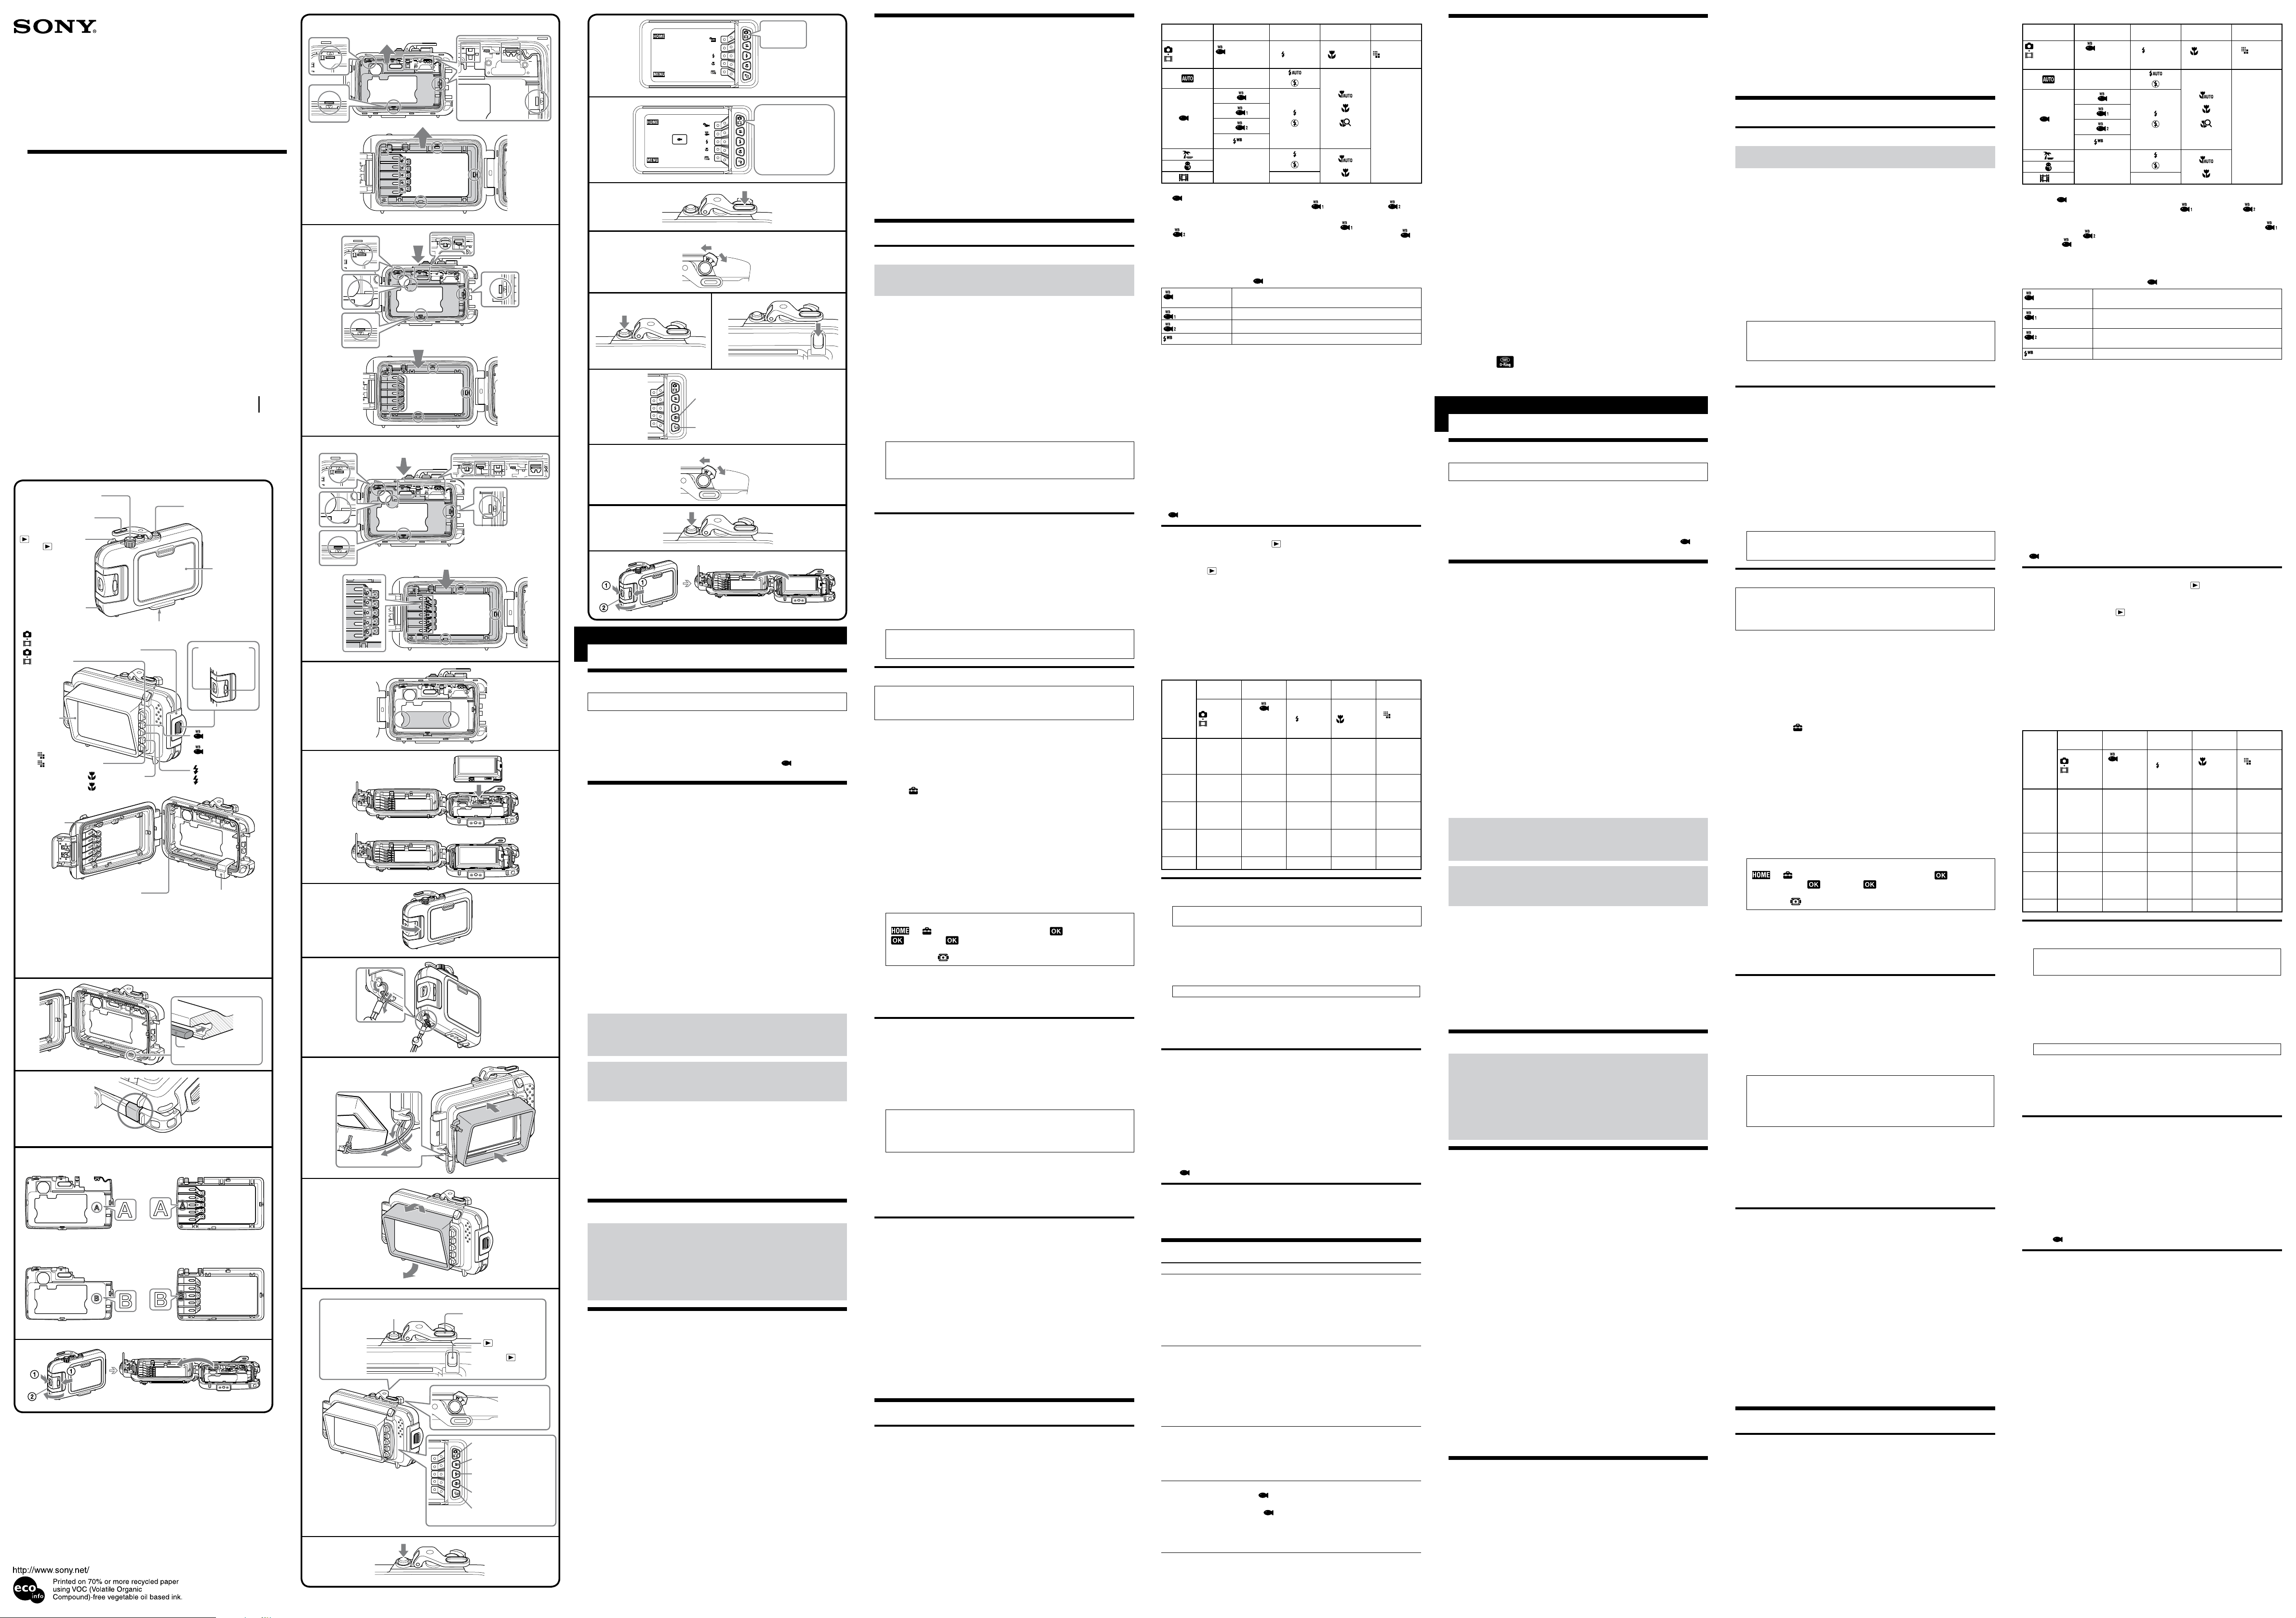
Waterproof Case
Marine pack
Boîtier étanche
Caisson étanche
4-111-867-12(2)
MPK-THG
© 2008 Sony Corporation Printed in Japan
Owner’s Record
e model and serial numbers are located inside of the unit.
Record the serial number in the space provided below.
Refer to them whenever you call upon your Sony dealer regarding this product.
Model No. MPK-THG Serial No. _________________________
Operating Instructions
Mode d’emploi
Manual de instrucciones
Spacer*
2
Entretoise*
2
O-ring
Joint torique
Drip-proof packing
Garniture pare-gouttes
1
1
3
1
2
Drip-proof packing
Garniture pare-gouttes
Shutter lever
Manette du déclencheur
Front glass
Verre avant
Tripod receptacle*
1
Filetage pour trépied*
1
(Playback) button
Touche (Lecture)
POWER button
Commutateur
d’alimentation
Hook for hand strap
Crochet pour
courroie de mein
Zoom lever
Manette de zoom
*
1
When using a tripod, use one screws that are 5.5 mm or shorter. is equipment cannot
be rmly fastened on a tripod using long screws. Attempting to do so will damage this
equipment.
*
2
Remove the spacer to use the marine pack.
*
1
Si vous utilisez un trépied, utilisez des vis d’une longueur inférieure ou égale à 5,5 mm. Cet
équipement ne peut pas se xer solidement sur un trépied à l’aide de vis longues. Celles-ci
pourrait l’endommager.
*
2
Retirez l’entretoise pour utiliser le Marine Pack.
Zoom lever
Manette de
zoom
Shutter lever
Manette du
déclencheur
POWER button
Commutateur d’alimentation
(Playback)
button
Touche
(Lecture)
OPEN button
Touches OPEN
Buckle
Fermoir
LCD hood
Pare-soleil de
l’écran LCD
3
4
Control button 1
Touche de commande 1
Control button 2
Touche de commande 2
Control button 3
Touche de commande 3
Control button 4
Touche de commande 4
Control button 5
Touche de commande 5
Press the control button
until the desired mode
icon is displayed.
Appuyez sur la touche
de commande jusqu’à
ce que l’icône du mode
souhaité s’ache.
2
3
4
Control button 4
Touche de commande 4
Control button 5
Touche de commande 5
(Underwater white
balance) button
Touche (Balance
blanc sous l’eau)
(Flash) button
Touche (Flash)
(Macro) button
Touche (Macro)
(Image size) button
Touche (Taille Img)
Front attachment A (for DSC-T77)
Fixation avant A (pour le DSC-T77)
1
Rear attachment A (for DSC-T77)
Fixation arrière A (pour le DSC-T77)
Front attachment B (for DSC-T700)
Fixation avant B (pour le DSC-T700)
Rear attachment B (for DSC-T700)
Fixation arrière B (pour le DSC-T700)
2
English
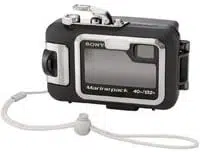
Main Feature
Useable at a depth of up to 40 m (132 feet) underwater.
is marine pack MPK-THG is exclusively for use with the Sony Digital Still
Camera DSC-T700/T77. (Digital Still Camera for this case is not available in all
countries/regions.)
is marine pack is waterproof so the digital still camera can be used in the rain,
snow, at the beach, or underwater.
Using the marine pack with the digital still camera setting to (Underwater)
will enable you to record beautiful underwater images.
Precautions
When using this marine pack while diving, be sure to pay attention to the
surrounding situation. Lack of attention may cause an accident while diving.
In case a water leakage is occurred, be sure to pay attention to the surrounding
situation and surface following the safety rules for diving.
Do not subject the front glass to strong shock, as it may crack.
Avoid opening the marine pack at the beach or on the water. Preparation such as
installing the digital still camera and changing the “Memory Stick Duo” should be
done in a place with low humidity and no salty air.
Do not throw the marine pack into the water.
Avoid using the marine pack in places with strong waves.
Avoid using the marine pack under the following situations:
in a very hot or humid place.
in water hotter than 40 ˚C (104 ˚F).
at temperatures lower than 0 ˚C (32 ˚F).
In these situations moisture condensation or water leakage may occur and damage
the equipment.
Use the marine pack for no longer than 30 minutes at a time in temperatures
above 35 ˚C (95 ˚F).
Do not leave the marine pack under direct sunlight in a very hot and humid place
for a long period of time. If you cannot avoid leaving the marine pack under
direct sunlight, be sure to cover the pack with a towel or other protection.
e digital still camera heats up if it is used inside the marine pack for a long time.
Before removing the digital still camera from the marine pack, leave the marine
pack in the shade or other cool place for a while to cool down.
A loose or nipped O-ring, sand or dirt on the O-ring may cause water leaks
under water.
Be sure to check the O-ring before use.
For details, read the O-ring Maintenance Manual.
If sun oil is on the marine pack, be sure to wash it o thoroughly using
lukewarm water. If the marine pack is le with sun oil on its body, the surface
of the marine pack may become discolored or damaged. (such as cracks on the
surface.)
Water leakage
If water happens to leak in, stop exposing the marine pack to water immediately.
If the digital still camera gets wet, take it to the nearest Sony dealer immediately.
Repair costs must be borne by the customer.
Anti-fogging of the front glass
Install the digital still camera in a low-humidity room or a similar environment.
Place the desiccant inside the marine pack one or two hours before shooting.
Store the unused desiccant in its original bag and keep the bag rmly closed. By
adequately drying the desiccant, it can be used about 200 times.
Before use
Before using the digital still camera underwater, rst take the marine pack
to a depth of about 1 m (3.3 feet) and check that the digital still camera is
operating properly and that the marine pack is not leaking, then commence
your dive.
In the unlikely event that a malfunction of the marine pack causes damage
due to water leakage, Sony does not guarantee against damages to the
equipment contained in it (digital still camera, battery pack, etc.) and the
recorded contents, nor expenses entailed in the photography.
O-ring and Drip-proof packing
O-ring
is equipment uses an O-ring to maintain its water resistance. For details, refer to
the separate O-ring Maintenance Manual.
Improper handling of the O-ring can result in water leakage.
Drip-proof packing
Do not remove or apply grease to the drip-proof packing. If the packing rises up or
is nipped, this may result in water leaks.
If the drip-proof packing comes o, ret it carefully so that it is not twisted. (See
illustration )
O-ring and drip-proof packing serviceable life
O-ring
e serviceable life of the O-ring varies with frequency of use of the marine pack
and conditions. Generally, it is about one year.
Drip-proof packing
Replace the drip-proof packing with a new one if you nd scratches or cracks on it.
Aer replacing, check that no water leaks in.
Grease
Use the grease in the blue tube (supplied). Using the grease in the yellow tube or
other manufacturer’s grease will damage the O-ring, and cause water leaks.
O-ring, drip-proof packing and grease
You can obtain the O-ring, drip-proof packing and grease at the nearest Sony dealer.
O-ring (model No. 4-115-566-01)
Drip-proof packing (model No. 4-115-567-01)
Grease (model No. 2-582-620-01)
2-
1
Press.
Appuyez sur.
(Shooting mode)
button
Touche (Mode de
prise de vue)
Français
Caractéristique principale
Utilisable jusqu’à une profondeur de 40 mètres (132 pieds) sous l’eau.
Le Marine Pack (caisson étanche) MPK-THG est conçu spécialement pour
l’appareil photo numérique Sony DSC-T700/T77. (Les appareils photo
numériques compatibles avec ce boîtier ne sont pas disponibles dans tous les
pays/toutes les régions.)
Ce marine pack est étanche à l’eau, ce qui permet d’utiliser l’appareil photo
numérique sous la pluie, la neige, à la plage ou sous l’eau.
L’utilisation du caisson étanche avec l’appareil photo numérique réglé sur
(Sous l’eau) vous permet de prendre de superbes photos sous-marines.
Précautions
Lorsque vous utilisez le caisson étanche pour la plongée, faites attention à
l’environnement. Un manque d’attention peut être à l’origine d’un accident
pendant la plongée.
En cas d’inltration d’eau, faites attention à l’environnement et remontez à la
surface en respectant les règles de plongée.
Ne soumettez pas le verre avant à des chocs importants car il pourrait se fendre.
N’ouvrez pas le Marine Pack sur la plage ou dans l’eau. Les opérations
préparatoires, telles que la mise en place de l’appareil photo numérique et
le changement de « Memory Stick Duo », doivent être eectuées à l’abri de
l’humidité et de l’air salin.
Ne jetez pas le Marine Pack dans l’eau.
N’utilisez pas le Marine Pack par fortes vagues.
N’utilisez pas le Marine Pack dans les conditions suivantes:
dans un endroit très chaud ou humide,
dans de l’eau chaude à plus de 40 °C (104 °F),
à des températures inférieures à 0 °C (32 °F).
Dans de telles conditions, le matériel pourrait être endommagé par une
condensation d’humidité ou une inltration d’eau.
N’utilisez pas le Marine Pack plus de 30 minutes d’alée par une température
supérieure à 35 °C (95 °F).
Ne laissez pas longtemps le Marine Pack en plein soleil dans un endroit très chaud
et humide. Si vous ne pouvez éviter de le laisser au soleil, recouvrez-le d’une
serviette ou d’une autre protection.
L’appareil photo numérique s’échaue s’il est utilisé pendant longtemps
à l’intérieur du Marine Pack. Avant d’en retirer l’appareil photo, laissez
temporairement le Marine Pack à l’ombre ou dans un endroit frais pour qu’il se
refroidisse.
Un joint torique relâché ou pincé ou la présence de sable ou de saletés sur le
joint peut entraîner des inltrations d’eau.
Vériez le joint torique avant d’utiliser l’équipement.
Pour plus d’informations, reportez-vous au Mode d’emploi du joint torique.
S’il y a de la crème solaire sur le Marine Pack, prenez soin de l’éliminer
convenablement avec de l’eau tiède. Si la surface du boîtier du Marine Pack est
souillée avec de la crème solaire, elle risque d’en être décolorée et endommagée.
(craquelures sur la surface)
Inltration d’eau
Si de l’eau s’inltre dans le Marine Pack, arrêtez immédiatement de l’exposer à l’eau.
Si l’appareil photo numérique est mouillé, portez-le immédiatement chez le
revendeur Sony le plus proche. Les frais de réparation seront à la charge de
l’utilisateur.
Traitement anti-buée du verre avant
Installez l’appareil photo numérique dans une pièce peu humide ou dans un
endroit similaire.
Insérez un dessicatif dans le Marine Pack une à deux heures avant la prise de vue.
Conservez le dessicatif non utilisé dans son emballage d’origine et fermez
hermétiquement. Si vous séchez correctement le dessicatif, vous pouvez l’utiliser
environ 200 fois.
Avant la première utilisation
Avant de plonger pour une prise de vues sous-marine, immergez le Marine
Pack à 1 mètre (3,3 pieds) sous l’eau environ et assurez-vous que l’eau ne
s’inltre pas à l’intérieur et que l’appareil photo numérique fonctionne
correctement.
Dans le cas très improbable où une anomalie du Marine Pack causerait des
dommages dus à une inltration d’eau, notez que la garantie Sony ne couvre
pas les dommages subis par le matériel (appareil photo numérique, batterie,
etc.) à l’intérieur du Marine Pack, le contenu enregistré ou les frais encourus
pour la prise de vues.
Joint torique et garniture pare-gouttes
Joint torique
L’équipement utilise un joint torique pour garantir son étanchéité. Pour plus
d’informations, reportez-vous au Mode d’emploi séparé du joint torique.
Une manipulation inadéquate du joint torique peut entraîner une inltration d’eau.
Garniture pare-gouttes
Ne retirez pas et ne placez pas de graisse sur la garniture pare-gouttes car ceci
pourrait entraîner une saillie de la garniture hors du boîtier ou son pincement.
Si la garniture pare-gouttes se détache, remettez-la soigneusement en place de sorte
qu’elle ne soit pas tordue. (Voir l’illustration )
Durée de service du joint torique et de la garniture pare-gouttes
Joint touque
La durée de service du joint torique et de la garniture pare-gouttes varie selon la
fréquence d’utilisation du Marine Pack et les conditions d’entreposage. Elle est
généralement d’une année environ.
Garniture pare-gouttes
Remplacez la garniture pare-gouttes par une neuve si elle présente des éraures ou
des craquelures.
Après le remplacement, assurez-vous qu’il n’y a pas d’inltration d’eau.
Graisse
Utilisez la graisse du tube bleu (fourni). L’emploi de la graisse du tube jaune ou
d’une graisse d’un autre fabricant endommagerait le joint torique et entraînerait des
inltrations d’eau.
Joint torique, une garniture pare-gouttes et graisse
Vous pouvez vous procurer des joints toriques, une garniture pare-gouttes et de la
graisse pour objectif chez un revendeur Sony.
Joint torique (No. de modèle : 4-115-566-01)
Garniture pare-gouttes (No. de modèle : 4-115-567-01)
Graisse (No. de modèle : 2-582-620-01)
Entretien
Après une prise de vues dans un endroit exposé à la brise marine, lavez le Marine
Pack à l’eau douce avec les fermoirs correctement verrouillés pour en faire partir
le sel et le sable, puis essuyez-le avec un chion doux et sec. Il est recommandé
de plonger le Marine Pack dans de l’eau douce pendant 30 minutes environ. Ne
laissez pas de sel dessus car il pourrait attaquer les parties métalliques et de la
rouille risquerait de se former et de causer une inltration d’eau.
S’il y a de la crème solaire sur le Marine Pack, prenez soin de l’éliminer
convenablement avec de l’eau tiède.
Essuyez l’intérieur du Marine Pack avec un chion doux et sec. Ne le rincez pas à
l’eau.
Eectuez les opérations d’entretien ci-dessus après chaque utilisation du Marine
Pack. N’utilisez aucune sorte de solvant, tel qu’alcool, benzine ou diluant pour le
nettoyage car ces substances peuvent attaquer la nition du Marine Pack.
Lors du stockage du Marine Pack
Posez l’entretoise fournie avec le Marine Pack pour protéger le joint torique contre
l’usure. (Voir l’illustration )
Empêchez l’accumulation de poussière sur le joint torique.
Passez une légère couche de graisse sur le joint torique et insérez-le dans la gorge
du boîtier. Rangez ensuite le Marine Pack dans un endroit frais et bien aéré. Ne
verrouillez pas le fermoir.
Ne rangez pas le Marine Pack dans un endroit froid, très chaud ou humide ou
avec de la naphtaline ou du camphre. Ceci pourrait l’endommager.
Préparation
Remise en place de la xation
* Si vous utilisez le DSC-T77, vous pouvez ignorer les étapes suivantes, car la
xation A du DSC-T77 est déjà xée au Marine Pack au moment de l’achat.
1 Ouvrez le Marine Pack. (-1)
Appuyez en même temps sur les deux touches OPEN pour libérer le fermoir
dans le sens de la èche et ouvrir le boîtier du Marine Pack.
Remarques
Veillez à ne pas perdre l’entretoise, car vous en aurez besoin pour ranger le
Marine Pack.
2 Remettez les xations en place.
Détachez la xation avant A et la xation arrière A du DSC-T77 (-
2)
Détachez la xation aux endroits indiqués par le symbole , puis soulevez-la
en la saisissant par la partie identiée par le symbole dans l’illustration.
Installez la xation avant B et la xation arrière B du DSC-T700 (-
2)
Appuyez aux endroits identiés par le symbole , puis insérez fermement les
parties identiées par le symbole dans l’illustration.
Après avoir remis en place la xation, appuyez plusieurs fois sur les touches du
Marine Pack an de vérier leur bon fonctionnement.
Rattachez la xation avant A et la xation arrière A du DSC-T77
(-2)
Appuyez aux endroits identiés par le symbole , puis insérez fermement
les parties identiées par le symbole dans l’illustration.
* Une fois la xation retirée du Marine Pack, ne la tendez pas avant de la ranger. Si
vous la rangez alors qu’elle est déformée, vous risquez de l’endommager.
Préparation du joint torique et de la garniture pare-
gouttes
1 Retirez le joint torique.
2 Enduisez le joint torique de graisse.
Enlevez le sable et autres saletés présents sur le joint torique, sur la rainure du
joint ou sur la surface du Marine Pack entrant en contact avec le joint torique.
Enduisez le joint torique d’une ne couche uniforme de graisse.
3 Fixez le joint torique sur le Marine Pack.
4 Vériez que la garniture pare-gouttes est exempte de sable ou de
saletés.
Remarques
N’éliminez pas et n’appliquez pas de graisse sur la garniture pare-gouttes.
Le boîtier du Marine Pack risque d’être éraé et de l’eau pourrait s’inltrer si le
couvercle est refermé alors que du sable ou des saletés se trouvent sur le joint
torique ou la garniture pare-gouttes.
Veillez à lire le manuel d’entretien du joint torique fourni séparément
car il renferme des informations importantes sur la manipulation du
joint torique.
Préparation de l’appareil photo numérique
Installez l’appareil photo numérique autant que possible dans un
endroit peu humide. En eet, l’ouverture ou la fermeture du Marine Pack
dans un endroit chaud ou humide peut provoquer la formation de buée
sur le verre avant.
Pour plus d’informations, reportez-vous au mode d’emploi fourni avec l’appareil
photo numérique.
1 Retirez la sangle de l’appareil photo numérique.
2 Insérez la batterie et le « Memory Stick Duo ».
Utilisez une batterie complètement chargée.
Assurez-vous que l’espace disponible sur le « Memory Stick Duo » est susant
pour l’enregistrement d’images.
3 Abaissez le capuchon de l’objectif pour mettre l’appareil photo
numérique sous tension.
Prenez garde de ne pas toucher l’objectif lorsque vous abaissez son capuchon.
4 Appuyez sur (Réglages) dans la catégorie HOME et réglez
[Logement] sur [Act].
Vériez que [Logement] est réglé sur [Act].
Quand [Logement] est réglé sur [Act], les seules fonctions de l’appareil photo
numérique encore disponibles sont la touche externe ainsi que les touches
suivantes de l’écran LCD.
En mode Prise de vue :
HOME, MENU, mode Prise de vue, Balance blanc sous l’eau, Flash, Macro,
Taille Img
En mode Visualisation :
HOME, MENU, Supprimer, Grand angle, Rotation temporaire de l’image
sur l’écran, Lecture/Stop (pendant la lecture de lms), Vers l’image suivante,
Vers l’image précédente
Une fois l’appareil photo numérique installé dans le Marine Pack, les touches
HOME ou MENU sont désactivées.
Activation de la fonction Logement
(Réglages) [Paramètres princip.]
[Logement] [Act]
Vériez que [Logement] est réglé sur [Act], puis appuyez sur [BACK] et [×].
Vériez que (Logement) apparaît sur l’écran.
5 Assurez-vous que l’objectif et l’écran de l’appareil photo numérique
ne sont pas souillés.
Remarques
Ceci désactive Illuminat. AF.
Quand [Logement] est réglé sur [Act], Illuminat.AF. est automatiquement réglé sur
[Désact] et est inutilisable.
Mise en place de l’appareil photo numérique dans le
Marine Pack
1 Placez le dessicatif fourni dans le Marine Pack.
Placez le dessicatif dans l’espace prévu à cet eet à l’avant du boîtier du Marine
Pack. Puis maintenez le dessicatif au niveau de la partie de la xation avant.
(-1)
* Placez le dessicatif fourni dans le Marine Pack une à deux heures avant la prise
de vue.
2 Mettez l’appareil photo numérique hors tension.
3 Installez l’appareil photo numérique dans le Marine Pack. (-3)
Laissez le capuchon d’objectif de l’appareil photo numérique abaissé. Si vous
forcez la fermeture du caisson étanche quand le capuchon de l’objectif est
fermé, vous risquez de provoquer une anomalie.
N’oubliez pas de mettre l’appareil photo numérique hors tension
lorsque vous l’installez ou le retirez.
Assurez-vous que l’appareil photo numérique est correctement installé.
4 Fermez le boîtier du Marine Pack et bouclez le fermoir. (-4)
Tenez bien le boîtier du Marine Pack et bouclez le fermoir jusqu’à ce qu’il
s’encliquette.
Remarques
Lorsque vous fermez le boîtier du Marine Pack, assurez-vous qu’il n’y a pas de
saletés, de sable, de cheveux ou d’autres corps étrangers sur le joint torique ou
dans la rainure du joint. Des inltrations d’eau peuvent être occasionnées si l’un de
ces corps étrangers est coincé lors de la fermeture.
Fixation des accessoires
Attachez la sangle
Il est recommandé d’attacher la sangle (fournie) avant d’utiliser le Marine Pack.
(Voir illustration )
Remarques
Veillez à ne pas coincer la sangle quand vous fermez le boîtier du caisson étanche
sous peine de provoquer des inltrations d’eau à l’intérieur de l’appareil.
Mise en place et retrait du pare-soleil de l’écran LCD
Fixation du pare-soleil de l’écran LCD (-)
1 Fixez la sangle fournie d’origine avec le pare-soleil de l’écran LCD au
caisson étanche.
2 Alignez le pare-soleil de l’écran LCD sur le rail de xation et appuyez
fermement dessus comme illustré.
Remarques
Veillez à ne pas coincer la sangle fournie avec le pare-soleil de l’écran LCD quand
vous fermez le boîtier du caisson étanche sous peine de provoquer des inltrations
d’eau à l’intérieur de l’appareil.
Retrait du pare-soleil de l’écran LCD (-)
Déployez le pare-soleil de l’écran LCD et détachez-le du rail.
Utilisation du Marine Pack
Prise de vues
1 Mettez l’appareil photo sous tension. (-1)
2 Dénissez les réglages.
Appuyez sur les touches de commande du caisson étanche pour dénir les
réglages.
Fonctionnement des touches de commande
Appuyez lentement sur la touche de commande.
Icône achée à l’écran
Un seul appui de la touche de commande
Les réglages en cours s’achent à côté de chaque touche de commande. (-2)
Deux appuis de la touche de commande
L’icône de mode du réglage en cours, qui peut être modié en appuyant sur la
touche de commande, s’ache au centre de l’écran.
Continuez à appuyer sur la touche de commande jusqu’à ce que l’icône du mode
souhaité s’ache au centre de l’écran. (-2)
Modes disponibles avec le caisson étanche
Touche de
commande 1
Touche de
commande 2
Touche de
commande 3
Touche de
commande 4
Touche de
commande 5
Touche
(Mode de
prise de vue)
Touche
(Balance blanc
sous l’eau)
Touche
(Flash)
Touche
(Macro)
Touche
(Taille Img)
Tous les
réglages
peuvent être
utilisés
*1
*2
*3
*1 Pour prendre des vues sous-marines, nous vous recommandons d’utiliser le
réglage (Sous l’eau).
*2 Vous pouvez régler Balance blanc sous l’eau sur (Sous l’eau 1) et (Sous
l’eau 2) uniquement lorsque le ash est réglé sur Flash désactivé. Si vous avez
réglé le ash sur Flash activé alors que Balance blanc sous l’eau est réglé sur
(Sous l’eau 1) et (Sous l’eau 2), Balance blanc sous l’eau est automatiquement
réglé sur (Auto).
*3 Pour plus d’informations sur l’enregistrement de lms, reportez-vous au mode
d’emploi de l’appareil photo numérique.
Sélection de la balance des blancs sous l’eau
Ajustez la tonalité des couleurs en mode (Sous l’eau).
(Auto)
L’appareil photo règle automatiquement la tonalité des
couleurs sous l’eau pour leur conférer un aspect naturel.
(Sous l’eau 1)
Utilisez ce réglage pour les prises de vues sous-marines
lorsque le bleu est dominant.
(Sous l’eau 2)
Utilisez ce réglage pour les prises de vues sous-marines
lorsque le vert est dominant.
(Flash)
Sélectionnez ce réglage pour utiliser le ash sous l’eau.
Pour plus d’informations, consultez le mode d’emploi fourni avec l’appareil photo
numérique.
3 Appuyez sur la manette du déclencheur pour prendre des vues. (-
3)
Utilisation du zoom (Voir l’illustration )
Appuyez sur le côté W pour une prise de vue grand angle. (Le sujet s’éloigne.)
Appuyez sur le côté T pour une prise de vues au téléobjectif. (Le sujet se
rapproche.)
Remarques
Si vous n’utilisez pas l’appareil photo numérique pendant un certain temps lors
d’une prise de vues, il s’éteint automatiquement pour économiser la batterie. Pour
utiliser de nouveau l’appareil photo numérique, remettez-le sous tension, voir le
mode d’emploi fourni avec l’appareil photo numérique.
Si vous utilisez le ash avec le Marine Pack, la distance de prise de vue peut être
réduite dans certaines situations. Il est conseillé d’utiliser la lampe vidéo sous-
marine HVL-ML20M (en option).
En mode « modo loupe », la mise au point peut se faire sur la poussière ou les
saletés présentes sur le verre à l’intérieur du Marine Pack. Il est donc conseillé de
bien nettoyer la surface du verre.
Pendant l’enregistrement de lms, le son n’est pas correctement enregistré.
(Sous l’eau) n’est pas disponibles avec les lms.
Lecture
Vous pouvez visionner des images à l’aide de la touche (Lecture). Le son n’est pas
audible.
1 Mettez l’appareil photo sous tension. (-1)
2 Appuyez sur la touche (Lecture). (-2)
3 Sélectionnez l’image souhaitée en appuyant sur la touche de
commande 4 ou 5. (-3)
Vers l’image précédente en appuyant sur la touche de commande 4
Vers l’image suivante en appuyant sur la touche de commande 5
4 Agrandissez ou réduisez l’image de lecture en utilisant la manette
de zoom.
Réduisez lentement l’image en maintenant la manette de zoom enfoncée vers le
côté Grand angle (W). (-4)
Agrandissez lentement l’image en maintenant la manette de zoom enfoncée vers
le côté Téléobjectif (T). (-4)
En cours de lecture, la fonction de chaque touche change ainsi qu’indiqué dans le
tableau ci-dessous.
Touche de
commande 1
Touche de
commande 2
Touche de
commande 3
Touche de
commande 4
Touche de
commande 5
Touche
(Mode de
prise de vue)
Touche
(Balance
blanc sous
l’eau)
Touche
(Flash)
Touche
(Macro)
Touche
(Taille Img)
Photo
Supprimer
Grand angle
Rotation
temporaire
de l’image
sur l’écran
Vers l’image
suivante
Vers l’image
précédente
Film
(pause)
Supprimer Lecture
Vers l’image
suivante
Vers l’image
précédente
Film
(lecture)
Supprimer Stop
Vers l’image
suivante
Vers l’image
précédente
Zoom en
mode de
lecture
(Haut)
(Droite)
(Gauche)
(Bas)
BACK
Suppression
OK Sortie
Retrait de l’appareil photo numérique
1 Mettez l’appareil photo hors tension. (-1)
N’oubliez pas de mettre l’appareil photo hors tension lorsque vous
installez ou retirer.
2 Appuyez en même temps sur les deux touches OPEN pour libérer
le fermoir dans le sens de la èche et ouvrir le boîtier du Marine
Pack. (-2)
3 Retirez l’appareil photo numérique hors du Marine Pack.
Lorsque l’appareil photo numérique a fonctionné pendant longtemps, il est
relativement chaud. Mettez l’appareil photo hors tension et laissez-le se refroidir
pendant un certain temps avant de le retirer du Marine Pack.
Veillez à ne pas faire tomber l’appareil en le retirant.
4 Réglez Logement sur [Désact].
Remarques
Avant d’ouvrir le Marine Pack, rincez-le avec de l’eau du robinet ou de l’eau douce,
puis essuyez-le complètement avec un chion doux. Lorsque vous l’ouvrez, veillez à
ne pas le mouiller avec l’eau de votre combinaison de plongée, de vos cheveux ou de
votre corps.
Avant de partir en plongée
Avant de partir faire de la photographie sous-marine, immergez le Marine
Pack à 1 mètre (3,3 pieds) sous l’eau environ et assurez-vous qu’il fonctionne
correctement et que de l’eau ne s’inltre pas à l’intérieur.
Installez l’appareil photo numérique dans le Marine Pack avant la plongée et,
autant que possible, évitez de l’ouvrir et de le fermer à bord d’un bateau ou sur la
plage. L’installation de l’appareil photo numérique doit s’eectuer en intérieur dans
un endroit où le taux d’humidité est faible.
Avant d’utiliser le Marine Pack, assurez-vous qu’il n’y a pas de saletés coincées
entre les moitiés avant et arrière du boîtier.
Avant d’utiliser le Marine Pack, vériez toujours le nombre d’images que vous
pouvez enregistrer et l’autonomie restante de la batterie.
Pour prendre des vues sous-marines, nous vous recommandons d’utiliser le
réglage (Sous l’eau).
Meilleur moment de la journée pour la prise de vues
Le meilleur moment de la journée pour la prise de vues est entre 10 h et
14 h, lorsque le soleil est à la verticale.
Pour photographier dans des endroits mal éclairés par le soleil ou la nuit, utilisez la
torche de plongée sous-marine HVL-ML20M (en option).
(Suite á la page arrière)

(Suite de la page avant)
En cas de problème
Symptôme Cause/Remèdes
Présence de gouttes d’eau à
l’intérieur du Marine Pack.
Le joint torique est entaillé ou fendillé.
Remplacez le joint torique par un neuf.
Le joint torique n’est pas correctement en place.
Placez le joint torique uniformément dans la gorge.
Les fermoirs sont mal verrouillés.
Verrouillez correctement les fermoirs.
Le dessicatif n’a pas été séché correctement.
Utilisez un dessicatif séché correctement.
Les fonctions
d’enregistrement et de
lecture n’ agissent pas.
La batterie est déchargée.
Rechargez complètement la batterie.
Le « Memory Stick Duo » est plein.
Insérez un autre « Memory Stick Duo » ou eacez
les données inutiles du « Memory Stick Duo ».
Le taquet de protection en écriture du « Memory
Stick Duo » est réglé sur LOCK.
Réglez le taquet sur la position d’enregistrement ou
insérez un « Memory Stick Duo » neuf.
L’appui de la touche de
mode de prise de vue,
Balance blanc sous l’eau,
Flash, Macro ou Taille Img
ne permute pas les modes.
Le réglage en cours s’ache sur l’écran si vous
appuyez une fois sur la touche.
Appuyez de nouveau sur la touche tout en
visualisant le réglage en cours sur l’écran.
L’image de lecture ne
s’ache pas dans la couleur
prévue. (pendant la prise
de vue sous l’eau)
L’appareil photo numérique n’est peut-être pas réglé
sur (Sous l’eau).
Assurez-vous que l’appareil photo est réglé sur
(Sous l’eau).
La balance des blancs sous l’eau n’est peut-être pas
réglée correctement.
Vériez le réglage de la balance des blancs sous
l’eau de l’appareil photo numérique.
Spécications
Matière
Plastique (PC, ABS), verre
Étanchéité à l’eau
Joint torique, fermoir
Résistance à la pression
Jusqu’à une profondeur de 40 m (132 pieds) sous l’eau
Commutateurs pouvant être commandés de l’extérieur
Alimentation, Déclencheur, Lecture, Zoom (W/T), Mode Prise de vue, Balance
blanc sous l’eau, Flash, Macro, Taille Img
Dimensions
environ 134 × 94 × 38 mm (5 3/8 × 3 3/4 × 1 1/2 po.) (l/h/p)
(parties saillantes non comprises)
Poids
environ 260 g (9,2 oz) (Marine Pack seulement)
Articles inclus
Boîtier étanche (1)
Courroie de mein (1)
Pare-soleil de l’écran LCD (1)
Fixation avant A (pour le DSC-T77) (1)*
Fixation arrière A (pour le DSC-T77) (1)*
* Fixée au boîtier étanche au moment de l’achat.
Fixation avant B (pour le DSC-T700) (1)
Fixation arrière B (pour le DSC-T700) (1)
Graisse (1)
Joint torique (1)
Dessicatif (2 kits) (1)
Entretoise (1)
Jeu de documents imprimés
Accessoires en option
Kit de bras VCT-MP1K
Torche de plongée HVL-ML20M (doit être utilisée avec le kit de bras
VCT-MP1K et la batterie « InfoLITHIUM » (série M), (le chargeur de batterie
série M))
Kit de joint torique ACC-MP101
(Vériez que l’icône est bien indiquée sur l’emballage.)
La conception et les spécications peuvent être modiées sans préavis.
Espaciador*
2
Junta tórica
Empaquetadura
impermeable
1
Empaquetadura
impermeable
Palanca de
obturación
Cristal frontal
Rosca para montaje en trípode*
1
Botón
(Reproducción)
Botón POWER
Gancho para la
correa de muñeca
Palanca de zoom
*
1
Cuando utilice un trípode, cerciórese de utilizar tornillos de 5,5 mm o menos. Este equipo
no podrá sujetarse rmemente a un trípode con tornillos largos. El intento de utilizar estos
tornillos podría dañar el equipo.
*
2
Retire el espaciador para usar el portacámara subacuático.
Palanca de
obturación
Botón de
apertura
(OPEN)
Hebilla
Cubierta de
la pantalla de
cristal líquido
3
4
Botón (Balance
Blanco submarino)
Botón (Flash)
Botón (Macro)
Botón (Tam imagen)
Acoplamiento frontal A (para
DSC-T77)
1
Acoplamiento posterior A (para
DSC-T77)
Acoplamiento frontal B (para DSC-
T700)
Acoplamiento posterior B (para
DSC-T700)
1
Botón (modo
Toma de imagen)
2-
1
3
1
2
Pulse el botón de
control hasta que
aparezca el icono del
modo que desee.
2
3
4
Botón de control 4
Botón de control 5
Pulsar.
Palanca de
zoom
Botón POWER
Botón
(Reproducción)
Botón de control 1
Botón de control 2
Botón de control 3
Botón de control 4
Botón de control 5
2
Français
Español
Característica principal
Utilizable bajo agua a una profundidad de hasta 40 metros.
Este portacámara subacuático MPK-THG es exclusivamente para utilizarse con
la cámara digital DSC-T700/T77 Sony. (El modelo de cámara digital de imágenes
jas para esta funda no está disponible en todos los países o regiones).
Este portacámara subacuático es resistente al agua, y permite utilizar la cámara
digital en la lluvia, la nieve, la playa o debajo del agua.
Si utiliza el portacámara subacuático con la cámara digital ajustada en
(Submarino) podrá captar impresionantes imágenes submarinas.
Precauciones
Cuando utilice este portacámara subacuático cuando bucee, preste atención a la
situación de los alrededores. La falta de atención podría provocar un accidente
durante el buceo.
En caso de producirse inltración de agua, preste atención a la situación de los
alrededores y emerja de acuerdo con las normas de seguridad para buceo.
No someta el cristal frontal a golpes fuertes porque podrá agrietarse.
Evite abrir el portacámara subacuático en la playa o en el agua. Las operaciones de
preparación como la instalación de la cámara digital de imágenes jas y el cambio
del “Memory Stick Duo” debe llevarse a cabo en lugares con poca humedad y sin
aire salado.
No arroje el portacámara subacuático al agua.
Evite utilizar el portacámara subacuático en lugares de fuertes olas.
Evite utilizar el portacámara subacuático en las situaciones siguientes:
en un lugar muy cálido o húmedo.
en agua más caliente de 40 °C.
a temperaturas inferiores a 0 °C.
En estas situaciones podrá producirse condensación de humedad o fugas de agua
y dañarse el equipo.
No utilice el portacámara subacuático durante más de 30 minutos por vez en
temperaturas superiores a los 35 °C.
No deje el portacámara subacuático bajo la luz solar directa en un lugar muy
cálido y húmedo durante largo tiempo. Si no puede evitar dejarlo bajo la luz solar
directa, asegúrese de cubrirlo con una toalla u otra protección.
La cámara digital se calentará si se utiliza dentro del portacámara subacuático
durante mucho tiempo. Antes de extraer la cámara digital del portacámara
subacuático, deje éste a la sombra o en otro lugar fresco durante cierto tiempo
para que se enfríe.
Una junta tórica oja, pillada, con arena o sucia puede causar la inltración de
agua.
Compruebe la junta tórica antes de utilizarla.
Con respecto a los detalles, lea el manual de mantenimiento de la junta tórica.
Si hay aceite bronceador en el portacámara subacuático, lávelo completamente
utilizando agua tibia. Si dejase el portacámara subacuático con aceite
bronceador en su cuerpo, la supercie del mismo podría decolorar o dañarse.
(como rajas en la supercie.)
Inltración de agua
En caso producirse una inltración de agua al interior, deje de exponer el
portacámara subacuático al agua inmediatamente.
Si se moja la cámara digital, llévela inmediatamente al distribuidor Sony más
cercano. Los costes de reparación tendrá que abonarlos el usuario.
Antiempañante del cristal frontal
Instale la cámara digital de imágenes jas en una sala o un entorno similar con
poca humedad.
Coloque el desecador en el portacámara subacuático una o dos horas antes de su
uso.
Guarde el desecador que no haya utilizado en su bolsa original y mantenga la
bolsa bien cerrada. Si el desecador se seca de manera adecuada, se puede utilizar
unas 200 veces.
Antes de la utilización
Antes de utilizar la cámara digital bajo el agua, sumerja primero el
portacámara subacuático a una profundidad de aproximadamente
1 metro y compruebe que la cámara digital funciona debidamente y que
el portacámara subacuático no tiene fugas, y a continuación comience su
buceo.
En el caso improbable de que un mal funcionamiento del portacámara
subacuático ocasione daños debidos a una fuga de agua, Sony no se
responsabilizará de los daños al equipo alojado en él (cámara digital, batería,
etc.) ni del contenido grabado, ni tampoco de los gastos relacionados con la
fotografía.
Junta tórica y empaquetadura
impermeable
Junta tórica
Este equipo utiliza una junta tórica para mantener su resistencia al agua. Con
respecto a los detalles, consulte el Manual de mantenimiento de la junta tórica
separado.
El manejo inadecuado de la junta tórica podría resultar en la inltración de agua.
Empaquetadura impermeable
No quite ni aplique grasa a la empaquetadura contra la inltración de gotas de agua.
Si la empaquetara se levantase o pillase, podría inltrarse agua.
Si la empaquetadura impermeable se desprende, vuelva a colocarla cuidadosamente
de forma que no quede retorcida. (Consulte la ilustración )
Duración útil de la junta tórica y de la empaquetadura
impermeable
Junta tórica
La duración útil de la junta tórica variará con la frecuencia de utilización del
portacámara subacuático y las condiciones. En general, será de aproximadamente
un año.
Empaquetadura impermeable
Reemplace la empaquetadura impermeable por otra nueva cuando encuentre rayas
o rajas en ella.
Después del reemplazo, compruebe que no haya inltración de agua.
Grasa
Utilice la grasa del tubo azul (suministrado). La utilización de la grasa del tubo
amarillo o de otros fabricantes podría dañar la junta tórica y causar la inltración
de agua.
Junta tórica, empaquetadura impermeable, y grasa
Usted podrá adquirir juntas tórica, empaquetadura impermeable, y grasa para
objetivos en el proveedor Sony más cercano.
Junta tórica (modelo núm. 4-115-566-01)
Empaquetadura impermeable (modelo núm. 4-115-567-01)
Grasa (modelo núm. 2-582-620-01)
Mantenimiento
Después de grabar en un lugar expuesto a brisas marinas, lave el portacámara
subacuático con agua dulce para retirar la sal y la arena con las hebillas
perfectamente abrochadas, y a continuación frote con un paño suave y seco. Se
recomienda sumergir el portacámara subacuático en agua dulce durante unos 30
minutos. Si se deja sal en él, podrán dañarse las partes metálicas o formarse óxido
y ocasionar fugas de agua.
Si hay aceite bronceador en el portacámara subacuático, lávelo completamente
utilizando agua tibia.
Limpie el interior del portcámara subacuático con un paño suave y seco. No lo
lave con agua.
Cerciórese de realizar el mantenimiento indicado cada vez que lo utilice. No use
ningún disolvente, como alcohol, bencina, ni diluidor de pintura para la limpieza, ya
que podría dañar el acabado de la supercie del mismo.
Cuando guarde el portacámara subacuático
Ponga el espaciador suministrado con el portacámara subacuático para evitar el
desgaste de la junta tórica. (Consulte la ilustración )
Evite que se acumule polvo en la junta tórica.
Recubra ligeramente la junta tórica con grasa e insértela en la ranura de asiento,
luego guarde el portacámara subacuático en un lugar fresco y bien ventilado. No
abroche la hebilla.
Evite guardar el portacámara subacuático en un lugar muy cálido o húmedo,
o junto con naalina o alcanfor, ya que en estas condiciones se puede dañar el
portacámara subacuático.
Preparación
Reemplazo del acoplamiento
* Si utiliza la DSC-T77, no es necesario realizar las acciones siguientes, dado
que el acoplamiento A de la DSC-T77 ya está incorporado al portacámara
subacuático de serie.
1 Abra el portacámara subacuático. (-1)
Presione simultáneamente los botones OPEN y libere la hebilla en el sentido
de la echa para abrir el cuerpo del portacámara subacuático.
Notas
Vigile que el espaciador no se caiga, ya que lo necesitará para guardar el
portacámara subacuático.
2 Reemplace los acoplamientos.
Extraiga el acoplamiento frontal A y el acoplamiento posterior A de la
DSC-T77 (-2)
Separe los puntos indicados con y sujete la parte que se indica con la marca
en la ilustración para levantar el acoplamiento.
Coloque el acoplamiento frontal B y el acoplamiento posterior B en la
DSC-T700 (-2)
Presione los puntos que se indican con la marca y, a continuación, inserte
rmemente los puntos que se indican con la marca en la ilustración.
Tras reemplazar el acoplamiento, presione varias veces los botones del
portacámara subacuático para comprobar su funcionamiento.
Vuelva a instalar el acoplamiento frontal A y la jación posterior del
modelo DSC-T77 (-2)
Presione los puntos que se indican con la marca y, a continuación,
inserte rmemente los puntos que se indican con la marca en la
ilustración.
* Tras extraer el acoplamiento del portacámara subacuático, nunca lo alise antes de
guardarlo. De lo contrario, podría dañarse por la deformación.
Preparación de la junta tórica y del empaquetadura
impermeable
1 Extraiga la junta tórica.
2 Engrase la junta tórica.
Limpie la arena o la suciedad de la junta tórica, de la ranura de asentamiento o
del cuerpo del portcámara subacuático donde toque dicha junta. Cubra la junta
con una capa de grasa ligera y uniforme.
3 Inserte la junta tórica en el portcámara subacuático.
4 Compruebe que no haya arena ni suciedad en el empaquetadura
impermeable.
Notas
No retire el embalaje impermeable ni lo engrase.
Es posible que el cuerpo del portcámara subacuático se ralle o que se ltre
agua si cierra la cubierta con arena o suciedad en la junta tórica o en el
empaquetadura impermeable.
Asegúrese de leer el Manual de mantenimiento de la junta tórica
suministrado por separado.
En este manual se proporciona información importante referente al
manejo de dicha junta tórica.
Preparación de la cámara digital de imágenes jas
Instale la cámara digital de imágenes jas en una sala o un entorno
similar con poca humedad. La apertura o el cierre del portcámara
subacuático en lugares cálidos o húmedos podría provocar que el cristal
frontal se empañase.
Para obtener más información, consulte el manual de instrucciones suministrado
con la cámara digital de imágenes jas.
1 Retire la correa de la cámara digital de imágenes jas.
2 Inserte la batería y el “Memory Stick Duo”.
Asegúrese de utilizar una batería completamente cargada.
Asegúrese de que el “Memory Stick Duo” dispone de espacio suciente para
grabar imágenes.
3 Baje la cubierta del objetivo para encender la cámara digital de
imágenes jas.
Procure no tocar el objetivo al abrir la cubierta.
4 Toque (Ajustes) en la categoría HOME y ajuste [Envoltura] en
[Activar].
Compruebe que el ajuste [Envoltura] está establecido en [Activar].
Tras ajustar [Envoltura] en [Activar], las funciones de la cámara digital de
imágenes jas quedarán limitadas a los botones externos y a las funciones de
los botones siguientes en la pantalla LCD.
En el modo de toma de imagen:
HOME, MENU, modo Toma de imagen, Balance Blanco submarino, Flash,
Macro, Tam imagen
En el modo visualización:
HOME, MENU, Borrar, Zoom panorámico, Pantalla girada temporalmente,
Reproducir/Detener (al reproducir películas), A la imagen siguiente, A la
imagen anterior
Después de instalar la cámara digital de imágenes jas en el portacámara
subacuático, los botones HOME o MENU quedan desactivados.
Cómo colocar la envoltura
(Ajustes) [Ajustes principales]
[Envoltura] [Activar]
Compruebe que el ajuste [Envoltura] está establecido en [Activar] y toque
[BACK] y [×].
Compruebe que el icono (Envoltura) aparece en pantalla.
5 Compruebe que no haya suciedad ni en el objetivo ni en la pantalla
de cristal líquido de la cámara digital de imágenes jas.
Notas
La suciedad desactiva el Iluminador AF.
Al ajustar [Envoltura] en [Activar], el Iluminador AF se ajusta automáticamente en
[Desactivar] y ya no puede utilizarse.
Instalación de la cámara digital de imágenes jas en
el portcámara subacuático
1 Coloque el desecador suministrado en el portacámara subacuático.
Coloque el desecador en el espacio destinado al desecador en la parte frontal del
cuerpo del portacámara subacuático. A continuación, mantenga el desecador en
la parte del acoplamiento frontal. (-1)
* Coloque el desecador suministrado en el portacámara subacuático una o dos
horas antes de su uso.
2 Desconecte la alimentación de la cámara digital de imágenes jas.
3 Instale la cámara digital de imágenes jas en el portcámara
subacuático. (-3)
Mantenga la cubierta del objetivo de la cámara digital de imágenes jas
bajada. Si cierra el portacámara subacuático a la fuerza con la cubierta del
objetivo bajada se pueden producir fallos de funcionamiento.
Asegúrese siempre de desconectar la alimentación al instalar o
extraer la cámara digital de imágenes jas.
Asegúrese de que la cámara digital de imágenes jas está colocada
correctamente.
4 Cierre el cuerpo del portcámara subacuático y apriete la hebilla.
(-4)
Asegure el cuerpo del portacámara subacuático y apriete la hebilla hasta oír un
clic.
Notas
Al cerrar el cuerpo del portcámara subacuático, asegúrese de que no haya residuos,
arena, cabellos ni ningún otro cuerpo extraño ni en la junta tórica ni en la ranura
de asentamiento. Si hubiera algún cuerpo extraño en dichos lugares, podrían
producirse ltraciones de agua.
Instalación de los accesorios
Coloque la correa de mano
Le recomendamos colocar la correa de mano (suministrada) antes de utilizar el
portcámara subacuático. (Consulte la ilustración )
Notas
Tenga cuidado de no pillar la correa de mano al cerrar el cuerpo del portacámara
subacuático. Si sucediera, podría ltrarse agua en el interior.
Instalación y extracción de la cubierta de la pantalla
de cristal líquido
Instalación de la cubierta de la pantalla de cristal líquido (-)
1 Coloque la correa suministrada en la cubierta de la pantalla de
cristal líquido en el portacámara subacuático.
2 Alinee la cubierta de la pantalla de cristal líquido con la guía
de acoplamiento y empújela con fuerza como se muestra en la
ilustración.
Notas
Tenga cuidado de no pillar la correa de mano de la cubierta de la pantalla de cristal
líquido al cerrar el cuerpo del portacámara subacuático. Si sucediera, podría ltrarse
agua en el interior.
Extracción de la cubierta de la pantalla de cristal líquido (-)
Separe la cubierta de la pantalla de cristal líquido de la guía.
Utilización del portacámara subacuático
Grabación
1 Conecte la alimentación. (-1)
2 Ajuste los modos de grabación.
Pulse los botones de control del portacámara subacuático para ajustar los modos
de grabación.
Uso de los botones de control
Pulse los botones de control lentamente.
Visualización de iconos en pantalla
Si pulsa el botón de control una vez
Aparecen los ajustes actuales junto a cada botón de control. (-2)
Si pulsa el botón de control dos veces
Aparece, en el centro de la pantalla, el icono del modo de ajuste actual
seleccionado tras pulsar el botón de control.
Pulse el botón de control varias veces hasta que se muestre el icono del modo
deseado en el centro de la pantalla. (-2)
Modo disponible con el portacámara subacuático
Botón de
control 1
Botón de
control 2
Botón de
control 3
Botón de
control 4
Botón de
control 5
Botón
(modo Toma
de imagen)
Botón
(Balance Blanco
submarino)
Botón
(Flash)
Botón
(Macro)
Botón
(Tam imagen)
Pueden
utilizarse
todos los
modos.
*1
*2
*3
*1 Al grabar imágenes subacuáticas, se recomienda utilizar la opción
(Submarino).
*2 Las opciones Balance Blanco submarino en (Submarino 1) y
(Submarino 2) solamente se pueden ajustar cuando el ash está ajustado en
Flash desactivado. Si ajusta el ash en Flash activado cuando Balance Blanco
submarino está ajustado en (Submarino 1) o (Submarino 2), el ajuste
Balance Blanco submarino se establece automáticamente en (Auto).
*3 Consulte el manual de instrucciones de la cámara digital de imágenes jas para
obtener más información sobre la grabación de películas.
Selección del balance blanco submarino
Ajusta el tono del color en el modo (Submarino).
(Auto)
La cámara ajusta automáticamente los tonos de color bajo el
agua para que tengan un aspecto natural.
(Submarino 1)
Ajustes para condiciones subacuáticas con un azul muy
intenso.
(Submarino 2)
Ajustes para condiciones subacuáticas con un verde muy
intenso.
(Flash)
Ajustes para utilizar el ash bajo el agua.
Para obtener más información, consulte las instrucciones suministradas con la
cámara digital.
3 Pulse la palanca de obturación para grabar imágenes. (-3)
Utilización del zoom (Consulte la ilustración )
Pulse el lado W para gran angular (el motivo aparecerá más alejado).
Pulse el lado T para telefoto (el motivo aparecerá más cerca).
Notas
Si no graba imágenes durante un cierto periodo de tiempo, la cámara digital de
imágenes jas se apagará automáticamente para evitar que se agote la batería. Para
volver a utilizar la cámara digital, vuelva a conectar su alimentación. Con respecto
a los detalles, consulte el manual de instrucciones suministrado con la cámara
digital.
Si utiliza el ash cuando la cámara digital esté en el portacámara subacuático,
la distancia de fotograado puede acortarse dependiendo de la situación. Se
recomienda utilizar una lámpara para vídeo subacuática HVL-ML20M (opcional).
El polvo o la suciedad en la supercie del interior del portacámara subacuático
podrían enfocarse en el “modo de lupa” de la cámara digital. En tal caso, elimine
el polvo y la suciedad de la supercie del vidrio.
Mientras graba películas, el audio no puede grabarse correctamente.
(Submarino) no está disponible con las películas.
Reproducción
Es posible reproducir imágenes mediante el botón (Reproducción). No podrá oír
el sonido.
1 Conecte la alimentación. (-1)
2 Pulse el botón (Reproducción). (-2)
3 Seleccione la imagen que desee pulsando el botón de control 4 o 5.
(-3)
A la imagen anterior pulsando el botón de control 4
A la imagen siguiente pulsando el botón de control 5
4 Aumente o reduzca la imagen reproducida con la palanca de zoom.
Reduzca la imagen poco a poco manteniendo pulsada la palanca de zoom en el
lado W. (-4)
Amplíe la imagen poco a poco manteniendo pulsada la palanca de zoom en el
lado T. (-4)
Durante la reproducción, la función de los botones se modicará tal y como se
muestra en el cuadro que aparece a continuación.
Botón de
control 1
Botón de
control 2
Botón de
control 3
Botón de
control 4
Botón de
control 5
Botón
(modo Toma
de imagen)
Botón
(Balance
Blanco
submarino)
Botón
(Flash)
Botón
(Macro)
Botón
(Tam
imagen)
Imagen
ja
Borrar
Zoom
panorámico
Pantalla girada
temporalmente
A la imagen
siguiente
A la imagen
anterior
Imagen en
movimiento
(pausa)
Borrar Reproducir
A la imagen
siguiente
A la imagen
anterior
Imagen en
movimiento
(reproducir)
Borrar Detener
A la imagen
siguiente
A la imagen
anterior
Con el
zoom de
reproducción
(hacia
arriba)
(hacia la
derecha)
(hacia la
izquierda)
(hacia abajo)
BACK
Borrando
OK Salir
Extracción de la cámara digital
1 Desconecte la alimentación. (-1)
Antes de instalar o extraer la cámara digital, desconecte su
alimentación.
2 Pulse los dos botones OPEN simultáneamente y libere la hebilla
en el sentido de la echa para abrir el cuerpo del portacámara
subacuático. (-2)
3 Extraiga la cámara digital del portacámara subacuático.
Cuando haya utilizado la cámara digital durante mucho tiempo, se calentará.
Desconecte la alimentación de la cámara digital, y deje que se enfríe durante
cierto tiempo antes de extraerla del portacámara subacuático.
Tenga cuidado de no dejar caer la cámara digital cuando la extraiga.
4 Ajuste la envoltura en [Desactivar].
Notas
Antes de abrir el portacámara subacuático, aclárelo con agua del grifo o con agua
dulce y luego frótelo con un paño suave y seco. Cuando lo abra, tenga cuidado de no
dejar que chorree agua de su cuerpo, cabello o traje de agua en la cámara digital.
Antes de bucear
Antes de grabar imágenes bajo el agua, sumerja primero el portacámara
subacuático a una profundidad de aproximadamente 1 metro y compruebe que
funciona debidamente y que no haya fugas, y a continuación comience su buceo.
Instale la cámara digital en el portacámara subacuático antes de bucear, y evite, en
lo posible, abrir y cerrarlo cuando esté en una embarcación o en la costa del mar.
Al instalar la cámara digital de imágenes jas, debe hacerlo siempre en el exterior
y en lugares con poca humedad.
Antes de utilizar le portacámara subacuático, cerciórese de que no hayan
residuos pillados entre las mitades delantera y trasera del cuerpo del portacámara
subacuático.
Antes de utilizar el portcámara subacuático, compruebe siempre el número de
imágenes que se pueden grabar y la batería restante.
Al grabar imágenes subacuáticas, se recomienda utilizar la opción
(Submarino).
Horas apropiadas para grabar
La hora más apropiada para grabar imágenes es entre las 10:00 AM y las 2:00 PM,
cuando el sol se encuentra directamente encima.
Para grabar imágenes en lugares en los que no llegue bien la luz solar, o por la
noche, utilice una lámpara para vídeo subacuática HVL–ML20M (opcional).
Solución de problemas
Síntoma Causa/acciones correctivas
Hay gotas de agua
dentro del portacámara
subacuático.
Hay raspaduras o grietas en la junta tórica.
Sustituya la junta tórica con otra nueva.
La junta tórica no está puesta correctamente.
Ponga la junta tórica uniformemente en la ranura.
La hebilla no está abrochada.
Abroche la hebilla hasta que produzca un
chasquido.
El desecador no se ha secado de manera adecuada.
Utilice desecador que se haya secado
adecuadamente.
Las funciones de grabación
no trabajan.
La batería se ha agotado.
Cargue completamente la batería.
El “Memory Stick Duo” está lleno.
Inserte otro o borre los datos innecesarios del
“Memory Stick Duo”.
La lengüeta de protección contra escritura del
“Memory Stick Duo” está ajustada en la posición
LOCK.
Ajústela en la posición de grabación o inserte un
nuevo “Memory Stick Duo”.
Al pulsar el botón de modo
Toma de imagen, el botón
Balance Blanco submarino,
el botón Flash, el botón
Macro o el botón Tam
imagen no se cambiará de
modo.
El ajuste actual aparece en la pantalla cuando se
pulsa el botón una vez.
Vuelva a pulsar el botón mientras visualiza los
ajustes actuales en la pantalla.
La imagen reproducida
no aparece en el color que
esperaba. (Al grabar bajo
el agua)
Puede que la cámara digital no esté ajustada en
(Submarino).
Compruebe que la cámara digital está ajustada en
(Submarino).
Puede que el Balance Blanco submarino no esté
ajustado correctamente.
Compruebe el ajuste de Balance Blanco submarino
de la cámara digital.
Especicaciones
Material
Plástico (PC, ABS), cristal
Estanqueidad
Junta tórica, hebilla
Resistencia a la presión
Hasta una profundidad de 40 metros bajo el agua
Interruptores que se pueden accionar externamente
Alimentación, Disparador, Reproducción, Zoom (W/T), Modo Toma de imagen,
Balance Blanco submarino, Flash, Macro, Tam imagen
Dimensiones
Aprox. 134 × 94 × 38 mm (an/al/prf)
(excluidas las piezas protectoras)
Peso
Aprox. 260 g (portacámara subacuático solamente)
Elementos incluidos
Funda resistente al agua (1)
Correa de muñeca (1)
Cubierta de la pantalla de cristal líquido (1)
Acoplamiento frontal A (para DSC-T77) (1)*
Acoplamiento posterior A (para DSC-T77) (1)*
* Se incluye con la funda resistente al agua al comprar el producto.
Acoplamiento frontal B (para DSC-T700) (1)
Acoplamiento posterior B (para DSC-T700) (1)
Grasa (1)
Junta tórica (1)
Desecador (paquete de dos unidades) (1)
Espaciador (1)
Juego de documentación impresa
Accesorios opcionales
Juego de brazo VCT-MP1K
Lámpara para vídeo subacuática HVL-ML20M (tendrá que utilizarse junto con
el juego de brazo VCT-MP1K y la batería “InfoLITHIUM” (serie M), (cargador
de baterías de la serie M))
Kit de anillo tórico ACC-MP101
(Compruebe que el paquete presente el icono .)
El diseño y las especicaciones están sujetos a cambio sin previo aviso.